Hanwha Techwin SEW3041W Wireless Baby Monitor User Manual Part 3
Samsung Techwin Co Ltd Wireless Baby Monitor Part 3
UserManual.wiki
>
Hanwha Techwin
>
SEW3041W User Manual
>
User Manual Part 3
Contents
1.
User Manual Part 1
2.
User Manual Part 2
3.
User Manual Part 3
User Manual Part 3
Navigation menu
Upload a User Manual
Namespaces
Wiki Guide
HTML
PDF
Info
Views
User Manual
Discussion / Help
Navigation
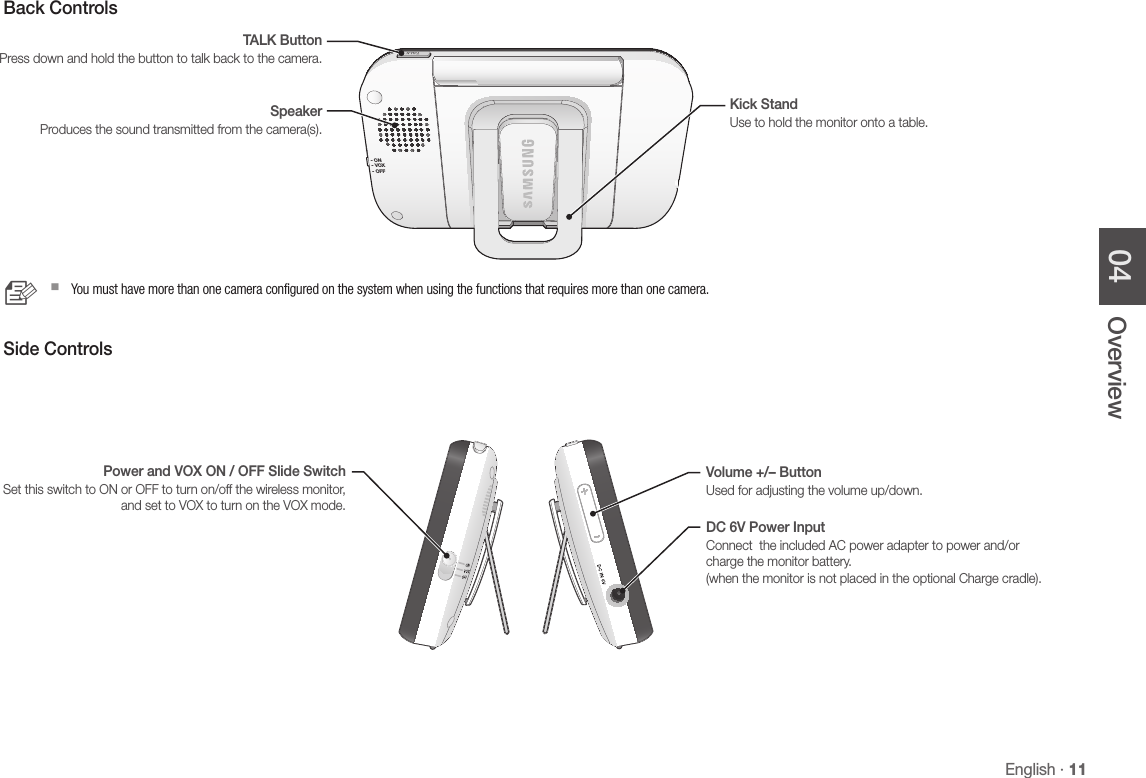
![10 · OverviewGetting to know your Monitoring systemWireless MonitorAfter opening the box, fully charge the monitor before use. After initial charge, recharge as needed.Front Controls Navigation Controls / ButtonViewing Mode: The following controls are used while watching live video from the camera:• Press the [$] or [%] button to adjust camera’s framing upwards or downwards.• Press the [_] or [+] button to adjust camera’s framing to the left or right.• Press [ ] button to turn on/off the night light.• While in zooming, use [$/%/_/+] button to move the screen around.Menu Mode: Use the [$/%/_/+] button arrows to navigate in Menu Mode. Press the [ ] button to confirm the menu selection. oVerVIeW Power LEDIndicator turns green when powered. When battery is charging, this LED will in green color.4.3” LCD ScreenDisplays video from the camera.Sound Level LEDsFlashes when sound is detected.MENU ButtonPress to access from video monitor mode to menu mode operation. In menu mode, press this button will go back to monitor mode with save from selection.SLEEP ButtonUsed to turn on / off the screen by press this button. User can turn on the video again by pressing any buttons. If camera is disconnected, monitor screen would be turned on automatically in Sleep mode. Monitor Antenna Receives and sends signals from or to the camera. Microphone When there are pairing between monitor and camera, There is a function of transmission of audio only. Navigation Controls / oK/Night light Button 1. Used to navigate while in Menu Mode. 2. Used for PTZ operation and Night Light while in Viewing Mode.](https://usermanual.wiki/Hanwha-Techwin/SEW3041W.User-Manual-Part-3/User-Guide-2294794-Page-1.png)