Harman Becker Automotive Systems 9091 Infotainment System with Fondunit (with BT, Kleer technology) User Manual BA 222 ECE NA 2013 05b kein Druck 1 en GB
Harman Becker Automotive Systems Infotainment System with Fondunit (with BT, Kleer technology) BA 222 ECE NA 2013 05b kein Druck 1 en GB
Contents
- 1. User Manual
- 2. User Manual II
User Manual II

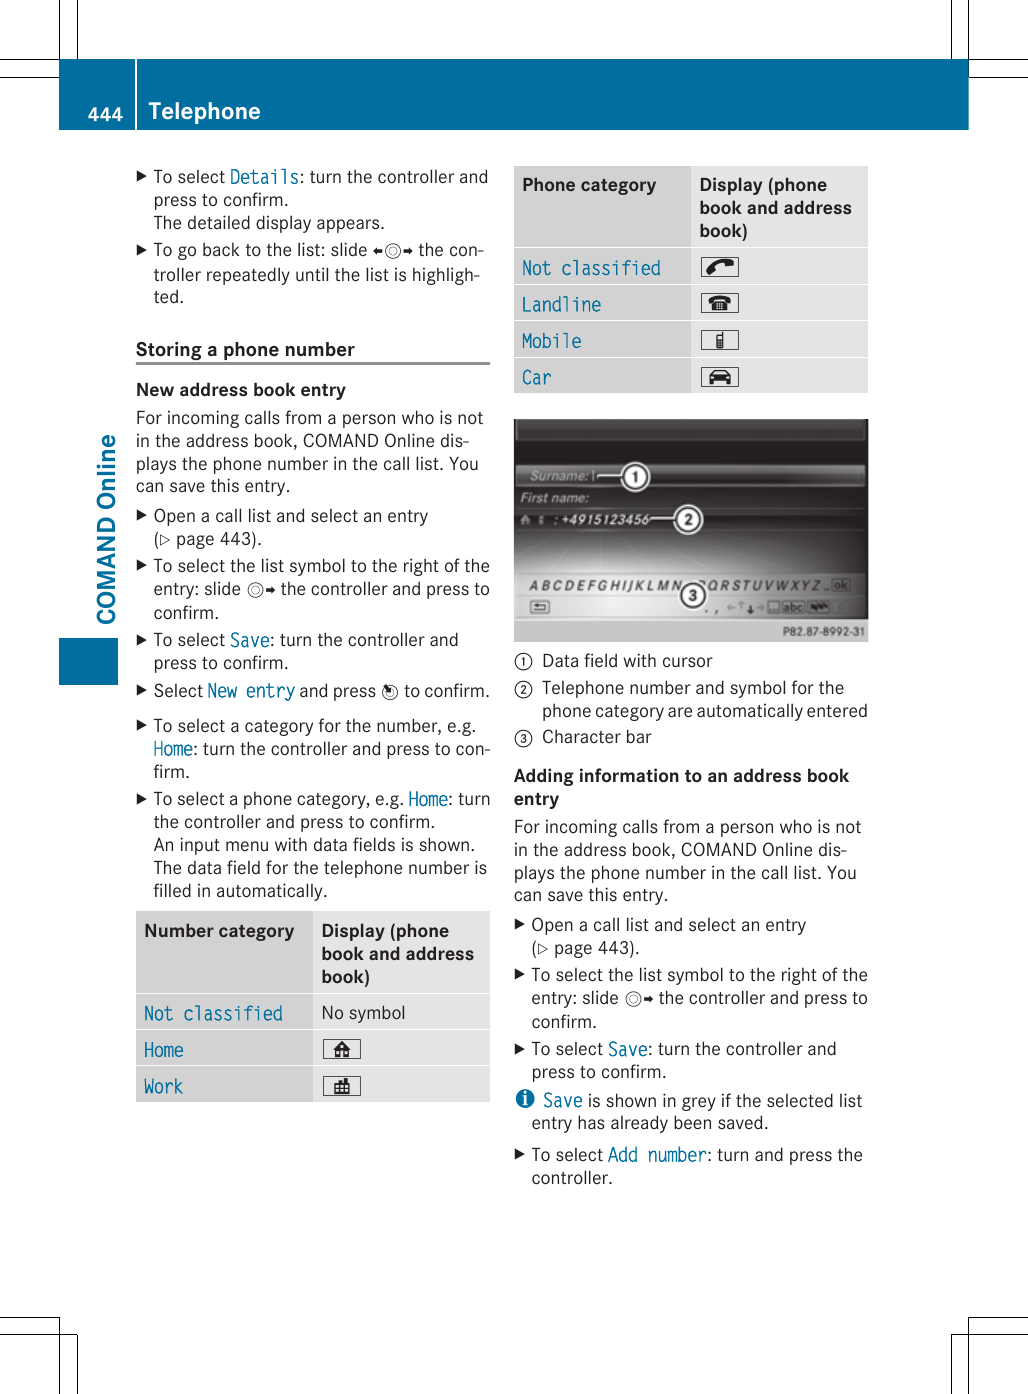
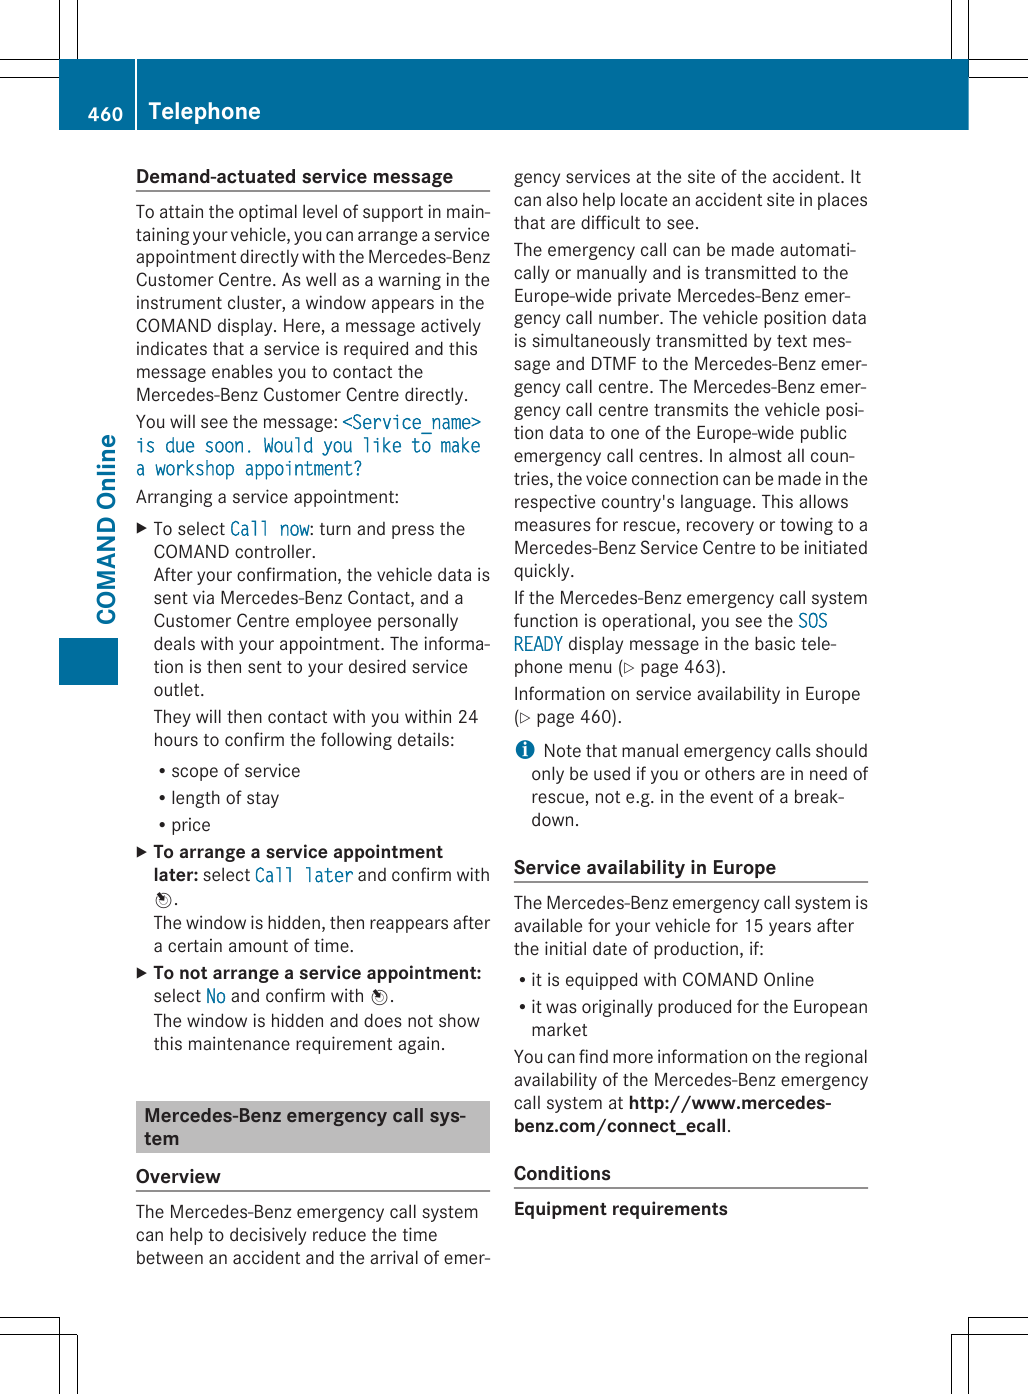

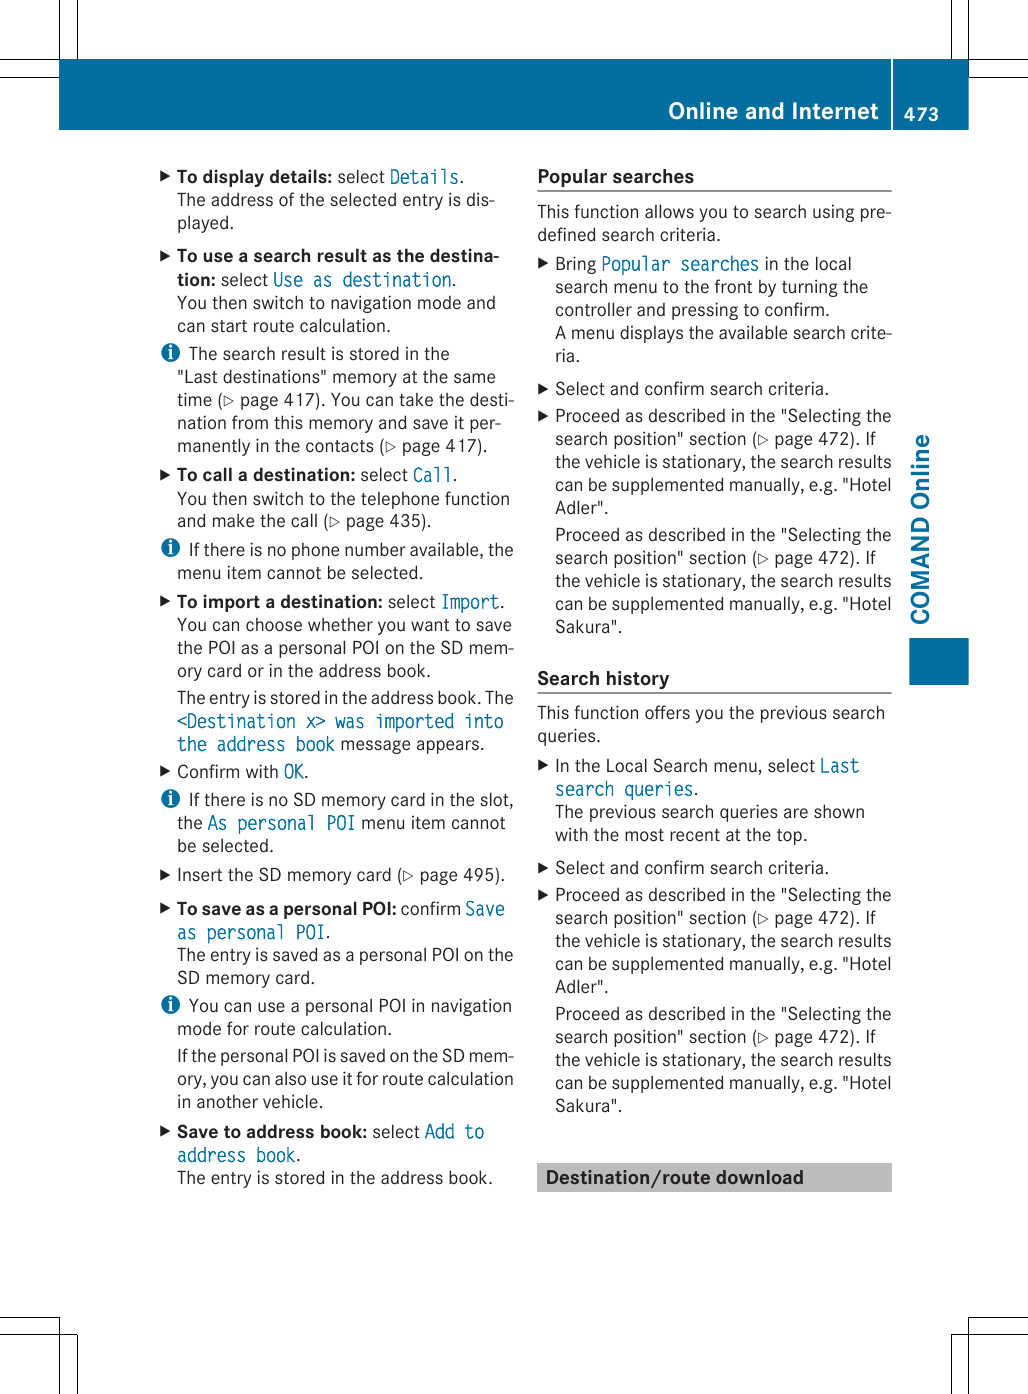

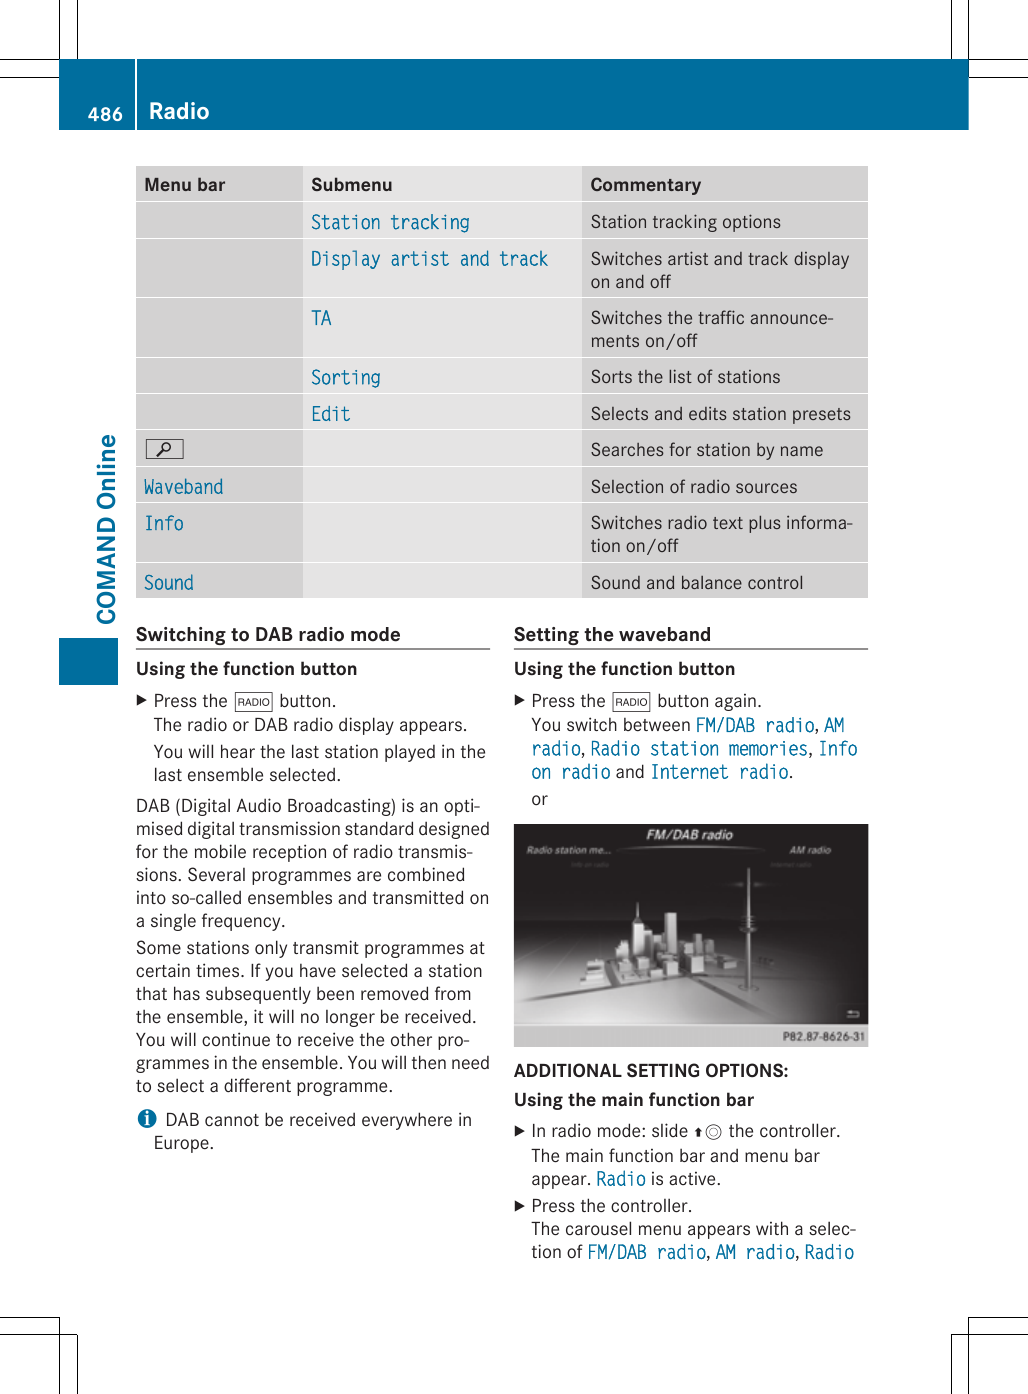
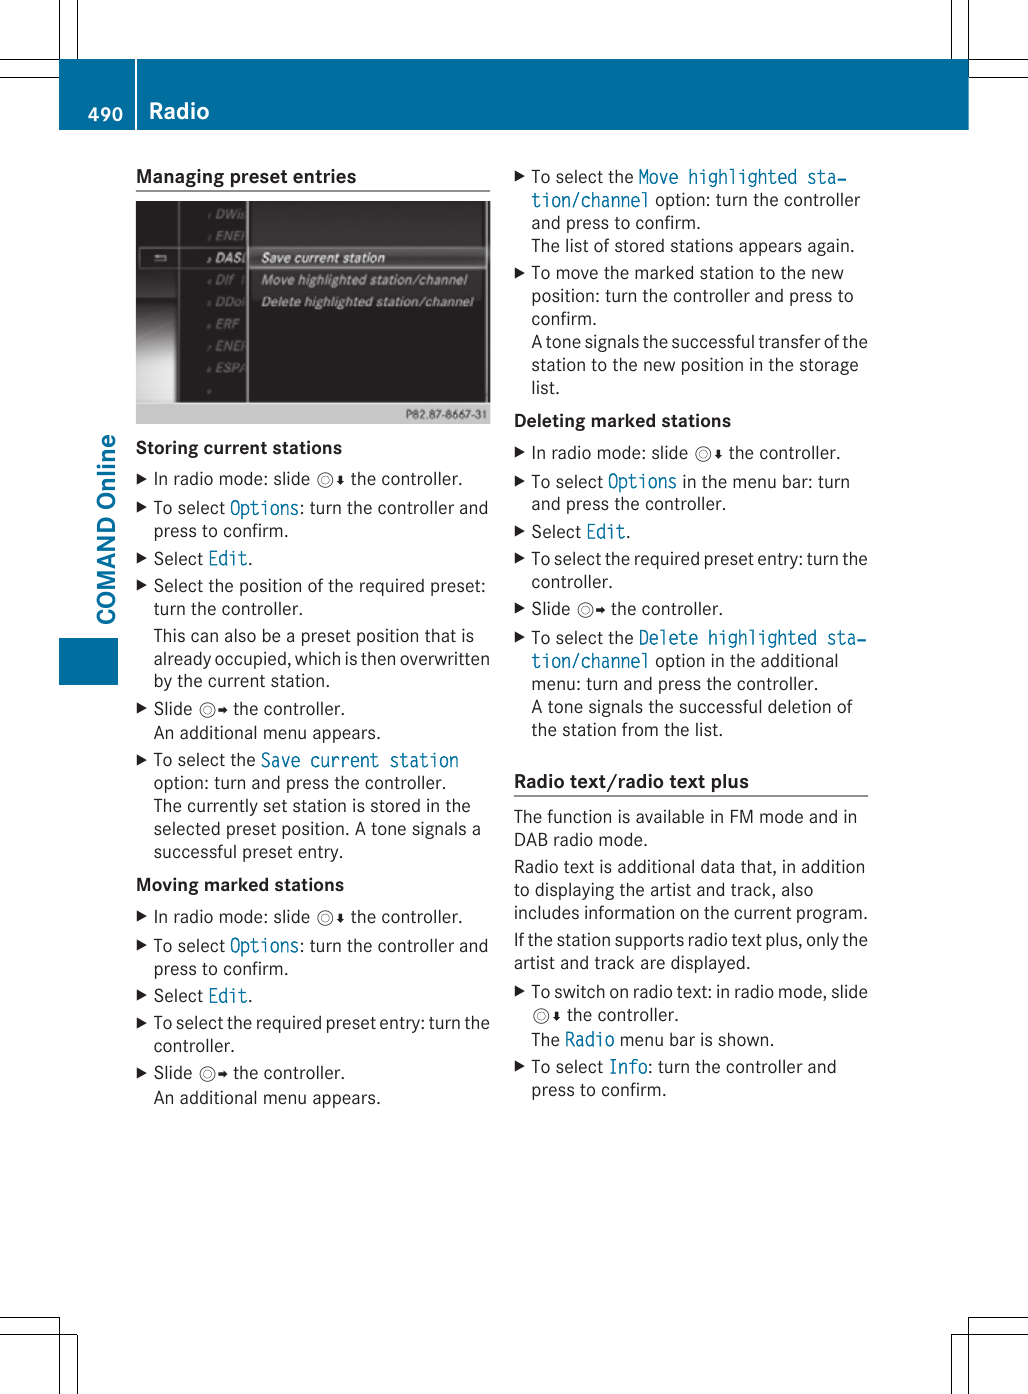
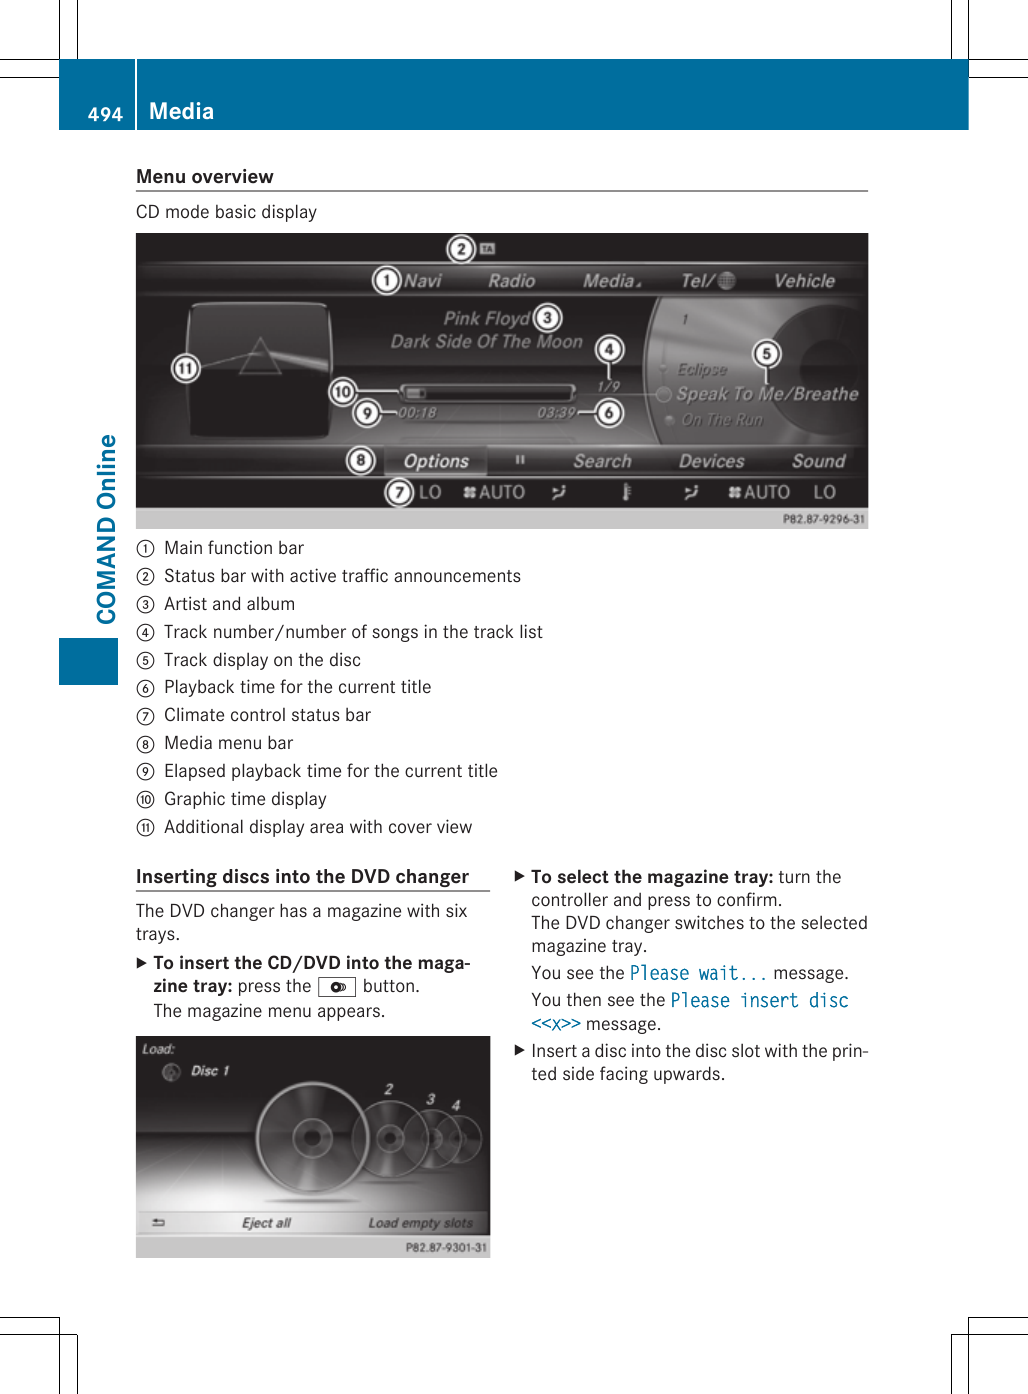


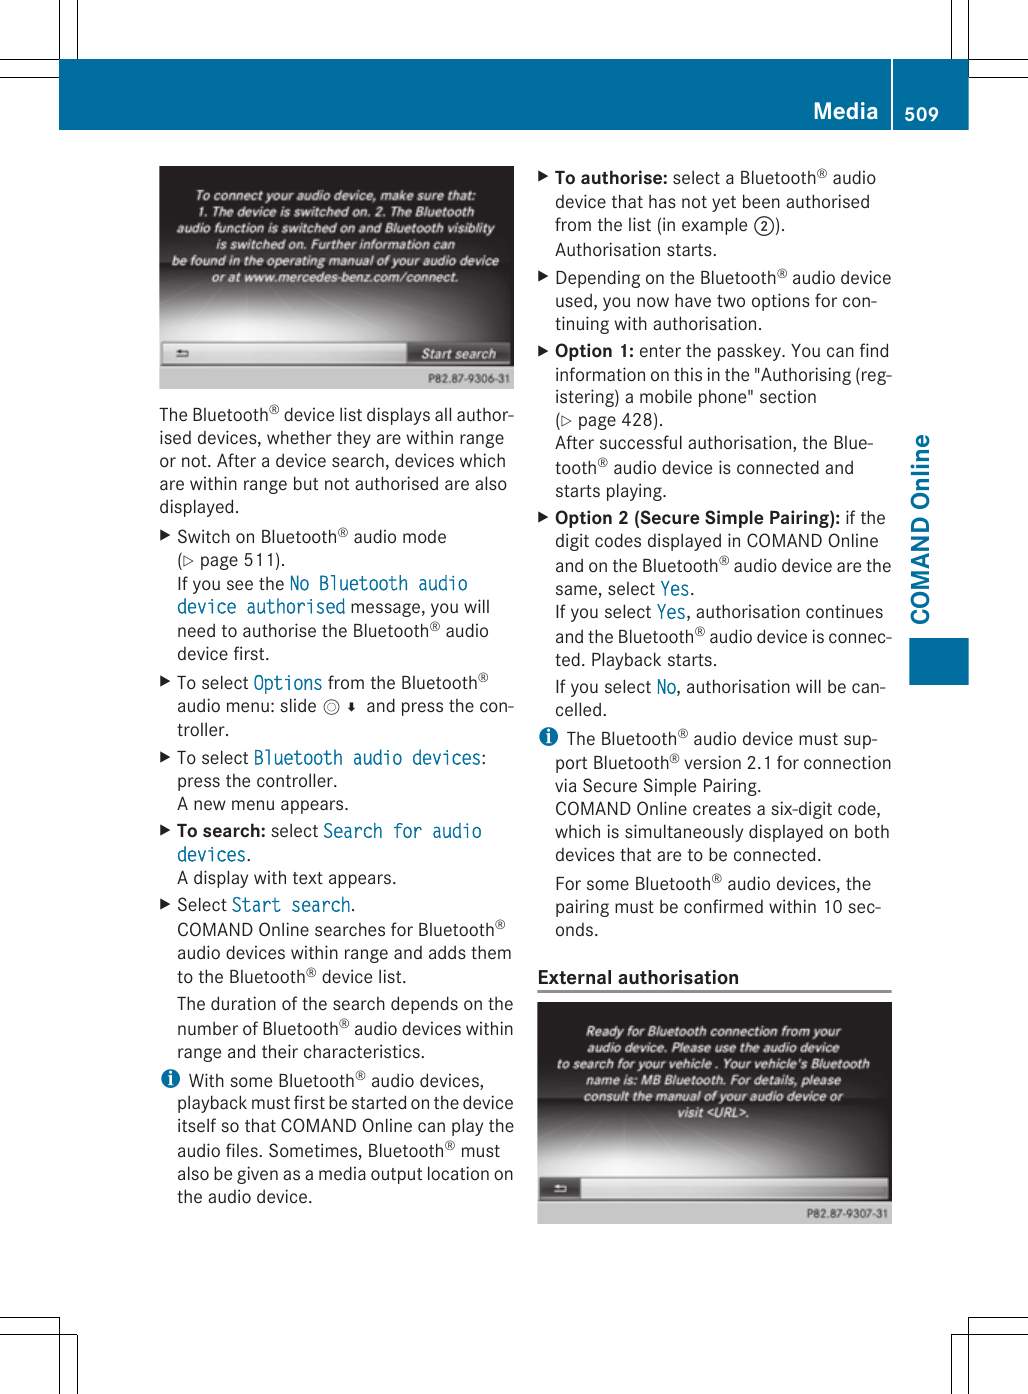
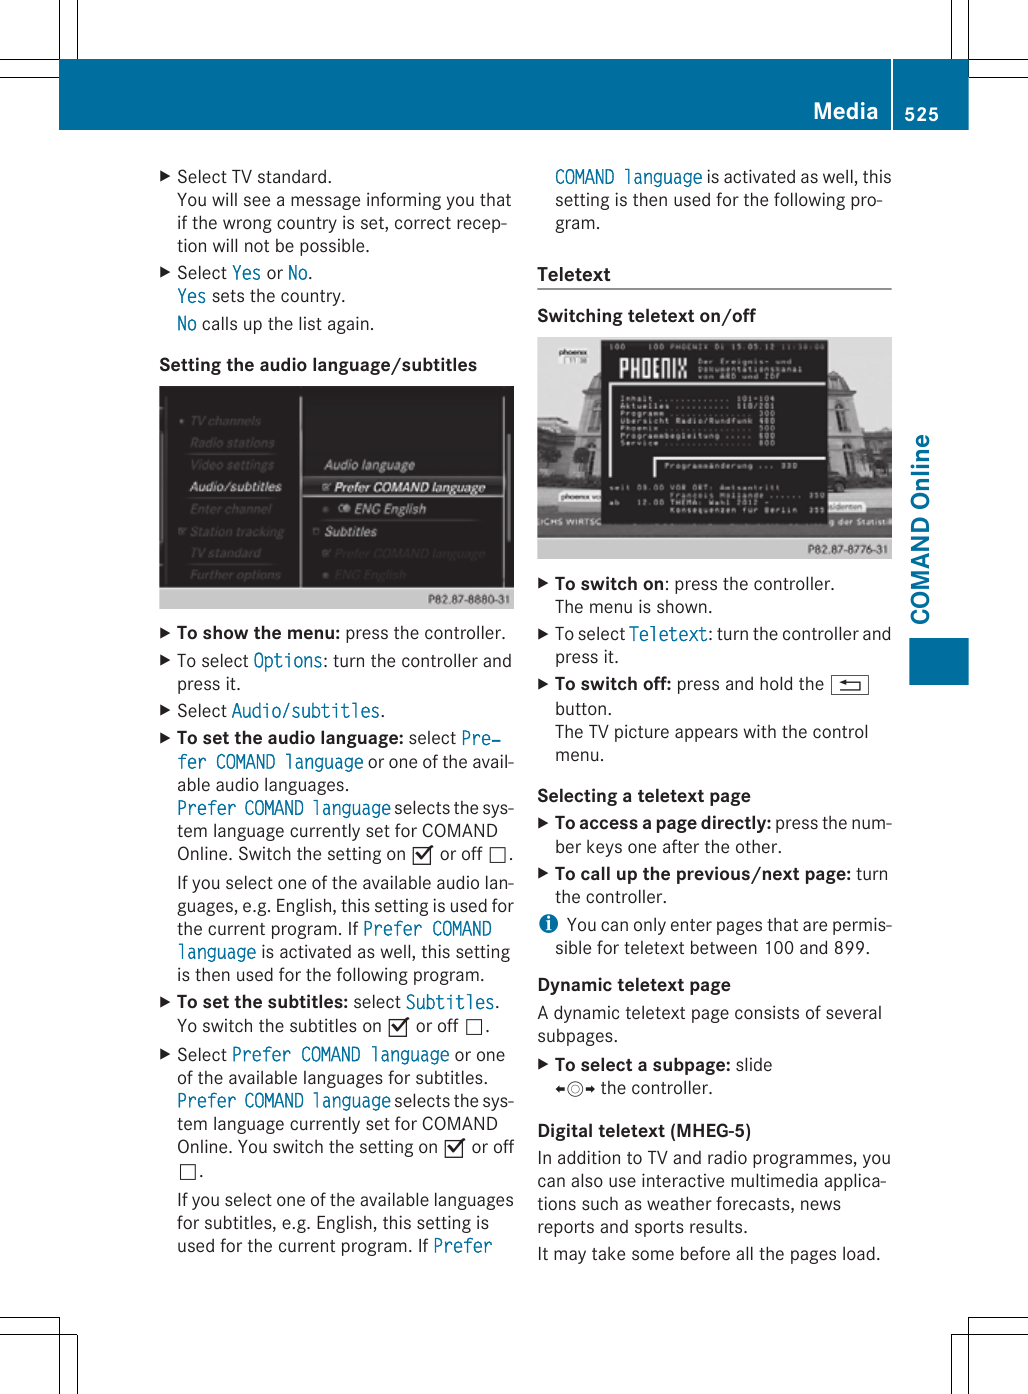
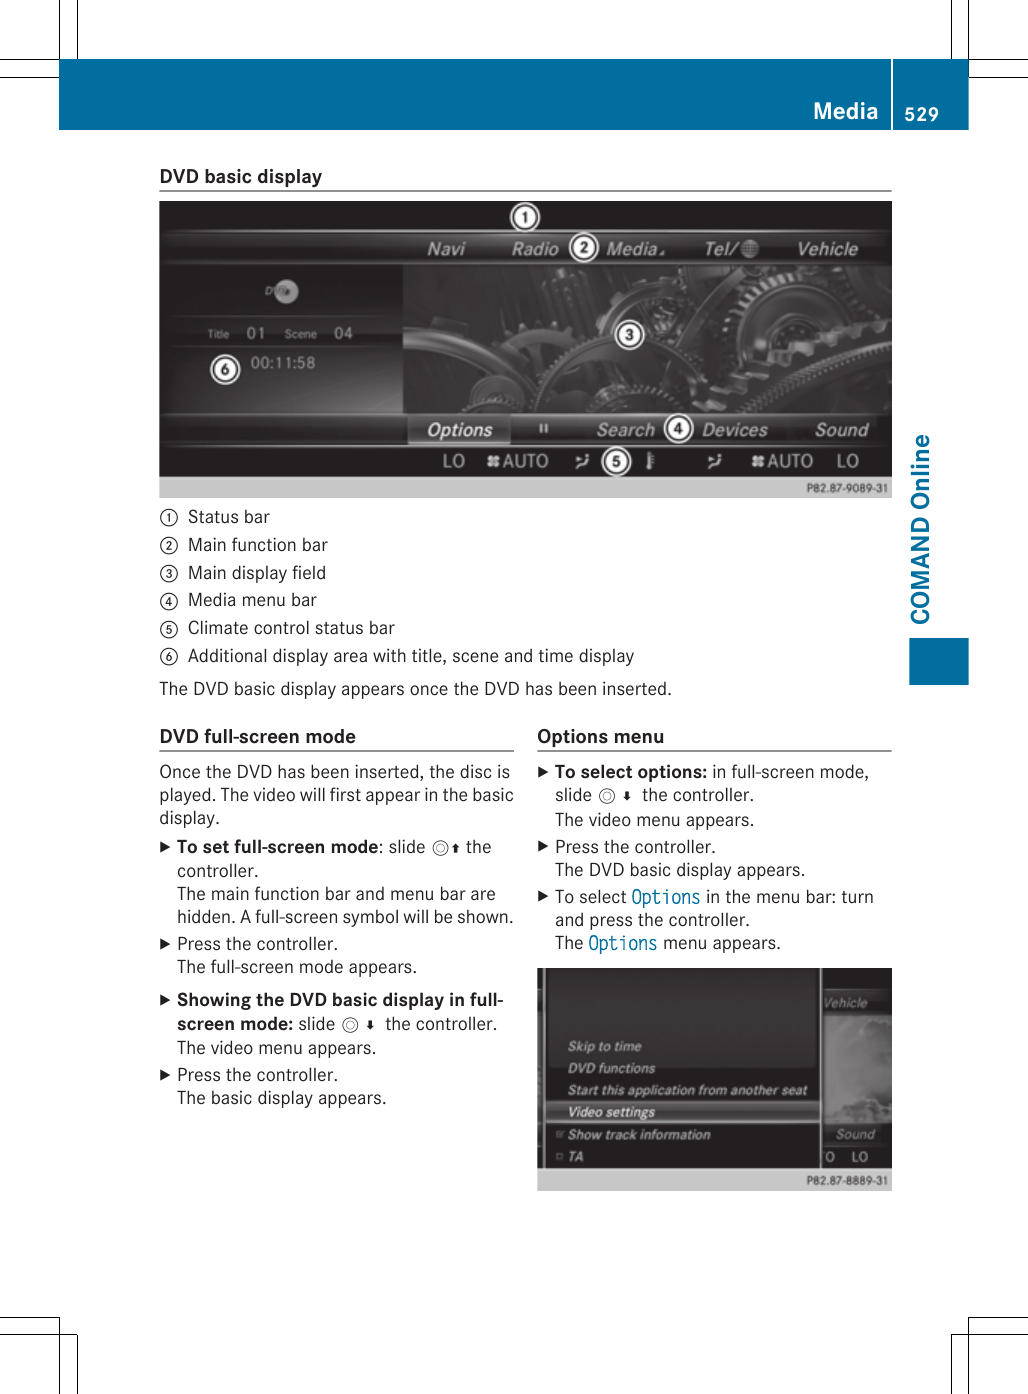
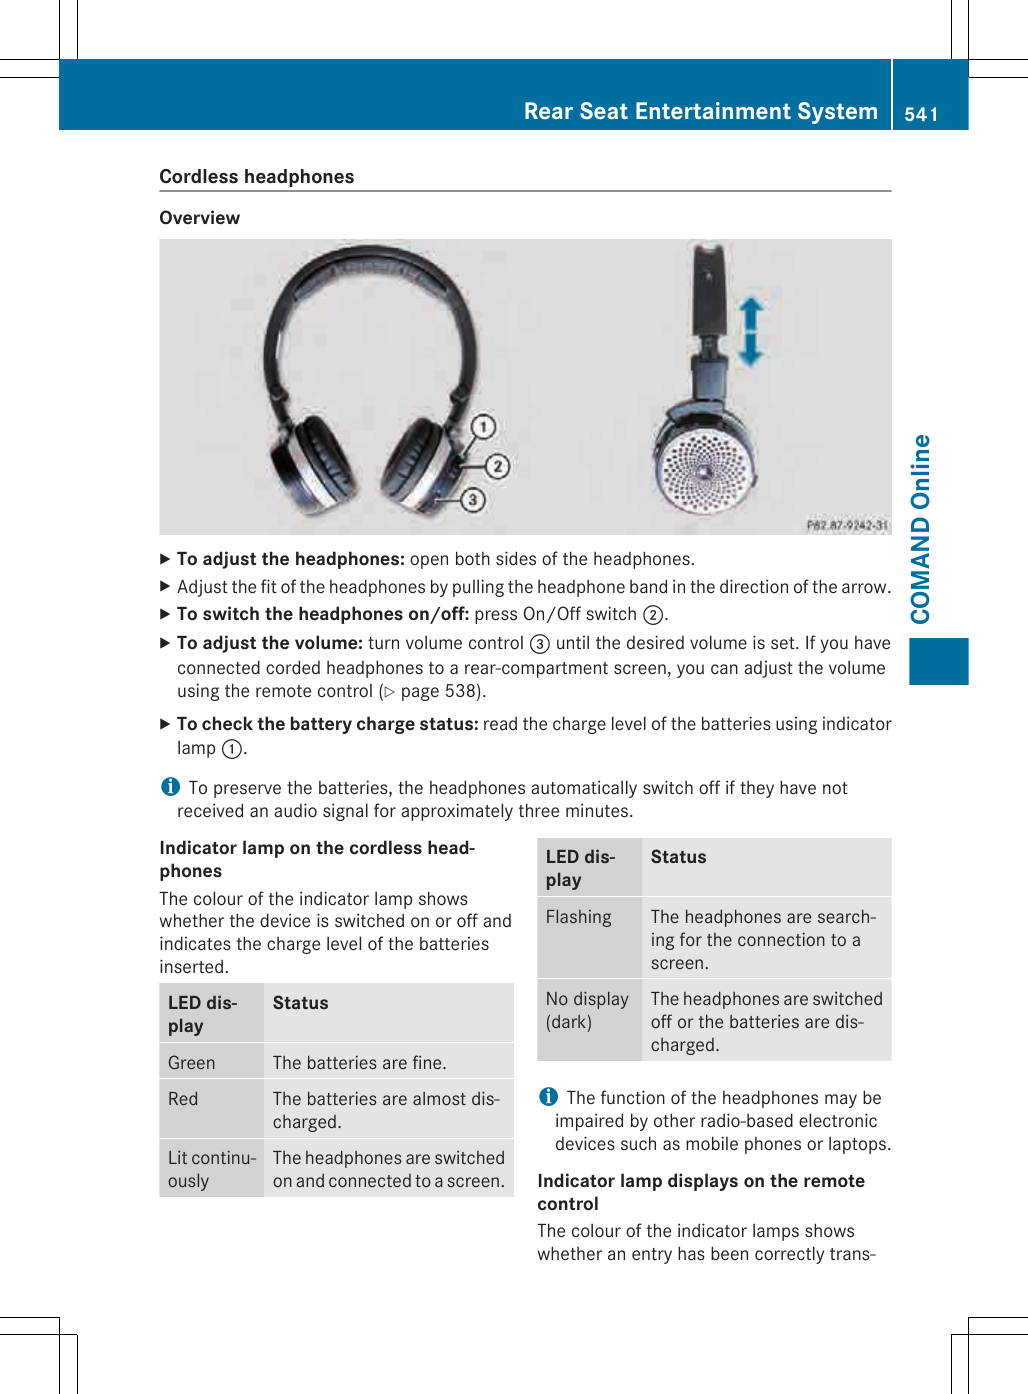

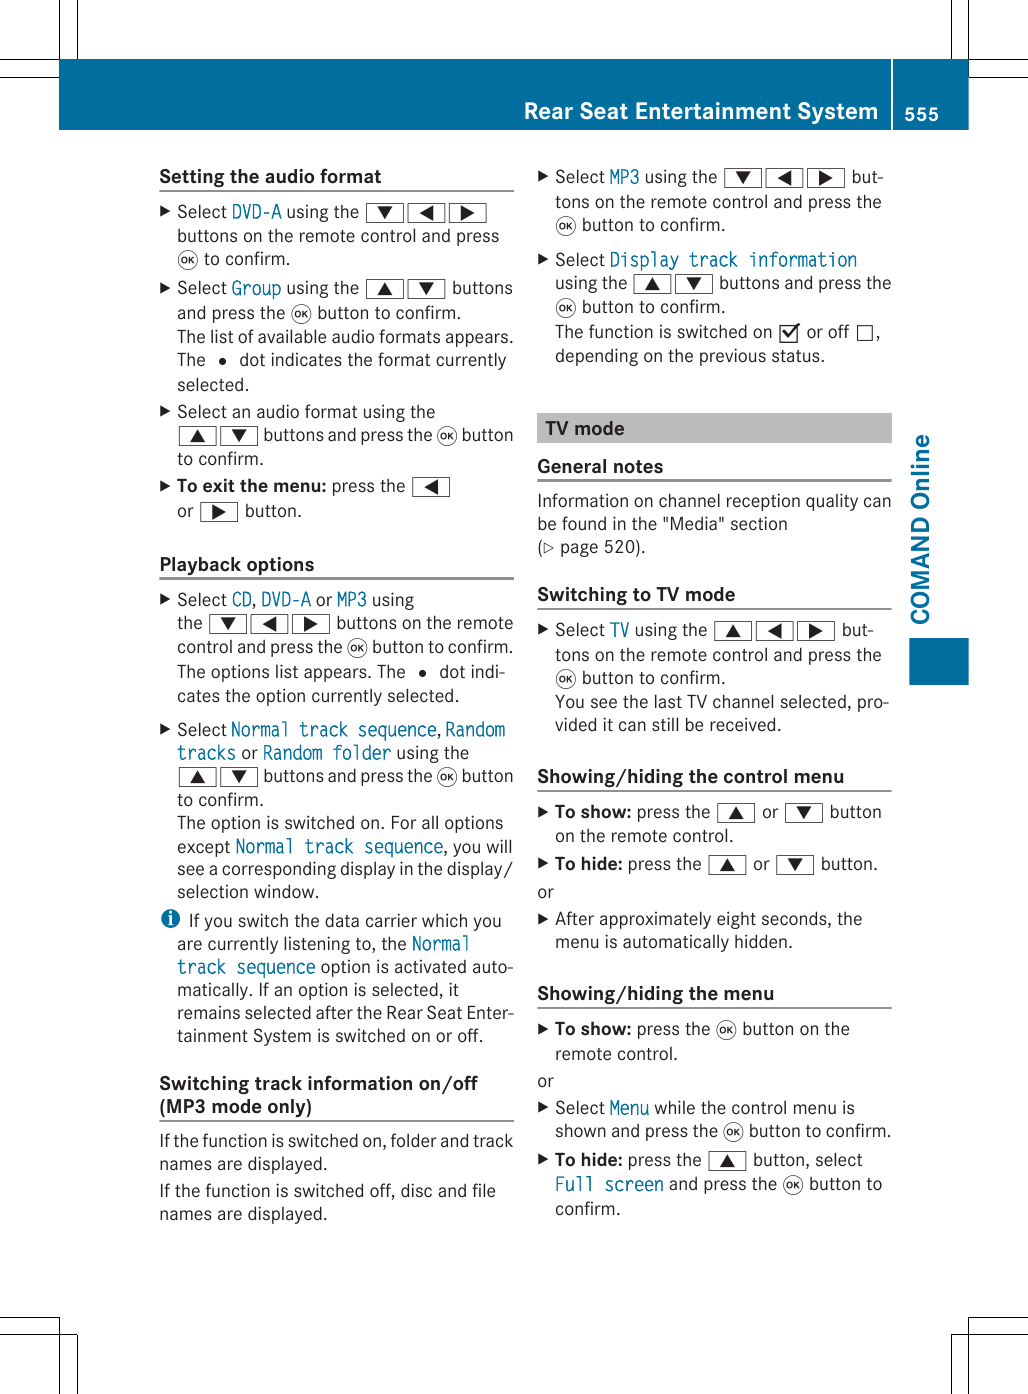
![stored and automatically charged in themobile phone bracket. [Depending on theequipment in the mobile phone bracket in therear centre console/rear seat armrest.]:Loudspeaker;Volume button=Menu button?End buttonAMicrophoneBBack buttonCTransmit buttonDUSB socketETouchscreenThe handset is operated using both the but-tons and the touchscreen. While the buttonson the device are pressed, the touchscreen isoperated by using gestures on the symbols,menus and lists displayed <Link>.iIn order to be able to use the handset asa telephone, it must be connected to amobile phone via Bluetooth.iTo avoid scratching the touchscreen, donot use any sharp objects.Removing/inserting the handsetThe handset is kept in the mobile phonebracket, where it is safely stored and auto-matically charged.RemovingXTo remove the handset, press the two but-tons on the mobile phone bracket and liftthe handset out.InsertingXTo insert the handset, slide it into the lowerpart of the mobile phone bracket.XGently push the handset down until it snapsinto the mobile phone bracket.Switching the handset on/offSwitching the handset onXPress (change symbol)~. The startscreen appears.After a few seconds, the main menuappears (->) and the handset is ready foruse.546 Rear Seat Entertainment SystemCOMAND Online](https://usermanual.wiki/Harman-Becker-Automotive-Systems/9091.User-Manual-II/User-Guide-1943926-Page-114.png)
![User Instruction NTG5 NTG5_UserManual-SV_130307-english.docx Version 1.0 1 Technical Information 1.1 Materials NTG5 infotainment system está em conformidade com os mais recentes lançamentos de directivas RoHS (2002/95/EC) e ELV (2000/53/EC), e também o regulamento REACH (CE) No. 1907/2006. Marcação de polímero partes acc. a VDA 260, respectivamente EN ISO 1043.Declaration of Conformity to EC regulation R&TTE. 1.2 Declaration of Conformity to EC regulation R&TTE Česky [Czech]: HARMAN tímto prohlašuje, že tento NTG5 system je ve shodě se základními požadavky a dalšími příslušnými ustanoveními směrnice 1999/5/ES. Dansk [Danish]: Undertegnede HARMAN erklærer herved, at følgende udstyr NTG5 system overholder de væsentlige krav og øvrige relevante krav i direktiv 1999/5/EF. Deutsch [German]: Hiermit erklärt HARMAN, dass sich das Gerät NTG5 system in Übereinstimmung mit den grundlegenden Anforderungen und den übrigen einschlägigen Bestimmungen der Richtlinie 1999/5/EG befindet. Eesti [Estonian]: Käesolevaga kinnitab HARMAN seadme NTG5 system vastavust direktiivi 1999/5/EÜ põhinõuetele ja nimetatud direktiivist tulenevatele teistele asjakohastele sätetele. English: Hereby, HARMAN, declares that this NTG5 system is in compliance with the essential requirements and other relevant provisions of Directive 1999/5/EC. Español [Spanish]: Por medio de la presente HARMAN declara que el NTG5 system cumple con los requisitos esenciales y cualesquiera otras disposiciones aplicables o exigibles de la Directiva 1999/5/CE. Ελληνική [Greek]: ΜΕ ΤΗΝ ΠΑΡΟΥΣΑ HARMAN ∆ΗΛΩΝΕΙ ΟΤΙ NTG5 system ΣΥΜΜΟΡΦΩΝΕΤΑΙ ΠΡΟΣ ΤΙΣ ΟΥΣΙΩ∆ΕΙΣ ΑΠΑΙΤΗΣΕΙΣ ΚΑΙ ΤΙΣ ΛΟΙΠΕΣ ΣΧΕΤΙΚΕΣ ∆ΙΑΤΑΞΕΙΣ ΤΗΣ Ο∆ΗΓΙΑΣ 1999/5/ΕΚ. Français [French]: Par la présente HARMAN déclare que l'appareil NTG5 system est conforme aux exigences essentielles et aux autres dispositions pertinentes de la directive 1999/5/CE. Italiano [Italian]: Con la presente HARMAN dichiara che questo NTG5 system è conforme ai requisiti essenziali ed alle altre disposizioni pertinenti stabilite dalla direttiva 1999/5/CE. Latviski [Latvian]: Ar šo HARMAN deklarē, ka NTG5 system atbilst Direktīvas 1999/5/EK būtiskajām prasībām un citiem ar to saistītajiem noteikumiem. Lietuvių [Lithuanian]: Šiuo HARMAN deklaruoja, kad šis NTG5 system atitinka esminius reikalavimus ir kitas 1999/5/EB Direktyvos nuostatas. Nederlands [Dutch]: Hierbij verklaart HARMAN dat het toestel NTG5 system in overeenstemming is met de essentiële eisen en de andere relevante bepalingen van richtlijn 1999/5/EG. Malti [Maltese]: Hawnhekk, HARMAN, jiddikjara li dan NTG5 system jikkonforma mal-ħtiġijiet essenzjali u ma provvedimenti oħrajn relevanti li hemm fid-Dirrettiva 1999/5/EC. Magyar [Hungarian]: Alulírott, HARMAN nyilatkozom, hogy a NTG5 system megfelel a vonatkozó alapvetõ követelményeknek és az 1999/5/EC irányelv egyéb elõírásainak. Polski [Polish]: Niniejszym HARMAN oświadcza, że NTG5 system jest zgodny z zasadniczymi wymogami oraz pozostałymi stosownymi postanowieniami Dyrektywy 1999/5/EC Português [Portuguese]: HARMAN declara que este NTG5 system está conforme com os requisitos essenciais e outras disposições da Directiva 1999/5/CE. Slovensko [Slovenian]: HARMAN izjavlja, da je ta NTG5 system v skladu z bistvenimi zahtevami in ostalimi relevantnimi določili direktive 1999/5/ES. Slovensky [Slovak]: HARMAN týmto vyhlasuje, že NTG5 system spĺňa základné požiadavky a všetky príslušné ustanovenia Smernice 1999/5/ES. Suomi [Finnish]: HARMAN vakuuttaa täten että NTG5 system tyyppinen laite on direktiivin 1999/5/EY oleellisten vaatimusten ja sitä koskevien direktiivin muiden ehtojen mukainen. Svenska [Swedish]: Härmed intygar HARMAN att denna NTG5 system står I överensstämmelse med de väsentliga egenskapskrav och övriga relevanta bestämmelser som framgår av direktiv 1999/5/EG. Íslenska (Icelandic): Hér með lýsir HARMAN yfir því að NTG5 system er í samræmi við grunnkröfur og aðrar kröfur, sem](https://usermanual.wiki/Harman-Becker-Automotive-Systems/9091.User-Manual-II/User-Guide-1943926-Page-133.png)
![User Instruction NTG5 NTG5_UserManual-SV_130307-english.docx Version 1.0 gerðar eru í tilskipun 1999/5/EC Norsk [Norwegian]: HARMAN erklærer herved at utstyret NTG5 system er i samsvar med de grunnleggende krav og øvrige relevante krav i direktiv 1999/5/EF. 1.3 FCC statements (North America) (§15.19) "This device complies with Part 15 of the FCC Rules. Operation is subject to the following two conditions: (1) this device may not cause harmful interference, and (2) this device must accept any interference received, including interference that may cause undesired operation” and (§15.21) “CAUTION TO USERS” / “FCC WARNING” “Changes or modifications not expressly approved by the party responsible for compliance could void the user's authority to operate the equipment “ 1.4 Industry Canada (IC) statement This Class B digital apparatus complies with Canadian ICES-003. Cet appareil numérique de la classe B est conforme à la norme NMB-003 du Canada. This device complies with Industry Canada licence-exempt RSS standard(s). Operation is subject to the following two conditions: (1) this device may not cause interference, and (2) this device must accept any interference, including interference that may cause undesired operation of the device. Le présent appareil est conforme aux CNR d'Industrie Canada applicables aux appareils radio exempts de licence. L'exploitation est autorisée aux deux conditions suivantes: (1) l'appareil ne doit pas produire de brouillage, et (2) l'utilisateur de l'appareil doit accepter tout brouillage radioélectrique subi, même si le brouillage est susceptible d'en compromettre le fonctionnement. This equipment complies with FCC and IC radiation exposure limits set forth for an uncontrolled environment. The antennas should be installed and operated with minimum distance of 20 cm between the radiator and any person. This transmitter must not be co-located or operating in conjunction with any other antenna or transmitter. Cet appareil est conforme aux limites d'exposition aux rayonnements de la IC pour un environnement non contrôlé. Les antennes doivent être installées de façon à garder une distance minimale de 20 centimètres entre le radiateur et toute personne. L'émetteur ne doit pas être colocalisé ni fonctionner conjointement avec une autre antenne ou émetteur.“RF EXPOSURE INFORMATION”“This equipment complies with FCC and IC radiation exposure limits set forth for an uncontrolled environment. The antennas should be installed and operated with minimum distance of 20 cm between the radiator and any person. This transmitter must not be co-located or operating in conjunction with any other antenna or transmitter."](https://usermanual.wiki/Harman-Becker-Automotive-Systems/9091.User-Manual-II/User-Guide-1943926-Page-134.png)