Harman Consumer ONBEATWIAN iPod, iPhone and iPad docking speaker dock with Bluetooth User Manual
Harman Consumer, Inc. iPod, iPhone and iPad docking speaker dock with Bluetooth Users Manual
Users Manual
OWNER’S MANUAL
speaker dock for iPod/iPhone/iPad
JBL® ONBEAT XTREME™
iPod, iPhone and iPad docking speaker dock with Bluetooth
2
INTRODUCTION
The JBL® OnBeat Xtreme™ speaker dock provides the ultimate in high-
quality sound for your iPod, iPhone, iPad or other Bluetooth®-enabled
devices. Built-in Bluetooth technology lets you play and control your
music wirelessly from anywhere within a 30-foot radius. You can
wirelessly stream high-quality audio from Internet radio and even handle
phone calls. The JBL OnBeat Xtreme unit’s rotating dock connector lets
you orient your iPod, iPhone, or iPad device with its screen in portrait or
landscape mode, and the included USB cable connects the JBL OnBeat
Xtreme dock to your computer so you can charge and synchronize your
iPod, iPhone, or iPad device with your iTunes library.
COMPATIBILITY
The JBL OnBeat Xtreme system is compatible with most Bluetooth-
enabled devices, music players, cell phones and laptops. Enabled with
Bluetooth A2DP (Advanced Audio Distribution Profile), AVRCP (Audio/
Video Remote Control Profile) and HFP (Hands-Free Profile), the system
can stream high-quality sound and serve as a speakerphone. The stereo
Aux connection also lets you enjoy high-quality audio from a variety of
devices such as MP3 and CD players, desktop computers (all platforms),
laptops and satellite radio tuners.
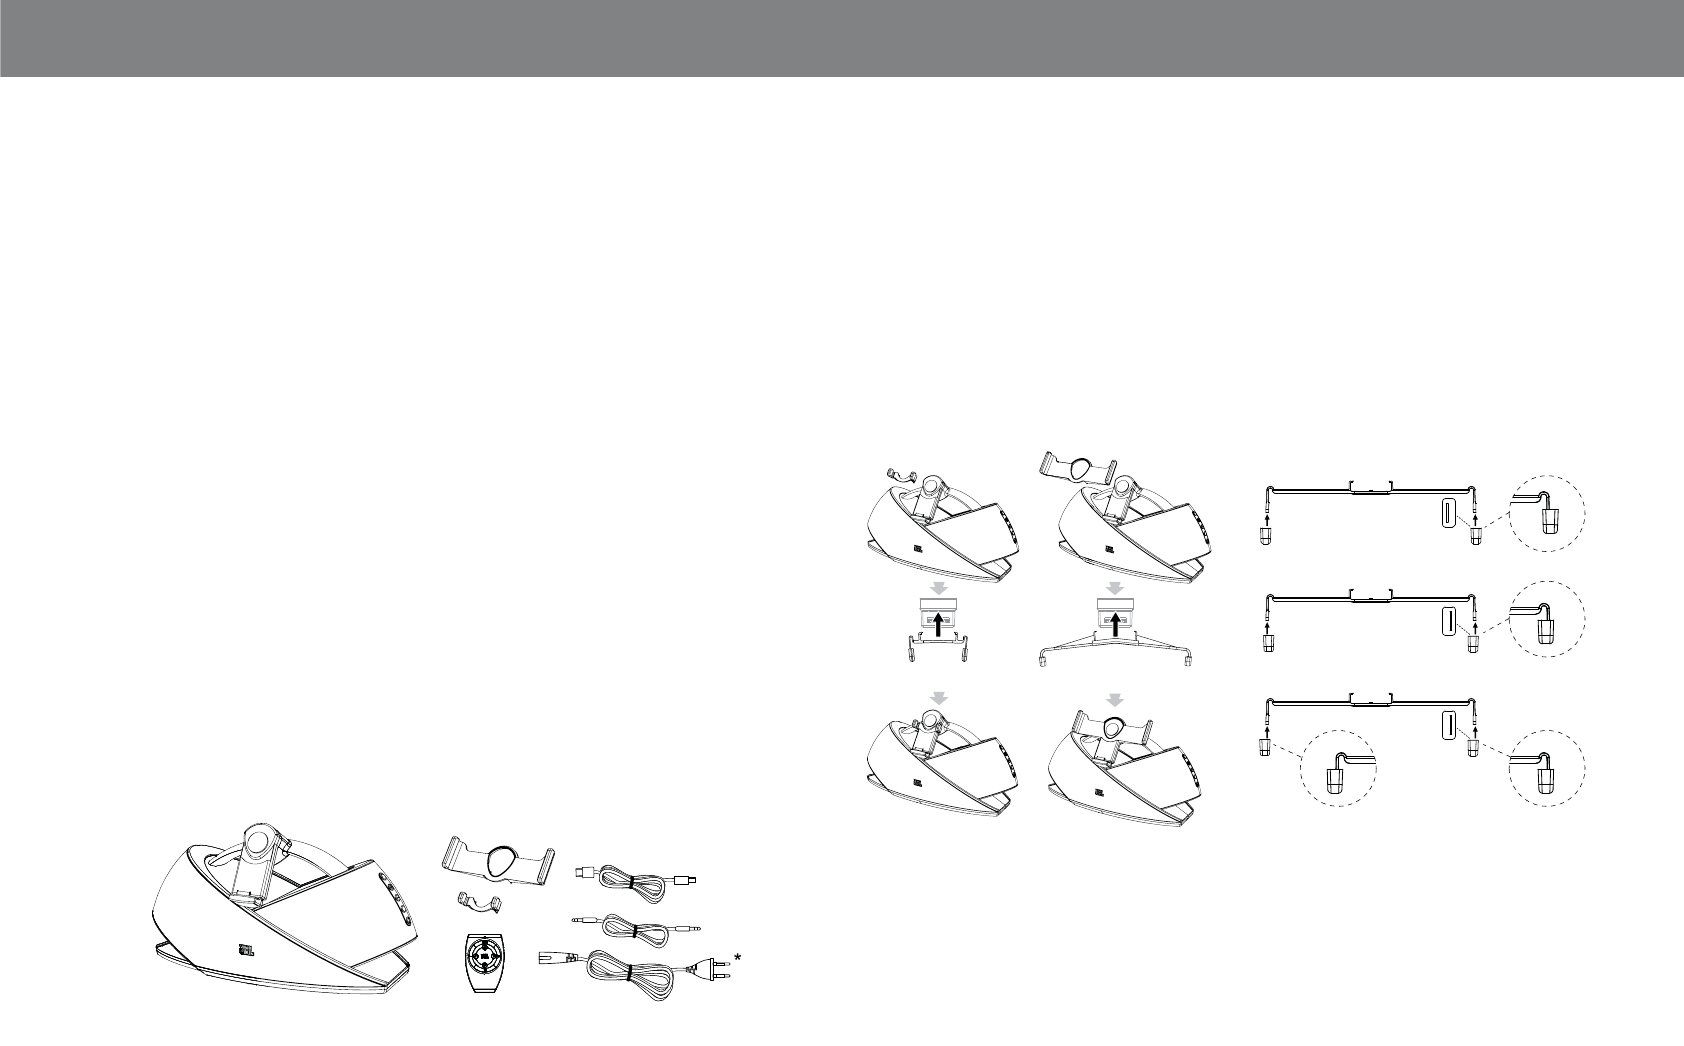
INCLUDED ITEMS
Carefully unpack your speaker dock, and confirm that all the items shown
here are included: JBL OnBeat Xtreme speaker dock, AC power cord*,
remote control, iPod touch/iPhone adapter clip, iPad adapter clip, USB
cable and 3.5mm stereo audio cable.
*AC cord varies by region
CONNECTIONS
ATTACH THE iPod/iPhone/iPad ADAPTER CLIP
Your JBL OnBeat Xtreme speaker dock includes two adapter clips: one
for an iPod touch/iPod classic/iPhone device, and another for an iPad
device (NOTE: the iPod 5G and iPod nano models do not require an
adapter clip.)
Attach the appropriate adapter clip to the JBL OnBeat Xtreme unit as
shown below. Rotate the rubber end caps as shown to accommodate
different model iPad devices and units with third-party skins.
iPod touch/iPhone
Bend Clip
Slightly
Bend Clip
Slightly
For iPad 2 with Smart Cover
and for Units with Third-Party Skins
iPad
For iPad 1
For iPad 2
3
^^^QISJVT
English
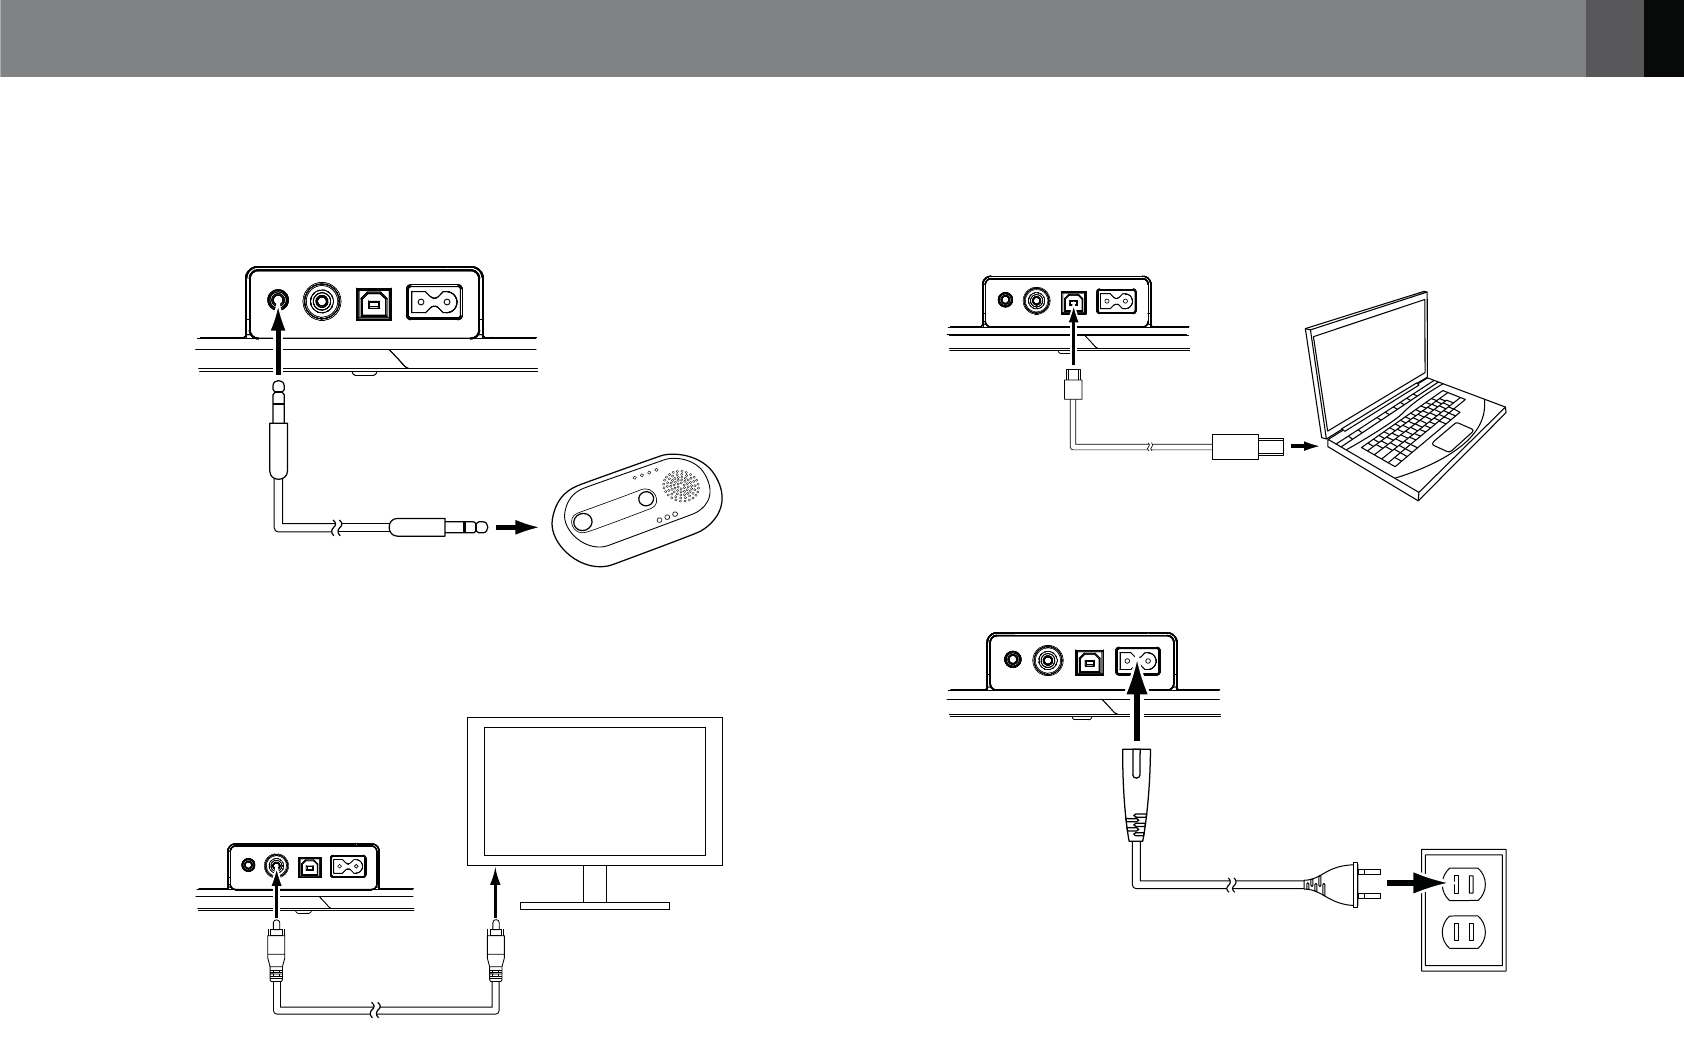
CONNECT AN AUXILIARY DEVICE
If you are going to use your JBL OnBeat Xtreme system with another
audio source, plug one end of the supplied 3.5mm (1/8") stereo cable
into the JBL OnBeat Xtreme Aux In connector, and plug the other end
into the audio source’s audio out or headphone out connector.
AUX IN
VIDEO OUT
iTUNES AC IN
100 – 240V 50/60Hz
3.5mm Stereo Cable
(supplied)
CONNECT TO A TV
If you want to view videos or photos from your iPod, iPhone or iPad
device on a TV, plug one end of a composite video cable (not supplied)
into the JBL OnBeat Xtreme Video Out connector, and plug the other end
into your TV’s composite video input connector.
AUX IN
VIDEO OUT
iTUNES AC IN
100 – 240V 50/60Hz
Composite Video Cable
(not supplied)
CONNECT TO iTunes
Connect the supplied USB Type Mini B cable to the JBL OnBeat Xtreme
USB port and to a USB port on the computer on which your iTunes
library is located. This allows you to sync a docked iPod/iPhone/iPad
device with iTunes (see Synchronizing with iTunes, on page 10).
AUX IN
VIDEO OUT
iTUNES AC IN
100 – 240V 50/60Hz
USB Cable
(supplied)
CONNECT POWER
Insert the supplied AC cord into the JBL OnBeat Xtreme AC In connector
and plug it into a working AC wall outlet.
AUX IN
VIDEO OUT
iTUNES AC IN
100 – 240V 50/60Hz
4
USING YOUR JBL ONBEAT XTREME
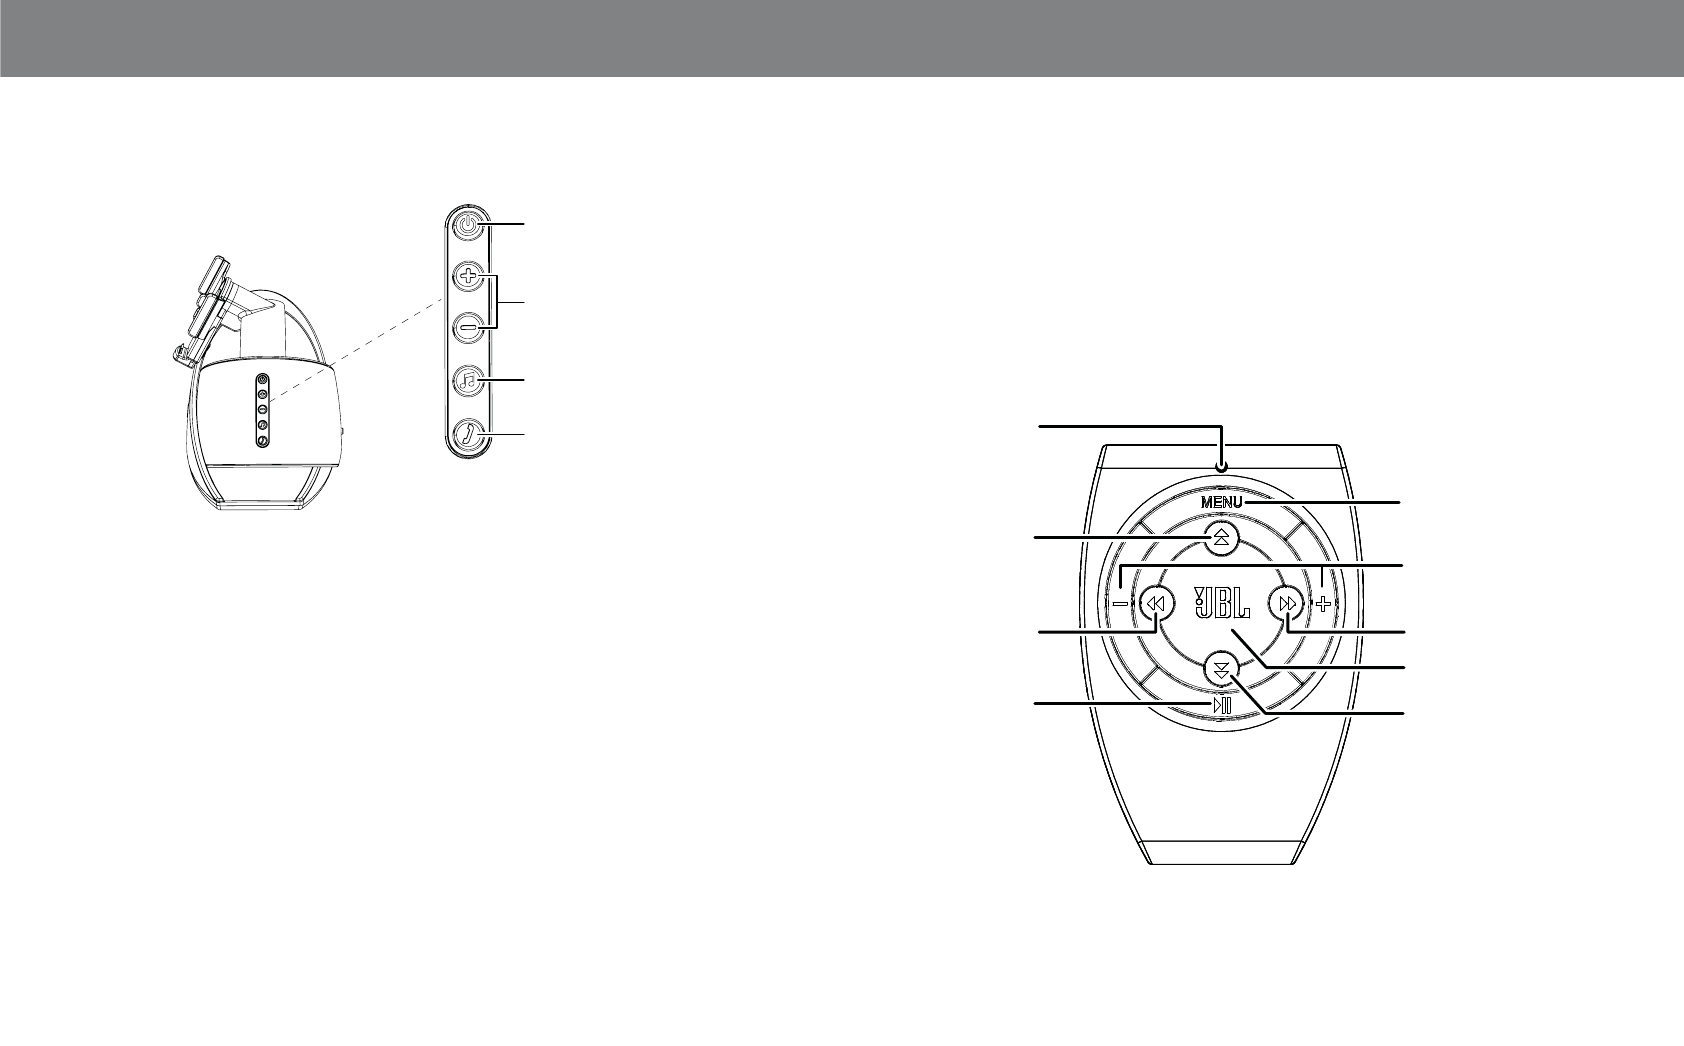
CONTROLS
Power Button
Volume Up/Down Buttons
Source Select Button
Bluetooth Button
Power button: Press this button to turn the JBL OnBeat Xtreme on. The
Power Button LED will glow white. When the system is on, press this
button to place the system in the sleep mode. The LED will glow amber.
NOTE: Pressing the Power button will also place a docked device into
its sleep mode. The JBL OnBeat Xtreme will automatically enter the sleep
mode whenever no control buttons have been pressed and no audio
signal has been present for 10 minutes.
Volume Up/Down buttons: Press these buttons to raise and lower
the volume. Press both buttons simultaneously to mute or unmute the
volume.
Source Select button: Press this button to cycle through the audio
sources: Bluetooth, iPod/iPhone/iPad dock, Auxiliary input. The Source
Select LED changes color to indicate which audio source is selected.
See Power and Source Select LEDs on page 9.
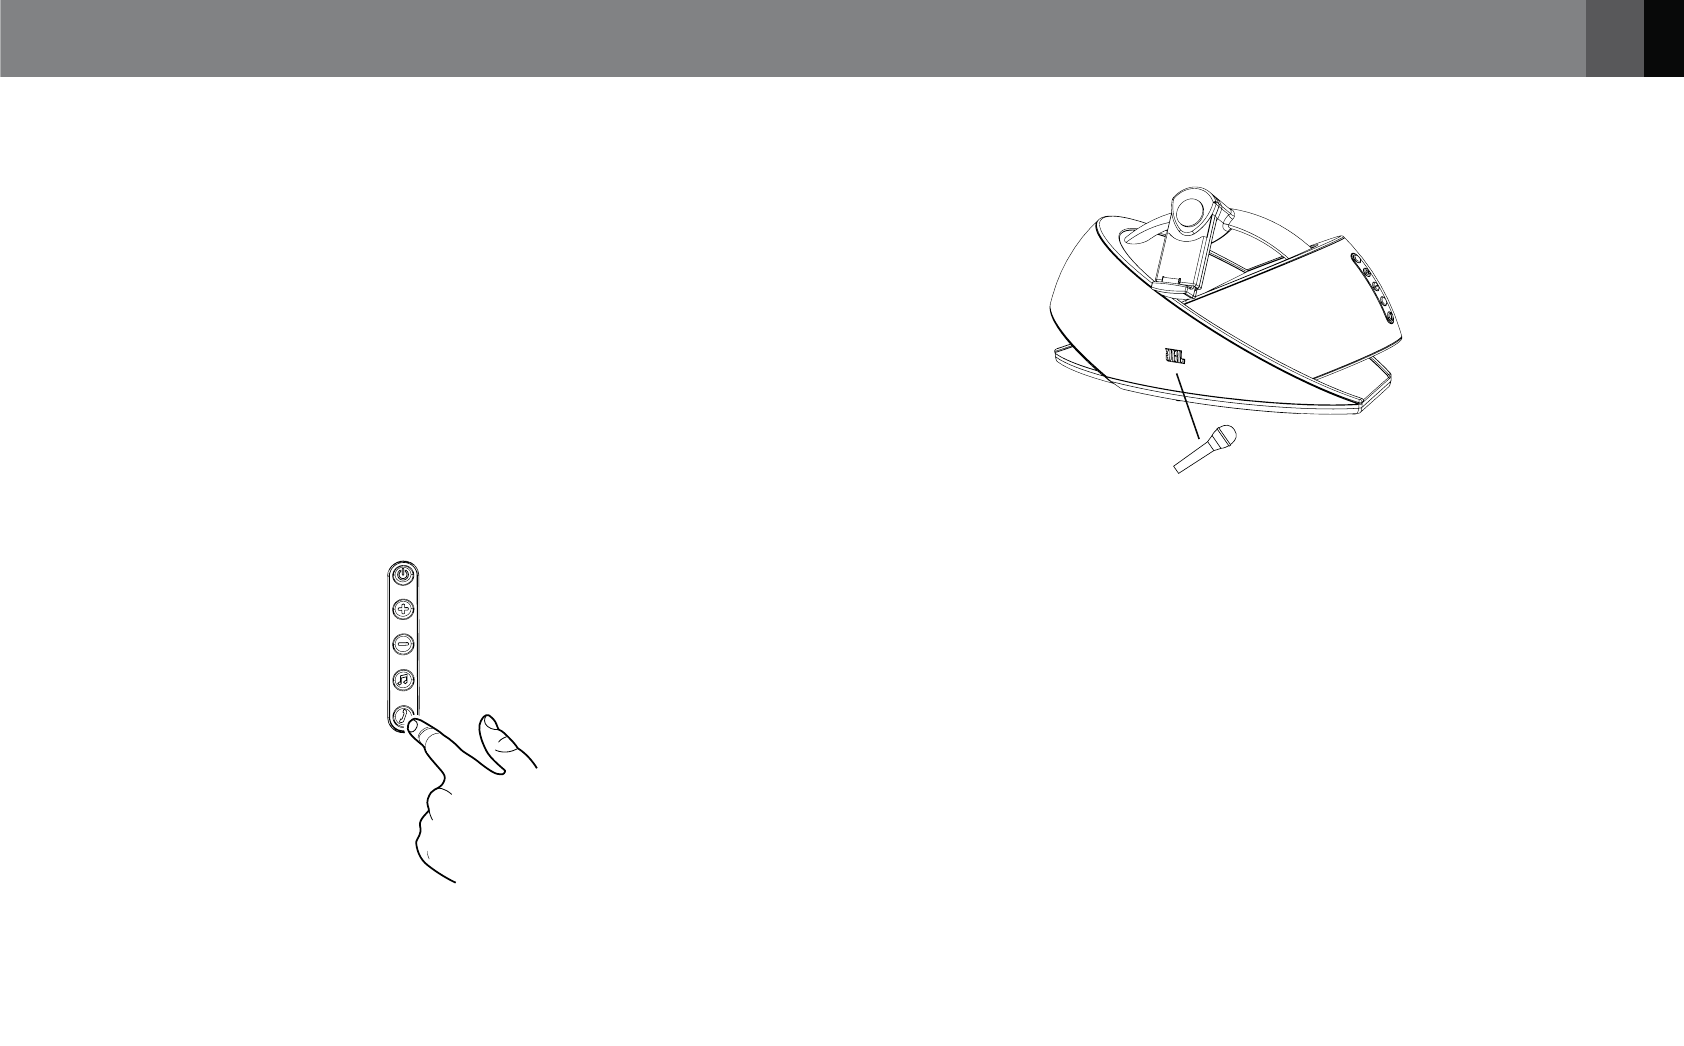
Bluetooth button: Press this button to answer a phone call and perform
other Bluetooth functions. See Bluetooth Pairing, on page 6; and
Receiving a Phone Call from a Bluetooth-enabled Device, and Placing a
Phone Call from a Bluetooth-enabled Device, on page 7.
REMOTE CONTROL FUNCTIONS
You can use the JBL OnBeat Xtreme remote control to power on and off
the JBL OnBeat Xtreme unit, change the volume, select music from your
docked device, change the audio source and change the EQ settings.
Indicator Light
Volume Up/Down
Buttons
Next Button
Down Button
Enter/OK Button
Menu Button
Up Button
Previous Button
Play/Pause
Button

5
^^^QISJVT
English
Remote
Control Button
Action Function
Enter/OK Short press Confirms a selection.
Long press Changes the EQ setting (see EQ Settings, on page 9, for details).
Menu Short press Acts as the menu button on the docked device.
Long press Changes the audio source from the docked device, to Bluetooth, to the auxiliary device.
Volume Down* Short press • If the audio is not muted, each press lowers the volume by an increment of 1 (in a range of 1-30).
• If the audio is muted, this restores audio to the level prior to muting.
Long press Continuously lowers the volume.
Volume Up* Short press • If the audio is not muted, each press raises the volume by an increment of 1 (in a range of 1-30).
• If the audio is muted, this restores audio to the level prior to muting.
Long press Continuously raises the volume.
Play/Pause Short press Play/pause music or video.
Long press • If the JBL OnBeat Xtreme is in the sleep mode, this turns the unit on.
• If the JBL OnBeat Xtreme is on, this puts the unit in the sleep mode.
Left Short press Changes to the previous audio or video track.
Long press Rewinds the audio or video.
Right Short press Changes to the next audio or video track.
Long press Fast-forwards through the audio or video track.
Up Short press Scroll up.
Down Short press Scroll down.
* Press the Volume Up and Volume Down buttons simultaneously to mute and unmute the volume.

6
BLUETOOTH PAIRING
Before you can use your JBL OnBeat Xtreme system with a Bluetooth-
enabled device, you must pair it with that device.
NOTE: The maximum distance for Bluetooth functionality is approximately
30 feet.
To pair the JBL OnBeat Xtreme system with your device:
1. Make sure your JBL OnBeat Xtreme system is turned on (the Power
LED glows white).
2. To place the JBL OnBeat Xtreme unit in Bluetooth Pairing/Discoverable
mode, press the Source Select button until the LED flashes blue.
3. Put your Bluetooth-enabled device in Pairing mode so both devices
can “see” each other. (Refer to the Bluetooth-enabled device’s user’s
guide for directions and details about putting it into Pairing mode.) The
JBL OnBeat Xtreme unit will be represented as JBL OnBeat Xtreme on
your Bluetooth-enabled device.
4. If prompted by your device, enter the JBL OnBeat Xtreme password,
which is 0000.
5. The JBL OnBeat Xtreme system is successfully paired and ready to
use when the Source Select button stops flashing and glows blue.
NOTE: Bluetooth pairing between two devices does not have to
be repeated after a successful initial pairing unless the JBL OnBeat
Xtreme system has been removed from the Bluetooth-enabled device’s
Bluetooth device list or the JBL OnBeat Xtreme’s power cord has
been disconnected. While the JBL OnBeat Xtreme is in the Bluetooth-
connected mode you can force the unit into the Bluetooth pairing mode
by pressing the Source Select button for at least two seconds.
LISTENING TO MUSIC FROM A BLUETOOTH-ENABLED DEVICE
1. Make sure the JBL OnBeat Xtreme system is paired with your
Bluetooth-enabled device (see Bluetooth Pairing, at left).
2. Make sure the JBL OnBeat Xtreme system is in Bluetooth mode (the
Source Select LED glows blue).
3. Go to the Bluetooth-enabled device’s music player and play music.
Refer to the Bluetooth-enabled device’s user’s guide for directions
and details about using its music player and transmitting music via
Bluetooth technology.
4. Use the Bluetooth-enabled device to navigate the music player.
7
^^^QISJVT
English
RECEIVING A PHONE CALL FROM A BLUETOOTH-ENABLED DEVICE
1. Make sure the JBL OnBeat Xtreme system is paired (see Bluetooth
Pairing, on page 6).
2. When you hear your Bluetooth-enabled device’s ringtone from the
JBL OnBeat Xtreme system, press the Bluetooth button to answer
the phone call.
• To reject an incoming phone call: Press and hold the Bluetooth
button on the JBL OnBeat Xtreme unit for two seconds.
• To accept a second incoming phone call while putting the first call
on hold: Press the Bluetooth button.
• To reject a second incoming phone call while staying on the first
call: Press and hold the Bluetooth button on the JBL OnBeat
Xtreme for two seconds.
• To mute a phone call: Press both Volume buttons on the JBL
OnBeat Xtreme system. To unmute the phone call: Press either
Volume button on the JBL OnBeat Xtreme unit.
The JBL OnBeat Xtreme system’s built-in microphone lets you use it as
a speakerphone.
3. When the phone call is finished, press the Bluetooth button to end the
phone call.
PLACING A PHONE CALL FROM A BLUETOOTH-ENABLED DEVICE
1. Make sure the JBL OnBeat Xtreme system is paired (see Bluetooth
Pairing, on page 6).
2. When there is no active call and no incoming call, you can place a call
from the JBL OnBeat Xtreme system.
• To receive a voice prompt for the Bluetooth status: Press the
Bluetooth button on the JBL OnBeat Xtreme unit.
• To enter voice recognition mode: Press and hold the Bluetooth
button for two seconds. (If voice recognition is not supported on
the device, this action redials the last phone number that was
called from the paired phone.)
3. When the phone call is finished, use the appropriate voice command
or press the Bluetooth button to end the phone call.
8
DOCKING AN iPod/iPhone/iPad DEVICE
NOTE: When docking an iPod, iPhone or iPad device, you must set the
device’s “Shake to Shuffle” feature to “Off.” Otherwise, the JBL OnBeat
Xtreme unit’s bass energy can activate the device’s shuffle trigger,
causing songs to change unexpectedly.
1. To dock an iPod or iPhone, place the device on the 30-pin connector
with the device tilted forward.
2. When the device is firmly seated on the connector, push it all the way
back into the dock.
Place on
Connector
Push
Back
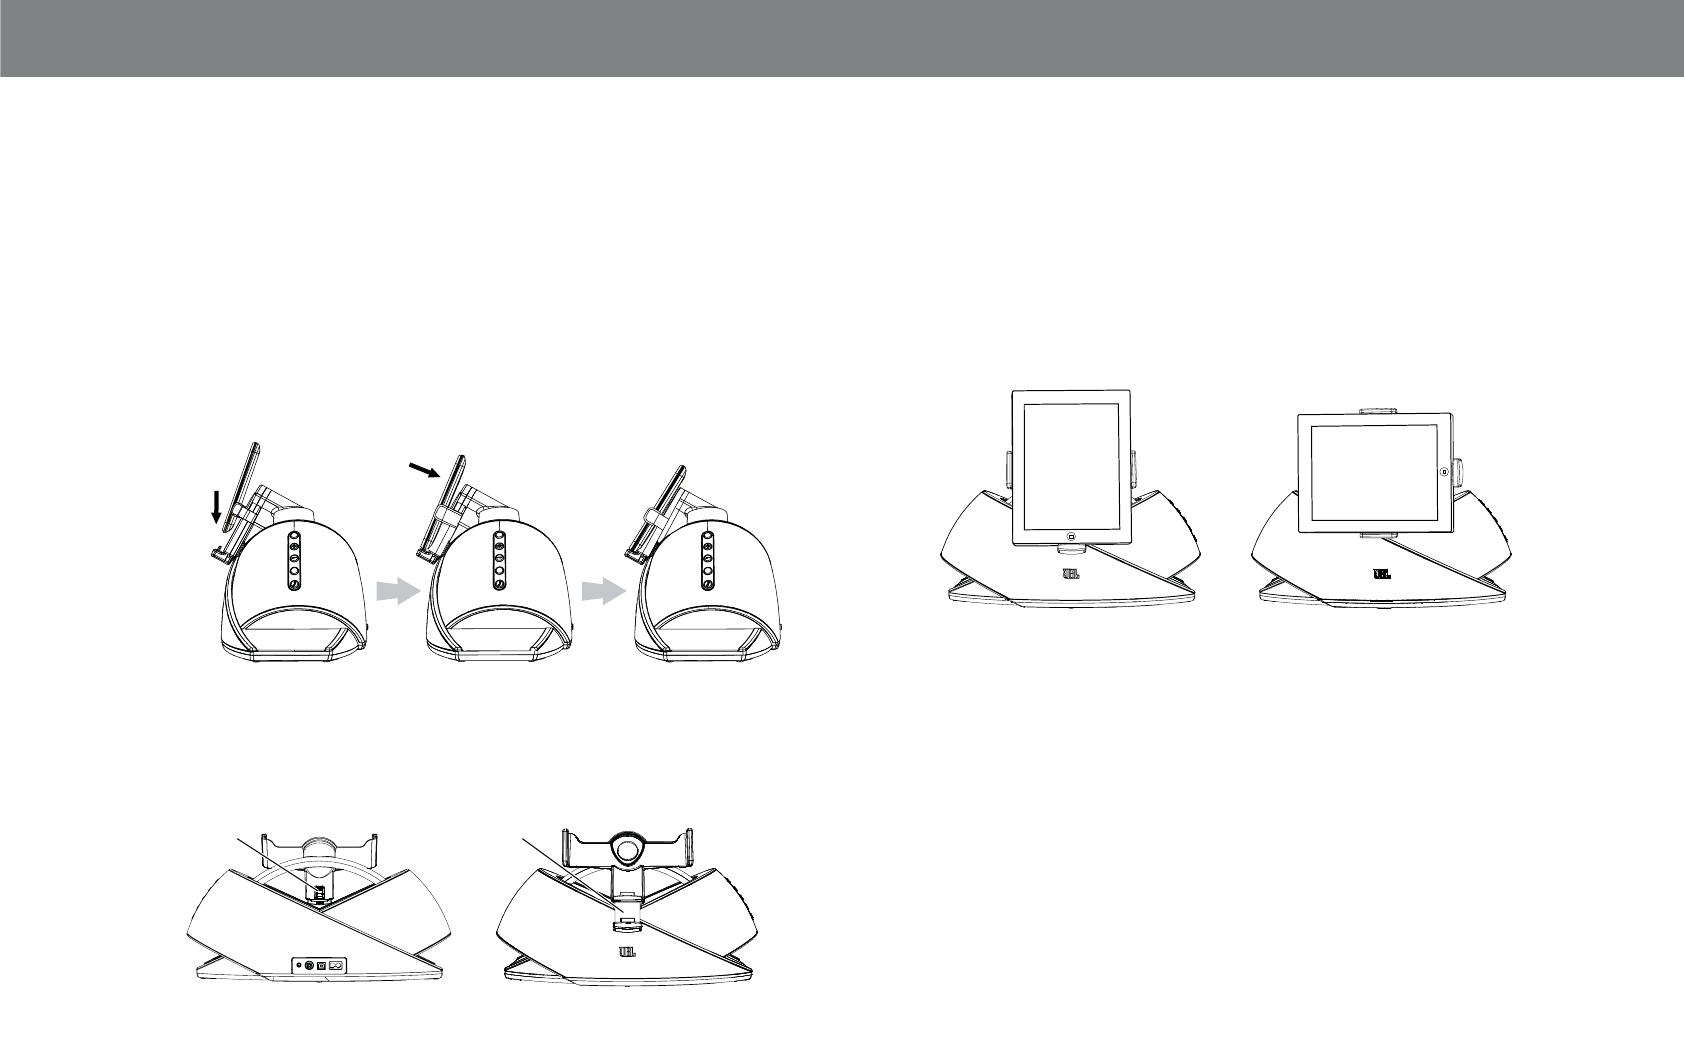
To dock an iPad device, press the lock button on the back of the dock
and extend the base of the dock, then follow steps 1 and 2 above.
Dock Base
Lock Button
Extend
Dock Base
ROTATING THE DOCK
When an iPod/iPhone/iPad device is docked in the JBL OnBeat Xtreme
speaker dock, you can rotate the dock to the landscape mode.
To rotate the dock to the landscape mode, turn it 90 degrees
counterclockwise. To rotate it back to the portrait mode, turn it 90
degrees clockwise. The dock will hold the device in place at both the
portrait and the landscape positions.
Portrait Mode Landscape Mode
PLAYING VIDEO AND PHOTO FILES
When you dock your iPod, iPhone or iPad device on the JBL OnBeat
Xtreme system, its video output will automatically be set to off, even if it
was turned on before you docked the device.
To turn the JBL OnBeat Xtreme system video output on, press the Menu
button on the remote control for at least two seconds. The JBL OnBeat
Xtreme Source Select LED will flash white once. The video from the
iPod, iPhone or iPad device will play on the connected TV. To turn the
video output off, press the remote’s Menu button again for at least two
seconds. The JBL OnBeat Xtreme Source Select LED will flash white
twice.

9
^^^QISJVT
English
EQ SETTINGS
The JBL OnBeat Xtreme dock has five equalizer (EQ) modes that adjust
the tone quality to suit different types of programs: Music (default),
Movies, Internet Radio, Chat, or Games, in that order.
Use the remote control to change the EQ setting for the active source:
1. Press and hold the Enter button on the remote control. The EQ will
advance to the next setting (Movies) and the Source Select LED will
flash to indicate that the EQ setting has advanced.
2. Each press-and-hold of the Enter button advances the EQ to the next
mode: Movies, Internet Radio, Chat, and Games. The Source Select
LED will flash each time the EQ advances.
3. When the Source Select LED flashes twice, the EQ has returned to
Music mode.
POWER AND SOURCE SELECT LEDS
The Power LED color changes to indicate the state of JBL OnBeat
Xtreme unit.
Power LED Color State
White – Constant JBL OnBeat Xtreme unit is on.
White – Flashing JBL OnBeat Xtreme unit is muted.
Amber – Constant JBL OnBeat Xtreme unit is in sleep mode.
Amber – Flashing JBL OnBeat Xtreme unit is in software upgrade mode.*
No LED JBL OnBeat Xtreme unit is off.
The Source Select LED color changes to indicate which source is active.
Source Select
LED Color
State
White – Constant iPod/iPhone/iPad dock is the active source.
White – Quick Flash Once EQ for iPod/iPhone/iPad is changed to Movies,
Games, Chat, or Internet Radio mode.
White – Quick Flash Twice EQ for iPod/iPhone/iPad is changed to Music
mode.
White – Flash Once Video is switched on.
White – Flash Twice Video is switched off.
Blue – Constant Bluetooth-enabled device is the active source.
Blue – Flashing Bluetooth-enabled device is in Pairing mode.
Blue – Quick Flash Once EQ for the Bluetooth-enabled device is changed
to Movies, Games, Chat, or Internet Radio mode.
Blue – Quick Flash Twice EQ for the Bluetooth-enabled device is changed
to Music mode.
Amber – Constant Auxiliary input device is the active source.
Amber – Quick Flash Once EQ for the auxiliary input device is changed to
Movies, Games, Chat, or Internet Radio mode.
Amber – Quick Flash Twice EQ for the auxiliary input device is changed to
Music mode.
*If the Power LED and the Source Select LED are both flashing amber
slowly, the software upgrade failed.

10
SYNCHRONIZING WITH iTunes
NOTE: Before attempting to synchronize your iPod/iPhone/iPad device
with iTunes, be sure that both your device and iTunes are updated to the
latest software version.
1. Place your iPod/iPhone/iPad device on the JBL OnBeat Xtreme
docking connector. Make sure to insert the device all the way onto
the connector.
2. Use your computer’s iTunes software to synchronize the device with
iTunes.
3. When you’re finished synchronizing, eject the device from iTunes.
CHARGING A DOCKED iPod/iPhone/iPad DEVICE
The JBL OnBeat Xtreme speaker dock will charge your iPod or iPhone
device whenever it is docked.
NOTE: The JBL OnBeat Xtreme speaker dock may not charge a docked
iPad device via the USB connection to a PC. If the iPad device charges
when it is connected directly to the PC via USB, it will charge while
docked on the JBL OnBeat Xtreme speaker dock. If the iPad device does
not charge when it is connected directly to the PC via USB, it will not
charge while docked on the JBL OnBeat Xtreme speaker dock.
UPGRADING FIRMWARE
Your JBL OnBeat Xtreme unit has upgradeable firmware that lets you take
advantage of new features and improvements as they become available.
Go to www.jbl.com for information about checking your unit’s firmware
version and instructions on upgrading to a newer firmware version.
RESTORING SYSTEM SETTINGS
You can restore the JBL OnBeat Xtreme unit’s factory default settings
at any time.
1. Make sure the Power is on. (The Power LED glows white.)
2. Simultaneously press the Power and Source Select buttons.
JBL ONBEAT APPLICATION
The JBL OnBeat application is downloadable free from the iTunes App
Store. It features a music browser, an alarm clock and EQ functions that
let you select the best sound for your music, movies, gaming, chat or
Internet radio.

11
^^^QISJVT
English
TROUBLESHOOTING SOUND QUALITY
Symptom Possible Problem Solution Note
No sound (Power button LED is not
illuminated)
Faulty AC connection Make sure that the JBL OnBeat Xtreme
system is connected to a working AC
outlet.
The Power button LED glows white when
the power is on.
No sound (Power button LED glows
amber.)
The JBL OnBeat Xtreme system is in
sleep mode.
Press the Power button until it glows
white.
No sound (Power button LED glows
white.)
The incorrect source is selected. Press the Source Select button until the
correct source is selected.
The Source Select button glows blue for
Bluetooth, white for the iPod/iPhone/iPad
dock, and amber for the auxiliary input.
The volume is set too low. Press the Volume Up (+) button to
increase the volume.
The iPod/iPhone/iPad is not docked
properly.
Re-attach the iPod/iPhone/iPad to the
dock.
You may need to remove the skin from
the device before attaching it to the dock.
Sound crackles, hisses or is distorted • Turn down the volume on the iPod/
iPhone/iPad or auxiliary device.
• Make sure that the EQ setting on the
iPod/iPhone/iPad is set to “Off.”
Loud hum or buzzing • Make sure that the audio cable is
plugged all the way into the JBL OnBeat
Xtreme’s Audio In jack.
• Replace the audio cable.
• Unplug the power supply and connect it
to a different AC outlet.
Sound comes from only one speaker • Make sure that the iPod/iPhone/iPad
device is properly seated all the way into
the docking connector.
• Make sure that the audio cable is
plugged all the way into the JBL OnBeat
Xtreme’s Audio In jack.
• Make sure the audio cable is a stereo
cable.

12
TROUBLESHOOTING BLUETOOTH PAIRING
Symptom Possible Problem Solution Note
The audio device does not pair with the
JBL OnBeat Xtreme
The audio device is not compatible with
the JBL OnBeat Xtreme unit.
Verify compatibility with manufacturer.
The JBL OnBeat Xtreme unit is not
powered on.
Press the Power button on the
JBL OnBeat Xtreme system.
The Power button glows white when the
unit is on.
The JBL OnBeat Xtreme source is not in
Bluetooth mode.
Press the Source Select button until it
flashes blue.
The Source Select button flashes blue
when it is in pairing mode and glows blue
when it is in Bluetooth mode.
Bluetooth-enabled device’s battery is low. Recharge the device’s battery following
the instructions in its user manual.
SPECIFICATIONS
Compatibility*
(Bluetooth):
Compatibility*
(docking):
iPad WiFi + 3G, iPad Wi-Fi®, iPad 2, docking versions of
the iPod (including iPod nano 5th generation, iPod touch
2nd generation, iPod nano 4th generation, iPod classic,
iPod touch 1st generation, iPod nano 3rd generation,
iPod nano 2nd generation, iPod 5th generation, iPhone
4, iPhone 3GS, iPhone 3G, iPhone, MP3 and CD players,
desktop and laptop computers (all platforms)
Transducers: Two x JBL Atlas™ woofers and two JBL Ridge tweeters
Amplifier power: 30 watts x 4
Frequency
response:
20Hz – 20kHz
Signal-to-noise ratio: XXdB
Input impedance
(Aux input):
>15k ohms
Input connections: Main connection – iPod and iPhone docking connector;
Aux input connection – 3.5mm (1/8") stereo mini jack
Power requirement: 100V – 240V AC, 50Hz/60Hz
Power consumption: 120W (maximum); 40W (operational)
Dimensions
(H x D x W):
9" x 9-5/8" x 17-1/2" (230mm x 244mm x 445mm)
Weight: 8.9 lb (4kg)
* Compatibility at time of writing. For the latest compatibility information,
visit www.jbl.com

13
^^^QISJVT
English
© 2011 HARMAN International Industries, Incorporated. All rights reserved.
JBL is a trademark of HARMAN International Industries, Incorporated, registered in the
United States and/or other countries.
Atlas and OnBeat Xtreme are trademarks of HARMAN International Industries, Incorporated.
The Bluetooth word mark and logo are registered trademarks and are owned by the Bluetooth
SIG, Inc., and any use of such marks by HARMAN International Industries, Incorporated, is
under license.
iPhone, iPod, iPod nano, iPod classic, iTunes, iPod touch and iPad are trademarks of Apple
Inc., registered in the U.S. and other countries. iPod/iPhone/iPad not included.
“Made for iPod,” “Made for iPhone” and “Made for iPad” mean that an electronic accessory has
been designed to connect specifically to iPod, iPhone and iPad respectively, and has been
certified by the developer to meet Apple performance standards. Apple is not responsible for
the operation of this device or its compliance with safety and regulatory standards.
Wi-Fi is a registered trademark of the Wi-Fi Alliance.
Features, specifications and appearance are subject to change without notice.
Part No. 950-0344-001
HARMAN Consumer, Inc.
8500 Balboa Boulevard, Northridge, CA 91329 USA
127( 7KLV HTXLSPHQW KDV EHHQ WHVWHG DQG
I
RXQG WR FRPSO\ ZLWK WKH
OLPLWVIRUD&ODVV%GLJLWDOGHYLFHSXUVXDQWWR3DUWRIWKH)&&5XOHV
7KHVH OLPLWV DUH GHVLJQHG WR SURYLGH UHDVRQDEOH SURWHFWLRQ DJDLQVW
KDUPIXOLQWHUIHUHQFHLQDUHVLGHQWLDOLQVWDOODWLRQ
7KLVHTXLSPHQWJHQHUDWHVXVHVDQGFDQUDGLDWHUDGLRIUHTXHQF\HQHUJ\
DQG LI QRW LQVWDOOHG DQG XVHG LQ DFFRUGDQFH ZLWK WKH LQVWUXFWLRQV PD\
FDXVHKDUPIXOLQWHUIHUHQFHWRUDGLRFRPPXQLFDWLRQV
+RZHYHU WKHUH LV QR JXDUDQWHH WKDW LQWHUIHUHQFH ZLOO QRW RFFXU LQ D
SDUWLFXODULQVWDOODWLRQ
,IWKLVHTXLSPHQWGRHVFDXVHKDUPIXOLQWHUIHUHQFHWR UDGLR RU WHOHYLVLRQ
UHFHSWLRQ ZKLFK FDQ EH GHWHUPLQHG E\ WXUQLQJ WKH HTXLSPHQW RII DQG
RQWKH XVHU LV HQFRXUDJHGWR WU\ WR FRUUHFWWKH LQWHUIHUHQFH E\ RQHRU
PRUHRIWKHIROORZLQJPHDVXUHV
5HRULHQWRUUHORFDWHWKHUHFHLYLQJDQWHQQD
,QFUHDVHWKHVHSDUDWLRQEHWZHHQWKHHTXLSPHQWDQGUHFHLYHU
&RQQHFWWKHHTXLSPHQWLQWRDQRXWOHWRQDFLUFXLWGLIIHUHQWIURPWKDWWR
ZKLFKWKHUHFHLYHULVFRQQHFWHG
&RQVXOWWKHGHDOHURUDQH[SHULHQFHGUDGLR79WHFKQLFLDQIRUKHOS
)&&QRWLFHWRXVHUVDQGSURGXFWVWDWHPHQWV
7KLVGHYLFHFRPSOLHVZLWKSDUWRIWKH)&&5XOHV
2SHUDWLRQLVVXEMHFWWRWKHIROORZLQJWZRFRQGLWLRQV
7KLVGHYLFHPD\QRWFDXVHKDUPIXOLQWHUIHUHQFHDQG
7KLVGHYLFHPXVWDFFHSWDQ\LQWHUIHUHQFHUHFHLYHG
LQFOXGLQJLQWHUIHUHQFHWKDWPD\FDXVHXQGHVLUHGRSHUDWLRQ
&KDQJHV RU PRGL
I
LFDWLRQV QRW H[SUHVVO\ DSSURYHG E\ WKH SDUW\
UHVSRQVLEOHIRUFRPSOLDQFHFRXOGYRLGWKHXVHUVDXWKRULW\WRRSHUDWHWKH
HTXLSPHQW
7KLVHTXLSPHQWFRPSOLHVZLWK)&&UDGLDWLRQH[SRVXUHOLPLWVVHWIRUWKIRU
DQ XQFRQWUROOHG HQYLURQPHQW 7KLV HTXLSPHQW VKRXOG EH LQVWDOOHG DQG
RSHUDWHGZLWKPLQLPXPFPEHWZHHQWKHUDGLDWRUDQG\RXUERG\
7KLVWUDQVPLWWHUPXVWQRWEHFROORFDWHGRURSHUDWLRQLQFRQMXQFWLRQZLWK
DQ\RWKHUDQWHQQDRUWUDQVPLWWHUXQOHVVDXWKRUL]HGWRGRVRE\WKH)&&
IC Warning
T
his device complies with Indusy Canada License-exempt RSS standard(s).
Operation is subject to the following two conditions :
(1) this device may not cause interference, and
(2) this device must accept any interference,
including interference that may cause undesired operation of the device.