Harman BD100 Blu-RAY DISC SYSTEM User Manual JBL Cinema BD100 ENG MANUAL RE0 1
Harman International Industries, Inc Blu-RAY DISC SYSTEM JBL Cinema BD100 ENG MANUAL RE0 1
Harman >
Contents
- 1. JBL_Cinema BD100 ENG. MANUAL RE0.1
- 2. MANUAL WARNING
JBL_Cinema BD100 ENG. MANUAL RE0.1
2
Thank you for choosing a JBL®
producT!
This quick-start guide contains all the information you need to connect
and set up your new JBL Cinema BD100 home theater system.
To conserve our natural resources, your home theater system does
not include a printed owner’s manual. An owner’s manual containing
complete information about operating all of your new home theater
system’s features is available at our Web site. Go to www.jbl.com and
download the Cinema BD100 Home Theater System Owner’s Manual.
Your Cinema BD100 system is designed to be compatible with
region management information that is encoded on most Blu-ray
Disc and DVD recordings. Your system will only play discs that
contain region coding for the area where your system was shipped
and intended for sale:
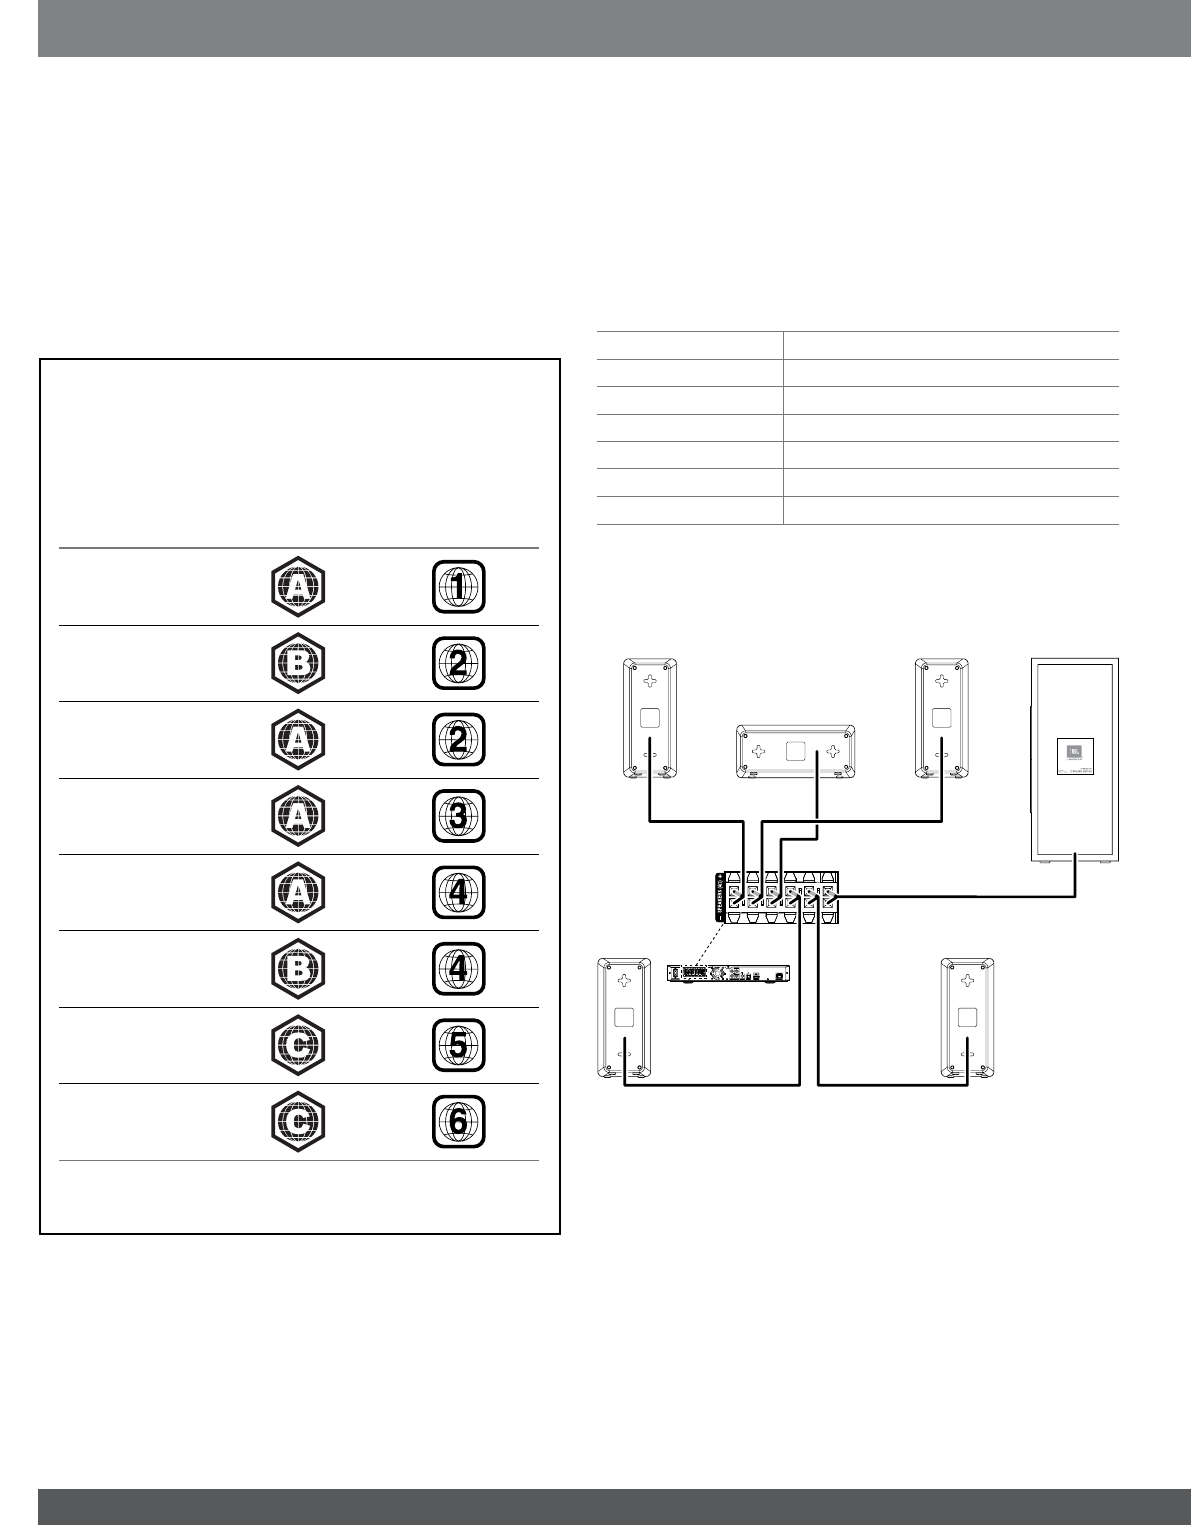
AREA WHERE
SOLD
BLU-RAY DISC
REGION CODE
DVD REGION
CODE
USA, Canada
Europe, Middle
East
Japan
Korea, S.E. Asia
Mexico, Latin
America
Australia, New
Zeland
Russia, India
China
For example, Cinema BD100 systems shipped to and sold in the
USA will only play Blu-ray Discs that contain region code A and
DVD discs that contain region code 1.
connecTions
CONNECT THE SPEAKERS
CAUTION: Before making any connections to the BD100 receiver,
ensure that the receiver’s AC cord is unplugged from the receiver
and the AC outlet. Making speaker connections with the receiver
plugged in and turned on could damage your speakers.
Your Cinema BD100 receiver has color-coded speaker connectors and
the Cinema BD100 speaker wires are color-coded to make it easy to
properly connect the speakers.
white front left (+)
red front right (+)
blue surround left (+)
gray surround right (+)
green center (+)
purple subwoofer (+)
black (–) on all speakers
Connect the speaker’s wire with the colored band to the receiver’s
speaker terminal with the same color. Connect the speaker’s black
wire to the black receiver speaker terminal directly under the colored
terminal.
AUX IN
COAXIAL IN
VIDEO OUT
AC INPUT
100–240v—50/60Hz 50W
RADIO ANTENNA
FM 75W
NETWORK
OPTICAL IN HDMI OUT
FRONT R
CENTER
FRONT L
SURR R SURR L
FRONT R
Speaker
Red
Band to
Red Tab
White
Band to
White Tab
Green Band
to Green Tab
Gray Band
to Gray Tab
Blue Band
to Blue Tab
Purple Band to Purple Tab
SURR L
Speaker
SURR R
Speaker
FRONT L
Speaker SUBWOOFER
CENTER
Speaker
IMPORTANT: Make sure the (+) and (–) bare wires do not touch each
other or any metal object on the receiver’s rear panel. Touching wires
can cause a short circuit that can damage the BD100 receiver.
3
www.jbl.com
English
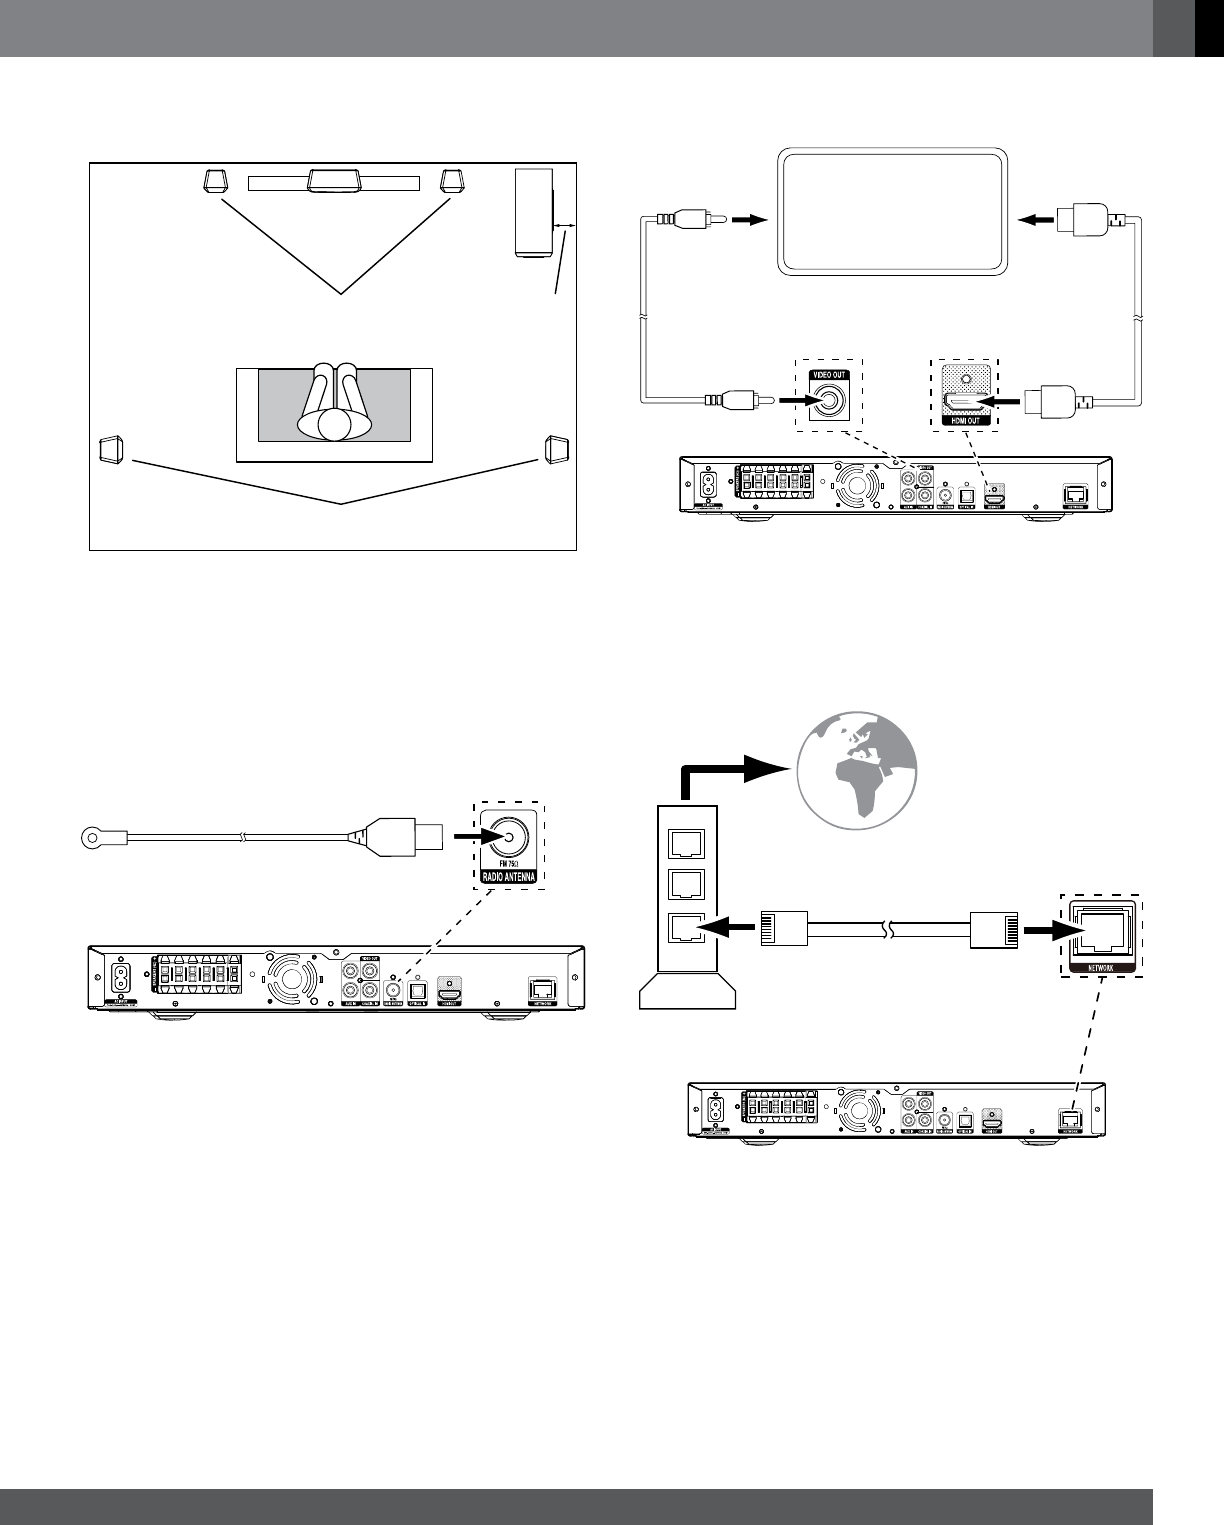
PLACE THE SPEAKERS
Place the speakers and subwoofer according to the illustration below.
TV
Place Center Speaker
Above or Below
Center of TV
Place Left & Right Speakers
on Either Side of TV Place Subwoofer
with Speaker
4" – 6"
(100mm – 160mm)
Away from Wall
Place Left & Right Surround Speakers
to Sides of or Slightly Behind Listeners
• You can mount the left, right, center and surround speakers on the
wall using picture hanger hardware.
• Placing the subwoofer with it’s speaker 4" – 6" (100mm – 160mm)
from a wall maximizes bass performance and helps protect the
exposed speaker unit from accidental damage.
For more detailed speaker placement information, please go to www.jbl.
com and download the Cinema BD100 Home Theater System Owner’s
Manual.
CONNECT THE RADIO ANTENNA
FM Antenna (supplied)
CONNECT A TV OR VIDEO DISPLAY
TV
Composite
Video Cable
(not supplied)
HDMI Cable
(not supplied)
Use this connection
if your TV has an
HDMI connector
Use this connection
if your TV does
not have an HDMI
connector
NOTE: If your TV supports the HDMI Audio Return Channel and you
access digital TV channels from your TV’s built-in tuner or you have
other sources already connected directly to your TV, you can feed their
sound to the Cinema BD100 system via the HDMI Out connector’s
Audio Return Channel, and they will not require additional connections
to the receiver.
CONNECT TO YOUR WIRED HOME NETWORK
To
Internet
Network
Modem
CAT-5/5E Cable
(not supplied)
NOTE: Download the Cinema BD100 Home Theater System Owner’s
Manual from www.jbl.com and refer to the Setting Up the Receiver
section for information about joining the receiver with your network.
4
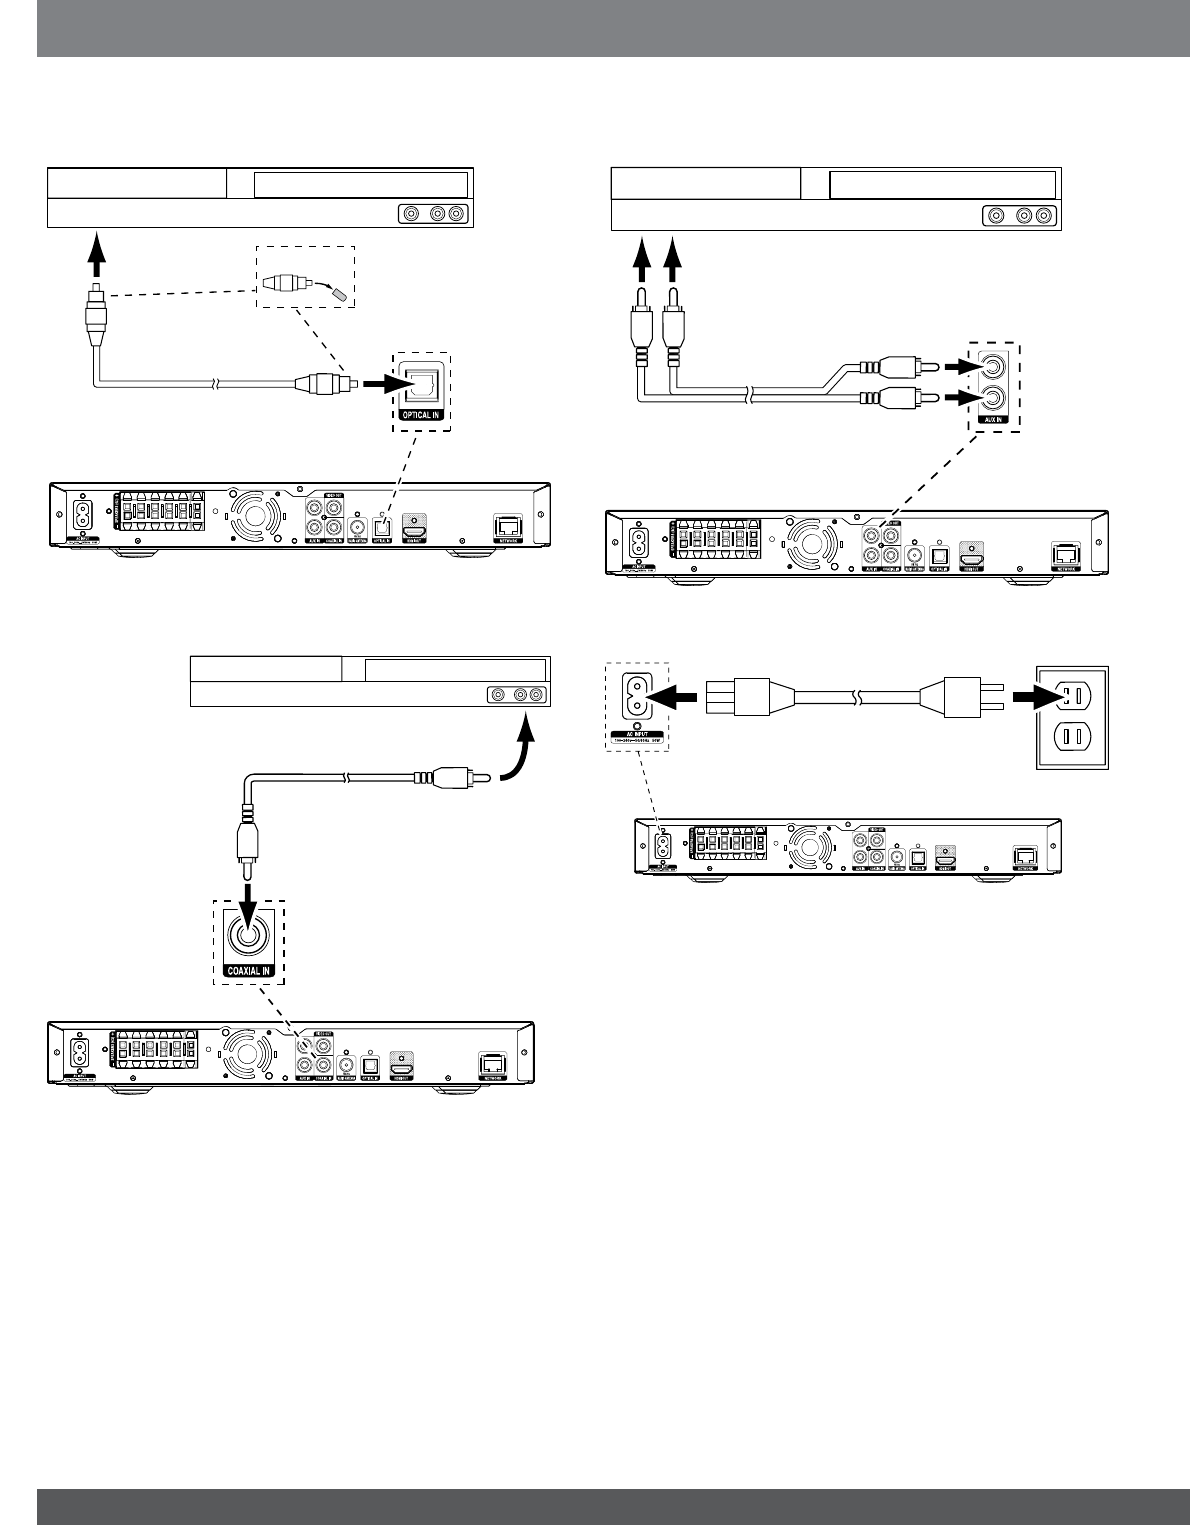
CONNECTING YOUR OPTICAL DIGITAL AUDIO SOURCE DEVICE
Optical-Equipped Source Device
Remove Caps
To Optical Digital
Audio Output
Optical Digital Audio Cable
(not supplied)
CONNECTING YOUR COAXIAL DIGITAL AUDIO SOURCE DEVICE
Coaxial-Equipped Source Device
To Coaxial Digital
Audio Output
Coaxial Digital Audio Cable
(not supplied)
CONNECTING YOUR ANALOG AUDIO SOURCE DEVICE
Analog Source Device
To Stereo Analog
Audio Output
Stereo Audio Cable
(not supplied)
CONNECT THE AC POWER
Power Cord
(supplied)
100 – 240V
50/60Hz
5
www.jbl.com
English
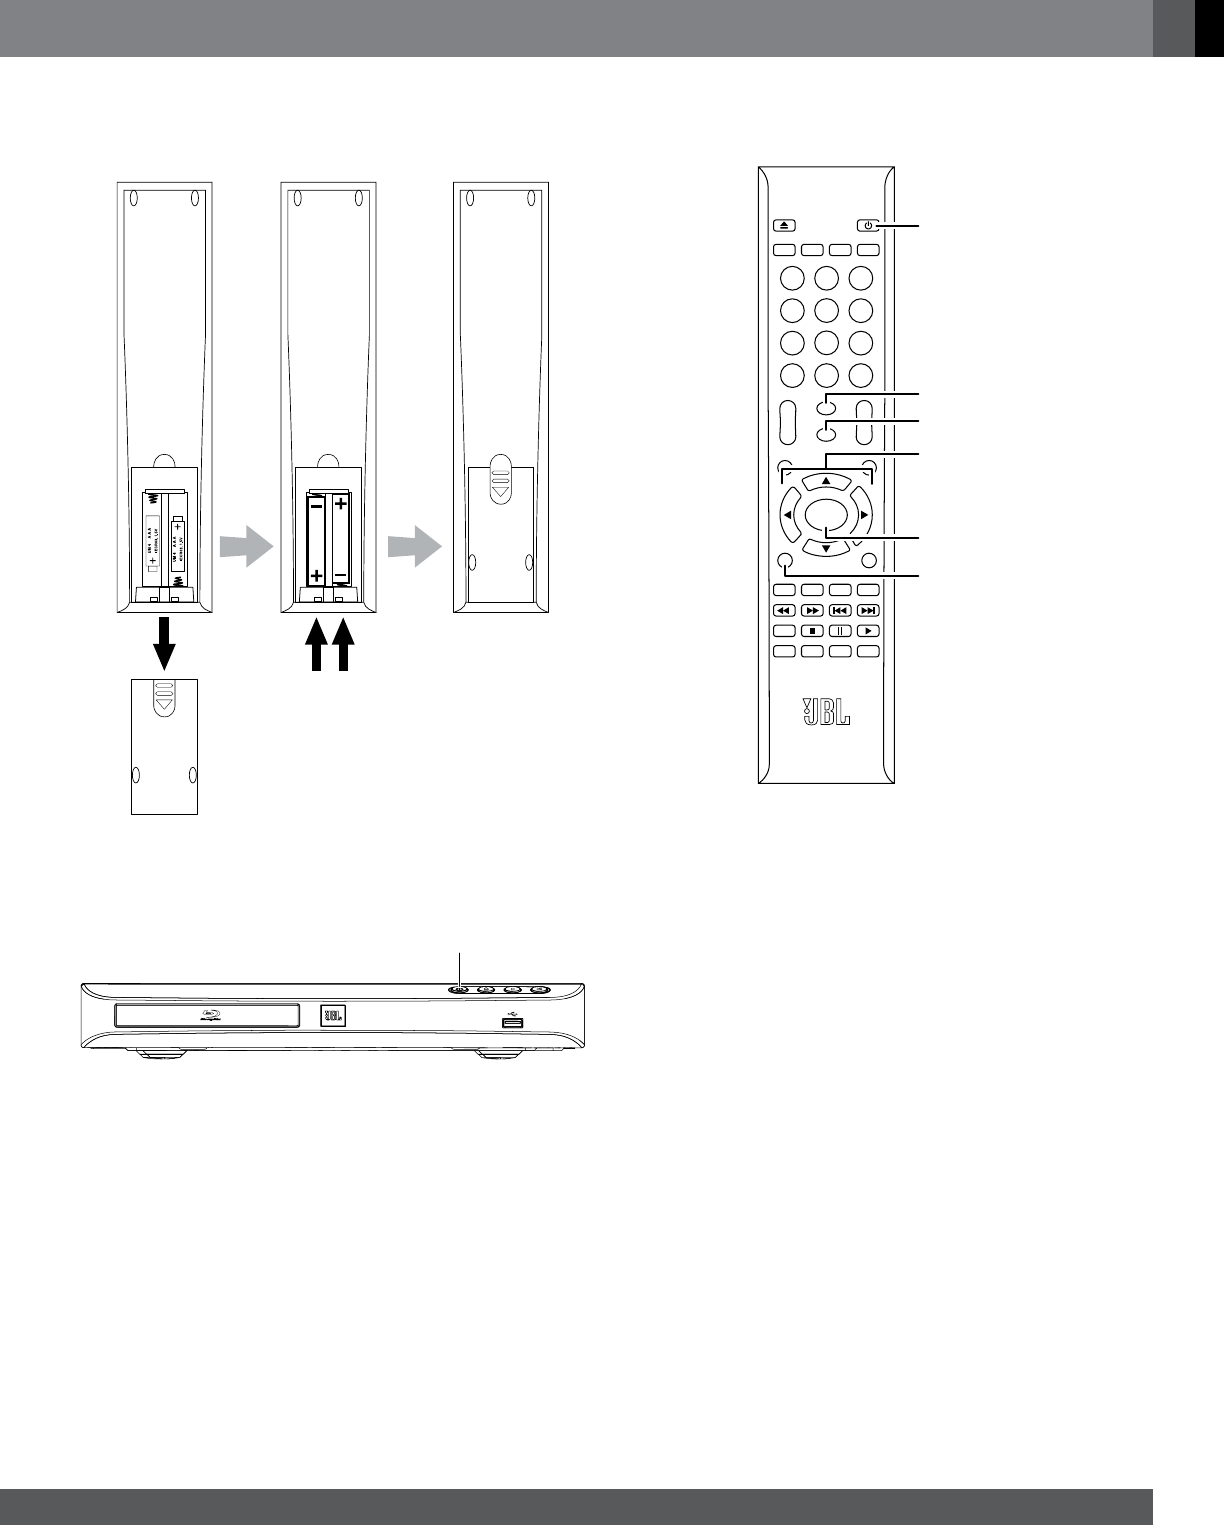
seT up The receiver
INSTALL THE BATTERIES IN THE REMOTE CONTROL
TURN ON THE RECEIVER
Press the receiver’s Power button to turn it on.
Power
Button
To set up your BD100 receiver you will use the remote to navigate
through the on-screen menus and to make selections from them.
DISC
MUTE
VOL+
VOL–
CH+
CH–
SETUP
HOME
ENTER
TOP MENU
POP-UP MENU
CLEAR/EXIT
REPEAT
A–B
PROGRAM
BOOKMARK THUMBNAIL
ZOOM
SUBTITLE
AUDIOSURR
OPTIONS
DISPLAY
123
456
78
0
9
RADIO
STREAM
SOURCE
Power Button
Setup Button
Home Button
Cursor Buttons
Enter Button
Clear/Exit
Button
• Use the Cursor Up/Down buttons to navigate through the menu list.
To select a highlighted item, press the Enter button. The screen will
change depending on your selection.
• To return to the previous screen, press the Cursor Left button.
6
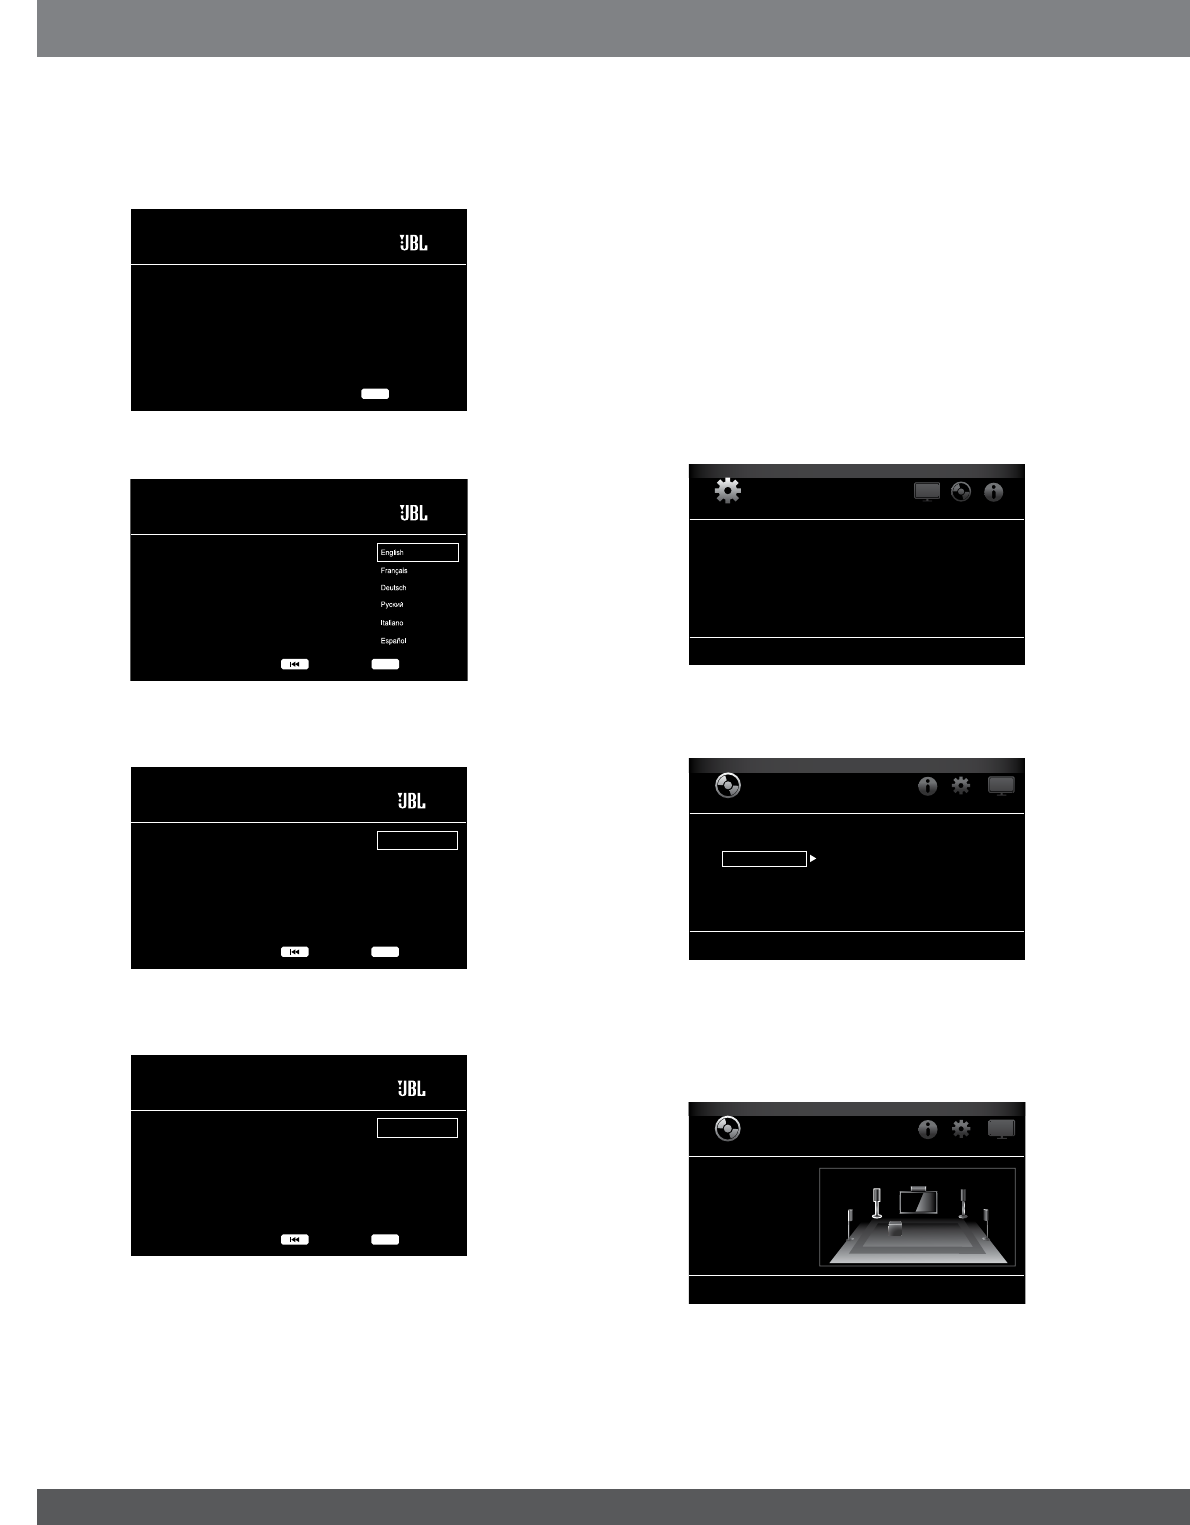
seTup Wizard
When you turn your BD100 receiver on for the first time, the on-screen
menu will display the Setup Wizard introduction screen.
Setup Wizard
Welcome! Thanks for choosing JBL Cinema BD.
The following steps will ensure you get the best
performance from your new system.
You can adjust any of these settings later and
review advanced user settings by selecting
“Settings” from the Home Menu.
Next1/5 ENTER
Press the Enter button, and the language selection screen will appear.
Please the language you would like to use
with JBL Cinema BD.
Setup Wizard
Next2/5 ENTER
Previous
After selecting the language you want the BD100 receiver to use, press
the Enter button, and the Initial Setup TV resolution screen will appear.
JBL Cinema BD automatically selects the best resolution
for most TVs. If you have an older display or other
requirements, you can manually select your resolution.
Otherwise, of if you’re unsure, select ‘Auto’ to continue.
Upon making a selection the screen will change to the
chosen resolution. You will be presented with the option
to continue with the new resolution or ‘Cancel’ to return
to the previous resolution. If the screen remains blank
please wait 15 seconds without pressing anything and
the system will automatically return to the previous
resolution.
Auto
1080p
1080i
720p
480p/576p
480i/576i
Setup Wizard
Next3/5 ENTER
Previous
After selecting your TV’s resolution, press the Enter button, and the
Initial Setup aspect-ratio screen will appear.
PleasesSelect the best aspect ratio for JBL Cinema
BD to use with your TV.
The most common option is ‘16:9 Full’.
Consult the owner’s manual for additional details.
16:9 Full
16:9 Normal
4:3 Pan & Scan
4:3 Letterbox
Setup Wizard
Next4/5 ENTER
Previous
After selecting the aspect ratio that best fits your TV, press the Enter
button to save your settings and then press it again to exit the Setup
Wizard screens.
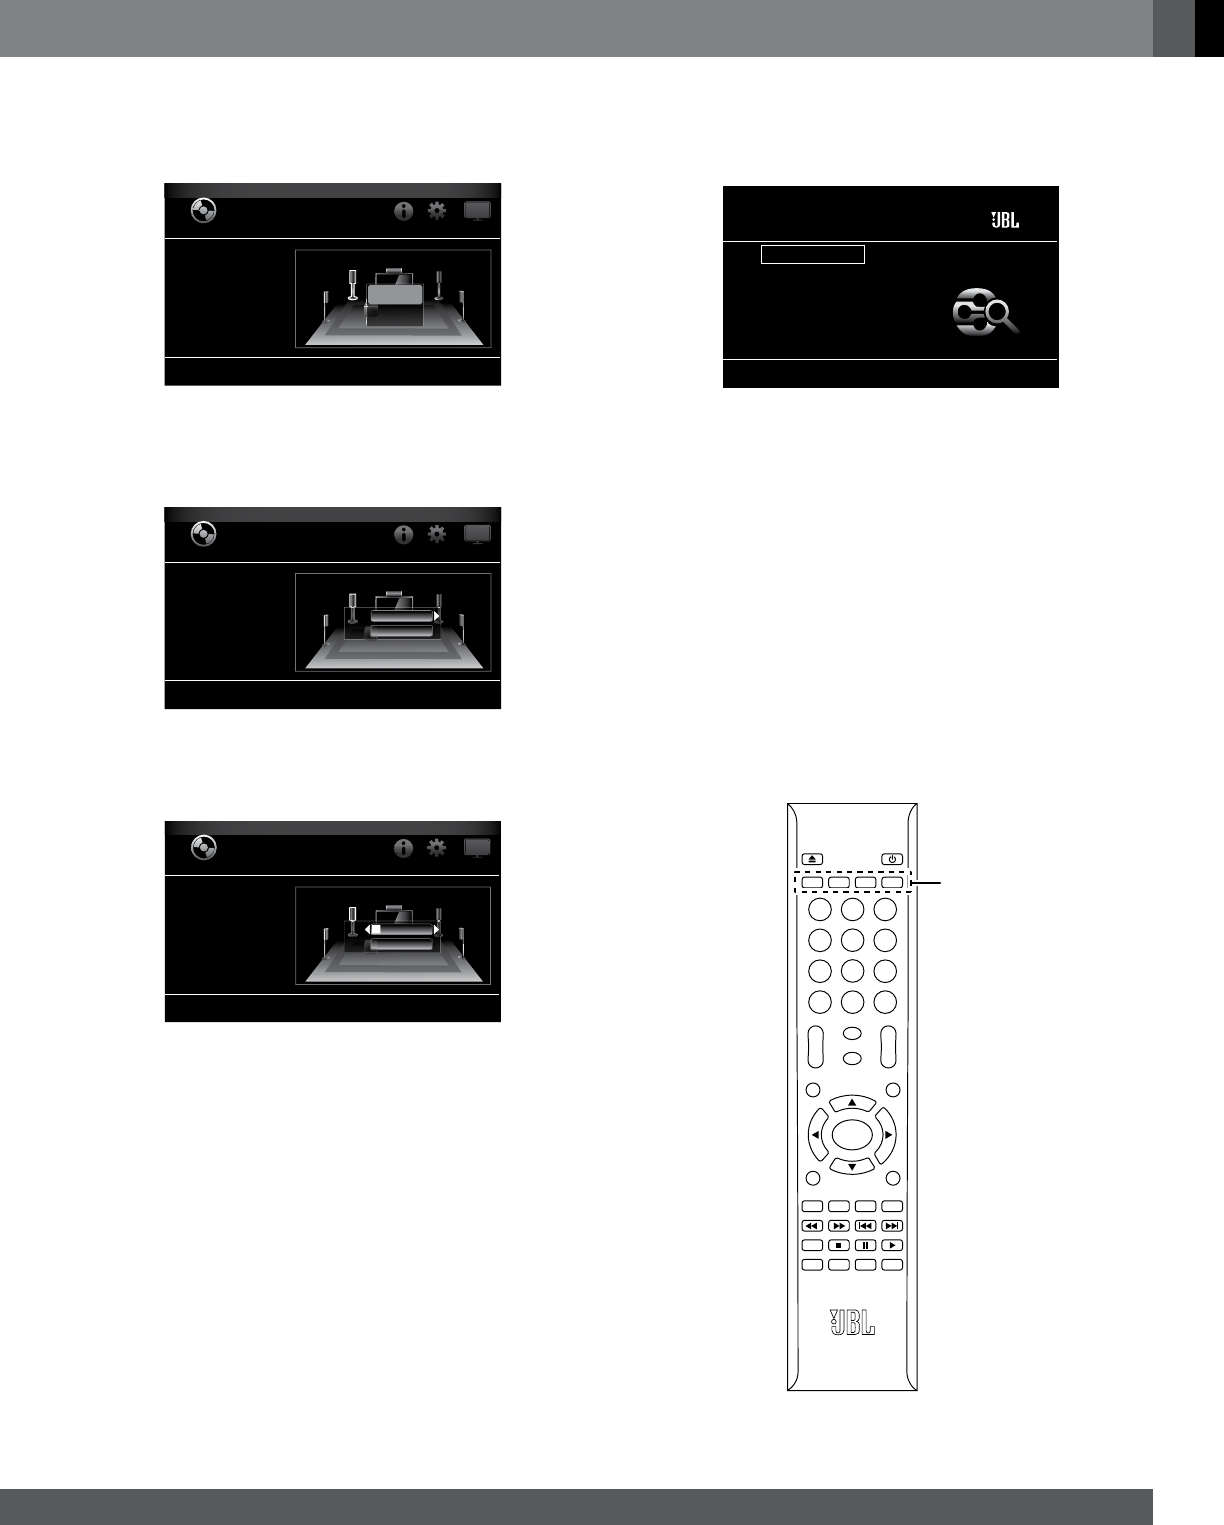
seT The speaker disTances
Before you use your Cinema BD100 system you need to enter the
distance from each speaker to your listening position. When you
installed your Cinema BD100 system, you may have had to place some
speakers a little farther away from the listening position than others.
Sounds that are supposed to arrive simultaneously from different
speakers may blur, due to different arrival times. The BD100 receiver
provides an adjustment that compensates for these real-world speaker
placement differences, so your Cinema BD100 system can deliver a
superior surround-sound experience. (Even if all your speakers are the
same distance from the listening position you still need to enter their
distances.)
1. Measure the distance from each speaker (except the subwoofer) to
your main listening position. Write the distances down.
2. Press the remote’s Setup button.The General Settings menu will
appear.
General Settings
System
Language
Playback
Parental Control
Network
3. Use the right Cursor button to select Audio Settings, then use
the down Cursor button to select Speaker Settings. The Speaker
Settings screen will appear.
Audio Settings
Audio Output
Speaker Settings
Test Tone More...
4. Press the right Cursor button to select Test Tone, then press it again
to select More... The Speaker Settings screen will appear and you
will hear test noise circulate through each speaker in turn. The active
speaker will be highlighted on the screen. (Use the remote’s Volume
– button to lower the volume if the test noise is too loud.)
Audio Settings
Audio Output
Speaker Settings
SUB
L
LS RS
R
C
7
www.jbl.com
English
5. Press the Enter button when the speaker you want to adjust is
highlighted. The Level and Distance adjustment selections for that
speaker will appear.
Audio Settings
Audio Output
Speaker Settings
SUB
L
LS RS
R
C
S
UB
S
Level
Distance
6. Press the down Cursor button to highlight Distance, then press the
Enter button to select it. The speaker’s distance adjustment will
appear. Note: You do not need to adjust the individual speaker levels
at this time.
Audio Settings
Audio Output
Speaker Settings
SUB
L
LS RS
R
C
L
R
0.0
0.0
7. Use the right Cursor button to set the distance you measured for
that speaker. (The distances show in meters. Each .3 meters equals
1 foot).
Audio Settings
Audio Output
Speaker Settings
SUB
L
LS RS
R
C
L
R
0.6
0.0
8. Repeat steps 5 – 7 for each speaker in the system (except the
subwoofer). To return to the previous menu screen, press the Clear/
Exit button.
9. When you have set the distances for all the speakers, press the
Setup button to exit the setup menu.
For complete information about all of your Cinema BD100 system’s
settings and adjustments, download the Cinema BD100 Home Theater
System Owner’s Manual from www.jbl.com.
using The Bd100 receiver
Press the remote’s Home button to display the Home Menu screen:
DLNA Search
Pandora
Picasa
YouTube
FM Radio
Bluetooth
Home Menu
The available sources are listed on the left. If a disc has been inserted
into the receiver’s built-in disc slot, it will appear on the list as “Blu-ray
Disc,” “DVD Video”, “CDDA” or “Data Disc” (audio or data CD-R disc).
If you have inserted a USB device into the receiver’s USB port, it will
appear on the list as “USB.”
The “Input” source displays a screen that lets you access digital and
analog sources you connected to the receiver’s rear-panel optical digital
and analog inputs, as well as the HDMI Audio Return Channel.
To select a source from the list, use the Cursor Up/Down buttons to
highlight the desired source, then press the Enter button to select it.
You can also select sources by pressing the four Source Selector
buttons on the remote. Repeatedly press the “Stream” button to access
available streaming services and Bluetooth. (Different streaming services
are available in different regions. See the Cinema BD100 Home Theater
System Owner’s Manual for details.) Repeatedly press the “Source”
button to access audio sources you connected to the receiver’s rear-
panel connectors and the HDMI Audio Return channel.
DISC
MUTE
VOL+
VOL–
CH+
CH–
SETUP
HOME
ENTER
TOP MENU
POP-UP MENU
CLEAR/EXIT
REPEAT
A–B
PROGRAM
BOOKMARK THUMBNAIL
ZOOM
SUBTITLE
AUDIOSURR
OPTIONS
DISPLAY
123
456
78
0
9
RADIO
STREAM
SOURCE
Source
Buttons
For complete information about using all of your Cinema BD100
system’s features, download the Cinema BD100 Home Theater
System Owner’s Manual from www.jbl.com.

HARMAN International Industries, Incorporated
8500 Balboa Boulevard, Northridge, CA 91329 USA
Made in P.R.C.
© 2012 HARMAN International Industries, Incorporated. All rights reserved.
JBL is a trademark of HARMAN International Industries, Incorporated, registered in the United States and/or other countries.
Blu-ray Disc and BD-Live are trademarks of the Blu-ray Disc Association. The Bluetooth word mark and logo are registered
trademarks and are owned by the Bluetooth SIG, Inc., and any use of such marks by HARMAN International Industries,
Incorporated, is under license. DivX Certified® to play DivX® and DivX Plus® HD (H.264/MKV) video up to 1080p HD
including premium content. DivX®, DivX Certified®, DivX Plus® HD and associated logos are trademarks of Rovi Corporation
or its subsidiaries and are used under license. DLNA®, the DLNA Logo and DLNA CERTIFIED® are trademarks, service
marks, or certification marks of the Digital Living Network Alliance. Manufactured under license from Dolby Laboratories.
Dolby, Pro Logic and the double-D symbol are registered trademarks of Dolby Laboratories.DTS-HD Master Audio Essential.
Manufactured under license under U.S. Patent Nos: 5,956,674; 5,974,380; 6,226,616; 6,487,535; 7,392,195; 7,272,567;
7,333,929; 7,212,872 & other U.S. and worldwide patents issued & pending. DTS-HD, the Symbol, & DTS-HD and the
Symbol together are registered trademarks & DTS-HD Master Audio | Essential is a trademark of DTS, Inc. Product includes
software. © DTS, Inc. All Rights Reserved. HDMI, the HDMI logo, and High-Definition Multimedia Interface are registered
trademarks of HDMI Licensing LLC in the United States and other countries. Java, Java Powered and the Java Steaming
Coffee Cup logo are trademarks or registered trademarks of Sun Microsystems, Inc., or its subsidiaries in the United States
and other countries. Microsoft, Windows and Windows Media are registered trademarks of Microsoft Corporation in the
United States and/or other countries.
Pandora is a registered trademark of Pandora Media, Inc.
Picasa is a trademark of Google, Inc.
WMA (Windows Media Audio) is a proprietary file format developed by Microsoft. This item incorporates copy-protection
technology that is protected by U.S. patents and other intellectual-property rights of Rovi Corporation. Reverse engineering
and disassembly are prohibited.
YouTube is a trademark of Google, Inc.
Features, specifications and appearance are subject to change without notice.
Part # 950-0481-001, Rev. A www.jbl.com
SPECIFICATION:
Bluetooth
Frequency range: 2402MHz ~ 2480MHz
Transmitter power: <8 dBm (ERIP)
Modulation: GFSK/ π /4-DQPSK/8-DPSK
Function: Streaming audio play, supports Bluetooth 2.1+EDR, A2DP v1.2, AVRCP v1.4, and Supports AAC.
Power
Working voltage: 100-240V~50/60Hz
Power consumption: 50 Watts
Standby consumption: 0.5 Watt
Operating temperature: +41°F – +95°F (+5°C – +35°C)