Harman BE2820 Automotive Infotainment Unit w/ Bluetooth, GPS and WLAN User Manual 2
Harman International Industries, Inc. Automotive Infotainment Unit w/ Bluetooth, GPS and WLAN 2
Harman >
Contents
- 1. User manual_2
- 2. User manual_1
- 3. Users Manual-1
- 4. Users Manual-2
User manual_2
MirrorLink™ (TYPE A/B ONLY)
96
MirrorLink™ (TYPE A/B ONLY)
MirrorLink™
The MirrorLinkTM function allows smartphone content to be
operated via the system.
To use the MirrorLinkTM application, connect your
Android device to the USB port.
Depending on differences between models or software
version etc., some models might be incompatible with this
system.
When using the application, read the precautions indicated
in “BEFORE USING THE APPLICATION”. (→P.92)
This function is not available if the smartphone is
not compliant with MirrorLink™ of Car Connectivity
Consortium™.
OVERVIEW
The MirrorLink™ operation screen can be reached by the
following methods:
● Connecting a MirrorLink™ device. (→P.39)
●Select
MirrorLink
(MirrorLink) on the “Apps (Apps)”
screen. (→P.28)
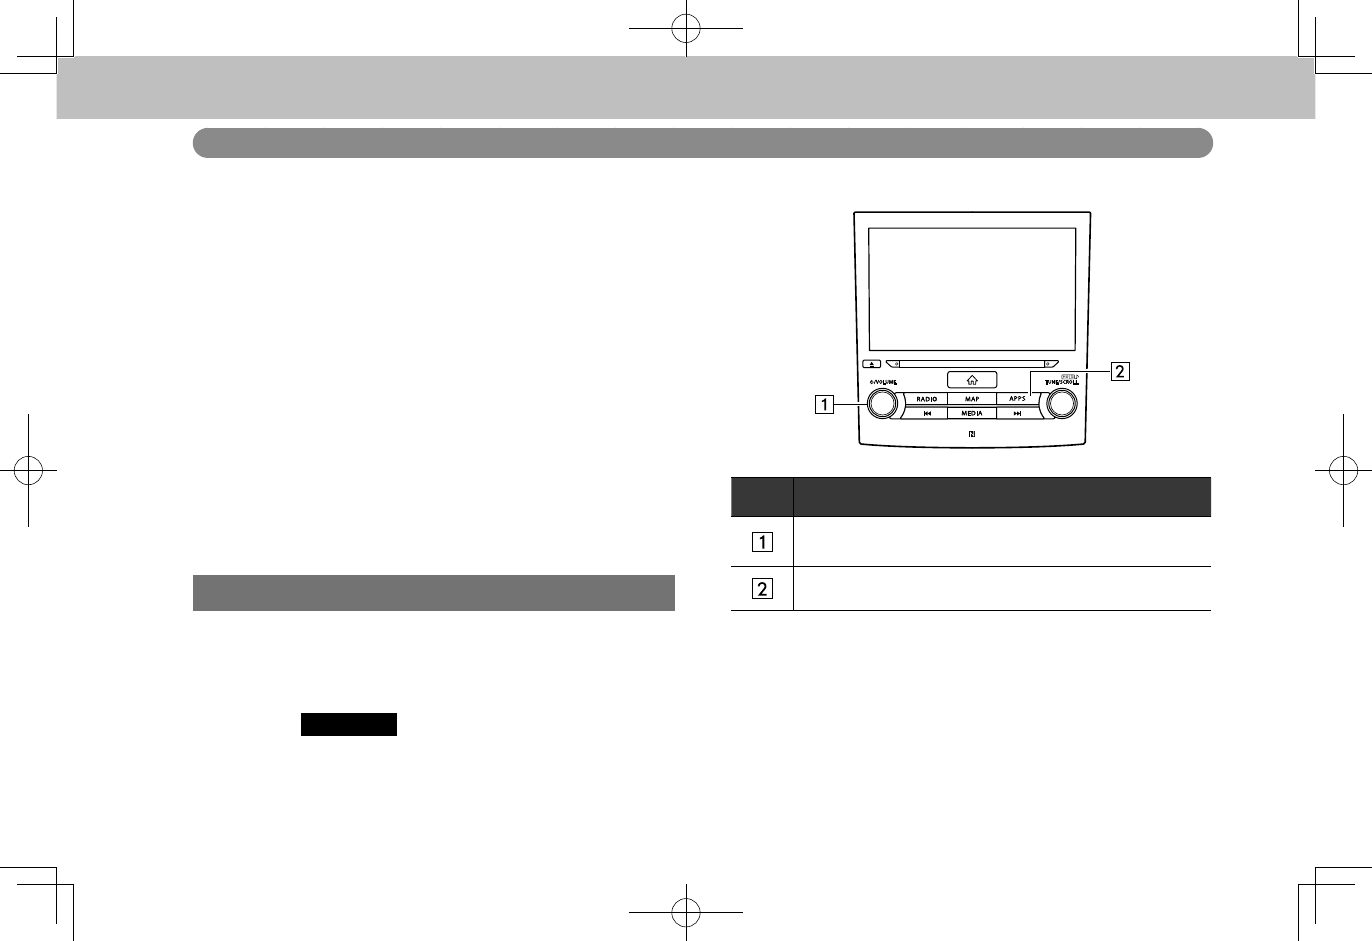
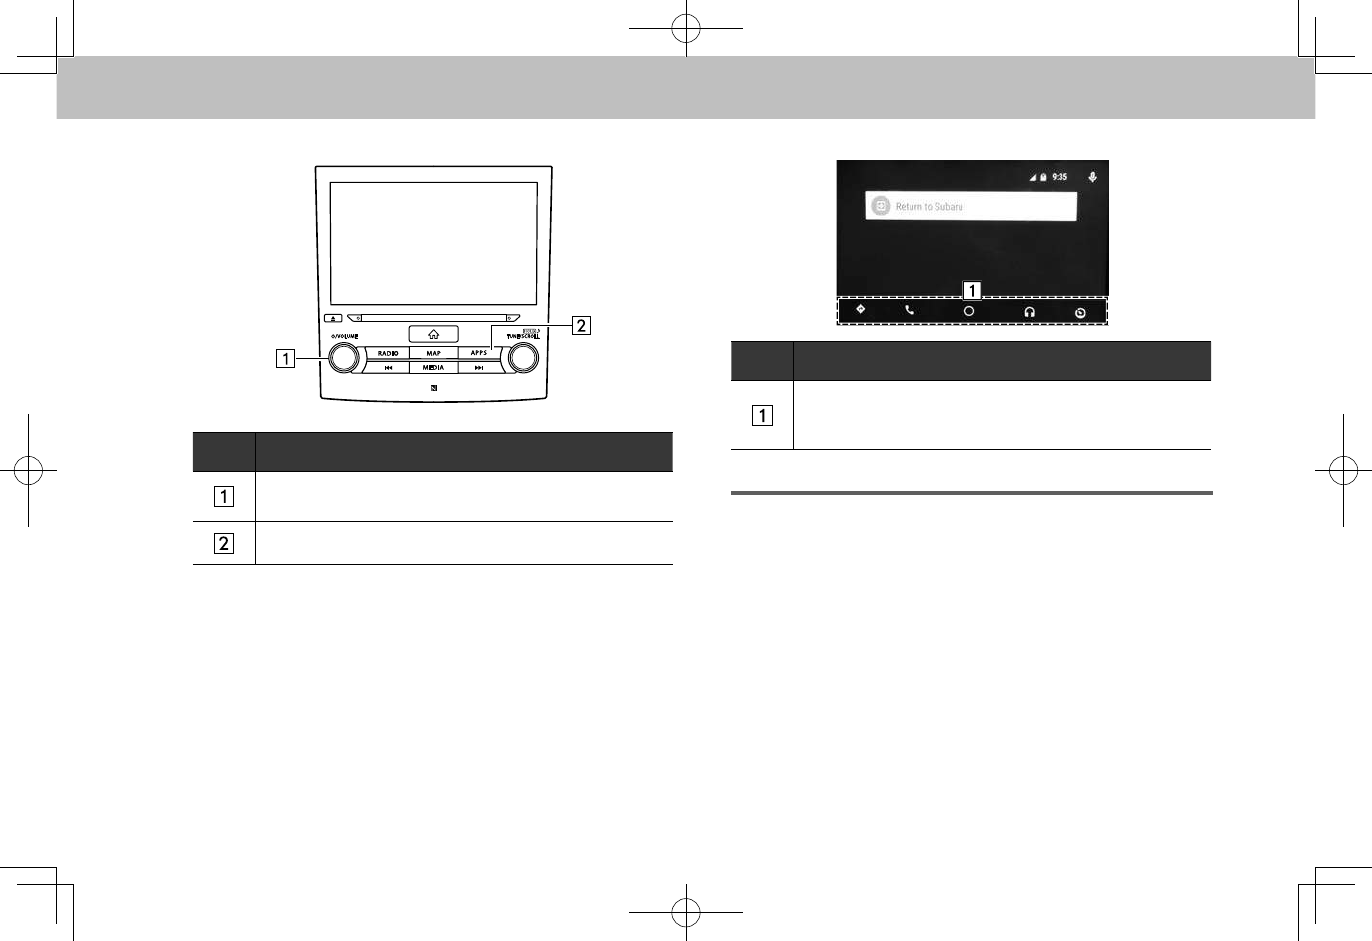
XControl panel
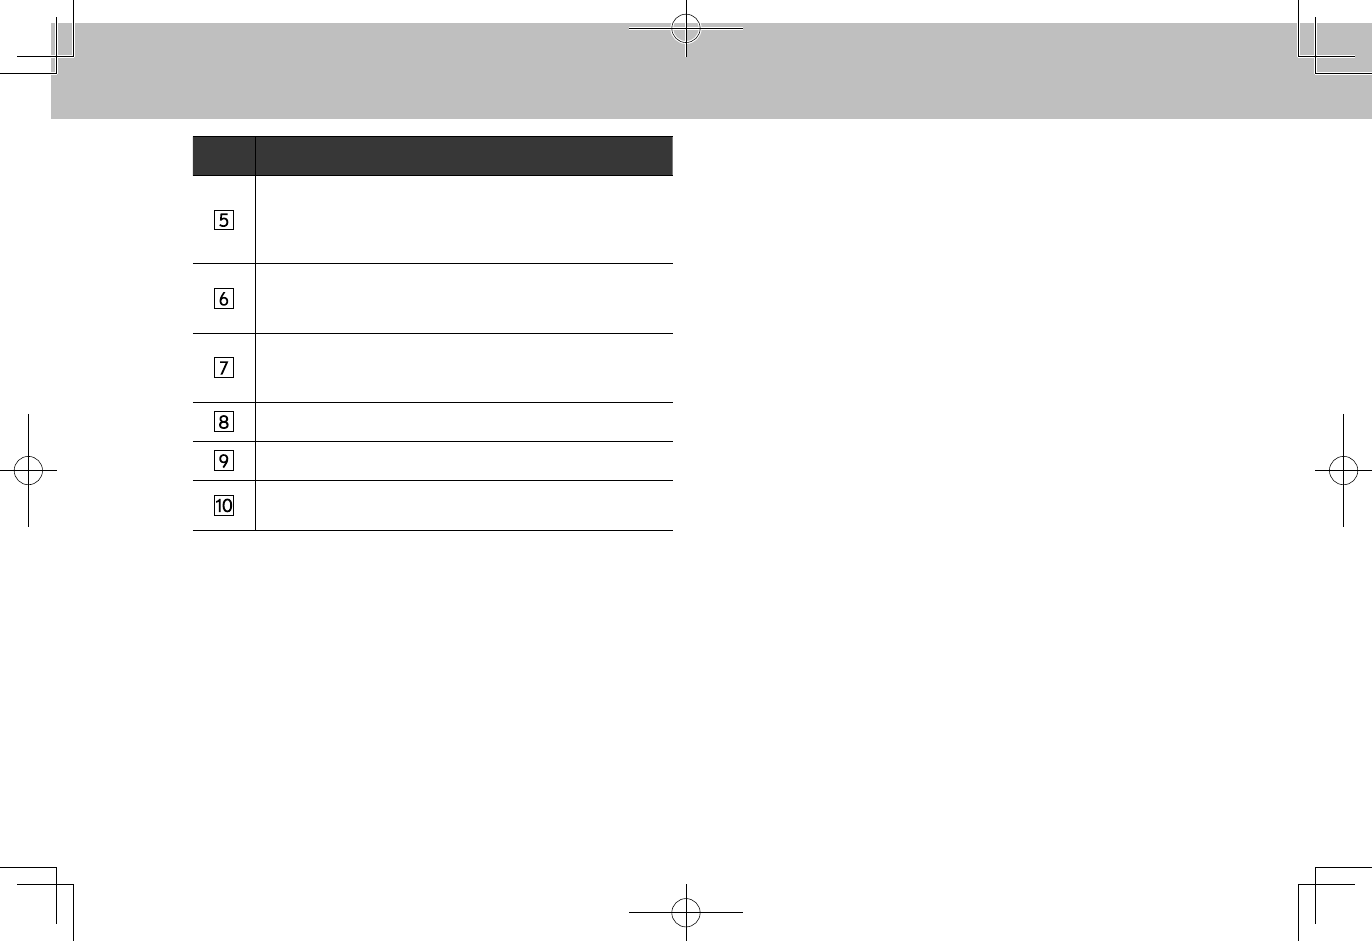
No. Function
Turn to adjust volume.
Press and hold to turn the audio system on/off.
Press to display the “Apps (Apps)” screen.
MirrorLink™ (TYPE A/B ONLY)
97
APPS
5
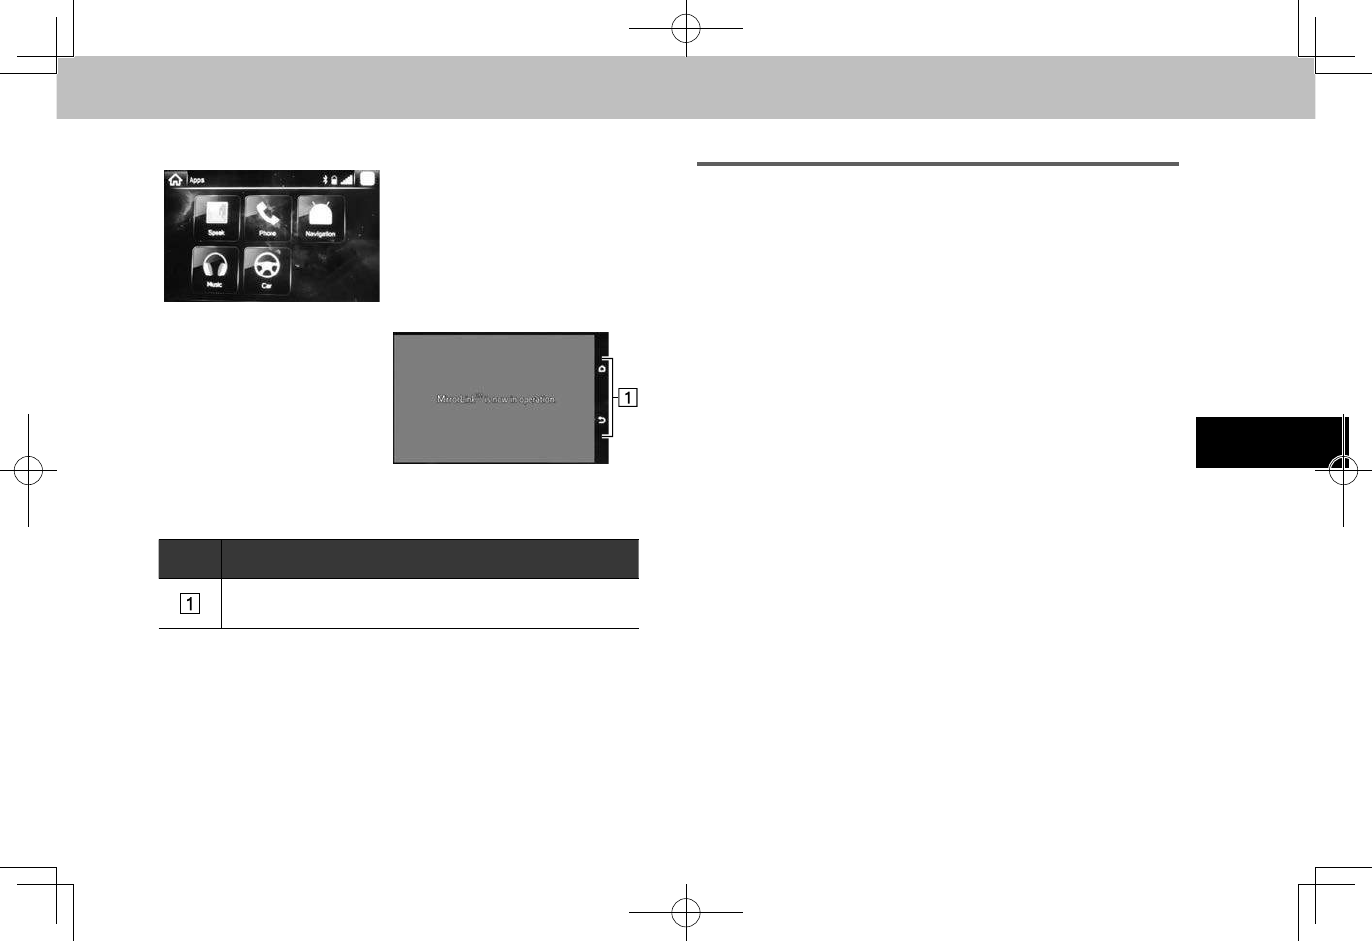
XControl screen
<Application screen>
<Operation screen*>
*: The displayed screen will differ depending on the connected smartphone.
No. Function
Displays software buttons that function as the buttons
on the smartphone.
NOTE
lThis function cannot be used while USB audio is in use.
lIt may not be possible to use certain applications while driving.
ABOUT THE SUPPORTED DEVICES
●Your smartphone must support the MirrorLinkTM
version 1.2, 1.1, 1.0 function.
●Available operations will differ depending on your
smartphone. Refer to your smartphone owner’s
manual, or consult the manufacturer.
ahaTM by HARMAN
98
ahaTM by HARMAN
ahaTM by HARMAN
aha is a cloud-based application that connects to the system
and gives you access to your favorite web content safely
and easily. There are over 40,000 stations spanning internet
radio, personalized music, audiobooks, Facebook, Twitter,
restaurant and hotel searches, weather and more. For more
about aha, go to the aha site (http://www.aharadio.com).
When connecting iPhone or Android devices with the aha
application installed, you can control, view, and hear aha
content through the system.
To use the aha application, connect your iPhone to the
USB port, or connect your Android device via Bluetooth.
When using the application, read the precautions indicated
in “BEFORE USING THE APPLICATION”. (→P.92)
With navigation function: You may be also display POI
information from the aha application on the map screen and
route to these POIs.
OVERVIEW
The ahaTM by HARMAN operation screen can be reached by
the following methods:
●Run the aha application on your smartphone.
●Connect the iPhone to the USB port, or connect the
Android device by utilizing the Bluetooth connection.
• For details about connecting an iPhone: →P.39
For details about registering or connecting an
Android device: →P.54
●For Android devices: Select
Aha
(Aha) on the “Apps
(Apps)” screen. (→P.28)
APPS
5
ahaTM by HARMAN
99
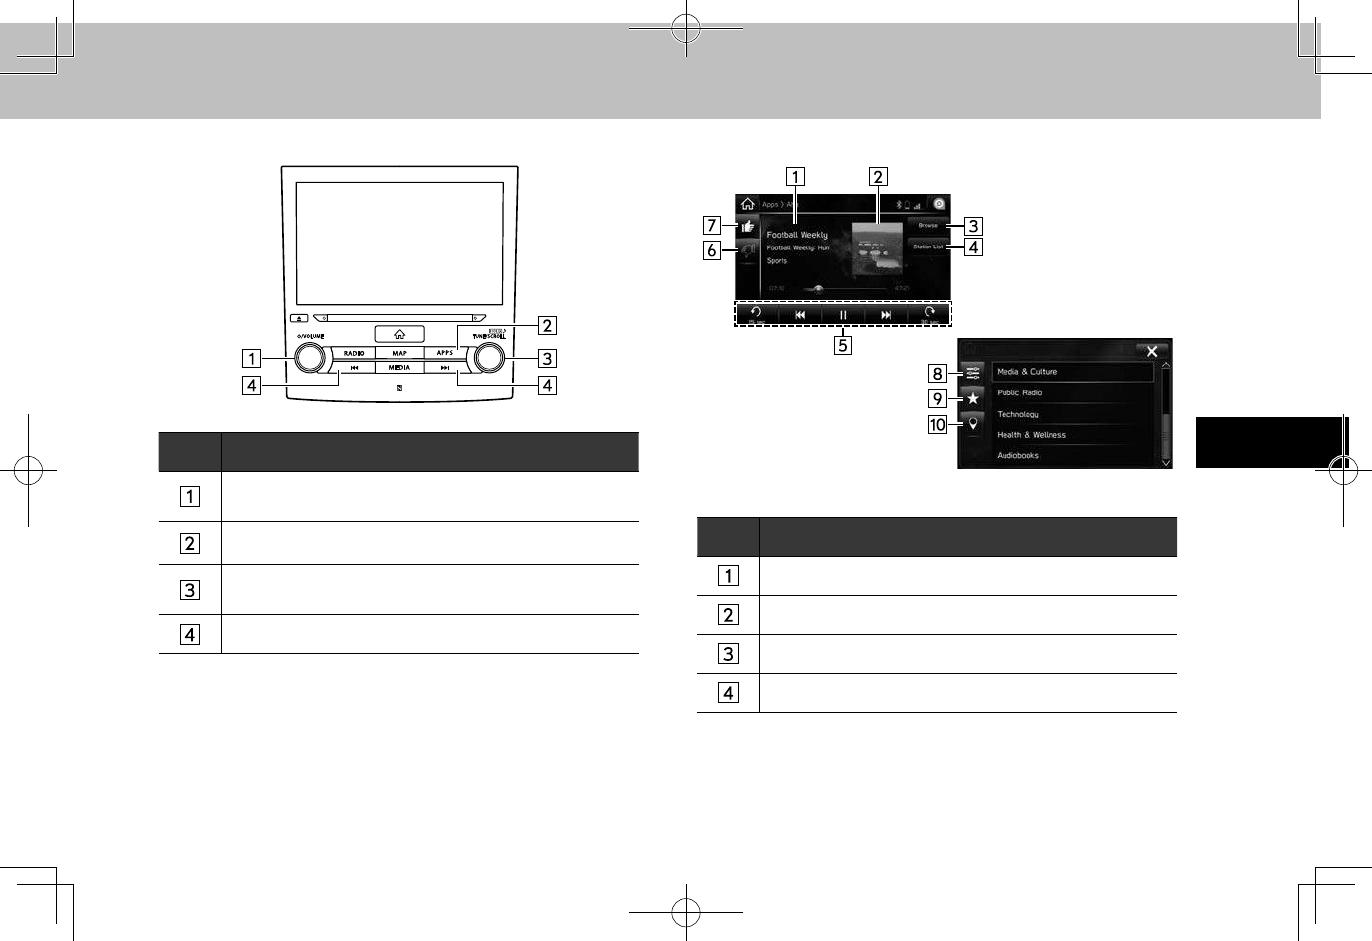
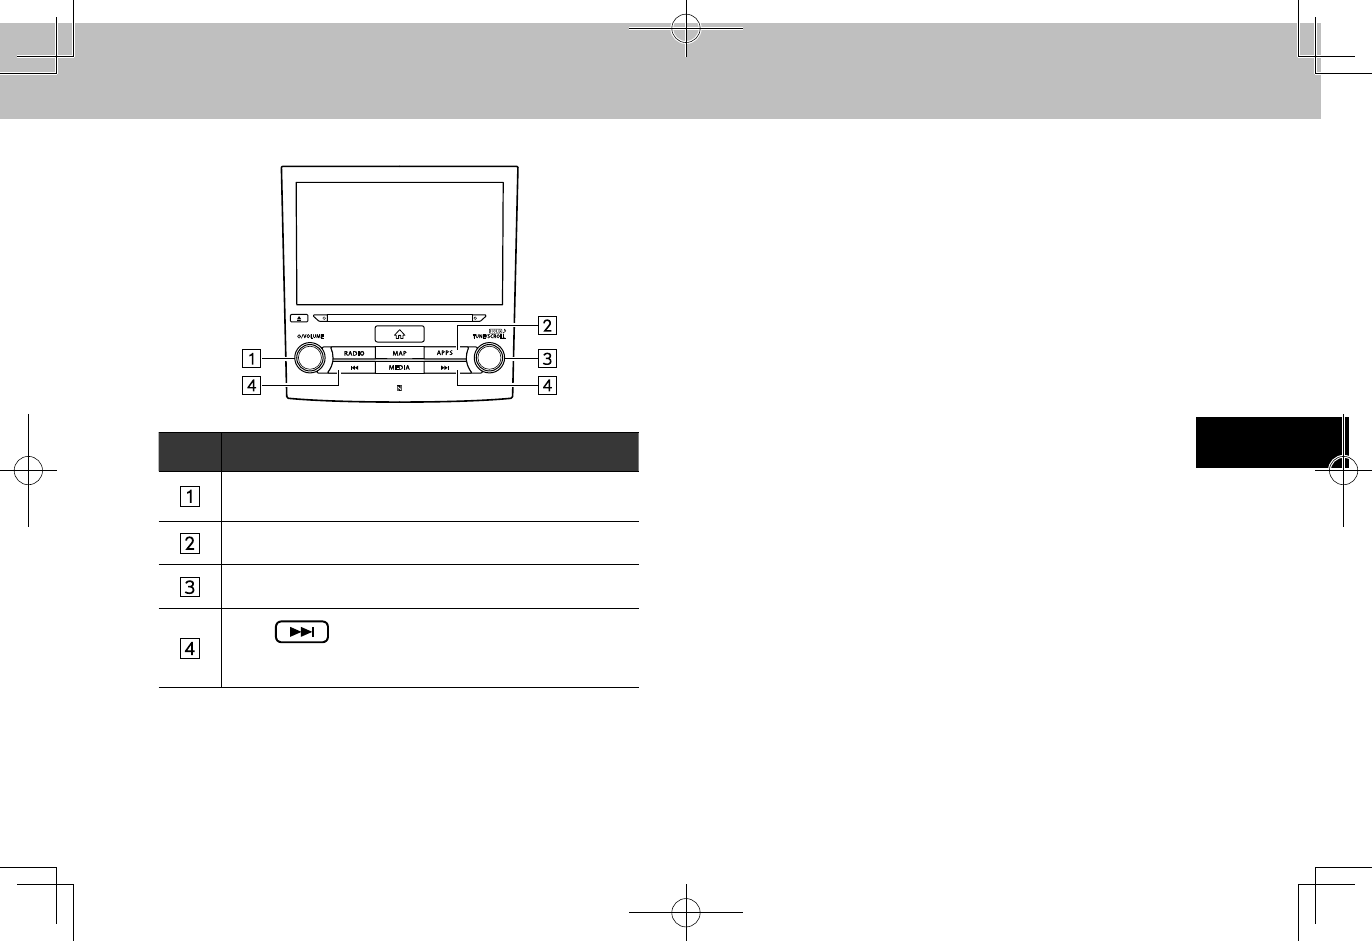
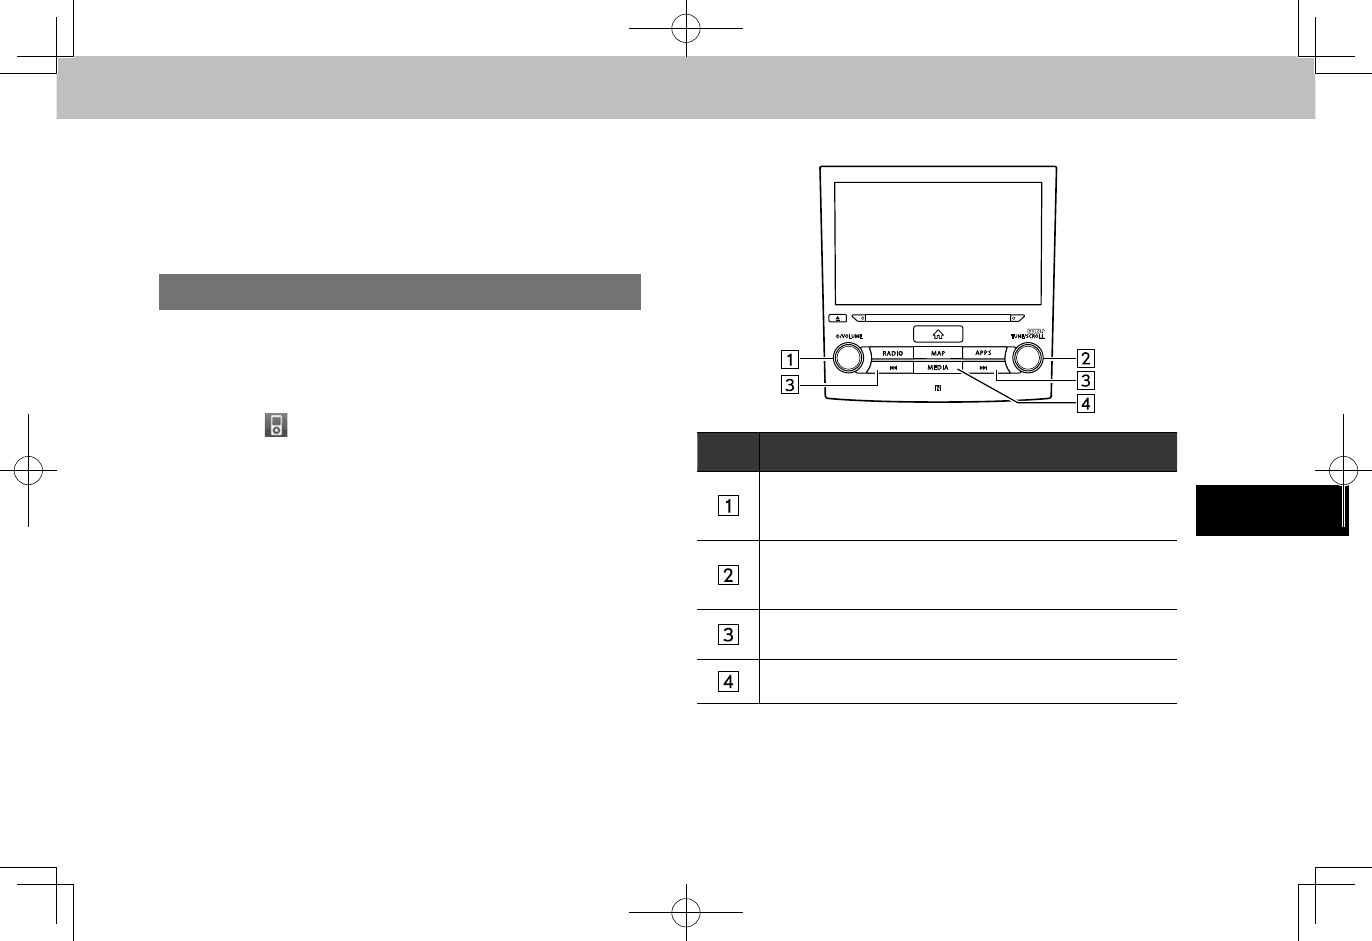
XControl panel
No. Function
Turn to adjust volume.
Press and hold to turn the audio system on/off.
Press to display the “Apps (Apps)” screen.
Turn to display the next/previous content item.
Press to select an audio mode.
Press to display the next/previous content item.
XControl screen
<Top screen>
<Browse screen>
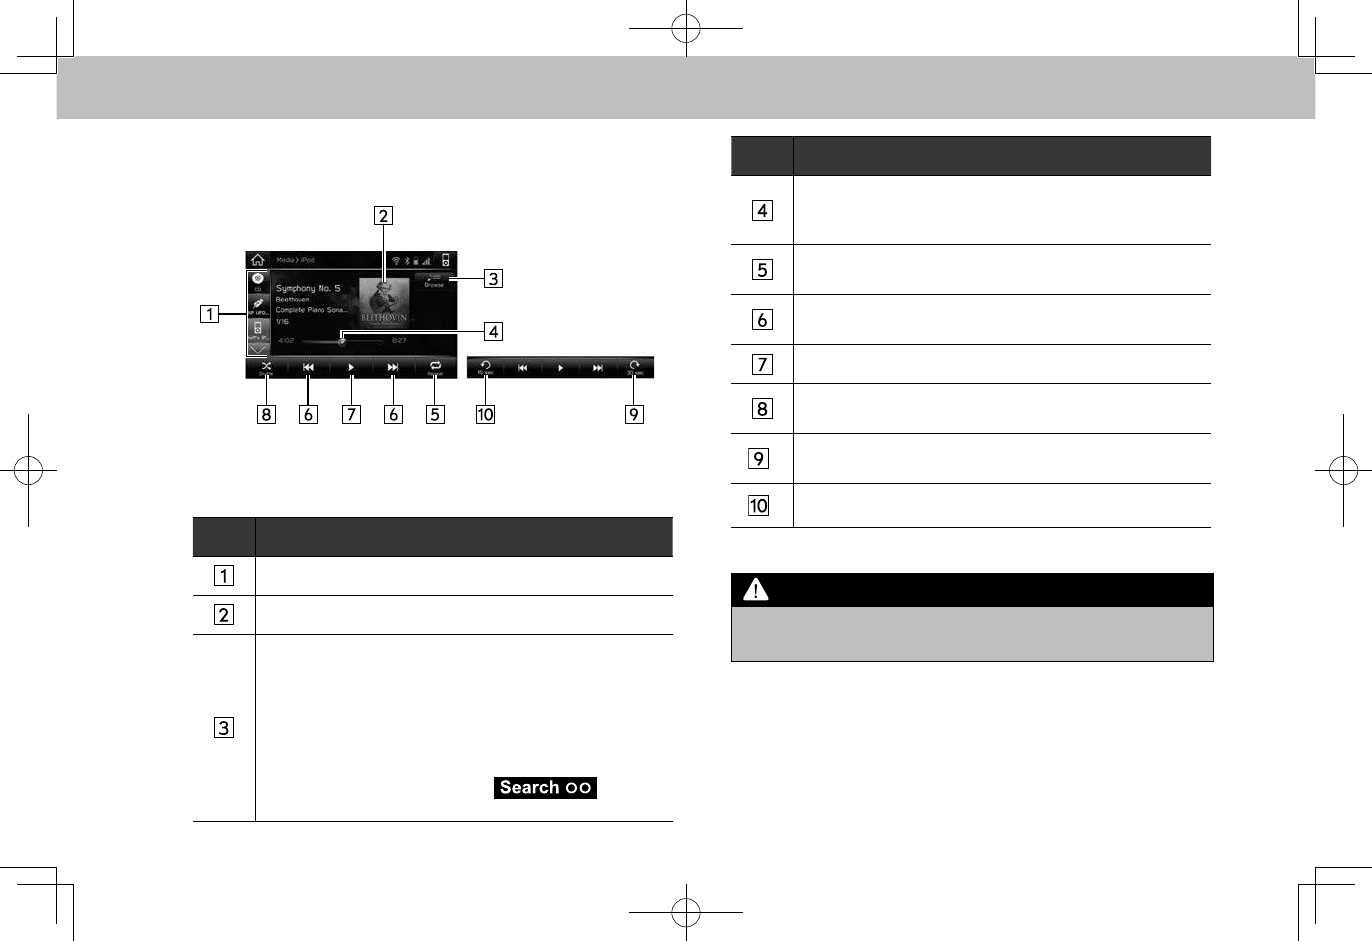
No. Function
Displays station name.
Displays cover art.
Select to display the browse screen.
Select to display the station list screen.
ahaTM by HARMAN
100
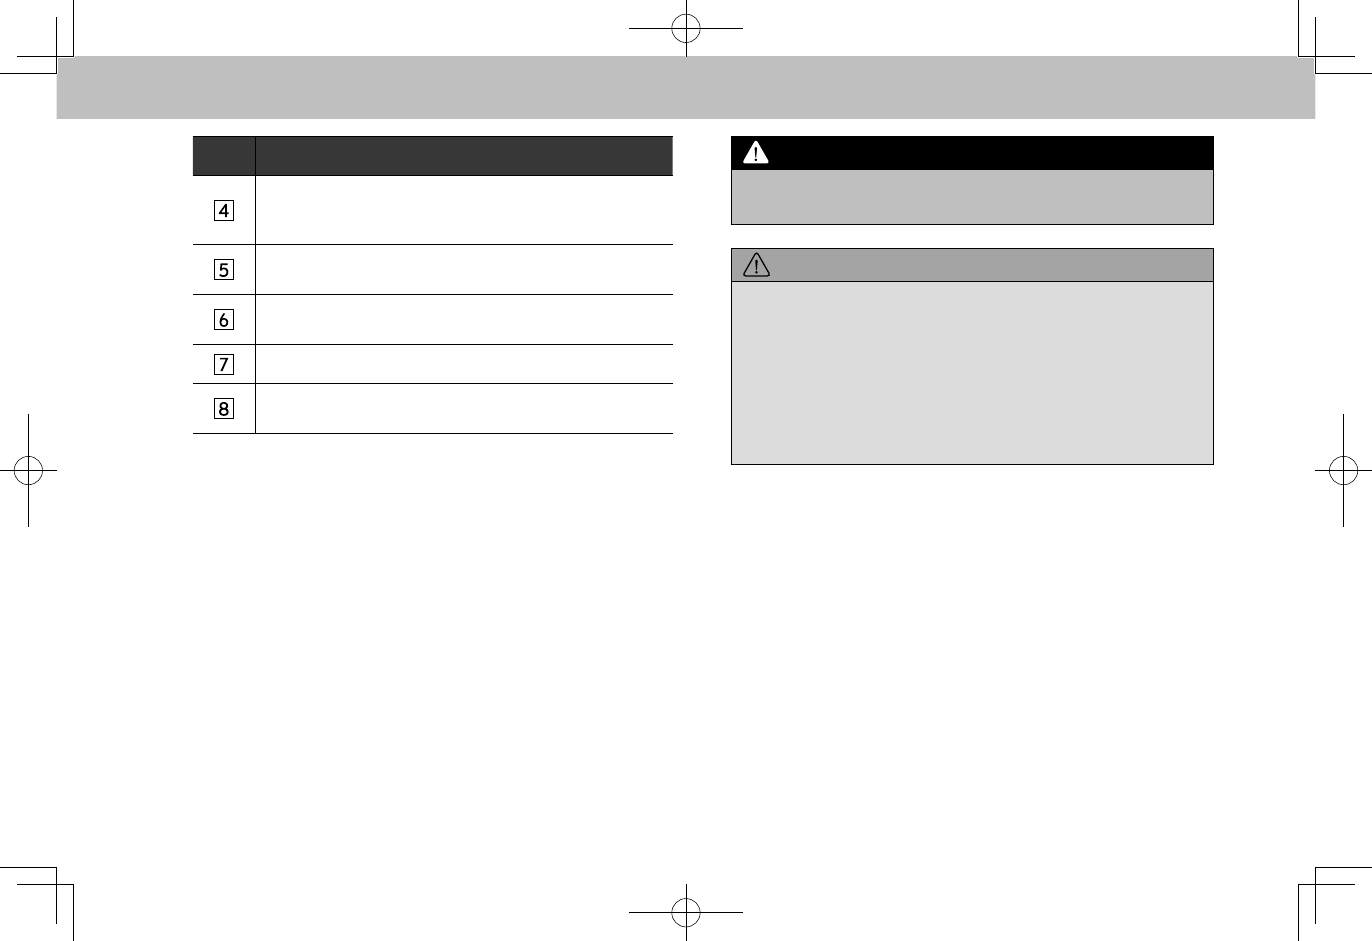
No. Function
Top screen operation buttons.
• Content items can be changed, and if content items
contain information, calls can be placed and content
items can be set* for destinations, etc.
Select to upload “Dislike” information to the application
server. To cancel “Dislike” information that is being
uploaded to the server, select this button again.
Select to upload “Like” information to the application
server. To cancel “Like” information that is being
uploaded to the server, select this button again.
Select to display a list of preset stations.
Select to display a list of featured stations.
Select to display a list of stations using the location
information.
*: Type A only
NOTE
lWhen you switch to other modes with the aha application
activated and then turn the system Off/On with the smartphone
device still connected, the aha mode will start instead of
the last mode used. If you do not want to start the aha mode
automatically, turn off the aha application on the smartphone.
lTop 35 entries in the preset station list on the smartphone are
displayed. When there are more than 35 entries in the preset
station list, change the order of the entries in the list on the
smartphone. You can change the priority of your preset stations
within the aha application (after disconnected from this system)
to modify the station list shown on the screen. Please see your
smartphone aha application “Edit Presets” to modify this list.
lIf there are multiple audio les stored on your iPhone, it may
take some time until playback starts.
lPlayback may be intermittent when you switch to streaming
Bluetooth audio from aha on your smartphone device.
lThe following operations are not available on this system.
Perform these operations on the smartphone.
• Add/Reorder/Delete stations
• Log in to Facebook/Twitter (When not logged in, login will
be required by the station. It is necessary to do so when the
device is disconnected from the system.)
lFor the aha function, the following touch screen gestures are not
available.
• Double touch with one nger
• Double touch with two ngers
lThe audio system will turn off when the aha application is closed
on the iPhone and/or Android device.
APPS
5
ahaTM by HARMAN
101
ABOUT THE SUPPORTED DEVICES FOR aha
This system supports the following devices.
●iPhone: iOS 5.0 or later
●Android: Android2.2 or later
NOTE
lNote that the warranty does not apply if an unsupported iPhone
is connected.
lThe available functions may vary depending on the type of
Android device.
Pandora®
102
Pandora®
Pandora®
Pandora is free personalized radio that offers effortless and
endless music enjoyment and discovery.
To use the Pandora application, connect your iPhone
to the USB port, or connect your Android device via
Bluetooth.
Depending on differences between models or software
version etc., some models might be incompatible with this
system.
This function is not available if the Pandora application has
not been installed on the smartphone.
When using the application, read the precautions indicated
in “BEFORE USING THE APPLICATION”. (→P.92)
NOTE
lPandora is available in the United States, Australia, and New
Zealand.
OVERVIEW
The Pandora operation screen can be reached by the
following methods:
●Connect the iPhone to the USB port, or connect the
Android device by utilizing the Bluetooth connection.
• For details about connecting an iPhone: →P.39
For details about registering or connecting an
Android device: →P.54
●Select
Pandora
(Pandora) on the “Apps (Apps)”
screen. (→P.28)
APPS
5
Pandora®
103
XControl panel
No. Function
Turn to adjust volume.
Press and hold to turn the audio system on/off.
Press to display the “Apps (Apps)” screen.
Press to select an audio mode.
Press to skip to the next track.
Select and hold to rate the track currently playing as
“Like” or “Dislike”.
Pandora®
104
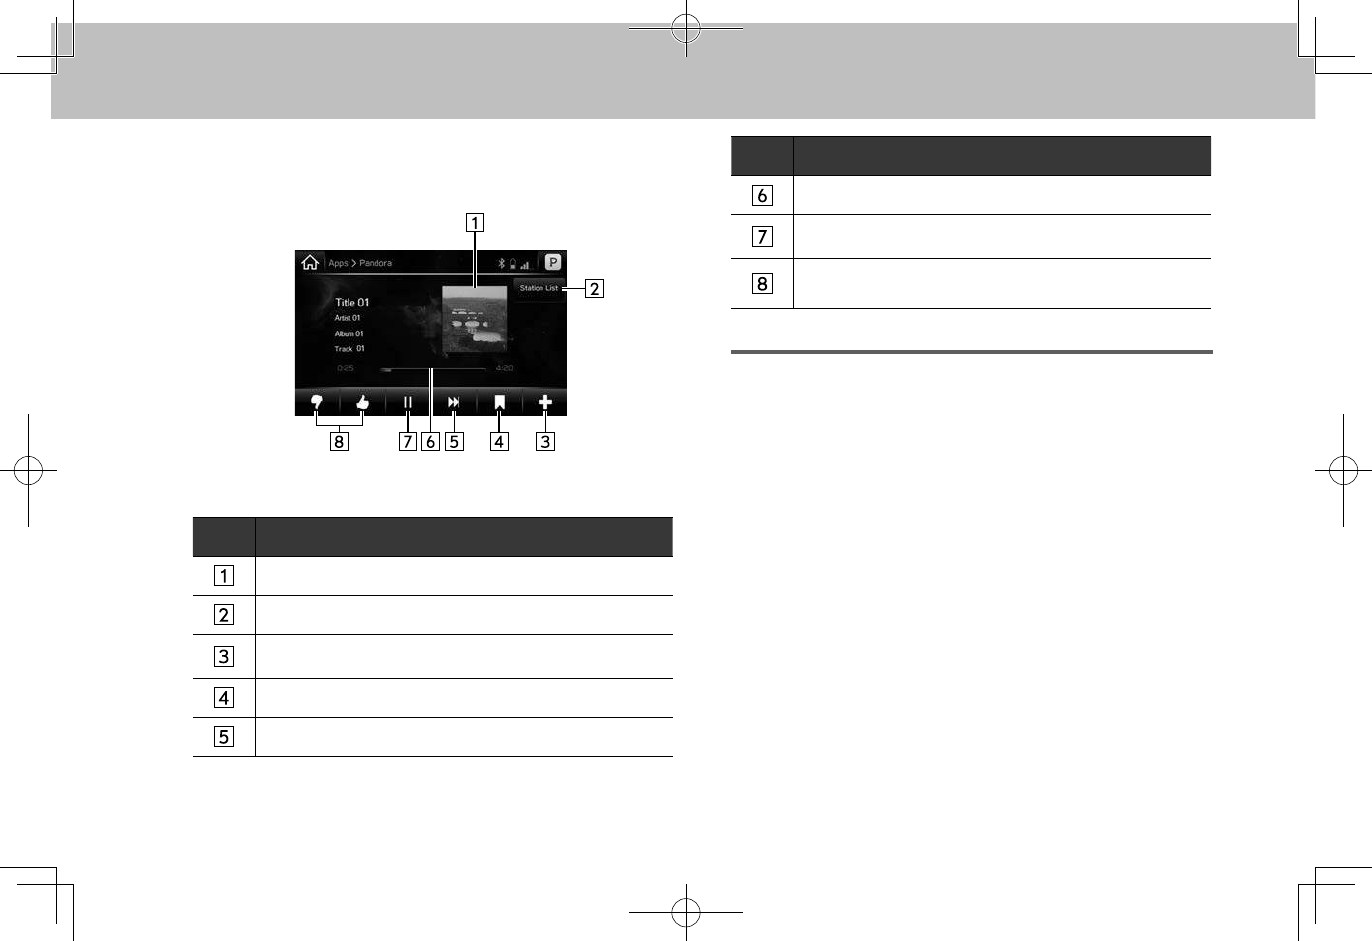
XControl screen
No. Function
Displays cover art.
Select to display the station list screen.
Select to create a station from artist or track.
Select to bookmark the track currently playing.
Select to skip to the next track.
No. Function
Shows progress.
Select to pause/play.
Select to rate the track currently playing as “Like” or
“Dislike”.
ABOUT THE SUPPORTED DEVICES
This system supports the following devices.
●iPhone: iOS 5.0 or later
●Android: Differs with mobile device used
Apple Carplay
105
APPS
5
Apple Carplay
Apple Carplay
CarPlay can be used to view iPhone maps, play music,
and place calls by connecting your iPhone to the system.
Supported applications can also be run.
●For details on the services or the operations, check
the Apple Carplay site
(https://ssl.apple.com/ios/carplay/).
To use the Apple Carplay application, connect your
iPhone to the USB port, or via Wi-Fi®*.
*: Type A/B only
When using the application, read the precautions indicated
in “BEFORE USING THE APPLICATION”. (→P.92)
OVERVIEW
The Apple Carplay operation screen can be reached by the
following methods:
●Connect your iPhone to the USB port, or connect via
Wi-Fi®*.
*: Type A/B only
• For details about connecting your iPhone to the
USB port: →P.39
For details about connecting your iPhone via Wi-
Fi®: →P.65
●Select
Apple Carplay
(Apple Carplay) on the “Apps
(Apps)” screen. (→P.28)
Apple Carplay
106
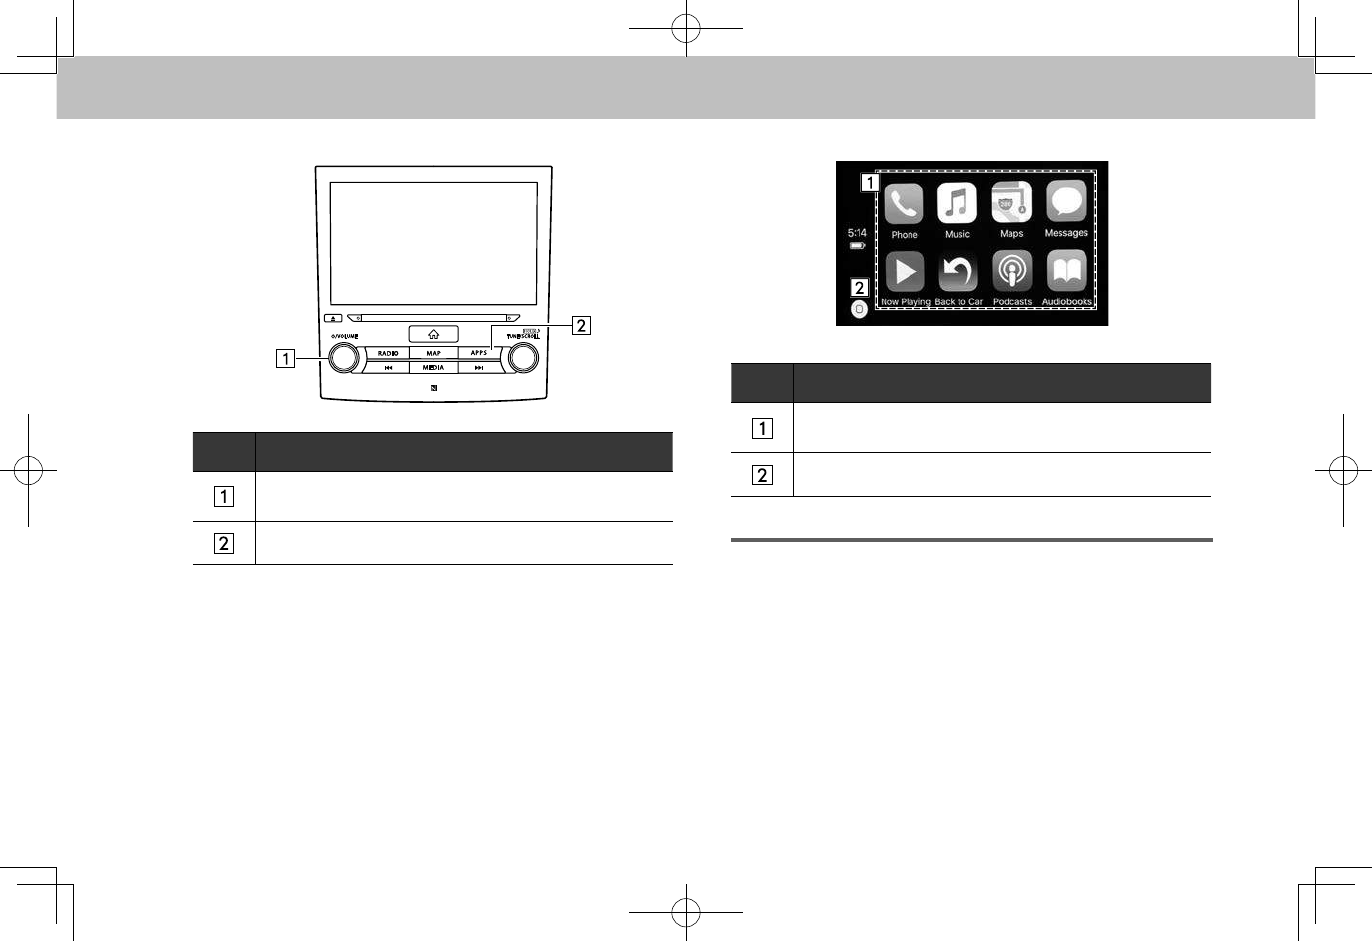
XControl panel
No. Function
Turn to adjust volume.
Press and hold to turn the audio system on/off.
Press to display the “Apps (Apps)” screen.
XControl screen
*: The displayed screen will differ depending on the connected iPhone.
No. Function
Displays the application buttons.
Select to start the application.
Select to display the home screen of Apple Carplay.
ABOUT THE SUPPORTED DEVICES
This system supports the following devices.
●iPhone:
Android Auto
107
APPS
5
Android Auto
Android Auto
Android Auto can be used to view Android maps, play
music, and place calls by connecting your Android terminal
to the system. Supported applications can also be run.
●For details on the services or the operations, check
the Android Auto site (https://www.android.com/auto/)
and (https://support.google.com/androidauto/).
To use the Android Auto application, connect your
Android device to the USB port, or via Wi-Fi®*.
*: Type A/B only
When using the application, read the precautions indicated
in “BEFORE USING THE APPLICATION”. (→P.92)
OVERVIEW
The Android Auto operation screen can be reached by the
following methods:
●Connect your Android device to the USB port, or
connect via Wi-Fi®*.
*: Type A/B only
• For details about connecting your Android device to
the USB port: →P.39
For details about connecting your Android device
via Wi-Fi®: →P.65
●Select
Android Auto
(Android Auto) on the “Apps
(Apps)” screen. (→P.28)
Android Auto
108
XControl panel
No. Function
Turn to adjust volume.
Press and hold to turn the audio system on/off.
Press to display the “Apps (Apps)” screen.
XControl screen
No. Function
Displays the application/information buttons.
Select to start the application, or select to display
information.
ABOUT THE SUPPORTED DEVICES
This system supports the following devices.
●Android:
TravelLink (TYPE A/B ONLY)
109
APPS
5
TravelLink (TYPE A/B ONLY)
TravelLink*
*: SiriusXM U.S. satellite and data services are available only in the 48
contiguous USA and DC. SiriusXM satellite service is also available in
Canada; see www.siriusxm.ca.
Data service information, which is comprised of sports
information, weather information, stock information and fuel
information, can be received via the SiriusXM® Radio.
To receive the data service information in the vehicle, a
subscription to the SiriusXM® Satellite Radio Service is
necessary. (→P.125)
Content set to use the SiriusXM® Satellite Radio Service is
reset when personal information is initialized.
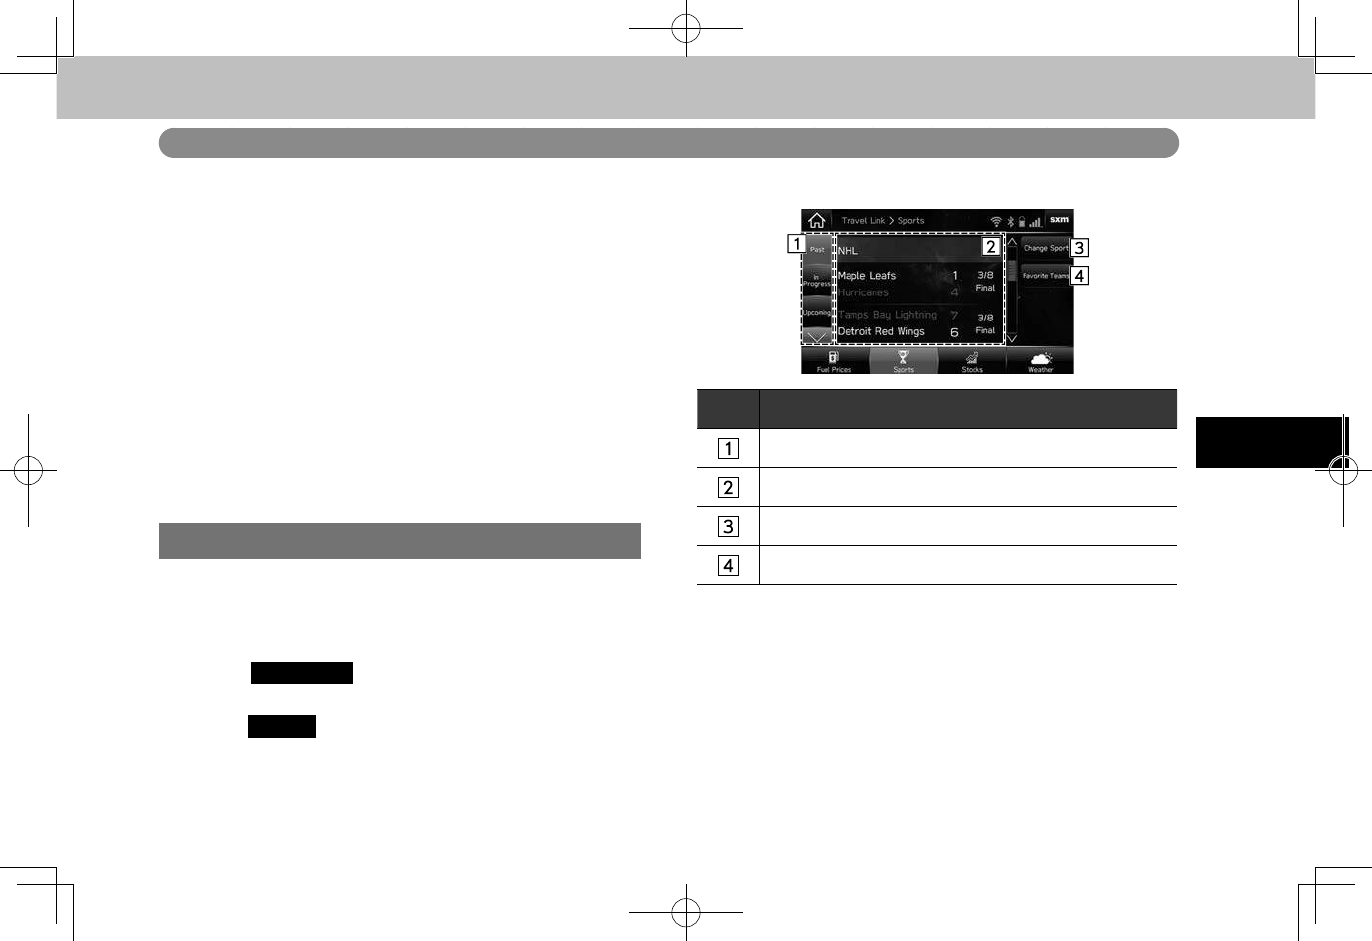
DISPLAYING SPORTS INFORMATION
By registering your favorite team, sports information such as
games and results, the status of games still in progress, and
future game schedules can be displayed.
1. Select
TravelLink
(TravelLink) on the “Apps (Apps)”
screen. (→P.28)
2. Select
Sports
(Sports).
3. Check that sports information is displayed.
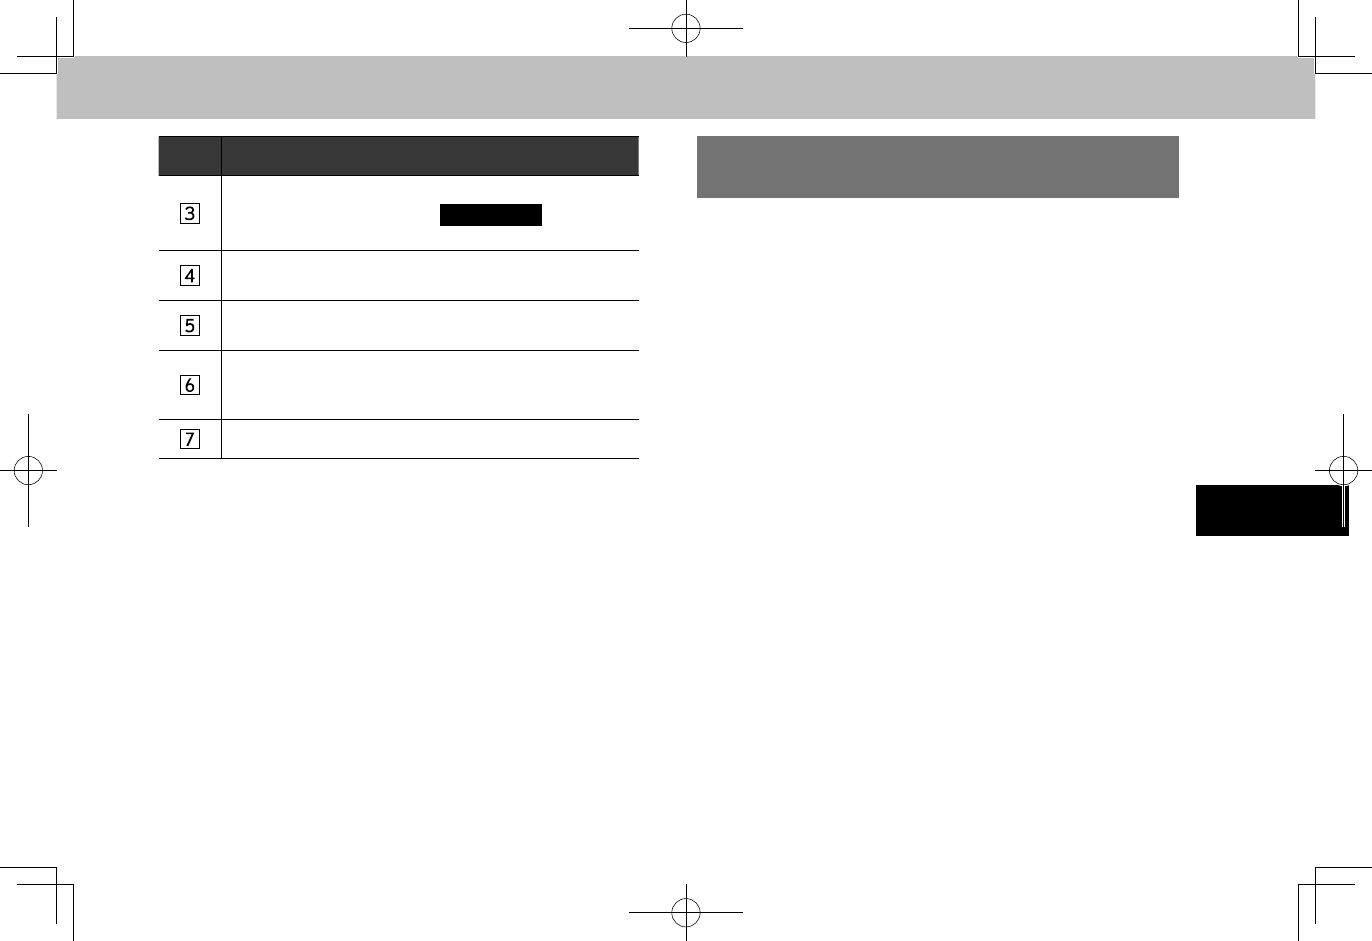
No. Function
Select to change the displayed information.
Sports information are displayed.
Select to set which sports information is displayed.
Select to edit or register your favorite team.
NOTE
lUp to XX favorite teams can be registered.
TravelLink (TYPE A/B ONLY)
110
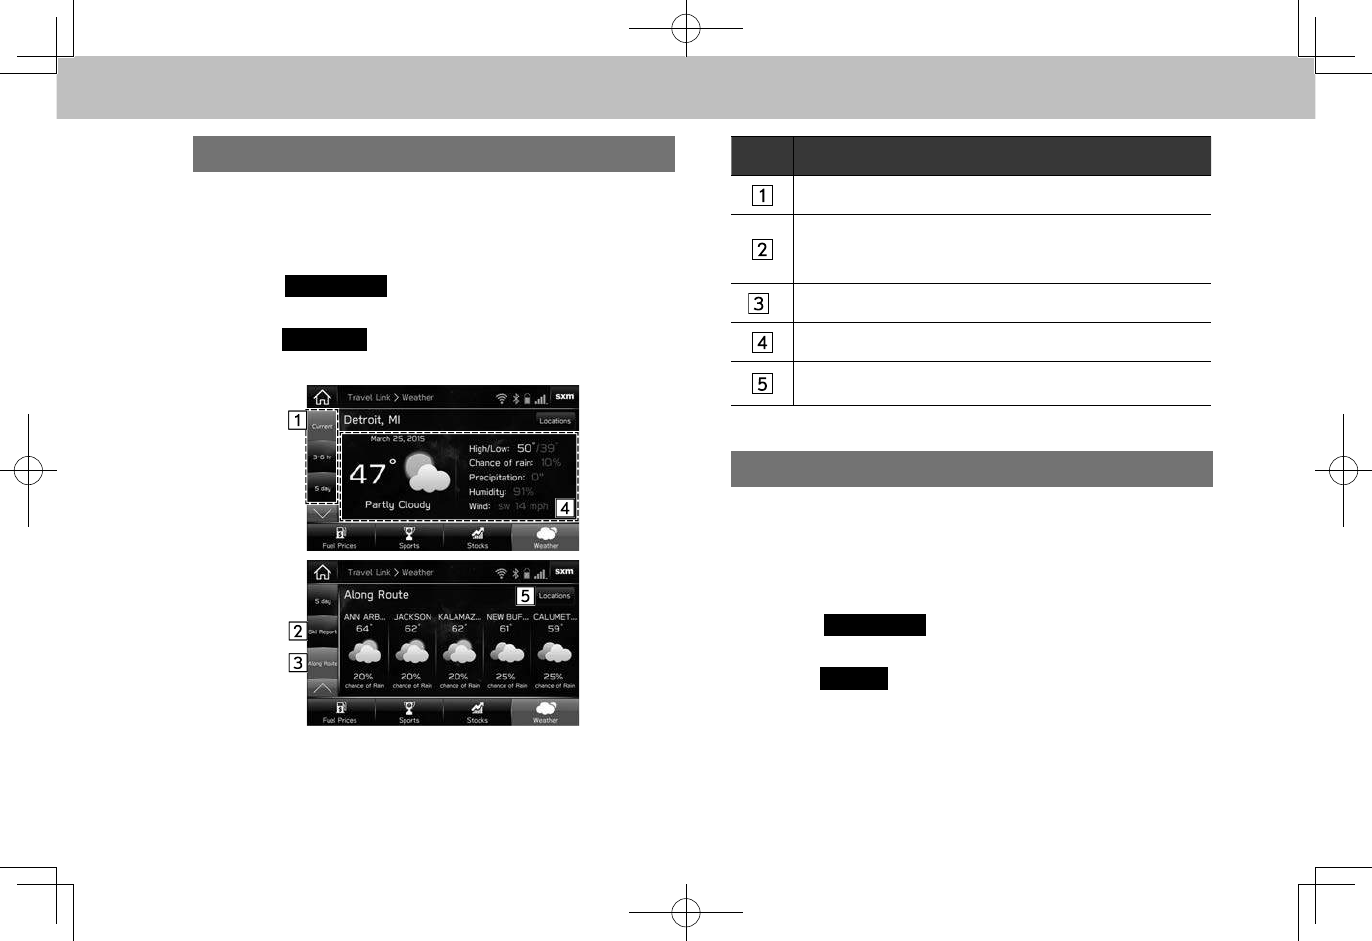
DISPLAYING WEATHER INFORMATION
Weather forecasts, forecast temperature or highest/lowest
temperature, and the chances of precipitation, etc. can be
displayed in weather information.
1. Select
TravelLink
(TravelLink) on the “Apps (Apps)”
screen (→P.28).
2. Select
Weather
(Weather).
3. Check that weather information is displayed.
No. Function
Select to switch the timing of the displayed forecast.
Select to display ski area facility information such as the
current air temperature, wind and snow conditions, and
the amount of snowfall.
*
Select to display the weather forecast along the route.
Weather information are displayed.
Select to set the forecast region.
*: Type A only
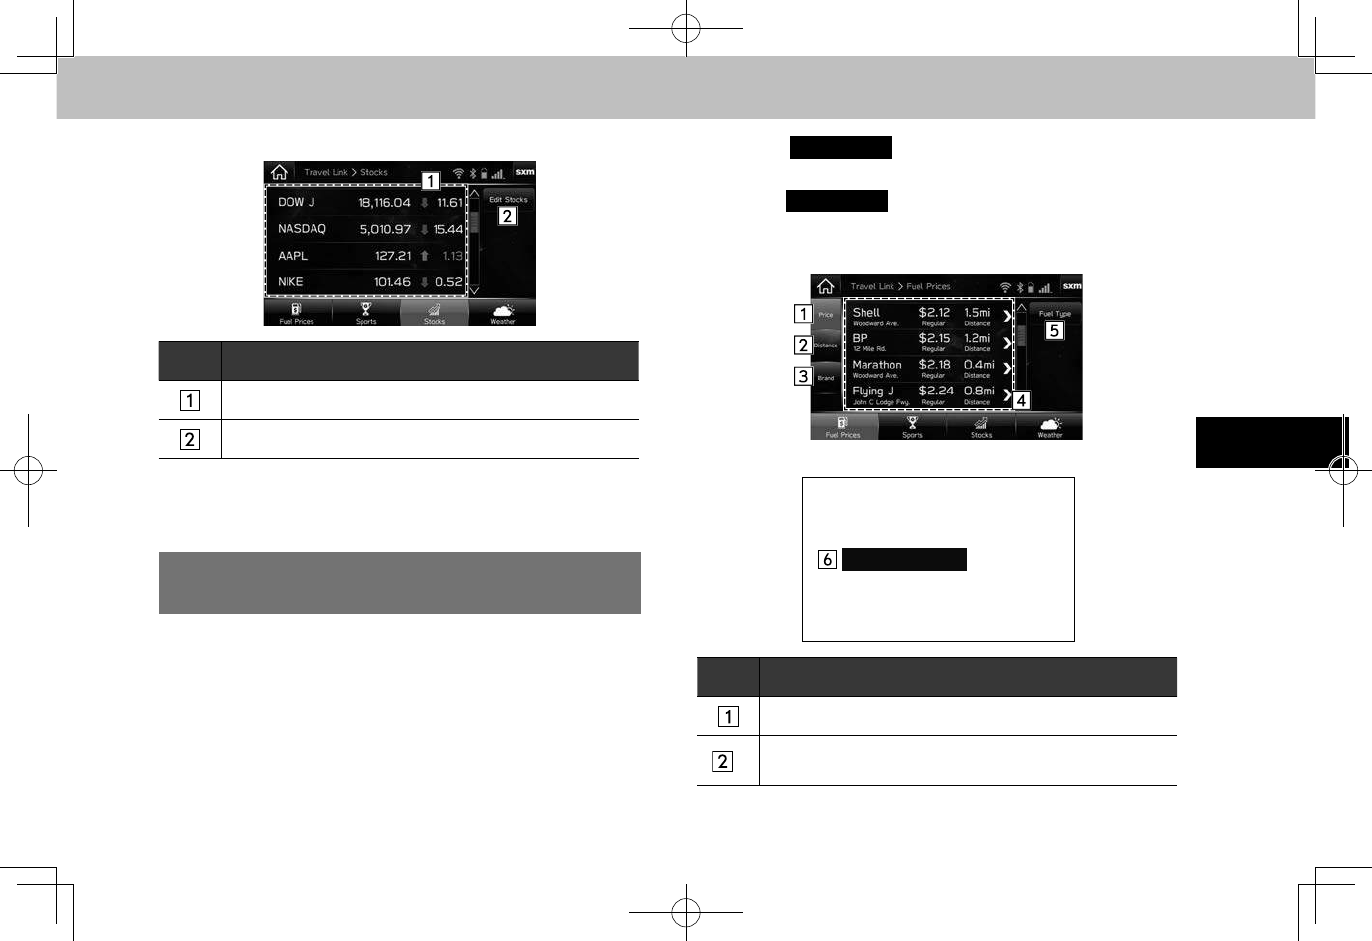
DISPLAYING STOCKS INFORMATION
Company names, stock prices, and price uctuations can
be displayed in stock information. Fluctuations greater than
zero are displayed with green arrows, and uctuations less
than zero are displayed with red arrows.
1. Select
TravelLink
(TravelLink) on the “Apps (Apps)”
screen (→P.28).
2. Select
Stocks
(Stocks).
TravelLink (TYPE A/B ONLY)
111
APPS
5
3. Check that stock information is displayed.
No. Function
Stocks information are displayed.
Select to add or edit stocks.
NOTE
lUp to XX stocks can be registered.
DISPLAYING FUEL INFORMATION
(NOT AVAILABLE IN CANADA)
Gas station information can be displayed, and gas stations
can be set* in fuel information. When Bluetooth is enabled
on your cellular phone, calls can be placed if the displayed
information screen contains phone number information.
*: Type A only
1. Select
TravelLink
(TravelLink) on the “Apps (Apps)”
screen (→P.28).
2. Select
Fuel Prices
(Fuel Prices).
3. Check that fuel information is displayed.
XType A only
XType B only
Change Location
No. Function
Select to sort gas station by price.
*1
Select to sort gas station by distance from the current
position.
TravelLink (TYPE A/B ONLY)
112
No. Function
Select to sort gas station by brand.
Gas station information are displayed.
Select to set the fuel type.
*2
Select to change the location in which fuel information is
displayed.
*1: Type A only
*2: Type B only
NOTE
lUp to 25 gas stations can be displayed.
lThe distance from the current position are displayed only when
the system is equipped with the navigation function.
If the route has been set, gas stations along the route are
displayed, and if no route has been set, gas stations within a 30
mile radius from the current location are displayed.
113
AUDIO
6
6
BASIC OPERATION
114
BASIC OPERATION
SOME BASICS
This section describes some of the basic features of the
audio system. Some information may not pertain to your
system.
Your audio system works when the ignition switch is turned
to the “ACC” or “ON” position.
CAUTION
lTo prevent the battery from being discharged, do not leave the
audio system on longer than necessary when the engine is
not running.
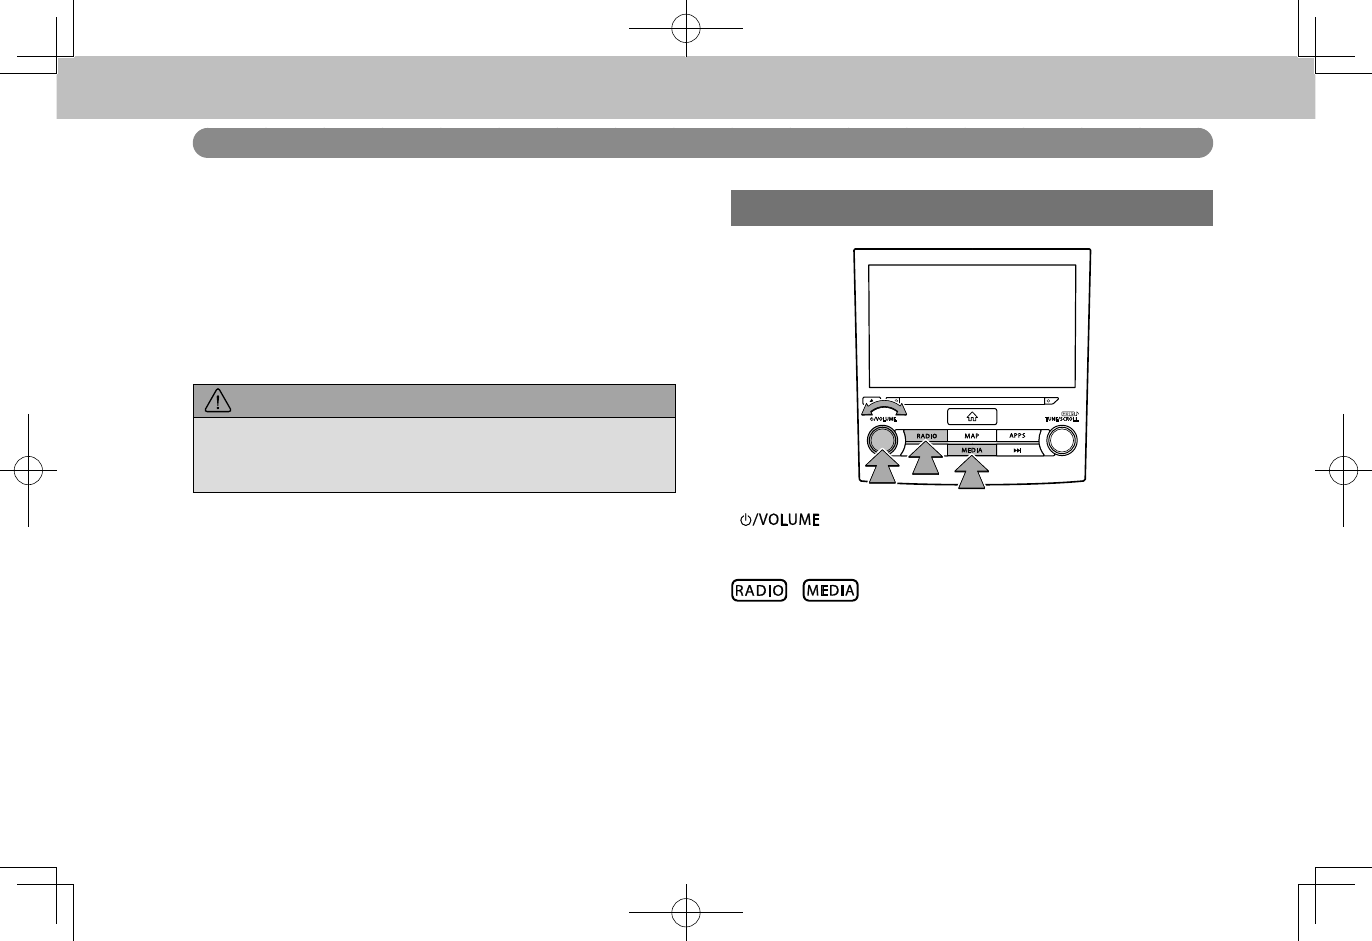
TURNING THE SYSTEM ON AND OFF
“ ” knob: Press and hold to turn the audio system
on and off. The system turns on in the last mode used. Turn
this knob to adjust the volume.
, : Press to display screen buttons for the
audio system.
BASIC OPERATION
115
AUDIO
6
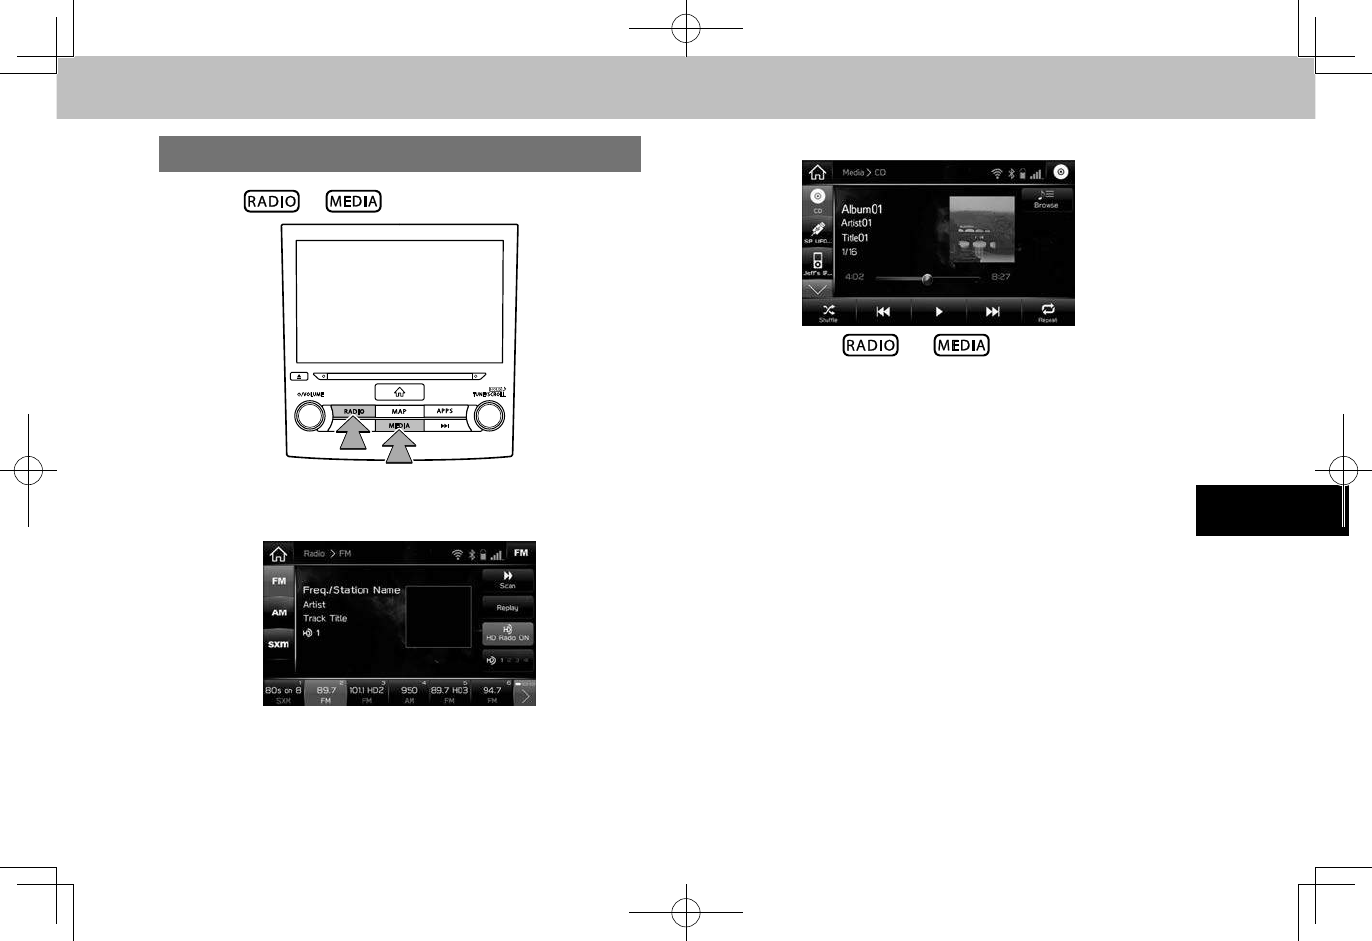
SELECTING AN AUDIO SOURCE
1. Press or .
2. Select the desired audio source.
X“Radio (Radio)” screen
X“Media (Media)” screen
●Each time or is pressed, the audio
source can also be changed.
BASIC OPERATION
116
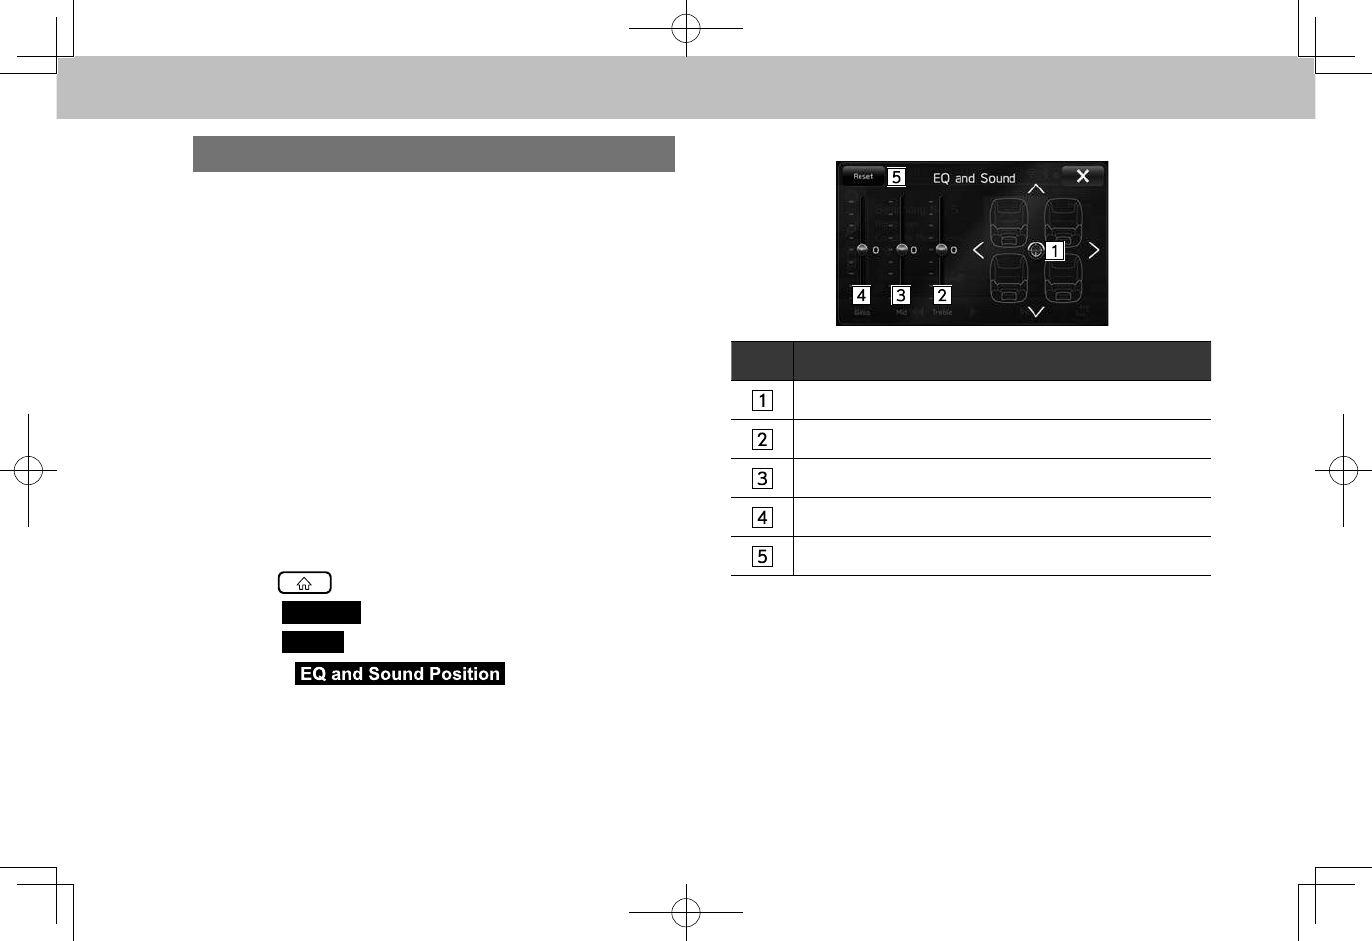
SOUND SETTINGS
The following sound quality can be adjusted.
TONE:
How good an audio program sounds is largely determined
by the mix of the treble, mid and bass levels. In fact,
different kinds of music and vocal programs usually sound
better with different mixes of treble, mid and bass.
BALANCE:
A good balance of the left and right stereo channels and of
the front and rear sound levels is also important.
Keep in mind that when listening to a stereo recording or
broadcast, changing the right/left balance will increase the
volume of 1 group of sounds while decreasing the volume of
another.
1. Press .
2. Select
Settings
(Settings).
3. Select
Sound
(Sound).
4. Select (EQ and Sound
Position).
5. Set the desired item.
No. Function
Select the icon to adjust sound balance.
Select the sliders to adjust high-pitched tones.
Select the sliders to adjust mid-pitched tones.
Select the sliders to adjust low-pitched tones.
Select to reset all setup items.
NOTE
lThe “EQ and Sound (EQ and Sound)” screen can also be
displayed by pressing and holding the “TUNE/SCROLL” knob.
BASIC OPERATION
117
AUDIO
6
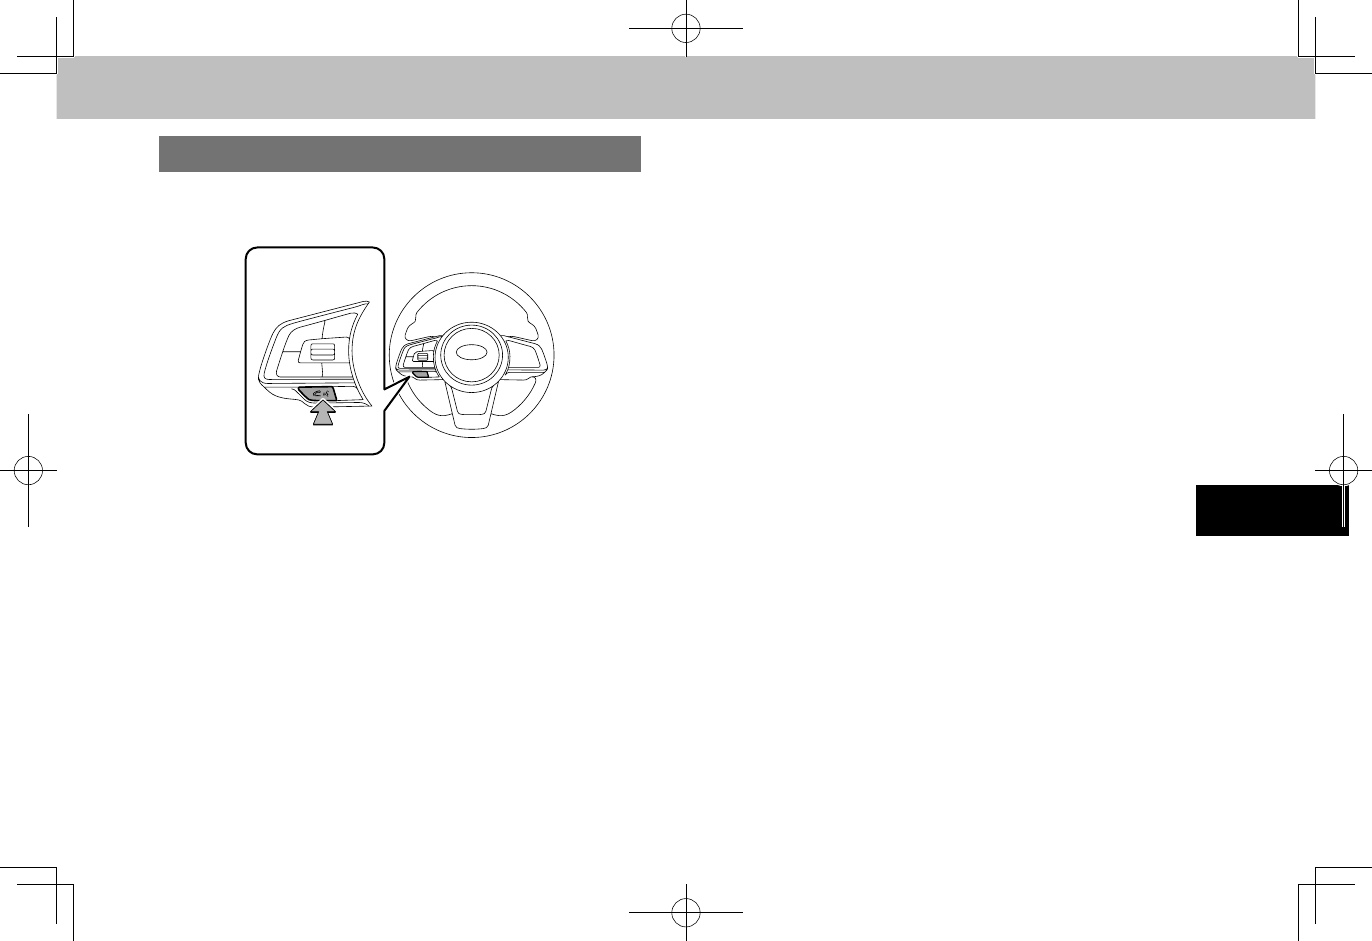
VOICE RECOGNITION SYSTEM
1. Press this switch to operate the voice recognition
system.
●The voice recognition system and its list of
commands can be operated. (→P.193)
RADIO OPERATION
118
RADIO OPERATION
AM/FM RADIO
OVERVIEW
The FM/AM radio operation screen can be reached by
selecting
FM
(FM) or
AM
(AM) on the “Radio (Radio)”
screen. (→P.115)
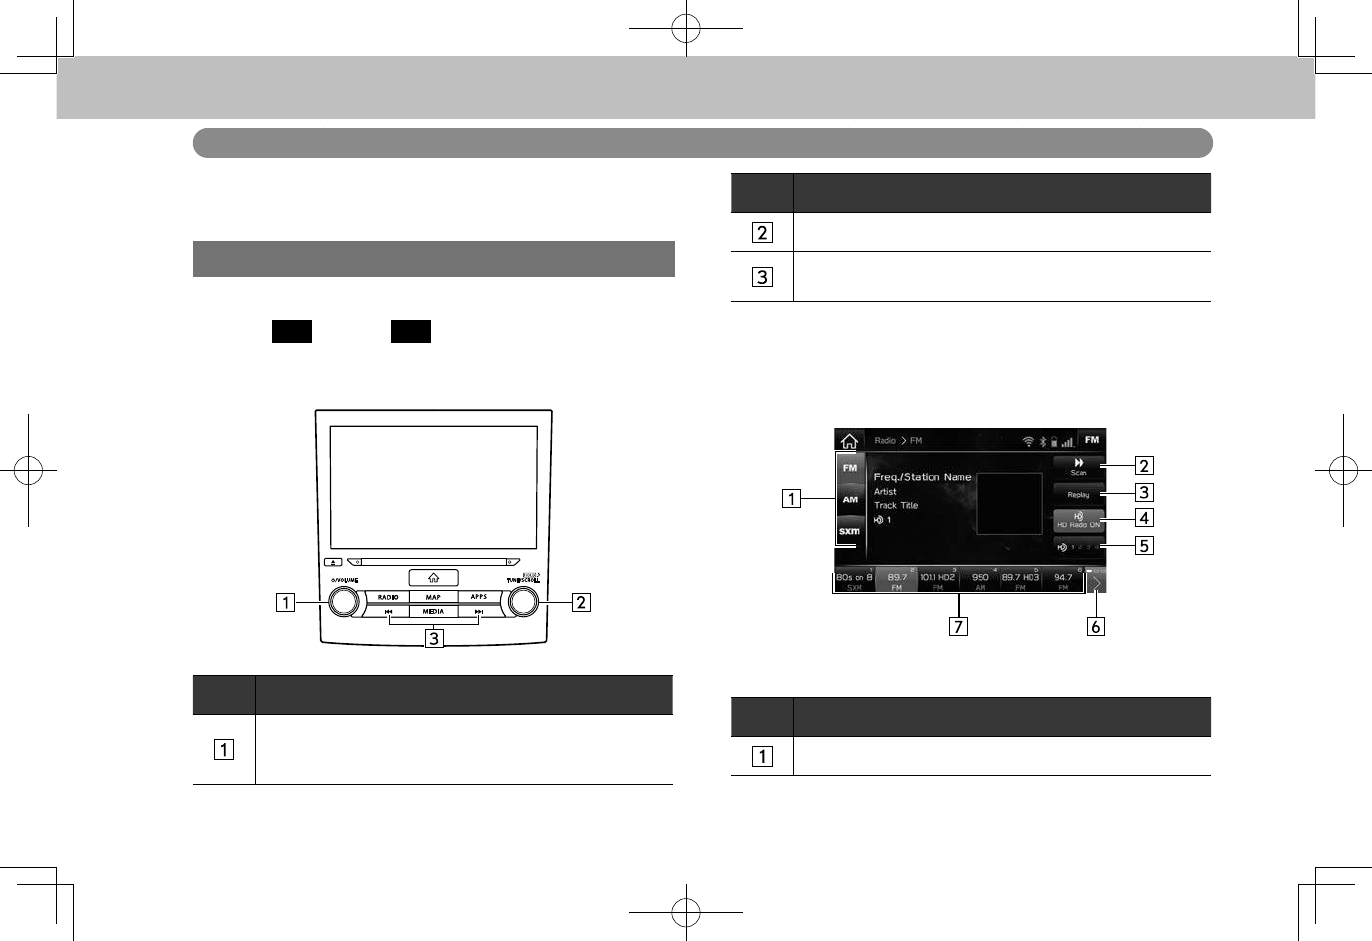
XControl panel
No. Function
Turn to adjust volume.
Press to mute the audio system.
Press and hold to turn the audio system on/off.
No. Function
Turn to step up/down frequencies.
Press to seek up/down available stations/channels.
Press and hold for continuous seek.
XControl screen
No. Function
Select to change radio modes.
RADIO OPERATION
119
AUDIO
6
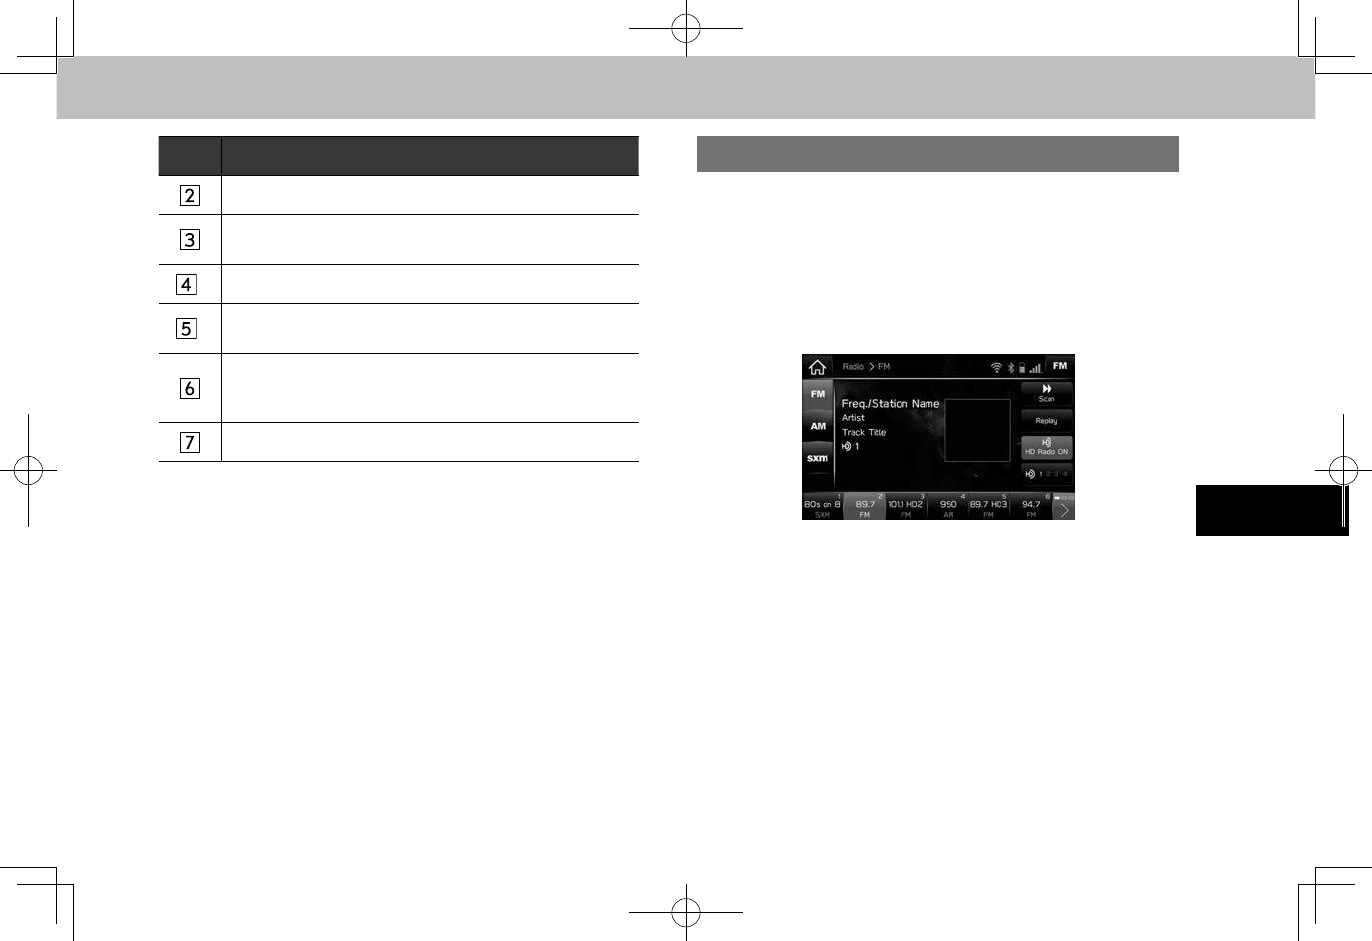
No. Function
Select to scan for receivable stations/channels.
Select to display the cache radio operation buttons.
(→P.122)
*
Select to turn HD Radio mode on/off.
*
Select to change multicast channels available.
(→P.121)
Select to scroll the list of preset buttons.
The preset station list can also be scrolled by swiping
the list.
Select to tune to preset stations/channels.
*: Type A/B only
NOTE
lThe radio automatically changes to stereo reception when a
stereo broadcast is received.
lType A/B only: The radio automatically blends to an HD Radio
signal in AM or FM where available.
PRESETTING A STATION
Radio mode has a mix preset function, which can store up
to 18 stations from any of the AM, FM or SiriusXM Satellite*
Radio bands.
*: Type A/B only
1. Tune in the desired station.
2. Select and hold one of the desired preset station button.
●To change the preset station to a different one, follow
the same procedure.
RADIO OPERATION
120
AVAILABLE HD Radio™ TECHNOLOGY
(TYPE A/B ONLY)
HD Radio Technology manufactured under license from
iBiquity Digital Corporation. U.S. and Foreign Patents.
HD Radio™ and the HD, HD Radio, and “Arc” logos are
proprietary trademarks of iBiquity Digital Corp.
HD Radio™ Technology is the digital evolution of analog
AM/FM radio. Your radio product has a special receiver
which allows it to receive digital broadcasts (where
available) in addition to the analog broadcasts it already
receives. Digital broadcasts have better sound quality than
analog broadcasts as digital broadcasts provide free, crystal
clear audio with no static or distortion. For more information,
and a guide to available radio stations and programming,
refer to www.hdradio.com.
RADIO OPERATION
121
AUDIO
6
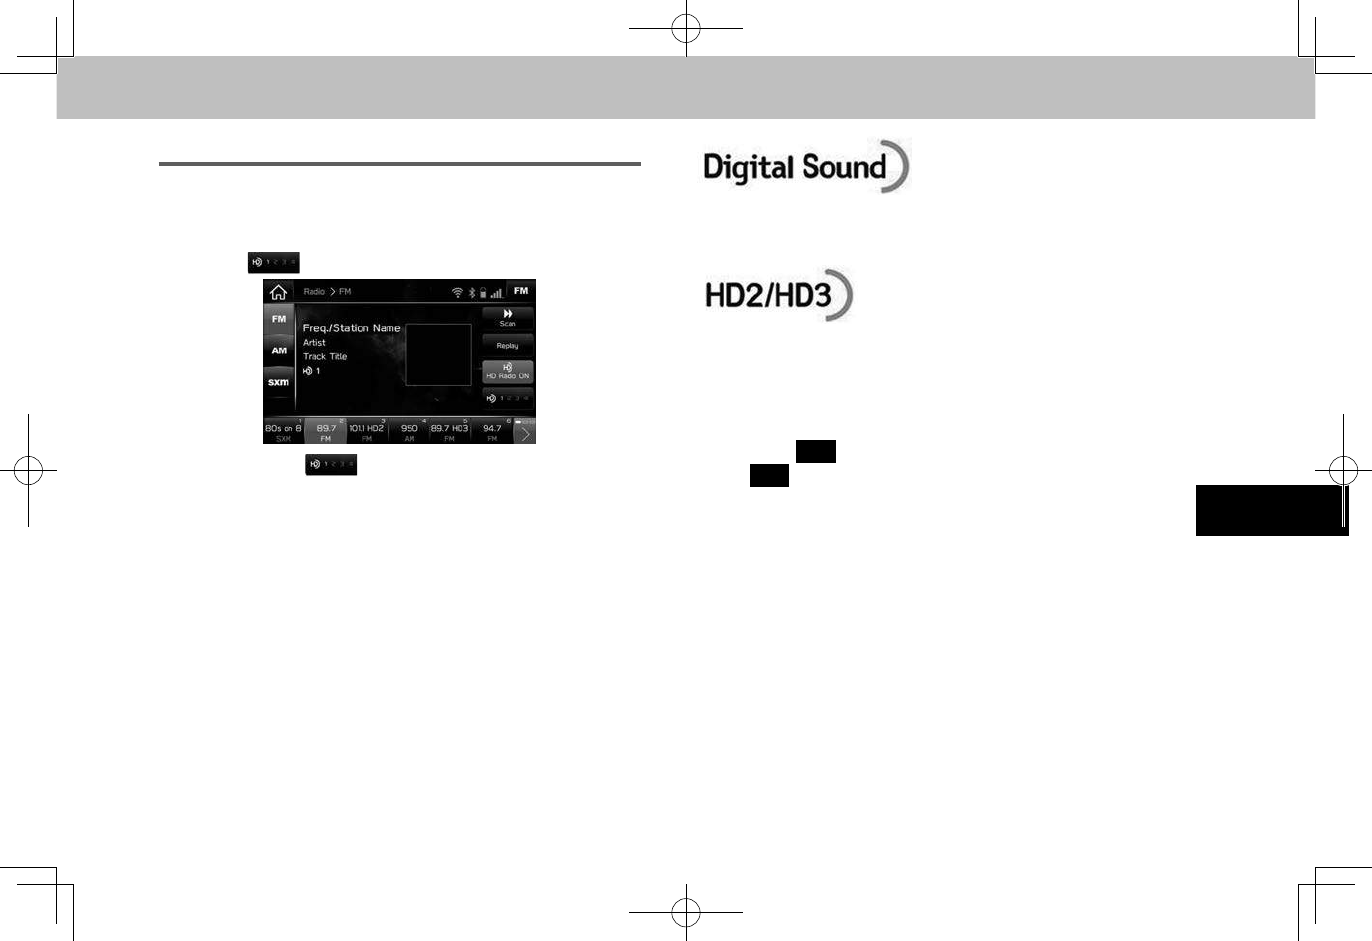
MULTICAST
On the FM radio frequency most digital stations have
“multiple” or supplemental programs on one FM station.
1. Select .
●Each time is selected, the channel can be
changed.
●Turning the “TUNE/SCROLL” knob can also select
the desired multicast channel.
●Digital, CD-quality sound. HD Radio Technology enables
local radio stations to broadcast a clean digital signal. AM
sounds like today’s FM and FM sounds like a CD.
●FM stations can provide additional digital-only audio
programming on HD2/HD3 Channels.
NOTE
lHD Radio™ stations can be preset.
lAn orange
HD)
will be displayed on the screen when in digital.
The
HD)
will rst appear in a gray color indicating the station is
indeed (an analog and) a digital station. Once the digital signal is
acquired, the logo will change to a bright orange color.
lThe song title and artist name will appear on the screen when
available by the radio station. The radio station can send album
pictures when available.
lAs a user works through the analog radio stations, (where
applicable) the radio receiver will automatically tune from an
analog signal to a digital signal within 5 seconds.
RADIO OPERATION
122
●Program Service Data: Presents song name, artist, station
IDs, and other relevant data streams.
●Visual information related to content being played on
your HD Radio receiver, such as Album Art, historical
photographs, still art from live broadcasts, among other
related content.
●iTunes® Tagging provides you the opportunity to discover
a wide range of content and the means to “tag” that
content for later review and purchase from the iTunes®
Store. Also refer to the Apple Automotive specications for
implementing iTunes® Tagging.
CACHING RADIO PROGRAMS
A radio program can be cached and played back in a time-
shifted manner.
AUTOMATIC PLAYBACK OF THE CACHE
If the radio broadcast is interrupted by another audio
output, such as an incoming phone call, the system will
automatically cache the interrupted portion and perform
time-shift playback when the interruption ends. To manually
operate the cache operation: (→P.123)
NOTE
lThe system can store up to 20 minutes. Cached data will be
erased when the radio mode or station is changed or when the
audio system is turned off.
lIf noise or silence occurs during the caching process, cache-
writing will continue, with the noise or silence recorded as is. In
this case, the cached broadcast will contain the noise or silence
when played back.

RADIO OPERATION
123
AUDIO
6
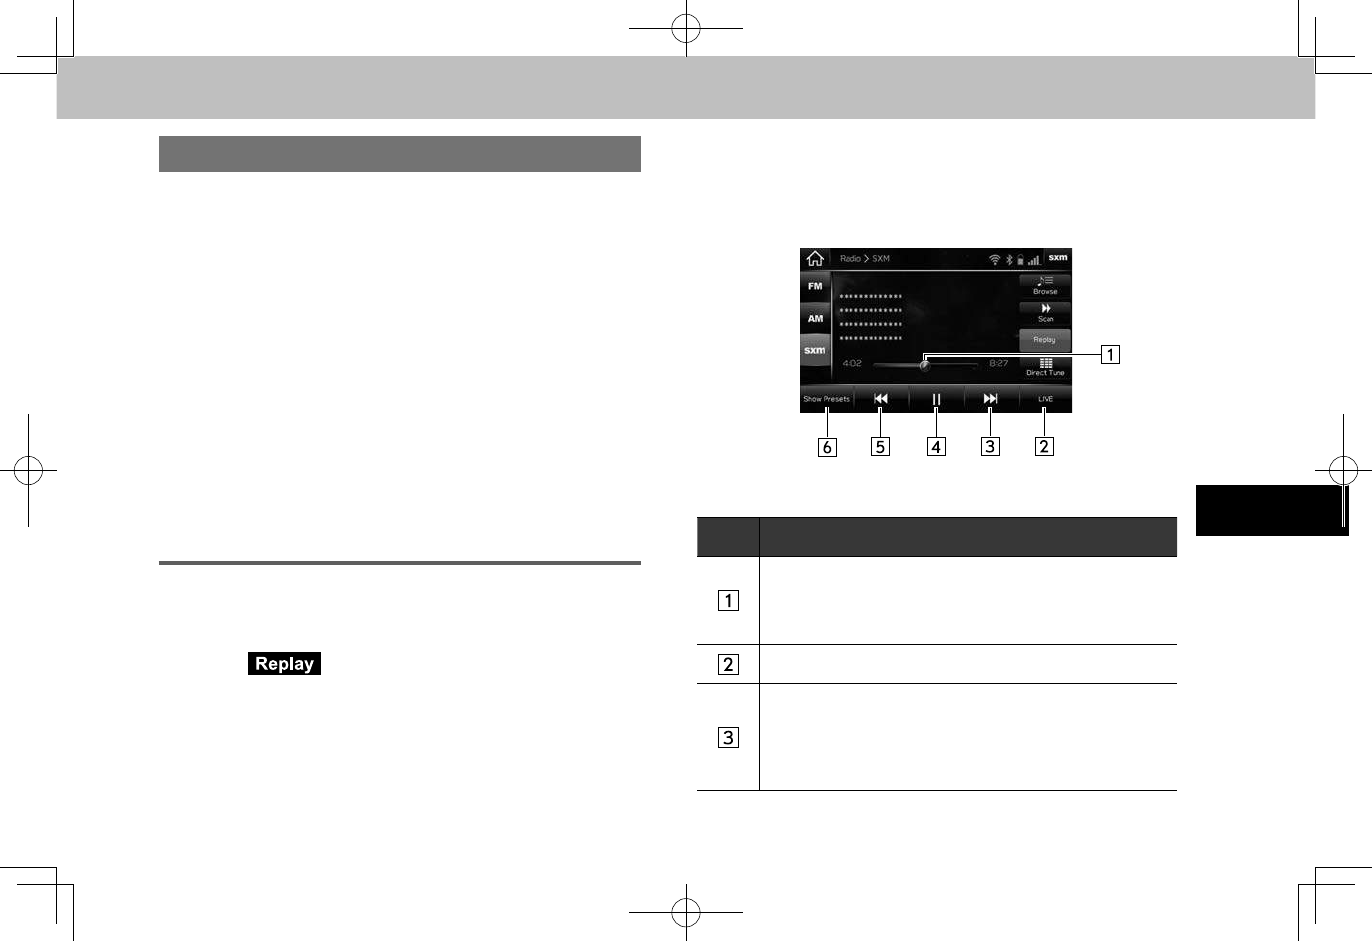
PLAYING BACK THE CACHE MANUALLY
The broadcast cached in the program cache can be played
back manually.
1. Select (Replay). (→P.118)
2. Select the desired cache radio operation button.
No. Information/Function
Shows the current playback location relative to the
cached broadcast recording time with a bar scale.
The playback location can be changed by dragging the
sliders.
No. Information/Function
Returns to the live radio broadcast.
Select: Skips forward 2 minutes.
Select and hold: Fast forwards continuously.
Pauses or plays the radio broadcast.
Select: Skips backward 2 minutes.
Select and hold: Fast rewinds continuously.
Exits cached playback.
NOTE
lThe time displayed on the bar scale may differ from the
actualtime.
●Type A/B only: Allows HD Radio receivers to store content
(songs/programs and data) in a buffer. Playback shall
start at any point in the buffer and shall continue until the
end of the buffer or until the user has selected to stop
playback. Live Pause has the ability to store both analog
and digital content in the buffer.
RADIO OPERATION
124
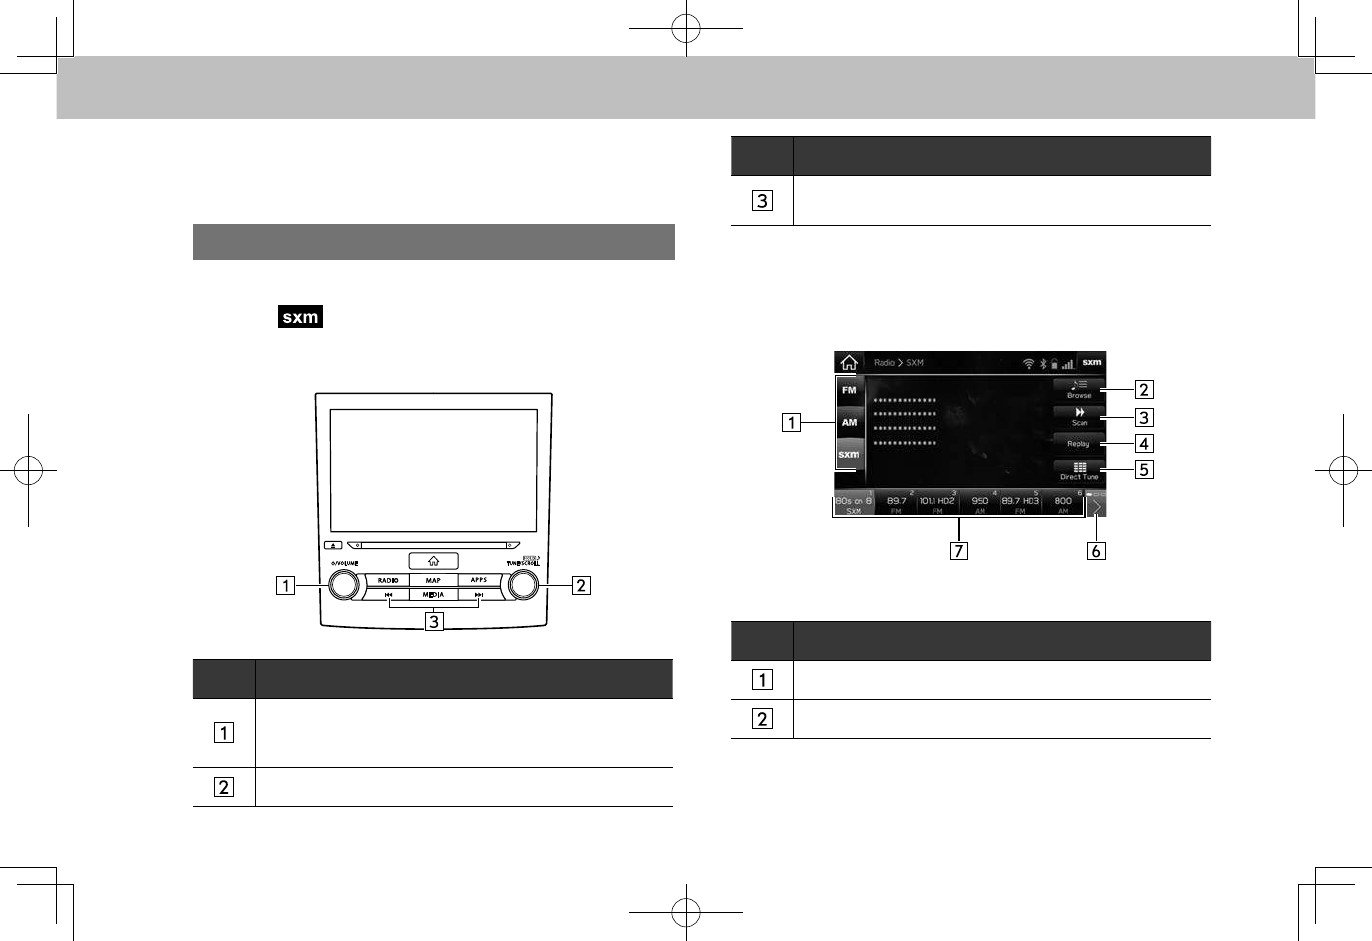
SiriusXM® Satellite Radio (TYPE A/B
ONLY)
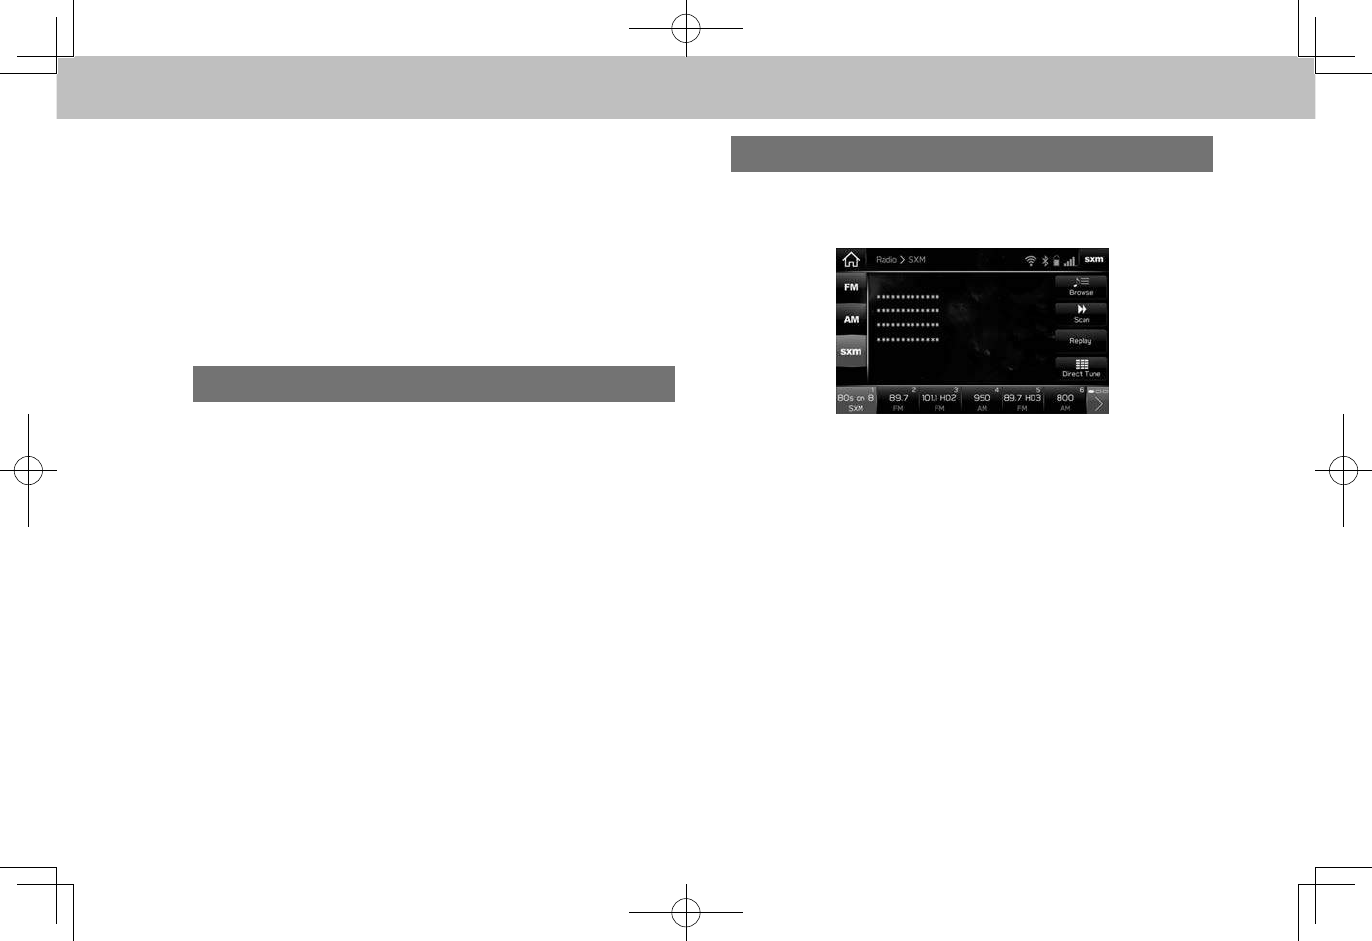
OVERVIEW
The SiriusXM® operation screen can be reached by
selecting (sxm) on the “Radio (Radio)” screen.
(→P.115)
XControl panel
No. Function
Turn to adjust volume.
Press to mute the audio system.
Press and hold to turn the audio system on/off.
Turn to step up/down channels.
No. Function
Press to seek up/down available channels.
Press and hold for continuous seek.
XControl screen
No. Function
Select to change radio modes.
Select to search channels. (→P.131)
RADIO OPERATION
125
AUDIO
6
No. Function
Select to search subscribed channels by category.
When Tune Start is set to on,
Tune Scan
(Tune
Scan) will be displayed. (→P.131)
Select to display the cache radio operation buttons.
(→P.129)
Select to search channels by entering the channel
number.
Select to scroll the list of preset buttons.
The preset station list can also be scrolled by swiping
the list.
Select to tune to preset stations/channels.
NOTE
lIf the ignition switch is turned “OFF” and then set to the “ACC”
or “ON” position when listening to an XL channel, broadcasting
from the XL channel will not begin. If so, the SXM001 channel
will be broadcast.
lXL channels may include frequent explicit language or mature
programming.
HOW TO SUBSCRIBE TO SiriusXM® Satellite
Radio
To listen to a satellite radio broadcast in the vehicle, a
subscription to the SiriusXM® Satellite Radio service is
necessary.
A SiriusXM® Satellite Radio is a tuner designed exclusively
to receive broadcasts provided under a separate
subscription. SiriusXM U.S. satellite and data services
are available only in the 48 contiguous USA and DC.
SiriusXM satellite service is also available in Canada; see
www.siriusxm.ca.
RADIO OPERATION
126
HOW TO SUBSCRIBE
It is necessary to enter into a separate service agreement
with SiriusXM® Satellite Radio Services in order to receive
satellite broadcast programming in the vehicle. Additional
activation and service subscription fees apply that are not
included in the purchase price of the vehicle and digital
satellite tuner.
●For complete information on subscription rates and
terms, or to subscribe to SiriusXM® Satellite Radio:
XU.S.A.
Refer to www.siriusxm.com or call
1-877-447-0011.
XCanada
Refer to www.siriusxm.ca or call
1-877-209-0079.
WARNING
lSiriusXM® Satellite Radio Services — Legal Disclaimers and
Warnings
• Fees and Taxes — Subscription fee, taxes, one time
activation fee, and other fees may apply. Subscription fee
is consumer only. All fees and programming subject to
change.
Subscriptions subject to Customer Agreement available
at www.siriusxm.com. (U.S.A.) or www.siriusxm.ca
(Canada) SiriusXM U.S. satellite and data services are
available only in the 48 contiguous USA and DC. SiriusXM®
Satellite Radio Service is also available in Canada; see
www.siriusxm.ca.
Explicit Language Notice — Channels with frequent explicit
language are indicated with an “XL” preceding the channel
name. Channel blocking is available for SiriusXM® Satellite
Radio receivers by notifying SiriusXM at;
U.S.A. Customers:
Visit www.siriusxm.com or calling
1-877-447-0011
Canadian Customers:
Visit www.siriusxm.ca or calling
1-877-209-0079
RADIO OPERATION
127
AUDIO
6
CAUTION
lIt is prohibited to copy, decompile, disassemble, reverse
engineer, hack, manipulate, or otherwise make available any
technology or software incorporated in receivers compatible
with the SiriusXM® Satellite Radio Services or that support
the SiriusXM website, the Online Service or any of its content.
Furthermore, the AMBE® voice compression software included
in this product is protected by intellectual property rights
including patent rights, copyrights, and trade secrets of Digital
Voice Systems, Inc.
lNote: this applies to SiriusXM® Satellite Radio receivers only
and not SiriusXM Ready devices.
NOTE
lSiriusXM® Satellite Radio Services--Descriptions
• Only SiriusXM® Satellite Radio brings you more of what
you love, all in one place. Get over 175 channels, including
commercial-free music, plus the best sports, news, talk,
comedy and entertainment. Welcome to the world of satellite
radio. More information about SiriusXM® Satellite Radio is
available online at www.siriusxm.com (U.S.A.) or
www.siriusxm.ca (Canada).
NOTE
lSiriusXM® Satellite Radio Services — Subscription Instructions
• For SiriusXM Services requiring a subscription (such as
SiriusXM® Satellite Radio Services, and some Infotainment &
data services), the following paragraph shall be included.
Required SiriusXM® Satellite Radio Services and some
Infotainment & data services monthly subscriptions sold
separately after trial period. Subscription fee is consumer only.
All fees and programming subject to change. Subscriptions
are subject to the Customer Agreement available at
www.siriusxm.com. SiriusXM U.S. satellite and data services
are available only in the 48 contiguous USA and DC.
SiriusXM satellite service is also available in Canada; see
www.siriusxm.ca. © 2013 SiriusXM Radio Inc. Sirius, XM
and all related marks and logos are trademarks of SiriusXM
Radio Inc. All other marks, channel names and logos are the
property of their respective owners.
For more information, program schedules, and to subscribe
or extend subscription after complimentary trial period; more
information is available at:
USA Customers:
Visit www.siriusxm.com or call
1-877-447-0011
RADIO OPERATION
128
NOTE
lSiriusXM® Satellite Radio Service is solely responsible for the
quality, availability and content of the satellite radio services
provided, which are subject to the terms and conditions of the
SiriusXM Satellite Radio customer service agreement.
lCustomers should have their radio ID ready; the radio ID can
be found by tuning to “Ch 000” on the radio. For details, see
“DISPLAYING THE RADIO ID” below.
lAll fees and programming are the responsibility of SiriusXM®
Satellite Radio Services and are subject to change.
DISPLAYING THE RADIO ID
Each SiriusXM tuner is identied with a unique radio ID.
The radio ID is required when activating SiriusXM Satellite
Services or when reporting a problem.
The radio ID can be checked on the SiriusXM subscription
screen. (→P.66)
●If “Ch 000” is selected using the “TUNE/SCROLL”
knob, the ID code, which is 8 alphanumeric
characters, will be displayed. If another channel is
selected, the ID code will no longer be displayed. The
channel (000) alternates between displaying the radio
ID and the specic radio code.
PRESETTING A CHANNEL
1. Tune in the desired channel.
2. Select and hold one of the desired preset station button.
●To change the preset station to a different one, follow
the same procedure.
RADIO OPERATION
129
AUDIO
6
CACHING RADIO PROGRAMS
A radio program can be cached and played back in a time-
shifted manner.
The program that is currently being listened to, and channel
programs registered as Smart Favorites can be cached.
NOTE
lIf noise or silence occurs during the caching process, cache-
writing will continue, with the noise or silence recorded as
is. In this case, the cached broadcast will contain the noise or
silence when played back. If reception is poor or radio waves are
disrupted, the caching process will not be performed properly,
and several seconds of silence will be recorded.
lIt may not be possible to cache depending on the
broadcasting channel and program (advertising or billboard, etc.)
being broadcasted.
PLAYING BACK THE CACHE
The broadcast cached in the program cache can be played
back.
1. Select (Replay). (→P.124)
2. Select the desired cache radio operation button.
No. Information/Function
Shows the current playback location relative to the
cached broadcast recording time with a bar scale.
The playback location can be changed by dragging the
sliders.
Returns to the live radio broadcast.
Select: Access the desired program. Skips forward
through program.
Select and hold: Fast forwards continuously.
The fast forward speed increased the longer the button
is held down.
RADIO OPERATION
130
No. Information/Function
Pauses or plays the radio broadcast.
Select: Access the desired program. Skips back through
program.
Select and hold: Fast rewinds continuously.
The fast rewind speed increased the longer the button is
held down.
Exits cached playback.
NOTE
lThe time displayed on the bar scale may differ from the actual
time.
REGISTERING A SMART FAVORITE
CHANNEL
The TuneStart and TuneScan functions can be used by
registering preset channels as Smart Favorites. Up to 5
channels can be registered in Smart Favorites.
1. Select
Smart Favs Setup
(Smart Favs Setup) on the
option screen.
2. Select check boxes for preset channels to be
registered, and then select
OK
(OK).
TuneStartTM FUNCTION
TuneStart begins playing the current program from the
beginning when tuning to a channel registered in Smart
Favorites, allowing you to enjoy the complete program.
TuneStart is applicable to channels registered in Smart
Favorites. (→P.130)
It is necessary to turn on TuneStart to use this function.
(→P.66)
NOTE
lLive radio is broadcast immediately after switching from another
mode to SiriusXM mode even if the TuneStart setting is turned
ON. The TuneStart function starts if switching to a channel
registered in Smart Favorites within SiriusXM mode.
lThe TuneStart function is not applicable to programs for which
even a little has been listened to from the start.
RADIO OPERATION
131
AUDIO
6
TuneScanTM FUNCTION
TuneScan is a function used to listen to the rst 10 seconds
of all recorded programs one after another.
TuneScan is applicable to channels registered in Smart
Favorites, and programs that are currently being listened to.
(→P.130)
It is necessary to turn on TuneStart to use this function.
(→P.66)
1. Select
Tune Scan
(Tune Scan).
●Select
Tune Scan
(Tune Scan) again when the
desired program is reached to continue playing that
program.
NOTE
lThe TuneScan function is not applicable to the following
program.
• Program that has been listened to for 30 seconds or longer
• If the start of the program has not been cached
• If the cached program is shorter than 45 seconds (However,
this excludes programs that are currently being broadcast.)
And in addition to the above conditions, the TuneScan function
may not work depending on the channel or program.
SEARCHING BY FEATURED FAVORITES
Featured Favorites are a collection of channels that are
created by the SiriusXM programming team that are
updated several times throughout the year.
The desired Featured Favorite channel can be selected
from the list screen. (→P.131)
It is necessary to turn on Featured Favorites to listen to a
Featured Favorite channel. (→P.66)
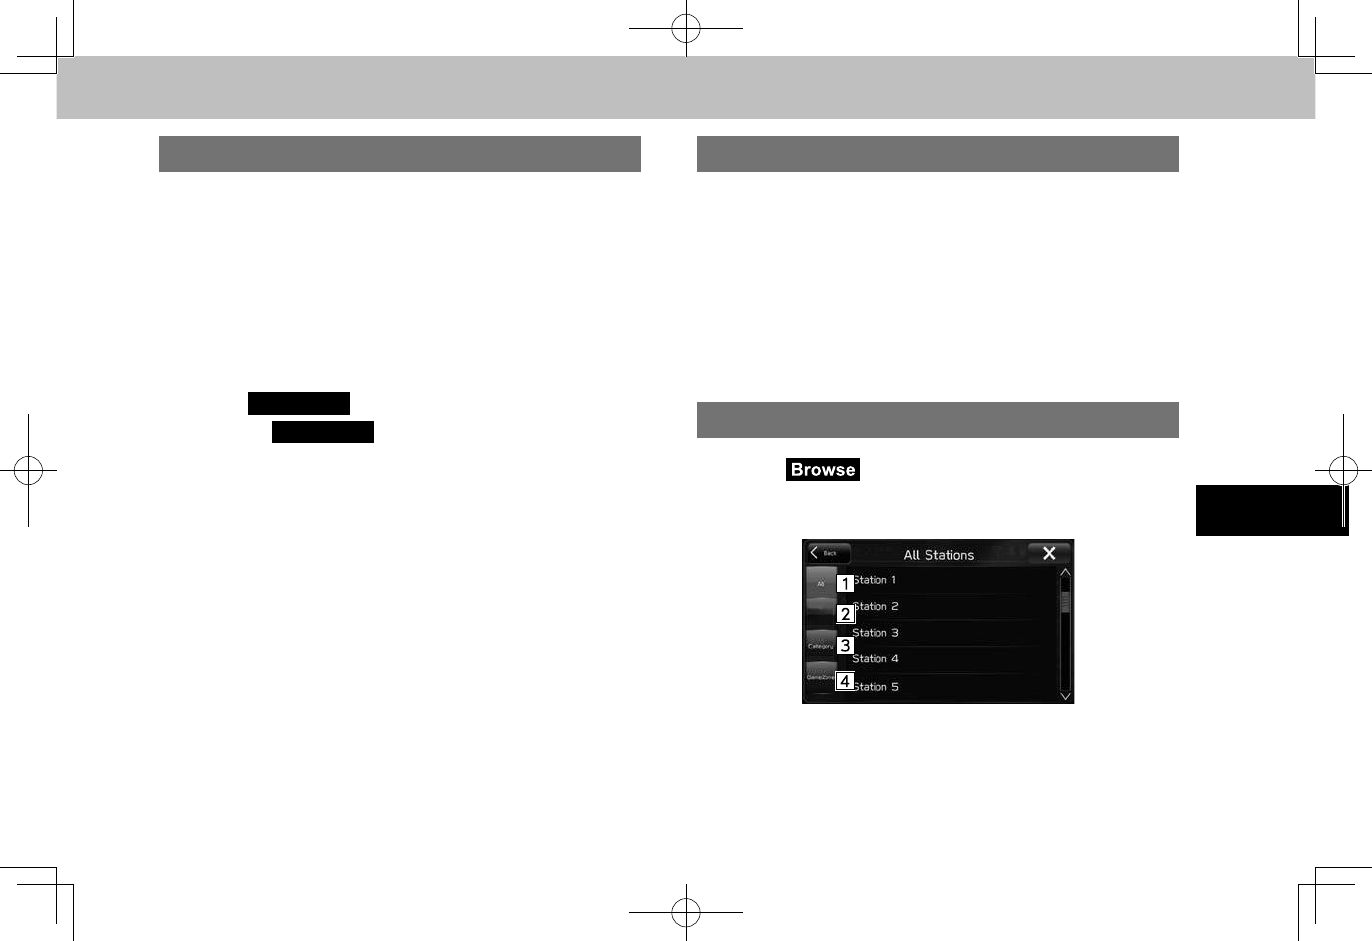
SELECTING A CHANNEL FROM THE LIST
1. Select (Browse).
2. Select the desired list, and then select the desired
channel.
RADIO OPERATION
132
No. Function Page
Select to display the all channels list. -
Select to display the preset channels list. -
Select to display channel categories and
Featured Favorite channel list. 132
Select to display the sports channels list. 132
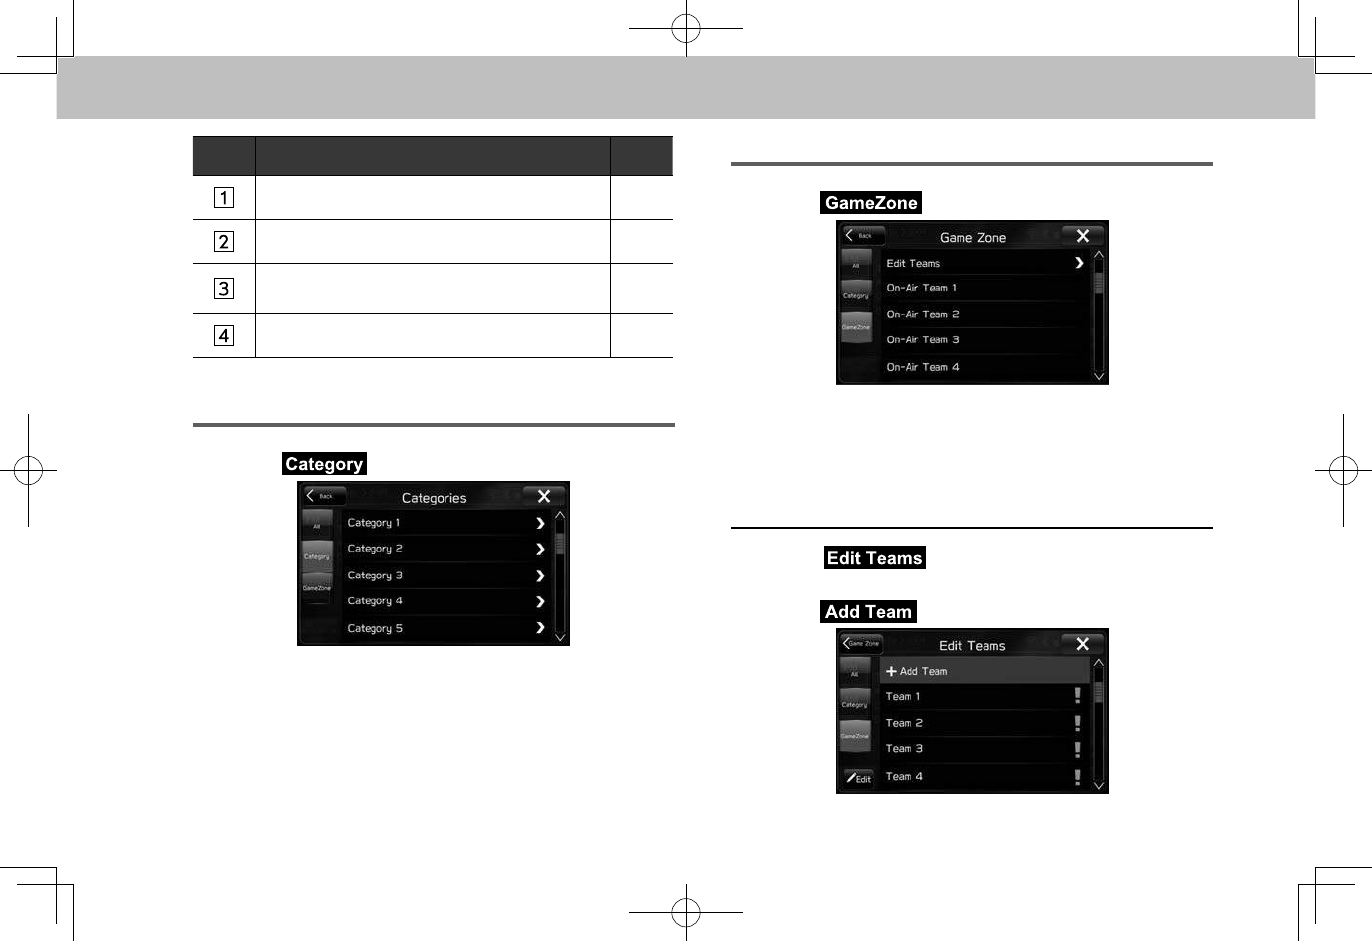
SELECTING FROM CATEGORIES AND FEATURED
FAVORITE CHANNEL LIST
1. Select (Category).
●Received Featured Favorite channels is listed on the
top of the list.
2. Select the desired channel.
SELECTING FROM THE SPORTS CHANNELS LIST
1. Select (GameZone).
●The teams which is being broadcast at present or the
registered team are displayed on the list.
● The order of the item can be changed. (→P.133)
2. Select the desired team.
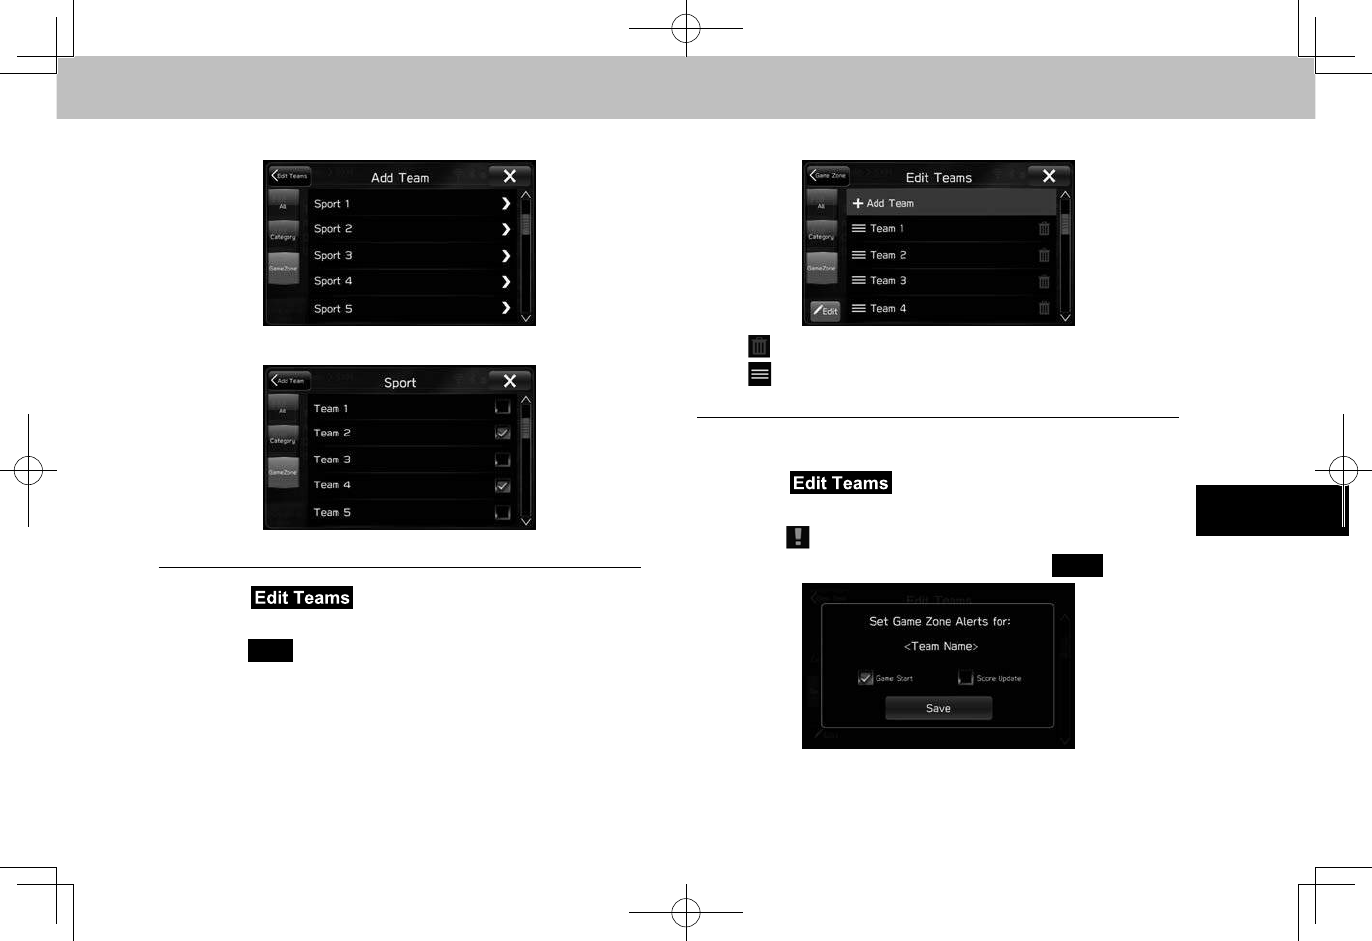
nADDING TEAMS
1. Select (Edit Teams) on the “Game Zone
(Game Zone)” screen. (→P.132)
2. Select (Add Team).
RADIO OPERATION
133
AUDIO
6
3. Select the desired sports.
4. Select the desired team.
nEDITING THE LIST
1. Select (Edit Teams) on the “Game Zone
(Game Zone)” screen. (→P.132)
2. Select
Edit
(Edit).
3. Select the desired item to be set.
●: Select to delete the item.
●: Drag an item to the desired position.
nSETTING POP UP ALERTS
Pop up alerts can be set to display on the screen.
1. Select (Edit Teams) on the “Game Zone
(Game Zone)” screen. (→P.132)
2. Select next to the desired item.
3. Select the desired item, and then select
Save
(Save).

MEDIA OPERATION
134
MEDIA OPERATION
CD (TYPE A/B ONLY)
OVERVIEW
The CD operation screen can be reached by the following
methods:
● Insert a disc. (→P.38)
●Select on the “Media (Media)” screen. (→P.115)
XControl panel
No. Function
Turn to adjust volume.
Press to mute the audio system.
Press and hold to turn the audio system on/off.
Press to eject a disc.
Disc slot
Turn to select a track.
Press and hold to display the sound setting screen.
(→P.116)
Press to select a track.
Press and hold to fast forward/rewind.
Press to switch between media sources.
MEDIA OPERATION
135
AUDIO
6
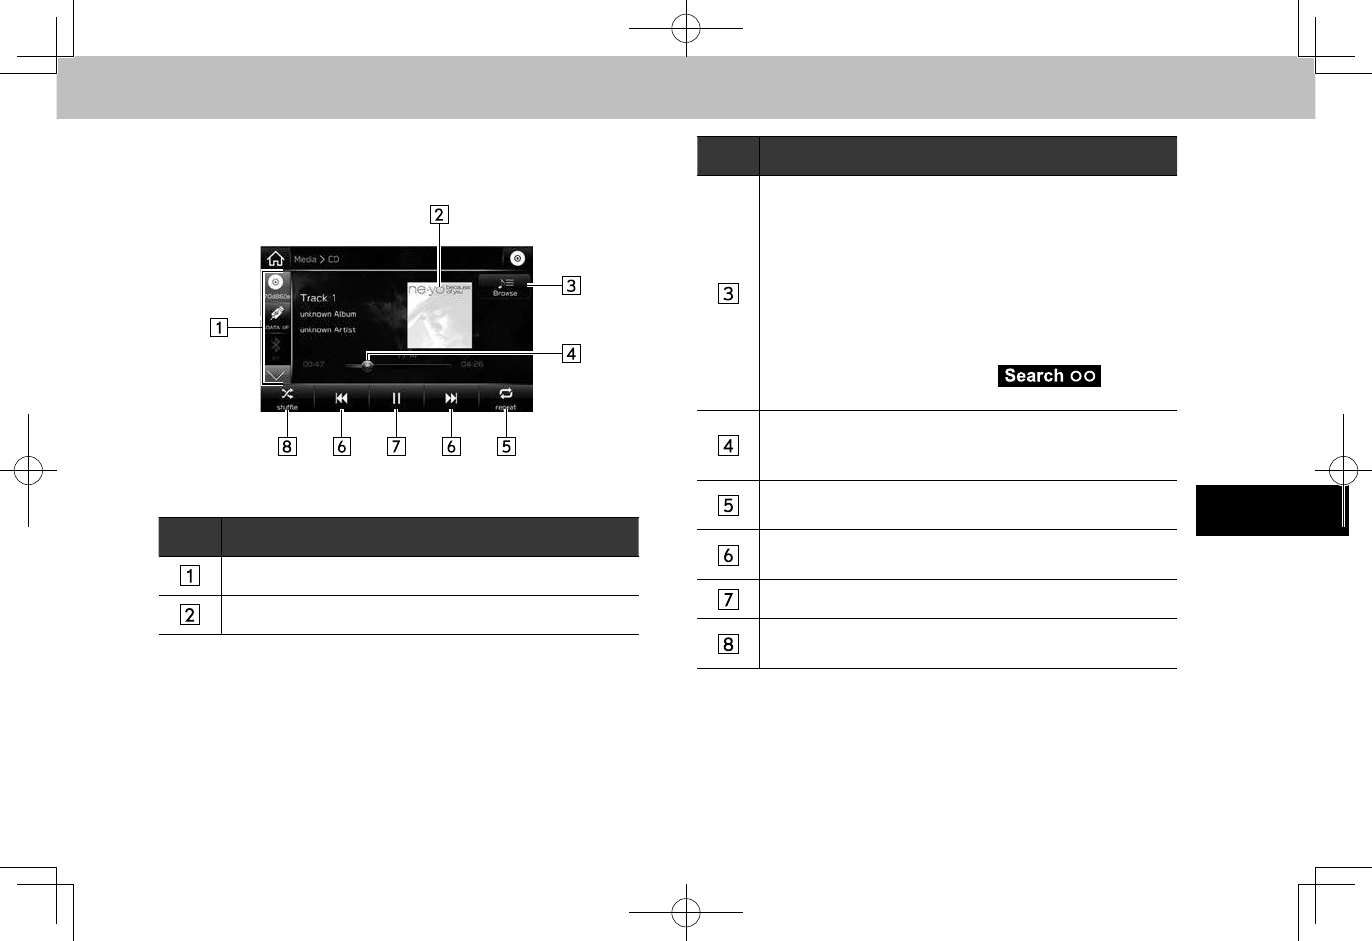
XControl screen
No. Function
Select to switch between other media sources.
Displays cover art.
No. Function
XAudio CD
Select to display a track list.
XMP3/WMA/AAC disc
Select to display the play mode selection screen.
• “Artists (Artists)”/“Albums (Albums)”/“Songs
(Songs)”/“Playlists (Playlists)”/“Genres
(Genres)”/“Composers (Composers)”/“Folders
(Folders)”are on the play mode selection screen.
• If audio les contain information such as the artist
name and album name, select (Search
OO) in each play mode to search by play mode name.
Shows progress.
The playback location can be changed by dragging the
sliders.
Select to enable/disable repeat playback of the track
currently playing.
Select to select a track.
Select and hold to fast forward/rewind.
Select to pause/play.
Select to enable/disable random playback for the tracks
currently playing on the CD.
MEDIA OPERATION
136
NOTE
lIf a disc contains CD-DA les and MP3/WMA/AAC les, only the
CD-DA les can be played back.
lIf a CD-TEXT disc is inserted, the title of the disc and track will
be displayed. Up to 32 characters can be displayed.
lIf the disc contains no CD-TEXT, only the track number would be
displayed on the screen.
USB MEMORY
Audio les on the USB memory can be played back.
OVERVIEW
The USB Audio playback screen can be reached by the
following methods:
● Connect a USB memory. (→P.39)
●Select on the “Media (Media)” screen. (→P.115)
MEDIA OPERATION
137
AUDIO
6
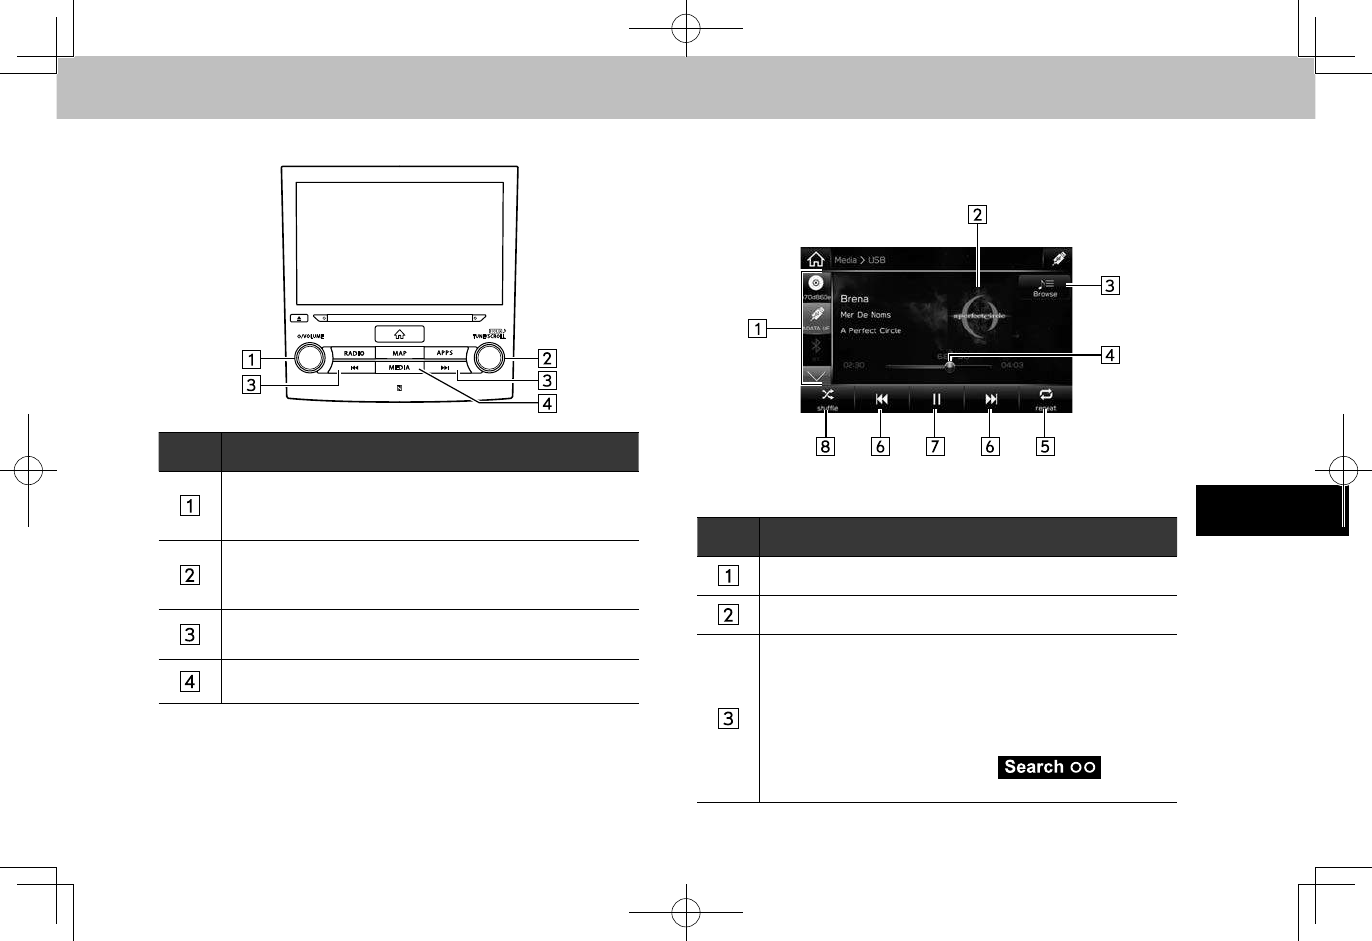
XControl panel
No. Function
Turn to adjust volume.
Press to mute the audio system.
Press and hold to turn the audio system on/off.
Turn to select a track.
Press and hold to display the sound setting screen.
(→P.116)
Press to select a track.
Press and hold to fast forward/rewind.
Press to switch between media sources.
XControl screen
No. Function
Select to switch between other media sources.
Displays cover art.
Select to display the play mode selection screen.
• “Artists (Artists)”/“Albums (Albums)”/“Songs
(Songs)”/“Playlists (Playlists)”/“Genres
(Genres)”/“Composers (Composers)”/“Folders
(Folders)”are on the play mode selection screen.
• If audio les contain information such as the artist
name and album name, select (Search
OO) in each play mode to search by play mode name.
MEDIA OPERATION
138
No. Function
Shows progress.
The playback location can be changed by dragging the
sliders.
Select to enable/disable repeat playback of the track
currently playing.
Select to select a track.
Select and hold to fast forward/rewind.
Select to pause/play.
Select to enable/disable random playback for the tracks
currently playing from the USB memory.
WARNING
lDo not operate the player’s controls or connect the USB
memory while driving.
CAUTION
lDo not leave your portable player in the car. In particular, high
temperatures inside the vehicle may damage the portable
player.
lDo not push down on or apply unnecessary pressure to the
portable player while it is connected as this may damage the
portable player or its terminal.
lDo not insert foreign objects into the port as this may damage
the portable player or its terminal.
NOTE
lIf tag information exists, the le names will be changed to track
names.
MEDIA OPERATION
139
AUDIO
6
iPod
When an iPod is connected, you can play iPod music les.
On this unit, you can perform operations such as selecting
a le from a list or changing to the random playback mode.
OVERVIEW
The iPod operation screen can be reached by the following
methods:
● Connect an iPod. (→P.39)
●Select on the “Media (Media)” screen. (→P.115)
XControl panel
No. Function
Turn to adjust volume.
Press to mute the audio system.
Press and hold to turn the audio system on/off.
Turn to select a track.
Press and hold to display the sound setting screen.
(→P.116)
Press to select a track.
Press and hold to fast forward/rewind.
Press to switch between media sources.
MEDIA OPERATION
140
XControl screen
No. Function
Select to switch between other media sources.
Displays cover art.
Select to display the play mode selection screen.
• “Artists (Artists)”/“Albums (Albums)”/“Songs
(Songs)”/“Playlists (Playlists)”/“Genres
(Genres)”/“Composers (Composers)”/“Folders
(Folders)”/“Audiobooks (Audiobooks)”/“Podcasts
(Podcasts)”are on the play mode selection screen.
• If audio les contain information such as the artist
name and album name, select (Search
OO) in each play mode to search by play mode name.
No. Function
Shows progress.
The playback location can be changed by dragging the
sliders.
Select to enable/disable repeat playback of the track
currently playing.
Select to select a track.
Select and hold to fast forward/rewind.
Select to pause/play.
Select to enable/disable random playback for the tracks
currently playing on the iPod.
*
Select to fast forward the current content item for 15
seconds.
*
Select to rewind the current content item for 15 seconds.
*: Display when playing Audiobooks or Podcasts
WARNING
lDo not operate the player’s controls or connect the iPod while
driving.
MEDIA OPERATION
141
AUDIO
6
CAUTION
lDo not leave your portable player in the car. In particular, high
temperatures inside the vehicle may damage the portable
player.
lDo not push down on or apply unnecessary pressure to the
portable player while it is connected as this may damage the
portable player or its terminal.
lDo not insert foreign objects into the port as this may damage
the portable player or its terminal.
NOTE
lWhen an iPod is connected using a genuine iPod cable, the iPod
starts charging its battery.
lIf playing iPod music, perform operation at the system. Certain
functions may not be available if played directly from the
iPod. Furthermore, depending on the connected iPod, certain
functions may not be available.
lDepending on the iPod and the songs in the iPod, iPod cover
art may be displayed. It may take time to display iPod cover art,
and the iPod may not be operated while the cover art display is
in process.
lWhen an iPod is connected and the audio source is changed to
iPod mode, the iPod will resume playing from the same point it
was last used.
lTracks selected by operating a connected iPod may not be
recognized or displayed properly.
Bluetooth AUDIO
The Bluetooth audio system enables users to enjoy listening
to music that is played on a portable player on the vehicle
speakers via wireless communication.
This audio system supports Bluetooth, a wireless data
system capable of playing portable audio music without
cables. If your device does not support Bluetooth, the
Bluetooth audio system will not function.
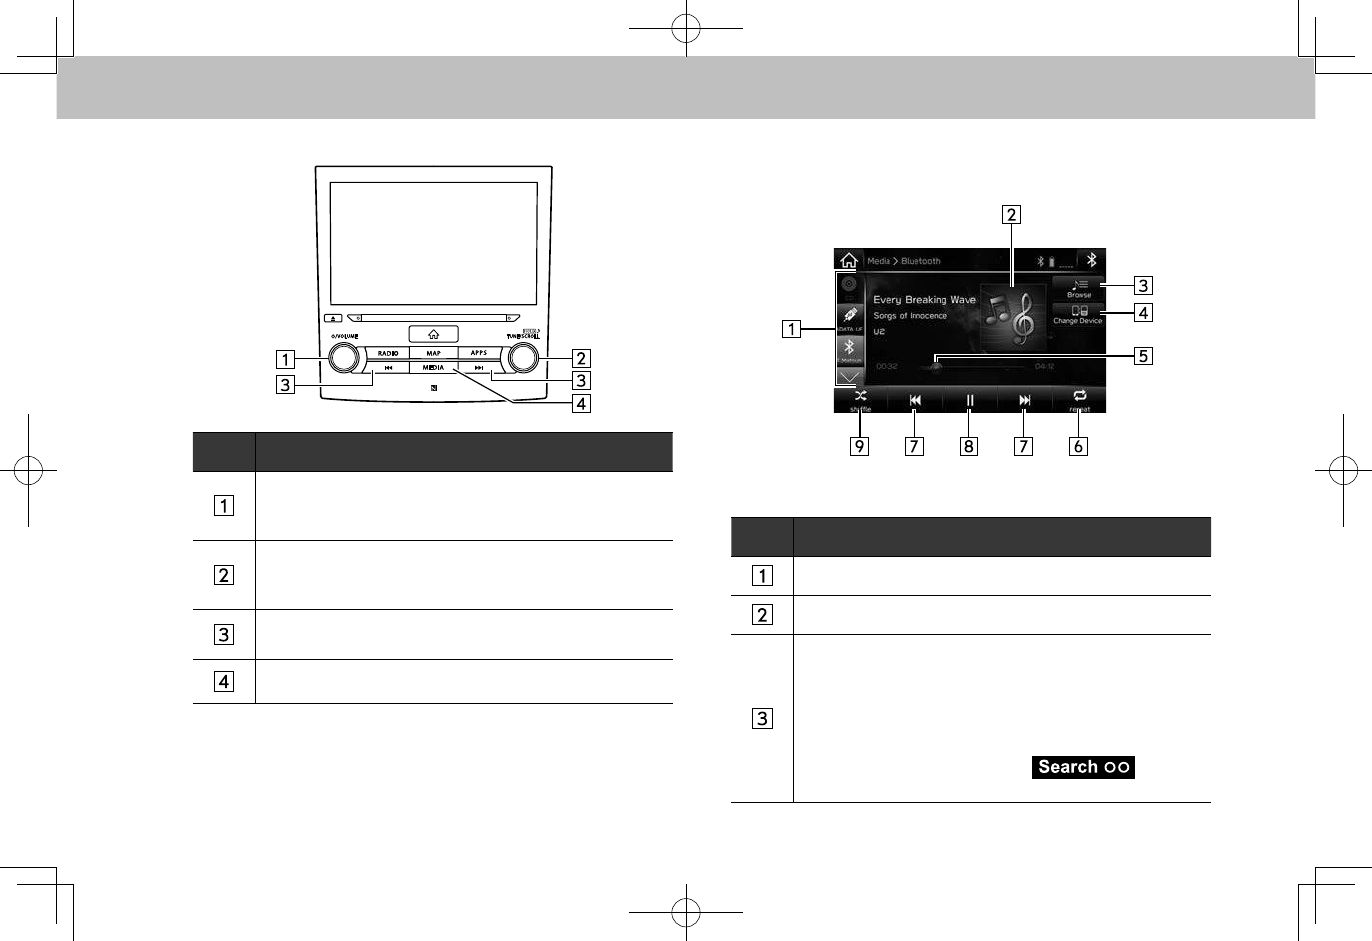
OVERVIEW
The Bluetooth audio operation screen can be reached by
selecting on the “Media (Media)” screen. (→P.115)
Depending on the type of portable player connected, some
functions may not be available and/or the screen may look
differently than shown in this manual.
MEDIA OPERATION
142
XControl panel
No. Function
Turn to adjust volume.
Press to mute the audio system.
Press and hold to turn the audio system on/off.
Turn to select a track.
Press and hold to display the sound setting screen.
(→P.116)
Press to select a track.
Press and hold to fast forward/rewind.
Press to switch between media sources.
XControl screen
No. Function
Select to switch between other media sources.
Displays cover art.
Select to display the play mode selection screen.
• “Artists (Artists)”/“Albums (Albums)”/“Songs
(Songs)”/“Playlists (Playlists)”/“Genres
(Genres)”/“Composers (Composers)”/“Folders
(Folders)”are on the play mode selection screen.
• If audio les contain information such as the artist
name and album name, select (Search
OO) in each play mode to search by play mode name.
MEDIA OPERATION
143
AUDIO
6
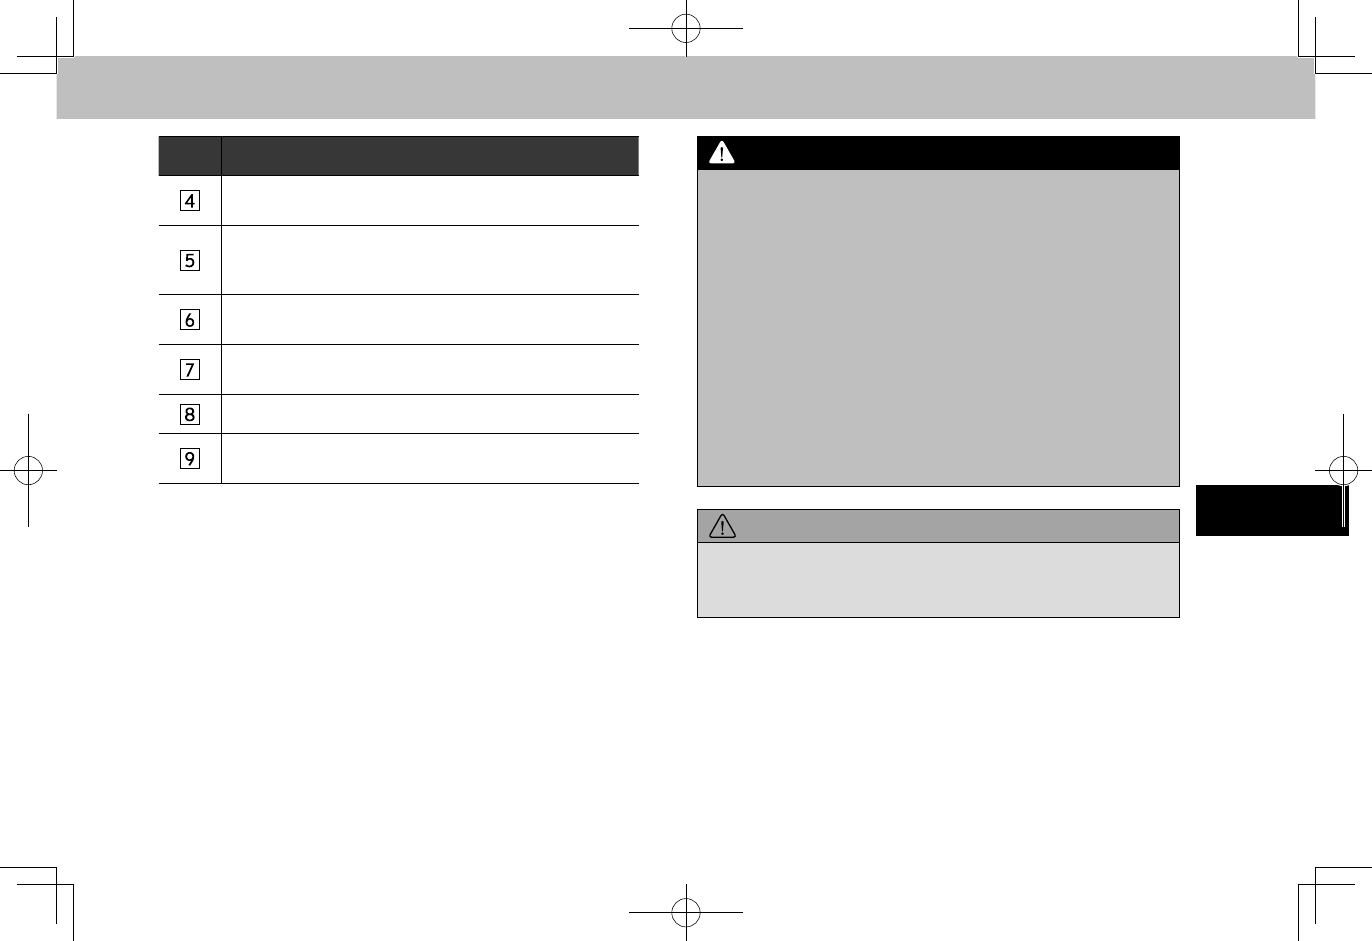
No. Function
Select to display the “Change Device (Change Device)”
screen. (→P.144)
Shows progress.
The playback location can be changed by dragging the
sliders.
Select to enable/disable repeat playback of the track
currently playing.
Select to select a track.
Select and hold to fast forward/rewind.
Select to pause/play.
Select to enable/disable random playback for the tracks
currently playing on the Bluetooth audio device.
WARNING
lDo not operate the player’s controls or connect to the
Bluetooth audio system while driving.
lYour audio unit is tted with Bluetooth antennas. People with
implantable cardiac pacemakers, cardiac resynchronization
therapy-pacemakers or implantable cardioverter debrillators
should maintain a reasonable distance between themselves
and the Bluetooth antennas. The radio waves may affect the
operation of such devices.
lBefore using Bluetooth devices, users of any electrical
medical device other than implantable cardiac pacemakers,
cardiac resynchronization therapy-pacemakers or implantable
cardioverter debrillators should consult the manufacturer
of the device for information about its operation under the
inuence of radio waves. Radio waves could have unexpected
effects on the operation of such medical devices.
CAUTION
lDo not leave your portable player in the vehicle. In particular,
high temperatures inside the vehicle may damage the portable
player.
MEDIA OPERATION
144
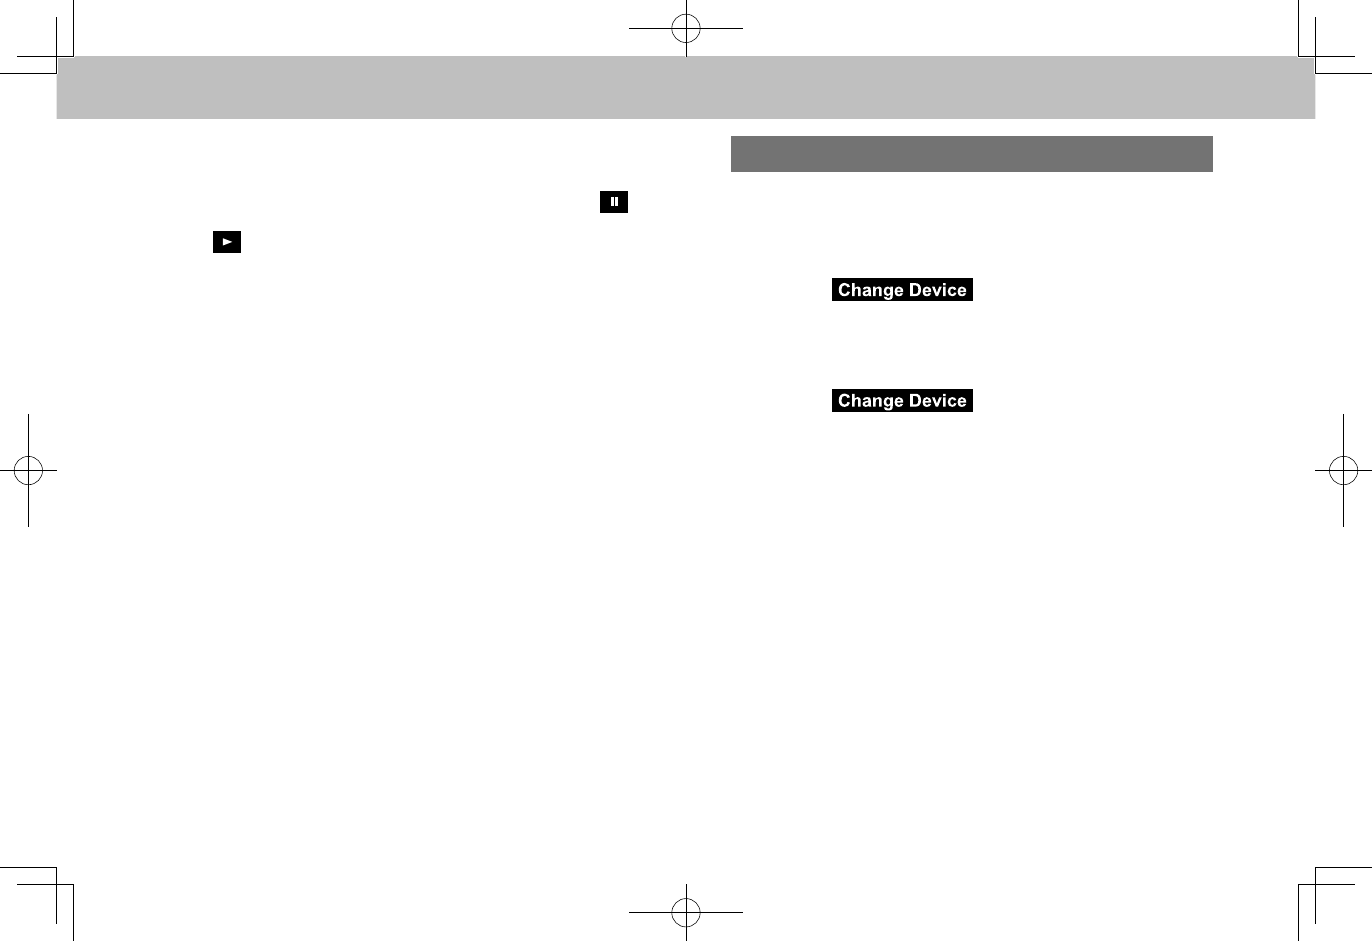
NOTE
lDepending on the Bluetooth device that is connected to the
system, the music may start playing when selecting while
it is paused. Conversely, the music may pause when selecting
while it is playing.
lIn the following conditions, the system may not function:
• The Bluetooth device is turned off.
• The Bluetooth device is not connected.
• The Bluetooth device has a low battery.
lIt may take time to connect the phone when Bluetooth audio is
being played.
lFor operating the portable player, see the instruction manual that
comes with it.
lIf the Bluetooth device is disconnected due to poor reception
from the Bluetooth network when the ignition switch is turned
to the “ACC” or “ON” position, the system will automatically
reconnect to the portable player.
lIf the Bluetooth device is disconnected on purpose, such as it
was turned off, this does not happen. Reconnect the portable
player manually.
lBluetooth device information is registered when the Bluetooth
device is connected to the Bluetooth audio system. When
selling or disposing of the vehicle, remove the Bluetooth audio
information from the system. (→P.62)
CONNECTING A Bluetooth DEVICE
To use the Bluetooth audio system, it is necessary to
register a Bluetooth device with the system.
XRegistering an additional device
1. Select (Change Device) on the
Bluetooth audio control screen.
2. For more information: →P.57
XSelecting a registered device
1. Select (Change Device) on the
Bluetooth audio control screen.
2. Select the Bluetooth device to be connected.
MEDIA OPERATION
145
AUDIO
6
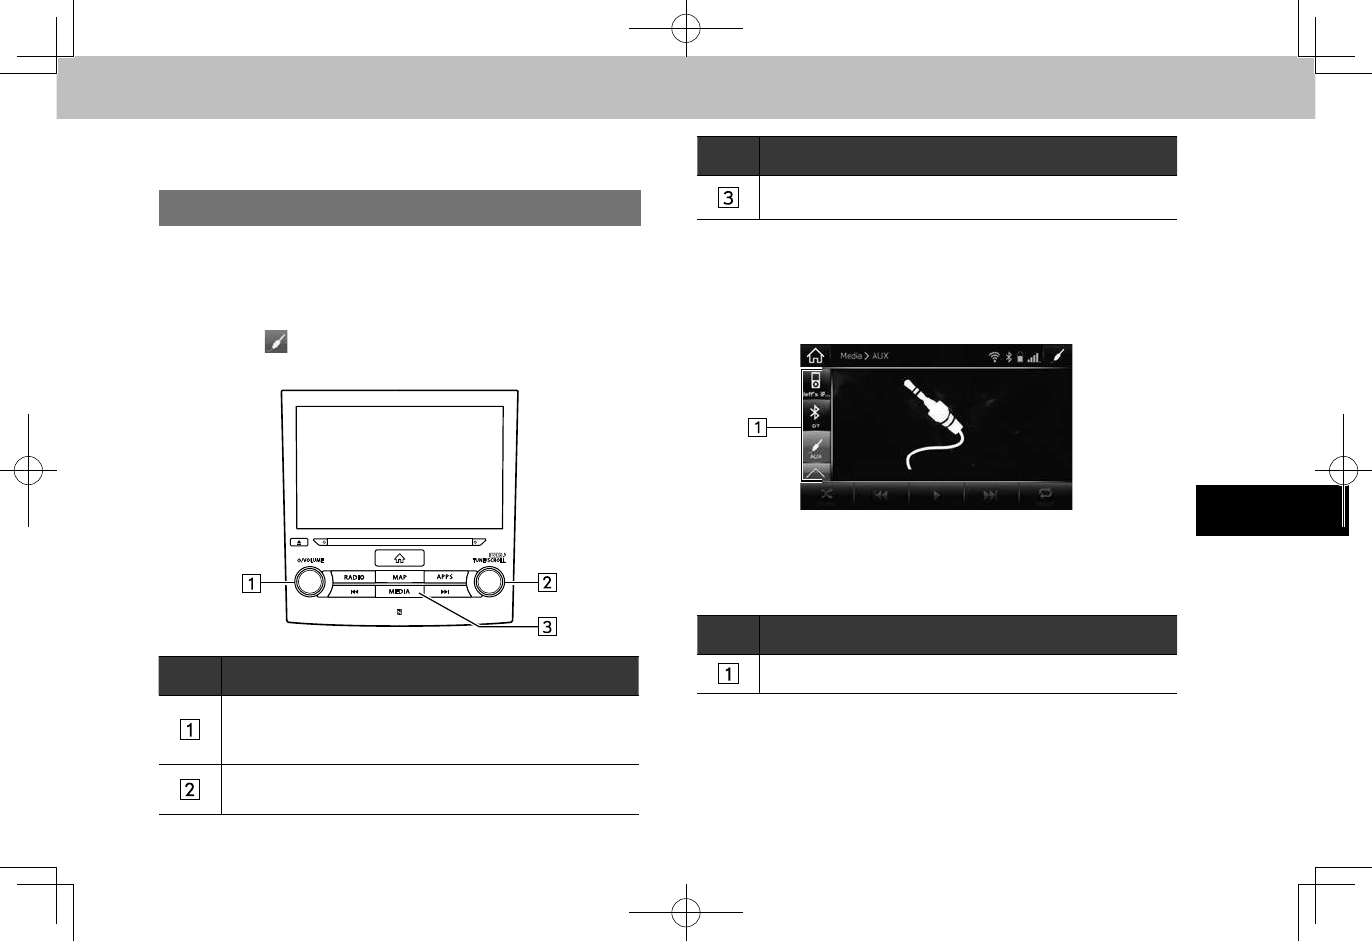
AUX
OVERVIEW
The AUX operation screen can be reached by the following
methods:
● Connect a portable audio device. (→P.39)
●Select on the “Media (Media)” screen. (→P.115)
XControl panel
No. Function
Turn to adjust volume.
Press to mute the audio system.
Press and hold to turn the audio system on/off.
Press and hold to display the sound setting screen.
(→P.116)
No. Function
Press to switch between media sources.
XControl screen
No. Function
Select to switch between other media sources.
MEDIA OPERATION
146
WARNING
lDo not operate the player’s controls or connect the portable
audio device while driving.
CAUTION
lDo not leave portable audio device in the vehicle. The
temperature inside the vehicle may become high, resulting in
damage to the player.
lDo not push down on or apply unnecessary pressure to
the portable audio device while it is connected as this may
damage the portable audio device or its terminal.
lDo not insert foreign objects into the port as this may damage
the portable audio device or its terminal.
AUDIO REMOTE CONTROLS
147
AUDIO
6
AUDIO REMOTE CONTROLS
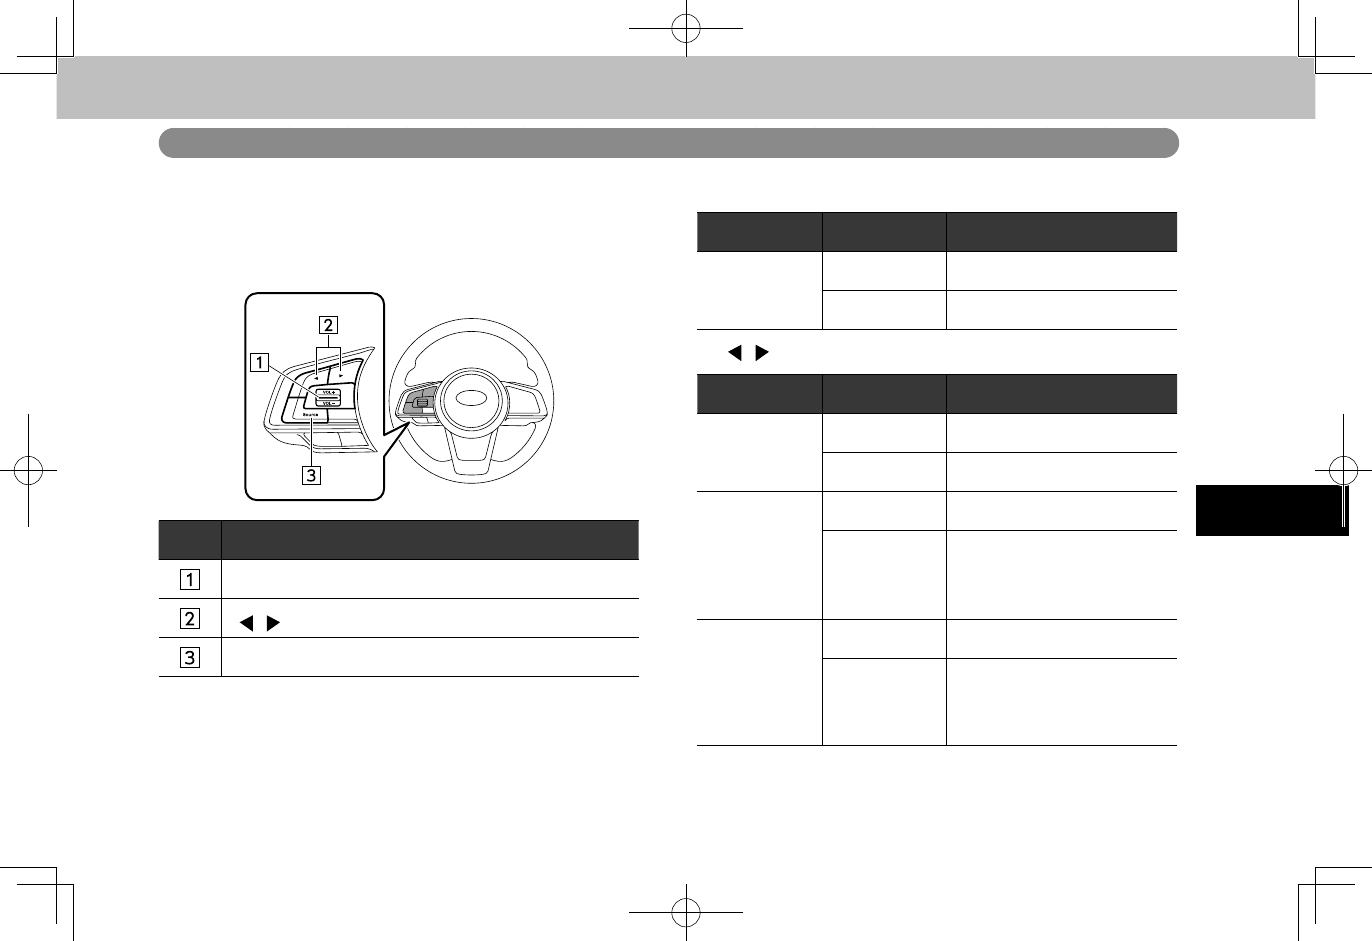
STEERING SWITCHES
Some parts of the audio system can be adjusted using the
switches on the steering wheel.
No. Switch
“VOL +/VOL -” switch
“ / ” switch
“Source” switch
X“VOL +/VOL -” switch
Mode Operation Function
Volume
Press Volume up/down
Press and hold Volume up/down continuously
X“ / ” switch
Mode Operation Function
AM/FM Radio,
SiriusXM®*1
Press Preset channel up/down
Press and hold Seek up/down continuously
aha
Press Content up/down
Press and hold
Rewind the current content
item for 15 seconds/ Fast
forward the current content
item for 30 seconds
Audio CD*1,
MP3/WMA/
AAC disc*1,
USB, iPod,
Bluetooth
audio
Press Select a track
Press and hold Fast forward/rewind
AUDIO REMOTE CONTROLS
148
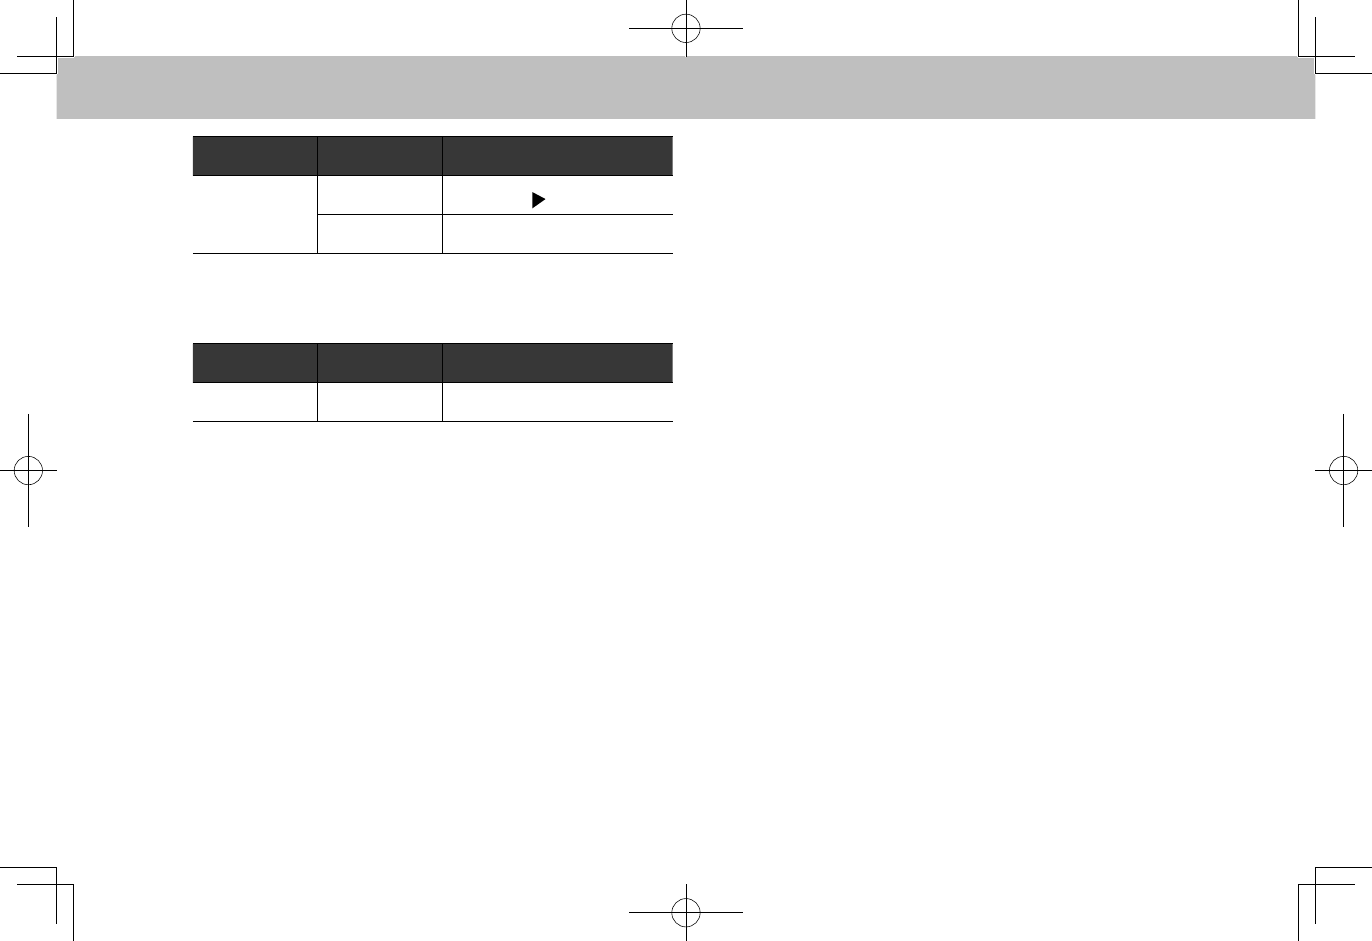
Mode Operation Function
Pandora*2
Press Track up (“ ”only)
Press and hold Thumbs up/down
*1: Type A/B only
*2: Pandora is available in the United States, Australia, and New Zealand.
X“Source” switch
Mode Operation Function
All Press Change audio modes
NOTE
lIn the aha, Pandora*1 and SUBARU STARLINK*2 mode, some
operation may be done on the screen depend on the selected
APPS.
*1: Pandora is available in the United States, Australia, and New Zealand.
*2: Type A/B only
TIPS FOR OPERATING THE AUDIO SYSTEM
149
AUDIO
6
TIPS FOR OPERATING THE AUDIO SYSTEM
OPERATING INFORMATION
CAUTION
lTo avoid damage to the audio system:
• Be careful not to spill beverages over the audio system.
• Type A/B only: Do not put anything other than an
appropriate disc into the disc slot.
NOTE
lThe use of a cellular phone inside or near the vehicle may cause
a noise from the speakers of the audio system which you are
listening to. However, this does not indicate a malfunction.
RADIO
Usually, a problem with radio reception does not mean there
is a problem with the radio — it is just the normal result of
conditions outside the vehicle.
For example, nearby buildings and terrain can interfere
with FM reception. Power lines or phone wires can interfere
with AM signals. And of course, radio signals have a limited
range. The farther the vehicle is from a station, the weaker
its signal will be. In addition, reception conditions change
constantly as the vehicle moves.
Here, some common reception problems that probably do
not indicate a problem with the radio are described.

TIPS FOR OPERATING THE AUDIO SYSTEM
150
FM
Fading and drifting stations: Generally, the effective range
of FM is about 25 miles (40 km). Once outside this range,
you may notice fading and drifting, which increase with
the distance from the radio transmitter. They are often
accompanied by distortion.
Multi-path: FM signals are reective, making it possible for
2 signals to reach the vehicle’s antenna at the same time. If
this happens, the signals will cancel each other out, causing
a momentary utter or loss of reception.
Static and uttering: These occur when signals are blocked
by buildings, trees or other large objects. Increasing the
bass level may reduce static and uttering.
Station swapping: If the FM signal being listened to is
interrupted or weakened, and there is another strong station
nearby on the FM band, the radio may tune in the second
station until the original signal can be picked up again.
AM
Fading: AM broadcasts are reected by the upper
atmosphere — especially at night. These reected signals
can interfere with those received directly from the radio
station, causing the radio station to sound alternately strong
and weak.
Station interference: When a reected signal and a signal
received directly from a radio station are very nearly the
same frequency, they can interfere with each other, making
it difcult to hear the broadcast.
Static: AM is easily affected by external sources of electrical
noise, such as high tension power lines, lightening or
electrical motors. This results in static.
SiriusXM® (TYPE A/B ONLY)
●Cargo loaded on the roof luggage carrier, especially
metal objects, may adversely affect the reception of
SiriusXM® Satellite Radio.
● Alternation or modications carried out without
appropriate authorization may invalidate the user’s
right to operate the equipment.
TIPS FOR OPERATING THE AUDIO SYSTEM
151
AUDIO
6
CD PLAYER AND DISC (TYPE A/B ONLY)
●Extremely high temperatures can keep the CD player
from working. On hot days, use the air conditioning
system to cool the inside of the vehicle before using
the player.
●Bumpy roads or other vibrations may make the CD
player skip.
●If moisture gets into the CD player, the discs may
not be able to be played. Remove the discs from the
player and wait until it dries.
WARNING
lCD players use an invisible laser beam which could cause
hazardous radiation exposure if directed outside the unit. Be
sure to operate the player correctly.
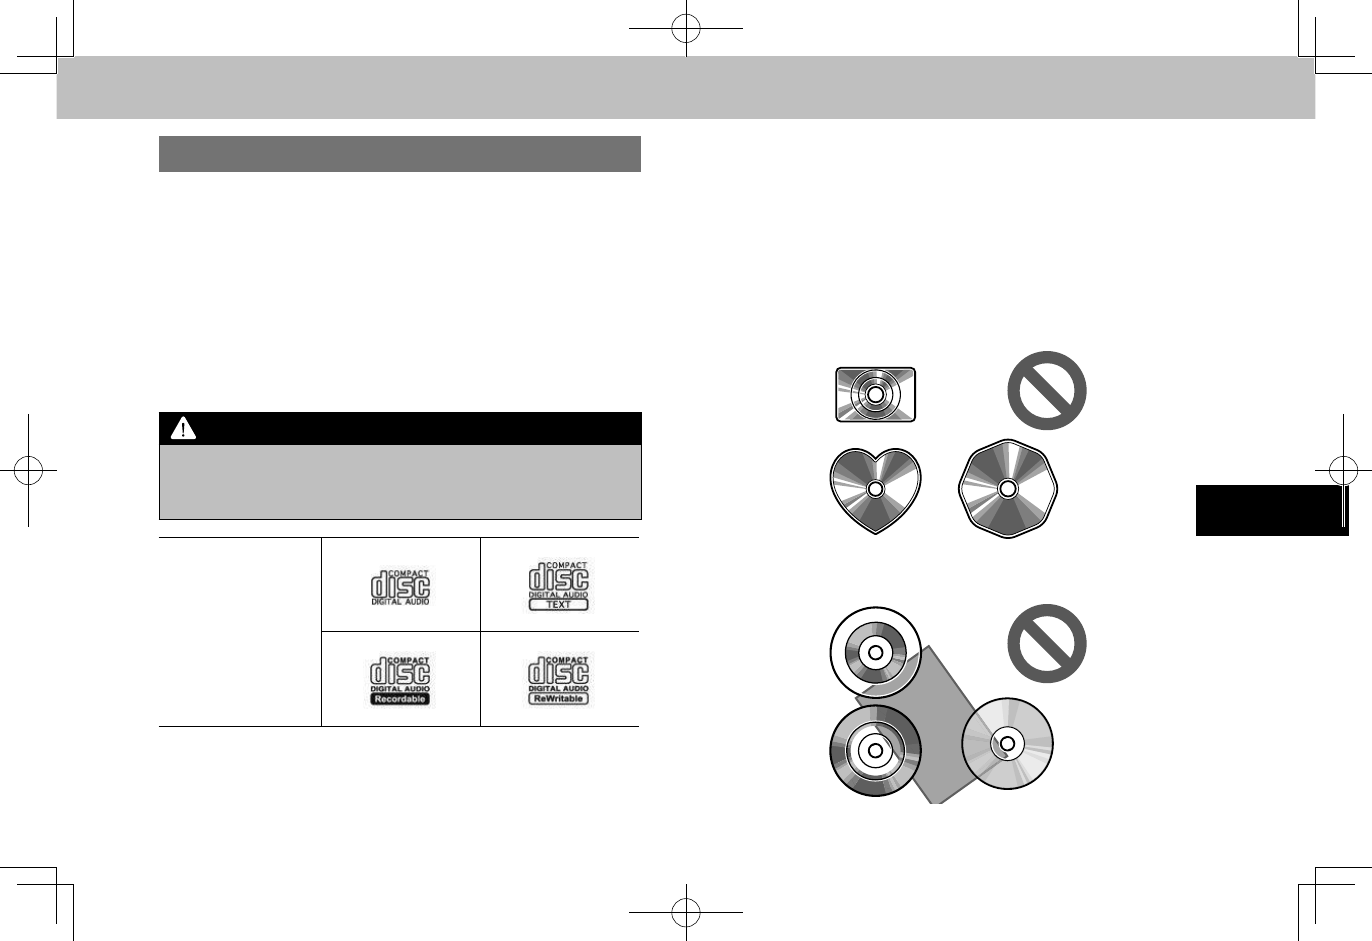
Audio CDs
●Use only discs marked as shown above. The
following products may not be playable on your
player:
• SACD
• dts CD
• Copy-protected CD
• Video CD
XSpecial shaped discs
XTransparent/translucent discs
TIPS FOR OPERATING THE AUDIO SYSTEM
152
XLow quality discs
XLabeled discs
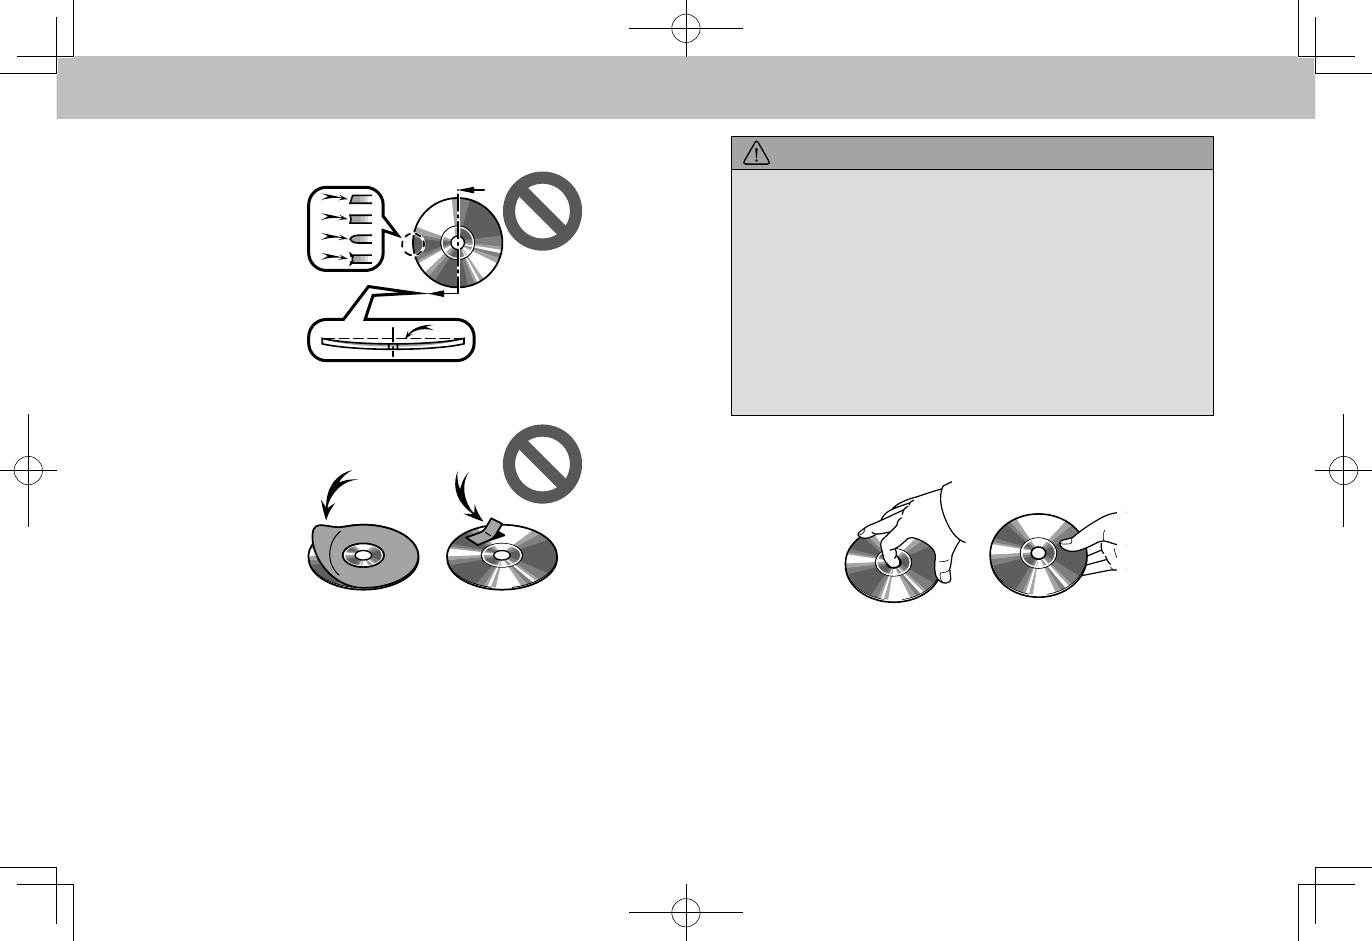
CAUTION
lDo not use special shaped, transparent/translucent,
low quality or labeled discs such as those shown in the
illustrations. The use of such discs may damage the player, or
it may be impossible to eject the disc.
lThis system is not designed for use of Dual Discs. Do not use
Dual Discs because they may cause damage to the player.
lDo not use discs with a protection ring. The use of such discs
may damage the player, or it may be impossible to eject the
disc.
lDo not use printable discs. The use of such discs may
damage the player, or it may be impossible to eject the disc.
CorrectWrong
●Handle discs carefully, especially when inserting
them. Hold them on the edge and do not bend them.
Avoid getting ngerprints on them, particularly on the
shiny side.
TIPS FOR OPERATING THE AUDIO SYSTEM
153
AUDIO
6
●Dirt, scratches, warping, pin holes or other disc
damage could cause the player to skip or to repeat a
section of a track. (To see a pin hole, hold the disc up
to the light.)
●Remove discs from the players when not in use.
Store them in their plastic cases away from moisture,
heat and direct sunlight.
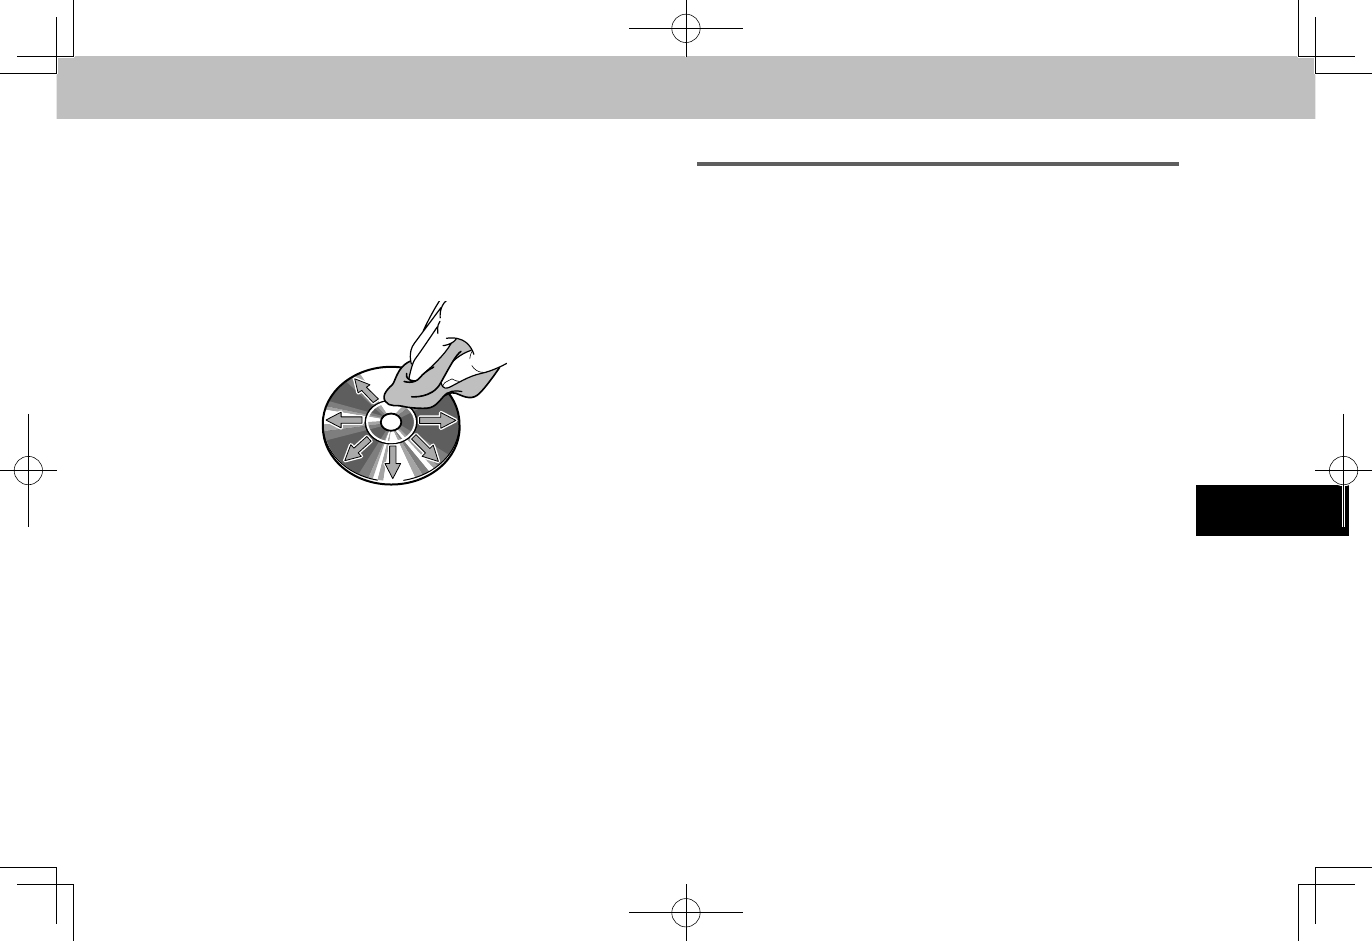
To clean a disc: Wipe it with a soft, lint-free cloth that has
been dampened with water. Wipe in a straight line from
the center to the edge of the disc (not in circles). Dry it
with another soft, lint-free cloth. Do not use a conventional
record cleaner or anti-static device.
CD-R/RW DISCS
●CD-R/CD-RW discs that have not been subject to
the “nalizing process” (a process that allows discs
to be played on a conventional CD player) cannot be
played.
●It may not be possible to play CD-R/CD-RW discs
recorded on a music CD recorder or a personal
computer because of disc characteristics, scratches
or dirt on the disc, or dirt, condensation, etc. on the
lens of the unit.
●It may not be possible to play discs recorded on a
personal computer depending on the application
settings and the environment. Record with the
correct format. (For details, contact the appropriate
application manufacturers of the applications.)
●CD-R/CD-RW discs may be damaged by direct
exposure to sunlight, high temperatures or other
storage conditions. The unit may be unable to play
some damaged discs.
●If you insert a CD-RW disc into the player, playback
will begin more slowly than with a conventional CD or
CD-R disc.
●Recordings on CD-R/CD-RW cannot be played using
the DDCD (Double Density CD) system.

TIPS FOR OPERATING THE AUDIO SYSTEM
154
USB MEMORY
●USB communication formats: USB 2.0 HS (480
Mbps) and FS (12 Mbps)
●File formats: FAT 16/32
●Correspondence class: Mass storage class
iPod
The following iPod®, iPod nano®, iPod classic®, iPod
touch® and iPhone® devices can be used with this system.
Made for
●iPod touch (5th generation)
●iPod touch (4th generation)
●iPod touch (3rd generation)*
●iPod touch (2nd generation)*
●iPod touch (1st generation)*
●iPod classic
●iPod with video*
●iPod nano (7th generation)
●iPod nano (6th generation)
●iPod nano (5th generation)
●iPod nano (4th generation)
●iPod nano (3rd generation)
●iPod nano (2nd generation)*
●iPod nano (1st generation)*
●iPhone 5
●iPhone 4S
●iPhone 4*
●iPhone 3GS*
●iPhone 3G*
●iPhone*
*: The voice recognition system not supported
●Depending on differences between models or
software versions etc., some models might be
incompatible with this system.
●iPod video is not supported.
●For USA customers, please visit www.subaru.com for
details. Outside of the USA customers, contact your
local dealer to arrange a demonstration in order to
conrm whether or not the phone can be paired with
the vehicle.
TIPS FOR OPERATING THE AUDIO SYSTEM
155
AUDIO
6
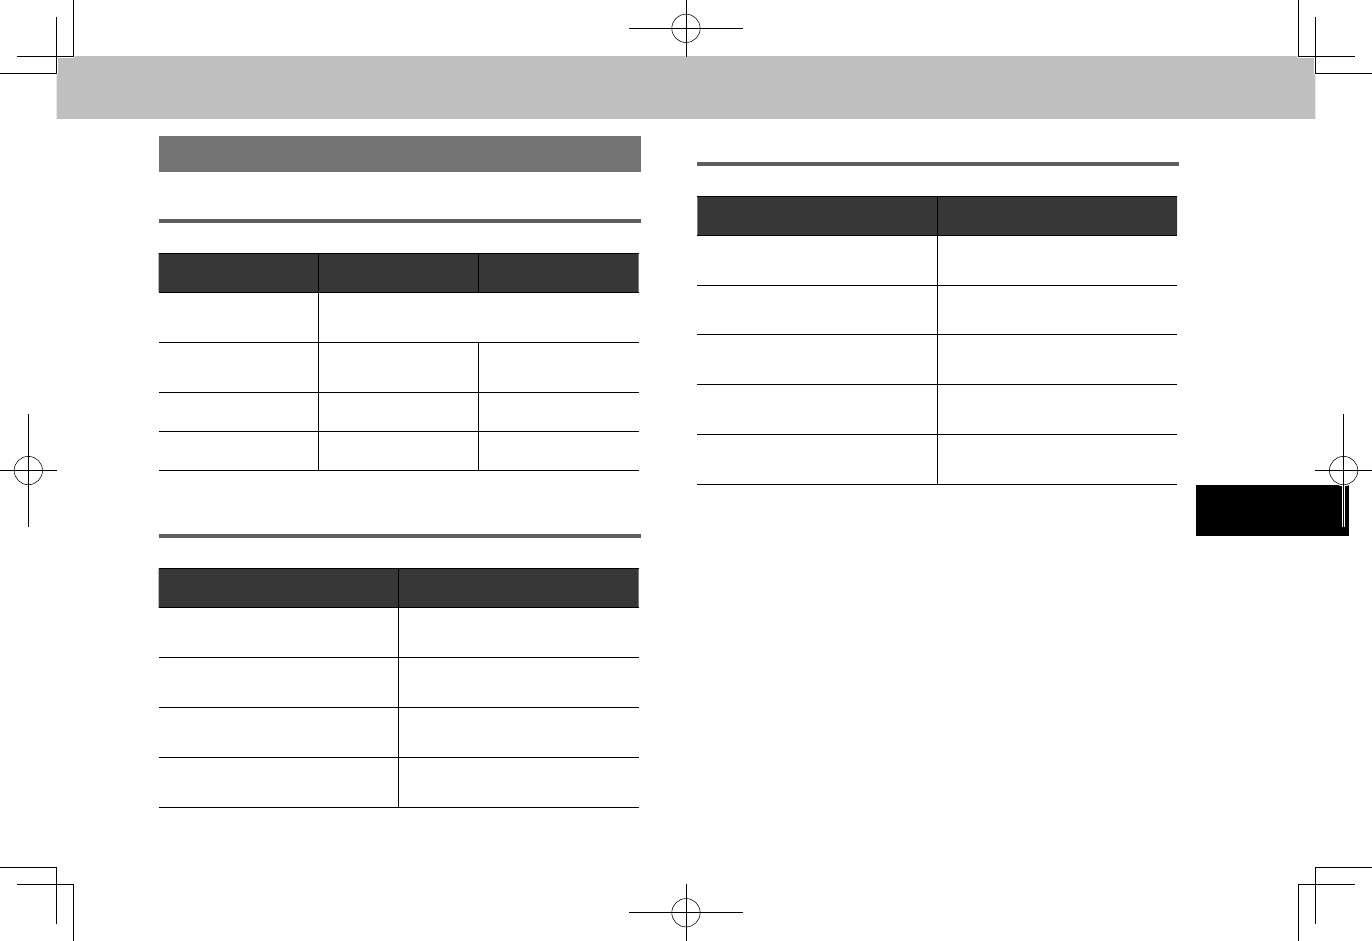
FILE INFORMATION
COMPATIBLE COMPRESSED FILES
Item USB DISC*
Compatible le
format MP3/WMA/AAC
Folders in the
device Maximum 3000 Maximum 192
Files in the device Maximum 9999 Maximum 255
Files per folder Maximum 255 —
*: Type A/B only
CORRESPONDING SAMPLING FREQUENCY
File type Frequency (kHz)
MP3 les:
MPEG 1 LAYER 3 32/44.1/48
MP3 les:
MPEG 2 LSF LAYER 3 16/22.05/24
WMA les:
Ver. 7, 8, 9 (9.1/9.2) 32/44.1/48
AAC les:
MPEG4/AAC-LC 11.025/16/22.05/24/
32/44.1/48
CORRESPONDING BIT RATES
File type Bit rate (kbps)
MP3 les:
MPEG 1 LAYER 3 32 - 320
MP3 les:
MPEG 2 LSF LAYER 3 8 - 160
WMA les:
Ver. 7, 8 CBR 48 - 192
WMA les:
Ver. 9 (9.1/9.2) CBR 48 - 320
AAC les:
MPEG4/AAC-LC 16 - 320
●The player is compatible with VBR (Variable Bit Rate).
●MP3 (MPEG Audio Layer 3), WMA (Windows Media
Audio) and AAC (Advanced Audio Coding) are audio
compression standards.
● This system can play MP3/WMA/AAC les on CD-R*,
CD-RW discs*, USB memory, and Bluetooth device.
*: Type A/B only
●This system can play disc recordings compatible with
ISO 9660 level 1 and level 2 and with the Romeo and
Joliet le system.
● When naming an MP3/WMA/AAC le, add an
appropriate le extension (.mp3/.wma/.m4a).
TIPS FOR OPERATING THE AUDIO SYSTEM
156
● This system plays back les with .mp3/.wma/.m4a
le extensions as MP3/WMA/AAC les respectively.
To prevent noise and playback errors, use the
appropriate le extension.
● This system can play only the rst session when
using multi-session compatible CDs.
● MP3 les are compatible with the ID3 Tag Ver. 1.0,
Ver. 1.1, Ver. 2.2 and Ver. 2.3 formats. This system
cannot display disc title, track title and artist name in
other formats.
● WMA/AAC les can contain a WMA/AAC tag that is
used in the same way as an ID3 tag. WMA/AAC tags
carry information such as track title and artist name.
● This system can play back AAC les encoded by
iTunes.
● The sound quality of MP3/WMA les generally
improves with higher bit rates. In order to achieve a
reasonable level of sound quality, discs recorded with
a bit rate of at least 128 kbps are recommended.
●The MP3/WMA player does not play back MP3/
WMA les from discs recorded using packet write
data transfer (UDF format). Discs should be recorded
using “pre-mastering” software rather than packet-
write software.
●m3U playlists are not compatible with the audio
device.
●MP3i (MP3 interactive) and MP3PRO formats are not
compatible with the audio device.
● When playing back les recorded as VBR (Variable
Bit Rate) les, the play time will not be correctly
displayed if the fast forward or rewind operations are
used.
●It is not possible to check folders that do not include
MP3/WMA/AAC les.
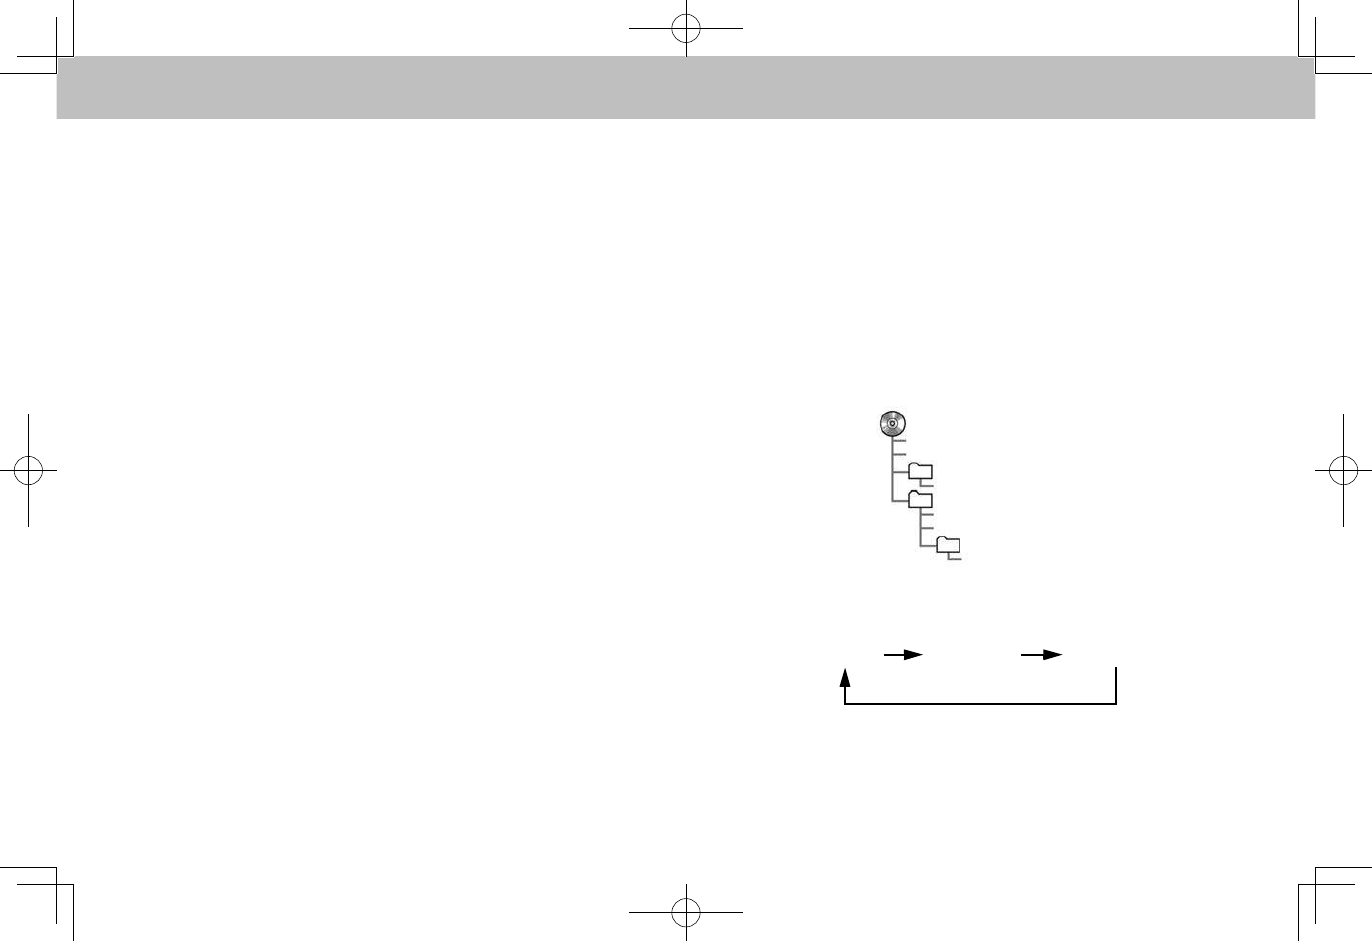
● MP3/WMA/AAC les in folders up to 8 levels deep
can be played. However, the start of playback may be
delayed when using discs containing numerous levels
of folders. For this reason, we recommend creating
discs with no more than 2 levels of folders.
001.mp3
002.wma
Folder 1
003.mp3
Folder 2
004.mp3
005.wma
Folder 3
006.m4a
●The play order of the compact disc with the structure
shown above is as follows:
001.mp3 002.wma . . .006.m4a
●The order changes depending on the personal
computer and MP3/WMA/AAC encoding software you
use.
TIPS FOR OPERATING THE AUDIO SYSTEM
157
AUDIO
6
TERMS
PACKET WRITE
●This is a general term that describes the process of
writing data on-demand to CD-R, etc., in the same
way that data is written to oppy or hard discs.
ID3 TAG
●This is a method of embedding track-related
information in an MP3 le. This embedded information
can include the track number, track title, the artist’s
name, the album title, the music genre, the year of
production, comments, cover art and other data. The
contents can be freely edited using software with ID3
tag editing functions. Although tags are restricted to a
certain number of characters, the artist name, track
title, and album title can be viewed when the track is
played back.
WMA TAG
● WMA les can contain a WMA tag that is used in the
same way as an ID3 tag. WMA tags carry information
such as track title and artist name.
ISO 9660 FORMAT
●This is the international standard for the formatting of
CD-ROM folders and les. For the ISO 9660 format,
there are 2 levels of regulations.
● Level 1: The le name is in 8.3 format (8 character le
names, with a 3 character le extension. File names
must be composed of one-byte capital letters and
numbers. The “_” symbol may also be included.)
● Level 2: The le name can have up to 31 characters
(including the separation mark “.” and le extension).
Each folder must contain fewer than 8 hierarchies.
m3u
●Playlists created using “WINAMP” software have a
playlist le extension (.m3u).
MP3
●MP3 is an audio compression standard determined
by a working group (MPEG) of the ISO (International
Standard Organization). MP3 compresses audio data
to about 1/10 the size of that on conventional discs.

TIPS FOR OPERATING THE AUDIO SYSTEM
158
WMA
●WMA (Windows Media Audio) is an audio
compression format developed by Microsoft®. It
compresses les into a size smaller than that of MP3
les. The decoding formats for WMA les are Ver. 7,
8 and 9.
●This product is protected by certain intellectual
property rights of Microsoft Corporation and third
parties. Use or distribution of such technology outside
of this product is prohibited without a license from
Microsoft or an authorized Microsoft subsidiary and
third parties.
AAC
●AAC is short for Advanced Audio Coding and refers to
an audio compression technology standard used with
MPEG2 and MPEG4.
159
NAVIGATION SYSTEM
(TYPE A ONLY)
7
7
BASIC OPERATION
160
BASIC OPERATION
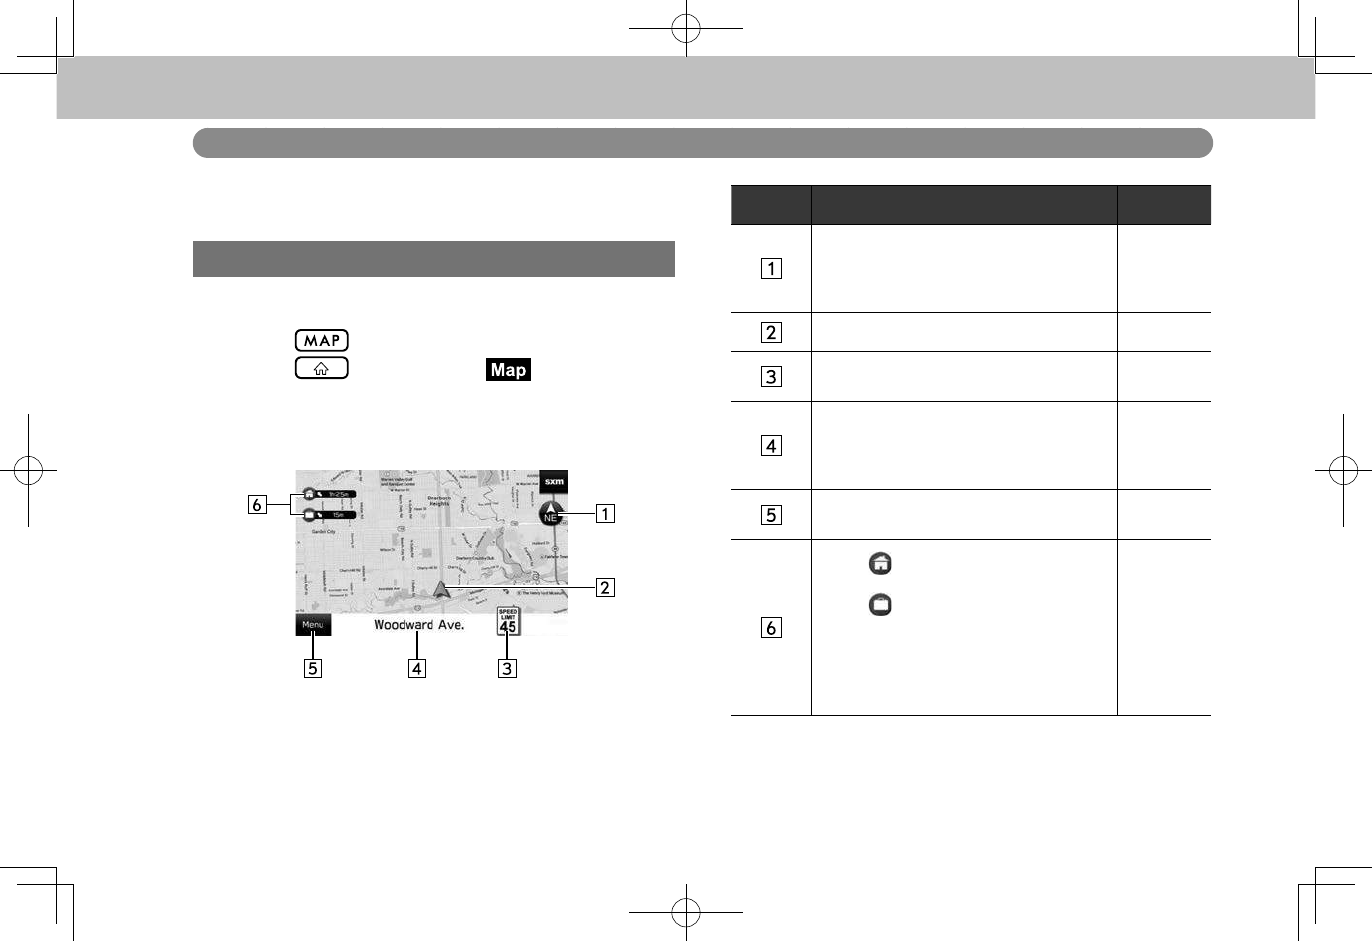
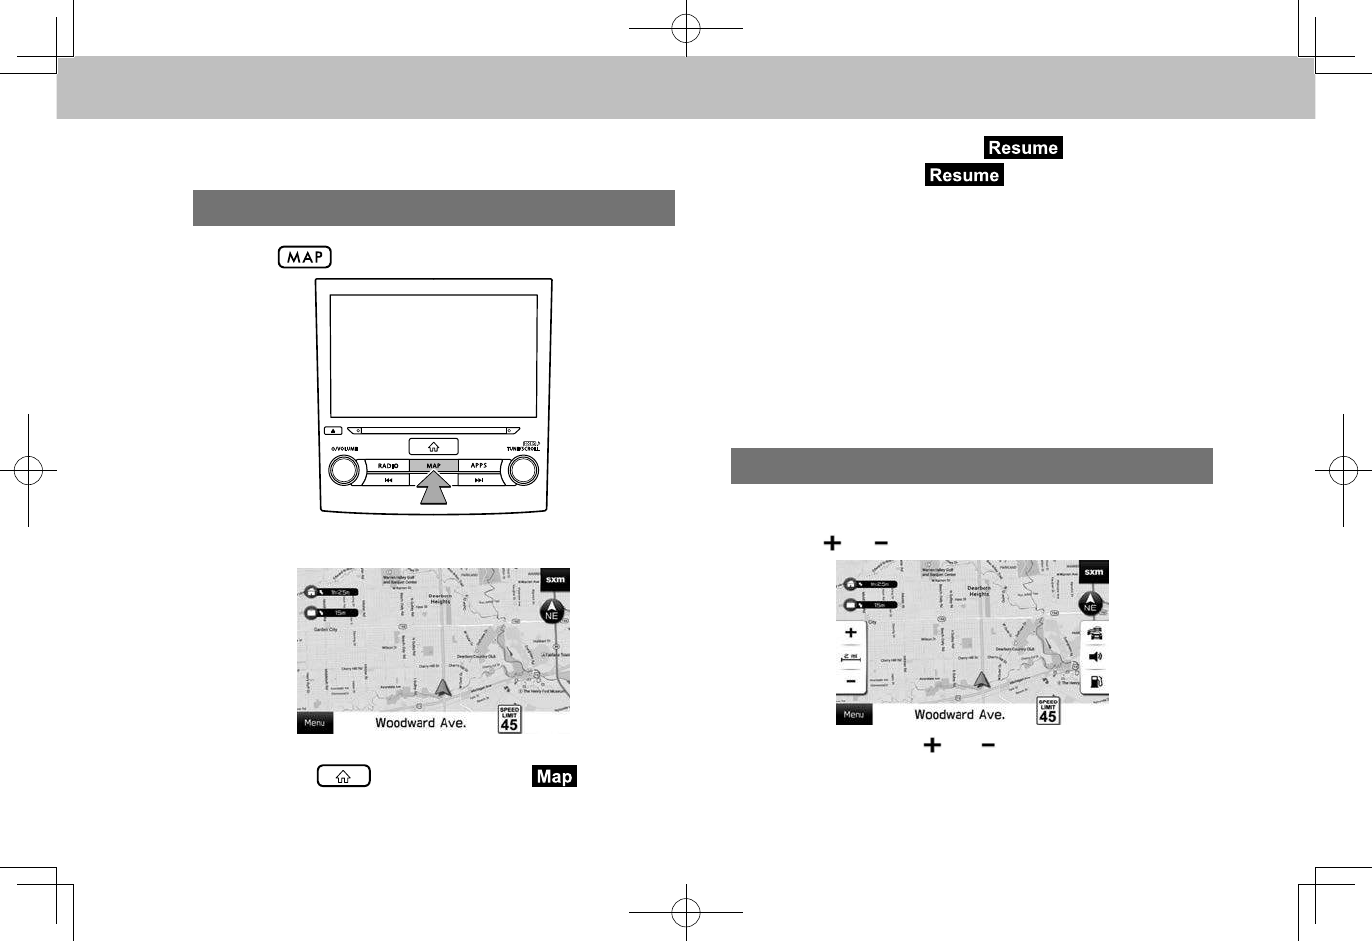
MAP SCREEN
MAP SCREEN OVERVIEW
The map screen can be reached by the following methods:
●Press .
●Press , and then select (Map).
No. Information/Function Page
Select to change the map display mode
between 2D north-up, 2D heading-up or
3D. In 3D map, only a heading-up view
is available.
163
Displays the current vehicle position. -
Displays the speed limit of the road
currently being travelled on. -
Displays the current street name.
Select to display the current location and
geo-coordinates, and register the point
as home, work or favorite.
166
Select to display the destination search
menu. 170, 171,
172, 173
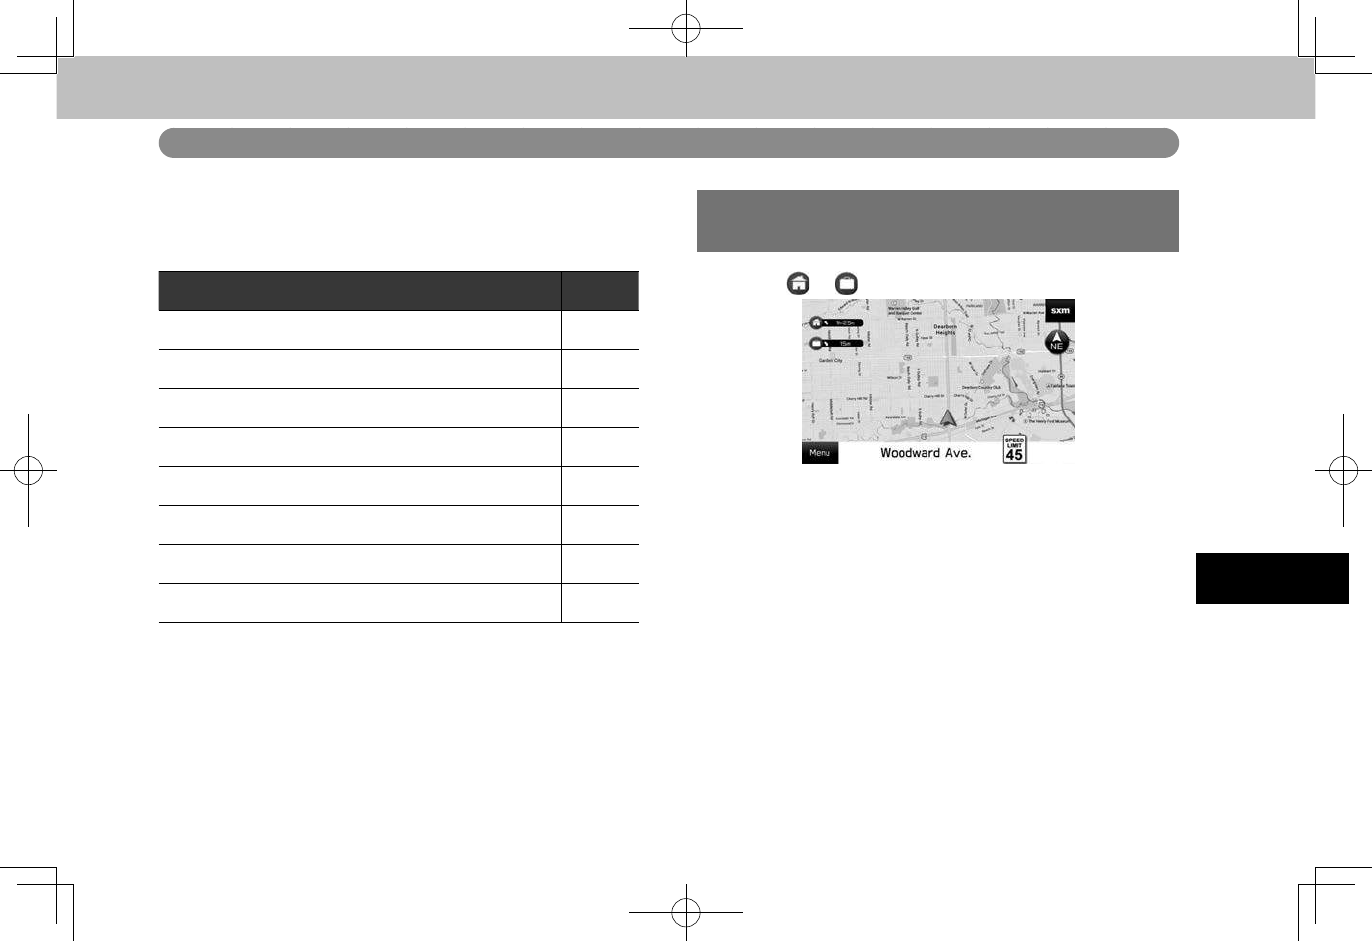
Select to set home as the
destination.
Select to set work as the destination.
The estimated travel time and direction
to the home/work is displayed beside
the icon. The travel time should update
every 10 minutes unless the vehicle is
100 miles or more from the destination.
169

BASIC OPERATION
161
NAVIGATION SYSTEM
7
MAP SCREEN BUTTONS OVERVIEW
The map screen buttons can be reached by selecting any
point on the map.
No. Function Page
Select to set the display of the trafc
information on/off. 164
Select to mute/unmute the voice
guidance. -
No. Function Page
Select to search for gas stations.
When driving on the highway during
route guidance, select to search for gas
stations, restaurants or rest areas near
the next three highway exits.
173
Select to change the map scale. 162
BASIC OPERATION
162
MAP SCREEN OPERATION
CURRENT POSITION DISPLAY
1. Press .
2. Check that the current position map is displayed.
●The current position map can also be displayed by
pressing , and then selecting (Map).
●After the map operation, (Resume) may be
displayed. Select (Resume) to return to the
previous screen.
NOTE
lWhile driving, the current position mark is xed on the screen
and the map moves.
lThe current position is automatically set as the vehicle receives
signals from the GPS (Global Positioning System). If the current
position is not correct, it is automatically corrected after the
vehicle receives signals from the GPS.
lAfter the battery disconnection, or on a new vehicle, the current
position may not be correct. As soon as the system receives
signals from the GPS, the correct current position is displayed.
MAP SCALE
1. Select any point on the map.
2. Select or to change the scale of the map screen.
●Select and hold or to continue changing the
scale of the map screen.
BASIC OPERATION
163
NAVIGATION SYSTEM
7
NOTE
lThe scale of the map screen can also be changed by selecting
double touch or pinch operation. (→P.40)
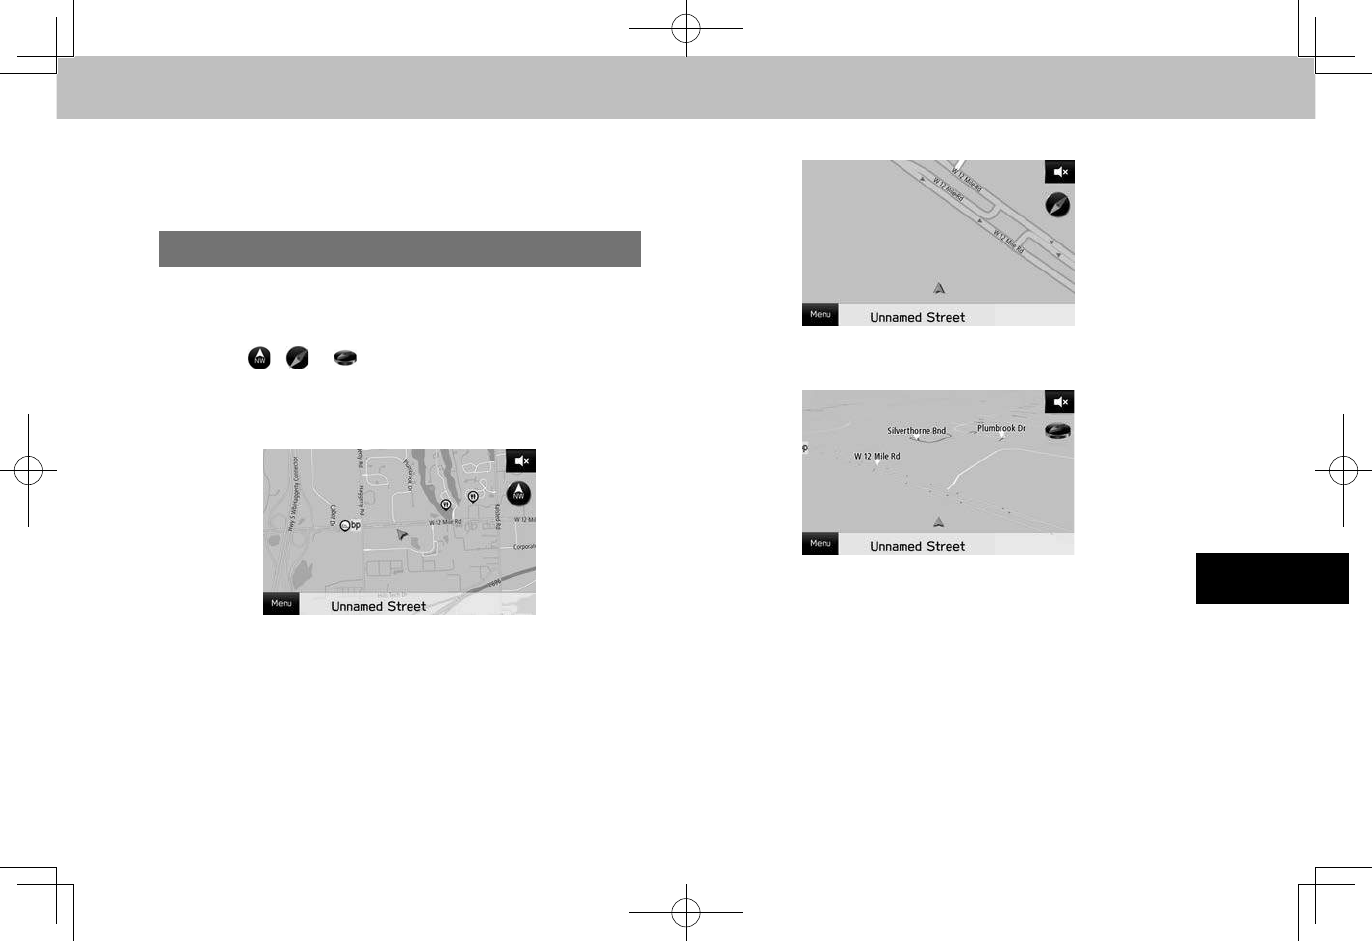
ORIENTATION OF THE MAP
The orientation of the map can be changed between 2D
north-up, 2D heading-up and 3D.
1. Select , or .
●Each time the symbol is selected, the orientation of
the map is changes.
X2D north-up
●Regardless of the direction of vehicle travel, north is
always up.
●The letter(s) indicate the vehicle’s heading direction
(e.g. N for north).
X2D heading-up
●The direction of vehicle travel is always up.
X3D heading-up
●The direction of vehicle travel is always up.
BASIC OPERATION
164
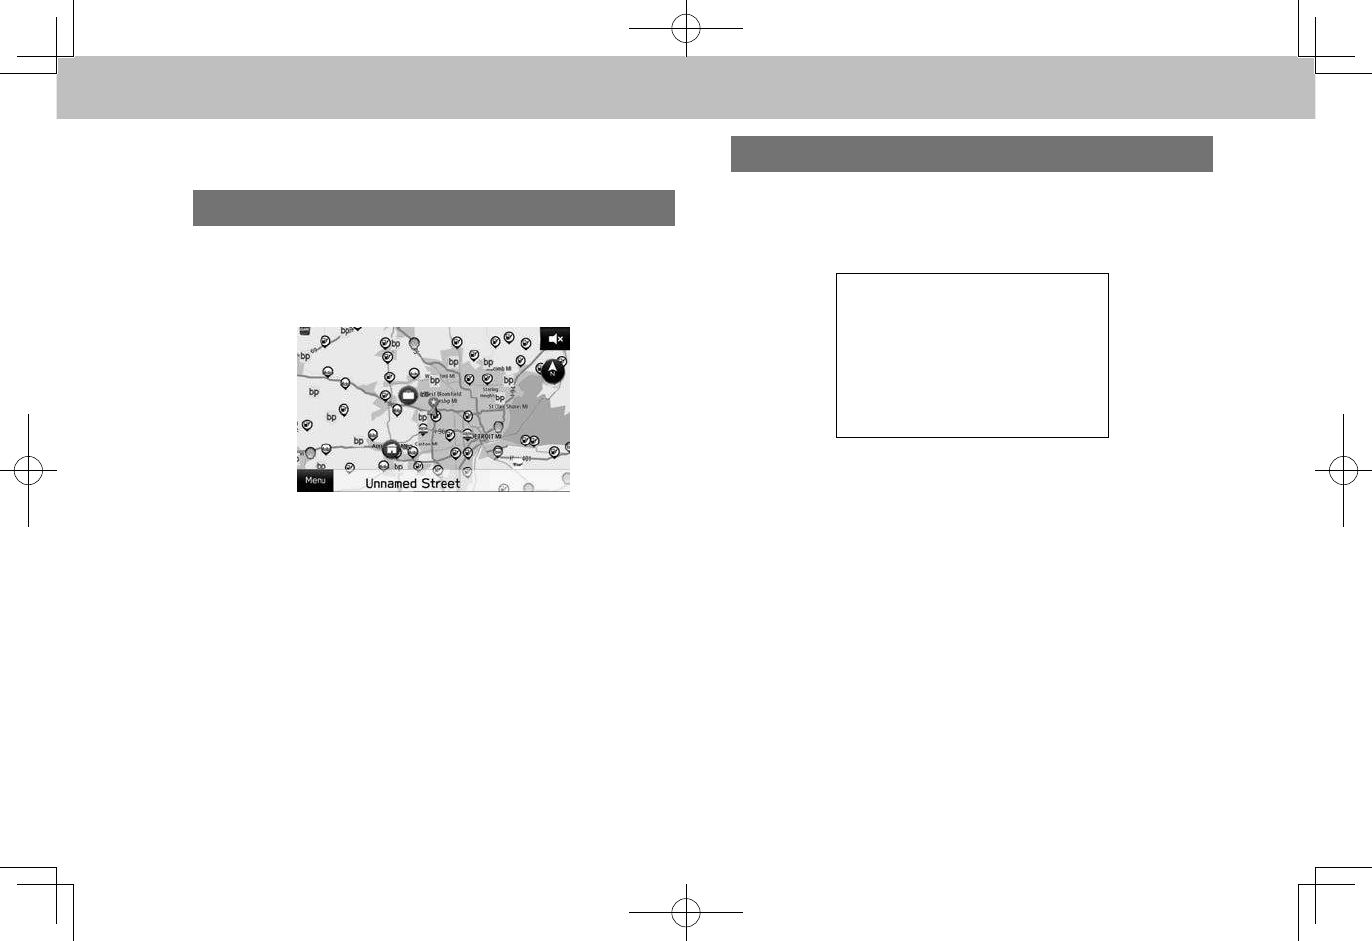
MAP SCREEN INFORMATION
POI ICONS
Points of Interest such as gas stations and restaurants can
be displayed on the map screen. Their location can also be
set as a destination.
NOTE
lThe display of POI icons can be set on/off. (→P.183)
TRAFFIC INFORMATION
Road sections affected by trafc conditions are displayed in
a different color on the map, and a small icon representing
the type of trafc condition is displayed above the road.
● The display of the trafc information can be set on/off.
(→P.161)
BASIC OPERATION
165
NAVIGATION SYSTEM
7
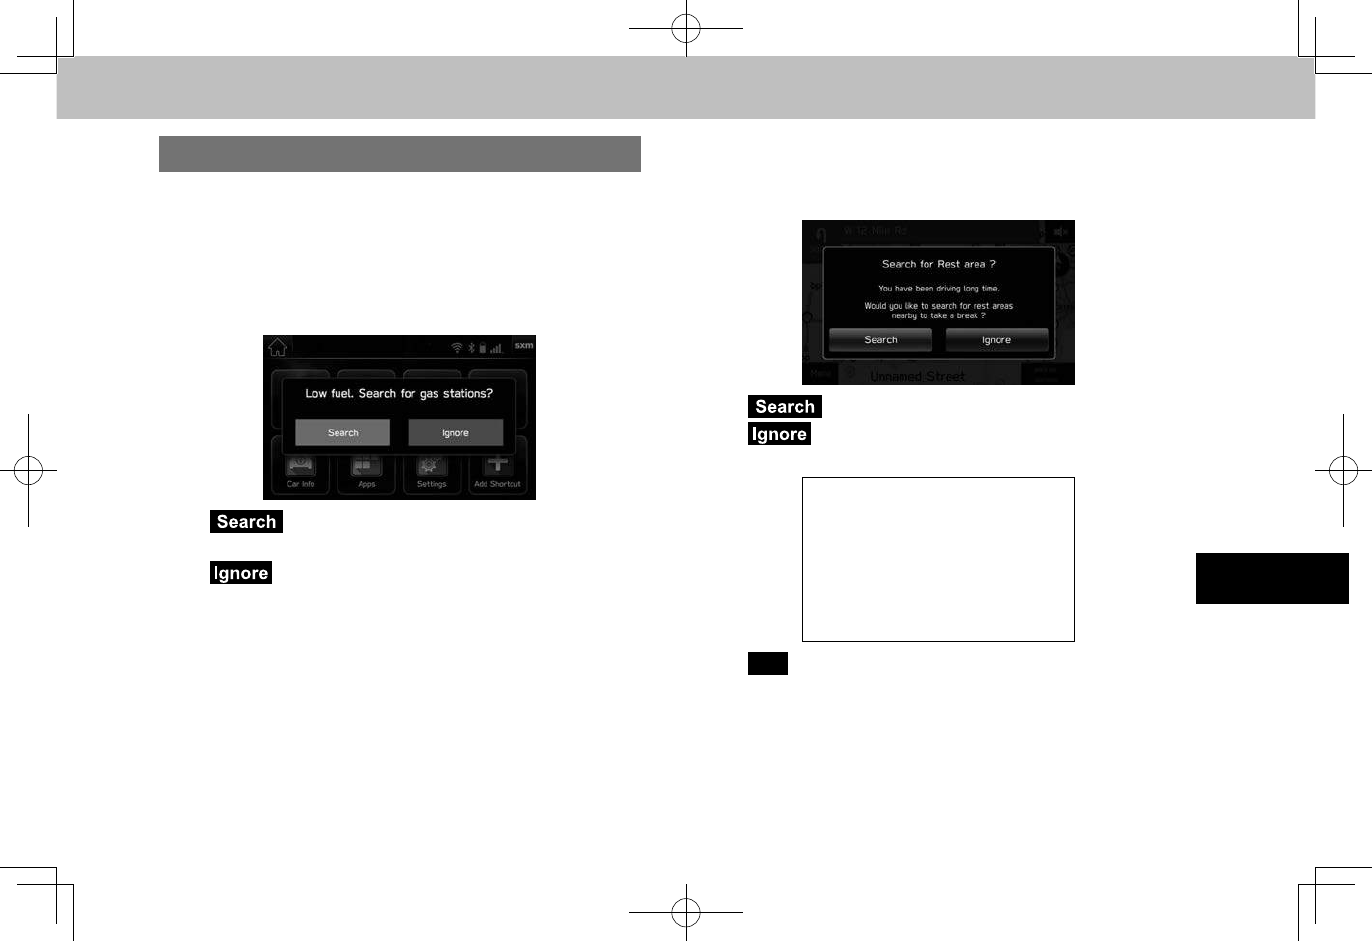
OTHER INFORMATION
A pop up window will be displayed according to the driving
situation, etc.
XLow fuel warning
When the fuel level is low, a warning message will pop up
on the screen.
● (Search): Select to search for gas stations.
(→P.173)
● (Ignore): Select to delete the message.
XPeriodic rest notication
When you have been driving for a long time, a warning
message will pop up on the screen.
● (Search): Select to search for rest areas.
● (Ignore): Select to delete the message.
XSevere weather warning
●
OK
(OK): Select to delete the message.
BASIC OPERATION
166
MEMORY POINTS
REGISTERING MEMORY POINTS
The desired point can be registered as home, work or
favorite.
The registered points can be set as a destination.
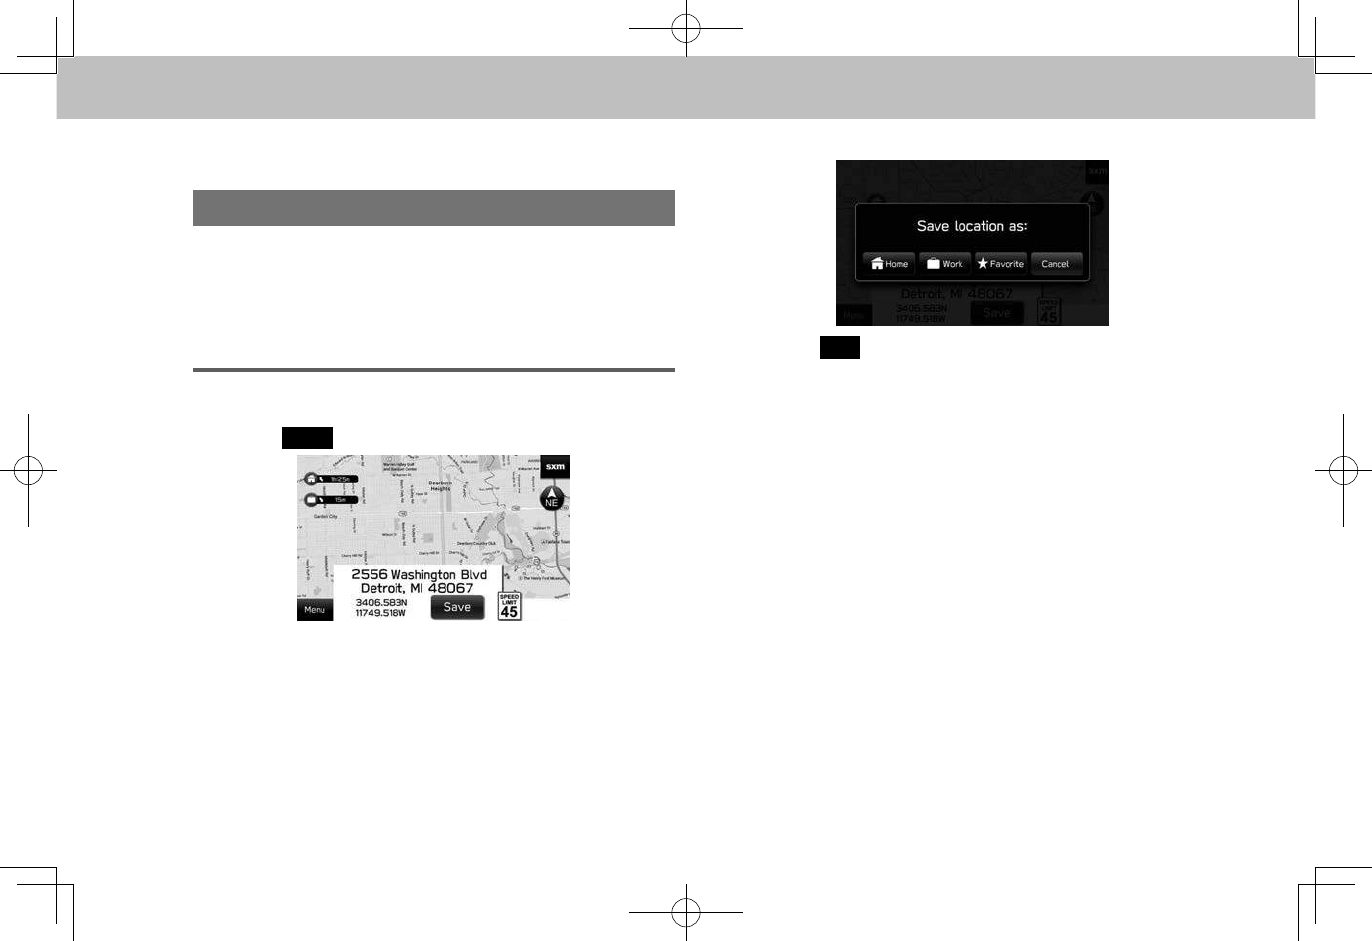
REGISTERING THE CURRENT POINT
1. Select the current street name.
2. Select
Save
(Save).
3. Select the desired item to be registered to.
4. Select
OK
(OK).
●The point is registered in the favorite places list.
(→P.173)
●The icons are displayed on the map.
NOTE
lHome and work can also be registered from the route options
screen (→P.176) or the navigation settings screen (→P.183).
lFavorite can also be registered from the route calculation
screen. (→P.174)
BASIC OPERATION
167
NAVIGATION SYSTEM
7
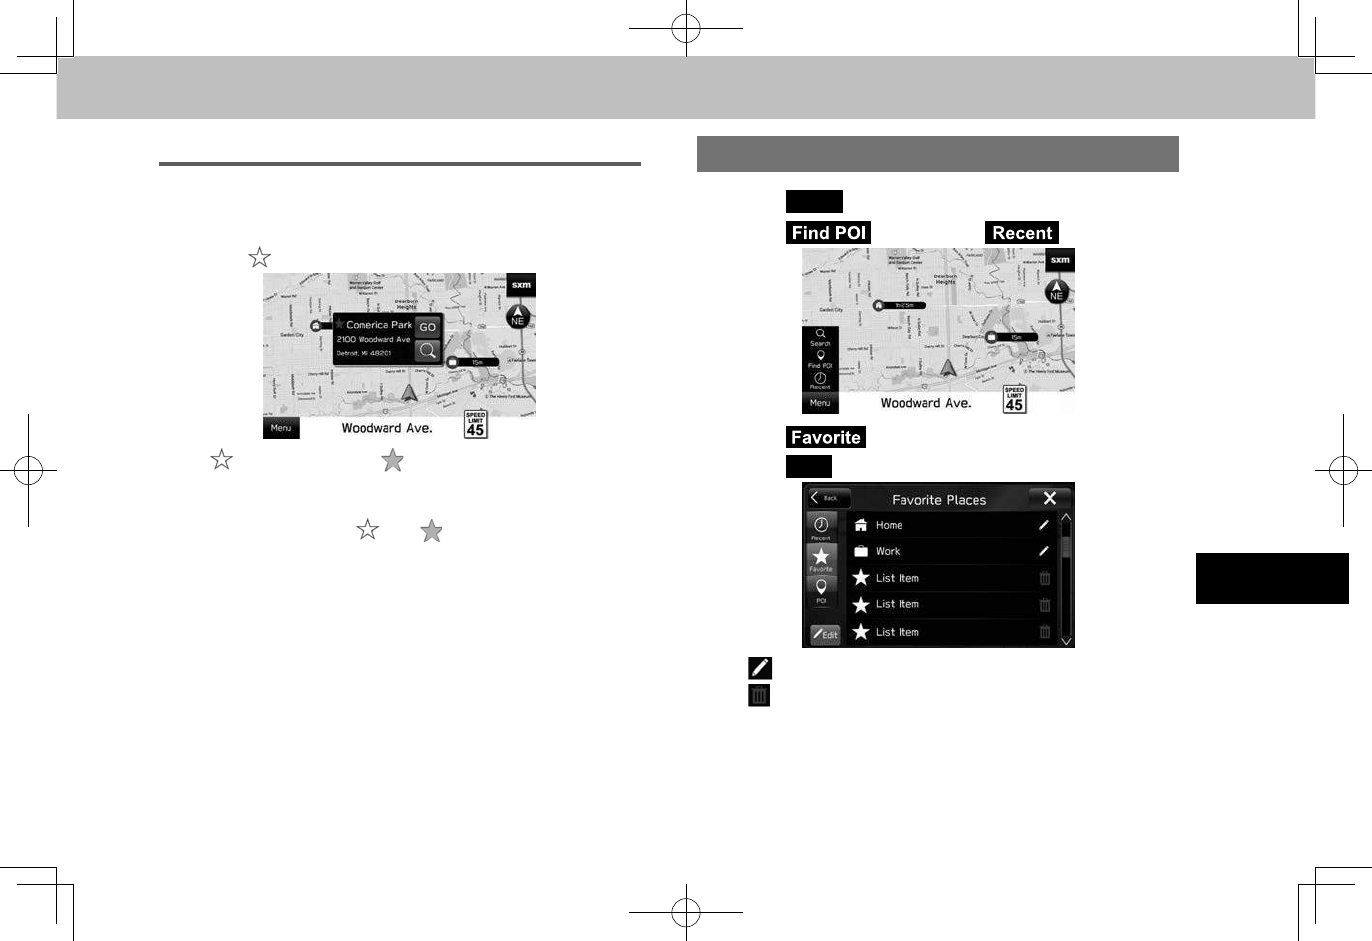
REGISTERING FROM THE MAP
1. Select and hold the desired point on the map or POI
icon.
2. Select .
● is changed to (yellow), and the point is
registered in the favorite places list.
●Each time the symbol is selected, the symbol
changes between and (yellow).
EDITING MEMORY POINTS
1. Select
Menu
(Menu).
2. Select (Find POI) or (Recent).
3. Select (Favorite).
4. Select
Edit
(Edit).
● : Select to edit the address. (→P.168)
● : Select to delete the item. (→P.168)
BASIC OPERATION
168
EDITING HOME OR WORK
1. Select next to “Home (Home)” or “Work (Work)”.
2. Enter an address, and then select (Search).
3. Select the desired item from the list, and then select
Save
(Save).
4. Select (Conrm).
NOTE
lHome and work can also be edited from the route options screen
(→P.176) and the navigation settings screen (→P.183).
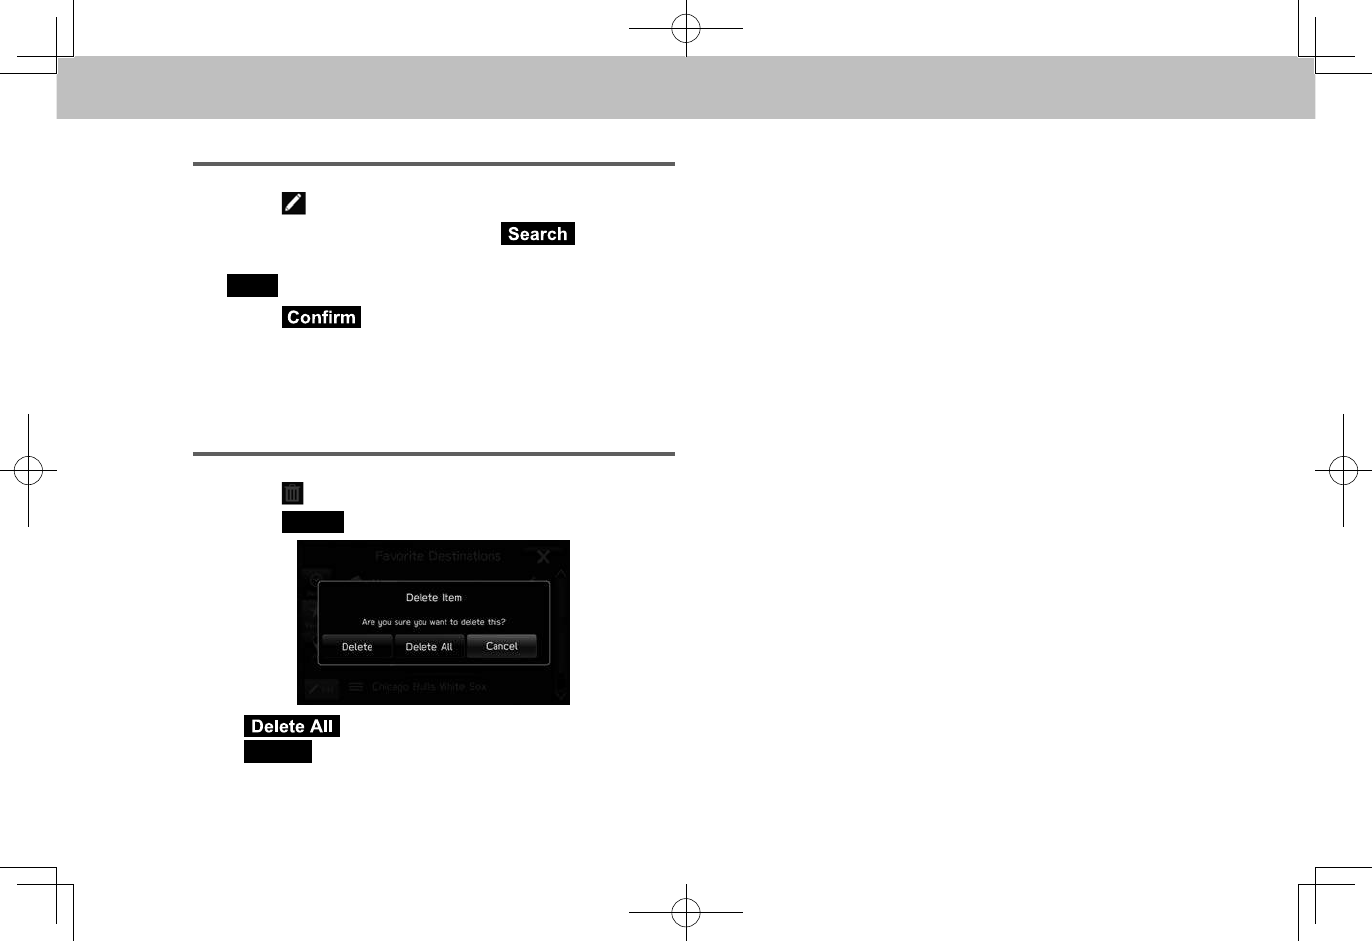
DELETING FAVORITE
1. Select next to the desired item to be deleted.
2. Select
Delete
(Delete).
● (Delete All): Select to delete all items.
●
Cancel
(Cancel): Select to cancel deleting.
NOTE
lFavorite can also be deleted from the route calculation screen.
(→P.174)
DESTINATION SEARCH
169
NAVIGATION SYSTEM
7
DESTINATION SEARCH
SEARCH OPERATION
There are several ways to search for a destination.
Function Page
Setting home or work as the destination. 169
Searching on the map. 170
Searching by entering a search word. 170
Searching by POIs. 171
Searching from previously set destinations. 172
Searching from the favorite places list. 173
Searching for gas stations. 173
Searching by phonebook. 81
SETTING HOME OR WORK AS THE
DESTINATION
1. Select or .
●The estimated travel time and direction to the
destination is displayed beside the icon.
2. Check that the route calculation screen is displayed.
(→P.174)
NOTE
lTo use this function, it is necessary to register the entry.
(→P.166)
lHome and work can also be set as the destination from the
favorite places list. (→P.173)
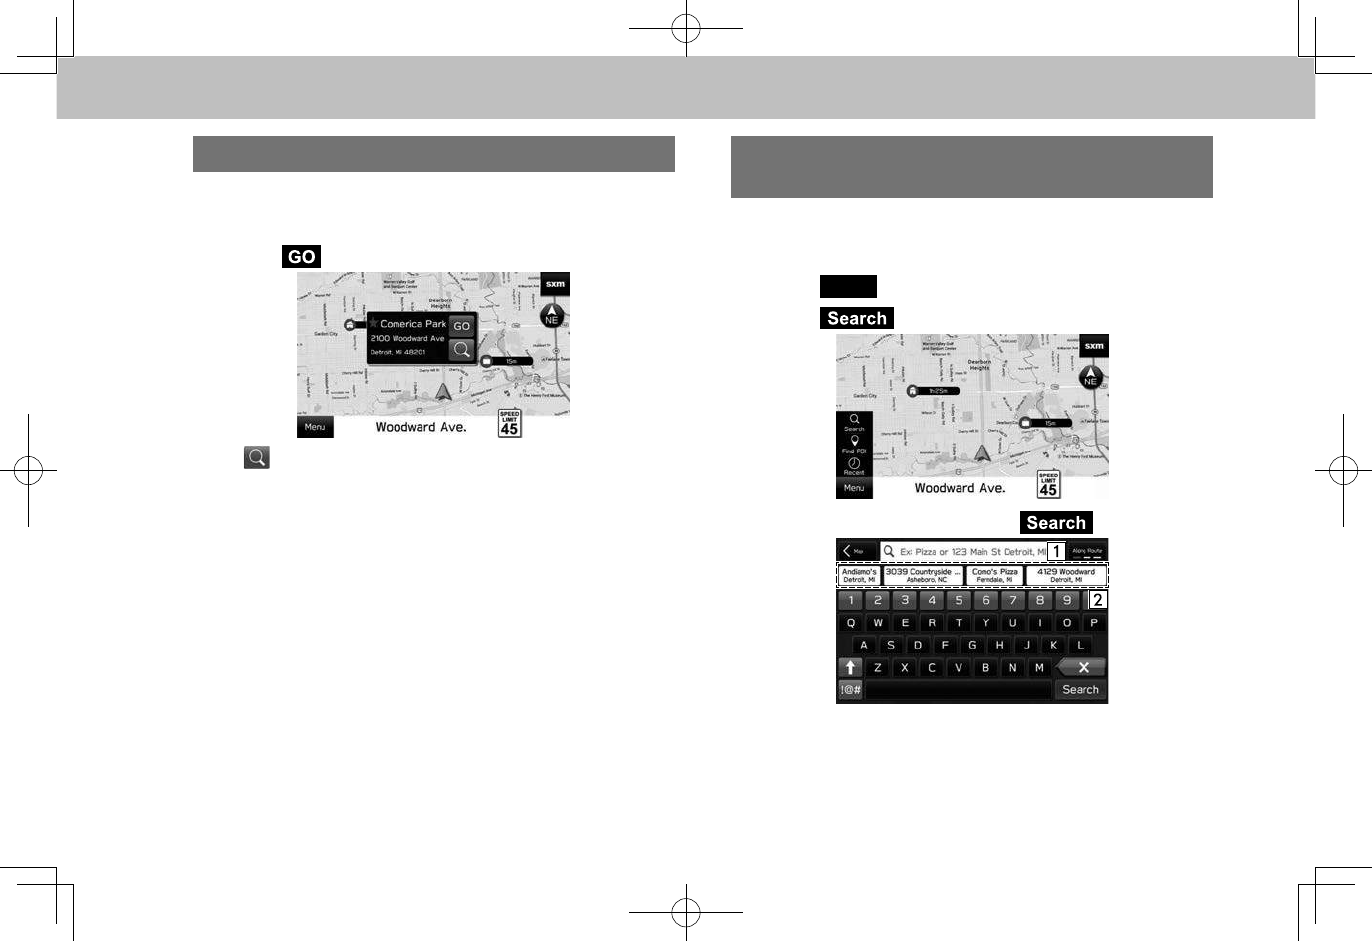
DESTINATION SEARCH
170
SEARCHING ON THE MAP
1. Select and hold the desired point on the map or select
POI icon.
2. Select (GO).
●: Select to search for a destination around the
point.
3. Check that the route calculation screen is displayed.
(→P.174)
SEARCHING BY ENTERING A SEARCH
WORD
The destination can be set by entering a search word, for
example an address or a facility name, etc.
1. Select
Menu
(Menu).
2. Select (Search).
3. Enter the word, and then select (Search).
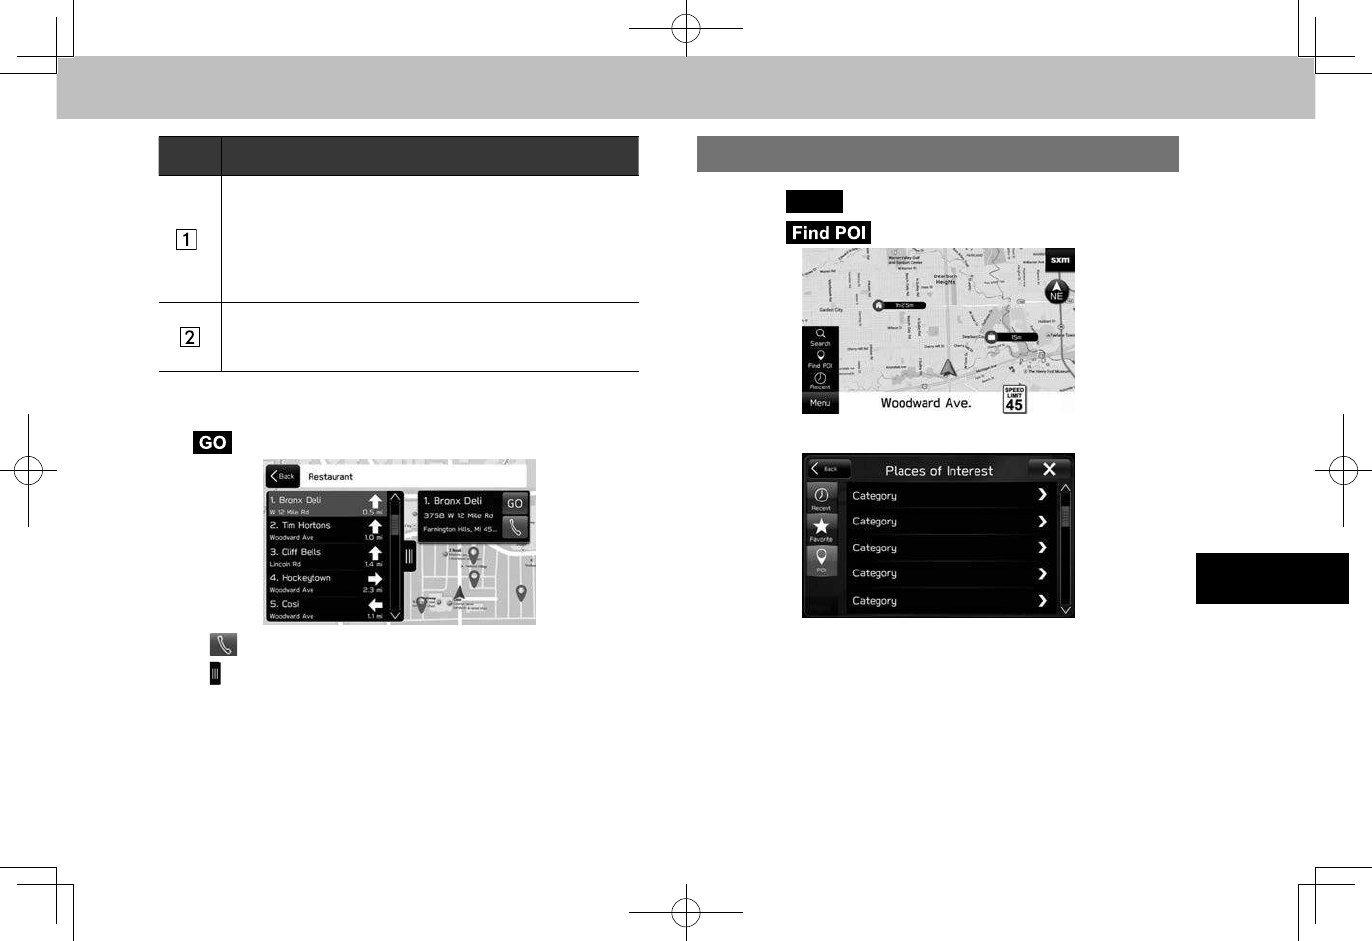
DESTINATION SEARCH
171
NAVIGATION SYSTEM
7
No. Function
*
Select to set the radius lter. Once the radius lter has
been set, only item within the radius will be searched.
Each time the button is selected, the radius lter
changes between “Along Route (Along Route)”, “Near
Destination (Near Destination)” and “Near Me (Near
Me)”.
Some candidate destinations are displayed based the
input characters. The search result screen is displayed
when an item is selected.
*: During route guidance
4. Select the desired item from the list, and then select
(GO).
●: Select to call the registered phone number.
●: Select to open/close the list.
5. Check that the route calculation screen is displayed.
(→P.174)
SEARCHING BY POIs
1. Select
Menu
(Menu).
2. Select (Find POI).
3. Select the desired category.
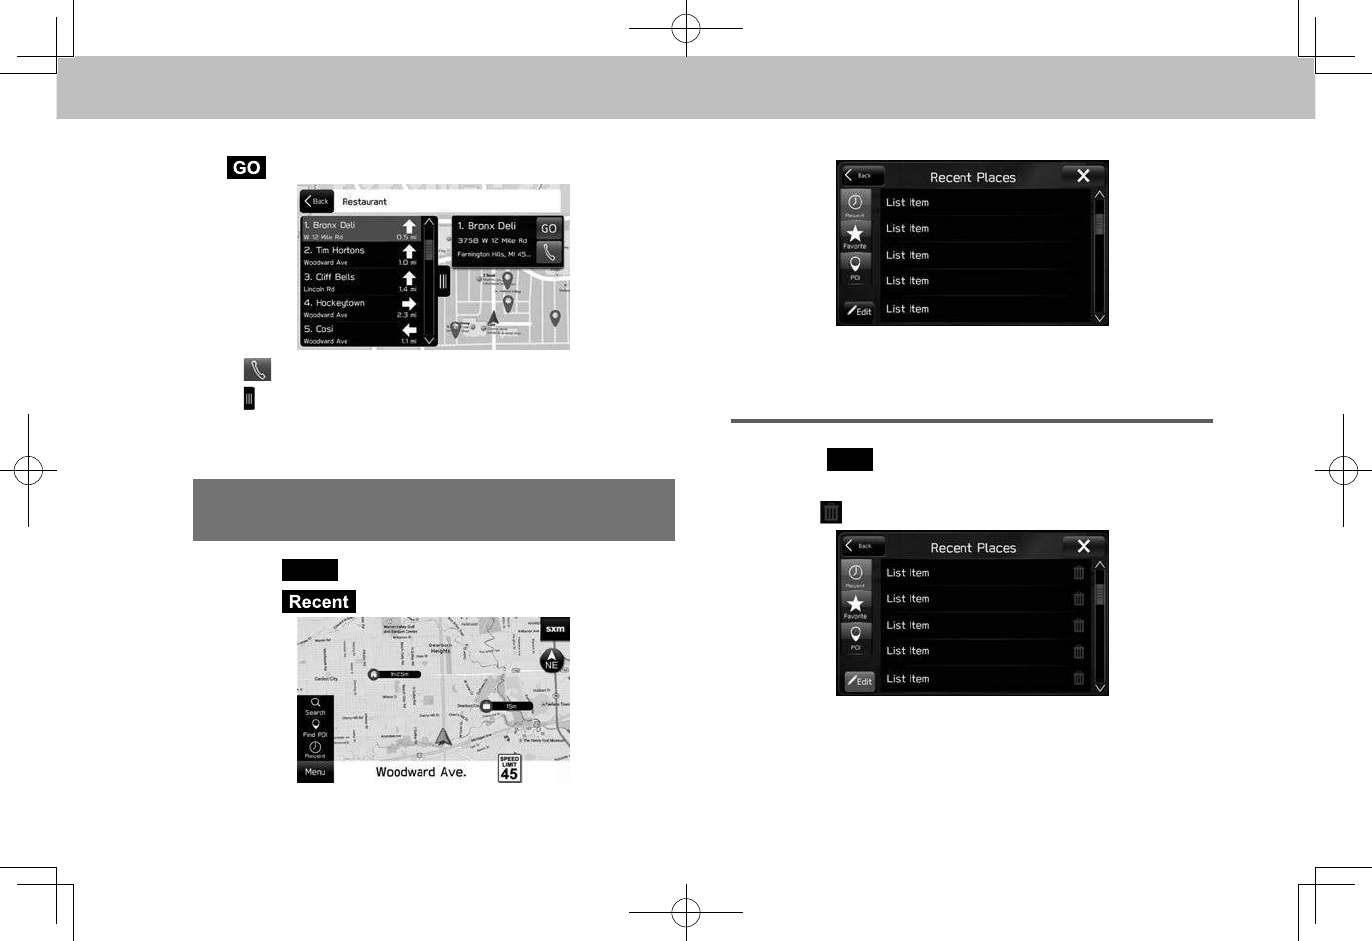
DESTINATION SEARCH
172
4. Select the desired item from the list, and then select
(GO).
●: Select to call the registered phone number.
●: Select to open/close the list.
5. Check that the route calculation screen is displayed.
(→P.174)
SEARCHING FROM PREVIOUSLY SET
DESTINATIONS
1. Select
Menu
(Menu).
2. Select (Recent).
3. Select the desired item.
4. Check that the route calculation screen is displayed.
(→P.174)
DELETING THE ITEM IN THE LIST
1. Select
Edit
(Edit) on the “Recent Places (Recent
Places)” screen.
2. Select next to the desired item to be deleted.
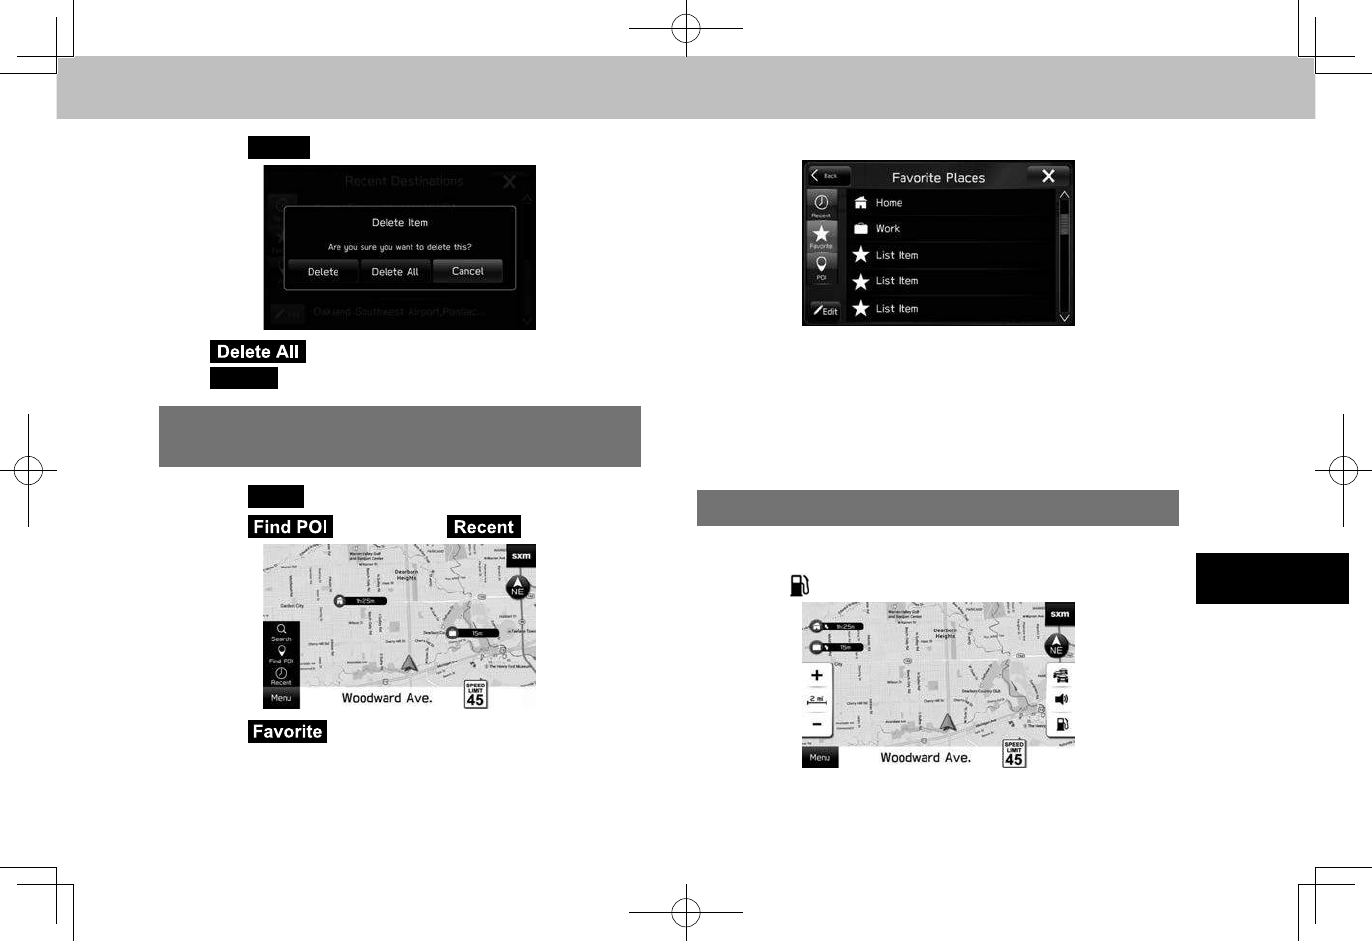
DESTINATION SEARCH
173
NAVIGATION SYSTEM
7
3. Select
Delete
(Delete).
● (Delete All): Select to delete all items.
●
Cancel
(Cancel): Select to cancel deleting.
SEARCHING FROM THE FAVORITE PLACES
LIST
1. Select
Menu
(Menu).
2. Select (Find POI) or (Recent).
3. Select (Favorite).
4. Select the desired item.
5. Check that the route calculation screen is displayed.
(→P.174)
NOTE
lTo use this function, it is necessary to register the entry.
(→P.166)
SEARCHING FOR GAS STATIONS
1. Select any point on the map.
2. Select .
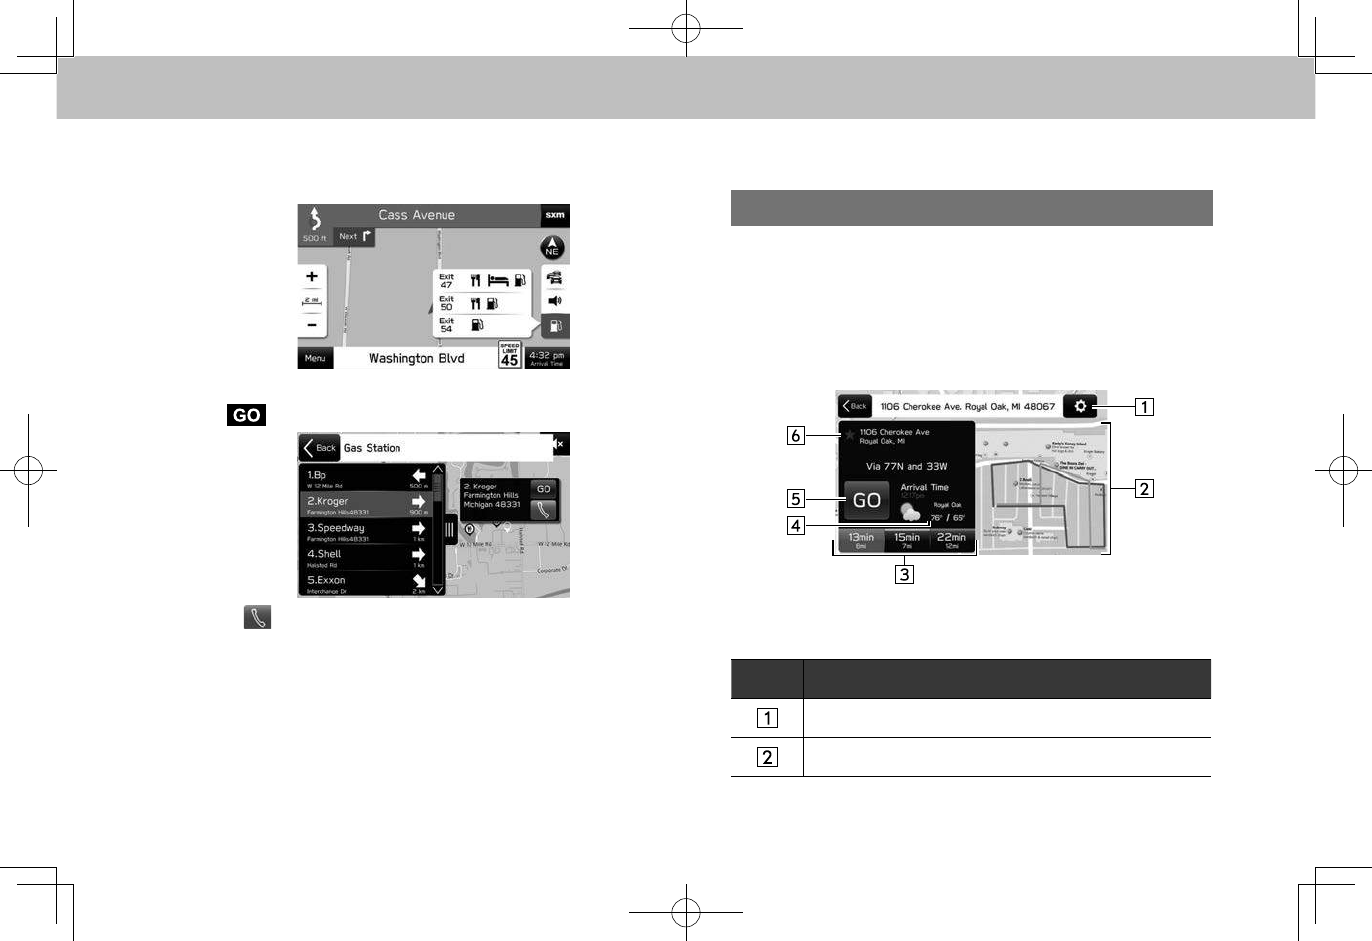
DESTINATION SEARCH
174
●When driving on the highway during route guidance,
gas stations, restaurants or rest areas near the next
three highway exits can be selected.
3. Select the desired item from the list, and then select
(GO).
●: Select to call the registered phone number.
4. Check that the route calculation screen is displayed.
(→P.174)
ROUTE CALCULATION
ROUTE CALCULATION SCREEN
After searching for the destination, the route calculation
screen will be displayed.
No. Information/Function
Select to display the route options screen. (→P.176)
Displays the route overview.
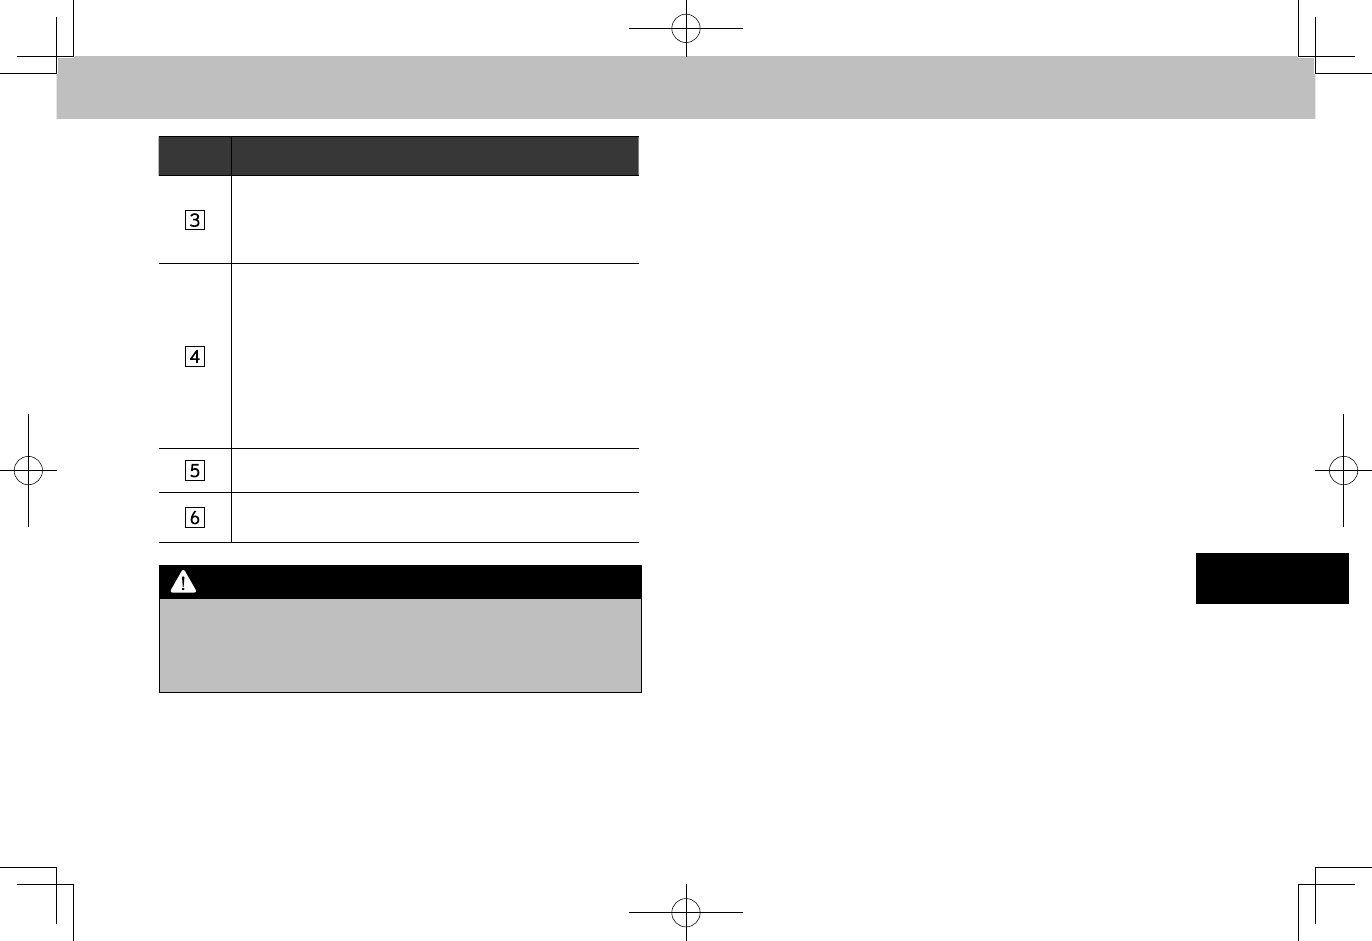
DESTINATION SEARCH
175
NAVIGATION SYSTEM
7
No. Information/Function
Select the one of the three recommended routes.
• Blue: The fastest route
• Yellow: The shortest route
• Red: An ecological route
If TravelLink is available, the weather icon name,
name of the weather station closest to the destination,
and the High/Low temperature for that location will be
displayed.
By selecting any of the weather elements, they will be
applied to the “Current (Current)” TravelLink weather
screen with the appropriate (Destination) weather
station selected.
For details on TravelLink: →P.109
Select to start route guidance.
Select to register the point in the favorite places list.
(→P.173)
WARNING
lBe sure to obey trafc regulations and keep road conditions
in mind while driving. If a trafc sign on the road has been
changed, the route guidance may not indicate such changed
information.
NOTE
lThe route for returning may not be the same as that for going.
lThe route guidance to the destination may not be the shortest
route or a route without trafc congestion.
lRoute guidance may not be available if there is no road data for
the specied location.
lIf a destination that is not located on a road is set, the vehicle will
be guided to the point on a road nearest to the destination. The
road nearest to the selected point is set as the destination.
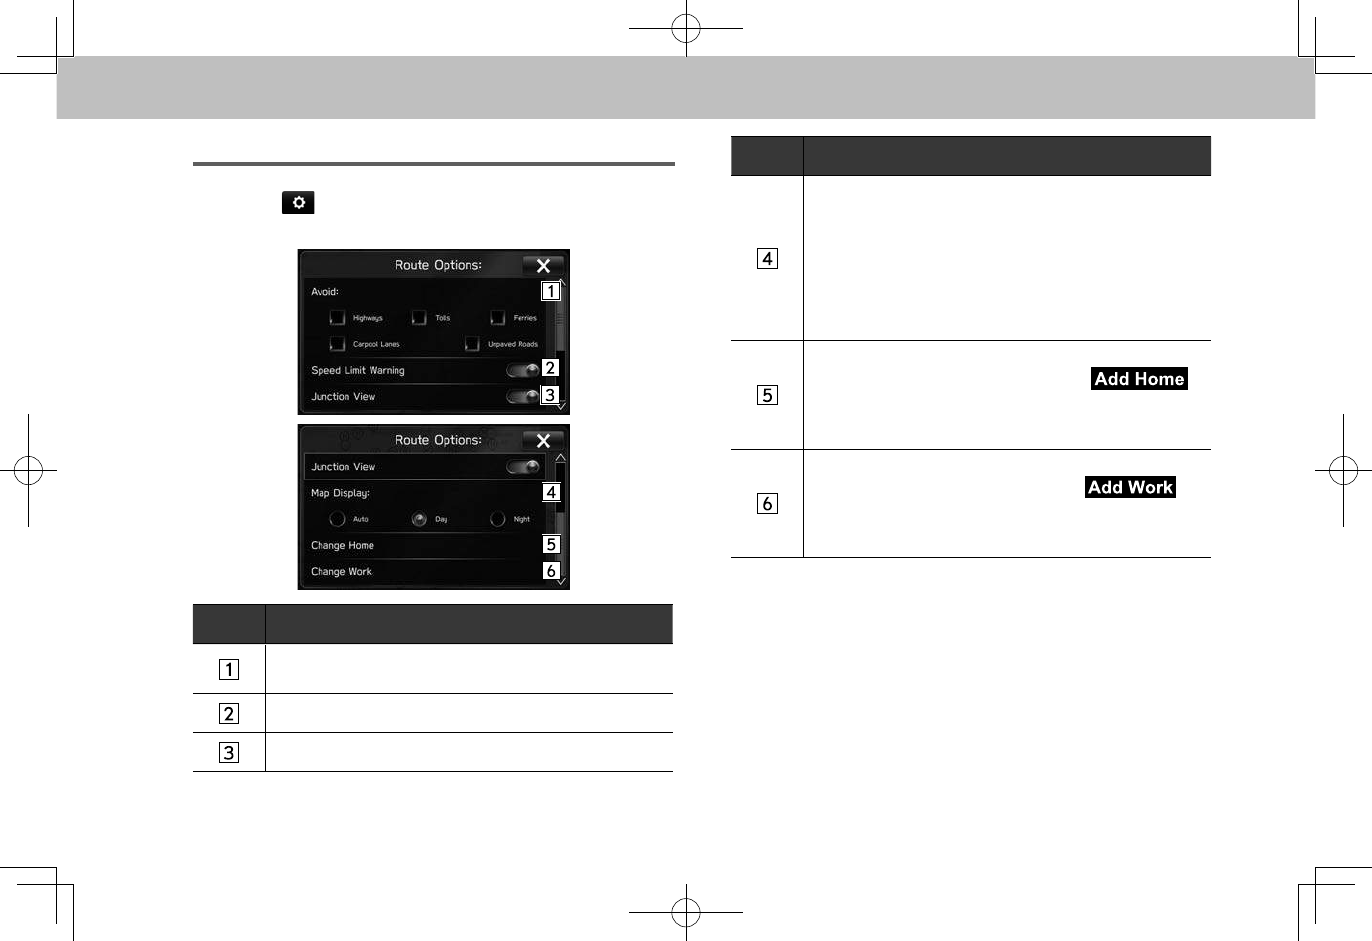
DESTINATION SEARCH
176
ROUTE OPTIONS SCREEN
1. Select on the route calculation screen.
2. Select the desired item to be set.
No. Function
Select to set the avoidance criteria for the current
route.
Select to set speed limit information on/off.
Select to set the display of the junction view on/off.
No. Function
Select to set the screen mode.
“Auto (Auto)”: Select to change the screen to day or
night mode depending on the position of the headlight
switch.
“Day (Day)”: Select to always display the map in day
mode.
“Night (Night)”: Select to always display the map in
night mode.
Select to register or edit the home address.
• When home has not been registered,
(Add Home) is displayed.
• For details on registering or editing the address:
→P.168
Select to register or edit the work address.
• When work has not been registered,
(Add Work) is displayed.
• For details on registering or editing the address:
→P.168
NOTE
lSetting the route in the above method affects the current route
only. Route option defaults can be changed from the navigation
settings screen. (→P.183)
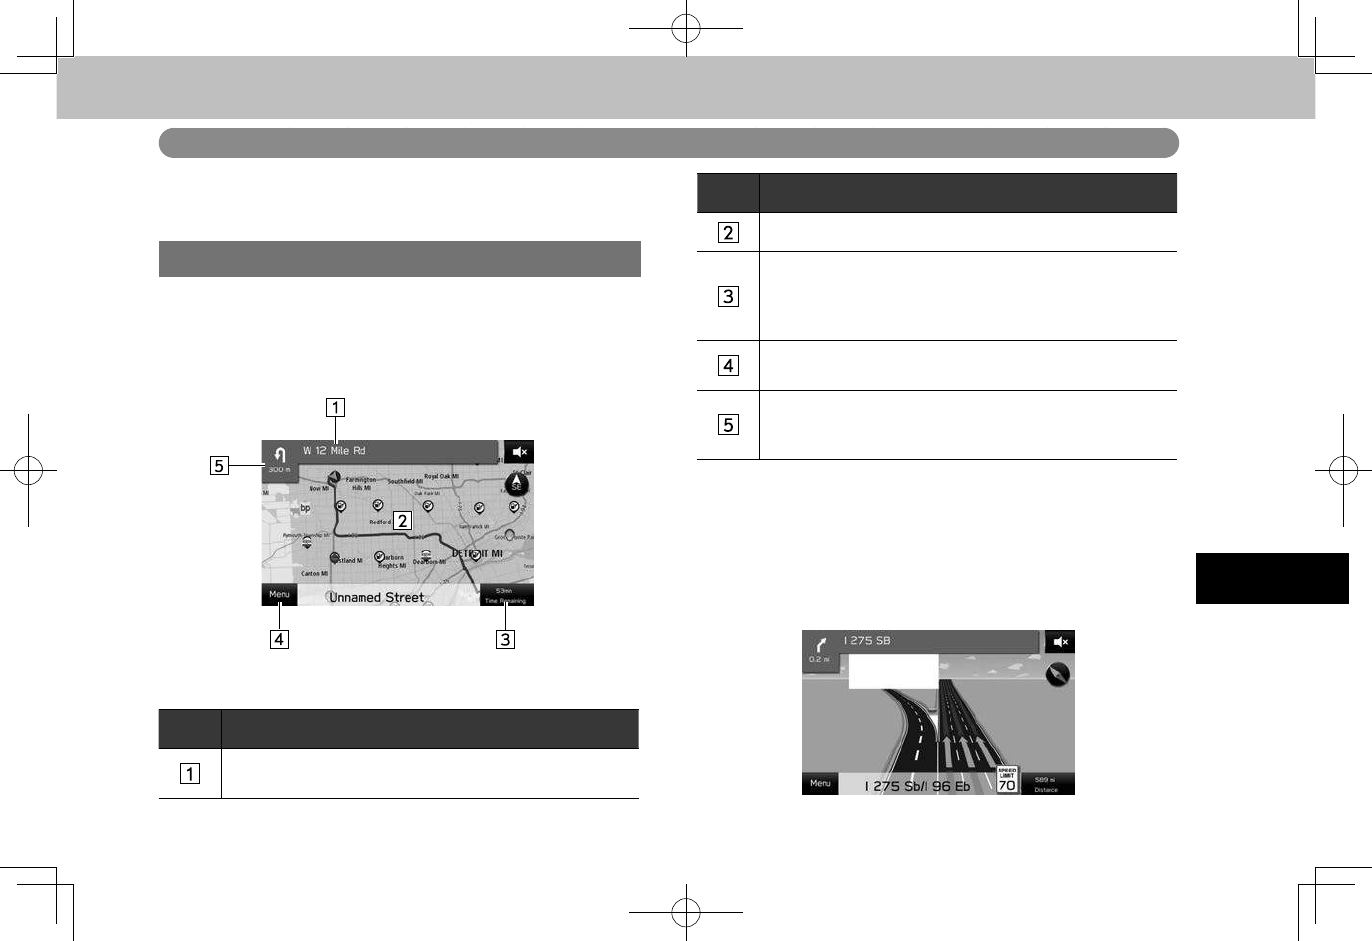
ROUTE GUIDANCE
177
NAVIGATION SYSTEM
7
ROUTE GUIDANCE
ROUTE GUIDANCE
ROUTE GUIDANCE SCREEN
During the route guidance, various types of guidance
screens can be displayed depending on conditions.
No. Information/Function
Displays the next street name.
Select to display the turn/itinerary list. (→P.180, 181)
No. Information/Function
Displays guidance route.
Displays the distance, the estimated travel time to
the destination, or the estimated arrival time at the
destination. Select information box, and then select the
desired information.
Select to search for a destination or stop the route
guidance (→P.181).
Displays distance to the next turn with the arrow
indicating the turn direction.
Select to repeat the last navigation announcement.
XJunction screen
When approaching an expressway exit or a complicated
intersection, the map switches to a 3D display if the
necessary information can be displayed. An arrow indicates
the lane in which you should drive. Signs are also displayed
if the information is available.
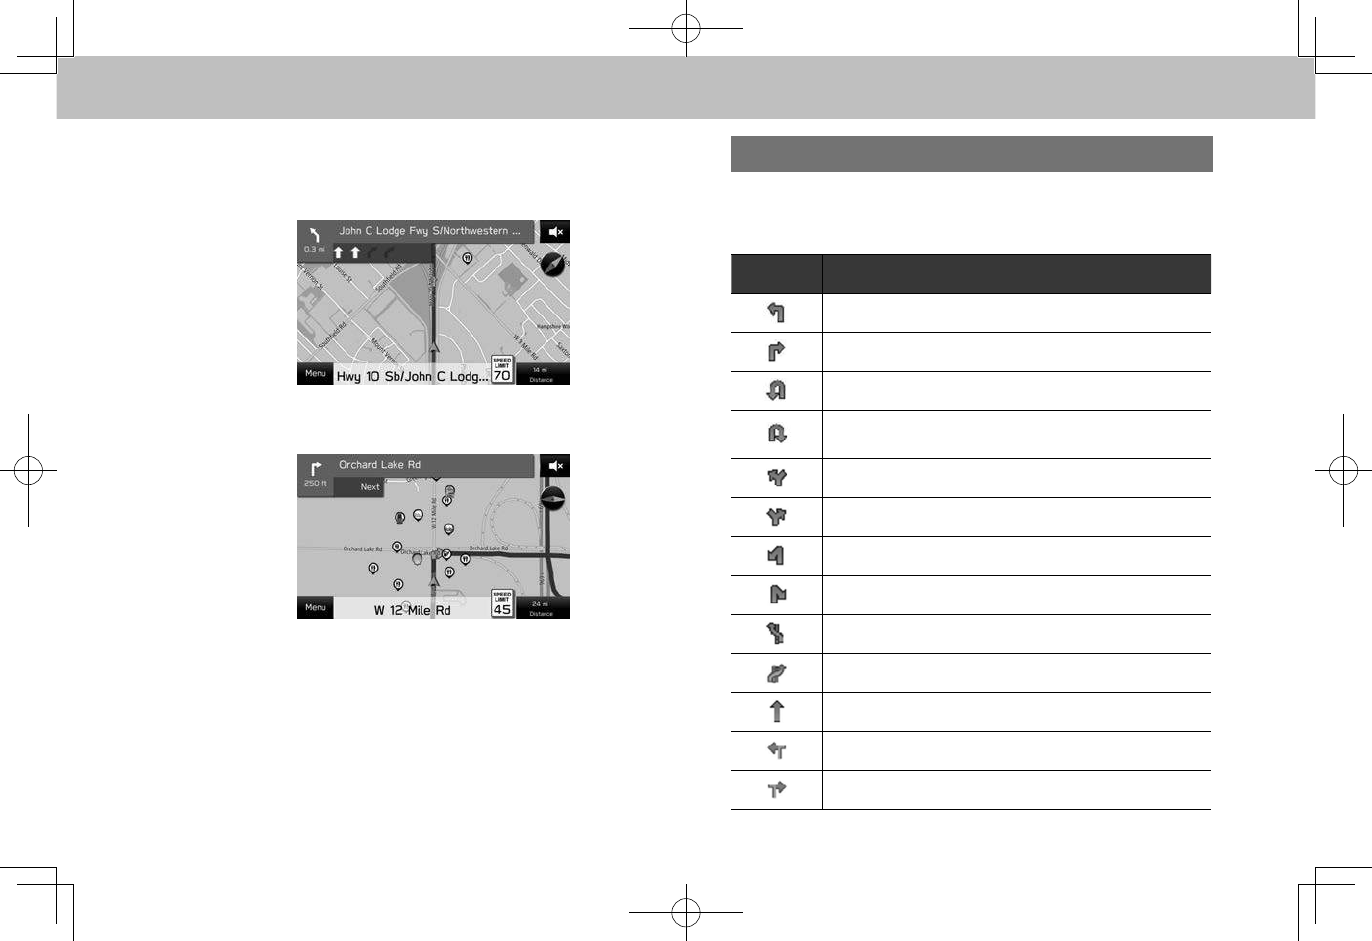
ROUTE GUIDANCE
178
XLane recommendation screen
When approaching a turning point, the lane
recommendation will be displayed automatically.
When approaching a turning point, “Next (Next)” will be
displayed automatically.
NOTE
lIf the vehicle goes off the guidance route, the route is searched
again.
lFor some areas, the roads have not been completely digitized in
our database. For this reason, the route guidance may select a
road that should not be traveled on.
STANDARD MAP ICON
The following table shows the most frequently displayed
route events.
Icon Explanation
Turn left
Turn right
U-turn left
U-turn right
Keep left at the fork in the road.
Keep right at the fork in the road.
Turn left & sharp curve.
Turn right & sharp curve.
Stay in the left lane.
Stay in the right lane.
Go straight ahead at the intersection.
Turn left at the T junction.
Turn right at the T junction.

ROUTE GUIDANCE
179
NAVIGATION SYSTEM
7
Icon Explanation
Go left at the roundabout. Third exit (next change in
direction).
Join the roundabout (the route change after the next
change).
Join the expressway.
Leave the expressway.
Board the ferry.
Disembark from the ferry.
You are half way to your destination.
You have arrived at your destination.
TYPICAL VOICE GUIDANCE
PROMPTS
As the vehicle approaches an intersection, or point, where
maneuvering the vehicle is necessary, the system’s voice
guidance will provide various messages.
WARNING
lBe sure to obey the trafc regulations and keep the road
condition in mind especially when you are driving on IPD
roads. The route guidance may not have the updated
information such as the direction of a one way street.
NOTE
lTo adjust the voice guidance volume: →P.68
lVoice guidance may be made early or late.
lIf the system cannot determine the current position correctly,
you may not hear voice guidance or may not see the magnied
intersection on the screen.
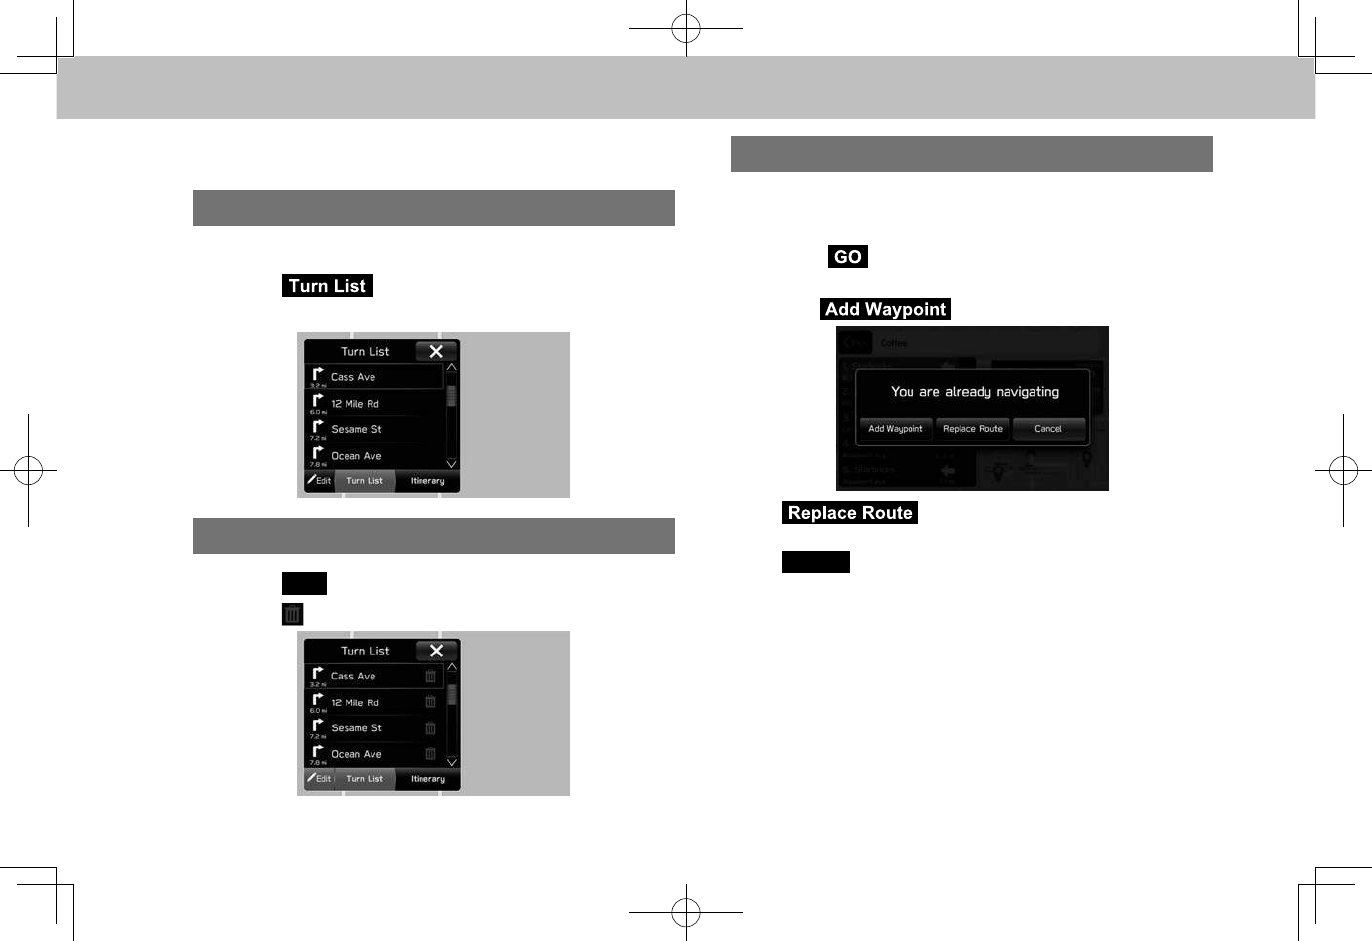
ROUTE GUIDANCE
180
ROUTE RELATED FUNCTIONS
CHECKING THE ROUTE
1. Select the next street name. (→P.177)
2. Select (Turn List).
3. Select the item to check the route.
EDITING ROUTE
1. Select
Edit
(Edit) on the “Turn List (Turn List)” screen.
2. Select next to the desired item to be deleted.
●The route will be recalculated automatically.
ADDING DESTINATIONS
1. Search for an additional destination in the same way as
a destination search.(→P.169)
2. Select (GO) on the route calculation screen.
(→P.174)
3. Select (Add Waypoint).
● (Replace Route): Select to replace
the existing destination with a new one.
●
Cancel
(Cancel): Select to cancel adding
destinations.
●The route will be recalculated automatically.
NOTE
lThe last entered destination is added as the rst destination. The
order of destination can be changed. (→P.181)

ROUTE GUIDANCE
181
NAVIGATION SYSTEM
7
CHECKING THE ITINERARY
1. Select the next street name. (→P.177)
2. Select (Itinerary).
3. Select the item to check the itinerary.
REORDERING DESTINATIONS
1. Select
Edit
(Edit) on the “Itinerary (Itinerary)” screen.
2. Select next to the desired destination, and then drag
it to the desired position.
●The route will be recalculated automatically.
DELETING DESTINATIONS
1. Select
Edit
(Edit) on the “Itinerary (Itinerary)” screen.
2. Select next to the desired item to be deleted.
3. Select
OK
(OK) when the conrmation screen
appears.
●The route will be recalculated automatically.
STOPPING ROUTE GUIDANCE
1. Select
Menu
(Menu).
2. Select
Cancel
(Cancel).
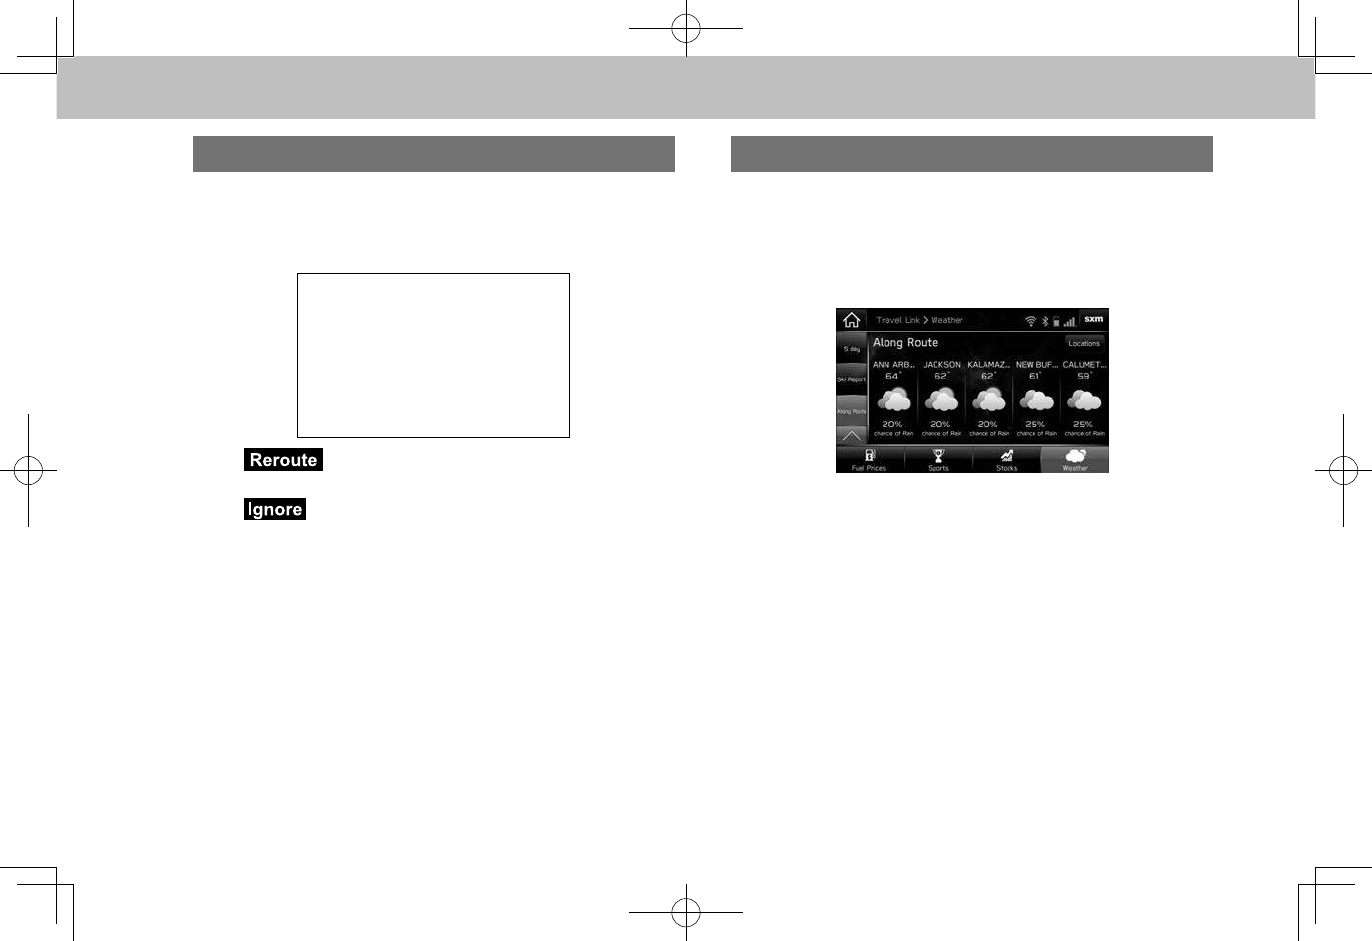
ROUTE GUIDANCE
182
REROUTING THE ROUTE
When trafc information of the guidance route has been
received, a pop-up window will be displayed to ask if you
wish to reroute.
● (Reroute): Select to calculate the new
route.
● (Ignore): Select to delete the message.
WEATHER INFORMATION
“At Destination (At Destination)” and “Along Route (Along
Route)” weather information can be checked during route
guidance using the TravelLink function.
For details on TravelLink: →P.109

SETUP
183
NAVIGATION SYSTEM
7
SETUP
NAVIGATION SETTINGS
1. Press .
2. Select
Settings
(Settings).
3. Select (Navigation).
4. Select the desired item to be set.
NAVIGATION SETTINGS SCREEN
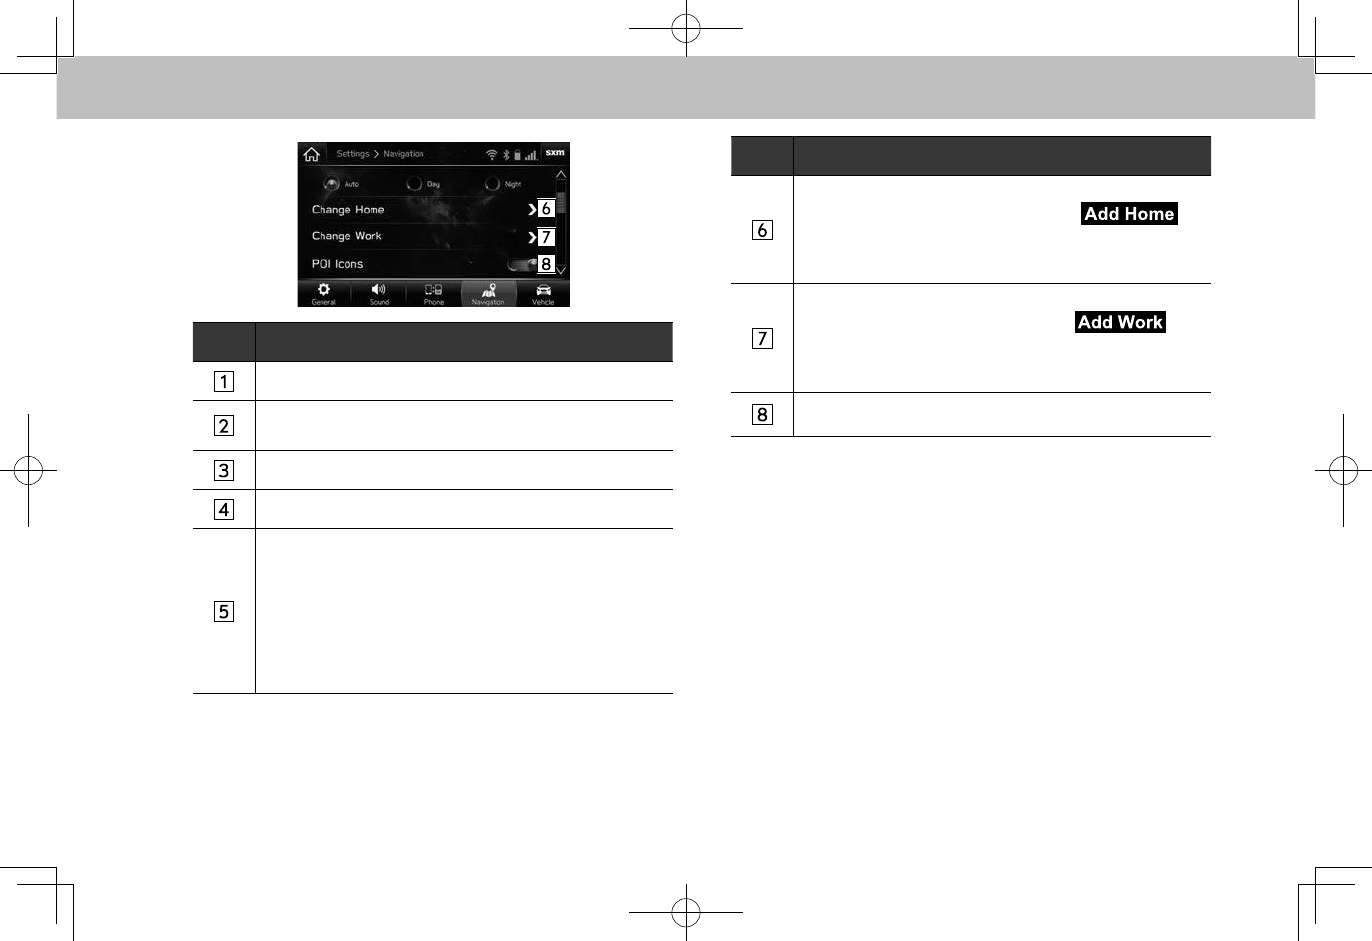
SETUP
184
No. Function
Select to set the route type.
Select to set the avoidance criteria for the route
calculation.
Select to set speed limit information on/off.
Select to set the display of the junction view on/off.
Select to set the screen mode.
“Auto (Auto)”: Select to change the screen to day or
night mode depending on the position of the headlight
switch.
“Day (Day)”: Select to always display the map in day
mode.
“Night (Night)”: Select to always display the map in night
mode.
No. Function
Select to register or edit the home address.
• When home has not been registered,
(Add Home) is displayed.
• For details on registering or editing the address:
→P.168
Select to register or edit the work address.
• When work has not been registered,
(Add Work) is displayed.
• For details on registering or editing the address:
→P.168
Select to set the display of POI icons on/off.
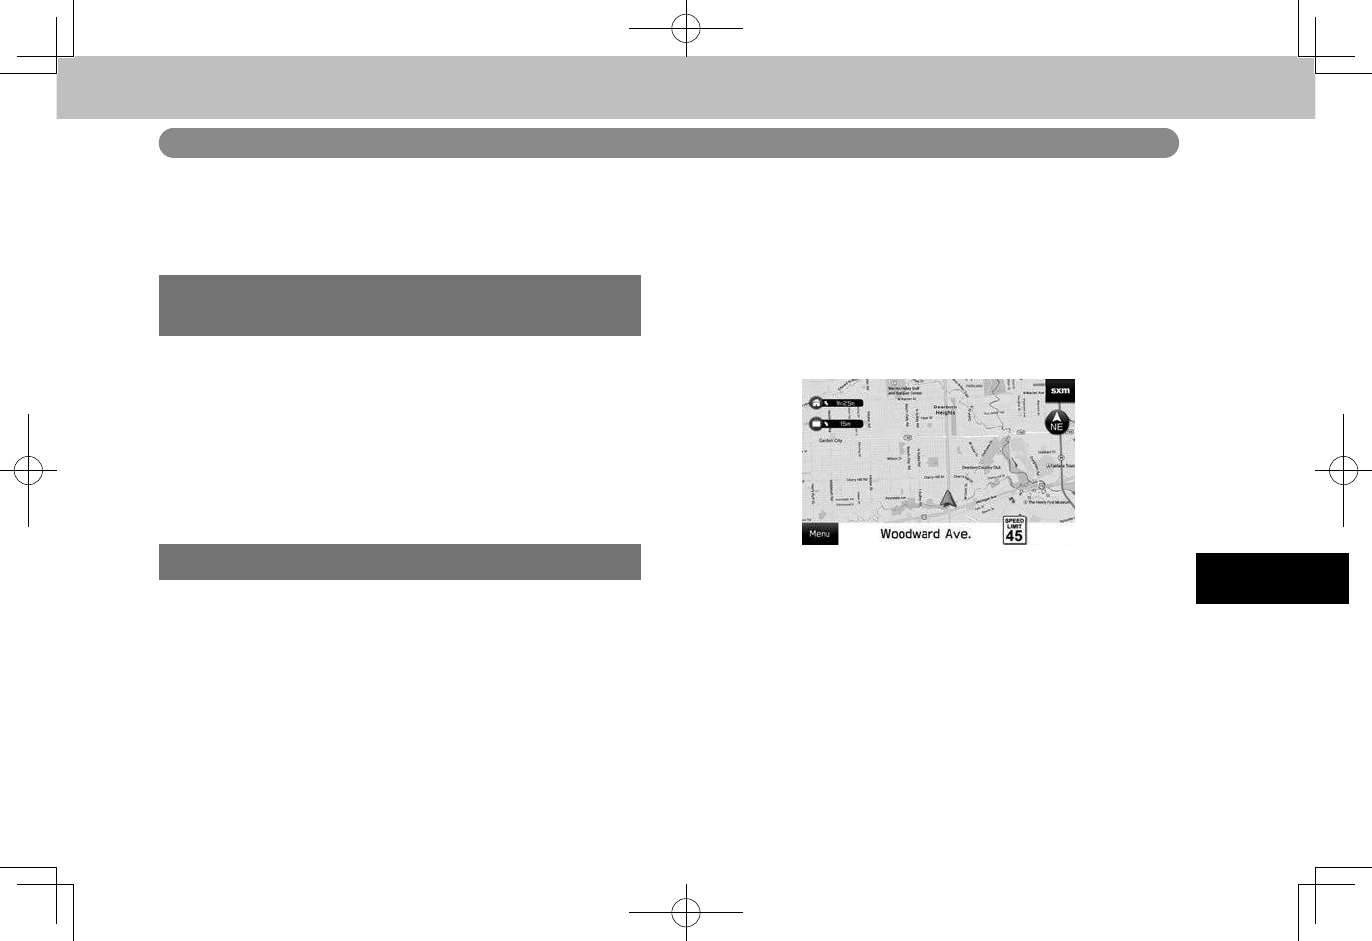
TIPS FOR THE NAVIGATION SYSTEM
185
NAVIGATION SYSTEM
7
TIPS FOR THE NAVIGATION SYSTEM
GPS (GLOBAL POSITIONING
SYSTEM)
REGARDING ERRORS IN CURRENT
POSITION DISPLAY
The system displays the vehicle current position based on
GPS information and data from various sensors and road
maps. However, when the radiowave signals from GPS
satellites are weak or when signals are received from only
two satellites or less, errors may occur in the position.
Modifying or adjusting the system will not prevent these
errors.
LIMITATIONS OF THE NAVIGATION SYSTEM
This navigation system calculates the current position using
satellite signals, various vehicle signals, map data, etc.
However, an accurate position may not be shown depending
on satellite conditions, road conguration, vehicle condition
or other circumstances.
The Global Positioning System (GPS) developed and
operated by the U.S. Department of Defense provides
an accurate current position, normally using 4 or more
satellites, and in some case 3 satellites. The GPS system
has a certain level of inaccuracy. While the navigation
system compensates for this most of the time, occasional
positioning errors of up to 300 ft. (100 m) can and should be
expected. Generally, position errors will be corrected within
a few seconds.
The GPS signal may be physically obstructed, leading to
inaccurate vehicle position on the map screen. Tunnels, tall
buildings, trucks, or even the placement of objects on the
instrument panel may obstruct the GPS signals.
The GPS satellites may not send signals due to repairs or
improvements being made to them.
Even when the navigation system is receiving clear GPS
signals, the vehicle position may not be shown accurately or
inappropriate route guidance may occur in some cases.
TIPS FOR THE NAVIGATION SYSTEM
186
CAUTION
lThe installation of window tinting may obstruct the GPS
signals. Most window tinting contains some metallic content
that will interfere with GPS signal reception of the antenna in
the instrument panel. We advise against the use of window
tinting on vehicles equipped with navigation systems.
●Accurate current position may not be shown in the
following cases:
• When driving on a small angled Y-shaped road.
• When driving on a winding road.
• When driving on a slippery road such as in sand,
gravel, snow, etc.
• When driving on a long straight road.
• When freeway and surface streets run in parallel.
• After moving by ferry or vehicle carrier.
• When a long route is searched during high speed
driving.
• After repeating a change of direction by going
forward and backward, or turning on a turntable in
a parking lot.
• When leaving a covered parking lot or parking
garage.
• When a roof carrier is installed.
• When driving with tire chains installed.
• When the tires are worn.
• After replacing a tire or tires.
• When using tires that are smaller or larger than the
factory specications.
• When the tire pressure in any of the 4 tires is not
correct.
●Inappropriate route guidance may occur in the
following cases:
• When turning at an intersection off the designated
route guidance.
• If you set more than 1 destination but skip any of
them, auto reroute will display a route returning to
the destination on the previous route.
• When turning at an intersection for which there is
no route guidance.
• When passing through an intersection for which
there is no route guidance.
• During auto reroute, the route guidance may not be
available for the next turn to the right or left.
• During high speed driving, it may take a long time
for auto reroute to operate. In auto reroute, a detour
route may be shown.
• After auto reroute, the route may not be changed.
• If an unnecessary U-turn is shown or announced.
TIPS FOR THE NAVIGATION SYSTEM
187
NAVIGATION SYSTEM
7
• If a location has multiple names and the system
announces 1 or more of them.
• When a route cannot be searched.
• If the route to your destination includes gravel,
unpaved roads or alleys, the route guidance may
not be shown.
• Your destination point might be shown on the
opposite side of the street.
• When a portion of the route has regulations
prohibiting the entry of the vehicle that vary by time
or season or other reasons.
• The road and map data stored in the navigation
system may not be complete or may not be the
latest version.
NOTE
lThis navigation system uses tire turning data and is designed to
work with factory-specied tires for the vehicle. Installing tires
that are larger or smaller than the originally equipped diameter
may cause inaccurate display of the current position. The tire
pressure also affects the diameter of the tires, so make sure that
the tire pressure of all 4 tires is correct.
MAP DATA
REGARDING ROADS AND PLACE NAME
DATA
When maps are created, land surveys are conducted
and information on road improvements and reopening
is collected to provide the most accurate information
possible. However, modications to roads, place names and
facilities may be carried out at any time. Consequently, we
cannot guarantee that map data contains no errors in road
positions, conguration and names, or in facility names.
TIPS FOR THE NAVIGATION SYSTEM
188
NAVIGATION DATABASE UPDATES
Navigation database can be updated using a USB memory.
For details, contact your SUBARU dealer or visit
www.subaru.com.
XFree map update
1. Connect a USB memory containing the new navigation
database les.
2. Select (Install Now) to update.
3. Select
OK
(OK).
●If an error message appears, follow the guidance on
the screen to try again.
XPaid map update
1. Connect a USB memory device containing the new
navigation database les.
2. Select (Enter PIN).
3. Enter your PIN code, and then select (Install).
4. Select
OK
(OK).
●If an error message appears, follow the guidance on
the screen to try again.
189
Siri/VOICE
RECOGNITION
SYSTEM
8
8
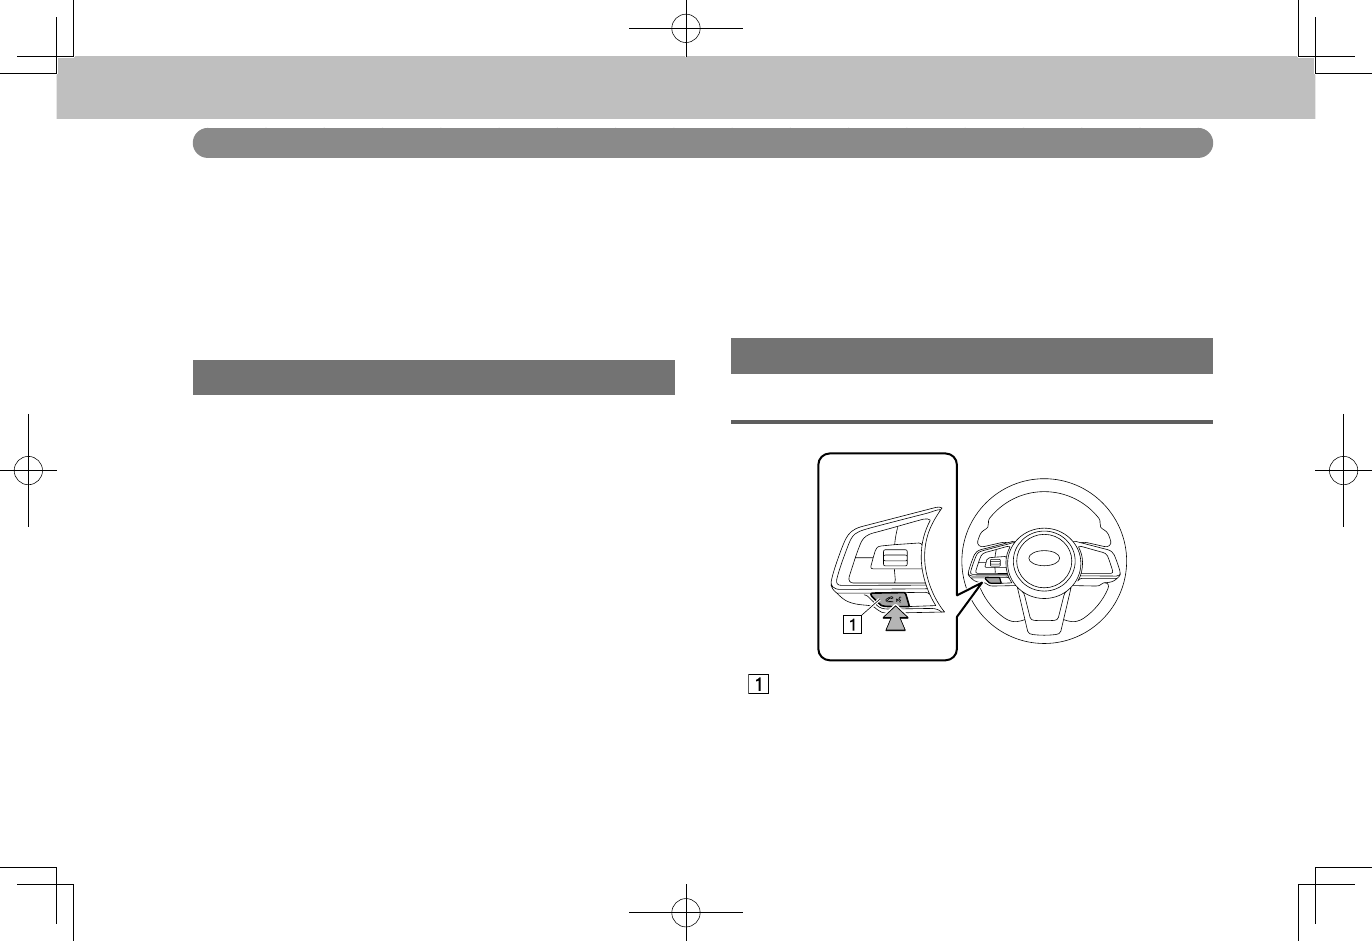
Siri
190
Siri
Siri®
Siri is a function that allows your iPhone and iPod touch to
be used without any manual operation by connecting your
device to the unit.
To use Siri, connect your device via Bluetooth.
BEFORE USING Siri
This section describes the preparation required to use Siri.
●Register your iPhone or iPod touch in the unit.
(→P.54)
●Connect your iPhone or iPod touch to the unit.
(→P.57)
●Enable Siri in your iPhone or iPod touch settings.
(See Apple website for details.)
●An iPhone and iPod touch data plan: If the data plan
for your iPhone and iPod touch does not provide for
unlimited data usage, additional charges from your
carrier may apply for accessing app-based connected
content via 3G, 4G, Wi-Fi, or 4G LTE wireless
networks.
●Connection to the internet via 3G, 4G, Wi-Fi, or 4G
LTE networks.
NOTE
lAvailable operations will differ based on your iPhone and iPod
touch.
lBe careful not to exceed the data usage limits for your iPhone
and iPod touch. Doing so will result in additional data usage
charges from your phone carrier.
USING Siri
STEERING SWITCH
Talk switch
●Press and hold the talk switch to start Siri.
●To cancel Siri, press and hold the talk switch.
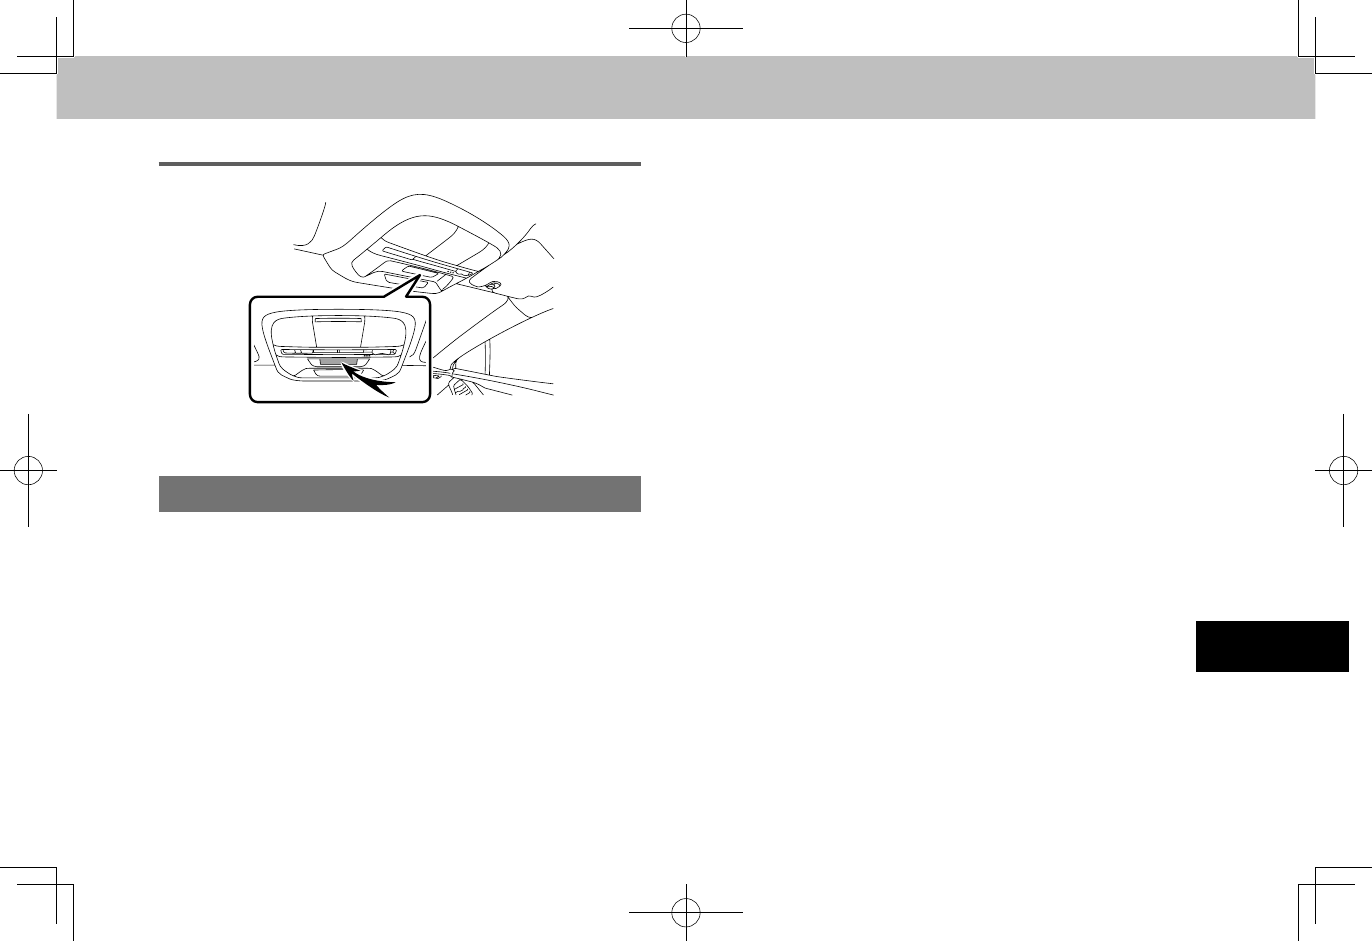
Siri
191
Siri/VOICE RECOGNITION SYSTEM
8
MICROPHONE
●It is unnecessary to speak directly into the
microphone when using Siri.
Siri OPERATION
1. Press and hold the talk switch.
2. Speak when you hear the beep sound.
●If required to say more, the system will notify you with
the beep sound. Continue speaking.
●If the system fails to recognize what is being said, or
to request a different operation, press the talk switch.
●To cancel Siri, press and hold the talk switch.
NOTE
lSiri cannot be started while placing or receiving hands-free
calls with your iPhone and iPod touch (including while holding
incoming calls), or while having a hands-free conversation.
lSiri cannot be used while using the system’s voice recognition
function. Start Siri after exiting the voice recognition function.
lThe system screen will display the calling screen when a hands-
free call is placed.
lUnit operation while using Siri will differ depending on your
iPhone or iPod touch.
lSiri may not recognize what is being said if:
• Spoken too quickly.
• Spoken at a low or high volume.
• Driving with a window open.
• Passengers are talking while using Siri.
• The air conditioning speed is set high.
• When air from the ventilator blows directly toward the
microphone.
lIn the following conditions, the system may not recognize what is
being said properly, and use of Siri may not be possible.
• What is being said is incorrect or unclear. Note that certain
words, accents or speech patterns may be difcult for your
iPhone or iPod touch to recognize.
• There is excessive background noise, such as wind noise.
lFunctionality offered by Siri is dependent on the iOS version,
and as such, specications may be subject to change without
prior notice.

Siri
192
ABOUT THE SUPPORTED DEVICES FOR Siri
This system supports the following devices.
nSupported iOS versions
●iOS6 or later (6, 7)
nSupported models
●iPhone 5
●iPhone 4s
●iPod touch (5th generation)
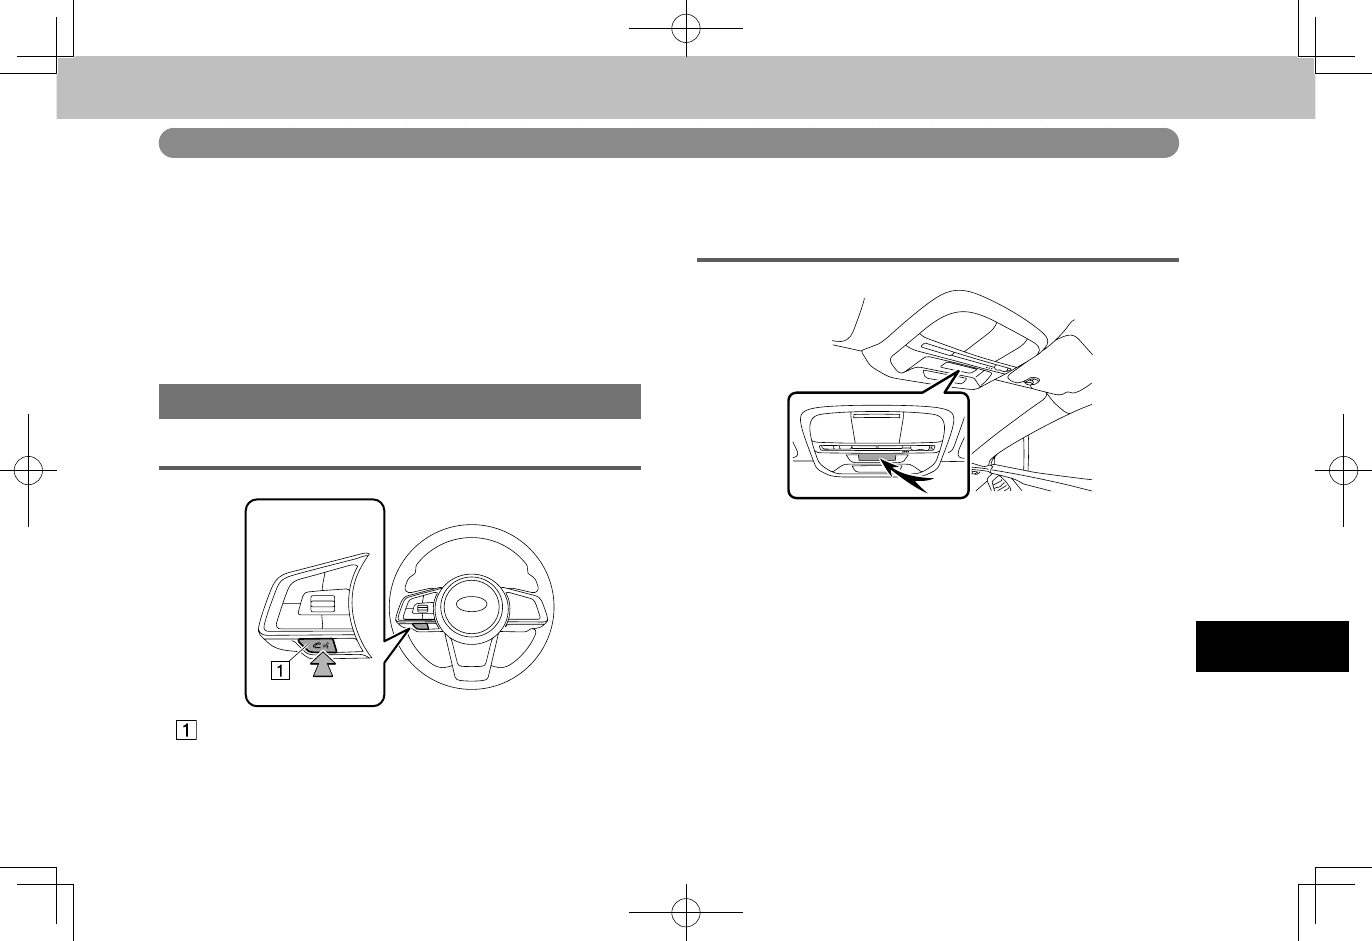
VOICE RECOGNITION SYSTEM OPERATION
193
Siri/VOICE RECOGNITION SYSTEM
8
VOICE RECOGNITION SYSTEM OPERATION
VOICE RECOGNITION SYSTEM
The voice recognition system enables the navigation,
audio, hands-free systems, etc. to be operated using voice
commands.
Refer to the command list for samples of voice commands.
(→P.197)
USING THE VOICE RECOGNITION SYSTEM
STEERING SWITCH
Talk switch
●Press the talk switch to start the voice recognition
system.
●To cancel voice recognition, press and hold the talk
switch or the source switch.
MICROPHONE
●It is unnecessary to speak directly into the
microphone when giving a command.
NOTE
lWait for the conrmation beep before speaking a command.
lVoice commands may not be recognized if:
• Spoken too quickly.
• Spoken at a low or high volume.
• Driving with a window open.
• Passengers are talking while voice commands are spoken.
• The air conditioning speed is set high.
• When air from the ventilator blows directly toward the
microphone.
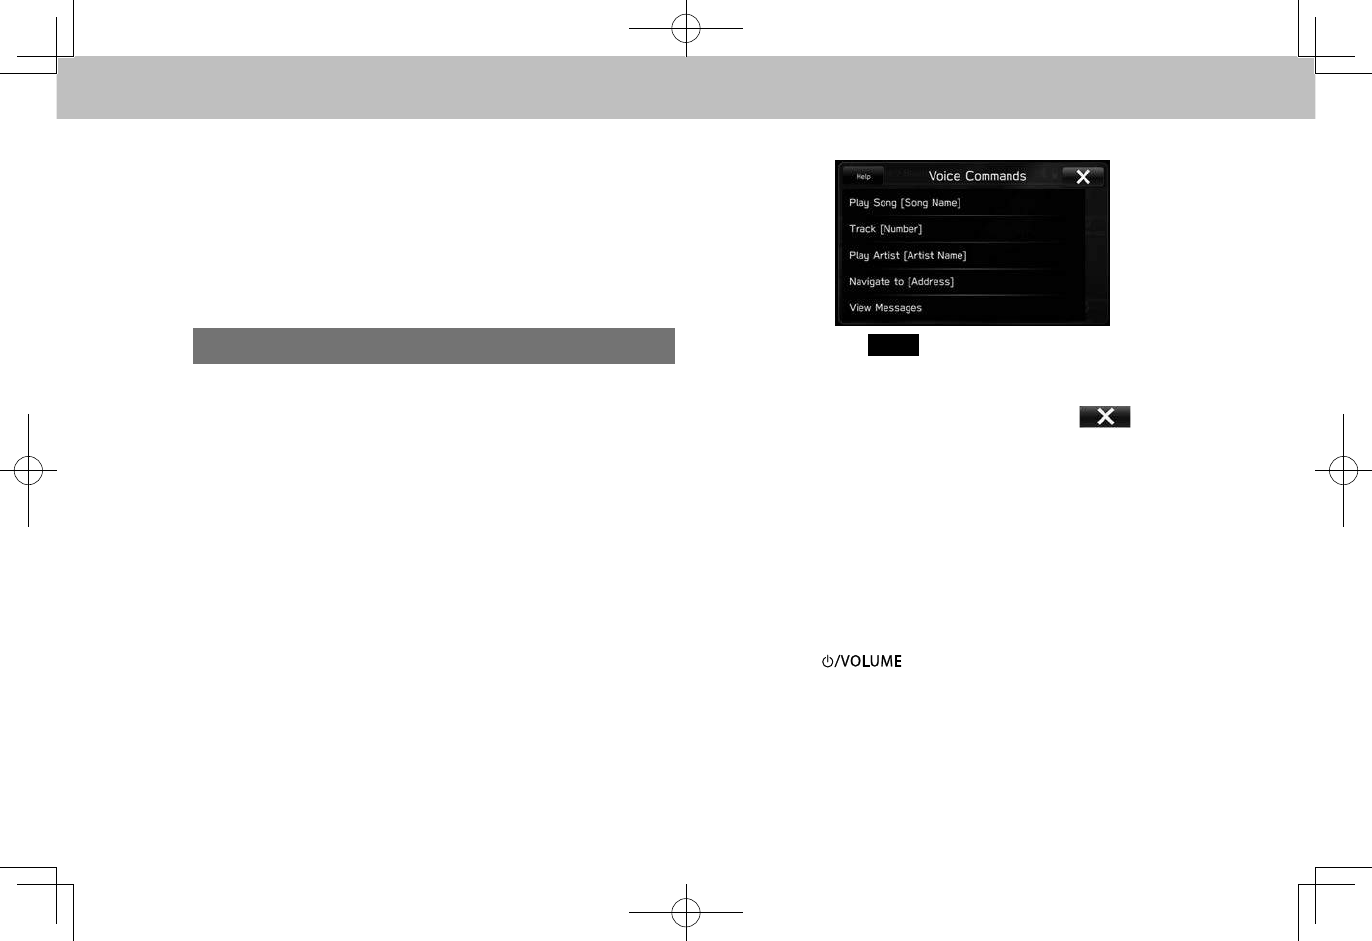
VOICE RECOGNITION SYSTEM OPERATION
194
NOTE
lIn the following conditions, the system may not recognize the
command properly and using voice commands may not be
possible:
• The command is incorrect or unclear. Note that certain words,
accents or speech patterns may be difcult for the system to
recognize.
• There is excessive background noise, such as wind noise.
VOICE RECOGNITION SYSTEM OPERATION
1. Press the talk switch.
●After the voice recognition top screen has been
displayed, speech guidance will commence.
NOTE
lA caution display appears after pressing the talk switch while
an external device is connected and the stored data is being
read. Be sure to start the operation after the caution display
disappears.
lWhen the voice recognition mode is in audio mode, voice
guidance for the voice recognition system can be skipped by
pressing the talk switch.
2. Say the command.
●Selecting
Help
(Help) or saying “Help” prompts
voice guidance to offer examples of commands and
operation methods.
●To cancel voice recognition, select , or press
and hold the talk switch.
NOTE
lIf the system does not respond or the conrmation screen does
not disappear, press the talk switch and try again.
lVoice recognition prompts can be set. Some voice guidance
can be canceled by setting voice prompts to off. Use this
setting when it is desirable to say a command immediately after
pressing the talk switch and hearing a beep.
• Voice recognition prompts: →P.62
• Voice recognition prompts volume: →P.68
lTurn the “” knob, or use the volume control switch on
the steering wheel to adjust the speech guidance volume.
lThe system’s voice recognition function cannot be used while
using Siri. Start the voice recognition function after exiting Siri.

VOICE RECOGNITION SYSTEM OPERATION
195
Siri/VOICE RECOGNITION SYSTEM
8
VOICE COMMAND EXAMPLE: SEARCH FOR A
SONG
1. Press the talk switch.
2. Say “Play song <name>”.
● A conrmation screen will be displayed showing
the recognition result, and the system starts playing
music.
●If multiple matching items are found, a selection
screen will be displayed. Say “<number>” or select
the number. The system then starts playing music.
NOTE
lType A/B only: The Gracenote database is only compatible with
USB or iPod mode.
lUSB memory or iPod must be connected to enable track
searching and playback. (→P.39)
lWhen USB memory or iPod is connected, recognition data is
created so tracks can be searched using voice commands.
lRecognition data is updated under the following conditions:
• When USB memory or iPod data has changed.
• When the voice recognition language is changed. (→P.62)
lWhile the recognition data is being created or being updated, a
track search cannot be performed using a voice command.
VOICE COMMAND EXAMPLE: CALL NAME
1. Press the talk switch.
2. Say “Call <contacts> <phone types>”.
●If multiple matching items are found, a selection
screen will be displayed. Say “<number>” or select
the number.
NOTE
lIn the same manner as it is displayed on the screen, “Call
<contacts> <phone types> (Call <contacts> <phone types>)”,
after saying “Call a contact” say the name, or the name and
type of phone, of a contact.
For example: “Call a contact”, “John Smith” or “Call a
contact”, “Mary Davis”, “Mobile”
lThere are 3 types of phones: Home, Work and Mobile.
lShort or abbreviated names in the contacts list may not be
recognized. Change names in the contacts list to full names.
lSometimes a voice recognition result conrmation screen will be
displayed. After conrming the result, say “Yes” or “No”.
lWhen the system recognizes multiple names from the contacts
list, a name candidate list will be displayed on the screen. If the
desired name is not displayed on the top of the screen, say or
select the number of the name from the candidate list (number 1,
number 2, etc.) to select a name from the candidate list.
lWhen a contact has multiple phone numbers registered in the
contacts list, a candidate list will be displayed. If the desired
phone number is not displayed on the top of the screen, say
or select the number of the desired phone number from the
candidate list (number 1, number 2, etc.) to select a phone
number from the candidate list.
VOICE RECOGNITION SYSTEM OPERATION
196
VOICE COMMAND EXAMPLE: DIAL NUMBER
1. Press the talk switch.
2. Say “Dial <Number>”.
●Say the phone number one digit at a time.
For example, if the phone number is “4251231234”:
Say “four two ve one two three one two three
four”.
3. When the conrmation screen appears, say “Yes”,
select
Yes
(Yes), or press the switch on the
steering wheel.
●Try saying the complete number. If it is not
recognized, however, numbers can be added,
deleted, or changed.
VOICE COMMAND EXAMPLE: ENTERING
ADDRESS (TYPE A ONLY)
1. Press the talk switch.
2. Say “Navigate to <full address with city and state>”.
●Say the whole address without any pauses between
“<house number><street name><city and
state>”. If there are any pauses between parts of the
destination address, the system may not be able to
recognize voice command operation.
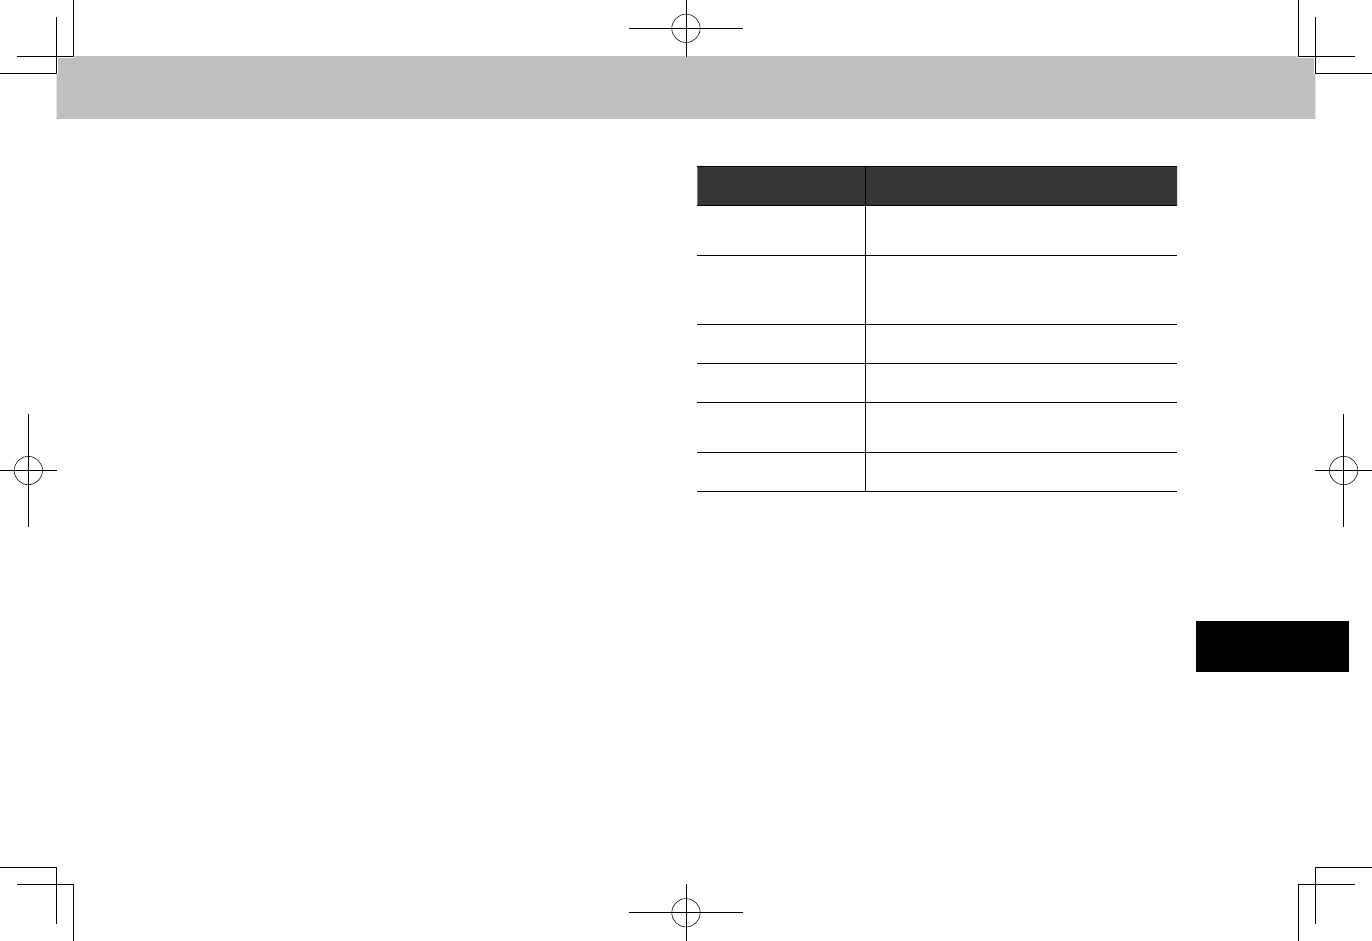
VOICE RECOGNITION SYSTEM OPERATION
197
Siri/VOICE RECOGNITION SYSTEM
8
COMMAND LIST
Recognizable voice commands and their actions are shown
below.
●Frequently used commands are listed in the following
tables.
●For devices that are not installed in the vehicle, the
related commands will not be displayed in the screen.
Also, according to conditions, other commands may
not be displayed in the screen.
●The functions available may vary according to the
system installed.
●Voice recognition language can be changed.
(→P.62)
NOTE
lThe notations used in the commands are as follows.
• [○○○]: Numbers, titles, or names to be spoken
• (○○○): Choose one of the command from within the brackets
XMain commands
Voice command Function
Enter an Address* Enables setting a destination by saying
the address
Navigate to [House
Number, Street, City,
State]*
Enables setting a destination by saying
the address with city and state
Call [Name] Place a call to the said contact name
Dial [Number] Places a call to the said phone number
Find Nearest [POI]* Displays a list of POI category near the
current position
Help Changes to help screen
*: Type A only
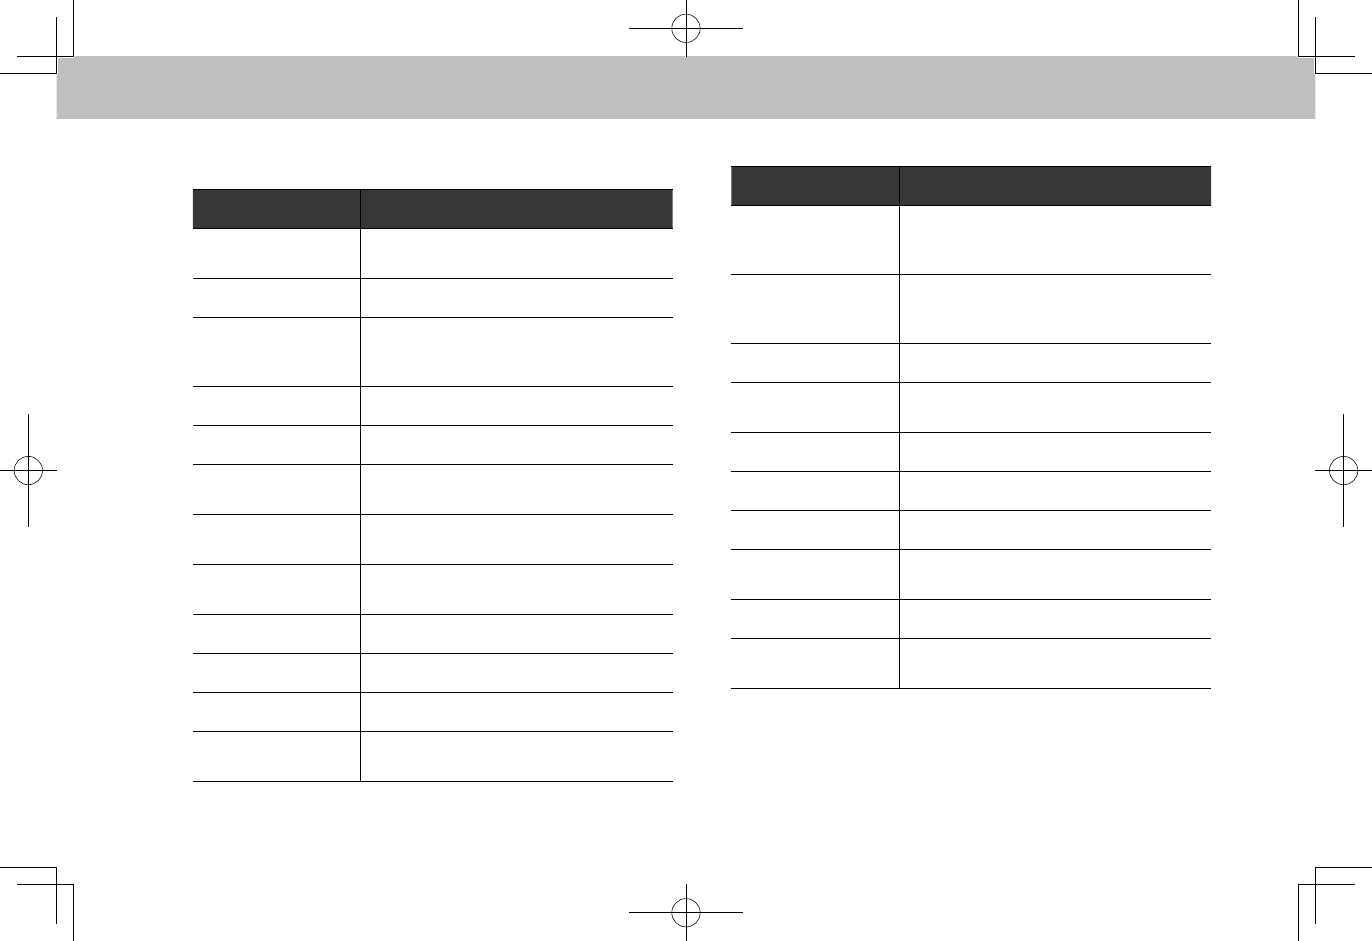
VOICE RECOGNITION SYSTEM OPERATION
198
XNavigation commands*
*: Type A only
Voice command Function
Enter an Address Enables setting a destination by saying
the address
Enter Country Enables setting the country
Navigate to [House
Number, Street, City,
State]
Enables setting a destination by saying
the address with city and state
Drive Home Displays the route to home
Drive to Work Displays the route to work
Find Nearest [POI] Displays a list of POI category near the
current position
Find Gas Station Displays the list of gas station near the
current position
Find Parking Lot Displays the list of parking lot near the
current position
Show Map Displays the map screen
Stop Route Cancels route guidance
Where am I Displays current location on map
Navigation Help Displays a list of voice commands related
to navigation
XPhone commands
Voice command Function
Send a Text
Message to [Name]
[Phone Type]
Send the preset message to the said
contact name and phone type of the
contact from the phonebook
Call [Name] [Phone
Type]
Place a call to the said contact name
and phone type of the contact from the
phonebook
Dial [Number] Places a call to the said phone number
Redial Places a call to the phone number of the
latest outgoing call
Paired Phones Displays the phone settings screen
Recent Calls Displays the call history screen
Missed Calls Displays the missed call list screen
Reply to Text
Message Reply to text message
View Text Messages Displays the message inbox screen
Phone help Displays a list of voice commands related
to controlling your phone
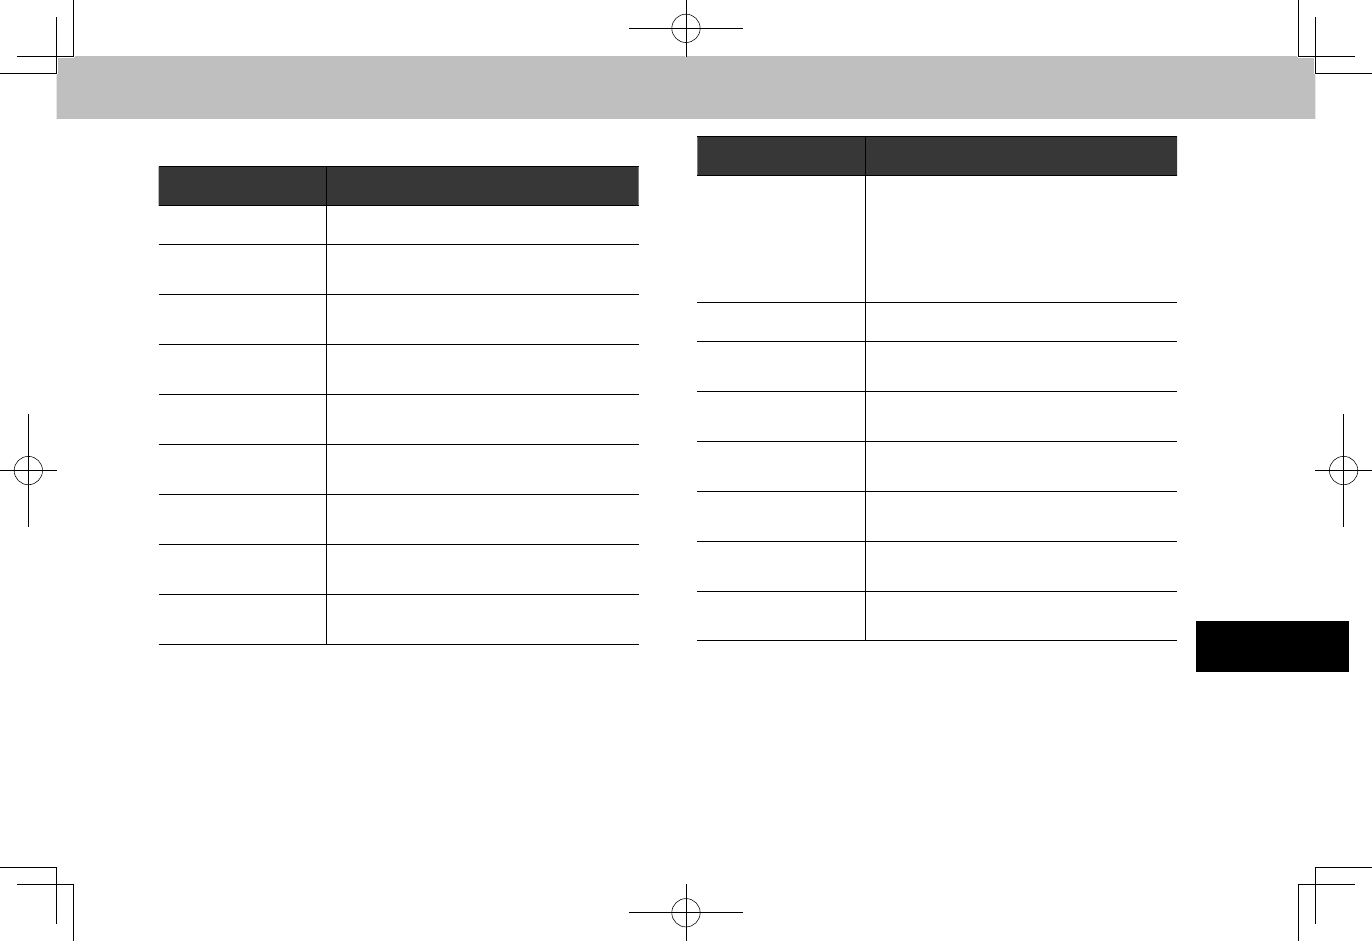
VOICE RECOGNITION SYSTEM OPERATION
199
Siri/VOICE RECOGNITION SYSTEM
8
XMedia commands
Voice command Function
Track [Number] Plays the selected track
Play Song [Song
Name] Plays the selected song
Play Album [Album
Name] Plays tracks from the selected album
Play Artist [Artist
Name] Plays tracks from the selected artist
Play Genre [Genre
Name] Plays tracks from the selected genre
Play Playlist [Playlist
Name] Plays tracks from the selected playlist
Play Podcast
[Podcast Name] Plays the selected podcast
Play Audiobook
[Book Name] Plays the selected audiobook
Play Composer
[Composer Name] Plays tracks from the selected composer
Voice command Function
Show (Songs/
Albums/Artists/
Genres/Playlists/
Podcasts/
Audiobooks/
Composers)
Displays the list of Songs/Albums/Artists/
Genres/Playlists/ Podcasts/Audiobooks/
Composers
Shufe (On/Off) Turn shufe on/off
Browse Album
[Album Name] Displays the list of songs of the album
Browse Artist [Artist
Name] Displays the list of albums of the artist
Browse Genre
[Genre Name] Displays the list of artists of genre
Browse Playlist
[Playlist Name] Displays the list of playlist
Browse Composer
[Composer Name]
Displays the list of albums from the
composer
Media Help Displays a list of commands related to
the radio
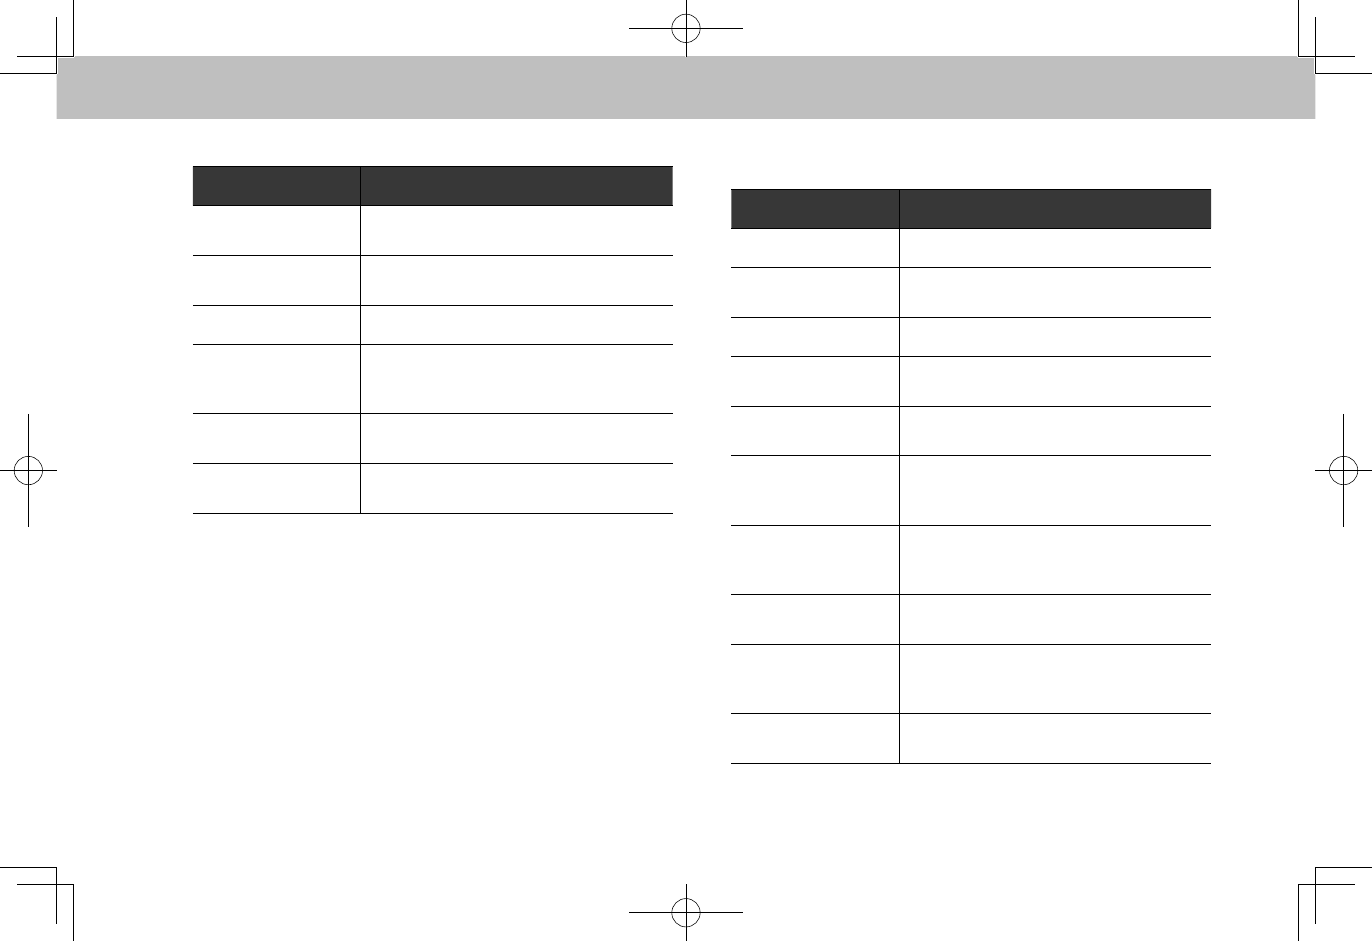
VOICE RECOGNITION SYSTEM OPERATION
200
XRadio commands
Voice command Function
Tune to [Frequency]
(FM/AM) Switches to FM/AM and tunes to said
frequency
Station [FM Station
Name] Switches to the spoken FM station
Preset [Number] Switches to the preset channel
Satellite Channel
[Name or Channel
Number]*
Switches to satellite channel number
Satellite Category
[Category Name]*
Displays the list of Satellite Channels of
the spoken category
Radio Help Displays a list of commands related to
the radio
*: Type A/B only
XClimate commands*
*: Type A/B only
Voice command Function
Auto AC (On/Off) Switches on the Auto AC mode On/Off
Max AC (On/Off) Switches on the Maximum AC mode On/
Off
Fan (On/Off) Turns Fan to Level 3/Off
Set Fan Speed to
[1-5]
Sets the Fan Speed to Spoken Fan
Speed
(Increase/Decrease)
Fan Speed Increments/Decrements Fan Speed
Set Driver
Temperature to
[Number]
Sets the Driver temperature to Spoken
Temperature
Set Passenger
Temperature to
[Number]
Sets the Passenger temperature to
Spoken Temperature
(Increase/ Decrease)
Driver Temperature Increments/Decrements Driver
temperature
(Increase/ Decrease)
Passenger
Temperature
Increments/Decrements Passenger
temperature
Set Temperature to
[Number]
Sets the temperature to Spoken
Temperature
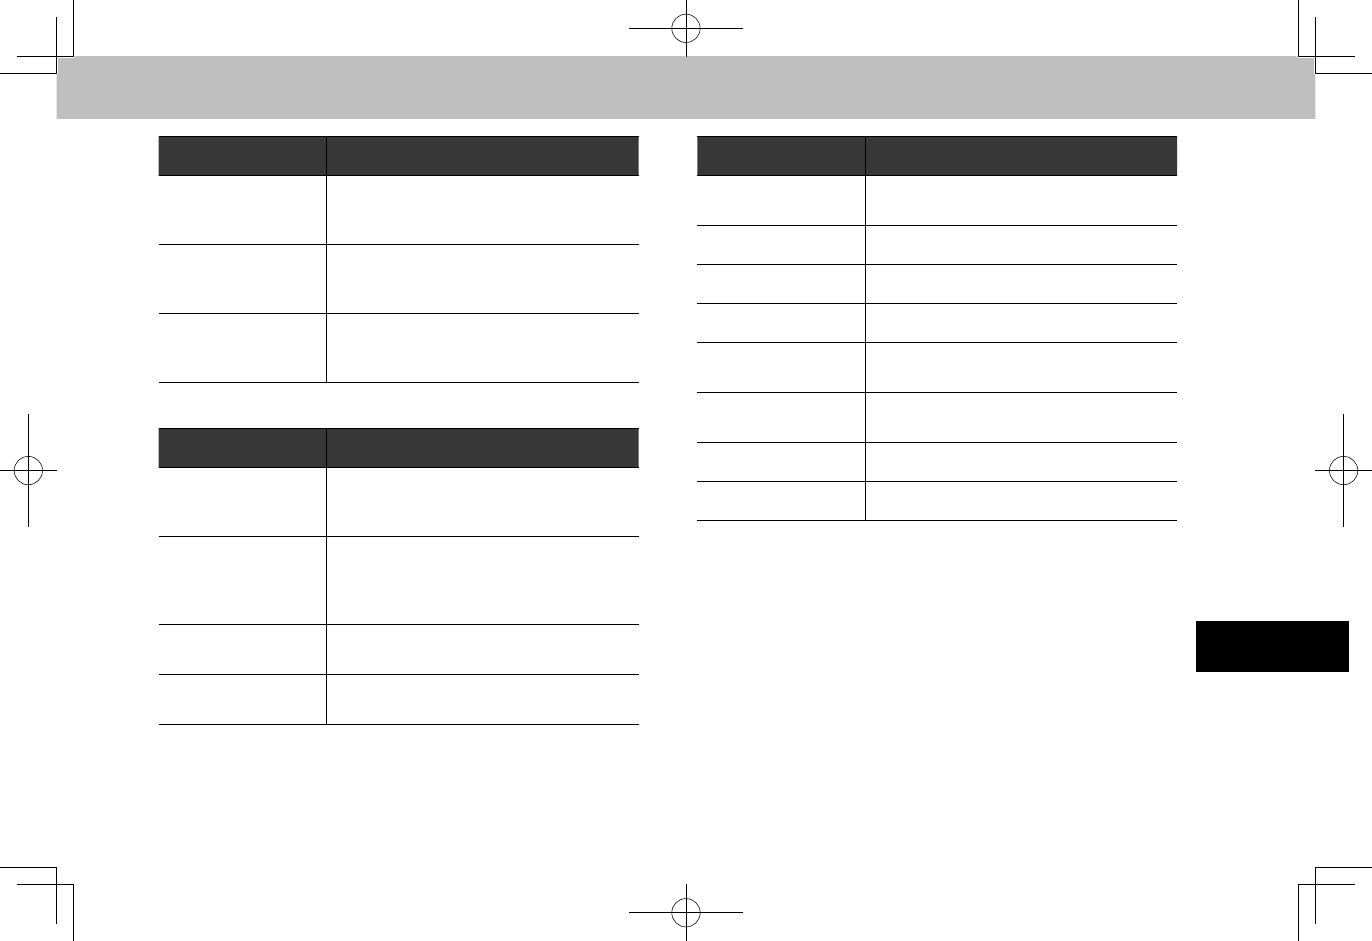
VOICE RECOGNITION SYSTEM OPERATION
201
Siri/VOICE RECOGNITION SYSTEM
8
Voice command Function
(Increase /
Decrease)
Temperature Increments/Decrements temperature
Set Both
Temperatures to
[Number]
Sets the Both temperature to Spoken
Temperature
(Increase /
Decrease) Both
Temperatures
Increments/Decrements Both
temperature
XMore commands
Voice command Function
Change Source to
(AM/FM/USB/ iPod/
Bluetooth/ Auxiliary)
Changes source to AM/FM/USB/ iPod/
Bluetooth/ Auxiliary
Go to (Radio/Media/
Phone/CarPlay/
Android Auto/Home/
Settings/Apps)
Changes screen to Radio/Media/Phone/
CarPlay/Android Auto/Home/Settings/
Apps
Gas Prices*1Changes screen to TravelLink Fuel
Prices
Sports Scores*1Changes screen to TravelLink Sports
Scores
Voice command Function
Stocks*1Changes screen to TravelLink Stock
Prices
Weather*1Changes screen to TravelLink Weather
Go to Aha Changes screen to Aha
Go to Pandora*2Changes screen to Pandora
Go to CarPlay Changes screen to carplay auto
projection mode
Go to Android Auto Changes screen to android auto
projection mode
Repeat Play back last dialog prompt
Cancel Cancels current dialog session
*1: Type A/B only
*2: Pandora is available in the United States, Australia, and New Zealand.

MEMO
202
203
APPENDIX/WHAT TO
DO IF/INDEX
9
9
MAP DATABASE INFORMATION AND UPDATES (TYPE A ONLY)
204
MAP DATABASE INFORMATION AND UPDATES (TYPE A ONLY)
MAP DATABASE INFORMATION AND UPDATES (TYPE A ONLY)
205
APPENDIX/WHAT TO DO IF/INDEX
9
MAP DATABASE INFORMATION AND UPDATES (TYPE A ONLY)
206
CERTIFICATION
207
APPENDIX/WHAT TO DO IF/INDEX
9
CERTIFICATION
CERTIFICATION
SiriusXM® Satellite Radio (TYPE A/B ONLY)
●© 2013 SiriusXM Radio Inc. Sirius, XM and all related
marks and logos are trademarks of SiriusXM Radio
Inc. All other marks, channel names and logos are the
property of their respective owners.
SiriusXM DATA SERVICE (TYPE A/B ONLY)
Neither SiriusXM nor Subaru is responsible for any errors
or inaccuracies in the SiriusXM data services or its use in
vehicle.
RADIO WAVE COMMUNICATIONS
XU.S.A.
● FCC ID: 2AHPN-BE2820
●This device complies with part 15 of the FCC Rules.
Operation is subject to the following two conditions: (1)
This device may not cause harmful interference, and
(2) this device must accept any interference received,
including interference that may cause undesired
operation.
WARNING
lFCC WARNING
Changes or modications not expressly approved by the party
responsible for compliance could void the user’s authority to
operate the equipment.
lCAUTION: Radio Frequency Radiation Exposure
This equipment complies with FCC radiation exposure limits
set forth for an uncontrolled environment and meets the FCC
radio frequency (RF) Exposure Guidelines. This equipment
should be installed and operated keeping the radiator at
least 20cm or more away from person’s body in normal use
position.
lCo-location: This transmitter must not be co-located or
operated in conjunction with any other antenna or transmitter.
CERTIFICATION
208
XCanada
● IC: 6434C-BE2819
●This device complies with Industry Canada licence-
exempt RSS standard(s). Operation is subject to the
following two conditions: (1) this device may not cause
interference, and (2) this device must accept any
interference, including interference that may cause
undesired operation of the device.
Le présent appareil est conforme aux CNR d’Industrie
Canada applicables aux appareils radio exempts de
licence. L’exploitation est autorisée aux deux conditions
suivantes : (1) l’appareil ne doit pas produire de
brouillage, et (2) l’utilisateur de l’appareil doit accepter
tout brouillage radioélectrique subi, même si le brouillage
est susceptible d’en compromettre le fonctionnement.
WARNING
lCAUTION: Radio Frequency Radiation Exposure
This equipment complies with IC radiation exposure limits set
forth for an uncontrolled environment and meets RSS-102 of
the IC radio frequency (RF) Exposure rules. This equipment
should be installed and operated keeping the radiator at
least 20cm or more away from person’s body (excluding
extremities: hands, wrists, feet and ankles).
ATTENTION : l’exposition aux rayonnements radiofréquence
- Cet équipement est conforme aux limites d’exposition
aux rayonnements énoncées pour un environnement non
contrôlé et respecte les règles d’exposition aux fréquences
radioélectriques (RF) CNR-102 de l’IC. Cet équipement doit
être installé et utilisé en gardant une distance de 20cm ou
plus entre le dispositif rayonnant et le corps (à l’exception des
extrémités : mains, poignets, pieds et chevilles).
CERTIFICATION
209
APPENDIX/WHAT TO DO IF/INDEX
9
XMéxico
●RCPFUFT14-1151
●La operación de este equipo está sujeta a las siguientes
dos condiciones: (1) es posible que este equipo o
dispositivo no cause interferencia perjudicial y (2) este
equipo o dispositivo debe aceptar cualquier interferencia,
incluyendo la que pueda causar su operación no
deseada.
Gracenote (TYPE A/B ONLY)
●Gracenote®, Gracenote logo and logotype, and the
“Powered by Gracenote” logo are either registered
trademarks or trademarks of Gracenote, Inc. in the United
States and/or other countries.
●Music and recognition technology and related data are
provided by Gracenote®.
Gracenote is the industry standard in music recognition
technology and related content delivery.
For more information, please visit www.gracenote.com.
CERTIFICATION
210
Bluetooth
●The Bluetooth® word mark and logos are registered
trademarks owned by Bluetooth SIG, Inc. and any use of
such marks by Fujitsu Ten Limited is under license. Other
trademarks and trade names are those of their respective
owners.
CERTIFICATION
211
APPENDIX/WHAT TO DO IF/INDEX
9
iPod
●“Made for iPod” and “Made for iPhone” mean that an
electronic accessory has been designed to connect
specically to iPod or iPhone respectively, and has been
certied by the developer to meet Apple performance
standards.
●Apple is not responsible for the operation of this device
or its compliance with safety and regulatory standards.
Please note that the use of this accessory with iPod or
iPhone may affect wireless performance.
●iPhone, iPod, iPod classic, iPod nano, and iPod touch are
trademarks of Apple Inc., registered in the U.S. and other
countries. Lightning is a trademark of Apple Inc.
●App Store is a service mark of Apple Inc.
MirrorLinkTM (TYPE A/B ONLY)
● MirrorLink Certied™, the Design Only™ Certication
Logo, MirrorLink™ and the MirrorLink™ Logo are
certication marks and trademarks of the Car Connectivity
Consortium LLC. Unauthorized use is strictly prohibited.
Pandora
●Pandora, the Pandora logo, and the Pandora trade dress
are trademarks or registered trademarks of Pandora
Media, Inc. Used with permission.
Google
●Google Play is a trademark of Google Inc.

HOW TO GET THE SOURCE CODE USING THE OPEN SOURCE
212
HOW TO GET THE SOURCE CODE USING THE OPEN SOURCE
This system implements software using the open source.
For customers who would like to get the source code of the
software, it is available by downloading it from the web site
of Clarion, Co., Ltd.
For details, refer to the following web site.
http://www.clarion.com/us/en/support/index.html
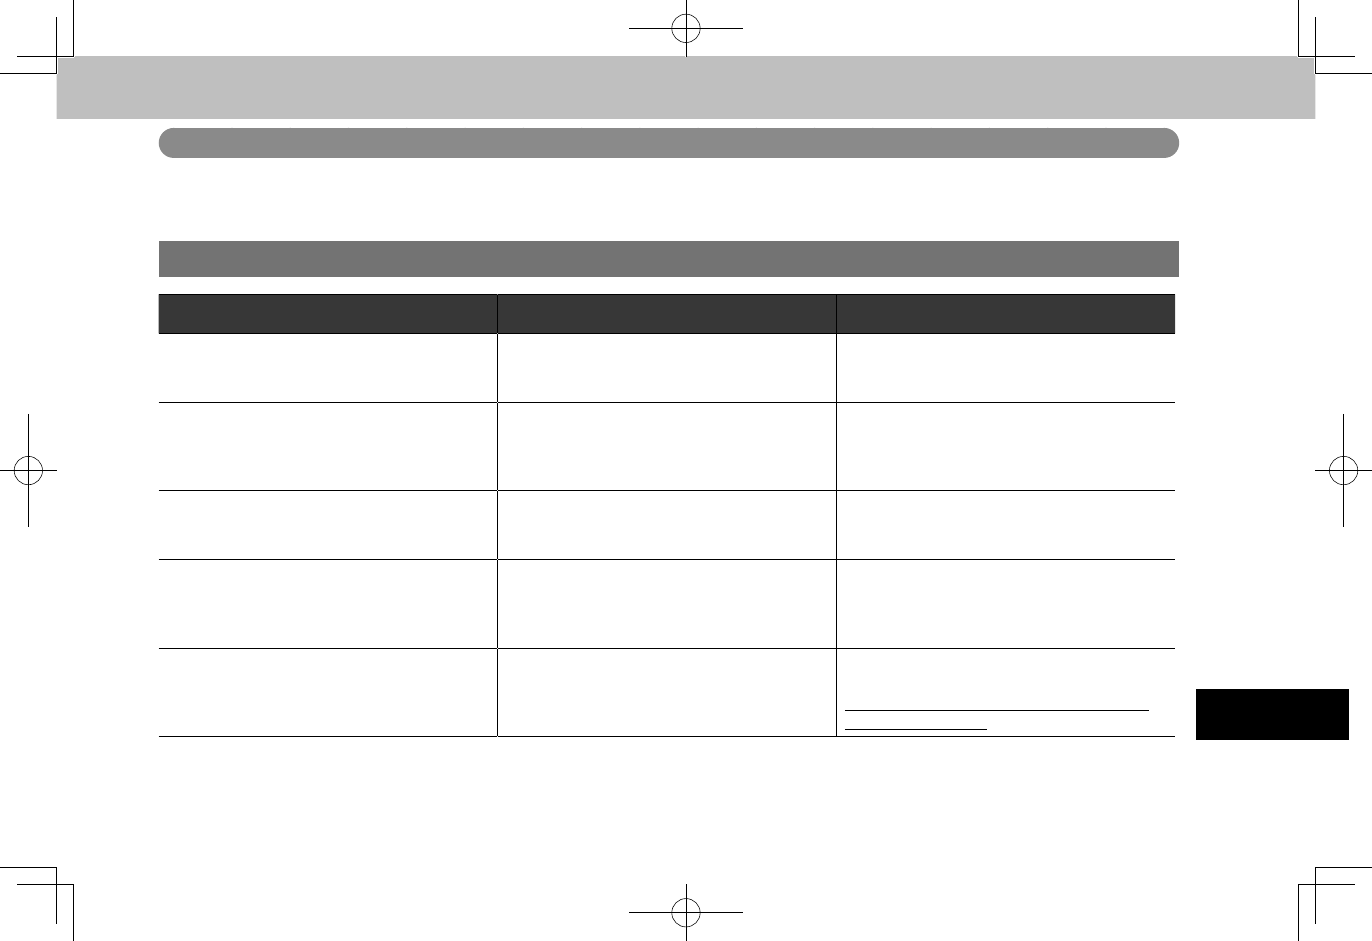
WHAT TO DO IF
213
APPENDIX/WHAT TO DO IF/INDEX
9
WHAT TO DO IF
TROUBLESHOOTING
RADIO OPERATION (TYPE A/B ONLY)
Experience Cause Action
Mismatch of time alignment- a user may hear
a short period of programming replayed or an
echo, stutter or skip.
The radio stations analog and digital volume
is not properly aligned or the station is in
ballgame mode.
None, radio broadcast issue. A user can
contact the radio station.
Sound fades, blending in and out. Radio is shifting between analog and digital
audio.
Reception issue, may clear-up as the vehicle
continues to be driven. Turning the indicator
of the HD Radio button off can force radio in
an analog audio.
Audio mute condition when an HD2/HD3
multicast channel had been playing. The radio does not have access to digital
signals at the moment.
This is normal behavior, wait until the digital
signal returns. If out of the coverage area,
seek a new station.
Audio mute delay when selecting an HD2/
HD3 multicast channel preset.
The digital multicast content is not available
until HD Radio™ broadcast can be decoded
and make the audio available. This takes up
to 7 seconds.
This is normal behavior, wait for the audio to
become available.
Text information does not match the present
song audio. Data service issue by the radio broadcaster.
Broadcaster should be notied. Complete
the form;
www.ibiquity.com/automotive/report_radio_
station_experiences.
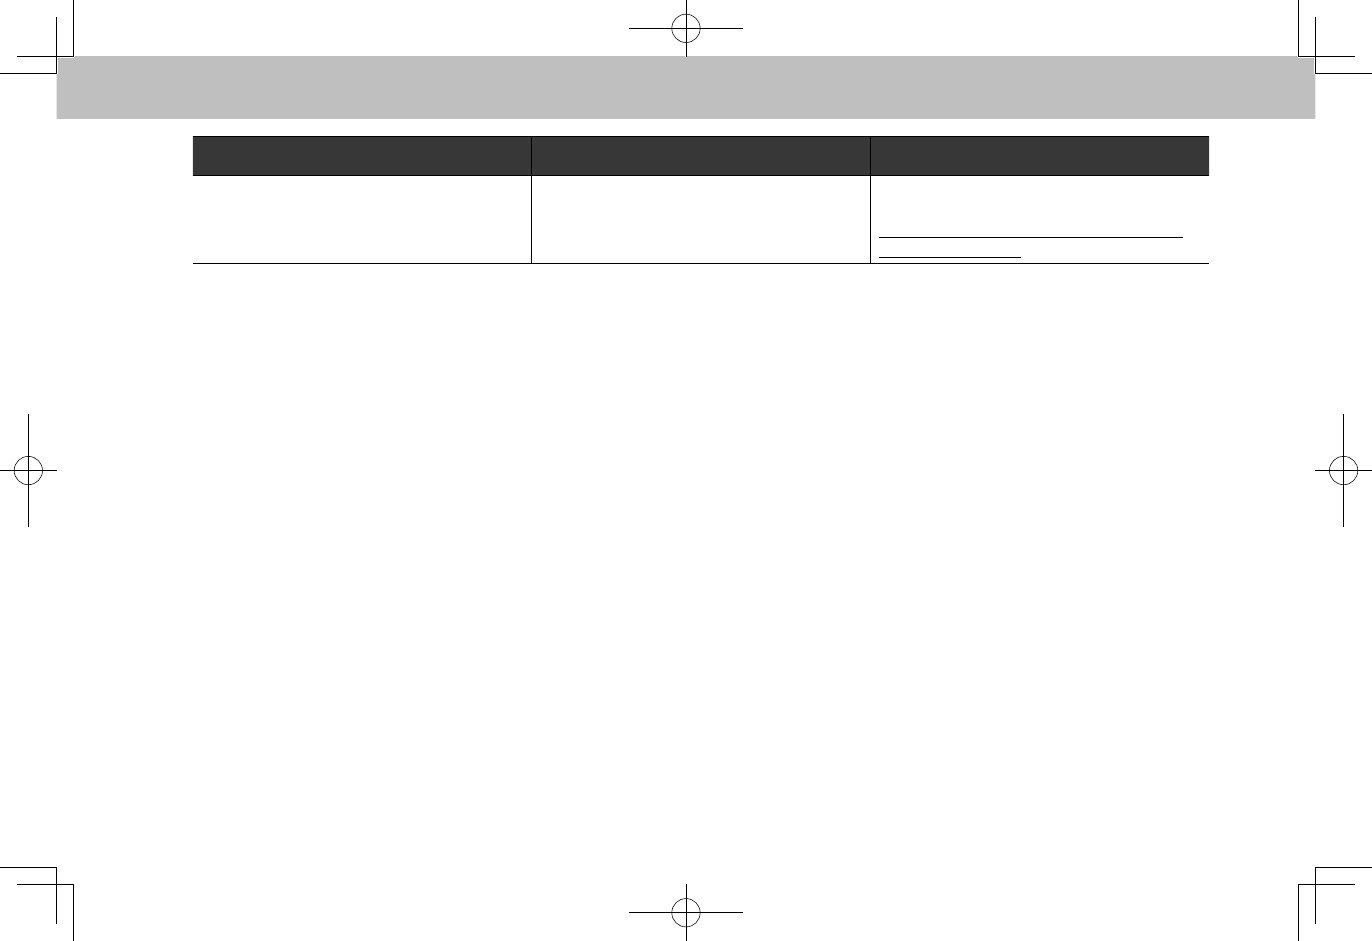
WHAT TO DO IF
214
Experience Cause Action
No text information shown for the present
selected frequency. Data service issue by the radio broadcaster.
Broadcaster should be notied. Complete
the form;
www.ibiquity.com/automotive/report_radio_
station_experiences.
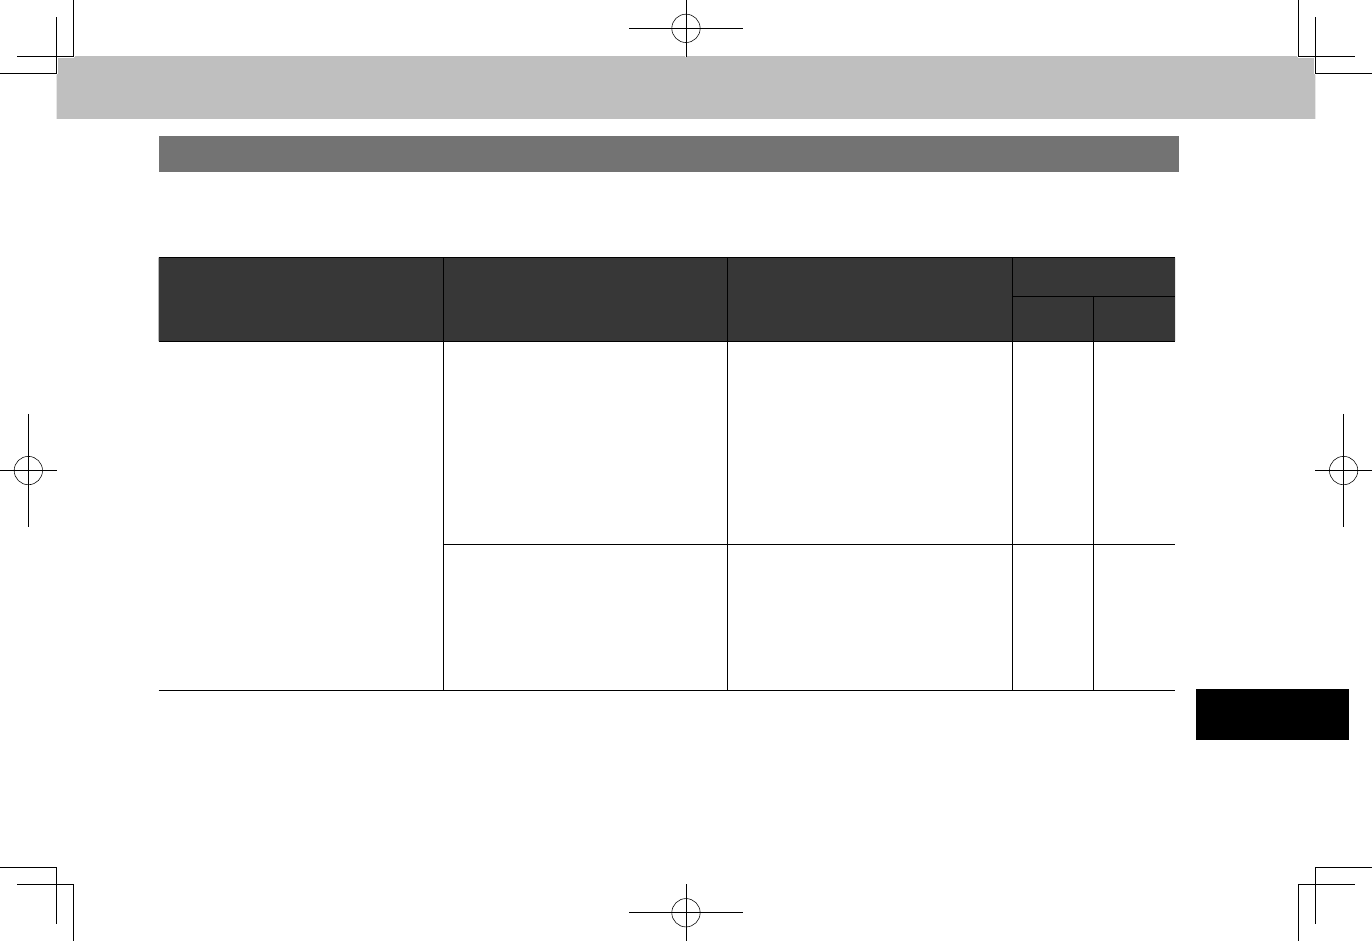
WHAT TO DO IF
215
APPENDIX/WHAT TO DO IF/INDEX
9
PHONE
If there is a problem with the hands-free system or a Bluetooth device, rst check the table below.
XWhen using the hands-free system with a Bluetooth device
Symptom Likely cause Solution
Page
Cellular
phone This
system
The hands-free system or Bluetooth
device does not work.
The connected device may not be a
compatible Bluetooth cellular phone.
For a list of specic devices which
operation has been conrmed on this
system.
For USA customers, please visit
www.subaru.com for details.
Outside of the USA customers,
contact your local dealer to arrange
a demonstration in order to conrm
whether or not the phone can be
paired with the vehicle.
* 55
The Bluetooth version of the
connected cellular phone may be
older than the specied version.
Use a cellular phone with Bluetooth
version 1.1 or higher.
Recommended:
• Type A/B only: Ver. 3.0 +EDR or
higher
• Type C only: Ver. 2.1 +EDR or
higher
* 55
*: For details, refer to the owner’s manual that came with the cellular phone.
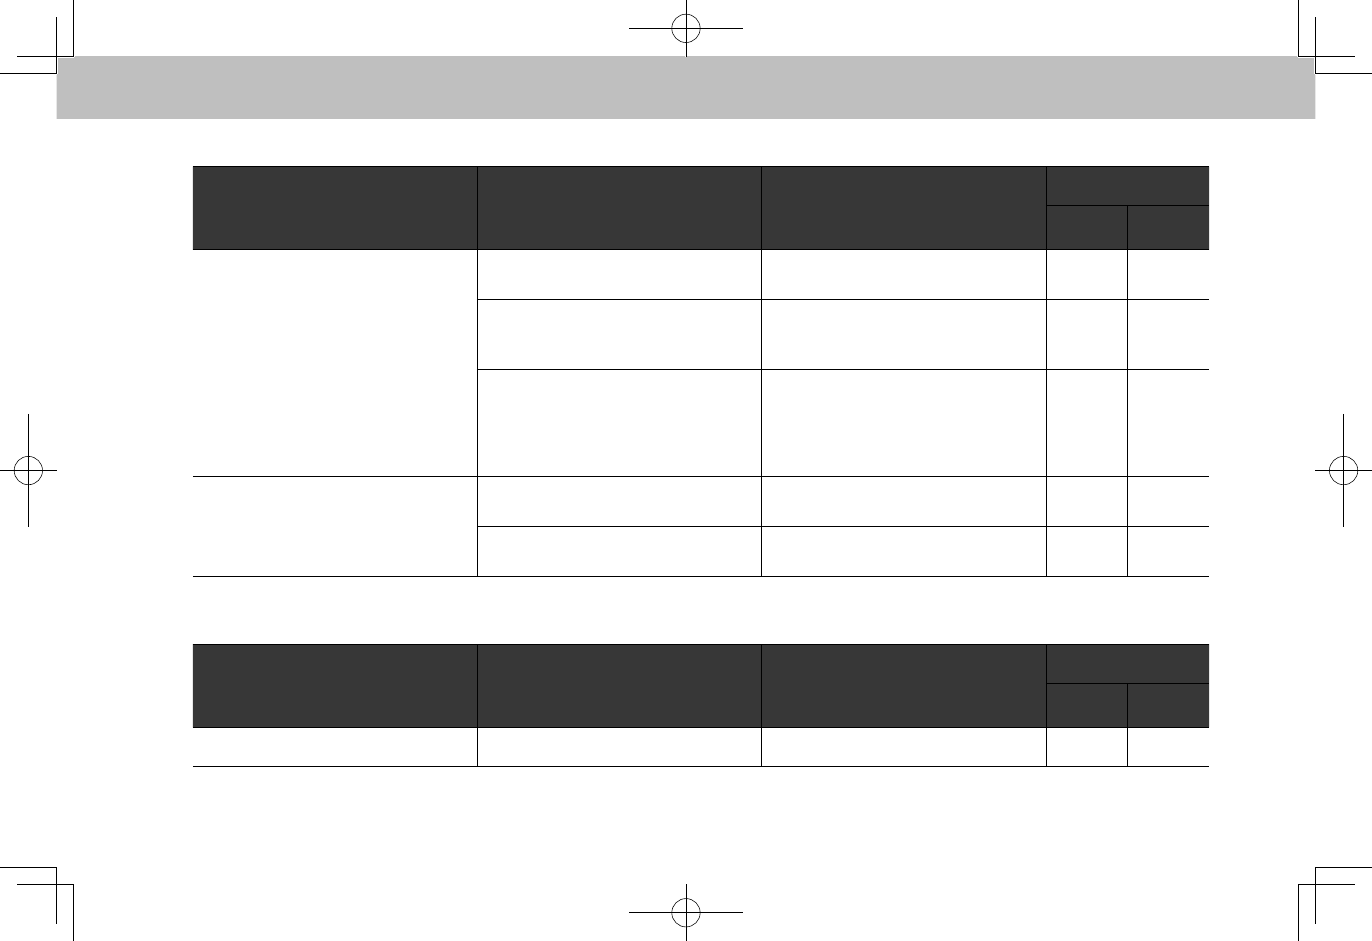
WHAT TO DO IF
216
XWhen registering/connecting a cellular phone
Symptom Likely cause Solution
Page
Cellular
phone This
system
A cellular phone cannot be
registered.
An incorrect passcode was entered
on the cellular phone. Enter the correct passcode on the
cellular phone. * -
The registration operation has not
been completed on the cellular phone
side.
Complete the registration operation
on the cellular phone (approve
registration on the phone). * -
Old registration information remains
on either this system or the cellular
phone.
Delete the existing registration
information from both this system and
the cellular phone, then register the
cellular phone you wish to connect to
this system.
* 59
A Bluetooth connection cannot be
made.
Another Bluetooth device is already
connected. Manually connect the cellular phone
you wish to use to this system. - 57
Bluetooth function is not enabled on
the cellular phone. Enable the Bluetooth function on the
cellular phone. * -
*: For details, refer to the owner’s manual that came with the cellular phone.
XWhen making/receiving a call
Symptom Likely cause Solution
Page
Cellular
phone This
system
A call cannot be made/received. Your vehicle is in a “No Service” area. Move into the service area. - -
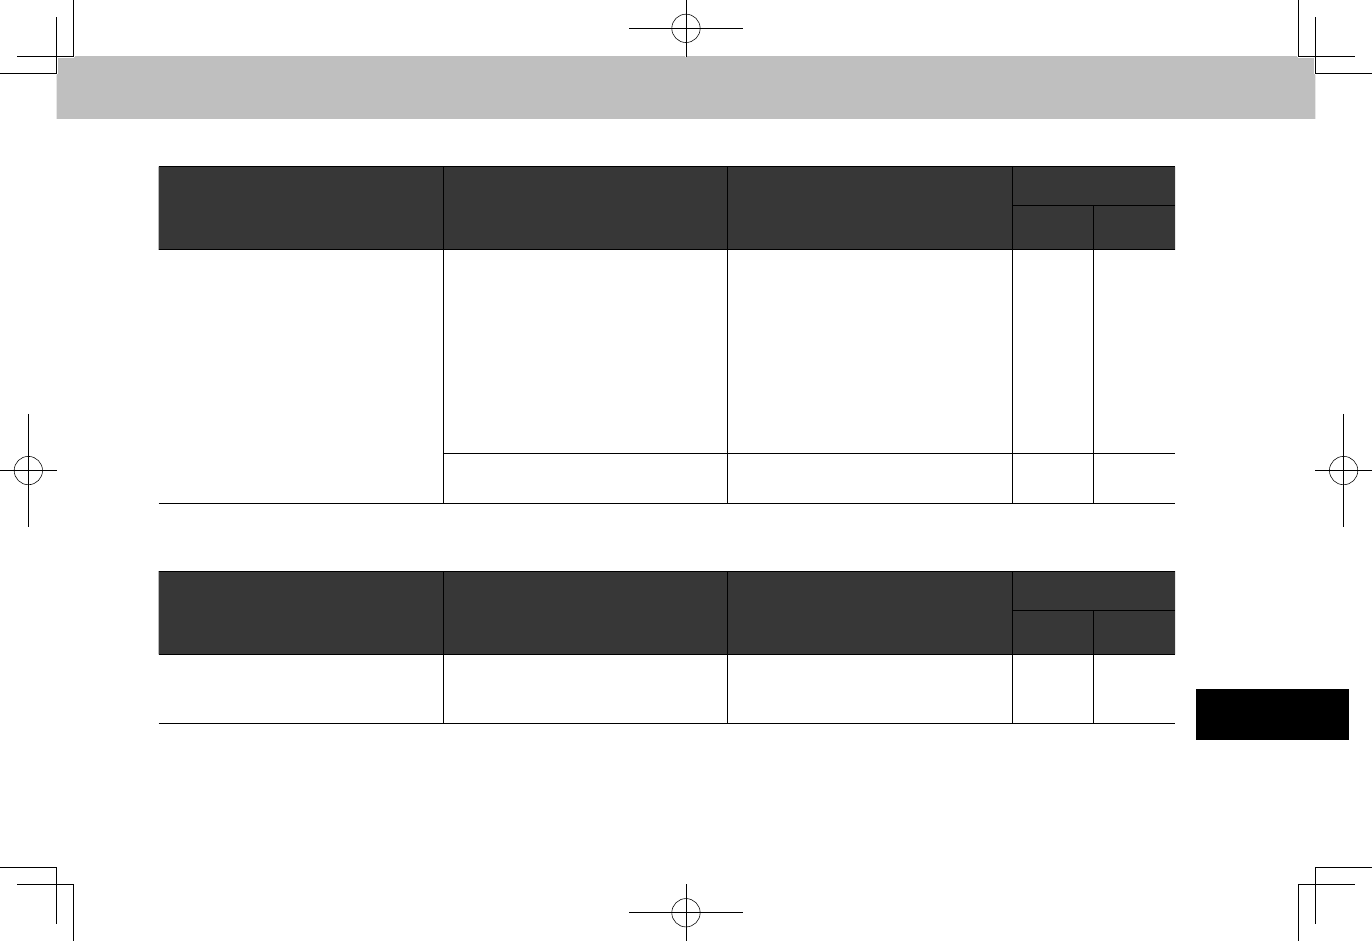
WHAT TO DO IF
217
APPENDIX/WHAT TO DO IF/INDEX
9
XWhen using the phonebook
Symptom Likely cause Solution
Page
Cellular
phone This
system
Phonebook data cannot be
transferred automatically.
The prole version of the connected
cellular phone may not be compatible
with transferring phonebook data.
For a list of specic devices which
operation has been conrmed on this
system.
For USA customers, please visit
www.subaru.com for details.
Outside of the USA customers,
contact your local dealer to arrange
a demonstration in order to conrm
whether or not the phone can be
paired with the vehicle.
* 55
Automatic contact transfer function
on this system is set to off. Set automatic contact transfer
function on this system to on. - 59
*: For details, refer to the owner’s manual that came with the cellular phone.
XWhen using the Bluetooth message function
Symptom Likely cause Solution
Page
Cellular
phone This
system
Messages cannot be viewed. Message transfer is not enabled on
the cellular phone.
Enable message transfer on the
cellular phone (approve message
transfer on the phone). * -
*: For details, refer to the owner’s manual that came with the cellular phone.
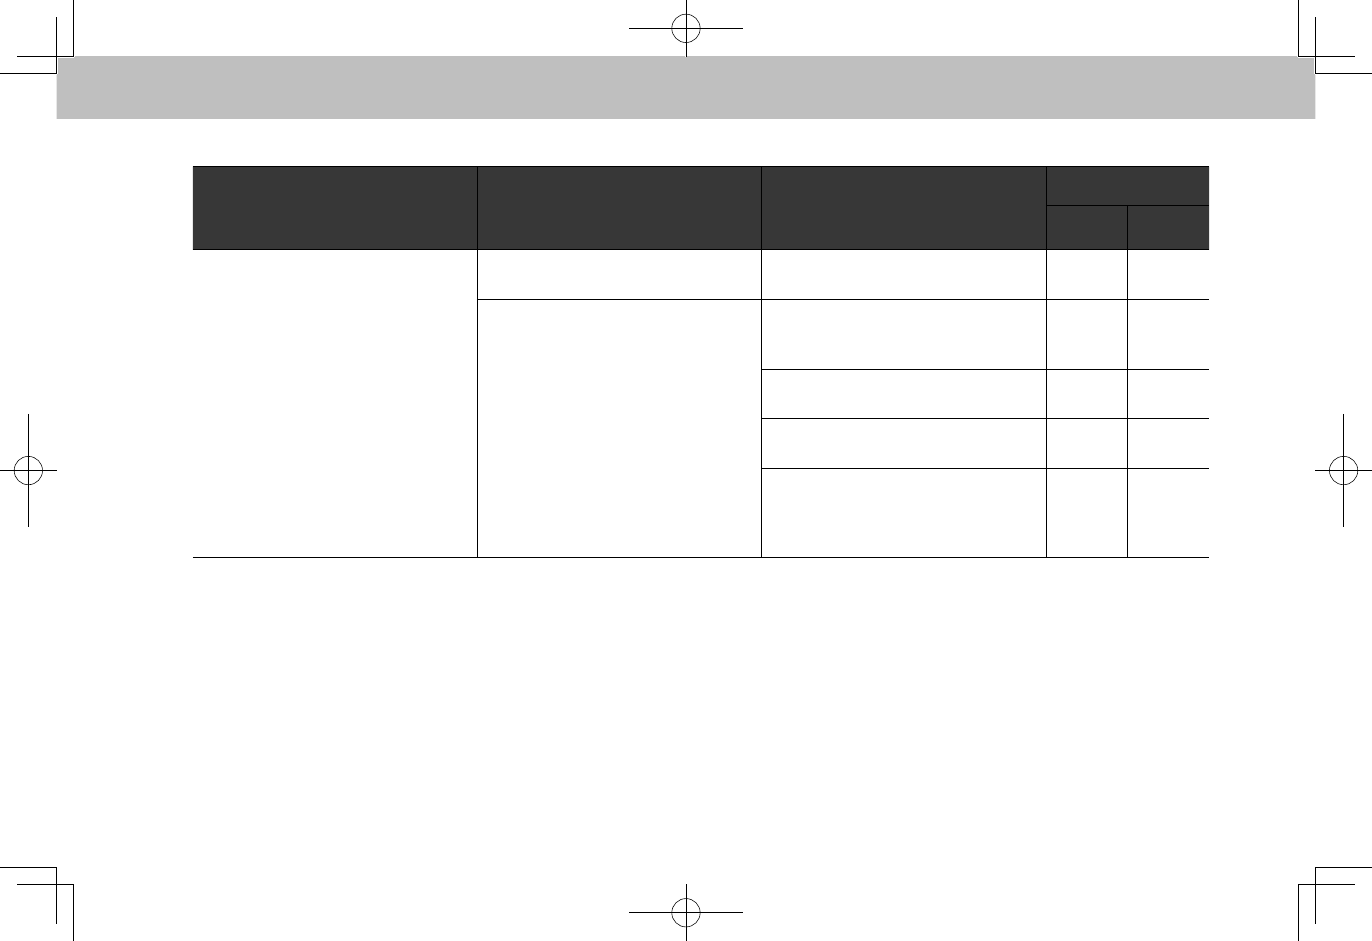
WHAT TO DO IF
218
XIn other situations
Symptom Likely cause Solution
Page
Cellular
phone This
system
Even though all conceivable
measures have been taken, the
symptom status does not change.
The cellular phone is not close
enough to this system. Bring the cellular phone closer to this
system. - -
The cellular phone is the most likely
cause of the symptom.
Turn the cellular phone off, remove
and reinstall the battery pack, and
then restart the cellular phone. * -
Enable the cellular phone’s Bluetooth
connection. * -
Stop the cellular phone’s security
software and close all applications. * -
Before using an application installed
on the cellular phone, carefully check
its source and how its operation
might affect this system.
* -
*: For details, refer to the owner’s manual that came with the cellular phone.

ERROR MESSAGES
219
APPENDIX/WHAT TO DO IF/INDEX
9
ERROR MESSAGES
If the following messages appear, check by referring to the cause and action below.
Mode Message Cause Action
FM radio “No stations available.
(No stations available.)” Displayed when the FM radio signal
is lost (while accessing). Try to receive the signal again in a
location free from obstructions.
HD Radio*1
“No HD Radio signal available.
(No HD Radio signal available.)” The HD Radio reception is poor. Try to receive the signal again in a
location free from obstructions.
“No channels available.
(No channels available.)” Displayed when the HD Radio signal
is lost (while accessing). Try to receive the signal again in a
location free from obstructions.
“Saving the HD Radio tag was
unsuccessful.
(Saving the HD Radio tag was
unsuccessful.)”
Failed to save the tag information. Acquire the tag information again.
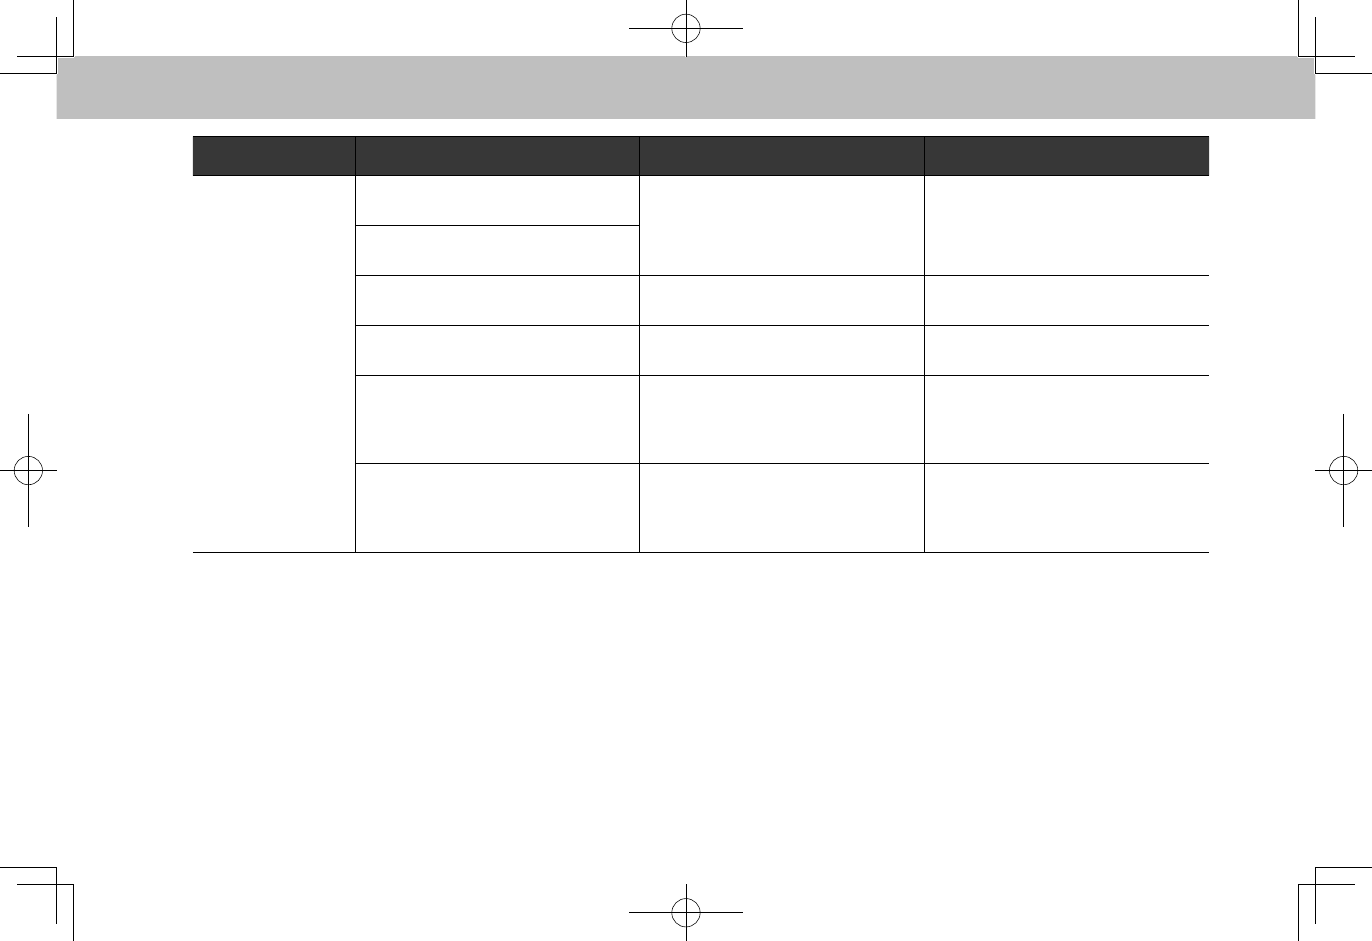
ERROR MESSAGES
220
Mode Message Cause Action
SiriusXM®*1
“Check Antenna
(Check Antenna)” The SiriusXM antenna is not
connected. Check whether the SiriusXM antenna
cable is attached securely.
“Antenna Disconnected (Antenna
Disconnected)”
“Antenna Shorted (Antenna Shorted)” A short circuit occurs in the antenna
or the surrounding antenna cable.
See a SUBARU certied dealer for
assistance.
“No Signal (No Signal)” The SiriusXM signal is too weak at
the current location. Wait until your vehicle reaches a
location with a stronger signal.
“Ch Unavailable (Ch Unavailable)” The channel you selected is no
longer available.
Wait for a few seconds until the
radio returns to the previous channel
or “Ch 001”. If it does not change
automatically, select another channel.
“Ch Unsubscribed (Ch
Unsubscribed)”
The current radio station is no longer
available due to changes in the
contract status.
Wait for a few seconds until the
radio returns to the previous channel
or “Ch 001”. If it does not change
automatically, select another channel.
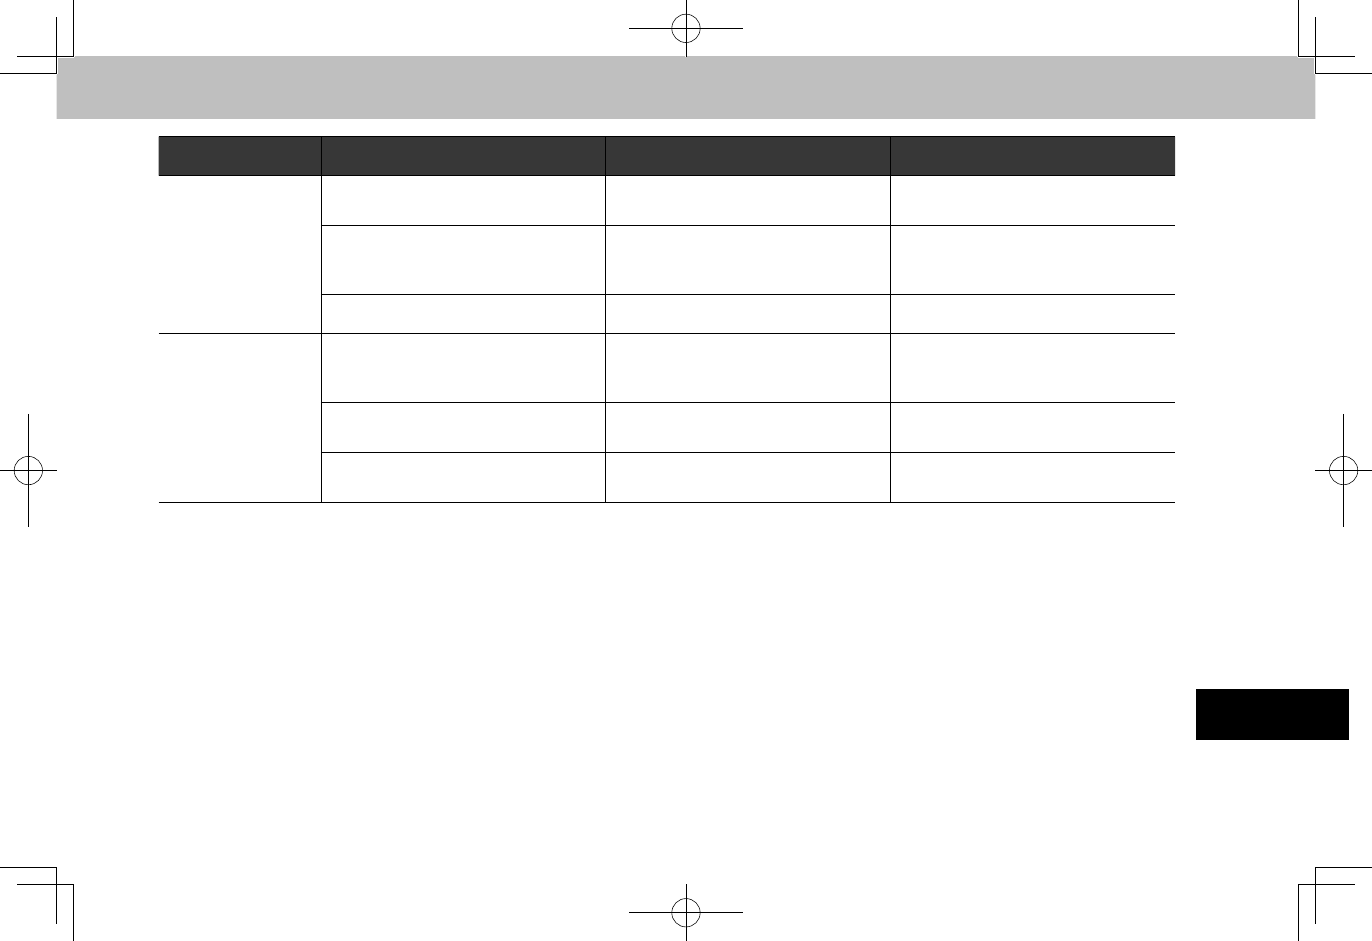
ERROR MESSAGES
221
APPENDIX/WHAT TO DO IF/INDEX
9
Mode Message Cause Action
CD*1
“No music les found. (No music les
found.)” This indicates that no MP3/WMA/
AAC les are included in the disc.
Insert a disc on which playable music
data is recorded.
“Check DISC (Check DISC)” It indicates that the disc is dirty,
damaged, or it was inserted upside
down. Clean the disc or insert it correctly.
“DISC Error (DISC Error)” There is a trouble inside the system. Eject the disc.
USB
“No music les found. (No music les
found.)”
This indicates that no MP3/WMA/
AAC les are included in the USB
memory.
Connect a USB memory in which
playable music data is stored.
“No video les found. (No video les
found.)” This indicates that there is no video
data in the USB memory. Connect a USB memory in which
playable video data is stored.
“USB Error (USB Error)” Because an over current was
detected. Stop using the device for a short time
and then try again.

ERROR MESSAGES
222
Mode Message Cause Action
iPod
“No music les found.
(No music les found.)”
This indicates that there is no music
data in the iPod. Connect a iPod in which playable
music data is stored.
“iPod Error.
(iPod Error.)”
• Playback failure or communication
abnormality.
• Because an over current was
detected.
• Connect a iPod correctly.
(→P.39)
• Stop using the device for a short
time and then try again.
“Please check the iPod rmware
version.
(Please check the iPod rmware
version.)”
This indicates that the software
version is not compatible.
Perform the iPod rmware updates
and try again.
“iPod authorization has failed.
(iPod authorization has failed.)” This indicates that it failed to
authorize the iPod. Please check your iPod.
“iPod storage is full. Tags cannot be
stored.
(iPod storage is full. Tags cannot be
stored.)”
There is no space remaining in the
iPod memory. Connect an iPod with space
remaining in its memory.
Bluetooth Audio
“Music tracks not supported. Please
check your audio player. (Music
tracks not supported. Please check
your audio player.)”
A device that is incompatible with
audio playback was connected.
• Check the device settings.
• Connect a device that is compatible
with audio playback.

ERROR MESSAGES
223
APPENDIX/WHAT TO DO IF/INDEX
9
Mode Message Cause Action
SUBARU
STARLINK*1
Please disconnect mobile device
and install the SUBARU STARLINK
application on your mobile device and
try again.
Bluetooth disconnected, please
reconnect and try again.
Smartphone data connection is poor,
please try to connect again.
• The SUBARU STARLINK
application has not been installed
on your smartphone.
• Your smartphone power was turned
OFF.
• The Bluetooth connection has been
lost.
• The signal quality is weak.
• Lines are congested.
• Install the SUBARU STARLINK
application.
• Turn ON the your smartphone
power.
• Check the Bluetooth connection.
• Move the car and connect to
SUBARU STARLINK again.
• Wait a short while and connect to
SUBARU STARLINK again.
• Start the SUBARU STARLINK
application on your smartphone,
check the service availability, and
then reconnect.
aha
“Information acquisition error.
(Information acquisition error.)” When not able to get the requested
information. Please try again (Refresh etc.) later
or reconnect it.
“Poor wireless reception. (Poor
wireless reception.)” When a communication error has
been detected. Please try again in a better
communications environment.
“Entry not recognized. (Entry not
recognized.)” When an invalid operation has been
executed. Please try again (Refresh etc.) later
or reconnect it.
“The station list cannot be acquired.
(The station list cannot be acquired.)” When not able to get the station
information. Please try again (Refresh etc.) later
or reconnect it.
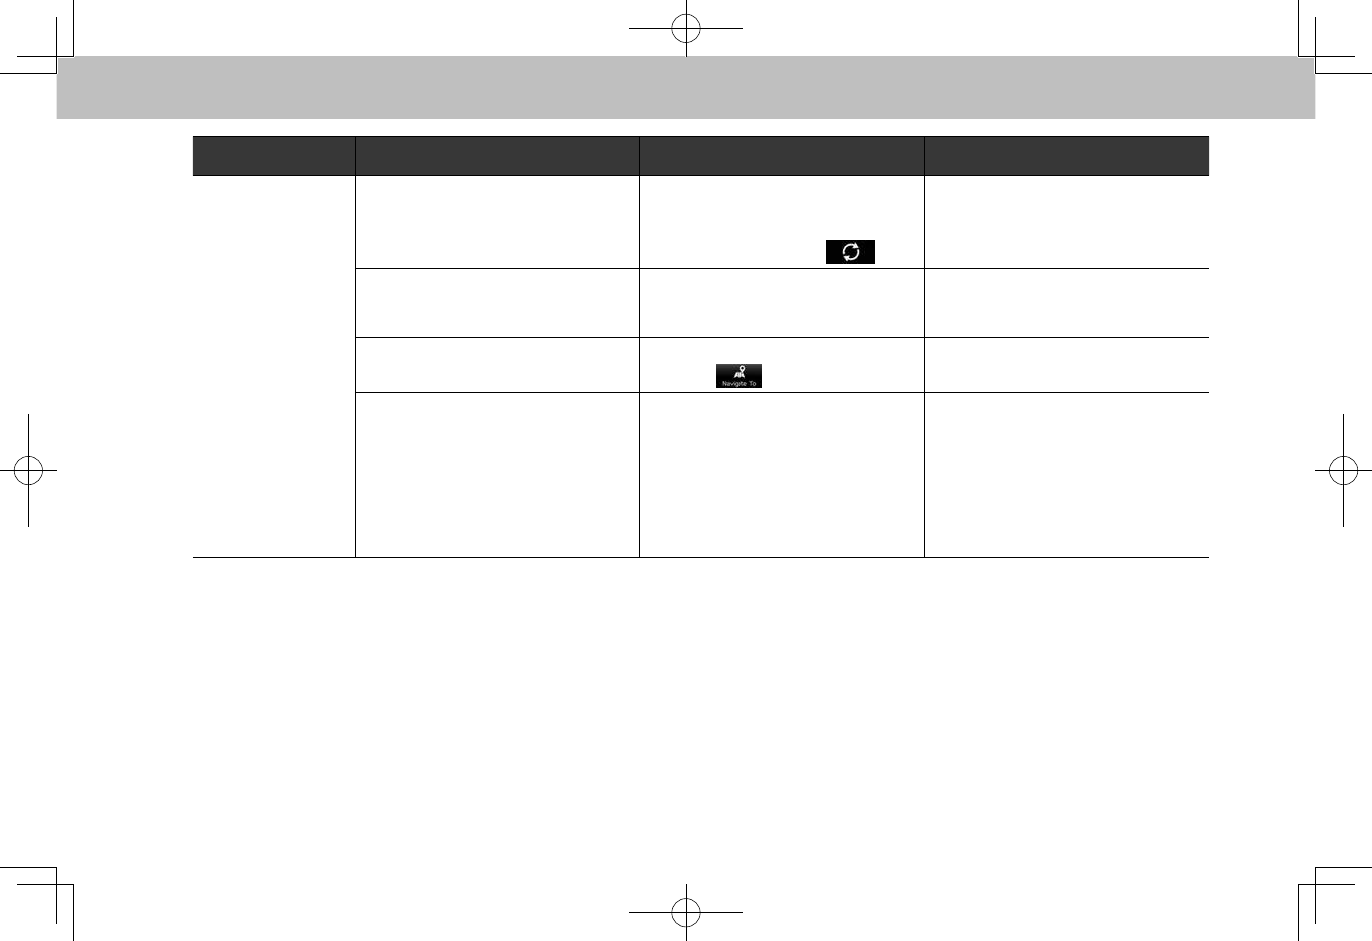
ERROR MESSAGES
224
Mode Message Cause Action
aha
“The content cannot be acquired.
(The content cannot be acquired.)”
• When not able to get the content
information.
• When not able to switch to the Top
content when selecting .
• Please try again (Refresh etc.) later
or reconnect it.
• Select the desired station again
when the station list appears.
“Action not available. (Action not
available.)”
When content-specic operations
such as “fast forward” or “rewind” are
not available.
Please try again (Refresh etc.) later
or reconnect it.
“Failed. (Failed.)” When data transmission failed when
selecting .Please try again later.
“aha communication error - Please
check Owner’s Manual. (aha
communication error - Please check
Owner’s Manual.)”
• When invalid data is received from
the aha application or there is no
response.
• When the connection to the aha
application via Bluetooth is not
available.
• When the data reception from this
unit is rejected.
Please try again (Refresh etc.)
later or reconnect it. If it is still not
improved, restart the aha application.
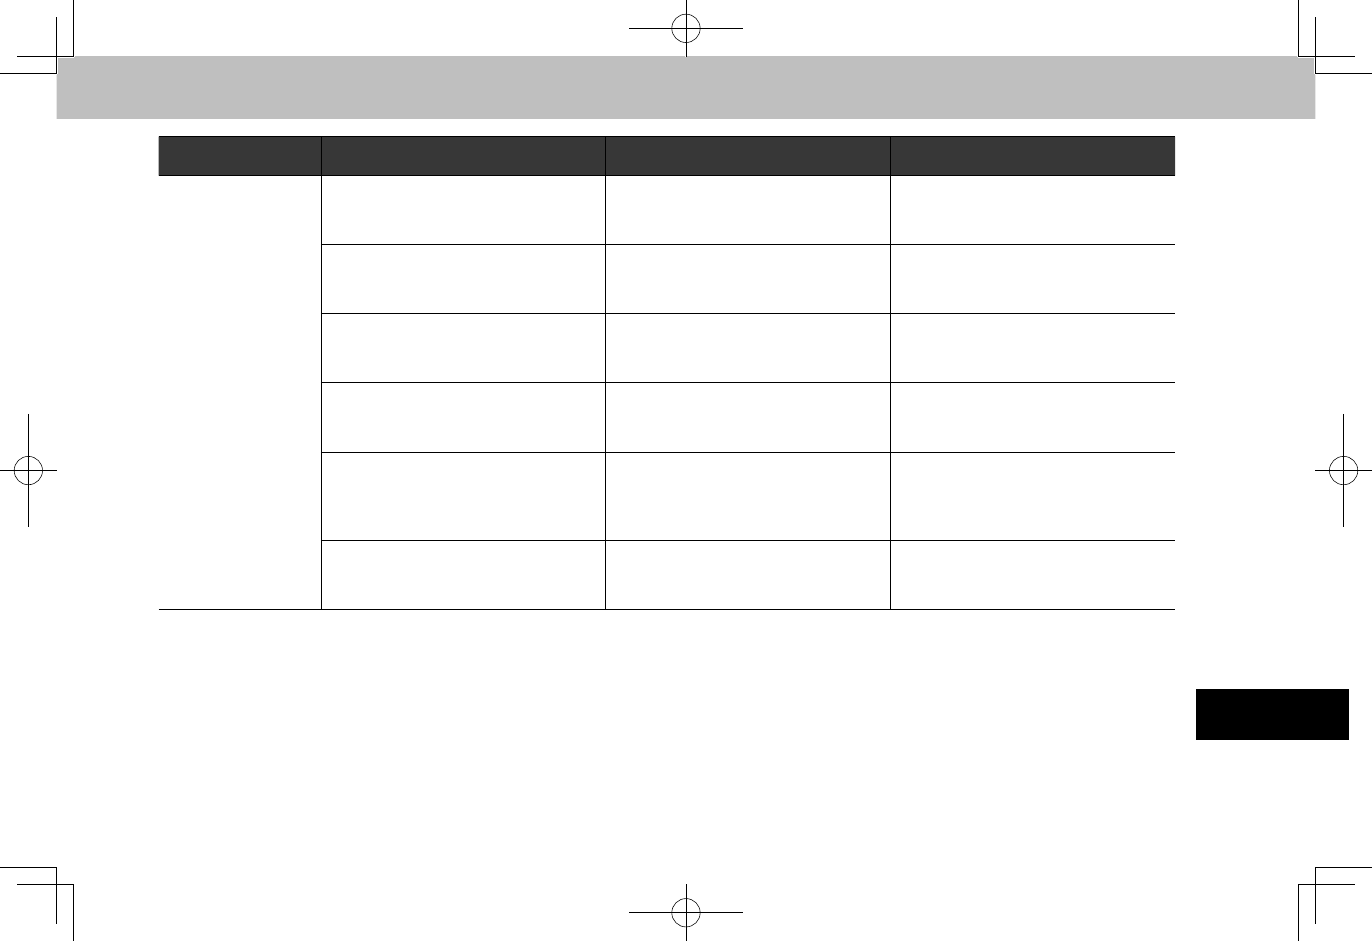
ERROR MESSAGES
225
APPENDIX/WHAT TO DO IF/INDEX
9
Mode Message Cause Action
Pandora*2
“No stations have been added to your
list. (No stations have been added to
your list.)”
When no stations have been
registered. Please register stations.
“Your ratings information was not
saved. (Your ratings information was
not saved.)”
When ratings information has not
been updated to the Pandora server. Please try again later.
“Bookmark not saved. (Bookmark not
saved.)”
When bookmark registration
information has not been updated to
the Pandora server. Please try again later.
“Pandora is not available at your
current location. (Pandora is not
available at your current location.)”
When Pandora is used in an area
where it is not available. Please try again at a different
location.
“The selected Pandora station is
no longer available. (The selected
Pandora station is no longer
available.)”
When the selected station has been
deleted, or has expired. Please select another station.
“Pandora Error. (Pandora Error.)” When the Pandora server is
undergoing maintenance, or another
error has occurred. Please try again later.
*1: Type A/B only
*2: Pandora is available in the United States, Australia, and New Zealand.
NOTE
lIf the malfunction is not rectied: Take your vehicle to your SUBARU dealer.
INDEX
226
INDEX
A
ahaTM by HARMAN .........................................................................98
AM radio ....................................................................................... 118
Android Auto ................................................................................. 107
Apple Carplay ............................................................................... 105
AUX ..............................................................................................145
B
Bluetooth ........................................................................................54
Proles ........................................................................................55
Registering Bluetooth device ...................................................... 54
Bluetooth audio.............................................................................141
Bluetooth phone message ..............................................................86
C
Calling on Bluetooth phone ............................................................78
By contacts list ............................................................................81
By favorites list............................................................................80
By keypad ................................................................................... 81
By last number ............................................................................79
By recent calls list ....................................................................... 80
CD ................................................................................................134
Command list................................................................................197
D
Destination search ........................................................................169
E
Entering letters, numbers/list screen ..............................................41
Entering letters/numbers.............................................................41
List screen operation ..................................................................42
Error messages ............................................................................219
F
FM radio ....................................................................................... 118
G
General settings .............................................................................62
GPS .............................................................................................. 185
Limitations.................................................................................185
H
Hands-free system .........................................................................74
Home screen operation ..................................................................45
Adding shortcut buttons .............................................................. 45
Deleting/moving shortcut buttons ...............................................46
INDEX
227
APPENDIX/WHAT TO DO IF/INDEX
9
I
Initial screen ...................................................................................34
iPod ..............................................................................................139
M
Map data.......................................................................................187
Update ......................................................................................188
Map screen information ................................................................ 164
Map screen operation ...................................................................162
Current position display ............................................................162
Map scale .................................................................................162
Orientation of the map ..............................................................163
Media operation ............................................................................134
AUX ..........................................................................................145
Bluetooth audio .........................................................................141
CD.............................................................................................134
iPod...........................................................................................139
USB memory ............................................................................136
Memory points settings.................................................................166
MirrorLinkTM.....................................................................................96
N
Navigation settings .......................................................................183
P
Pandora ........................................................................................ 102
Phone settings ................................................................................56
R
Radio operation ............................................................................ 118
AM/FM radio ............................................................................. 118
SiriusXM® satellite radio ............................................................124
Rear view camera...........................................................................47
Receiving on Bluetooth phone........................................................82
Incoming calls ............................................................................. 82
Route guidance ............................................................................177
Route related functions.................................................................180
Adding destinations ..................................................................180
Checking itinerary ..................................................................... 181
Checking route..........................................................................180
Deleting destinations ................................................................181
Editing route..............................................................................180
Reordering destinations ............................................................181
Rerouting route ......................................................................... 182
Stopping guidance .................................................................... 181
Weather information .................................................................182
INDEX
228
S
Screen adjustment..........................................................................43
Adjusting brightness ...................................................................43
Day and night mode....................................................................43
Search operation ..........................................................................169
Favorite places list .................................................................... 173
Gas stations ..............................................................................173
Home/work................................................................................169
On the map ............................................................................... 170
POIs ..........................................................................................171
Previously set destinations .......................................................172
Search word..............................................................................170
Setting ............................................................................................53
General ....................................................................................... 62
Navigation .................................................................................183
Phone .........................................................................................56
Sound .........................................................................................68
Vehicle ........................................................................................70
Siri ................................................................................................190
SiriusXM® satellite radio ...............................................................124
Sound settings ................................................................................68
Status display .................................................................................44
Steering switches .........................................................................147
SUBARU STARLINK ......................................................................95
T
Talking on Bluetooth phone ............................................................83
Call waiting .................................................................................85
Sending tones .............................................................................84
Touch screen gestures ...................................................................40
Touch screen operation ..................................................................41
Trafc information ......................................................................... 164
TravelLink .....................................................................................109
Troubleshooting ............................................................................ 213
Typical voice guidance prompts ...................................................179
U
USB memory ................................................................................136
V
Vehicle customization ..................................................................... 70
Voice recognition system ..............................................................193
W
Weather information .....................................................................182