Harman Magnafire Sf Owner S Manual
2014-07-05
: Harman Harman-Magnafire-Sf-Owner-S-Manual harman-magnafire-sf-owner-s-manual harman pdf
Open the PDF directly: View PDF ![]() .
.
Page Count: 18
3-90-70738R9_08/13
SAFETY NOTICE
PLEASE READ THIS ENTIRE MANUAL BEFORE YOU INSTALL AND USE YOUR NEW ROOM HEATER. FAILURE TO
FOLLOW INSTRUCTIONS MAY RESULT IN PROPERTY DAMAGE, BODILY INJURY, OR EVEN DEATH.
FOR USE IN THE U.S. AND CANADA. NOT SUITABLE FOR INSTALLATION IN MOBILE HOMES
IF THIS HARMAN® STOVE IS NOT PROPERLY
INSTALLED, A HOUSE FIRE MAY RESULT. FOR YOUR SAFETY, FOLLOW
INSTALLATION DIRECTIONS.
CONTACT LOCAL BUILDING OR FIRE OFFICIALS ABOUT RESTRICTIONS AND INSTALLATION INSPECTION
REQUIREMENTS IN YOUR AREA.
CONTACT YOUR LOCAL AUTHORITY (SUCH AS MUNICIPAL BUILDING DEPARTMENT, FIRE DEPARTMENT, FIRE
PREVENTION BUREAU, ETC.) TO DETERMINE THE NEED FOR A PERMIT.
CETTE GUIDE D’UTILISATION EST DISPONIBLE EN FRANCAIS. CHEZ VOTRE CONCESSIONNAIRE DE HARMAN®.
SAVE THESE INSTRUCTIONS.
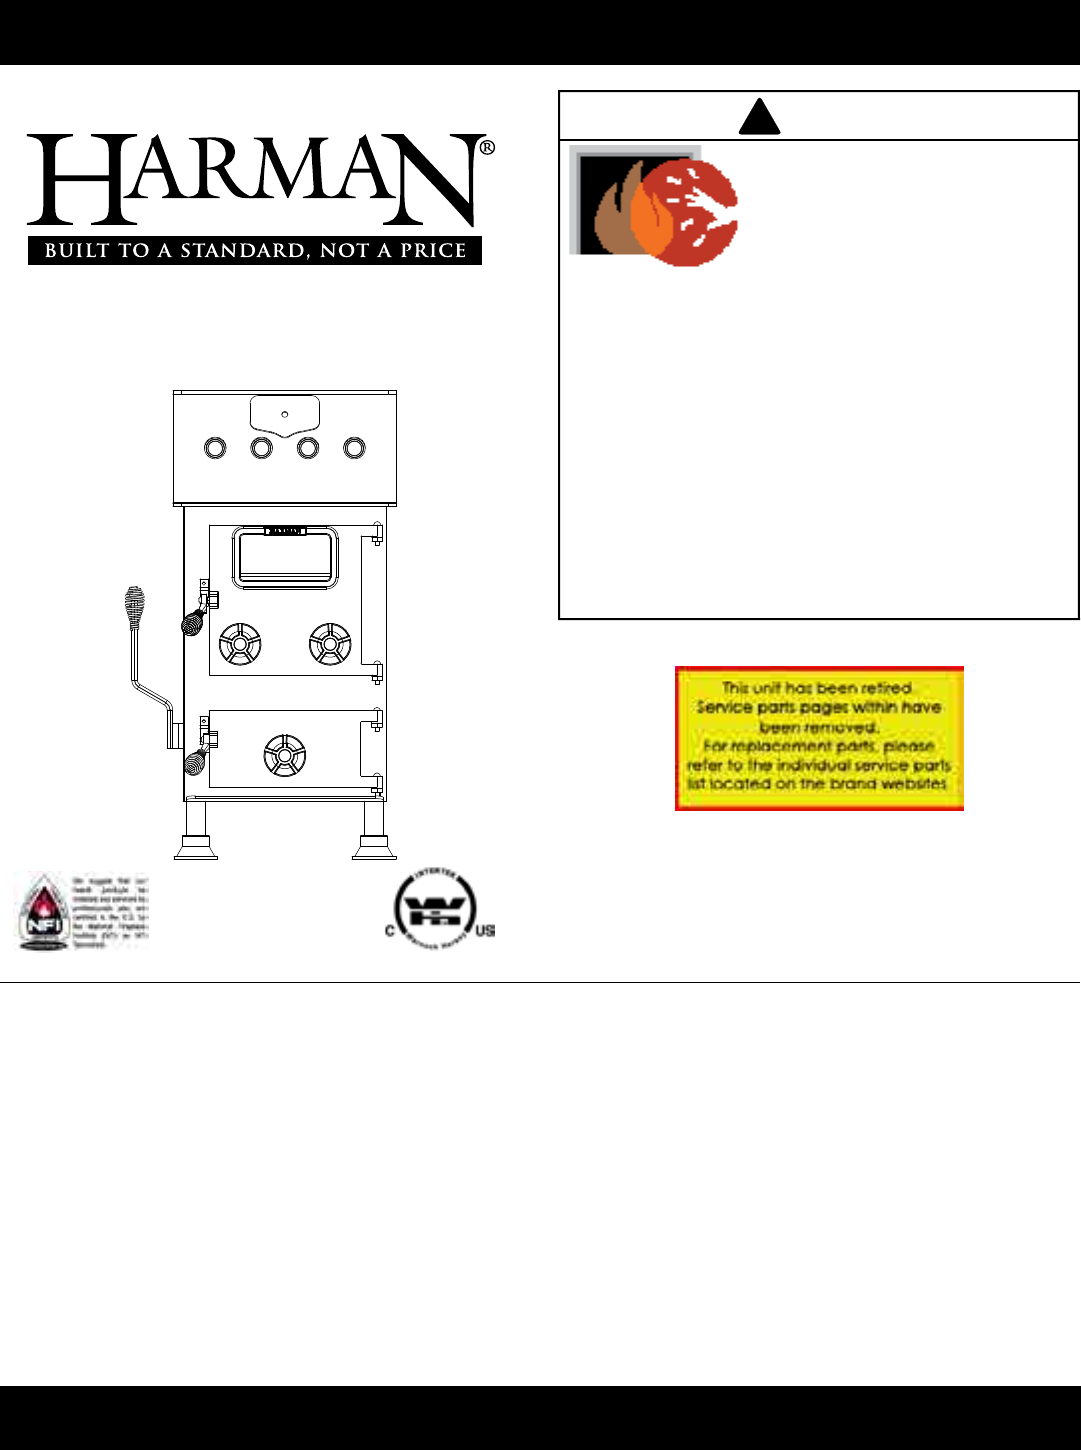
Installation & Operating Manual
Model(s):
SF250 Coal Stove
NOTICE: SAVE THESE INSTRUCTIONS
Hot glass will cause burns.
• Donottouchglassuntilitiscooled
• NEVERallowchildrentotouchglass
• Keepchildrenaway
• CAREFULLYSUPERVISEchildreninsameroomas
stove.
• Alertchildrenandadultstohazardsofhightemperatures.
High temperatures may ignite clothing or other
ammable materials.
• Keepclothing,furniture,draperiesandotherammable
materialsaway.
HOT SURFACES!
Glassandothersurfacesarehotduring
operationandcooldown.
WARNING
!

23-90-70738R9_08/13
TABLE OF CONTENTS
= Contains updated information
SafetyConsiderations............. 3
Specications ................... 4
Assembly....................... 5
Installation...................... 6
Chimney&Venting..............7-8
OperatingInstructions............. 9
Maintenance................... 10
OptionalBentHotWaterCoil ....11-12
TestingLabel................... 13
Warranty ....................14-15
Service&MaintenanceLog........ 16
SignaturePage................. 18

33-90-70738R9_08/13
CAUTION
• Keep Children Away
• May Cause Serious Burns
• All Surfaces of stove are hot. Do not touch.
• Keep children away.
• Serious burns will result if touched.
Fuel/Firing Warnings
Danger
Do not use chemicals or uids to start or “freshen up”
a re. Severe body burns or a re in your home could
result.
Do not burn garbage, gasoline, thinners, drain oil or
engine oil, kerosene, or fuel oil, etc. An explosion, a
house re, or personal injury could result. Keep all
such liquids well away from the stove while in use.
Neverburnmaterialsotherthancoal.Achimneyreorheat
exchangerfailurecouldresult.Thisincludeslargeamounts
ofcorrugatedboxes,woodshavings,paperscraps,garbage
orotherburnablematerials.
Ifchimneypipesorconnectorsreach500degreesfahrenheit
(maximumtemperature),thestoveisbeingover-red.We
recommend the purchase of a Magnetic Temperature
Gaugetomonitorthestoveandstacktemperaturesrelative
to the amount of draft the customer permits the stove to
operate.
Ithasbeenveriedthatcreosotewilligniteat650degrees
fahrenheit. It is the owner’s responsibility to follow these
recommendations.
Thisstoveconsumesairwhenitisburning.ifyourhouse
istightlysealedandinsulated,itisadvisablethatawindow
inthevicinitybeopenedslightlywhilethestoveisburning.
Information contained in this manual is manufacturer’s
recommendations and if there is any difference between
our recommendations and local code requirements, we
suggestfollowinglocalcoderequirements.
SAFETY CONSIDERATIONS
Curing Paint
During the rst few hours of burning, a blue smoke will
be observed rising from the painted surface of the stove.
It is advisable to increase the amount of fresh air (open
window)intheroomduringthisbreaking-inperiod.Donot
bealarmed,thisisnormalanddoesnotcauseharm.
Mobile Homes
This Harman® Stove is not approved for installation in
mobile/manufacturedhomes.
SPECIAL WARNING: NEVER OPERATE YOUR STOVE
WITHTHEFIREORASHDOOROPEN!
Keep Ash Pan Empty
Excessive ash buildup will block the airow around the
grates.This,andonlythis,willcausethegratestowarpand
sag.Neglectisnotcoveredbyyourstove’swarranty.
43-90-70738R9_08/13
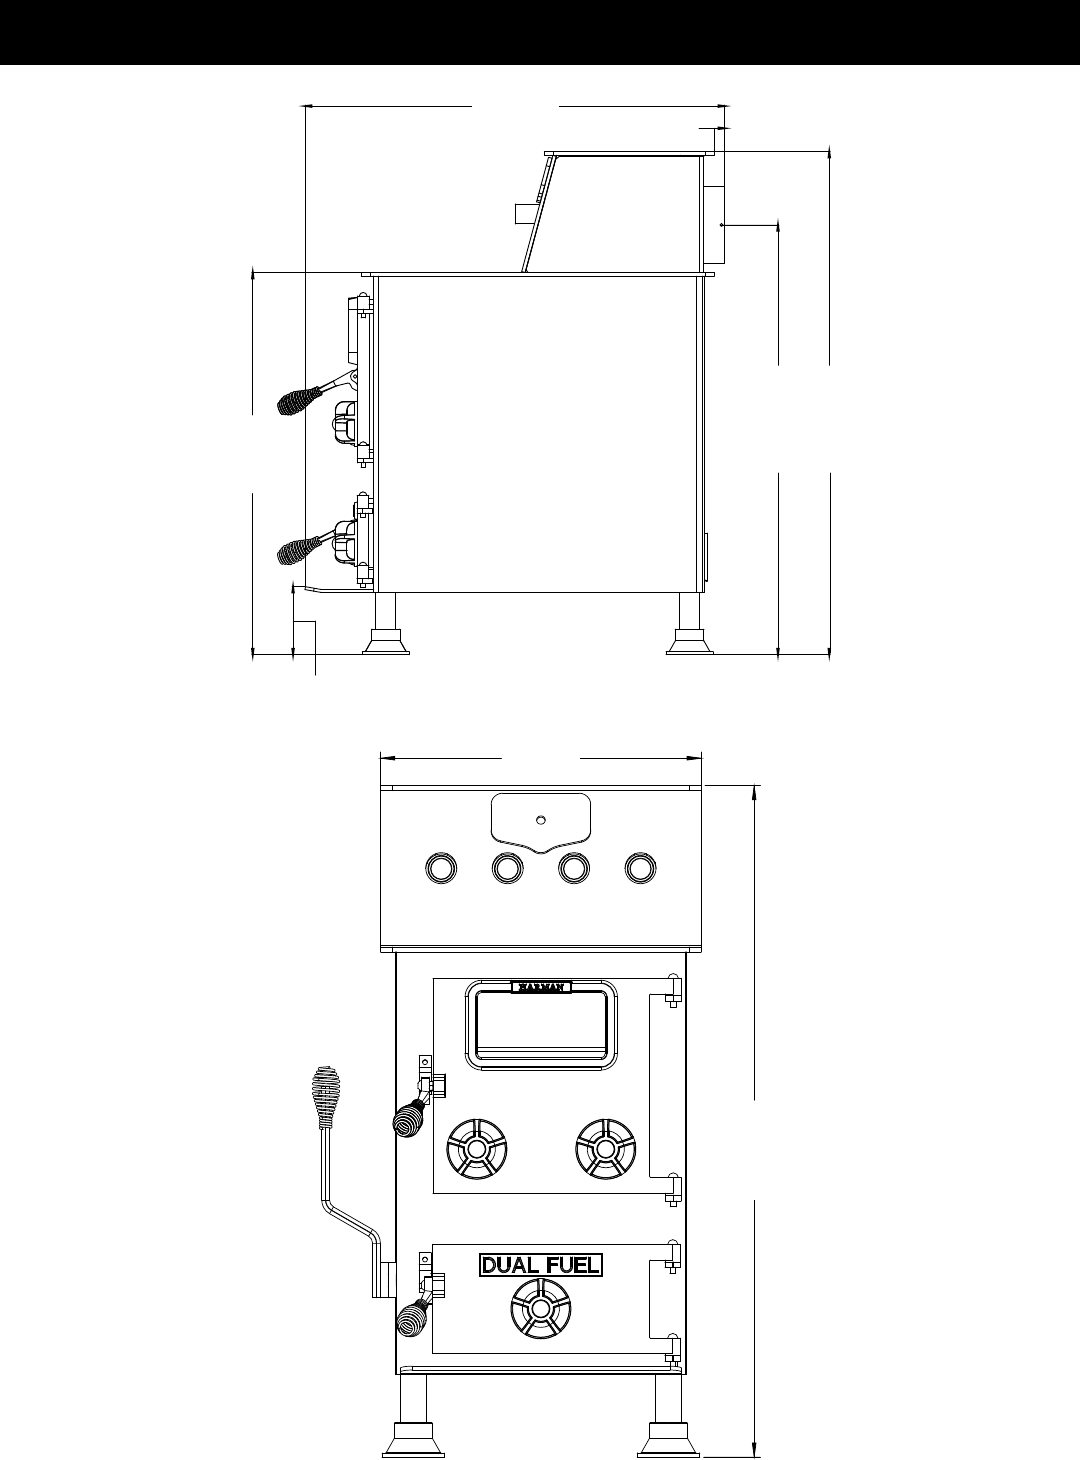
7/8
35 3/4
5 13/16
32 5/8
36 11/16
42 15/16
20 1/2
42 15/16
SPECIFICATIONS
53-90-70738R9_08/13
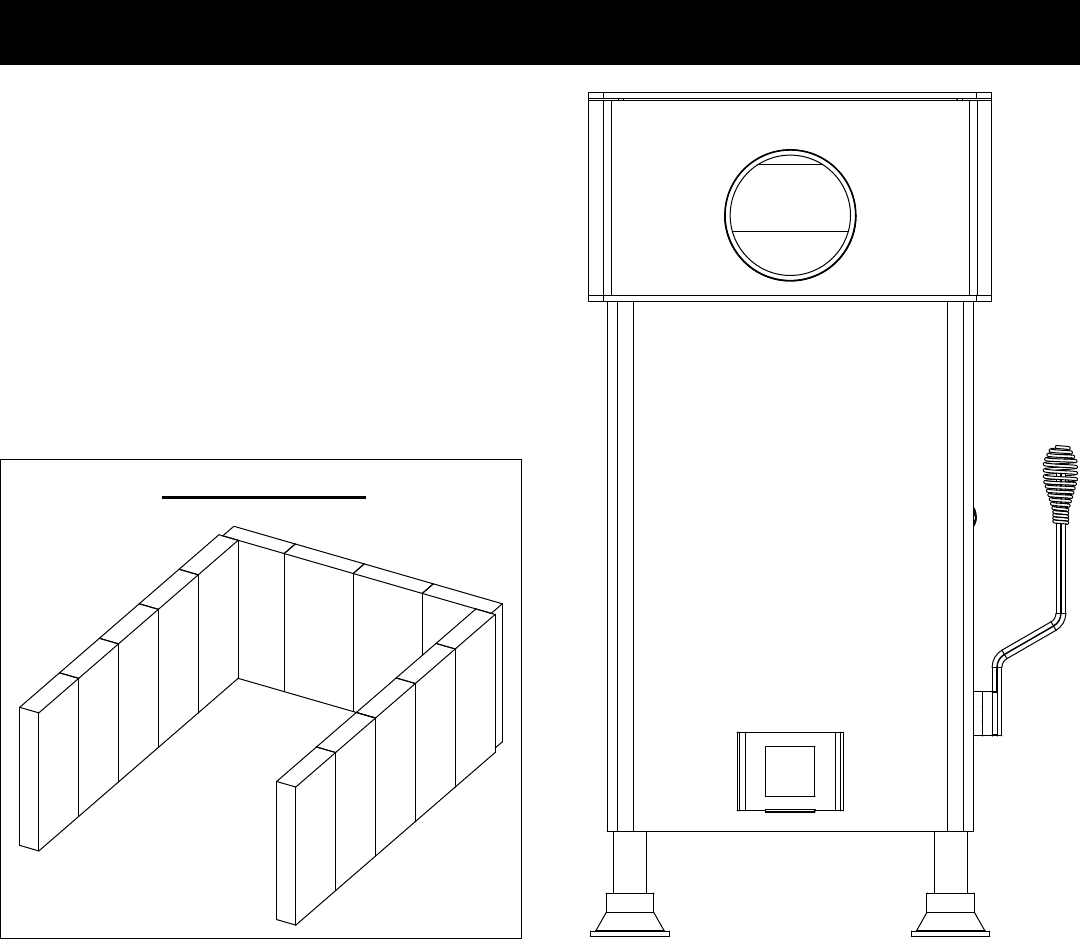
ASSEMBLY
Firebrick Diagram
Blower
The blower slides into the channel bracket on the rear of
thestoveasshownatright.Plugtheblowerintoaproperly
groundedreceptacle.
Shaker Handle
The shaker handle installs onto the shaker handle mount
usingthetwohex-boltsandwashersprovided.
Firebricks
TheSF250uses14“standard”rebricks,asshownbelow.
Thesestandardrebricks measure9”X4½” X1¼”each.
Therebricksarealreadyinstalledinthestovebutcanbe
removedtolightenthestoveformoving.Thedoorscanalso
beremovedbysimplyliftingthemoffofthehinges.
63-90-70738R9_08/13
INSTALLATION
WARNING:Thisstovemustbeinstalledinaccordancewith
allstateandlocalbuildingcoderequirements.
Locating the stove
Locatethestoveasclosetothechimneyorueaspossible,
whilestillmaintainingtheclearancestocombustibles.
Locate the stove where there is sufcient air supply for
ventilationandpropercombustion.
Clearance to Combustibles
Safestoveclearancetocombustiblewallsis24”totherear
and36”tothesidesandfront.Donotplacefurnitureandthe
likedirectlyinfrontofthestove.
Floor Protection
Floorprotectionforacombustibleoorshouldconsistof3/8”
millboardorastoveboardprovidingequalprotection(k=.84,
R=.45).Theoorprotectionshouldextend8”totherearand
eithersideand16”infrontofthestove.Theoorprotection
shouldalsoextend2”toeithersideofthechimneyconnector,
tothewallwheretheconnectorenterstheue.
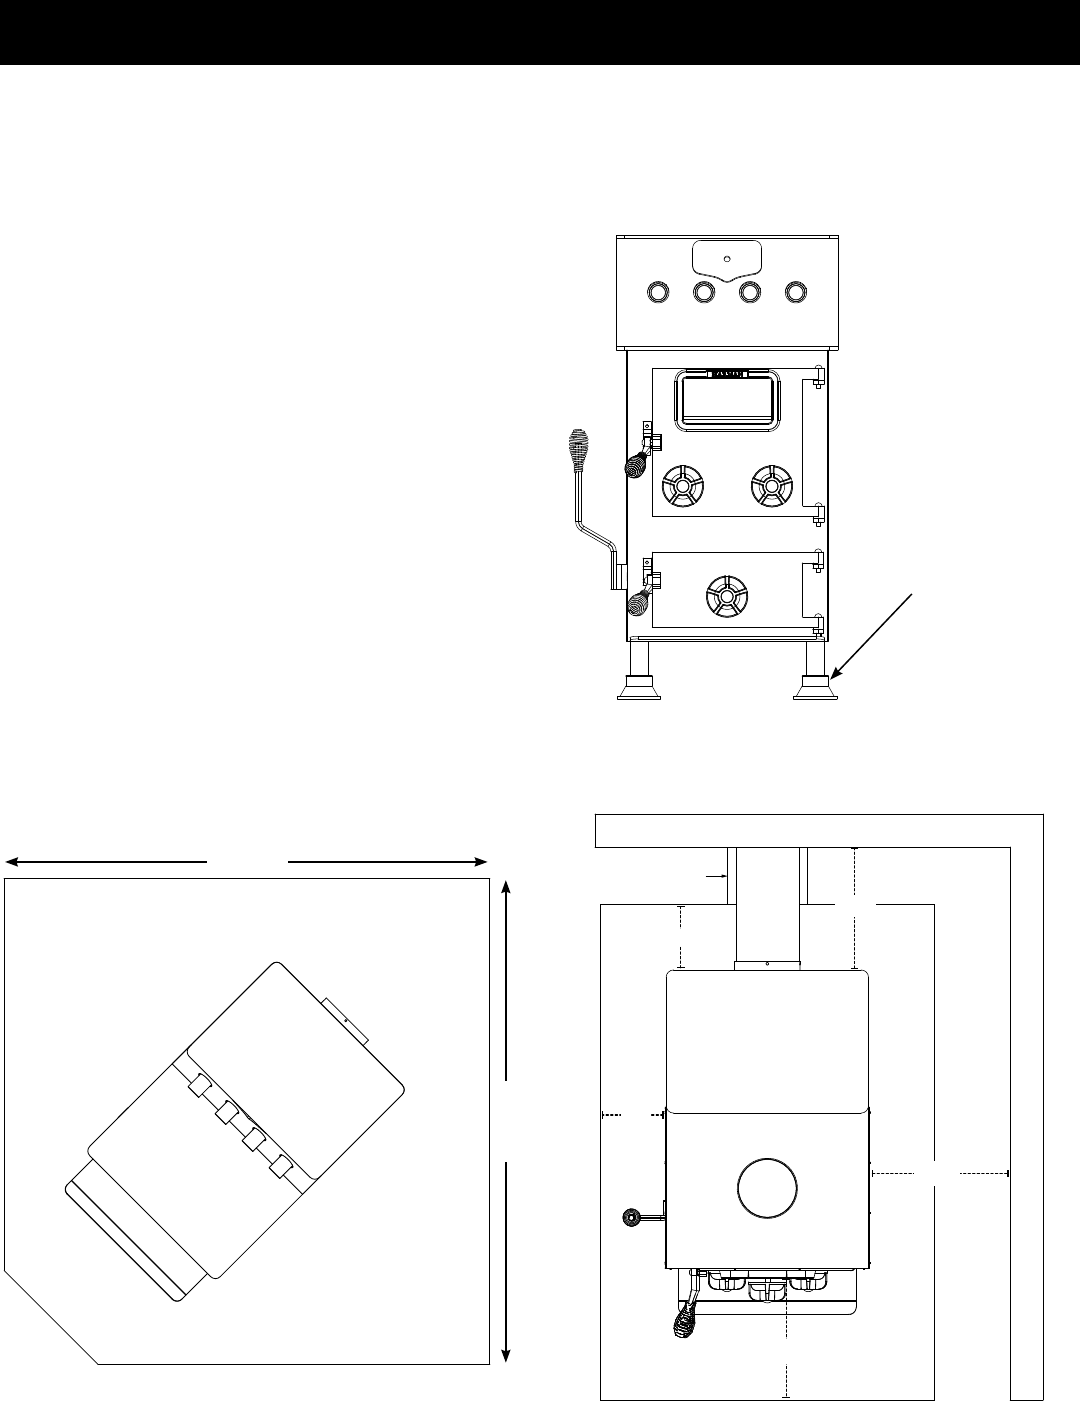
Adjustable Leveling Feet
To accomodate an un-even hearth surface, the SF250 is
equipped with adjustable leveling feet. Each foot can be
turnedin orout ofthe leg tolower orraise thatcorner of
thestove.
Turntheroundfootinorout
toleveleachcornerofthe
stove.
It is recommended that you have your unit installed and
servicedbyprofessionalswhoarecertiedbytheNational
FirplaceInstitute(NFI)asNFISpecialists.
Floor Protection
Floor Protection
36”
8”
8”
16”
24”
Alternate oor protector dimension may be used as long as they satisfy
the measurement requirements shown below.
Minumum size oor protection for a corner installation hearth pad is
54" x 54" (USA ONLY).
54"
54"
73-90-70738R9_08/13
CHIMNEY & VENTING
Types Of Chimneys
The chimney is one of the most important, yet most
neglected and misunderstood portions of any solid fuel
burning stove installation. Do not connect this stove to a
chimneyueservinganotherheatingdevice.
THE STOVE MUST BE CONNECTED TO ITS OWN
TILE-LINEDFLUE.AMINIMUMFLUESIZEOF8”X8”IS
NECESSARYFORPROPEROPERATION.
UNDER NO CIRCUMSTANCES SHOULD A MANUAL
FLUE DAMPER BE INSTALLED IN THE SMOKE PIPE
BETWEENTHESTOVEANDTHECHIMNEY.
NO DAMPER, HEAT SAVER OR AUTOMATIC VENT
DAMPER DEVICE SHOULD BE INSTALLED IN OR ON
THESMOKEPIPE.
CAUTION: THE CHIMNEY MUST BE A CLASS “A”
CHIMNEY, IN GOOD OPERATING AND CLEAN
CONDITION.
NOTE: THE USE OFALUMINUM TYPE “B” GAS VENT
FOR SOLID FUELS IS UNSAFE AND PROHIBITED BY
THENATIONALFIREPROTECTIONAGENCYCODE.
There are three types of class “A” chimneys:
1. Masonrywithtileliner,toincludebrickorstone.Itmust
besupportedongradelevelfoundation.
2. Insulated,manufacturedchimney,listedorcertiedbya
nationaltestagency.
3. Triple-wallmetalclass“A”chimney,listedorcertiedby
anationaltestagency.
Ifyourmasonrychimneyhasnotbeenusedforsometime,
haveitinspectedbyaqualiedperson.Ifalistedorcertied
manufactured chimney is to be used, make certain it is
installedinaccordancewiththemanufacturer’sinstructions
andalllocalandstatecodes.
Theminimumrecommendedheightforsolidfuelchimneys
is16feetfromthestovecollar.Thechimneymustbetwo
feethigherthananythingwithintenfeet.Italsomustextend
three feet above the point where it intersects or exits the
roofline.
In order to have a properly operating solid fuel heating
system, the chimney must be capable of providing the
necessarydraft.Theminimumrequireddraftis.06inchesof
watercolumn(W.C.).Thismustbemeasuredusingadraft
gauge.Ifthechimneycannotsupplythisconstantdraft,the
stovewill not operate properly.A barometric damper may
beusedandproperlyadjustedtocompensateforexcessive
draftonly.
IMPORTANT: When you measure the the draft, the stove
must be operating with sufcient time given for the stove
andchimneytowarm.Burnforatleastthirtyminutes.The
draftreadingisbesttaken18”upfromthecenteroftheue
outlet,intheconnectorpipe.Drillaholeinthepipeforthe
meter tube, and ll it with a screw or silicone when done
withthetest.
IMPORTANT: The connector pipe must be 24 gauge or
thicker.
Whenconnectingtheuepipetothestove,therstsection
should be installed inside the stove collar. It should be
securedtothecollarwith,atleast,threescrewsorrivets.
Do not pass the connector pipe through a wall or ceiling
withoutrstcheckingwithyourlocalcodes.Ifallowed,use
onlyapprovedpass-thrumethods.
NOTE:Allhorizontalrunsofventingshouldhavea1/4inch
ofriseperfootoflength.
Use no more than two 90° elbows in the connector. If a
barometricdamperisneeded,tocompensateforexcessive
draft,installitonlyinaverticalsectionofventpipe.
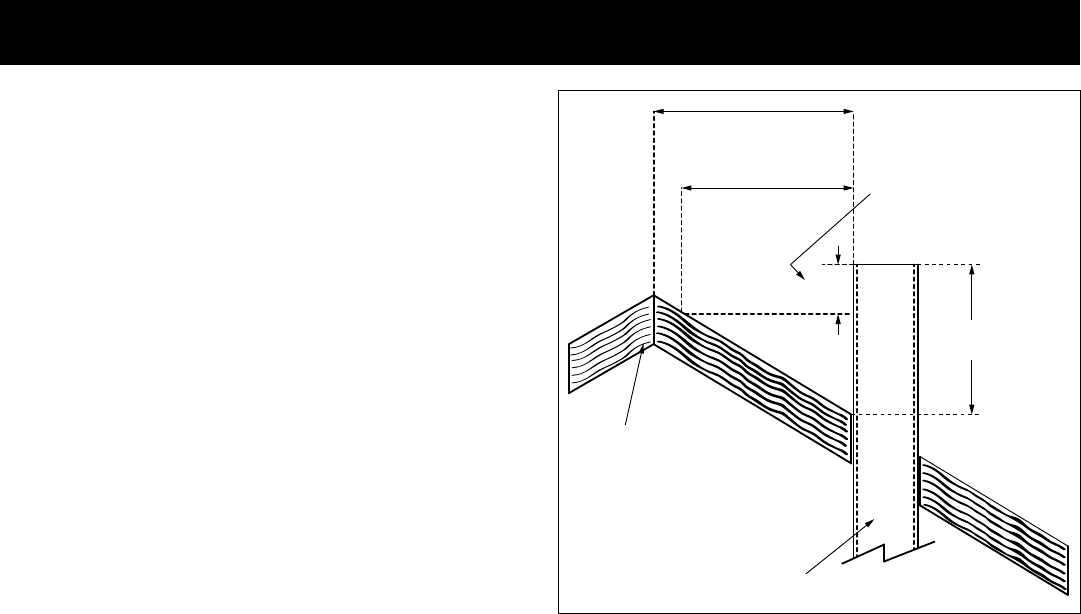
Thethreefoot,twofoot,tenfootrule
More than 10 Ft. (3 m)
10 Ft. (3 m)
2 Ft. (.6 m) Min
Height necessary
above any roof surface
within 10 Ft. (3 m)
3 Ft. (.9 m) minimum
above exit point
Ridge
Chimney
83-90-70738R9_08/13
CHIMNEY & VENTING
Possible causes of insufcient draft;
A. Chimney Leaks - Air leaking in around a loose tting
cleanout door, ue pipe joints and/or seams not secured,
improperplugopeningsordefectivemasonry.
B.ChimneyTooShort-Thegeneralruleforchimneys;16
feettall,three feetabovethe roofexit,and twofeet taller
thananythingwithintenfeet.
C. Blocked Chimney - Have the chimney cleaned and
inspected prior to installation and before each heating
season.
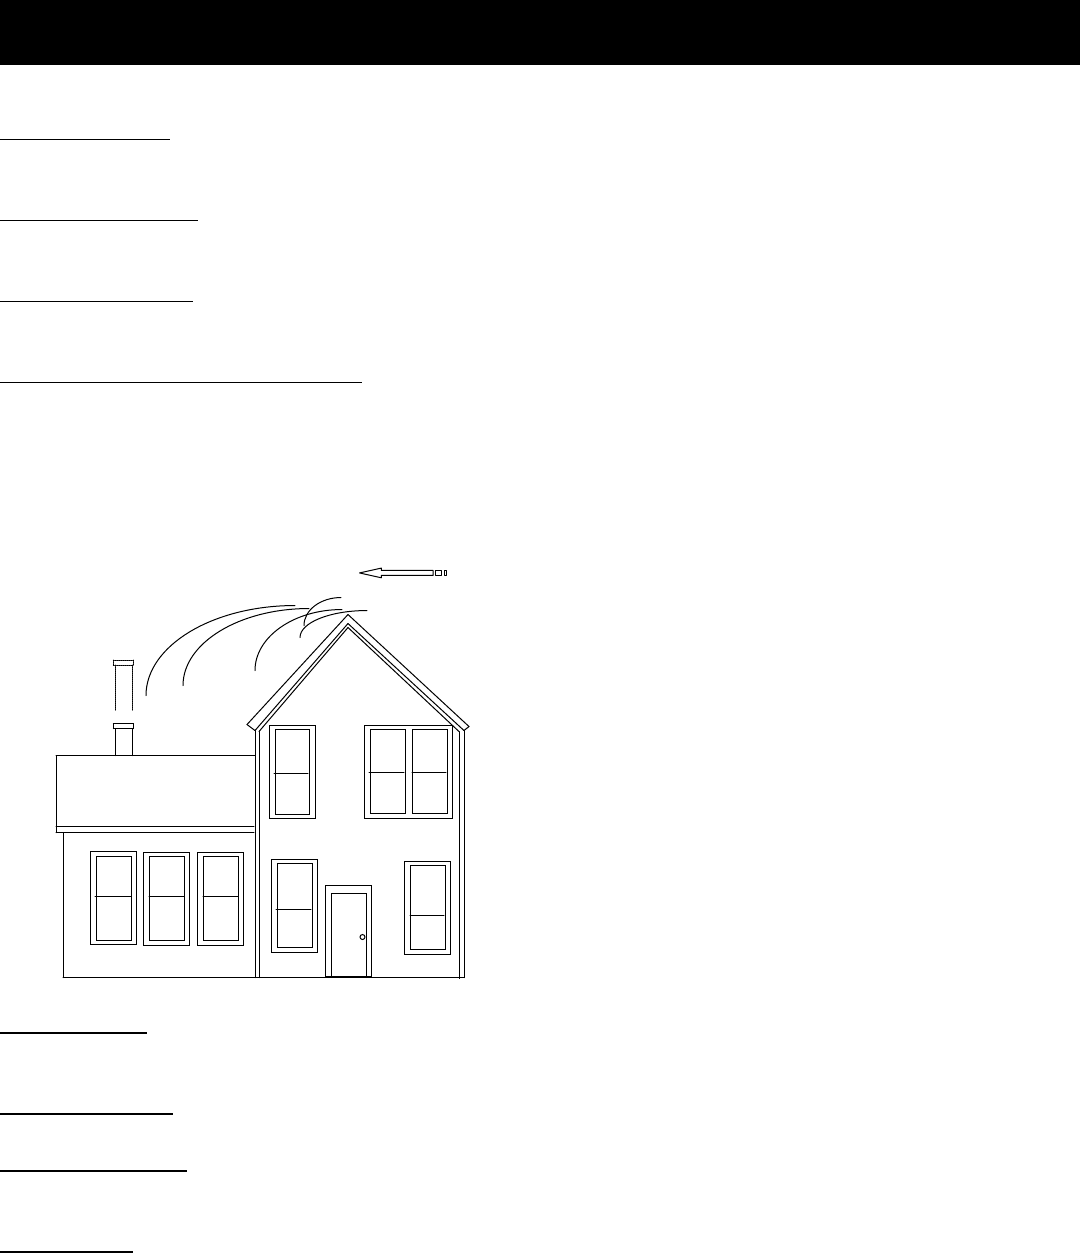
D.TreesOrOtherTopographicalBarriers-Impedingonthe
chimney’soperationorcausingadowndraftsituation.This
canalso be caused byadjacent buildings or anotherroof
ofthesamestructuregivingaircurrentsadownwardswirl.
NOTE:Thechimneyon theillustratedhouseistoo low,it
shouldberaisedtocompensatefordowndraftpotential.
Wind direction
Themostcommoncauseofpoordraftisanimproperlysized
ueliner.Itisrecommendedthattheinsidedimensionsof
the liner be at least as large as the appliance ue outlet
andnolargerthan125%ofthecollarforaroundue.An
example, a 8” ue collar is 50 square inches. Increased
by25%wouldbe63squareinches,orapproximatelya9”
roundue. Ingeneral forround liners,it isrecommended
thattheynotbeincreasedbymorethanoneinchfromthat
ofthestovecollar.Thiswillhelpensureproperdraftwiththe
loweruetemperatures.
REMEMBER; Asolidfuel burningstovecan onlyperform
aswellasitsventingsystemwillallowitto.
THEMOSTIMPORTANTTHINGTOREMEMBERABOUT
CHIMNEYS IS THEIR NEED FOR MAINTENANCE
AND CLEANING. IFA CHIMNEY IS NOT CLEANED ON
A FREQUENT BASIS, IT WILL AFFECT THE DRAFT
AS WELL AS BEING A CONTRIBUTING CAUSE TO A
POSSIBLECHIMNEYFIRE.
IF YOU HAVE A CHIMNEY FIRE:
1. GETEVERYONEOUTOFTHEHOUSE.
2. CALLTHEFIREDEPARTMENT.
3. CLOSE THE DRAFT CONTROL KNOBS ON THE
STOVE.
DO NOT USE THE CHIMNEY UNTIL IT HAS BEEN
THOROUGHLY CLEANED AND INSPECTED BY A
QUALIFIEDPERSON.
E.ChimneySize-Thechimneycannotbesmallerthanthe
ueexitfromtheappliance.Toolargeofachimneycould
staytoocooltopromoteadequatedraft.
F. Chimney Offsets - Offset chimneys should be avoided.
Theoffsetareacancollectdebrisandcauseablockage.
G.Elbowrestrictions-Thereshouldbenomorethantwo
90°elbowsortheequivalentusedinconnectingthestove
tothechimneyue.
H.SharedFlue-Nomorethanoneapplianceshallventinto
asingleue.

93-90-70738R9_08/13
OPERATING INSTRUCTIONS
The SF250 is approved for use with coal only. Burning
wood or other such fuels in this stove, except for the
purpose of igniting a coal re, is prohibited.
Starting A Fire
Beginbyopeningthedraftcontrolknobsonboththeload
doorandtheashdoor.Openbothdoors.Besureallitems
havebeenremovedfromtheashpan(i.e.touch-uppaint,
warrantyregistration,etc...)
Place aproximately eight sheets of newspaper, crumbled,
on top of the grates. Lay some kindling on top of the
crumbledpaper.Thiskindlingshouldbedryandnolarger
than3/4in.diameter.Itshouldbelayeredinacriss-cross
fashion to allow good air ow. Now place some slightly
larger pieces of wood (about 2” diameter) on top of the
kindling. Using a match or grill lighter, ignite the paper at
thebottomjustinsidethedoor.Closebothdoorsandallow
thekindlingandlargerwoodtocatchre.Afteraroundve
minutes,opentheloaddoorslightly,forafewsecondsand
thenopencompletely.Thisisagoodpracticetogetintoas
itwill allow any smokeand gases to clearaway from the
dooropening.Addsmallcompactpiecesofwoodwhenthe
kindlingisburninghot.Whenasubstantialbedofhotwood
coalsisestablished,startaddingcoalinsmallamountsat
a time.Allow a few minutes between coal loadings to be
surethat what you’ve addedis ignited.You cankeep the
ash door open through this process, but NEVER LEAVE
THESTOVEUNATTENDEDWITHADOOROPEN.Once
youhaveabedofburningcoal,youcanloadcoalintothe
stovetothetopoftherebricks.Alwaysmakesurethereis
someameshowingthroughthecoal.Thiswillensurethe
gasesarebeingburnedandnotaccumulatingintherebox.
Afteragoodcoalignition,setthedraftcontrolsontheload
doorto about 1/4 turn open.Thedraft control on the ash
doorisusedtocontroltherateofburn.Afterstartingare,
keepitabout2fullturnsopenforabout30minutes.Then,
adjust further closed to the proper output level. Normal
operationwillbebetweencrackedandoneturnopen.Since
coalrespondsslowlytodraftadjustments,makeonlysmall
adjustmentsandallowtimeinbetween.
Loading
Coalshouldonlybeaddedwhenthereisareasonablyhot
re.Thecoalbedshouldbebrightandvigorous.Ifthereis
burninghotandthereisadeepbedofcoals,fullloadscan
beadded.Ifitisnotasdescribed,addcoalinsmallbatches
only.
Increasing Heat From A Low Fire
Everyeffortshouldbe madenot toleta coalre burnso
longthatithasstartedtodie.Thiswillcausethereloading
processtobemuchlonger,andthereisagoodposibilityof
losingthere.
Donotshakeorstiralowre.
Openthedraftcontrolallthewayuntiltheregetsashotas
possible.Startaddingsmallbatchesofcoalandfollowthe
instructionsforstartingare.
Oncethereisagoodbedofburningcoals,thegratesmay
beshakentoremoveashes.
Shaking Ashes
Shaking should be done only when there is a hot re
burning. The frequency of shaking will depend on the
degreeof burning. Shaking shouldbe done at leastonce
perday,preferablytwice.
Thebestresultsfromshakingwilloccurwhenshortchoppy
strokesareused,ratherthanlong,evenstrokes.Graspthe
shakerhandlewithonehandandshakeit,onlymovingthe
actualhandle1/2inchorless.Dothisuntilyoustarttosee
hotcoalsfallingintotheashpan,thenstop.Donotrockthe
grates, as this will allow burning coal to fall through, and
you’lllosethere.
Ashes
The ashes should never be allowed to accumulate in the
ashpan.Excessashwillblocktherequiredairowthrough
thegratesandcausethemtowarpandsag.Neglectisnot
coveredbyyourstove’swarranty.
Ashes should be placed in a metal container with a
tight tting lid. This closed container of ashes should
be placed on a noncombustible oor or on the ground,
well away from any combustible materials, pending
nal disposal. If the ashes are disposed of by burial
in soil, or otherwise locally dispersed, they should be
retained in the closed container until all cinders have
thoroughly cooled.
Fuel
The SF250 is approved for burning anthracite coal. Pea,
Nut,andStovesizedcoalareallsuitable.
Grates
Thefunctionsofagratesystemaretosupportthefuelload,
while allowing air ow to the re in a balanced amount.
Anotherfunctionistoallowforashremovalwithoutlosing
there.TheSF250gratesystemprovidesforallofthisand
canberemovedwithnotoolsrequired.
10 3-90-70738R9_08/13
MAINTENANCE
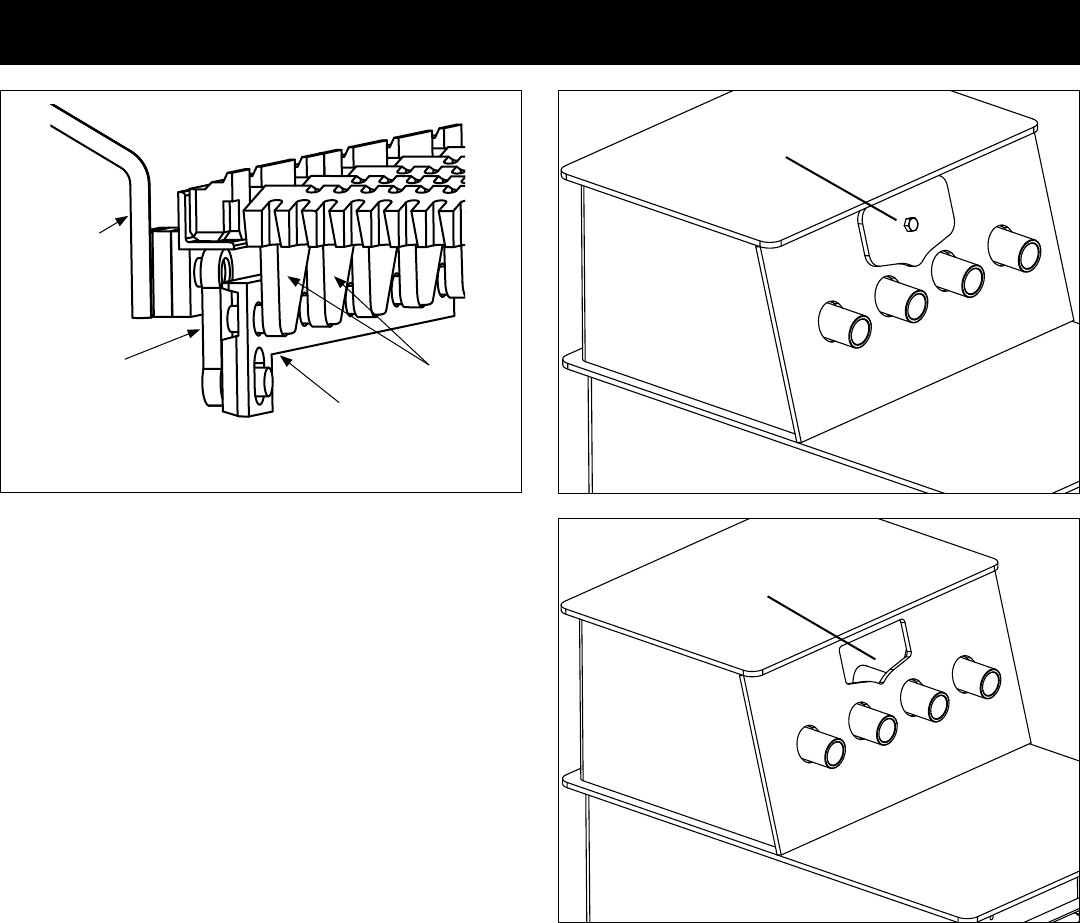
GRATE LINK
GRATES
SHAKER
BAR
SHAKER
HANDLE
(external)
Close-up view of grate system components
Periodic and Normal Everyday Maintenance
BlowerMotor-Cleanperiodicallytoremovepethairandlint
fromtheintakeandfan.
Grates-Keepashpanempty.
CAUTION: BEFORE CLEANING THE CHIMNEY AND
SMOKE PIPE, BE SURE THE FIRE IS OUT AND THE
STOVEISCOOL.
Avoid Chimney Fires. On a regular schedule, check for
creosoteandsootbuildupinthechimney,smokepipe,and
spiral chamber. These areas must be kept clean. Keep a
professionalchimneysweepinmind.
Steel brushes are the safest for cleaning metal surfaces.
Salt solutions and some chemical cleaners may damage
theueliner.
Tocleanthechimney,obtainastiffbrushwithanextendable
handle. Insert the brush into the chimney from the top.
Continuebrushingandsweepingdownwarduntiltheentire
lengthofthechimneyiscleaned.
Aftercleaningthechimney,anydebriswillbeatthebottom
bytheclean-outdoor.Opentheclean-outandvacuumthe
loosedebris.
Cleanthesmokepipe,fromthechimneytothestove,using
ametalbrush.
Cleaning of the spiral chamber - Remove clean-out plate
fromthefrontofthestove.Usinga3/4”wrench,loosenthe
clean-out bolt approximately 2 turns. Slide the clean-out
platetoonesideandremoveitfromtheopening.Scrape
the spiral chamber with a putty knife or similar tool. The
residuewillfalldowntothebottomofthechamberandcan
be removed through the ue opening on the back of the
stovebymeansofavacuumcleanerorasmallscoop.
In the rebox, remove all ashes and vacuum the entire
rebox.Inspect and replace any cracked rebricks. Since
coal and coal ashes will draw moisture, it is important
to thoroughly clean the rebox at the end of the heating
season.Someusersapplyathincoatingofoilorotherrust
inhibitortotheinsideworkings,overthesummer.Themain
thingisthatyouremovealloftheash.
Spiral Chamber Cleanout
Cleanout Plate Removed
11 3-90-70738R9_08/13
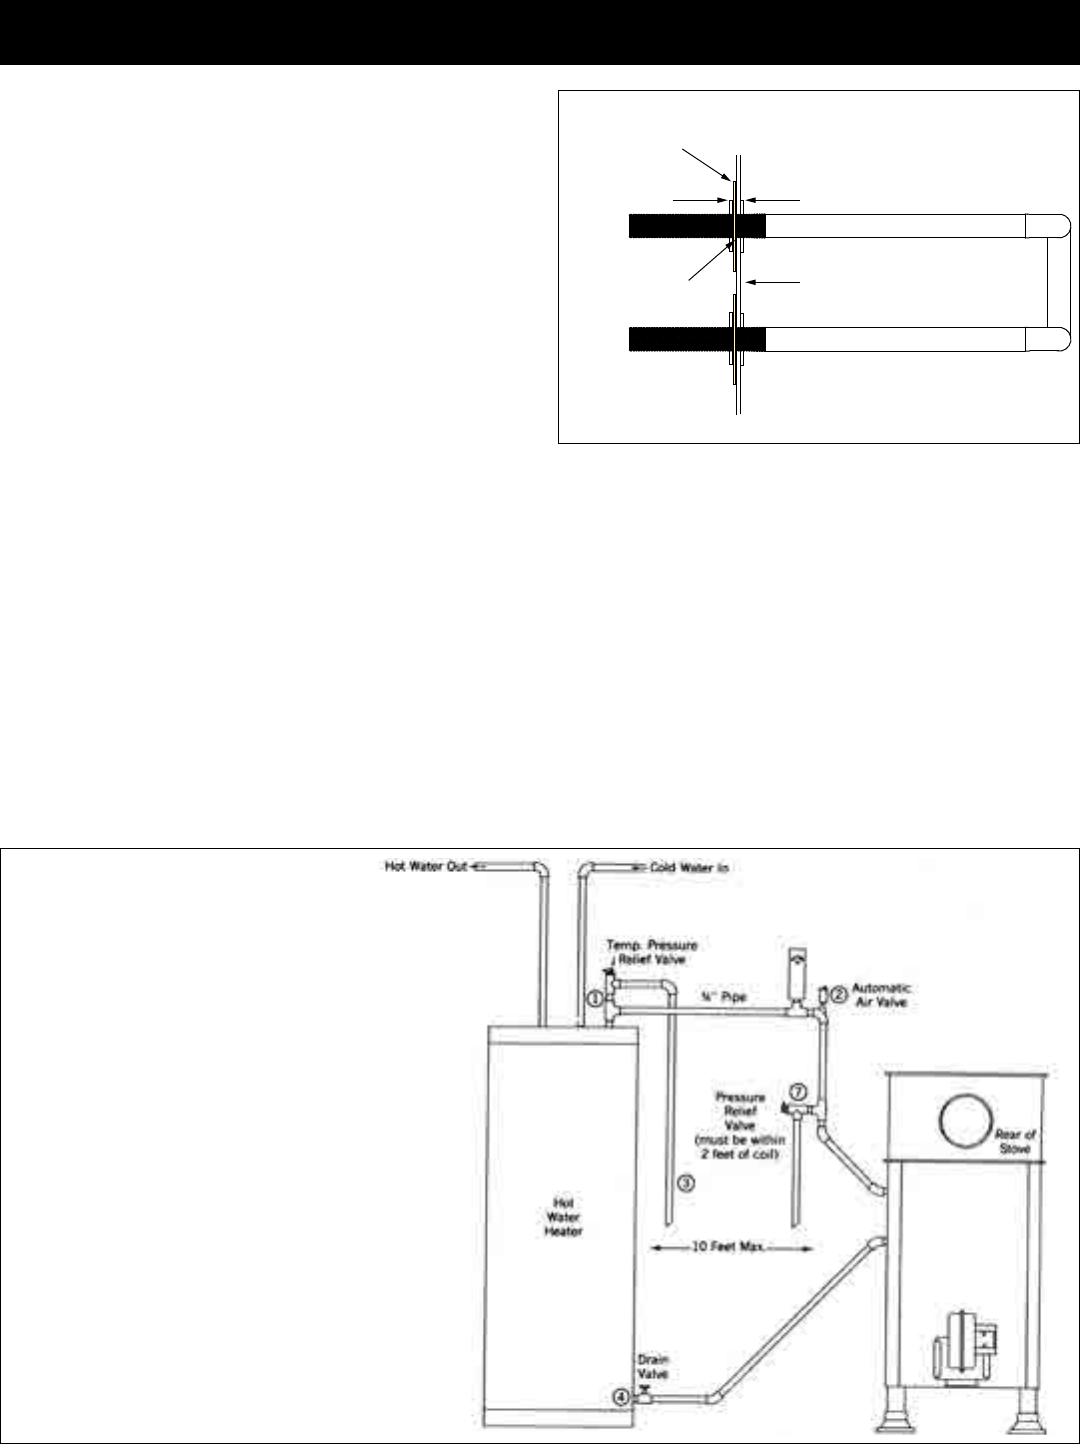
Example 1:Thermo-siphonMethod.Thisisthesimplestandmosteconomicalmethod,providingtheexistingwaterheater
(storagetank)iswithin10feetofthestove.Thewaterinlet,wheretheTemp/Pressurereliefvalveislocated,mustbehigher
thanthetoplegofthewatercoil.Thestoragetankshouldbeelevated,ifnecessary,toallowforproperthermo-siphonaction.
1. Turnoffthewaterheaterandthewatersupplytoit.Drainthetankcompletely.
2. RemovetheTemp/Pressurereliefvalveanddiscard.Installashort¾”nippleandtee(1)alongwithanewTemp/Pressure
reliefvalve.
3. Run¾”coppertubing,alongwiththenecessaryttings,betweenthestoragetankandthetoplegofthecoil.Installa
¾”ventelbowandautomatic“oattype”airvent(2)inthehighpointoftheline.Withintwofeetofthetoplegofthecoil,
installa150lb.pressurereliefvalve(7).Run¾”tubingfromthereleaseexitofbothreliefvalves,downward(3)sothat
thehotwatermayescapeintheeventofover-heating.
4. Removethedrainvalve,atthebottomofthestoragetank.Installa¾”nippleandtee,andreinstallthedrainvalvetothe
tee(4).Run¾”coppertubing,withthenecessaryttings,betweenthedrain/teecombinationandthelowerlegofthecoil.
Afteralloftheconnectionsarecompleted,youcanrellthetank.RestorepowertothewaterheaterONLYafterthetank
hasbeencompletelyrelled.
OPTIONAL BENT HOT WATER COIL
Optional Bent Hot Water Coil - Part #3-10-49202
Useaholesawandthetemplatesuppliedwiththecoilto
make two holes through the side wall of the stove. Keep
thecoilholesabovetherebrickandawayfromtheloading
door.Placeoneofthesuppliednutsoneachlegofthecoil.
Place the coil through the holes in the stove, and adjust
thenutssothatthepipesstickoutabout1¼”to1½”from
thesidewallofthestove.Putatwashersandnutsonthe
outside,andtightenwithin¼inch.Placeberglassgasket
aroundeachpipeatthewashersandtightensecurely.You
arenowreadytorunpipesaccordingtooneofthefollowing
examples.
EXAMPLE 1: Thermo-siphon Method.
(less than 10 feet.)
Outside Nut
Washer
Outside Nut
Packing Stove Side

12 3-90-70738R9_08/13
WATER COIL OPTION
Example 2:Circulatingpumpmethod.Usedwhenthedistanceismorethantenfeetorwhenthestoveisonahigherlevel
thantheexistingwaterheater.Inadditiontoacirculator,youmaywanttoaddaaquastattocontrolthepumpaccordingto
watertemperature.Thisisnotnecessaryifthecirculatorisleftruncontinuously.Anotheroptionisagatevalveplacednear
thecirculatortocontroltherateofow.
1. Turnoffthewaterheaterandthewatersupplytoit.Drainthetankcompletely.
2. RemovetheTemp/Pressurereliefvalveanddiscard.Installashort¾”nippleandtee(1)alongwithanewTemp/Pressure
reliefvalve.
3. Removethedrainvalve,atthebottomofthestoragetank.Installa¾”nippleandtee,andreinstallthedrainvalvetothe
tee(4).
4. Installacirculatingpump(6)asshown.Run¾”coppertubingfromthecirculatortothelowerlegofthecoil.Thisiswhere
theoptionalgatevalve(5)canbeinstalled.
5. Installa¾”teeanda150lb.pressurereliefvalve(7)inthetoplegwithin2feetofthetopoutletofthewatercoil.
6. Completethecopperlinebyrunningitbacktotheteeatthetopofthewatertank,makingsuretoinstallaventelbow
andautomaticairvent(2)atthehighpointoftheline.Theoptionalaquastatcanbeinstalledinthislineamaximumof
sixfeetfromthestove.Theaquastatmustbea“closeontemperaturerise”typeandmustbewiredandsettoturnonthe
circulatorwhenthewatertemperaturereaches120˚Farenheit.
ThesystemisnowreadytoberelledandpowerrestoredtothewaterheaterONLYafterthetankislled.
EXAMPLE 2: Circulator Method.
(more than 10 feet.)
3-90-70738R9_08/13
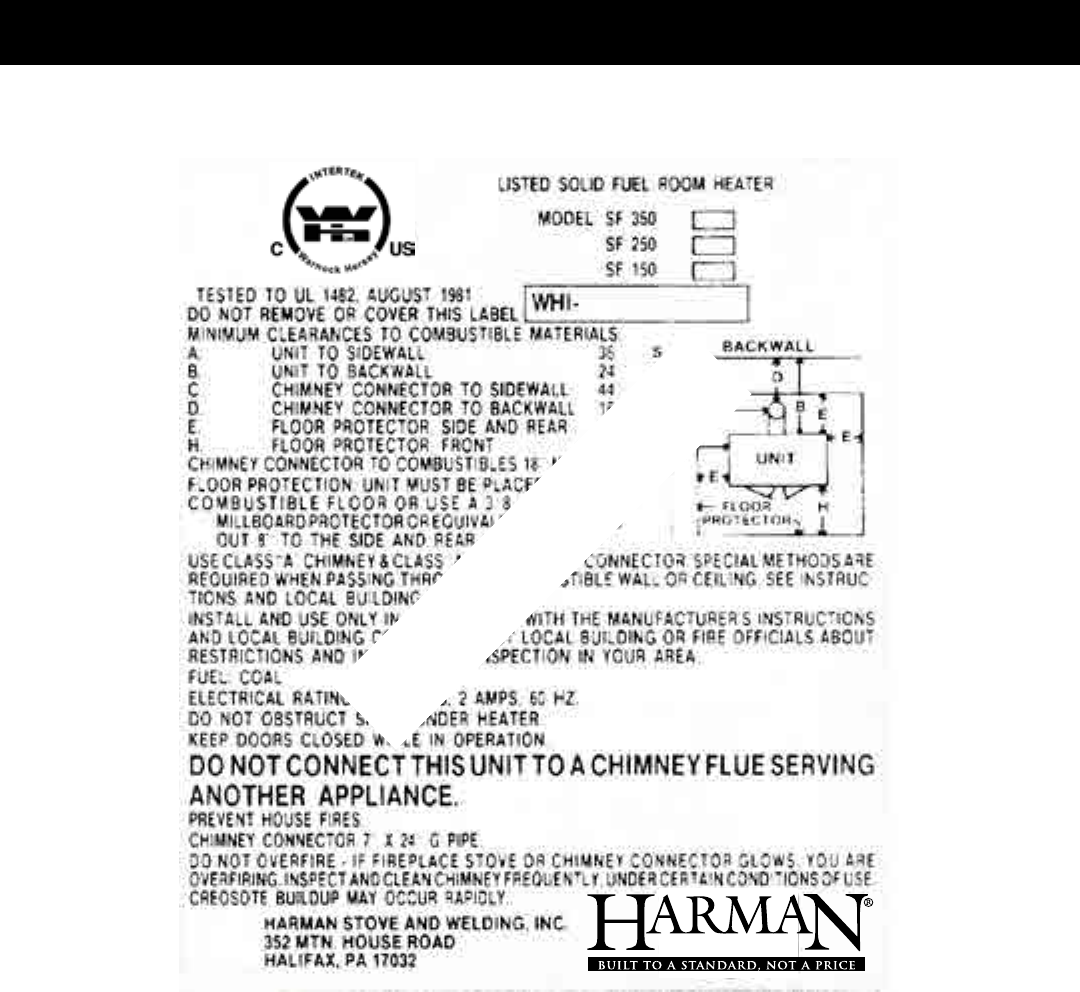
TESTING LABEL
*Thisapplianceisalsoapprovedforinstallationintoashop
SAMPLE
3-90-70738R9_08/13
14
4021-645F02-18-13
Page1of2
Hearth & Home Technologies
LIMITED LIFETIME WARRANTY
Hearth&HomeTechnologies,onbehalfofitshearthbrands(”HHT”),extendsthefollowingwarrantyforHHT
gas,wood,pellet,coalandelectrichearthappliancesthatarepurchasedfromanHHTauthorizeddealer.
WARRANTY COVERAGE:
HHTwarrantstotheoriginalowneroftheHHTapplianceatthesiteofinstallation,andtoanytransfereetakingownership
oftheapplianceatthesiteofinstallationwithintwoyearsfollowingthedateoforiginalpurchase,thattheHHTappliance
willbefreefromdefectsinmaterialsandworkmanshipatthetimeofmanufacture.Afterinstallation,ifcoveredcompo-
nentsmanufacturedbyHHTarefoundtobedefectiveinmaterialsorworkmanshipduringtheapplicablewarrantyperiod,
HHTwill,atitsoption,repairorreplacethecoveredcomponents.HHT,atitsowndiscretion,mayfullydischargeallofits
obligationsundersuchwarrantiesbyreplacingtheproductitselforrefundingtheverifiedpurchasepriceoftheproduct
itself.Themaximumamountrecoverableunderthiswarrantyislimitedtothepurchasepriceoftheproduct.Thiswarranty
issubjecttoconditions,exclusionsandlimitationsasdescribedbelow.
WARRANTY PERIOD:
Warrantycoveragebeginsonthedateoforiginalpurchase.Inthecaseofnewhomeconstruction,warrantycoverage
beginsonthedateoffirstoccupancyofthedwellingorsixmonthsafterthesaleoftheproductbyanindependent,
authorizedHHTdealer/distributor,whicheveroccursearlier.Thewarrantyshallcommencenolaterthan24months
followingthedateofproductshipmentfromHHT,regardlessoftheinstallationoroccupancydate.Thewarrantyperiodfor
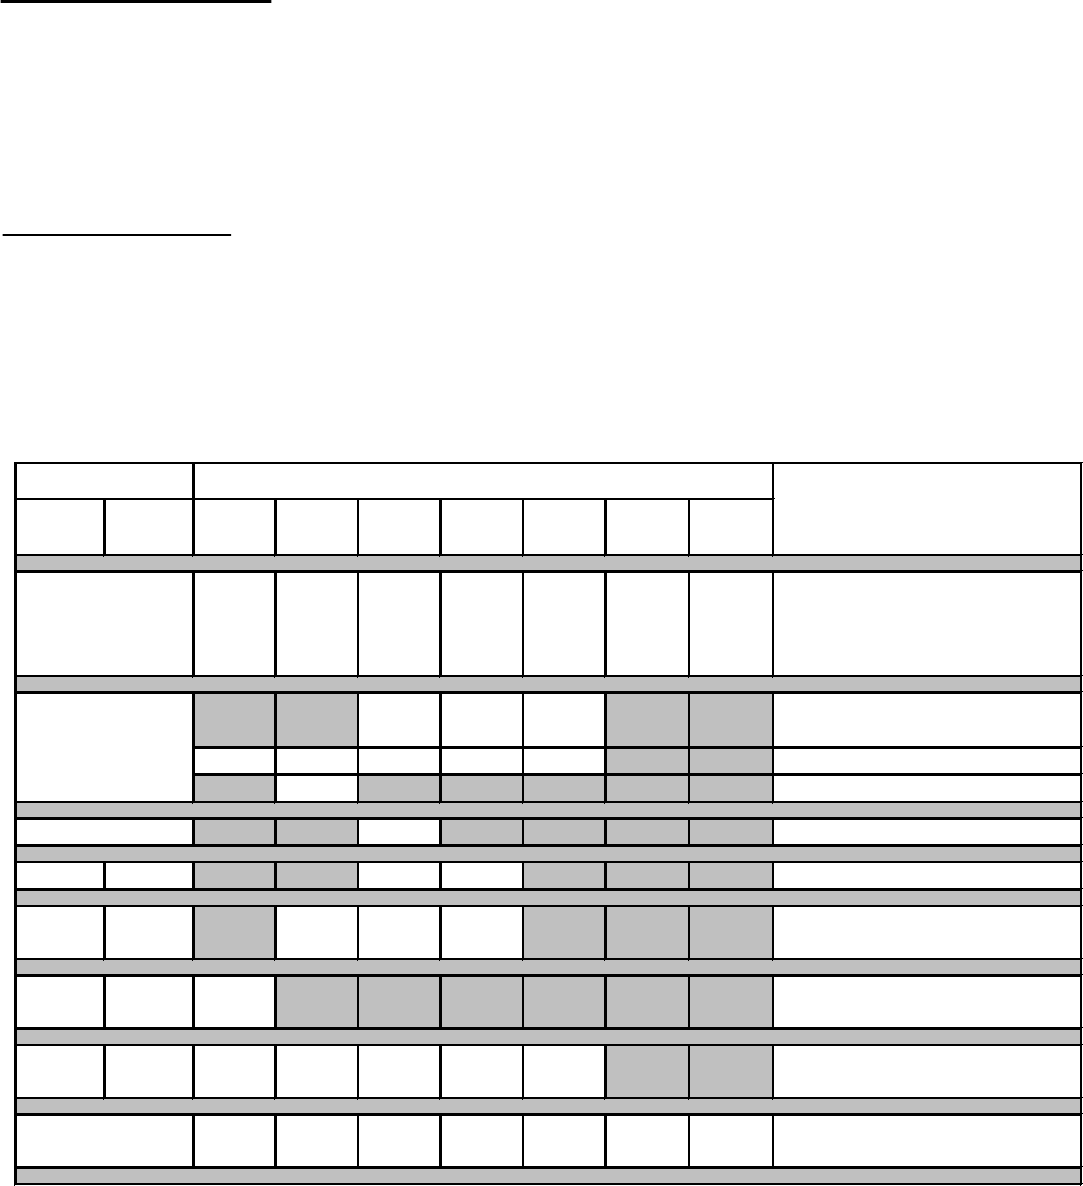
partsandlaborforcoveredcomponentsisproducedinthefollowingtable.
Theterm“LimitedLifetime”inthetablebelowisdefinedas:20yearsfromthebeginningdateofwarrantycoveragefor
gasappliances,and10yearsfromthebeginningdateofwarrantycoverageforwood,pellet,andcoalappliances.These
timeperiodsreflecttheminimumexpectedusefullivesofthedesignatedcomponentsundernormaloperatingconditions.
Seeconditions,exclusions,andlimitationsonnextpage.
Parts Labor Gas Wood Pellet EPA
Wood
Coal Electric Venting
XXXXXXX
Allpartsandmaterialexceptas
coveredbyConditions,
Exclusions,andLimitations
listed
XXX
Igniters,electroniccomponents,
andglass
X X X X X Factory-installedblowers
X Moldedrefractorypanels
X Firepotsandburnpots
5years 1year X X Castingsandbaffles
7years 3years X X X Manifoldtubes,
HHTchimneyandtermination
10
years
1year X Burners,logsandrefractory
Limited
Lifetime
3years X X X X X Fireboxandheatexchanger
XXXXXXX Allreplacementparts
beyondwarrantyperiod
WarrantyPeriod HHTManufacturedAppliancesandVenting
1Year
ComponentsCovered
3years
2years
90Days

3-90-70738R9_08/13
15
4021-645F02-18-13 Page2of2
WARRANTY CONDITIONS:
• ThiswarrantyonlycoversHHTappliancesthatarepurchasedthroughanHHTauthorizeddealerordistributor.Alistof
HHTauthorizeddealersisavailableontheHHTbrandedwebsites.
• ThiswarrantyisonlyvalidwhiletheHHTapplianceremainsatthesiteoforiginalinstallation.
•ThiswarrantyisonlyvalidinthecountryinwhichtheHHTauthorizeddealerordistributorthatsoldtheappliance
resides.
• Contactyourinstallingdealerforwarrantyservice.Iftheinstallingdealerisunabletoprovidenecessaryparts,contact
thenearestHHTauthorizeddealerorsupplier.Additionalservicefeesmayapplyifyouareseekingwarrantyservice
fromadealerotherthanthedealerfromwhomyouoriginallypurchasedtheproduct.
• Checkwithyourdealerinadvanceforanycoststoyouwhenarrangingawarrantycall.Travelandshippingcharges
forpartsarenotcoveredbythiswarranty.
This warranty is void if:
• Theappliancehasbeenover-firedoroperatedinatmospherescontaminatedbychlorine,fluorine,orotherdamaging
chemicals.Over-firingcanbeidentifiedby,butnotlimitedto,warpedplatesortubes,rustcoloredcastiron,bubbling,
crackinganddiscolorationofsteelorenamelfinishes.
• Theapplianceissubjectedtoprolongedperiodsofdampnessorcondensation.
• Thereisanydamagetotheapplianceorothercomponentsduetowaterorweatherdamagewhichistheresultof,but
notlimitedto,improperchimneyorventinginstallation.
LIMITATIONS OF LIABILITY:
• Theowner’sexclusiveremedyandHHT’ssoleobligationunderthiswarranty,underanyotherwarranty,expressor
implied,orincontract,tortorotherwise,shallbelimitedtoreplacement,repair,orrefund,asspecifiedabove.Inno
eventwillHHTbeliableforanyincidentalorconsequentialdamagescausedbydefectsintheappliance.Somestates
donotallowexclusionsorlimitationofincidentalorconsequentialdamages,sotheselimitationsmaynotapplytoyou.
Thiswarrantygivesyouspecificrights;youmayalsohaveotherrights,whichvaryfromstatetostate.EXCEPTTO
THEEXTENTPROVIDEDBYLAW,HHTMAKESNOEXPRESSWARRANTIESOTHERTHANTHEWARRANTY
SPECIFIEDHEREIN.THEDURATIONOFANYIMPLIEDWARRANTYISLIMITEDTODURATIONOFTHE
EXPRESSEDWARRANTYSPECIFIEDABOVE.
WARRANTY EXCLUSIONS:
Thiswarrantydoesnotcoverthefollowing:
• Changesinsurfacefinishesasaresultofnormaluse.Asaheatingappliance,somechangesincolorofinteriorand
exteriorsurfacefinishesmayoccur.Thisisnotaflawandisnotcoveredunderwarranty.
• Damagetoprinted,plated,orenameledsurfacescausedbyfingerprints,accidents,misuse,scratches,melteditems,
orotherexternalsourcesandresiduesleftontheplatedsurfacesfromtheuseofabrasivecleanersorpolishes.
• Repairorreplacementofpartsthataresubjecttonormalwearandtearduringthewarrantyperiod.Theseparts
include:paint,wood,pelletandcoalgaskets,firebricks,grates,flameguides,batteriesandthediscolorationofglass.
• Minorexpansion,contraction,ormovementofcertainpartscausingnoise.Theseconditionsarenormalandcom-
plaintsrelatedtothisnoisearenotcoveredbythiswarranty.
• Damagesresultingfrom:(1)failuretoinstall,operate,ormaintaintheapplianceinaccordancewiththeinstallation
instructions,operatinginstructions,andlistingagentidentificationlabelfurnishedwiththeappliance;(2)failureto
installtheapplianceinaccordancewithlocalbuildingcodes;(3)shippingorimproperhandling;(4)improperopera-
tion,abuse,misuse,continuedoperationwithdamaged,corrodedorfailedcomponents,accident,orimproperly/
incorrectlyperformedrepairs;(5)environmentalconditions,inadequateventilation,negativepressure,ordrafting
causedbytightlysealedconstructions,insufficientmake-upairsupply,orhandlingdevicessuchasexhaustfansor
forcedairfurnacesorothersuchcauses;(6)useoffuelsotherthanthosespecifiedintheoperatinginstructions;(7)
installationoruseofcomponentsnotsuppliedwiththeapplianceoranyothercomponentsnotexpresslyauthorized
andapprovedbyHHT;(8)modificationoftheappliancenotexpresslyauthorizedandapprovedbyHHTinwriting;
and/or(9)interruptionsorfluctuationsofelectricalpowersupplytotheappliance.
• Non-HHTventingcomponents,hearthcomponentsorotheraccessoriesusedinconjunctionwiththeappliance.
• Anypartofapre-existingfireplacesysteminwhichaninsertoradecorativegasapplianceisinstalled.
• HHT’sobligationunderthiswarrantydoesnotextendtotheappliance’scapabilitytoheatthedesiredspace.Informa-
tionisprovidedtoassisttheconsumerandthedealerinselectingtheproperappliancefortheapplication.Consider-
ationmustbegiventoappliancelocationandconfiguration,environmentalconditions,insulationandairtightnessof
thestructure.

16 3-90-70738R9_08/13
Date Of Service Performed By Description Of Service
Service & Maintenance Log

17 3-90-70738R9_08/13
NOTES
Proudly Printed On 100% Recycled Paper
At Harman®, we build each product to a standard, not a price.
(Signature of Boxer)
Your premium quality hearth product designed and assembled by the
experienced and skilled members at Harman® in Halifax, PA, USA.
