Harman UI16MIXER Remote Control Digital Mixer User Manual Manual
Harman International Industries, Inc Remote Control Digital Mixer Manual
UserManual.wiki
>
Harman
>
UI16MIXER User Manual
User Manual
Navigation menu
Upload a User Manual
Namespaces
Wiki Guide
HTML
PDF
Info
Views
User Manual
Discussion / Help
Navigation


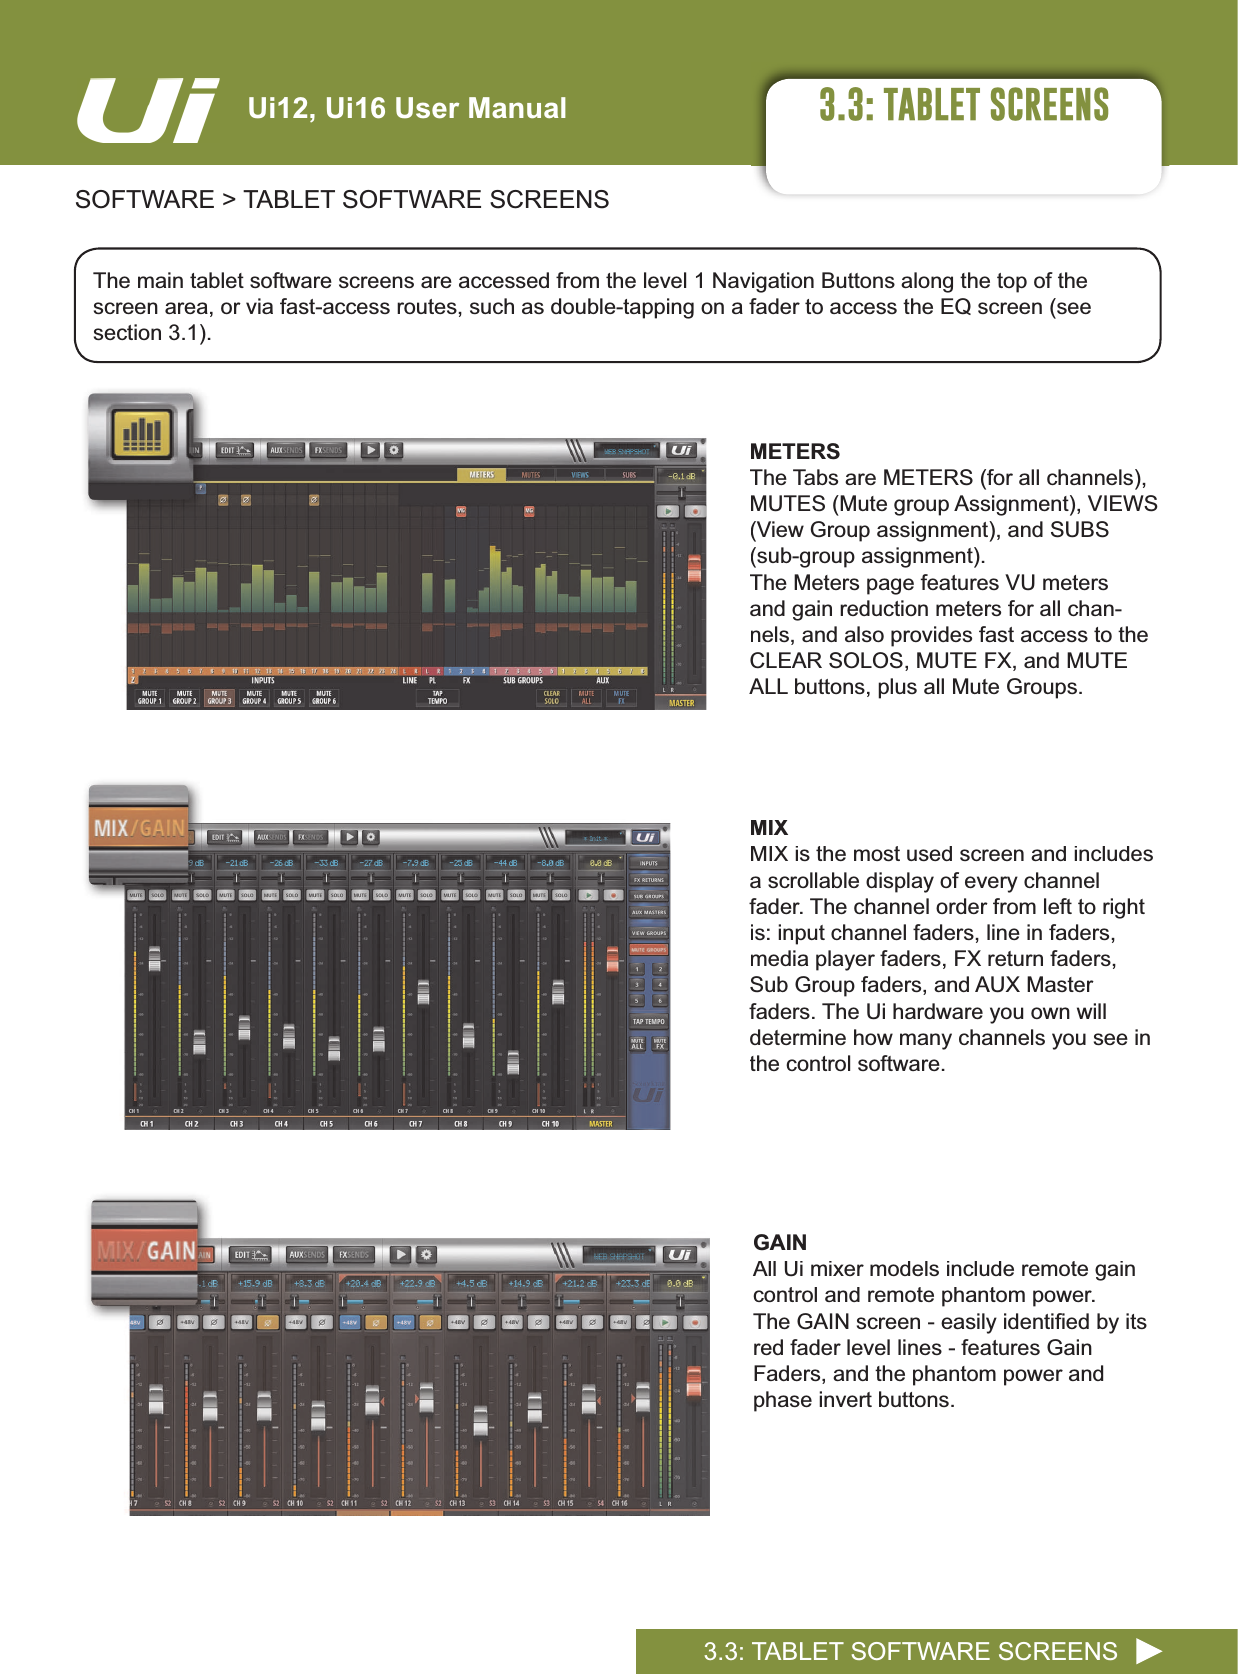
![1.3: SPECIFICATIONSINTRODUCTION > SAFETY1.3: SPECIFICATIONS8L8L8VHU0DQXDO6281'&5$)78L7<3,&$/63(&,),&$7,216)UHTXHQF\5HVSRQVH20Hz-20kHz +/- 0.25 dB7+'-20dBFS @ 1kHz <0.006%• NoiseResidual Noise -96dBuMic Input E.I.N.22Hz-22kHz unweighted: -109dB EINMix Noise masters at unity < -90dBu1 input to Mix at Unity gain < -86dBu&URVV7DON#N+]Channel ON attenuation <120dBChannel Fader Attenuation <120dBMic-Mic -103dB@ 1kHz, -93dB@ 10kHzLine-Line-103dB@ 1kHz, -93dB@ 10kHz,QSXW*DLQMic/Line Gain -40dB to +50dB (0.1dB steps, Step accuracy depends on size of fader in GUI)*DWHThreshold -inf to +6dBAuto AttackAuto Release&RPSUHVVRUThreshold -90dB +6dBRatio 1:1 - 50:1Attack 1ms - 400msRelease 10ms - 2000msMakeup Gain -24dB - +48dB• EQ Channel4 band parametriq EQEach Band Freq 20Hz to 22kHzQ .05 - 15Gain -20dB to +20dBHPF20Hz to 1kHz'HHVVHUThreshold -90dB to 6dB5DWLRLQ¿QLW\WRFrequency 2kHz to 15kHz(42XWSXWV32 band GEQ, 20Hz - 20KHz +-15dB&RPSUHVVRURXWSXWVThreshold -90dB +6dBRatio 1:1 - 50:1Attack 1ms - 400msRelease 10ms - 2000msMakeup Gain -24dB - +48dBGE[$)6RQDOORXWSXWVSDUDPHWULF(4¶V¿[HGÀRDWLQJ/DWHQF\Mic in - ADC -DSP -DAC - Line output 1.8ms,QSXWDQG2XWSXW/HYHOVMic Input +20dBu maxLine input +20dBu maxMix output +23dBu maxHeadphone outputs 500mW 1 output used #ȍPZERWKRXWSXWVXVHG,QSXWDQG2XWSXW,PSHGDQFHV0LFLQSXWNȍ/LQH,QSXWNȍ+L=,QSXWNȍ2XWSXWVDOODWȍ86%Max Current 500mAMax Current available to all ports: 900mA3RZHUConsumption (typical) < 25WAC input voltage range 88-265VAC auto sensingAC frequency 47-63Hz2SHUDWLQJ&RQGLWLRQVTemperature range 5°C - 45°CHumidity 0%-90%Storage Temperature -20°C to 60°C(2(Soundcraft reserves the right to change VSHFL¿FDWLRQVDQGRULPDJHVLQWKLVPDQXDOZLWK-out notice.](https://usermanual.wiki/Harman/UI16MIXER/User-Guide-3154446-Page-9.png)
![8L8L8VHU0DQXDO 3.0.1: UPDATES & REQUIREMENTSSOFTWARE UPDATES & REQUIREMENTS3.0.1: SOFTWARE UPDATES & REQUIREMENTSThe browser-based software control for the Ui Series actually runs from a virtual web server in the main Ui unit itself and is compatible with any modern browser software running on your control device. For Android users, you must use Android browser 4.4 or later, or another modern browser like Chrome to use the Ui web app.Up to 10 control devices can be used simultaneously.6RIWZDUH8SGDWHVRegular software updates are posted on the Soundcraft website and are available from the product page. In the Tablet software you can check your current Ui software version by navigating to the SETTINGS page and selecting the ABOUT tab. In the Phone software you can check your current Ui software version by navigating to the SETTINGS page and selecting the HELP tab.7RXSGDWHWKH8LVRIWZDUH'RZQORDGWKH8LXSGDWH¿OHIURPWKHZHEVLWHDQGOHDYHLQ]LSIRUPDW&RS\WKH]LS¿OHWRD86%PHGLDGHYLFHVXLWDEOHIRUFRQQHFWLRQWRD8LPL[HU¶V86%SRUW1RWH7KH¿OHcan reside in any directory. Any USB port on the mixer is also acceptable.3. Ensure your client device is connected to the Ui mixer GUI4. Connect the USB media 5. The GUI display will display that the USB device has been mounted. After the stick has been read (may-be 10 more seconds) the update will be recognised.6. The GUI will ask if you would like to update. Choose OK.7. The mixer will perform the update8. The GUI will present a message stating whether the update has been successful or not.9. You must power-cycle the unit and reconnect a client device.10. You can browse to the about page to see the new Firmware version information.IMPORTANT!1RWHWKDWLI\RXKDYHDQ\W\SHRI]LS¿OHRWKHUWKDQWKHXSGDWH¿OHLQDQ\GLUHFWRU\RQWKHUSB key already, the software update will not work.](https://usermanual.wiki/Harman/UI16MIXER/User-Guide-3154446-Page-19.png)
![3.2.1: KEYBOARD CONTROLSOFTWARE > KEYBOARD CONTROL3.2.1: KEYBOARD CONTROLFor users mixing with a device that has a keyboard, please see below a set of easily accessible key com-PDQGVPDNLQJLWTXLFNDQGHI¿FLHQWWRDFFHVVWKHPRVWXVHGIHDWXUHVRQWKHPL[HU8L8L8VHU0DQXDO[1]DASHBOARD[2]MIX/GAIN[3]EDIT[4]AUX SENDS[5]FX SENDS>@MEDIA>@SETTINGS[8]SNAPSHOTS (Same as click in NAV Display)[9]SLIDEOUT>63$&(%$5@SLIDEOUT.[Q]FX RETURNS[W]SUB GROUPS[E]AUX MASTERS[A]MUTE ALL[P]PRESETS[F]MUTE FX[M]MUTE>6@SOLO[C]CHANNEL POP UP MENU[~]UNDO (last page viewed)>/HIWDUURZ@Jump 1 channels to the left>5LJKWDUURZ@Jump 1 channels to the right>8SDUURZ@Jump 8 channels to the left>'RZQDUURZ@Jump 8 channels to the right>7$%@Toggle through the tabs inside EQ, DYN, FX, AUX.](https://usermanual.wiki/Harman/UI16MIXER/User-Guide-3154446-Page-29.png)