Harman UI16MIXER Remote Control Digital Mixer User Manual Manual
Harman International Industries, Inc Remote Control Digital Mixer Manual
Harman >
User Manual

User Guide
v3.0
For Soundcraft Ui12 & Ui16
®
®
series

INFORMATION
INFORMATION
INFORMATION
IMPORTANT
Please read this manual carefully before using your mixer
IRUWKH¿UVWWLPH
This equipment complies with the EMC directive 2004/108/EC and LVD 2006/95/EC.
This product is approved to safety standards:
EN 60950-1:2006 + A11:2009 + A1:2010 + A12:2011 + A2:2013
And EMC standards
EN55022: 2010
EN61000-3-3: 2013
EN55020 :2007+ A11
EN61000-4-2: 2009
EN61000-4-3: 2006 + A1+ A2
:DUQLQJ$Q\PRGL¿FDWLRQRUFKDQJHVPDGHWRWKLVGHYLFHXQOHVVH[SOLFLWO\DSSURYHGE\+DUPDQZLOO
LQYDOLGDWHWKHDXWKRULVDWLRQRIWKLVGHYLFH2SHUDWLRQRIDQXQDXWKRULVHGGHYLFHLVSURKLELWHGXQGHU6HFWLRQ
RIWKH&RPPXQLFDWLRQVDFWRIDVDPHQGHGDQG6XESDUWRI3DUWRI&KDSWHURIWKH&RGHRI
)HGHUDO5HJXODWLRQV
NOTE:
This equipment has been tested and found to comply with the limits for a Class B digital device, pursuant to
Part 15 of the FCC Rules. These limits are designed to provide reasonable protection against harmful interference in
a residential installation. This equipment generates, uses and can radiate radio frequency energy and, if not installed
and used in accordance with the instructions, may cause harmful interference to radio communications. However,
there is no guarantee that interference will not occur in a particular installation. If this equipment does cause harmful
interference to radio or television reception, which can be determined by turning the equipment off and on, the user is
encouraged to try to correct the interference by one or more of the following measures:
* Reorient or relocate the receiving antenna
* Increase the separation between the equipment and the receiver
* Connect the equipment into an outlet on a circuit different from that to which the receiver is connected.
* Consult the dealer or an experienced radio/TV technician for help.
For further details contact:
Harman International Industries Ltd, 8500 Balboa Blvd. Northridge,CA 91329 USA
email: soundcraft@harman.com
© Harman International Industries Ltd. 2014 All rights reserved
Parts of the design of this product may be protected by worldwide patents.
Part No. 5056809
Rev 1.0
E&OE September 2014
Soundcraft is a trading division of Harman International Industries Ltd. Information in this manual is subject to change
without notice and does not represent a commitment on the part of the vendor. Soundcraft shall not be liable for any
loss or damage whatsoever arising from the use of information or any error contained in this manual. No part of this
manual may be reproduced, stored in a retrieval system, or transmitted, in any form or by any means, electronic,
electrical, mechanical, optical, chemical, including photocopying and recording, for any purpose without the express
written permission of Soundcraft.
Harman International Industries Limited
8500 Balboa Blvd. Northridge,CA 91329 USA
http://www.soundcraft.com
8L8L8VHU0DQXDO

CONTENTS
CONTENTS
CONTENTS
$1,1752'8&7,21728L
1.1: Safety
1.2: Warranty
6SHFL¿FDWLRQV
*(77,1*67$57('
2.1: System Overview
2.2: Hardware I/O & Control
2.3: Input Channel Routing
2.4: Getting Connected
62)7:$5(&21752/
3.
0.1
:
Updates & Requirements
3.0.2: Reset The Mixer
3.1:
Software Navigation
3.1.1: Control / Gesture Summary
3.
2
:
Tablet Navigation
3.2.1: Keyboard Control
3.3: Tablet Screens
3.
4
:
Phone Navigation
3.
5
:
Phone Screens
0,;(5&+$11(/6
4.1: Input Gain Page
4.2: Input Mix Page
4.2.1: Input Sub Menu
4.3: Aux Sends
4.3.1: Aux Master
4.4: FX Sends
4.5: Group Master
4.6: Master Channel
4.6.1: Master Channel Sub-Menu
&+$11(/(',7
5.1: DigiTech
5.2: Parametric EQ
5.3: Graphic EQ
5.3.1 AFS
2
- Feedback Elimination
5.4: Dynamics
5.5: Aux / FX Sends
0,;)($785(6
6.1: View & Mute Groups
6.2: MOREME
/(;,&21);(',7
7.1: Reverb
7.2: Delay
7.3: Chorus
6+2:661$36+276
0(',$3/$<(55(&25'(5
6(77,1*6
1HWZRUN
&RQ¿JXUDWLRQ
10.1.1: Hotspot Settings
10.1.2: Wi-Fi Settings
10.1.3: LAN Settings
$33(1',;
Troubleshooting: No Sound?
$33(1',;
Troubleshooting: System FAQ
$33(1',;
F/W Updates
For clarity, this manual uses section references rather than page numbers. In some instances, one section reference
may extend to several pages.
8L8L8VHU0DQXDO
1.0: INTRODUCTION
INTRODUCTION TO Ui
1.0: INTRODUCTION TO Ui
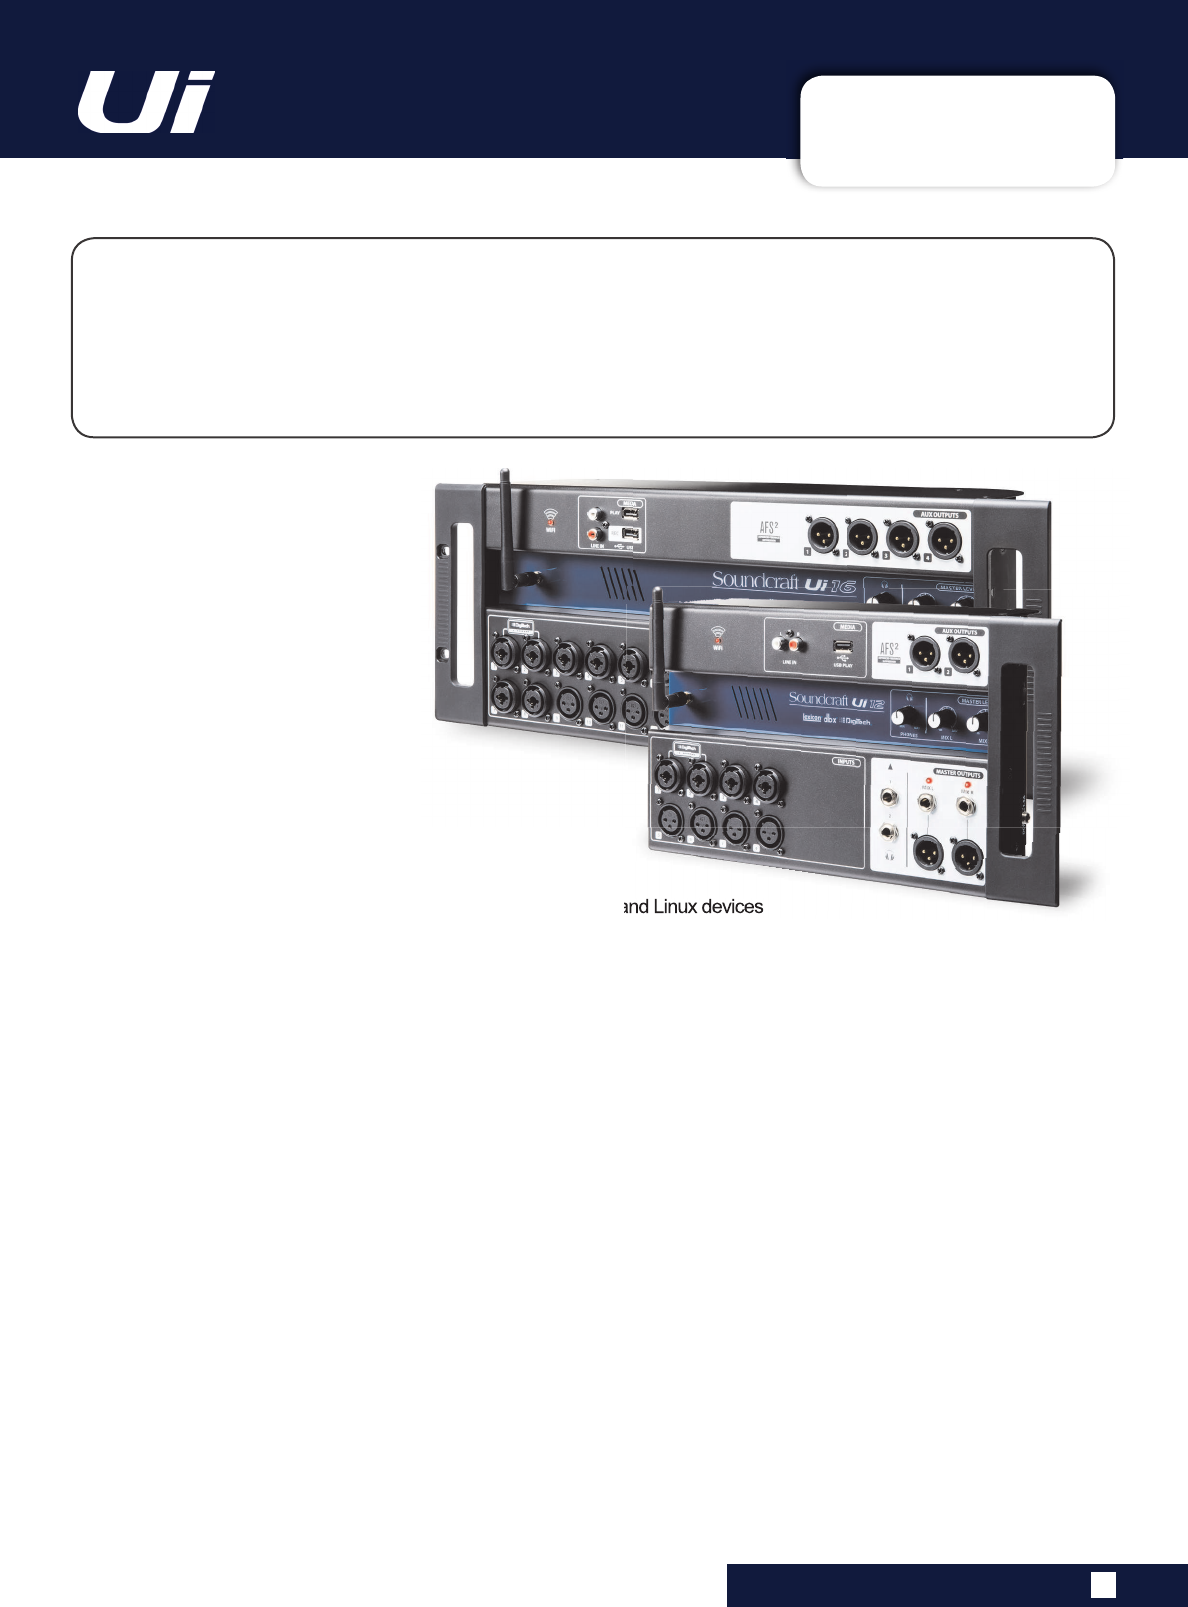
The Ui Series mixers feature cross-platform compatibility with iOS, Android, Windows, Mac OS, and
Linux devices, and can use up to 10 control devices simultaneously. In addition, the Ui12 and Ui16
each feature built-in HARMAN signal processing from dbx, DigiTech and Lexicon, including dbx AFS
2
,
DigiTech Amp Modeling, and more. Both models feature fully recallable and remote-controlled mic
JDLQ
DQG
SKDQWRP
SRZHU
DORQJ
ZLWK
EDQG
SDUDPHWULF
(4
KLJKSDVV
¿OWHU
FRPSUHVVRU
GHHVVHU
DQG
noise gate on input channels.
0$,1)($785(6
• Tablet/PC/Smartphone Controlled Digital Mixer
• Integrated Wi-Fi
• Cross-platform compatibility with iOS, Android, Windows, Mac OS, and Linux devices
• Use up to 10 control devices (tablets, phones, PCs) simultaneously
• Legendary Harman Signal Processing from dbx®, Digitech®, and Lexicon®
• Fully recallable and remote-controlled mic preamps
• 4-band Parametric EQ, High-Pass Filter, Compressor, De-esser and Noise Gate on input channels
• 31-band Graphic EQ, Noise Gate and Compressor on all outputs
• Real-Time Frequency Analyser (RTA) on inputs and outputs
• 3 or 4 dedicated Lexicon® FX effects processors: Reverb, Delay, Chorus, and Delay/Reverb (Ui16).
• 4 x Subgroups, Mute Groups, View Groups, and more mixer controls
• Show/Snapshot recall with channel safes and security lockout
• 2-channel USB audio playback and recording (Recording Ui16 only)
• Floor-ready rugged chassis for live applications
8L8L8VHU0DQXDO
The Ui16 boasts eight XLR combo mic/line inputs, four XLR mic inputs, two channels of Hi- Z/instrument
inputs, as well as a stereo RCA line input. A 2-channel USB media player is included, along with four
balanced XLR Aux outputs, two quarter-inch headphone outputs with level control, plus balanced stereo
XLR and quarter-inch main outputs. Two-channel USB audio playback is compatible with MP3, WAV and
AIFF formats, and 2-channel USB Record direct-to-memory devices functionality is possible as well.
The Ui16 also has an HDMI display connection output.
1.1: SAFETY
INTRODUCTION > SAFETY
1.1: INTRODUCTION > SAFETY
7KHLQWHUQDOSRZHUVXSSO\XQLWFRQWDLQVQRXVHUVHUYLFHDEOHSDUWV5HIHUDOOVHUYLFLQJWRDTXDOL¿HGVHUYLFH
HQJLQHHUWKURXJKWKHDSSURSULDWH6RXQGFUDIWGHDOHU
5DGLRIUHTXHQF\H[SRVXUH
This equipment complies with FCC radiation exposure limits set forth for an uncontrolled environment. End users must
IROORZ
WKH
VSHFL¿F
RSHUDWLQJ
LQVWUXFWLRQV
IRU
VDWLVI\LQJ
5)
H[SRVXUH
FRPSOLDQFH
7KLV
WUDQVPLWWHU
PXVW
QRW
EH
FRORFDW
-
HG
RU
RSHUDWLQJ
LQ
FRQMXQFWLRQ
ZLWK
DQ\
RWKHU
DQWHQQD
RU
WUDQVPLWWHU
1R
PRGL¿FDWLRQV
&KDQJHV
RU
PRGL¿FDWLRQV
QRW
expressly approved by the party responsible for compliance could void the user’s authority to operate the equipment.
The minimum distance required away from the Ui 12-16 mixer and or any antenna is 20cm.
&DQDGD6WDWHPHQW
This device complies with Industry Canada’s licence-exempt RSSs. Operation is subject to the following two condi
-
tions:
(1) This device may not cause interference; and
(2) This device must accept any interference, including interference that may cause undesired operation of the device.
Le présent appareil est conforme aux CNR d’Industrie Canada applicables aux appareils radio exempts de licence.
L’exploitation est autorisée aux deux conditions suivantes :
(1) l’appareil ne doit pas produire de brouillage;
(2) l’utilisateur de l’appareil doit accepter tout brouillage radioélectrique subi, même si le brouillage est susceptible
d’en compromettre le fonctionnement.
This End equipment should be installed and operated with a minimum distance of 20 centimeters between the radiator
and your body.
Cet équipement devrait être installé et actionné avec une distance minimum de 20 centimètres entre le radiateur et
votre corps.
6$)(7<127,&(6
)RU\RXURZQVDIHW\DQGWRDYRLGLQYDOLGDWLRQRIWKHZDUUDQW\
SOHDVHUHDGWKLVVHFWLRQFDUHIXOO\
,PSRUWDQW6\PEROV
Warnings
Alerts the user to the presence of uninsulated
‘dangerous voltage’ within the product’s
HQFORVXUH
WKDW
PD\
EH
RI
VXI¿FLHQW
PDJQLWXGH
to constitute a risk of electric shock to persons.
Cautions
Alerts the user to the presence of important
operating and maintenance (servicing)
instructions in the literature accompanying
the appliance.
8L8L8VHU0DQXDO

1.1: SAFETY
INTRODUCTION > SAFETY
1.1: INTRODUCTION > SAFETY
:$51,1*6
•
Read
these instructions.
•
.HHS
these instructions.
•
+HHG
all warnings.
•
)ROORZ
all instructions.
•
Clean
the apparatus only with a dry cloth.
•
'RQRW
install near any heat sources such as radiators, heat resistors, stoves, or other apparatus
LQFOXGLQJ
DPSOL¿HUV
WKDW
SURGXFH
KHDW
•
'RQRW
block any ventilation openings. Install in accordance with the manufacturer’s instructions.
•
'RQRW
use this apparatus near water.
•
'RQRW
defeat the safety purpose of the polarized or grounding type plug. A polarized plug has two
blades with one wider than the other. A grounding type plug has two blades and a third grounding
prong. The wide blade or the third prong are provided for your safety. When the provided plug does not
¿W
LQWR
\RXU
RXWOHW
FRQVXOW
DQ
HOHFWULFLDQ
IRU
UHSODFHPHQW
RI
WKH
REVROHWH
RXWOHW
•
Protect
the power cord from being walked on or pinched particularly at plugs, convenience
receptacles and the point where they exit from the apparatus.
•
Only
XVH
DWWDFKPHQWVDFFHVVRULHV
VSHFL¿HG
E\
WKH
PDQXIDFWXUHU
•
8QSOXJ
this apparatus during lightning storms or when unused for long periods of time.
•
Refer
DOO
VHUYLFLQJ
WR
TXDOL¿HG
VHUYLFH
SHUVRQQHO
6HUYLFLQJ
LV
UHTXLUHG
ZKHQ
WKH
DSSDUDWXV
KDV
EHHQ
damaged in any way such as power-supply cord or plug is damaged, liquid has been spilled or objects
have fallen into the apparatus, the apparatus has been exposed to rain or moisture, does not operate
normally, or has been dropped.
•
Use
RQO\
ZLWK
WKH
FDUW
VWDQG
WULSRG
EUDFNHW
RU
WDEOH
VSHFL¿HG
E\
WKH
PDQXIDFWXUHU
RU
VROG
ZLWK
WKH
apparatus. When the cart is used, use caution when moving the cart/apparatus combination to avoid
injury from tip-over.
•
No
QDNHG
ÀDPH
VRXUFHV
VXFK
DV
OLJKWHG
FDQGOHV
RU
FLJDUHWWHV
HWF
VKRXOG
EH
SODFHG
RQ
WKH
apparatus.
•
1RXVHUVHUYLFHDEOHSDUWV
5HIHU
DOO
VHUYLFLQJ
WR
D
TXDOL¿HG
VHUYLFH
HQJLQHHU
WKURXJK
WKH
appropriate Soundcraft dealer.
•
The socket-outlet
shall be installed near the equipment and shall be easily accessible.
,WLVUHFRPPHQGHGWKDWDOOPDLQWHQDQFHDQGVHUYLFHRQWKHSUR
GXFWVKRXOGEH
FDUULHGRXWE\6RXQGFUDIWRULWVDXWKRULVHGDJHQWV6RXQGFUDIW
FDQQRWDFFHSWDQ\
OLDELOLW\ZKDWVRHYHUIRUDQ\ORVVRUGDPDJHFDXVHGE\VHUYLFH
PDLQWHQDQFHRUUHSDLU
E\XQDXWKRULVHGSHUVRQQHO
:$51,1*7RUHGXFHWKHULVNRI¿UHRUHOHFWULFVKRFNGRQRWH[SRVHWKLV
DSSDUDWXVWRUDLQRUPRLVWXUH'RQRWH[SRVHWKHDSSDUDWXVWRG
ULSSLQJRUVSODVKLQJ
DQGGRQRWSODFHREMHFWV¿OOHGZLWKOLTXLGVVXFKDVYDVHVRQ
WKHDSSDUDWXV1R
QDNHGÀDPHVRXUFHVVXFKDVOLJKWHGFDQGOHVVKRXOGEHSODFHGR
QWKHDSSDUDWXV
9HQWLODWLRQVKRXOGQRWEHLPSHGHGE\FRYHULQJWKHYHQWLODWLRQRSHQLQJVZLWKLWHPV
VXFKDVQHZVSDSHUVWDEOHFORWKVFXUWDLQVHWF
8L8L8VHU0DQXDO
1.1: SAFETY
INTRODUCTION > SAFETY
1.1: INTRODUCTION > SAFETY
:$51,1*6
$'9,&()257+26(:+2386+7+(%281'$5,(6
Although your new console will not output any sound until you feed it signals, it has the
FDSDELOLW\
WR
SURGXFH
VRXQGV
ZKLFK
ZKHQ
PRQLWRUHG
WKURXJK
DQ
DPSOL¿HU
RU
KHDGSKRQHV
can damage hearing over time.
Please take care when working with your audio — if you are manipulating controls which
you don’t understand (which we all do when we are learning), make sure your monitors are turned
down. Remember that your ears are the most important tool of your trade, look after them, and they will
look after you.
0RVW
LPSRUWDQWO\
²
GRQ¶W
EH
DIUDLG
WR
H[SHULPHQW
WR
¿QG
RXW
KRZ
HDFK
SDUDPHWHU
DIIHFWV
WKH
VRXQG
²
this will extend your creativity and help.
NOTE: The packaging, in which your console arrived, forms part of the product and must
be retained for future use.
NOTE: This equipment has been tested and found to comply with the limits for a Class A
digital device, pursuant to Part 15 of the FCC Rules. These limits are designed to provide
reasonable protection against harmful interference when the equipment is operated in a
commercial environment. This equipment generates, uses and can radiate radio frequency
energy and, if not installed and used in accordance with the instruction manual, may cause
harmful interference to radio communications. Operation of this equipment in a residential
area is likely to cause harmful interference in which case the user will be required to correct the inter
-
ference at his own expense.
This Class A digital apparatus meets the requirements of the Canadian Interference-Causing
Equipment Regulations.
Cet appareil numérique de la Classe A respecte toutes les exigences du Règlement sur le matériel
brouilleur du Canada.
8L8L8VHU0DQXDO

1.2: WARRANTY
INTRODUCTION > SAFETY
1.2: INTRODUCTION > WARRANTY
:$55$17<
1 Soundcraft is a trading division of Harman International Industries Ltd.
(QG
8VHU
PHDQV
WKH
SHUVRQ
ZKR
¿UVW
SXWV
WKH
HTXLSPHQW
LQWR
UHJXODU
RSHUDWLRQ
Dealer means the person other than Soundcraft (if any) from whom the End User purchased the Equipment, pro
-
vided such a person is authorised for this purpose by Soundcraft or its accredited Distributor.
Equipment means the equipment supplied with this manual.
2 If within the period of twelve months from the date of delivery of the Equipment to the End User it shall prove
defective by reason only of faulty materials and/or workmanship to such an extent that the effectiveness and/or
usability thereof is materially affected the Equipment or the defective component should be returned to the Dealer
or to Soundcraft and subject to the following conditions the Dealer or Soundcraft will repair or replace the defec
-
tive components. Any components replaced will become the property of Soundcraft.
3 Any Equipment or component returned will be at the risk of the End User whilst in transit (both to and from the
Dealer or Soundcraft) and postage must be prepaid.
4 This warranty shall only be available if:
a) The Equipment has been properly installed in accordance with instructions contained in Soundcraft’s manual.
E
7KH
(QG
8VHU
KDV
QRWL¿HG
6RXQGFUDIW
RU
WKH
'HDOHU
ZLWKLQ
GD\V
RI
WKH
GHIHFW
DSSHDULQJ
DQG
c) No persons other than authorised representatives of Soundcraft or the Dealer have effected any replacement
of parts maintenance adjustments or repairs to the Equipment; and
d) The End User has used the Equipment only for such purposes as Soundcraft recommends, with only such
RSHUDWLQJ
VXSSOLHV
DV
PHHW
6RXQGFUDIW¶V
VSHFL¿FDWLRQV
DQG
RWKHUZLVH
LQ
DOO
UHVSHFWV
LQ
DFFRUGDQFH
6RXQGFUDIW¶V
recommendations.
5 Defects arising as a result of the following are not covered by this Warranty: faulty or negligent handling, chem
-
LFDO
RU
HOHFWURFKHPLFDO
RU
HOHFWULFDO
LQÀXHQFHV
DFFLGHQWDO
GDPDJH
$FWV
RI
*RG
QHJOHFW
GH¿FLHQF\
LQ
HOHFWULFDO
power, air-conditioning or humidity control.
7KH
EHQH¿W
RI
WKLV
:DUUDQW\
PD\
QRW
EH
DVVLJQHG
E\
WKH
(QG
8VHU
7. End Users who are consumers should note their rights under this Warranty are in addition to and do not affect
any other rights to which they may be entitled against the seller of the Equipment.
8L8L8VHU0DQXDO

1.3: SPECIFICATIONS
INTRODUCTION > SAFETY
1.3: SPECIFICATIONS
8L8L8VHU0DQXDO
6281'&5$)78L7<3,&$/63(&,),&$7,216
)UHTXHQF\5HVSRQVH
20Hz-20kHz +/- 0.25 dB
7+'
-20dBFS @ 1kHz <0.006%
• Noise
Residual Noise -96dBu
Mic Input E.I.N.22Hz-22kHz unweighted:
-109dB EIN
Mix Noise masters at unity < -90dBu
1 input to Mix at Unity gain < -86dBu
&URVV7DON#N+]
Channel ON attenuation <120dB
Channel Fader Attenuation <120dB
Mic-Mic -103dB@ 1kHz, -93dB@ 10kHz
Line-Line
-103dB@ 1kHz, -93dB@ 10kHz
,QSXW*DLQ
Mic/Line Gain -40dB to +50dB
(0.1dB steps, Step
accuracy depends on size of fader in GUI)
*DWH
Threshold -inf to +6dB
Auto Attack
Auto Release
&RPSUHVVRU
Threshold -90dB +6dB
Ratio 1:1 - 50:1
Attack 1ms - 400ms
Release 10ms - 2000ms
Makeup Gain -24dB - +48dB
• EQ Channel
4 band parametriq EQ
Each Band Freq 20Hz to 22kHz
Q .05 - 15
Gain -20dB to +20dB
HPF
20Hz to 1kHz
'HHVVHU
Threshold -90dB to 6dB
5DWLR
LQ¿QLW\
WR
Frequency 2kHz to 15kHz
(42XWSXWV
32 band GEQ, 20Hz - 20KHz
+-15dB
&RPSUHVVRURXWSXWV
Threshold -90dB +6dB
Ratio 1:1 - 50:1
Attack 1ms - 400ms
Release 10ms - 2000ms
Makeup Gain -24dB - +48dB
GE[$)6RQDOORXWSXWV
SDUDPHWULF
(4¶V
¿[HG
ÀRDWLQJ
/DWHQF\
Mic in - ADC -DSP -DAC - Line output
1.8ms
,QSXWDQG2XWSXW/HYHOV
Mic Input +20dBu max
Line input +20dBu max
Mix output +23dBu max
Headphone outputs 500mW 1 output used
#ȍ
PZ
ERWK
RXWSXWV
XVHG
,QSXWDQG2XWSXW,PSHGDQFHV
0LF
LQSXW
Nȍ
/LQH
,QSXW
Nȍ
+L=
,QSXW
Nȍ
2XWSXWV
DOO
DW
ȍ
86%
Max Current 500mA
Max Current available to all ports: 900mA
3RZHU
Consumption (typical) < 25W
AC input voltage range 88-265VAC auto sensing
AC frequency 47-63Hz
2SHUDWLQJ&RQGLWLRQV
Temperature range 5°C - 45°C
Humidity 0%-90%
Storage Temperature -20°C to 60°C
(2(
Soundcraft reserves the right to change
VSHFL¿FDWLRQV
DQG
RU
LPDJHV
LQ
WKLV
PDQXDO
ZLWK
-
out notice.
8L8L8VHU0DQXDO 2.0: GETTING STARTED
GETTING STARTED - AN INTRODUCTION TO THIS MANUAL
2.0: INTRODUCTION TO THIS MANUAL
Anyone with minimal audio experience should be able to operate the Soundcraft Ui Series consoles
without reading too much of this manual, though we do recommend you take the time to go through it.
An excellent place to start would be the feature list on the introductory page (section 1.0), the Wi-Fi
and software set-up guide (3.1), and the software control guides for phone (3.2) and tablet (3.3) soft
-
ware.
Please note:
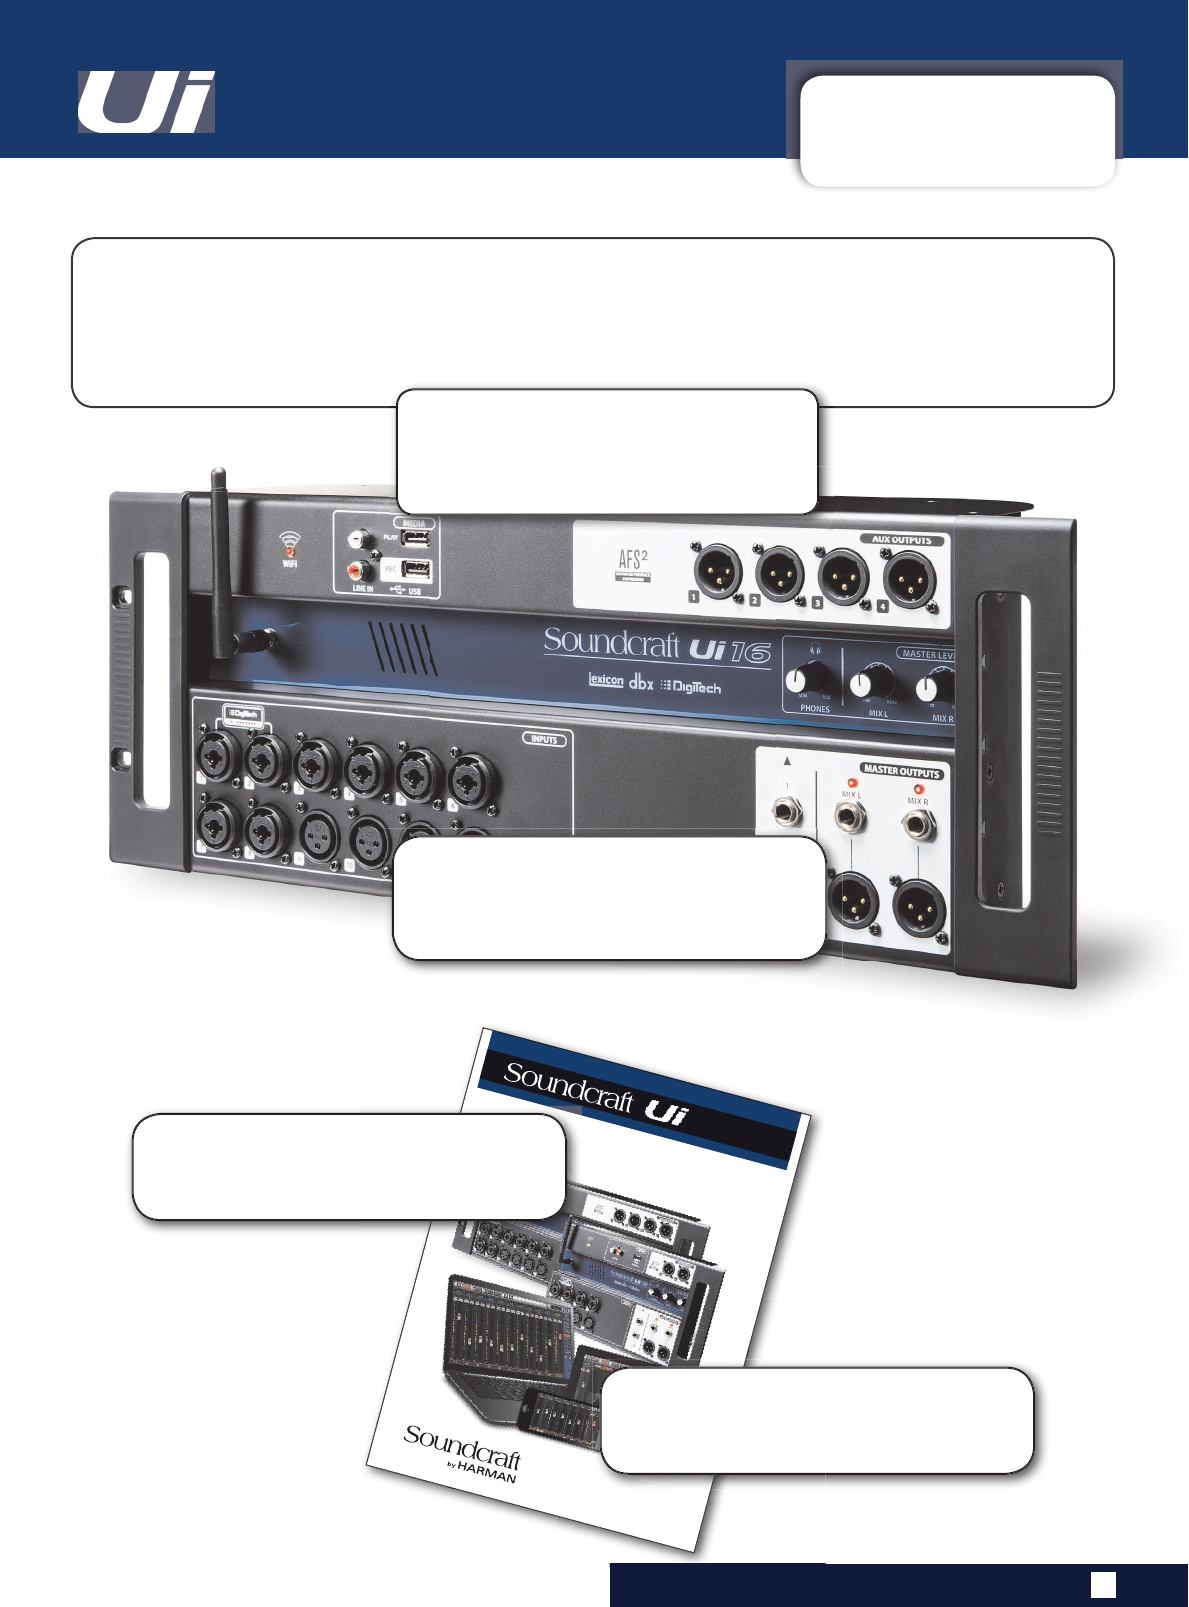
Most of the hardware illustrations
in this manual are based on the Ui16 console.
Where there are differences between operation
of Ui16 and Ui12, it is noted in the relevant
section.
User Guide
v2.0
For Soundcraft Ui12 & Ui16
®
®
series
3')
If you’re reading the PDF version of the manual,
you can use the thumbnail view and links from
the Contents page to navigate quickly.
For clarity, this manual uses section references
rather than page numbers. In some instances,
one section reference may extend to several
pages.
7RJHWVWDUWHGZLWK8LFRQWURO
JRWRWKHµ*HWWLQJ&RQQHFWHG
VHFWLRQ
2.1: SYSTEM OVERVIEW
GETTING STARTED > SYSTEM OVERVIEW
2.1: SYSTEM OVERVIEW
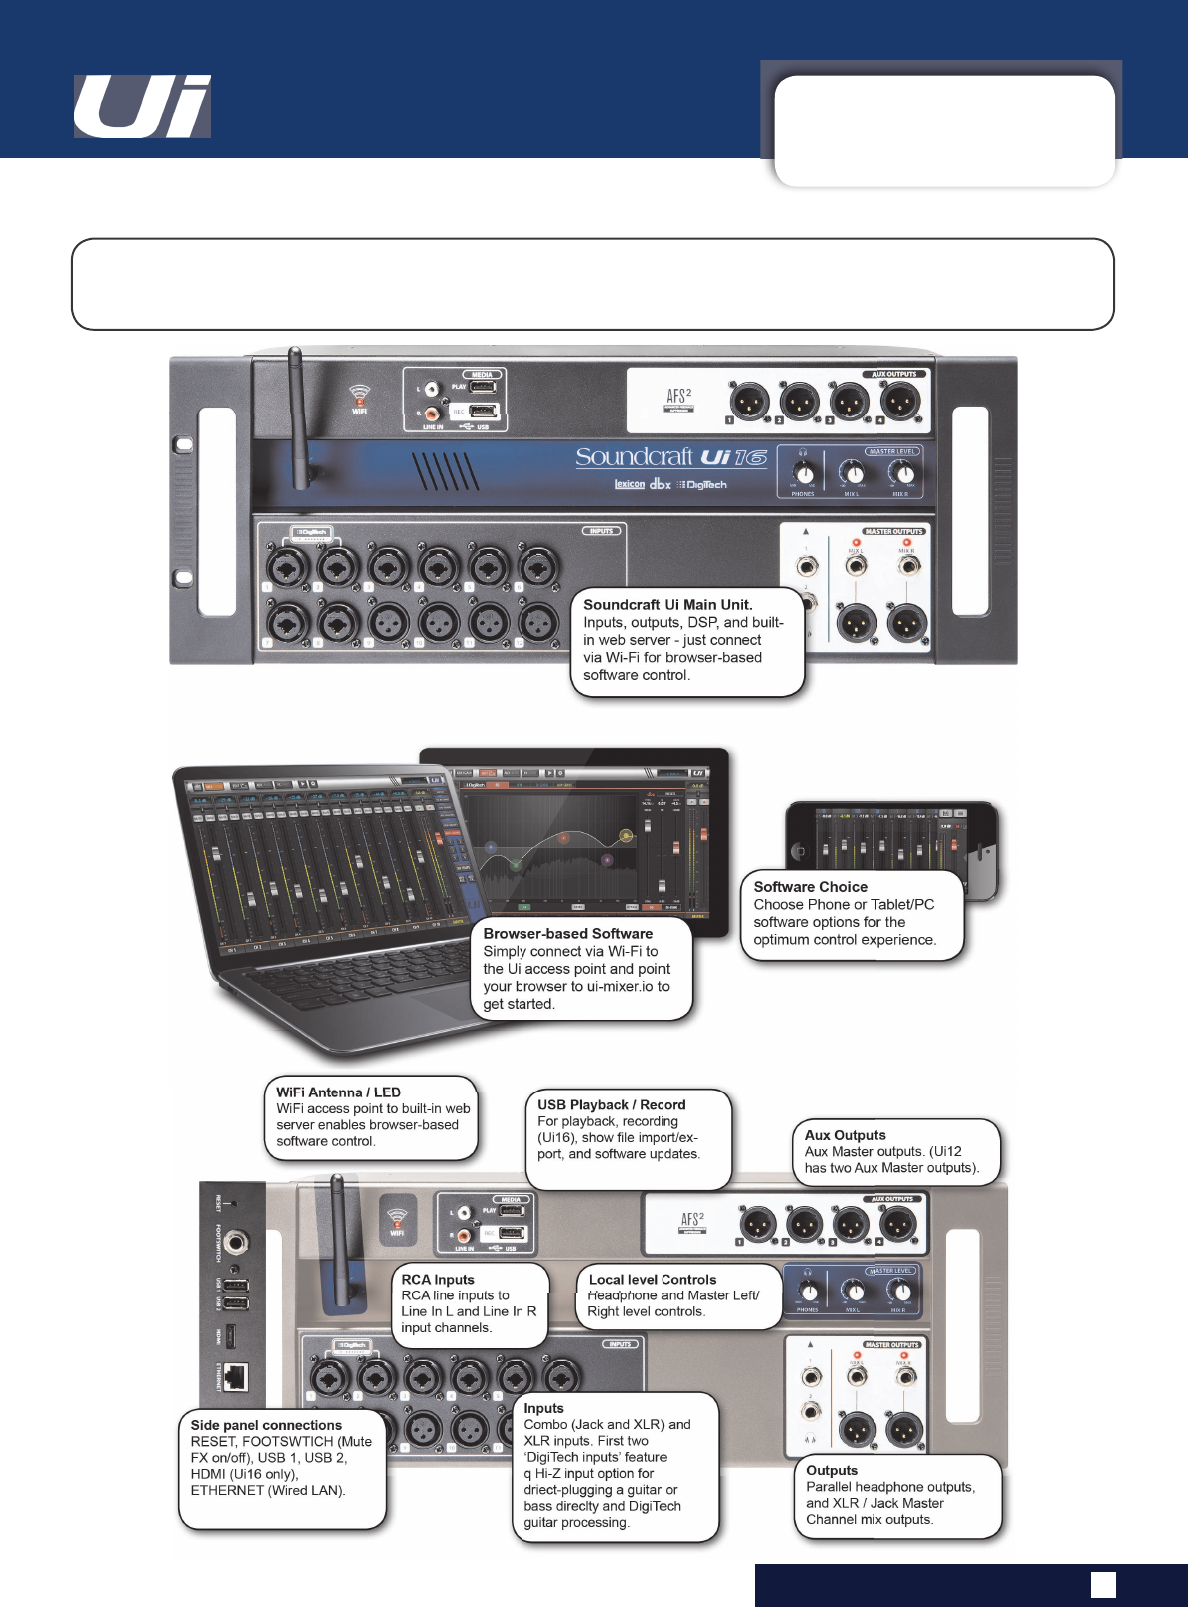
This Soundcraft Ui console uses a compact main unit with built-in I/O, processing, and web server. Phones,
tablets, and PCs can connect to the web server via Wi-Fi for platform-independant software control.
8L8L8VHU0DQXDO
2.2: HARDWARE I/O & CONTROL
GETTING STARTED > HARDWARE
2.2: Hardware I/O And Control
The Ui main unit’s front panel hosts all local audio inputs and outputs plus three master level controls.
2Q
RQH
VLGH
SDQHO
\RX
ZLOO
¿QG
WKH
SRZHU
FRQQHFWRU
DQG
SRZHU
VZLWFK
RQ
WKH
RWKHU
\RX
ZLOO
¿QG
WKH
RESET button, FOOTSWITCH connection, two USB ports, and the Ethernet (wired LAN) connection).
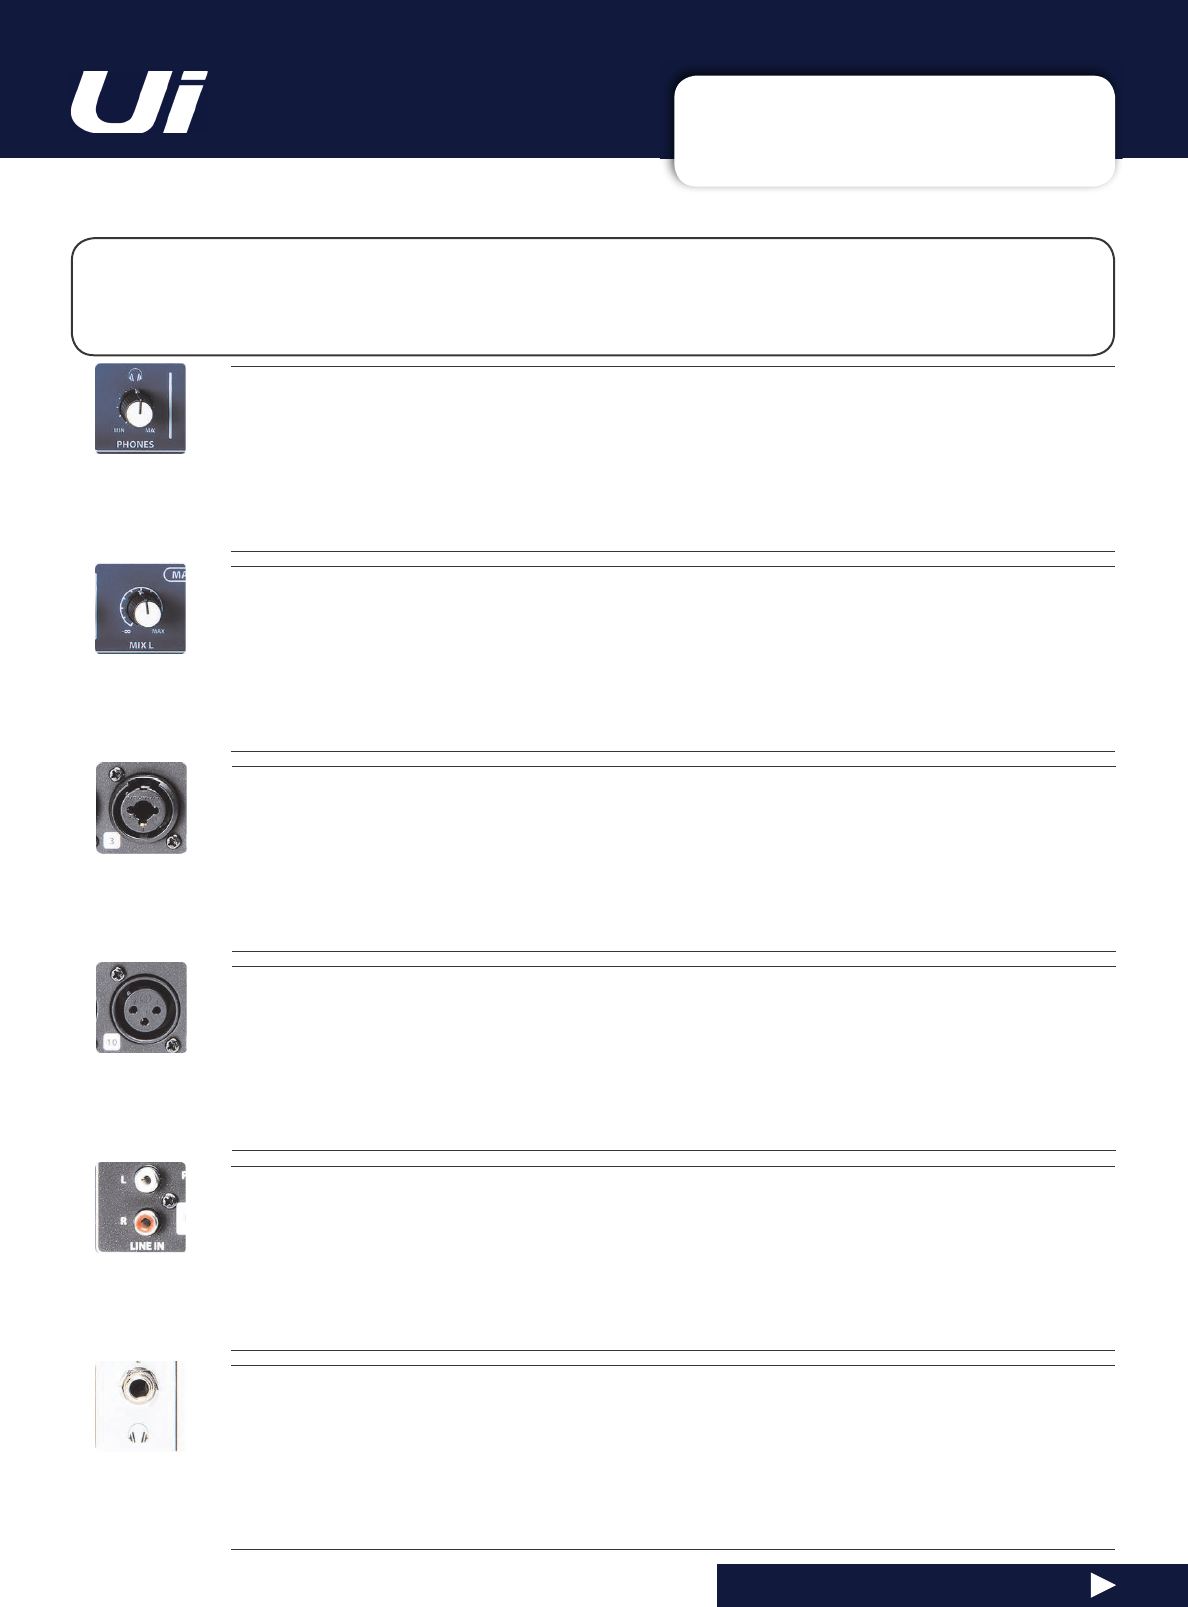
&20%2,1387
Connection for Jack or XLR - mic or Line level
The input number corresponds to channel number in the Ui control software.
;/5,QSXW
Mic or Line XLR Input
The input number corresponds to channel number in the Ui control software.
8L8L8VHU0DQXDO
3+21(6
Set level for headphones outputs
This controls the level on both headphone outputs. The headphone source signal defaults to the main stereo
signal but switches to the Solo bus when AFL or PFL is selected.
0,;/0,;5
Set levels for MIX L and Mix R outputs
The Mix output is the Ui’s main left/right stereo output and appears on both the XLR and Jack Mix L/R outputs.
/,1(,1
Line level RCA inputs
The RCA inputs feed the Line In L and Line In R channels in the UI mixer.
+($'3+21(6287
Parallel headphone sockets
These are not independent, meaning each output receives the same signal. The headphone outputs receive the
same audio signal as the main outputs unless a channel Solo is active, or the ‘AUX’ option is set in SETTINGS (this
assigns the highest-numbered aux pairs to the headphones outputs).
2.2: HARDWARE I/O & CONTROL
GETTING STARTED > HARDWARE
2.2: Hardware I/O And Control
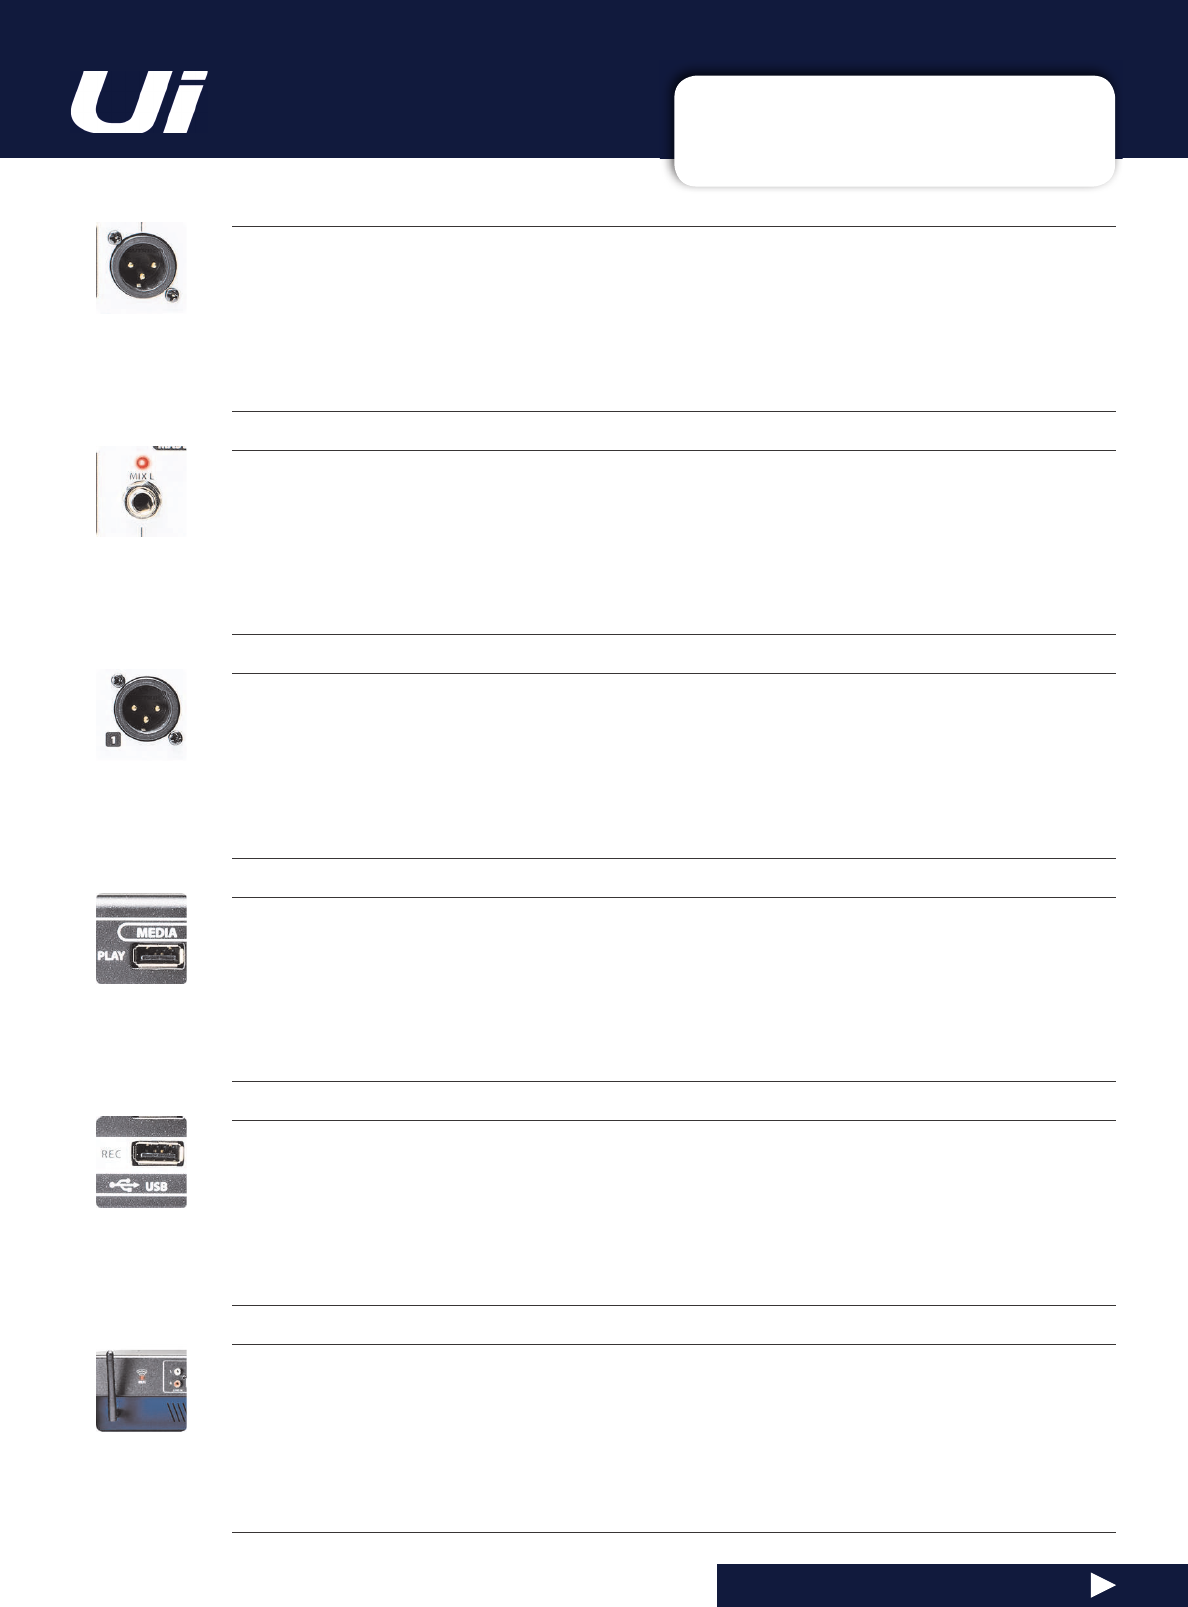
0,;/5287387-$&.
Master Channel Jack outputs
The Master Channel XLR and jack outputs are parallel connections (identical).
$8;2873876
Physical outputs for the Aux Master outputs
The Ui12 has two Aux Master outputs and the Ui16 has four.
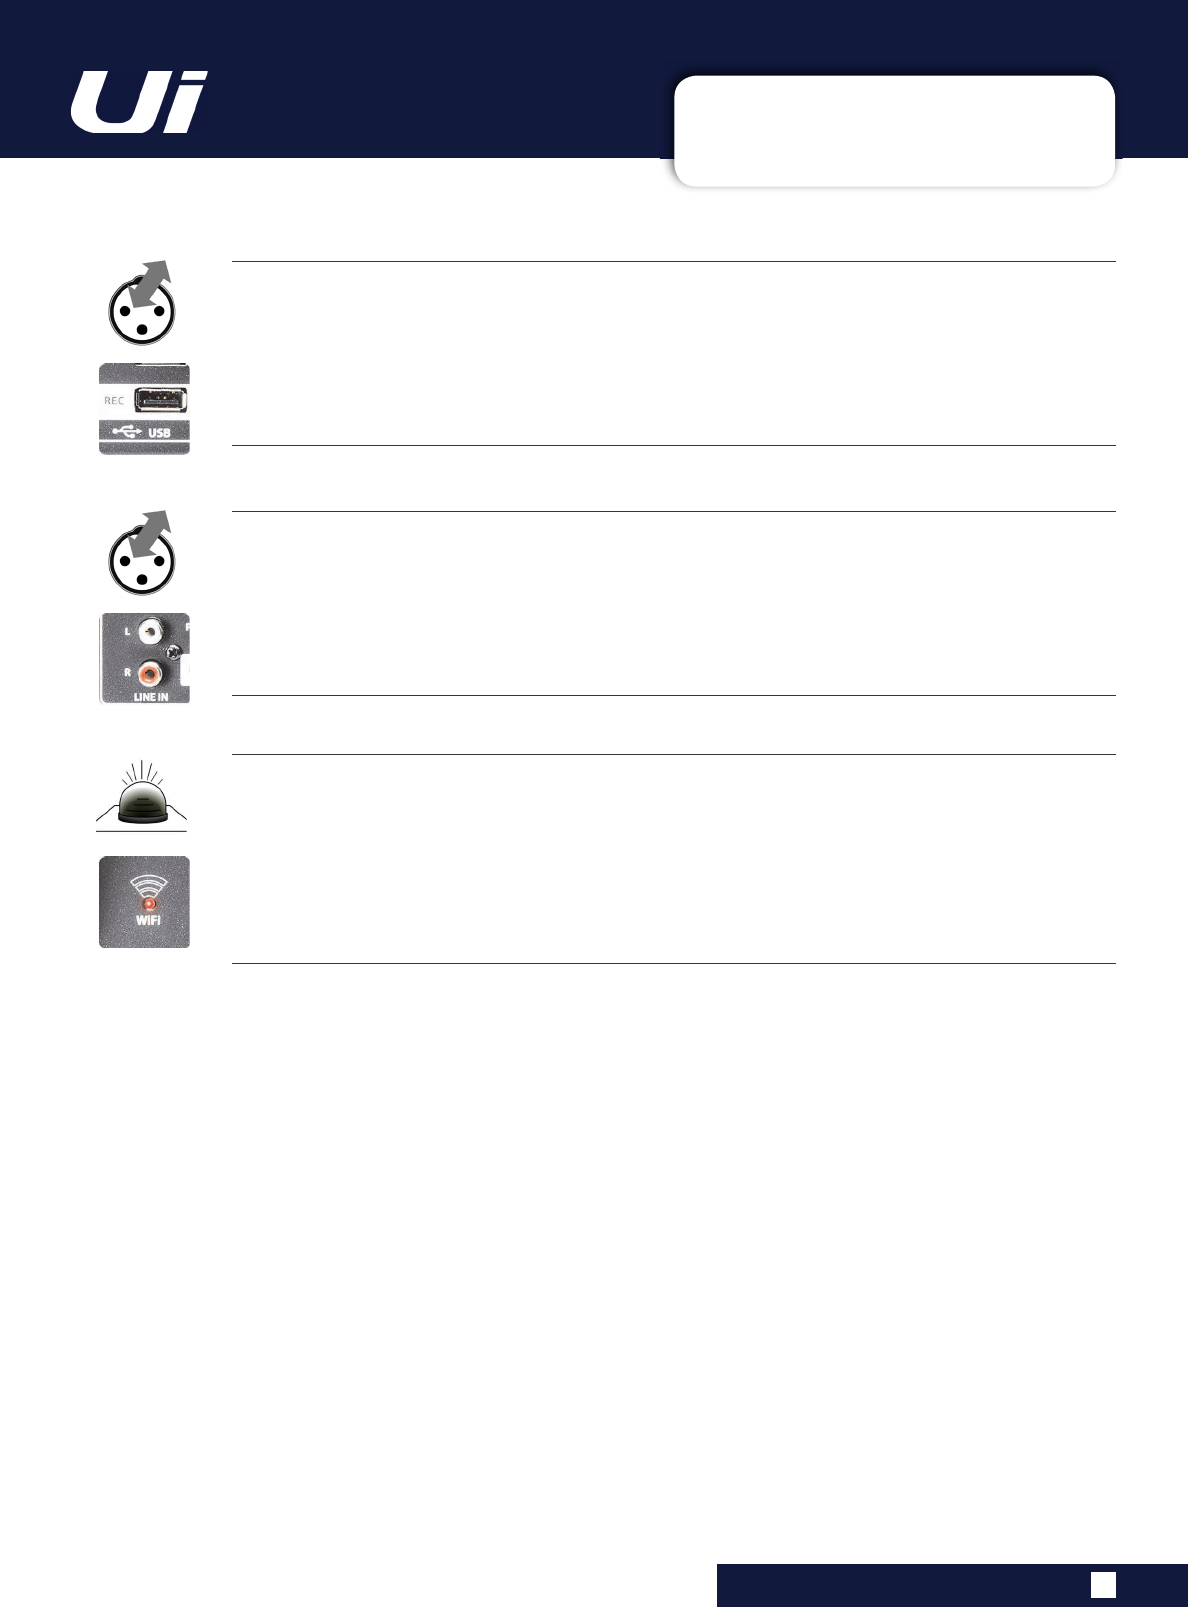
0(',$3/$<
86%
6RFNHW
IRU
86%
)ODVK
'ULYH
ZLWK
DXGLR
SOD\EDFN
¿OHV
Audio files must be saved to the USB stick as either MP3, AAC, .WAV, .OGG, .AIFF, or .FLAC files. See section 9.0.
This USB socket can also be used for Show File and Snaphot import/export, and software updates. There are two
additional USB sockets on the side of the unit.
8L8L8VHU0DQXDO
0,;/5287387;/5
Master Channel XLR outputs
The Master Channel XLR and jack outputs are parallel connections (identical).
0(',$5(&8L8LZLWKODWHVW)LUPZDUH
USB Socket for USB Flash Drive - for recording audio
The Soundcraft Ui 16mixer will record the Master Channel stereo output as a stereo file onto the storage device.
See guide for playback and recording instructions - section 9.0.
Wi-Fi Antenna
Necessary for wireless network connection - Hotspot or WiFi
Make sure the Antenna is firmly screwed into it’s socket and normally orientated vertically. For more information
on wireless network settings, see section 10.1.
2.2: HARDWARE I/O & CONTROL
GETTING STARTED > HARDWARE
2.2: Hardware I/O And Control
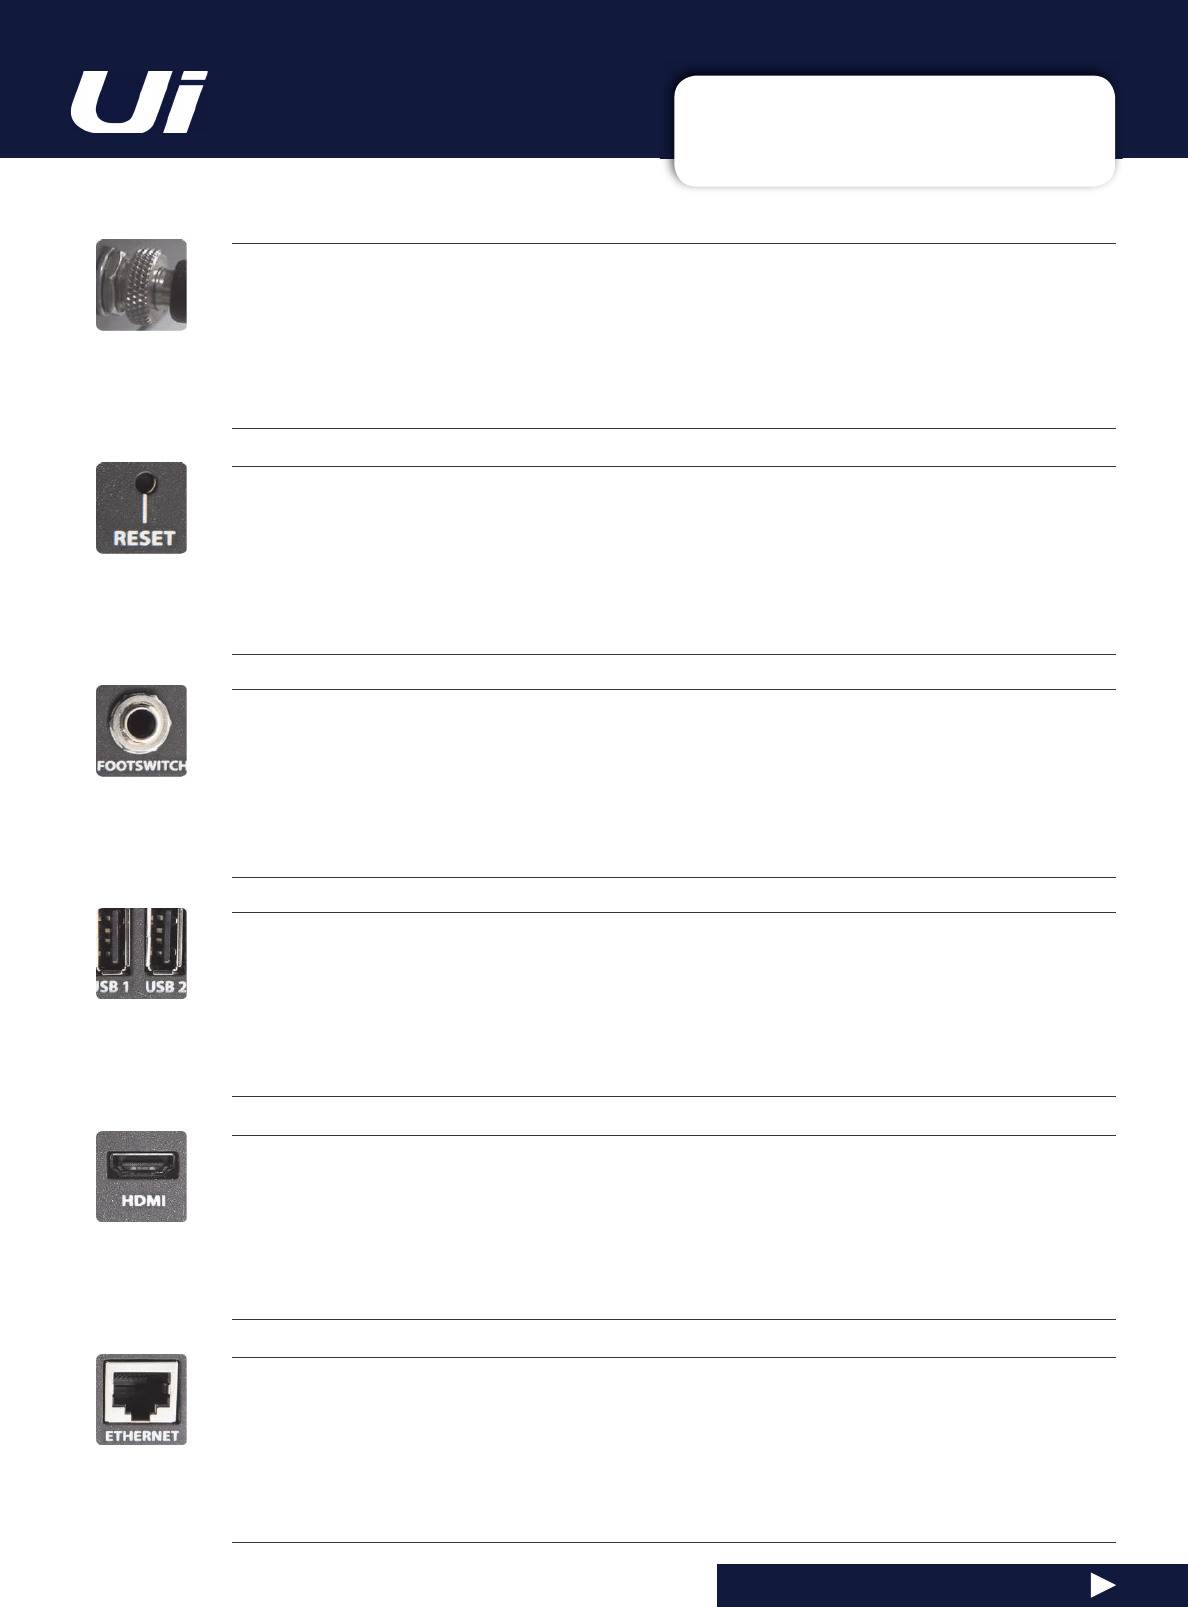
5(6(7
Recessed push switch used to reset the unit.
To reset Network settings ONLY, switch the unit on while holding down the reset button for at least ten seconds.
For a full system reset, see section 3.0.2.
)2276:,7&+
Footswtich connector used to toggle FX Mute on and off.
Use a footswitch with a quarter-inch jack connection. The unit will auto-detect the connector type, though the
footswitch itself must be a non-latching type.
86%&RQQHFWRUV
0D\
EH
XVHG
IRU
6KRZ
¿OH
LPSRUW
DQG
H[SRUW
VHFWLRQ
DQG
VRIWZDUH
XSGDWHV
There are USB connections on the front panel of the unit for audio recording and playback.
(7+(51(7
Standard RJ45-wired connector for use with wired Ethernet.
A wired Ethernet conenction to the Ui is the most secure. See section 10.1 for more details on network settings
and configurations.
+'0,&RQQHFWRU8L2QO\
Supports HDMI Video standard
The feature is not yet implemented.
8L8L8VHU0DQXDO
PWR
Power Connector & Switch
The Ui mixer has a power adapter with threaded locking ring. Insert the connector and screw the locking ring onto
the socket to prevent accidental removal and to ensure a satisfactory electrical connection for best performance.
Use the power switch with the reset button (other side panel) to reset the unit to factory default settings.
2.2: HARDWARE I/O & CONTROL
GETTING STARTED > HARDWARE
2.2: Hardware I/O And Control
Wi-Fi Indicator
Shows Wi-Fi is operating normally
The indicator also shows Wi-Fi boot status during power up. It stops its timed flash sequence when booted and
available for connections. Then flashes with data activity.
If the WiFi LED keeps flashing it can mean the firmware is not loading into the DSP. Make sure latest firmware is
loaded into the unit and that the DC power connector is properly screwed on.
8L8L8VHU0DQXDO
0(',$5(&8L8LZLWKODWHVW)LUPZDUH
USB Socket for USB Flash Drive - for recording audio
The Soundcraft Ui mixer will record the Master Channel stereo output as a stereo file onto the storage device. See
guide for playback and recording instructions - section 9.0.
/,1(,1
Line level RCA inputs
The RCA inputs feed the Line In L and Line In R channels in the UI mixer.
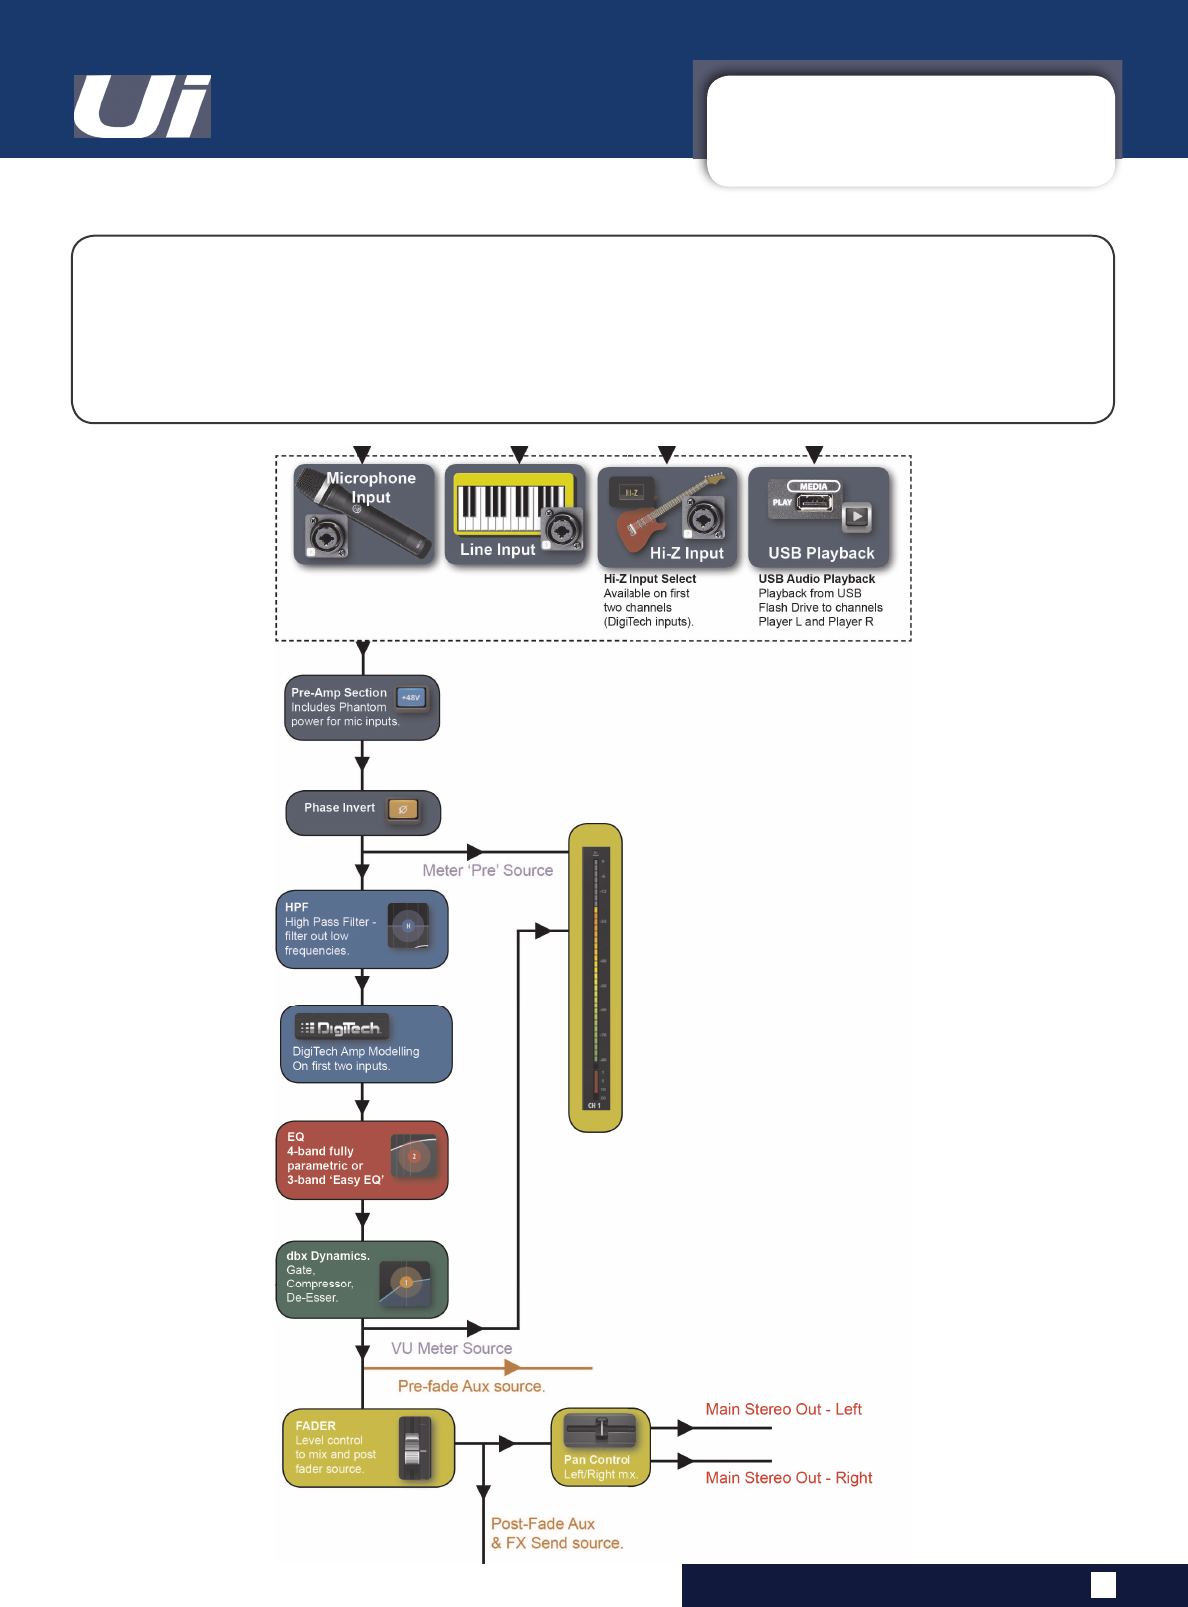
2.3: INPUT CHANNEL ROUTING
GETTING STARTED > INPUT CHANNEL ROUTING
2.3: INPUT CHANNEL ROUTING
The diagram shows the audio signal path through an input channel - from physical input to bus sends
(Aux, FX, Mix, and so on).
3OHDVH
QRWH
7KH
HQWLUH
VLJQDO
SDWK
H[FHSW
IRU
WKH
KDUGZDUH
SUH
DQG
RXWSXW
'$&V
LV
FOLSIUHH
ZLWK
LQ¿QLWH
headroom. It means that internal clipping is not introduced even by driving the EQ/Dyn to the max.
6XI¿FLHQWO\
UHGXFLQJ
WKH
OHYHO
RQ
WKH
0DVWHU
&KDQQHO
VWULS
ZLOO
JHW
ULG
RI
DQ\
FOLSSLQJ
RQ
WKH
RXWSXW
8L8L8VHU0DQXDO
2.4: GETTING CONNECTED
GETTING STARTED > GETTING CONNECTED
2.4: GETTING CONNECTED - SOFTWARE CONTROL
The Soundcraft Ui series uses built-in web server technology to enable computer, tablet, and
phone-based in-browser control of all functions - simply connect to the Ui Wi-Fi access point (hotspot)
and browse to the appropriate URL. Alternatively, you can connect via an existing Wi-Fi network, or via
a wired LAN (Local Area Network) using the Ethernet port on the side of the unit. See Section 10.1 for
GHWDLOV
RQ
QHWZRUN
FRQ¿JXUDWLRQ
8L8L8VHU0DQXDO
&RQQHFWLQJ7R8L+RWVSRWZLWKFRPSXWHUWDEOHWRUSKRQH
1) Ensure the Wi-Fi antenna is attached to the unit, connect the external power supply, and turn on the
SRZHU
WR
\RXU
PL[HU
<RX
ZLOO
VHH
DQ
/('
OLJKW
XS
LQVLGH
WKH
:L)L
ORJR
RQ
\RXU
8L
KDUGZDUH
WKLV
ZLOO
ÀDVK
until booted successfully.
2) Navigate to Wi-Fi set-up on your device and connect to the “Soundcraft Ui” access point. If this is the
¿UVW
WLPH
\RX
KDYH
FRQQHFWHG
WKH
GHIDXOW
SDVVZRUG
ZLOO
EH
µVFXLZODQ
3) Launch your device’s browser, and enter the URL ui-mixer.io. For Android users, you must use Android
browser 4.4 or later, or another modern browser like Chrome to use the Ui web app.
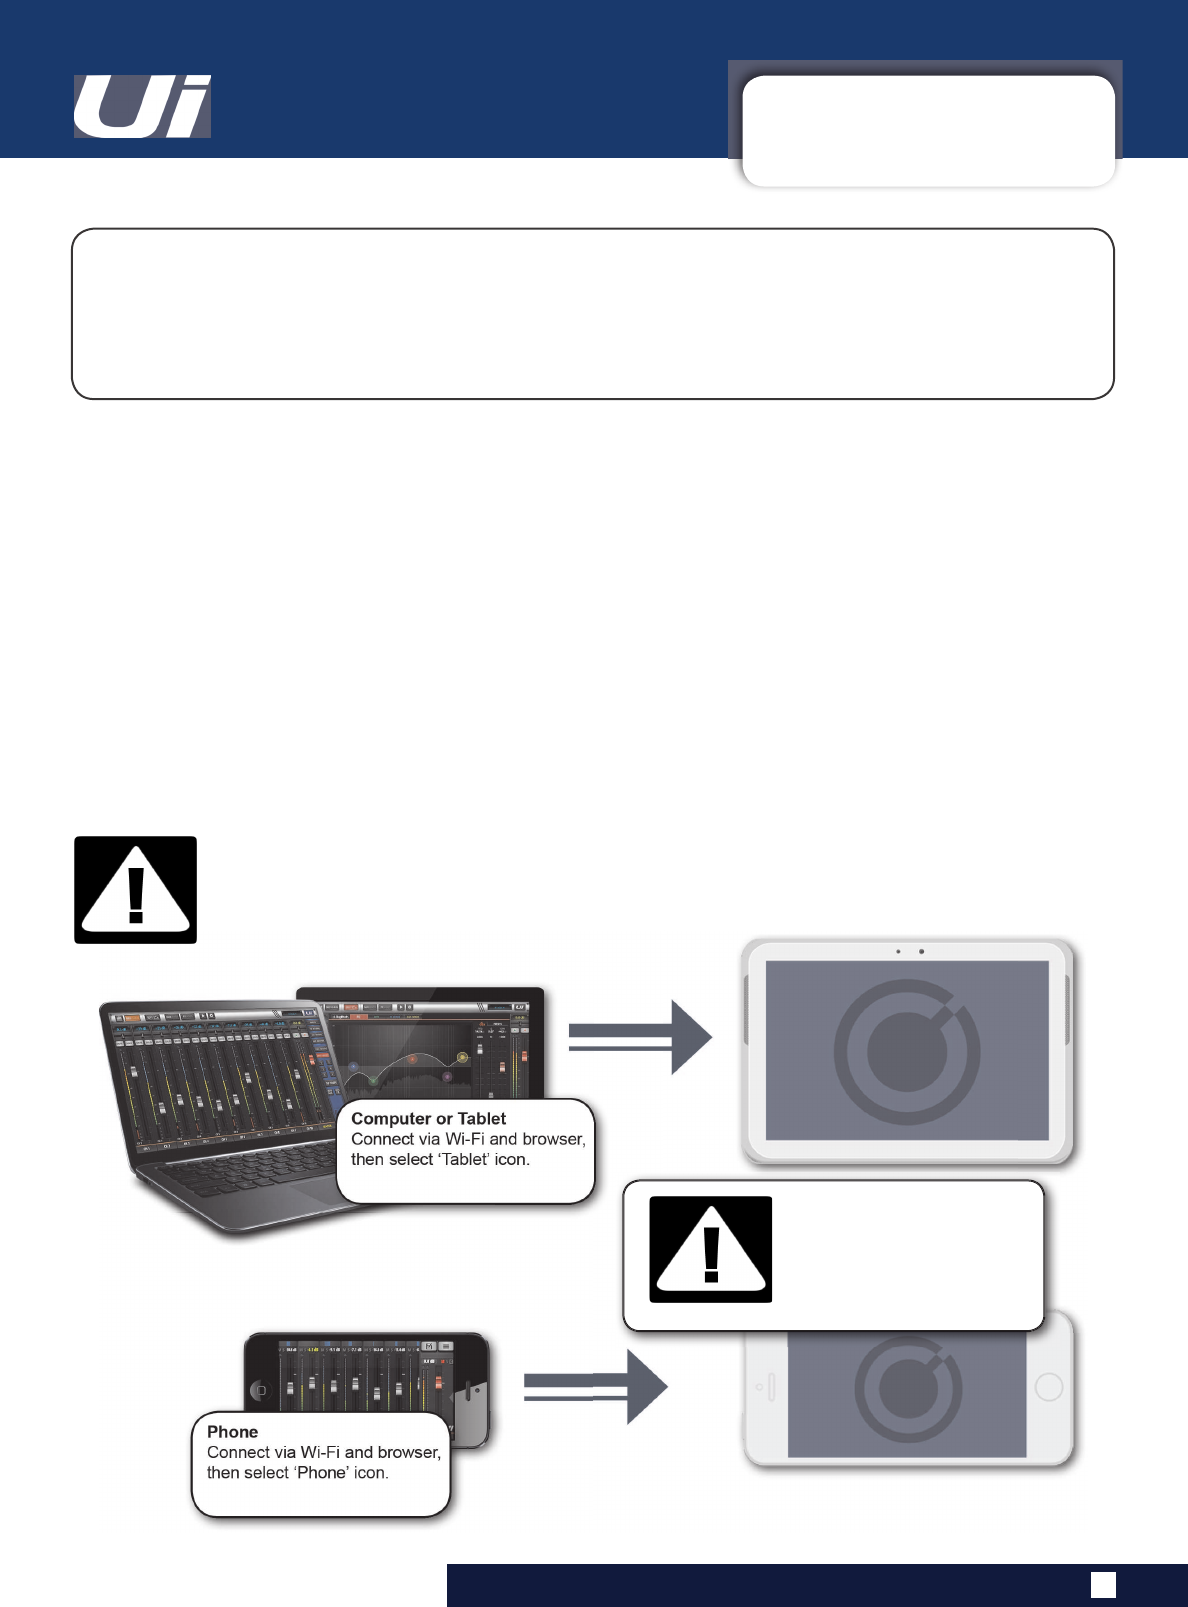
4) You should see the device selection screen showing icons for large screen (tab icon) and small screen
(phone icon) versions of the Ui software. Choose the version applicable to your device.
IMPORTANT!
7KH
¿UVW
WLPH
\RX
FRQQHFW
LW
LV
LPSRUWDQW
WR
VHW
XS
D
QHZ
SDVVZRUG
IRU
:L)L
DFFHVV
3UHVV
WKH
6HWWLQJV
LFRQ
WKHQ
FKRRVH
WKH
¿UVW
WDE
µ1(7:25.
WR
DFFHVV
WKH
SDVVZRUG
¿HOG
'()$8/7+276327
3$66:25'
VFXLZODQ
8L8L8VHU0DQXDO 3.0: SOFTWARE CONTROL
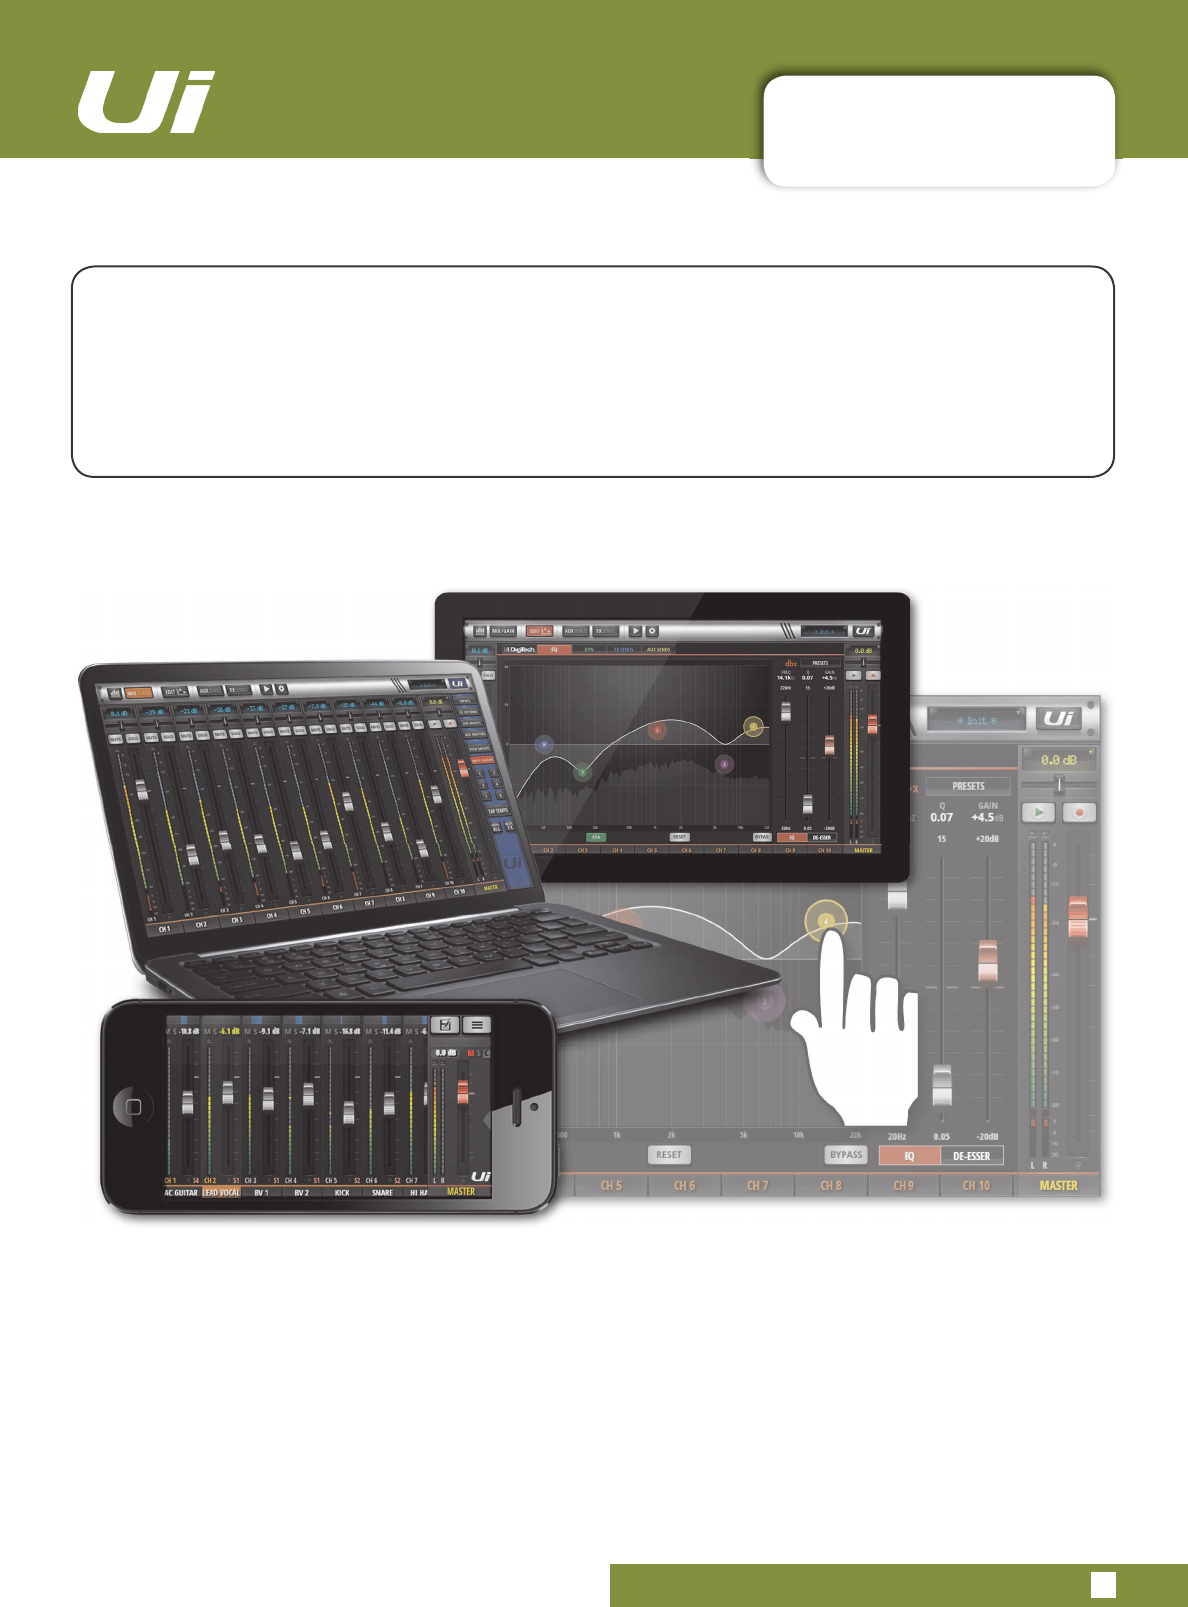
SOFTWARE CONTROL
3.0: SOFTWARE CONTROL
The browser-based software control for the Ui Series is available to any device in two versions.
The small-screen version is optimised for phone-sized devices; the large-screen version is optimised
for tablets and computers.
In order to make best use of your Ui mixer, please read this section of software control. There are
several navigation and menu access functions that will greatly simplify Ui control.

8L8L8VHU0DQXDO 3.0.1: UPDATES & REQUIREMENTS
SOFTWARE UPDATES & REQUIREMENTS
3.0.1: SOFTWARE UPDATES & REQUIREMENTS
The browser-based software control for the Ui Series actually runs from a virtual web server in the
main Ui unit itself and is compatible with any modern browser software running on your control
device. For Android users, you must use Android browser 4.4 or later, or another modern browser like
Chrome to use the Ui web app.
Up to 10 control devices can be used simultaneously.
6RIWZDUH8SGDWHV
Regular software updates are posted on the Soundcraft website and are available from the product page.
In the Tablet software you can check your current Ui software version by navigating to the SETTINGS page
and selecting the ABOUT tab. In the Phone software you can check your current Ui software version by
navigating to the SETTINGS page and selecting the HELP tab.
7RXSGDWHWKH8LVRIWZDUH
'RZQORDG
WKH
8L
XSGDWH
¿OH
IURP
WKH
ZHEVLWH
DQG
OHDYH
LQ
]LS
IRUPDW
&RS\
WKH
]LS
¿OH
WR
D
86%
PHGLD
GHYLFH
VXLWDEOH
IRU
FRQQHFWLRQ
WR
D
8L
PL[HU¶V
86%
SRUW
1RWH
7KH
¿OH
can reside in any directory. Any USB port on the mixer is also acceptable.
3. Ensure your client device is connected to the Ui mixer GUI
4. Connect the USB media
5. The GUI display will display that the USB device has been mounted. After the stick has been read (may
-
be 10 more seconds) the update will be recognised.
6. The GUI will ask if you would like to update. Choose OK.
7. The mixer will perform the update
8. The GUI will present a message stating whether the update has been successful or not.
9. You must power-cycle the unit and reconnect a client device.
10. You can browse to the about page to see the new Firmware version information.
IMPORTANT!
1RWH
WKDW
LI
\RX
KDYH
DQ\
W\SH
RI
]LS
¿OH
RWKHU
WKDQ
WKH
XSGDWH
¿OH
LQ
DQ\
GLUHFWRU\
RQ
WKH
USB key already, the software update will not work.

8L8L8VHU0DQXDO 3.0.2: RESET THE MIXER
SOFTWARE > RESET THE MIXER
3.0.2: RESET THE MIXER
7KHUH
DUH
WZR
OHYHOV
RI
UHVHW
IRU
WKH
8L
PL[HU
7KH
¿UVW
ZLOO
UHVHW
QHWZRUN
VHWWLQJV
LQ
WKH
HYHQW
WKDW
\RX
DUH
XQDEOH
WR
FRQQHFW
7KH
VHFRQG
XVHV
D
IXOOUHVHWW[W
¿OH
RQ
D
86%
PHPRU\
VWLFN
LQ
FRQMXQFWLRQ
ZLWK
WKH
UHVHW
EXWWRQ
7KLV
ZLOO
IXOO\
UHVHW
WKH
XQLW
EDFN
WR
LWV
IDFWRU\
¿UPZDUH
DQG
GHIDXOW
VHWWLQJV
Full Reset
This method removes all updates you may have performed on the mixer and returns the unit to its
GHIDXOW
IDFWRU\
VKLSSLQJ
¿UPZDUH
DQG
VWDWH
$OO
VHWWLQJV
VQDSVKRWV
XVHUV
SUR¿OHV
DQG
VKRZV
ZLOO
EH
ORVW
Please ensure you have saved/backed up any shows before resetting your Ui.
&UHDWH
D
WHVW
¿OH
QDPHG
IXOOUHVHWW[W
QR
FRQWHQWV
QHFHVVDU\
DQG
FRS\
WR
D
86%
VWLFN
2) Insert the USB stick into one of the Ui’s USB ports.
3) Use a slim, long object to hold the reset button down for approximately 10 seconds while you power on
the unit.
7KH
8L
ZLOO
UHFRJQLVH
WKH
IXOOUHVHWW[W
¿OH
RQ
WKH
86%
VWLFN
DQG
SHUIRUP
D
IXOO
IDFWRU\
UHVHW
5) You must power cycle the unit and reconnect the client device. Power off for at least 10-15 seconds be
-
fore powering back on.
Note:
$
ÀLFN
RI
WKH
SRZHU
RIIRQ
ZLOO
DOPRVW
DOZD\V
IDLO
WR
ERRW
SURSHUO\
DQG
FDQ
JHW
VWXFN
ZLWK
FRQWLQXRXV
ÀDVKLQJ
EOXH
:L)L
/('
0DNH
VXUH
WR
SRZHU
RII
ZDLW
VHFRQGV
WKHQ
SRZHU
RQ
7KH
EOXH
:L)L
/('
ZLOO
SXOVHÀDVK
IRU
DURXQG
VHFRQGV
WKHQ
UHPDLQ
RQ
1HWZRUNLQJ5HVHW
Reset Networking and Admin password if you have forgotten the admin password or if you are no longer
able to connect to the Ui.
Use a paper clip (or similar) to hold down the recessed reset button (side panel) down for approximately
10 seconds while you power on the unit. This will initialise the Ui’s networking and admin password to the
default state.
3.1: SOFTWARE NAVIGATION
SOFTWARE > SOFTWARE NAVIGATION
3.1: SOFTWARE NAVIGATION
8L8L8VHU0DQXDO
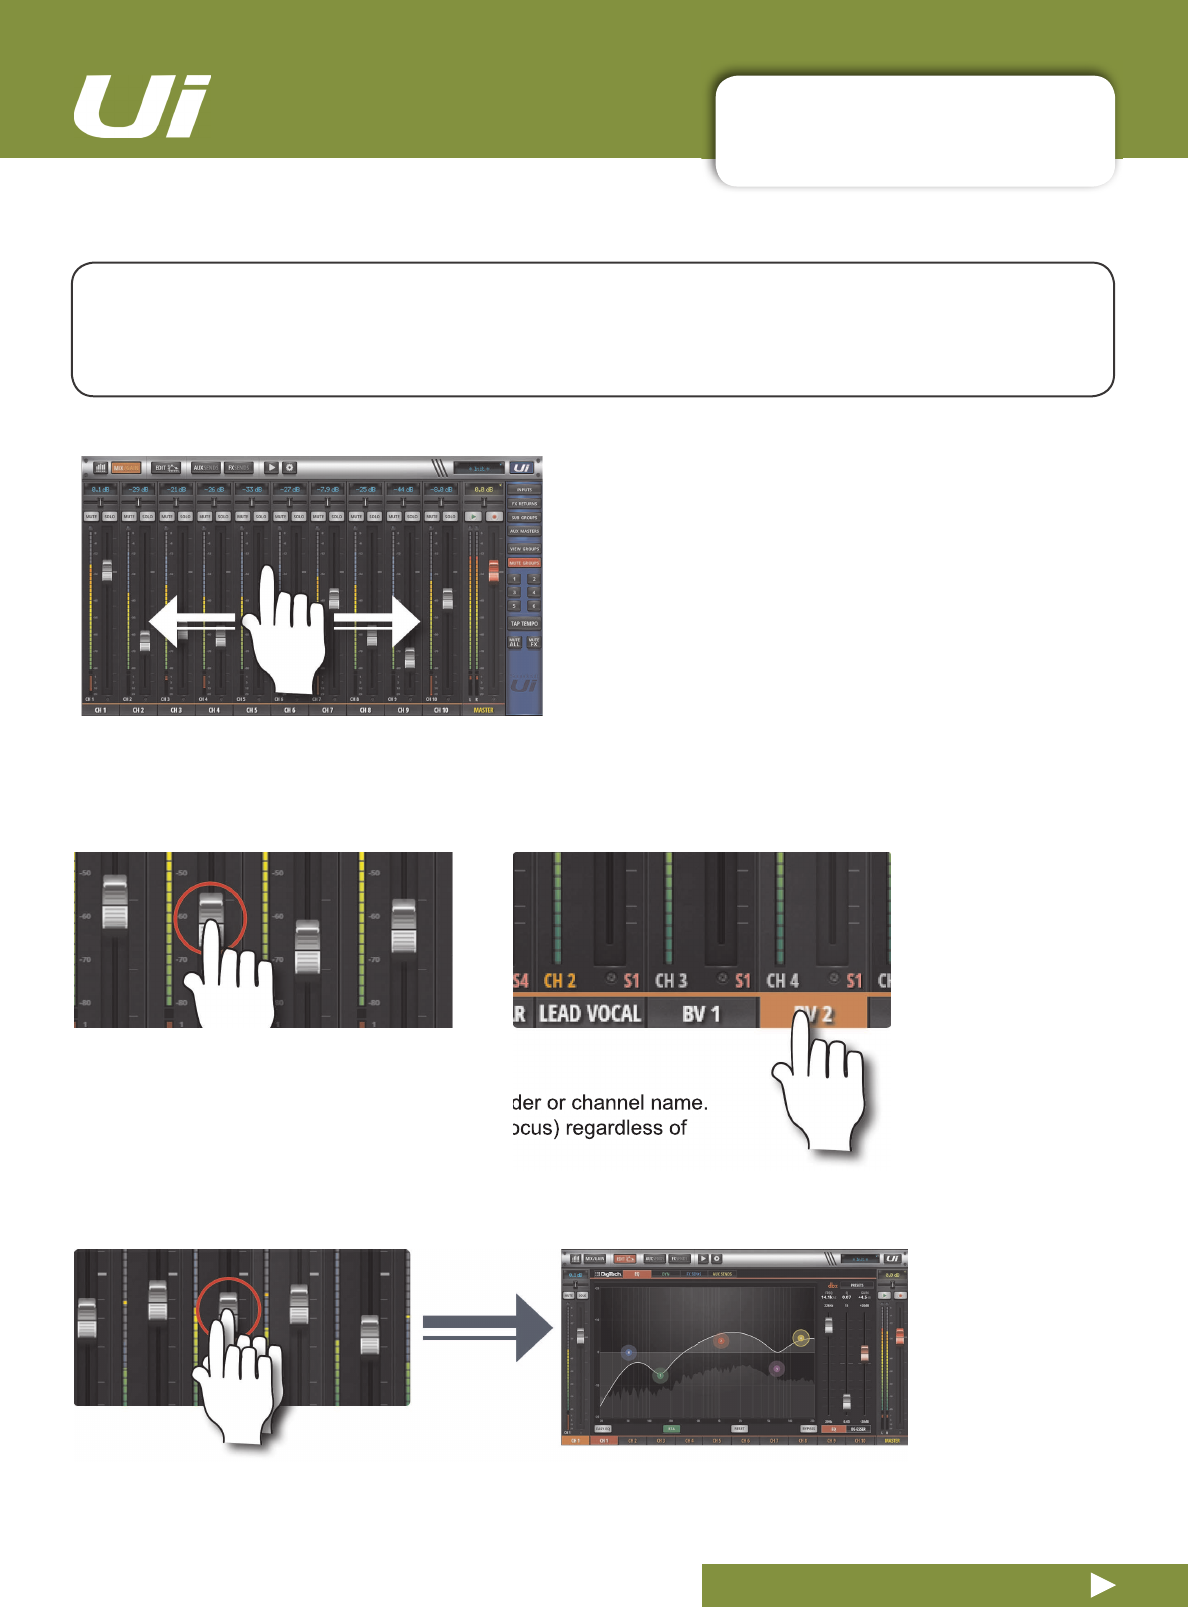
6FUROO0L[HU
Touch /Click and slide on the mixer screen to scroll
along to whole available mixer - including FX Send, Aux
Send and Group masters.
)DGHU&KDQQHO1DPH
Select a channel by touching or clicking on a fader or channel name.
The selected channel will remain active (keep focus) regardless of
function screen until a new channel is selected.
'RXEOH7DS)DGHU
Access the channel EQ from MIX Screen. Double tap or double click.
There are many navigation / gesture techniques common to both the Tablet and Phone versions of the Ui
control software. This section describes the main ones. Section 3.7 summarises all control gestures.
Please Note:
The screen shots shown are from the phone version of the software, except where the two
GLIIHU
VLJQL¿FDQWO\
LQ
FRQWHQW
3.1: SOFTWARE NAVIGATION
SOFTWARE > SOFTWARE NAVIGATION
3.1: SOFTWARE NAVIGATION
8L8L8VHU0DQXDO
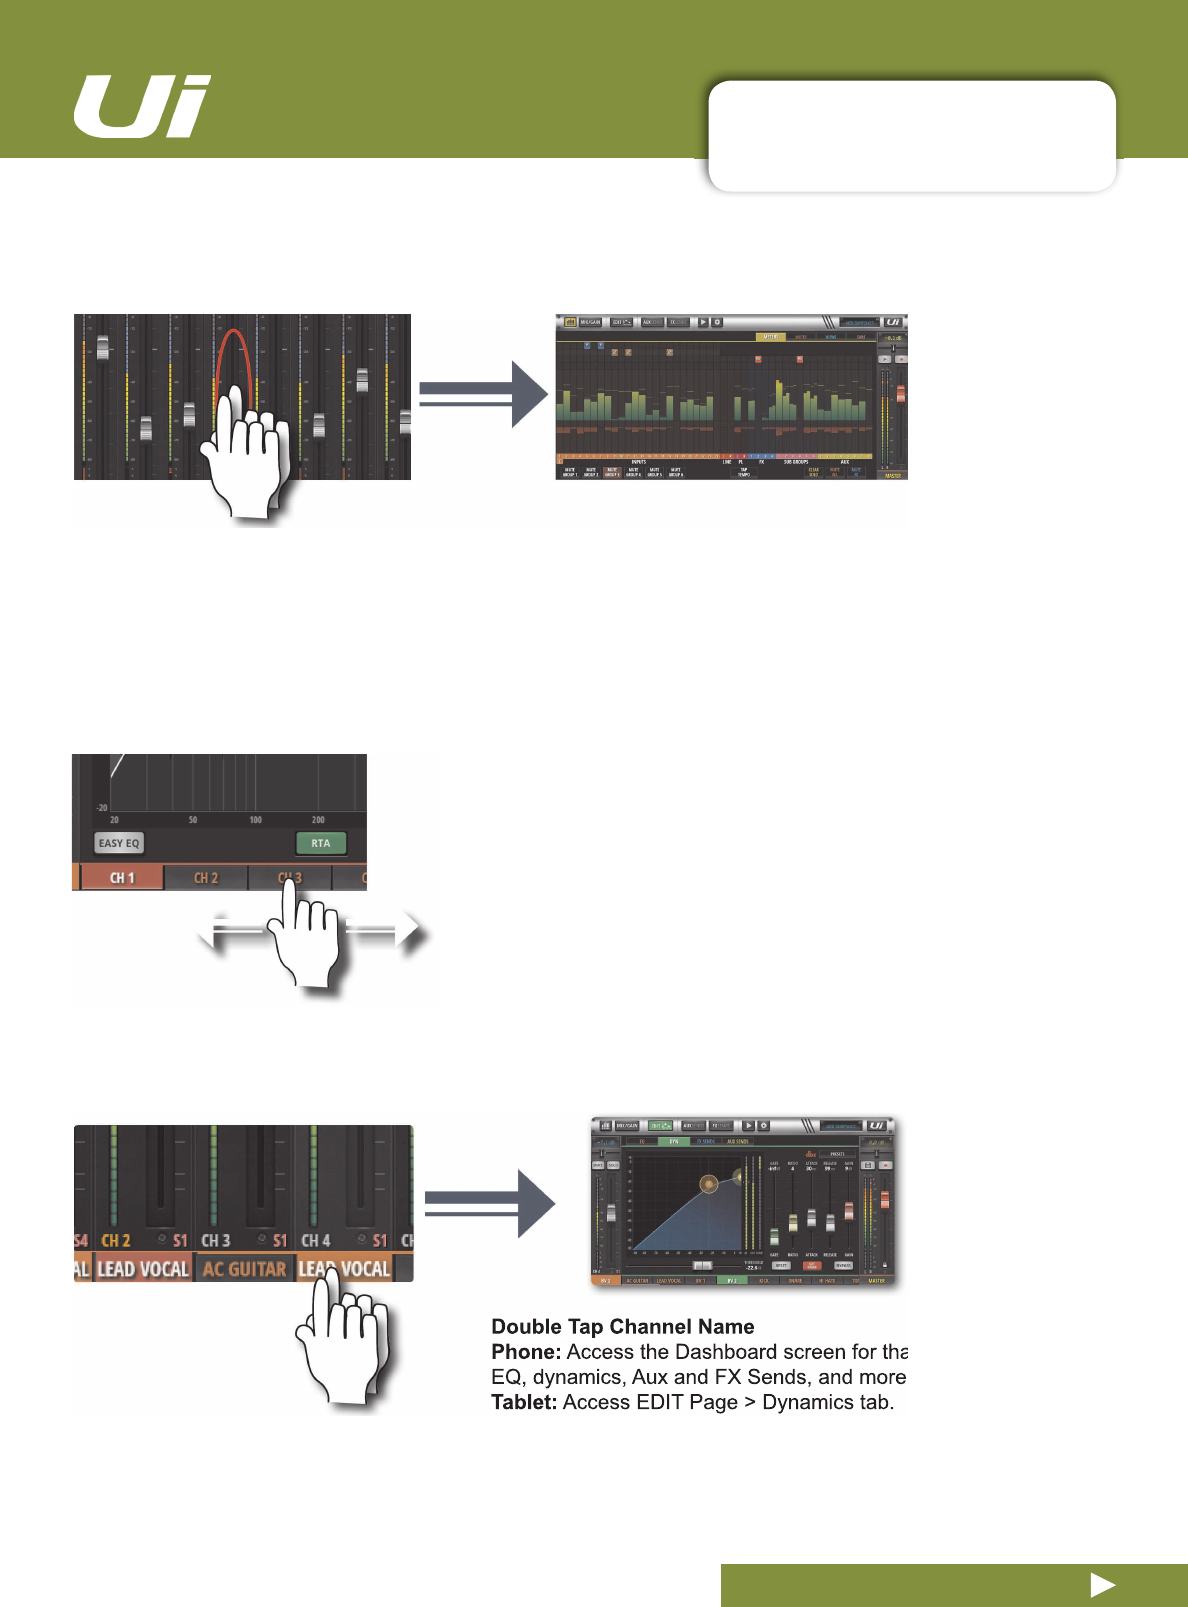
6FUROO&KDQQHO1DPHV
Touch/click-hold and slide on channel names to access channel
names across the whole mixer, including FX Sends, Aux Sends, and
Group Faders.
Access the Dashboard screen for that channel - access to
EQ, dynamics, Aux and FX Sends, and more.
'RXEOH7DS&KDQQHO6WULS
Double tap anywhere except the fader to access the METERS screen or switch back to the MIX screen from the
GAIN screen.
3.1: SOFTWARE NAVIGATION
SOFTWARE > SOFTWARE NAVIGATION
3.1: SOFTWARE NAVIGATION
8L8L8VHU0DQXDO
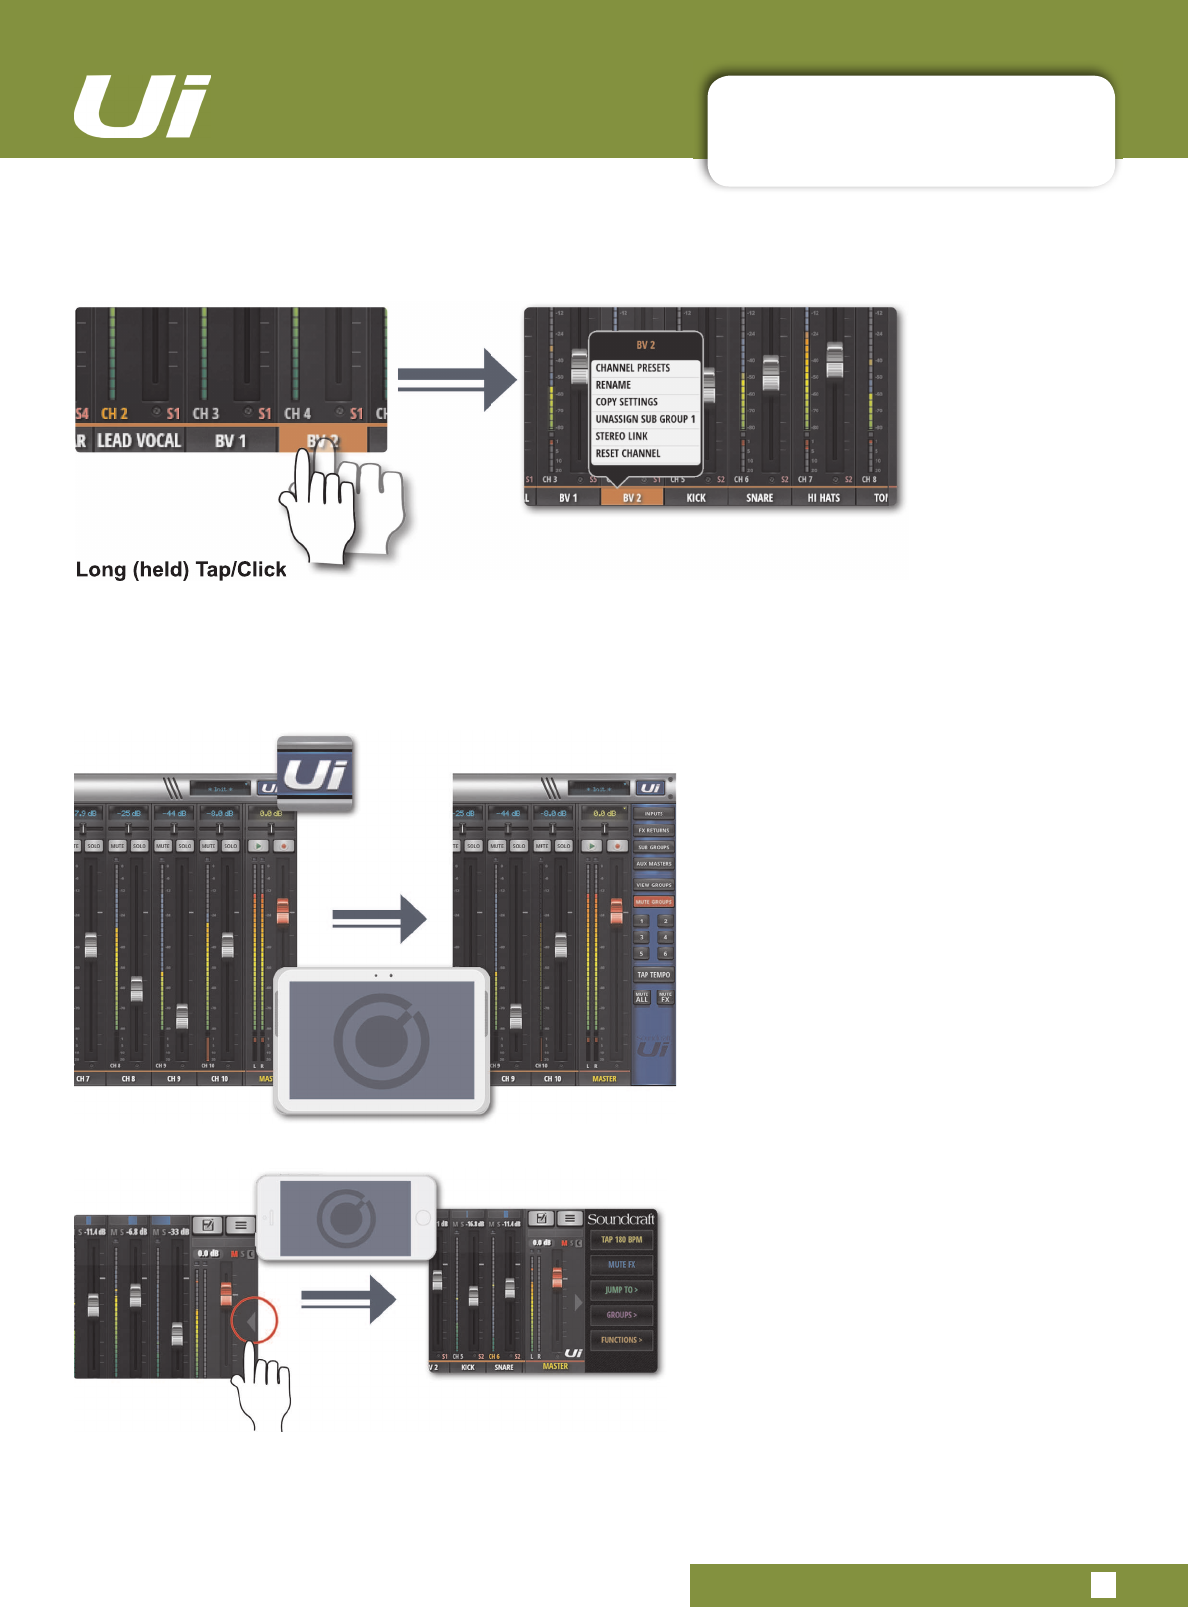
/RQJKHOG7DS&OLFN
$
ORQJ
WDSFOLFN
RQ
FHUWDLQ
FRQWUROV
EULQJV
XS
D
VXEPHQX
VSHFL¿F
WR
WKDW
FRQWURO
)RU
H[DPSOH
D
ORQJ
KROG
RU
click on a channel name gives access to channel presets, renaming, copy/paste settings, sub group assignment,
stereo linking, channel reset, and the ASSIGN ME function.
6OLGHRXW9LHZ
Touch the Slideout Arrow to the right of the
MIX screen to access the Slideout View
panel.
For the tablet software Slideout panel,
click/touch the Ui button in the top right
corner of the screen. The tablet Slideout
offers fast mixer navigation to common
channel groups, MUTE and VIEW group
access, the TAP TEMPO button, plus
MUTE ALL and MUTE FX functions.
On the phone software this gives fast
access to the TAP TEMPO and MUTE FX
buttons, plus JUMP TO (mixer navigation),
GROUPS (Mute & View Groups), and
FUNCTIONS (fast functions such as
playback and record) options.
You can pin the Slideout View in place via
the SETTINGS Screen.

3.1.1: CONTROL / GESTURE SUMMARY
SOFTWARE > CONTROL SUMMARY
3.1.1: CONTROL SUMMARY
There are many control gestures, taps, and clicks to help navigate the Ui Control software quickly and
intuitively. This is a summary of those control options.
8L8L8VHU0DQXDO
/LVWVHOHFWRUV
• Item selections available in list boxes can be made by double clicking/tapping on a selection in addition to using
a ‘load’ button trigger.
0,;SDJHVKRUWFXWV
• Double click/tap on channel virtual LCD display to return channel Vol to 0dB.
• Single click/tap on channel Pan or Balance control zone to temporarily display channel Pan or Balance value in
relative virtual channel LCD display.
• Double click/tap on channel Pan or Balance control to centre channel Pan or Balance.
• Double click/tap in INPUT channel strip zone (excluding fader cap) to navigate to METERS Page.
• Double click/tap in LINE INPUT channel strip zone (excluding fader cap) to navigate to METERS Page.
• Double click/tap in PLAYER channel strip zone (excluding fader cap) to navigate to PLAYER/MEDIA Page.
• Double click/tap in FX RETURN channel strip zone (excluding fader cap) to navigate to FX SENDS Page.
• Double click/tap in SUG GROUP channel strip zone (excluding fader cap) to navigate to METERS Page.
• Double click/tap in AUX MASTER channel strip zone (excluding fader cap) to navigate to AUX SENDS Page.
• Double click/tap on channel fader cap to navigate to channel EDIT mode EQ tab.
• Double click/tap on channel label (channel types: INPUT, LINE IN, PLAYER, SUB GROUP, AUX) to navigate to
selected channel EDIT page DYN tab.
• Double click/tap on channel label (channel type: FX RETURN) to navigate to selected channel EDIT page FX
tab (Global FX parameters).
• Long click/press and hold on channel label to instantiate channel pop-up menu.
• Single click/tap on top level navigation panel virtual LCD display to instantiate shows/snapshot pop-up list
short-cut activator.
• Long click/press-and-hold on top level navigation panel virtual LCD display to navigate to SETTINGS page
SHOWS tab.
• Single click/tap on MASTER channel virtual LCD display to navigate to METERS Page.
6/,'(2873DQHOVKRUWFXWV
/RQJ
FOLFNSUHVVDQGKROG
RQ
68%
*52836
WR
QDYLJDWH
WR
6XE
*URXS
FRQ¿JXUDWLRQ
0(7(56
SDJH
68%6
tab.
/RQJ
FOLFNSUHVVDQGKROG
RQ
9,(:
*52836
WR
QDYLJDWH
WR
9LHZV
FRQ¿JXUDWLRQ
0(7(56
SDJH
9,(:6
WDE
/RQJ
FOLFNSUHVVDQGKROG
RQ
087(
*52836
WR
QDYLJDWH
WR
0XWH
*URXSV
FRQ¿JXUDWLRQ
0(7(56
SDJH
MUTES tab).
• Long click/press-and-hold on TAP TEMPO for numeric tempo entry.
0(7(56SDJH
• Single click/tap on any channel meter VU zone to navigate to relevant channel on MIX page.
• Long click/press-and-hold on TAP button for numeric tempo entry.
&KDQQHO(',7SDJH!',*,7(&+WDE
• Single click/tap on amp head to bring up amp list selector
• Single click/tap on to bring up cab list selector

3.1.1: CONTROL / GESTURE SUMMARY
SOFTWARE > CONTROL SUMMARY
3.1.1: CONTROL SUMMARY
8L8L8VHU0DQXDO
&KDQQHO(',7SDJH!(4WDE
Parametric EQ:
• Double click/tap in vacant space to navigate to MIX page.
• Drag PEQ frequency balls to adjust dB gain and frequency values.
• Double click/tap frequency balls to reset selected frequency band to 0dB and default frequency.
• Pinch-gesture or mousewheel/trackpad scroll on selected frequency ball to adjust Q value.
• Drag DE-ESSER frequency ball to adjust frequency and dB threshold values.
• Drag LC/HPF frequency ball to adjust LC/HPF frequency value.
• Pinch-gesture or mousewheel/trackpad scroll on DE-ESSER frequency ball to adjust ratio value.
*UDSKLF(4
• Double click/tap in vacant space to navigate to MIX page.
• Drag GEQ frequency balls to adjust dB gain of selected frequency.
• Double click/tap frequency balls to reset selected frequency to 0dB.
• Single click/tap on mini GEQ segments (top left) to present high or low bands in main editor.
&KDQQHO(',7SDJH!'<1WDE
• Double click/tap in vacant space to navigate to MIX page.
• Drag threshold ball to adjust dynamics threshold value.
• Drag ratio ball to adjust dynamics ratio value.
&KDQQHO(',7SDJH!);WDE
• Double click/tap in vacant space to navigate to MIX page.
• Single click/tap in virtual FX rack for Preset Manager.
&KDQQHO(',7SDJH!$8;WDE
• Double click/tap in vacant space to navigate to MIX page.
$8;6(1'6SDJH
• Long click/press-and-hold channel strip PRE/POST button for ‘set all Pre or Post’ option.
• Double click/tap in channel send strip zone (excluding fader cap) to navigate to MIX Page.
• Double click/tap on channel label to navigate to selected channel EDIT page DYN tab.
• Long click/press-and-hold on channel label to instantiate channel pop-up menu.
• Double click/tap in channel LCD to ‘Return To Zero Level’.
);6(1'6SDJH
• Double click/tap in channel send strip zone (excluding fader cap) to navigate to MIX Page.
• Double click/tap on channel label to navigate to selected channel EDIT page DYN tab.
• Long click/press-and-hold on channel label to instantiate channel pop-up menu.
• Double click/tap in channel LCD to ‘Return To Zero Level’.
3/$<(50(',$SDJH
• Double click/tap in channel strip zone (excluding fader cap) to navigate to MIX Page.
• Double click/tap on channel fader cap to navigate to channel EDIT mode EQ tab.
• Double click/tap on channel label to navigate to selected channel EDIT page DYN tab.
• Long click/press-and-hold on channel label to instantiate channel pop-up menu.
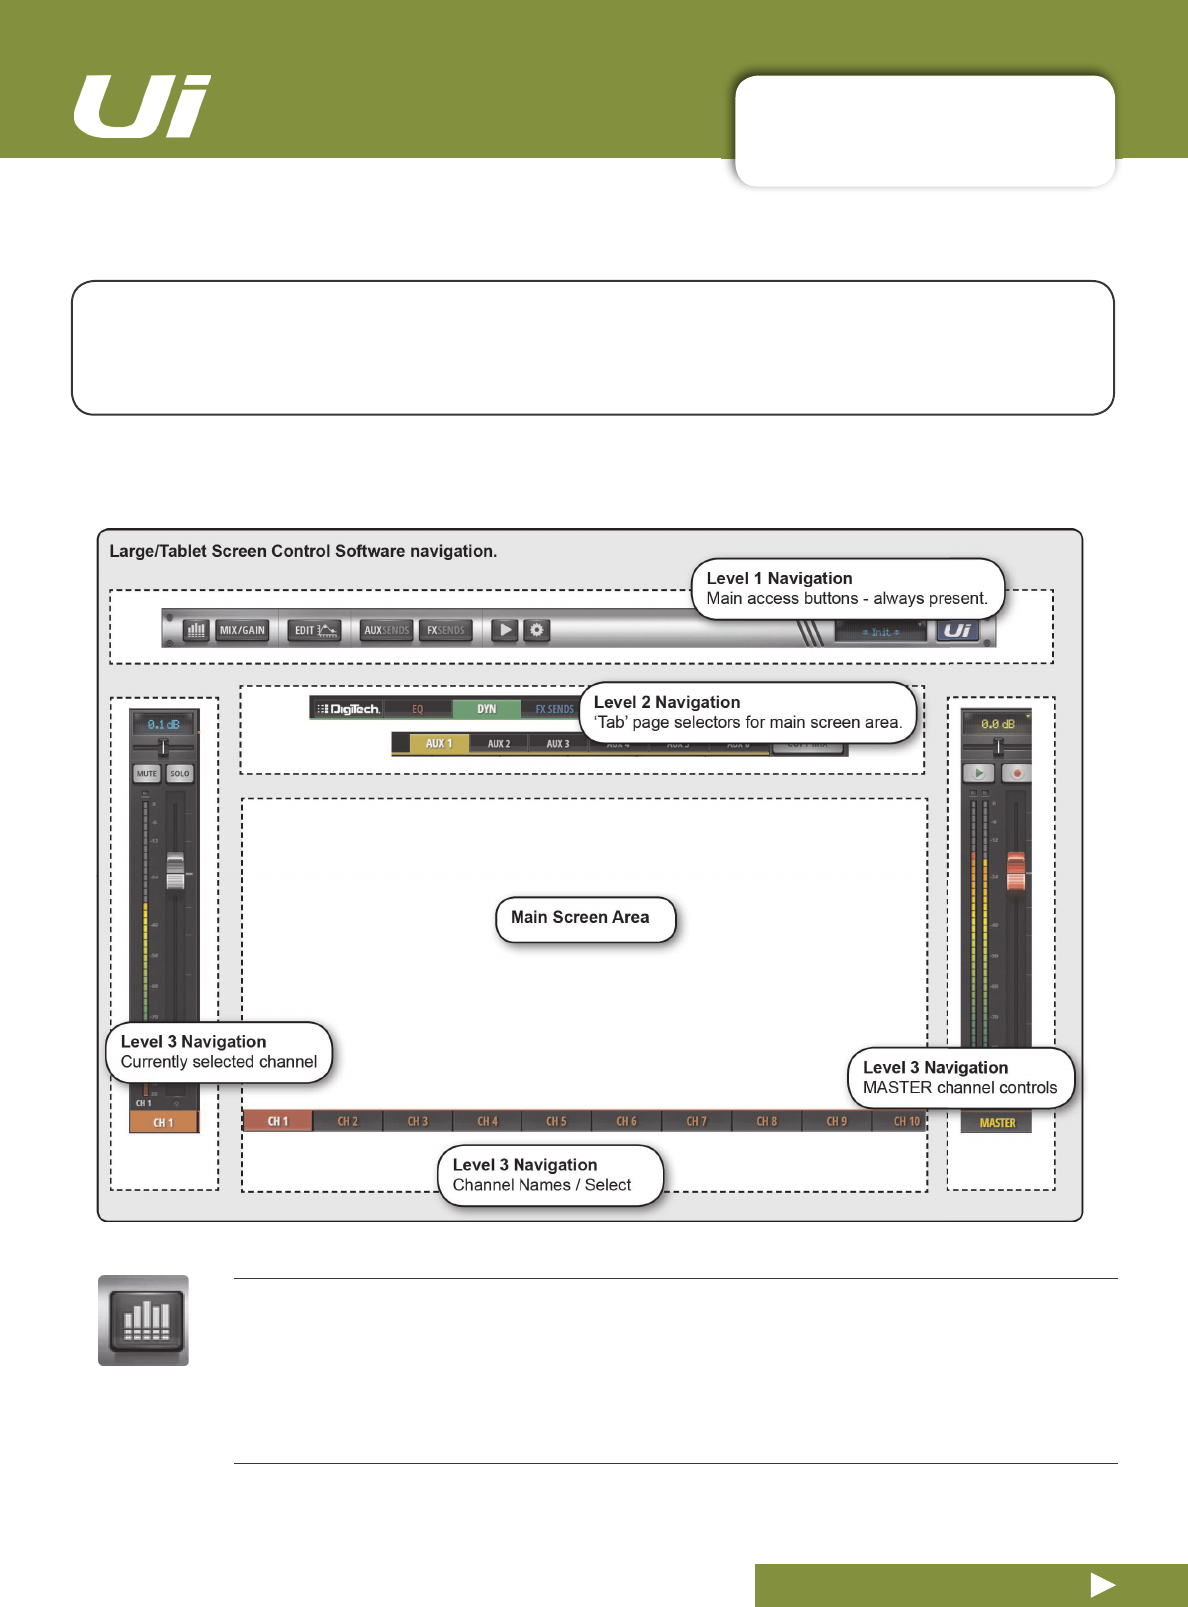
3.2: TABLET NAVIGATION
SOFTWARE > TABLET / LARGE SCREEN NAVIGATION
3.2: TABLET NAVIGATION
The MIX Screen is the default for the Ui tablet / large screen software - You can navigate from there to
other screens and functions in a variety of ways. The Level 1 Navigation controls take you directly to
various primary screens, Level 2 navigation (page tabs) switches layers within the selected screen, and
Level 3 navigation controls select individual channels.
8L8L8VHU0DQXDO
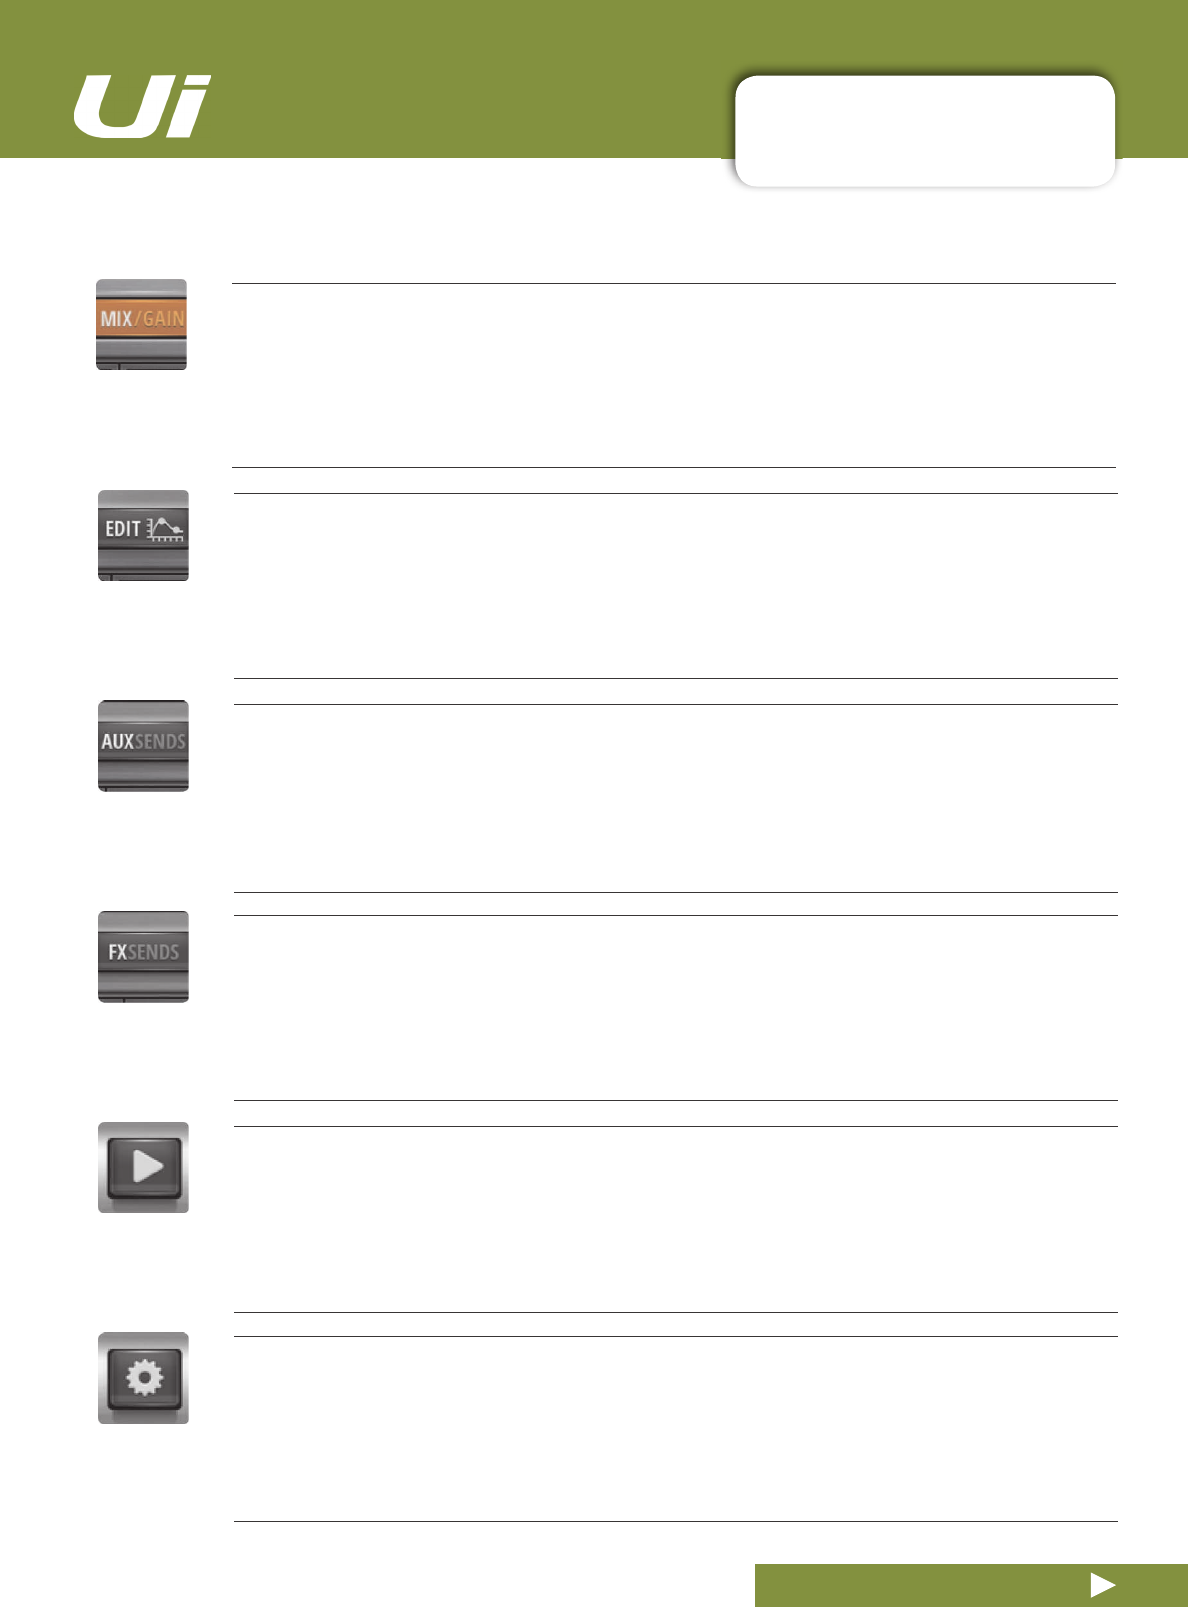
0(7(56
Access the METERS page
Tabs on this page are METERS (meters & status), MUTES, VIEWS, and SUBS (Sub Groups). The default meters
page shows status for phantom power, phase, mute, and solo, plus bargraph metering for level, gain reduction
(dynamics). You can activate mute groups, use Tap Tempo, and CLEAR SOLO, MUTE ALL, AND MUTE FX directly
from this page.
3.2: TABLET NAVIGATION
SOFTWARE > TABLET / LARGE SCREEN NAVIGATION
3.2: TABLET NAVIGATION
8L8L8VHU0DQXDO
(',7
Access the EDIT page for the selected channel
Resulting page configuration depends on selected channel. For example, the EDIT page for an input channel will
have EQ, Dynamics, Aux Sends, and FX Send tabs. Certain Tabs will be preselected if you navigate from certain
views. For example, selecting EDIT from the FX Sends main page will preselect the FX Sends tab in for the
highlighted channel.
);6(1'6
Access the FX SENDS page
Shows a fader based view of all FX send levels for the selected FX Send Bus. Also shows FX Return channel on
right hand side. Selecting EDIT from the FX SENDS page will preselect the FX Send tab for the selected input
channel.
6(77,1*6
Access the SETTING page
System and mixer settings and configurations.
$8;6(1'6
Access the AUX SENDS page
Shows a fader based view of all aux send levels for the selected aux bus. Also shows the Aux Master channel on
right hand side. Selecting EDIT from the AUX SENDS page will preselect the AUX SENDS tab for the selected
input channel.
0(',$
Access the MEDIA page
Playback and record controls, plus playlist and track selections. Also shows Playback L and Playback R channels
on left hand side.
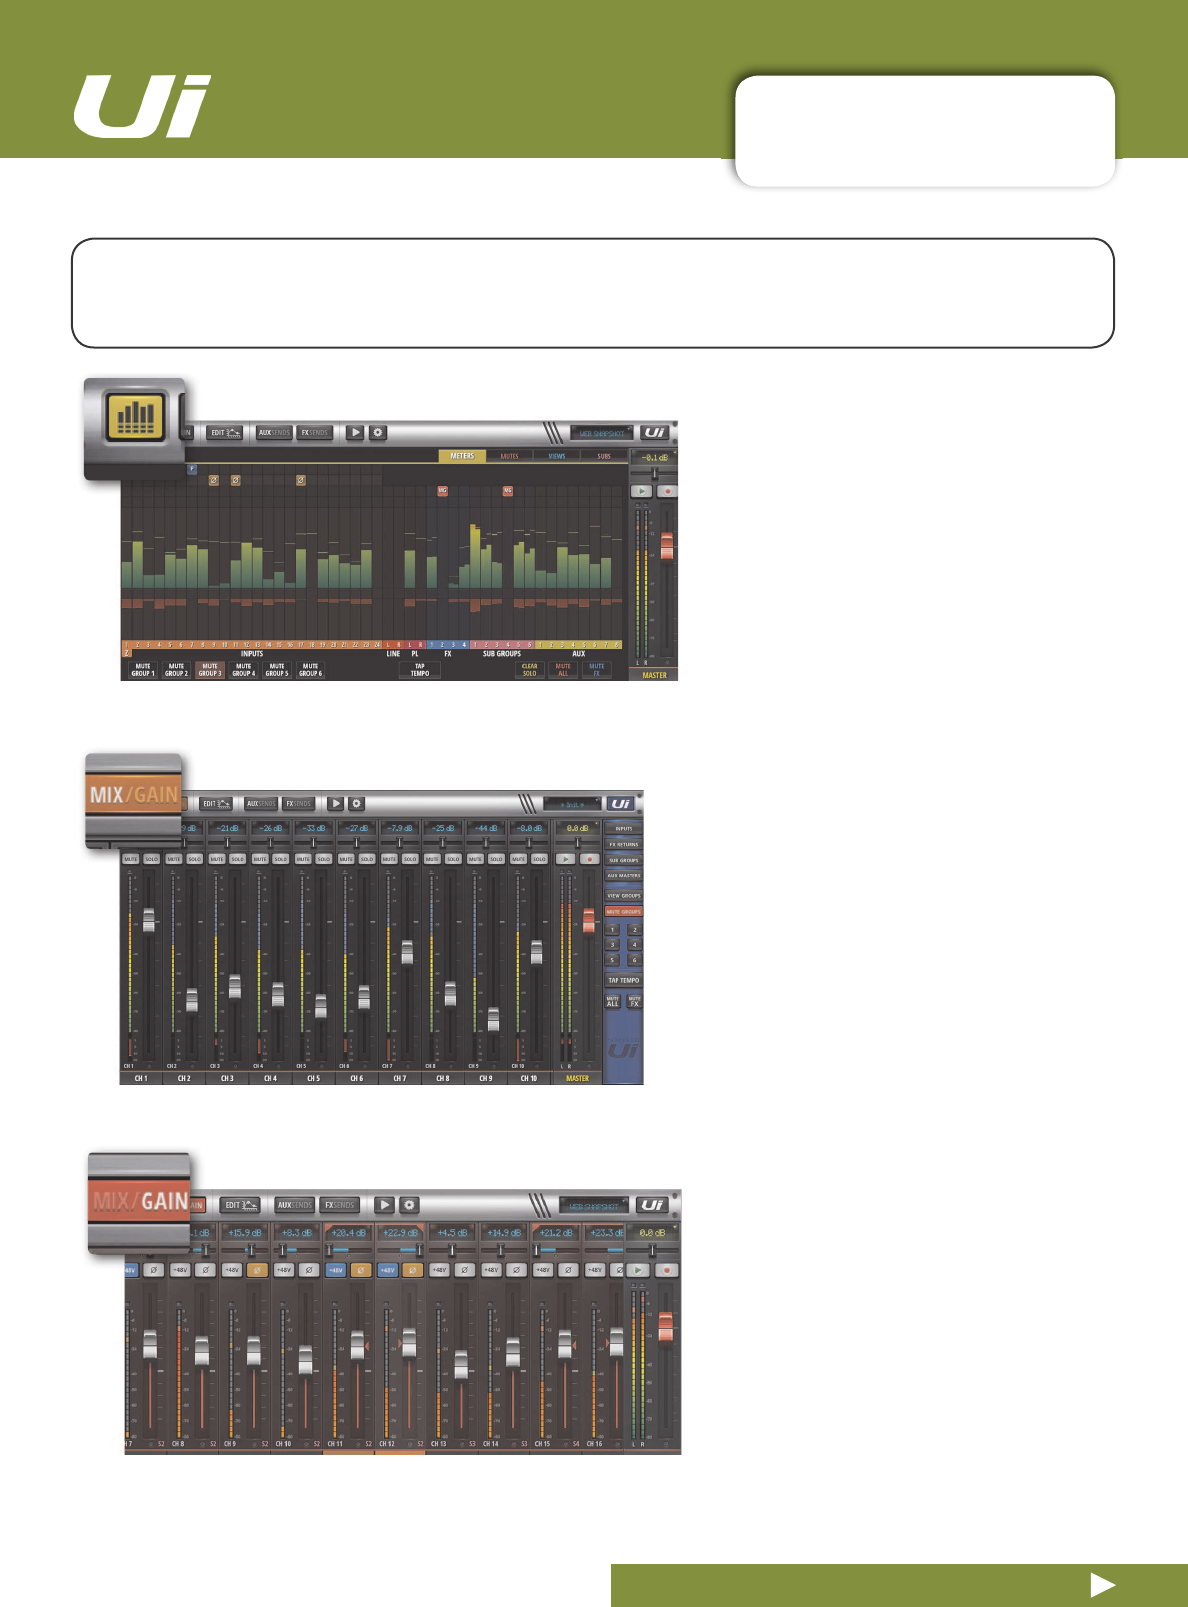
0,;*$,1
Access the MIX and GAIN pages
When the button is orange, the MIX page is shown (channel faders) and when the button is Red, the GAIN page is
shown (remote gain faders and input stage controls).

3.2: TABLET NAVIGATION
SOFTWARE > TABLET / LARGE SCREEN NAVIGATION
3.2: TABLET NAVIGATION
8L8L8VHU0DQXDO
61$36+27
Access the Show and Snapshots pop-up selector
Load shows and snapshots directly from this pop-up.
6/,'(287
Access the SLIDEOUT view on the right hand side of the screen
Oers fast view and status switching functionality. The Slideout view can be configured as ‘pinned’
(permanent) in the SETTINGS page for Mix and Aux/FX Sends pages independently.

3.2.1: KEYBOARD CONTROL
SOFTWARE > KEYBOARD CONTROL
3.2.1: KEYBOARD CONTROL
For users mixing with a device that has a keyboard, please see below a set of easily accessible key com
-
PDQGV
PDNLQJ
LW
TXLFN
DQG
HI¿FLHQW
WR
DFFHVV
WKH
PRVW
XVHG
IHDWXUHV
RQ
WKH
PL[HU
8L8L8VHU0DQXDO
[1]
DASHBOARD
[2]
MIX/GAIN
[3]
EDIT
[4]
AUX SENDS
[5]
FX SENDS
>@
MEDIA
>@
SETTINGS
[8]
SNAPSHOTS (Same as click in NAV Display)
[9]
SLIDEOUT
>63$&(%$5@
SLIDEOUT.
[Q]
FX RETURNS
[W]
SUB GROUPS
[E]
AUX MASTERS
[A]
MUTE ALL
[P]
PRESETS
[F]
MUTE FX
[M]
MUTE
>6@
SOLO
[C]
CHANNEL POP UP MENU
[~]
UNDO (last page viewed)
>/HIWDUURZ@
Jump 1 channels to the left
>5LJKWDUURZ@
Jump 1 channels to the right
>8SDUURZ@
Jump 8 channels to the left
>'RZQDUURZ@
Jump 8 channels to the right
>7$%@
Toggle through the tabs inside EQ, DYN, FX, AUX.
3.3: TABLET SCREENS
SOFTWARE > TABLET SOFTWARE SCREENS
3.3: TABLET SOFTWARE SCREENS
The main tablet software screens are accessed from the level 1 Navigation Buttons along the top of the
screen area, or via fast-access routes, such as double-tapping on a fader to access the EQ screen (see
section 3.1).
8L8L8VHU0DQXDO
0,;
MIX is the most used screen and includes
a scrollable display of every channel
fader. The channel order from left to right
is: input channel faders, line in faders,
media player faders, FX return faders,
Sub Group faders, and AUX Master
faders. The Ui hardware you own will
determine how many channels you see in
the control software.
0(7(56
The Tabs are METERS (for all channels),
MUTES (Mute group Assignment), VIEWS
(View Group assignment), and SUBS
(sub-group assignment).
The Meters page features VU meters
and gain reduction meters for all chan
-
nels, and also provides fast access to the
CLEAR SOLOS, MUTE FX, and MUTE
ALL buttons, plus all Mute Groups.
*$,1
All Ui mixer models include remote gain
control and remote phantom power.
7KH
*$,1
VFUHHQ
HDVLO\
LGHQWL¿HG
E\
LWV
red fader level lines - features Gain
Faders, and the phantom power and
phase invert buttons.