Harsper HL-400B LCD TV Monitor User Manual FCC CERTIFICATION B
Harsper Co., Ltd. LCD TV Monitor FCC CERTIFICATION B
Harsper >
Contents
- 1. Users Manual 1 of 3
- 2. Users Manual 2 of 3
- 3. Users Manual 3 of 3
Users Manual 3 of 3

REPORT NO : HCT-F04-0905 FCC ID : O5XHL-400B DATE : SEPTEMBER 10, 2004
HYUNDAI CALIBRATION & CERTIFICATION TECHNOLOGIES CO., LTD.
SAN 136-1, AMI-RI , BUBAL-EUP, ICHEON-SI,KYOUNKI-DO, 467-701,KOREA
TEL : +82 31 639 8518 FAX : +82 31 639 8525 www.hctec.co.kr
ATTACHMENT E.
- User’s Manual (3)
Setting the Channel
28 OWNER'S MANUAL
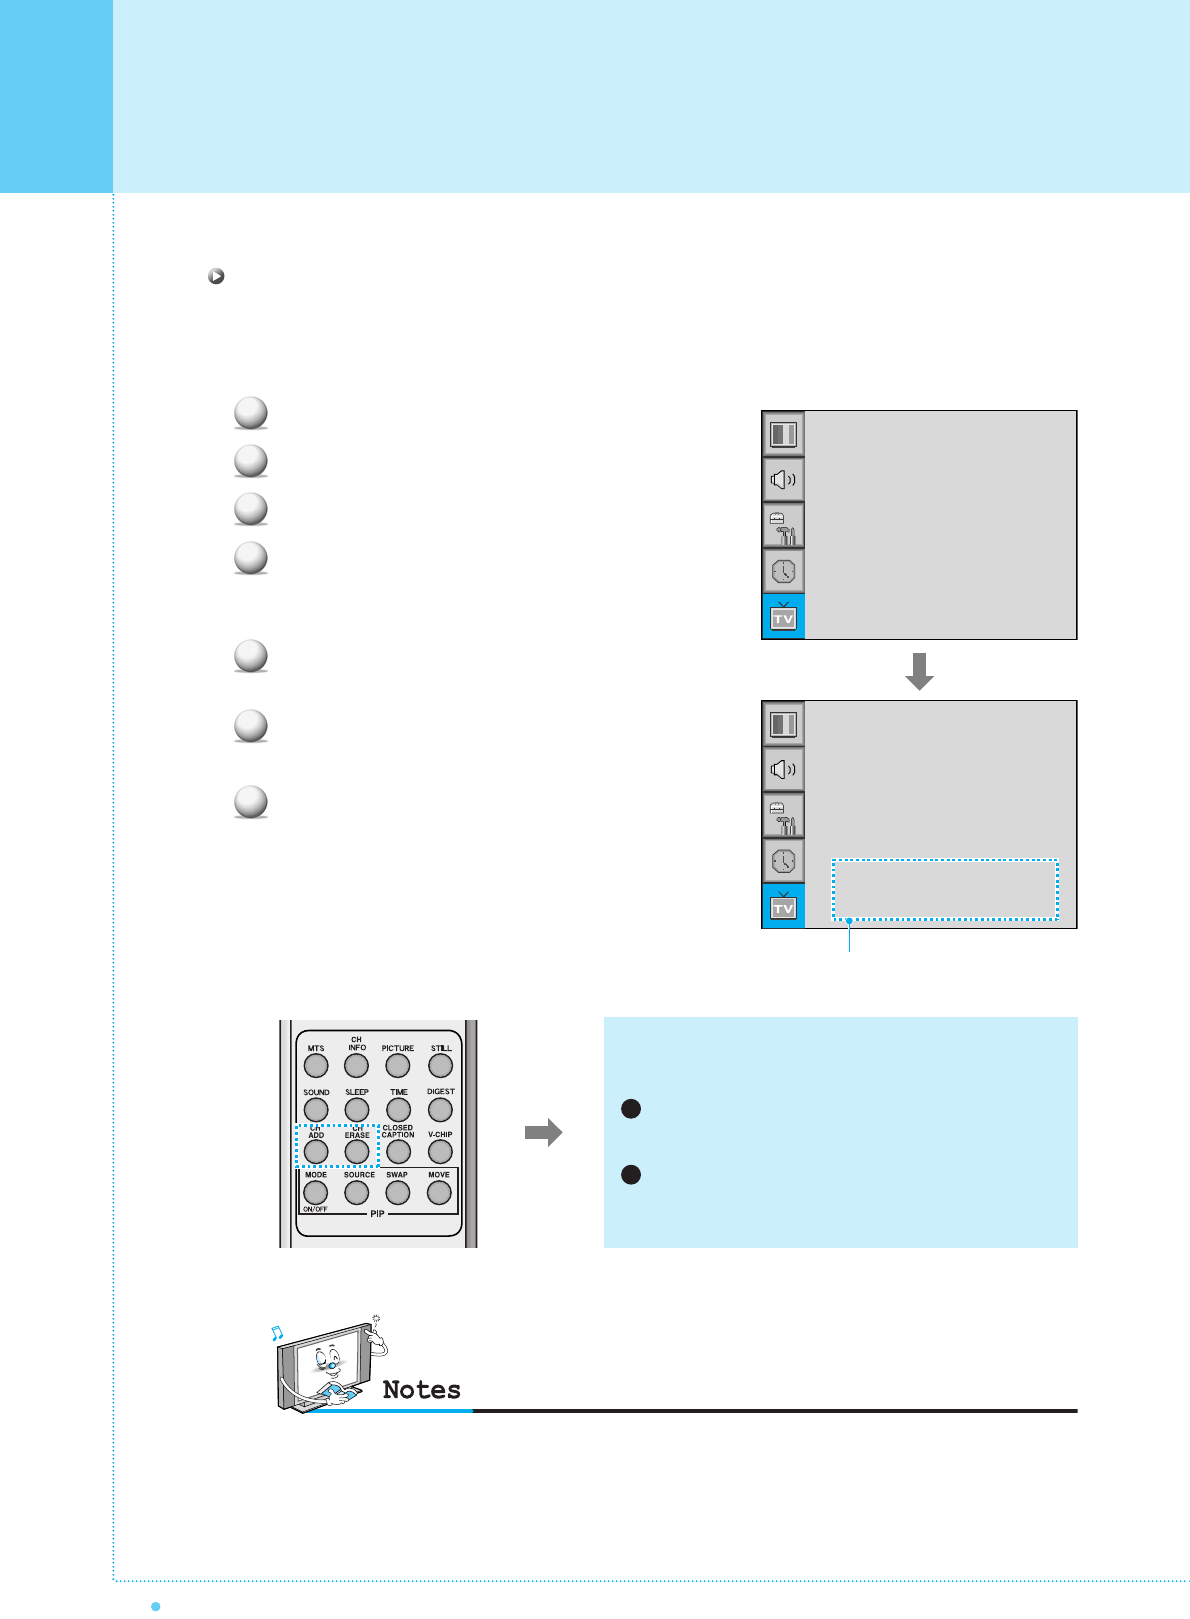
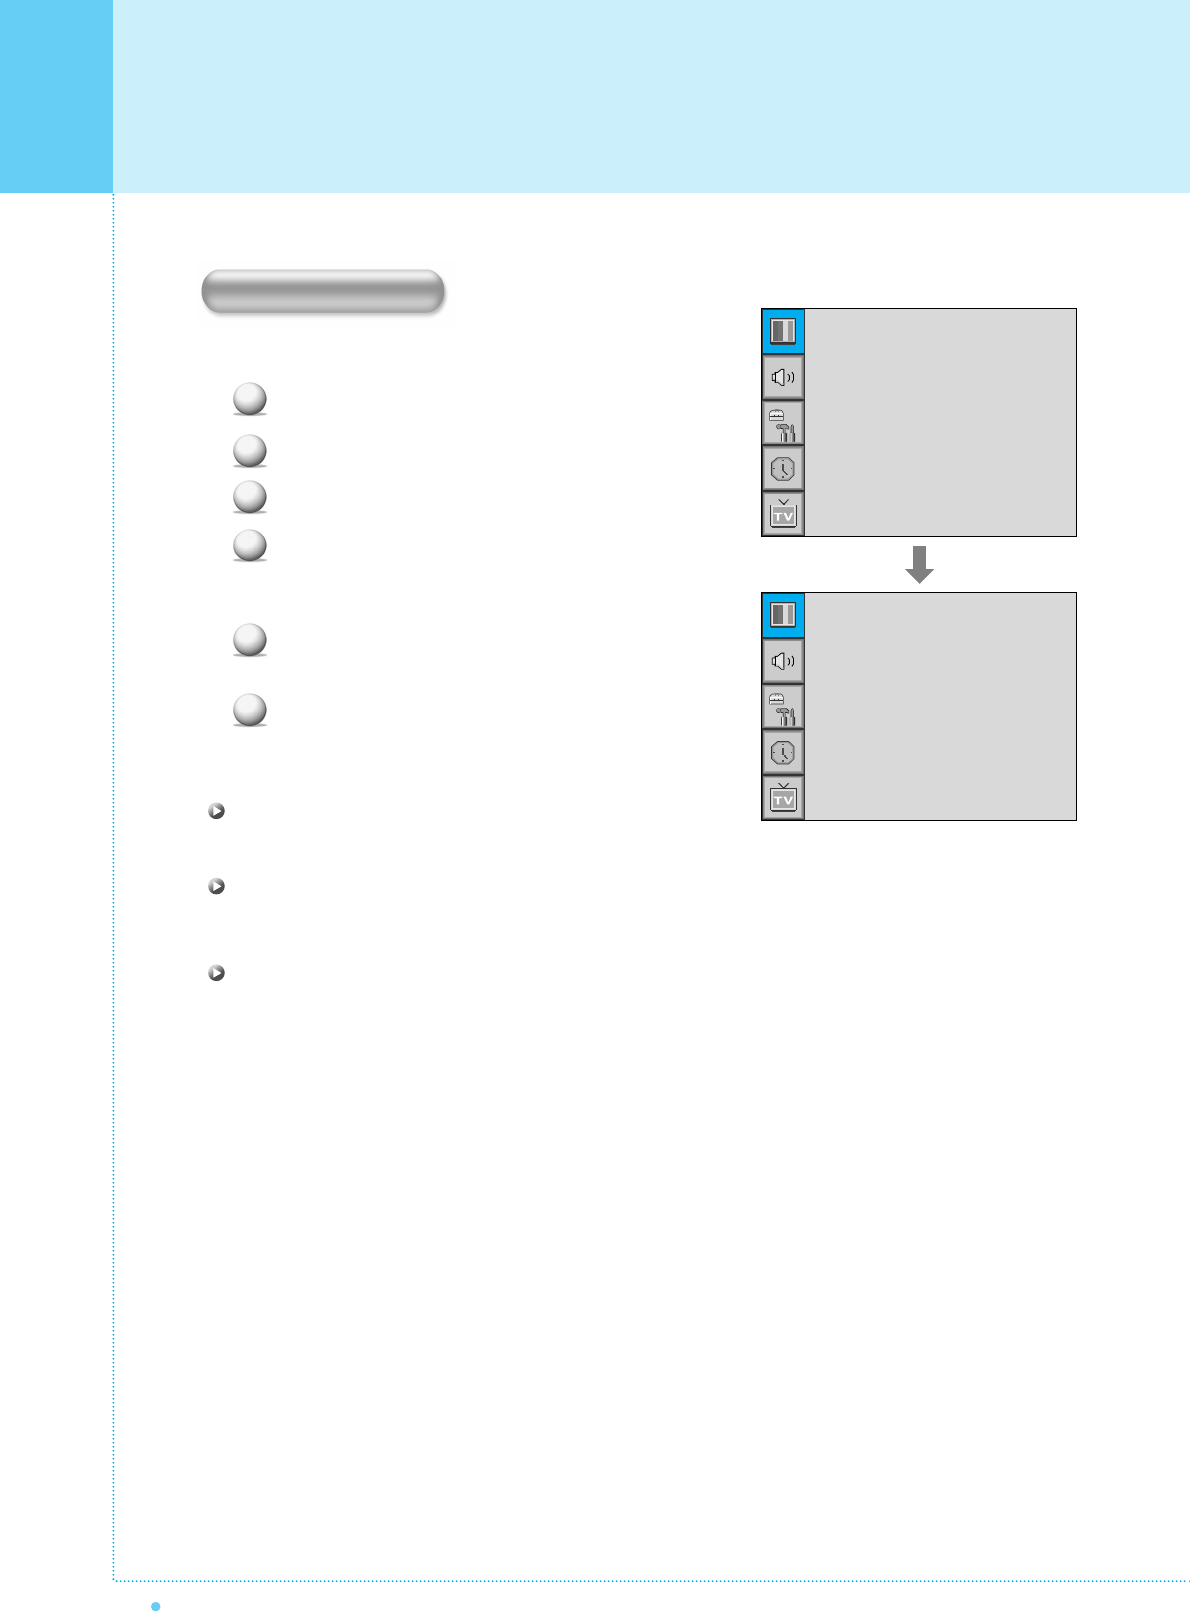
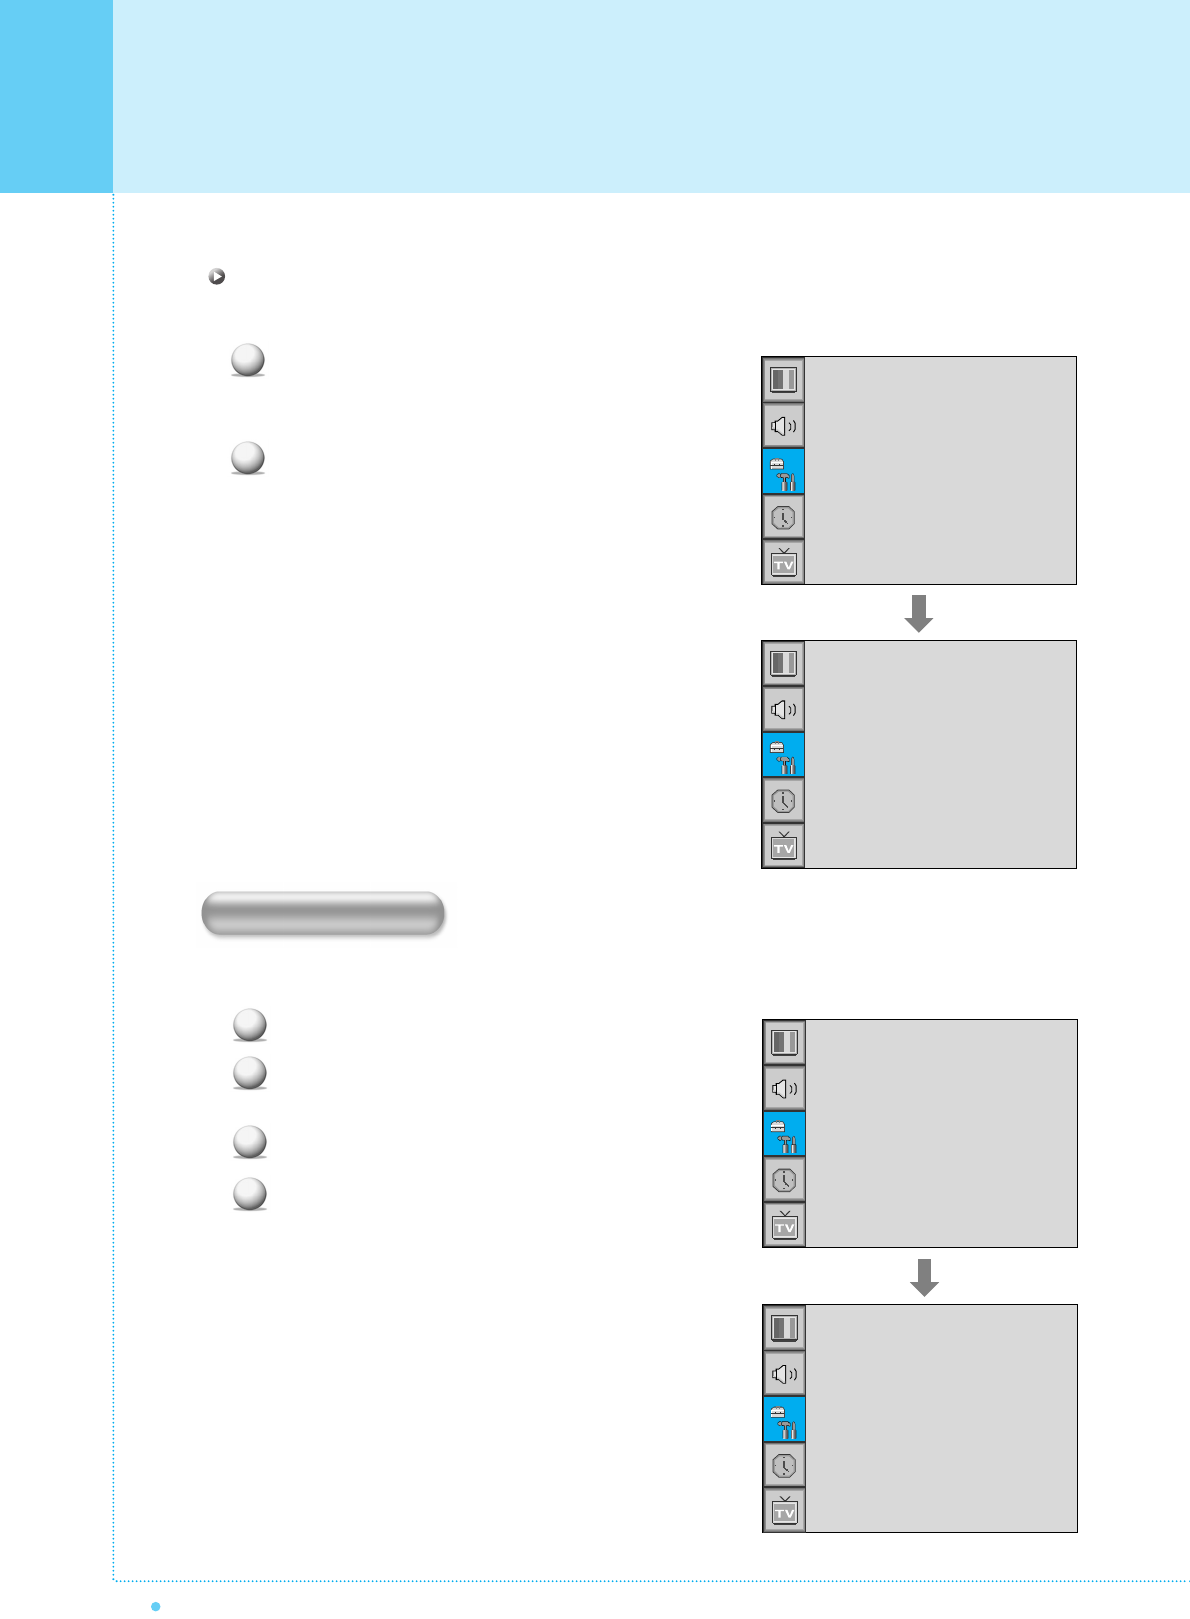
aSet the favorite channel
You can store of your favorite channels for each available input source (such as TV or CATV).
Then, when you press the FAVORITE button on the remote control, the Monitor display only the favorite
channels you previously stored, allowing you to quickly and easily find frequently wanted channels.
Press Menu/set button to display the main OSD menu.
Select the TV main menu.
Press Menu/Set to enter the TV sub menu.
Select CH and press the Menu/Set button.
Then the cursor moves into the ¥ parts and the
Skip and Fav menu appear.
In the ¥ parts , select the channel to skip or
set as the favorite channels.
Then press CH- button on the remote control to
enter the sub menu.
In sub menu, move with CH- and CH+ button and
set the values with VOL+ and VOL- button.
1
2
3
4
5
6
7
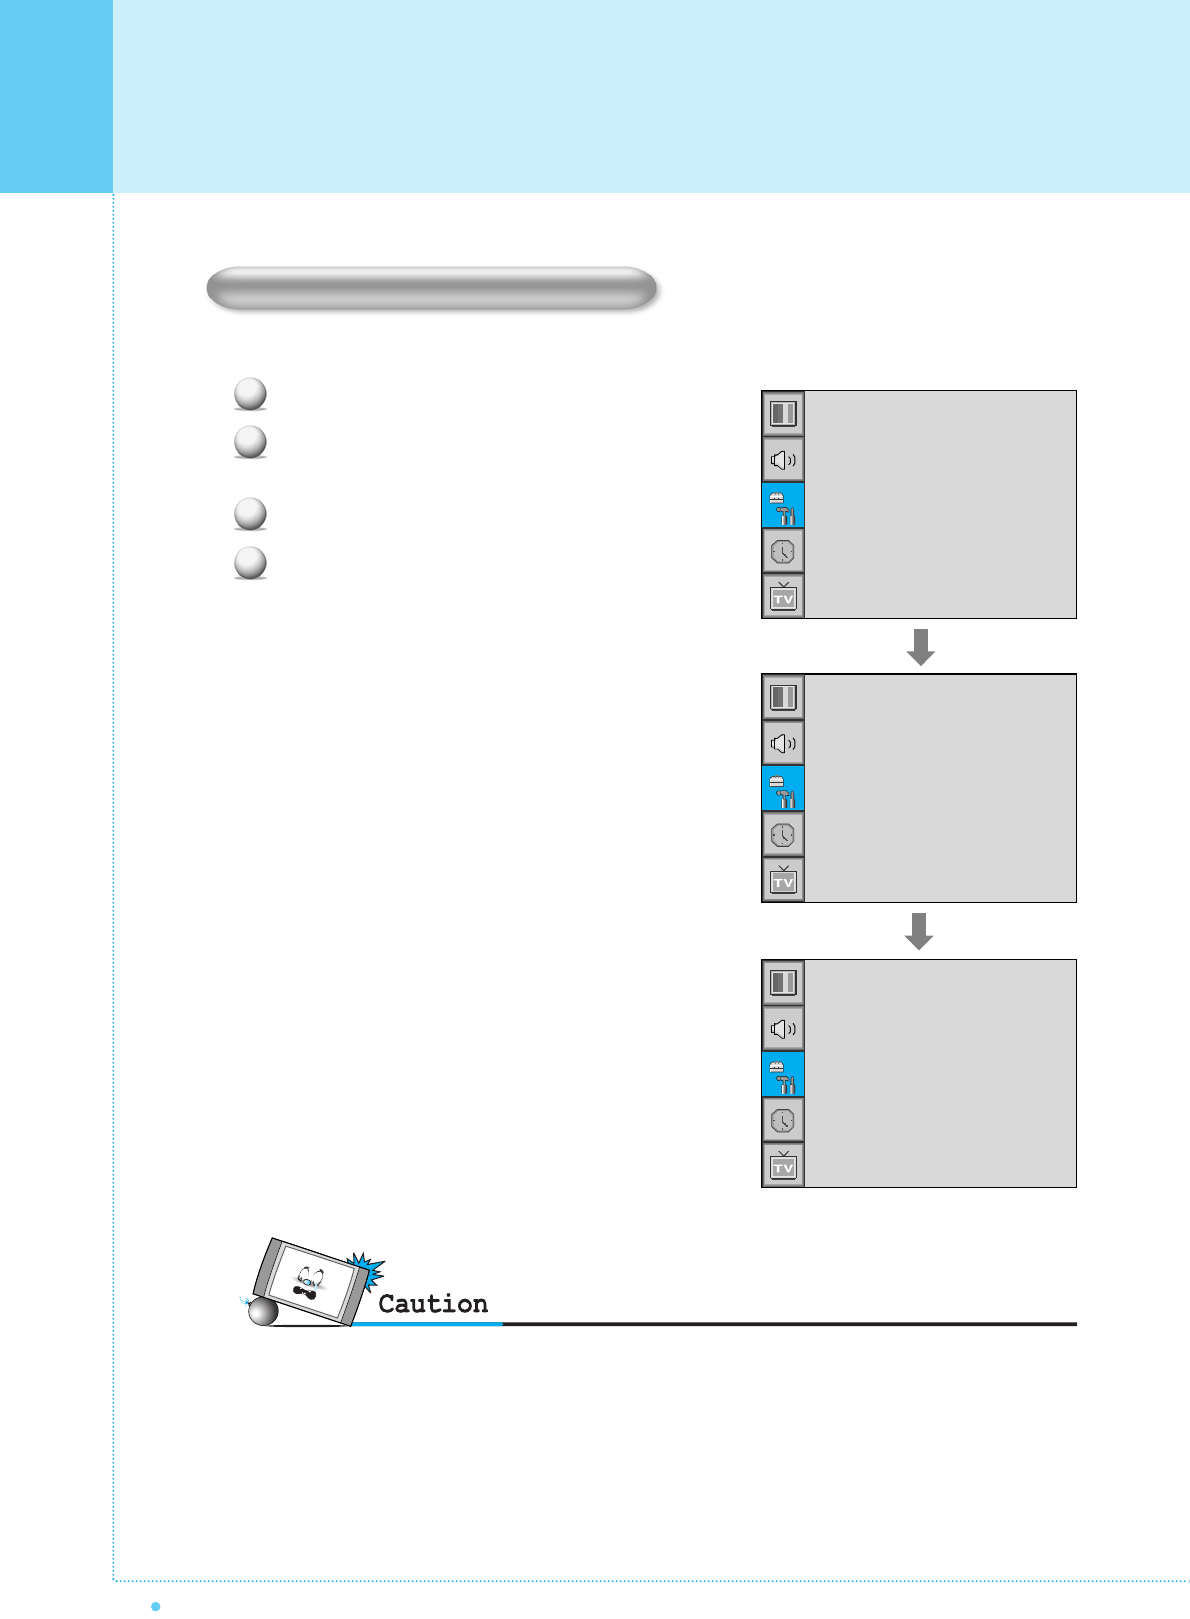
You can add or erase the current channel by the remote
control.
CH ADD
Add the current channel into the scanned channel list.
CH ERASE
Remove the current channel from the scanned
channel list.
1
2
•Only scanned channels can be set as Favorite Channels.
Channel Type
¥CATV
Auto Scan
Fine Tune
CH
¥CATV 5
Channel Type
¥CATV
Auto Scan
Fine Tune
CH
¥CATV 5
Skip Yes
Fav Yes
Sub menu appears
29
OWNER'S MANUAL
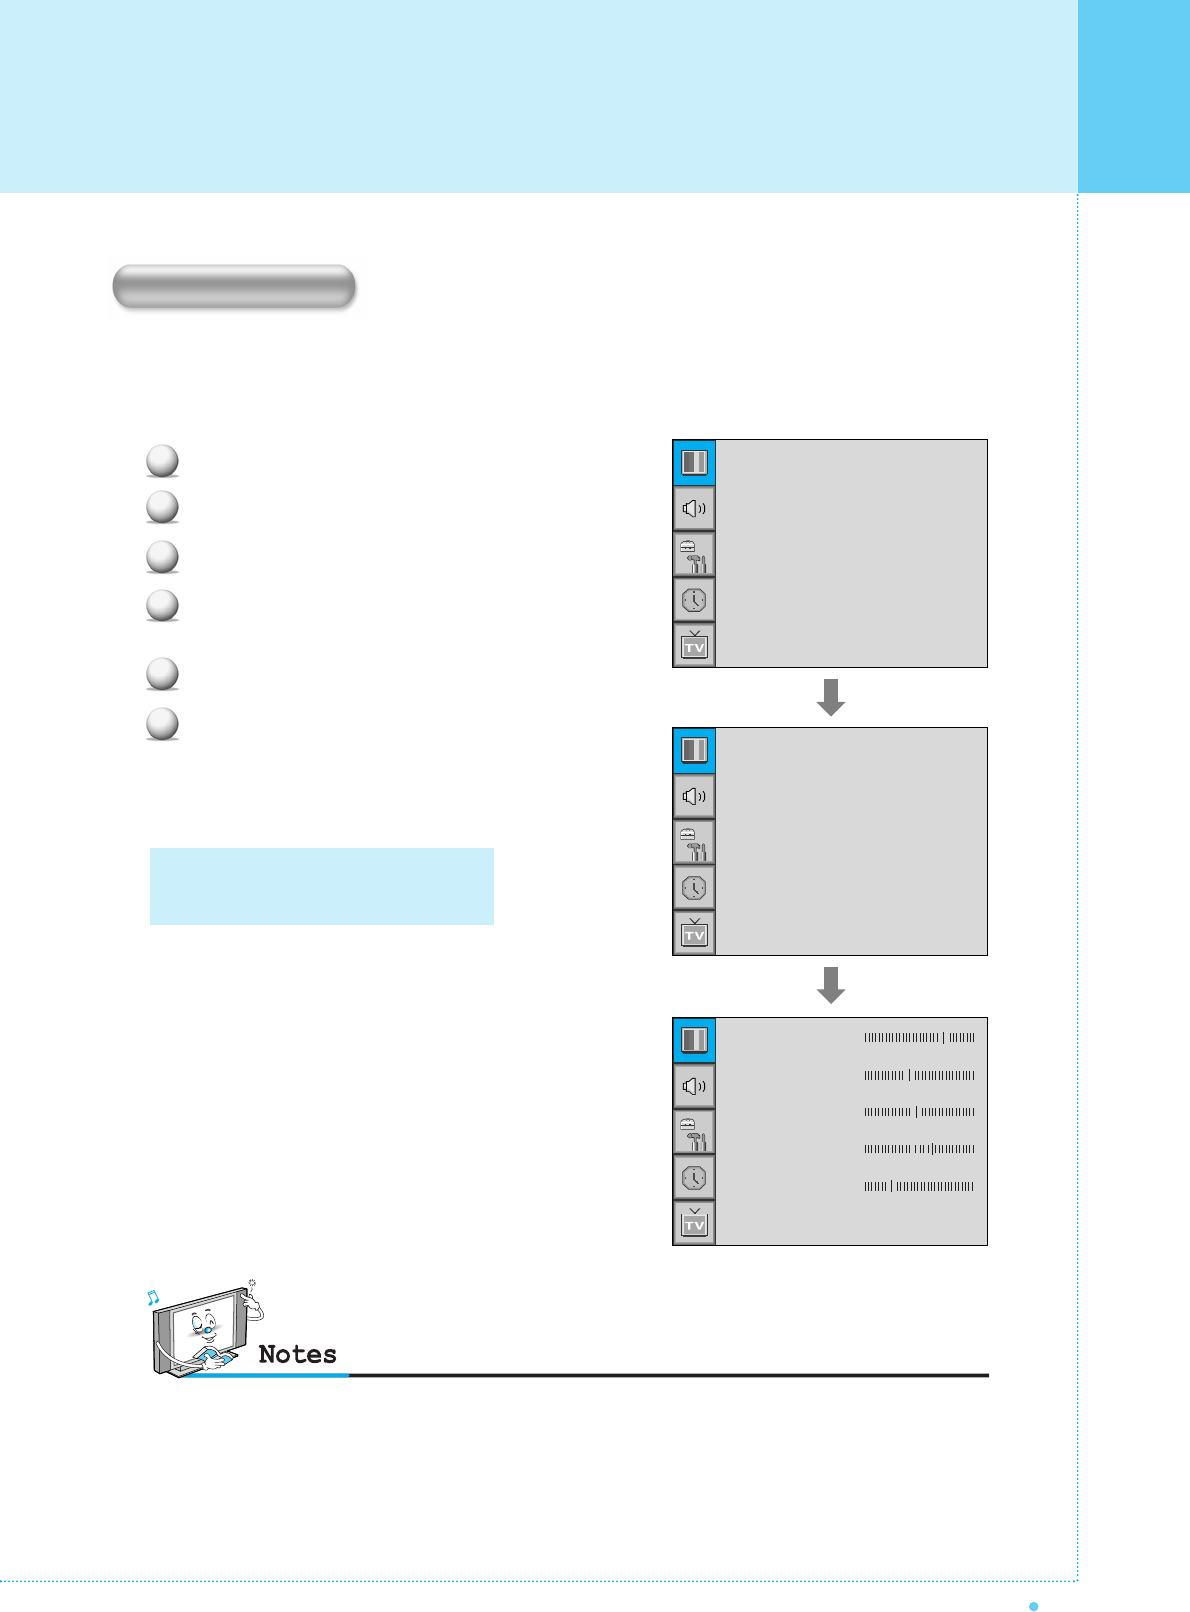
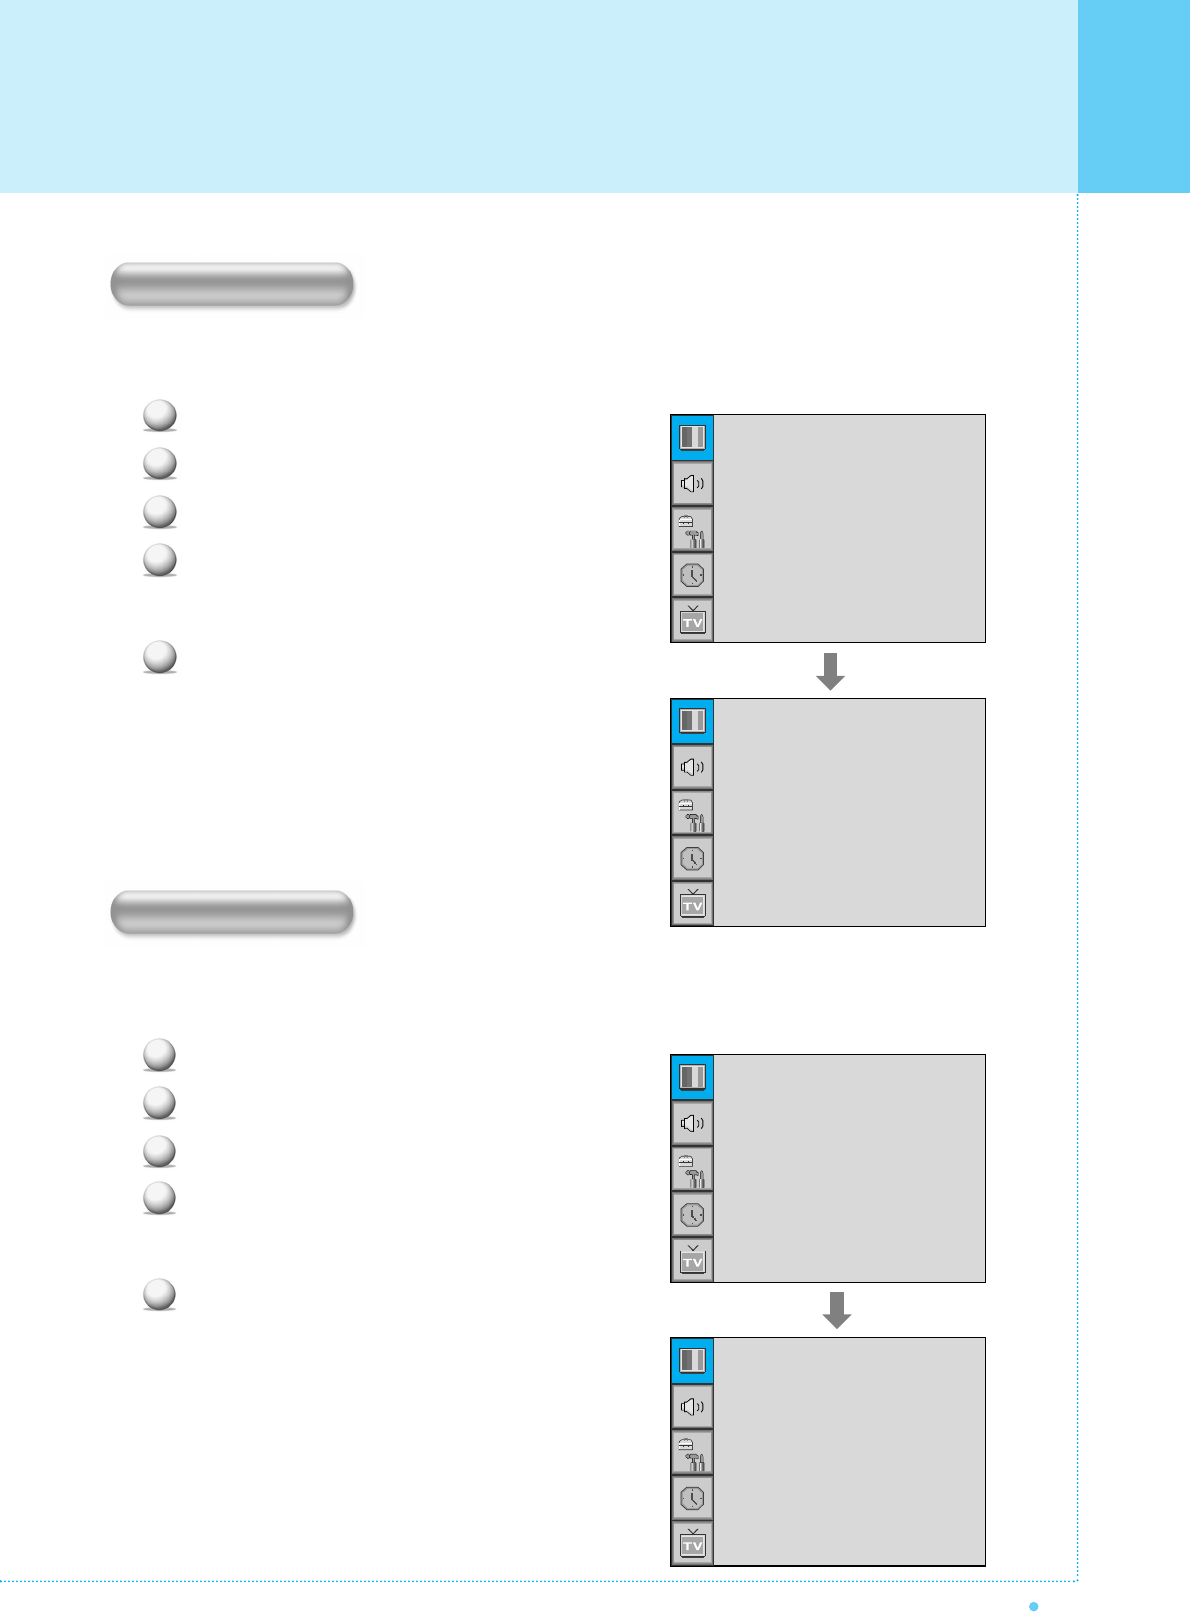
Your the Monitor has 3 automatic factory preset picture settings (“Standard”, “Vivid” and “Mild”).
You can choose Standard, Vivid or Mild by pressing “Picture” button on the remote control (or by making
a selection from the menu). Or you can select USER which automictically recalls your personalized picture
setting.
Press Menu/set button to display the main OSD menu.
Select the picture main menu.
Press Menu/Set to enter the sub menu.
Select Mode and press Menu/Set to enter the sub
menu. Then the picture sub mode appear.
Select the picture mode and press Menu/Set button.
You will see the picture setting bars.
Just Press BACK button on the remote control.
You can adjust each values of the picture setting,
but the changed values are stored as in USER mode.
1
2
3
4
5
6
Mode
Temperature
Video NR
Film Mode
Screen Format
Standard
Normal
¥ON
¥OFF
Wide
Standard
Vivid
Mild
User
USER mode has additional settings in
a sub-menu: See next page.
Contrast
Bright
Color
Tint
Sharpness
Recall
•Alternative method : Just press the "Picture" button on the remote control. Each time it is pressed, different mode
is selected.
Mode
Setting the Picture
Setting the Picture
30 OWNER'S MANUAL
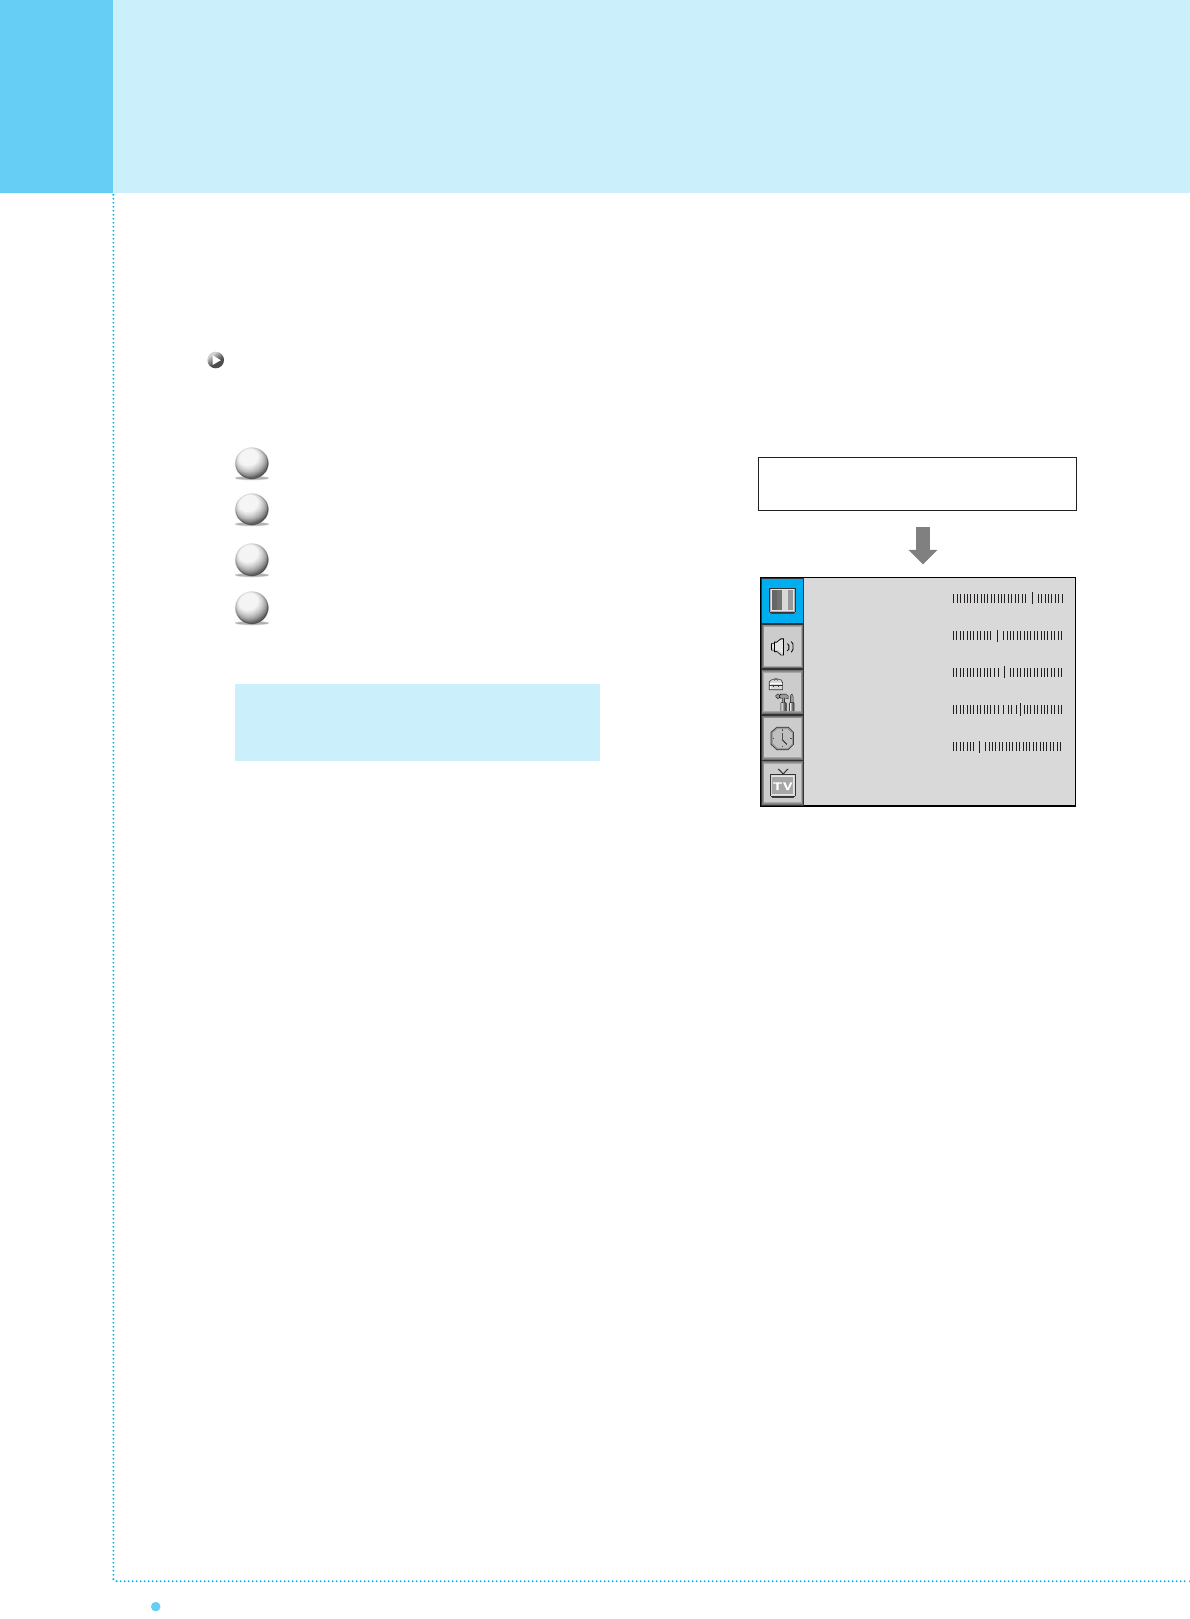
Picture Mode is to set CH+ or adjust Picture Adjust, Mode, Video Noise Reduction, Screen Format
and Burn Protection.
Adjust USER Mode
You can change the Contrast, Brightness, Color, and Sharpness according to personal preference in USER
mode.
Select the item to adjust with CH-, CH+ button.
Press Menu/Set button.
Adjust the item with VOL-, VOL+ button.
To cancel all adjust, select Recall and press
Menu/Set button.
1
2
3
4
For a more detailed description of these
settings, see the next page.
Select USER mode (Previous page)
Contrast
Bright
Color
Tint
Sharpness
Recall
31
OWNER'S MANUAL
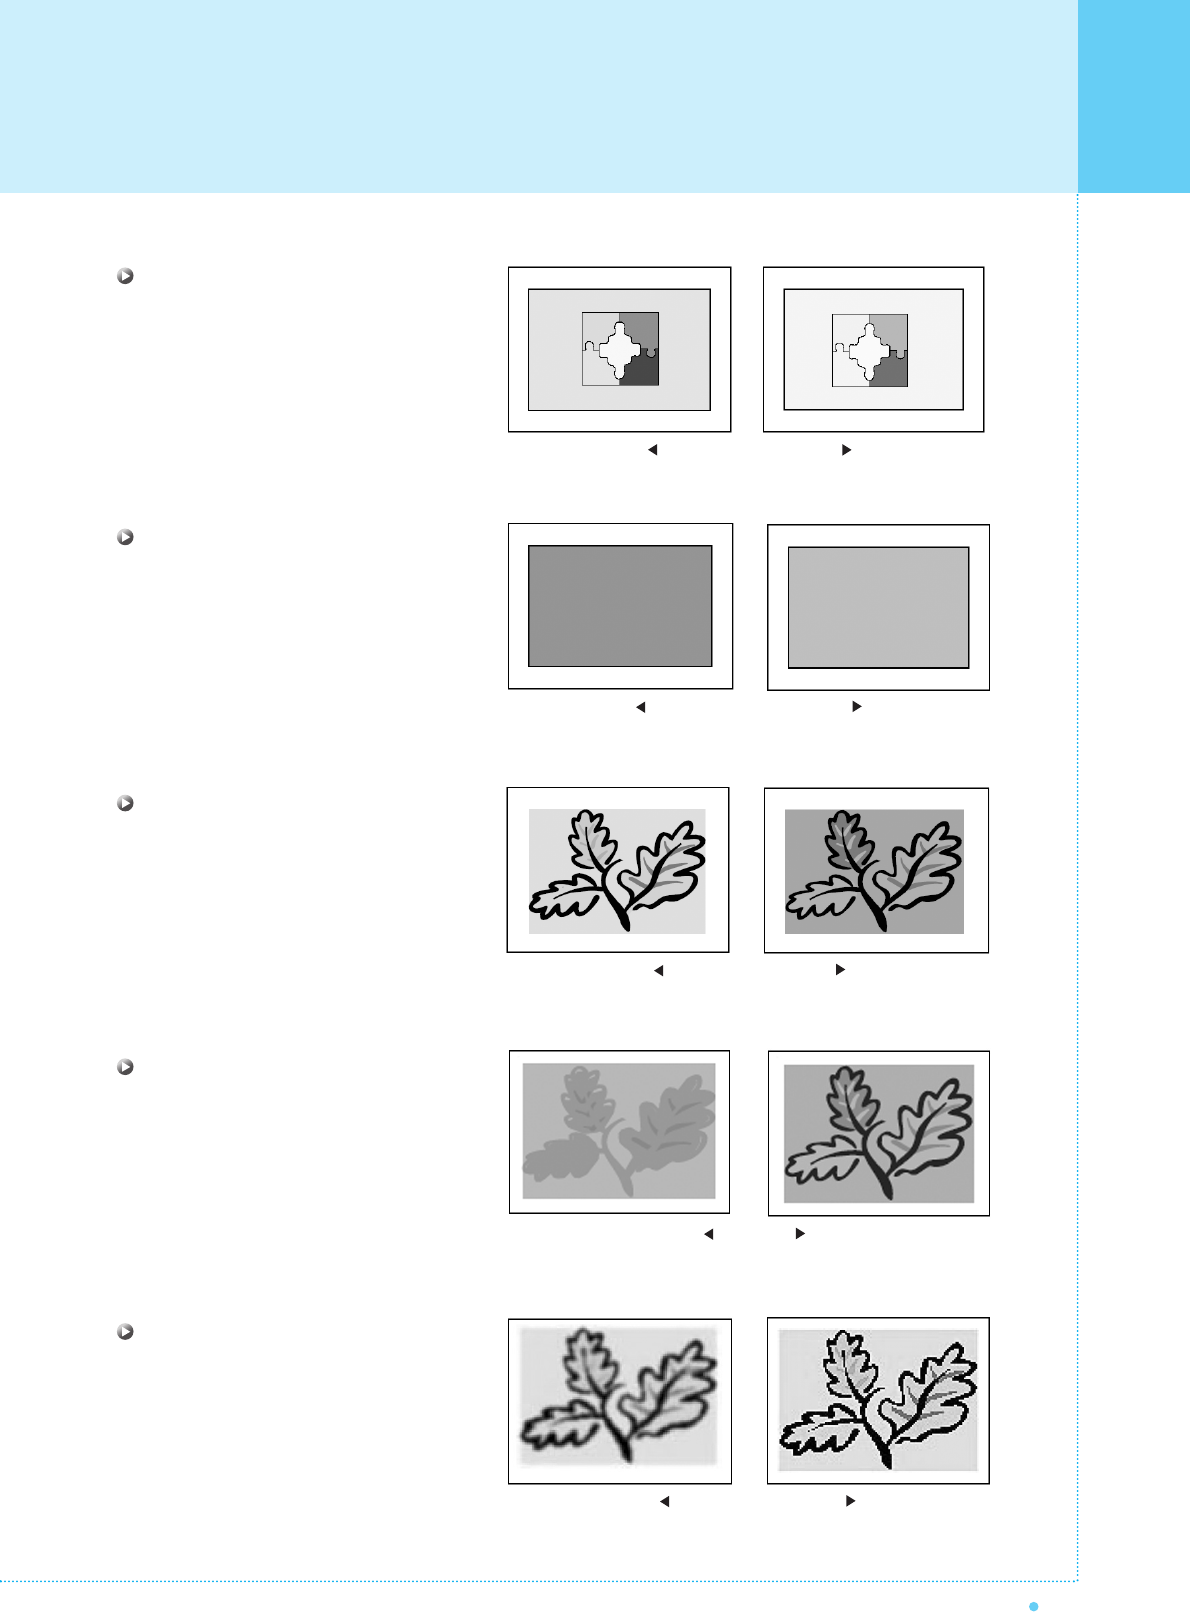
Contrast
Adjust brightness difference between
bright part of the screen and dark part.
Brightness
Adjust brightness of the screen.
Color
Adjust deep and light color of the screen.
Tint
Adjusts the balance between green
and yellow.
Sharpness
Adjust vividness of the screen.
Distinct Vague
Dark Bright
Decrease Increase
Green color is deeper Red color is deeper
Less sharp Sharp
Setting the Picture
Setting the Picture
32 OWNER'S MANUAL
Your the Monitor has 5 screen temperatures (color settings):
Press Menu/set button to display the main OSD menu.
Select the picture main menu.
Press Menu/Set to enter the picture menu.
Select Temperature and press Menu/Set to enter
the sub menu. Then the Picture-Temperature
sub menu appear.
Select the Temperature mode with CH-/CH+
button and press Menu/Set button.
Press BACK button to return.
Cool 1, 2
Screen seems cool: Strong Blue
Normal
Normal: Factory default.
Warm 1, 2
Screen seems warm: Strong Red
1
2
3
4
5
6
Mode
Temperature
Video NR
Film Mode
Screen Format
Standard
Normal
¥ON
¥OFF
Wide
Cool2
Cool1
Normal
Warm1
Warm2
Temperature
33
OWNER'S MANUAL
This function automatically filters out and reduces the image noise and improves picture quality where receiving
weak signals.
Press Menu/Set button to display the main OSD menu.
Select the picture main menu item.
Press Menu/Set to enter the sub menu.
Select Video NR and press VOL+ button to enter
the ¥ parts. Then the cursor moves into the
¥ parts.
Turn on or off Video NR function with CH+/CH-
button and press BACK button.
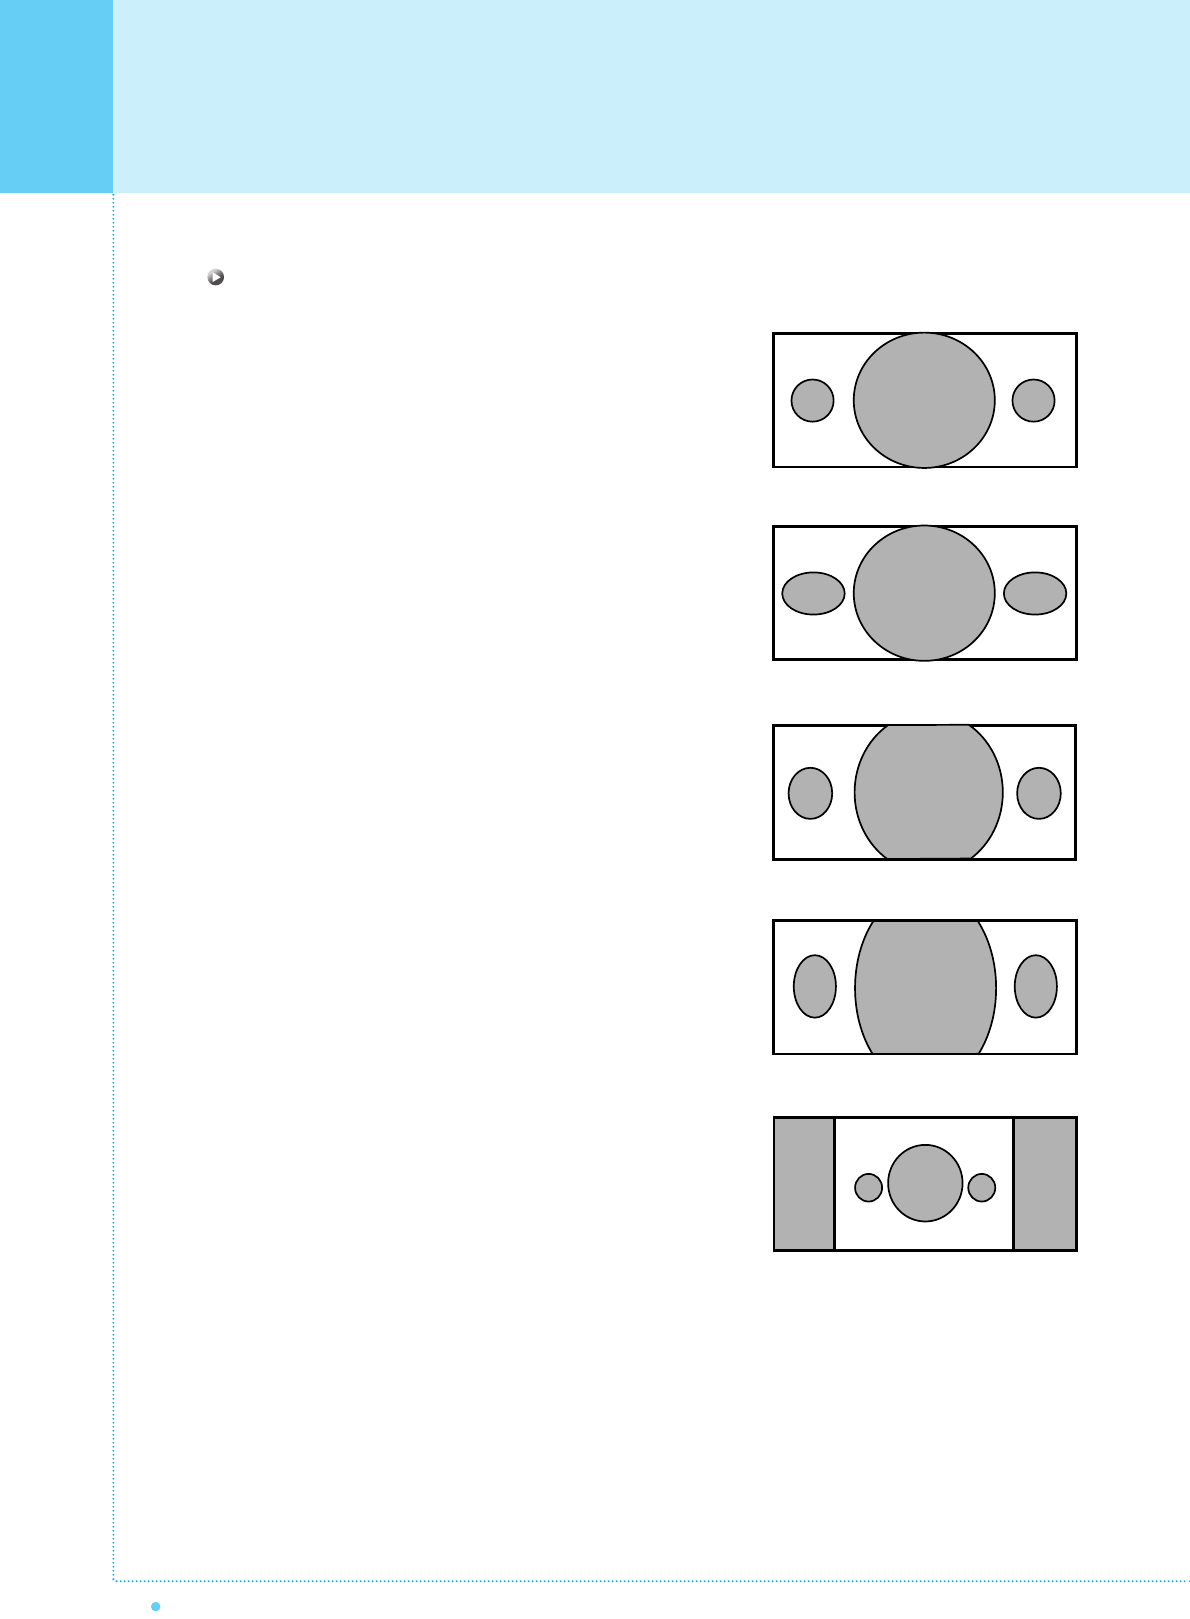
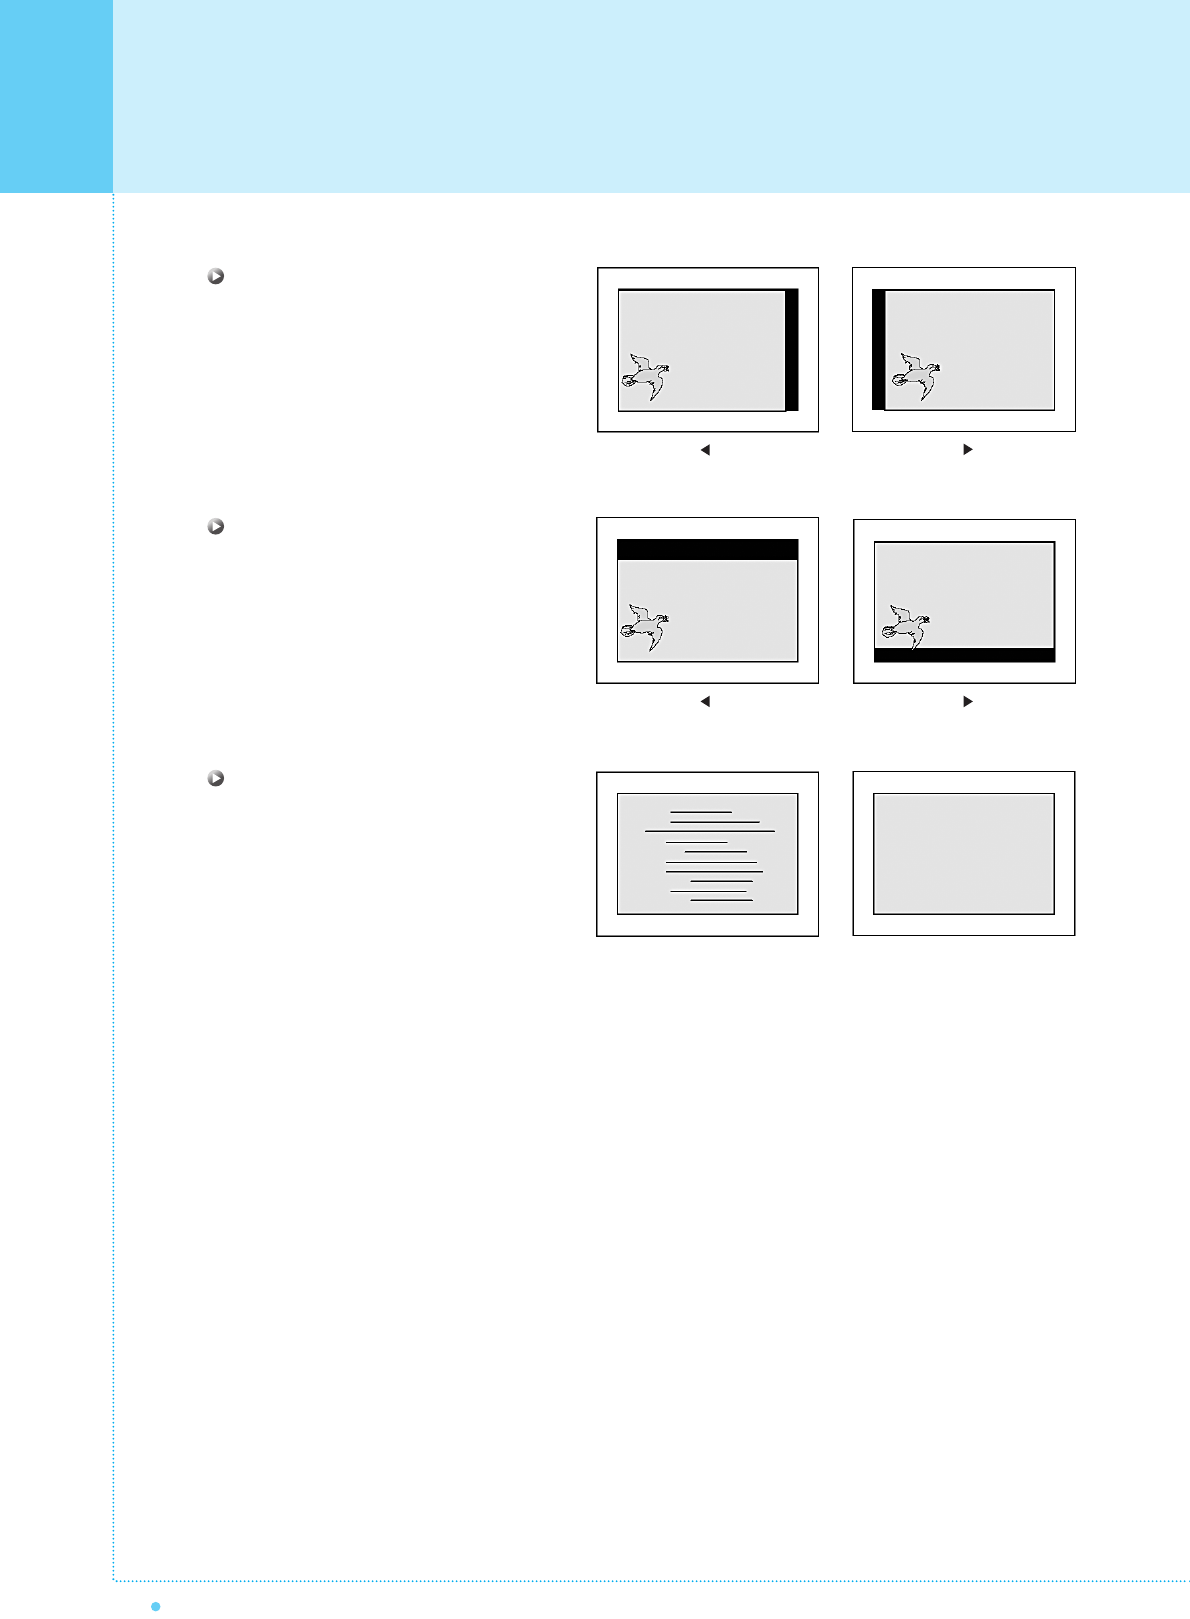
Your the Monitor has four Screen Formats: WIDE, PANORAMA, ZOOM1, ZOOM2, 4:3.
(For more detail description for these modes, refer to the next page.)
Press Menu/Set button to display the main OSD menu.
Select the picture main menu.
Press Menu/Set to enter the picture menu.
Select Screen Format and press Menu/Set to
enter the sub menu. Then the Screen Format
sub menu appear.
Select the screen format you want and press
Menu/Set button
1
2
3
4
5
Mode
Temperature
Video NR
Film Mode
Screen Format
Standard
Normal
¥ON
¥OFF
Wide
Wide
Panorama
Zoom1
Zoom2
4 : 3
1
2
3
4
5
Mode
Temperature
Video NR
Film Mode
Screen Format
Standard
Normal
¥OFF
¥OFF
Wide
Mode
Temperature
Video NR
Film Mode
Screen Format
Standard
Normal
¥ON
¥OFF
Wide
Video NR
Screen Format
Setting the Picture
Setting the Picture
34 OWNER'S MANUAL
Screen Format Description
Wide
Wide video: No change.
4:3 video: Expands 4:3 video signal horizontally to fit the
Wide screen.
Panorama
Wide video: No change.
4:3 video: Expands 4:3 video horizontally to fit the Wide
screen and to minimize distortion, sides are expanded
more than center.
Zoom 1
Expands Wide mode screen vertically.
Zoom 2
Expands zoom 1 mode screen vertically.
4 : 3
Wide video: The image is suppressed.
4:3 video: No expansion. There are gray areas besides
the image.
35
OWNER'S MANUAL
In PC mode, you can adjust the H, V-Position, Native Mode and Phase. Also you can adjust them automatically.
You can change H, V-Position, Native Mode and Phase in PC mode like usual PC monitors.
You can also adjust them automatically. (Auto adjust function.)
Press Menu/set button to display the main OSD menu.
Select the picture main menu with CH+, CH- button.
Press Menu/Set to enter the sub menu.
Select Geometry and press Menu/Set to enter the
sub menu. Then the picture Geometry sub menu
will appear.
Select the item to adjust with CH-, CH+ button.
Press Menu/Set button.
Then the cursor moves on the bar and you can
adjust the value with VOL-, VOL+ button.
To adjust these items, automatically, select Auto
Adjust and press Menu/Set button.
1
2
3
4
For more detail description refer to the next page.
1
2
3
4
Mode
Temperature
Geometry
Standard
Normal
H-Position
V-Position
Phase
Native Mode
¥ ON
Auto Adjust
Geometry
Setting the Picture ( PC )
Setting the Picture ( PC )
36 OWNER'S MANUAL
H-POSITION
V-POSITION
PHASE
Mismatch Match

37
OWNER'S MANUAL
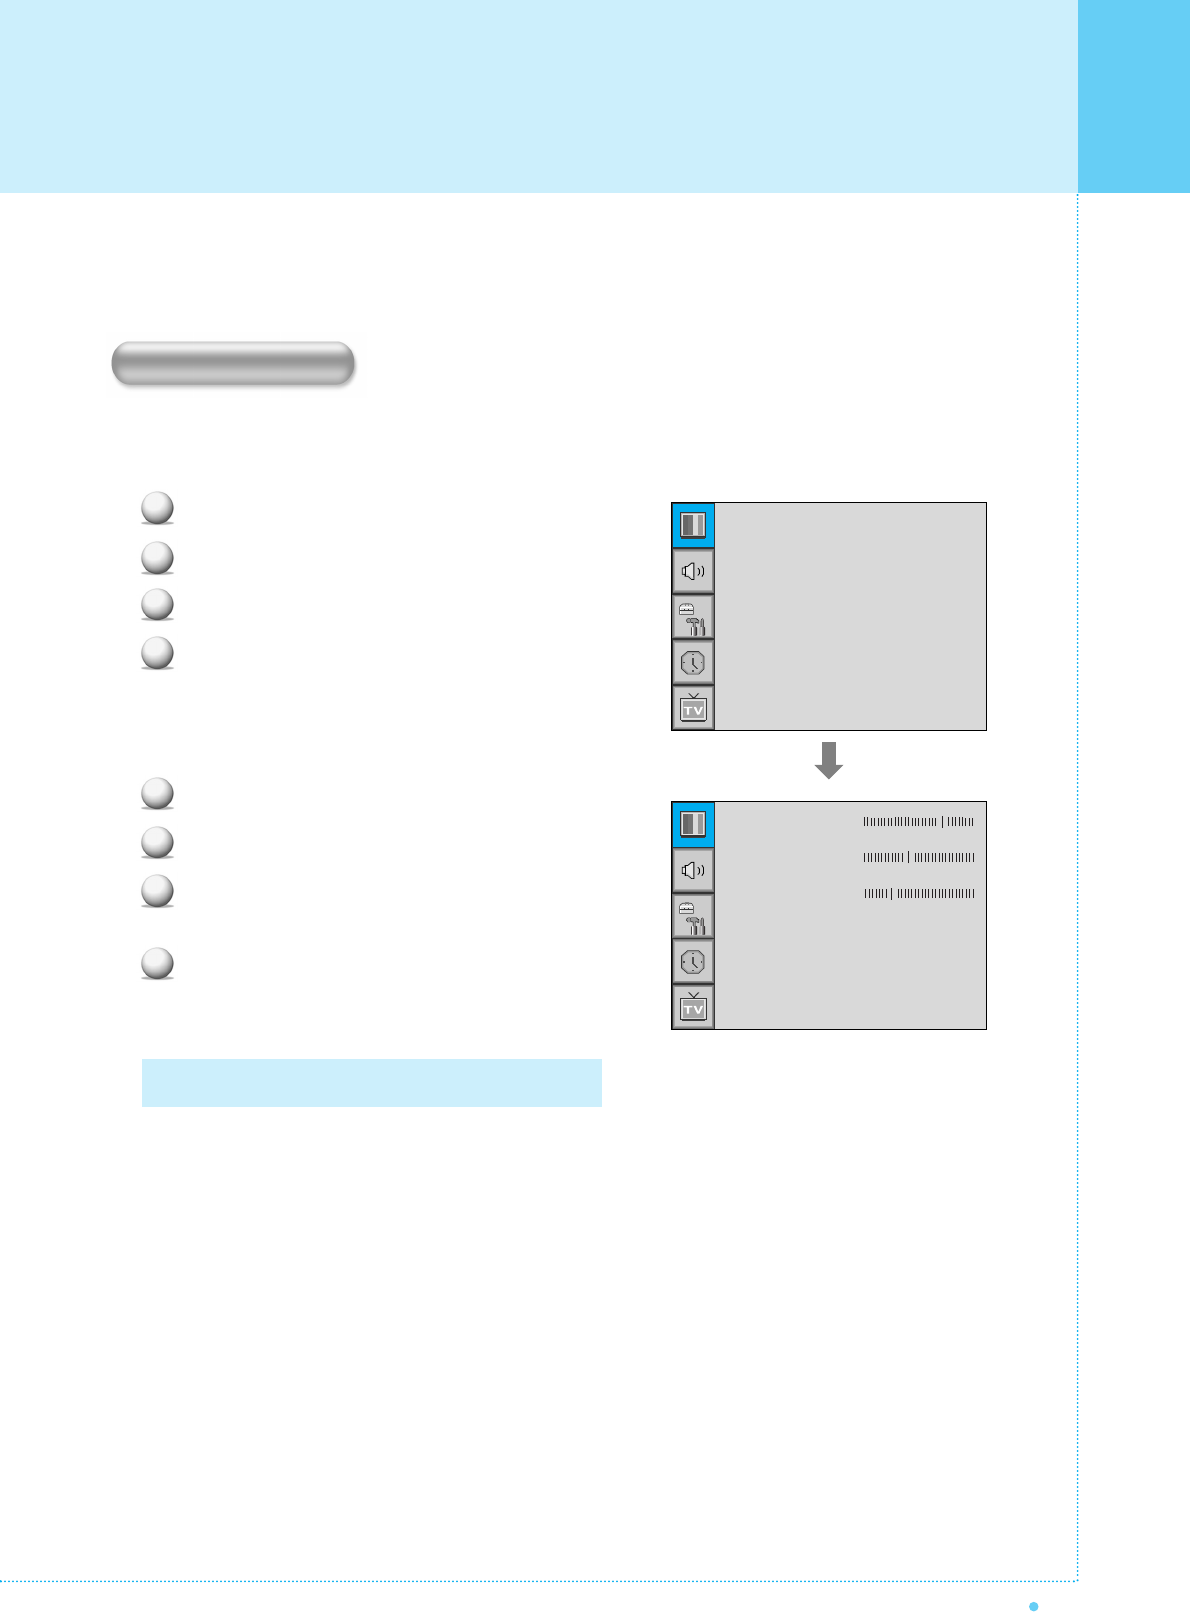
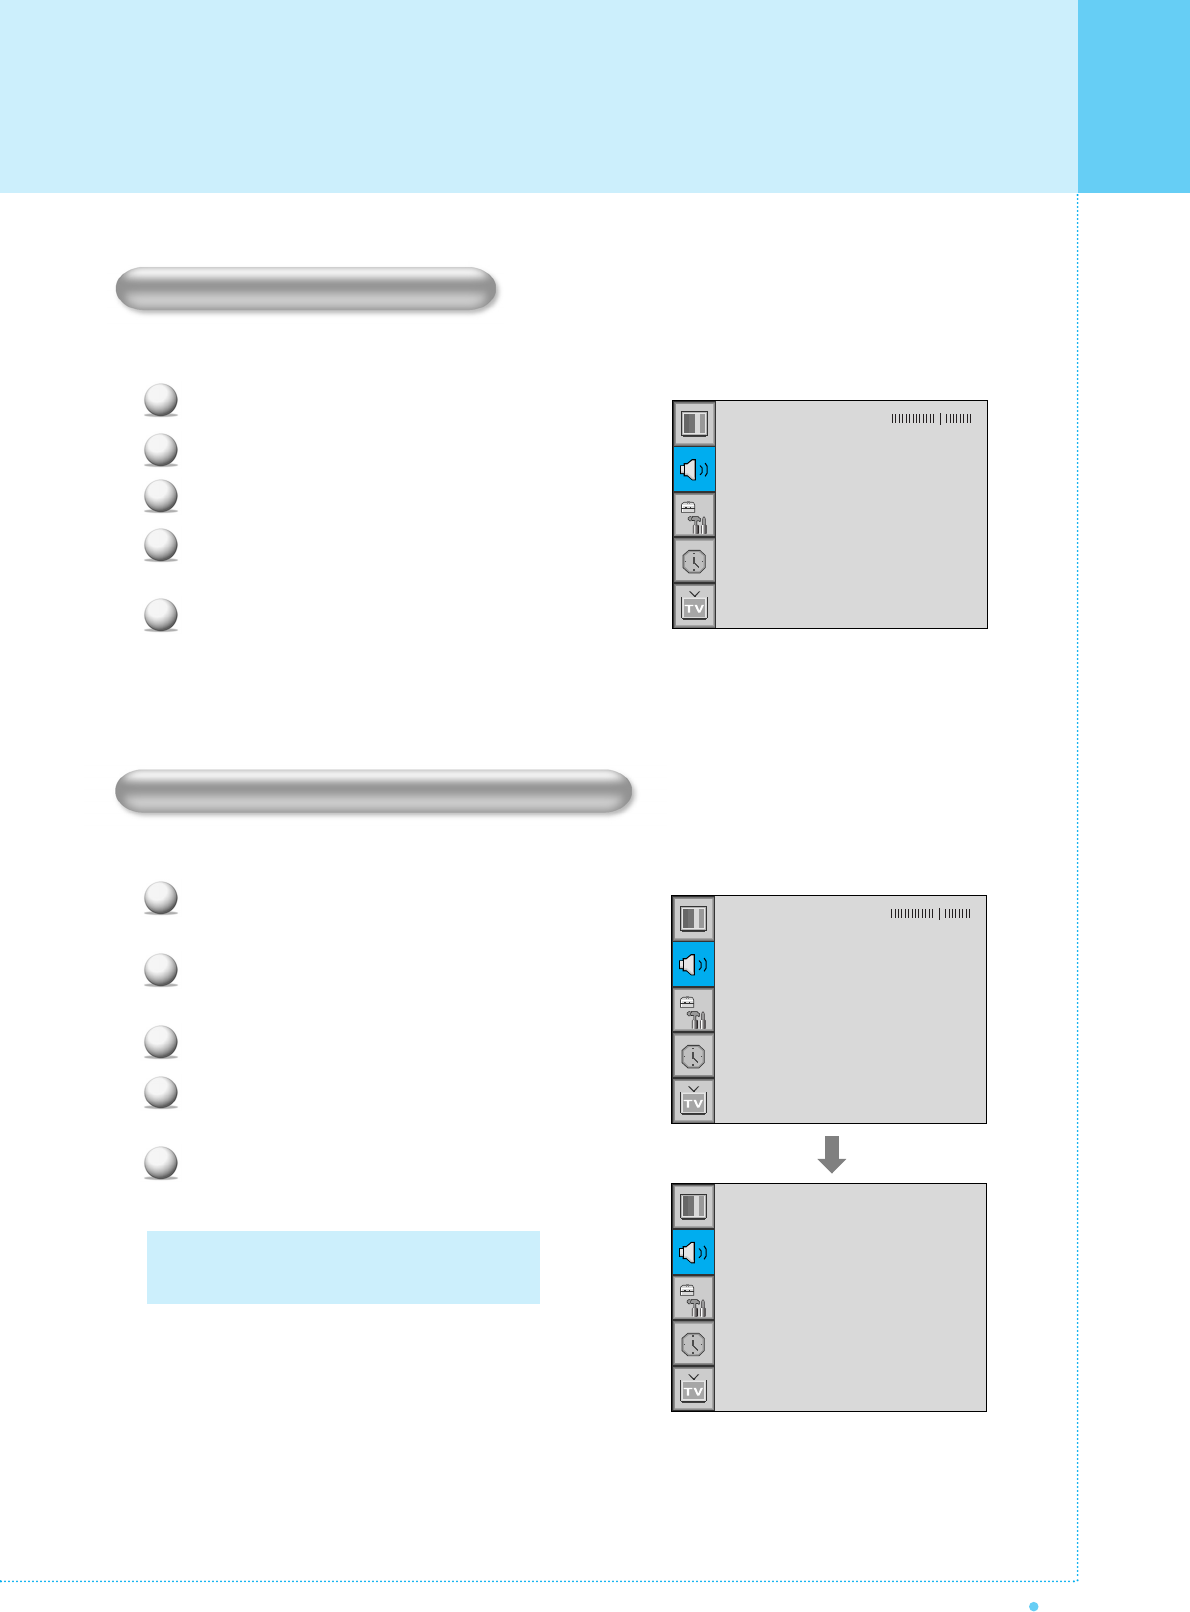
Your the Monitor has four automatic sound settings ("Standard", "Movie", "Music" and "News") that are preset
at the factory. You can activate either Standard, Movie, Music or News by pressing "SOUND" on the remote
control (or by making a selection from the menu) or you can select "Custom" which automatically recalls your
personalized sound settings.
Press Menu/set button to display the main OSD menu.
Select the SOUND main menu.
Press Menu/Set button to enter the sub menu.
Select Sound Mode and press Menu/Set to enter
the sub menu. Then the Mode sub menu appear.
Select the Equalizer setting and press Menu/Set
button.
You will see the Equalizer bars. Just press BACK
button on the remote control. You can adjust each
values of Equalizer, but the changed values are
stored as in USER mode.
1
2
3
4
5
6
0.1 0.5 1.5 5.0 10.0kHz
USER mode require more settings.
It has sub menu: See next page.
Equalizer
Balance
Sound Mode
Spatial effect
AVC
MTS
User
¥OFF
¥OFF
Stereo
Standard
Movie
Music
News
User
In SOUND Menu, you can adjust balance, MTS ( Multi-Track Sound), AVC (Auto Volume Control) and select
the equalizer settings.
This control allows you to adjust the balance of the left and right speaker output.
Press Menu/set button to display the main OSD menu.
Select the SOUND main menu.
Press Menu/Set to enter the sub menu.
Select Balance and press Menu/Set button.
Adjust the balance with VOL-, VOL+ button and
press Menu/Set button.
1
2
3
4
5
Balance
Sound Mode
Spatial effect
AVC
MTS
User
¥OFF
¥OFF
Stereo
Balance
Sound Mode
Setting the Sound

Setting the Sound
38 OWNER'S MANUAL
You can use the OSD menu to change the Treble, Bass, Balance and DRC according to your preference.
Equalizer menu appear when you select USER mode.
Select a gain bar with VOL+, VOL- button on the
remote control and adjust it with CH+/CH- button.
Press BACK or BACK button on the remote control to
exit Equalizer. The result will be saved automatically.
This function can create surround effect such as the sound seems to come from all directions.
Press Menu/set button to display the main OSD menu.
Select the SOUND main menu item with CH+/CH- button.
Press Menu/Set to enter the sub menu.
Select Spatial effect and press VOL+ button.
Turn on or off Spatial effect function with CH+/CH-
button and press Menu/Set button.
1
2
3
4
5
Balance
Sound Mode
Spatial effect
AVC
MTS
User
¥OFF
¥OFF
Stereo
Spatial Effect
1
2
3
Select USER mode (Previous page)
0.1 0.5 1.5 5.0 10.0kHz
Equalizer
User Adjust
39
OWNER'S MANUAL
This function adjust sound volume level automatically depending on the source.
Press Menu/set button to display the main OSD menu.
Select the SOUND main menu.
Press Menu/Set to enter the sub menu.
Select AVC and press VOL+ button to enter the ¥ parts.
Then the cursor moves into the ¥ parts.
Turn on or off AVC function with CH+/CH- button and
press BACK button.
Select sound signal format from the input source. There are Mono, Stereo, SAP sound formats.
Press Menu/set button to display the main OSD
menu.
Select the SOUND main menu with CH+/CH-
button on the remote control.
Press Menu/Set to enter the sub menu.
Select MTS and press Menu/Set to enter the
sub menu. Then the MTS sub menu appear.
Select the MTS format with CH+/CH- and
press Menu/Set button.
1
2
3
4
5
The available sound formats are displayed.
Usually, you can see Mono and Stereo.
Balance
Sound Mode
Spatial effect
AVC
MTS
User
¥OFF
¥OFF
Stereo
Mono
Stereo
SAP
MTS (Multichannel Television Sound)
1
2
3
4
5
Balance
Sound Mode
Spatial effect
AVC
MTS
User
¥OFF
¥OFF
Stereo
AVC(Auto Volume Control)
Setting the Sound
Setting the Others
40 OWNER'S MANUAL
Adjust the transparency of the OSD menu. There are 8 step from OFF to 7.
Press Menu/set button to display the main OSD menu.
Select the SET UP main menu with CH+/CH-
button on the remote control.
Press Menu/Set to enter the sub menu.
Select Translucent and press VOL+ button to enter the
¥ parts. Then the cursor moves into the ¥ parts.
Adjust with CH+/CH- button and press EXIT button.
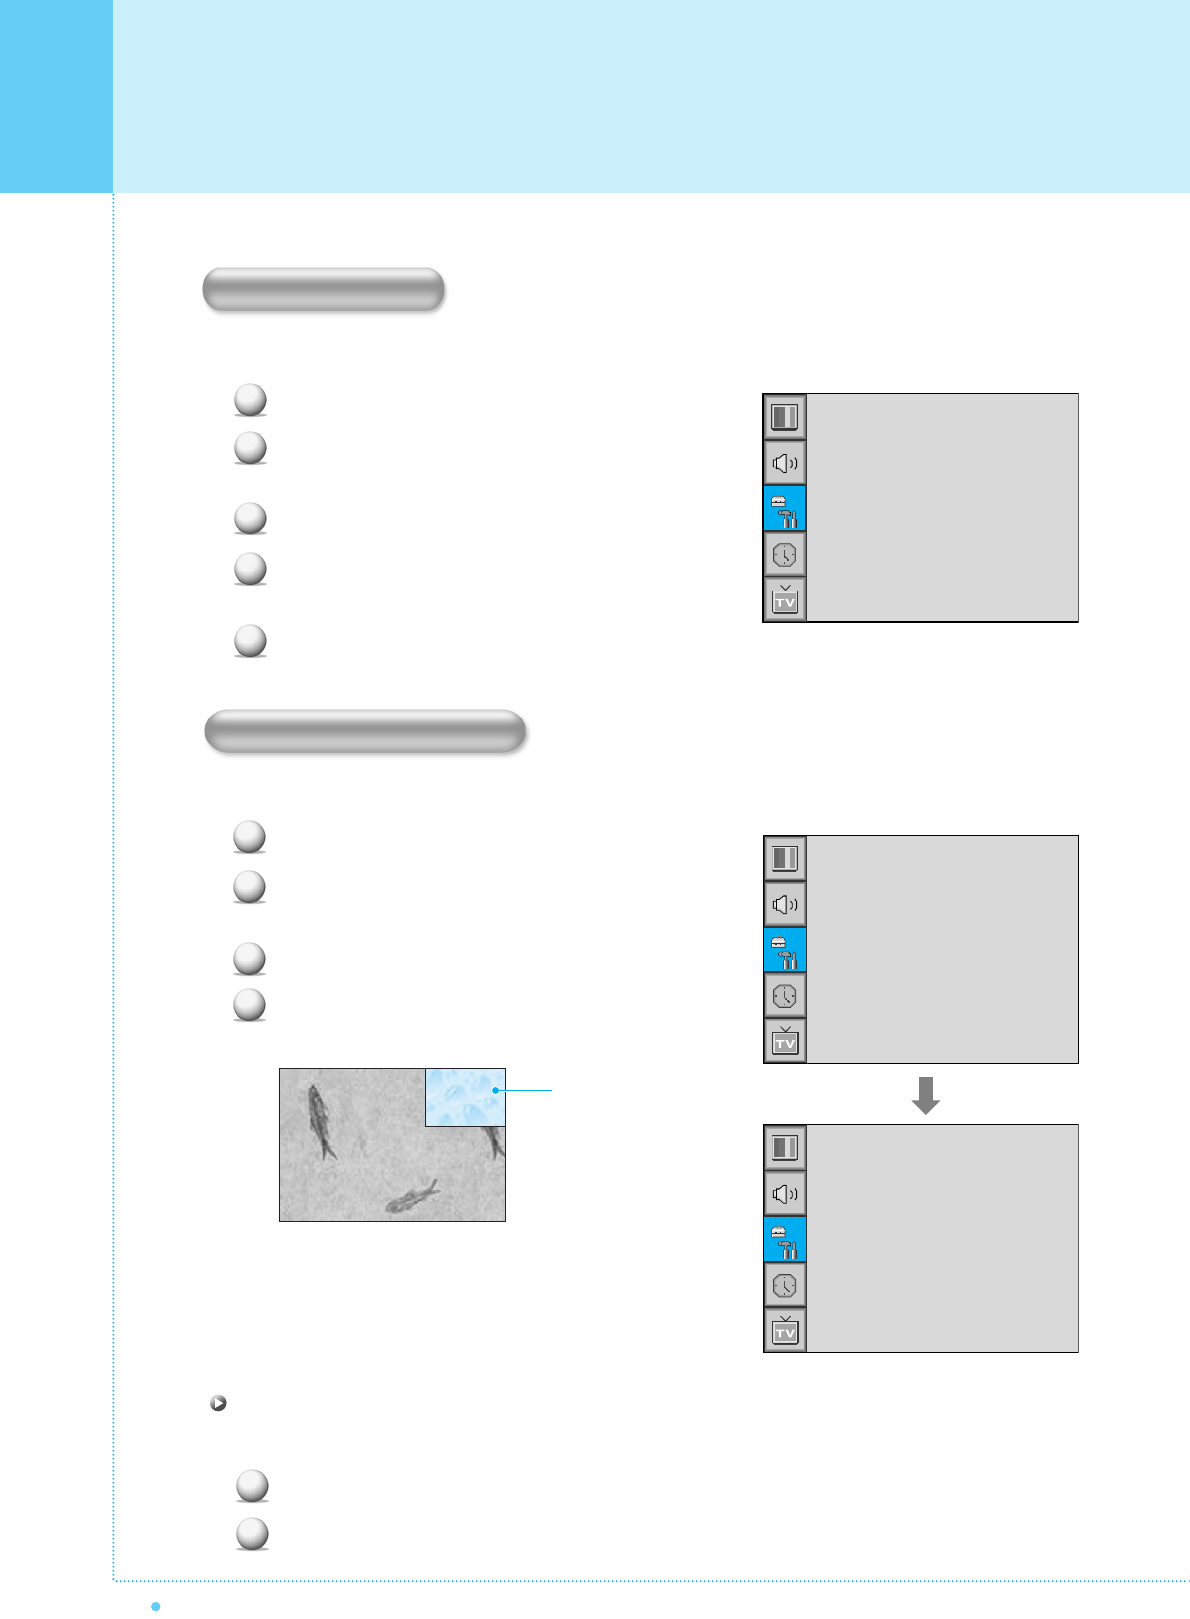
You can watch two channels or sources at the same time. And set up PIP size and position.
Press Menu/set button to display the main OSD menu.
Select the SET UP main menu with CH+/CH- button
on the remote control.
Press Menu/Set to enter the sub menu.
Select PIP and press Menu/Set to enter the sub menu.
Then the PIP sub menu appear.
1
2
3
4
PIP Window
Trucelant
PIP
V-Chip
Caption
Advanced
¥OFF
¥OFF
Size
Source
Picture Swap
Position
¥SMALL
PIP (Picture In Picture)
1
2
3
4
5
Trucelant
PIP
V-Chip
Caption
Advanced
¥OFF
¥OFF
Translucent
Size in PIP (Picture In Picture )
Change the size of the PIP window. There are 3 sizes: SMALL, Large, Twin.
Select Size and press VOL+ button to enter the ¥parts. Then the cursor moves into the ¥parts.
Adjust size function with CH+/CH- button and press Menu/Set button.
1
2
41
OWNER'S MANUAL
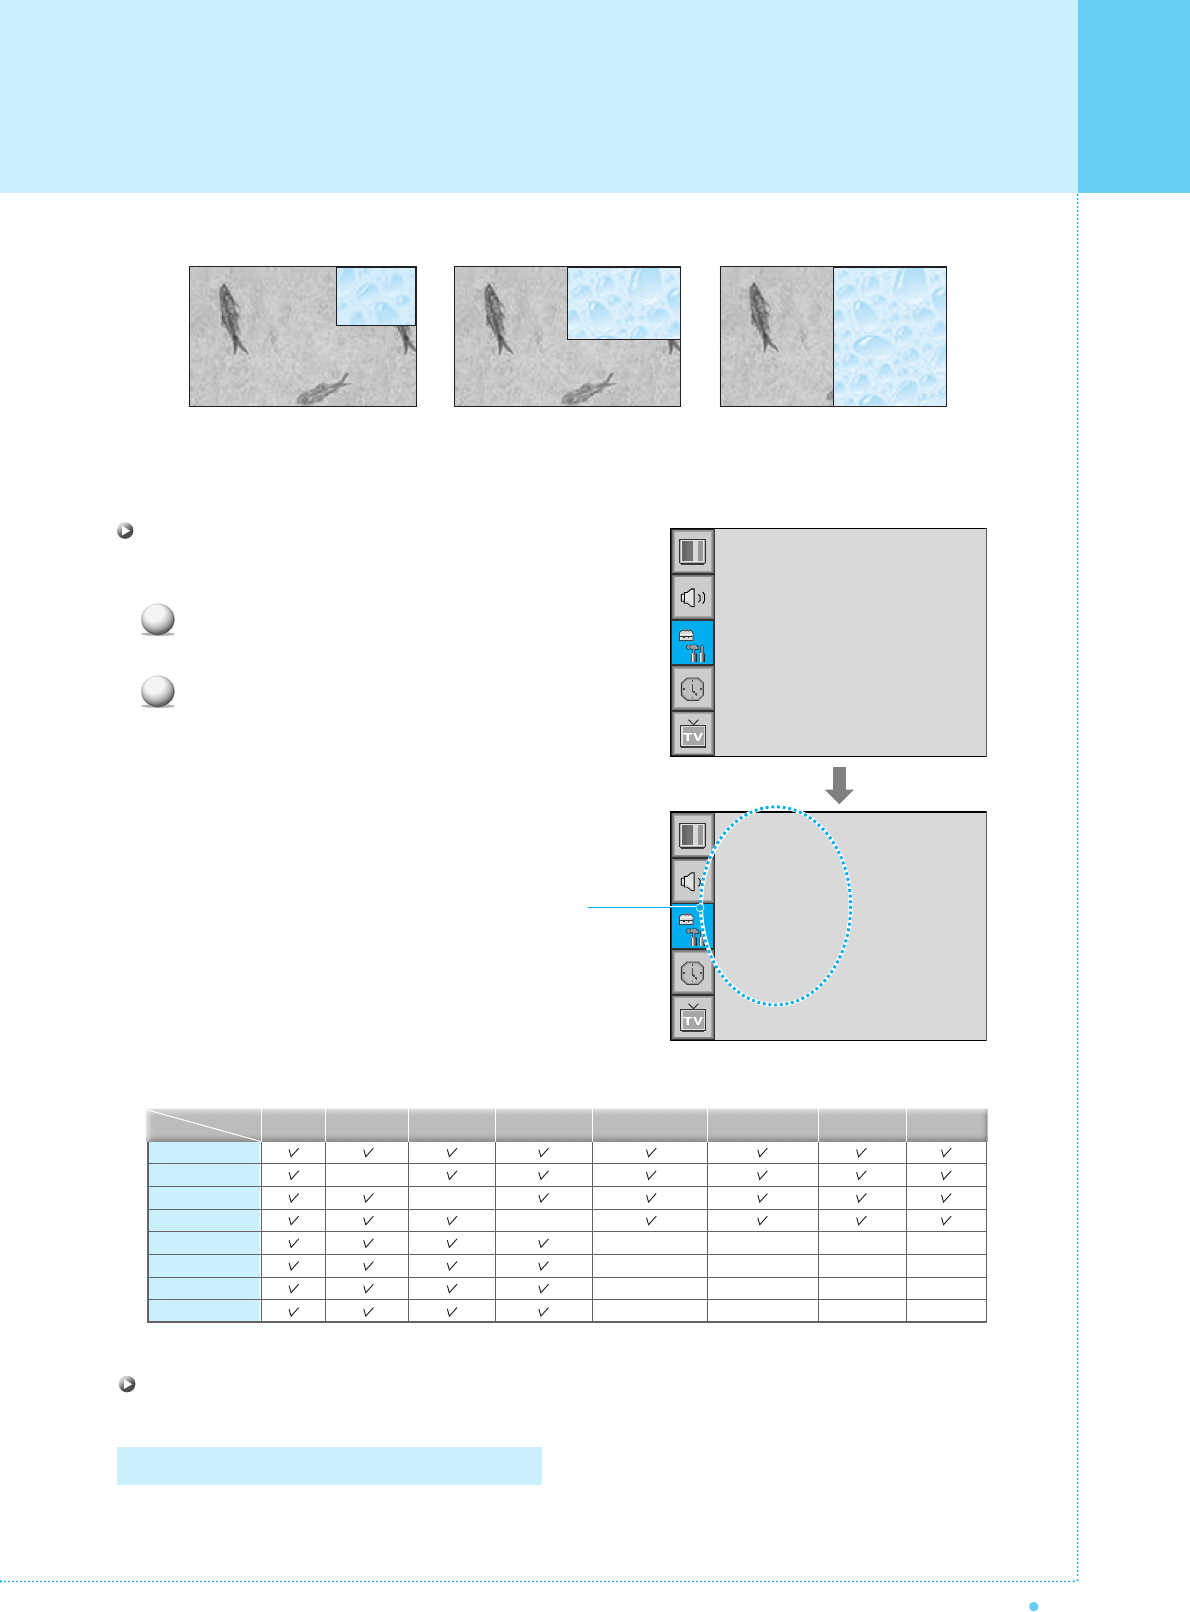
SMALL LARGE TWIN
Source in PIP
Change the source of the PIP window.
Select Source and press Menu/Set to enter the
sub menu. Then the PIP sub menu appear.
The available sources will be displayed.
Select the source and press Menu/Set button.
Size
Source
Picture Swap
Position
¥SMALL
TV
AV 1
AV 2
S-VIDEO/AV 3
1
2
This picture is an example.
The displayed sources may be
different depending on the
main input source.
TV
AV 1
AV 2
S-Video/AV 3
Component1
Component2
PC
DVI
–
–
–
–
–
–
–
–
–
–
PIP Main TV AV 1
–
AV 2
S-Video/AV 3
Component1 Component2 PC DVI
Select Picture Swap and press Menu/Set button.
Picture Swap in PIP (Picture In Picture)
Swap the sources of the main screen and the PIP window.
Setting the Others
–
–
–
–
–
–
–
–
Setting the Others
42 OWNER'S MANUAL
Position in PIP
Change the position of the PIP window.
Select Position with CH+/CH- button on the remote
control and press Menu/Set to enter the sub menu.
Then the PIP sub menu appear.
In Sub Menu, there are four positions.
Select the position with CH+/CH- button on the
remote control and press BACK button.
You can se up ID, Blue Back, Language and Front Key Lock in Advanced Menu.
Press Menu/set button to display the main OSD menu.
Select the SET UP main menu with CH+ / CH-
button on the remote control.
Press Menu/Set to enter the sub menu.
Select Advanced and press Menu/Set to enter
the Advanced menu.
Then the Advanced sub menu appear.
1
2
Size
Source
Picture Swap
Position
¥SMALL
Right Down
Right Up
Left Up
Left Down
1
2
3
4
Trucelant
PIP
V-Chip
Caption
Advanced
¥OFF
¥OFF
Set ID
Blue Back
Language
Front Key Lock
¥99
¥OFF
¥ENGLISH
¥OFF
Advanced

43
OWNER'S MANUAL
Set ID in Advanced
Set the ID of the Monitor for mass-controlling through the serial port.
Select Set ID and press VOL+ button to enter the
¥ part. Then the cursor moves into the ¥ part.
Adjust with CH+ / CH- button and press BACK button.
Blue Back in Advanced
You can set to display blue-color screen instead of noise screen.
Select Blue Back and press VOL+ button to enter
the ¥ parts. Then the cursor moves into the
¥ parts.
Turn the function on or off with CH+/CH- button
and press BACK button.
Language in Advanced
Set the language to use in OSD.
Supported languages are English, French, German, Spanish, Italian.
Select Language and press VOL+ button to enter
the ¥ parts. Then the cursor moves into
the ¥ parts.
Choose the Language with CH+ / CH- button and
press BACK button.
Front Key Lock in Advanced
Lock the OSD panel of the Monitor. It can protect the Monitor from children's power on/off or other
operation by miss.
Select Front Key Lock and press VOL+ button to enter
the ¥ parts. Then the cursor moves into the
¥ parts.
Turn the function on or off with CH+/CH- button
and press BACK button.
1
2
Set ID
Blue Back
Language
Front Key Lock
¥99
¥OFF
¥ENGLISH
¥OFF
1
2
Set ID
Blue Back
Language
Front Key Lock
¥99
¥OFF
¥ENGLISH
¥OFF
1
2
Set ID
Blue Back
Language
Front Key Lock
¥99
¥OFF
¥ENGLISH
¥OFF
1
2
Set ID
Blue Back
Language
Front Key Lock
¥99
¥OFF
¥ENGLISH
¥OFF
Setting the Others
Setting the Others
44 OWNER'S MANUAL
Parental restrictions can be set up using either of two methods: The TV guidelines or the MPAA rating.
Press Menu/set button to display the main OSD menu.
Select the SET UP main menu with CH+/CH-
button on the remote control.
Press Menu/Set to enter the sub menu.
After enter the password, the V-Chip sub menu appear.
1
2
3
4
•The factory default number is 0000 and the master button number is 9673.
Trucelant
PIP
V-Chip
Caption
Advanced
¥OFF
¥OFF
TV Blocking
Movie Blocking
Change Password
V-Chip Bocking
¥OFF
Pass Word
____
V-Chip (TV Parental Guidelines
45
OWNER'S MANUAL
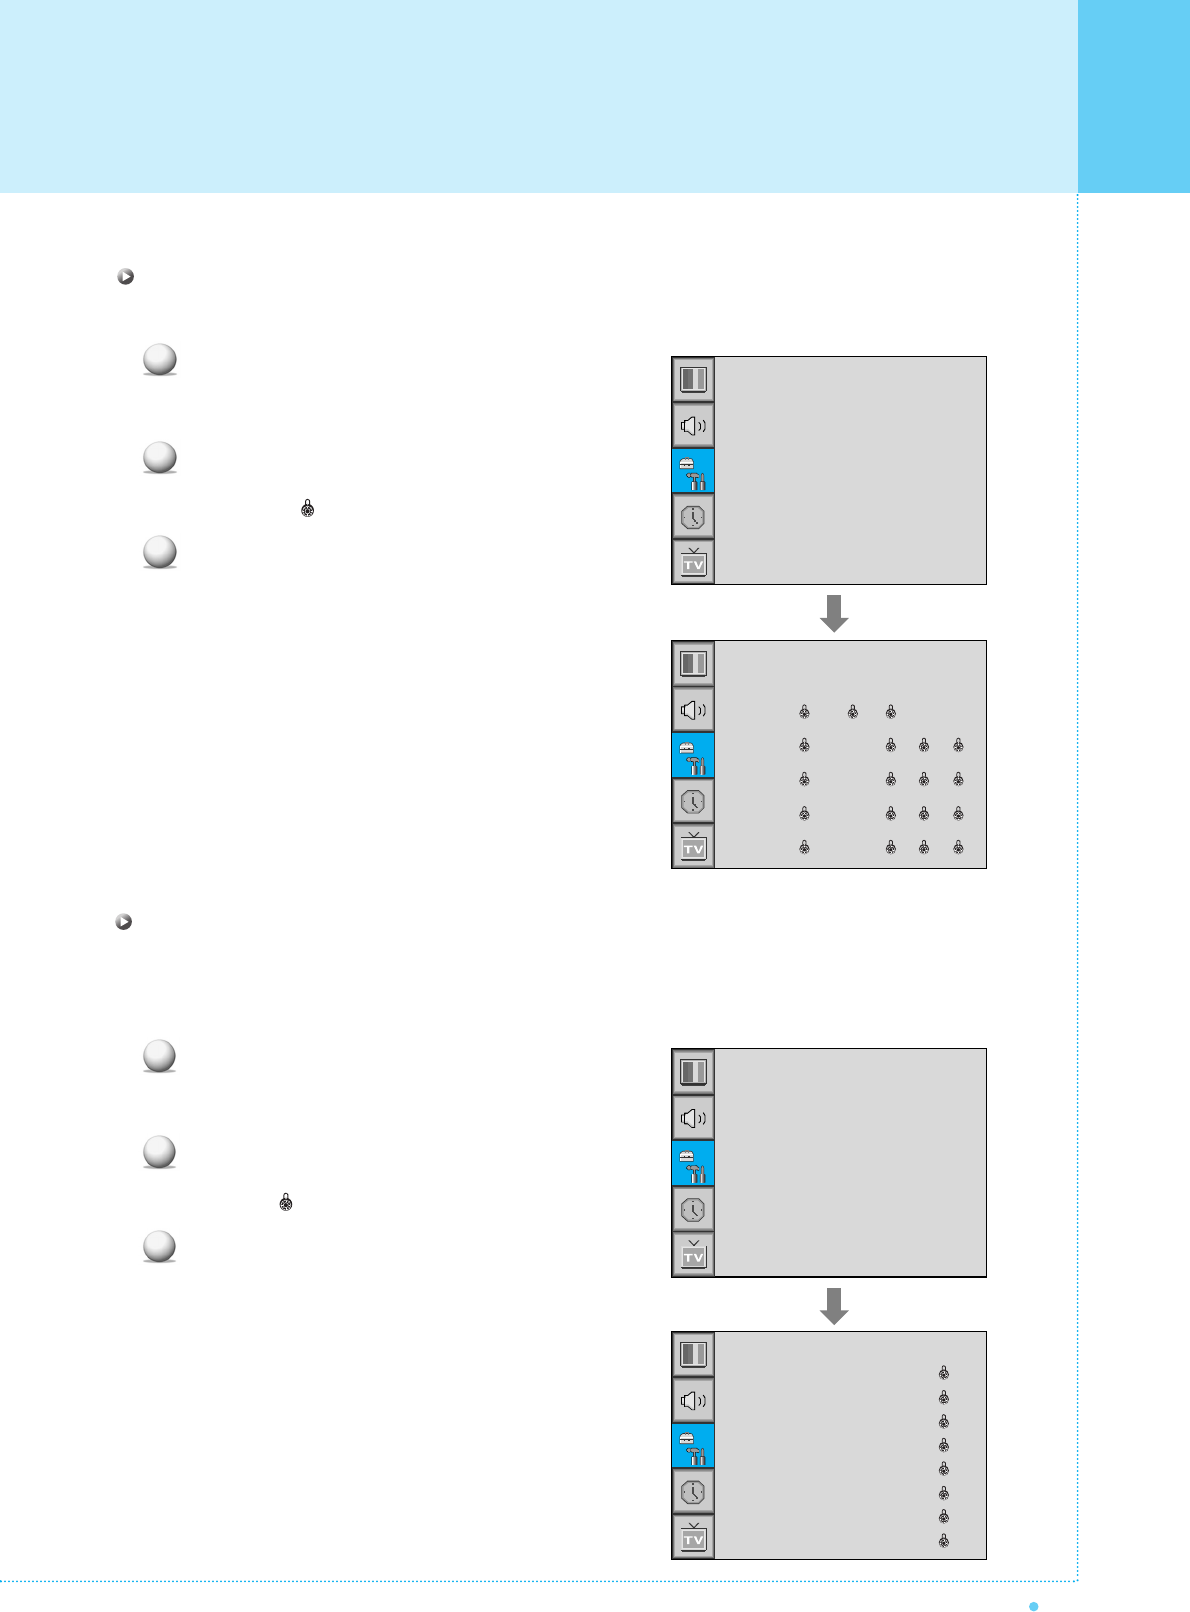
TV Blocking in V-Chip
You can set up Restrictions Using the "TV Parental Guidelines" of FCC.
Select TV Blocking with CH+/CH- button on the
remote control and press Menu/Set to enter the
sub menu. Then the TV Blocking sub menu appear.
You can independently lock the TV ratings.
The locked TV (FCC) ratings are indicated
by the symbol .
Press CH+/CH-/VOL+/VOL- buttons and the
Menu/Set button to activate the appropriate
restrictions for TV (FCC) rating system.
Note: These categories consist of two separate groups:
TV-Y and TV-Y7 (young children through age 7),
and TV-G through TV-MA (everybody else).
The restrictions for these two groups work
independently: If a household includes very
young children as well as young adults, the
TV guidelines must be set up separately for
each age group.
1
2
3
TV Blocking
Movie Blocking
Change Password
V-Chip Bocking
¥OFF
TV-Y
TV-Y7
TV-G
TV-PG
TV-14
TV-MA
Block FV D L S
Movie Blocking in V-Chip
The Movie Blocking uses the Motion Picture Association of America (MPAA) system, and its main application
is for movies. When the Rating Controls is on, the TV will automatically block any programs that are coded
with objectionable ratings (either MPAA or TV-Ratings).
Select Movie Blocking with CH+/CH- button on the
remote control and press Menu/Set to enter the sub
menu. Then the Movie Blocking sub menu appear.
You can independently lock the TV ratings.
The locked Movie (FCC) ratings are indicated by
the symbol .
Press CH+/CH- buttons and the Menu/Set button
to activate the appropriate restrictions for MPAA
rating system.
1
2
3
TV Blocking
Movie Blocking
Change Password
V-Chip Blocking
¥OFF
MPAA-G
MPAA-PG
MPAA-PG-B
MPAA-R
MPAA-R
MPAA-NC
MPAA-X
MOZZ-NR
Block
Setting the Others
Setting the Others
46 OWNER'S MANUAL
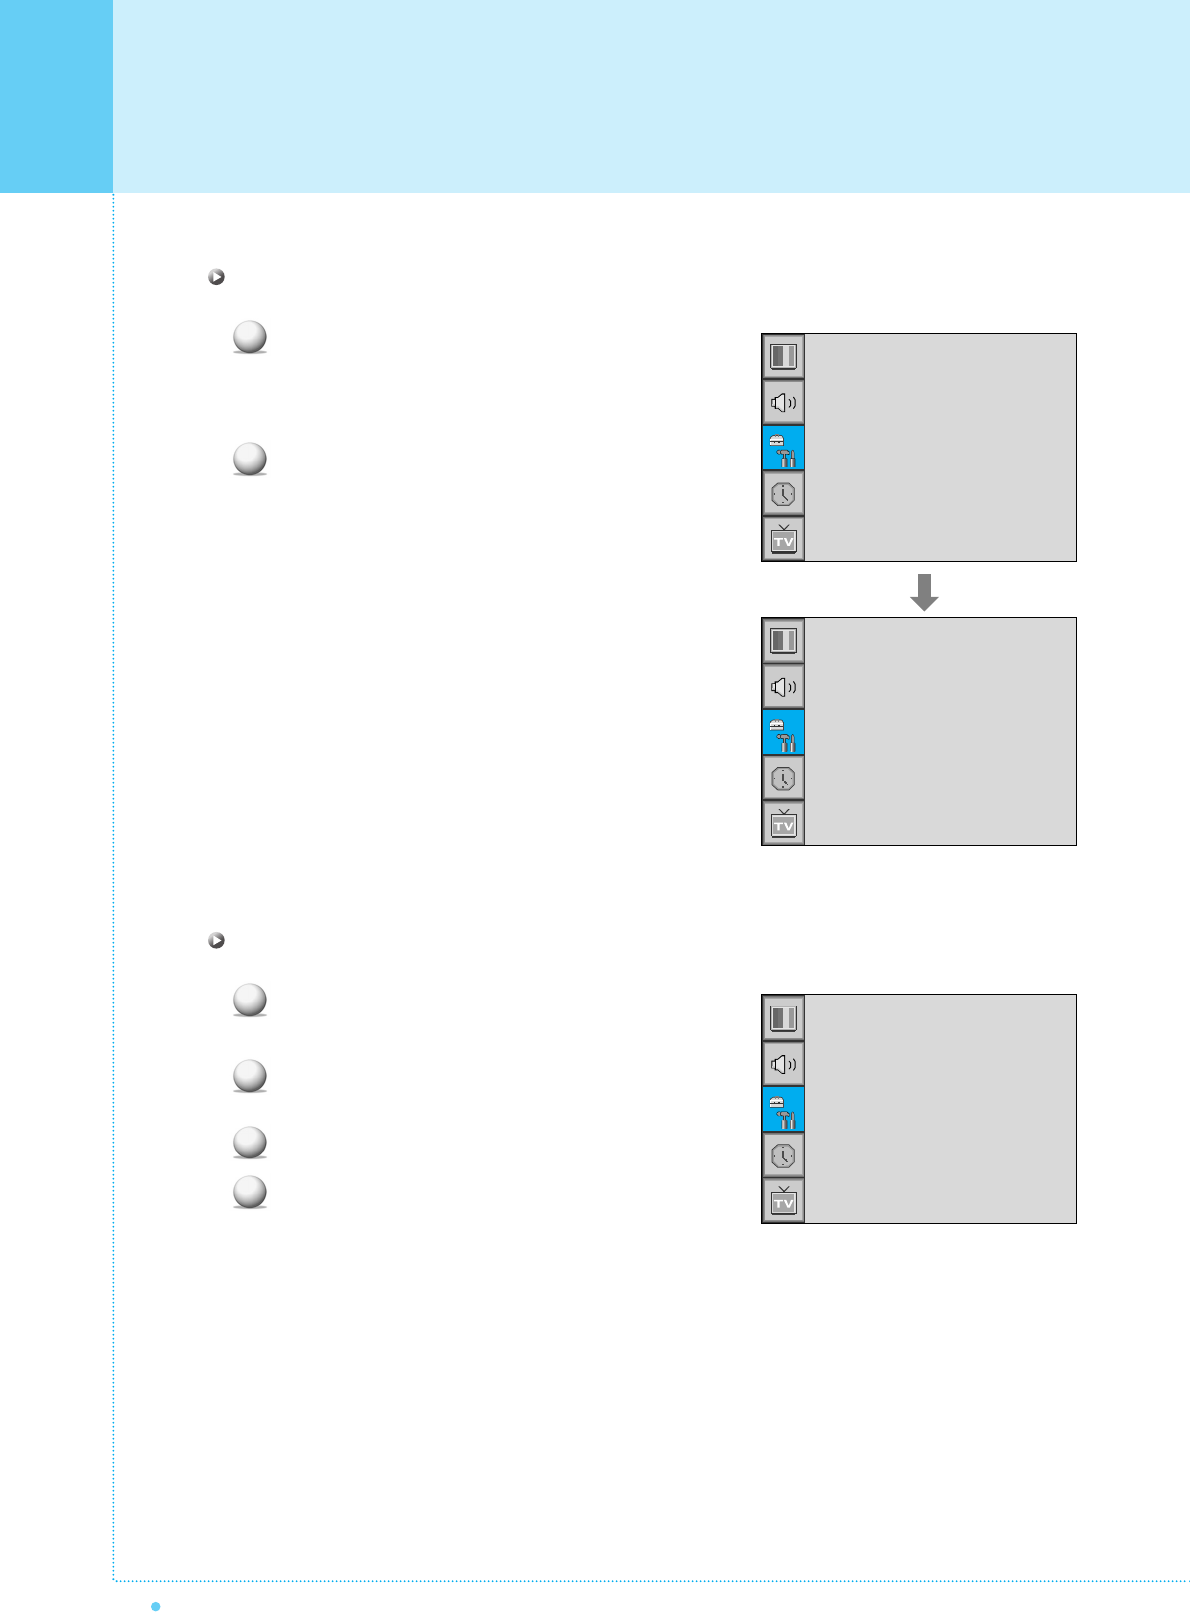
Change Password in V-Chip
Select Change Password with CH+/CH- button
on the remote control and press Menu/Set to enter
the sub menu. Then the Pass Word change sub
menu appear.
Enter the new password with numeric buttons on
the remote control.
V-Chip Blocking in V-Chip
Select V-Chip Blocking with CH+/CH- buttons
on the remote control.
Enter to the ¥ part by pressing VOL+ button.
Then the cursor moves into the ¥ parts.
ON / OFF the V-Chip Blocking with CH+/CH- buttons.
Exit with Back button on the remote control.
1
2
1
2
3
4
TV Blocking
Movie Blocking
Change Password
V-Chip Blocking
¥OFF
TV Blocking
Movie Blocking
Change Password
V-Chip Bocking
¥OFF
Pass Word
____
47
OWNER'S MANUAL
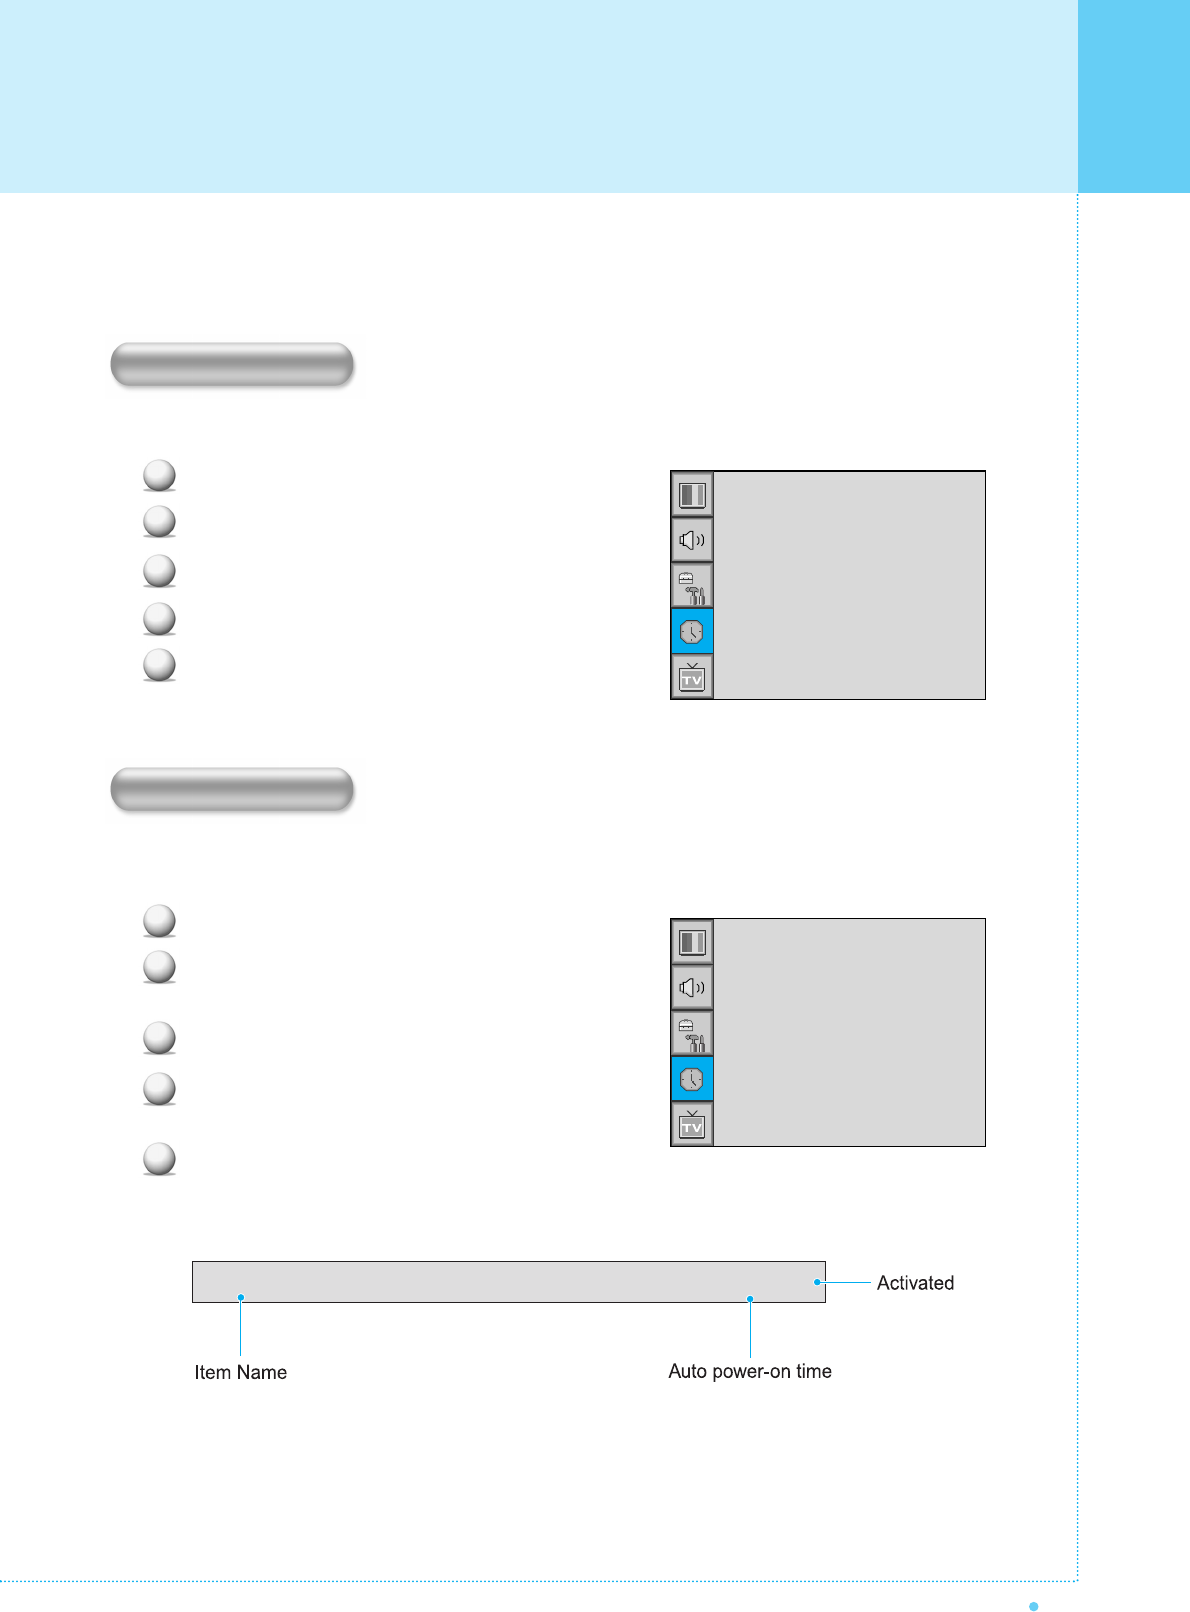
In the TIME menu, you can set the current time and auto power on / off.
Set the current time.
Press Menu/set button to display the main OSD menu.
Select the TIME main menu.
Press Menu/Set to enter the sub menu.
Select Time Set by pressing VOL+ button.
Move the cursor by pressing VOL-, VOL+ button
and adjust time by CH+, CH- button.
This the Monitor can be set to turn on automatically at specific time that you choose.
Before using the timer, you must set the Monitor's Time as described previously.
Press Menu/set button to display the main OSD menu.
Select the TIME main menu with CH+/CH- button
on the remote control.
Press Menu/Set to enter the sub menu.
Select On Time with CH+/CH- button and press
VOL+ button.
Move the cursor by VOL-, VOL+ button and adjust
time by CH+, CH- button.
1
2
3
4
5
1
2
3
4
5
On Time AM 05:11 ON
Time Set
On Time
On Channel
On Volume
Off Time
Sleep
AM 03:29
AM 05:11 ON
¥99
¥100
AM 05:11 OFF
¥OFF
Time Set
On Time
On Channel
On Volume
Off Time
Sleep
AM 03:29
AM 05:11 ON
¥99
¥100
AM 05:11 OFF
¥OFF
Time Set
On Time
Setting the Time
Setting the Time
48 OWNER'S MANUAL
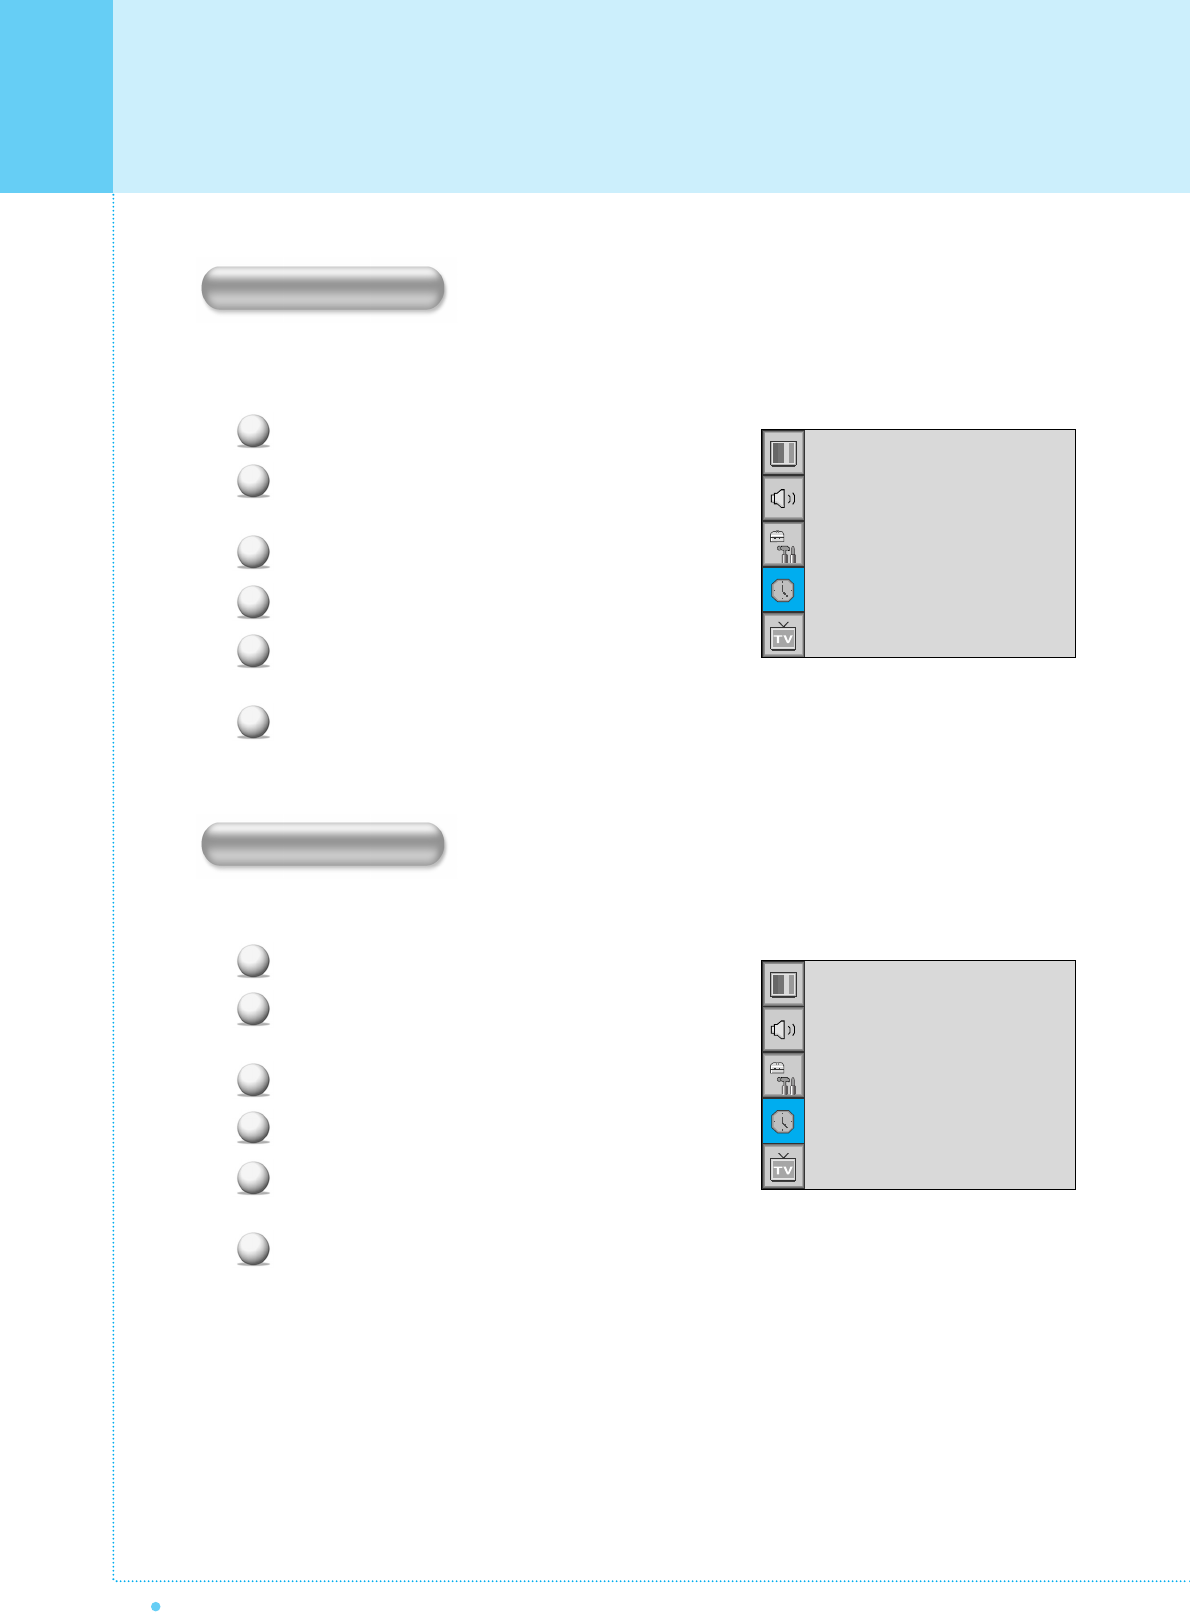
Set the channel when the Monitor power turn on automatically.
• Available only when the Time is set and On Time is ON.
Press Menu/set button to display the main OSD menu.
Select the TIME main menu with CH+/CH- button
on the remote control.
Press Menu/Set to enter the sub menu.
Select On Channel.
Enter to the ¥ part with VOL+ button. Then the
cursor moves into the ¥ parts.
Adjust the channel with CH+/CH- button.
Press BACK button to return.
• Available only when the Time is set and On Time is ON.
Press Menu/set button to display the main OSD menu.
Select the TIME main menu with CH+/CH- button
on the remote control.
Press Menu/Set to enter the sub menu.
Select On Volume.
Enter to the ¥ part by pressing VOL+ button.
Then the cursor moves into the ¥ parts.
Adjust the sound volume level with CH+/CH- button.
1
2
3
4
5
6
1
2
3
4
5
6
Time Set
On Time
On Channel
On Volume
Off Time
Sleep
AM 03:29
AM 05:11 ON
¥99
¥100
AM 05:11 OFF
¥OFF
Time Set
On Time
On Channel
On Volume
Off Time
Sleep
AM 03:29
AM 05:11 ON
¥99
¥100
AM 05:11 OFF
¥OFF
On Channel
On Volume
49
OWNER'S MANUAL
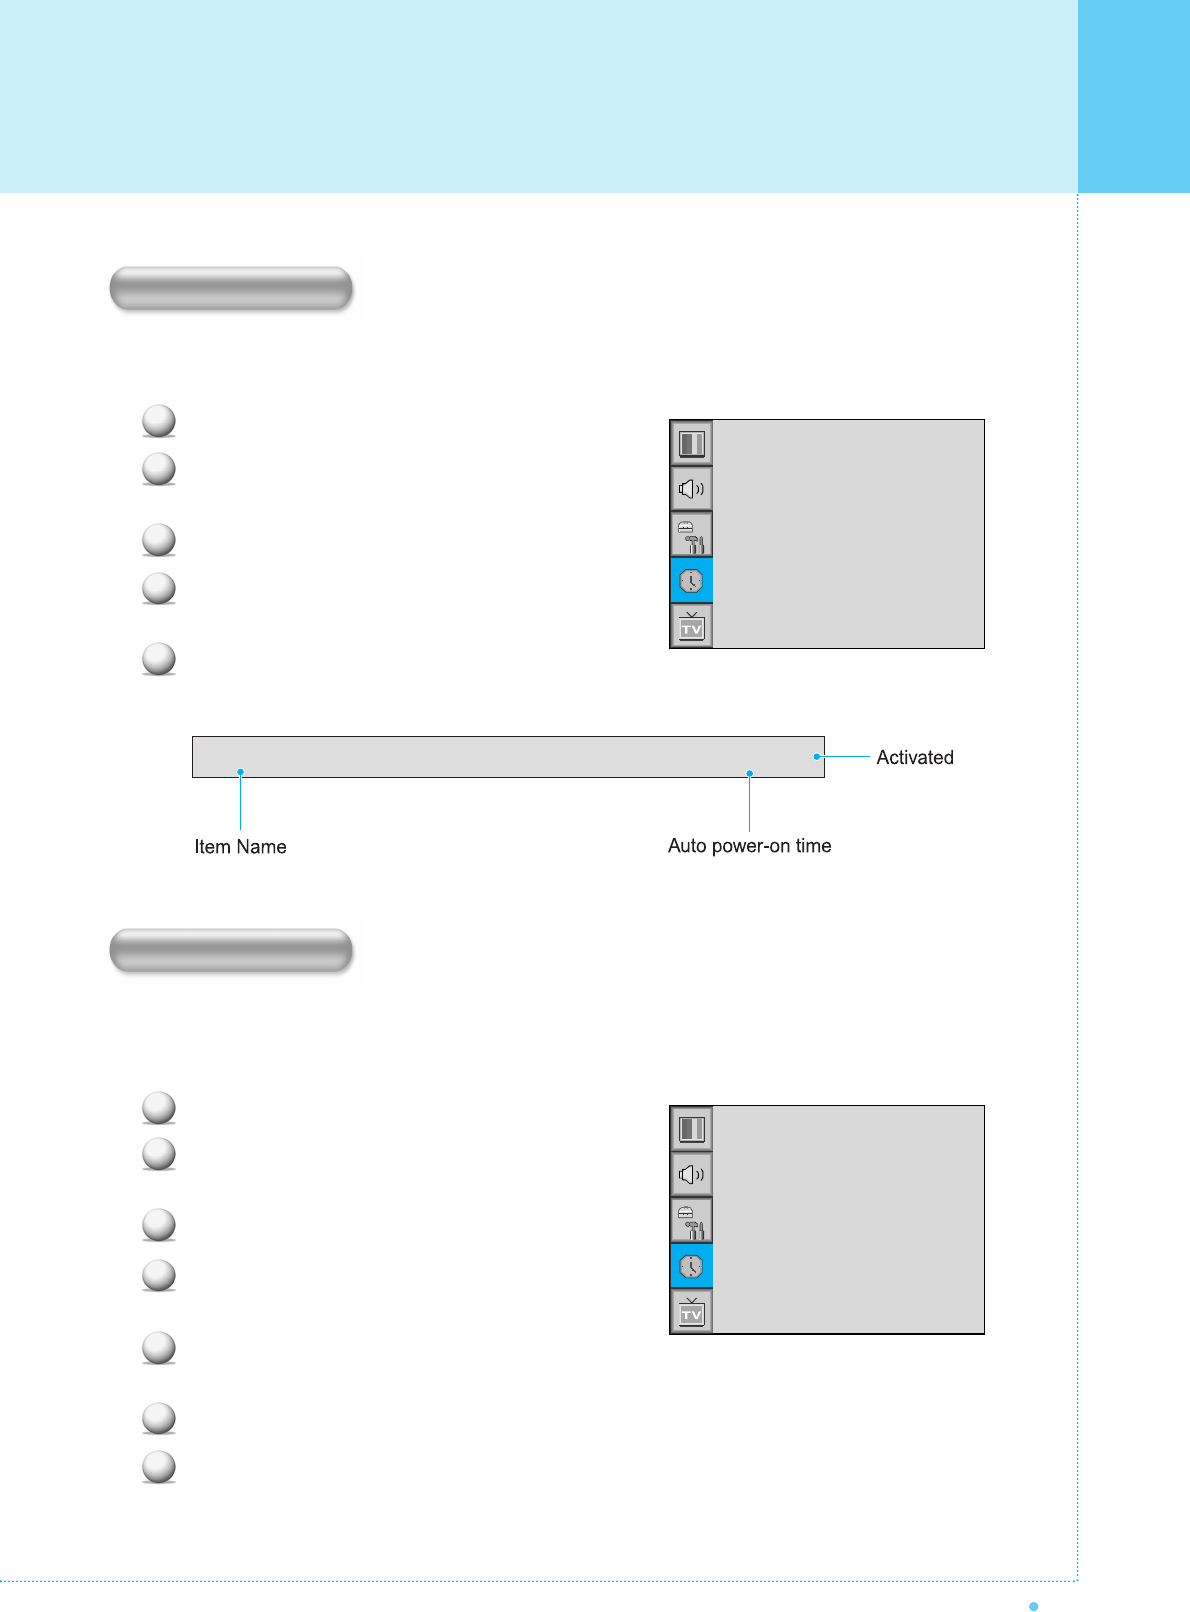
This the Monitor can be set to turn off automatically at specific times that you choose.
Before using the timer, you must set the Monitor's clock as described previously.
Press Menu/set button to display the main OSD menu.
Select the TIME main menu with CH+/CH- button
on the remote control.
Press Menu/Set to enter the sub menu.
Select Off Time with CH+/CH- button on the
remote control and press VOL+ button.
Move the cursor with VOL-/VOL+ button and
adjust time with CH+/CH- button.
You can set your the Monitor to automatically turn off after a preset interval.
If you turn off the Monitor in the state of setting up sleep time and turn on again, sleep time erased therefore
set up again. The time period runs from OFF(0min) to 180min. (OFF, 10min, 20, 30, 60, 90, 120, 150, 180)
Press Menu/set button to display the main OSD menu.
Select the TIME main menu. with CH+/CH- button
on the remote control.
Press Menu/Set to enter the sub menu.
Select Sleep with CH+/CH- button on the remote
control and press VOL+ button.
Enter to the ¥ part with VOL+ button.
Then the cursor moves into the ¥ parts.
Set the time period with CH+/CH- button.
Press BACK button to return.
1
2
3
4
5
1
2
3
4
5
6
7
Off Time AM 05:11 ON
Time Set
On Time
On Channel
On Volume
Off Time
Sleep
AM 03:29
AM 05:11 ON
¥99
¥100
AM 05:11 OFF
¥OFF
Time Set
On Time
On Channel
On Volume
Off Time
Sleep
AM 03:29
AM 05:11 ON
¥99
¥100
AM 05:11 OFF
¥OFF
Off Time
Sleep
Setting the Time
50 OWNER'S MANUAL
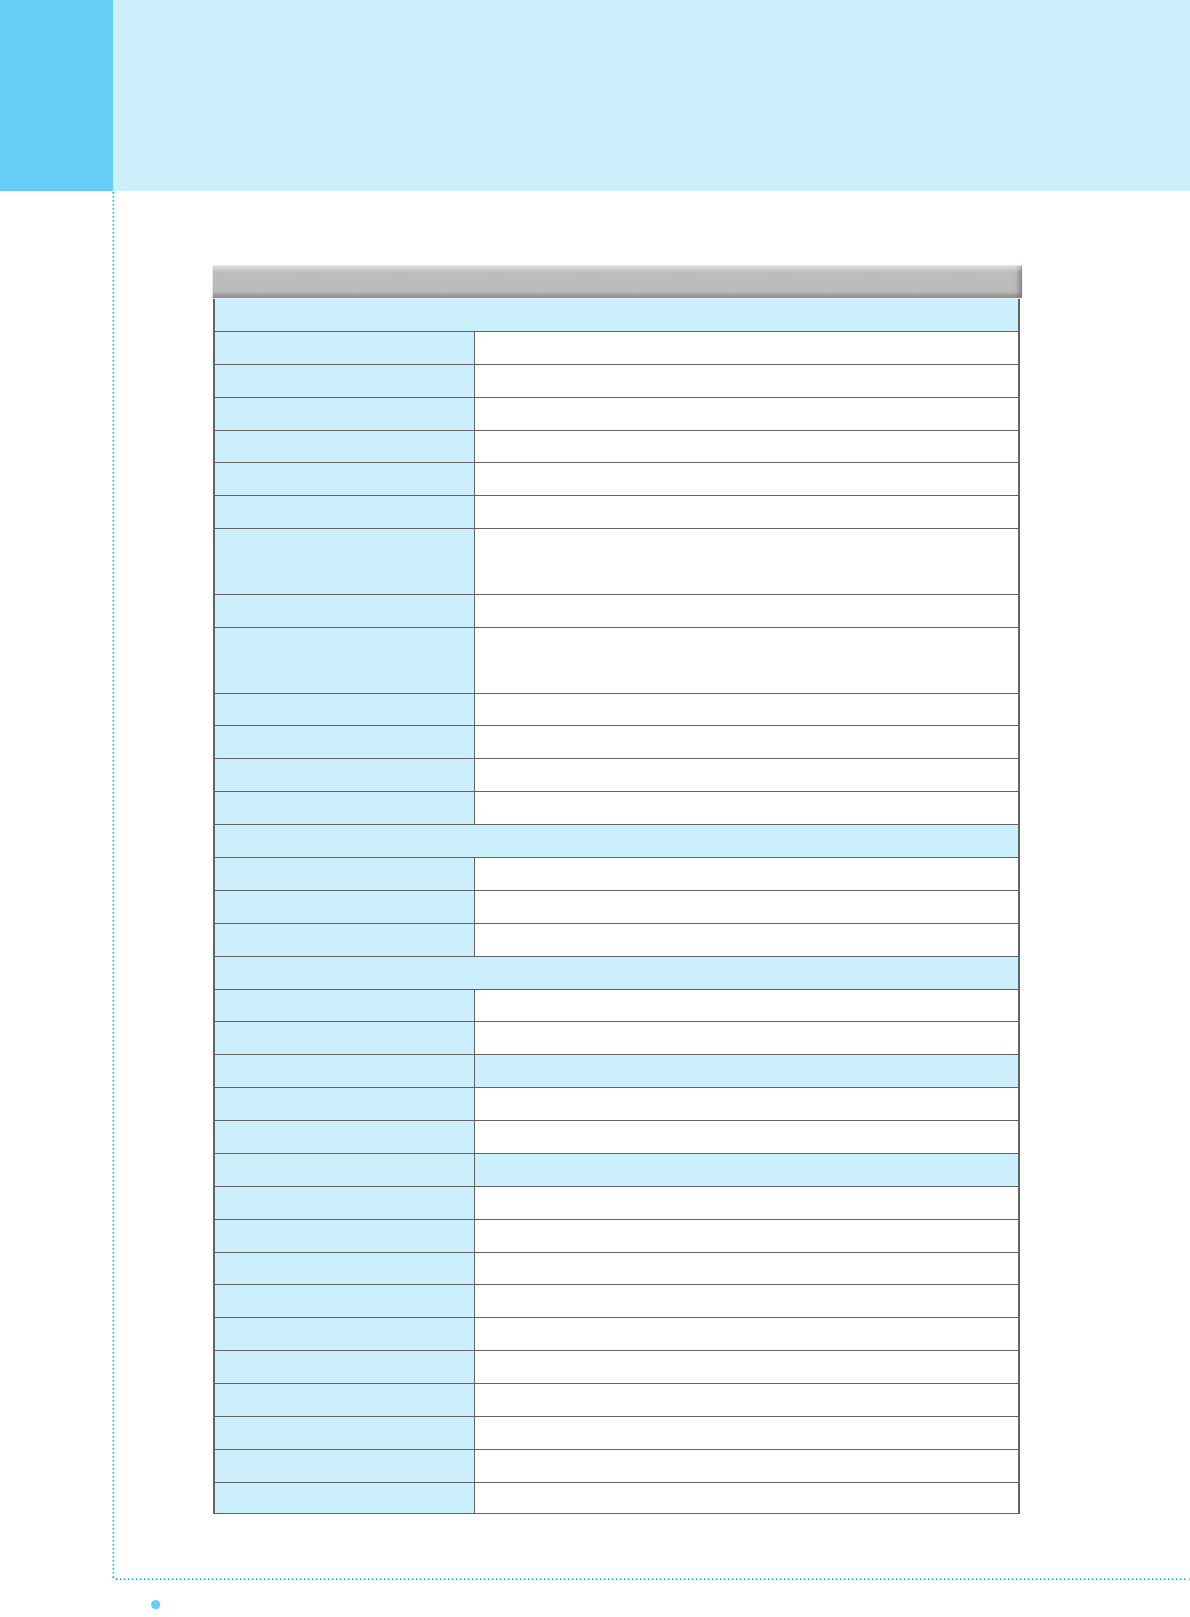
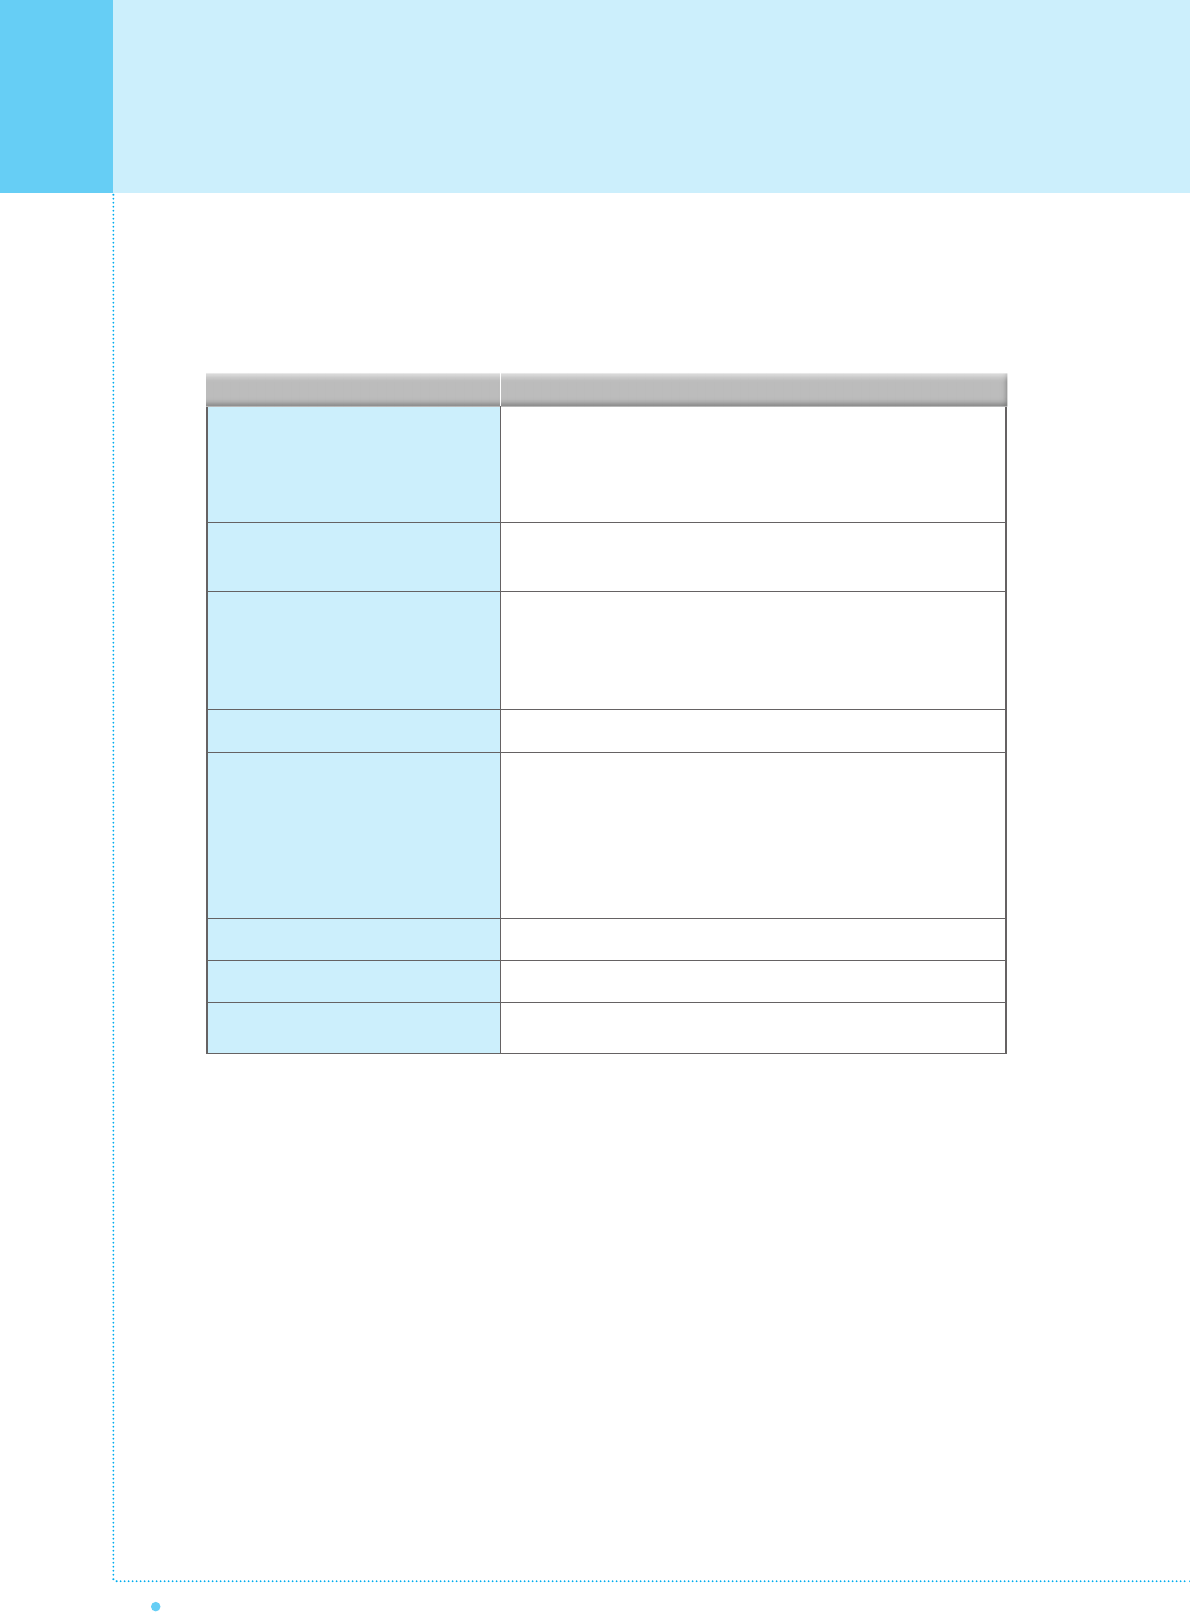
Specification
Display Size
Display Mode
Pixel Format
Contrast Ratio
Brightness
Resolution (RGB)
PIP
Input compatible
Video
Tuner Module
Programming
HDTV Input
Color temperature
Dimension / Weight
Main Only
With Stand
With Stand and Speaker
Miscellaneous
Audio
External Control
Power Consumption
Input Power
Power consumption
Connectivity
TV Input
Scat1,2 Input
Composite Input/Output
Component1,2 Input
S-Video Input
PC Input
DVI Input
Audio In/Output
Speaker Output
External Control Port
40-Inch 15 : 9 Diagonal
Variable 4 Modes (4:3 Mode / 16:9 X 3 Modes)
1028 X 768 Physical Pixel
600 : 1
450 cd/m
1280 X 768 / 50, 60Hz
Advanced multi-windows viewing PIP(picture in picture) with four
selectable window positions on Video mode.
Multiple input compatible
3D Comb filter, Advanced motion digital / Motion-Adaptive De-interlace
process, Digital progressiveline scaling.
TV / CATV (NTSC)
Favorite channel programming, Time Set, Set the Sleep timer.
480i/p(60Hz)/576i/p(60Hz)/720p(50,60Hz)/1080i(50,60Hz)
Selectable 6 Mode (Warm1,2, Normal, Cool1,2, User)
966(W) X 617(H) X 103(D) / 29 kg
966(W) X 666.3(H) X 299(D) / 30.8 kg
1166(W) X 675.1(H) X 305(D) / 34.8 kg
Built-in amplifier and two speaker(7Watt/Typ.) systems (optional)
Front OSD Key Control, Remote control, RS232C Control
AC 110 ~ 240V 50/60Hz
300 Watt
RF / CATV (NTSC)
RCA X 4Port (AV INPUT 1/2/3, AV OUTPUT)
RCA X 2Port (AV INPUT, AV OUTPUT)
RCA X 2Port (Y, Pb/Cb, Pr/Cr : 480i, 480p, 576i, 576p, 720p, 1080i)
Mini Din 4Pin X 1Port
Mini D-Sub 15Pin X 1Port / HDTV Input(480p, 576p, 720P, 1080i)
Mini D-Sub 29Pin X 1Port / HDTV Input(480p, 576p, 720p, 1080i)
RCA X 5Port
Cinch Type X 4Port(Stereo L/R), Head Phone Jack X 1Port(Optional)
Mini Din 9Pin X 1Port
Function and Specification
40" LCD TV Display Panel
2
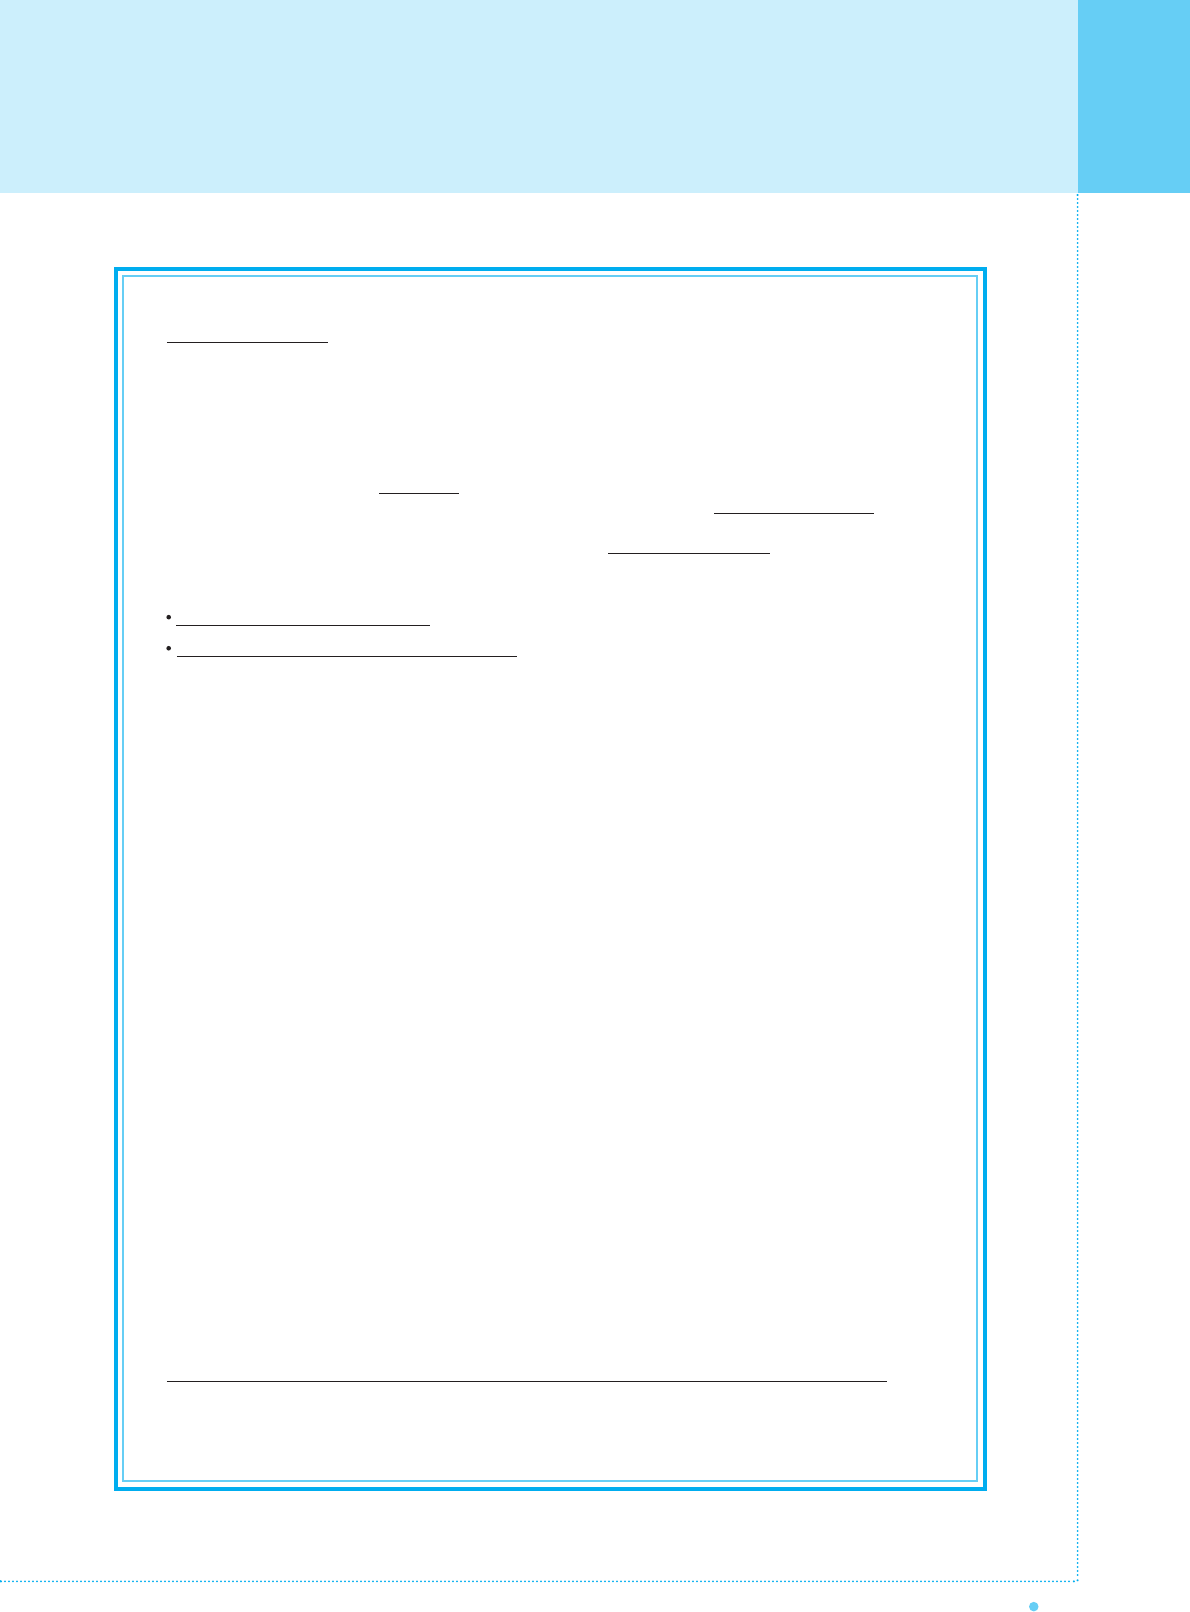
Troubleshooting
50 OWNER'S MANUAL
If your monitor is not working properly, please scan this list of problems and possible solutions.
It may save you time and money.
No picture & No sound • Check whether the Monitor is turned on.
• Power cord inserted into wall outlet?
• Plug another product's power cord into the wall outlet where the
Monitor's power cord was plugged in.
Picture OK & No sound • Press the VOLUME() button.
• Check the audio input signal.
The remote control doesn't work • Check to see if there is any object between the Monitor
and the remote control causing obstruction.
• Check to see if the batteries are installed with the correct
polarities.
Digital broadcasting screen problem • Check the digital signal strength and input antenna.
No or Poor color or Poor picture • Select Color in the Picture and press VOLUME () button.
• Keep a certain distance between the Monitor and the input
source.
• Activate any function to restore the brightness of the picture.
• Check to see that both the monitor and the source are
plugged in and turned on.
The image is too light or too dark • Adjust the Brightness or Contrast settings.
The image is too large or too small • Adjust the Size settings.
No output from one of the speakers • Adjust Balance in the Sound Menu.
Quick Action for Possible SolutionProblem
51
OWNER'S MANUAL
Warranty Card
Limited Warranty
Subject to the Limitations, Exclusions and Disclaimers hereof, InFocus Corporation ("InFocus") warrants that the
LCD Thin Display Device and Accessories (hereinafter collectively or individually referred to as "Product" as
appropriate) purchased from InFocus, an InFocus dis tributor, or an InFocus reseller will conform to InFocus'
specifications and be free from defects in material or workmanship for the respective Limited Warranty period
provided below. InFocus does not warrant that the Product will meet the specific requirements of the end-user
customer. If the Product while subject to this Limited Warranty, is defective in material or workmanship during the
warranty period, then InFocus, at its option, will REPAIR or REPLACE the Product. All exchanged parts and
Products replaced under this Limited Warranty will become property of InFocus. InFocus' sole obligation is to
supply (or pay for) all labor necessary to repair the Product found to be defective within the Limited Warranty
period and to repair or replace defective parts with new parts or, at the option of InFocus, serviceable used parts
that are equivalent or superior to new parts performance. Limited Warranty periods are as follows:
Product Limited Warranty Period: one (1) year from date of purchase.
Accessory Product Limited Warranty Period: one (1) year from date of purchase.
WARRANTY LIMITATION AND EXCLUSION
THIS WARRANTY SETS FORTH INFOCUS' MAXIMUM LIABILITY FOR ITS PRODUCT.
THIS WARRANTY EXTENDS ONLY TO PRODUCTS PURCHASED FROM INFOCUS OR AN INFOCUS
AUTHORIZED RESELLER. . InFocus shall have no further obligation under the foregoing Limited Warranty if the
Product has been damaged due to abuse, improper ventilation, fire, water, disaster, mispackaging, shipping,
lightning or other acts of nature, misuse, neglect, smoke exposure (cigarette or otherwise), accident, unusual
physical or electrical stress and/or power surges, unauthorized modifications (including use of an unauthorized
mount), tampering, alterations, service other than by InFocus or its authorized service providers, or failure
caused other than from ordinary use or failure to properly use the Product in the application for which said
Product was intended. In addition, failure of the end-user to follow maintenance procedures as outlined in the
product's user guide, where a schedule is specified for regular cleaning of certain parts (based on usage and
environment), and the end-user has failed to follow such schedule, the Product will not be covered under the
Limited Warranty. Finally, InFocus shall have no further obligation if InFocus Product was subjected to operating
conditions outside of the range specified in the user's guide or in this Limited Warranty. This Limited Warranty
excludes Product cleaning, repair, or replacement of plastics and glass due to cosmetic damage and damage as
a result of normal wear. Product repair outside of the terms of the Limited Warranty will be on a time and
materials basis. Prolonged Product "demonstration" causes unusual Product wear and is not considered normal
use under the terms of this Limited Warranty. Wide screen format displays (16:9, the aspect ratio of the screen
width to height) are primarily designed to view wide screen format full-motion video. The images displayed on
them should primarily be in the wide screen 16:9 ratio format, or expanded to fill the screen if your model offers
this feature, and constantly moving. Displaying stationary graphics and images on screen, such as the dark
side-bars on non-expanded standard 4:3 ratio format video, should be limited to no more than 15% of the total
viewing time. LCD burn-in as a result of excessive display of static images is not covered under the terms of this
Limited Warranty. The Accessory Product Limited Warranty covers the accessory item only and excludes normal
wear. Remanufactured Products and Software Products are exempt from the foregoing Limited Warranty. Please
refer to the appropriate Remanufactured Product Limited Warranty or Software Product Limited Warranty for
applicable Warranty information.
DISCLAIMER OF UNSTATED WARRANTIES
THE WARRANTY PRINTED ABOVE IS THE ONLY WARRANTY APPLICABLE TO THIS PRODUCT. ALL
OTHER WARRANTIES, EXPRESS OR IMPLIED, INCLUDING, BUT NOT LIMITED TO, THE IMPLIED
WARRANTIES OF MERCHANTABILITY AND FITNESS FOR PARTICULAR PURPOSE ARE DISCLAIMED.
THERE ARE NO WARRANTIES THAT EXTEND BEYOND THE DESCRIPTION ON THE FACE HEREOF AND
THE FOREGOING WARRANTY SHALL NOT BE EXTENDED, ALTERED OR VARIED EXCEPT BY WRITTEN
INSTRUMENT SIGNED BY INFOCUS. SOME JURISDICTIONS DO NOT ALLOW LIMITATIONS ON HOW
LONG AN IMPLIED WARRANTY MAY LAST, SO SUCH LIMITATIONS MAY NOT APPLY TO YOU.
Warranty Card
52 OWNER'S MANUAL
Limited Warranty Period
The Limited Warranty periods hereof commence on the date of purchase by the end-user customer. These
Limited Warranty provisions shall apply only to the end-user purchaser (first person or entity that purchased a
new Product for personal or business use and not for the purpose of distribution or resale).
SOME JURISDICTIONS MAY GRANT YOU CONSUMER RIGHTS WITH MINIMUM WARRANTY DURATION
THAT DIFFER FROM THE DURATIONS PROVIDED HEREIN, AND INFOCUS WILL HONOR ALL SUCH
CONSUMER RIGHTS.
To Be Eligible For Limited Warranty Coverage
Any person exercising a claim under this Limited Warranty must establish to the satisfaction of InFocus both the
date of purchase and that the Product was purchased new from InFocus or an InFocus authorized reseller. The
sales receipt or invoice, showing the date of purchase of the Product is the proof of the date of purchase.
To Obtain Warranty Service
During the Limited Warranty period, to exercise this Limited Warranty, the purchaser must first contact 1)
InFocus, 2) a service facility authorized by InFocus or 3) the place of original purchase.
InFocus Customer Service - 1-503-685-8888 or visit www.infocus.com/service
For Warranty service, the purchaser will be advised to return or deliver the defective Product freight and all fees
prepaid, to an InFocus Service Center or to a service facility authorized by InFocus. When returning Product to
InFocus, a Return Materials Authorization (RMA) # is required and must be clearly displayed on the outside of
the shipping carton or a similar package affording an equal degree of protection. InFocus or the service facility
authorized by InFocus will return the repaired/replaced Product freight prepaid to the purchaser.
Products returned for Warranty service must be accompanied by a written letter that: (i) explains the problem; (ii)
provides proof of date of purchase; (iii) provides the authorized reseller's name; and (iv) provides the model and
serial number of the Product. Upon request of InFocus Corporation or a service facility authorized by InFocus,
proof of legal import must accompany the warranty repair Product, otherwise the Product must be returned to the
place of original purchase, to the manufacturer (Purchaser must bear all tax, duty and freight), or the Purchaser
must bear charges for the warranty repair.
No repair or replacement of Product or part thereof shall extend the Limited Warranty period as to the entire
Product. Warranty on the repair part and workmanship shall only be effective for a period of ninety (90) days
following the repair or replacement of that part or the remaining period of the Product Limited Warranty whichever
is greater.
LIMITATION OF LIABILITY
IT IS UNDERSTOOD AND AGREED THAT INFOCUS' LIABILITY WHETHER IN CONTRACT, IN TORT, UNDER
ANY WARRANTY, IN NEGLIGENCE OR OTHERWISE SHALL NOT EXCEED THE RETURN OF THE AMOUNT
OF THE PURCHASE PRICE PAID BY PURCHASER AND UNDER NO CIRCUMSTANCES SHALL INFOCUS
BE LIABLE FOR SPECIAL, INDIRECT, INCIDENTAL OR CONSEQUENTIAL DAMAGES OR LOST PROFITS,
LOST REVENUES OR LOST SAVINGS. THE PRICE STATED FOR THE PRODUCTS IS A CONSIDERATION IN
LIMITING INFOCUS' LIABILITY.
Limitation on Bringing Action
- No action, regardless of form, arising out of the agreement to
purchase the Product may be brought by purchaser more than one year after the cause of action has accrued.
Governing Law
- Any action, regardless of form, arising out of the agreement to purchase the Product is
governed by Oregon law.
Mandatory Arbitration
- Any action, regardless of form, arising out of the agreement to purchase the
Product is subject to mandatory arbitration.
SOME JURISDICTIONS DO NOT ALLOW THE EXCLUSION OR LIMITATION OF INCIDENTAL OR
CONSEQUENTIAL DAMAGES SO THE ABOVE LIMITATION OR EXCLUSION MAY NOT APPLY TO YOU.
THIS LIMITED WARRANTY GIVES YOU SPECIFIC LEGAL RIGHTS, AND YOU MAY ALSO HAVE OTHER
RIGHTS, DEPENDING ON JURISDICTION.
IF YOU NEED ASSISTANCE....
For all types of Service and Support information on InFocus products
and services please go to our web site at www.infocus.com/service.
Many resources are available on our website.
Some examples are:
•Frequently Asked Questions about general
usage and technical issues
•E-mail support
•Online product registration
•Product data sheets
•Optional accessories
•Technical specifications