HeathCo 60WRC14TX Remote Control User Manual 598 1108 rev00
HeathCo LLC Remote Control 598 1108 rev00
UserManual.wiki
>
HeathCo
>
60WRC14TX User Manual
Users Manual
Navigation menu
Upload a User Manual
Namespaces
Wiki Guide
HTML
PDF
Info
Views
User Manual
Discussion / Help
Navigation
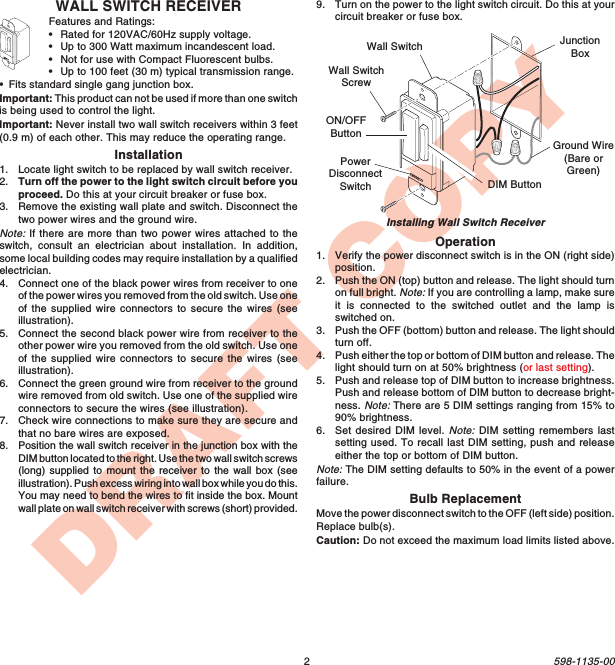
![3598-1135-00ENGLISHDRAFT COPYCHANNEL SETTINGSNote: Most installations will not require you to change any ofthe dip switches on your wireless product or remote control.Note: If purchasing more than one remote control system,select different operating channels unless interaction isdesired between the systems.These remote control products communicate by using channelsthat can be changed by sliding dip switches into the ON or OFF[on some switches the numbers 1 (ON) and/or 0 (OFF) are used]position on both the transmitter and receiver unit(s). The channelis factory set; however, there are 3 switches (8 selectablechannels) that allow you to expand your system and preventoutside interference. Other remote controlled unit(s) may causeinterference and the system may not function properly. Followthe instructions below for setting a new channel.1. Open the cases and locate dip switches on both the transmit-ter and receiver unit(s).2. Dip switches 1 through 3 are used for setting the channel(Remote Control Only - position 4 is not used and shouldremain in OFF position).3. To change the channel, slide dip switches to ON or OFF asneeded. It is recommended to only change one dip switch ata time and then check to see if system is functioning properly.IMPORTANT: Dip switches in positions 1 through 3 must bein the exact same configuration on both the transmitter andreceiver unit(s) for this system to function properly.Dip Switches - Shownin the OFF Position(Factory Default)ON1 2 3 4Dip Switches1 2 3 4ON20323VLithiumBatteryDIMONDIP SWITCH LOCATIONSWall Switch TransmitterWall Switch ReceiverDipSwitchesDipSwitchesAccess Door1 2 3 4ONhiumB](https://usermanual.wiki/HeathCo/60WRC14TX/User-Guide-294566-Page-3.png)