Hewlett Packard Enterprise WL560 11a/b/g Wireless Workgroup Bridge User Manual NighthawkQSG
Hewlett-Packard Company 11a/b/g Wireless Workgroup Bridge NighthawkQSG
Preliminary Manuals
Quick Start Guide
11a/b/g Wireless Workgroup Bridge
3CRWE675075
The 3Com 11a/b/g Wireless Workgroup Bridge combines high-performance, interoperability, and ease-
of-use to join isolated wired networks into a cohesive wireless local area network (WLAN). Instead of
traveling over wires, data is transmitted across the WLAN using radio waves.
The 3Com 11a/b/g Wireless Workgroup Bridge includes a robust suite of standards-based security
features, and supports wireless network standards including 802.11a and 802.11g. For a complete list of
the Bridge’s features, see the 3Com 11 a/b/g Wireless Workgroup Bridge User Guide located on the
3Com Installation CD.
This Quick Start Guide describes the basic installation of the Bridge. It covers the following topics:
■Unpacking the Bridge
■Deciding Where to Place the Bridge
■Connecting the Bridge
■Checking the LED Indicators
■Attaching An External Antenna
■Determining if you Need to Configure the Bridge
■Using the 3Com Installation CD
For complete instructions on using the Bridge, see the 3Com 11 a/b/g Wireless Workgroup Bridge
User Guide located on the 3Com Installation CD.
11
a
/
b
/
g
W
i
r
e
l
e
ss
W
o
r
k
g
r
oup
B
r
idg
e
P
ow
e
r
P
o
r
t
S
e
r
i
a
l
P
o
r
t
E
th
e
r
n
e
t
P
o
r
t
C
r
a
dl
e

Observing Safety Precautions
This equipment must be installed in compliance with local and national building codes, regulatory
restrictions, and FCC rules. For the safety of people and equipment, only professional network personnel
should install the Bridge.
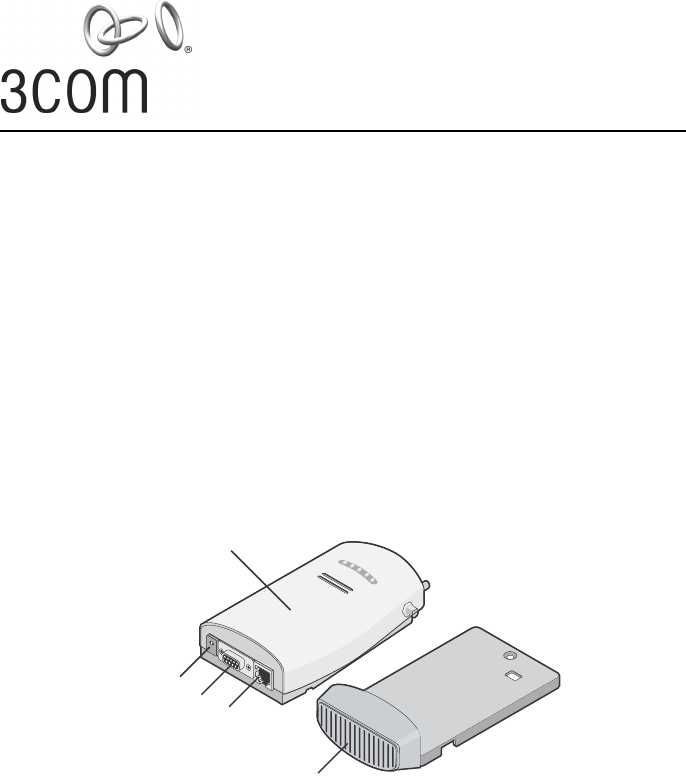
1 Unpacking the Bridge
Make sure that you have the following items, which are included with the Bridge:
■Power adapter and power cord.
■Standard Category 5 unshielded twisted pair (UTP) Ethernet cable.
■Locking bar (used for securing a wall-mounted installation).
■Rubber feet (four; used for a flat-surface installation).
■3Com Installation CD.
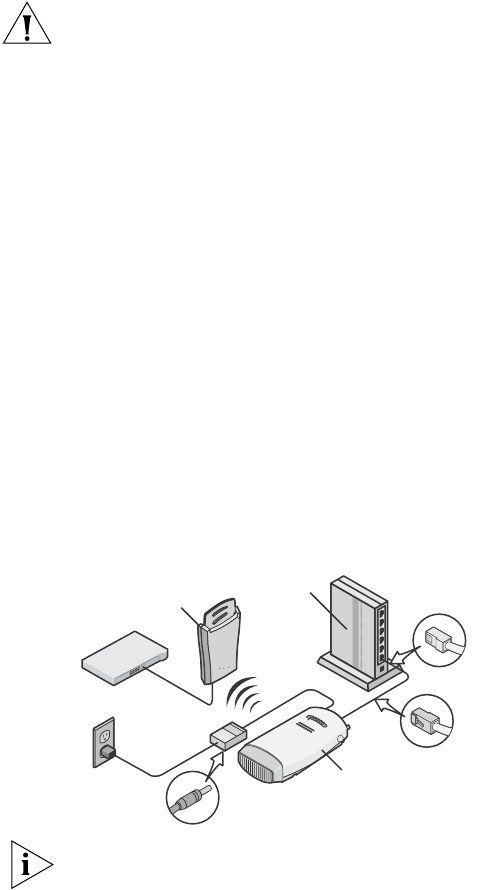
2 Deciding Where to Place the Bridge
Place the Bridge in a dry, clean location near the hub, computer, or printer that will be connected to the
Bridge. The location must have a power source and be within the following distance of a Wi-Fi-
compliant wireless LAN access point or ad hoc wireless station:
■For 802.11a compatibility, place the Bridge within 50 m (164 ft) of a Wi-Fi compliant wireless
LAN access point.
■For 802.11b/g compatibility, place the Bridge within 100 m (300 ft) of a Wi-Fi compliant
wireless LAN access point.
The location should be away from transformers, heavy-duty motors, fluorescent lights, microwave ovens,
refrigerators, or other equipment that could cause radio signal interference.
WARNING: To comply with FCC radio frequency (RF) exposure limits, a minimum body-to-
antenna distance of 20 cm (8 in.) must be maintained when the Bridge is operational.
WARNING: To avoid possible injury or damage to equipment, you must use either the provided
power supply or power supply equipment that is safety certified according to UL, CSA, IEC, or
other applicable national or international safety requirements for the country of use. All references
to power supply in this document refer to equipment meeting these requirements.
CAUTION: The 3Com power supply (part number 61-0107-000) input relies on a 16A rated
building fuse or circuit protector for short circuit protection of the line to neutral conductors.
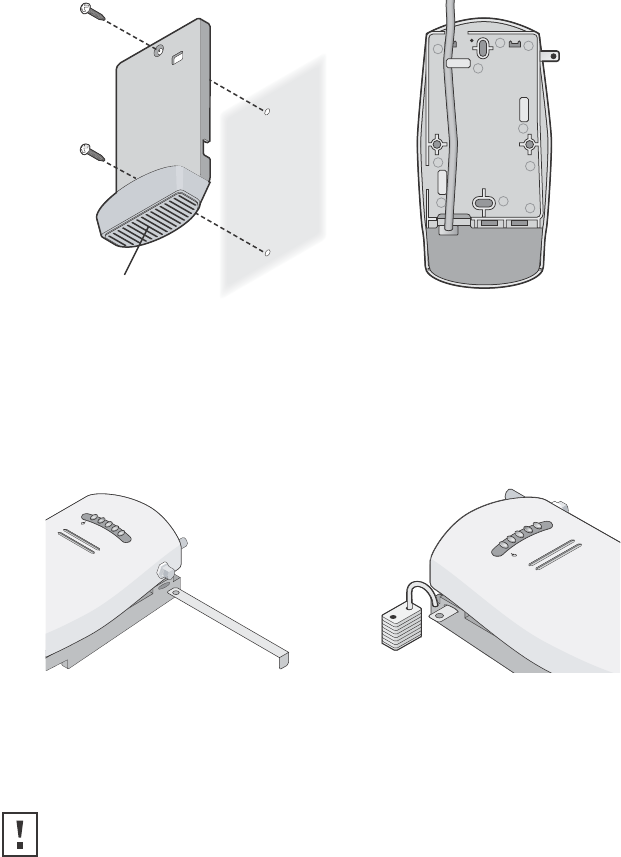
Wall-mounting the Bridge
The Bridge comes equipped with a cradle for mounting on a wall. For additional security, the Bridge also
comes with a locking bar, which can be used with a security lock (not provided) to lock the Bridge to the
cradle after the Bridge is mounted to the wall.
To wall-mount the Bridge:
1Screw the cradle to a wall.
2Route the power and Ethernet cables through the large opening in the cradle.
The figures below show the cradle being mounted to a wall, and then a cable being routed
through the large opening in the cradle.
3Connect the power and Ethernet cables to the ports on the front of the Bridge.
4Snap the Bridge onto the cradle.
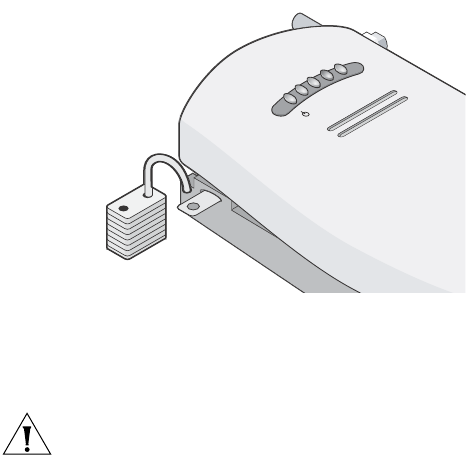
To install the locking bar, push the locking bar through the opening in the side of the cradle until the
hole on the locking bar is exposed. Insert a lock (not provided) through the hole on the locking bar,
and then close the lock to secure it in place. See the user guide for detailed instructions.
Placing the Bridge on a Flat Surface
To install the Bridge on a flat surface such as a table or desktop, remove the backing from the four
rubber feet and attach them on the bottom of the cradle.
CAUTION: Do not place the Bridge on any type of metal surface. Select a location that is clear
of obstructions and provides good reception.
Wall-mounting the cradle Routing a cable
C
r
a
dl
e
Inserting the locking bar Securing the bar with a lock
.11g
.100
.10
.11a
.11g
.100
.10
.11a

3 Connecting the Bridge
Before connecting the Bridge to an Ethernet client, connect the power supply. The figure below shows
the ports for connecting the power and Ethernet cables.
The bridge can also be connected to a serial device. Serial cables come with a variety of connector sizes.
If your connector is large and prevents the cradle from being attached to the Bridge, remove the end cap
on the cradle. This allows the connector to extend through the cradle.
Connecting to an Ethernet Device
The Bridge is designed to be connected to an Ethernet client device such as a hub, computer, or printer.
Connecting to a Hub
You can supply network connections for up to 16 devices, such as computers and network printers, by
connecting the Bridge to an Ethernet hub, as shown below.
CAUTION: To avoid the possibility of a transmission loop situation between the Bridge and
an access point, which could disrupt network operation, do not connect a Bridge that is set
in Wireless Client (Infrastructure) mode directly to the LAN (for example, through a wall
port or through a hub that is connected directly to the LAN).
P
ow
e
r
C
a
bl
e
E
th
e
r
n
e
t
C
a
bl
e
.
11
g
.
100
.
10
.
11
a
H
ub
11
a
/
b
/
g
W
i
r
e
l
e
ss
W
o
r
k
g
r
oup
B
r
id g
e
U
plin
k
P
o
r
t
A
cc
e
ss
P
oint
POWER
POWER
ETHERNET
ETHERNET
WIRELESS
WIRELESS
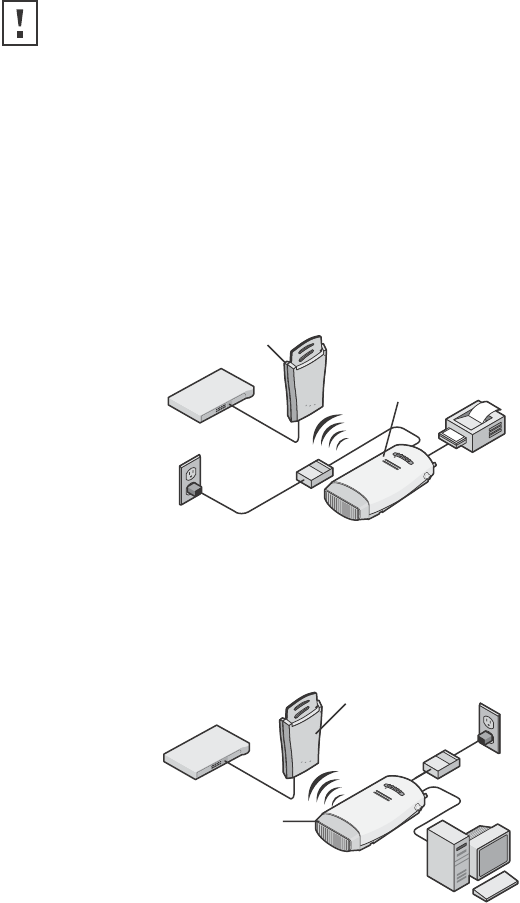
Connecting to a Network Printer
You can connect a network printer directly to the Bridge or to a hub that is connected to the Bridge.
Used this way, the Bridge allows you to place network printers in areas that are not wired for Ethernet.
1Configure the network printer as you would for connecting it to the wired LAN. For
details on configuring the printer, see your printer documentation.
2If necessary, configure the Bridge to associate with your access point.
3Connect the Bridge to power in its permanent location.
4Connect the network printer directly to the Bridge as shown in the figure below, or into a
hub that is connected to the Bridge as shown in the previous section, “Connecting to a
Hub.”
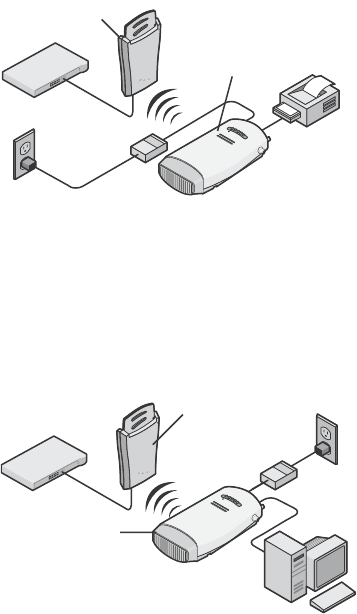
Connecting to a Computer
You can connect the Bridge directly to a computer as shown below. Used this way, the Bridge can
convert a desktop computer to a wireless computer. This connection also allows you to configure a
Bridge before connecting it to another device.
CAUTION: You can directly connect the Bridge to a hub that does not have an uplink
(MDIX) port, without the need of an Ethernet crossover cable.
.
11
g
.
100
.
10
.
11
a
11
a
/
b
/
g
W
i
r
e
l
e
ss
W
o
r
k
g
r
oup
B
r
id g
e
A
cc
e
ss
P
oint
POWER
POWER
ETHERNET
ETHERNET
WIRELESS
WIRELESS
.
11
g
.
100
.
10
.
11
a
11
a
/
b
/
g
W
i
r
e
l
e
ss
W
o
r
k
g
r
oup
B
r
idg
e
A
cc
e
ss
P
oint
POWER
POWER
ETHERNET
ETHERNET
WIRELESS
WIRELESS
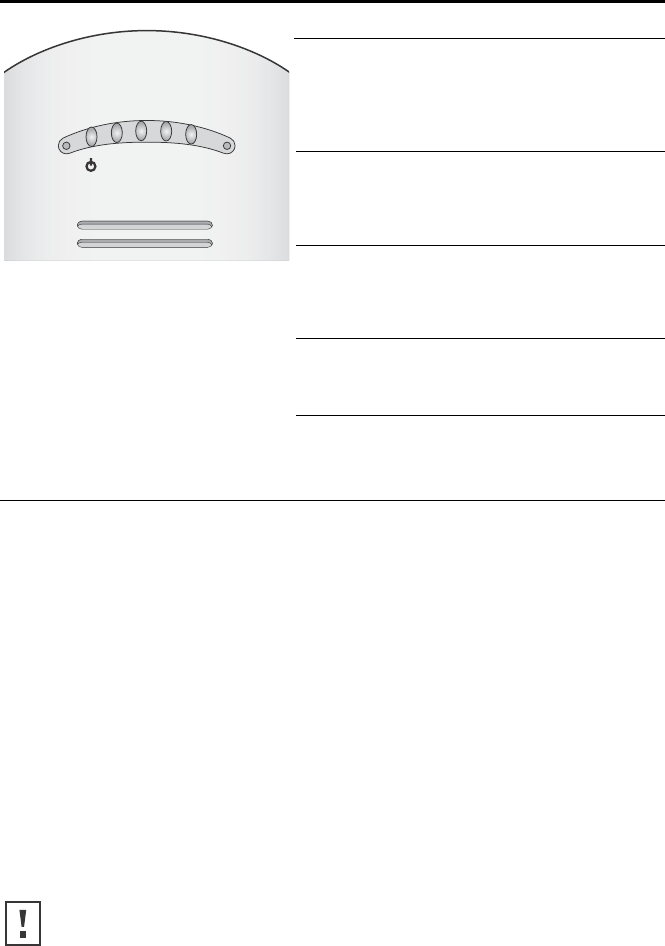
4 Checking the LED Indicators
When the Bridge is connected to power, LEDs indicate activity as follows (solid LED indicates connection;
blinking LED indicates activity):
5 Attaching An External Antenna
The Bridge has two internal diversity dual-band antennas. If you want to increase the range of the
Bridge, an external antenna can be attached to the external antenna connector on the Bridge. The
3Com-approved external antenna for this Bridge is the 3Com 2.4/5 GHz Omnidirectional Workgroup
Bridge Antenna (3CWE501). For more information, go to www.3Com.com
6 Determining if you Need to Configure the Bridge
If your network has a DHCP server and no special security requirements, you can most likely use the
Bridge just as it is shipped from the factory. View the Bridge’s default settings on the next page to
determine whether or not you need to configure the Bridge for your network.
It takes about one to two minutes for the Bridge to determine if there is a DHCP server on the network.
If your network does not have a DHCP server or is more complex, you will want to configure the Bridge
and organize devices so that you can manage the wireless LAN easily and keep it secure.
LED Color Indicates
Power Green
Off
The Bridge is powered up
and operating normally.
The Bridge is not receiving
power or there is a fault with
the power supply.
11a Green
Off
The Bridge has WLAN frame
transmissions over an
802.11a 5 GHz radio band.
No link is present.
11g Green
Off
The Bridge has WLAN frame
transmissions over an
802.11g 2.4 GHz radio band.
No link is present.
100 Green
Off
The Bridge has a 100 Mbps
Fast Ethernet connection.
No link is present.
10 Green
Off
The Bridge has a 10 Mbps
Ethernet connection.
No link is present.
CAUTION: For non-U.S. versions of the Bridge, you need to set the Country mode. This is done
when you first open the Bridge’s Configuration Management System. Select the Country in which
the Bridge is operating and then click Apply.
.11g
.100
.10
.11a

Networks with a DHCP Server
If your network has a DHCP server, an IP address is automatically assigned to the Bridge. Use the 3Com
Wireless Infrastructure Device Manager (Widman) included on the 3Com Installation CD to locate the
Bridge on the network and view its IP address.
After you determine the Bridge’s IP address, you can enter that IP address into a web browser on a computer
on the same subnet to view the Bridge’s system status or change its configuration.
Networks without a DHCP Server
If your network does not have a DHCP server, the Bridge uses a default IP address (169.254.2.2) that is
assigned at the factory. You can use that IP address to configure the Bridge, or you can assign a new
IP address to the Bridge.
To verify that the Bridge is using the default IP address assigned at the factory:
1Connect a computer directly to the Bridge using the supplied standard Category 5
UTP Ethernet cable.
2Enter the Bridge’s default IP address (169.254.2.2) into the computer’s web browser.
If the Configuration Management System starts, the Bridge is using the factory assigned
IP address. You can configure the Bridge with the following login information:
■Login name: admin
■Password: none (blank)
If the Configuration Management System does not start, the Bridge is on a different subnet
than the computer. Install and start the 3Com Wireless Infrastructure Device Manager to
discover the Bridge’s IP address.
Bridge Default Settings
The table below shows the Bridge configuration factory defaults.
Property Default Setting
Device Name 3Com WWB
Device Location None
Country For U.S. versions, United States and Canada
For non-U.S. version, set by the user
Client Mode Support multiple wired Ethernet clients
IP Network Setting Obtain IP address automatically
IP Address Obtained automatically (with a DHCP server)
169.254.2.2 (without a DHCP server)
Subnet Mask Obtained automatically (with a DHCP server)
255.255.0.0 (without a DHCP server)
Gateway IP Address Obtained automatically (with a DHCP server)
0.0.0.0 (without a DHCP server)
Network Mode Wireless Client (Infrastructure)
Radio Mode Auto Select
Wireless LAN Service Area Attach to any WLAN Service Area (ESSID) automatically
Channel Selection Automatic Best Channel (uses access point setting)
Transmit Power 100%

Copyright © 2004 3Com Corporation. All rights reserved. 3Com and the 3Com logo are registered
trademarks of 3Com Corporation. All other company and product names may be trademarks of the
respective companies with which they are associated.
DQA6750-75AAA01
Published July 2004
7 Using the 3Com Installation CD
The 3Com Installation CD contains the following tools and utilities:
■3Com Wireless Infrastructure Device Manager—an administration tool that helps you
select 3Com wireless LAN devices and launch their configurations in your Web browser.
■3Com 3CDaemon Server Tool—a firmware upgrade tool that can act as a TFTP Server, a
SysLog Server, an optional TFTP Client, or an optional FTP Server.
To use the 3Com Installation CD, you need a computer running Internet Explorer (latest version is
recommended) and one of the following operating systems: Windows XP, Windows 2000,
Windows NT 4.0, Windows Me, or Windows 98.
To install one of the tools on your computer:
1Turn on the computer.
2Insert the 3Com Installation CD in the CD-ROM drive.
The setup menu appears. If it does not appear, you can start the setup menu from the
Windows Start menu. For example: Start > Run > d:setup.exe.
3In the menu, click Tools and Utilities.
4In the next screen, click the tool you want to install.
5Follow the instructions on the screens to complete the installation.
Reboot the computer if prompted to do so.
6Launch the tool from the Windows Start menu.
For details on using the Wireless Infrastructure Device Manager, see “Using the 3Com
Wireless Infrastructure Device Manager” in the 3Com 11 a/b/g Wireless Workgroup Bridge
User Guide.
For instructions on using the 3CDaemon Server Tool, see the application’s online help.
Antenna Selection Internal
Data Preamble Long (if Network Mode is set to Ad-Hoc)
Same as access point setting (if Network Mode is set to Wireless Client
[Infrastructure])
Security Setting Open System (no security)
802.1x Authentication State Disabled
SNMP Enabled
Administration Login Name admin
Administration Password None (blank)
TFTP Server IP Address None
FTP Server IP Address None

http://www.3com.com/
Part No. DUA6750-75AAA01
Published July 2004
3Com 11a/b/g Wireless Workgroup Bridge
User Guide
Model: WL-560
3CRWE675075
3Com Corporation
350 Campus Drive
Marlborough
MA USA 01752-3064
Copyright © 2004, 3Com Corporation. All rights reserved. No part of this documentation may be reproduced
in any form or by any means or used to make any derivative work (such as translation, transformation, or
adaptation) without written permission from 3Com Corporation.
3Com Corporation reserves the right to revise this documentation and to make changes in content from time
to time without obligation on the part of 3Com Corporation to provide notification of such revision or change.
3Com Corporation provides this documentation without warranty, term, or condition of any kind, either
implied or expressed, including, but not limited to, the implied warranties, terms or conditions of
merchantability, satisfactory quality, and fitness for a particular purpose. 3Com may make improvements or
changes in the product(s) and/or the program(s) described in this documentation at any time.
If there is any software on removable media described in this documentation, it is furnished under a license
agreement included with the product as a separate document, in the hard copy documentation, or on the
removable media in a directory file named LICENSE.TXT or !LICENSE.TXT. If you are unable to locate a copy,
please contact 3Com and a copy will be provided to you.
UNITED STATES GOVERNMENT LEGEND
If you are a United States government agency, then this documentation and the software described herein are
provided to you subject to the following:
All technical data and computer software are commercial in nature and developed solely at private expense.
Software is delivered as “Commercial Computer Software” as defined in DFARS 252.227-7014 (June 1995) or
as a “commercial item” as defined in FAR 2.101(a) and as such is provided with only such rights as are
provided in 3Com’s standard commercial license for the Software. Technical data is provided with limited
rights only as provided in DFAR 252.227-7015 (Nov 1995) or FAR 52.227-14 (June 1987), whichever is
applicable. You agree not to remove or deface any portion of any legend provided on any licensed program or
documentation contained in, or delivered to you in conjunction with, this User Guide.
Unless otherwise indicated, 3Com registered trademarks are registered in the United States and may or may not
be registered in other countries.
3Com and the 3Com logo are registered trademarks of 3Com Corporation.
Intel and Pentium are registered trademarks of Intel Corporation. Microsoft, MS-DOS, Windows, and Windows
NT are registered trademarks of Microsoft Corporation. Novell and NetWare are registered trademarks of
Novell, Inc. UNIX is a registered trademark in the United States and other countries, licensed exclusively
through X/Open Company, Ltd.
IEEE and 802 are registered trademarks of the Institute of Electrical and Electronics Engineers, Inc.
All other company and product names may be trademarks of the respective companies with which they are
associated.
ENVIRONMENTAL STATEMENT
It is the policy of 3Com Corporation to be environmentally-friendly in all operations. To uphold our policy, we
are committed to:
Establishing environmental performance standards that comply with national legislation and regulations.
Conserving energy, materials and natural resources in all operations.
Reducing the waste generated by all operations. Ensuring that all waste conforms to recognized
environmental standards. Maximizing the recyclable and reusable content of all products.
Ensuring that all products can be recycled, reused and disposed of safely.
Ensuring that all products are labelled according to recognized environmental standards.
Improving our environmental record on a continual basis.
End of Life Statement
3Com processes allow for the recovery, reclamation and safe disposal of all end-of-life electronic components.
Regulated Materials Statement
3Com products do not contain any hazardous or ozone-depleting material.
Environmental Statement about the Documentation
The documentation for this product is printed on paper that comes from sustainable, managed forests; it is
fully biodegradable and recyclable, and is completely chlorine-free. The varnish is environmentally-friendly, and
the inks are vegetable-based with a low heavy-metal content.

CONTENTS
ABOUT THIS GUIDE
Conventions 2
Related Documentation 3
Accessing Online Documentation 3
Product Registration and Support 4
1INTRODUCTION
Product Features 5
Security 5
Wireless Network Standards 6
Network Configuration and Planning 7
Example Configurations 8
2INSTALLING THE BRIDGE
Unpacking the Bridge 9
Observing Safety Precautions 10
Deciding Where to Place the Bridge 11
Wall-Mounting the Bridge 11
Installing the Locking Bar 12
Placing the Bridge on a Flat Surface 13
Connecting the Bridge 14
Connecting to a Serial Device 14
Connecting to an Ethernet Device 15
About the Client List 15
Connecting to a Hub 15
Connecting to a Network Printer 16
Connecting to a Computer 16
Checking the LED Indicators 17
Attaching An External Antenna 18
Determining if you Need to Configure the Bridge 18
Using the 3Com Installation CD 21

3CONFIGURING THE BRIDGE
Using Secure Web Server Connection 23
Using the 3Com Wireless Infrastructure Device Manager 24
Using the Configuration Management System 27
Clearing and Applying System Configuration Settings 28
Changing System Properties 29
Setting IP Network Properties 30
Setting Wireless Network Properties 31
Setting Up an Ad-Hoc Network 33
Changing Wireless Security Settings 34
Changing RADIUS Settings 36
Changing SNMP Settings 37
Using the Access Control List 38
Serial Port 39
Resetting the Bridge 41
Restoring the Bridge to Factory Defaults 42
Upgrading the System 42
Changing the Administration Login Name and Password 44
Backing up a Configuration 44
Restoring a Configuration 44
Logging Out 45
Viewing Connection Status 45
Clearing the Ethernet Client List 45
Viewing System Summary 46
4TROUBLESHOOTING
Diagnosing Problems 47
Disconnecting the Bridge 49
Uninstalling Software and Documentation 49
Upgrading Bridge Firmware 49
ACOMMAND-LINE INTERFACE
Logging In 51
Logging Out 51
Configuring the Bridge 52


ABOUT THIS GUIDE
This guide provides all the information you need to install and use the
3Com 11a/b/g Wireless Workgroup Bridge in its default state.
The guide is intended for use by IT managers and experienced network
installation and administration professionals who have a basic knowledge
of current networking concepts.
If the information in the release notes that are shipped with your product
differ from the information in this guide, follow the instructions in the
release notes.
Most user guides and release notes are available in Adobe Acrobat
Reader Portable Document Format (PDF) or HTML on the 3Com
World Wide Web site:
http://www.3com.com/
2ABOUT THIS GUIDE
Conventions Table 1 and Table 2 list conventions that are used throughout this guide.
Table 1 Notice Icons
Icon Notice Type Description
Information note Information that describes important features or
instructions.
Caution Information that alerts you to potential loss of data or
potential damage to an application, system, or device.
Warning Information that alerts you to potential personal
injury.
Table 2 Text Conventions
Convention Description
Screen displays This typeface represents information as it appears on the
screen.
Syntax The word “syntax” means that you must evaluate the syntax
provided and then supply the appropriate values for the
placeholders that appear in angle brackets. Example:
To change your password, use the following syntax:
system password <password>
In this example, you must supply a password for <password>.
Commands The word “command” means that you must enter the
command exactly as shown and then press Return or Enter.
Commands appear in bold. Example:
To display IP information, enter the following command:
get ipaddr
The words “enter”
and “type” When you see the word “enter” in this guide, you must type
something, and then press Return or Enter. Do not press
Return or Enter when an instruction simply says “type.”
Keyboard key names If you must press two or more keys simultaneously, the key
names are linked with a plus sign (+). Example:
Press Ctrl+Alt+Del
Words in italics Italics are used to:
■Emphasize a point.
■Denote a new term at the place where it is defined in the
text.
■Identify menu names, menu commands, and software
button names. Examples:
From the Help menu, select Contents.
Click OK.

Related Documentation 3
Related
Documentation
In addition to this guide, each Bridge documentation set includes the
following:
■Quick Start Guide—printed guide that describes basic installation.
■Online Help—product help systems that describe how to use the
Configuration Management System and 3Com Wireless Infrastructure
Device Manager.
■Release Note—printed note that describes important product
information.
■README.TXT file—text file located on the 3Com Installation CD that
describes last-minute product information.
Accessing Online
Documentation
The CD supplied with your Bridge contains the following online
documentation:
■3Com 11a/b/g Wireless Workgroup Bridge User Guide
■3Com Wireless Infrastructure Device Manager Online Help
■3Com 11a/b/g Wireless Workgroup Bridge Configuration
Management System Online Help
To access the online documentation from the CD:
1Insert the 3Com Installation CD supplied with your Bridge in the CD-ROM
drive.
The setup menu appears. If it does not appear, you can start the setup
menu from the Windows Start menu. For example: Start > Run >
d:setup.exe.
2In the menu, click View the Documentation to view the Bridge User
Guide.
To view the online help, install and launch the Wireless Infrastructure
Device Manager or Configuration Management System. See Chapter 3
for instructions.

4ABOUT THIS GUIDE
Product
Registration and
Support
To register your product with 3Com, go to the following Web page:
http://esupport.3com.com
For support information, see “Obtaining Support for your 3Com
Product” on page 55 or log on to the 3Com Web site at
http://www.3com.com and navigate to the product support page.

1INTRODUCTION
3Com wireless technology has all of the benefits of a local area network
(LAN) without the constraints and expense of network wiring.
3Com 11a/b/g Wireless LAN products provide easy, affordable, flexible
ways to extend wireless networks to more users. This guide shows how
you can use the 3Com 11a/b/g Wireless Workgroup Bridge in your office
or classroom to connect groups of wired Ethernet client devices to your
wireless LAN.
Product Features The 3Com 11a/b/g Wireless Workgroup Bridge includes a robust suite of
standards-based security features, and supports wireless network
standards including 802.11a and 802.11g.
Security To protect sensitive data broadcast over the radio, 3Com supports
Wireless Equivalent Privacy (WEP) RC4 64-bit, 128-bit and 152-bit
shared-key encryption. 3Com strengthens this basic security mechanism
with additional security features, including:
■MAC address access control lists
■IEEE 802.1x per-port user authentication with RADIUS server
authentication support
■Temporal Key Integrity Protocol (TKIP)
■Advanced Encryption Standard (AES)
■WiFi Protected Access (WPA)
■Extensible Authentication Protocol (EAP) support: EAP-TTLS and PEAP
6CHAPTER 1: INTRODUCTION
Wireless Network
Standards
Understanding the characteristics of the 802.11a and 802.11g standards
can help you make the best choice for your wireless implementation plans.
802.11a
Ratified in 2002, 802.11a is IEEE’s more recent wireless standard. It
operates at the 5 GHz band and supports data rates at up to 54 Mbps. For
those organizations demanding even higher speeds, a “turbo mode” feature
can boost throughput rates up to 108 Mbps. And because there are fewer
devices in the 5 GHz band, there’s less potential for RF interference.
However, because it is at an entirely different radio spectrum, it is not
compatible with 802.11g.
The higher spectrum provides about 50 m (164 ft) of coverage—about
half what 802.11g offers.
Consider 802.11a when you need high throughput in a confined space
and you are:
■Running high-bandwidth applications like voice, video, or multimedia
over a wireless network that can benefit from a five-fold increase in
data throughput.
■Transferring large files like computer-aided design files, preprint
publishing documents or graphics files, such as MRI scans for medical
applications, that demand additional bandwidth.
■Supporting a dense user base confined to a small coverage area.
Because 802.11a has a greater number of non-overlapping channels,
you can pack more wireless devices in a tighter space.
802.11g
802.11g operates in the 2.4 GHz band at up to 54 Mbps. Ratified in
2003, it supports the widest coverage—up to 100 m (328 ft). However, is
subject to a greater risk of radio interference because it operates in the more
popular 2.4 GHz band.
802.11b operates at up to 11 Mbps and supports coverage up to 100 m
(328 ft).

Network Configuration and Planning 7
Consider 802.11g when you need wider coverage and vendor
compatibility and you are:
■Maintaining support for existing 802.11b users and the existing
wireless investment while providing for expansion into 802.11g.
■Implementing a complete wireless LAN solution, including bridges,
gateways, access points and clients; Wi-Fi certification guarantees
compatibility among vendors.
■Providing access to hot spots in public spaces such as coffee shops or
university cafeterias.
Network
Configuration and
Planning
The Bridge can operate in either infrastructure or ad-hoc mode, and can
support a stand-alone wireless network configuration or an integrated
configuration with 10/100 Mbps Ethernet LANs.
Operating in infrastructure mode and connected to an Ethernet hub, a
single Bridge can combine up to 16 client devices—such as computers
with network adapters and printers—into a multiclient workgroup. The
workgroup associates with the wired network through a wireless LAN
access point such as the 3Com 11a/b/g Wireless LAN Access Point.
Infrastructure configurations extend your wireless LAN to devices that
would otherwise have to be connected to the wired network.
Operating in ad-hoc mode, two or more Bridges can associate among
themselves and communicate with one another at close range without an
access point. You may wish to set up an ad-hoc network, for example, if
a group is working away from the office, or if a group in the office needs
to share files apart from the wired LAN.
8CHAPTER 1: INTRODUCTION
Example
Configurations
The following examples illustrate ways you can use the Bridge to
configure Ethernet client devices into workgroups. (Details for setting up
specific configurations are in “Installing the Bridge” on page 9.)
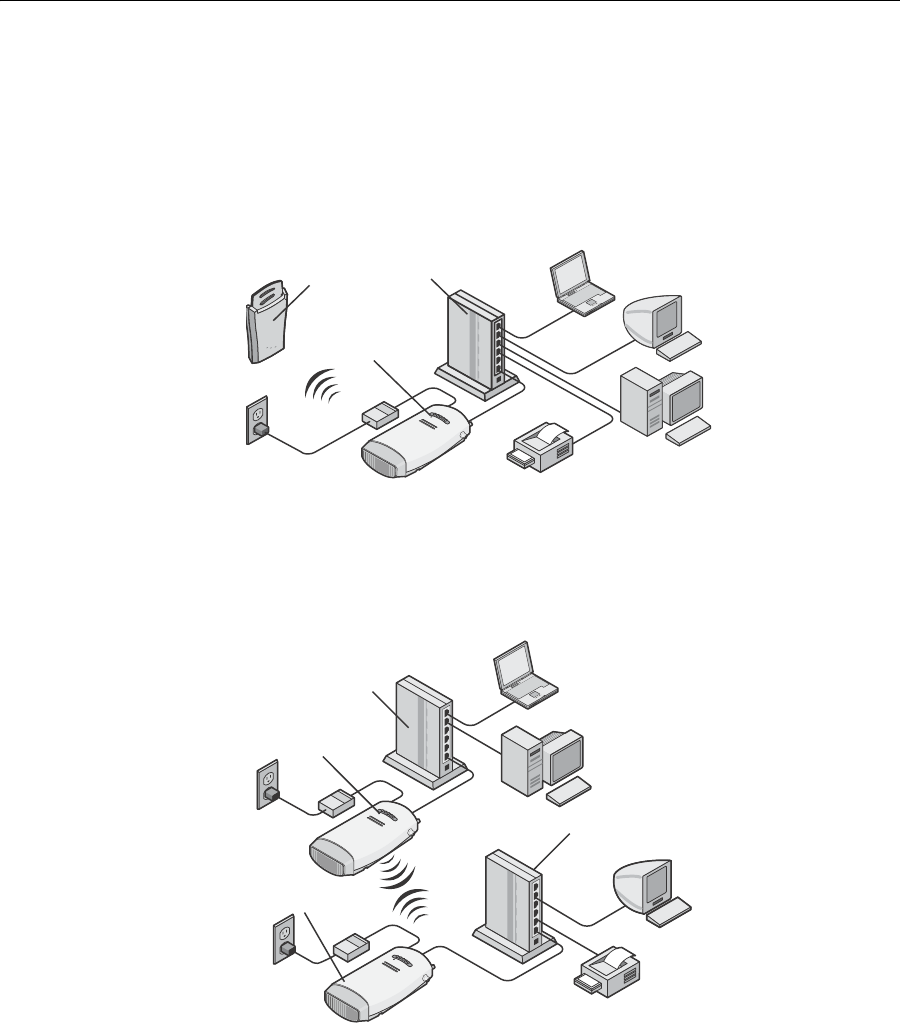
Wireless Infrastructure Network
You can connect several computers, including those with non-Windows
operating systems, and network printers, as shown in Figure 1.
Figure 1 Wireless Infrastructure Network
Workgroup Ad-Hoc Network
You can provide flexible wireless network association for small groups in
areas that cannot be wired, as shown in Figure 2.
Figure 2 Workgroup Ad-Hoc Network
POWER
POWER
ETHERNET
ETHERNET
WIRELESS
WIRELESS
POWER
POWER
ETHERNET
ETHERNET
WIRELESS
WIRELESS
.
11
g
.
100
.
10
.
11
a
A
cc
e
ss
P
oint
H
ub
11
a
/
b
/
g
W
i
r
e
l
e
ss
W
o
r
k
g
r
oup
B
r
idg
e
.
11
g
.
100
.
10
.
11
a
11
a
/
b
/
g
W
i
r
e
l
e
ss
W
o
r
k
g
r
oup
B
r
id g
e
H
ub
.
11
g
.
100
.
10
.
11
a
11
a
/
b
/
g
W
i
r
e
l
e
ss
W
o
r
k
g
r
oup
B
r
id g
e
H
ub

2INSTALLING THE BRIDGE
This chapter contains the information you need to install and set up the
Bridge. It covers the following topics:
■Unpacking the Bridge
■Observing Safety Precautions
■Deciding Where to Place the Bridge
■Connecting the Bridge
■Checking the LED Indicators
■Attaching An External Antenna
■Determining if you Need to Configure the Bridge
■Using the 3Com Installation CD
Unpacking the
Bridge
Make sure that you have the following items, which are included with the
Bridge:
■Power adapter and power cord.
■Standard Category 5 unshielded twisted pair (UTP) Ethernet cable.
■Locking bar (used for securing a wall-mounted installation).
■Rubber feet (four; used for a flat-surface installation).
■3Com Installation CD.
You can directly connect the Bridge to a hub that does not have an uplink
(MDIX) port, without the need of an Ethernet crossover cable.
For wall-mounting installations, you need the following items, which
are not included with the Bridge:
■Mounting screws.
■Plastic anchors (for drywall mounting).
To secure the Bridge using the locking bar, you need a lock (not
supplied).
10 CHAPTER 2: INSTALLING THE BRIDGE
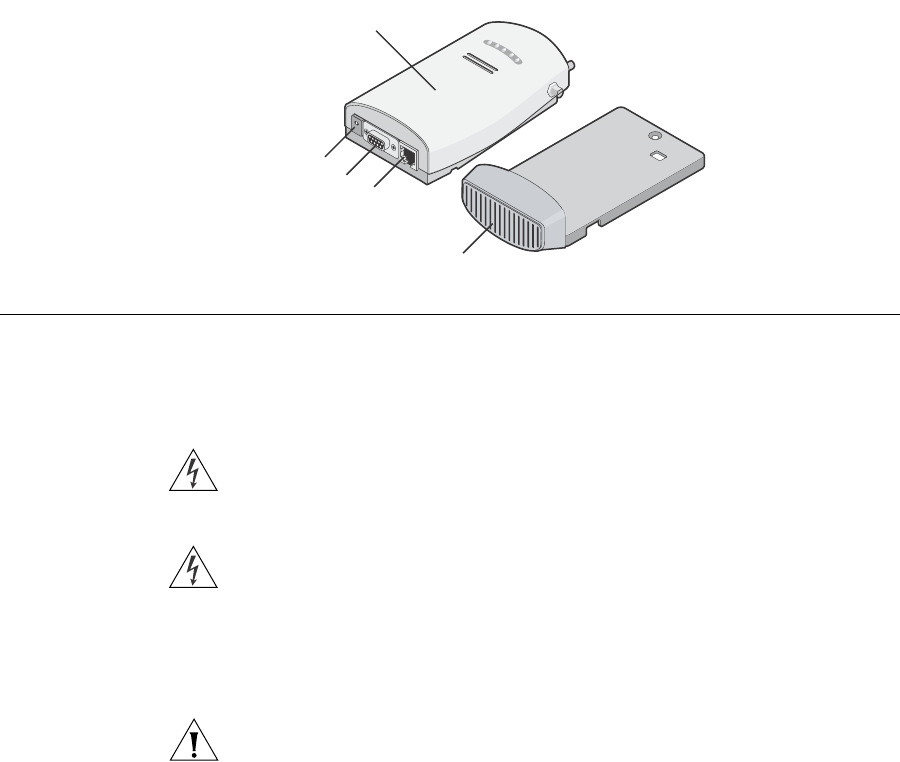
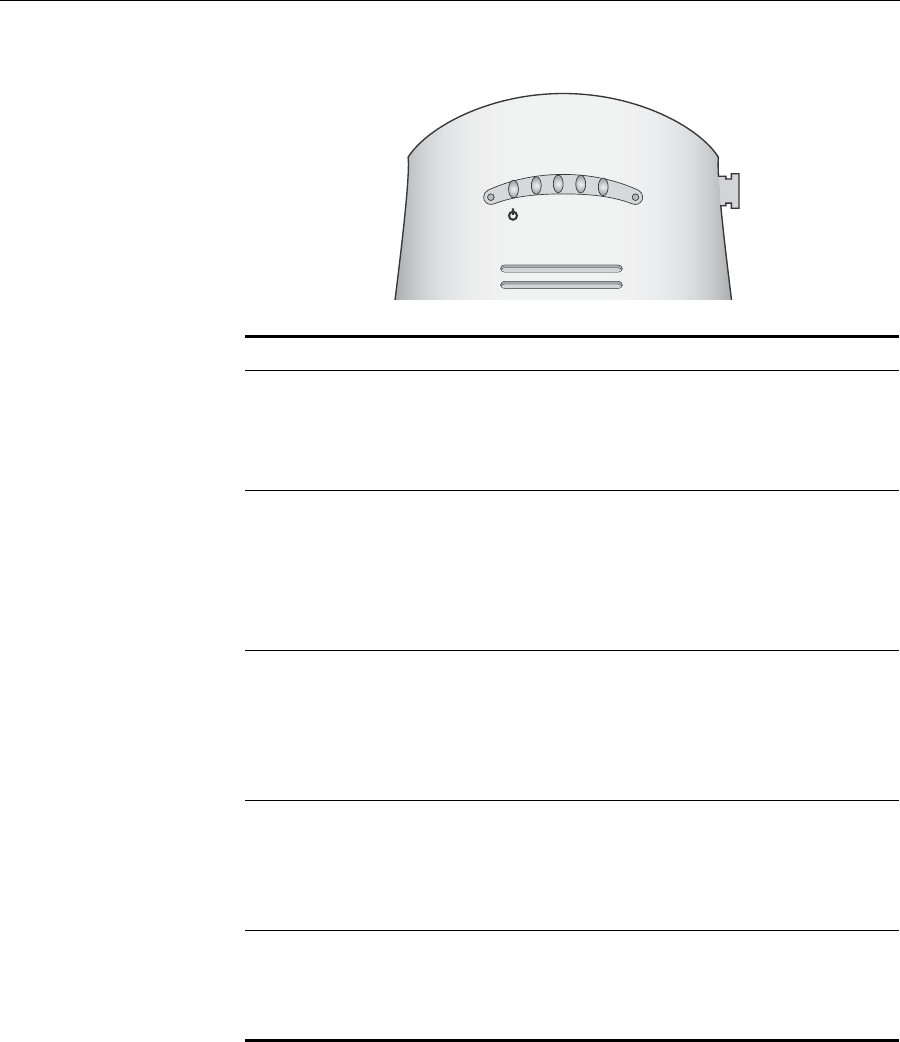
Figure 3 shows the front view of the Bridge, including the LEDs and
connecting ports. It also shows the cradle, which is used to mount the
Bridge to a wall or to install the Bridge on a flat surface.
Figure 3 Bridge
Observing Safety
Precautions
This equipment must be installed in compliance with local and national
building codes, regulatory restrictions, and FCC rules. For the safety of
people and equipment, only professional network personnel should
install the Bridge.
WARNING: To comply with FCC radio frequency (RF) exposure limits, a
minimum body-to-antenna distance of 20 cm (8 in.) must be maintained
when the Bridge is operational.
WARNING: To avoid possible injury or damage to equipment, you must
use either the provided power supply or power supply equipment that is
safety certified according to UL, CSA, IEC, or other applicable national or
international safety requirements for the country of use. All references to
power supply in this document refer to equipment meeting these
requirements.
CAUTION: The 3Com power supply (part number 61-0107-000) input
relies on a 16A rated building fuse or circuit protector for short circuit
protection of the line to neutral conductors.
11
a
/
b
/
g
W
i
r
e
l
e
ss
W
o
r
k
g
r
oup
B
r
idg
e
P
ow
e
r
P
o
r
t
S
e
r
i
a
l
P
o
r
t
E
th
e
r
n
e
t
P
o
r
t
C
r
a
dl
e
Deciding Where to Place the Bridge 11
Deciding Where to
Place the Bridge
Place the Bridge in a dry, clean location near the hub, computer, or
printer that will be connected to the Bridge. The location must have a
power source and be within the following distance of a Wi-Fi compliant
wireless LAN access point or ad-hoc wireless station:
■For 802.11a compatibility, place the Bridge within 50 m (164 ft) of a
Wi-Fi compliant wireless LAN access point.
■For 802.11b/g compatibility, place the Bridge within 100 m (328 ft) of
a Wi-Fi compliant wireless LAN access point.
The location should be away from transformers, heavy-duty motors,
fluorescent lights, microwave ovens, refrigerators, or other equipment
that could cause radio signal interference.
Wall-Mounting the
Bridge
The Bridge comes with a cradle for mounting on a wall. For additional
security, the Bridge also comes with a locking bar, which can be used
with a security lock (not provided) to lock the Bridge to the cradle after
the Bridge is mounted to a wall.
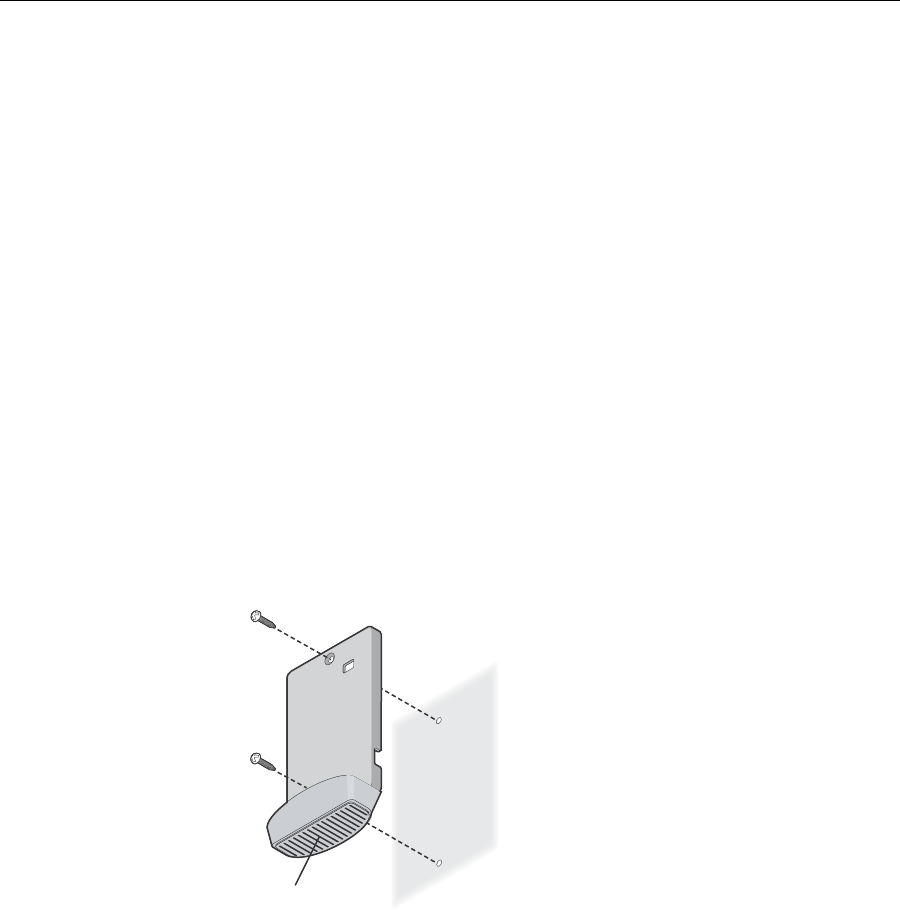
To wall-mount the bridge:
1Screw the cradle to a wall, as shown in Figure 4.
Figure 4 Wall-Mounting the Bridge
C
r
a
dl
e

12 CHAPTER 2: INSTALLING THE BRIDGE
2Route the power and Ethernet cables through the large opening in the cradle.
Figure 5 shows a cable being routed under the cradle.
Figure 5 Routing Cable Under the Cradle
3Connect the power and Ethernet cables to the ports on the Bridge.
4Snap the Bridge onto the cradle.
Installing the
Locking Bar
For additional security, install the locking bar in the cradle after the Bridge
is mounted to the wall. Use your own lock to secure it in place.
To install the locking bar:
1Insert the locking bar through the opening in the side of the cradle, as
shown in Figure 6.
Figure 6 Inserting the Locking Bar
.11g
.100
.10
.11a
Deciding Where to Place the Bridge 13
2Push the locking bar through the opening until the hole on the locking
bar is exposed.
3Insert a lock through the hole on the locking bar, and then close the lock
to secure it in place, as shown in Figure 7.
Figure 7 Securing the Locking Bar
Placing the Bridge on
a Flat Surface
The Bridge comes with four rubber feet that can be used to install the
Bridge on a flat surface such as a table or desktop.
CAUTION: Do not place the Bridge on any type of metal surface. Select a
location that is clear of obstructions and provides good reception.
Remove the backing from the rubber feet and attach them to the bottom
of the cradle. After the rubber feet are installed, place the Bridge on a flat
surface.
.11g
.100
.10
.11a
14 CHAPTER 2: INSTALLING THE BRIDGE
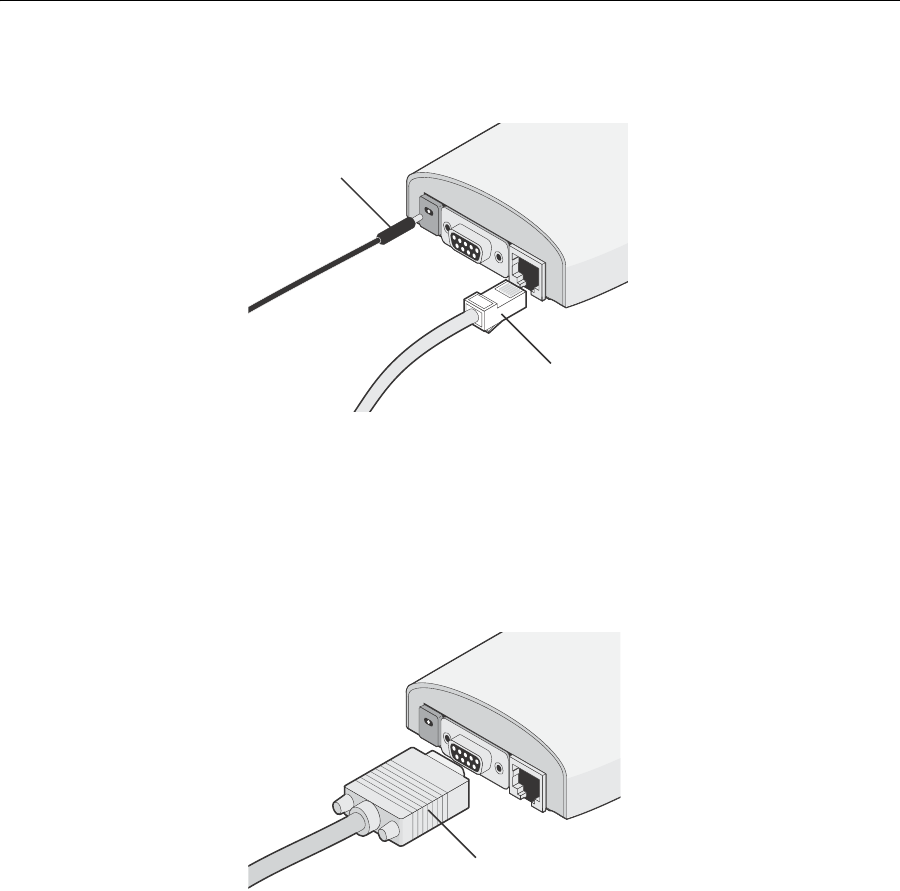
Connecting the
Bridge
The Bridge has power, Ethernet, and serial ports, as shown in Figure 8.
Before connecting the Bridge to an Ethernet device, connect the power.
Figure 8 Connecting the Power
Connecting to a
Serial Device
The Bridge can also be connected to a serial device, as shown in Figure 9.
Serial cables come with a variety of connector sizes. If your connector is
large and prevents the cradle from being attached to the Bridge, remove
the end cap on the cradle. This allows the connector to extend through
the cradle.
Figure 9 Connecting a Serial Cable
P
ow
e
r
C
a
bl
e
E
th
e
r
n
e
t
C
a
bl
e
S
e
r
i
a
l
C
a
bl
e
Connecting the Bridge 15
Connecting to an
Ethernet Device
The Bridge is designed to be connected to an Ethernet client device such
as a hub, computer, or printer.
CAUTION: To avoid the possibility of a transmission loop situation between
the Bridge and an access point, which could disrupt network operation, do
not connect a Bridge that is set in Wireless Client (Infrastructure) mode
directly to the LAN (for example, through a wall port or through a hub that is
connected directly to the LAN).
About the Client List The Bridge supports up to 16 specific Ethernet client devices. It uses a
client list of MAC addresses to keep track of specific devices that have
been connected.
After 16 different devices have been connected, the client list is full, and
you must clear it before the next new device can associate with the
network through the Bridge.
To clear the list, you must access the Bridge’s Configuration Management
System. Details are in “Clearing the Ethernet Client List” on page 45.
Connecting to a Hub You can supply network connections for up to 16 devices, such as
computers and network printers, by connecting the Bridge to an Ethernet
hub, as shown in Figure 10.
Figure 10 Connecting to a Hub
You can directly connect the Bridge to a hub that does not have an uplink
(MDIX) port, without the need of an Ethernet crossover cable.
.
11
g
.
100
.
10
.
11
a
H
ub
11
a
/
b
/
g
W
i
r
e
l
e
ss
W
o
r
k
g
r
oup
B
r
id g
e
U
plin
k
P
o
r
t
A
cc
e
ss
P
oint
POWER
POWER
ETHERNET
ETHERNET
WIRELESS
WIRELESS
16 CHAPTER 2: INSTALLING THE BRIDGE
Connecting to a
Network Printer
You can connect a network printer directly to the Bridge or to a hub that
is connected to the Bridge. Used this way, the Bridge allows you to place
network printers in areas that are not wired for Ethernet.
1Configure the network printer as you would for connecting it to the wired
LAN. For details on configuring the printer, see your printer documentation.
2If necessary, configure the Bridge to associate with your access point.
3Connect the Bridge to the power supply in its permanent location.
4Connect the network printer directly to the Bridge as shown in Figure 11,
or to a hub that is connected to the Bridge as shown in “Connecting to a
Hub” on page 15.
Figure 11 Connecting to a Network Printer
Connecting to a
Computer
You can connect the Bridge directly to a computer as shown in Figure 12.
Used this way, the Bridge can convert a desktop computer to a wireless
computer. This connection also allows you to configure a Bridge before
connecting it to another device.
Figure 12 Connecting to a Computer
.
11
g
.
100
.
10
.
11
a
11
a
/
b
/
g
W
i
r
e
l
e
ss
W
o
r
k
g
r
oup
B
r
id g
e
A
cc
e
ss
P
oint
POWER
POWER
ETHERNET
ETHERNET
WIRELESS
WIRELESS
.
11
g
.
100
.
10
.
11
a
11
a
/
b
/
g
W
i
r
e
l
e
ss
W
o
r
k
g
r
oup
B
r
idg
e
A
cc
e
ss
P
oint
POWER
POWER
ETHERNET
ETHERNET
WIRELESS
WIRELESS
Checking the LED Indicators 17
Checking the LED
Indicators
When the Bridge is connected to power, LEDs indicate activity as follows:
Figure 13 LED Indicators
Table 3 LED Descriptions
LED Color Indicates
Power Green
Off
The Bridge is powered up and operating
normally.
The Bridge is not receiving power or there is a
fault with the power supply.
11a Green (solid)
Green (blinking)
Off
The Bridge has an 802.11a 5 GHz radio band
connection.
The Bridge is transmitting WLAN frames over an
802.11a 5 GHz radio band.
No link is present.
11g Green (solid)
Green (blinking)
Off
The Bridge has an 802.11g 2.4 GHz radio band
connection.
The Bridge is transmitting WLAN frames over an
802.11g 2.4 GHz radio band.
No link is present.
100 Green (solid)
Green (blinking)
Off
The Bridge has a 100 Mbps Fast Ethernet
connection.
The Bridge has 100 Mbps Fast Ethernet activity.
No link is present.
10 Green (solid)
Green (blinking)
Off
The Bridge has a 10 Mbps Ethernet connection.
The Bridge has 10 Mbps Ethernet activity.
No link is present.
.11g
.100
.10
.11a
18 CHAPTER 2: INSTALLING THE BRIDGE
Attaching An
External Antenna
The Bridge has two internal diversity dual-band antennas.
If you want to increase the range of the Bridge, an external antenna can
be attached to the external antenna connector on the Bridge.
The 3Com-approved external antenna for this Bridge is the
3Com 2.4/5 GHz Omnidirectional Workgroup Bridge Antenna
(3CWE501). For more information, go to www.3Com.com
Determining if you
Need to Configure
the Bridge
If your network has a DHCP server and no special security requirements,
you can most likely use the Bridge just as it is shipped from the factory.
It takes approximately one to two minutes for the Bridge to determine if
there is a DHCP server on the network.
View the Bridge’s default settings on page 20 to determine whether or
not you need to configure the Bridge for your network. If the factory
defaults meet your requirements, you can connect the Bridge as
described in “Connecting the Bridge” on page 14.
If your network does not have a DHCP server or is more complex, you
may have to configure the Bridge and organize devices so that you can
manage the wireless LAN easily and keep it secure. You can use the
3Com Wireless Infrastructure Device Manager (Widman) included on the
3Com Installation CD.
For non-U.S. versions of the Bridge, you need to set the Country mode.
This is done when you first open the Bridge’s Configuration Management
System. See “Using the Configuration Management System” on page 27
for instructions.
Networks with a DHCP Server
If your network has a DHCP server, an IP address is automatically assigned
to the Bridge. Use the 3Com Wireless Infrastructure Device Manager
(Widman) included on the 3Com Installation CD to locate the Bridge on
the network and view its IP address.
Alternatively, you can enter the Bridge’s IP address into a web browser on
a computer on the same subnet to view the Bridge’s system status or
change its configuration. See “Configuring the Bridge” on page 23 for
instructions.
Determining if you Need to Configure the Bridge 19
Networks without a DHCP Server
If your network does not have a DHCP server, the Bridge uses a default
IP address (169.254.2.2) that is assigned at the factory. You can use that
IP address to configure the Bridge, or you can assign a new IP address to
the Bridge.
To verify that the Bridge is using the default IP address assigned at the
factory:
1Connect a computer directly to the Bridge using the supplied standard
Category 5 UTP Ethernet cable.
See Figure 12 on page 16 for a connection diagram.
2Enter the Bridge’s default IP address (169.254.2.2) into the computer’s
web browser.
■If the Configuration Management System starts, the Bridge is using
the factory assigned IP address. You can configure the Bridge with the
following login information:
■Login name: admin
■Password: none (blank)
See “Configuring the Bridge” on page 23 for detailed instructions.
■If the Configuration Management System does not start, the Bridge is
on a different subnet than the computer. Install and start the 3Com
Wireless Infrastructure Device Manager to discover the Bridge’s IP
address. See “Using the 3Com Wireless Infrastructure Device
Manager” on page 24 for instructions.

20 CHAPTER 2: INSTALLING THE BRIDGE
Bridge Default Settings
Table 4 shows the Bridge configuration factory defaults.
Table 4 Factory Default Settings
Property Default Setting
Device Name 3Com WWB
Device Location None
Country For U.S. versions, United States and Canada
For non-U.S. version, set by the user
Client Mode Support multiple wired Ethernet clients
IP Network Setting Obtain IP address automatically
IP Address Obtained automatically (with a DHCP server)
169.254.2.2 (without a DHCP server)
Subnet Mask Obtained automatically (with a DHCP server)
255.255.0.0 (without a DHCP server)
Gateway IP Address Obtained automatically (with a DHCP server)
0.0.0.0 (without a DHCP server)
Network Mode Wireless Client (Infrastructure)
Radio Mode Auto Select
Wireless LAN Service Area Attach to any WLAN Service Area (ESSID) automatically
Channel Selection Automatic Best Channel (uses access point setting)
Transmit Power 100%
Antenna Selection Internal
Data Preamble Long (if Network Mode is set to Ad-Hoc)
Same as access point setting (if Network Mode is set
to Wireless Client [Infrastructure])
Security Setting Open System (no security)
802.1x Authentication State Disabled
SNMP Enabled
Administration Login Name admin
Administration Password None (blank)
TFTP Server IP Address None
FTP Server IP Address None

Using the 3Com Installation CD 21
Using the 3Com
Installation CD
The 3Com Installation CD contains the following tools and utilities:
■3Com Wireless Infrastructure Device Manager—an administration
tool that helps you select 3Com wireless LAN devices and launch their
configurations in your Web browser.
■3Com 3CDaemon Server Tool—a firmware upgrade tool that can
act in four different capacities:
■As a TFTP Server, used for firmware upgrades as well as backup
and restore functions.
■As a SysLog Server, which is necessary to view SysLog messages.
■As an optional TFTP Client.
■As an optional FTP Server.
To use the 3Com Installation CD, you need a computer running one of the
operating systems and browser listed in Table 5.
Table 5 Supported Operating Systems and Browser
Operating Systems Windows XP
Windows 2000
Windows NT 4.0
Windows Me
Windows 98
Browser Internet Explorer (latest version is recommended)
22 CHAPTER 2: INSTALLING THE BRIDGE
To install one of the tools on your computer:
1Turn on the computer.
2Insert the 3Com Installation CD in the CD-ROM drive.
The setup menu appears. If it does not appear, you can start the setup
menu from the Windows Start menu. For example: Start > Run >
d:setup.exe.
3In the menu, click Tools and Utilities.
4In the next screen, click the tool you want to install.
5Follow the instructions on the screens to complete the installation.
Reboot the computer if prompted to do so.
6Launch the tool from the Windows Start menu.
For details on using the Wireless Infrastructure Device Manager, see
“Using the 3Com Wireless Infrastructure Device Manager” on page 24.
For instructions on using the 3CDaemon Server Tool, see the application’s
online help.

3CONFIGURING THE BRIDGE
If the Bridge configuration that was set at the factory does not meet your
network requirements, or if you want to customize the settings, you can
use these tools to change the configuration:
Using Secure Web
Server Connection
The Bridge can be configured using Secure Socket Layer (SSL) technology,
which is used to encrypt data exchanged between the computer and the
Bridge during a configuration session.
Without SSL enabled, data is exchanged in the form of plain text and can
be intercepted during the configuration session.
You must enable the HTTPS option to establish a secure session.
See “WebUI Protocol” in Table 9 on page 30 for instructions.
Table 6 Configuration Tools
Configuration Tool Description
3Com Wireless
Infrastructure Device
Manager (Widman)
Helps you locate 3Com wireless LAN devices on the
network, select a device and view its properties, and
launch the device’s configuration in your Web browser.
See “Using the 3Com Wireless Infrastructure Device
Manager” on page 24 for details.
3Com 11a/b/g Wireless
Workgroup Bridge
Configuration
Management System
Resides on the Bridge and lets you configure the Bridge
through your Web browser.
See “Using the Configuration Management System” on
page 27 for details.
Command-line Interface Allows you to view and modify the Bridge configuration
from a terminal or PC through a Telnet connection.
See Appendix A, “Command-Line Interface” for details.

24 CHAPTER 3: CONFIGURING THE BRIDGE
Using the 3Com
Wireless
Infrastructure
Device Manager
The 3Com Wireless Infrastructure Device Manager (Widman) helps you
locate 3Com wireless LAN devices on the network, select a device and
view its properties, and launch the Configuration Management System in
your Web browser.
The Wireless Infrastructure Device Manager must be installed on a
computer that:
■Has a working Ethernet adapter.
■Is running Internet Explorer and one of the Windows operating
systems listed in “Using the 3Com Installation CD” on page 21.
■Is on the same subnet as the Bridge.
See “Using the 3Com Installation CD” on page 21 for installation
instructions.
The device to be configured using the Wireless Infrastructure Device
Manager must be:
■Connected to power.
■Wired to the network, associating with the wireless network, or, in
some cases with the Bridge, connected directly to the computer.
If there is more than one device with the same name in the network (for
example, 3Com WWB), make a note of the MAC address of the device
you want to select so that you can identify it in the device manager.
If you do not have a DHCP server on your network, it can take up to one
minute for a device to become discovered after it has been powered up.
To use the 3Com Wireless Infrastructure Device Manager:
1Launch the device manager by selecting Start > Programs >
3Com Wireless > Wireless Infrastructure Device Manager.
If you have more than one network adapter installed on your computer,
you may be prompted to choose a network adapter. Choose the
appropriate adapter and click OK.
The Wireless Network Tree appears in the 3Com Wireless Infrastructure
Device Manager window, as shown in Figure 14.
The tree lists all WLAN service areas on the network and expands to show
the 3Com wireless LAN devices that are associated to each service area.

Using the 3Com Wireless Infrastructure Device Manager 25
Devices in a different subnet than your computer are identified with
exclamation points (!). You can refresh this display by clicking Refresh. You
should refresh the display, for example, after you change a device IP address.
Figure 14 Wireless Infrastructure Device Manager Wireless Network Tree
2In the Wireless Network Tree, select the device you want to configure.
If more than one wireless LAN device appears in the tree and you are not
sure that you have selected the right one, click Properties and check the
MAC address to verify that it is the one you want.
3Click Configure.
■If the selected device is on the same subnet as your computer, the
Configuration Management System main page appears in your Web
browser. See “Using the Configuration Management System” on
page 27, for details.
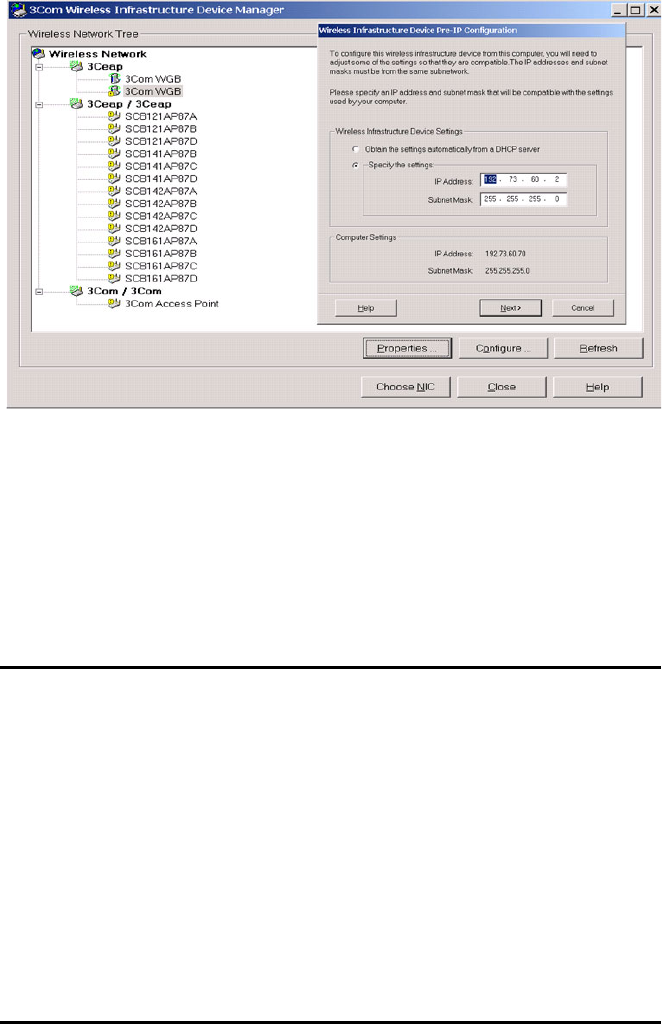
■If the selected device is on a different subnet, the device manager
helps you to assign an IP address on the same subnet as your
computer, as shown in Figure 15. You may accept the address offered
or enter an address and click Next.
26 CHAPTER 3: CONFIGURING THE BRIDGE
Figure 15 Wireless Infrastructure Device Manager Pre-IP Configuration
4The next window prompts for an administrative password to allow the
new IP address to be set. If this is the first time the device is being
configured, leave the password field blank and click Next.
The configuration main page appears in your Web browser. See “Using
the Configuration Management System” on page 27 for details.
Table 7 describes the functions of the buttons in the 3Com Wireless
Infrastructure Device Manager window.
Table 7 Infrastructure Device Manager Options
Button Description
Properties Displays the following properties of the selected device:
Device Name, Device Type, Wireless LAN Service Area (ESSID),
IP Address, Subnet Mask, and MAC Address.
Configure Launches the Configuration Management System for the
selected device. If the selected device is on a different subnet,
you are prompted to assign an address on the same subnet as
your computer.
Refresh Scans the network and displays the connected 3Com 11a/b/g
Wireless LAN devices.
Choose NIC If your computer has more than one network interface card
installed, allows you to choose which card to use.
Close Closes the device manager window and ends the session.
Help Launches the device manager help page in your browser.

Using the Configuration Management System 27
Using the
Configuration
Management
System
The 3Com11a/b/g Wireless Workgroup Bridge Configuration
Management System resides on the Bridge and lets you configure the
Bridge through your Web browser.
To use the Configuration Management System, the computer you are
using to connect to the Bridge must be located on the same subnet as
the Bridge.
There are two ways to access the Configuration Management System:
■Enter the IP address of the Bridge in your computer’s web browser.
■Start the 3Com Wireless Infrastructure Device Manager, locate the
Bridge, and then click Configure.
For non-U.S. versions of the Bridge, when you first open the
Configuration Management System you are prompted to select the
country in which the Bridge is operating. Select the country in which the
Bridge is installed to ensure compliance with local regulations, and then
click Apply.
When you first open the Configuration Management System, you are
prompted for a user name and password:
■User name — admin
■Password — blank (press enter)
The Configuration Management System displays the Connection Status
page, as detailed in Table 8.
Table 8 Connection Status Page
Property Description Default Value
Connection The MAC address of the associated
access point. N/A
Network Type The type of network for which the
Bridge is configured: Wireless
Client (Infrastructure) or Ad-hoc
(Peer-to-Peer).
Wireless Client
(Infrastructure)
SSID The Service Set ID. Varies (Infrastructure)
3Com (Ad-Hoc)

28 CHAPTER 3: CONFIGURING THE BRIDGE
Clearing and
Applying System
Configuration
Settings
The pages in the Configuration Management System have two buttons:
Clear and Apply.
■Clear returns the settings to the values they were when you last
clicked Apply.
■Apply stores the settings permanently in the nonvolatile flash memory.
After you click Apply, the new settings take effect and you can see the
changes on the System Summary page.
CAUTION: Your changes are lost if you forget to click Apply before:
moving to a new configuration page, resetting the device, or closing the
browser.
Radio Mode The radio channel over which the
Bridge is communicating with
clients.
2.4 GHz 54 Mbps
(802.11g)
Current Channel The channel over which the Bridge
is communicating with clients. N/A
Security The type of security for which the
Bridge is configured. Open System
(no security)
Rx Data Rate (Mbps) The rate at which the Bridge is
receiving information. N/A
Tx Data Rate (Mbps) The rate at which the Bridge is
transmitting information. N/A
Link Quality The normalized transmitted data
rate (that is, the current data rate
over the maximum data rate).
Note: Link Quality is shown in
Infrastructure mode only.
N/A
Signal Strength The strength of the radio signal
that the Bridge detects. N/A
Activity (Packets Rx) The number of packets the Bridge
has received. N/A
Activity (Packets Tx) The number of packets the Bridge
has transmitted. N/A
IP Address The IP address of the Bridge. Varies
Table 8 Connection Status Page (continued)

Using the Configuration Management System 29
Changing System
Properties
Under System Configuration, click System Properties. The System
Properties page displays the properties of the selected Bridge. You can
change properties by entering a value in a field (see Table 9). When you are
finished, click Apply. Table 9 describes the properties.
Table 9 System Properties Page
Property Description Default Value
Device Name This name appears in the System
Summary window. You can change the
default name to one of your choice.
3Com WWB
Device Location If you use the default device name,
entering the location is optional. N/A
Client Mode This setting allows the Bridge to support
single or multiple Ethernet clients
attached to the Bridge.
Support Single Wired Ethernet Client is
used only when the Bridge is used for
replacement of a 3Com Ethernet Client
Bridge. Select a MAC option:
■Capture: Each time the Bridge is
powered on, it captures its MAC
address from the first packet it
receives on the Ethernet port. The
Bridge detects and uses the same
MAC address as the device plugged
into the Ethernet port.
The Bridge uses the previously
captured MAC address upon
power-on until the first packet is
received on the Ethernet port.
■Dynamic: The Bridge changes its
MAC address each time the device
plugged into the Ethernet port
changes.
The Bridge detects the MAC address
of the device plugged into the
Ethernet port and uses that as its
own. The Bridge uses the built-in
MAC address upon power-on until a
packet is received on the Ethernet
port.
■Built-in: The Bridge uses the
manufacturing radio MAC address
as default.
Support multiple wired
Ethernet clients

30 CHAPTER 3: CONFIGURING THE BRIDGE
Setting IP Network
Properties
Under System Configuration, click IP Network. The IP Network Properties
page appears, where you can change the settings shown in Table 10.
If you change the IP address and click Apply, you cannot continue to
configure the device using the old IP address. Therefore, you must do the
following steps after changing the IP address:
1Close your browser.
2Return to the 3Com Wireless Infrastructure Device Manager and click
Refresh.
3Select the device and click Configure to start a new configuration session.
Table 10 describes the IP Network properties.
Web GUI
Protocol This setting allows users to enable the
secure data exchange scheme over SSL
during a configuration session.
■HTTPS — enables SSL technology.
■HTTP — disables SSL technology.
HTTP
Table 9 System Properties Page (continued)
Table 10 IP Network Properties Page
Setting Description
IP Network Setting This setting allows you to change the IP address of the device.
To let the device get an IP address automatically from a DHCP
server, select Obtain an IP address automatically and click
Apply.
To specify an IP address, select Specify an IP address, enter the
IP address parameters in the spaces provided, and click Apply.
IP Address When Specify an IP address is selected, enter the IP address in
the space provided, and click Apply.
Subnet Mask When Specify an IP address is selected, enter the Subnet Mask
in the space provided, and click Apply.
Gateway IP
Address When Specify an IP address is selected, enter the Gateway IP
Address in the space provided, and click Apply.

Using the Configuration Management System 31
Setting Wireless
Network Properties
Under System Configuration, click Wireless Network. The Wireless
Network Properties page appears, where you can select different wireless
settings, as described in Table 11. When you are finished, click Apply.
Table 11 Wireless Network Page
Setting Description
Network Mode Select Wireless Client (Infrastructure) to associate with an
access point.
Select Ad-hoc (Peer-to-Peer) to join or form an ad-hoc
network.
Radio Mode See “Network Configuration and Planning” on page 7 for
information on selecting the best Radio Mode for your
network.
Select Auto Select to have the Bridge select the best
Radio Mode automatically.
Select 802.11a to set the Bridge to operate in 802.11a mode.
Select 802.11a Turbo to set the Bridge to operate using
802.11a Turbo mode. In some countries you can use
Turbo Mode, allowing the Bridge to operate with a data rate of
up to 108 Mbps. If Turbo Mode is not allowed in your country,
this option is not available.
Select 802.11b/802.11g to set the Bridge to operate in
802.11b/802.11g mode.
Select 802.11g Turbo to set the Bridge to operate using
802.11g Turbo mode. (See 802.11a Turbo description above.)
Wireless LAN
Service Area Select Attach to any WLAN Service Area (ESSID) automatically
to allow the Bridge to associate with any access point without
specifying the ESSID. In this mode, the Bridge uses the ESSID of
the access point with the best signal strength. This mode is not
available when the network mode is Ad-hoc (Peer-to-Peer).
Select Specify the Wireless LAN Service Area to allow the
Bridge to associate only with access points with the same
service area. You may enter the WLAN service area name or
select it from the list. You must specify the WLAN service area
when the network mode is Ad-hoc (Peer-to-Peer).
To maintain a wireless association, the WLAN service area on a
Bridge and the access point with which it is associated must
match exactly. Therefore, if the Bridge is set to Specify the
WLAN Service Area and you change the access point WLAN
service area, make sure to also change the Bridge WLAN
service area.

32 CHAPTER 3: CONFIGURING THE BRIDGE
Channel Selection If Radio Mode is set to Auto Select, you do not have the
following options to choose from.
When the network mode is Wireless Client (Infrastructure), a
user may have the Bridge automatically select an appropriate
channel by using Automatic Best Channel or specify the
channels by using Specify Channel.
When the network mode is Ad-hoc (Peer-to-Peer) you may
specify channel selection as follows:
■Automatic Best Channel—When this option is enabled, the
Bridge scans the primary channels. If the Bridge is
establishing a new ad-hoc network, it chooses the channel
with the least number of packets. If the Bridge is joining an
existing ad-hoc network, it selects the channel in use.
■Specify Channel—Click the button preceding this option
and enter the Advanced Wireless Network page. On this
page, you can choose channels from the Channel list.
Transmit Power This option specifies the level of transmission power. Select
one of the values (100%, 50%, 25%, 12%, min) from the
drop-down menu.
Decrease the Transmit Power setting if more than one Bridge is
using the same channel frequency.
Antenna Selection Select an antenna for the radio signal:
■Internal — this default setting should be used in most
circumstances.
■External and one internal antenna — this setting
automatically determines which antenna is best for sending
packets to individually attached clients. Choose this setting
if the Bridge is located in a place that is surrounded or
hindered by metal paths or walls.
Data Preamble To increase performance, click Short (Enhanced performance).
When equipment that does not support short preamble is also
being used, click Long (Wi-Fi Interoperable).
Note: The Data Preamble option is available in ad-hoc mode
only. This option is not available for 802.11a and 802.11a
Turbo modes.
Table 11 Wireless Network Page (continued)

Using the Configuration Management System 33
Setting Up an Ad-Hoc
Network
Operating in ad-hoc mode, two or more Bridges can associate among
themselves to form an ad-hoc network without the intervention of an
access point. You may wish to set up an ad-hoc network, for example, if
a group is working away from the office, or if a group in the office needs
to share files apart from the wired LAN.
CAUTION: To ensure correct operation, the settings on the two Bridges
must match exactly. To avoid the possibility of losing wireless association
while you are configuring, 3Com recommends that you connect the Bridge
directly to the computer.
1Connect the first Bridge to power and use the Ethernet cable to connect
it to the computer.
2Use the 3Com Wireless Infrastructure Device Manager to select the
Bridge and launch the Configuration Management System.
3Under System Configuration, click Wireless Network.
4In the Wireless Network page:
aLocate the Network Mode field and select Ad-hoc (Peer-to-Peer).
bSpecify the Wireless LAN Service Area and the Channel Selection as
described in “Setting Wireless Network Properties” on page 31.
cSet the Data Preamble.
To increase performance, select Short (Enhanced performance). When
equipment that does not support short preamble is also being used,
select Long (Wi-Fi Interoperable). When you are finished, click Apply.
Security settings default to Open System (no security). Optionally, you can
set different WEP settings as described in “Changing Wireless Security
Settings” on page 34.
5When you are finished, click Apply.
6End the browser session.
7Repeat steps 1–6 with the second Bridge. Make sure you configure
Bridge settings to match exactly. When you are finished, click Apply and
end the browser session.
8Connect the Ethernet devices to the Bridges. If you use hubs, make sure
that the Bridges are connected through the hub uplink ports.
34 CHAPTER 3: CONFIGURING THE BRIDGE
Changing Wireless
Security Settings
Under System Configuration, click Wireless Security. The Wireless Security
Settings page appears, where you can select the type of security to be
used on the Bridge.
The Bridge can be configured to support three types of data encryption:
WEP, TKIP, and AES. After selecting a data encryption type, you can
select an authentication type.
The following sections describe the settings. To maintain wireless
association, the settings on clients and the access points they associate
with (or other members of an ad-hoc network) must match exactly.
No Security (Open System)
No encryption is used. The network communications could be intercepted
by unintended recipients.
40/64-bit Shared Key (WEP)
This option encrypts the wireless transmissions to protect data, but still
allows communication among compatible wireless LAN clients and access
points from third-party manufacturers that are Wi-Fi certified.
This type of security requires you to set up encryption in one of the
following ways:
■String—For use only with other 3Com 11a/b/g wireless devices, an
encryption string is a case-sensitive string of characters between 6 and
30 characters long. To enter the string, select Enter a string to
generate shared keys. Then type any combination of letters and
numbers in the space provided and select Apply.
■Shared keys—Hexadecimal keys are sequences of hexadecimal digits
arranged into four keys. A hexadecimal digit may be a letter from
A to F or a number from 0 to 9. This type of encryption is compatible
with equipment from other manufacturers that use Wi-Fi certified
40-bit encryption. To enter the keys, select Specify shared keys and
which to use. In the shared keys window, enter all the keys in the
provided spaces, then select a radio button in the Selected Key
column to specify which key to use and select Apply.

Using the Configuration Management System 35
104/128-bit Shared Key
This option can be used with other 3Com 11a/b/g Wireless LAN devices
and with equipment from certain manufacturers that also support 128-bit
shared key encryption. It provides a higher level of security than the 40-bit
Shared Key (Wi-Fi) option and uses a more complicated type of encryption.
This type of security requires you to set up encryption using a string or
shared keys as described in “40/64-bit Shared Key (WEP)” on page 34.
128/152-bit Shared Key
This option can be used with other 3Com 11a/b/g Wireless LAN devices
and with equipment from certain manufacturers that also support 152-bit
shared key encryption. It provides a higher level of security than the 128-bit
Shared Key option and uses a more complicated type of encryption. This
type of security requires you to set up encryption using a string or shared
keys as described in “40/64-bit Shared Key (WEP)” on page 34.
Click the button preceding Specify Shared Keys and Which Key to Use to
create or modify WEP keys.
TKIP
The Temporal Key Integrity Protocol (TKIP) option improves data
encryption over WEP scheme by dynamically updating the encryption
keys every 10,000 packets. TKIP provides per-packet key mixing, a
message integrity check, and a re-keying mechanism.
To use TKIP:
1On the Wireless Security page, select TKIP.
2Select WPA-PSK for home network or WPA for the scenarios where
RADIUS servers are employed:
■WPA-PSK: Enter a pass-phrase key or hexidecimal key. The key can be
generated based on a pass-phrase or a sequence of manually entered
64 hexidecimals. The 64 hexidecimals can be automatically generated
by selecting Generate a Random Key.
■WPA: Select an authentication scheme (TTLS or PEAP), a relevant
authentication type, a user name, and a password. If you select TLS,
enter an upload file name and password, and then select Upload.
3Select Apply.
Click the button of TKIP to set TKIP relevant parameters.

36 CHAPTER 3: CONFIGURING THE BRIDGE
AES
The Advanced Encryption Standard (AES) option uses the highest security
cipher for data encryption.
To use AES:
1On the Wireless Security page, select AES.
2Select WPA-PSK for home network or WPA for the scenarios where
RADIUS servers are employed:
■WPA-PSK: Enter a pass-phrase key or hexidecimal key. The key can be
generated based on a pass-phrase or a sequence of manually entered
64 hexidecimals. The 64 hexidecimals can be automatically generated
by selecting Generate a Random Key.
■WPA: Select an authentication scheme (TTLS or PEAP), a relevant
authentication type, a user name, and a password. If you select TLS,
enter an upload file name and password, and then select Upload.
3Select Apply.
Click the button of AES to set or modify AES relevant parameters.
Changing RADIUS
Settings
Under System Configuration, click RADIUS. The RADIUS page appears,
where you can set the primary and secondary RADIUS Server settings.
This page allows for configuration of a Remote Access Dial-in User Service
(RADIUS) server for authentication purposes in 802.1x networks. You can
change the settings by entering values in the fields as described in
Table 12. When you are finished, select Apply.
Table 12 RADIUS Authentication Server Settings
Setting Description
802.1x Authenticator
State Enable or disable RADIUS authentication by selecting Enable
or Disable.
Primary RADIUS
Server Enter the IP address of the primary RADIUS Authentication
Server. Make sure this address matches the address set in the
RADIUS Authentication software.
Primary RADIUS Port Enter the port number of the primary RADIUS Authentication
Server. Make sure this number matches the number set in the
RADIUS Authentication software. The default port is 1812.
Primary RADIUS
Secret Enter the password of the primary RADIUS Authentication
Server. Make sure this password matches the password set in
the RADIUS Authentication software.

Using the Configuration Management System 37
Changing SNMP
Settings
Under System Configuration, click SNMP to display and change settings
for the Simple Network Management Protocol.
To communicate with the Bridge, the SNMP agent must first be enabled
and the Network Management Station must submit a valid community
string for authentication.
Secondary RADIUS
Server Enter the IP address of the secondary RADIUS Authentication
Server. Make sure this address matches the address set in the
RADIUS Authentication software.
Secondary RADIUS
Port Enter the port number of the secondary RADIUS
Authentication Server. Make sure this number matches the
number set in the RADIUS Authentication software. The
default port is 1812.
Secondary RADIUS
Secret Enter the password of the secondary RADIUS Authentication
Server. Make sure this password matches the password set in
the RADIUS Authentication software.
Table 12 RADIUS Authentication Server Settings (continued)
Table 13 SNMP Settings
Setting Description
SNMP Enables or disables SNMP.
Contact Sets the location string that describes the system location.
Maximum length: 255 characters.
Community Name
(Read Only) Specifies a community string with read-only access.
Authorized management stations are able to retrieve MIB
objects. Maximum length: 23 characters.
Community Name
(Read/Write) Specifies a community string with read-write access.
Authorized management stations are able to both retrieve
and modify MIB objects. Maximum length: 23 characters.
Trap Destination
IP Address Enter the IP address of the trap manager that will receive
these messages.
Trap Destination
Community Name Enter the community name of the trap manager that will
receive these messages.

38 CHAPTER 3: CONFIGURING THE BRIDGE
Using the Access
Control List
You can determine which clients can access the Bridge using the Access
Control List.
Follow these steps:
1Launch the Configuration Management System.
2Under System Configuration, click Access Control List.
3In the Access Control List page, click Add.
The Access Control List New ACL page appears.
4Enter the MAC address of the client you want to add to the
Access Control List, and select the permission type.
5Repeat steps 3 and 4 for each client.
6Select the Access Control List (ACL) Type:
■Allow—allows the client to access the Bridge.
■Deny—prohibits the client from accessing the Bridge.
CAUTION: Make sure that the MAC address of the computer through
which you are configuring the Bridge is included in the control list if you
want to set the access control type to Allow. If you want to set the access
control type to Deny, make sure that the MAC address of the computer is
not included in the access control list. Failure to do so results in access to
the Bridge being blocked; the Bridge will no longer be configurable
through the computer.
7Click Save.
To delete a client from the Access Control List, highlight the client and
then click Delete.
Using the Configuration Management System 39
Serial Port Under System Configuration, click Serial Port to set up network serial port
operation.
About UART
A Universal Asynchronous Receiver/Transmitter (UART) is the
fundamental hardware for serial communication, controlling the speed
and method of data transfer of the serial port.
Applications utilizing a network serial port between an RS-232 interface
and a wireless device use a TCP/IP socket connection. Any program that
uses standard TCP/IP network sockets may be used to communicate with
the serial port of the Bridge. Once a socket is established to the Bridge,
any data written to the socket is sent out the serial port of the Bridge. At
the same time, any data received by the serial port of the Bridge is
returned via the socket connection.
The Bridge network serial port may be used in two modes:
■Server Mode — TCP Listen Port
■Client Mode — TCP Connect Port
In Server Mode, the Bridge waits for a TCP/IP socket connection to be
made by the network program with which it will communicate.
Server Mode should be used if you have a central server that expects to
open a TCP/IP socket connection to the Bridge.
In Client Mode, the Bridge establishes a socket connection to the
IP address and port number specified in the configuration. Client Mode
should be used if your system expects the Bridge to open a TCP/IP socket
connection to a central server.
Configuring UART Settings
For proper operation, it is imperative that these settings always match the
settings of the device to which the bridge is connected via the RS-232
port. There are two groups of parameters that need to be configured to
accomplish this task: UART Settings and Flow Control Settings.
Flow control is the process of adjusting the flow of data from one device
to another to ensure that the receiving device can handle all of the
incoming data.
40 CHAPTER 3: CONFIGURING THE BRIDGE
To configure the UART settings:
1Select the baud rate of your device.
The baud rate indicates the data transfer rate of the serial port. The baud
rate ranges from 300 to 115200 bits per second (bps). Standard rates are
300, 1200, 2400, 9600, 19200, 38400, 57600, 115200.
2Determine the data bits setting of the device you are connecting to the
Bridge, then set the Data Bits setting for the bridge that matches the data
bits setting of that device.
The Data Bits setting determines the number of bits used to transmit
data. The possible values are 7 and 8.
3Determine the stop bits setting of the device you are connecting to the
Bridge, then set the Stop Bits setting on the Bridge that matches the stop bits
setting of that device.
The Stop Bits setting determines the number of bits used to represent an
end of a character. The value can be 1 or 2.
4Determine the parity bit setting of the device you are connecting to the
Bridge, then set the Parity Bit setting on the Bridge that matches the parity
bit setting of that device.
The Parity Bit setting is used to check for correct data transmission.
Options are: none, even, and odd.
5Set the flow control setting.
Flow control becomes an important factor when one of the devices is
capable of transmitting data at a rate faster than the other can receive it.
There are two basic types of flow control, hardware and software.
Configuring Operation Mode
■Select CLI Console if you want to configure the Bridge through
CLI commands.
Attach your computer to the serial port on the Bridge, and then
configure the Bridge through the computer.
■Select Network Serial Port to establish a TCP/IP socket with a remote
computer in either infrastructure or ad-hoc mode. This allows you to
do data communication with the remote computer, rather than
configure the Bridge.
Using the Configuration Management System 41
Configuring Network Serial Port Settings
For Server Mode, click Server Mode and enter the port number to which
the Bridge connects in the List on port field. The default port number is
4000.
For Client Mode, select Client Mode and enter the IP address and port
number to which the Bridge connects. The default port number is 4000.
Applying Settings
After you set the UART settings, operation mode, and network serial port
settings, select Apply to make the settings take effect.
The socket can be substantially established between a client and server;
that is, a Bridge in server mode and the other in client mode. The Bridge
with the Network Serial Port option set cannot work alone. Generally, a
Bridge is set to server mode first, which listens to a designated port. The
other Bridge is then set to client mode, which connects to the designated
port on the IP address of the Bridge set to server mode.
Resetting the Bridge If the Bridge stops responding correctly, you can perform a reset, which
disrupts the network association temporarily, but does not affect Bridge
configuration settings that have already been applied with Apply.
To reset the Bridge, under Tools, click Reset Wireless Workgroup Bridge.
In the next page, click Reset.
The Bridge can also be reset using the Wireless Infrastructure Device
Manager (Widman). Right-click the Bridge in Widman, and then select
Reset.
42 CHAPTER 3: CONFIGURING THE BRIDGE
Restoring the Bridge
to Factory Defaults
You can restore Bridge settings to the defaults that were set at the
factory either manually or through software.
To restore the settings manually, insert a pointed object (such as the end
of a straightened paper clip) into the reset hole on the back of the unit
near the RJ-45 connector and hold for five seconds.
To restore the settings through software:
1Under Tools, click Restore Factory Defaults.
2Click Restore.
If the Bridge was using an IP address setting other than the default,
restoring the factory defaults will change the IP address. If you want to
continue configuring the Bridge, do the following:
1Close your browser.
2Return to the 3Com Wireless Infrastructure Device Manager and click Refresh.
3Select the device and click Configure to start a new configuration session.
Upgrading the
System
You can download firmware updates or updates of the Configuration
Management System from the 3Com Web site and install those updates
on the Bridge.
Options for upgrading the system include using a Trivial File Transfer Protocol
(TFTP) server or File Transfer Protocol (FTP) server. The Bridge acts as a TFTP or
FTP client to receive the download. Alternatively, you an use the HTTP option
and upload the firmware from a downloaded file placed on your computer.
Information regarding upgrade availability and procedures can be
obtained from the 3Com Web site as follows:
1Log on to the 3Com Web site at http://www.3com.com.
2Navigate to the product support page for the 3Com 11a/b/g Wireless
Bridge to access the downloads and instructions.
3Follow the instructions at the 3Com Web site.
Using the Configuration Management System 43
Using TFTP
The general instructions for installing the upgrade using TFTP are:
1Launch the Configuration Management System.
2Under Tools, click Upgrade System.
3Select TFTP.
4Enter the file name for the firmware.
5Enter the IP address of the TFTP server where the upgrade files are located.
6Click Upgrade.
Using FTP (default)
The general instructions for installing the upgrade using FTP are:
1Launch the Configuration Management System.
2Under Tools, click Upgrade System.
3Select FTP.
4Enter the file name for the firmware.
5Enter the IP address of the FTP server where the upgrade files are located.
6Enter the user name, password, and filename in the appropriate fields.
7Click Upgrade.
Using HTTP
The general instructions for installing the upgrade using HTTP are:
1Launch the Configuration Management System.
2Under Tools, click Upgrade System.
3Select HTTP.
4Click Browse to locate the downloaded firmware file.
5Click Upgrade to start the upgrade process.
The upgrade takes place through the HTTP protocol from the local
computer.
44 CHAPTER 3: CONFIGURING THE BRIDGE
Changing the
Administration Login
Name and Password
3Com recommends that you set a password to protect against
unauthorized access. After you set the password, you must enter it each
time you launch the configuration for the device.
Under Tools, click Change Administration Password. The Change
Administration Password page appears, where you can change the login
name and administration password for the device. Enter the current
password and new password in the spaces provided and click Save.
Backing up a
Configuration
As part of system maintenance, you should save and back up the
configurations of individual Bridges in case you need to reload them in
the future. The backup saves all the parameters of the selected Bridge in
a file on your computer. The file can be used later to restore the
configuration on this or another bridge.
1Set the Bridge parameters in the System Configuration pages.
2Under Tools, click Backup Wireless Workgroup Bridge.
3In the next page, click Backup Now.
4Specify a name and location for the backup, and click OK.
Restoring a
Configuration
If you have stored a backup configuration on your computer, you can
restore the configuration as follows:
1Under Tools, click Restore Wireless Workgroup Bridge.
2In the next page, click Browse and select the backup file to upload.
3Click Restore.
The configuration is restored and activated on the Bridge. This operation
may cause the Bridge to reboot.
If the Bridge was using an IP address setting other than the backup,
restoring the configuration will change the IP address. If you want to
continue configuring the Bridge, do the following:
1Close your browser.
2Return to the 3Com Wireless Infrastructure Device Manager and click Refresh.
3Select the device and click Configure to start a new configuration session.
Using the Configuration Management System 45
Logging Out To log out of the Configuration Management System, click Logout under
Tools.
Viewing Connection
Status
Under System Summary, click Connection Status to view a summary of
the Bridge’s current connection information. See Table 8 on page 27 for
details.
Clearing the Ethernet
Client List
The Bridge supports up to 16 specific clients (for example, computers and
printers) and keeps track of the clients with a list of their MAC addresses.
After the client limit is reached, you must clear the client list to allow a
new client to associate with the network. For example, in a hub
configuration with 16 clients connected, if you disconnect a desktop
computer and connect a new laptop in its place, you must clear the client
list to establish network association for the laptop.
To clear the Ethernet Client List:
1Disconnect a client by unplugging its Ethernet cable from the hub or the
Bridge.
2Launch the Configuration Management System.
3Under System Status, click Ethernet Client List.
4In the Ethernet Client List page, click Clear Client List.
The Bridge erases the client list. Clients that remain connected to the Bridge
are added to the list automatically when they next interact with the network.
5Connect the new client by plugging its Ethernet cable into the hub or the
Bridge.
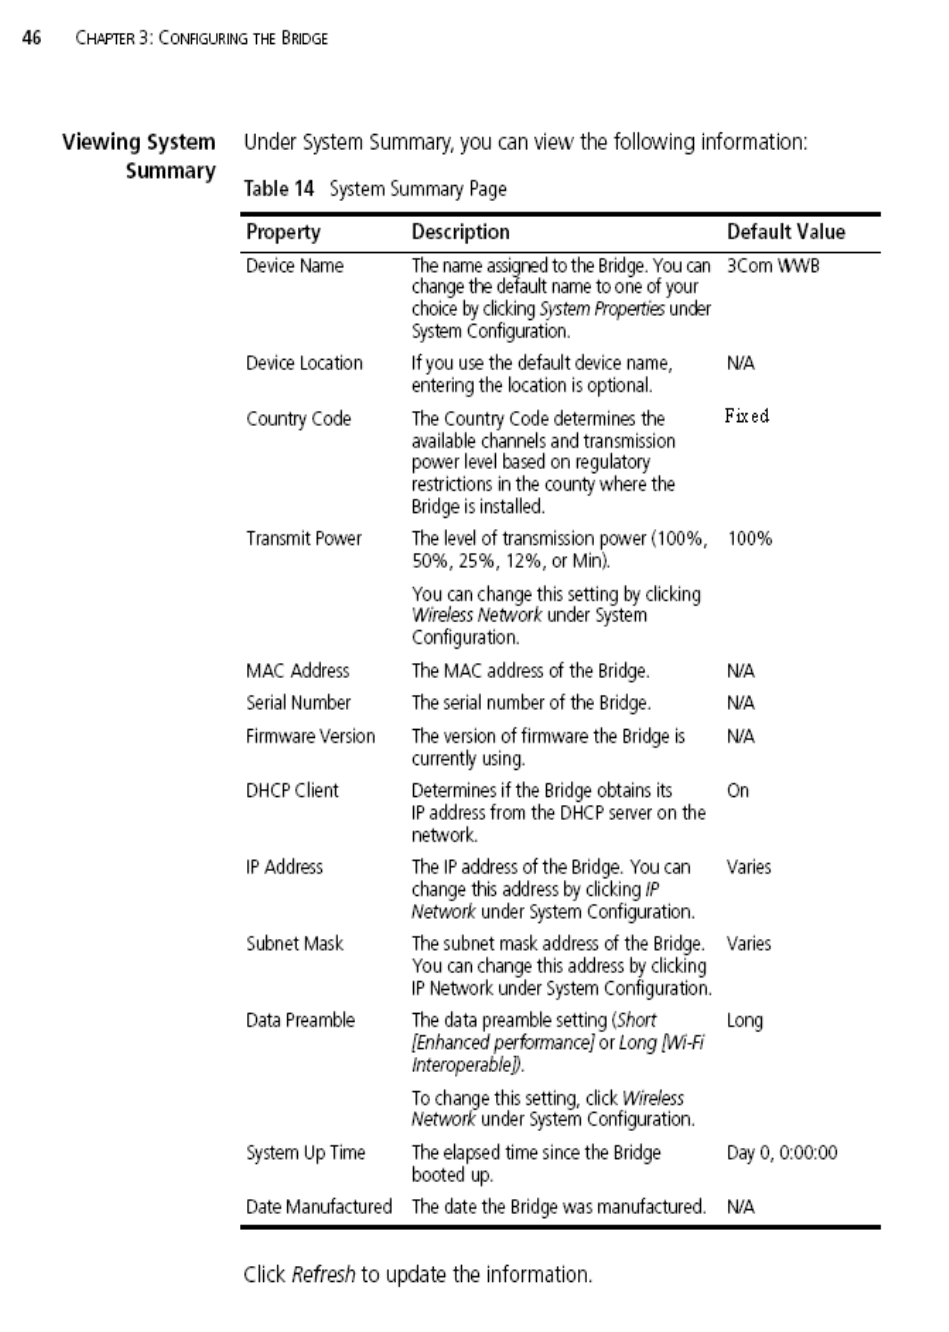

4TROUBLESHOOTING
Diagnosing
Problems
If you have difficulty with the Bridge, try the solutions in the following
table.
Table 15 Troubleshooting
Symptom Solution(s)
16 devices have been
connected to the Bridge,
either simultaneously or
sequentially. After
connecting another device,
the new device cannot
associate with the network.
The Bridge supports up to 16 specific clients (for
example, computers and printers) and keeps track of
them using a client list of MAC addresses. After the
client limit is reached, you must clear the client list to
allow a new client to associate. For example, in a hub
configuration with 16 clients connected, if you
disconnect a desktop computer and connect a laptop
in its place, you must clear the client list to establish
network association.
1Disconnect a client by unplugging its Ethernet cable
from the hub.
2Use the 3Com Wireless Infrastructure Device
Manager to select the Bridge and launch its
Configuration Management System.
3Under System Configuration, click Ethernet Client
List. The Ethernet Client List page appears. Click
Clear Client List.
4Connect the new client by plugging its Ethernet
cable into the hub.

48 CHAPTER 4: TROUBLESHOOTING
After you change the IP
address, after you restore a
backup configuration, or
after you reset the Bridge to
factory defaults, the
Configuration Management
System stops responding
and you cannot continue
configuring the Bridge.
If you change the IP address and click Apply, you
cannot continue to configure the device using the old
IP address. Similarly, after you restore a backup
configuration or reset the Bridge to factory defaults,
the IP address setting may be changed.
To recover from this situation and continue configuring
the Bridge:
1Close your browser.
2Return to the 3Com Wireless Infrastructure Device
Manager and click Refresh.
3Select the device and click Configure to start a new
configuration session and set its IP address.
The Bridge cannot associate
with an access point.
■Adjust the position of the Bridge to improve
reception.
■Launch the Bridge Configuration Management
System and make sure the security settings on the
Bridge match those on the access point.
The Wireless Network Tree
does not appear in the
3Com Wireless
Infrastructure Device
Manager window.
Verify that you are using the correct network adapter.
In the device manager window, click Choose NIC.
Select the network adapter for the network you want
to scan, and click OK.
The Bridge has a yellow
exclamation point (!) next to
it in the Wireless
Infrastructure Device
Manager.
The Bridge is on a different subnet than the computer
attempting to configure it.
To recover from this situation and continue configuring
the Bridge:
1Close your browser.
2Return to the 3Com Wireless Infrastructure Device
Manager and click Refresh.
3Select the device and click Configure to start a new
configuration session.
4Make sure the subnet address matches that of the
computer.
Two Bridges cannot
communicate in ad-hoc
mode.
■Adjust the positions of the Bridges to improve reception.
■To ensure correct operation in ad-hoc mode, the
settings on the two Bridges must match exactly.
Launch the Bridge Configuration Management
System and make sure that the Wireless LAN Service
Area, channel selections, Data Preamble setting, and
security setting are the same on both Bridges.
Table 15 Troubleshooting (continued)
Disconnecting the Bridge 49
Disconnecting the
Bridge
To disconnect the Bridge:
CAUTION: Disconnecting the Bridge ends the network association. To avoid
possible data loss, exit all networking applications on connected devices before you
disconnect the Bridge.
1Unplug the Bridge Ethernet cable from the hub or other device.
2Unplug the Bridge power cord.
Uninstalling
Software and
Documentation
If you want to uninstall the 3Com 11a/b/g Wireless Workgroup Bridge
software and documentation, you can either use the standard operating
system procedure for removing programs or use the following shortcut
procedure:
1From the Windows Start menu, select Start > Programs > 3Com Wireless
> Uninstall 3Com Wireless Infrastructure Device Manager.
2When prompted to confirm, click OK.
Upgrading Bridge
Firmware
Firmware is the software that is installed on the Bridge at the factory.
Some problems can be solved by installing a new version of the firmware.
For details on how to download a firmware update from the 3Com
customer support Web site and install it on your Bridge, see “Upgrading
the System” on page 42
You are running
Windows NT. After you
connect the Bridge, your
computer cannot obtain a
valid IP address.
The Bridge configuration settings may not be compatible
with the network. If they are not, and your Windows NT
computer is set up to obtain its IP address from a DHCP
server, the Bridge is unable to associate with the network
to obtain the IP address.
To work around this problem, set a static IP address on
your computer. Then set the Bridge configuration to
match the network. When the Bridge is able to
associate, reset your computer to obtain its IP address
from the DHCP server. If the Bridge should also obtain
its IP settings from the DHCP server, make sure this is
configured properly on the IP Network page and
applied just before ending the session.
Table 15 Troubleshooting (continued)

ACOMMAND-LINE INTERFACE
The Bridge can be configured through the command line interface (CLI).
The CLI allows viewing and modification of the Bridge configuration from
a terminal or PC through a Telnet connection.
Logging In To access the CLI, use Telnet to log in to the Bridge using its IP address.
The CLI prompts for a login user name and password and displays a
version banner and a CLI prompt. The CLI is now ready to accept
commands.
3Com WWB login: admin
Password: (no password)
3Com WWB
->
The login and password entries are case-sensitive.
Logging Out To disconnect from the CLI, log out using the quit command.
3Com WWB ->
3Com WWB -> quit
After quitting the CLI, re-initiate the login sequence to log in to the CLI.
52 APPENDIX A: COMMAND-LINE INTERFACE
Configuring the
Bridge
Using the CLI, you can configure the standard settings listed in Table 16.
All CLI commands are case-sensitive. Enter either the entire CLI command
string. For example:
3Com WWB-> get rate
Data Rate: best
The configuration changes do not take effect until the Bridge is rebooted.
Table 16 CLI Settings and Commands
Setting Default Commands
IP Address 169.254.2.2 get ipaddr
set ipaddr
IP Subnet Mask 255.255.0.0 get ipmask
set ipmask
DHCP Client Mode Enabled get dhcpc
set dhcpc
ESSID ANY get ssid
set ssid
40/64-bit WEP Keys None get key40
set key40
104/128-bit WEP Keys None get key104
set key104
128/156-bit WEP Keys None get key128
set key128
40/64-bit WEP Keys
Authentication Type None get wepauth40
set wepauth40
104/128-bit WEP Keys
Authentication Type None get wepauth104
set wepauth104
128/156-bit WEP Keys
Authentication Type None get wepauth128
set wepauth128

Configuring the Bridge 53
Security Open System get security
set security
Network Mode Wireless Client get operationmode
set operationmode
Connection Status N/A get wlanstatus
Reset to Factory Defaults N/A set factorydefault
Enable 802.1X
Authentication Disabled get authenticator
set authenticator
Data Rate Selection Best get rate
set rate
TKIP WPA Selection WPA-PEAP get tkipwpa
set tkipwpa
AES WPA Selection WPA-PEAP get aeswpa
set aeswpa
UART Configuration 9600 bps 8-N-1,
no flow control get uart
set uart
Table 16 CLI Settings and Commands (continued)

BOBTAINING SUPPORT FOR YOUR
3COM PRODUCT
3Com offers product registration, case management, and repair services
through eSupport.3com.com. You must have a user name and password to
access these services, which are described in this appendix.
Register Your
Product to Gain
Service Benefits
To take advantage of warranty and other service benefits, you must first
register your product at:
http://eSupport.3com.com/
3Com eSupport services are based on accounts that are created or that
you are authorized to access.
Solve Problems
Online
The 3Com Knowledgebase helps you to troubleshoot 3Com products.
This query-based interactive tool is located at:
http://knowledgebase.3com.com
It contains thousands of technical solutions written by 3Com support
engineers.

56 APPENDIX B: OBTAINING SUPPORT FOR YOUR 3COM PRODUCT
Purchase Extended
Warranty and
Professional Services
To enhance response times or extend your warranty benefits, you can
purchase value-added services such as 24x7 telephone technical support,
software upgrades, onsite assistance, or advanced hardware replacement.
Experienced engineers are available to manage your installation with
minimal disruption to your network. Expert assessment and implementation
services are offered to fill resource gaps and ensure the success of your
networking projects. For more information on 3Com Extended Warranty and
Professional Services, see:
http://www.3com.com/
Contact your authorized 3Com reseller or 3Com for additional product
and support information. See the table of access numbers later in this
appendix.
Access Software
Downloads
You are entitled to bug fix / maintenance releases for the version of
software that you initially purchased with your 3Com product. To obtain
access to this software, you need to register your product and then use the
Serial Number as your login. Restricted Software is available at:
http://eSupport.3com.com/
To obtain software releases that follow the software version that you
originally purchased, 3Com recommends that you buy an Express or
Guardian contract, a Software Upgrades contract, or an equivalent support
contract from 3Com or your reseller. Support contracts that include software
upgrades cover feature enhancements, incremental functionality, and bug
fixes, but they do not include software that is released by 3Com as a
separately ordered product. Separately orderable software releases and
licenses are listed in the 3Com Price List and are available for purchase from
your 3Com reseller.
Contact Us 3Com offers telephone, Internet, and e-mail access to technical support and
repair services. To access these services for your region, use the appropriate
telephone number, URL, or e-mail address from the table in the next section.

Contact Us 57
Telephone Technical
Support and Repair
To obtain telephone support as part of your warranty and other service
benefits, you must first register your product at:
http://eSupport.3com.com/
When you contact 3Com for assistance, please have the following
information ready:
■Product model name, part number, and serial number
■A list of system hardware and software, including revision level
■Diagnostic error messages
■Details about recent configuration changes, if applicable
To send a product directly to 3Com for repair, you must first obtain a
return materials authorization number (RMA). Products sent to 3Com
without authorization numbers clearly marked on the outside of the package
will be returned to the sender unopened, at the sender’s expense. If your
product is registered and under warranty, you can obtain an RMA number
online at http://eSupport.3com.com/. First-time users must apply for a
user name and password.
Telephone numbers are correct at the time of publication. Find a current
directory of 3Com resources by region at:
http://csoweb4.3com.com/contactus/
Country Telephone Number Country Telephone Number
Asia, Pacific Rim Telephone Technical Support and Repair
Australia
Hong Kong
India
Indonesia
Japan
Malaysia
New Zealand
1 800 678 515
800 933 486
+61 2 9424 5179 or
000800 650 1111
001 803 61009
00531 616 439 or
03 3507 5984
1800 801 777
0800 446 398
Pakistan
Philippines
P.R. of China
Singapore
S. Korea
Taiwan
Thailand
+61 2 9937 5083
1235 61 266 2602 or
1800 1 888 9469
800 810 3033
800 6161 463
080 333 3308
00801 611 261
001 800 611 2000
You can also obtain support in this region at this e-mail address:
apr_technical_support@3com.com
Or request a repair authorization number (RMA) by fax using this number: + 61 2 9937 5048

58 APPENDIX B: OBTAINING SUPPORT FOR YOUR 3COM PRODUCT
Europe, Middle East, and Africa Telephone Technical Support and Repair
From anywhere in these regions, call: +44 (0)1442 435529
From the following countries, call the appropriate number:
Austria
Belgium
Denmark
Finland
France
Germany
Hungary
Ireland
Israel
Italy
01 7956 7124
070 700 770
7010 7289
01080 2783
0825 809 622
01805 404 747
06800 12813
01407 3387
1800 945 3794
199 161346
Luxembourg
Netherlands
Norway
Poland
Portugal
South Africa
Spain
Sweden
Switzerland
U.K.
342 0808128
0900 777 7737
815 33 047
00800 441 1357
707 200 123
0800 995 014
9 021 60455
07711 14453
08488 50112
0870 909 3266
You can also obtain support in this region using this URL:
http://emea.3com.com/support/email.html
Latin America Telephone Technical Support and Repair
Antigua
Argentina
Aruba
Bahamas
Barbados
Belize
Bermuda
Bonaire
Brazil
Cayman
Chile
Colombia
Costa Rica
Curacao
Ecuador
Dominican Republic
1 800 988 2112
0 810 444 3COM
1 800 998 2112
1 800 998 2112
1 800 998 2112
52 5 201 0010
1 800 998 2112
1 800 998 2112
0800 13 3COM
1 800 998 2112
AT&T +800 998 2112
AT&T +800 998 2112
AT&T +800 998 2112
1 800 998 2112
AT&T +800 998 2112
AT&T +800 998 2112
Guatemala
Haiti
Honduras
Jamaica
Martinique
Mexico
Nicaragua
Panama
Paraguay
Peru
Puerto Rico
Salvador
Trinidad and Tobago
Uruguay
Venezuela
Virgin Islands
AT&T +800 998 2112
57 1 657 0888
AT&T +800 998 2112
1 800 998 2112
571 657 0888
01 800 849CARE
AT&T +800 998 2112
AT&T +800 998 2112
54 11 4894 1888
AT&T +800 998 2112
1 800 998 2112
AT&T +800 998 2112
1 800 998 2112
AT&T +800 998 2112
AT&T +800 998 2112
57 1 657 0888
You can also obtain support in this region in the following ways:
■Spanish speakers, enter the URL: http://lat.3com.com/lat/support/form.html
■Portuguese speakers, enter the URL: http://lat.3com.com/br/support/form.html
■English speakers in Latin America should send e-mail to: lat_support_anc@3com.com
US and Canada — Telephone Technical Support and Repair
All locations: Network Jacks; Wired or Wireless Network Interface Cards:
All other 3Com products
1 847 262 0070
1 800 876 3266
Country Telephone Number Country Telephone Number
END USER LICENSE AGREEMENT
Customer shall take all steps necessary to protect Wind River's and its licensors' proprietary rights in the
Run-Time Module and to ensure that each Run-Time Module distributed by Customer will be accompanied
by a localized copy of an End User License Agreement.
Such End User License Agreement shall prohibit the End User from: (i) copying the Run-Time Module, except
for archive purposes consistent with the End User's archive procedures; (ii) transferring the Run-Time Module
to a third party apart from the Target Application; (iii) modifying, decompiling, disassembling, reverse
engineering or otherwise attempting to derive the Source Code of the Run-Time Module; (iv) exporting the
Run-Time Module or underlying technology in contravention of applicable U.S. and foreign export laws and
regulations; and (v) using the Run-Time Module other than in connection with operation of the Target
Application.
In addition, the End User License Agreement shall: (i) state that the Run-Time Module is licensed, not sold and
that Customer and its licensors retain ownership of all copies of the Run-Time Module; (ii) expressly disclaim
all implied warranties, including without limitation the implied warranties of merchantability, fitness for a
particular purpose, title and non-infringement; (iii) exclude liability for any special, indirect, punitive,
incidental and consequential damages; and (iv) require that any further distribution of the Run-Time Module
be subject to the same restrictions set forth herein.
The End User License Agreement shall also state that, with respect to the Run-Time Module, Wind River and
its licensors are third party beneficiaries of the End User License Agreement and that the provisions related to
the Run-Time Module are made expressly for the benefit of, and are enforceable by, Wind River and its
licensors.

REGULATORY INFORMATION
The 3Com 11 a/b/g Wireless Workgroup Bridge (Model WL-560) must be installed and used in strict
accordance with the manufacturer’s instructions as described in the user documentation that comes with the
product. This device complies with the following radio frequency and safety standards.
This product contains encryption. It is unlawful to export out of the U.S. without obtaining a U.S. Export
License.
This product does not contain any user serviceable components. Any unauthorized product changes or
modifications will invalidate 3Com’s warranty and all applicable regulatory certifications and approvals.
CAUTION: EXPOSURE TO RADIO FREQUENCY RADIATION.
This device generates and radiates radio-frequency energy. In order to comply with FCC radio-frequency
exposure guidelines for an uncontrolled environment, this equipment must be installed and operated while
maintaining a minimum body to antenna distance of 20 cm (approximately 8 in.).
This device must not be co-located or operated in conjunction with any other antenna or transmitter.
The installer of this radio equipment must ensure that the antenna is located or pointed such that it does not
emit RF field in excess of Health Canada limits for the general population; consult Safety Code 6, obtainable
from Health Canada’s website www.hc-sc.gc.ca/rpb.
USA - RADIO FREQUENCY REQUIREMENTS.
This device is for indoor use only when using channels 36, 40, 44 or 48 in the 5.15 to 5.25 GHz frequency
range.
High power radars are allocated as primary users of the 5.25 to 5.35 GHz and 5.65 to 5.85 GHz bands. These
radar stations can cause interference with and/or damage this device.
USA-FEDERAL COMMUNICATIONS COMMISSION (FCC)
This device complies with part 15 of the FCC Rules. Operation is subject to the following two conditions: (1)
This device may not cause harmful interference, and (2) this device must accept any interference received,
including interference that may cause undesired operation.
This equipment has been tested and found to comply with the limits for a Class B digital device, pursuant to
Part 15 of FCC Rules. These limits are designed to provide reasonable protection against harmful interference
in a residential installation. This equipment generates, uses, and can radiate radio frequency energy. If not
installed and used in accordance with the instructions, it may cause harmful interference to radio
communications. However, there is no guarantee that interference will not occur in a particular installation.
If this equipment does cause harmful interference to radio or television reception, which can be determined
by tuning the equipment off and on, the user is encouraged to try and correct the interference by one or
more of the following measures:
■Reorient or relocate the receiving antenna
■Increase the distance between the equipment and the receiver
■Connect the equipment to outlet on a circuit different from that to which the receiver is connected
■Consult the dealer or an experienced radio/TV technician for help
The user may find the following booklet prepared by the Federal Communications Commission helpful:
The Interference Handbook
This booklet is available from the U.S. Government Printing Office, Washington, D.C. 20402. Stock No.
004-000-0034504.
3Com is not responsible for any radio or television interference caused by unauthorized modification of the
devices included with this 3Com 11a/b/g Wireless Workgroup Bridge (Model WL-560), or the substitution or
attachment of connecting cables and equipment other than specified by 3Com.
The correction of interference caused by such unauthorized modification, substitution or attachment will be
the responsibility of the user.
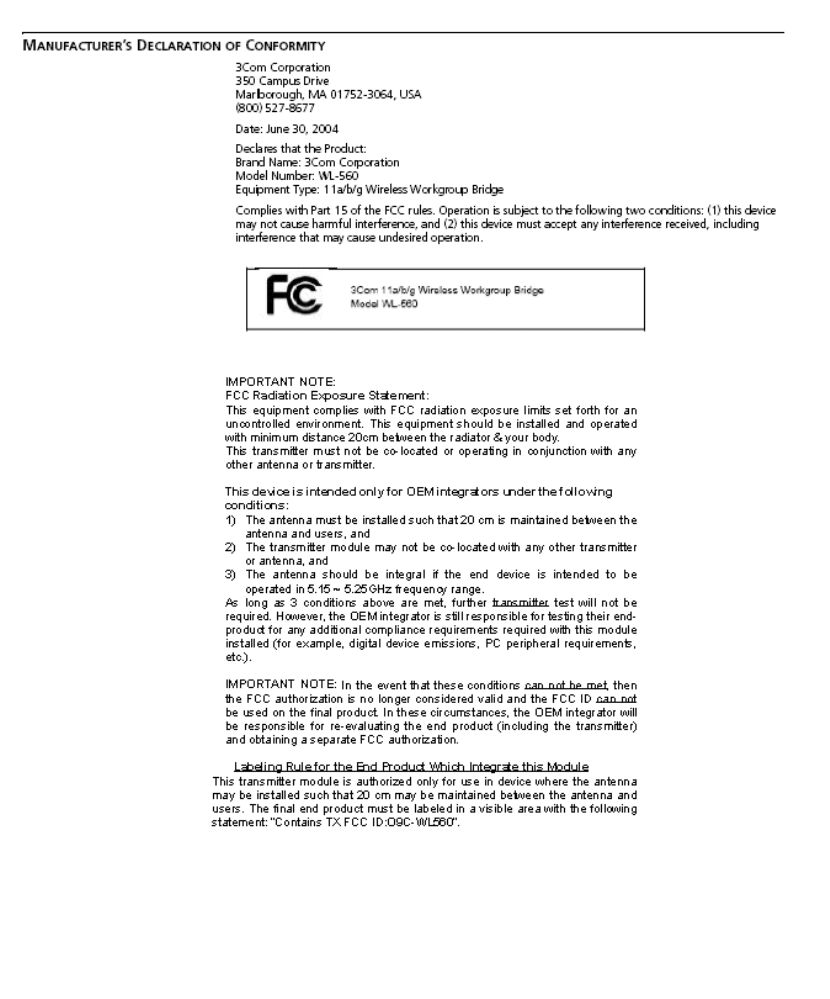

CANADA – INDUSTRY CANADA (IC)
This device complies with RSS 210 of Industry Canada.
Operation is subject to the following two conditions: (1) this device may not cause interference, and (2) this
device must accept any interference, including interference that may cause undesired operation of this
device.”
L ‘ utilisation de ce dispositif est autorisée seulement aux conditions suivantes: (1) il ne doit pas produire de
brouillage et (2) l’ utilisateur du dispositif doit étre prêt à accepter tout brouillage radioélectrique reçu, même
si ce brouillage est susceptible de compromettre le fonctionnement du dispositif.
The term "IC" before the equipment certification number only signifies that the Industry Canada technical
specifications were met.
To reduce potential radio interference to other users, the antenna type and its gain should be so chosen that
the equivalent isotropically radiated power (EIRP) is not more than that required for successful
communication. To prevent radio interference to the licensed service, this device is intended to be operated
indoors and away from windows to provide maximum shielding. Equipment (or its transmit antenna) that is
installed outdoors is subject to licensing.
Pour empecher que cet appareil cause du brouillage au service faisant l'objet d'une licence, il doit etre utilize
a l'interieur et devrait etre place loin des fenetres afin de Fournier un ecram de blindage maximal. Si le matriel
(ou son antenne d'emission) est installe a l'exterieur, il doit faire l'objet d'une licence.
High power radars are allocated as primary users of the 5.25 to 5.35 GHz and 5.65 to 5.85 GHz bands. These
radar stations can cause interference with and/or damage this device.
INDUSTRY CANADA (IC) EMISSIONS COMPLIANCE STATEMENT
This Class B digital apparatus complies with Canadian ICES-003.
AVIS DE CONFORMITÉ À LA RÉGLEMENTATION D’INDUSTRIE CANADA
Cet appareil numérique de la classe B est conform à la norme NMB-003 du Canada.
SAFETY COMPLIANCE NOTICE
This device has been tested and certified according to the following safety standards and is intended for use
only in Information Technology Equipment which has been tested to these or other equivalent standards:
■UL Standard 60950 (3rd Edition) or 60950-1
■CAN/CSA C22.2 No. 60950 or 60950-1
■IEC 60950 or 60950-1
■EN 60950 or 60950-1

EUROPE – EU DECLARATION OF CONFORMITY
Marking by the above symbol indicates compliance with the Essential Requirements and other relevant
provisions of the R&TTE Directive of the European Union (1999/5/EC). This equipment meets the following
conformance standards:
EN300 328, EN301 893, EN301 489-17, EN60950
NOTE: To ensure product operation is in compliance with local regulations, select the country in which the
product is installed. Refer to “Configuring the Bridge” in the user guide.
EUROPE - DECLARATION OF CONFORMITY IN LANGUAGES OF THE EUROPEAN COMMUNITY
English Hereby, 3Com Corporation, declares that this 11a/b/g Wireless Workgroup Bridge
is in compliance with the essential requirements and other relevant provisions of
Directive 1999/5/EC.
Finnish 3Com Corporation vakuuttaa täten että 11a/b/g Wireless Workgroup Bridge
tyyppinen laite on direktiivin 1999/5/EY oleellisten vaatimusten ja sitä koskevien
direktiivin muiden ehtojen mukainen.
Dutch Hierbij verklaart 3Com Corporation dat het toestel 11a/b/g Wireless Workgroup
Bridge in overeenstemming is met de essentiële eisen en de andere relevante
bepalingen van richtlijn 1999/5/EG
Bij deze verklaart 3Com Corporation dat deze 11a/b/g Wireless Workgroup Bridge
voldoet aan de essentiële eisen en aan de overige relevante bepalingen van
Richtlijn 1999/5/EC.
French Par la présente 3Com Corporation déclare que l'appareil 11a/b/g Wireless
Workgroup Bridge est conforme aux exigences essentielles et aux autres
dispositions pertinentes de la directive 1999/5/CE
Par la présente, 3Com Corporation déclare que ce 11a/b/g Wireless Workgroup
Bridge est conforme aux exigences essentielles et aux autres dispositions de la
directive 1999/5/CE qui lui sont applicables
Swedish Härmed intygar 3Com Corporation Company att denna 11a/b/g Wireless
Workgroup Bridge står I överensstämmelse med de väsentliga egenskapskrav och
övriga relevanta bestämmelser som framgår av direktiv 1999/5/EG.
Danish Undertegnede 3Com Corporation Company erklærer herved, at følgende udstyr
11a/b/g Wirelss Workgroup Bridge overholder de væsentlige krav og øvrige relevante
krav i direktiv 1999/5/EF.
German Hiermit erklärt 3Com Corporation, dass sich dieser/diese/dieses 11a/b/g Wireless
Workgroup Bridge in Übereinstimmung mit den grundlegenden Anforderungen
und den anderen relevanten Vorschriften der Richtlinie 1999/5/EG befindet".
(BMWi)
Hiermit erklärt 3Com Corporation die Übereinstimmung des Gerätes 11a/b/g
Wireless Workgroup Bridge mit den grundlegenden Anforderungen und den
anderen relevanten Festlegungen der Richtlinie 1999/5/EG. (Wien)
Greek Ì Å ÔÇÍ ÐÁÑÏ ÕÓÁ 3Com Corporation ÄÇËÙÍÅÉ Ï ÔÉ 11a/b/g Wireless Workgroup
Birdge ÓÕÌ Ì Ï ÑÖÙÍÅÔÁÉ ÐÑÏ Ó ÔÉÓ Ï ÕÓÉÙÄÅÉÓ ÁÐÁÉÔÇÓÅÉÓ ÊÁÉ ÔÉÓ ËÏ
ÉÐÅÓ Ó×ÅÔÉÊÅÓ ÄÉÁÔÁÎÅÉÓ ÔÇÓ Ï ÄÇÃÉÁÓ 1999/5/ÅÊ
Italian Con la presente 3Com Corporation dichiara che questo 11a/b/g Wireless
Workgroup Bridge è conforme ai requisiti essenziali ed alle altre disposizioni
pertinenti stabilite dalla direttiva 1999/5/CE.

EUROPE – RESTRICTIONS FOR USE OF 2.4GHZ FREQUENCIES IN EUROPEAN COMMUNITY COUNTRIES
Spanish Por medio de la presente 3Com Corporation declara que el 11a/b/g Wireless
Workgroup Bridge cumple con los requisitos esenciales y cualesquiera otras
disposiciones aplicables o exigibles de la Directiva 1999/5/CE
Portuguese 3Com Corporation declara que este 11a/b/g Wireless Workgroup Bridge está
conforme com os requisitos essenciais e outras disposições da Directiva 1999/5/CE.
België/
Belgique:
For private usage outside buildings across public grounds over less than 300m no special
registration with IBPT/BIPT is required. Registration to IBPT/BIPT is required
for private usage outside buildings across public grounds over more than 300m. For
registration and license please contact IBPT/BIPT.
Voor privé-gebruik buiten gebouw over publieke groud over afstand kleiner dan 300m
geen registratie bij BIPT/IBPT nodig; voor gebruik over afstand groter dan 300m is wel
registratie bij BIPT/IBPT nodig. Voor registratie of licentie kunt u contact opnemen met
BIPT.
Dans le cas d’une utilisation privée, à l’extérieur d’un bâtiment, au-dessus d’un espace
public, aucun enregistrement n’est nécessaire pour une distance de moins de 300m. Pour
une distance supérieure à 300m un enregistrement auprès de I’IBPT est requise. Pour les
enregistrements et licences, veuillez contacter I’IBPT.
Deutschland: License required for outdoor installations. Check with reseller for procedure to follow
Anmeldung im Outdoor-Bereich notwendig, aber nicht genehmigungspflichtig.Bitte mit
Händler die Vorgehensweise abstimmen.
France: Restricted frequency band: only channels 1 to 7 (2400 MHz and 2454 MHz respectively)
may be used outdoors in France. Please contact A.R.T. (http://www.arttelecom.fr) for
applicable procedures to follow.
Bande de fréquence restreinte: seuls les canaux 1- 7 (2400 et 2454 MHz respectivement)
doivent être utilisés endroits extérieur en France. Vous pouvez contacter I’Autorité de
Régulation des Télécommuniations (http://www.art-telecom.fr) pour la procédure à
suivre.
Italia: License required for indoor use. Use with outdoor installations not allowed.
E’necessaria la concessione ministeriale anche per l’uso interno.
Verificare con i rivenditori la procedura da seguire.
Nederland: License required for outdoor installations. Check with reseller for procedure to follow.
Licentie verplicht voor gebruik met buitenantennes. Neem contact op met verkoper voor
juiste procedure.

EUROPE – RESTRICTIONS FOR USE OF 5GHZ FREQUENCIES IN EUROPEAN COMMUNITY COUNTRIES
■To remain in conformance with European spectrum usage laws for Wireless LAN operation, the above
2.4GHz and 5GHz channel limitations apply. The user should check the current channel of operation. If
operation is occurring outside of the allowable frequencies as listed above, the user must cease operating
the 11a/b/g Wireless Workgroup Bridge at that location and consult the local technical support staff
responsible for the wireless network.
■The 5GHz Turbo mode feature is not allowed for operation in any European Community country.
■This device must not be operated in ad-hoc mode using channels in the 5GHz bands in the European
Community. Ad-hoc mode provides a direct communication between two client devices without a
Wireless LAN Access Point.
■This device must be used with Access Points that have employed and activated a radar detection feature
required for European Community operation in the 5GHz bands. This device will operate under the control
of the Access Point in order to avoid operating on a channel occupied by any radar system in the area. The
presence of nearby radar operation may result in temporary interruption in communications of this device.
The Access Point’s radar detection feature will automatically restart operation on a channel free of radar.
You may consult with the local technical support staff responsible for the wireless network to ensure the
Access Point device(s) are properly configured for European Community operation.
European Community
Countries
5150-5250 MHz
Channels: 36, 40,
44, 48
Indoor Only
5250-5350 MHz
Channels: 52, 56,
60, 64
Indoor Only
5470-5725MHz
Channels: 100, 104,
108, 112, 116, 120,
124, 128, 132, 136, 140
Indoor/Outdoor
Austria
✔X X
Belgium, France,
Switzerland,
Liechtenstein ✔ ✔ X
Denmark, Finland,
Germany, Greece,
Iceland, Ireland, Italy,
Luxembourg,
Netherlands, Norway,
Portugal, Spain, Sweden,
UK
✔ ✔ ✔
✔allowed Xnot allowed