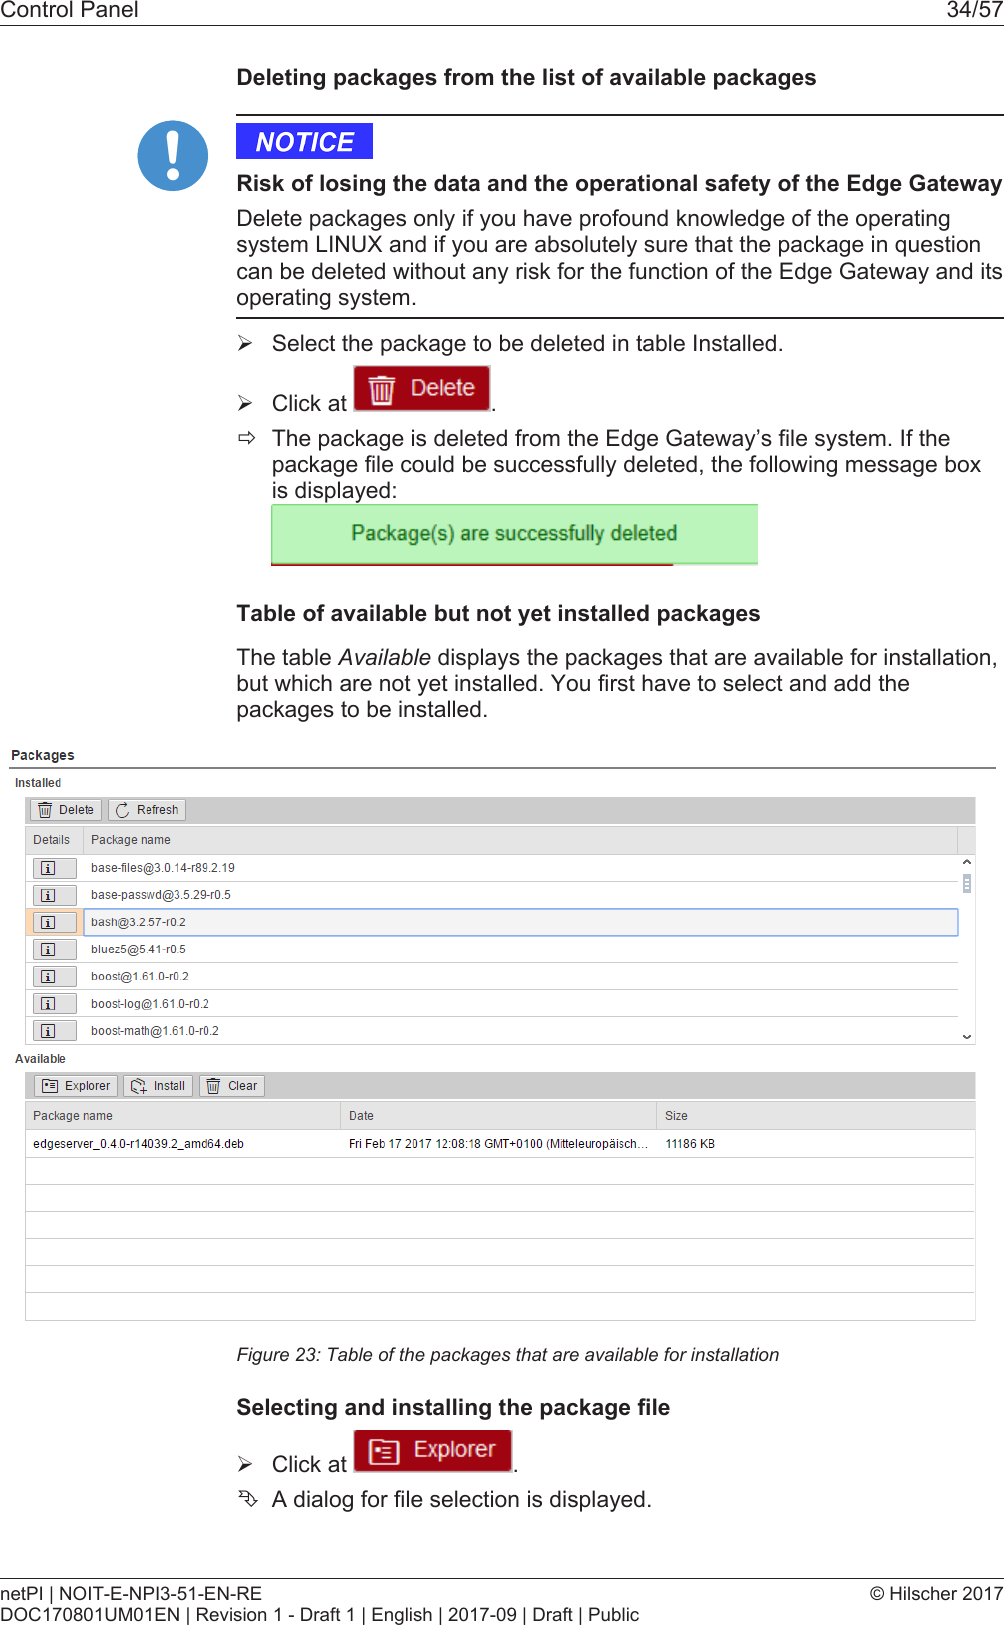
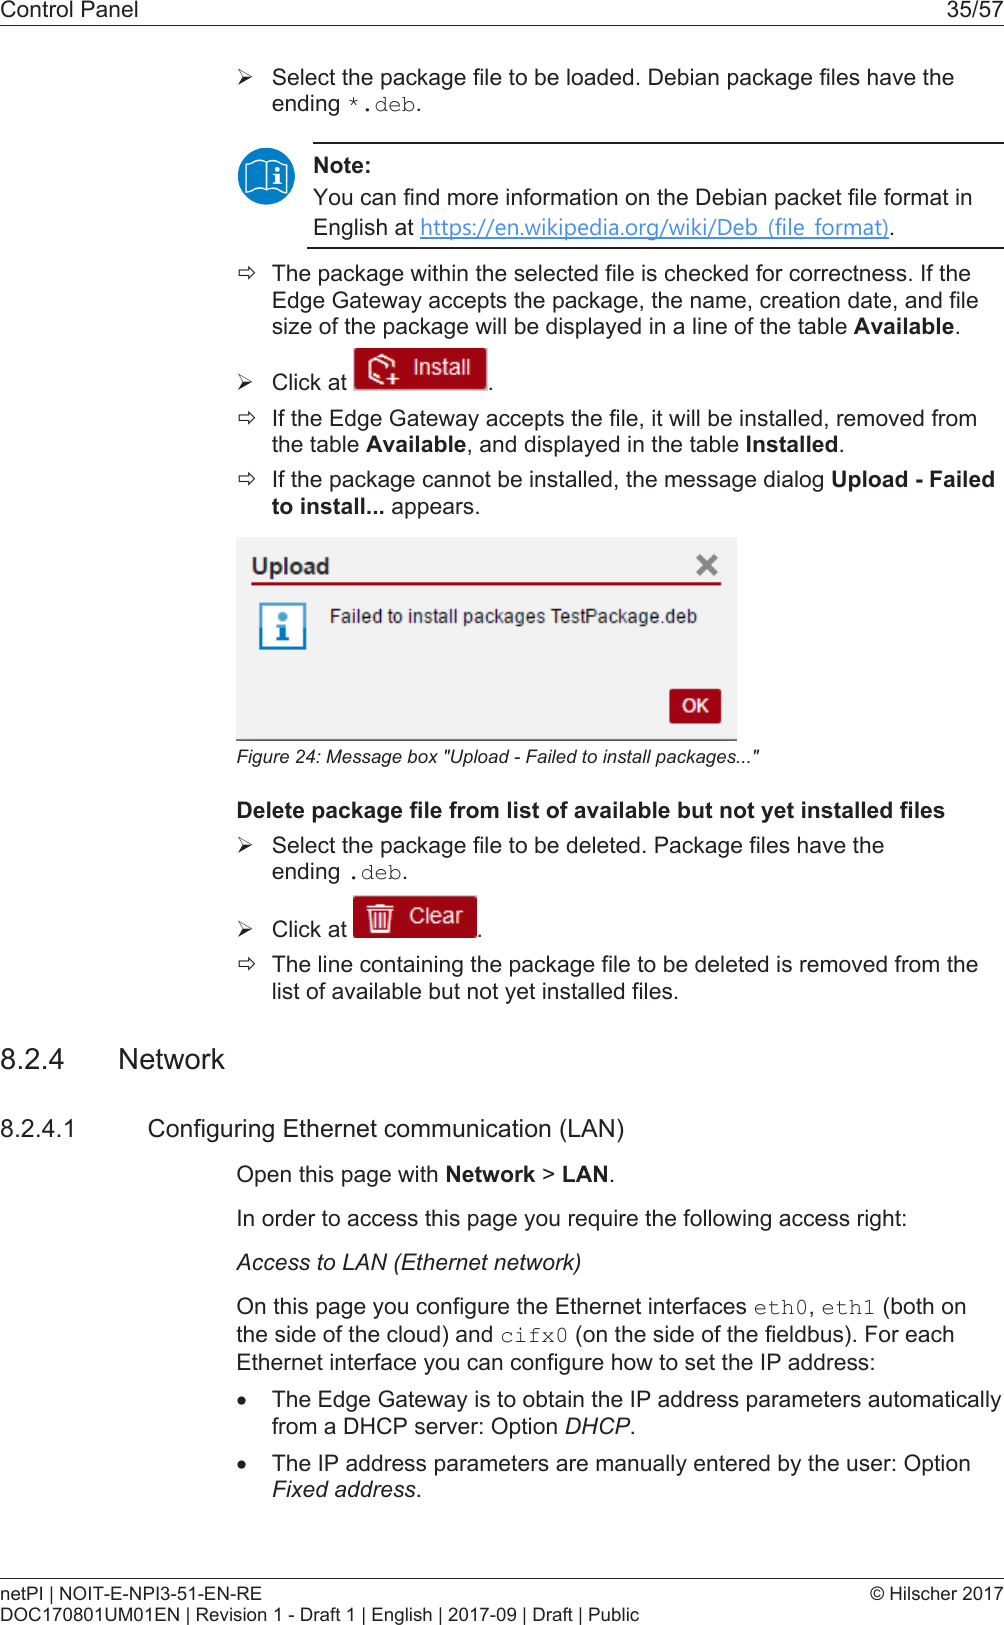
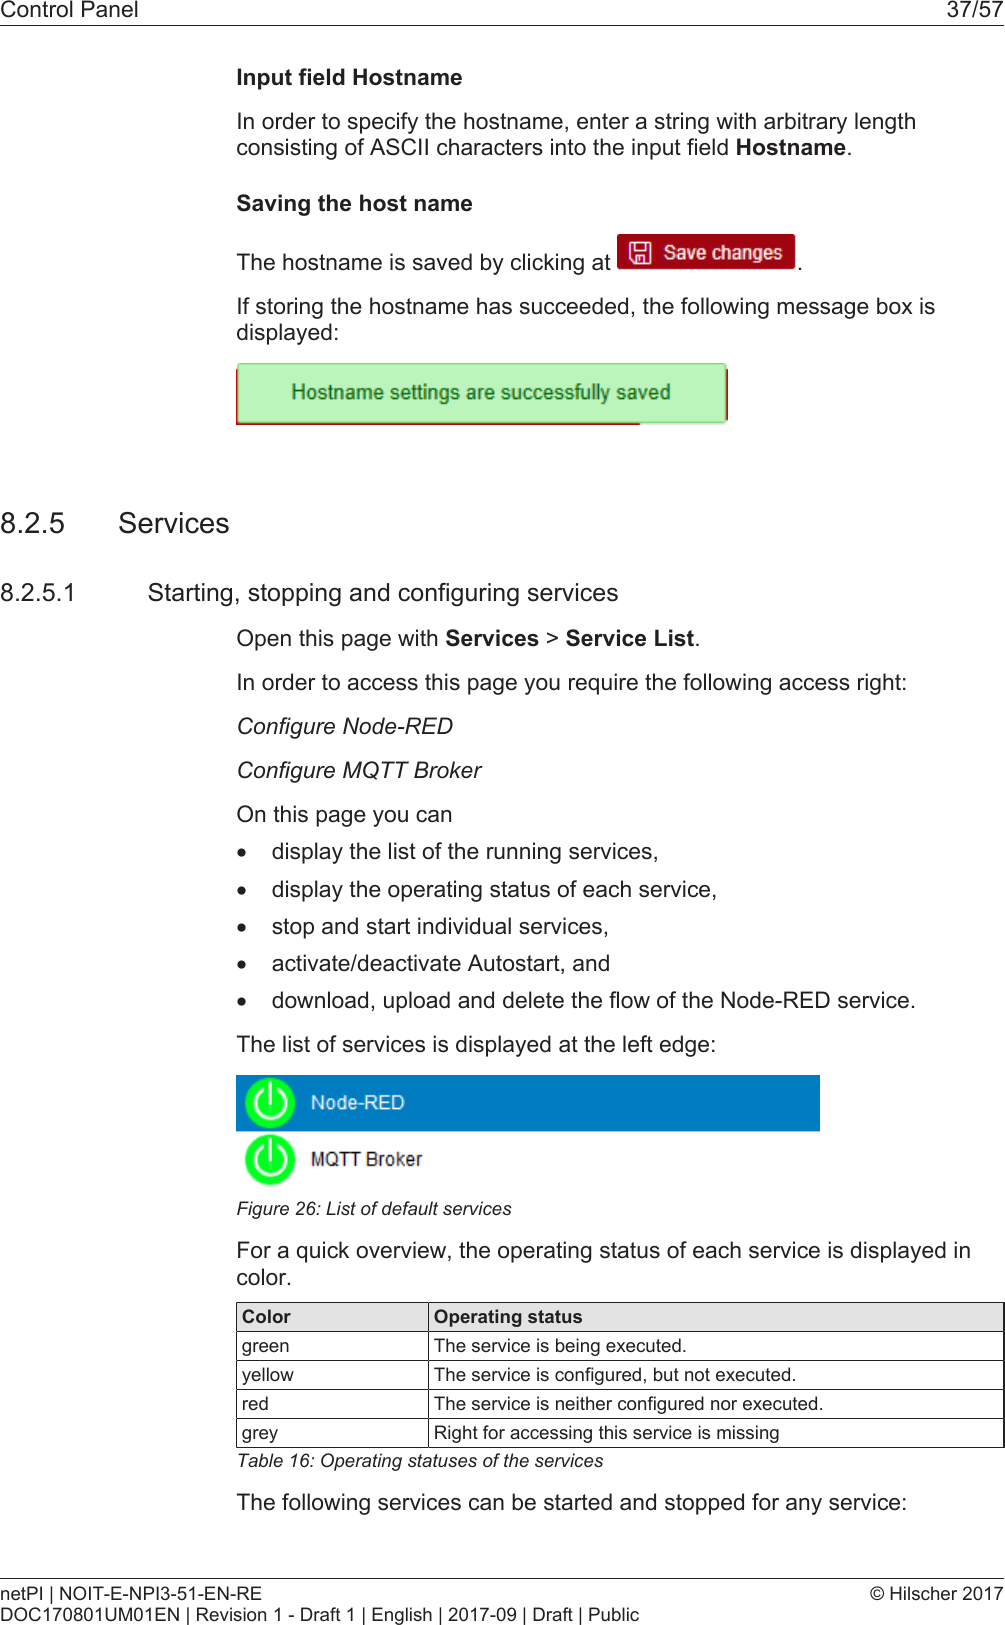
Hilscher Gesellschaft fuer Systemautomation mbH 0001 Hilscher RPi3 Automation Platform User Manual netPI NIOT E NPI3 51 EN RE UM 01 EN Draft 3
Hilscher Gesellschaft fuer Systemautomation mbH Hilscher RPi3 Automation Platform netPI NIOT E NPI3 51 EN RE UM 01 EN Draft 3
User Manual
![Introduction 6/57Liability disclaimerThe hardware and/or software was created and tested by HilscherGesellschaft für Systemautomation mbH with utmost care and is madeavailable as is. No warranty can be assumed for the performance orflawlessness of the hardware and/or software under all applicationconditions and scenarios and the work results achieved by the user whenusing the hardware and/or software. Liability for any damage that may haveoccurred as a result of using the hardware and/or software or thecorresponding documents shall be limited to an event involving willful intentor a grossly negligent violation of a fundamental contractual obligation.However, the right to assert damages due to a violation of a fundamentalcontractual obligation shall be limited to contract-typical foreseeabledamage.It is hereby expressly agreed upon in particular that any use or utilization ofthe hardware and/or software in connection with·Flight control systems in aviation and aerospace;·Nuclear fusion processes in nuclear power plants;·Medical devices used for life support and·Vehicle control systems used in passenger transportshall be excluded. Use of the hardware and/or software in any of thefollowing areas is strictly prohibited:·For military purposes or in weaponry;·For designing, engineering, maintaining or operating nuclear systems;·In flight safety systems, aviation and flight telecommunications systems;·In life-support systems;·In systems in which any malfunction in the hardware and/or softwaremay result in physical injuries or fatalities.You are hereby made aware that the hardware and/or software was notcreated for use in hazardous environments, which require fail-safe controlmechanisms. Use of the hardware and/or software in this kind ofenvironment shall be at your own risk; any liability for damage or loss dueto impermissible use shall be excluded.WarrantyHilscher Gesellschaft für Systemautomation mbH hereby guarantees thatthe software shall run without errors in accordance with the requirementslisted in the specifications and that there were no defects on the date ofacceptance. The warranty period shall be 12 months commencing as of thedate of acceptance or purchase (with express declaration or implied, bycustomer's conclusive behavior, e.g. putting into operation permanently).The warranty obligation for equipment (hardware) we produce is 36months, calculated as of the date of delivery ex works. The aforementionedprovisions shall not apply if longer warranty periods are mandatory by lawpursuant to Section 438 (1.2) BGB, Section 479 (1) BGB and Section 634a(1) BGB [Bürgerliches Gesetzbuch; German Civil Code] If, despite of alldue care taken, the delivered product should have a defect, which alreadynetPI | NOIT-E-NPI3-51-EN-REDOC170801UM01EN | Revision 1 - Draft 1 | English | 2017-09 | Draft | Public© Hilscher 2017](https://usermanual.wiki/Hilscher-Gesellschaft-fuer-Systemautomation-mbH/0001/User-Guide-3581857-Page-6.png)

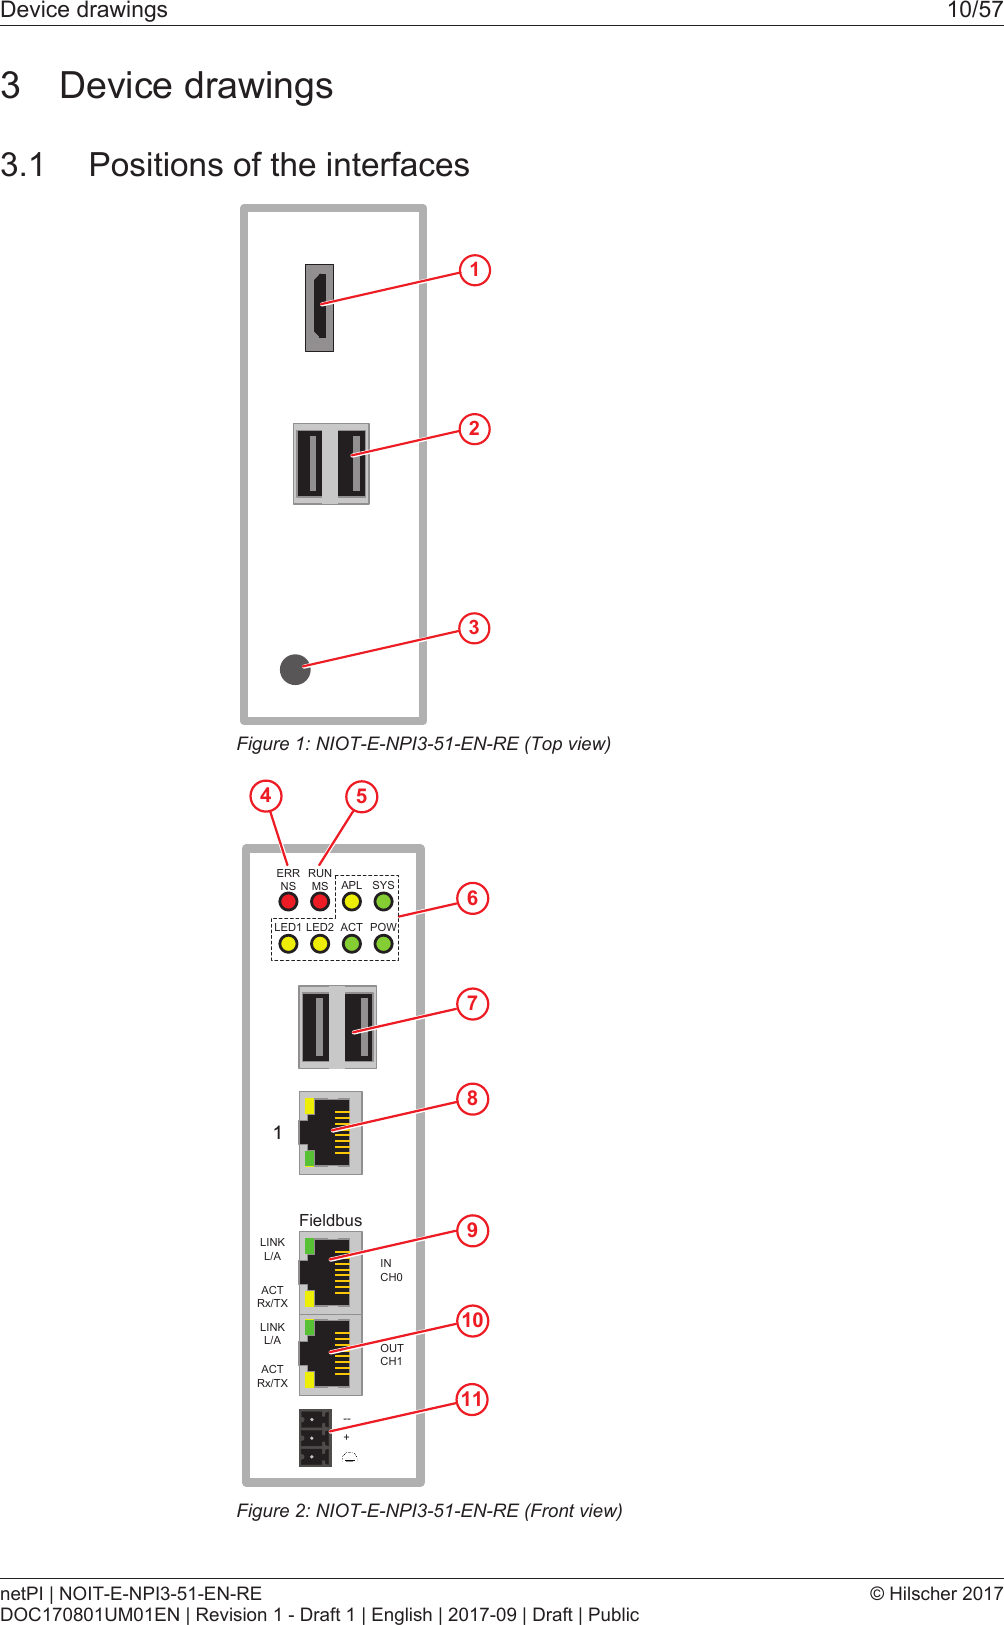
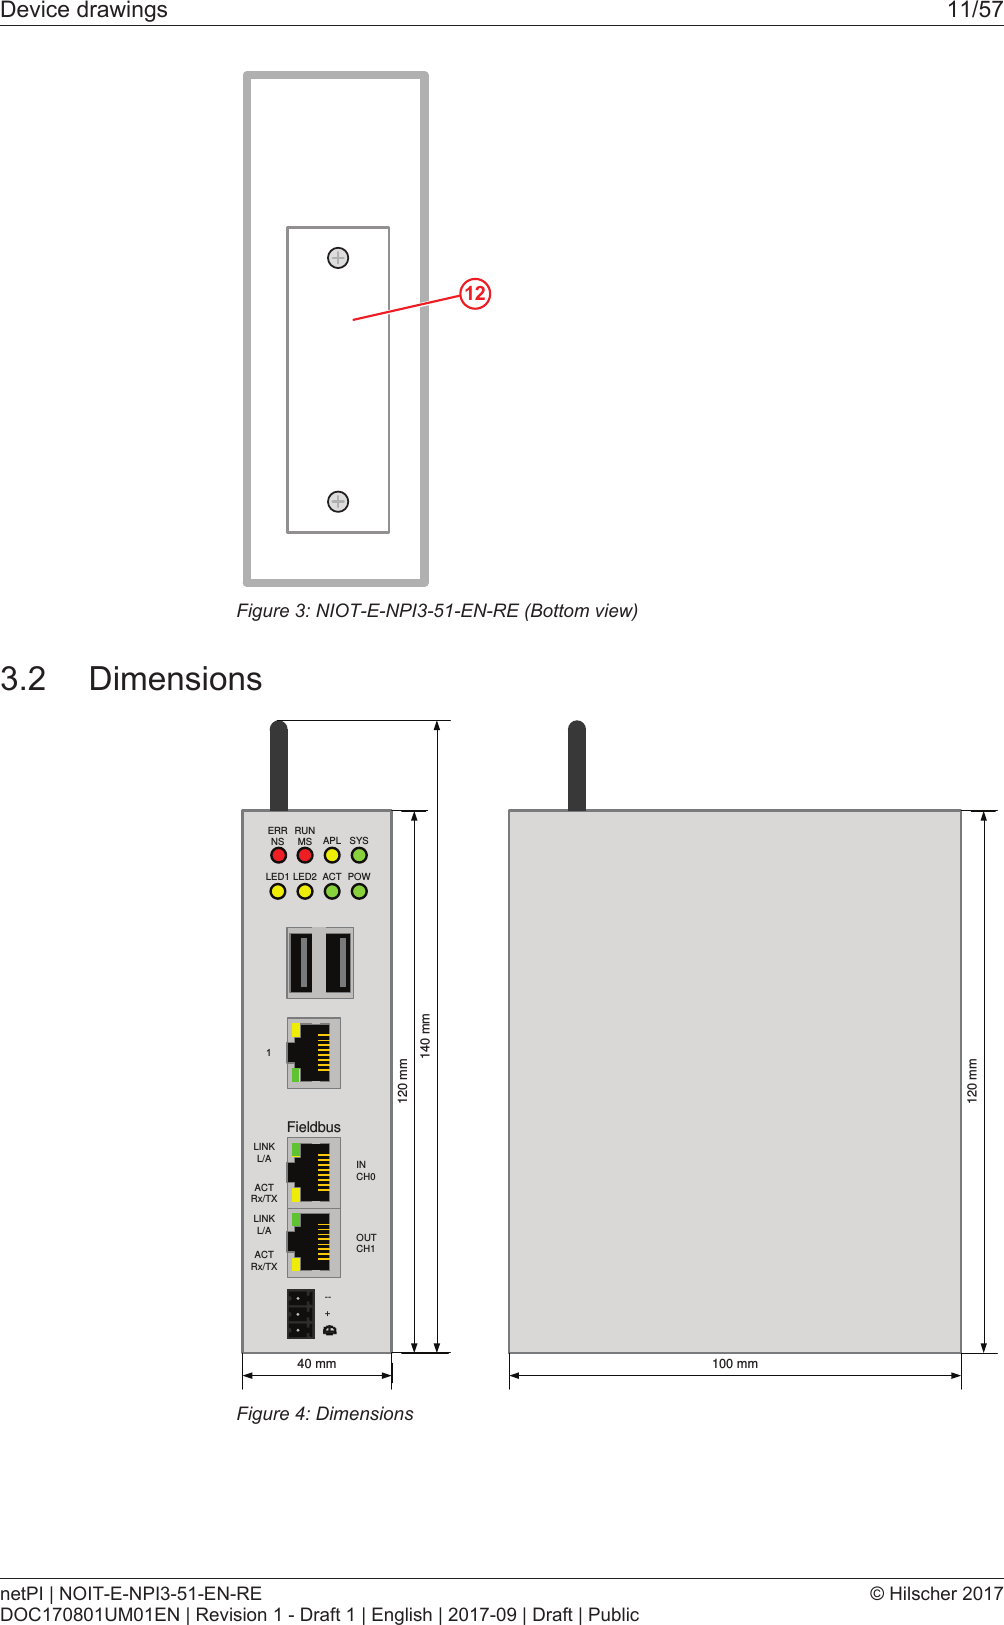
![Connections and mounting 12/574 Connections and mounting4.1 MountingMount the Edge Gateway on a DIN rail onto the wall of the cabinet.4.2 Power supplyDC 24V Pin Signal Description- GND Ground (Reference potential)+ +24 V DC +24 V DCFE Functional earthTable2: Power supply connector NIOT-E-TPI51-EN-RE4.3 LAN connectorsThe Edge Gateway has one LAN connector for connecting it to the cloudnetwork, positions (8) and (see section Positions of theinterfaces [}page10]).The MAC addresses of the LAN interfaces are printed on the device label.Section Configuring Ethernet communication (LAN) [}page35] describes,how you can set the IP address parameters of the LAN interfaces.4.4 Real-Time Ethernet connectorsThe Edge Gateway has 2 RJ45-connectors to connect the fieldbus to aReal-Time Ethernet network, positions (9) and (10) (see section Positionsof the interfaces [}page10]).4.5 USB connectorsThe Edge Gateway has 4 USB connectors (4 x USB 2.0), positions (2) and(7) (see section Positions of the interfaces [}page10]). You do not needthe USB connectors for operation of the Edge Gateway. You need the USBconnector if you connect a keyboard in order to change settings in theBIOS or if you do a firmware recovery with a USB stick.4.6 Wi-Fi antennasYou can use the Edge Gateway for wireless network communication. TheEdge Gateway supports 2 Wi-Fi operating modes: Access Point andClient. Operating mode Access Point allows the Edge Gateway to connectto a mobile device in order to configure the Edge Gateway from a mobiledevice.Section WiFi describes how you activate the antennas and how to set theWi-Fi operating mode.netPI | NOIT-E-NPI3-51-EN-REDOC170801UM01EN | Revision 1 - Draft 1 | English | 2017-09 | Draft | Public© Hilscher 2017](https://usermanual.wiki/Hilscher-Gesellschaft-fuer-Systemautomation-mbH/0001/User-Guide-3581857-Page-12.png)

![LEDs 15/575.2 Gateway status LEDsLEDs indicating communication status, system status, application statusand voltage supply. The position of the LEDs is indicated by position (3) insection Positions of the LEDs on the gateway [}page14].ERRNSRUNMSAPL SYSLED1 LED2 ACT POWFigure6: Gateway state LEDsLED Color MeaningERRNS (red)/ (green)LED communication status Real-Time-Ethernet.Name and function depends on used RTE protocol:PROFINET IO Device = ERR (Bus failure) EtherNet/IP Adapter = NS(Network status) See sectionSee section LEDs of the PROFINET IO Device interface [}page16] and section LEDs of theEtherNet/IP Adapter interface [}page17].RUNMS (red)/ (green)LED communication status Real-Time-Ethernet.Name and function depends on used RTE protocol:PROFINET IO Device = RUN (System failure)EtherNet/IP Adapter = MS (Module status)See section LEDs of the PROFINET IO Device interface [}page16] and section LEDs of theEtherNet/IP Adapter interface [}page17].APL( yellow)Application statusSYS(yellow)/ (green)System statusLED1( yellow)GPIO12: can be programmed, currently not used.LED2(yellow)GPIO13: can be programmed, currently not used.ACT (green) ActivityPOW (green) Voltage supply is OKTable3: Description of gateway status LEDsnetPI | NOIT-E-NPI3-51-EN-REDOC170801UM01EN | Revision 1 - Draft 1 | English | 2017-09 | Draft | Public© Hilscher 2017](https://usermanual.wiki/Hilscher-Gesellschaft-fuer-Systemautomation-mbH/0001/User-Guide-3581857-Page-15.png)
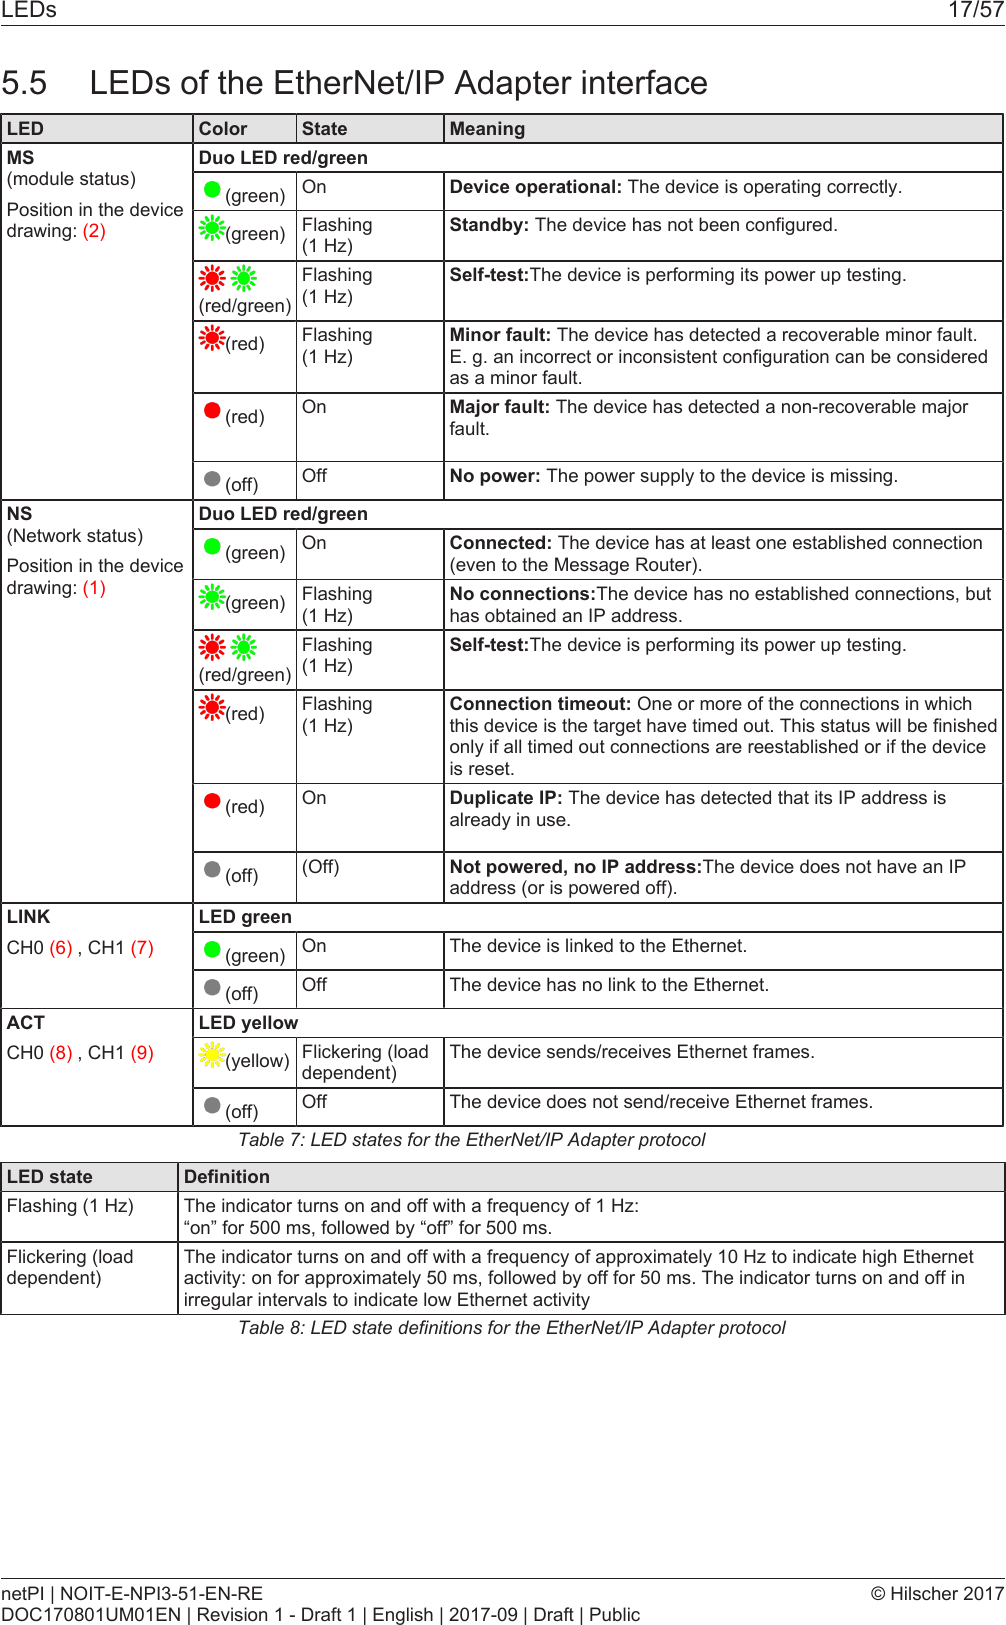
![LEDs 16/575.3 LEDs of the LAN interfaceLEDs indicating state of the LAN communication. For the positions of theLAN LEDs, see positions (2) and (3) in section Positions of the LEDs on thegateway [}page14].LED Color State MeaningLINKSee position (3)LED green (green) On 100 MBit MBit network connection (off) off 10 MBit or no network connectionRX/TXSee position (2)LED yellow (yellow) Flickering(loaddependent)The device sends/receives frames (off) off The device does not send/receive frames.Table4: LEDs LAN interface NIOT-E-TPI51-EN-RE5.4 LEDs of the PROFINET IO Device interfaceLED Color State MeaningSF (System Failure)Position in the devicedrawing: (2)Duo LED red/green(off) (Off) No error(red) Flashing (1 Hz, 3 s)DCP signal service is initiated via the bus.(red) On Watchdog timeout; channel, generic or extended diagnosispresent; system errorBF (Bus Failure)Position in the devicedrawing: (1)Duo LED red/green(off) Off No error(red) Flashing (2 Hz)No data exchange(red) On No configuration; or low speed physical link; or no physical linkLINKCH0 (6) , CH1 (7)LED green(green) On The device is linked to the Ethernet.(off) Off The device has no link to the Ethernet.RX/TXCH0 (8) , CH1 (9)LED yellow(yellow) Flickering (loaddependent)The device sends/receives Ethernet frames.(off) Off The device does not send/receive Ethernet frames.Table5: LED states for the PROFINET IO-Device protocolLED state DefinitionFlashing (1 Hz, 3 s)The indicator turns on and off for 3 seconds with a frequency of 1 Hz: “on” for 500 ms, followed by “off” for 500 ms.Flashing (2 Hz)The indicator turns on and off with a frequency of 2 Hz: “on” for 250 ms, followed by “off” for 250 ms.Flickering (loaddependent)The indicator turns on and off with a frequency of approximately 10 Hz to indicate high Ethernetactivity: "on" for approximately 50 ms, followed by "off" for 50 ms. The indicator turns on and off inirregular intervals to indicate low Ethernet activity.Table6: LED state definitions for the PROFINET IO-Device protocolnetPI | NOIT-E-NPI3-51-EN-REDOC170801UM01EN | Revision 1 - Draft 1 | English | 2017-09 | Draft | Public© Hilscher 2017](https://usermanual.wiki/Hilscher-Gesellschaft-fuer-Systemautomation-mbH/0001/User-Guide-3581857-Page-16.png)
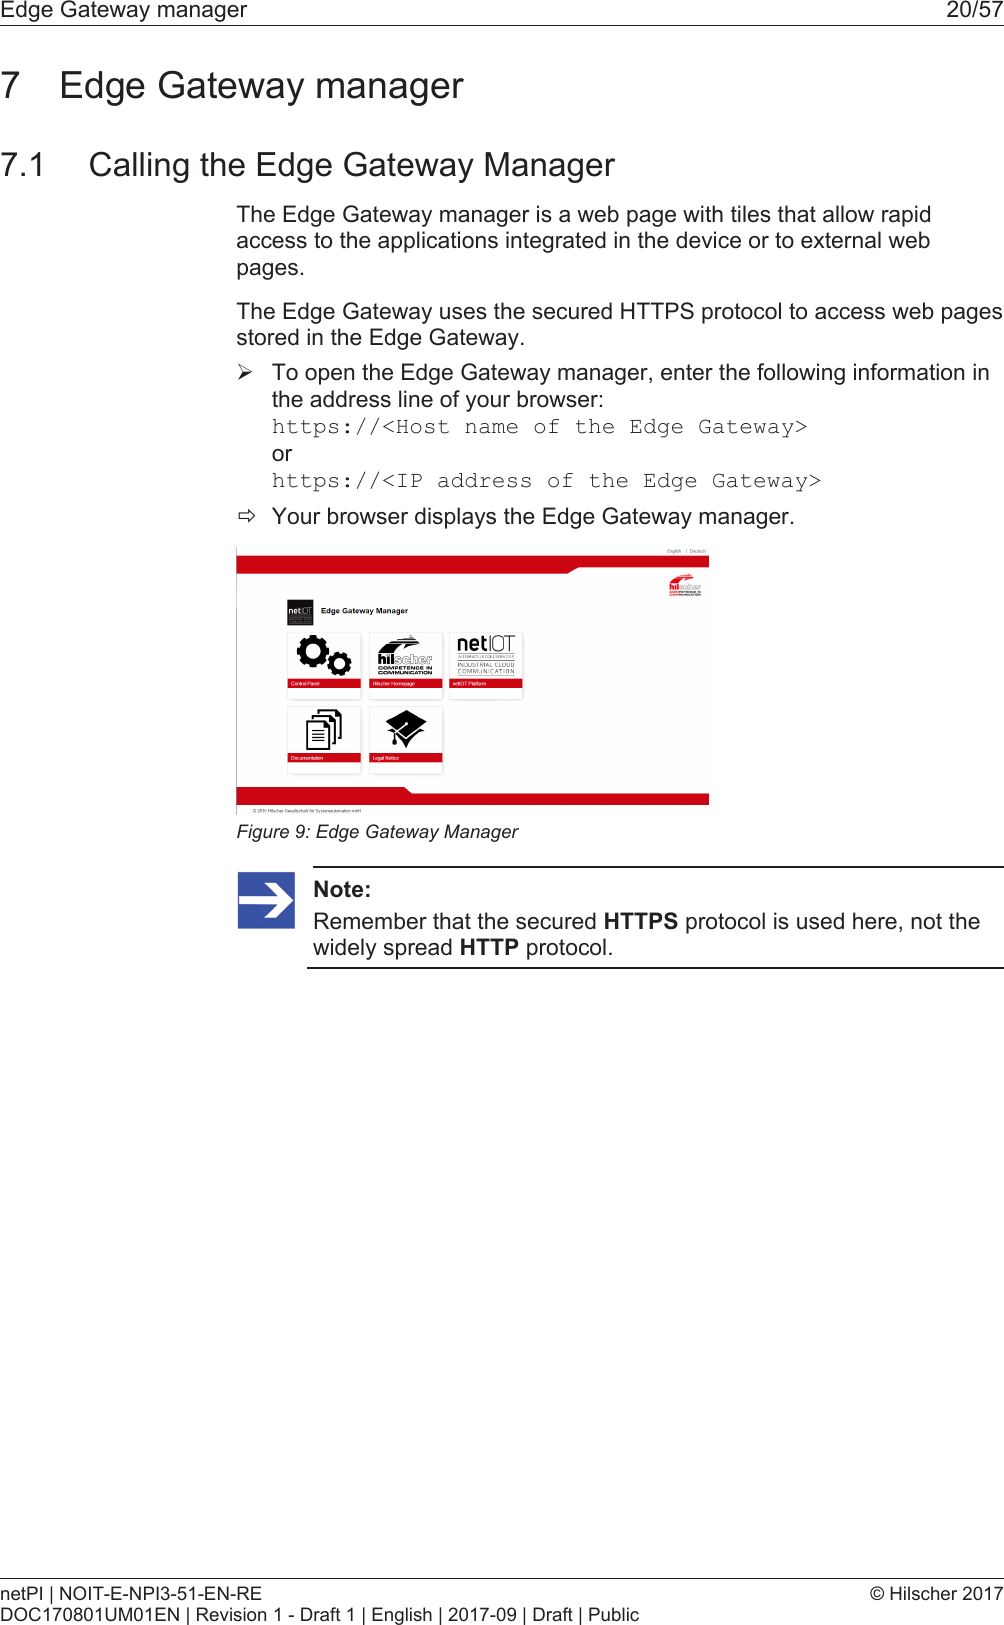
![Commissioning the Edge Gateway 18/576 Commissioning the Edge Gateway6.1 Establishing the IP address communicationAn IP address is required to address the Edge Gateway in the LANnetwork.The following figure shows the factory setting of the LAN interfaces and theassignment of the connections.6.2 Using the web browser to establish a connection with theEdge GatewayYou have three possibilities to access the Edge Gateway:1. by means of the host name (see section Using the hostname [}page18])2. by access via the Windows network (see section Access to the EdgeGateway in the Windows network environment [}page19]),3. by using the IP address (see section Using the IP address).6.2.1 Using the host nameThe Edge Gateway has a host name you can use to access the device.Where do you find the host name on the device?The device is delivered (factory setting) with a label printed at its bottom. Inthe figure below the host name has a red frame.Establishing a connection with the host nameØEnter the following address in the address line of your browser:https://<hostname>Example: For the device with the host name NT0002A233E559 enter https://NT0002A233E559 ðThe Edge Gateway Manager opens.You can now use the Edge Gateway manager to configure the device. Forthis purpose, read section Edge Gateway manager web page [}page21].netPI | NOIT-E-NPI3-51-EN-REDOC170801UM01EN | Revision 1 - Draft 1 | English | 2017-09 | Draft | Public© Hilscher 2017](https://usermanual.wiki/Hilscher-Gesellschaft-fuer-Systemautomation-mbH/0001/User-Guide-3581857-Page-18.png)
![Commissioning the Edge Gateway 19/576.2.2 Access to the Edge Gateway in the Windows network environmentTo be located easily in the network, the Edge Gateway uses the UPnPtechnology (Universal Plug and Play). This technology will display the EdgeGateway in the Windows network environment.ØTo display all devices in the network, click on Network in the WindowsExplorer.ÊYou will find the Edge Gateway under Other Devices:Figure7: netIOT Edge Gateway in the Windows networkØOpen the context menu of this entry and select Properties.Figure8: Properties of the Edge GatewayÊThe menu provides information on the Edge Gateway, e.g. serialnumber, MAC address, host name or die IP address.ØClick on the link under Device web page.ðThe Edge Gateway manager opens.ØTo open the Edge Gateway manager, you can also double-click on thedevice icon.ðThe Edge Gateway manager opens.You can now use the Edge Gateway manager to configure the device. Forthis purpose, read section Edge Gateway manager web page [}page21].netPI | NOIT-E-NPI3-51-EN-REDOC170801UM01EN | Revision 1 - Draft 1 | English | 2017-09 | Draft | Public© Hilscher 2017](https://usermanual.wiki/Hilscher-Gesellschaft-fuer-Systemautomation-mbH/0001/User-Guide-3581857-Page-19.png)
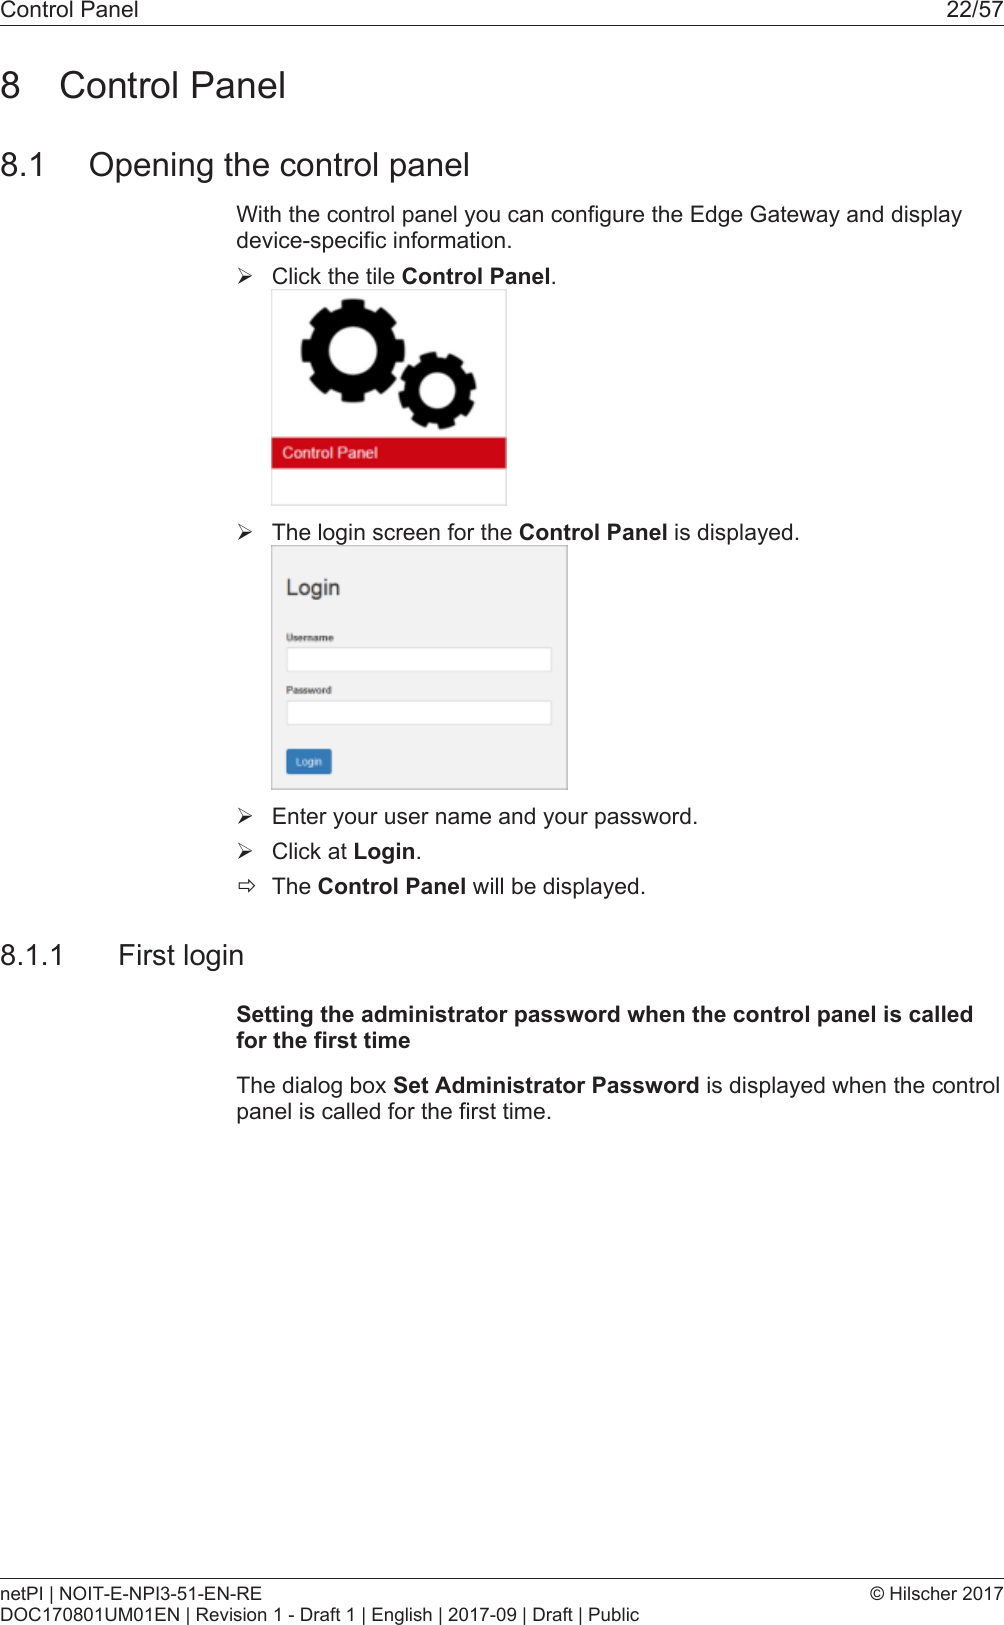
![Edge Gateway manager 21/577.2 Edge Gateway manager web pageThe Edge Gateway manager displays tiles that allow rapid access to theapplications integrated in the device or external web pages.Icon FunctionOpens the control panel of the Edge Gateway.The control panel configures the Edge Gateway and displaysinformation on the system. Section Control Panel [}page22]describes the possibilities of configuration as well as the displayedinformation on the system.Opens the Docker management.See section Isolated application execution withDocker [}page48].Opens the Edge Gateway documentation stored in the device.Opens the homepage of the netIOT platform in the Internet.Requires a connection to the Internet.Opens the Hilscher homepage in the Internet.Requires a connection to the Internet.Opens legal information concerning the Edge Gateway.Requires a connection to the Internet.Table9: Starting applications with the Edge Gateway managernetPI | NOIT-E-NPI3-51-EN-REDOC170801UM01EN | Revision 1 - Draft 1 | English | 2017-09 | Draft | Public© Hilscher 2017](https://usermanual.wiki/Hilscher-Gesellschaft-fuer-Systemautomation-mbH/0001/User-Guide-3581857-Page-21.png)
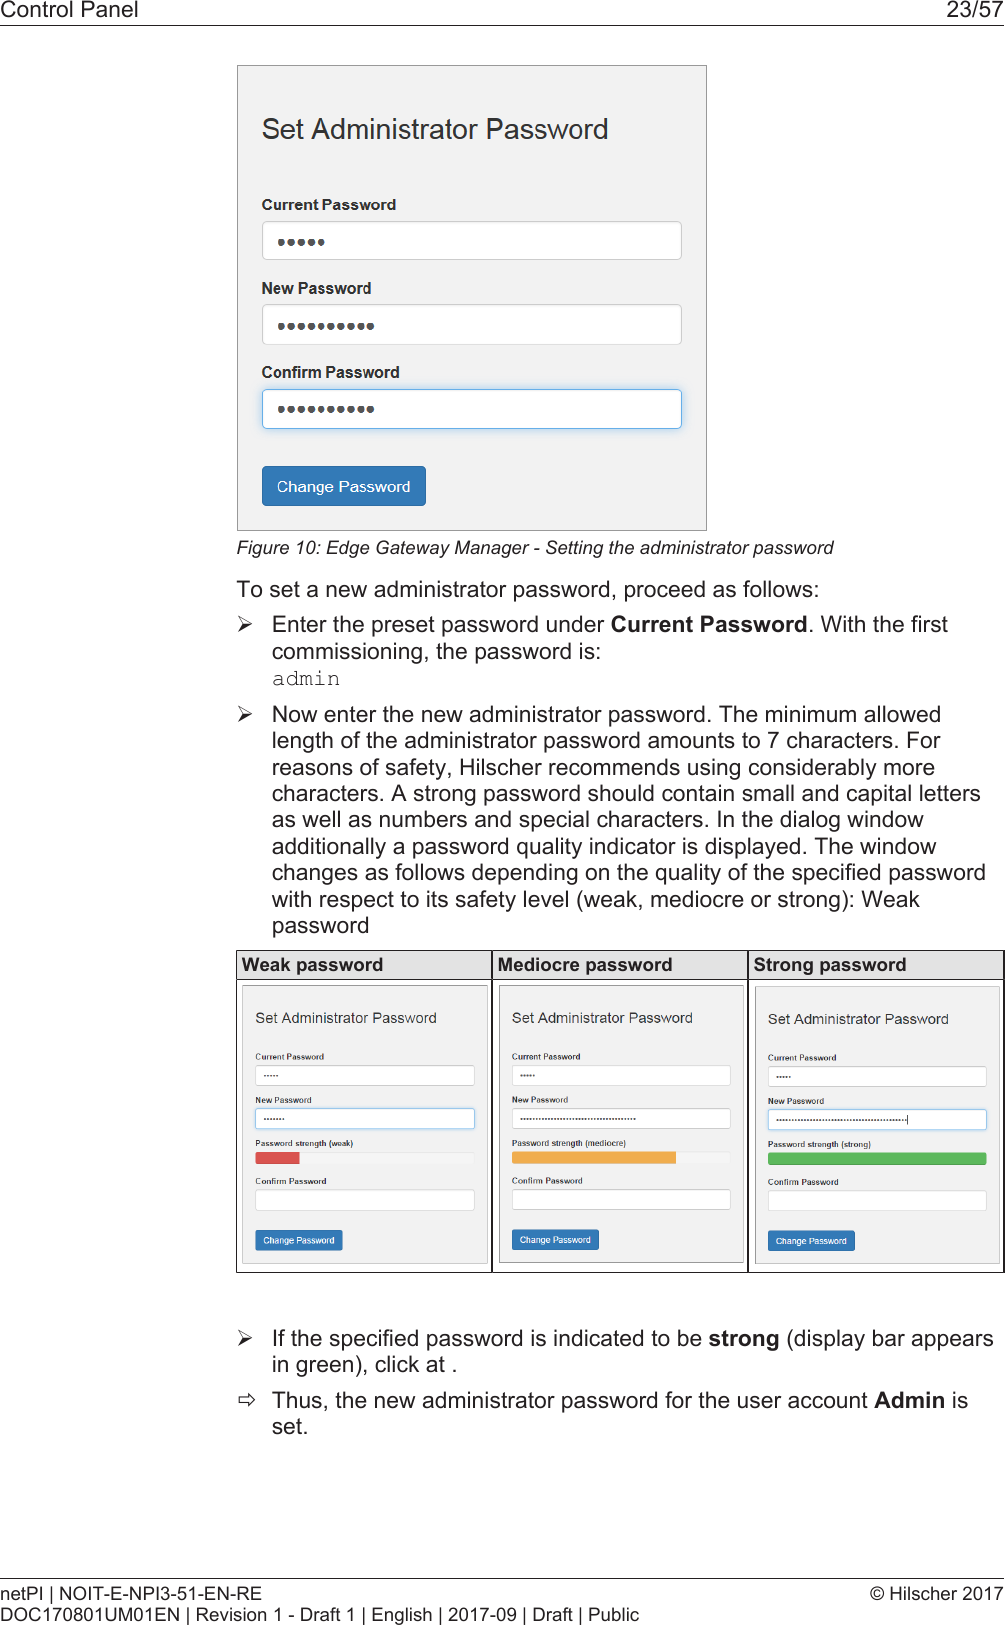
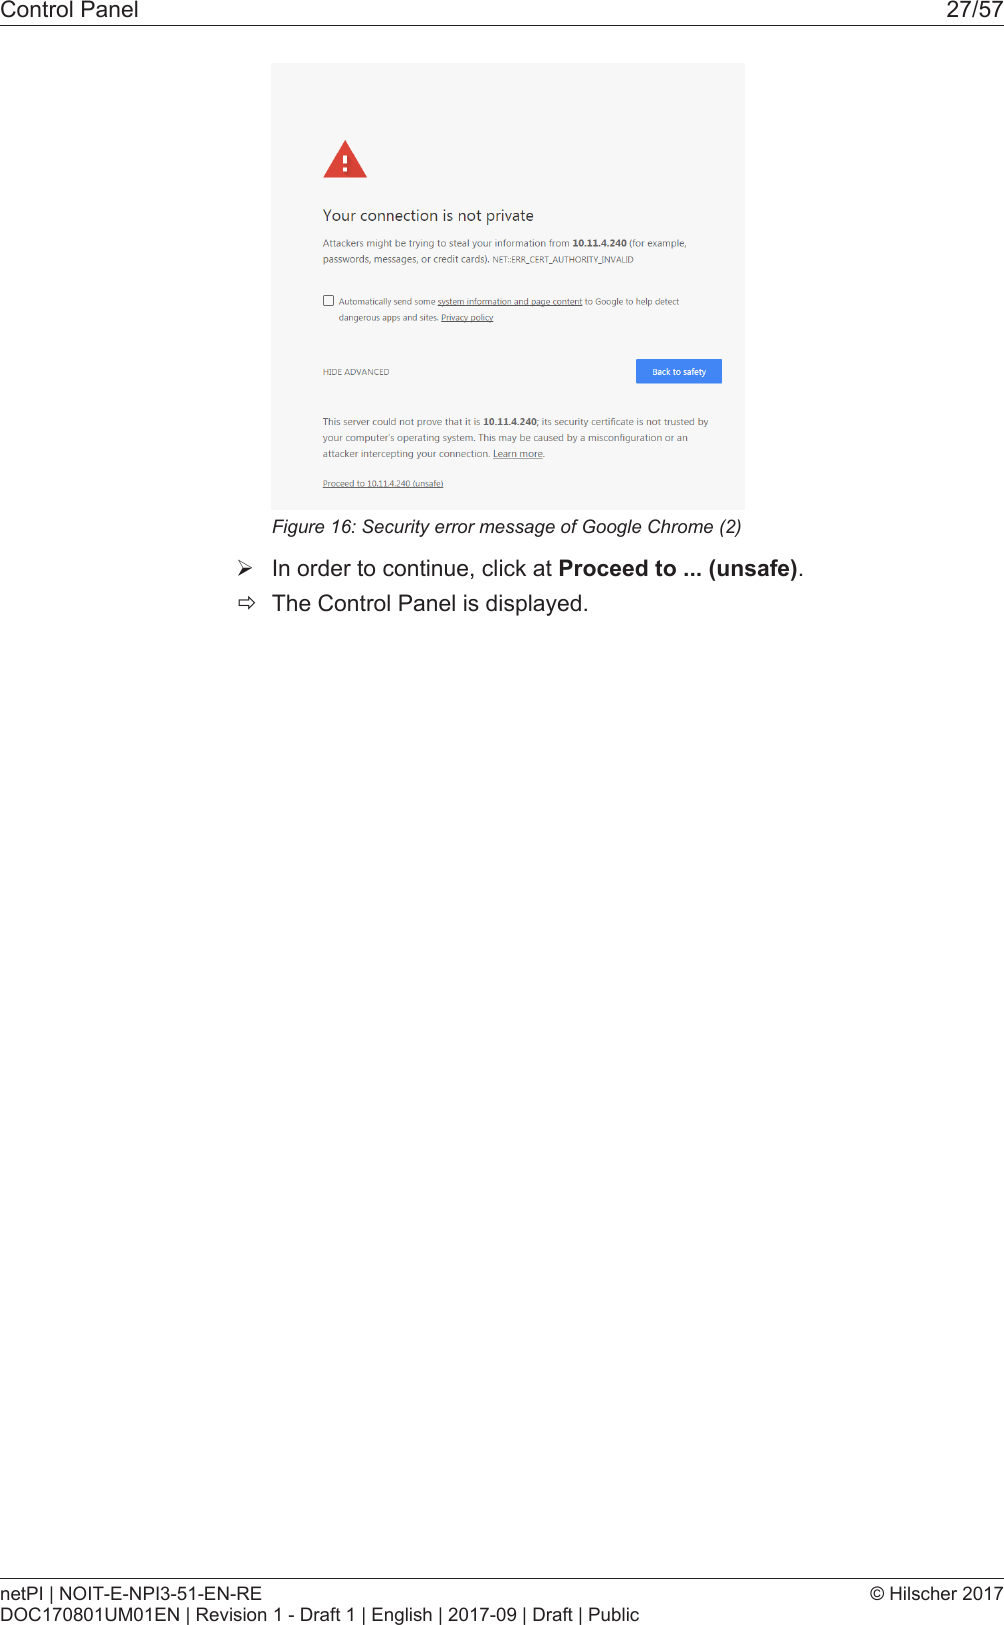
![Control Panel 24/57ðNow, you can work with the control panel as an administrator, you cancreate further users in the user management, and assign access rights.With the specified password you can work with the control panel asadministrator.Also see about this2User management [}40]8.1.2 Secure connectionEdge Gateways support web connections secured by SSH/TSL viahttps:// accesses only.By definition, a secure connection can provide an efficient protection only ifa certificate proves that the server is secure. Only then can runningtransactions of the initiating browser and the server be considered asprotected against interception and data theft.This is why the browser at first inquires a certificate of verification from theserver (Gateway). This certificate proves that the issuer has verified thesecurity of the server. Each browser provides a preinstalled list of knownauthorized issuers of certificates.Each time the certificate of the server arrives at the browser, the browsercompares the issuer of the certificate with the issuers stored in the list ofknown authorized issuers of certificates.If the issuer of the certificate is not listed, the browser will signal acertificate error and request the user's confirmation to continue because itassumes that the connection is insecure.As standard, Edge Gateways contain a certificate issued by Hilscher that isnot on the list of the known authorized issuers of certificates. Due to that,the browser signals an insecure connection and requests the confirmationto continue. When this confirmation has been given once, any futureconnections will be established without further requests.Note:In the control panel you can replace this certificate any time by thecertificate of a known authorized issuer of certificates, see sectionUploading and installing own security certificates [}page43]).netPI | NOIT-E-NPI3-51-EN-REDOC170801UM01EN | Revision 1 - Draft 1 | English | 2017-09 | Draft | Public© Hilscher 2017](https://usermanual.wiki/Hilscher-Gesellschaft-fuer-Systemautomation-mbH/0001/User-Guide-3581857-Page-24.png)
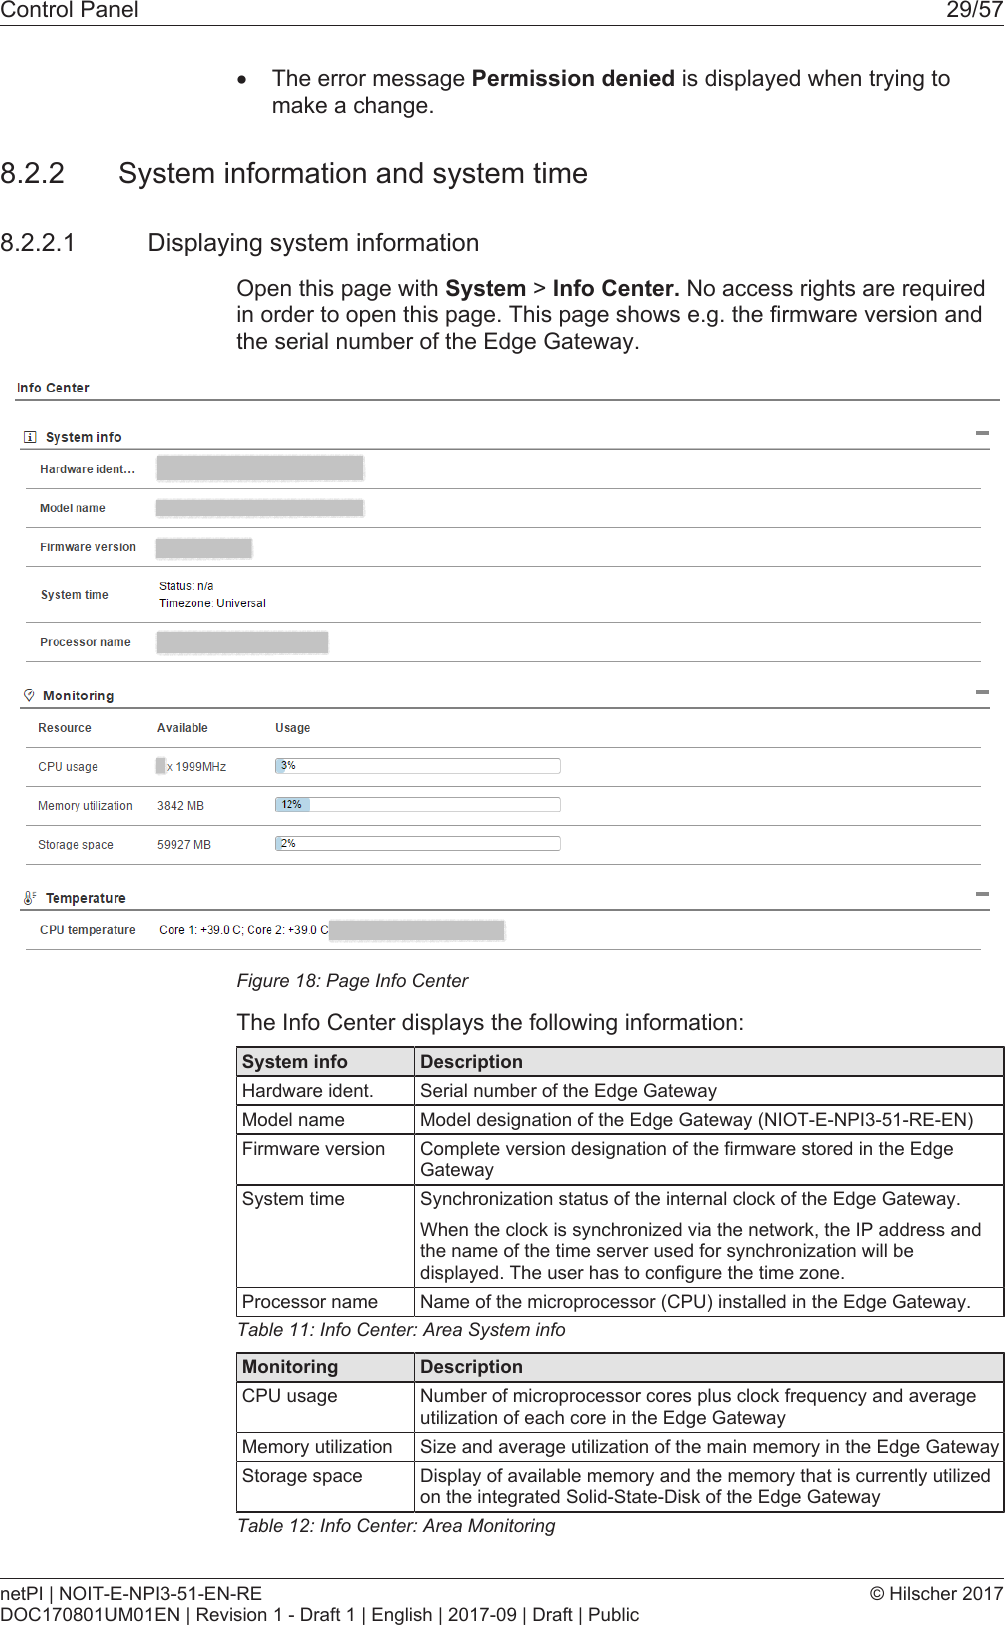
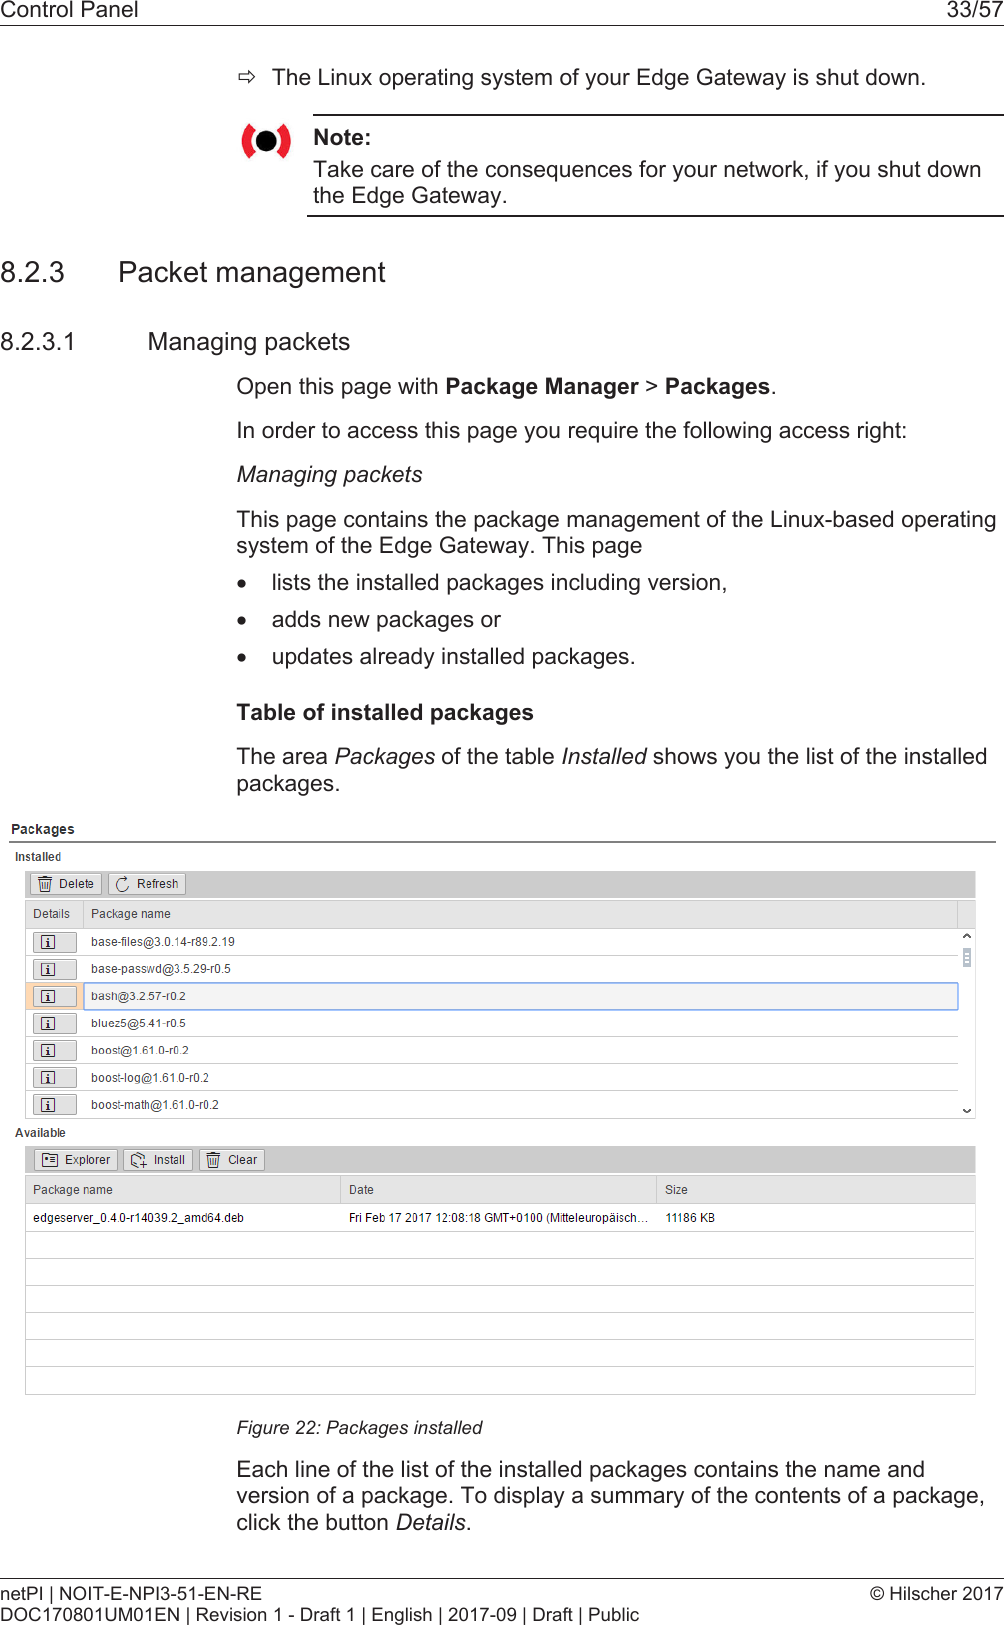
![Control Panel 28/578.2 Control Panel commands8.2.1 Overview and main menuThe following figure displays the main menu of the Control Panel.Figure17: Main menu of the Control PanelMenu Submenu Description Details in sectionSystem Info Center Displaying the system information, monitoring ofthe processor core temperature, and a systemmonitor for the usage of CPU, main memory,and SSDDisplaying systeminformation [}page29]Time Settings of system time and timesynchronization.Setting the systemtime [}page30]Reboot Rebooting the Linux operating system of theEdge GatewayRebooting thesystem [}page32]Shutdown Shutting down the Linux operating system of theEdge GatewaySystem shutdown [}page32]PackageManagerPackages Managing the packages of the Linux-basedoperating system of the Edge Gateway.Packet management [}page33]Network LAN Configuring the Ethernet interfaces to the field orcloud.Configuring Ethernetcommunication(LAN) [}page35]WiFi Configuring the WiFi communication WiFiHostname Displaying and configuring the host nameidentifying the Edge Gateway in the network.Hostname [}page36]Services Service List Displaying, starting, and stopping the services ofthe Edge Gateway.Services [}page37]UserManagementRoles Displaying and configuring the permissions foruser roles.Managing user roles [}page40]Accounts Displaying user accounts und assigning userroles.Managing useraccounts [}page42]Security SSL Certificate Installing the SSL safety certificate. Security certificates [}page42]Help Info Displaying current software version. Help [}page46]Session User Profile Displaying the permissions of the user. User profile [}page46]Logout Logout Logout [}page47]Table10: Functional overview of the Control PanelFor the pages which can be invoked via the Control Panel, the followingapplies:If for the selected page, no access right for reading is present, this has thefollowing implications:·No data are displayed. All important controls and displays of the pageare grayed out respectively inactive.·The error message Permission denied is displayed when accessingthe page.If there is read but no write access right present, this has the followingimplications:netPI | NOIT-E-NPI3-51-EN-REDOC170801UM01EN | Revision 1 - Draft 1 | English | 2017-09 | Draft | Public© Hilscher 2017](https://usermanual.wiki/Hilscher-Gesellschaft-fuer-Systemautomation-mbH/0001/User-Guide-3581857-Page-28.png)
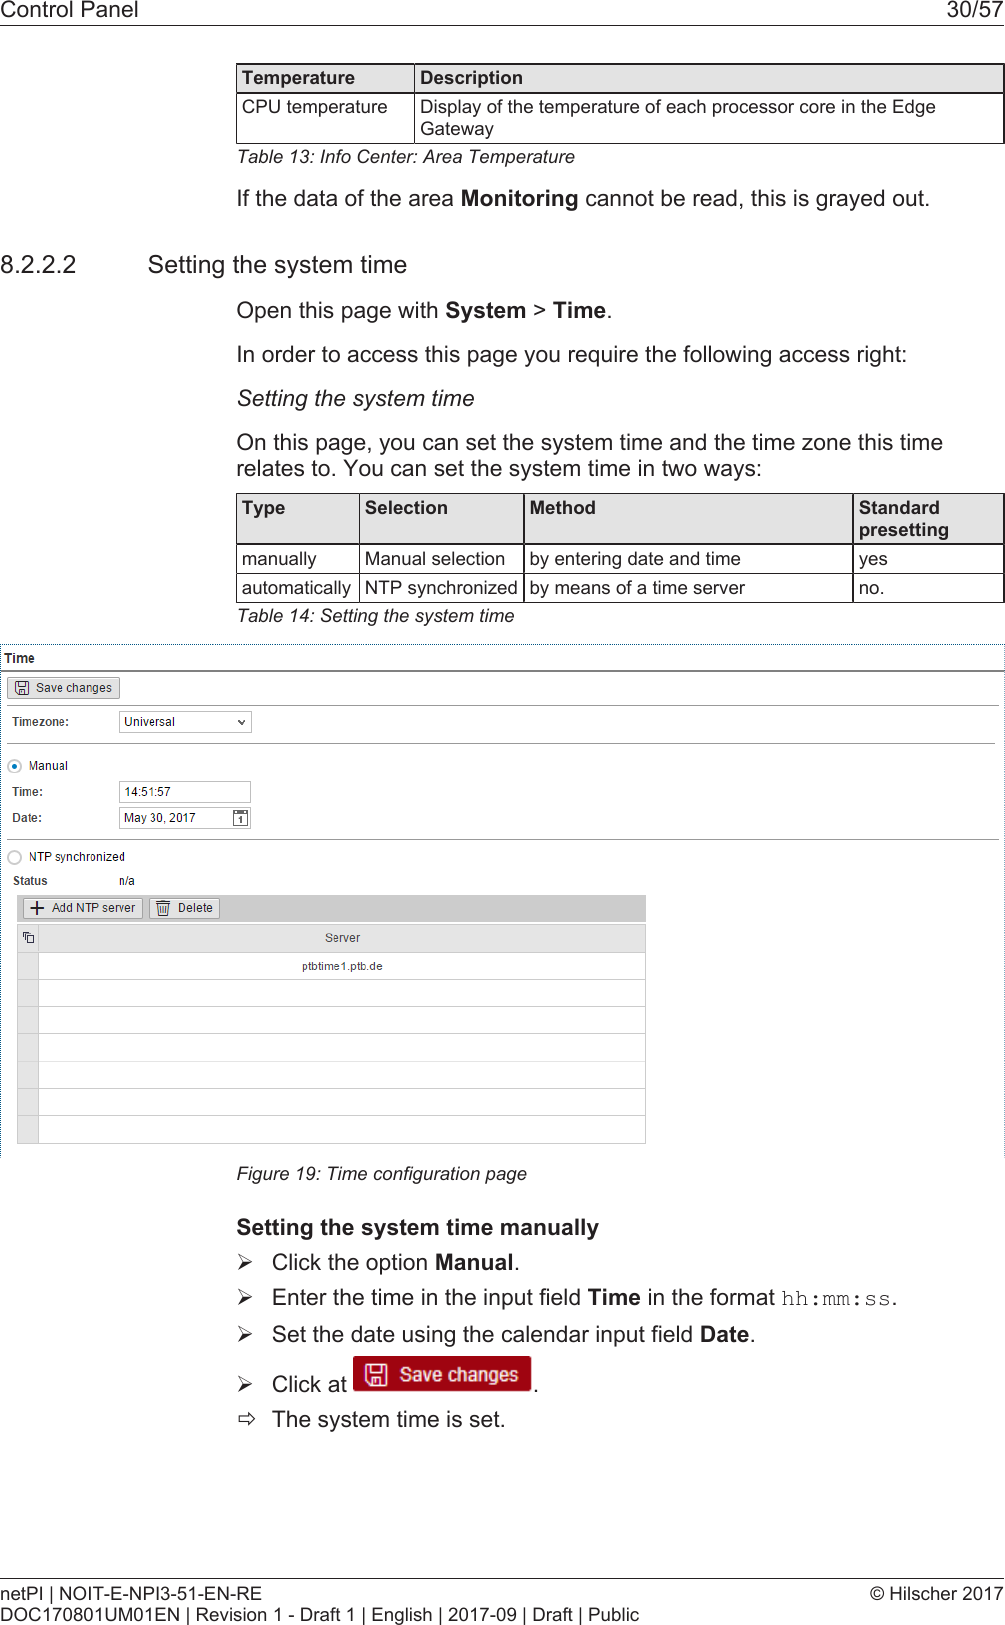

![Control Panel 36/57The IP address parameters include the IP address, the subnet mask, theGateway address, and the IP addresses of the 1st and 2nd domain nameserver.The default IP address of the LAN connection port 2 is 192.168.253.1with the subnet mask 255.255.255.0.Column MeaningName displays the name of the LAN interface.MAC address displays the MAC address of the LAN interface.Settings Selecting the configuration method: Here you can select between·DHCP (IP address parameters automatically obtained from a DHCPserver) or·Fixed address (IP address parameters entered by the user)If you enter the IP address manually, also always enter the subnetmask and the Gateway address.Domain NameSystemIf you enter the IP address parameters manually, enter the IP addressof the 1st and 2nd domain name server.Table15: Table LAN: Meaning of the columnsIf you want to permanently save the changes you made, click at afterwards.8.2.4.2 HostnameOpen this page with Network > Hostname.In order to access this page you require the following access right:Access to hostname of Edge GatewayOn this page you configure the host name.The host name identifies the device via the WiFi or LAN network.The default host name starts with the two letters "NT" followed by the LANMAC address of the LAN connection port 1 of the Edge Gateway. ExampleNT0002A233E559. The default host name is printed on the label at thebottom of the Edge Gateway. With the host name you can access the EdgeGateway from your PC even without knowing the IP address of the EdgeGateway (also see Using the web browser to establish a connection withthe Edge Gateway [}page18]).If the Edge Gateway does not obtain an IP address from a DHCP server,the system cannot translate the host name and you cannot access thedevice.Figure25: HostnamenetPI | NOIT-E-NPI3-51-EN-REDOC170801UM01EN | Revision 1 - Draft 1 | English | 2017-09 | Draft | Public© Hilscher 2017](https://usermanual.wiki/Hilscher-Gesellschaft-fuer-Systemautomation-mbH/0001/User-Guide-3581857-Page-36.png)
![Control Panel 41/57An access right is set per resource. Each configuration page of the controlpanel which contains settable device parameters is a resource. Access viaREST-API (see Functions of the Edge Server) is also a resource.An access right can be assigned to the following single resources:Access right / Resource Access to resourceaccomplished via menuentryUsageSystemSetting the system time System >Time Setting the systemtime [}page30]Packet managementManaging packets Package Manager >PackagesManaging packets [}page33]Network accessAccess to LAN (Ethernetnetwork)Network > LAN Configuring Ethernetcommunication(LAN) [}page35]Access onto WiFI (wirelessnetwork)Network > WiFi Configuring wirelesscommunication (WiFi)Access onto hostname of EdgeGatewayNetwork > Hostname Hostname [}page36]Access onto Field network(Ethernet network)Network > FieldServicesConfigure Node-RED Services > Node-RED Starting, stopping andconfiguringservices [}page37]Configure MQTT Broker Services > MQTT Broker Starting, stopping andconfiguringservices [}page37]SecurityInstall security certificates Security > SSL/TLSCerticateUploading and installing ownsecuritycertificates [}page43]Edge ServerAccess via REST-API Edge Server (REST API) Functions of the Edge ServerTable17: Access rights onto resourcesEach resource may obtain one of the following access rights:Access rights onto resource CheckboxNo access NoneRead access only ReadRead and write access Read, WriteTable18: Access rights to resourcesAdding a new roleØClick at netPI | NOIT-E-NPI3-51-EN-REDOC170801UM01EN | Revision 1 - Draft 1 | English | 2017-09 | Draft | Public© Hilscher 2017](https://usermanual.wiki/Hilscher-Gesellschaft-fuer-Systemautomation-mbH/0001/User-Guide-3581857-Page-41.png)
![Control Panel 42/57ðThe dialog box for entering the role name is displayed.ØEnter a name for the role, e.g. User.ØClick Add.ðThe role is added.Setting the access rights of a roleØClick a role.ðThe resources and access rights for this role will be displayed.ØAssign the access right per resource.ØClick at The following figure shows the access rights of the administrator.Also see about this2Uploading and installing own security certificates [}43]8.2.6.2 Managing user accountsOpen this page with User Management > Accounts.On this page you can·add·process·delete user accounts.Figure31: User account pageEach user account has a user name, a password, and an assigned role.8.2.7 Security certificatesThe menu Security offers you the possibility to display the contents ofsecurity certificates and to upload and install these.It looks like:Figure32: Security submenunetPI | NOIT-E-NPI3-51-EN-REDOC170801UM01EN | Revision 1 - Draft 1 | English | 2017-09 | Draft | Public© Hilscher 2017](https://usermanual.wiki/Hilscher-Gesellschaft-fuer-Systemautomation-mbH/0001/User-Guide-3581857-Page-42.png)

![Control Panel 45/578.2.7.2 Information about the currently loaded security certificateIn the lower area of page SSL Certificate information concerning thecurrently loaded security certificate is displayed.Figure35: SSL Certificate – Info areaThe single lines have the following meanings:Information about the security certificateLine Abbreviation MeaningIdentity/verified byCN Identity/verified bycountry C Countrystate ST Statelocality L Localityorganization O OrganizationOrganizationunitOU Organization unitmail CN E-mail addressValidity starts - Start of validity duration of certificateValidity ends - End of validity duration of certificateIn factory-new state the Edge Gateway contains a self-signed certificate.You should replace this by an own certificate that you can upload andinstall in the way described above (see Uploading and installing ownsecurity certificates [}page43]).netPI | NOIT-E-NPI3-51-EN-REDOC170801UM01EN | Revision 1 - Draft 1 | English | 2017-09 | Draft | Public© Hilscher 2017](https://usermanual.wiki/Hilscher-Gesellschaft-fuer-Systemautomation-mbH/0001/User-Guide-3581857-Page-45.png)
![Isolated application execution with Docker 48/579 Isolated application execution with DockerThe Edge Gateway enables the user to execute his own applications withinthe protected Linux operating system. A software platform becomesnecessary to allow the execution of said applications withoutsimultaneously opening the possibility of evading the safety mechanisms ofthe Linux operating system. For that purpose, the Edge Gateway uses theopen-source software "Docker" from Docker Inc. (https://www.docker.com/).In order to work with Docker, read and write access rights at Docker UI arerequired. You can check whether you have the required access rights viathe menu entry User profile [}page46]. Granting read and right accessrights requires administrator rights and is described in section Managinguser roles [}page40].Note:For more information on Docker, see the documentation of theDocker organization under https://docs.docker.com/.9.1 Working with Docker via the web GUIThis section describes·how to operate Docker via the portainer.io interface of the browser·how to run additional software on the Edge Gateway with Docker (usingthe web server NGINX as an example).9.1.1 The portainer.io interfaceTasks of the portainer.io interfaceThe portainer.io interface serves:·to add new containers·to provide functions for controlling the code execution such as Start,Stop, Kill, Restart, Pause, Resume, and Remove·to configure the containers.Starting the portainer.io interface for working with the containersTo start the portainer.io interface, proceed as follows:ØOpen the Edge Gateway Manager, if it is not already open. For this purpose see Calling the Edge Gateway Manager [}page20]ØClick the tile Docker Management in the Edge Gateway Manager..netPI | NOIT-E-NPI3-51-EN-REDOC170801UM01EN | Revision 1 - Draft 1 | English | 2017-09 | Draft | Public© Hilscher 2017](https://usermanual.wiki/Hilscher-Gesellschaft-fuer-Systemautomation-mbH/0001/User-Guide-3581857-Page-48.png)
![Isolated application execution with Docker 49/57Figure39: Tile Docker in the Edge Gateway ManagerÊThe portainer.io login screen will be displayed. In the field Username,admin is already entered. This is the only predefined user name.ØEnter the password for the user name admin. This password is set inthe user management of the Edge Gateway Manager, see Usermanagement [}page40].ÊThe start page "Dashboard" of the user interface portainer.io will bedisplayed.Figure40: View of portainer.io dashboardØClick Containers in the menu on the left or Containers on the page"Dashboard".ðThe page "Container list" will be displayed. This list contains the namesand statuses of all currently known containers and provides thefunctions for controlling the code execution.netPI | NOIT-E-NPI3-51-EN-REDOC170801UM01EN | Revision 1 - Draft 1 | English | 2017-09 | Draft | Public© Hilscher 2017](https://usermanual.wiki/Hilscher-Gesellschaft-fuer-Systemautomation-mbH/0001/User-Guide-3581857-Page-49.png)