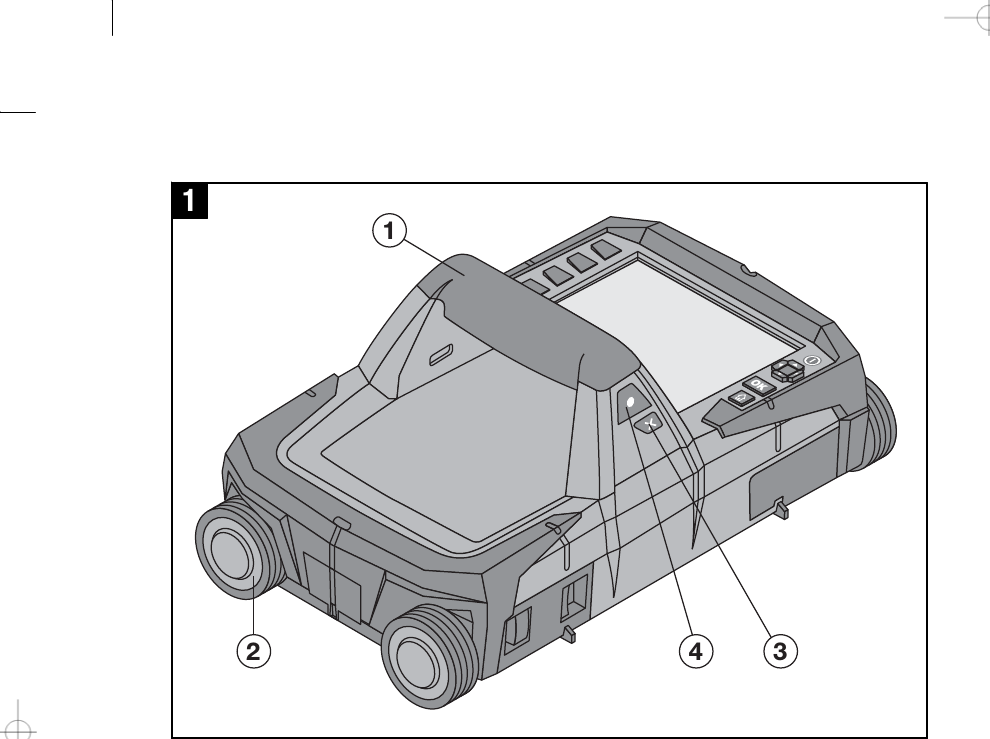
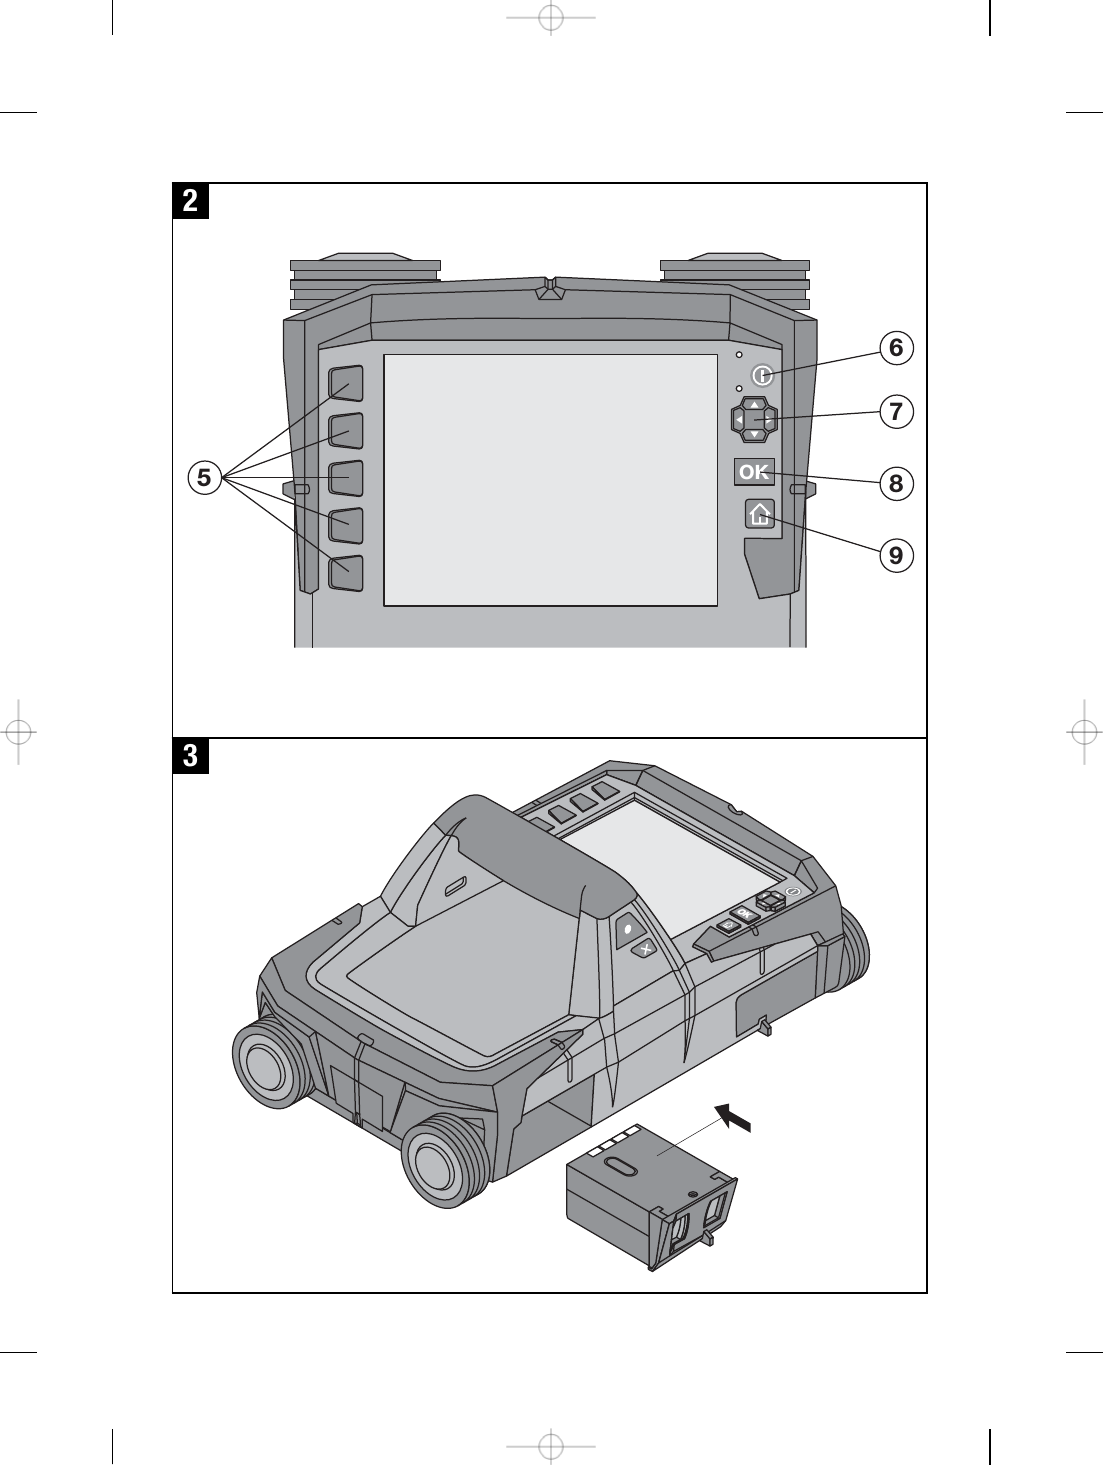
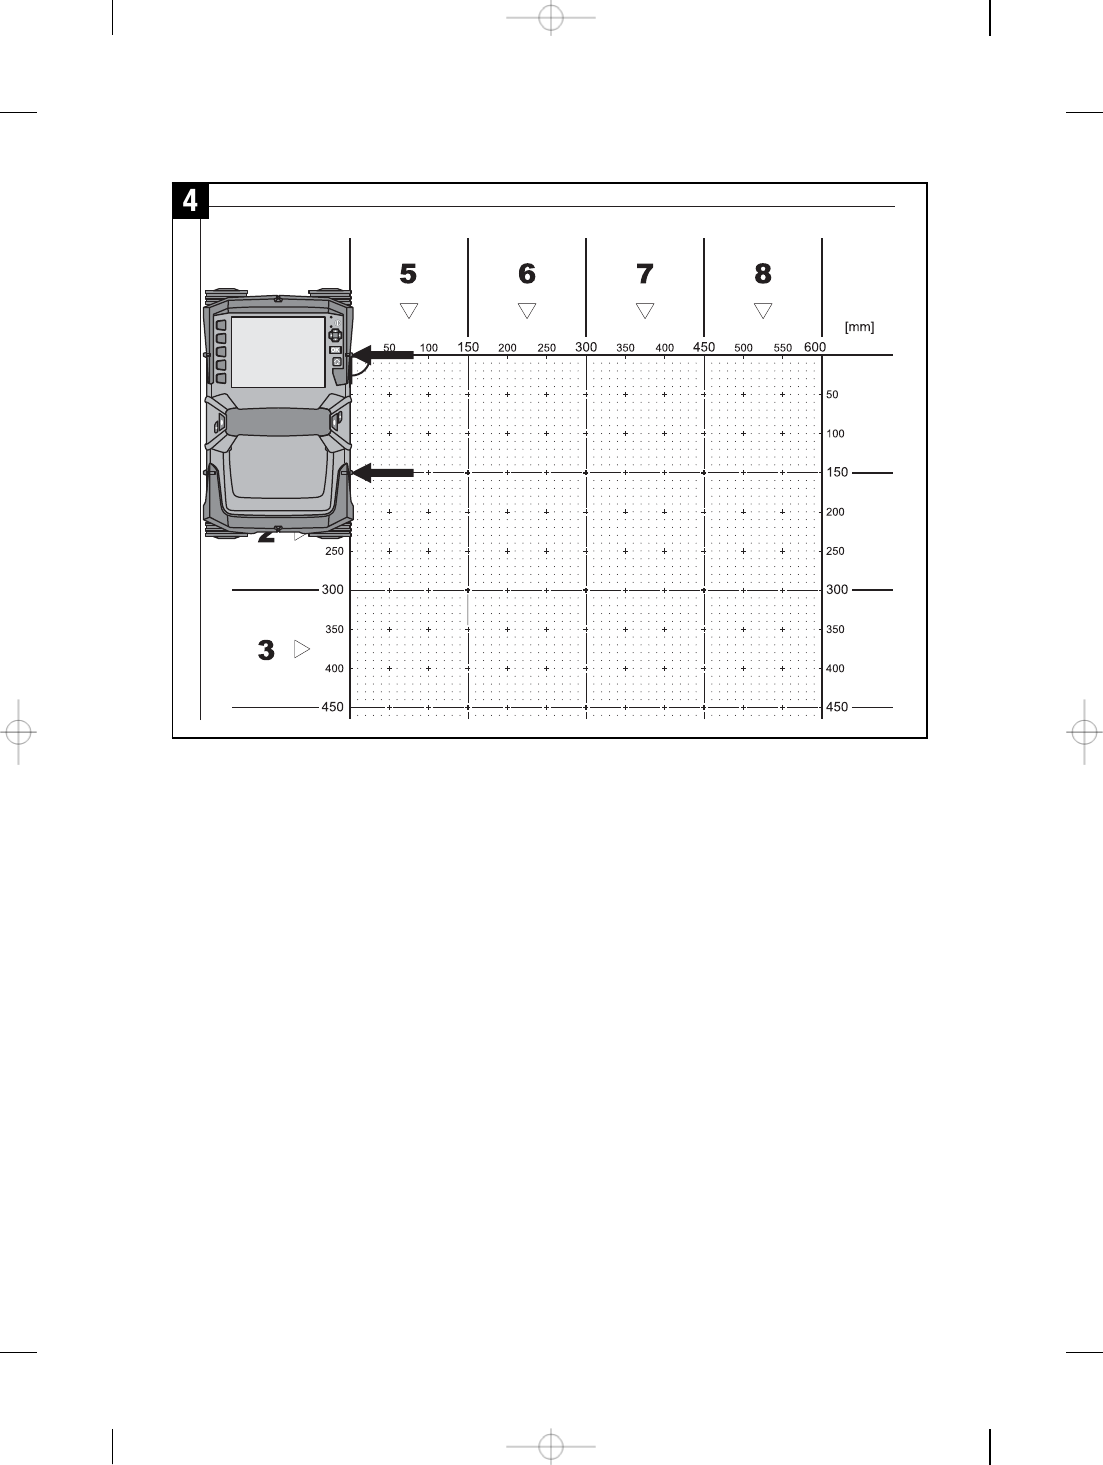
Hilti PS1000R1 Ground Penetrating Radar User Manual Hilti Omega

Hilti Corporation Ground Penetrating Radar Hilti Omega

User Manual

 0,1
 0, 0,23
0,4
ORIGINAL OPERATING INSTRUCTIONSPS 1000 x‑scanIt is essential that the operating instruc-tions are read before the tool is operatedfor the first time.Always keep these operating instructionstogether with the tool.Ensure that the operating instructions arewith the tool when it is given to other per-sons.Contents Page1. General information 12. Description 23. Before use 24. Operation 25. Settings 51These numbers refer to the corresponding illustra-tions. The illustrations can be found on the fold-outcover pages. Keep these pages open while studyingthe operating instructions.Scanner 1@Grip;Wheels=Cancel button%Start/stop buttonButtons 2&Function buttons(On/off button)Rocker switch+Confirmation button (OK)§Home button1. General information1.1 Explanation of the pictograms and otherinformationSymbolsRead theoperatinginstructionsbefore use.2. Description2.1 UseThe PS 1000 is used for locating objects embeddedin concrete structures.2.2 Limitations of useThe tool complies with the requirements of EN302066-1 and 302067-2.Prior to planned use of ground or wall penetratingradar equipment, the user/operator should check thatthere are no sensitive radio sites/systems in the nearvicinity (airfields, radio astronomy sites, etc.). Thesesites may be generally defined in the licence issued bythe responsible national administration. If these arepresent in the area, then liaison with the organizationen1
concerned should take place to obtain agreement,prior to any measurements being performed.3. Before use3.1 Inserting the battery pack and switching on the device 31. Fully charge the PSA 81 battery pack (see Operating instructions for PUA 81 power supply).2. When charged, insert the battery pack.3. Switch the tool on by pressing the on/off button.Outside the operating temperature, the fault message no. 00012 is displayed and the device is automaticallyswitched off. Allow the device to cool down or warm up and then switch it on.3.2 SettingsOn brand-new devices, you will first be prompted to select the language, country, region and unit.1. Use the rocker switch to select the desired language and confirm your choice with the "OK" functionbutton.2. Then use the rocker switch and the confirmation button to select the required parameter and then carryout the settings.3. After carrying out the settings, use the "OK" function button to confirm them.NOTE You can also use the "Skip" function button to shift these settings so that they will remain the samethe next time the device is switched on.4. Operation4.1 Displaying the Operating instructions1. Press the home button for 3 seconds.The Operating instructions will be shown context-sensitively in the display field. You can then navigatethroughout the complete Operating instructions.2. To close the Operating instructions, press the "Back" function button.4.2 Basic functionsYou can use the function buttons to select the available functions.You can use the rocker switch to shift the focus, change parameter values or, depending on the setting, shiftthe cross hairs, change the layer thickness, etc.You can use the "OK" confirmation button to select the focalized element or start data processing.en2
4.3 Carrying out Quickscan detectionLocating objects embedded in concrete structures in real time mode for direct marking.1. Switch the device on and navigate to the home screen using the Home button.2. Select the "Quickscan detection" function.3. Hold the scanner onto the surface to be examined.4. Start the measurement with the start/stop button.A beep is heard which signals the start of the measurement and a red recording point appears in thedisplay field.5. Move the scanner to the left or right (at least 30 cm / 12") and back along the same measurement trackover the surface to be scanned in order to locate the embedded objects.If the scanning movement is very fast, an audible and visible warning is issued. If the scanning movementis too fast, the measurement is canceled.6. You can use the "Color scheme", "Contrast" and "Param." function buttons to adjust the visualizationparameters.NOTE You must set the values for "Param." before measuring (see Operating instructions in the device).7. End the measurement with the start/stop button.A double beep signals that the measurement has ended.4.4 Quickscan recordingNOTEThis function is not available for the PS 1000‑B version.Recording a relatively long measurement scan line in concrete structures.1. In the home screen, select the "Quickscan recording" function.2. Set the scanning direction.3. Hold the scanner onto the surface to be examined.4. Start the measurement with the start/stop button.A beep is heard which signals the start of the measurement and a red recording point appears in thedisplay field. You must scan a minimum length of 32 cm (13") in order to receive analyzable data. Themaximum scanning length is 10 m (30 ft).en3
5. Move the scanner in the direction which you preset.If the scanning movement is very fast, an audible and visible warning is issued. If the scanning movementis too fast, the measurement is canceled.Do not change the scanning direction. If you move the scanner more than 16 cm (7") in the other direction,the measurement will be automatically canceled.6. End the measurement with the start/stop button.A double beep signals that the measurement has ended.7. Check the measurement result with the "Preview" function. Set the control behavior of the rocker switchusing the function button at the top on the left.NOTE You can use the "Contrast", "Param." and "View" function buttons to change the visualizationparameters. If you change the "Param.", the data must be recalculated. To do this, press the "OK"confirmation button.4.5 Image scan 4For a flat view of objects embedded in concrete structures.1. Carry out a Quickscan detection to evaluate the orientation of the embedded objects (see Section 4.3).2. Move the reference grid at right angles to the location of object location onto the surface to be examined.3. In the home screen, select the "Image scan" function.4. Select the grid size (only possible with the PS 1000 version) and the starting point.5. According to grid and starting point, hold the scanner on the surface to be examined.6. Start the measurement with the start/stop button.A beep is heard which signals the start of the measurement and a red recording dot appears in the displayfield. A double beep signals the end of the track.The measurement ends automatically at the end of each measurement track.7. Move the scanner according to the specified grid over the surface to be examined. As far as possible,measure all the tracks.If the scanning movement is very fast, an audible and visible warning is issued. If the scanning movementis too fast, the measurement is canceled and the measurement track must be repeated.8. To discard the track which was last measured, press the Cancel button.You can then start a new measurement.After the last track has been scanned, the measurement result is displayed immediately and you can checkand analyze the measurement result.You can use the "Contrast", "Parameters" and "View" function buttons to change the visualizationparameters. If you change the "Parameters", the data must be recalculated. To do this, press the "OK"confirmation button.4.6 ProjectsYou can use this function to manage projects and to display and analyze recorded scans:1. In the home screen, select "Projects".en4
2. Select the desired project. The active project is marked by a "dog-eared" crease.3. Select the desired scan.The scan is displayed and can be reanalyzed.5. Settings5.1 You can adjust the following:BrightnessVolume levelDate / timeEnergy modesCountry settings (country, region, language, unit)NOTEPress the "Help" function button to call up the complete Operating instructions.en5
7613 FCC-Hinweis (gültig in USA) / ICES-Hinweis (gültig in Kanada)FCC statement (valid in USA)CAUTIONThis equipment has been tested and found to comply with the limits for a class B digitaldevice, pursuant to part 15 of the FCC rules. These limits are designed to providereasonable protection against harmful interference in a residential installation. Thisequipment generates, uses, and can radiate radiofrequency energy and, if not installedand used in accordance with the instructions, may cause harmful interference to radiocommunications.However, there is no guarantee that interference will not occur in a particular installation. Ifthis equipment does cause harmful interference to radio or television reception, which canbe determined by turning the equipment on and off, the user is encouraged to try tocorrect the interference by one or more of the following measures:• Re-orient or re-locate the receiving antenna.• Increase the distance between the equipment and receiver.• Connect the equipment to an outlet on a circuit different from that to which the receiver isconnected.• Consult the dealer or an experienced TV/radio technician for assistance.NOTEChanges or modifications not expressly approved by the party responsible for compliancecould void the user’s authority to operate the equipment.This device complies with part 15 of the FCC Rules.Operation is subject to the following two conditions:1) this device may not cause harmful interference, and2) this device must accept any interference received, including interference thatmay cause undesired operation.For US customers:
77Operation of this device is restricted to law enforcement, fire and rescue officials,scientific research institutes, commercial mining companies, construction companies andprivate parties operating on behalf of these groups. Operation by any other party is aviolation of 47 U.S.C. § 301 and could subject the operator to serious legal penalties.Coordination Requirements(a) UWB imaging systems require coordination through the FCC before the equipmentmay be used. Theoperator shall comply with any constraints on equipment usage resulting from thiscoordination.(b) The users of UWB imaging devices shall supply detailed operational areas to the FCCOffice of Engineering and Technology who shall coordinate this information with theFederal Government through the National Telecommunications and InformationAdministration. The information provided by the UWB operator shall include the name,address and other pertinent contact information of the user, the desired geographicalarea of operation, and the FCC ID number and other nomenclature of the UWBdevice. This material shall be submitted to the following address: Frequency Coordination Branch, OET Federal Communications Commission 445 12th Street, SW Washington, D.C. 20554 ATTN: UWB Coordination(d) Users of authorized, coordinated UWB systems may transfer them to other qualifiedusers and to different locations upon coordination of change of ownership or location tothe FCC and coordinationwith existing authorized operations.(e) The NTIA/FCC coordination report shall include any needed constraints that apply today-to-day operations. Such constraints could specify prohibited areas of operations orareas located near authorized radio stations for which additional coordination is requiredbefore operation of the UWB equipment. If additional local coordination is required, alocal coordination contact will be provided.Ground Penetrating Radar Coordination Notice And Equipment Registration
78Note: This form is only for Domestic United States users. Failure to do this is a violation ofFederal law.1. Date:2. Company name:3. Address:4. Contact Information [contact name and phone number]:5. Area Of Operation [state(s)]:6. Equipment Identification Brand Name:  PS 1000 FCC-ID:  SDL-PS1000R17. Receipt Date Of Equipment:Fax this form to the FCC at: 202-418-1944or mail to:Frequency Coordination Branch, OETFederal Communications Commission445 12th Street, SWWashington, D.C. 20554ATTN: UWB CoordinationDo not send this information to Hilti Corporation.IC statement (for Canada only)This device complies with the requirements defined in RSS-220 in conjunction with RSS-Gen of IC.Operation is subject to the following two conditions:1) this device may not cause harmful interference, and2) this device must accept any interference received, including interference that maycause undesired operation.See belowBrand Name: PS 1000 FCC-ID: SDL-PS1000R1
79For Canadian customers:This device shall be operated only where directed to the ground or wall, and is in contactwith the ground or wall surface. This device shall be operated only by law enforcementagencies, scientific research institutes, commercial mining companies, constructioncompanies, and emergency rescue or fire-fighting organizations.

Navigation menu