Hisense Electric LCDD0004 LCD TV. User Manual
Hisense Electric Co., Ltd. LCD TV. Users Manual
UserManual.wiki
>
Hisense Electric
>
LCDD0004 User Manual
Users Manual
Navigation menu
Upload a User Manual
Namespaces
Wiki Guide
HTML
PDF
Info
Views
User Manual
Discussion / Help
Navigation
![1. Press [CH ] button on the remote control, you can change the channels. (Press [VOL ]button to raise or lower the volume).2. Press [CH ]button on the front panel of the TV set, you can also change the channels. (Press [VOL ] button to raise or lower the volume).3. Press the numeric buttons on the remote control to display the corresponding channels.Note: Changing the channels can also be achieved by directly pressing the programme No. If you want to choose the programme No. from 1 to 9, press the numeric buttons directly. If you want to select a programme No. that double-digit or three-figure, the time between twice pressing the numbers should not be more than 3 seconds. / / //Changing Channels/ VolumeSelect input sourceChange picture mode Choose the current input signal of the main picture. You can press the TV AV COMP HDMI VGA button to choose the source you want or press [INPUT] button to display the signal inputs. Press [ ]button to select the source you wanted to enter, then press [ ] button to confirm.You can also press the [ INPUT] button continuously to choose the source you want.//ENTER It can be set as Standard, Cinema, User and Vivid. This mode achieves a certain image display effect by setting the brightness, contrast and color etc.Change the batteries1. Open the battery cover on the back of the remote control.2. Install two AAA size (1.5V) batteries. Match the “+” and “-” signs on the batteries to the signs on the battery compartment.3. Close the battery cover.Note:1. If the remote control doesn't work normally, unstable, or cannot control the TV, please replace the batteries.2. If you do not use the remote control for a long time, remove the batteries.The effective range of remote control1. The remote control distance: 8 meters in front of the TV set.2. The remote control angle: taking the television infrared light receiver window as an apex, 6 meters away, its controlled angle (left to right) is within 30 degrees, while the vertical angle (up to down)is within 30 degrees.Brief operations of remote control1. 2.Connect the TV power line to AC outlet.3. Press the Power button on the TV set. When the TV is on, press the Power button on the remote control, and the TV will enter Standby state. Press this button again, and you can watch TV normally.4. Press the Power button again to turn off the TV.Note:In order to save power consumption, set the TV in Standby state if you do not watch TV for a short time.If the TV is turned off , to turn it on agin, please wait at least 5 seconds in case the abnormal phenomena occurred.Connect the Power Cord to the connector on the back of the TV, if the Power cord in accessories. When connecting the power cord to the connector of the TV, make sure the power cord is fully inserted in the place. Bad contact may cause high temperature of the connector and the risk of fire or other damagesPower on/offUsing the remote controlBasic operations11](https://usermanual.wiki/Hisense-Electric/LCDD0004/User-Guide-1272206-Page-12.png)
![Change sound mode Mute soundSet sleep timerIt can be set as Standard, Speech, User and Music. This mode achieves a special sound effect by setting equalizer. Press [Mute] button to turn the sound off, press this button again to turn the sound back on. This function is used to switch off sound temporarily.It can set the TV to let it enter into the Standby state automatically, Press this button repeatedly to select the proper sleeping clock mode, and the clock tells you the remaining time before the TV enters Standby state. Basic operationsChange view ratioGUIDEPress the [ZOOM] button to select from six zoom modes: Wide, Normal, Zoom, Cinema , Panorama, Dot-to-Dot or Auto.GUIDE: Electronic programme Guide, you can see the programme information.12Note: The option of zoom mode is different in different sources](https://usermanual.wiki/Hisense-Electric/LCDD0004/User-Guide-1272206-Page-13.png)
![You can adjust: Tuner Mode - Select the TV signal source. You can select Antenna or Cable. Channel Scan - Scans for channels that have signals and stores the channels information in memory. DTV: The scanned TV programmes in digital signals. TV: The scanned programmes in analog signals. Channel Skip - Deletes a channel stored in memory. When you press CHΛ or CHV, your TV skips the channel you deleted. You can still tune to the channel using the number buttons on the remote control. MTS - Selects the sound mode. You can select Mono, Stereo, or SAP(Second Audio Program). Audio Language - Selects the audio language for a program. SAP (Second Audio Program) - Depending on the particular program being broadcast, you can listen to a foreign-language translation.:Adjust:Adjust Channel SkipENTER Set Select MENU Back2 Analog3 Analog4 Analog5 Analog6 Analog7 Analog8 Analog9 Analog10 Analog11 Analog Channel ScanChannel: 0 Search Type Antenna8%DTV 0 TV 050MENU: ReturnChannel Scan Channel Skip MTS Stereo Audio Language English TVTuner Mode Antenna Select Adjust MENU Back1 Press Menu button to display the main menu.2 Press button to select TV item. 3 Press [ ] button to enter TV menu.4 Press [ button to select the option, press [ /] button to enter or press [ button to exit. 5 When you are finished, press the Menu button to close the menu.[/]ENTER/] ENTER/Exit]/Changing the TV settings Using the TV Menu13](https://usermanual.wiki/Hisense-Electric/LCDD0004/User-Guide-1272206-Page-14.png)
![You can adjust: Picture Mode - Adjusts the Picture Mode. You can select Standard, Cinema, User or Vivid. Brightness - You can increase or decrease the brightness of the picture. Increasing the brightness can add more light to dark areas of the picture, while decreasing the brightness can add more darkness to light areas of the picture. Contrast - You can increase or decrease the contrast of the picture. Increase the contrast to adjust the white areas of the picture or decrease the contrast to adjust the black areas of the picture. Saturation - Adjusts the intensity of the colors. - Sharpness - You can increase the sharpness level for clearer images or decrease the sharpness level for smoother images. Color temperature - Changes the color temperature. You can select the color temperature from three options: Cool, Standard or Warm. Advanced Video - Accesses advanced video settings such as DNR, Adaptive Luma Control and Flesh Tone. Hue Adjusts the wareLength of the color. DNR: It can optimize the picture signal from time and space; reduce the outside noise interference and return the pure initial signal. It has four ratings: Low, Standard, Strong and Off.Adaptive Luma Control: According to the content of picture, it can adjust brightness automatically.Flesh Tone: When this feature is "on" state, the TV could be the basis of image content, for color correction. Advanced Video Select MENU Back AdjustAdaptive Luma Control OffFlesh Tone OffDNR LowVideo SelectBrightness 5050Contrast50SaturationHUE 0Color Temperature StandardPicture Mode User5SharpnessAdvanced Video MENU Back AdjustChanging the TV settings Using the Video Menu1 Press Menu button to display the main menu.2 Press button to select Video item. 3 Press [ ] button to enter menu.4 Press [ button to select the option, press [ /] button to enter or press [ button to exit. 5 When you are finished, press the Menu button to close the menu.[/]ENTER Video/] ENTER/Exit]/14](https://usermanual.wiki/Hisense-Electric/LCDD0004/User-Guide-1272206-Page-15.png)
![You can adjust: Equalizer Select MENU Back Adjust120Hz10db0db-10db00000500Hz 1.5KHz 5KHz 10KHz Balance - Adjusts the volume of the left and right speakers. Surround Sound - Turns the surround sound effect on or off. Equalizer - Weaken or enlarge the sound of the main frequency points. SPDIF Type - Selects the SPDIF type. You can select PCM, Dolby Digital or Off. Auto Volume Control - Adjust volume according to different audio signal. PCM - PCM is an encoding, mainly used for anolog signal, Dolby mainly used for digital signal. Dolby - when the data stream carries Dolby signal, digital SPDIF outputs Dolby data stream. When the data stream carries no Dolby signal, it transports PCM data stream. Auto - when the data stream carries Dolby signal, digital SPDIF outputs Dolby data stream. When the data stream carries no Dolby signal, it transports PCM data stream. No matter the data stream carries Dolby stream or not, it outputs PCM data stream.Note: Via SPDIF Type, you can choose the digital audio out type. If Auto Volume Control is On, that means audio out control is activated.Audio Select MENU Back AdjustSurround Sound On SPDIF Type PCM Balance 0EqualizerAuto Volume Control Off Changing the TV settings Using the Audio Menu1 Press Menu button to display the main menu.2 Press button to select Audio item. 3 Press [ ] button to enter menu.4 Press [ button to select the option, press [ /] button to enter or press [ button to exit. 5 When you are finished, press the Menu button to close the menu.[/]ENTER Audio/] ENTER/Exit]/15](https://usermanual.wiki/Hisense-Electric/LCDD0004/User-Guide-1272206-Page-16.png)
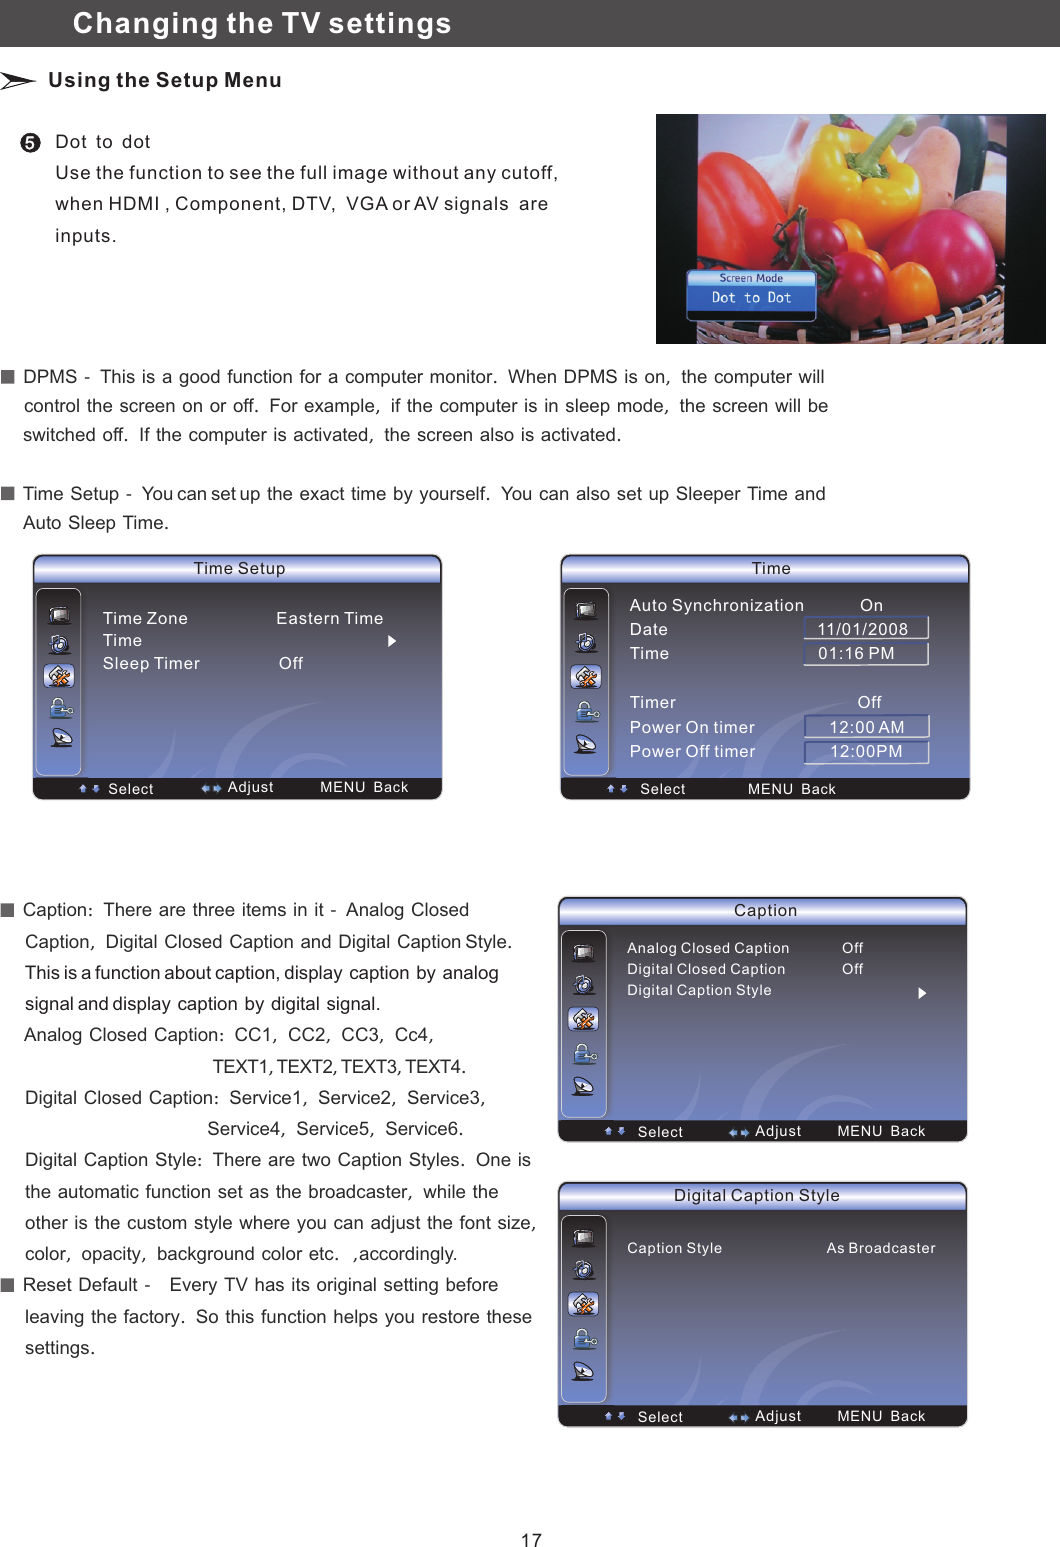
![Setup Select MENU Back AdjustOSD Language EnglishOSD Timeout 15secScreen Mode WideDPMS OnTime Setup CaptionReset DefaultNormalThe original 4:3 aspect ratio (1.33:1 signal) is preserved, so black bars are added to theleft and right of the image. Standard TV broadcasts are displayed with a 4:3 aspect ratio.WideWhen watching a standard broadcast or full-framemovie in this mode, the display image is stretched proportionately to fill the TV screen. When watching a widescreen (1.78:1 signal)program or movie, the display image fills the TV screen. ZoomStretches the 4:3 aspect ratio image vertically and horizontally to fill the screen at 1:1.78 aspect ratio. 123 OSD Language - Use the right or left arrow button to choose the OSD Language among English, and French. Spanish Screen Mode - Use the arrow button to choose the screen aspect ration from Wide, Normal, Cinema, Panorama, Dot-to-Dot or Auto. Zoom, You can adjust: Changing the TV settings Using the Setup Menu1 Press Menu button to display the main menu.2 Press button to select Setup item. 3 Press [ ] button to enter menu.4 Press [ button to select the option, press [ /] button to enter or press [ button to exit. 5 When you are finished, press the Menu button to close the menu.[/]ENTER Setup/] ENTER/Exit]/4CinemaStretches the 4:3 aspect ratio image vertically and horizontally to fill the screen at 1:2.35 aspect ratio.16](https://usermanual.wiki/Hisense-Electric/LCDD0004/User-Guide-1272206-Page-17.png)
![Parental Select MENU Exit ENTER EnterChange Password Channel BlockInput BlockProgram Block:Adjust:AdjustENTER: Set :Select MENU:BackS-1 Digital ATOS-1S-2S-3 Digital ATOS-35 Analog6 Analog7 Analog8 Analog9 Analog10 Analog11 Analog Digital ATOS-2Channel Block:Adjust:AdjustENTER Set MENU Back1 TV23 Component4 VGA5 HDMI 16 HDMI 27 HDMI 3 AVInput Block Change Password - The first time you use this function, use the default password. If you want to change it, first enter the new password then enter the same password again. Channel Block - This function will let you block any channel you want. Input Block - You can block the input source with this function. For example, if you want to block AV input, just highlight [AV] and press [ENTER].The AV input will not be seen in the screen. Clean All - This function will let you clean all the channels stored on this TV. Note: If you choose this function, all the programs you preset will be lost.? Program Block- A. Rating Enable is on. B. U.S. TV Ratings: You can choose TV ratings according to the illustration on the screen. C. The settings for U.S. Movie Ratings, Canada (English) Ratings and Canada (French) Ratings follow Step B. If you want to block the unrated program, please turn on this function. When you first use this function, the default password is [0000]. Once you input this password, you can: Press [ ] to highlight an option, then press [ to adjust the option. You can adjust: / / ]:Adjust:AdjustRating Enable OnUS.TV RatingsUS.Movie RatingsCanadian English RatingsCanadian French RatingsOpen V ChipBlock Unrated OffProgram Block Select MENU Back AdjustInput password MENU: ReturnChanging the TV settings Using the Parental Menu1 Press Menu button to display the main menu.2 Press button to select Setup item. 3 Press [ ] button to enter menu.4 Press [ button to select the option, press [ /] button to enter or press [ button to exit. 5 When you are finished, press the Menu button to close the menu.[/]ENTER Setup/] ENTER/Exit]/18](https://usermanual.wiki/Hisense-Electric/LCDD0004/User-Guide-1272206-Page-19.png)