Hisense Electric LCDD0015 Part15 Subpart B-LCD Monitor User Manual
Hisense Electric Co., Ltd. Part15 Subpart B-LCD Monitor
UserManual.wiki
>
Hisense Electric
>
LCDD0015 User Manual
W9HLCDD0015_User Manual
Navigation menu
Upload a User Manual
Namespaces
Wiki Guide
HTML
PDF
Info
Views
User Manual
Discussion / Help
Navigation
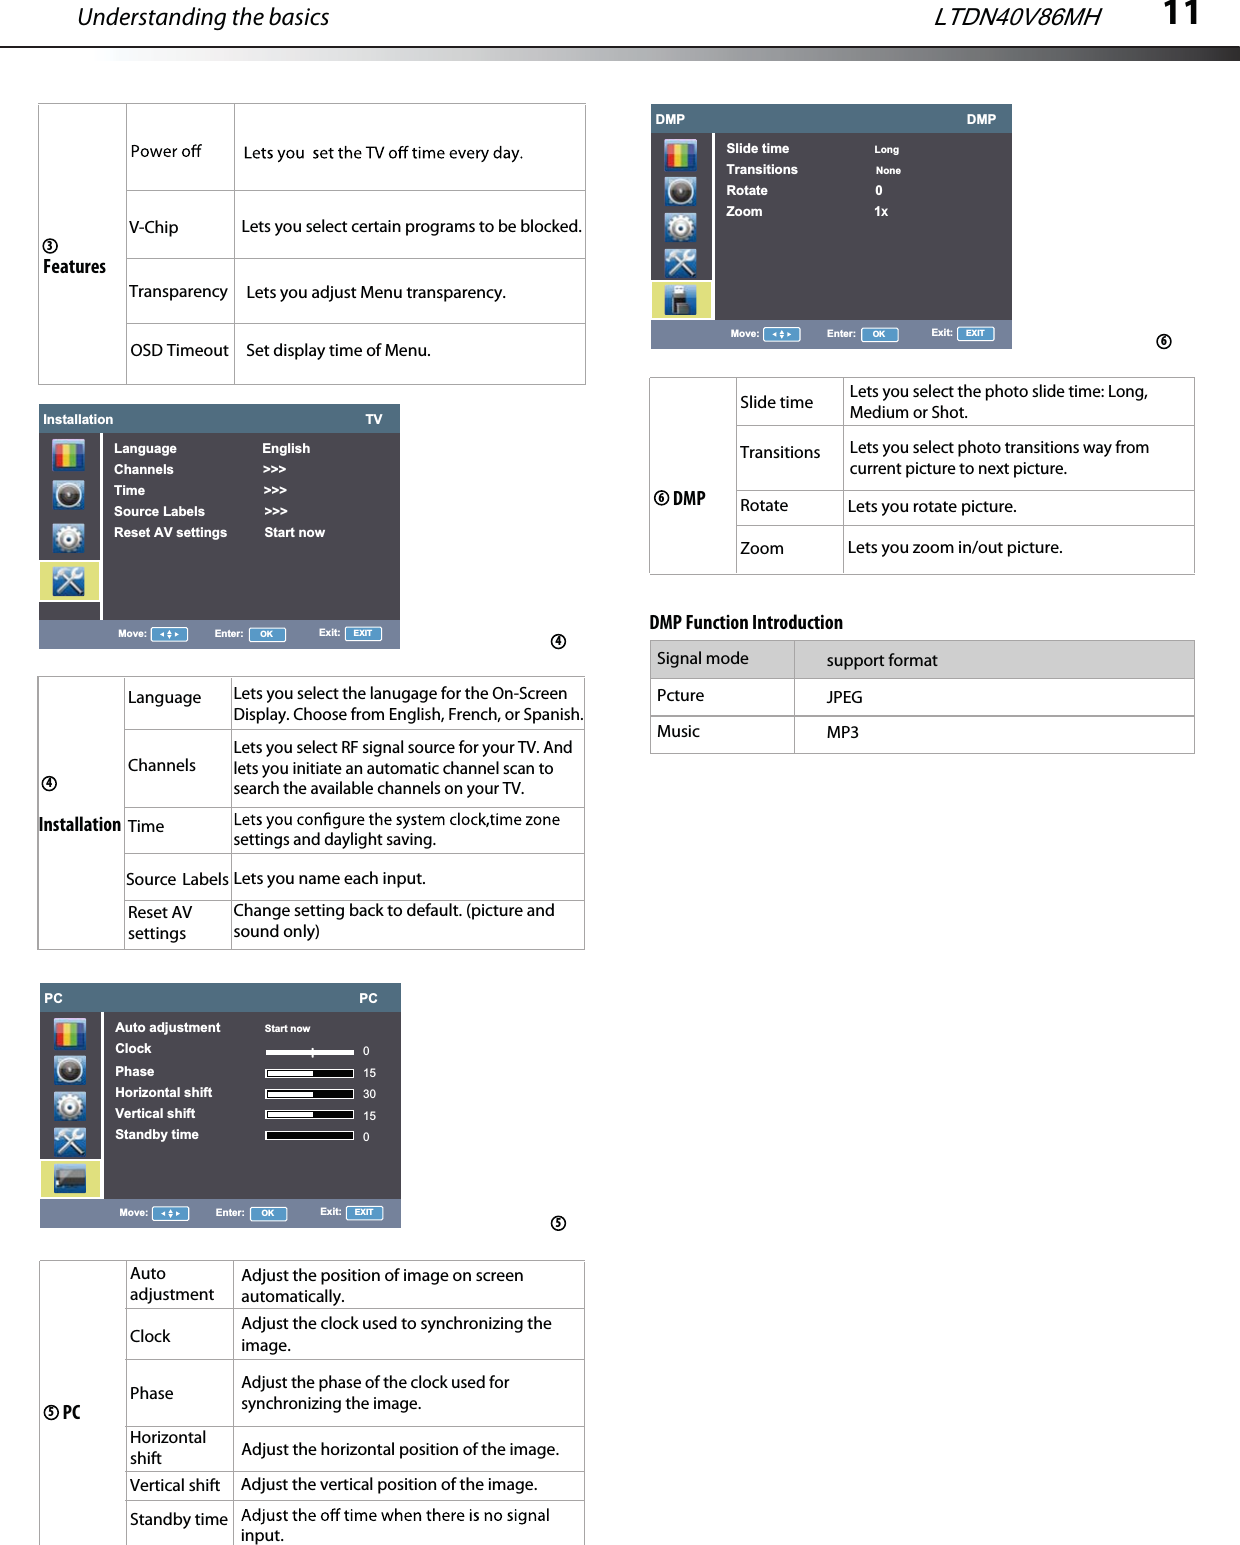
![12Adjusting the pictureTo adjust the picture:1Press MENU. The Main menu opens.2Press ENTER or . The Picture menu opens.3Press or to highlight an option, then press or to accessthe option, and press or to adjust the option. You can select:Picture Mode—Selects the picture mode. You can select: Vivid (a bright and vivid picture) Standard (a standard picture): You can also press PICTURE on the remote control to select the Backlight –Lets you control panel overall brightness. Increasing the backlight can add more light to overall screen picture and the TV uses more power consumption. While decreasing the backlight can add more darkness to overall screen picture and the TV uses less power consumption. Saturation– Lets you adjust the intensity of the colors.Sharpness–Lets you increase the sharpness level for clearer images or decrease the sharpness level for smoother images.Color temperature –Lets you change the color temperature. You can select the color temperature from three options: Cool, Normal or Warm.4Press EXIT to return to the previous menu, or press ʉ to close the menu.Choosing the display format (aspect ratio)To choose the display format:1Press ASPECT on the remote control repeatedly to cycle through the available display formats. Options include:Normal —Selects the 4:3 aspect ratio to show a picture with black bar on both right and left hand side.Zoom1 —Enlarges the picture but may crop the top and bottom of picture. And has less black bar on right and left Full Screen—Shows a full-screen picture.Panorama —Stretches the picture at the edges, butmaintains a good aspect ratio at the center of the screen.Adjusting the soundTo adjust the sound:1Press MENU. The Main menu opens.2Press or to highlight sound, then press ENTER or . The sound menu opens.3Equalizer—4Press to return to the previous menu, or press ʉ to close the menu. Selecting the audio modeTo select the audio mode:Press SOUND on the remote control one or more times to cycle through the available sound modes. Options include: StandarderutciPerutciP picture mode.–Lets you increase or decrease the contrast of the picture. Increase the contrast to adjust the white areas of the picture or decrease the contrast to adjust the black areas of the picture.Contrast–Lets you increase or decrease the brightness of the picture. Increasing the brightness can add more light to dark areas of the picture, while decreasing the brightness can add more darkness to light areas of the picture.BrightnessNoteENTERPress or to highlight an option, then press or to accessthe option, and press or to adjust the option. You can select:ENTERBalance——Adjusts the balance between the left and right audio channels.than Normal aspect mode.Note: In analog TV mode, allows you to select all aspect modes.In digital TV mode, allows you to select Normal mode and full- screen mode. Zoom and panorama modes are not available. (for normal programs).Music (for music programs).Clear Voice (for news or sports programs).Custom (for a customized sound mode).Adjusting picture and soundLTDN40V86MHPicture TV.......Picture mode StandardContrastBrightnessBacklightSaturationHueSharpnessColor temperature Normal505055005Move: Enter: OK Exit: EXITGame(a finely detailed picture) Cinema(the brightness is decreaced) Power saver(decrease the backlight for to save energy) Hue – Lets you adjust the overall color of the picture (only supported in TV/AV mode).Sound TVSound mode StandardEnglishEqualizer >>>BalanceDigital audio language0Move: Enter: OK Exit: EXIT — Press [ / ] to select between 3 different pre-adjusted sound modes:Standard,music,and Clear voice. The User mode preserves your preferred sound settings after using the Equalizer available under the Sound submenu. Sound modeSet the users' mode of sound, press [ / ] button to select the sound component of 120HZ, 500HZ, 1.5K, 5K, and 10K. Press [▲/▼] button to weaken or enlarge the sound to the proper value.In TV mode, you can adjust:In TV mode, you can adjust:Zoom2 —Enlarges the picture but may crop the top and bottom of picture. And no black bar on right and left. Digital audio language In digital TV mode,allows you to select the audio language for a program. In analog TV mode,you can't see this optionAdjusting the Features1Press MENU. The Main menu opens.2Press or to highlight Features, then press ENTER or . The Features menu opensIn TV mode, you can adjust:EXIT](https://usermanual.wiki/Hisense-Electric/LCDD0015/User-Guide-1656416-Page-14.png)
![133Press or to highlight an option, then press or to accessthe option, and press or to adjust the option. You can select:ENTERCaption settings – Lets you set up closed captions (CC). Settings include Closed captions On/Off, Analog caption service, Digital caption service and Digital caption options.Closed captions - Lets you select On, Off or On during mute. Analog caption service - Lets you select one CC server among CC-1,CC-2,CC-3,CC-4,T-1,T-2,T-3 and T-4. Digital caption service: Lets you select one cc server among CS-1,CS-2,CS-3,CS-4,CS-5 and CS-6.Digital caption options: Lets you adjust the CCfont, color, background etc or you can keep default set by the broadcaster. Changing channel settings LTDN40V86MHFeatures TVCaption settings >>>Sleep time 0Power on >>>Power off >>>V-Chip >>>Change PIN >>>Transpaerncy 0OSD Timeout >>>Move: Enter: OK Exit: EXITSleep time –Lets you select auto sleep time among 0 to 180 minutes.Power on – Lets you set up auto turn TV on time.Power off –Lets you set up auto turn TV off time.V-Chip – Lets you prevent your children from watching inappropriate material on TV. When set, parental controls read the rating of the program and deny access to programs that exceed the ratings level you select. To watch programs that exceed the selected rating, you must enter a password.Hotel Function Lock TVMove: Enter: OK Exit: EXIT OffSearch Lock OffUser Save Lock OffPicture Lock OffAudio Lock OffFeatures Lock OffInstallation Lock OffDMP Lock Off.......Function V-Chip TVMove: Enter: OK Exit: EXITUS TV Parental Guid... >>>US MPAA Rating SelectCanadian English Rating SelectCanadian French Rating Select.......Press the number buttons to enter the four-digit password. The default password is 0532. The V-Chip menu opens.Access to V-Chip MenuProgram Block– A–Rating Enable is on.B–U.S. TV Ratings: You can choose TV ratings according to the illustration on the screen.C–The settings for U.S. Movie Ratings, Canada (English) Ratings, and Canada (French) Ratings follow Step B. If you want to block an unrated program, turn on this function. You can select all the ratings listed in the charts below.Press or to highlight an option, then press or to accessthe option. Press or to highlight a rating and press to ENTERENTERlockand all other lower ratings. the rating and all other higher ratings or unlock the rating and U.S. TV ratings (age-based)These ratings are determined by the Federal Communications Commission (FCC).TV-Y All children.TV-Y7 Suitable for children 7 and older.TV-G General audiences.TV-PG Parental guidance suggested.TV-14 Parental guidance strongly suggested.TV-MA Mature audiences only.U. S. TV ratings (content-based)FV Fantasy violence.V Violence.S Sexual situations.L Strong language.D Suggestive dialog.U.S. movie (MPAA) ratingsThese ratings are determined by the Motion Picture Association of America (MPAA).G General audiences.PG Parental guidance suggested.PG-13 Suitable for children 13 and older.R Parental guidance suggested for children under 17.NC-17 Not suitable for children under 17.X Adults only.Canadian French ratingsdetermined by La Régle du cinéma du Québec.G General audiences.8 ans+ Suitable for children 8 and older.13 ans+ Suitable for children 13 and older.16 ans+ Suitable for children 16 and older.18 ans+ Adults only.Canadian English ratingsThese ratings are based on the Canadian Home Video Rating System, determined by the Canadian Motion Picture Distributors Association (CMPDA).C Suitable for all children.C8+ Suitable for children 8 and older.G General audiences.PG Parental guidance suggested.14+ Suitable for children 14 and older.18+ Adults only.The V-Chip can block non rated programs as per "CEA-608-Note:E sec. L.3". If the option to block [None], [NR], [E]or [E] programs is used in[U.S,TV ratings ]kk, [U.S.movie(MPAA) ratings]kk, [Canada English ratings]kk or [Canada French ratings ]kk accordingly “unusualresultsmay occur, and the unit may not receive emergency bulletins or other types of programming:” · Emergency Bulletins (Such as EAS messages, weather warnings and others) · Locally originated programming · News · Political · Public Service Announcements · Religious · Sports · Weather.](https://usermanual.wiki/Hisense-Electric/LCDD0015/User-Guide-1656416-Page-15.png)