Hisense Electric LCDD0017 Part15 Subpart B-LCD Monitor User Manual
Hisense Electric Co., Ltd. Part15 Subpart B-LCD Monitor
UserManual.wiki
>
Hisense Electric
>
LCDD0017 User Manual
W9HLCDD0017_User Manual
Navigation menu
Upload a User Manual
Namespaces
Wiki Guide
HTML
PDF
Info
Views
User Manual
Discussion / Help
Navigation


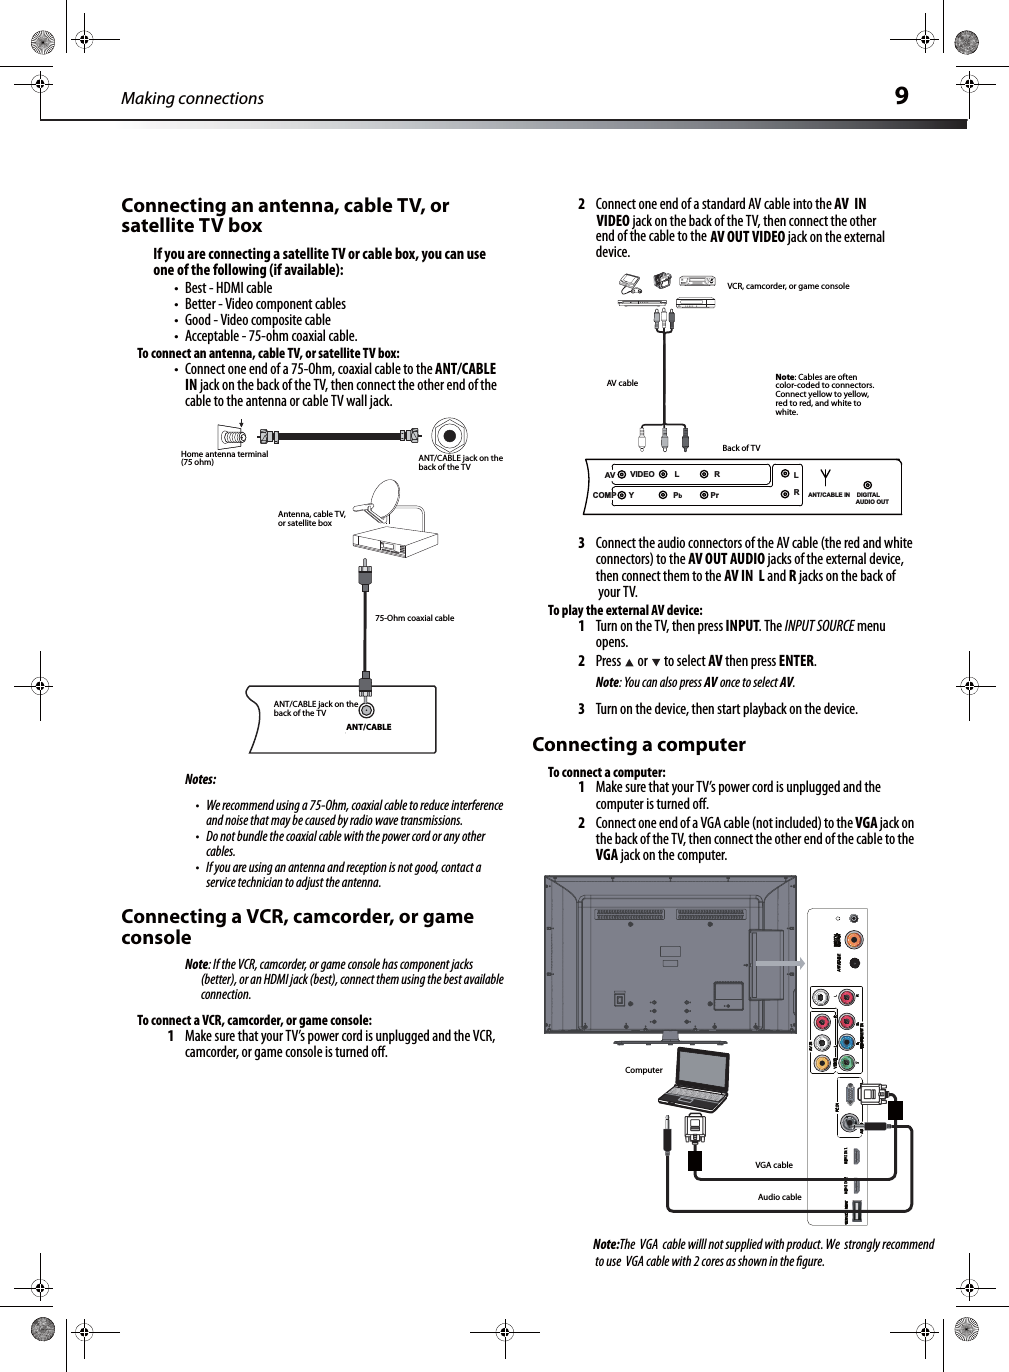

![Turning on your TV for the first time 11Turning on your TV for the first timeTo configure your TV:1Make sure that you have inserted the batteries in the remote control, connected your devices to the TV, and connected the AC power.2Press (Power), then wait several seconds. The Initial Setup screen opens (only the first time you turn on your TV). Follow the prompts to complete the setup.3Press ENTER to start the wizard, the language select screen opens.45Press or to highlight Antenna or Cable depending onthe type of connection you have, then press ENTER. The Channel Scan screen opens.6Press or to select Scan, then press ENTER. The channel scan begins.Your TV automatically scans for available channels in your area and stores the channel information in the channel list. This may take several minutes. While scanning, the TV displays a progress report.Notes: tChannel scan is not necessary if you are using a satellite or cable box.tChannel scan can take up to 30+ minutes.tYou can press EXIT at any time to stop the auto scan, but you will need to run the auto scan again to create a channel list.Understanding the basicsTurning your TV on or offTo turn your TV on or off (standby mode):1Plug the power cord into an AC power outlet.2Press (power). Your TV turns on.3Press again to turn off your TV. When you turn off your TV, it goes into standby mode.Warning: When your TV is in standby mode, it is still receiving power. To completely disconnect power, unplug the power cord.Note: If your TV does not receive an input signal for several minutes, it automatically goes into standby mode.Selecting the video input sourceTo select the video input source:1Turn on your TV, then press INPUT on the remote control or on the TV. The INPUT SOURCE menu opens.2Press or to highlight the video source you want, then press ENTER. Options include TV, AV, Component, VGA (computer), HDMI1 or HDMI2. Selecting a channelTip: If you are using a cable or satellite box, use the remote control that came with that device to change channels. To select a channel:tPress CH /CH to go to the next or previous channel.tPress the number buttons to enter the channel number you want, then wait for the channel to change, or press ENTER to change the channel immediately.Welcome to use the Wizard forinitial Setup!!Initial Setup WelcomePlease press [ENTER] to start thewizard.Please select your language: Select ENTER Next BackInitial Setup LanguageEnglishEspanõlFrançaisPress or to select the menu language you want, then press ENTER. The Tuner Mode screen opens.Select ENTER Next BackAntennaCableInitial Setup TunerPlease select your tuner mode:Select ENTER Next BackScanSkip ScanInitial Setup Channel ScanFirst,please connect cable and/orantenna.Start channel scan now?If you skip this step, the channelscan could be performed in Menu.](https://usermanual.wiki/Hisense-Electric/LCDD0017/User-Guide-1662593-Page-14.png)

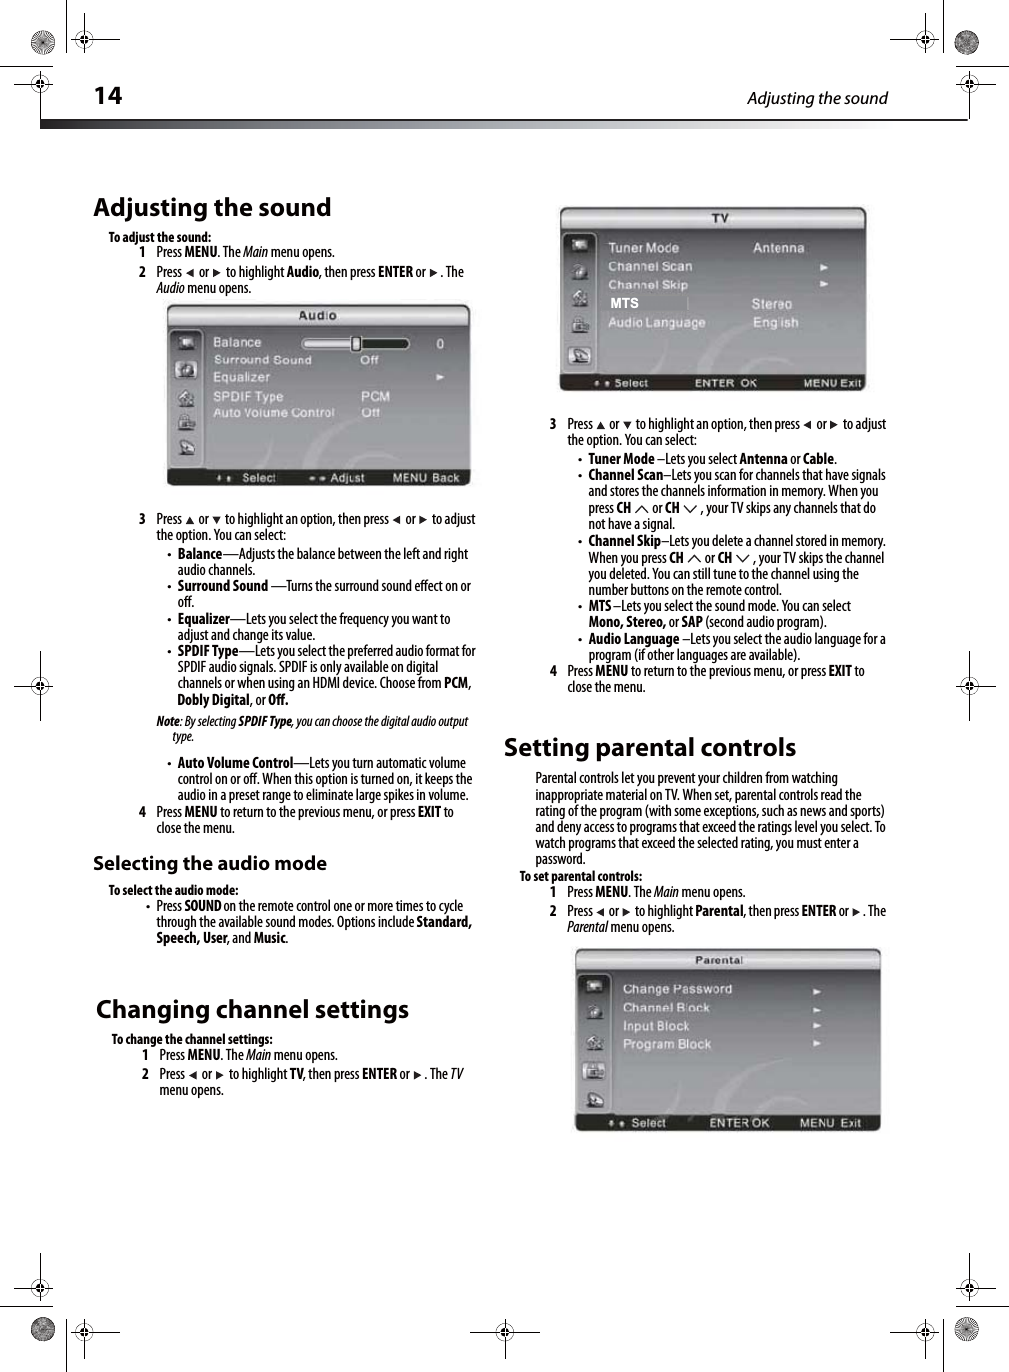
![Adjusting the picture 13Note: Menu items that are not selectable are grayed out. Menus in this manual are described in TV mode, unless otherwise indicated.Adjusting the pictureTo adjust the picture:1Press MENU. The Main menu opens.2Press ENTER or . The Video menu opens.3Press or to highlight an option, then press or to adjust the option. You can select:tPicture Mode—Selects the picture mode. You can select: tVivid (a bright and vivid picture) tStandard (a standard picture)tCinema (a finely detailed picture)tUser (customized picture). Note: You can also press PICTURE on the remote control to select the picture mode.tBrightness–Lets you increase or decrease the brightness of the picture. Increasing the brightness can add more light to dark areas of the picture, while decreasing the brightness can add more darkness to light areas of the picture.tContrast–Lets you increase or decrease the contrast of the picture. Increase the contrast to adjust the white areas of the picture or decrease the contrast to adjust the black areas of the picture.tSaturation–Lets you adjust the intensity of the colors.tHUE–Lets you adjust the overall color of the picture (only supported in TV/AV mode).tSharpness–Lets you increase the sharpness level for clearer images or decrease the sharpness level for smoother images.tColor Temperature –Lets you change the color temperature. You can select the color temperature from three options: Cool, Standard, or Warm.tAdvanced Video–Lets you access and adjust advanced video settings, such as DNR, Adaptive Luma Control, Flesh 4Press MENU to return to the previous menu, or press EXIT to close the menu.Choosing the display format (aspect ratio)To choose the display format:tPress ASPECT on the remote control repeatedly to cycle through the available display formats. Options include:tNormal —Selects the correct aspect ratio to match the source image.tZoom —Enlarges the picture but may crop the top and bottom. tWide—Shows a full-screen picture.tCinema—Stretches the picture at the edges [21:9 aspect], but maintains a good aspect ratio at the center of the screen.ParentalChannel BlockLets you select certain channels to be blocked.Program BlockLets you select certain programs to be blocked.Input Block Lets you select certain input sources to be blocked.Change PasswordLets you set a new password for parental controls.Clean All Eliminates all channels (and presets) stored in the TV.TVTuner Mode Lets you select the signal source for your TV (Antenna or Cable).Channel ScanLets you initiate an automatic channel scan to set up the available channels in your TV.Channel SkipLets you select certain channels to eliminate from the available channels list.MTS Program) function. This lets you listen to a program using an alternative second language. Function availability depends on your TV provider.Audio LanguageLets you select the language track you prefer for viewing digital TV programs. Available options depend on your digital TV provider.SaturationHUELets you enable the SAP (Second Audio Tone.](https://usermanual.wiki/Hisense-Electric/LCDD0017/User-Guide-1662593-Page-16.png)