Hisense Electric LCDD0033 Part15 Subpart B-LED LCD TV User Manual W9HLCDD0033 2
Hisense Electric Co., Ltd. Part15 Subpart B-LED LCD TV W9HLCDD0033 2
Contents
- 1. W9HLCDD0033_ User Manual 1
- 2. W9HLCDD0033_ User Manual 2
W9HLCDD0033_ User Manual 2
40K368AW
ctual product.
Connect a USB device for browsing photos, music and movies.
USB
Mobile Hard Disk
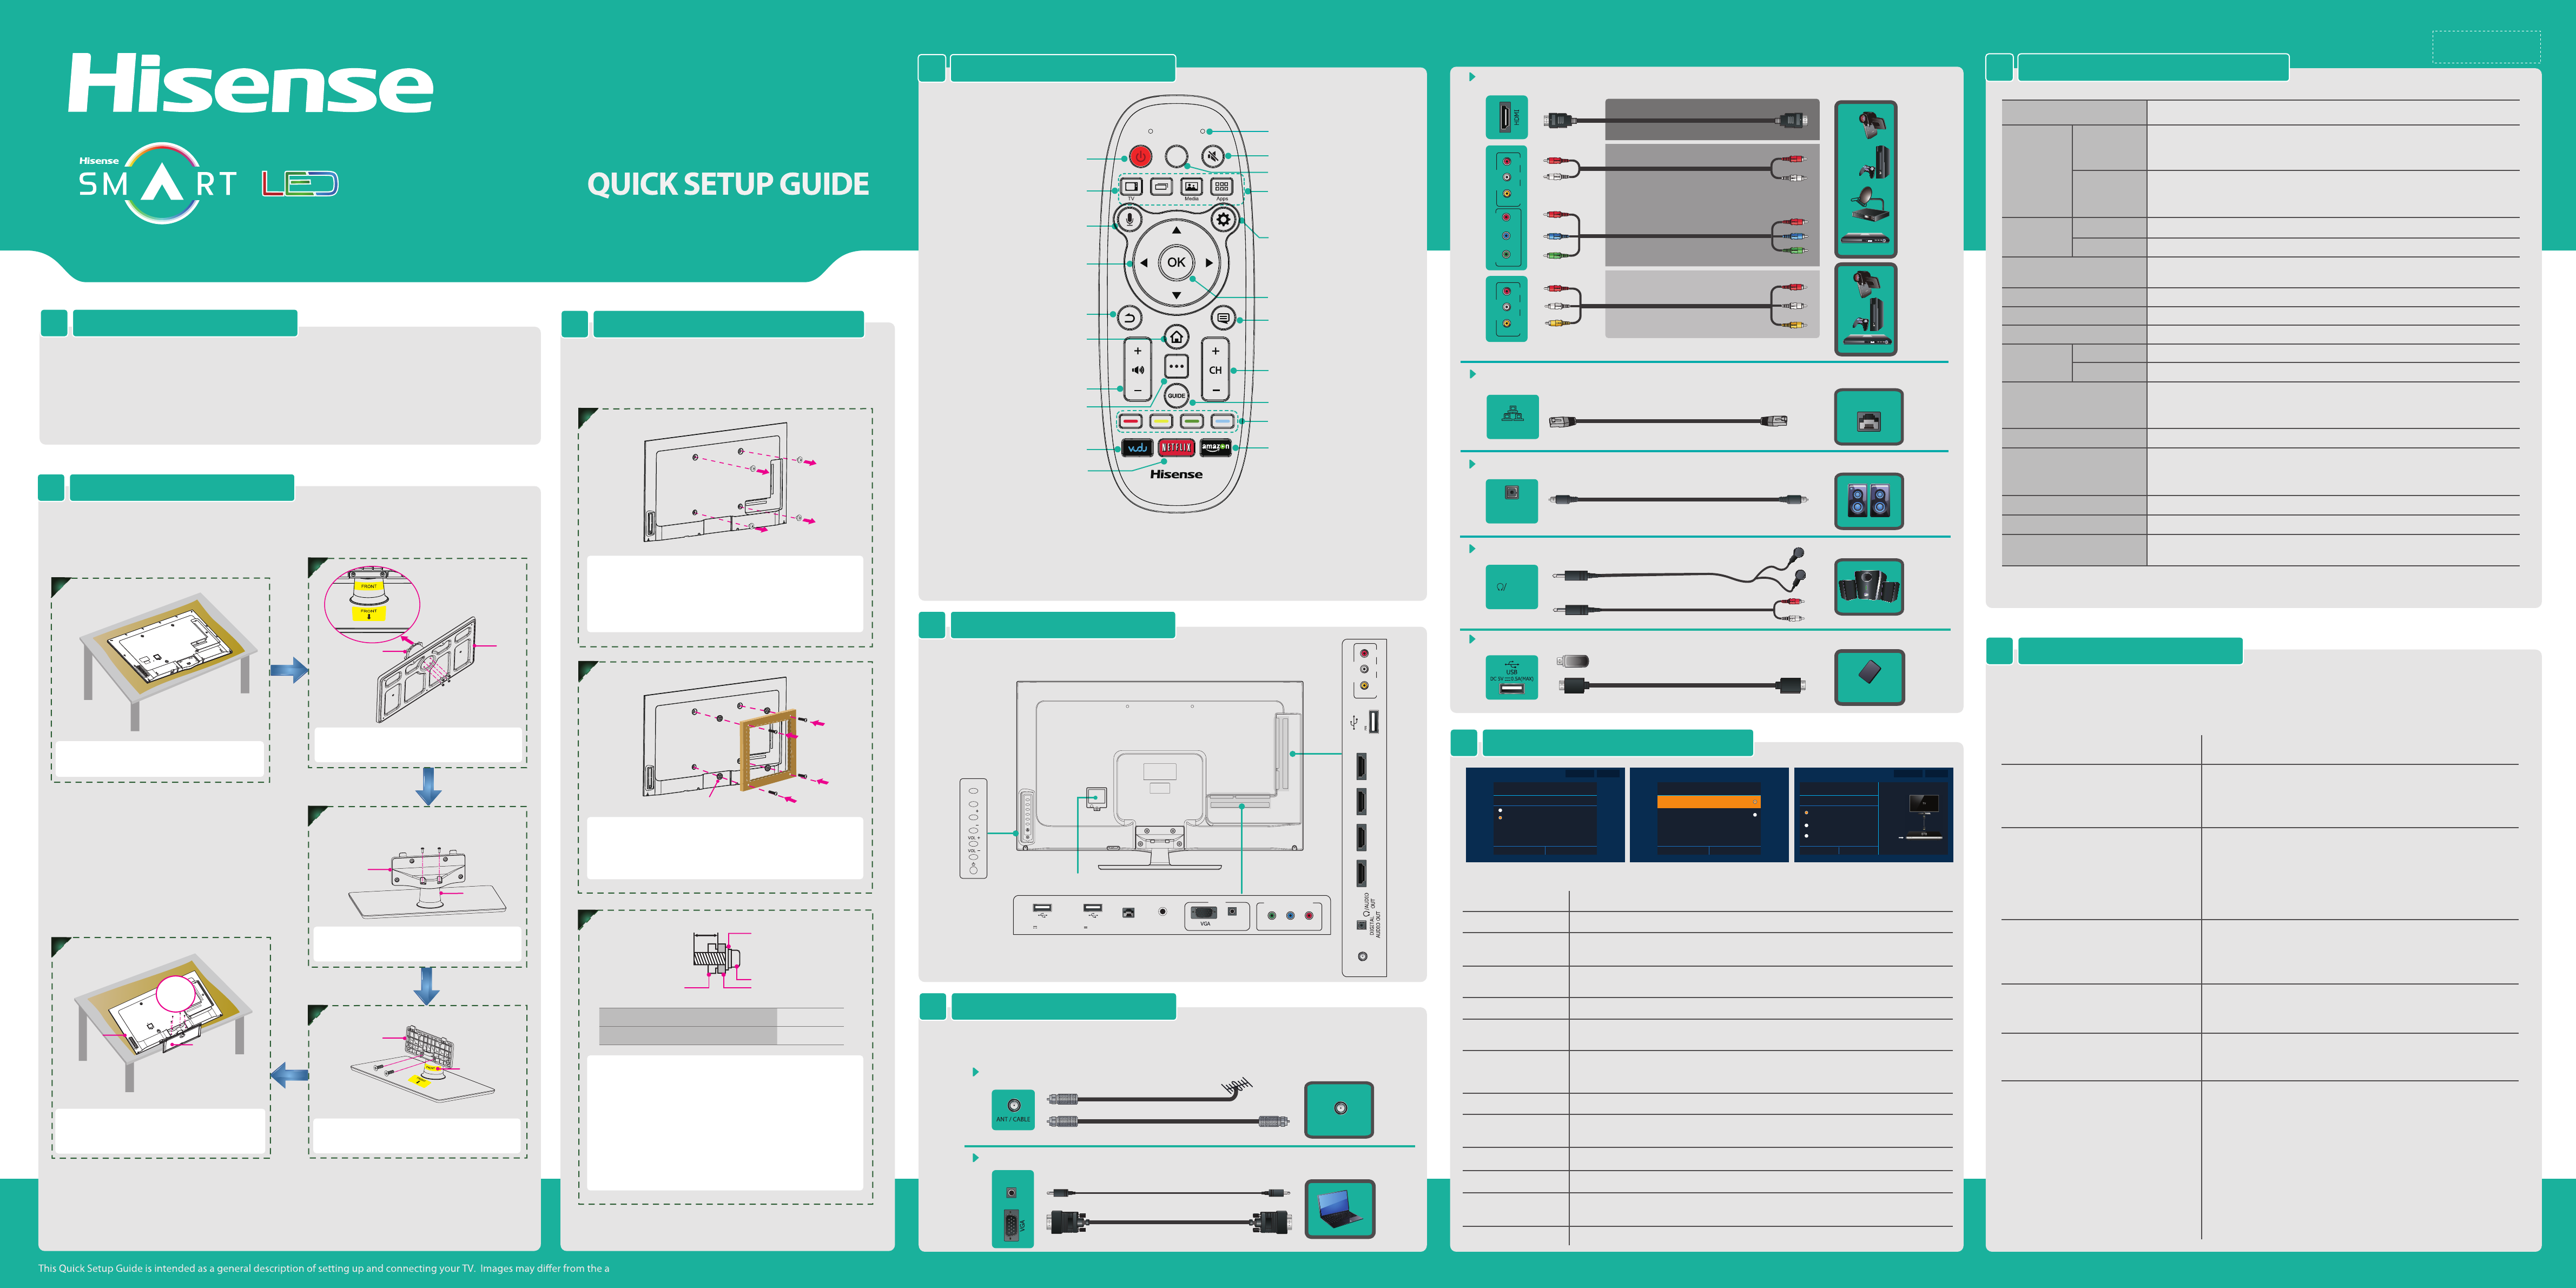
REMOTE CONTROL4SPECIFICATIONS8
Turning the TV On for the First Time
7
INSTALLING A WALL-MOUNT BRACKET
3
If you want to attach the TV to a wall-mount bracket (not
provided), you should rst remove the stand if it is
pre-attached (see Step 1).
ACCESSORIES LIST1
•
User Manual
•
Quick Setup Guide
•
Warranty Card
•
Remote Control
•
Battery x 2
•
Spacer x 4
•
Screw (M5 x 12mm) x 4
•
Screw ( M4 x 12mm) x 6
•
Screw (ST4 x 14mm) x 2
•
Wall-mounted screw (M6 x 30mm) x 4
INSTALLING THE STAND2
Follow the illustrations below to complete the installation steps.
CY-
Connect an optical cable from an external digital audio system.
DIGITAL AUDIO OUT
DIGITAL
AUDIO OUT
Weight
LCD Panel Minimum size
(diagonal)
Screen resolution
40K368AWModel Name
Dimension
Without Stand
Width: 36.3 inches (921.8 mm)
Height: 21.8 inches (555.2 mm)
Depth: 2.27 inches (57.9 mm)
Width: 36.3 inches (921.8 mm)
Height: 24 inches (611.2 mm)
Depth: 8.85 inches (225 mm)
25.3 lbs (11.5 kg)
28.6 lbs (13 kg)
40 inches
1920 × 1080
Audio power 7 W + 7 W
Power supply
Receiving
systems
120 V ~ 60 Hz
Receiving channels
Tuner type
Environmental conditions
VHF: 2~13 UHF: 14~69 CATV: 1 ~ 125
Digital Terrestrial Broadcast (8VSB): 2 ~ 69
Digital cable (64/256 QAM): 1 ~ 135
NTSC
ATSC / QAM
Component Input
VGA Input VGA (640×480 / 60 Hz), SVGA (800×600 / 60 Hz), XGA (1024×768 / 60 Hz)
480 I / 60 Hz, 480 P / 60 Hz, 720 P / 60 Hz, 1080 I / 60 Hz, 1080 P / 60 Hz
HDMI Input RGB / 60 Hz (640×480, 800×600, 1024×768)
YUV / 60 Hz (480 I, 480 P, 720 P, 1080 I, 1080 P)
Frequency synthesized
Temperature: 41°F ~ 95°F (5°C ~ 35°C)
Humidity: 20% ~ 80% RH
Atmospheric pressure: 86 kPa ~ 106 kPa
With Stand
Analog
Digital
Without Stand
With Stand
When there is something wrong with your TV, you can try turning o the TV and restarting it. You can
also refer to the following chart for problem and solution tips. If the problem cannot be resolved, please
contact Hisense for additional assistance 1-888-935-8880.
• Check if the power cord is plugged into AC outlet and if it has electricity.
• Check if you have pressed [POWER] button on the TV or [POWER]
button on the remote control.
• Check to see if LED on. If illuminated, power to TV is OK.
• Check for the correct output connection on the external source and for
the correct input connection on the TV.
• Make sure you have made the correct selection for the input mode for
the incoming signal.
• Check the volume settings.
• Check if Mute mode is set "on" .
• Check if headphones are connected.
• Check if the audio output is set to AV receiver (if so, be sure the AVR is
powered on and set to the proper input).
• If using a cable / satellite set top box, check if Mute is set to On.
• Check network physical connection, make sure connection is correct.
• Make sure configuration is correct according to your network service
provider.
• You need a broadband (high speed) Internet service with a speed of
no less than 1.5 Mbps.
• Connect the TV to the Internet through your router by an ethernet
cable or wireless connection. If the connection fails, check with your
internet service provider or router manufacturer to determine if there is
a firewall, content filter, or proxy settings that may block the TV from
accessing the Internet.
• After connecting the TV to the Internet, press the [Home] button on the
remote to access the Applications.
• Caution: Do not try to repair the TV yourself. Refer all servicing to
qualified repair personnel.
POSSIBLE SOLUTIONSSYMPTOMS
No sound or picture
Picture is normal, but no sound
Network connection fail.
Connect Netix fail.
I have connected an external source to
my TV and I get no picture and/or sound.
How do I get the Applications to work
on my TV?
• Check network connection is correct, both physically and configuration.
• Make sure that network connection test is successful.
• For Netflix: Enter “Netflix” to reset Netflix account.
Barcode
35*10.5mm
Connect Headphone for audio out of the TV.
HEADPHONE
OR
AUDIO
OUT
MAKING CONNECTIONS5
HELP TOPICS9
TV CONNECTORS
6
Check the jacks for position and type before making any connections. Loose connections
can result in image or color problems. Make sure that all connections are tight and secure.
NOTE:
1. The LED on the remote control will blink with each key press.
2. In pairing mode, the red LED will light continuously for ~60-seconds.
3.When pairing is complete, the blue LED will ash three times.
4.The LED light will blink continuously when the battery is low.
5.The remote control will automatically go into sleep mode thirty seconds after the last key press. Sleep Mode can conserve
battery life. Any movement or key press will immediately wake up the remote.
Connect an outdoor VHF/UHF antenna.
ANT
OR
HDMI / COMP / AV Connect an HDMI cable or Comp/AV Adapter from an external A/V equipment.
Video Eect:
BEST (HDMI)
BETTER
(COMPONENT)
GOOD
(AV)
VGA & VGA AUDIO Connect a VGA cable and an audio cable from the PC.
PC/DVI
AUDIO IN
LAN Connect an ethernet cable to access a network or the Internet. TV also features wireless
connectivity.
LAN
LAN
Select inputs
Display the number keys and
media control keys Specificial function keys
Launch the VUDU application
Launch the Netflix application
Power Off/On
MIC: Receive the voice
History
MIC
INPUT Mute the sound
TV: Display the TV
History: Display the applications
recently used
Press the menu key to see the
available options anywhere
Select the next/previous channel
Display the TV program guide
Launch the amazon application
Display the Settings menu
Enter the voice search
Navigation buttons
Turn the volume up or down
Return to the previous display,
or exit the application.
The Home key gives you quick access
to apps like PrimeTime, YouTube,
Netflix and Chrome, no matter
where you are on your TV.
Confirm button
Media: Launch the Multi-Media
player.
Apps: Launch the all applications
screen.
VIDEO
AV IN
L R VIDEO
AV IN
L R
Y PBPR
COMPONENT IN
Follow the on-screen instructions to customize your TV settings according to your preferences.
VHF/UHF Antenna
Cable
ANT OUT
Power input TV Bottom View
TV Side View
Button View
VIDEO
AV IN
L R
USB1
DC5V 0.5A(MAX)
HDMI1(ARC)HDMI2(DVI)HDMI3HDMI4
ANT/CABLE
IR BLASTER
LAN
DC 5V 0.5A(MAX)
USB2
DC 5V 0.5A(MAX)
USB3 Y PBPR
COMPONENT IN
PC/DVI
AUDIO IN
PC IN
INPUT
CH
CH
OK
1
Make sure the TV is laid face-down on a clean, safe, and
cushioned space, remove the original screws in the bracket
holes on the TV back.
Note: These 4 screws which got from back cover mount hole could not be
used any more.
SPACER x4
2
M6 x 30mm
Wall monuted-screws
Place the provided spacers in the corresponding bracket
holes. Attach purchased bracket (1.5mm to 2.5mm thickness)
on the TV with 4 screws which are in the accessories bag.
Follow instructions provided with the wall-mount bracket.
9.5 ~ 11.5 mm
Wall-Mount Bracket
Screw
SpacerThe TV's rear cover
Wall-Mount hole pattern VESA (mm) 200 × 200
Wall-Mount screw size (mm) M6
3
Follow instructions provided with the Wall-Mount bracket.
• If you are not sure of your ability to do complete the
installation, contact a professional installer or service
technician for assistance. The manufacturer is not
responsible for any damages or injuries that occur due to
mishandling or incorrect assembly.
• The selected screws are 9.5 ~ 11.5 mm in length when
measured from the attaching surface of the TV's rear cover.
The diameter and length of the screws differ depending on
the Wall-Mount Bracket model.
3
Secure the STAND COVER to the STAND
COLUMN with 2 screws.
STAND COVER
STAND COLUMN
M4 × 12mm
SCREWS
5
Align the BASE STAND with the screw holes
on the bottom of TV BACK, secure the BASE
STAND to the TV with the 4 screws tightly.
BASE STAND
TV BACK
M5×12mm
SCREWS
1
Carefully place your TV on a soft, cushioned,
surface to prevent damage to the screen.
2
M4 x 12mm
Secure the STAND COLUMN to the BASE
with 4 screws.
BASE
STAND COLUMN
SCREWS
Secure the STAND COVER to the STAND
COLUMN with 2 screws.
STAND COVER
4
STAND COLUMN
SCREWS
ST4 × 14mm
• Please press [▲/
▲
] button to select your language: English, Spanish or French.
• Press and hold down [RED] and [OK] buttons simultaneously until the Red LED turns on.
And wait for a while until the remote paired automatically.
OPERATIONSMENU
Language setting
Bluetooth Remote
pairing
• Hisense legal information. If you do not accept the agreement, internet functions and
services will not be available.
Hisense legal notice
• Connecting to the Internet via Ethernet cable or WiFi.
Connect to the Internet
• Connecting to the DLNA device. By checking this box, you will connect to the DLNA
device and share your good time with family.
DLNA setting
• Select your Mode Setting: Home Mode or Retail Mode.
• Home Mode default settings are recommended for in-home use. ENERGY STAR qualified.
Retail Mode is intended for in-store display and reset video settings at Power on.
Select Usage patterns
• Signing in with your Google Account.
Google Account
• Check the TV to send the usage statistics and crash reports to Google automatically.
Help make Google TV
better
• Enter ZIP code so that you receive accurate programming information.
Enter ZIP code
• Select the video input you use to connect your TV service to your TV.
Set up TV service
• The initial settings are completed.
That’s it!
• Select your Audio amplifier manufacturer. To control your receiver, connect the IR blaster.
Set up AV Receiver
control
Connect to the Internet
How do you connect to the Internet?
Ethernet cable(connected)
Wireless
Back Next
Step 4 of 11 Explain step Skip step
Select Usage patterns
Retail Mode
Back Next
Step 6 of 11
Home Mode
Home Mode default settings are recommended for in-home use. ENERGY
STAR qualified
Retail Mode is intended for in-store display and reset video settings at
Power on
Set up TV service
How do you watch TV?
I have cable,satellite or other TV service
with a set-top box.
I have over-the-air other TV service
using my built-in TV tuner.
I do not have a TV service.
Back Next
Step 10 of 11 Explain step Skip step
HDMI out
to Google TV
Set-top box
Cable, satellite,
or other TV service