Hisense Electric LCDD0042 LED LCD TV User Manual W9HLCDD0042 2
Hisense Electric Co., Ltd. LED LCD TV W9HLCDD0042 2
Contents
- 1. W9HLCDD0042_User Manual 1
- 2. W9HLCDD0042_User Manual 2
W9HLCDD0042_User Manual 2
Quick Start Guide
Help Hisense improve the environment by reducing paper waste.
For detailed instructions and feature descriptions, access the full
User Manual online at www.hisense-usa.com/support.
H4 Series

2
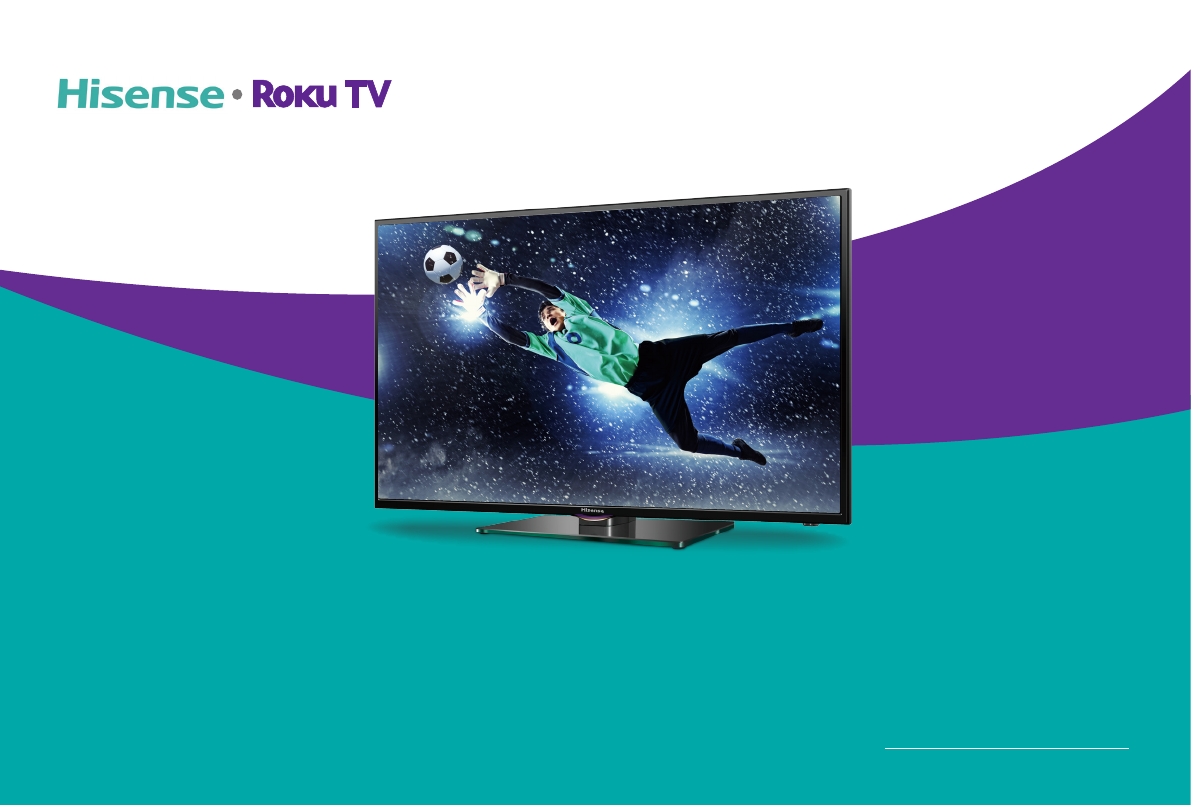
Your easiest way to endless entertainment
Control with ease
Control your Hisense • Roku TV with the super simple
remote, your smartphone or tablet.
Cast media
Send video, music and photos from your
smartphone or tablet to the big screen.
Search
Find movies and TV shows across top streaming
channels,* sorted so you can choose the best
option or value.
Choose & personalize
Personalize your Home screen with broadcast TV,
your favorite 1500+ streaming channels, your game
console and other devices.
*Roku® Search is for movies and TV shows and does not work with all channels.
Connect now to get the most out of your Hisense • Roku® TV
3
Get the most out of your Hisense • Roku TV
Congratulations on your new Hisense • Roku TV! This Quick Start Guide will walk you through a few easy steps to get your TV set
up, start streaming over 1,500 streaming channels, and much more. For more details about setup and features of your new TV,
access the online Hisense • Roku TV User Manual at www.hisense-usa.com/support.
To access the user manual, you will need to enter your model number located on the side and back of the TV or on the outside of the box.
From the Support page, you can also:
• Access Frequently Asked Questions
• Download the latest firmware for your TV
• Order accessories
• Access warranty information
To speak to a representative in our Electronics Consumer Care Center, call 1-888-935-8880 Monday through Friday from
8 A.M. to 8 P.M. EST and Saturday through Sunday from 9 A.M. to 6 P.M. EST.
You can also send an email to Service@hisense-usa.com.
This Quick Start Guide is intended as a general guideline to help you set up your Hisense • Roku TV. Images throughout this document are for
illustrative purposes only and may differ from the actual product.

4
Register your TV to receive Hisense news
Because we value your business, we want to keep you in the know of 'all things Hisense'. Using your mobile phone, scan the first
QR code to register your TV and the second QR code to access the Support page. Depending on the make and model of your
phone, you may need to download a QR code scanning application. You can also access the Product Registration or Support
page by visiting www.hisense-usa.com/support/productreg or www.hisense-usa.com/support.
Packaged contents
Your package in which you purchased your new TV contains the following items:
• Hisense • Roku TV
• TV stand
• TV base
• Power cord
• Hisense • Roku TV Quick Start Guide (this document)
Registration page QR code Support page QR code
• Important Safety Information and Warranty Card leaflet
• 2 AAA batteries
• Hisense • Roku TV remote
• 8 Phillips screws (total): 4 (M5x12mm) and 4 (ST4x16)
IMPORTANT: Look inside the styrofoam (within the upper and bottom parts of the box) to make sure that you have removed all items
that come with the TV.
Required tools and devices
• Phillips screwdriver (not included) to attach the TV stand
• Wireless router (not included) for Internet connectivity
5
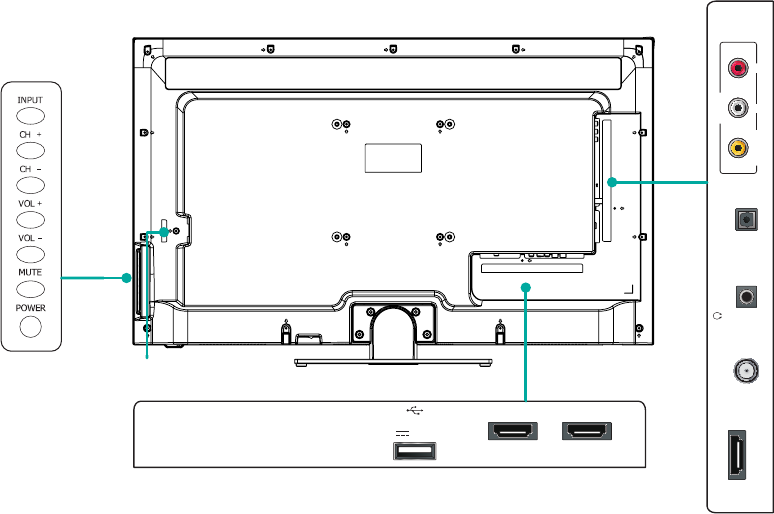
Buttons and ports on the Hisense • Roku TV
USB
HDMI 3
DC 5V 0.5A(MAX)
HDMI 2
TV Bottom View
TV Side View
Button View
HDMI 1(ARC) VIDEO L
AV IN
R
Ant/Cable /AUDIO
OUT
DIGITAL
AUDIO OUT
AC power cord
AC power cord
6
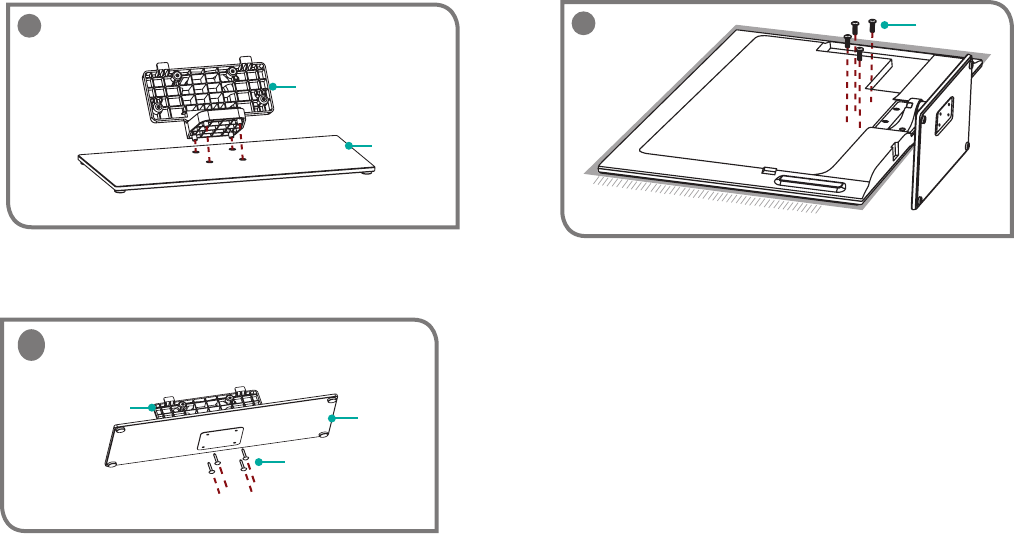
1
Base
Stand cover
Screw (ST4×16)
Base
Stand cover
2
STEP 1. Attach the TV stand or wall mount bracket (not included)
For steps to attach the wall mount see page 7.
Insert the stand cover into the base as shown.
Secure the stand cover to the base with 4 screws (ST4×16).
Place the TV face down on a soft surface and secure the stand
to the TV with the 4 (M5x12) screws.
3 Screw
(M5×12)
7
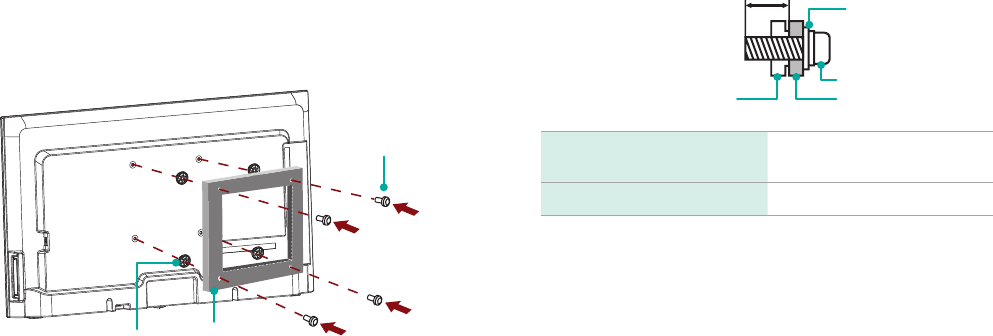
Install the wall mount bracket (not included)
If you wish to mount the TV on a wall, you must purchase a
wall mount bracket separately. However, before you begin the
manufacturer's instructions be sure to:
1. Remove the TV stand if you already attached it.
2. Place the TV face down on a clean, safe and cushioned
surface.
3. Place the spacers (not included) in the corresponding
bracket holes.
CAUTION:
• When attaching the wall mount, use the spacers
(provided by the third-party manufacturer) between
the TV and the bracket.
Bracket
(not provided)
Screw
(not provided)
Spacer
(not provided)
• To prevent internal damage to the TV and ensure it is
mounted securely, use fixing screws (not provided) that
are 9.5-11.5 mm in length when measured from the
attaching surface of the mounting hook.
Wall mount hole pattern VESA
(mm) 200 × 200 (for 40”)
Wall mount screw size (mm) M6
Follow instructions provided with the wall mount bracket.
• If you are not sure of your ability to complete the installation,
contact a professional installer or service technician for
assistance. Hisense is not responsible for any damages or
injuries that occur due to mishandling or incorrect assembly.
• The selected screws are 9.5-11.5 mm in length when
measured from the attaching surface of the TV rear cover.
Note: The diameter and length of the screws differ depending on the
wall mount bracket model.
The rear cover of the TV Spacer
Screw
Wall mount bracket
9.5 - 11.5 mm
8
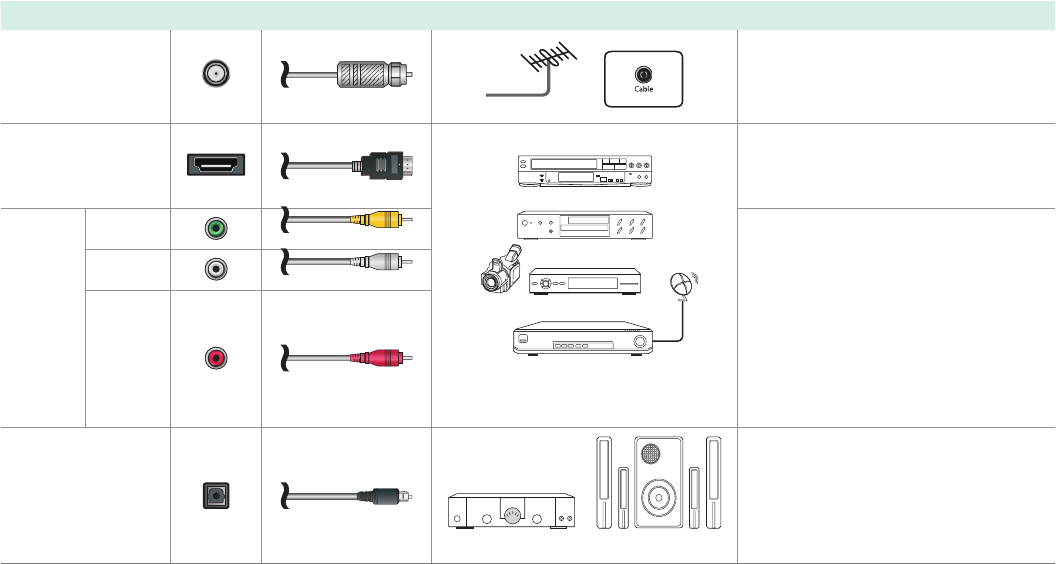
STEP 2. Connect devices to your TV
Check to ensure that you have selected the right cables for the ports and that they are connected securely. Loose connections can
affect the quality of the picture image and color.
TV label Port Cable External Equipment Brief Description
ANT/CABLE
Antenna
VHF/UHF Antenna
ANT OUT
Connect an outdoor or indoor
antenna.
HDMI®
DVD Player/Recorder
Set-top Box
Satellite Receiver
Satellite
antenna
cable
VCR
Video
Camera
Connect a High Denition Multimedia
Interface (HDMI) cable from an
external device.
AV IN
VIDEO Yellow
Connect a composite video cable
and left-right audio cables from an
external AV device.
LWhite
RRed
DIGITAL AUDIO
OUT
SpeakerAudio Amplier
Connect an optical cable from an
external digital audio system.
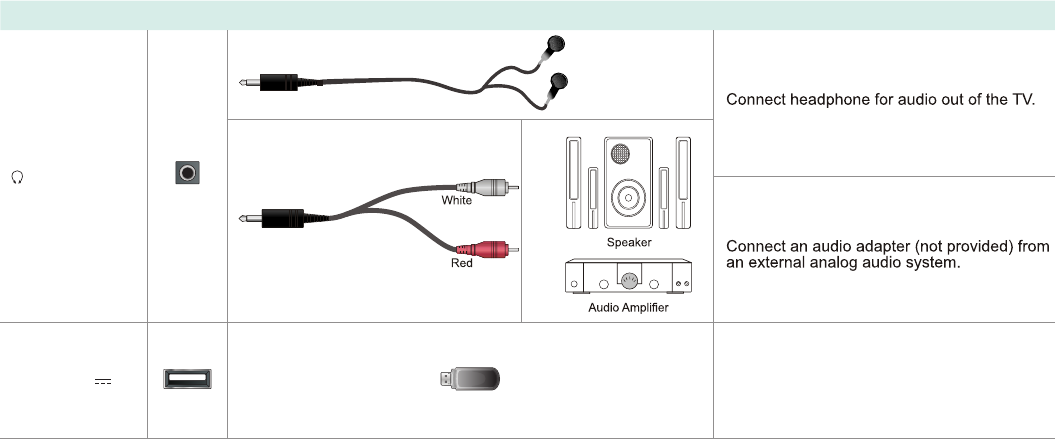
9
TV label Port Cable External Equipment Brief Description
/ AUDIO OUT
USB
DC 5V
0.5A(MAX)
Connect a USB device for browsing
photos, music and movies.
The unit recognizes only a USB Memory
Stick.
10
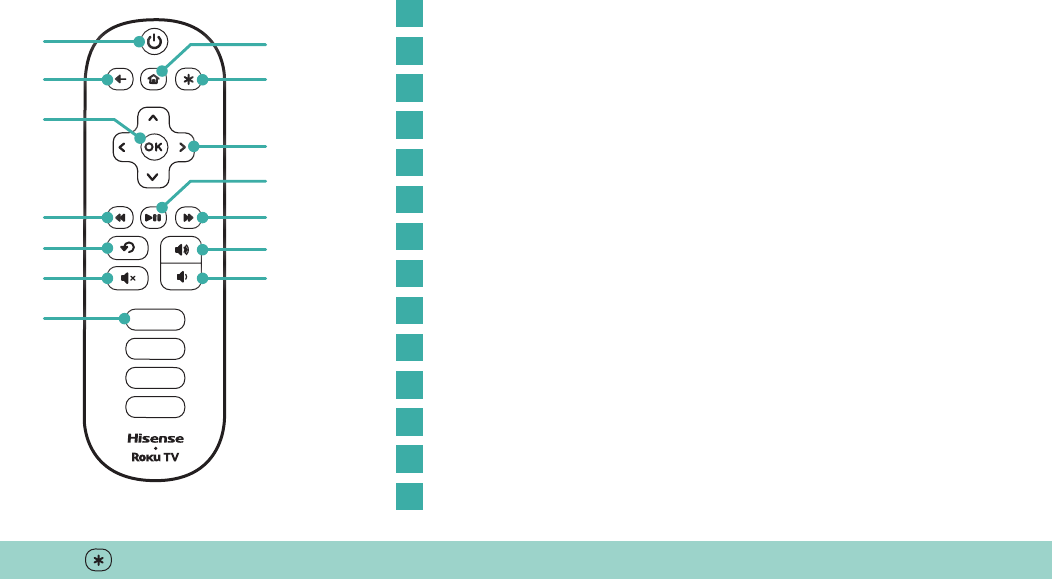
Meet your remote
The TV remote should feel right at home in your hand. We designed it to be incredibly intuitive for watching TV and navigating
on-screen menus.
TIP: The button gives you easy access to picture settings, display options and more. Try it on every screen.
A
B G
J
L
M
E
H
F
N
K
D
C
I
POWER Turn TV on and off
BACK Return to previous screen
HOME Return to Roku Home screen
OK Select an option from a menu
UP or DOWN Move up or down; LEFT or RIGHT Move left or right
INSTANT REPLAY Replay last 7 seconds of streaming video
OPTIONS View more options
RWD SCAN Rewind streaming video, scroll left one page at a time
PLAY/PAUSE Start or pause playback
FWD SCAN Fast forward streaming video, scroll right one page at a time
CHANNEL SHORTCUT Instant access to popular channels
VOLUME UP Increase TV volume
VOLUME DOWN Decrease TV volume
MUTE Silence TV sound
A
E
I
C
G
K
M
B
F
J
D
H
L
N
11
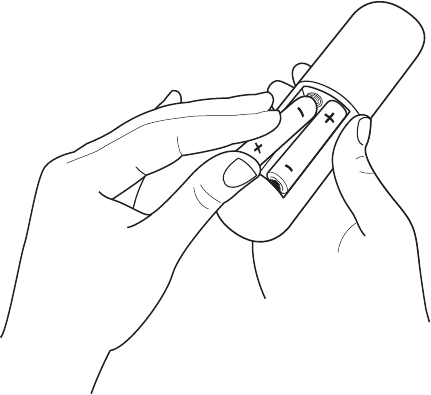
STEP 3. Power up
Power up your TV remote by inserting the included batteries.
CAUTION
• Dispose of the batteries in a designated disposal area.
Do not throw them into a fire.
• Remove old batteries immediately to prevent them from
leaking into the battery compartment.
• If you do not intend to use the remote control for a long
time, remove the batteries.
• Battery chemicals can cause a rash. If the batteries leak,
clean the battery compartment. If chemicals touch your
skin, wash it immediately.
• Do not mix old and new batteries.
• Do not mix alkaline, standard (carbon-zinc) or
rechargeable (for example, NiCd or NiMH) batteries.
• If your remote gets warm/hot during use, discontinue
use and contact customer support immediately at
www.hisense-usa.com/support.
12
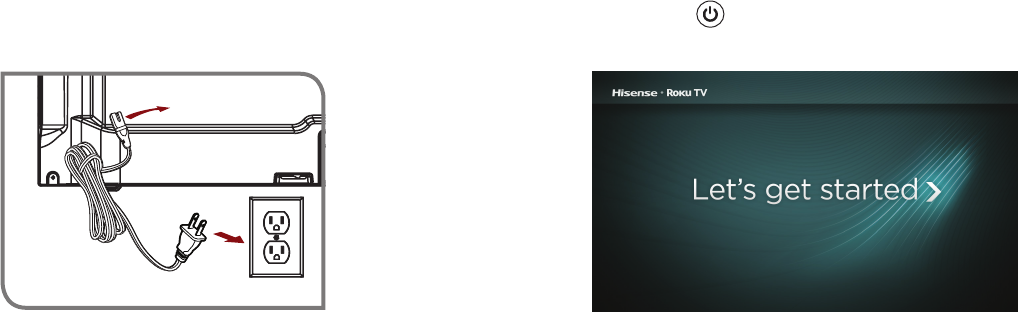
Press the Power button on the remote to turn on the TV. A
startup screen appears that displays the Hisense • Roku TV logo.
Choose Set up for home use to access all TV features and
maximize energy savings.
Turn on the TV
Connect the power cord to the back of your TV and plug it into a
power outlet.
Note: Only retailers that need to set up the TV for display should select Set up for store use.
Wall Outlet
Power
Cord
13
Connecting brings out your
TV’s full potential!
Make any night a movie night
More than 35,000 movies to choose from, across major
streaming movie channels like Netflix, Amazon Instant
Video, Redbox Instant, VUDU, and more.*
Explore loads of free trials
Your Hisense • Roku TV comes packed with special
offers, including 30-day free trials from popular streaming
channels like Amazon Instant Video, Netflix, Redbox
Instant, Spotify, DailyBurn, and more.
Rule the watercooler
Binge on the most buzzworthy shows on streaming channels
like FOXNOW, HBO GO, Hulu Plus, & Netflix.*
Live stream your favorite sports with the biggest selection of
streaming sports packages out there.
Get in the groove
Stream music from one of 85 music channels like
Pandora, VEVO and Spotify. Access your entire MP3
collection instantly with Amazon Cloud Player or the Roku
Media Player.
*Subscriptions or other payments may be required to access content on certain channels. For example, Netflix requires a paid subscription, which
gives you access to movie and TV show titles in the Netflix streaming catalog. Some channels may not be available to all households in every market
or in all countries where Roku players or other products with the Roku platform are sold.
14
STEP 4. Complete the guided setup
It’s the final stretch, hurray! To connect your Hisense • Roku TV to the Internet:
1. Sign in to your wireless network. The TV automatically finds the local wireless networks in your area and lists them from the
strongest to weakest signal. Select your network and sign in. Remember that network passwords are case sensitive.
2. Activate your Roku account. From your smartphone, tablet, or computer, go to www.roku.com/link and enter the code that is
displayed on your TV screen. Roku accounts are free, and while a valid credit card number is required to create your account,
rest assured you will only be charged if you authorize purchases of apps and games from the Roku Channel Store.
If you are not ready to connect your TV to a wireless network, you can still use it to view live broadcast channels through your
antenna, Set Top Box (STB) or Satellite.
Complete the rest of the on-screen prompts and setup is done. Congratulations!
NOTE: Once you’re connected, your TV will automatically update with the latest software—plus you can start streaming the
entertainment you know and love. Unlike other TVs, your new Hisense • Roku TV automatically receives regular software updates in
the background when it’s connected to the Internet. This allows it to give you a better experience.

15
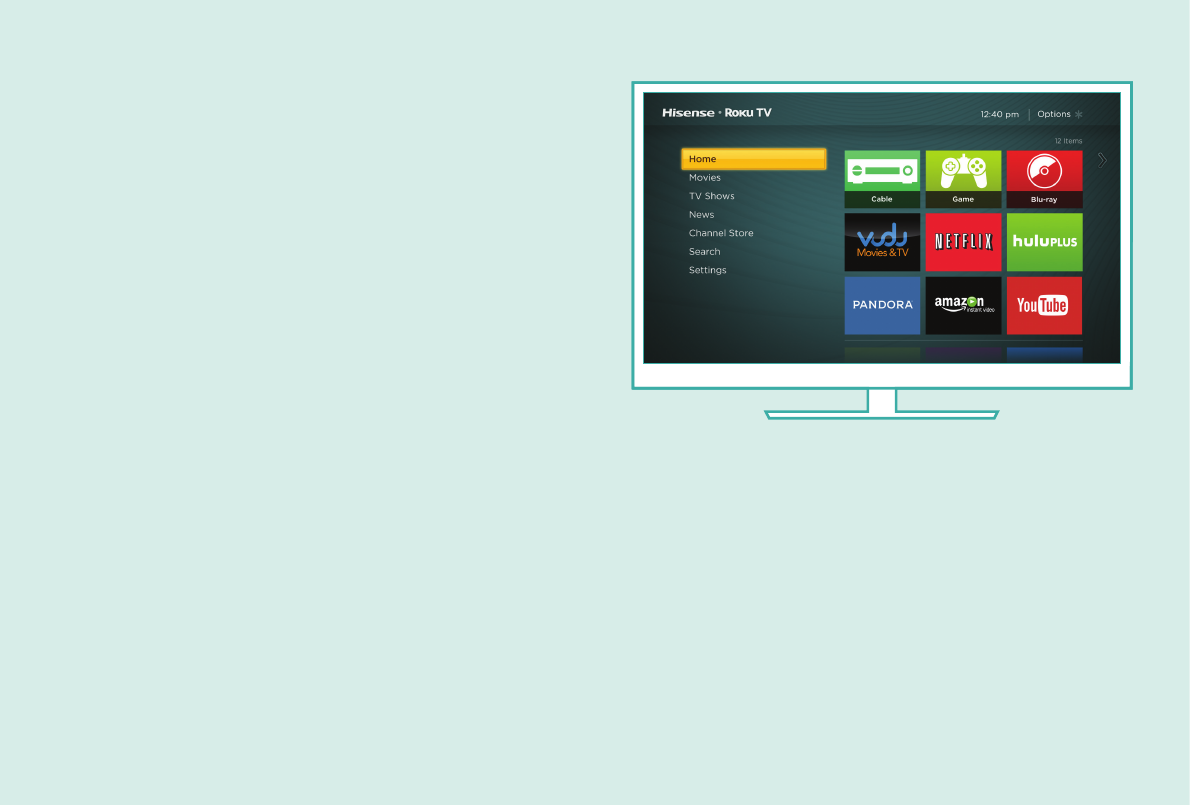
STEP 5. Personalize your Home screen
The Hisense • Roku TV Home screen is your starting point to enjoy endless live and streaming entertainment.
The Home screen menu lets you access a ton of streaming
entertainment, search for streaming movies and TV shows and
change your settings.
The grid of tiles on the right lets you visually choose among
your favorite streaming channels and the inputs where you
have attached devices such as a DVR, game console, antenna,
or set top box.
Continue using the remote to personalize your Home screen
and channel line-up, stream movies, and so much more. The
fun has just begun!

16
Product specifications
MODEL NAME 40' H4 Series
Dimension Without Stand Width 36.4 in. (924.3 mm) x Height 21.9 in. (554 mm) x Depth 3.3 in. (84.5 mm)
With Stand Width 36.4 in. (924.3 mm) x Height 23 in. (583.5mm) x Depth 6.7 in. (170mm)
Weight Without Stand 22 lbs (10 kg)
With Stand 25.3 lbs (11.5 kg)
DISPLAY
Active Screen Size (Diagonal) 40 inches
Screen Resolution 1920 x 1080
Panel Selected Full High Denition backlight
POWER
Power Supply AC 120V, 60Hz
Standby Consumption Less then 1W
Audio Power 7W + 7W
CHANNELS & SIGNALING
17
Receiving Channels VHF: 2 - 13, UHF: 14 - 69, CATV: 1 - 125
Digital Terrestrial Broadcast (8VSB): 2 - 69
Digital cable (64/256 QAM): 1 - 135
CHANNELS & SIGNALING
Tuner Type Frequency synthesized
Receiving System Analog: NTSC
Digital: ATSC/QAM
HDMI Input RGB/60Hz (640x480,800x600,1024x768)
YUV/60Hz (480I,480P,720P,1080I,1080P)
OTHER FEATURES
Parental Control Yes
HD Supported Denitions 480i, 480P, 720P, 1080i,1080P
Sleep Timer Yes
Wall Mount Support VESA Standard (excluded)
Energy Star 6.1 Yes
Wi-Fi Built In Yes
Environmental Conditions Temperature: 41°F - 95°F (5°C - 35°C)
Humidity: 20% - 80% RH
Atmospheric pressure: 86 kPa - 106 kPa
Product specifications (continued)
18
Quick problem-solving tips
When you experience an issue with your TV, turn it off and on again. If this does not resolve the problem, then refer to the tips below.
If the problem is still not resolved, then contact our Hisense Electronics Consumer Care Center at 1-888-935-8880 Monday through
Friday 8 A.M. to 8 P.M. EST and Saturday through Sunday from 9 A.M. to 6 P.M. EST.
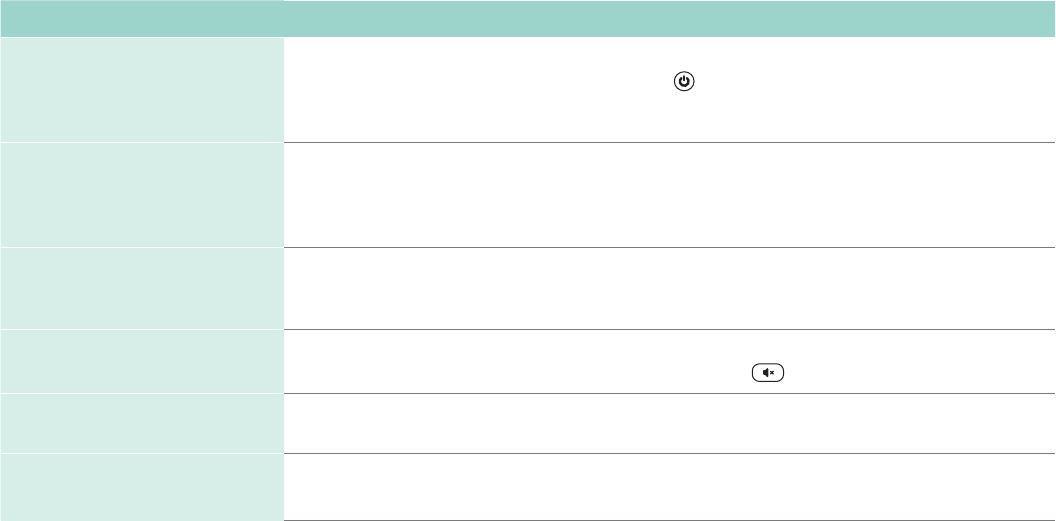
SOUND OR PICTURE ISSUES POSSIBLE SOLUTIONS
You do not see a picture when
turning on the TV
• Check if the LED light is on. If it is, then there is power to the TV.
• The TV may be in Standby mode. Press the Power button on the remote control to activate the unit
from Standby.
• Check if the power cord is plugged into an active electrical outlet.
You have connected an external
source to your TV but can not nd
it on the Home screen
• Make sure your external source is turned on.
• Check to see if the correct input tile is selected on the Home Screen for the external source you
want to view.
• Check to see if the external source device connection is snug and fully inserted into the TV port.
When you turn on your TV, there is
a delay for a few seconds before
the picture appears
• This is normal. If you have already set up your TV, it is initializing and searching for previous setting
information.
You see a normal picture but do
not hear any sound
• Check that volume is turned up.
• Check if “Mute” mode is ON. Turn off mute by pressing the Mute button again, or pressing volume up.
You hear sound but picture color
is faded or in black and white
• Check that the Color value is set to 50 or greater.
• Check the color on another channel or input tile.
Your sound or picture is distorted
or appears wavy
• Turn off and/or remove any electrical appliance that may be nearby the TV panel.
• Insert the power plug of the TV set into another power outlet.

19
SOUND OR PICTURE ISSUES POSSIBLE SOLUTIONS
Your sound or picture is blurry or
cuts out
• If you are using an external antenna, check the connections for a snug and tight t.
• Adjust or reposition the antenna placement.
You see horizontal/vertical
stripes on the picture, or it is
shaking
• Turn off and/or remove any electrical appliance that may be nearby the TV panel.
• Insert the TV power cord into another electrical outlet.
CONNECTIVITY ISSUES POSSIBLE SOLUTIONS
You cannot connect to your
wireless network
• Make sure you have selected the correct wireless network name on the Choose Wireless
Network screen.
• Make sure that you entered the correct wireless password for your network (passwords are
case sensitive).
• If you have turned off SSID broadcasting on your wireless router, add your network by selecting
Add Private Network from the Select Wireless Network screen.
• To check if it is a password problem, temporarily disable security on the wireless router.
• If you are not getting 3 or more signal strength bars above the wireless network icon, adjust the
position of the TV (if possible) or the wireless router. Even a few inches in one direction or
another may help.
REMOTE CONTROL ISSUES POSSIBLE SOLUTIONS
Your remote control is not
responding to button presses
• Check that the TV is still on.
• Check that the batteries are good and are inserted properly.
• Check that there are no obstacles between the remote control and the front of the TV.
• Try moving closer to the TV. If the LED on the TV ashes when you press any of the buttons on the
remote control, the issue is not with the remote control.
Quick problem-solving tips (continued)

© 2014 Roku, Inc. and Hisense Company Ltd.
All material in this Quick Start Guide is the property of Roku Inc. and Hisense Company Ltd. and its subsidiaries, and is protected under U.S. and International copyright
and/or other intellectual property laws. Reproduction or transmission of the materials, in whole or in part, in any manner, electronic, print, or otherwise, without the prior written
consent of Roku, Inc. and Hisense Company Ltd. is a violation of the rights of Roku, Inc. and Hisense Company Ltd. rights under the aforementioned laws.
No part of this publication may be stored, reproduced, transmitted or distributed, in whole or in part, in any manner, electronic or otherwise, whether or not for a charge or
other or no consideration, without the prior written permission of Roku, Inc. and Hisense Company Ltd.
Requests for permission to store, reproduce, transmit or distribute materials may be made to the following address:
Hisense USA Corporation
7310 McGinnis Ferry Road
Suwanee, GA 30024.
Hisense, and any and all other Hisense product names, logo’s, slogans or marks are registered trademarks of Hisense Company Ltd. and its subsidiaries. All other trademarks
are the property of their respective holders. Roku, Roku TV, Happy Streaming and the Roku logo are the trademarks or registered trademarks of Roku, Inc.
ES-