Hisense Electric LCDD0052 Part15 Subpart B-LED LCD TV User Manual W9HLCDD0052 2 1
Hisense Electric Co., Ltd. Part15 Subpart B-LED LCD TV W9HLCDD0052 2 1
Contents
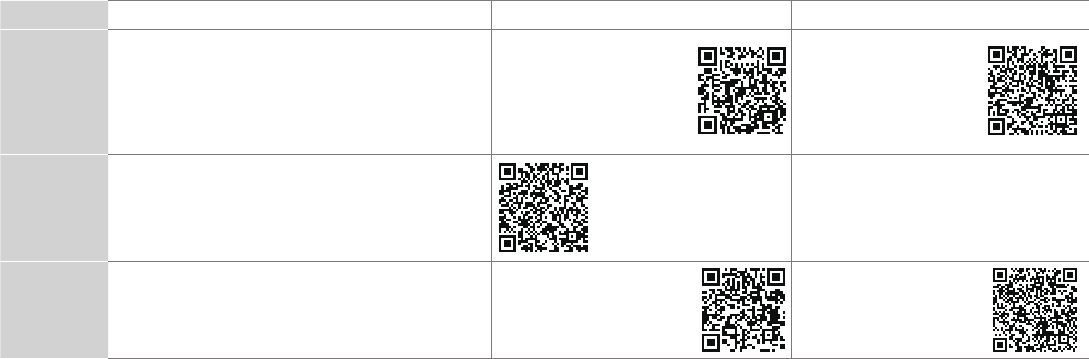
- 1. W9HLCDD0052_User Manual 1
- 2. W9HLCDD0052_User Manual 2_1
- 3. W9HLCDD0052_User Manual 2_2
- 4. W9HLCDD0052_User Manual 3
W9HLCDD0052_User Manual 2_1

1
Your easiest way to endless entertainment
Legal Disclaimers:
*Subscription or other payment may be required to access certain channels. Content may not be available in all areas in which the Roku TVs are sold and
channel availability is subject to change.
† Roku search is for movies and TV shows and does not work with all channels.
º Limitation apply. Please see support.roku.com for device compatibility information.
2
WELCOME TO THE SHARP FAMILY!
Congratulations on the purchase of your new SHARP Roku TV Series! This Quick Start Guide will walk you
through a few easy steps to set up your TV.
Because we value your business, we want to keep you in the know of 'all things SHARP'. Using your mobile phone, scan the Registration page QR code
to register your TV. Depending on the make and model of your phone, you may need to download a QR code scanning app.
Country Customer Care Center SHARP Support Page REGISTER YOUR TV
U.S.A • Phone: 1-888-935-8880
• Hours of Operation:
Monday - Friday: 9 AM to 9 PM EST
Saturday - Sunday: 9 AM to 6 PM EST
• Service Email: support@sharptvusa.com
http:// www.sharptvusa.com
/support
www.sharptvusa.com/
support/productreg.asp
No need to register
CANADA • Phone: 1-855-271-6271
• Hours of Operation:
Monday - Friday: 8 AM to 8 PM EST
• Service Email: Canadasupport@sharp-canada.ca
http://www.sharp-canada.
ca/support/
MEXICO • Phone: 01-800-999-7277
• Hours of Operation: Monday-Friday 09:00-18:00
• Service Email: servicio@SHARPTV.com.mx
http://www.SHARPTV.com.
mx/support/
http://www.SHARPTV.
com.mx/support/product
Reg.asp
Disclaimer: This Quick Start Guide is intended as a general guideline to help you set up your SHARP Roku TV.
Images throughout this document are for illustrative purposes only and may differ from the actual product.
3
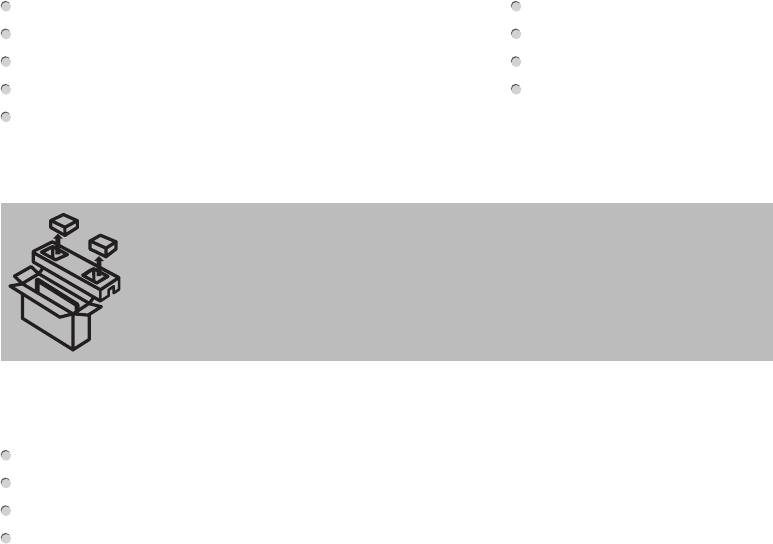
· Please check foam for accessories before discarding.
· Veuillez vérifier la mousse pour qu'il n'y ait pas d'accessoires avant de la jeter.
· Antes de desechar la espuma, asegúrese de retirar todos los accesorios.
Packaged contents
Your package in which you purchased your new TV contains the following items:
TV Power Cord (for 43"/50"/55")
Remote Control 2 AAA batteries
SHARP Roku TV (this document) Important Safety Information and Warranty Card leaflet
2 legs that forms the TV stand 4 screws (ST4×12) (for 32")
4 screws(M4×20) (for 43"/50"/55")
IMPORTANT:
To prevent accidentally discarding items that came with your TV, be sure to check ALL of the foam in the carton box.
Required tools and devices
Wireless router (not included) for Internet connectivity
Phillips screwdriver (not included) to secure the TV stand
HDMI and other types of cables (not included) to connect external devices to the TV
Wall mount bracket (not included) if you prefer to mount the TV to the wall
4
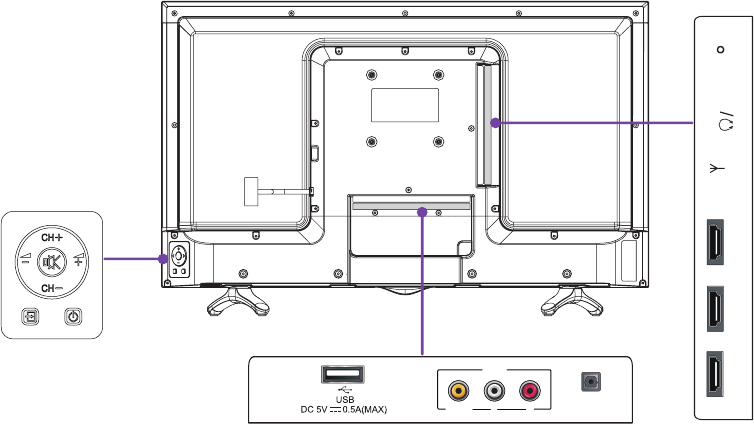
Buttons and ports on the SHARP Roku TV
Back View of the TV (32")
TV Side Vi
ew
TV Bottom View
TV Bottom Panel
VIDEO LR
AV IN
DIGITAL
AUDIO OUT
HDMI 1(ARC) ANT/Cable
AUDIO
OUT RESETHDMI 2HDMI 3
5
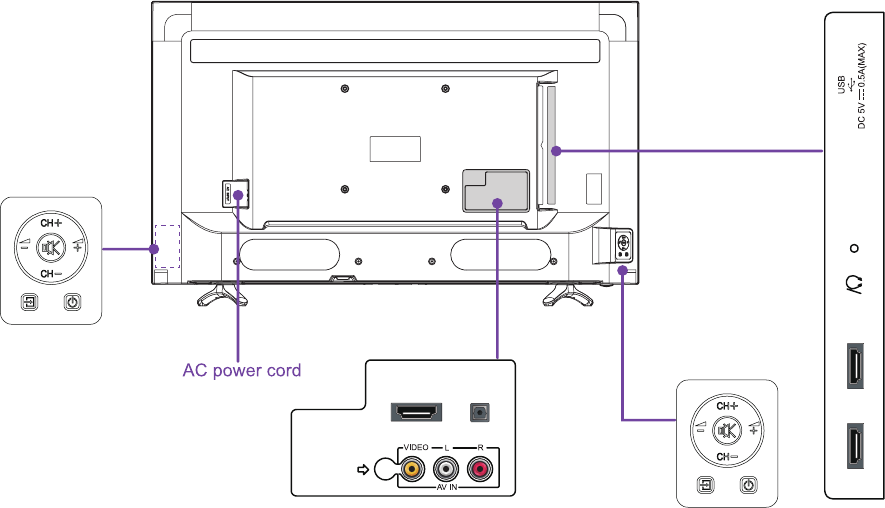
Back View of the TV (43"/50"/55")
TV Side Vi
ew
TV Bottom View TV Bottom Panel
S
ANT/CABLE
HDMI 1
AUDIO
OUT
ARC
HDMI 2RESET
HDMI 3
DIGITAL
AUDIO OUT
(for 43″/55″)
TV Bottom Panel
(for 50″)
6
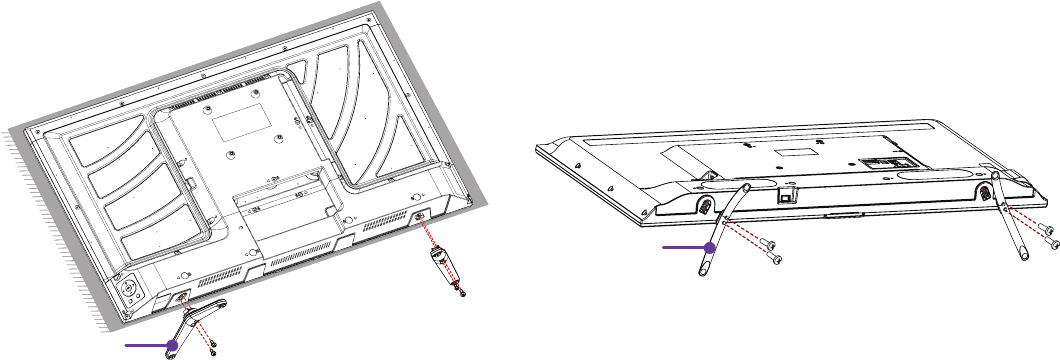
STEP 1. Attach the TV stand or wall mount bracket (not included)
Attach the TV Stand (For steps to attach the wall mount see page 7)
Follow the illustrations and instructions below to complete the installation steps:
1. Carefully place your TV facing down on a soft, flat surface to prevent damage to the TV or scratches to the screen.
2. Remove the two legs (that form the stand) from the accessory bag and then insert them into the bottom slots of the TV.
3. Secure the legs to the TV with the 4 screws in the accessory bag.
Screws: M4×20 (43"/50"/55")
leg
Screws: ST4×12 (32")leg
7
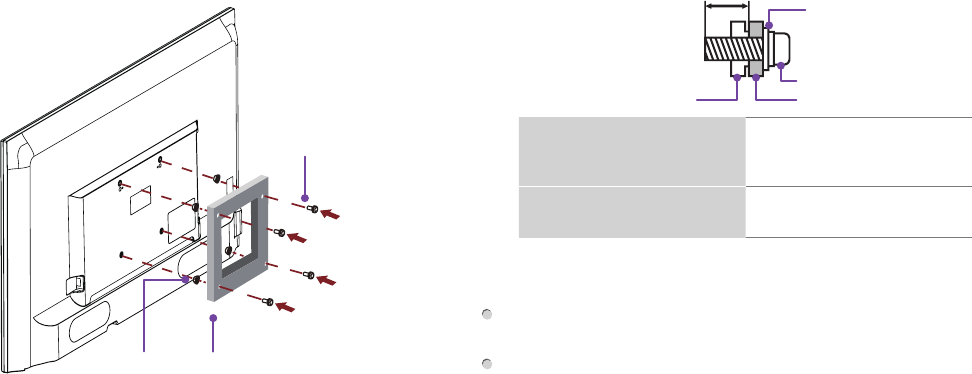
Attach the Wall Mount Bracket (not included)
Before you begin the third-party manufacturer instructions, be
sure to do the following things:
1. Place the TV face down on a flat, clean, safe and cushioned
surface.
2. Remove the TV stand if you already attached it.
3. Place the spacers (not included) in the corresponding bracket
holes.
CAUTION:
• Whenyouattachthemount,besuretousethespacers
(provided by the third-party manufacturer) between the TV
and the bracket.
• Topreventinternal damagetotheTVandensureit
ismountedsecurely,besuretousefixingscrews
(not provided) that are 8 - 9.5 mm (32") / 9.5 - 11.5 mm
(43"/50"/55") in length when measured from the attaching
surface of the mounting hook.
9.5 - 11.5 mm (43"/50"/55″)
8 - 9.5 mm (32")
Wall mount hole pattern
VESA (mm)
100 × 100 (for 32″)
200 × 200 (for 43″/55″)
200 × 400 (for 50″)
Wall mount screw size (mm) M4 (for 32″)
M6 (for 43″/50/″55″)
Follow instructions provided with the Wall mount bracket.
To complete the installation, please contact the wall-mount
manufacturer or the retailer from which you purchased the TV.
The selected screws are 8 - 9.5 mm / 9.5 - 11.5 mm in length
when measured from the attaching surface of the rear cover.
The diameter and length of the screws differ depending on the
Wall mount bracket model.
NOTE: The diameter and length of the screws differ depending
on the wall mount bracket model.
Screw
(not provided)
Bracket
(not provided)
Spacer
(not provided)
Rear cover of the TV Spacer
Screw
Wall mount bracket
8
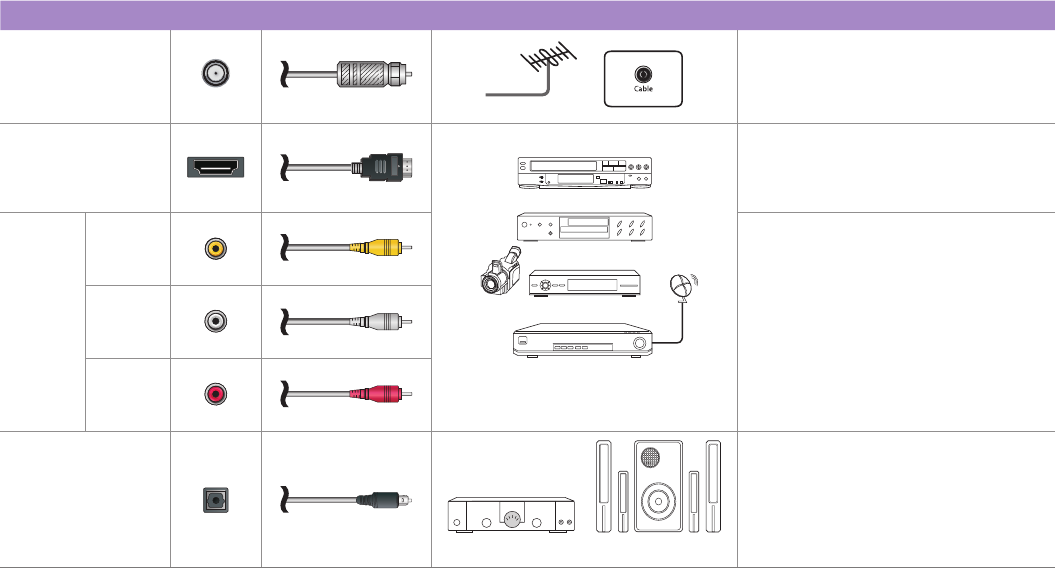
STEP 2. Connect devices to your TV
Check to ensure that you have selected the right cables for the ports and that they are connected securely. Loose connections can
affect the quality of the picture image and color. (Cables and External Equipment not included.)
TV label Port Cable External Equipment Brief Description
ANT/CABLE
Antenna
VHF/UHF Antenna
ANT OUT
Connect an outdoor or indoor
antenna.
HDMI
DVD Player/Recorder
Set-top Box
Satellite Receiver
Satellite
antenna
cable
VCR
Video
Camera
Connect a High Denition Multimedia
Interface (HDMI®) cable from an
external device.
AV IN
VIDEO Yellow
Connect a composite video cable
and left-right audio cables from an
external AV device.
LWhite
RRed
DIGITAL AUDIO
OUT
SpeakerAudio Amplier
Connect an optical cable from an
external digital audio system.
9
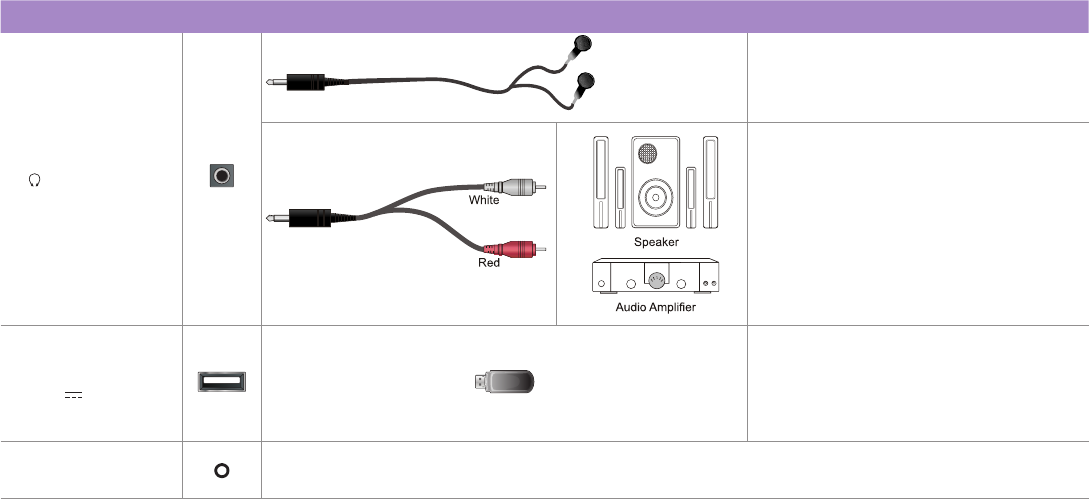
TV label Port Cable External Equipment Brief Description
/ AUDIO OUT
Connect headphone for audio out of the
TV.
Connect an audio adapter (not provided)
from an external analog audio system.
USB
DC 5V 0.5A(MAX)
Connect a USB device for browsing
photos, music and movies.
The unit only recognizes a USB Memory
Stick.
RESET Restart or factory reset your TV.
10
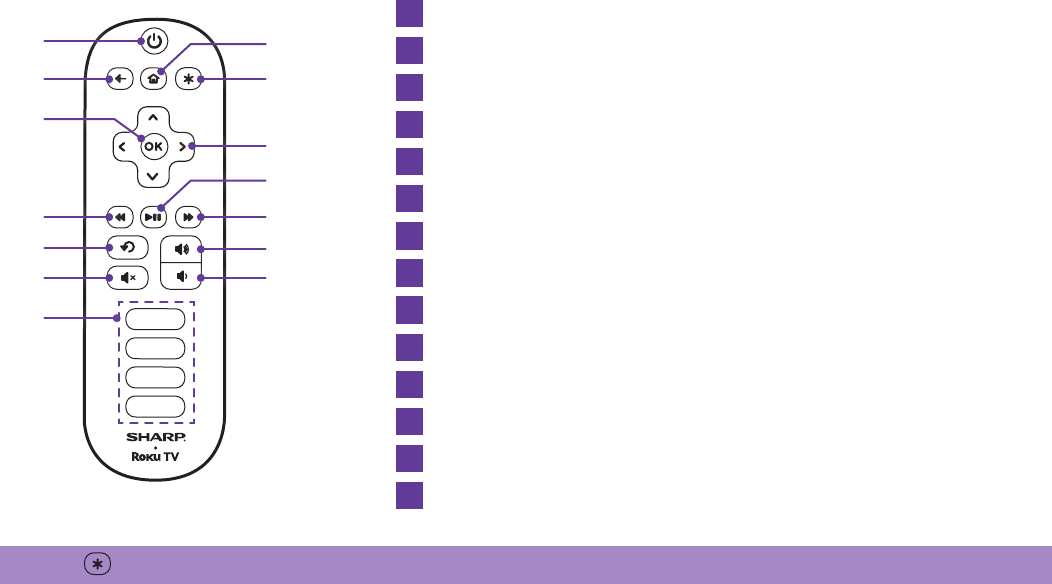
Buttons on your TV remote
The TV remote should feel right at home in your hand. We designed it to be incredibly intuitive for watching TV and navigating
on-screen menus.
TIP: The button gives you easy access to picture settings, display options and more. Try it on every screen.
POWER Turn TV on and off
BACK Return to previous screen
HOME Return to Roku Home screen
OK Select an option from a menu
UP or DOWN Move up or down; LEFT or RIGHT Move left or right
INSTANT REPLAY Replay last 7 seconds of streaming video
OPTIONS Access to picture settings, move streaming channel icons and more
RWD SCAN Rewind streaming video, scroll left one page at a time
PLAY/PAUSE Start or pause playback
FWD SCAN Fast forward streaming video, scroll right one page at a time
CHANNEL SHORTCUT Instant access to popular channels
VOLUME UP Increase TV volume
VOLUME DOWN Decrease TV volume
MUTE Silence TV sound
A
E
I
C
G
K
M
B
F
J
D
H
L
N
A
B G
J
L
M
E
H
F
N
K
D
C
I
11
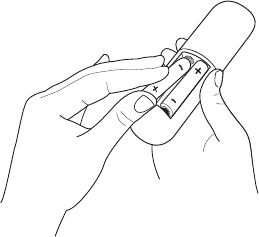
STEP 3. Begin using your remote
Power up your TV remote by inserting the included batteries.
CAUTION
• Dispose the batteries in a designated disposal area. Do not throw them into a fire.
• Remove old batteries immediately to prevent them from leaking into the battery compartment.
• If you do not intend to use the remote control for a long time, remove the batteries.
• Battery chemicals can cause a rash. If the batteries leak, clean the battery compartment. If chemicals touch your skin, wash it
immediately.
• Do not mix old and new batteries.
• Do not mix alkaline, standard (carbon-zinc) or rechargeable (for example, NiCd or NiMH) batteries.
• If your remote gets warm/hot during use, discontinue use and contact customer support immediately at
www.sharptvusa.com/support.
UsingYourCableSet-topBoxorSatelliteReceiverRemoteasa‘Universal’Remote.
If you prefer to use your Cable Set-top Box or Satellite Receiver Remote as a ‘Universal Remote’, please refer to the manual that
your cable or satellite service provided. It will include instructions on how to program their remote to your television. You can nd
codes that work with your SHARP Roku TV and the most common cable and satellite provider’s universal remote control at
www.roku.com/universalremote