Hisense Electric LCDF0005 Part15 Subpart B-LCD Monitor User Manual W9HLCDF0005 2
Hisense Electric Co., Ltd. Part15 Subpart B-LCD Monitor W9HLCDF0005 2
Contents
- 1. W9HLCDF0005_user Manual 1
- 2. W9HLCDF0005_user Manual 2
W9HLCDF0005_user Manual 2
21
Advanced Features
Network Setup (Auto)
Use the Automatic Network Setup while your connecting the
TV to a network that supports DHCP. To set up your TV’s
cable network connection automatically, follow these steps:
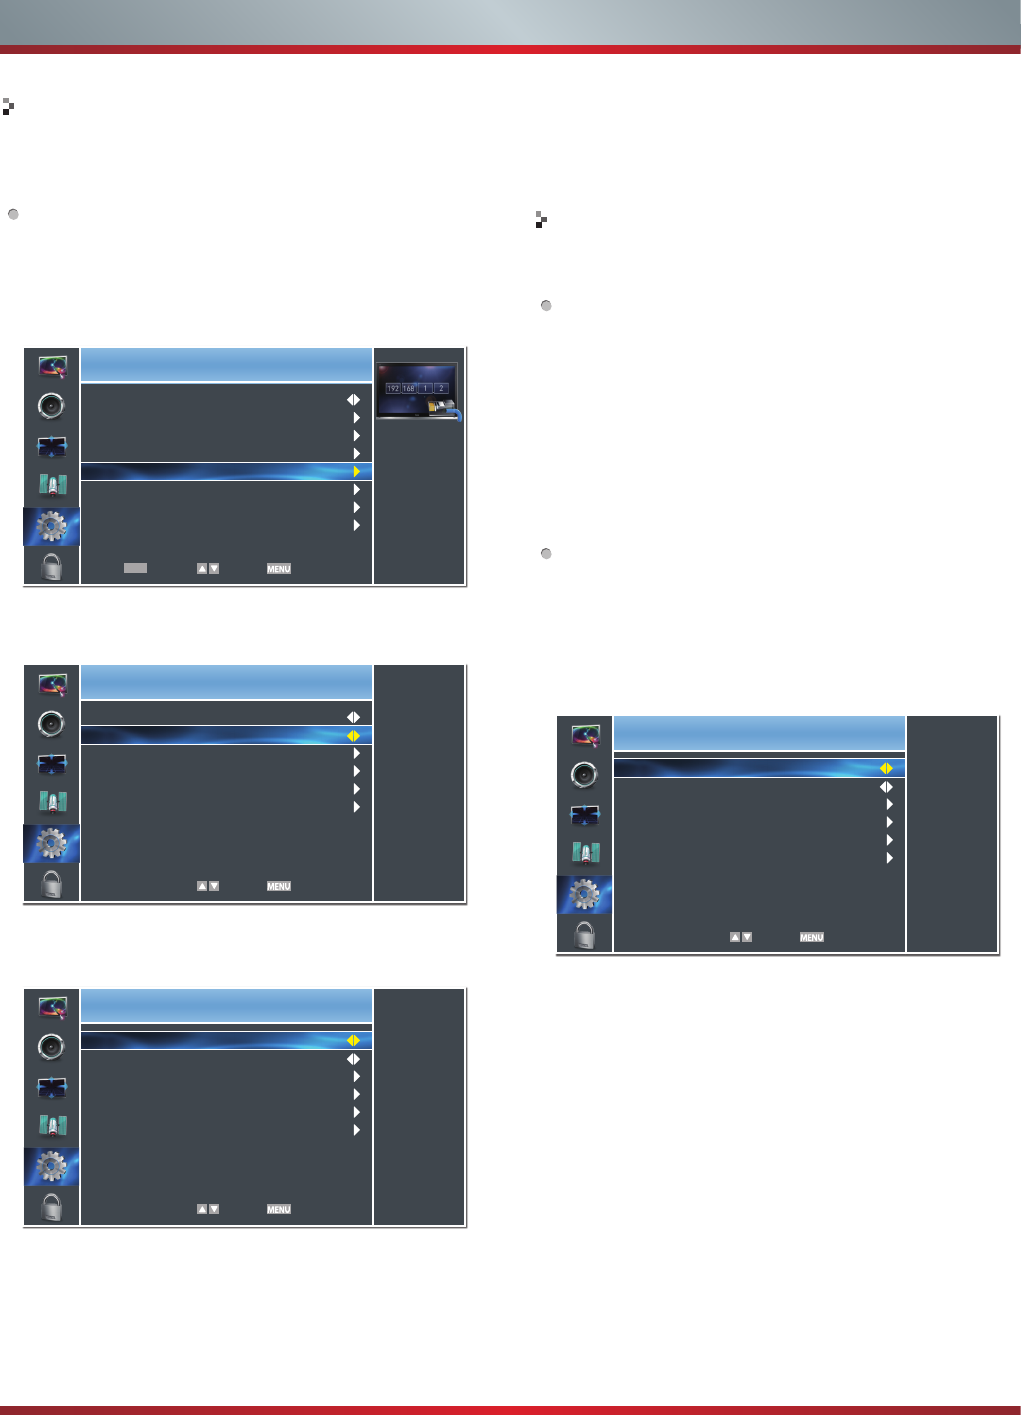
How to set up automatically
1. Connect your TV to your LAN as described in the
previous section.
2. Turn on your TV, operate according to the description in
the Settings menu until the Network screen appears.
3. On the Network screen, select Configuration and press
[ENTER] button to enter the submenu.
4. Set Internet Connection to On and Interface to Ethernet.
5. Select IP Setting and press [ENTER] button to enter it.
6. Set Address Type to Auto.
7. Auto acquires and enters the necessary connection
values automatically.
8. If the connection values are not automatically entered,
please check your modem and router manuals for
Network Setup (Manual)
Use the Automatic Network Setup when connecting your TV
to a network that requires a Static IP address.
Getting the Network Connection Values
To get the network connection values on most windows
computers, follow these steps:
1. Right click the Network icon on the bottom right of the
screen.
2. In the pop-up menu that appears, click Status.
3. On the dialog that appears, click the Support tab.
4. On the Support tab, click the Details button. The network
connection values are displayed.
How to set up manually
To set up your TV’s network connection manually, follow
these steps:
1. Follow Steps 1 through 5 in the “How to set up
automatically” procedure.
2. Set Address Type to Manual.
3. Press [▲/▼] button to select IP Address and press [◄/►]
button to move the cursor to the entry field. Then press
0~9 buttons to enter the numbers.
4. Press [MENU] button to exit IP Address and press [▲/▼]
button to select the next options to enter the numbers.
5When done, press [MENU] button to return to the
previous menu.
6. Select Connection Test to check the internet connectivity.
Settings
Select connection type
Internet Connection
Interface
Wireless Setting
Information
IP Setting
Connection Test
On
Ethernet
Select Back
Settings
Address Type
IP Address
Subnet Mask
Default Gateway
Primary DNS
Secondary DNS
Auto
176. 16. 0. 0
255. 255. 255. 255
172. 16. 0. 0
172. 16. 2. 2
0. 0. 0. 0
Select Back
Settings
Address Type
IP Address
Subnet Mask
Default Gateway
Primary DNS
Secondary DNS
Manual
0. 0. 0. 0
0. 0. 0. 0
0. 0. 0. 0
0. 0. 0. 0
0. 0. 0. 0
Select Back
Settings
Initiate network
connection
Language
Menu Settings
Time Setup
Caption
Network
Demo Mode
Version Info
Reset Default
English
Enter Select Exit
OK
directions to enable automatic IP addressing by DHCP.
Or, follow the steps listed to the follow to manually
configure the network connection.
22
Advanced Features
Connecting to a Wireless Network
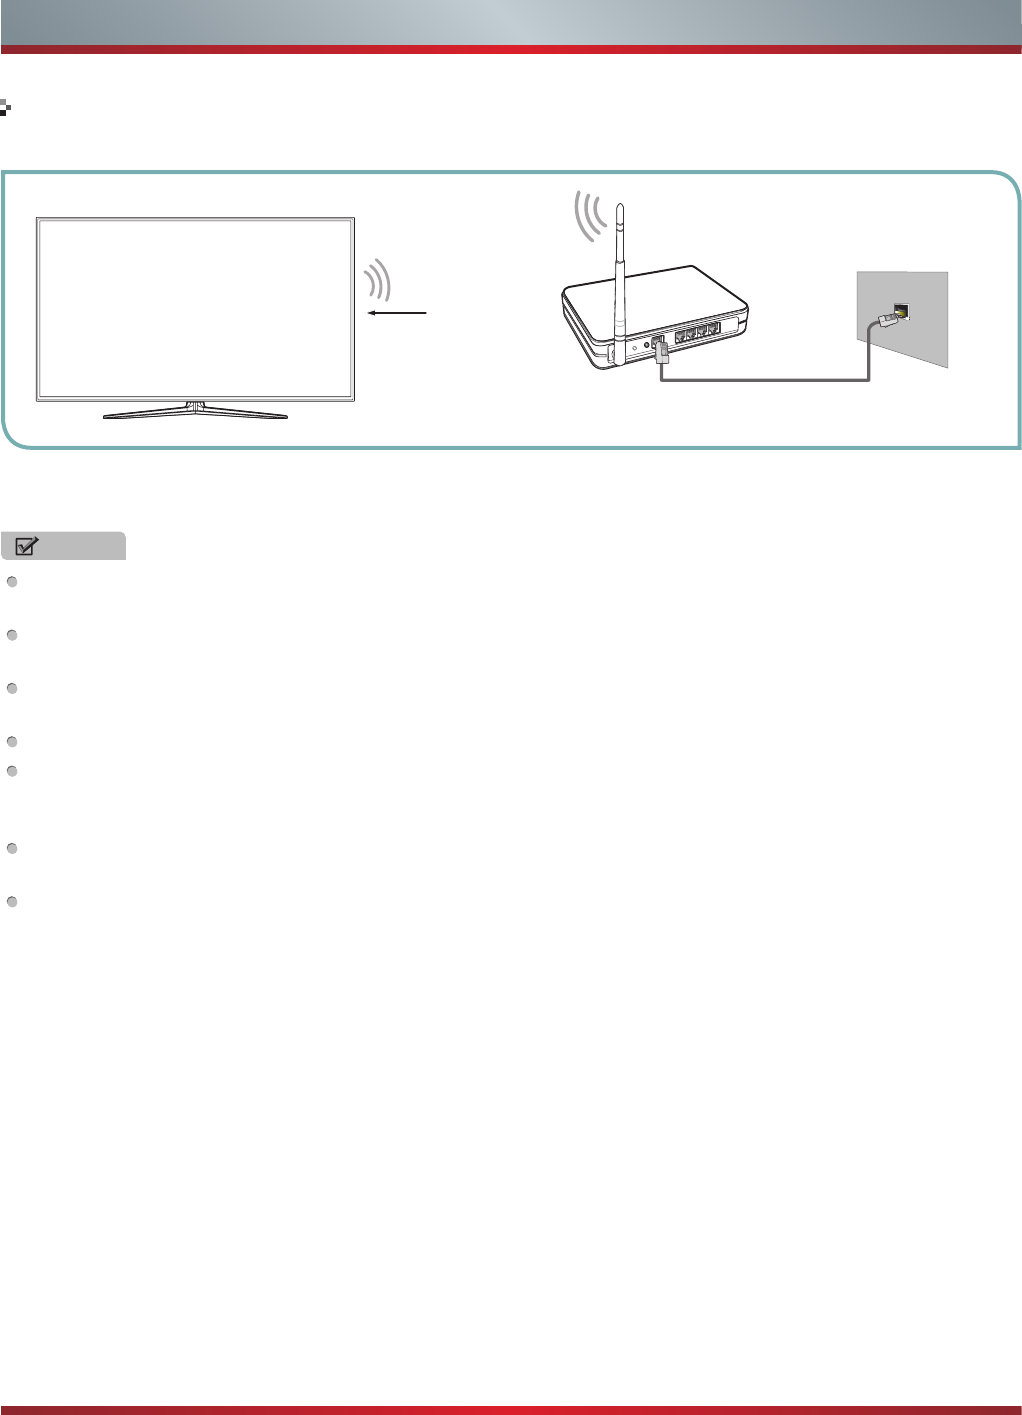
To connect your TV to your network wirelessly, you need a wireless router or modem. See the illustration below.
Hisense’s built-in Wireless LAN Adapter supports the IEEE 802.11 b/g/n communication protocols. Hisense recommends using
IEEE 802.11n router. When you play the video over a IEEE 802.11b/g connection, the video may not play smoothly.
NOTES
You must use the Hisense’s built-in Wireless LAN Adapter to use a wireless network, the set doesn’t support external USB
network adapter.
To use a wireless network, your TV must be connected to a wireless IP sharer. If the wireless IP sharer supports DHCP, your
TV can use a DHCP or static IP address to connect to the wireless network.
Select a channel for the wireless IP sharer that is not currently being used. If the channel set for the wireless IP sharer is
currently being used by another device nearby, this will result in interference and communication failure.
If you apply a security system other than the systems listed below, it will not work with the TV.
If Pure High-throughput (Greenfield) 802.11N mode is selected and the Encryption type is set to WEP, TKIP or TKIP-
AES (WPS2 Mixed) for your Access Point (AP), Hisense TVs will not support a connection in compliance with new Wi-Fi
certification specifications.
If your AP supports WPS (Wi-Fi Protected Setup), you can connect to the network via PBC (Push Button Configuration) or
PIN (Personal Identification Number). WPS will automatically configure the SSID and WPA key in either mode.
Connection Methods: You can setup the wireless network connection three ways.
-Scan
-Manual
-Auto
Wireless IP Sharer(Router)
(with DHCP Server)
LAN Cable
Wireless LAN Adapter
built-in TV set
The LAN Port on
the Wall
23
Advanced Features
Wireless Setting
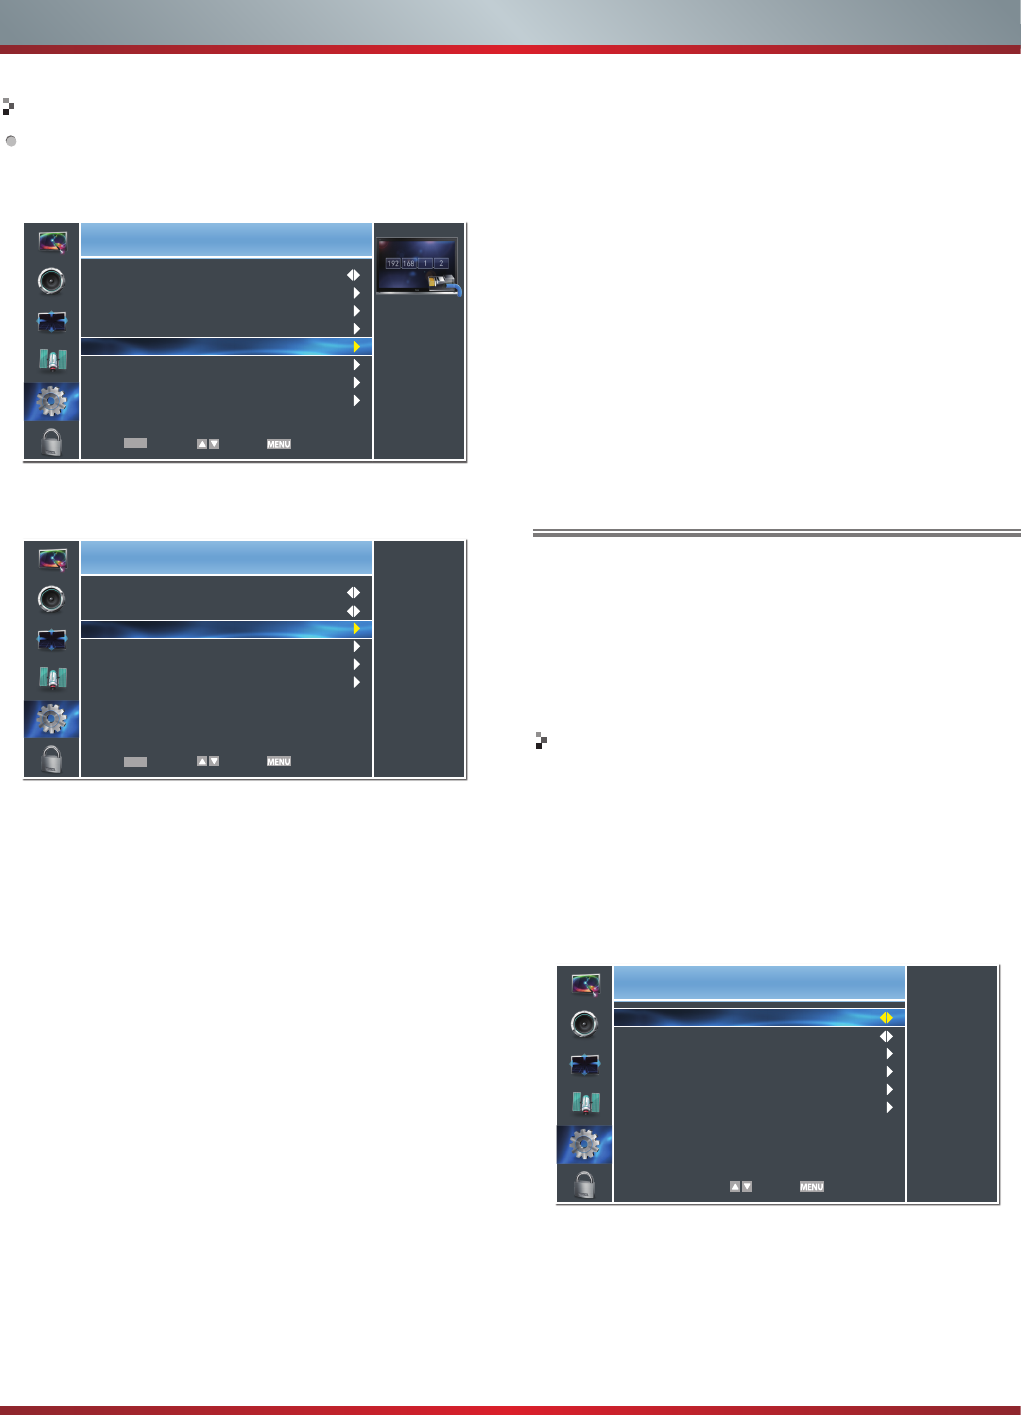
How to set up
1. Turn on your TV, operate according to the description in
the Settings menu until the Network screen appears.
2. On the Network screen, select Configuration and press
[ENTER] button to enter the submenu.
3. Set Internet Connection to On and Interface to Wireless.
4. Select Wireless Setting and press [ENTER] button to
enter it.
You can select: Scan\Manual\Auto.
5. If you select Scan, a screen will appear listing all of the
wireless networks within range of the TV. Use the [▲/▼]
keys to select the wireless network with your router
SSID and press [ENTER] to confirm. Proceed to Step 7.
6. If you select Manual, a screen will appear prompting
you to enter the SSID of your wireless network. Press
[ENTER] and an on-screen keyboard will pop up. Enter
the SSID and select OK. Press [ENTER] to confirm and
a screen will appear prompting you select the security
mode for your wireless network. Use the [▲/▼] keys
to select the proper security mode and press [ENTER]
to confirm. If you selected None for the security mode,
proceed to step 9.
7. A screen will appear prompting you to enter the
password for the selected security mode. Press [ENTER]
and an on-screen keyboard will pop up. Enter the
password and select OK. Press [ENTER] to confirm.
Proceed to Step 9.
8. If you select Auto, a screen will appear prompting you to
select PIN (personal identification number) or PBC
Settings
Setup wireless
connection.
Internet Connection
Interface
Wireless Setting
Information
IP Setting
Connection Test
On
Wireless
Enter Select Exit
OK
Settings
Initiate network
connection
Language
Menu Settings
Time Setup
Caption
Network
Demo Mode
Version Info
Reset Default
English
Enter Select Exit
OK
DLNA Settings
Computer, TV and other digital devices can be connected
via DLNA and they can share files with each other. You
can use the TV set as a DLNA DMP (Digital Media Player)
device to enjoy movies, pictures, music and other multimedia
materials in your computer through DLNA connection.
DLNA Setting needs to be set on TV and computer
Respectively.
Network Setup:
1. Turn on your TV, operate according to the description in
the Settings menu until the Network screen appears.
2. On the Network screen, select Configuration and press
[ENTER] button to enter the submenu.
3. Set Internet Connection to On and Interface to Ethernet.
4. Select IP Setting and press [ENTER] button to enter it.
5. Set Address Type to Auto.
6. Auto acquires and enters the necessary connection
values automatically.
7. If the connection values are not automatically entered,
please check your modem and router manuals for
directions to enable automatic IP addressing by DHCP.
Or, follow the steps below to manually configure the
network connection.
Settings
Address Type
IP Address
Subnet Mask
Default Gateway
Primary DNS
Secondary DNS
Auto
176. 16. 0. 0
255. 255. 255. 255
172. 16. 0. 0
172. 16. 2. 2
0. 0. 0. 0
Select Back
(push button configuration) setup. Choose the method
supported by your wireless access point.
8a. If you choose PIN, an identification number will appear
on the screen for you to enter into the access point. After
entering the PIN, press the [►] key. If the PIN is in use
by another device, select [REFRESH] to obtain a new
PIN and enter it into the access point. After entering the
PIN, press the [►] key.
8b. If you choose PBC, a screen will appear prompting to
press [►] key. After pressing the [►] key you have two
minutes to locate and press the Push Button on your
access point to connect to the TV.
9. Press the [MENU] key to return to the previous menu.
10. Select Connection Test to check the Internet connectivity.
24
Advanced Features
To set up your TV’s network connection manually,
follow these steps:
1). Follow Steps 1 through 5 in the “How to set up
automatically” procedure.
2). Set Address Type to Manual.
8. Set Address Type to Manual, enter IP Setting. Then
press [▲/▼] button to select IP Address and press [◄/►]
button to move the cursor to the entry field. Then press
0~9 buttons to enter the numbers.
9. Press [MENU] button to exit IP Address and press [▲/▼]
button to select the next options to enter the numbers.
10. When done, press [MENU] to return to the previous
menu.
11. Select Connection Test to check the Internet connectivity.
Set DLNA to On:
1. On the Network screen, select Applications and press
[ENTER] button to enter the submenu.
2. Press [◄/►] button to set DLNA to On.
Settings
Set DLNA on or off
DLNA
Netflix
VUDU
On
Select Back
Media Share Settings in Computer
Settings to Share Files
If your computer does not support DLNA, you may install
software that supports DLNA such as TVersity or Windows
Media Player. We recommend Windows Media Player as the
installation and setup is easier.
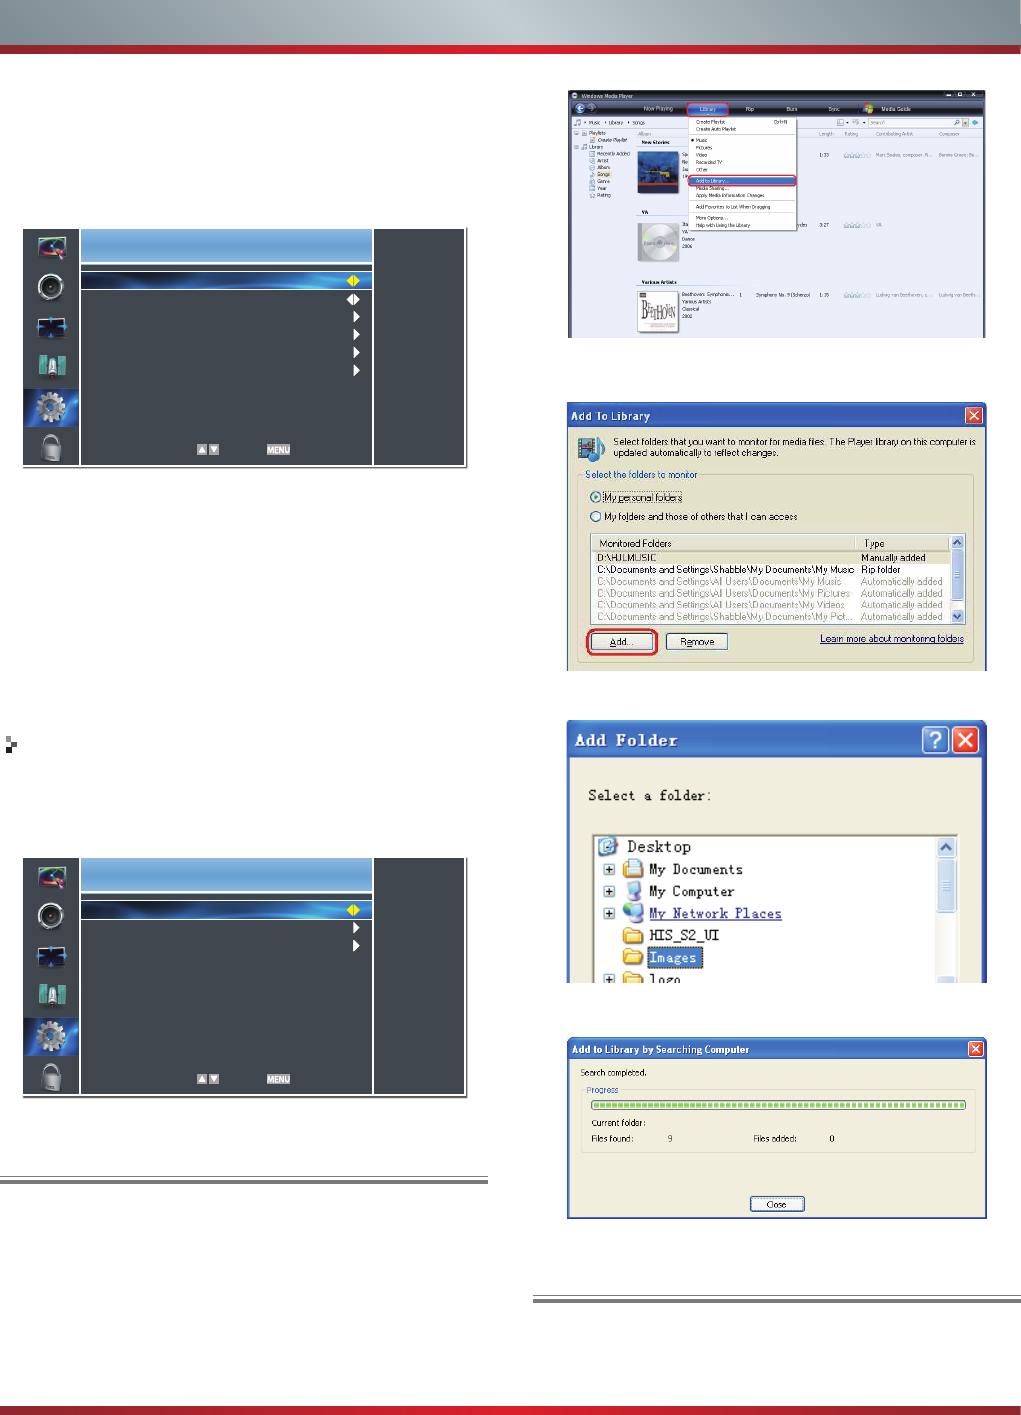
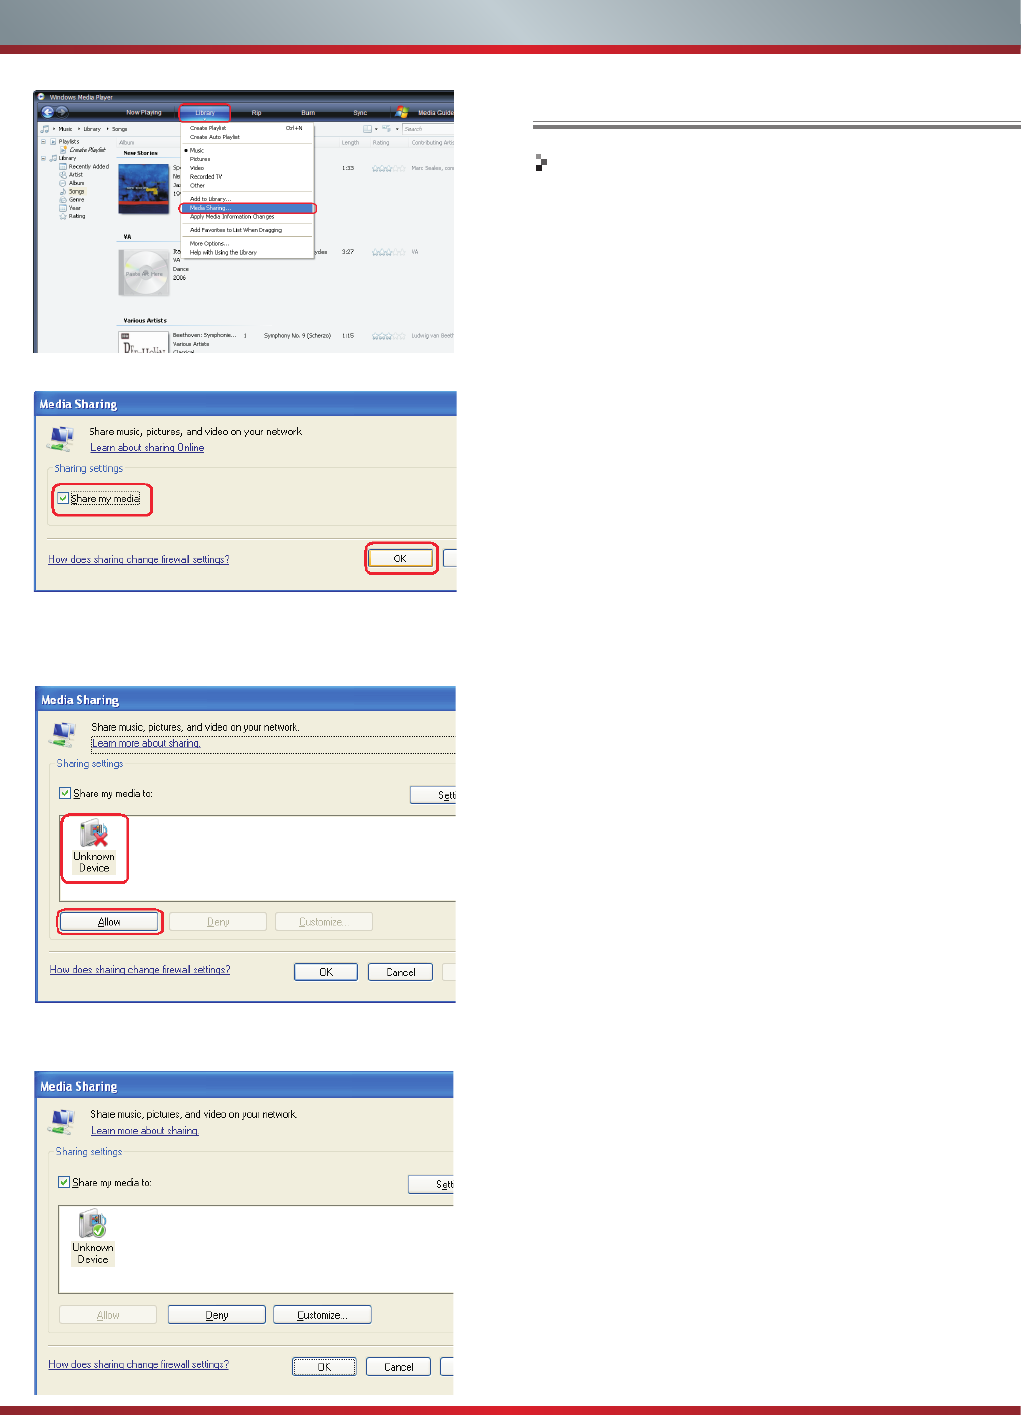
1. Start the Windows Media Player(V11 or higher).
2. Click “Library” and then “Add to Library...”.
3. The “Add To Library” will pop up on the screen. Click
“Add”.
4. Select a folder and click OK button.
5. Click “Close” to close the dialog.
1. Click “Library” and move the cursor to select “Media
Sharing...”
Settings
Address Type
IP Address
Subnet Mask
Default Gateway
Primary DNS
Secondary DNS
Manual
0. 0. 0. 0
0. 0. 0. 0
0. 0. 0. 0
0. 0. 0. 0
0. 0. 0. 0
Select Back
25
Advanced Features
Network Function
NOTICE FOR USE
If you use VUDU services, see the following note before
using it.
1. Use of Internet services requires a working broadband
Internet connection (1 to 2 Mbps for SD video, 2.25 to 4.5
Mbps for HD video and 4.5 to 9 Mbps for HDX video).
2. VUDU and other Internet-based services are not provided
by Hisense, may change or be discontinued at any
time and may be subject to restrictions imposed by
your Internet service provider. The quality, functionality,
or availability of such services may be affected by the
capacity of your Internet connection. Use of VUDU video-
on-demand and other Internet services may require the
creation of a separate account through a computer with
internet access.
3. Certain VUDU services may not be available for this TV
model.
4. VUDU video-on-demand and other Internet services may
require payment of one-time and/or recurring charges.
5. You are solely responsible for any charges incurred as a
result of using Internet-based content, including, without
limitation, communications charges for the provision of
Internet or network services and any charges incurred
for third-party Internet content services, such as video on
demand or subscription services. All third-party services
are provided in accordance with whatever terms and
conditions are established between such third-party
providers and you.
6. HISENSE MAKES NO REPRESENTATIONS OR
WARRANTIES ABOUT THE CONTENT, AVAILABILITY
OR FUNCTIONALITY OF THE VUDU SERVICE OR
OTHER INTERNET DELIVERED THIRD-PARTY
SERVICES AND DOES NOT WARRANT THAT ANY
OF THEM WILL BE UNINTERRUPTED, ERROR FREE
OR SATISFACTORY. ANY IMPLIED WARRANTY,
INCLUDING BUT NOT LIMITED TO ANY IMPLIED
WARRANTY OF MERCHANTABILITY OR FITNESS
FOR A PARTICULAR PURPOSE OF ANY THIRD PARTY
CONTENT OR SERVICE, IS EXPRESSLY EXCLUDED
AND DISCLAIMED. UNDER NO CIRCUMSTANCES
WILL HISENSE BE LIABLE IN CONTRACT, TORT OR
UNDER ANY OTHER THEORY FOR ANY DAMAGES
ARISING OUT OF OR IN CONNECTION WITH YOUR
USE OF ANY CONTENT OR SERVICE PROVIDED
BY ANY THIRD PARTY, EVEN IF ADVISED OF THE
POSSIBILITY OF SUCH DAMAGES.
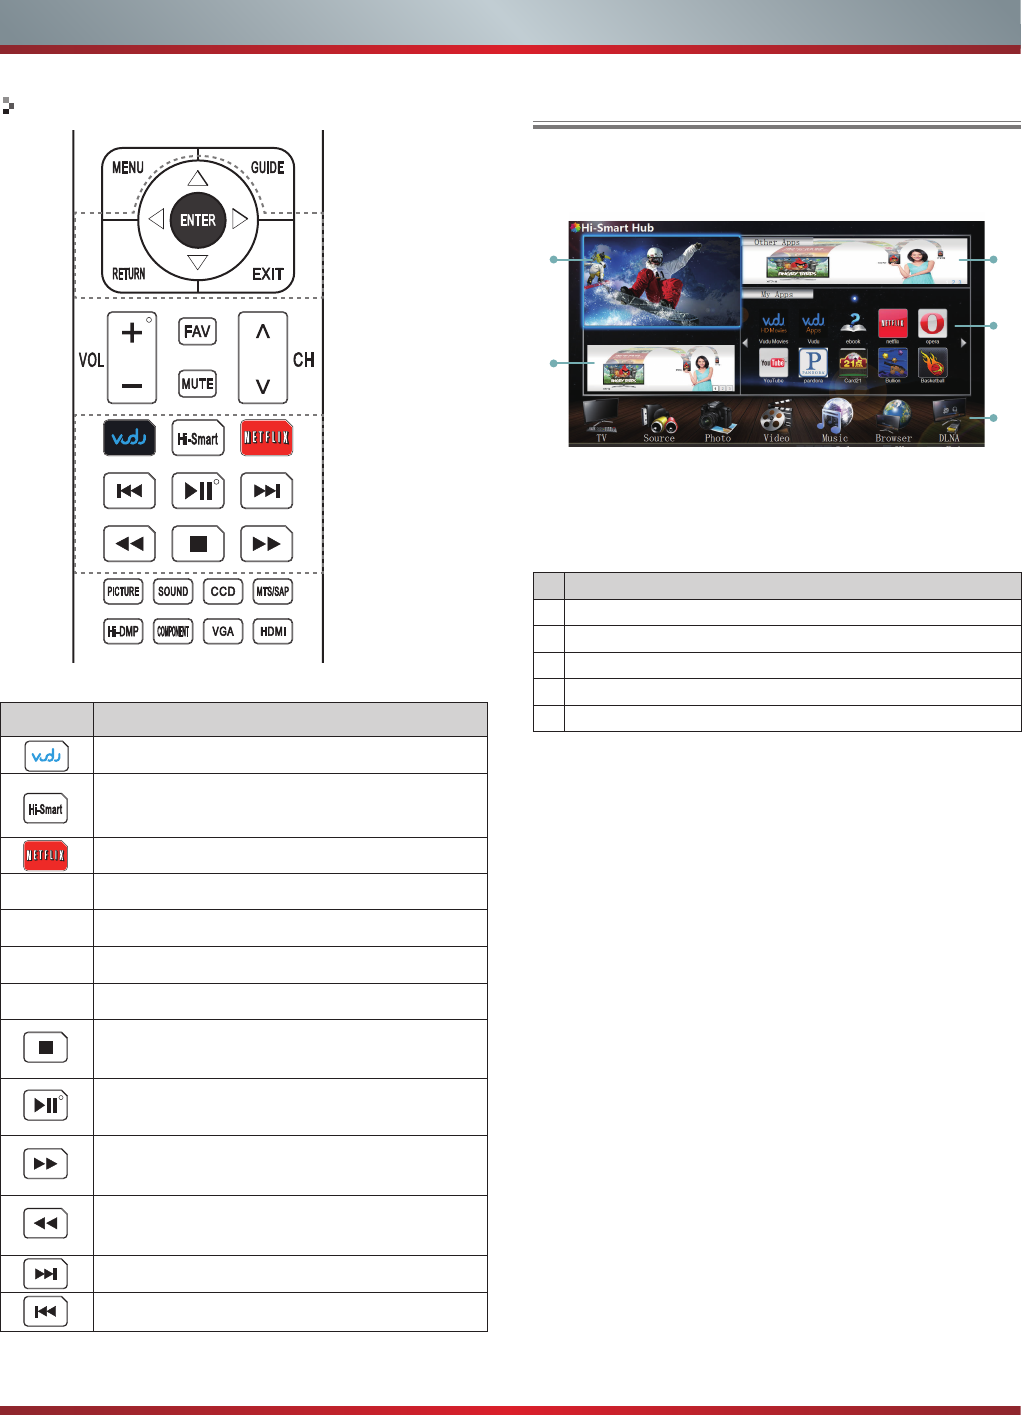
2. Click the box to select “Share my media” and click [OK].
3. An equipment icon will appear on the white area if
the DLNA Settings has been correctly set. Select the
appropriate icon and then click “Allow”.
4. The TV now has access to the shared files on the
computer.
26
Advanced Features
Operational buttons
Buttons Description
Press to launch Vudu Movies App directly.
Opens the Hi-Smart Hub with links to various
Internet Services.
Press to launch Netflix App directly.
▲/▼/◄/► Selects the on-screen menu items.
ENTER Confirms selections.
EXIT Closes the menu.
RETURN Returns to the previous menu.
Stops playback and displays the movie title
screen.
Pauses playback. Press the button to return to
playback.
Displays the TrickPlay screen and fast forwards
playback.
Displays the TrickPlay screen and fast reverses
playback.
Plays the next video.
Plays the previous video.
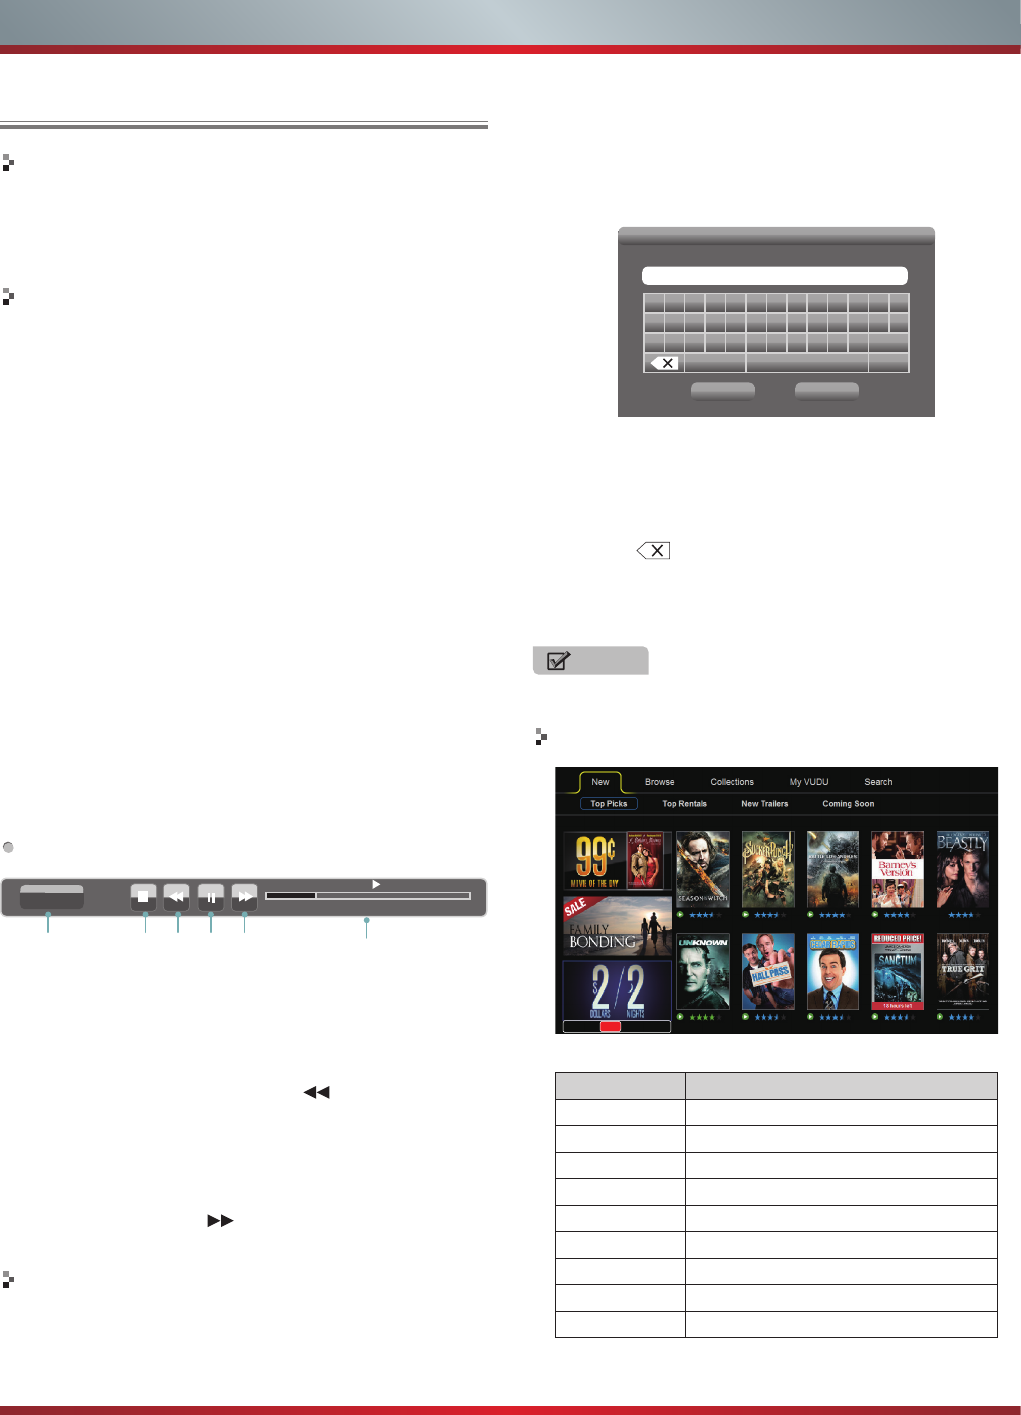
1. Press the [Hi-Smart] button to display network main
menu.
2. Press [▲/▼/◄/►] button to select the interface you
want to view and press [ENTER] to enter the following
description.
No Interface description
1The current signal
2The Hisense advertisement
3Hisense market
4Network options
5Source options
1
2
3
4
5
Enter the Network Applications
27
Advanced Features
VUDU HD Movies
Brief introduction
VUDU is an on-demand service that offers high-definition
movies on Web.
For enjoying more movies, please register and log in to
your account.
Operation instructions
You can access the VUDU HD Movies by the following
method:
1. Press the [Hi-Smart] button to display network main
menu.
2. Press [▲/▼/◄/►] button to select the VUDU HD Movies
icon and press [ENTER] to enter it (Refer to “Enter the
network application”), or press [VUDU] button to enter
directly.
3. Select the Sign Up Now icon on the VUDU HD Movies
interface, and press [ENTER] to enter.
4. Enter your email address to start your VUDU experience.
( Refer to “How to Input the Email Address” )
5. Press [▲/▼/◄/►] button to move the cursor to select
service items in the VUDU HD Movies home page, and
press [ENTER] button to confirm.
6. In the process of watching a movie, press [ENTER] button
to display/exit the tool bar, press [◄/►] button to select
the function icon, and press [ENTER] button to confirm.
7. Press [RETURN] button to return the upper menu, or
press [EXIT] button to close the menu.
Tool Bar
1. Press [ENTER] button to enter and press [◄/►] button to
select the chapter.
2. Stop playback.
3. Fast backward. Press [ENTER] button to select the
backward speed. You can press [ ] button to achieve
the function.
4. Play/Pause. You can press [►II] button to play/pause
directly when there is no control bar on the screen.
5. Fast forward. Press [ENTER] button to select the forward
speed. You can press [ ] button to achieve the function.
6. Progress bar. The progress bar when playing.
How to Input the Email Address
1. Press [▲/▼/◄/►] button to move the cursor to the
address bar and press [ENTER] button to confirm.
0:00:34 0:02:32
Chapters
2 3 4 51
2. Press [ENTER] button to display the keyboard.
There are some shortcuts on the bottom of the keyboard
so that you can input part of the address often used
directly.
Other keys are used as the keyboard of your computer.
3. Press [▲/▼/◄/►] button to move the cursor to the
characters you want to select and then press [ENTER]
button to confirm.
If you want to delete one character, move the cursor to
Back key and press [ENTER] button to confirm.
4. Move the cursor to Done key and press [ENTER] button
to confirm if you have completed the address input. Then
the new address will appear on the address bar.
VUDU HD Movies home page
a b c d e f g h i j k l m
n o p q r s t u v w x y z
0123456789@.com
Symbols Space Shift
Enter email address
Back Done
Enter email address
Enter email address to begin enjoying VUDU!
NOTE
TV screen may be difference with picture.
6
Press for help
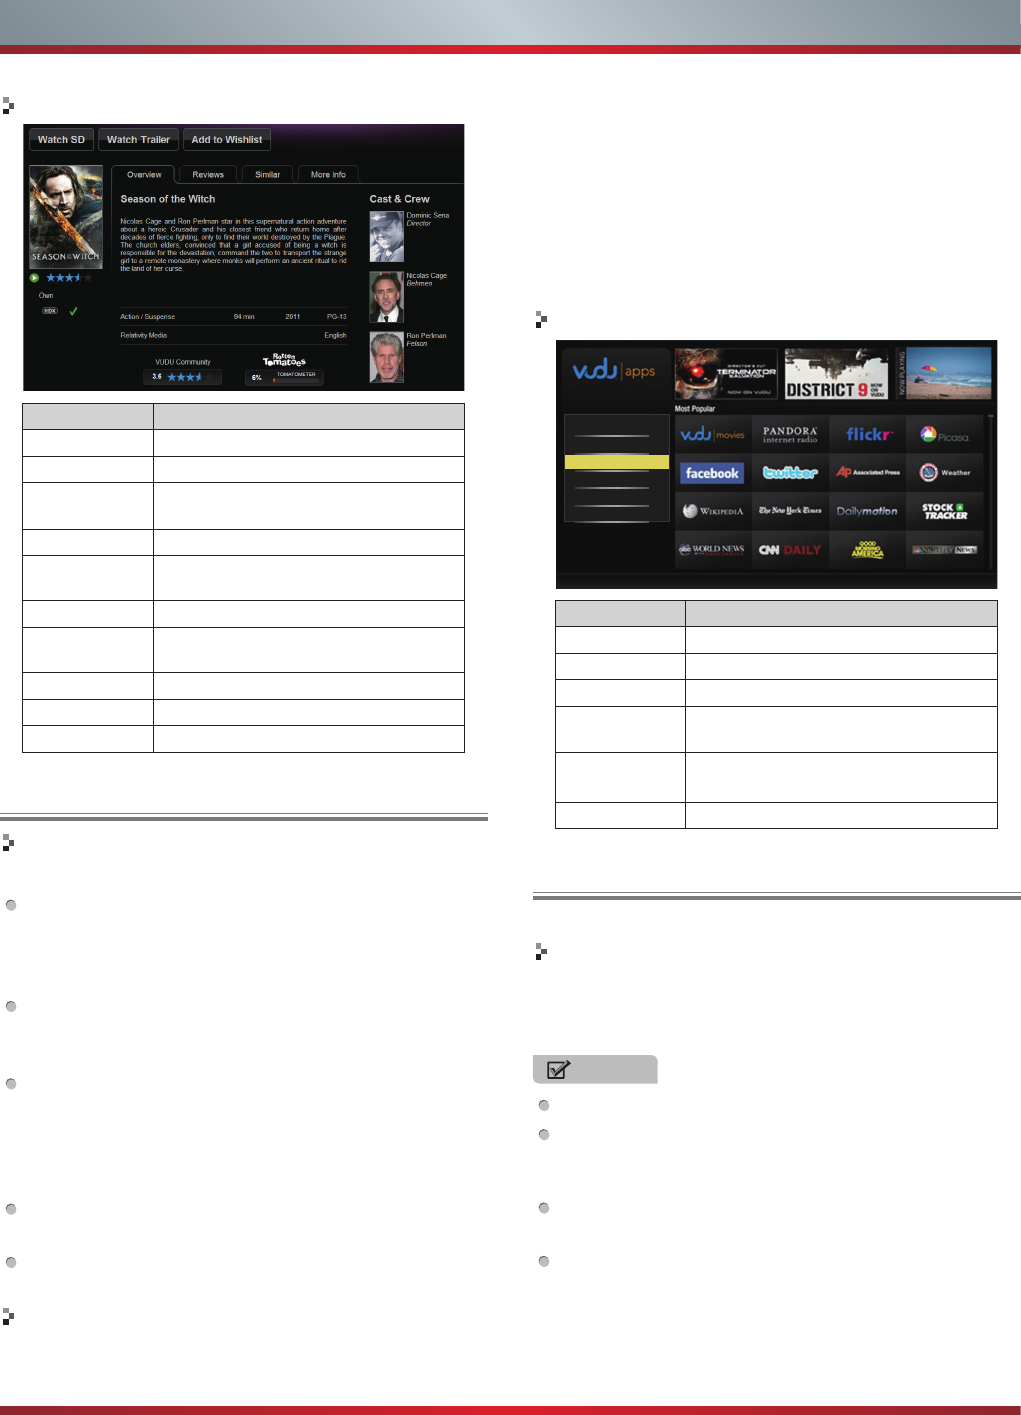
Title Function
New The latest movies
Top Picks Mostly picked up movies
Top Rentals Mostly rented movies
New Trailers Latest trailers
Coming Soon The movies can be picked soon
Browse Browse all the movies in VUDU
Collections Browse the classified movies
My VUDU The movies user bought or rented
Search Search movies in VUDU
28
Advanced Features
VUDU HD Movies subpage
Title Function
Rent/Own To rent or buy current movie
Watch Trailer To watch trailer of the current movie
2 Minute
Preview
To preview current movie for 2
minutes
Add to Wishlist Add current movie to your wishlist
Rate/share To rate current movie or share it to
your friends in Facebook or Twitter
Overview The overview of current movie
Cast&Crew The cast and crew of current movies
and find their related movies
Reviews The reviews of current movie
Similar The similar types of movies
More Info The detail information of current movie
VUDU Apps
Brief introduction
The applications platform for connected TVs.
VUDU Apps provides customers with access to a wide
range of Internet services and applications including
streaming video, music on demand, photo browsing,
social networking and more.
VUDU Apps supports the development of responsive
apps designed specifically for use on home HD
televisions.
VUDU Apps uses a unique, cloud-based architecture
optimized for consumer electronics devices, including
delivering the latest applications to consumers without
the need for software downloads or frequent firmware
updates.
Devices featuring VUDU Apps* will begin shipping to
consumers since the first quarter of this year.
VUDU Apps** allows you to see app updates while
watching live television.
Operation instructions
You can access the VUDU Apps by the following
methods:
1. Press the [Hi-Smart] button to display network main
menu.
2. Press [◄/►/▲/▼] button to select the VUDU Apps icon
and press [ENTER] to enter it.
3. Press [◄/►/▲/▼] button to select the widget you want to
access, and press [ENTER] to enter it.
4. You can press [RETURN] to return the upper menu or
press [EXIT] button to close the Widgets display.
VUDU Apps home page
MY FAVORITES
MOST POPULAR
NEWEST
BROWSE BY GENRE
SHOW TICKER
INFO&SETTINGS
Title Function
My favorites The user’s favorite applications
Most popular The most popular applications
Newest The newest applications in VUDU
Browse by
genre Browse applications by genre
Show Ticker Show the applications at the bottom of
screen while watching TV
Info&settings VUDU Apps system information
Netflix
Netix unlimited membership required.
Brief introduction
Instantly watch thousands of TV episodes & movies
streaming over the Internet from Netflix. Unlimited
membership required.
NOTES
TV screen may be difference with picture.
For more information on Netflix visit http://www.netflix.
com/help or login to your Netflix account and click “Help”
at the top of the page.
Your broadband fluency and picture quality depend on
the network speed and original bit rate.
Illustrations are examples and may differ from the actual
Netflix screens. The display and operations may change
as a result of a software update. Use Netflix without
configuring a proxy server. Part or all of Netflix may not
be available when connecting to the Internet via a proxy
server.
29
Advanced Features
Operation instructions
1. Press the [Hi-Smart] button to display network main
menu.
2. Press [◄/►/▲/▼] button to select the Netflix icon and
press [ENTER] to enter it, or press [NETFLIX] button to
enter Netflix website directly.
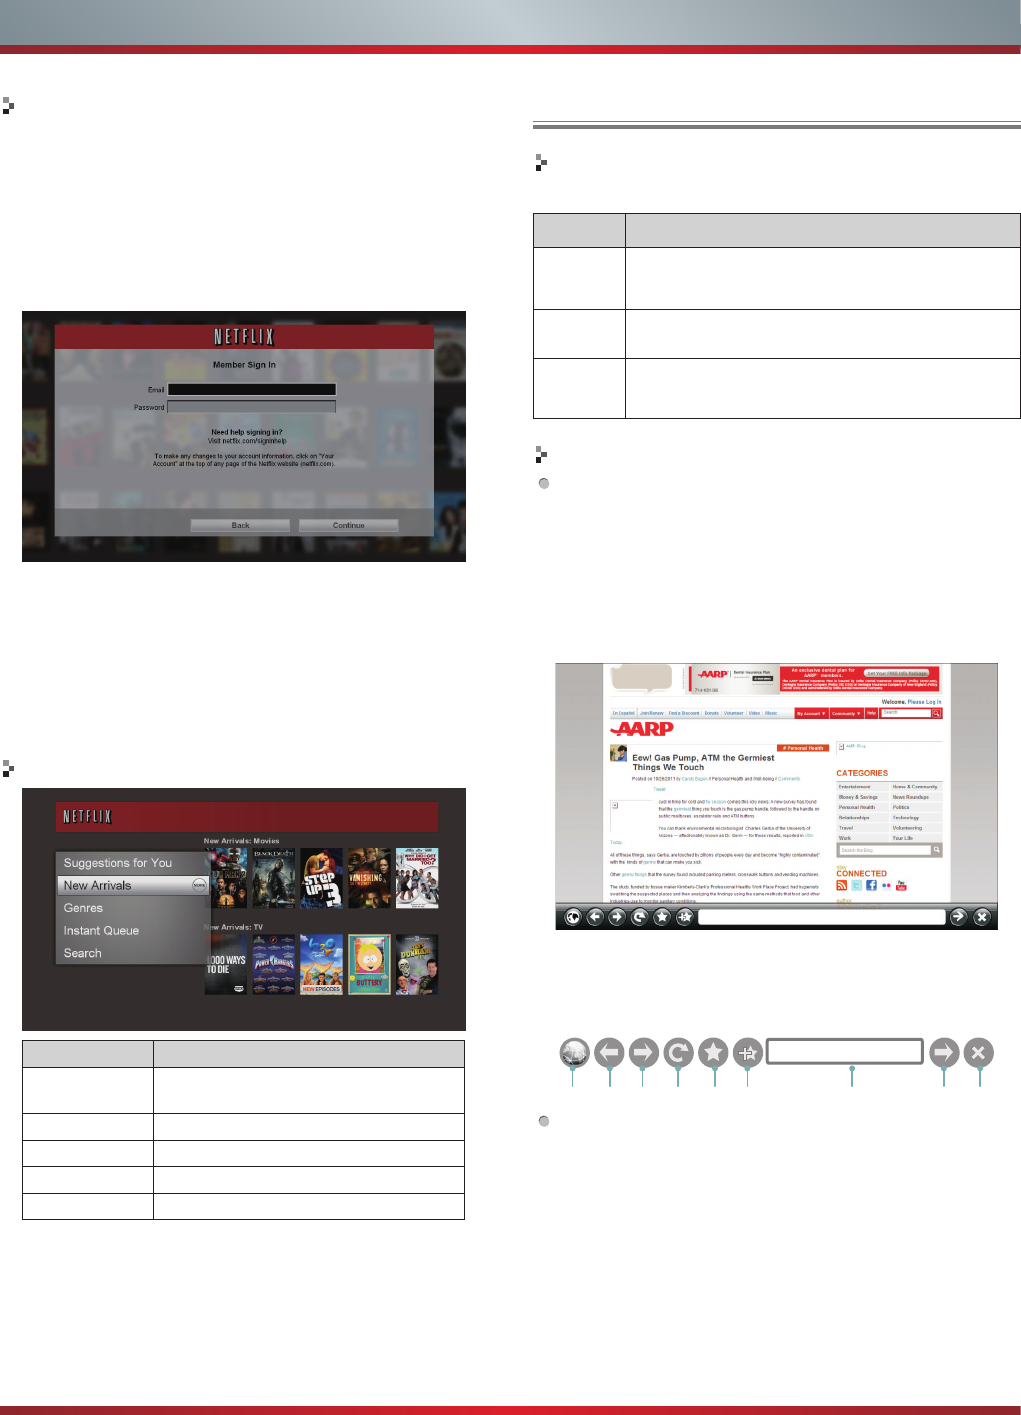
3. Input Email and Password in following window to sign in. (
Refer to “How to Input the Email Address” )
4. Press [▲/▼/◄/►] button to move the cursor to select
service items in the Netflix home page, and [ENTER]
button to confirm.
5. In the process of watching a movie, press operational
buttons to control the movie.
6. Press [RETURN] button to return the upper menu, or
press [EXIT] button to close the menu.
Netflix Movies home page
Title Function
Suggestions for
you
The movies suggested for you by
Netflix
New Arrivals The new arrivals
Genres Browse movies in different genres
Instant Queue Your list of movies
Search Search for available titles
Opera
The function of the buttons on the remote
control
Operation instructions
How to enter the Opera Browser
The Network setup must be correct. Then you can use
the network.
1. Press the [Hi-Smart] button to display network main
menu.
2. Press [◄/►/▲/▼] button to select the opera icon and
press [ENTER] to enter it.
3. Then the default interface will appears on the screen.
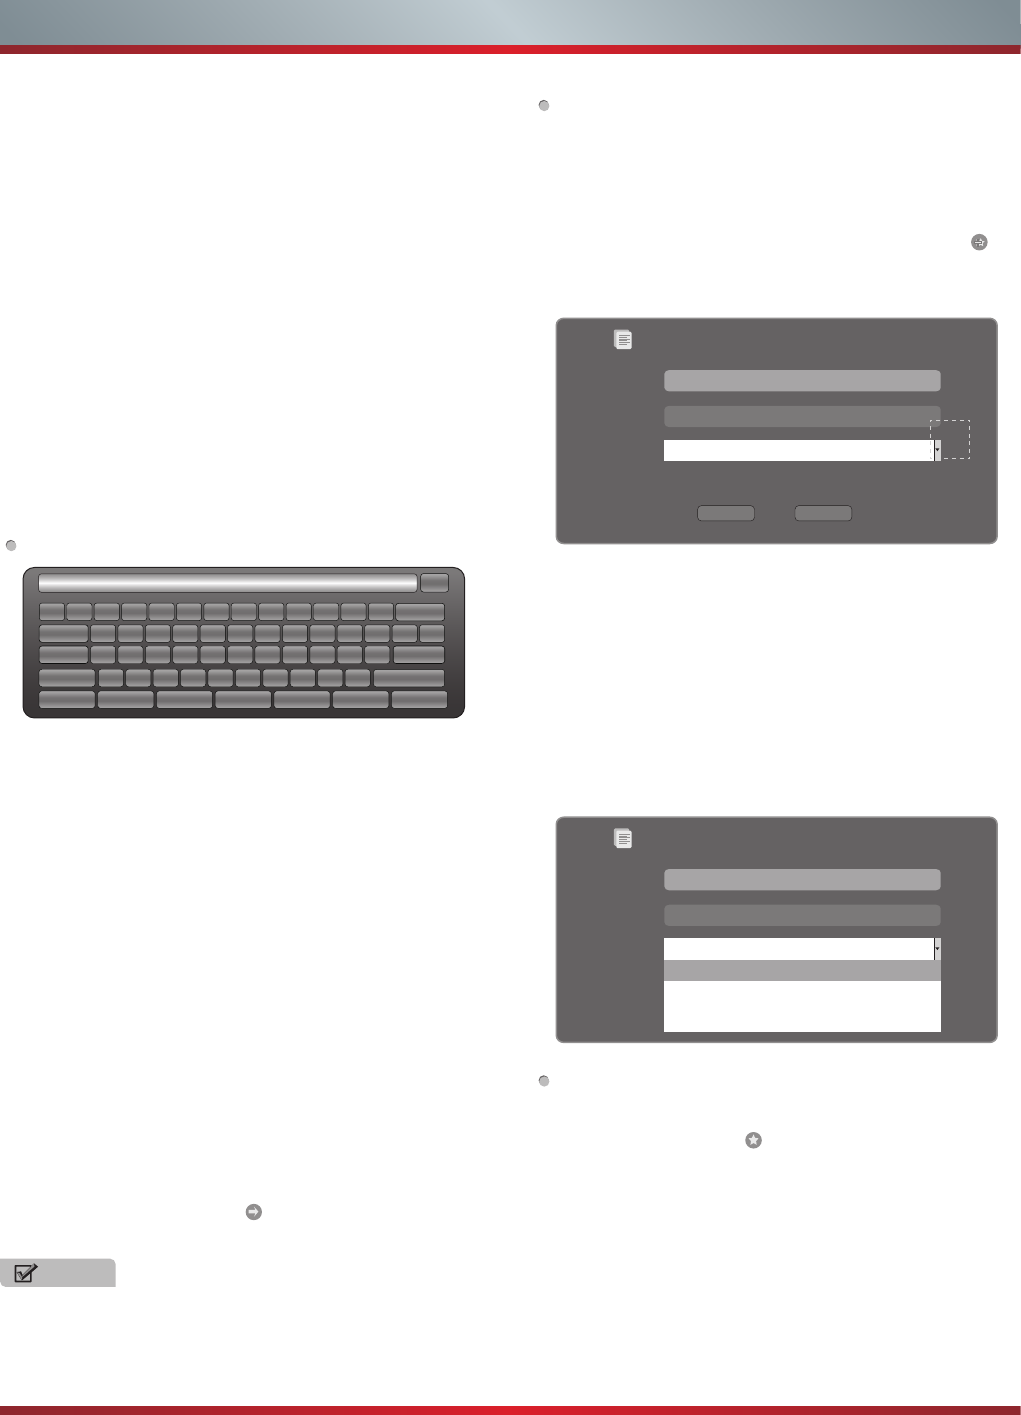
There are some function icons on the bottom of the
screen:
The function of the buttons on the screen:
1. Back to main page.
Move the cursor to the icon and press [ENTER] button to
return to the default interface.
2. Back to previous page.
Move the cursor to the icon and press [ENTER] button to
return to the previous viewed web page.
3. Return a page.
Move the cursor to the icon and press [ENTER] button to
go forward to the previous viewed web pages.
Buttons Description
▲/▼/◄/► Press these buttons to move the cursor on the
screen as the mouse of the computer.
MENU Press the button to display/cancel the keyboard
on the screen.
ENTER Press the button to confirm the selection. Press
the button twice to search the new website.
21 3 4 5 6 7 8
Address bar
30
Advanced Features
4. Refresh page.
Move the cursor to the icon and press [ENTER] button to
refresh the current page.
5. Folder.
Move the cursor to the icon and press [ENTER] button to
enter the favorite folder.
6. Add Folder.
Move the cursor to the icon and press [ENTER] button to
add the website to the favorite folder.
7. Address bar.
Input the website you want to view.
8. Sure to enter the Address of the page
Move the cursor to the icon and press [ENTER] button to
search the website.
9. Exit Opera.
Move the cursor to the icon and press [ENTER] button to
close the page.
How to Input the New Address
1. Press [▲/▼/◄/► ] button to move the cursor to the
address bar and press [ENTER] button to confirm.
2. Press [MENU] to display the keyboard.
There are some shortcuts on the bottom of the keyboard
so that you can input part of the address often used
directly.
Other keys are used as the keyboard of your
3. Press[▲/▼/◄/►] button to move the cursor to the
characters you want to select and then press [ENTER]
button to confirm.
If you want to delete one character, move the cursor to
Back key and press [ENTER] button to confirm. Or if you
want to re-enter all the characters, move the cursor to
Reset key and press [ENTER]button to confirm.
4. Move the cursor to Enter key and press [ENTER] button
to confirm if you have completed the address input.
Then the new address will appear on the address bar.
5. Move the cursor to the address bar and press [ENTER]
button twice to enter the website.
Or move the cursor to the and press [ENTER] button
to search.
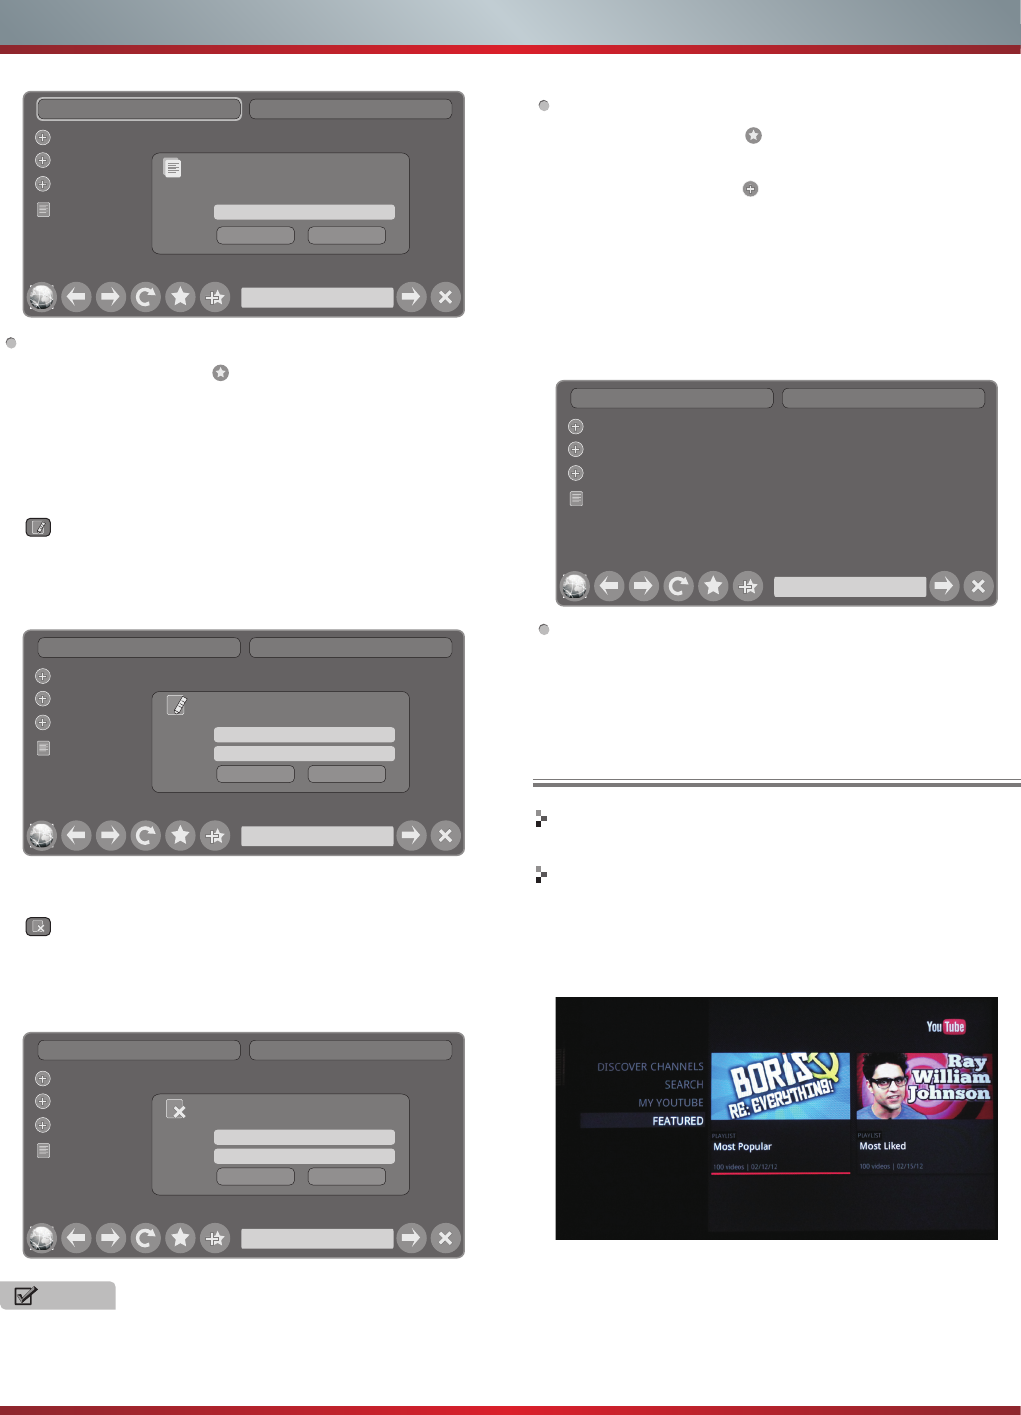
How to Add a Bookmark
If you want to find the often viewed website from the
favorite folder, you can follow the steps to add it to the
folder.
1. Input the address on the address bar and enter it.
2. Press [▲/▼/◄/►] button to move the cursor to the and
press [ENTER] button to confirm.
The menu will pop up on the screen.
3. Press [▲/▼/◄/►] button to move the cursor to the icon
marked with dashed box on the right screen. Then press
[ENTER] button to confirm to display all the folders.
4. Press [▲/▼] button to select the folder you want to add
the bookmark to. And press [ENTER] button to confirm.
5. Move the cursor to the Add button and then press [ENTER]
button to confirm.
If you do not want to add the book mark, move the cursor
to the Cancel button and press [ENTER] button to confirm.
How to Add a Folder
You can add a folder to the favorite as follows:
1. Move the cursor to the icon and press [ENTER] button
to confirm. The menu will pop up on the screen.
2. Move the cursor to Add a folder button and press [ENTER]
button to confirm.
A pop-up menu appears on the screen.
3. Move the cursor to Name bar and press [ENTER] button
to confirm. Follow the steps 2~4 in “How to Input the New
Address” to input the name.
4. Move the cursor to Add button and press [ENTER] button
to confirm and the new folder has been added.
CN
1 2
w
s
x
e
d
c
r
f
v
t
g
b
y
h
n
u
j
m
i
k
,
o
l
.
p
;
/
[
‘
]
Enter
Space
\q
a
z
Tab
Caps L
Shift
http:// www. .com .org .gov .net Reset
3 4 5 6 7 8 9 0 - = Back
、
NOTE
There is only recommend to open the English website.
Add a bookmark
Are you sure to add it?
Name:
URL:
Folder:
Add Cancel
HISENSE
Http://www.hisense.com.au/
Root folder
Add a bookmark
Are you sure to add it?
Name:
URL:
Folder:
HISENSE
Http://www.hisense.com.au/
Root folder
Root folder
Opera Software
GOGI SDK
Opera technology
31
Advanced Features
How to Edit/Delete a Folder/Bookmark
1. Move the cursor to the icon and press [ENTER] button
to confirm. The menu will pop up on the screen.
2. Move the cursor to the folder /bookmark directly and there
will be two icons on the right of it. Move the cursor to one
of the icons and press [ENTER] button to display a pop-
up menu.
: Edit button.
1).Move the cursor to the Name/URL bar and press
[ENTER] button to confirm. Follow the steps 2~4 in
“How to Input the New Address” to edit it.
2).Move the cursor to Edit button , then press [ENTER] to
confirm and the folder/bookmark will be saved.
: Delete button.
Move the cursor to the Delete button and press [ENTER]
button to confirm. Then the folder/bookmark will be
deleted from the favorite folder.
Add a folder Close bookmark manager
Http://www.hisense.com.au/
Opera Software
GOGI SDK
Opera technology
HISENSE Name:
Add Cancel
Add a bookmark
Are you sure to add it?
Add a folder Close bookmark manager
Http://www.hisense.com.au/
Opera Software
GOGI SDK
Opera technology
HISENSE
Name: HISENSE
Edit Cancel
Edit this bookmark
Are you sure to edit it?
URL: http://www.hisense.com.au/help/warranty
Add a folder Close bookmark manager
Http://www.hisense.com.au/
Opera Software
GOGI SDK
Opera technology
HISENSE
Name: HISENSE
Delete Cancel
Delete this bookmark
Are you sure to delete it?
URL: http://www.hisense.com.au/help/warranty
NOTE
There is only Name bar on the pop-up menu for folder.
How to select the Website from the favorite folder
1. Move the cursor to the icon and press [ENTER] button
to confirm. The menu will pop up on the screen.
2. Move the cursor to the icon before the folder name and
press [ENTER] button to confirm.
The websites in the folder will appear in the following
lines.
3. Move the cursor to the website you want to view and
press [ENTER] button to confirm.
If the website is in the root folder, you can select it
directly . And do not need operate as step 2.
How to exit the manager
Move the cursor to the Close bookmark manager icon
and press [ENTER] button to confirm.
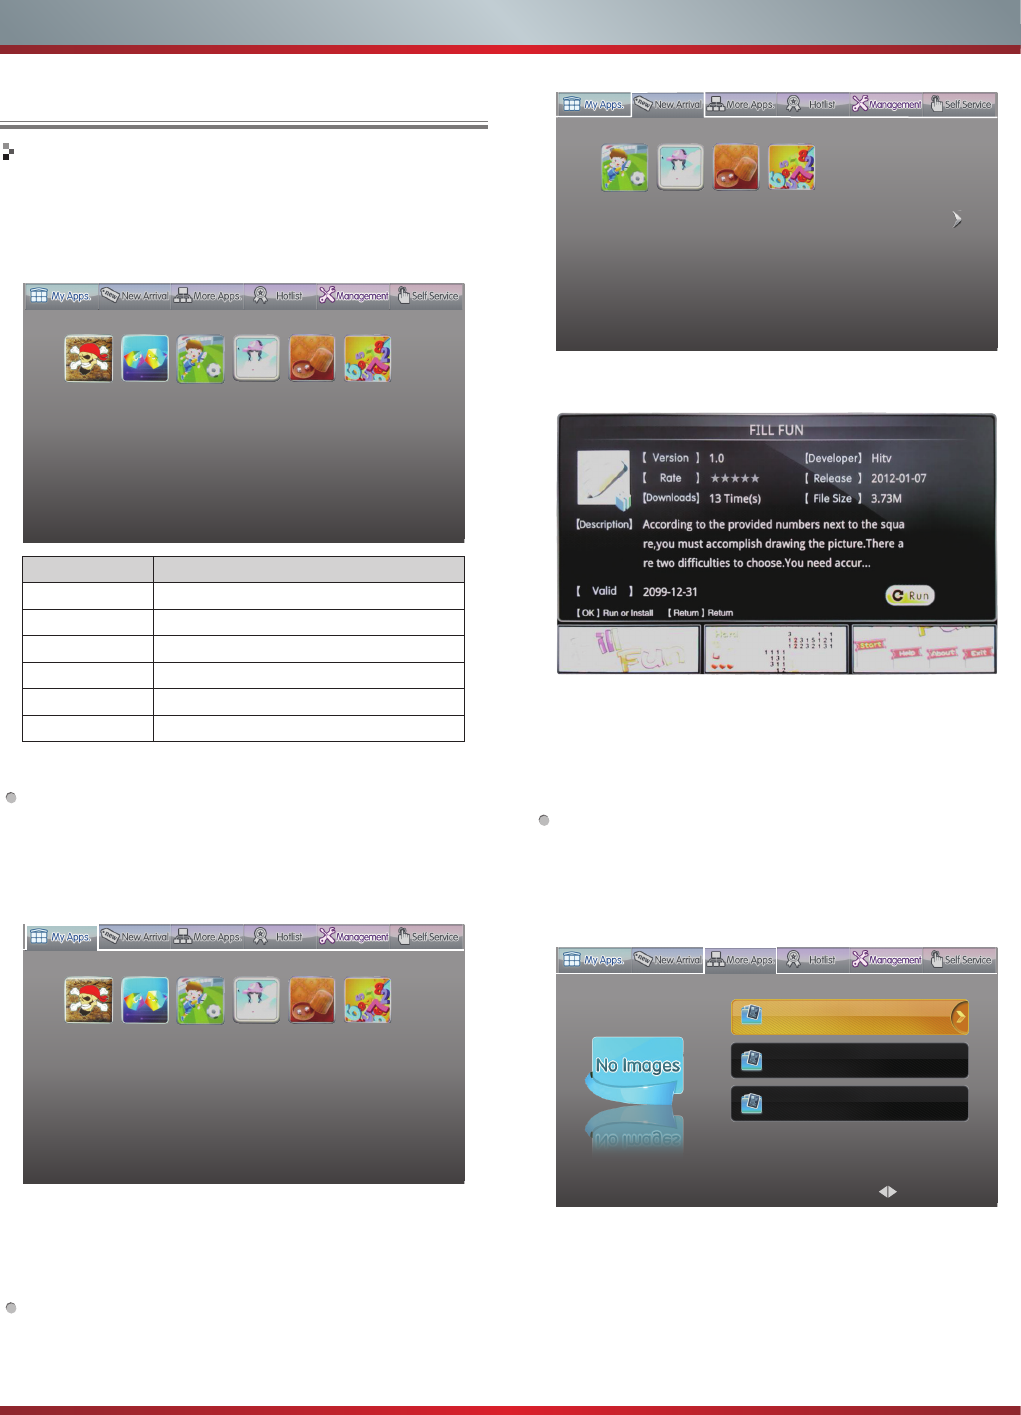
Brief introduction
Watches the video via YouTube.
Operation introduction
1. Press the [Hi-Smart] button to display network main
menu.
2. Press [▲/▼/◄/►] button to select the YouTube icon and
press [ENTER] to enter it.
Add a folder Close bookmark manager
Http://www.hisense.com.au/
Opera Software
GOGI SDK
Opera technology
HISENSE
YouTube
32
Operation introduction
1. Press the [Hi-Smart] button to display network main
menu.
2. Press [▲/▼/◄/►] button to select the Other Apps and
press [ENTER] to enter it.
3. Follow the steps as following.
My Apps:
Display the applications of downloaded and installed on
the local.
1) Press [◄/►] to select the title of My Apps and press [▼/
ENTER] to enter it.
2) Press [▲/▼/◄/►] to select the applications you want to
enter and press [Enter] to confirm.
3) Press [RETURN] to return to the title.
New Arrival:
1) Press [◄/►] to select the title of New Arrival and press [▼/
ENTER] to enter it.
Other Apps
Title Function
My Apps. Your local applications
New Arrival The applications of the latest online
More Apps. Applications classification to download
Hotlist The pop ranking applications
Management Delete the local applications
SelfService View the service information
Advanced Features
2) Press [▲/▼/◄/►] to select the applications you want to
install and press [ENTER] to confirm.
3) Press [ENTER] to install the applications or press
[RETURN] to return to the new arrival home page.
If installed, the application will be shown in My Apps
interface.
4) Press [RETURN] to return to the title.
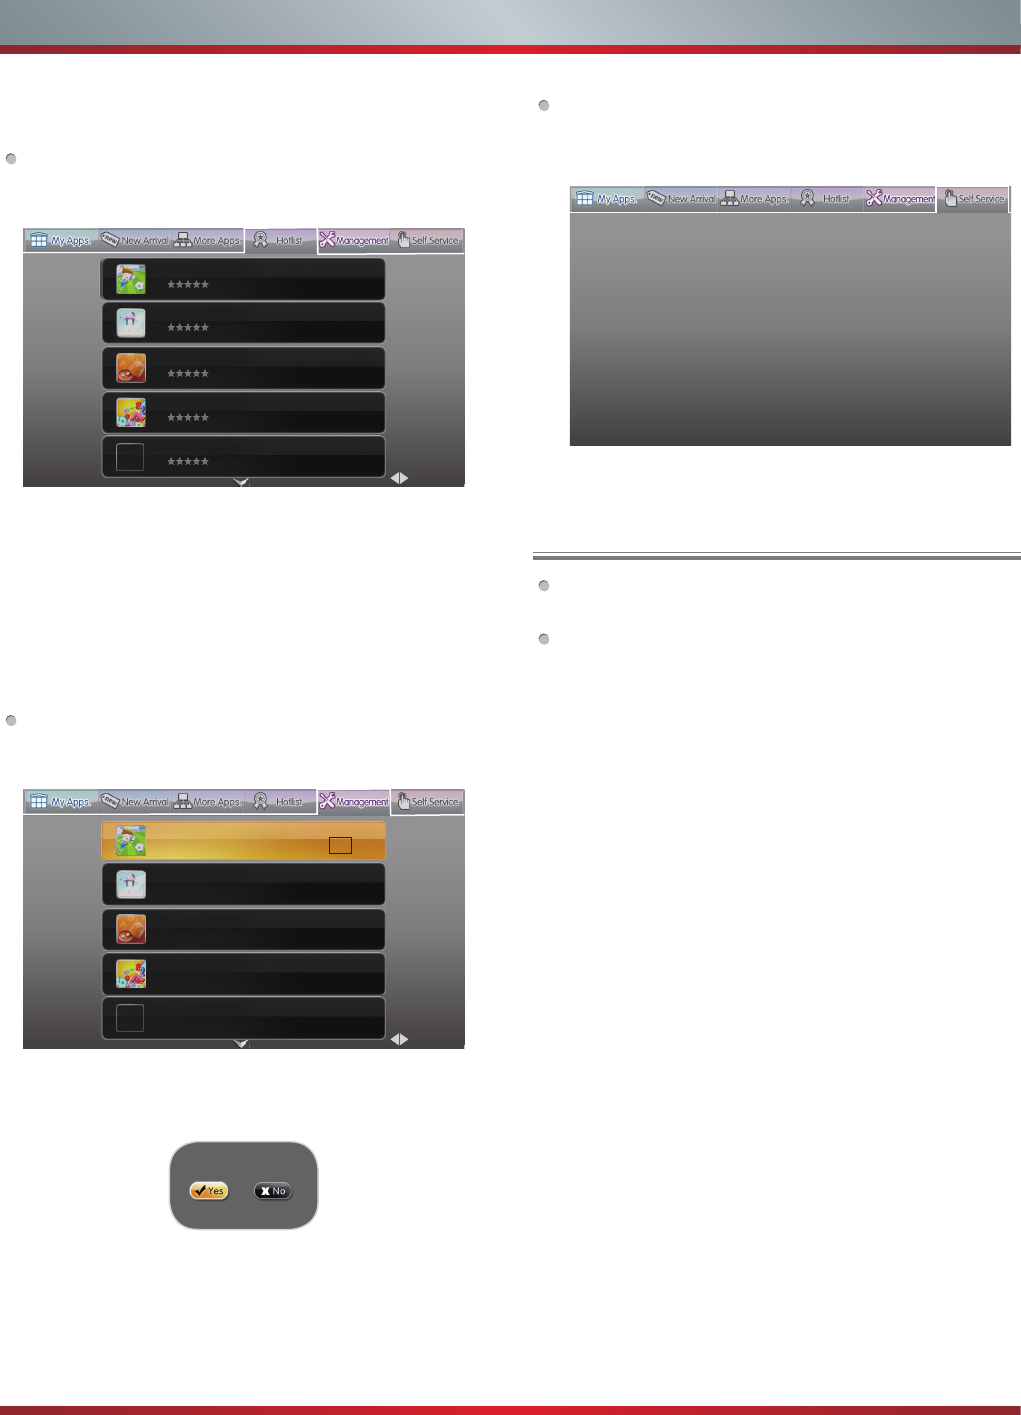
More Apps:
Classify the applications by story, knowledge and funny
game.
1) Press [◄/►] to select the title of More Apps and press [▼/
ENTER] to enter it.
2) Press [▲/▼] to select the classification and press
[ENTER] to confirm.
3) Press [▲/▼/◄/►] to select the applications you want to
install and press [ENTER] to confirm.
4) Press [ENTER] to install the applications or press
[RETURN] to return to the More Apps home page.
STORY
KNOWLEDGE
FUNNY GAME
Page 1/2
Navy Bat... Tetris Penalty dress-up DICE GUESS NU
Navy Bat... Tetris Penalty dress-up DICE GUESS NU
Penalty dress-up DICE GUESS NU
33
Advanced Features
If installed, the applications will be shown in My Apps
interface.
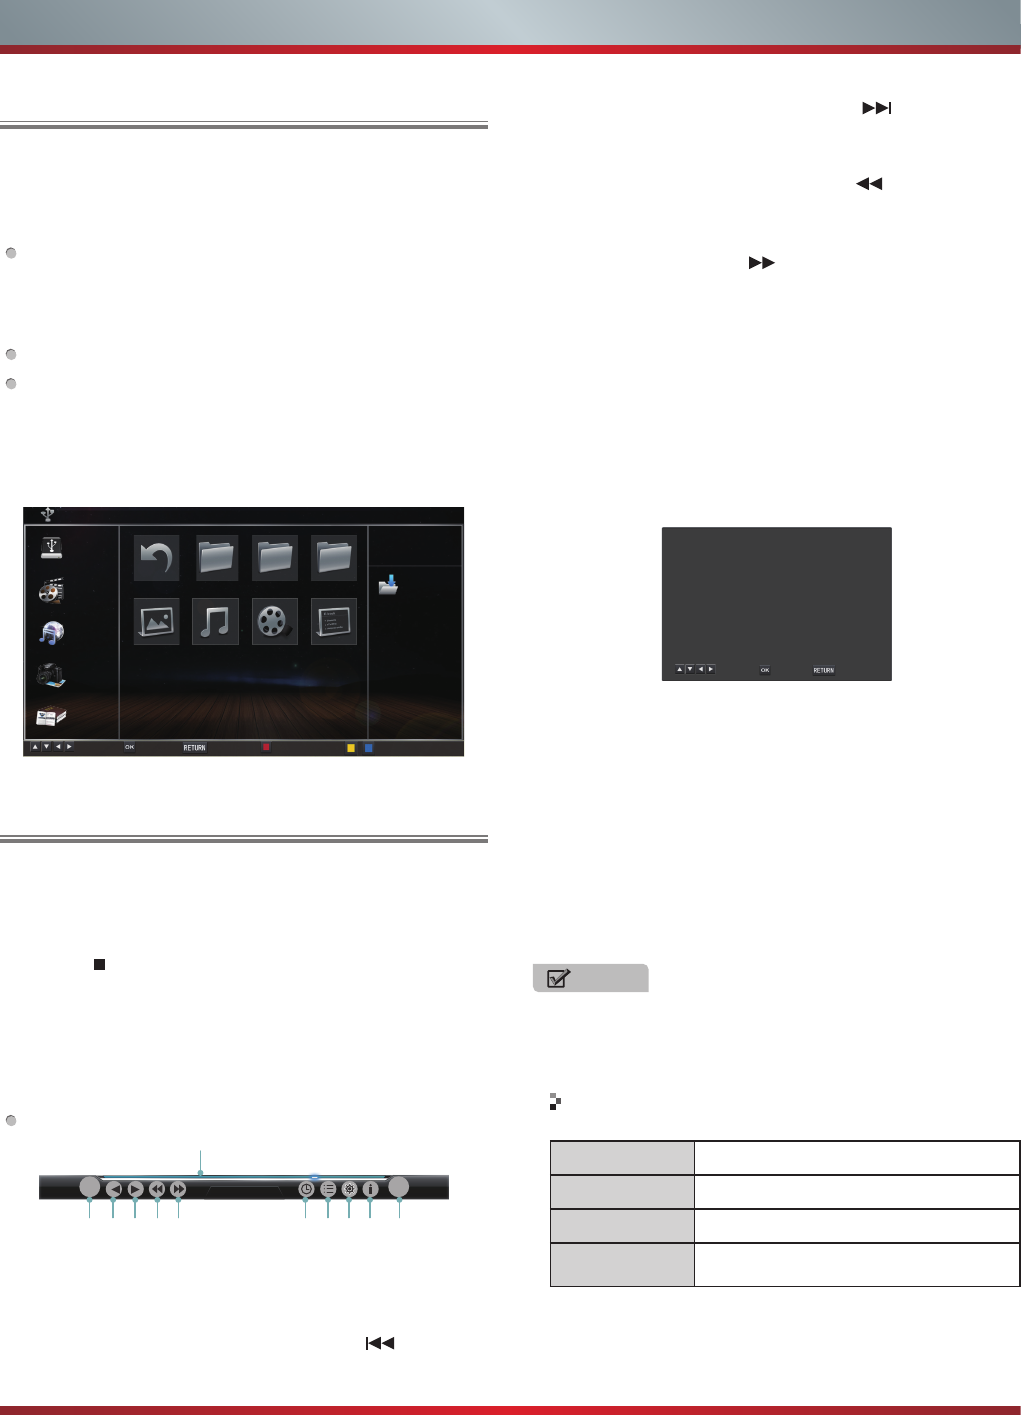
Hotlist:
1) Press [◄/►] to select the title of Hotlist and press [▼/
ENTER] to enter it.
2) Press [◄/►] to page up/down and press [▲/▼] to select
the applications you want to install and press [ENTER] to
confirm.
3) Press [ENTER] to install the applications or press
[RETURN] to return to the Hotlist homepage.
If installed, the applications will be shown in My Apps
interface.
4) Press [RETURN] to return to the title.
Management:
1) Press [◄/►] to select the title of Management and press
[▼/ENTER] to enter it.
2) Press [◄/►] to page up/down and press [▲/▼] to select
the applications you want to delete.
3) Press [ENTER] to display the menu.
4) Press [◄/►] to select Yes/No and press [ENTER] to
delete.
5) Press [RETURN] to return to the title.
Are you sure?
SelfService:
Press [◄/►] to select the title of SelfService and press
[ENTER] to view the service information.
VUDU customer care: To learn more about VUDU, visit
the frequently Asked questions at www.vudu.com/support.
Netix customer service:
US: (866) 716-0414
Canada: (866) 348-2353
Other Information
Our Promise
Thanks for you and your family choose Hisense Smart TV, we will
continue to provide better and more services.
Service Information
If your TV meet quality problem, please kindly let us know, we will
make every effort to serve you.
Appstore Version
1.0.29.0
Device ID
861003009000006000000150FE1FC402
Penalty 1.0
Hitv Issued In 2012-01-07 1
Dress-up 1.0
Hitv Issued In 2012-01-07 2
DICE 1.0
Hitv Issued In 2011-12-13 3
Guess nu 1.0
Hitv Issued In 2012-01-12 4
Penalty 1.0
Hitv Issued In 2011-12-13 5
Page 1/2
Dress-up 1.1
Valid until:2099-12-31 Size:2.73M
DICE 1.0
Valid until:2099-12-31 Size:5.48M
Guess nu 1.0
Valid until:2099-12-31 Size:5.88M
Penalty 1.0
Valid until:2099-12-31 Size:1.66M
Page 1/2
Penalty 1.0
Valid until:2099-12-31 Size:5.48M OK Delete
34
Advanced Features
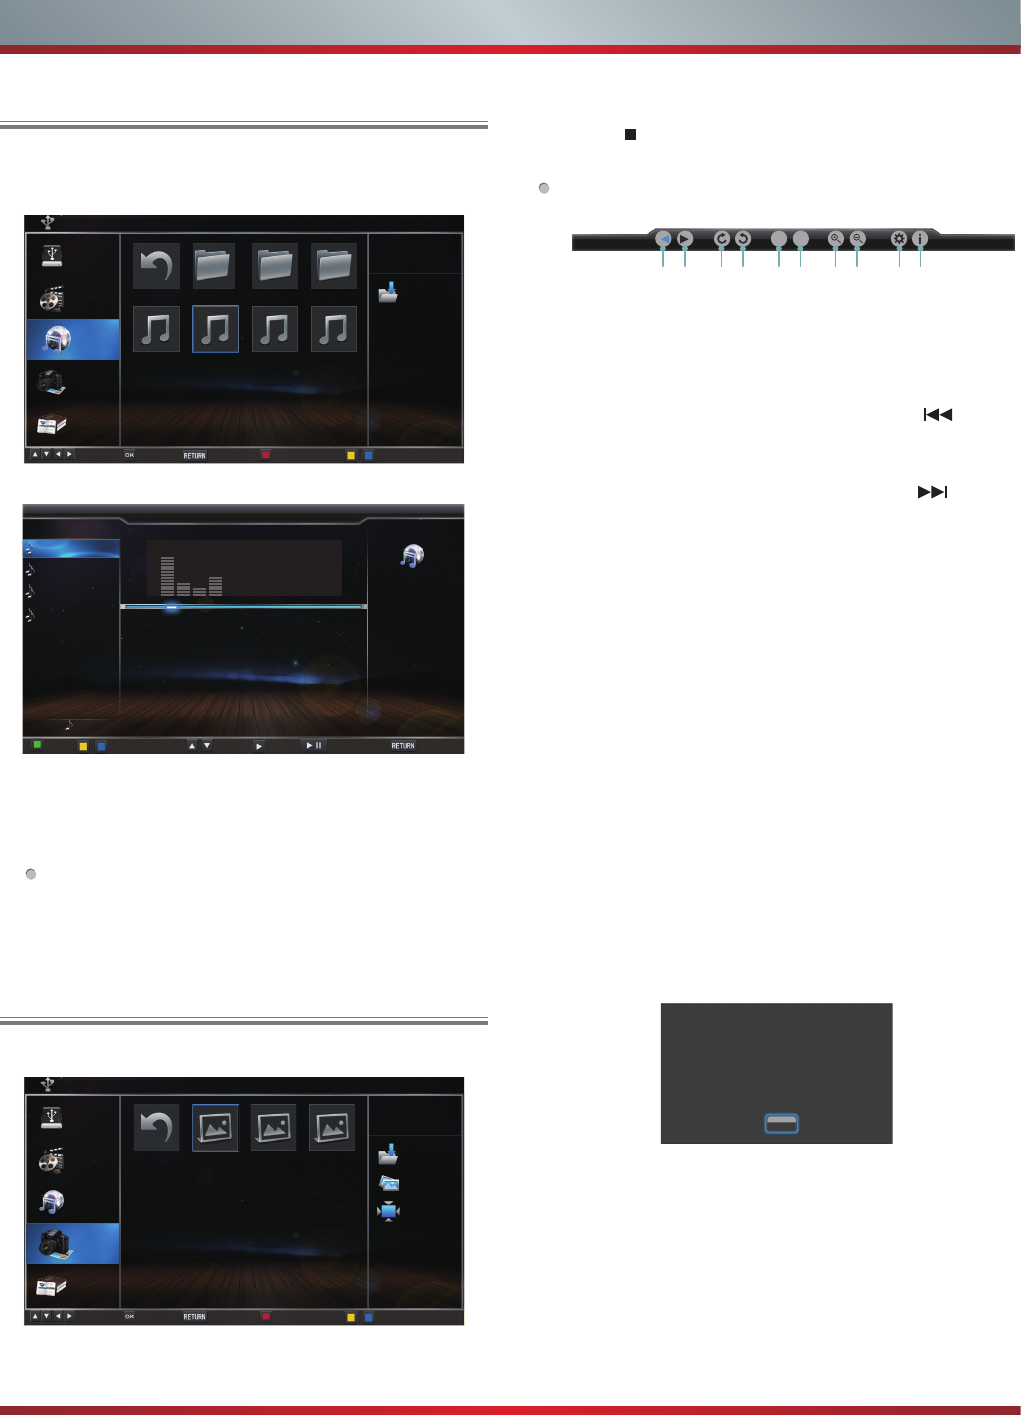
1. Press [RED] button to switch to All or Video.
2. Press [▲/
▲
/
▲
/
▲
] to select the video you want to view.
3. Press [ENTER] to play the video.
4. Press [/RETURN] to exit the video and return to the
previous directory.
5. Press [ENTER] button to display/exit the video control
bar.
6. Press [◄/►] button to select the function icon and then
press [ENTER] to confirm.
Tool bar
1. The progress bar when playing.
2. Play/Pause. You can press [►II] directly to play/pause
when there is no control bar on the screen.
3. Play the previous video. You can press [ ] directly to
achieve the function when no control bar display on the
screen.
Please note that Hisense will not assume any responsibility
for any lost data and cannot guarantee perfect compatibility
with all mass storage devices. Be sure to insert the USB
disk or mobile hard disk with standard USB2.0 port.
Press [INPUT] button to display the INPUT menu, press
[▲/▼] button to highlight the Hi-DMP source, then press
[ENTER] button to confirm. (If you want to exit Hi-DMP,
you can press [INPUT] button to switch to other sources).
Press [RED] button to switch the media type.
Press [YELLOW/BLUE] to turn to the previous/next page.
1. Press [▲/▼/◄/►] button to select the folder/file you want
to open and then press [ENTER] to enter/play the folder/
file.
2. Press [RETURN] to return to the previous directory.
Digital Media Play
Enjoy Video Files
NOTE
You can press [ASPECT] button to change the aspect
ratio (Normal, Full Screen, Original Size) while playing
the video.
DMP C:
Information
m.mp3
Select Enter Return Type Filter Page up/down
Return F1 F2 F3
P.jpg m.mp3 v.dat t.txt
All
Video
Music
Picture
Book
4. Play the next video. You can press [ ] to achieve the
function when no control bar display on the screen.
5. Fast backward. Then press [ENTER] to select the
backward speed. You can press [ ] to achieve the
function.
6. Fast forward. Then press [ENTER] to select the forward
speed. You can press [ ] to achieve the function.
7. Select time to play
1) Press [◄/►] to select the position you want to set.
2) Press [0~9] to set the time and press [▲/▼/◄/►] to
adjust it.
3) Press [ENTER] to confirm and the video will to play at
the time you have set.
8. Play list
1) Press Yellow/Blue button to page and press [▲/▼] to
select the video.
2) Press [ENTER] to confirm. And press [Exit] to exit the
menu.
9. Options
1) Press [▲/▼] to select the options in the menu.
2) Press [◄/►] to select the settings.
3) Press [ENTER] to confirm.
10. Program info
Allows you to view the program information.
11. Stop playback
Option Set
Repeat
Picture Mode
Subtitle Selection
AUDIO
Once
User
NO
I/I
Select Enter Exit
Playable format list
Files Format Playable format
Photo JPG
Music Mp3
Video MPEG1(.dat), MPEG2(.mpg/.ts),
XVID (.avi), H.264(.mov/.ts/.mkv)
1
2 3 4 5 6 7 8 9 10 11
00:00:36/00:20:01
I
II
I
■
35
1. Press [RED] button to switch to All or Music.
2. Press [▲/
▲
/
▲
/
▲
] to select the music you want to view.
3. Press [ENTER] to play the music.
4. All the music is listed on the left. Press [▲/▼] button to
select the music and press [►] button to mark it. You can
press [YELLOW/BLUE] button to turn to the previous /
next page.
Press [GREEN] button to select the Mode: Mark/All/
Single.
5. Press [RETURN] to exit the music playback interface.
1. Press [RED] button to switch to All or Picture.
2. Press [▲/
▲
/
▲
/
▲
] to select the picture you want to view.
Advanced Features
Enjoy Music Files
Browse the Pictures
Current Playing: a3.mp3
a1.mp3
m.mp3
a2.mp3
a3.mp3
01/01
Mode: None
Status: Play
Title: a1
Artist:
Album:
Genre: Other
Year:
Duration:00:04:13
Next:
00:00:24/00:04:13
Mode Select Return
Mark Play/PausePage up/down
DMP C:\ music
Information
music
Select Enter Return Type Filter Page up/down
Return F1 F2 F3
a1.mp3 m.mp3 a2.mp3 a3.mp3
All
Video
Music
Picture
Book
DMP C:\ Picture
Information
Picture
jpg
257:383
Select Enter Return Type Filter Page up/down
Return 1.jpg 2.jpg 3.jpg
All
Video
Music
Picture
Book
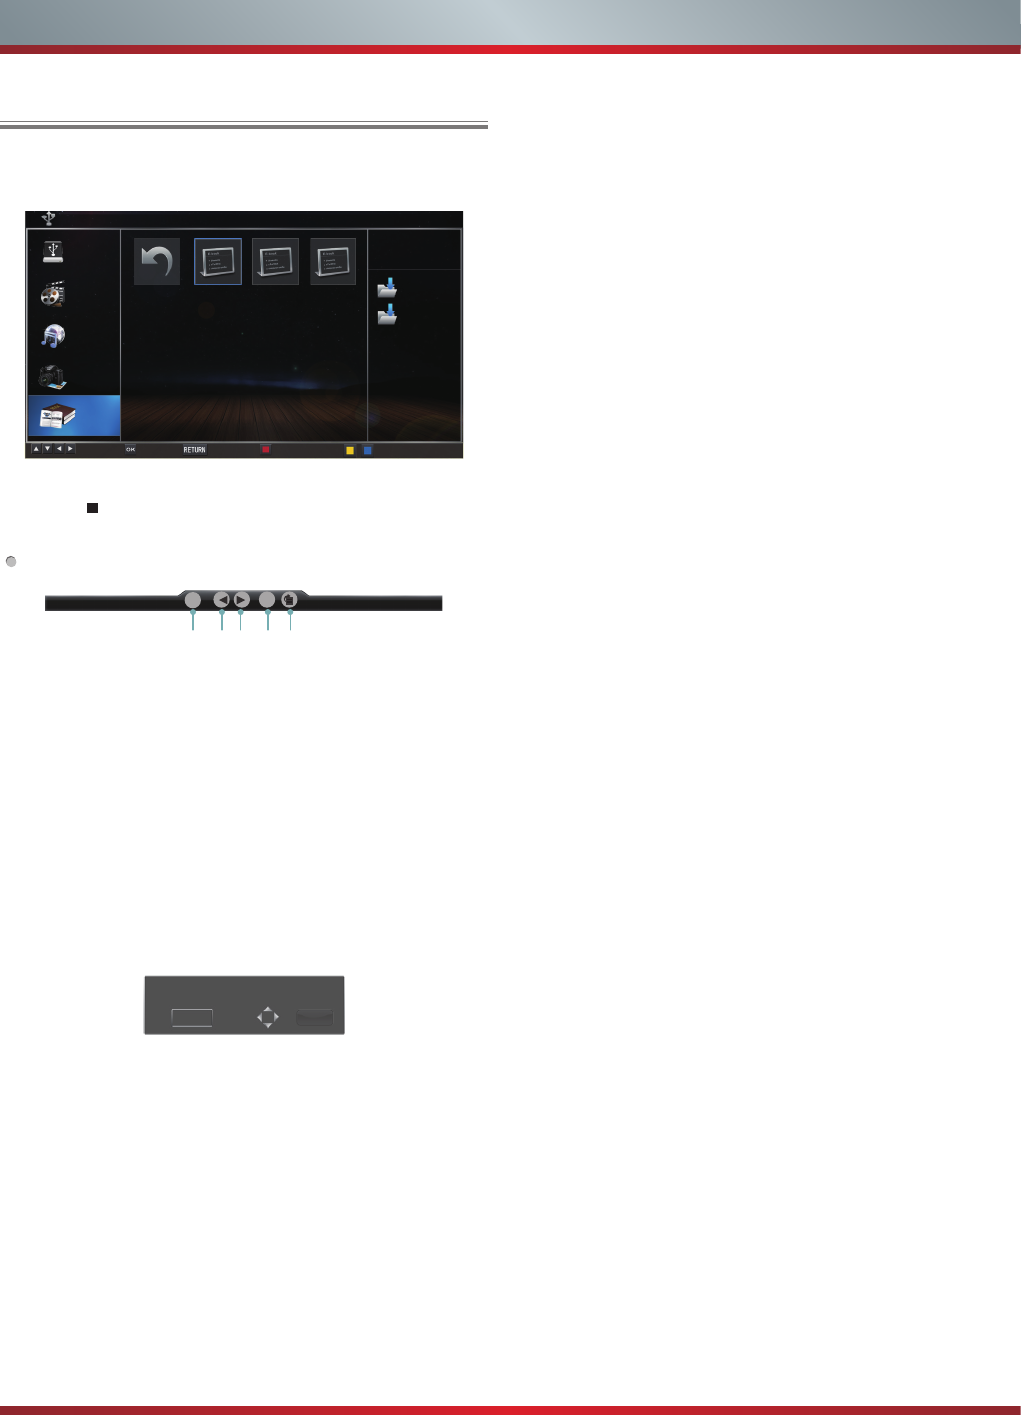
3. Press [ENTER] to browse the picture.
4. Press [ /RETURN] to exit the picture and return to the
previous directory.
Tool bar
When browsing the pictures
Press [ENTER] button to display/exit the picture control
bar, and press [◄/►] button to select the function icon
and then press [ENTER] button to confirm.
1. Browse the previous picture. You can press[ ] button
directly to achieve the function when no control bar
displays on the screen.
2. Browse the next picture. You can press [ ] button
directly to achieve the function when no control bar
displays on the screen.
3. Allows the picture to rotate 90 degrees clockwise.
4. Allows the picture to rotate 90 degrees anti-clockwise.
5. Play/pause. You can press [ENTER] button directly
when no control bar on the screen.
6. Stop browsing the picture. You can press [■] button
directly when no control bar on the screen.
7. Zoom in the picture.
8. Zoom out the picture.
9. Option Set. Press [▲/▼] button to select the options and
press [◄/►] button to set them.
Speed - Allows you to browse the picture at different
speed.
Effect - Allows you to set how the picture appears on
the screen.
Background Music - Allows you to enjoy the music when
browsing the pictures if it is set On.
10. Picture info. Allows you to view the picture information.
Option Set
Speed
Effect
Background Music
Fast
None
Off
Enter
I
I
II ■
1 2 3 4 5 6 7 8 9 10
36
Browse the Text Files
Advanced Features
1. Press [RED] button to switch to All or Book.
2. Press [▲/
▲
/
▲
/
▲
] to select the text you want to view.
3. Press [ENTER] button to confirm.
4. Press [ /RETURN] to exit the text and return to the
previous directory.
Tool bar
When browsing the text les
When no tool bar appears on the screen, you can press
[▲/▼] to move the text lines up/down.
Press [ENTER] to display/exit the tool bar. Press [◄/►]
to select the corresponding icons and then press
[ENTER] to confirm.
1. Stop/resume automatic page
2. View the previous page.
3. View the next page.
4. Stop browsing.
5. Allows you to select page to view.
1). Press [0~9] buttons to input the page or press [▲/▼]
to adjust it.
2). Press [◄/►] to select Enter and press [ENTER] to
confirm.
DMP C:\TXT
Information
TXT
Select Enter Return Type Filter Page up/down
Return 1.txt 2.txt t.txt
All
Video
Music
Picture
Book
Goto Page
0000 Enter
1.txt 1/16 Status:Play
21 3 4 5
I
I
■
II
37
Other Information
Trouble Shooting
When something appears wrong with your TV refer to below chart. If the proposed remedy’s do not work , then unplug
the AC cord from wall, wait at least 60 seconds, plug AC back in and then turn on the TV. If the problem still cannot be
solved, please contact the help line provided on the warranty card or a professional technician.
SYMPTOMS POSSIBLE SOLUTIONS
No sound or picture.
Check if the power cord is plugged into AC outlet and if it has electricity.
Check if you have pressed [POWER] button on the TV or [POWER] button on the remote
control.
Check to see if LED light is either red or blue. If illuminated, power to TV is OK.
I have connected an external source
to my TV and I get no picture and/or
sound.
Check for the correct output connection on the external source and for the correct input
connection on the TV.
Make sure you have made the correct selection for the input mode for the incoming signal.
When I turn on my television, there
is a few second delay before the
picture appears. Is this normal?
Yes, this is normal. That is the TV searching for previous setting information and initializing the
TV.
Picture is normal, but no sound. Check the volume settings.
Check if Mute mode is set “on”.
Sound but no picture or black and
white picture.
If black and white picture first unplug TV from AC outlet and re-plug after 60 seconds.
Check Color Setting if picture is black and white.
Sound and picture distorted or
appear wavy.
An electrical appliance may be affecting TV set. Turn off any appliances, if interference goes
away, move appliance farther away from TV.
Insert the power plug of the TV set into another power outlet.
Sound and picture is blurry or cuts
out momentarily.
If using an external antenna, check the direction, position and connection of the antenna.
Adjust the direction of your antenna or reset or fine tune the channel.
Horizontal/vertical stripe on picture
or picture is shaking. Check if there is interfering source nearby, such as appliance or electric tool.
The plastic cabinet makes a “clicking”
type of sound.
“Click” sound can be caused when the room temperature changes. This change causes the
television cabinet to expand or contract, which makes the sound. This is normal and the TV is OK.
Black square appears in the center
of my television screen?
The Closed Caption function is set in the text mode. To remove it, access Closed Caption from
the menu screen and change the Mode setting from text to either CC1 or off .
On some channels getting another
language or sometimes no sound at
all.
That would indicate that the MTS mode on your unit is set to “SAP” mode. We suggest setting
the MTS mode to either “Stereo” or “Mono”. For further instruction, please see “MTS” in your user
manual.
SAP is Second Audio Program. It’s a second audio channel that is usually used for a second
language or descriptive audio for the visually impaired.
MTS stands for Multichannel Television Sound, a standard that allows the encoding of 3
channels of audio within a standard NTSC (analog) video signal to a television. A television that
is able to receive MTS Stereo allows you to watch television with stereo sound.
Not getting all of my cable channels
on the television or I'm only getting
13 channels.
Check the cable connection for an incoming signal. The best way to confirm signal is to use another
TV and/or contact your cable company.
[CH
V
/ V] don't work when I set the
Channel to Cable? They work with
the Air setting?
After switching to Cable, please auto program the channels. The TV will “remember” all the
channels then the TV will allow you to surf the channels with [CH
V
/ V] buttons.

38
Other Information
SYMPTOMS POSSIBLE SOLUTIONS
Remote control does not work.
Confirm that TV still has power and is operational.
Change the batteries in the remote control.
Check if the batteries are correctly installed.
Confirm the remote control is matched with the TV (see “Match the Remote Control with TV”).
If using a universal remote, be sure to select the TV mode on the remote.
If the remote still does not work:
-remove and reinstall the batteries correctly to reset the remote or install new batteries.
-press TV and then Power to turn on the TV. With a universal remote if you have reset or
changed the batteries you will need to reprogram the remote for the other units.
MATCH: Turn on your TV using the Tap Pad located on the TV (see “Viewing the Control Panel).
Aim your remote control within 6 inches of the lower left corner of your TV. Press the [-] and [LAST]
buttons on the remote control simultaneously for at least 3 seconds. The LED at the top of your
remote will light for one second and blink slowly three times to indicated the remote has paired
with the TV.
Network connection fail.
Check network physical connection, make sure connection is correct.
Enter “Menu”,”Settings”,”Network”,”Configuration” , make sure configuration is correct according
to your network service provider.
Enter “Menu”, “Settings”, “Network”, “Configuration”, “Connection Test” to make sure that
network connection test is successful.
Connect VUDU/Netflix fail.
Check network connection is correct, both physically and configuration.
Enter “Menu”, “Settings”, “Network”, “Configuration”, “Connection Test” to make sure that
network connection test is successful.
For VUDU: Enter “Menu”, “Settings”, “Network”, “Configuration”, “Applications”, “VUDU”,
“Deactivation” to reset VUDU account.
For Netflix: Enter “Menu”, “Settings”, “Network”, “Configuration”, “Applications”, “Netflix”,
“Deactivation” to reset Netflix account.
Log out VUDU/Netflix or change log
in account.
For VUDU:
1. Press [EXIT] button on remote to exit VUDU.
2. Enter “Menu”, “Settings”, “Network”, “Configuration”, “Applications”, “VUDU”, “Deactivation”
to reset VUDU account.
For Netflix:
1. Press [EXIT] button on remote to exit VUDU.
2. Enter “Menu”, “Settings”, “Network”, “Configuration”, “Applications”, “Netflix”, “Deactivation”
to reset Netflix account.
DLNA does not work.
Check network connection is correct, both physically and configuration.
Make sure DLNA server (PC or Mac) has shared media content and TV has permission to
access shared media.
Enter “Menu”, “Settings”, “Network”, “Applications”, turn on “DLNA”.
Select Hi-DMP source to find shared contents. Select “Hi-DMP” source by using [INPUT] button
on remote or press [Hi-Smart] button and then select “Multi-Media” Icon.
How do I get the Hi-Smart Hub to
work on my TV?
You need a broadband (high speed) Internet service with a speed of no less than 1.5 Mbps.
Connect the TV to the Internet through your router by an ethernet cable or wireless connection.
If the connection fails, check with your internet service provider or router manufacturer to
determine if there is a firewall, content filter, or proxy settings that may block the TV from
accessing the Internet.
After connecting the TV to the Internet, press the [Hi-Smart] button on the remote to access the
Hi-Smart Hub.
Caution: Do not try to repair the TV yourself. Refer all servicing to qualified repair personnel.

39
Other Information
General
NOTE
Features, appearance and specifications are subject to change without notice.
Model Name 55T770DW
Dimension
Without Stand
Width: 49.1 inches (1247 mm)
Height: 28.4 inches (722 mm)
Depth: 1.8 inches (45 mm)
With Stand
Width: 49.1 inches (1247 mm)
Height: 31.0 inches (788 mm)
Depth: 12.2 inches (309 mm)
Weight
Without Stand 55.1 lbs (25 kg)
With Stand 59.5 lbs (27 kg)
LCD Panel Minimum size
(diagonal) 55 inches
Screen resolution 1920 × 1080
Audio power 10 W + 10 W
Subwoofer 7W
Power consumption Please refer to the rating label.
Power supply 120 V ~ 60 Hz
Receiving
systems
Analog NTSC
Digital NTSC / ATSC / QAM
Environmental conditions
Temperature: 41°F ~ 95°F (5°C~ 35°C)
Humidity: 20%-80% RH
Atmospheric pressure: 86 kPa - 106 kPa
Component Input 480 I / 60 Hz, 480 P / 60 Hz, 720 P / 60 Hz, 1080 I / 60 Hz, 1080 P / 60 Hz
VGA Input VGA (640×480 / 60 Hz), SVGA (800×600 / 60 Hz), XGA (1024×768 / 60 Hz)
HDMI Input RGB / 60 Hz (640×480, 800×600, 1024×768)
YUV / 60 Hz (480 I, 480 P, 720 P, 1080 I, 1080 P)