Hisense Electric LCDF0006 LCD Monitor User Manual
Hisense Electric Co., Ltd. LCD Monitor
UserManual.wiki
>
Hisense Electric
>
LCDF0006 User Manual
W9HLCDF0006_User Manual
Navigation menu
Upload a User Manual
Namespaces
Wiki Guide
HTML
PDF
Info
Views
User Manual
Discussion / Help
Navigation


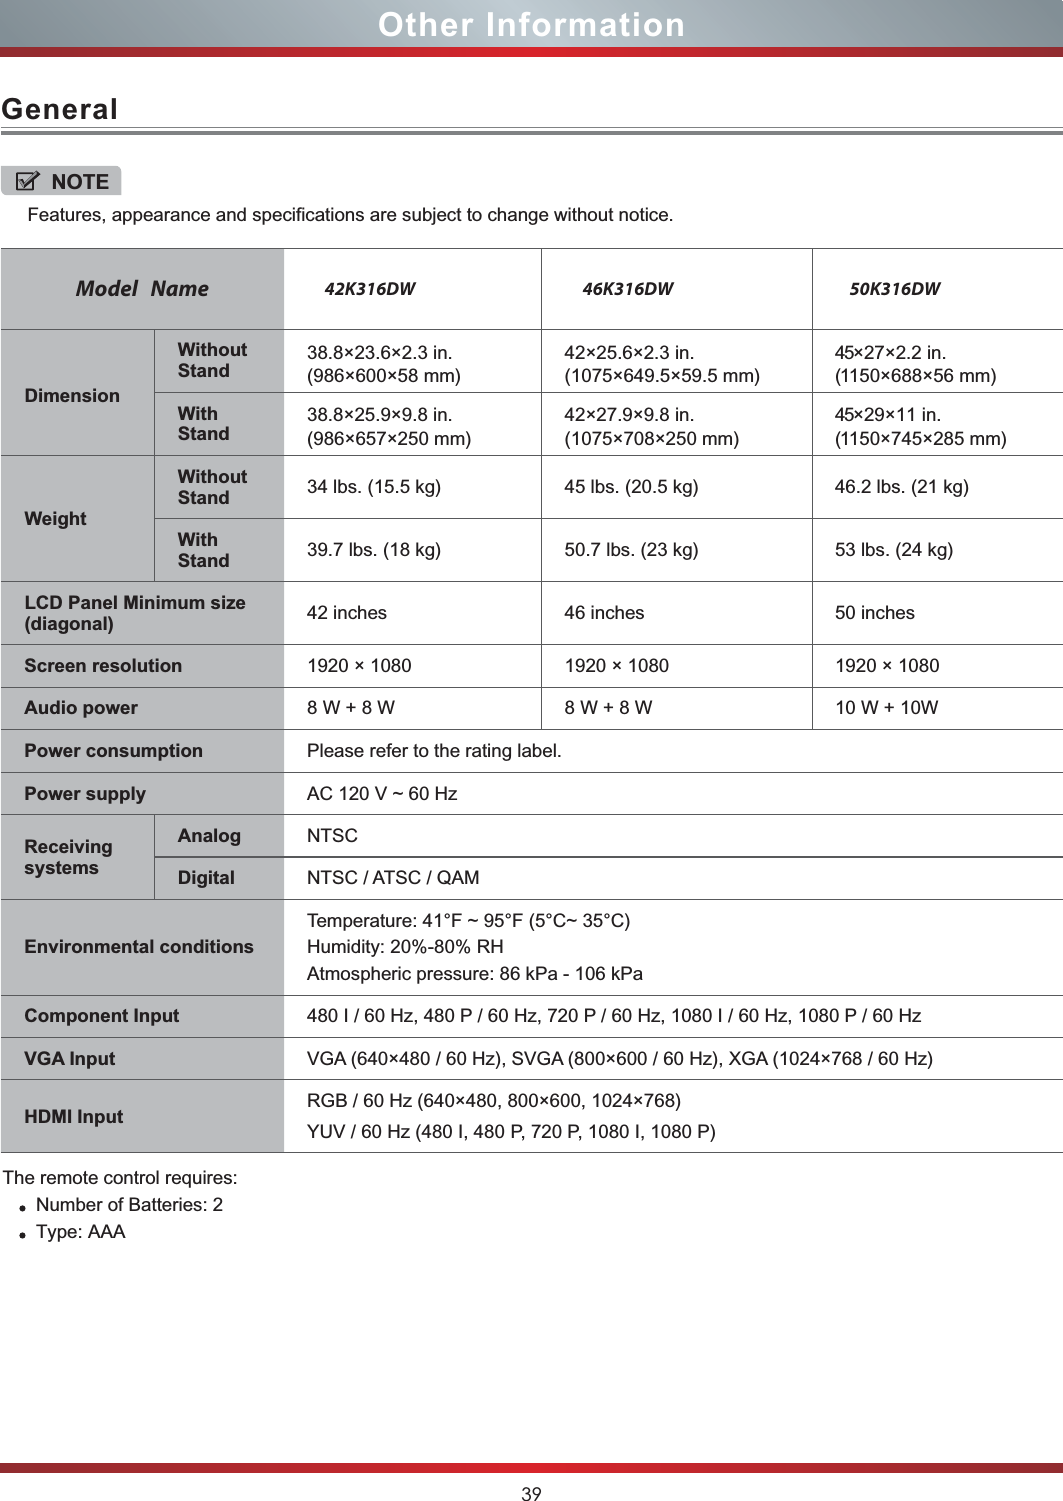
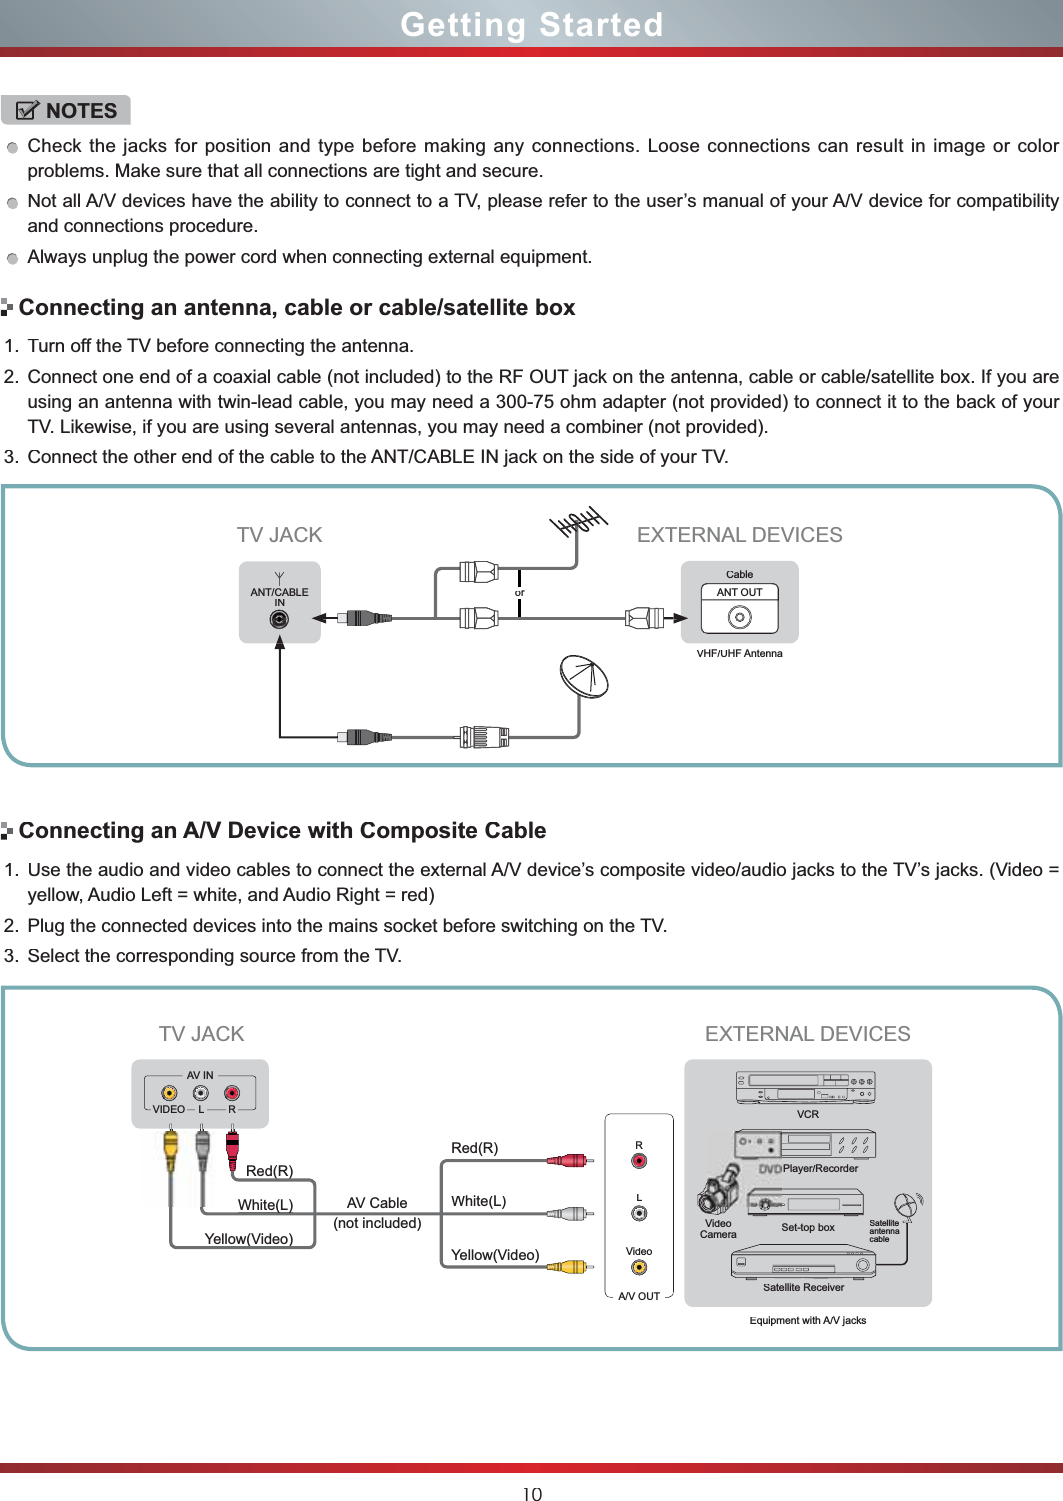
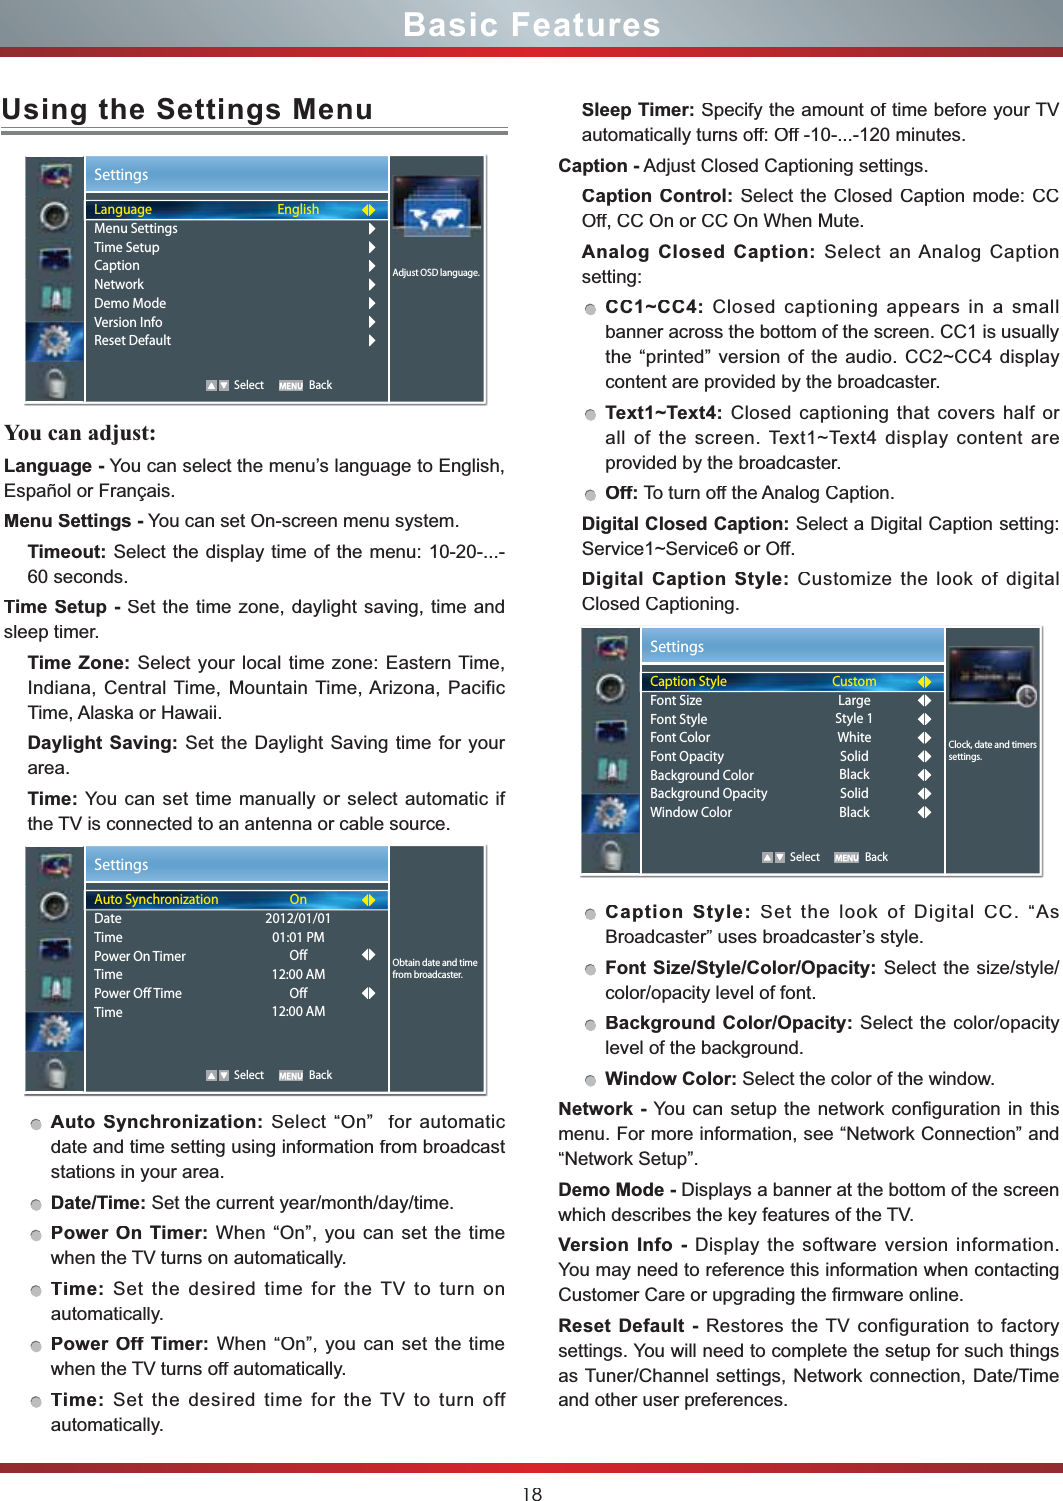
![7Viewing the Remote ControlGetting StartedNOTESFOR ILLUSTRATION ONLY.[RED/GREEN/YELLOW/BLUE] buttons are used for Electronic Program Guide (EPG), Hi-Smart Hub and Digital Media Player(DMP). After pressing the [GUIDE], [Hi-Smart] or [Hi-DMP] button, the same color buttons will appear with explanations in theon-screen display (OSD). Follow the steps shown in the OSD.Power on/offIncrease VolumeSelect sound modeDecrease VolumeReturn to the previous menuSelect picture modeMute buttonMenu buttonDash button(use when entering a digital sub-channel▲/▲/▲/▲Navigate Up/Down/Left/Right or adjust on-screen menu settingsDisplays the information bannerOpen the DTV program guideConfirm selections(if available)3D buttonDisplay the favorite channel listZoom ButtonSet the sleep timerEnter the VUDU HD MovieClose the menuNext channel Previous channel Select input sourceAdjust Closed Caption (CCD) modeAudio select buttonDirect channel selectionSpecial function buttonsMedia content control function buttonsGo to the previous channel Enter the NETFLIX instant streamingOpen the Hi-Smart HubEN-33921AMMTTSS//SSAAPPDDIISSPPLLAAYYSSOOUUNNDDMMUUTTEECCCCDDEEXXIITTCCOOMMPPOONNEENNTTHHDDMMIIRREETTUURRNNGGUUIIDDEEMMEENNUUHHii--DDMMPPVVGGAA-IINNPPUUTTPPIICCTTUURREE33DDLLAASSTTFFAAVV®Hii--SmmaarrttAASSPPEECCTTSSLLEEEEPPEENNTTEERRHi-DMP (digital multimedia player) buttonSelect COMPONENT input sourceSelect HDMI input sourceSelect VGA input source](https://usermanual.wiki/Hisense-Electric/LCDF0006/User-Guide-1719349-Page-14.png)
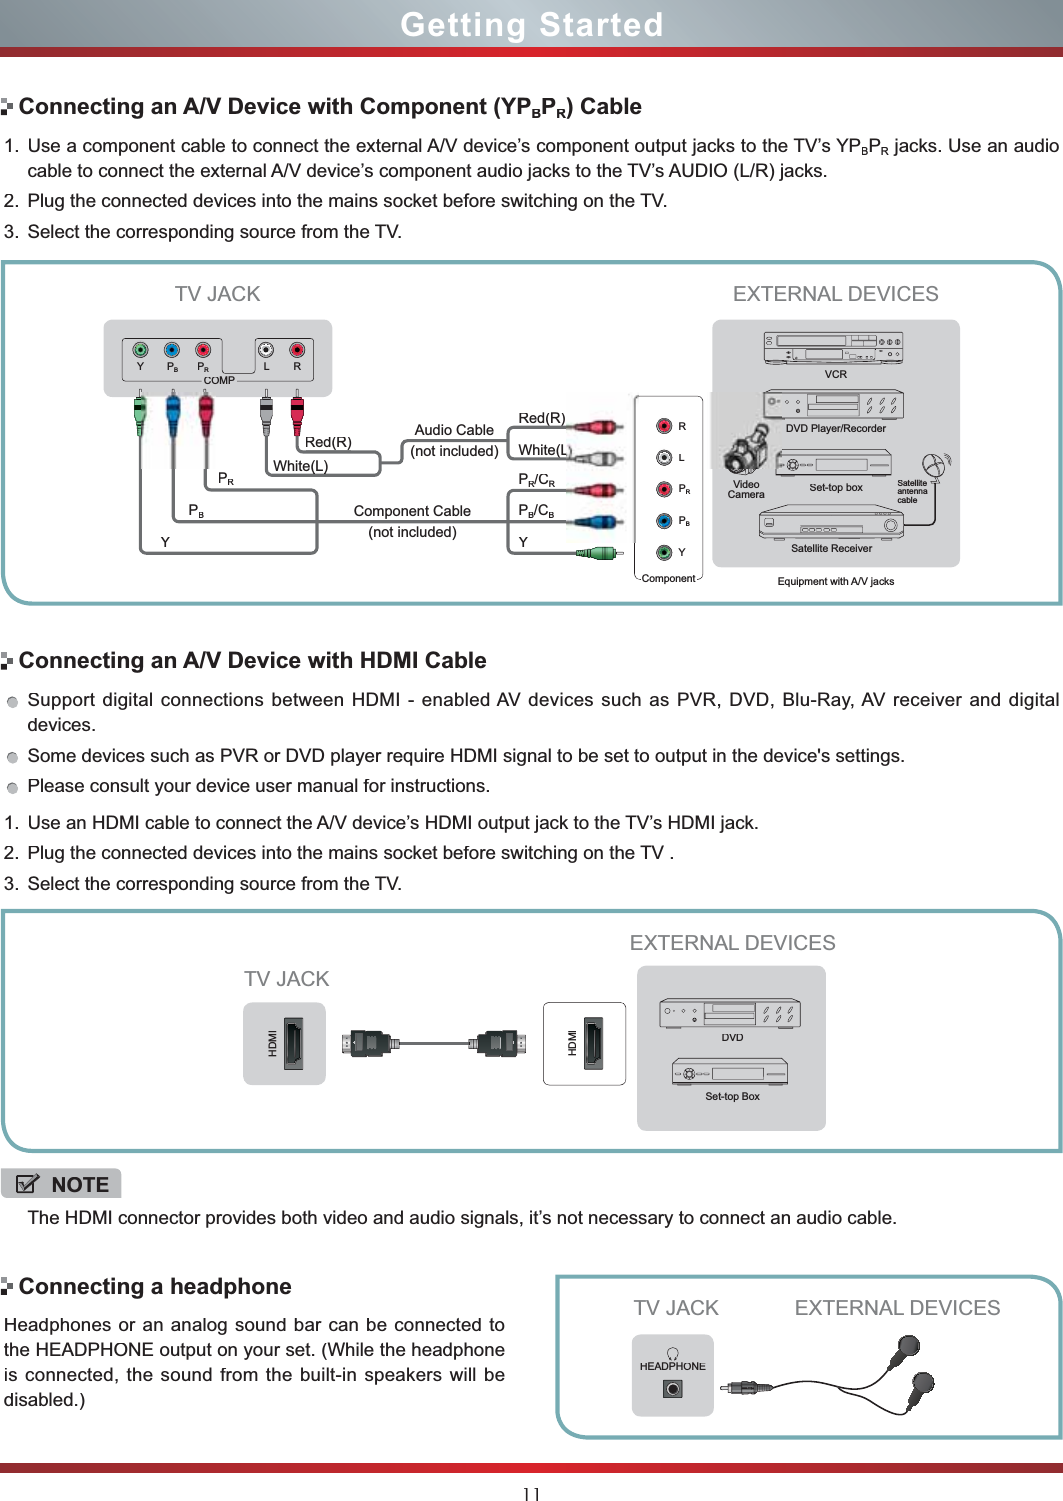
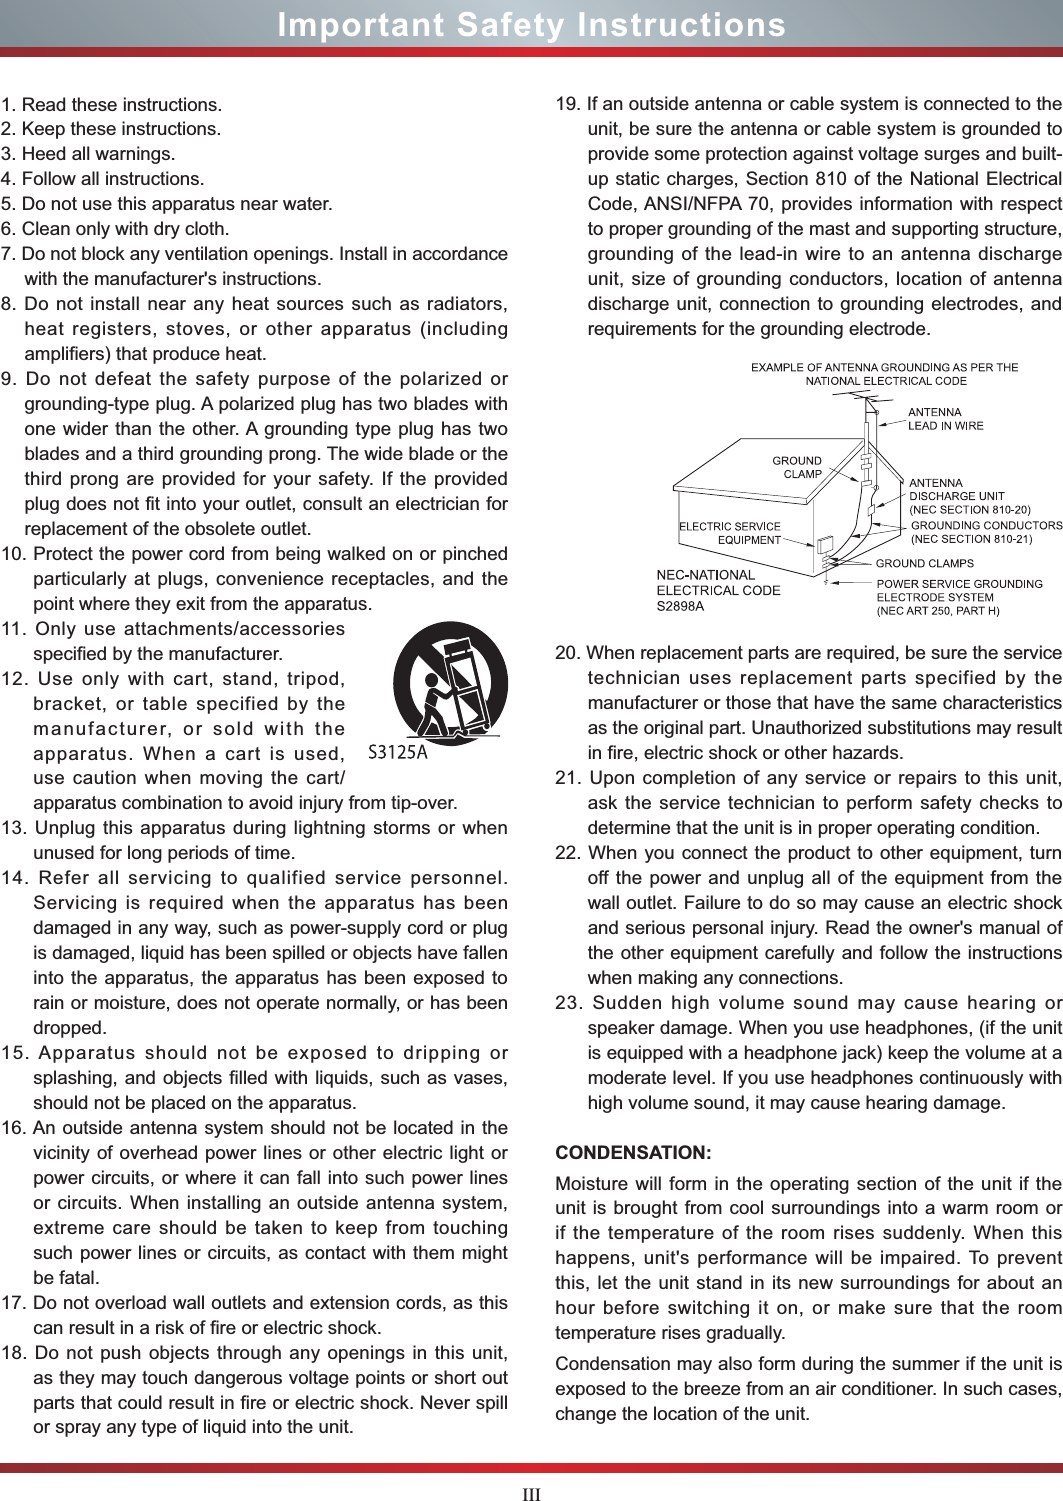
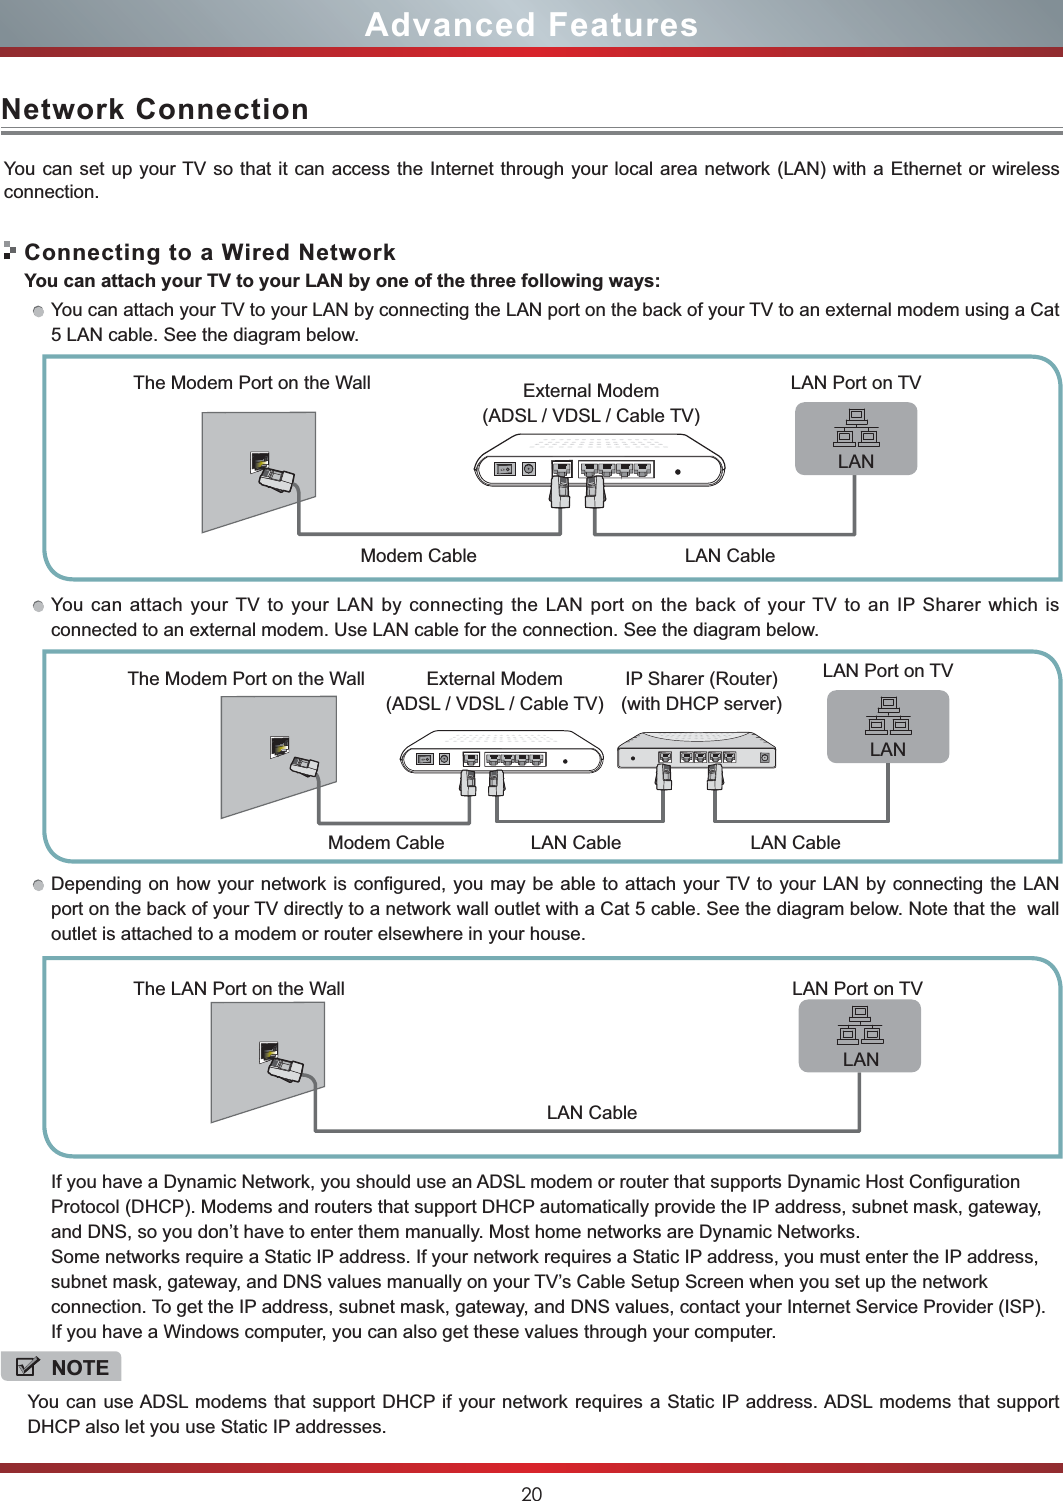
![13Basic Features1.Make sure that you have: Installed the remote control batteries.Connected an antenna or cable.Connected the power cord.Matched the remote control withTV.2.Press[POWER]buttontoturnonyourTV.TheSetupWizard menu displays.3.Press[▲/▲/▲/▲] toselectyourmenulanguage:English,Spanish or French, press [ENTER] button to confirm.4.Press[▲/▲]toselectyourPictureMode:HomeModeorRetail Mode, press [ENTER] button to confirm.IfyouselectRetailMode,amessageappears“Areyousureyouwantretailmode?”Select“YeYYs”tocontinue,orselect “No” to change your selection.IMPORTANTTT:Atfirst,youhavetomatchtheremotecontrol with TV.VVTo turn yourTTTV on or off (standby mode):ff1.Plug the power cord into anAC power outlet.2.Press[POWER]button,YourYYTV turns on.3.Press[POWER]buttonagaintoturnoffffyourTV.Whenyou turn off yourffTV, it goes into standby mode.TheSetupWizardmenuappearsthefirsttimeyouturnontheTV.Itwillassistyoutospecifyffthemenulanguage,Picture Mode,Tuner Mode and Channel Installation.IMPORTANTTT:MakesurethattheantennaorcableisconnectedandawiredorwirelessInternetconnectionisavailable.Turning the TV On for the First TimeTurningthe TV on or offIfyouselectedRetailMode,EnergySavingisnotrealized.5.Press[▲/▲]toselectyourTunerMode:AntennaorCable, press [ENTER] button to confirm.6.Press[▲/▲]tosettheChannelInstallation:ScanorSkipScan, press [ENTER] button to confirm. Ifyouselect“Scan”,yourTVautomaticallystartsChannelInstallation available in your viewing area.Ifyouselect“SkipScan”,yourTVdoesnotscanforchannels.Dependingonthereceptioncondition,itmaytakeupto25minutesormoretocompletememorizingchannels.Please allow the process to complete without interruption.WARNINGWWWhenyourTVisinstandbymode,itisstillreceivingpower.ToTTcompletelydisconnectpower,unplugthepowercord.NOTEIfyourTVdoesnotreceiveaninputsignalforseveralminutes, it automatically goes into standby mode.EXITChoose your menu LanguageEnglishEspañolFrançaisSelect Next ExitBack Select Next ExitEXITChoose your Picture ModeHome modeRetail modeHome mode default settings are recommended for in-home use.ENERGY STAR® qualied.Retail mode is intended for in-store display and resets videosettings at Power On.EXITPlease connect cable or antennaChannel InstallationStatus: Scanning...ATV Program Installed: 3DTV Program Installed: 2Cancel8%ThefirsttimeyouturnonyourTV,youmustselecttheTVsignalsource.YouYYrTVstoresthisinformation,soyoudonotneedtochangetheTVsignalsourceunlessitchanges.Forexample,youchangefromanoutsideantennatocableTV.To select the video input source:TT1.TurnonyourTV,thenpress[INPUT]buttonontheremoteorontheTV.TheInput Source menu opens.2.Press[▲/▲]buttontohighlighttheinputsource,thenpress[ENTER]button.3.Press[POWER]buttonagaintoturnoffffyourTV.Whenyou turn off yourffTV, it goes into standby mode.Selecting theInputSourceINPUTTVAVComponentVGAHDMI 1HDMI 2HDMI 3HDMI 4Hi-DMPEXITOKSelectEnterExit](https://usermanual.wiki/Hisense-Electric/LCDF0006/User-Guide-1719349-Page-20.png)
![14Basic FeaturesAspect - Select the screen aspect ratio from Normal, Wide,Zoom and Cinema.Normal: The original 4:3 aspectratio (1.33:1 signal) is preserved,so black bars are added to the leftand right of the image. Standard TVbroadcasts are displayed with a 4:3aspect ratio.Wide: When watching a standardbroadcast or full-frame movie inthis mode, the display image isstretched proportionately to fillthe TV screen. When watching awidescreen (1.78:1 signal) programor movie, the display image fills theTV screen.Zoom: Stretch the 4:3 aspect ratioimage vertically and horizontally tofill the screen at 1:1.78 aspect ratio.Cinema: Stretch the 4:3 aspect ratioimage vertically and horizontally tofill the screen at 1:2.35 aspect ratio. Shortcuts InstructionsDISPLAY - Display the information banner. The informationincluding channel number, channel name, current systemtime, tuner mode, audio stream, video format, audiolanguage, closed caption mode, parental locks rated,program details, etc.GUIDE - Open the DTV program guide. The program guideinformation is provided by the broadcasting company.FAV - Display your Favorite List. You can add or deletechannels to create your favorite list. Cursor up/down: Press [▲/▲] button to select theoption.Add/Erase: Press [YELLOW] button to add or delete thechannel from Favorite List.Page up/down: Press [RED/GREEN] button to page upor down. VUDU - VUDUTM is an on-demand, pay-per-view, servicethat offers high-definition movies via the Web. You canaccess the VUDU service by pressing this button. Hi-Smart - Press to open the Hi-Smart Hub. The Hi-SmartHub provides convenient access to Services and Appswhich let you watch movies, TV shows, listen to music, andmuch more.NETFLIX - Press to open the Netflix interface. Netflix is anonline DVD and Blu-ray Disc rental service, offering instantaccess to movies and TV shows to Netflix members. Netflixunlimited membership required (subscription not included).1. Press the [CHV/V] (or [CH +/-]) on the TV/remote controlto change the channel.2. Press the [VOLV/V] (or [VOL +/-]) on the TV/remotecontrol to adjust the volume.3. Press the numeric buttons on the remote control todisplay the corresponding channels.Changing Channels / VolumeNOTEChanging the channels can also be achieved by directlyentering the channel number using the numeric keys onthe remote control. If you are entering a two or three digitchannel number, the time between key presses should be less than 3 seconds.](https://usermanual.wiki/Hisense-Electric/LCDF0006/User-Guide-1719349-Page-21.png)
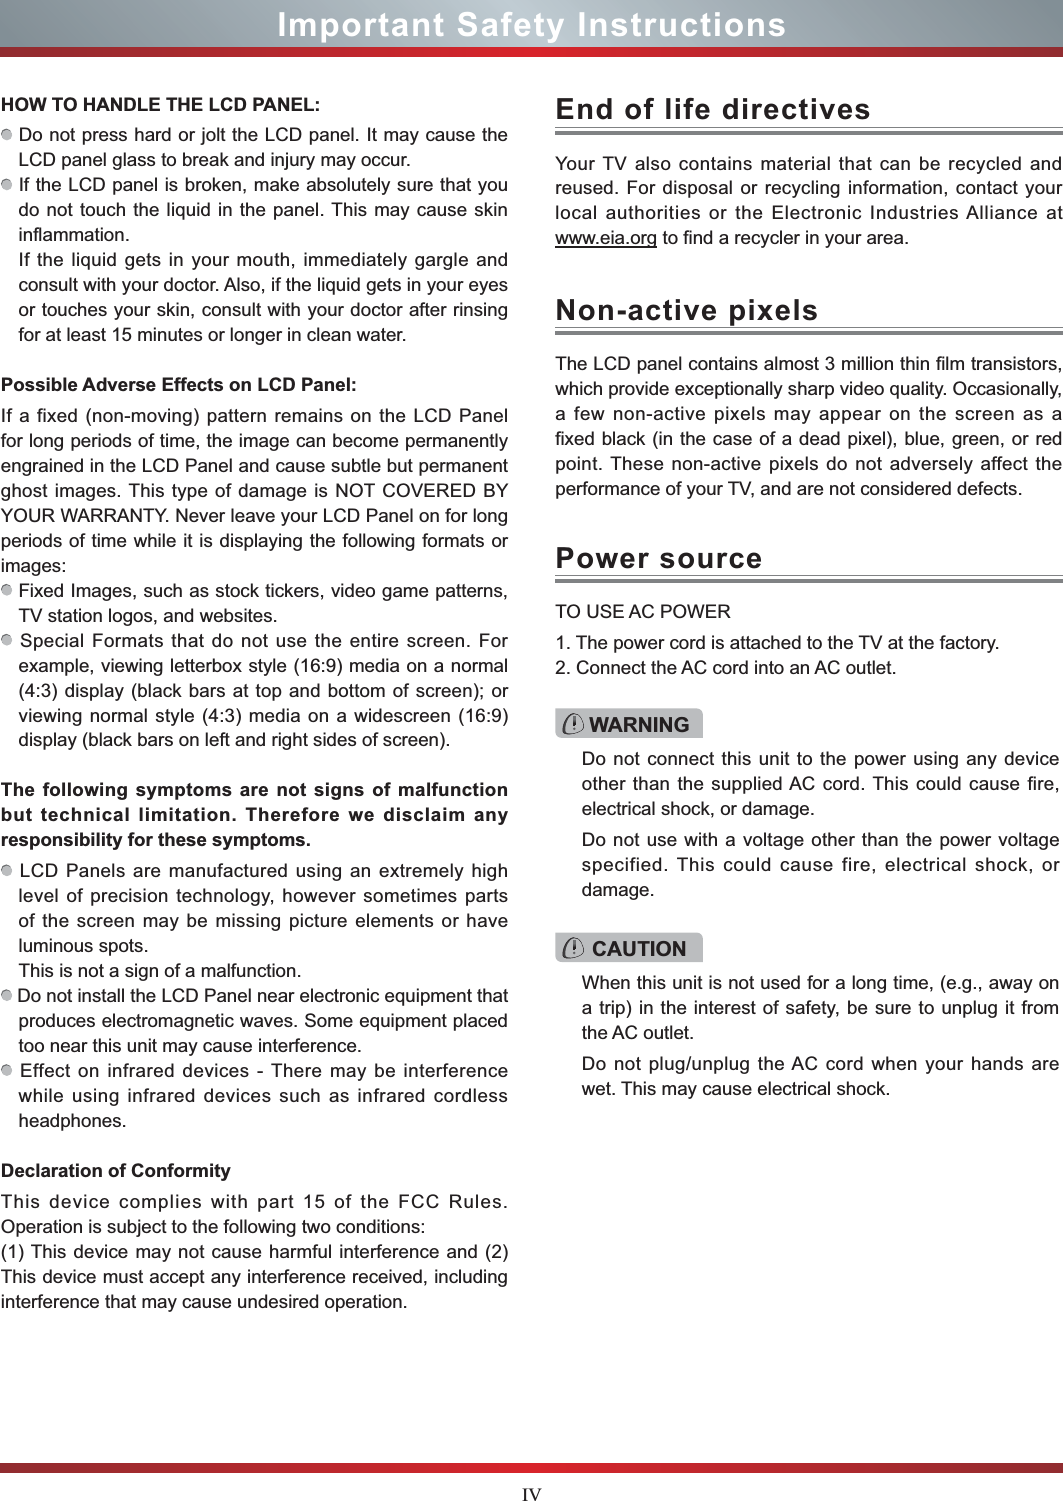
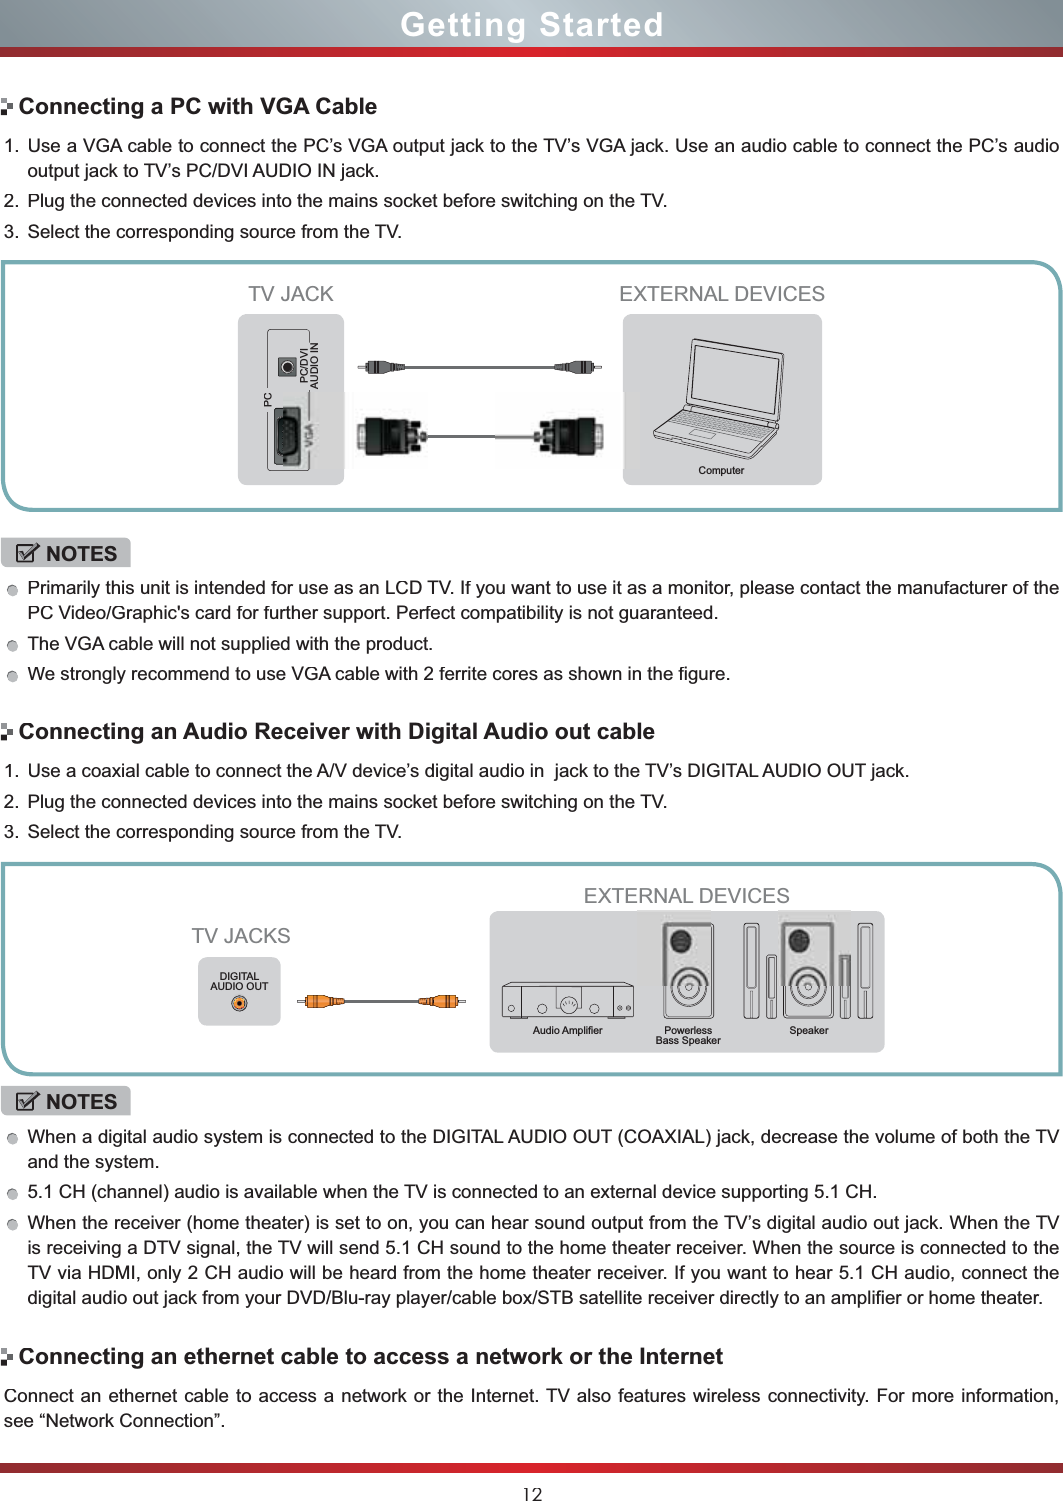
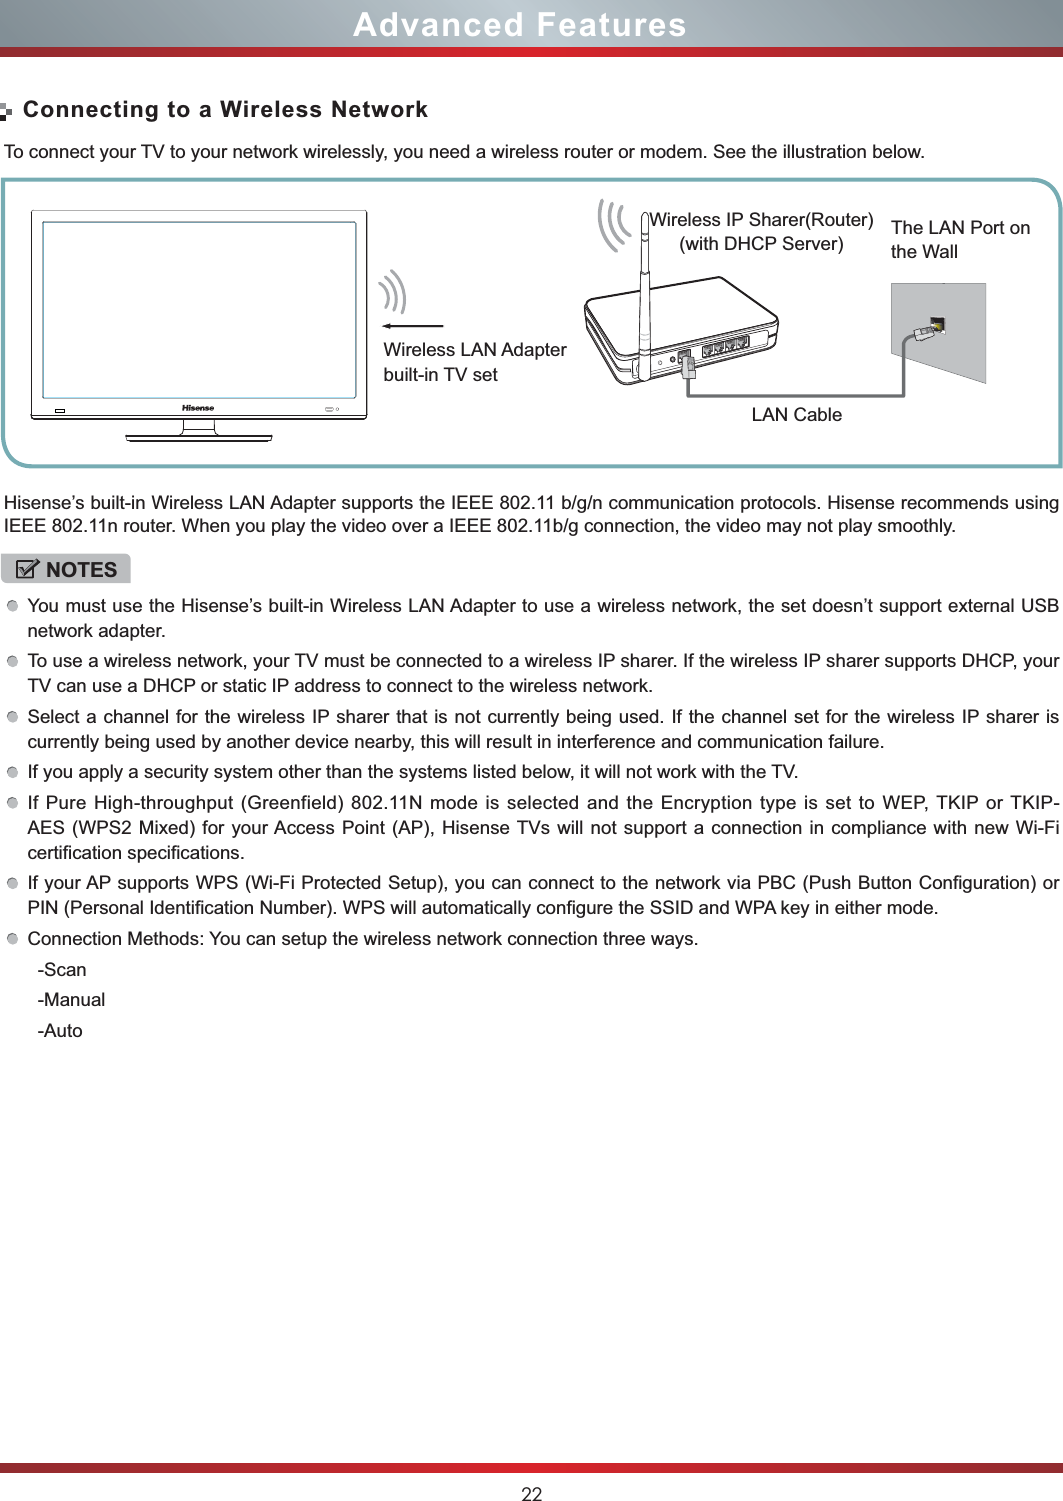
![15Basic FeaturesTo Use the Menu1Press the [Menu] button to open the main menu.2Press [▲/▲] to select a menu option, then press[▲/ENTER] to enter the menu.3In each menu, you can:Press [▲/▲] to select an item,Press [▲/▲] to adjust the value, orPress [▲/ENTER] to enter the submenu,Press [RETURN] to exit the submenu.4Press [EXIT] button to exit the menu.NOTEFOR ILLUSTRATION ONLY.Using the Picture MenuYou can adjust:Picture Mode - Adjust the Picture Mode. You can select Standard, Theater, Energy Saving, Game, Custom or Vivid.Brightness - Increase or decrease the brightness of the picture. Increasing the brightness can add more light to dark areas of the picture, while decreasing the brightness can add more darkness to light areas of the picture.Contrast - Increase or decrease the contrast of the picture. Increase the contrast to adjust the white areas of the picture or decrease the contrast to adjust the black areas of the picture.Color - Adjust the level of color in the picture.Tint - Adjust flesh tones so they appear natural.Sharpness - You can increase the sharpness level for clearer images or decrease the sharpness level for smoother images.Advanced Video - Access advanced video settings such as Color Temperature,Noise Reduction and Adaptive Contrast .Color Temperature: Change the color temperature. You can select a preset color temperature: Cool, Standard and Warm.Noise Reduction: Optimize the picture quality by filtering signal interference. You can select Off, Low, Medium or High.Adaptive Contrast: Automatically adjusts the contrast level of the selected input source.Picture Select BackAutomatically adjust picture detail andColor TemperatureNoise ReductionAdaptive ContrastWarmMediumOnNOTEWhen 3D video is watched under the fluorescent lamp (50~60 Hz) or tri-band fluorescent tube, there may be slight flicker, so please adjust the illumination downward or switch off the light.Certain functions, such as change aspect ratio,arenott ratio,areavailable when watching 3D movies and TV shows.Other brands 3D glasses may not be supported.Sit upright facing the TV when watching 3D movies and TV shows.This TV supports automatic identification of common 3D formats when connected to HDMI V1.4 compatible sources. Other 3D sources require manual setup. Enter Select ExitPictureAdjust image to suit personal preferences.Picture ModeBrightnessContrastColorTintSharpnessAdvanced Video3D505050010StandardStandardOKbrightness.](https://usermanual.wiki/Hisense-Electric/LCDF0006/User-Guide-1719349-Page-22.png)
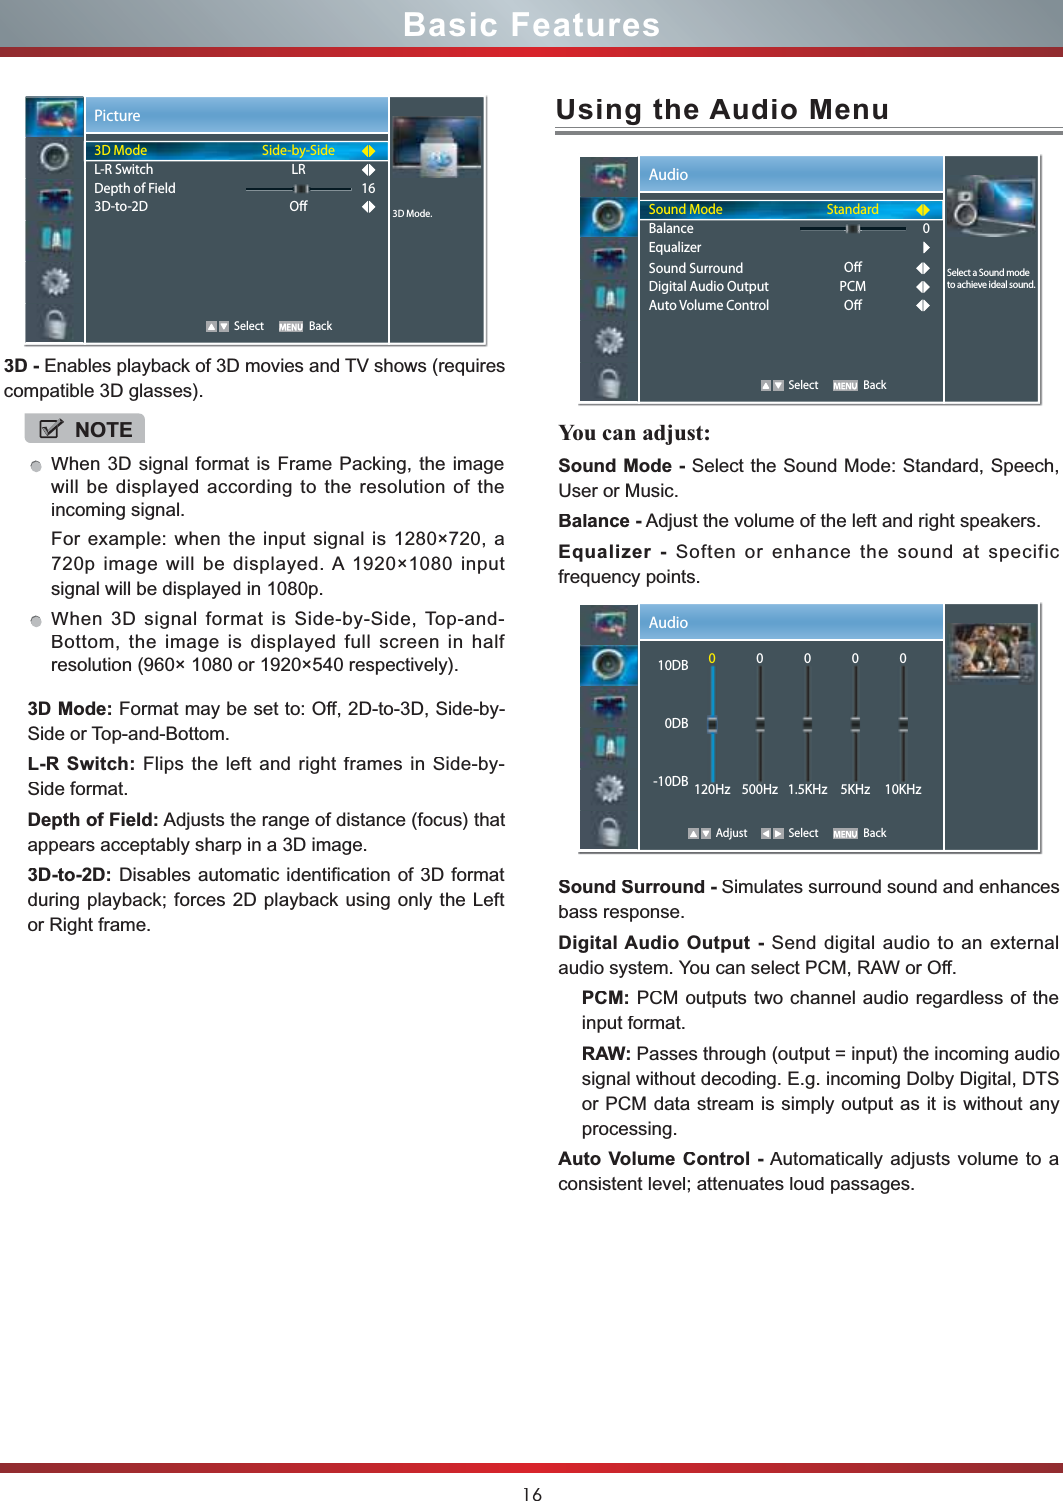
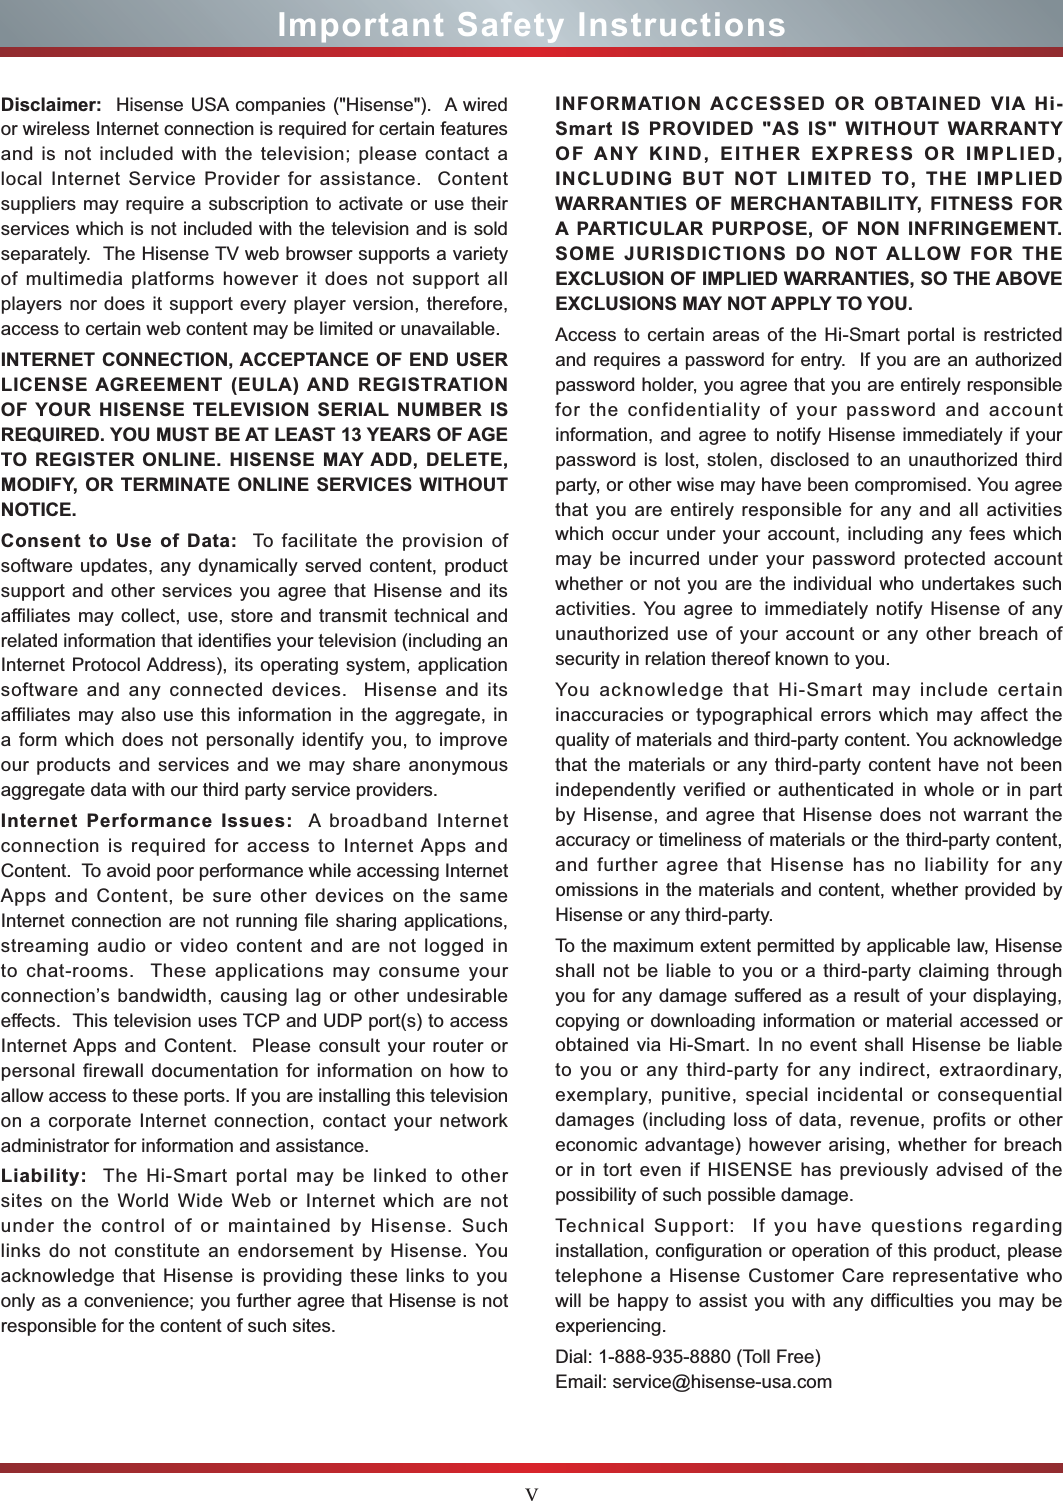
![17Basic FeaturesUsing the Screen MenuUsing the Channels MenuYou can adjust:H.Position - Move the image right or left.V.Position - Move the image up or down.Phase - Adjust the focus of stable images.Clock - Adjust the sample frequency.Auto Adjust - Detects input signal clock, phase and position and adjusts TV display accordingly.You can adjust:Tuner Mode - Select TV source: Antenna or Cable.Auto Channels Search - Scans for channels that havesignals and stores the channels information in the channellist.Channel Skip - You can cancel a channel stored in thechannel list.Favorite List - Add or delete channels to create a favoritelist. You can press [FAV] button to display your Favorite List.MTS - Select the default audio stream: Mono, Stereo or SAP.Audio Language - Select the audio language: English,Español or Français.NOTEOnly available in VGA mode.ScreenEnter Select Exit393023127 Image positioning and PC settings.H.PositionV.PositionPhaseClockAuto AdjustOKChannels Select BackSelect tuner connect mode.Tuner ModeAuto Channel SearchChannel SkipFavorite ListMTSAudio LanguageAntennaStereoEnglish CancelAuto ScanStatus: Scanning... AntennaAnalog Channels: 0Digital Channels: 08%NOTEWhen you press [CHV / V] button, your TV skipsthe channel you cancelled. You can still tune to thechannel using the number buttons on the remotecontrol.NOTEOnly available in TV mode.](https://usermanual.wiki/Hisense-Electric/LCDF0006/User-Guide-1719349-Page-24.png)
![19Basic FeaturesUsing the Lock MenuWhen you first use this function, the default password is [0000]. Once you input this password, you can set options.You can adjust:Channel Block - Block selected Channels on the TV.Program Block - Block selected Programs on the TV.Rating Enable:Block or unblock TV ratings.U.S. TV Ratings: Restrict TV programs by USA Ratings.U.S. Movie Ratings: Restrict movie by USA Ratings.Canadian English/French Ratings:Restrict movie and TV programs by Canadian Ratings.Open V-Chip: Display an advanced V-Chip ratings table for digital channels (USA only).Block Unrated:Block unrated TV programs.Input Block - Block selected Input source on the TV.Change Password - If you want to change the default password, first enter the new password then enter the same password again.Clean All - You can reset all locks to factory mode.Following is the description of these ratings.U.S. Movie RatingsRating Defined asGGeneral audiencePGParental Guidance suggestedPG-13Parents strongly cautionedRRestrictedNC-17 No one 17 and under admittedXAdult audience onlyLockEnter Select BackPrevent access to TV services.Channel BlockProgram BlockInput BlockChange PasswordClean AllOKU.S. TV RatingsAgeDefined asTV-YAll childrenTV-Y7Directed to older childrenTV-GGeneral audienceTV-PGParental Guidance suggestedTV-14Parents Strongly cautionedTV-MA Mature Audience onlyContentsDefined asAAll of the ratings below that rating set blockedautomaticallyDSuggestive dialogueLStrong languageSSexual situationsVViolenceFVFantasy ViolenceCanadian English RatingsRatingDescriptionCChildrenC8+Children 8 years and olderGGeneral Programming, suitable for all audiencesPGParents Guidance14+Viewers 14 years and older18+Adult ProgrammingCanadian French RatingsRatingDescriptionGGeneral8 ans+8+General; Not recommended for youngchildren13 ans+Programming may not be suitable for childrenunder the age of 1316 ans+Programming is not be suitable for children under the age of 1618 ans+Programming restricted to adults](https://usermanual.wiki/Hisense-Electric/LCDF0006/User-Guide-1719349-Page-26.png)
![21Advanced FeaturesNetwork Setup (Auto)Use the Automatic Network Setup while your connecting the TV to a network that supports DHCP. To set up your TV’s cable network connection automatically, follow these steps:How to set up automatically 1.Connect your TV to your LAN as described in the previous section. 2.Turn on your TV, operate according to the description in the Settings menu until the Network screen appears.3.On the Network screen, select Configuration and press [ENTER] button to enter the submenu.4.Set Internet Connection to On and Interface to Ethernet.5.Select IP Setting and press [ENTER] button to enter it.6.Set Address Type to Auto.7.Auto acquires and enters the necessary connection values automatically.8.If the connection values are not automatically entered, please check your modem and router manuals for Network Setup (Manual)Use the Automatic Network Setup when connecting your TVto a network that requires a Static IP address.Getting the Network Connection ValuesTo get the network connection values on most windows computers, follow these steps:1.Right click the Network icon on the bottom right of the screen.2.In the pop-up menu that appears, click Status.3.On the dialog that appears, click the Support tab.4.On the Support tab, click the Details button. The network connection values are displayed.How to set up manuallyTo set up your TV’s network connection manually, follow these steps:1.Follow Steps 1 through 5 in the “How to set up automatically” procedure.2.Set Address Type to Manual.3.3UHVV>Ÿź@EXWWRQWRVHOHFW,3$GGUHVVDQGSUHVV>ŻŹ@button to move the cursor to the entry field. Then press 0~9 buttons to enter the numbers.4.3UHVV>0(18@EXWWRQWRH[LW,3$GGUHVVDQGSUHVV>Ÿź@button to select the next options to enter the numbers. 5When done, press [MENU] button to return to the previous menu.6.Select Connection Test to check the internet connectivity. SettingsSelect connection typeInternet ConnectionInterfaceWireless SettingInformationIP SettingConnection Test OnEthernet Select BackSettingsAddress TypeIP AddressSubnet MaskDefault GatewayPrimary DNSSecondary DNSAuto176. 16. 0. 0255. 255. 255. 255172. 16. 0. 0172. 16. 2. 20. 0. 0. 0 Select BackSettingsAddress TypeIP AddressSubnet MaskDefault GatewayPrimary DNSSecondary DNSManual0. 0. 0. 00. 0. 0. 00. 0. 0. 00. 0. 0. 00. 0. 0. 0 Select BackSettingsInitiate networkconnectionLanguageMenu SettingsTime SetupCaptionNetworkDemo ModeVersion InfoReset DefaultEnglishEnter Select ExitOKdirections to enable automatic IP addressing by DHCP. Or, follow the steps listed to the follow to manually configure the network connection.](https://usermanual.wiki/Hisense-Electric/LCDF0006/User-Guide-1719349-Page-28.png)
![23Advanced FeaturesWireless SettingHow to set up1.Turn on your TV, operate according to the description in the Settings menu until the Network screen appears.2.On the Network screen, select Configuration and press [ENTER] button to enter the submenu.3.Set Internet Connection to On and Interface to Wireless.4.Select Wireless Setting and press [ENTER] button to enter it.You can select: Scan\Manual\Auto.5.If you select Scan, a screen will appear listing all of the ZLUHOHVVQHWZRUNVZLWKLQUDQJHRIWKH798VHWKH>Ÿź@keys to select the wireless network with your router SSID and press [ENTER] to confirm. Proceed to Step 7.6.If you select Manual, a screen will appear prompting you to enter the SSID of your wireless network. Press [ENTER] and an on-screen keyboard will pop up. Enter the SSID and select OK. Press [ENTER] to confirm and a screen will appear prompting you select the security PRGHIRU\RXUZLUHOHVVQHWZRUN8VHWKH>Ÿź@NH\Vto select the proper security mode and press [ENTER] to confirm. If you selected None for the security mode, proceed to step 9.7.A screen will appear prompting you to enter the password for the selected security mode. Press [ENTER] and an on-screen keyboard will pop up. Enter the password and select OK. Press [ENTER] to confirm. Proceed to Step 9.8.If you select Auto, a screen will appear prompting you to select PIN (personal identification number) or PBCSettingsSetup wirelessconnection.Internet ConnectionInterfaceWireless SettingInformationIP SettingConnection Test OnWirelessEnter Select ExitOKSettingsInitiate networkconnectionLanguageMenu SettingsTime SetupCaptionNetworkDemo ModeVersion InfoReset DefaultEnglishEnter Select ExitOKDLNA SettingsComputer, TV and other digital devices can be connectedvia DLNA and they can share files with each other. Youcan use the TV set as a DLNA DMP (Digital Media Player)device to enjoy movies, pictures, music and other multimediamaterials in your computer through DLNA connection.DLNA Setting needs to be set on TV and computer Respectively.Network Setup:1.Turn on your TV, operate according to the description inthe Settings menu until the Network screen appears.2.On the Network screen, select Configuration and press[ENTER] button to enter the submenu.3.Set Internet Connection to On and Interface to Ethernet.4.Select IP Setting and press [ENTER] button to enter it.5.Set Address Type to Auto.6.Auto acquires and enters the necessary connectionvalues automatically.7.If the connection values are not automatically entered,please check your modem and router manuals for directions to enable automatic IP addressing by DHCP.Or, follow the steps below to manually configure thenetwork connection.SettingsAddress TypeIP AddressSubnet MaskDefault GatewayPrimary DNSSecondary DNSAuto176. 16. 0. 0255. 255. 255. 255172. 16. 0. 0172. 16. 2. 20. 0. 0. 0 Select Back(push button configuration) setup. Choose the methodsupported by your wireless access point.8a.If you choose PIN, an identification number will appear on the screen for you to enter into the access point. After HQWHULQJWKH3,1SUHVVWKH>Ź@NH\,IWKH3,1LVLQXVHby another device, select [REFRESH] to obtain a newPIN and enter it into the access point. After entering the3,1SUHVVWKH>Ź@NH\8b.If you choose PBC, a screen will appear prompting toSUHVV>Ź@NH\$IWHUSUHVVLQJWKH>Ź@NH\\RXKDYHWZRminutes to locate and press the Push Button on your access point to connect to the TV.9.Press the [MENU] key to return to the previous menu.10.Select Connection Test to check the Internet connectivity.](https://usermanual.wiki/Hisense-Electric/LCDF0006/User-Guide-1719349-Page-30.png)
![24Advanced FeaturesTo set up your TV’s network connection manually,follow these steps:1). Follow Steps 1 through 5 in the “How to set upautomatically” procedure.2). Set Address Type to Manual.8.Set Address Type to Manual, enter IP Setting. Thenpress [▲/▼] button to select IP Address and press [ button to move the cursor to the entry field. Then press0~9 buttons to enter the numbers.9. Press [MENU] button to exit IP Address and press [▲/▼]button to select the next options to enter the numbers.10. When done, press [MENU] to return to the previousmenu.11.Select Connection Test to check the Internet connectivity.Set DLNA to On:1.On the Network screen, select Applications and press [ENTER] button to enter the submenu.2. Press button to set DLNA to On.SettingsSet DLNA on or oDLNANetixVUDUOn Select BackMedia Share Settings in ComputerSettings to Share Files llatsni yam uoy ,ANLD troppus ton seod retupmoc ruoy fIsoftware that supports DLNA such as TVersity or Windows Media Player. We recommend Windows Media Player as the installation and setup is easier.1.Start the Windows Media Player 11 or later version.2.Click “Library” and then “Add to Library...”.3.The “Add To Library” will pop up on the screen. Click “Add”.4.Select a folder and click OK button.5.Click “Close” to close the dialog.1.Click “Library” and move the cursor to select “MediaSharing...”SettingsAddress TypeIP AddressSubnet MaskDefault GatewayPrimary DNSSecondary DNSManual0. 0. 0. 00. 0. 0. 00. 0. 0. 00. 0. 0. 00. 0. 0. 0 Select Back[press [[▲ /▲] [2.Press ▲ / ▲ ]](https://usermanual.wiki/Hisense-Electric/LCDF0006/User-Guide-1719349-Page-31.png)
![25Advanced FeaturesNetwork FunctionNOTICE FOR USEIf you use VUDU services, see the following note before using it.1. Use of Internet services requires a working broadband Internet connection (1 to 2 Mbps for SD video, 2.25 to 4.5 Mbps for HD video and 4.5 to 9 Mbps for HDX video).2. VUDU and other Internet-based services are not provided by Hisense, may change or be discontinued at any time and may be subject to restrictions imposed by your Internet service provider. The quality, functionality, or availability of such services may be affected by the capacity of your Internet connection. Use of VUDU video-on-demand and other Internet services may require the creation of a separate account through a computer with internet access.3. Certain VUDU services may not be available for this TV model.4. VUDU video-on-demand and other Internet services may require payment of one-time and/or recurring charges.5. You are solely responsible for any charges incurred as a result of using Internet-based content, including, without limitation, communications charges for the provision of Internet or network services and any charges incurred for third-party Internet content services, such as video on demand or subscription services. All third-party services are provided in accordance with whatever terms and conditions are established between such third-party providers and you.6. HISENSE MAKES NO REPRESENTATIONS OR WARRANTIES ABOUT THE CONTENT, AVAILABILITY OR FUNCTIONALITY OF THE VUDU SERVICE OR OTHER INTERNET DELIVERED THIRD-PARTY SERVICES AND DOES NOT WARRANT THAT ANY OF THEM WILL BE UNINTERRUPTED, ERROR FREE OR SATISFACTORY. ANY IMPLIED WARRANTY, INCLUDING BUT NOT LIMITED TO ANY IMPLIED WARRANTY OF MERCHANTABILITY OR FITNESS FOR A PARTICULAR PURPOSE OF ANY THIRD PARTY CONTENT OR SERVICE, IS EXPRESSLY EXCLUDED AND DISCLAIMED. UNDER NO CIRCUMSTANCES WILL HISENSE BE LIABLE IN CONTRACT, TORT OR UNDER ANY OTHER THEORY FOR ANY DAMAGES ARISING OUT OF OR IN CONNECTION WITH YOUR USE OF ANY CONTENT OR SERVICE PROVIDED BY ANY THIRD PARTY, EVEN IF ADVISED OF THE POSSIBILITY OF SUCH DAMAGES.2. Click the box to select “Share my media” and click [OK].3. An equipment icon will appear on the white area if the DLNA Settings has been correctly set. Select the appropriate icon and then click “Allow”.4. The TV now has access to the shared files on the computer.](https://usermanual.wiki/Hisense-Electric/LCDF0006/User-Guide-1719349-Page-32.png)
![26Advanced FeaturesOperational buttonsButtons DescriptionPress to launch VUDU Movies App directly.Opens the Hi-Smart Hub with links to variousInternet Services.Press to launch Netflix App directly.▲/▼/ / Selects the on-screen menu items. ENTER Confirms selections. EXIT Closes the menu. RETURN Returns to the previous menu.Stops playback and displays the movie titlescreen.Pauses playback. Press the button to return toplayback.Displays the TrickPlay screen and fast forwardsplayback.Displays the TrickPlay screen and fast reversesplayback.Plays the next video. Plays the previous video. 1. Press the [Hi-Smart] button to display Hi-Smart Hub.2. Press [▲▲▲▲▲/▼/ / ]buttontoselecttheinterfaceyouwant to view and press [ENTER] to enter the followingdescription.No Interface description1Live TV2Information3Apps Market4My Applications5Quick Launcher BarEnter the Network Applications▲▲VUDU HD MoviesBrief introductionVUDU is an on-demand service that offers high-definitionmovies on Web.For enjoying more movies, please register and log in toyour account.Operation instructionsYou can access the VUDU HD Movies by the followingmethod:1. Press the [Hi-Smart] button to display network mainmenu.2. Press [▲/▼/ / ] button to select the VUDU HD Moviesicon and press [ENTER] to enter it (Refer to “Enter thenetwork application”), or press [VUDU] button to enterdirectly.3. Select the Sign Up Now icon on the VUDU HD Moviesinterface, and press [ENTER] to enter.TV Input Picture Video Music Network DLNA12345DDIISSPPLLAAYYEEXXIITTRREETTUURRNNGGUUIIDDEEMMEENNUUHHii--DDMMPPHii--SmmaarrttAASSPPEECCTTEENNTTEERRHii--Smmaarrtt](https://usermanual.wiki/Hisense-Electric/LCDF0006/User-Guide-1719349-Page-33.png)
![27Advanced Features4. Please read the content of the Disclaimer first. If agree,press [Green] button and then access the network mainmenu. If disagree, press [Red] button or [Yellow] buttonto cancel or exit Disclaimer menu, then network cannotbe used.5. Enter your email address to start your VUDU experience. ( Refer to “How to Input the Email Address” )6. Press button to move the cursor to select service items in the VUDU HD Movies home page, and press [ENTER] button to confirm.7. In the process of watching a movie, press [ENTER] button to display/exit the tool bar, press [ / ] button to select the function icon, and press [ENTER] button to confirm. 8. Press [RETURN] button to return the upper menu, or press [EXIT] button to close the menu.Tool Bar1. Press [ENTER] button to enter and press [ / ] button to select the chapter. 2. Stop playback.3. Fast backward. Press [ENTER] button to select the backward speed. You can press [ ] button to achieve the function.4. Play/Pause. You can press [ II] button to play/pause directly when there is no control bar on the screen.5. Fast forward. Press [ENTER] button to select the forward speed. You can press [ ] button to achieve the function.6. Progress bar. The progress bar when playing.How to Input the Email Address1. Press [ button to move the cursor to the address bar and press [ENTER] button to confirm.0:00:34 0:02:32Chapters234512. Press [ENTER] button to display the keyboard.There are some shortcuts on the bottom of the keyboard so that you can input part of the address often used directly.Other keys are used as the keyboard of your computer. 3. Press [ button to move the cursor to the characters you want to select and then press [ENTER] button to confirm. If you want to delete one character, move the cursor to Back key and press [ENTER] button to confirm.4. Move the cursor to Done key and press [ENTER] button to confirm if you have completed the address input. Then the new address will appear on the address bar.VUDU HD Movies home pageabcde fghi j k lmnopq r s t uvwxyz0123456789@.comSymbols Space ShiftEnter email addressBack DoneEnter email addressEnter email address to begin enjoying VUDU!NOTETV screen may be difference with picture.6Press for helpTitle FunctionNew The latest moviesTop Picks Mostly picked up moviesTop Rentals Mostly rented moviesNew Trailers Latest trailersComing Soon The movies can be picked soonBrowse Browse all the movies in VUDUCollections Browse the classified moviesMy VUDU The movies user bought or rentedSearch Search movies in VUDU///]▲/▼//]▼▼▲▼▼▼▲▼▼▼▼▼▼▼▼[///]](https://usermanual.wiki/Hisense-Electric/LCDF0006/User-Guide-1719349-Page-34.png)
![28Advanced FeaturesVUDU HD Movies subpageTitle FunctionRent/Own To rent or buy current movieWatch Trailer To watch trailer of the current movie2 Minute PreviewTo preview current movie for 2 minutesAdd to Wishlist Add current movie to your wishlistRate/share To rate current movie or share it to your friends in Facebook or TwitterOverview The overview of current movieCast&Crew The cast and crew of current movies and find their related movies Reviews The reviews of current movieSimilar The similar types of moviesMore Info The detail information of current movieVUDU AppsBrief introductionThe applications platform for connected TVs.VUDU Apps provides customers with access to a wide range of Internet services and applications including streaming video, music on demand, photo browsing, social networking and more.VUDU Apps supports the development of responsive apps designed specifically for use on home HD televisions.VUDU Apps uses a unique, cloud-based architecture optimized for consumer electronics devices, including delivering the latest applications to consumers without the need for software downloads or frequent firmware updates.Operation instructionsYou can access the VUDU Apps by the following methods:1. Press the [Hi-Smart] button to display network main menu.2. Press [ button to select the VUDU Apps icon and press [ENTER] to enter it.3. Press [ button to select the widget you want to access, and press [ENTER] to enter it. 4. You can press [RETURN] to return the upper menu or press [EXIT] button to close the Widgets display.VUDU Apps home pageMY FAVORITESMOST POPULARNEWESTBROWSE BY GENRESHOW TICKERINFO&SETTINGSTitle FunctionMy favorites The user’s favorite applicationsMost popular The most popular applications Newest The newest applications in VUDUBrowse by genre Browse applications by genre Show Ticker Show the applications at the bottom of screen while watching TVInfo&settings VUDU Apps system informationNetflixBrief introductionInstantly watch thousands of TV episodes & movies streaming over the Internet from Netflix. Unlimited membership required.NOTESTV screen may be difference with picture.For more information on Netflix visit http://www.netflix.com/help or login to your Netflix account and click “Help” at the top of the page.Your broadband fluency and picture quality depend on the network speed and original bit rate.Illustrations are examples and may differ from the actual Netflix screens. The display and operations may change as a result of a software update. Use Netflix without configuring a proxy server. Part or all of Netflix may not be available when connecting to the Internet via a proxy server. [▲/▲/▲/▲] ▲/▲/▲/▲]](https://usermanual.wiki/Hisense-Electric/LCDF0006/User-Guide-1719349-Page-35.png)
![29Advanced FeaturesOperation instructions1. Press the [Hi-Smart] button to display network mainmenu.2. Press [ button to select the Netflix icon andpress [ENTER] to enter it, or press [NETFLIX] button toenter Netflix website directly.3. Input Email and Password in following window to sign in. (Refer to “How to Input the Email Address” )4. Press [ button to move the cursor to selectservice items in the Netflix home page, and [ENTER]button to confirm.5. In the process of watching a movie, press operationalbuttons to control the movie. 6. Press [RETURN] button to return the upper menu, orpress [EXIT] button to close the menu.Netflix Movies home pageTitle FunctionSuggestions foryouThe movies suggested for you byNetflixNew Arrivals The new arrivalsGenres Browse movies in different genresInstant Queue Your list of moviesSearch Search for available titlesOperaThe function of the buttons on the remotecontrolOperation instructionsHow to enter the Opera BrowserThe Network setup must be correct. Then you can usethe network.1. Press the [Hi-Smart] button to display network mainmenu.2. Press [ button to select the opera icon andpress [ENTER] to enter it.3. Then the default interface will appears on the screen.There are some function icons on the bottom of thescreen:The function of the buttons on the screen:1. Back to main page.Move the cursor to the icon and press [ENTER] button toreturn to the default interface.2. Back to previous page.Move the cursor to the icon and press [ENTER] button toreturn to the previous viewed web page.3. Return a page.Move the cursor to the icon and press [ENTER] button togo forward to the previous viewed web pages.Buttons DescriptionPress these buttons to move the cursor on thescreen as the mouse of the computer. MENU Press the button to display/cancel the keyboardon the screen. ENTER Press the button to confirm the selection. Pressthe button twice to search the new website.213456 91078 Address bar▲/▲/▲/▲]▲/▲/▲/▲▲/▲/▲/▲]▲/▲/▲/▲]"?](https://usermanual.wiki/Hisense-Electric/LCDF0006/User-Guide-1719349-Page-36.png)
![30Advanced Features4. Refresh page.Move the cursor to the icon and press [ENTER] button to refresh the current page.5. Folder.Move the cursor to the icon and press [ENTER] button to enter the favorite folder.6. Add Folder.Move the cursor to the icon and press [ENTER] button to add the website to the favorite folder.7. Help.Move the cursor to the icon and press [ENTER] button for help.8. Address bar.Input the website you want to view.9. Sure to enter the Address of the pageMove the cursor to the icon and press [ENTER] button to search the website.10. Exit Opera.Move the cursor to the icon and press [ENTER] button to close the page.How to Input the New Address1. Press button to move the cursor to the address bar and press [ENTER] button to confirm.2. Press [MENU] to display the keyboard.There are some shortcuts on the bottom of the keyboard so that you can input part of the address often used directly.Other keys are used as the keyboard of your 3. eht ot rosruc eht evom ot nottubsserPcharacters you want to select and then press [ENTER] button to confirm. If you want to delete one character, move the cursor to Back key and press [ENTER] button to confirm. Or if you want to re-enter all the characters, move the cursor to Reset key and press [ENTER]button to confirm.4. Move the cursor to Enter key and press [ENTER] button to confirm if you have completed the address input.Then the new address will appear on the address bar.5. Move the cursor to the address bar and press [ENTER] button twice to enter the website.Or move the cursor to the and press [ENTER] button to search.CN12wsxedcrfvtgbyhnujmik,ol.p;/[‘]EnterSpace\qazTabCaps LShifthttp:// www. .com .org .gov .net Reset3 4 5 6 7 8 9 0 - = BackǃNOTEThere is only recommend to open the English website. [▲▲▲/▼//] [▲▲▲/▼//] How to Add a BookmarkIf you want to find the often viewed website from the favorite folder, you can follow the steps to add it to the folder.1. Input the address on the address bar and enter it.2. 3UHVV>ŸźŻŹ@EXWWRQWRPRYHWKHFXUVRUWRWKH andpress [ENTER] button to confirm. The menu will pop up on the screen.3. 3UHVV>ŸźŻŹ@EXWWRQWRPRYHWKHFXUVRUWRWKHLFRQmarked with dashed box on the right screen. Then press [ENTER] button to confirm to display all the folders.4. 3UHVV>Ÿź@EXWWRQWRVHOHFWWKHIROGHU\RXZDQWWRDGGthe bookmark to. And press [ENTER] button to confirm.5. Move the cursor to the Add button and then press [ENTER] button to confirm.If you do not want to add the book mark, move the cursor to the Cancel button and press [ENTER] button to confirm.How to Add a FolderYou can add a folder to the favorite as follows:1. Move the cursor to the icon and press [ENTER] button to confirm. The menu will pop up on the screen.2. Move the cursor to Add a folder button and press [ENTER] button to confirm.A pop-up menu appears on the screen.3. Move the cursor to Name bar and press [ENTER] button to confirm. Follow the steps 2~4 in “How to Input the New Address” to input the name.4. Move the cursor to Add button and press [ENTER] button to confirm and the new folder has been added. Add a bookmarkAre you sure to add it?Name:URL:Folder:Add CancelHISENSEHttp://www.hisense.com.au/Root folderAdd a bookmarkAre you sure to add it?Name:URL:Folder:HISENSEHttp://www.hisense.com.au/Root folderRoot folderOpera SoftwareGOGI SDKOpera technology](https://usermanual.wiki/Hisense-Electric/LCDF0006/User-Guide-1719349-Page-37.png)
![31Advanced FeaturesHow to Edit/Delete a Folder/Bookmark1. Move the cursor to the icon and press [ENTER] button to confirm. The menu will pop up on the screen.2. Move the cursor to the folder /bookmark directly and there will be two icons on the right of it. Move the cursor to one of the icons and press [ENTER] button to display a pop-up menu.: Edit button.1).Move the cursor to the Name/URL bar and press [ENTER] button to confirm. Follow the steps 2~4 in “How to Input the New Address” to edit it.2).Move the cursor to Edit button , then press [ENTER] to confirm and the folder/bookmark will be saved.: Delete button.Move the cursor to the Delete button and press [ENTER] button to confirm. Then the folder/bookmark will be deleted from the favorite folder.Add a folder Close bookmark managerOpera SoftwareGOGI SDKOpera technologyHISENSE Name:Add CancelAdd a bookmarkAre you sure to add it?Http://www.hisense.com.au/"Add a folder Close bookmark managerOpera SoftwareGOGI SDKOpera technologyHISENSEName: HISENSEEdit CancelEdit this bookmarkAre you sure to edit it?URL: http://www.hisense.com.au/help/warrantyHttp://www.hisense.com.au/"Add a folder Close bookmark managerOpera SoftwareGOGI SDKOpera technologyHISENSEName: HISENSEDelete CancelDelete this bookmarkAre you sure to delete it?URL: http://www.hisense.com.au/help/warrantyHttp://www.hisense.com.au/"NOTEThere is only Name bar on the pop-up menu for folder. How to select the Website from the favorite folder1. Move the cursor to the icon and press [ENTER] button to confirm. The menu will pop up on the screen.2. Move the cursor to the icon before the folder name and press [ENTER] button to confirm. The websites in the folder will appear in the following lines.3. Move the cursor to the website you want to view and press [ENTER] button to confirm.If the website is in the root folder, you can select it directly . And do not need operate as step 2.How to exit the managerAdd a folder Close bookmark managerOpera SoftwareGOGI SDKOpera technologyHISENSEHttp://www.hisense.com.au/"Move the cursor to the Close bookmark manager icon and press [ENTER] button to confirm.Brief introductionWatches the video via YouTube.Operation introduction1. Press the [Hi-Smart] button to display network main menu.2. 3UHVV>ŸźŻŹ@EXWWRQWRVHOHFWWKH<RX7XEHLFRQDQGpress [ENTER] to enter it. YouTube](https://usermanual.wiki/Hisense-Electric/LCDF0006/User-Guide-1719349-Page-38.png)
![32Operation introduction1.Press the [Hi-Smart] button to display network main menu.2.3UHVV>ŸźŻŹ@EXWWRQWRVHOHFWWKH2WKHU$SSVDQGpress [ENTER] to enter it.3.Follow the steps as following.My Apps:Display the applications of downloaded and installed on the local.1)3UHVV>ŻŹ@WRVHOHFWWKHWLWOHRI0\$SSVDQGSUHVV>źENTER] to enter it.2)3UHVV>ŸźŻŹ@WRVHOHFWWKHDSSOLFDWLRQV\RXZDQWWRenter and press [Enter] to confirm.3)Press [RETURN] to return to the title.New Arrival:1)3UHVV>ŻŹ@WRVHOHFWWKHWLWOHRI1HZ$UULYDODQGSUHVV>źENTER] to enter it.Other AppsTitleFunctionMy Apps. Your local applicationsNew ArrivalThe applications of the latest onlineMore Apps. Applications classification to downloadHotlistThe pop ranking applicationsManagementDelete the local applications SelfServiceView the service informationAdvanced Features2)3UHVV>ŸźŻŹ@WRVHOHFWWKHDSSOLFDWLRQV\RXZDQWWRinstall and press [ENTER] to confirm.3)Press [ENTER] to install the applications or press[RETURN] to return to the new arrival home page.If installed, the application will be shown in My Appsinterface.4)Press [RETURN] to return to the title.More Apps:Classify the applications by story, knowledge and funnygame.1)3UHVV>ŻŹ@WRVHOHFWWKHWLWOHRI0RUH$SSVDQGSUHVV>źENTER] to enter it.2)3UHVV>Ÿź@WRVHOHFW WKHFODVVLILFDWLRQDQGSUHVV[ENTER] to confirm.3)3UHVV>ŸźŻŹ@WRVHOHFWWKHDSSOLFDWLRQV\RXZDQWWRinstall and press [ENTER] to confirm.4)Press [ENTER] to install the applications or press [RETURN] to return to the More Apps home page.KNOWLEDGEFUNNY GAMEPage 1/2Navy Bat... Tetris Penalty dress-up DICE GUESS NUNavy Bat... Tetris Penalty dress-up DICE GUESS NUPenalty dress-up DICE GUESS NU](https://usermanual.wiki/Hisense-Electric/LCDF0006/User-Guide-1719349-Page-39.png)
![33Advanced FeaturesIf installed, the applications will be shown in My Apps interface.Hotlist:1)3UHVV>ŻŹ@WRVHOHFWWKHWLWOHRI+RWOLVWDQGSUHVV>źENTER] to enter it.2)3UHVV>ŻŹ@WRSDJHXSGRZQDQGSUHVV>Ÿź@WRVHOHFWthe applications you want to install and press [ENTER] to confirm.3)Press [ENTER] to install the applications or press [RETURN] to return to the Hotlist homepage.If installed, the applications will be shown in My Apps interface.4)Press [RETURN] to return to the title.Management:1)3UHVV>ŻŹ@WRVHOHFWWKHWLWOHRI0DQDJHPHQWDQGSUHVV>ź(17(5@WRHQWHULW2)3UHVV>ŻŹ@WRSDJHXSGRZQDQGSUHVV>Ÿź@WRVHOHFWthe applications you want to delete.3)Press [ENTER] to display the menu.4)3UHVV>ŻŹ@WRVHOHFW<HV1RDQGSUHVV>(17(5@WRdelete.5)Press [RETURN] to return to the title.Are you sure?SelfService:3UHVV>ŻŹ@WRVHOHFW WKH WLWOHRI6HOI6HUYLFHDQGSUHVV[ENTER] to view the service information.VUDU customer care: To learn more about VUDU, visit the frequently Asked questions at www.vudu.com/support.1HWÀL[FXVWRPHUVHUYLFH:US: (866) 716-0414Canada: (866) 348-2353Other InformationOur Promise Thanks for you and your family choose Hisense Smart TV, we will continue to provide better and more services.Service Information If your TV meet quality problem, please kindly let us know, we will make every effort to serve you.Appstore Version 1.0.29.0Device ID 861003009000006000000150FE1FC402Penalty 1.0Hitv Issued In 2012-01-07 1Dress-up 1.0Hitv Issued In 2012-01-07 2DICE 1.0Hitv Issued In 2011-12-13 3Guess nu 1.0Hitv Issued In 2012-01-12 4Penalty 1.0Hitv Issued In 2011-12-13 5Page 1/2Dress-up 1.1Valid until:2099-12-31 Size:2.73MDICE 1.0Valid until:2099-12-31 Size:5.48MGuess nu 1.0Valid until:2099-12-31 Size:5.88MPenalty 1.0Valid until:2099-12-31 Size:1.66MPage 1/2](https://usermanual.wiki/Hisense-Electric/LCDF0006/User-Guide-1719349-Page-40.png)
![34Advanced Features1.Press[RED]button to switch to All or Video.2.Press [ŸŸ/Ÿ/Ÿ] to select the video you want to view.3.Press [ENTER] to play the video.4.Press [/RETURN] to exit the video and return to theprevious directory.5.Press [ENTER] button to display/exit the video controlbar.6.3UHVV>ŻŹ@EXWWRQWRVHOHFWWKHIXQFWLRQLFRQDQGWKHQpress [ENTER] to confirm.Tool bar 1.The progress bar when playing.2.3OD\3DXVH<RXFDQSUHVV>Ź,,@GLUHFWO\WRSOD\SDXVHwhen there is no control bar on the screen.3.Play the previous video. You can press [] directly to achieve the function when no control bar display on the screen.Please note that Hisense will not assume any responsibility for any lost data and cannot guarantee perfect compatibility with all mass storage devices. Be sure to insert the USB disk or mobile hard disk with standard USB2.0 port.Press [INPUT] button to display the INPUT menu, press >Ÿź@EXWWRQWRKLJKOLJKWWKH+L'03VRXUFHWKHQSUHVV[ENTER] button to confirm. (If you want to exit Hi-DMP, you can press [INPUT] button to switch to other sources).Press [RED] button to switch the media typeILOWHU.Press [YELLOW/BLUE] to turn to the previous/next page.1.3UHVV>ŸźŻŹ@EXWWRQWRVHOHFWWKHIROGHUILOH\RXZDQWto open and then press [ENTER] to enter/play the folder/file.2.Press [RETURN] to return to the previous directory.Digital Media PlayHUEnjoy Video FilesNOTEYou can press [ASPECT] button to change the aspect ratio (Normal, Full Screen, Original Size) while playing the video.DMP C:Informationm.mp3Select Enter Return Type Filter Page up/downReturn F1 F2 F3P.jpg m.mp3 v.dat t.txtAllVideoMusicPictureBook4.Play the next video. You can press [] to achieve the function when no control bar display on the screen.5.Fast backward. Then press [ENTER] to select the backward speed. You can press [] to achieve thefunction.6.Fast forward. Then press [ENTER] to select the forwardspeed. You can press [] to achieve the function.7.Select time to play3UHVV>ŻŹ@WRVHOHFWWKHSRVLWLRQ\RXZDQWWRVHW3UHVV>a@WRVHWWKHWLPHDQGSUHVV>ŸźŻŹ@WRadjust it.3) Press [ENTER] to confirm and the video will to play at the time you have set.8.Play list3UHVV<HOORZ%OXHEXWWRQWRSDJHDQGSUHVV>Ÿź@WRselect the video.2) Press [ENTER] to confirm. And press [Exit] to exit the menu.9.Options3UHVV>Ÿź@WRVHOHFWWKHRSWLRQVLQWKHPHQX3UHVV>ŻŹ@WRVHOHFWWKHVHWWLQJV3) Press [ENTER] to confirm.10.Program infoAllows you to view the program information.11.Stop playbackOption SetRepeatPicture Mode Subtitle SelectionAUDIOOnceUserNOI/ISelect Enter ExitPlayable format listPlayable formatFiles FormatPhotoJPGMusicMp3VideoDivx 3.11/4.x/5.1/6.0, Windows-EDIAVideo v9, MPEG2123456789101100:00:36/00:20:01IIIḬ](https://usermanual.wiki/Hisense-Electric/LCDF0006/User-Guide-1719349-Page-41.png)
![351.Press[RED]button to switch to All or Music.2.3UHVV>Ÿ/Ÿ/Ÿ/Ÿ] to select the music you want to view.3.Press [ENTER] to play the music.4.$OOWKHVRQJVDUH OLVWHGRQWKHOHIW3UHVV>Ÿź@EXWWRQWRVHOHFWWKHVRQJDQGSUHVV>Ź@EXWWRQWRPDUNLW<RXFDQpress [YELLOW/BLUE] button to turn to the previous /next page. Press [GREEN] button to select the Mode: Mark/All/Single.5. Press [RETURN] to exit the music playback interface.1.Press[RED] button to switch to All or Picture.2.3UHVV>Ÿ/Ÿ/Ÿ/Ÿ] to select the picture you want to view.Advanced FeaturesEnjoy Music FilesBrowse the PicturesCurrent Playing: a3.mp3a1.mp3m.mp3a2.mp3a3.mp301/01Mode: NoneStatus: Play Title: a1Artist:Album:Genre: OtherYear:Duration:00:04:13Next:00:00:24/00:04:13Mode Select ReturnMark Play/PausePage up/downDMP C:\ musicInformationmusicSelect Enter Return Type Filter Page up/downReturn F1 F2 F3a1.mp3 m.mp3 a2.mp3 a3.mp3 AllVideoMusicPictureBookDMP C:\ PictureInformationPicturejpg257:383Select Enter Return Type Filter Page up/downReturn 1.jpg 2.jpg 3.jpgAllVideoMusicPictureBook3.Press [ENTER] to browse the picture.4.Press [/RETURN] to exit the picture and return to theprevious directory.Tool bar When browsing the picturesPress [ENTER] button to display/exit the picture controlEDUDQGSUHVV>ŻŹ@EXWWRQWRVHOHFWWKHIXQFWLRQ LFRQand then press [ENTER] button to confirm.1.Browse the previous picture. You can press[ ] button directly to achieve the function when no control bar displays on the screen.2.Browse the next picture. You can press [ ] buttondirectly to achieve the function when no control bar displays on the screen.3.Allows the picture to rotate 90 degrees clockwise.4.Allows the picture to rotate 90 degrees anti-clockwise.5.Play/pause. You can press [ENTER] button directlywhen no control bar on the screen.6.6WRSEURZVLQJWKH SLFWXUH<RXFDQSUHVV>Ŷ@EXWWRQdirectly when no control bar on the screen.7.Zoom in the picture.8.Zoom out the picture.9.2SWLRQ6HW3UHVV>Ÿź@EXWWRQWRVHOHFWWKHRSWLRQVDQGSUHVV>ŻŹ@EXWWRQWRVHWWKHPSpeed - Allows you to browse the picture at differentspeed.Effect - Allows you to set how the picture appears onthe screen.Background Music - Allows you to enjoy the music whenbrowsing the pictures if it is set On.10.Picture info. Allows you to view the picture information.Option SetSpeedEffectBackground MusicFastNoneOffEnterIII ̰2345678910](https://usermanual.wiki/Hisense-Electric/LCDF0006/User-Guide-1719349-Page-42.png)
![36Browse the Text FilesAdvanced Features1.Press [RED] button to switch to All or Book.2.3UHVV>ŸŸ/Ÿ/Ÿ] to select the text you want to view.3.Press [ENTER] button to confirm.4.Press [/RETURN] to exit the text and return to theprevious directory.Tool bar:KHQEURZVLQJWKHWH[W¿OHVWhen no tool bar appears on the screen, you can press >Ÿź@WRPRYHWKHWH[WOLQHVXSGRZQ3UHVV>(17(5@WRGLVSOD\H[LWWKHWRROEDU3UHVV>ŻŹ@to select the corresponding icons and then press [ENTER] to confirm.1.Stop/resume automatic page 2.View the previous page. 3.View the next page. 4.Stop browsing.5.Allows you to select page to view.3UHVV>a@EXWWRQVWRLQSXWWKHSDJHRUSUHVV>Ÿź@to adjust it.3UHVV>ŻŹ@ WR VHOHFW (QWHUDQGSUHVV>(17(5@WRconfirm.DMP C:\TXTInformationTXTSelect Enter Return Type Filter Page up/downReturn 1.txt 2.txt t.txtAllVideoMusicPictureBookGoto Page0000 Enter1.txt 1/16 Status:Play21345IḬII](https://usermanual.wiki/Hisense-Electric/LCDF0006/User-Guide-1719349-Page-43.png)
![37Other InformationTrouble ShootingWhen something appears wrong with your TV refer to below chart. If the proposed remedy’s do not work , then unplug the AC cord from wall, wait at least 60 seconds, plug AC back in and then turn on the TV. If the problem still cannot be solved, please contact the help line provided on the warranty card or a professional technician.SYMPTOMS POSSIBLE SOLUTIONSNo sound or picture.Check if the power cord is plugged into AC outlet and if it has electricity.Check if you have pressed [POWER] button on the TV or [POWER] button on the remote control.Check to see if LED light is either red or blue. If illuminated, power to TV is OK.I have connected an external source to my TV and I get no picture and/or sound.Check for the correct output connection on the external source and for the correct input connection on the TV.Make sure you have made the correct selection for the input mode for the incoming signal.When I turn on my television, there is a few second delay before the picture appears. Is this normal?Yes, this is normal. That is the TV searching for previous setting information and initializing the TV.Picture is normal, but no sound. Check the volume settings.Check if Mute mode is set “on”.Sound but no picture or black and white picture.If black and white picture first unplug TV from AC outlet and re-plug after 60 seconds.Check Color Setting if picture is black and white.Sound and picture distorted or appear wavy.An electrical appliance may be affecting TV set. Turn off any appliances, if interference goes away, move appliance farther away from TV.Insert the power plug of the TV set into another power outlet.Sound and picture is blurry or cuts out momentarily.If using an external antenna, check the direction, position and connection of the antenna.Adjust the direction of your antenna or reset or fine tune the channel.Horizontal/vertical stripe on picture or picture is shaking. Check if there is interfering source nearby, such as appliance or electric tool.The plastic cabinet makes a “clicking” type of sound.“Click” sound can be caused when the room temperature changes. This change causes the television cabinet to expand or contract, which makes the sound. This is normal and the TV is OK.Black square appears in the center of my television screen?The Closed Caption function is set in the text mode. To remove it, access Closed Caption from the menu screen and change the Mode setting from text to either CC1 or off .On some channels getting another language or sometimes no sound at all.That would indicate that the MTS mode on your unit is set to “SAP” mode. We suggest setting the MTS mode to either “Stereo” or “Mono”. For further instruction, please see “MTS” in your user manual.SAP is Second Audio Program. It’s a second audio channel that is usually used for a second language or descriptive audio for the visually impaired.MTS stands for Multichannel Television Sound, a standard that allows the encoding of 3 channels of audio within a standard NTSC (analog) video signal to a television. A television that is able to receive MTS Stereo allows you to watch television with stereo sound.Not getting all of my cable channels on the television or I'm only getting 13 channels.Check the cable connection for an incoming signal. The best way to confirm signal is to use another TV and/or contact your cable company.[CHV / V] don't work when I set the Channel to Cable? They work with the Air setting?After switching to Cable, please auto program the channels. The TV will “remember” all the channels then the TV will allow you to surf the channels with [CHV / V] buttons.](https://usermanual.wiki/Hisense-Electric/LCDF0006/User-Guide-1719349-Page-44.png)
![38Other InformationSYMPTOMS POSSIBLE SOLUTIONSRemote control does not work.Confirm that TV still has power and is operational.Change the batteries in the remote control.Check if the batteries are correctly installed.If using a universal remote, be sure to select the TV mode on the remote.If the remote still does not work:-remove and reinstall the batteries correctly to reset the remote or install new batteries.-press TV and then Power to turn on the TV. With a universal remote if you have reset or changed the batteries you will need to reprogram the remote for the other units.Network connection fail.Check network physical connection, make sure connection is correct.Enter “Menu”,”Settings”,”Network”,”Configuration” , make sure configuration is correct according to your network service provider.Enter “Menu”, “Settings”, “Network”, “Configuration”, “Connection Test” to make sure that network connection test is successful.Connect VUDU/Netflix fail.Check network connection is correct, both physically and configuration.Enter “Menu”, “Settings”, “Network”, “Configuration”, “Connection Test” to make sure that network connection test is successful.For VUDU: Enter “Menu”, “Settings”, “Network”, “Configuration”, “Applications”, “VUDU”, “Deactivation” to reset VUDU account.For Netflix: Enter “Menu”, “Settings”, “Network”, “Configuration”, “Applications”, “Netflix”, “Deactivation” to reset Netflix account.Log out VUDU/Netflix or change log in account.For VUDU:1. Press [EXIT] button on remote to exit VUDU. 2. Enter “Menu”, “Settings”, “Network”, “Configuration”, “Applications”, “VUDU”, “Deactivation” to reset VUDU account.For Netflix:1. Press [EXIT] button on remote to exit VUDU. 2. Enter “Menu”, “Settings”, “Network”, “Configuration”, “Applications”, “Netflix”, “Deactivation” to reset Netflix account.DLNA does not work.Check network connection is correct, both physically and configuration.Make sure DLNA server (PC or Mac) has shared media content and TV has permission to access shared media.Enter “Menu”, “Settings”, “Network”, “Applications”, turn on “DLNA”.Select Hi-DMP source to find shared contents. Select “Hi-DMP” source by using [INPUT] button on remote or press [Hi-Smart] button and then select “Multi-Media” Icon.How do I get the Hi-Smart Hub to work on my TV?You need a broadband (high speed) Internet service with a speed of no less than 1.5 Mbps.Connect the TV to the Internet through your router by an ethernet cable or wireless connection. If the connection fails, check with your internet service provider or router manufacturer to determine if there is a firewall, content filter, or proxy settings that may block the TV from accessing the Internet.After connecting the TV to the Internet, press the [Hi-Smart] button on the remote to access the Hi-Smart Hub.Caution: Do not try to repair the TV yourself. Refer all servicing to qualified repair personnel.](https://usermanual.wiki/Hisense-Electric/LCDF0006/User-Guide-1719349-Page-45.png)