Hisense Electric LCDF0021 LED LCD TV User Manual W9HLCDF0021 1
Hisense Electric Co., Ltd. LED LCD TV W9HLCDF0021 1
Contents
- 1. W9HLCDF0021_User Manual_1
- 2. W9HLCDF0021_User Manual_2
- 3. W9HLCDF0021_User Manual_3
- 4. W9HLCDF0021_User Manual_4
W9HLCDF0021_User Manual_1


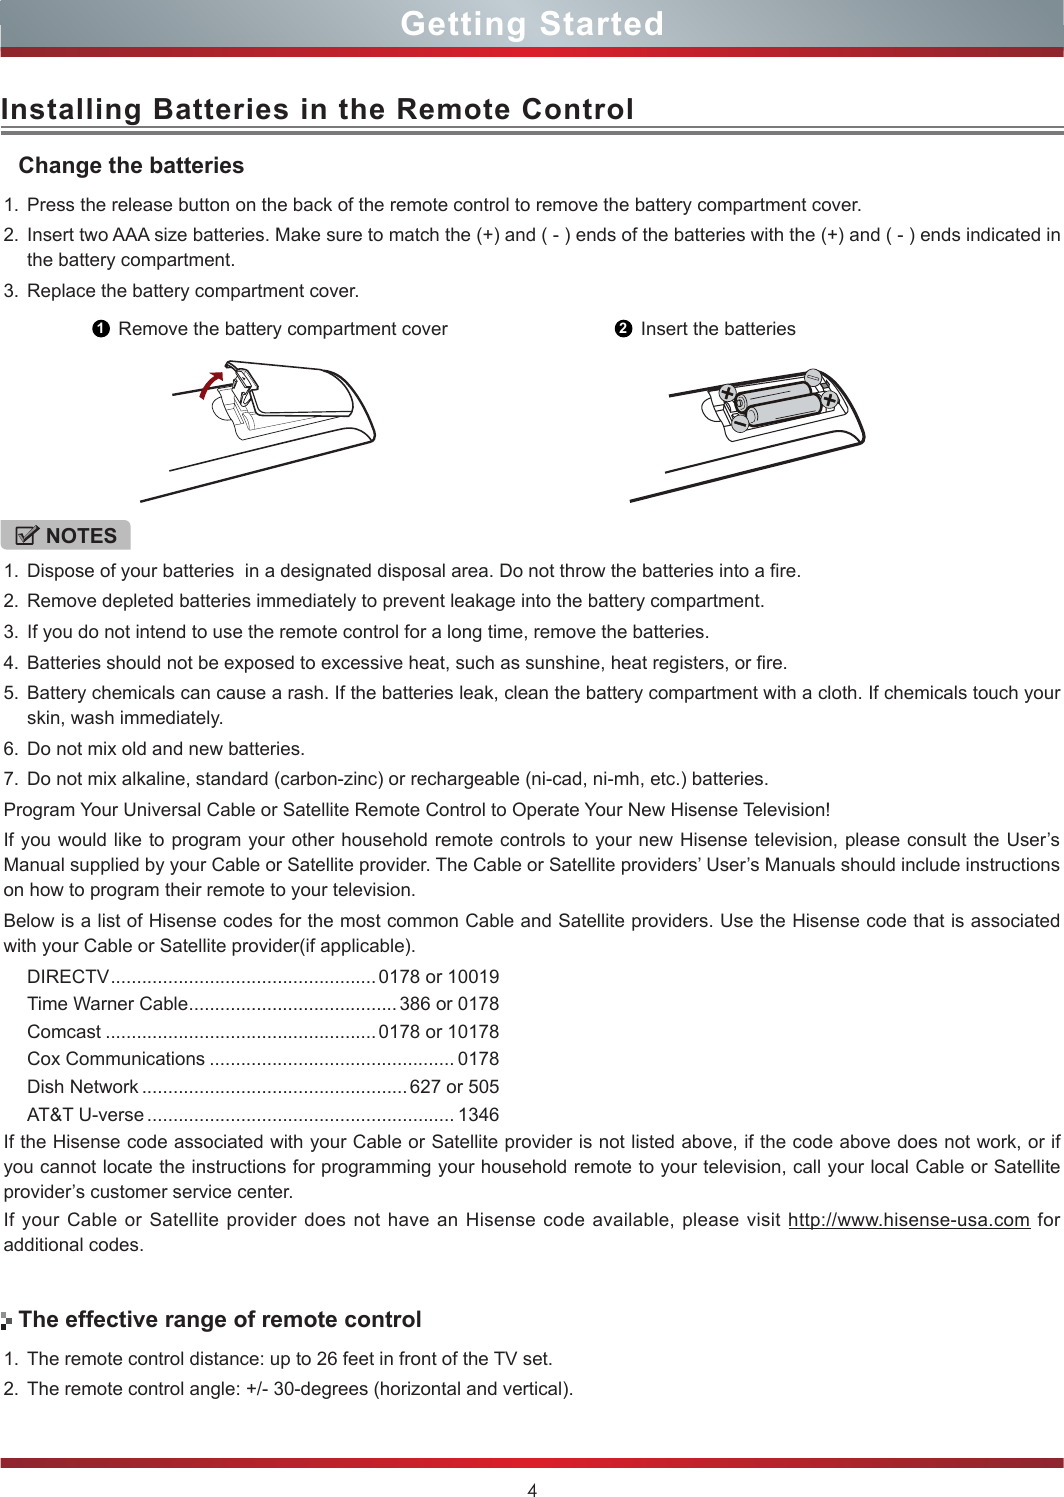
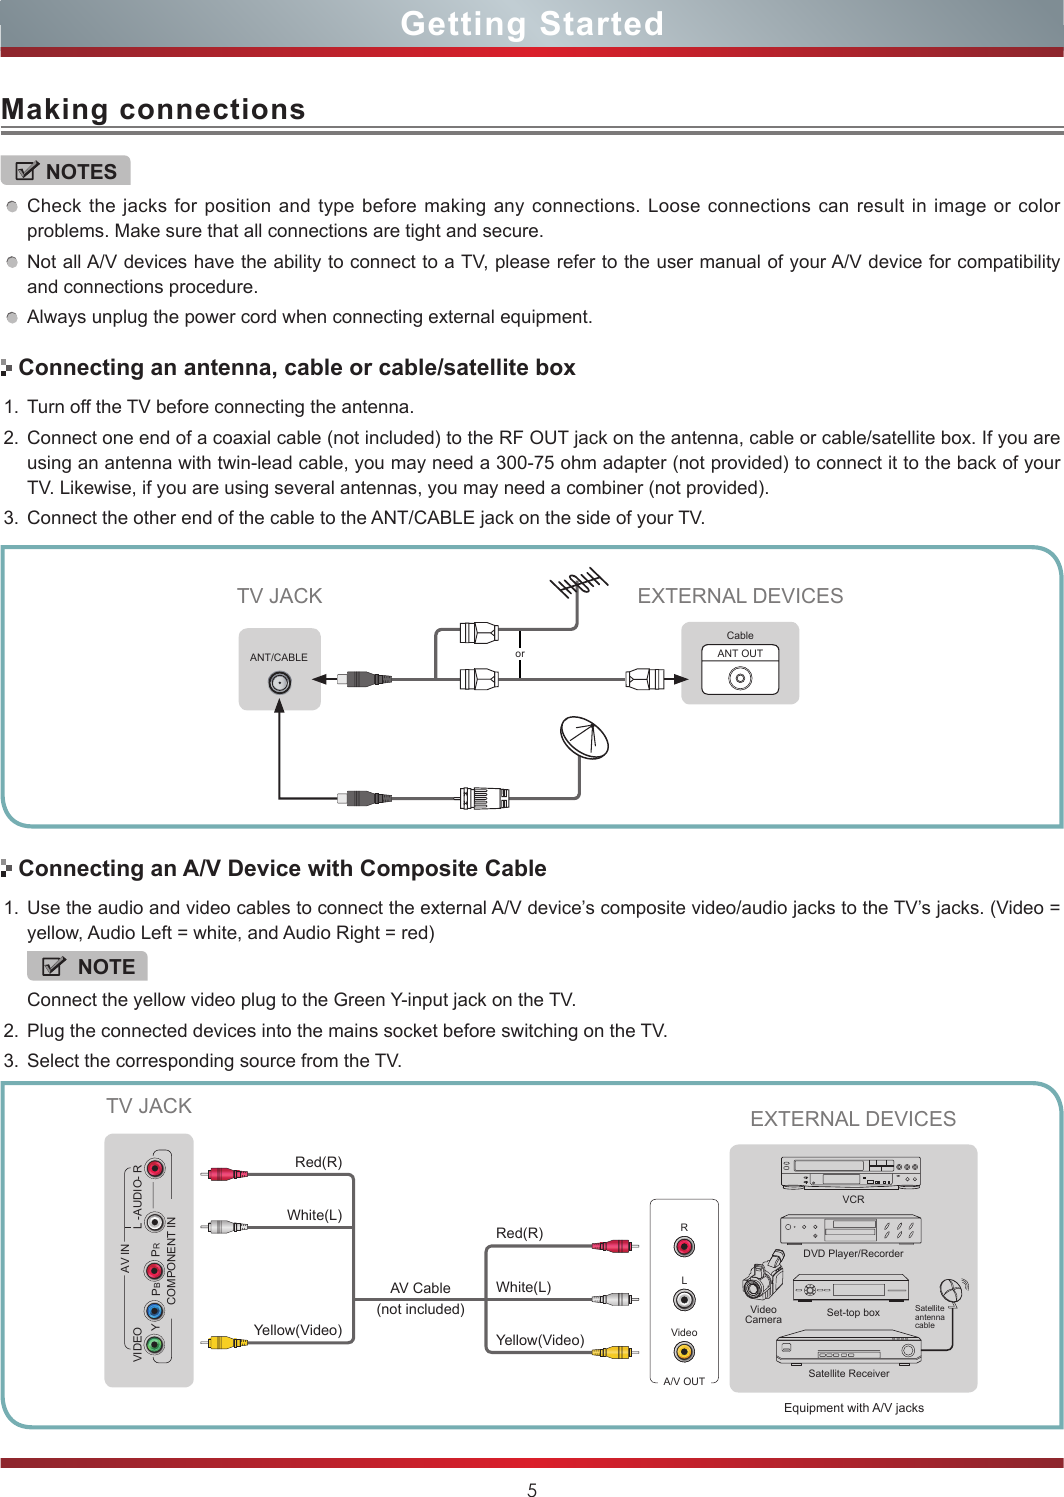
![3 Remote Control Button LayoutNOTESFOR ILLUSTRATION ONLY. [RED/GREEN/YELLOW/BLUE] buttons are used for Electronic Program Guide (EPG). After pressing the [GUIDE] button when viewing digital channels, the same color buttons will appear with explanations in the on-screen display (OSD). Follow the steps shown in the OSD.Power on/offDecrease volumeMedia content control function buttonsReturn to the previous menuLaunch Vudu HD MoviesLaunch Netix Increase volumeAdjust Closed Caption (CCD) modeAudio select buttonMENU buttonDash buttonSelect a digital sub-channel▲/▲/▲/▲Navigate Up / Down / Left / Rightor adjust OSD settingsSet the sleep timerSelect picture modeSelect sound mode Display the information bannerConrm selectionsMUTE buttonASPECT buttonClose the menuNext channelDisplay the favorite channel listGo to the previous channelEnter TV sourcePrevious channelHiMedia (Digital Media Player)Open the HiSmart Home MenuSelect input sourceInfra-red transmitterOpen the DTV program guide(if available)Select VGA / HDMI sourceSpecial function buttons (see Notes)Direct channel selectionGetting StartedLaunch YouTube App](https://usermanual.wiki/Hisense-Electric/LCDF0021.W9HLCDF0021-User-Manual-1/User-Guide-2027169-Page-10.png)
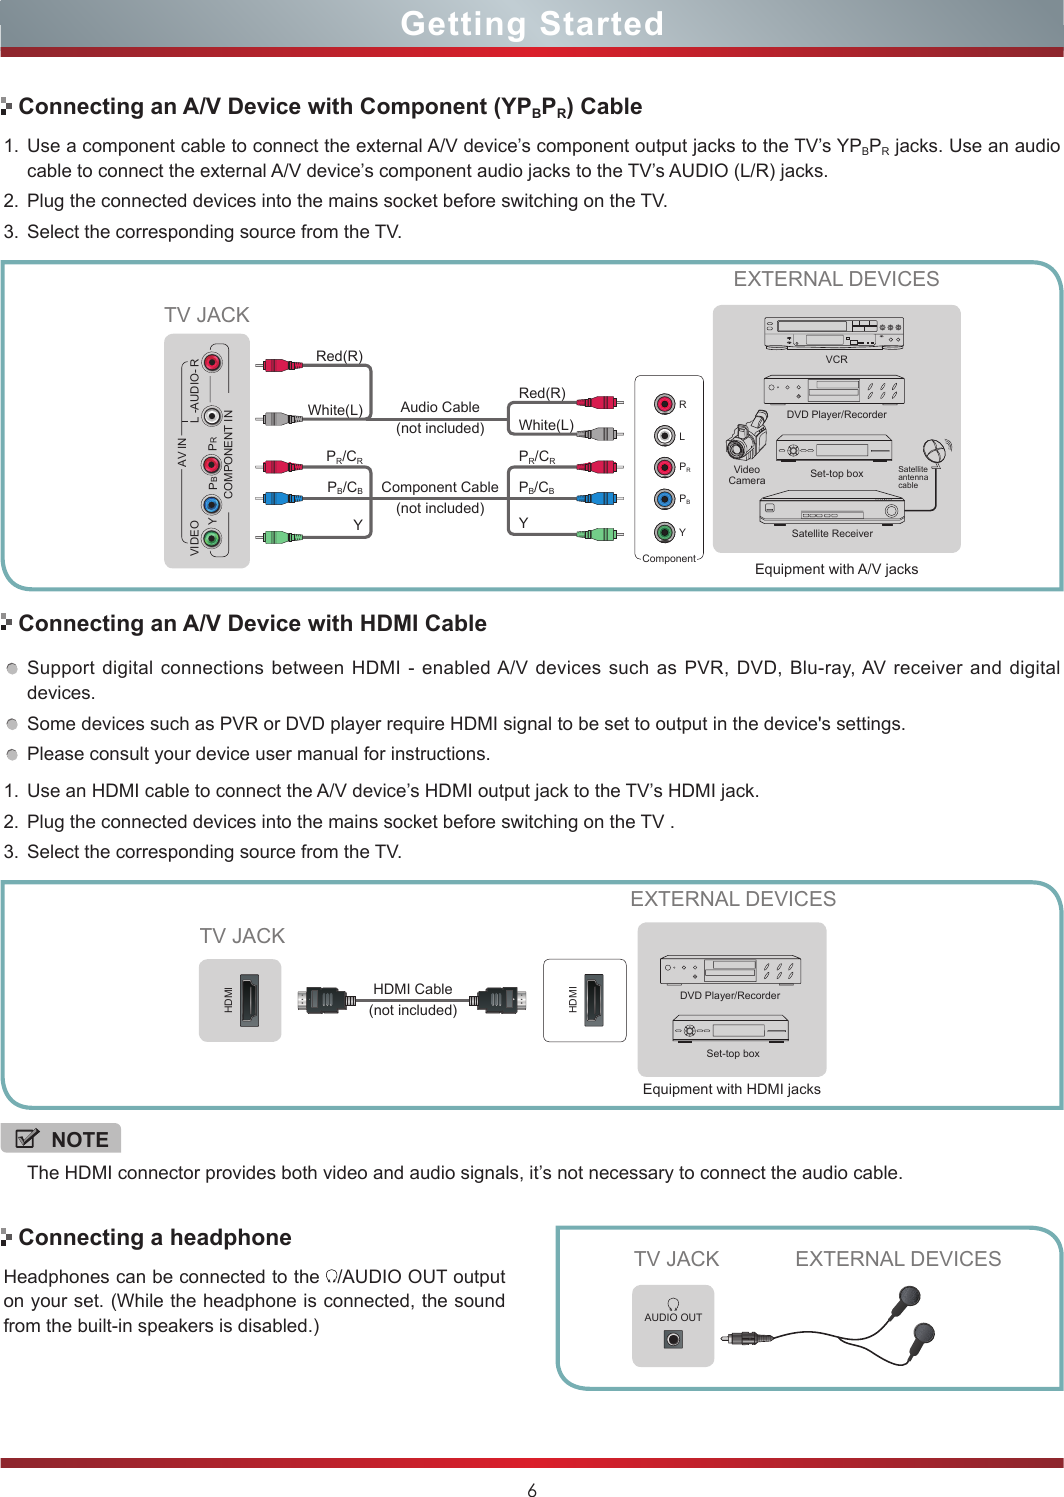
![10Basic FeaturesTurning the TV On for the First TimeThe Setup Wizard menu appears the first time you turn on the TV. It will assist you to specify the menu language, country setting, Use Mode, Network Setting and Channel Installation.IMPORTANT: Make sure that the antenna or cable is connected and a wired or wireless Internet connection is available.1. Make sure that you have:Installed the remote control batteries.Connected the power cord.Connected to an antenna or cable TV signal.NOTEThe customer will be prompted to connect a Network cable in the Select Network wizard screen.2. Connect your TV’s power cord to a power outlet, then press power. The Initial Setup screen opens.3. Please press [ENTER] to start the wizard, then press [▲/▲] button to select your language: English, Spanish or French, select [Next] to confirm and move to the Welcome screen. Next1. Language setting Next: Country SettingLanguage settingsEnglishEspañolFrançaisThe Welcome screen displays the available input devices and interfaces.4. Select the country where you will operate the TV.Previous Next2.Country setting Next: Time Zone SettingCountry settingUSACanadaMexico5. Select the local time zone according to your region.Previous Next3.Time zone setting Next: Use ModeTime Zone settingsPacic TimeMountain TimeCentral TimeEastern TimeHawaii Daylight Saving TimeDaylight Saving: Set the Daylight Saving time for your area.6. Select Use Mode Setting: Home Mode or Retail Mode. Home Mode is the recommended setting which offers full functionality of the television.Previous Next4.Use Mode Next: Network SettingUse ModeHome modeRetail modeHome mode default settings are recommended for in-home use.ENERGY STAR ® qualied.If you select Retail Mode, a message appears “Are you sure to change to retail mode?” Select “OK” to continue, or select “Cancel” to change your selection.Home Mode is the recommended setting which offers full functionality of the television. If you selected Retail Mode, Energy Savings are not realized.To turn your TV on or off (standby mode):1. Plug the power cord into an AC power outlet.2. Press [POWER] button. Your TV turns on. 3. Press [POWER] button again to turn off your TV. When you turn off your TV, it goes into standby mode.Turning your TV on or offWARNINGWhen your TV is in standby mode, it is still receiving power. To completely disconnect power, unplug the power cord.NOTEIf your TV does not receive an input signal for several minutes, it automatically goes into standby mode.](https://usermanual.wiki/Hisense-Electric/LCDF0021.W9HLCDF0021-User-Manual-1/User-Guide-2027169-Page-17.png)
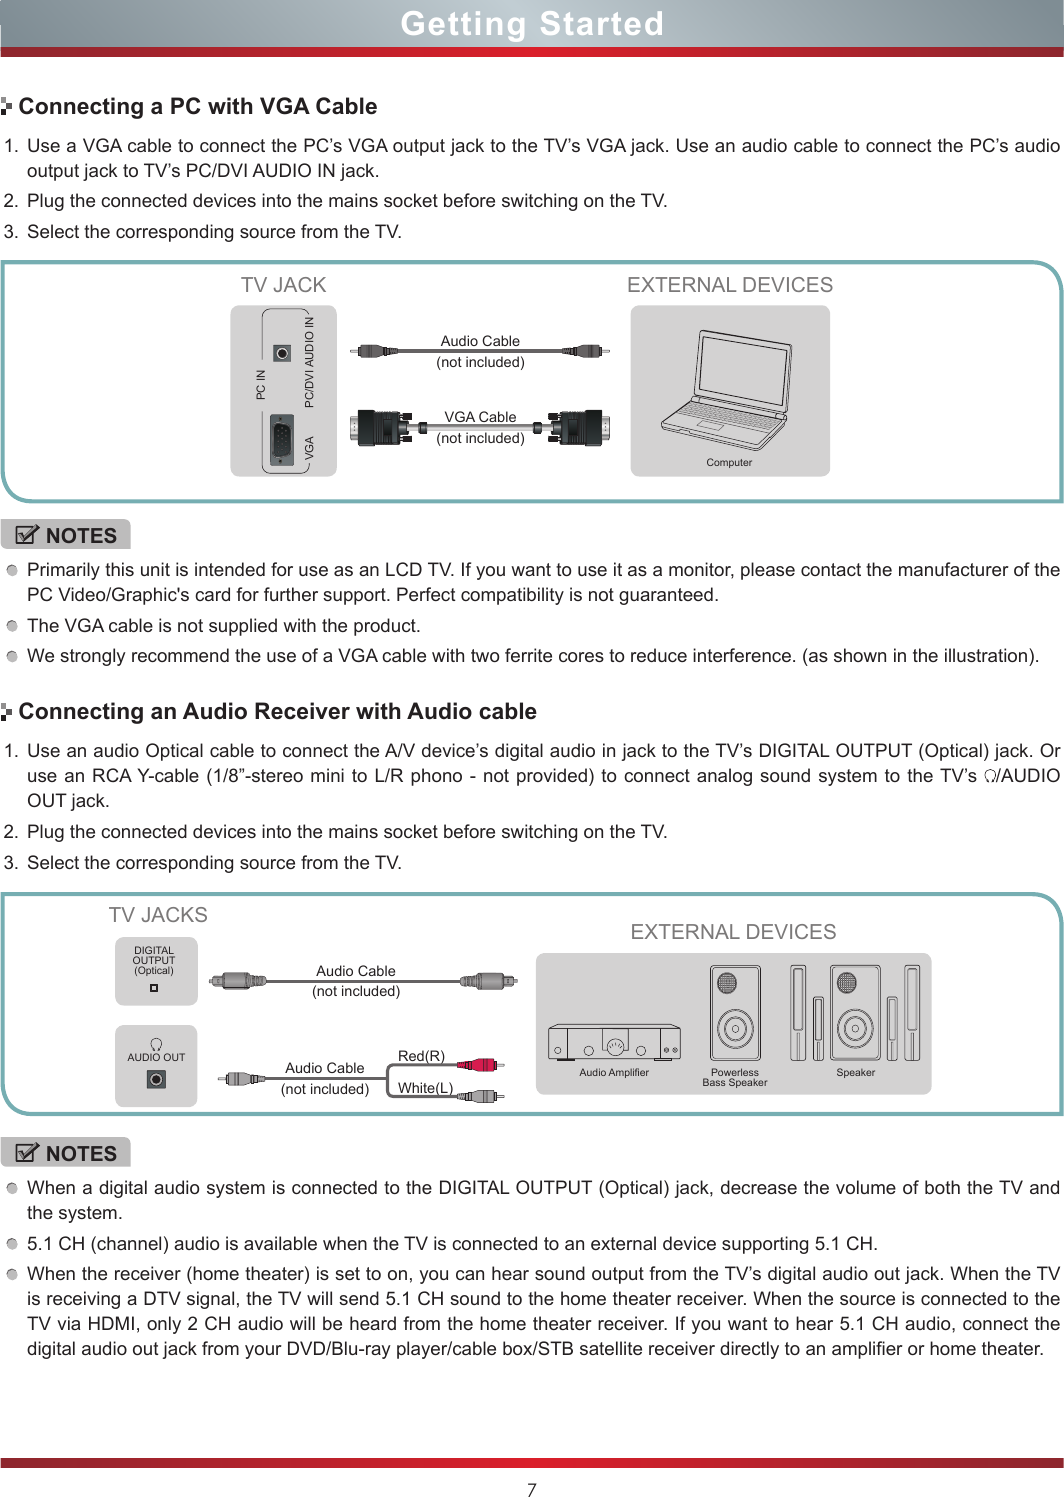
![118. The Channel Search.Press [▲/▲] to select your Tuner Mode: Antenna or Cable, press [ENTER] button to confirm.Channel SearchPlease allow 30 minutes to complete.30%Stop6. Channel SearchATV Channels added:0DTV Channels added:0Press [▲/▲] to set the Channel Installation: Scan or Skip Scan, press [ENTER] button to confirm.If you select “Scan”, your TV automatically starts Channel Installation available in your viewing area.If you select “Skip Scan”, your TV does not scan for channels.1. Press the [CH V/V] (or [CH +/-]) on the TV/remote control to change the channel.2. Press the [VOL V/V] (or [VOL +/-]) on the TV/remote control to adjust the volume.3. Press the numeric buttons on the remote control to display the corresponding channels.Changing Channels / VolumeThe first time you turn on your TV, you must select the TV signal source. Your TV stores this information, so you do not need to change the TV signal source unless it changes. For example, you change from an outside antenna to cable TV.To select the video input source:1. Turn on your TV, then press [INPUT] button on the remote or on the TV. The Input Source menu opens.2. Press [▲/▲] button to highlight the input source, then press [ENTER] button.Selecting the Input SourceNOTEChanging the channels can also be achieved by directly entering the channel number using the numeric keys on the remote control. If you are entering a two or three digit channel number, the time between key presses should be less than 3 seconds.7. Select Network : Connect your TV to access the network.5.Select Network Next: Channel SearchEND USER TERMS AND CONDITIONS AND PRIVACY POLICY FOR HISMART SERVICES. The product/device you have purchased from Hisense USA Corp., or its Parent Company, afliates and/or Subsidiary Company, its successors and/or assigns (hereinafter referred to as “Hisense”) provides direct access to the internet through one or more internet provider services (hereinafter referred “Web Service(s)”).All content and services accessible through this device belong to Hisense USA Corp., “Hisense” is sometimes also referred to herein as “we” or “us”) or third parties and are protected by copyright, patent, trademark and/or other intellectual property laws. Such content and services are provided solely for your personal non-commercial use. You may not useSelect Network AgreeDisagreeWhen the Network Setting menu opens, Hisense Service Terms and Conditions will appear. Press [◄/►] to scroll through the pages. Please read it carefully.If you want to access the internet, press the [Agree] button to set your TV’s network connections. Otherwise, press the [Disagree] button to enter the Channel search menu.Previous Next5.Select Network Next: Channel SearchSelect Network Wired NetworkWireless NetworkConnect a wireless network with Wi-FiSkipYou can select the network conguration in this menu or choose to skip network conguration. For more information or to setup the network conguration later, see “Network Connection” and “Network Setup”.Depending on the reception condition, it may take up to 30 minutes or more to complete memorizing channels. Please allow the process to complete without interruption.After the Channel Search, a summary of the current settings will be displayed. Select “go” to exit the wizard.](https://usermanual.wiki/Hisense-Electric/LCDF0021.W9HLCDF0021-User-Manual-1/User-Guide-2027169-Page-18.png)
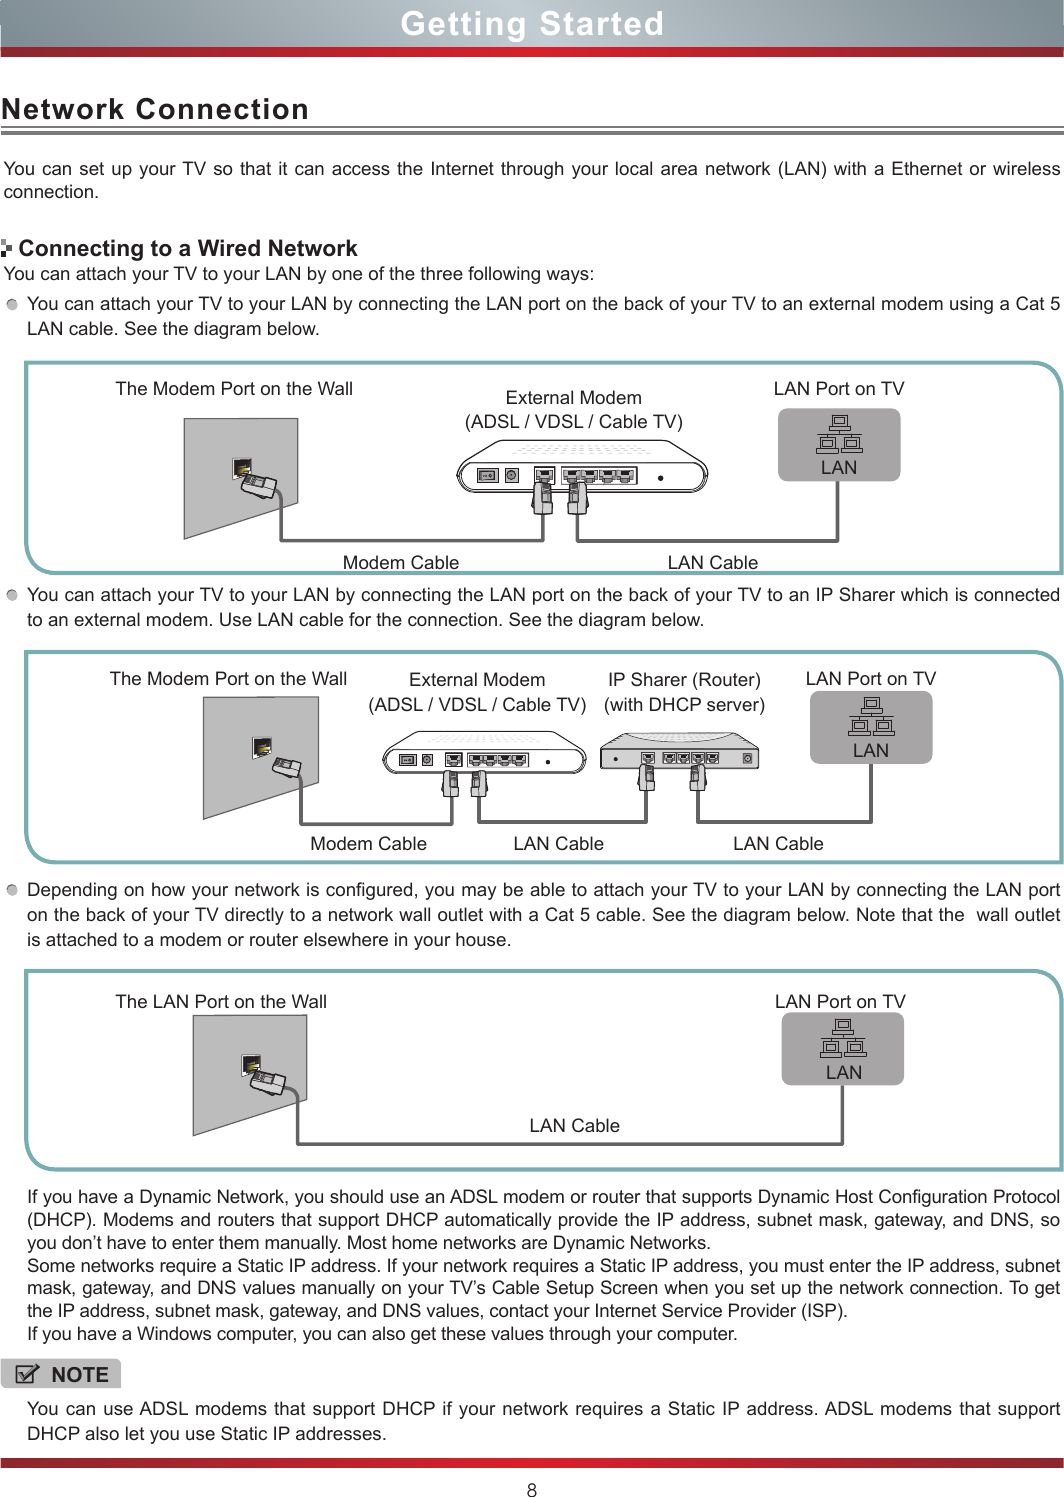
![12Aspect - Select the screen aspect ratio from Normal, Wide, Zoom, Cinema , 1:1 Pixel Map, and Auto.Normal: The original 4:3 aspect ratio (1.33:1 signal) is preserved, so black bars are added to the left and right of the image. Standard TV broadcasts are displayed with a 4:3 aspect ratio.Wide: When watching a standard broadcast or full-frame movie in this mode, the display image is stretched proportionately to fill the TV screen. When watching a widescreen (1.78:1 signal) program or movie, the display image fills the TV screen.Auto: Automatically adjusts the image based on the screen size and the TV program.Zoom: Stretch the 4:3 aspect ratio image vertically and horizontally to fill the screen at 1:1.78 aspect ratio.Cinema: Stretch the 4:3 aspect ratio image vertically and horizontally to fill the screen at 1:2.35 aspect ratio. 1:1 Pixel Map: Displays the native signal format pixel-by-pixel without any video processing or scaling. In this mode, 1920 x 1080 resolution sources fill the screen while all other resolutions are centered and surrounded by black bars. Picture - Press this button to set the picture mode. It can be set as Vivid, Standard, Energy Savings, Game, Theater or Custom. This mode achieves a certain image display effect by setting the brightness, contrast and Speech.Sound - Press this button to set the sound mode. It can be set as Standard, Speech, Music and Custom.Mute - Press this button to turn the sound off, press this button again to turn the sound back on. This function is used to switch off sound temporarily.Shortcuts Instructions Sleep - It can set the TV to let it enter into the Standby state automatically. Press this button repeatedly to select the proper sleeping clock mode, and the clock tells you the remaining time before the TV enters Standby state. Display - Press this button to display the information including channel number, channel name, current system time, tuner mode, audio stream, video format, audio language, closed caption mode, parental lock rating, program details, etc.CCD - Press the [CCD] button to the Closed Caption mode: CC Off, CC On or CC On When Mute.MTS - Press the [MTS] button to selec the default audio stream: Mono, Stereo or SAP.](https://usermanual.wiki/Hisense-Electric/LCDF0021.W9HLCDF0021-User-Manual-1/User-Guide-2027169-Page-19.png)
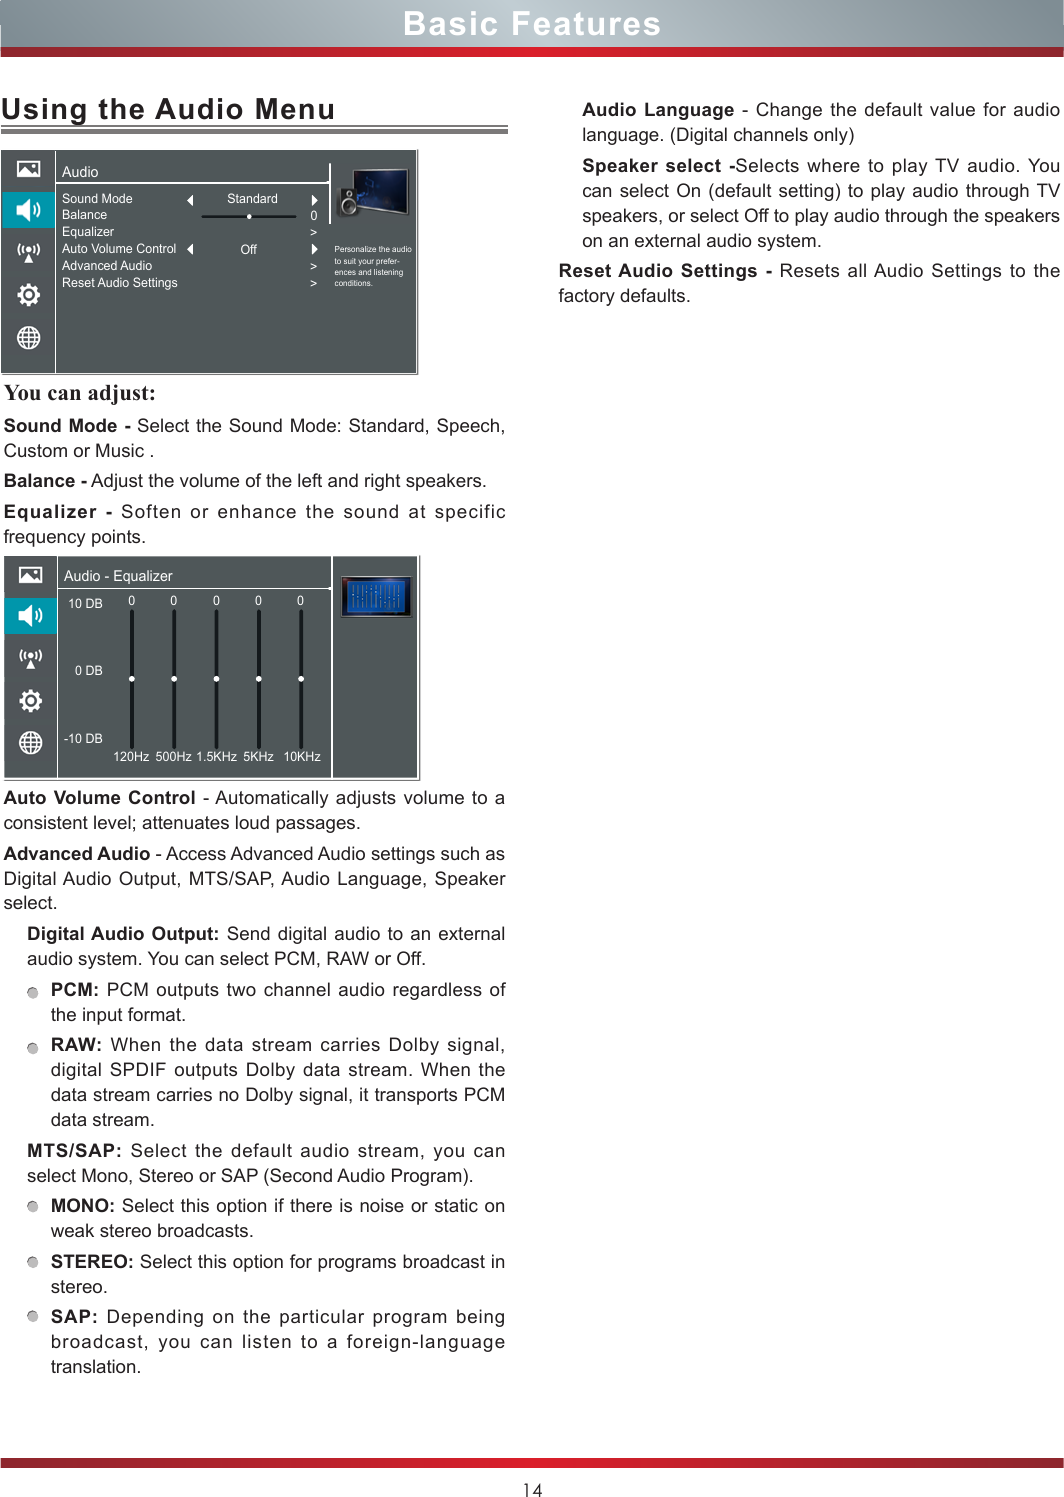
![13Using the Picture MenuYou can adjust: Picture Mode - Adjust the Picture Mode. You can select Vivid, Standard, Energy Savings, Theater, Custom or Game mode.NOTEThe option of the Picture Mode is different in different inputs. (For more information, see “Shortcuts Instructions”)Brightness - Increase or decrease the brightness of the picture. Increasing the brightness can add more light to dark areas of the picture, while decreasing the brightness can add more darkness to light areas of the picture.Contrast - Increase or decrease the contrast of the picture. Increase the contrast to adjust the white areas of the picture or decrease the contrast to adjust the black areas of the picture.Color - Adjust the level of color in the picture.Tint - Adjust the hue of the picture.Sharpness - You can increase the sharpness level for clearer images or decrease the sharpness level for smoother images.Basic FeaturesTo Use the Menu1Press the [MENU] button to open the main menu.2Press [▲/▲] to select a menu option, then press [▲/ENTER] button to enter the menu.3In each menu, you can: Press [▲/▲] to select an item, Press [▲/▲] to adjust the value, orPress [▲/ENTER] to enter the submenu, Press [MENU] to back the previous menu. 4Press [EXIT] to exit the menu.NOTEThe menus in the user manual may vary slightly from the actual screen.Advanced Video - Access advanced video settings such as Color Temperature, Noise Reduction, Dynamic Backlight Control (DCR) and Adaptive Contrast.Color Temperature : Change the color temperature. You can select a preset color temperature: Cool, Normal and Warm (when set to cool, whites are bluer; when set to warm, whites are yellower)Noise Reduction : Optimize the picture quality by filtering signal interference. You can select Off, Low, Auto, Medium or High.Dynamic Backlight Control (DCR) : Enhances the contrast ratio between light and dark areas of the picture. You can select Off, Low or High.Adaptive Contrast : Automatically adjusts the contrast level of the selected input source.Overscan: In DTV mode, Select ON to extend the image beyong the display so the picture edges are not visible.Reset Picture Settings - Resets all Picture settings to the factory defaults.PicturePersonalize the picture to suit your preferences and viewing conditions.Picture ModeBrightnessContrastColorTintSharpnessAdvanced VideoReset Picture Settings505050010>>Energy SavingsPicturePersonalize the picture to suit your preferences and viewing conditions.Picture ModeBrightnessContrastColorTintSharpnessAdvanced VideoReset Picture Settings505050010>>Energy Savings](https://usermanual.wiki/Hisense-Electric/LCDF0021.W9HLCDF0021-User-Manual-1/User-Guide-2027169-Page-20.png)
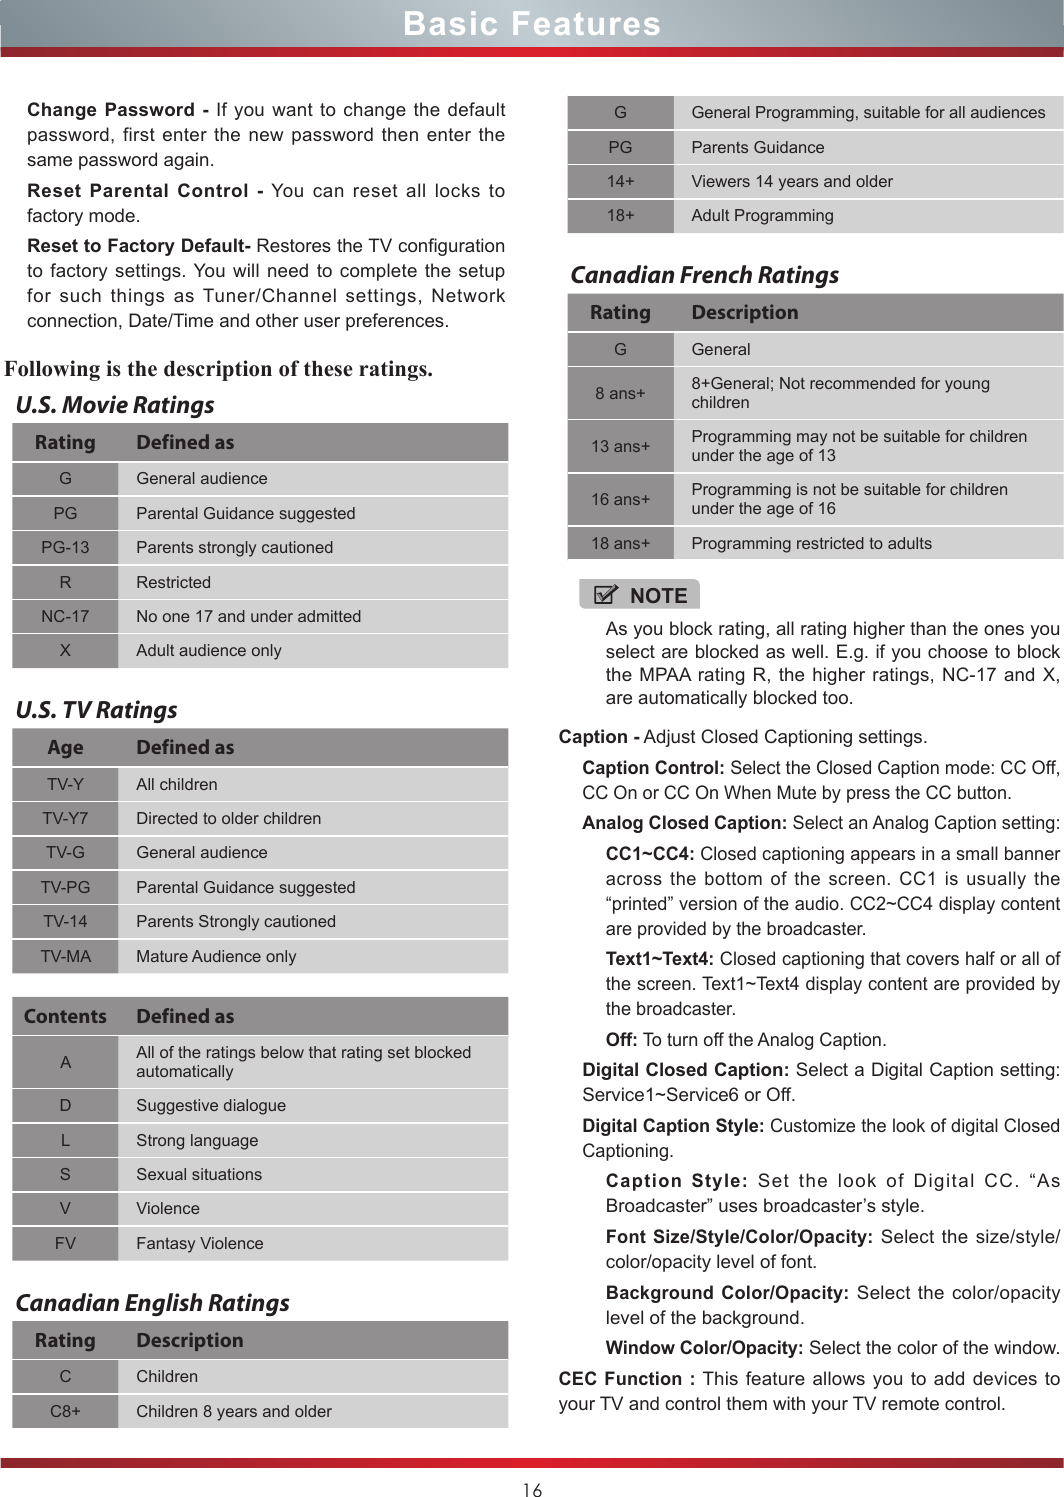
![15You can adjust: Tuner Mode - Select the TV signal source. You can select Antenna or Cable.Auto Channel Search - Scans for channels that have signals and stores the channels information in memory.Digital Channels: The scanned TV program in digital signals.Analog Channels: The scanned TV program in analog signals.Channel Skip - You can cancel a channel stored in memory.NOTEWhen you press [CH V/V] (or [CH +/-]) button, your TV skips the channel you cancelled. You can still tune to the channel using the number buttons on the remote control.Favorite List - Display your Favorite List. You can add or delete channels to create your favorite list.NOTEWhen you press [CH V/V] (or [CH +/-]) button, your TV skips the channel you cancelled. You can still tune to the channel using the number buttons on the remote control.Signal Strength - This menu is used to check the signal strength of your antenna system. Usually strengths of above 75% indicates an acceptable signal for your TV to display correct image. Each channel may vary in signal / quality strengths and its common for broadcast strengths to change in your area. The signal strength of the channel on the screen is displayed.NOTEIf lower than 75% we advise to have your antenna system checked by qualified personnel.Using the TV MenuChannelsPersonalize the local television services settings.Tuner ModeAuto Channel SearchChannel SkipFavorite ListSignal Strength >>>5AntennaUsing the Setup MenuYou can adjust: Menu Settings - You can set On-screen menu system.Language: You can select the menu’s language to English,Español or Français.Timeout: Select the display time of the menu: 10-20-...-60 seconds.Time Setup - Set the time zone, daylight saving, time and sleep timer.Country: Select your local Country.Time Zone: Select your local time zone: Eastern Time, Indiana, Central Time, Mountain Time, Arizona, Pacific Time, Alaska or Hawaii.Daylight Savings: Set the Daylight Saving time for your area.Date/Time: Set the current year/month/day/time.Sleep Timer: Select the amount of time before the TV to turns off automatically.Parental Controls - Prevent unauthorized users, such as children, from watching unsuitable programs.When you first use this function, the default password is [0000]. Once you input this password, you can set options.You can change password in the Lock submenu.Channel Block : Block selected Channels on the TV.Program Block : Block selected Programs on the TV.Rating Enable: Block or unblock TV ratings.U.S. TV Ratings: Restrict TV programs by USA Ratings.U.S. Movie Ratings: Restrict movies by USA Ratings.Canadian English/French Ratings: Restrict movies and TV programs by Canadian Ratings.Open V-Chip: Display an advanced V-Chip ratings table for digital channels (USA only).Block Unrated: Block unrated TV programs.Input Block - Block selected Input source on the TV.Button Lock(On/Off) - Block or unblock use of the remote control.SettingsPersonalize the general TV setting.Menu SettingsTime SetupParental ControlsCaptionCEC FunctionDemo ModePower LEDVersion InfoReset Settings>>>>>>>OffOnBasic Features](https://usermanual.wiki/Hisense-Electric/LCDF0021.W9HLCDF0021-User-Manual-1/User-Guide-2027169-Page-22.png)
![17You can adjust: Configuration - Select On or Off. When On mode is selected, the following options are available.Internet Connection : Setting the Internet Connection.Interface : You can set up your TV so that it can access the Internet through your local area network (LAN) with a Ethernet or wireless connection.Wireless Setting : You can set up your TV’s wireless connection.Information : Display network configuration information.IP Setting : Allows you to set IP address, subnet mask, gateway, primary and secondary DNS.Connection Test : Press the [ENTER] button to test network status.Basic FeaturesCEC function: Press [►] to set On/Off.Auto turn off: Your added devices can be off automatically by turning off the TV.TV Auto On: Your TV can be on automatically by turning on your added devices.Audio Receive: Turning ARC function on or off. NOTESHDMI cables must be used to connect HDMI CEC-compatible devices to your TV.The connected device’s HDMI CEC feature must be turned on.If you connect an HDMI device that is not HDMI CEC-compatible, all the HDMI-CEC Control features do not work.Depending on the connected HDMI device, the HDMI-CEC Control feature may not work.Demo Mode - Displays a banner at the top of the screen which describes the key features of the TV.Power LED - Select this feature to turn off or On the Power LED indicator on the front panel on your TV. Version Info - View the software version information.Reset Settings - Restores the TV configuration to factory settings.Using the Network MenuAuto Upgrade - Update the software using the Internet.Configure your network. For detailed procedures on using the Network Setup, refer to the “Connecting to the Internet or a network” instructions. If you want the Network Update to work automatically, please select Auto Updates (On). If you want to do the Network Update manually, please select Auto Updates (Off).If the Internet connection doesn’t operate properly, check the Network Configuration settings and try again. If the problem persists, use the USB method below to update.Firmware Upgrade - Insert a USB drive containing the software update file, downloaded from the Hisense website. (www.hisense-usa.com).Please be careful not to disconnect the power or remove the USB drive until updates are complete. The TV will be turned off and on automatically after completing the software update. When software is updated, video and audio settings you made will return to their default settings and your personal settings will be deleted. We advise you to write down your settings so that you can easily reset them after the update.Applications - Network application.DLNA: Digital Media Player (Hi-DMP) feature of Digital Living Network Alliance. Press the [◄/►] buttons to set DLNA to On.NetworkPersonalize the network connection settings.ConfigurationAuto UpgradeFirmware UpgradeApplications>>>Off](https://usermanual.wiki/Hisense-Electric/LCDF0021.W9HLCDF0021-User-Manual-1/User-Guide-2027169-Page-24.png)
![18Basic FeaturesConnecting to a Wired NetworkNetwork Setup (Auto)Use the Automatic Network Setup to connect the TV to a network that supports DHCP. To set up your TV’s network connection automatically, follow these steps:How to set up automatically 1. Connect your TV to your LAN as described in the previous section. 2. Turn on your TV, operate according to the description in the Settings menu until the Network screen appears.3. On the Network screen, select Configuration and press [ENTER] button to enter the submenu.4. Set Internet Connection to On and Interface to Ethernet.5. Select IP Setting and press [ENTER] button to enter it.6. Set Address Type to Auto.7. Auto acquires and enters the necessary connection values automatically.8. If the connection values are not automatically entered, please check your modem and router manuals for directions to enable automatic IP addressing by DHCP. Or, follow the steps listed in the following section, Network Setup (Manual), to manually configure the network connection.Network Setup (Manual)Use the Manual Network Setup when connecting your TV to a network that requires a Static IP address.Getting the Network Connection ValuesTo get the network connection values on most windows computers, follow these steps:1. Right click the Network icon in the bottom right of the screen.2. In the pop-up menu that appears, click Status.3. On the dialog that appears, click the Support tab.4. On the Support tab, click the Details button. The network connection values are displayed.How to manually setup the network connectionTo set up your TV’s network connection manually, follow these steps:1. Follow Steps 1 through 5 in the “How to set up automatically” procedure.2. Set Address Type to Manual.3. Press [▲/▼] button to select IP Address and press [◄/►] button to move the cursor to the entry field. Then press 0~9 buttons to enter the numbers.4. Press [MENU] button to exit IP Address and press [▲/▼] button to select the next options to enter the numbers. 5When done, press [MENU] button to return to the previous menu.6. Select Connection Test to check the internet connectivity. Wireless SettingHow to set up 1. Turn on your TV, press Menu and select Settings Network.2. On the Network screen, select Configuration and press the [ENTER] button to enter the submenu.3. Set Internet Connection to On and Interface to Wireless.4. Select Wireless Setting and press the [ENTER] button you can select: Scan / Manual / Auto.5. If you select Scan, a screen will appear listing all of the wireless networks within range of the TV. Use the [▲/▼] button to select the wireless network with your router SSID and press the [ENTER] to confirm. Proceed to Step 7.6. If you select Manual, a screen will appear prompting you to enter the SSID of your wireless network. Press [ENTER] and an on-screen keyboard will pop up. Enter the SSID and select OK. Press [ENTER] and a screen will appear prompting you select the security mode for your wireless network. Use the [▲/▼] button to select the proper security mode and press [ENTER] to confirm. If you selected None for the security mode, proceed to step 9.7. A screen will appear prompting you to enter the password for the selected security mode. Press [ENTER] and an on-screen keyboard will pop up. Enter the password and select OK. Press [ENTER] to confirm. Proceed to Step 9.Netflix: Deactivate Netflix and display the exclusive Netflix ESN.VUDU: Deactivate VUDU.PANDORA: Deactivate Pandora.My Shared Devices: Allow or deny content sharing from other devices on your network.NOTES•Software Update can also be performed via downloading the latest software to a USB memory device.•Please be careful not to disconnect the power or remove the USB drive until updates are complete. The TV will be turned on automatically after completing the software update. When software is updated, video and audio settings you made will return to their default settings and your personal settings will be deleted. We advise you to write down your settings so that you can easily reset them after the update.NetworkPersonalize the network connection settings.ConfigurationAuto UpgradeFirmware UpgradeApplications>>>Off](https://usermanual.wiki/Hisense-Electric/LCDF0021.W9HLCDF0021-User-Manual-1/User-Guide-2027169-Page-25.png)
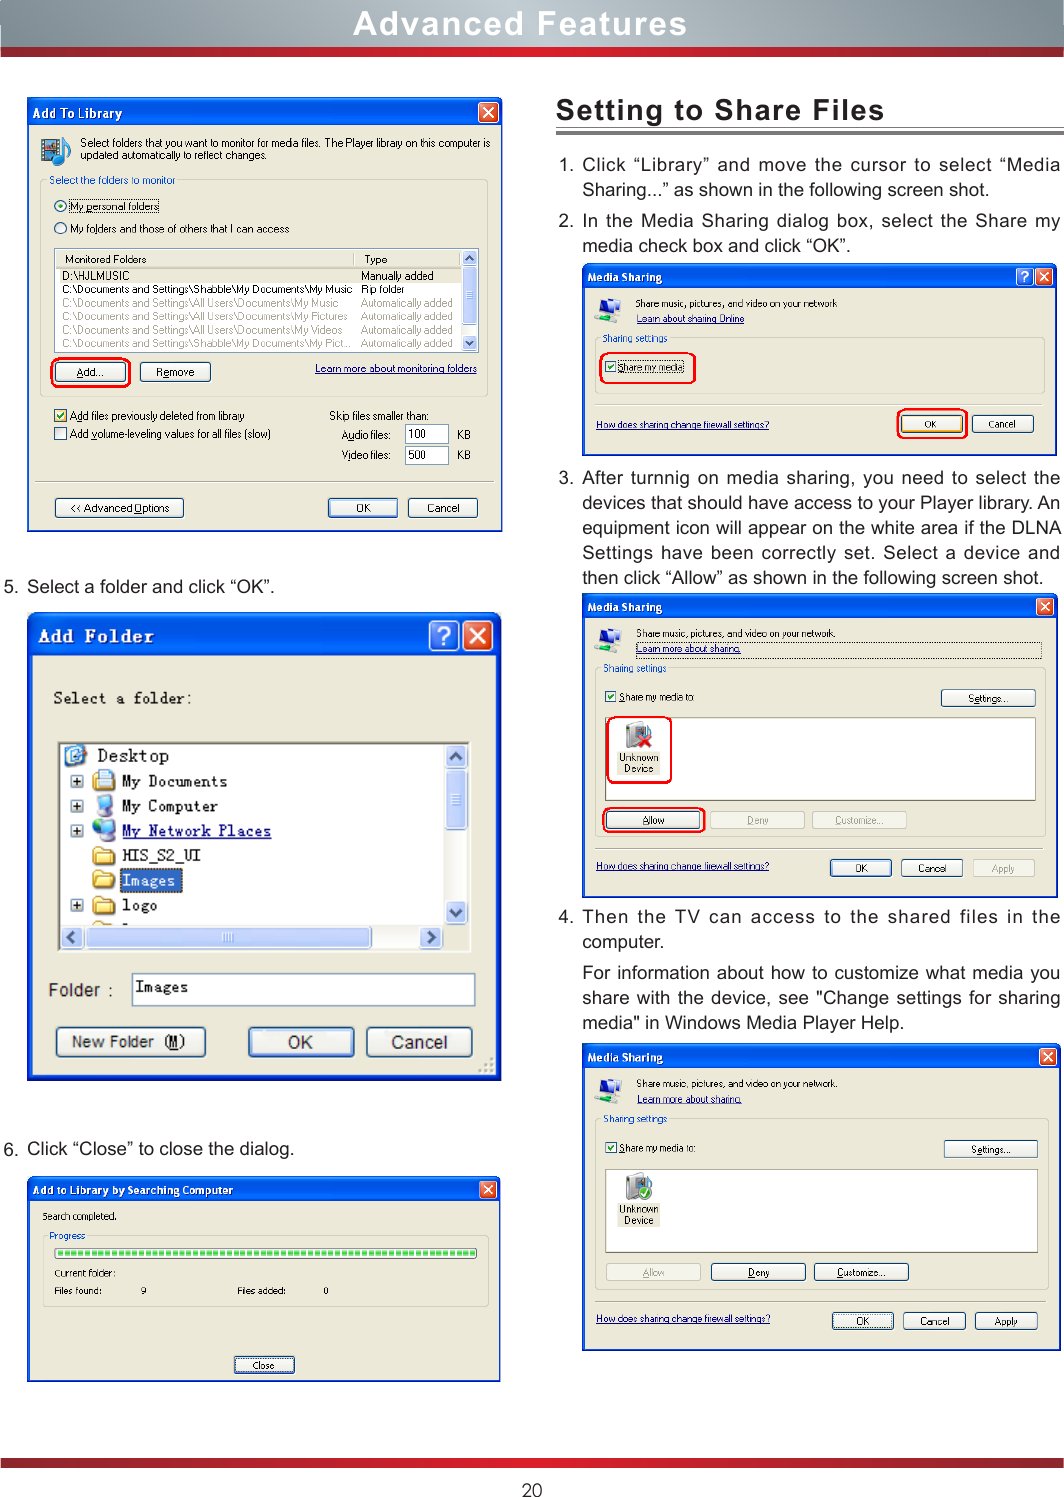
![19Advanced FeaturesYou can use DLNA Certified computers, TVs, and other devices to play or transfer the videos, pictures, and music stored on your phone , tablet or other devices connected to your network. For more about DLNA (Digital Living Network Alliance), visit www.dlna.org. Make sure your phone and TV are both connected to the same Wi-Fi network. Set DLNA to On:1. On the Network screen, select Applications and press the [ENTER] button to enter the submenu. 2. Press the [◄/►] buttons to set DLNA to On.DLNA SettingIf your computer does not support DLNA, you may install software that supports DLNA such as TVersity or Windows Media Player (Version V11 or higher). We recommend Windows Media Player as the installation and setup is easier.1. On the PC taskbar, click Start.2. Point to All Programs, and then click Windows Media Player.3. Click “Library” tab and then “Add to Library...” as shown in the following screen shot.4. In the Add To Library dialog box, click “Add” as shown in the following screen shot.Media Share Settings in Computer8. If you select Auto, a screen will appear prompting you to select PIN (personal identification number) or PBC (push button configuration) setup. Choose the method supported by your wireless access point. If you choose PIN, an identification number will appear on the screen for you to enter into the access point. After entering the PIN, press the [►] button. If the PIN is in use by another device, select [REFRESH] to obtain a new PIN and enter it into the access point. After entering the PIN, press the [►] button.If you choose PBC, a screen will appear prompting to press [►] button. After pressing the [►] button you have two minutes to locate and press the Push Button on your access point to connect to the TV.9. Press the [MENU] button to return to the previous menu.10. Select Connection Test to check the Internet connectivity.](https://usermanual.wiki/Hisense-Electric/LCDF0021.W9HLCDF0021-User-Manual-1/User-Guide-2027169-Page-26.png)