Hisense Electric LCDF0021 LED LCD TV User Manual W9HLCDF0021 1
Hisense Electric Co., Ltd. LED LCD TV W9HLCDF0021 1
Contents
- 1. W9HLCDF0021_User Manual_1
- 2. W9HLCDF0021_User Manual_2
- 3. W9HLCDF0021_User Manual_3
- 4. W9HLCDF0021_User Manual_4
W9HLCDF0021_User Manual_1

ES- Español
MANUAL DEL USUARIO
Antes de utilizar el televisor, por favor lea este manual
detenidamente y consérvelo para futuras referencias.
English
ES-

A
B
Important Safety Instructions
1. Read these instructions.
2. Keep these instructions.
3. Heed all warnings.
4. Follow all instructions.
5. Do not use this apparatus near water.
6. Clean only with dry cloth.
7. Do not block any ventilation openings. Install in accordance
with the manufacturer's instructions.
8. Do not install near any heat sources such as radiators,
heat registers, stoves, or other apparatus (including
amplifiers) that produce heat.
9. Do not defeat the safety purpose of the polarized or
grounding-type plug. A polarized plug has two blades with
one wider than the other. A grounding type plug has two
blades and a third grounding prong. The wide blade or the
third prong are provided for your safety. If the provided
plug does not fit into your outlet, consult an electrician for
replacement of the obsolete outlet.
10. Protect the power cord from being walked on or pinched
particularly at plugs, convenience receptacles, and the
point where they exit from the apparatus.
11. Only use attachments/accessories specified by the
manufacturer.
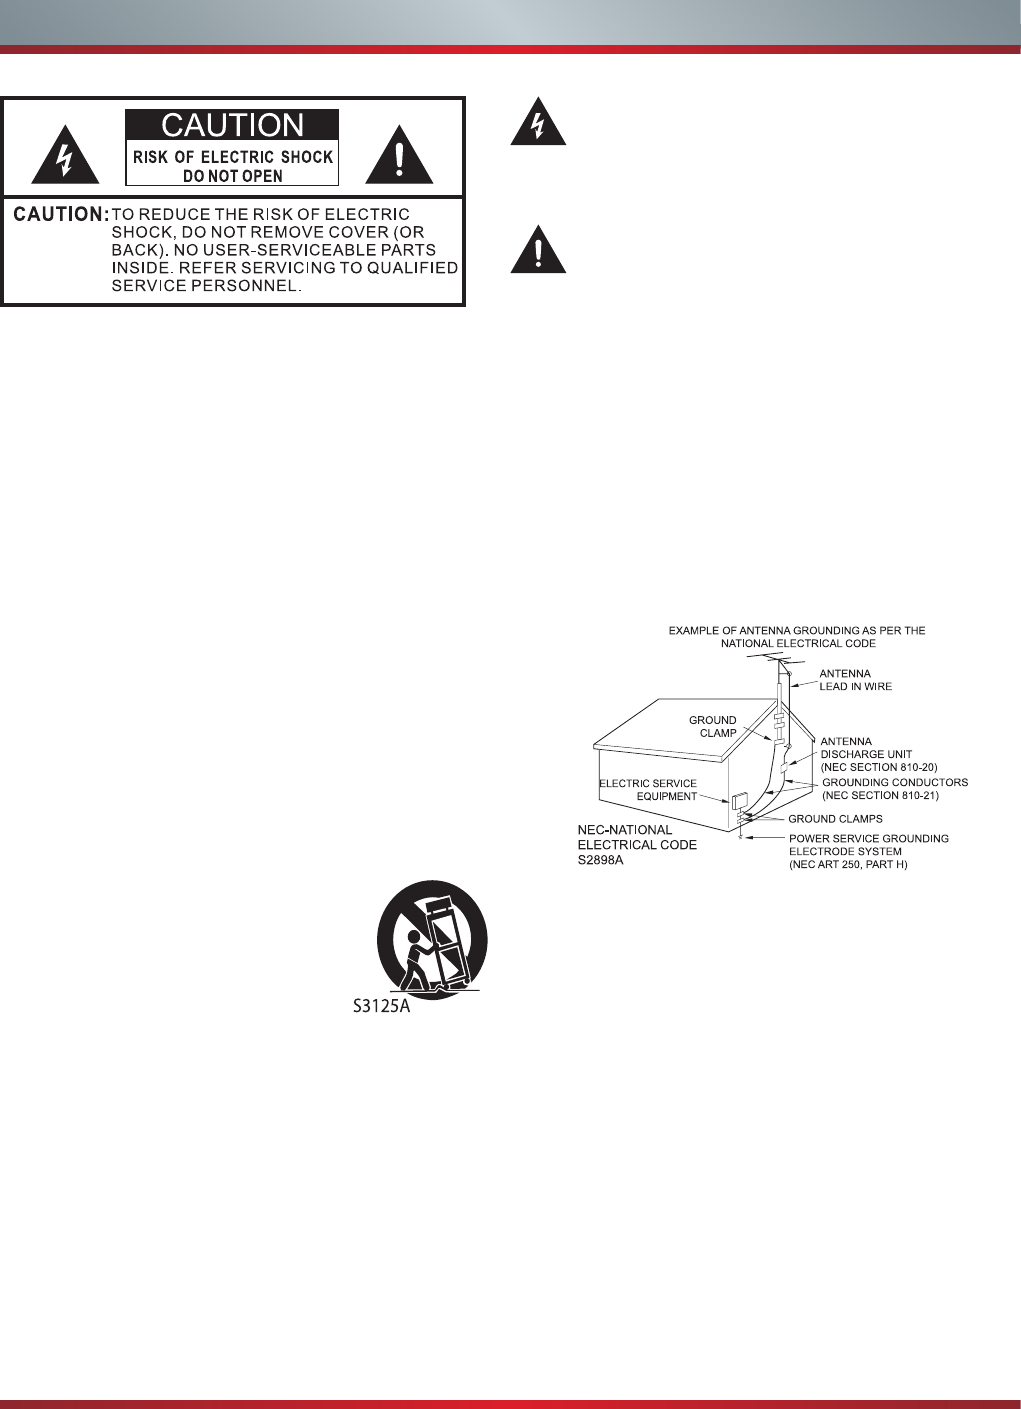
12. Use only with cart, stand, tripod,
bracket, or table specified by the
manufacturer, or sold with the
apparatus. When a cart is used,
use caution when moving the cart/
apparatus combination to avoid injury
from tip-over.
13. Unplug this apparatus during lightning storms or when
unused for long periods of time.
14. Refer all servicing to qualified service personnel.
Servicing is required when the apparatus has been
damaged in any way, such as power-supply cord or plug
is damaged, liquid has been spilled or objects have fallen
into the apparatus, the apparatus has been exposed to
rain or moisture, does not operate normally, or has been
dropped.
15. Apparatus should not be exposed to dripping or
splashing, and objects filled with liquids, such as vases,
should not be placed on the apparatus.
16. An outside antenna system should not be located in the
vicinity of overhead power lines or other electric light or
power circuits, or where it can fall into such power lines
or circuits. When installing an outside antenna system,
extreme care should be taken to keep from touching
such power lines or circuits, as contact with them might
be fatal.
17. Do not overload wall outlets and extension cords, as this
can result in a risk of fire or electric shock.
18. Do not push objects through any openings in this unit,
as they may touch dangerous voltage points or short out
parts that could result in fire or electric shock. Never spill
or spray any type of liquid into the unit.
19. If an outside antenna or cable system is connected to the
unit, be sure the antenna or cable system is grounded to
provide some protection against voltage surges and built-
up static charges, Section 810 of the National Electrical
Code, ANSI/NFPA 70, provides information with respect
to proper grounding of the mast and supporting structure,
grounding of the lead-in wire to an antenna discharge
unit, size of grounding conductors, location of antenna
discharge unit, connection to grounding electrodes, and
requirements for the grounding electrode.
20. When replacement parts are required, be sure the service
technician uses replacement parts specified by the
manufacturer or those that have the same characteristics
as the original part. Unauthorized substitutions may result
in fire, electric shock or other hazards.
21. Upon completion of any service or repairs to this unit,
ask the service technician to perform safety checks to
determine that the unit is in proper operating condition.
The lightning flash with arrowhead symbol, within an
equilateral triangle is intended to alert the user to the
presence of uninsulated dangerous voltage within the
product's enclosure that may be of sufcient magnitude
to constitute a risk of electric shock.
The exclamation point within an equilateral triangle is
intended to alert the user to the presence of important
operating and maintenance (servicing) instructions in
the literature accompanying the appliance.

C
Important Safety Instructions
Your TV also contains material that can be recycled and
reused. For disposal or recycling information, contact your
local authorities or the Electronic Industries Alliance at
www.eia.org to find a recycler in your area.
End of life directives
Power source
WARNING
Do not connect this unit to the power using any device
other than the supplied AC cord. This could cause fire,
electrical shock, or damage.
Do not use with a voltage other than the power voltage
specified. This could cause fire, electrical shock, or
damage.
TO USE AC POWER
1. The power cord is attached to the TV at the factory.
2. Connect the AC cord into an AC outlet.
CAUTION
When this unit is not used for a long time, (e.g., away on
a trip) in the interest of safety, be sure to unplug it from
the AC outlet.
Do not plug/unplug the AC cord when your hands are
wet. This may cause electrical shock.
The LCD panel contains almost 3 million thin film transistors,
which provide exceptionally sharp video quality. Occasionally,
a few non-active pixels may appear on the screen as a
fixed black (in the case of a dead pixel), blue, green, or red
point. These non-active pixels do not adversely affect the
performance of your TV, and are not considered defects.
Non-active pixels
22. When you connect the product to other equipment, turn
off the power and unplug all of the equipment from the
wall outlet. Failure to do so may cause an electric shock
and serious personal injury. Read the owner's manual of
the other equipment carefully and follow the instructions
when making any connections.
23. Sudden high volume sound may cause hearing or
speaker damage. When you use headphones, (if the unit
is equipped with a headphone jack) keep the volume at a
moderate level. If you use headphones continuously with
high volume sound, it may cause hearing damage.
CONDENSATION:
Moisture will form in the operating section of the unit if the
unit is brought from cool surroundings into a warm room or
if the temperature of the room rises suddenly. When this
happens, unit's performance will be impaired. To prevent
this, let the unit stand in its new surroundings for about an
hour before switching it on, or make sure that the room
temperature rises gradually.
Condensation may also form during the summer if the unit is
exposed to the breeze from an air conditioner. In such cases,
change the location of the unit.
HOW TO HANDLE THE LCD PANEL:
Do not press hard or jolt the LCD panel. It may cause the
LCD panel glass to break and injury may occur.
If the LCD panel is broken, make absolutely sure that you
do not touch the liquid in the panel. This may cause skin
inflammation.
If the liquid gets in your mouth, immediately gargle and
consult with your doctor. Also, if the liquid gets in your eyes
or touches your skin, consult with your doctor after rinsing
for at least 15 minutes or longer in clean water.
Possible Adverse Effects on LCD Panel:
If a fixed (non-moving) pattern remains on the LCD Panel
for long periods of time, the image can become permanently
engrained in the LCD Panel and cause subtle but permanent
ghost images. This type of damage is NOT COVERED BY
YOUR WARRANTY. Never leave your LCD Panel on for long
periods of time while it is displaying the following formats or
images:
Fixed Images, such as stock tickers, video game patterns,
TV station logos, and websites.
Special Formats that do not use the entire screen. For
example, viewing letterbox style (16:9) media on a normal
(4:3) display (black bars at top and bottom of screen); or
viewing normal style (4:3) media on a widescreen (16:9)
display (black bars on left and right sides of screen).
The following symptoms are not signs of malfunction
but technical limitation. Therefore we disclaim any
responsibility for these symptoms.
LCD Panels are manufactured using an extremely high
level of precision technology, however sometimes parts
of the screen may be missing picture elements or have
luminous spots.
This is not a sign of a malfunction.
Do not install the LCD Panel near electronic equipment that
produces electromagnetic waves. Some equipment placed
too near this unit may cause interference.
Effect on infrared devices - There may be interference
while using infrared devices such as infrared cordless
headphones.
Declaration of Conformity
This device complies with part 15 of the FCC Rules.
Operation is subject to the following two conditions:
(1) This device may not cause harmful interference and (2)
This device must accept any interference received, including
interference that may cause undesired operation.
D
Important Safety Instructions
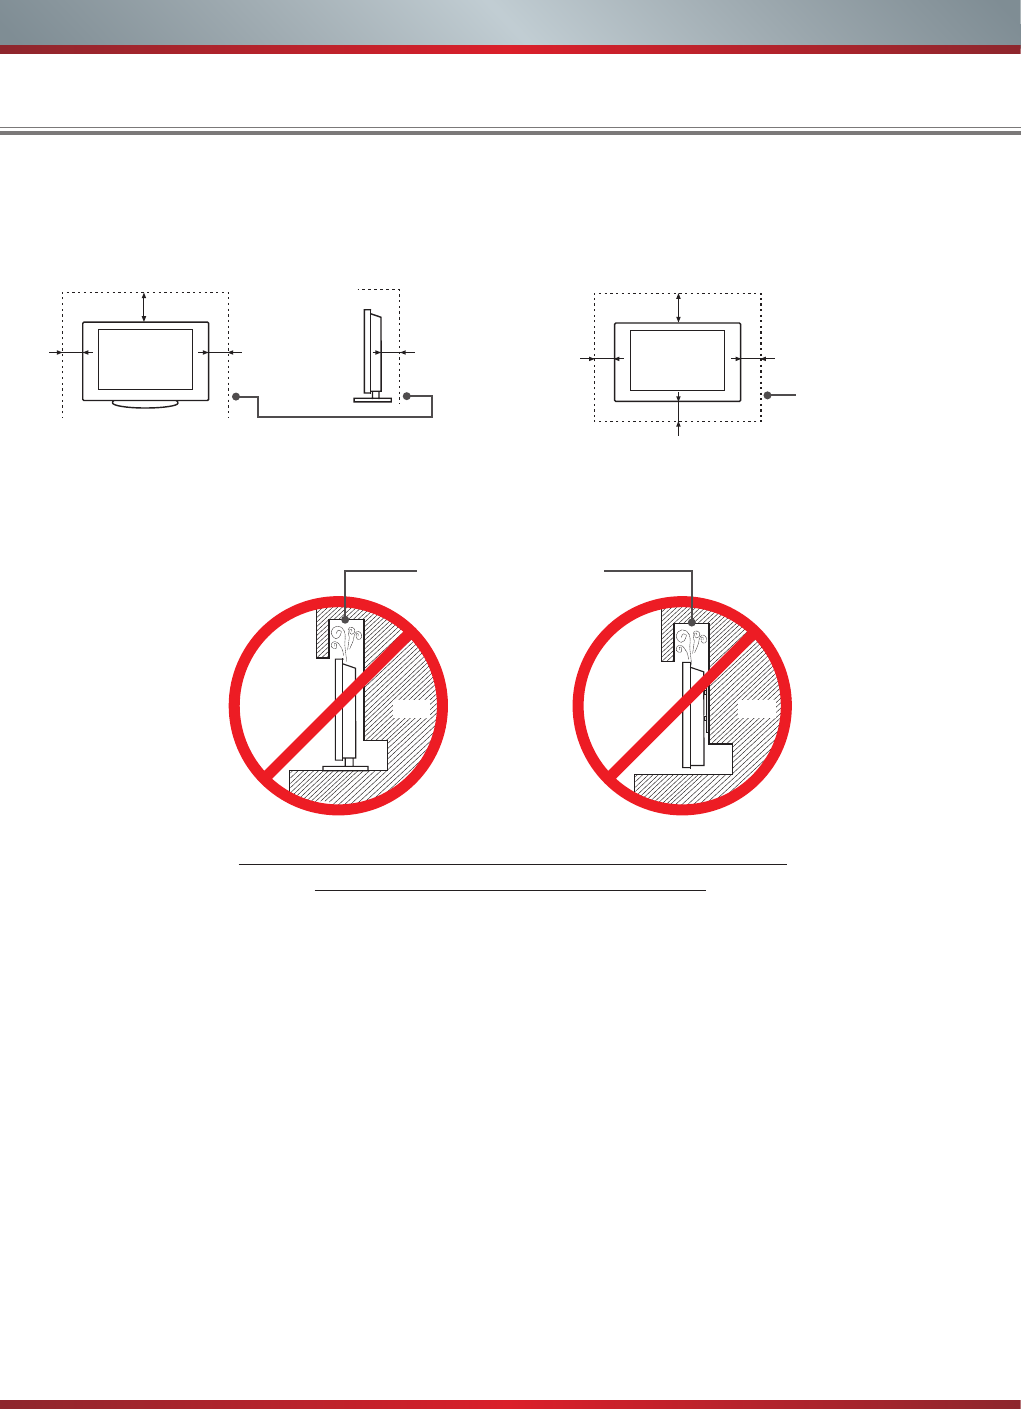
When Installing the TV Against a Wall or Enclosed Area
Install with stand
Never install the TV set as follows:
Install on the wall
Make sure that your TV has adequate air circulation. Allow enough space around the TV as shown below. Avoid operating the
TV at temperatures below 41°F (5°C).
Leave at least this much
space around the set.
Leave at least this much
space around the set.
4 inches
(10cm)
4 inches
(10cm) 4 inches
(10cm)
4 inches
(10cm)
4 inches
(10cm)
2 3⁄8 inches
(6cm)
12 inches
(30cm) 12 inches
(30cm)
Wall Wall
Air circulation is blocked.
Inadequate air circulation can lead to overheating of the TV and
may cause damage to your TV or cause a re.

E
Legal Notices
FCC Statement
NOTE:
This equipment has been tested and found to comply with
the limits for a class B digital Device, pursuant to part 15
of the FCC Rules. These limits are designed to provide
reasonable protection against harmful interference in a
residential installation. This equipment generates, uses and
can radiate radio frequency energy and, if not installed and
used in accordance with the instructions, may cause harmful
interference to radio Communications. However, there is
no guarantee that interference will not occur in a particular
installation. If this equipment does cause harmful interference
to radio or television reception, which can be determined by
turning the equipment off and on, the user is encouraged to
try to correct the interference by one or more of the following
measures:
Reorient or relocate the receiving antenna.
Increase the separation between the equipment and the
receiver.
Connect the equipment into an outlet on a circuit different
from that to which the receiver is connected.
Consult the dealer or an experienced radio/TV technician
for help.
FCC ID Number WiFi Module: WWMMN42756IV2
The WiFi Module complies with FCC radiation exposure
limits set forth for an uncontrolled environment. This device
should be installed and operated with a minimum distance of
20 centimeters between the radiator and your body.
Hisense and associated logos where applicable are registered trademarks of Hisense Group in the United States and/or other
countries. All other trademarks are property of their respective owners. 2013 Hisense USA, Corporation. All Rights Reserved.
Manufactured under license from Dolby Laboratories. Dolby and the double-D symbol are trademarks of Dolby Laboratories.
* Specications subject to change without notice.
This TV incorporates High-Denition Multimedia Interface (HDMITM) technology.
HDMI, the HDMI logo and High-Denition Multimedia Interface are trademarks or registered trademarks of HDMI Licensing LLC.
WARNING
The manufacturer is not responsible for any radio or TV
interference caused by unauthorized modifications to
this equipment. Such modifications could void the user's
authority.
Energy Star
Your Hisense TV is ENERGY
STAR ® qualified in the “Energy
Savings” mode. It meets strict energy
efficiency guidelines set by the U.S.
Environmental Protection Agency
and Department of Energy. ENERGY
STAR is a joint program of these
government agencies, designed to
promote energy efficient products and practices. Changes to
certain features, settings, and functionalities of this TV (i.e.
TV Guide, Picture, Sound) can increase or change the power
consumption. Depending upon such changed settings, the
power consumption may exceed the limits required for the
ENERGY STAR qualification in the “Energy Savings” mode.
NOTE
Where the MAINS plug or an appliance coupler is used
as the disconnect device, the disconnect device shall
remain readily operable.

1
Contents
Getting Started
Viewing the Remote Control ............................................................................3
Installing Batteries in the Remote Control .......................................................4
Making Connections ........................................................................................ 5
Network Connection ........................................................................................8
Basic Features
Turning your TV on or off ................................................................................10
Turning the TV On for the First Time .............................................................. 10
Changing Channels / Volume ......................................................................... 11
Selecting the Input Source ............................................................................. 11
Shortcuts Instructions ..................................................................................... 12
To Use the Menu ............................................................................................13
Using the Picture Menu ..................................................................................13
Using the Audio Menu ....................................................................................14
Using the TV Menu ......................................................................................... 15
Using the Setup Menu .................................................................................... 15
Using the Network Menu ................................................................................17
Advanced Features
DLNA Setting .................................................................................................. 19
Media Share Settings in Computer.................................................................19
Setting to Share Files .....................................................................................20
Network Function............................................................................................21
Using the Home Menu ....................................................................................22
Movies ............................................................................................................22
Apps ...............................................................................................................22
AccuWeather ..................................................................................................22
YouTube .........................................................................................................22
VUDU Movies ................................................................................................. 23

2
Contents
Advanced Features
VUDU Apps ....................................................................................................23
Netflix..............................................................................................................24
Vimeo .............................................................................................................24
Pandora .......................................................................................................... 25
Twitter ............................................................................................................. 25
Picasa .............................................................................................................25
Opera..............................................................................................................26
Opera Apps.....................................................................................................28
Digital Media Receiver (HiBeam) ...................................................................29
Digital Media Player(HiMedia) ........................................................................ 29
Browse Pictures..............................................................................................30
Enjoy Video Files ............................................................................................ 30
Enjoy Music Files............................................................................................32
Other Information
Troubleshooting .............................................................................................. 32
3
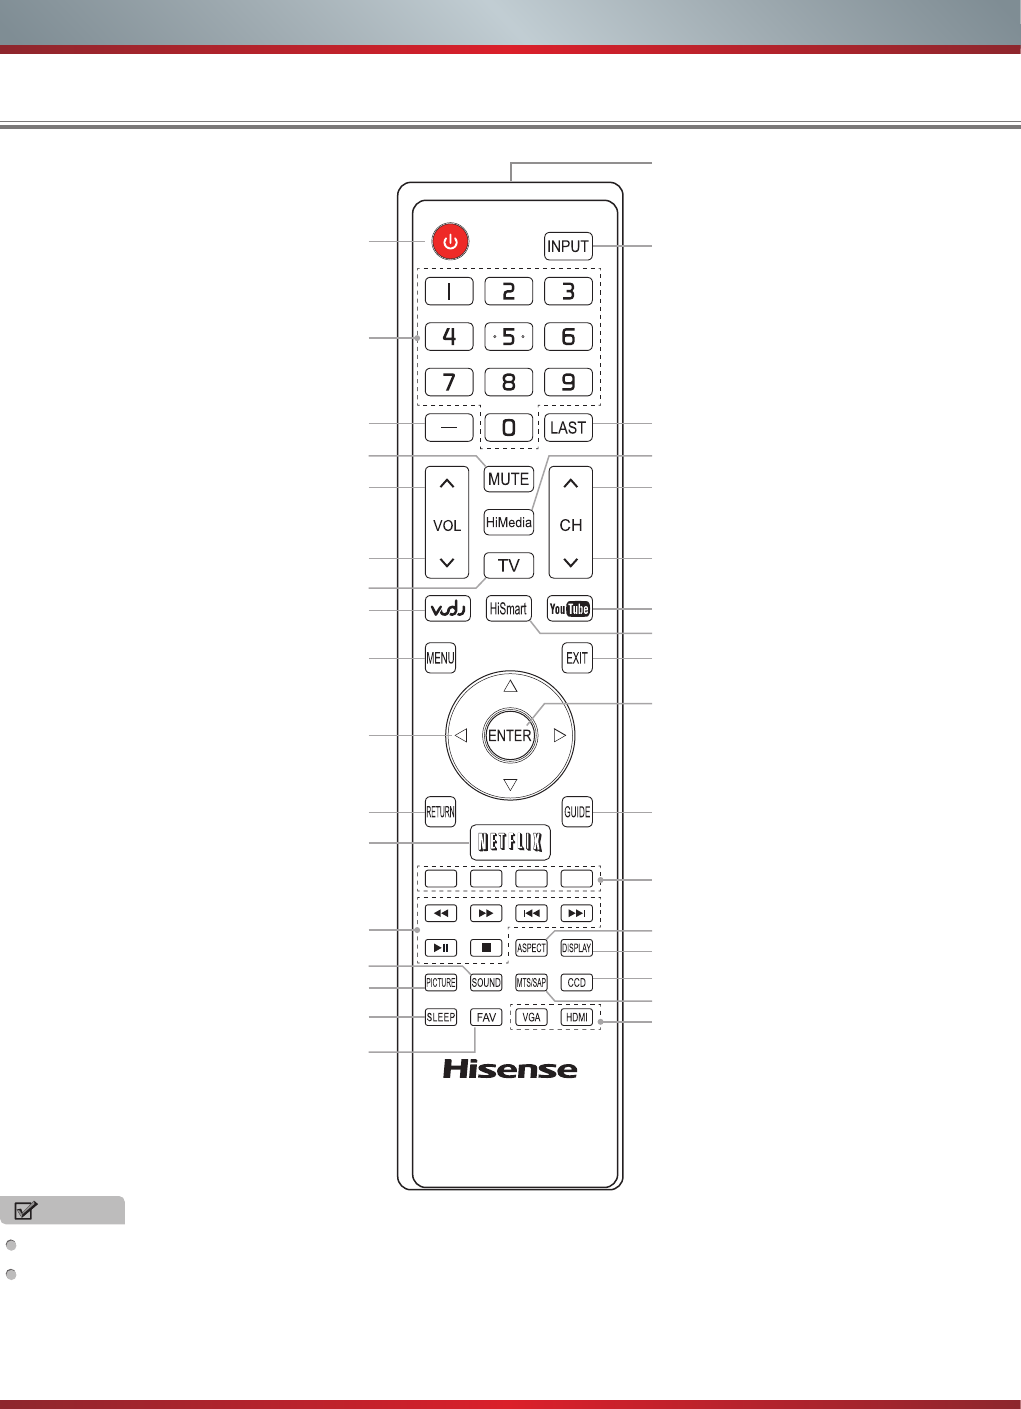
Remote Control Button Layout
NOTES
FOR ILLUSTRATION ONLY.
[RED/GREEN/YELLOW/BLUE] buttons are used for Electronic Program Guide (EPG).
After pressing the [GUIDE] button when viewing digital channels, the same color buttons will appear with explanations in the
on-screen display (OSD). Follow the steps shown in the OSD.
Power on/off
Decrease volume
Media content control function buttons
Return to the previous menu
Launch Vudu HD Movies
Launch Netix
Increase volume
Adjust Closed Caption (CCD) mode
Audio select button
MENU button
Dash button
Select a digital sub-channel
▲/
▲
/
▲
/
▲
Navigate Up / Down / Left / Right
or adjust OSD settings
Set the sleep timer
Select picture mode
Select sound mode Display the information banner
Conrm selections
MUTE button
ASPECT button
Close the menu
Next channel
Display the favorite channel list
Go to the previous channel
Enter TV source
Previous channel
HiMedia (Digital Media Player)
Open the HiSmart Home Menu
Select input source
Infra-red transmitter
Open the DTV program guide
(if available)
Select VGA / HDMI source
Special function buttons (see Notes)
Direct channel selection
Getting Started
Launch YouTube App
4
Installing Batteries in the Remote Control
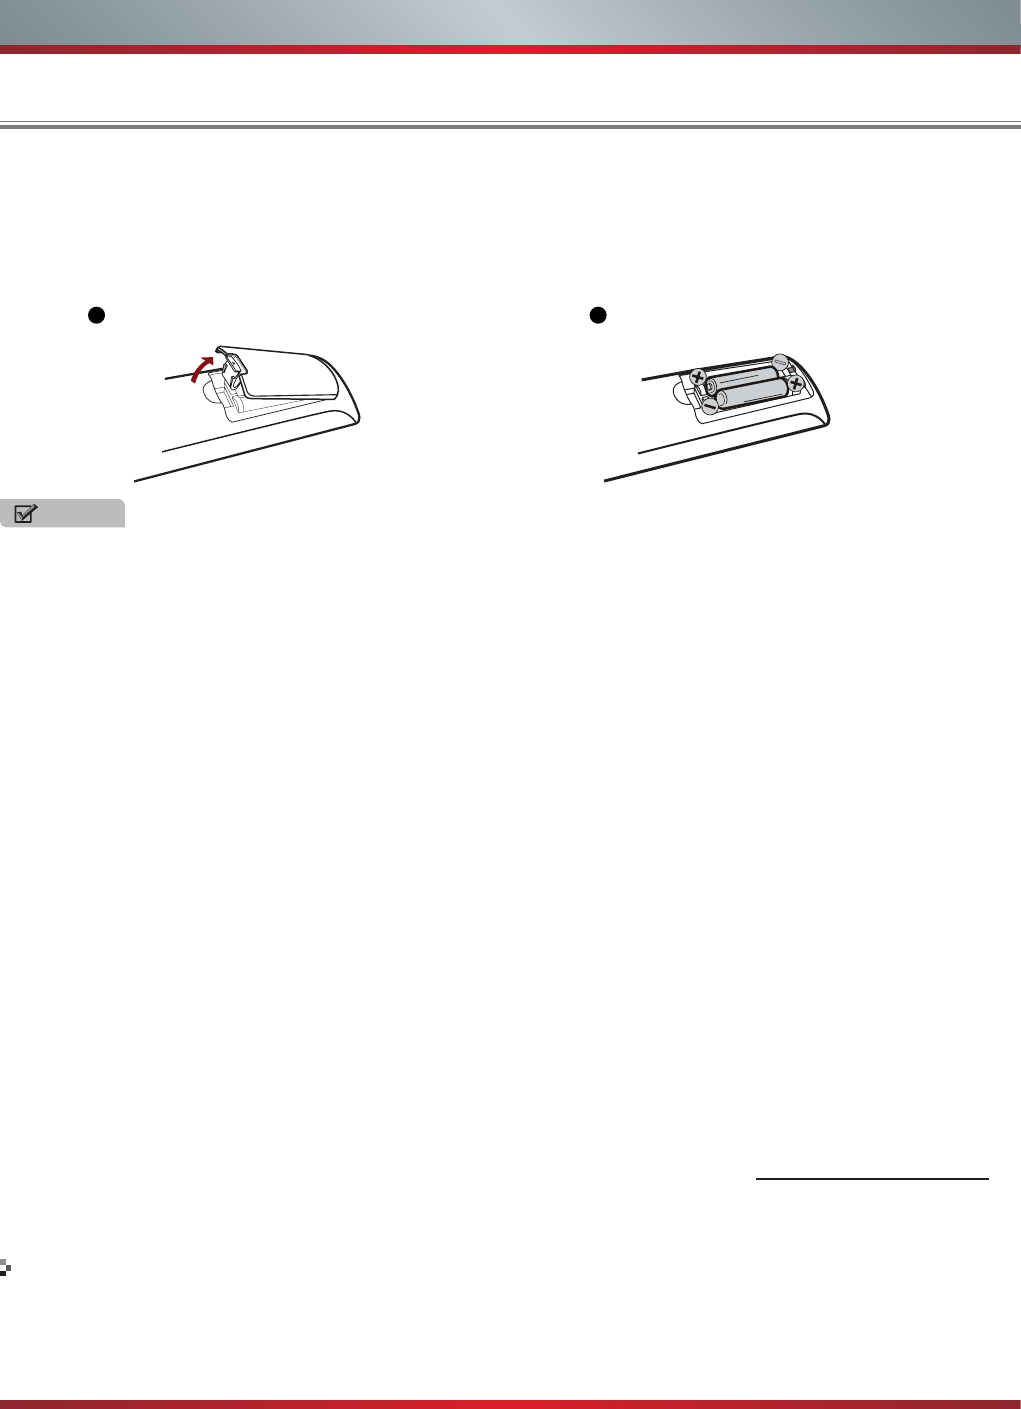
1. Press the release button on the back of the remote control to remove the battery compartment cover.
2. Insert two AAA size batteries. Make sure to match the (+) and ( - ) ends of the batteries with the (+) and ( - ) ends indicated in
the battery compartment.
3. Replace the battery compartment cover.
NOTES
1. Dispose of your batteries in a designated disposal area. Do not throw the batteries into a fire.
2. Remove depleted batteries immediately to prevent leakage into the battery compartment.
3. If you do not intend to use the remote control for a long time, remove the batteries.
4. Batteries should not be exposed to excessive heat, such as sunshine, heat registers, or fire.
5. Battery chemicals can cause a rash. If the batteries leak, clean the battery compartment with a cloth. If chemicals touch your
skin, wash immediately.
6. Do not mix old and new batteries.
7. Do not mix alkaline, standard (carbon-zinc) or rechargeable (ni-cad, ni-mh, etc.) batteries.
Program Your Universal Cable or Satellite Remote Control to Operate Your New Hisense Television!
If you would like to program your other household remote controls to your new Hisense television, please consult the User’s
Manual supplied by your Cable or Satellite provider. The Cable or Satellite providers’ User’s Manuals should include instructions
on how to program their remote to your television.
Below is a list of Hisense codes for the most common Cable and Satellite providers. Use the Hisense code that is associated
with your Cable or Satellite provider(if applicable).
DIRECTV ................................................... 0178 or 10019
Time Warner Cable ........................................386 or 0178
Comcast .................................................... 0178 or 10178
Cox Communications ............................................... 0178
Dish Network ................................................... 627 or 505
AT&T U-verse ........................................................... 1346
If the Hisense code associated with your Cable or Satellite provider is not listed above, if the code above does not work, or if
you cannot locate the instructions for programming your household remote to your television, call your local Cable or Satellite
provider’s customer service center.
If your Cable or Satellite provider does not have an Hisense code available, please visit http://www.hisense-usa.com for
additional codes.
Change the batteries
1Remove the battery compartment cover 2Insert the batteries
1. The remote control distance: up to 26 feet in front of the TV set.
2. The remote control angle: +/- 30-degrees (horizontal and vertical).
The effective range of remote control
Getting Started
5
Making connections
Getting Started
NOTES
Check the jacks for position and type before making any connections. Loose connections can result in image or color
problems. Make sure that all connections are tight and secure.
Not all A/V devices have the ability to connect to a TV, please refer to the user manual of your A/V device for compatibility
and connections procedure.
Always unplug the power cord when connecting external equipment.
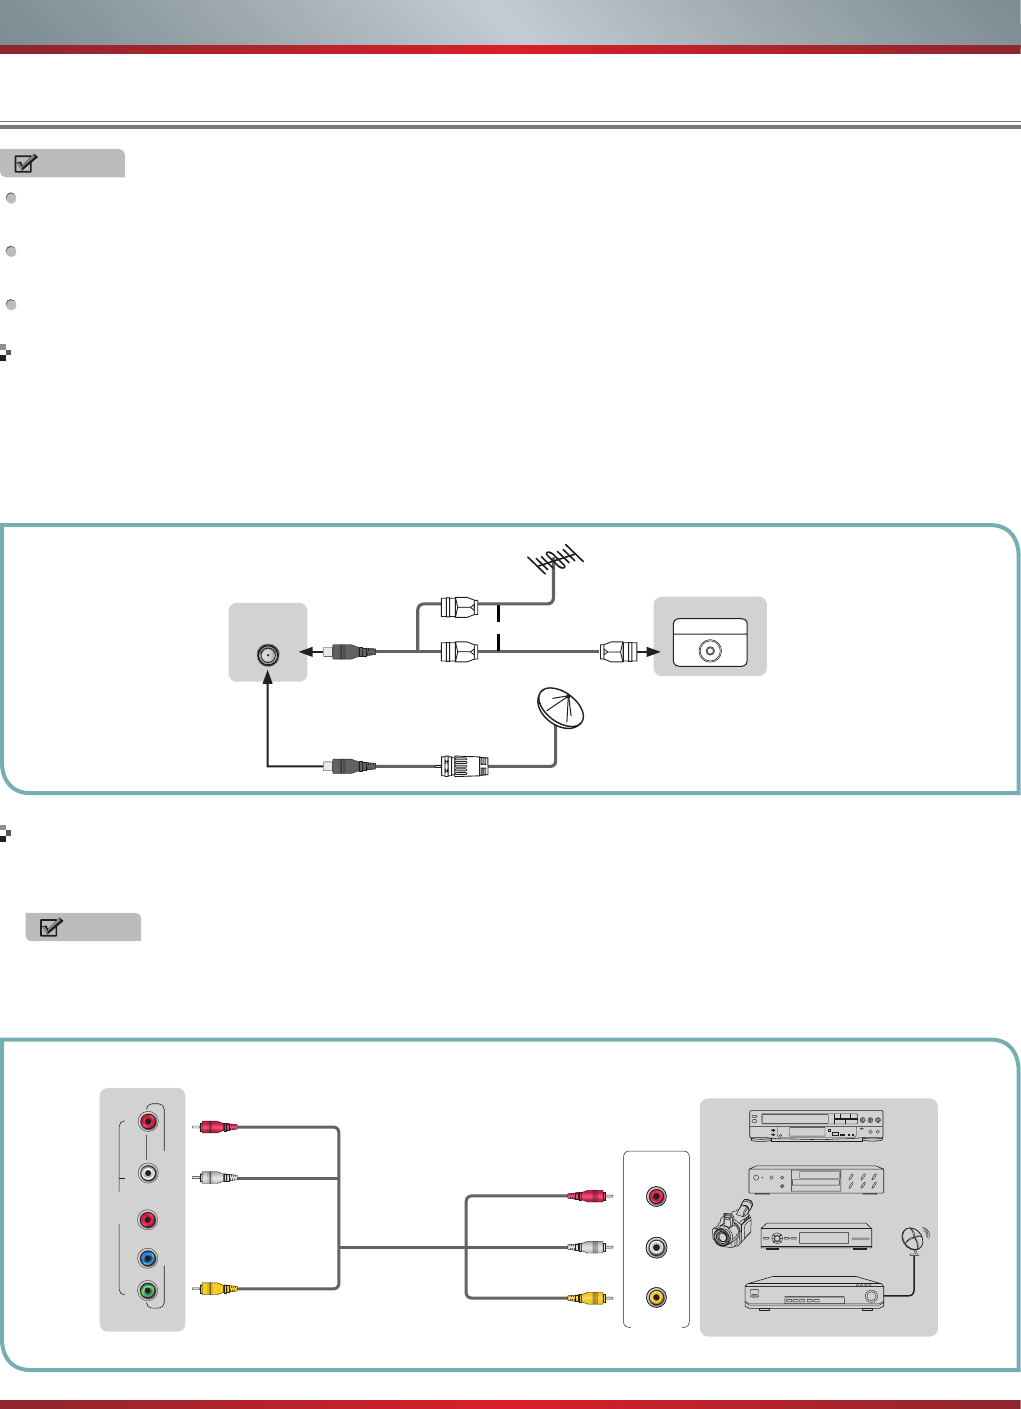
Connecting an antenna, cable or cable/satellite box
Connecting an A/V Device with Composite Cable
or ANT OUT
Cable
EXTERNAL DEVICESTV JACK
1. Turn off the TV before connecting the antenna.
2. Connect one end of a coaxial cable (not included) to the RF OUT jack on the antenna, cable or cable/satellite box. If you are
using an antenna with twin-lead cable, you may need a 300-75 ohm adapter (not provided) to connect it to the back of your
TV. Likewise, if you are using several antennas, you may need a combiner (not provided).
3. Connect the other end of the cable to the ANT/CABLE jack on the side of your TV.
1. Use the audio and video cables to connect the external A/V device’s composite video/audio jacks to the TV’s jacks. (Video =
yellow, Audio Left = white, and Audio Right = red)
NOTE
Connect the yellow video plug to the Green Y-input jack on the TV.
2. Plug the connected devices into the mains socket before switching on the TV.
3. Select the corresponding source from the TV.
ANT/CABLE
Equipment with A/V jacks
DVD Player/Recorder
Video
Camera
EXTERNAL DEVICES
Set-top box
Satellite Receiver
Satellite
antenna
cable
VCR
A/V OUT
Video
L
R
White(L)
White(L)
Yellow(Video)
Yellow(Video)
Red(R)
Red(R)
TV JACK
AV Cable
(not included)
YPBPR
L -AUDIO- RVIDEO
AV IN
COMPONENT IN
6
Getting Started
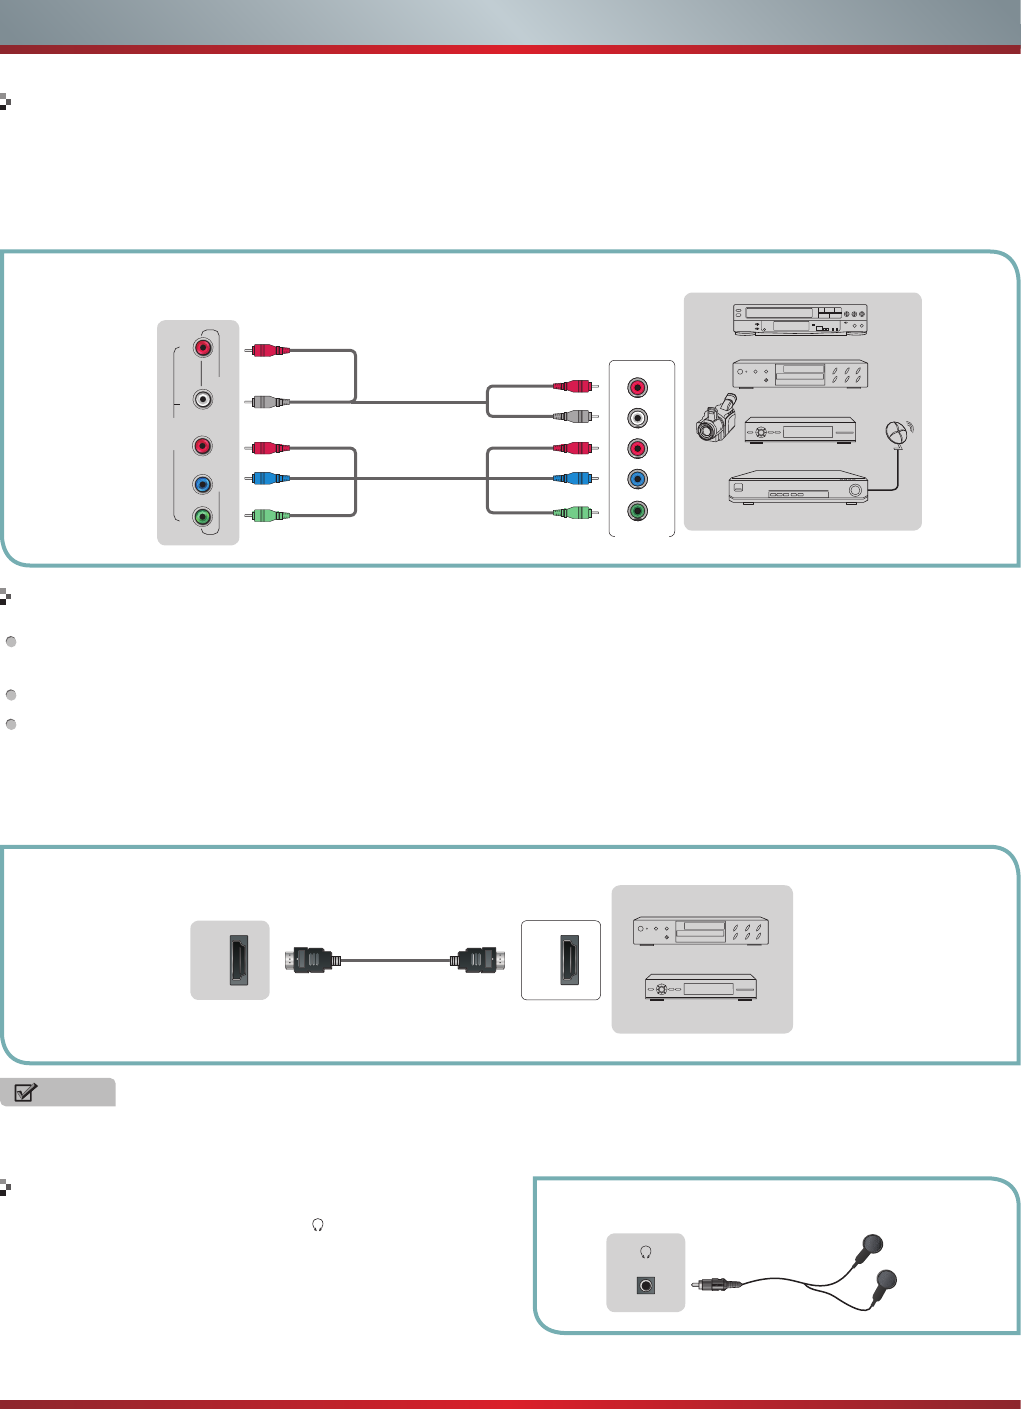
Connecting an A/V Device with Component (YPBPR) Cable
Connecting an A/V Device with HDMI Cable
1. Use a component cable to connect the external A/V device’s component output jacks to the TV’s YPBPR jacks. Use an audio
cable to connect the external A/V device’s component audio jacks to the TV’s AUDIO (L/R) jacks.
2. Plug the connected devices into the mains socket before switching on the TV.
3. Select the corresponding source from the TV.
Support digital connections between HDMI - enabled A/V devices such as PVR, DVD, Blu-ray, AV receiver and digital
devices.
Some devices such as PVR or DVD player require HDMI signal to be set to output in the device's settings.
Please consult your device user manual for instructions.
1. Use an HDMI cable to connect the A/V device’s HDMI output jack to the TV’s HDMI jack.
2. Plug the connected devices into the mains socket before switching on the TV .
3. Select the corresponding source from the TV.
NOTE
The HDMI connector provides both video and audio signals, it’s not necessary to connect the audio cable.
Equipment with A/V jacks
DVD Player/Recorder
Video
Camera
EXTERNAL DEVICES
Set-top box
Satellite Receiver
Satellite
antenna
cable
VCR
White(L)
White(L)
Red(R)
Red(R)
Audio Cable
(not included)
Component Cable
(not included)
HDMI
HDMI
TV JACK
EXTERNAL DEVICES
DVD Player/Recorder
Set-top box
Equipment with HDMI jacks
HDMI Cable
(not included)
TV JACK
Component
R
L
PR
PB
Y
PR/CR
PR/CR
PB/CB
PB/CB
Y
Y
Connecting a headphone
Headphones can be connected to the /AUDIO OUT output
on your set. (While the headphone is connected, the sound
from the built-in speakers is disabled.) AUDIO OUT
EXTERNAL DEVICESTV JACK
YPBPR
L -AUDIO- RVIDEO
AV IN
COMPONENT IN
7
Getting Started
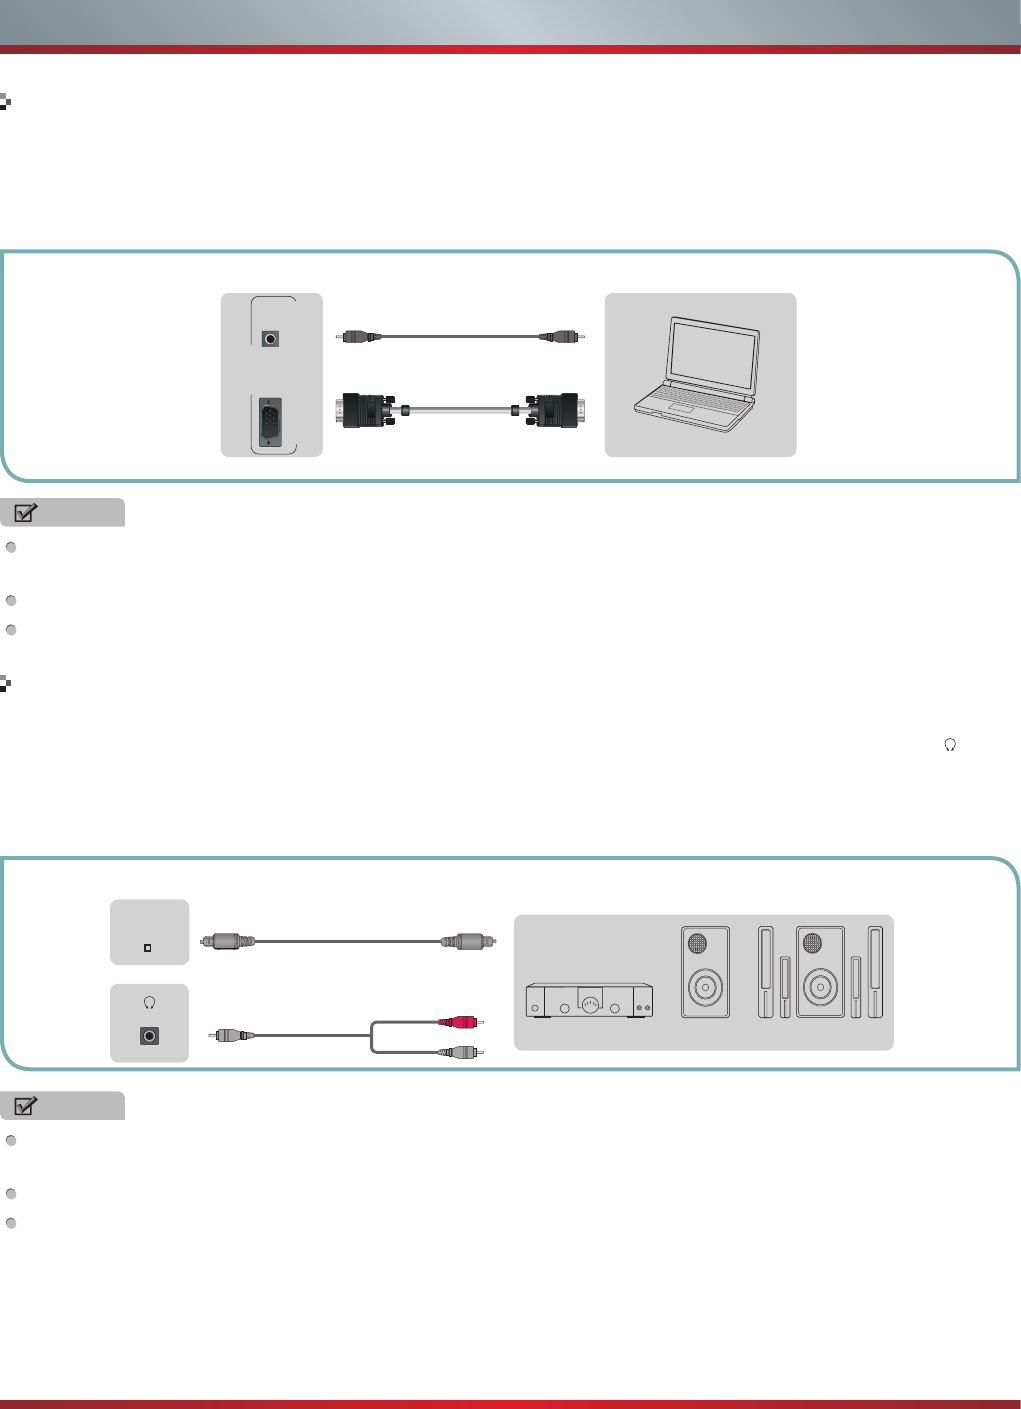
Connecting a PC with VGA Cable
1. Use a VGA cable to connect the PC’s VGA output jack to the TV’s VGA jack. Use an audio cable to connect the PC’s audio
output jack to TV’s PC/DVI AUDIO IN jack.
2. Plug the connected devices into the mains socket before switching on the TV.
3. Select the corresponding source from the TV.
NOTES
Primarily this unit is intended for use as an LCD TV. If you want to use it as a monitor, please contact the manufacturer of the
PC Video/Graphic's card for further support. Perfect compatibility is not guaranteed.
The VGA cable is not supplied with the product.
We strongly recommend the use of a VGA cable with two ferrite cores to reduce interference. (as shown in the illustration).
EXTERNAL DEVICES
Computer
TV JACK
Audio Cable
(not included)
VGA Cable
(not included)
Connecting an Audio Receiver with Audio cable
1. Use an audio Optical cable to connect the A/V device’s digital audio in jack to the TV’s DIGITAL OUTPUT (Optical) jack. Or
use an RCA Y-cable (1/8”-stereo mini to L/R phono - not provided) to connect analog sound system to the TV’s /AUDIO
OUT jack.
2. Plug the connected devices into the mains socket before switching on the TV.
3. Select the corresponding source from the TV.
NOTES
When a digital audio system is connected to the DIGITAL OUTPUT (Optical) jack, decrease the volume of both the TV and
the system.
5.1 CH (channel) audio is available when the TV is connected to an external device supporting 5.1 CH.
When the receiver (home theater) is set to on, you can hear sound output from the TV’s digital audio out jack. When the TV
is receiving a DTV signal, the TV will send 5.1 CH sound to the home theater receiver. When the source is connected to the
TV via HDMI, only 2 CH audio will be heard from the home theater receiver. If you want to hear 5.1 CH audio, connect the
digital audio out jack from your DVD/Blu-ray player/cable box/STB satellite receiver directly to an amplifier or home theater.
PC IN
VGA PC/DVI AUDIO IN
TV JACKS EXTERNAL DEVICES
Powerless
Bass Speaker
Speaker
Audio Amplier
AUDIO OUT
White(L)
Red(R)
Audio Cable
(not included)
Audio Cable
(not included)
DIGITAL
OUTPUT
(Optical)
8
Getting Started
Network Connection
You can set up your TV so that it can access the Internet through your local area network (LAN) with a Ethernet or wireless
connection.
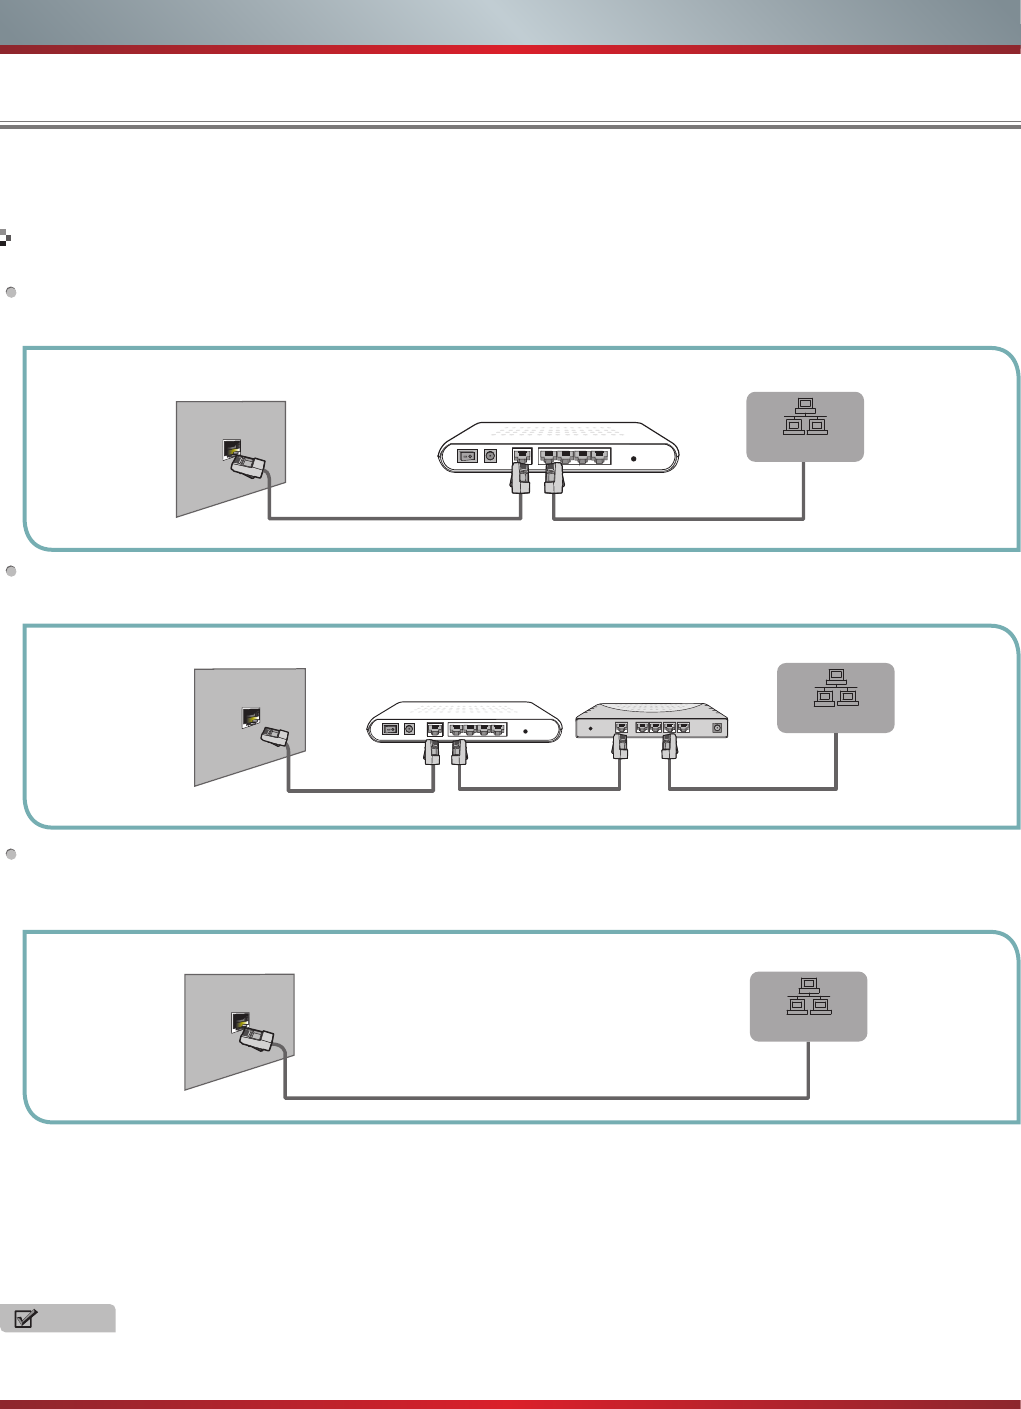
You can attach your TV to your LAN by one of the three following ways:
You can attach your TV to your LAN by connecting the LAN port on the back of your TV to an external modem using a Cat 5
LAN cable. See the diagram below.
You can attach your TV to your LAN by connecting the LAN port on the back of your TV to an IP Sharer which is connected
to an external modem. Use LAN cable for the connection. See the diagram below.
Depending on how your network is configured, you may be able to attach your TV to your LAN by connecting the LAN port
on the back of your TV directly to a network wall outlet with a Cat 5 cable. See the diagram below. Note that the wall outlet
is attached to a modem or router elsewhere in your house.
If you have a Dynamic Network, you should use an ADSL modem or router that supports Dynamic Host Configuration Protocol
(DHCP). Modems and routers that support DHCP automatically provide the IP address, subnet mask, gateway, and DNS, so
you don’t have to enter them manually. Most home networks are Dynamic Networks.
Some networks require a Static IP address. If your network requires a Static IP address, you must enter the IP address, subnet
mask, gateway, and DNS values manually on your TV’s Cable Setup Screen when you set up the network connection. To get
the IP address, subnet mask, gateway, and DNS values, contact your Internet Service Provider (ISP).
If you have a Windows computer, you can also get these values through your computer.
The Modem Port on the Wall
Modem Cable LAN Cable
LAN Port on TV
External Modem
(ADSL / VDSL / Cable TV)
LAN
The Modem Port on the Wall
Modem Cable LAN Cable LAN Cable
LAN Port on TV
External Modem
(ADSL / VDSL / Cable TV)
IP Sharer (Router)
(with DHCP server)
LAN
The LAN Port on the Wall LAN Port on TV
LAN Cable
LAN
NOTE
You can use ADSL modems that support DHCP if your network requires a Static IP address. ADSL modems that support
DHCP also let you use Static IP addresses.
Connecting to a Wired Network
9
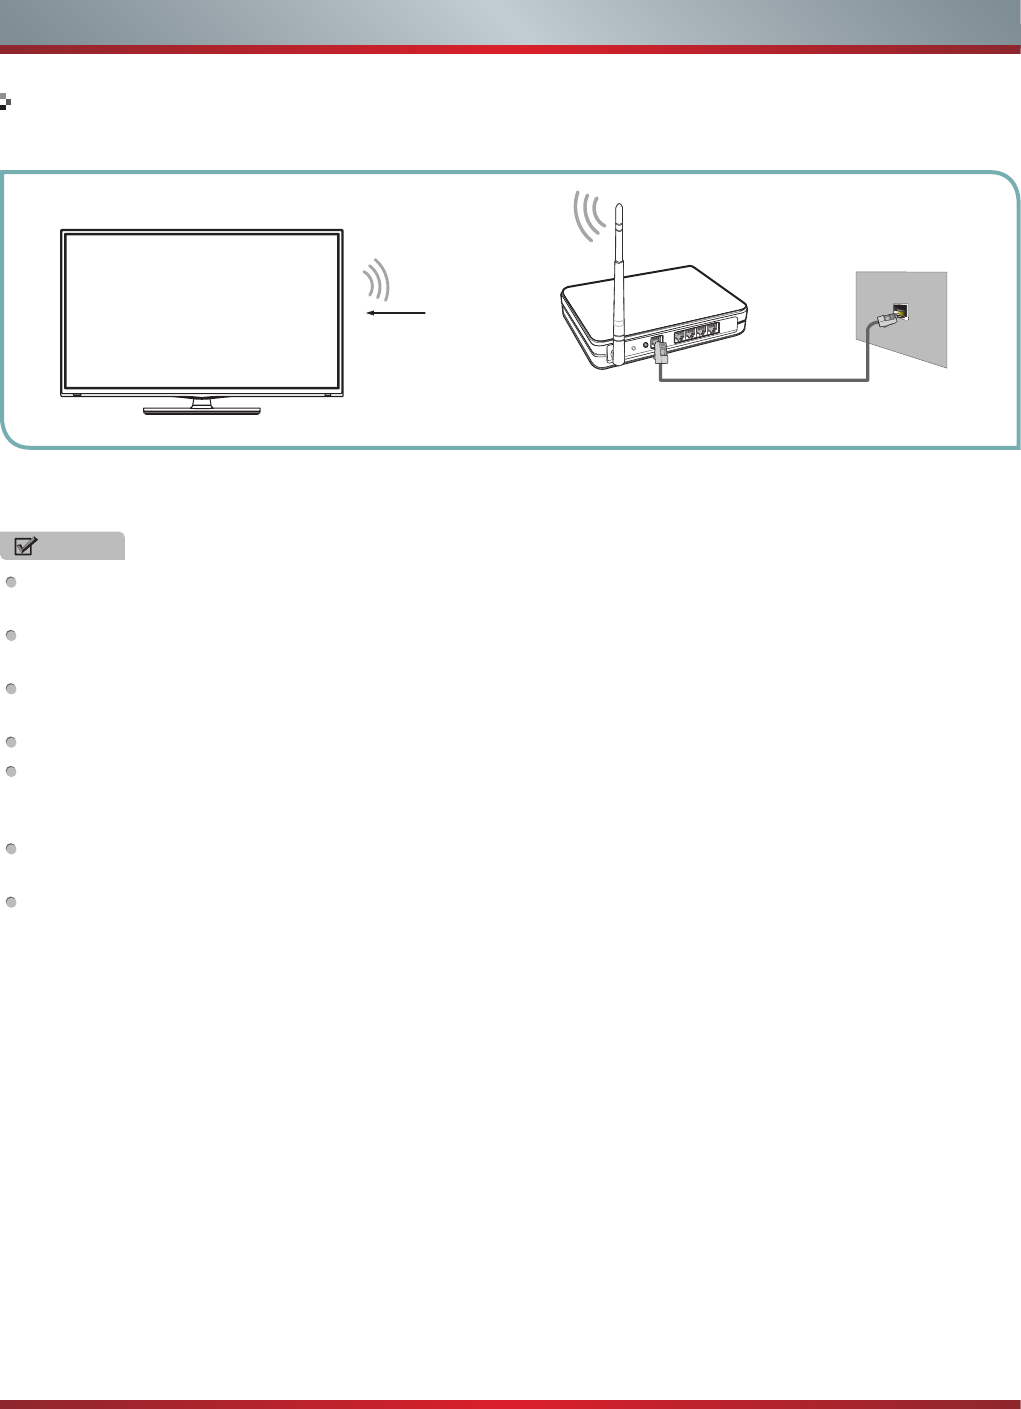
To connect your TV to your network wirelessly, you need a wireless router or modem. See the illustration below.
Hisense’s built-in Wireless LAN Adapter supports the IEEE 802.11 b/g/n communication protocols. Hisense recommends using
IEEE 802.11n router. When you play the video over a IEEE 802.11b/g connection, the video may not play smoothly.
NOTES
You must use the Hisense’s built-in Wireless LAN Adapter to use a wireless network, the set doesn’t support external USB
network adapter.
To use a wireless network, your TV must be connected to a wireless IP sharer. If the wireless IP sharer supports DHCP, your
TV can use a DHCP or static IP address to connect to the wireless network.
Select a channel for the wireless IP sharer that is not currently being used. If the channel set for the wireless IP sharer is
currently being used by another device nearby, this will result in interference and communication failure.
If you apply a security system other than the systems listed below, it will not work with the TV.
If Pure High-throughput (Greenfield) 802.11N mode is selected and the Encryption type is set to WEP, TKIP or TKIP-AES
(WPS2 Mixed) for your Access Point (AP), this player will not support a connection in compliance with new Wi-Fi certification
specifications.
If your AP supports WPS (Wi-Fi Protected Setup), you can connect to the network via PBC (Push Button Configuration) or
PIN (Personal Identification Number). WPS will automatically configure the SSID and WPA key in either mode.
Connection Methods: You can setup the wireless network connection three ways.
-Scan
-Manual
-Auto
Connecting to a Wireless Network
Wireless IP Sharer(Router)
(with DHCP Server)
LAN Cable
Wireless LAN Adapter
built-in TV set
The LAN Port on
the Wall
Getting Started
10
Basic Features
Turning the TV On for the First Time
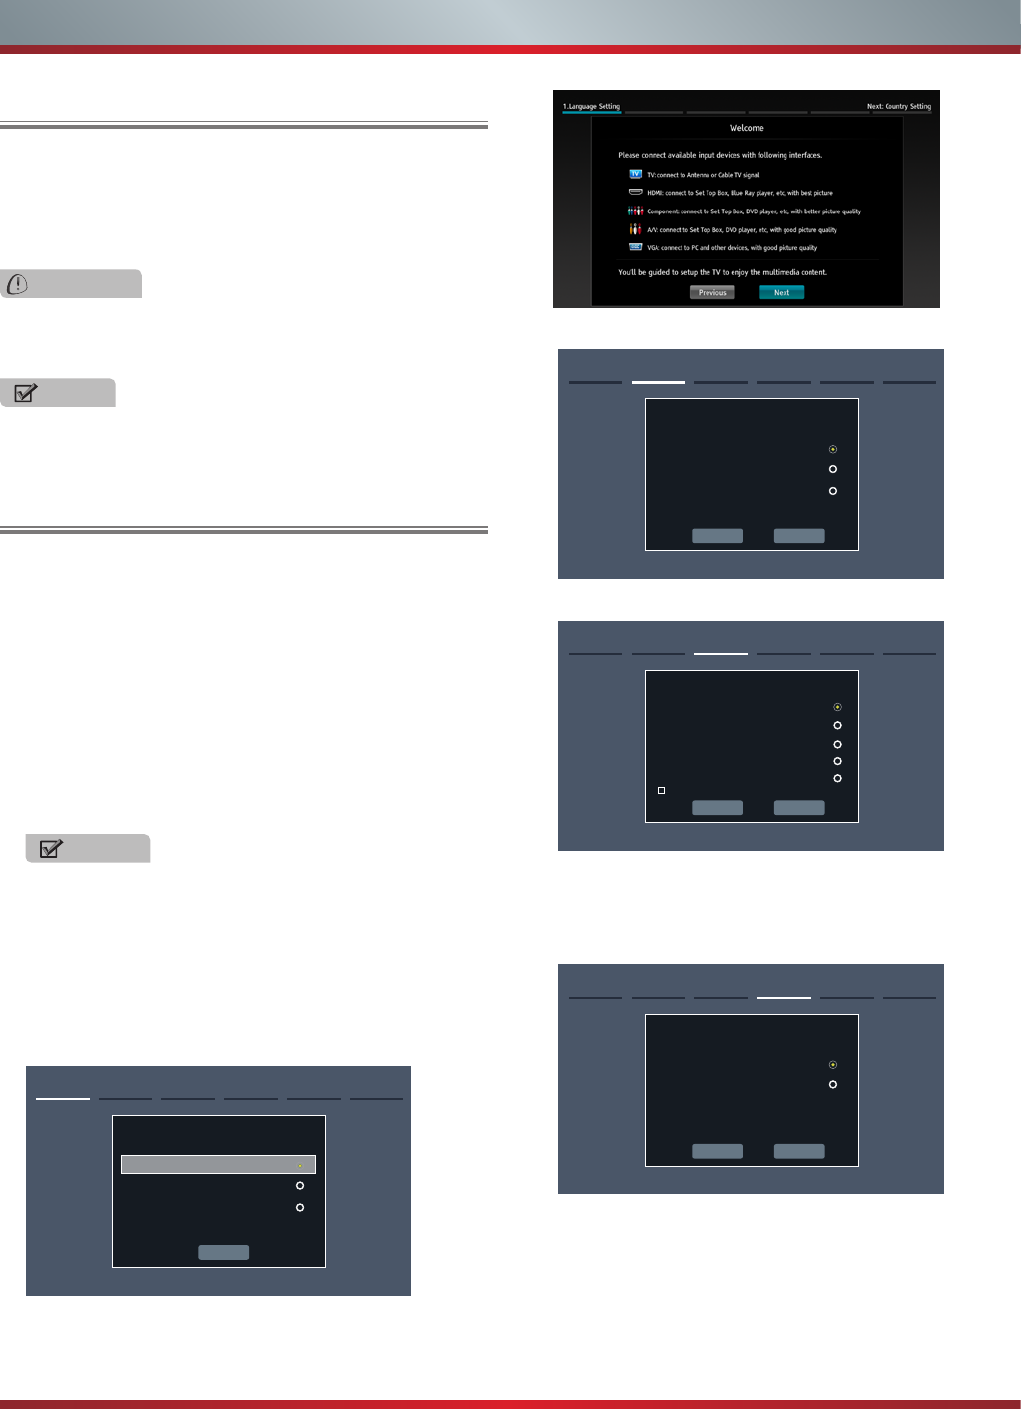
The Setup Wizard menu appears the first time you turn
on the TV. It will assist you to specify the menu language,
country setting, Use Mode, Network Setting and Channel
Installation.
IMPORTANT: Make sure that the antenna or cable is
connected and a wired or wireless Internet connection
is available.
1. Make sure that you have:
Installed the remote control batteries.
Connected the power cord.
Connected to an antenna or cable TV signal.
NOTE
The customer will be prompted to connect a Network
cable in the Select Network wizard screen.
2. Connect your TV’s power cord to a power outlet, then
press power. The Initial Setup screen opens.
3. Please press [ENTER] to start the wizard, then press
[▲/
▲
] button to select your language: English, Spanish
or French, select [Next] to confirm and move to the
Welcome screen.
Next
1. Language setting Next: Country Setting
Language settings
English
Español
Français
The Welcome screen displays the available input devices
and interfaces.
4. Select the country where you will operate the TV.
Previous Next
2.Country setting Next: Time Zone Setting
Country setting
USA
Canada
Mexico
5. Select the local time zone according to your region.
Previous Next
3.Time zone setting Next: Use Mode
Time Zone settings
Pacic Time
Mountain Time
Central Time
Eastern Time
Hawaii
Daylight Saving Time
Daylight Saving: Set the Daylight Saving time for your area.
6. Select Use Mode Setting: Home Mode or Retail Mode.
Home Mode is the recommended setting which offers full
functionality of the television.
Previous Next
4.Use Mode Next: Network Setting
Use Mode
Home mode
Retail mode
Home mode default settings are recommended
for in-home use.ENERGY STAR ® qualied.
If you select Retail Mode, a message appears “Are you
sure to change to retail mode?” Select “OK” to continue,
or select “Cancel” to change your selection.
Home Mode is the recommended setting which offers full
functionality of the television. If you selected Retail Mode,
Energy Savings are not realized.
To turn your TV on or off (standby mode):
1. Plug the power cord into an AC power outlet.
2. Press [POWER] button. Your TV turns on.
3. Press [POWER] button again to turn off your TV. When
you turn off your TV, it goes into standby mode.
Turning your TV on or off
WARNING
When your TV is in standby mode, it is still receiving
power. To completely disconnect power, unplug the power
cord.
NOTE
If your TV does not receive an input signal for several
minutes, it automatically goes into standby mode.
11
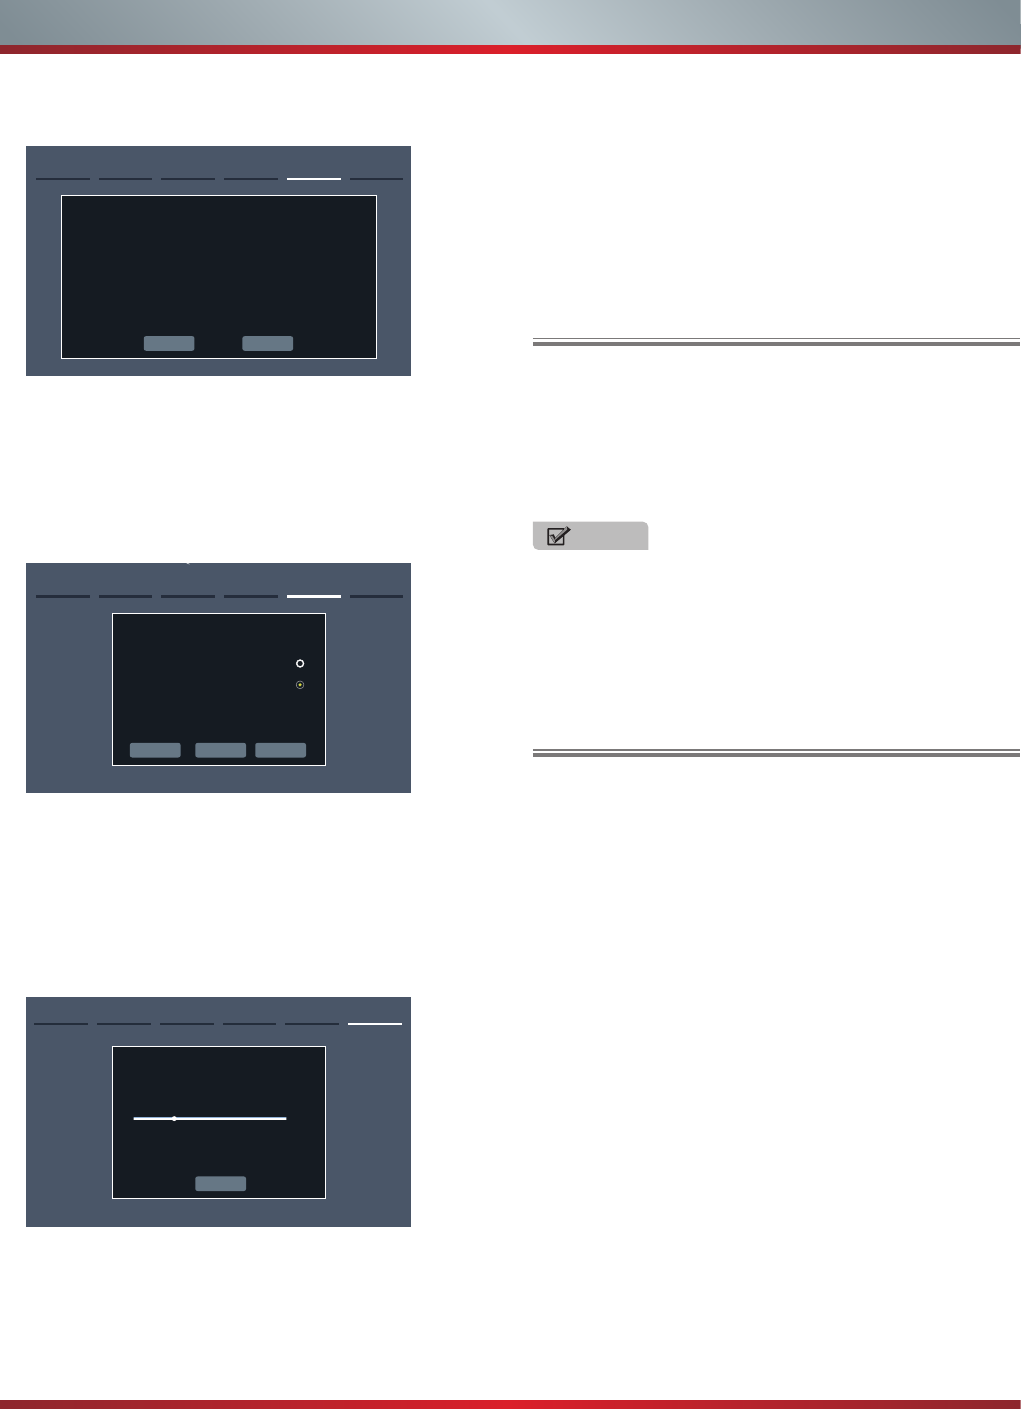
8. The Channel Search.
Press [▲/
▲
] to select your Tuner Mode: Antenna or
Cable, press [ENTER] button to confirm.
Channel Search
Please allow 30 minutes to complete.
30%
Stop
6. Channel Search
ATV Channels added:0
DTV Channels added:0
Press [
▲
/
▲
] to set the Channel Installation: Scan or Skip
Scan, press [ENTER] button to confirm.
If you select “Scan”, your TV automatically starts
Channel Installation available in your viewing area.
If you select “Skip Scan”, your TV does not scan for
channels.
1. Press the [CH
V
/V] (or [CH +/-]) on the TV/remote control
to change the channel.
2. Press the [VOL
V
/V] (or [VOL +/-]) on the TV/remote
control to adjust the volume.
3. Press the numeric buttons on the remote control to
display the corresponding channels.
Changing Channels / Volume
The first time you turn on your TV, you must select the TV
signal source. Your TV stores this information, so you do not
need to change the TV signal source unless it changes. For
example, you change from an outside antenna to cable TV.
To select the video input source:
1. Turn on your TV, then press [INPUT] button on the remote
or on the TV. The Input Source menu opens.
2. Press [▲/
▲
] button to highlight the input source, then
press [ENTER] button.
Selecting the Input Source
NOTE
Changing the channels can also be achieved by directly
entering the channel number using the numeric keys on
the remote control. If you are entering a two or three digit
channel number, the time between key presses should be
less than 3 seconds.
7. Select Network : Connect your TV to access the
network.
5.Select Network Next: Channel Search
END USER TERMS AND CONDITIONS AND PRIVACY POLICY FOR
HISMART SERVICES. The product/device you have purchased from Hisense
USA Corp., or its Parent Company, afliates and/or Subsidiary Company, its
successors and/or assigns (hereinafter referred to as “Hisense”) provides direct
access to the internet through one or more internet provider services (hereinafter
referred “Web Service(s)”).All content and services accessible through this
device belong to Hisense USA Corp., “Hisense” is sometimes also referred to
herein as “we” or “us”) or third parties and are protected by copyright, patent,
trademark and/or other intellectual property laws. Such content and services
are provided solely for your personal non-commercial use. You may not use
Select Network
AgreeDisagree
When the Network Setting menu opens, Hisense Service
Terms and Conditions will appear. Press [◄/►] to scroll
through the pages. Please read it carefully.
If you want to access the internet, press the [Agree]
button to set your TV’s network connections. Otherwise,
press the [Disagree] button to enter the Channel search
menu.
Previous Next
5.Select Network Next: Channel Search
Select Network
Wired Network
Wireless Network
Connect a wireless network with Wi-Fi
Skip
You can select the network conguration in this menu
or choose to skip network conguration. For more
information or to setup the network conguration later, see
“Network Connection” and “Network Setup”.
Depending on the reception condition, it may take
up to 30 minutes or more to complete memorizing
channels. Please allow the process to complete
without interruption.
After the Channel Search, a summary of the current
settings will be displayed. Select “go” to exit the wizard.
12
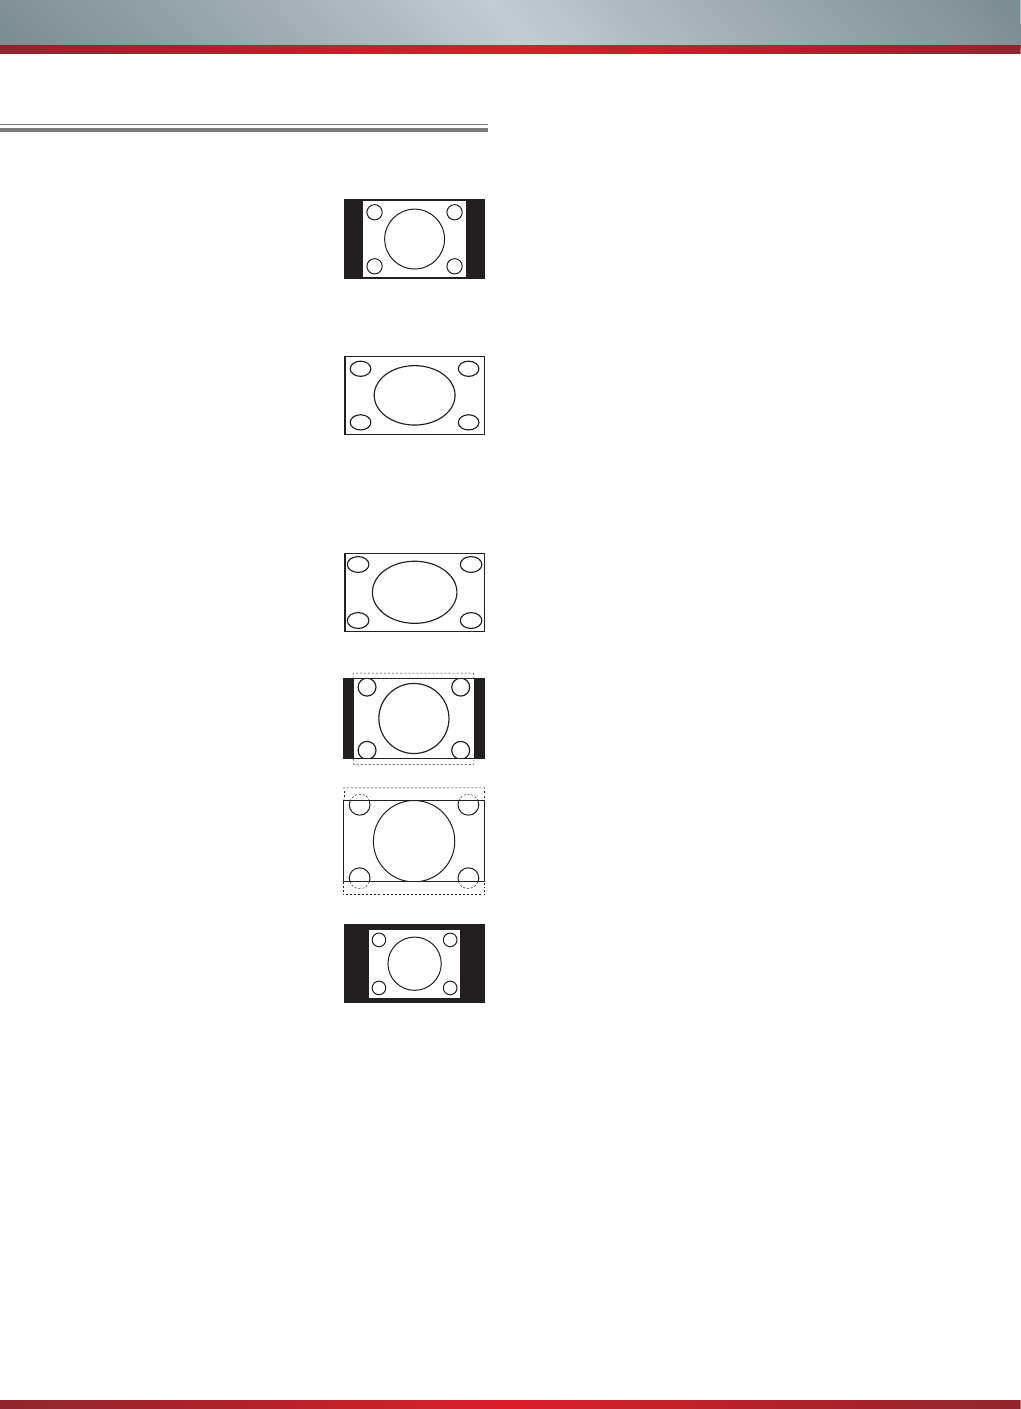
Aspect - Select the screen aspect ratio from Normal, Wide,
Zoom, Cinema , 1:1 Pixel Map, and Auto.
Normal: The original 4:3 aspect
ratio (1.33:1 signal) is preserved,
so black bars are added to the left
and right of the image. Standard TV
broadcasts are displayed with a 4:3
aspect ratio.
Wide: When watching a standard
broadcast or full-frame movie in
this mode, the display image is
stretched proportionately to fill
the TV screen. When watching a
widescreen (1.78:1 signal) program
or movie, the display image fills the
TV screen.
Auto: Automatically adjusts the
image based on the screen size and
the TV program.
Zoom: Stretch the 4:3 aspect ratio
image vertically and horizontally to
fill the screen at 1:1.78 aspect ratio.
Cinema: Stretch the 4:3 aspect ratio
image vertically and horizontally to
fill the screen at 1:2.35 aspect ratio.
1:1 Pixel Map: Displays the native
signal format pixel-by-pixel without
any video processing or scaling. In
this mode, 1920 x 1080 resolution
sources fill the screen while all
other resolutions are centered and
surrounded by black bars.
Picture - Press this button to set the picture mode. It can be
set as Vivid, Standard, Energy Savings, Game, Theater or
Custom. This mode achieves a certain image display effect
by setting the brightness, contrast and Speech.
Sound - Press this button to set the sound mode. It can be
set as Standard, Speech, Music and Custom.
Mute - Press this button to turn the sound off, press this
button again to turn the sound back on. This function is used
to switch off sound temporarily.
Shortcuts Instructions Sleep - It can set the TV to let it enter into the Standby
state automatically. Press this button repeatedly to select
the proper sleeping clock mode, and the clock tells you the
remaining time before the TV enters Standby state.
Display - Press this button to display the information
including channel number, channel name, current system
time, tuner mode, audio stream, video format, audio
language, closed caption mode, parental lock rating,
program details, etc.
CCD - Press the [CCD] button to the Closed Caption mode:
CC Off, CC On or CC On When Mute.
MTS - Press the [MTS] button to selec the default audio
stream: Mono, Stereo or SAP.
13
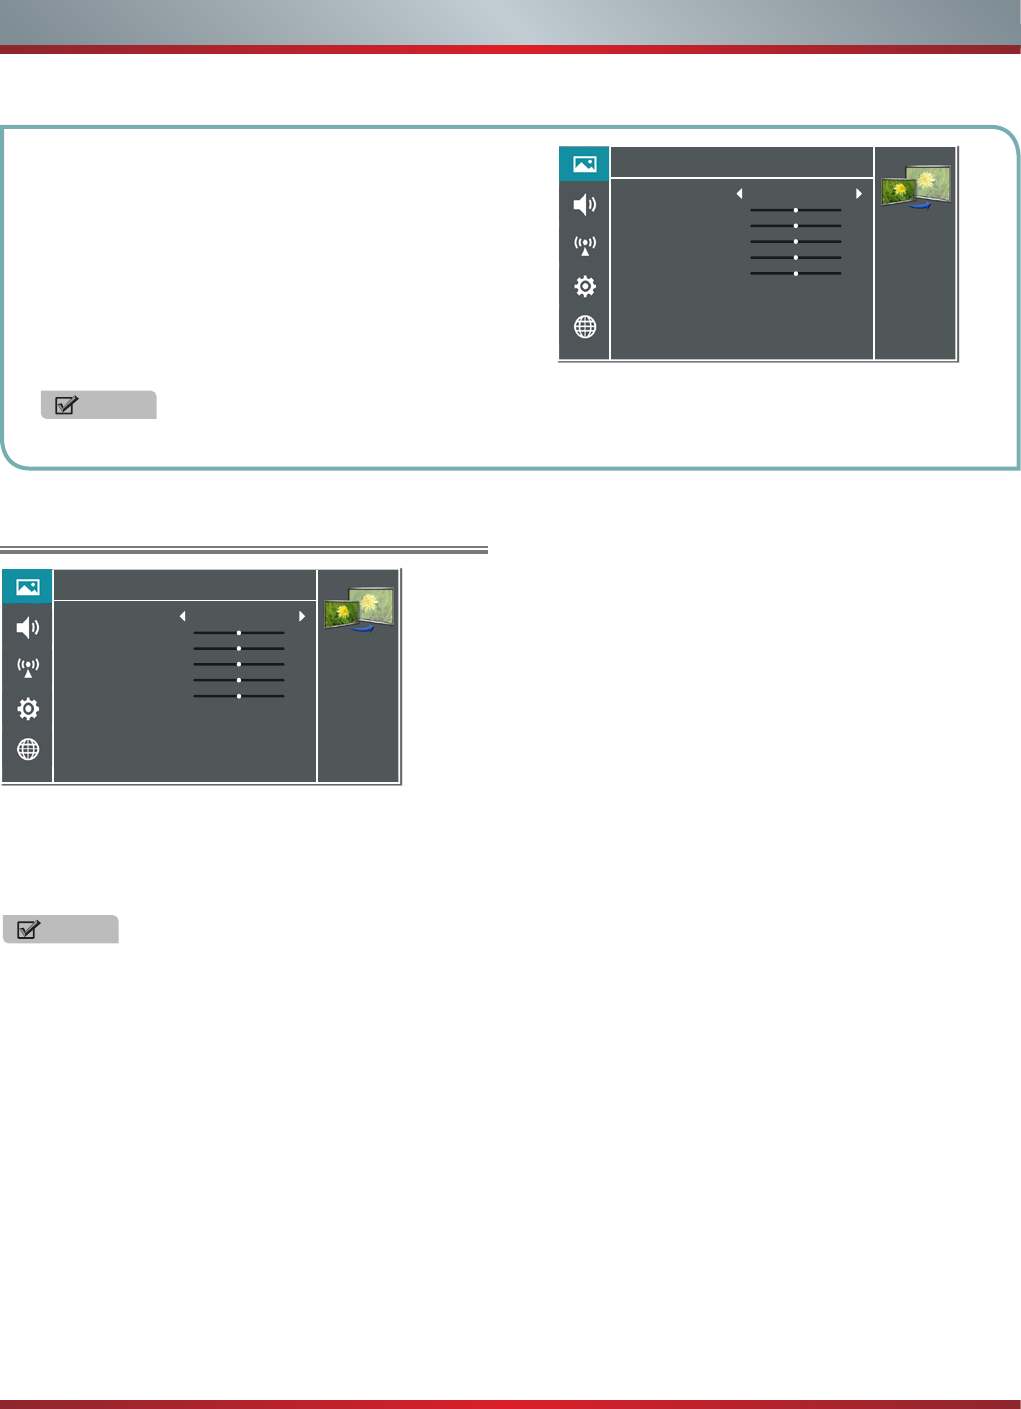
Using the Picture Menu
You can adjust:
Picture Mode - Adjust the Picture Mode. You can select
Vivid, Standard, Energy Savings, Theater, Custom or Game
mode.
NOTE
The option of the Picture Mode is different in different
inputs. (For more information, see “Shortcuts
Instructions”)
Brightness - Increase or decrease the brightness of the
picture. Increasing the brightness can add more light to dark
areas of the picture, while decreasing the brightness can
add more darkness to light areas of the picture.
Contrast - Increase or decrease the contrast of the picture.
Increase the contrast to adjust the white areas of the picture
or decrease the contrast to adjust the black areas of the
picture.
Color - Adjust the level of color in the picture.
Tint - Adjust the hue of the picture.
Sharpness - You can increase the sharpness level for clearer
images or decrease the sharpness level for smoother images.
Basic Features
To Use the Menu
1Press the [MENU] button to open the main menu.
2Press [▲/
▲
] to select a menu option, then press [
▲
/
ENTER] button to enter the menu.
3In each menu, you can:
Press [▲/
▲
] to select an item,
Press [
▲
/
▲
] to adjust the value, or
Press [
▲
/ENTER] to enter the submenu,
Press [MENU] to back the previous menu.
4Press [EXIT] to exit the menu.
NOTE
The menus in the user manual may vary slightly from the actual screen.
Advanced Video - Access advanced video settings such
as Color Temperature, Noise Reduction, Dynamic Backlight
Control (DCR) and Adaptive Contrast.
Color Temperature : Change the color temperature. You
can select a preset color temperature: Cool, Normal and
Warm (when set to cool, whites are bluer; when set to
warm, whites are yellower)
Noise Reduction : Optimize the picture quality by
filtering signal interference. You can select Off, Low, Auto,
Medium or High.
Dynamic Backlight Control (DCR) : Enhances the
contrast ratio between light and dark areas of the picture.
You can select Off, Low or High.
Adaptive Contrast : Automatically adjusts the contrast
level of the selected input source.
Overscan: In DTV mode, Select ON to extend the image
beyong the display so the picture edges are not visible.
Reset Picture Settings - Resets all Picture settings to the
factory defaults.
Picture
Personalize the
picture to suit your
preferences and
viewing conditions.
Picture Mode
Brightness
Contrast
Color
Tint
Sharpness
Advanced Video
Reset Picture Settings
50
50
50
0
10
>
>
Energy Savings
Picture
Personalize the
picture to suit your
preferences and
viewing conditions.
Picture Mode
Brightness
Contrast
Color
Tint
Sharpness
Advanced Video
Reset Picture Settings
50
50
50
0
10
>
>
Energy Savings
14
Basic Features
Using the Audio Menu
You can adjust:
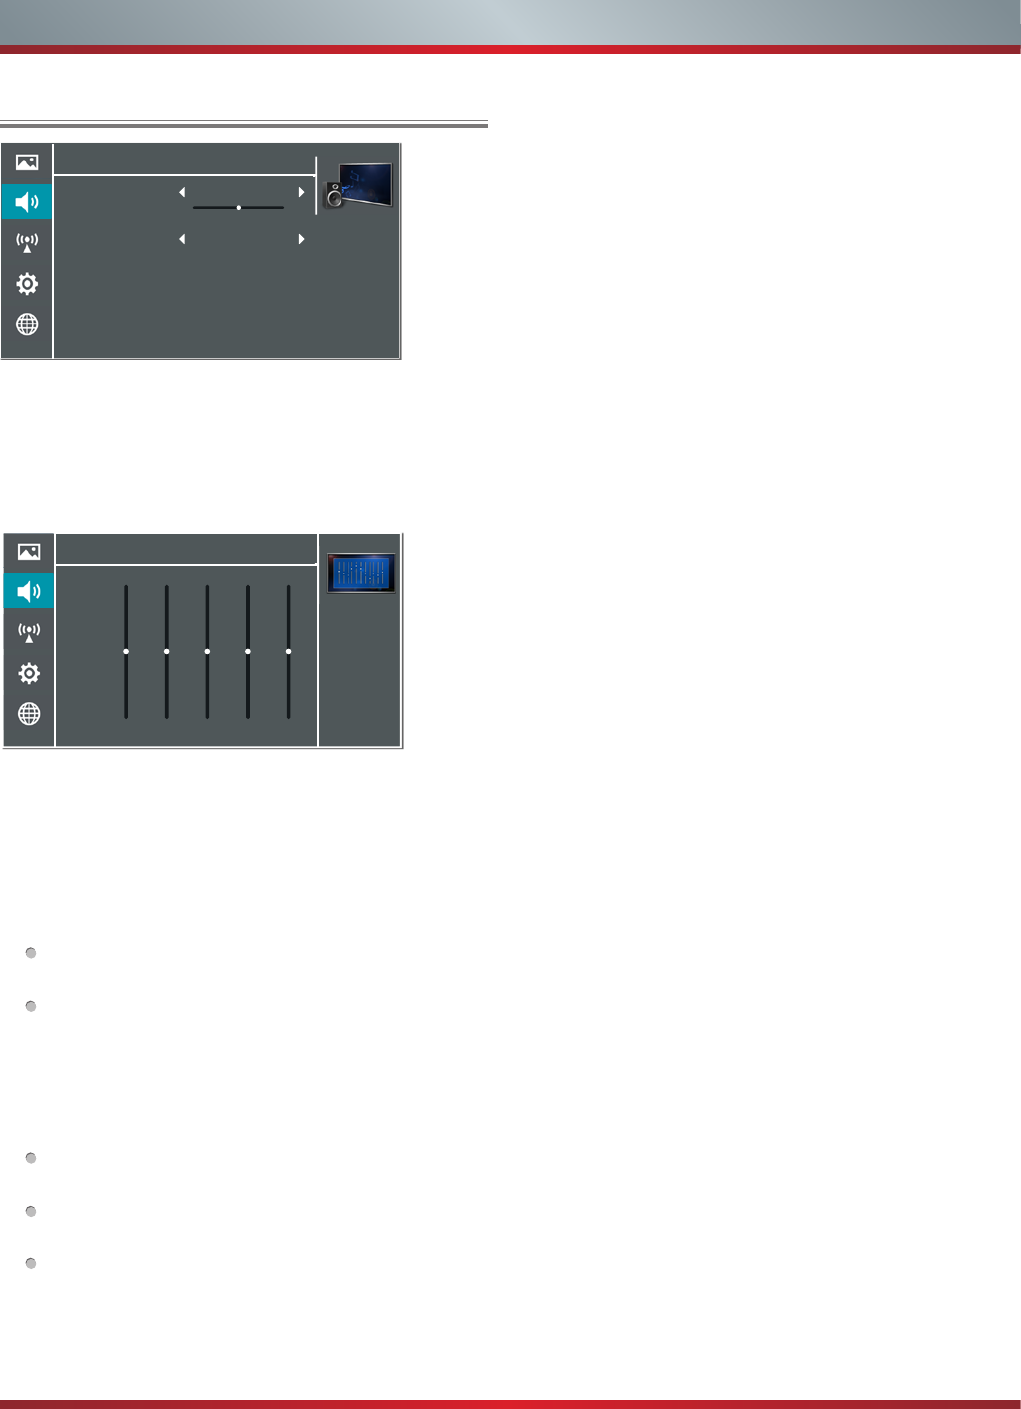
Sound Mode - Select the Sound Mode: Standard, Speech,
Custom or Music .
Balance - Adjust the volume of the left and right speakers.
Equalizer - Soften or enhance the sound at specific
frequency points.
Auto Volume Control - Automatically adjusts volume to a
consistent level; attenuates loud passages.
Advanced Audio - Access Advanced Audio settings such as
Digital Audio Output, MTS/SAP, Audio Language, Speaker
select.
Digital Audio Output: Send digital audio to an external
audio system. You can select PCM, RAW or Off.
PCM: PCM outputs two channel audio regardless of
the input format.
RAW: When the data stream carries Dolby signal,
digital SPDIF outputs Dolby data stream. When the
data stream carries no Dolby signal, it transports PCM
data stream.
MTS/SAP: Select the default audio stream, you can
select Mono, Stereo or SAP (Second Audio Program).
MONO: Select this option if there is noise or static on
weak stereo broadcasts.
STEREO: Select this option for programs broadcast in
stereo.
SAP: Depending on the particular program being
broadcast, you can listen to a foreign-language
translation.
Audio Language - Change the default value for audio
language. (Digital channels only)
Speaker select -Selects where to play TV audio. You
can select On (default setting) to play audio through TV
speakers, or select Off to play audio through the speakers
on an external audio system.
Reset Audio Settings - Resets all Audio Settings to the
factory defaults.
Audio
Personalize the audio
to suit your prefer-
ences and listening
conditions.
Sound Mode
Balance
Equalizer
Auto Volume Control
Advanced Audio
Reset Audio Settings
0
>
>
>
Standard
Off
Audio - Equalizer
10 DB
0 DB
-10 DB
0
120Hz 500Hz 1.5KHz 5KHz 10KHz
00 0 0
15
You can adjust:
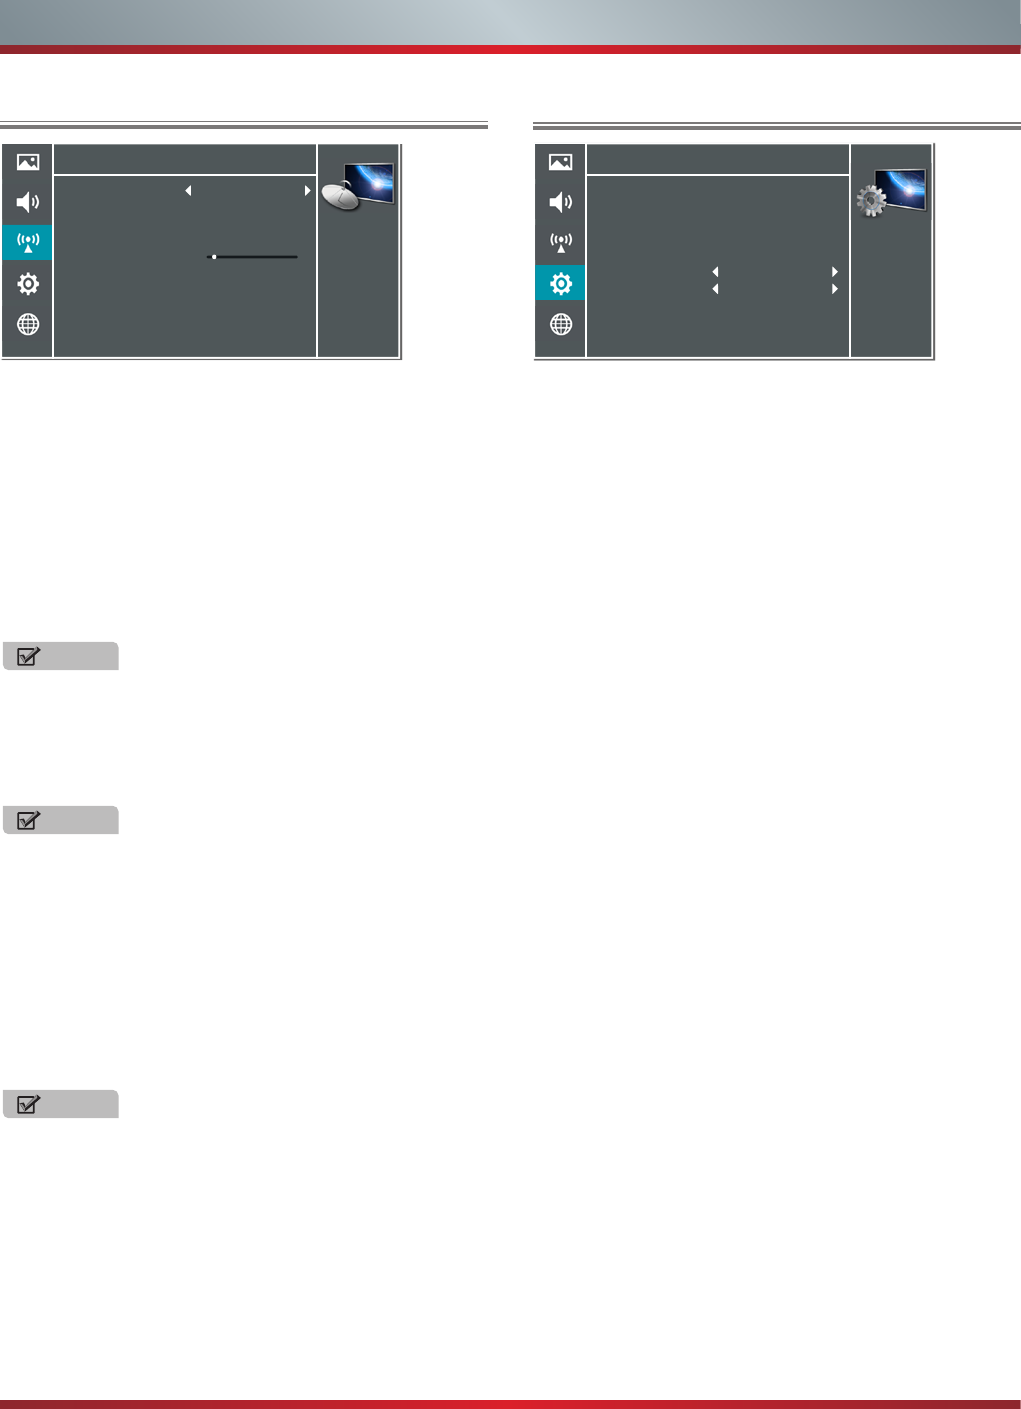
Tuner Mode - Select the TV signal source. You can select
Antenna or Cable.
Auto Channel Search - Scans for channels that have
signals and stores the channels information in memory.
Digital Channels: The scanned TV program in digital
signals.
Analog Channels: The scanned TV program in analog
signals.
Channel Skip - You can cancel a channel stored in memory.
NOTE
When you press [CH V/V] (or [CH +/-]) button, your TV
skips the channel you cancelled. You can still tune to the
channel using the number buttons on the remote control.
Favorite List - Display your Favorite List. You can add or
delete channels to create your favorite list.
NOTE
When you press [CH V/V] (or [CH +/-]) button, your TV
skips the channel you cancelled. You can still tune to the
channel using the number buttons on the remote control.
Signal Strength - This menu is used to check the signal
strength of your antenna system. Usually strengths of above
75% indicates an acceptable signal for your TV to display
correct image. Each channel may vary in signal / quality
strengths and its common for broadcast strengths to change
in your area. The signal strength of the channel on the
screen is displayed.
NOTE
If lower than 75% we advise to have your antenna system
checked by qualified personnel.
Using the TV Menu
Channels
Personalize the local
television services
settings.
Tuner Mode
Auto Channel Search
Channel Skip
Favorite List
Signal Strength
>
>
>
5
Antenna
Using the Setup Menu
You can adjust:
Menu Settings - You can set On-screen menu system.
Language: You can select the menu’s language to
English,Español or Français.
Timeout: Select the display time of the menu: 10-20-...-
60 seconds.
Time Setup - Set the time zone, daylight saving, time and
sleep timer.
Country: Select your local Country.
Time Zone: Select your local time zone: Eastern Time,
Indiana, Central Time, Mountain Time, Arizona, Pacific
Time, Alaska or Hawaii.
Daylight Savings: Set the Daylight Saving time for your
area.
Date/Time: Set the current year/month/day/time.
Sleep Timer: Select the amount of time before the TV to
turns off automatically.
Parental Controls - Prevent unauthorized users, such as
children, from watching unsuitable programs.
When you first use this function, the default password is
[0000]. Once you input this password, you can set options.
You can change password in the Lock submenu.
Channel Block : Block selected Channels on the TV.
Program Block : Block selected Programs on the TV.
Rating Enable: Block or unblock TV ratings.
U.S. TV Ratings: Restrict TV programs by USA
Ratings.
U.S. Movie Ratings: Restrict movies by USA Ratings.
Canadian English/French Ratings: Restrict movies
and TV programs by Canadian Ratings.
Open V-Chip: Display an advanced V-Chip ratings
table for digital channels (USA only).
Block Unrated: Block unrated TV programs.
Input Block - Block selected Input source on the TV.
Button Lock(On/Off) - Block or unblock use of the
remote control.
Settings
Personalize the
general TV setting.
Menu Settings
Time Setup
Parental Controls
Caption
CEC Function
Demo Mode
Power LED
Version Info
Reset Settings
>
>
>
>
>
>
>
Off
On
Basic Features

16
Caption - Adjust Closed Captioning settings.
Caption Control: Select the Closed Caption mode: CC Off,
CC On or CC On When Mute by press the CC button.
Analog Closed Caption: Select an Analog Caption setting:
CC1~CC4: Closed captioning appears in a small banner
across the bottom of the screen. CC1 is usually the
“printed” version of the audio. CC2~CC4 display content
are provided by the broadcaster.
Text1~Text4: Closed captioning that covers half or all of
the screen. Text1~Text4 display content are provided by
the broadcaster.
Off: To turn off the Analog Caption.
Digital Closed Caption: Select a Digital Caption setting:
Service1~Service6 or Off.
Digital Caption Style: Customize the look of digital Closed
Captioning.
Caption Style:
Set the look of Digital CC. “As
Broadcaster” uses broadcaster’s style.
Font Size/Style/Color/Opacity:
Select the size/style/
color/opacity level of font.
Background Color/Opacity:
Select the color/opacity
level of the background.
Window Color/Opacity:
Select the color of the window.
CEC Function :
This feature allows you to add devices to
your TV and control them with your TV remote control.
Basic Features
Following is the description of these ratings.
U.S. Movie Ratings
Rating Defined as
G General audience
PG Parental Guidance suggested
PG-13 Parents strongly cautioned
R Restricted
NC-17 No one 17 and under admitted
X Adult audience only
U.S. TV Ratings
Age Defined as
TV-Y All children
TV-Y7 Directed to older children
TV-G General audience
TV-PG Parental Guidance suggested
TV-14 Parents Strongly cautioned
TV-MA Mature Audience only
Contents Defined as
AAll of the ratings below that rating set blocked
automatically
D Suggestive dialogue
L Strong language
S Sexual situations
V Violence
FV Fantasy Violence
Canadian English Ratings
Rating Description
C Children
C8+ Children 8 years and older
GGeneral Programming, suitable for all audiences
PG Parents Guidance
14+ Viewers 14 years and older
18+ Adult Programming
Canadian French Ratings
Rating Description
G General
8 ans+ 8+General; Not recommended for young
children
13 ans+ Programming may not be suitable for children
under the age of 13
16 ans+ Programming is not be suitable for children
under the age of 16
18 ans+ Programming restricted to adults
NOTE
As you block rating, all rating higher than the ones you
select are blocked as well. E.g. if you choose to block
the MPAA rating R, the higher ratings, NC-17 and X,
are automatically blocked too.
Change Password - If you want to change the default
password, first enter the new password then enter the
same password again.
Reset Parental Control - You can reset all locks to
factory mode.
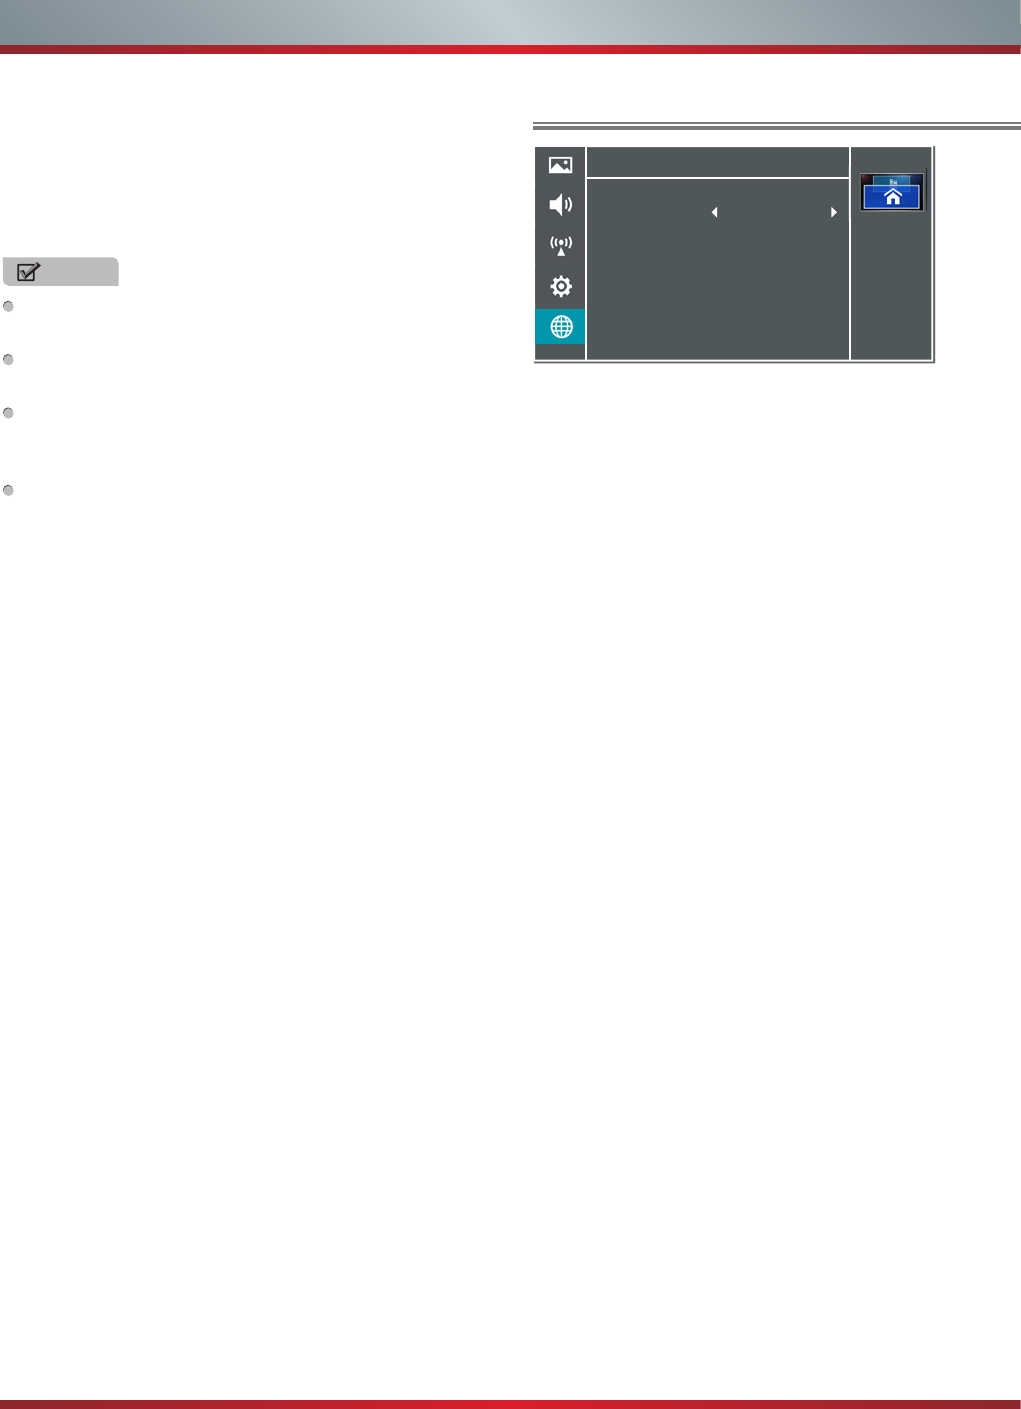
Reset to Factory Default- Restores the TV configuration
to factory settings. You will need to complete the setup
for such things as Tuner/Channel settings, Network
connection, Date/Time and other user preferences.
17
You can adjust:
Configuration - Select On or Off. When On mode is
selected, the following options are available.
Internet Connection : Setting the Internet Connection.
Interface : You can set up your TV so that it can access
the Internet through your local area network (LAN) with a
Ethernet or wireless connection.
Wireless Setting : You can set up your TV’s wireless
connection.
Information : Display network configuration information.
IP Setting : Allows you to set IP address, subnet mask,
gateway, primary and secondary DNS.
Connection Test : Press the [ENTER] button to test
network status.
Basic Features
CEC function: Press [►] to set On/Off.
Auto turn off: Your added devices can be off automatically
by turning off the TV
.
TV Auto On:
Your TV can be on automatically by turning
on your added devices.
Audio Receive:
Turning ARC function on or off.
NOTES
HDMI cables must be used to connect HDMI CEC-
compatible devices to your TV.
The connected device’s HDMI CEC feature must be
turned on.
If you connect an HDMI device that is not HDMI CEC-
compatible, all the HDMI-CEC Control features do not
work.
Depending on the connected HDMI device, the HDMI-
CEC Control feature may not work.
Demo Mode -
Displays a banner at the top of the screen
which describes the key features of the TV.
Power LED - Select this feature to turn off or On the Power
LED indicator on the front panel on your TV.
Version Info - View the software version information.
Reset Settings - Restores the TV configuration to factory
settings.
Using the Network Menu
Auto Upgrade - Update the software using the Internet.
Configure your network. For detailed procedures on using
the Network Setup, refer to the “Connecting to the Internet
or a network” instructions. If you want the Network Update
to work automatically, please select Auto Updates (On).
If you want to do the Network Update manually, please
select Auto Updates (Off).
If the Internet connection doesn’t operate properly, check
the Network Configuration settings and try again. If the
problem persists, use the USB method below to update.
Firmware Upgrade - Insert a USB drive containing the
software update file, downloaded from the Hisense website.
(www.hisense-usa.com).
Please be careful not to disconnect the power or remove
the USB drive until updates are complete. The TV will
be turned off and on automatically after completing the
software update. When software is updated, video and
audio settings you made will return to their default settings
and your personal settings will be deleted. We advise you
to write down your settings so that you can easily reset
them after the update.
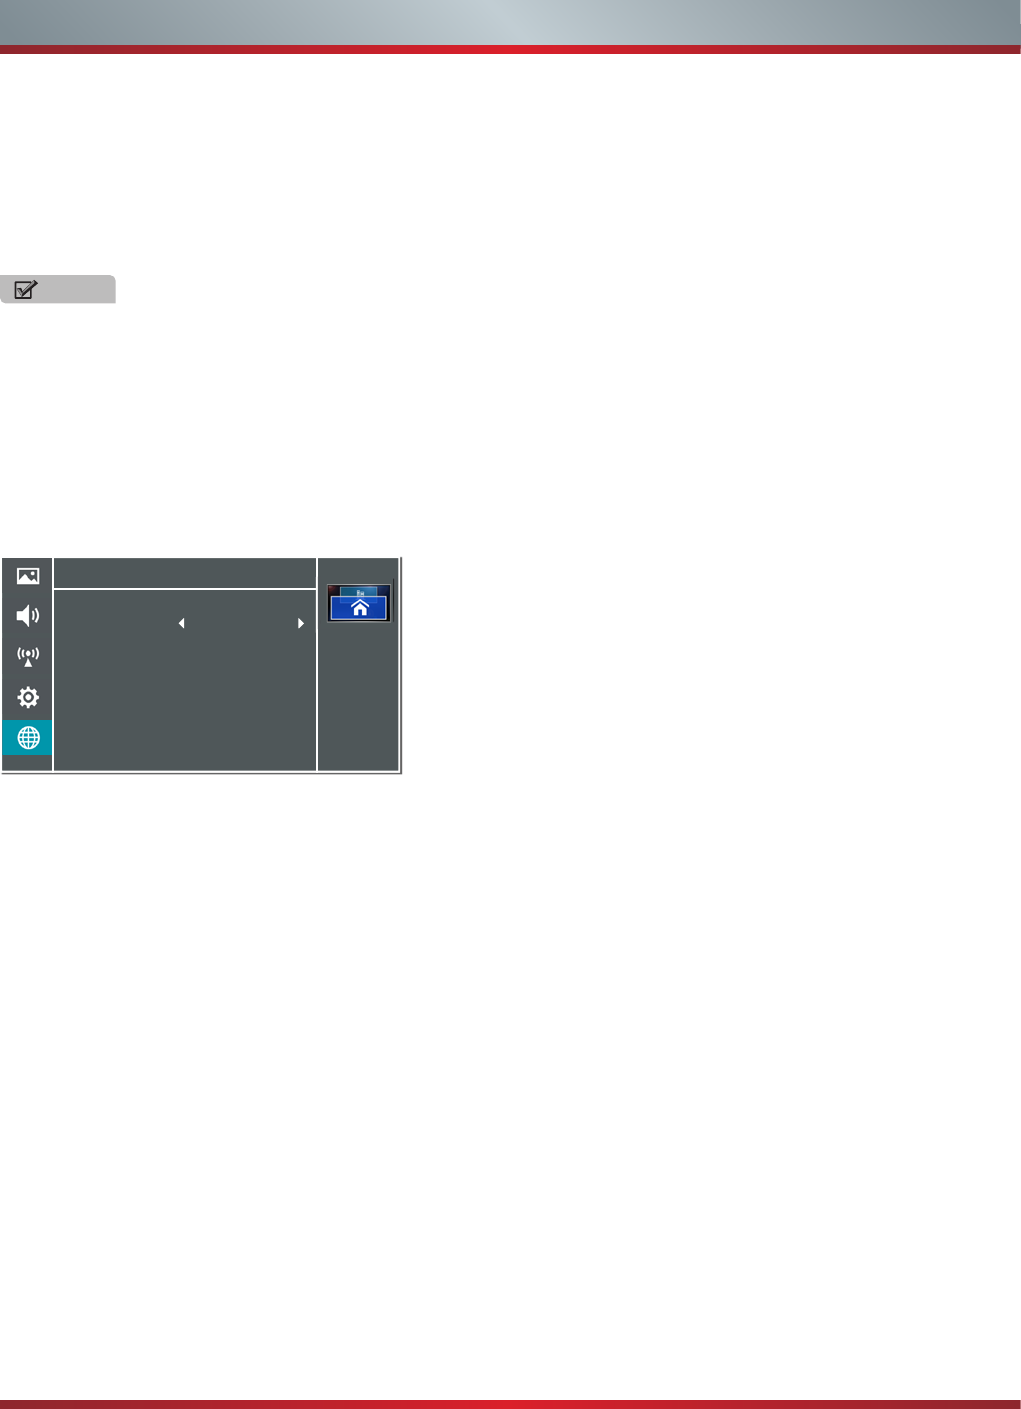
Applications - Network application.
DLNA: Digital Media Player (Hi-DMP) feature of Digital
Living Network Alliance. Press the [◄/►] buttons to set
DLNA to On.
Network
Personalize the
network connection
settings.
Configuration
Auto Upgrade
Firmware Upgrade
Applications
>
>
>
Off
18
Basic Features
Connecting to a Wired Network
Network Setup (Auto)
Use the Automatic Network Setup to connect the TV to a
network that supports DHCP. To set up your TV’s network
connection automatically, follow these steps:
How to set up automatically
1. Connect your TV to your LAN as described in the
previous section.
2. Turn on your TV, operate according to the description in
the Settings menu until the Network screen appears.
3. On the Network screen, select Configuration and press
[ENTER] button to enter the submenu.
4. Set Internet Connection to On and Interface to Ethernet.
5. Select IP Setting and press [ENTER] button to enter it.
6. Set Address Type to Auto.
7. Auto acquires and enters the necessary connection
values automatically.
8. If the connection values are not automatically entered,
please check your modem and router manuals for
directions to enable automatic IP addressing by DHCP.
Or, follow the steps listed in the following section,
Network Setup (Manual), to manually configure the
network connection.
Network Setup (Manual)
Use the Manual Network Setup when connecting your TV to
a network that requires a Static IP address.
Getting the Network Connection Values
To get the network connection values on most windows
computers, follow these steps:
1. Right click the Network icon in the bottom right of the
screen.
2. In the pop-up menu that appears, click Status.
3. On the dialog that appears, click the Support tab.
4. On the Support tab, click the Details button. The network
connection values are displayed.
How to manually setup the network connection
To set up your TV’s network connection manually, follow
these steps:
1. Follow Steps 1 through 5 in the “How to set up
automatically” procedure.
2. Set Address Type to Manual.
3. Press [▲/▼] button to select IP Address and press [◄/►]
button to move the cursor to the entry field. Then press
0~9 buttons to enter the numbers.
4. Press [MENU] button to exit IP Address and press [▲/▼]
button to select the next options to enter the numbers.
5When done, press [MENU] button to return to the
previous menu.
6. Select Connection Test to check the internet connectivity.
Wireless Setting
How to set up
1. Turn on your TV, press Menu and select Settings Network.
2. On the Network screen, select Configuration and press
the [ENTER] button to enter the submenu.
3. Set Internet Connection to On and Interface to Wireless.
4. Select Wireless Setting and press the [ENTER] button
you can select: Scan / Manual / Auto.
5. If you select Scan, a screen will appear listing all of the
wireless networks within range of the TV. Use the [▲/▼]
button to select the wireless network with your router SSID
and press the [ENTER] to confirm. Proceed to Step 7.
6. If you select Manual, a screen will appear prompting
you to enter the SSID of your wireless network. Press
[ENTER] and an on-screen keyboard will pop up. Enter
the SSID and select OK. Press [ENTER] and a screen
will appear prompting you select the security mode for
your wireless network. Use the [▲/▼] button to select
the proper security mode and press [ENTER] to confirm.
If you selected None for the security mode, proceed to
step 9.
7. A screen will appear prompting you to enter the password
for the selected security mode. Press [ENTER] and an
on-screen keyboard will pop up. Enter the password and
select OK. Press [ENTER] to confirm. Proceed to Step 9.
Netflix: Deactivate Netflix and display the exclusive
Netflix ESN.
VUDU: Deactivate VUDU.
PANDORA: Deactivate Pandora.
My Shared Devices: Allow or deny content sharing from
other devices on your network.
NOTES
•Software Update can also be performed via downloading
the latest software to a USB memory device.
•Please be careful not to disconnect the power or remove
the USB drive until updates are complete. The TV will
be turned on automatically after completing the software
update. When software is updated, video and audio
settings you made will return to their default settings and
your personal settings will be deleted. We advise you
to write down your settings so that you can easily reset
them after the update.
Network
Personalize the
network connection
settings.
Configuration
Auto Upgrade
Firmware Upgrade
Applications
>
>
>
Off
19
Advanced Features
You can use DLNA Certified computers, TVs, and other
devices to play or transfer the videos, pictures, and music
stored on your phone , tablet or other devices connected to
your network. For more about DLNA (Digital Living Network
Alliance), visit www.dlna.org. Make sure your phone and TV
are both connected to the same Wi-Fi network.
Set DLNA to On:
1. On the Network screen, select Applications and press
the [ENTER] button to enter the submenu.
2. Press the [◄/►] buttons to set DLNA to On.
DLNA Setting
If your computer does not support DLNA, you may install
software that supports DLNA such as TVersity or Windows
Media Player (Version V11 or higher). We recommend
Windows Media Player as the installation and setup is
easier.
1. On the PC taskbar, click Start.
2. Point to All Programs, and then click Windows Media
Player.
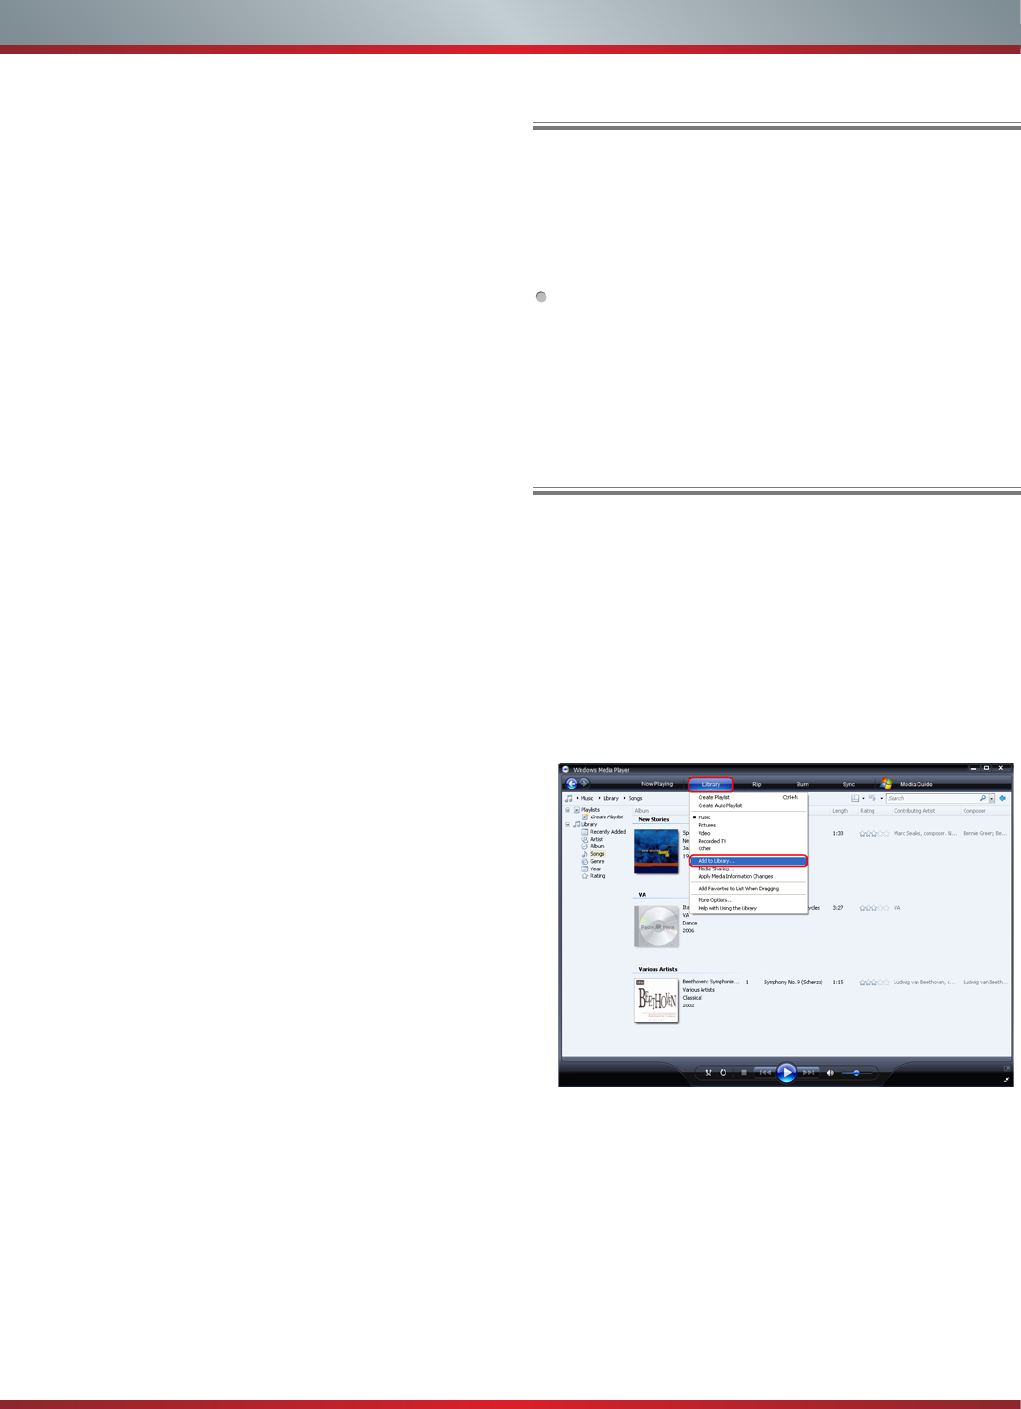
3. Click “Library” tab and then “Add to Library...” as shown in
the following screen shot.
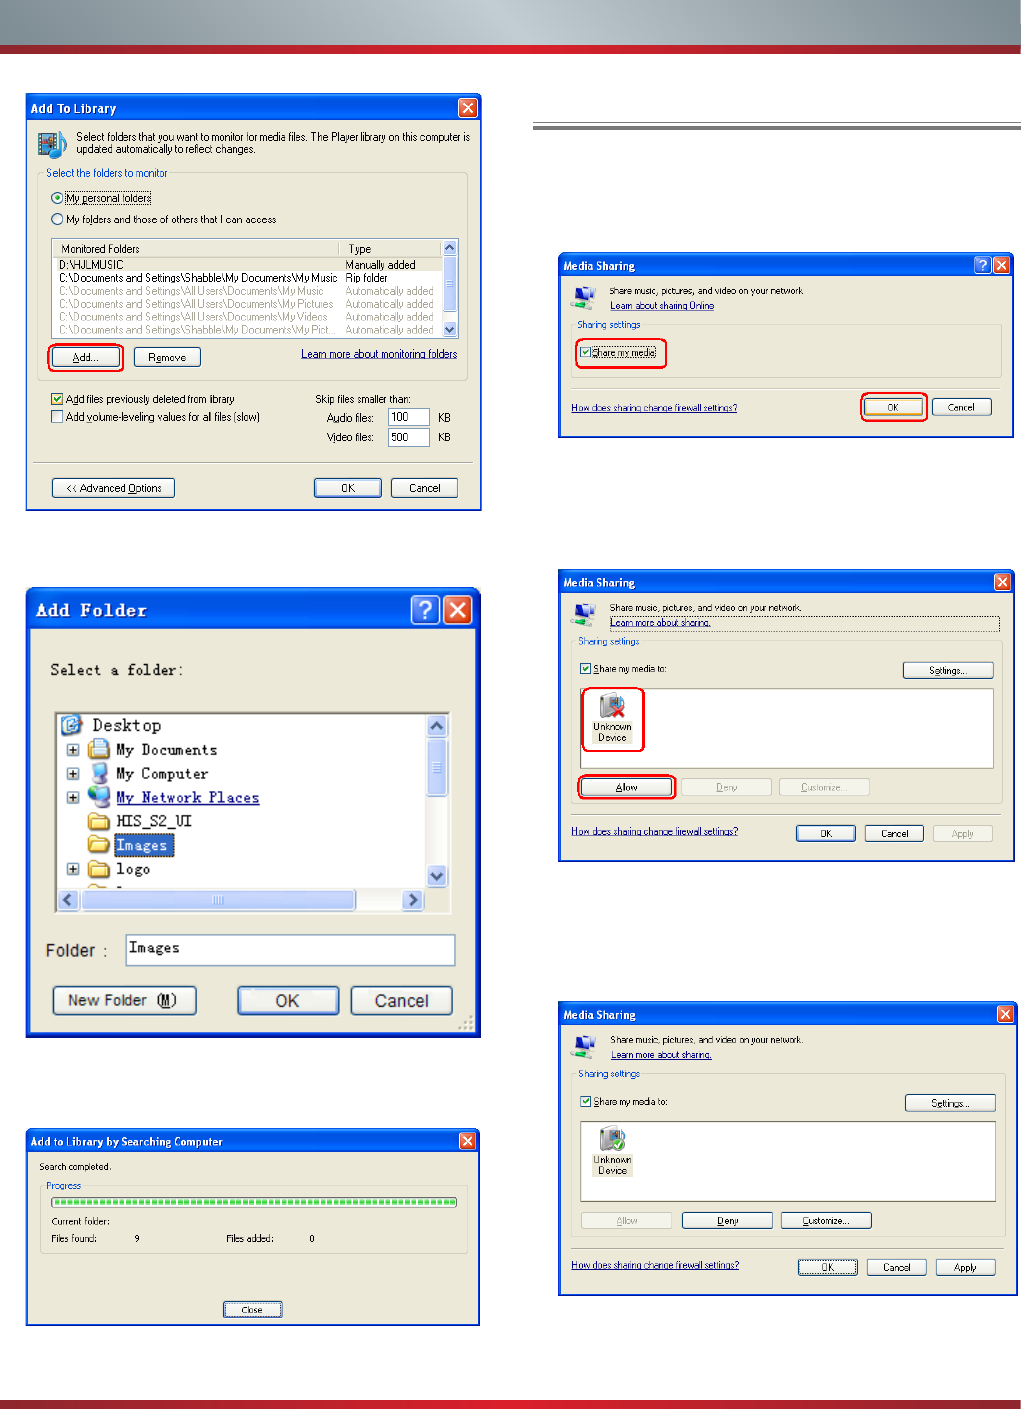
4. In the Add To Library dialog box, click “Add” as shown in
the following screen shot.
Media Share Settings in Computer
8. If you select Auto, a screen will appear prompting you
to select PIN (personal identification number) or PBC
(push button configuration) setup. Choose the method
supported by your wireless access point.
If you choose PIN, an identification number will
appear on the screen for you to enter into the access
point. After entering the PIN, press the [►] button. If
the PIN is in use by another device, select [REFRESH]
to obtain a new PIN and enter it into the access point.
After entering the PIN, press the [►] button.
If you choose PBC, a screen will appear prompting
to press [►] button. After pressing the [►] button you
have two minutes to locate and press the Push Button
on your access point to connect to the TV.
9. Press the [MENU] button to return to the previous menu.
10. Select Connection Test to check the Internet connectivity.
20
Advanced Features
5. Select a folder and click “OK”.
6. Click “Close” to close the dialog.
1. Click “Library” and move the cursor to select “Media
Sharing...” as shown in the following screen shot.
2. In the Media Sharing dialog box, select the Share my
media check box and click “OK”.
3. After turnnig on media sharing, you need to select the
devices that should have access to your Player library. An
equipment icon will appear on the white area if the DLNA
Settings have been correctly set. Select a device and
then click “Allow” as shown in the following screen shot.
4. Then the TV can access to the shared files in the
computer.
For information about how to customize what media you
share with the device, see "Change settings for sharing
media" in Windows Media Player Help.
Setting to Share Files