Hisense Electric LCDF0088 Part15 Subpart B-LED LCD TV User Manual W9HLCDF0088 3
Hisense Electric Co., Ltd. Part15 Subpart B-LED LCD TV W9HLCDF0088 3
Contents
- 1. W9HLCDF0088_User Manual 1
- 2. W9HLCDF0088_User Manual 2
- 3. W9HLCDF0088_User Manual 3
- 4. W9HLCDF0088_User Manual 4
- 5. W9HLCDF0088_User Manual 5
W9HLCDF0088_User Manual 3
11
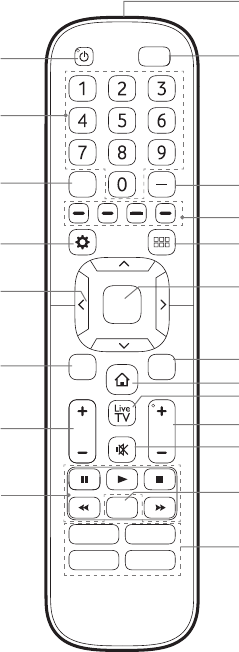
ButtonsonyourTVremote
SLEEP
VOLCH
OK
CC
BACK EXIT
INPUT
Infrared transmitter
Power on / off
Enter Channels / input numbers
Media content control function buttons
Dash button
Select a digital sub-channel
D-pad (up/down/left/right
navigation buttons)
Volume (up/down)
Adjust Sleep timer setting
The 'Gear' button for the Quick setup menu
Return to the previous place in the menu or app
Live TV
Change TV input source
All Apps
Confirmation button
Channel (up/down)
Mute and restore sound
Exit the application
Turn Closed Caption On/Off
Special function buttons
Quick access buttons to apps
Display the Home screen
APP
APPAPP
APP

12
STEP4.Beginusingyourremote
1. Slide the back cover to open the battery compartment of the remote
control
Insert the batteriesGently push and slide Gently push and slide
2. Insert two AAA size batteries. Make sure to match the (+) and
(-) ends of the batteries with the (+) and (-) ends indicated in the
battery compartment.
3. Replace the battery compartment cover.
ImportantInformationabouttheremoteandbatteries
• Discardbatteriesinadesignateddisposalarea.Donotthrow
themintoare.
• Removeoldbatteriesimmediatelytopreventthemfromleaking
intothebatterycompartment.
• Ifyoudonotintendtousetheremotecontrolforalongtime,
thenremovethebatteries.
• Batterychemicalscancausearash.Ifthebatteriesleak,clean
thebatterycompartmentwithacloth.Ifchemicalstouchyour
skinthenwashitimmediately.
• Donotmixoldandnewbatteries.
• Donotmixalkaline,standard(carbon-zinc)orrechargeable
(NiCd,NiMH,etc.)batteries.
• Donotcontinueusingtheremoteifitgetswarmorhot.
CallourSupportCenterimmediatelyontheSHARP
supportwebsite.
Remote Control Range Information
●Theremotecontrolcanworkatadistanceofupto26feetin
front of the TV set.
●Itcanworkata30degreehorizontalorverticalangle.
ProgramYourUniversalCableorSatellite
RemoteControltoOperateYourNewSHARP
Television(onlyforUSA)
If you would like to program your other household remote
controls to your new SHARP television,please refer to the User
Manual supplied by your Cable or Satellite provider. It should
include instructions on how to program their remote to your
television.
A list of SHARP codes for the most common Cable and Satellite
providers are listed below. Use the SHARP code that is
associated with your Cable or Satellite provider (if applicable).
DIRECTV......0178, 10178, 10019, 10748, 11314, 11660, 11710,
11780, 12049, 10171, 11204, 11326, 11517, 11564, 11641,
11963, 12002, 12183
TimeWarnerCable......386, 0178, 10178, 400, 450, 461, 456,
0748, 1463, 0463, 10463
13
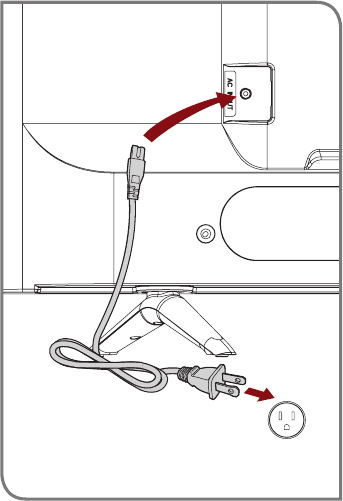
STEP5.PowerontheTV
Plug the power cord into a wall outlet.
Power Cord
Wall Outlet
Comcast......0178, 10178, 10463, 11463, 10748, 11314, 11660,
10171, 11204, 11326, 11517, 11641, 11780, 11785, 11892, 11963,
12002
CoxCommunications......0178, 10178, 1326, 1463
DishNetwork......505, 627, 538, 720, 659
If the SHARP code associated with your Cable or Satellite provider
is not listed, does not work or you cannot locate the instructions to
program your remote, call your local Cable or Satellite provider's
customer service center.
If your Cable or Satellite provider does not have a SHARP code
available, please contact us at one of the phone numbers on Page 2.
UsingYourCableSet-topBoxorSatelliteReceiver
Remote as a ‘Universal’ Remote
If you prefer to use your Cable Set-top Box or Satellite Receiver
Remote as a ‘Universal Remote’, then visit the Support page to view
a list of the codes.

14
Press the Powerbutton on the remote to turn on the TV. A
splash screen that shows the SHARP logo appears. Next, the
First-Time Setup Menu begins by prompting you to choose your
Language, Country, and Time Zone.
STEP6.Completetherst-timesetupmenu
After the splash screen that shows the SHARP logo appears, begin
therst-timesetupmenu.
Screen Task
LANGUAGE
AND
LOCATION
• UsingtheD-padarrowsofyourremote,choose
your Language, Country and Time Zone. Next,
navigate to the Forward arrow and press OK.
TERMS OF
SERVICE
• PressOK to select Acceptall.Whenyou’redone
navigate to the Forward arrow and press OK.
TV USAGE
MODE
•SelectHome Mode(which appears by default).
Next,navigate to the Forward arrow and press OK.
•Note: ‘Store mode’ should only be selected by
Retailers who plan to demonstrate the TV.
NETWORK
CONNECTION
•IfyourTVdoesnotautomaticallydetectanEthernet
connection, then select WiFi.Whenyou’redone,
select your network from the list that displays and
move to the next screen.
LANGUAGE AND LOCATION
Language
Language Country Time Zone
TermsMode Network Input Done
+ + +
English United States Select