Hisense Electric PADP0005 Sero 7 LE User Manual
Hisense Electric Co., Ltd. Sero 7 LE
UserManual.wiki
>
Hisense Electric
>
PADP0005 User Manual
User Manual
Navigation menu
Upload a User Manual
Namespaces
Wiki Guide
HTML
PDF
Info
Views
User Manual
Discussion / Help
Navigation


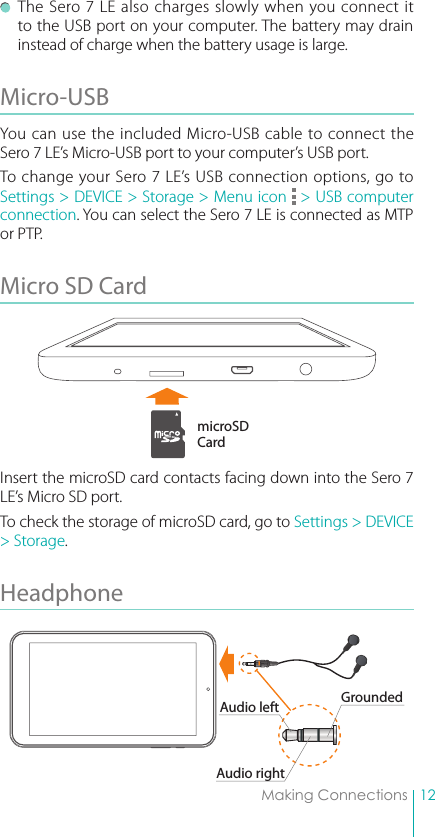
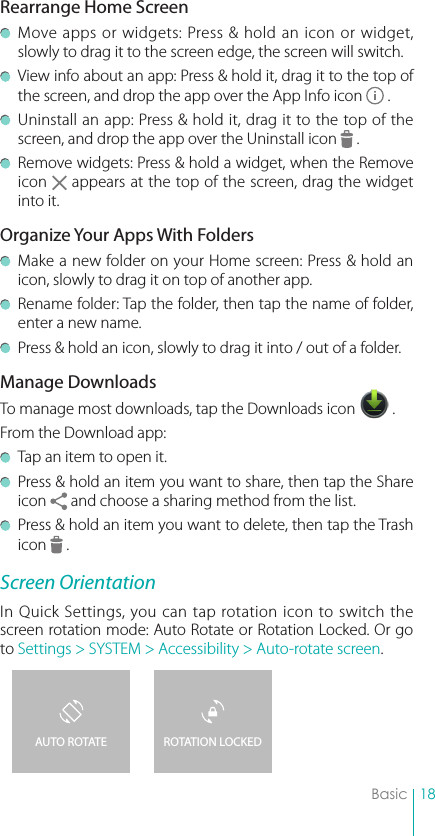
![13Making ConnectionsHeadphones can be connected to the Sero 7 LE’s headphone port. Microphone connection is not supported. For more information about headphones, see Important Safety Instructions on page 29. Wi-Fi You can connect to a wireless access point, or hotspot to use Wi-Fi. Some hotspots are open and you can simply connect to them. Others implement security features that require other steps to set up.Add a Wi-Fi NetworkYou can add a Wi-Fi network so your device will remember it, along with any security credentials, and connect to it automatically when it’s in range. You must also add a Wi-Fi network if the network does not broadcast its name (SSID), or to add a Wi-Fi network when you are out of range.1. Turn on Wi-Fi, if it’s not already on.2. Tap the Plus icon at the top of the screen.3. Enter the SSID (name) of the network. If necessary, enter security or other network configuration details.4. Tap Save.Forget a Wi-Fi NetworkTo forget a Wi-Fi network, go to Settings > WIRELESS & NETWORKS > Wi-Fi > [the network name] > Forget.Advanced Wi-Fi SettingsTo set the Advanced Wi-Fi, go to Settings > WIRELESS & NETWORKS > Wi-Fi > Menu icon > Advanced . Network notification - By default, when Wi-Fi is on, you receive notification in the Status bar when your device detects an open Wi-Fi network. Uncheck this option to turn off notification. Keep Wi-Fi on during sleep - To select whether to put the Sero 7 LE in sleep mode when it’s connected to Wi-Fi.](https://usermanual.wiki/Hisense-Electric/PADP0005/User-Guide-2379791-Page-14.png)

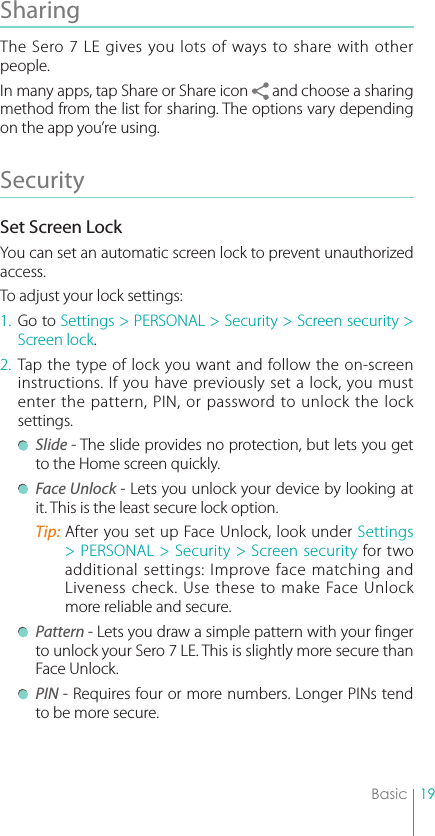

![25Basic3. Follow the on-screen instructions.4. Most accounts require a username and password, but the details depend on the kind of account and the configuration of the service you’re connecting to.When you’re finished, the account is added in one of two places: Google Accounts show up under Settings > ACCOUNTS > Google. Other accounts show up under Settings > ACCOUNTS on the main Settings screen.Remove an AccountYou can remove any account and all information associated with it from your Sero 7 LE, including email, contacts, settings, and so on. To remove a Google account, go to Settings > ACCOUNTS > Google > [account-name] > Menu icon > Remove account. For any other type of account, go to Settings > ACCOUNTS > [account - type] > [account - name] and look for the Remove option.Syncing Configure Auto-sync for All AppsTo control Auto-sync for all apps that use it, go to Settings > WIRELESS & NETWORKS > Data usage > Menu icon , and check or uncheck Auto-sync data. Configure Google Account Sync SettingsTo adjust a single Google Account’s sync settings:1. Go to Settings > PERSONAL > Accounts > Google.indicates that none of an account’s information is configured to sync automatically.indicates that some or all of an account’s information is configured to sync automatically.](https://usermanual.wiki/Hisense-Electric/PADP0005/User-Guide-2379791-Page-26.png)