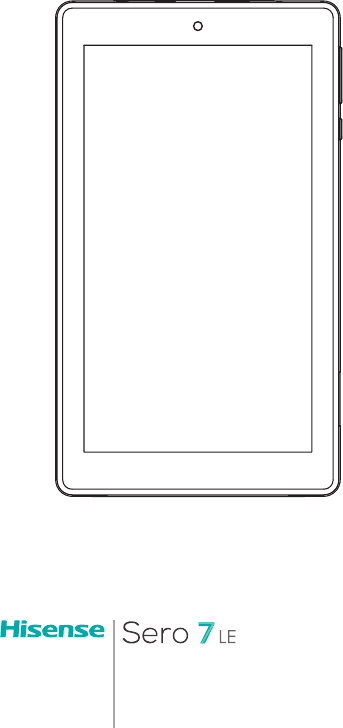
Hisense Electric PADP0005 Sero 7 LE User Manual
Hisense Electric Co., Ltd. Sero 7 LE
User Manual
User Manual

1
Content
Need to Know .......................................................... 3
Model and Serial Numbers ............................................................. 3
Getting Started ........................................................ 4
Package Contents ................................................................................ 4
Understanding Your Sero 7 LE Tablet .......................................5
Home Screen ..........................................................................................7
Buttons ........................................................................................................8
Making Connections ...........................................11
Battery ...................................................................................................... 11
Micro-USB .............................................................................................. 12
Micro SD Card ...................................................................................... 12
Headphone ........................................................................................... 12
Wi-Fi ........................................................................................................... 13
VPN ............................................................................................................. 14
Basic ........................................................................... 16
Setup Guide .......................................................................................... 16
Basic Operation .................................................................................. 17
Sharing ..................................................................................................... 19
Security .................................................................................................... 19
Settings .................................................................................................... 21
Location................................................................................................... 24
Google Account ................................................................................. 24
Syncing .................................................................................................... 25

2
Appendix A ............................................................27
Specifications ....................................................................................... 27
Troubleshooting ................................................................................ 28
Appendix B.............................................................29
Important Safety Instructions .................................................... 29
Certification and Compliance.................................................... 32
Appendix C ............................................................36
Legal Terms ........................................................................................... 36
Copyright and Trademark Notices .......................................... 38

3Need to Know
Need to Know
Read this chapter to learn where to view the model and serial
numbers.
Model and Serial Numbers
Model Number
You can go to Settings > SYSTEM > About tablet to view the
Model number.
Serial Number
You can go to Settings > SYSTEM > About tablet > Status to
view the Serial number.
1
4Getting Started
Getting Started
Read this chapter to learn about Sero 7 LE features, how to
use the controls, and more.
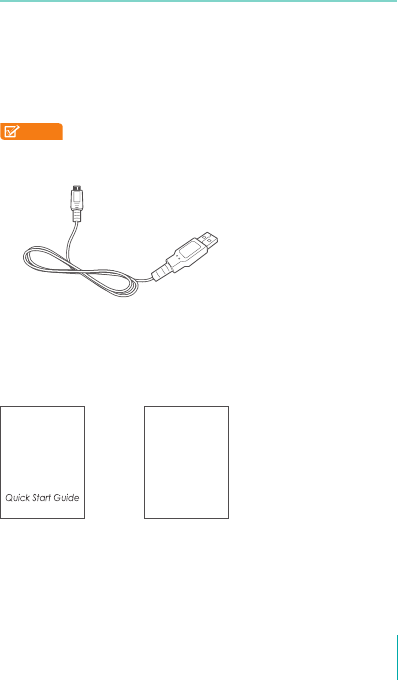
Package Contents
The following items are included with the Sero 7 LE:
Power Adapter
Use the power adapter to connect the outlet to charge the
battery.
NOTE The power adapter may vary in different countries.
Micro-USB Cable
Use the USB cable to connect the Sero 7 LE’s Micro-USB
port to the power adapter to charge the battery, or to your
computer.
Quick Start Guide & Warranty
Warranty
2
5Getting Started
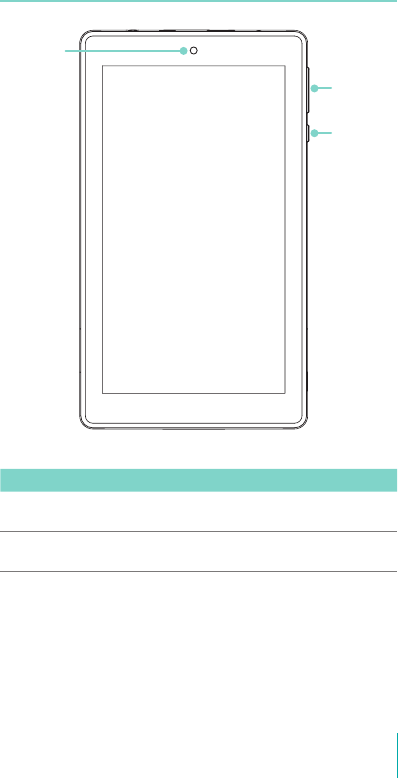
Understanding Your Sero 7 LE Tablet
Item Function
Volume Up/Down
Buttons
Press to adjust the volume.
Power Button Press & hold to turn on/o; Press it to put/wake
the unit in/from sleep mode.
Power
Button
Camera
Volume
Up/Down
Buttons
6Getting Started
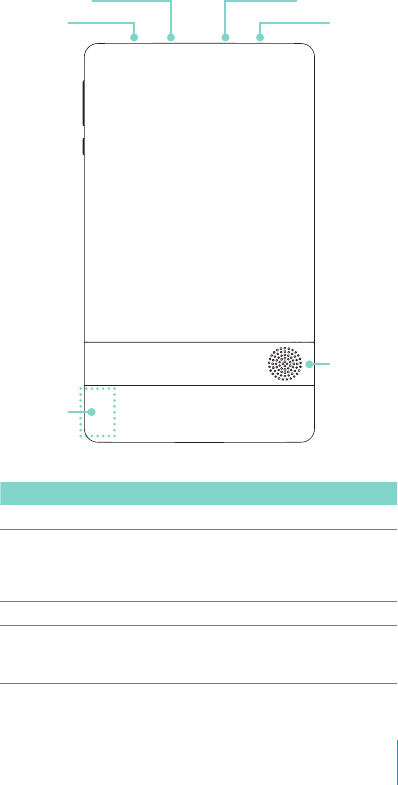
Item Function
Micro SD port Plug microSD card (up to 32G).
Micro-USB port Connect to wall outlet with Micro-USB cable
and power adapter for charging. Connect to a
computer, keyboard, more other devices with
USB port.
Headphone port Headphone connections for personal listening.
Wireless Antenna Support wireless network function.
NOTE Avoid holding this region when using
wireless.
Speaker
Wireless
Antenna
Head-
phone
port
Micro-
phone
Micro-USB portMicro SD port
7Getting Started
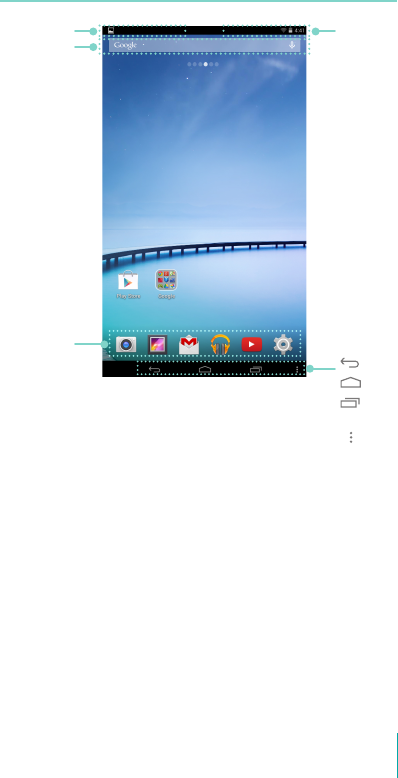
Home Screen
To move between Home screens, slide left or right.
Notification and Status Bar
At the top of the screen, you’ll see indicators that inform
you about the status of your Sero 7 LE. You can open the
Notification Tray or the Quick settings by pressing the
Notification or Status bar and dragging it down.
The table below lists icons that appear the most frequently in
the Notification and Status Bar.
Status Bar
Navigation
Buttons
Back
Home
Recent
Apps
Menu
Notication Bar
Google Search
App Icons
8Getting Started
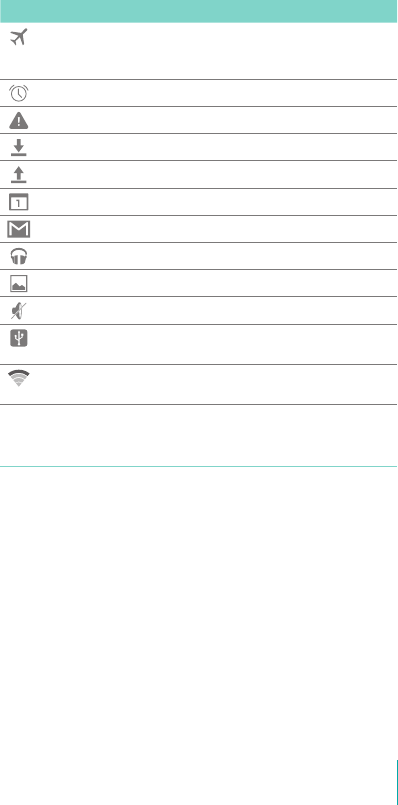
Icon What it means
Airplane mode Shows that airplane mode is on. You can not
access the Internet. Non-wireless features are
available.
Alarm An alarm is set.
Alert Install/update/enable Google Play service.
Downloaded Received les
Uploaded Sent les
Calendar Task reminders.
Message Received new message.
Music Play Music application is running.
Screenshots Screenshot captured.
Silent mode Silent mode is on.
USB tethering Sero 7 LE has connected to a computer and
the USB tethering is turned on.
Wi-Fi Sero 7 LE has a Wi-Fi Internet connection. The
more bars, the stronger the connection.
Buttons
Power Button
Turn Sero 7 LE On
Press & hold the Power button until the Hisense logo displays.
Turn Sero 7 LE Off
In awake mode, press & hold the Power button until a
message displays. Next, tap Power Off > OK. Your Sero 7 LE will
shut down.
Set Airplane / Silent Mode
In awake mode, press & hold the Power button until a
message displays. You can set Airplane mode and Silent mode.
9Getting Started
Put Sero 7 LE in Sleep Mode
Press the Power button to put the Sero 7 LE in sleep mode.
If you do not touch the screen for several minutes, then the
Sero 7 LE will automatically go into sleep mode.
Tip: You can go to Settings > DEVICE > Display > Sleep to set
the screen timeout.
Wake Sero 7 LE From Sleep Mode
Press the Power button to wake the Sero 7 LE from sleep
mode.
Forced Shutdown
If your Sero 7 LE becomes unresponsive during use, you can
press & hold the Power button for 8 seconds to shut it down.
Then press the Power button to restart it.
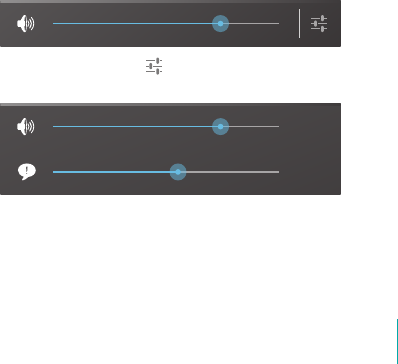
Volume Up/Down Buttons
Silent Mode Off
Press the Volume Up/Down button to increase or decrease
the volume. You can also slide the focus on the volume bar to
adjust it.
Press Settings button to stretch the volume bar, then you
can adjust the notifications’ volume.
Tip: You can go to Settings > DEVICE > Sound > Volumes to
adjust the volume of the alarm.
10Getting Started
Silent Mode On
Press the Volume Up/Down button to turn off Silent mode,
then you can press the Volume button to increase or decrease
the volume.
Navigation Buttons
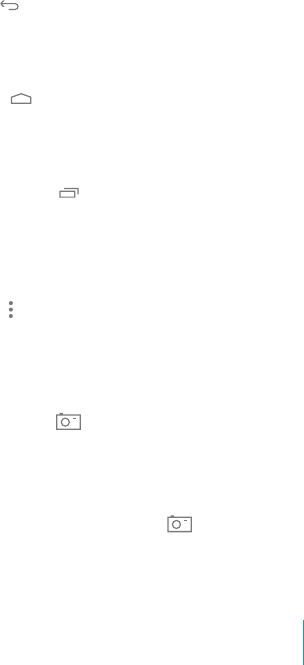
Back Button
Tap this button to open the previous screen you were working
in, even if it was in a different app. Once you go back to the
Home screen, no further history will be available.
Home Button
Tap this button from anywhere on your Sero 7 LE to return to
the Home screen. If you’re viewing a left or right Home screen,
this will open the central Home screen.
Recent Apps Button
Tap this button to view recently used apps. Tap an app to use
it again.
You can slide down to see more apps. You can also slide it
away to the left or right.
Menu Button
Tap this button to choose your wallpaper, add a widget to
any screen, add or delete a screen. You can set the launcher
preferences. You can also open your system settings or apps’
management interface.
Screenshots Button
Tap this button to capture the screen. The screenshots is saved
in Gallery > Screenshots.
Tip: You can go to Settings > DEVICE > Screenshot, check the
Show the screenshot button in the statusbar checkbox to
showed up the Screenshots button at the bottom of
the screen.
11Making Connections
Making Connections
Read this chapter to learn how to connect to an external
device and establish data transmission.
Battery
The Sero 7 LE has an internal Lithium-ion Polymer rechargeable
battery. For important safety instructions about the battery
and charging the Sero 7 LE, see Important Safety Instructions
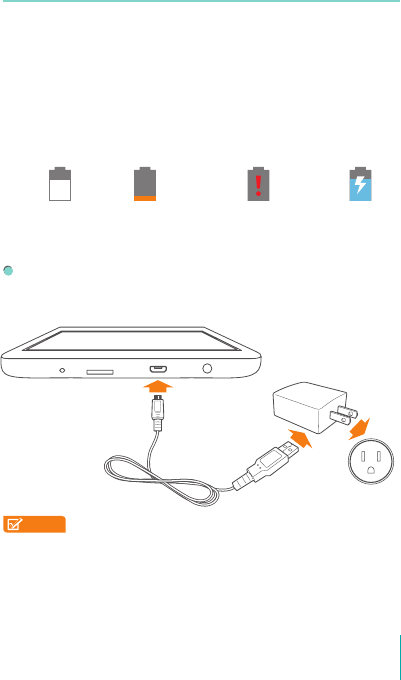
on page 29.
The Battery Icon
The battery icon in the upper-right corner of the status bar
shows the battery level or charging status.
High battery Low battery Needs to be charged Charging
Charging the Battery
The best way to charge the battery is to plug your Sero 7 LE
into a wall outlet using the power adapter and Micro-USB
cable included with your accessories.
NOTES • Use the power adapter and Micro-USB cable
included with your accessories. Other power
adapters and Micro-USB cables may charge more
slowly or not at all.
• The power adapter and wall outlet are only for
reference, they may vary in different countries.
Micro-USB
Cable
Power
Adapter
Wall Outlet
3
12Making Connections
The Sero 7 LE also charges slowly when you connect it
to the USB port on your computer. The battery may drain
instead of charge when the battery usage is large.
Micro-USB
You can use the included Micro-USB cable to connect the
Sero 7 LE’s Micro-USB port to your computer’s USB port.
To change your Sero 7 LE’s USB connection options, go to
Settings > DEVICE > Storage > Menu icon > USB computer
connection. You can select the Sero 7 LE is connected as MTP
or PTP.
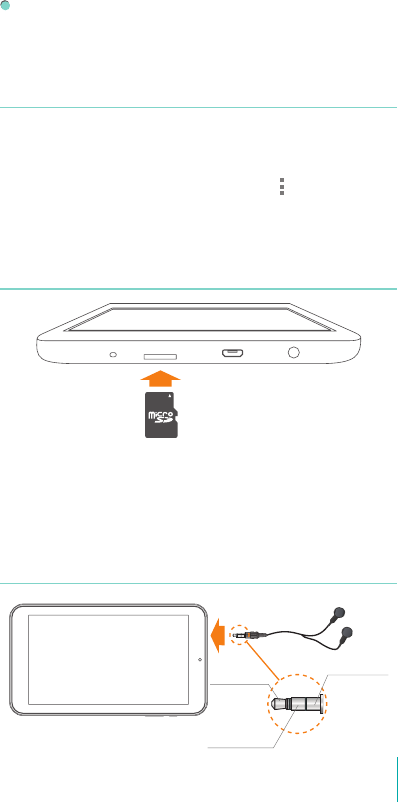
Micro SD Card
Insert the microSD card contacts facing down into the Sero 7
LE’s Micro SD port.
To check the storage of microSD card, go to Settings > DEVICE
> Storage.
Headphone
microSD
Card
Audio left
Audio right
Grounded
13Making Connections
Headphones can be connected to the Sero 7 LE’s headphone
port. Microphone connection is not supported. For more
information about headphones, see Important Safety
Instructions on page 29.
Wi-Fi
You can connect to a wireless access point, or hotspot to use
Wi-Fi. Some hotspots are open and you can simply connect to
them. Others implement security features that require other
steps to set up.
Add a Wi-Fi Network
You can add a Wi-Fi network so your device will remember
it, along with any security credentials, and connect to it
automatically when it’s in range. You must also add a Wi-Fi
network if the network does not broadcast its name (SSID), or
to add a Wi-Fi network when you are out of range.
1. Turn on Wi-Fi, if it’s not already on.
2. Tap the Plus icon at the top of the screen.
3. Enter the SSID (name) of the network. If necessary, enter
security or other network configuration details.
4. Tap Save.
Forget a Wi-Fi Network
To forget a Wi-Fi network, go to Settings > WIRELESS &
NETWORKS > Wi-Fi > [the network name] > Forget.
Advanced Wi-Fi Settings
To set the Advanced Wi-Fi, go to Settings > WIRELESS &
NETWORKS > Wi-Fi > Menu icon > Advanced .
Network notification - By default, when Wi-Fi is on, you
receive notification in the Status bar when your device
detects an open Wi-Fi network. Uncheck this option to turn
off notification.
Keep Wi-Fi on during sleep - To select whether to put the
Sero 7 LE in sleep mode when it’s connected to Wi-Fi.

14Making Connections
Scanning always available - Check to scan for networks
even when Wi-Fi is turned off.
Install certificates - To use a certificate to identify your
Sero 7 LE, you must obtain it with help from your system
administrator, and install it in your tablet’s trusted credential
storage.
Wi-Fi optimization - By default, when Wi-Fi is on the battery
usage is optimized.
MAC address - The Media Access Control (MAC) address of
your device when connected to a Wi-Fi network.
IP address - The Internet Protocol (IP) address assigned
to the device by the Wi-Fi network you are connected
to (unless you used the IP settings to assign it a static IP
address).
Configure Proxy Settings for a Wi-Fi Network
Some network administrators require you to connect to
internal or external network resources via a proxy server. By
default, the Wi-Fi networks you add are not configured to
connect via a proxy, but you can change that for each Wi-Fi
network you’ve added.
1. Press & hold a network in the list of Wi-Fi networks you’ve
added.
2. Tap Modify network in the dialog that opens.
3. Select Show advanced options.
4. If the network has no proxy settings, tap None under Proxy
Settings, then tap Manual in the menu that opens.
5. Enter the proxy settings supplied by your network
administrator.
6. Tap Save.
NOTE Proxy settings are used by the browser but may not be
used by other apps.
VPN
To configure VPN access, you must first obtain the details from
your network administrator. Depending on your organization’s

15Making Connections
solution, you may need to obtain a VPN app, either from your
administrator or on Google Play.
Go to Settings > WIRELESS & NETWORKS > More > VPN.
Add a VPN
1. From the VPN screen, tap the Plus icon to add VPN
profile.
2. In the form that appears, fill in the information provided by
your network administrator.
3. Tap Save.
Connect to a VPN
1. From the VPN screen, tap the name of the VPN.
2. In the dialog that opens, enter any requested credentials.
3. Tap Connect.
Edit a VPN
1. From the VPN screen, press & hold the name of the VPN
profile.
2. In the dialog that opens, tap Edit profile.
3. Edit the VPN settings you want.
4. Tap Save.
Delete a VPN
1. From the VPN screen, press & hold the name of the VPN
profile.
2. Press & hold the VPN you want to delete.
3. In the dialog that opens, touch Delete profile.
16Basic
Basic
Read this chapter to learn about the Sero 7 LE basic features.
Setup Guide
Turning Your Sero 7 LE On for the First Time
To start, turn on your Sero 7 LE by pressing and holding Power
button until the Hisense logo appears. After the animation
appears, follow the on-screen instructions to set up your Sero
7 LE.
1. Slide up and down to select the language, then tap icon.
2. Connect to a Wi-Fi network. Tap a network name to see
more details or connect to it, and enter a password if
necessary.
NOTES • You can skip connecting progress, and set a Wi-Fi
network in Settings later.
• If your skip connecting progress, the following steps
will vary.
3. When prompted, sign in the using email address and
password for your Google Account. If you don’t have one
yet, go ahead and create one. For more information about
Google Account, see Google Account on page 24.
NOTE If you do not log in to Google Account, the following
steps will vary.
4. Select your Google services.
5. Set up your credit card with Google Wallet.
6. Select your time zone, set current date and time of your
Sero 7 LE.
7. Enter your name.
4
17Basic
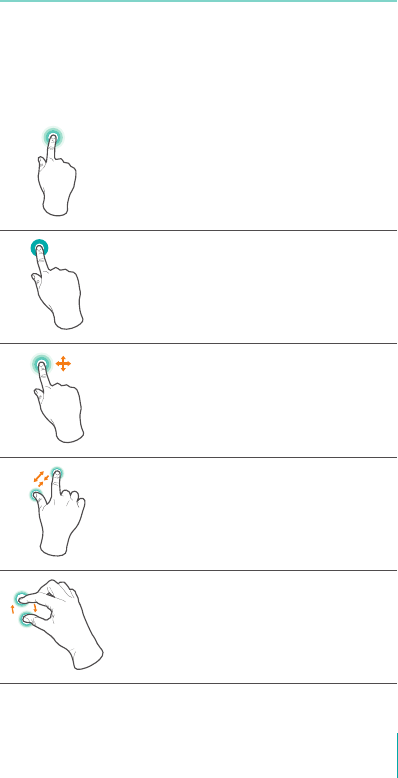
Basic Operation
Using Apps
You interact with the Sero 7 LE using your fingers to tap,
double tap, press & hold, slide, pinch, and rotate objects on
the touchscreen.
Tap or Double Tap
To select a feature or item, quickly touch the
screen.
Double tap your finger quickly on an item to
bring up more details.
Press & Hold
Touch the screen and hold it there for 2 seconds.
In many situations, pressing and holding will
open a menu.
Slide or Drag
Touch the screen and slide your finger to another
location.
Press and hold on an object and slide it to
another location on the screen.
Zoom
Place two fingers about an inch apart on the
screen. Slide them together to ‘zoom out’.
Slide your fingers apart to ‘zoom in’.
Rotate
Place two fingers about an inch apart on the
screen. Rotate them in clockwise or counter-
clockwise.
18Basic
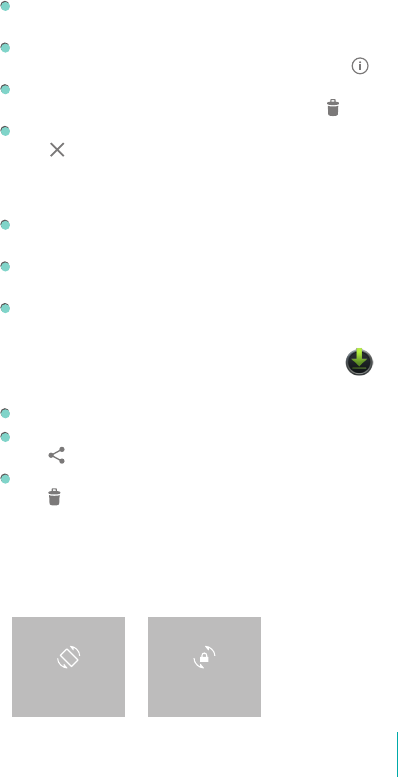
Rearrange Home Screen
Move apps or widgets: Press & hold an icon or widget,
slowly to drag it to the screen edge, the screen will switch.
View info about an app: Press & hold it, drag it to the top of
the screen, and drop the app over the App Info icon .
Uninstall an app: Press & hold it, drag it to the top of the
screen, and drop the app over the Uninstall icon .
Remove widgets: Press & hold a widget, when the Remove
icon appears at the top of the screen, drag the widget
into it.
Organize Your Apps With Folders
Make a new folder on your Home screen: Press & hold an
icon, slowly to drag it on top of another app.
Rename folder: Tap the folder, then tap the name of folder,
enter a new name.
Press & hold an icon, slowly to drag it into / out of a folder.
Manage Downloads
To manage most downloads, tap the Downloads icon .
From the Download app:
Tap an item to open it.
Press & hold an item you want to share, then tap the Share
icon and choose a sharing method from the list.
Press & hold an item you want to delete, then tap the Trash
icon .
Screen Orientation
In Quick Settings, you can tap rotation icon to switch the
screen rotation mode: Auto Rotate or Rotation Locked. Or go
to Settings > SYSTEM > Accessibility > Auto-rotate screen.
ROTATION LOCKEDAUTO ROTATE
19Basic
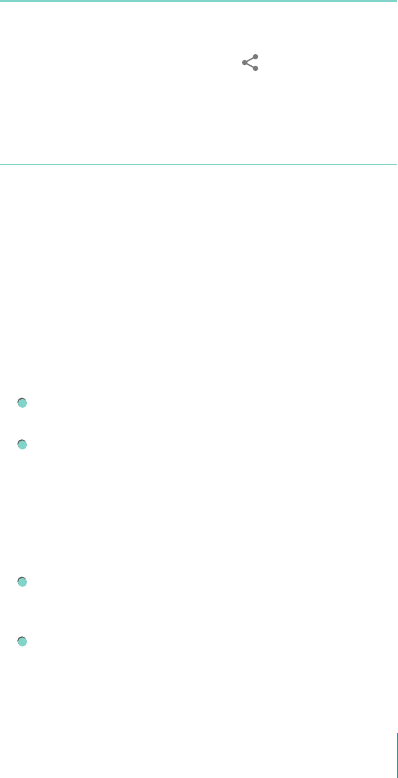
Sharing
The Sero 7 LE gives you lots of ways to share with other
people.
In many apps, tap Share or Share icon and choose a sharing
method from the list for sharing. The options vary depending
on the app you’re using.
Security
Set Screen Lock
You can set an automatic screen lock to prevent unauthorized
access.
To adjust your lock settings:
1. Go to Settings > PERSONAL > Security > Screen security >
Screen lock.
2. Tap the type of lock you want and follow the on-screen
instructions. If you have previously set a lock, you must
enter the pattern, PIN, or password to unlock the lock
settings.
Slide - The slide provides no protection, but lets you get
to the Home screen quickly.
Face Unlock - Lets you unlock your device by looking at
it. This is the least secure lock option.
Tip: After you set up Face Unlock, look under Settings
> PERSONAL > Security > Screen security for two
additional settings: Improve face matching and
Liveness check. Use these to make Face Unlock
more reliable and secure.
Pattern - Lets you draw a simple pattern with your finger
to unlock your Sero 7 LE. This is slightly more secure than
Face Unlock.
PIN - Requires four or more numbers. Longer PINs tend
to be more secure.
20Basic
Password - Requires four or more letters or numbers. This
is the most secure option, as long as you create a strong
password.
Tips: For best security, specify a password that
• Is least 8 characters long.
• Contains a mixture of numbers, letters, and special
symbols.
• Doesn’t contain any recognizable words or phrases.
Encrypt Your Data
Encryption provides additional protection in case your device
is stolen and may be required or recommended in some
organizations.
NOTE Encryption is irreversible. The only way to revert to an
unencrypted device is to perform a factory data reset,
which erases all your data.
Before turning on encryption, prepare as follows:
1. Set a lock screen PIN or password.
2. Charge the battery.
3. Plug in your Sero 7 LE.
4. Schedule an hour or more for the encryption process:
you must not interrupt it or you will lose some or all of
your data.
When you’re ready to turn on encryption:
1. Go to Settings > PERSONAL > Security > Encryption >
Encrypt tablet.
2. Read the information about encryption carefully.
The Encrypt tablet button is dimmed if your battery is
not charged or your Sero 7 LE is not plugged in. If you
change your mind about encrypting your Sero 7 LE, tap
the Back button .
NOTE If you interrupt the encryption process, you will lose
data.
3. Tap Encrypt tablet.
4. Enter your lock screen PIN or password and tap Continue.
5. Tap Encrypt tablet again.

21Basic
Settings
Settings lets you configure the Sero 7 LE, set app options, add
accounts, and change other preferences.
WIRELESS & NETWORKS
Data Usage
Data usage refers to the amount of data uploaded or
downloaded by your Sero 7 LE during a given period. And you
can view data usage by app and access app settings.
Airplane Mode
Airplane mode disables the wireless features in order to
reduce potential interference with aircraft operation and other
electrical equipment.
To turn Airplane mode on, tap Settings > WIRELESS &
NETWORKS > More > Airplane mode.
DEVICE
Sound
You can set your Sero 7 LE to play a sound whenever you
get a new message, email, alert, or reminder. You can also set
sounds for pressing icons and locking your Sero 7 LE.
Display
You can adjust the brightness of the display or the screen
timeout. You can set the wallpaper, or the font size. And you
can also set what appears on screen when sleep mode is on.
Screenshot
You can select delay time to capture the screen. You can also
set the location of screenshot storage.
Storage
You affect the way apps use internal storage directly and
indirectly in many ways - for example, by:
22Basic
Installing or uninstalling apps.
Downloading files in Chrome, Gmail, and other apps.
Creating files (for example, by taking pictures).
Deleting downloaded files or files you created.
Copying files between Sero 7 LE and a computer via USB.
Apps
You’ll see three tabs at the top of the screen, each displaying a
list of apps or their components:
Downloaded - Displays apps you’ve downloaded on Google
Play or other sources.
Running - Displays all apps, processes, and services that are
currently running or that have cached processes, and how
much RAM they are using.
All - Displays all apps that came with the Sero 7 LE and all
apps you downloaded from Google Play or other sources.
To switch the order of the lists displayed in the Downloaded
or All tabs, tap Menu icon > Sort by name or Sort by size.
PERSONAL
Backup & Reset
You can back up app data, Wi-Fi passwords, and other
settings to Google servers. You can also restore the Sero 7 LE’s
configuration to factory settings.
SYSTEM
Date & Time
You can set time zone, date, time and date format. If Sero 7
LE connected with a Wi-Fi, you can also select use network-
provided time.
Accessibility
To modify your device’s Accessibility settings:
TalkBack - Controls spoken feedback for visually impaired
users.

23Basic
Captions - Choose to turn on captions for your device.
Magnification gestures - Turn on to toggle zoom in and out,
as well as temporarily magnify what’s under your finger.
Large text - Check to increase the text size on all your
device’s screens.
Auto-rotate screen - Check to have the screen auto-rotate
in portrait and landscape modes.
Speak passwords - Check to get spoken feedback while
typing passwords. If this option is not checked, you will
need a headset to hear the letters you type for passwords.
Accessibility shortcut - Lets you quickly enable accessibility
features.
Text-to-speech output - Lets you specify text-to-speech
engine details and speech rate.
Touch & hold delay - Lets you adjust the delay required for
the device to notice that you’re touching and holding an
item.
Printing
You can print directly from Sero 7 LE.
Tap Cloud Print to view a list of available printers. To add a
printer or manage settings, tap the Menu icon .
About Tablet
You can view the version information, the status of battery,
network, and other information.
You can also update the software version via the network.
There are two ways to access the update screen:
If the latest version is checked by system, a notification will
appear in the Notification Bar. Open the Notification Tray
and tap the notification.
If you dismiss the update notification, go to Settings >
SYSTEM > About tablet > System updates.

24Basic
Location
Sero 7 LE can use different modes to access location
information.
Each mode uses different sources to estimate Sero 7 LE’s
location. Apps that have your permission can use this
information to deliver location-based services, such as the
ability to check in, view commute traffic, or find nearby
restaurants.
Location for Sero 7 LE
To control what location information Sero 7 LE can use, go to
Settings > PERSONAL > Location.
Apps Using Your Location
To know which apps are currently accessing or have recently
accessed your location, go to Settings > PERSONAL > Location
> Recent Location Requests.
Location Services
These settings control location services across multiple apps:
On - One or more accounts is on for this service.
Off - All accounts are off for this service.
Manage Location Reporting & Location History
To open or closer Location Reporting, tap Location >
Location services > Google Location Reporting > Location
Reporting, slide the switch ON or OFF.
To open or closer Location History, tap Location > Location
services > Google Location Reporting > Location History,
slide the switch ON or OFF. You can also delete Location
History.
Google Account
Add an Account
1. Go to Settings > ACCOUNTS > Add account.
2. Tap the kind of account to add.
25Basic
3. Follow the on-screen instructions.
4. Most accounts require a username and password, but
the details depend on the kind of account and the
configuration of the service you’re connecting to.
When you’re finished, the account is added in one of two
places:
Google Accounts show up under Settings > ACCOUNTS >
Google.
Other accounts show up under Settings > ACCOUNTS on
the main Settings screen.
Remove an Account
You can remove any account and all information associated
with it from your Sero 7 LE, including email, contacts, settings,
and so on.
To remove a Google account, go to Settings > ACCOUNTS
> Google > [account-name] > Menu icon > Remove
account.
For any other type of account, go to Settings > ACCOUNTS
> [account - type] > [account - name] and look for the
Remove option.
Syncing
Configure Auto-sync for All Apps
To control Auto-sync for all apps that use it, go to Settings
> WIRELESS & NETWORKS > Data usage > Menu icon , and
check or uncheck Auto-sync data.
Configure Google Account Sync Settings
To adjust a single Google Account’s sync settings:
1. Go to Settings > PERSONAL > Accounts > Google.
indicates that none of an account’s information is
configured to sync automatically.
indicates that some or all of an account’s information is
configured to sync automatically.

26Basic
2. Tap the account whose sync settings you want to change.
3. The Sync Settings screen opens, displaying a list of the
kinds of information the account can sync.
4. Tap items as needed.
Unchecking an option does not remove the information from
your Sero 7 LE; it simply stops it from being kept in sync with
the version on the web.
Sync a Google Account Manually
1. Go to Settings > ACCOUNTS > Google.
2. Tap the account whose data you want to sync.
3. Tap Menu icon > Sync now.
Tip: None of an account’s information is configured to sync
automatically.
27Appendix A
Appendix A
Specifications
Product Name Sero 7 LE
Model E2371
Dimension (L × W × T) 7.45 inches × 4.27 inches × 0.39 inches
(189.2 mm × 108.5 mm × 10 mm)
Weight 0.74 lbs (335 g)
Display Diagonal 7 inches
Resolution 1024 × 600
Hardware Platform RK2926 Dual Core ARM Cortex-A9, 1.0GHz
Storage RAM 1GB
ROM 8GB1
Extendable
Memory
Micro SD (up to 32G, support hot plug)
Antenna Wi-Fi 802.11 b/g/n (2.4G)
Camera 0.3 M
Power AC Power Adapter (5V/ 1.5A)
Battery Rechargeable2 lithium polymer battery
Battery Capacity /
Voltage
3000 mAh / 3.7 V
Audio Built-in speaker
External Port 3.5 mm stereo headphone port; Micro-
USB port; Micro SD port
Operating Temperature 32°F to 95°F (0°C to 35°C)
Storage Temperature -4°F to 113°F (-20°C to 45°C)
1 : Because the system will occupy part of the memory space, the
available user space will be less than 8GB.
2 : The rechargeable battery in Sero 7 LE should be replaced only
by Hisense Service.
A
28Appendix A
Troubleshooting
When there appears to be an issue with your Sero 7 LE, refer
to the tips listed below for a resolution. If the problem still
cannot be solved, then contact the local Hisense Electronics
Consumer Care Center or a professional technician.
Sero 7 LE displays network or service error message
When you are located in places with poor signals, then your
Sero 7 LE may not be able to connect. Try to move to other
places to get a stronger signal strength.
If you do not make a reservation, some of the options can
not be used. Please contact your service provider for more
details.
Touch screen response is slow or incorrect
If the Sero 7 LE’s touch screen response is incorrect, please try
the following:
Remove any protective film of the touch screen. The
protective film may prevent the device recognition input.
Make sure that you are fingers are dry and clean before you
tap the touch screen.
Restart the Sero 7 LE to clear any temporary software bugs.
Make sure that the Sero 7 LE’s software has been upgraded
to the latest version.
Sero 7 LE is frozen or a serious error appears
If the Sero 7 LE is frozen or suspended, you may need to
close the app program or reset the tablet.
If the Sero 7 LE is frozen or slow to respond, press & hold
the Power button for 8 seconds to the reset the tablet.
If the problem persists, restore the factory data.
Sero 7 LE gets warm
When you use your device for a long time, the Sero 7 LE may
be warm to the touch. This is normal and will not affect the life
or performance of the unit.
29Appendix B
Appendix B
Important Safety Instructions
1. Read these instructions.
2. Keep these instructions.
3. Heed all warnings.
4. Follow all instructions.
5. Do not defeat the safety purpose of the polarized or
grounding-type plug. A polarized plug has two blades with
one wider than the other. A grounding type plug has two
blades and a third grounding prong. The wide blade or the
third prong are provided for your safety. If the provided
plug does not fit into your outlet, consult an electrician for
replacement of the obsolete outlet.
6. Protect the power cord from being walked on or pinched
particularly at plugs, convenience receptacles, and the
point where they exit from the unit.
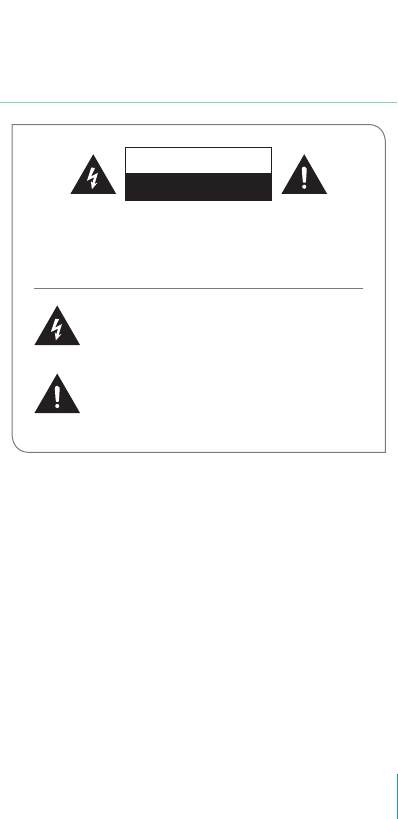
The lightning flash with arrow head symbol,
within an equilateral triangle is intended to
alert the user that parts inside the product
constitute a risk of electric shock to persons.
The exclamation point within an equilateral
triangle is intended to alert the user that
important operating and servicing instructions
are in the papers with the appliance.
WARNING: TO REDUCE THE RISK OF ELECTRIC SHOCK, DO
NOT REMOVE COVER OR BACK. NO USER-SERVICEABLE
PARTS INSIDE. REFER SERVICING TO QUALIFIED SERVICE
PERSONNEL.
WARNING
RISK OF ELECTRIC SHOCK
DO NOT OPEN
B
30Appendix B
7. Only use attachments/accessories specified by the
manufacturer.
8. Refer all servicing to qualified service personnel. Servicing is
required when the unit has been damaged in any way, such
as power-supply cord or plug is damaged, liquid has been
spilled or objects have fallen into the unit, the unit has been
exposed to rain or moisture, does not operate normally, or
has been dropped.
9. Do not install near any heat sources such as radiators, heat
registers, stoves, or other units (including amplifiers) that
produce heat.
10. Unplug this unit during lightning storms or when unused
for long periods of time.
Warning
All packing materials such as internal bags, plastic collars,
plastic films, and carton inserts are not part of this product
and should be discarded.
Do not try to disassemble the unit.
Only use a wall outlet to charge your Sero 7 LE and the
power adapter that came with the device.
Do not expose the unit to moisture or water.
Keep the unit clean by wiping it with a slightly damp cloth.
To prevent hearing damage, never use headphones at
excessive volume levels. Listening to loud sounds for an
extended period may cause temporary or permanent
hearing loss.
Never use Sero 7 LE while operating a motor vehicle or
bicycle.
If you feel discomfort in your hands or any pain using Sero
7 LE, please stop immediately.
In case of long periods of use, take frequent breaks.
If a small part is coming out of the Sero 7 LE, do not try to
remove it. Keep it away from small children.
31Appendix B
Never force a connector into a port of Sero 7 LE. If a
connector and a port do not join with reasonable force,
make sure that the connector matches the port and that
you have positioned the connector correctly in relation to
the port.
To clean the screen, simply use a soft damp cloth. Do not
use alcohol, solvent, aerosol spray or abrasive cleaners to
clean your Sero 7 LE.
The product and the adapter should be periodically
examined for conditions that may result in the risk of fire,
electric shock, or injury to persons and that, in an event
such conditions, the adapter should not be used until
properly repaired.
Operate Sero 7 LE in a place where the temperature
is between 0º and 35ºC (32º to 95ºF). Low or high
temperature conditions might temporarily shorten battery
life or cause Sero 7 LE to temporarily stop working properly.
Avoid dramatic changes in temperature or humidity when
using Sero 7 LE, as condensation may form on or within
Sero 7 LE.
Store Sero 7 LE in a place where the temperature is
between -20º and 45ºC (-4º to 113ºF). Don’t leave Sero 7 LE
in your car because temperatures in parked cars can exceed
this range.
When you’re using Sero 7 LE or charging the battery, it is
normal for Sero 7 LE to get warm. The exterior of Sero 7
LE functions as a cooling surface that transfers heat from
inside the unit to the cooler air outside.
The rechargeable battery in Sero 7 LE should be replaced
only by Hisense Service.
Do not expose a battery pack or installed batteries to
excessive heat such as sunshine, fire or the like.
If you will not use Sero 7 LE frequently, then we recommend
that you fully charge and discharge the battery every three
months in order to maximize the battery lifespan.
If you will not use Sero 7 LE frequently, then we recommend
that you keep the battery level at around 50 percent in
order to maximize the battery life span.

32Appendix B
If Sero 7 LE has not been used for a long period of time,
then the battery might be in an over-discharge protection
mode and take longer to charge.
Never remove or insert microSD card while the Sero 7 LE is
powered on.
The manufacturer is not responsible for any radio or TV
interference caused by unauthorized modifications to
this equipment. Such modifications could void the user’s
authority to operate the equipment.
Sero 7 LE North America edition is limited using channel
1-11. This limited operation can be only set by software
and was done before the product down from the product
line. All the products for North America marketing were
embedded this limited before shipping. Customers have no
way to choose the channel 12 & 13.
Certification and Compliance
Exposure to Radio Frequency Energy
Sero 7 LE contains radio transmitters and receivers. When
on, Sero 7 LE sends and receives radio frequency (RF) energy
through its antenna. The Wireless antenna is located on the
back of the device, see Understanding Your Sero 7 LE Tablet
on page 5 for more details. Sero 7 LE has been tested
and meets the SAR (Specific Absorption Rate) exposure
requirements for WLAN operation.
Sero 7 LE is designed and manufactured to comply with
the limits for exposure to RF energy set by the Federal
Communications Commission (FCC) of the United State. The
exposure standard employs a unit of measurement known as
the specific absorption rate, or SAR. The SAR limit applicable to
Sero 7 LE set by the FCC is 1.6 watts per kilogram (W/kg). Tests
for SAR are conducted using standard operating positions
specified by these agencies, with Sero 7 LE transmitting at its
highest certified power level in all tested frequency bands.
Although SAR is determined at the highest certified power
level in each frequency band, the actual SAR level of Sero 7
LE while in operation can be well below the maximum value
33Appendix B
because Sero 7 LE adjusts its WLAN transmitting power based
in part on orientation and proximity to the wireless network.
In general, the closer you are to a WLAN Router, the lower the
WLAN transmitting power level.
Sero 7 LE has been tested, and meets the FCC and European
Union RF exposure guidelines for WLAN operation. When
tested at direct body contact, Sero 7 LE’s maximum SAR value
for each frequency band is outlined below:
FCC SAR
Frequency Band
(MHz)
FCC 1g SAR Limit
(W/kg)
Highest Value
(W/kg)
Model: E2371
2412-2462 1.6
EN SAR
Band EN 10g SAR Limit (W/kg) Highest Value (W/kg)
Model: E2371
Wi-Fi 2.4 GHz 2.0
Additional Information
For more information from the FCC about exposure to RF
energy, see: www.fcc.gov/oet/rfsafety .
The FCC and the U.S. Food and Drug Administration (FDA)
also maintain a consumer website at www.fda.gov/Radiation-
EmittingProducts/default.htm to address inquiries about the
safety of mobile phones. Check the website periodically for
updates.
For information about the scientific research related to RF
energy exposure, see the EMF Research Database maintained
by the World Health Organization at: www.who.int/emf .
FCC Compliance Statement
This device complies with part 15 of the FCC rules. Operation
is subject to the following two conditions: (1) this device
may not cause harmful interference, and (2) this device must
accept any interference received, including interference that
may cause undesired operation.
Information to Users
According to the FCC Part 15.19, 15.21, and 15.105 rules, for this EUT, the instructions or operation manual
furnished the user shall include the following or similar statement, placed in a prominent location in the text of the
manual:
FCC RF Exposure Information and Statement
The SAR limit of USA (FCC) is 1.6 W/kg averaged over one gram of tissue. Device types Sero 7 LE/E2371 (FCC
ID: W9HPADP0005) has also been tested against this SAR limit. The highest SAR value reported under this
standard during product certification for use at the properly worn on the body is 0.6186W/kg. This device was
tested for typical body-worn operations with the back of the handset kept 0cm from the body. To maintain
compliance with FCC RF exposure requirements, use accessories that maintain a 0cm separation distance between
the user's body and the back of the handset. The use of belt clips, holsters and similar accessories should not
contain metallic components in its assembly. The use of accessories that do not satisfy these requirements may not
comply with FCC RF exposure requirements, and should be avoided.
FCC Warning
This device complies with Part 15 of the FCC Rules. Operation is subject to the following two conditions:
(1) This device may not cause harmful interference, and (2) this device must accept any interference received,
including interference that may cause undesired operation.
NOTE 1: This equipment has been tested and found to comply with the limits for a Class B digital device,
pursuant to part 15 of the FCC Rules. These limits are designed to provide reasonable protection against harmful
interference in a residential installation. This equipment generates, uses and can radiate radio frequency energy
and, if not installed and used in accordance with the instructions, may cause harmful interference to radio
communications. However, there is no guarantee that interference will not occur in a particular installation. If this
equipment does cause harmful interference to radio or television reception, which can be determined by turning
the equipment off and on, the user is encouraged to try to correct the interference by one or more of the following
measures:
- Reorient or relocate the receiving antenna.
- Increase the separation between the equipment and receiver.
-Connect the equipment into an outlet on a circuit different from that to which the receiver is connected.
-Consult the dealer or an experienced radio/TV technician for help.
NOTE 2: Any changes or modifications to this unit not expressly approved by the party responsible for
compliance could void the user's authority to operate the equipment.
35Appendix B
NOM warning
This equipment complies with Mexican Standard
Regulations.
Disposal and Recycling Information
The symbol means that according to local laws
and regulations your product should be disposed
of separately from household waste. When this
product reaches its end of life, take it to a
collection point designated by local authorities.
Some collection points accept products for free.
The separate collection and recycling of your
product at the time of disposal will help conserve
natural resources and ensure that it is recycled in a manner
that protects human health and the environment.

36Appendix C
Appendix C
Legal Terms
The product/device you have purchased from Hisense
Co., Ltd. or it’s Parent Company, affiliates and/or Subsidiary
Company, its successors and/or assigns (hereinafter referred
to as “Hisense”) provides direct access to the internet through
one or more internet provider services (hereinafter referred
“Web Service”). All content and services accessible through
this device belong to Hisense Co., Ltd. “Hisense” is sometimes
also referred to herein as “we” or “us”) or third parties and
are protected by copyright, patent, trademark and/or other
intellectual property laws. Such content and services are
provided solely for your personal non-commercial use. You
may not use any content or services in a manner that has not
been authorized by the content owner or service provider
or prohibited by law. You may not modify, copy, republish,
upload, post, transmit, translate, sell, create derivative works,
exploit, or distribute in any manner or medium any content or
services displayed through this device except as permitted by
applicable law or as authorized in writing by Hisense.
YOU EXPRESSLY ACKNOWLEDGE AND AGREE THAT USE OF
THE DEVICE IS AT YOUR SOLE RISK. TO THE EXTENT PERMITTED
BY LAW, THE DEVICE AND ALL CONTENT AND SERVICES
ARE PROVIDED “AS IS”WITHOUT WARRANTY, CONDITION,
TERM, REPRESENTATION OR UNDERTAKING OF ANY KIND,
EITHER EXPRESS OR IMPLIED. TO THE EXTENT PERMITTED
BY LAW, HISENSE EXPRESSLY DISCLAIMS ALL WARRANTIES,
CONDITIONS, TERMS, REPRESENTATIONS AND UNDERTAKINGS
WITH RESPECT TO THE DEVICE AND ANY CONTENT AND
SERVICES, EITHER EXPRESSED OR IMPLIED, INCLUDING,
BUT NOT LIMITED TO, WARRANTIES OF MERCHANTABILITY,
OF SATISFACTORY QUALITY, FITNESS FOR A PARTICULAR
PURPOSE, OF ACCURACY, OF QUIET ENJOYMENT, AND NON-
INFRINGEMENT OF THIRD PARTY RIGHTS. TO THE EXTENT
PERMITTED BY LAW, HISENSE DOES NOT GUARANTEE
THE ACCURACY, VALIDITY, TIMELINESS, LEGALITY, OR
COMPLETENESS OF ANY CONTENT OR SERVICE MADE
C

37Appendix C
AVAILABLE THROUGH THE DEVICE AND DOES NOT WARRANT
THAT THE DEVICE, CONTENT OR SERVICES WILL MEET YOUR
REQUIREMENTS, OR THAT OPERATION OF THE DEVICE OR
SERVICES WILL BE UNINTERRUPTED OR ERROR-FREE. TO THE
EXTENT PERMITTED BY LAW, UNDER NO CIRCUMSTANCES,
INCLUDING NEGLIGENCE, SHALL HISENSE BE LIABLE, WHETHER
IN CONTRACT OR TORT OR OTHERWISE, FOR ANY DIRECT,
INDIRECT, INCIDENTAL, SPECIAL OR CONSEQUENTIAL LOSS
OR DAMAGES, LOSS OF PROFIT, REVENUE, INTEREST, BUSINESS
OR CORRUPTION OF DATA, ATTORNEY FEES, EXPENSES, OR
ANY OTHER LOSS OR DAMAGES ARISING OUT OF, OR IN
CONNECTION WITH, ANY INFORMATION CONTAINED IN, OR
AS A RESULT OF THE USE OF THE DEVICE, OR ANY CONTENT
OR SERVICE ACCESSED BY YOU OR ANY THIRD PARTY, EVEN IF
ADVISED OF THE POSSIBILITY OF SUCH LOSS OR DAMAGES. IF
THE LAW OF A PARTICULAR JURISDICTION DOES NOT PERMIT
HISENSE TO EXCLUDE WARRANTIES AS CONTAINED HEREIN,
THEN HISENSE SHALL BE READ TO PERMIT HISENSE TO LIMIT
AND EXCLUDE ANY SUCH WARRANTIES TO THE MAXIMUM
EXTENT AS PERMITTED BY THE LAW.
The country location you have identified during the set-up
process may grant you access to certain content, advertising
and services of third parties or Hisense. The third party
content and linked sites are not under our control, and we
have neither reviewed the contents of these third-party web
sites, nor do we claim any responsibility for the access to,
maintenance, content or suitability of, these third-party web
sites or applications. You expressly acknowledge and agree
that the identification of your country location and you’re
linking to any third party site or application is entirely at your
own risk, and it is your responsibility to view and abide by the
terms of use and privacy policies applicable to any third party
site. You understand and agree that, to the extent permitted
by law, Hisense shall in no event be liable for any direct,
indirect, incidental, special or consequential loss or damages,
attorney fees, expenses, or any other loss or damages arising
out of, or in connection with, your unauthorized access to
third party content based on your selection of a country
location or otherwise.
All content and services accessible through this device may
be changed, suspended, removed, terminated or interrupted,

38Appendix C
or access may be denied or disabled at any time, without
notice, and Hisense makes no representation or warranty that
any content or service will remain available for any period
of time. Content and services are transmitted by means of
networks and transmission facilities over which Hisense has
no control. Without limiting the generality of this Disclaimer,
and to the extent permitted by law, Hisense expressly
disclaims any responsibility or liability for any change,
interruption, disabling, removal or suspension of any content
or service made available through this device. Hisense may
impose limits on the use, disabling, removal or suspension of
any content or service made available through this device.
Hisense may impose limits on the use of, or access to, certain
services or content in any case and without notice or liability.
Hisense is neither responsible nor liable for customer service
related to the third party content and services. You need to
accept the terms of service and privacy policy in order to use
“Hisense Smart” platform on your Tablet. All the applications
in the Tablet are provided by are subject to modification
or termination with or without any notice. Any question or
request for service relating to such content or services should
be made directly to the respective third party applications and
service providers.
Copyright and Trademark Notices
Hisense and associated logos where applicable are registered
trademarks of Hisense Group in Canada, the United Sates,
Mexico and/or other countries. All other trademarks are
property of their respective owners. 2014 Hisense Co., Ltd. All
Rights Reserved.
Wi-Fi® is a registered mark of the Wi-Fi Alliance.
Android, Google Play and other marks are trademarks of
Google Inc..
Screenshots and product images are simulated and for
instructional purposes only. They may differ from the actual
product and are subject to change without notice. Content
shown may vary from actual available content, which may
change without notice.

Ver. 14.01