Hobbico FLITT Flitt Drone RTF User Manual
Hobbico Inc Flitt Drone RTF Users Manual
UserManual.wiki
>
Hobbico
>
FLITT User Manual
Users Manual
Navigation menu
Upload a User Manual
Namespaces
Wiki Guide
HTML
PDF
Info
Views
User Manual
Discussion / Help
Navigation
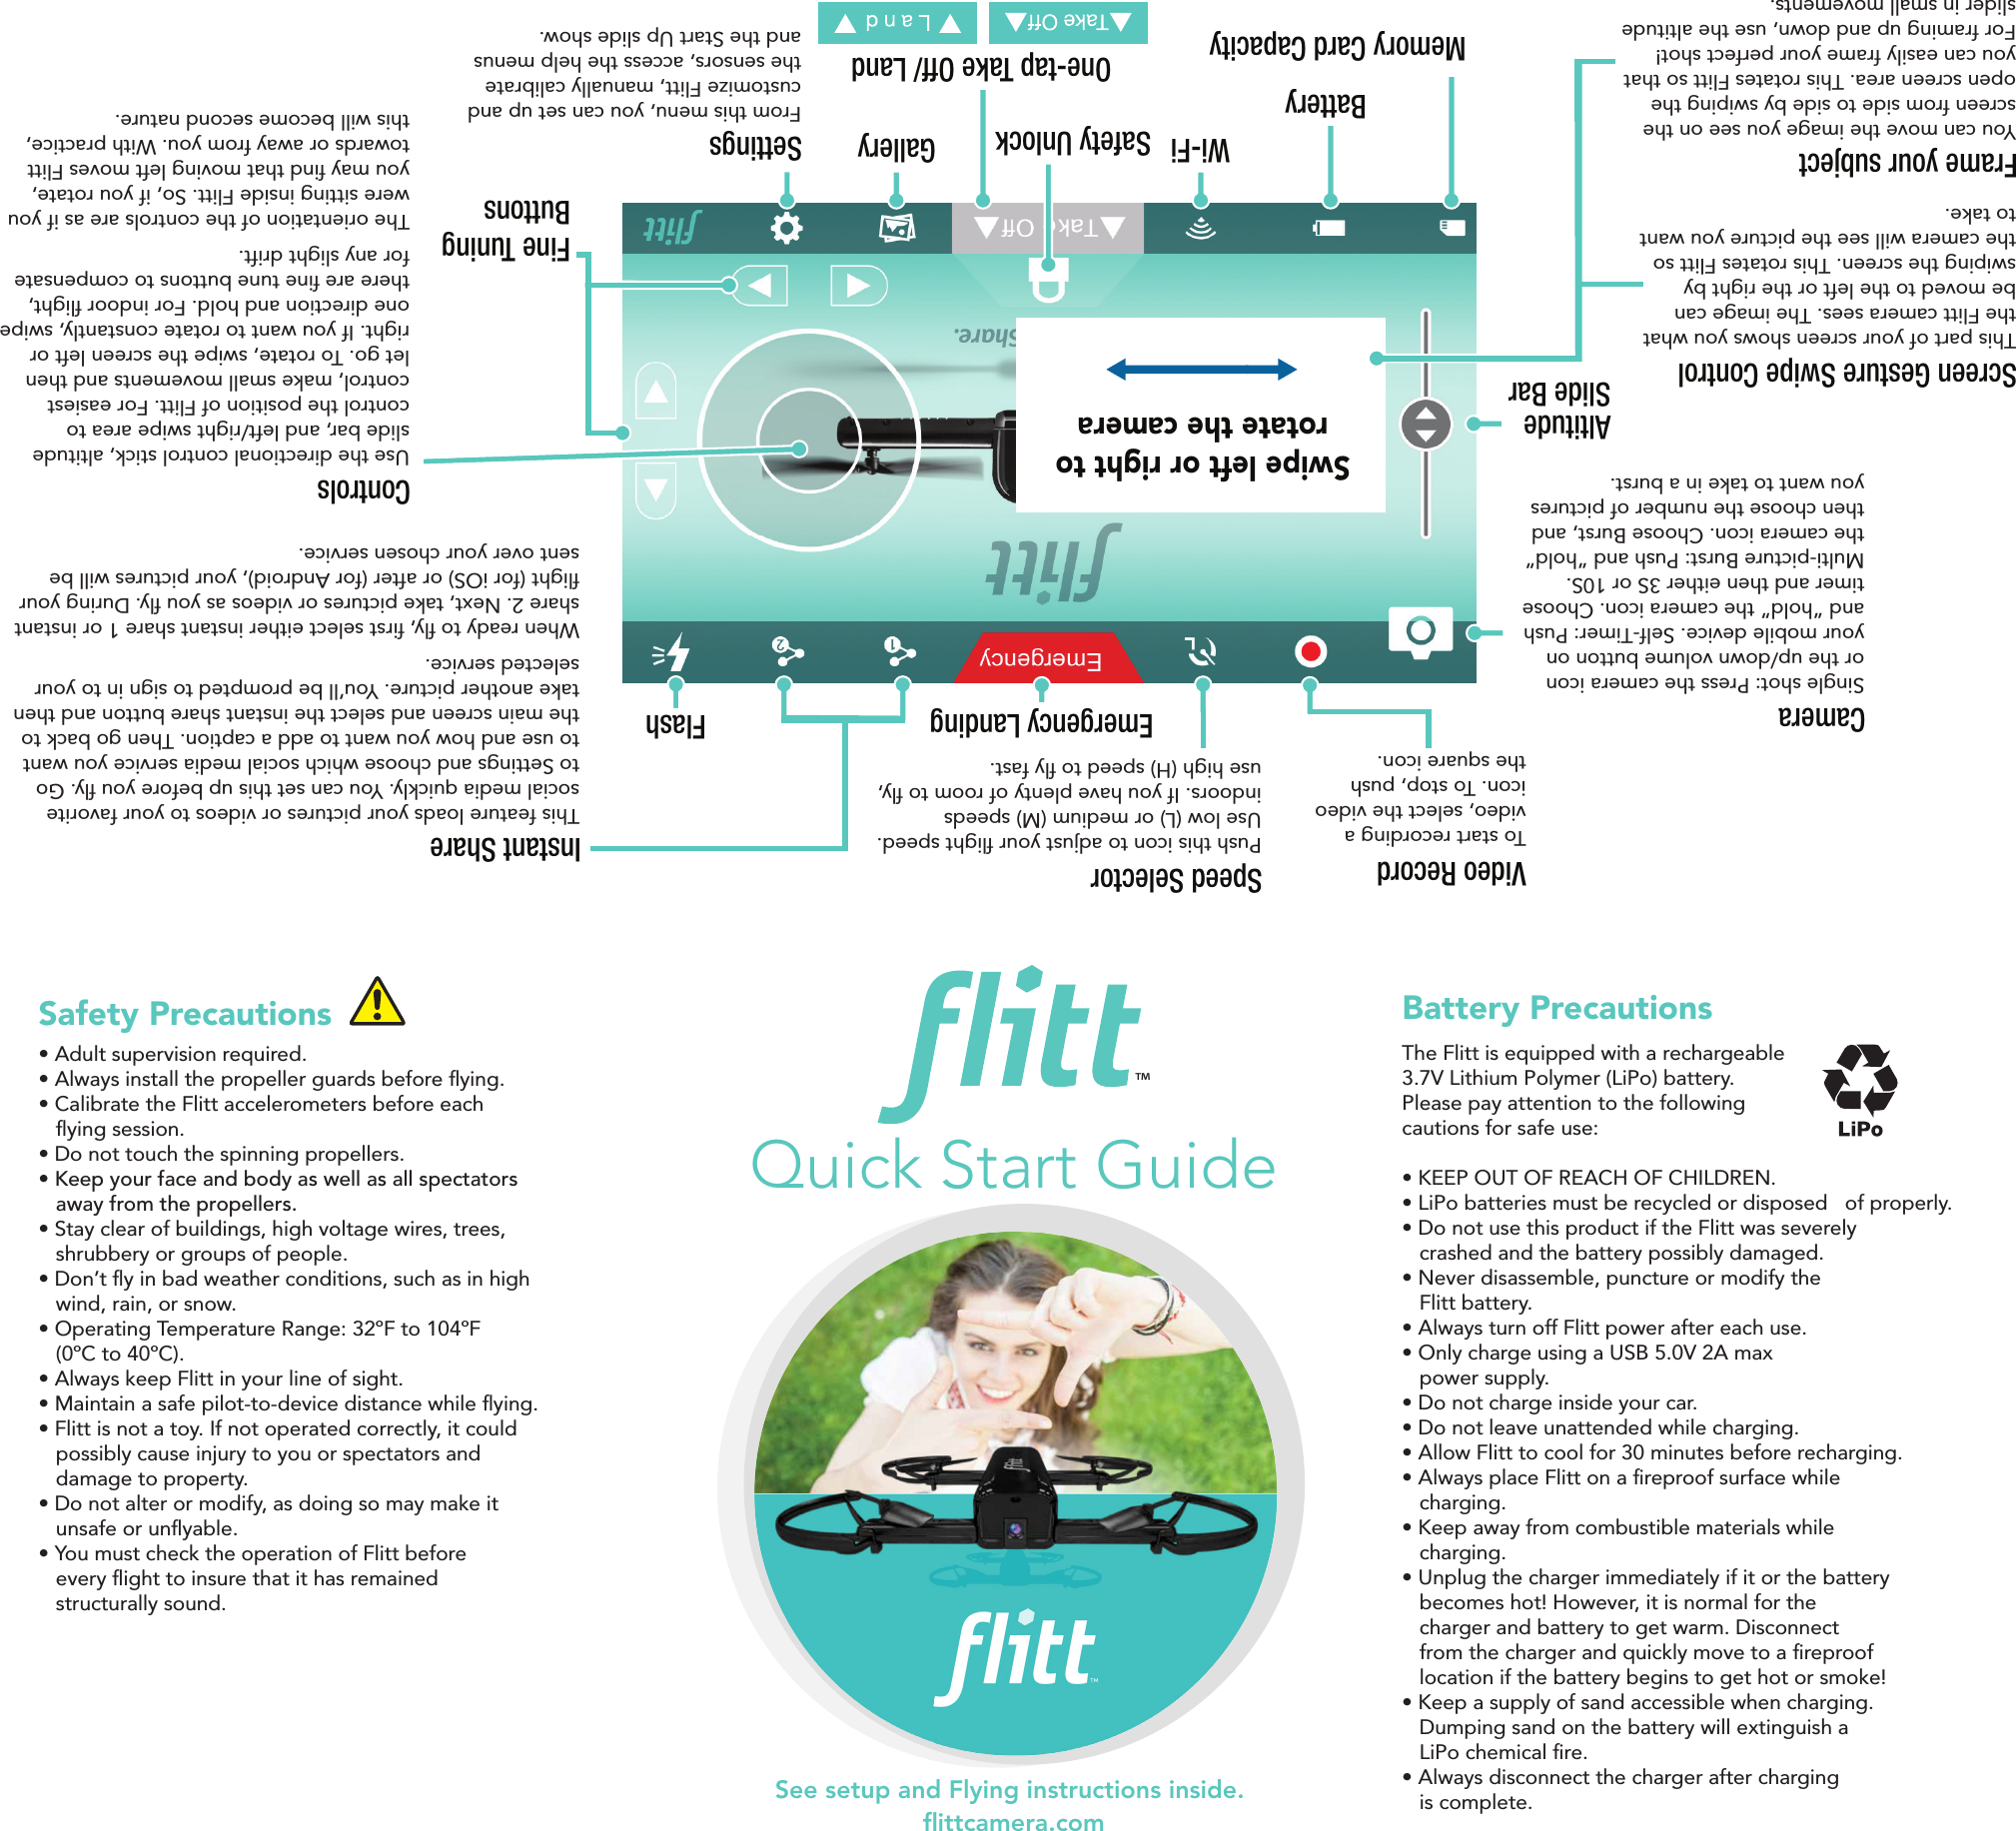
![FCC ID: IYFFLITT IC: 11104A-FLITTSetupFly Wi-FiNetwork1: Charge the battery 2: Download the app 3: Turn on 4: Open the arms 1: Get Ready. 2: Controls 3: Land 4: Power off 5: Attach the propeller guards 6: Connect your phone 7: Open the app Unlock the battery. Grip the battery from the sides and push up.Push the power button and hold for a few seconds until the LED stays on.Open the arms fully. Plug the charger into any standard USB power source.The LED will be solid while charging.The LED will ash when nished.Always disconnect when nished.Insert the battery and lock in place.Apple and the Apple logo are trademarks of Apple Inc., registered in the U.S. and other countries.App Store is a service mark of Apple Inc. Android and Google Play are trademarks of Google Inc.Search the app store for “Flitt.”Install a prop guard into the end of each arm. Match A guards to A arms and B guards to B arms.Go to Wi-Fi Settings on your phone and look for the network Flitt-******. Connect and enter Password: 12345678Watch the slide show to learn aboutthe controls and features.6.5 feet [2M]In settings, you can set the camera to face away from you to capture scenery.Position Flitt on a level surface with the camera facing you.Push “unlock” and hold for 2 secondsCalibrate the sensors if prompted.We recommend recalibrating the sensors after a hard landing or crash. Access this feature through the settings menu.Push “Take off” when green. For your safety, Flitt will re-lock after ve seconds to prevent unintentional takeoffs.Move slider to change altitude. Move controls in the direction you want to travel.LandTAPTo land immediately, push EMERGENCYPush and hold until the LED turns off.It’s easiest to fold up Flitt starting with the back arms rst.Now head out to your next photo shoot!BAAAABBB© 2017 Flitt™, a Hobbico® company.3 008 049HCAE11LL V1.0FCC StatementThis device complies with part 15 of the FCC rules. Operation is subject to the following two conditions.(1) This device may not cause harmful interference.(2) This device must accept any interference received, including interference that may cause undesired operation.ANY CHANGES OR MODIFICATIONS NOT EXPRESSLY APPROVED BY THE PARTY RESPONSIBLE FOR COMPLIANCE COULD VOID THE USER’S AUTHORITY TO OPERATE THE EQUIPMENT.This equipment has been tested and found to comply with the limits for a Class B digital device, pursuant to Part 15 of the FCC Rules. These limits are designed to provide reasonable protection against harmful interference in a residential installation. This equipment generates, uses and can radiate radio frequency energy and, if not installed and used in accordance with the instructions, may cause harmful interference to radio communications. However, there is no guarantee that interference will not occur in a particular installation.If this equipment does cause harmful interference to radio or television reception, which can be determined by turning the equipment off and on, the user is encouraged to try to correct the interference by one or more of the following measures:• Reorient or relocate the receiving antenna.• Increase the separation between the equipment and receiver.• Connect the equipment into an outlet on a circuit different from that to which the receiver is connected.• Consult the dealer or an experienced radio/TV technician for help.FCC Radiation Exposure Statement: • This equipment complies with FCC radiation exposure limits set forth for an uncontrolled environment.• This transmitter must not be co-located or operating in conjunction with any other antenna or transmitter.• This equipment should be installed and operated with minimum distance 20cm between the radiator& your body.ISEDC Radiation Exposure Statement:• This equipment complies with ISEDC RF radiation exposure limits set forth for an uncontrolled environment.• This transmitter must not be co-located or operating in conjunction with any other antenna or transmitter.• This equipment should be installed and operated with minimum distance 20cm between the radiator& your body.• Cet appareil est conforme aux limitesd’exposition de rayonnement RF ISEDC établiespour un environnement non controlé.• Cetémetteur ne doit pas être co-implanté oufonctionner en conjonction avec toute autreantenne ou transmetteur • Cet équipement doit être installé et utiliséavec une distance minimale de 20cm entre leradiateur & votre corps.ISEDC RSS Warning This device complies with ISEDC licence-exempt RSS standard (s). Operation is subject to the following two conditions: (1) this device may not cause interference (2) this device must accept any interference,including interference that may cause undesired operation of the device Le présent appareil est conforme aux CNR d'ISEDC applicables aux appareils radio exempts de licence. L'exploitation est autorisée aux deux conditions suivantes: (1) l'appareil ne doit pas produire de brouillage, et (2) l'utilisateur de l'appareil doit accepter tout brouillage radioélectrique subi, même si le brouillage est susceptible d'en compromettre le fonctionnement.](https://usermanual.wiki/Hobbico/FLITT/User-Guide-3585611-Page-2.png)