Users Manual
The Flitt is equipped with a rechargeable
3.7V Lithium Polymer (LiPo) battery.
Please pay attention to the following
cautions for safe use:
• KEEP OUT OF REACH OF CHILDREN.
• LiPo batteries must be recycled or disposed of properly.
• Do not use this product if the Flitt was severely
crashed and the battery possibly damaged.
• Never disassemble, puncture or modify the
Flitt battery.
• Always turn off Flitt power after each use.
• Only charge using a USB 5.0V 2A max
power supply.
• Do not charge inside your car.
• Do not leave unattended while charging.
• Allow Flitt to cool for 30 minutes before recharging.
• Always place Flitt on a reproof surface while
charging.
• Keep away from combustible materials while
charging.
• Unplug the charger immediately if it or the battery
becomes hot! However, it is normal for the
charger and battery to get warm. Disconnect
from the charger and quickly move to a reproof
location if the battery begins to get hot or smoke!
• Keep a supply of sand accessible when charging.
Dumping sand on the battery will extinguish a
LiPo chemical re.
• Always disconnect the charger after charging
is complete.
• Adult supervision required.
• Always install the propeller guards before ying.
• Calibrate the Flitt accelerometers before each
ying session.
• Do not touch the spinning propellers.
• Keep your face and body as well as all spectators
away from the propellers.
• Stay clear of buildings, high voltage wires, trees,
shrubbery or groups of people.
• Don’t y in bad weather conditions, such as in high
wind, rain, or snow.
• Operating Temperature Range: 32ºF to 104ºF
(0ºC to 40ºC).
• Always keep Flitt in your line of sight.
• Maintain a safe pilot-to-device distance while ying.
• Flitt is not a toy. If not operated correctly, it could
possibly cause injury to you or spectators and
damage to property.
• Do not alter or modify, as doing so may make it
unsafe or unyable.
• You must check the operation of Flitt before
every ight to insure that it has remained
structurally sound.
Battery Precautions
Safety Precautions
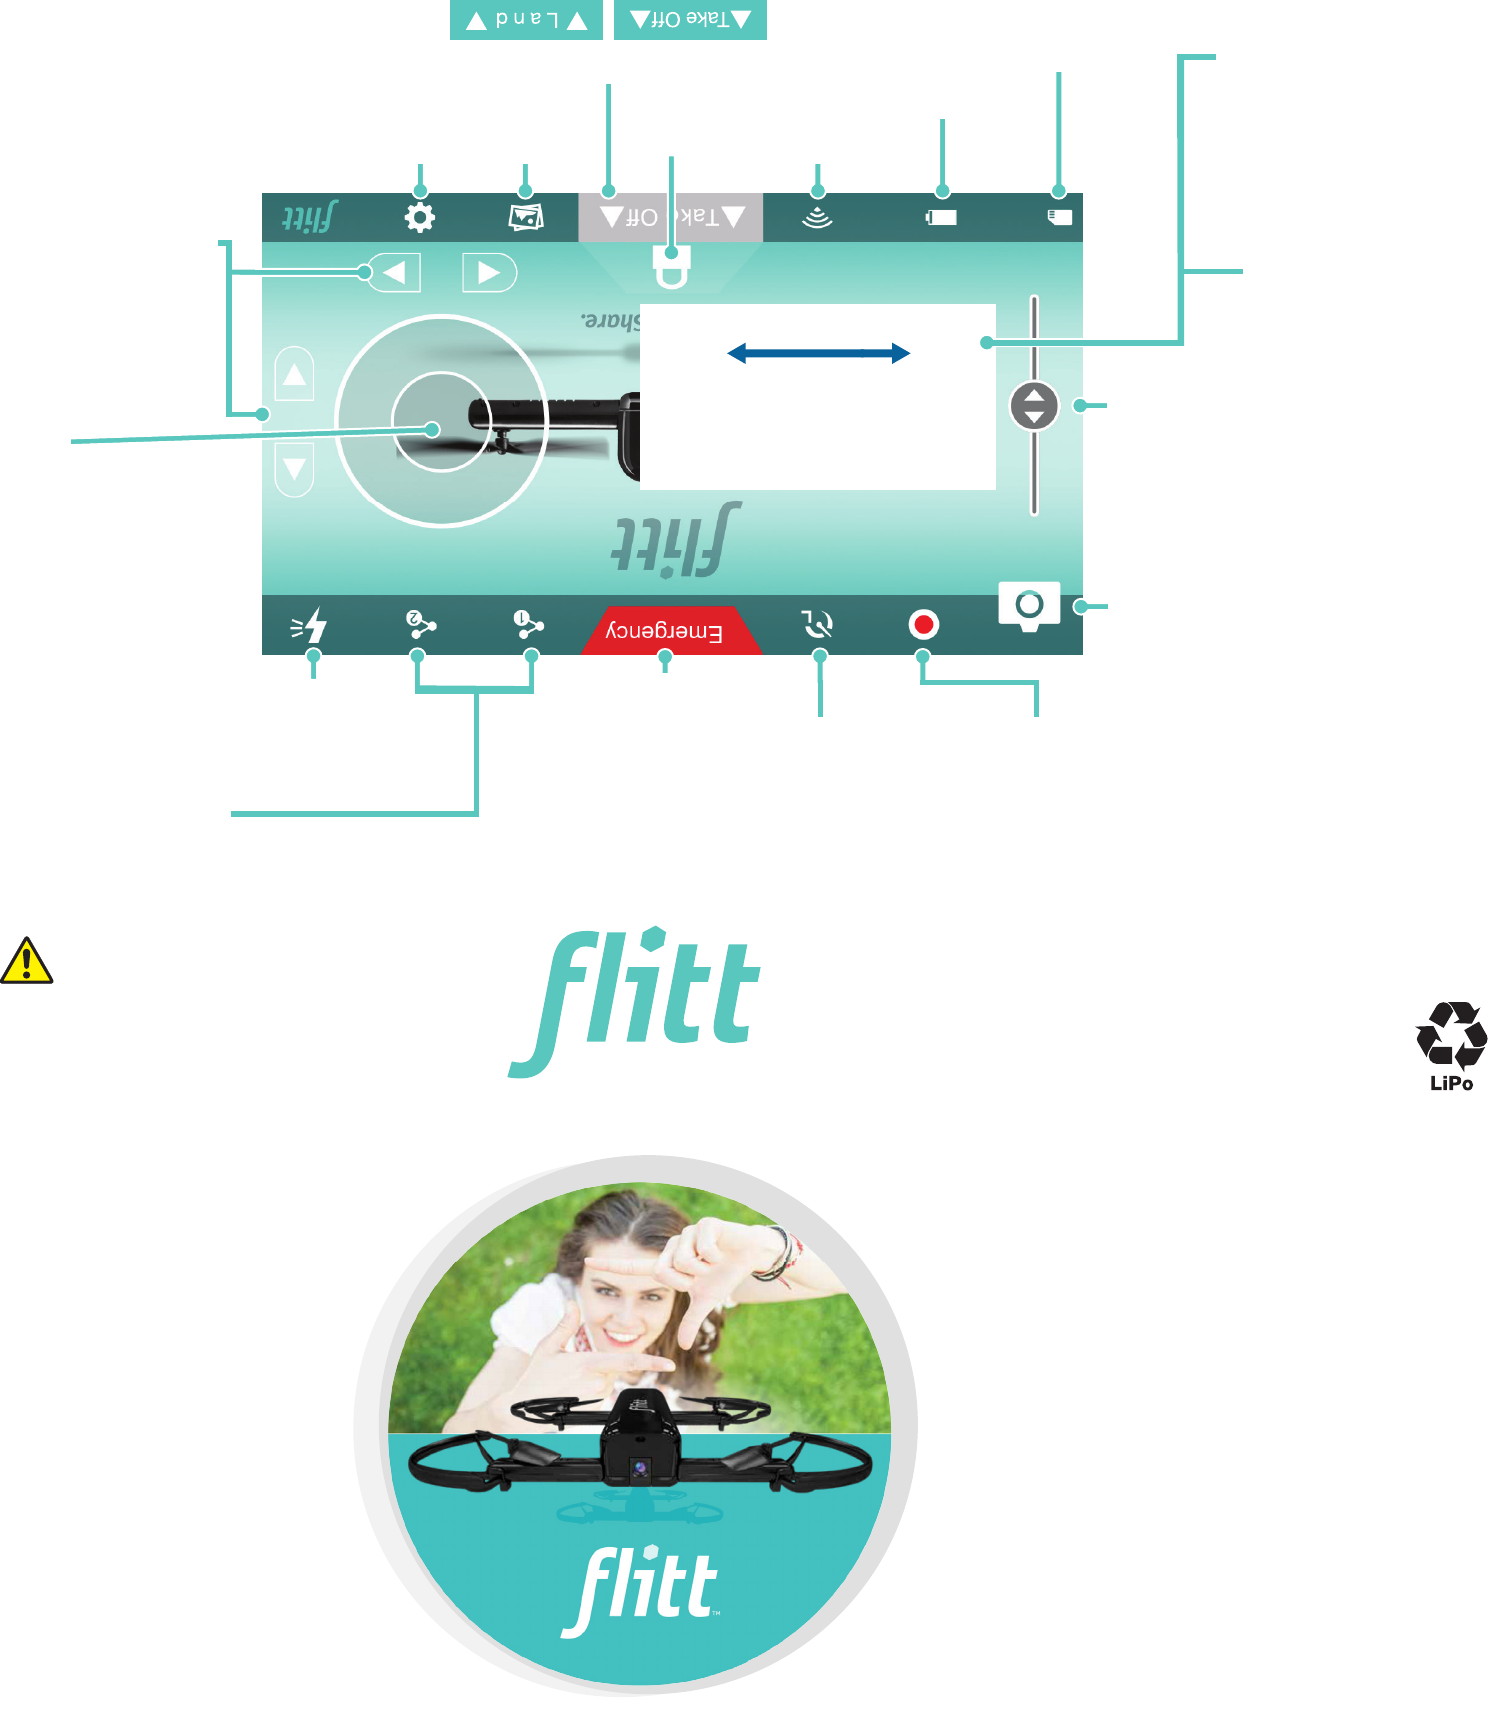
Quick Start Guide
Instant Share
Fine Tuning
Buttons
Gallery Settings
Wi-Fi
Memory Card Capacity
Battery
Altitude
Slide Bar
Flash
Controls
Emergency Landing
Video Record
Safety Unlock
One-tap Take Off/ Land
Camera
From this menu, you can set up and
customize Flitt, manually calibrate
the sensors, access the help menus
and the Start Up slide show.
Swipe left or right to
rotate the camera
Swipe left or right to
rotate the camera
Frame your subject
Single shot: Press the camera icon
or the up/down volume button on
your mobile device. Self-Timer: Push
and “hold” the camera icon. Choose
timer and then either 3S or 10S.
Multi-picture Burst: Push and “hold”
the camera icon. Choose Burst, and
then choose the number of pictures
you want to take in a burst.
To start recording a
video, select the video
icon. To stop, push
the square icon.
Use the directional control stick, altitude
slide bar, and left/right swipe area to
control the position of Flitt. For easiest
control, make small movements and then
let go. To rotate, swipe the screen left or
right. If you want to rotate constantly, swipe
one direction and hold. For indoor ight,
there are ne tune buttons to compensate
for any slight drift.
The orientation of the controls are as if you
were sitting inside Flitt. So, if you rotate,
you may nd that moving left moves Flitt
towards or away from you. With practice,
this will become second nature.
Push this icon to adjust your ight speed.
Use low (L) or medium (M) speeds
indoors. If you have plenty of room to y,
use high (H) speed to y fast.
Speed Selector
This feature loads your pictures or videos to your favorite
social media quickly. You can set this up before you y. Go
to Settings and choose which social media service you want
to use and how you want to add a caption. Then go back to
the main screen and select the instant share button and then
take another picture. You’ll be prompted to sign in to your
selected service.
When ready to y, rst select either instant share 1 or instant
share 2. Next, take pictures or videos as you y. During your
ight (for iOS) or after (for Android), your pictures will be
sent over your chosen service.
This part of your screen shows you what
the Flitt camera sees. The image can
be moved to the left or the right by
swiping the screen. This rotates Flitt so
the camera will see the picture you want
to take.
Screen Gesture Swipe Control
You can move the image you see on the
screen from side to side by swiping the
open screen area. This rotates Flitt so that
you can easily frame your perfect shot!
For framing up and down, use the altitude
slider in small movements.
™
ittcamera.com
See setup and Flying instructions inside.
FCC ID: IYFFLITT IC: 11104A-FLITT
Setup
Fly
Wi-Fi
Network
1: Charge the battery 2: Download the app 3: Turn on
4: Open the arms
1: Get Ready. 2: Controls
3: Land 4: Power off
5: Attach the propeller guards 6: Connect your phone 7: Open the app
Unlock the battery. Grip the battery from the sides
and push up.
Push the power button and
hold for a few seconds until the
LED stays on.
Open the arms fully.
Plug the charger into any standard
USB power source.
The LED will be solid while charging.
The LED will ash when nished.
Always disconnect when nished.
Insert the battery and lock
in place.
Apple and the Apple logo are trademarks of Apple Inc.,
registered in the U.S. and other countries.
App Store is a service mark of Apple Inc. Android and
Google Play are trademarks of Google Inc.
Search the app store for “Flitt.”
Install a prop guard into the end of each arm.
Match A guards to A arms and B guards to B arms.
Go to Wi-Fi Settings on your phone
and look for the network Flitt-******.
Connect and enter Password: 12345678
Watch the slide show to learn about
the controls and features.
6.5 feet [2M]
In settings, you can set the camera to face
away from you to capture scenery.
Position Flitt on a level surface with the
camera facing you.
Push “unlock” and hold for 2 seconds
Calibrate the sensors if prompted.
We recommend recalibrating the sensors after a hard landing or crash.
Access this feature through the settings menu.
Push “Take off” when green.
For your safety, Flitt will re-lock
after ve seconds to prevent
unintentional takeoffs.
Move slider to change altitude. Move controls in the direction you
want to travel.
Land
TAP
To land immediately, push EMERGENCY
Push and hold until the
LED turns off.
It’s easiest to fold up Flitt
starting with the back arms rst.
Now head out to your next
photo shoot!
BA
A
A
AB
B
B
© 2017 Flitt™, a Hobbico® company.3 008 049HCAE11LL V1.0
FCC Statement
This device complies with part 15 of the FCC rules. Operation is subject to the following two conditions.
(1) This device may not cause harmful interference.
(2) This device must accept any interference received, including interference that may cause undesired operation.
ANY CHANGES OR MODIFICATIONS NOT EXPRESSLY APPROVED BY THE PARTY RESPONSIBLE FOR COMPLIANCE COULD
VOID THE USER’S AUTHORITY TO OPERATE THE EQUIPMENT.
This equipment has been tested and found to comply with the limits for a Class B digital device, pursuant to Part 15 of
the FCC Rules. These limits are designed to provide reasonable protection against harmful interference in a residential
installation. This equipment generates, uses and can radiate radio frequency energy and, if not installed and used in
accordance with the instructions, may cause harmful interference to radio communications. However, there is no guarantee
that interference will not occur in a particular installation.
If this equipment does cause harmful interference to radio or television reception, which can be determined by turning the
equipment off and on, the user is encouraged to try to correct the interference by one or more of the following measures:
• Reorient or relocate the receiving antenna.
• Increase the separation between the equipment and receiver.
• Connect the equipment into an outlet on a circuit different from that to which the receiver is connected.
• Consult the dealer or an experienced radio/TV technician for help.
FCC Radiation Exposure Statement:
• This equipment complies with FCC radiation exposure limits set forth for an uncontrolled environment.
• This transmitter must not be co-located or operating in conjunction with any other antenna or transmitter.
• This equipment should be installed and operated with minimum distance 20cm between the radiator& your body.
ISEDC Radiation Exposure Statement:
• This equipment complies with ISEDC RF radiation exposure limits set forth for an uncontrolled environment.
• This transmitter must not be co-located or operating in conjunction with any other antenna or transmitter.
• This equipment should be installed and operated with minimum distance 20cm between the radiator& your body.
• Cet appareil est conforme aux limitesd’exposition de rayonnement RF ISEDC établiespour un environnement
non controlé.
• Cetémetteur ne doit pas être co-implanté oufonctionner en conjonction avec toute autreantenne ou transmetteur
• Cet équipement doit être installé et utiliséavec une distance minimale de 20cm entre leradiateur & votre corps.
ISEDC RSS Warning
This device complies with ISEDC licence-exempt RSS standard (s). Operation is subject
to the following two conditions:
(1) this device may not cause interference
(2) this device must accept any interference,including interference that may cause undesired
operation of the device
Le présent appareil est conforme aux CNR d'ISEDC applicables aux appareils radio
exempts de licence. L'exploitation est autorisée aux deux conditions suivantes:
(1) l'appareil ne doit pas produire de brouillage, et
(2) l'utilisateur de l'appareil doit accepter tout brouillage radioélectrique subi, même si le brouillage est susceptible d'en compromettre le fonctionnement.