Honeywell 7300-2011B Wireless Handheld computer User Manual 7300 Revb
Honeywell International Inc Wireless Handheld computer 7300 Revb
Contents
- 1. chaper 1 to 5
- 2. chapter 6 to 10
- 3. ch 1 updated with RF exposure statement
chapter 6 to 10
51
•
•
•
•
•
•
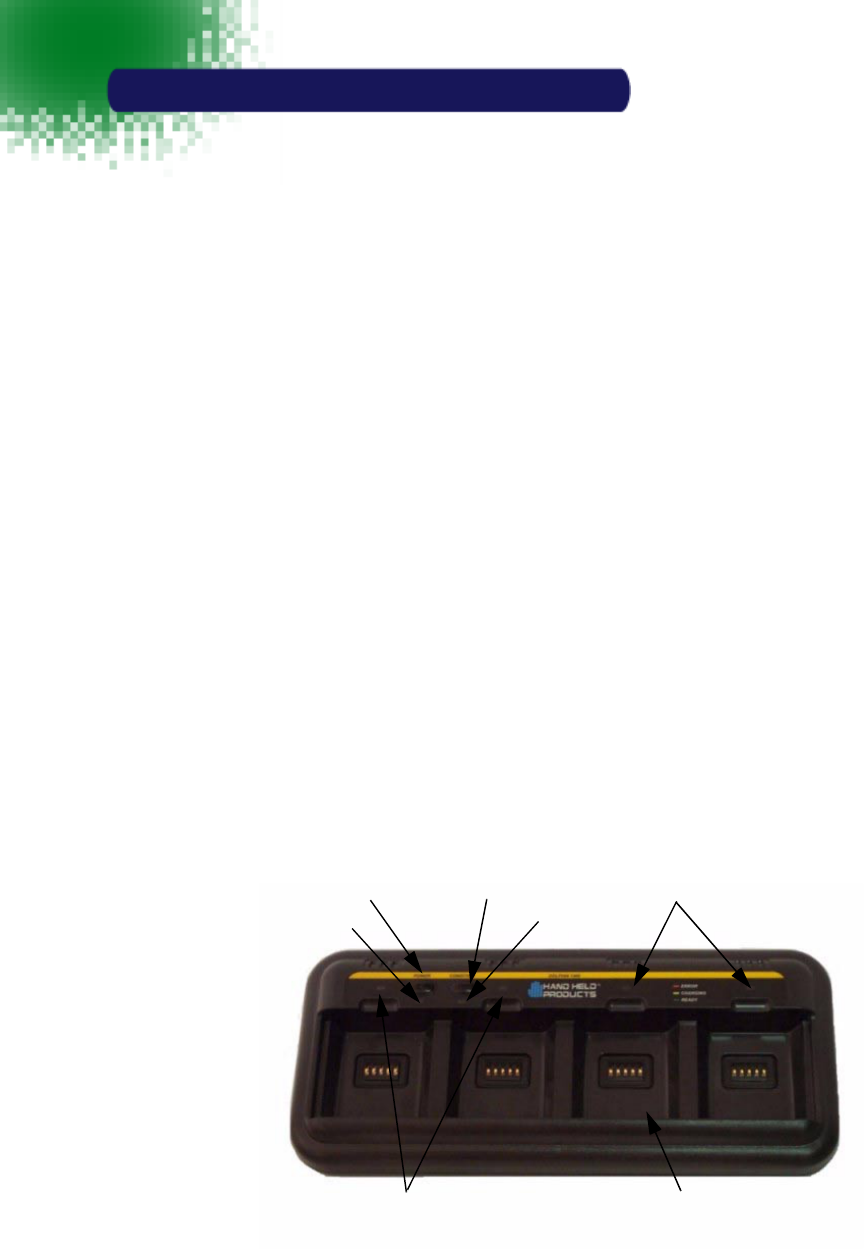
Dolphin® QuadCharger
The Dolphin® QuadCharger provides intelligent battery management
for NiMH (Nickel Metal Hydride) Dolphin battery packs.
The charger fully charges as many as four NiMH batteries in 2.5
hours. Charging slots work independently to control charging and
discharging of individual battery packs. The QuadCharger is
compatible with all models in the Dolphin® family of hand held
computers.
As battery packs charge, the charging circuitry uses a three-step
process that senses changes in temperature and voltage and drops
to a trickle charge when the packs are fully charged. This feature
allows the user to leave batteries in the charger indefinitely, which
maintains the batteries at peak capacity without damage. The
charger also resets and calibrates battery pack data to accurately
show battery status on the Dolphin display.
The QuadCharger also conditions and calibrates batteries for longer,
more consistent performance.
Dolphin QuadCharger Parts and Function
Top Panel
Charging Pocket
Status LEDs
Status LEDs
Condition Switch
& Condition LED
Power Switch
& Power LED
6
52
•
•
•
•
•
•
Charging Pocket
The QuadCharger has four charging pockets for charging and/or conditioning
batteries for your Dolphin terminal.
Power Switch
Press and hold the Power Switch for approximately one second, then release, to
turn on the Dolphin QuadCharger. The Power Switch LED is green when the unit
is on. To turn the charger off, press and hold the Power Switch for about two
seconds and then release. This feature prevents the unit from being accidently
turned off during use or on when not in use.
Condition Switch
Press the Condition Switch to start a battery conditioning cycle. The orange
Conditon Switch LED flashes during the conditioning cycle.
Status LEDs
A Status LED is located above each of the four battery pockets.
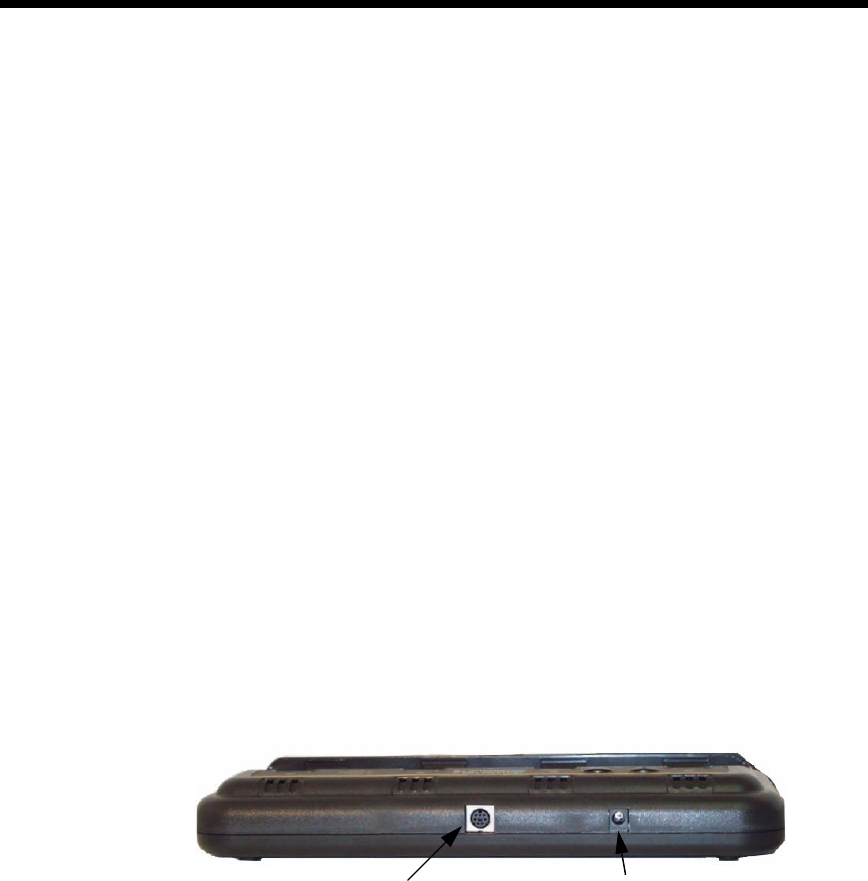
Rear Panel
Power Supply Connector
Use this connector to attach a power supply to the Quad Charger. The universal
power supply accepts input voltages between 90-265 volts.
Communications Port
The communications port is for factory use only in programming the Quad
Charger.
Rear Panel of Dolphin Quad Charger
Power Supply ConnectorCommunications Port

53
•
•
•
•
•
•
Charging Batteries In The QuadCharger
Follow these steps to charge batteries in the QuadCharger:
1. Set up the charger for use
2. Supply power
3. Insert batteries
CAUTION: Do not attempt to recharge any battery pack in the Dolphin QuadCharger
that is not manufactured by HHP especially for this device. To do so will void your
warranty and could damage the Dolphin QuadCharger.
Setting Up The QuadCharger
The Dolphin QuadCharger should be setup on any dry, stable surface. DIN rail
slots on the bottom panel allow the charger to be wall or desktop-mounted for
easily adapting the unit to your environment.
The charger must be connected to a power source for any type of operation.
Supplying Power To The QuadCharger
CAUTION: Using a non-HHP power cord voids your warranty and could result in
serious damage to the Dolphin QuadCharger’s circuitry.
Locate the AC power cord that came with the Dolphin QuadCharger. Plug the
cord into the power supply connector on the back of the unit and, then plug the
power cord into a wall socket.
Press and hold the Power Switch for approximately one second, then release, to
turn on the Dolphin QuadCharger. The GREEN power LED will illuminate and the
charger will undergo a self-diagnostic test.
Inserting and Removing Battery Packs
To insert a battery pack, place the end of the battery without the locking tab into
the bottom of the charging pocket and snap the battery into place with a hinging
motion. Once the battery is properly seated, the orange status LED for that
particular pocket will illuminate.
For best results, battery packs should be at room temperature before recharging
them; temperature has a marked effect on charging. The recommended
temperature range is 50° to 95° F (10° to 35° C).
The LEDs indicate the charging status of batteries as described in the chart
shown on the next page:

54
•
•
•
•
•
•
To remove a battery pack, push the locking tab down and pull the battery out from
the charging pocket with a hinging motion.
Servicing The Battery Pack
To service battery packs, insert batteries into the charging pockets and press the
Condition button. The Condition LED will flash during the conditioning cycle. This
starts an automatic process where batteries are completely discharged and then
recharged to full capacity in eight hours. The Condition and Calibrate cycle resets
and calibrates battery data so that the user gets longer, more consistent
performance from the batteries. HHP recommends that battery packs should be
serviced, or calibrated once a month.
Because the Dolphin QuadCharger is accumulating battery pack information
during the entire Condition and Calibrate cycle, it is important not to remove the
battery until the cycle has been completed and the Condition LED is no longer
flashing. Batteries inserted after the “Condition and Calibrate” switch has been
depressed will receive a standard charge. The chart below describes the Status
LEDs during the Condition and Calibrate cycle:
Status LED Description
Green Charging is complete and
battery is ready for service.
Orange Battery is being charged at a
maximum charge rate
Red Error was encountered during
charge cycle
Status of LEDs during Charging Cycle
Status LED Description
Solid Green
Cycle is complete. Battery
remains in trickle charge until
removed from the charger.
Flashing Orange Battery is being conditioned
Solid Red Error was encountered during
charge cycle
Status of LEDs during Condition and Calibrate Cycle

55
•
•
•
•
•
•
Storing Batteries
To maintain top performance from batteries, follow the guidelines below when
storing them:
Avoid storing batteries outside of the specified range of -4 to 104° F ( -20 to 40°C)
or in extremely high humidity.
For prolonged storage, do not keep batteries stored in a charger that is connected
to a power source.
During long-term storage, battery deactivation may tend to occur which may
cause charging to stop early during recharging after storage. This issue can be
handled by charging and discharging the battery several times. Also, the first
charging after prolonged storage may yield a lower than normal capacity. While
this will vary depending on the storage conditions, charging and discharging the
battery several times will almost completely restore capacity.
Troubleshooting
If you encounter problems with the Dolphin QuadCharger, refer to chart below for
possible solutions. If problems persist, please contact HHP Technical Support.
Problem Issue
The ‘CHARGING” LED does not
come on when I insert a battery pack
into the Dolphin QuadCharger
Check the power connections on the
Dolphin QuadCharger. Also check to
ensure the POWER switch is ON and
the battery pack is properly seated.
The red status LED comes on during
charging.
Try to charge the battery in one of the
other charging pockets. If the red
Status LED comes on again, then the
problem is associated with the
battery pack. If the red status stays
with the charging pocket, the problem
is associated with the charging
circuity.
The red status LED remains on
without a battery in the charging
pocket.
An error occurred during the self-
diagnostic test for that particular
charging pocket. Call HHP Product
Service and request an RMA. See
Chapter 9 for additional warranty and
return information.

56
•
•
•
•
•
•

57
•
•
•
•
•
•
Dolphin® Mobile IntelliBase
Power Conditioning
The Mobile IntelliBase provides power to the Dolphin terminal to
enable the terminal to charge its battery.
Ir/IrDA Optical Communications
The infrared, or Ir communications port, on the Mobile IntelliBase
connects with the IrDA port on the Dolphin terminal. With no pins or
contacts to break, Ir will work reliably for years. Reliable data
communications at speeds of up to 115k baud can be transmitted by
the Mobile IntelliBase.
The Mobile IntelliBase infrared connection to the terminal uses IrDA-
compliant hardware and software for a standard reliable connection.
Convenient Storage
The Mobile IntelliBase is a safe and convenient storage receptacle for
the Dolphin terminal.
7
58
•
•
•
•
•
•
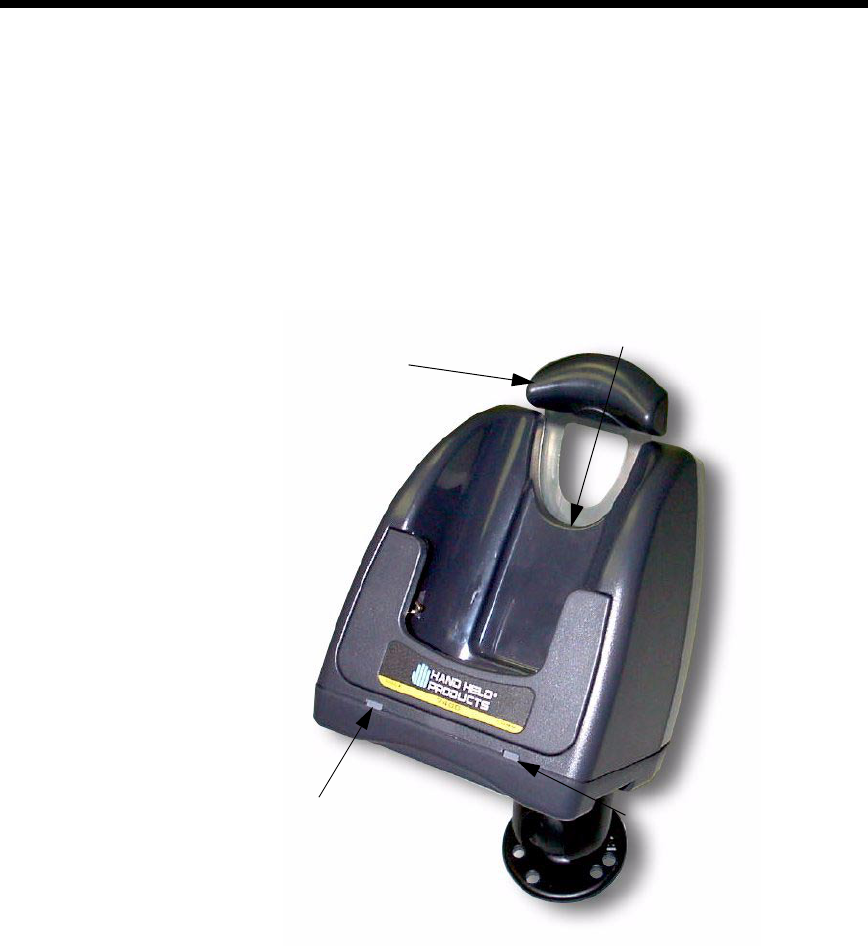
Mobile IntelliBase Parts and Functions
Front Panel
The front panel of the Mobile IntelliBase has one slot:
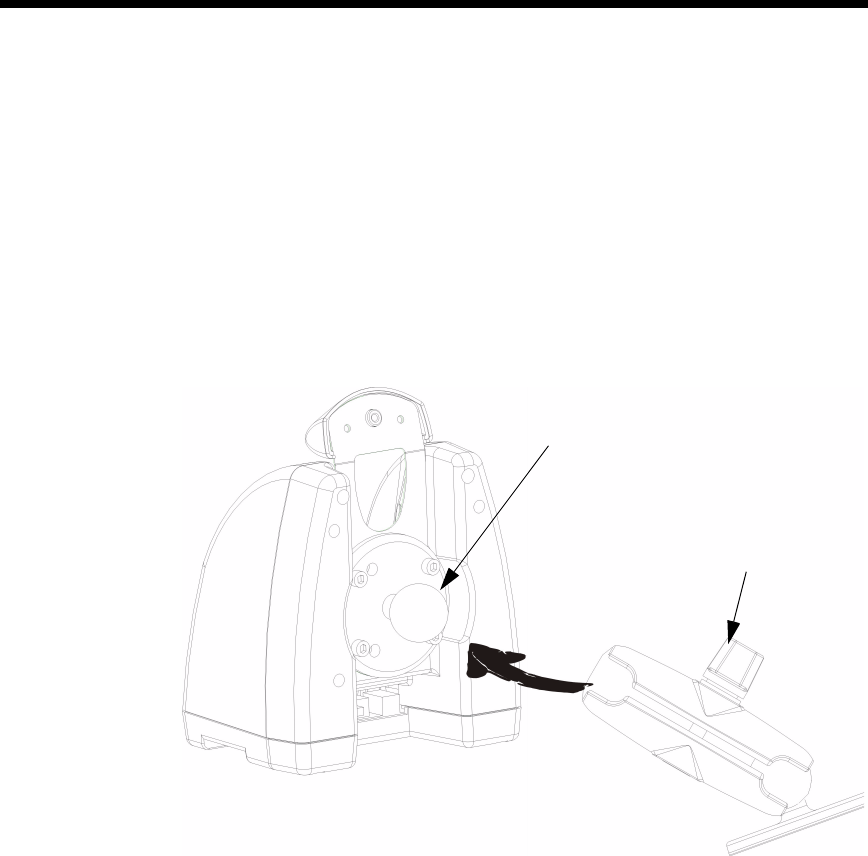
Dolphin Terminal Well Place the Dolphin in this well to communicate with a host
device and to charge the Dolphin’s battery.
LEDs There are two LEDs on the front panel of the Mobile IntelliBase.
1. Dock LED Turns solid green when the Dolphin Terminal is properly seated into the
Dolphin Mobile IntelliBase.
Front Panel of Dolphin Mobile IntelliBase
Terminal
Well
DOCK LED COMM
LED
Spring-Arm
Assembly
59
•
•
•
•
•
•
2. COMM LED
Indicates the status of data transfer between the Host Device and the
Dolphin Terminal as described below:
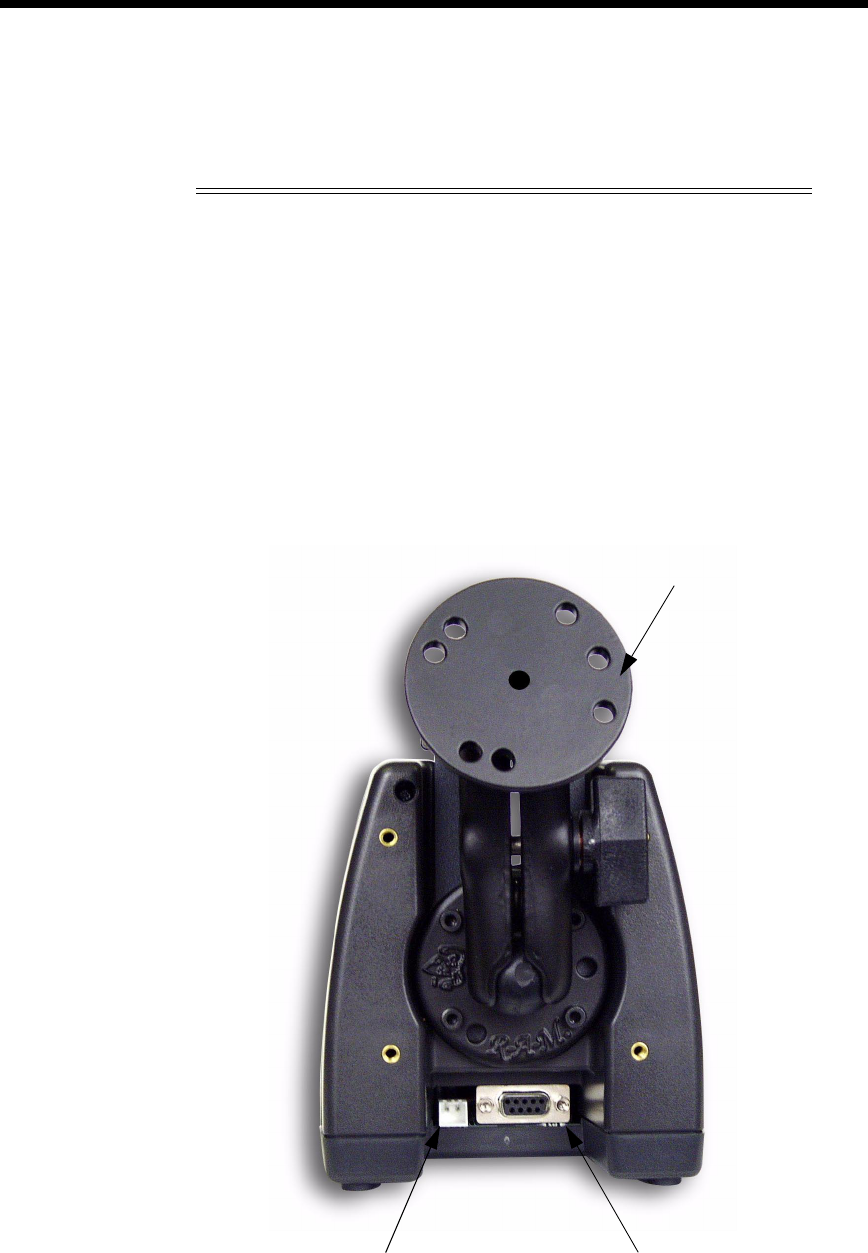
Rear Panel
Table 4:
Comm LED Description
Red LED
Data is being sent from the Host Device to the
Dolphin
Mobile IntelliBase.
Green LED
Data is being sent from the Dolphin Mobile
IntelliBase to the Host Device.
Orange LED
Data is being sent at high data rates.
Rear Panel of Dolphin Mobile IntelliBase
RS-232
Communications
Port
Power Supply
Connector
Mounting Bracket

60
•
•
•
•
•
•
There is a power supply connector and an RS-232 connector:
Power supply connector Use this connector to attach a power supply to the Mobile
IntelliBase. The power supply provides power for communications and battery
charging.
RS-232 Communications Port
Use a standard serial cable to connect this port to a
host RS-232 device.
Bottom Panel of Mobile IntelliBase
A four-position Baud Rate switch, located on the bottom of the Mobile IntelliBase,
is used to select the communication baud rate. Switch position and the
corresponding baud rates are shown in the chart below.
Table 5: Baud Rate Table For Connecting To PCs
Baud Rate Switch 1 Switch 2 Switch 3 Switch 4
115200 OFFONONON
57600 ON OFF OFF ON
38400 ON OFF ON ON
19200 ON ON OFF ON
9600 ON ON ON ON
Table 6: Baud Rate Table For Connecting To Modems
Baud Rate Switch 1 Switch 2 Switch 3 Switch 4
115200 OFFONONOFF
57600 ON OFF OFF OFF
38400 ON OFF ON OFF
19200 ON ON OFF OFF
9600 ON ON ON OFF

61
•
•
•
•
•
•
Powering the Dolphin Terminal
When seated in the Mobile IntelliBase, the Dolphin terminal receives the power it
needs to charge the battery and to run its internal circuitry.
The Dolphin terminal can be stored indefinitely in the Mobile IntelliBase without
damage to the terminal or the Mobile IntelliBase. Keep the Mobile IntelliBase
plugged in so that the Dolphin terminal battery pack stays fully charged.
Charging A Dolphin Terminal
The Mobile IntelliBase supplies charging power to the Dolphin terminal so that the
terminal can monitor the charging of its battery pack. This charging method
protects the battery from being damaged by overcharging. Therefore, the Dolphin
terminal may be stored indefinitely in the Mobile IntelliBase without damage to the
terminal, the battery pack, or the Mobile IntelliBase.
To charge a Dolphin terminal, follow these steps:
1. Insert a battery pack into the Dolphin terminal.
2. Place the terminal, imager engine window up and the LCD visible, in the Terminal Well
of the Mobile IntelliBase.
3. Let it glide down into the well until it stops.
4. Once the Dolphin terminal is properly seated, the Dock LED on the
Mobile IntelliBase will be solid GREEN.
Deep-Cycling Batteries
For maximum battery life, HHP recommends that you deep-cycle (service) the
battery twice before initial use and once a month thereafter. Since the Dolphin
7400 Mobile Intellibase does not have deep-cycling capabilities, it is
recommended that you use the Battery Conditioning Utility software, the
IntelliBase+ or a Dolphin QuadBattery Charger. See the Battery Management
section in Chapter 3 for more information.
Setting Up For Communications with the Mobile IntelliBase
The Mobile IntelliBase RS-232 interface allows the Dolphin terminal to
communicate to a personal computer, modem, or any standard RS-232 device
using a standard serial cable and communications software.
The IrDA 1.0 software stack is integrated into the Mobile IntelliBase to allow
communication between the cradle and devices such as modems or printers that
are not IrDA ready or do not communicate with a half duplex serial protocol. This
allows any full or half duplex RS-232 device to communicate through the
IntelliBase with no IrDA protocol software. See Tables 2 or 3 for the baud rate
switch settings.
62
•
•
•
•
•
•
Installing The Dolphin Mobile IntelliBase
Mounting the Mobile IntelliBase Spring Arm Assembly
The adjustable mounting bracket holds the terminal securely in place and gives
the user a variety of options for mounting the Mobile IntelliBase. See the
directions below for mounting the bracket.
To attach the bracket:
1. Loosen the turnscrew located on the side of the bracket.
2. Attach the bracket to the ball joint on the back of the Mobile IntelliBase and tighten the
turnscrew.
Ball joint
Turnscrew

63
•
•
•
•
•
•
Connecting the Cables
Connect the Mobile IntelliBase to the host computer or other device by plugging
an RS-232 serial cable into the RS-232 Communications Port on the rear of the
Mobile IntelliBase. Plug the other end of the RS-232 serial cable into the correct
port on the host RS-232 device.
The wiring of your cable depends on whether the other device is set up as a DCE
(Data Communications Equipment) or DTE (Data Terminal Equipment) device.
The Mobile IntelliBase Communication Port is configured as a DCE device. To
communicate with a DTE device such as a computer, use a standard (or straight-
through) RS-232 cable. To communicate with a DCE device, use either a null
modem adapter in line with a standard RS-232 cable, or a null-modem serial
cable.
You can make your own cables by following the pin configuration in the chart
below. To do so, you must determine if your host RS-232 device is 9-pin or 25-
pin, and whether it is configured as a DCE or DTE device.
Supplying Power to the Dolphin Mobile IntelliBase
The Mobile IntelliBase can be powered from either a 12 or 24 volt DC source.
Power is connected to the input power connector located on the rear of the Mobile
IntellieBase.
HHP recommends that you leave the Mobile IntelliBase connected to its power
source at all times, so that it is always ready to use.
Pin Configuration
HomeBase /Host
Port (DCE)
IBM AT
DB9 (DTE)
IBM XT
DB25
(DTE)
Modem
DB25 (DCE)
Pin / Input Signal
2 / (RD) 2 3 2
3 / (TD) 3 2 3
5 / (SG) 5 7 7
4 / (DTR) 4 20 6
6 / (DSR) 6 6 20
7 / (RTS) 7 4 5
8 / (CTS) 8 5 4
64
•
•
•
•
•
•
Setting the Baud Rate
After connecting the cables and supplying power to the Mobile IntelliBase, set the
baud rate switch. Refer to the Baud Rate Tables earlier in this section for
guidance on setting the switch.
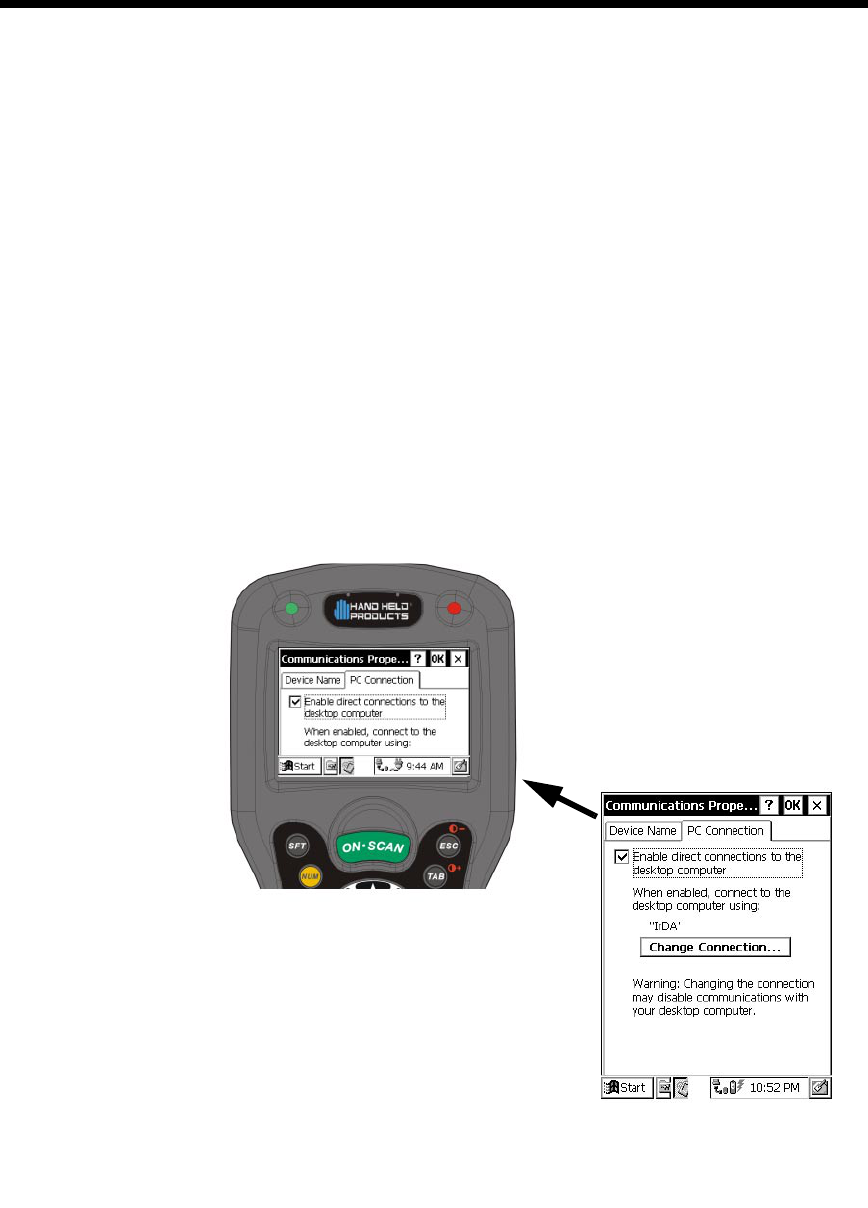
Configuring the Dolphin Terminal
The Communication Properties must be configured on Dolphin 7300 terminal in
order for it to communicate with the Mobile IntelliBase.
To set Communication Properties:
1. Select Start>Settings>Control Panel>Communication Settings.
2. Select the PC Connection tab.
Communication Properties
Full View of Screen
65
•
•
•
•
•
•
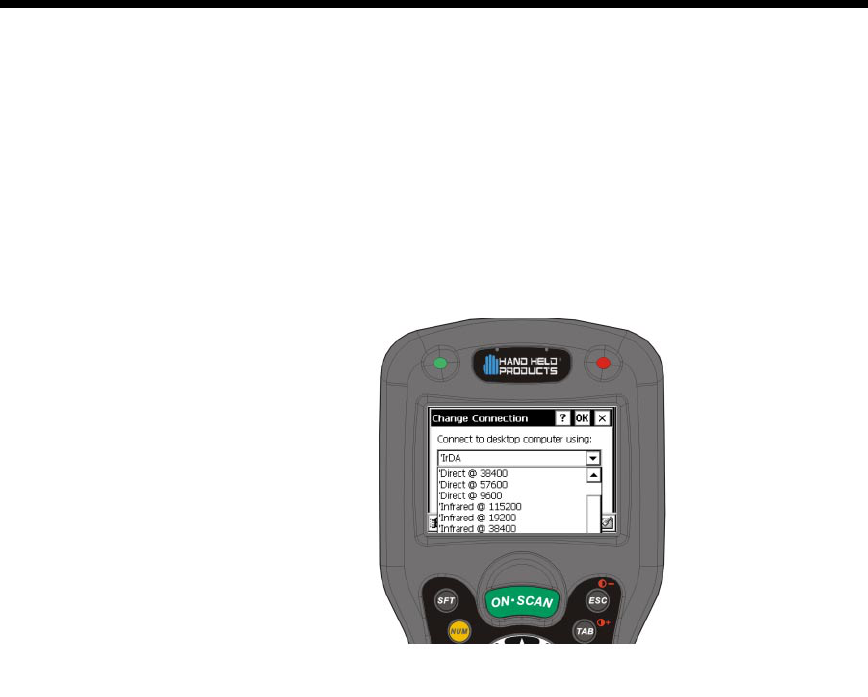
3. Select Change Connection and choose the desired option for connecting to the desktop
computer. Choose IrDA for Mobile IntelliBase IrDA connection and click OK.
4. Place the Dolphin 7300 in the Mobile IntelliBase.
5. On the Dolphin 7300 desktop, double-click on ActiveSync.
Change Connection Screen

66
•
•
•
•
•
•

67
•
•
•
•
•
•
Developing Applications
Applications for the Dolphin hand held computer are developed in the
Microsoft® Windows® CE environment.
Microsoft Windows CE is a compact, highly efficient, scalable
operating system designed for embedded systems and products. Its
modular platform allows developers flexibility to customize it for a
variety of small footprint and mobile 32-bit devices. Windows CE
supports various hardware peripherals, devices and networking
systems. These include keyboards, touchscreens, serial ports,
Ethernet connections, and storage devices, such as PC cards.
The Dolphin platform contains most components of the basic
Windows® CE kernel except for Pocket Word, Pocket Excel and
Pocket Outlook. The kernel is the central module of the operating
system. It is the part of the operating system that loads first, and it
remains in main memory. Because it stays in memory, it is important
for the kernel to be as small as possible while still providing all the
essential services required by other parts of the operating system and
applications. Data synchronization also is not supported as the
Dolphin terminal is not designed for use as a single target.
For more information about Windows CE, check out these websites:
Microsoft Pocket PC (www.pocketpc.com) - General information
Chris De Herrera’s Windows CE website (www.cewindows.net) -
General information and FAQs
MSDN (msdn.microsoft.com/embedded) - Technical articles,
developer documentation and downloads
VBCE.com (www.vbce.com) - eMbedded Visual Basic information
and FAQs
8

68
•
•
•
•
•
•

69
•
•
•
•
•
•
Warranty, Support and Service
Limited Warranty
Hand Held Products, Inc., d/b/a HHP ("HHP") warrants its products to
be free from defects in materials and workmanship and to conform to
HHP’s published specifications applicable to the products purchased
at the time of shipment. This warranty does not cover any HHP
product which is (i) improperly installed or used; (ii) damaged by
accident or negligence, including failure to follow the proper
maintenance, service, and cleaning schedule; or (iii) damaged as a
result of (A) modification or alteration by the purchaser or other party,
(B) excessive voltage or current supplied to or drawn from the
interface connections, (C) static electricity or electro-static discharge,
(D) operation under conditions beyond the specified operating
parameters, or (E) repair or service of the product by anyone other
than HHP or its authorized representatives.
This warranty shall extend from the time of shipment for the duration
published by HHP for the product at the time of purchase ("Warranty
Period"). Any defective product must be returned (at purchaser’s
expense) during the Warranty Period to HHP’s factory or authorized
service center for inspection. No product will be accepted by HHP
without a Return Materials Authorization, which may be obtained by
contacting HHP. In the event that the product is returned to HHP or
its authorized service center within the Warranty Period and HHP
determines to its satisfaction that the product is defective due to
defects in materials or workmanship, HHP, at its sole option, will
either repair or replace the product without charge, except for return
shipping to HHP.
EXCEPT AS MAY BE OTHERWISE PROVIDED BY APPLICABLE
LAW, THE FOREGOING WARRANTY IS IN LIEU OF ALL OTHER
COVENANTS OR WARRANTIES, EITHER EXPRESSED OR
IMPLIED, ORAL OR WRITTEN, INCLUDING, WITHOUT
LIMITATION, ANY IMPLIED WARRANTIES OF
MERCHANTABILITY OR FITNESS FOR A PARTICULAR
PURPOSE.
HHP’S RESPONSIBILITY AND PURCHASER’S EXCLUSIVE
REMEDY UNDER THIS WARRANTY IS LIMITED TO THE REPAIR
OR REPLACEMENT OF THE DEFECTIVE PRODUCT. IN NO
EVENT SHALL HHP BE LIABLE FOR INDIRECT, INCIDENTAL, OR
CONSEQUENTIAL DAMAGES, AND, IN NO EVENT, SHALL ANY
LIABILITY OF HHP ARISING IN CONNECTION WITH ANY
PRODUCT SOLD HEREUNDER (WHETHER SUCH LIABILITY
ARISES FROM A CLAIM BASED ON CONTRACT, WARRANTY,
TORT, OR OTHERWISE) EXCEED THE ACTUAL AMOUNT PAID
TO HHP FOR THE PRODUCT. THESE LIMITATIONS ON
LIABILITY SHALL REMAIN IN FULL FORCE AND EFFECT EVEN
WHEN HHP MAY HAVE BEEN ADVISED OF THE POSSIBILITY OF
9

70
•
•
•
•
•
•
SUCH INJURIES, LOSSES, OR DAMAGES. SOME STATES, PROVINCES, OR
COUNTRIES DO NOT ALLOW THE EXCLUSION OR LIMITATIONS OF
INCIDENTAL OR CONSEQUENTIAL DAMAGES, SO THE ABOVE LIMITATION
OR EXCLUSION MAY NOT APPLY TO YOU.
All provisions of this Limited Warranty are separate and severable, which means
that if any provision is held invalid and unenforceable, such determination shall
not affect the validity of enforceability of the other provisions hereof.
The limited duration of the warranty for the Dolphin 7300 terminal is as described
below:
Terminals with an integrated imager are covered by a two-year limited warranty.
If
equipped with a touch screen display, the display is covered by a one-year limited
warranty.
The limited duration of the warranty for the Dolphin HomeBase, IntelliBase,
IntelliBase+, USB HomeBase, Mobile IntelliBase and QuadCharger is for one
year.
The limited duration of the warranty for batteries is one year. The battery life will
be greatly increased when following the specific battery instructions in the user
guide. Rechargeable batteries are highly susceptible to “battery memory” and if
instructions are not followed, the amount of hours of usage and the life of the
battery are greatly reduced.
Batteries returned to HHP in this reduced state may or may not be replaced under
this warranty.
Use only power adapters approved for use by HHP. Failure to do so may result in
improper operation or damage to the unit and will void the warranty.
HHP, Inc. extends these warranties only to the first end-users of the products.
These warranties are non-transferable.
How Problems Should Be Handled
Should the Dolphin terminal or any of the peripherals prove to be defective within
the stated warranty period from the of date of purchase, return the product, as
described in the RMA procedures below, and we will, at our option, repair or
replace the product, to whatever extent HHP deems necessary to restore the
product to proper operating condition, without any charge to you.

71
•
•
•
•
•
•
Return Information
If you purchased the product from an Authorized HHP Reseller, contact the
Reseller with the unit's serial number. Your Reseller will contact Hand Held, on
your behalf, to arrange for the unit to be serviced.
If you purchased the product directly from Hand Held, or have been instructed by
your Reseller to contact HHP directly, call the Customer Services Department in
your area to request a Repair Maintenance Authorization (RMA) number.
North America:
(TEL) (800)-782-4263
(FAX) (704)-566-9904
Latin America
(TEL) (239)-263-7600
(FAX) (239)-263-9689
Europe, Middle East and Africa:
(TEL) Int+31 (0) 40 29 01 600
(FAX) Int+31 (0) 40 24 25 672
The United Kingdom:
(TEL) Int+44 (0) 1 925 240055 or Int+353 1 216 0070
(FAX) Int+44 (0) 1 925 631280 or Int+353 1 925 6353
Asia/Pacific:
(TEL) Int+852-2511-3050 or 2511-3132
(FAX) Int+852-2511-1355
Japan:
(TEL) Int+81-3-5212-7392
(FAX) Int+81-3-3261-7372
You must have an RMA number to receive service from any of HHP’s repair
facilities. Failure to obtain an RMA number before shipping your product to this
repair facility can delay the processing of your repair request.
When calling for service at any of our repair facilities, please be prepared to give
the following information:
·Product's type and serial number
·Brief description of problem
·Dated Proof-of-Purchase

72
•
•
•
•
•
•
Place the product in its original packaging with a copy of your original invoice and
ship the product prepaid to the appropriate address below. Write the RMA number
on the mailing label under the address.
If your equipment is still covered under the initial end-user's product warranty,
please notify the Product Services Representative when you call. Please include
a copy of the original invoice in the package to avoid possible service delays. For
your protection, we recommend you insure any equipment being sent to HHP.
After repair or replacement of the equipment, HHP will ship the product, at our
cost, to your location. Non-warranty repairs will be returned, at the customer's
North and South America:
HHP
Products Services Department
7510 East Independence Blvd., #100
Charlotte, NC 28227-9411
Europe, Middle East and Africa :
Nijverheidsweg 9
5627 BT Eindhoven
The Netherlands
The United Kingdom :
Dallam Court
Dallam Lane Warrington
Cheshire WA2 7LT
United Kingdom
Asia/Pacific
10/F Tung Sun Commercial Centre
194-200 Lockhart Road
Wanchai, Hong Kong
Japan Office
Bon Marusan 8F
3-5-1 Kanda-Jinbocho
Chiyoda-ku
Tokyo 101, Japan
Latin America Office
5117 Castello Drive
Suite 1
Naples, FL 34103

73
•
•
•
•
•
•
expense, unless otherwise requested. Units currently under a service agreement
will be shipped per the service agreement.
Please make note of the RMA number (if required) before shipping and the
product's serial number for future reference.
How To Extend Your Warranty
HHP offers a variety of service plans on our hardware products. These
agreements offer continued coverage for your equipment after the initial warranty
expires. For more information, contact your HHP sales representative, customer
account representative or the Product Service Marketing Manager or your
Authorized Reseller.
Application Support
If you have a question or problem with your Dolphin terminal or Dolphin
peripheral, you can get technical assistance from HHP's Application Support
department.
North America:
(TEL) 1-(800) 782-4263
8 a.m. and 9 p.m., Eastern Time,
Monday through Friday
support@hhp.com
Europe, Middle East and Africa:
(TEL) Int+31-40 242 4486
9 a.m. - 5 p.m., Central European
Time, Monday through Friday
euro_support@hhp.com
The United Kingdom:
(TEL)+44 1925 240055
9 a.m. - 5:30 p.m., UK Time, Monday
through Friday
euro_support@hhp.com
Asia:
(TEL)Int+852-2511-3050 or 2511-
3132
asia_support@hhp.com
Latin America:
(TEL) (239) 263-7600
la_support@hhp.com

74
•
•
•
•
•
•

75
•
•
•
•
•
•
Appendix A
Use the keyboard shortcuts in the chart below to navigate the Dolphin
7300 terminal’s keyboard.
Windows Keyboard Shortcuts
Press To
CTRL + C Copy.
CTRL + X Cut.
CTRL + V Paste.
CTRL + Z Undo.
DELETE Delete.
CTRL + RIGHT ARROW Move the insertion point to the beginning
of the next word.
CTRL + LEFT ARROW Move the insertion point to the beginning
of the previous word.
CTRL + DOWN ARROW Move the insertion point to the beginning
of the next paragraph.
CTRL + UP ARROW Move the insertion point to the beginning
of the previous paragraph.
SHIFT with any of the arrow keys Select more than one item in a window or
on the desktop, or select text within a
document.
CTRL+A Select all.
ALT+ENTER View properties for the selected item.
ALT+TAB Switch between open items.
ALT+ESC Cycle through items in the order they were
opened.
CTRL+ESC Display the
Start
menu.
ALT+Underlined letter in a menu name Display the corresponding menu.
Underlined letter in a command name on
an open menu
Carry out the corresponding command.
BACKSPACE View the folder one level up in My
Computer or Windows Explorer.
ESC Cancel the current task.
10

76
•
•
•
•
•
•
Using the Modifier Keys
The Dolphin 7300 terminal keyboard features the standard PC keyboard modifier
keys, Alt, Ctrl and Shift. The Shift key only modifies the next key pressed; it must
be pressed before each key you wish to make lower case. For single-handed
operation, the Shift key only modifies the next key pressed; it must be pressed
before each key you wish to modify. Functions of the Alt and Ctrl keys are
dependent on the software application in use.
There are two additional modifier keys located on the bottom row of the keyboard.
Use these keys in combination with other keys to type the corresponding color-
coded characters and functions. The Red and Blue keys only modify the next key
pressed; these keys must be pressed and released before each key you wish to
modify to the Blue or Red case. See the charts below for key combinations that
access the functions and special characters using these keys.
43-Key Alpha/Numeric Keyboard
Blue Key Functions & Characters For 43-Key Alpha/Numeric
Keyboard
Key Combination Function/Special Character
Double tap Blue key Activate/Deactivate Mouse Utility
Blue key + D - (minus)
Blue key + H _ (underscore)
Blue key + L =
Blue key + P +
Blue key + Q ;
Blue key + R :
Blue key + S *
Blue key + T /
Blue key + U @
Blue key + X \

77
•
•
•
•
•
•
*
Note: Exit the mouse utility before adjusting the contrast.
Key Combinations
Use the key combinations listed below to access certain keyboard functions or to
use special characters that are not defined on the 43-key version of the Dolphin
keyboard.
Red Key Functions & Characters For 43-Key Alpha Shifted
Numeric Keyboard
Key Combination Function/Special Character
Red key + ESC Lightens Contrast*
Red key + TAB Darkens Contrast*
Red key + SFT Toggles on Caps Lock
Red key + Q F1
Red key + R F2
Red key + S F3
Red key + T F4
Red key + U F5
Red key + V F6
Red key + W F7
Red key + X F8
Red key + Y START
Red key + Z INS (insert)
Red key + SP BKSP (backspace)
Red key + BACKLIGHT KEY DEL (delete)
Key Combinations Using NUM & SFT Keys
Key/Key Combination Function/Special Character
NUM + SFT + A !
NUM + SFT + B @
NUM + SFT + C #
NUM + SFT + E $
NUM + SFT + F %
NUM + SFT + G ^
78
•
•
•
•
•
•
35 Key Numeric/Alpha
NUM + SFT + I &
NUM + SFT + J *
NUM + SFT + K (
NUM + SFT + M >
NUM + SFT + N )
NUM + SFT + O <
Key Combinations Using Blue & SFT Keys
Key/Key Combinations Function/Special Characters
Blue + SFT + T ?
Blue + SFT + X |
Key Combinations Using NUM & SFT Keys
Key/Key Combination Function/Special Character
Blue Key Functions & Characters For 35-Key Numeric/Alpha
Keyboard
Key Combination Function/Special Character
Double tap Blue key Activate/Deactivate Mouse Utility
Blue key + . +
Blue key + , -
Blue key + F1 ;
Blue key + F2 :
Blue key + F3 /
Blue key + F4 \
Blue key + SP _
Blue key + DEL @
Blue key + 0 (zero) =

79
•
•
•
•
•
•
Key Combinations
Use the key combinations listed below to access certain keyboard functions or to
use special characters that are not defined on the 35-key version of the Dolphin
7300 keyboard.
Key Combinations Using ALPHA & SFT Keys
Key/Key Combination Function/Special Character
ALPHA + SFT + 1 !
ALPHA + SFT + 2 @
ALPHA + SFT + 3 #
ALPHA + SFT + 4 $
ALPHA + SFT + 5 %
ALPHA + SFT + 6 ^
ALPHA + SFT + 7 &
ALPHA + SFT + 8 *
ALPHA + SFT + 9 (
ALPHA + SFT + 0 )
ALPHA + SFT + . (period) >
ALPHA + SFT + , (comma) <

80
•
•
•
•
•
•
56 Key Full Alpha Numeric
Blue Key Functions & Characters For 56-Key
Full Alpha Numeric Keyboard
Key Combination Function/Special Character
Double tap Blue key Activate/Deactivate Mouse Utility
Blue key + . +
Blue key + , -
Blue key + A ;
Blue key + B :
Blue key + C /
Blue key + D \
Blue key + E _
Blue key + F @
Red Key Functions & Characters for 56-Key
Full Alpha Numeric Keyboard
Key Combination Function/Special Character
Red key + ESC Lightens Contrast*
Red key + TAB Darkens Contrast*
Red key + SFT Toggles on Caps Lock
Red key + A F1
Red key + B F2
Red key + C F3
Red key + D F4
Red key + E F5
Red key + F F6
Red key + G F7
Red key + H F8
Red key + I F9
Red key + J F10
Red key + K F11
Red key + L F12

81
•
•
•
•
•
•
Note: Exit the mouse utility before adjusting the contrast.
Key Combinations
Use the key combinations listed below to access certain keyboard functions or to
use special characters that are not defined on the 56-key version of the Dolphin
7300 keyboard.
Red key + M F13
Red key + N F14
Red key + O F15
Red key + P F16
Red key + Q F17
Red key + R F18
Red key + S F19
Red key + T F20
Red key + U F21
Red key + V F22
Red key + W F23
Red key + X F24
Red key + Y Z
Key Combinations Using SFT & Number Keys
Key/Key Combination Function/Special Character
SFT + 1 !
SFT + 2 @
SFT + 3 #
SFT + 4 $
SFT + 5 %
SFT + 6 ^
SFT + 7 &
SFT + 8 *
SFT + 9 (
Red Key Functions & Characters for 56-Key
Full Alpha Numeric Keyboard
Key Combination Function/Special Character

82
•
•
•
•
•
•
SFT + 0 )
SFT + . (period) >
SFT + , (comma) <
Key Combinations Using SFT & Number Keys
Key/Key Combination Function/Special Character
83
•
•
•
•
•
•
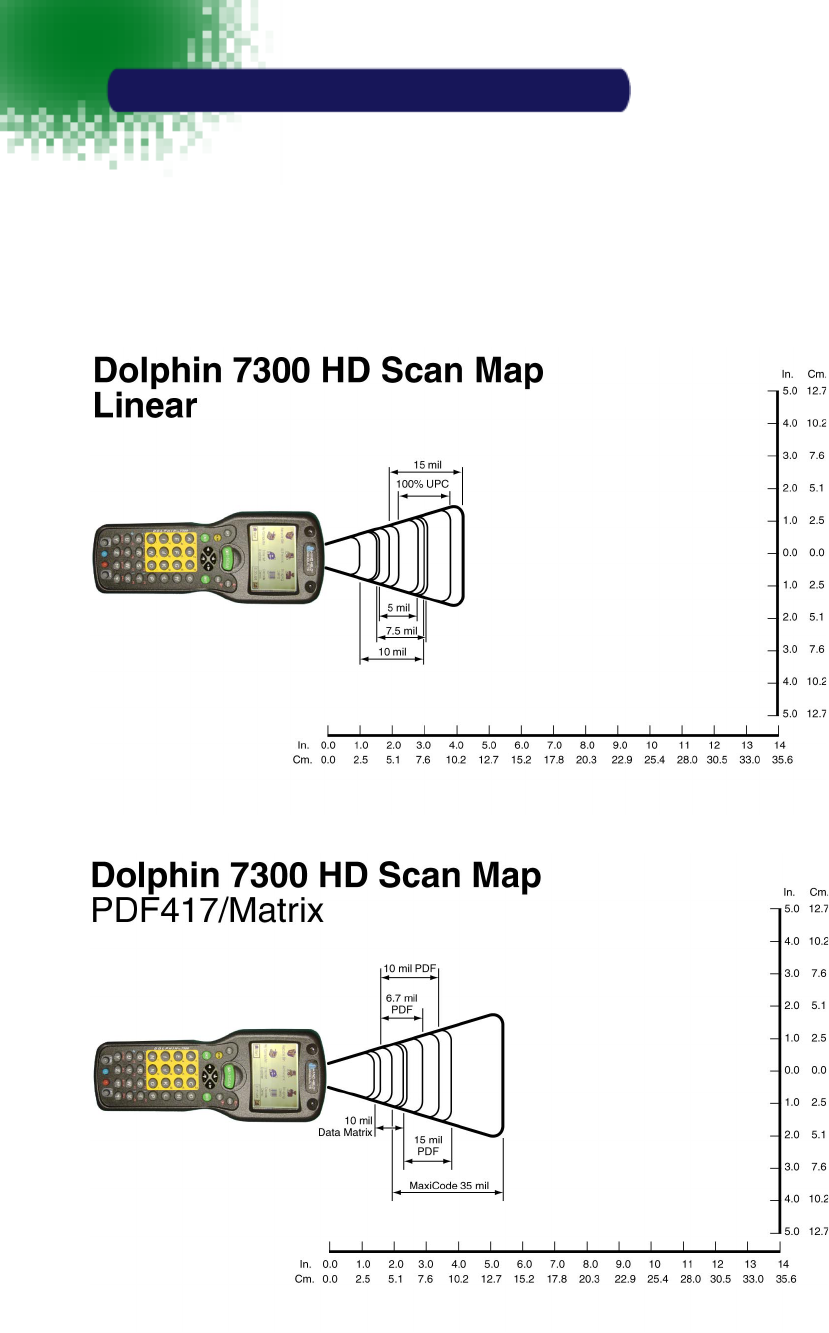
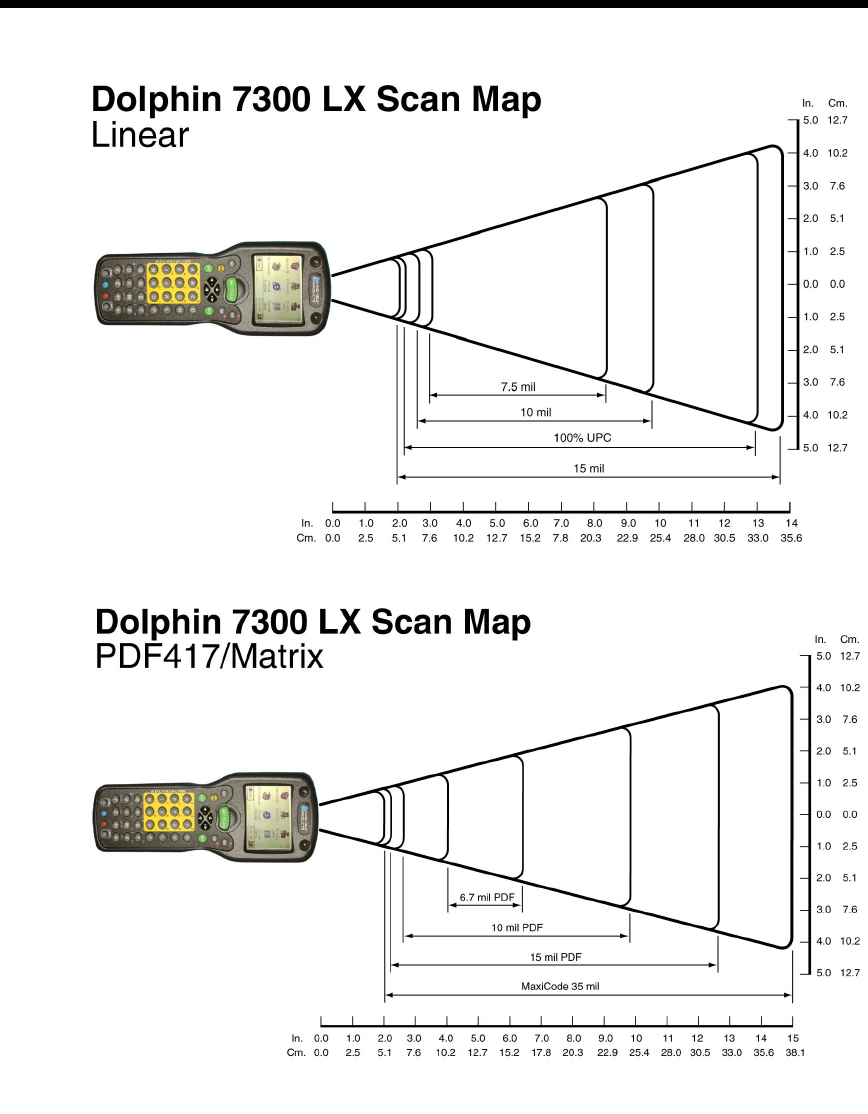
Appendix B
Dolphin 7300 Scan Maps
11
84
•
•
•
•
•
•

4619 Jordan Road
P.O. Box 188
Skaneateles Falls, NY 13153-0187
7300/UG Rev B