Honeywell 9500LUPE Handheld PC with GSM, WLAN and BT transmitter User Manual

Honeywell International Inc Handheld PC with GSM, WLAN and BT transmitter

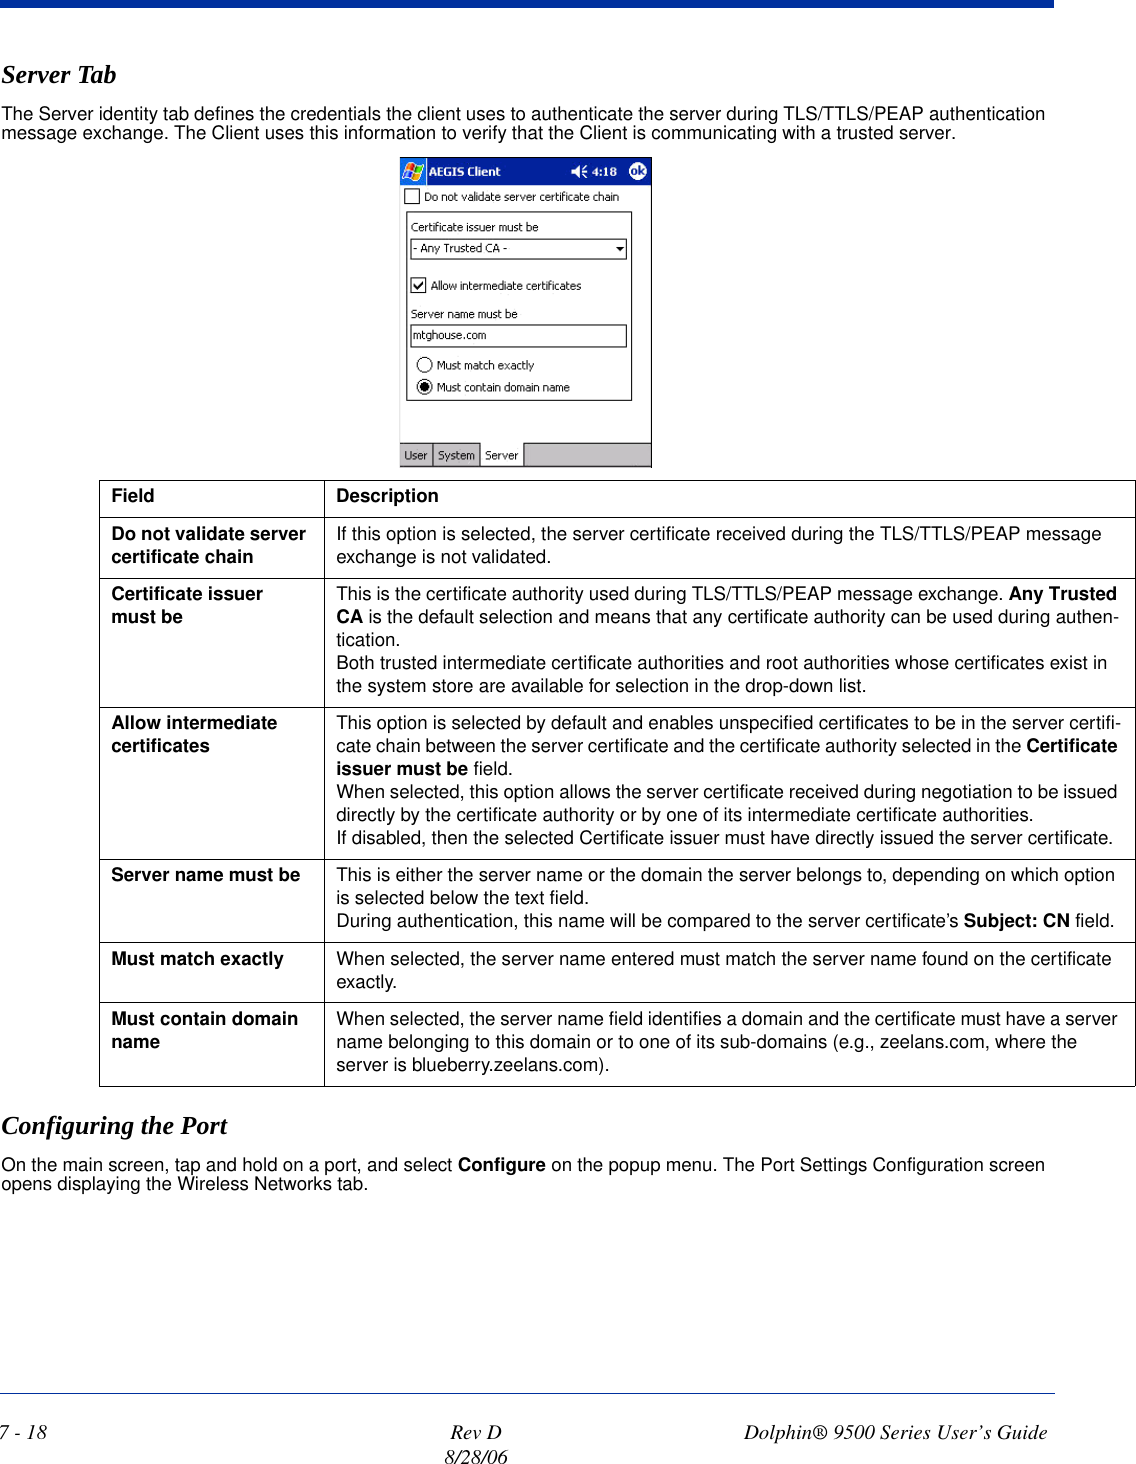
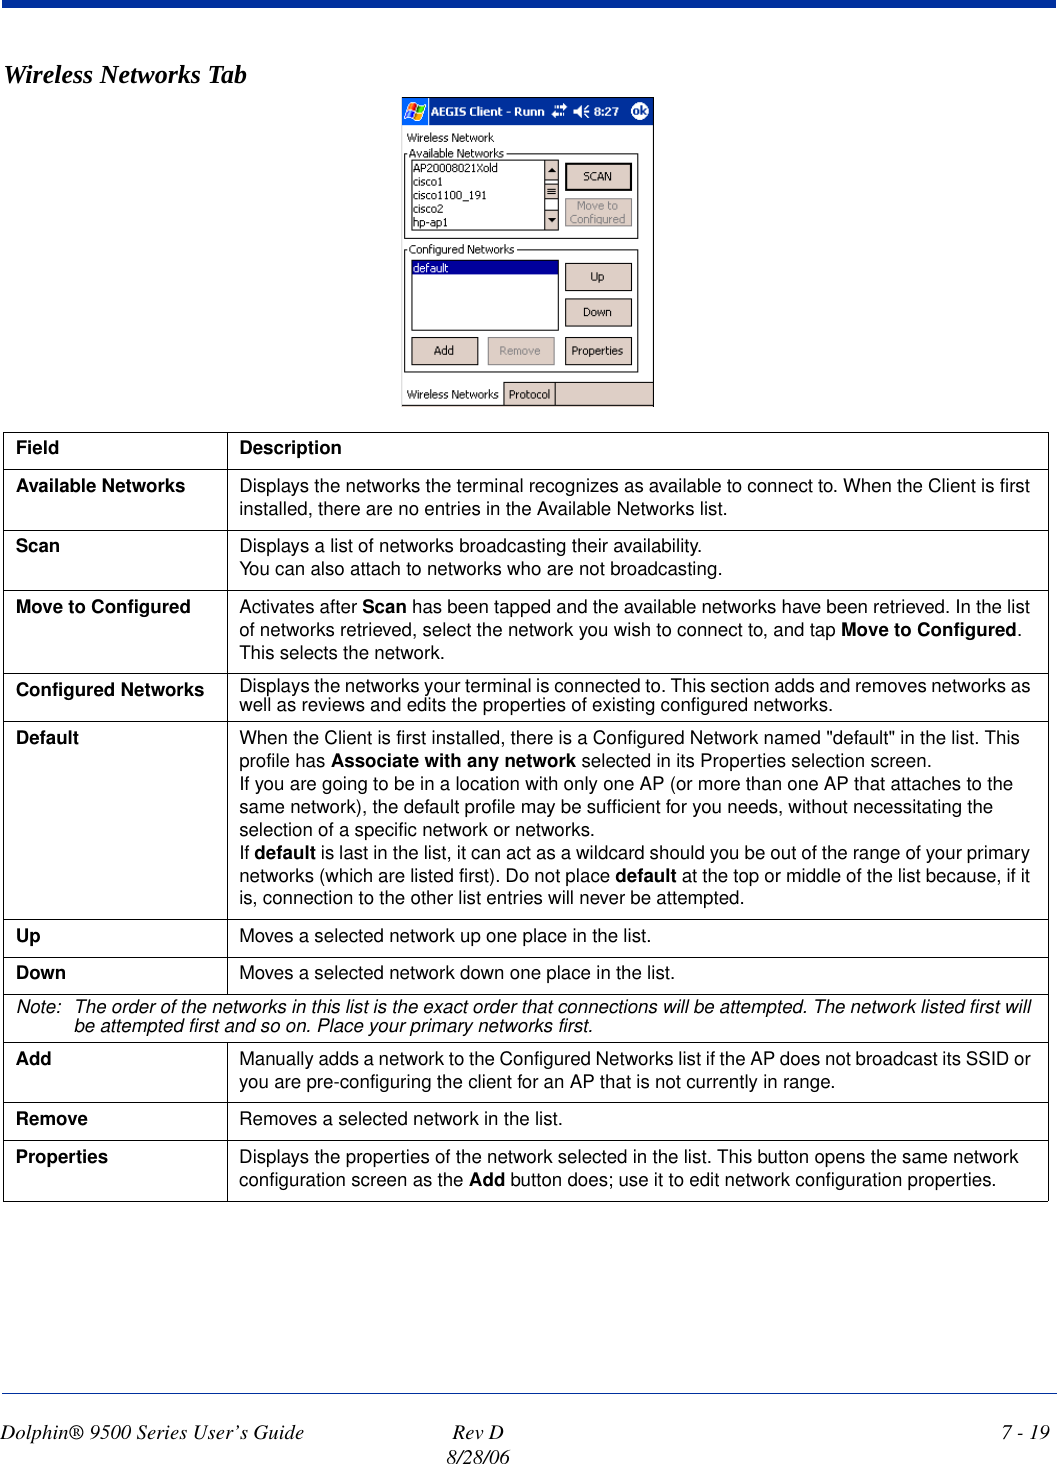
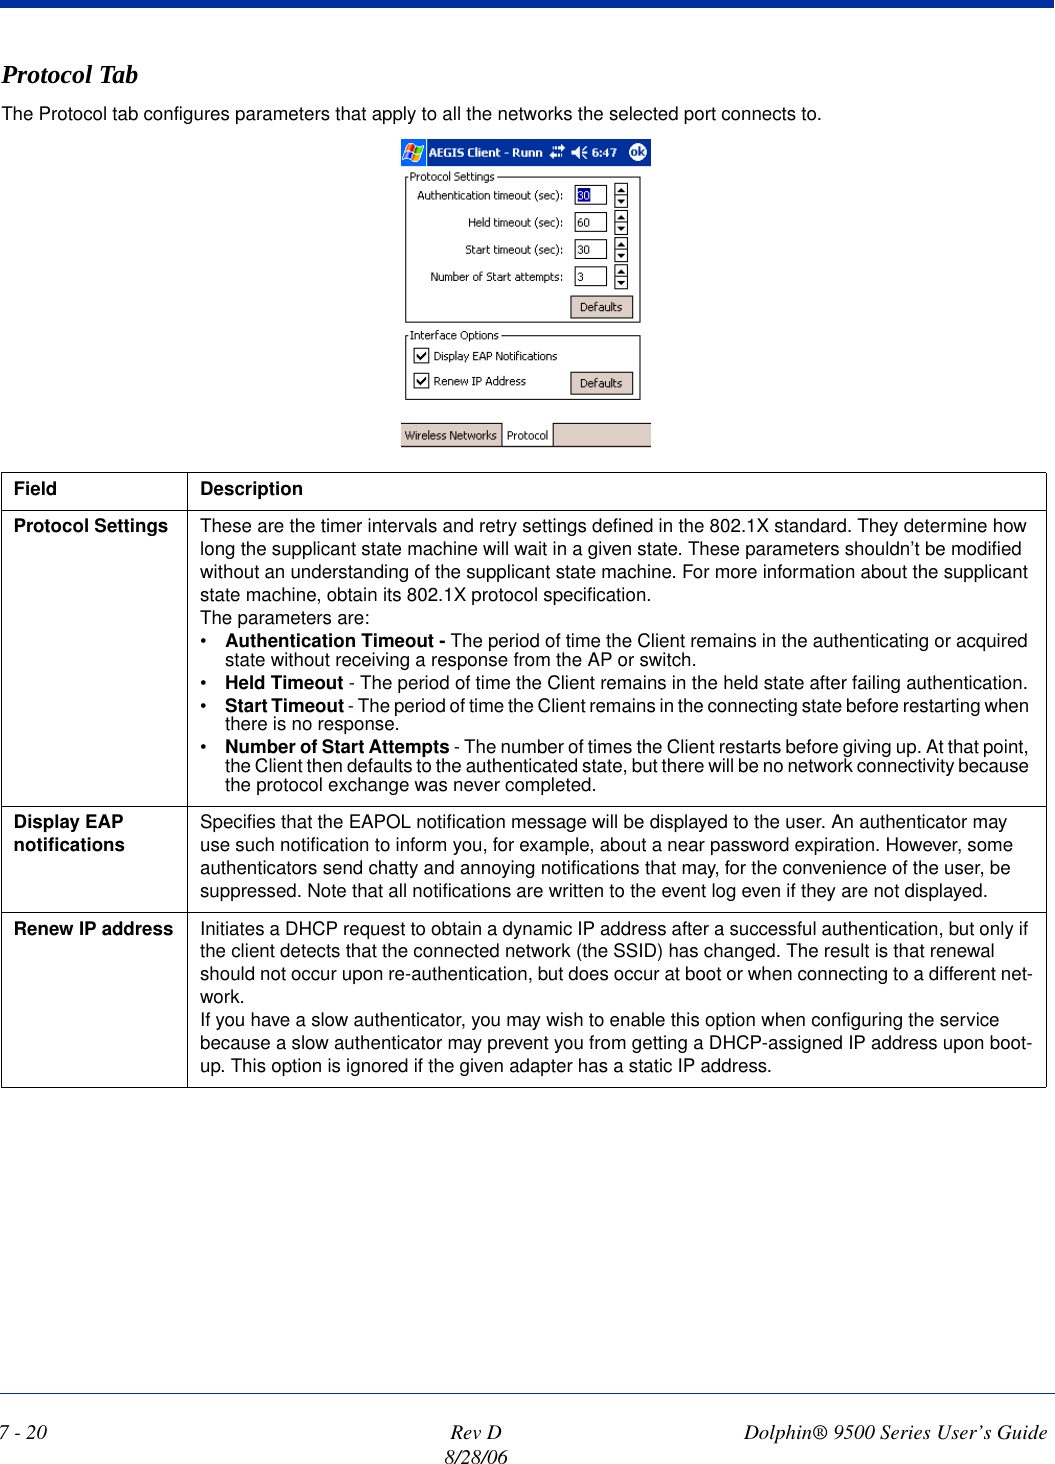
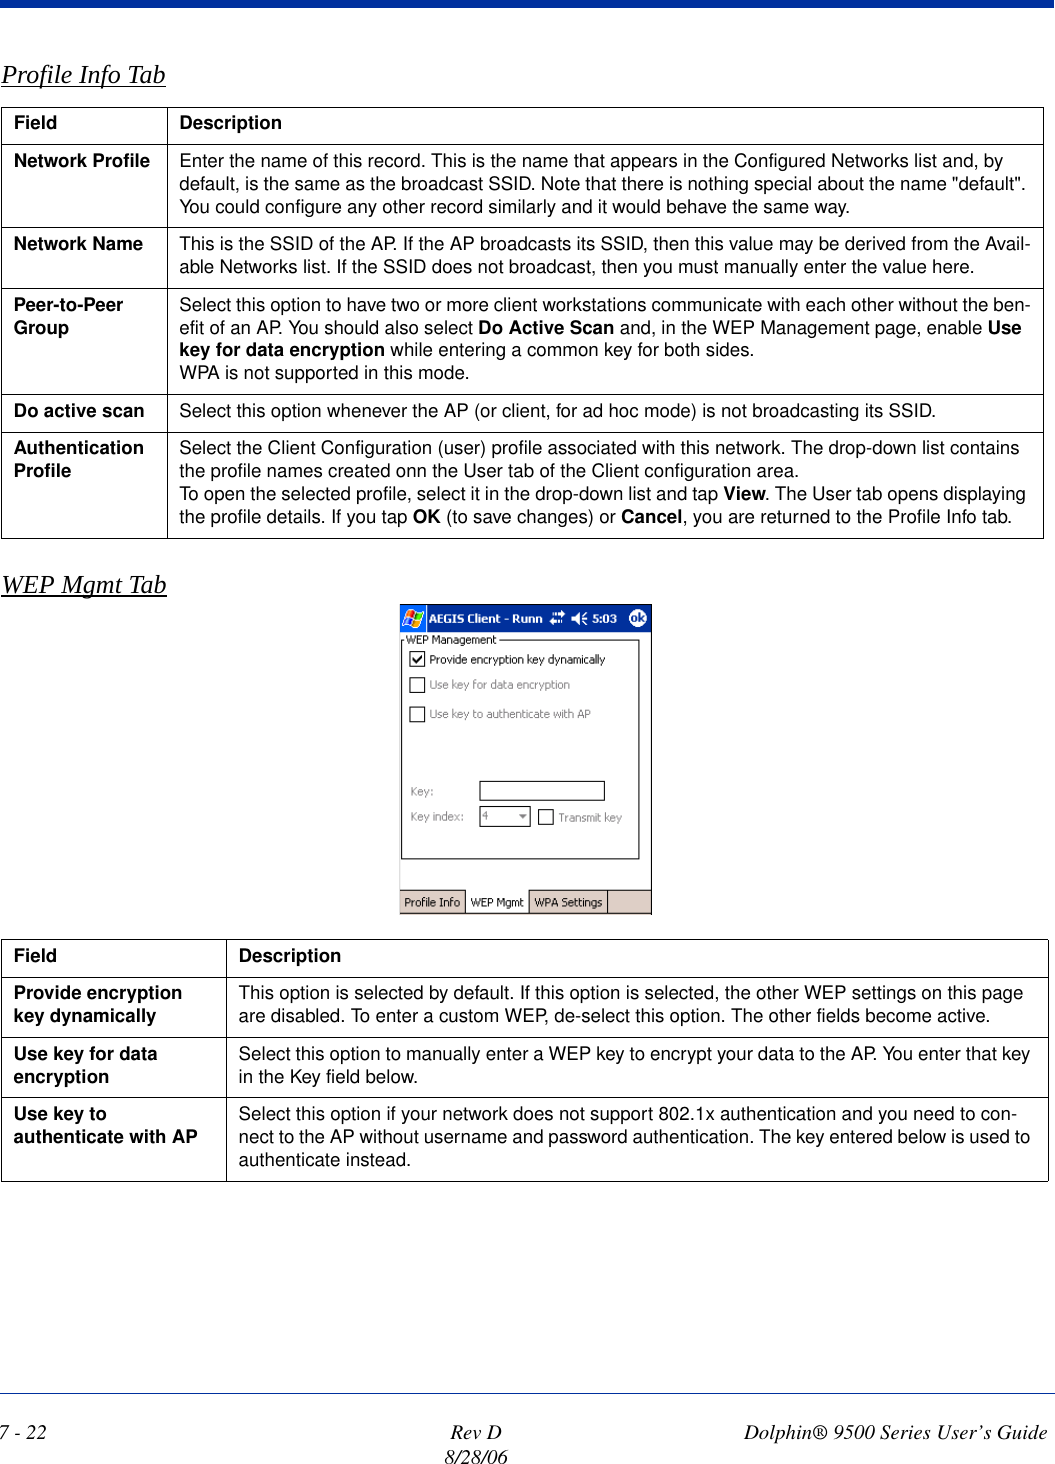
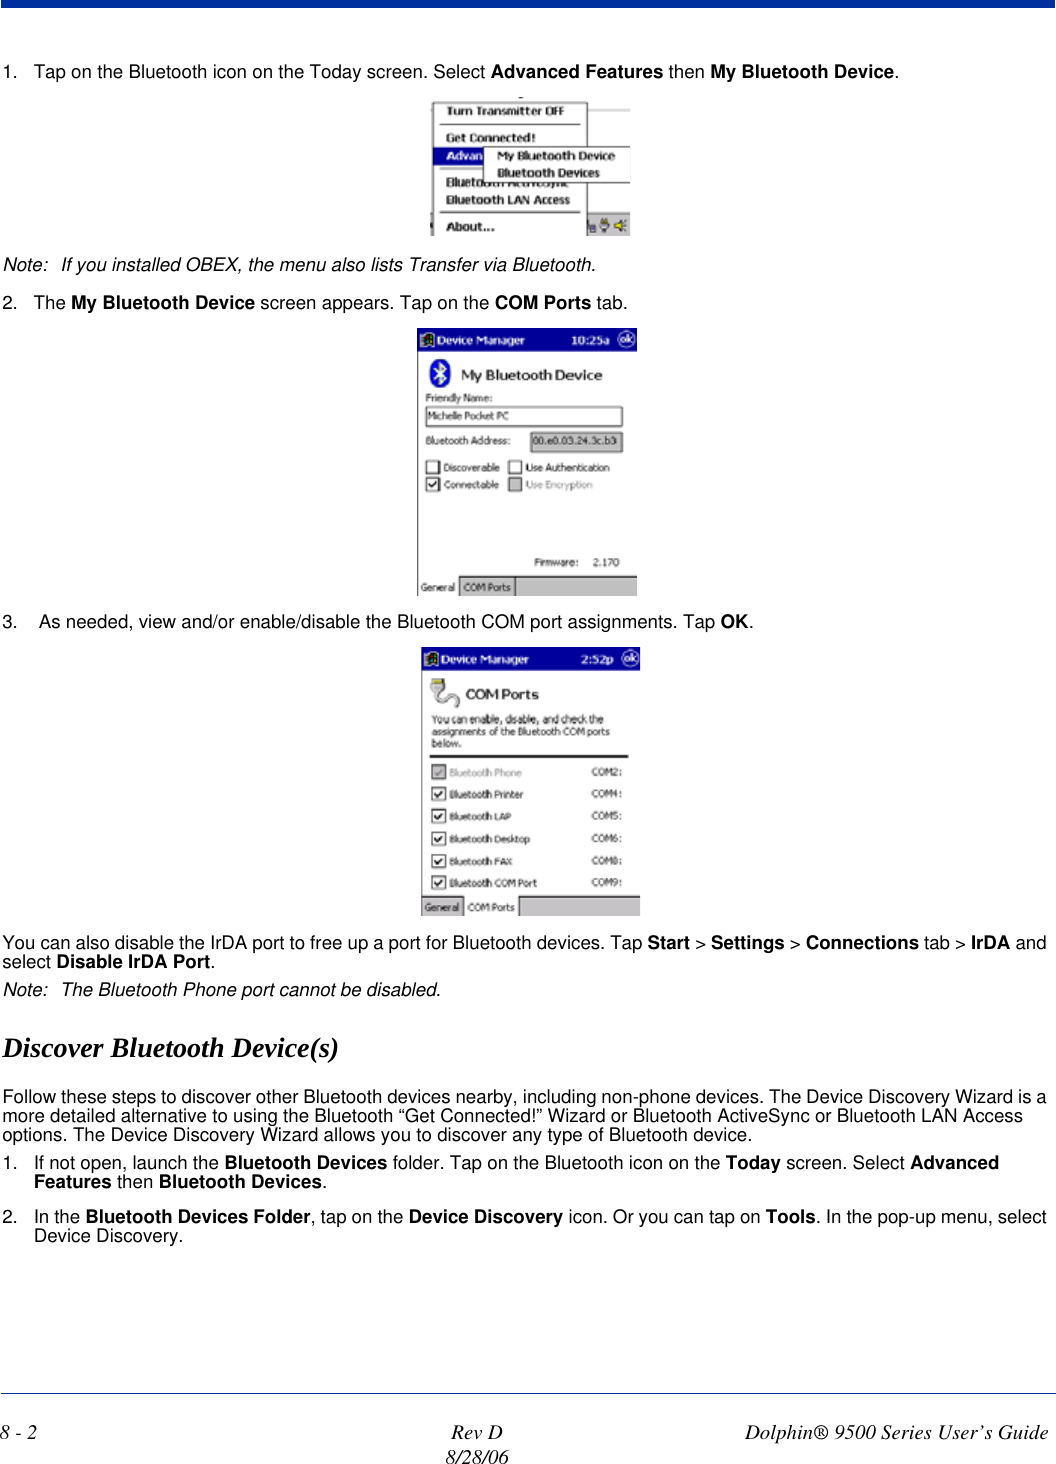
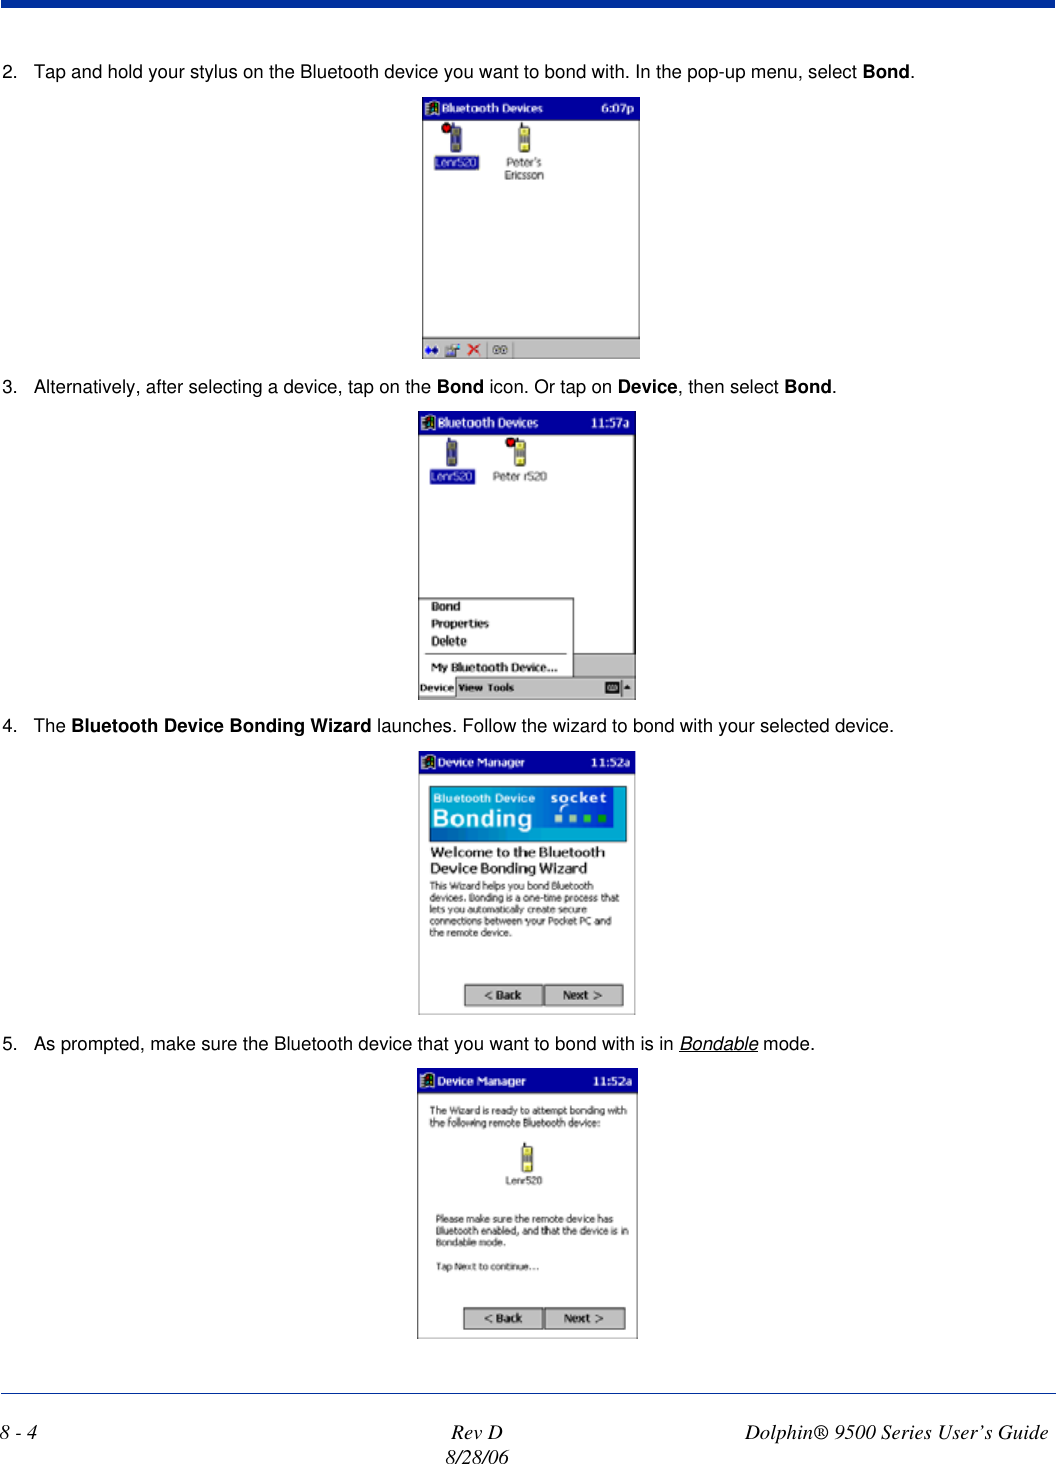
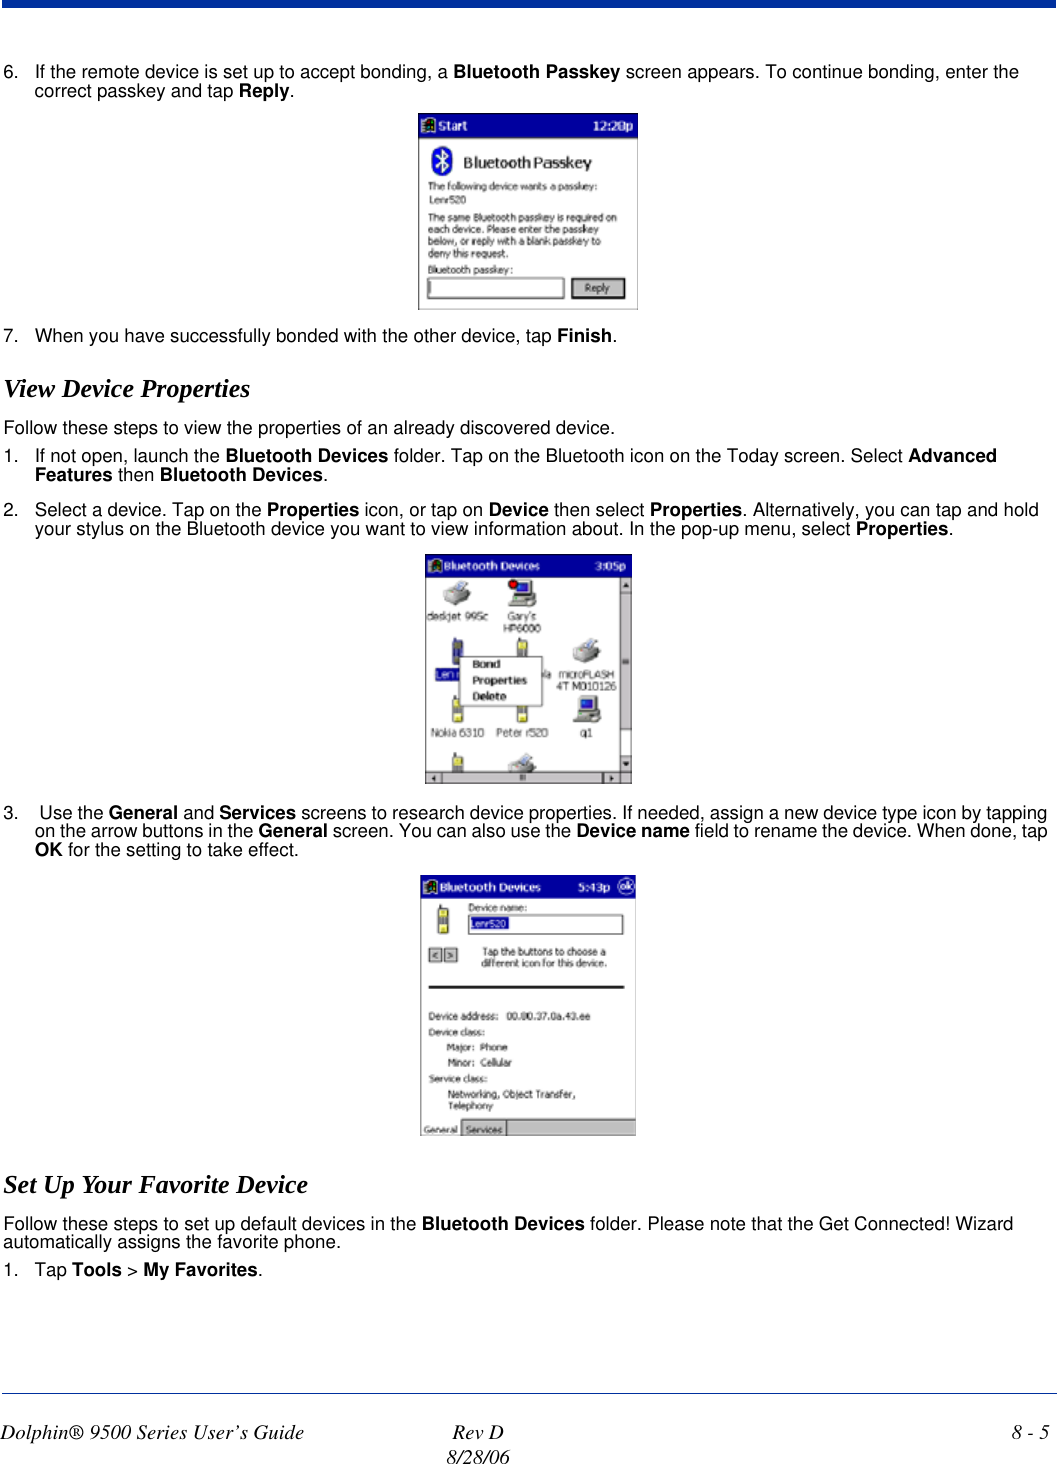
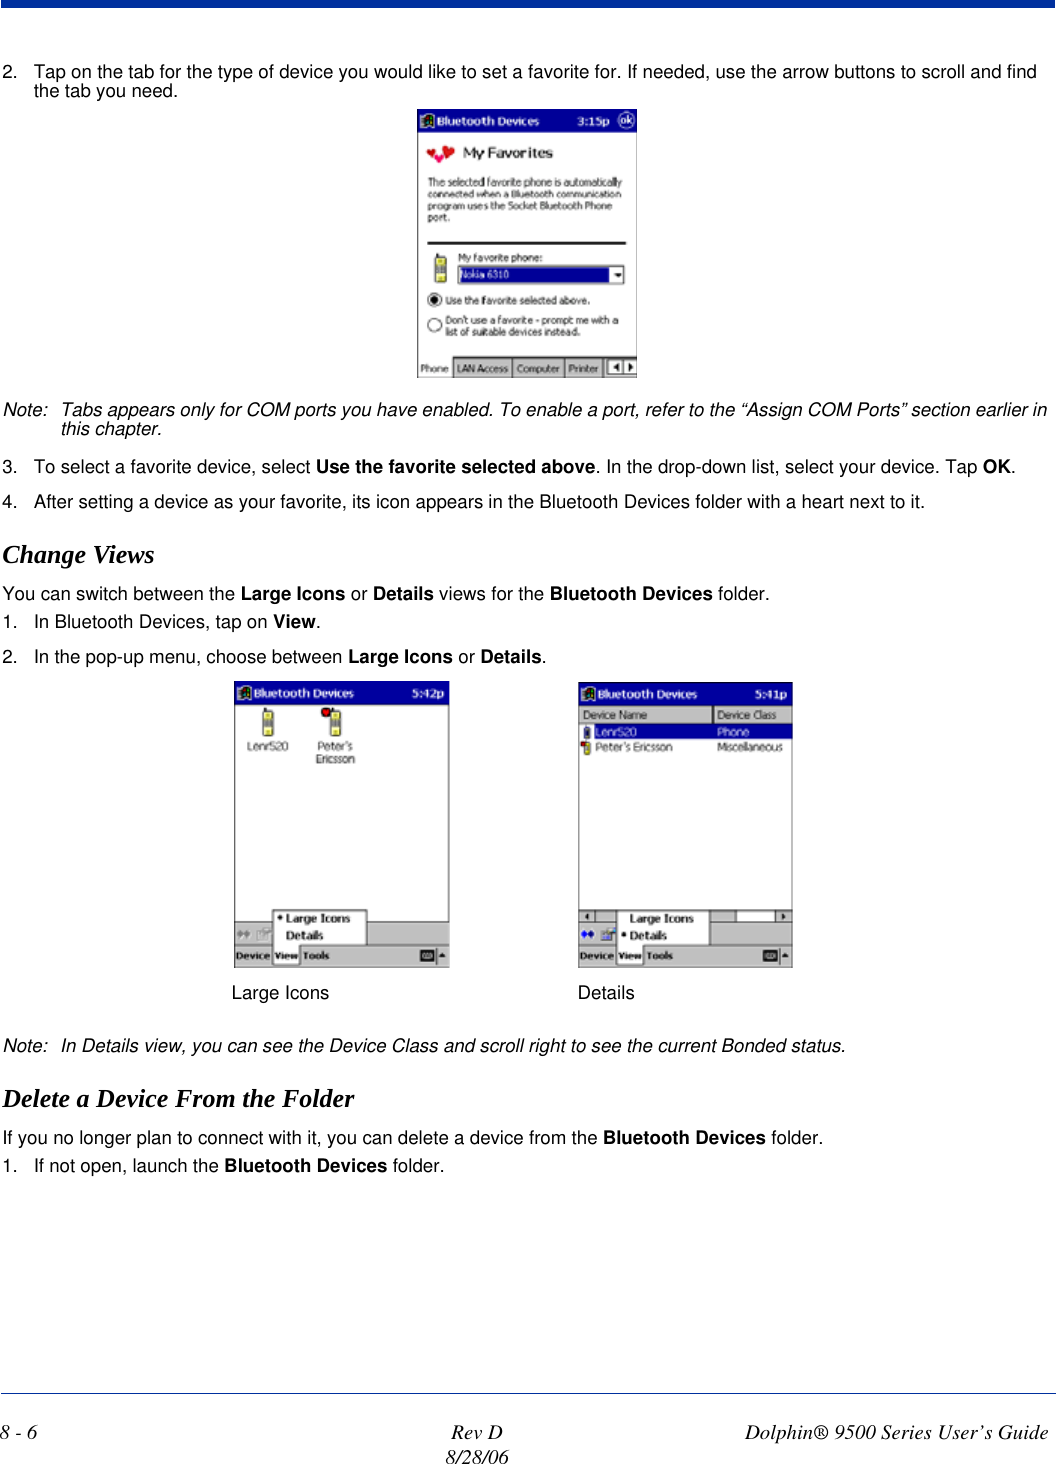
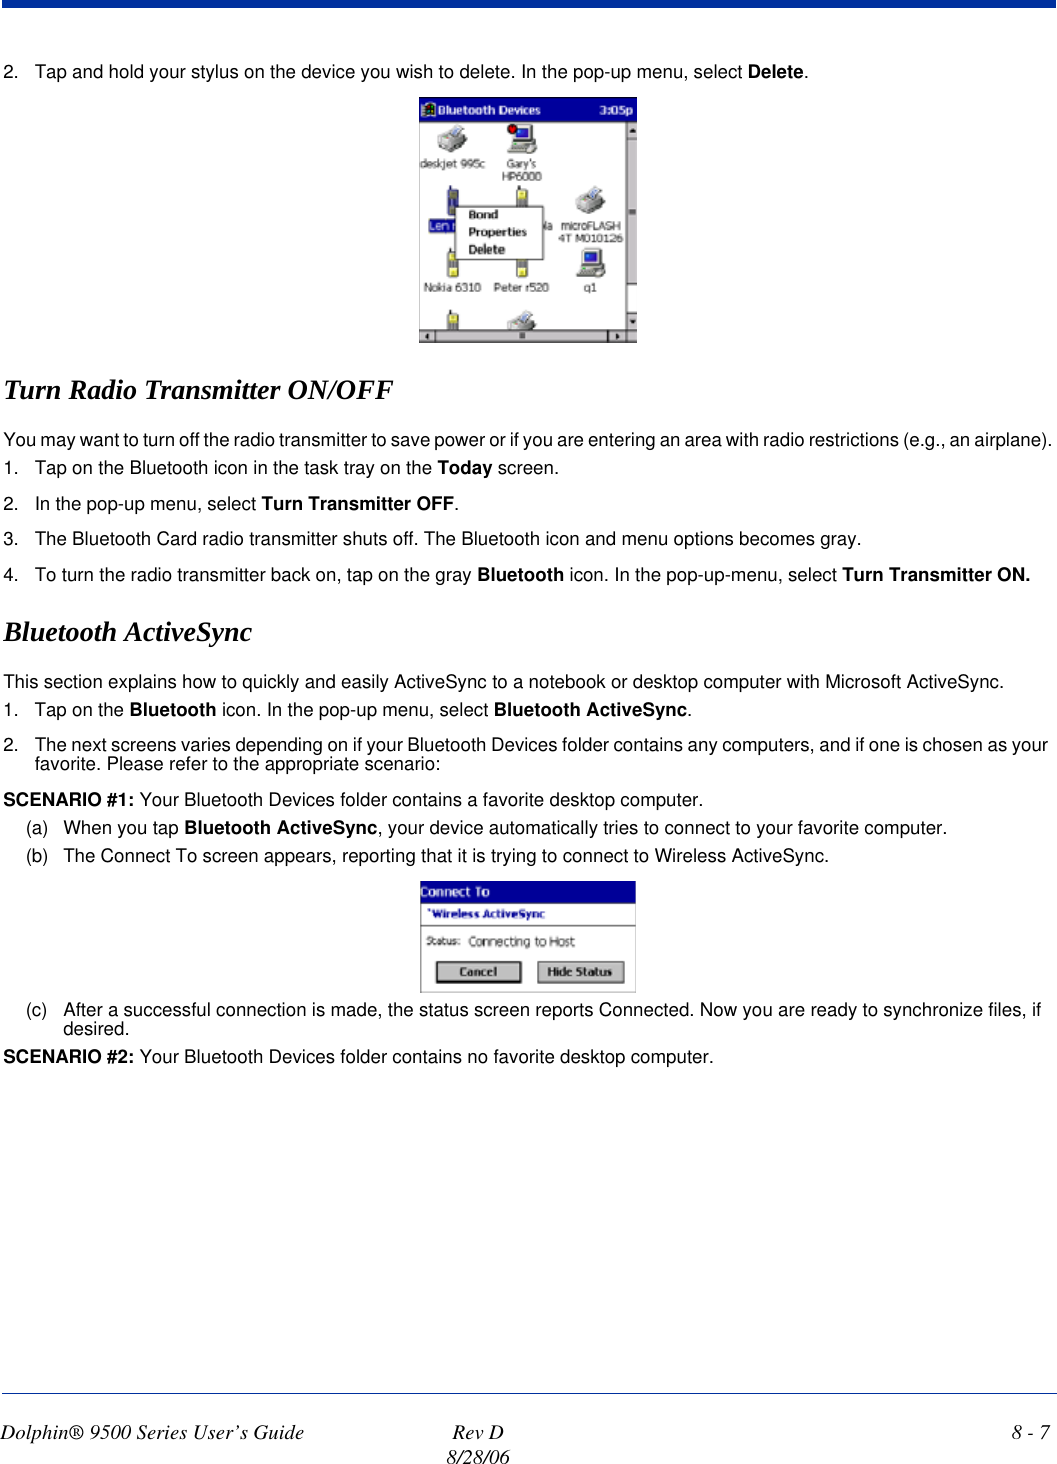
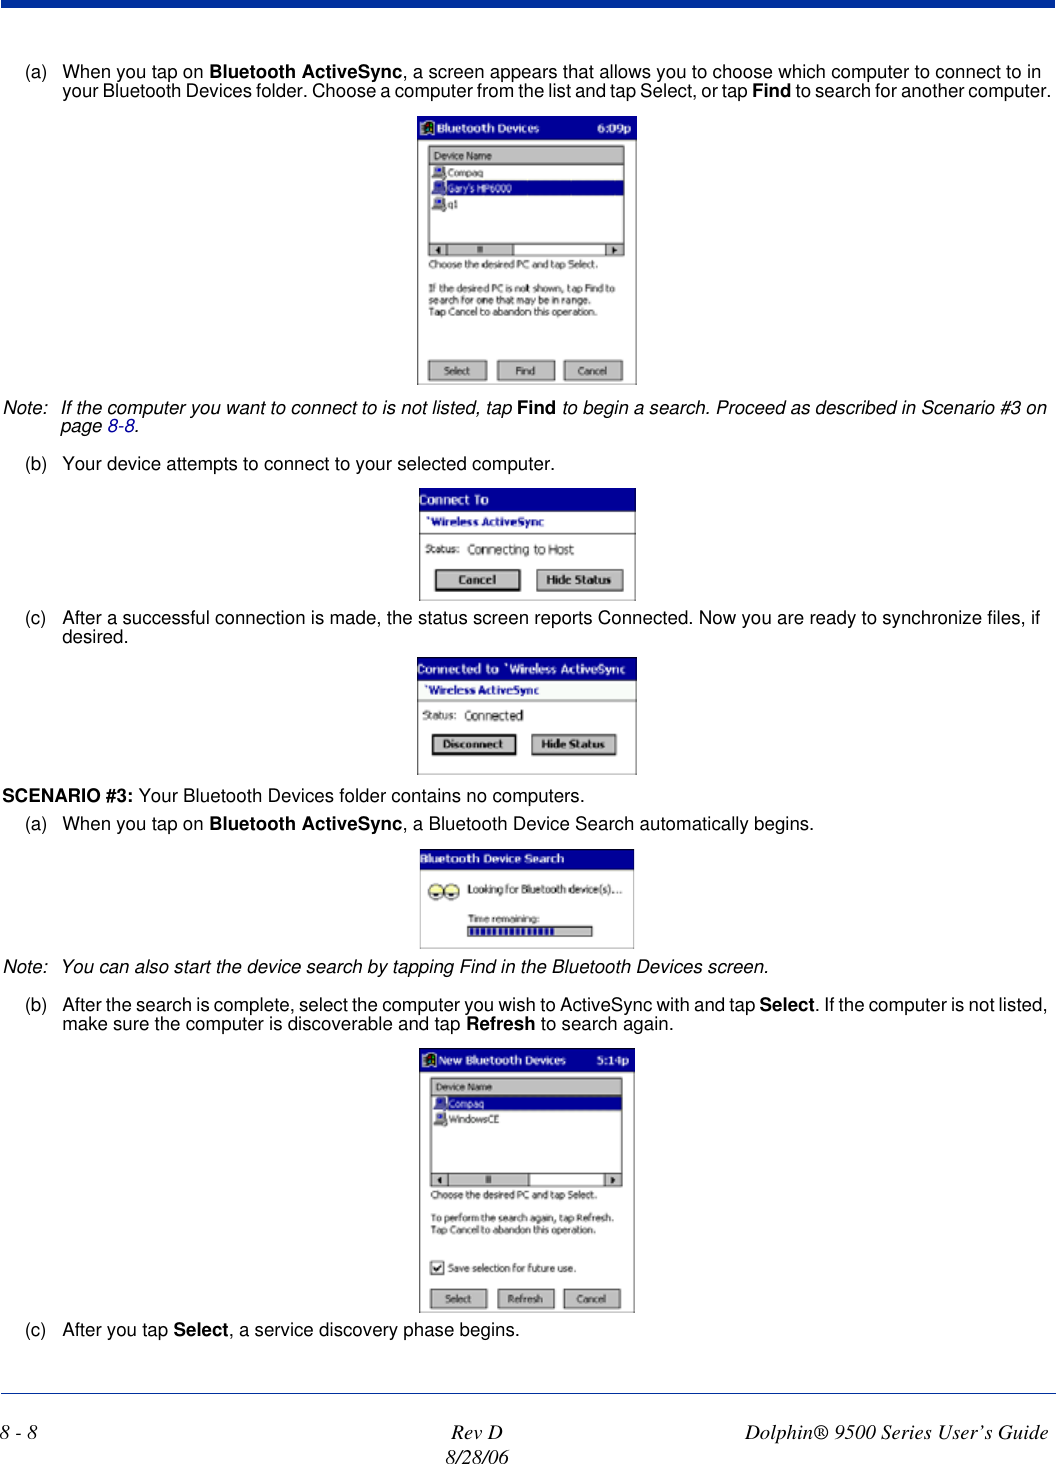
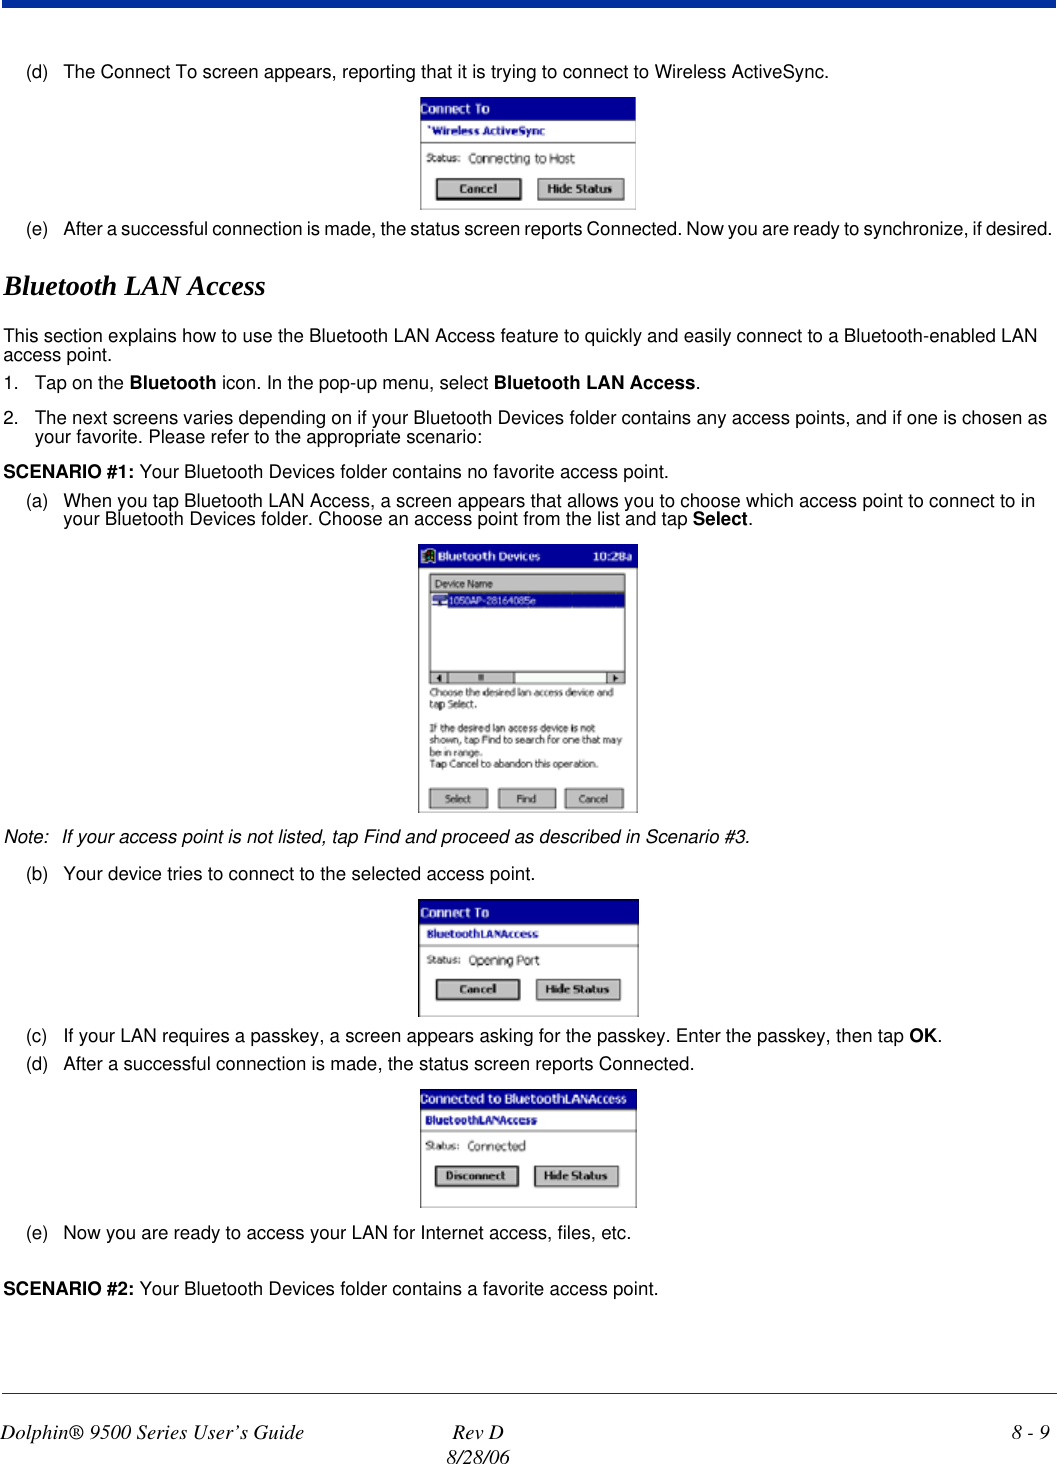
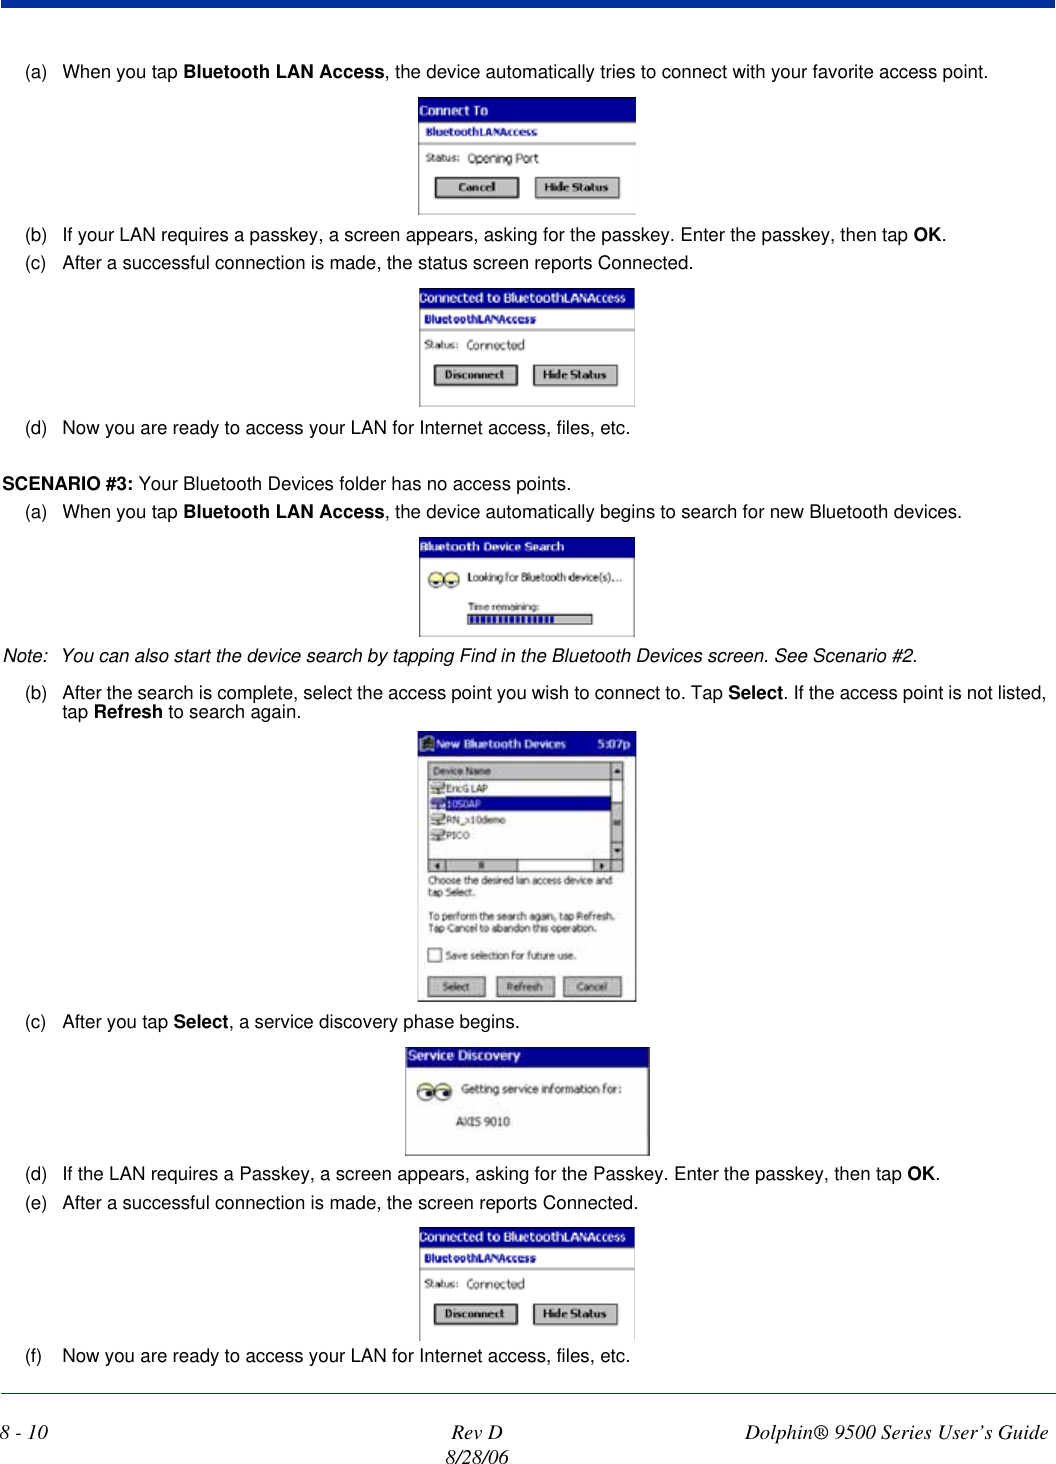
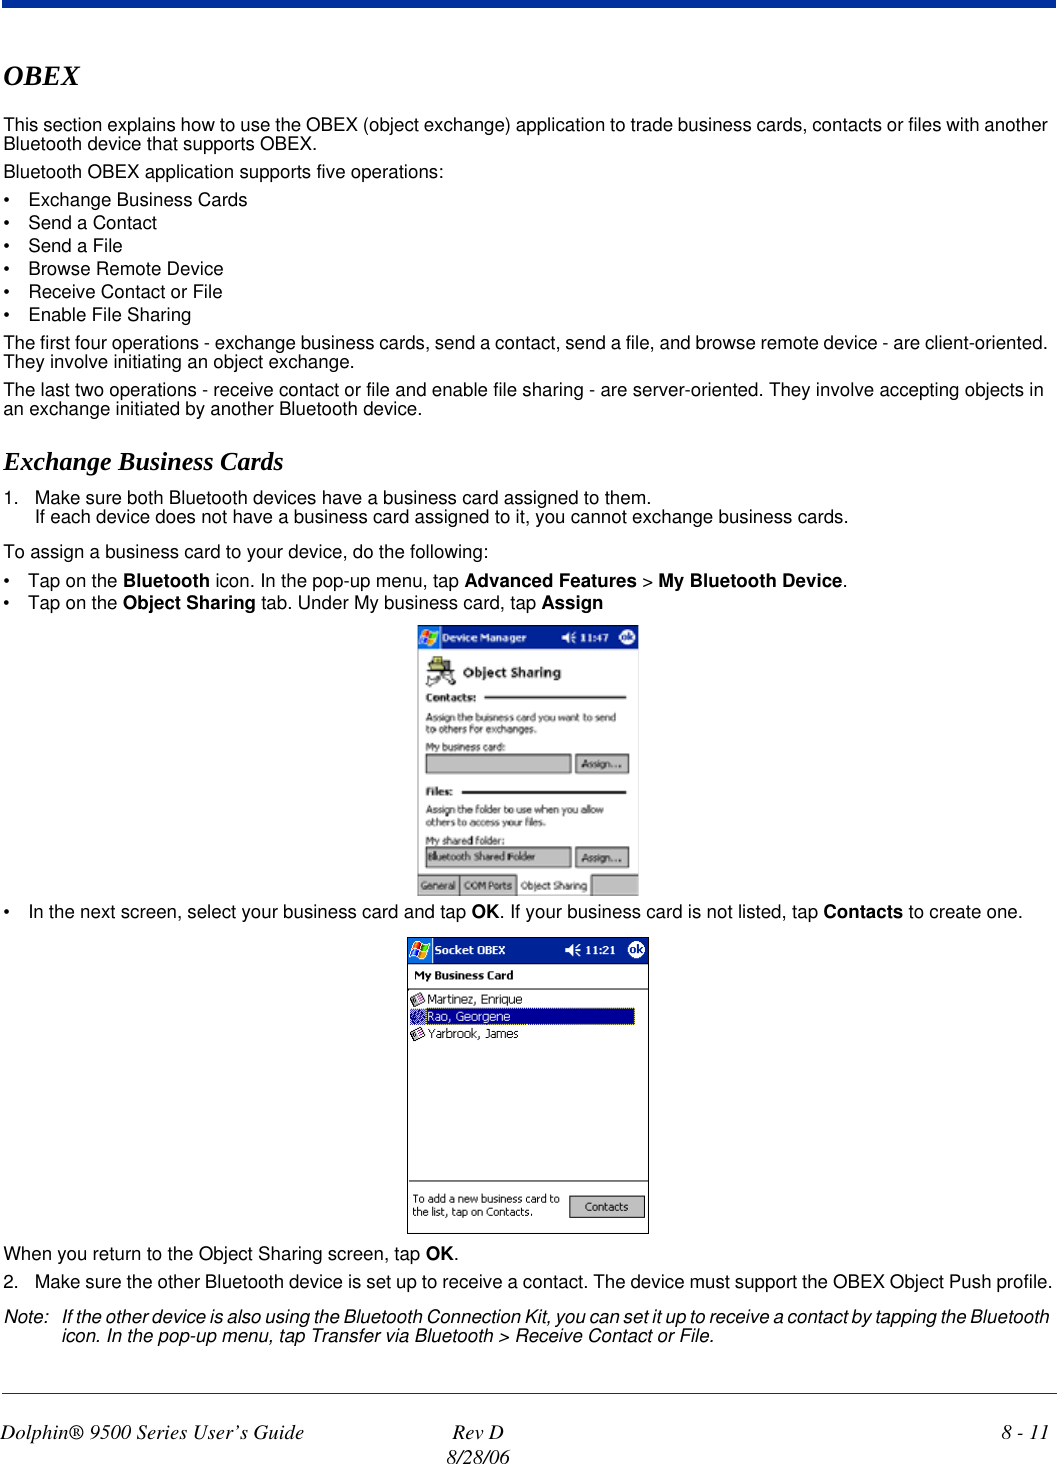
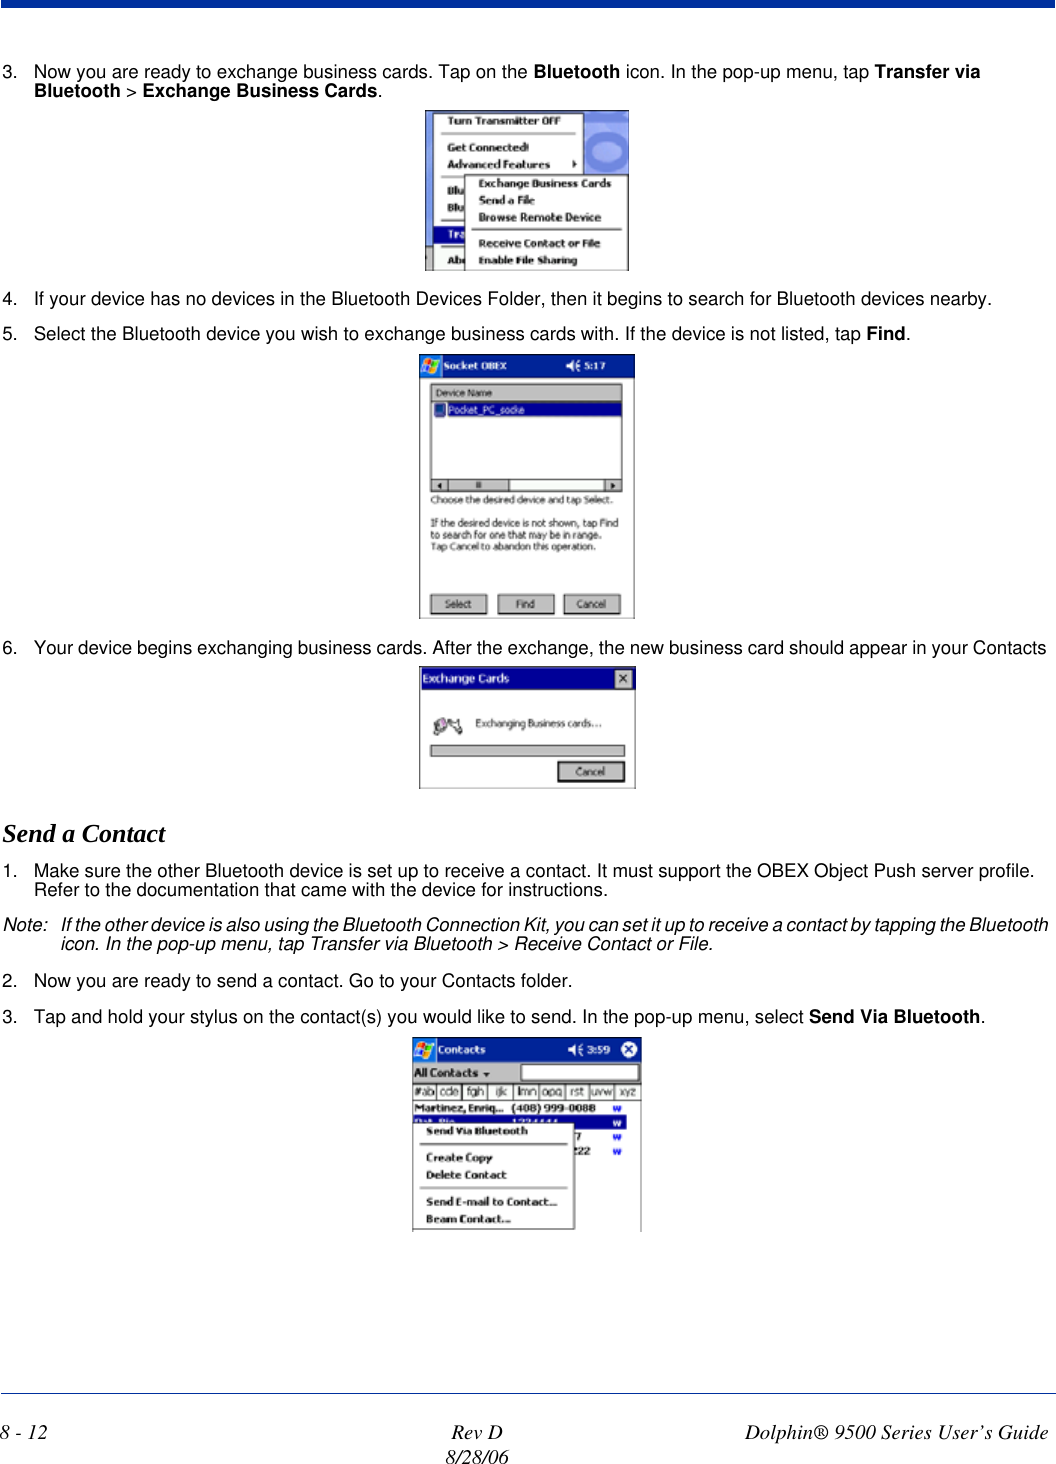
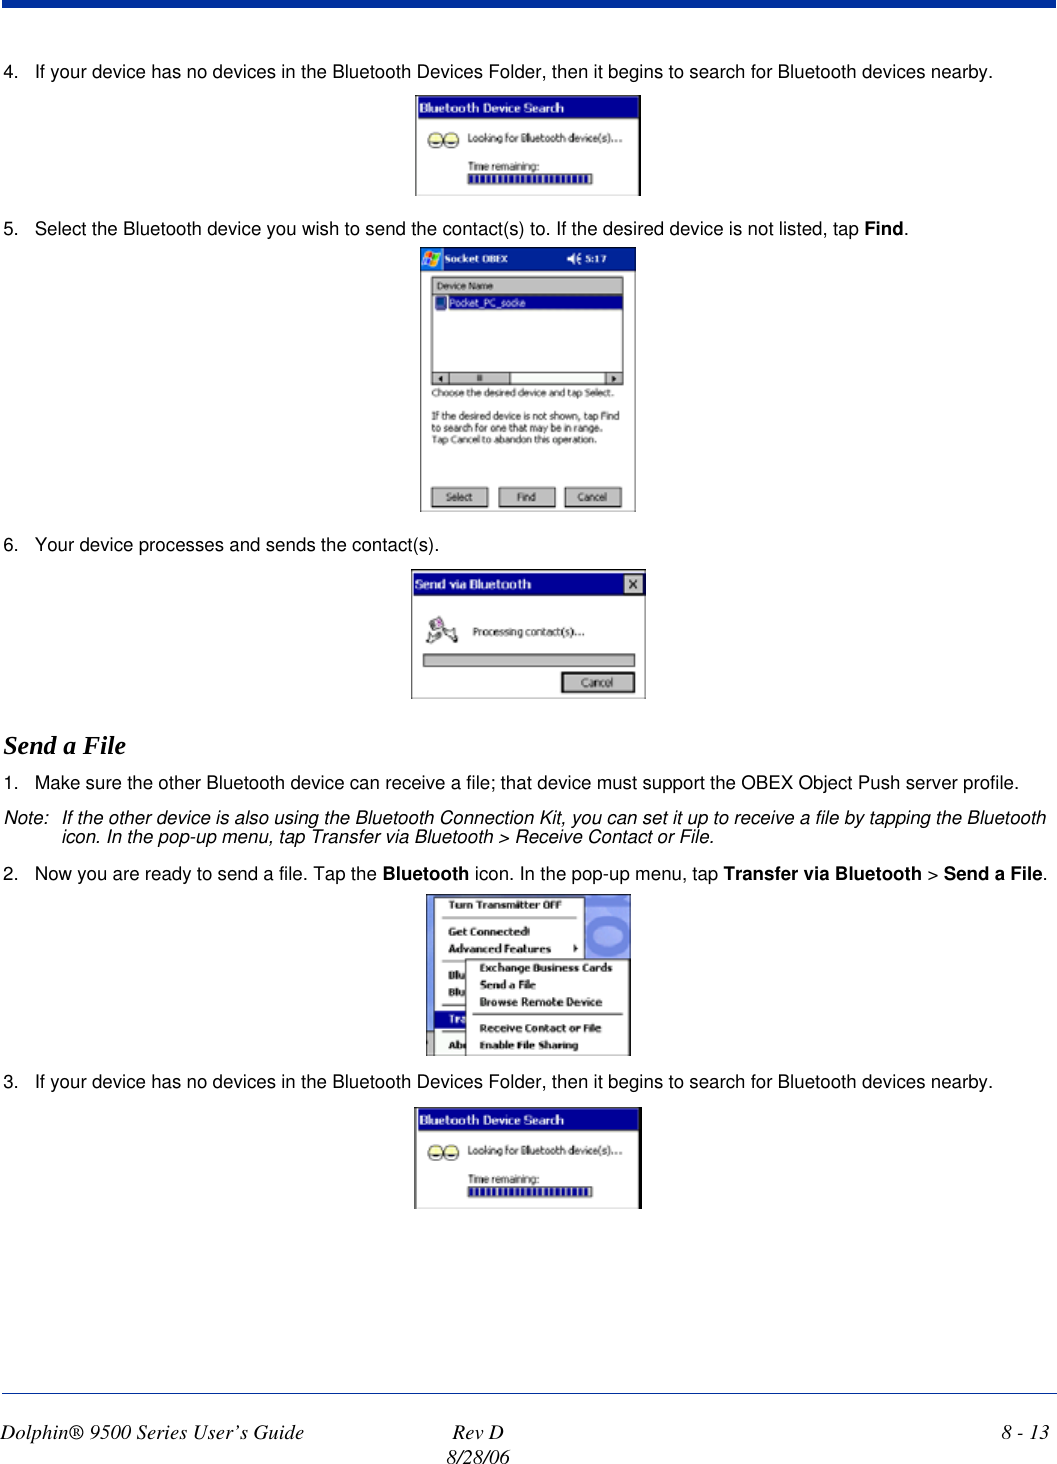
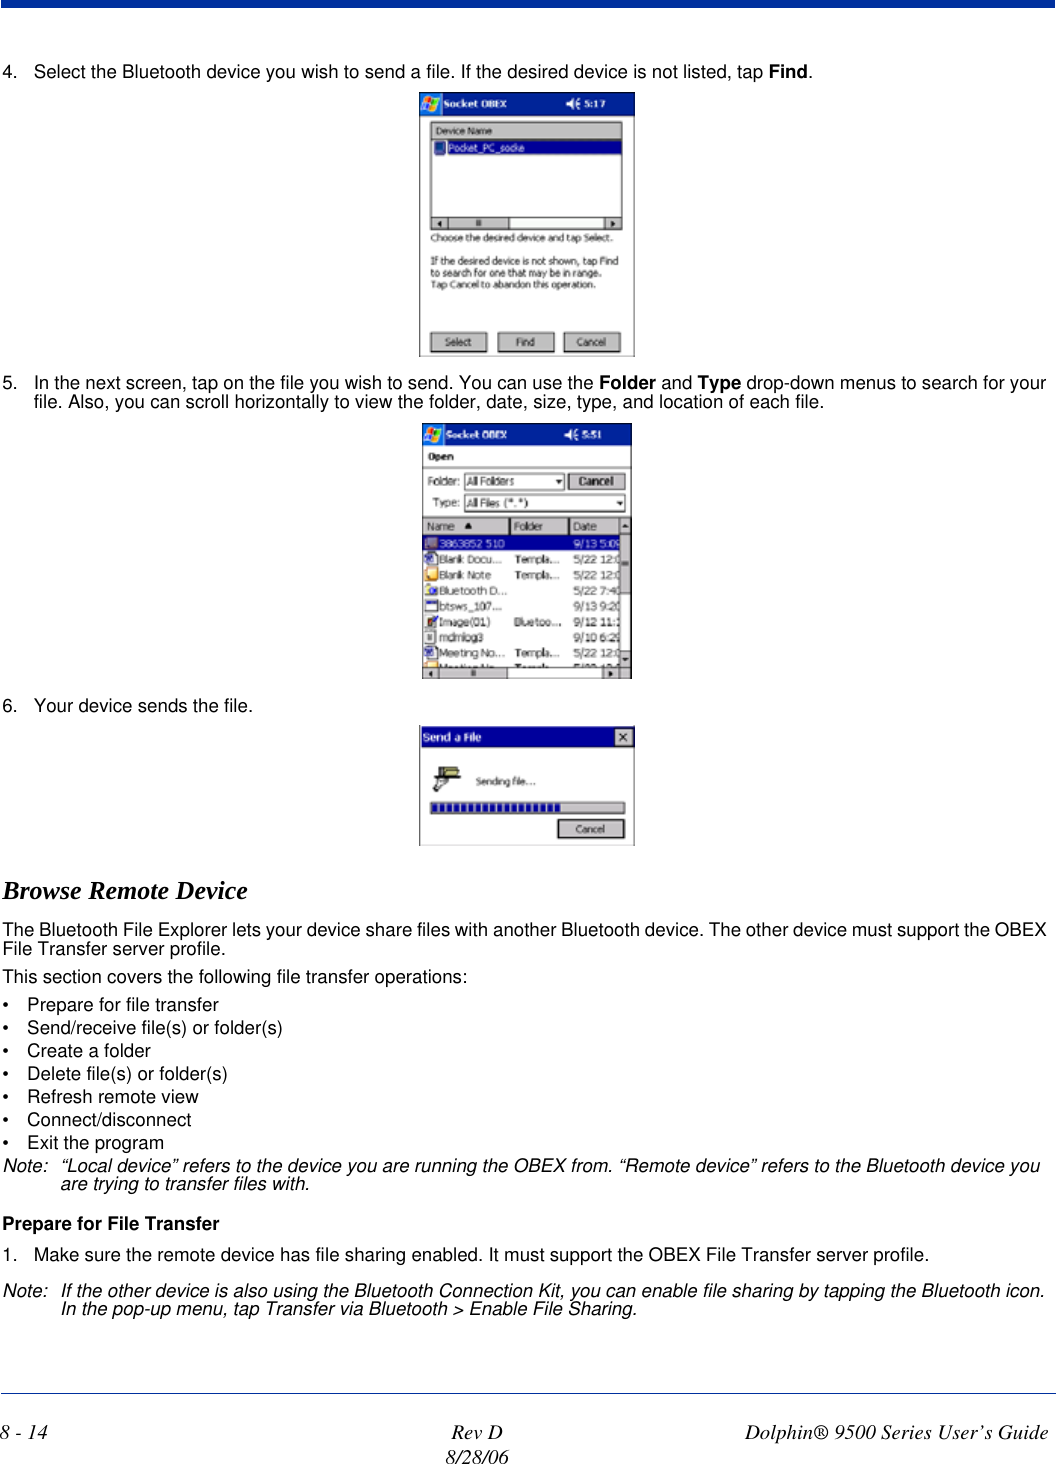
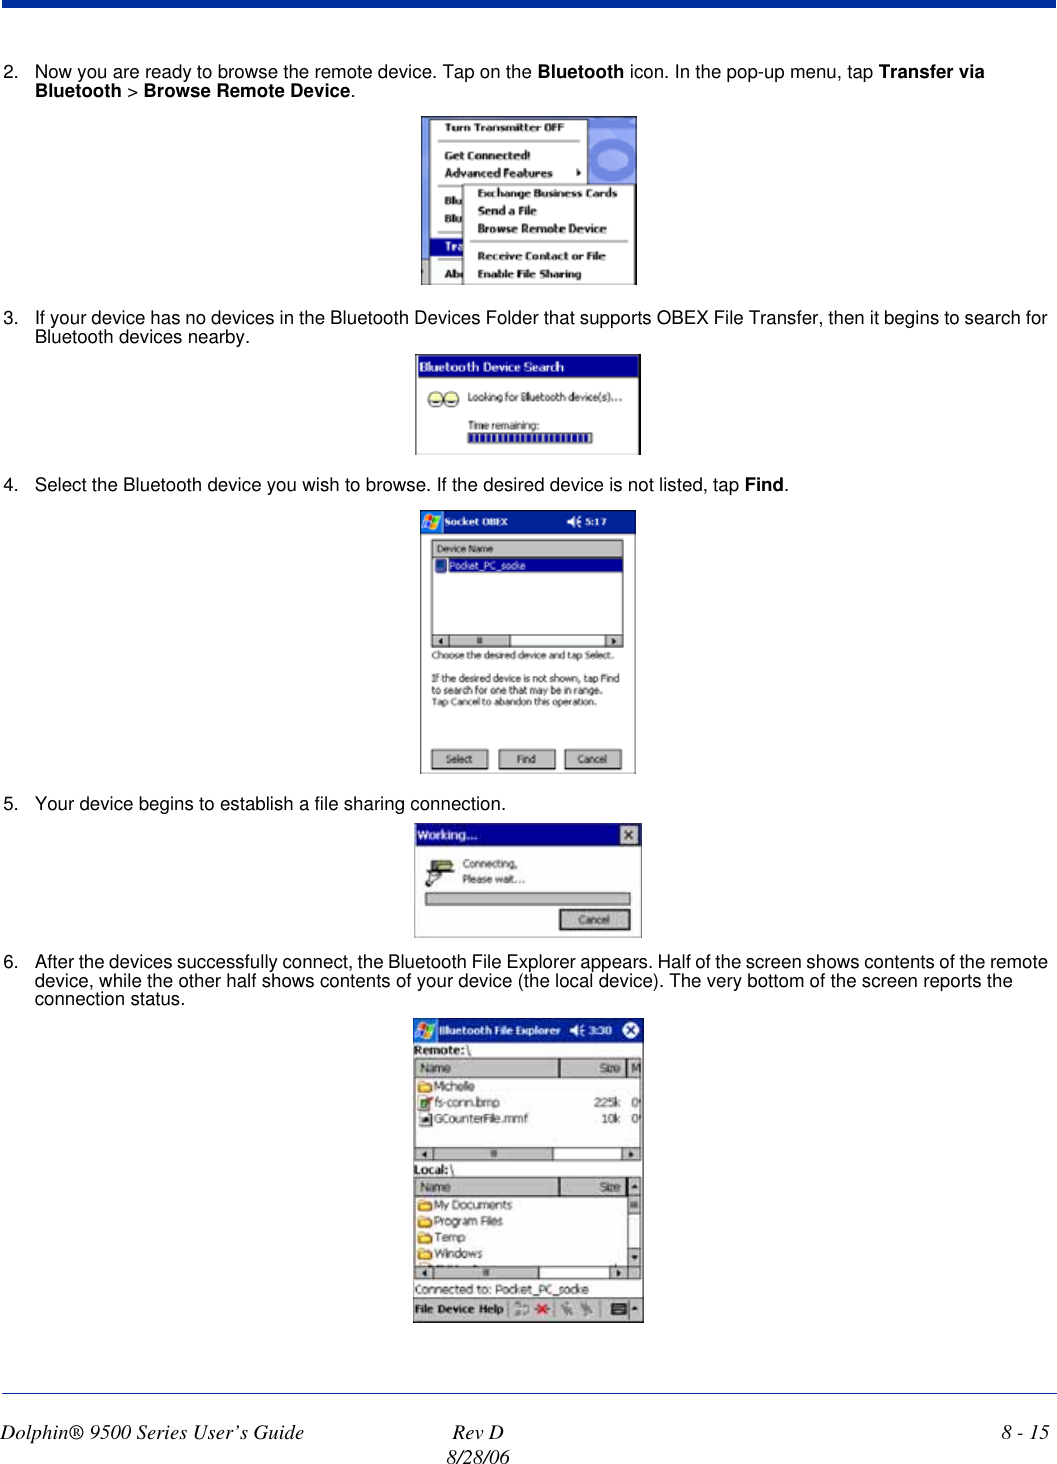
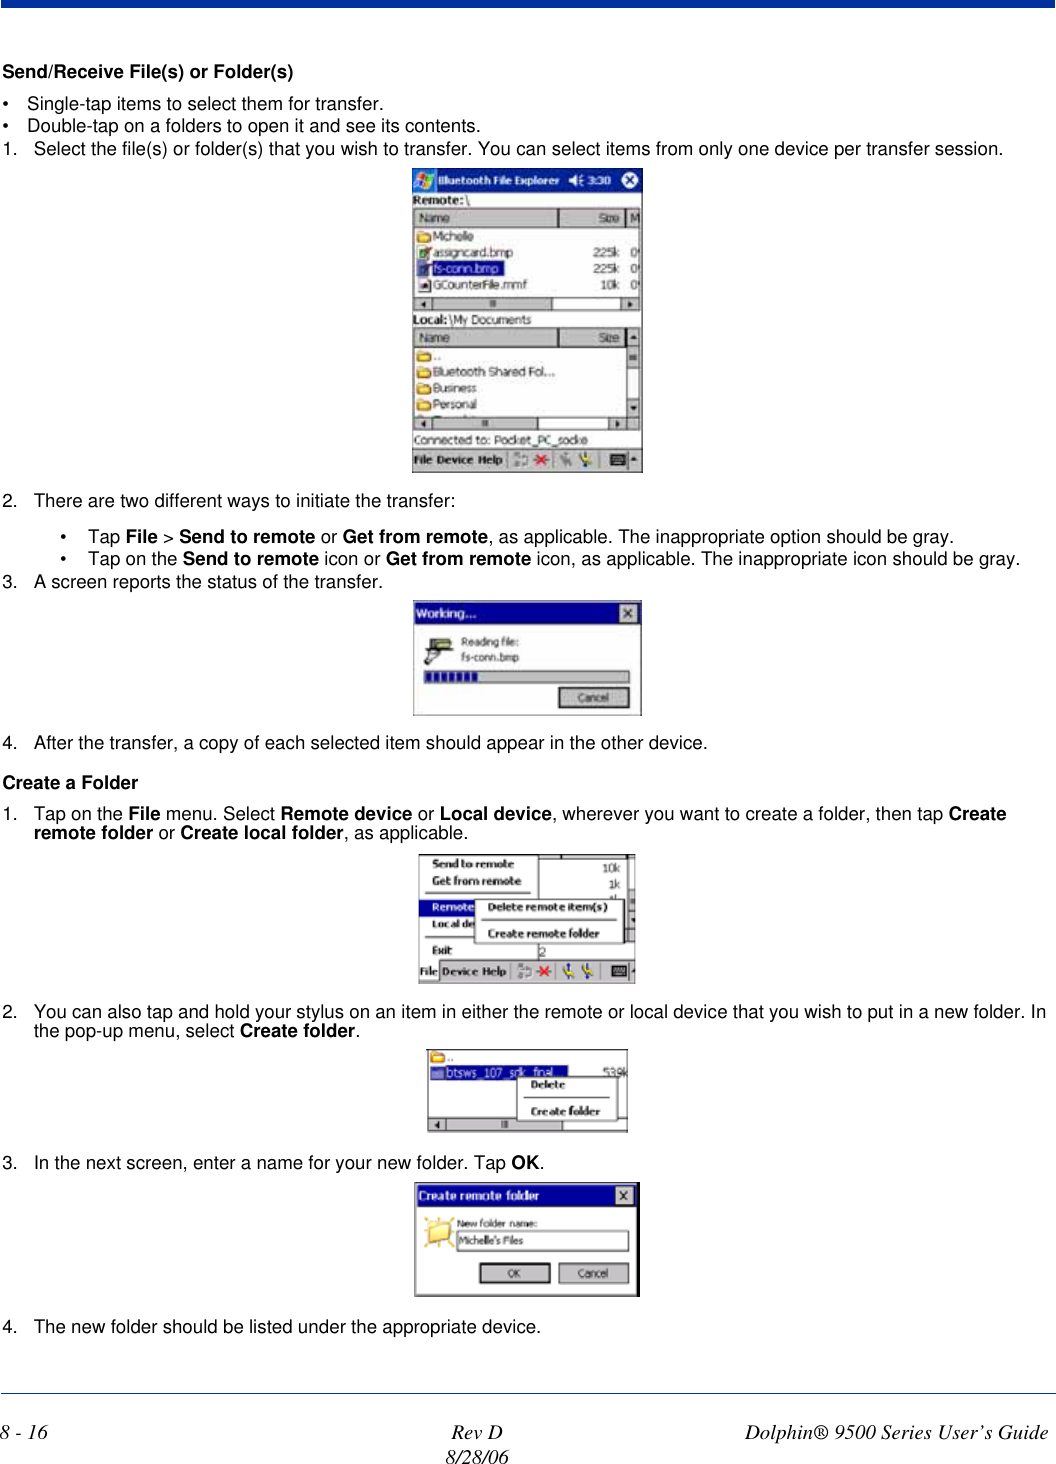
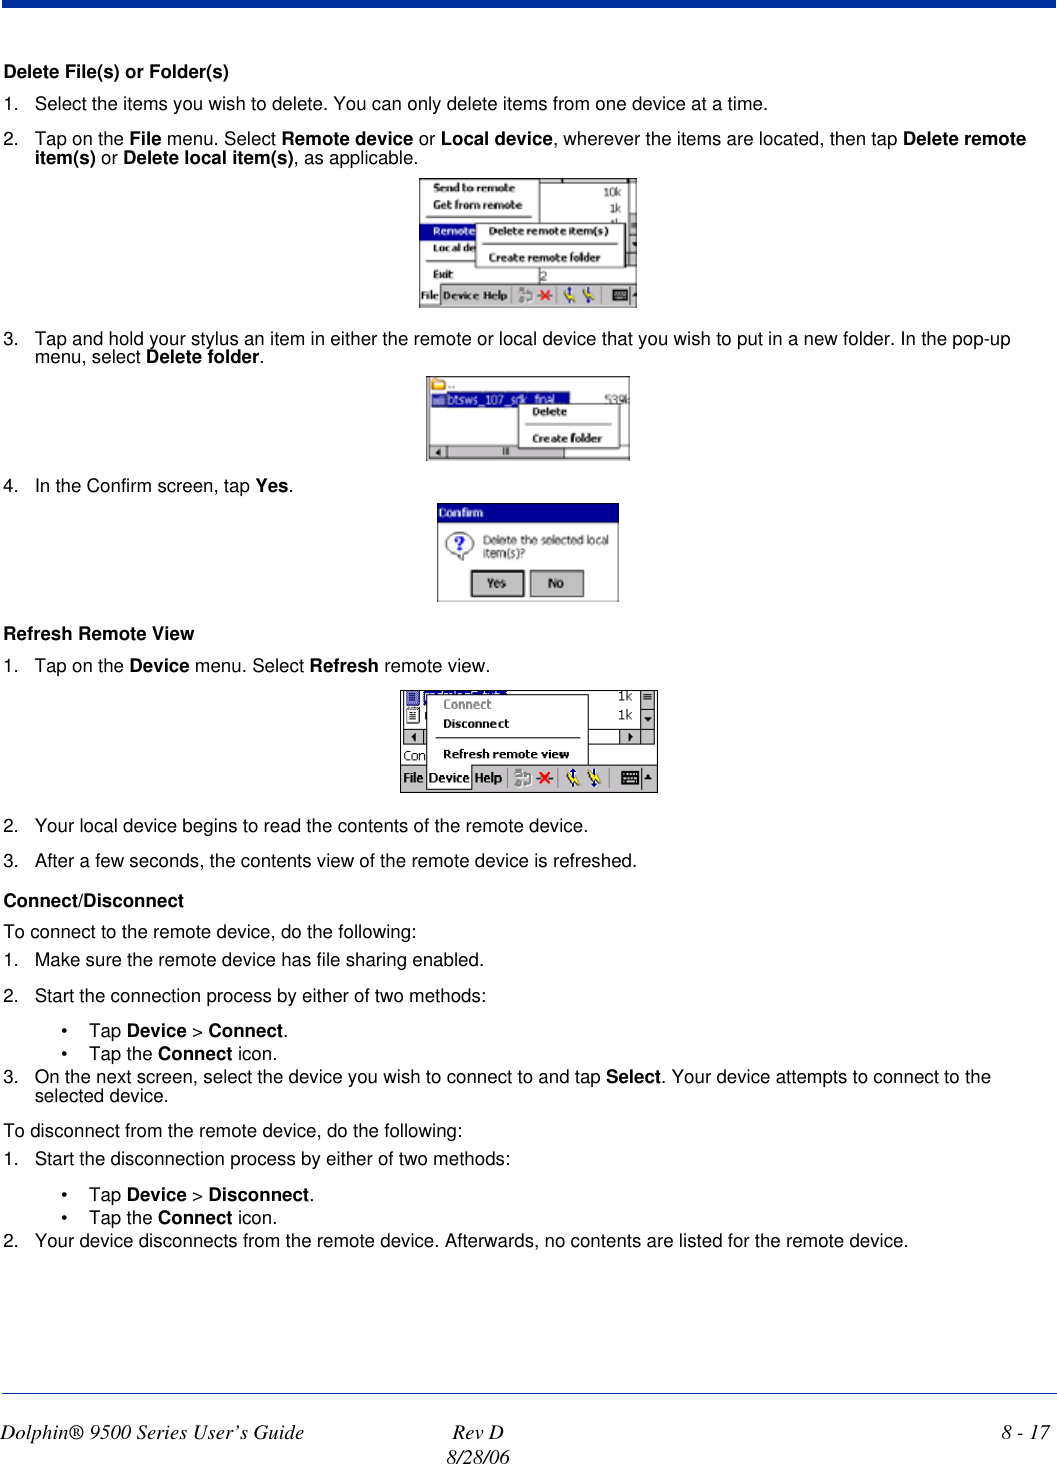
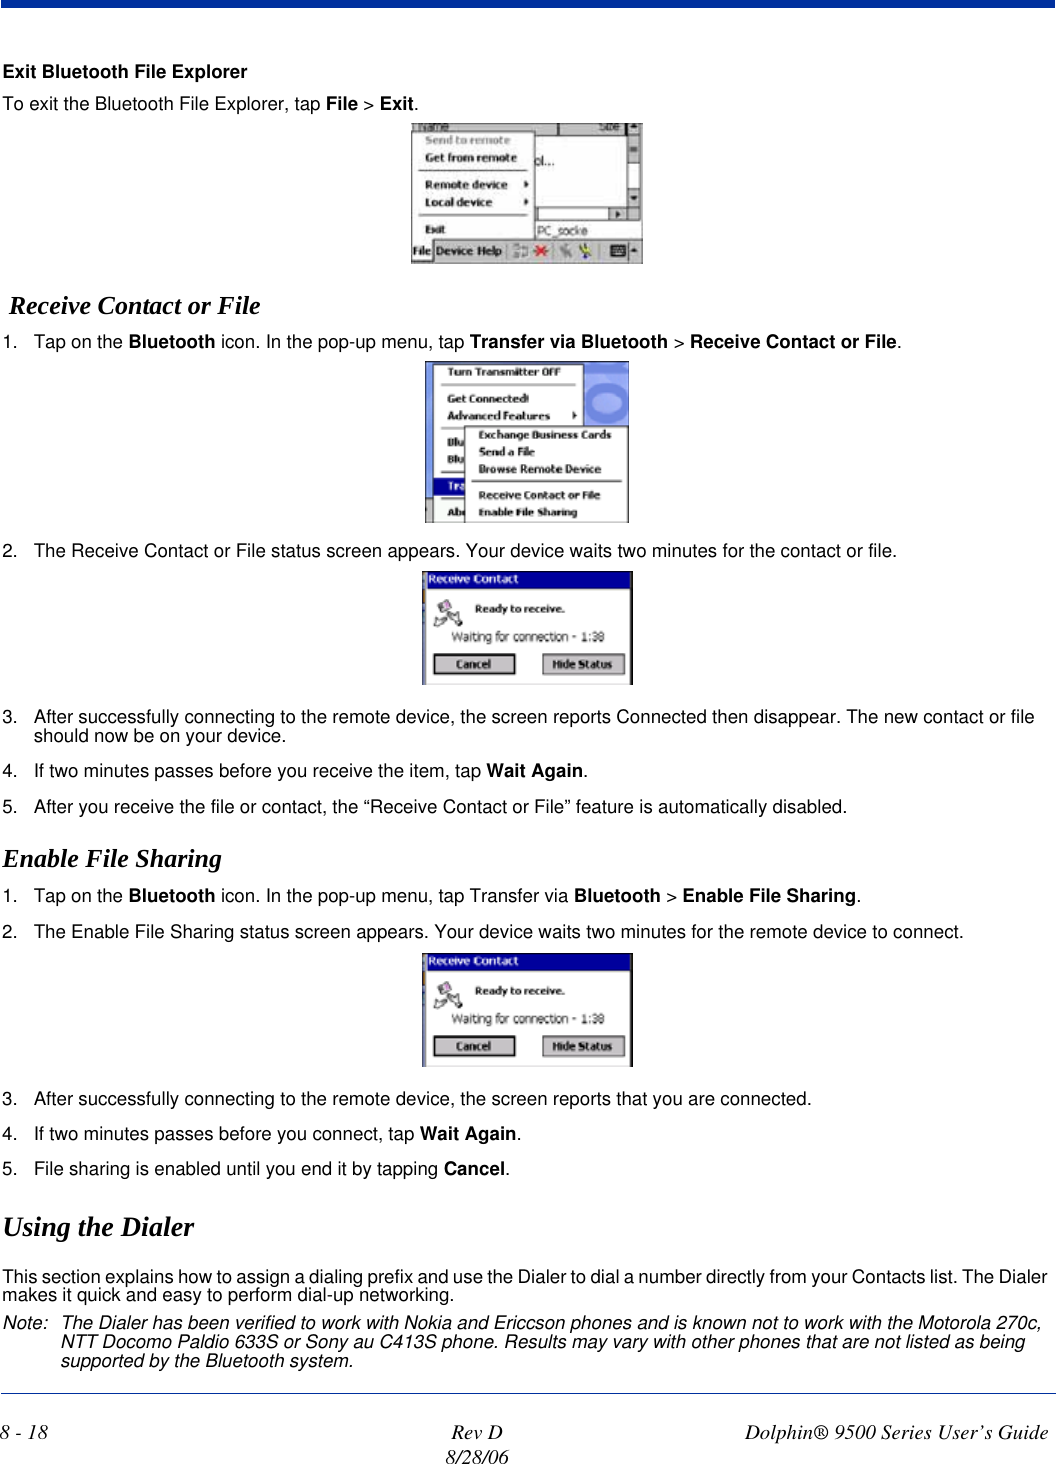
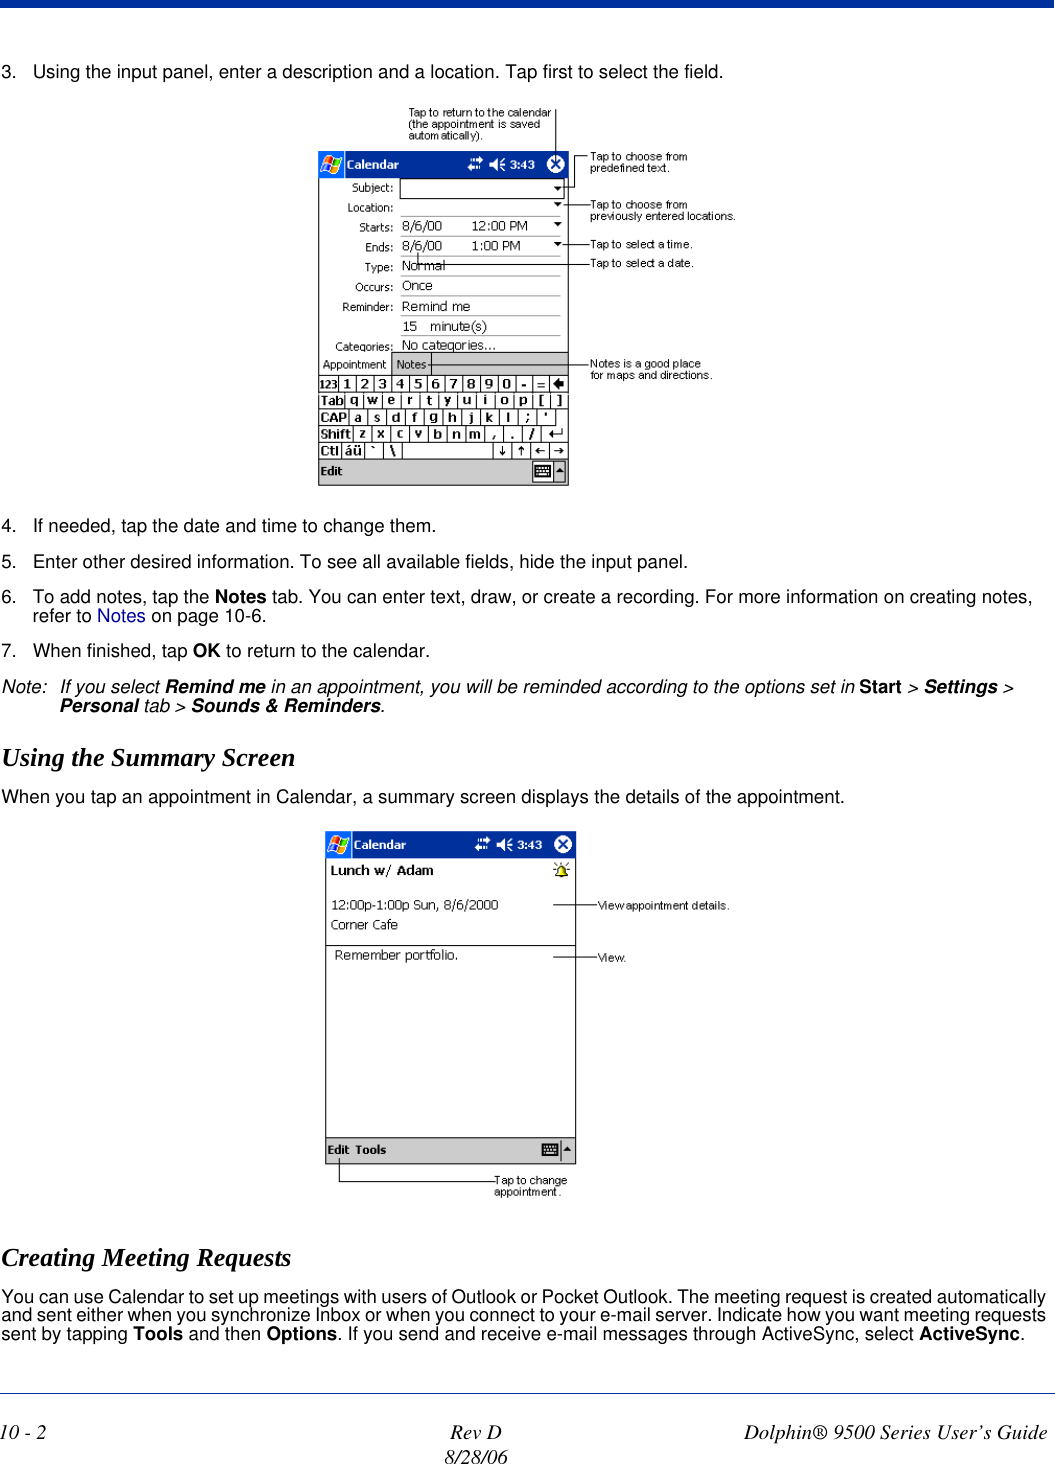
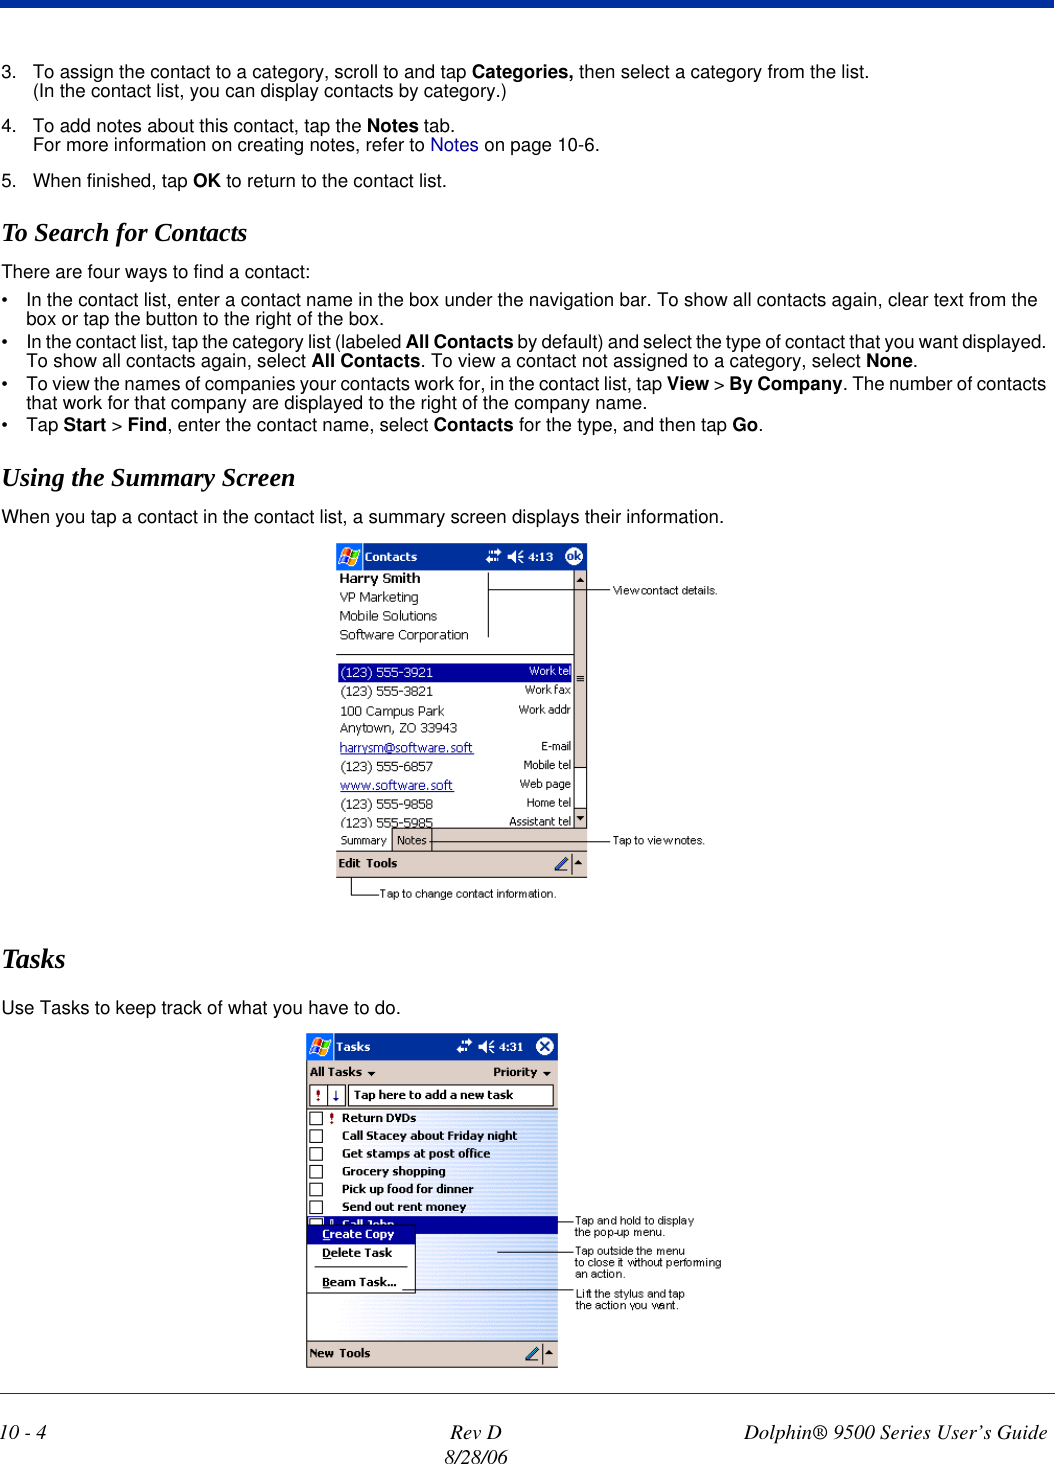
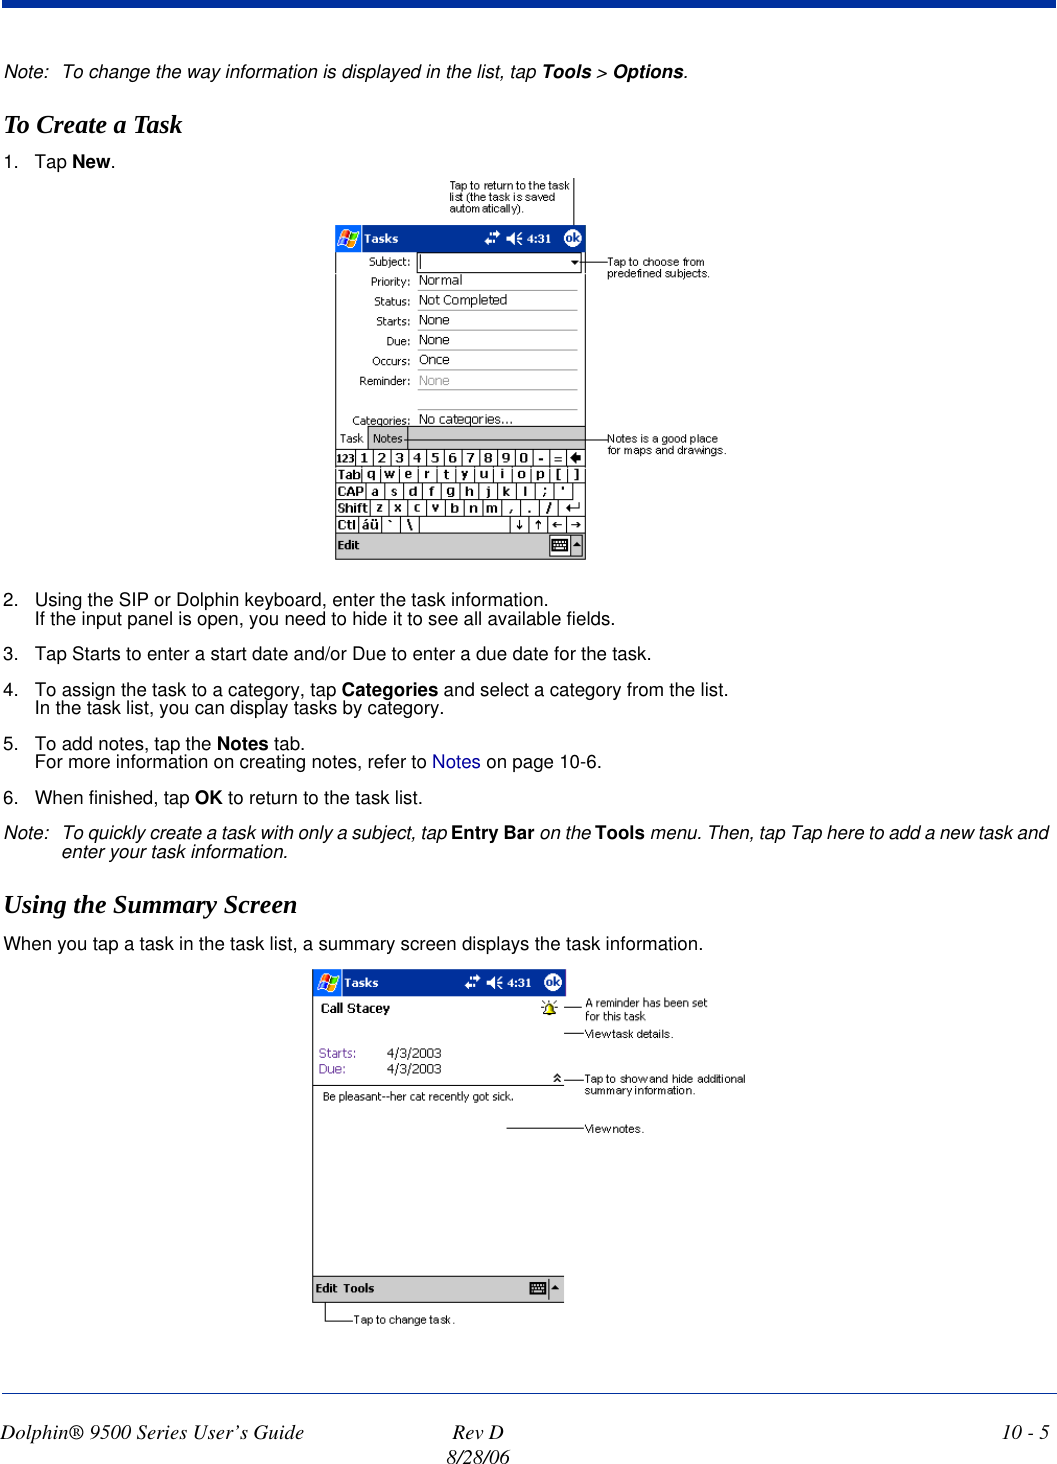
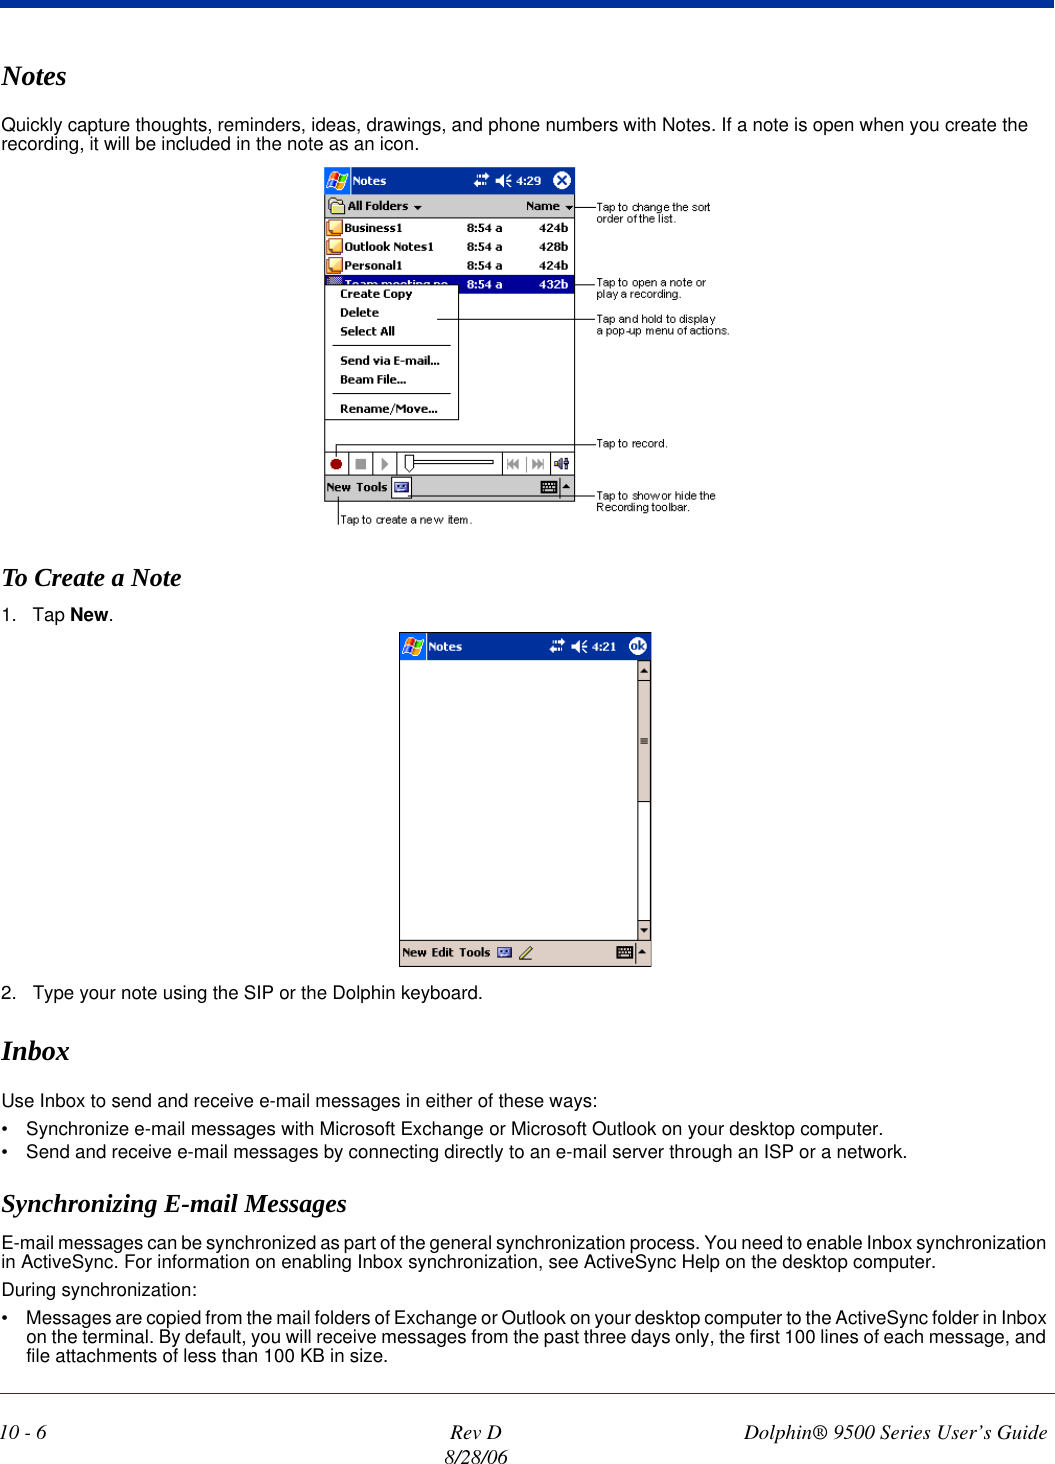
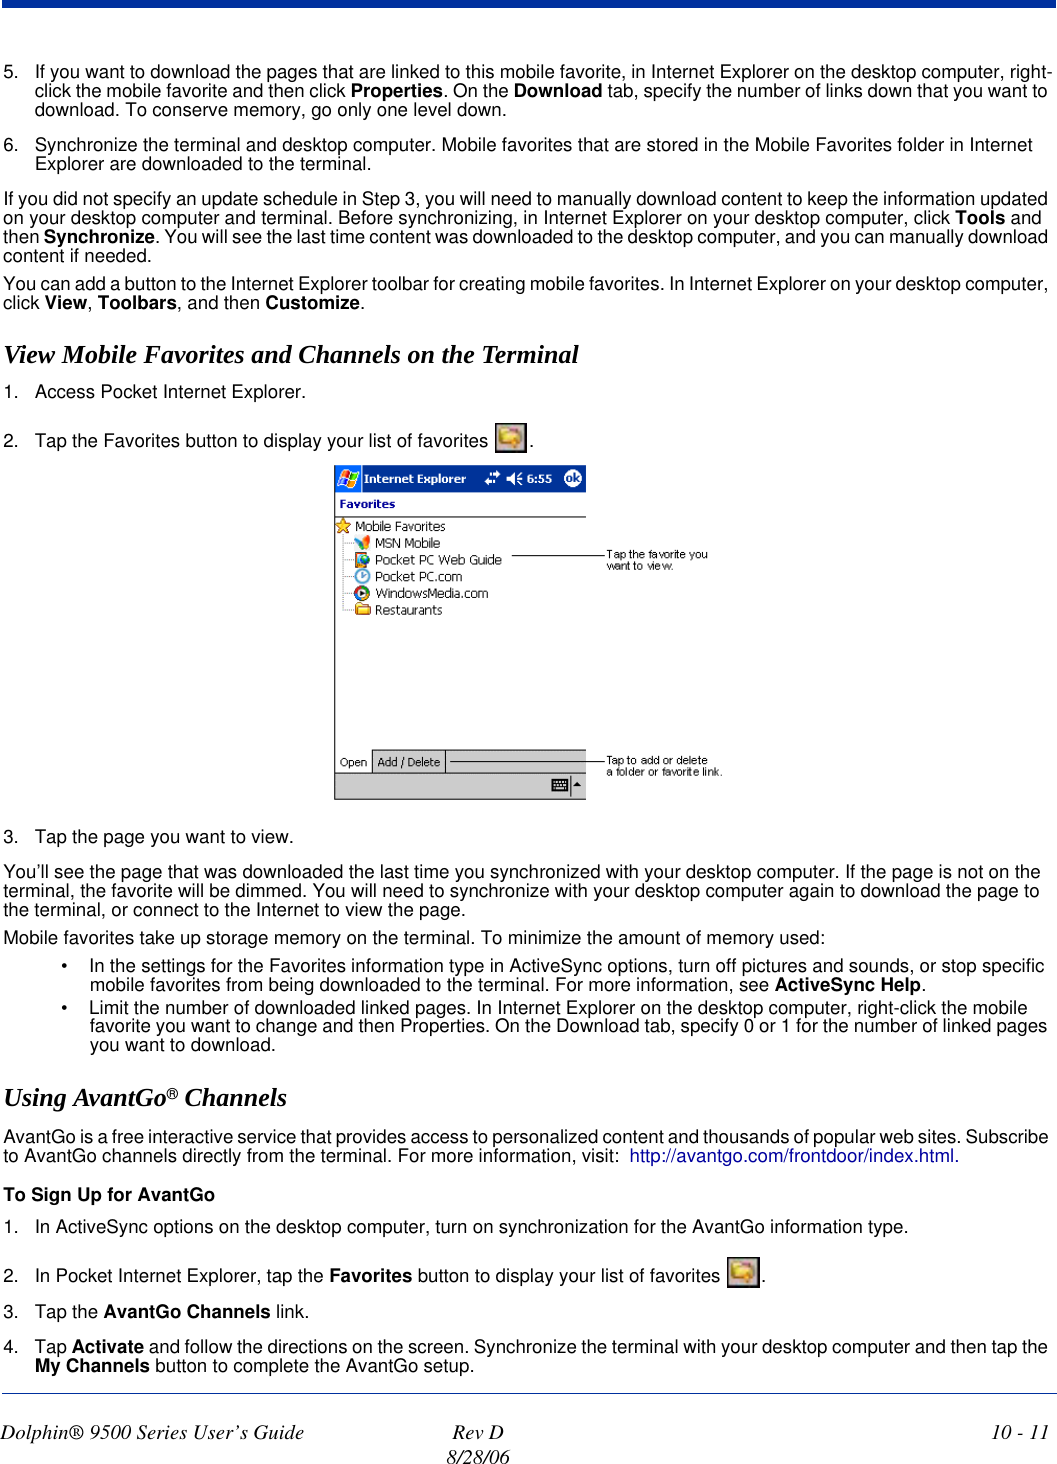
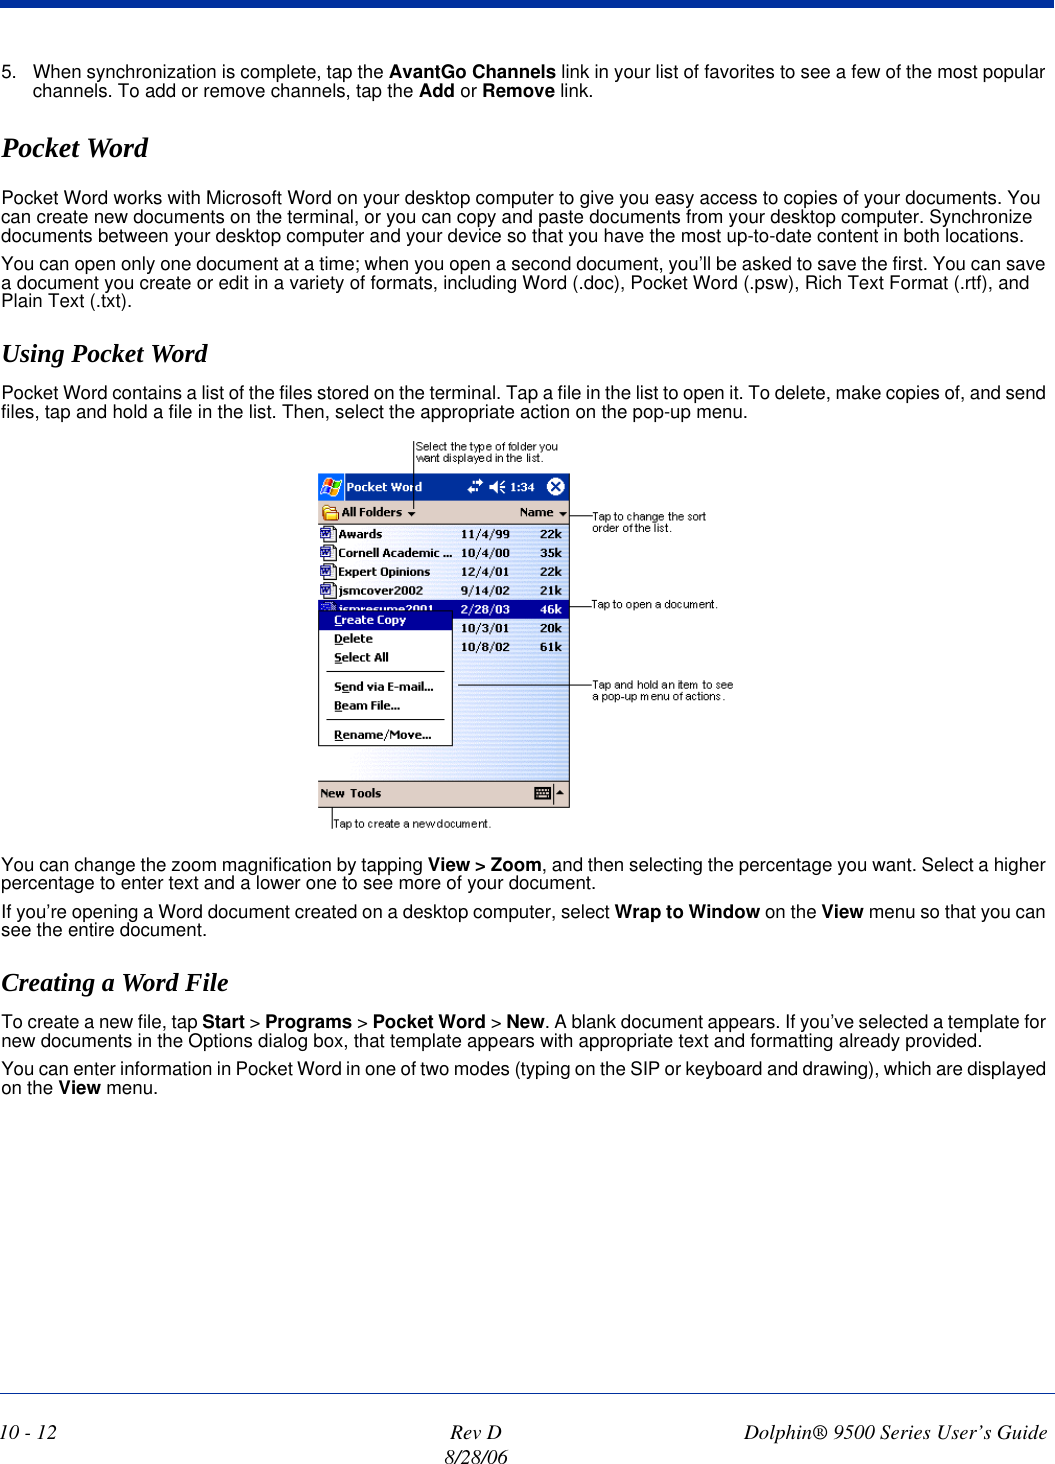
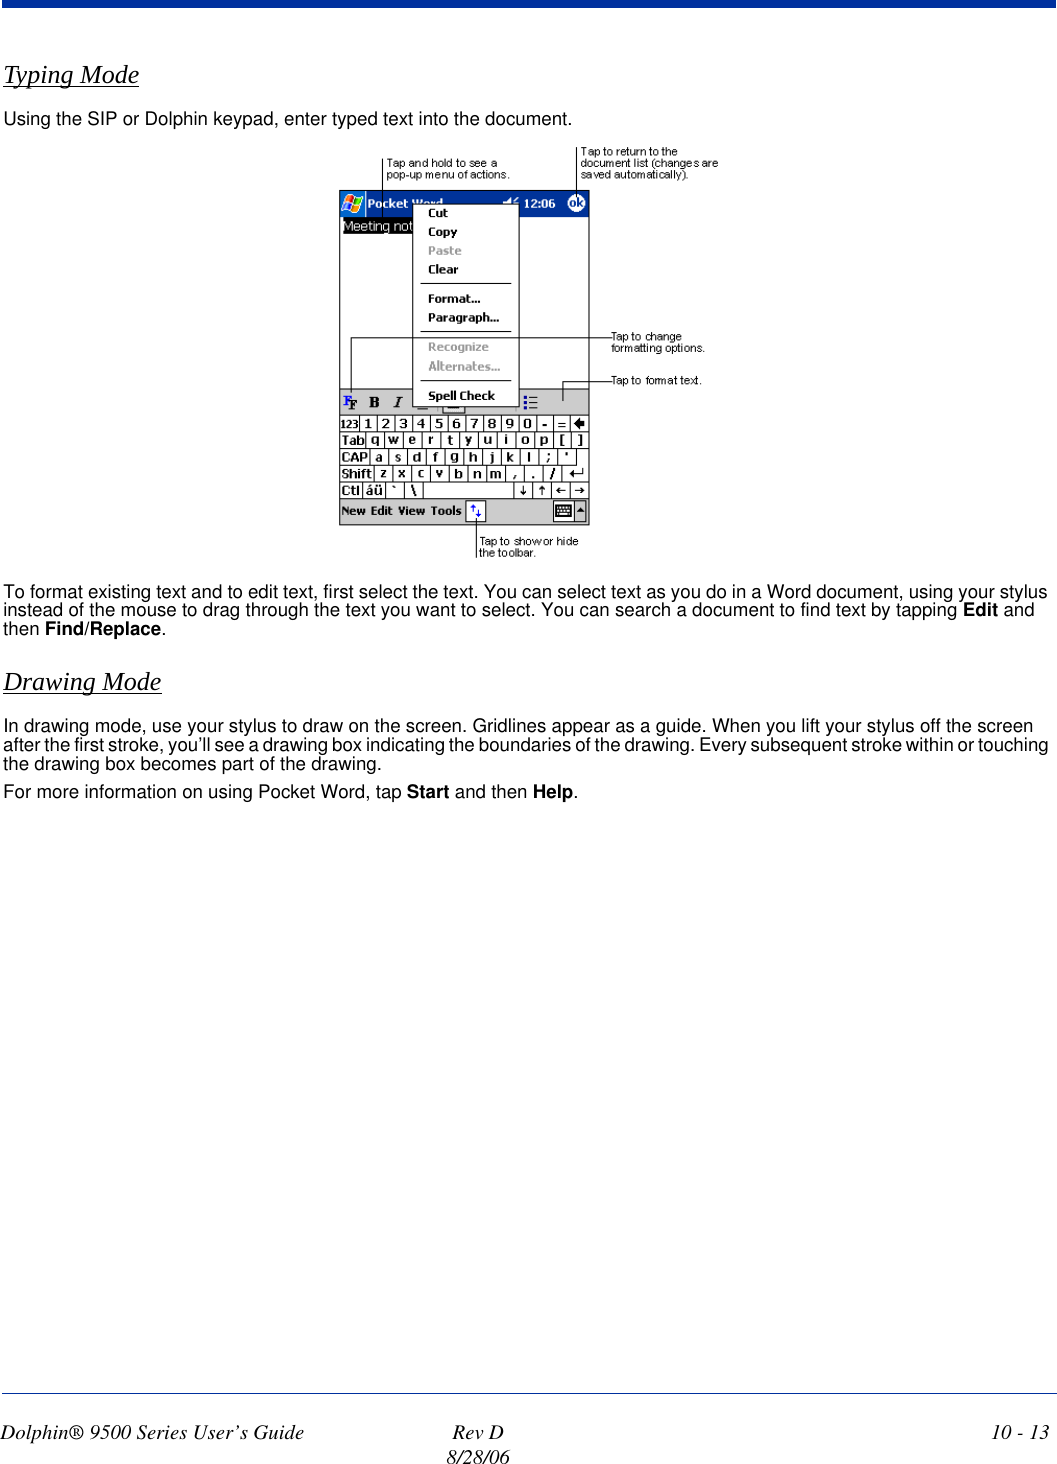
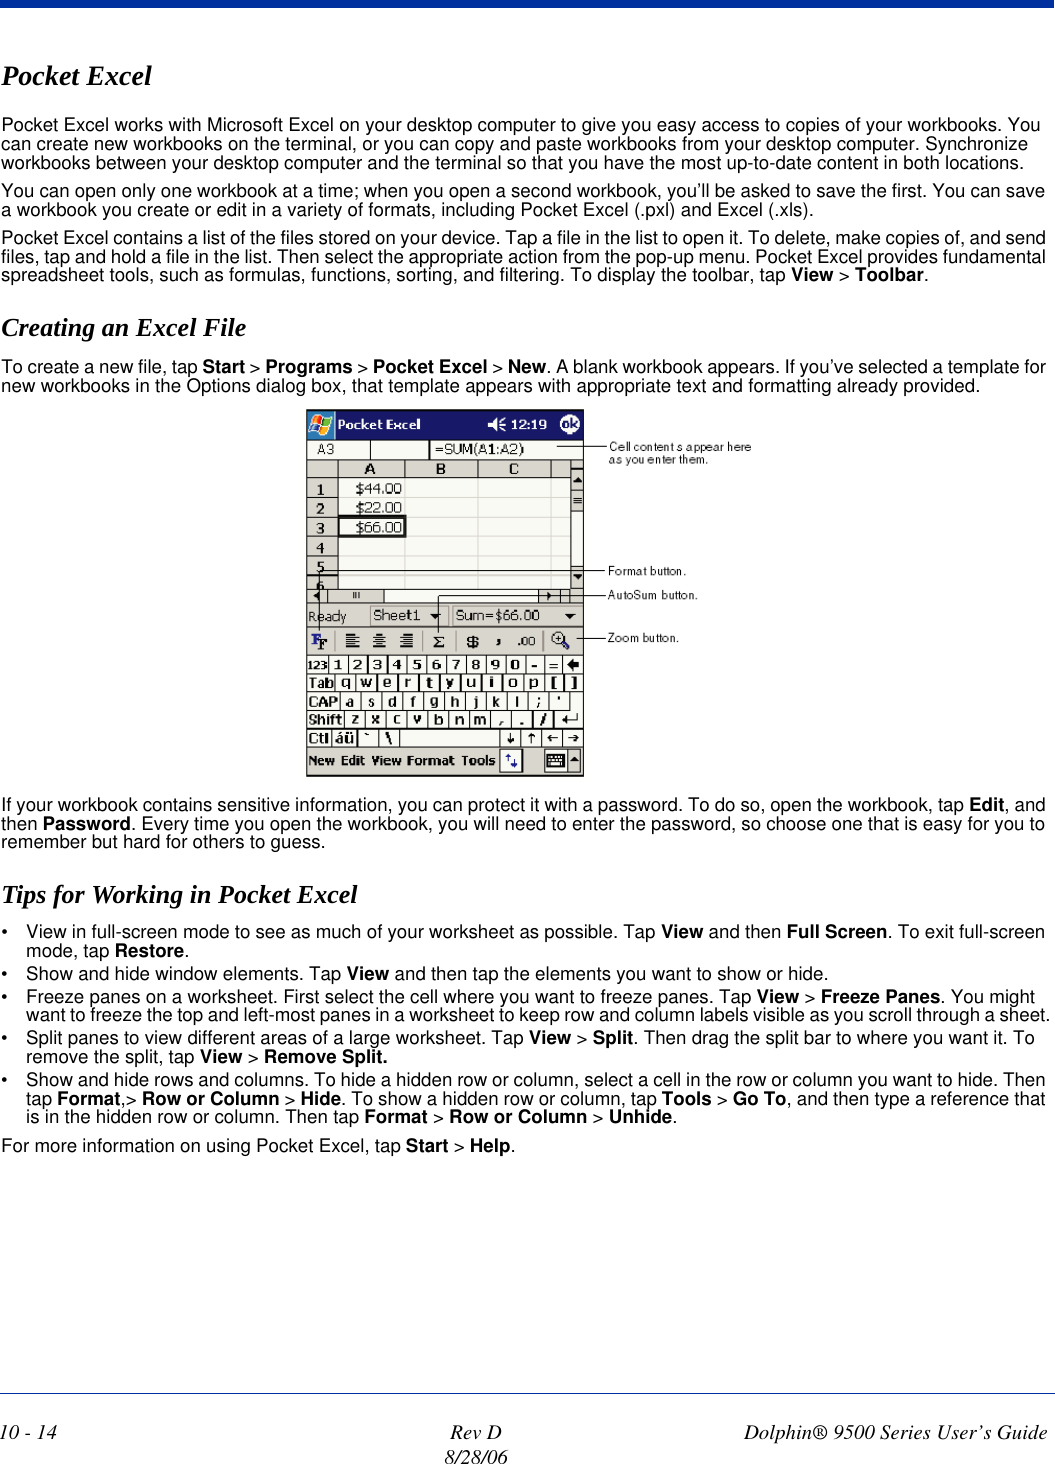
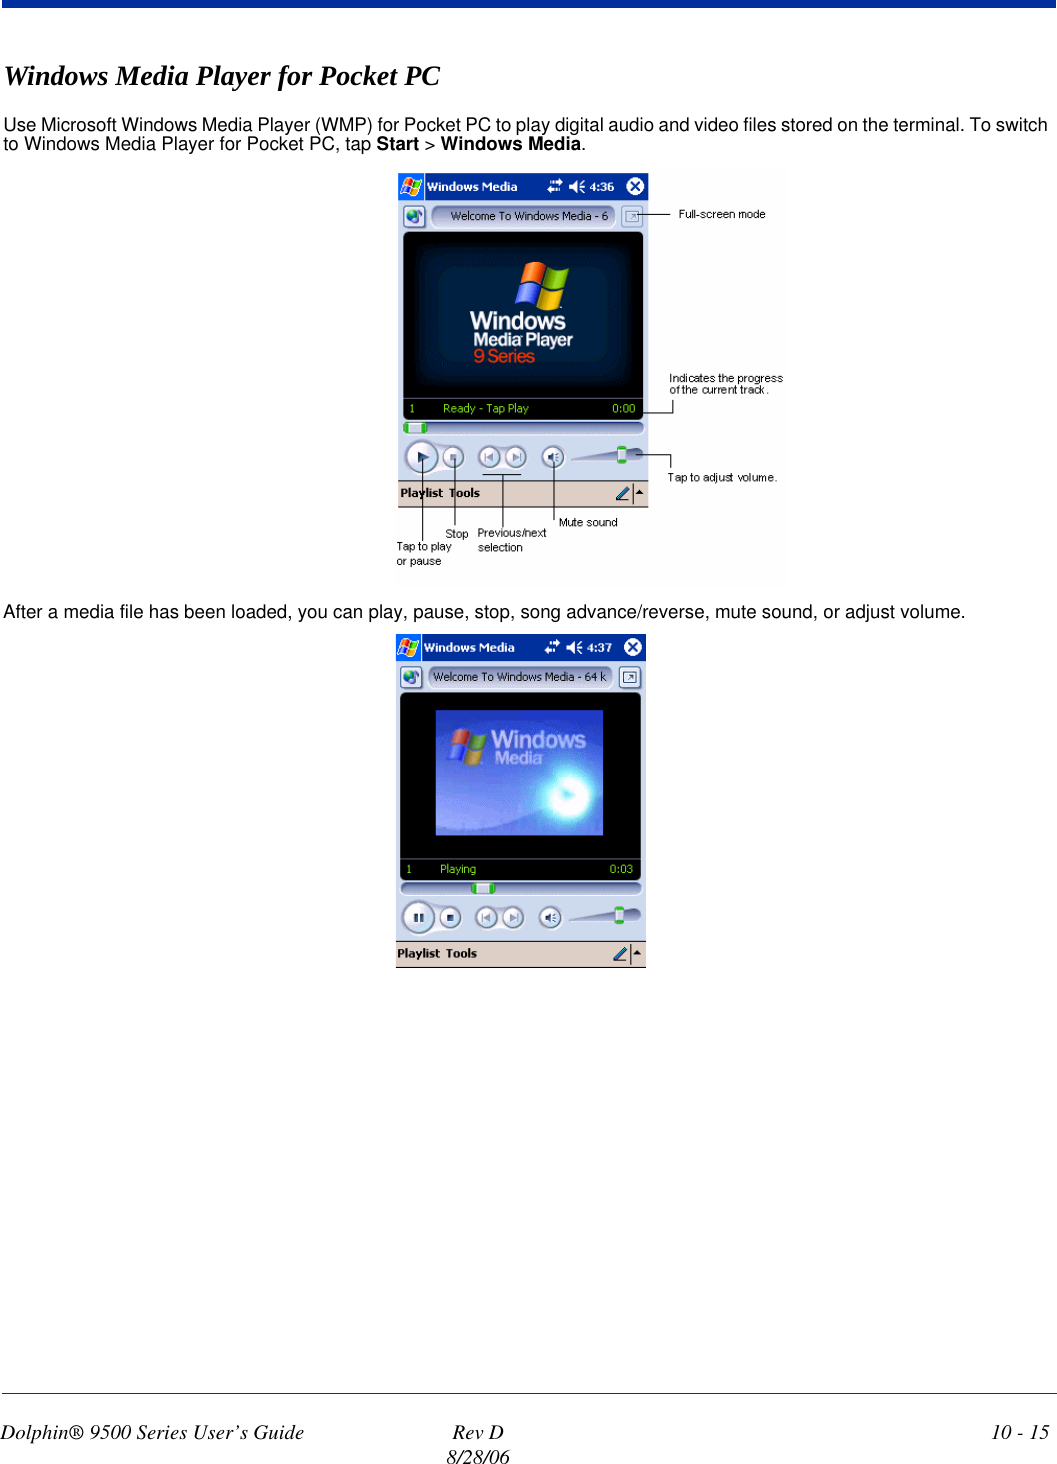
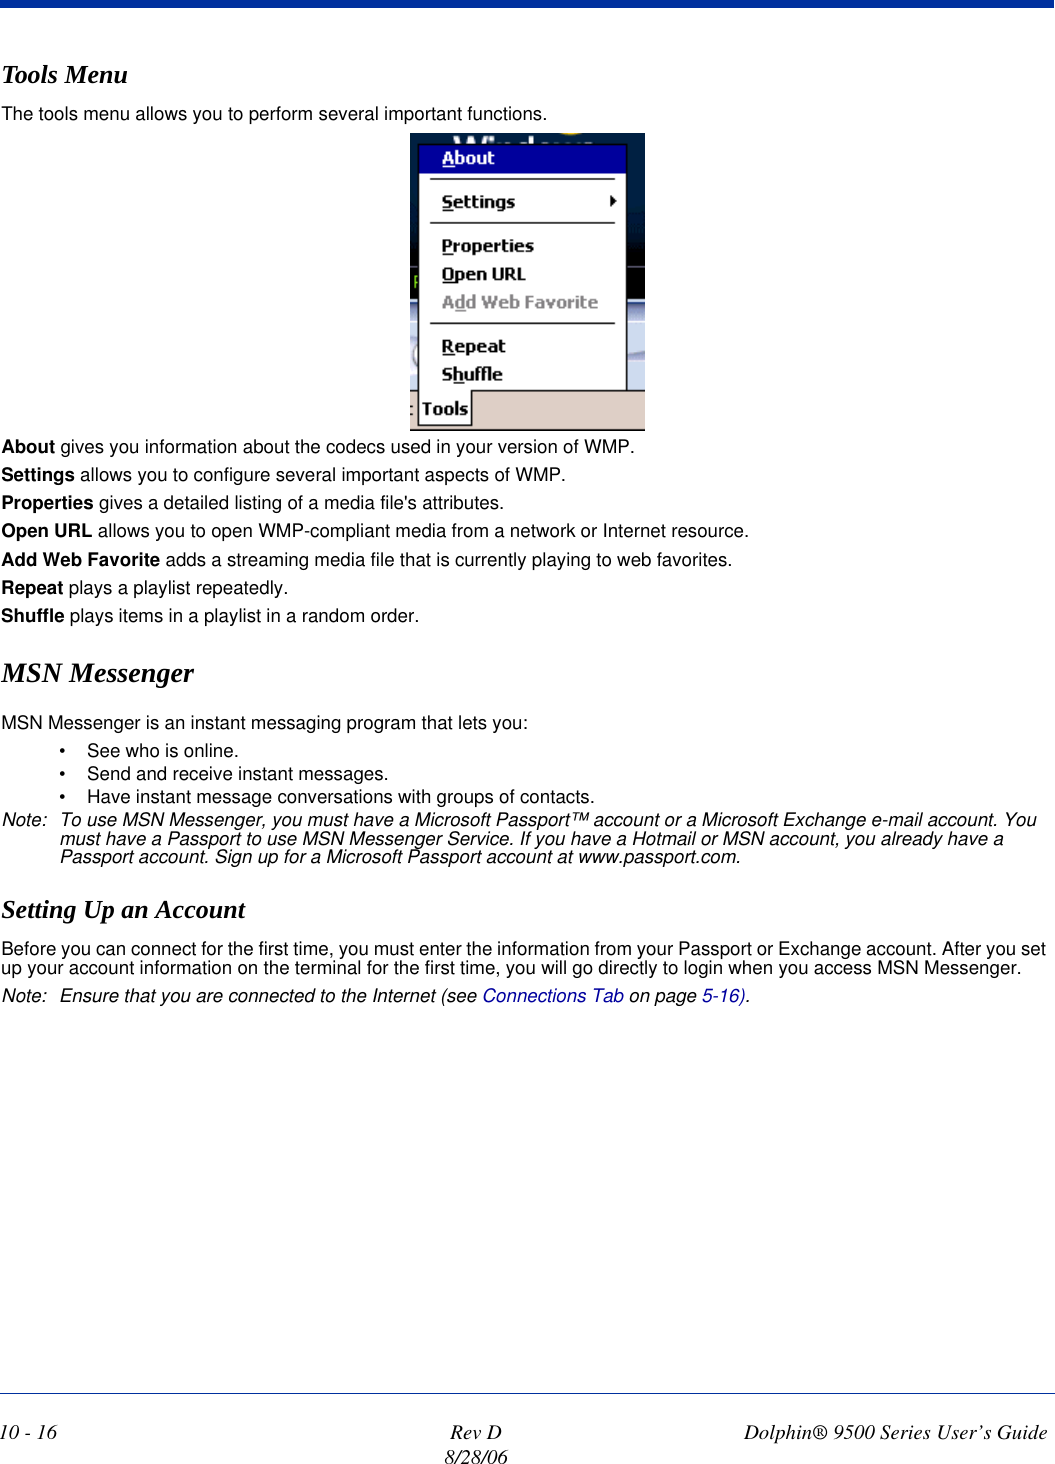
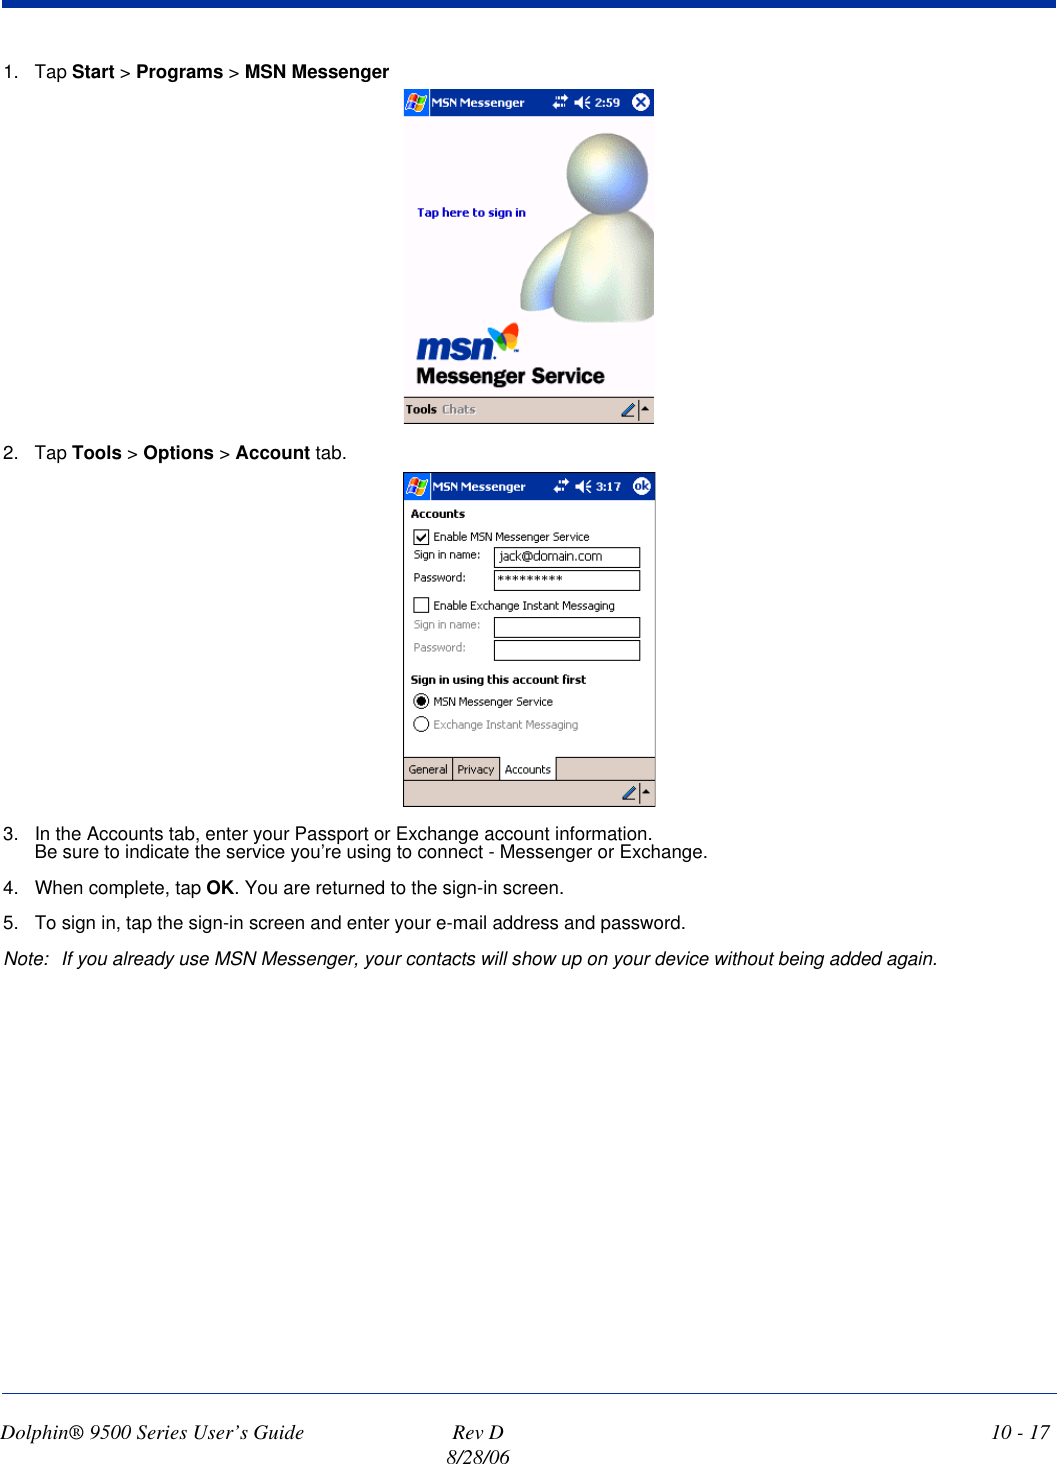
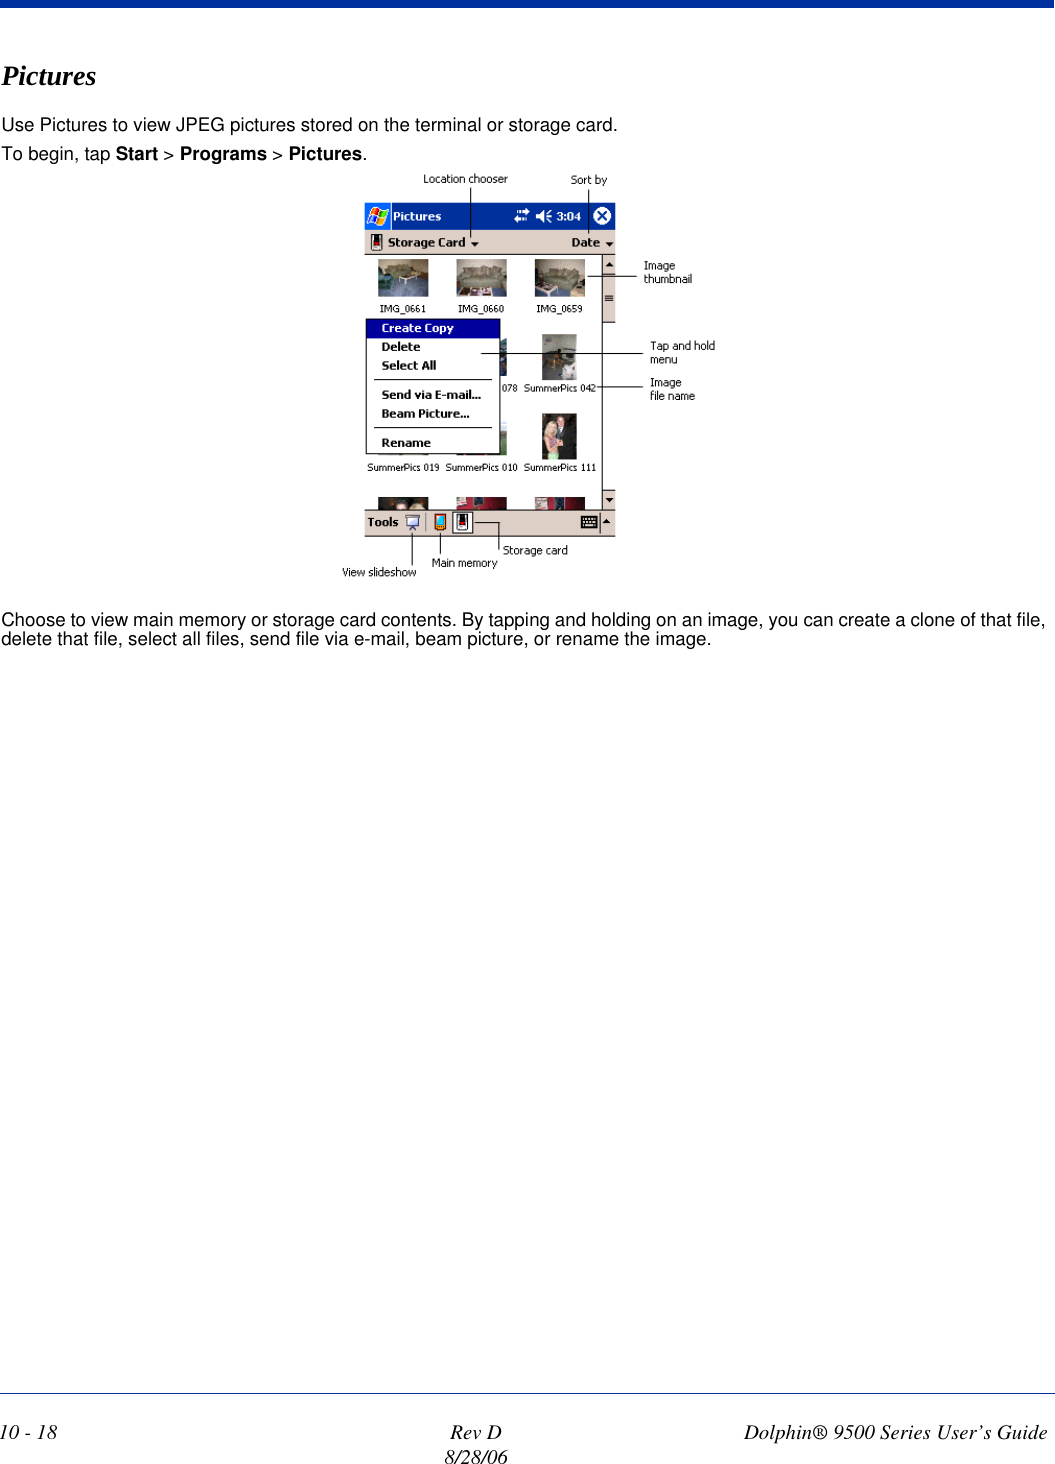
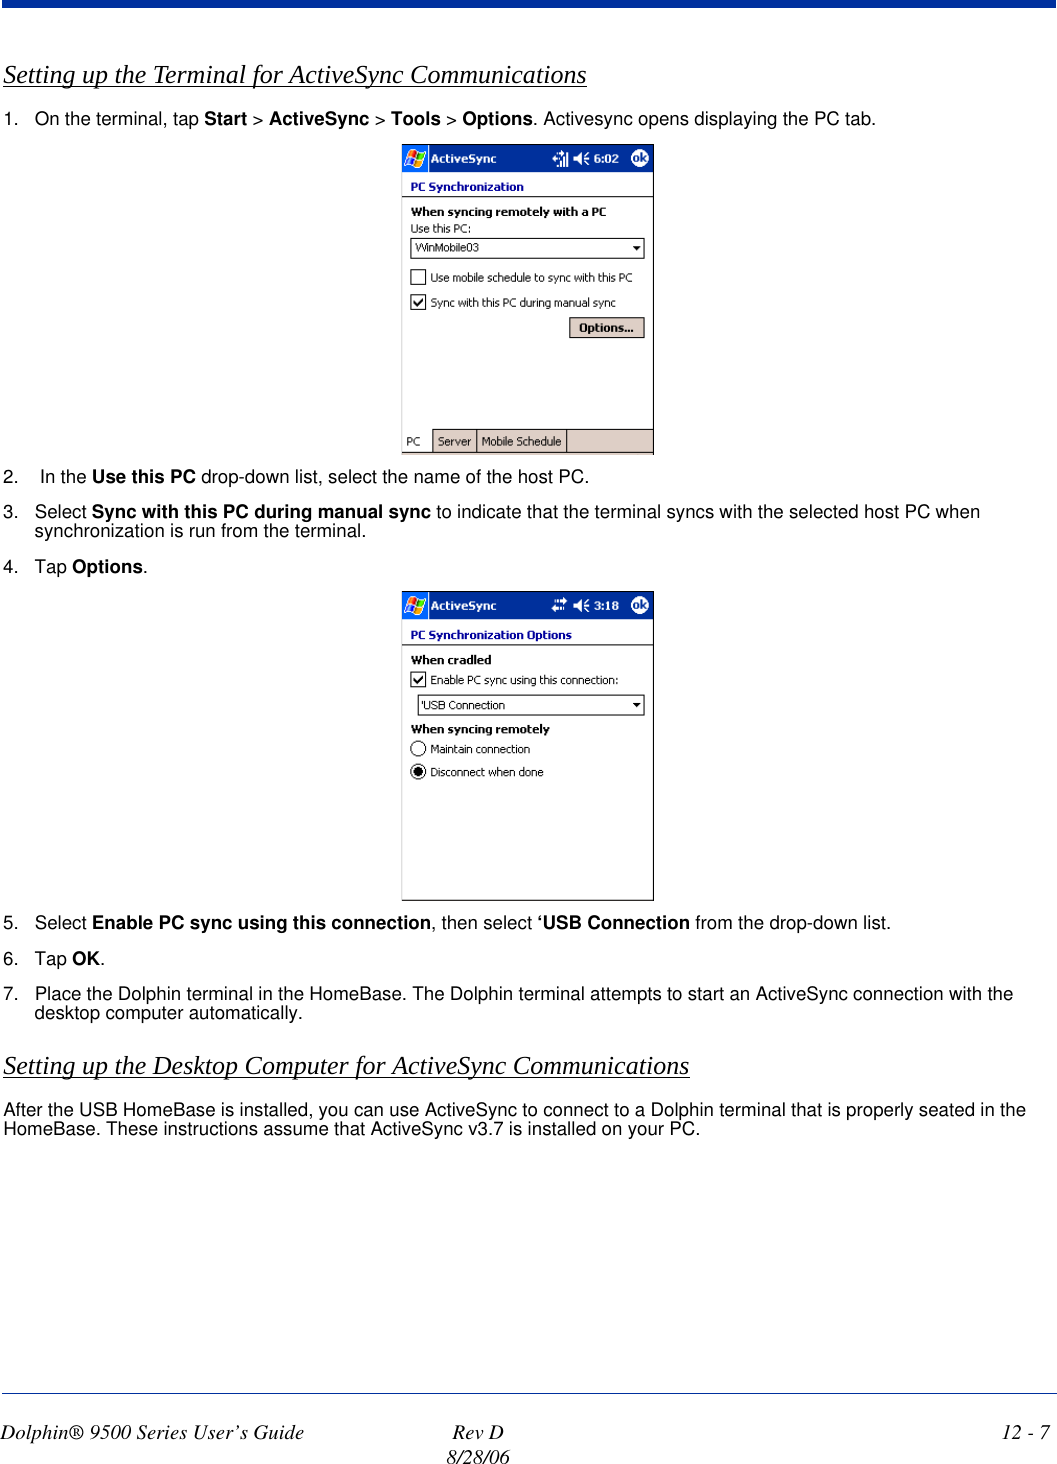
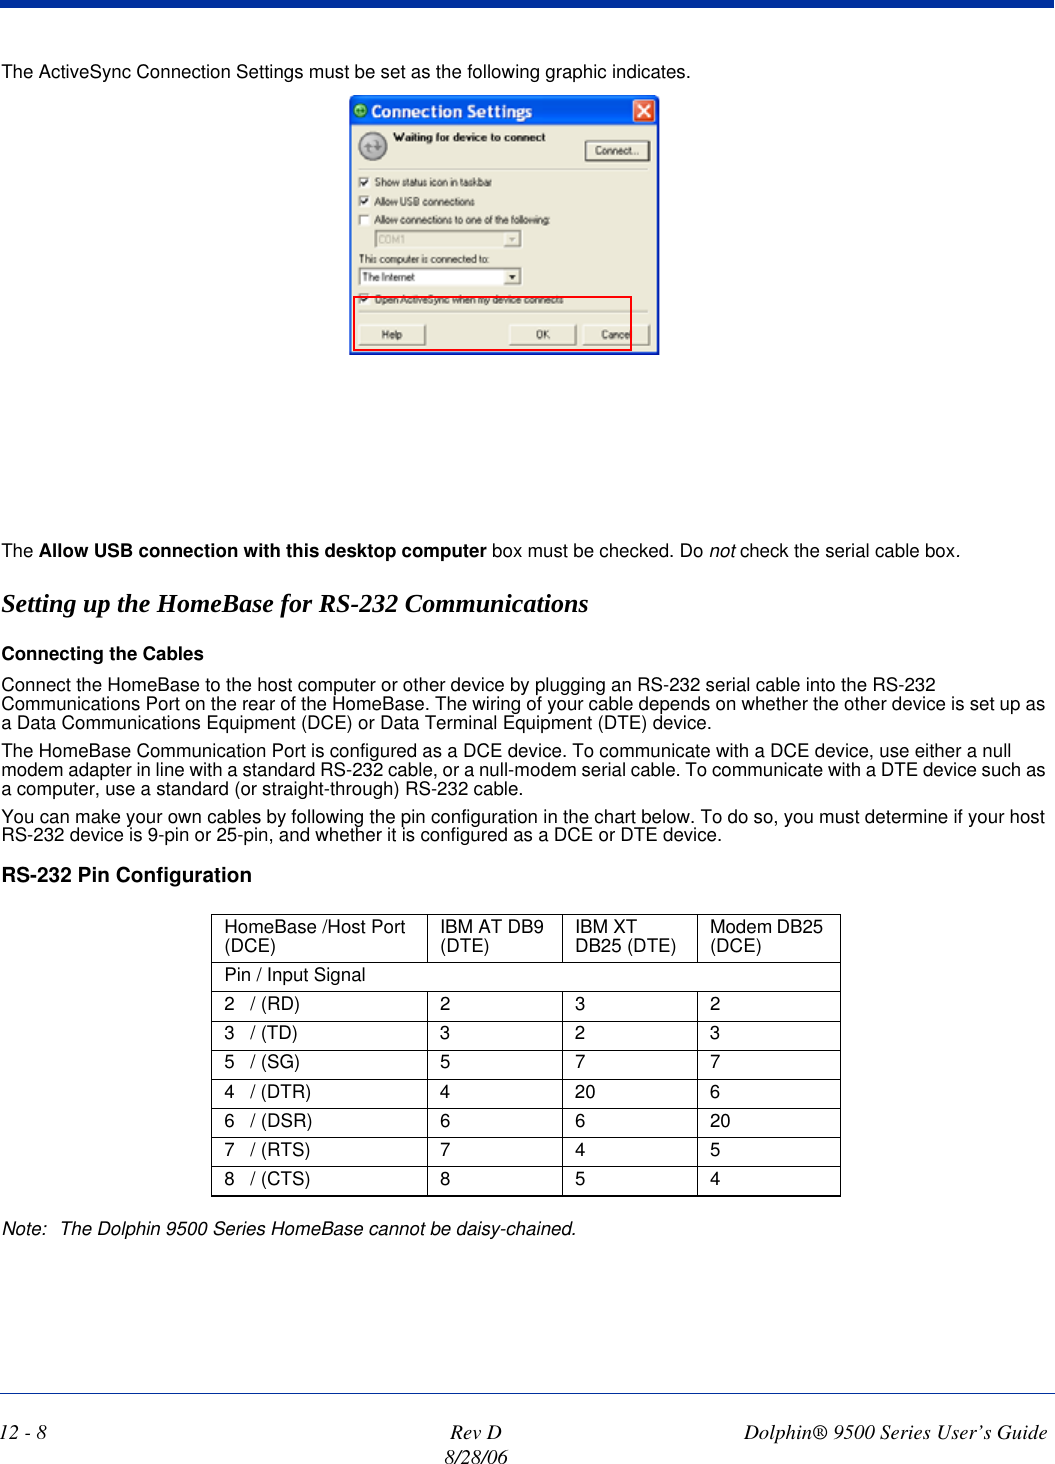
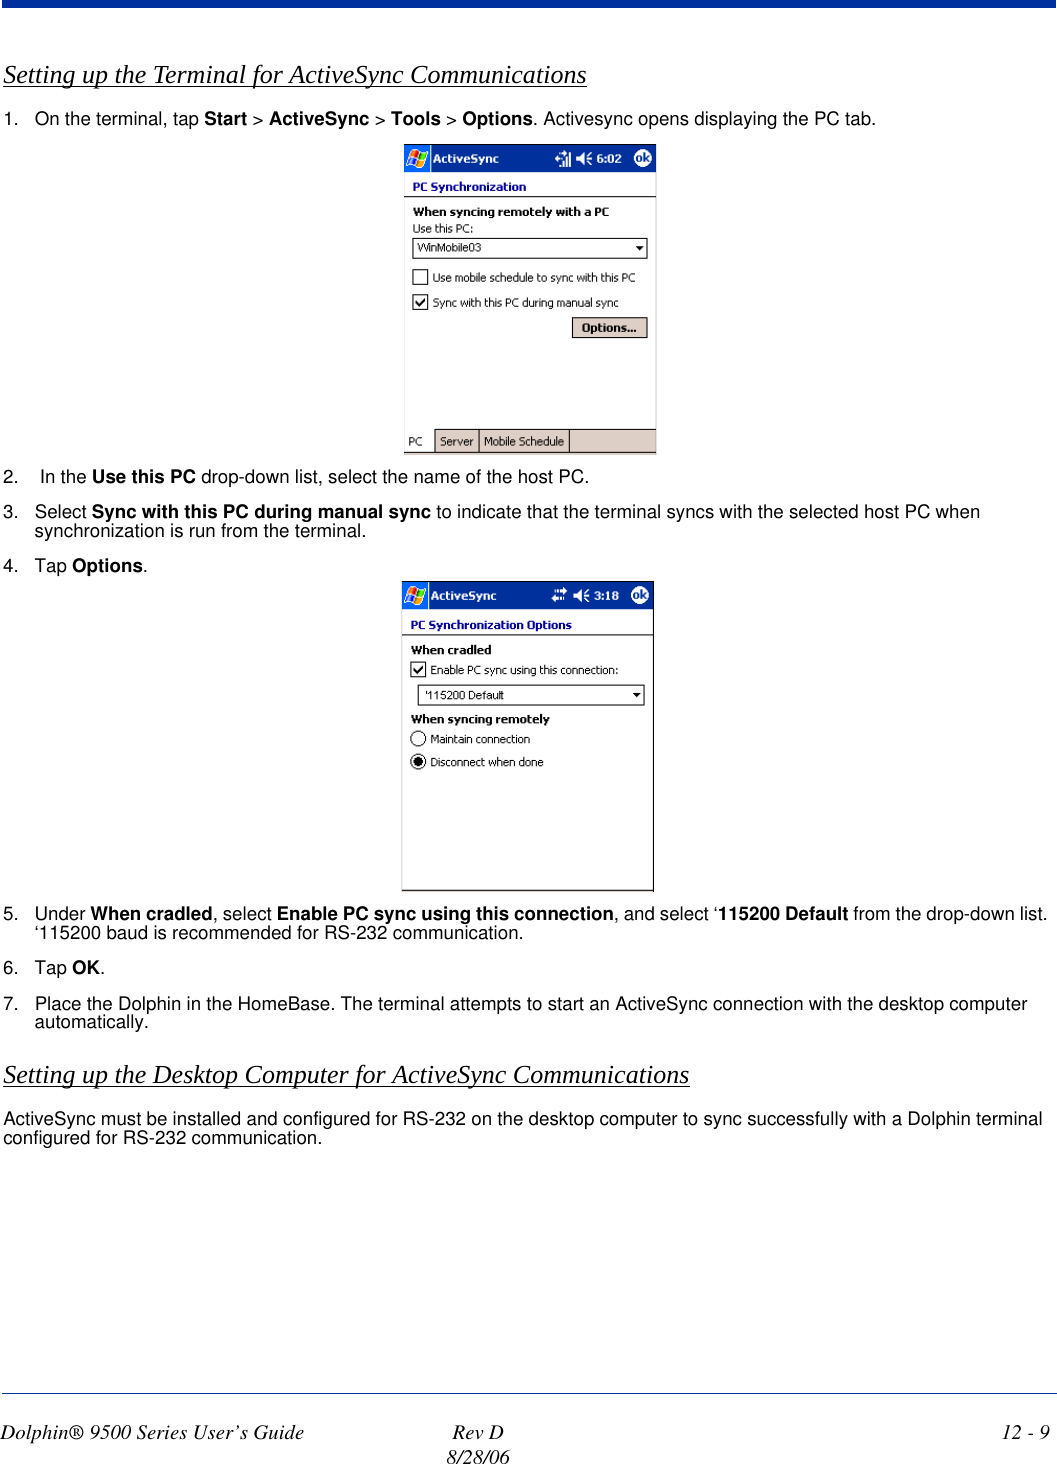
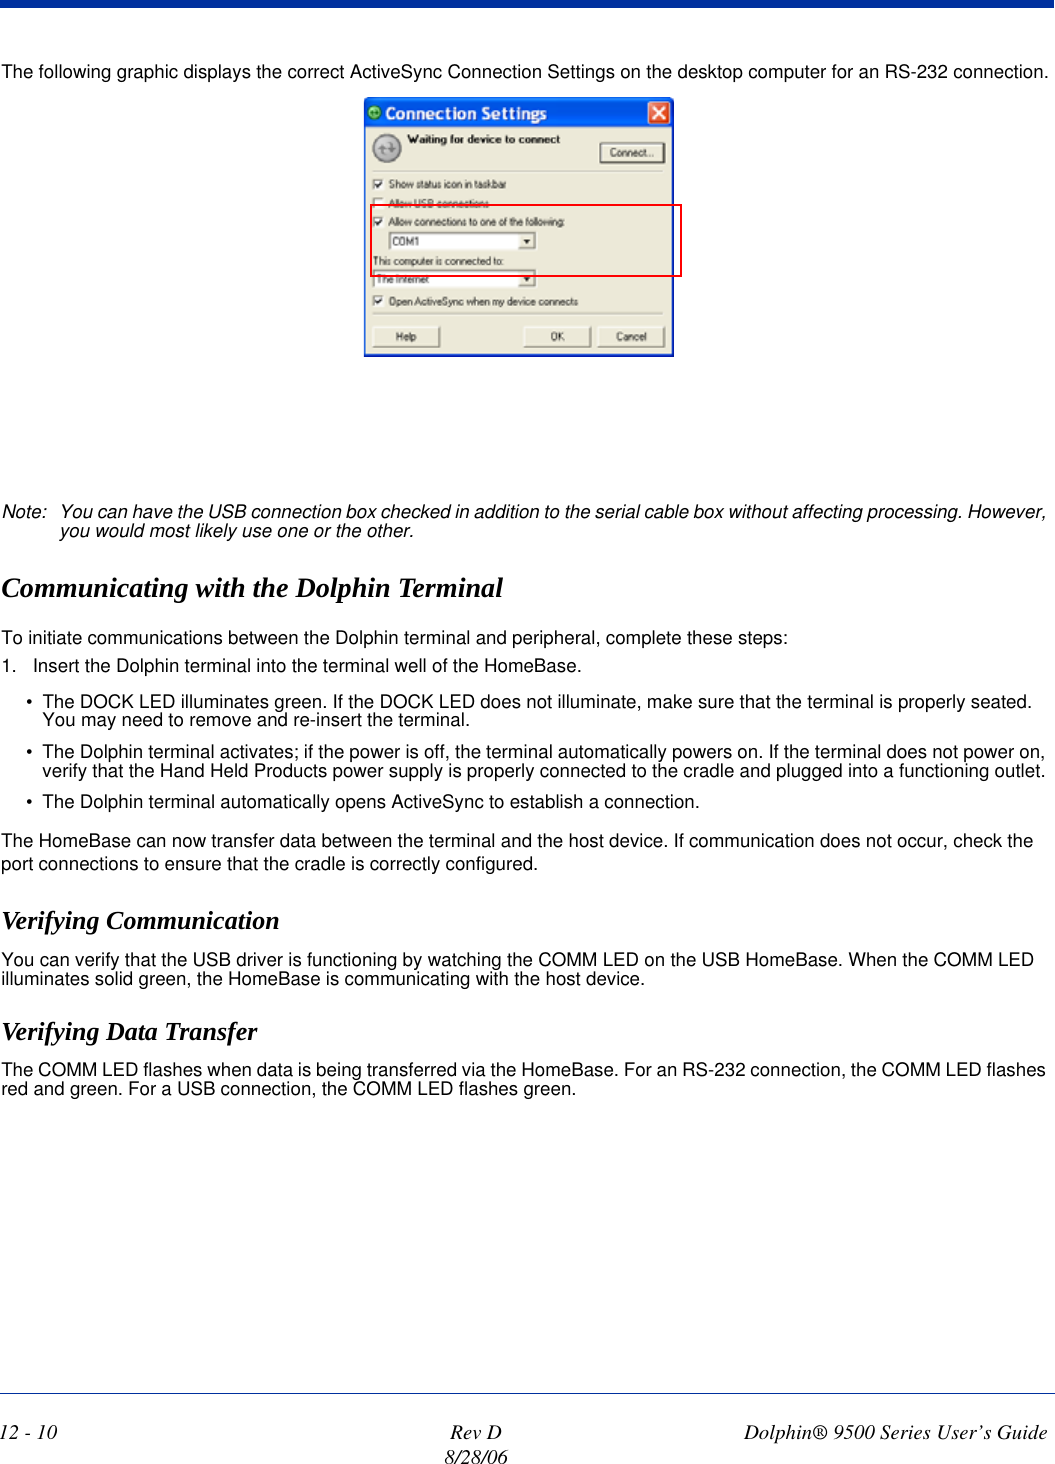
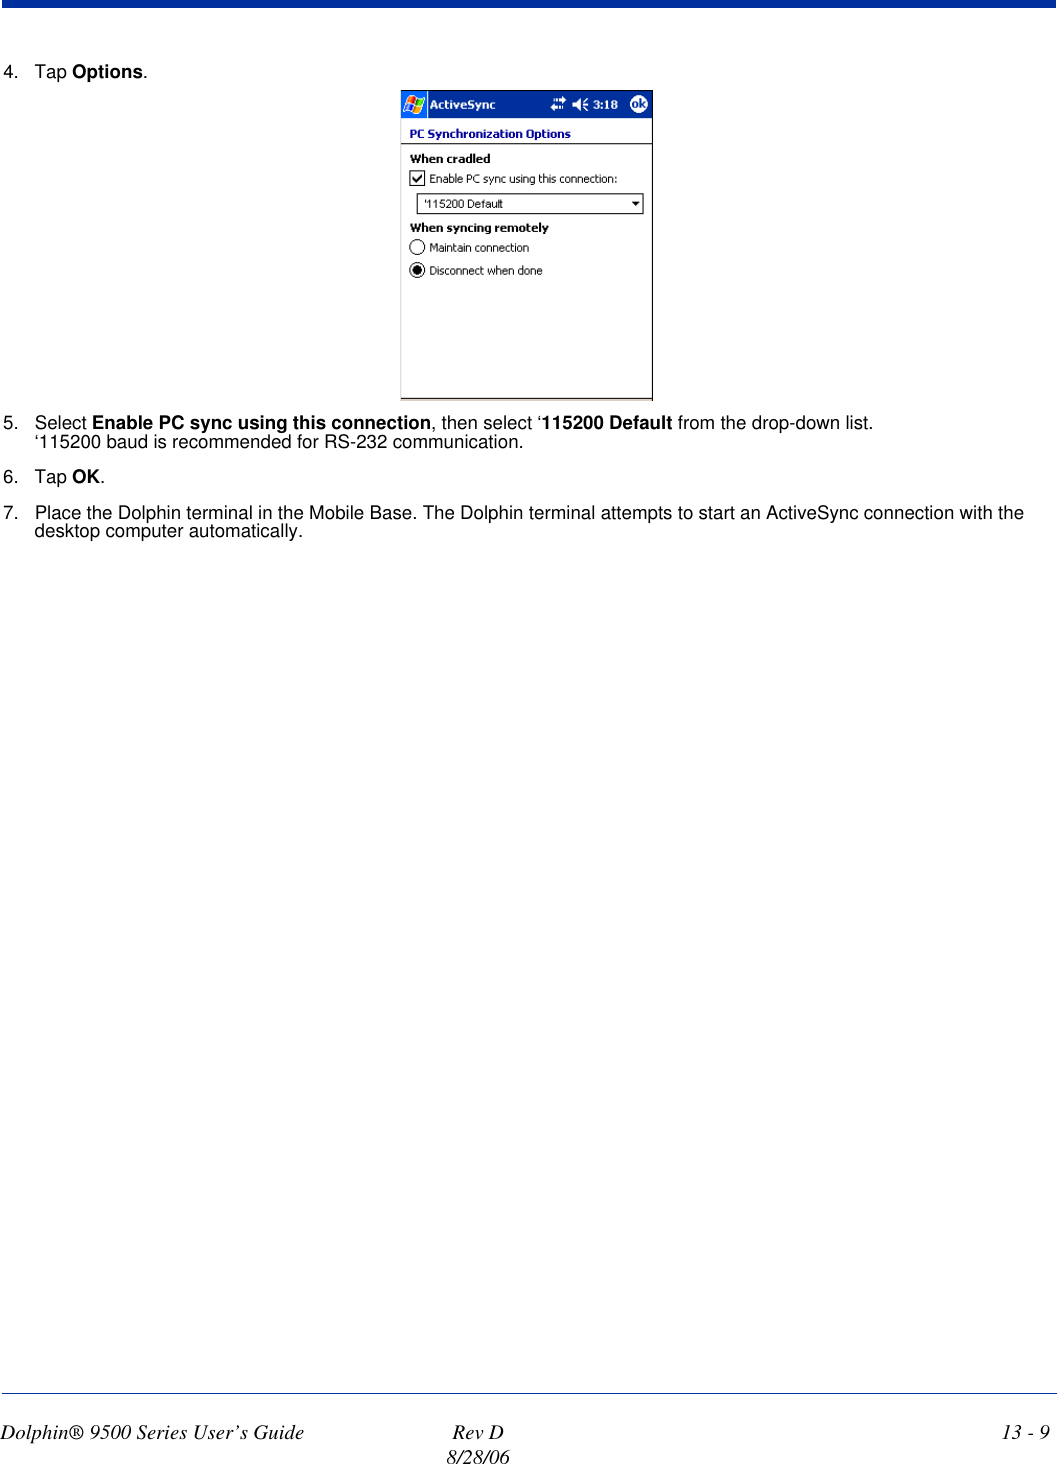
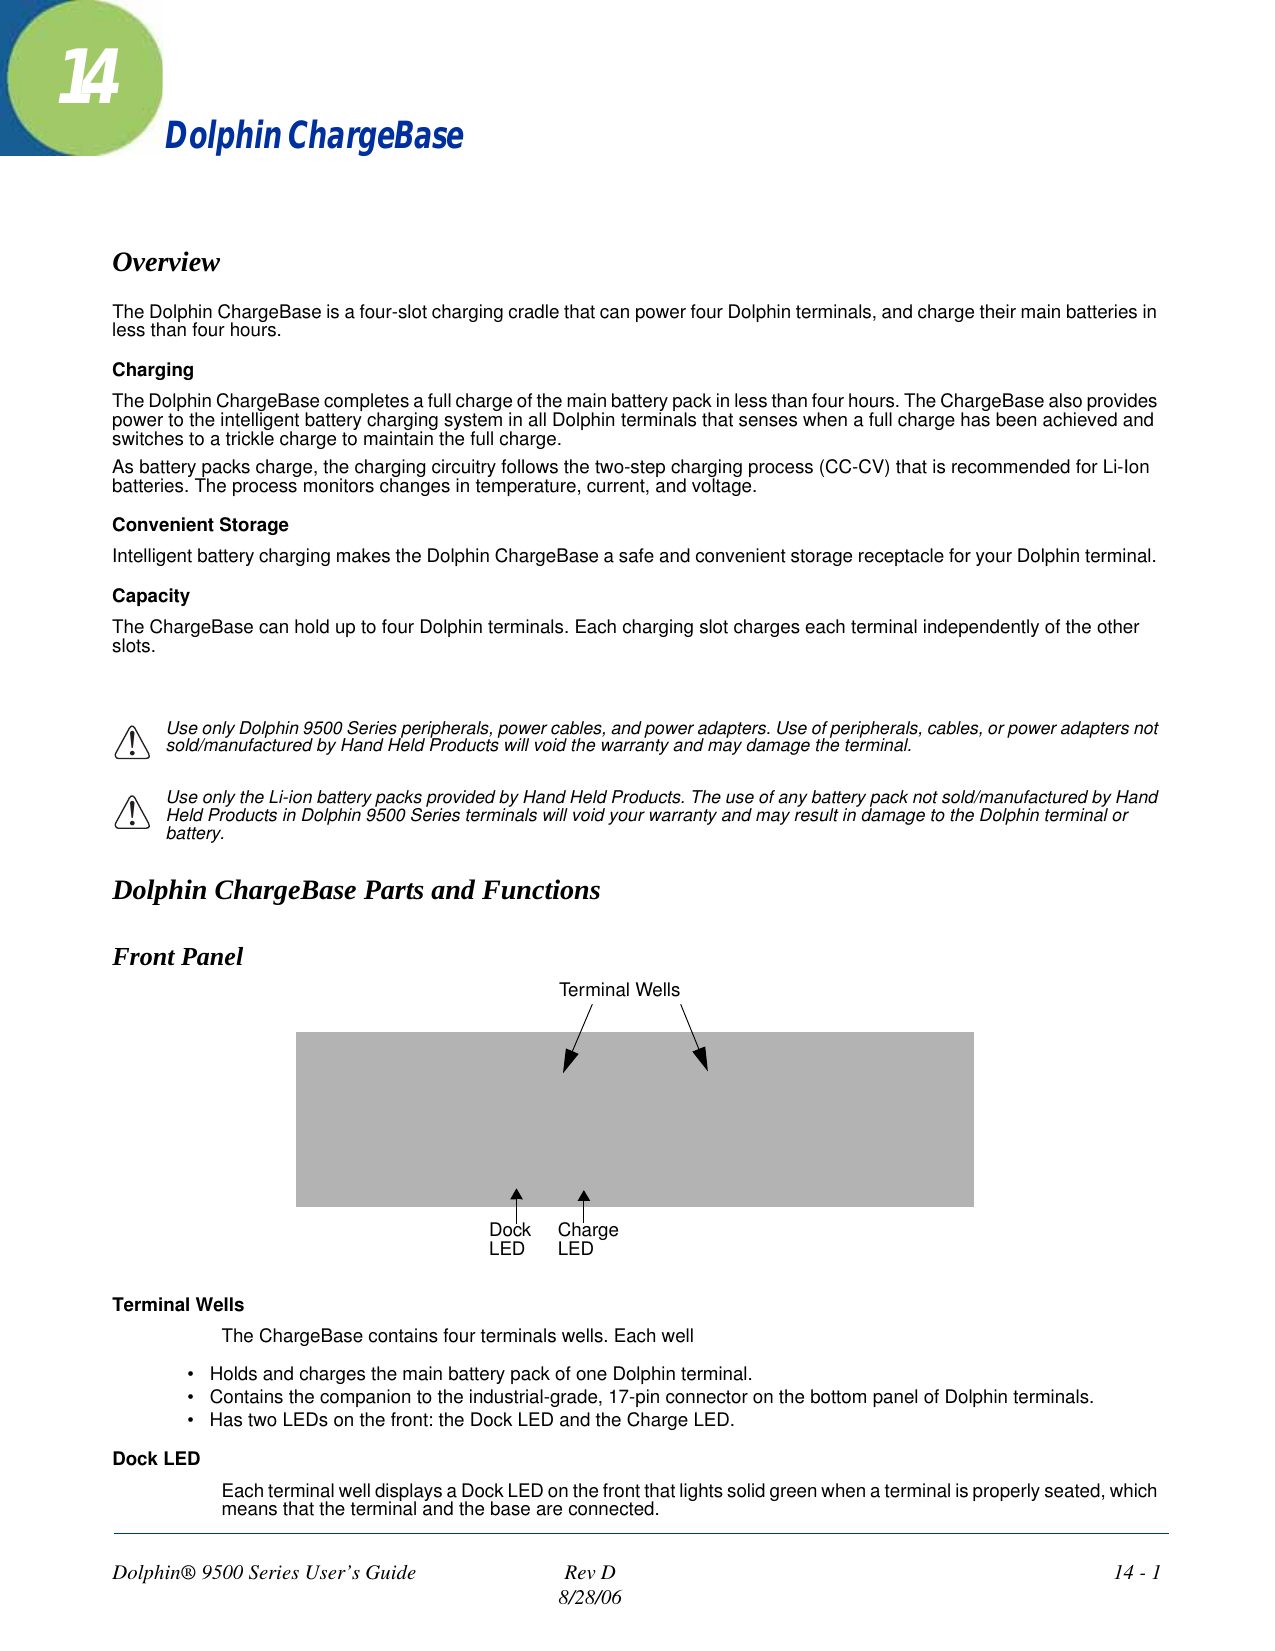
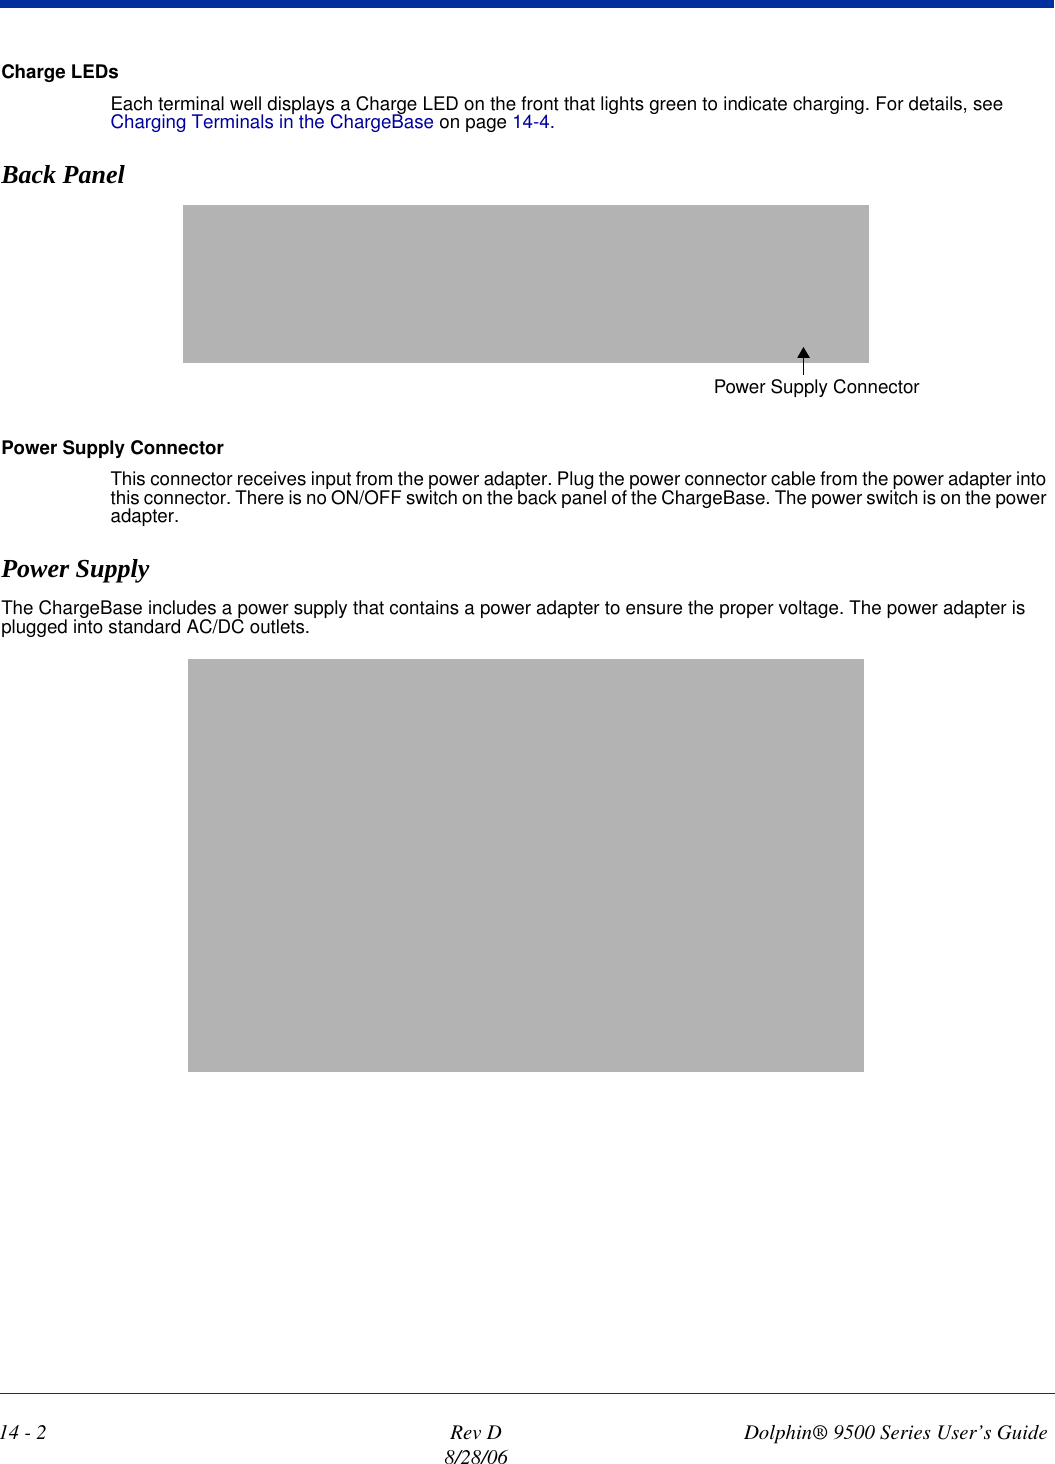
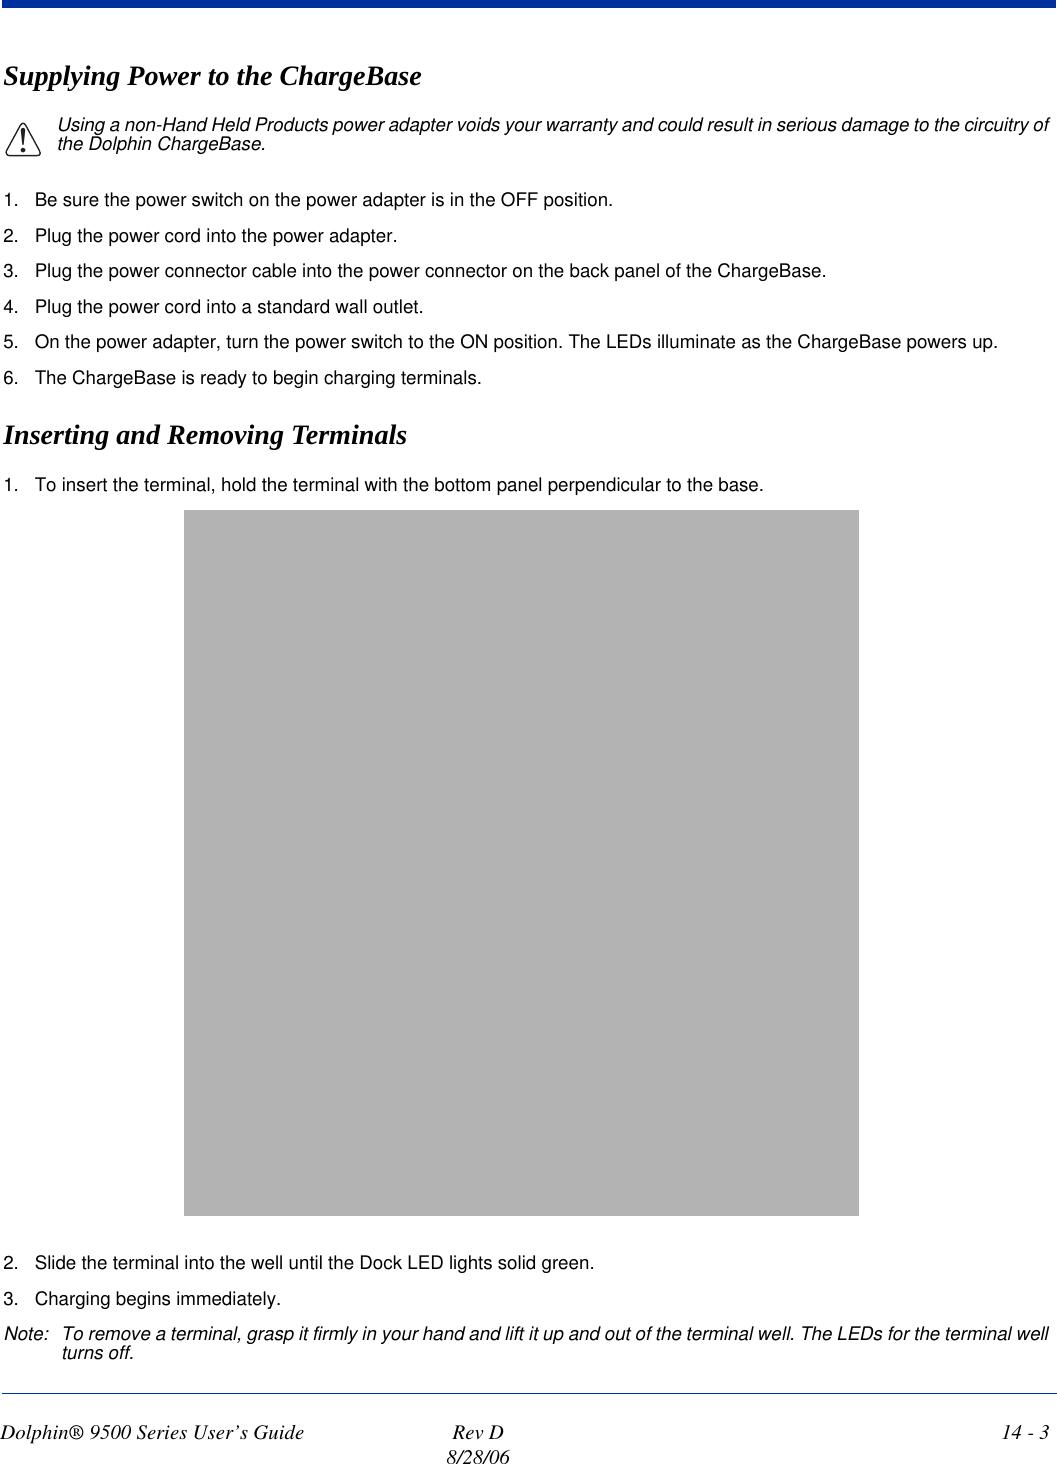
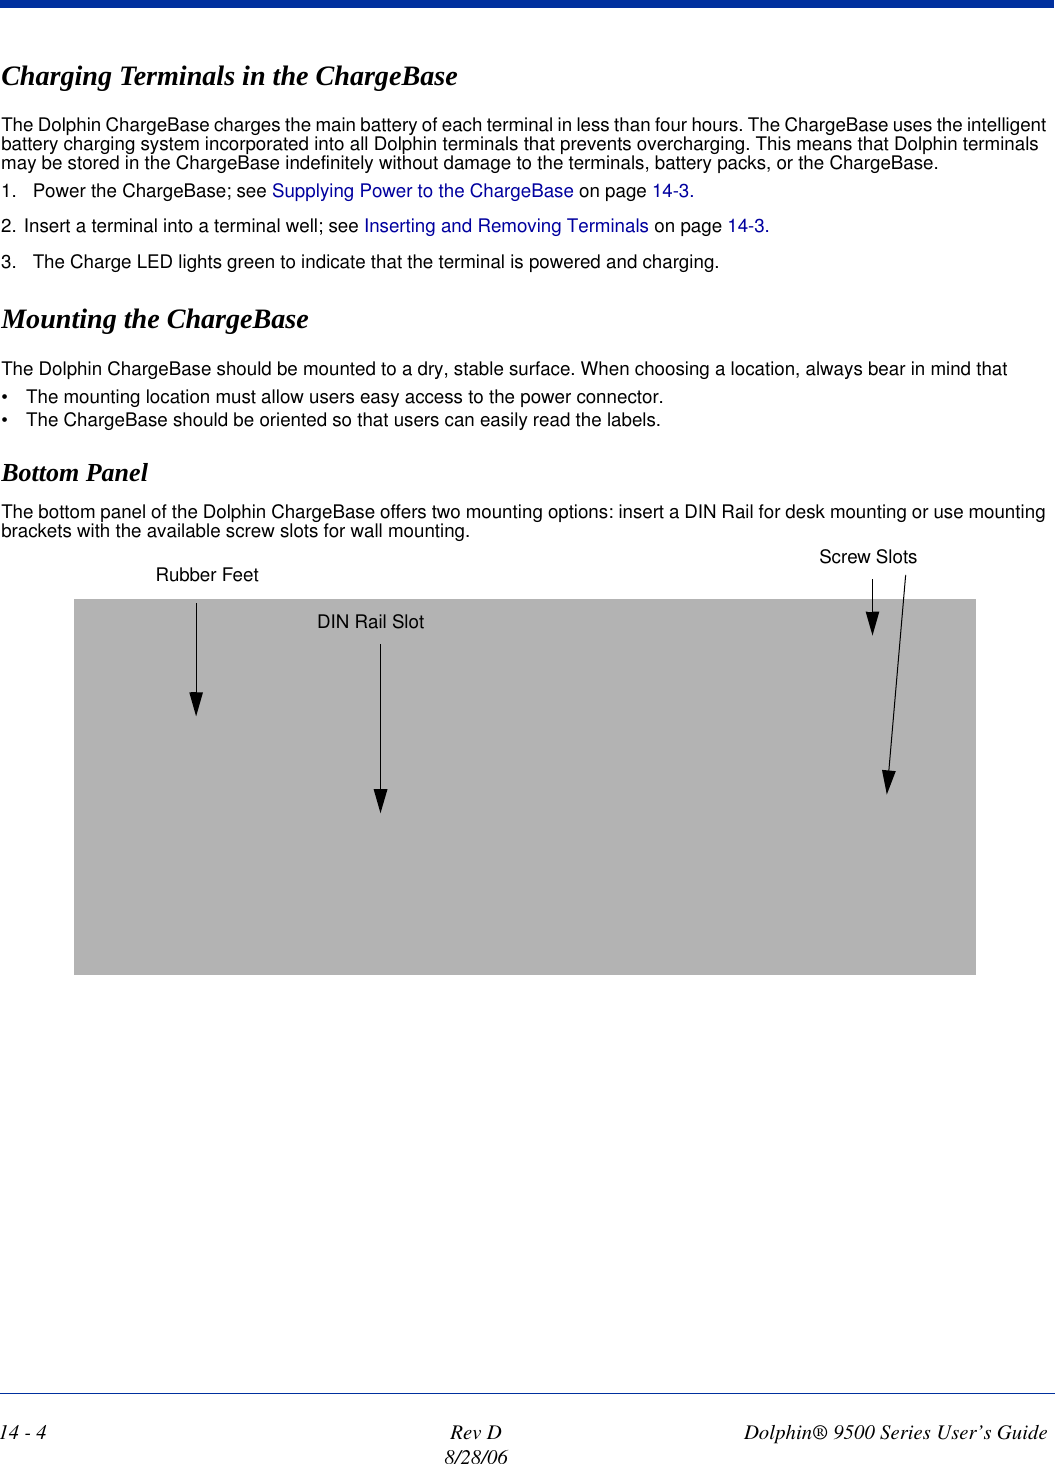
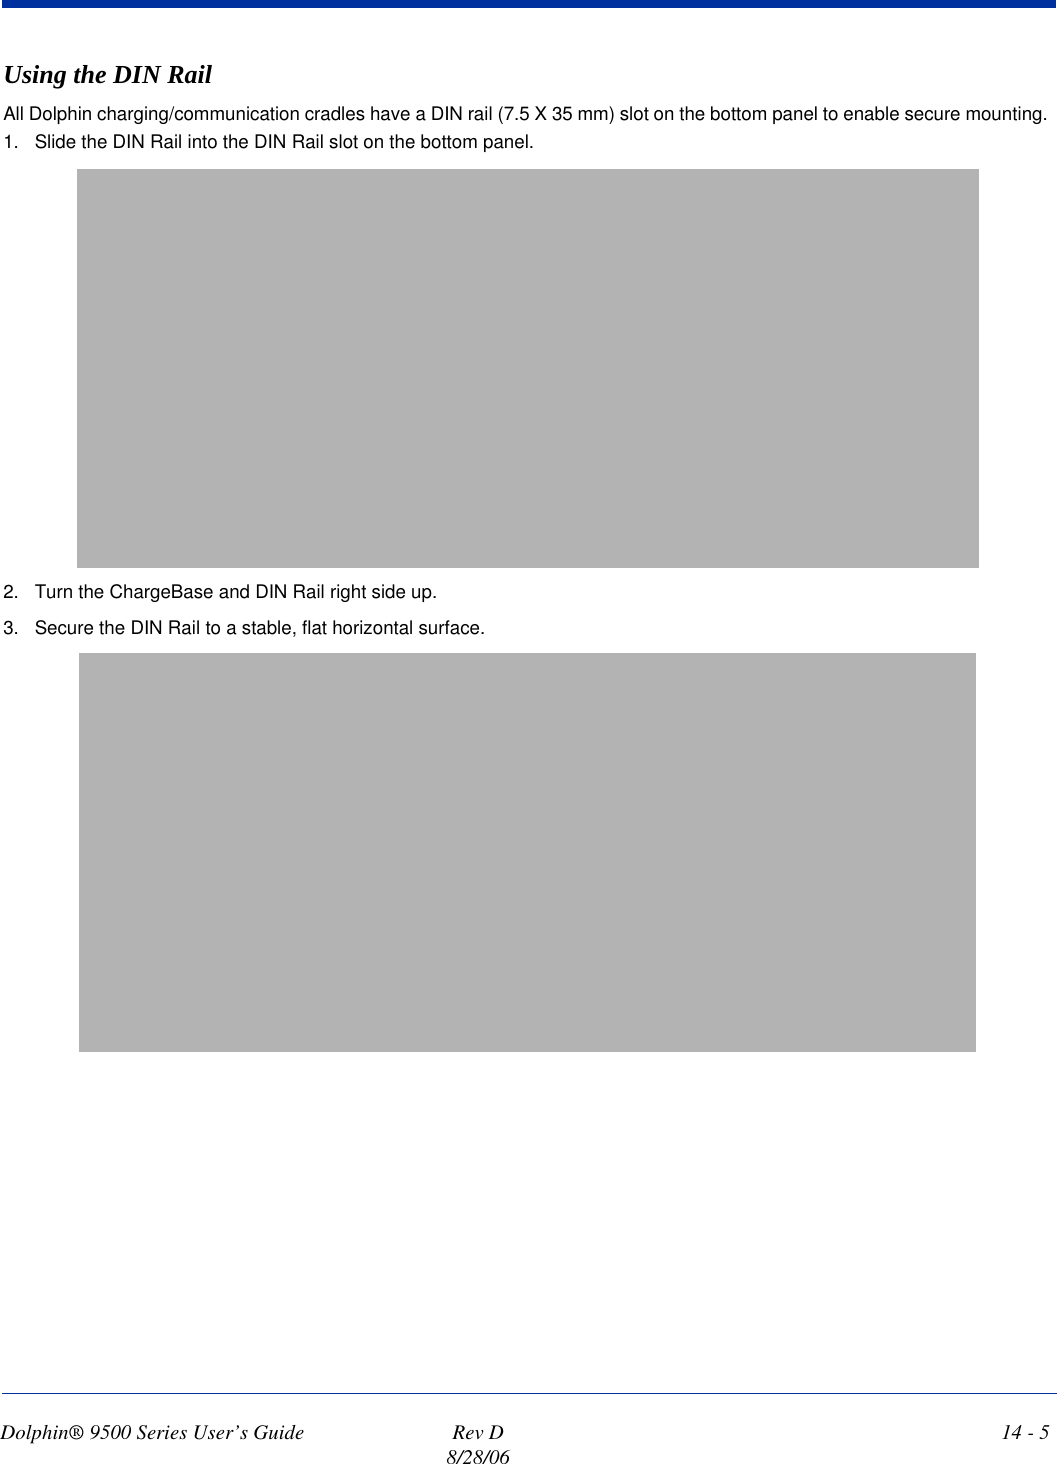
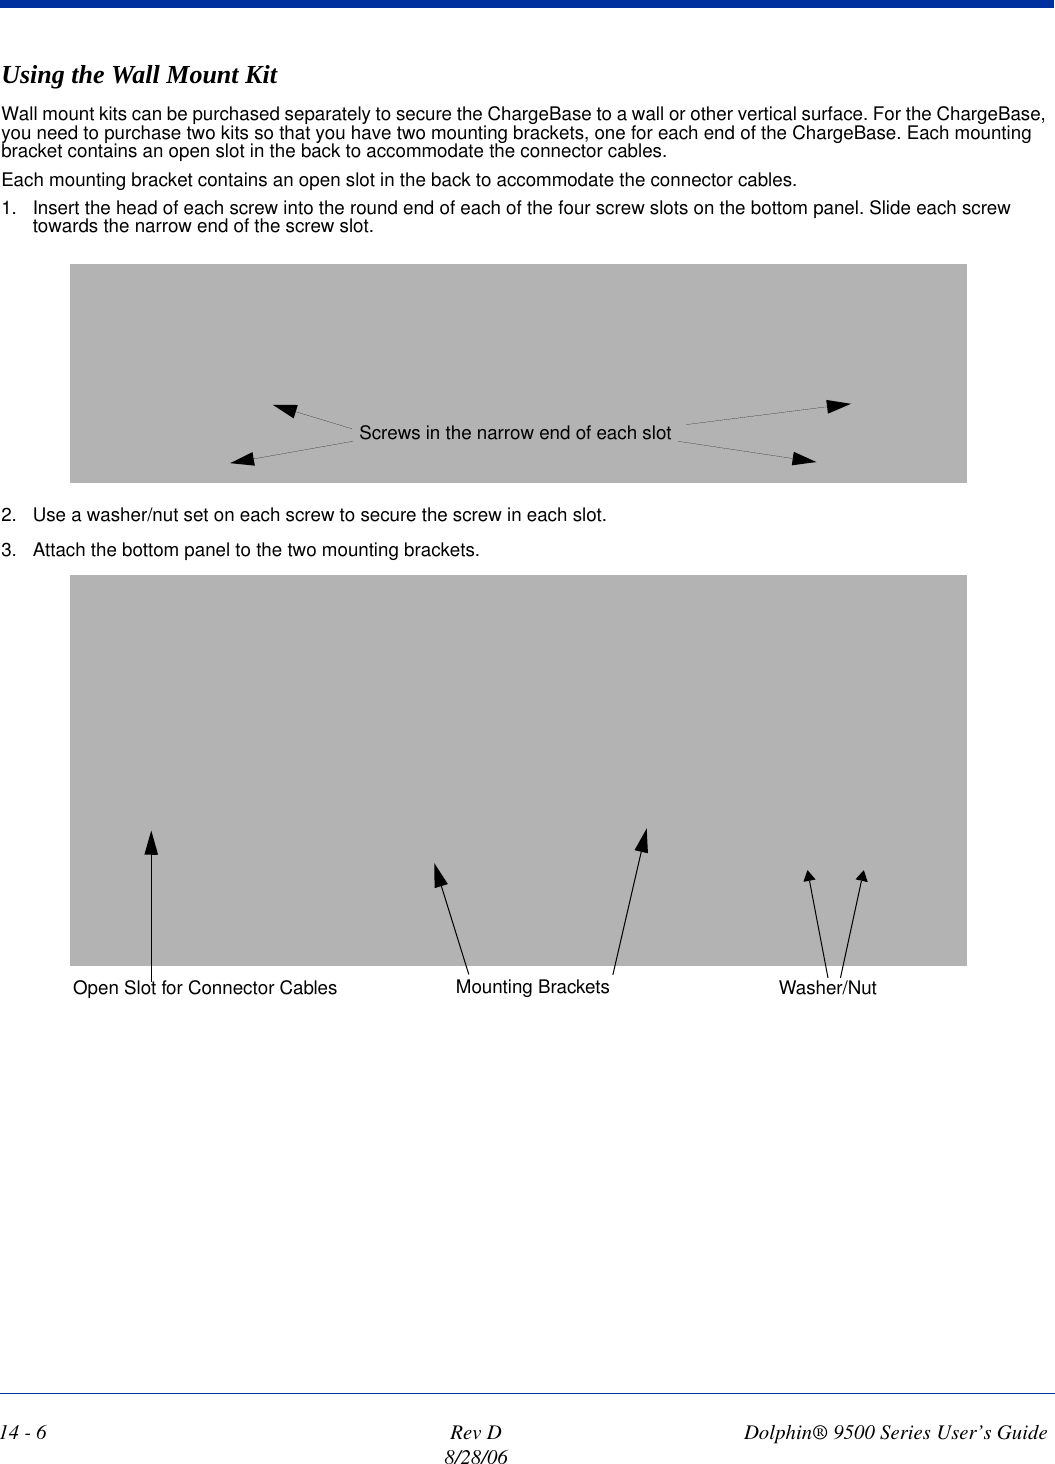
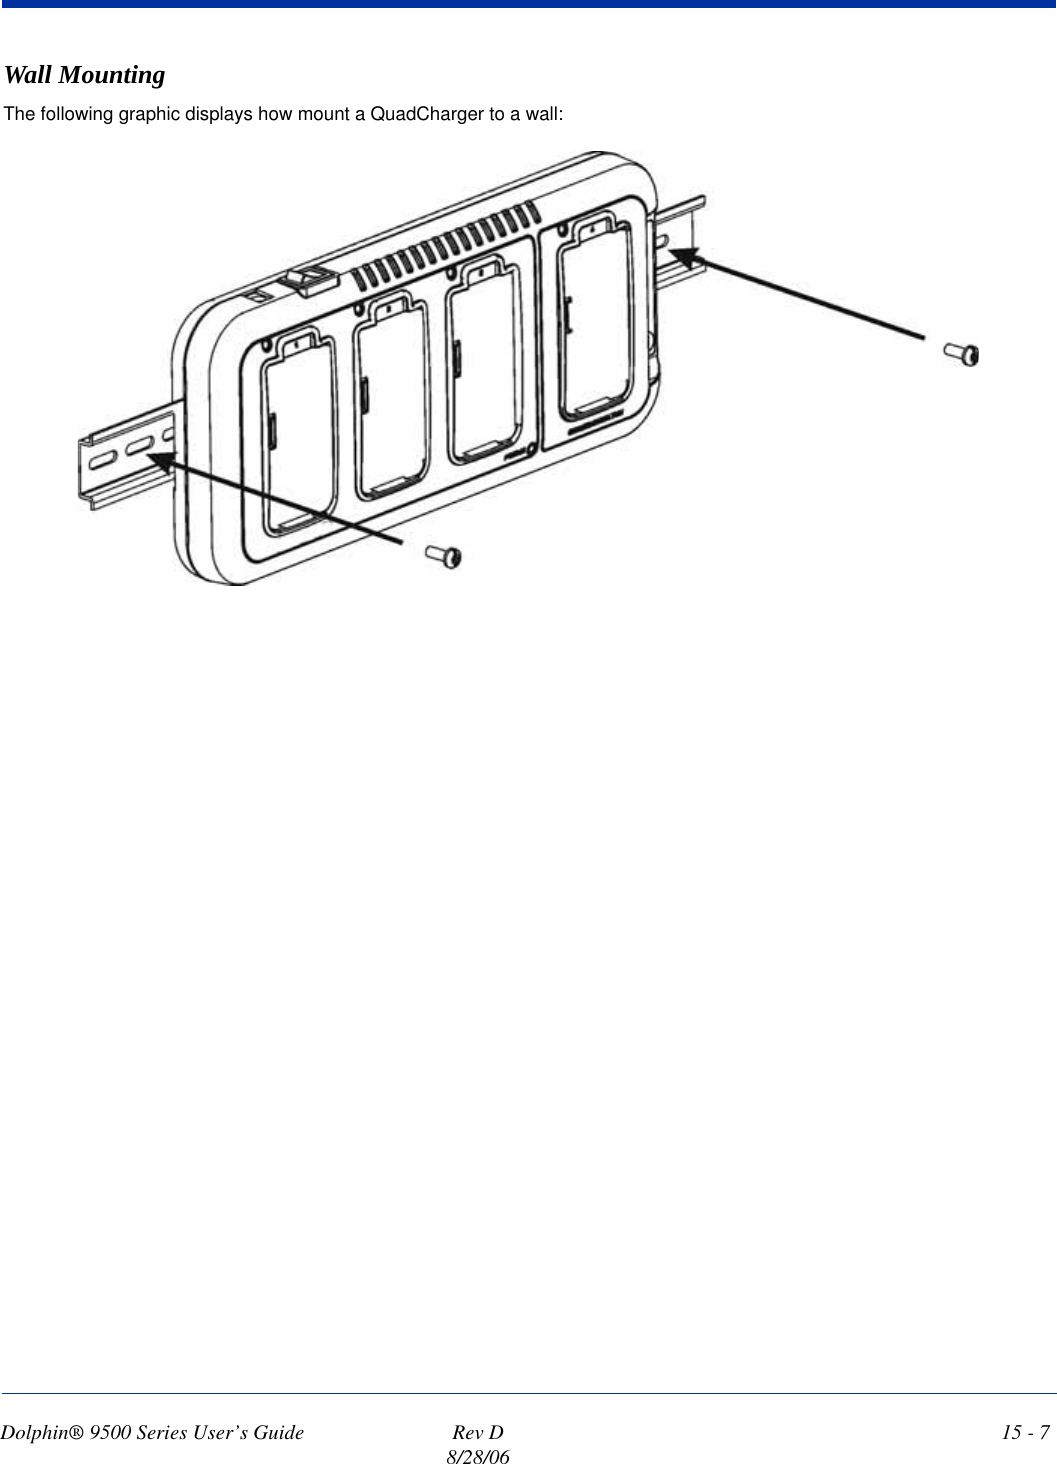
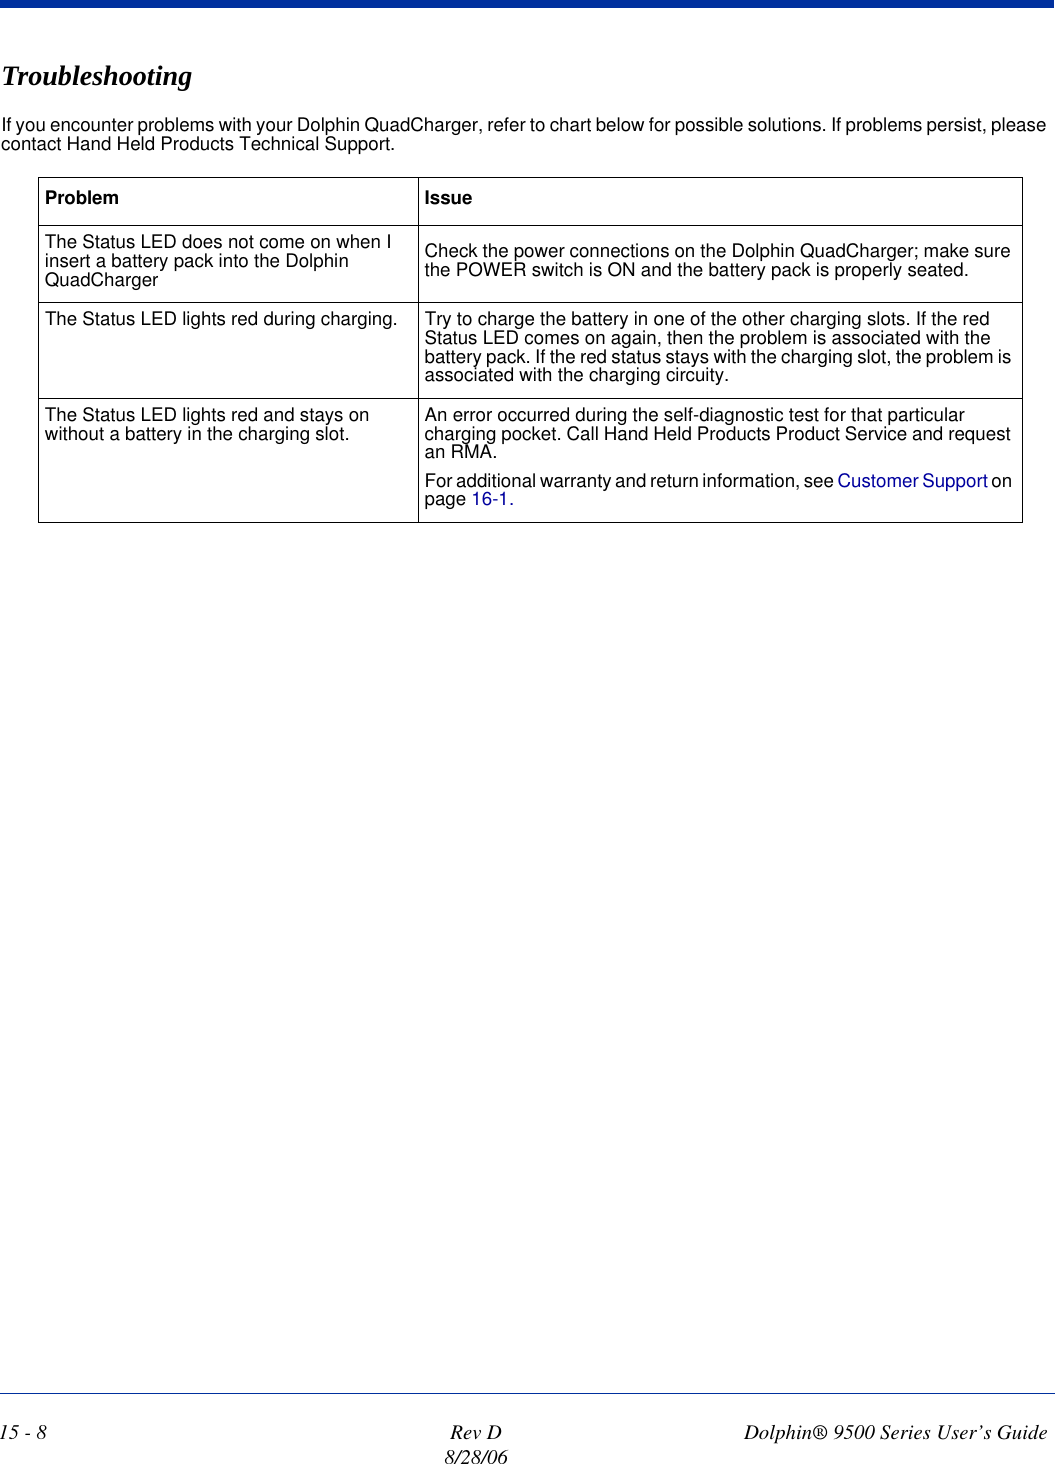
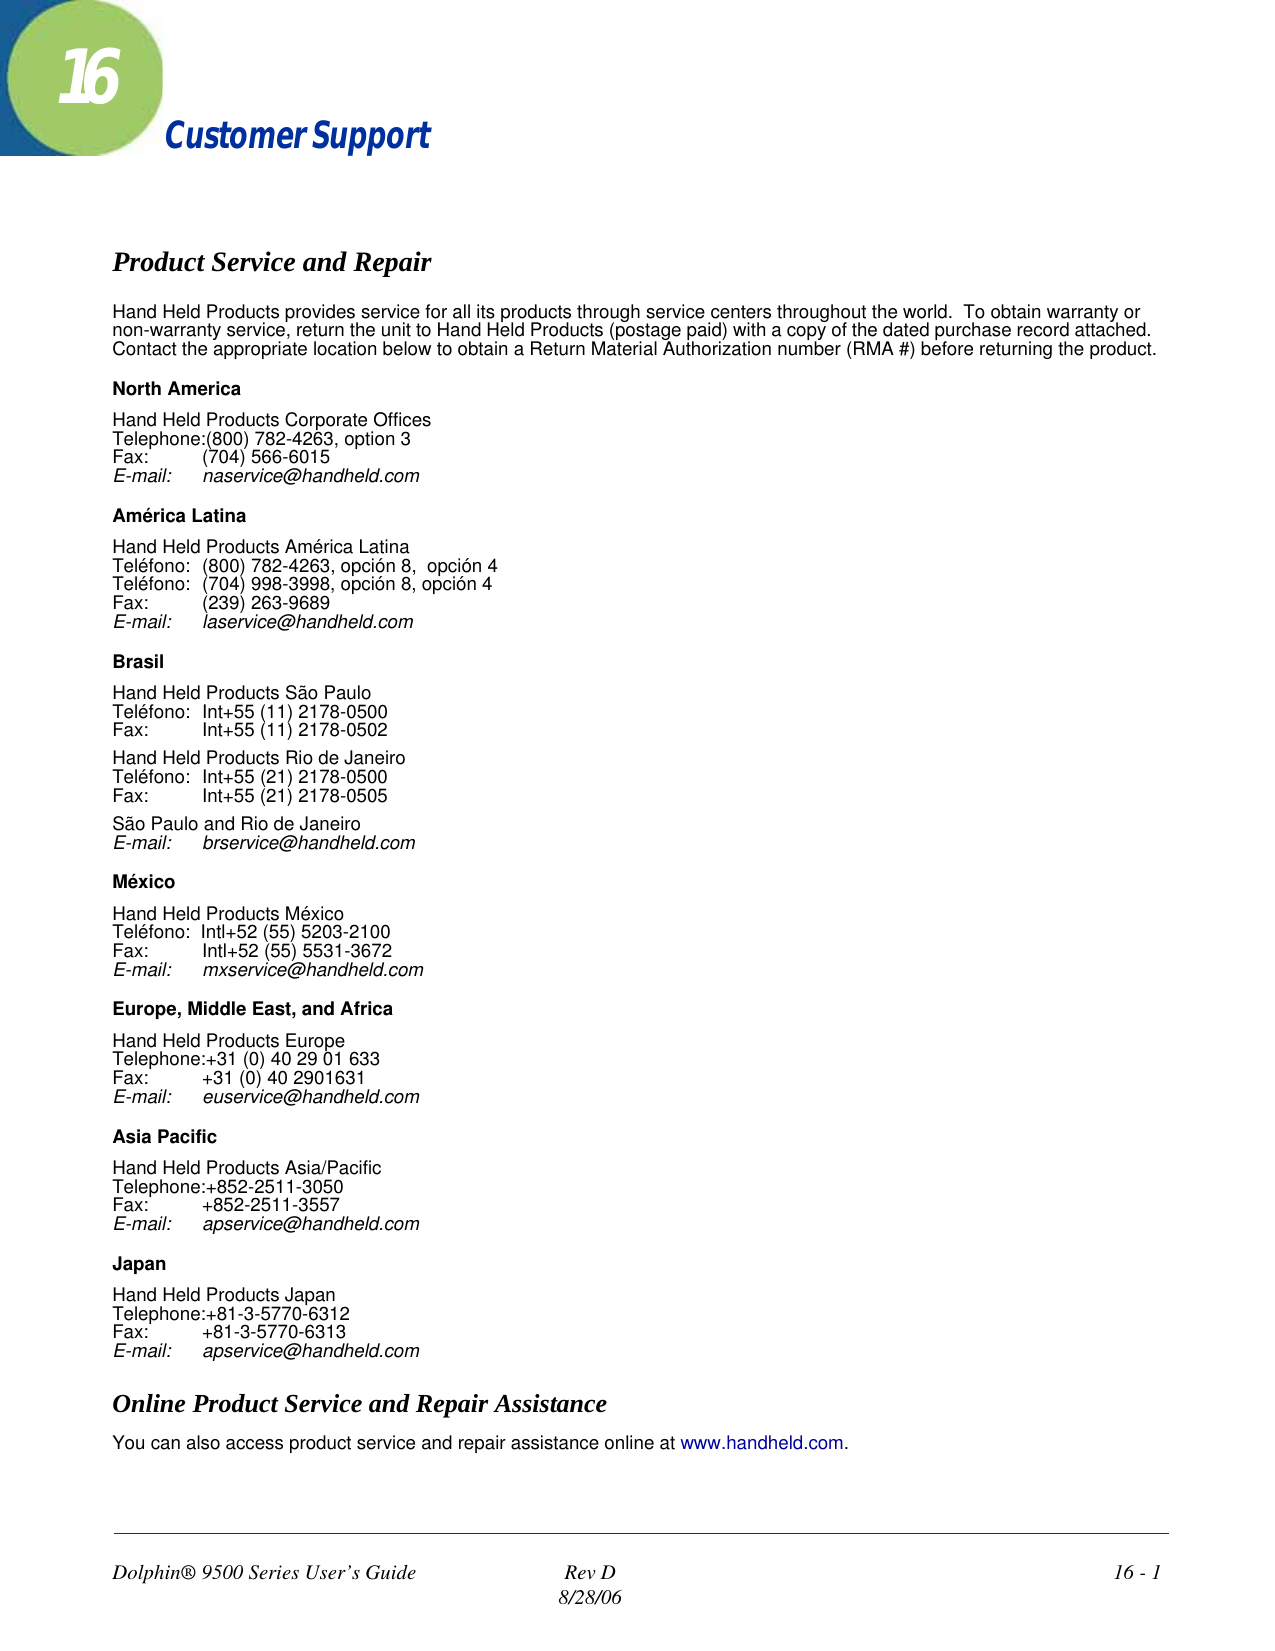
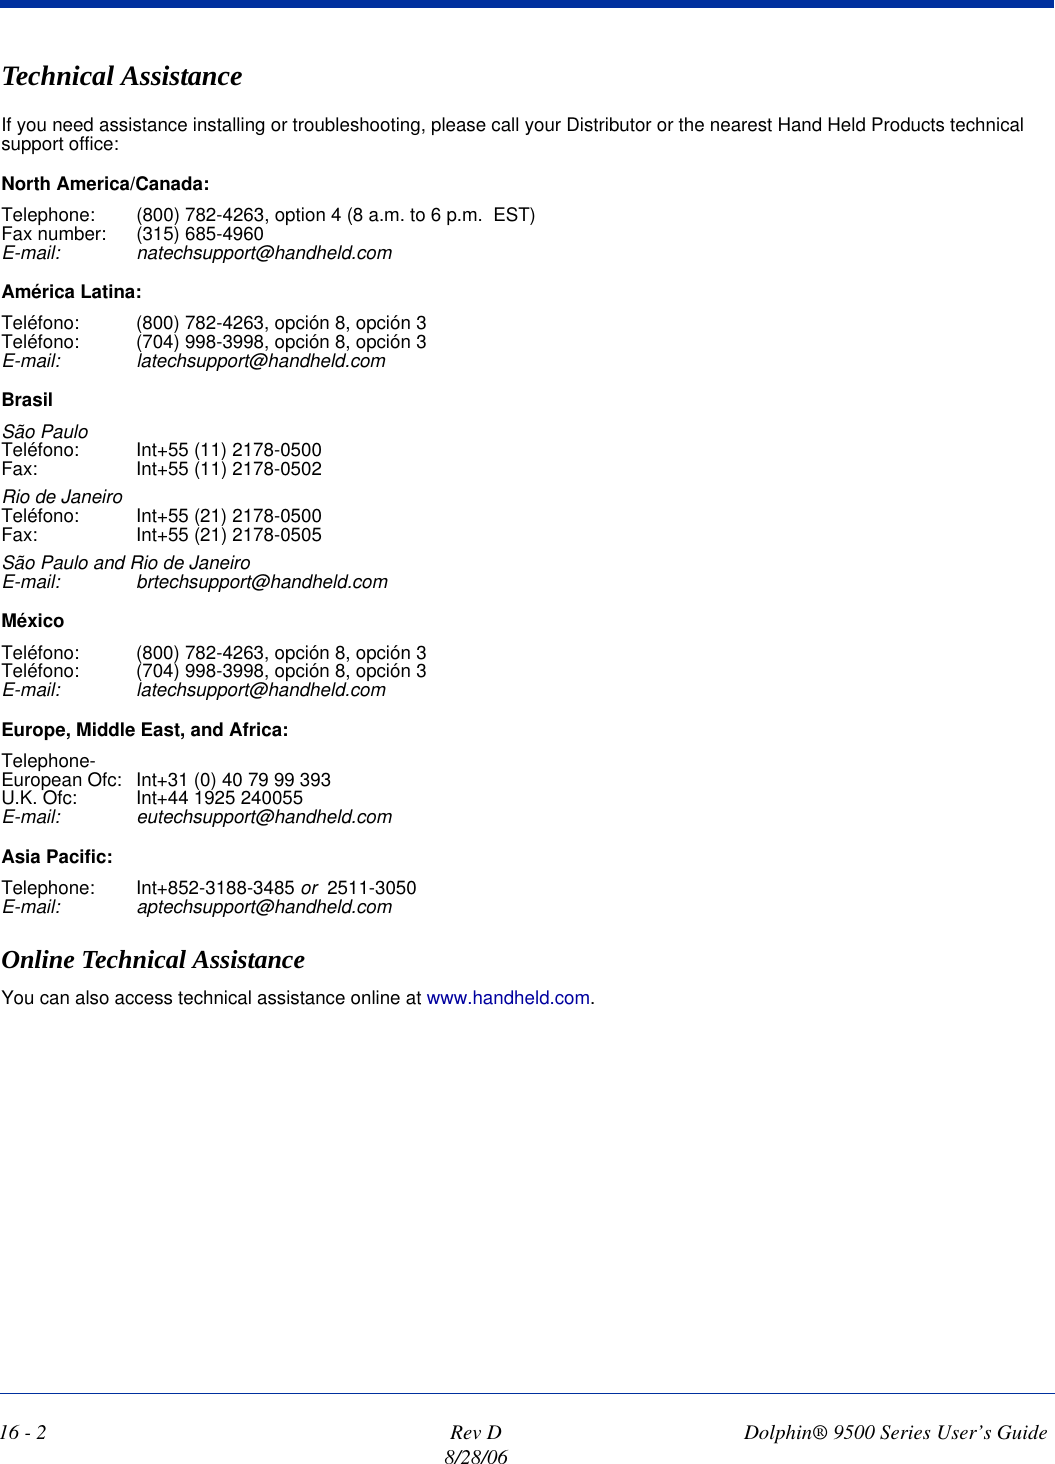
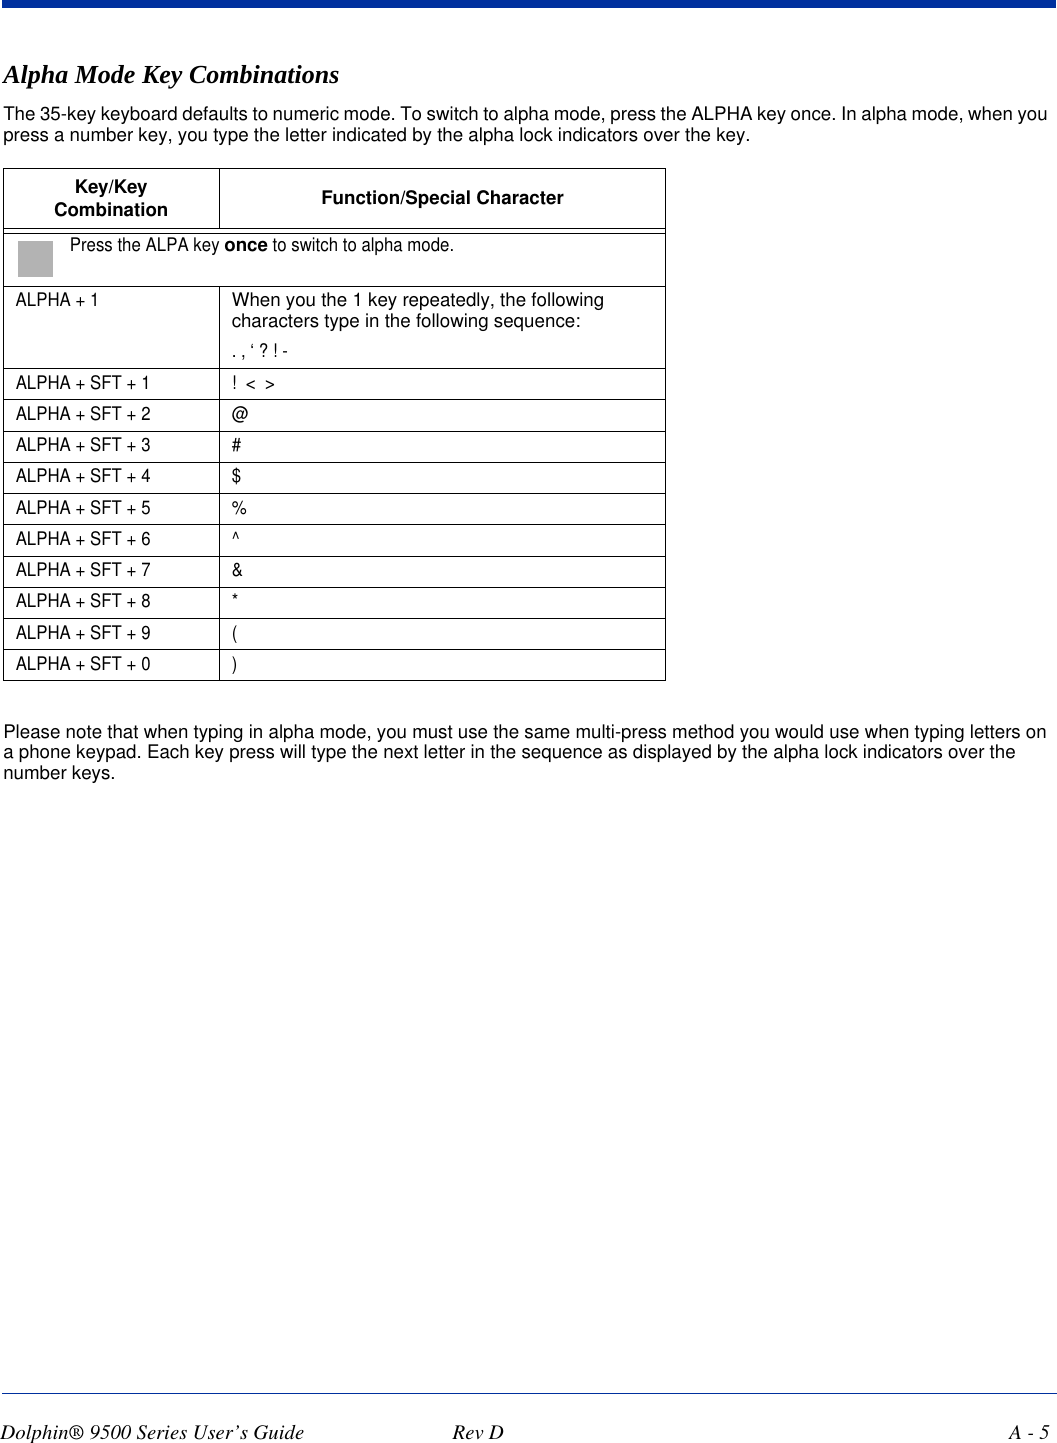
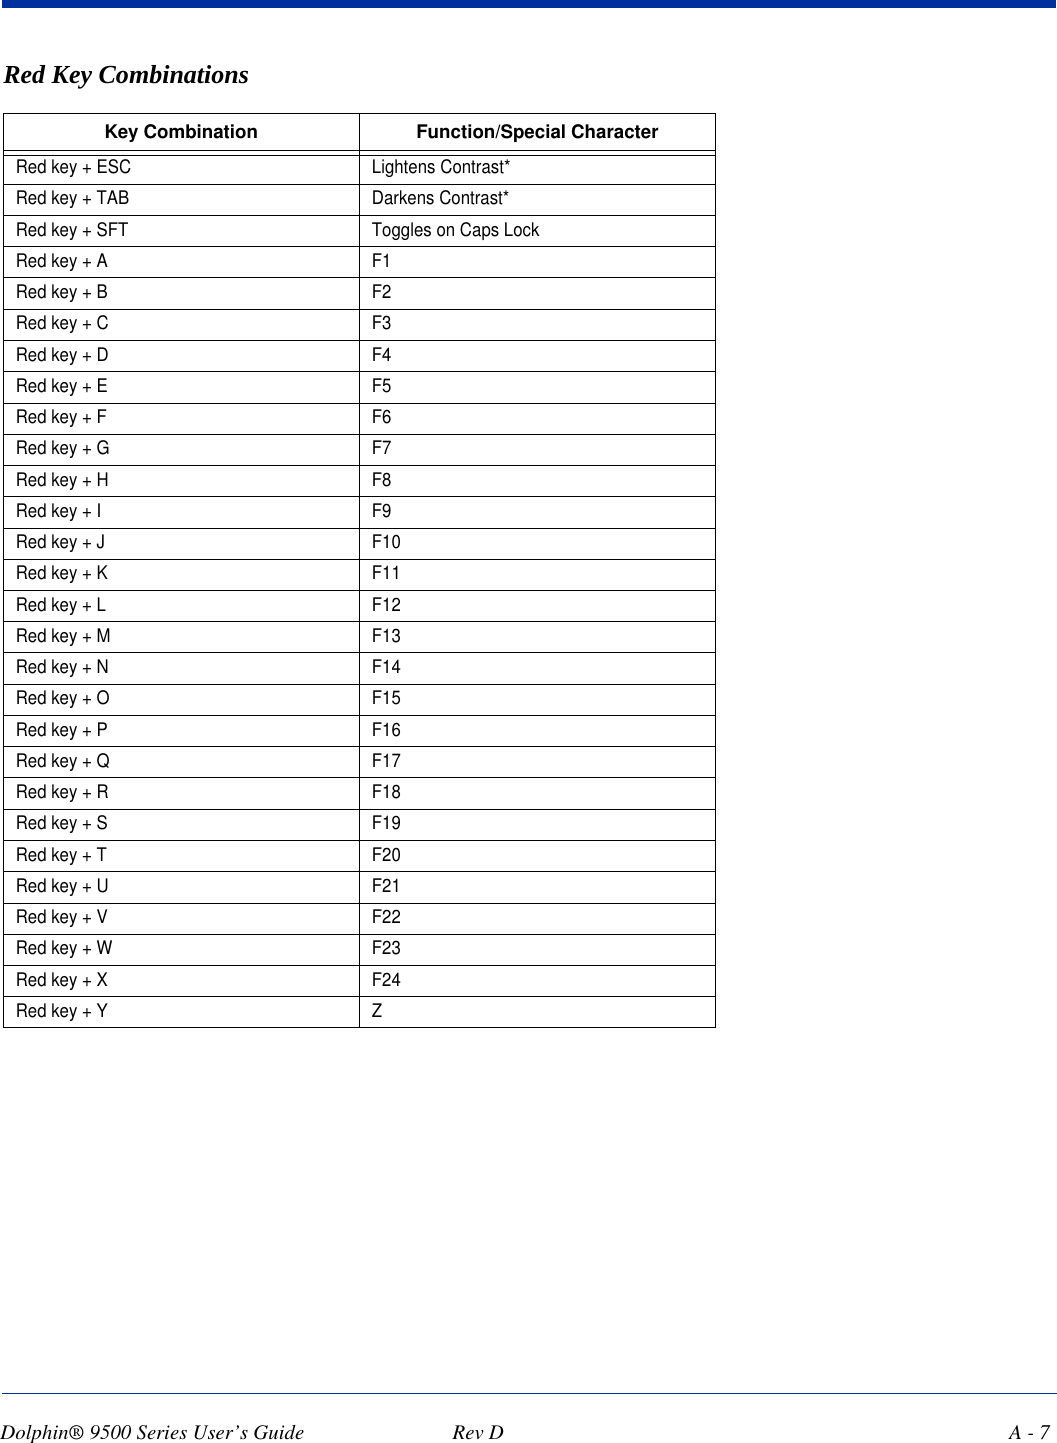
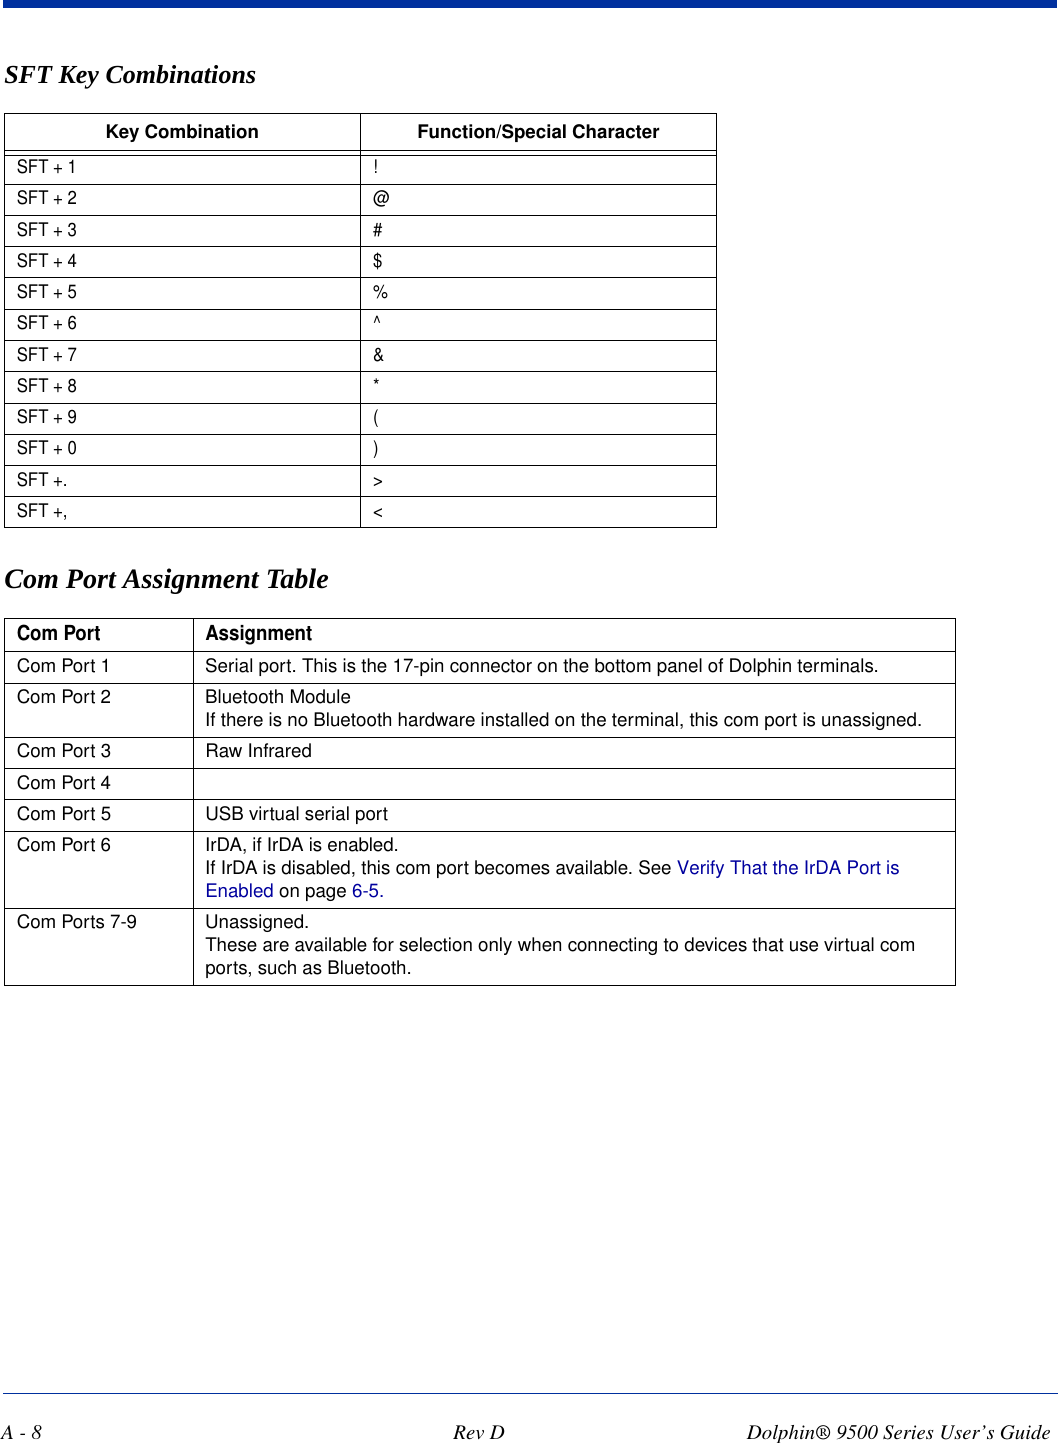
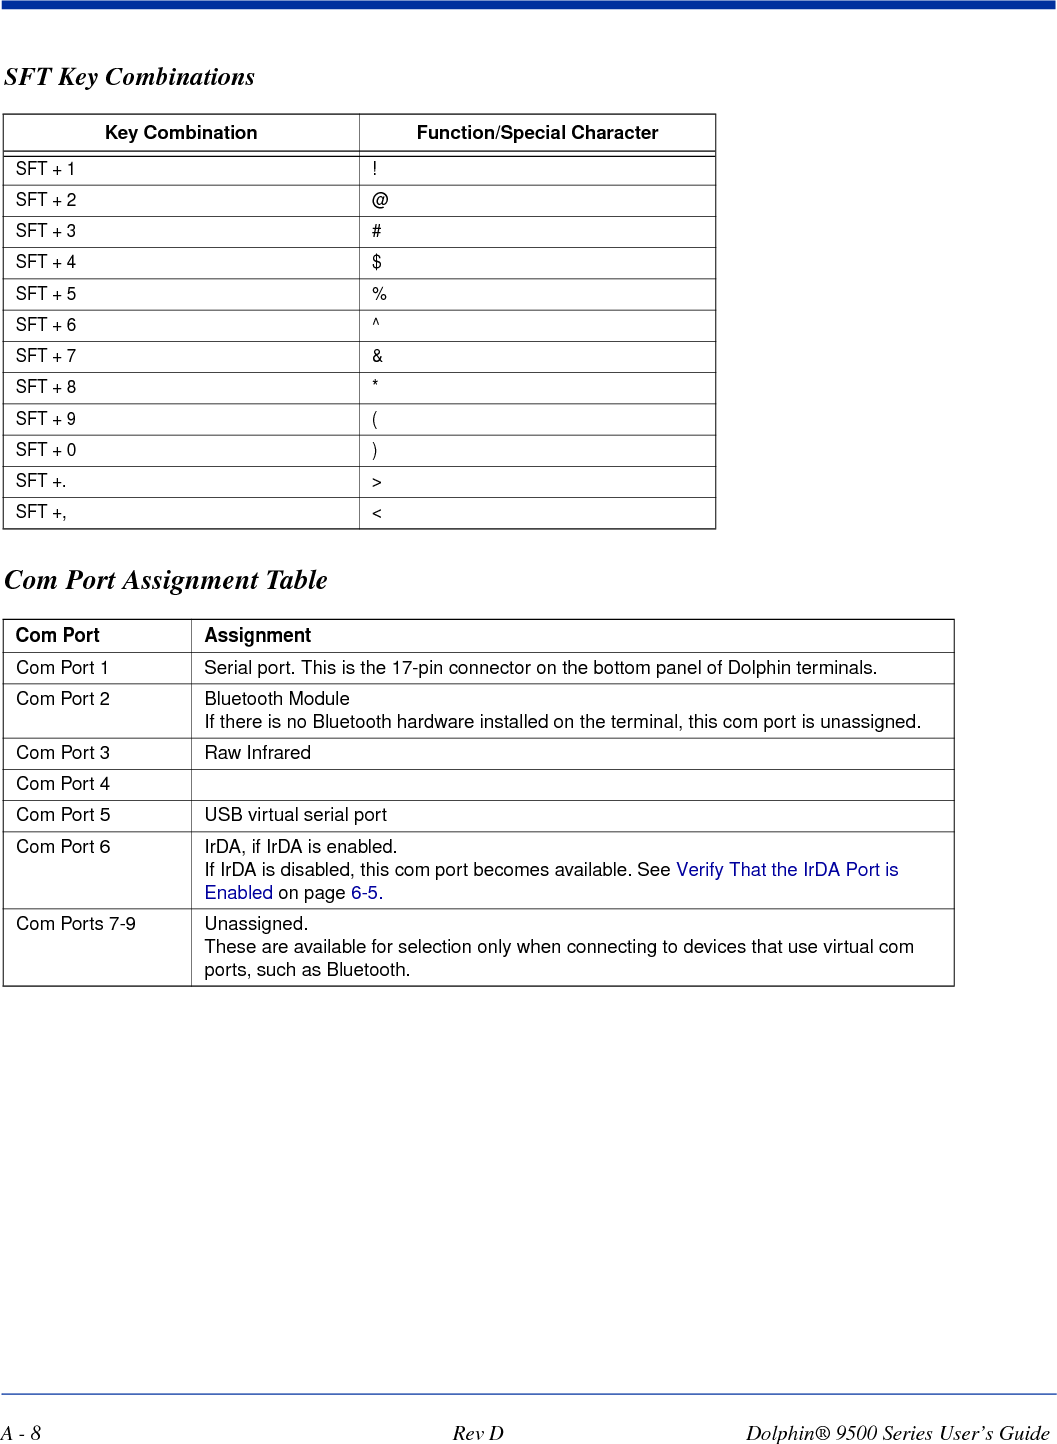
Revised User Manual Part 2

7 - 18 Rev D8/28/06 Dolphin® 9500 Series User’s GuideServer TabThe Server identity tab defines the credentials the client uses to authenticate the server during TLS/TTLS/PEAP authentication message exchange. The Client uses this information to verify that the Client is communicating with a trusted server. Configuring the Port On the main screen, tap and hold on a port, and select Configure on the popup menu. The Port Settings Configuration screen opens displaying the Wireless Networks tab.Field DescriptionDo not validate server certificate chain If this option is selected, the server certificate received during the TLS/TTLS/PEAP message exchange is not validated.Certificate issuer must be  This is the certificate authority used during TLS/TTLS/PEAP message exchange. Any Trusted CA is the default selection and means that any certificate authority can be used during authen-tication.Both trusted intermediate certificate authorities and root authorities whose certificates exist in the system store are available for selection in the drop-down list. Allow intermediate certificates This option is selected by default and enables unspecified certificates to be in the server certifi-cate chain between the server certificate and the certificate authority selected in the Certificate issuer must be field. When selected, this option allows the server certificate received during negotiation to be issued directly by the certificate authority or by one of its intermediate certificate authorities. If disabled, then the selected Certificate issuer must have directly issued the server certificate.Server name must be This is either the server name or the domain the server belongs to, depending on which option is selected below the text field.During authentication, this name will be compared to the server certificate’s Subject: CN field.Must match exactly When selected, the server name entered must match the server name found on the certificate exactly.Must contain domain name When selected, the server name field identifies a domain and the certificate must have a server name belonging to this domain or to one of its sub-domains (e.g., zeelans.com, where the server is blueberry.zeelans.com).
Dolphin® 9500 Series User’s Guide  Rev D8/28/067 - 19Wireless Networks TabField DescriptionAvailable Networks  Displays the networks the terminal recognizes as available to connect to. When the Client is first installed, there are no entries in the Available Networks list.Scan Displays a list of networks broadcasting their availability. You can also attach to networks who are not broadcasting.Move to Configured Activates after Scan has been tapped and the available networks have been retrieved. In the list of networks retrieved, select the network you wish to connect to, and tap Move to Configured. This selects the network.Configured Networks Displays the networks your terminal is connected to. This section adds and removes networks as well as reviews and edits the properties of existing configured networks.Default When the Client is first installed, there is a Configured Network named "default" in the list. This profile has Associate with any network selected in its Properties selection screen. If you are going to be in a location with only one AP (or more than one AP that attaches to the same network), the default profile may be sufficient for you needs, without necessitating the selection of a specific network or networks. If default is last in the list, it can act as a wildcard should you be out of the range of your primary networks (which are listed first). Do not place default at the top or middle of the list because, if it is, connection to the other list entries will never be attempted.Up Moves a selected network up one place in the list.Down Moves a selected network down one place in the list.Note: The order of the networks in this list is the exact order that connections will be attempted. The network listed first will be attempted first and so on. Place your primary networks first.Add Manually adds a network to the Configured Networks list if the AP does not broadcast its SSID or you are pre-configuring the client for an AP that is not currently in range. Remove Removes a selected network in the list.Properties Displays the properties of the network selected in the list. This button opens the same network configuration screen as the Add button does; use it to edit network configuration properties.
7 - 20 Rev D8/28/06 Dolphin® 9500 Series User’s GuideProtocol TabThe Protocol tab configures parameters that apply to all the networks the selected port connects to.Field DescriptionProtocol Settings These are the timer intervals and retry settings defined in the 802.1X standard. They determine how long the supplicant state machine will wait in a given state. These parameters shouldn’t be modified without an understanding of the supplicant state machine. For more information about the supplicant state machine, obtain its 802.1X protocol specification. The parameters are:•Authentication Timeout - The period of time the Client remains in the authenticating or acquired state without receiving a response from the AP or switch. •Held Timeout - The period of time the Client remains in the held state after failing authentication. •Start Timeout - The period of time the Client remains in the connecting state before restarting when there is no response. •Number of Start Attempts - The number of times the Client restarts before giving up. At that point, the Client then defaults to the authenticated state, but there will be no network connectivity because the protocol exchange was never completed.Display EAP notifications Specifies that the EAPOL notification message will be displayed to the user. An authenticator may use such notification to inform you, for example, about a near password expiration. However, some authenticators send chatty and annoying notifications that may, for the convenience of the user, be suppressed. Note that all notifications are written to the event log even if they are not displayed.Renew IP address Initiates a DHCP request to obtain a dynamic IP address after a successful authentication, but only if the client detects that the connected network (the SSID) has changed. The result is that renewal should not occur upon re-authentication, but does occur at boot or when connecting to a different net-work. If you have a slow authenticator, you may wish to enable this option when configuring the service because a slow authenticator may prevent you from getting a DHCP-assigned IP address upon boot-up. This option is ignored if the given adapter has a static IP address.
Dolphin® 9500 Series User’s Guide  Rev D8/28/067 - 21Configuring a Network ProfileTo configure a network profile, on the main screen, tap and hold on the port, tap Configure, then tap Add. The Network Profile screen opens displaying the Profile Info tab.Note: The settings on these tab windows are interrelated. This means that selecting one may disable access to others.
7 - 22 Rev D8/28/06 Dolphin® 9500 Series User’s GuideProfile Info TabWEP Mgmt TabField DescriptionNetwork Profile Enter the name of this record. This is the name that appears in the Configured Networks list and, by default, is the same as the broadcast SSID. Note that there is nothing special about the name "default". You could configure any other record similarly and it would behave the same way.Network Name This is the SSID of the AP. If the AP broadcasts its SSID, then this value may be derived from the Avail-able Networks list. If the SSID does not broadcast, then you must manually enter the value here.Peer-to-Peer Group  Select this option to have two or more client workstations communicate with each other without the ben-efit of an AP. You should also select Do Active Scan and, in the WEP Management page, enable Use key for data encryption while entering a common key for both sides. WPA is not supported in this mode.Do active scan Select this option whenever the AP (or client, for ad hoc mode) is not broadcasting its SSID. Authentication Profile  Select the Client Configuration (user) profile associated with this network. The drop-down list contains the profile names created onn the User tab of the Client configuration area.To open the selected profile, select it in the drop-down list and tap View. The User tab opens displaying the profile details. If you tap OK (to save changes) or Cancel, you are returned to the Profile Info tab.Field DescriptionProvide encryption key dynamically This option is selected by default. If this option is selected, the other WEP settings on this page are disabled. To enter a custom WEP, de-select this option. The other fields become active.Use key for data encryption Select this option to manually enter a WEP key to encrypt your data to the AP. You enter that key in the Key field below.Use key to authenticate with AP Select this option if your network does not support 802.1x authentication and you need to con-nect to the AP without username and password authentication. The key entered below is used to authenticate instead.
Dolphin® 9500 Series User’s Guide  Rev D8/28/067 - 23WPA Settings TabLoggingThe event log is an ASCII text file named “LOG8021X.TXT” located in the directory defined by the WINDIR environment variable (usually the Windows directory). The information the log records is determined by the log settings on the System tab.The format of the entries is  Time Stamp Message TextKey In this field, enter the WEP key. ASCII:  5 or 13 charactersHexadecimal: 10 or 26 characters.When the key entered is in the correct format, the screen changes to display the type - ASCII or Hexadecimal. Key Index/Transmit Key The Key Index drop-down list contains the available keys. You may enter up to four keys for reception; the Client will try all four to find one that works with the AP.From the drop-down list, select the key to be used for transmission as well. If the key selected is the transmit key, the Transmit key box is checked. To change the transmit key, select another key and check the Transmit key box. The check box of the original transmit key will be automatically de-selected.Field DescriptionWPA Mode This drop-down list contains the following options:•Disabled - Do not enable WPA mode. This is the default selection.•WPA 802.1x - Enable WPA and obtain key information through the 802.1x protocol. •WPA PSK - Enable WPA with Pre-Shared Key (PSK) information entered in the field below. This mode is used if the 802.1x protocol is not being used for authentication.PSK pass-phrase This field activates if you select WPA PSK in the WPA Mode drop-down list.Enter a Hexadecimal value that is 64 characters long. Asterisks appear as you type for increased security.Field Description
7 - 24 Rev D8/28/06 Dolphin® 9500 Series User’s GuideThe Refresh button at the bottom of the screen is used to update the log file while you are reading it. If the file gets too large, old entries are automatically deleted.If you wish to start with a blank file, exit from the Client (so the icon no longer appears at the lower right of the screen) and delete the log file (log8021x) in File Explorer. When you restart the Client, a new log file is created.Installing Certificates with CertAddCertificate RequirementsDuring configuration, you may have specified one or two certificates to use during the authentication process. The specified identity should match the Issued to field in the certificate and should be registered on the authentication server (i.e., RADIUS server) that is used by the authenticator. In addition, your certificate must be valid on the authentication server. This requirement depends on the authentication server and generally means that the authentication server must know the issuer of your certificate as a trusted Certificate Authority (CA). If the selected certificate does require a password or pass phrase to decode the private key, enter this value in the “Certificate Pass Phrase” field. This value will be encrypted when the configuration is saved. However, on some systems, there may not be a certificate. If that is the case, you can use the section below as a primer on OS X certificate management.About CertAddCertAdd is a standalone utility that allows certificates to be selected and installed on a Windows Mobile device.   Installing CertificatesClient or CA certificates can be imported from *.cer (same as *.der), *.p7b, or *.pfx files.1. Download the certificate file to the My Documents folder. The location isn’t critical, although you may want to create a standard folder for consistency.2. Go to Start > Programs > Meetinghouse Certificate Installer. All valid certificate file types located in the My Documents folder appear in the list. 3. Tap and hold on a certificate in the list. A pop-up appears asking if you want to install the certificate.
Dolphin® 9500 Series User’s Guide  Rev D8/28/067 - 254. Tap OK. The certificate is loaded into the correct certificate store.Advice and WorkaroundsIssue Possible Causes and SolutionsThe Client will not start on the device with an error message about missing files. Perform a soft reset.The wireless network interface (port) does not appear in the main AEGIS screen.• The license is not valid (If you have entered a time-limited license, is your clock on the device correct?).• Restart the client - on the main screen tap Client > Restart.• Perform a soft reset.• If the radio is turned off or the radio card is not present, this will sometimes cause the port name to not appear.• If the radio driver is very old and does not support NDIS 5.1 commands, the Client may not be able to detect it.The wireless network interface appears, but when I select it and tap Configure, the Scan button is disabled.Enable the radio; Start > Settings > Connections tab > Radio Man-ager.The client is not attaching to the correct AP. The default network profile instructs the client to attach to the first available AP. On the Wireless Networks window, select a network, move it to Configured Networks, and then move it above default in the list.The Client is failing authentication even though all my information was entered correctly.1. Verify that the network profile for the AP corresponds to the authentication profile you created for it. • Select the network profile in the Configured Networks list.• Tap Properties. The Profile Info tab opens - see page 7-22.• In the Authentication profiles drop-down list, select the profile you want to review.• Tap View. The User tab appears displaying the profile’s information.2. Verify that you have configured the identity and password into the correct fields on the User tab in the authentication profile. If you are using PEAP or TTLS, the username and password are entered in the Tunneled authentication section.My AP does not broadcast its SSID. Even though I have manually configured an AP with that name, the Client won't associate with it.• Make sure that the desired SSID is listed as the Network Name, not the Network Profile (which is a screen label).• Verify that Do Active Scan is selected on the Profile Info tab. If not selected, the Client will not attempt to find the AP.I am authenticated, but I don't get an IP address through DHCP.On the main screen, tap and hold on your AP, tap Configure on the popup menu, and select the Protocol tab. Verify that Renew IP Address is selected. I cannot attach to my old network that does not support 802.1x authentication, but is using WEP encryption.• Verify that you can see your SSID in the Available Networks list on the Wireless Networks tab. Move the SSID to the top of the Configured Networks list so that it is accessed first. If the SSID is not there, you can add it manually and enter the SSID as the network name.• Select the SSID and tap Properties.• On the Profile Info tab, select Do active scan if your AP does not broadcast its SSID. • On the WEP Mgmt tab, select Use key for data encryption and Use key to authenticate with AP.• Enter the WEP Key.• On the Protocol tab, select Renew IP Address (unless you have entered one manually separate from the Client)• Note that the port status indicator in the main screen reads "Associated," not "Authenticated" when the connection is complete; although the log file will indicate "Entered AUTHENTICATED state."I made changes, but they do not appear to have taken effect.  Always tap OK before exiting a screen you have changed. Then restart the Client from the Client menu on the main screen.
7 - 26 Rev D8/28/06 Dolphin® 9500 Series User’s GuideHow do I enable peer-to-peer (ad-hoc) mode to have two clients communicate without an AP?• On the Wireless Networks tab, add a new profile to the Configured Network list. • On the Profile Info tab, give each side the same network name (SSID). • Select Peer-to-Peer Group (ad hoc mode) and Do active scan. • On the WEP management section, select Use key for data encryption and enter an identical key for both clients. • Verify that this network profile is the first (or only) one in the Configured Network list and try to restart both clients at roughly the same time.Advice and WorkaroundsIssue Possible Causes and Solutions
Dolphin® 9500 Series User’s Guide  Rev D8/28/068 - 18Wireless PAN (WPAN) Communications with BluetoothOverviewDolphin terminals are available with a Bluetooth radio for WPAN (Wireless Personal Area Network) usage. When the Dolphin is first initialized, the *.cab file and module for Bluetooth are installed.Enabling the Bluetooth RadioBefore using the radio, make sure that the Bluetooth radio is enabled. When the radio is enabled, the Bluetooth icon appears in the task tray on the Today screen.   Note: Radios are enabled in the Radio Manager; tap Start > Settings > Connections tab > Radio Manager.Setting Up Your Bluetooth CardNote: If you use the Get Connected! Wizard, which is recommended for normal usage, then this step is not necessary. This step would be used to change the friendly name of your device.1. Tap the Bluetooth icon that appears in the task tray on the Today screen.2. In the pop-up menu, select Advanced Features, then My Bluetooth Device. (If you installed OBEX, the menu also lists Transfer via Bluetooth.)3.  In the My Bluetooth Device screen, you can modify the Friendly Name and make any desired configuration changes. When done, tap OK.• In normal phone connect operation, Discoverable mode is not needed and should be disabled.• If you do enable Discoverable mode (e.g., for ActiveSync), note that it does not shut off by itself. To save power, remember to disable it when not needed. •Connectable, Use Authentication, and Use Encryption are also not required for printing or dial-up networking applications.• Check Use Authentication to enable the Use Encryption option.Assign COM PortsFollow these steps to view and/or modify the Bluetooth COM ports.
8 - 2 Rev D8/28/06 Dolphin® 9500 Series User’s Guide1. Tap on the Bluetooth icon on the Today screen. Select Advanced Features then My Bluetooth Device.Note: If you installed OBEX, the menu also lists Transfer via Bluetooth.2. The My Bluetooth Device screen appears. Tap on the COM Ports tab.3.  As needed, view and/or enable/disable the Bluetooth COM port assignments. Tap OK. You can also disable the IrDA port to free up a port for Bluetooth devices. Tap Start > Settings > Connections tab > IrDA and select Disable IrDA Port.Note: The Bluetooth Phone port cannot be disabled. Discover Bluetooth Device(s)Follow these steps to discover other Bluetooth devices nearby, including non-phone devices. The Device Discovery Wizard is a more detailed alternative to using the Bluetooth “Get Connected!” Wizard or Bluetooth ActiveSync or Bluetooth LAN Access options. The Device Discovery Wizard allows you to discover any type of Bluetooth device.1. If not open, launch the Bluetooth Devices folder. Tap on the Bluetooth icon on the Today screen. Select Advanced Features then Bluetooth Devices.2. In the Bluetooth Devices Folder, tap on the Device Discovery icon. Or you can tap on Tools. In the pop-up menu, select Device Discovery.
Dolphin® 9500 Series User’s Guide  Rev D8/28/068 - 33. Follow the Bluetooth Device Discovery Wizard to search for Bluetooth devices nearby. When prompted, select the device type you seek.4.  When the search is complete, a screen reports the discovered Bluetooth devices. Check the box next to any device you wish to save information about, (i.e., any devices you wish to connect to). Tap Next.5.  A service discovery phase begins, 5-10 seconds per chosen device.6. In the next screen, tap Finish.Bond With Discovered Device(s)Follow these steps to bond with an already discovered Bluetooth device. In most cases, bonding is for establishing secure communications with a Bluetooth-enabled phone. This is a more detailed alternative to using the Bluetooth “Get Connected! Wizard.”Important!• Do not try to bond with a Motorola Timeport 270C or Nokia 6310!• Do not use this method to bond with a printer! The third-party printing software included on the installation CD also handles bonding.1. If not open, launch the Bluetooth Devices folder. Tap on the Bluetooth icon in the Today screen. Select Advanced Features, then Bluetooth Devices.
8 - 4 Rev D8/28/06 Dolphin® 9500 Series User’s Guide2. Tap and hold your stylus on the Bluetooth device you want to bond with. In the pop-up menu, select Bond.3. Alternatively, after selecting a device, tap on the Bond icon. Or tap on Device, then select Bond.4. The Bluetooth Device Bonding Wizard launches. Follow the wizard to bond with your selected device. 5. As prompted, make sure the Bluetooth device that you want to bond with is in Bondable mode.
Dolphin® 9500 Series User’s Guide  Rev D8/28/068 - 56. If the remote device is set up to accept bonding, a Bluetooth Passkey screen appears. To continue bonding, enter the correct passkey and tap Reply.7. When you have successfully bonded with the other device, tap Finish.View Device PropertiesFollow these steps to view the properties of an already discovered device. 1. If not open, launch the Bluetooth Devices folder. Tap on the Bluetooth icon on the Today screen. Select Advanced Features then Bluetooth Devices.2. Select a device. Tap on the Properties icon, or tap on Device then select Properties. Alternatively, you can tap and hold your stylus on the Bluetooth device you want to view information about. In the pop-up menu, select Properties.3.  Use the General and Services screens to research device properties. If needed, assign a new device type icon by tapping on the arrow buttons in the General screen. You can also use the Device name field to rename the device. When done, tap OK for the setting to take effect.Set Up Your Favorite DeviceFollow these steps to set up default devices in the Bluetooth Devices folder. Please note that the Get Connected! Wizard automatically assigns the favorite phone.1. Tap Tools > My Favorites.
8 - 6 Rev D8/28/06 Dolphin® 9500 Series User’s Guide2. Tap on the tab for the type of device you would like to set a favorite for. If needed, use the arrow buttons to scroll and find the tab you need.Note: Tabs appears only for COM ports you have enabled. To enable a port, refer to the “Assign COM Ports” section earlier in this chapter.3. To select a favorite device, select Use the favorite selected above. In the drop-down list, select your device. Tap OK.4. After setting a device as your favorite, its icon appears in the Bluetooth Devices folder with a heart next to it.Change ViewsYou can switch between the Large Icons or Details views for the Bluetooth Devices folder.1. In Bluetooth Devices, tap on View.2. In the pop-up menu, choose between Large Icons or Details.Note: In Details view, you can see the Device Class and scroll right to see the current Bonded status.Delete a Device From the FolderIf you no longer plan to connect with it, you can delete a device from the Bluetooth Devices folder. 1. If not open, launch the Bluetooth Devices folder.Large Icons Details
Dolphin® 9500 Series User’s Guide  Rev D8/28/068 - 72. Tap and hold your stylus on the device you wish to delete. In the pop-up menu, select Delete.Turn Radio Transmitter ON/OFFYou may want to turn off the radio transmitter to save power or if you are entering an area with radio restrictions (e.g., an airplane).1. Tap on the Bluetooth icon in the task tray on the Today screen.2. In the pop-up menu, select Turn Transmitter OFF.3. The Bluetooth Card radio transmitter shuts off. The Bluetooth icon and menu options becomes gray.4. To turn the radio transmitter back on, tap on the gray Bluetooth icon. In the pop-up-menu, select Turn Transmitter ON.Bluetooth ActiveSyncThis section explains how to quickly and easily ActiveSync to a notebook or desktop computer with Microsoft ActiveSync.1. Tap on the Bluetooth icon. In the pop-up menu, select Bluetooth ActiveSync.2. The next screens varies depending on if your Bluetooth Devices folder contains any computers, and if one is chosen as your favorite. Please refer to the appropriate scenario:SCENARIO #1: Your Bluetooth Devices folder contains a favorite desktop computer.(a) When you tap Bluetooth ActiveSync, your device automatically tries to connect to your favorite computer. (b) The Connect To screen appears, reporting that it is trying to connect to Wireless ActiveSync.(c) After a successful connection is made, the status screen reports Connected. Now you are ready to synchronize files, if desired.SCENARIO #2: Your Bluetooth Devices folder contains no favorite desktop computer.
8 - 8 Rev D8/28/06 Dolphin® 9500 Series User’s Guide(a) When you tap on Bluetooth ActiveSync, a screen appears that allows you to choose which computer to connect to in your Bluetooth Devices folder. Choose a computer from the list and tap Select, or tap Find to search for another computer.Note: If the computer you want to connect to is not listed, tap Find to begin a search. Proceed as described in Scenario #3 on page 8-8.(b) Your device attempts to connect to your selected computer.(c) After a successful connection is made, the status screen reports Connected. Now you are ready to synchronize files, if desired.SCENARIO #3: Your Bluetooth Devices folder contains no computers.(a) When you tap on Bluetooth ActiveSync, a Bluetooth Device Search automatically begins.Note: You can also start the device search by tapping Find in the Bluetooth Devices screen.(b) After the search is complete, select the computer you wish to ActiveSync with and tap Select. If the computer is not listed, make sure the computer is discoverable and tap Refresh to search again.(c) After you tap Select, a service discovery phase begins.
Dolphin® 9500 Series User’s Guide  Rev D8/28/068 - 9(d) The Connect To screen appears, reporting that it is trying to connect to Wireless ActiveSync.(e) After a successful connection is made, the status screen reports Connected. Now you are ready to synchronize, if desired.Bluetooth LAN AccessThis section explains how to use the Bluetooth LAN Access feature to quickly and easily connect to a Bluetooth-enabled LAN access point.1. Tap on the Bluetooth icon. In the pop-up menu, select Bluetooth LAN Access.2. The next screens varies depending on if your Bluetooth Devices folder contains any access points, and if one is chosen as your favorite. Please refer to the appropriate scenario:SCENARIO #1: Your Bluetooth Devices folder contains no favorite access point.(a) When you tap Bluetooth LAN Access, a screen appears that allows you to choose which access point to connect to in your Bluetooth Devices folder. Choose an access point from the list and tap Select. Note: If your access point is not listed, tap Find and proceed as described in Scenario #3.(b) Your device tries to connect to the selected access point.(c) If your LAN requires a passkey, a screen appears asking for the passkey. Enter the passkey, then tap OK.(d) After a successful connection is made, the status screen reports Connected.(e) Now you are ready to access your LAN for Internet access, files, etc.SCENARIO #2: Your Bluetooth Devices folder contains a favorite access point.
8 - 10 Rev D8/28/06 Dolphin® 9500 Series User’s Guide(a) When you tap Bluetooth LAN Access, the device automatically tries to connect with your favorite access point.(b) If your LAN requires a passkey, a screen appears, asking for the passkey. Enter the passkey, then tap OK.(c) After a successful connection is made, the status screen reports Connected.(d) Now you are ready to access your LAN for Internet access, files, etc.SCENARIO #3: Your Bluetooth Devices folder has no access points. (a) When you tap Bluetooth LAN Access, the device automatically begins to search for new Bluetooth devices.Note: You can also start the device search by tapping Find in the Bluetooth Devices screen. See Scenario #2.(b) After the search is complete, select the access point you wish to connect to. Tap Select. If the access point is not listed, tap Refresh to search again.(c) After you tap Select, a service discovery phase begins.(d) If the LAN requires a Passkey, a screen appears, asking for the Passkey. Enter the passkey, then tap OK.(e) After a successful connection is made, the screen reports Connected.(f) Now you are ready to access your LAN for Internet access, files, etc.
Dolphin® 9500 Series User’s Guide  Rev D8/28/068 - 11OBEXThis section explains how to use the OBEX (object exchange) application to trade business cards, contacts or files with another Bluetooth device that supports OBEX.Bluetooth OBEX application supports five operations:• Exchange Business Cards• Send a Contact• Send a File• Browse Remote Device• Receive Contact or File• Enable File SharingThe first four operations - exchange business cards, send a contact, send a file, and browse remote device - are client-oriented. They involve initiating an object exchange.The last two operations - receive contact or file and enable file sharing - are server-oriented. They involve accepting objects in an exchange initiated by another Bluetooth device.Exchange Business Cards1. Make sure both Bluetooth devices have a business card assigned to them.If each device does not have a business card assigned to it, you cannot exchange business cards.To assign a business card to your device, do the following:• Tap on the Bluetooth icon. In the pop-up menu, tap Advanced Features > My Bluetooth Device.• Tap on the Object Sharing tab. Under My business card, tap Assign• In the next screen, select your business card and tap OK. If your business card is not listed, tap Contacts to create one.When you return to the Object Sharing screen, tap OK.2. Make sure the other Bluetooth device is set up to receive a contact. The device must support the OBEX Object Push profile.Note: If the other device is also using the Bluetooth Connection Kit, you can set it up to receive a contact by tapping the Bluetooth icon. In the pop-up menu, tap Transfer via Bluetooth > Receive Contact or File.
8 - 12 Rev D8/28/06 Dolphin® 9500 Series User’s Guide3. Now you are ready to exchange business cards. Tap on the Bluetooth icon. In the pop-up menu, tap Transfer via Bluetooth > Exchange Business Cards.4. If your device has no devices in the Bluetooth Devices Folder, then it begins to search for Bluetooth devices nearby.5. Select the Bluetooth device you wish to exchange business cards with. If the device is not listed, tap Find.6. Your device begins exchanging business cards. After the exchange, the new business card should appear in your Contacts Send a Contact1. Make sure the other Bluetooth device is set up to receive a contact. It must support the OBEX Object Push server profile. Refer to the documentation that came with the device for instructions.Note: If the other device is also using the Bluetooth Connection Kit, you can set it up to receive a contact by tapping the Bluetooth icon. In the pop-up menu, tap Transfer via Bluetooth > Receive Contact or File.2. Now you are ready to send a contact. Go to your Contacts folder.3. Tap and hold your stylus on the contact(s) you would like to send. In the pop-up menu, select Send Via Bluetooth.
Dolphin® 9500 Series User’s Guide  Rev D8/28/068 - 134. If your device has no devices in the Bluetooth Devices Folder, then it begins to search for Bluetooth devices nearby.5. Select the Bluetooth device you wish to send the contact(s) to. If the desired device is not listed, tap Find.6. Your device processes and sends the contact(s).Send a File1. Make sure the other Bluetooth device can receive a file; that device must support the OBEX Object Push server profile. Note: If the other device is also using the Bluetooth Connection Kit, you can set it up to receive a file by tapping the Bluetooth icon. In the pop-up menu, tap Transfer via Bluetooth > Receive Contact or File.2. Now you are ready to send a file. Tap the Bluetooth icon. In the pop-up menu, tap Transfer via Bluetooth > Send a File.3. If your device has no devices in the Bluetooth Devices Folder, then it begins to search for Bluetooth devices nearby.
8 - 14 Rev D8/28/06 Dolphin® 9500 Series User’s Guide4. Select the Bluetooth device you wish to send a file. If the desired device is not listed, tap Find.5. In the next screen, tap on the file you wish to send. You can use the Folder and Type drop-down menus to search for your file. Also, you can scroll horizontally to view the folder, date, size, type, and location of each file.6. Your device sends the file.Browse Remote DeviceThe Bluetooth File Explorer lets your device share files with another Bluetooth device. The other device must support the OBEX File Transfer server profile.This section covers the following file transfer operations:• Prepare for file transfer• Send/receive file(s) or folder(s)• Create a folder• Delete file(s) or folder(s)• Refresh remote view• Connect/disconnect• Exit the programNote: “Local device” refers to the device you are running the OBEX from. “Remote device” refers to the Bluetooth device you are trying to transfer files with.Prepare for File Transfer1. Make sure the remote device has file sharing enabled. It must support the OBEX File Transfer server profile.Note: If the other device is also using the Bluetooth Connection Kit, you can enable file sharing by tapping the Bluetooth icon. In the pop-up menu, tap Transfer via Bluetooth > Enable File Sharing.
Dolphin® 9500 Series User’s Guide  Rev D8/28/068 - 152. Now you are ready to browse the remote device. Tap on the Bluetooth icon. In the pop-up menu, tap Transfer via Bluetooth > Browse Remote Device.3. If your device has no devices in the Bluetooth Devices Folder that supports OBEX File Transfer, then it begins to search for Bluetooth devices nearby.4. Select the Bluetooth device you wish to browse. If the desired device is not listed, tap Find.5. Your device begins to establish a file sharing connection.6. After the devices successfully connect, the Bluetooth File Explorer appears. Half of the screen shows contents of the remote device, while the other half shows contents of your device (the local device). The very bottom of the screen reports the connection status.
8 - 16 Rev D8/28/06 Dolphin® 9500 Series User’s GuideSend/Receive File(s) or Folder(s)• Single-tap items to select them for transfer.• Double-tap on a folders to open it and see its contents.1. Select the file(s) or folder(s) that you wish to transfer. You can select items from only one device per transfer session. 2. There are two different ways to initiate the transfer:• Tap File > Send to remote or Get from remote, as applicable. The inappropriate option should be gray.• Tap on the Send to remote icon or Get from remote icon, as applicable. The inappropriate icon should be gray.3. A screen reports the status of the transfer.4. After the transfer, a copy of each selected item should appear in the other device.Create a Folder1. Tap on the File menu. Select Remote device or Local device, wherever you want to create a folder, then tap Create remote folder or Create local folder, as applicable.2. You can also tap and hold your stylus on an item in either the remote or local device that you wish to put in a new folder. In the pop-up menu, select Create folder.3. In the next screen, enter a name for your new folder. Tap OK.4. The new folder should be listed under the appropriate device.
Dolphin® 9500 Series User’s Guide  Rev D8/28/068 - 17Delete File(s) or Folder(s)1. Select the items you wish to delete. You can only delete items from one device at a time.2. Tap on the File menu. Select Remote device or Local device, wherever the items are located, then tap Delete remote item(s) or Delete local item(s), as applicable.3. Tap and hold your stylus an item in either the remote or local device that you wish to put in a new folder. In the pop-up menu, select Delete folder.4. In the Confirm screen, tap Yes.Refresh Remote View1. Tap on the Device menu. Select Refresh remote view.2. Your local device begins to read the contents of the remote device.3. After a few seconds, the contents view of the remote device is refreshed.Connect/DisconnectTo connect to the remote device, do the following:1. Make sure the remote device has file sharing enabled.2. Start the connection process by either of two methods:• Tap Device > Connect.• Tap the Connect icon.3. On the next screen, select the device you wish to connect to and tap Select. Your device attempts to connect to the selected device.To disconnect from the remote device, do the following:1. Start the disconnection process by either of two methods:• Tap Device > Disconnect.• Tap the Connect icon.2. Your device disconnects from the remote device. Afterwards, no contents are listed for the remote device.
8 - 18 Rev D8/28/06 Dolphin® 9500 Series User’s GuideExit Bluetooth File ExplorerTo exit the Bluetooth File Explorer, tap File > Exit.  Receive Contact or File1. Tap on the Bluetooth icon. In the pop-up menu, tap Transfer via Bluetooth > Receive Contact or File.2. The Receive Contact or File status screen appears. Your device waits two minutes for the contact or file.3. After successfully connecting to the remote device, the screen reports Connected then disappear. The new contact or file should now be on your device.4. If two minutes passes before you receive the item, tap Wait Again.5. After you receive the file or contact, the “Receive Contact or File” feature is automatically disabled.Enable File Sharing1. Tap on the Bluetooth icon. In the pop-up menu, tap Transfer via Bluetooth > Enable File Sharing.2. The Enable File Sharing status screen appears. Your device waits two minutes for the remote device to connect.3. After successfully connecting to the remote device, the screen reports that you are connected.4. If two minutes passes before you connect, tap Wait Again.5. File sharing is enabled until you end it by tapping Cancel.Using the DialerThis section explains how to assign a dialing prefix and use the Dialer to dial a number directly from your Contacts list. The Dialer makes it quick and easy to perform dial-up networking.Note: The Dialer has been verified to work with Nokia and Ericcson phones and is known not to work with the Motorola 270c, NTT Docomo Paldio 633S or Sony au C413S phone. Results may vary with other phones that are not listed as being supported by the Bluetooth system.
Dolphin® 9500 Series User’s Guide  Rev D8/28/068 - 19Assign a Dialing PrefixIf you have not already assigned a dialing prefix during the install process, you can do so by following these steps:1. Tap Start > Settings > System tab > Dialer.2. Select the appropriate Dialing Prefix, then tap OK.Using the Dialer1. To use the dialer, the device must already be connected to the Bluetooth phone. You can use the Get Connected! Wizard to do this. Also, the Bluetooth phone must be selected as your favorite.2. Tap Start > Contacts.3. Tap and hold your stylus on the contact you wish to dial to. In the pop-up menu, select Dial Contact. Alternatively, you can tap on Tools and select Dial Contact.4. If you have multiple phone numbers for a contact, a screen appears listing them, including any dialing prefix you may have assigned. Select the phone number you wish to dial.
8 - 20 Rev D8/28/06 Dolphin® 9500 Series User’s Guide5. Your device connects to your phone and begins dialing.The Dialer can dial a phone number containing any of the following non-numeric characters:*#+./!@-\space    A    B    C     D     T      P     WThe following string can also be included in a phone number: (',')The Dialer cannot dial a phone number containing non-numeric characters other than those listed above. Hand Held Products recommends that you follow the standard Microsoft Outlook format for phone numbers.Get Connected WizardThe Get Connected! Wizard guides you through a one-time setup process that prepares the device and phone for Bluetooth connections. The wizard varies depending on what phone you want to connect to.Ericcson, Nokia 6210, NTT DoCoMo, Sony Phones 1. Tap on the Bluetooth task tray icon. In the pop-up menu, select Get Connected!2. Follow the Bluetooth “Get Connected!” Wizard. In the second screen, use the drop-down list to select your Bluetooth phone. The wizard provides tailored instructions based on your selection.3. Follow the next screen(s) to prepare your specific phone for Bluetooth connections. You may need to do 1, 2 or all of the following steps:(a) Naming your Bluetooth phone(b) Setting your Bluetooth phone in Discoverable mode
Dolphin® 9500 Series User’s Guide  Rev D8/28/068 - 21(c) Preparing your Bluetooth passkey. 4. When the search is complete, a list of the discovered Bluetooth phones appears. Choose the phone you wish to connect to, and tap Select. A service discovery phase begins, about 5-10 seconds.5. As prompted in the next screen, prepare your phone for bonding. For instructions on setting your phone to “Bondable” or “Pairable” mode, refer to your phone manual. Have your passkey ready, then tap Next>.6. In the next screen, enter the passkey. Tap Reply.7. The mobile phone may then either automatically accept the passkey or ask you to enter one. If prompted for a passkey, use the same one you entered on the mobile computer.Note: Ericsson T68/T68i only: When the phone asks you if you want to bond, select 2: Add to paired devices. Do not tap ACCEPT.8. Tap Finish. After successfully connecting, the phone appears in the Bluetooth Devices folder. On the Today screen, the Bluetooth icon blinks. You do not need to run the Get Connected! Wizard again unless you plan to switch between different phones.Note: You may also switch between different phones by assigning a new “favorite phone” in the Bluetooth Devices folder.Motorola Timeport 270C, Nokia 3650/6310/7650/8910/8910i 1. Tap on the Bluetooth task tray icon. In the pop-up menu, select Get Connected!2. Follow the Bluetooth “Get Connected!” Wizard. In the second screen, use the drop-down list to select your Bluetooth phone. The wizard provides tailored instructions for your phone.Note: The screens below are for the Nokia 7650.
8 - 22 Rev D8/28/06 Dolphin® 9500 Series User’s Guide3. As directed on the next two screens, assign the phone a unique name, set the phone to Discoverable mode, and tap Next.4. The device searches for the phone. When the search is over, a list of the discovered Bluetooth phones appears.5. Choose the phone you want to connect to, and tap Select. A service discovery phase begins, about 5-10 seconds.6. The next two screens describe procedures you complete outside of the wizard. Read through each screen but do not complete the described procedures until you exit the wizard. Bonding with your phone - This must be completed to establish the Bluetooth connection and involves dial-up networking. Automatic Connections - This procedure is optional but makes future Bluetooth connections more convenient. 7. Continue to the last screen of the wizard and tap Finish. Now proceed to STEP 6 to complete the bonding process and, if desired, set up automatic connections.Dial Up ConnectionComplete the following steps to create a new Bluetooth internet connection via an ISP. Before setting up dial-up networking, prepare yourself with dial-up information and other necessary settings from your office network or isp. Also, refer to Microsoft’s connection manager for additional information.
Dolphin® 9500 Series User’s Guide  Rev D8/28/068 - 231. Tap Start > Settings > Connections tab > Connections. 2. In the top field, select Internet Settings and tap Modify. Then, tap New.3. Name=A name that you will remember for future connections. Modem=Bluetooth Phone. Baud Rate=115200. 4. Tap Next.5. In the Phone number field, enter the dial-up number. Tap Next.6. Uncheck Wait for dial tone before dialing. Tap Finish.7. Now you are ready to start the connection. In the Connections screen, under Internet Settings, tap Connect. In Network Log On, verify the dialing settings. Tap OK. Automatic Connections for Motorola Timeport 270C:• On the phone, press MENU.• Scroll to Settings, then press SELECT.• Scroll to Connection, then press ON.• On Bluetooth Link, press SELECT.• Scroll to Devices, then press SELECT.• Choose your mobile computer, then press EDIT.• Scroll to Access:Ask, then press CHANGE.• Scroll to Automatic, then press SELECT. Press DONE.Automatic Connections for Nokia 3650/7650:• On the phone, press MENU.• Scroll to Connectivity, then press OPTIONS.• The Open option should be highlighted. Press SELECT.• The Bluetooth option should be highlighted. Press OPTIONS.• The Open option should be highlighted. Press SELECT.
8 - 24 Rev D8/28/06 Dolphin® 9500 Series User’s Guide• Scroll to the right tab to access the Paired devices list. Highlight your mobile computer, then press OPTIONS.• Scroll to Set as authorized, then press SELECT.• In the confirmation screen, press YES.Automatic Connections for Nokia 6310/8910/8910i:• On the phone, press MENU.• Scroll to 10 Bluetooth, then press SELECT.• Scroll to 4 View Paired Devices, then press SELECT.• Highlight the Dolphin terminal, then press OPTIONS.• Scroll to 3 Request Connection Authorization, then press NO.To use a different Bluetooth phone for dial-up networking, you can use the same connection setup, but you must make the new phone your favorite. Just run the Get Connected! Wizard again, select the new phone, and make it your new Favorite when prompted.
Dolphin® 9500 Series User’s Guide  Rev D8/28/069 - 19Wireless WAN (WWAN) Communications with GSM/GPRS The Dolphin 9500 is the only terminal in the Dolphin 9500 Series that can be configured with an integrated Siemens® GSM/GPRS quad-band radio module for WWAN communications.Overview Enabling the GSM/GPRS Radio The radio driver for GSM is installed and enabled by default after each hard reset. Before using the radio, make sure that the GSM radio is enabled. For details, see Using the Radio Manager on page 4-15.GSM RadiosDolphin 7900 terminals can support an MC-45 or MC-75 radio for two-way voice and data communication. MC-45 Radio Supports 900/1800/1900 MHz frequencies for use in Europe, Middle East, Asia, and Australia. MC-75 Radio Supports 850/900/1800/1900 MHz frequencies for use in the U.S., Canada, Latin America, Europe, Middle East, Asia, and Australia. Dual-Band AntennaDolphin terminals configured with a GSM radio feature an external antenna that is optimized for power output and receiver sensitivity. This is an omni-directional antenna with zero dBm gain. For the MC-75 radio, there are two different antennas based on geographical location; each supports two bandwidths:Europe  Supports 900 MHz and 1800 MHz bands. This antenna is color-coded with a white O-ring on the inside of the antenna.North America Supports 850 MHz and 1900 MHz bands. This antenna is color-coded with a green O-ring on the inside of the antenna.RequirementsUsing GMS/GPRS on a Dolphin 9500 terminal requires a:• Network subscription to a GSM/GPRS network (you need to know what service providers are in your geographic area), and• SIM card that has been activated by the network service provider installed on the terminal (see SIM Card Installation on page 9-2).CapabilitiesDolphin terminals with integrated GSM/GPRS radios are optimized for the following two-way voice and data communications:   • GSM voice data ("dial-up")• SMS (Short Message Service) text messages• GPRS Class 10 - data transmissions average 40-60 Kbps (available speed depends on the wireless network carrier)GSM  Short for Global System for Mobile communications, GSM is an open, non-proprietary wireless WAN system that is constantly evolving and growing. One of its great strengths is international roaming capability, which provides standardized dialing in more than 170 countries. GPRS  Short for General Packet Radio Service, GPRS is a non-voice value added service that allows packet-switched data to be instantly sent and received across mobile telephone networks.
9 - 2 Rev D8/28/06 Dolphin® 9500 Series User’s GuideSIM Card InstallationShort for Subscriber Information Module, a SIM card stores the subscriber's personal information, GSM/GPRS radio settings, security keys, contacts, etc. SIM cards are installed in compatible mobile devices, enabling you to switch devices without losing personal and setup information. SIM Card RequirementsBefore installing the SIM card:• The SIM card must be activated by the service provider.• The terminal must be powered down.Note: If no SIM card is installed, you can still make emergency phone calls such as 9-1-1, for example.To Install a SIM CardOn the Dolphin 9500 terminal, access to the SIM card is located under the battery well, which enables easy access to the SIM card while securing it under an installed battery.1. Turn off your terminal and lay it face-down on a flat surface.2. Remove the battery pack; see To Remove the Main Battery Pack on page 2-7. 3. Unscrew the faceplate of the SIM card door. You must use a Torx T6 wrench. You can purchase this wrench from Hand Held Products, part number 100001700.4. Insert your SIM card. Make sure the interface on the card is connected to the SIM Card interface in the slot; the beveled corner is in the upper right corner.Battery WellSIM Card DoorBattery Interface
Dolphin® 9500 Series User’s Guide  Rev D8/28/069 - 35. Place the SIM card door over the secured SIM card and fasten the screws.6. Install the battery pack and turn on the terminal.Audio ModesThe back panel of the Dolphin 9500 contains both a speaker and a microphone that you can use to send and receive audio signals over the GSM network; see Back Panel Features on page 3-4. There are three audio modes:Handset Handset mode is when you use the use the back panel of the terminal just as you would a cell phone, holding the speaker to your ear to receive audio information and the your mouth over the microphone to send audio information. This is the default audio mode. Headset Headset mode is when you plug a headset into the audio jack and speak into the microphone. You must use a 2.5mm plug; no other audio plug will fit.Hands-Free Hands-free mode is when you use the back panel of the Dolphin 9500 as a speakerphone. To switch the back panel to speakerphone, in the Dialler, tap Settings > Speakerphone. The audio levels adjust appropriately for speakerphone use.Volume ControlUse the Dolphin keyboard to manually adjust the volume.To raise the volume, press the Blue modifier key + up arrow To lower the volume, press the Blue modifier key + down arrow Keyboard Combinations for CallsEach keyboard option contains a key combination to send and end a call using the Red modifier key. Keyboard  To Send, Press… To End (reject), Press…35-key keyboard Red + SP Red + DEL43-key keyboard Red + D Red + H56-key keyboard Red + 3 Red + 6SIM Card InterfaceScrewsSIM Card DoorSIM Card
9 - 4 Rev D8/28/06 Dolphin® 9500 Series User’s Guide
Dolphin® 9500 Series User’s Guide  Rev D8/28/0610 - 110ApplicationsDolphin terminals ship with the following Microsoft applications installed:•Calendar•Contacts•Tasks•Notes•Inbox•Pocket Internet Explorer•Pocket Word•Pocket Excel•Windows Media Player for Pocket PC•MSN Messenger•PicturesNote: Microsoft® Money, Microsoft® Reader are NOT installed on Dolphin terminals when shipped but may be installed from the Microsoft Companion CD.CalendarUse Calendar to schedule appointments, including meetings and other events. You can check your appointments in one of several views (Agenda, Day, Week, Month, and Year) and easily switch views by using the View menu.Note: You can customize the Calendar display, such as changing the first day of the week, by tapping Options on the Tools menu. To Create an Appointment1. If you are in Day or Week view, tap the desired date and time for the appointment.2. Tap New.
10 - 2 Rev D8/28/06 Dolphin® 9500 Series User’s Guide3. Using the input panel, enter a description and a location. Tap first to select the field. 4. If needed, tap the date and time to change them.5. Enter other desired information. To see all available fields, hide the input panel.6. To add notes, tap the Notes tab. You can enter text, draw, or create a recording. For more information on creating notes, refer to Notes on page 10-6.7. When finished, tap OK to return to the calendar. Note: If you select Remind me in an appointment, you will be reminded according to the options set in Start > Settings > Personal tab > Sounds & Reminders. Using the Summary ScreenWhen you tap an appointment in Calendar, a summary screen displays the details of the appointment.Creating Meeting RequestsYou can use Calendar to set up meetings with users of Outlook or Pocket Outlook. The meeting request is created automatically and sent either when you synchronize Inbox or when you connect to your e-mail server. Indicate how you want meeting requests sent by tapping Tools and then Options. If you send and receive e-mail messages through ActiveSync, select ActiveSync.
Dolphin® 9500 Series User’s Guide  Rev D8/28/0610 - 3To Schedule a Meeting1. Create an appointment.2. In the appointment details, hide the input panel, and then tap Attendees.3. From the list of e-mail addresses you’ve entered in Contacts, select the meeting attendees. The meeting notice is created automatically and placed in the Outbox folder.For more information on sending and receiving meeting requests, see Calendar Help and Inbox Help.ContactsContacts maintains the contact information - phone numbers, e-mails, addresses, etc. - you need on your terminal. Note: To change the way information is displayed in the list, tap Tools > Options.To Create a Contact1. On the Contacts screen, tap New.2. Using the SIP or Dolphin keyboard, enter the contact’s information. Scroll down to see all available fields.
10 - 4 Rev D8/28/06 Dolphin® 9500 Series User’s Guide3. To assign the contact to a category, scroll to and tap Categories, then select a category from the list. (In the contact list, you can display contacts by category.)4. To add notes about this contact, tap the Notes tab.For more information on creating notes, refer to Notes on page 10-6.5. When finished, tap OK to return to the contact list.To Search for ContactsThere are four ways to find a contact: • In the contact list, enter a contact name in the box under the navigation bar. To show all contacts again, clear text from the box or tap the button to the right of the box. • In the contact list, tap the category list (labeled All Contacts by default) and select the type of contact that you want displayed. To show all contacts again, select All Contacts. To view a contact not assigned to a category, select None. • To view the names of companies your contacts work for, in the contact list, tap View > By Company. The number of contacts that work for that company are displayed to the right of the company name. •Tap Start > Find, enter the contact name, select Contacts for the type, and then tap Go. Using the Summary ScreenWhen you tap a contact in the contact list, a summary screen displays their information. TasksUse Tasks to keep track of what you have to do.
Dolphin® 9500 Series User’s Guide  Rev D8/28/0610 - 5Note: To change the way information is displayed in the list, tap Tools > Options.To Create a Task1. Tap New.2. Using the SIP or Dolphin keyboard, enter the task information.If the input panel is open, you need to hide it to see all available fields.3. Tap Starts to enter a start date and/or Due to enter a due date for the task. 4. To assign the task to a category, tap Categories and select a category from the list. In the task list, you can display tasks by category.5. To add notes, tap the Notes tab. For more information on creating notes, refer to Notes on page 10-6.6. When finished, tap OK to return to the task list.Note: To quickly create a task with only a subject, tap Entry Bar on the Tools menu. Then, tap Tap here to add a new task and enter your task information.Using the Summary ScreenWhen you tap a task in the task list, a summary screen displays the task information.
10 - 6 Rev D8/28/06 Dolphin® 9500 Series User’s GuideNotesQuickly capture thoughts, reminders, ideas, drawings, and phone numbers with Notes. If a note is open when you create the recording, it will be included in the note as an icon. To Create a Note1. Tap New.2. Type your note using the SIP or the Dolphin keyboard.InboxUse Inbox to send and receive e-mail messages in either of these ways: • Synchronize e-mail messages with Microsoft Exchange or Microsoft Outlook on your desktop computer.• Send and receive e-mail messages by connecting directly to an e-mail server through an ISP or a network.Synchronizing E-mail MessagesE-mail messages can be synchronized as part of the general synchronization process. You need to enable Inbox synchronization in ActiveSync. For information on enabling Inbox synchronization, see ActiveSync Help on the desktop computer.During synchronization:• Messages are copied from the mail folders of Exchange or Outlook on your desktop computer to the ActiveSync folder in Inbox on the terminal. By default, you will receive messages from the past three days only, the first 100 lines of each message, and file attachments of less than 100 KB in size.
Dolphin® 9500 Series User’s Guide  Rev D8/28/0610 - 7• E-mail messages in subfolders must be selected in ActiveSync on your desktop computer to be transferred.• E-mail messages in the Outbox folder on the terminal are transferred to Exchange or Outlook, and then sent from those programs.Note: You can also synchronize e-mail messages with your desktop computer from a remote location. For more information, see Chapter 7.Connecting Directly to an E-mail ServerIn addition to synchronizing e-mail messages with your desktop computer, you can send and receive e-mail messages by connecting to an e-mail server. When you connect the terminal to the e-mail server, new messages are downloaded to the Inbox folder, messages in the Outbox folder are sent, and messages that have been deleted on the e-mail server are removed from the Inbox folder.Messages received directly from an e-mail server are linked to your e-mail server rather than your desktop computer. When you delete a message on the terminal, it is also deleted from the e-mail server the next time you connect the terminal to the e-mail server according to the settings selected in ActiveSync.You can work online or offline. When working online, you read and respond to messages while connected to the e-mail server. Messages are sent as soon as you tap Send, which saves space on the terminal. When working offline, after you’ve downloaded new message headers or partial messages, you can disconnect from the e-mail server and then decide which messages to download completely. The next time you connect, Inbox downloads the complete messages you’ve marked for retrieval and sends the messages you’ve composed.Receiving MessagesWhen you connect to your e-mail server or synchronize with your desktop computer, by default, you’ll receive messages from the last five days only, the first 100 lines of each new message, and file attachments of less than 100 KB in size. The original messages remain on the e-mail server or your desktop computer. You can mark the messages that you want to retrieve in full during your next synchronization or e-mail server connection. In the message list, tap and hold the message you want to retrieve. On the pop-up menu, tap Mark for Download. The icons in the Inbox message list give you visual indications of message status.You specify your downloading preferences when you set up the service or select your synchronization options. You can change them at any time:• Change options for Inbox synchronization using ActiveSync options. For more information, see ActiveSync Help.• Change options for direct e-mail server connections in Inbox on the terminal. Tap Tools and then tap Options. On the Service tab, tap the service you want to change. Tap and hold the service and select Delete to remove a service.Using the Message ListMessages you receive are displayed in the message list. By default, the most recently received messages are displayed first in the list and unread messages are displayed in bold type.
10 - 8 Rev D8/28/06 Dolphin® 9500 Series User’s GuideWhen you tap on a message to open it, the following screen appears: Composing Messages1. Tap New. 2. In the To field, enter the e-mail or SMS address of one or more recipients, separating them with a semicolon (;), or select a name from the contact list by tapping the Address Book button. All e-mail addresses entered in the e-mail fields in Contacts appear in the Address Book.3. Compose your message. To enter preset or frequently used messages, tap My Text and select a message.4. Tap Send when you’ve finished the message. If you are working offline, the message is moved to the Outbox folder and will be sent the next time you connect.5. If you are sending an SMS message and want to know if it was received, tap Edit, Options, and select Request SMS text message delivery notification before sending the message.Managing E-mail Messages and FoldersMessages are displayed in one of five folders for each service you have created: Inbox, Deleted Items, Drafts, Outbox, and Sent Items. The Deleted Items folder contains messages that have been deleted on the device. The behavior of the Deleted and Sent Items folders depends on the selected options. To select these options, tap Tools > Options > Message tab.To move a message to another folder, in the message list, tap and hold the message, tap Move to on the pop-up menu, and select the desired folder.To create additional folders, tap Tools > Manage Folders. Folder Behavior with a Direct Connection to an E-mail ServerThe behavior of the folders you create depends on whether you are using ActiveSync, SMS, POP3, or IMAP4. ActiveSyncIf you use ActiveSync, e-mail messages in the Inbox folder in Outlook on your desktop computer are automatically synchronized with the terminal. You can select to synchronize additional folders by designating them for ActiveSync. The folders you create and the messages you move will then be mirrored on the server. For example, if you move two messages from the Inbox folder to a folder named Family, and you have designated Family for synchronization, the server creates a copy of the Family folder and copies the messages into that folder. You can then read the messages while away from your desktop computer.SMSIf you use SMS, messages are stored in the Inbox folder.
Dolphin® 9500 Series User’s Guide  Rev D8/28/0610 - 9POP3If you use POP3 and you move e-mail messages to a folder you created, the link is broken between the messages on the terminal and their copies on the mail server. The next time you connect, the mail server will see that the messages are missing from the terminal Inbox and delete them from the server. This prevents you from having duplicate copies of a message, but it also means that you will no longer have access to messages that you move to folders created from anywhere except the terminal. IMAP4If you use IMAP4, the folders you create and the e-mail messages you move are mirrored on the server. Therefore, messages are available to you anytime you connect to your mail server, whether it is from the terminal or desktop computer. This synchronization of folders occurs whenever you connect to your mail server, create new folders, or rename/delete folders when connected. Pocket Internet Explorer Use Microsoft Pocket Internet Explorer to view Web or WAP pages in either of these ways:• During synchronization with your desktop computer, download your favorite links and mobile favorites that are stored in the Mobile Favorites subfolder in Internet Explorer on the desktop computer.• Connect to an ISP or network and browse the Web. When connected to an ISP or network, you can also download files and programs from the Internet or intranet.Accessing Pocket Internet ExplorerTo switch to Pocket Internet Explorer, tap Start and then Internet Explorer.You can use Pocket Internet Explorer to browse Mobile Favorites and channels that have been downloaded without connecting to the Internet. You can also connect to the Internet through an ISP or a network connection and browse the Web.Browse the Internet on Your TerminalYou must set up a connection to your ISP or corporate network using Connections before browsing; see Using an ISP on page 6-8. If you select Pocket Internet Explorer before setting up the network connections, a screen may appear allowing you to proceed to the connection settings screen. After you select the settings, return to Pocket Internet Explorer. 1. Open Internet Explorer (Start > Internet Explorer).2. To connect and start browsing, tap View and then Address Bar. 3. In the address bar that appears at the top of the screen, enter the Web address you want to visit and then tap Go. 4. Tap the arrow to choose from previously entered addresses.If Mobile Favorites have been set up, you can tap one of them to start browsing. See The Mobile Favorites Folder on page 10-10. To add a favorite link while browsing, navigate to the page you want to add, tap and hold on the page, and tap Add to Favorites on the pop-up menu.
10 - 10 Rev D8/28/06 Dolphin® 9500 Series User’s GuideView OptionsYou can switch to a One Column view, which condenses web content into a single column so that you do not have to scroll right to see the entire page. Tap View > Layout > One Column.The Mobile Favorites FolderPurposeThe Mobile Favorites folder was created on your desktop computer when you installed ActiveSync. It enables you to create Favorite Links on your desktop computer that you can transfer to your Dolphin terminal. Those Favorite Links are then available for selection when browsing the internet on your terminal. ProcessFirst, you create your Favorite Links in the Mobile Favorites folder on your desktop computer. Then, the next time you sync your desktop computer with your terminal, those Mobile Favorites are transferred to the Mobile Favorites folder on to your terminal. Only items stored in the Mobile Favorites subfolder in the Favorites folder in Internet Explorer on your desktop computer are synchronized with the Mobile Favorites folder on your terminal. Note: Unless you mark a Favorite Link as a mobile favorite, only the link downloads to your terminal, and you will need to connect to your ISP or network to view the content. For more information on synchronization, see ActiveSync Help on the desktop computer.Creating and Synchronizing Mobile Favorites If you are using Microsoft Internet Explorer 5.0 or later on your desktop computer, you can download Mobile Favorites to the terminal. Synchronizing mobile favorites downloads Web content to your device so that you can view pages while you are disconnected from your ISP and desktop computer.Use the Internet Explorer plug-in installed with ActiveSync to create mobile favorites1. On your desktop computer, open Internet Explorer, click Tools > Create Mobile Favorite.2. To change the link name, enter a new name in the Name box. 3. Optionally, in Update, select a desired update schedule.4. Tap OK. Internet Explorer downloads the latest version of the page to your desktop computer.Default View  One Column View
Dolphin® 9500 Series User’s Guide  Rev D8/28/0610 - 115. If you want to download the pages that are linked to this mobile favorite, in Internet Explorer on the desktop computer, right-click the mobile favorite and then click Properties. On the Download tab, specify the number of links down that you want to download. To conserve memory, go only one level down.6. Synchronize the terminal and desktop computer. Mobile favorites that are stored in the Mobile Favorites folder in Internet Explorer are downloaded to the terminal.If you did not specify an update schedule in Step 3, you will need to manually download content to keep the information updated on your desktop computer and terminal. Before synchronizing, in Internet Explorer on your desktop computer, click Tools and then Synchronize. You will see the last time content was downloaded to the desktop computer, and you can manually download content if needed.You can add a button to the Internet Explorer toolbar for creating mobile favorites. In Internet Explorer on your desktop computer, click View, Toolbars, and then Customize.View Mobile Favorites and Channels on the Terminal1. Access Pocket Internet Explorer.2. Tap the Favorites button to display your list of favorites  . 3. Tap the page you want to view. You’ll see the page that was downloaded the last time you synchronized with your desktop computer. If the page is not on the terminal, the favorite will be dimmed. You will need to synchronize with your desktop computer again to download the page to the terminal, or connect to the Internet to view the page.Mobile favorites take up storage memory on the terminal. To minimize the amount of memory used:• In the settings for the Favorites information type in ActiveSync options, turn off pictures and sounds, or stop specific mobile favorites from being downloaded to the terminal. For more information, see ActiveSync Help.• Limit the number of downloaded linked pages. In Internet Explorer on the desktop computer, right-click the mobile favorite you want to change and then Properties. On the Download tab, specify 0 or 1 for the number of linked pages you want to download.Using AvantGo® ChannelsAvantGo is a free interactive service that provides access to personalized content and thousands of popular web sites. Subscribe to AvantGo channels directly from the terminal. For more information, visit:  http://avantgo.com/frontdoor/index.html.To Sign Up for AvantGo 1. In ActiveSync options on the desktop computer, turn on synchronization for the AvantGo information type.2. In Pocket Internet Explorer, tap the Favorites button to display your list of favorites  .3. Tap the AvantGo Channels link.4. Tap Activate and follow the directions on the screen. Synchronize the terminal with your desktop computer and then tap the My Channels button to complete the AvantGo setup.
10 - 12 Rev D8/28/06 Dolphin® 9500 Series User’s Guide5. When synchronization is complete, tap the AvantGo Channels link in your list of favorites to see a few of the most popular channels. To add or remove channels, tap the Add or Remove link.Pocket WordPocket Word works with Microsoft Word on your desktop computer to give you easy access to copies of your documents. You can create new documents on the terminal, or you can copy and paste documents from your desktop computer. Synchronize documents between your desktop computer and your device so that you have the most up-to-date content in both locations.You can open only one document at a time; when you open a second document, you’ll be asked to save the first. You can save a document you create or edit in a variety of formats, including Word (.doc), Pocket Word (.psw), Rich Text Format (.rtf), and Plain Text (.txt). Using Pocket Word   Pocket Word contains a list of the files stored on the terminal. Tap a file in the list to open it. To delete, make copies of, and send files, tap and hold a file in the list. Then, select the appropriate action on the pop-up menu.You can change the zoom magnification by tapping View > Zoom, and then selecting the percentage you want. Select a higher percentage to enter text and a lower one to see more of your document.If you’re opening a Word document created on a desktop computer, select Wrap to Window on the View menu so that you can see the entire document.Creating a Word FileTo create a new file, tap Start > Programs > Pocket Word > New. A blank document appears. If you’ve selected a template for new documents in the Options dialog box, that template appears with appropriate text and formatting already provided.You can enter information in Pocket Word in one of two modes (typing on the SIP or keyboard and drawing), which are displayed on the View menu.
Dolphin® 9500 Series User’s Guide  Rev D8/28/0610 - 13Typing ModeUsing the SIP or Dolphin keypad, enter typed text into the document. To format existing text and to edit text, first select the text. You can select text as you do in a Word document, using your stylus instead of the mouse to drag through the text you want to select. You can search a document to find text by tapping Edit and then Find/Replace.Drawing ModeIn drawing mode, use your stylus to draw on the screen. Gridlines appear as a guide. When you lift your stylus off the screen after the first stroke, you’ll see a drawing box indicating the boundaries of the drawing. Every subsequent stroke within or touching the drawing box becomes part of the drawing. For more information on using Pocket Word, tap Start and then Help.
10 - 14 Rev D8/28/06 Dolphin® 9500 Series User’s GuidePocket ExcelPocket Excel works with Microsoft Excel on your desktop computer to give you easy access to copies of your workbooks. You can create new workbooks on the terminal, or you can copy and paste workbooks from your desktop computer. Synchronize workbooks between your desktop computer and the terminal so that you have the most up-to-date content in both locations.You can open only one workbook at a time; when you open a second workbook, you’ll be asked to save the first. You can save a workbook you create or edit in a variety of formats, including Pocket Excel (.pxl) and Excel (.xls).Pocket Excel contains a list of the files stored on your device. Tap a file in the list to open it. To delete, make copies of, and send files, tap and hold a file in the list. Then select the appropriate action from the pop-up menu. Pocket Excel provides fundamental spreadsheet tools, such as formulas, functions, sorting, and filtering. To display the toolbar, tap View > Toolbar.Creating an Excel FileTo create a new file, tap Start > Programs > Pocket Excel > New. A blank workbook appears. If you’ve selected a template for new workbooks in the Options dialog box, that template appears with appropriate text and formatting already provided. If your workbook contains sensitive information, you can protect it with a password. To do so, open the workbook, tap Edit, and then Password. Every time you open the workbook, you will need to enter the password, so choose one that is easy for you to remember but hard for others to guess.Tips for Working in Pocket Excel• View in full-screen mode to see as much of your worksheet as possible. Tap View and then Full Screen. To exit full-screen mode, tap Restore.• Show and hide window elements. Tap View and then tap the elements you want to show or hide.• Freeze panes on a worksheet. First select the cell where you want to freeze panes. Tap View > Freeze Panes. You might want to freeze the top and left-most panes in a worksheet to keep row and column labels visible as you scroll through a sheet.• Split panes to view different areas of a large worksheet. Tap View > Split. Then drag the split bar to where you want it. To remove the split, tap View > Remove Split.• Show and hide rows and columns. To hide a hidden row or column, select a cell in the row or column you want to hide. Then tap Format,> Row or Column > Hide. To show a hidden row or column, tap Tools > Go To, and then type a reference that is in the hidden row or column. Then tap Format > Row or Column > Unhide.For more information on using Pocket Excel, tap Start > Help.
Dolphin® 9500 Series User’s Guide  Rev D8/28/0610 - 15Windows Media Player for Pocket PCUse Microsoft Windows Media Player (WMP) for Pocket PC to play digital audio and video files stored on the terminal. To switch to Windows Media Player for Pocket PC, tap Start > Windows Media.After a media file has been loaded, you can play, pause, stop, song advance/reverse, mute sound, or adjust volume.
10 - 16 Rev D8/28/06 Dolphin® 9500 Series User’s GuideTools MenuThe tools menu allows you to perform several important functions. About gives you information about the codecs used in your version of WMP.Settings allows you to configure several important aspects of WMP.Properties gives a detailed listing of a media file's attributes.Open URL allows you to open WMP-compliant media from a network or Internet resource.Add Web Favorite adds a streaming media file that is currently playing to web favorites.Repeat plays a playlist repeatedly.Shuffle plays items in a playlist in a random order.MSN MessengerMSN Messenger is an instant messaging program that lets you:• See who is online.• Send and receive instant messages.• Have instant message conversations with groups of contacts.Note: To use MSN Messenger, you must have a Microsoft Passport™ account or a Microsoft Exchange e-mail account. You must have a Passport to use MSN Messenger Service. If you have a Hotmail or MSN account, you already have a Passport account. Sign up for a Microsoft Passport account at www.passport.com. Setting Up an AccountBefore you can connect for the first time, you must enter the information from your Passport or Exchange account. After you set up your account information on the terminal for the first time, you will go directly to login when you access MSN Messenger.Note: Ensure that you are connected to the Internet (see Connections Tab on page 5-16).
Dolphin® 9500 Series User’s Guide  Rev D8/28/0610 - 171. Tap Start > Programs > MSN Messenger2. Tap Tools > Options > Account tab. 3. In the Accounts tab, enter your Passport or Exchange account information. Be sure to indicate the service you’re using to connect - Messenger or Exchange.4. When complete, tap OK. You are returned to the sign-in screen.5. To sign in, tap the sign-in screen and enter your e-mail address and password.Note: If you already use MSN Messenger, your contacts will show up on your device without being added again.
10 - 18 Rev D8/28/06 Dolphin® 9500 Series User’s GuidePicturesUse Pictures to view JPEG pictures stored on the terminal or storage card. To begin, tap Start > Programs > Pictures. Choose to view main memory or storage card contents. By tapping and holding on an image, you can create a clone of that file, delete that file, select all files, send file via e-mail, beam picture, or rename the image.
Dolphin® 9500 Series User’s Guide  Rev D8/28/0611 - 111Dolphin 9501 and Dolphin 9551OverviewDolphin 9550/9551 terminals contain the same robust features of the Dolphin 9500 Series, such as the Windows Mobile platform and rugged ergonomics. In addition, the Dolphin 9550/9551 terminal offer laser engine support, which enables you to scan and decode linear bar codes from greater distances. The expanded scanning and decoding capabilities combined with the terminal’s durability make Dolphin 9501/9551 terminals ideal for in-premise mobile application environments.Laser Engine SpecificationsDolphin 9550/9551 terminals may be equipped with one of the following SE1200 non decoded laser engines:Note: Dolphin 9501/9551 terminals do not support image capture.Supported Bar Code Symbologies Laser engines support only the decoding of linear bar codes; see 1D Symbologies on page 2-6.Aiming OptionsLaser engines do not support omni-directional scanning. To achieve an optimal scan, center the red aiming beam across the bar code horizontally as shown below.Laser Engine LocationThe laser engine points straight out of the contoured casing on the back panel of Dolphin 9501/9551 terminals. Name Bar Code Type Decodes from …SE1200HP (High Performance) 5 mil 2.75 to 7 in (0.07 to 0.17 m)55 mil reflective 5 to 50 in (.13 to 1.27 m)SE1200LR (Long Range) 10 mil 10 to 24 in (0.25 to .6 m)100 mil reflective 66 to 232 in (1.67 to 5.9 m)SE1200ALR (Advanced Long Range) 13 mil 18 to 39 in (0.45 to 1 m) 100 mil reflective 102 to 363 in (2.6 to 9.2 m)Image Engine Window
11 - 2 Rev D8/28/06 Dolphin® 9500 Series User’s GuideRadio OptionsDolphin 9501/9551 terminals can be configured with one or a combination of 802.11b and Bluetooth radios.For more information about radio operations, see Using the Radio Manager on page 4-15.Keyboard OptionsDolphin 9501/9551 terminals can be configured with any of the Dolphin keyboards. For more information, see Using the Keyboards on page 4-7.Peripherals and AccessoriesBecause Dolphin 9501/9551 terminals have the same Mechanical Connector (see page 3-9), they are compatible with all Dolphin 9500 Series Peripherals (see page 2-3) and Dolphin 9500 Series Accessories (see page 2-4). However, due to their different shape, both the Dolphin 9501/9551 terminals have their own enclosures.Note: The Dolphin 9551 requires the Dolphin 9550 Mobile Base to accommodate the pistol-grip handle. Front Panel FeaturesDolphin 9501/9551 terminals contain the same front panel features; see Front Panel Features on page 3-2.Bottom Panel FeaturesAll Dolphin 9500 series terminals contain the same industrial-grade, mechanical connector on the bottom panel; see Bottom Panel Features on page 3-9.
Dolphin® 9500 Series User’s Guide  Rev D8/28/0611 - 3Dolphin 9501 HardwareDolphin 9501 Side PanelThe Dolphin 9501 contains a powerful laser engine inside a solid, flashlight form factor. Like the Dolphin 9551, the front end of the bottom housing accommodates the laser engineFinger SaddleLaser Engine
11 - 4 Rev D8/28/06 Dolphin® 9500 Series User’s GuideDolphin 9501 Back PanelFor secure handling in the field, the back panel of the Dolphin 9501 contains a finger saddle. SpeakerLaser EngineMicrophoneFinger Saddle
Dolphin® 9500 Series User’s Guide  Rev D8/28/0611 - 5Dolphin 9501 Hand Strap and StylusThe hand strap is attached to the finger saddle and contains two stylus loops on either side.
11 - 6 Rev D8/28/06 Dolphin® 9500 Series User’s GuideDolphin 9551 HardwareThe Dolphin 9551 terminal features the same integrated pistol grip as the Dolphin 9550 for secure and versatile handling in scan-intensive applications. The front end of the bottom housing accommodates the laser engine. Dolphin 9551 Side PanelThe following graphic shows the left, side panel of the Dolphin 9551.Just like the Dolphin 9550, the stylus is stored in the pistol-grip handle.
Dolphin® 9500 Series User’s Guide  Rev D8/28/0611 - 7Dolphin 9551 Back PanelSpeakerLaser EngineMicrophonePistol-Grip Handle
11 - 8 Rev D8/28/06 Dolphin® 9500 Series User’s Guide
Dolphin® 9500 Series User’s Guide  Rev D8/28/0612 - 112Dolphin HomeBaseOverviewAs the hub of your Dolphin system, the Dolphin HomeBase charging and communication cradle supports both RS-232 and USB communications, which make it able to interface with the majority of PC-based enterprise systems. When a terminal is seated in the HomeBase, its main battery pack charges in less than four hours. PowerThe HomeBase completes a full charge of the main battery pack in less than four hours. The HomeBase also provides power to the intelligent battery charging system in all Dolphin terminals that senses when a full charge has been achieved and switches to a trickle charge to maintain the full charge. CommunicationsReliable data communications at speeds of up to 115k baud can be transmitted by the HomeBase through the RS-232 serial port. Using the full-speed USB port, the data transmission rate goes up to 12 Mbps. HomeBases cannot be physically connected to each other - sometimes referred to as “daisy-chained” - but can be networked together via a serial or USB hub.Convenient Storage Intelligent battery charging makes the Dolphin HomeBase a safe and convenient storage receptacle for your Dolphin terminal. CapacityThe Dolphin HomeBase holds one terminal and features an auxiliary battery well behind the terminal well that can charges a battery pack independently of the terminal well. This means that one HomeBase can charge two battery packs: the one installed in the terminal and a spare. Use only Dolphin 9500 Series peripherals, power cables, and power adapters. Use of peripherals, cables, or power adapters not sold/manufactured by Hand Held Products will void the warranty and may damage the terminal.Use only the Li-ion battery packs provided by Hand Held Products. The use of any battery pack not sold/manufactured by Hand Held Products in the Dolphin 9500 Series terminals will void your warranty and may result in damage to the Dolphin terminal or battery.!!
12 - 2 Rev D8/28/06 Dolphin® 9500 Series User’s GuideDolphin HomeBase Parts and FunctionsFront Panel Terminal Well Place the Dolphin terminal in this well to communicate with a host device, power the terminal, and charge its battery pack. If the host device is a desktop computer that uses ActiveSync, synchronization begins immediately. While seated in the terminal well, the main battery installed in the terminal charges. The HomeBase completely charges a battery pack in less than four hours. Auxiliary Battery WellSee Auxiliary Battery Well on page 12-3.DOCK LED   Turns solid green when the Dolphin terminal is properly seated in the Dolphin HomeBase. When this light is on, the terminal is connected to the base.AUX Battery LED Indicates status of the battery charging in the auxiliary battery well.   To see the auxiliary battery well, see Rear Panel on page 12-3.For information about charging a battery in the auxiliary battery well, see page 12-5.COMM LED   This is the communication LED. It indicates the status of data transfer between the Dolphin terminal and the host device. The color of this LED differs if the HomeBase is using the serial or USB port connection.This color means…Orange The auxiliary battery is charging. Green The auxiliary battery has completed charging and is ready for use.Terminal WellDOCK LEDAuxiliary Battery WellAUX Battery LEDCOMM LED
Dolphin® 9500 Series User’s Guide  Rev D8/28/0612 - 3If using the serial port   If using the USB port  Rear Panel Auxiliary Battery Well The HomeBase enables you to charge an additional Li-ion battery pack independently of the terminal well. This feature ensures that you can always have a fully-charged battery for your Dolphin terminal. See Charging a Spare Battery in the Auxiliary Battery Well on page 12-5.USB PortThis USB Port is full-speed and 2.0 compliant. Using a USB cable, you can connect the HomeBase to a peripheral device, such as a desktop computer or printer. When the Dolphin terminal is seated in the terminal well, it is connected to the peripheral device via the HomeBase. The USB port on the HomeBase requires that you use ActiveSync 3.7 or higher.RS-232 Port Use a 9-pin, RS-232 cable from Hand Held Products to connect this port to a peripheral device for RS-232 data communication. For more information, see HomeBase Serial Connector on page 12-4.DC Power Jack Use a power cable from Hand Held Products to supply power to this power jack. For more information, see Powering the HomeBase on page 12-4.This color means…Red Serial data is being sent from the Host Device to the Dolphin HomeBase. Green Serial data is being sent from the Dolphin HomeBase to the Host Device.Orange Serial data is being sent at high data rates.This color means…Green LEDA USB Connection is established with the host computer.Auxiliary Battery WellDC Power JackRS-232 PortUSB Port
12 - 4 Rev D8/28/06 Dolphin® 9500 Series User’s GuidePowering the HomeBaseThe terminal requires 9.5 Volts DC input for communications and battery charging; the Hand Held Products’ power cable contains a power adapter that converts the power source voltage accordingly. Only the power adapter cable from Hand Held Products converts the voltage appropriately.Hand Held Products recommends that you leave the Dolphin HomeBase connected to its power source at all times, so that it is always ready to use.1. Connect the Hand Held Products’ power cable to the DC jack on the rear panel of the HomeBase. 2. Connect the Hand Held Products’ power cable to the power adapter.3. Plug the power adapter cable into the power source. The HomeBase is now powered. HomeBase Serial ConnectorThe following diagram displays the pin diagram of the serial connector of the HomeBase. Note: Signals referenced are for a DTE device. The HomeBase is at a right-angle to the printed circuit board (PCB). The ninth pin has a ring indicator (RI).
Dolphin® 9500 Series User’s Guide  Rev D8/28/0612 - 5Charging the Main BatteryThe Dolphin HomeBase powers the terminal and fully charges its main battery pack in less than four hours. The HomeBase contains an intelligent battery charging system that protects the battery from being damaged by overcharging. The unit senses when a battery pack is fully charged and automatically switches to a trickle charge that maintains the battery at full capacity. Therefore, Dolphin terminals may be stored in the HomeBase without damage to the terminals, battery packs, or peripherals.To check battery power, use the Power system setting; see Power on page 5-10.For more information about Hand Held Products Li-ion batteries, see Batteries on page 3-10.To Power a Terminal and Charge its Main Battery1. Install the battery pack in the terminal; see Install the Main Battery Pack on page 2-7.1. Connect the HomeBase to the power supply provided by Hand Held Products.2. Slide the terminal into the terminal well until the Dock LED lights green to indicate that the terminal is properly seated.3. The battery pack begins charging. Charging a Spare Battery in the Auxiliary Battery Well The auxiliary battery well located on the back of the HomeBase charges a spare battery independently of the terminal well. The Aux Battery LED on the front panel indicates the status of the battery in this well. Charge time is less than four hours; see Auxiliary Battery Well on page 12-3.1. Insert the end of the battery without the locking tab into the bottom of the auxiliary well opening.2. Snap the battery into place with a hinging motion. The Aux Battery LED lights orange.3. Use the AUX Battery LED to monitor charging progress.
12 - 6 Rev D8/28/06 Dolphin® 9500 Series User’s GuideCommunicationsUSBThe HomeBase also supports USB communications via the USB port located on the back. The HomeBase acts as a USB device by interfacing the USB signals of the Dolphin terminal to the USB of the host computer. Using a standard USB cable, the HomeBase’s USB interface allows the Dolphin terminal to communicate with a personal computer or to be networked through a USB hub.RS-232The HomeBase supports RS-232 communications via the RS-232 Communications Port located on the back of the device. This port enables the Dolphin terminal to communicate to a personal computer, modem, or any RS-232 device using a standard serial cable and communications software.Note: The HomeBase should have only one type of interface cable connected at a time, either USB or RS-232.Equipment RequirementsTo use the HomeBase for communications, you need the following equipment:• A HomeBase powered by a power cable and power adapter cable from Hand Held Products• For RS-232 communications, a Serial cable • For USB communications, a USB cable Setting up the HomeBase for USB CommunicationDolphin terminals support USB communications out of the box.Required Equipment:• HomeBase with power supply• USB Cable• ActiveSync v3.7 or above• Windows® 98 Second Edition*, Windows® Me, Windows® 2000, or Windows® XP computer. The HomeBase does not support Windows NT® when using a USB connection because Windows NT does not support USB. *Windows® 98 second edition provides full USB support.To Install the HomeBase Using USBNote: You must be using ActiveSync 3.7 or higher.1. Plug in the power supply and connect it to the back of the HomeBase. 2. Plug the USB cable into the back of the HomeBase.3. At this point, the hardware is installed and operating. You may need to reboot your PC to complete the installation process.
Dolphin® 9500 Series User’s Guide  Rev D8/28/0612 - 7Setting up the Terminal for ActiveSync Communications1. On the terminal, tap Start > ActiveSync > Tools > Options. Activesync opens displaying the PC tab.2.  In the Use this PC drop-down list, select the name of the host PC.3. Select Sync with this PC during manual sync to indicate that the terminal syncs with the selected host PC when synchronization is run from the terminal.4. Tap Options.5. Select Enable PC sync using this connection, then select ‘USB Connection from the drop-down list. 6. Tap OK.7. Place the Dolphin terminal in the HomeBase. The Dolphin terminal attempts to start an ActiveSync connection with the desktop computer automatically.Setting up the Desktop Computer for ActiveSync CommunicationsAfter the USB HomeBase is installed, you can use ActiveSync to connect to a Dolphin terminal that is properly seated in the HomeBase. These instructions assume that ActiveSync v3.7 is installed on your PC.
12 - 8 Rev D8/28/06 Dolphin® 9500 Series User’s GuideThe ActiveSync Connection Settings must be set as the following graphic indicates.The Allow USB connection with this desktop computer box must be checked. Do not check the serial cable box.Setting up the HomeBase for RS-232 CommunicationsConnecting the CablesConnect the HomeBase to the host computer or other device by plugging an RS-232 serial cable into the RS-232 Communications Port on the rear of the HomeBase. The wiring of your cable depends on whether the other device is set up as a Data Communications Equipment (DCE) or Data Terminal Equipment (DTE) device. The HomeBase Communication Port is configured as a DCE device. To communicate with a DCE device, use either a null modem adapter in line with a standard RS-232 cable, or a null-modem serial cable. To communicate with a DTE device such as a computer, use a standard (or straight-through) RS-232 cable. You can make your own cables by following the pin configuration in the chart below. To do so, you must determine if your host RS-232 device is 9-pin or 25-pin, and whether it is configured as a DCE or DTE device.RS-232 Pin ConfigurationNote: The Dolphin 9500 Series HomeBase cannot be daisy-chained.HomeBase /Host Port (DCE) IBM AT DB9 (DTE) IBM XT DB25 (DTE) Modem DB25 (DCE)Pin / Input Signal2   / (RD) 2 3 23   / (TD) 3 2 35   / (SG) 5 7 74   / (DTR) 4 20 66   / (DSR) 6 6 207   / (RTS) 7 4 58   / (CTS) 8 5 4
Dolphin® 9500 Series User’s Guide  Rev D8/28/0612 - 9Setting up the Terminal for ActiveSync Communications1. On the terminal, tap Start > ActiveSync > Tools > Options. Activesync opens displaying the PC tab.2.  In the Use this PC drop-down list, select the name of the host PC.3. Select Sync with this PC during manual sync to indicate that the terminal syncs with the selected host PC when synchronization is run from the terminal.4. Tap Options.5. Under When cradled, select Enable PC sync using this connection, and select ‘115200 Default from the drop-down list. ‘115200 baud is recommended for RS-232 communication. 6. Tap OK.7. Place the Dolphin in the HomeBase. The terminal attempts to start an ActiveSync connection with the desktop computer automatically.Setting up the Desktop Computer for ActiveSync CommunicationsActiveSync must be installed and configured for RS-232 on the desktop computer to sync successfully with a Dolphin terminal configured for RS-232 communication.
12 - 10 Rev D8/28/06 Dolphin® 9500 Series User’s GuideThe following graphic displays the correct ActiveSync Connection Settings on the desktop computer for an RS-232 connection.Note: You can have the USB connection box checked in addition to the serial cable box without affecting processing. However, you would most likely use one or the other.Communicating with the Dolphin TerminalTo initiate communications between the Dolphin terminal and peripheral, complete these steps:1. Insert the Dolphin terminal into the terminal well of the HomeBase. • The DOCK LED illuminates green. If the DOCK LED does not illuminate, make sure that the terminal is properly seated. You may need to remove and re-insert the terminal.• The Dolphin terminal activates; if the power is off, the terminal automatically powers on. If the terminal does not power on, verify that the Hand Held Products power supply is properly connected to the cradle and plugged into a functioning outlet.• The Dolphin terminal automatically opens ActiveSync to establish a connection.The HomeBase can now transfer data between the terminal and the host device. If communication does not occur, check the port connections to ensure that the cradle is correctly configured. Verifying CommunicationYou can verify that the USB driver is functioning by watching the COMM LED on the USB HomeBase. When the COMM LED illuminates solid green, the HomeBase is communicating with the host device.Verifying Data TransferThe COMM LED flashes when data is being transferred via the HomeBase. For an RS-232 connection, the COMM LED flashes red and green. For a USB connection, the COMM LED flashes green.
Dolphin® 9500 Series User’s Guide  Rev D8/28/0612 - 11Mounting the HomeBaseSet the Dolphin HomeBase on a dry, stable surface, such as a desktop or workbench near an electrical outlet. Be sure to provide enough workspace with good lighting for the user to view and operate the Dolphin terminal while it is in the HomeBase.When choosing a location, bear in mind that: • the mounting location must allow users easy access to the Auxiliary Battery Well, and• the serial and USB ports as well as the power jack face straight out of the rear panel, and you will most likely want easy access to them in the future.Desk MountingDolphin charging/communication cradles have a DIN rail (7.5 X 35 mm) slot on the bottom to allow for secure desk attachment of the unit if desired.   To mount the HomeBase, you slide the DIN rail slot along the bottom panel and secure it. Then, using the appropriate nuts and bolts, secure the DIN rail to the desk or flat surface. Auxiliary Battery WellSerial and USB port location (not in view) DIN Rail (7.5 X 35 mm)
12 - 12 Rev D8/28/06 Dolphin® 9500 Series User’s GuideWall MountingYou can purchase a wall mount kit that contains• a mounting bracket,• three screws, and• six washer/nut sets. The back wedge of the mounting bracket contains an open slot for the power and communications cables. There is an extra space between this slot and the rear panel of the HomeBase to allow easy access to the power and communications ports. For more details on both ports, see Rear Panel on page 12-3.Turn the secured HomeBase right side up.Attach the bottom panel to the mounting bracket; match the holes to the secured screws.4.2.Back wedge Open slot for cordsInsert a screw into the round end of each screw slot on the bottom panel. Slide each screw towards the narrow end of the slot. Then, use a washer/nut set on each screw to secure the screw in the slot.Use the remaining washer/nut sets to secure the mounting brackets to the bottom panel.Secure the back wedge of the mounting brackets to a stable vertical surface.1.3.5.
Dolphin® 9500 Series User’s Guide  Rev D8/28/0613 - 113Dolphin Mobile BaseOverviewThe Dolphin Mobile Base charging and communication cradle is designed specifically for in-premise and in-transit data collection applications. It features a flexible mounting bracket, a cigarette lighter adapter, and a power cable to adapt it to your environment. When a terminal is seated in the Mobile Base, its main battery pack charges in less than four hours. The serial connector supports RS-232 communication and power out to peripheral devices, such as hand held scanners.As the hub of your Dolphin mobile data collection system, the Mobile Base performs three important functions: charging, communications, and storage. ChargingThe Dolphin Mobile Base completes a full charge of the main battery pack in less than four hours. The Mobile Base also provides power to the intelligent battery charging system in all Dolphin terminals that senses when a full charge has been achieved and switches to a trickle charge to maintain the full charge. CommunicationsThe Mobile Base transmits data to other devices at speeds of up to 115K baud via its RS-232 serial port.Convenient Storage Intelligent battery charging makes the Mobile Base a safe and convenient storage receptacle for your Dolphin terminal.CapacityThe Mobile Base holds one terminal.Use only Dolphin 9500 Series peripherals, power cables, and power adapters. Use of peripherals, cables, or power adapters not sold/manufactured by Hand Held Products will void the warranty and may damage the terminal.Use only the Li-ion battery packs provided by Hand Held Products. The use of any battery pack not sold/manufactured by Hand Held Products in Dolphin 9500 Series terminals will void your warranty and may result in damage to the Dolphin terminal or battery.!!
13 - 2 Rev D8/28/06 Dolphin® 9500 Series User’s GuideMobile Base Parts and FunctionsFront PanelThe front panel of the Mobile Base has one slot. The following graphic features the Mobile Base with the Dolphin 9500 inserted into the terminal well.Terminal Well  Place the terminal in this well to communicate with a host device and charge the main battery pack. Mounting Brackets Use these to mount the Mobile Base to a fixed location.DOCK LED  Illuminates solid green when the Dolphin terminal is properly seated in the terminal well.COMM LED    Indicates the status of data transfer between the host device and the Dolphin terminalCOMM LED color Indicates that…Red  Data is being sent from the Host Device to the Dolphin Mobile Base. Green  Data is being sent from the Dolphin Mobile Base to the Host Device.Orange  Data is being sent at high data rates.Terminal WellCOMM LEDMounting BracketsDOCK LED
Dolphin® 9500 Series User’s Guide  Rev D8/28/0613 - 3Bottom PanelThe power supply and RS-232 connectors are located on the bottom of the unit.Power Supply ConnectorUse this connector to attach a Hand Held Products power cable to the Dolphin Mobile Base. The Mobile Base can be powered by an external DC power source of between 11 VDC to 48 VDC. To run on vehicle power, you can use the 12 VDC cable or 24 VDC cable option. The appropriate cable comes with the kit you ordered. The 12 VDC cable can be used with a cigarette lighter outlet. The 24 VDC, pigtail cable can be used to “hard-wire” into the vehicle power bus.Verify that the power source is always within the specified range and observe correct input voltage polarity. An improper input voltage range (above the 48 VDC maximum) or reverse polarity could damage the power conversion circuitry.RS-232 Communications Port Use a standard serial cable to connect the unit to a host device via RS-232; see Mobile Base Serial Connector on page 13-8. RS-232 Communications PortPower Supply Connector!
13 - 4 Rev D8/28/06 Dolphin® 9500 Series User’s GuidePowering the Dolphin TerminalWhen seated in a Mobile Base that is connected to the appropriate power source, the Dolphin terminal receives the power to charge its main battery and run its internal circuitry. Keep the Mobile Base plugged into the power source so that the Dolphin terminal battery pack stays fully charged.For more information about powering the Mobile Base, see Powering the Dolphin Mobile Base on page 13-6.Charging the Dolphin TerminalThe Mobile Base supplies charging power to the Dolphin terminal so that the terminal can monitor the charging of its battery pack. This charging method protects the battery from being damaged by overcharging. Therefore, the Dolphin terminal may be stored indefinitely in the Mobile Base without damage to the terminal, the battery pack, or the Mobile Base.To charge a Dolphin terminal, complete these steps:1. Insert a battery pack into the Dolphin terminal.2. Slide the terminal, imager window up and the LCD visible, into the terminal well of the Mobile Base until it stops. 3. When the Dolphin terminal is properly seated, the DOCK LED on the Mobile Base illuminates solid green. The terminal begins charging automatically.
Dolphin® 9500 Series User’s Guide  Rev D8/28/0613 - 5Installing the Dolphin Mobile BaseTo install the Dolphin Mobile Base, you need to mount it securely to an appropriate location and supply it with power.Mounting the Mobile BaseThe adjustable mounting bracket holds the terminal securely in place and gives the user a variety of options for mounting the Mobile Base. When selecting a location, keep in mind that the power supply and serial connectors point straight out the bottom panel.Back Panel and Brackets 1. Loosen the turnscrew.2. Insert the ball joint of the mounting bracket to the back of the bracket.3. Insert the ball joint on the back of the Mobile Base into the other side of the bracket.4. Tighten the turnscrew to secure both ball joints.5. Secure the mounting bracket to the appropriate location.Back PanelLatchThe latch sits on top of the spring arm assembly and holds the back of the terminal securely in place. The graphic above displays the mounting of a Dolphin 9500 terminal. There is another Dolphin Mobile Base that contains a special latch to accommodate the pistol-grip handle on the Dolphin 9550.Locking TabsWhen positioned as shown in the above graphic, the locking tabs secure the spring arm assembly, latch, and terminal in place. When seating a terminal, turn both arms up to allow the spring arm to move as necessary while the terminal is being inserted. After the terminal is seated, turn both arms toward the center to lock them.The both locking tabs must be pointing up to insert or remove a terminal in the Mobile Base.TurnscrewPower supply and RS-232 connectors (not in view) Mounting BracketLocking tabsBall JointBracketLatchSpring Arm AssemblyBall Joint
13 - 6 Rev D8/28/06 Dolphin® 9500 Series User’s GuideSpring Arm AssemblyThe spring arm assembly is the column that connects the latch to the back of the Mobile Base.Ball JointsThere are two ball joints: one on the back of the Mobile Base and one on the mounting bracket. Both ball joints are inserted into the bracket and secured to mount the Mobile Base.ConnectorsThe power and RS-232 connectors are located on the bottom panel. For more information, see Bottom Panel on page 13-3.BracketsBracketThe bracket contains the turnscrew and two slots. Ball joints are inserted into each slot and secured with the turnscrew.TurnscrewThe turnscrew is located on the top of the bracket. Rotate the turnscrew to secure or loosen the ball joint slots.Mounting BracketThe mounting bracket is what you attach to the mounting surface. It is comprised of a ball joint and flat disk. The disk contains drill holes you use to secure the Mobile Base to the mounting surface.Powering the Dolphin Mobile BaseNote: Hand Held Products recommends that you leave the Mobile Base connected to its power source at all times. The Mobile Base is powered via the power connector on the bottom panel; see Bottom Panel on page 13-3. Both the power and serial connectors are straight out, not at an angle. The Mobile Base must be powered by a 12 to 48 volt DC source.
Dolphin® 9500 Series User’s Guide  Rev D8/28/0613 - 7Setting the Mobile Base Up for Communications The Mobile Base RS-232 interface allows the Dolphin terminal to communicate to a personal computer, modem, or any standard RS-232 device using a standard serial cable and communications software.Connecting the CablesConnect the Mobile Base to the host computer or other device by plugging an RS-232 serial cable into the RS-232 Communications Port on the bottom of the Mobile Base. Plug the other end of the RS-232 serial cable into the correct port on the host RS-232 device. The wiring of your cable depends on whether the other device is set up as a Data Communications Equipment (DCE) or Data Terminal Equipment (DTE) device. The Mobile Base Communication Port is configured as a DCE device. To communicate with a DTE device such as a computer, use a standard (or straight-through) RS-232 cable. To communicate with a DCE device, use either a null modem adapter in line with a standard RS-232 cable, or a null-modem serial cable. RS-232 Pin Configuration Refer to this table if you want to make your own cables. To do so, you must determine if your host RS-232 device is • 9-pin or 25-pin and • configured as a DCE or DTE device.Mobile Base /Host Port (DCE) IBM AT DB9 (DTE) IBM XT DB25 (DTE) Modem DB25 (DCE)Pin / Input Signal2   / (RD) 2 3 23   / (TD) 3 2 35   / (SG) 5 7 74   / (DTR) 4 20 66   / (DSR) 6 6 207   / (RTS) 7 4 58   /   (CTS) 8 5 4
13 - 8 Rev D8/28/06 Dolphin® 9500 Series User’s GuideMobile Base Serial ConnectorThe following diagram displays the pin diagram of the serial connector of the bottom panel of the Mobile Base. Note: Signals referenced are for a DTE device.The Mobile Base connector is straight to the printed circuit board (PCB). The ninth pin sends 500mA at 5V power out. This can power a peripheral device, such as a mobile printer, as long as that peripheral device can accept 500mA at 5V.Configuring the Terminal for ActiveSync Communications1. On the terminal, tap Start > ActiveSync > Tools > Options. ActiveSync opens displaying the PC tab.2.  In the Use this PC drop-down list, select the name of the host PC.3. Select Sync with this PC during manual sync to indicate that the terminal syncs with the selected host PC when synchronization is run from the terminal.
Dolphin® 9500 Series User’s Guide  Rev D8/28/0613 - 94. Tap Options.5. Select Enable PC sync using this connection, then select ‘115200 Default from the drop-down list. ‘115200 baud is recommended for RS-232 communication. 6. Tap OK.7. Place the Dolphin terminal in the Mobile Base. The Dolphin terminal attempts to start an ActiveSync connection with the desktop computer automatically.
13 - 10 Rev D8/28/06 Dolphin® 9500 Series User’s Guide
Dolphin® 9500 Series User’s Guide  Rev D8/28/0614 - 114Dolphin ChargeBaseOverviewThe Dolphin ChargeBase is a four-slot charging cradle that can power four Dolphin terminals, and charge their main batteries in less than four hours.   ChargingThe Dolphin ChargeBase completes a full charge of the main battery pack in less than four hours. The ChargeBase also provides power to the intelligent battery charging system in all Dolphin terminals that senses when a full charge has been achieved and switches to a trickle charge to maintain the full charge. As battery packs charge, the charging circuitry follows the two-step charging process (CC-CV) that is recommended for Li-Ion batteries. The process monitors changes in temperature, current, and voltage. Convenient Storage Intelligent battery charging makes the Dolphin ChargeBase a safe and convenient storage receptacle for your Dolphin terminal. CapacityThe ChargeBase can hold up to four Dolphin terminals. Each charging slot charges each terminal independently of the other slots.Use only Dolphin 9500 Series peripherals, power cables, and power adapters. Use of peripherals, cables, or power adapters not sold/manufactured by Hand Held Products will void the warranty and may damage the terminal.Use only the Li-ion battery packs provided by Hand Held Products. The use of any battery pack not sold/manufactured by Hand Held Products in Dolphin 9500 Series terminals will void your warranty and may result in damage to the Dolphin terminal or battery.Dolphin ChargeBase Parts and FunctionsFront Panel Terminal WellsThe ChargeBase contains four terminals wells. Each well • Holds and charges the main battery pack of one Dolphin terminal. • Contains the companion to the industrial-grade, 17-pin connector on the bottom panel of Dolphin terminals.• Has two LEDs on the front: the Dock LED and the Charge LED.Dock LEDEach terminal well displays a Dock LED on the front that lights solid green when a terminal is properly seated, which means that the terminal and the base are connected.!!Charge LEDDock LEDTerminal Wells
14 - 2 Rev D8/28/06 Dolphin® 9500 Series User’s GuideCharge LEDsEach terminal well displays a Charge LED on the front that lights green to indicate charging. For details, see Charging Terminals in the ChargeBase on page 14-4.Back Panel   Power Supply ConnectorThis connector receives input from the power adapter. Plug the power connector cable from the power adapter into this connector. There is no ON/OFF switch on the back panel of the ChargeBase. The power switch is on the power adapter.Power SupplyThe ChargeBase includes a power supply that contains a power adapter to ensure the proper voltage. The power adapter is plugged into standard AC/DC outlets.Power Supply Connector
Dolphin® 9500 Series User’s Guide  Rev D8/28/0614 - 3Supplying Power to the ChargeBaseUsing a non-Hand Held Products power adapter voids your warranty and could result in serious damage to the circuitry of the Dolphin ChargeBase.1. Be sure the power switch on the power adapter is in the OFF position. 2. Plug the power cord into the power adapter.3. Plug the power connector cable into the power connector on the back panel of the ChargeBase.4. Plug the power cord into a standard wall outlet.5. On the power adapter, turn the power switch to the ON position. The LEDs illuminate as the ChargeBase powers up.6. The ChargeBase is ready to begin charging terminals.Inserting and Removing Terminals 1. To insert the terminal, hold the terminal with the bottom panel perpendicular to the base. 2. Slide the terminal into the well until the Dock LED lights solid green. 3. Charging begins immediately.Note: To remove a terminal, grasp it firmly in your hand and lift it up and out of the terminal well. The LEDs for the terminal well turns off.!
14 - 4 Rev D8/28/06 Dolphin® 9500 Series User’s GuideCharging Terminals in the ChargeBaseThe Dolphin ChargeBase charges the main battery of each terminal in less than four hours. The ChargeBase uses the intelligent battery charging system incorporated into all Dolphin terminals that prevents overcharging. This means that Dolphin terminals may be stored in the ChargeBase indefinitely without damage to the terminals, battery packs, or the ChargeBase.1. Power the ChargeBase; see Supplying Power to the ChargeBase on page 14-3.2. Insert a terminal into a terminal well; see Inserting and Removing Terminals on page 14-3.3. The Charge LED lights green to indicate that the terminal is powered and charging.Mounting the ChargeBaseThe Dolphin ChargeBase should be mounted to a dry, stable surface. When choosing a location, always bear in mind that • The mounting location must allow users easy access to the power connector.• The ChargeBase should be oriented so that users can easily read the labels.Bottom PanelThe bottom panel of the Dolphin ChargeBase offers two mounting options: insert a DIN Rail for desk mounting or use mounting brackets with the available screw slots for wall mounting.DIN Rail SlotScrew SlotsRubber Feet
Dolphin® 9500 Series User’s Guide  Rev D8/28/0614 - 5Using the DIN RailAll Dolphin charging/communication cradles have a DIN rail (7.5 X 35 mm) slot on the bottom panel to enable secure mounting. 1. Slide the DIN Rail into the DIN Rail slot on the bottom panel. 2. Turn the ChargeBase and DIN Rail right side up.3. Secure the DIN Rail to a stable, flat horizontal surface.
14 - 6 Rev D8/28/06 Dolphin® 9500 Series User’s GuideUsing the Wall Mount KitWall mount kits can be purchased separately to secure the ChargeBase to a wall or other vertical surface. For the ChargeBase, you need to purchase two kits so that you have two mounting brackets, one for each end of the ChargeBase. Each mounting bracket contains an open slot in the back to accommodate the connector cables.Each mounting bracket contains an open slot in the back to accommodate the connector cables.1. Insert the head of each screw into the round end of each of the four screw slots on the bottom panel. Slide each screw towards the narrow end of the screw slot. 2. Use a washer/nut set on each screw to secure the screw in each slot.3. Attach the bottom panel to the two mounting brackets.Screws in the narrow end of each slotWasher/NutOpen Slot for Connector Cables Mounting Brackets
Dolphin® 9500 Series User’s Guide  Rev D8/28/0614 - 74. Using the remaining washer and nut sets, secure the mounting brackets to the bottom panel.5. Secure the mounting brackets to an appropriate vertical surface.
14 - 8 Rev D8/28/06 Dolphin® 9500 Series User’s Guide
Dolphin® 9500 Series User’s Guide  Rev D8/28/0615 - 115Dolphin QuadChargerOverviewThe Dolphin QuadCharger is a four-slot charging station that provides intelligent battery management for the Li-ion battery packs used in Dolphin terminals. Batteries charge in less than four hours. The fourth slot features a battery analyzer that completely resets a battery, then displays its remaining capacity.CompatibilityThe QuadCharger is compatible with the Li-ion batteries that power the Dolphin terminals.Charging ProcessEach charging slot works independently of the other three. As battery packs charge, the charging circuitry follows the two-step charging process (CC-CV) that is recommended for Li-Ion batteries. The process monitors changes in temperature, current, and voltage and resets the battery pack.CapacityThe Dolphin QuadCharger holds four Li-ion batteries.Use only Dolphin 9500 Series peripherals, power cables, and power adapters. Use of peripherals, cables, or power adapters not sold/manufactured by Hand Held Products will void the warranty and may damage the terminal.Use only the Li-ion battery packs provided by Hand Held Products. The use of any battery pack not sold/manufactured by Hand Held Products in Dolphin 9500 Series terminals will void your warranty and may result in damage to the Dolphin terminal or battery.!!
15 - 2 Rev D8/28/06 Dolphin® 9500 Series User’s GuideDolphin QuadCharger Parts and FunctionsTop Panel Charging SlotsThe QuadCharger contains four charging slots. Each slot holds one Li-ion battery and charges it independently of the other slots. When a battery is placed in each slot, it immediately begins charging.   Charge/Analyze SlotThis is the fourth slot and the only one that can be used to analyze a battery. When a battery is placed in this slot, it begins charging just as it does in the other three slots. However, if you press the ANALYZE button, it runs the battery in this slot through the complete Analyze cycle. For more information, see Using the Battery Analyzer on page 15-5.Battery Capacity Indicator LEDsThese LEDs give a readout of the remaining battery capacity after it has run through a complete analyze cycle. For more information, see Battery Capacity Indicator LEDs on page 15-2.Analyze ButtonPress this button to start a battery analyze cycle; see Using the Battery Analyzer on page 15-5.Status LEDsA status LED is located above each of the four battery slots. The color of the LED indicates the charge status of the batteries in its slot. Status LED color This color indicates that the battery in the slot…Green Has completed its charge cycle and is ready for use.Orange Is being charged at a maximum charge rate.Red Encountered an error during the most recent charge cycle.OSLOT 4BATTERYCAPACITY100%0%ANALYZECHARGE/ANALYZE1234Charging SlotsStatus LEDCharge/Analyze SlotBattery Capacity LEDsAnalyze Button
Dolphin® 9500 Series User’s Guide  Rev D8/28/0615 - 3Back PanelPower SwitchToggle the power switch to turn the QuadCharger on and off. Power Supply ConnectorUse this connector to attach the power supply to the QuadCharger. The universal power supply accepts input voltages between 90-265 volts.Supplying Power to the QuadChargerThe QuadCharger must be connected to a power source via the Hand Held Products power adapter cable so that voltage is adjusted appropriately.1. Locate the AC power adapter cable and plug it into the power source. 2. Connect the power cable to the power adapter.3. Connect the power cable to the supply connector on the back of the QuadCharger. 4. Press the power switch to the ON position.The power LED illuminates green, and the charger performs a self-diagnostic test that lasts approximately five seconds.1234SwcOCHARGE/ANALYZE0%ALYZELOT 4TTERYPACITY0%Power Supply ConnectorPower SwitchStatus LED
15 - 4 Rev D8/28/06 Dolphin® 9500 Series User’s GuideInserting and Removing Battery Packs To insert a battery pack, place the end of the battery without the locking tab into the bottom of the charging pocket and snap the battery into place with a hinging motion. The Status LED for that particular slot illuminates orange when the battery has been properly inserted.To remove a battery pack, push the locking tab down and pull the battery out from the charging slot with a hinging motion.Storing BatteriesRecommendationsTo maintain top performance from batteries, follow these storage guidelines:• Avoid storing batteries outside of the specified temperature range of -4 to 104° F (-20 to 40°C) or in extremely high humidity.• For prolonged storage, do not keep batteries stored in a charger that is connected to a power source. Charging Batteries in the QuadChargerFor best results, battery packs should be at room temperature before recharging them; temperature has a marked effect on charging. The recommended temperature range is 50° to 95° F (10° to 35° C). 1. Set up the QuadCharger.2. Supply the QuadCharger with power and turn the power switch on.3. Insert batteries into the appropriate slots. The Status LED for each slot turns orange to indicate that the battery has begun a charge cycle.4. When the Status LED turns green, the battery in the slot has completed charging.
Dolphin® 9500 Series User’s Guide  Rev D8/28/0615 - 5Using the Battery AnalyzerPurposeUsing the Charge/Analyze slot helps you monitor the charge capacity of Li-ion batteries over time.LocationThe battery analyzer is located in the fourth slot - named the Charge/Analyze slot - of the ChargeBase. Only a battery placed in this slot can be run through an Analyze cycle. This slot contains Battery Capacity LEDs along the right side.Analyze CycleThe Analyze cycle is initiated when a battery is placed in the Charge/Analyze slot and the ANALYZE button is pressed. In an Analyze cycle, batteries are completely discharged, then recharged to capacity. The length of time it takes for a battery to complete the Analyze cycle varies depending on the initial state of the battery’s charge. Minimum time is 8 hours, maximum time is 12 hours.Battery Capacity LEDsThe Battery Capacity LEDs are located along the right side of the Charge/Analyze slot. Each LED equates to 10% battery capacity. These LEDs display the capacity of the battery at the end of the Analyze cycle. Battery capacity is displayed as a percentage of measured capacity/rated capacity. Status LEDThe Charge/Analyze slot also contains a standard status LED in the upper, left corner of the slot. When this slot is used for regular charging, this LED operates in the usual manner; see Status LEDs on page 15-2.When this slot is being used to analyze a battery, the Status LED functions as follows:To Analyze a Battery1. Insert the battery into the Charge/Analyze slot (the fourth).2. Press the ANALYZE button. The Status LED flashes orange to indicate that the analyzing cycle has begun.The Dolphin QuadCharger is accumulating battery pack information during the entire Analyze cycle. Do NOT remove the battery until the cycle has been completed. 3. Upon completion of the Analyze cycle, the Status LED lights solid green, and the Battery Capacity Indicator LEDs display the battery’s capacity.You can verify a battery’s capacity by installing the battery in a terminal and checking the power; see Power on page 5-10.Status LED color Indicates that the battery in the slot…Solid Green Has completed the Analyze cycle. Flashing Orange Is being analyzed. Solid Red Encountered an error during the Analyze cycle.!
15 - 6 Rev D8/28/06 Dolphin® 9500 Series User’s GuideMounting the QuadChargerThe Dolphin QuadCharger should be on a dry, stable surface. To easily adapt the QuadCharger to your environment, it can be mounted on a flat, horizontal surface such as a desktop or workbench, or a flat, vertical surface such as a wall. When choosing a location, always bear in mind that • the mounting location must allow users easy access to power switch and power connector.• the QuadCharger should be oriented so that users can easily insert and remove battery packs and read the labels, especially for the Battery Analyzer.Desk MountingAll Dolphin charging/communication cradles have a DIN rail (7.5 X 35 mm) slot on the bottom panel to enable secure mounting. To mount the QuadCharger, you slide the DIN rail slot along the bottom panel and secure it. Then, using the appropriate nuts and bolts, secure the DIN rail to the desk or wall.    The following graphic displays how to mount the QuadCharger to a desk:
Dolphin® 9500 Series User’s Guide  Rev D8/28/0615 - 7Wall MountingThe following graphic displays how mount a QuadCharger to a wall:
15 - 8 Rev D8/28/06 Dolphin® 9500 Series User’s GuideTroubleshootingIf you encounter problems with your Dolphin QuadCharger, refer to chart below for possible solutions. If problems persist, please contact Hand Held Products Technical Support. Problem IssueThe Status LED does not come on when I insert a battery pack into the Dolphin QuadChargerCheck the power connections on the Dolphin QuadCharger; make sure the POWER switch is ON and the battery pack is properly seated.The Status LED lights red during charging. Try to charge the battery in one of the other charging slots. If the red Status LED comes on again, then the problem is associated with the battery pack. If the red status stays with the charging slot, the problem is associated with the charging circuity.The Status LED lights red and stays on without a battery in the charging slot. An error occurred during the self-diagnostic test for that particular charging pocket. Call Hand Held Products Product Service and request an RMA. For additional warranty and return information, see Customer Support on page 16-1.
Dolphin® 9500 Series User’s Guide  Rev D8/28/0616 - 116Customer SupportProduct Service and RepairHand Held Products provides service for all its products through service centers throughout the world.  To obtain warranty or non-warranty service, return the unit to Hand Held Products (postage paid) with a copy of the dated purchase record attached.  Contact the appropriate location below to obtain a Return Material Authorization number (RMA #) before returning the product.North AmericaHand Held Products Corporate OfficesTelephone:(800) 782-4263, option 3Fax:   (704) 566-6015E-mail:   naservice@handheld.comAmérica LatinaHand Held Products América LatinaTeléfono:  (800) 782-4263, opción 8,  opción 4Teléfono:  (704) 998-3998, opción 8, opción 4 Fax:   (239) 263-9689E-mail:   laservice@handheld.comBrasilHand Held Products São PauloTeléfono:  Int+55 (11) 2178-0500Fax:   Int+55 (11) 2178-0502Hand Held Products Rio de JaneiroTeléfono: Int+55 (21) 2178-0500Fax:   Int+55 (21) 2178-0505São Paulo and Rio de JaneiroE-mail:   brservice@handheld.comMéxicoHand Held Products MéxicoTeléfono:  Intl+52 (55) 5203-2100Fax:   Intl+52 (55) 5531-3672E-mail:   mxservice@handheld.comEurope, Middle East, and AfricaHand Held Products EuropeTelephone:+31 (0) 40 29 01 633Fax:   +31 (0) 40 2901631E-mail:   euservice@handheld.comAsia PacificHand Held Products Asia/PacificTelephone:+852-2511-3050 Fax:    +852-2511-3557E-mail:   apservice@handheld.comJapanHand Held Products JapanTelephone:+81-3-5770-6312 Fax:   +81-3-5770-6313 E-mail:   apservice@handheld.comOnline Product Service and Repair AssistanceYou can also access product service and repair assistance online at www.handheld.com.
16 - 2 Rev D8/28/06 Dolphin® 9500 Series User’s GuideTechnical AssistanceIf you need assistance installing or troubleshooting, please call your Distributor or the nearest Hand Held Products technical support office:North America/Canada:Telephone: (800) 782-4263, option 4 (8 a.m. to 6 p.m.  EST)Fax number: (315) 685-4960E-mail: natechsupport@handheld.comAmérica Latina:Teléfono:  (800) 782-4263, opción 8, opción 3Teléfono:  (704) 998-3998, opción 8, opción 3E-mail: latechsupport@handheld.comBrasilSão PauloTeléfono:  Int+55 (11) 2178-0500Fax:  Int+55 (11) 2178-0502Rio de JaneiroTeléfono:  Int+55 (21) 2178-0500Fax:  Int+55 (21) 2178-0505São Paulo and Rio de JaneiroE-mail: brtechsupport@handheld.comMéxicoTeléfono:  (800) 782-4263, opción 8, opción 3Teléfono:  (704) 998-3998, opción 8, opción 3E-mail: latechsupport@handheld.comEurope, Middle East, and Africa:Telephone-European Ofc: Int+31 (0) 40 79 99 393U.K. Ofc: Int+44 1925 240055E-mail: eutechsupport@handheld.comAsia Pacific:Telephone: Int+852-3188-3485 or  2511-3050  E-mail: aptechsupport@handheld.comOnline Technical AssistanceYou can also access technical assistance online at www.handheld.com.
16 - 3 Rev D8/28/06 Dolphin® 9500 Series User’s GuideLimited WarrantyHand Held Products, Inc. (“Hand Held Products”) warrants its products to be free from defects in materials and workmanship and to conform to Hand Held Products’s published specifications applicable to the products purchased at the time of shipment. This warranty does not cover any Hand Held Products product which is (i) improperly installed or used; (ii) damaged by accident or negligence, including failure to follow the proper maintenance, service, and cleaning schedule; or (iii) damaged as a result of (A) modification or alteration by the purchaser or other party, (B) excessive voltage or current supplied to or drawn from the interface connections, (C) static electricity or electro-static discharge, (D) operation under conditions beyond the specified operating parameters, or (E) repair or service of the product by anyone other than Hand Held Products or its authorized representatives.This warranty shall extend from the time of shipment for the duration published by Hand Held Products for the product at the time of purchase (“Warranty Period”). Any defective product must be returned (at purchaser’s expense) during the Warranty Period to Hand Held Products’ factory or authorized service center for inspection. No product will be accepted by Hand Held Products without a Return Materials Authorization, which may be obtained by contacting Hand Held Products. In the event that the product is returned to Hand Held Products or its authorized service center within the Warranty Period and Hand Held Products determines to its satisfaction that the product is defective due to defects in materials or workmanship, Hand Held Products, at its sole option, will either repair or replace the product without charge, except for return shipping to Hand Held Products.EXCEPT AS MAY BE OTHERWISE PROVIDED BY APPLICABLE LAW, THE FOREGOING WARRANTY IS IN LIEU OF ALL OTHER COVENANTS OR WARRANTIES, EITHER EXPRESSED OR IMPLIED, ORAL OR WRITTEN, INCLUDING, WITHOUT LIMITATION, ANY IMPLIED WARRANTIES OF MERCHANTABILITY OR FITNESS FOR A PARTICULAR PURPOSE.HAND HELD PRODUCTS’ RESPONSIBILITY AND PURCHASER’S EXCLUSIVE REMEDY UNDER THIS WARRANTY IS LIMITED TO THE REPAIR OR REPLACEMENT OF THE DEFECTIVE PRODUCT. IN NO EVENT SHALL HAND HELD PRODUCTS BE LIABLE FOR INDIRECT, INCIDENTAL, OR CONSEQUENTIAL DAMAGES, AND, IN NO EVENT, SHALL ANY LIABILITY OF HAND HELD PRODUCTS ARISING IN CONNECTION WITH ANY PRODUCT SOLD HEREUNDER (WHETHER SUCH LIABILITY ARISES FROM A CLAIM BASED ON CONTRACT, WARRANTY, TORT, OR OTHERWISE) EXCEED THE ACTUAL AMOUNT PAID TO HAND HELD PRODUCTS FOR THE PRODUCT. THESE LIMITATIONS ON LIABILITY SHALL REMAIN IN FULL FORCE AND EFFECT EVEN WHEN HAND HELD PRODUCTS MAY HAVE BEEN ADVISED OF THE POSSIBILITY OF SUCH INJURIES, LOSSES, OR DAMAGES. SOME STATES, PROVINCES, OR COUNTRIES DO NOT ALLOW THE EXCLUSION OR LIMITATIONS OF INCIDENTAL OR CONSEQUENTIAL DAMAGES, SO THE ABOVE LIMITATION OR EXCLUSION MAY NOT APPLY TO YOU.All provisions of this Limited Warranty are separate and severable, which means that if any provision is held invalid and unenforceable, such determination shall not affect the validity of enforceability of the other provisions hereof.The limited duration of the warranty for Dolphin 9500 Series is as follows:• Dolphin 9500 and Dolphin 9550 terminals with an integrated imager are covered by a two-year limited warranty.• Dolphin 9501 and Dolphin 9551 terminals with an integrated laser engine are covered by a one-year limited warranty.   • Touch screens are covered by a one-year limited warranty.• Dolphin HomeBase, Mobile Base, ChargeBase, Net Base, Mobile Charger, and QuadCharger are covered by a one-year limited warranty. • The limited duration of the warranty for batteries is one year. Use of any battery not sold/manufactured by Hand Held Products may damage the terminal and/or the battery and will void the warranty. Batteries returned to Hand Held Products in a reduced state may or may not be replaced under this warranty. Battery life will be greatly increased when following the battery instructions in this user’s guide.• Use of any peripheral with the Dolphin terminal not manufactured/sold by Hand Held Products will void the warranty. This includes but is not limited to: cables, power supplies, cradles, and docking stations. • Use only power adapters approved for use by Hand Held Products. Failure to do so may result in improper operation or damage to the unit and will void the warranty.Hand Held Products, Inc. extends these warranties only to the first end-users of the products. These warranties are non-transferable.How to Extend Your WarrantyHand Held Products offers a variety of service plans on our hardware products. These agreements offer continued coverage for your equipment after the initial warranty expires. For more information, contact your Hand Held Products Sales Representative, Customer Account Representative, the Product Service Marketing Manager, or your Authorized Reseller.
16 - 4 Rev D8/28/06 Dolphin® 9500 Series User’s Guide
Dolphin® 9500 Series User’s Guide  Rev D A - 1AKeyboard CombinationsGeneral Windows Keyboard Shortcuts   Press these keys,  To…CTRL + C CopyCTRL + X CutCTRL + V PasteCTRL + Z UndoDELETE DeleteCTRL + RIGHT ARROW Move the insertion point to the beginning of the next word.CTRL + LEFT ARROW Move the insertion point to the beginning of the previous word.CTRL + DOWN ARROW Move the insertion point to the beginning of the next paragraph.CTRL + UP ARROW Move the insertion point to the beginning of the previous paragraph.SHIFT with any of the arrow keys Select more than one item in a window or on the desktop, or select text within a document.CTRL+ A Select all.ALT + ENTER View properties for the selected item.ALT + TAB Switch between open items.ALT + ESC Cycle through items in the order they were opened.ALT + Tap on Touch screen Right-clickCTRL + ESC Display the Start menu.ALT + Underlined letter in a menu name Display the corresponding menu.Underlined letter in a command name on an open menu Carry out the corresponding command.BACKSPACE View the folder one level up in My Computer or Windows Explorer.ESC Cancel the current task.
Dolphin® 9500 Series User’s Guide  Rev D A - 243-Key Alpha/Numeric Keyboard   Blue Key Combinations Key Combination Function/Special CharacterBlue key + D -Blue key + H _Blue key + L =Blue key + P +Blue key + Q ;Blue key + R :Blue key + S *Blue key + T /Blue key + U @Blue key + X \Blue key + Y  START
Dolphin® 9500 Series User’s Guide  Rev D A - 3Red Key Combinations Num Lock Key Combinations The 43-key keyboard defaults to alpha mode. To switch to num lock mode, press the NUM key once. In Num Lock mode, when you press a letter key, you type the number indicated by the num lock indicators over the key. Key Combination Function/Special CharacterRed key + ESC Lightens Contrast*Red key + TAB Darkens Contrast*Red key + SFT Toggles on Caps LockRed key + Q F1Red key + R F2Red key + S F3Red key + T F4Red key + U F5Red key + V F6Red key + W F7Red key + X F8Red key + Z InsertRed key + SP BackspaceRed key + BKSP DeleteKey/Key Combination Function/Special CharacterPress the NUM key only once to switch to num lock mode.NUM + SFT + A !NUM + SFT + B @NUM + SFT + C #NUM + SFT + E $NUM + SFT + F %NUM + SFT + G ^NUM + SFT + I &NUM + SFT + J *NUM + SFT + K (NUM + SFT + M >NUM + SFT + N )NUM + SFT + O <
A - 4 Rev D  Dolphin® 9500 Series User’s Guide35-Key Numeric/Alpha KeyboardBlue Key Combinations  Key Combination Function/Special CharacterBlue key + SP +Blue key + DEL -Blue key + F1 ;Blue key + F2 :Blue key + F3 /Blue key + F4 \Blue key + BKSP STARTBlue key + F5 _Blue key + F6 @
Dolphin® 9500 Series User’s Guide  Rev D A - 5Alpha Mode Key CombinationsThe 35-key keyboard defaults to numeric mode. To switch to alpha mode, press the ALPHA key once. In alpha mode, when you press a number key, you type the letter indicated by the alpha lock indicators over the key. Please note that when typing in alpha mode, you must use the same multi-press method you would use when typing letters on a phone keypad. Each key press will type the next letter in the sequence as displayed by the alpha lock indicators over the number keys. Key/Key Combination Function/Special CharacterPress the ALPA key once to switch to alpha mode. ALPHA + 1When you the 1 key repeatedly, the following characters type in the following sequence:. , ‘ ? ! -ALPHA + SFT + 1 !  <  >ALPHA + SFT + 2 @ALPHA + SFT + 3 #ALPHA + SFT + 4 $ALPHA + SFT + 5 %ALPHA + SFT + 6 ^ALPHA + SFT + 7 &ALPHA + SFT + 8 *ALPHA + SFT + 9 (ALPHA + SFT + 0 )
A - 6 Rev D  Dolphin® 9500 Series User’s Guide56-Key Full Alpha/NumericBlue Key Combinations Key Combination Function/Special CharacterBlue key + . +Blue key + , -Blue key + A ;Blue key + B @Blue key + E _Blue key + F :
Dolphin® 9500 Series User’s Guide  Rev D A - 7Red Key Combinations Key Combination Function/Special CharacterRed key + ESC Lightens Contrast*Red key + TAB Darkens Contrast*Red key + SFT Toggles on Caps LockRed key + A F1Red key + B F2Red key + C F3Red key + D F4Red key + E F5Red key + F F6Red key + G F7Red key + H F8Red key + I F9Red key + J F10Red key + K F11Red key + L F12Red key + M F13Red key + N F14Red key + O F15Red key + P F16Red key + Q F17Red key + R F18Red key + S F19Red key + T F20Red key + U F21Red key + V F22Red key + W F23Red key + X F24Red key + Y Z
A - 8 Rev D  Dolphin® 9500 Series User’s GuideSFT Key Combinations Com Port Assignment Table Key Combination Function/Special CharacterSFT + 1 !SFT + 2 @SFT + 3 #SFT + 4 $SFT + 5 %SFT + 6 ^SFT + 7 &SFT + 8 *SFT + 9 (SFT + 0 )SFT +. >SFT +, <Com Port  AssignmentCom Port 1 Serial port. This is the 17-pin connector on the bottom panel of Dolphin terminals.Com Port 2 Bluetooth ModuleIf there is no Bluetooth hardware installed on the terminal, this com port is unassigned.Com Port 3 Raw InfraredCom Port 4Com Port 5 USB virtual serial portCom Port 6 IrDA, if IrDA is enabled. If IrDA is disabled, this com port becomes available. See Verify That the IrDA Port is Enabled on page 6-5.Com Ports 7-9 Unassigned. These are available for selection only when connecting to devices that use virtual com ports, such as Bluetooth.
™ Hand Held Products, Inc.700 Visions DriveP.O. Box 208Skaneateles Falls, NY  13153-020895-UGRev D8/28/06

Navigation menu