Honeywell CT50LFN DOLPHIN CT50 Mobile Computer (Terminal) User Manual CT50 W10 EN UG AG Rev c 2
Honeywell International Inc DOLPHIN CT50 Mobile Computer (Terminal) CT50 W10 EN UG AG Rev c 2
Contents
CT50-W10-EN-UG-AG Rev (c)-2
Chapter 2 — About the User Interface and Applications
Dolphin CT50 Mobile Computer with Windows 10 IoT Mobile Enterprise User Guide 31
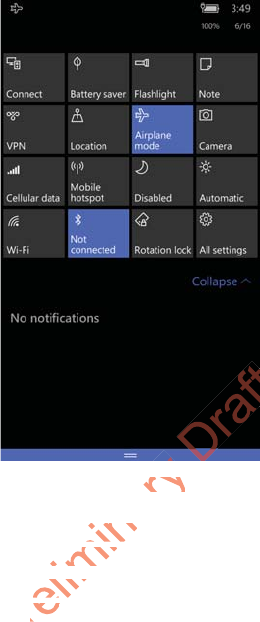
View Action Center
Use the Action Center to view the battery charge level, view details
about a notification, or to quickly access and modify settings.
Windows Action Center
•To open the action center, touch and hold the status bar at the top of
the screen and then drag down.
•To close the action center, swipe up from the bottom of the screen, or
tap the Back or Home buttons.
•To dismiss a notification, swipe it sideways.
•To dismiss all notifications, tap the X in the top right corner.
Preliminary
tion Cent
n Ce
pen the acen the
e screen ae screen
To c l o s eTo c l o s
tap thtap
•
Draft
2018-10-15

Chapter 2 — About the User Interface and Applications
32 Dolphin CT50 Mobile Computer with Windows 10 IoT Mobile Enterprise User Guide
Customize the Start Screen
The Start screen is the first screen you see when you power on the
computer and unlock the screen. You can add, delete, move, resize, or
group tiles into folders for quick access. Tiles can be apps, contacts,
maps, albums, or office files. Live tiles provide notifications and updates
in real time, such as weather information.
On the Start screen:
1Touch and hold a tile.
2Drag the tile to a new location on the Start screen:
•Tap Unpin ( ) to delete the tile.
•Tap the arrow ( ) to toggle through the tile sizes
Set the Date, Time, or Time Zone
The computer gets the current date and time from its network
connection. You can manually set the date, time, and time zone for your
location. The 24-hour clock is turned off by default. By default, the CT50
is set to automatically update the time and date for your current location.
Use this procedure to manually set the date, time, or time zone.
1Tap All Apps > Settings > Time & language > Date & time.
2Tap the toggle box for Set date and time automatically to turn it off.
3Tap the Time zone, Date, and Time to set each one manually.
To set the Date and Time, you need to select the correct values and
then tap .
To set the Time zone, you just need to tap the new time zone.
Preliminary
e bo
me zone,
e zone
the Date athe Date
n tap .ap
To set the o set th
Draft
te t
te t
anually
ually
ettingsettings
ox for ox for
2018-10-15
he tile si
e tile s
and timeand tim
t the datt the dat
turned of
urned
he tim
he tim

Chapter 2 — About the User Interface and Applications
Dolphin CT50 Mobile Computer with Windows 10 IoT Mobile Enterprise User Guide 33
View Software Information
1Tap All Apps > Settings > System > About.
2Tap more info. The following information appears on the screen:
•Model
•Carrier
•Software
•Version
•OS build
•Firmware and hardware revision numbers
•Bootloader version
•Radio software and hardware version number
•Chip SOC version
•Screen resolution
•MAC address
•MEID, MDN, IMEI, and IMS
View Hardware Information
Use the DiagnosticInfo app to view detailed hardware information on the
computer.
1Tap All Apps > DiagnosticInfoW10.
2Swipe up or down to scroll through these settings:
•System Date/Time
•Device Information
•Honeywell Apps (version numbers)
•Radio Information (includes MAC, Bluetooth, IP Addresses)
•Battery Information
•Memory Information
•Scanner Information
3To export the diagnostic information to a text file, tap .
4Select a folder location and then tap .
5Tap OK to return to the DiagnosticInfo screen.
Preliminary
icIn
Apps > DApps > D
pe up or de up or
SystemSyst
••
DevD
••
Draft
nd
nd
ionon
nfo apnfo ap
2018-10-15
on numbn num
IMS
IMS
Chapter 2 — About the User Interface and Applications
34 Dolphin CT50 Mobile Computer with Windows 10 IoT Mobile Enterprise User Guide
Honeywell Applications on the Computer
Honeywell applications help you troubleshoot and connect your
computer to other devices and networks.
Honeywell Applications Available on the CT50
Icon Application Description
DiagnosticInfoW10 Use the DiagnosticInfo app to view
device information, Honeywell Apps,
Radio Information, Battery Information,
Memory Information, and Scanner
Information.
IPConfig Use IPConfig to view network adapter
information.
Ping Use Ping to verify communication links
or to make sure a specific IP address is
working.
Route Use Route to view and edit the rules
that govern how packets destined for
various subnets are routed.
ScanDemoW10 Use ScanDemo to demonstrate how
the scanner works. You can use it to
scan a bar code, set the symbologies it
scans, and determine the computer
response to a scanned bar code.
Preliminary
mi
Dr
emoW1
emoW1
Draft
Dr
2
UsUs
2018-
se Ping te Ping
or to maor to ma
workiwork
8-10-1
nfig to vienfig to vi
ion.on.
15
ation
ation
1
8-
20

35
3
About the Scanner
Use this chapter to understand how to scan bar codes and
how to configure the scanner.
Preliminary
Draft
2018-10-15
scan baan ba

Chapter 3 — About the Scanner
36 Dolphin CT50 Mobile Computer with Windows 10 IoT Mobile Enterprise User Guide
About the Scanner
The internal scanner can read 1D and 2D bar code symbologies,
composite symbologies, and postal codes. It also supports omni-
directional scanning for greater flexibility in real-world settings. The
image engine can also capture black and white images, such as
signatures and pictures of damaged inventory.
About ScanDemoW10
ScanDemo demonstrates the functionality of the scanner in the CT50
and is not intended as a functional business solution. Detailed
information on how to create custom applications for the CT50 is
provided in the Software Development Kit (SDK) section of the Dolphin
CT50 Software tab on www.honeywellaidc.com.
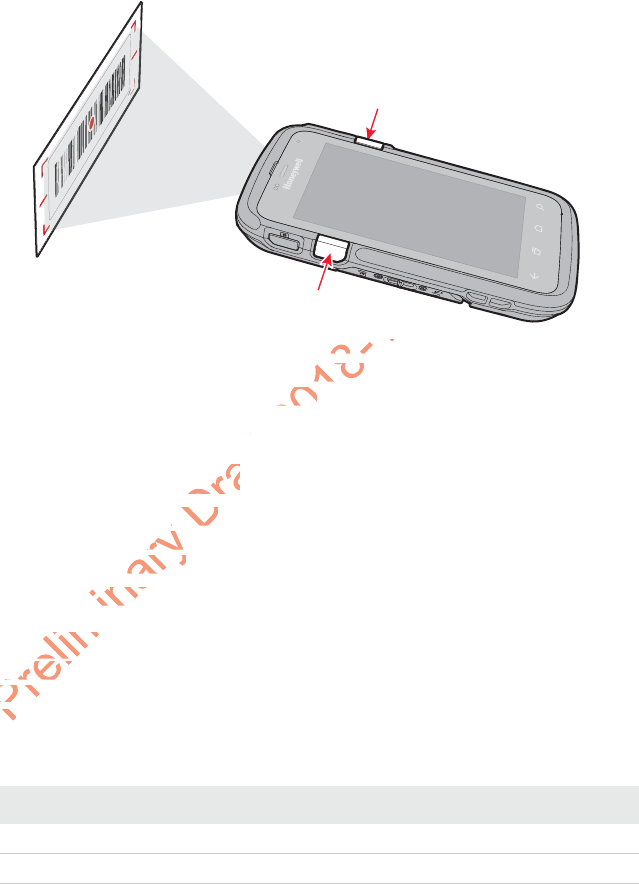
Scan a Bar Code
ScanDemoW10 demonstrates the functionality of the scanner in the
CT50 and is not intended as a functional business solution. Detailed
information on how to create custom applications for the CT50 is
provided in the Software Development Kit (SDK) section of the Dolphin
CT50 Software tab on www.honeywellaidc.com.
The scanner has an aiming beam to help you correctly frame bar codes.
It also supports omni-directional (360°) scanning to make it easier for
you to scan bar codes.
1Tap All Apps > ScanDemoW10.
2Point the scanner window at the bar code and hold the computer
steady a few inches from the label.
Warning: Do not stare into the imager laser aimer.
Note: Before you start scanning bar codes, you can use the Settings app
within ScanDemoW10 to enable only the bar code symbologies that you
need.
Preliminary
em
t intend
nten
on how to
how to
in the n the
SoftSo
Software taftware
e scanner scanne
t also supalso su
you to syou t
Note
No
Draft
w.h
w.h
monstrmonst
2018-10-15
ality of thy of th
usiness sines
tom appltom appl
lopment
lopmen
oneyw
oney
Chapter 3 — About the Scanner
Dolphin CT50 Mobile Computer with Windows 10 IoT Mobile Enterprise User Guide 37
3Press one of the Scan buttons. The illumination frame appears.
Make sure the entire bar code is inside of the frame. When the
scanner successfully reads a bar code, you hear a high beep and the
Good Read LED turns on briefly.
4Release the Scan button.
About the Scanner Settings
You can set several scanner settings from the ScanDemo application
that determine scanning options and profile settings. Settings include
these sections: Scan, Symbology, and Profiles.
•Swipe the screen left or right to access the Settings menu.
Scan Settings
Use the scan settings to determine how the scanner acts when you scan
a bar code. You can control whether it vibrates, makes a sound, and how
it scans.
Scan Settings and Descriptions
Scan Setting Description
Vibrate Turns on or off the vibrate on a good read.
Sound Turns on or off the beeps to indicate a good read.
Preliminary
al
scannin
cann
ns: Scan,
: Scan,
e the screthe scr
can Setan Se
Use the scUse the
a bar coa bar
it sca
it s
Draft
n.
n
ngsngs
scannscan
2018-10
nside ofnside of
bar code,r code
riefly.riefly.
10-1
0-15
0-1
0-1
0-1
15
15
1
1
1
1
1
1
1
1
1
1
1
1
1
0-1
1
1
1
0-1
1
1
1
01
1
01
1
1
1
1
1
1
1
15
015
1
1
1
1
1
1
1
1
1
1
1
1
1
1
1
1
1
1
0-1
15
1
1
1
1
1
1
1
1
1
15
1
01
01
1
01
01
1
1
1
01
1
01
1
1
1
0-1
1
15
15
1

Chapter 3 — About the Scanner
38 Dolphin CT50 Mobile Computer with Windows 10 IoT Mobile Enterprise User Guide
Symbology Settings
The Symbology Settings define the bar code symbologies the scanner
will decode with the ScanDemo app.
•Touch the toggle box next to a symbology to enable or disable it.
•Swipe up or down to scroll through the list of available symbologies.
For a complete list of all available symbologies, see Appendix A,
“Specifications” on page 77.
Profile Settings for ScanDemoW10
The built-in Point of Service (POS) profiles are applied by the
ScanDemoW10 app using the Microsoft POS application program
interface (API), ClaimedBarcodeScanner.SetActiveProfileAsync. This
API sets the active profile on the CT50 bar code scanner. The profile
strings defined by the \Documents\Profile\
HoneywellDecoderSettingsv2.exm file are returned to the app using
BarcodeScanner.GetSupportedProfiles. It gets the list of profiles
supported by the bar code scanner.
Scan Mode There are three options for scan mode:
• Normal: Normal mode requires you to press
Scan or one of the Scan buttons between
each scan.
• Automatic: Automatic mode activates the
scanner for continuous scanning without
requiring you to touch Scan on the screen
each time.
• Continuous: Continuous mode activates the
scanner only when you touch and hold one of
the Scan buttons.
Automatic Interval Adjusts the automatic interval from 0 to 30
seconds between each scan.
Scan Settings and Descriptions (continued)
Scan Setting Description
Profile Settings and Descriptions
Profile Description
HON:Reset Resets all symbology settings to disabled.
HON:EnablePreviewOnDecode Profile not supported in ScanDemoW10.
Preliminary
e list of a
ist of
ions” on p
ns” on
file Settfile Se
e built-in Pobuilt-in
ScanDemoanDem
interfaceinterfac
API s
AP
Draft
Demo
emo
ox next tx next t
wn to sc
n to sc
2018-
e the b
e the b
ap
ap
8-10-
atic interatic inte
n each seach s
0-15
s m
s
ou touch
u touc
0-
8-
Chapter 3 — About the Scanner
Dolphin CT50 Mobile Computer with Windows 10 IoT Mobile Enterprise User Guide 39
About the Wedge Mode Profile
Wedge mode enables a default list of symbologies (for example, UPCA,
Code 39, Code 128, GS1128, Aztec, Data Matrix, Maxicode, Pdf417 and
QR code). You can enable or disable Symbologies for wedge mode
using a profile named HONWedge. Profile commands customize scan
wedge mode behaviors. Customers set wedge mode configuration
commands using an .exm file. To learn more about customized profiles,
see the next section “Create a Custom Profile” on page 41.
You can use the following HONWedge profile commands to modify the
scan wedge.
HON:EnablePreviewOnDecodeAttempt Profile not supported in ScanDemoW10.
HON:DisablePreview The default profile. Disables sending images to
the application. Only decode results are shown on
the screen.
HON:EnableOOBE Enables the symbology types required when the
built-in Out-of-box plug-in runs at first boot for
scanning EZConfig labels. This profile allows you
to scan a prov.xml file to set up the CT50. You
cannot modify this profile.
HON:ScanButtonEnable Enables the Scan button.
HON:ScanButtonDisable Disables the scan button.
Profile Settings and Descriptions (continued)
Profile Description
HONWedge Profile Commands
Profile Commands Description Default
ENABLE_WEDGE Controls when bar code data is inserted into
the keyboard buffer.
While in wedge mode, scanning is disabled
and enabled using the ENABLE_WEDGE
profile command.
Tr u e
(Enabled)
Preliminary
a
ng an .e
an
section ection
“C
“
use the folse the f
wedge.edge.
Commandomman
Pre
ds
Draft
28, A
28, A
ble or dis
e or dis
d d
HONWHONW
ors. Cu
ors. C
ex
e
2018-10
Profilerofil
lt list of
t list of
Azte
zte
0-15
.
tton.tton.
5
1
0

Chapter 3 — About the Scanner
40 Dolphin CT50 Mobile Computer with Windows 10 IoT Mobile Enterprise User Guide
WEDGE_POWER_TIMEOUT Use this command to optimize scan
performance or to save power.
The WEDGE_POWER_TIMEOUT defaults to
30 ms. After 30 seconds of inactivity, the
scan acquisition system enters a low power
state. Press the scan button to exit the low
power state and power up the scan
acquisition system.
The timeout value is set using the
WEDGE_POWER_TIMEOUT profile
command. The units are milliseconds.
30 ms
PREAMBLE Adds a prefix to the start of the bar code
data.
POSTAMBLE Adds a suffix at the end of the data to bar
code data.
ENTER_DELAY Inserts a delay between bar codes when
wedging the bar code data into the keyboard
buffer. A delay of ENTER_DELAY is inserted
whenever the Wedge encounters a carriage
return, line feed, or tab key. The units for
ENTER_DELAY are milliseconds.
Some applications, such as Excel, may
require additional processing time when
advancing to the next input field. Without a
delay, data may arrive faster than the
application can process the data. You can
use the POSTAMBLE command to add a line
feed at the end of each bar code.
200 ms
HONWedge Profile Commands (continued)
Profile Commands Description Default
Preliminary
ER_
R_
ome appl
me app
require adequire ad
advancadvan
delaydel
ap
P
Draft
ar co
r co
ay of EN
of EN
the Wede Wed
ne feed,
ne feed
DELA
DEL
201
tween ba
ween b
de d
e d
018-1
of the dof the
8-10-15
e e
onds.ds
e bar coe bar c
0-1
8-1
01

Chapter 3 — About the Scanner
Dolphin CT50 Mobile Computer with Windows 10 IoT Mobile Enterprise User Guide 41
Create a Custom Profile
You may need to create customized profiles to configure the scanner for
your application. Some settings are only possible when using
customized profiles.
The computer uses profiles to enable symbologies, configure symbology
options, and set scanning options. The
HoneywellDecoderSettingsV2.exm file is used to define or specify one or
more profiles and must be placed on the computer in either of these two
locations:
• \Documents\Profile
The user must create the Profile folder. To learn how to transfer files
from your PC to the mobile computer, see “How to Transfer Files”
on page 22.
• \SharedData\Enterprise\Persistent\Profile
This folder is only accessible by an Enterprise signed application.
To download a sample HoneywellDecoderSettingsV2.exm file, go to
www.honeywellaidc.com, navigate to the CT50 product page, and then
select “Honeywell Decoder Settings Sample EXM File” under the
Software listings.
When the HoneywellDecoderSettingsV2.exm file is updated, the
computer receives notification, performs initial processing of the profile
information, and writes status information to the
HoneywellDecoderSettingsV2.err file. The err file is written back to the
same location as the .exm file, either \Documents\Profile or
\SharedData\Enterprise\Persistent\Profile.
The HoneywellDecoderSettingsV2.exm file may contain profiles for both
Wedge Mode and POS Mode. The HoneywellDecoderSettingsV2.exm is
in XML format and each section element defines a different profile. The
profile targeted for Wedge Mode is identified by the name “HONWedge”.
There can only be one HONWedge profile. All other profiles are available
for POS applications.
The HONWedge profile is applied whenever the computer enters Wedge
Mode. POS profiles are applied when a POS application calls the POS
API to set an active profile. POS profiles may be automatically applied
using the Apply command set to true.
Preliminary
wel
e
ives noti
es no
and write
nd write
ellDecoderlDecode
ocation ascation
aredData\EredDat
The HoneThe Hon
Wedge Wed
in XM
in
Draft
, nav
, na
der Setti
er Setti
DecoDeco
2018-10-15
learn ho
earn h
ee ee
“How“How
ent\Proent\P
by an Enby an En
wellDe
wellDe
cc
igat
gat

Chapter 3 — About the Scanner
42 Dolphin CT50 Mobile Computer with Windows 10 IoT Mobile Enterprise User Guide
Custom Profile Example
The following example contains two profiles, one for Wedge Mode and
one for POS Mode.
•The .exm file contains the required ConfigDoc element named “Data
Collection Profiles.” This element is not optional and must alway be
included.
•The Section tags <section> identify the profile names. The POS
profile name may be customized to anything you want but wedge
mode profile must be named “HONWedge”. For the example below,
“C39 Internal Scanner” is used for the POS Mode profile and
“HONWedge” for the Wedge Mode profile.
•The command tags <cmd> identify the profile settings.
•The Device command <cmd=“Device”> is set to Internal to indicate
the internal scanner and not an external scanner (e.g., ring scanner).
The second profile, named “HONWedge,” must contain a Device
command set to Internal but a POS profile can be set to either
Internal or USB.
•The Type command (cmd=“TYPE”), is set to Full, which instructs the
scanning system to first restore defaults before applying the
commands in the profile.
•The Apply (cmd=“APPLY”) command instructs the scanning system
to automatically apply the profile when a POS application claims the
scanner. The Apply command is not applicable to Wedge Mode. In
Wedge Mode the “HONWedge” profile is automatically applied
whenever the scanning system switches to Wedge Mode.
•The “HONWedge” profile enables EAN-13 and issues a command to
include the check digit.
•The “HONWedge” profile shows the syntax for issuing wedge
commands, including how to enter binary data as postambles or
preambles.
Preliminary
md=
cally app
ally a
The Apply
he App
e Mode the Mode
enever thenever t
The “HONThe “HO
includeinclu
••
TheT
Draft
md=“
md=
first resto
st rest
profile.profile.
“APP“APP
2018-10-15
ofile sette sett
> >
is set is se
ernal scaal sca
NWedgeNWedg
a POS pra POS pr
TYP
YP

Chapter 3 — About the Scanner
Dolphin CT50 Mobile Computer with Windows 10 IoT Mobile Enterprise User Guide 43
<?xml version="1.0"?>
<ConfigDoc flags="000" name="Data Collection Profiles" desc="Profiles used for
scanner configuration via POS Scanner API">
<HHPReserved>
<Key name="EXMVersion">1.0.1</Key>
<Key name="ContentVersion">1.0.0</Key>
</HHPReserved>
<Section flags="000" name="C39 Internal Scanner" id="C39">
<Key cmd="DEVICE" desc="Specifies the scanner type" list="Internal,USB"
name="Device Type">Internal</Key>
<Key cmd="TYPE" list="Incremental,Full" name="ProfileType">Full</Key>
<Key cmd="APPLY" list="true,false" min="" name="ApplyProfileOnLoad">false</Key>
<Key cmd="DEC_CODE39_ENABLED" list="true,false" name="Code 39 Enable Symbology"
id="Enable" gr="flag">true</Key>
<Key cmd="DEC_CODE39_MIN_LENGTH" name="Code 39 Minimum Character Length"
id="MinLength" min="0" max="48">3</Key>
</Section>
<Section flags="000" name="HONWedge" id="WedgeConfig">
<Key cmd="DEVICE" list="Internal,USB" name="Device Type">Internal</Key>
<Key cmd="TYPE" list="Incremental,Full" name="ProfileType">Full</Key>
<Key cmd="ENABLE_WEDGE" list="true,false" name="WedgeEnable">true</Key>
<Key cmd="PREAMBLE" name="Preamble">MyPreamble</Key>
<Key cmd="POSTAMBLE" name="Postamble">
</Key>
<Key cmd="ENTER_DELAY" min="" name="Enter Delay">400</Key>
<Key cmd="WEDGE_POWER_TIMEOUT" min="2" max="10000"
name="ImagerPowerTimeout">5000</Key>
<Key cmd="DEC_EAN13_ENABLED" list="true,false" name="EAN13 Enable Symbology"
id="Enable" gr="flag">true</Key>
<Key cmd="DEC_EAN13_2CHAR_ADDENDA_ENABLED" list="true,false" name="EAN13 2 Digit
Addenda (UPC/EAN)"
id="Addenda2Digit" gr="flag">false</Key>
<Key cmd="DEC_EAN13_5CHAR_ADDENDA_ENABLED" list="true,false" name="EAN13 5 Digit
Addenda (UPC/EAN)"
id="Addenda5Digit" gr="flag">false</Key>
<Key cmd="DEC_EAN13_CHECK_DIGIT_TRANSMIT" list="true,false" name="EAN13 Send
Check Character"
id="CheckTransmit" gr="flag">true</Key>
</Section>
</ConfigDoc>
Available Profile Commands
Here is a list of the available profile commands you can use when
creating customer profiles:
"DEC_CODE128_ENABLED"
"DEC_CODE128_MIN_LENGTH"
"DEC_CODE128_MAX_LENGTH"
"DEC_GS1_128_ENABLED"
"DEC_GS1_128_MIN_LENGTH"
"DEC_GS1_128_MAX_LENGTH"
"DEC_C128_ISBT_ENABLED"
"DEC_CODE39_ENABLED"
Preliminary
fals
l
DIGIT_TRA
GIT_T
flag"ag"
>>
trutr
ofile Cofile C
Here is Here
creat
cr
Draft
ABLED" LED"
</Key></Key>
A_ENABLE
A_ENAB
</
</
2018-10-15
0-1
pe"pe
>
Inte
eType"eType"
>
dgeEnablgeEnab
Key>y
ey>y>
ay"y"
>
400400
10000" 10000"
alse"
alse"

Chapter 3 — About the Scanner
44 Dolphin CT50 Mobile Computer with Windows 10 IoT Mobile Enterprise User Guide
"DEC_CODE39_MIN_LENGTH"
"DEC_CODE39_MAX_LENGTH"
"DEC_CODE39_CHECK_DIGIT_MODE"
"DEC_CODE39_FULL_ASCII_ENABLED"
"DEC_CODE39_START_STOP_TRANSMIT"
"DEC_CODE39_APPEND_ENABLED"
"DEC_CODE39_BASE32_ENABLED"
"DEC_DATAMATRIX_ENABLED"
"DEC_DATAMATRIX_MIN_LENGTH"
"DEC_DATAMATRIX_MAX_LENGTH"
"DEC_UPCA_ENABLED"
"DEC_COUPON_CODE_MODE"
"DEC_UPCA_CHECK_DIGIT_TRANSMIT"
"DEC_UPCA_NUMBER_SYSTEM_TRANSMIT"
"DEC_UPCA_2CHAR_ADDENDA_ENABLED"
"DEC_UPCA_5CHAR_ADDENDA_ENABLED"
"DEC_UPCA_ADDENDA_REQUIRED"
"DEC_UPCA_ADDENDA_SEPARATOR"
"DEC_UPCE0_ENABLED"
"DEC_UPCE1_ENABLED"
"DEC_UPCE_CHECK_DIGIT_TRANSMIT"
"DEC_UPCE_NUMBER_SYSTEM_TRANSMIT"
"DEC_UPCE_2CHAR_ADDENDA_ENABLED"
"DEC_UPCE_5CHAR_ADDENDA_ENABLED"
"DEC_UPCE_ADDENDA_REQUIRED"
"DEC_UPCE_ADDENDA_SEPARATOR"
"DEC_EAN8_ENABLED"
"DEC_UPCE_EXPAND
"DEC_EAN8_CHECK_DIGIT_TRANSMIT"
"DEC_EAN8_2CHAR_ADDENDA_ENABLED"
"DEC_EAN8_5CHAR_ADDENDA_ENABLED"
"DEC_EAN8_ADDENDA_REQUIRED"
Preliminary
DE
_ENABL
ENAB
CE1_ENAE1_EN
UPCE_CHPCE_
EC_UPCEC_UPC
"DEC_UP"DEC_
"DEC_"D
Draft
DDEND
DEND
NDA_RENDA_RE
ENDA_ENDA
2018-10-15
NSMIT"SMIT
EM_TRAM_TRA
NDA_E
NDA_E
DA
A

Chapter 3 — About the Scanner
Dolphin CT50 Mobile Computer with Windows 10 IoT Mobile Enterprise User Guide 45
"DEC_EAN8_ADDENDA_SEPARATOR"
"DEC_EAN13_ENABLED"
"DEC_EAN13_CHECK_DIGIT_TRANSMIT"
"DEC_EAN13_2CHAR_ADDENDA_ENABLED"
"DEC_EAN13_5CHAR_ADDENDA_ENABLED"
"DEC_EAN13_ADDENDA_REQUIRED"
"DEC_EAN13_ADDENDA_SEPARATOR"
"DEC_AZTEC_ENABLED"
"DEC_AZTEC_MIN_LENGTH"
"DEC_AZTEC_MAX_LENGTH"
"DEC_HK25_ENABLED"
"DEC_HK25_MIN_LENGTH"
"DEC_HK25_MAX_LENGTH"
"DEC_CODABAR_ENABLED"
"DEC_CODABAR_MIN_LENGTH"
"DEC_CODABAR_MAX_LENGTH"
"DEC_CODABAR_START_STOP_TRANSMIT"
"DEC_CODABAR_CHECK_DIGIT_MODE"
"DEC_CODABAR_CONCAT_ENABLED"
"DEC_CODABLOCK_F_ENABLED"
"DEC_CODABLOCK_F_MIN_LENGTH"
"DEC_CODABLOCK_F_MAX_LENGTH"
"DEC_CODE11_ENABLED"
"DEC_CODE11_MIN_LENGTH"
"DEC_CODE11_MAX_LENGTH"
"DEC_CODE11_CHECK_DIGIT_MODE"
"DEC_CODE93_ENABLED"
"DEC_CODE93_MIN_LENGTH"
"DEC_CODE93_MAX_LENGTH"
"DEC_COMPOSITE_ENABLED"
"DEC_COMPOSITE_MIN_LENGTH"
"DEC_COMPOSITE_MAX_LENGTH"
Preliminary
_C
BAR_CO
R_CO
DABLOCKABLOC
CODABLOODAB
EC_CODAC_COD
"DEC_CO"DEC_C
"DEC_"D
Draft
_LENGT
ENGT
TART_STTART_ST
CHECKCHEC
2018-10-15
GTH"
GTH"
TH
TH

Chapter 3 — About the Scanner
46 Dolphin CT50 Mobile Computer with Windows 10 IoT Mobile Enterprise User Guide
"DEC_COMPOSITE_WITH_UPC_ENABLED"
"DEC_HANXIN_ENABLED"
"DEC_HANXIN_MIN_LENGTH"
"DEC_HANXIN_MAX_LENGTH"
"DEC_IATA25_ENABLED"
"DEC_IATA25_MIN_LENGTH"
"DEC_IATA25_MAX_LENGTH"
"DEC_I25_ENABLED"
"DEC_I25_MIN_LENGTH"
"DEC_I25_MAX_LENGTH"
"DEC_I25_CHECK_DIGIT_MODE"
"DEC_KOREA_POST_ENABLED
"DEC_KOREA_POST_MIN_LENGTH"
"DEC_KOREA_POST_MAX_LENGTH"
"DEC_M25_ENABLED"
"DEC_M25_MIN_LENGTH"
"DEC_M25_MAX_LENGTH"
"DEC_MAXICODE_ENABLED"
"DEC_MAXICODE_MIN_LENGTH"
"DEC_MAXICODE_MAX_LENGTH"
"DEC_MICROPDF_ENABLED"
"DEC_MICROPDF_MIN_LENGTH"
"DEC_MICROPDF_MAX_LENGTH"
"DEC_MSI_ENABLED"
"DEC_MSI_MIN_LENGTH"
"DEC_MSI_MAX_LENGTH"
"DEC_MSI_CHECK_DIGIT_MODE"
"DEC_PDF417_ENABLED"
"DEC_PDF417_MIN_LENGTH"
"DEC_PDF417_MAX_LENGTH"
"DEC_QR_ENABLED"
"DEC_QR_MIN_LENGTH"
Preliminary
E_
ODE_MI
DE_M
XICODE_MCODE
MICROPDICRO
EC_MICROC_MICR
"DEC_MIC"DEC_
"DEC_"D
Draft
TH""
NGTH"NGTH"
ENABENA
2018-10-15
TH"H"
NGTH"NGTH"

Chapter 3 — About the Scanner
Dolphin CT50 Mobile Computer with Windows 10 IoT Mobile Enterprise User Guide 47
"DEC_QR_MAX_LENGTH"
"DEC_RSS_14_ENABLED"
"DEC_RSS_LIMITED_ENABLED"
"DEC_RSS_EXPANDED_ENABLED"
"DEC_RSS_EXPANDED_MIN_LENGTH"
"DEC_RSS_EXPANDED_MAX_LENGTH"
"DEC_S25_ENABLED"
"DEC_S25_MIN_LENGTH"
"DEC_S25_MAX_LENGTH"
"DEC_TELEPEN_ENABLED"
"DEC_TELEPEN_MIN_LENGTH"
"DEC_TELEPEN_MAX_LENGTH"
"DEC_TELEPEN_OLD_STYLE
"DEC_TLC39_ENABLED"
"DEC_TRIOPTIC_ENABLED"
"DEC_OCR_MODE"
"DEC_POSTAL_ENABLED"
"DEC_POSTAL_ENABLED_DIRECT",
"DEC_POSTNET_CHECK_DIGIT_TRANSMIT"
"DEC_PLANETCODE_CHECK_DIGIT_TRANSMIT"
"DEC_VIDEO_REVERSE_ENABLED"
"DEC_WINDOW_MODE"
"DEC_WINDOW_TOP"
"DEC_WINDOW_BOTTOM"
"DEC_WINDOW_LEFT"
"DEC_WINDOW_RIGHT
"DEC_OCR_ACTIVE_TEMPLATES"
"DEC_OCR_TEMPLATE"
"GENERIC"
"DEC_ECI_HANDLING"
"SCN_ACTIVESTANDBY_TIMEOUT"
"SCN_SCAN_TIMEOUT"
Preliminary
EN
NET_CHE
T_CH
ANETCODNETCO
VIDEO_RDEO_
EC_WINDOC_WIN
"DEC_WI"DEC_W
"DEC_"D
Draft
BLED"BLED"
ABLEDABLE
2018-10-15
Chapter 3 — About the Scanner
48 Dolphin CT50 Mobile Computer with Windows 10 IoT Mobile Enterprise User Guide
"WEDGE_POWER_TIMEOUT"
"ENABLE_WEDGE"
"ENABLE_GOOD_READ_BEEP"
"PREAMBLE"
"POSTAMBLE"
"ENTER_DELAY"
Preliminary
Draft
2018-10-15

49
4
Use the Phone
You can use the phone feature to make and receive phone calls,
as well as transmit data through wireless wide-area networks
(WWANs).
Preliminary
Draft
2018-10-15
d receiveeceive
s wide-as wide

Chapter 4 — Use the Phone
50 Dolphin CT50 Mobile Computer with Windows 10 IoT Mobile Enterprise User Guide
About the Phone
Phone features on the computer include a speaker and a microphone.
You can also use a Bluetooth headset or hands-free kit. The phone
feature, if present, is enabled by default.
The WAN radio in your computer determines the supported network
types:
•If your computer includes the UMTS/HSPA+ WAN radio, you can
connect to UMTS networks.
•If your computer includes the Flexible Network Radio, you can
connect to CDMA or UMTS networks in all regions that support these
technologies. The Flexible Network Radio is a software-defined radio
(SDR) that can be configured for CDMA or UMTS depending on your
wireless communication needs.
Honeywell supports Verizon in the United States (only) as a CDMA
network carrier.
After you turn on the phone and activate service with your wireless
carrier, you can customize the phone features and network settings in
the Wireless & Networks section of the Settings app.
Activate the UMTS Phone
Activating the UMTS phone on your CT50 is done the same way whether
your computer has the Flexible Network Radio or the UMTS/HSPA+WAN
radio.
You use a SIM card to activate the UMTS phone on the CT50. You can
purchase the SIM card from your network provider.
1Power off the CT50.
2Disconnect the handstrap from the bottom of the computer.
3Press and slide the battery door toward the bottom of the computer
to unlock the door.
4Lift up on the edge of the battery and remove it from the computer.
Note: Both WWAN radios support Network Information and Time Zone
(NITZ) messages to automatically set the system time.
Preliminary
S PhonS Pho
ating the Uating the
ur computecompu
radio.dio.
You usYo u u
purc
Draft
the
the
s section
section
adios supadios sup
autom
autom
2018-10-15
gions
ions
is a softw
a soft
A or UMTor UMT
e e
UnitedUnit
nd activa
d activ
phon
phon
Chapter 4 — Use the Phone
Dolphin CT50 Mobile Computer with Windows 10 IoT Mobile Enterprise User Guide 51
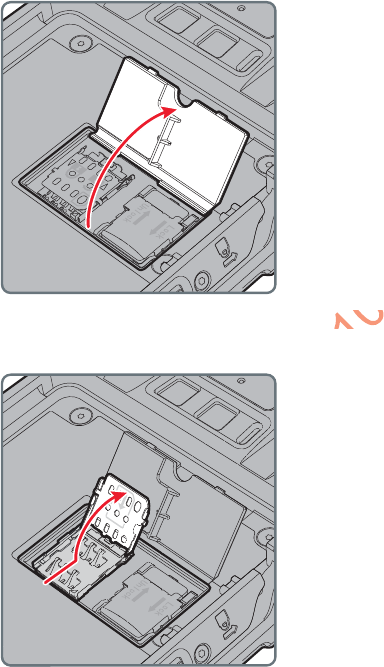
5Lift up on the SIM and MicroSD door.
6Press down and slide the SIM door toward the top of the CT50 to
open it.
Preli
el
elimina
ry
y
y
y
y
y
y
y
y
y
y
y
y
y
y
y
y
minary
minary
inary
r
inary
ry
ary
n
n
n
n
n
in
in
a
in
i
n
a
n
y
ary
y
ry
y
ary
ary
y
ary
ary
r
y
ry
ry
ry
ry
r
r
r
y
y
y
y
y
ry
ary
ry
y
ry
y
ry
r
y
y
ry
ry
ry
ry
ry
a
a
a
ry
y
ry
ary
i
a
a
a
a
a
a
in
n
a
a
a
a
a
a
a
a
a
a
a
a
a
a
na
n
n
n
i
in
i
in
i
in
mina
i
in
i
in
na
n
n
n
in
in
in
y
y
y
r
y
ry
ry
y
y
r
y
r
y
ry
y
y
y
y
y
ry
ry
y
ry
y
y
ry
ry
r
r
r
r
r
r
ry
ry
ry
r
r
ry
ary
ary
ar
ar
ar
r
ar
ar
a
ar
ar
a
ry
ar
ary
ry
a
a
a
a
a
ary
ry
ar
ry
ar
ar
na
in
in
n
i
i
i
in
in
n
in
in
in
in
n
a
in
in
a
n
n
in
ary
r
ary
na
a
a
ry
r
n
ar
a
in
in
n
n
na
n
a
a
a
a
a
a
a
ar
r
a
a
a
ar
ar
r
r
n
n
na
a
in
n
in
ry
r
r
a
a
r
ary
ry
ry
ry
a
ary
ary
ary
ary
ary
ary
ary
r
ar
y
ry
ary
ry
a
n
y
ry
ry
ry
y
ry
y
y
y
ry
ary
ary
y
ry
ry
a
a
a
a
a
ry
ry
ry
a
y
ry
ary
ary
ry
ary
r
r
r
ry
ry
ry
r
r
ry
r
ar
ary
ary
ary
a
in
in
ary
a
r
in
in
ry
y
na
a
n
n
r
r
r
r
r
a
ar
ary
ary
ar
in
i
i
i
i
n
a
n
r
a
n
r
a
a
n
r
a
n
a
a
r
a
r
r
a
r
r
a
a
n
a
a
a
r
r
y
a
n
ary
ary
ary
n
n
r
a
a
ary
ary
n
n
a
a
a
n
y
n
a
a
ry
r
n
a
ary
ary
ary
ary
in
na
ry
ary
ary
ary
ary
in
ar
ar
ary
ar
ary
na
ar
in
in
ar
na
in
ary
a
ary
in
ar
ar
na
ary
in
na
in
ar
in
n
ar
ary
ry
ar
ary
ry
a
in
a
ry
ar
in
i
ry
na
a
in
ar
ry
ry
ry
ry
ry
y
r
ary
ry
ry
n
n
y
elim
Draft
t
t
ft
ft
ft
ft
aft
raft
raft
ra
ft
t
t
t
t
t
t
t
t
t
t
t
t
t
t
t
t
t
t
t
Draf
Draf
D
D
D
D
ra
r
ra
a
Dr
Dr
D
ra
r
ra
r
r
D
D
D
D
ra
ra
ra
r
ra
ra
r
ra
a
ra
ra
ra
Dr
D
D
D
D
r
D
D
D
D
r
r
D
D
D
D
D
D
D
D
Dr
D
ra
D
D
D
D
D
20
2
2
20
20
20
20
2
2
2
2
2
2
2
2
2
20
2
2
2
2
2
2
2
20
2
2
20
20
20
018-10-15
oward thward t
01
201
Chapter 4 — Use the Phone
52 Dolphin CT50 Mobile Computer with Windows 10 IoT Mobile Enterprise User Guide
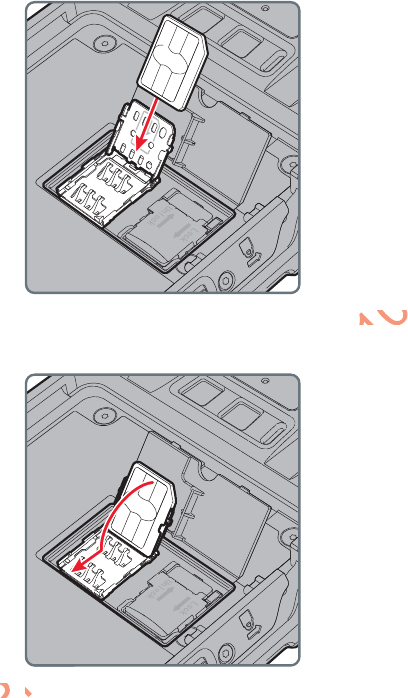
7Insert the SIM card in the door.
8Close the SIM card door and slide it toward the bottom of the CT50 to
secure it.
9Replace the battery, reconnect the handstrap, and press the Power
button to turn on the CT50. The phone is now ready to use.
Preli
99
RepR
b
el
elimina
mina
inary
mina
inary
inary
ry
ry
n
n
n
n
in
a
n
in
i
n
n
a
n
ary
y
ary
ary
y
ary
ary
ry
ary
ry
ry
ry
ry
a
a
a
ry
i
a
a
a
a
a
a
in
n
a
a
a
a
a
a
a
a
a
a
a
a
a
a
a
a
a
n
n
n
n
in
i
in
i
in
mina
i
n
in
i
na
n
n
n
in
in
y
ry
ry
y
y
ry
ry
ry
y
y
ry
ry
ary
ary
r
ar
r
ar
a
ar
ar
a
ry
ar
ry
a
a
a
a
a
ary
ry
ar
in
in
in
in
in
in
na
na
n
y
ary
ry
ry
ary
ry
ry
y
y
y
y
y
y
y
y
y
y
y
y
y
ry
ry
y
ry
ar
na
in
in
n
i
i
i
in
in
n
in
in
in
in
n
a
in
in
a
n
n
in
ary
a
a
a
ry
n
a
in
in
n
n
na
a
n
a
a
a
a
a
a
a
ar
a
a
a
n
n
na
a
in
n
in
ry
a
a
ary
ry
ry
a
r
ary
ry
ry
ary
ary
ary
ary
ry
ry
a
n
ry
ary
ry
a
a
a
a
a
ry
ry
ry
a
ry
ary
ry
ry
ry
ry
ry
ry
r
ar
ry
ary
ary
a
in
in
ry
a
in
in
na
n
a
ar
in
i
i
i
i
n
a
n
a
n
a
a
n
a
n
a
a
a
a
a
a
a
n
a
a
a
a
n
ary
ary
ary
n
n
r
a
ary
ry
n
n
a
n
y
n
a
a
ry
r
n
a
ary
ary
ary
ary
in
na
ry
ary
ary
ry
ary
in
ar
ary
ary
ar
ary
na
ar
in
in
ar
na
in
ry
a
ry
in
ar
ar
na
ry
in
a
in
in
n
ary
ary
ry
ary
ary
ry
a
in
a
ry
ar
n
i
na
a
in
ar
n
ry
ry
ary
ry
n
n
y
y
y
ary
ary
ary
y
ry
r
r
ry
ry
r
elim
Draft
t
t
ft
ft
ft
ft
aft
raft
raft
a
ft
t
t
t
t
t
t
t
t
t
t
t
t
t
t
t
t
t
t
t
Draf
ra
D
D
D
D
ra
r
ra
Dr
Dr
D
ra
r
ra
r
r
D
D
D
D
ra
ra
ra
r
ra
ra
r
ra
ra
ra
ra
Dr
D
D
D
D
r
D
D
D
D
r
r
D
D
D
D
D
D
Dr
D
Dr
D
ra
D
D
D
D
D
D
D
D
20
2
2
20
20
20
20
2
2
2
2
2
2
2
2
2
20
2
2
2
2
2
2
2
20
2
2
20
20
20
018-10-15
oward thward t
01
201

Chapter 4 — Use the Phone
Dolphin CT50 Mobile Computer with Windows 10 IoT Mobile Enterprise User Guide 53
Activate the CDMA Phone
To activate the CDMA phone in your mobile computer, you need to
contact your wireless carrier and set up an account.
You also need to provide the carrier with the Mobile Equipment Identifier
(MEID) for the computer. You can find the MEID:
•on a label located in the battery compartment.
•on the outside of the computer shipping box.
The activation process is slightly different for each CDMA carrier. Your
carrier sales contact and a Honeywell representative can guide you
through the process.
Make a Phone Call
Once the phone is activated, you can make a phone call.
1On the Start screen, tap .
2Tap the keypad icon to enter the number, and then touch the Call
button to dial the number.
Answer the Phone
When you receive a phone call, the Incoming Call screen opens,
showing the caller ID. All incoming calls are recorded in the Call log. If
you miss a call, you receive a notification.
Make an Emergency Phone Call
You can use the phone to make an emergency phone call, even if the
SIM card is missing from your UMTS phone or if you do not have a valid
CDMA account. In either case, the phone shows that you have no
service. However, if you dial certain emergency numbers (such as 112,
911, 000, 08, 118, 119, or 999) the call will go through.
Note: For the CDMA phone, settings are permanently stored in the
WWAN radio after activation. CDMA settings persist through a factory
data reset.
Preliminary
the
e
e
you receivou rece
wing the cawing the
ou miss a miss a
Eme
Em
Draft
d, yo
d, y
, tap ap
con to e
con to e
numnum
t
2018-10-15
or each or each
epresentresen
ou ca
u ca
Chapter 4 — Use the Phone
54 Dolphin CT50 Mobile Computer with Windows 10 IoT Mobile Enterprise User Guide
Preliminary
Draft
2018-10-15

55
5
Use the Camera
Use this chapter to learn how to take pictures and record
videos with the color camera.
Preliminary
Draft
2018-10-15
pictures ures

Chapter 5 — Use the Camera
56 Dolphin CT50 Mobile Computer with Windows 10 IoT Mobile Enterprise User Guide
About the Color Camera
The CT50 contains an 8-megapixel color camera for taking pictures and
videos. The camera and flash are located on the back of the computer.
Use the Photos app to view photos and videos stored on the CT50.
Adjust the Camera and Video Settings
The camera and video settings are adjustable from within the Camera
app.
How to Zoom
The camera zoom is controlled using a pinching motion on the touch
screen. Place two fingers on the screen at the same time, and then:
•spread them apart to zoom in (enlarge an object).
•pinch them together to zoom out.
Change Photo Settings
You can change the camera settings for best results when taking
pictures.
1Press the Camera button to open the camera app.
2Configure these automatic settings:
•Flash
•HDR
3From the right side of the screen, tap to view and modify these
photo settings:
•White balance
•Focus
•Sensitivity
•Shutter speed
•Brightness
4Tap a setting from the menu.
Note: HDR (high dynamic range) is enabled by default which means that
the flash is controlled by the HDR and the other settings are overwritten.
When you press , HDR is disabled.
Preliminary
ress the ess the
C
2
ConfiguConfig
••
F
h dyna
dyn
ontrolled b
ntrolled
press press
Draft
amera seamera se
m
m
2018-10-15
nching mnching
n at the st the s
enlarge anlarge
m out.out.

Chapter 5 — Use the Camera
Dolphin CT50 Mobile Computer with Windows 10 IoT Mobile Enterprise User Guide 57
5Slide the photo setting icon along the half-circle until you reach the
setting you want.
6When you are done changing settings, tap the screen.
Change Video Settings
You can change the video settings for best results when taking videos.
1From the right side of the screen, tap to view and modify these
photo settings:
•Video light
•White balance
•Focus
•Brightness
2When you are done changing the settings, tap the screen.
Take a Photo
1Press the Camera button or tap All Apps > Camera.
2Using the screen as a viewfinder, move the computer until you see
the image you want to capture.
3Tap the screen to set the focus.
4Press the Camera button or tap the camera icon ( ) to take a
picture. The camera takes a picture and small image of the picture
appears in viewfinder at the top of the screen.
•To view the picture, tap the thumbnail image.
•To return to the Camera app, tap the back button ( ).
Record a Video
1Press the Camera button or tap All Apps > Camera.
2Tap the video icon ( ) at the bottom of the screen.
3Tap the video icon to start recording video.
4When you are done recording, tap the video icon again to stop
recording.
Preliminary
en to
to
Camera b
Camera
. The camThe ca
ears in viewars in v
To viewTo vie
••
To rT
Vid
V
Draft
on o
on o
s a viewfia viewf
ant to caant to ca
set
set
2018-10-15
ettings, tngs, t
r tap
tap
Chapter 5 — Use the Camera
58 Dolphin CT50 Mobile Computer with Windows 10 IoT Mobile Enterprise User Guide
Preliminary
Draft
2018-10-15

59
6
Configure the Computer
Use this chapter to learn how to configure the CT50. You
will also find information on how to configure network
communications and wireless security.
Preliminary
Draft
2018-10-15
gure the e the
configurconfigu
curity.ity.
Chapter 6 — Configure the Computer
60 Dolphin CT50 Mobile Computer with Windows 10 IoT Mobile Enterprise User Guide
How to Configure the Computer
You can configure many parameters on the computer such as the display
orientation, or the network settings. The values you set for these
parameters determine how the computer operates.
You configure the computer using the Settings app.
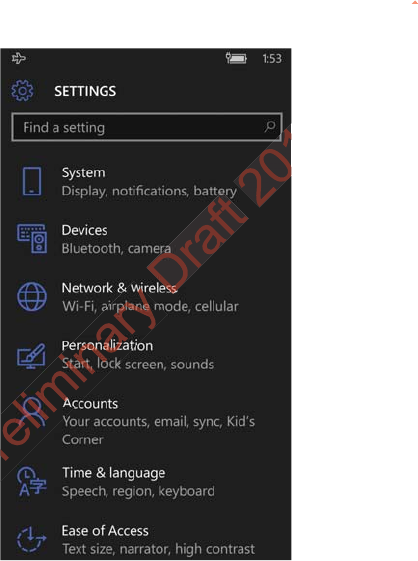
Start the Settings App
The Settings app is located in the All Apps menu.
•Tap All Apps > Settings. Or, pull down the Action Center from the
top of the screen and tap All Settings.
Pre
018-10-15
tio
t
Chapter 6 — Configure the Computer
Dolphin CT50 Mobile Computer with Windows 10 IoT Mobile Enterprise User Guide 61
About the Structure of the Settings App
Use this section to learn about the structure of the Settings app so you
can find parameters quickly.
Settings App Structure
Setting Description
System Provides information about your CT50 and lets you
set the brightness level, screen rotation, battery
saver settings, and photos+camera settings.
Devices Lets you configure the default camera, Bluetooth
settings, NFC, the mouse, and USB connections.
Network & wireless Lets you configure your Wi-Fi network, turn on or off
airplane mode, turn on a mobile hotspot, and
configure cellular data usage.
Personalization Lets you personalize the CT50 according to your
needs. You can configure the theme, sounds,
screen lock times, notifications, and more.
Accounts Lets you set up email, contacts, and workplace
accounts.
Time & language Lets you configure the date and time, language,
region, and keyboard settings.
Ease of Access Lets you configure the text size, contrast, zooming
capability, and narration and speech settings for the
CT50.
Privacy Lets you configure the privacy settings for your
CT50 such as location and account info.
Update & security Lets you backup data to the cloud, check for
updates, find your phone, and configure developer
features.
Extras Lets you configure extra information for the CT50
such as turn off display on face down. It also
provides battery information.
Prelim
Update & spdate &
limin
y
inary
sL
ca
c
in
lim
P
D
et
et
Draf
Lets you Lets you
regionregion
aft
ou s
ou
ounts.nts.
af
D
20
set up
set u
2018-1
nalize thnalize
can confican conf
ck times,ck times,
8-10-15
Wi-Fi neWi-Fi ne
on a mobon a m
data usata usa
15
t c
t
and US
and U
15
8-1
20
Chapter 6 — Configure the Computer
62 Dolphin CT50 Mobile Computer with Windows 10 IoT Mobile Enterprise User Guide
About Network Communications
You can use the mobile computer in your wireless or wired data
collection network. You can connect your computer using:
•802.11 radio communications.
•Ethernet communications.
•Bluetooth communications.
•Near Field Communication (NFC) technology.
•USB and serial communications.
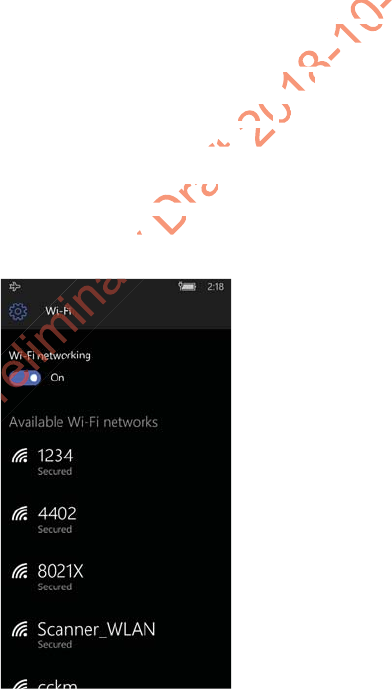
Connect to a Wi-Fi Network
The CT50 has an 802.11 radio to transfer data using wireless
communications. Before you connect to a Wi-Fi network, you need to
know about your network security protocol and its required credentials.
By default, the 802.11 radio is disabled.
When a Wi-Fi connection is active, you can view connection information
or edit the networks settings by selecting the network name on the Wi-Fi
Settings screen.
1Tap All Apps > Settings > Network & Wireless > Wi-Fi.
2Touch the toggle box to turn on Wi-Fi. A list of discovered networks
appears.
Preliminary
gle
e
Draft
s by
s b
Settingsettings
box tbox
2018-10-15
data usidata u
o a Wi-FiWi-Fi
otocol antocol
abled.bled.
ctive,
tive,
youyo
y seley sele
Chapter 6 — Configure the Computer
Dolphin CT50 Mobile Computer with Windows 10 IoT Mobile Enterprise User Guide 63
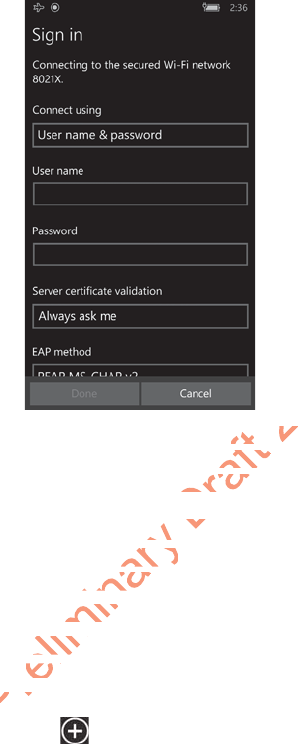
3Tap a network name in the list to view details:
If the network is secured, a list of required information appears (such
as a password, or other credentials). To connect to the secured
network, enter the required information and tap Done.
Connect to a Hidden Wi-Fi Network
For security reasons, some networks do not appear on the available
network list even if you are in range.
1Tap All Apps > Settings > Wi-Fi.
2Touch the toggle box to turn on Wi-Fi. A list of discovered networks
appears.
3Scroll to the bottom of the screen and tap Manage.
4Tap and the Add Network screen appears.
5In the Network name box, type the network name. The network
name is case-sensitive.
6Tap Add.
7If the network is secure, you are asked to provide information
relevant to the network security protocol such as a password, key, or
certificate. Type the required information.
8Tap Done to connect.
Preliminary
o a H
a H
reasons, s
asons,
st even if yst even if
p
All AppsAll Ap
Touch theTouch th
appeaappe
33
ScrS
4
Draft
d, a
d, a
her cred
er cred
e requirede require
Hid
Hid
2018-10-15
list o
st o

Chapter 6 — Configure the Computer
64 Dolphin CT50 Mobile Computer with Windows 10 IoT Mobile Enterprise User Guide
Modify Channel Settings
You can manually select the channels the 802.11 radio uses for
communication.
1Tap All Apps > Settings > Extras > Wi-Fi Radio Settings.
2Tap Channel Settings.
3Swipe left or right to view the channels available under the 2.5 GHz,
5 GHz, and DFS bands.
4Select the boxes next to the channels to enable or disable them.
5Tap to save the settings.
Change Roaming Settings
By default, roaming is enabled for the 802.11 radio. When enabled, the
Wi-Fi radio automatically roams from one access point to another as
needed to provide seamless connectivity.
1Tap All Apps > Settings > Extras > Wi-Fi Radio Settings.
2Tap Roaming Settings.
3Tap the Roaming check box to disable roaming.
4Tap to save the settings.
Connect to an Ethernet Network
By default, the CT50 is configured to obtain IP addresses automatically
through the DHCP server. In most cases, you can simply insert the CT50
into an Ethernet dock and connect to the Ethernet network. To connect
the computer to an Ethernet network, you need an Ethernet dock.
1Make sure the dock is connected to your Ethernet network.
2Place the computer in the dock.
3Tap All Apps > DiagnosticInfoW10 to view the assigned IP
address.
How to Connect to Virtual Private Networks
The computer supports connecting to virtual private networks (VPNs).
To configure VPN access, you must obtain details from your network
administrator. To establish a VPN connection, you must first create a
VPN profile on the CT50.
Preliminary
CT50 is
CT50
DHCP ser
HCP se
thernet dohernet d
mputer to puter t
Make surMake s
22
PlacePlac
33
Ta
Draft
b
settings.ttings.
Netw
Net
2018-10-15
1 radio. Wdio. W
access paccess
ty.
as as
>>
Wi- W
ox to d
ox to d

Chapter 6 — Configure the Computer
Dolphin CT50 Mobile Computer with Windows 10 IoT Mobile Enterprise User Guide 65
Add a VPN Profile
Before you can connect to a VPN, you must add VPN information.
1Tap All Apps > Settings > Network & Wireless > VPN.
2Tap to Add a VPN connection.
3From the VPN provider box, select a provider from the drop-down
list.
4In the Server name or address box, type the server name or IP
address of the VPN server.
5In the VPN type box, choose Point to Point Tunneling Protocol
(PPTP), L2TP/IPsec with certificate, L2TP/IPsec with pre-shared
key, or IKEv2.
The VPN service provider only appears in the options if you have
already downloaded and installed the service provider app. If
necessary, you can touch the link under the Type box to connect and
download an SSL VPN app from the Windows Store.
6Select the Type of sign-in info required to connect to the VPN
server and then type the required information.
7(Optional) Type a User name and Password.
8Tap Save. The VPN connection appears on the screen.
About Wireless Security
The computer provides these security solutions for your wireless
network:
•Wi-Fi Protected Access 2 (WPA2™)
•Wi-Fi Protected Access (WPA)
•802.1x
•LEAP
•WEP
Honeywell recommends WPA2 security with PSK (Personal) or 802.1x
(Enterprise) key management.
Before you set security, you need to enable the radio, set the date, and
set the SSID on your computer. To use 802.1x security, you need to load
a root certificate on your computer. To use transport layer security (TLS)
with 802.1x security, you also need to load a user certificate.
Use the Settings app to access and configure all wireless security
settings.
Preliminary
Secu
Sec
uter providuter prov
k:
Wi-Fi ProtWi-Fi Pr
Wi-Fi PWi-F
••
8028
Draft
r namnam
N conneconne
cu
cu
2018-10-15
Ps
s
in the opin the o
service servic
under thender th
m the Winm the W
nfofo
requ req
equired
quired
ee

Chapter 6 — Configure the Computer
66 Dolphin CT50 Mobile Computer with Windows 10 IoT Mobile Enterprise User Guide
About Certificates
The CT50 allows you to install digital certificates for secure client
communications with websites and services. You can install certificates
through Microsoft Edge, email, or mobile device management (MDM).
Once you install a certificate, you can use it to set up your VPN profiles,
Wi-Fi, and email accounts. You can only remove a certificate if you
restart the computer. For help, see “Restart the Computer” on
page 73.
Install a Certificate with Microsoft Edge
Some certificates are posted and made available for download through a
device-accessible URL.
1Type the URL in the Microsoft Edge address bar.
2Select the certificate. It opens on the CT50.
3When prompted, select to install the certificate.
Install a Certificate with Email
The Windows 10 Mobile certificate installer supports .cer, .p7b, .pem,
and .pfx files.
1Open the email with the ecrypted certificate file attached.
2Save the file to the CT50.
3Select the file to open it and choose install.
4Type any security information required.
How to Install a Certificate with MDM
Administrators can use Mobile Device Management (MDM) software to
add root and CA certificates or configure the CT50 to enroll a client
certificate with an enrollment server that supports Simple Certificate
Enrollment Protocol (SCEP) used for certificate based client
authentication (such as Wi-Fi, VPN, or email). To learn how to install
certificates with MDM, go to https://technet.microsoft.com/en-us/
itpro/windows/keep-secure/installing-digital-certificates-on-
windows-10-mobile.
Preliminary
ail w
w
file to the
e to the
t the file tothe file
ype any sepe any s
all a Ceall a C
Admin
Ad
dd
Draft
ail
ai
e certificcertifi
th t
th t
2018-10-15
ble for do
e for d
address ddress
the CT5the C
tall the ctall the c
l
l

Chapter 6 — Configure the Computer
Dolphin CT50 Mobile Computer with Windows 10 IoT Mobile Enterprise User Guide 67
About Bluetooth Communications
The CT50 is Bluetooth-enabled, which lets you connect to other
Bluetooth devices. You need to turn on the Bluetooth radio before you
can discover and connect to other Bluetooth devices. By default, the
radio is turned off.
The Bluetooth radio maintains its current state through a system reset. If
you perform a factory data reset, you must recreate pairings to devices.
Connect a Bluetooth Device
To connect to a Bluetooth device, you must enable Bluetooth and then
select the device from a list of discovered devices.
1Tap All Apps > Settings > Devices > Bluetooth.
2Touch the toggle to turn on Bluetooth. A list of available Bluetooth
devices appears.
3Tap the name of the device you want to pair with the CT50. As the
Bluetooth radio attempts to connect with the device, “Pairing”
appears under the name.
4If the device requires a pin, do one of the following:
•Compare the pin displayed on both the computer and other
device in the Pairing accessory message box. If they match,
select OK.
•Enter the pin for the device and then select Done.
5When the devices are paired successfully, “paired” appears under
the device name.
Disconnect a Paired Device
You can disconnect a paired Bluetooth device from the Settings app.
1Tap All Apps > Settings > Devices > Bluetooth.
2Touch and hold the name of the paired device and then select
Delete.
Note: If you are attempting to connect to a printer or a headset, the
default pin may be 1234 or 0000. If neither of these pin numbers work,
consult the device documentation for the pin number.
Preliminary
der the
r th
vice requir
e requi
ompare thmpare
device indevice
selectsele
••
En
55
W
Draft
on
on
he devicehe devic
attempt
attempt
na
na
2018
Devicesevices
n Bluet
Blue
8-10-15
ble Bl
e Bl
ces.es.
a printer a printe
her of ther of th
r the pin the p

Chapter 6 — Configure the Computer
68 Dolphin CT50 Mobile Computer with Windows 10 IoT Mobile Enterprise User Guide
About Serial and USB Communications
You can use these accessories to transmit data to and receive data from
another device through serial or USB communications:
•Vehicle dock
•HomeBase
•Ethernet HomeBase
•USB snap-on adapter
•RS-232 DEX adapter
For information on these accessories, contact your local sales
representative.
About Near Field Communication (NFC)
NFC technology provides the ability for short-range, wireless data
transfer between the CT50 and NFC tags or other NFC enabled devices
placed in close proximity to the back of the computer. NFC equipped
CT50 models support the following modes of operation:
• NFC tag reader/writer mode: The computer reads or writes digital
information from or to an NFC tag.
• Peer-to-Peer (P2P) mode: The computer uses Android Beam or
Bluetooth technology to transfer screen content (such as a picture,
contact information, Web page url, or file) between NFC enabled
devices.
Note: Sleep Mode (Suspend Mode) and the screen lock temporarily
turns the NFC radio off.
Pre
P
eliminary
er (P2P
(P2
h technolog
echnolo
ct informatit informa
ces.es.
e: e:
Sleep MSleep
urns the Nns the
Draft
th
follow
ollow
writer moter mo
or to an
or to a
)
)
2018-10-15
our loc
ur lo
catioatio
ty
for shfor sh
NFC tag NFC tag
e back
e back
n
n

69
7
Manage and Maintain the CT50
Use this chapter to understand how to upload software, perform
troubleshooting, and maintain the CT50.
Preliminary
Draft
2018-10-15
d softwaoftwa

Chapter 7 — Manage and Maintain the CT50
70 Dolphin CT50 Mobile Computer with Windows 10 IoT Mobile Enterprise User Guide
Update the CT50 Software
You can use a microSD card to flash a specific firmware image to the
CT50 or to update the computer if there is no access to the internet for
over-the-air (OTA) automatic updates. To update the CT50 with a
microSD card, you will need a:
•4GB microSD card.
•valid full flash update image (.ffu) supplied by Customer Support.
1Copy the .ffu image to the root directory on the microSD card.
You must rename the update image to “upg_<platform>_00.00.ffu”
for the computer to recognize it. <platform> corresponds to the first
seven characters of the Configuration Number (CN) and can be
found printed on the inside of the battery compartment.
2Insert the microSD card into the CT50. For help, see “Insert a
microSD Card” on page 20.
3Apply external power to the CT50 and power it on.
The computer must have power for the length of the entire flash
process which can take up to 15 minutes.
4Set up your computer again when you are prompted to select a
language.
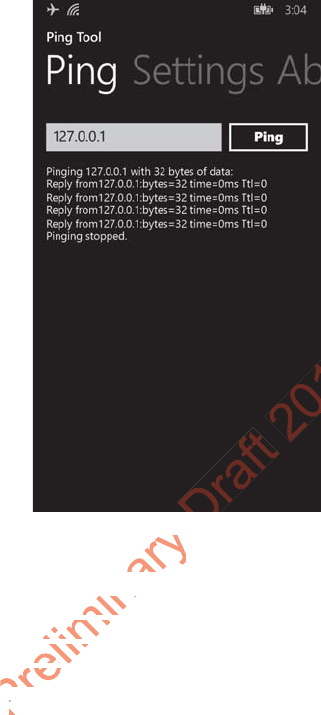
Test a Network Connection
The Ping app provides a GUI-based version of the traditional command
line ping utility. Pinging sends out an echo request to a specific computer
on the network. Use Ping to verify communication links or to make sure a
specific address is working.
1Tap All Apps > Ping.
2Type the destination IP address in the box.
Caution: All data on the CT50 is erased during the flash process.
Make sure any files you want to keep are backed up prior to
updating the software.
Preliminary
r m
m
hich can
ch ca
your compour com
uage.age.
work work
The PiThe
ne
Draft
d int
d in
page 20
age 20
ower to thwer to th
ust haust h
2018-10-15
y on the on the
e to “upg_o “upg_
<platformplatfo
guration Nguration
of the baof the ba
o the
o the
Chapter 7 — Manage and Maintain the CT50
Dolphin CT50 Mobile Computer with Windows 10 IoT Mobile Enterprise User Guide 71
3Tap Ping. The results appear in the lower half of the screen.
View Network Adapter Information
The IPConfig app displays, releases, and renews IP parameters for on-
board network adapters. Use IPConfig to view information on the
network adapters including the MAC address, IP address, netmask,
gateway, and DHCP settings.
1Tap All Apps > IPConfig.
2From the AdapterInfo screen, touch the box under Adapter.
3Select one of the integrated network adapters installed in the
computer from the drop-down menu.
Preliminary
Adapt
dap
Config apponfig ap
d network d netwo
etwork adawork ad
gateway, gatewa
11
Ta
D
018-10-15

Chapter 7 — Manage and Maintain the CT50
72 Dolphin CT50 Mobile Computer with Windows 10 IoT Mobile Enterprise User Guide
Change How Data Packets are Routed
The Route app allows you to view and edit the rules that govern how
packets destined for various subnets are routed. These rules tell the
computer which gateways, on a given subnet, may be used to route
packets to hosts on other subnets. You can add, delete, clear, or print a
route. This procedure explains how to add a route.
1Tap All Apps > Route.
2Type the range of IP addresses to which this rule will apply in the
Destination and Netmask fields.
3Type the Gateway.
4(Optional) Type the Metric.
5(Optional) Type the Interface.
6Tap Execute. The system verifies your results and the Output screen
lets you know if your entry was added successfully.
How to Restart the Computer
If the computer or an application locks up, or if the computer does not
respond when you press the Power button, you may need to restart the
computer.
The computer uses the configuration currently saved in flash memory
during the boot process. Try these methods, in order, to restart the
computer:
•Restart: Restarts the computer and goes through the initialization
process.
• Clean boot: Completely erases the computer memory, including all
applications and data files, except those found in any removable
storage.
• Reset to factory settings: Returns the computer to the factory
default state.
r uses the
uses th
boot proceoot pro
er:
estart:estart:
R
processproce
•Clea•Cle
ap
Draft
m
pplicatioplicatio
press the
press the
2018-10-15
your resyour res
added sadded
mput
mpu
Chapter 7 — Manage and Maintain the CT50
Dolphin CT50 Mobile Computer with Windows 10 IoT Mobile Enterprise User Guide 73
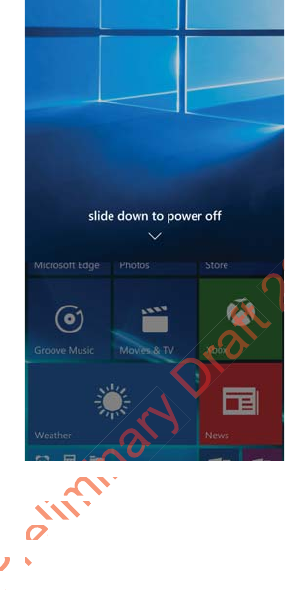
Restart the Computer
You may need to restart the computer to correct conditions where an
application stops responding to the system.
1Save your files and close any open applications.
2Press and hold the Power button until this screen appears:
3Swipe down toward the bottom of the screen to power off the CT50.
The word “Goodbye” appears on the screen as the computer powers
off.
4Press the Power button to turn on the CT50.
If the touch screen is unresponsive:
•Press and hold the Power button for approximately 13 seconds. The
computer automatically restarts.
Prelimina
wipe down pe dow
The word he wor
off.off.
44
PreP
th
2018-10-15

Chapter 7 — Manage and Maintain the CT50
74 Dolphin CT50 Mobile Computer with Windows 10 IoT Mobile Enterprise User Guide
Clean Boot the Computer
If reset does not work, use a clean boot to get the computer up and
running for further troubleshooting.
When you perform a clean boot, all personal content is erased and all
factory default settings are restored on the computer. The clean boot
discards any account information you may have added, including your
Microsoft account information. Only installed Microsoft over-the-air
(OTA) updates persist after you perform a clean boot.
1Tap All Apps > Settings > System > About.
2Scroll to the bottom of the screen and tap Reset your phone.
3When the warning appears, select the check boxes you want to apply
and then tap Yes.
4When prompted again, tap Yes. You should see “goodbye” appear
on the screen and then a set of gears with a status bar below until the
computer turns off.
5Press the Power button to turn on the CT50. You will need to set up
your computer again.
Caution: A clean boot erases the memory on the computer,
including all applications and data files with the exception of the
information found in any removable storage. You must reimplement
any custom provisioning after a clean boot.
Preliminary
e
ter aga
er ag
Draft
tap
tap
en a set
n a set
f.
butto butto
2018-10-15
> AboutAbou
and tap and tap
elect the elect the
YesYes
5
You m
ou m
t.

Chapter 7 — Manage and Maintain the CT50
Dolphin CT50 Mobile Computer with Windows 10 IoT Mobile Enterprise User Guide 75
Reset the Computer to Factory Default State
If the computer is unresponsive and all other recovery methods have
failed, you probably need to reset the computer to the factory default
state.
When you reset the computer to the factory default state, all personal
content is erased and all factory default settings are restored on the
computer. The reset discards any account information you may have
added, including your Microsoft account information. Only installed
Microsoft over-the-air (OTA) updates persist after you perform a reset.
1Press and hold the Volume Down and Power buttons
simultaneously until a large exclamation point appears on the screen.
This process can take quite a while, but continue to hold down on the
two buttons until you see the exclamation point.
2Press the following buttons in this order:
a Volume Up
b Volume Down
cPower
d Volume Down
Once the computer resets, the language selection screen appears.
You need to set up the computer again.
Caution: Resetting the computer to the factory default state erases
the memory on the computer, including all applications and data
files with the exception of the information found in any removable
storage. You must reimplement any custom provisioning after
resetting the computer to the factory default state.
Preliminary
Down
ow
er
olume Dolume
Once the cOnce the
You neeYou ne
Draft
ee the
e th
buttobutto
ns ns
2018-10
wnwn
and and
P
xclamatixclamati
e a whil
e a whi
eex
ex
0-15
pplica
plica
found in
und in
tom proom pro
default sefault

Chapter 7 — Manage and Maintain the CT50
76 Dolphin CT50 Mobile Computer with Windows 10 IoT Mobile Enterprise User Guide
Clean the Computer
To keep the computer in good working order, you may need to clean the
scanner window, color camera window, and the touch screen. Clean the
windows and the touch screen as often as needed for the environment in
which you are using the computer. To clean the computer, use one of
these recommended cleaning agents:
•Acetic acid, 10% in water
•Ethyl alcohol, 10% in water
•Mild soap solutions
1Press the Power button to suspend the computer.
2Dip a clean cloth towel in the cleaning agent and wring out the
excess.
3Wipe off the scanner window, camera lens, and flash area. Do not
allow any abrasive material to touch these surfaces.
4Wipe dry.
5Let the computer completely air dry before using again.
Caution: There are no user-serviceable parts inside the computer.
Opening the computer will void the warranty and may cause
damage to the internal components.
Note: Honeywell recommends that you must leave the battery installed
when you clean the computer. Leaving the battery installed helps prevent
fluids from entering the computer through the SIM card and microSD
card connectors.
Preliminary
cloth t
oth
off the scaoff the s
ow any abrw any a
Wipe dry.Wipe dr
55
Let theLet
Draft
r
r
button button
ow
ow
mpu
mpu
2018-10-15
rts insid
s insid
ranty ananty an
hat you mat you m
Leaving
Leavin
ter thter th
77
A
Specifications
Preliminary
Draft
2018-10-15

Chapter A — Specifications
78 Dolphin CT50 Mobile Computer with Windows 10 IoT Mobile Enterprise User Guide
Physical and Environmental Specifications
This section lists the physical and environmental specifications for the
CT50.
Physical Dimensions
Length: 160 mm (6.30 in)
Width: 82.5 mm (3.25 in)
Depth: 19 mm (0.75 in) (without handstrap)
22.6 mm (0.89 in) (with handstrap)
Weight: 342 g (1.13 lbs) (including battery)
Tumble and Drop Specifications
Tumble specification: 1000 1 m tumbles
Drop specification: 5 ft multiple drops to unyielding steel plate,
-10 °C to +50 °C (14 °F to 122 °F) temperature
range and 4 ft drop at -20 ° C (-4 °F)
Power and Electrical Specifications
Operating battery: Rechargeable Lithium-ion 3.9 V, 4000 mAh
battery
Electrical rating: 5 V, 2 A
Temperature and Humidity Specifications
Operating temperature: -20 °C to 50 °C (-4 °F to 122 °F)
Storage temperature: -30 °C to 70 °C (-22 °F to 158 °F)
For maximum battery life, store at 23 °C
(73 °F) at 50% charge.
Relative humidity
(operating):
0% to 95% non-condensing
Environmental rating: IP67, Category 1
Prelimina
perature aperature
OperatingOperatin
StoragStor
nary
ating:ing:
ary
y:
ary
na
Pre
Draft
g
l Specifil Specif
ft
2018-10-15
ding b
ing b
umblesmble
tiple tiple
dropdrop
C to +50 C to +50
e and 4
e and 4
5
15
8
2

Chapter A — Specifications
Dolphin CT50 Mobile Computer with Windows 10 IoT Mobile Enterprise User Guide 79
Screen Specifications
4.66-inch TFT color LCD with backlight, 720-pixel HD, outdoor viewable
touch screen.
Language Support
World-wide English, French, German, Italian, Spanish, Simplified
Chinese, Traditional Chinese.
Bar Code Symbologies Supported
The CT50 supports these bar code symbologies:
1D Symbologies
•China Post
•Codabar
•Code 11
•Code 128
•Code 32
•Code 39
•Code 39 with Full ASCII
•Code 93
•EAN-8
•EAN-8 with 2 Digit Addenda
•EAN-8 with 5 Digit Addenda
•EAN-13
CT50 Non-Incendive Computer Specifications
The CT50 mobile computers with non-incendive (NI) certification
comply with the following specifications for North America and Canada
regions only.
Location Suitable for use in Division 2 locations
Safety SGS Listing - ISA/ANSI 12.12.01,
CAN/CSA C22.2 No 213-15
Gases Class I - Groups A. B. C, D
Dusts Class II - Groups E, F. G
Fibers and Flyings Class III
Maximum Ambient
Temperature
T4A rating for ambient temperature range
-20°C to 50°C.
ymbo
mbo
pports the
ports th
ologiesologies
na Posta Post
CodabarCodaba
••
Code Cod
••
Co
Draft
nch, Ge
ch, Ge
Chinese.Chinese.
olog
olog
2018-10-15
klight, 72ght, 7
mbient t
bient
C.
5
0-

Chapter A — Specifications
80 Dolphin CT50 Mobile Computer with Windows 10 IoT Mobile Enterprise User Guide
•EAN-13 with 2 Digit Addenda
•EAN-13 with 5 Digit Addenda
•GS1-128
•Korea Post
•IATA 2 of 5
•Industrial 2 of 5
•Interleaved 2 of 5
•ISBN
•ISBN with 5 Digit Addenda
•ISBT 128
•Matrix 2 of 5
•MSI
•EAN.RCC (RSS-14)
•RSS Limited
•RSS Expanded
•Te l e p e n
•Trioptic Code
•UPC-A
•UPC-A with 2 Digit Addenda
•UPC-A with 5 Digit Addenda
•UPC-E0
•UPC-E with 2 Digit Addenda
•UPC-E with 5 Digit Addenda
•UPC-A (Coupon Code)
2D Symbologies
•Aztec Code
•Codablock A
•Codablock F
•DataMatrix
•HanXin
•Maxicode
•Micro PDF 417
Preliminary
h 2 Digit
2 Dig
with 5 Digwith 5 D
C-E0E0
UPC-E wiUPC-E w
•
UPC-EUPC
••
UP
Draft
2018-10-15

Chapter A — Specifications
Dolphin CT50 Mobile Computer with Windows 10 IoT Mobile Enterprise User Guide 81
•MicroQr
•PDF 417
•QR Code
•TLC39
•OCR-A
•OCR-B
Postal Codes
•Australian Post
•Canadian Post
•KIX (Netherlands Dutch) Post
•Japanese Post
•British Post
•Planet Code
•Postnet
•UsIntelligent
Imager Reading Distances
The guaranteed depth of field measurements were taken using these
parameters:
•Distances are measured from the front of the engine.
•23 °C (73 °F), 0 lux
•Photographic quality codes
Note: Time to Read and Depth of Field are impacted if the bar code
symbol is at the edge of the image.
White Illumination Monochrome Sensor Only - Guaranteed Specs
Focus Standard Range (SR
Symbology Near Distance
(in/cm)
Far Distance
(in/cm)
Delta
(in/cm)
5 mil Code 39/128 3.6 (9.1) 5.6 (14.2) 2.0 (5.1)
10 mil Code 39/128 1.9 (4.8) 12.0 (30.5) 10.1 (25.6)
100% UPC 2.1 (5.3) 15.1 (38.1) 12.9 (32.7)
6.7 mil PDF 417 2.5 (6.4) 6.6 (16.7) 4.1 (10.4)
Pre
P
eliminary
are meas
e me
73 °F), 0 lu3 °F), 0 lu
otographic graphi
e:e:
Time to Time
ymbol is ambol is
Wh
Draft
istance
stance
th of fieldh of field
2018-10-15
Chapter A — Specifications
82 Dolphin CT50 Mobile Computer with Windows 10 IoT Mobile Enterprise User Guide
10 mil DataMatrix/Aztec 2.9 (7.4) 7.3 (18.5) 4.4 (11.1)
White Illumination Monochrome Sensor Only - Typical Specs
Focus Standard Range (SR
Symbology Near Distance
(in/cm)
Far Distance
(in/cm)
Delta
(in/cm)
5 mil Code 39/128 2.5 (6.4) 6.4 (16.3) 3.9 (9.9)
10 mil Code 39/128 1.1 (2.8) 13.0 (33.0) 11.9 (30.2)
100% UPC 1.8 (4.6) 16.5 (41.9) 14.7 (37.3)
6.7 mil PDF 417 1.8 (4.6) 7.3 (18.5) 5.5 (14.0)
10 mil DataMatrix/Aztec 2.1 (5.3) 8.0 (20.3) 5.9 (15.0)
White Illumination Monochrome Sensor Only - Guaranteed Specs
Focus Standard Range (SR
Symbology Near Distance
(in/cm)
Far Distance
(in/cm)
Delta
(in/cm)
Preliminary
Draft
2.
ft
20
1 (5.3)
(5.3)
2018
(4.6)4.6)
18-
)
8-10
1313
10-1
0
015
Dis
n/cm)
6.4 (16.4
10
8-
18
20
2
Preliminary
Draft
2018-10-15

Honeywell
www.honeywellaidc.com
Copyright © 2017
Honeywell International Inc.
All rights reserved.
Dolphin CT50 Mobile Computer with Windows 10 IoT Mobile Enterprise User Guide
*CT50-W10-EN-UG*
P/N CT50-W10-EN-UG!' Rev C
Preliminary
Draft
2018-10-15