Honeywell QC900A Bar Code Scanner with BT User Manual QC890
Honeywell International Inc Bar Code Scanner with BT QC890
Contents
- 1. User Manual Appendix
- 2. User Manual
User Manual
™
User’s Guide
Quick Check® 890
Bar Code Verifier
Quick Check® ImageData

Disclaimer
Hand Held Products, Inc. (“Hand Held Products”) reserves the right to make
changes in specifications and other information contained in this document
without prior notice, and the reader should in all cases consult Hand Held
Products to determine whether any such changes have been made. The
information in this publication does not represent a commitment on the part of
Hand Held Products.
Hand Held Products shall not be liable for technical or editorial errors or
omissions contained herein; nor for incidental or consequential damages
resulting from the furnishing, performance, or use of this material.
This document contains proprietary information that is protected by copyright. All
rights are reserved. No part of this document may be photocopied, reproduced,
or translated into another language without the prior written consent of Hand
Held Products.
©2006 Hand Held Products, Inc. All rights reserved.
Web Address: www.handheld.com
Quick Check® is a registered trademark of Hand Held Products, Inc.
Microsoft, Windows, Windows Mobile, Windows NT, Windows 2000, Windows
ME, Windows XP, ActiveSync, Outlook, and the Windows logo are trademarks
or registered trademarks of Microsoft Corporation.
The Bluetooth® word mark and logos are owned by Bluetooth SIG, Inc.
Note: Software screens included in this document are in English only and are
included for reference only. They may be different from the screen that
displays on your terminal.

i
Chapter 1 - Getting Started
Introduction........................................................................... 1-1
Unpacking the QC890 Verifier............................................. 1-1
QC890 Verifier Features....................................................... 1-1
Using the QC890 Verifier..................................................... 1-2
Scan Button........................................................................... 1-2
Scan Button LEDs.......................................................... 1-2
User LED Indications..................................................... 1-3
Physical Connections............................................................ 1-3
Specifications........................................................................ 1-4
Internal Battery ..................................................................... 1-4
Charging the Battery ...................................................... 1-4
Powering On the QC890 Verifier .................................. 1-4
Chapter 2 - Quick Check ImageData
Quick Check ImageData....................................................... 2-1
Installation of Quick Check ImageData ............................... 2-1
Communication Interfaces.................................................... 2-1
USB Communication Interface ...................................... 2-1
USB COM Port Emulation............................................. 2-2
RS-232 Serial Communication Interface ....................... 2-3
RS-232 Selections .......................................................... 2-3
Bluetooth............................................................................... 2-3
Using the QC890 Verifier with Bluetooth Devices ....... 2-4
Enabling Your Device for Bluetooth.................................... 2-5
Enabling QCID for Bluetooth............................................... 2-7
Using Quick Check ImageData ............................................ 2-8
Help System.......................................................................... 2-9
Chapter 3 - Using the Quick Check 890 Verifier System
Scanning a Bar Code Symbol Using the QC890 Verifier .... 3-1
Scanning a Bar Code Symbol Using
Quick Check ImageData .................................................... 3-1
Table of Contents

ii
Calibrating the QC890 Verifier ............................................ 3-2
Scanning Properly Using a Pen/Mouse Wand...................... 3-3
Calibrating an External Pen/Mouse Wand ........................... 3-4
Scanning Properly Using the QC3800V Linear Imager:...... 3-5
Calibration Log..................................................................... 3-6
Reflectometer Mode ............................................................. 3-7
Chapter 4 - Maintenance
Cleaning the External Devices.............................................. 4-1
QC890 Verifier ..................................................................... 4-1
Recertification....................................................................... 4-1
Chapter 5 - Customer Support
Product Service and Repair .................................................. 5-1
Online Product Service and Repair Assistance.............. 5-2
Technical Assistance ............................................................ 5-2
Online Technical Assistance .......................................... 5-3
Limited Warranty.................................................................. 5-3
Chapter A - Apertures
Pen/Mouse Wand Aperture Selection...................................A-1
Chapter B - Menu Setting Bar Codes
Resetting the Standard Product Defaults ..............................B-1
Illumination Timer................................................................B-1
Power Down Timer...............................................................B-1
Chapter C - Symbology Defaults - Operation

Quick Check® 890 User’s Guide 1 - 1
1
Getting Started
Introduction
The Quick Check® 890 Verifier System (QC890) is a professional quality control
system for verifying the readability and standards compliance of printed linear
bar code symbols. This verification system implements an integrated approach
that consists of the QC890 Verifier unit and the Quick Check® ImageData
(QCID) software.
The QC890 system offers ease of use, stability and repeatability, flexibility,
increased user features and control, and quality testing of the most common
industry applications and symbologies.
Unpacking the QC890 Verifier
After you open the shipping carton containing the product, take the following
steps:
• Check for damage during shipment. Report damage immediately to the
carrier who delivered the carton.
• Make sure the items in the carton match your order.
• Save the shipping container for later storage or shipping.
The standard accessories that should be included in your kit are:
• Quick Start Guide
• CD with QCID software and this User’s Guide
• DC power supply with cord (includes adapters for different countries)
• Interface cables (USB and RS-232)
• Plastic gauge
•Metal ruler
• Reference test symbols
• Calibration bar code page
QC890 Verifier Features
The QC890 Verifier is a full-featured bar code verification system compatible with
all major linear bar code symbologies. It is both a quick and easy-to-use pass/
fail analyzer of bar code symbols and a powerful measuring tool for detailed
testing of bar code symbols.
The QC890 Verifier provides all of the information you need to interpret overall
symbol quality.

1 - 2 Quick Check® 890 User’s Guide
The verifier tests the following symbologies:
Using the QC890 Verifier
The QC890 Verifier offers a choice of Automatic, 5, 6, and 10 mil aperture
settings. External devices (i.e., mouse wands, pen wands, and linear imagers)
are available with apertures designed to match the most common X dimensions.
Wands are available with apertures of 3 (Mouse Wand only), 5, 6, 10, and 20
(Mouse Wand only) mil. These aperture sizes correspond to those specified in
ISO/IEC 15416 Bar Code Print Quality Test Specification - Linear Symbols. The
proper aperture should be selected based on the X dimension range shown in
the table in the Pen/Mouse Wand Aperture Selection (page A-1) section.
Choosing an inappropriate scanning aperture results in inaccurate quality
measures. Too small an aperture may detect reflectance non-uniformities (spots
and voids) that would not affect scanning with a "normal" aperture size. Too large
an aperture will not be able to resolve individual elements of the symbol.
Scan Button
The scan button on top of the unit wakes the unit from power down. A first press
of the button turns on illumination and a second press activates reading
capabilities.
Scan Button LEDs
• Red LED - error conditions
• Green LED - good symbols and configuration changes
Codabar Interleaved 2 of 5
Code 11 MSI
Code 16K PDF417
Code 39 Reduced Space Symbology (RSS-14,
RSS Limited, RSS Expanded)
Code 49 Regular 2 of 5
Code 93 Telepen
Code 128 UPC/EAN
IATA 2 of 5

Quick Check® 890 User’s Guide 1 - 3
User LED Indications
Audio Sound
An audio signal (default ON) provides a quick indication if a scan passes or fails
the current test. You can change the pitch/volume of these beeps (see
Illumination Timer on page B-1). After a scan, one short, high pitch beep
indicates that the symbol passes an appropriate group of tests, while one long,
low pitch beep indicates that it fails.
Special Features
The QC890 Verifier supports the Reflectometer mode. In the Reflectometer
mode, the unit operates as a free-running reflectometer. See "Reflectometer
Mode" on page 3-7 for additional information.
Physical Connections
A DC power barrel on the back of the unit connects to a power supply for external
power and battery charging.
The DB9 port on the unit connects to the pen wand, mouse wand, or customized
imager. Refer to "Scanning Properly Using the QC3800V Linear Imager:" on
page 3-5. If you are using any of these devices, refer to "Scanning Properly
Using a Pen/Mouse Wand" on page 3-3 for additional information.
The RJ45 ten pin connector provides the USB or RS-232 serial interface to the
host. Refer to "USB Communication Interface" on page 2-1 and "RS-232 Serial
Communication Interface" on page 2-3 for details on connecting your unit.
LED Indication Cause
Green Solid Charging
Green Flash Good read
Red Solid Error condition
Red Flashing Low battery

1 - 4 Quick Check® 890 User’s Guide
Specifications
Internal Battery
Note: Batteries are factory replaceable only. You must return your unit to Hand
Held Products for replacement (see Product Service and Repair on page
5-1).
Charging the Battery
Note: The battery may be in an unknown charge state at delivery. We
recommend that you charge the battery for at least 6 hours prior to use.
You may use the while charging it.
To charge the batteries:
1. Plug the power supply into the port on the back of the unit.
2. Plug in the power supply to the AC main source.
The QC890 Verifier uses a rechargeable battery. The QC890 Verifier can be
operated from the battery or power supply. With a set of properly charged
batteries, the unit operates for a minimum of 20 hours. When not in use, you can
leave the unit connected to the charger.
Powering On the QC890 Verifier
• If the power supply is attached and plugged into a wall outlet, the QC890
Verifier is on.
• If the QC890 Verifier is attached to the USB host with power on, the verifier
is on.
• If the QC890 Verifier is operating using the battery, it shuts itself off after 15
minutes of inactivity to conserve battery power. Pressing the scan button on
top of the unit one time powers up the unit from the power down mode.
Item Specification
Dimensions 7” (18cm)W x 6”(15.cm)H x 5.4” (14cm)D
Weight 1 lb 8 oz (680 grams)
Temperature Storage: -20° to 70°C
Operational: 0° to 50°C
Humidity 20% to 95% RH non condensing
Battery Built-in factory - Lithium Ion rechargeable

Quick Check® 890 User’s Guide 2 - 1
2
Quick Check ImageData
Quick Check ImageData
The Quick Check ImageData (QCID) program was designed for use in
conjunction with the QC890 Verifier. Use of any other hardware devices with this
program is not supported. Installation of the QCID software for your appropriate
operating system is included on the CD-ROM that accompanied your verifier.
The QCID is the graphical interface to the Quick Check 890 Verifier. The
verification results can be saved for later reference.
Installation of Quick Check ImageData
To install the Quick Check ImageData, insert the CD and follow the instructions
that display.
Communication Interfaces
The QC890 Verifier system supports the following interfaces: USB, RS-232, and
Bluetooth®.
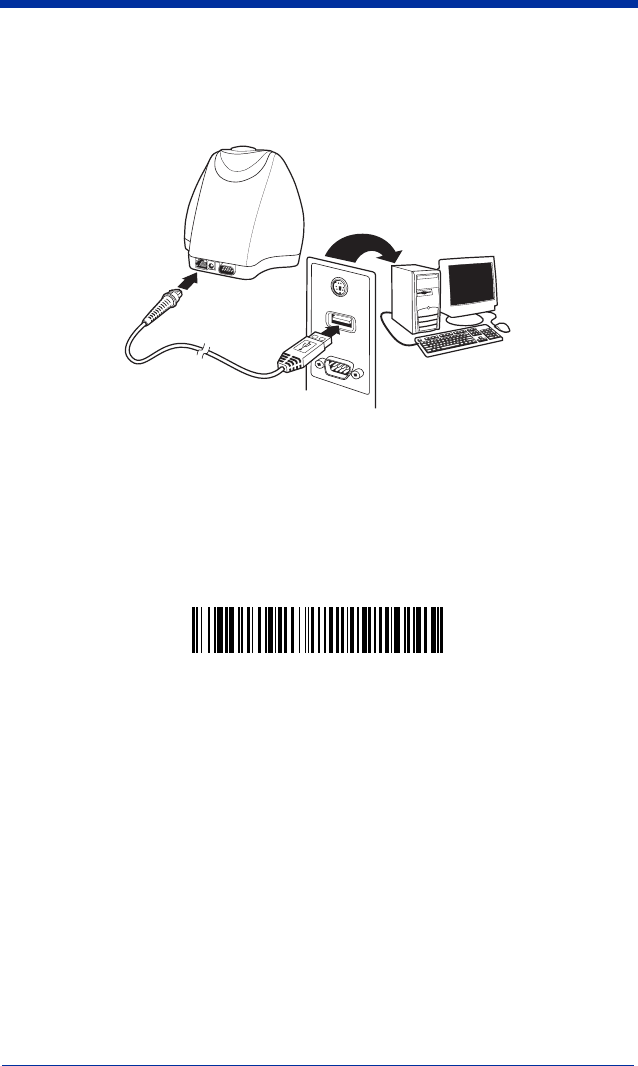
USB Communication Interface
For the USB interface, the Hand Held Products CDC-ACM driver must be
installed prior to using the QC890 Verifier. This driver is copied to the following
directory during install:
<install location>\Drivers\USBCOMPortEmulation/hhpcdc.inf
The default <install location> is C:\Program Files\Hand Held Products\Quick
Check ImageData\drivers\USBCOMPortEmulation.
2 - 2 Quick Check® 890 User’s Guide
Note: Please review the file, readme.htm, in the install location prior to running
the QCID.
Connect the QC890 Verifier to the host as shown in the illustration below.
USB COM Port Emulation
Scan the following bar code to program the QC890 Verifier to emulate an RS-
232-based COM Port. After connecting the QC890 Verifier and upon successful
installation of the USB driver, the driver will use the next available COM Port. All
QC890 Verifiers that have been configured for USB COM Port emulation use this
host assigned port number. USB COM Port Emulation is the default interface for
the QC890 Verifier.
Note: No additional configuration (e.g., baud rate) is necessary.
1
2
* USB COM Port Emulation
Quick Check® 890 User’s Guide 2 - 3
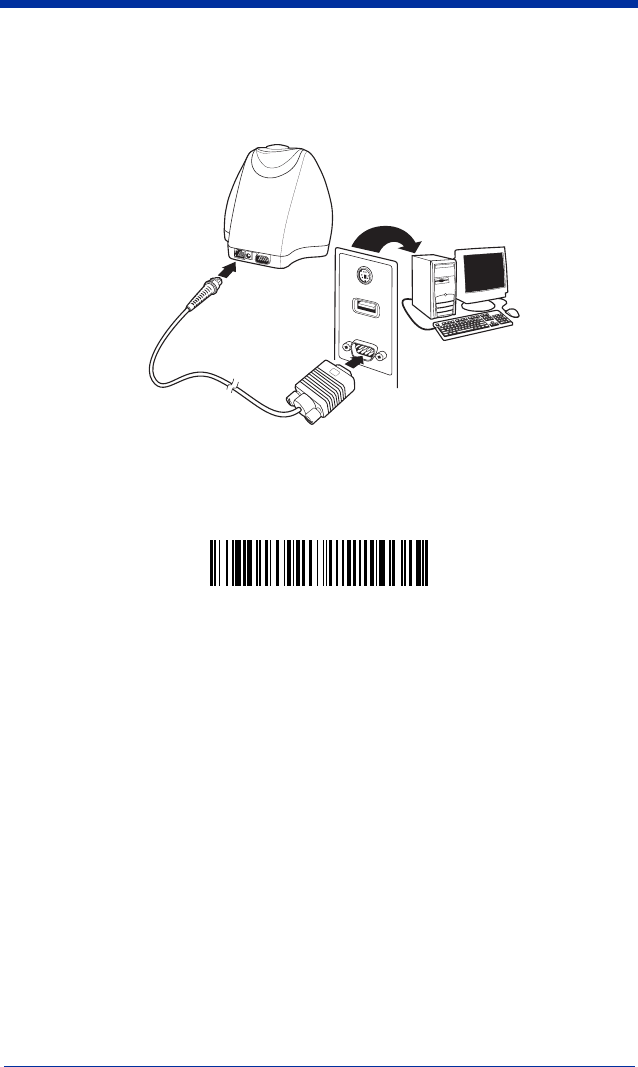
RS-232 Serial Communication Interface
An RS-232 interface requires no additional drivers. Connect the QC890 Verifier
to the host as shown in the illustration below.
RS-232 Selections
Scan the following bar code to select RS-232 communications.
The RS-232 settings supported are:
Bluetooth
The Bluetooth implementation uses the SPP (Serial Port Profile) profile to
connect the QC890 Verifier to the host system. The QC890 SPP profile is a
standard Bluetooth profile implementation. This allows the QC890 system to be
compatible with most Bluetooth hardware. The QC890 unit can be used with
existing Bluetooth radios built into laptops, PCs, or PDAs.
Baud Rate: 115,200
Parity: None
Data Bits: 8
Stop Bits: 1
Flow Control: None
RS-232 Communication

2 - 4 Quick Check® 890 User’s Guide
Using the QC890 Verifier with Bluetooth Devices
Note: If you chose to use the USB or RS-232 interfaces, the Bluetooth
communication interface automatically turns off.
The QC890 Verifier may be used with Bluetooth devices (e.g., laptop, PC, PDA,
etc.). Scanning the Bluetooth bar code below turns the Bluetooth option on in the
QC890 Verifier.
Default = Off.
Note: If you turn the Bluetooth option on, scan the appropriate bar code that
follows to connect to a PC/Laptop or PDA/Mobility Systems device.
To establish a Bluetooth connection to a PC/Laptop, scan the bar code below,
follow the instructions supplied with your Bluetooth device to locate the QC890
Verifier, and connect to it. If you go out of range with your QC890 Verifier, the
QC890 Verifier automatically reconnects to the Bluetooth device once you come
back in range.
When Bluetooth communication is enabled, the default is PC/
Laptop.
To establish a Bluetooth connection to a PDA or Hand Held Products Mobility
Systems device, scan the bar code below, follow the instructions supplied with
your Bluetooth device to locate the QC890 Verifier, and connect to it. If you go
out of range with your QC890 Verifier, the QC890 Verifier will not re-connect. It
will be up to the host device to re-connect to the QC890 Verifier.
Bluetooth On
* Bluetooth Connection - PC/Laptop
Bluetooth Connection - PDA/Mobility Systems Device
Quick Check® 890 User’s Guide 2 - 5
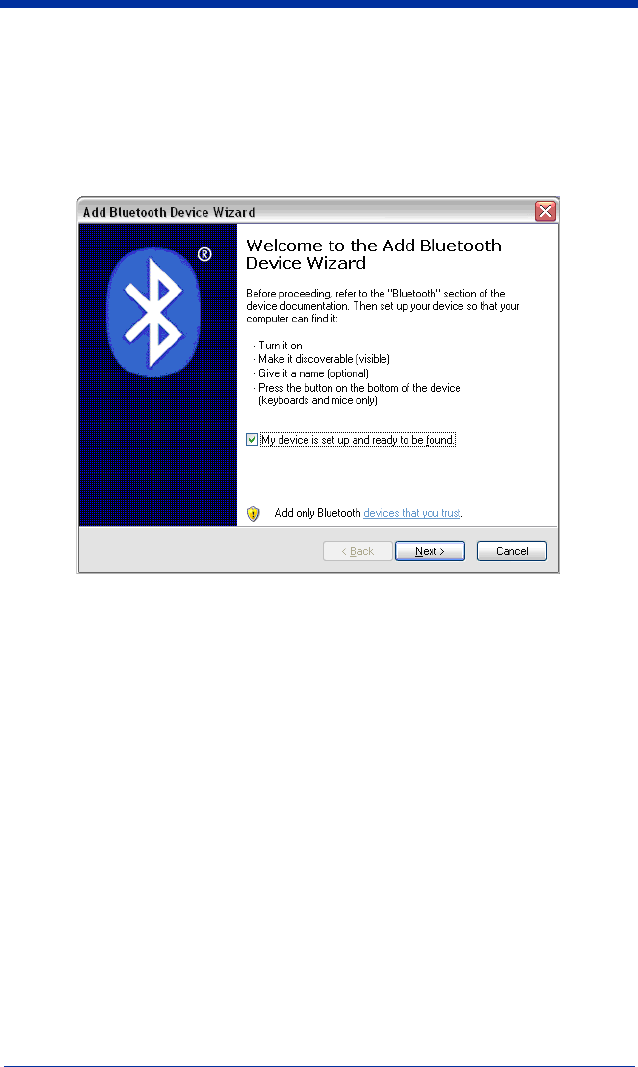
Enabling Your Device for Bluetooth
After scanning the appropriate Bluetooth connection bar code, you need to run
the Quick Check ImageData application to enable the Bluetooth radio in your
device (PC, PDA, or Mobility Systems device) in order to look for the QC890
Verifier.
2 - 6 Quick Check® 890 User’s Guide
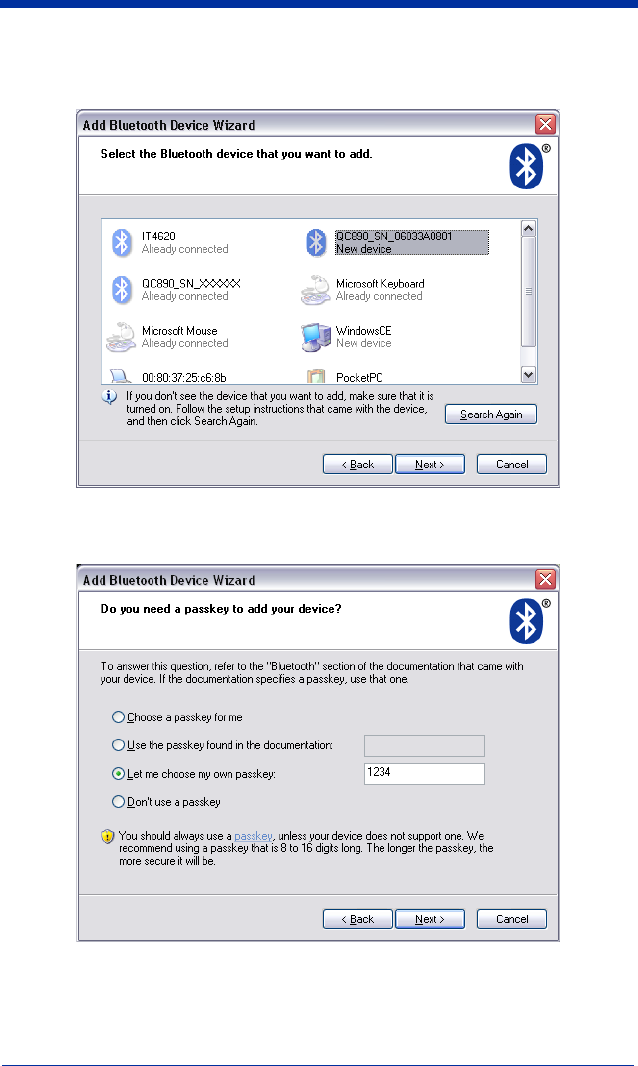
Once the QC890 Verifier is recognized, it appears in the list of available devices.
Select the QC890 Verifier to which you want to bond and select Next.
You will be asked if you need a passkey to add your device. The default passkey
for all Hand Held Products QC890 verifiers is “1234.”
The Wizard loads the QC890 Verifier information into your device. You may be
given a choice of selecting a check box if you want your QC890 Verifier to be set
as the default device to which Quick Check ImageData connects.
Quick Check® 890 User’s Guide 2 - 7
Once you select Finish, your device is ready to communicate with the QC890
Verifier via the assigned ports. Make a note of the assigned port number. You
will need to know this port number in the following installation steps.
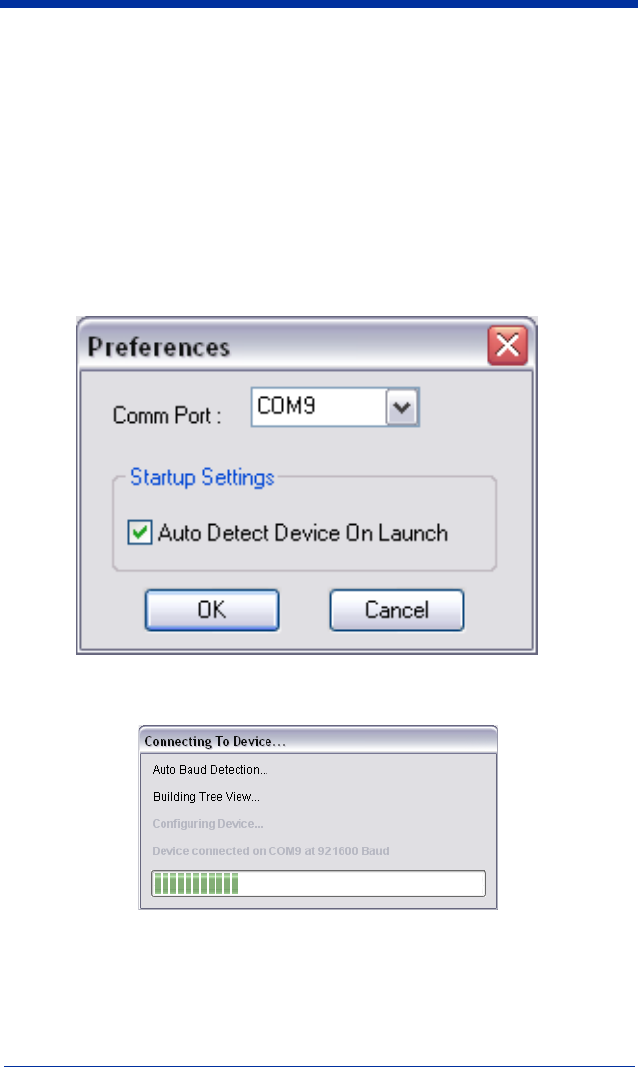
Enabling QCID for Bluetooth
1. Once you open the QCID application, click on File -> Preferences.
2. Choose the assigned incoming port number reported in the Add Bluetooth
Device wizard.
3. Click OK.
4. Your QC890 Verifier then connects to the QCID application.
2 - 8 Quick Check® 890 User’s Guide
Using Quick Check ImageData
For the PC version of Quick Check ImageData, start Quick Check ImageData by
clicking on Start->Programs->Hand Held Products->Quick Check ImageData
or double click the Quick Check ImageData icon on your desktop (set up during
installation).
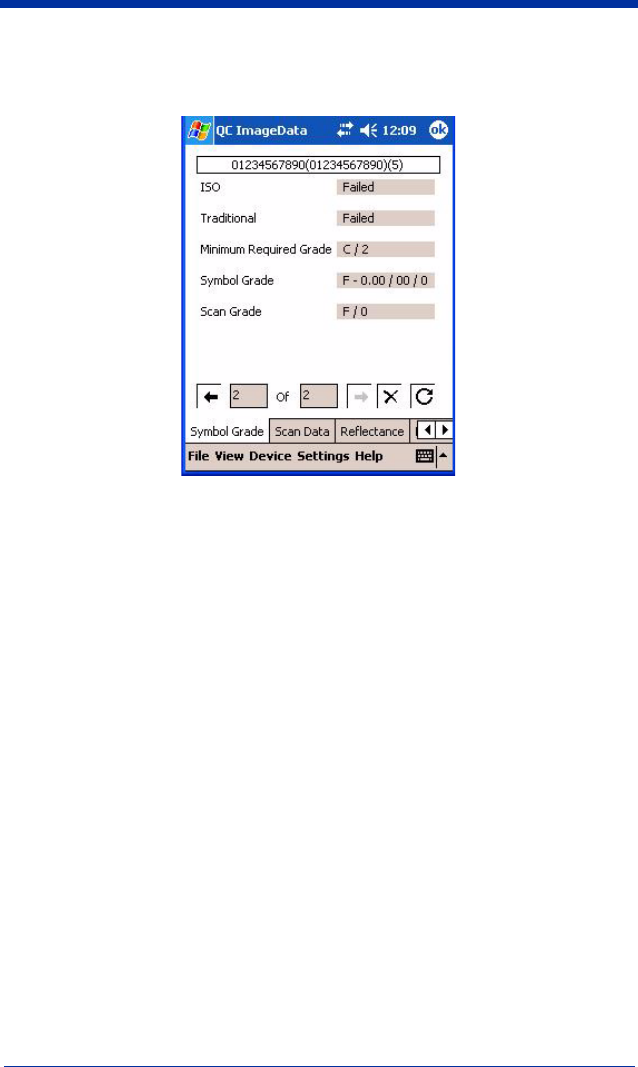
For the Windows Mobile for Pocket PC version, start Quick Check ImageData by
clicking on Start
->Programs. Select the Quick Check ImageData icon.
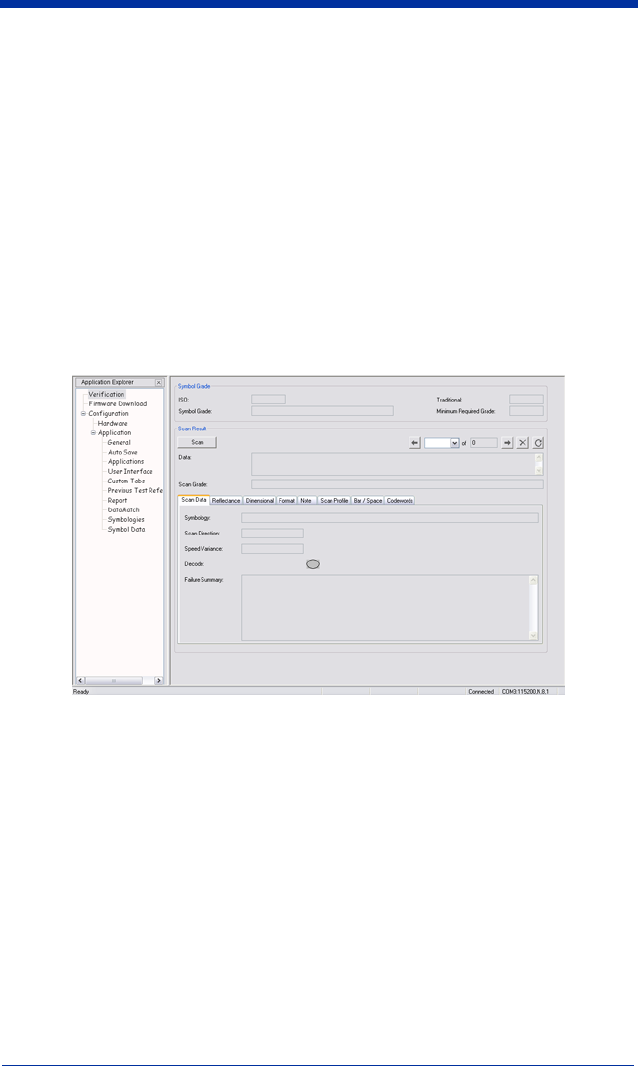
The first time you use QCID, the application asks you to select the COM Port to
which the QCID is attached. After you make the selection, QCID attempts to
connect to the attached QC890 Verifier. When a connection is established, the
main screen of the application, as shown below, displays.
PC Main Screen
Quick Check® 890 User’s Guide 2 - 9
Help System
The Quick Check ImageData program has an extensive help system to aid in the
verification of your bar codes. Please refer to the help files for questions
regarding the verification process and for specific questions regarding the QCID
program.
Windows Mobile for Pocket PC Main Screen

Quick Check® 890 User’s Guide 3 - 1
3
Using the Quick Check 890 Verifier System
Scanning a Bar Code Symbol Using the QC890 Verifier
Note: Calibration is a requirement of the ISO/IEC standards. Without proper
initial calibration, the values displayed may not be accurate. Please be
sure to calibrate the QC890 Verifier
prior to scanning bar codes and when
you change apertures and/or external scanning devices
.
1. Place the QC890 Verifier on top of the symbol.
2. Press the scan button on top of the unit to turn on illumination. Look through
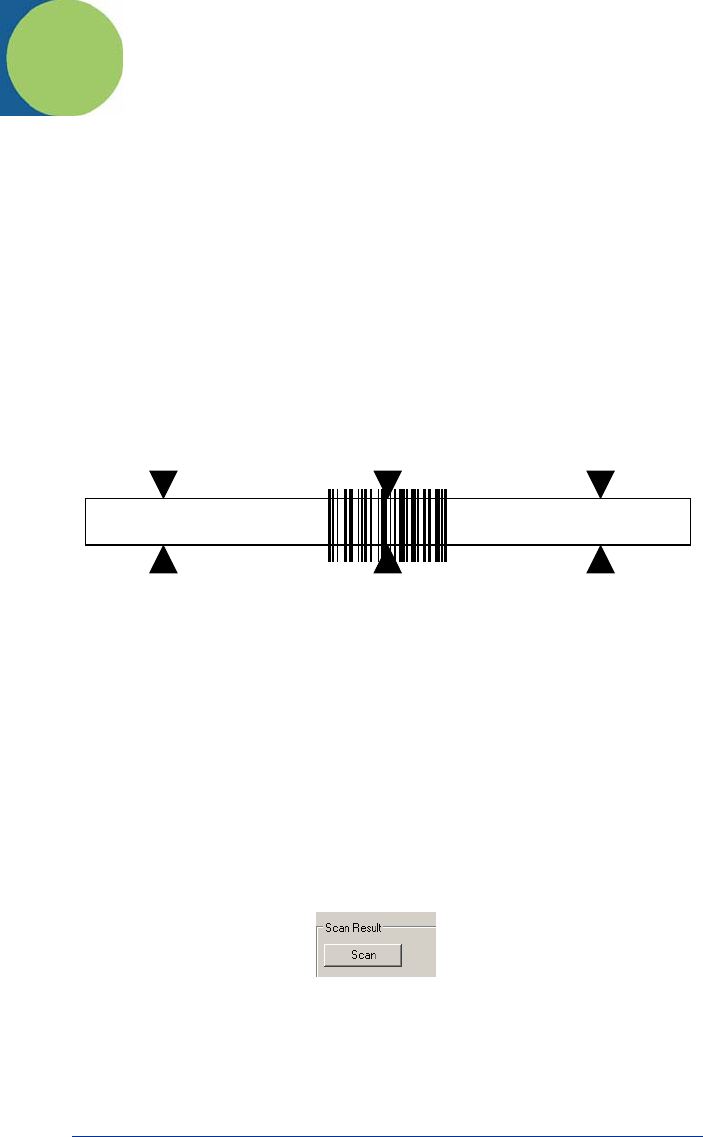
the unit’s window to align the unit with the bar code.
Note: The best verification data is gathered by aligning the center of the symbol
to the center arrows.
3. Press the scan button on top of the unit again while the illumination is on to
scan and verify the bar code.
Scanning a Bar Code Symbol Using
Quick Check ImageData
A scan can be initiated with Quick Check ImageData.
1. Place the QC890 Verifier on top of the symbol.
2. If necessary, press the scan button on top of the unit to turn on illumination to
aid in alignment of the symbol.
3. For the PC version, click the Scan button on the Main Display window.
3 - 2 Quick Check® 890 User’s Guide
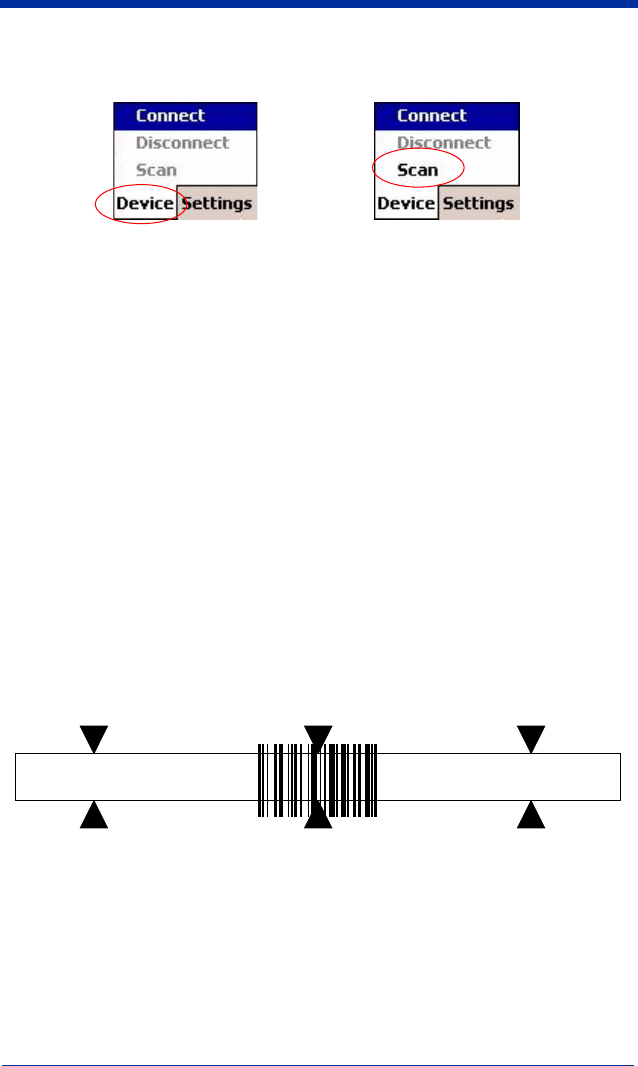
4. For the Windows Mobile for Pocket PC version, select Device and then
Scan from the Scan Data tab.
Calibrating the QC890 Verifier
Note: Calibration is a requirement of the ISO/IEC standards and must be
performed with each aperture change.
When calibrating the QC890 Verifier system, the QC890 Verifier must be
connected to QCID. While preparing to calibrate the QC890 Verifier system, it is
important to align the center of the reflectance page symbol to the center arrows
and to keep the QC890 Verifier flat and level to the surface of the reflectance
page.
The reflectance page is a precision standard that is made of photographic
materials. To ensure proper calibration, you must replace the reflectance page
if it becomes dirty or physically damaged. Make sure to use only the original
calibration tools that were supplied with your QC890 Verifier kit or certified
replacements obtained from Hand Held Products.
1. Place the verifier on top of the symbol.
2. Press the scan button on top of the unit to turn on illumination.
3. Look through the unit’s window to align the unit with the bar code.
Note: The best verification data is gathered by aligning the center of the symbol
to the center arrows.
4. Press the scan button on top of the unit a second time while the illumination
is on to scan the calibration bar code. You will hear a series of beeps and
Quick Check® 890 User’s Guide 3 - 3
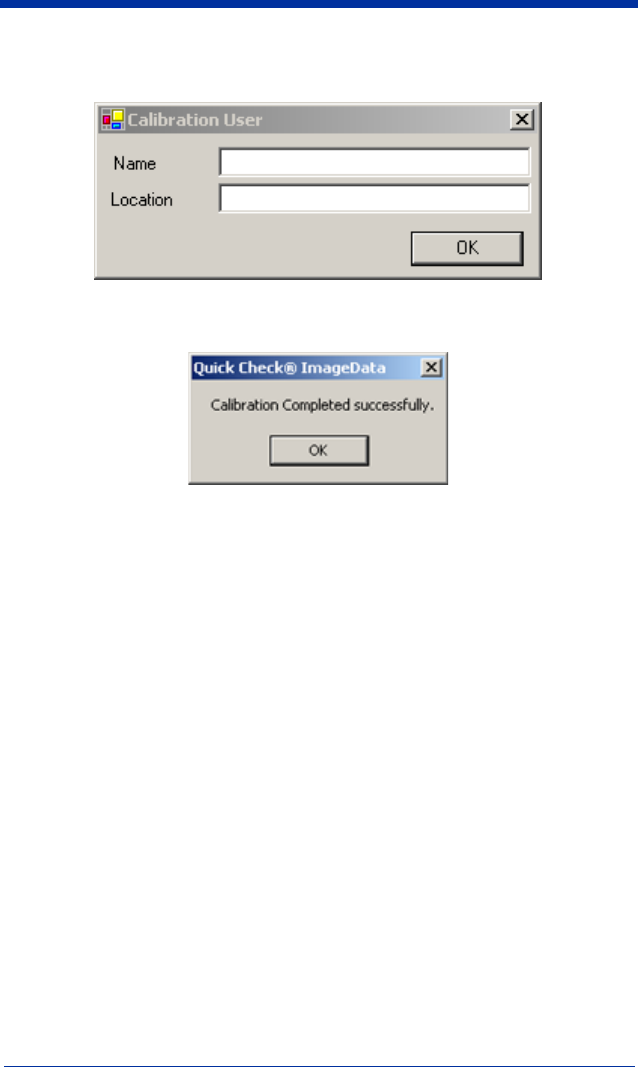
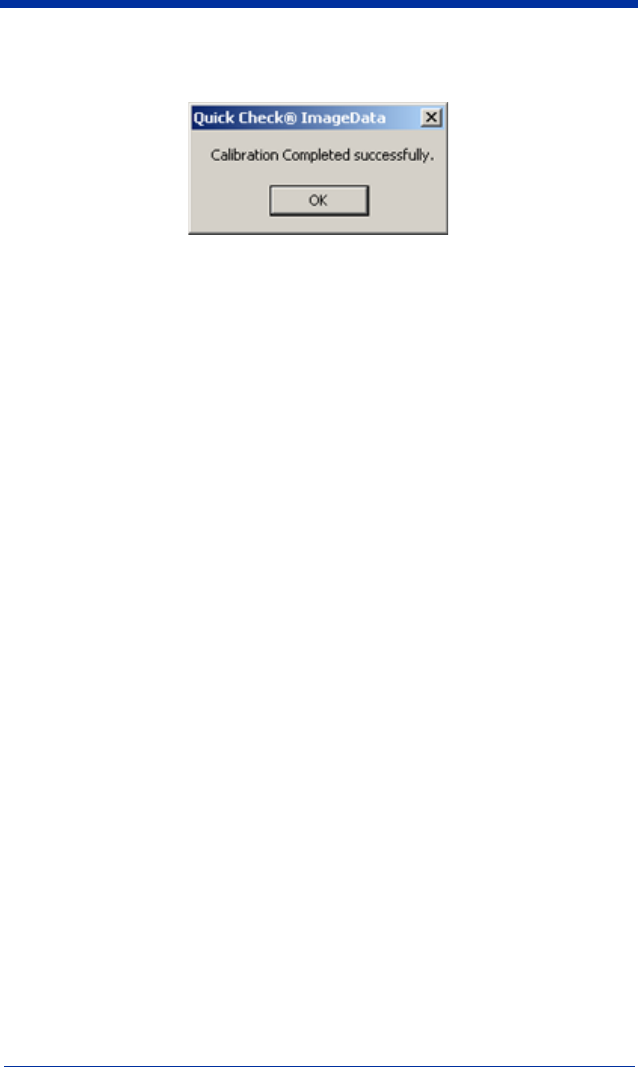
the illumination will turn off. If the calibration process is successful, the
following screen displays.
5. Enter the prompted data (Name and Location) and press OK. The following
screen displays.
6. If the unit does not calibrate, contact Hand Held Products Technical Support
(see Technical Assistance on page 2).
Scanning Properly Using a Pen/Mouse Wand
1. Turn on the verifier and confirm that it is operational (i.e., does not need to be
charged or calibrated).
2. Hold the pen wand as you would a pen or pencil, placing your fingers on
each side of the foot near the tip.
or
Hold the mouse wand as you would a computer mouse.
3. Lightly touch the wand against either quiet zone (clear area) on either side of
the bar code. For the pen wand, you will have the proper scanning angle
when the tip and the reflectance guide (black plastic clamp) are flat on the
scanning surface.
4. At about the same speed with which you would quickly underline a sentence
in this manual, and without interruption, gently move the wand across the
center of the bar code. You do not need to press hard on the wand while
scanning the bar code. Gentle pressure on the wand will not scratch the
contacted surface, but pressing down hard may damage the code and yield
poor results.
5. Listen for audible tones.
3 - 4 Quick Check® 890 User’s Guide
• If you hear a single beep tone followed by another single beep of the same
tone, it signifies a good read.
• If you hear a single beep and then a beep of a different tone, the unit detected
an error in the scanned symbol.
Calibrating an External Pen/Mouse Wand
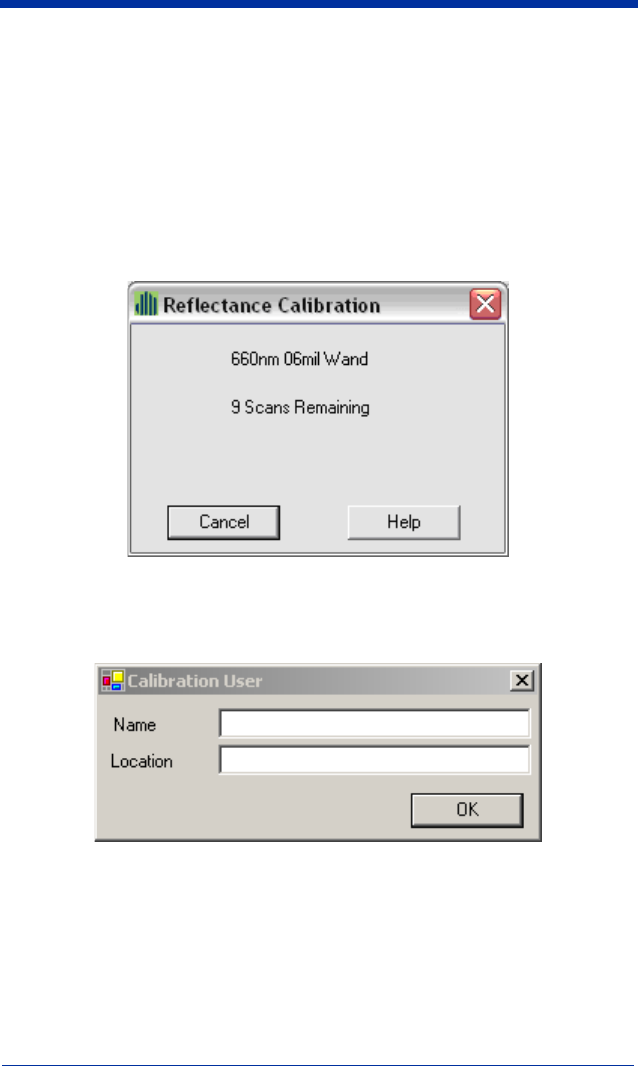
1. Using the proper scan technique described in step 4 above, scan the
reflectance page. You will hear a single beep after the first good scan and
the following display appears:
2. Continue to scan the reflectance page for a total of ten good scans. After
each good scan, a single beep sounds and the display indicates the number
of good scans you need to obtain. After the tenth good scan, the following
window displays:
Quick Check® 890 User’s Guide 3 - 5
3. After you type in your name and location, click OK. The following message
appears:
Note: When using the external QC3800V linear imager, it does not report ISO/
IEC reflectance parameters; therefore no calibration is necessary or
possible.
Scanning Properly Using the QC3800V Linear Imager:
1. The best reading position for the QC3800V linear imager is 6 inches
(150mm) from the surface of the bar code to the face of the scanner, with an
angle of incidence of 15 degrees from perpendicular. At this orientation, the
system performance approximates an average circular aperture size of .006
to .008 inches (.152 to .203 mm). Extreme variations from this orientation
may negatively affect the accuracy of some parameter results.
2. Scanning is initiated by depressing the trigger on the linear imager.
3. Listen for an audible tone. When the unit scans and decodes a bar code, it
emits a single beep.
• If the unit cannot decode a bar code after a trigger pull, nothing happens.
• After a successful decode, with a result that passes the minimum acceptable
grade, the unit emits another beep of the same tone.
• A decode that fails to receive a grade above the minimum requirement causes
the unit to emit a beep of a different tone.
3 - 6 Quick Check® 890 User’s Guide
Note: The QC3800V reading width (includes quiet zones) is 6 inches.
Note: The QC3800V is the only device that can be used as a non-contact input
device with a QC890 Verifier unit. The QC3800V should not be used with
any decoders, terminals, or other brand of verifiers.
Calibration Log
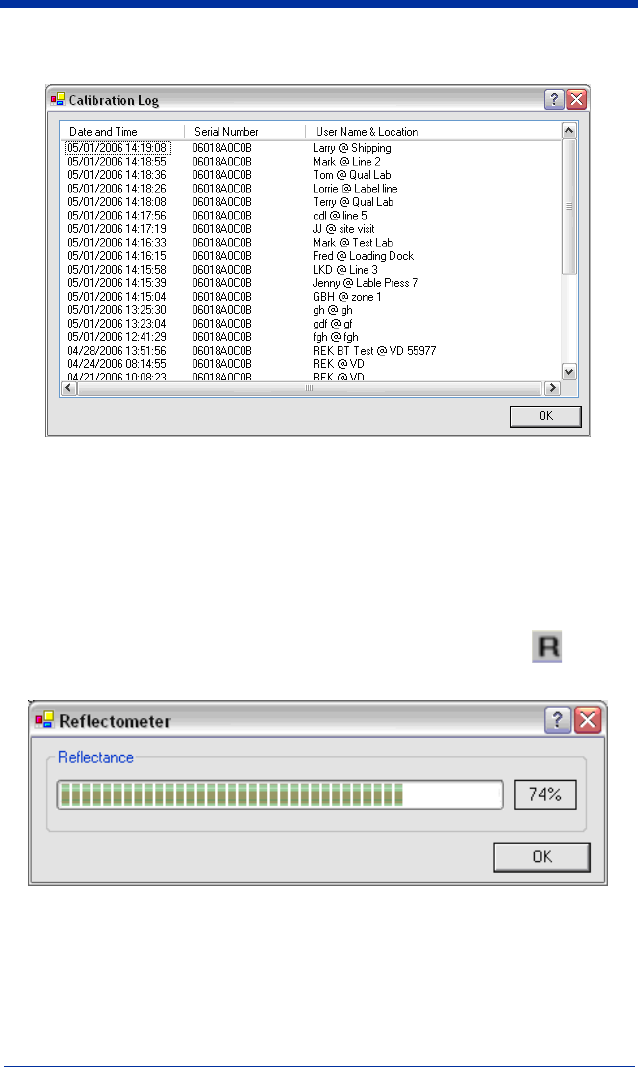
The Calibration Log records the instances when calibration was performed. It
records the Date/Time set on your PC, serial number of the QC890 Verifier being
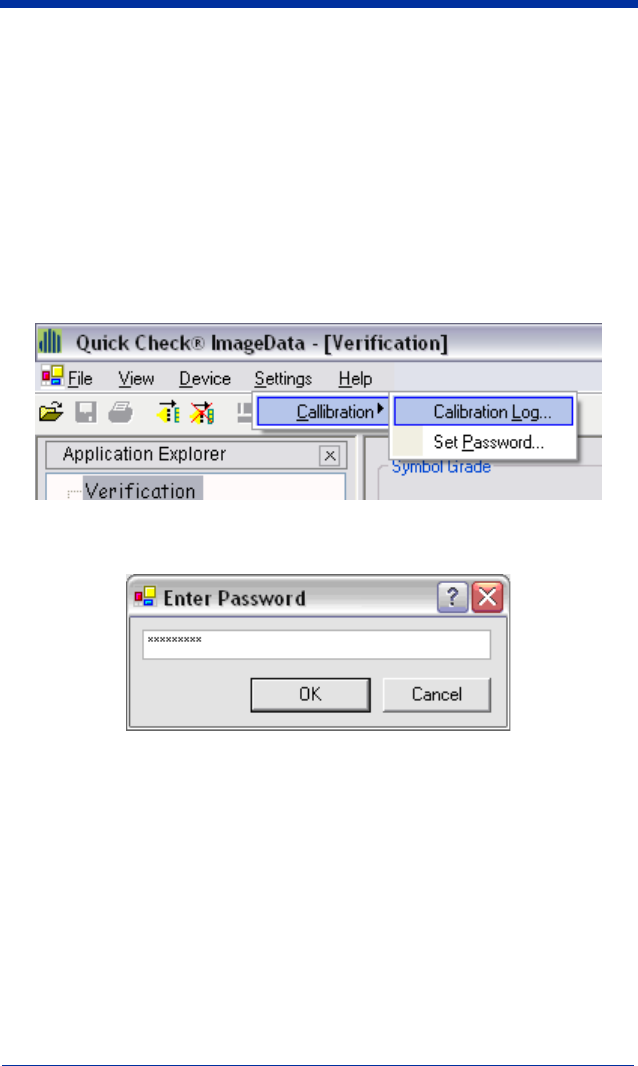
calibrated, and the name and location of the operator. To access the Calibration
Log, click on Settings -> Calibration -> Calibration Log.
You will be prompted to enter a password. The password can be either the
Master Password (Visions07) or a password you previously set.
Quick Check® 890 User’s Guide 3 - 7
The Calibration Log looks like this:
Reflectometer Mode
Note: The Reflectometer Mode is only available for use with the mouse/pen
wands.
Reflectometer Mode measures the spot reflectance of the area at which the
imager is “looking.”
1. To activate the Reflectometer, click on the Reflectometer icon ( ) on the
tool bar below the menu options. The Reflectometer window opens.
2. Place the scanning device on any surface to see the spot reflectance of that
surface. The green status bars shows the reflectance signal strength. The
field to the right of the status bar shows the percentage of reflectance.
3. Select OK to exit the Reflectometer mode.


Quick Check® 890 User’s Guide 4 - 1
4
Maintenance
Cleaning the External Devices
Occasionally the scanner tip or window may become partially obstructed by ink,
paper fibers, or other particulate deposits (such as wax or varnish). To ensure
reliable scanning, you should periodically check and, if necessary, clean the tip
with a soft cloth.
Note: Damaged tips for the pen wand should be replaced. Consult your dealer
or Hand Held Products Product Service and Repair Department for
details (see Product Service and Repair on page 5-1).
QC890 Verifier
Occasionally the view window or alignment window may become dusty or dirty.
Use a soft cloth to clean both of the windows. Since the open slot of the
alignment window is where the code is “seen,” dirt on the window does not affect
the readability of the QC890 Verifier.
Note: It is not necessary, nor is it advisable, to insert anything into the open slot
on the bottom of the QC890 Verifier.
Recertification
Sending the QC890 Verifier back to Hand Held Products periodically for a factory
calibration and re-certification is recommended; however the frequency is based
on your company’s ISO procedures regarding test and measurement equipment.
When you are ready to re-certify your QC890 Verifier, please contact Product
Service and Repair for pricing and a Return Material Authorization (RMA)
number (see Product Service and Repair on page 5-1).


Quick Check® 890 User’s Guide 5 - 1
5
Customer Support
Product Service and Repair
Hand Held Products provides service for all its products through service centers
throughout the world. To obtain warranty or non-warranty service, return the unit
to Hand Held Products (postage paid) with a copy of the dated purchase record
attached. Contact the appropriate location below to obtain a Return Material
Authorization number (RMA #) before returning the product.
North America
Hand Held Products Corporate Offices
Telephone: (800) 782-4263, option 3
Fax: (704) 566-6015
E-mail: naservice@handheld.com
América Latina
Hand Held Products América Latina
Teléfono: (704) 998-3998, opción 8, opción 4
Fax: (239) 263-9689
E-mail: laservice@handheld.com
Brasil
Hand Held Products
São Paulo
Teléfono: Int+55 (11) 2178-0500
Fax: Int+55 (11) 2178-0502
Hand Held Products
Rio de Janeiro
Teléfono: Int+55 (21) 2178-0500
Fax: Int+55 (21) 2178-0505
São Paulo and Rio de Janeiro
E-mail: brservice@handheld.com
México
Hand Held Products México
Teléfono: Intl+52 (55) 5203-2100
Fax: Intl+52 (55) 5531-3672
E-mail: mxservice@handheld.com
Europe, Middle East, and Africa
Hand Held Products Europe
Telephone: +31 (0) 40 29 01 633
Fax: +31 (0) 40 2901631
E-mail: euservice@handheld.com

5 - 2 Quick Check® 890 User’s Guide
Asia Pacific
Hand Held Products Asia/Pacific
Telephone: +852-2511-3050
Fax: +852-2511-3557
E-mail: apservice@handheld.com
Japan
Hand Held Products Japan
Telephone: +81-3-5770-6312
Fax: +81-3-5770-6313
E-mail: apservice@handheld.com
Online Product Service and Repair Assistance
You can also access product service and repair assistance online at
www.handheld.com.
Technical Assistance
If you need assistance installing or troubleshooting, please call your Distributor
or the nearest Hand Held Products technical support office:
North America/Canada:
Telephone: (800) 782-4263, option 4 (8 a.m. to 6 p.m. EST)
Fax number: (315) 685-4960
E-mail: natechsupport@handheld.com
América Latina:
Teléfono: (800) 782-4263, opción 8, opción 3
Teléfono: (704) 998-3998, opción 8, opción 3
E-mail: latechsupport@handheld.com
Brasil
São Paulo
Teléfono: Int+55 (11) 2178-0500
Fax: Int+55 (11) 2178-0502
Rio de Janeiro
Teléfono: Int+55 (21) 2178-0500
Fax: Int+55 (21) 2178-0505
São Paulo and Rio de Janeiro
E-mail: brtechsupport@handheld.com

Quick Check® 890 User’s Guide 5 - 3
México
Teléfono: (800) 782-4263, opción 8, opción 3
Teléfono: (704) 998-3998, opción 8, opción 3
E-mail: latechsupport@handheld.com
Europe, Middle East, and Africa:
Telephone-
European Ofc: Int+31 (0) 40 79 99 393
U.K. Ofc: Int+44 1925 240055
E-mail: eutechsupport@handheld.com
Asia Pacific:
Telephone: Int+852-3188-3485
or
2511-3050
E-mail: aptechsupport@handheld.com
Online Technical Assistance
You can also access technical assistance online at www.handheld.com.
Limited Warranty
Hand Held Products, Inc. ("Hand Held Products") warrants its products to be free
from defects in materials and workmanship and to conform to Hand Held
Products’ published specifications applicable to the products purchased at the
time of shipment. This warranty does not cover any Hand Held Products product
which is (i) improperly installed or used; (ii) damaged by accident or negligence,
including failure to follow the proper maintenance, service, and cleaning
schedule; or (iii) damaged as a result of (A) modification or alteration by the
purchaser or other party, (B) excessive voltage or current supplied to or drawn
from the interface connections, (C) static electricity or electro-static discharge,
(D) operation under conditions beyond the specified operating parameters, or (E)
repair or service of the product by anyone other than Hand Held Products or its
authorized representatives.
This warranty shall extend from the time of shipment for the duration published
by Hand Held Products for the product at the time of purchase ("Warranty
Period"). Any defective product must be returned (at purchaser’s expense)
during the Warranty Period to Hand Held Products’ factory or authorized service
center for inspection. No product will be accepted by Hand Held Products
without a Return Materials Authorization, which may be obtained by contacting
Hand Held Products. In the event that the product is returned to Hand Held
Products or its authorized service center within the Warranty Period and Hand
Held Products determines to its satisfaction that the product is defective due to
defects in materials or workmanship, Hand Held Products, at its sole option, will
either repair or replace the product without charge, except for return shipping to
Hand Held Products.

5 - 4 Quick Check® 890 User’s Guide
EXCEPT AS MAY BE OTHERWISE PROVIDED BY APPLICABLE LAW, THE
FOREGOING WARRANTY IS IN LIEU OF ALL OTHER COVENANTS OR
WARRANTIES, EITHER EXPRESSED OR IMPLIED, ORAL OR WRITTEN,
INCLUDING, WITHOUT LIMITATION, ANY IMPLIED WARRANTIES OF
MERCHANTABILITY OR FITNESS FOR A PARTICULAR PURPOSE.
HAND HELD PRODUCTS’ RESPONSIBILITY AND PURCHASER’S
EXCLUSIVE REMEDY UNDER THIS WARRANTY IS LIMITED TO THE
REPAIR OR REPLACEMENT OF THE DEFECTIVE PRODUCT. IN NO EVENT
SHALL HAND HELD PRODUCTS BE LIABLE FOR INDIRECT, INCIDENTAL,
OR CONSEQUENTIAL DAMAGES, AND, IN NO EVENT, SHALL ANY
LIABILITY OF HAND HELD PRODUCTS ARISING IN CONNECTION WITH
ANY PRODUCT SOLD HEREUNDER (WHETHER SUCH LIABILITY ARISES
FROM A CLAIM BASED ON CONTRACT, WARRANTY, TORT, OR
OTHERWISE) EXCEED THE ACTUAL AMOUNT PAID TO HAND HELD
PRODUCTS FOR THE PRODUCT. THESE LIMITATIONS ON LIABILITY
SHALL REMAIN IN FULL FORCE AND EFFECT EVEN WHEN HAND HELD
PRODUCTS MAY HAVE BEEN ADVISED OF THE POSSIBILITY OF SUCH
INJURIES, LOSSES, OR DAMAGES. SOME STATES, PROVINCES, OR
COUNTRIES DO NOT ALLOW THE EXCLUSION OR LIMITATIONS OF
INCIDENTAL OR CONSEQUENTIAL DAMAGES, SO THE ABOVE
LIMITATION OR EXCLUSION MAY NOT APPLY TO YOU.
All provisions of this Limited Warranty are separate and severable, which means
that if any provision is held invalid and unenforceable, such determination shall
not affect the validity of enforceability of the other provisions hereof. Use of any
peripherals not manufactured/sold by Hand Held Products voids the warranty.
This includes but is not limited to: cables, power supplies, cradles, and docking
stations. Hand Held Products, Inc. extends these warranties only to the first end-
users of the products. These warranties are nontransferable.
The limited duration of the warranty for the Quick Check 890 Verifier is for two
(2) years.
Quick Check® 890 User’s Guide A - 1
A
Apertures
Pen/Mouse Wand Aperture Selection
The table below is a handy reference to help you choose the proper aperture size
required for the size/type bar code you wish to verify. This data is based on the
standard ISO/IEC 15416 Bar code Print Quality Test Specification - Linear
Symbols.
Note: 6 mil aperture specified for UPC/EAN only.
Note: 3 mil and 20 mil aperture available in mouse wand style only.
Check your application standard's requirements for specified aperture
requirements. If no aperture is specified, use the aperture that is as close to, but
not larger than, 80% of the narrow element width.
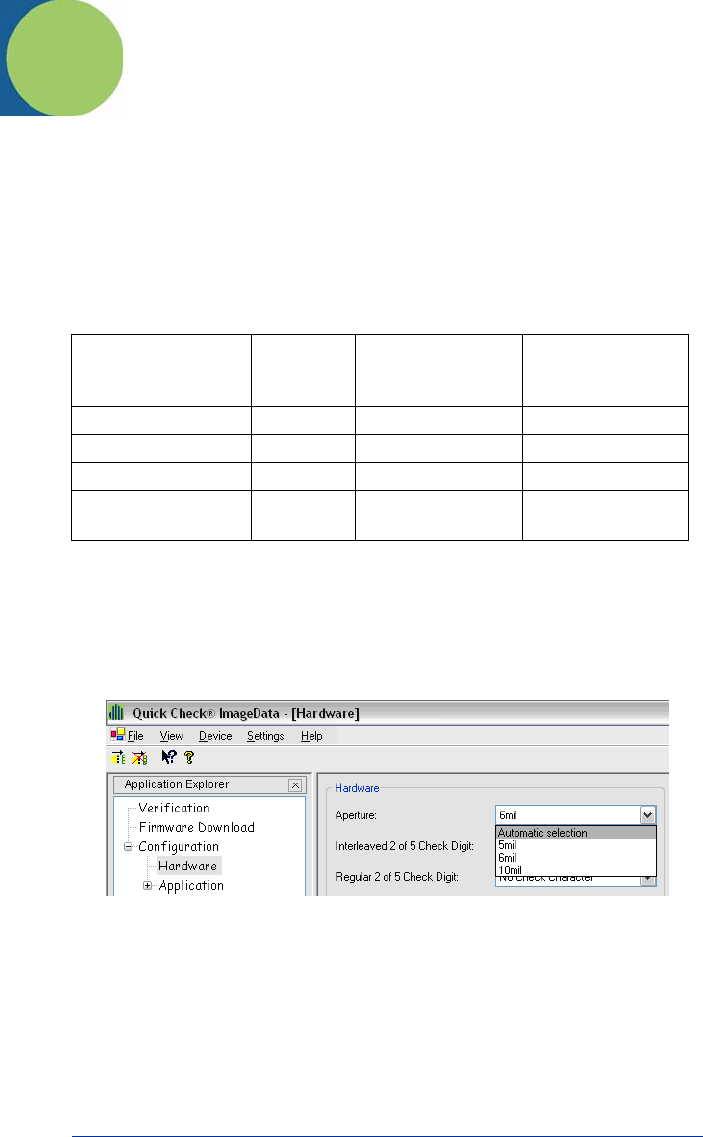
The QC890 Verifier has an Automatic selection feature available ONLY for the
internal optics. When using the Automatic selection feature, the verifier
automatically selects from a 5, 6, or 10mil aperture. This selection is determined
by the symbology (e.g., EAN/UPC selects 6mil aperture) or as determine by the
internal optics’ ability to calculate the width of the narrow element and select the
aperture as determined by the table above.
Aperture Diame-
ter (in .001”)/Aper-
ture Ref. No.
Aperture
Diameter
"X" Dimension
Range (in
inches)
"X" Dimension
Range (in mm)
03 0.075 0.004" to 0.007" 0.100 to 0.180
05 0.125 0.0071" to .013” .0180 to 0.330
10 0.250 0.0131"to 0.025" 0.330to 0.635
20 0.500 0.0251" and
larger
0.635 and larger


Quick Check® 890 User’s Guide B - 1
B
Menu Setting Bar Codes
The QC890 bar code verifiers are programmed in the factory for the most
common settings. If you need to change these settings, programming is
accomplished by scanning the bar codes included in this chapter.
An asterisk (*) next to an option indicates the default setting.
Resetting the Standard Product Defaults
If you aren’t sure what programming options are in your device, or you’ve
changed some options and want the factory settings restored, scan the
Standard Product Default Settings
bar code below.
Illumination Timer
Scan the appropriate bar code to set the duration (in seconds) of the illumination.
Default = 5 seconds.
Power Down Timer
Note: This option applies to battery operation only.
When there is no activity within a specified time period, the QC890 Verifier enters
low power mode. Scan the appropriate Power Time-Out bar code to change the
time-out duration (in seconds).
Note: Scanning zero (0) is the equivalent of setting no time-out.
Standard Product Default Settings
3 seconds
*5 seconds
15 seconds

B - 2 Quick Check® 890 User’s Guide
If there are no scans during the “scanner power time-out timer” interval, the
QC890 Verifier goes into power down mode. Whenever a scan occurs, the
“scanner power time-out timer” is reset.
Default = 15 minutes
No Power Down Timeout
5 minutes
*15 minutes
60 minutes
120 minutes

Quick Check® 890 User’s Guide C - 1
C
Symbology Defaults - Operation
The default QC890 symbologies and operation are listed below:
* Enabled by default. Can be scanned when disabled.
** Disabled by default. Can be scanned when disabled.
*** Disabled by default. Cannot be scanned when disabled.
•Codabar* •Interleaved 2 of 5*
•Code 11** • MSI***
•Code 16K*** • PDF417***
•Code 39*
•Reduced Space Symbology
(RSS-14, RSS Limited, RSS
Expanded)***
•Code 49*** • Regular 2 of 5***
•Code 93*•Telepen**
•Code 128*•UPC/EAN*
•IATA 2 of 5 *** • Unrecognized***

C - 2 Quick Check® 890 User’s Guide

Hand Held Products, Inc.
700 Visions Drive
P.O. Box 208
Skaneateles Falls, NY 13153-0208
QC890-UG Rev A
6-06