Hoover BH50010 User Manual STICK VAC Manuals And Guides L0903015
HOOVER Vacuum, Upright Manual L0903015 HOOVER Vacuum, Upright Owner's Manual, HOOVER Vacuum, Upright installation guides
User Manual: Hoover BH50010 BH50010 HOOVER STICK VAC - Manuals and Guides View the owners manual for your HOOVER STICK VAC #BH50010. Home:Vacuums & Floor Care Parts:Hoover Parts:Hoover STICK VAC Manual
Open the PDF directly: View PDF ![]() .
.
Page Count: 2
OWNER'S MANUAL
GUIDE D'UTILISATION • MANUALDEL USUARIO
WARNING:
CLEANERASSEMBLYMAY INCLUDESMALLPARTS.SMALL PARTSCAN
PRESENTA CHOKINGHAZARD.
When using an electrical appliance,basic precautionsshould always be
followed, includingthe following:
•READALL INSTRUCTIONSBEFOREUSINGTHIS APPLIANCE.
* ALWAYSFOLLOWTHESESAFETYINSTRUCTIONS.
* SEESEPARATEMANUALPERTAININGTO BATTERYAND CHARGING
OPERATION.
* DO NOTLEAVEVACUUMCLEANERUNATTENDED.
* WARNING:FULLYASSEMBLEVACUUMCLEANERBEFOREOPERATING.
* WARNING:THISPRODUCTCONTAINSCHEMICALSKNOWNTOTHESTATEOF
CALIFORNIATO CAUSECANCER,BIRTHDEFECTSOR REPRODUCTIVEHARM.
WASHHANDSAFTERUSING,
• Donotusetheunit,store,orchargebatteryoutdoorsoronwetsurfaces.Donotallowto getwet.
•Donotallowto beusedas atoy.CloseattenlJonis necessarywhenusedbyor nearchildren.
• Useonlyasdescribedinthismanual.Useonlymanufacturer'srecommendedattachments.
• Donotusechargerwithdamagedcordorplug.Ifvacuumorchargeris notworkingasit should,
hasbeendropped,damaged,leftoutdoors,ordroppedintowater,returnitto aservicecenterfor
inspection.CalltheExclusiveHooverPlatinumColleclJonTM MemberServicesLine1.877.MYPLTNM
(1.877.697.5866)Mon.-Fri.8am-5pmEST(USA& Canada)orvisitwww.hoover.comforthe
nearestservicecenter.
• Donotpullorcarrybychargercord,usecordas ahandle,closeadooroncord,orpullcordaround
sharpedgesorcomers.Donotrunapplianceovercord.Keepcordawayfromheatedsurfaces.
• Donotunplugchargerby pullingoncord.To unplugcharger,graspthe plug,notthecord.
**Donothandlecharger(includingchargerplugandterminals),battery,orappliancewithwethands.
Keephair,looseclothing,fingers,andall partsof bodyawayfromopeningsandmovingparts.
Donotpickupanythingthatisburningorsmoking,suchascigarettes,matchesorhotashes.
Donotusethevacuumcleanerwithoutfilteranddirtcupin place.
• Useextracarewhencleaningonstairs.
• Donotuseto pickupflammableor combustibleliquidssuchasgasoline,oruseinareaswhere
theymaybepresent.
• Leaksfrombatterycellscanoccurunderextremeconditions.Ifanyliquidgetsonthe skin
washquicklywithsoapandwater.Ifanyliquidgetsintotheeyes,donotrubeyes,immediately
flushthemwithcleanwaterconlJnuouslyfor aminimumof 15minutes.Seekmedicalattention
immediately.
• Useonlythe charger(HooverPart#BH50005)suppliedbythe manufacturerto recharge.
• Storethevacuumcleanerindoors.Putthevacuumcleanerawayafteruseto preventtripping
accidents.
• Useonlybattery(HooverPart# BH50000)suppliedbymanufacturerto operatethisproduct.
• Alwaysturn offandremovebatterybeforeconneclJngordisconnectingoplJonalmotorizedpower
brush,orbeforeservicing.
• Donotdisposeof batteryina fireortrashcompactor.Seebatterydisposalsectionat endofthis
manualfordirections.
• Donotputanyobjectintoopenings.Donotusewithanyopeningblocked;keepfreeof dust,lint,
hair,andanythingthatmayreduce airflow.
• Donotincineratethe charger,battery,orapplianceevenif it is severelydamaged.Thebatteriescan
explodeinafire.
4
5
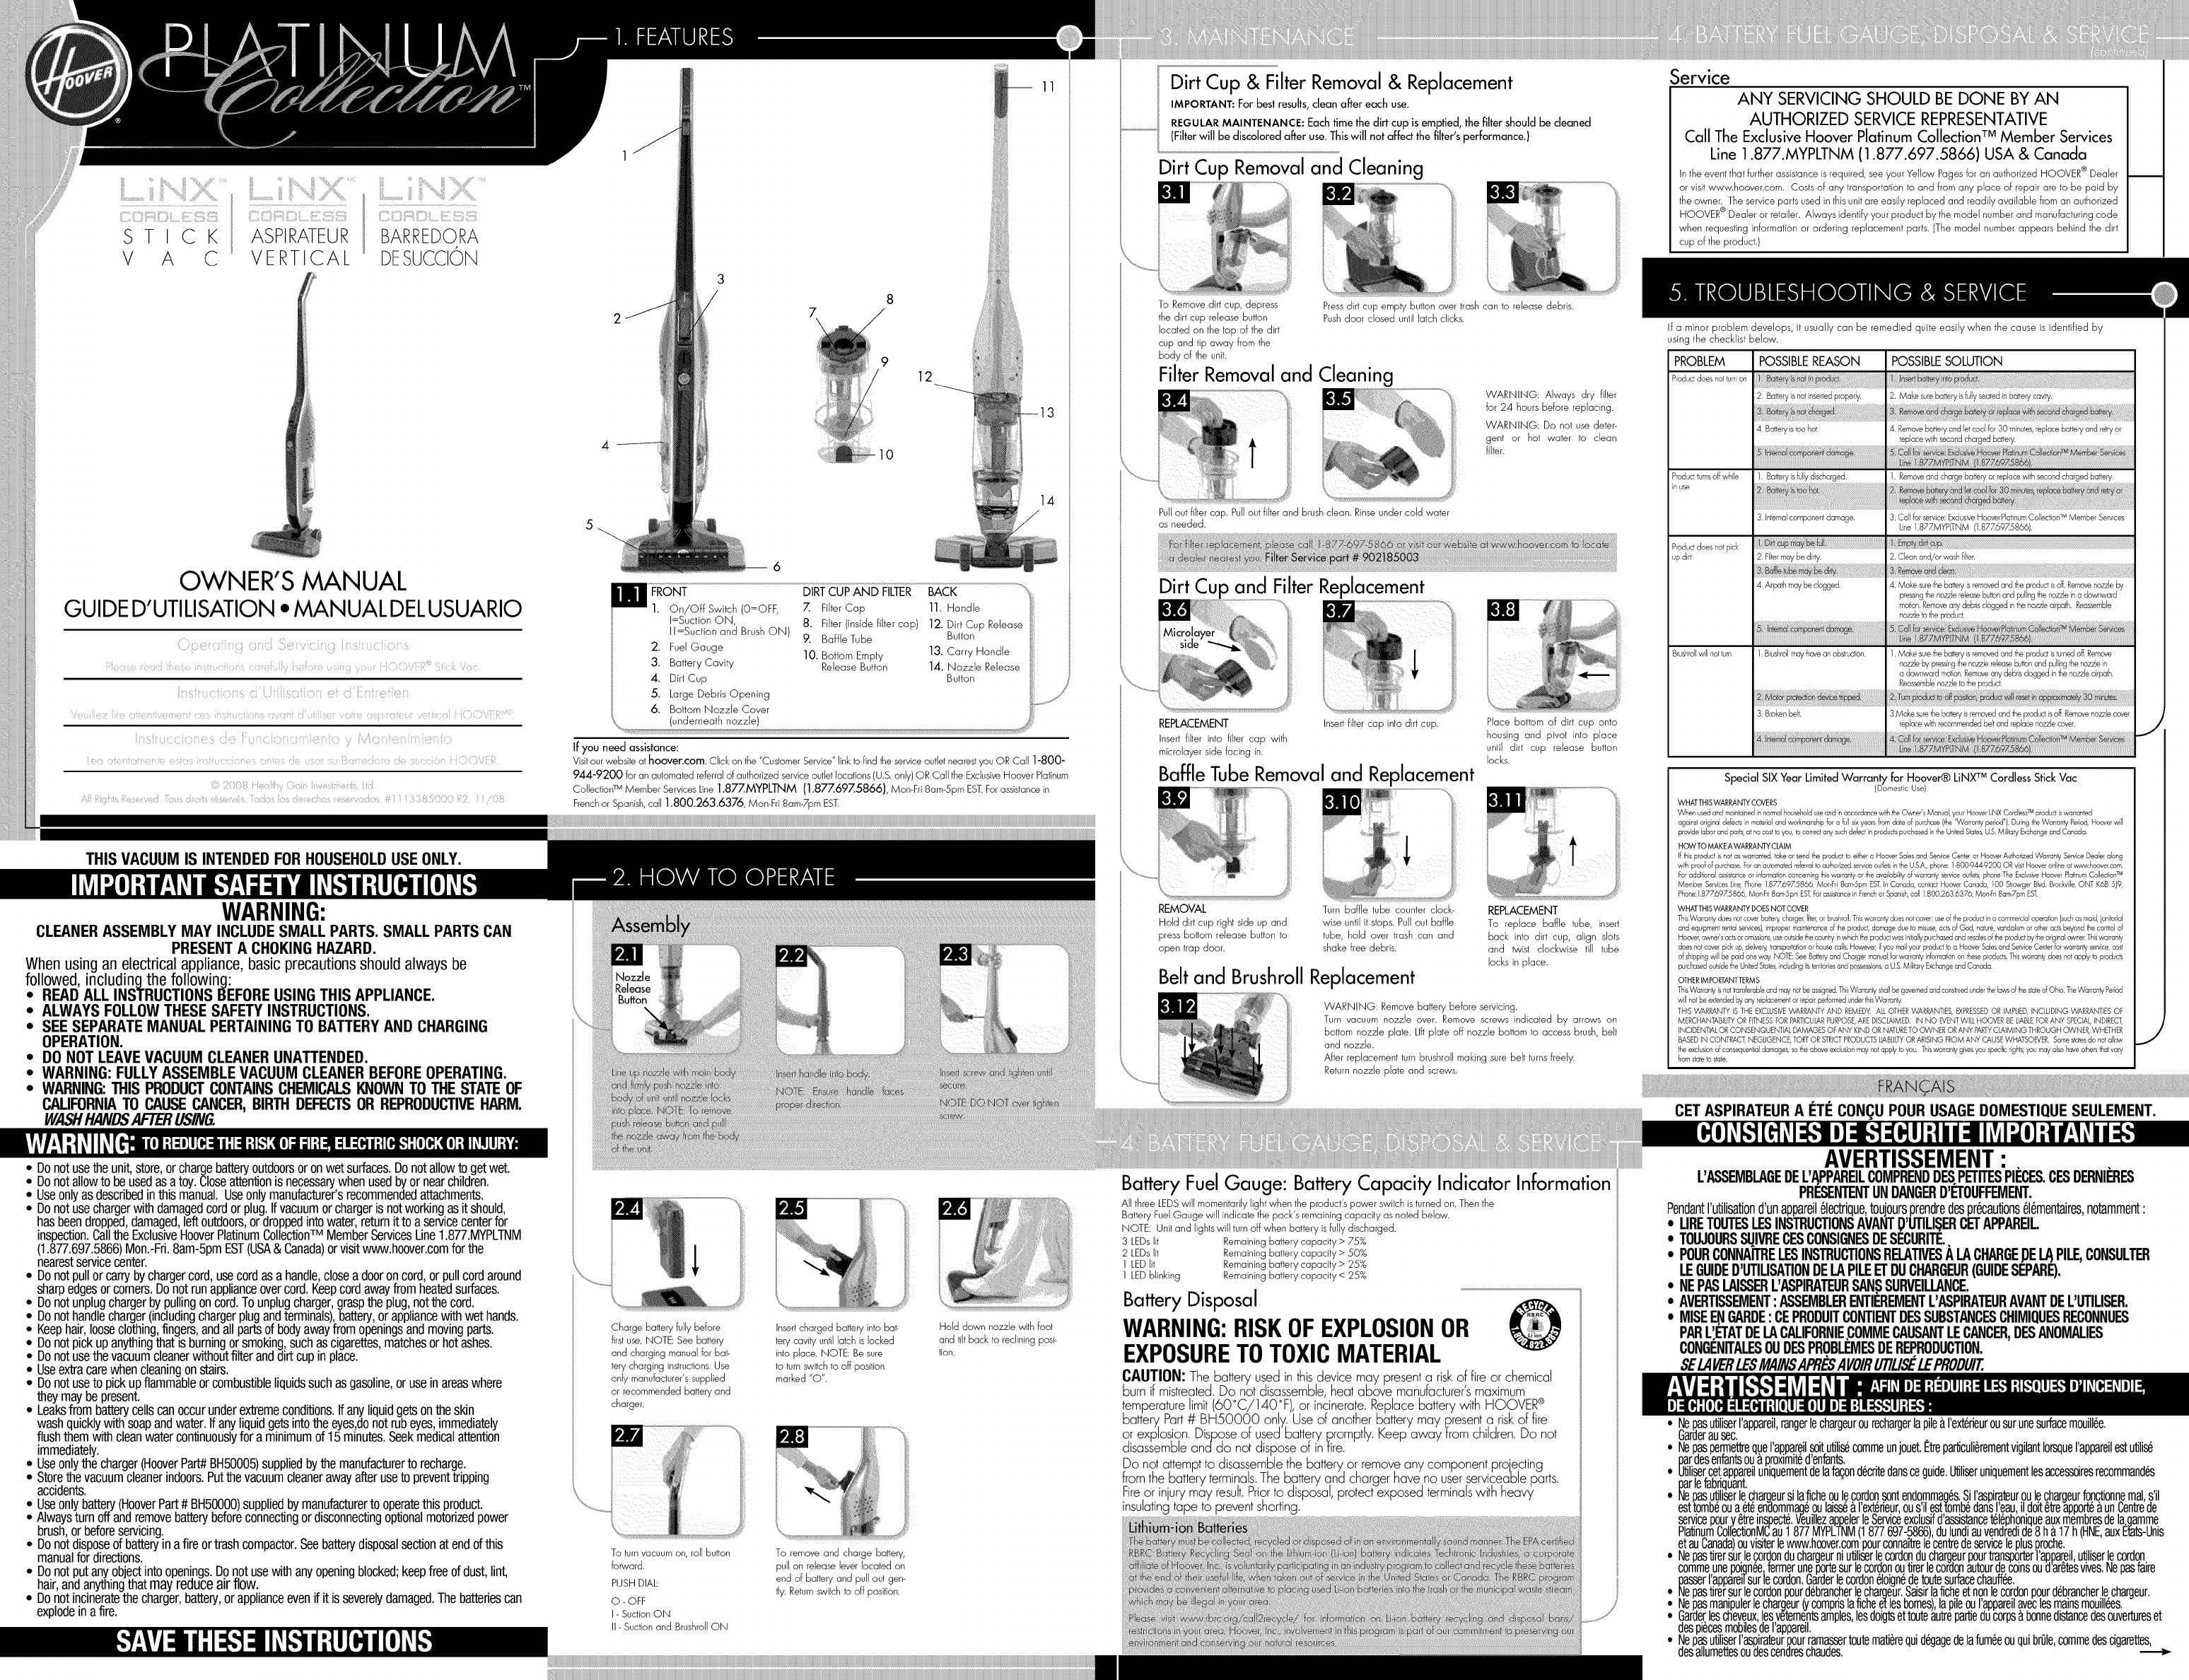
'_FRONT
1. On/Off Switch(O=OFF,
8
7
9
12
0
DJkTcuP AND ihLTEP_BACK
Z FilterCap 11. Handle
I=Suction ON,
II =Suction and BrushON)
2. Fuel Gauge
3. Battery Cavity
4. Dirt Cup
5. Large Debris Opening
6. Bottom Nozzle Cover
8. Filter(inside filter cap) 12. Dirt Cup Release
9. Baffle Tube Button
10. Bottom Empty 13. Carry Handle
Release Button 14. Nozzle Release
Button
11
(underneath nozzle)
If you need assistance:
Visitour website at hoovencom Click on the "Customer Service" link to find the service outlet nearestyou OR Call 1-800-
944-9200 for an automated referral of authorized service outlet locations (U.S. only) OR Call the ExclusiveHoover Platinum
Collection TM Member Services Line 1.877.MYPLTNM (1.877.697.5866), Mon-Fri 8am-5pm EST.For assistance in
French or Spanish, call 1.800.263.6376, Mon-Fri 8am-7pm EST.
Charge batteiy fully before
first use. NOTE: See batteiy
and charging manual for bat-
te_ycharging instructions. Use
only manufacturer's supplied
or recommended battery and
charger.
Insert charged batteiy into bat-
teiy cav@ until latch is locked
into place. NOTE: Be sure
to turn switch to off position
marked "0".
Hold down nozzle with foot
and tilt back to reclining posi-
tion.
To turn vacuum on, roll button
forward.
PUSH DIAL
O-OFF
I - Suction ON
II - Suction and BrushroJJON
To remove and charge batteq/,
pull on release lever located on
end of batteiy and pull out gen-
tly. Return switch to off position.
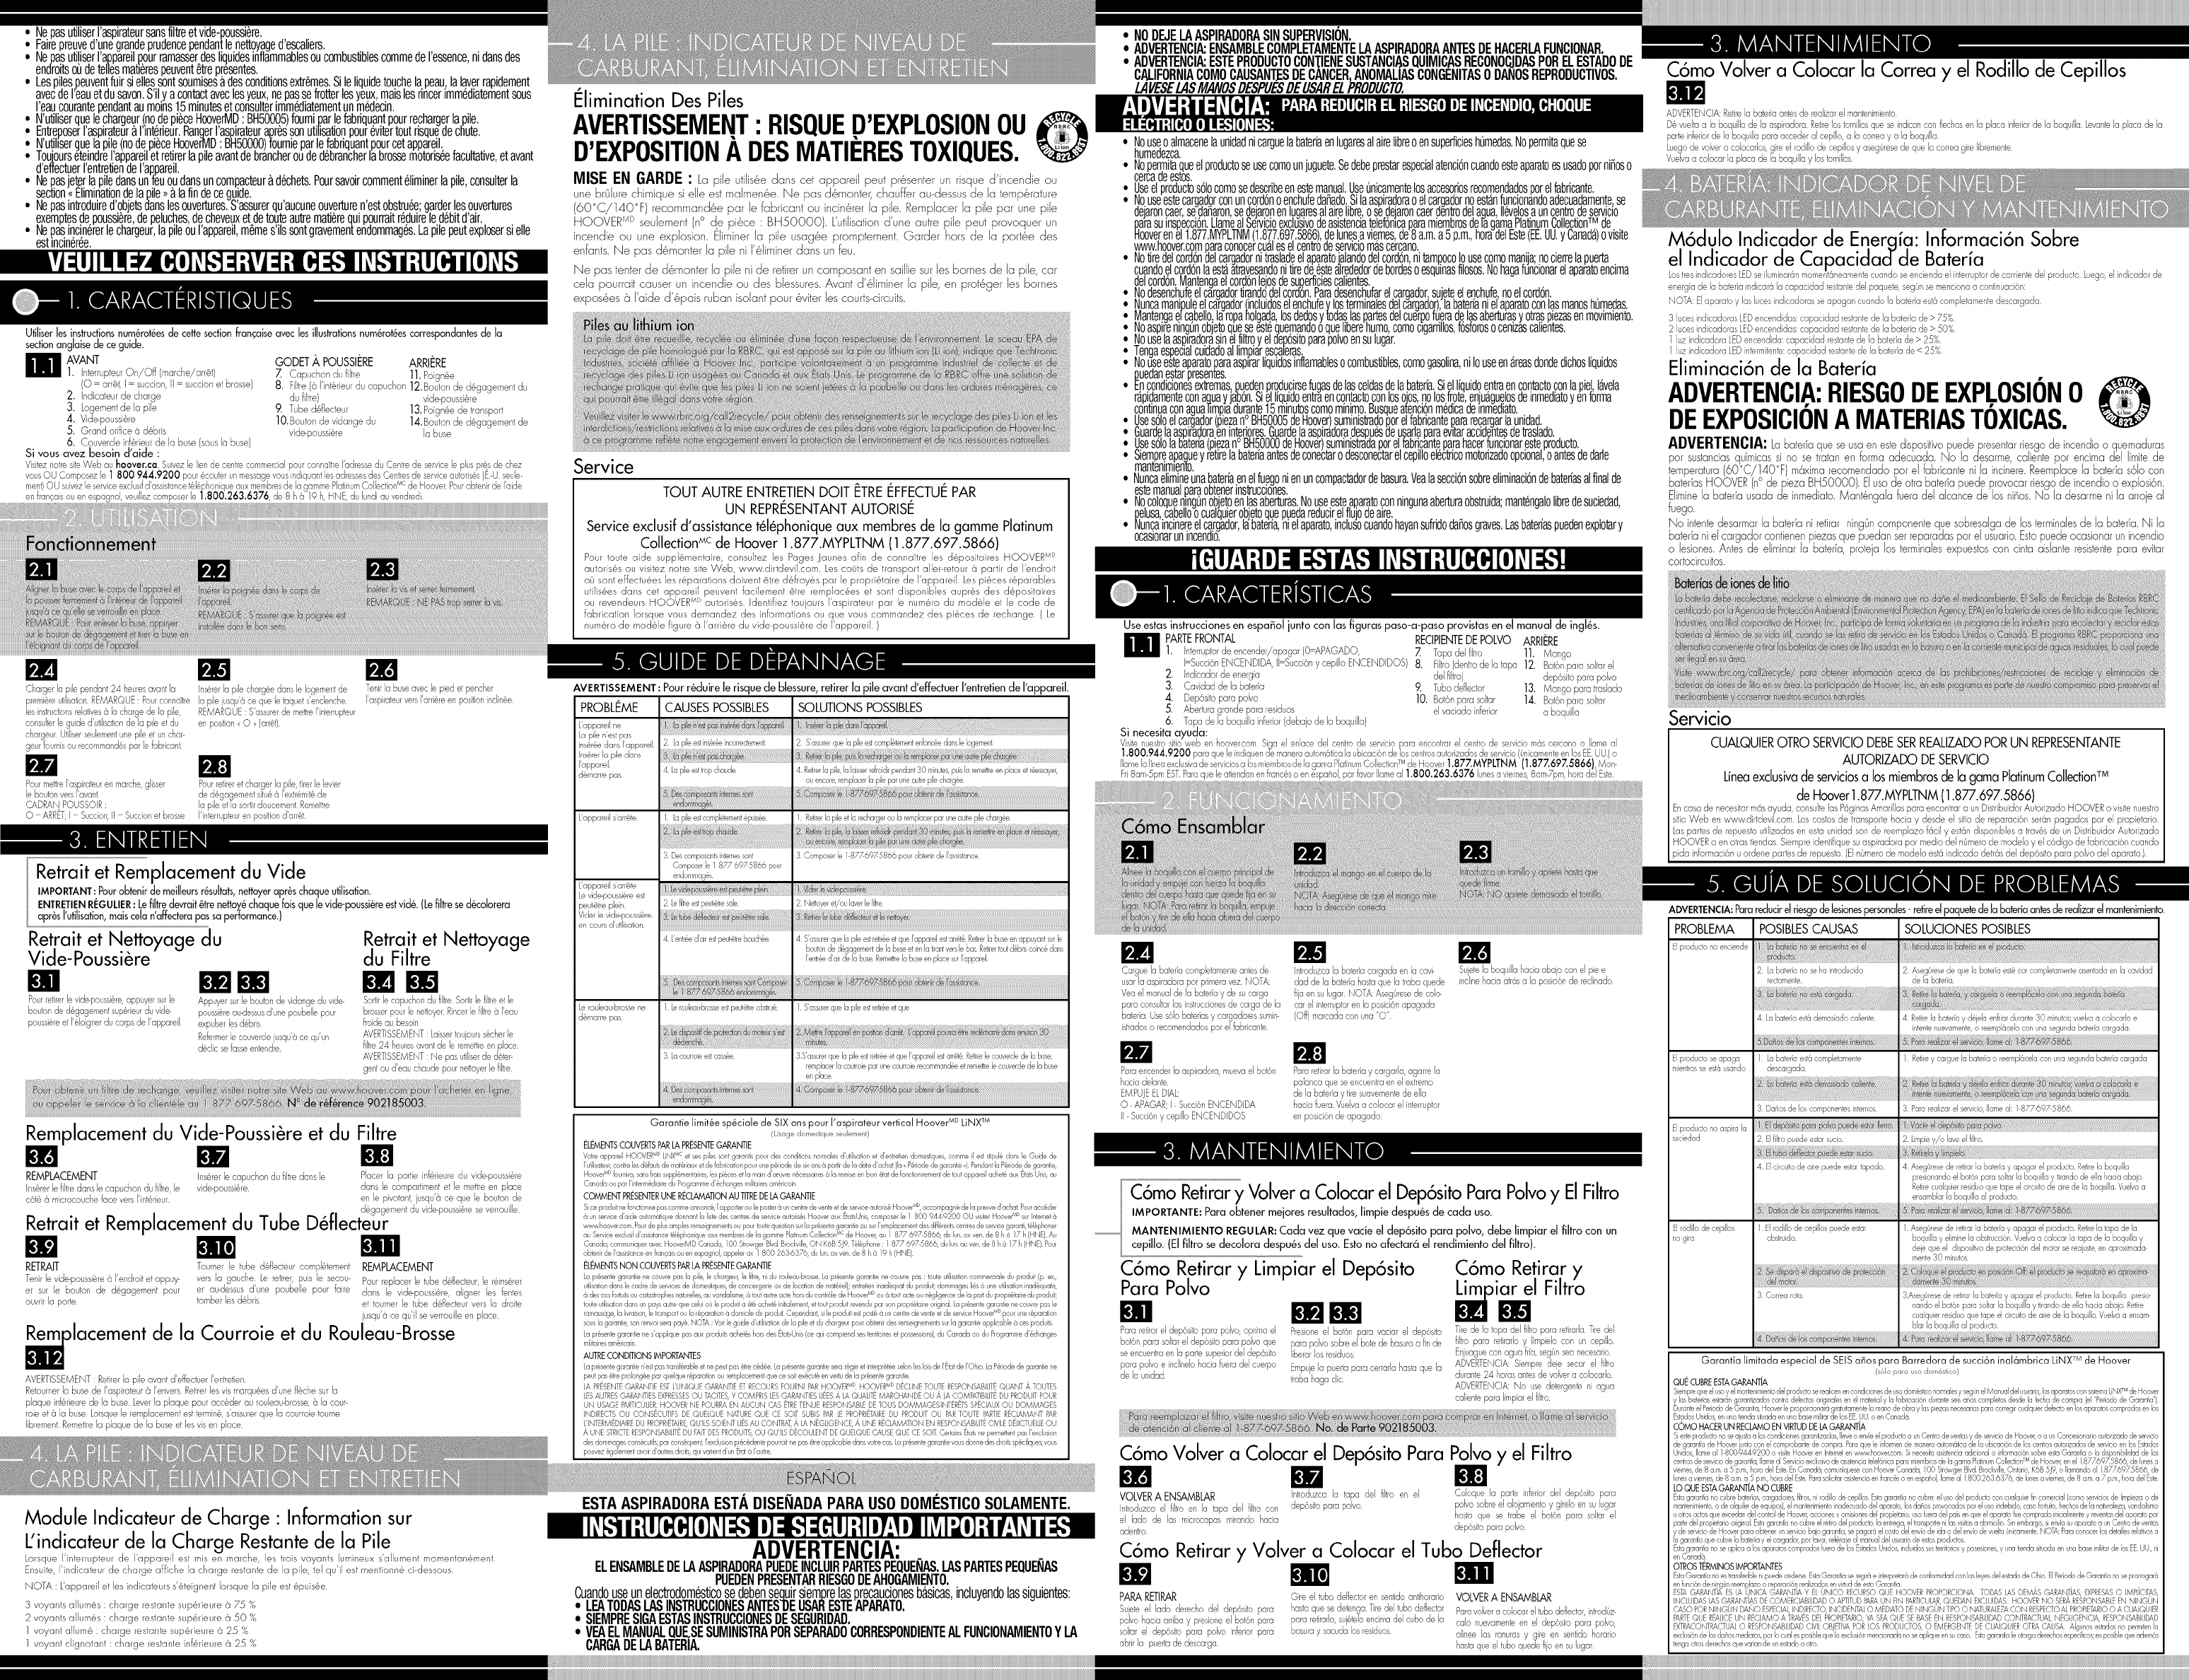
Dirt Cup & Filter Removal & Replacement
IMPORTANT: For best results, clean after each use.
REGULAR MAINTENANCE: Each time the dirt cup is emptied, the filter should be cleaned
(Filter will be discolored after use. Thiswill not affect the filter's performance.)
Dirt Cup Removaland Cleaning
To Remove dirt cup, depress
the dirt cup release button Push door closed until latch clicks.
located on the top of the dirt
cup and tip away from the
body of the unit.
Filter Removal and Cleaning
Press dirt cup emp_ button over trash can to release debris.
Pull out filter cap. Pull out filter and brush clean. Rinseunder cold water
as needed.
Dirt Cup and Filter Replacement
WARNING: Always dry filter
for 24 hours before replacing.
WARNING: Do not use deter-
gent or hot water to clean
filter.
REPLACEMENT Insert filter cap into dirt cup.
Insert filter into filter cap with
micrdayer side facing in.
Baffle Tube Removal and Replacement
Place bottom of dirt cup onto
housing and pivot into place
until dirt cup release button
locks.
REMOVAL
Hold dirt cup right side up and
press bottom release button to
open trap door.
Turn baffle tube counter clock-
wise until it stops. Pull out baffle
tube, hold over trash can and
shake free debris.
Belt and Brushroll Replacement
REPLACEMENT
To replace baffle tube, insert
back into dirt cup, align slots
and twist clockwise till tube
locks in place.
WARNING: Remove batteq/before self/icing.
Turn vacuum nozzle over. Remove screws indicated by arrows on
bottom nozzle plate. Lift plate off nozzle bottom to access brush, belt
and nozzle.
After replacement turn brushroJJmaking sure belt turns freely.
Return nozzle plate and screws.
Battery FuelGauge: Battery Capacity Indicator Information
All three LEDSwill momentarily light when the product's power switch isturned on. Then the
Battery Fuel Gauge will indicate the pack's remaining capacity as noted below.
NOTE: Unit and lights will turn off when battery isfully discharged.
3 LEDs lit Remaining battery capacity > 75%
2 LEDs lit Remaining battery capacity > 50%
1 LED lit Remaining battery capacity > 25%
1 LED blinking Remaining battery capacity < 25%
Battery Disposal
WARNING:RISKOFEXPLOSIONOR
EXPOSURETOTOXICMATERIAL @
CAUTION:The battery used inthisdevice may presenta riskof fire or chemical
burn if mistreated.Do not disassemble,heat above manufacturer'smaximum
temperaturelimit(60°C/140°F), or incinerate.Replacebattery with HOOVER®
battery Part# BH50000 only. Useof anotherbattery may .presenta riskof fire
or explosion.Disposeof used battery promptly.Keep away from children.Do not
disassembleanddo not disposeof in fire.
Do not attemptto disassemblethe battery or removeany componentprojecting
fromthe batteryterminals.The battery and chargerhave no userserviceableparts.
Fireor injurymay result.Priorto disposal,protectexposedterminalswith heavy
insulatingtape to preventshorting.
Service
ANY SERVICING SHOULD BEDONE BYAN
AUTHORIZED SERVICEREPRESENTATIVE
Call The Exclusive Hoover Platinum CollectionTM Member Services
Line 1.877.MYPLTNM (1.877.697.5866) USA & Canada
In the event that further assistance is required, see your Yellow Pages for an authorized HOOVER ® Dealer
or visit www.hoover.com. Costs of any transportation to and from any place of repair are to be paid by
the owner. The service parts used in this unit are easily replaced and readily available from an authorized
HOOVER e Dealer or retailer. Always identify your product by the model number and manufacturing code
when requesting information or ordering replacement parts. (The model number appears behind the dirt
cup of the product.)
If a minor problem develops, it usually can be remedied quite easily when the cause is identified by
using the checklist below.
PROBLEM
Productdoes not turnon
Productturnsoff whib
in use
Productdoes not pick
up dirt
Brushrollwill notturn
POSSIBLEREASON POSSIBLESOLUTION
,-o_ ] _y ....
2. Battery isnot insertedproperly. 2. Make sure batteryis fullyseated in battery cavity.
4. Battery istoo hot.
1. Batteryisfullydischarged.
3. Internalcomponent damage.
2. Filtermaybe dirty.
4. Airpath may be dogged.
1. Brushrdlmay havean obstruction.
4. Removebatteryand let cool for 30 minutes,replace battery and retry or
replace with second cha_ged battery.
1. Removeand charge battery or replace with second charged battery.
3. Call for service: Exclusve HooverPlatinumCdlectionTM Member Services
Line1.87ZMYPLTNM (1.87Z69Z5866).
2. Clean and/or wash flter.
4. Make surethe batteryisremovedand the productisoff. Removenozzleby
pressingthe nozzlerelease buttonand pdling fne nozzlein a dowT_ward
moron.Removeany debrisclogged in the nozzle airpath. Reassemble
nozzleto the product.
1. Make surefne batteryisremovedand the p_oductisturnedofr. Remove
nozzleby pressingthe nozzle releasebuttonand pdlingfne nozzle in
a downward motion.Removeany debrisdogged in the nozzle airpath.
Reassemblenozzleto the product.
&Make surethe batteryisremovedand the ploduct is o_.Removenozzle cover
replacewith recommendedbelt and replace nozzlecover.
]i_o _ _xd
Y_tT 69
Special SiX Year Limited Warranty for Hoover@ LiNXTM Cordless Stick Vac
(Domestic Use)
WHATTHISWARRANTYCOVERS
When usedand maintainedinnormalhouseholduseand inaccoldancewttntneOwneFsManual,you HooverLiNXCordlessTM productiswairanfed
againstoriginaldefectsin matel:dand workmanshipfor a Fullsx yearsfromdate of pwchaseJtne"Warrantypel:od").DudngtheWarranty Pel:od,Hooverwill
prayde laborand parts,at nocostto you, to conedany suchdefectin productspurchasedintheUnted Slates,U.S.Mihar¥ Exchangeand Canada.
HOW TO MAKEA WARRANTYCLAIM
If thisproductisnotas warlanted,takeorsendthe productto eithera HooverSalesand SelviceCenteror HooverAuthoFzedWarrant/Servce Dealeralong
wttnproofof purchase.Foran automatedr_[erlalto authol:zedselviceoutletsinthe U.SA.,phone: 1-800-944-9200OR,/st Hooveronlineatwww.hoave{:com.
Foraddttonalassistanceorinformatbnconcerningthiswarrantyor theavailabilityof warlan_/serviceoutlets,phoneTheExclu;r,/eHooverPlatnumCollectonTM
MemberServcesLne,PhoneL87Z69Z5866, Mor'-Fri8am-5pmEST.In Canada,contactHoover Canada, 100 St_owgerBlvd.Brockvlle,ONT K6B 5]9,
Phone:l.87Z69Z5866, Mon-Fri8am-5pmESI_Forassistancein Frenchor Spanish,call 1.800.263.6376, Monfri 8am-TpmESI_
WHATTHISWARRANTYDOESNOTCOVER
ThisWarrantydoesnotcoverhately charger)_ltel;orbrusFuolLThiswarrantydoesnotcover: useof theproductina comme{daloperaton (suchas maid,janitol:d
and equipmentr_ntalse{Vces),impropermaintenanceof the product,damagedue to misuse,acts of God, nature,vandalismor otheractsbeyondthecontrolof
Hoover)owne/sactsoromissions,useoutsidethecountryinwhchtheproductwasin_allypulchasedandresalesoFtheproductbytheoriginalowner:Thiswarranty
doesnotcover pickup, dellvel¥transportationor housecalls. Howevel;ifyou mailyourproductto a HooverSalesand ServiceCenterforwarrantyservce,cost
of shippingwill be paid oneway. NOTE:SeeBattel¥and Chaigermanualforwarrantyinformatonon theseproducts.Thiswairan_/doesnotapply to products
pulchasedoutsde theUntedStates,includingtsterritoriesand possessions,a U.S.Mihal¥ ExchangeandCanada.
OTHERIMPORTANTTERMS
ThisWarlan_/isnot#ansferableand may notbeassgned.ThisWarrantyshallbe governedand consl_uedunderthelawsof thestateof Oho. TheWarrantyPel:od
will notbeextendedbyany replacementorrepairperlormedunderthisWarranty.
THISWARRANTYISTHE EXCLUSIVEWARRANTYAND REMEDY.ALLOTHERWARRANTIES,EXPRESSEDOR IMPLIED,INCLUDINGWARRANTIESOF
MERCHANTABILITYOR FITNESSFORPARTICULARPURPOSE,AREDISCLAIMED.IN NO EVENTWILLHOOVERBELIABLEFORANY SPECIAL,INDIRECT,
INODENTIALORCONSENQUENTIALDAMAGESOF ANYKIND ORNATURETOOWNERORANY PARTYCLAIMING THROUGHOWNER,WHETHER
BASEDIN CONTRACT,NEGLIGENCE,TORTOR STRICTPRODUCTSLIABLILTYORARISINGFROMANY CAUSEWHATSOEVER.Somestatesdo notallow
theexdusonof consequenfaldamages,so theaboveexclusionmay notapply to you. Thiswairan_/gvesyou speci_ r:ghts;you may alsohaveothersthatvarY.
flora state to state.
CETASPIRMEUR A ETE CON!_UPOURUSAGEDOMESTIQUESEULEMENT.
AVERTISSEMENT:
L'ASSEMBLAGEDEL'APPAREILCOMPRENDDESPETITESPIJ:CES.CESDERNIJ:RES
PRESENTENTUNDANGERD'ETOUFFEMENT.
PendantI'utilisationd'unappareilelectrique,toujoursprendredesprecautionselementaires,notamment:
•LIRETOUTESLESINSTRUCTIONSAVANTI)'UTILISERCETAPPAREIL.
•TOUJOURS_IVRECESCONSIGNESDESECURITE.
•POURCONNAITRELESINSTRUCTIONSRELATIVES._LACHARGEDE_PILE,CONSULTER
LEGUIDED'UTILISATIONDELAPILEETDUCHARGEUR(GUIDESEPARE).
•NEPASLAISSERL'ASPIRATEURSAN,SSURVEILLANCE.
•AVERTISSEMENT:ASSEMBLERENTIEREMENTL'ASPIRATEURAVANTDEL'UTILISER.
•MISEENGARDE:CEPRODUITCONTENTDESSUBSTANCESCHIMIQUESRECONNUES
PARL',ETATDELACALIFORNIE,COMMECAUSANTLECANCER,DESANOMALIES
CONGENITALESOUDESPROBLEMESDEREPRODUCTION.
SELAVERLESMAINSAPRESAVOIRUTILISELEPRODUIT
•NepasutiliserI'appareil,rangerlechargeurourechargerlapileaI'ext_rieurousurunesurfacemouill_e.
Garderausec.
NepaspermetlrequeI'appareilsaltutilis_commeunjouet,letreparticulierementvigilantIorsqueI'appareilestutilis_
pardesenfantsouaproximited'enfants.
Utili,sercetappareiluniquementdelafaoondecritedansceguide.Utiliseruniquementlesaccessoiresrecommandes
partefabdquant.
Nepasutiliserlechargeursilaficheoulecordonsontendommafles.Silaspirateuroulechargeurfonctionnemal,s'il
esttomb_oua_t_en_lommafl_oulai_ &I'ext_deur,ous'ilesttomb_dansI'eau,ildolt_treapport_&unCentrede
servicepoury_treinspect&VeuillezaBoelerleServiceexclusifd'assistancet_l%honiqueauxmembresdela.gamme
PlatinumCollectionMCau1877MYPLTNM(1877697-5866),dulundiauvendredide8h&17h(HNE,auxEfats-Unis
etauCanada)ouvisiterlewww.hoover.compourconnaftrelecentredeserviceleplusproche.
NepastirersurlecordonduchargeurniutiliserlecordonduchargeurpourtransporterI'appareil,utiliserlecordon
commeunepoiflneefermeruneportesurlecordonoutirerlecordonautourdecoinsoud'aretesvives.Nepasfaire
passerI'appareirsurlecordon.Garderlecordoneloignedetoutesurfacechauffee.
Nepastirersurlecordonpourd_brancherlecharfleur.Saisirlaficheetnonlecordonpourd@ancherlechargeur.
Nep,as,man!pulerle,chargeur(ycompri,sla!icheet.lesbarnes)I.apileouI',appareilav,eclesmainsmouillees.. .
uareer_escneveux,_esvetementsamp_es,_esaoigtsettouteautrepattieaucorps&oonneaistanceaesouvertureset
despiecesmobilesdeI'appareil.
NepasutiliserIaspirateurpourramassertoutematierequid_gagedelafum_eouquibn)le,commedescigarettes,
desallumettesoudescendreschaudes. -_
Nepasutiliserraspirateursansfiltreetvide-poussiere.
Fairepreuved'unegrandeprudencependantlenettoyaged'escaliers.
Nepasutilis?,rI'appareilpourramasserdesliguidesinflammablesoucombustiblescommedeI'essencenidansdes
eneroits00aetellesmat_erespeuventetrepresentes.
Lespilespeuventfuirsiellessentsoumisesadesconditionsextremes.Sileliquidetouchelapeau,lalaverrapidement
avecdeI'eauetdusavon.S'ilyacontactaveclesyeux,nepassefrotterlesyeux,maislesrincer_mmediatementsous
I'eaucourantependantaumains15minutesetconsulterimmediatementunmedecin.
N'utiliserquelechargeur.lnodepieceHooverMD:BH50005)foumiparlefabriquantpourrecharge.rlapile.
Lntreposeri'aspirateuraflnterieur.Hangeri'aspirateurapressonutilisationpourevitertoutrisqueaechute.
N'utihserquelapile(nodepieceHooverMD:BH50000)fournieparlefabriquantpourcetappareil.
Toujours@indreI'appareiletretirerlapileavantdebrancheroudedebrancherlabrossemotoriseefacultative,etavant
d'effectuerI'entretiendeI'appareil.
Nepasjet¢rlapiledansunfeuoudansuncompacteuradechets.Poursavoircommenteliminerlapile,consulterla
section<<Eliminationdelapile>>alafindeceguide.
Nepasintroduired'objetsdanslesouvertures.S'assurerqu'aucuneouverturen'estobstruee;garderlesouvertures
exemptesdepoussiere,depeluches,decheveuxetdetouteautrematierequipourraitreduireledebitd'air.
Nepasincinererlechargeur,lapileouI'appareil,m@es'ilssentgravementendommages.Lapilepeutexplosersielle
est_ncineree.
Ivi lJllI =1itvi :111
Utiliserlesinstructionsnum@rot@esde cettesectionfrancaiseavec les illustrationsnum@rot@escorrespondantesde la
sectionanglaise de ceguide.
_ AVANT
1. ]nterrupreur On/O{{ (marche/arr@t)
(0 = orret,I= succion,II =sucaonerbrosse)
2. Indicateurde charge
3. Logementde la pile
4. Vide_poussiere
5. Grandorifice6 debris
6. Couvercleinferieurde la buse(souslabuse)
Si vous avez besoin d'aide :
GODET ,_,POUSSIERE ARRIERE
7. Capuchondu filtre 11.Poignee
8. Fihre(6 I'inrerieurdu capuchon12.Boutonde degagementdu
du filrre)
9. Tubeddlecteur
lO.Boutonde vidangedu 14.Boutonde degagementde
vide-poussiere la buse
m m
Charger Io pile pendant 24 heures ovant Io Ins@rerIo pile chorg@e dons le Iogement de
p+emi@reutilisation. REMARQUE : Pour conna_tre la pile iusqu'@ ce que le taquet s'enclenche
les instructions relatives 6la charge de la pile, REMARQUE : S'assurer de me_treI'interrupteur
consulter le guide d'utihsation de la pile et du en position <<0 >>(arret)
TenirIo buseavecle pied et pencher
I'ospiroteurversI'or@e en positioninclin@e
m m
CADRANPOUSSOIR:
0 - ARRET;I- Succion;II- Succionetbrosse
Retrait et Remplacementdu Vide
IMPORTANT: Pourobtenirde meilleursr_sultats,nettoyerapr_schaqueutilisation.
ENTRETIENRI_GULIER:Lefi[tredevrait6trenettoy_chaque foisque levide-poussi_reestvid6. (Lefiltresed6colorera
apr_s['utilisation,maisce[an'affecterapassaperformance.)
Retrait et Nettoyage du
Vide-Poussi re
Pour retirer ]evidepoussi@re, appuyer sur le Appuyer sur le bouton de vidange du vide-
bouton de d_gagement sup@rieurdu vide- poussi@reaudessus d'une poubdle pour
poussi&re et 1'61oignerdu corps de I'appareil expulset les debris
Refermer le couverde jusqu'6 ce qu'un
dechc se fasse entendre.
Retrait et Nettoyage
du Filtre
Blm
froide au besoin
gent oud'eau chaudepour netroyerlefiltre
Remplacement du Vide-Poussi re et du Filtre
i m m
REMPLACEMENT Inserer le capuchon du filtre dans le Placer la paltie inf_rieure du vide-poussi_re
Ins@er le filtre dans le capuchon du fibre, le vide-poussi_re dans le compartiment er]e mettre en place
cet6 _ microcouche face vers I'int_rieur en le pivotant, jusqu'6 ce que le bouton de
. .. d_gagemenr du vide-poussi_re se verrouille
Retrait et Remplacement du Tube Deflecteur
RETRAIT Tourner le tube ddlecteur completement REMPLACEMENT
Tenir le vide-poussi_te 6 I'en&oir er appuy- vers la gauche Le retirer, puis le secou-
er sur le bouton de d_gagement pour er audessus d'une poubeJle pour faire
ouwir la porte tomber les d_btis
jusqu'6 ce qu'i] se verrouille en place
lacement de la Courroie et du Rouleau-Brosse
AVERTISSEMENT : Reriret la pile avant d'effectuer I'entretien
Retoumer la buse de I'aspirateur 6 I'envers Retirer les vis marquees d'une fleche sur Ja
plaque inferieure de la buse Lever Ja plaque pour acceder au rouleau-brosse, _ la cour:
roie er _ la buse Lorsque le +emplacement esr termin_, s'assurer que la courroie toume
hbremenr Remettre la plaque de la buse er les vis en place
Module Indicateur de Charge" Information sur
L'indicateur de la Charge Restante de la Pile
Lorsque I'interrupteur de I'appareil est mis en marche, les trois voyants lumineux s'allument mamentanement
Ensuite, I'indicateur de charge affiche Ja charge restante de Ja pile, tel qu'il est mentionne ci-dessous
NOTA : L'appareil et les indicateurs s'eteignent Iorsque Ja pile est epuisee
3 voyants allum@s : charge restante superieure 6 75 %
2 voyants allum@s : charge restante sup_rieure 6 50 %
1 voyant allum_ : charge restante sup_rieure 6 25 %
1 voyant clignotant : charge restante inferieure 6 25 %
Elimination DesPiles
AVERTISSEMEN.T: RISQUE.D'EXPLOSIONOU
D'EXPOSITIONA DESMATIERESTOXIQUES.
MISE EN GARDE:Lo pile utiJisd_edons cet appareiJ peut prd_senterun risque d'incendie ou
une brOJurechimique sieJJeest maJmend_e.Ne pas dd_moniel;chauffer au-dessusde Jatempd_rature
(60°C/140°F) recommandd_epar Jefabricant ou incind_rerJapile. RempJacerJapile par une pile
HOOVERMDseulement(n° cJepierce: BH50000). L'utilisationd'une autre pile peut provoquer un
incendie ou une explosion. Eliminerla pile usagd_epromptement.Garder bars de la portd_edes
enfants.Ne pas dd_monterJapile ni J%Jiminerdons unfeu.
Ne pastenter de dd_monterJapile ni de retireruncomposant en saiJJiesurJesbarnes de Japile, car
cela pourrait causer un incendie ou des blessures.Avant d'd_Jiminerla pile,en prof_ger les barnes
exposees 6 I'aide d'_pais ruban isoJantpour _viter Jescourts-circuits.
Service
TOUT AUTRE ENTRETIENDOlT F:TREEFFECTUEPAR
UN REPRESENTANTAUTORISE
Service exclusif d'assistance telephonique aux membres de la gamme Platinum
Collection _c de Hoover 1.877.MYPLTNM (1.877.697.5866)
ou revendeurs HOOVER t''_ autoris@s. Identifiez toujours I'aspirateur par le num_ro du modele et le code de
fabrication Iorsque vous demandez des informations ou que vous commandez des pieces de rechange ( Le
numero de madele figure 6 I'arriere du vide-poussiere de J'appareil )
AVERTISSEMENT:Pour r_duire le risque de blessure, retirer la pile avant d'effectuer I'entretien de I'appareil.
PROBLI_ME
L'appa_eil ne
Ins@rerla pile dans
I'appa_eil.
d@ma_repas
L'appa_eil s'a_rete
L'appa_eil s'ar@e
LevideT_ouss@eest
peut_he plein
Lerouleau-brosse ne
d@ma_repas
CAUSESPOSSIBLES
4 Lapileesttrapchaude
1 Lapile estcomplBtementBpuisee.
3 Descomposantsinternessont
Composerle 1 877 6975866 pour
endommag_s
2 Lefihreestpeut_tresale
SOLUTIONS POSSIBLES
2 S'assurerque la pileestcompbtementenfonceedonsle Iogement
4 R@er la pile la laisserrdroidirpendant30 minutes,puisla remettreen place et r@essayer,
ou encore,remplacerla pilepar une autrepile chargee
1 Retirerla pileetla rechargeroula remplacerpar uneautrepile charg@e
3 Composer le 1 87_69_5866 pour obtenirde lassistance
4 Lentr@edair estpeut_trebouch@e
1 Lerouleaubrosseestpeut_Streobstru@
3 Lacourroieestcaste
I S'assurerque la pile estretireeet que
3S'assurerque la pileestreflr&eet queI appareilestar+@t6Retirerle couverclede la buse
remplacerla courrdepar unecour+oierecornmandBeet remetrrele couverclede la buse
en place
m797-!'a i ta
Garantie limit&e sp&ciale de SIX ans pour I'aspirateur vertical Hoover MD LiNX TM
IUsage domestique seulement)
ELEMENTSCOUVERTSPARIA PRESENTEGARANTIE
VotreappareilHOOVERvD LiNXvc et sespilessontgarantispour descondi_onsnormalesd'utilisa_onet d'entretiendomestiques,commeil est4pul& dansle Guide de
I'udisateur,contrelesd@tautsde mat@riauxetde_abricationpourunep@riodedesixans6 partirde ladate d'achat(la_ P@riodede garantie_)Pendantla P@riode,de garantie,
HoovervDburnira,sansflaissuppl&mentaires,lesp&cesetla maind'oeuvren@cessaires_ la remiseenban @tatde bndonnementdetout appareilachet&auxEtatsUnis,au
Canadaou parI'interm@diairedu Programmed'@changesmilitairesam&ricain
COMMENT PRESENTERUNE RECLAMATIONAU TITREDE IA GARANTIE
Sice produitnebnctionnepascornrqeannonc_,I'apporterou le poster6 uncentrede venteet deserviceautoris@Hoover''D,accompagn@dela preuved'achat Pouracc&der
6 unserviced'aide automatiquedonnantla listedescentresde serviceautoris@sHooveraux EtatsUnis,composerle 1 800 9449200 OU visiterHoovervD surInternet6
v_v hoovercamPourdeplusamplesrenseignementsou pourtoutequestionsurlapr&sentegarantieousurI'emplacementdesdifl&rentscentesdeservicegaranti,telephoner
au Serviceexclusifd'assistanoet@l@honiqueauxmembresde la gammePlatinumCollection``'<:de Hoover,au 1 877 692"5866, dulun auven de 8 h_ 17 h(HNE)Au
Canada,communiqueravecHooverMDCanada, 100StrowgerBlvd Brockville,ON K6B5J9 Tel@phone: 1 877 6975866, dulunauven de 8 h_ 17 h (HNE)Pour
obtenirdeI'assistanceenfranqaisouen espagnol,appelerau 1800 2636376, dulun auven de 8 h _ 19h (HNE)
ELEMENTSNON COUVERTSPARIA PRESENTEGARANTIE
Lapr&sentegarantiene couvrepas la pile,le chargeur,le flltre,ni du rouleaubrosseLapr@sentegaran_enecouvrepas :toute utilisationcomrqerdaleduproduitIp ex,
udisationdansle cadredeservicesde dome4ques,de conciergerieoude locationde mat+riel);entre_eninad@quatdu produitdommagesli&s_ uneudisationinadequate,
6 descasbrtuitsoucatastrophesnaturelles,auvandalisme,_ toutautreactehatsducontrelede HoovervDou6 toutacteou negligencede la partdu propri&tairedupro@it:
touteutilisationdansunpaysautrequeceluioOle produita @@achet&initialement,et toutproduitrevenduparson propri@taireoriginal Lapr@sentegarantienecouvrepas le
ramassage,la livraison,letransportou la r@aration6 domicileduproduitCependant,sileproduitestpost&6 uncentredeventeet deserviceHoovervDpour uner@aration
sousla garantie,sonrenvoiserapay@NOTA :Voirle guided'utilisationde la pileetduchargeurpourobtenirdes renseignementssurla garantieapplicable_ cesproduits
Lapr@sentegarantienesappliquepasaux produitsachet@shatsdes EtatsUnisIcequi comprendsesterritoireset possessions),du Canadaou duProgrammed'&changes
militairesam@ricain
AUTRECONDITIONS IMPORTANTES
Lapr&sentegarantien'estpas tans_@rableet nepeutpas@e c@d&eLapr&sentegarantieserar&gieet interpr@t&eselonles loisde I'EtatdeI'Ohio LaP&riodede garantiene
peutpas&treprolong@eparquelquer@arationouremplacementque cesaltexecuteenvertudela pr@sentegarantie
LAPRESENTEOARANTIEESTL'UNIQUEGARANTIEEl RECOURSFOURNIPARHOOVERvD HOOVER''D DECUNETOUTERESPONSABILITEQUANT A TOUTES
LESAUTRESGARANTIESEXPRESSESOU TACFES,Y COMPRISLESGARANTIESLIEES,_ LA QUALITEMARCHANDEOU,_ LACOMPAT,IBILITEDU PRODUITPOUR
UN USAOEPARTICUUERHOOVERNE POURRAEN AUCUN CASETRETENUERESPONSABLEDE TOUSDOMMAGESINTERETSSPECIAUXOU DOMMAGES
INDIRECTSOU CONSECUTIFSDE QUELQUENATUREQUE CE SOP SUBIS PARLE PROPRIETAIREDU PRODUITOU PARTOUTEPARTIERECLAMANTPAR
!'INTERMEDIAIREDU PROPRIETA!RE,QU'ILSSOIENTLIESAU CONTRAT,_ LANEGLIGENCE,A UNERECLAMATIONEN RESPONSABILITECIVILEDELICTUELLEOU
A UNESTRICTERESPONSABILITEDU FAITDESPRODUITS,OU QU'ILSDECOULENTDEQUELQUECAUSEQUECE SOITCertainsEtatsne permettentpasI'exclusion
ESTAASPIRADORAESTA DISENADAPARA USODOMESTICOSOLAMENTE.
ADVERTENCIA:
ELENSAMBLEDELAASPIRADORAPUEDEINCLUIRPARTESPEQUE_IAS.I.ASPARTESPEQUE_IAS
PUEDENPRESENTARRIESGODEAHOGAMIENTO.
Cuandouseunelectrodomesticosedebense_uirsiemprelasp.recaucionesba_sicas,incluyendolassiguientes:
•LEATODASI.ASINSTRUCCIONESANTES'DEUSARESTEAPARATO.
•SIEMPRESIGAESTASINSTRUCCIONESDESEGURIDAD.
•VEAELMANUALQUESESUMINISTRAPORSEPARADOCORRESPONDIENTEALFUNCIONAMIENTOYLA
CARGADELABATERIA.
• NODEJELAASPIRADORASINSUPERVISION.
• ADVERTENCIA:ENSAMBLECOMPLETAMENTELAASPIRADORAANTESDEHACERLAFUNCIONAR.
•ADVERTENCIA:ESTEPRODUCTOCON'[IENESUSTANCIASQUIMICASRECONOCIDASPORELESTADODE
CALIFORNIACOMOCAUSANTESDECANCER,ANOMALIASCONGENITAS0 DANOSREPRODUCTIVOS.
LAVESE/.ASMANOSDESPUESDEUSARELPRODUCTO.
• NouseoalmacenelaunidadnicarguelabateriaenlugaresalaimlibreoensuperficieshOmedas.Nopermitaquese
humedezca.
• Nopermitaqueelproductoseusecomounjuguete.SedebeprestarespecialatenciencuandoesteaparatoesusadoporniSoso
cercaaeestos.
i Useelproductoselocomosedescribeenestemanual.UseOnicamentelosaccesoriosrecomendadosporelfabricante.
Nouseestecargadorconungordenoenchufeda,Sado.Silaaspir,adoraoelca!gador9qestanfunc(onandoadecuadamente,se
aejaroncaer,seaaSaron,seaejaronenlugaresalaimlibre,oseaejaroncaeraenFoae!agua,Ilevelosauncentroaeserviclo
parasuinspeccien.LlamealSewicioexciusivoaeasistenciatelefenlcaparamiemnmsaelagamaPlalJnumuollectionT_de
Hooverenel1.877.MYPLTNM(1.877.697,.5866),delunesaviemes,ae_a.m.abp.m.,noraaelEste(EE.UU.yCanaaa)ovisite
www.noover.comparaconocercualeselcenboaeserviciomascercano. ,
NolJredelcordoni:lelcargadornitrasladeelaparatojalandodelcord6n,ni_ampocoiousecomomania;nocierrelapuerta
cuandoelcord6nlaes_atravesandonitiredeestealrededordebordesoesquinasfilosos.Nohagafuncionarelaparatoencima
elcord6n.Mantengaelcord6nlejosdesupe_iescalientes., ....
oaesenchufeeicargaaorlJ,rg,naoaeic?rabn,vara,aesenchufarei,carganoqsuje_eienchufe,noeicora6n. , ,
uncamani#uieeicargaaorlincluidos,eienchufeviesterminaiesae!cargaaor),lanaterianieiaparatoconiasmanosnOmeeas.
antengaeicaDello,iaropanoigana,lOSaeaosytodasiaspartesaeicuerporueraueiasaDe@rasyotraspiezasenmovimien_o.
aspi[eningOnoDjetequeseestequemanaooqueliberenumo,comocigarrillos,f6srorosocenizascaiientes.
ouseiaasPLraaorasinelfiltroyeldep6sitoparapoivoensuiugar.
ngaespecialcuiaanoallim+piarescaieras_ .........
ouseesteaparatoparaaspirariiquiaosin_amablesocomDuslJbles,comogasoiina,niiouseenareasaonaeaicnosiiquiaos
ueaanestarpresentes.
_ncondicionesexbemas,,pueden.producirsefugasdelasceldasdelabateria.Sielliquidoentraenconlacteconlapie,I,lavela
rapiuamenteconagua7jap6n,bielliquiaoentraencontactoconlOSojos,nolOS_ote,enjuagueiosaeinmeaiatoyenrorma
continuaconaguaiirn,l_iaaurante15minutoscomominimo._usquea[enci6nmedcaaeinmeaiate., ,
Uses_ioeicargaaor(piezanoBH50005deHoover)suminisbanoporelfanricantepararecargariauniaag.
uuameiaaspiranoraeninteriores,uuareeiaaspiraaoraaespu_saeusanaparaevitaracciaentesaebasiano.
Uses61olabateria(piezan_BH50000deHoover)suministradaporelfabricanteparahacerfuncionaresteproducto., ,
biempreapagueyretireiaDateriaantesaecone4aroaesconectareicepilloeiecUicomotorizanoopcionai,oantesaeaane
mantenimiento.
i uncaelimineunabateriaenelfu.egonienuncompac_adordebasura.Vealasecci6nsobreeliminaci6ndebateriasalfinalde
estemanualparaob!enerinsFucciones.. .......
i'_ocoioqueningOnobjeteeniasaDe@ras,i_ouseesteaparatoconningunaaDerturaoDstruiaa;mant_ngaiolibreaesucieaan,
peiusa,canedocuaiquierobjetoquepueaareaucirel!lujoaeaim. .......
r+uncaincinereeicargaaor,ianateria,nieiaparato,inciusocuanaonayansurriaoaa_osgraves.Lasnateriaspueaenexpio_ary
ocasionarunincenaio.
Use estas instrucciones en espafiol junto con las figuras paso-a-paso provistas en el manual de ingles.
RECIPIENTEDEPOLVO ARRIERE
Interruptorde encende//apagar(O=APAGADO, 7. Tapadd fihro 11. Mango
I=Succi6nENCENDIDA,ll=Succieny cepilloENCENDIDOS)8. Fihro(dentrodela rapa 12. Botenparasoltarel
2. Indicadorde energ'a dd flltro) depesitoparapolvo
3. Cavidaddela ba+er'a 9. Tubadeflector 13. Mangoparatraslado
4. Dep6sitoparapolvo 10. Borenparasoltar 14. Botenparasoltar
5. Aberruragrandepararesiduos elvaciadoinferior a boquilla
_ ARTEFRONTAL
1.
m m m
baterla Useselo baterlasy cargadoressumin-
istradoso recomendadospotel fabficante
(Off) marcadacon una"0"
m m
Paraencenderla aspiradora,muevael boten
hociadeJante.
EMPUJEELDIAL:
O-APAGAR; I-Succi6n ENCENDIDA
II- Succieny cepillo ENCENDIDOS
de la baterlay tiresuavementede ella
haciafuera Vuelvaa colocar el interrupter
en posiciende apagado
C6moRetirary Volvera Colocarel Dep6sitoParaPolvoy ElFiltro
IMPORTANTE: Para obtener mejores resultados, limpie despues de cada uso.
MANTENIMIENTO REGULAR: Cada vez que vacie el dep6sito para polvo, debe limpiar el filtro con un
cepillo.(El fihrosedecolora despuesdel uso. Estono afectar6el rendimientodel fihro).
C6mo Retirar y Limpiar el Dep6sito C6mo Retirar y
Para Polvo Lim " el Filtro
Pararetirarel depesitopara polvo,oprimael
boten para soharel depesitopara pdvo que
seencuentraenla portesuperiordel depesito
para polvo e incllndo haaa fueradd cuerpo
de la unidad
Presioneel bot6n para vaciar el depesito
ara polvosabreel batede basuraa finde
elar losresiduos
Empujela puenapara cenarla basraque la
trabahaga clic
Tirede la topa dd filtro pora retirorlaTire del
ADVERTENCIA:No usedetergenteni agua
cahentepara limpiarel filtro.
C6mo Volver a Colocar el Dep6sitoPara Polvoy el Filtro
VOLVERA ENSAMBLAR Inlroduzea la tapa del filtro en el Coloque la parte infelior del depesito para
Introduzca el fihro en la tapa dd filtro con depesito para polvo pdvo sabre el alo amiento y glrdo en su lugar
el lado de los miaocapas miranda haaa hasta que se trabe e boten para sotar e
adentro dep6sito para pdvo
C6mo Retirar yVolver a Colocar el Tuba Deflector
PARARETIRAR Gire el tuba deflector en sentido antiholario VOLVER A ENSAMBLAR
Su ere el lado derecho del depesito para Para vdver a colocar el tuba deflector, introdOz-
pave hacia atriba y presione e boten para calo nuevamente en el depesito para polvo,
soltar el depesito para polvo inferior para basura y sacuda los residuos
abrir la puer+a de descarga
C6mo Volver a Colocar la Correa y el Rodillode Cepillos
ADVERTENCIA:RetireIo baterb antesde reahzorel mantenimiento
D@vueltaa Jaboquillade la aspiradota Retirelostornillosque se indicancon flechasen la placainfedorde la boquilla LevanteJaplaca de la
parteinferiorde la boquillapara accederal cepillo,a la cotreay a la boquilla
Lueaode volvera cdocarlos,gire el rodillode cepillosy asegOresede que la cotrea gire hbremente
VueWaa colocarla placade la boquillay losbrnillos
M6dulo Indicador de Ener.qia: Informaci6n Sabre
el Indicador de Capacidacrde Bateria
Lostres indicadores LED se iluminaren mon_entenear;_ente cuando se enaenda el interruptor de corfiente dd ptoducto Luego, el indicador de
energla de la baterla indicar6 la capacidad restante dd paquete, segOn se menciona a continuaden:
NOTA: El apatato y las luces indicadotas se apagan cuando la baterla est6 completamente descargada
3 luces indicadoras LEDencendidas: capaadad restante de la baterla de > 75%
2 luces indicadoras LEDencendidas: capaadad restante de la baterla de > 50%
1 luz indicadora LED encendida: capacidad restante de la baterla de > 25%
1 luz indicadora LED intermitente: capaddad restante de la baterla de < 25%
Eliminaci6n de la Baterfa
ADVERTENCIA:RIESGODEEXPLOSION0 @
DEEXPOSICIONA MATERIASTOXICAS.
ADVERTENCIA:Labateriaqueseusaenestedispositivopuedepresentarriesgode incendioo quemaduras
par sustanciasquimicassi no se tratanen farinaadecuada.No la desarme,cahentepar encimadeJlimitede
temperatura(60°C/140°F}m6ximarecomendado_or eJfabricantenila incinere.Reemplacela bateriaseJocon
bateriasHOOVERnode piezaBH50000. Elusadeotra bateriapuedeprovocarriesgode incendioo explosien.
Eiminea bateriausadadeinmediato.Mant@ngaa fuerade a cancede as ni_os.No a desarmeni a arroiea
fuego.
No intentedesarmarla baterianiretirarnin,qOncomponentequesobresal,qade losterminalesde la bateria.Ni la
baterianiel cargadorcontienenpiezasquepuedansetreparadasparel us"uario.Estopuedeocasionarunincendio
o lesiones.Antesde eJiminarla bateria,protejalosterminalesexpuestoscon cintaaislanteresistentepara evitar
cortocircuitos.
Servicio
CUALQUIEROTROSERVICIODEBESERREALIZADOPaRUN REPRESENTANTE
AUTORIZADODESERVICIO
Lineaexclusivadeserviciosa losmiembrosdela gamaPlatinumCollectionTM
pida informacien u ordene partes de repuesto (El nOmero de modelo est6 indicado derres del depesito para pdvo del aparato)+
ADVERTENClA:Pararducir elriesgode lesionespersonales-retireelpaquetede labaterlaantesderealizarelmantenimiento.
PROBLEMA POSIBLESCAUSAS SOLUCIONES POSIBLES
Elproducto no enciende
Elproductono aspirala
suciedad
Elrodillode cepillos
nogira
2 Labateria no se ha introducido
rectamerlte.
4 La bateria est6 demasiado cahente.
2 AsegOresede que la baterla est@car completamenteasentada en la cavidad
de la bateria.
4 Retirela baterla y d@jelaenfriar durante 30 minutos;vuelva a colocarla e
intente nuevamente,o reemplecela con una segunda baterla cargada
1 Labateria est6completamente IRetirey cargue la baterlao reemplecela con una segunda baterla cargada
descargada.
3 Dar_osde los componentesinternos 3 Parareahzar el servicio,Ilameal: 1877 697 5866
2. Elflhropuede estar sucio. 2. Limpiey/o lave el Filtro.
4 Elcircuito de aire puede estar tapado. 4 AsegOresede retirarla bateriay apagar el producto Retirela boquilla
1 Elrodillo de cepillos puede estar
obstruido
3 Correa rata
ll!_l_ilill_l_l_!illll_lll!li_!_!il_i_il!!_!li_i_ii_i!illllllllllllllllll!llllll
mente30 minutos.
blar la boquilla al producto.
TM
Garantla limitada especial de SEIS arias para Barredora de succi6n inalembrica LiNX de Hoover
Is.lo para usa dom@stico)
QUI_CUBREESTAGARANTIA
COMOHACERUNRECLAMOENVIRTUDDEIA GARANTIA
LOQUEESTAGARANTIANO CUBRE
OTROSTERMINOSIMPORTANTES
ESTAGARANTIAES LA UNICA GARANTIAY ELUNICO RECURSOQUE HOOVERPROPORCIONA TODASLASDEMASOARAN,TIAS,EXPRESAS0 IMRLICIT,_S,
INCLUIDASLASOARANTIASDECOMERCIABILIDAD0 APTITUDPARAUN FIN PARTICULAR,QUEDANEXCLUIDASHOOVERNO SERARESPONSABLEEN NINGUN
CASO PORNINGUN DAiqO ESPECIAL,IND]RECTO,INCIDENTAL0 MEDIATODENINGUN TIPO0 NATURALEZACON RESPECTOALPROPIETARIO0 A CUALQUIER
PARTEQUE REALICEUN RECLAMOA TRAVESDELPROPIETARIO,YASEAQUE SEBASEEN RESPONSABILIDADCONTRACTUAL,NEGUGENCIA,RESPONSABILIDAD
EXTRACONTRACTUAL0 RESPONSABILIDADCIVILOBjETIVAPORLOS PRODUCTOS,0 EMERGENTEDECUALQUIEROTRACAUSA Algunosestadosno permitenla
exclusiende losdahosmediatos,par Io cud esposibleque laexclusienmencionadanoseapliqueensucaso Estagaran_aleotorgaderechosespedflcoses posibleque ademes
tengaotrosderechosquevariande unestadoa otro
