User Manual
BH70970

1
TABLE OF CONTENTS
What’s in the Box...............................................................4
Getting to Know Rogue™..........................................................5
Technology.............................................................7
The Hoover Home App ...........................................................8
SmartWall™ Technology.....................................................10
Scheduling............................................................11
Operating Rogue™ .............................................................13
Charging .............................................................13
Cleaning .............................................................15
Maintaining Rogue™............................................................16
Emptying the Dirt Cup .....................................................16
Brush Roll and Side Brush Maintenance ...........................................17
Cleaning the Sensors and Wheels ..............................................18
Troubleshooting...............................................................19
Factory Reset . . . . . . . . . . . . . . . . . . . . . . . . . . . . . . . . . . . . . . . . . . . . . . . . . . . . . . . . . . 20
Important Safety Instructions .....................................................21
2
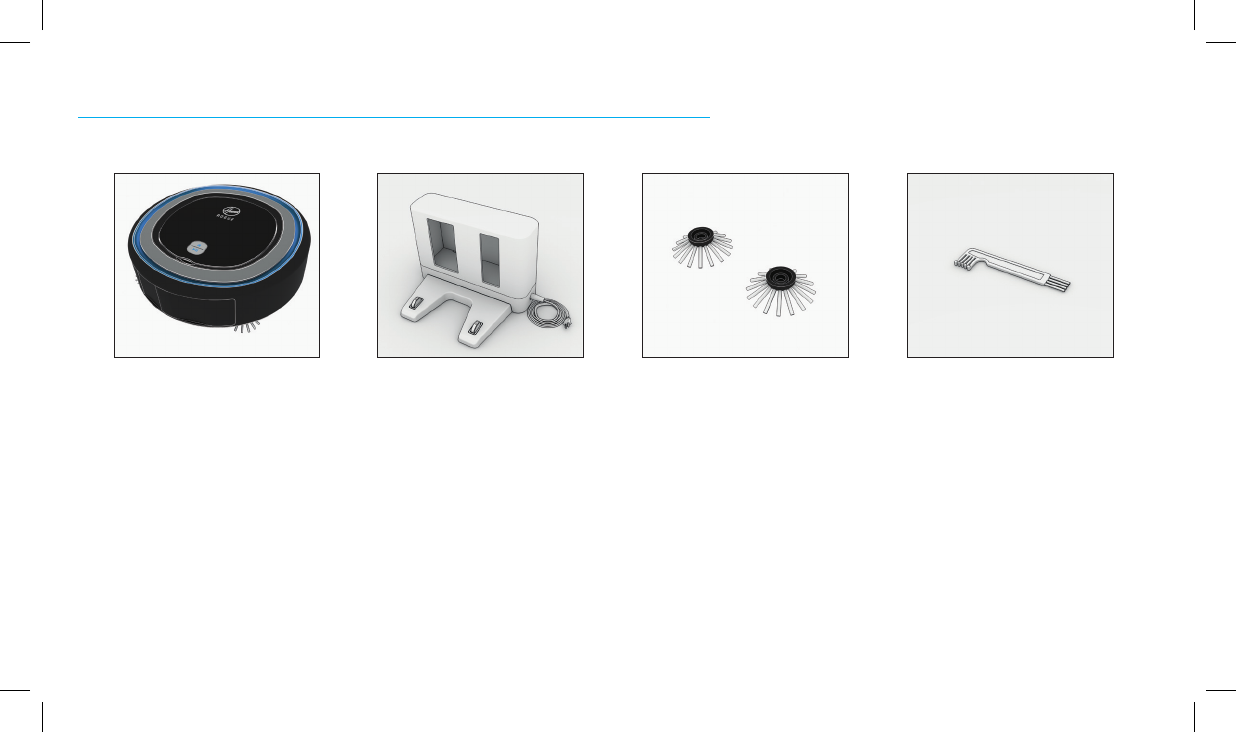
WHAT’S IN THE BOX
I’m Rogue™, of course I come with accessories.
Rogue™ Robot Vacuum My Base (Docking Station) 2 Side Brushes* Cleaning Tool
*Accessories vary per model.
3
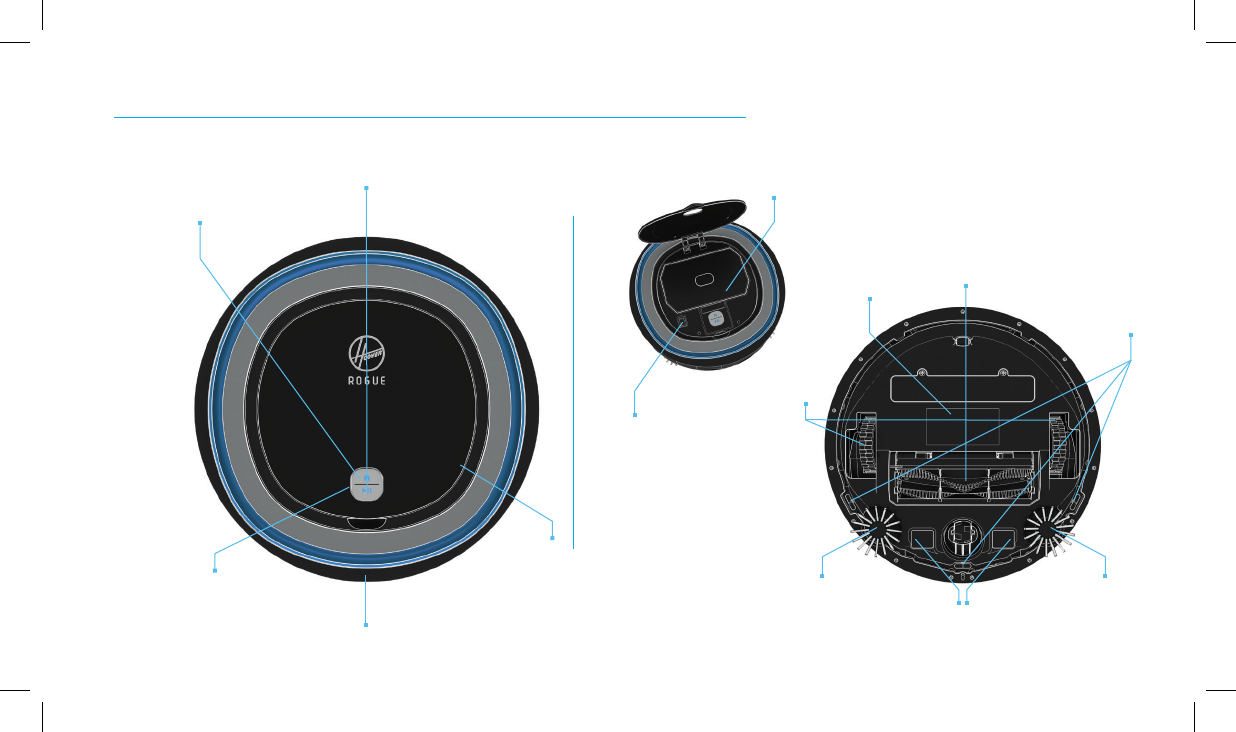
GETTING TO KNOW ROGUE™
Dirt Cup and Filter
Send Rogue™ Back to Base (Dock)
ON/OFF Switch
Rogue's Cover
Rogue™ Control Center
Robart® Technology Navigation Sensors
Charging Sensors
Wheels
Side Brush
Side Brush
Start/Stop Cleaning
Top View Top Open View
Bottom View
Cliff Sensors
Brush Roll
Battery
4
GETTING TO KNOW ROGUE™
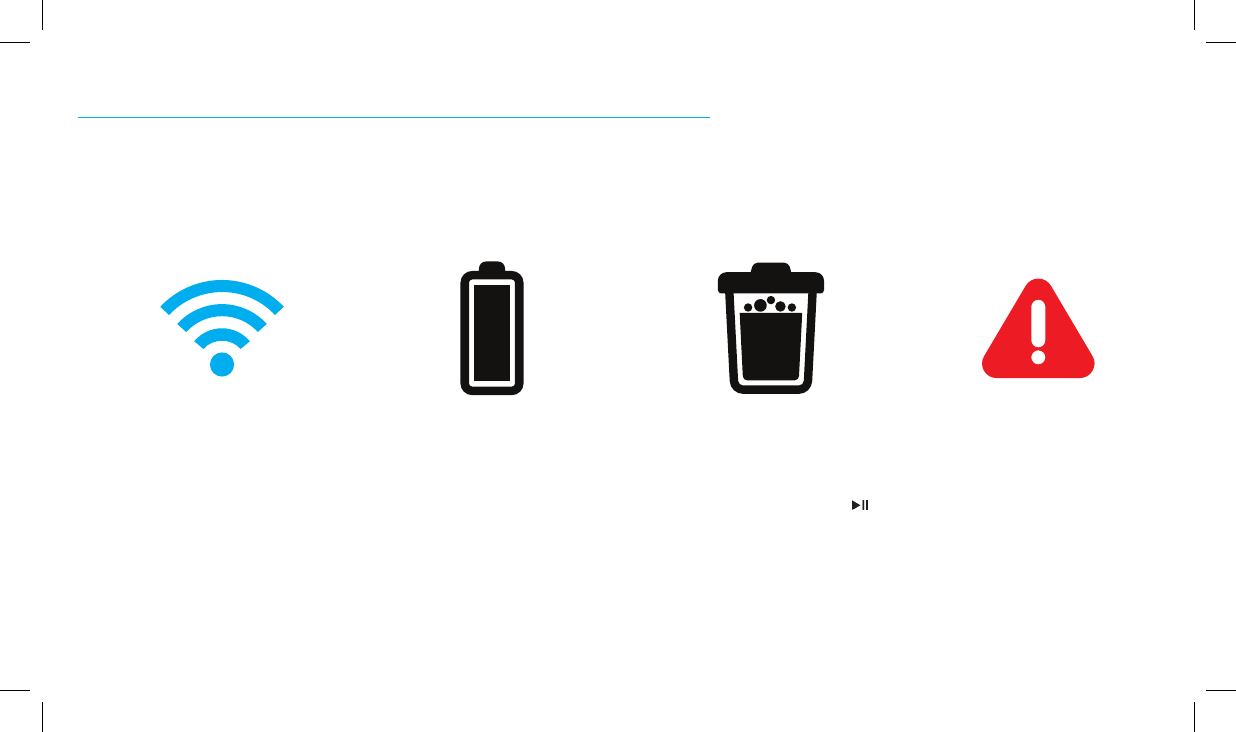
Rogue™ Control Center
These icons are located on my lid and will light up when active.
This blue Wi-Fi symbol will light up
when you are connected to Wi-Fi
through the Hoover Home App. If it’s
not lit, I’m not connected.
To set up a connection, turn to
page 8.
This battery symbol lets you know my
battery status. If you don’t see it lit
up, I have enough battery life. When
it starts blinking, I’m going to head
back to my base to recharge.
When you see this symbol, it means
my dirt cup is full. Please make sure
to empty it so I can continue cleaning.
The light will disappear once you
empty the dirt cup and press the .
When you see this symbol flashing,
I’m in trouble. It might be as simple
as something stuck in my brush roll
or it could be an internal error.
Turn to page 19 for some common
errors I might encounter and how you
can help me.
Wi-Fi Connectivity Battery Dirt Cup Full Error
5
GETTING TO KNOW ROGUE™
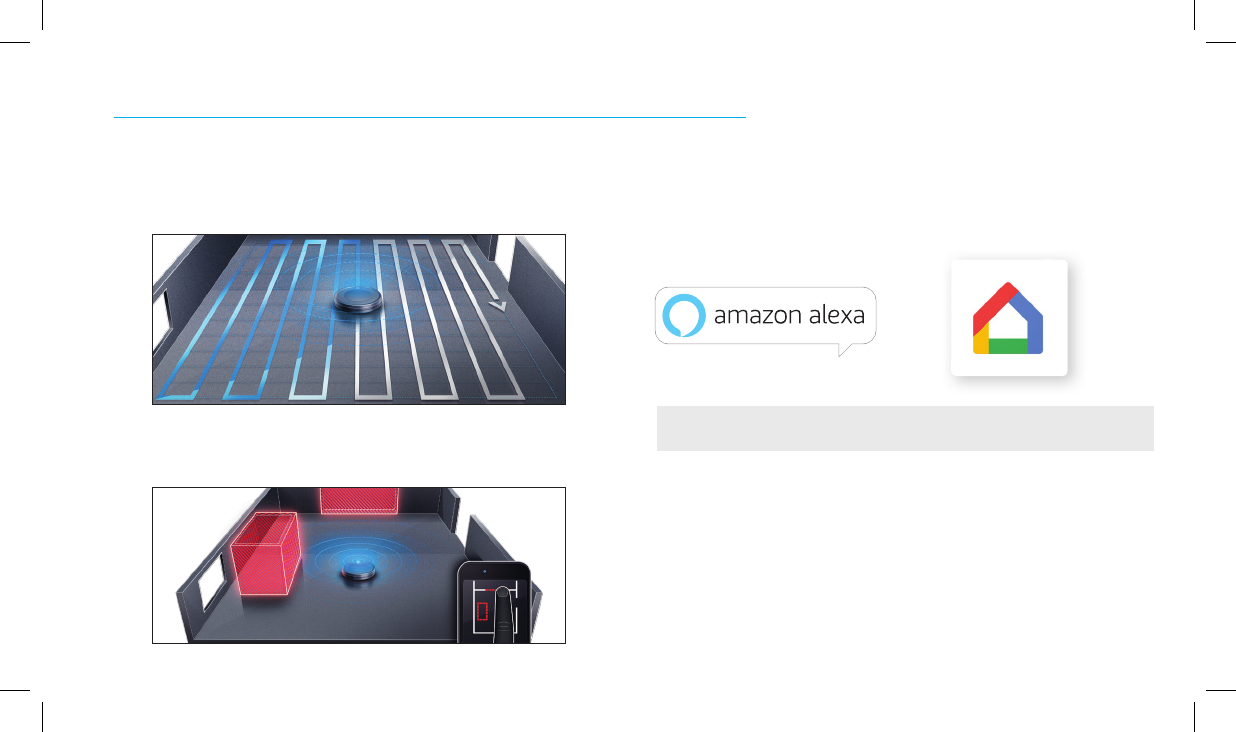
Voice Control
I’ve got a pretty good relationship with Amazon Alexa* and Google Home Assistant*.
If you own an Amazon Alexa product or a Google Home Assistant, you can use them
to communicate with me. Download the skill set in the Amazon Alexa or Google Home
App.
Robart® Technology with Memory Navigation
I utilize a high-tech laser to map and navigate your home because I'm
highly intelligent. I will also remember your home's floor plan so you can
customize how I clean (See SmartWall™ Technology on page 10).
SmartWall™ Technology
Through the Hoover Home App, you can designate rooms and areas as off
limits but I don’t know why you would want to. *Amazon Alexa and Google Home Assistant sold separately.
NOTE: The Hoover Home App is required to interact with Amazon Alexa and Google Home
Assistant. Be on the look out for new skills/commands coming soon.
Amazon, Alexa and all related logos are trademarks of Amazon.com, Inc. or its afliates.
Google Home is a trademark of Google Inc.
The ROBART logo is a registered trademark of Robart GmbH.
6
• Utilize SmartWall™ Technology to create barriers and boundaries
• Connect to your Amazon Alexa* or Google Home Assistant* products
• View your floor plan and see where I’ve cleaned
• Allow you to easily create a schedule by day, time and room
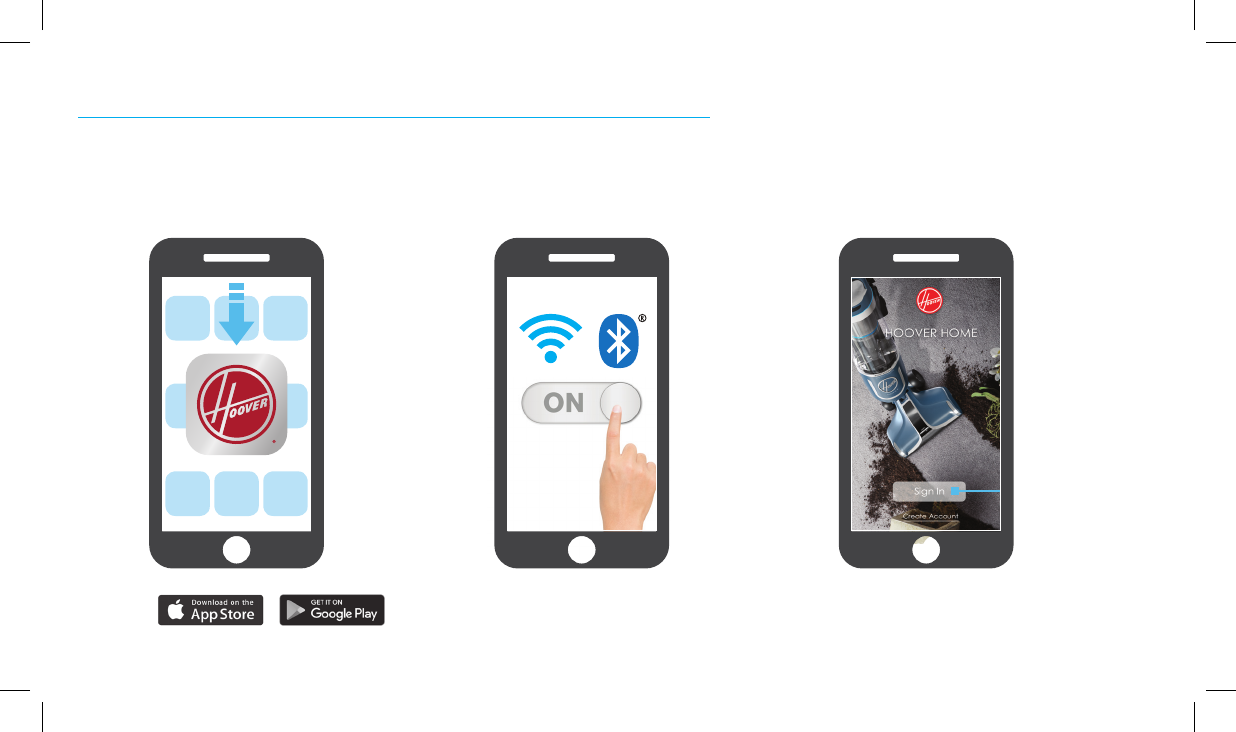
THE HOOVER HOME APP
Why download my App?
Make sure your device’s Wi-Fi and
Bluetooth are ON.
NOTE: I only work on 2.4GHz networks so make sure you aren’t on a 5GHz.
Most routers will broadcast both so just switch on over to the 2.4GHz.
21
Open the Hoover Home App and
create an account.
3
Apple, the Apple logo, and iPhone are trademarks
of Apple Inc., registered in the U.S. and other
countries. App Store is a ser vice mark of Apple Inc.,
registered in the U.S. and other countries.
Google Play and Google Play logo are trademarks
of Google Inc.
Download the Hoover Home App
• Start, stop and control me right from your device
• Receive push notifications directly from me, so I can keep you updated on all missions
• Access support materials if I’m in trouble
• Stay up-to-date on the latest firmware to ensure I’m operating at my best
The Bluetooth® word mark and logos are registered trademarks owned by Bluetooth SIG, Inc. and any use of such marks by
TTI Floorcare NA is under license. Other trademarks and trade names are those of their respective owners.”
7
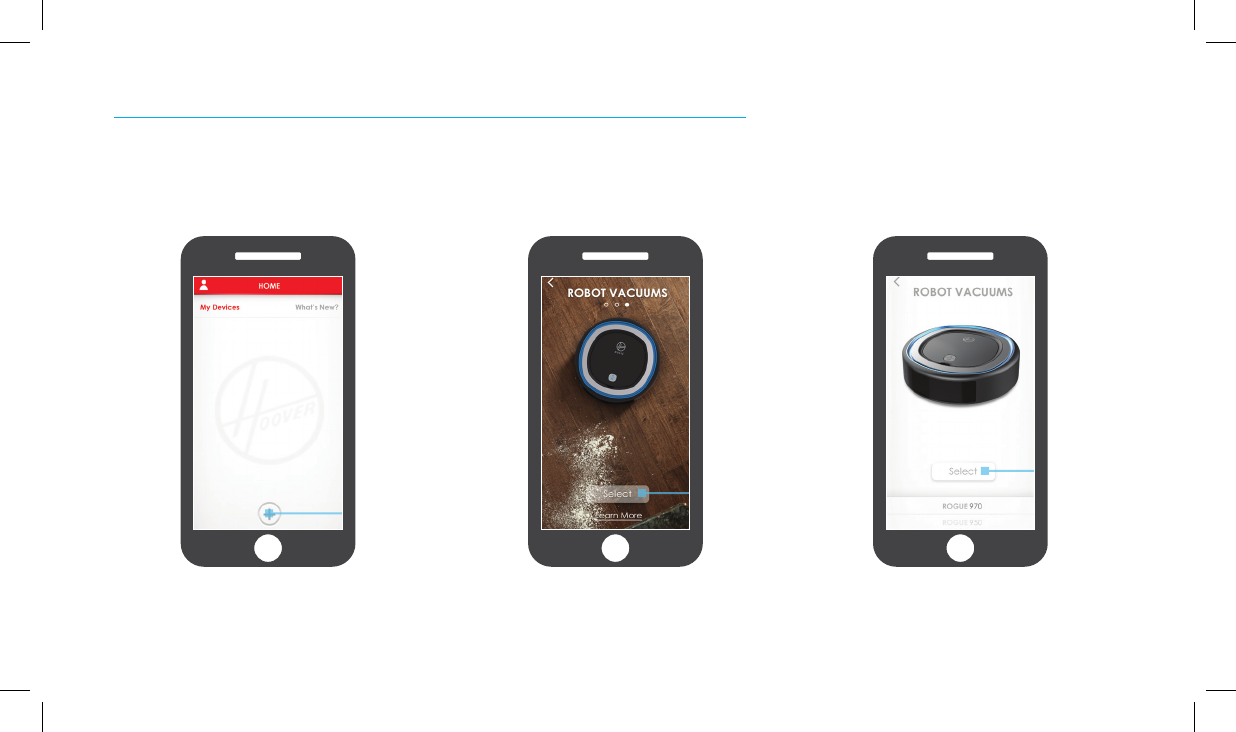
THE HOOVER HOME APP
After you create your account,
press “Add Device”.
Swipe until you reach ROBOT
VACUUMS, then press “Select”. Scroll until you find your model
and then follow the guided on
screen set up.
4 5 6
8
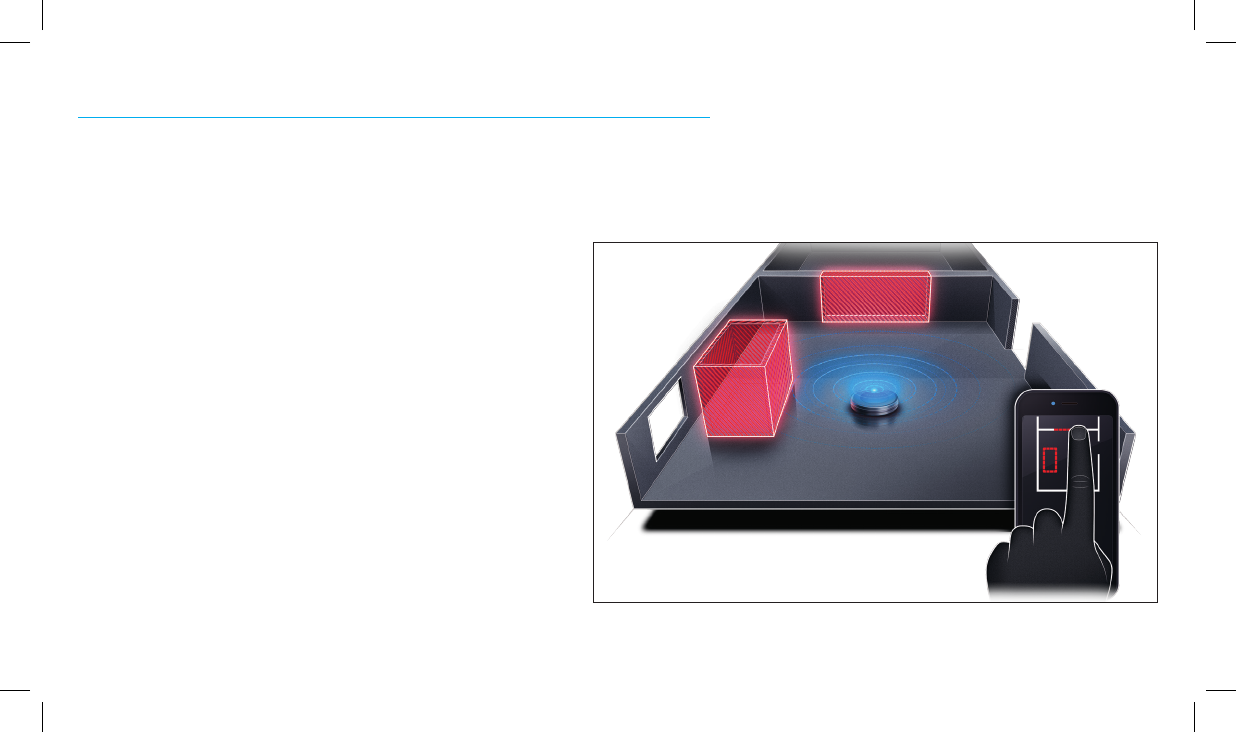
THE HOOVER HOME APP: SMARTWALL™ TECHNOLOGY
I understand you might not want me in certain areas or rooms, so use SmartWall™ Technology in the Hoover Home App to create
boundaries and barriers that I won’t cross.
If you have not downloaded the Hoover Home App, please go to page 8 for instructions on how to get connected. Before attempting to use SmartWall™ Technology,
please allow Rogue™ to complete the Recon Mode to explore its surroundings and map your floor plan.
• Mark entire rooms as off-limits.
• Mark areas within rooms as off-limits (I want to avoid the dog bowl
just as much as you do).
Why use SmartWall™ Technology?
Visit Hoover.com for a SmartWall™ Technology tutorial.
9
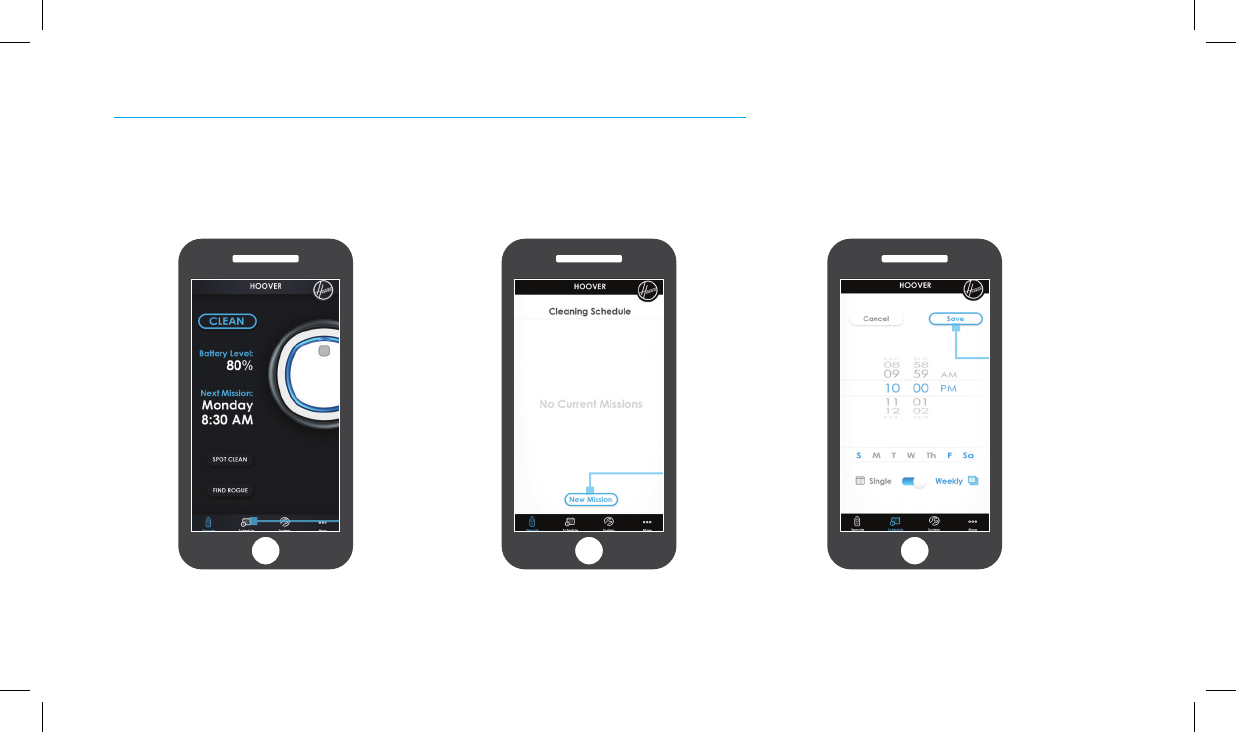
THE HOOVER HOME APP: SCHEDULING
Want to plan my cleaning missions ahead of time? You can schedule me by day, time and room in the Hoover Home App.
If you have not downloaded the Hoover Home App, please go to page 8 for instructions on how to get connected. In order to schedule by room, you must have a floor plan
established and zones created. Please let Rogue™ run its Recon Mode to map your floor plan before attempting to schedule by room.
Select the time and day and press
SAVE. If you would like to repeat
scheduled cleaning, toggle from
SINGLE to WEEKLY and press SAVE.
To create a schedule, press the
ADD button.
Open the Hoover Home App and
select the schedule icon.
1 2 3
10
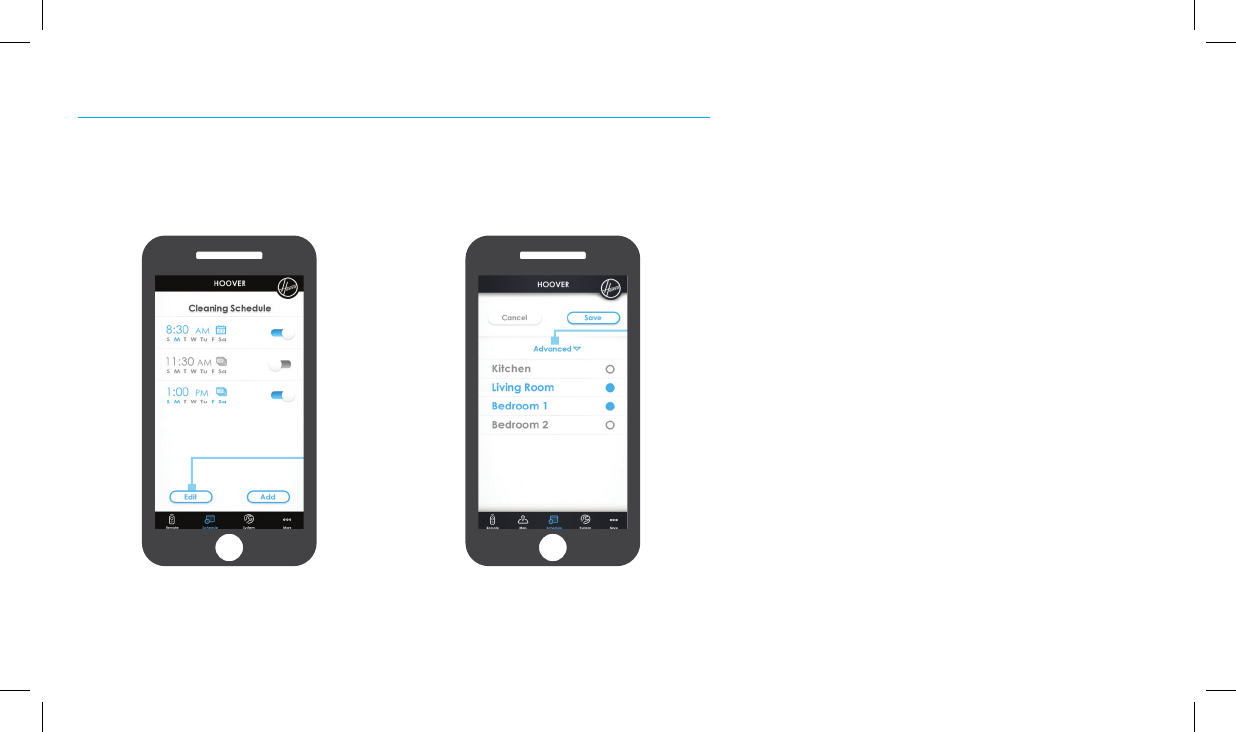
THE HOOVER HOME APP: SCHEDULING
To edit or delete a scheduled
cleaning, press the EDIT button.
To schedule by room, press the
Advanced schedule option and follow
the instructions on the screen.
4 5
11
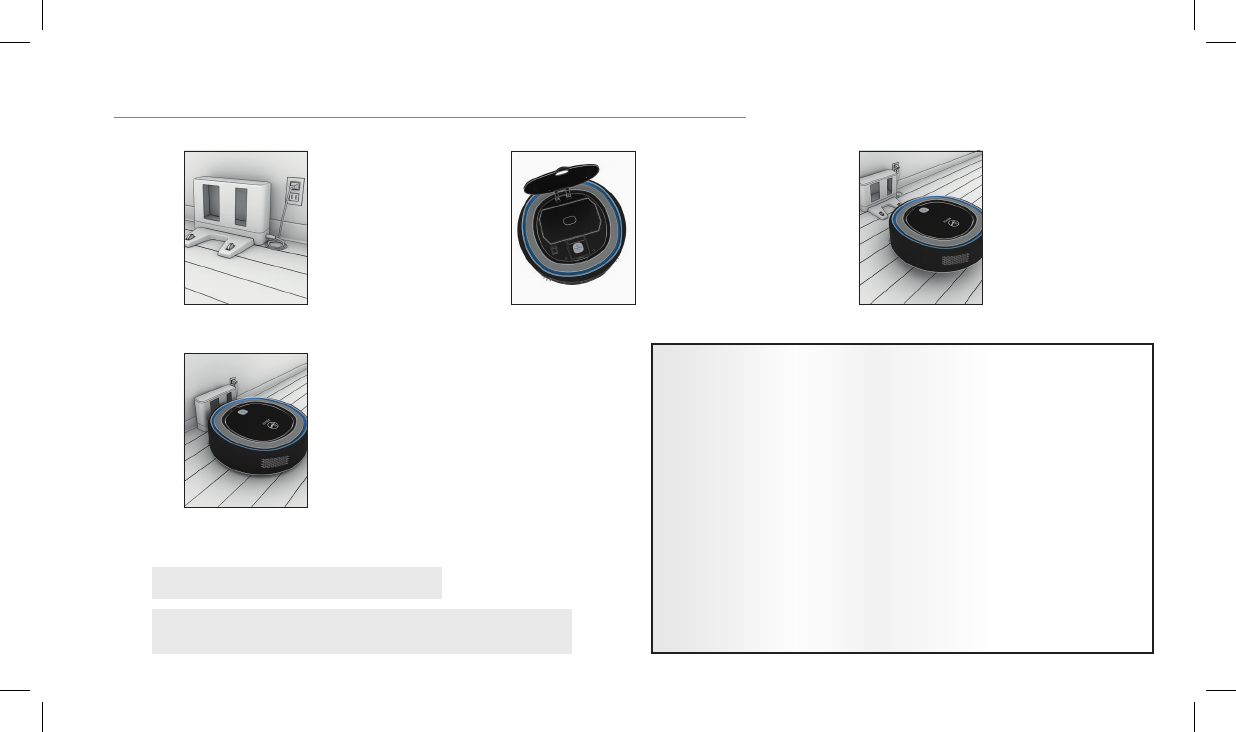
OPERATING ROGUE™: CHARGING
To power me ON, open my lid
and flip the power switch.
I only need about 3 hours to fully
charge (impressive, right?). When
I’m ready to go, my charging light
will stop flashing.
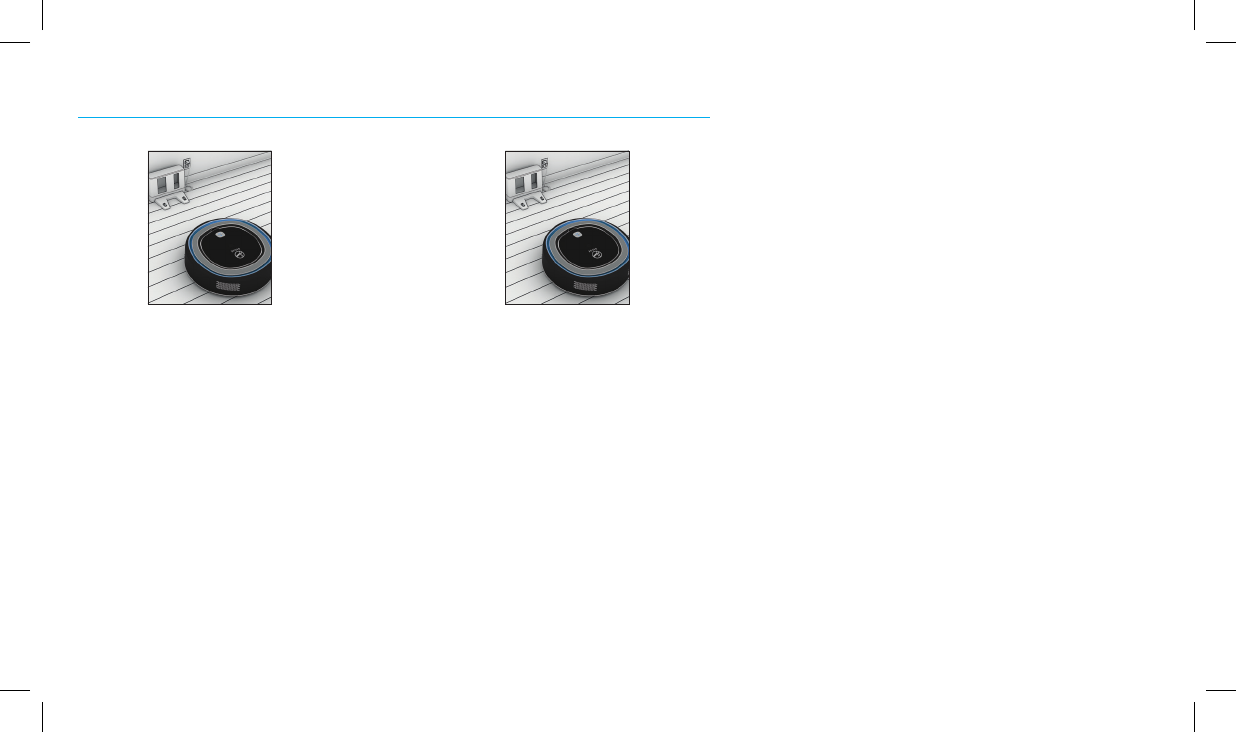
Find a good spot for my
base. I would prefer to
have 4 ft. on each side.
Plug in the AC adaptor to
the side of the dock and
into a wall outlet.
1 2
4
To make sure I’m charged
and ready to clean, manually
place me on my base. I’ll
flash my charging light and
give a beep to let you know
I’m aligned correctly.
3
NOTE: I arrive with limited battery life (traveling can be exhausting). To get the
most out of my first clean, I recommend charging me for approximately 3 hours.
TIP: I perform best if my base is set up on hard floor.
Follow all charging instructions and do not charge the battery pack or appliance
outside of the temperature range specified in the instructions. Charging
improperly or at temperatures outside of the specified range may damage the
battery and increase the risk of fire.
Have servicing performed by a qualified repair person using only identical
replacement parts. This will ensure that the safety of the product is maintained.
Do not modify or attempt to repair the appliance or the battery pack (as
applicable) except as indicated in the instructions for use and care.
If the device is not in use for an extended period, charge the battery fully and store it
in a cool and dry place to protect the battery from any potential damage.
Do not use outdoors or on wet surfaces.
! IMPORTANT !
12
OPERATING ROGUE™: CHARGING
If I didn’t complete my
cleaning mission before my
battery ran out, no worries!
Once I am charged, I will
automatically go back out
to where I left off to finish
cleaning.
After I complete cleaning
missions, I will automatically
make my way back to the
base to recharge.
5 6
13
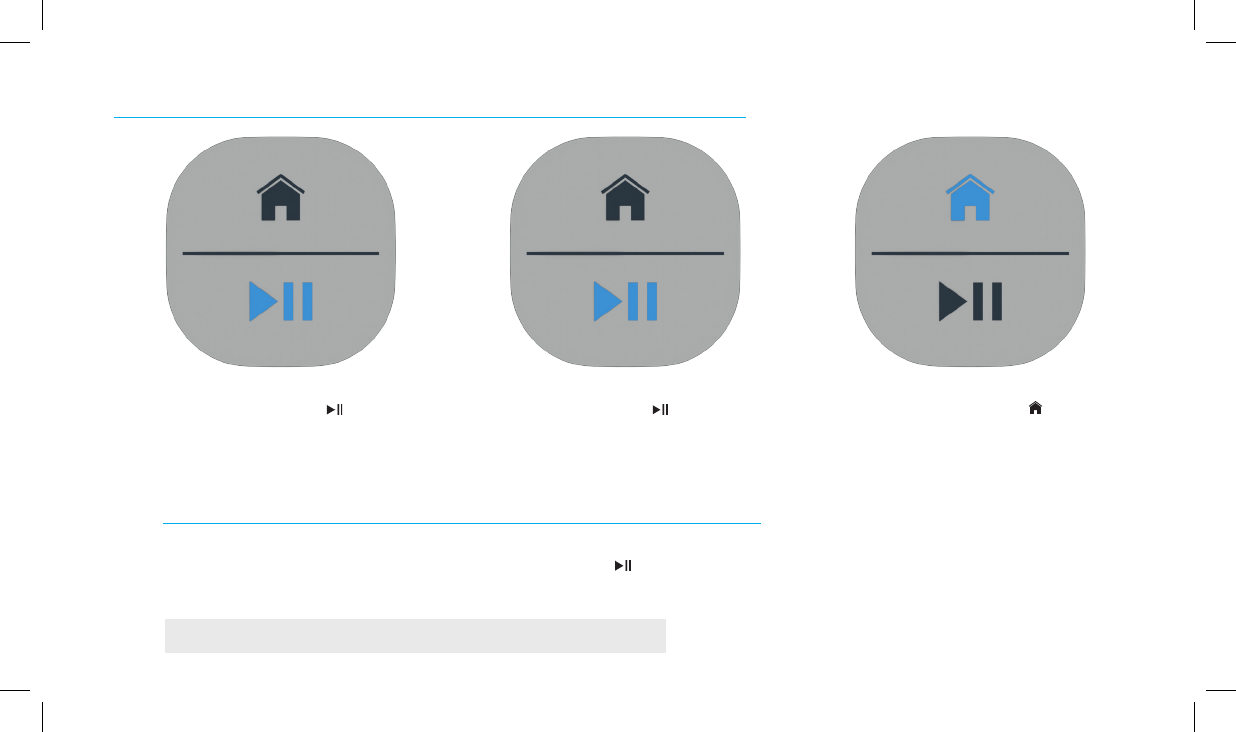
OPERATING ROGUE™: CLEANING
When you’re ready to send me on a
cleaning mission, press the button.
I’ll beep and start up to let you know I’ve
accepted the mission.
If you want me to take a break or pause
mid-cleaning, press the button again.
If you want me to terminate the cleaning
mission completely, press my button and
I’ll start traveling back to my base.
NOTE: For hands-free control, download the Hoover Home App to control Rogue™ from anywhere.
FIRST CLEANING MISSION
During my first mission, I will go into Recon Mode and explore my new surroundings. Once I’m done with my Recon and mapping, I’ll head back to my
base. Download the Hoover Home App to see your floor plan or press to send me out on a mission to clean your mapped home.
14
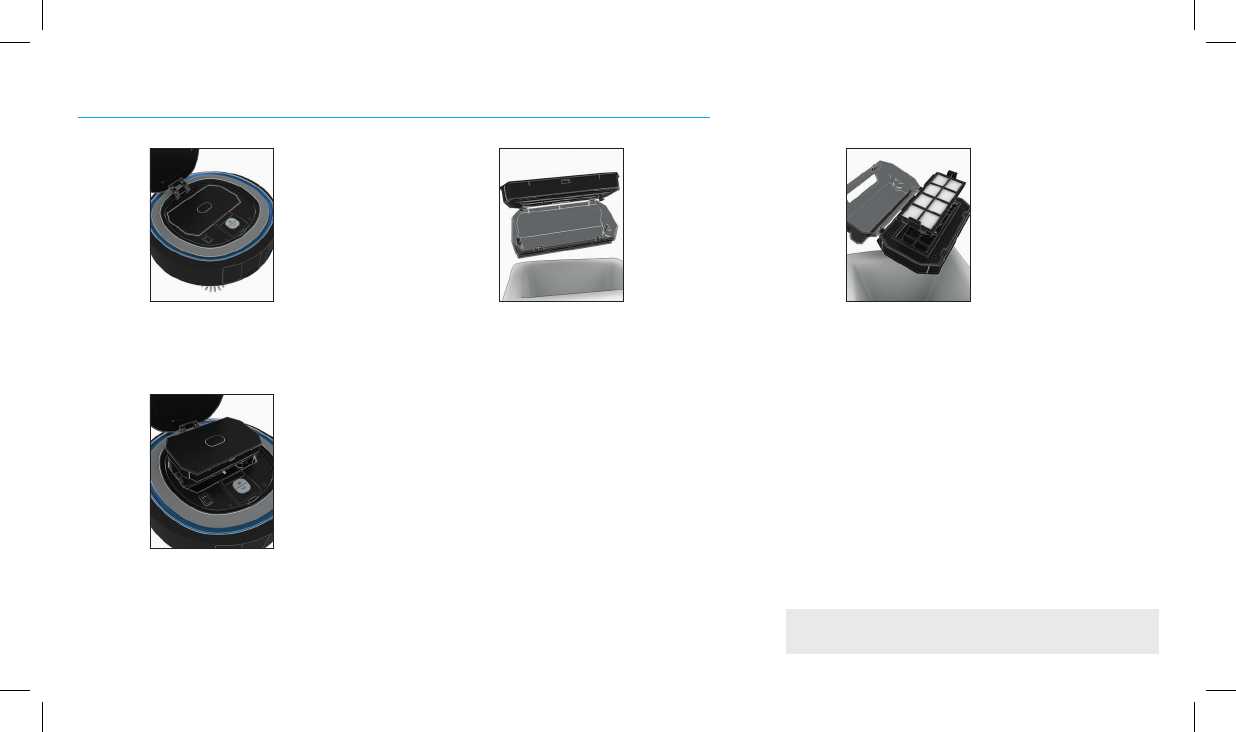
MAINTAINING ROGUE™: EMPTYING THE DIRT CUP
Lift the lid upwards and
remove all the dirt inside.
I would prefer you did this
after every cleaning mission.
After you've emptied the dirt
cup and cleaned the filter,
reinsert into Rogue™ and
firmly snap into place.
Lift my lid and push the
button in the center to
access my dirt cup (the dirt
cup is that square container
filled with all the dirt, dust
and pet hair I just picked up
for you).
1 2
4
My filter is attached to the
inside of the dirt cup, this
should be cleaned too. You can
pull the tabs on the side of the
filter to remove - the filter is
rinsable to ensure extended
filter life.
NOTE: Please ensure the filter
is completely dry before
reinserting into Rogue™.
3
To purchase additional filters, visit Hoover.com or Hoover.ca
15
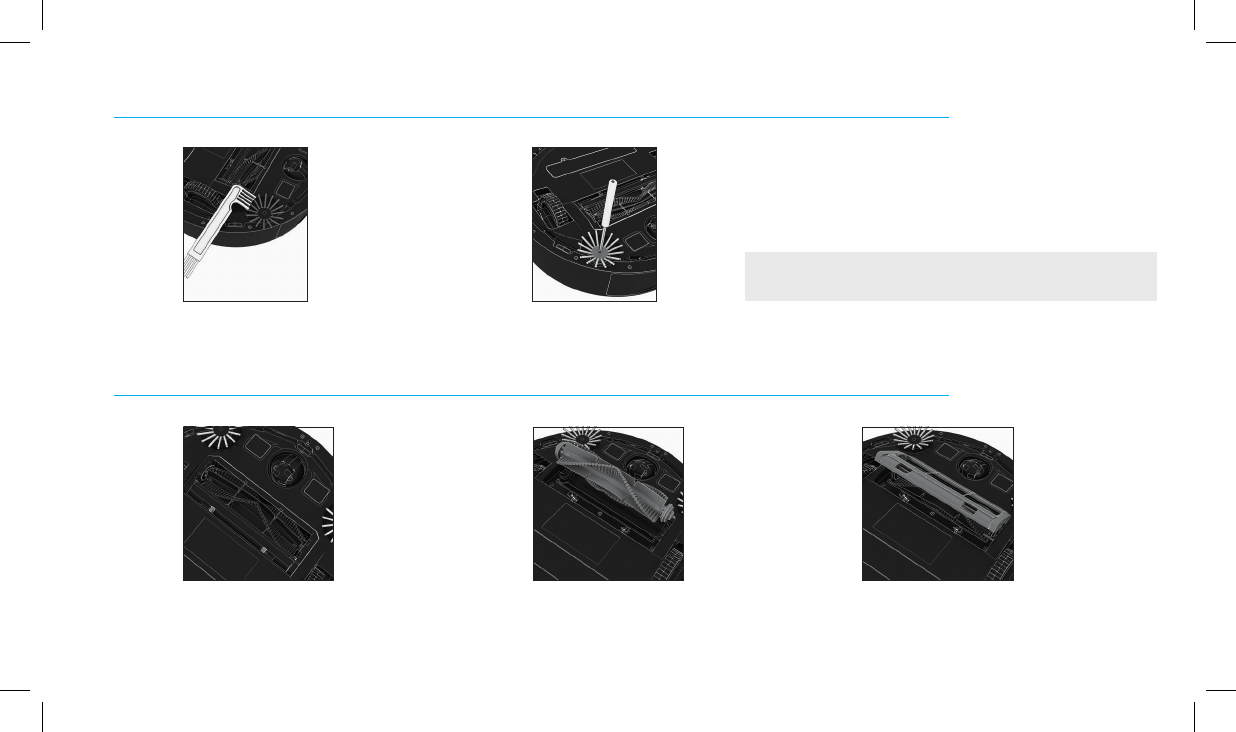
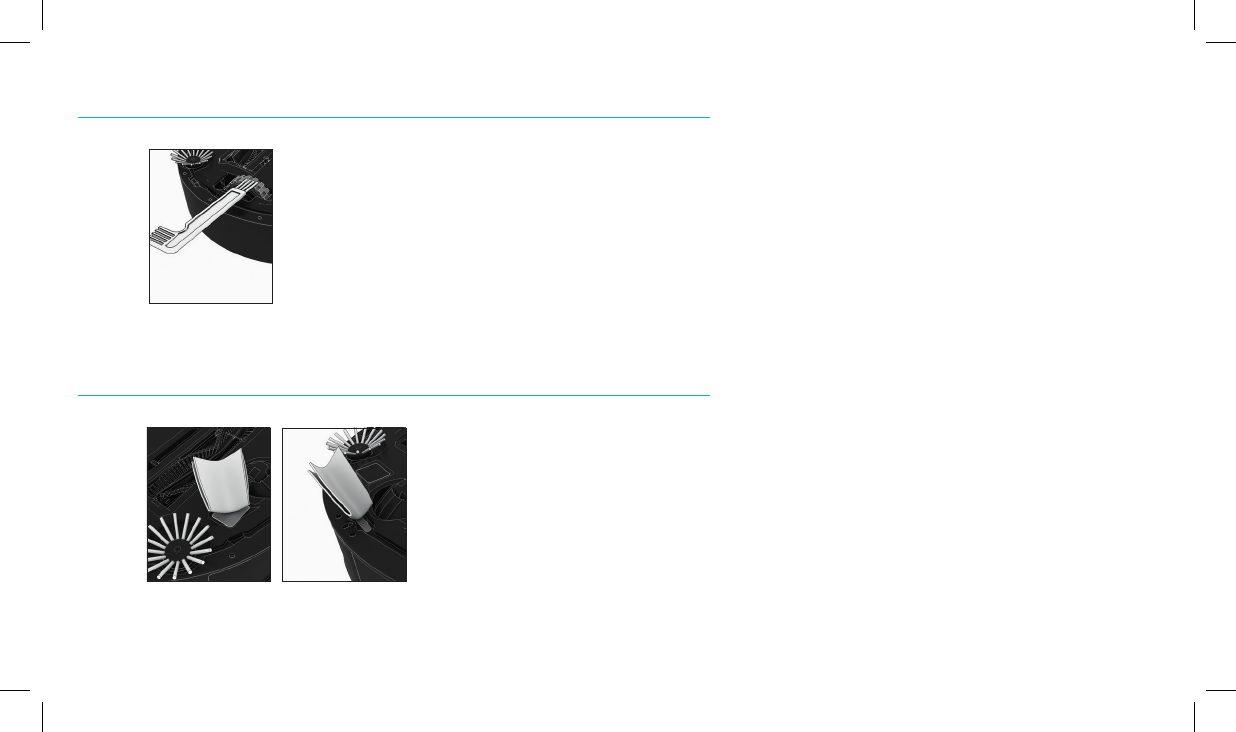
MAINTAINING ROGUE™: CLEANING/CHANGING THE SIDE BRUSHES
MAINTAINING ROGUE™: CLEANING/CHANGING THE BRUSH ROLL
To change my side brushes,
use a Philips head screwdriver
to unscrew the screw in the
middle of my side brush. Be
careful it’s small and easy
to lose.
Remove any dirt, dust
and pet hair from my side
brush with the cleaning
tool provided.
21
Press the two blue tabs to
remove my brush roll cover.
Lift out my brush roll to
clean it or replace it.
1 2
Replace the cover by
snapping it back into
place.
3
To purchase additional side brushes, visit Hoover.com or Hoover.ca
To purchase additional filters, visit Hoover.com or Hoover.ca
16
MAINTAINING ROGUE™: CLEANING THE WHEELS
MAINTAINING ROGUE™: CLEANING THE SENSORS
Clean my wheels regularly
to remove any dirt, dust and
pet hair by using the cleaning
tool I came with. Please do
this so I can move effectively
on my cleaning missions.
1
Use a clean, dry cloth to clean
my sensors. This ensures I
continue to run smoothly by
being able to see.
1

17
The Problem The Cause The Action
Error - Cliff Sensor Cliff sensor is covered with dirt.
Rogue™ is stuck at a drop-off.
See page 18 for instructions on cleaning the sensors.
Move Rogue™ to another location.
Error - Main brush Brush roll is stuck or not spinning properly. Clean the brush roll of any dirt, lint or hair. See page 14 for instructions.
Error - Suction motor There is something blocking the suction path. Remove brush roll and dirt cup (see pages 13 & 14 for instructions) and remove any obstructions.
Error - Critically low battery Battery is too low and unable to return to docking station to recharge. Manually place Rogue™ on the docking station to charge. See page 10 for instructions.
Error - Wheel stuck Wheel is stuck or not spinning properly. Clean the wheels of any dirt, lint or hair. See page 18 for instructions.
Error - No Dust bin Dirt cup is not installed or is installed incorrectly. See page 16 for instructions.
Error - Unit picked up Rogue™ is lifted off the ground or the wheel is elevated excessively. Place unit back on the ground properly.
Error - Side brush stuck Side brush is stuck or not spinning properly. Clean the side brush off of any dirt, lint or hair. See page 14 for instructions.
Error - Electrical disconnection Internal software connection was lost. Factory reset. See page 20 for instructions.
Error - Firmware update failure Connection was lost. Ensure stable Wi-Fi connection and redownload the rmware from the Hoover Home App.
Error - Wi-Fi chip failure Can’t establish a connection. Ensure Wi-Fi router is broadcasting 2.4Ghz (not 5Ghz).
Error - Robot stuck error Rogue™ is stuck. Manually move Rogue™.
Error - Bumper error Something is obstructing the bumper. Remove any obstruction in the bumper.
TROUBLESHOOTING
Am I causing trouble?
Visit Hoover.com for FAQs and additional troubleshooting.
MAINTAINING ROGUE™: CLEANING THE WHEELS
MAINTAINING ROGUE™: CLEANING THE SENSORS

18
FACTORY RESET
Sometimes I might just need a hard reset. If nothing on the last page works to solve my issues, follow these instructions
to reset. Be warned, this is a factory reset so it will erase everything!
• Press button and hold for 10 seconds.
• All indicator lights will shut off for 1-2 seconds.
• Rogue™ will then reboot and all indicator lights will illuminate.

19
IMPORTANT SAFETY INSTRUCTIONS
SAVE THESE INSTRUCTIONS
When using an electrical appliance, basic precautions should always be followed,
including the following:
READ ALL INSTRUCTIONS BEFORE USING THIS APPLIANCE. THIS PRODUCT IS INTENDED FOR
HOUSEHOLD USE ONLY. IF USED COMMERCIALLY WARRANTY IS VOID.
WARNING: TO REDUCE THE RISK OF FIRE,
ELECTRIC SHOCK, DAMAGE OR INJURY:
• Use appliances only with specifically designated battery packs.
• Use of any other battery packs may create a risk of injury and fire.
• When battery pack is not in use, keep it away from other metal objects,
like paper clips, coins, keys, nails, screws or other small metal objects,
that can make a connection from one terminal to another. Shorting the
• battery terminals together may cause burns or a fire.
• Do not expose a battery pack or appliance to fire or excessive temperature.
Exposure to fire or temperature above 130°C may cause explosion. The
temperature of 130°C can be replaced by the temperature of 265°F.
• Follow all charging instructions and do not charge the battery pack or
appliance outside of the temperature range specified in the instructions.
• Charging improperly or at temperatures outside of the specified range may
damage the battery and increase the risk of fire.
• Have servicing performed by a qualified repair person using only identical
replacement parts. This will ensure that the safety of the product is
maintained.
• Do not modify or attempt to repair the appliance or the battery pack (as
applicable) except as indicated in the instructions for use and care.
• Fully assemble before operating.
• The charger is for indoor use only.
• Do not allow to be used as a toy. Not intended for use by children age 12
and under. Close supervision is necessary when used near children. To
avoid injury or damage, keep children away from product, and do not allow
children to place fingers or other objects into any openings.
• Use only as described in this manual. Use only Hoover® recommended
attachments and products.
• Do not use charger with damaged cord or plug. If appliance or charger is not
working as it should, has been dropped, damaged, left outdoors, or dropped
into water, take it to a service center prior to continuing use.
• Do not pull or carry charger by cord, use cord as a handle, close a door on
cord, or pull cord around sharp edges or corners. Do not place product on
cord. Do not run appliance over cord. Keep cord away from heated surfaces.
• Do not unplug charger by pulling on cord. To unplug charger, grasp the plug,
not the cord.
FACTORY RESET

20
• Do not handle charger including charger plug and charger terminals, or
appliance with wet hands.
• Do not put any object into openings. Do not use with any opening blocked; keep
free of dust, lint, hair, and anything that may reduce air flow.
• Keep hair, loose clothing, fingers, and all parts of body away from openings
and moving parts.
• Do not place cleaner on stairs or furniture, as it may result in injury
or damage.
• Do not use to pick up flammable or combustible liquids, such as gasoline, or
fine wood shavings, or use in areas where they may be present.
• Do not pick up anything that is burning or smoking, such as cigarettes,
matches, or hot ashes.
• Do not use without Dirt Cup and Filters in place.
• Turn power switch off before removing or installing brush roll.
• Do not incinerate the charger, battery, or appliance even if it is severely
damaged. The batteries can explode in a fire.
• This product includes rechargeable Lithium Ion batteries. Do not expose
batteries to high temperatures, as they may catch fire and/or explode. Do not
dispose of battery in a fire or trash compactor. See battery disposal section for
directions.
• Do not attempt to disassemble battery.
• Leaks from battery cells can occur under extreme conditions. If any liquid gets
on the skin wash quickly with soap and water. If any liquid gets into the eyes,
do not rub eyes, immediately flush them with clean water continuously for a
minimum of 15 minutes. Seek medical attention immediately.
• Use only the charger (part #440011974) supplied by Hoover® to recharge.
• Do not touch or insert objects into battery pack or charger terminals.
• Do not attempt to short circuit the battery or charger terminals.
• Place the cords from other appliances out of the area to be cleaned.
• Do not operate the vacuum in a room where an infant or child is sleeping.
• Do not operate the vacuum in an area where there are lit candles or fragile
objects on the floor to be cleaned.
• Do not operate the vacuum in a room that has lit candles on furniture that the
vacuum may accidentally hit or bump into.
• Do not allow children to sit on vacuum.
WARNING: TO REDUCE THE RISK OF ELECTRIC SHOCK, THE
CHARGER HAS A POLARIZED PLUG (ONE BLADE IS WIDER THAN THE
OTHER). THIS PLUG WILL FIT IN A POLARIZED OUTLET ONLY ONE
WAY. IF THE PLUG DOES NOT FULLY FIT IN THE OUTLET, REVERSE
THE PLUG. IF IT STILL DOES NOT FIT, CONTACT A QUALIFIED
ELECTRICIAN TO INSTALL THE PROPER OUTLET. DO NOT CHANGE THE
PLUG IN ANY WAY.
WARNING: This product contains chemicals known to the State
of California to cause cancer, birth defects or reproductive harm. WASH
HANDS AFTER HANDLING.

21
• Avoid picking up hard, sharp objects with this product, as they may cause damage.
• Store appropriately indoors in a dry place. Do not expose machine to freezing
temperatures. This product includes rechargeable Lithium Ion Batteries. Do not expose
batteries to high temperatures, as they may catch re and/or explode.
• With brush roll on, do not allow cleaner to sit in one location for an extended period of
time, as damage to oor can result.
BEFORE USE
WARNING: Ensure that no children or pets are in the room or have access to
the room to be cleaned to avoid risk of injury.
CAUTION: To avoid risk of damage, put away fragile objects, loose cords and
small objects that could topple over.
• To avoid damage to the oor, put away any pointed or sharp objects that could get
under the robot and scratch the oor surface.
• Your robot is designed to take up small quantities of dirt and does not replace an
upright vacuum cleaner. Use Rogue™ regularly to help reduce your weekly vacuuming
time.
• Rogue™ cleans hard oor and low pile carpet. It is not recommended for use on high
pile carpet.
• Dark colored carpets or objects may trigger Rogue’s™ sensors, so it may not vacuum
on or around them.
ROBOT BATTERY DISPOSAL
• To preserve natural resources please recycle or dispose of
expired battery pack properly. This product contains Lithium Ion
Battery must be disposed of properly. Local, state, or federal law
may prohibit disposal of Lithium Ion batteries in ordinary trash.
• Consult your local waste authority for information regarding
available recycling and/or disposal options. For disposal information,
call The Rechargeable Recycling Corporation at 1-800-3-BATTERY.
WARNING: Upon removal of cover battery pack terminals with heavy
duty adhesive tape. Do not attempt to destroy or disassemble battery pack or
remove any of it’s components. Lithium Ion Batteries must be recycled or disposed
of properly. Also, never touch both terminals with metal objects or vacuum parts
as short circuit may result. Keep vacuum parts away from children. Failure to
comply with these warnings could result in re and/or serious injury.

22
SERVICE & WARRANTY
BATTERY SERVICE INFORMATION
ANY SERVICING SHOULD BE DONE BY AN AUTHORIZED SERVICE REPRESENTATIVE
Call 1-877-897-2050 USA & Canada
In the event that further assistance is required, visit an authorized service center. Find one nearest you by
visiting our website at www.hoover.com. Costs of any transportation to and from any place of repair are
to be paid by the owner. Always identify your product by the model number and manufacturing code when
requesting information or ordering replacement parts. (The model number and manufacturing code for the
vacuum appears on the bottom and/or back of the product, and on the back of the battery and charger.)
LIMITED ONE YEAR WARRANTY (DOMESTIC USE)
WHAT THIS WARRANTY COVERS: When used and maintained in normal household use and in accordance
with the Owner’s Guide, your Hoover® product and battery are warranted against original defects in
material and workmanship for a full year. During the Warranty Period, Hoover® will provide labor and
parts, at no cost to you, to correct any such defect in your products.
HOW TO MAKE A WARRANTY CLAIM: If this product is not as warranted, take or send the product to a
Hoover® Authorized Warranty Service Dealer along with proof of purchase. If the batteries are not as
warranted, either take or send the batteries along with proof of purchase to a Hoover® authorized dealer
or contact Hoover® Services at 1-877-897-2050.
For an automated referral to authorized service outlets in the U.S.A., phone 1-877-897-2050 or visit
Hoover® online at www.hoover.com.
WHAT THIS WARRANTY DOES NOT COVER: This warranty does not cover belts, lters and brush rolls, use of
the product in a commercial operation (such as maid, janitorial and equipment rental services), improper
maintenance of the product, damage due to misuse, acts of God, nature, vandalism or other acts beyond
the control of Hoover®, owner’s acts or omissions, use outside the country in which the product was
initially purchase and resales of the product by the original owner. This warranty does not cover pick up,
delivery, transportation or house calls. However, if you mail your product to a Hoover® Sales and Service
Center for warranty service, cost of shipping will be paid one way. Please call Hoover® Services, 1-877-
897-2050, on how to ship this product. This warranty does not apply to products purchased outside the
United States, including its territories and possessions, a U.S. Military Exchange and Canada.
OTHER IMPORTANT TERMS: This warranty is not transferable and may not be assigned. This warranty shall
be governed and construed under the laws of the state of Ohio. The Warranty Period will not be extended
by any replacement of batteries or parts or repair performed under this warranty.
THIS WARRANTY IS THE EXCLUSIVE WARRANTY AND REMEDY ALL OTHER WARRANTIES, EXPRESSED
OR IMPLIED, INCLUDING WARRANTIES OF MERCHANTABILITY OR FITNESS FOR PARTICULAR PURPOSE,
ARE DISCLAIMED IN NO EVENT WILL HOOVER BE LIABLE FOR ANY SPECIAL, INDIRECT, INCIDENTAL OR
CONSEQUENTIAL DAMAGES OF ANY KIND OR NATURE TO OWNER OR ANY PARTY CLAIMING THROUGH OWNER,
WHETHER BASED IN CONTRACT, NEGLIGENCE, TORT OR STRICT PRODUCTS LIABILITY OR ARISING FROM ANY
CAUSE WHATSOEVER.
Some states do not allow the exclusion of consequential damages, so the above exclusion may not apply
to you. This warranty gives you specic rights; you may also have others that vary from state to state.

23
DECLARATION OF CONFORMITY
This device complies with Part 15 of the FCC Rules / Industry Canada license-exempt RSS standard(s).
Operation is subject to the following two conditions: (1) this device may not cause harmful inteference,
and (2) this device must accept any interference received, including interference that may cause
undesired operation.
Under Industry Canada regulations, this radio transmitter may only operate using an antenna of a
type and maximum (or lesser) gain approved for the transmitter by industry Canada. To reduce
potential radio interference to other users, the antenna type and its gain should be chosen that
the equivalent isotropically radiated power (e.i.r.p.) is not more than that necessary for successful
communication.
MPE REMINDING
To satisfy FCC / IC RF exposure requirements, a separation distance of 20 cm or more should be
maintained between the antenna of this device and persons during device operation.
To ensure compliance, operations at closer than this distance is not recommended.
Changes or modications not expressly approved by the party responsible for compliance could
void the user’s authority to operate the equipment.
This equipment has been tested and found to comply with the limits for a Class B digital device, pursuant
to part 15 of the FCC Rules. These limits are designed to provide reasonable protection against harmful
interference in a residential installation. This equipment generated uses and can radiate radio frequency
energy and, if not installed and used in accordance with the instructions, may cause harmful interference
to radio communications. However, there is no guarantee that interference will not occur in a particular
installation. If this equipment does cause harmful interference to radio or television reception, which
can be determined by turning the equipment off and on, the user is encouraged to try to correct the
interference by one or more of the following measures:
• Reorient or relocated the receiving antenna.
• Increase the separation between the equipment and receiver.
• Connect the equipment into an outlet on a circuit different from that to which the receiver is connected.
• Consult the dealer or an experienced radio/TV technician for help.
The manufacturer is not responsible for any radio or TV interference caused by unauthorized modifications or change to this equipment. Such
modifications or change could void the user’s authority to operate the equipment.
Le présentappareilestconforme aux CNR d'Industrie Canada applicables aux appareils radio exempts de licence. L'exploitationestautorisée aux
deux conditions suivantes : (1) l'appareil ne doit pas produire de brouillage, et (2) l'utilisateur de l'appareildoit accepter tout
brouillageradioélectriquesubi, mêmesi le brouillageest susceptible d'encompromettre le fonctionnement.