Hoover H2510 User Manual CORDLESS POWER MOP Manuals And Guides L0804035
HOOVER Carpet/Floor Sweepers Manual L0804035 HOOVER Carpet/Floor Sweepers Owner's Manual, HOOVER Carpet/Floor Sweepers installation guides
User Manual: Hoover H2510 H2510 HOOVER CORDLESS POWER MOP - Manuals and Guides View the owners manual for your HOOVER CORDLESS POWER MOP #H2510. Home:Vacuums & Floor Care Parts:Hoover Parts:Hoover CORDLESS POWER MOP Manual
Open the PDF directly: View PDF ![]() .
.
Page Count: 12
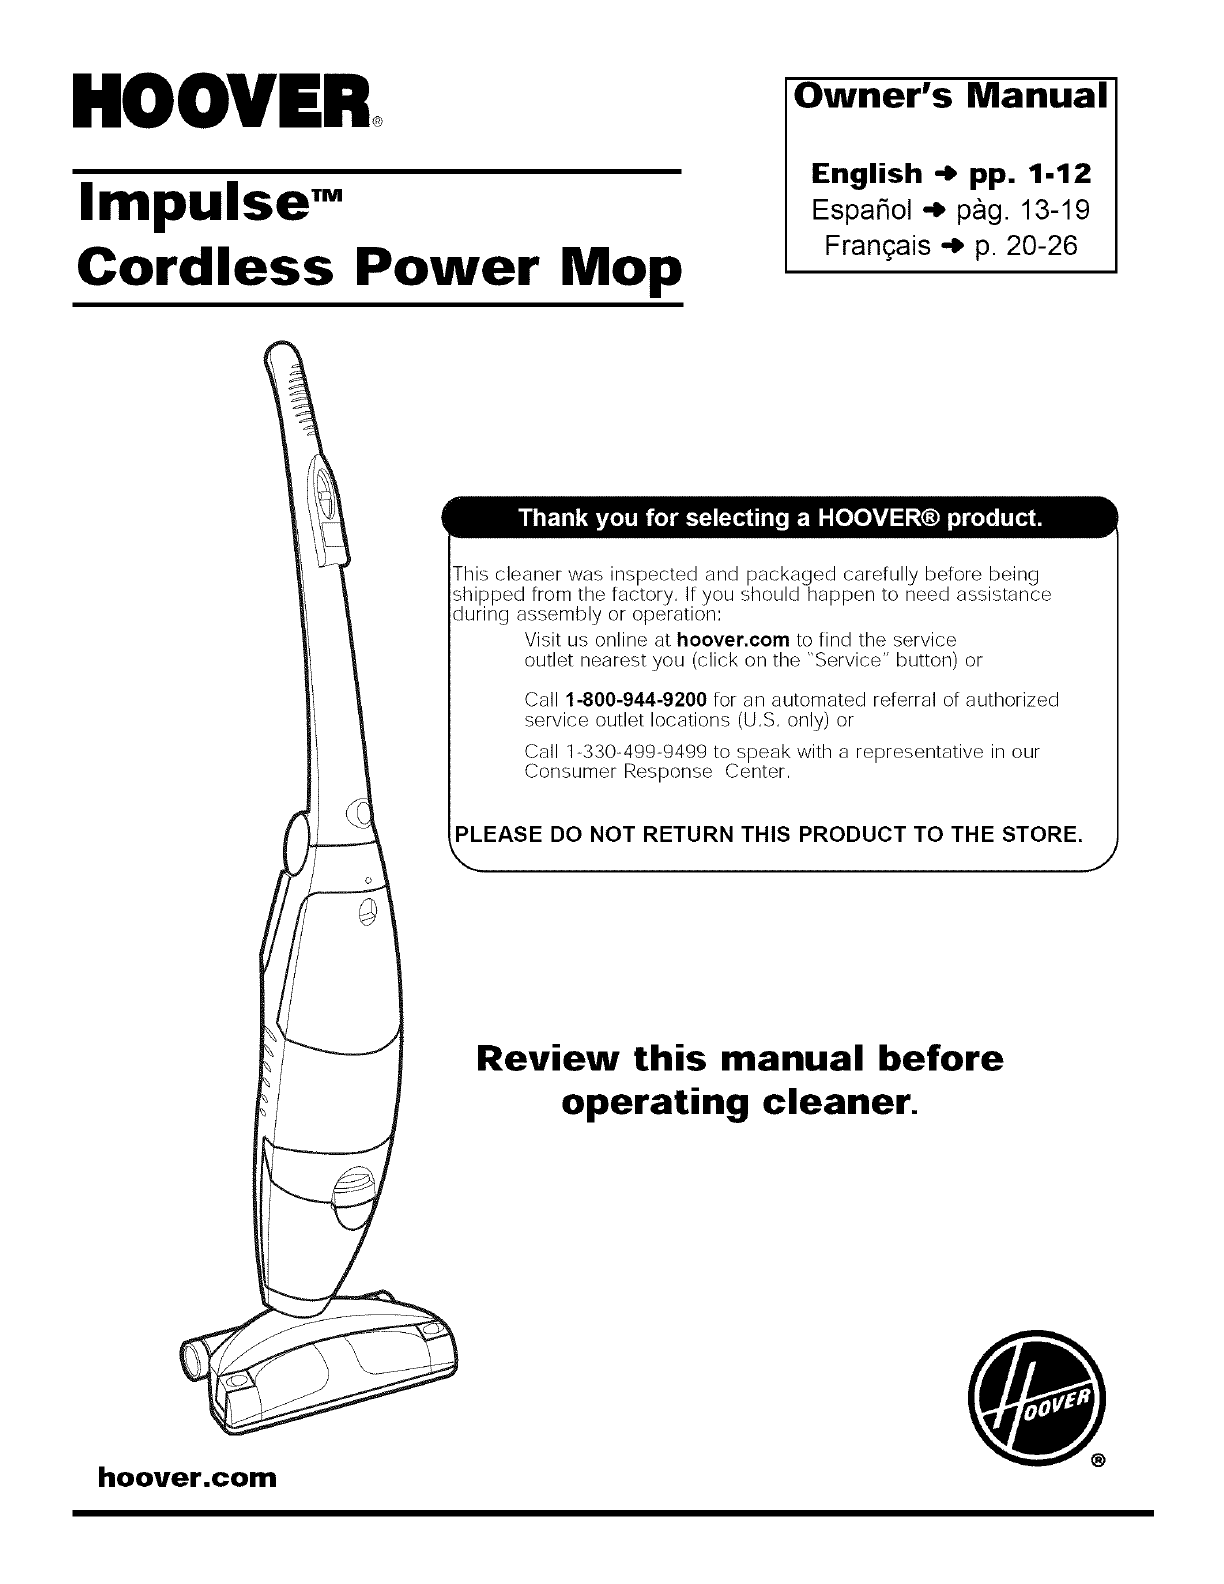
HOOVER
Impulse"
Cordless Power Mop
Owner's Manual
English -) pp. 1-12
EspaSol -_ pag 13-19
Frangais -_ p 20-26
This cleaner was inspected and packaged carefully before being
shipped from the factory, If you should happen to need assistance
during assembly or operation:
Visit us online at hoover.corn to find the service
outlet nearest you (click on the "Service" button) or
Call 1-800-944-9200 for an automated referral of authorized
service outlet locations (US only) or
Call 1-330-499-9499 to speak with a representative in our
Consumer Response Center
PLEASE DO NOT RETURN THIS PRODUCT TO THE STORE.
_..
Review this manual before
operating cleaner.
hoover.com
Fill in and retain
The model and serial number are
located on the back of the cleaner.
For your personal records, please
enter the COMPLETE mode/and
serial number in the spaces provid-
ed and retain this information.
Your cleaner is model
and has serial number
It is suggested that you attach your
sales receipt to this owner's
manual. Verification of date of
purchase may be required for
warranty service of your Hoover
product.
Index
Unpacking ....................................... 3
Cleaner descriptions ...................... 4
How to use ................................... 4-8
Automatic shut-off ..................... 6
Clean solution tank ................. 5-6
Recovery tank ...................................6-7
Storage ...................................... 10
How to clean ................................ 7-9
To clean floor .............................. 7
Cleaning sealed wood floors .7-8
Picking up spills ......................... 8
If You Have a Problem ................. 11
Service ....................................... 11
Important Safeguards .................... 2
Maintenance .............................. 8-10
Cleaning the brushes ................. 9
Cleaning the nozzle .................... 9
Warranty ........................................ 12
Parts & accessories mail order
form ............................................... 27
© 2006 The Hoover Company
hoover.corn
Whe! usming_ngcrictalapgantce,SwPysffole_u parerdonSs,=_
including the following:
READ ALL INSTRUCTIONS BEFORE USING THIS APPLIANCE
WARNING:
To reduce the risk of fire, electric shock, or injury:
• Use indoors only.
• Use only on surfaces moistened by the cleaning process or small spills. Do not
immerse product.
•For use on bare floors or sealed wood floors. Do not use on carpets.
•Always install float before any wet pick up operation.
•Close supervision is necessary when any appliance is used by or near children.
Do not allow cleaner to be used as a toy or to run unattended at any time.
•Keep hair, loose clothing, fingers, feet and all parts of body away from open-
ings and all moving parts.
•Do not pick up anything that is burning or smoking, such as cigarettes,
matches, or hot ashes.
•Do not pick up or use flammable or combustible materials such as gasoline or
fine wood sandings or use in areas where present.
•Avoid picking up hard, sharp objects with the cleaner. They may damage the
cleaner.
•Do not put any object into openings. Do not use with any opening blocked;
keep free of dust, lint, hair, or anything that may reduce air flow.
•Do not use charger with damaged cord or plug. If appliance is not working as it
should, has been dropped, damaged, left outdoors, or dropped into water, take
it to a Hoover Sales & Service Center or Authorized Hoover Waranty Service
Dealer.
•Do not clean over floor electrical outlets.
•Do not use without filter and tanks in place.
•Keep detergents and other cleaners out of children's reach.
•Do not pick up chlorine bleach, pine based cleaners, drain cleaner, or any other
toxic material with this appliance.
•When using recommended chemicals with this machine, be certain area is well
ventilated.
•Follow manufacturer's instructions for all chemicals used with this machine. Do
not exceed recommended mixing ratios.
•Store in a dry place. Do not expose machine to freezing temperatures.
•Use cleaner only for its intended use as described in the instructions.
•Use only manufacturer's recommended attachments.
•Do not incinerate this appliance even if it is severely damaged. The battery can
explode in a fire.
•Do not unplug by pulling on charger cord. To unplug, grasp the charger, not
the cord. Never handle plug or charger with wet hands.
•Use only the charger supplied by the manufacturer to recharge this appliance.
•Charge indoors only.
•Turn appliance off before recharging.
•Use extra care when cleaning on stairs.
•Do not pull or carry by charger cord. Do not use charger cord as a handle,
close door on charger cord, or pull charger cord around sharp edges or cor-
ners. Do not run appliance over charger cord.
•Keep charger cord away from heated surfaces.
•Unplug charger from outlet when not in use. Unplug appliance from charger
before servicing.
LISTED
WARN | N G: Thisproductconta,nschem,ca,sknownto
the State of California to cause cancer and reproductive toxicity.
WASH HANDS AFTER HANDLING.
Save these instructions!
FOR HOUSEHOLD USE ONLY.
Questions or Concerns?
Hoover wants to quickly resolve any concerns about your cleaner or questions regarding its use, Look on
the list provided with the product for your local Hoover Sales & Service Center or in the Yellow Pages
under "Vacuum Cleaners - Household" for the nearest Authorized Hoover Warranty Service Dealer
(Depot) or call:
Visit us online at hoover.corn to find the service outlet nearest you
(click on the "Service" button) OR
Call 1-800-944-9200 for an automated referral of authorized service outlet locations (U,S, only) OR
Call 1-330-499-9499 to speak with a representative in the Hoover Consumer Response Center,
ma
A
B
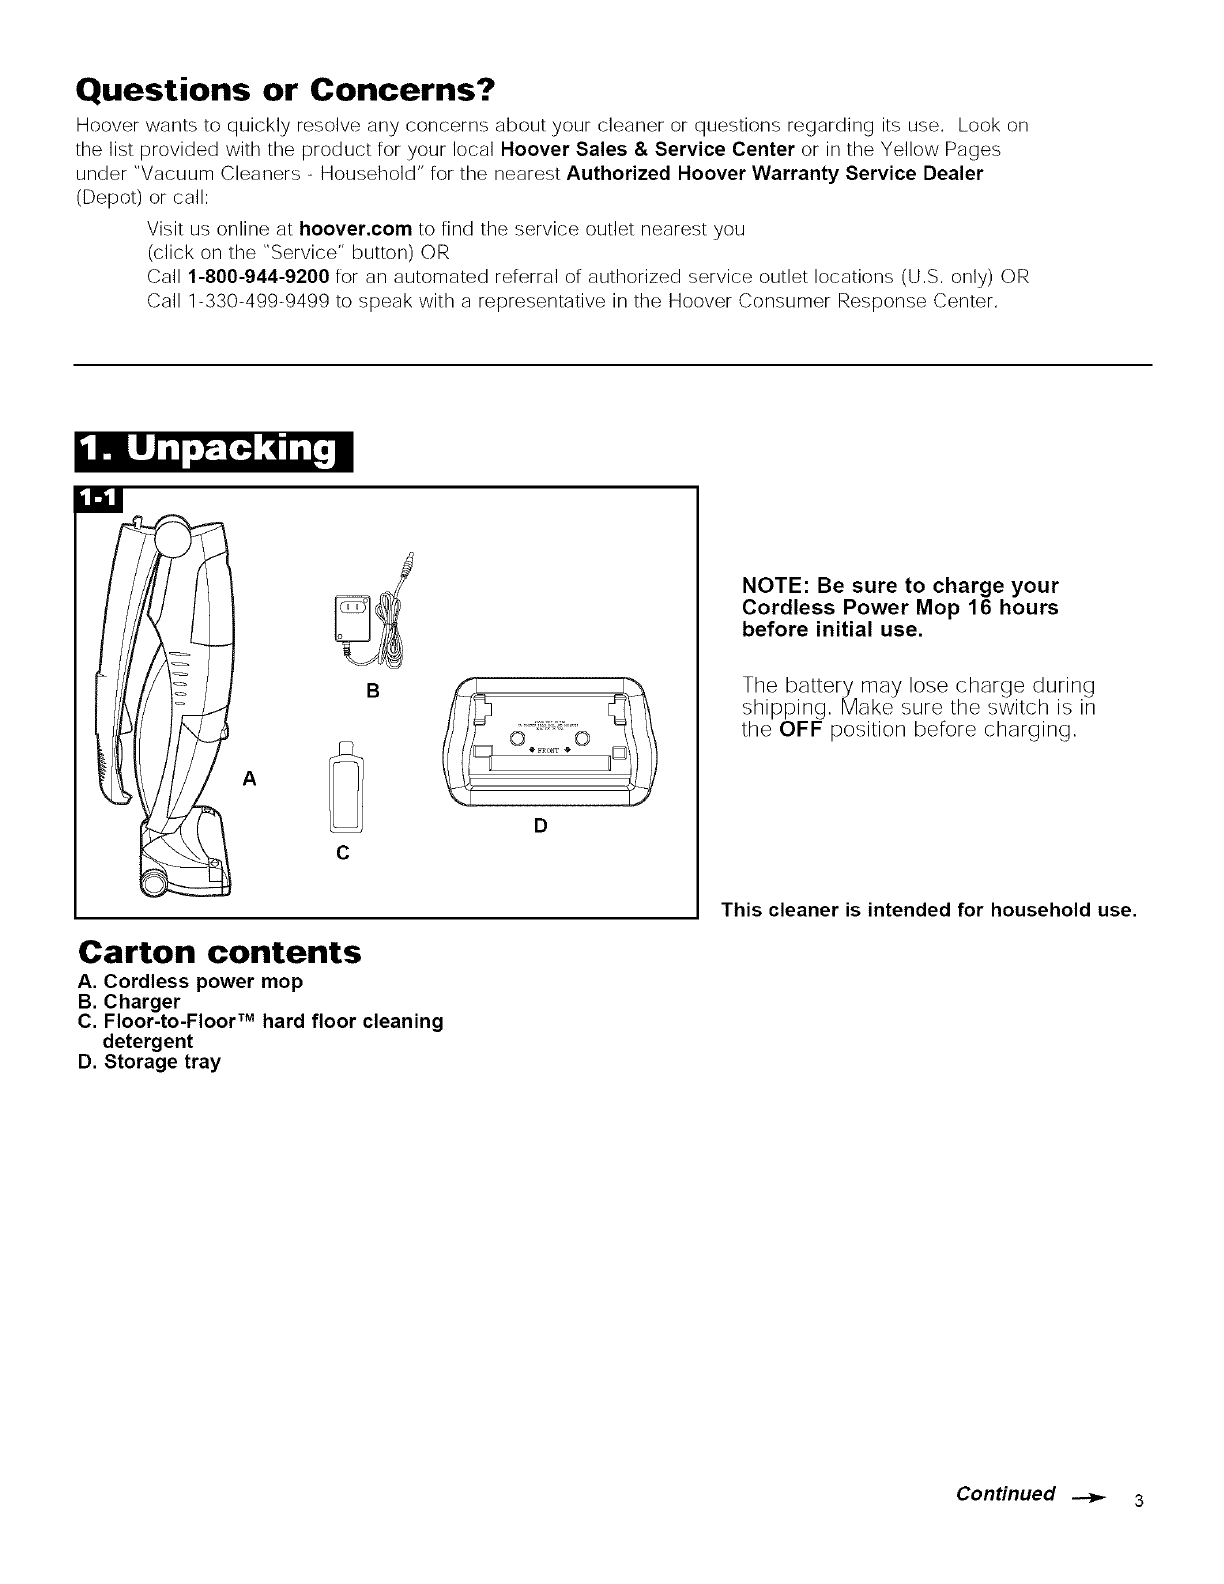
Carton contents
A. Cordless power mop
B. Charger
C. Floor-to-Floor TM hard floor cleaning
detergent
D. Storage tray
NOTE: Be sure to charge your
Cordless Power Mop 16 hours
before initial use.
The battery may lose charge during
shipping, Make sure the switch is in
the OFF position before charging,
This cleaner is intended for household use.
ConHnued _ 3
Charging
15 19
1. Hand grip
2. Solution trigger
3. Mode selector switch - choose
SCRUB, OFF or PICK UP
4. Mode indicator
5. Handle
6. Handle release button - use to
fold handle for storage
7. Battery indicator light
8. Clean solution tank cap/
measuring cup
9. Clean solution tank release
10. Clean solution tank
11. Recovery tank lid and filter
12. Recovery tank release
13. Recovery tank - collects dirty
cleaning solution
14. Nozzle release buttons - release
nozzle for easy clean-up
15. Nozzle
16. Squeegee - located underneath
nozzle
17. Battery compartment
18. Battery charger receptacle
19. Soft tread wheels
20. Battery charger
21. Storage tray
This cleaner is intended for
household use.
I<51
With switch in OFF position, plug
charger (A) into 110/120 volt electri-
cal outlet,
Firmly press charger end into cleaner
receptacle (B), located on the back of
the cleaner, Press firmly on cleaner
to ensure that end of cord is fully
connected. Your cleaner will begin
charging, It is designed to be stored
on charge and ready for use at all
times,
4
Charge battery for 16 hours before
initial use. If performance drops to
an unacceptable level during
cleaning, refer to "Troubleshooting"
section,
NOTE:
• It is normal for the charger to feel
warm when the battery is charging,
Never charge battery in temperatures
above 100 ° F or below 32 ° F,
• Charging light illuminates red when
cleaner is charging, When battery is
at full charge, the charging light will
illuminate green,
• The cleaner can be on a constant
charge so it is always ready for use,
Make sure it is in OFF position
before charging. However, if the
cleaner will not be used for several
weeks at a time, unplugging it is rec-
ommended,
Do not use an outlet which is con-
trolled with a wall switch for charg-
ing your cleaner.
Unfold handle
C
Press on button (C) to raise handle
(D) to upright position until it locks in
place,
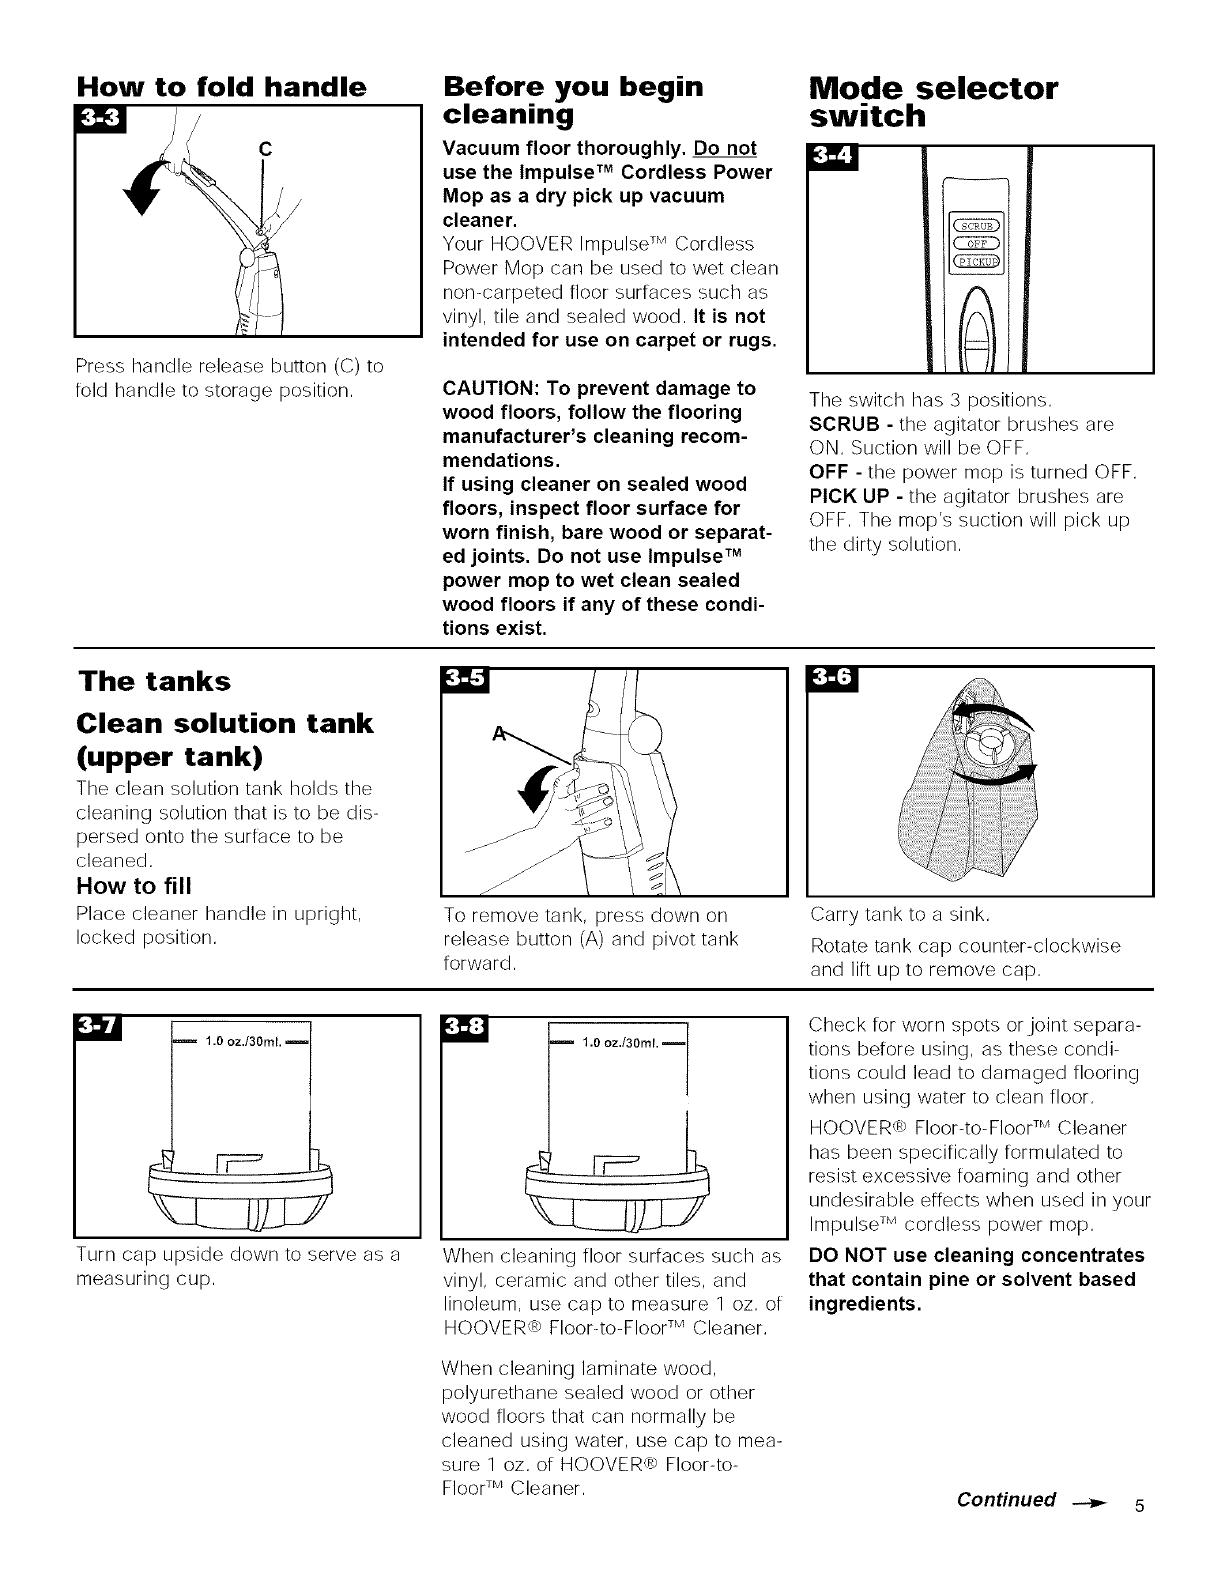
How to fold handle
c
/
Press handle release button (C) to
fold handle to storage position,
Before you begin
cleaning
Vacuum floor thoroughly. Do not
use the Impulse TM Cordless Power
Mop as a dry pick up vacuum
cleaner.
Your HOOVER Impulse TM Cordless
Power Mop can be used to wet clean
non-carpeted floor surfaces such as
vinyl, tile and sealed wood, It is not
intended for use on carpet or rugs.
CAUTION: To prevent damage to
wood floors, follow the flooring
manufacturer's cleaning recom-
mendations.
If using cleaner on sealed wood
floors, inspect floor surface for
worn finish, bare wood or separat-
ed joints. Do not use Impulse TM
power mop to wet clean sealed
wood floors if any of these condi-
tions exist.
Mode selector
switch
MM
z
(;cRu_
OFF
'ICKU
The switch has 3 positions,
SCRUB - the agitator brushes are
ON, Suction will be OFF,
OFF - the power mop is turned OFF,
PICK UP - the agitator brushes are
OFF, The mop's suction will pick up
the dirty solution,
The tanks
Clean solution tank
(upper tank)
The clean solution tank holds the
cleaning solution that is to be dis-
persed onto the surface to be
cleaned,
How to fill
Place cleaner handle in upright,
locked position,
/
To remove tank, press down on
release button (A) and pivot tank
forward,
Carry tank to a sink,
Rotate tank cap counter-clockwise
and lift up to remove cap,
m 1.0 oz.t30ml.
Turn cap upside down to serve as a
measuring cup,
1.0 oz./30ml.
When cleaning floor surfaces such as
vinyl, ceramic and other tiles, and
linoleum, use cap to measure 1 oz, of
HOOVER,> Floor-to-Floor TM Cleaner,
When cleaning laminate wood,
polyurethane sealed wood or other
wood floors that can normally be
cleaned using water, use cap to mea-
sure 1 oz, of HOOVER,> Floor-to-
FloorTM Cleaner,
Check for worn spots orjoint separa-
tions before using, as these condi-
tions could lead to damaged flooring
when using water to clean floor,
HOOVER_ Floor-to-Floor TM Cleaner
has been specifically formulated to
resist excessive foaming and other
undesirable effects when used in your
Impulse TM cordless power mop,
DO NOT use cleaning concentrates
that contain pine or solvent based
ingredients.
Conffnued _ 5
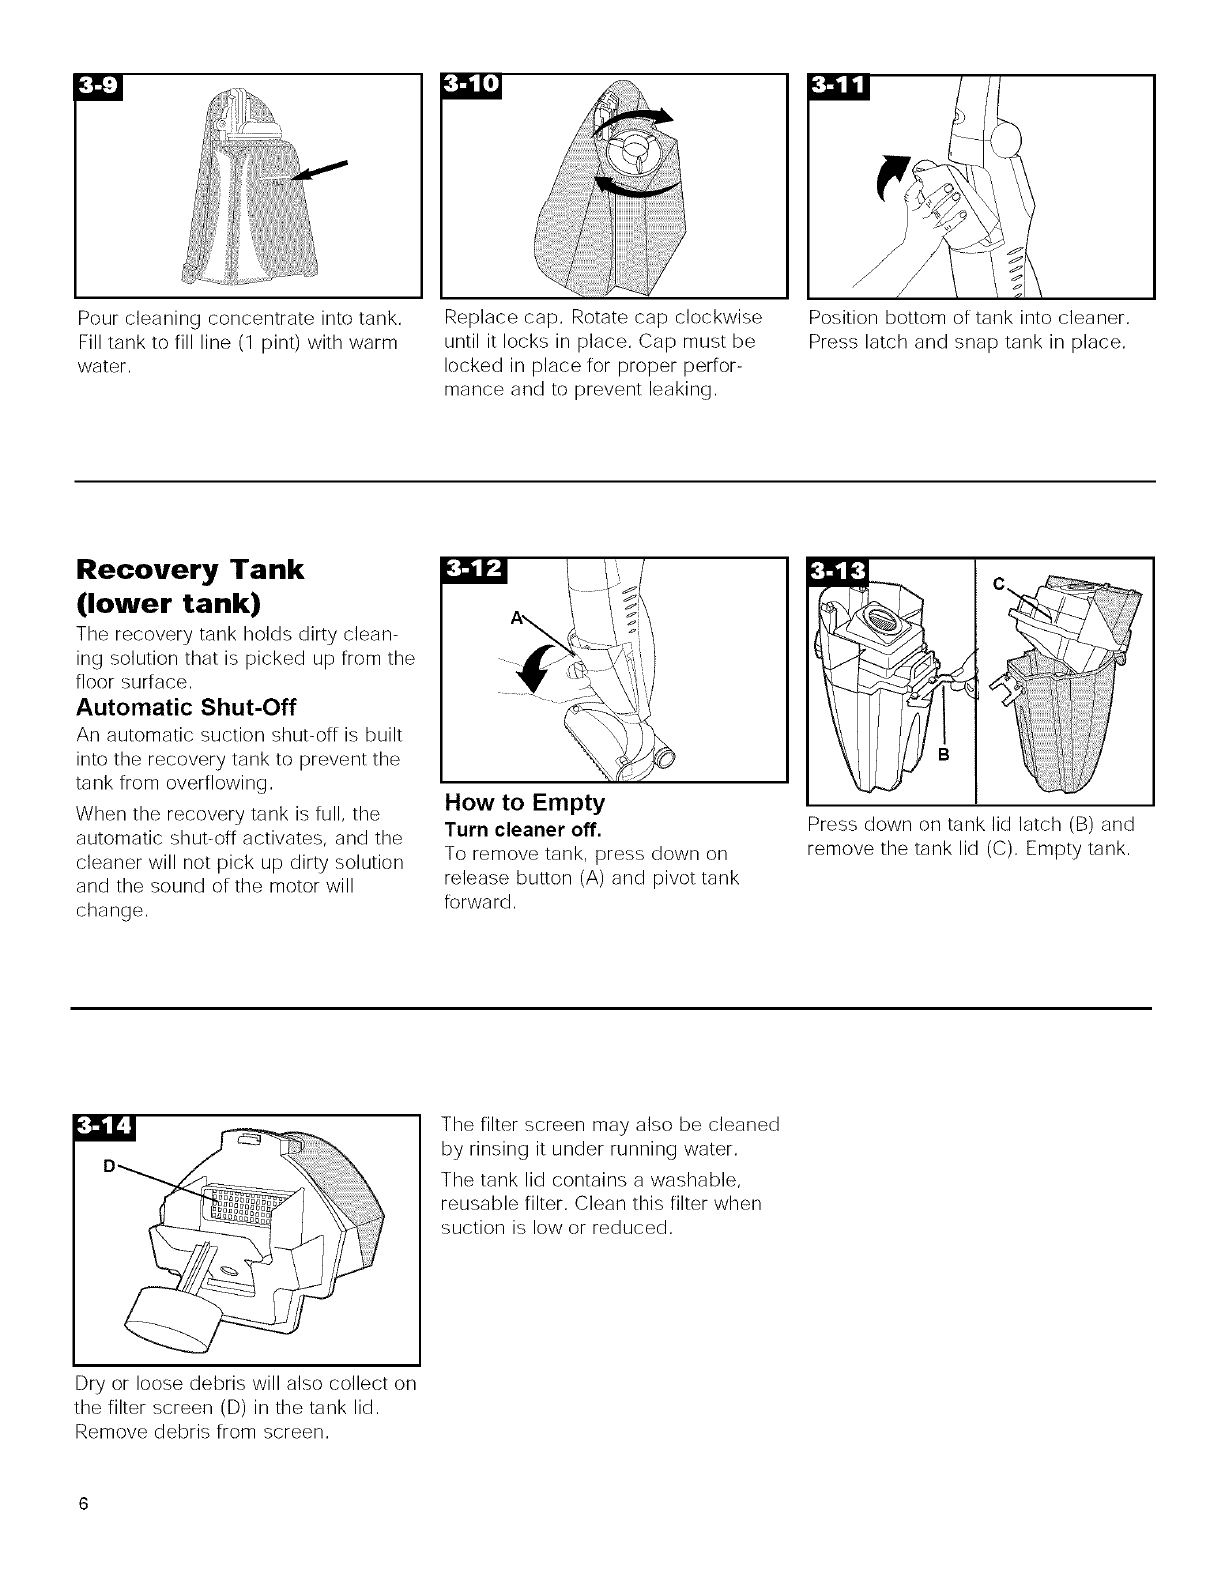
Pourcleaningconcentrateintotank,
Filltanktofillline(1pint)withwarm
water,
Replacecap,Rotatecapclockwise
untilit locksin place,Capmustbe
lockedinplacefor properperfor-
manceandto preventleaking,
Positionbottomoftankintocleaner,
Presslatchandsnaptankinplace,
Recovery Tank
(lower tank)
The recovery tank holds dirty clean-
ing solution that is picked up from the
floor surface,
Automatic Shut-Off
An automatic suction shut-off is built
into the recovery tank to prevent the
tank from overflowing,
When the recovery tank is full, the
automatic shut-off activates, and the
cleaner will not pick up dirty solution
and the sound of the motor will
change,
How to Empty
Turn cleaner off.
To remove tank, press down on
release button (A) and pivot tank
forward,
Press down on tank lid latch (B) and
remove the tank lid (C), Empty tank,
Dry or loose debris will also collect on
the filter screen (D) in the tank lid,
Remove debris from screen,
The filter screen may also be cleaned
by rinsing it under running water,
The tank lid contains a washable,
reusable filter, Clean this filter when
suction is low or reduced,
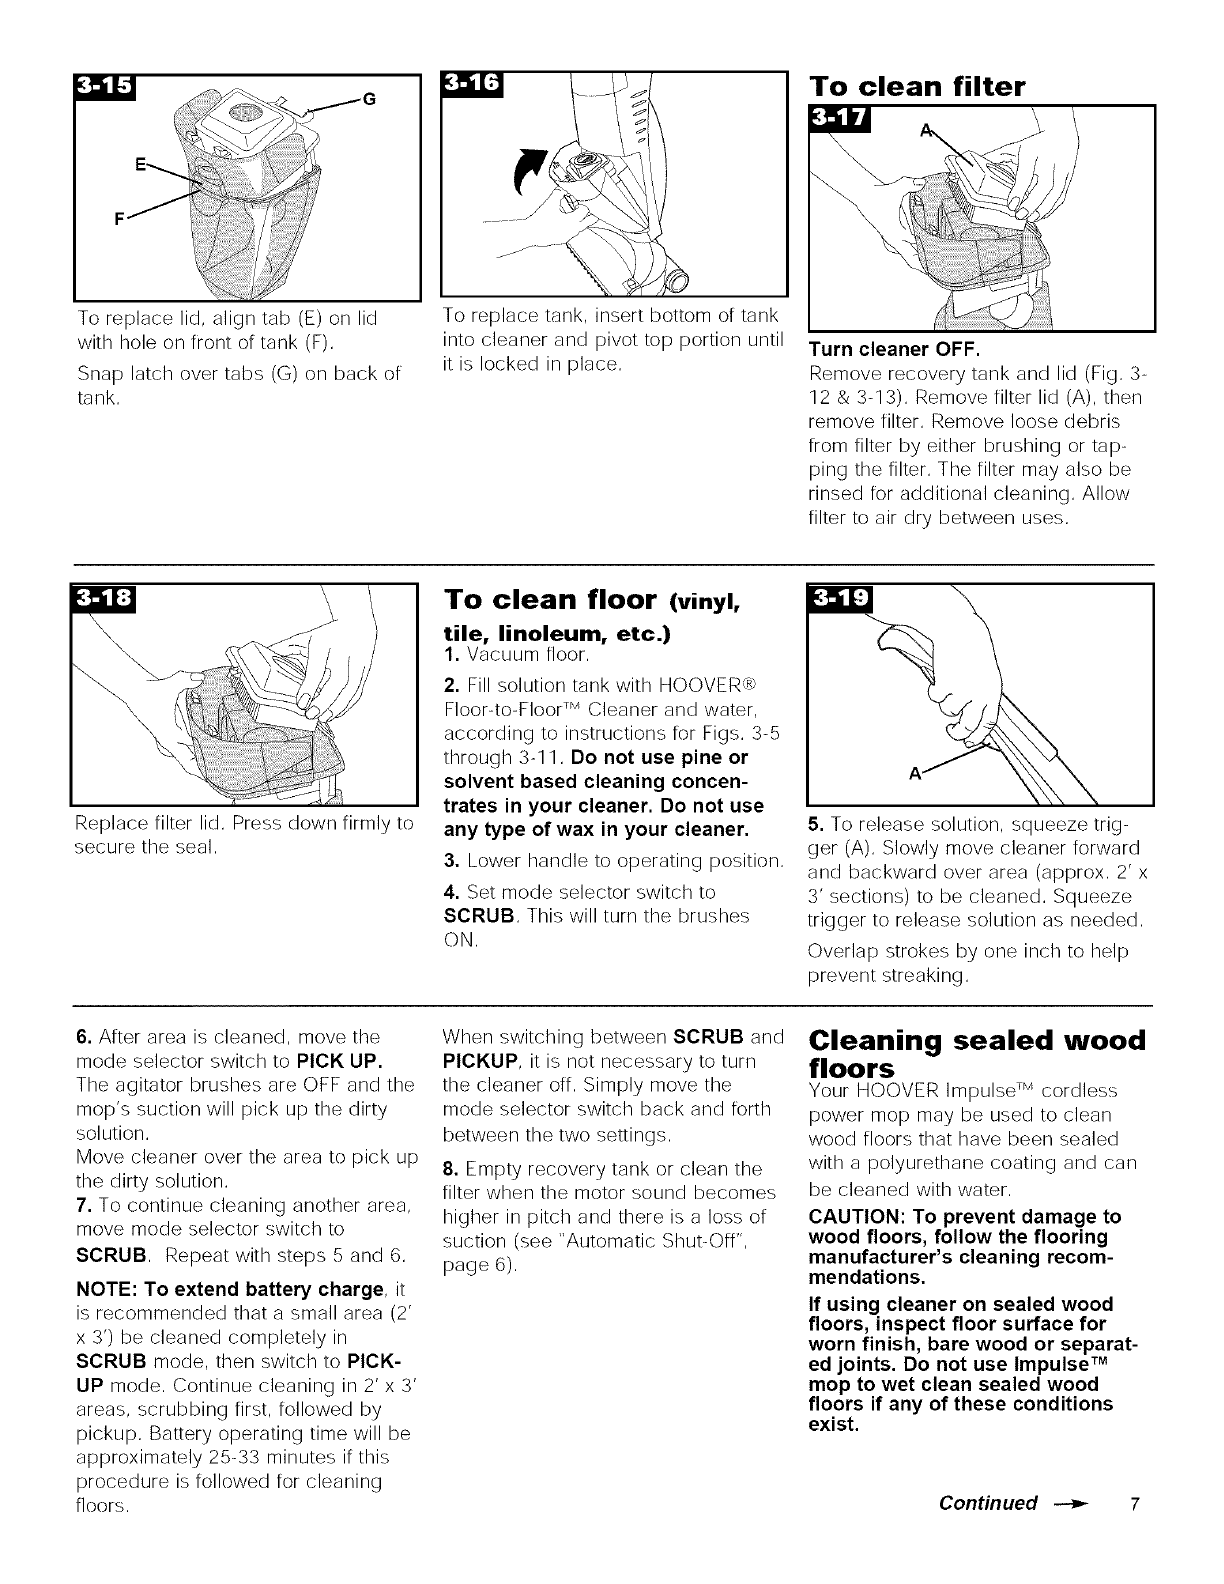
Toreplacelid,aligntab(E)onlid
withholeonfrontoftank(F).
Snaplatchovertabs(G)onbackof
tank.
Toreplacetank,insertbottomoftank
intocleanerandpivottopportionuntil
it is lockedinplace.
To clean filter
Turn cleaner OFF.
Remove recovery tank and lid (Fig. 3-
12 & 3-13). Remove filter lid (A), then
remove filter. Remove loose debris
from filter by either brushing or tap-
ping the filter. The filter may also be
rinsed for additional cleaning. Allow
filter to air dry between uses.
Replace filter lid. Press down firmly to
secure the seal.
To clean floor (vinyl,
tile, linoleum, etc.)
1. Vacuum floor.
2. Fill solution tank with HOOVER_
Floor-to-Floor TM Cleaner and water,
according to instructions for Figs. 3-5
through 3-11, Do not use pine or
solvent based cleaning concen-
trates in your cleaner. Do not use
any type of wax in your cleaner.
3. Lower handle to operating position.
4. Set mode selector switch to
SCRUB. This will turn the brushes
ON.
5. To release solution, squeeze trig-
ger (A). Slowly move cleaner forward
and backward over area (approx. 2' x
3' sections) to be cleaned. Squeeze
trigger to release solution as needed.
Overlap strokes by one inch to help
prevent streaking.
6. After area is cleaned, move the
mode selector switch to PICK UP.
The agitator brushes are OFF and the
mop's suction will pick up the dirty
solution.
Move cleaner over the area to pick up
the dirty solution.
7. To continue cleaning another area,
move mode selector switch to
SCRUB. Repeat with steps 5 and 6.
NOTE: To extend battery charge, it
is recommended that a small area (2'
x 3') be cleaned completely in
SCRUB mode, then switch to PICK-
UP mode. Continue cleaning in 2' x 3'
areas, scrubbing first, followed by
pickup. Battery operating time will be
approximately 25-33 minutes if this
procedure is followed for cleaning
floors.
When switching between SCRUB and
PICKUP, it is not necessary to turn
the cleaner off. Simply move the
mode selector switch back and forth
between the two settings.
8. Empty recovery tank or clean the
filter when the motor sound becomes
higher in pitch and there is a loss of
suction (see "Automatic Shut-Off",
page 6).
Cleaning sealed wood
floors
Your HOOVER Impulse TM cordless
power mop may be used to clean
wood floors that have been sealed
with a polyurethane coating and can
be cleaned with water,
CAUTION: To prevent damage to
wood floors, follow the flooring
manufacturer's cleaning recom-
mendations.
If using cleaner on sealed wood
floors, inspect floor surface for
worn finish, bare wood or separat-
ed joints. Do not use Impulse TM
mop to wet clean sealed wood
floors if any of these conditions
exist.
Continued _ 7
1. Inspect floor surface for worn fin-
ish. bare wood or separated joints.
Do not use your Impulse TM power
mop to wet clean the floor if any of
these conditions exist.
2. Vacuum floor.
3. Fill solution tank with HOOVER,>
Floor-to-Floor TM Cleaner and water.
according to instructions for Figs. 3-5
through 3-11.
Do not use pine or solvent based
detergents. Do not put any type of
wax in your cleaner.
4. Lower handle to operating position.
5. Set mode selector switch to
SCRUB, This will turn the brushes
ON.
6. To release solution, squeeze trig-
ger. Slowly move cleaner forward and
backward over area (approx. 2' x 3'
sections) to be cleaned. Squeeze
trigger to release solution as needed.
Overlap strokes by one inch to help
prevent streaking.
7. After area is cleaned, move the
mode selector switch to PICK UP.
The agitator brushes are OFF and the
mop's suction will pick up the dirty
solution.
Move cleaner over the area to pick
up the dirty solution.
8. To continue cleaning another area.
move mode selector switch to
SCRUB. Repeat with steps 6 and 7.
NOTE: To extend battery charge, it
is recommended that a small area (2'
x 3') be cleaned completely in
SCRUB mode, then switch to PICK-
UP mode, Continue cleaning in 2' x 3'
areas, scrubbing first, followed by
pickup, Battery charge time will be
between 25-33 minutes if this proce-
dure is followed for cleaning floors,
When switching between SCRUB and
PICKUP. it is not necessary to turn the
cleaner off. Simply move the mode
selector switch back and forth
between the two settings.
9. Empty recovery tank or clean the
filter when the motor sound becomes
higher in pitch and there is a loss of
suction (see "Automatic Shut-Off".
page 6).
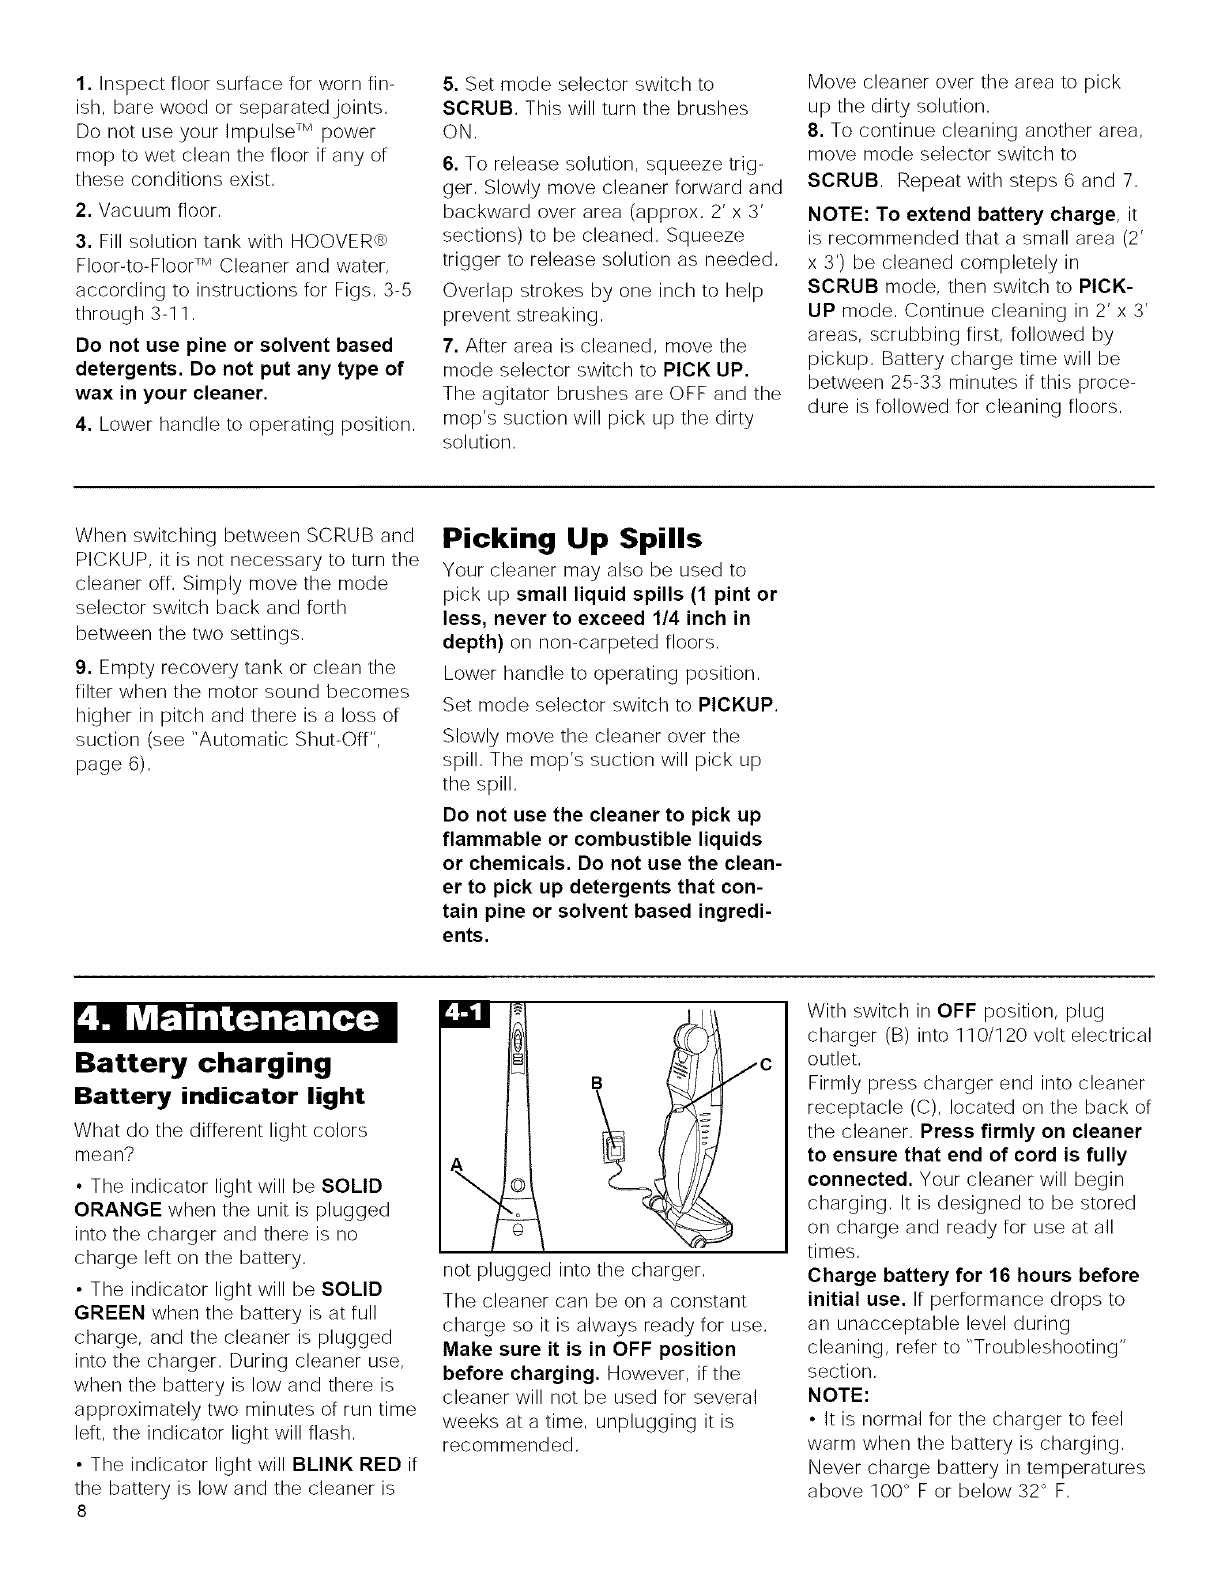
Battery charging
Picking Up Spills
Your cleaner may also be used to
pick up small liquid spills (1 pint or
less, never to exceed 1/4 inch in
depth) on non-carpeted floors.
Lower handle to operating position.
Set mode selector switch to PICKUP.
Slowly move the cleaner over the
spill. The mop's suction will pick up
the spill.
Do not use the cleaner to pick up
flammable or combustible liquids
or chemicals. Do not use the clean-
er to pick up detergents that con-
tain pine or solvent based ingredi-
ents.
Battery indicator light
What do the different light colors
mean?
• The indicator light will be SOLID
ORANGE when the unit is plugged
into the charger and there is no
charge left on the battery.
• The indicator light will be SOLID
GREEN when the battery is at full
charge, and the cleaner is plugged
into the charger. During cleaner use.
when the battery is low and there is
approximately two minutes of run time
left. the indicator light will flash.
• The indicator light will BLINK RED if
the battery is low and the cleaner is
8
c
not plugged into the charger.
The cleaner can be on a constant
charge so it is always ready for use.
Make sure it is in OFF position
before charging. However. if the
cleaner will not be used for several
weeks at a time. unplugging it is
recommended.
With switch in OFF position, plug
charger (B) into 110/120 volt electrical
outlet.
Firmly press charger end into cleaner
receptacle (C). located on the back of
the cleaner. Press firmly on cleaner
to ensure that end of cord is fully
connected. Your cleaner will begin
charging. It is designed to be stored
on charge and ready for use at all
times.
Charge battery for 16 hours before
initial use. If performance drops to
an unacceptable level during
cleaning, refer to "Troubleshooting"
section.
NOTE:
• It is normal for the charger to feel
warm when the battery is charging.
Never charge battery in temperatures
above 100° F or below 32 ° F.
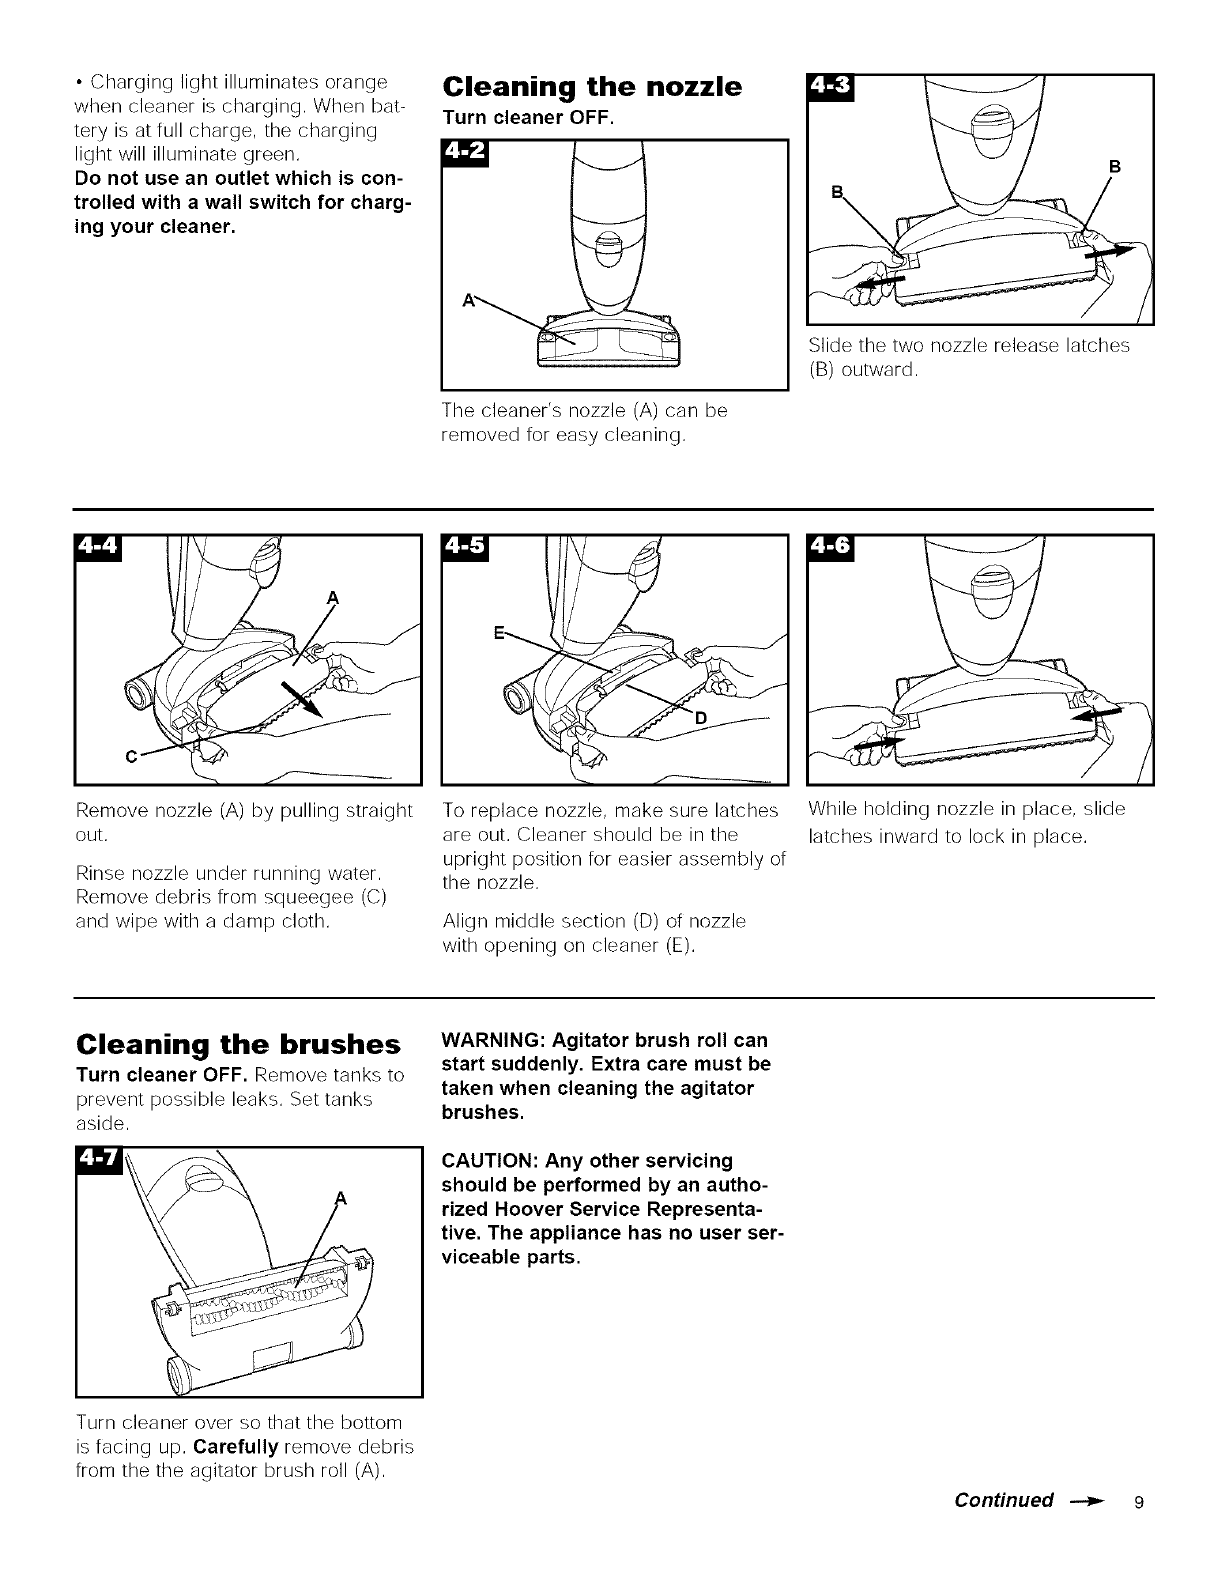
• Charginglightilluminatesorange
whencleanerischarging,Whenbat-
teryisatfullcharge,thecharging
lightwillilluminategreen,
Do not use an outlet which is con-
trolled with a wall switch for charg-
ing your cleaner.
Cleaning the nozzle
Turn cleaner OFF.
The cleaner's nozzle (A) can be
removed for easy cleaning,
Slide the two nozzle release latches
(B) outward,
A
Remove nozzle (A) by pulling straight
out,
Rinse nozzle under running water,
Remove debris from squeegee (C)
and wipe with a damp cloth,
To replace nozzle, make sure latches
are out, Cleaner should be in the
upright position for easier assembly of
the nozzle,
Align middle section (D) of nozzle
with opening on cleaner (E),
While holding nozzle in place, slide
latches inward to lock in place,
Cleaning the brushes
Turn cleaner OFF. Remove tanks to
prevent possible leaks, Set tanks
aside,
Turn cleaner over so that the bottom
is facing up, Carefully remove debris
from the the agitator brush roll (A),
WARNING: Agitator brush roll can
start suddenly. Extra care must be
taken when cleaning the agitator
brushes.
CAUTION: Any other servicing
should be performed by an autho-
rized Hoover Service Representa-
tive. The appliance has no user ser-
viceable parts.
ConHnued _ 9

Storage
Turn cleaner OFF. If battery needs
charging, refer to "Maintenance -
Battery Charging".
•Empty and rinse solution and recov-
ery tanks, Allow to air dry,
• Allow filter in recovery tank lid to
dry,
• Make sure that nothing is pressing
on the nozzle squeegee,
• Do not store cleaner on a wood sur-
face unless cleaner is completely
dry,
Storage tray
r: _:]
A
A convenient tray provides storage of
your power mop and helps to protect
the brushes and squeegee when not
in use, Place the cordless mop in the
tray with the wheels in the recessed
areas to the back (A) and the nozzle
to the front,
Your
um batteries,
When these batteries no longer
recharge, they must be removed
from the cleaner and disposed of
properly in accordance with state
laws as described below,
NOTE: Do not remove the batteries
to recharge them, The batteries
should only be removed if they no
longer recharge and you plan to dis-
pose of the cleaner,
How to remove battery
pack
A\ _ BA
Using a Phillips screwdriver, remove
screws (A) on battery door (B),
Remove door,
\
/
Remove battery pack from unit, To
disconnect battery pack from termi-
nal, push down on tab (C) and pull
connector (D) straight out,
Dispose of battery pack in accordance
with your state's laws,
Battery pack replacement should
be done only by an authorized
Hoover Service Representative.
Contact your local Hoover Sales
and Service Center.
The EPA certified RBRC e>Battery
Recycling Seal on the nickel-cadmi-
um (Ni-Cd) battery indicates The
Hoover Company is voluntarily partici-
pating in an industry program to col-
lect and recycle these batteries at the
end of their useful life, when taken out
of service in the United States or
Canada, The RBRC e_program pro-
vides a convenient alternative to plac-
ing used Ni-Cad batteries into the
trash or the municipal waste stream,
which may be illegal in your area,
Please call 1-800-8-BATTERY TM for
information on Ni-Cd battery recycling
and disposal bans/restrictions in your
area,
Hoover's involvement in this program
is part of our commitment to preserv-
ing our environment and conserving
our natural resources,
10
If a minor problem occurs, it usually
can be solved quite easily when the
cause is found by using the check list
below,
Possible cause
Possible solution
• Battery not charged
•Recharge battery making sure
cleaner is fully connected to end of
cord
• NO Voltage in wall plug
•Check fuse or breaker
• Blown fuse/tripped breaker
•Replace fuse/reset breaker,
Possible cause
Possible solution
•Automatic shut-off activated
•Turn cleaner OFF and then ON
again or
•Empty recovery tank (see "Auto-
marie shut-off" section)
•Filter or filter lid missing or not
positioned correctly
• Ensure recovery tank filter and filter
lid are properly positioned in the
recovery tank lid (Figs, 3- 77 & 3- 78)
•Recovery tank and/or solution
tank not positioned properly
•Ensure that both tanks are locked in
place,
•Filter is dirty
•Clean f)lter
•Nozzle not properly positioned
• Ensure nozzle is replaced proper!y
and locked (Figs, 4-5 & 4-6),
',t'_ RP2JTi_I:]'D__; I'_;h'[_
Possible cause
Possible solution
•Excess cleaning concentrate
foaming in tanks
•Use HOOVERm_ Floor-to-Floor TM
Cleaner, it is alow-foam formulation,
If using cleaning concentrate other
than HOOVERm_ Floor-to-FlooF _
Cleaner, remix cleaning solution
using less concentrate,
•Solution tank not properly installed
• Ensure that tank is installed properly
(Fig, 3-11)
•Recovery tank is full
• Empty tank
Possible cause
Possible solution
•Cleaner not set for PICKUP
•Set mode selector switch to PICKUP
•Recovery tank not properly
installed
• Ensure that recovery tank is
installed properly (Fig, 3- 76),
•Recovery tank full/automatic shut-
off engaged.
•Remove and empty recovery tank,
•Filter or filter lid missing or not
properly positioned
• Ensure recovery tank filter and filter
lid are properly positioned in the
recovery tank IM (Figs, 3-77 & 3-78),
Possible cause
Possible solution
•Solution tank not firmly in place
•Make sure tank is securely locked in
position,
•Solution tank empty
•Refill solution tank,
Possible cause
Possible solution
•Mode selector switch set for
PICKUP
•Move mode selector switch to
SCRUB position (Fig, 3-4),
•Circuit breaker inside cleaner is
tripped
•To reset the breaker:
(1) Slide the mode selector switch to
OFF,
(2) Wait one minute,
(3) Turn the mode selector switch to
SCRUB and continue cleaning,
If the brushes continue to stall and the
breaker trs_s again, clean the brushes
to remove debris, (Fig, 4-7)
Possible cause
Possible solution
•Charger not firmly plugged in
• Plug charger in firm!y
Service
To obtain approved HOOVER service and
genuine HOOVER parts, locate the near-
est Hoover Sales and Service Center or
Authorized Hoover Warranty Service
Dealer (Depot) by:
•checking the Yellow Pages
under "Vacuum Cleaners -
Household" OR -
• checking the list or Sales and
Service Centers provided with this
cleaner OR -
•checking the Service section or
Hoover on-line at hoover.corn
OR-
•calling 1-800-944-9200 for an auto=
mated referral or authorized service
outlet locations (U,S, only),
Do not send your cleaner to Hoover in
North Canton, Ohio [or service, this will
only result in delay.
I[ [urther assistance is needed, contact
the Consumer Response Center,
Phone: 1-330-499-9499.
In Canada, contact Hoover Canada,
Burlington, Ontario LTR 4A8,
Phone: 1-800=263-6376.
Always identi[y your cleaner by the com-
plete model number when requesting
information or ordering parts, (The model
number appears on the back or the
cleaner,)
Continued --_ 11
Full One Year
Warranty
(Domestic Use)
Your HOOVER_m appliance is warranted in
normal household use, in accordance with
the Owner's Manual against original
detects in material and workmanship [or a
period or one rull year from date or pur-
chase, This warranty provides, at no cost
to you, all labor and parts to place this
appliance in correct operating condition
during the warranted period, This warran-
ty applies when the appliance is pur-
chased in the United States including its
territories and possessions, or in Canada
or from a U. S, Military Exchange. Appli-
ances purchased elsewhere are covered
by a limited one year warranty which cov-
ers the cost or parts only, This warranty
does not apply ir the appliance is used in
a commercial or rental application,
This warranty only applies when the prod-
uct is in use in the country or territory in
which it is purchased.
Warranty service can only be obtained by
presenting the appliance to one or the fol-
lowing authorized warranty service out-
lets. Proor or purchase will be required
before service is rendered.
1, Hoover Sales and Service Centers
2. Hoover Authorized Warranty Service
Dealers (Depots).
For an automated referral of authorized
service outlets in the U.S.A.,
phone 1-800-944-9200 OR
Visit Hoover on-line at hoover.corn
This warranty does not cover pick up,
delivery, or house calls; however, i[ you
mail your appliance to a Hoover Sales
and Service Center for warranty service,
transportation will be paid one way.
While this warranty gives you specific
legal rights, you may also have other
rights which vary [rom state to state.
I[ [urther assistance is needed, or i[ there
are questions concerning this warranty or
the availability or warranty service outlets,
phone the Consumer Response Center,
Phone 1-330-499-9499,
In Canada, contact Hoover Canada,
Burlington, Ontario L7R 4A8,
1-800-263-6376,
12
