Hp Cluster Software Installation Guide 3PAR Extension
2015-03-28
: Hp Hp-Cluster-Software-Installation-Guide-669615 hp-cluster-software-installation-guide-669615 hp pdf
Open the PDF directly: View PDF ![]() .
.
Page Count: 29
- HP 3PAR Cluster Extension Software Installation Guide
- Contents
- 1 Preparing to install HP 3PAR Cluster Extension
- 2 Installing HP 3PAR Cluster Extension Software
- Prerequisites
- Pre-installation procedures
- Checking the IP network setup and SAN configuration
- Installing the multipath software
- Installing and configuring the JRE
- Installing HP 3PAR Command Line Interface (CLI)
- Configuring the HP 3PAR storage system
- Creating hosts and setting host persona
- Creating virtual volumes and adding a LUN presentation
- Creating Remote Copy volume groups
- LUN presentation to the secondary virtual volume(s)
- Installing Microsoft Failover Cluster (MSFC) on all nodes
- Installing HP 3PAR Cluster Extension Software
- HP 3PAR Cluster Extension maintenance
- Troubleshooting installation and maintenance problems
- Registering the resource type and resource extension DLL manually
- Unregistering the resource type and resource extension DLL manually
- Registering the CLX PowerShell Cmdlet DLL manually [Windows Server 2012 only]
- Unregistering the CLX PowerShell Cmdlet DLL manually [Windows Server 2012 only]
- Upgrading from HP 3PAR Cluster Extension 1.00.00 and 2.00.00 (Windows Server 2008/2008 R2)
- 3 Licensing
- 4 Support and other resources
- Glossary
- Index

HP 3PAR Cluster Extension Software
Installation Guide
Abstract
This guide contains detailed instructions for installing and removing HP 3PAR Cluster Extension Software. The intended audience
has independent knowledge of related software and of the HP 3PAR Storage System and its software.
HP Part Number: 5697-2264
Published: November 2012
Edition: 3
© Copyright 2012 Hewlett-Packard Development Company, L.P.
Confidential computer software. Valid license from HP required for possession, use or copying. Consistent with FAR 12.211 and 12.212, Commercial
Computer Software, Computer Software Documentation, and Technical Data for Commercial Items are licensed to the U.S. Government under
vendor's standard commercial license.
The information contained herein is subject to change without notice. The only warranties for HP products and services are set forth in the express
warranty statements accompanying such products and services. Nothing herein should be construed as constituting an additional warranty. HP shall
not be liable for technical or editorial errors or omissions contained herein.
Acknowledgments
Intel®, Itanium®, Pentium®, Intel Inside®, and the Intel Inside logo are trademarks or registered trademarks of Intel Corporation or its subsidiaries
in the United States and other countries.
Microsoft®, Windows®, Windows® XP, and Windows NT® are U.S. registered trademarks of Microsoft Corporation.
Adobe® and Acrobat® are trademarks of Adobe Systems Incorporated.
Oracle and Java are registered trademarks of Oracle and/or its affiliates.

Contents
1 Preparing to install HP 3PAR Cluster Extension................................................5
Ideal environment.....................................................................................................................5
Network communication requirements.........................................................................................5
Storage replication link requirements...........................................................................................5
Server cluster infrastructure requirements......................................................................................5
How HP 3PAR Cluster Extension Software interacts with its environment...........................................5
Failover function..................................................................................................................6
How HP 3PAR Cluster Extension utilizes virtual volumes.............................................................6
How HP 3PAR Cluster Extension stores information...................................................................6
General installation prerequisites................................................................................................6
Disk space and system memory requirements...........................................................................6
Required firmware and software.................................................................................................7
2 Installing HP 3PAR Cluster Extension Software ...............................................8
Prerequisites.............................................................................................................................8
Pre-installation procedures.........................................................................................................8
Checking the IP network setup and SAN configuration..............................................................8
Installing the multipath software.............................................................................................9
Installing and configuring the JRE...........................................................................................9
Installing HP 3PAR Command Line Interface (CLI).....................................................................9
Configuring the HP 3PAR storage system.................................................................................9
Creating hosts and setting host persona..................................................................................9
Creating virtual volumes and adding a LUN presentation........................................................10
Creating Remote Copy volume groups..................................................................................10
LUN presentation to the secondary virtual volume(s)...............................................................10
Installing Microsoft Failover Cluster (MSFC) on all nodes.........................................................10
Installing HP 3PAR Cluster Extension Software ...........................................................................11
HP 3PAR Cluster Extension maintenance....................................................................................13
Modifying the 3PAR Cluster Extension installation...................................................................13
Repairing the 3PAR Cluster Extension installation....................................................................14
Removing 3PAR Cluster Extension ........................................................................................14
Troubleshooting installation and maintenance problems...............................................................15
Registering the resource type and resource extension DLL manually...............................................19
Unregistering the resource type and resource extension DLL manually............................................20
Registering the CLX PowerShell Cmdlet DLL manually [Windows Server 2012 only]..........................20
Unregistering the CLX PowerShell Cmdlet DLL manually [Windows Server 2012 only].......................21
Upgrading from HP 3PAR Cluster Extension 1.00.00 and 2.00.00 (Windows Server 2008/2008
R2).......................................................................................................................................21
3 Licensing.................................................................................................22
Retrieving a license key...........................................................................................................22
Using AutoPass to retrieve permanent license keys.......................................................................22
Two types of licensing model supported by CLX..........................................................................22
Using the clxautopass command-line utility.................................................................................23
Installing instanton license keys............................................................................................23
Applying host based permanent license ....................................................................................23
Importing a license key from a file........................................................................................23
Using the HP 3PAR Cluster Extension registration tool ............................................................23
Applying Device based permanent license.................................................................................23
Applying Device based permanent license keys in clustered environment...................................23
Applying Device based permanent license keys in non-clustered environment.............................24
Removing license key..............................................................................................................24
Contents 3
4 Support and other resources......................................................................26
Contacting HP........................................................................................................................26
New and changed information in this edition.............................................................................26
Related information.................................................................................................................26
Whitepapers.....................................................................................................................26
HP websites......................................................................................................................26
Typographic conventions.........................................................................................................27
Glossary....................................................................................................28
Index.........................................................................................................29
4 Contents

1 Preparing to install HP 3PAR Cluster Extension
This chapter provides information about general environment considerations and pre-installation
requirements.
Ideal environment
The ideal configuration environment consists of at least five servers (two at each data center site
and one as an arbitrator at a third site) with separate, redundant communications links for cluster
heartbeats, client access, and a pair of HP 3PAR storage system with Remote Copy configuration.
All communications interfaces must be installed in pairs to serve as failover components, in order
to prevent single points of failure.
Network communication requirements
When using HP 3PAR Cluster Extension, note the following:
•Network communications links and components between the dispersed data centers must be
redundant and physically routed differently to prevent the “backhoe” issue that is created
when all links between data centers are cut together. This redundancy and routing is especially
important to prevent the split-brain syndrome that occurs when systems in both data centers
form new clusters and allow access to both copies of the data. Using redundant and separately
routed communication links and components, you can configure the failover behavior so that
the application service startup procedure stops if none of the remote cluster members can be
reached.
•Multi-pathing software must be used for host-to-storage connections.
Storage replication link requirements
To ensure reliable data backup between the local (primary) and remote (secondary) storage systems,
at least two HP 3PAR Remote Copy links must be available when the storage systems are connected
to provide redundancy and protection against single points of failure. Although communications
links can cover considerable distances, each network segment must be extended to the dispersed
data center to maintain a heartbeat among all servers. For extended distances, you must purchase
extender components to bundle the HP 3PAR Remote Copy links.
Server cluster infrastructure requirements
Use two cluster nodes at each site to give local application service failover procedures among
local cluster systems priority over remote, more time-consuming failover procedures. When failing
over, the software must reconfigure the storage systems to change the mirroring direction. At the
remote site, two systems should be available in case the primary failover system experiences a
hardware or power failure.
For windows, using a Node Majority quorum requires an odd number of cluster nodes, with at
least one system in a third location. Where as, using a Node Majority with file share witness
requires even number of cluster nodes at each site with file share witness server at the third location.
CAUTION: HP 3PAR Cluster Extension works with one server at each location, with a single I/O
path between the server and storage system, and a single link between storage systems. However,
any configuration with a single point of failure is not considered highly available or disaster tolerant.
HP does not support configurations with single points of failure; configurations with one system at
each location are supported only if there are no single points of failure.
How HP 3PAR Cluster Extension Software interacts with its environment
This section describes the ways in which HP 3PAR Cluster Extension interacts with its environment.
Ideal environment 5
Failover function
HP 3PAR Cluster Extension Software requires cluster software to automatically fail over among
systems on a local site or between sites. Because the software manipulates the application startup
process before storage system virtual volumes are accessed, it must be integrated as the first
resource (in the order of resources). The software must be installed on all servers in the cluster that
can run the application service.
How HP 3PAR Cluster Extension utilizes virtual volumes
To write to HP 3PAR Remote Copy paired virtual volumes, you must ensure that the paired virtual
volumes are in read/write mode. Volume group members (paired virtual volumes) are in read/write
mode on the source (primary) virtual volume only. The destination (secondary) virtual volume is in
read-only mode.
•In case of a failover, HP 3PAR Cluster Extension Software automatically changes the direction
of the mirrored pair. A reboot of the server is not necessary.
•In case of a disaster, the storage system can have several different states for volume group
members. HP 3PAR Cluster Extension Software determines whether those virtual volumes can
be accessed and made available to the application service.
How HP 3PAR Cluster Extension stores information
HP 3PAR Cluster Extension stores information about the application environment in an internal
object database and uses HP 3PAR InForm CLI to gather information about the state of the associated
volume group members. Information about the configured storage system environment and failover
behavior is transferred either directly by the cluster software or by gathering it from the user
configuration file. An internal object database provides the software with the format and default
value of supported parameters.
Virtual volume states are stored in the internal object database, which uses a rule engine to process
those states. The rule engine matches current volume group member states and configuration
parameters with a defined rule, stores it in the database, and invokes predefined actions. Those
actions prepare the volume group member virtual volumes to be enabled for access or stop the
application service startup process if the matching rule requires a stop.
General installation prerequisites
This section describes general installation prerequisites for HP 3PAR Cluster Extension.
Ensure that the following conditions are met before installing HP 3PAR Cluster Extension Software:
•HP Remote Copy links (including extender hardware) are redundant and bidirectional.
•Alternate I/O paths (network and storage links) between servers and the HP 3PAR storage
system are set up.
•Cluster and client networks are redundant.
•Cluster nodes can communicate with each other.
•The latest supported software and firmware versions, fixes, FC adapter firmware, and driver
versions for your servers and HP 3PAR storage systems are installed.
•The cluster nodes in your zoning configuration each recognize their respective (local) HP 3PAR
storage system, but not the remote HP 3PAR storage system.
Disk space and system memory requirements
•50 MB for the HP 3PAR Cluster Extension installation directory (%ProgramFiles%\Hewlett-
Packard\Cluster Extension 3PAR)
•At least 25 MB of system memory
6 Preparing to install HP 3PAR Cluster Extension


2 Installing HP 3PAR Cluster Extension Software
This chapter describes the installation of HP 3PAR Cluster Extension Software in Microsoft clustering
environments with HP 3PAR storage systems.
NOTE:
•You can install, uninstall, modify, and repair HP 3PAR Cluster Extension on all of the nodes
in a cluster by running the installer from one node in the cluster.
•For information on configuring HP 3PAR Cluster Extension in a Microsoft clustering environment,
see the HP 3PAR Cluster Extension Software Administrator Guide.
Prerequisites
Before installing HP 3PAR Cluster Extension, perform the following tasks:
1. Check “General installation prerequisites” (page 6) to ensure that your setup meets the
general pre-installation requirements.
2. Perform the required Windows pre-installation procedures. For instructions, see “Pre-installation
procedures” (page 8).
3. Download the HP 3PAR Cluster Extension Software installer.
a. Browse to https://h20392.www2.hp.com/portal/swdepot/displayProductInfo.do?
productNumber=CLX.
b. Click HP Storage > Storage Software in the product category list.
c. Follow the on-screen instructions to download the installer.
Pre-installation procedures
This section describes the procedures you must perform to prepare the data centers for HP 3PAR
Cluster Extension installation and configuration. Perform these procedures before you install HP
3PAR Cluster Extension.
1. “Checking the IP network setup and SAN configuration” (page 8)
2. “Installing the multipath software” (page 9)
3. “Installing and configuring the JRE” (page 9)
4. “Installing HP 3PAR Command Line Interface (CLI)” (page 9)
5. “Configuring the HP 3PAR storage system” (page 9)
6. “Creating hosts and setting host persona” (page 9)
7. “Creating virtual volumes and adding a LUN presentation” (page 10)
8. “Creating Remote Copy volume groups” (page 10)
9. “Installing Microsoft Failover Cluster (MSFC) on all nodes” (page 10)
Checking the IP network setup and SAN configuration
Verify that your IP network setup and SAN configuration meet the following requirements:
•HP 3PAR Cluster Extension requires a cluster environment in which one location failure will
not cause the entire cluster to shut down.
•In a Node Majority quorum cluster, all nodes must be distributed so that an equal number of
nodes are located in the local and remote data centers and an additional node in a third
location functions as a tiebreaker or arbitrator.
The third location can be a separate room in a separate fire protection zone with separate
power connections. The arbitrator node can act as a regular cluster node and can be connected
8 Installing HP 3PAR Cluster Extension Software

to one of the storage systems. However, a connection to either storage system is not necessary
for the node to act as a tiebreaker.
•SAN fabrics can be extended to allow array-based data replication. See the HP StorageWorks
SAN Design Reference Guide and the HP 3PAR Remote Copy Users Guide for supported SAN
extension configuration and instructions on setting up your HP 3PAR Remote Copy environment.
Installing the multipath software
You must use supported multipath software to take advantage of the I/O path failover feature.
Install the multipath software on the cluster system before connecting the system to the second I/O
path. For more information on installing the multipath software, see 3PAR Windows Implementation
Guide located at: www.hp.com/go/saw.
Installing and configuring the JRE
To install the product license using the HP AutoPass GUI, you must first install the JRE. See the CLX
SPOCK website for the supported JRE versions.
NOTE: This step is required only if you want to use the AutoPass GUI to manage license keys. If
you do not install the JRE, you can use the HP 3PAR Cluster Extension registration tool to install
license keys. For more information about using the registration tool, see “Using the HP 3PAR Cluster
Extension registration tool ” (page 23).
Installing HP 3PAR Command Line Interface (CLI)
HP 3PAR Cluster Extension communicates with the HP 3PAR storage system using the HP 3PAR
Command Line Interface (CLI). Ensure that you install and test the supported version of HP 3PAR
Command Line Interface (CLI) on all cluster nodes where Cluster Extension software will be installed.
For more information, see 3PAR CLI Administrator’s Manual located at www.hp.com/go/saw.
NOTE: While installing or upgrading HP 3PAR Command Line Interface (CLI) on Windows, the
environment variable Path will be updated with the CLI install directory. Occasionally, this change
does not take effect and you may have to re-login to Windows. HP recommends that you test the
CLI commands after you install or upgrade HP 3PAR CLI and try to re-login, if the commands fail
due to the binary not found error.
Configuring the HP 3PAR storage system
For detailed information on configuring the HP 3PAR storage system, see the 3PAR Management
Console User Guide or the 3PAR CLI Administrator’s Manual. You can also consult your HP service
representative for further assistance, including help with creating a geographically dispersed cluster
environment.
Creating hosts and setting host persona
Before you can assign disk storage to a cluster node, you must create a host entry for the locally
connected server/node on each HP 3PAR storage system. Each HP 3PAR storage system port
connecting to a host HBA port through a fabric or direct connection must be set to the correct host
persona. Host personas are a set of behaviors that permit hosts connected to FC ports on the HP
3PAR storage systems to deviate from the default host behavior. Host personas are tied to the host
name and identified by the host persona number. Use the HP 3PAR CLI commands or the HP 3PAR
Management Console to display, create, modify, and remove host personas. For more information,
see the HP 3PAR CLI Administrator’s Manual or the HP 3PAR Management Console Online Help.
HP recommends that you run HP 3PAR Host Explorer software on hosts connected to HP 3PAR
storage systems. When a host is created on a HP 3PAR storage system, unassigned WWNs are
presented to the storage system. If the Host Explorer agents are not running on the attached hosts,
the storage system cannot determine the WWNs assigned to the hosts, and you must manually
Pre-installation procedures 9

assign each WWN to a host. If Host Explorer agents are running, the HP 3PAR storage system
automatically groups WWNs for the host together, assisting with creating the host. The Host
Explorer agent runs as a service.
For more information on creating hosts and setting host persona, see the 3PAR Windows
Implementation Guide located at: www.hp.com/go/saw.
Creating virtual volumes and adding a LUN presentation
Create the storage (virtual volume) on a primary 3PAR storage system for your application data
using the HP 3PAR Management Console GUI or CLI and then export the virtual volumes (thin
provisioned or fully provisioned) to the cluster nodes connected to that 3PAR storage system. You
must create a replica of the created virtual volume on a back up storage system. The size of the
replica should match with the primary virtual volume, but they can have different RAID levels and
availability levels (for example, Cage versus Magazine).
For more information, see the 3PAR Management Console User Guide or the 3PAR CLI
Administrator’s Manual.
Creating Remote Copy volume groups
Before you can use HP 3PAR Cluster Extension, you must create a Remote Copy volume group that
includes your previously created virtual volumes. When you create a Remote Copy volume group,
the size of virtual volume(s) on the primary 3PAR storage system should match with the virtual
volume(s) on the secondary 3PAR storage system.
For detailed steps on creating a Remote Copy volume group, see the 3PAR Remote Copy User's
Guide.
LUN presentation to the secondary virtual volume(s)
Export the virtual volumes to the cluster nodes connected to the secondary 3PAR storage system.
When a Remote Copy volume group is started and virtual volumes are in "synced" state, the
secondary virtual volumes will be in read-only mode and data replication direction will be from
primary volume group to the secondary volume group.
Installing Microsoft Failover Cluster (MSFC) on all nodes
This section describes the steps for installing MSFC on the cluster nodes.
1. Before installing MSFC, create your disk configuration through the Disk Manager. If the disks
are not visible, re-scan your disks in the Disk Manager.
NOTE: You may need to shut down all but one server on the source storage system to
successfully configure your disks in the Disk Manager. Errors may occur during partitioning
and formatting because all servers that you present the same disk to on the local storage will
compete for access to the disk. This will not happen after the cluster software is installed and
you have formatted or partitioned the disk(s).
In rare cases, certain FC drivers will show disk access errors in the event log (event ID 51)
when the disk access is set to read-only. This can be ignored for read-only destination disks
and should not occur after HP 3PAR Cluster Extension is installed.
You must reboot the server(s) on the destination storage system or re-scan the disks in the Disk
Manager before and after installing the cluster software, and when you add storage in read-only
mode on the destination side.
2. Enable Microsoft Failover Cluster feature on all nodes and create the failover cluster using the
nodes.
10 Installing HP 3PAR Cluster Extension Software

NOTE: For Windows Server 2012, Failover Cluster Command Interface feature
(cluster.exe) is not installed by default when Failover Cluster feature is enabled. You need
to enable Failover Cluster Command Interface feature for cluster.exe to function. However,
cluster.exe is not required for CLX to function in Windows Server 2012.
In Server Core Cluster environment, enable RSAT-Clustering-PowerShell, [Display name Failover
Cluster Module for Windows PowerShell] for CLX installer to function.
3. Select the CLX supported Microsoft Failover Cluster Quorum model.
Quorum configuration which includes disk witness is not supported by HP 3PAR Cluster
Extension.
4. Run the Microsoft Cluster Validation Tool to validate your cluster.
If the Failover Cluster Validation Report lists a failed storage test, you can ignore this error.
For more information, see the following Microsoft TechNet document: http://
technet.microsoft.com/en-US/library/b153c638-ff53-4470-8b72-010046b8dcc6.aspx.
After the cluster software is installed, you can install HP 3PAR Cluster Extension Software on
all cluster nodes that have an FC connection to the local or remote 3PAR storage system and
are used to access storage resources on the 3PAR storage system. For installation instructions,
follow the procedure in “Installing HP 3PAR Cluster Extension Software ” (page 11).
If the system that acts as an arbitrator or tiebreaker is not connected to either 3PAR storage
system, you do not need to install the software on that cluster node.
Installing HP 3PAR Cluster Extension Software
HP 3PAR Cluster Extension Software provides a standard InstallShield wizard . The setup program
includes integration with Microsoft clustering and the generic software interface. The installer
includes the following features:
•Cluster resource type
Cluster Extension 3PAR resource type, (For Windows Server 2008/2008 R2/2012).◦
◦Cluster Extension 3PAR for VM Management resource type, (For Windows Server 2012
only).
◦PowerShell Cmdlets for creation of CLX resources for VM and CSV disk (For Windows
Server 2012 only).
•Command Line Interface (clx3parrun.exe)
•HP 3PAR Cluster Extension documentation
To install HP 3PAR Cluster Extension:
1. Ensure that the cluster service is running on all cluster nodes.
2. Ensure that the cluster management application is not running on the cluster nodes where you
plan to install HP 3PAR Cluster Extension.
NOTE: Failover Cluster Management is used on Windows Server 2008/2008 R2/2012.
3. Run the installer by doing one of the following:
•Double-click the HP 3PAR Cluster Extension installation package.
•Run the HP 3PAR Cluster Extension installation package from the command prompt. This
option is used for Server Core or Hyper-V Server installation. See Microsoft documentation
for more information on installing applications in a Server Core or Hyper-V Server
environment.
Installing HP 3PAR Cluster Extension Software 11
4. Follow the on screen instructions to accept the license agreement and enter your identification.
The Setup Type dialog box appears.
5. In the Setup Type dialog box, select one of the following options, and then click Next:
•Select Typical to install the resource DLLs, resource extension DLL, PowerShell Cmdlet DLL,
CLX command line interface (clx3parrun.exe) and documentation.
•Select Compact to install only the resource DLLs, resource extension DLL, PowerShell Cmdlet
DLL, and CLX command line interface (clx3parrun.exe).
•Select Custom to select specific components to install.
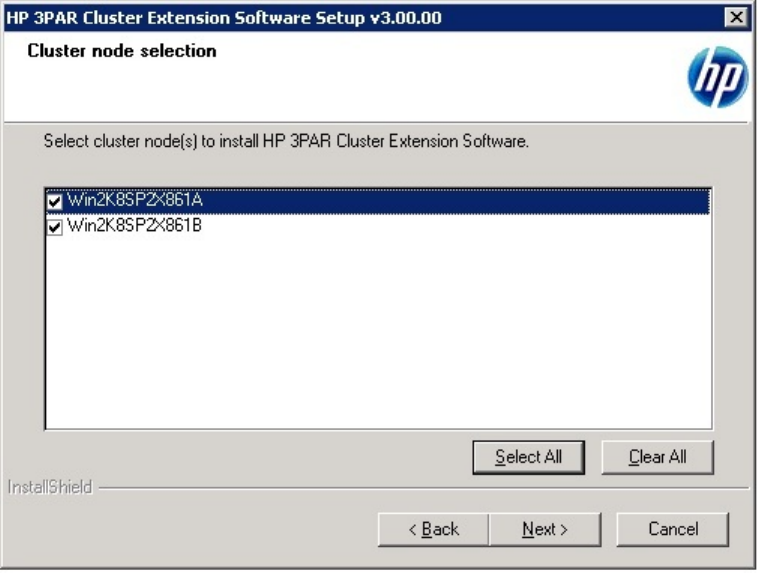
The Cluster node selection dialog box appears.
6. Select the cluster nodes for 3PAR Cluster Extension installation, and then click Next.
The Choose Destination Location dialog box appears.
12 Installing HP 3PAR Cluster Extension Software
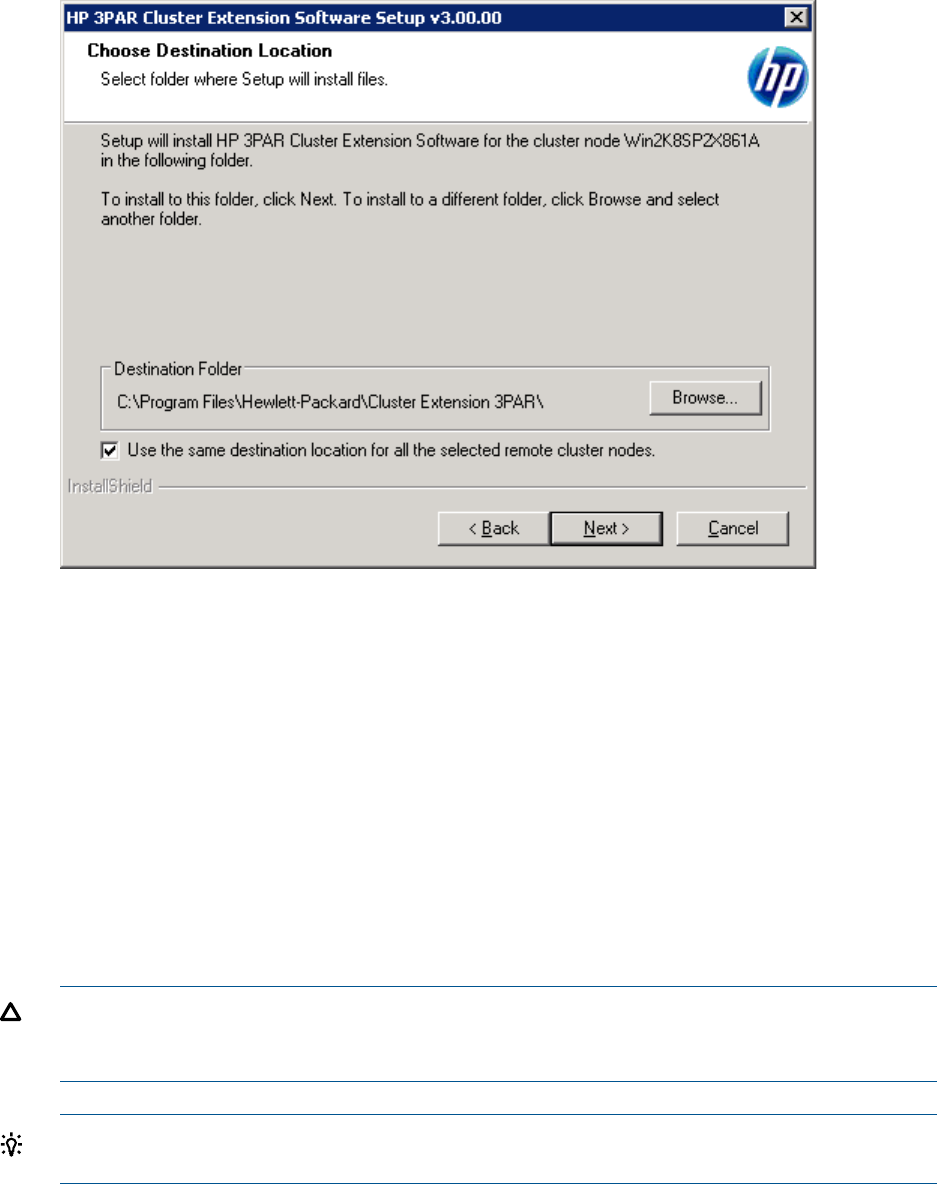
7. Accept the default location, or click Browse and specify a new destination.
8. Specify whether the installation directory will apply to all nodes selected for installation:
•If you want to use the same destination location for all nodes selected in the previous
step, select the Use the same destination location for all the selected remote cluster nodes
check box, and then click Next.
•If you do not want to use the same destination for all nodes selected in the previous step,
do not select the Use the same destination location for all the selected remote cluster nodes
check box, and click Next to continue.
9. For all remote cluster nodes: Accept the default location or enter a new location, and then
click Next.
10. The installer asks if you want to install a permanent license. Click Yes to install a permanent
license. Follow the instructions in to retrieve and install the license, and then click Finish.
CAUTION: You must perform the permanent license installation procedure separately on
each cluster node. Cluster-wide installation does not install a permanent license on remote
cluster nodes.
TIP: To start the configuration tool at the end of the installation, select the Launch Configuration
Tool check box before you click Finish.
11. To perform the required configuration steps, follow the instructions in the HP 3PAR Cluster
Extension Software Administrator Guide.
HP 3PAR Cluster Extension maintenance
Modifying the 3PAR Cluster Extension installation
Once 3PAR Cluster Extension is installed, you can modify the installation by adding or removing
components.
HP 3PAR Cluster Extension maintenance 13
1. Start the 3PAR Cluster Extension InstallShield wizard:
a. Depending on your version of Windows, do one of the following:
•Select Start→Control Panel→Programs and Features.
•For Server Core or Hyper-V Server: Run the 3PAR Cluster Extension installation
package from the command line. Continue to Step 2.
b. Select HP 3PAR Cluster Extension. Click Uninstall/Change.
The InstallShield maintenance window appears.
2. Select Modify, and then click Next.
The Select Features window appears.
3. Select the check boxes next to the features you want to install, clear the check boxes next to
the features you want to remove, and then click Next.
The Cluster node selection window appears.
4. Select the cluster nodes to modify, and then click Next.
The InstallShield wizard notifies you that remote maintenance is in progress. For each selected
cluster node, the wizard notifies you that maintenance was successful or unsuccessful.
5. For each remote maintenance confirmation window, click OK.
The Maintenance Complete window appears.
6. Click Finish to close the InstallShield wizard.
Repairing the 3PAR Cluster Extension installation
Once 3PAR Cluster Extension is installed, you can repair the installation.
1. Start the 3PAR Cluster Extension InstallShield wizard:
a. Depending on your version of Windows, do one of the following:
•Select Start→Control Panel→Programs and Features.
•For Server Core or Hyper-V Server: Run the 3PAR Cluster Extension installation
package from the command line. Continue to Step 2.
b. Select HP 3PAR Cluster Extension . Click Uninstall/Change.
The InstallShield maintenance window appears.
2. Select Repair, and then click Next.
The Cluster node selection window appears.
3. Select the cluster nodes to repair, and then click Next.
The InstallShield wizard notifies you that remote maintenance is in progress.
4. For each remote maintenance confirmation window, click OK.
The Maintenance Complete window appears.
5. Click Finish to close the InstallShield wizard.
Removing 3PAR Cluster Extension
1. Make sure that the Microsoft failover cluster GUI is not running.
14 Installing HP 3PAR Cluster Extension Software

2. Start the 3PAR Cluster Extension InstallShield wizard:
a. Depending on your version of Windows, do one of the following:
•Select Start→Control Panel→Programs and Features.
•For Server Core or Hyper-V Server: Run the 3PAR Cluster Extension installation
package from the command line. Continue to Step 3.
b. Select HP 3PAR Cluster Extension . Click Uninstall/Change.
The InstallShield maintenance window appears.
3. Select Remove, and then click Next.
The InstallShield wizard prompts you to confirm the uninstall request.
4. Click Yes to confirm the request.
The Cluster node selection window appears.
5. Select the cluster nodes for 3PAR Cluster Extension removal, and then click Next.
6. Do one of the following:
•Click Yes if you want to save the Cluster Extension configuration file. Enter a file name,
and then click Save.
•Click No.
7. Click OK.
The install wizard asks if you want to unregister the cluster resource type from all nodes in the
cluster. HP recommends that you do not unregister the cluster resource type until you are
uninstalling HP 3PAR Cluster Extension Software from the last node in the cluster. Do one of
the following:
•If you have not unregistered the cluster resource type, and this is the last node in the
cluster, click Yes.
•If you have unregistered the cluster resource type from one of the other cluster nodes,
click No.
The Uninstall Complete window appears.
8. Click Finish.
NOTE: On Server Core Failover cluster nodes, if user wants to back up the CLX configuration
data before CLX uninstallation, user needs to manually copy the file clx3PARcfg present at the
location <CLX Installation Path>\bin. CLX uninstallation process will not be able to back
up the configuration data during the uninstallation.
Troubleshooting installation and maintenance problems
This section helps you locate and identify installation and maintenance problems. The cluster-wide
installation feature allows you to install HP 3PAR Cluster Extension on multiple nodes in a cluster
by running the installer from one node in the cluster. Cluster-wide installation is no different than
local installation on each individual node.
Cluster-wide installation can fail to obtain the remote installation status if a remote node becomes
unreachable. This can happen if the network connection or remote cluster node fails. If this type
of failure occurs, find the error code in the file %WINDIR%\CLXSetup_nodename.result,
available on the unreachable node, and then locate the error in Table 1 (page 16).
In addition to showing the results of the installation process, the .result file helps you identify
the status of remote maintenance if cluster level maintenance (modify, repair, remove) fails.
Troubleshooting installation and maintenance problems 15

NOTE: If the .result file is not found on the remote cluster node, run the HP 3PAR Cluster
Extension setup by logging on to the remote cluster node locally.
If you receive an error similar to Another installation is already in progress…,
then stop the process IDriver.exe (and msiexec.exe) using task manager, or reboot the node
and rerun the HP 3PAR Cluster Extension setup locally.
Example
If you start a cluster-wide installation on Node1 of a 3-node cluster, with all nodes selected for
installation, and the network connection to Node2 and Node3 is lost by Node1, then the
cluster-wide installation process cannot get the status of the remote node installation. In this situation,
use the %WINDIR%\CLXSetup_nodename.result file to obtain the remote node installation
status. To check the .result file for the remote nodes, log on to Node2 and Node3, and access
the file %WINDIR%\CLXSetup_nodename.result on each node. Compare the errors in the
file to the information in Table 1 (page 16).
NOTE: If cluster installation fails with the message Could not get the system drive
for the cluster node... or Setup was unable to run the installation in
remote machine..., confirm that the WMI service is running using the Microsoft Management
Console. To use the HP 3PAR Cluster Extension cluster-wide installation feature, the WMI service
must be running.
On Windows Server 2012, installation of the CLX product would register the CLX resource type
and registration of resource type copies the CLX resource DLL files clxs3parmscs.dll and
clx3parvmmscs.dll to %SystemDrive%\Windows\Cluster folder on all the cluster nodes.
Uninstallation of CLX will not remove these files but will be renamed. Once the uninstallation is
complete, the files should be manually removed.
After the user has completed the uninstallation of the CLX product on all the cluster nodes, if any
CLX resources (Cluster Extension 3PAR or Cluster Extension 3PAR for VM Management) exist in
the cluster, then, next time when the user completes the installation of the CLX product on all the
cluster nodes, the cluster service must be restarted on all the cluster nodes.
On Windows Server 2012 Server Core, apart from failover cluster, the feature
RSAT-Clustering-PowerShell should be installed whose display name is Failover Cluster Module for
Windows PowerShell. This feature is required by the CLX installer for registration and un-registration
of CLX resources during the installation.
If you are installing CLX product on a cluster whose nodes contain both Server Core and Non-Server
Core, then you should install the CLX product from the Non-Server Core cluster node.
Table 1 Windows remote installation error codes
Corrective actionDescriptionERROR code
N/AInstallation was successful on the local
cluster node.
ERROR_INSTALLATION_SUCCESS
N/AHP 3PAR Cluster Extension was
successfully removed from the local
cluster node.
ERROR_REMOVAL_SUCCESS
N/AHP 3PAR Cluster Extension was
successfully repaired on the local
cluster node.
ERROR_REPAIR_SUCCESS
N/AHP 3PAR Cluster Extension was
successfully modified on the local
cluster node.
ERROR_MODIFY_SUCCESS
Run the setup on the local cluster node.Setup failed on the local cluster node.ERROR_READ_INPUT_FILE_FAILED
The silent input file is corrupt.
16 Installing HP 3PAR Cluster Extension Software

Table 1 Windows remote installation error codes (continued)
Corrective actionDescriptionERROR code
Run the setup on the local cluster node.Setup failed on the local cluster node.ERROR_INVALID_HANDLE
Internal Error. Could not invoke the DLL.
Run the setup on the local cluster node.Setup failed on the local cluster node.SILENT_INPUT_FILE_CORRUPTED
The silent input file is corrupted or
could not be found.
Run the setup on the local cluster node.Setup failed on the local cluster node.LOCAL_NODE_NAME_NOT_FOUND
Could not find the local node name.
Register the resource type by running
the following cluster command:
Installation completed on the local
cluster node.
ERROR_CLXMSCS_REGISTER_FAILED
cluster restype "Cluster
Setup was unable to register the
resource type Cluster Extension 3PAR. Extension 3PAR" /create
/dll:clx3parmscs.dll
/type:"Cluster Extension
3PAR". For more information, see
“Registering the resource type and
resource extension DLL manually”
(page 19)
Register the resource extension DLL by
running the following cluster command:
Installation completed on the local
cluster node.
ERROR_CLXMSCSEX_REGISTER_FAILED
Cluster /
Setup was unable to register the HP
3PAR Cluster Extension DLL. regadminext:clx3parmscsex.dll.
For more information, see “Registering
the resource type and resource
extension DLL manually” (page 19)
Run the setup on the local cluster node.Setup failed on the local cluster node.ERROR_INSTALLDIR_NOT_FOUND
Setup was not able to get the
INSTALLDIR value.
Run the setup on the local cluster node.Setup failed on the local cluster node.ERROR_CLUS_SERVICE_UNKNOWN
Setup is not able to determine whether
the cluster service is running.
Start the cluster service on the local
node and run the HP 3PAR Cluster
Extension setup.
Setup failed on the local cluster node.
The cluster service is not running.
Please start the cluster service.
ERROR_CLUS_SERVICE_NOT_RUNNING
Run the setup on the local cluster node.Installation failed on the local cluster
node. The PCF file could not be
created.
ERROR_PCF_CREATION_FAILED
Check the eventlog for more
information, and then run the HP 3PAR
Setup completed on the local cluster
node.
The AutoPass package was not
installed properly. HP 3PAR Cluster
ERROR_AUTOPASS_INSTALL_FAILED
Cluster Extension setup with the repair
option.
Extension will not function correctly until
the AutoPass package is properly
installed.
Install the instant-on license on the local
node by running the following
Installation completed on the local
cluster node.
ERROR_CLXAUTOPASS_INSTANTON_FAILED
command: clxautopass.exe
–installinstanton
Setup was unable to run
clxautopass.exe
–installinstanton on the local
cluster node.
Troubleshooting installation and maintenance problems 17

Table 1 Windows remote installation error codes (continued)
Corrective actionDescriptionERROR code
Make sure msiexec.exe can be
executed, and then run the HP 3PAR
Uninstall completed on the local cluster
node.
Setup was unable to run the
msiexec.exe command.
ERROR_AUTOPASS_REMOVAL_FAILED
Cluster Extension setup on the local
cluster node.
Run the setup on the local cluster node.Uninstall failed on the local cluster
node.
ERROR_RESOURCE_STATE_UNKNOWN
Setup is not able to determine whether
a HP 3PAR Cluster Extension resource
is still running.
Remove all Cluster Extension 3PAR
-type resource(s) from this cluster, and
Uninstall failed on the local cluster
node.
ERROR_RESOURCE_EXISTS
then run the HP 3PAR Cluster Extension
setup.
Setup is unable to remove the HP 3PAR
Cluster Extension resource type. HP
3PAR Cluster Extension resource(s) are
still configured in this cluster.
Remove all Cluster Extension 3PAR
-type resource(s) from this cluster, and
Uninstall failed on the local cluster
node.
ERROR_RESOURCE_STATE_ONLINE
then run the HP 3PAR Cluster Extension
setup.
A HP 3PAR Cluster Extension resource
is still online.
Unregister the resource extension DLL
by running the following cluster
Uninstall failed on the local cluster
node.
ERROR_CLXMSCSEX_UNREGISTER_FAILED
command: Cluster
Setup was unable to unregister the HP
3PAR Cluster Extension DLL. /unregadminext:clx3parmscsex.dll.
For more information, see
“Unregistering the resource type and
resource extension DLL manually”
(page 20)
Delete the file clxpcf from
INSTALL_DIR\bin.
Uninstall completed on the local cluster
node.
Setup was unable to delete the PCF file.
ERROR_PCF_REMOVAL_FAILED
Remove the environment variable
HPCLX_3PAR_PATH from the local
cluster node.
Uninstall completed on the local cluster
node.
Could not unset the path variables.
CLXUNSETPATH_FAILED
Delete the clxeventlog.dll from
the following registry entry:
Uninstall completed on the local cluster
node.
Could not delete clxeventlog.dll
from the following registry entry:
ERROR_DELETE_EVENTLOG_DLL_FAILED
HKEY_LOCAL_MACHINE\SOFTWARE\
Microsoft\Windows\
CurrentVersion\SharedDlls
HKEY_LOCAL_MACHINE\SOFTWARE\
Microsoft\Windows\
CurrentVersion\SharedDlls
Delete clx3parmscs.dll and
clx3parmscsex.dll from the
following registry entry:
Uninstall completed on the local cluster
node.
Could not delete clx3parmscs.dll
and clx3parmscsex.dll from the
following registry entry:
ERROR_UNINSTALL_DRS_FILES_FAILED
HKEY_LOCAL_MACHINE\SOFTWARE\
Microsoft\Windows\
CurrentVersion\SharedDlls
HKEY_LOCAL_MACHINE\SOFTWARE\
Microsoft\Windows\
CurrentVersion\SharedDlls
Register the Resource type “Cluster
Extension 3PAR for VM Management”.
Installation completed on cluster node.
Setup was unable to register resource
ERROR_CLXMSCS_3PAR_VMMGMT_REGISTER_FAILED
For more information, see “Registering
18 Installing HP 3PAR Cluster Extension Software

Table 1 Windows remote installation error codes (continued)
Corrective actionDescriptionERROR code
the resource type and resource
extension DLL manually” (page 19)
type Cluster Extension 3PAR for VM
Management.
Register the CLX Cmdlet DLL. For more
information, see “Registering the CLX
Installation completed on cluster node.
Setup was unable to register CLX 3PAR
Cmdlets DLL.
ERROR_3PAR_VMMGMT_CMDLET_REGISTER_FAILED
PowerShell Cmdlet DLL manually
[Windows Server 2012 only]”
(page 20)
Unregister the CLX Cmdlet DLL. For
more information, see “Unregistering
Uninstallation completed on cluster
node. Setup was unable to unregister
CLX 3PAR Cmdlets DLL.
ERROR_3PAR_VMMGMT_CMDLET_UNREGISTER_FAILED
the resource type and resource
extension DLL manually” (page 20)
Registering the resource type and resource extension DLL manually
If a problem occurs during installation, execute the following commands from the command line
to register the resource type from any one of the cluster nodes:
1. Confirm that the resource type is registered with Windows cluster by entering the following
cluster command:
cluster resourcetype
OR
Using PowerShell Cmdlet
Get-ClusterResourceType
If the resource type is registered, the output includes the following information:
Display Name Resource Type Name
Cluster Extension 3PAR Cluster Extension 3PAR
If the resource type is not registered using cluster command:
a. Enter cluster resource type "Cluster Extension 3PAR" /CREATE /
DLLNAME:clx3parmscs.dll /TYPE:"Cluster Extension 3PAR".
b. Run the cluster resourcetype command again to verify that the resource type is
now registered.
Using PowerShell Cmdlet:
Add-ClusterResourceType -Name "Cluster Extension 3PAR" -Dll
"c:\windows\system32\clx3parmscs.dll" -DisplayName "Cluster Extension
3PAR"
2. Registration of resource extension DLL should not be performed on server core environments.
Check whether the cluster administrator extension DLL is registered with Windows cluster to
provide the Cluster Administrator GUI functionality by entering:
cluster resourcetype "Cluster Extension 3PAR" /PROPERTIES
If the resource extension DLL is registered, the output is displayed as shown below:
M Cluster Extension 3PAR AdminExtensions
{C977EFB9-B640-4E6C-9473-ECE586EC2074}
This command should be executed on all cluster nodes.
If the resource extension DLL is not registered:
a. Enter cluster/REGADMINEXT:clx3parmscsex.dll.
b. Run the cluster resourcetype command again to verify that the DLL is now
registered.
PowerShell Cmdlets can also be used to perform the above steps.
Registering the resource type and resource extension DLL manually 19

To check if the resource extension DLL is registered, run the following command:
(Get-ClusterResourceType "Cluster Extension 3PAR").AdminExtensions
If the resource extension DLL is registered, the output will show the GUID of the admin extension
as shown
{C977EFB9-B640-4E6C-9473-ECE586EC2074}
If resource extension DLL is not registered
1. Run the command regsvr32 c:\windows\system32\clx3parmscsex.dll. Run this
command on all the cluster nodes.
2. Run the command on the PowerShell environment:
(Get-ClusterResourceType "Cluster Extension 3PAR").AdminExtensions
= "{C977EFB9-B640-4E6C-9473-ECE586EC2074}"
This command should be executed only, from one of the cluster nodes.
Unregistering the resource type and resource extension DLL manually
Enter the following command to unregister the resource extension DLL:
cluster /UNREGADMINEXT:clx3PARmscsex.dll
Enter the following command to unregister the resource type:
cluster resourcetype "Cluster Extension 3PAR" /delete
Using the PowerShell
Enter the following command to unregister the resource extension DLL:
1. Run the command regsvr32 /u c:\windows\system32\clx3parmscsex.dll. This
should be executed on all the cluster nodes.
2. Run the command on the PowerShell Environment (Get-ClusterResourceType "Cluster
Extension 3PAR").AdminExtensions = ""
This should be executed only from one of the cluster nodes.
Enter the command to unregister the resource type from one of the cluster nodes.
Remove-ClusterResourceType -Name "Cluster Extension 3PAR"
NOTE: On Windows Server 2012, another cluster resource of type "Cluster Extension 3PAR for
VM Management" is also created. If an user experiences issues in registration and unregistration
of this resource type, follow the steps mentioned in “Registering the resource type and resource
extension DLL manually” (page 19) and “Unregistering the resource type and resource extension
DLL manually” (page 20) to overcome the issues.
Registering the CLX PowerShell Cmdlet DLL manually [Windows Server
2012 only]
If a problem occurs during installation, execute the following commands from the command line
on all the cluster nodes to register the PowerShell Cmdlets DLL.
Check if Cmdlet is registered or not. Launch PowerShell Window. Run the Command
Get-PSSnapin -Registered
If the Cmdlet is registered then the following output will be displayed:
Name : CLX3PARCmdletsSnapin
PSVersion : 3.0
Description : This PowerShell SnapIn provides cmdlets for helping the user manage CLX 3PAR with
Microsoft Windows PowerShell.
20 Installing HP 3PAR Cluster Extension Software

If the Cmdlet is not registered, then you have to manually register the Cmdlet DLL using the following
command from the CLX product bin directory:
C:\Windows\Microsoft.NET\Framework64\v4.0.30319\InstallUtil.exe
CLX3PARCmdlets.dll
Unregistering the CLX PowerShell Cmdlet DLL manually [Windows Server
2012 only]
If a problem occurs during uninstallation, execute the following commands from the command line
on all the cluster nodes to unregister the PowerShell Cmdlets DLL.
Check if Cmdlet is registered or not. Launch PowerShell Window. Run the command Get-PSSnapin
-Registered
If the Cmdlet is registered then the following output will be displayed:
Name : CLX3PARCmdletsSnapin
PSVersion : 3.0
Description : This PowerShell SnapIn provides cmdlets for helping the user manage CLX 3PAR with
Microsoft Windows PowerShell
If you want to manually unregister the Cmdlet DLL, use the following command from the CLX product
bin directory:
C:\Windows\Microsoft.NET\Framework64\v4.0.30319\InstallUtil.exe /u
CLX3PARCmdlets.dll
Upgrading from HP 3PAR Cluster Extension 1.00.00 and 2.00.00
(Windows Server 2008/2008 R2)
IMPORTANT: Before starting the upgrade procedure, save the HP 3PAR Cluster Extension
configuration file, if it exists.
You can save the file by using the Export feature in the HP 3PAR Cluster Extension configuration
tool. For instructions on saving the file, see the HP 3PAR Cluster Extension Administrator Guide.
After completing the upgrade procedure in this section, use the Import feature in the HP 3PAR
Cluster Extension configuration tool to import the saved configuration file.
Perform the upgrade procedure on each node locally. HP 3PAR Cluster Extension does not support
remote upgrades.
To upgrade from HP 3PAR Cluster Extension 1.00.00 and 2.00.00:
1. Download the HP 3PAR Cluster Extension Software from https://h20392.www2.hp.com/
portal/swdepot/displayProductInfo.do?productNumber=CLX.
2. Move all of the applications from the current node to any other node.
3. Double-click the HP 3PAR Cluster Extension installation package and then follow the onscreen
instructions.
4. Restart the cluster service on the node.
5. Repeat this procedure for all other nodes that are running HP 3PAR Cluster Extension 1.00.00
and 2.00.00.
Unregistering the CLX PowerShell Cmdlet DLL manually [Windows Server 2012 only] 21

3 Licensing
This chapter explains how to obtain and install the product license keys. A license key is required
to use all of the product features. The License Entitlement Certificate provides instructions on how
to obtain a license key. In the meantime, a temporary, instant-on license key is available so that
you can immediately start using all of the features. The instant-on key is valid for 60 days from the
first use. Upon expiration of the instant-on license key, the features will be disabled. You must
obtain a permanent license key to continue using the features.
Retrieving a license key
When you purchase this product, you receive a License Entitlement Certificate. You will need
information from this certificate to retrieve and enter your license keys.
You can use any of the following methods to request a license key:
•Obtain a license key from http://www.hp.com/software/licensing.
•Use AutoPass to retrieve permanent license keys. See “Using AutoPass to retrieve permanent
license keys” (page 22).
•Fax the Password Request Form that came with your License Entitlement Certificate. See the
certificate for fax numbers in your area.
•Call or email the HP Password Center. See the certificate for telephone numbers in your area
or email addresses.
Using AutoPass to retrieve permanent license keys
To retrieve permanent license keys:
1. Start AutoPass, located in the CLX product's bin directory:
clxautopass -ovlicensemgr
AutoPass requires that a JRE and/or SDK be installed on the cluster node. See the CLX SPOCK
website for the latest supported JRE versions.
2. Take one of the following actions:
•If you have an Internet connection, click Retrieve/Install License Key.
•If you installed the product on a system that does not have an Internet connection, click
Retrieve License Key through Email/Fax. When you receive the license key in email, start
AutoPass and click Install/Restore License Key.
3. For MSFC environments only: After installing the permanent license keys, restart the product
so that the license will be recognized. You can restart the product by restarting the Microsoft
cluster service.
Two types of licensing model supported by CLX
There are two types of licensing model supported by CLX.
1. Host based permanent license: In this licensing model, HP 3PAR CLX license needs to be
procured for each node that uses HP 3PAR Cluster Extension (CLX). If Microsoft Failover Cluster
has [Nh] number of nodes which has CLX software installed connected to [Na] number of
storage arrays, you need to procure [Nh] number of host based permanent licenses to make
CLX work. For example, if a user has five cluster nodes having CLX installed, he needs to have
five host based CLX licenses – one for each node. Applying Host based permanent license is
a node specific operation. For more information, see “Applying host based permanent license
” (page 23). This licensing model is supported since previous releases.
2. Device based permanent license: In this newly introduced licensing model, user needs to
procure licenses for each storage device connected to the failover cluster independent of the
22 Licensing
number of hosts to which the storage devices are connected. For example, if the failover
Cluster has [Nh] number of nodes which has CLX software installed and connected to [Na]
number of storage devices, user needs to procure only [Na] number of device based permanent
licenses – one for each storage device. Using a particular CLX utility, user can import these
licenses in all the nodes of the cluster at once. See “Applying Device based permanent license”
(page 23) to know how to apply the device based licenses in the CLX setup. User has to
choose one of the CLX licensing models in his CLX setup and he needs to decide based on
the price set for each node or device based CLX license and the number of host cluster nodes
and storage arrays, user has in his CLX setup.
Using the clxautopass command-line utility
In addition to using the clxautopass command to start AutoPass, you can also use the command
at the CLI to install the instant-on license and import a password from the license key file.
Installing instanton license keys
If the installation process failed to install the license, you can use the command line to install it.
First repair any conditions that may have caused the license installation to fail, and then run the
following command to install the license:
clxautopass -installinstanton
Applying host based permanent license
If you have procured host based permanent license, you can use one of the following options to
apply the host based permanent license to individual hosts.
Importing a license key from a file
When you receive the license key file by email, import the license key by running the following
command:
clxautopass -addpasswords <license file path>
Where license file path is the full (absolute) path name to the license key file.
This command is equivalent to using the Install/Restore License Key from file option in AutoPass.
Using the HP 3PAR Cluster Extension registration tool
To install a license key:
1. For Windows Server 2008/2008 R2: Select Start→All Programs→Hewlett-Packard→HP
3PAR Cluster Extension Software→HP 3PAR Cluster Extension Registration Tool.
For Windows Server 2012: Select Start→All Apps→Hewlett-Packard→HP 3PAR Cluster
Extension Registration Tool.
2. Click Browse.
3. Browse to your license key file, and then click Install License.
4. Click Close when you are done installing the license keys.
Applying Device based permanent license
If you have procured device based permanent license, use the following procedures to apply device
based permanent license key in clustered and non-clustered environment.
Applying Device based permanent license keys in clustered environment
If you have procured the device based license for HP 3PAR CLX, then you can use this tool to apply
license to all the cluster nodes automatically running from one of the cluster nodes. This means
Using the clxautopass command-line utility 23

that, if you run this tool from any one of the cluster nodes with the following option, permanent
license in all other cluster nodes will be imported automatically.
Usage:
ClxDeviceLicenseRegistration[.exe] {[-f <License File 1> <License File
2>>] | [-s <License File 1>]} [. . .<License File n>]
Options:
•-f : Import the device based permanent licenses using multiple license files. This option has to
be used to apply the licenses for the first time or can be used later, but minimum two device
based permanent license files should be provided.
•-s : Import the device based permanent license using single license file. This option has to be
used subsequently to import the license for a device purchased only if you have already
applied device based permanent licenses earlier for different devices in the same Microsoft
failover cluster.
[License File] : Device based permanent license file name with path.
Examples:
ClxDeviceLicenseRegistration.exe -f <License File 1> <License File 2>
[ . . .<License File n>]
ClxDeviceLicenseRegistration.exe -s <License File 1> > [ . . . <License
File n>]
Where License File is a device based license file name with path. At least two or more valid
device based permanent license files should be provided.
This command is equivalent to manually importing the HP 3PAR CLX device based permanent
license in each individual cluster node one by one using either clxautopass utility or the HP 3PAR
Cluster Extension registration tool.
NOTE: This tool is applicable only if you procure device based permanent licenses. This tool
should not be used if you procure node based permanent licenses.
Applying Device based permanent license keys in non-clustered environment
If CLX3PARrun.exe is used for failover operation in a non-clustered environment and if you have
purchased device based permanent licenses, follow the procedure for permanent license installation.
Once you procure the device based license file, import the license key by running the following
command:
clxautopass -addpasswords <Device based license File path>
Where license File path is the full (absolute) path name to the license key file.
Removing license key
1. Start AutoPass, located in the product's bin directory:
clxautopass -ovlicensemgr
2. Click Remove License Key.
24 Licensing
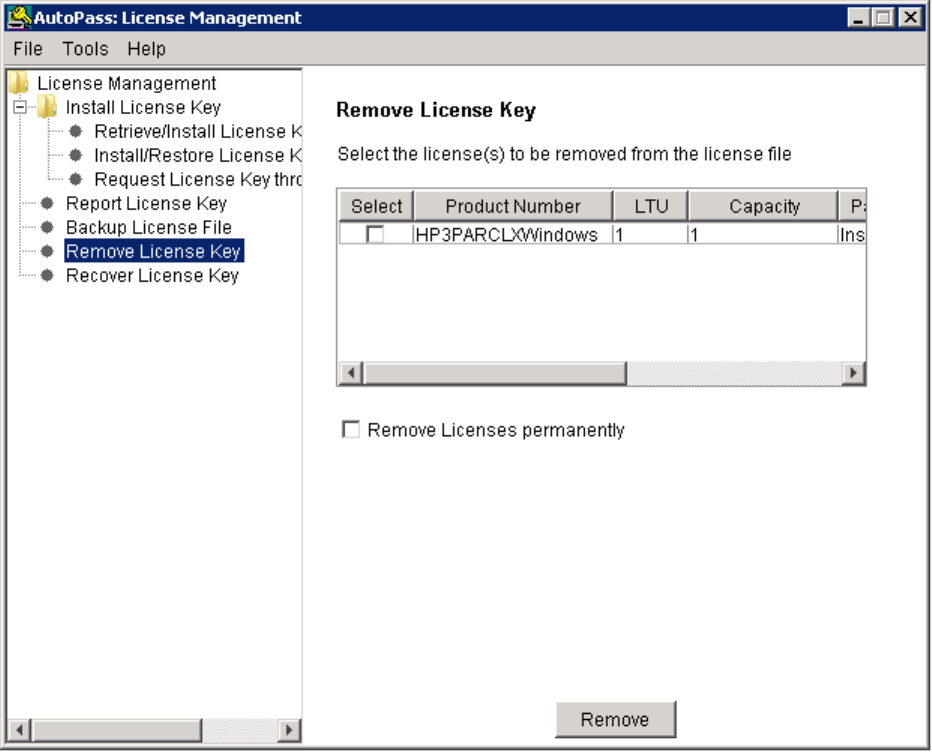
3. Select any installed license key, and then click Remove.
Removing license key 25

4 Support and other resources
Contacting HP
For worldwide technical support information, see the HP support website:
http://www.hp.com/support
Before contacting HP, collect the following information:
•Product model names and numbers
•Technical support registration number (if applicable)
•Product serial numbers
•Error messages
•Operating system type and revision level
•Detailed questions
New and changed information in this edition
•HP 3PAR Cluster Extension support for Windows Server 2012.
•HP 3PAR Cluster Extension support for Windows Server 2003 is not available in this release.
Related information
The following documents [and websites] provide related information:
•HP 3PAR Cluster Extension Software Administrator Guide
•HP 3PAR Cluster Extension Software Release Notes
You can find these documents on the Manuals page of the HP Business Support Center website:
http://www.hp.com/support/manuals
In the Storage section, click Storage software and then select your product.
Whitepapers
The following white papers are available at www.hp.com/storage/whitepapers:
•Live Migration across data centers and disaster tolerant virtualization architecture with HP
StorageWorks Cluster Extension and Microsoft Hyper-VTM
•Implementing HP StorageWorks Cluster Extension for Windows in a VMware Virtual Machine
NOTE: The above whitepapers are specific to HP P6000 (EVA) and HP P9000 (XP) storage
systems, but the functionally is also applicable for HP 3PAR storage systems.
HP websites
For additional information, see the following HP websites:
•http://www.hp.com
•http://www.hp.com/go/storage
•http://www.hp.com/service_locator
•http://www.hp.com/support/manuals
•Single Point of Connectivity Knowledge (SPOCK)
26 Support and other resources

•http://www.hp.com/support/downloads
•http://www.hp.com/storage/whitepapers
Typographic conventions
Table 2 Document conventions
ElementConvention
Cross-reference links and e-mail addressesBlue text: Table 2 (page 27)
Website addressesBlue, underlined text: http://www.hp.com
Bold text •Keys that are pressed
•Text typed into a GUI element, such as a box
•GUI elements that are clicked or selected, such as menu
and list items, buttons, tabs, and check boxes
Text emphasisItalic text
Monospace text •File and directory names
•System output
•Code
•Commands, their arguments, and argument values
Monospace, italic text •Code variables
•Command variables
Emphasized monospace textMonospace, bold text
WARNING! Indicates that failure to follow directions could result in bodily harm or death.
CAUTION: Indicates that failure to follow directions could result in damage to equipment or data.
IMPORTANT: Provides clarifying information or specific instructions.
NOTE: Provides additional information.
TIP: Provides helpful hints and shortcuts.
Typographic conventions 27

Glossary
CLI Command-line interface. An interface comprised of various commands which are used to control
operating system responses.
DLL Dynamic-link library.
failover A role-reversal process where the backup Remote Copy volume group is converted to the primary
Remote Copy volume group.
FC Fibre Channel. A network technology primarily used for storage networks.
GUI Graphical User Interface.
heartbeat A periodic synchronization signal issued by cluster software or hardware to indicate that a node
is an active member of the cluster.
host A computer that runs user applications and uses (or potentially uses) one or more virtual disks
that are created and presented by the array controller.
JRE Java Runtime Environment.
LUN Logical unit number.
MSFC Microsoft Failover Cluster
quorum In Windows clustering: A cluster resource that has been configured to control the cluster,
maintaining essential cluster data and recovery information. In the event of a node failure, the
quorum acts as a tiebreaker and is transferred to a surviving node to ensure that data remains
consistent within the cluster.
SAN Storage area network. A network of storage devices available to one or more servers.
split-brain
syndrome
A state of data corruption that can occur if a cluster is re-formed as subclusters of nodes at each
site, and each subcluster assumes authority, starting the same set of applications and modifying
the same data.
SPOCK Single Point of Connectivity Knowledge website. SPOCK is the primary portal used to obtain
detailed information about supported HP StorageWorks product configurations.
storage system A synonym of storage array and virtual array. A group of disks in one or more disk enclosures
combined with controller software that presents disk storage capacity as one or more virtual disks.
virtual volume A virtual storage unit created by mapping data from one or more logical disks.
volume group A group of virtual volumes that are logically related and for which there is a cross-volume ordering
of writes.
WWN A 64- or 128-bit identifier that uniquely identifies the address of a component on the fabric.
28 Glossary

Index
A
adding LUN presentations, 10
AutoPass command-line utility, 23
AutoPass license program, 22
C
clxautopass command-line utility, 23
Configuring HP 3PAR storage system, 9
contacting HP, 26
conventions
document, 27
text symbols, 27
creating
virtual volumes, 10
volume groups, 10
creating hosts, 9
D
document
conventions, 27
related information, 26
documentation
HP website, 26
H
help
obtaining, 26
HP
technical support, 26
HP 3PAR Cluster Extension
Failover function, 6
storing information, 6
Virtual volume utilization, 6
I
installation
HP 3PAR Cluster Extension, 11
Installation prerequisites
Disk space and system memory, 6
Firmware and software, 6
Installing HP 3PAR Cluster Extension, 8
Command Line Interface , 9
JRE , 9
multipath , 9
Installing MSFC, 10
L
Licensing
icensing models, 22
Retrieving a license key, 22
licensing
Device based permanent license, 23
Host based permanent license, 23
installing license keys, 23
registration tool (Windows Server 2008/2008 R2/
2012), 23
removing license key, 24
retrieving license keys, 22
M
Modifying
3PAR CLuster Extension installation, 13
P
Preparing to install HP 3PAR Cluster Extension
Ideal environment, 5
Network communication requirements, 5
Server cluster infrastructure requirements, 5
Storage replication link requirements, 5
R
Registering
resource extension DLL, 19
resource type, 19
related documentation, 26
Removing
3PAR Cluster Extension, 14
Repairing
3PAR CLuster Extension installation, 14
retrieving license keys, 22
S
setting host persona, 9
symbols in text, 27
T
technical support
HP, 26
service locator website, 26
text symbols, 27
Troubleshooting, 15
troubleshooting
Windows error codes, 19
typographic conventions, 27
U
Uninstalling
3PAR Cluster Extension, 14
Unregistering
resource extension DLL, 20
resource type, 20
W
websites
HP , 26
product manuals, 26
29
