Hp E Commerce Server Accelerator Sa7120 Users Manual
Hp-E-Commerce-Server-Accelerator-Sa7100-Users-Manual-155727 hp-e-commerce-server-accelerator-sa7100-users-manual-155727
2015-01-05
: Hp Hp-E-Commerce-Server-Accelerator-Sa7120-Users-Manual-155728 hp-e-commerce-server-accelerator-sa7120-users-manual-155728 hp pdf
Open the PDF directly: View PDF ![]() .
.
Page Count: 192 [warning: Documents this large are best viewed by clicking the View PDF Link!]
- hp e-commerce server accelerator sa7100/sa7120
- Table of Contents
- Introduction
- Installation and Initial Configuration
- Theory of Operation
- Security
- Single Server Acceleration
- Multiple Servers
- Working with Internet Traffic Management (ITM) Devices
- Multiple SA7100/SA7120s and Cascading Processing
- Keys and Certificates
- Redirection: Clients and Unsupported Ciphers
- Client Authentication
- SSL Processing
- Failure Conditions, Fail-safe, and Fail-through
- Scenarios
- Command Reference
- Remote Management
- Alarms and Monitoring
- Software Updates
- Troubleshooting
- Front Panel
- Failure/Bypass Modes
- Supported Ciphers
- Regulatory Information
- Software License Agreement
- Support Services
- Glossary
hp e-commerce
server accelerator
sa7100/sa7120
user guide
© Copyright 2001 Hewlett-Packard Company. All rights reserved.
Hewlett-Packard Company
3000 Hanover Street
Palo Alto, CA 94304-1185
Publication Number
5971-0894
February 2001
Disclaimer
The information contained in this document is subject to change without notice.
HEWLETT-PACKARD COMPANY MAKES NO WARRANTY OF ANY
KIND WITH REGARD TO THIS MATERIAL, INCLUDING, BUT NOT
LIMITED TO, THE IMPLIED WARRANTIES OF MERCHANTABILITY
AND FITNESS FOR A PARTICULAR PURPOSE. Hewlett-Packard shall not
be liable for errors contained herein or for incidental or consequential damages
in connection with the furnishing, performance, or use of this material.
Hewlett-Packard assumes no responsibility for the use or reliability of its
software on equipment that is not furnished by Hewlett-Packard.
Warranty
A copy of the specific warranty terms applicable to your Hewlett-Packard
products and replacement parts can be obtained from
http://www.hp.com/serverappliances/support.
*Other brands and names are the property of their respective owners.

Table of Contents
Chapter 1: Introduction
About this User Guide . . . . . . . . . . . . . . . . . . . . . . . . . . . . . . . . . . . . . . . . . . . . . . . . . 1
Who Should Use this Book. . . . . . . . . . . . . . . . . . . . . . . . . . . . . . . . . . . . . . . . . . . . . . 2
Before You Begin . . . . . . . . . . . . . . . . . . . . . . . . . . . . . . . . . . . . . . . . . . . . . . . . . . . . . 2
How to Use this Book. . . . . . . . . . . . . . . . . . . . . . . . . . . . . . . . . . . . . . . . . . . . . . . . . . 2
Chapter 2: Installation and Initial Configuration
Before You Begin . . . . . . . . . . . . . . . . . . . . . . . . . . . . . . . . . . . . . . . . . . . . . . . . . . . . . 5
Installing the SA7100/SA7120 Free-Standing or in a Rack. . . . . . . . . . . . . . . . . . . . . 6
Rack Installation . . . . . . . . . . . . . . . . . . . . . . . . . . . . . . . . . . . . . . . . . . . . . . . . . . . 6
Free-Standing Installation . . . . . . . . . . . . . . . . . . . . . . . . . . . . . . . . . . . . . . . . . . . . 7
Network Connections. . . . . . . . . . . . . . . . . . . . . . . . . . . . . . . . . . . . . . . . . . . . . . . . 7
Status Check. . . . . . . . . . . . . . . . . . . . . . . . . . . . . . . . . . . . . . . . . . . . . . . . . . . . . . . 8
Network and Server LEDs . . . . . . . . . . . . . . . . . . . . . . . . . . . . . . . . . . . . . . . . . 8

C O N T E N T S HP e-Commerce Server Accelerator SA7100/SA7120 User Guide
iv
Inline LED. . . . . . . . . . . . . . . . . . . . . . . . . . . . . . . . . . . . . . . . . . . . . . . . . . . . . . 8
Admin Terminal Connection . . . . . . . . . . . . . . . . . . . . . . . . . . . . . . . . . . . . . . . . . . 9
HyperTerminal* Paste Operations. . . . . . . . . . . . . . . . . . . . . . . . . . . . . . . . . . . . . . 9
Troubleshooting . . . . . . . . . . . . . . . . . . . . . . . . . . . . . . . . . . . . . . . . . . . . . . . . . . . . . 10
Server and Network LEDs . . . . . . . . . . . . . . . . . . . . . . . . . . . . . . . . . . . . . . . . 10
Continuing Configuration . . . . . . . . . . . . . . . . . . . . . . . . . . . . . . . . . . . . . . . . . . . 10
Chapter 3: Theory of Operation
Security . . . . . . . . . . . . . . . . . . . . . . . . . . . . . . . . . . . . . . . . . . . . . . . . . . . . . . . . . . . . 11
Single Server Acceleration . . . . . . . . . . . . . . . . . . . . . . . . . . . . . . . . . . . . . . . . . . . . . 11
Multiple Servers . . . . . . . . . . . . . . . . . . . . . . . . . . . . . . . . . . . . . . . . . . . . . . . . . . . . . 12
Working with Internet Traffic Management (ITM) Devices . . . . . . . . . . . . . . . . . . . 13
Positioning SA7100/SA7120 between ITM Device and Client Network . . . . . . . 13
Positioning SA7100/SA7120 between ITM Device and Server . . . . . . . . . . . . . . 14
Multiple SA7100/SA7120s and Cascading Processing . . . . . . . . . . . . . . . . . . . . . . . 14
Scalability and Cascading . . . . . . . . . . . . . . . . . . . . . . . . . . . . . . . . . . . . . . . . . . . 14
Spilling and Throttling. . . . . . . . . . . . . . . . . . . . . . . . . . . . . . . . . . . . . . . . . . . . . . 15
Availability. . . . . . . . . . . . . . . . . . . . . . . . . . . . . . . . . . . . . . . . . . . . . . . . . . . . . . . 15
Keys and Certificates . . . . . . . . . . . . . . . . . . . . . . . . . . . . . . . . . . . . . . . . . . . . . . . . . 16
Cutting and Pasting with HyperTerminal* . . . . . . . . . . . . . . . . . . . . . . . . . . . . 16
Obtaining a Certificate from VeriSign* or Other Certificate Authority . . . . . . . . 17
Procedure. . . . . . . . . . . . . . . . . . . . . . . . . . . . . . . . . . . . . . . . . . . . . . . . . . . . . . 17
Exporting a Key/Certificate from a Server . . . . . . . . . . . . . . . . . . . . . . . . . . . . . . 20
Apache* Interface to Open SSL* (mod_ssl). . . . . . . . . . . . . . . . . . . . . . . . . . . 20
Apache SSL*. . . . . . . . . . . . . . . . . . . . . . . . . . . . . . . . . . . . . . . . . . . . . . . . . . . 20
Stronghold*. . . . . . . . . . . . . . . . . . . . . . . . . . . . . . . . . . . . . . . . . . . . . . . . . . . . 21
Importing into the SA7100/SA7120 . . . . . . . . . . . . . . . . . . . . . . . . . . . . . . . . . 21
Creating a new Key/Certificate on the SA7100/SA7120. . . . . . . . . . . . . . . . . . . . 22
Procedure. . . . . . . . . . . . . . . . . . . . . . . . . . . . . . . . . . . . . . . . . . . . . . . . . . . . . . 22
Global Site Certificates . . . . . . . . . . . . . . . . . . . . . . . . . . . . . . . . . . . . . . . . . . . . . 23
Overview . . . . . . . . . . . . . . . . . . . . . . . . . . . . . . . . . . . . . . . . . . . . . . . . . . . . . . 23
Global Site Certificate Paste Procedure . . . . . . . . . . . . . . . . . . . . . . . . . . . . . . 24
Redirection: Clients and Unsupported Ciphers . . . . . . . . . . . . . . . . . . . . . . . . . . . . . 26
Client Authentication . . . . . . . . . . . . . . . . . . . . . . . . . . . . . . . . . . . . . . . . . . . . . . . . . 27
Creating a Client CA Certificate using OpenSSL* . . . . . . . . . . . . . . . . . . . . . . . . 28
SSL Processing . . . . . . . . . . . . . . . . . . . . . . . . . . . . . . . . . . . . . . . . . . . . . . . . . . . . . . 29
Server Assignment (“Mapping”) . . . . . . . . . . . . . . . . . . . . . . . . . . . . . . . . . . . . . . 29

Table of Contents
v
Automapping. . . . . . . . . . . . . . . . . . . . . . . . . . . . . . . . . . . . . . . . . . . . . . . . . . . 30
Automapping with user-specified key and certificate. . . . . . . . . . . . . . . . . . . . 30
Automapping with multiple port combinations . . . . . . . . . . . . . . . . . . . . . . . . 30
Deleting automapping entries . . . . . . . . . . . . . . . . . . . . . . . . . . . . . . . . . . . . . . 30
Manual mapping . . . . . . . . . . . . . . . . . . . . . . . . . . . . . . . . . . . . . . . . . . . . . . . . 31
Combining automapping and manual mapping . . . . . . . . . . . . . . . . . . . . . . . . 31
Blocking. . . . . . . . . . . . . . . . . . . . . . . . . . . . . . . . . . . . . . . . . . . . . . . . . . . . . . . . . 31
Specific IP, Specific Port . . . . . . . . . . . . . . . . . . . . . . . . . . . . . . . . . . . . . . . . . 31
Subnet, Specific Port. . . . . . . . . . . . . . . . . . . . . . . . . . . . . . . . . . . . . . . . . . . . . 32
All IPs, Specific Port. . . . . . . . . . . . . . . . . . . . . . . . . . . . . . . . . . . . . . . . . . . . . 32
Delete a Block . . . . . . . . . . . . . . . . . . . . . . . . . . . . . . . . . . . . . . . . . . . . . . . . . . 33
Failure Conditions, Fail-safe, and Fail-through . . . . . . . . . . . . . . . . . . . . . . . . . . . . . 34
Chapter 4: Scenarios
Scenario 1—Single Server . . . . . . . . . . . . . . . . . . . . . . . . . . . . . . . . . . . . . . . . . . . . . 36
Procedure for Scenario 1 . . . . . . . . . . . . . . . . . . . . . . . . . . . . . . . . . . . . . . . . . . . . 36
Automapping. . . . . . . . . . . . . . . . . . . . . . . . . . . . . . . . . . . . . . . . . . . . . . . . . . . 36
Manual Configuration . . . . . . . . . . . . . . . . . . . . . . . . . . . . . . . . . . . . . . . . . . . . 36
Scenario 2—Multiple Servers . . . . . . . . . . . . . . . . . . . . . . . . . . . . . . . . . . . . . . . . . . 38
Procedure for Scenario 2 . . . . . . . . . . . . . . . . . . . . . . . . . . . . . . . . . . . . . . . . . . . . 38
Scenario 3—Multiple SA7100/SA7120s, Cascaded . . . . . . . . . . . . . . . . . . . . . . . . . 40
Initial Configuration. . . . . . . . . . . . . . . . . . . . . . . . . . . . . . . . . . . . . . . . . . . . . . . . 40
Procedure for Scenario 3 . . . . . . . . . . . . . . . . . . . . . . . . . . . . . . . . . . . . . . . . . . . . 41
Scenario 4—Different Ingress and Egress Routers . . . . . . . . . . . . . . . . . . . . . . . . . . 43
Procedure for Scenario 4 . . . . . . . . . . . . . . . . . . . . . . . . . . . . . . . . . . . . . . . . . . . . 43
Scenario 5—Configuring a Firewall. . . . . . . . . . . . . . . . . . . . . . . . . . . . . . . . . . . . . . 44
Server Configuration . . . . . . . . . . . . . . . . . . . . . . . . . . . . . . . . . . . . . . . . . . . . . . . 44
SA7120 Configuration . . . . . . . . . . . . . . . . . . . . . . . . . . . . . . . . . . . . . . . . . . . 45
Chapter 5: Command Reference
Online Help . . . . . . . . . . . . . . . . . . . . . . . . . . . . . . . . . . . . . . . . . . . . . . . . . . . . . . . . 47
Command Line Interface . . . . . . . . . . . . . . . . . . . . . . . . . . . . . . . . . . . . . . . . . . . . . . 48
User Authentication . . . . . . . . . . . . . . . . . . . . . . . . . . . . . . . . . . . . . . . . . . . . . . . . 48
Command Line Prompt . . . . . . . . . . . . . . . . . . . . . . . . . . . . . . . . . . . . . . . . . . . . . 48
Syntax. . . . . . . . . . . . . . . . . . . . . . . . . . . . . . . . . . . . . . . . . . . . . . . . . . . . . . . . . . . 48
Abbreviation to Uniqueness. . . . . . . . . . . . . . . . . . . . . . . . . . . . . . . . . . . . . . . . . . 49
Moving the Insertion Point . . . . . . . . . . . . . . . . . . . . . . . . . . . . . . . . . . . . . . . . . . 50

C O N T E N T S HP e-Commerce Server Accelerator SA7100/SA7120 User Guide
vi
Command History . . . . . . . . . . . . . . . . . . . . . . . . . . . . . . . . . . . . . . . . . . . . . . . . . 50
Cutting Text . . . . . . . . . . . . . . . . . . . . . . . . . . . . . . . . . . . . . . . . . . . . . . . . . . . . . 51
Command Summary . . . . . . . . . . . . . . . . . . . . . . . . . . . . . . . . . . . . . . . . . . . . . . . . . . 52
Command Reference. . . . . . . . . . . . . . . . . . . . . . . . . . . . . . . . . . . . . . . . . . . . . . . . . . 57
Help Commands. . . . . . . . . . . . . . . . . . . . . . . . . . . . . . . . . . . . . . . . . . . . . . . . . . . 57
Status Command . . . . . . . . . . . . . . . . . . . . . . . . . . . . . . . . . . . . . . . . . . . . . . . . . . 57
SSL Commands . . . . . . . . . . . . . . . . . . . . . . . . . . . . . . . . . . . . . . . . . . . . . . . . . . . 58
Port Mapping Commands . . . . . . . . . . . . . . . . . . . . . . . . . . . . . . . . . . . . . . . . . . . 67
Operational Commands . . . . . . . . . . . . . . . . . . . . . . . . . . . . . . . . . . . . . . . . . . . . . 70
Remote Management Commands . . . . . . . . . . . . . . . . . . . . . . . . . . . . . . . . . . . . . 73
Alarms and Monitoring Commands. . . . . . . . . . . . . . . . . . . . . . . . . . . . . . . . . . . . 79
Configuration Commands . . . . . . . . . . . . . . . . . . . . . . . . . . . . . . . . . . . . . . . . . . . 82
Administration Commands
Logging Commands. . . . . . . . . . . . . . . . . . . . . . . . . . . . . . . . . . . . . . . . . . . . . . . . 87
Chapter 6: Remote Management
Overview. . . . . . . . . . . . . . . . . . . . . . . . . . . . . . . . . . . . . . . . . . . . . . . . . . . . . . . . . . . 93
Limitations . . . . . . . . . . . . . . . . . . . . . . . . . . . . . . . . . . . . . . . . . . . . . . . . . . . . . . . 94
Remote Management CLI Commands. . . . . . . . . . . . . . . . . . . . . . . . . . . . . . . . . . 94
Remote Telnet Sessions . . . . . . . . . . . . . . . . . . . . . . . . . . . . . . . . . . . . . . . . . . . . . . . 96
Local Serial Console . . . . . . . . . . . . . . . . . . . . . . . . . . . . . . . . . . . . . . . . . . . . . . . 96
Remote Console, Telnet. . . . . . . . . . . . . . . . . . . . . . . . . . . . . . . . . . . . . . . . . . . . . 97
Changing the Telnet Port . . . . . . . . . . . . . . . . . . . . . . . . . . . . . . . . . . . . . . . . . . . . 97
Disabling Telnet. . . . . . . . . . . . . . . . . . . . . . . . . . . . . . . . . . . . . . . . . . . . . . . . . . . 98
Remote SSH Sessions. . . . . . . . . . . . . . . . . . . . . . . . . . . . . . . . . . . . . . . . . . . . . . . . . 98
Local Serial Console . . . . . . . . . . . . . . . . . . . . . . . . . . . . . . . . . . . . . . . . . . . . . . . 98
Remote Console, SSH . . . . . . . . . . . . . . . . . . . . . . . . . . . . . . . . . . . . . . . . . . . . . . 99
Changing the SSH Port . . . . . . . . . . . . . . . . . . . . . . . . . . . . . . . . . . . . . . . . . . . . 100
Disabling SSH . . . . . . . . . . . . . . . . . . . . . . . . . . . . . . . . . . . . . . . . . . . . . . . . . . . 100
SNMP . . . . . . . . . . . . . . . . . . . . . . . . . . . . . . . . . . . . . . . . . . . . . . . . . . . . . . . . . . . . 100
Standards Compliance . . . . . . . . . . . . . . . . . . . . . . . . . . . . . . . . . . . . . . . . . . . . . 101
HP MIB Tree . . . . . . . . . . . . . . . . . . . . . . . . . . . . . . . . . . . . . . . . . . . . . . . . . . . . 101
Supported MIBs . . . . . . . . . . . . . . . . . . . . . . . . . . . . . . . . . . . . . . . . . . . . . . . 102
Where to find MIB Files . . . . . . . . . . . . . . . . . . . . . . . . . . . . . . . . . . . . . . . . . 102
Enterprise Private MIB Summary . . . . . . . . . . . . . . . . . . . . . . . . . . . . . . . . . . . . 102
Trap Summary . . . . . . . . . . . . . . . . . . . . . . . . . . . . . . . . . . . . . . . . . . . . . . . . . . . 106
Standard SNMP Traps. . . . . . . . . . . . . . . . . . . . . . . . . . . . . . . . . . . . . . . . . . . 106

Table of Contents
vii
Private Traps in the HP private MIB
(hpssl-appliance-mib.my) . . . . . . . . . . . . . . . . . . . . . . . . . . . . . . . . . . . . . . . . 106
Enabling SNMP . . . . . . . . . . . . . . . . . . . . . . . . . . . . . . . . . . . . . . . . . . . . . . . . . . 107
Specifying SNMP Information . . . . . . . . . . . . . . . . . . . . . . . . . . . . . . . . . . . . 108
Community String. . . . . . . . . . . . . . . . . . . . . . . . . . . . . . . . . . . . . . . . . . . . . . 109
Trap Community String . . . . . . . . . . . . . . . . . . . . . . . . . . . . . . . . . . . . . . . . . 109
Chapter 7: Alarms and Monitoring
Overview. . . . . . . . . . . . . . . . . . . . . . . . . . . . . . . . . . . . . . . . . . . . . . . . . . . . . . . . . . 111
Alarm Types . . . . . . . . . . . . . . . . . . . . . . . . . . . . . . . . . . . . . . . . . . . . . . . . . . . . . . . 113
ESC: Encryption Status Change Alarm . . . . . . . . . . . . . . . . . . . . . . . . . . . . . . . 113
Alarm Modifiers and Messages: . . . . . . . . . . . . . . . . . . . . . . . . . . . . . . . . . . . 113
RSC: Refused SSL Connections . . . . . . . . . . . . . . . . . . . . . . . . . . . . . . . . . . . . . 113
Alarm Modifiers and Messages. . . . . . . . . . . . . . . . . . . . . . . . . . . . . . . . . . . . 114
Extended Data . . . . . . . . . . . . . . . . . . . . . . . . . . . . . . . . . . . . . . . . . . . . . . . . . 114
RSC Alarm CLI Commands . . . . . . . . . . . . . . . . . . . . . . . . . . . . . . . . . . . . . . 114
UTL: Utilization Threshold Alarm . . . . . . . . . . . . . . . . . . . . . . . . . . . . . . . . . . . 115
Alarm Modifiers and Messages. . . . . . . . . . . . . . . . . . . . . . . . . . . . . . . . . . . . 115
Extended Data . . . . . . . . . . . . . . . . . . . . . . . . . . . . . . . . . . . . . . . . . . . . . . . . . 115
UTL Alarm CLI commands . . . . . . . . . . . . . . . . . . . . . . . . . . . . . . . . . . . . . . 116
OVL: Overload Alarm . . . . . . . . . . . . . . . . . . . . . . . . . . . . . . . . . . . . . . . . . . . . 116
Alarm Modifiers and Messages. . . . . . . . . . . . . . . . . . . . . . . . . . . . . . . . . . . . 117
Extended Data . . . . . . . . . . . . . . . . . . . . . . . . . . . . . . . . . . . . . . . . . . . . . . . . . 117
OVL Alarm CLI Commands. . . . . . . . . . . . . . . . . . . . . . . . . . . . . . . . . . . . . . 117
NLS: Network Link Status Alarm . . . . . . . . . . . . . . . . . . . . . . . . . . . . . . . . . . . 117
Alarm Modifiers and Messages. . . . . . . . . . . . . . . . . . . . . . . . . . . . . . . . . . . . 117
Extended Data . . . . . . . . . . . . . . . . . . . . . . . . . . . . . . . . . . . . . . . . . . . . . . . . . 118
Alarm Logging . . . . . . . . . . . . . . . . . . . . . . . . . . . . . . . . . . . . . . . . . . . . . . . . . . . . . 118
Example: list logs command: . . . . . . . . . . . . . . . . . . . . . . . . . . . . . . . . . . . . . 118
Example: status command. . . . . . . . . . . . . . . . . . . . . . . . . . . . . . . . . . . . . . . . 119
Example: status alarms command. . . . . . . . . . . . . . . . . . . . . . . . . . . . . . . . . . 121
Monitoring . . . . . . . . . . . . . . . . . . . . . . . . . . . . . . . . . . . . . . . . . . . . . . . . . . . . . . . . 121
Monitoring Reports . . . . . . . . . . . . . . . . . . . . . . . . . . . . . . . . . . . . . . . . . . . . . . . 121
Report Configuration . . . . . . . . . . . . . . . . . . . . . . . . . . . . . . . . . . . . . . . . . . . . . . 121
Monitoring Reports CLI Commands. . . . . . . . . . . . . . . . . . . . . . . . . . . . . . . . 122

C O N T E N T S HP e-Commerce Server Accelerator SA7100/SA7120 User Guide
viii
Chapter 8: Software Updates
Before Upgrading. . . . . . . . . . . . . . . . . . . . . . . . . . . . . . . . . . . . . . . . . . . . . . . . . 126
Monitoring output data can interfere with import/export operations.. . . . . . . 126
IP blocks may not persist across software upgrade. . . . . . . . . . . . . . . . . . . . . 126
Using Windows* HyperTerminal*. . . . . . . . . . . . . . . . . . . . . . . . . . . . . . . . . . . . . . 127
Chapter 9: Troubleshooting
Appendix A: Front Panel
Buttons and Switches . . . . . . . . . . . . . . . . . . . . . . . . . . . . . . . . . . . . . . . . . . . . . . . . 134
Front Panel LEDs . . . . . . . . . . . . . . . . . . . . . . . . . . . . . . . . . . . . . . . . . . . . . . . . . . . 134
Connectors . . . . . . . . . . . . . . . . . . . . . . . . . . . . . . . . . . . . . . . . . . . . . . . . . . . . . . . . 136
Appendix B: Failure/Bypass Modes
Bypass Button. . . . . . . . . . . . . . . . . . . . . . . . . . . . . . . . . . . . . . . . . . . . . . . . . . . . . . 138
Fail-through Switch (Security Level) . . . . . . . . . . . . . . . . . . . . . . . . . . . . . . . . . . . . 138
Appendix C: Supported Ciphers
Cipher Strength. . . . . . . . . . . . . . . . . . . . . . . . . . . . . . . . . . . . . . . . . . . . . . . . . . . . . 141
SSL Version Level . . . . . . . . . . . . . . . . . . . . . . . . . . . . . . . . . . . . . . . . . . . . . . . . . . 142
Appendix D: Regulatory Information
Taiwan Class A EMI Statement . . . . . . . . . . . . . . . . . . . . . . . . . . . . . . . . . . . . . . . . 145
VCCI Statement . . . . . . . . . . . . . . . . . . . . . . . . . . . . . . . . . . . . . . . . . . . . . . . . . . . . 146
FCC Part 15 Compliance Statement . . . . . . . . . . . . . . . . . . . . . . . . . . . . . . . . . . . . . 146
Canada Compliance Statement (Industry Canada) . . . . . . . . . . . . . . . . . . . . . . . . . . 147
CE Compliance Statement . . . . . . . . . . . . . . . . . . . . . . . . . . . . . . . . . . . . . . . . . . . . 147
CISPR 22 Statement . . . . . . . . . . . . . . . . . . . . . . . . . . . . . . . . . . . . . . . . . . . . . . . . . 148
VCCI Class A (Japan). . . . . . . . . . . . . . . . . . . . . . . . . . . . . . . . . . . . . . . . . . . . . . . . 148
Australia . . . . . . . . . . . . . . . . . . . . . . . . . . . . . . . . . . . . . . . . . . . . . . . . . . . . . . . . . . 148
WARNING . . . . . . . . . . . . . . . . . . . . . . . . . . . . . . . . . . . . . . . . . . . . . . . . . . . . . 148
AVERTISSEMENT . . . . . . . . . . . . . . . . . . . . . . . . . . . . . . . . . . . . . . . . . . . . . . . . . 149
WARNUNG . . . . . . . . . . . . . . . . . . . . . . . . . . . . . . . . . . . . . . . . . . . . . . . . . . . . . . . 150
AVVERTENZA . . . . . . . . . . . . . . . . . . . . . . . . . . . . . . . . . . . . . . . . . . . . . . . . . . . . 150

Table of Contents
ix
ADVERTENCIAS . . . . . . . . . . . . . . . . . . . . . . . . . . . . . . . . . . . . . . . . . . . . . . . . . . 151
Wichtige Sicherheitshinweise. . . . . . . . . . . . . . . . . . . . . . . . . . . . . . . . . . . . . . . . . . 152
Appendix E: Software License Agreement
Mozilla* and expat* License Information . . . . . . . . . . . . . . . . . . . . . . . . . . . . . . . . 158
MOZILLA PUBLIC LICENSE, Version 1.1 . . . . . . . . . . . . . . . . . . . . . . . . . . . 158
Support Services
Support for your SA7100/SA7120 . . . . . . . . . . . . . . . . . . . . . . . . . . . . . . . . . . . . . . 171
U.S. and Canada. . . . . . . . . . . . . . . . . . . . . . . . . . . . . . . . . . . . . . . . . . . . . . . . . . 171
Europe . . . . . . . . . . . . . . . . . . . . . . . . . . . . . . . . . . . . . . . . . . . . . . . . . . . . . . . . . 172
Asia . . . . . . . . . . . . . . . . . . . . . . . . . . . . . . . . . . . . . . . . . . . . . . . . . . . . . . . . . . . 173
Latin America . . . . . . . . . . . . . . . . . . . . . . . . . . . . . . . . . . . . . . . . . . . . . . . . . . . 174
Other Countries . . . . . . . . . . . . . . . . . . . . . . . . . . . . . . . . . . . . . . . . . . . . . . . . . . 174
Glossary
Index

C O N T E N T S HP e-Commerce Server Accelerator SA7100/SA7120 User Guide
x
Notes

Introduction
Congratulations on your choice of the HP e-Commerce Server
Accelerator SA7100/SA7120. The processing of secure transactions
through Secure Socket Layer (SSL) can use up to 90% of even the
largest servers’ CPU power and can degrade response time
significantly. The SA7100/SA7120 provides a completely
transparent way to increase the performance of Web sites for SSL
transactions. The SA7100/SA7120 is positioned in front of the server
farm, where it intercepts SSL transactions, processes them, and relays
them to the servers. The SA7100/SA7120 performs all encryption
and decryption management in this environment with a minimum of
administrator interaction.
About this User Guide
This User Guide supports the HP e-Commerce Server Accelerator
SA7100 and the HP e-Commerce Server Accelerator SA7120. By
default this text refers to the product as “SA7100/SA7120.” Where
appropriate, the text refers to “SA7100” or “SA7120.” Additionally,
notes in the left-hand margin may be used to distinguish the two prod-
ucts. Illustrations of the command prompt use:
“HP SA7120>”.

C H A P T E R 1 HP e-Commerce Server Accelerator SA7100/SA7120 User Guide
2
Who Should Use this Book
This User Guide is intended for administrators with the following
background:
•Familiarity with networking concepts and terminology.
•Basic knowledge of network topologies.
•Basic knowledge of networks and IP routing.
•Some knowledge of SSL, keys, and certificates.
•Knowledge of Web servers.
Before You Begin
SA7100/SA7120 setup can be divided into three basic procedures:
•Physically install single or multiple SA7100/SA7120s with sin-
gle or multiple servers.
•Configure your SA7100/SA7120 in the Command Line Inter-
face.
•Identify existing certificates or obtain new ones you want to use
in SSL operations.
How to Use this Book
The information in this book is organized as follows:
•Chapter 1: Introduction provides an introduction and overview
of the SA7100/SA7120, and a summary of new features.
•Chapter 2: Installation and Initial Configuration contains
installation and initial configuration procedures. (This material is
also discussed in the separate Quick Start Guide.)
•Chapter 3: Theory of Operation explains the general principles
behind SA7100/SA7120 operation.
•Chapter 4: Scenarios provides examples of SA7100/SA7120
configurations, together with specific procedures for their
implementation.
•Chapter 5: Command Reference explains the Command Line
Interface (CLI), and lists the commands and their functions.

C H A P T E R 1 How to Use this Book
3
•Chapter 6: Remote Management details how you can use Telnet,
Secure Shell (SSH), and SNMP to manage the SA7100/SA7120
from remote locations.
•Chapter 7: Alarms and Monitoring explains the ways in which
you can configure the device to report information to you, either
routinely or as a result of abnormal events or conditions.
•Chapter 8: Software Updates provides procedures for obtaining
SA7100/SA7120 system software updates.
•Chapter 9: Troubleshooting is a table containing symptoms of
problems you may encounter with corresponding likely causes
and remedies.
•Appendix A: Front Panel diagrams and explains the SA7100/
SA7120’s front panel LEDs, buttons, and connections.
•Appendix B: Failure/Bypass Modes explains how the SA7100/
SA7120 deals with failure conditions and details the bypass
function.
•Appendix C: Supported Ciphers lists the supported encryption
ciphers.
•Appendix D: Regulatory Information provides information
regarding the SA7100/SA7120’s compliance with applicable
regulations.
•Appendix E: Software License Agreement contains the software
license and terms and conditions of user of this product.
•Support Services contains customer support telephone numbers
for various locales.
•Glossary defines terms appearing in this User Guide.

C H A P T E R 1 HP e-Commerce Server Accelerator SA7100/SA7120 User Guide
4
Notes

Installation and Initial
Configuration
Before You Begin
WARNING: Do not
remove the device’s
cover. There are no user-
servicable parts inside.
Before you begin installation, you need the following:
•IP address for SA7100/SA7120 (only if you intend to use the
Remote Management).
•IP addresses and IP port numbers of servers.
•Keys/certificates. See Chapter 3 for information on obtaining
keys and certificates.
•Network cables, such as straight-through and/or crossover
cables. (The table in the section “Network Connections” in this
chapter identifies the types of cables you must use.)
•Phillips screwdriver (rack-mounting only).
•Rack-mounting screws (rack-mounting only).
C H A P T E R 2 HP e-Commerce Server Accelerator SA7100/7120 User Guide
6
Installing the SA7100/SA7120 Free-Standing or
in a Rack
The HP e-Commerce Server Accelerator SA7100/SA7120 is
physically installed in either of two ways:
•In a standard 19” rack, cantilevered from the provided mounting
brackets.
•Free-standing on a flat surface with sufficient space for air-flow.
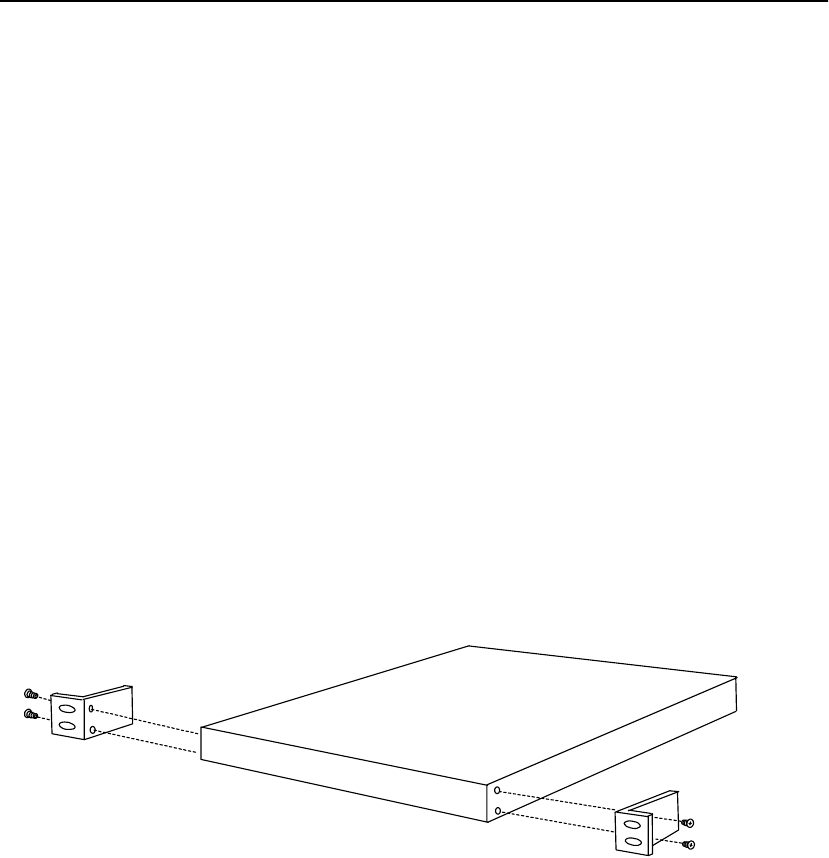
Rack
Installation
Rack mounting requires the use of the mounting brackets, and all four
of the included Phillips screws.
1. Locate the two mounting brackets and the four screws. (Two
screws for each bracket.)
2. Attach a mounting bracket to each side of the SA7100/SA7120,
using two of the provided screws for each bracket. Use the holes
near the front of the SA7100/SA7120’s sides. The brackets have
both round and oval holes; the flange with round holes attaches
to the SA7100/SA7120, the flange with oval holes to the rack.
Mounting Bracket Orientation
3. Position the SA7100/SA7120 in the desired space of your 19”
rack and attach the front flange of each mounting bracket to the
rack with two screws each. (Rack-mounting screws are not
provided.)

C H A P T E R 2 Installing the SA7100/SA7120 Free-Standing or in a Rack
7
Free-Standing
Installation
1. Attach the provided self-adhesive rubber feet to the SA7100/
SA7120’s bottom.
2. Place the SA7100/SA7120 on a flat surface and make sure that
there is adequate airflow surrounding the unit (allow at least one
inch of air space on all sides).
Network
Connections
Use the table below to select and install the appropriate cables. (All
cables must be Category 5 UTP or better.)
NOTE: Use caution
when connecting both of
the SA7100/SA7120’s
network ports to the same
switch, hub, or router.
Doing so creates a
feedback loop that
adversely effects network
bandwidth.
3. Connect the provided power cable to the back of the unit. (There
is no power switch.) Under normal circumstances, the SA7100/
SA7120 requires approximately 30 seconds to boot. When the
boot is complete, the unit’s Power LED is steadily illuminated.
(If the Power LED is not steadily illuminated, see Chapter 9,
“Troubleshooting,” to rectify before proceeding to Step 3.)
4. The Inline LED should be either steadily illuminated or blinking
(to indicate Inline mode). If it is not, press the Bypass switch on
the device’s front panel to enable Inline mode.
SA7100/SA7120’s
network
connector
SA7100/SA7120’s
server
connector
Workstation or Server Crossover cable Straight-through cable
Switch or Hub Straight-through cable Crossover cable
Router Crossover cable Not recommended
SA7100/SA7120
network
connector*
N/A Straight-through cable
SA7100/SA7120
server
connector*
Straight-through cable N/A
* Applicable only to multiple, cascaded units.
C H A P T E R 2 HP e-Commerce Server Accelerator SA7100/7120 User Guide
8
5. At this point both the Network and Server LEDs should be
steadily illuminated. If not, please see Chapter 9,
“Troubleshooting.”
Network Connections
Status Check Before proceeding to the Admin Terminal Connection section, take a
moment to verify that the SA7100/SA7120 is correctly connected.
Network and Server LEDs
Verify that the Network and Server LEDs are both illuminated. If one
or both are not, refer to the Troubleshooting section at the end of this
chapter.
Inline LED
A blinking Inline LED indicates that the system is online in Fail-safe
mode. Refer to the Troubleshooting section at the end of this chapter
or Appendix B, “Failure/Bypass Modes.”
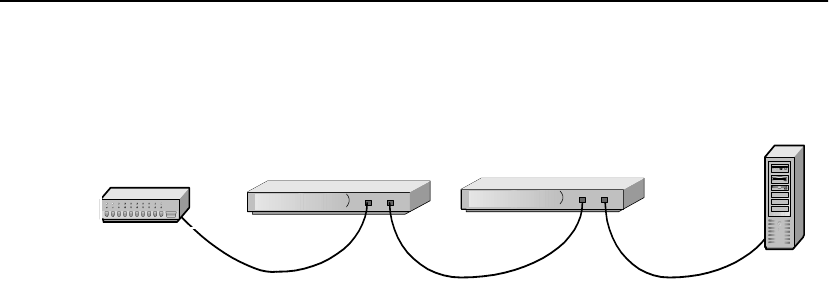
HP e-Commerce Server Accelerators
Hub/Router/Switch Server

C H A P T E R 2 Installing the SA7100/SA7120 Free-Standing or in a Rack
9
Admin
Terminal
Connection
Run HyperTerminal* or a similar terminal emulator on your PC. The
steps below are illustrative of HyperTerminal*. Other terminals will
require different procedures.
1. Use the serial cable provided with the SA7100/SA7120 to con-
nect the device’s serial port (the left-hand serial port labeled
“Console”) to the serial port of any terminal. (A PC running Win-
dows* HyperTerminal* is used here as an example.)
Front Panel Connectors and LEDs
2. Type an appropriate name in the Name field of the Connection
Description window (e.g., “Configuration”), and then click the
OK button. The Phone Number panel appears.
3. In the Connect Using… field specify “COM1” (or the serial port
through which the PC is connected to the SA7100/SA7120 if
different from COM1).
4. Click the OK button. The COM1 Properties panel appears. Set
the values displayed here to 9600, 8, none, 1, and none.
5. Click the OK button.
HyperTerminal*
Paste
Operations
If you’re using HyperTerminal* you must make the following
configuration change:
1. In the File menu, click Properties.
2. Click the Settings tab.
3. Click the ASCII Setup button.
4. Change the values of Line and Character delay from 0 to at least
1 millisecond.
Network Link
(RJ45) Server Link
(RJ45)
Network Link
(green) Server Link
(green)
Console
Power Error Overload Activity
(green) (red) (amber) (green) Inline
(green)
Aux Console

C H A P T E R 2 HP e-Commerce Server Accelerator SA7100/7120 User Guide
10
5. Click OK to exit ASCII Setup.
6. Click OK to exit Connection Properties.
Troubleshooting
Server and Network LEDs
If either the Network or Server LED fails to illuminate using either
straight-through or crossover network cables, the problem may be
elsewhere in the network. Verify by wiring around the SA7100/
SA7120.
Inline LED
The Fail-through switch allows you to control what happens in the
event of a failure. It is located in a recess between the Network and
Server connectors. Use a small screwdriver or paper clip to
manipulate the switch. The two options are:
•Allow traffic to flow through the SA7100/SA7120 unprocessed.
(Fail-through mode, indicated by a steadily illuminated Inline
LED.)
•Block traffic flow through the SA7100/SA7120 entirely. (Fail-
safe mode, indicated by a blinking Inline LED.)
Please see Appendix B for a table describing all permutations of LED
operation.
Continuing
Configuration
This concludes basic configuration of the SA7100/SA7120. To
configure the unit for production please continue with Chapter 3,
Theory of Operations, or Chapter 4, Scenarios.

Theory of Operation
Security
The HP e-Commerce Server Accelerator SA7100/SA7120 offers
Remote Management capability. This feature requires that the
SA7100/SA7120’s network interface be assigned an IP address, thus
security becomes a matter for your attention. If you intend to manage
your SA7100/SA7120 from a remote location, be sure to read the
section, “Access Control” in Chapter 6.
Single Server Acceleration
Typically, SA7100/SA7120 supports the SSL processing needs of a
single server. This is the simplest and most common configuration.
The SA7100/SA7120 is connected to the network between the router
and the server.
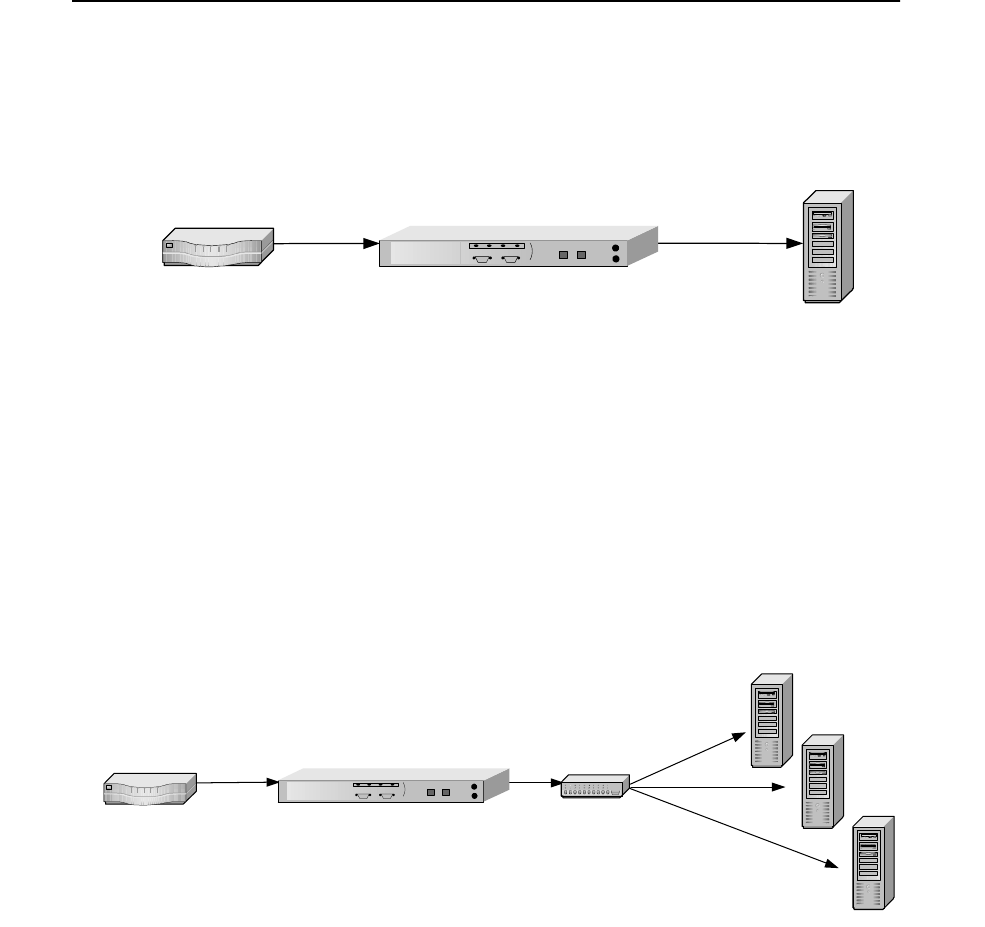
C H A P T E R 3 HP e-Commerce Server Accelerator SA7100/SA7120 User Guide
12
Ideally, the SA7100/SA7120 is installed in the network in such a way
as to minimize network latency.
SA7100/SA7120 in Single Server Configuration
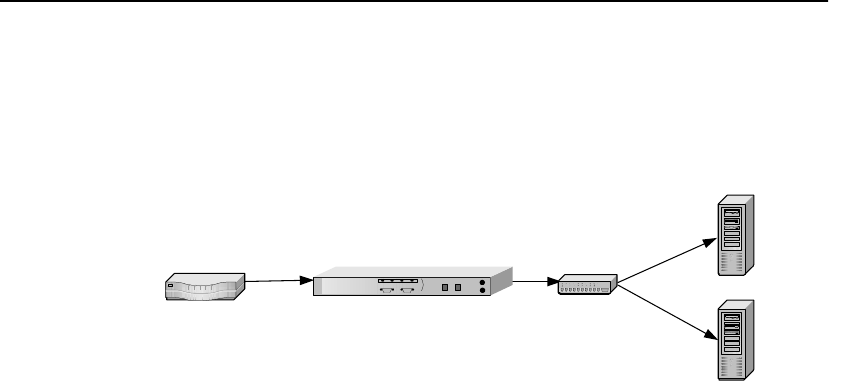
Multiple Servers
Given the SSL processing power of the SA7100/SA7120, multiple
servers can be supported. In this configuration, the SA7100/SA7120
sits between the router and the switch. SSL traffic intended for these
servers is intercepted and other traffic is passed through.
SA7100/SA7120 in Multiple Server Configuration
Single Server
Router
HP e-Commerce Server Accelerator
SA7100/7120
Server 1
Server 2
Server 3
hub/switchRouter
HP e-Commerce Server Accelerator
SA7100/7120
C H A P T E R 3 Working with Internet Traffic Management (ITM) Devices
13
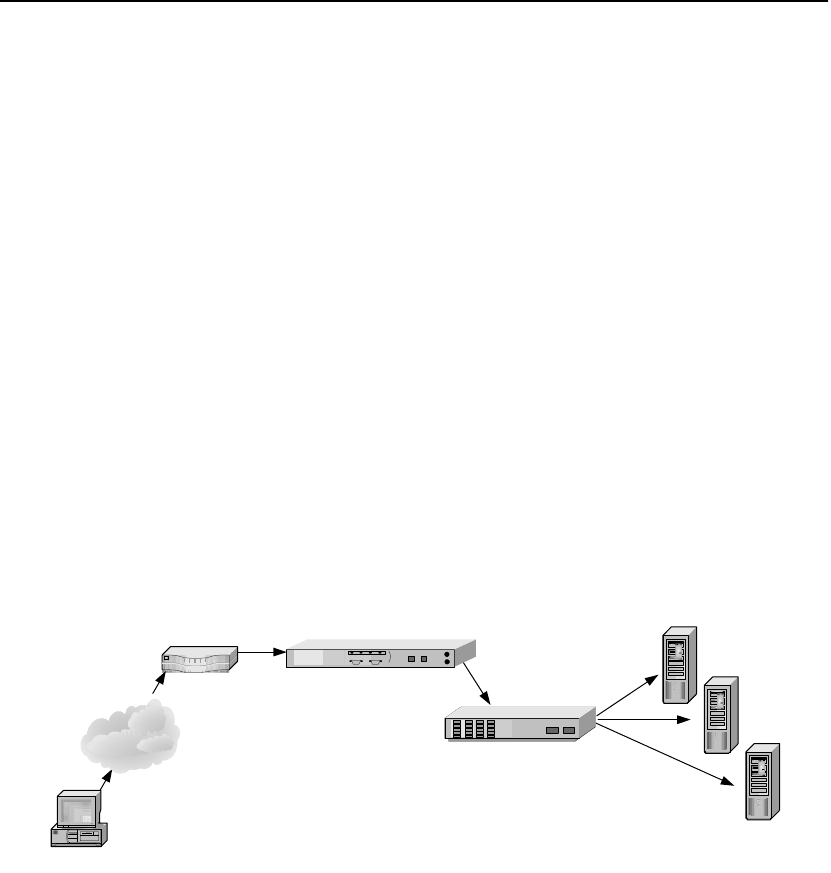
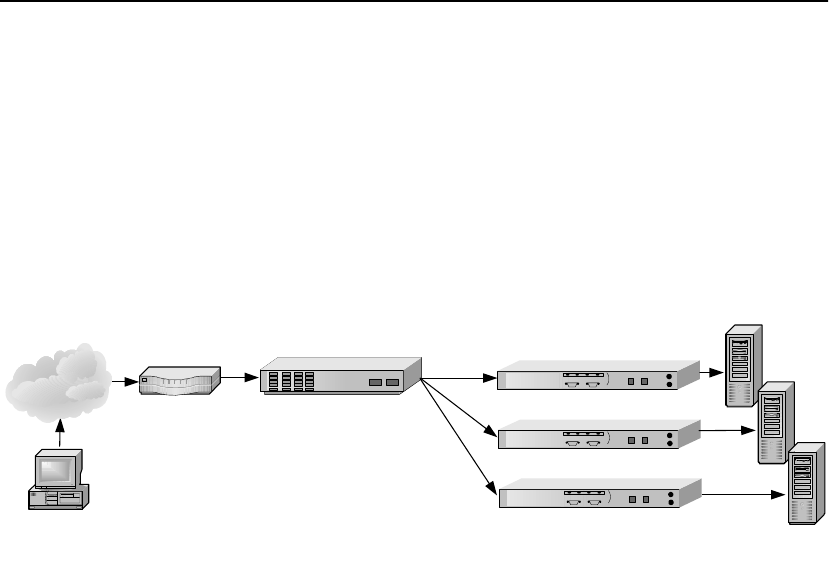
Working with Internet Traffic Management (ITM)
Devices
The SA7100/SA7120 is compatible with Internet Traffic
Management (ITM) devices. In such environments, the SA7100/
SA7120 lies between the router and the ITM device, or between the
ITM device and the server. ITM devices distribute workload across
multiple servers and redirect traffic based on content.
Positioning
SA7100/
SA7120
between ITM
Device and
Client Network
If the ITM device supports layer 7 traffic management, URLs must
be readable (that is, unencrypted). Therfore, in environments
performing layer 7 load balancing, it is recommended that the
SA7100/SA7120 be placed between the ITM device and the client
network.
SA7100/SA7120 Between Router and ITM Device
Client
Router
HP e-Commerce Server Accelerator SA7100/7120
Server 3
Server 1
Server 2
ITM Device
Internet
C H A P T E R 3 HP e-Commerce Server Accelerator SA7100/SA7120 User Guide
14
Positioning
SA7100/
SA7120
between ITM
Device and
Server
If security considerations require limited network access to clear text,
the SA7100/SA7120 should be placed between the ITM device and
the server.
NOTE: The illustrated
configuration precludes
layer 7 load balancing
because secure traffic
through the ITM device is
encrypted.
SA7100/SA7120s Between ITM Device and Servers
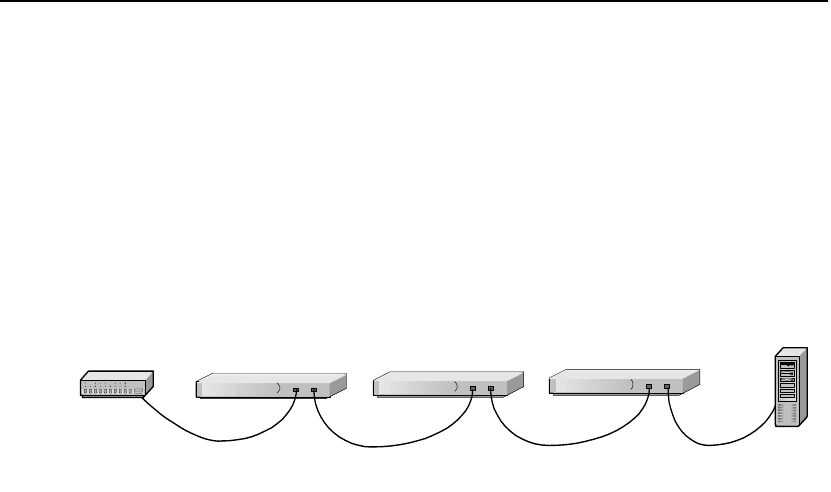
Multiple SA7100/SA7120s and Cascading
Processing
Scalability and
Cascading
The SA7100/SA7120’s capabilities are scalable by chaining, or
“cascading,” multiple SA7100/SA7120s together. In such
configurations, each unit’s server side connector is wired to the
network side connector of the next SA7100/SA7120 in line. The last
SA7100/SA7120 in line is connected to the server, switch, or ITM
device.
Router
HP e-Commerce Server Accelerator
SA7100/7120s
Client
ITM Device
Servers
Internet
C H A P T E R 3 Multiple SA7100/SA7120s and Cascading Processing
15
Spilling and
Throttling
When the SA7100/SA7120’s “spill” option is enabled, if a given
SA7100/SA7120 cannot process a request within a specified interval,
the request is passed on, still encrypted, to the next SA7100/SA7120
in line. The last SA7100/SA7120 on the server side can also be
enabled to spill to the server. Spilling is performed dynamically on a
connection-by-connection basis. (See spill command, Chapter 5,
“Command Reference.”) If spill is disabled, the SA7100/SA7120
“throttles,” that is, will not accept incoming requests when it becomes
overloaded.
Cascaded SA7100/SA7120s
Availability When a SA7100/SA7120 fails or is set to Bypass mode while Fail-
through is enabled, the SA7100/SA7120’s network side and server
side network adapters are directly connected, allowing traffic to pass
through to the next device until the failed unit is brought back into
service. This feature eliminates a single point of failure and provides
a high level of availability, should there be a failure. In installations
with multiple SA7100/SA7120s, the next unit in the cascade picks up
the encryption/decryption workload, while in single SA7100/SA7120
configurations, the server assumes the load. See “Failure/Bypass
Modes” in Appendix B for more information.
HP e-Commerce Server Accelerator SA7100/7120s
Hub/Router/Switch
Server

C H A P T E R 3 HP e-Commerce Server Accelerator SA7100/SA7120 User Guide
16
Keys and Certificates
WARNING: The
SA7100/SA7120 comes
with default keys and
certificates for test
purposes. Certificates for
production use should be
obtained from a
recognized certificate
authority.
A necessary part of the SA7100/SA7120 configuration is the use of
keys and certificates. A key is a set of numbers used to encrypt or
decrypt data. A certificate is a “form” that identifies a server or user.
The certificate contains information about your company as well as
information from a third party that verifies your identity.
There are three ways to obtain keys and certificates:
•Obtaining a certificate from VeriSign* or other Certificate
Authority (or “CA”)
•Using an existing key/certificate
•Creating a new key/certificate on the SA7100/SA7120
Cutting and Pasting with HyperTerminal*
Cutting and pasting is an integral part of the next several procedures.
Below are procedures for cutting and pasting in HyperTerminal*. If
you use some other terminal program, consult that product’s
documentation for appropriate procedures.
To copy an item (key, certificate signing request, etc.) from
HyperTerminal*:
1. Open the HyperTerminal* window.
2. Click and drag to select the item.
3. After the item is selected, open the Edit menu and click Copy (or
type <ctrl-c>).
4. Open the window where you will paste the data, and position the
cursor at the appropriate point.
5. In the Edit menu, click Paste (or type <ctrl-v>).
To paste an item (key, certificate signing request, etc.) into
HyperTerminal*:
1. Display the item in the appropriate application window, then
click and drag to select the item.
2. Once the item is selected, click the Edit menu and select Copy
(or type <ctrl-c>).

C H A P T E R 3 Keys and Certificates
17
3. Move to the HyperTerminal* window, and position the cursor at
the appropriate point.
4. Pull down the Edit menu, and select Paste to Host (or type
<ctrl-v>).
Obtaining a
Certificate
from VeriSign*
or Other
Certificate
Authority
Use the create key command to create your key and the create sign
command to create a signing request to be sent to VeriSign* or other
CA for authentication. The CA will return it in approximately one to
five days. After you have received the certificate, use the import cert
command to import it into the SA7100/SA7120.
The fields input to create a signing request are called collectively a
Distinguished Name (DN). For optimal security, one or more fields
must be modified to make the DN unique.
Procedure
Create a key:
1. Type the create key command at the prompt:
HP SA7120> create key
Key strength (512/1024) [512]:
New keyID [001]: mywebserver
Keypair was created for keyID: mywebserver
2. Create a Certificate Signing Request:
HP SA7120> create sign mywebserver
You are about to be asked to enter information
that will be incorporated into your
certificate request. The "common name" must be
unique. For other fields, you could use
default values.
Certifying authorities have specific guidelines on how to answer each
of the questions. These guidelines may vary by certifying authority.
Please refer to the guidelines of the certifying authority to whom you
submit your Certificate Signing Request (CSR). Please keep the
following in mind when entering the information that will be
incorporated into your certificate request:
•Country code: This is the two-letter ISO abbreviation for your
country (for example, US for the United States).
•State or Province: This is the name of the state or province
where your organization’s head office is located. Please enter the
full name of the state or province. Do not abbreviate.

C H A P T E R 3 HP e-Commerce Server Accelerator SA7100/SA7120 User Guide
18
•Locality: This is usually the name of the city where your
organization’s head office is located.
•Organization: This should be the organization that owns the
domain name. The organization name (corporation, limited
partnership, university, or government agency) must be
registered with some authority at the national, state, or city level.
Use the legal name under which your organization is registered.
Please do not abbreviate your organization’s name and do not use
any of the following characters: < > ~ ! @ # $ % ^ * / \ ( ) ?.
•Organizational unit: This is normally the name of the
department or group that will use the certificate.
•Common name: The common name is the “fully qualified
domain name,” (or FQDN) used for DNS lookups of your server
(for example, www.mysite.com). Browsers use this information
to identify your Web site. Some browsers will refuse to establish
a secure connection with your site if the server name does not
match the common name in the certificate. Please do not include
the protocol specifier “http://” or any port numbers or path names
in the common name. Do not use wildcard characters such as * or
?, and do not use an IP address.
•E-mail address: This should be the e-mail address of the
administrator responsible for the certificate.
3. Export the Certificate Signing Request (CSR).
In this example, xmodem is used to send the CSR to a PC connected
to the console port.
HP SA7120> export sign mywebserver
Export protocol: (xmodem, ascii) [ascii]:x
<Enter>
Use Ctrl-x to kill transmission
Beginning export...
Export successful!
HP SA7120>
To submit the CSR to a certifying authority, paste it into the field
provided in the authority’s online request form. Remember to include
the “-----BEGIN CERTIFICATE REQUEST-----” and “-----END
CERTIFICATE REQUEST-----” lines.
Typically, the CSR will look something like this:
-----BEGIN CERTIFICATE REQUEST-----
MIIBnDCCAQUACQAwXjELMAkGA1UEBhMCQ0ExEDOABgNVBAgT
B09udGFayW8xEDAOBgNVBAcTB01vbnRyYWwxDDAKBgNVBAoT

C H A P T E R 3 Keys and Certificates
19
A0tGQzEdMBsGA1UEAxMUd3d3Lmlsb3ZlY2hpY2tlbi5jb20w
gZ0wDQYJKoZIhvcNAQEBBQADgYsAMIGHAoGBALmJA2FLSGJ9
iCF8uwfPW2AKkyyKoe9aHnnwLLw8WWjhl[ww9pLietwX3bp6
Do87mwV3jrgQ1OIwarj9iKMLT6cSdeZ0OTNn7vvJaNv1iCBW
GNypQv3kVMMzzjEtOl2uGl8VOyeE7jImYj4HlMa+R168AmXT
82ubDR2ivqQwl7AgEDoAAwDQYJKoZIhvcNAQEEBQADgYEAn8
BTcPg4OwohGIMU2m39FVvh0M86ZBkANQCEHxMzzrnydXnvRM
KPSE208x3Bgh5cGBC47YghGZzdvxYJAT1vbkfCSBVR9GBxef
6ytkuJ9YnK84Q8x+pS2bEBDnw0D2MwdOSF1sBb1bcFfkmbpj
N2N+hqrrvA0mcNpAgk8nU=
-----END CERTIFICATE REQUEST-----
4. When the CA returns the certificate, import it into the SA7100/
SA7120. Use the import cert command, with the KeyID. As
with the import key, choose an import protocol for importing the
key. Use p for paste. After the paste is finished, add three periods
to display the command line.
HP SA7120> import cert mywebserver
keyid is mywebserver;
Import protocol: (paste, xmodem) [paste]:
<Enter>
Type or paste in date, end with ... alone on line
-----BEGIN CERTIFICATE-----
MIIDKDCCAtKgAwIBAgIBADANBgkqhkiG9w0BAQQFADCBnDEL
MAkGA1UEBhMCVVMxCzAJBgNVBAgTAkNBMQ4wDAYDVQQHEwVQ
b3dheTEaMBgGA1UEChMRQ29tbWVyY2Ug
.
.
.
-----END CERTIFICATE----- <Enter>
... <Enter>
Import successful!
HP SA7120>
5. Create mapping for Server 1. Use the create map command to
specify the server IP address, ports, and keyID.
HP SA7120> create map
Server IP (0.0.0.0): 10.1.1.30
SSL (network) port [443]: <Enter>
Cleartext (server) port [80]: <Enter>
KeyID to use for mapping: mywebserver
6. Save the configuration when the server has been mapped.
HP SA7120> config save
Saving configuration to flash...
Configuration saved to flash
HP SA7120>

C H A P T E R 3 HP e-Commerce Server Accelerator SA7100/SA7120 User Guide
20
Using an Existing Key/Certificate
Exporting a
Key/Certificate
from a Server
This method is used when it is important that the existing keys and
certificates are used.
NOTE: Currently there
is no published method
for extracting private
keys from Microsoft* IIS
or Netscape* servers.
Consult your server software documentation for detailed instructions
on how to export keys and certificates. Once you have exported the
keys and certificates, use the import key and import cert commands
to paste the keys and certificates into your SA7100/SA7120. Some
general instructions are provided below for the Apache* Web Server.
Apache* Interface to Open SSL* (mod_ssl)
For key:
1. Look in $APACHEROOT/conf/httpd.conf for location of *.key
file.
2. Copy and paste the key file.
For certificate:
1. Look in $APACHEROOT/conf/httpd.conf for location of *.crt
file (certificate).
2. Copy and paste the certificate file.
Apache SSL*
For key:
1. Look in $APACHESSLROOT/conf/httpd.conf for location of
*.key file.
2. Copy and paste the key file.
For certificate:
1. Look in $APACHESSLROOT/conf/httpd.conf for location of
*.cert file.
2. Copy and paste the certificate file.

C H A P T E R 3 Keys and Certificates
21
Stronghold*
For key:
1. Look in $STRONGHOLDROOT/conf/httpd.conf for location of
*.key file.
2. Copy and paste the key file.
For certificate:
1. Look in $STRONGHOLDROOT/conf/httpd.conf for location of
*.cert file.
2. Copy and paste the certificate file.
Importing into the SA7100/SA7120
1. Use the import key command with the keyID, and choose an
import protocol for importing the key. In this case, use the default
to “paste.” When the paste is finished, add a line break followed
by three periods to display the command line.
HP SA7120> import key mywebserver
Import protocol: (paste, xmodem) [paste]:
<Enter>
Type or paste in date, end with ... alone on line
-----BEGIN RSA PRIVATE KEY-----
MIIBOgIBAAJBALGOlBH14vIdtfuA+UnyRIoKya13ey8mj3GD
QakdwoDJALu+jtcC
.
.
.
S9dPdwp6zctsZeztn/ewPeNamz3q8QoEhY8CawEA
-----END RSA PRIVATE KEY-----<Enter>
... <Enter>
Import successful!
HP SA7120>
2. Use the import cert command with the keyID. As with import
key, choose an import protocol for importing the key. Use the
default to “paste.” When the paste is finished, add a line break
followed by three periods to display the command line.
HP SA7120> import cert mywebserver
keyid is mywebserver;
Import protocol: (paste, xmodem) [paste]:
<Enter>
Type or paste in date, end with ... alone on line

C H A P T E R 3 HP e-Commerce Server Accelerator SA7100/SA7120 User Guide
22
-----BEGIN CERTIFICATE-----
MIIDKDCCAtKgAwIBAgIBADANBgkqhkiG9w0BAQQFADCBnDEL
MAkGA1UEBhMCVVMxCzAJBgNVBAgTAkNBMQ4wDAYDVQQHEwVQ
b3dheTEaMBgGA1UEChMRQ29tbWVyY2Ug
.
.
.
-----END CERTIFICATE----- <Enter>
... <Enter>
Import successful!
HP SA7120>
3. Create a server mapping. Use the create map command to
specify the server IP address, ports, and keyID.
HP SA7120> create map
Server IP (0.0.0.0): 10.1.1.30
SSL (network) port [443]: <Enter>
Cleartext (server) port [80]: <Enter>
KeyID to use for mapping: mywebserver
4. Save the configuration when the server has been mapped.
HP SA7120> config save
Saving configuration to flash...
Configuration saved to flash
HP SA7120>
Creating a new
Key/Certificate
on the SA7100/
SA7120
Use the create key and create cert commands to create new keys and
certificates for SA7100/SA7120 operation. This procedure can be
used when there are no existing keys and certificates on the server.
The advantage is that this method is very fast, but a CA has not signed
the certificates.
The fields input to create a certificate are called a Distinguished
Name (DN). For optimal security, one or more fields must be
modified to make the DN unique.
Procedure
1. Create a key as follows:
HP SA7120> create key
Enter the key strength [512,1024]: 512
New keyID [001]: mywebserver
Keypair was created for keyID: mywebserver
2. Enter the create cert command with the keyID
HP SA7120> create cert mywebserver
You are about to be asked to enter information…

C H A P T E R 3 Keys and Certificates
23
Enter the information for the certificate, as prompted:
•Country
•State
•Locality
•Organization
•Organization unit
•Common name (for example, www.myserver.com)
•E-mail address
3. Create a server mapping. Use the create map command to
specify the server IP address, ports, and keyID.
HP SA7120> create map
Server IP (0.0.0.0): 10.1.1.30
SSL (network) port [443]: <Enter>
Cleartext (server) port [80]: <Enter>
KeyID to use for mapping: mywebserver
4. Save the configuration when the server has been mapped.
HP SA7120> config save
Saving configuration to flash...
Configuration saved to flash
HP SA7120>
Global Site
Certificates
Overview
NOTE: The SA7100/
SA7120 supports only one
root CA certificate per
mapping. However,
multiple intermediate CA
certificates per single
mapping are supported.
Four types of certificates are involved in the following discussion:
•Root Certificate. The certificate of a trusted CA such as
Ve ri Sign . *
•Server Certificate. Loaded on the server. Can be either self-
generated or received from a CA such as VeriSign*. Interacts
with requesting browser’s root certificate to establish encryption
level.
•Global Site Certificate. An extended server certificate. Allows
128-bit encryption for export-restricted browsers.
•Intermediate certificate authority (CA) Certificate. A certificate
“signed,” that is, authenticated, by a recognized CA such as
VeriSign*, and used to validate a global site certificate. Called an
“intermediate CA certificate” in the following discussion.

C H A P T E R 3 HP e-Commerce Server Accelerator SA7100/SA7120 User Guide
24
Export versions of Internet Explorer* and Netscape* Communicator
use 40-bit encryption to initiate connections to SSL servers. Upon
receiving a client request, the server responds by sending a digital
certificate. If this certificate is a conventional server certificate (that
is, not a global site certificate), browser and server complete the SSL
handshake and use a 40-bit key to encrypt application data. If the
server responds to a requesting browser with a global site certificate,
the client automatically renegotiates the connection to use 128-bit
encryption.
A global site certificate is validated by an accompanying intermediate
CA certificate. (Such pairs are called “chained certificates.”)
Examples of intermediate CA certificates include Microsoft SGC
Root* and VeriSign Class 3*. When a requesting browser receives a
global site certificate along with an intermediate CA certificate, the
browser’s root certificate is used to validate the intermediate CA
certificate, which in turn is used to validate the global site certificate,
thus letting the browser know that it can renegotiate the connection to
use 128-bit encryption.
Global Site Certificate Paste Procedure
If you wish to use a global site certificate, you must import both the
global site certificate and its accompanying intermediate CA
certificate. Both certificates must be chained together in a single file.
Use the import cert command to import either single or chained
certificates. In the latter case, paste the server’s global site certificate
first, followed by the intermediate CA certificate. Follow the
intermediate CA certificate by typing three periods on a new line.
Example:
HP SA7120> import cert <keyID>
Import protocol: (paste, xmodem) [paste]:
Type or paste in data, end with ... alone on line
NOTE: There must be no
white space before,
between, or after
certificates, and the
“Begin...” headers and
“End...” trailers must all
be retained.
-----BEGIN CERTIFICATE-----
MIIFZTCCBM6gAwIBAgIQCTN2wvQH2CK+rgZKcTrNBzANBgkq
hkiG9w0BAQQFADCBujEfMB0GA1UEChMWVmVyaVNpZ24gVHJ1
c3QgTmV0d29yazEXMBUGA1UECxMOVmVyaVNpZ24sIEluYy4x
MzAxBgNVBAsTKlZlcmlTaWduIEludGVybmF0aW9uYWwgU2Vy
:
dmVyIENBIC0gQ2xhc3MgMzFJMEcGA1UECxNAd3d3LnZlcmlz
aWduLmNvbS9DUFMg
SW5jb3JwLmJ5IFJlZi4gTElBQklMSVRZIExURC4oYyk5NyBW
ZXJpU2lnbjAeFw05
OTExMTEwMDAwMDBaFw0wMDExMTAyMzU5NTlaMIHHMQswCQYD

C H A P T E R 3 Keys and Certificates
25
VQQGEwJVUzETMBEG
-----END CERTIFICATE-----
-----BEGIN CERTIFICATE-----
MIIEMTCCA5qgAwIBAgIQI2yXHivGDQv5dGDe8QjDwzANBgkq
hkiG9w0BAQIFADBfMQswCQYDVQQGEwJVUzEXMBUGA1UEChMO
VmVyaVNpZ24sIEluYy4xNzA1BgNVBAsTLkNsYXNzIDMgUHVi
bGljIFByaW1hcnkgQ2VydGlmaWNhdGlvbiBBdXRob3JpdHkw
HhcNOTcwNDE3MDAwMDAwWhcN
:
OTk3IFZlcmlTaWduMA0GCSqGSIb3DQEBAgUAA4GBALiMmMMr
SPVyzWgNGrN0Y7uxWLaYRSLsEY3HTjOLYlohJGyawEK0Rak6
+2fwkb4YH9VIGZNrjcs3S4bmfZv9jHiZ/4PC/
NlVBp4xZkZ9G3hg9FXUbFXIaWJwfE22iQYFm8hDjswMKNXRj
M1GUOMxlmaSESQeSltLZl5lVR5fN5qu
-----END CERTIFICATE-----<Enter>
...<Enter>
Import successful!
HP SA7120>

C H A P T E R 3 HP e-Commerce Server Accelerator SA7100/SA7120 User Guide
26
Redirection: Clients and Unsupported Ciphers
NOTE: The user must
provide the redirect URL
and ensure that it is
available, as well as
define the content of the
redirect page.
When a client that does not support the selected cipher suite attempts
to connect to the SA7100/SA7120, the default behavior is to reject the
connection, resulting in the client system reporting a fatal error.
However, the SA7100/SA7120 allows you to specify a “redirect
address” where you can provide clients with additional information.
The set redirect command allows you to specify a redirect Web
address for any Map ID. The show redirect command displays any
redirect addresses currently configured.
WARNING: If the
redirect URL causes a
client to access the same
SA7100/SA7120 mapping
that invoked the
redirection an infinite
loop condition will occur.
HP SA7120> list map
Map Net Ser Cipher Re- Client
ID KeyID Server IP Port Port Suites direct Auth
== ===== ========= ==== ==== ====== ===== ====
1 default Any 443 80 all(v2+v3) n n
2 sample 10.1.2.5 443 80 med(v2+v3) n n
HP SA7120> set redirect 2
Enter a redirect URL at following prompt
e.g. http://www.e-comm_site.com/somebrowser.html
Enter redirect URL []:http://www.e-
comm_site.com/cipher_info.html
HP SA7120> list map
Map Net Ser Cipher Re- Client
ID KeyID Server IP Port Port Suites direct Auth
== ===== ========= ==== ==== ====== ===== ====
1 default Any 443 80 all(v2+v3) n n
2 sample 10.1.2.5 443 80 med(v2+v3) y n
HP SA7120> show redirect 2
Redirect URL for map 2 is set: http://www.e-
comm_site.com/cipher_info.html
To disable a redirect URL for a mapping:
HP SA7120> set redirect 2 none
HP SA7120> show redirect 2
Redirect URL for map 2 is not set

C H A P T E R 3 Client Authentication
27
Client Authentication
By default, the SA7100/SA7120 does not authenticate client
identities, however specific map IDs can be configured to request
client certificates for the purpose of verifying identities. When this
feature is enabled, the SA7100/SA7120 verifies that client
certificates are signed by a known CA. This feature is controlled by
the import client_ca command.
Example:
First, use the list map command to display the current map IDs and
their configurations including, in the last column, Client
Authentication, enabled (y) or disabled (n).
HP SA7120> list map
Map Net Ser Cipher Re- Client
ID KeyID Server IP Port Port Suites direct Auth
== ===== ========= ==== ==== ====== ===== ====
1 default Any 443 80 all(v2+v3) n n
2 sample 10.1.2.57 443 80 med(v2+v3) n n
Next, import the client CA certificate for Map ID 2.
HP SA7120> import client_ca 2
Import protocol: (paste, xmodem) [paste]:
<Enter>
Type or paste in data, end with ... alone on line
-----BEGIN CERTIFICATE-----
MIIDxzCCAzCgAwIBAgIBADANBgkqhkiG9w0BAQQFADCBpDEL
MAkGA1UEBhMCVVMxEzARBgNVBAgTCkNhbGlmb3JuaWExEjAQ
BgNVBAcTCVNhbiBEaWVnbzEUMBIGA1UE
.
.
.
XcCabZcfBRuYcZeUoNrGUl8tD80jp2YNG1vidgLEaD1YCli5
I9/mNrcB25mSfdAR
/08ROTMxm4VKOSA=
-----END CERTIFICATE-----<Enter>
...<Enter>

C H A P T E R 3 HP e-Commerce Server Accelerator SA7100/SA7120 User Guide
28
Verify the import by using the list map command again. Note that the
Client Auth column now shows client authentication for Map ID 2
enabled.
HP SA7120> list map
Map Net Ser Cipher Re- Client
ID KeyID Server IP Port Port Suites direct Auth
== ===== ========= ==== ==== ====== ===== ====
1 default Any 443 80 all(v2+v3) n n
2 sample 10.1.2.57 443 80 med(v2+v3) n y
Clients connecting to “map 2” are required to present a client
certificate signed by the CA whose certificate was imported above. If
they do not present a properly signed certificate, their connection
attempt is refused.
Creating a
Client CA
Certificate
using
OpenSSL*
There are software packages available that handle the details of client
certificate generation, however, you can implement them manually.
The following example illustrates the appropriate steps using
OpenSSL*:
1. Generate the key pair for the client CA:
openssl genrsa -out ca_key.pem 1024
To acquire a copy of OpenSSL* for your environment, access the
OpenSSL* Web site at www.openssl.org.
NOTE: Generate the
client CA certificate: openssl req -new -x509 -config hp.cnf -key
ca_key.pem -days 365 -out ca_cert.pem
NOTE: In this example,
ca_cert.pem is your
trusted CA and signing
certificate.
2. Using the import client_ca command, import ca_cert.pem
For each client:
1. Generate a key pair:
openssl genrsa -out key.pem 1024
2. Generate a certificate signing request:
openssl req -new -config hp.cnf -days 365
-key key.pem -out csr.pem

C H A P T E R 3 SSL Processing
29
3. Sign the client certificate signing request with the client CA
certificate:
openssl x509 -req -CAcreateserial -CAkey
ca_key.pem -CA ca_cert.pem -days 365 -in csr.pem
-out cert.pem
4. Combine the key.pem and cert.pem keys into one file by
typing this command:
cat key.pem cert.pem > all.pem
5. Convert to p12 format by typing this command:
openssl pkcs12 -export -in all.pem -out
<file>.p12 - name “MY NAME”
The output file <file>.p12 will be imported into the browser as a
personal certificate.
SSL Processing
The SA7100/SA7120 handles several SSL protocols, for example,
HTTPS (which is the default). For security purposes, you can block
access to specified IPs or ports (see “Blocking” section). Traffic that
is not mapped or blocked flows through transparently. Supported
protocols are listed below. (Ports listed are “well-known” port
assignments. Any available port may be used.)
•HTTPS 443 (default)
•IMAPS 993
•POP3S 995
•SMTPS 465
•NNTPS 563
•LDAPS 636
Server
Assignment
(“Mapping”)
Keypairs and their associated certificates are referenced by a keyID.
A server is identified by a unique combination of server IP and
network port. Mapping is the process of associating a keyID with a
server (using server IP, network port, and server port). The SA7100/
SA7120 supports two types of mapping:
•Automapping
•Manual mapping

C H A P T E R 3 HP e-Commerce Server Accelerator SA7100/SA7120 User Guide
30
Automapping
NOTE: Remember to
save the configuration
(with the config save
command) after making
mapping changes.
Automapped entries are identified by a server IP address of zero
(0.0.0.0). When a server IP address of zero is specified, the SA7100/
SA7120 intercepts packets to any server IP address with the matching
network ports. As with any mapping entry, the combination of server
IP address and network port must be unique.
The initial configuration for the SA7100/SA7120 provides an
automapping entry for network port 443 and server port 80. This is
associated with the internally generated default keypair and
certificate with the keyID of “default.” Under this initial
configuration, automapping occurs on any server with this network
port (443) when traffic is routed through the SA7100/SA7120.
Automapping with user-specified key and
certificate
When a user-specified key and certificate are to be automapped, the
user can replace the initial automapping entry with the create map
command. By specifying the same unique identifier (server IP of
0.0.0.0, and network port of 443) with a user-generated keyID, the
user can overwrite the initial automapping entry. (The key and
certificate may be obtained through any of the methods described
previously in this chapter.)
Automapping with multiple port combinations
The user can specify multiple automapping entries when the network
port is unique. For example, a user might specify, in addition to the
initial network (443) and server (80) port combination, a combination
of network (8010) and server (80) port.
Deleting automapping entries
Any automapping entry can be deleted, but if the initial automapping
is deleted and no other mapping entry is specified, the SA7100/
SA7120 automatically recreates the initial automapping entry. Either
replace the initial automapping entry or create another mapping/
automapping entry and then delete the initial automapping entry
using the delete map command.

C H A P T E R 3 SSL Processing
31
Manual mapping
The user can create (with the create map command) one or more
mapping entries for individual servers. This is the only way to specify
unique keyIDs for each server. Normally, when manual mapping is
performed, the initial automapping entry is deleted, but this is not a
requirement.
Combining automapping and manual mapping
NOTE: If both manual
mappings and applicable
automappings are
available, the SA7100/
SA7120 always uses the
manual mapping.
Any combination of automapping and manual mapping entries, up to
a total of 1000, can be used provided the server IP address and
network port combinations are unique. Several of the scenarios in
Chapter 4 include step-by-step mapping procedures.
Blocking For security purposes, the SA7100/SA7120 allows the blocking of
particular IP addresses and ports. IP/port combinations can be
blocked on the basis of:
NOTE: Blocking
operations apply to both
TCP and UDP traffic.
•Specific IP, specific port
•Subnet, specific port
•All IPs, specific port
Specific IP, Specific Port
To block a specific server IP and specific port combination:
1. Type the create block command.
2. Type the IP address.
3. Press Enter to accept the default IP mask.
4. Type the specific port.
5. Press Enter to accept the default port mask.
Example:
HP SA7120> create block
Client IP to block [0.0.0.0]: 10.1.2.1
Client IP mask [0.0.0.0]: 255.255.255.255
Server IP to block [0.0.0.0]: 20.1.2.1
Server IP mask [0.0.0.0]: 255.255.255.255
Server Port to block: 80
Server Port mask [0xffff]:<Enter>

C H A P T E R 3 HP e-Commerce Server Accelerator SA7100/SA7120 User Guide
32
Use the show block command to verify:
HP SA7120> show block
--------
blocks :
---------
(1) block 10.1.2.1 255.255.255.255 20.1.2.1
255.255.255.255 80 0xffff
Subnet, Specific Port
To block a subnet, and specific port combination:
1. Specify a subnet, using 0 as the address’s final octet. (In the
example below, all IPs from “10.1.2.x” to “20.1.2.x” are blocked
on port 80.)
2. Type the subnet mask, with 0 indicating the portion of the IP
address to be ignored.
3. Type the specific port.
4. Press Enter to accept the default port mask.
Example:
HP SA7120> create block
Client IP to block [0.0.0.0]: 10.1.2.0
Client IP mask [0.0.0.0]: 255.255.255.0
Server IP to block [0.0.0.0]: 20.1.2.0
Server IP mask [0.0.0.0]: 255.255.255.0
Server Port to block: 80
Server Port mask [0xffff]:<Enter>
Use show block to verify:
HP SA7120> show block
-----------
blocks :
-----------
(1) block 10.1.2.0 255.255.255.0 20.1.2.0
255.255.255.0 80 0xffff
-----------
All IPs, Specific Port
To block a specific port on all IP addresses:
1. Type all zeroes as the IP address to be blocked.
2. Type all zeroes as the IP wildcard mask to be blocked.
3. Type the specific port.

C H A P T E R 3 SSL Processing
33
4. Press Enter to accept the default port mask.
Example:
HP SA7120> create block
Client IP to block [0.0.0.0]: <Enter>
Client IP mask [0.0.0.0]: <Enter>
Server IP to block [0.0.0.0]:<Enter>
Server IP mask [0.0.0.0]:<Enter>
Server Port to block: 80
Server Port mask [0xffff]:<Enter>
5. Use the show block command to confirm the block:
HP SA7120> show block
-----------
blocks :
-----------
(1) block
0.0.0.0 0.0.0.0 0.0.0.0 0.0.0.0 80 0xffff
-----------
Delete a Block
The example below illustrates how to delete a subnet block. Type the
delete block command with the block ID (block ID is 1 in the
example):
1. Use the show block command to identify the block to be deleted.
HP SA7120> show block
-----------
blocks :
-----------
(1) block 10.1.2.1 255.255.255.255 20.1.2.1
255.255.255.255 80 0xffff
-----------
2. Use the delete block command followed by the block ID to
delete the block.
HP SA7120> delete block 1

C H A P T E R 3 HP e-Commerce Server Accelerator SA7100/SA7120 User Guide
34
Failure Conditions, Fail-safe, and Fail-through
During any failure condition of the SA7100/SA7120, unprocessed
data packets can either pass through or not, depending on whether
Fail-safe or Fail-through mode is enabled. The Fail-through switch is
by default in Fail-safe mode, meaning that during a failure no data
packets will pass from one side of the SA7100/SA7120 to the other.
For details, see “Failure/Bypass Modes” in Appendix B.

Scenarios
This section contains scenarios illustrating examples of HP e-
Commerce Server Accelerator SA7100/SA7120 configurations:
•Scenario 1: Single server
•Scenario 2: Multiple servers
•Scenario 3: Multiple SA7100/SA7120s, cascaded
•Scenario 4: Different ingress and egress routers
•Scenario 5: Configuring a Firewall

C H A P T E R 4 HP e-Commerce Server Accelerator SA7100/SA7120 User Guide
36
Scenario 1—Single Server
This scenario describes a typical configuration of a SA7100/SA7120
with one server, using either automapping or manual configuration/
mapping. This scenario describes the fastest way to get up and
running with a SA7100/SA7120.
Single SA7100/SA7120, Single Server Installation
Procedure for
Scenario 1
Automapping
1. Physically connect the SA7100/SA7120 to the router and to one
server.
2. Initiate HTTPS traffic to the server. The SA7100/SA7120
monitors traffic and uses the initial mapping (with associated
default key and certificate) to decrypt HTTPS traffic and pass
clear text HTTP traffic to the server.
Manual Configuration
1. Perform the installation as described in Chapter 2. Access the
SA7100/SA7120 command prompt.
2. Acquire the appropriate keys and certificates following the
procedure in the “Keys and Certificates” section in Chapter 3.
3. Create a mapping for the server. Use the create map command
to specify the server IP address, ports, and keyID.
HP SA7120> create map
Server IP (0.0.0.0): 10.1.1.30
SSL (network) port [443]: <Enter>
Cleartext (server) port [80]: <Enter>
KeyID to use for mapping: myserver
Single Server
Router
HP e-Commerce Server Accelerator

C H A P T E R 4 Scenario 1—Single Server
37
4. You can delete the default mapping. After the user has manually
created the mapping, the default mapping can be deleted. In this
case, delete MapID number 1. MapID number 2 becomes
MapID number 1 when the default is deleted.
HP SA7120> delete map 1
HP SA7120> list maps
Map Net Ser Cipher Re- Client
ID KeyID Server IP Port Port Suites direct Auth
== ===== ========= ==== ==== ====== =====
====
1 myserver 10.1.1.30 443 80 med(v2+v3) n n
HP SA7120>
5. Save the configuration when the server has been mapped.
HP SA7120> config save
Saving configuration to flash...
Configuration saved to flash
HP SA7120>
C H A P T E R 4 HP e-Commerce Server Accelerator SA7100/SA7120 User Guide
38
Scenario 2—Multiple Servers
This scenario shows how to configure two or more servers.
Single SA7100/SA7120, Multiple Server Installation
Procedure for
Scenario 2
1. Perform the installation as described in Chapter 2. Access the
SA7120 command prompt.
2. Acquire the appropriate keys and certificates following the
procedure in the Keys and Certificates section in Chapter 3.
3. Create a mapping for Server 1. Use the create map command to
specify the server IP address, ports, and keyID.
HP SA7120> create map
Server IP: 10.1.1.30
SSL (network) port [443]: <Enter>
Cleartext (server) port [80]: <Enter>
KeyID to use for mapping: myserver
4. Create a mapping for Server 2. As in the previous step, use the
create map command to specify the server IP address, ports for
the second server, and the keyID.
HP SA7120> create map
Server IP: 10.1.1.31
SSL (network) port [443]: <Enter>
Cleartext (server) port [80]: <Enter>
KeyID to use for mapping: myserver2
5. Use the list map command to view the mapping. (Multiple keys
and certificates can also be imported and each mapped to
individual servers. If you do this, at least one field in the
certificate information—usually the common name—must be
unique.)
HP SA7120> list map
Server 1
10.1.1.30
Server 2
10.1.1.31
Hub/switch
Router HP e-Commerce Server Accelerator

C H A P T E R 4 Scenario 2—Multiple Servers
39
Map Net Ser Cipher Re- Client
ID KeyID Server IP Port Port Suites direct Auth
== ===== ========= ==== ==== ============ ====== ====
1 default Any 443 80 all(v2+v3) n n
2 myserver 10.1.1.30 443 80 med(v2+v3) n n
3 myserver2 10.1.1.31 443 80 med(v2+v3) n n
HP SA7120>
6. After you have manually created a mapping, the default
mapping can be deleted. In this case, delete MapID number 1.
MapID number 2 becomes MapID number 1 when the default is
deleted.
HP SA7120> delete map 1
HP SA7120> list map
Map Net Ser Cipher Re- Client
ID KeyID Server IP Port Port Suites direct
Auth
== ===== ========= ==== ==== ====== =====
====
1 myserver 10.1.1.30 443 80 med(v2+v3) n n
2 myserver2 10.1.1.31 443 80 med(v2+v3) n n
HP SA7120>
7. To configure a third or fourth web server to operate with the
SA7100/SA7120, repeat the steps above, specifying a different
IP address for each server.
8. Save the configuration when mapping is completed for the
server(s).
HP SA7120> config save
Saving configuration to flash...
Configuration saved to flash
HP SA7120>

C H A P T E R 4 HP e-Commerce Server Accelerator SA7100/SA7120 User Guide
40
Scenario 3—Multiple SA7100/SA7120s,
Cascaded
This scenario shows how to cascade SA7100/SA7120s for additional
performance and availability. The same procedures apply that were
performed in Scenario 3. In addition, the complete configuration of
the first SA7100/SA7120 is exported to the second SA7100/SA7120
in line.
Initial
Configuration
•Two or more SA7100/SA7120s must be physically installed on
the same network. To cascade multiple SA7100/SA7120s,
connect from the server port of the first SA7100/SA7120 to the
network port of the next SA7100/SA7120 in line, and then again
connect from the server port to the network port of the next
SA7100/SA7120 in line, or to the server. (See Chapter 2 for more
information.)
•On the first SA7100/SA7120, the set spill enable command is
used to enable spilling so that the next SA7100/SA7120 in line
can handle the overflow. Spill is then enabled for each
subsequent SA7100/SA7120, except the last one. Do not
configure the last SA7100/SA7120 to spill to the server.
•The first SA7100/SA7120 should be fully configured; any
necessary keys, certificates or maps must exist. The complete
configuration is exported from the first, then imported to the next
SA7100/SA7120 in line. This procedure is repeated for any
additional SA7100/SA7120s in line.
Multiple (Cascaded) SA7100/SA7120s
HP e-Commerce Server Accelerators
Hub/Router/Switch
Server

C H A P T E R 4Scenario 3—Multiple SA7100/SA7120s, Cascaded
41
Procedure for
Scenario 3
1. Configure the SA7100/SA7120 farthest from the server as
described in any of the preceding scenarios. Remain connected to
that specific SA7100/SA7120 for the export configuration
procedure.
2. At the command prompt, type the set spill enable command.
This allows overflow traffic to be transferred to the second
SA7100/SA7120 for processing.
3. Save configuration.
HP SA7120> config save
Saving configuration to flash...
Configuration saved to flash
HP SA7120>
4. Export the configuration. Use the export config command.
Choose xmodem mode to export.
HP SA7120> export config
Export protocol: (xmodem, ascii) [ascii]: xmodem
<Enter>
Beginning export...
5. Select Receive from the HyperTerminal* Transfer menu.
6. Type or use the Browse button to specify the directory in which
you want to place the received file.
7. Select xmodem as the receiving protocol.
8. Click the Receive button.
9. Specify a filename for the received file and click OK. The
operation concludes and the normal prompt reappears.
Use Ctrl-X to kill transmission
Export successful!
HP SA7120>
10. Connect to the second SA7100/SA7120 (“Device 2”), either
through the console connection or another window (if both are
connected to the same PC).
11. Press the Bypass button on Device 2’s front panel to put the
machine in bypass mode.
12. Import the configuration. Use the import config command to
begin the process. Select xmodem and press Enter to begin the
import process.
HP SA7120> import config
Import protocol: (paste, xmodem) [paste]: xmodem

C H A P T E R 4 HP e-Commerce Server Accelerator SA7100/SA7120 User Guide
42
<Enter>
Use Ctl-X to cancel upload
13. Select Send from the HyperTerminal* Transfer menu.
14. Type or use the Browse button to specify the file to send.
15. Select xmodem as the sending protocol.
16. Click the Send button. The transfer completes and then you are
prompted to verify that you want to install this configuration.
Do you want to install this config ? [y]:
17. After verification (y) or refusal (n), the prompt reappears.
HP SA7120>
18. Change Device 2’s IP address using the set ip command.
HP SA7120> set ip
Enter IP Address (’none’ to delete) [10.1.2.65]:
1.1.1.1
Enter Netmask (’none’ to delete)
[255.255.255.0]: 2.2.2.2
19. Save the configuration.
HP SA7120> config save
Saving configuration to flash...
Configuration saved to flash
HP SA7120>
20. Press the Bypass button on Device 2’s front panel to put the
machine in inline mode.
21. Repeat steps 11-20 for any additional SA7100/SA7120s. On the
last SA7100/SA7120 in the chain, disable spilling with the set
spill disable command.
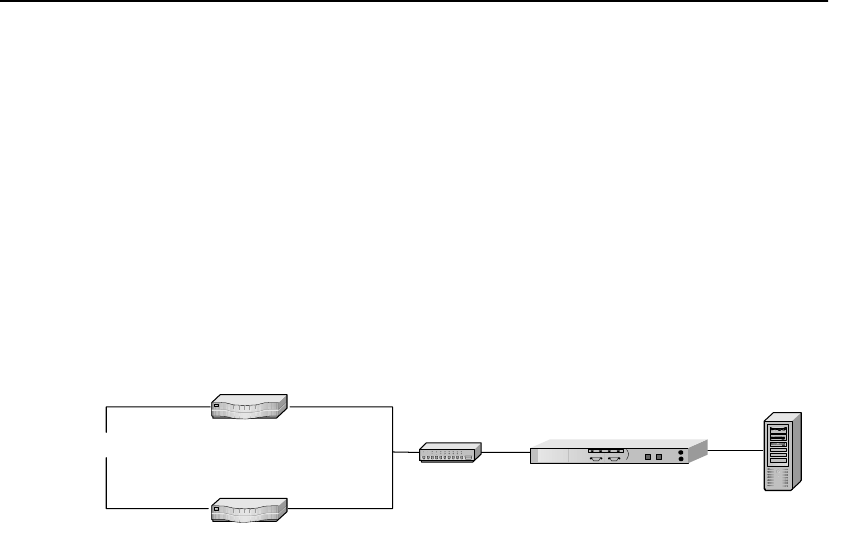
C H A P T E R 4 Scenario 4—Different Ingress and Egress Routers
43
Scenario 4—Different Ingress and Egress
Routers
This scenario describes the configuration of a SA7100/SA7120 when
the ingress and egress traffic paths are different. This scenario
includes:
•One or more servers
•One or more cascaded SA7100/SA7120s
•One or more ingress routers
•One egress router
Installation with Ingress and Egress Routers
Procedure for
Scenario 4
1. Configure your SA7100/SA7120 (as described in any of the
previous scenarios).
NOTE: Execute an “arp
–a” (or equivalent
command for your OS) on
the server to display the
MAC address of the
default gateway. This is
the address you should
use.
2. Determine the MAC address of the egress router through which
you want to route outbound traffic.
3. At the CLI prompt, enter the default egress router.
HP SA7120> set egress_mac 00:11:22:33:44:55
Egress MAC set to 00:11:22:33:44:55
HP SA7120> config save
Saving configuration to flash...
Configuration saved to flash
HP SA7120>
4. To reverse this process:
HP SA7120> set egress_mac none
Server
Switch
Client Ingress Router
Egress Router
HP e-Commerce Server
Accelerator
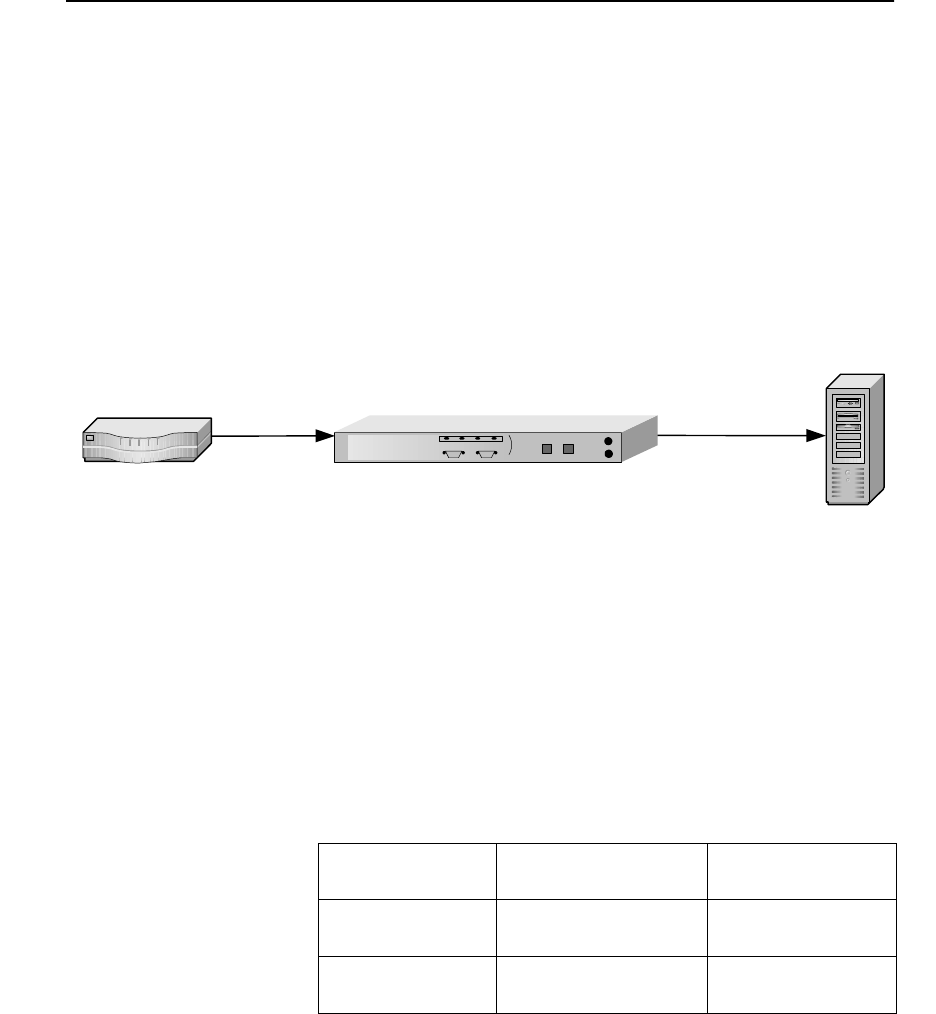
C H A P T E R 4 HP e-Commerce Server Accelerator SA7100/SA7120 User Guide
44
Scenario 5—Configuring a Firewall
This scenario describes the recommended network configuration to
allow a SA7100/SA7120 to provide SSL services for a single server
that also serves plain-text HTTP documents. Actual procedures for
adjusting the firewall and server configurations vary widely
depending upon the products used, so the steps outlined here are
necessarily approximations and must be adjusted as required by the
particulars of your environment. Please consult your server and
firewall documentation for additional information.
Single SA7100/SA7120 configured with single server and firewall
Server
Configuration
Servers providing both HTTP and HTTPS services typically have
two instances of the Web Server process configured:
•One listening on the standard HTTP port of 80, providing
unencrypted access to non-sensitive information, and
•Another listening on port 443 providing access to SSL encrypted
sensitive information.
For the SA7120 to provide SSL services, the web server process
providing port 443 services requires two modifications.
Server
Firewall
HP e-Commerce Server Appliance SA7100/SA7120
Port Number Connection Type Content Served
80 HTTP Non-sensitive
443 HTTPS Sensitive

C H A P T E R 4Scenario 5—Configuring a Firewall
45
•First, because the SA7120 performs all of the SSL processing,
the web server process must be configured to expect only
standard HTTP (unencrypted) connections, even for sensitive
content.
•Second, the web server process must be configured to listen for
these HTTP connections on a port other than the standard
HTTPS port (443). In this scenario we configure the port 443
service to listen on port 81.
SA7120 Configuration
The SA7120 must be configured to intercept HTTPS connections on
port 443 and forward them to the server. In the preceding section, we
configured the server to provide access to sensitive data through port
81, so that should be the clear text port when creating a server
assignment (or “map”) on the SA7120. Perform the following steps
to create the server assignment:
1. Perform the installation as described in Chapter 2 and access the
command line prompt.
2. Acquire the appropriate keys and certificates following the
procedure in the “Keys and Certificates” section in Chapter 3.
3. Create a mapping for the server. Use the create map command
to specify the server IP address, ports, and keyID.
HP SA7120> create map
Server IP (0.0.0.0): 10.1.1.30
SSL (network) port [443]: <Enter>
Cleartext (server) port [80]: 81
KeyID to use for mapping: serv1
Port Number Connection Type Content Served
80 HTTP Non-sensitive
81 HTTP Sensitive

C H A P T E R 4 HP e-Commerce Server Accelerator SA7100/SA7120 User Guide
46
NOTE: The device
automatically adjusts the
list of MapIDs as they
are created and deleted,
thus MapID 2 becomes
MapID 1 when the default
(the original MapID 1) is
deleted.
4. Once a user-created server assignment exists, the default
mapping can be deleted. In this example, delete MapID number
1.
HP SA7120> > delete map 1
HP SA7120> list maps
Map Net Ser Cipher Re- Client
ID KeyID Server IP Port Port Suites direct Auth
== ===== ========= ==== ==== ========== ===== ====
1 serv1 10.1.1.30 443 80 med(v2+v3) n n
HP SA7120>
5. Save the configuration.
HP SA7120> config save
Saving configuration to flash...
Configuration saved to flash
HP SA7120>
Firewall Configuration
Absent a firewall, outside clients would be able to connect to services
on the web server and possibly gain access to sensitive data—on port
80 using HTTP to access non-sensitive data, on port 443 using
HTTPS to access sensitive data, and on port 81 using HTTP to access
that same sensitive data. Obviously, allowing access to sensitive data
over an unencrypted connection on port 81 is not desirable.
Consequently a firewall should be configured to prevent such access.
NOTE: In this
configuration, the
firewall may occasionally
report the blocking of
outbound packets from
the Server on port 81.
This is normal—a side-
effect of the varying
latencies characteristic of
Internet traffic—and does
not indicate a problem
with the configuration
Port Access
80 Allowed
443 Allowed
All Others Denied

Command
Reference
The HP e-Commerce Server Accelerator SA7100/SA7120 is fully
configurable through the Command Line Interface (CLI). The CLI is
accessible through both the console and aux console RS232 ports or
remotely via Telnet and SSH.
Online Help
The SA7100/SA7120 provides online help with the following
options:
•Type help to display a summary of commands.
•Type help <command> (or ? <command>) for a
description of a specific command or, if relevant, a list of
subcommands you can enter from within <command>.
•Type help usage (or ? <usage>)to display all commands
and their usage.

C H A P T E R 5 HP e-Commerce Server Accelerator SA7100/SA7120 User Guide
48
•Type tty_char to display a list of special terminal editing
characters.
Command Line Interface
The CLI handles all user interactions on the console and auxiliary
console RS232 ports. One instance per port runs at all times.
User
Authentication
To gain access to the CLI, the user must first be authenticated by
providing a password at the logon banner prompt. The logon banner
provides build version information and the serial number.
Command Line
Prompt
The standard command line prompt for the SA7120 is:
HP SA7120>
The prompt for the SA7100 is:
HP SA7100>
The prompt can be changed with the set prompt command.
Syntax The CLI uses the following syntax:
Symbol Significance
Angled Brackets (<>) Angled brackets designate where you type variable parameters.
Straight Brackets ([ ]) Choices of parameters appear between straight brackets, separated
by vertical bars.
Braces ({}) Optional commands or parameters appear between braces.
Boldface Commands shown as they are typed after the CLI prompt appear
in boldface type. (The prompt appears in normal typeface to
distinguish it from the command text.)
Vertical Bar ( | ) Separates choices of input parameters within straight brackets.
You can choose only one of a set of choices separated by the
vertical bar. (Do not include the vertical bar in the command.)

C H A P T E R 5 Command Line Interface
49
Abbreviation
to Uniqueness
It is not always necessary to type the entire command. CLI commands
can be abbreviated to uniqueness. For example, “del” as show below
is sufficient to represent the delete command:
HP SA7120> del
Usage: delete item [arg]
block blockID
cert keyID
client_ca mapID
key keyID
logs logID|all
map mapID
patch
permit permitID
sign keyID
snmp_community
trap_community
However, “sh” as shown below, is not an abbreviation to uniqueness
in that it does not distinguish between show and showsnmp.
HP SA7120> sh
The solitary letter “e” in the context of the next example, (i.e.,
preceded by “ssh”), uniquely indicates ssh enable.
HP SA7120> set ssh e
SSH Service started.

C H A P T E R 5 HP e-Commerce Server Accelerator SA7100/SA7120 User Guide
50
Input Editing Commands
Moving the
Insertion Point
Command
History
A history of recently executed commands is stored in a buffer and can
be accessed with the following commands:
Command Description
ctrl-b Move back one character.
ctrl-f Move forward one character.
ctrl-a Move to the start of the current line.
ctrl-e Move to the end of the line.
ctrl-l Clear the screen and redraw the current line, leaving the current
line at the top of the screen.
Command Description
ctrl-p Move “up” through the history list
ctrl-n Move “down” through the history list
ctrl-r (Reverse-search-history) Search backward starting at the current
line and moving up incrementally through the command history.
ctrl-s (Forward-search-history) Search forward starting at the current
line and moving down incrementally through the command
history.

C H A P T E R 5 Command Line Interface
51
Cutting Text
Command Description
ctrl-d Delete the character underneath the cursor.
ctrl-k Delete the text from the current cursor position to the end of the
line.
ctrl-u Delete backward from the cursor to the beginning of the current
line.
ctrl-w Delete the word behind the cursor, using white space as a word
boundary.
ctrl-y Paste text that has been cut using any of the four above deletion
commands.
backspace/del Delete the character to the left of the cursor.

C H A P T E R 5 HP e-Commerce Server Accelerator SA7100/SA7120 User Guide
52
Command Summary
This section contains a high-level view of the SA7100/SA7120’s
command structure. Details appear in the Command Reference.
Command Command Options
bypass
config default
compare
reset
save
create block
cert <keyID>
key <keyID>
map
permit
sign <keyID>
delete block <blockID>
cert <keyID>
client_ca <mapID>
key <keyID>
logs<logID | all>
map <mapID>
patch
permit <permitID>
sign <keyID>
snmp_community
trap_community
exit
export key <keyID>
cert <keyID>
sign <keyID>
log <logID>
config
factory_default
help help
help <command>
help usage

C H A P T E R 5 Command Summary
53
import cert <keyID>
client_ca <mapID>
config
key <keyID>
patch
upgrade
inline
list blocks
filters (shows blocks and permits)
keys
logs
maps
permit
monitoring
procs
snmp_community
system
trap_community
nic
password
reboot
Command Command Options

C H A P T E R 5 HP e-Commerce Server Accelerator SA7100/SA7120 User Guide
54
set alarms <all none esc rsc utl ovl nls>
cache <enable | disable>
ciphers <mapID>
ciphers <mapID> default
client_tmo <seconds>
date
defcert
egress_mac x:x:x:x:x:x
egress_mac none
ether
idleto <timeout>
ip <ip> <netmask>
kstrength
max_remote_sessions<0-5>
monitoring <enable | disable>
monitoring_interval <seconds>
monitoring_fields <seconds>
more
ovl_window <seconds>
prompt
redirect <mapID>
redirect <mapID> none
route x.x.x.x
rsc_window <seconds>
serial
server_tmo <seconds>
ssh <enable | disable>
ssh_port <port>
spill <enable | disable>
system
telnet <enable | disable>
telnet_port <port>
utl_highwater <percentage>
utl_lowwater <percentage>
utl_window <seconds>
Command Command Options

C H A P T E R 5 Command Summary
55
show alarms
blocks
cache
ciphers <mapID>
cert <keyID>
client_ca <mapID>
client_tmo
config
config default
config saved
date
defcert
egress_mac
ether
filters
idleto
info
ip
key <keyID>
kstrength
logs
map
max_remote_sessions
monitoring
monitoring_interval
monitoring_fields
more
ovl_window
permits
rsc_window
redirect <mapID>
route
serial
server_tmo
ssh
ssh_port
sign <keyID>
spill
status <arg>
telnet
Command Command Options

C H A P T E R 5 HP e-Commerce Server Accelerator SA7100/SA7120 User Guide
56
show telnet_port
utl_highwater
utl_lowwater
utl_window
setsnmp snmp <enable | disable>
snmp_community
snmp_port <port>
snmp_info
sys_contact
sys_location
sys_name
trap_authen <enable | disable>
trap_community
trap_port <port>
showsnmp snmp
snmp_community
snmp_info
snmp_port
sys_contact
sys_location
sys_name
trap_authen
trap_community
trap_port
status line
realtime
alarms
<log>
tty_char
Command Command Options

C H A P T E R 5 Command Reference
57
Command Reference
Help
Commands
Status
Command
Command Description
help Display the list of available commands.
help <command> Display usage for a single command.
help usage Display all commands and their usage.
tty_char View the available list of keyboard shortcut commands.
Command Description
status Display device statistics. Several modes are available, as described
below. (Default: realtime.)
Syntax:
HP SA7120> status <arg>
where:
<line> specifies a line-oriented display of statistics.
<realtime> specifies that statistics be displayed in realtime.
<alarms> shows current alarm events.
<log> shows statistics and alarm events in log file.

C H A P T E R 5 HP e-Commerce Server Accelerator SA7100/SA7120 User Guide
58
SSL
Commands
Command Description
create key Create a new keypair and associate it with a Key ID.
Example:
HP SA7120> create key
Key strength (512/1024) [512]: 1024
New keyID [001]:<Enter>
Keypair was created for keyID: 001.
HP SA7120>
delete key Delete a specified keypair for a given Key ID.
Syntax:
HP SA7120> delete key <keyID>
where <keyID> is the Key ID whose associated keypair you
want to delete.
import key Import a keypair for the specified Key ID.
Syntax:
HP SA7120> import key <keyID>
where <keyID> is the ID of the keypair you want to import.

C H A P T E R 5 Command Reference
59
export key Export a keypair for a specified Key ID (ASCII or xmodem).
Syntax:
HP SA7120> export key <keyID>
Export protocol: (xmodem, ascii) [ascii]:
<Enter>
Press any key to start, then again when
done...<Enter>
-----BEGIN RSA PRIVATE KEY-----
MIIBOgIBAAJBALqeajCDgfa8fY8FROLi0B8fVp3m4EI
2MpOzKvEKKe6Kk5pDBkH83tUBkssGBtbnDYHkiAyGzA
.
.
.
UFFSNgBRvbkiNvaNiVqKeutwDEhgCL0PDueo
-----END RSA PRIVATE KEY-----<Enter>
HP SA7120>
where <keyID> is the identifier of the keypair you want to
export.
show key Display the expanded keypair (including PEM format) for a
specified Key ID. If no Key ID is specified, displays all keys.
Syntax:
HP SA7120> show key <keyID>
where <keyID> is the Key ID whose associated keypair you
want to view.
list keys List available Key IDs.
Example:
HP SA7120> list keys
001
default
HP SA7120>
Command Description

C H A P T E R 5 HP e-Commerce Server Accelerator SA7100/SA7120 User Guide
60
create cert Create a new certificate for a specified Key ID.
Syntax:
HP SA7120> create cert <keyID>
where <keyID> is the Key IDfor which you want to create a
certificate.
delete cert Delete the certificate associated with a specified Key ID.
Syntax:
HP SA7120> delete cert <keyID>
where <keyID> is the Key ID whose associated certificate you
want to delete.
import cert Import a certificate to associate with a specified Key ID.
Syntax:
HP SA7120> import cert <keyID>
where <keyID> is the Key ID whose associated certificate you
want to import.
export cert Export the certificate for a specified Key ID.
Syntax:
HP SA7120> export cert <keyID>
where <keyID> is the Key ID whose associated certificate you
want to export.
Command Description

C H A P T E R 5 Command Reference
61
show cert Display the expanded certificate (including PEM format)
associated with a specified Key ID. If no Key ID is specified,
displays all certificates.
Syntax:
HP SA7120> show cert <keyID>
where <keyID> is the Key ID whose associated certificate you
want to view.
set ciphers Establish the list of ciphers and cipher strengths that will be
recognized by the specified Map ID.
Syntax:
HP SA7120> set ciphers <mapID>
1 - all
2 - high
3 - medium
4 - low
5 - export only
6 - Customized Ciphers
Select cipher strength [1]: 1
1 - SSLv2
2 - SSLv3
3 - SSLv2 and SSLv3
Select ciphers from SSL version [3]: 2
HP SA7120>
where mapID is the identifier of the mapping whose ciphers you
want to set.
Command Description

C H A P T E R 5 HP e-Commerce Server Accelerator SA7100/SA7120 User Guide
62
set redirect Set an alternative address to which a client is directed in the event
it doesn’t support the specified Map ID’s selected cipher suites.
Syntax:
HP SA7120> set redirect <mapID> [none]
Enter redirect URL []: <URL>
where <mapID> is the Map ID for which you want to define a
redirect URL, and <URL> is the Web address to which you want
to redirect clients that don’t support the selected cipher suites.
Enter the optional parameter [none] to disable an existing
redirect URL for the specified Map ID.
show redirect Displays the alternative address, if one is configured for the
specified Map ID, to which a client is directed in the event it
doesn’t support the selected cipher suite.
Syntax:
HP SA7120> show redirect <mapID>
where <mapID> is the Map ID whose redirect URL you want to
display. If no redirect address is defined, a command line message
informs you of the fact:
HP SA7120> show redirect 1
Redirect URL for map 1 is not set.
HP SA7120>
show client_ca Displays the expanded client certificate (including PEM format)
associated with the specified Map ID. If no client certificate has
been imported this command displays a message to that effect. If
no Map ID is specified, all client certificates are displayed.
Syntax:
HP SA7120> show client_ca <mapID>
where <mapID> is the mapID number of the key whose imported
client certificate you want to display.
Command Description

C H A P T E R 5 Command Reference
63
import client_ca If you want to authenticate a client, use this command to import
the trusted CA’s certificate. When enabled, clients without
certificates or with invalid certificates are refused connection.
Syntax:
HP SA7120> import client_ca <mapID>
Import protocol: (paste, xmodem) [paste]:
<Enter>
Type or paste in data, end with ... alone on
line
(certificate pasted here...)
...
where <mapID> is the mapID number with which the client
certificate will be associated.
delete client_ca Deletes the client certificate associated with the specified Map
ID.
Syntax:
HP SA7120> delete client_ca <mapID>
where <mapID> is the mapID number whose associated client
certificate you wish to delete.
create sign Create the signing request for a specified Key ID.
Syntax:
HP SA7120> create sign <keyID>
where <keyID> is the Key ID number of the Key for which you
want to create a signing request.
Command Description

C H A P T E R 5 HP e-Commerce Server Accelerator SA7100/SA7120 User Guide
64
delete sign Delete the signing request for a specified Key ID.
Syntax:
HP SA7120> delete sign <keyID>
where <keyID> is the Key ID number of the Key whose signing
request you want to delete.
export sign Export signing request (PEM format) for specified Key ID.
Syntax:
HP SA7120> export sign <keyID>
where <keyID> is the Key ID number of the Key whose signing
request you want to export.
show sign <keyID> Display expanded signing request (PEM format) for specified
Key ID. If no Key ID is specified, all signing requests are
displayed.
Syntax:
HP SA7120> show sign <keyID>
where <keyID> is the Key ID number of the key whose signing
request you want to display.
Command Description

C H A P T E R 5 Command Reference
65
set defcert Set the default certificate creation information. For example,
country, state, city, organization, organization unit, issuer name,
and issuer e-mail address. You can change all, some or none of
the fields. Press Enter to accept a default and move to the next
field.
Example:
HP SA7120> set defcert
Country name [US]:
State [California]:
City [Palo Alto]:
Organization [Hewlett-Packard Company]:
Organization unit [Server Appliances
Division]:
Issuer name [www.hp.com]:
Issuer email address [support@hp.com]:
Make changes [y]:
Changes applied
HP SA7120>
show defcert Display the default certificate creation information.
Example:
HP SA7120> show defcert
Country : US
State : California
City : Palo Alto
Organization : Hewlett-Packard Company
Unit : Server Appliances Division
Name : www.hp.com
Email : support@hp.com
HP SA7120>
Command Description

C H A P T E R 5 HP e-Commerce Server Accelerator SA7100/SA7120 User Guide
66
set kstrength Set the default key strength. Usable values are 512 or 1024. The
default value is 512.
Syntax:
HP SA7120> set kstrength <512 | 1024>
where <512> allows you to specify low key strength and
<1024> allows you to specify high key strength.
show kstrength Display the default key strength value.
Example:
HP SA7120> show kstrength
Default key strength: 512
set client_tmo Interval that the connection between the client and server can
remain idle (i.e., no data crosses the connection in either
direction) following a client request.
Syntax:
HP SA7120> set client_tmo <n>
where <n> is a value in seconds between 5 and 36000.
show client_tmo Displays the currently specified client timeout value.
Example:
HP SA7120> show client_tmo
Client timeout is 5 seconds
HP SA7120>
Command Description

C H A P T E R 5 Command Reference
67
Port Mapping
Commands
These commands are used to execute the operations described in
Chapter 3’s Mapping and Blocking sections.
set server_tmo Limits the period of time to establish a connection with the server.
If the connection is not established within the specified time, the
client request is rejected.
NOTE: Typical causes for server timeout include: server
powered off, server not accessible, application is not available on
the specified port.
Syntax:
HP SA7120> set server_tmo <n>
where <n> is a value in seconds between 5 and 36000.
show server_tmo Displays the currently specified server timeout value.
Example:
HP SA7120> show server_tmo
Server timeout [secs]: 5
HP SA7120>
Command Description
Command Definition
create block Create a block to preclude access to specified IP addresses or
through specified ports. A single IP, a single port, or all ports can
be blocked. If fewer than all ports are to be blocked, you must
repeat the create block command for each one.
Example:
HP SA7120> create block
Client IP to block [0.0.0.0]: 10.1.2.1
Client IP mask [0.0.0.0]: 255.255.0.0
Server IP to block [0.0.0.0]: 20.1.2.1
Server IP mask [0.0.0.0]: 255.255.0.0
Server Port to block: 80
Server Port mask [0xffff]:<Enter>
HP SA7120>

C H A P T E R 5 HP e-Commerce Server Accelerator SA7100/SA7120 User Guide
68
delete block Delete a block specified by index number. Use show block (see
below) to correlate existing blocks with their numbers.
Example:
HP SA7120> delete block 1
HP SA7120>
show block Display all existing blocks.
Example:
HP SA7120> show block
--------
blocks :
---------
(1) block 10.1.2.1 255.255.0.0 20.1.2.1
255.255.0.0 80 0xffff
----------
create permit Create a configuration allowing a specified user access to specified
servers and ports, and/or denying the specified user access to
specified servers and ports.
Example:
HP SA7120> create permit
Client IP to permit [0.0.0.0]:10.1.2.1
Client IP mask [0.0.0.0]:255.255.0.0
Server IP to permit [0.0.0.0]:20.1.2.1
Server IP mask [0.0.0.0]:255.255.0.0
Server Port to permit: 443
Server Port mask [0xffff]:<Enter>
HP SA7120>
delete permit Delete a permit specified by index number. Use show permit (see
below) to correlate existing permits with their numbers.
Example:
HP SA7120> delete permit 1
HP SA7120>
Command Definition

C H A P T E R 5 Command Reference
69
show permit Display permits currently in force.
Example:
HP SA7120> show permit
--------
permits :
---------
(1) permit 10.1.2.1 255.255.0.0 20.1.2.1
255.255.0.0 443 0xffff
----------
HP SA7120>
create map Create a mapping that associates server IP, SSL port, clear text
port, and Key ID.
Example:
HP SA7120> create map
Server IP (0.0.0.0): 1.1.1.1
SSL (network) port [443]: 443
Cleartext (server) port [80]: 8080
KeyID to use for mapping: 4
HP SA7120>
NOTE: The Key ID used with a new mapping must exist prior to
executing create map. Use create key to create a new Key ID. Also,
a certificate must be associated with the key ID prior to using the
mapping. (See Chapter 3 for details.)
delete map <mapID> Delete a mapping.
NOTE: All MapIDs of a higher number than the one specified for
deletion are decremented by one when this command is executed.
Syntax:
HP SA7120> delete map <n>
where <n> is the Map ID of the mapping you want to delete.
show map Display all mappings. (Same as list maps.)
Command Definition

C H A P T E R 5 HP e-Commerce Server Accelerator SA7100/SA7120 User Guide
70
Operational
Commands
list maps List all mappings. (Same as show map.)
Example:
HP SA7120> list maps
Map Net Ser Cipher Re- Client
ID KeyID Server IP Port Port Suites direct Auth
== ===== ========= ==== ==== ====== ===== ====
1 default Any 443 80 all(v2+v3) n n
2 sample 1.1.2.5 443 80 med(v2+v3) n n
HP SA7120>
Command Definition
Command Description
bypass
WARNING: Do not issue
the bypass command from a
remote management session
(Telnet or SSH). Doing so
will result in an immediate
disconnect from the
SA7100/SA7120.
Enables bypass mode, in which traffic flows through SA7100/
SA7120 without being processed. See Failure/Bypass Modes in
Appendix B for details. See the inline command below for
reversing bypass.
Example:
HP SA7120> bypass
The LED labeled “inline” on the SA7120’s front panel turns off
when bypass is enabled.
NOTE: The SA7100/SA7120 can be placed in bypass mode
simultaneously with the bypass switch and the CLI’s bypass
command. When this occurs, you must use both the bypass switch
and the CLI’s insert command to return the unit to inline mode.

C H A P T E R 5 Command Reference
71
inline Enables inline mode, in which the SA7100/SA7120 processes
traffic normally. (As opposed to bypass mode, in which traffic may
flow through the device unprocessed.)
Example:
HP SA7120> inline
The LED labeled “inline” on the SA7100/SA7120’s front panel is
illuminated when inline mode is enabled.
NOTE: Other factors may preclude the use of inline mode. See
Failure/Bypass Modes in Appendix B.
set route Specify the address of the router or gateway through which the
SA7100/SA7120 communicates with the Internet.
Syntax:
HP SA7120> set route
Enter Default Route (’none’ to delete) [none]:
255.255.255.001
HP SA7120>
show route Display the currently specified address of the router or gateway
through which the SA7100/SA7120 communicates with the
Internet.
Syntax:
HP SA7120> show route
Default Route: 255.255.255.001
HP SA7120>
Command Description

C H A P T E R 5 HP e-Commerce Server Accelerator SA7100/SA7120 User Guide
72
set spill Allows you to enable or disable spill mode. “Spill” is used to
offload processing of a request, when the SA7100/SA7120 has
reached a specified queue threshold, to a secondary SA7100/
SA7120 or to the server.
Example:
HP SA7120> set spill enable
Verify spill setting with the show spill command:
HP SA7120> show spill
Spill on overload: enabled
HP SA7120>
show spill Display spill setting (enabled or disabled).
Example:
HP SA7120> show spill
Spill on overload: disabled
reboot Reboots the SA7100/SA7120.
WARNING: Any configuration changes made during the current
CLI session will be lost upon rebooting. Refer to the config save
command for details regarding saving configuration changes.
Example:
HP SA7120> reboot
Are you sure you want to reboot [n]: y
System rebooting...done
(System reboots, eventually prompting you for your password.)
Command Description

C H A P T E R 5 Command Reference
73
Remote
Management
Commands
Command Description
list procs List all processes associated with the CLI and remote management
commands (inetd, telnetd, sshd2, and snmpd).
Example:
HP SA7120> list procs
PID: 40 PROG: cli
PID: 41 PROG: cli
HP SA7120>
set ip Assign an IP address and netmask to the SA7100/SA7120’s
network interface for Telnet and SSH sessions.
CAUTION: The assignment of an IP address introduces security
issues. Please refer to the “Access Control” section of Chapter 6.
NOTE: To disable a currently configured IP, use set ip followed
by none.
Example:
HP SA7120> set ip
Enter IP Address (’none’ to delete)
[10.1.2.124]:
Enter Netmask [255.255.0.0]:
set
max_remote_sessions Set the maximum allowed number of concurrently running Telnet
and SSH sessions.
Syntax:
HP SA7120> set max_remote_sessions <0-5>
where <0-5> is the maximum number of remote sessions you
want to allow. Default: 5.

C H A P T E R 5 HP e-Commerce Server Accelerator SA7100/SA7120 User Guide
74
set telnet Enables or disables Telnet sessions. When this command is set to
“enable” and an IP address is assigned to the SA7100/SA7120’s
network interface, you can access the device’s CLI via remote
Telnet session. When disabled, the device refuses Telnet
connections. The console prompts for any missing parameters.
Default: disable.
Syntax:
HP SA7120> set telnet enable
Need an IP address to start Telnet service.
Enter IP Address [209.218.240.67]: 10.1.2.124
Need a netmask to start Telnet service.
Enter Netmask [255.255.255.0]:
Optional Default Route to start Telnet service.
Enter Default Route (’none’ to delete) [none]:
Telnet Services started.
HP SA7120>
show telnet Displays current Telnet status: enabled or disabled.
Example:
HP SA7120> show telnet
Telnet: enabled
set telnet_port Set the port on which Telnet connections are accepted. (Default
port: 23.)
Syntax:
HP SA7120> set telnet_port <port>
where <port> is the number of the port to which Telnet sessions
will connect.
show telnet_port Display the port on which Telnet sessions are currently accepted.
Example:
HP SA7120> show telnet_port
Telnet Port Number: 23
Command Description

C H A P T E R 5 Command Reference
75
set ssh Enable or disable Secure Shell (SSH) sessions. When this
command is set to “enable” and an IP address is assigned to the
SA7100/SA7120’s network interface, you can access the device’s
CLI via remote SSH session. When disabled, the device refuses
SSH connections. Default: disable.
Syntax:
HP SA7120> set ssh <enable|disable>
show ssh Display current SSH status: enabled or disabled.
Example:
HP SA7120> show ssh
SSH: disabled
set ssh_port Set the port on which SSH connections are accepted. (Default port:
22.)
Syntax:
HP SA7120> set ssh_port <port>
where <port> is the number of the port to which SSH sessions
will connect.
show ssh_port Display port on which SSH sessions are currently accepted.
Example:
HP SA7120> show ssh_port
SSH Port Number: 22
setsnmp Enable or disable the SNMP agent. When enabled, you can set
configure SNMP information and parameters (see setsnmp
snmp_info, below) for the SA7100/SA7120. Default: disable.
Syntax:
HP SA7120> setsnmp <enable|disable>
showsnmp snmp Displays the current status of the SNMP agent: enabled or
disabled.
Example:
HP SA7120> showsnmp snmp
SNMP: Enabled
Command Description

C H A P T E R 5 HP e-Commerce Server Accelerator SA7100/SA7120 User Guide
76
setsnmp snmp_info Set the following SNMP information and parameters:
•SNMP port (Default: 161)
•SNMP trap port (Default: 162)
•Contact person
•System name
•System location
Example:
HP SA7120> setsnmp snmp_info
SNMP Port [161]: 161
SNMP Trap Port [162]: 162
Contact Person []: support
System Location []:Palo Alto
System Name []: SA7120
showsnmp snmp_info Display the currently effective SNMP information and parameters.
Example:
HP SA7120> showsnmp snmp_info
SNMP Port Number : 161
SNMP Trap Port Number: 162
SNMP System Contact : support
SNMP System Name : SA7120
SNMP System Location : Palo Alto
System IP Address : 10.1.2.124
System Netmask : 255.255.255.0
Default Route : None
setsnmp
snmp_community Set SNMP community strings.
Example:
HP SA7120> setsnmp snmp_community
IP []:xxx.xxx.xxx.xxx
Community String []:<string>
Command Description

C H A P T E R 5 Command Reference
77
list snmp_community Display currently configured SNMP community strings.
Example:
HP SA7120> list snmp_community
<2> Current SNMP Community String(s):
1.) IP: 0.0.0.0 => String: public
2.) IP: 0.0.0.0 => String: private
delete snmp_community Delete SNMP community strings.
Example:
HP SA7120> delete snmp_commmunity
SNMP Community String(s) Deletion.
<2> Current Available SNMP Community String(s):
1.) IP: 0.0.0.0 => String: public
2.) IP: 0.0.0.0 => String: private
Enter number (1 to 2) to delete (q to quit) [1]: 2
Enter number (1 to 2) to delete (q to quit) [1]: q
setsnmp trap_authen When enabled, the SNMP manager receives traps upon failed
authentication attempts.
Example:
HP SA7120> setsnmp trap_authen <enable|disable>
shownmp trap_authen Displays current status of trap authentication trap.
Example:
HP SA7120> showsnmp trap_authen
Trap Authentication: enabled
setsnmp
trap_community Sets SNMP trap community strings.
Example:
HP SA7120> setsnmp trap_community
SNMP Trap Community String(s) Setting.
Enter a SNMP Trap Community IP (q to quit): 0.0.0.0
Enter a SNMP Trap Community String (q to quit):
private
Enter a SNMP Trap Community IP (q to quit): 0.0.0.0
Enter a SNMP Trap Community String (q to quit):
public
Enter a SNMP Trap Community IP (q to quit): q
Command Description

C H A P T E R 5 HP e-Commerce Server Accelerator SA7100/SA7120 User Guide
78
list trap_community Display SNMP trap community strings.
Example:
HP SA7120> list trap_community
SNMP Trap Community String(s) information.
<2> Current SNMP Trap Community String(s):
1.) IP: 0.0.0.0 => String: public
2.) IP: 0.0.0.0 => String: private
delete trap_community Delete SNMP trap community strings.
Example:
HP SA7120> delete trap_community
SNMP Trap Community String(s) Deletion.
<2> Current Available SNMP Trap Community
String(s):
1.) IP: 0.0.0.0 => String: public
2.) IP: 0.0.0.0 => String: private
Enter number (1 to 2) to delete (q to quit) [1]: 2
Enter number (1 to 2) to delete (q to quit) [1]: q
Command Description

C H A P T E R 5 Command Reference
79
Alarms and
Monitoring
Commands
Command Description
set alarms Enable all or a selection of the SA7120’s alarms.
Syntax:
HP SA7120> set alarms
<all none esc rsc utl ovl nls>
where
all enables all five of the SA7120’s alarms.
esc enables the Encryption Status Change Alarm.
rsc enables the Refused SSL Connection Alarm
utl enables the Utilization Threshold Alarm
ovl enables the Overload Alarm
nls enables the Network Link Status Alarm
To disable all alarms, use none:
Example:
HP SA7120> set alarms all
HP SA7120> show alarms
Alarms set: esc rsc utl ovl nls
show alarms Display the list of currently enabled alarms.
Example:
HP SA7120> set alarms none
HP SA7120> show alarms
Alarms set:
NOTE: When no alarms are set (i.e., when none is specified in set
alarms), the display shows an empty field.
set rsc_window Set interval (window) at which the device checks for refused SSL
connections and, if any are detected, issues an RSC Alarm.
(Range: 5-65000 seconds, default: 15)
Syntax:
HP SA7120> set rsc_window <sec>
where <sec> is the number of seconds of the desired interval.

C H A P T E R 5 HP e-Commerce Server Accelerator SA7100/SA7120 User Guide
80
show rsc_window Display current Refused SSL Connections Alarm interval.
Syntax:
HP SA7120> show rsc_window
Check for refused SSL connections [secs]:
set utl_window Set interval (window) at which the device checks for exceeded
utilization thresholds (CPU load, Connections per Second, or Total
Open Connections) and, if any are detected, issues a Utilization
Threshold Alarm. (Range: 5-65000 seconds, default: 15)
NOTE: The data collected for utilization threshold metrics tends
to be bursty, so a smoothing algorithm is used to prevent
continuous alarms. The utilization window is a user-specified
sliding interval during which data is collected and averaged.
Consequently, shorter intervals are likely to result in some
extraneous alarms.
NOTE: See also set utl_highwater and set utl_lowwater.
Syntax:
HP SA7120> set utl_window <sec>
where <sec> is the number of seconds of the desired interval.
set utl_highwater Set the Utilization Threshold Alarm high-water value. Expressed
as a percentage, the high-water value represents the highest CPU
utilization, Connections per Second, or Total Open Connections
required to trigger a UTL Alarm. (Range: 2-100%, default: 90)
NOTE: See also set utl_window and set utl_lowwater.
Syntax:
HP SA7120> set utl_highwater <%>
where <%> is the percentage defining the upper threshold of CPU
utilization, Connections per Second, or Total Open Connections
required to trigger a Utilization Threshold Alarm.
Command Description

C H A P T E R 5 Command Reference
81
set utl_lowwater Set the Utilization Threshold Alarm low-water value. Expressed as
a percentage, the low-water value represents the lowest CPU
utilization, Connections per Second, or Total Open Connections
required to trigger a UTL Alarm. (Range: 1-99%, default: 60)
NOTE: See also set utl_window and set utl_highwater.
Syntax:
HP SA7120> set utl_lowwater <%>
where <%> is the percentage defining the lower threshold of CPU
utilization, Connections per Second, or Total Open Connections
required to trigger a Utilization Threshold Alarm.
show utl_window Display the current Utilization Threshold Alarm window.
Example:
HP SA7120> show utl_window
Utilization window set [secs]: 10.
show utl_highwater Display the Utilization Threshold Alarm’s current upper threshold.
Example:
HP SA7120> show utl_highwater
Utilization High water mark [%]: 80
show utl_lowwater Display the Utilization Threshold Alarm’s current lower threshold.
Example:
HP SA7120> show utl_lowwater
Utilization Low water mark [%]: 60
set ovl_window Set interval (window) at which the device checks for overloads
resulting in the device executing a spill or throttle and, if any are
detected, issues an Overload Alarm. (Range: 5-65000, default: 15)
Syntax:
HP SA7120> set ovl_window 10
Command Description

C H A P T E R 5 HP e-Commerce Server Accelerator SA7100/SA7120 User Guide
82
Configuration
Commands
show ovl_window Display the current Overload Alarm window.
Example:
HP SA7120> show ovl_window
Check for overload conditions [sec]: 10
Command Description
Command Description
show config Display current volatile configuration settings.
Example:
HP SA7120> show config
# default config file created on Tues July 25
06:56:46 2000
(Configuraton parameters are displayed here...)
HP SA7120>
show config saved Display saved non-volatile configuration settings.
Example:
HP SA7120> show config saved
Saved configuration
===================
(Configuraton parameters are displayed here...)
HP SA7120>

C H A P T E R 5 Command Reference
83
show config default Display default configuration settings. These are values used when
factory default commands are executed.
Example:
HP SA7120> show config default
Default configuration
=====================
conlog 0xffffffef
ilog 0xffffffff
trace 0xfffff3dd
media auto
logport tty01
cache 3
server_tmo 5
client_tmo 30
serverif exp1
netif exp0
map 0.0.0.0 443 80 default
kpanic reboot
monitoring_interval 15
monitoring_fields 0x1F
alarm_mask 0x00000000
ovl_window 15
rsc_window 15
utl_window 15
utl_highwater 90
utl_lowwater 60
idle 300
kstrength 512
con_speed 9600
con_bits 8
con_stop 1
con_parity n
max_remote_sessions 5
trap_authen 1
defcert_cname US
defcert_state California
defcert_city San Diego
defcert_orgname Company Name
defcert_orgunit Company Division
defcert_name www.company.com
defcert_email support@company.com
prompt HP SA7120>
HP SA7120>
Command Description

C H A P T E R 5 HP e-Commerce Server Accelerator SA7100/SA7120 User Guide
84
config compare Display differences between saved and current configuration. For
optimal flexibility in configuration and testing, the SA7100/
SA7120 supports both “current” (volatile) and “saved” (non-
volatile) configurations. The config compare command displays
the differences, if any, between the two configurations.
Example:
HP SA7120> config compare
Only in /keys: 4
HP SA7120>
config reset Restore saved configuration.
WARNING: Executing this command causes the system to reboot.
Example:
HP SA7120> config reset
Reverting to saved configuration
Reset (y/n) [n]: y
Reset to saved configuration
System rebooting...
config default Clears current and saved configurations and restores factory
defaults.
WARNING: Executing this command causes the system to reboot.
Example:
HP SA7120> config default
Reset to factory default configuration [n]: y
Reset to factory defaults
System rebooting...
config save Save the current configuration to the flash (non-volatile) memory.
Example:
HP SA7120> config save
Saving configuration to flash...
Configuration saved to flash
HP SA7120>
Command Description

C H A P T E R 5 Command Reference
85
export config
WARNING: Do not edit an
exported configuration file.
Export all configuration, key, sign and certificate information
(ASCII, xmodem).
Example:
HP SA7120> export config
Export protocol: (xmodem, ascii) [ascii]:
Press any key to start, then again when
done...
# default config file created on Fri Jul 28
06:56:46 2000
(...configuration specifics are displayed...)
HP SA7120>
import config Import a configuration file (paste, xmodem).
Example:
HP SA7120> import config
Import protocol: (paste, xmodem) [paste]:
Type or paste in data, end with ... alone on
line
.
.
.
Do you want to install this config ? [y]: n
HP SA7120>
Command Description

C H A P T E R 5 HP e-Commerce Server Accelerator SA7100/SA7120 User Guide
86
import upgrade Import a complete software release. (See Chapter 8 for details
regarding software updates.)
Example:
HP SA7120> import upgrade
Import protocol: (xmodem) [xmodem]:
Start xmodem upload now
Use Ctl-x to cancel upload
Verifying upgrade image...
upgrade image valid
version x.x, build xxx
Continue with the upgrade? [n]:y
NOTE: All saved logs will be deleted and the system will reboot
upon sucessful completion of the upgrade.
import patch Import a partial software upgrade
Example:
HP SA7120> import patch
Enter patch name [80.patch] <patch name>
Import protocol: (xmodem)
[xmodem]:
Start xmodem upload now
Use Ctl-x to cancel upload
Patch: Imported.
list system Displays the device’s CPU, memory and crypto card information.
HP SA7120> list system
=================================================
SYSTEM INFO
=================================================
* CPU : Pentium II (498 MHz)
* Real MEM : 536870912 (512.00 MB)
* Crypto : 3
Command Description

C H A P T E R 5 Command Reference
87
Administration
Commands
factory_default Returns to factory configuration settings.
Example:
HP SA7120> factory_default
Reset to default configuration [n]: y
Reset to factory defaults
System rebooting...done
T944 V2.31 DXC.
..
868242+361188O/S running
Generating 512 bit default key
Generating default certificate
Saving default key/cert to flash
Restricted Rights Legend
(...copyright and version information displayed here...)
Serial 0:a0:a5:11:4:9d
password:
Command Description
Command Description
password Set the password.
Example:
HP SA7120> password
Old password:<xxxxx>
Enter new admin password (5 chars min.):<yyyyy>
Retype new password:<yyyyy>
admin Password changed...
HP SA7120>

C H A P T E R 5 HP e-Commerce Server Accelerator SA7100/SA7120 User Guide
88
show info Display software version information.
Example:
HP SA7120> show info
============================================
=== hp e-commerce server accelerator sa7120
=== Copyright (c) 2001 Hewlett-Packard
Company
===
=== Version 2.3.2, Build xx
============================================
set date Set the date and time.
WARNING: Execution of this command reboots the SA7100/
SA7120.
Example:
HP SA7120> set date
Year [2000]:
Month [2]:
Day [16]:
Hour (24 hour clock) [15]:
Minute [10]:
The system must reboot for changes to take
affect. Reboot [y]: n
HP SA7120>
show date Displays current date and time.
set egress_mac Allows the configuration of a SA7100/SA7120 when the ingress
and egress traffic paths are different. (See Chapter 4, Scenario 4.)
Command Description

C H A P T E R 5 Command Reference
89
set ether Specify ethernet settings.
Example:
HP SA7120> set ether
1 - auto
2 - 10baseT, half duplex
3 - 10baseT, full duplex
4 - 100baseTX, half duplex
5 - 100baseTX, full duplex
Select media type [1]:
Media set to auto
HP SA7120>
show ether Display ethernet settings.
Example:
HP SA7120> show ether
Ethernet media set to auto
HP SA7120>
set idleto Set the console idle interval. After <n > minutes absence of
keyboard activity, the user is automatically logged off.
Syntax:
HP SA7120> set idleto <n>
where <n> is a value in minutes from 0 to 525600. A value of “0”
specifies that the console never goes idle.
show idleto Display console timeout.
Example:
HP SA7120> show idleto
Idle timeout is 5 minutes
HP SA7120>
set more Set the page length of the console display. Default is 300.
Syntax:
HP SA7120> set more <n>
where <n> is the desired number of lines. Valid inputs are 0 (to
disable), or 23 or greater.
Command Description

C H A P T E R 5 HP e-Commerce Server Accelerator SA7100/SA7120 User Guide
90
show more Display the current setting for the console display’s page length.
Default is 300.
Example:
HP SA7120> show more
Set 23 lines per page
nic Allows you to set the network interface card configuration.
Example:
HP SA7120> nic
1 - auto
2 - 10baseT, half duplex
3 - 10baseT, full duplex
4 - 100baseTX, half duplex
5 - 100baseTX, full duplex
Select media type [1]:
set prompt Change the prompt from “HP SA7120>” to the desired prompt.
Example:
HP SA7120> set prompt
Prompt [HP SA7120> ]: <Enter>
HP SA7120>
set serial Allows user to set the console port to monitor the CLI or the output
logging, and set the speed, data bits, stop bits, and parity bits. The
aux console port is fixed at 115200, 8, 1, N. This command returns
the user to the “password” prompt after setting the console port.
Example:
HP SA7120> set serial
Baud rate (9600/115200) [9600]: <Enter>
Data bits (7/8) [8]: <Enter>
Stop bits (1/2) [1]: <Enter>
Parity (n/e/o) [n]: <Enter>
Set serial parameters [y]: <Enter>
HP SA7120>
Command Description

C H A P T E R 5 Command Reference
91
Logging
Commands
show serial Display console serial parameters.
Example:
HP SA7120> show serial
Speed: 9600
Bits: 8
Stop bits: 1
Parity: n
HP SA7120>
exit Log the user out of the CLI. If the current configuration has
changed, the user is allowed to save the current configuration as
the active configuration.
Example:
HP SA7120> exit
Exiting CLI...
.
.
.
password:
Command Description
Command Description
export log
NOTE: Log files referred
to here are not human-
readable.
Export a saved log/trace file.
Syntax:
HP SA7120> export log <logID>
where <logID> is the ID of the specific log you want to export.
Example:
HP SA7120> export log a
Export protocol: (xmodem) [xmodem]:
Use Ctrl-X to kill transmission
Beginning export...

C H A P T E R 5 HP e-Commerce Server Accelerator SA7100/SA7120 User Guide
92
delete log Delete saved log/trace files from /flash/logs.
Syntax:
HP SA7120> delete log <logID> | all
where <logID> is the ID of the specific log you want to delete,
and all deletes all logs.
list logs List all log files.
Command Description

Remote
Management
Overview
The current software release allows you to remotely manage the
SA7100/SA7120. Remote management is available via three
protocols:
•Telnet
•Secure Shell (SSH)
•SNMP
NOTE: Remote
management functions
can be enabled and
configured only through
the local serial console.
When enabled, remote management allows you to access the device’s
Command Line Interface (CLI) from Telnet or SSH sessions running
on remotely located machines. Up to five remote sessions can be
configured, including both Telnet and SSH sessions (Default: 5).
Before you can use the device’s remote management function, you
must enable and configure it at the local serial console. Remote
management requires that the device’s network interface be assigned
an IP address.
Remote SNMP management is supported to the extent of allowing
control of the System group of MIB-II.

C H A P T E R 6 HP e-Commerce Server Accelerator SA7100/SA7120 User Guide
94
Limitations Note that several CLI capabilities available at the local console are
unavailable in remote sessions. These are:
•Assignment of an IP address to the SA7100/SA7120’s network
interface
•Enable/disable Telnet, SSH, or SNMP
•Change Telnet, SSH, or SNMP ports
•Set maximum number of Telnet or SSH sessions
•If import or export operations are carried out while any of the
device’s monitors are enabled, the monitors’ periodic output will
be inserted into the data flow of the import or export.
Workaround: Before performing an import or export operation,
turn off all monitors:
HP SA7120> set monitoring disable
The CLI commands that control remote management potentially
affect the device’s configuration files, thus if a remote management
configuration is to persist across a shutdown/startup of the device,
you must follow remote management configuration with the CLI
command config save. This ensures that the configuration will be
restored upon startup.
Remote
Management
CLI
Commands
Remote management is enabled or disabled and configured by using
a series of CLI commands available only at the local serial console.
The exact sequence varies depending on the type and configuration
of the remote session you want to enable. (Usage is detailed in
subsequent sections.) These commands are:
General:
•set ip <ip> <netmask> assigns an IP address and netmask to the
SA7100/SA7120’s network interface.
•set max_remote_sessions <1-5> sets the maximum allowed
number of concurrently running Telnet and SSH sessions.
Telnet-specific:
•set telnet enable|disable enables or disables Telnet sessions.
•show telnet displays current Telnet status: enabled or disabled.
•set telnet_port <port> sets the Telnet port. (Default: 23.)

C H A P T E R 6Overview
95
•show telnet_port displays current Telnet port.
SSH-specific:
•set ssh enable|disable enables or disables SSH sessions.
•show ssh displays current SSH status: enabled or disabled.
•set ssh_port <port> sets the SSH port. (Default: 22.)
•show ssh_port displays current SSH port.
SNMP-specific:
•setsnmp snmp enable|disable enables or disables SNMP
management.
•showsnmp snmp displays current SNMP status: enabled or
disabled.
•setsnmp snmp_info sets the following SNMP information and
parameters:
•SNMP port (Default: 161)
•SNMP trap port (Default: 162)
•SNMP agent IP address
•Contact person
•System name
•System location
•showsnmp snmp_info displays current SNMP information and
parameters.
•setsnmp snmp_community sets SNMP community strings.
•list snmp_community displays SNMP community strings.
•delete snmp_community deletes SNMP community strings.
•setsnmp trap_community sets SNMP permission strings.
•list trap_community displays SNMP permission strings.
•delete trap_community deletes SNMP permission strings.

C H A P T E R 6 HP e-Commerce Server Accelerator SA7100/SA7120 User Guide
96
Remote Telnet Sessions
NOTE: The default
password for Telnet
sessions is admin.
This section contains procedures for accessing the SA7100/SA7120’s
CLI via remote Telnet session.
Local Serial
Console
Assign an IP address to the SA7100/SA7120’s network interface
using the following procedure:
HP SA7120> set ip
Enter IP [10.1.2.56]: 10.1.1.1
Enter Netmask [255.255.255.0]:
Verify the IP and netmask (optional):
HP SA7120> show ip
System IP Address : 10.1.1.1
System Netmask : 255.255.255.0
HP SA7120>
Enable remote Telnet sessions:
HP SA7120> set telnet enable
Configure the network route:
HP SA7120> set route
Enter Default Route (’none’ to delete)
[10.1.1.1] : <Enter>
Verify the route configuration (optional):
HP SA7120> show route
Default Route : 10.1.1.1
Delete a route configuration (optional):
HP SA7120> set route none
NOTE: To ensure that
this remote management
configuration persists
across a device shutdown
and startup, run the
config save command.
Remote Telnet management is now enabled and configured on the
SA7100/SA7120. Now you can access the CLI from a remote Telnet
session.

C H A P T E R 6 Remote Telnet Sessions
97
Remote
Console,
Telnet
With remote Telnet enabled on the SA7100/SA7120, use the
following procedure to access it’s CLI:
NOTE: If other remote
sessions are already
running and the new one
exceeds the number
allowed as configured
with the set
max_remote_sessions
command, the CLI
displays the message,
“Max Remote Session
Limit of (5) exceeded!”
Either close a session, or
increase the maximum
number allowed.
Unix-prompt> telnet 10.1.1.1
Trying 10.1.1.1...
Connected to 10.1.1.1.
Escape character is ’^]’.
.
.
.
Serial 0:a0:a5:11:4:2e
password:<password>
After you enter your password, the Telnet session displays the
SA7100/SA7120’s CLI. From this point, you can manage the device
as you would from the local serial console, minus the few disallowed
commands listed in the “Limitations” section near the beginning of
this chapter.
Changing the
Telnet Port
The Telnet port is set and displayed by using the CLI commands set
telnet_port <port> and show telnet_port.
These commands are available only at the local serial console and
when the remote management is enabled. By default, the Telnet port
number is 23.
To set the Telnet port:
HP SA7120> set telnet_port 230
To display the Telnet port:
HP SA7120> show telnet_port
Telnet Port Number: 230

C H A P T E R 6 HP e-Commerce Server Accelerator SA7100/SA7120 User Guide
98
Disabling
Telnet
Telnet sessions are disabled at the SA7100/SA7120’s local serial
console. To disable, follow the steps below:
HP SA7120> set telnet disable
To verify Telnet disable:
HP SA7120> show telnet
Telnet: disable
To ensure that Telnet sessions remain disabled across a device
shutdown and startup, run the config save command.
Remote SSH Sessions
NOTE: The default user
name and password for
SSH sessions are admin.
This section contains procedures for accessing the SA7100/SA7120’s
CLI via remote Secure Shell (SSH) session. The table below
illustrates ciphers supported by the domestically available SA7120
under SSH1 and SSH2. The export version of the product supports
only the SSH2 cipher DES.
Supported Ciphers
Local Serial
Console
Assign an IP address to the SA7100/SA7120’s network interface
using the following procedure:
HP SA7120> set ip
Enter IP [10.1.2.56]: 10.1.1.1
Enter Netmask [255.255.255.0]:
Verify the IP and netmask (optional):
HP SA7120> show ip
System IP Address: 10.1.1.1
System Netmask: 255.255.255.0.
Enable remote SSH sessions:
HP SA7120> set ssh enable
SSH1 SSH2
Cipher 3DES, DES, Blowfish 3DES, Twofish, RC4,
“None”
MAC MD5, “None”

C H A P T E R 6 Remote SSH Sessions
99
Configure the network route:
HP SA7120> set route
Enter Default Route (’none’ to delete)
[10.1.1.1] : <Enter>
Verify the route configuration (optional):
HP SA7120> show route
Default Route : 10.1.1.1
Delete a route configuration (optional):
HP SA7120> set route none
NOTE: To ensure that
this remote management
configuration persists
across a device shutdown
and startup, run the
config save command.
Remote SSH management is now enabled and configured on the
SA7100/SA7120. Now you can access the CLI from a remote SSH
session.
Remote
Console, SSH
With remote SSH enabled on the SA7100/SA7120, use the following
procedure to access it’s CLI:
Unix-prompt> ssh -1 admin 10.1.1.1
.
.
.
Serial 0:a0:a5:11:4:2e
password:<password>
NOTE: If other remote
sessions are already
running and the new one
exceeds the number
allowed as configured
with the set
max_remote_sessions
command, the CLI
displays the message,
“Max Remote Sesion
Limit of (5) exceeded!”
Either close a session, or
increase the maximum
number allowed.
After you enter your password, the SSH session displays the SA7100/
SA7120’s CLI. From this point, you can manage the device as you
would from the local serial console, minus the few disallowed
commands listed in the “Limitations” section near the beginning of
this chapter.

C H A P T E R 6 HP e-Commerce Server Accelerator SA7100/SA7120 User Guide
100
Changing the
SSH Port
The SSH port is set and displayed by using the CLI commands set
ssh_port <port> and show ssh_port.
These commands are available only at the local serial console and
when the remote management is enabled. By default, the SSH port
number is 22.
To set the SSH port:
HP SA7120> set ssh_port 220
To display the SSH port:
HP SA7120> show ssh_port
SSH Port Number: 220
Disabling SSH SSH sessions are disabled at the SA7100/SA7120’s local serial
console. To disable, follow the steps below:
HP SA7120> set ssh disable
To verify SSH disable:
HP SA7120> show ssh
SSH: disable
To ensure that SSH sessions remain disabled across a device
shutdown and startup, run the config save command.
SNMP
The HP e-Commerce Server Accelerator SA7100/SA7120 has a
fully compliant, embedded SNMP agent that supports SNMPv1 and
SNMPv2c requests. In addition to standard MIB-II, HP private
enterprise MIBs provide the following capabilities:
•Monitor the health of the SA7100/SA7120’s hardware and
network links
•Monitor the flags used to enable and disable alarms and monitors
•Monitor the SA7100/SA7120’s load as indicated by CPU
utilization, connection count, and connections per second
•Monitor status and performance of SSL encryption and
decryption functions
•Monitor overloads, spills, and throttles
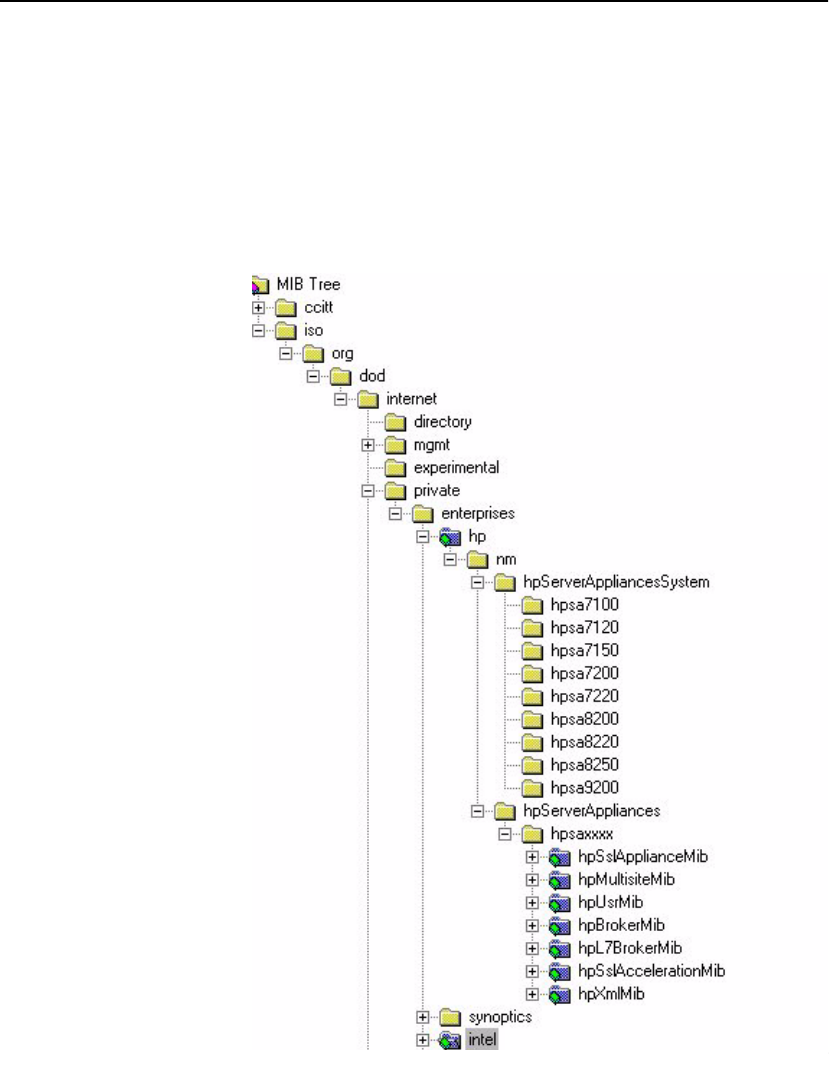
C H A P T E R 6SNMP
101
Standards
Compliance
The SA7100/SA7120 SNMP agent is bilingual and can support both
SNMPv1 and SNMPv2c requests. HP private enterprise MIB files are
compliant with SMIv2 as specified in RFC 1902. SET operations are
not allowed for any private MIB objects for the SA7100/SA7120,
although you can change MIB variable values by way of commands
issued on the CLI.
HP MIB Tree The figure below illustrates the top level of HP’s MIB tree.
HP’s MIB Tree (top level)

C H A P T E R 6 HP e-Commerce Server Accelerator SA7100/SA7120 User Guide
102
All HP enterprise MIBs and MIB objects are defined under the
mib2ext branch of the tree. All system object IDs that identify
products are defined under the hpServerAppliancesSystem
branch of the tree.
Supported MIBs
Management Information Base-II (MIB-II)
HP Enterprise MIBs:
hpserver-header.my
hpssl-appliance-mib.my
Where to find MIB Files
Electronic copies of the HP MIB files used by the SA7100/SA7120
are shipped with the product on CD-ROM.
Write access through SNMP SET is not allowed for any MIB
variables or SNMP groups. An SNMP SET on any group returns an
error.
The standard SNMP traps, coldStart, warmStart,
authenticationfailure, linkUp and linkDown are
supported.
hpserver-header.my
hpserver-header.my contains all the system object IDs defined
for HP products. All system object IDs are defined under the
hpServerAppliancesSystem branch of the hp tree.
Enterprise
Private MIB
Summary
Following is a summary of the SA7100/SA7120 private MIB:
mode
inline(1): Device is configured to accelerate
SSL traffic
bypass(2): Device is configured to pass through
all SSL traffic
failMode
safe(1): Two ethernet segments fail open,
stopping traffic
through(2): Two ethernet segments fail shorted,
allowing traffic to continue
spillMode
throttle(1): Device will throttle SSL
connections when utilization reaches 100%

C H A P T E R 6SNMP
103
spill(2): Device will spill SSL connections when
utilization reaches 100%
sslSessionCache
enabled(1): SSL session caching is turned on
disabled(2): SSL session caching is turned off
restarts
Number of times the system has restarted
appLastRestart
The value of sysUpTime at the time the last
restart of the application process happened
encryptionAlarm
enabled(1): Encryption status change alarm is
turned on
disabled(2): Encryption status change alarm is
turned off
sslConnectionAlarm
enabled(1): SSL connection alarm is turned on
disabled(2): SSL connection alarm is turned off
thresholdAlarm
enabled(1): Threshold alarm is turned on
disabled(2): Threshold alarm is turned off
overloadAlarm
enabled(1): Overload alarm is turned on
disabled(2): overload alarm is turned off
linkStatusAlarm
enabled(1): Network link status alarm is turned
on
disabled(2): Network link status alarm is turned
off
encryptProcessingState
on(1): SSL processing on
off(2):SSL processing halted
encryptProcessingStateReason
normal(1): Normal
hardware(2): Change caused by hardware fault
consoleBypass(3): Bypass mode enabled at
console
consoleInline(4): Inline mode enabled at
console
frontPanelBypass(5): Bypass mode enabled at
front panel
frontPanelInline(6): Inline mode enabled at
front panel
serverInterfaceState
State of the server-side interface

C H A P T E R 6 HP e-Commerce Server Accelerator SA7100/SA7120 User Guide
104
networkInterfaceState
State of the network-side interface
utilWindow
Sliding window (in seconds) to calculate average
connections, CPU utilization, and active
connnection rates
cpuUtil
CPU utilization percentage (0-100)
cpuUtilNetwork
CPU utilization percentage processing network
traffic (0-100)
cpuUtilProxy
CPU proxy utilization percentage (0-100)
cpuUtilHiWater
CPU utilization high water mark (2-100)
cpuUtilLoWater
CPU utilization low water msrk (1-99)
cpuUtilState
When CPU utilization exceeds the hi water mark,
CPU utilization state is in alert and is not
returned to normal until the lo water threshold
is crossed
sslCps
SSL connections per second
sslCpsMaximum
Maximum SSL connection rate in connections per
second since (re)start
sslCpsHiWater
SSL connections per second high water mark
sslCpsLoWater
SSL connections per second low water mark
sslCpsState
When SSL connections per second exceeds the hi
water mark, sslCpsState is in alert and is not
returned to normal until the lo water threshold
is crossed
sslConnCnt
Current number of concurrent open SSL
connections
sslConnCntMaximum
Maximum number of concurrent open SSL
connections since (re)start
sslConnTotal
Total number of SSL connections processed
sslConnCntHiWater

C H A P T E R 6SNMP
105
Concurrent open SSL connection count high water
mark
sslConnCntLoWater
Concurrent open SSL connection count low water
mark
sslConnCntState
When concurrent open SSL connection count
exceeds the hi water mark, sslConnCntState is in
alert and is not returned to normal until the lo
water threshold is crossed
encryptedBps
Encryption rate in bytes per second
encryptedBpsMaximum
Maximum encryption rate in bytes per second
since (re)start
encryptedBytesTotalMb
Total number of megabytes of data encrypted
decryptedBps
Decryption rate in bytes per second
decryptedBpsMaximum
Maximum decryption rate in bytes per second
since (re)start
decryptedBytesTotalMb
Total number of megabytes of data decrypted
sslOverloadInterval
The periodic interval (in seconds) used when
counting the number of spilled or throttled SSL
connections. If any SSLconnections were spilled
or throttled in the lastsslOverloadInterval, a
trap is generated. If sslOverloadInterval is 0,
no trap is generated
throttlesPerSec
Number of throttles per second
throttlesPerSecMaximum
Maximum number of throttles per second since
(re)start
throttlesTotal
Total number of throttles since (re)start
throttles
Total number of throttles in the last
sslOverloadInterval
spillsPerSec
Number of spills per second
spillsPerSecMaximum
Maximum number of spills per second since
(re)start

C H A P T E R 6 HP e-Commerce Server Accelerator SA7100/SA7120 User Guide
106
spillsTotal
Total number of spills since (re)start
spills
Number of spills in the last sslOverloadInterval
refusedSslInterval
The periodic interval (in seconds) used when
counting the number of refused SSL connections.
If any SSL connections were refused in this time
interval, a trap is generated.
cipherSuiteMismatch
Number of refused SSL connections in the last
refusedSslInterval which are due to inability of
the client and server to agree upon a cipher
suite
clientCertAuthFail
Number of refused SSL connections in the last
refusedSslInterval which are due to
authentication failure of the client
certificate
Trap Summary The following list summarizes the traps generated by the SA7100/
SA7120. For details about a particular trap, please read the
description of each MIB above, or read the documentation within the
MIB file. Traps are generated by SNMP.
Standard SNMP Traps
coldStart
warmStart
authenticationFailure
linkUp
linkDown
Private Traps in the HP private MIB
(hpssl-appliance-mib.my)
encryptionStopped
Alert issued whenever the device stops
processing SSL traffic
encryptionResumed
Resumes processing traffic after having been
stopped
serverInterfaceStateChanged
The server-side interface state changed
networkInterfaceStateChanged
The network-side interface state changed

C H A P T E R 6SNMP
107
cpuUtilAlert
The device has exceeded the CPU utilization high
water threshold
cpuUtilNormal
CPU utilization back to normal levels
sslCpsAlert
The device has exceeded the SSL connections per
second high water threshold
sslCpsNormal
The SSL connections per second processed by the
device is back to normal levels
sslConnCntAlert
The device has exceeded the open SSL connection
count high water threshold
sslConnCntNormal
The open SSL connection count of the device is
back to normal levels
sslConnectionRefusedMismatch
SSL connections were refused in the past
sslRefusedInterval due to cipher suite
negotiation
failuresslConnectionRefusedAuthFail
SSL connections were refused in the past
sslRefusedInterval due to authentication failure
of the client certificate
sslOverloadSpills
SSL connections were spilled in the past
sslOverloadInterval
sslOverloadThrottles
SSL connections were throttled in the past
sslOverloadInterval
appRestartAlert
SSL processing application has restarted
Enabling
SNMP
Enabling and disabling SNMP is accomplished with the CLI
command, setsnmp snmp enable|disable. Operational status can be
verified using showsnmp snmp.
Examples:
HP SA7120> setsnmp snmp enable
HP SA7120> showsnmp snmp
SNMP: enable
HP SA7120> setsnmp snmp disable
HP SA7120> showsnmp snmp
SNMP: disable

C H A P T E R 6 HP e-Commerce Server Accelerator SA7100/SA7120 User Guide
108
Specifying SNMP Information
Configurable SNMP parameters can be set collectively using the
setsnmp snmp_info command as illustrated below:
HP SA7120> setsnmp snmp_info
SNMP Port [161]: 161
SNMP Trap Port [162]: 162
Contact Person []: support
System Location []:
System Name []: SA7120
Current values of SNMP parameters are displayed using the
shownmp snmp_info command:
HP SA7120> showsnmp snmp_info
SNMP Port Number : 161
SNMP Trap Port Number: 162
SNMP System Contact : support
SNMP System Name : SA7120
SNMP System Location :
System IP Address: x.x.x.x
System Netmask: y.y.y.y
Default Route: z.z.z.z
You can also configure SNMP information elements individually
using the following commands:
•setsnmp snmp_port sets the SNMP port
•setsnmp trap_port sets the SNMP trap port
•setsnmp sys_contact sets the contact person
•setsnmp sys_name sets the system name
•setsnmp sys_location sets the system location
Correspondingly, the values set with the above commands are
displayed using the commands:
•showsnmp snmp_port
•showsnmp trap_port
•showsnmp sys_contact
•showsnmp sys_name
•showsnmp sys_location

C H A P T E R 6SNMP
109
Community String
Use CLI commands setsnmp snmp_community, list
snmp_community and delete snmp_community to set, list, and
delete SNMP community strings.
HP SA7120> setsnmp snmp_community
SNMP Community String(s) Setting.
<2> Current SNMP Community String(s):
1.) IP: 1.1.1.1 => String: 1.1.1.2 => Rights: read
2.) IP: 1.1.1.3 => String: 1.1.1.4 => Rights: read
Enter a SNMP Community IP (q to quit) [1.1.1.4]:
1.1.1.5
Enter a SNMP Community String (q to quit)
[1.1.1.5]: 1.1.1.6
Enter a SNMP Community IP (q to quit) [1.1.1.1]: q
HP SA7120>
HP SA7120> list snmp_community
SNMP Community String(s) information.
<2> Current SNMP Community String(s):
1.) IP: 1.1.1.1 => String: 1.1.1.2 => Rights: read
2.) IP: 1.1.1.3 => String: 1.1.1.4 => Rights: read
3.) IP: 1.1.1.5 => String: 1.1.1.6 => Rights: read
HP SA7120>
HP SA7120> delete snmp_community
SNMP Community String(s) Deletion.
<2> Current Available SNMP Community String(s):
1.) IP: 1.1.1.1 => String: 1.1.1.2 => Rights: read
2.) IP: 1.1.1.3 => String: 1.1.1.4 => Rights: read
3.) IP: 1.1.1.5 => String: 1.1.1.6 => Rights: read
Enter number (1 to 2) to delete (q to quit) [1]: 2
Enter number (1 to 2) to delete (q to quit) [1]: q
HP SA7120>
Trap Community String
Use CLI commands setsnmp trap_community, list
trap_community and delete trap_community to set, display, and
delete trap community strings.
HP SA7120> setsnmp trap_community
SNMP Trap Community String(s) Setting.
Enter a SNMP Trap Community IP (q to quit): 0.0.0.0
Enter a SNMP Trap Community String (q to quit): private
Enter a SNMP Trap Community IP (q to quit): 0.0.0.0

C H A P T E R 6 HP e-Commerce Server Accelerator SA7100/SA7120 User Guide
110
Notes

Alarms and
Monitoring
Overview
The HP e-Commerce Server Accelerator SA7100/SA7120 supports:
•Alarms that can be sent to the console upon pre-designated
events
•Periodic status-monitoring reports
Both alarms and monitor reports are single lines of text. Both can be
written either to the local administration console or to remote
management sessions (Telnet or Secure Shell only). On the display,
alarms are prefaced by the letter “A,” and monitor reports with the
letter “M.” Both have timestamps.

C H A P T E R 7 HP e-Commerce Server Accelerator SA7100/SA7120 User Guide
112
Alarms can be configured to immediately notify the user of the
following conditions:
•Encryption Status change
•Refused SSL connections
•Utilization (Threshold) alarms
•Overload alarms
•Network Link Status
All alarms are disabled by default and may be enabled in any
combination.
Alarm format:
A:mm/dd/yyyy hh:mm:ss
ALARM_CODE:MODIFIER:EXTENDED_DATA:/*message*/
Where:
A: Identifies the message as an alarm (as
opposed to a monitor report).
mm/dd/yyyy hh:mm:ss The timestamp.
ALARM_CODE: The alarm type:
[ESC|RSC|UTL|OVL|NLS].
MODIFIER: The alarm modifier, a code identifying
the event that triggered the alarm.
NOTE: The Encryption
Status Change alarm
(ESC) does not display
extended data.
EXTENDED_DATA: Any additional relevant data.
/*message*/: Human-readable text description of
the alarm.
The CLI commands for alarm configuration are:
For example:
HP SA7120> set alarm
Usage: set alarms [args]
all => All alarms turned on.
esc => Encryption status change alarm.
nls => Network link status alarm.
none => All alarms turned off (disabled).
ovl => Overload alarm.
Command Parameters Default
set alarm all, esc, rsc, utl, ovl, nls none
show alarm

C H A P T E R 7 Alarm Types
113
rsc => Refused SSL conections alarm.
utl => Utilization threshold alarm.
HP SA7120> set alarm all
HP SA7120> show alarm
Alarms set: esc rsc utl ovl nls.
HP SA7120> set alarm none
HP SA7120> show alarm
Alarms set:
Alarm Types
The configurable alarm types are detailed in separate sections below.
ESC:
Encryption
Status Change
Alarm
When enabled, an alarm is issued when the device is changed
between INLINE and BYPASS modes. This change can be made
from the CLI using the commands inline or bypass, or at the device’s
front panel by pressing the BYPASS button.
Format:
A:mm/dd/yyyy hh:mm:ss ESC:HDWR|CONB|CONI|FNTB|
FNTI|APPR:/*message*/
Where:
A: identifies the message as an alarm.
mm/dd/yyyy hh:mm:ss is the timestamp.
ESC: identifies the message as an Encryption
Status Change Alarm.
Alarm Modifiers and Messages:
HDWR: indicates crypto card failure
CONB: indicates console-controlled bypass
CONI: indicates console-controlled inline
FNTB: indicates front panel-controlled bypass
FNTI: indicates front panel-controlled inline
APPR: indicates application restart
RSC: Refused
SSL
Connections
When enabled, an alarm is generated whenever SSL connections are
refused for cipher suite mismatch or client certificate authentication
failure during the current user-specified period (5 to 65000 seconds,
default: 15 seconds). The total number of refused SSL connections is
reported along with the reason for refusal. This alarm can be enabled
or disabled at the CLI.

C H A P T E R 7 HP e-Commerce Server Accelerator SA7100/SA7120 User Guide
114
Format:
A:mm/dd/yyyy hh:mm:ss
RSC:CSMM|CCAF:XXX:
/*message*/
Where:
A: identifies the message as an alarm.
mm/dd/yyyy hh:mm:ss is the timestamp.
RSC: identifies the message as an Refused SSL
Connections Alarm.
Alarm Modifiers and Messages
CSMM: Cipher suite mismatch
CCAF: Client certificate authenticate failure
Extended Data
XXX: An integer value indicating the number of
refused SSL connections that occurred in the
current alarm period.
RSC Alarm CLI Commands
To set Refused SSL Connections Alarm time window:
set rsc_window <seconds> (Range: 5-65000,
default: 15)
To display Refused SSL Connections Alarm time window
show rsc_window
Examples:
HP SA7120> set rsc_window 10
HP SA7120> show rsc_window
Check for refused SSL connections [secs]: 10

C H A P T E R 7 Alarm Types
115
UTL:
Utilization
Threshold
Alarm
This alarm monitors three utilization threshold values:
•CPU
•Connections per Second
•Total Open Connections
When enabled, an alarm is issued whenever any of the utilization
values exceeds its high-water mark, or, having exceeded the high-
water mark, drops below the low-water mark. The user defines the
high and low-water marks. By default, the high-water mark is 90%
and the low-water mark is 60%.
The data collected for utilization threshold metrics tends to be bursty,
so a smoothing algorithm is used to prevent continuous alarms.The
utilization window is a user-specified sliding interval during which
data is collected and averaged. Consequently, shorter intervals are
likely to result in some extraneous alarms. The interval can be set
from 5 to 65000 seconds (default: 15).
Format:
A:mm/dd/yyyy hh:mm:ss
UTL:ALRT|NMRL:CPU|CON|CPS:/*message*/
Where:
A: identifies the message as an alarm.
mm/dd/yyyy hh:mm:ss is the timestamp.
UTL: identifies the message as an Utilization
Threshold Alarm.
Alarm Modifiers and Messages
ALRT: Message: [CPU|Open connections|CPS] exceed
high water mark
NMRL: Message: [CPU|Open connections|CPS] drop
below low water mark
Extended Data
CPU: Indicates that CPU Utilization triggered
the alarm.
CON: Indicates that Total Active Connections
triggered the alarm.
CPS: Indicates that Connections per Second
triggered the alarm.

C H A P T E R 7 HP e-Commerce Server Accelerator SA7100/SA7120 User Guide
116
UTL Alarm CLI commands
To set Utilization Threshold Alarm time window:
set utl_window <seconds> (Range: 5-65000,
default: 15)
To set Utilization Threshold Alarm high-water value:
set utl_highwater <percentage> (Range: 2-100,
default: 90)
To set Utilization Threshold Alarm low-water value:
set utl_lowwater <percentage> (Range: 1-99,
default: 60)
To display current settings:
show utl_window
show utl_highwater
show utl_lowwater
Examples:
HP SA7120> set utl_window 10
HP SA7120> show utl_window
Utilization Window set [secs]: 10
HP SA7120> set utl_highwater 80
HP SA7120> show utl_highwater
Utilization High water mark [%]: 80
HP SA7120> set utl_lowwater 60
HP SA7120> show utl_lowwater
Utilization Low water mark [%]: 60
OVL: Overload
Alarm
WARNING: This alarm
indicates loss of encryp-
tion/decryption. (Normal
SSL operation resumes
when the alarm ceases.)
When enabled, an alarm is issued upon occurence of overloads
resulting in spills or throttles during the current user-configured
alarm period (5 to 65000 seconds, default: 15 seconds).
Format:
A:mm/dd/yyyy hh:mm:ss
OVL:SPIL|THRT:XXX:
/*message*/
Where:
A: identifies the message as an alarm.
mm/dd/yyyy hh:mm:ss is the timestamp.
OVL: identifies the message as an Overload
Alarm.

C H A P T E R 7 Alarm Types
117
Alarm Modifiers and Messages
SPIL: indicates overload resulting in a spill.
Message: Spill mode.
THRT: indicates overload resulting in a
throttle. Message: Throttle mode.
Extended Data
XXX: An integer value indicating the total
number of overload events that occurred during
the most recent alarm period.
OVL Alarm CLI Commands
To set Overload Alarm time window:
HP SA7120> set ovl_window <seconds> (Range: 5-
65000, default: 15)
To display Overload Alarm time window:
HP SA7120> show ovl_window
Examples:
HP SA7120> set ovl_window 10
HP SA7120> show ovl_window
Check for overload conditions [sec]: 10
NLS: Network
Link Status
Alarm
An alarm is issued whenever the Network or Server link status is
changed.
Format:
A:mm/dd/yyyy hh:mm:ss
NLS:NETL|SVRL:LNKD|10HDX|10FDX|100HDX|100FDX:/
*message*/
Where:
A: identifies the message as an alarm.
mm/dd/yyyy hh:mm:ss is the timestamp.
NLS: identifies the message as a Network Link
Status Alarm.
Alarm Modifiers and Messages
NETL: indicates the network port status.
Message: [No carrier|10Mb/s|100Mb/s][half
duplex|full duplex]
SVRL indicates the server port status. Message:
[No carrier|10Mb/s|100Mb/s] [half duplex|full
duplex]

C H A P T E R 7 HP e-Commerce Server Accelerator SA7100/SA7120 User Guide
118
Extended Data
LINKD: indicates no carrier.
10HDX: indicates 10Mb/s, half duplex.
10FDX: indicates 10Mb/s, full duplex.
100HDX: indicates 100Mb/s, half duplex.
100FDX: indicates 100Mb/s, full duplex.
Alarm Logging
The SA7100/SA7120 maintains a circular buffer of alarms issued.
The most recent alarms, as well as historical logs generated and saved
as a result of exceptional conditions, are viewable at the console or in
Telnet or Secure Shell (SSH) remote sessions. Viewing the current
alarms results in an immediate dump of the alarm buffer.
The historical logs consist of a snapshot of the information retrievable
via the status line command followed by a dump of the alarm buffer
existing at the time of the exceptional condition.
These alarms can be viewed on the console using the CLI command,
status alarms. Additionally, any logs generated and saved as a result
of an exceptional condition are viewable by using the CLI command,
status <log filename>. (A list of the viewable log files is displayed
using the list logs command.)
Alarms can be echoed to the console by enabling the monitoring
function. Monitoring reports are disabled by default, and are enabled
with the set monitoring <enable | disable> command. The
monitoring application is aware of the port on which the enable
command arrives, and accordingly sends reports to that same port,
thus monitoring reports are displayed on the same console from
which the feature is enabled.
Below are examples of the CLI commands for log viewing, the
defaults, and ranges where applicable:
Example: list logs command:
HP SA7120> list logs
20000727_145544

C H A P T E R 7 Alarm Logging
119
Example: status command
HP SA7120> status 20000727_145544
================= STATE ====================
Boot time: Thu Jul 27 14:54:21
2000
Curr time: Thu Jul 27 14:55:43
2000
Restarts: 3
KTR Mask: 0xFFFFF3DD
Total Connections: 0
Active Connections: 0, 0 (cur, max)
Connections/Second: 0, 0 (cur, max)
Util Status:
Secure Bytes Read: 0
Plain Bytes Read: 0
Secure Bytes Wrote: 0
Plain Bytes Wrote: 0
Bytes Allocated to dbufs: 0
Bytes Per dbuf: 0
Spill Mode: disable
Transactions Spilled: 0
Times Thottled Accepts: 0
Bypass Mode: disable
L&M board status: RESPEND INLINE
(0x00000060)
Network NIC: 100baseTX Half
Duplex
(0x00000026
0x00000003 0x00000026)
Server NIC: No carrier
(0x00000023
0x00000001 0x00000023)
Network LED: on
Server LED: off
Next heartbeat deadline: never
SSL Caching: Enabled.
--------------- Configuration --------------
conlog 0xffffffef
ilog 0xffffffff
trace 0xfffff3dd
media auto
logport tty01
cache 3

C H A P T E R 7 HP e-Commerce Server Accelerator SA7100/SA7120 User Guide
120
server_tmo 5
client_tmo 30
serverif exp1
netif exp0
map 0.0.0.0 443 80 default
kpanic reboot
monitoring_interval 0
monitoring_fields 0x1f
alarm_mask 0x0000001f
ovl_window 15
rsc_window 15
utl_window 15
utl_highwater 90
utl_lowwater 60
idle 300
kstrength 512
con_speed 9600
con_bits 8
con_stop 1
con_parity n
defcert_cname US
defcert_state California
defcert_city San Diego
defcert_orgname Company Name
defcert_orgunit Company Division
defcert_name www.company.com
defcert_email support@company.com
prompt HP SA7120>
trap_authen
remote_if exp0
ip 10.1.11.34
netmask 255.255.0.0
A:07/27/2000 14:54:47:NLS:SVRL:NC:/* Server port
status, No carrier */
A:07/27/2000 14:54:41:NLS:SVRL:100FDX:/* Server
port status, 100Mb/s, full dupl/
A:07/27/2000 14:54:21:NLS:NETL:100HDX:/* Network
port status, 100Mb/s, half dup/
A:07/27/2000 14:54:21:NLS:SVRL:NC:/* Server port
status, No carrier */
A:01/01/1970 00:00:00:ESC:APPR:3:/* Application
Restarted */

C H A P T E R 7 Monitoring
121
Example: status alarms command
HP SA7120> status alarms
A:07/27/2000 14:57:05:ESC:CONI:/* Console inline
*/
A:07/27/2000 14:57:05:NLS:NETL:100HDX:/* Network
port status, 100Mb/s, half dup/
A:07/27/2000 14:57:01:ESC:CONB:/* Console bypass
*/
A:07/27/2000 14:57:01:NLS:NETL:NC:/* Network port
status, No carrier */
A:07/27/2000 14:56:51:NLS:SVRL:NC:/* Server port
status, No carrier */
A:07/27/2000 14:56:46:NLS:SVRL:100FDX:/* Server
port status, 100Mb/s, full dupl/
A:07/27/2000 14:56:30:ESC:CONI:/* Console inline
*/
A:07/27/2000 14:56:30:NLS:NETL:100HDX:/* Network
port status, 100Mb/s, half dup/
A:07/27/2000 14:56:29:NLS:NETL:NC:/* Network port
status, No carrier */
A:07/27/2000 14:56:29:NLS:SVRL:NC:/* Server port
status, No carrier */
HP SA7120>
Monitoring
Monitoring
Reports
A monitoring report is one line of user-configurable text displayed at
the console at a user-configurable interval of between five and 65000
seconds. The interval default is 15 seconds. Monitoring reports are
disabled by default, and are enabled with the set monitoring
<enable | disable> command. The monitoring application is aware of
the port on which the enable command arrives, and accordingly sends
reports to that same port, thus monitoring reports are displayed on the
same console from which the feature is enabled.
Report
Configuration
Report output begins with the letter “M” (for Monitor report, to
distinguish them from Alarm reports) and the timestamp. Other fields
are user-selectable via CLI commands (discussed below in
“Monitoring Reports CLI Commands”). The standard default fields
are mode, failmode, CPU, CPS, and OVRLD. Monitor reports are
disabled by default.

C H A P T E R 7 HP e-Commerce Server Accelerator SA7100/SA7120 User Guide
122
Monitor report format:
M:mm/dd/yyyy hh:mm:ss
mode:failmode:CPU;i,k,a:CPS;c,m,t:OVRLD;r,c,m,t:
NetIF;s:SvrIF;s:BES;c,m,t;BDS;c,m,t
Where:
M Monitor report
mm/dd/yyyy hh:mm:ss Timestamp
mode Bypass mode status [INLINE|BYPASS]
failmode Fail mode status [SAFE|THRU]
CPU;i,k,a CPU%; (i)dle, (k)ernel, (a)pplication
CPS;c,m,t SSL Connections per Second; (c)urrent,
(m)ax, (t)otal
OVRLD;r,c,m,t Overload events; (r)esponse
[SPIL|THRT], (c)urrent, (m)ax,
(t)otal
NetIF;s Net interface; (s)tatus
[NC|10HDX|10FDX|100HDX|100FDX]
SvrIF;s Svr interface; (s)tatus
[NC|10HDX|10FDX|100HDX|100FDX]
BES;c,m,t Bytes Encrypted per Second; (c)urrent,
(m)ax, (t)otal
BDS;c,m,t Bytes Decrypted per Second; (c)urrent,
(m)ax, (t)otal
Monitoring Reports CLI Commands
CLI commands for console monitoring, with defaults and ranges
where applicable are discussed below:
set monitoring_interval <seconds>
(Range: 5-65000; Default: 15 )
show monitoring_interval
set monitoring_fields <fields>
Usage: set monitoring_fields [args]
all => All monitoring fields enabled.
cps => SSl connections per second.
cpu => CPU utilization.
dec => Decrypted Data throughput.
enc => Encrypted Data throughput.
failmode => Fail-safe or Fail-through mode.
link => Network and Server Link status.
mode => INLINE or BYPASS mode.
ovrld => Number of spills when spill is
enabled or throttles when spill is
disabled.
show monitoring_fields

C H A P T E R 7 Monitoring
123
set monitoring enable|disable (Default: disable)
show monitoring
Examples:
HP SA7120> set monitoring_interval 15
HP SA7120> show monitoring_interval
Monitoring report interval [secs]: 15
HP SA7120> set monitoring disable
HP SA7120> show monitoring
Monitoring for this terminal: disabled
HP SA7120> set monitoring_fields all
HP SA7120> show monitoring_fields
Monitoring report fields: mode failmode cpu cps
ovrld link enc dec
HP SA7120> set monitoring enable
HP SA7120> show monitoring
Monitoring for this terminal: enabled
HP SA7120> set monitoring_fields
Select monitoring fields (all, mode, failmode,
cpu, cps, ovrld, link, enc,
dec) [all]: all
HP SA7120> show monitoring_fields
Monitoring report fields: mode failmode cpu cps
ovrld link enc
HP SA7120> set monitoring enable
HP SA7120> show monitoring
Monitoring for this terminal: enabled

C H A P T E R 7 HP e-Commerce Server Accelerator SA7100/SA7120 User Guide
124
Notes

Software Updates
Use the import upgrade command to upgrade your HP e-Commerce
Server Accelerator SA7100/SA7120 software. When you upgrade
your SA7100/SA7120 software, the configuration (including all
keys, certificates, and mapping) is saved. However, all log files are
cleared. The software is in the form of an image file (*.IMG).
Use the import patch command to install a patch to a current
software release. Patches typically effect fixes to minor software
issues. Customer Support can provide guidance regarding patches
appropriate to your system, if any.

C H A P T E R 8 HP e-Commerce Server Accelerator SA7100/SA7120 User Guide
126
Before
Upgrading
Monitoring output data can interfere with import/
export operations
If import or export operations are carried out while any of the
device’s monitors are enabled, the monitors’ periodic output will be
inserted into the data flow of the import or export. Workaround:
Before performing an import or export operation, turn off all
monitors:
HP SA7120> set monitoring disable
Details on the device’s monitoring functions are found in Chapter 6.
IP blocks may not persist across software upgrade
The device may, after the automatic reboot following an import
upgrade, experience a problem with reestablishing any IP blocks
created before the upgrade. If this is the case, the console displays a
message similar to either of the following examples:
Upgrading...
System rebooting...09/20 13:41:43 Build 122 Tue
Sep 19 02:40:36 PDT 2000 09/20 13:41:44 "block
9.8.7.6 255.255.255.255 99 0xffff" is incomplete
and ignored
Warning: "ciphers ALL:!ADH:!EDH" at line # 11
ignored.
Warning: "block 9.8.7.6 255.255.255.255 99
0xffff" at line # 30 ignored.
Do you want to install this config ? [y]:
Use the create block command to recreate any desired IP blocks after
the upgrade is complete:
HP SA7120> create block
Client IP to block [0.0.0.0]:<n.n.n.n>
Client IP mask [0.0.0.0]:<n.n.n.n>
Server IP to block [0.0.0.0]:<n.n.n.n>
Server IP mask [0.0.0.0]:<n.n.n.n>
Server Port to block:<nn>
Server Port mask [0xffff]:
HP SA7120>

C H A P T E R 8 Using Windows* HyperTerminal*
127
Using Windows* HyperTerminal*
Command: import upgrade
Use the SA7100/SA7120’s aux console port, which defaults to 115.2
kbps, for greater speed. The import procedure (using xmodem)
requires approximately 7 minutes at 115.2 kbps.
1. Download the image file (.IMG) to the local PC.
2. Connect the serial cable from COM1 or COM2 to the SA7100/
SA7120 auxiliary console.
3. Log in to the SA7100/SA7120.
4. Type the import upgrade command. The command prompts for
xmodem. Press Enter to use the default (xmodem).
HP SA7120> import upgrade
Import protocol: (xmodem) [xmodem]: <Enter>
Start xmodem upload now
Use Ctl-X to cancel upload
5. In HyperTerminal*, click Send File from the Transfer menu,
select the file (you can type the filename or click the Browse
button to find the file), click to select the transfer protocol (1K
xmodem), and click Send.
Verifying upgrade image...
Upgrade image valid
=== Release x.x
=== Load xx, Fri Aug 25 05:31:51 2000
WARNING: All saved
logs will be deleted and
the system will reboot
upon successful
completion of the
upgrade.
6. Press y (for yes) at the “Continue with upgrade?” prompt.
Continue with upgrade? [n]: y
Upgrading...
System rebooting...done
Command: import patch
Use the SA7100/SA7120’s aux console port, which defaults to 115.2
kbps, for greater speed. The import procedure (using xmodem)
requires approximately 7 minutes at 115.2 kbps.
1. Download the patch file (.patch) to the local PC.
2. Connect the serial cable from COM1 or COM2 to the SA7100/
SA7120 auxiliary console.
3. Log in to the SA7100/SA7120.

C H A P T E R 8 HP e-Commerce Server Accelerator SA7100/SA7120 User Guide
128
4. Type the import patch command. The command prompts for
xmodem. Press Enter to use the default (xmodem).
HP SA7120> import patch
Import protocol: (xmodem) [xmodem]: <Enter>
Start xmodem upload now
Use Ctl-X to cancel upload
5. In HyperTerminal*, click Send File from the Transfer menu,
select the file (you can type the filename or click the Browse
button to find the file), click to select the transfer protocol (1K
xmodem), and click Send.
Verifying patch image...
Patch successfully imported.
The patch becomes effective upon the next system reboot. Should a
patch fail upon import, the last successfully imported patch is
reapplied.

Troubleshooting
Item Symptom Probable
Cause Remedy
1Server and/or
Network LEDs not
illuminated.
•Unit is in
Bypass mode.
•Improper
cabling.
•If the Inline LED is not illuminated
(solid or blinking) take the SA7100/
SA7120 out of Bypass mode by
either pressing the Bypass switch on
the unit’s front panel or using the
CLI’s inline command.
•Depending on what type of
equipment the SA7100/SA7120 is
connected to, either straight-through
or crossover Cat-5 network cables
are required for both Network and
Server ports. Switch out the
different cable types at each port
until both Network and Server LEDs
are illuminated.

C H A P T E R 9 HP e-Commerce Server Accelerator SA7100/SA7120 User Guide
130
2Non-SSL data does
not pass through
SA7100/SA7120.
Improper cabling. •Refer to Item 1 in this table.
•If both Network and Server LEDs
are illuminated, configure the
SA7100/SA7120 to Fail-through
mode (see Appendix B) and place
the unit in Bypass mode. This
effectively bypasses the SA7100/
SA7120, so if the problem persists
its origin is elsewhere in the
network.
3Web pages are not
completely
displayed, or an
error message such
as, “Document
Contains No Data”
appears.
The client timeout
value is too small.
“Client timeout” is
the interval that the
connection
between the client
and server can
remain idle (i.e., no
data crosses the
connection in
either direction)
following a client
request.
Increase the interval with the
following command:
HP SA7120> set client_tmo
<n>
where <n> is the interval in seconds.
The default is five seconds. The
recommended value is 1.5 times the
longest server response time.
4SSL traffic does not
pass through
SA7100/SA7120
•Improper
mappings.
•Improper
cabling.
•See Mapping in Chapter 3.
•See Item 1 in this table.
Item Symptom Probable
Cause Remedy

C H A P T E R 9 Troubleshooting
131
5Error message:
The page cannot be
displayed.
The digital
certificate and/or
private key is
corrupt.
Use the default key and certificate, or
create new key and unsigned
certificate. Try the page again.
If the error no longer appears, recreate
your private key and certificate
signing request (CSR) and resubmit to
the certificate authority to get a new
certificate.
6Error message
indicates that the
browser does not
recognize the
signer of this
certificate after
loading global
server ID.
The intermediate
certificate is not
installed or is
installed
improperly.
See Global Site Certificates in
Chapter 3 for correct procedures.
Item Symptom Probable
Cause Remedy

C H A P T E R 9 HP e-Commerce Server Accelerator SA7100/SA7120 User Guide
132
7Error message:
Server/Network
media mismatch
Server and
network ports
have
autonegotiated to
different media
settings.
Use the status command to determine
the media settings:
HP SA7120> status
.
.
Network port 100baseTX Full
Duplex
Server port 10baseT, Half
Duplex
Then use the nic command to force
common media attributes, e.g.:
HP SA7120> nic
1 - auto
2 - 10baseT, half duplex
3 - 10baseT, full duplex
4 - 100baseTX, half duplex
5 - 100baseTX, full duplex
Select media type [1] 2
In the example above, 2 is the correct
choice because the setting must reflect
the “least common denominator” of
both media speed and duplex attribute,
i.e., the server port is determinative
because it has both the lower speed
and lower (half) duplex attribute.
Item Symptom Probable
Cause Remedy
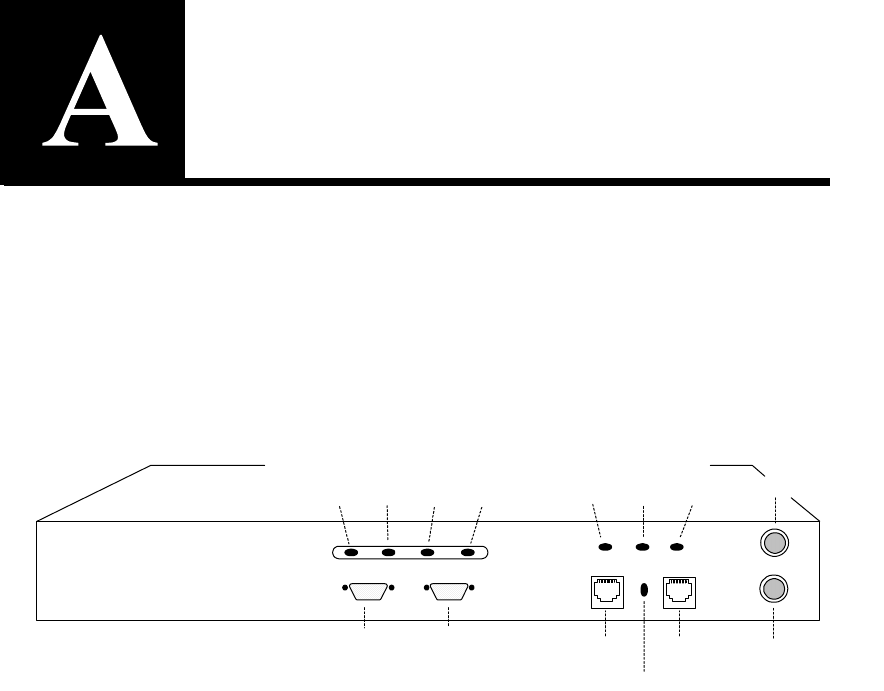
Front Panel
The following diagram shows the LEDs, buttons, switches and con-
nections for the HP e-Commerce Server Accelerator SA7100/
SA7120. Note that there is no power switch or button. Power is ap-
plied to the device by connecting the power cable.
Front Panel Connectors, Controls, and Indicators
Bypass
Reset
Network Link
(RJ45) Server Link
(RJ45)
Inline
(green)
Network Link
(green) Server Link
(green)
LEDs
Fail-through switch
Console
(CLI) Aux Console
(Diagnostics)
Power
(green) Error
(red) Overload
(amber)
Activity
(green)
LEDs

A P P E N D I X A HP e-Commerce Server Accelerator SA7100/SA7120 User Guide
134
Buttons and Switches
There are two buttons and one switch on the front panel of the
SA7100/SA7120.
Front Panel LEDs
The LED display provides high-level SA7100/SA7120 information.
There are seven LEDs on the SA7100/SA7120’s front panel, in two
groups of four and three, respectively.
Button/Switch Action
Reset button Press momentarily to issue a soft reset to the SA7100/SA7120.
Press for 5 seconds to reset the SA7100/SA7120 and restore the
factory defaults.
Bypass button Press to physically force bypass mode (bypass SA7100/SA7120
processing).
Fail-through/
Fail-safe switch Default: Fail-safe (up position), the network connection is broken
during a SA7100/SA7120 failure.
Fail-through (down position), the network connection is
maintained during a SA7100/SA7120 failure. Refer to Failure/
Bypass Modes in Appendix B for details.
LED Status
Power ON – Power is supplied to SA7100/SA7120.
OFF – No Power to SA7100/SA7120.
Error ON – Error condition found.
OFF – Normal operation.

A P P E N D I X A Front Panel LEDs
135
Overload ON – SA7100/SA7120 is saturated with SSL requests. LED ranges
from dim flickering to bright steady, indicating low to high spillover.
Refer to the spill command for ways to offload requests to another
SA7100/SA7120.
OFF – Normal operation.
Activity ON – SSL processing is being performed. Ranges from dim, when
processing loads are low to bright, when greater amounts of processing
are occuring.
OFF – No SSL processing is being performed.
Network Link ON – Operational network connection.
OFF – No operational network connection.
Inline
(See Appendix B, Failure/
Bypass Modes)
BLINKING GREEN – Fail-safe mode, which is the default. In the event
of a SA7100/SA7120 failure, traffic will not pass through.
STEADY GREEN – Fail-through mode, which allows traffic to pass
even with SA7100/SA7120 failure.
OFF – SA7100/SA7120 is not operational, or is in Bypass mode.
Server Link ON – Operational server connection.
OFF – No operational server connection.
LED Status

A P P E N D I X A HP e-Commerce Server Accelerator SA7100/SA7120 User Guide
136
Connectors
The following table describes the SA7100/SA7120’s connectors.
Designator Type Purpose
Network RJ45 100baseTX/10baseT connection to network (clients),
wired as a host port.
Server RJ45 100baseTX/10baseT connection to server (or servers),
wired as a hub port.
Console DB9 RS-232 DTE console port (9600 8, N, 1)
Aux Console DB9 RS-232 DTE console port (115200, 8, N, 1) includes
kernel diagnostics at boot.
Power Power input

Failure/Bypass
Modes
WARNING: Enabling
bypass mode will
instantly and without
warning terminate all
active remote
management sessions.
The HP e-Commerce Server Accelerator SA7100/SA7120 is
designed with the ability to automatically bypass e-Commerce traffic
in the event of a failure. If necessary, the user can force a bypass with
the Bypass button or from the command line interface using the
bypass command. There is also a security feature (Fail-through
switch). In the default Fail-safe position, this switch prevents traffic
from passing through unprocessed in the event of a failure or if
Bypass mode is manually activated.
The following discussion about the Bypass button and Fail-through
switch assumes that normal conditions for SA7100/SA7120
processing are in effect (i.e., the user has entered the appropriate CLI
commands to enable SA7100/SA7120 processing).
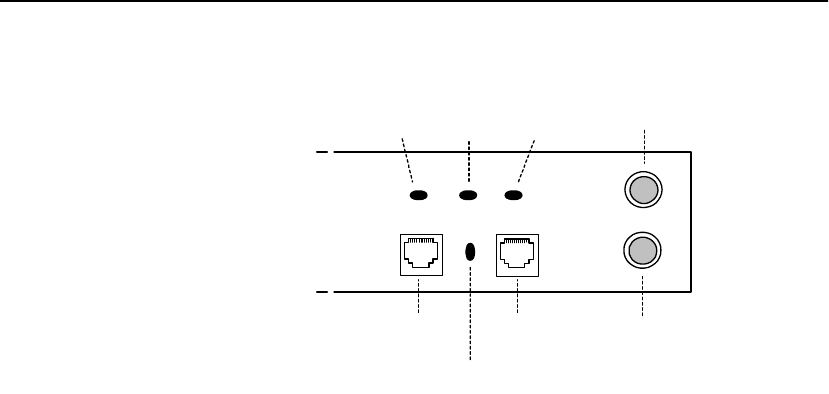
A P P E N D I X B HP e-Commerce Server Accelerator SA7100/SA7120 User Guide
138
Front Panel Detail: Failure/Bypass Mode Controls and Indicators
Bypass Button
Forcing a bypass of the SA7100/SA7120 may be necessary when
certain actions must be performed offline (e.g., configuration
changes, entering certificates, or problem isolation).
To force a bypass of SA7100/SA7120 processing, push the Bypass
button ON. The Network Link, Inline, and Server Link LEDs are off
in Bypass mode. ON disables the SA7100/SA7120’s ability to
process e-Commerce traffic. The mode of the Fail-through switch
controls whether traffic continues to flow unprocessed between the
client and the server (discussed below).
Fail-through Switch (Security Level)
This switch allows the user to control what happens in the event of a
failure. It is located in a recess between the network link and server
link connectors. Use a small screwdriver or paper clip to manipulate
the switch. The two options are to either let traffic flow through the
SA7100/SA7120 in the event of a failure (or the Bypass Switch being
on) or to block traffic. When the switch is in Fail-through mode
(down position), traffic is allowed to pass through unprocessed in the
event of a failure of the SA7100/SA7120 or if the Bypass toggle is
ON.
Bypass
Reset
Server Link
Inline
(green)
Network Link Server Link
LEDs
Fail-Through switch
Network Link

A P P E N D I X B Fail-through Switch (Security Level)
139
During normal processing, the Inline (green) LED on the front panel
indicates whether e-Commerce traffic will pass through in the event
of a failure (depending on Fail-through switch state). Steady green or
blinking green both mean that the SA7100/SA7120 is processing
traffic; blinking green indicates traffic will be blocked if the SA7100/
SA7120 fails (Fail-safe mode), and steady green indicates traffic will
continue (unprocessed) in the event of a failure (Fail-through mode).
When the Inline LED is off, no SSL processing is taking place, which
means either no traffic is passing through (Fail-safe), or the traffic
that is passing through is unprocessed (Fail-through).
The following conditions and Inline LED behavior are possible with
the Fail-through switch and Bypass button:
Device Mode Bypass
Button Fail-through
Switch Mode Traffic Status Inline LED
Failed N/A Fail-safe (Up
position) No traffic (either direction) off
Failed N/A Fail-through
(Down
position)
Passes through unprocessed off
N/A ON (Bypass) Fail-safe (Up
position) No traffic (either direction) off
N/A ON (Bypass) Fail-through
(Down
position)
Passes through unprocessed off
Operational OFF (Inline) Fail-safe (Up
position) Processing Blinking green
Operational OFF (Inline) Fail-through
(Down
position)
Processing Steady green

A P P E N D I X B HP e-Commerce Server Accelerator SA7100/SA7120 User Guide
140
Notes

Supported Ciphers
The HP e-Commerce Server Accelerator SA7100/SA7120 supports
only RSA key exchange and authentication. Diffie-Hellman
(including Anonymous and Ephemeral) key exchange/authentication
and DSS authentication are not supported.
Use the set cipher command to specify the cipher. The command
prompts you for the cipher strength and SSL version level. Options
for these values are:
Cipher Strength
•All - all supported ciphers (including export ciphers)
•High - all ciphers with 168-bit encryption (Triple-DES)
•Medium - all ciphers with 128-bit and higher encryption
(including High)
•Low - all ciphers with 64-bit and higher encryption (including
Medium and High)
•Export only - all export ciphers

A P P E N D I X C HP e-Commerce Server Accelerator SA7100/SA7120 User Guide
142
SSL Version Level
•SSLv2 - all SSL version 2.0 ciphers
•SSLv3 - all SSL version 3.0 ciphers
•SSLv2 and SSLv3 - all SSL version 2.0 and 3.0 ciphers
The default cipher value is all supported ciphers (both SSLv2 and
SSLv3).
The following table provides ciphers supported by the SA7100/
SA7120. Note that the export version of the software supports only
the ciphers marked “E” in the Profile column.
Name Protocol Key
Exchange Authentication Encryption
(key size) Message
Authentication Profile (Hi/
Medium/
Low/
Export)
DES-
CBC3-
SHA
SSLv3 RSA RSA 3DES(168) SHA1 H
IDEA-
CBC-SHA SSLv3 RSA RSA IDEA(128) SHA1 M
RC4-SHA SSLv3 RSA RSA RC4(128) SHA1 M
RC4-MD5 SSLv3 RSA RSA RC4(128) MD5 M
DES-
CBC-SHA SSLv3 RSA RSA DES(56) SHA1 L
DES-
CBC3-
MD5
SSLv2 RSA RSA 3DES(168) MD5 H
IDEA-
CBC-
MD5
SSLv2 RSA RSA IDEA(128) MD5 M

A P P E N D I X C SSL Version Level
143
RC2-
CBC-
MD5
SSLv2 RSA RSA RC2(128) MD5 M
RC4-MD5 SSLv2 RSA RSA RC4(128 MD5 M
RC4-64-
MD5 SSLv2 RSA RSA RC4(64) MD5 L
DES-
CBC-
MD5
SSLv2 RSA RSA DES(56) MD5 L
EXP-
DES-
CBC-SHA
SSLv3 RSA(512) RSA DES(40) SHA1 E
EXP-
RC2-
CBC-
MD5
SSLv3 RSA(512) RSA RC2(40) MD5 E
EXP-
RC4-MD5 SSLv3 RSA(512) RSA RC4(40) MD5 E
EXP-
RC2-
CBC-
MD5
SSLv2 RSA(512) RSA RC2(40) MD5 E
EXP-
RC4-MD5 SSLv2 RSA(512) RSA RC4(40) MD5 E
Name Protocol Key
Exchange Authentication Encryption
(key size) Message
Authentication Profile (Hi/
Medium/
Low/
Export)

A P P E N D I X C HP e-Commerce Server Accelerator SA7100/SA7120 User Guide
144
Notes

Regulatory
Information
Taiwan Class A EMI Statement

A P P E N D I X D HP e-Commerce Server Accelerator SA7100/SA7120 User Guide
146
VCCI Statement
Class A ITE
This is a Class A product based on the standard of the Voluntary
Control Council for Interference by Information Technology
Equipment (VCCI). If this equipment is used in a domestic
environment, radio disturbance may arise. When such trouble occurs,
the user may be required to take corrective actions.
Internal access to the device is intended only for qualified service
personnel.
FCC Part 15 Compliance Statement
This product has been tested and found to comply with the limits for
a Class A digital device pursuant to Part 15 of the FCC rules. These
limits are designed to provide reasonable protection against harmful
interference when the equipment is operated in a commercial
environment.
This product generates, uses, and can radiate radio frequency energy
and, if not installed and used in accordance with the instruction
manual, may cause harmful interference to radio communications.
However, there is no guarantee that interference will not occur in a
particular installation. If this equipment does cause harmful
interference to radio or television reception, which can be determined
by turning this equipment off and on, the user is encouraged to try to
correct the interference by one or more of the following measures:
•Change the direction of the radio or TV antenna.
•To the extent possible, relocate the radio, TV, or other receiver
away from the product.
•Plug the product into a different electrical outlet so that the
product and the receiver are on different branch circuits.
If these suggestions don’t help, consult your dealer or an experienced
radio/TV repair technician for more suggestions.

A P P E N D I X D Canada Compliance Statement (Industry Canada)
147
NOTE: This device complies with Part 15 of the FCC Rules.
Operation is subject to the following two conditions: (1) This
device may not cause harmful interference, and (2) this device must
accept any interference received, including interference that may
cause undesired operation.
CAUTION: If you make any modification to the equipment not
expressly approved by HP, you could void your authority to operate
the equipment.
Canada Compliance Statement (Industry
Canada)
Cet appareil numérique respecte les limites bruits radioélectriques
applicables aux appareils numériques de Classe A prescrites dans la
norme sur le matériel brouilleur: "Appareils Numériques", NMB-003
édictée par le Ministre Canadien des Communications.
This digital apparatus does not exceed the Class A limits for radio
noise emissions from digital apparatus set out in the
interference-causing equipment standard entitled: "Digital
Apparatus," ICES-003 of the Canadian Department of
Communications.
CE Compliance Statement
This HP e-Commerce Server Accelerator SA7100/SA7120 complies
with the EU Directive, 89/336/EEC, using the EMC standards
EN55022 (Class A) and EN55024:1998. This product also complies
with the EU Directive, 73/23/EEC, using the safety standard
EN60950.

A P P E N D I X D HP e-Commerce Server Accelerator SA7100/SA7120 User Guide
148
CISPR 22 Statement
WARNING: This is a Class A product. In a domestic environment
this product may cause radio interference in which case the user may
be required to take adequate measures.
VCCI Class A (Japan)
Australia
WARNING The system is designed to operate in a typical office environment.
Choose a site that is:
•Clean and free of airborne particles (other than normal room
dust).
•Well-ventilated and away from sources of heat including direct
sunlight.
•Away from sources of vibration or physical shock.
•Isolated from strong electromagnetic fields produced by
electrical devices.

A P P E N D I X D AVERTISSEMENT
149
•In regions that are susceptible to electrical storms, we
recommend you plug your system into a surge suppressor and
disconnect telecommunication lines to your modem during an
electrical storm.
•Provided with a properly grounded wall outlet.
Do not attempt to modify or use the supplied AC power cord if it is
not the exact type required.
Ensure that the system is disconnected from its power source and
from all telecommunications links, networks, or modem lines
whenever the chassis cover is to be removed. Do not operate the
system with the cover removed.
AVERTISSEMENT
Le système a été conçu pour fonctionner dans un cadre de travail
normal. L’emplacement choisi doit être:
•Propre et dépourvu de poussière en suspension (sauf la poussière
normale).
•Bien aéré et loin des sources de chaleur, y compris du soleil
direct.
•A l’abri des chocs et des sources de ibrations.
•Isolé de forts champs magnétiques géenérés par des appareils
électriques.
•Dans les régions sujettes aux orages magnétiques il est
recomandé de brancher votre système à un supresseur de
surtension, et de débrancher toutes les lignes de
télécommunications de votre modem durant un orage.
•Muni d’une prise murale correctement mise à la terre.
Ne pas utiliser ni modifier le câble d’alimentation C. A. fourni, s’il ne
correspond pas exactement au type requis.
Assurez vous que le système soit débranché de son alimentation ainsi
que de toutes les liaisons de télécomunication, des réseaux, et des
lignes de modem avant d’enlever le capot. Ne pas utiliser le système
quand le capot est enlevé.

A P P E N D I X D HP e-Commerce Server Accelerator SA7100/SA7120 User Guide
150
WARNUNG
Das System wurde für den Betrieb in einer normalen Büroumgebung
entwickelt. Der entwickelt. Der Standort sollte:
•sauber und staubfrei sein (Hausstaub ausgenommen);
•gut gelüftet und keinen Heizquellen ausgesetzt sein
(einschließlich direkter Sonneneinstrahlung);
•keinen Erschütterungen ausgesetzt sein;
•keine starken, von elektrischen Geräten erzeugten
elektromagnetischen Felder aufweisen;
•in Regionen, in denen elektrische Stürme auftreten, mit einem
Überspannungsschutzgerät verbunden sein; während eines
elektrischen Sturms sollte keine Verbindung der
Telekommunikationsleitungen mit dem Modem bestehen;
•mit einer geerdeten Wechselstromsteckdose ausgerüstet sein.
Versuchen Sie nicht, das mitgelieferte Netzkabel zu ändern oder zu
verwenden, wenn es sich nicht um genau den erforderlichen Typ
handelt.
Das System darf weder an eine Stromquelle angeschlossen sein noch
eine Verbindung mit einer Telekommunikationseinrichtung, einem
Netzwerk oder einer Modem-Leitung haben, wenn die
Gehäuseabdeckung entfernt wird. Nehmen Sie das System nicht ohne
die Abdeckung in Betrieb.
AVVERTENZA
Il sistema è progettato per funzionare in un ambiente di lavoro tipico.
Scegliere una postazione che sia:
•Pulita e libera da particelle in sospensione (a parte la normale
polvere presente nell’ambiente).
•Ben ventilata e lontana da fonti di calore, compresa la luce solare
diretta.
•Al riparo da urti e lontana da fonti divibrazione.
•Isolata dai forti campi magnetici prodotti da dispositivi elettrici.

A P P E N D I X D ADVERTENCIAS
151
•In aree soggette a temporali, è consigliabile collegare il sistema
ad un limitatore di corrente. In caso di temporali, scollegare le
linee di comunicazione dal modem.
•Dotata di una presa a muro correttamente installata.
Non modificare o utilizzare il cavo di alimentazione in c. a. fornito
dal produttore, se non corrisponde esattamente al tipo richiesto.
Prima di rimuovere il coperchio del telaio, assicurarsi che il sistema
sia scollegato dall’alimentazione, da tutti i collegamenti di
comunicazione, reti o linee di modem. Non avviare il sistema senza
aver prima messo a posto il coperchio.
ADVERTENCIAS
El sistema está diseñado para funcionar en un entorno de trabajo
normal. Escoja un lugar:
•Limpio y libre de partículas en suspensión (salvo el polvo
normal)
•Bien ventilado y alejado de fuentes de calor, incluida la luz solar
directa.
•Alejado de fuentes de vibración.
•Aislado de campos electromagnéticos fuertes producidos por
dispositivos eléctricos.
•En regiones con frecuentes tormentas eléctricas, se recomienda
conectar su sistema a un eliminador de sobrevoltage y
desconectar el módem de las líneas de telecomunicación durante
las tormentas.
•Previsto de una toma de tierra correctamente instalada.
No intente modificar ni usar el cable de alimentación de corriente
alterna, si no se corresponde exactamente con el tipo requerido.
Asegúrese de que cada vez que se quite la cubierta del chasis, el
sistema haya sido desconectado de la red de alimentación y de todos
lo enlaces de telecomunicaciones, de red y de líneas de módem. No
ponga en funcionamiento el sistema mientras la cubierta esté quitada

A P P E N D I X D HP e-Commerce Server Accelerator SA7100/SA7120 User Guide
152
Wichtige Sicherheitshinweise
1. Bitte lesen Sie sich diese Hinweise sorgfältig durch.
2. Heben Sie diese Anleitung für den spätern Gebrauch auf.
3. Vor jedem Reinigen ist das Gerät vom Stromnetz zu trennen.
Vervenden Sie keine Flüssig- oder Aerosolreiniger. Am besten
dient ein angefeuchtetes Tuch zur Reinigung.
4. Um eine Beschädigung des Gerätes zu vermeiden sollten Sie nur
Zubehörteile verwenden, die vom Hersteller zugelassen sind.
5. Das Gerät is vor Feuchtigkeit zu schützen.
6. Bei der Aufstellung des Gerätes ist auf sichern Stand zu achten.
Ein Kippen oder Fallen könnte Verletzungen hervorrufen.
Verwenden Sie nur sichere Standorte und beachten Sie die
Aufstellhinweise des Herstellers.
7. Die Belüftungsöffnungen dienen zur Luftzirkulation die das
Gerät vor Überhitzung schützt. Sorgen Sie dafür, daß diese
Öffnungen nicht abgedeckt werden.
8. Beachten Sie beim Anschluß an das Stromnetz die
Anschlußwerte.
9. Die Netzanschlußsteckdose muß aus Gründen der elektrischen
Sicherheit einen Schutzleiterkontakt haben.
10.Verlegen Sie die Netzanschlußleitung so, daß niemand darüber
fallen kann. Es sollete auch nichts auf der Leitung abgestellt
werden.
11.Alle Hinweise und Warnungen die sich am Geräten befinden sind
zu beachten.
12.Wird das Gerät über einen längeren Zeitraum nicht benutzt,
sollten Sie es vom Stromnetz trennen. Somit wird im Falle einer
Überspannung eine Beschädigung vermieden.
13.Durch die Lüftungsöffnungen dürfen niemals Gegenstände oder
Flüssigkeiten in das Gerät gelangen. Dies könnte einen Brand
bzw. Elektrischen Schlag auslösen.
14.Öffnen Sie niemals das Gerät. Das Gerät darf aus Gründen der
elektrischen Sicherheit nur von authorisiertem Servicepersonal
geöffnet werden.

A P P E N D I X D Wichtige Sicherheitshinweise
153
15.Wenn folgende Situationen auftreten ist das Gerät vom
Stromnetz zu trennen und von einerqualifizierten Servicestelle zu
überprüfen:
a. Netzkabel oder Netzstecker sint beschädigt.
b. Flüssigkeit ist in das Gerät eingedrungen.
c. Das Gerät war Feuchtigkeit ausgesetzt.
d. Wenn das Gerät nicht der Bedienungsanleitung ensprechend
funktioniert oder Sie mit Hilfe dieser Anleitung keine
Verbesserung erzielen.
e. Das Gerät ist gefallen und/oder das Gehäuse ist beschädigt.
f. Wenn das Gerät deutliche Anzeichen eines Defektes aufweist.
16.Bei Reparaturen dürfen nur Orginalersatzteile bzw. den
Orginalteilen entsprechende Teile verwendet werden. Der
Einsatz von ungeeigneten Ersatzteilen kann eine weitere
Beschädigung hervorrufen.
17.Wenden Sie sich mit allen Fragen die Service und Repartur
betreffen an Ihren Servicepartner. Somit stellen Sie die
Betriebssicherheit des Gerätes sicher.
18.Zum Netzanscluß dieses Gerätes ist eine geprüfte Leitung zu
verwenden, Für einen Nennstrom bis 6A und einem
Gerätegewicht größer 3kg ist eine Leitung nicht leichter als
H05VV-F, 3G, 0.75mm2 einzusetzen.

A P P E N D I X D HP e-Commerce Server Accelerator SA7100/SA7120 User Guide
154
Notes

Software License
Agreement
ATTENTION: USE OF THE SOFTWARE IS SUBJECT TO THE
HP SOFTWARE LICENSE TERMS SET FORTH BELOW. USING
THE SOFTWARE INDICATES YOUR ACCEPTANCE OF
THESE LICENSE TERMS. IF YOU DO NOT ACCEPT THESE
LICENSE TERMS, YOU MAY RETURN THE SOFTWARE FOR
A FULL REFUND. IF THE SOFTWARE IS BUNDLED WITH
ANOTHER PRODUCT, YOU MAY RETURN THE ENTIRE
UNUSED PRODUCT FOR A FULL REFUND.
HP SOFTWARE LICENSE TERMS
License Grant. HP grants you a license to Use one copy of the
Software. "Use" means storing, loading, installing, executing or
displaying the Software. You may not modify the Software or disable
any licensing or control features of the Software. If the Software is
licensed for "concurrent use", you may not allow more than the
maximum number of authorized users to Use the Software
concurrently.

A P P E N D I X E HP e-Commerce Server Accelerator SA7100/SA7120 User Guide
156
Ownership. The Software is owned and copyrighted by HP or its
third party suppliers. Your license confers no title or ownership and
is not a sale of any rights in the Software, its documentation or the
media on which they are recorded or printed. Third party suppliers
may protect their rights in the Software in the event of any
infringement.
Copies and Adaptations. You may only make copies or adaptations
of the Software for archival purposes or when copying or adaptation
is an essential step in the authorized Use of the Software on a backup
product, provided that copies and adaptations are used in no other
manner and provided further that Use on the backup product is
discontinued when the original or replacement product becomes
operable. You must reproduce all copyright notices in the original
Software on all copies or adaptations. You may not copy the
Software onto any public or distributed network.
No Disassembly or Decryption. You may not disassemble or
decompile the Software without HP’s prior written consent. Where
you have other rights under statute, you will provide HP with
reasonably detailed information regarding any intended disassembly
or decompilation. You may not decrypt the Software unless
necessary for the legitimate use of the Software.
Transfer. Your license will automatically terminate upon any
transfer of the Software. Upon transfer, you must deliver the
Software, including any copies and related documentation, to the
transferee. The transferee must accept these License Terms as a
condition to the transfer.
Termination. HP may terminate your license upon notice for failure
to comply with any of these License Terms. Upon termination, you
must immediately destroy the Software, together with all copies,
adaptations and merged portions in any form.
Export Requirements. You may not export or re-export the
Software or any copy or adaptation in violation of any applicable
laws or regulations.

A P P E N D I X E
157
U.S. Government Restricted Rights. The Software and any
accompanying documentation have been developed entirely at
private expense. They are delivered and licensed as "commercial
computer software" as defined in DFARS 252.227-7013 (Oct 1988),
DFARS 252.211-7015 (May 1991) or DFARS 252.227-7014 (Jun
1995), as a "commercial item" as defined in FAR 2.101(a), or as
"Restricted computer software" as defined in FAR 52.227-19 (Jun
1987)(or any equivalent agency regulation or contract clause),
whichever is applicable. You have only those rights provided for
such Software and any accompanying documentation by the
applicable FAR or DFARS clause or the HP standard software
agreement for the product involved.

A P P E N D I X E HP e-Commerce Server Accelerator SA7100/SA7120 User Guide
158
Mozilla* and expat* License Information
1. expat (http://www.jclark.com/xml/expat.html) is code used in the
SA7100/SA7120. The license governing the expat code is either
the Mozilla Public License (MPL) Version 1.1 or the GNU
General Public License.
2. The open source code has neither been modified by Hewlett-
Packard nor have files been added to or deleted from the source
code by Hewlett-Packard. Hewlett-Packard’s code is simply
linked to the expat code through its API function call.
3. Requirements for distribution of expat: Executable distributions
must include: (i) a notice stating that the Source Code is
available under the terms of the MPL. (ii) Any related manuals/
documentation accompanying the product must include a copy of
the MPL, as shown below:
MOZILLA
PUBLIC
LICENSE,
Version 1.1
1. Definitions
1.0.1. “Commercial Use” means distribution or otherwise
making the Covered Code available to a third party.
1.1. “Contributor” means each entity that creates or contributes
to the creation of Modifications.
1.2. ''Contributor Version'' means the combination of the
Original Code, prior Modifications used by a Contributor, and
the Modifications made by that particular Contributor.
1.3. ''Covered Code'' means the Original Code or Modifications
or the combination of the Original Code and Modifications, in
each case including portions thereof.
1.4. ''Electronic Distribution Mechanism'' means a mechanism
generally accepted in the software development community for
the electronic transfer of data.
1.5. ''Executable'' means Covered Code in any form other than
Source Code.
1.6. ''Initial Developer'' means the individual or entity identified
as the Initial Developer in the Source Code notice required by
Exhibit A.

A P P E N D I X E Mozilla* and expat* License Information
159
1.7. ’’Larger Work’’ means a work which combines Covered
Code or portions thereof with code not governed by the terms of
this License.
1.8. ’’License’’ means this document.
1.8.1. "Licensable" means having the right to grant, to the
maximum extent possible, whether at the time of the initial grant
or subsequently acquired, any and all of the rights conveyed
herein.
1.9. ’’Modifications’’ means any addition to or deletion from the
substance or structure of either the Original Code or any previous
Modifications. When Covered Code is released as a series of
files, a Modification is:
(a) Any addition to or deletion from the contents of a file
containing Original Code or previous Modifications.
(b) Any new file that contains any part of the Original Code
or previous Modifications.
1.10. ’’Original Code’’ means Source Code of computer software
code which is described in the Source Code notice required by
Exhibit A as Original Code, and which, at the time of its release
under this License is not already Covered Code governed by this
License.
1.10.1. "Patent Claims" means any patent claim(s), now owned
or hereafter acquired, including without limitation, method,
process, and apparatus claims, in any patent Licensable by
grantor.
1.11. ’’Source Code’’ means the preferred form of the Covered
Code for making modifications to it, including all modules it
contains, plus any associated interface definition files, scripts
used to control compilation and installation of an Executable, or
source code differential comparisons against either the Original
Code or another well known, available Covered Code of the
Contributor’s choice. The Source Code can be in a compressed or
archival form, provided the appropriate decompression or de-
archiving software is widely available for no charge.
1.12. "You’’ (or "Your") means an individual or a legal entity
exercising rights under, and complying with all of the terms of,
this License or a future version of this License issued under
Section 6.1. For legal entities, "You’’ includes any entity which
controls, is controlled by, or is under common control with You.

A P P E N D I X E HP e-Commerce Server Accelerator SA7100/SA7120 User Guide
160
For purposes of this definition, "control’’ means (a) the power,
direct or indirect, to cause the direction or management of such
entity, whether by contract or otherwise, or (b) ownership of
more than fifty percent (50%) of the outstanding shares or
beneficial ownership of such entity.
2. Source Code License.
2.1. The Initial Developer Grant.
The Initial Developer hereby grants You a world-wide, royalty-
free, non-exclusive license, subject to third party intellectual
property claims:
(a) under intellectual property rights (other than patent or
trademark) Licensable by Initial Developer to use, reproduce,
modify, display, perform, sublicense and distribute the
Original Code (or portions thereof) with or without
Modifications, and/or as part of a Larger Work; and
(b) under Patents Claims infringed by the making, using or
selling of Original Code, to make, have made, use, practice,
sell, and offer for sale, and/or otherwise dispose of the
Original Code (or portions thereof).
(c) the licenses granted in this Section 2.1(a) and (b) are
effective on the date Initial Developer first distributes
Original Code under the terms of this License.
(d) Notwithstanding Section 2.1(b) above, no patent license is
granted: 1) for code that You delete from the Original Code;
2) separate from the Original Code; or 3) for infringements
caused by: i) the modification of the Original Code or ii) the
combination of the Original Code with other software or
devices.
2.2. Contributor Grant.
Subject to third party intellectual property claims, each
Contributor hereby grants You a world-wide, royalty-free, non-
exclusive license
(a) under intellectual property rights (other than patent or
trademark) Licensable by Contributor, to use, reproduce,
modify, display, perform, sublicense and distribute the
Modifications created by such Contributor (or portions
thereof) either on an unmodified basis, with other
Modifications, as Covered Code and/or as part of a Larger
Work; and

A P P E N D I X E Mozilla* and expat* License Information
161
(b)under Patent Claims infringed by the making, using, or
selling of Modifications made by that Contributor either
alone and/or in combination with its Contributor Version (or
portions of such combination), to make, use, sell, offer for
sale, have made, and/or otherwise dispose of:
1) Modifications made by that Contributor (or portions
thereof); and 2) the combination of Modifications made by
that Contributor with its Contributor Version (or portions of
such combination).
(c) the licenses granted in Sections 2.2(a) and 2.2(b) are
effective on the date Contributor first makes Commercial Use
of the Covered Code.
(d) Notwithstanding Section 2.2(b) above, no patent license is
granted: 1) for any code that Contributor has deleted from the
Contributor Version; 2) separate from the Contributor
Version; 3) for infringements caused by: i) third party
modifications of Contributor Version or ii) the combination
of Modifications made by that Contributor with other
software (except as part of the Contributor Version) or other
devices; or 4) under Patent Claims infringed by Covered
Code in the absence of Modifications made by that
Contributor.
3. Distribution Obligations.
3.1. Application of License.
The Modifications which You create or to which You contribute
are governed by the terms of this License, including without
limitation Section 2.2. The Source Code version of Covered
Code may be distributed only under the terms of this License or a
future version of this License released under Section 6.1, and
You must include a copy of this License with every copy of the
Source Code You distribute. You may not offer or impose any
terms on any Source Code version that alters or restricts the
applicable version of this License or the recipients’ rights
hereunder. However, You may include an additional document
offering the additional rights described in Section 3.5.

A P P E N D I X E HP e-Commerce Server Accelerator SA7100/SA7120 User Guide
162
3.2. Availability of Source Code.
Any Modification which You create or to which You contribute
must be made available in Source Code form under the terms of
this License either on the same media as an Executable version or
via an accepted Electronic Distribution Mechanism to anyone to
whom you made an Executable version available; and if made
available via Electronic Distribution Mechanism, must remain
available for at least twelve (12) months after the date it initially
became available, or at least six (6) months after a subsequent
version of that particular Modification has been made available
to such recipients. You are responsible for ensuring that the
Source Code version remains available even if the Electronic
Distribution Mechanism is maintained by a third party.
3.3. Description of Modifications.
You must cause all Covered Code to which You contribute to
contain a file documenting the changes You made to create that
Covered Code and the date of any change. You must include a
prominent statement that the Modification is derived, directly or
indirectly, from Original Code provided by the Initial Developer
and including the name of the Initial Developer in (a) the Source
Code, and (b) in any notice in an Executable version or related
documentation in which You describe the origin or ownership of
the Covered Code.
3.4. Intellectual Property Matters
(a) Third Party Claims. If Contributor has knowledge that a
license under a third party’s intellectual property rights is
required to exercise the rights granted by such Contributor
under Sections 2.1 or 2.2, Contributor must include a text file
with the Source Code distribution titled "LEGAL’’ which
describes the claim and the party making the claim in
sufficient detail that a recipient will know whom to contact. If
Contributor obtains such knowledge after the Modification is
made available as described in Section 3.2, Contributor shall
promptly modify the LEGAL file in all copies Contributor
makes available thereafter and shall take other steps (such as
notifying appropriate mailing lists or news groups)
reasonably calculated to inform those who received the
Covered Code that new knowledge has been obtained.
(b) Contributor APIs. If Contributor’s Modifications include
an application programming interface and Contributor has
knowledge of patent licenses which are reasonably necessary

A P P E N D I X E Mozilla* and expat* License Information
163
to implement that API, Contributor must also include this
information in the LEGAL file.
(c) Representations. Contributor represents that, except as
disclosed pursuant to Section 3.4(a) above, Contributor
believes that Contributor’s Modifications are Contributor’s
original creation(s) and/or Contributor has sufficient rights to
grant the rights conveyed by this License.
3.5. Required Notices.
You must duplicate the notice in Exhibit A in each file of the
Source Code. If it is not possible to put such notice in a
particular Source Code file due to its structure, then You must
include such notice in a location (such as a relevant directory)
where a user would be likely to look for such a notice. If You
created one or more Modification(s) You may add your name as a
Contributor to the notice described in Exhibit A. You must also
duplicate this License in any documentation for the Source Code
where You describe recipients’ rights or ownership rights relating
to Covered Code. You may choose to offer, and to charge a fee
for, warranty, support, indemnity or liability obligations to one or
more recipients of Covered Code. However, You may do so only
on Your own behalf, and not on behalf of the Initial Developer or
any Contributor. You must make it absolutely clear than any such
warranty, support, indemnity or liability obligation is offered by
You alone, and You hereby agree to indemnify the Initial
Developer and every Contributor for any liability incurred by the
Initial Developer or such Contributor as a result of warranty,
support, indemnity or liability terms You offer.

A P P E N D I X E HP e-Commerce Server Accelerator SA7100/SA7120 User Guide
164
3.6. Distribution of Executable Versions.
You may distribute Covered Code in Executable form only if the
requirements of Section 3.1-3.5 have been met for that Covered
Code, and if You include a notice stating that the Source Code
version of the Covered Code is available under the terms of this
License, including a description of how and where You have
fulfilled the obligations of Section 3.2. The notice must be
conspicuously included in any notice in an Executable version,
related documentation or collateral in which You describe
recipients’ rights relating to the Covered Code. You may
distribute the Executable version of Covered Code or ownership
rights under a license of Your choice, which may contain terms
different from this License, provided that You are in compliance
with the terms of this License and that the license for the
Executable version does not attempt to limit or alter the
recipient’s rights in the Source Code version from the rights set
forth in this License. If You distribute the Executable version
under a different license You must make it absolutely clear that
any terms which differ from this License are offered by You
alone, not by the Initial Developer or any Contributor. You
hereby agree to indemnify the Initial Developer and every
Contributor for any liability incurred by the Initial Developer or
such Contributor as a result of any such terms You offer.
3.7. Larger Works.
You may create a Larger Work by combining Covered Code with
other code not governed by the terms of this License and
distribute the Larger Work as a single product. In such a case,
You must make sure the requirements of this License are fulfilled
for the Covered Code.
4. Inability to Comply Due to Statute or Regulation
If it is impossible for You to comply with any of the terms of this
License with respect to some or all of the Covered Code due to
statute, judicial order, or regulation then You must: (a) comply
with the terms of this License to the maximum extent possible;
and (b) describe the limitations and the code they affect. Such
description must be included in the LEGAL file described in
Section 3.4 and must be included with all distributions of the
Source Code. Except to the extent prohibited by statute or
regulation, such description must be sufficiently detailed for a
recipient of ordinary skill to be able to understand it.

A P P E N D I X E Mozilla* and expat* License Information
165
5. Application of this License
This License applies to code to which the Initial Developer has
attached the notice in Exhibit A and to related Covered Code.
6. Versions of the License.
6.1. New Versions.
Netscape Communications Corporation (’’Netscape’’) may
publish revised and/or new versions of the License from time to
time. Each version will be given a distinguishing version
number.
6.2. Effect of New Versions.
Once Covered Code has been published under a particular
version of the License, You may always continue to use it under
the terms of that version. You may also choose to use such
Covered Code under the terms of any subsequent version of the
License published by Netscape. No one other than Netscape has
the right to modify the terms applicable to Covered Code created
under this License.
6.3. Derivative Works.
If You create or use a modified version of this License (which
you may only do in order to apply it to code which is not already
Covered Code governed by this License), You must (a) rename
Your license so that the phrases ’’Mozilla’’, ’’MOZILLAPL’’,
’’MOZPL’’, ’’Netscape’’, "MPL", ’’NPL’’ or any confusingly
similar phrase do not appear in your license (except to note that
your license differs from this License) and (b) otherwise make it
clear that Your version of the license contains terms which differ
from the Mozilla Public License and Netscape Public License.
(Filling in the name of the Initial Developer, Original Code or
Contributor in the notice described in Exhibit A shall not of
themselves be deemed to be modifications of this License.)

A P P E N D I X E HP e-Commerce Server Accelerator SA7100/SA7120 User Guide
166
7. DISCLAIMER OF WARRANTY.
COVERED CODE IS PROVIDED UNDER THIS LICENSE
ON AN "AS IS’’ BASIS, WITHOUT WARRANTY OF ANY
KIND, EITHER EXPRESSED OR IMPLIED, INCLUDING,
WITHOUT LIMITATION, WARRANTIES THAT THE
COVERED CODE IS FREE OF DEFECTS,
MERCHANTABLE, FIT FOR A PARTICULAR PURPOSE OR
NON-INFRINGING. THE ENTIRE RISK AS TO THE
QUALITY AND PERFORMANCE OF THE COVERED CODE
IS WITH YOU. SHOULD ANY COVERED CODE PROVE
DEFECTIVE IN ANY RESPECT, YOU (NOT THE INITIAL
DEVELOPER OR ANY OTHER CONTRIBUTOR) ASSUME
THE COST OF ANY NECESSARY SERVICING, REPAIR
OR CORRECTION. THIS DISCLAIMER OF WARRANTY
CONSTITUTES AN ESSENTIAL PART OF THIS LICENSE.
NO USE OF ANY COVERED CODE IS AUTHORIZED
HEREUNDER EXCEPT UNDER THIS DISCLAIMER.
8. TERMINATION.
8.1. This License and the rights granted hereunder will terminate
automatically if You fail to comply with terms herein and fail to
cure such breach within 30 days of becoming aware of the
breach. All sublicenses to the Covered Code which are properly
granted shall survive any termination of this License. Provisions
which, by their nature, must remain in effect beyond the
termination of this License shall survive.
8.2. If You initiate litigation by asserting a patent infringement
claim (excluding declaratory judgment actions) against Initial
Developer or a Contributor (the Initial Developer or Contributor
against whom You file such action is referred to as "Participant")
alleging that:
(a) such Participant’s Contributor Version directly or
indirectly infringes any patent, then any and all rights granted
by such Participant to You under Sections 2.1 and/or 2.2 of
this License shall, upon 60 days notice from Participant
terminate prospectively, unless if within 60 days after
receipt of notice You either: (i) agree in writing to pay
Participant a mutually agreeable reasonable royalty for Your
past and future use of Modifications made by such
Participant, or (ii) withdraw Your litigation claim with respect
to the Contributor Version against such Participant. If within
60 days of notice, a reasonable royalty and payment

A P P E N D I X E Mozilla* and expat* License Information
167
arrangement are not mutually agreed upon in writing by the
parties or the litigation claim is not withdrawn, the rights
granted by Participant to You under Sections 2.1 and/or 2.2
automatically terminate at the expiration of the 60 day notice
period specified above.
(b) any software, hardware, or device, other than such
Participant’s Contributor Version, directly or indirectly
infringes any patent, then any rights granted to You by such
Participant under Sections 2.1(b) and 2.2(b) are revoked
effective as of the date You first made, used, sold, distributed,
or had made, Modifications made by that Participant.
8.3. If You assert a patent infringement claim against Participant
alleging that such Participant’s Contributor Version directly or
indirectly infringes any patent where such claim is resolved (such
as by license or settlement) prior to the initiation of patent
infringement litigation, then the reasonable value of the licenses
granted by such Participant under Sections 2.1 or 2.2 shall be
taken into account in determining the amount or value of any
payment or license.
8.4. In the event of termination under Sections 8.1 or 8.2 above,
all end user license agreements (excluding distributors and
resellers) which have been validly granted by You or any
distributor hereunder prior to termination shall survive
termination.

A P P E N D I X E HP e-Commerce Server Accelerator SA7100/SA7120 User Guide
168
9. LIMITATION OF LIABILITY.
UNDER NO CIRCUMSTANCES AND UNDER NO LEGAL
THEORY, WHETHER TORT (INCLUDING NEGLIGENCE),
CONTRACT, OR OTHERWISE, SHALL YOU, THE INITIAL
DEVELOPER, ANY OTHER CONTRIBUTOR, OR ANY
DISTRIBUTOR OF COVERED CODE, OR ANY SUPPLIER
OF ANY OF SUCH PARTIES, BE LIABLE TO ANY PERSON
FOR ANY INDIRECT, SPECIAL, INCIDENTAL, OR
CONSEQUENTIAL DAMAGES OF ANY CHARACTER
INCLUDING, WITHOUT LIMITATION, DAMAGES FOR
LOSS OF GOODWILL, WORK STOPPAGE, COMPUTER
FAILURE OR MALFUNCTION, OR ANY AND ALL OTHER
COMMERCIAL DAMAGES OR LOSSES, EVEN IF SUCH
PARTY SHALL HAVE BEEN INFORMED OF THE
POSSIBILITY OF SUCH DAMAGES. THIS LIMITATION OF
LIABILITY SHALL NOT APPLY TO LIABILITY FOR
DEATH OR PERSONAL INJURY RESULTING FROM SUCH
PARTY’S NEGLIGENCE TO THE EXTENT APPLICABLE
LAW PROHIBITS SUCH LIMITATION. SOME
JURISDICTIONS DO NOT ALLOW THE EXCLUSION OR
LIMITATION OF INCIDENTAL OR CONSEQUENTIAL
DAMAGES, SO THIS EXCLUSION AND LIMITATION MAY
NOT APPLY TO YOU.
10.U.S. GOVERNMENT END USERS.
The Covered Code is a ’’commercial item,’’ as that term is defined
in 48 C.F.R. 2.101 (Oct. 1995), consisting of ’’commercial
computer software’’ and ’’commercial computer software
documentation,’’ as such terms are used in 48 C.F.R. 12.212
(Sept. 1995). Consistent with 48 C.F.R. 12.212 and 48 C.F.R.
227.7202-1 through 227.7202-4 (June 1995), all U.S.
Government End Users acquire Covered Code with only those
rights set forth herein.

A P P E N D I X E Mozilla* and expat* License Information
169
11. MISCELLANEOUS.
This License represents the complete agreement concerning
subject matter hereof. If any provision of this License is held to
be unenforceable, such provision shall be reformed only to the
extent necessary to make it enforceable. This License shall be
governed by California law provisions (except to the extent
applicable law, if any, provides otherwise), excluding its conflict-
of-law provisions. With respect to disputes in which at least one
party is a citizen of, or an entity chartered or registered to do
business in the United States of America, any litigation relating
to this License shall be subject to the jurisdiction of the Federal
Courts of the Northern District of California, with venue lying in
Santa Clara County, California, with the losing party responsible
for costs, including without limitation, court costs and reasonable
attorneys’ fees and expenses. The application of the United
Nations Convention on Contracts for the International Sale of
Goods is expressly excluded. Any law or regulation which
provides that the language of a contract shall be construed
against the drafter shall not apply to this License.
12.RESPONSIBILITY FOR CLAIMS.
As between Initial Developer and the Contributors, each party is
responsible for claims and damages arising, directly or indirectly,
out of its utilization of rights under this License and You agree to
work with Initial Developer and Contributors to distribute such
responsibility on an equitable basis. Nothing herein is intended or
shall be deemed to constitute any admission of liability.
13.MULTIPLE-LICENSED CODE.
Initial Developer may designate portions of the Covered Code as
“Multiple-Licensed.” “Multiple-Licensed” means that the Initial
Developer permits you to utilize portions of the Covered Code
under Your choice of the NPL or the alternative licenses, if any,
specified by the Initial Developer in the file described in Exhibit
A.
14.EXHIBIT A -Mozilla Public License.
“The contents of this file are subject to the Mozilla Public
License Version 1.1 (the "License"); you may not use this file
except in compliance with the License. You may obtain a copy of
the License at http://www.mozilla.org/MPL/.

A P P E N D I X E HP e-Commerce Server Accelerator SA7100/SA7120 User Guide
170
Software distributed under the License is distributed on an "AS
IS" basis, WITHOUT WARRANTY OF ANY KIND, either
express or implied. See the License for the specific language
governing rights and limitations under the License.
The Original Code is _________________________________.
The Initial Developer of the Original Code is _______________.
Portions created by _____________________ are Copyright ©
______ _______________________. All Rights Reserved.
Contributor(s): ______________________________________.
Alternatively, the contents of this file may be used under the
terms of the _____ license (the “[___] License”), in which case
the provisions of [______] License are applicable instead of
those above. If you wish to allow use of your version of this file
only under the terms of the [____] License and not to allow
others to use your version of this file under the MPL, indicate
your decision by deleting the provisions above and replace them
with the notice and other provisions required by the [___]
License. If you do not delete the provisions above, a recipient
may use your version of this file under either the MPL or the
[___] License."
[NOTE: The text of this Exhibit A may differ slightly from the
text of the notices in the Source Code files of the Original Code.
You should use the text of this Exhibit A rather than the text
found in the Original Code Source Code for Your Modifications.]

Support Services
Support for your SA7100/SA7120
U.S. and
Canada
For hardware service and telephone support, contact:
•An HP-authorized reseller
or
•HP Customer Support Center at 1-800-633-3600

A P P E N D I X F HP e-Commerce Server Accelerator SA7100/SA7120 User Guide
134
Europe For hardware service and telephone support, contact:
•An HP-authorized reseller
or
•One of the following HP Customer Support Centers:
Country and Number
Austria – 0660 6386
Belgium (Dutch) – 02 626 8806
Belgium (French) – 02 626 8807
Czech Republic – 420 2 613 07 310
Denmark – 3929 4099
English (non-UK) – +44 0870 842 2339
Finland – 02 03 47 288
France – 01 43 62 3434
Germany – 0180 525 8143
Greece – +30 (0) 16196411
Hungary – 36 1 382 1111
Ireland – 01 662 5525
Israel – 972 9 952 4848
Italy – 02 2 641 0350
Netherlands – 020 6068751
Norway – 22 11 6299
Poland – +48 22 8659800
Portugal – 21 317 6333
Russia – 7095 797 3520
South Africa RSA – 086 000 1030
Outside RSA – +27 11 258 9301
Spain – 902 321 123
Sweden – 08 619 2170
Switzerland – 084 880 1111
Turkey – 90 212 221 6969
United Kingdom – 0870 842 2339

A P P E N D I X F Support for your SA7100/SA7120
135
Asia For hardware service and telephone support, contact an HP-
authorized reseller or one of these support centers:
Country and Number
Australia – 03-8877-8000
Hong Kong – 800-96-2598
India – 91-11-6826035
Indonesia – 0800-21511
Japan – 0120-220-119
Korea – +82-2-32700911
Malaysia – 60 3 2931811 or 1-800-881811
New Zealand –
Upper North Island – 09-356-6640
Lower North Island – 04-499-2026
South Island – 03-365-9805
People’s Republic of China – 86-8008105959
Philippines – 63 2 811-0643
Singapore – +65-2725300
Taiwan – +866-080-010055 / 886-2-7170055
Thailand – 66 2 6613891
Vietnam –
Hanoi – 84 4 9430101
Ho Chi Minh City – 84 8 8324155
Latin America For hardware service and telephone support, contact an HP-
authorized reseller or one of these support centers:
Country and Number
Argentina – (541) 4778-8380
Brazil –
Sao Paulo – (11) 3747-7799
All Others – 0800-15-77-51
Chile – 800-360-9999
Columbia – 9-800-91-9477
Guatemala – 1-800-999-5305
Mexico –
Ciudad de Mexico – 5258-9922
All Others – 800-472-6684
Peru – 0-800-10111
Puerto Rico – 1-877-232-0589
Venezuela –
Caracas – 207-8488
All Others – 800-47-777

A P P E N D I X F HP e-Commerce Server Accelerator SA7100/SA7120 User Guide
136
Other
Countries
For hardware service, contact your local authorized reseller or HP
sales office. For telephone support, contact your authorized reseller.

Glossary
This section defines terms and acronyms used throughout the HP e-
Commerce Server Accelerator SA7100/SA7120 User Guide.
Bypass User action causing traffic to bypass SA7100/SA7120 processing,
done either through the CLI bypass command or Bypass button on
the front panel of the SA7100/SA7120.
Cascading A configuration of two or more SA7100/SA7120s serially connected
together to accommodate larger e-Commerce traffic processing
(CPS) loads.
Certificate A digitally-signed token in an SSL-encrypted transaction containing
information including the issuer (Certificate Authority that issued the
certificate), the organization that owns the certificate, public key, the
validity period for the certificate, and the hostname.
Cipher Any encryption algorithm, either symmetric or public key, operating
either as a data stream or divided into blocks.
DNS Domain Name Server. A mechanism used in the Internet for
translating the names of host computers into addresses.
Flash Permanent (non-volatile) storage for configuration changes.

G L O S S A R Y HP e-Commerce Server Accelerator SA7100/SA7120 User Guide
176
Fulfillment Server A server that stores content used to satisfy user requests.
HTTP Hypertext Transfer Protocol: the protocol used between a Web
browser and a server to request a document and transfer its contents.
HTTPS HTTP exchanged over an SSL-encrypted session.
Inline When the SA7100/SA7120 is able to process SSL traffic, the Inline
LED on the front panel is lit (blinking or steadily illuminated).
IP Internet Protocol
IP Address A unique identifier for a node on an IP network. Expressed in “dotted
decimal” notation. For example: 10.0.0.1.
IP Service A network-accessible, IP-accessible Application Protocol. For
example: HTTP, FTP, and the like.
Key A public key and private key pair used to encrypt/decrypt messages.
Key Strength Length, in bits, of keys used in data encryption or authentication. For
example: 56, 128, 512.
Keypair Matching public and private keys.
Load Balancing The distribution of processing and communications activity across a
computer network so that no single device is overwhelmed. Load
balancing is particularly important for networks on which it is
difficult to predict the volume of requests likely to be issued to a
server. Busy Web sites typically employ two or more Web servers in
load balancing roles.
Port In the context of TCP/IP sessions, a unique protocol-specific handle.
Private Key The part of a key in a public key system that is kept secret and used
only by its owner. It is used for decrypting messages and for making
digital signatures.
Public Key The part of a key in a public key system that is distributed widely, and
is not kept secure. Used for encryption or for verifying signatures.
Service A service is an IP application paired with a port number. For
example: “HTTP:80.” This describes a service consisting of a
server's HTTP application listening on port 80. Another example of a
service: “FTP:21.”

G L O S S A R Y HP e-Commerce Server Accelerator SA7100/SA7120 User Guide
177
Signing Request Required for a request for certificate authentication by a Certificate
Authority.
SNMP Simple Network Management Protocol. An application-layer Intenet
protocol by which multiple devices in a network can be monitored
and to some extent configured.
SSL (Secure Socket
Layer) Protocol developed by Netscape for encrypted transmission over
TCP/IP networks, setting up a secure end-to-end link.
VeriSign*A well-known certificate authority.

G L O S S A R Y HP e-Commerce Server Accelerator SA7100/SA7120 User Guide
178
Notes

Index
A
Administration Commands 87
Alarms
Encryption status change 113
Logging 118
Network link status 117
Overload 116
Refused SSL connections 113
Utilization threshold 115
Automapping 30
Automapping with multiple port combi-
nations 30
Automapping with user-specified key
and certificate 30
B
Blocking 31
All IPs, specific port 32
Delete block 33
Specific IP, specific port 31
Subnet IP, subnet mask, specific port
32
Bypass mode 137
C
Cascading 14, 40
Certificate Authority 17
Certificates 16
Ciphers 142
Combining automapping and manual
mapping 31
Commands for manipulating the history
50
config save 37, 39
Configuration Commands 70
Connectors 136
Cut and Paste 51
D
delete map 37, 39
Deleting a block 33

I N D E X HP e-Commerce Server Accelerator SA7100/SA7120 User Guide
180
E
Egress routers 43
Encryption status change alarm 113
F
Failure/Bypass modes 137
Front panel LEDs 134
G
Getting Help 47
Global site certificates 23
H
Help 47
I
Import
certificate 19, 21
import
key 38
Ingress routers 43
Input Editing Commands 50
Installation
Rack mounting 6
Values to know before you begin 5
Wiring connections 7
K
Keys 16
L
Logging alarms 118
Logging Commands 91
M
Manual mapping 30, 31
Mapping 29
Multiple 7100/7120s 40
Multiple servers 38
N
Network connections 7
Network link status alarm 117
O
Operational Commands 70
Overload alarm 116
P
PassThrough switch 137
Port Mapping Commands 67
R
Rack installation 6
Redirection for unsupported ciphers 26
Refused SSL connections alarm 113
Remote Management 93
CLI commands 94
Limitations 94
Telnet 96
Telnet, changing port 97
Telnet, enabling/disabling 98
Telnet, local console 96
Telnet, remote console 97
Remote SSH sessions 98

I N D E X HP e-Commerce Server Accelerator SA7100/SA7120 User Guide
181
S
Scenarios
Cascading Multiple 7100/7120s 40
Using the 7100/7120 43
Using the 7100/7120 with Multiple
Servers 38
Using the 7100/7120 with One Serv-
er 36
SNMP 100
Community string 109
Enabling 107
Private traps 106
Specifying information 108
Standard traps 106
Trap community string 109
Trap summary 106
software
license agreement 155
Spill enable 41
Spilling 15
SSL Commands 58
SSL Processing 29
Status Commands 57
Support 171
Asia 173
Europe 172
Latin America 174
Other Countries 174
US and Canada 171
T
Telnet 96
Enabling/disabling 98
Throttling 15
Trap summary 106
U
Utilization threshold alarm 115

I N D E X HP e-Commerce Server Accelerator SA7100/SA7120 User Guide
182
Notes
