Hp Integrity Nonstop Release And Migration Installation Upgrade Guide G06.24 Software
2015-03-28
: Hp Hp-Integrity-Nonstop-Release-And-Migration-Installation-And-Upgrade-Guide-669457 hp-integrity-nonstop-release-and-migration-installation-and-upgrade-guide-669457 hp pdf
Open the PDF directly: View PDF ![]() .
.
Page Count: 320 [warning: Documents this large are best viewed by clicking the View PDF Link!]
- G06.24 Software Installation and Upgrade Guide
- What’s New in This Manual
- About This Manual
- 1 Overview of Installing G06.24
- Disk Space Requirements
- System Console Requirements
- HP NonStop Server Software Requirements
- DSM/SCM and the G06.24 RVU
- Managing Microcode and Firmware
- Investigating a New RVU
- Installing a New RVU
- Falling Back to the Previous RVU
- Resecuring and Licensing Requirements
- G06.24 Installation and Fallback Alerts for Products
- 4619 Disk Drives
- 6780 ServerNet Switch (G06.21)
- Backup and Restore 2 (BR2) (G06.24)
- C++ (G06.20)
- DP2 (G06.16, G06.23, G06.24)
- Gigabit Ethernet ServerNet Adapter (G06.16)
- Minimum Memory Requirements (G06.16)
- NonStop Kernel (NSK) Utilities (T9070AAK) (G06.22, 23, 24)
- OSM Configuration and Fallback (G06.08 to G06.24)
- OSS (G06.12 through G06.24)
- NonStop SQL/MP
- NonStop SQL/MX Release 2.0 (G06.23 and G06.24)
- NonStop Processor Multifunction (PMF) CRUs (G06.08 through G06.24)
- Spooler (G06.00 through G06.19)
- SCF Storage Subsystem (Online Disk Remirroring) (G06.21)
- SWID (T9298D40^AAK) (G06.20)
- Tandem Failure Data System (TFDS)
- TNS/R CRE Heap Manager (G06.15)
- TSM Client and Server Software (G06.22, G06.23, G06.24)
- Service Processor (SP) Firmware (G06.08 through G06.24)
- SCF for Data Alignment (G06.17)
- System Configuration Database
- NonStop TCP/IPv6 (G06.20, G06.22, G06.23, G06.24)
- TMF (G06.23 and G06.24)
- TNOS Server and TNOS Utility (G06.17 through G06.24)
- Visual Inspect (G06.20)
- WAN Wizard Pro (G06.21, G06.22, G06.23, G06.24)
- X25AM
- 2 G06.24 Upgrade Checklists
- 3 Installing SPRs Before Upgrading to the G06.24 RVU
- 4 Preparing to Upgrade the Server Software
- Save the Current Configuration File (CONFxxyy)
- Upgrade the System Console Software
- Verify System Operations
- Check Processor Status (Using either TSM or OSM)
- Check System Enclosure Components (Using TSM)
- Check Critical System Processes
- Check the Status of the ServerNet Addressable Controllers (SACs)
- Check Disk Subsystem Status
- Check the Swap File Configuration
- Check the Status of the Spooler Collector
- Check the Tape Drive Status
- Record the Current SYSnn
- Back Up Important Files
- 5 Installing the G06.24 RVU
- 6 Replacing the Disk Bootstrap Microcode (Pre-G06.06)
- 7 Updating Service Processor (SP) Firmware
- Alerts
- Before You Begin
- Update SP Firmware Using the TSM Service Application
- Determining If a Problem Has Occurred
- Recovery for Problems Updating SP Firmware (Using TSM)
- Updating SP Firmware Using the OSM Service Connection
- Notes for Using OSM to Update SP Firmware
- Firmware Update for Fabric Side-Y (Using OSM)
- Firmware Update for Fabric Side-X (Using OSM)
- Verifying the SP Firmware Update (Using OSM)
- Correcting a Failed SP Firmware Update (Using the OSM Service Connection)
- Using OSM and Downloading the SP Firmware File to the System Console (Optional)
- Updating Firmware Using the OSM Low-Level Link Application (Optional)
- 8 Updating Processor Boot Code
- 9 Updating SCSI Boot Code (Pre-G06.08 RVU)
- 10 Running ZPHIRNM
- 11 Loading the G06.24 RVU
- 12 Resuming Normal Operations
- 13 Preparing to Fall Back
- 14 Backing Out the DSM/SCM Revision
- 15 Returning Firmware to Previous Versions
- Alerts
- Returning Processor Boot Code to the Previous Version (Using TSM)
- Returning SP Firmware to the Previous Version (Using TSM)
- Returning SCSI Boot Code to the Previous Version (Using TSM)
- Returning SP Firmware to the Previous Version (Using OSM)
- Returning Bootcode Firmware to the Previous Version (Using OSM)
- 16 Running ZPHIRNM to Reactivate the Previous Software Revision
- 17 Loading the Previous RVU and Resuming Normal Operations
- A Using DSM/SCM to Install SPRs
- B Installing the Latest DSM/SCM SPRs and Client Software
- Before You Begin Installing DSM/SCM and Client SPRs
- Before You Begin Installing the Software Identification (SWID) SPR
- Alerts
- Copy (RESTORE) the D46 DSM/SCM Product Version and SWID (Optional) to Disk
- Receive the D46 SPRs for DSM/SCM
- Create a New Software Revision for DSM/SCM D46 SPR and SWID
- Build and Apply the DSM/SCM D46 Software Revision
- Rename the Applied DSM/SCM D46 Files
- If Running INSTALL^TEMPLATES Is Required
- Restart Applications
- Recovery for Problems While Installing the D46 Version of DSM/SCM
- Install the DSM/SCM Client From ZDSMSCM
- C Updating SWAN Concentrator CLIP Firmware
- Using the SWAN Fast Firmware Update Guided Procedure (Recommended if Using TSM)
- Using the TSM Firmware Update Dialog Box to Update SWAN Firmware
- Alert
- Before Updating SWAN CLIP Firmware
- Summary of SWAN Concentrator CLIP Firmware Update Steps (Using TSM)
- Required for Upgrading From T7953AAG and Later Firmware Versions
- Step 1: Stop the SWAN Concentrator and CLIPs
- Step 2: Point SWAN Concentrators to the New Firmware Object Code File
- Step 3: Initiate the Firmware Update Using TSM
- Step 4: Start the SWAN Concentrator and CLIPs
- Step 5: Verify That the SWAN CLIPs Are Running the Latest Firmware
- Step 6: Start Stopped Lines (If Necessary)
- Using the OSM Multi-Resource Actions Dialog Box to Update SWAN and SWAN 2 Firmware
- Summary of Steps for Upgrading From T7953AAG and Later SWAN Firmware Versions (Using OSM)
- Step 1: Stop the SWAN Concentrator and CLIPs
- Step 2: Check the Location and Version of the SWAN Firmware
- Step 3: Initiate the Firmware Update
- Step 4: Start the SWAN Concentrator and CLIPs
- If a CLIP Fails to Update (Using OSM)
- Glossary
- Index
G06.24 Software
Installation and
Upgrade Guide
Abstract
This manual provides detailed procedures for upgrading an HP NonStop™ S-series
server to the G06.24 release version update (RVU) from any G06.06 or later RVU.
Product Version
N.A.
Supported Release Version Updates (RVUs)
This publication supports the G06.24 RVU only.
Part Number Published
528593-005 January 2005
Document History
Part Number Product Version Published
528593-005 NA January 2005
528593-004 NA October 2004
528593-003 NA August 2004
528593-002 NA August 2004

Hewlett-Packard Company—528593-005
i
G06.24 Software Installation and
Upgrade Guide
Glossary Index Tables
What’s New in This Manual xi
Manual Information xi
New and Changed Information xi
About This Manual xiii
Who Should Use This Guide xiii
What This Guide Does Not Cover xiii
How This Guide Relates to Other Manuals xiv
Notation Conventions xv
1. Overview of Installing G06.24
Disk Space Requirements 1-1
System Console Requirements 1-1
TSM Client Applications 1-2
OSM Client-Based Components 1-2
HP NonStop Server Software Requirements 1-3
DSM/SCM and the G06.24 RVU 1-5
Installing Required or Recommended SPRs Before Installing a New RVU 1-5
Installing the G06.24 RVU Using DSM/SCM 1-5
Managing Microcode and Firmware 1-6
Updating Disk and Tape Bootstrap Microcode 1-6
Updating Firmware 1-7
Investigating a New RVU 1-13
Installing a New RVU 1-13
Upgrading NonStop S-Series Servers 1-15
Installing an IOAM Enclosure and Other Components 1-16
Falling Back to the Previous RVU 1-17
Using DSM/SCM FALLBACK and CLEANOSS Macros 1-18
DSM/SCM Client and Server Compatibility 1-19
Using ZPHIRNM 1-19
Resecuring and Licensing Requirements 1-20
NonStop TCP/IP FTP (G06.08) 1-20

Contents
G06.24 Software Installation and Upgrade Guide—528593-005
ii
1. Overview of Installing G06.24 (continued)
1. Overview of Installing G06.24 (continued)
Do Not Move or Relicense Pathway Files 1-20
Secure SCF Product Modules (Gnn.nn) 1-21
Resecure Visual Inspect (Gnn.nn) 1-21
G06.24 Installation and Fallback Alerts for Products 1-21
4619 Disk Drives 1-22
6780 ServerNet Switch (G06.21) 1-22
Backup and Restore 2 (BR2) (G06.24) 1-23
C++ (G06.20) 1-23
DP2 (G06.16, G06.23, G06.24) 1-24
Gigabit Ethernet ServerNet Adapter (G06.16) 1-24
Minimum Memory Requirements (G06.16) 1-24
NonStop Kernel (NSK) Utilities (T9070AAK) (G06.22, 23, 24) 1-24
OSM Configuration and Fallback (G06.08 to G06.24) 1-25
OSS (G06.12 through G06.24) 1-25
NonStop SQL/MP 1-28
NonStop SQL/MX Release 2.0 (G06.23 and G06.24) 1-28
NonStop Processor Multifunction (PMF) CRUs (G06.08 through G06.24) 1-32
Spooler (G06.00 through G06.19) 1-33
SCF Storage Subsystem (Online Disk Remirroring) (G06.21) 1-34
SWID (T9298D40^AAK) (G06.20) 1-35
Tandem Failure Data System (TFDS) 1-35
TNS/R CRE Heap Manager (G06.15) 1-35
TSM Client and Server Software (G06.22, G06.23, G06.24) 1-35
Service Processor (SP) Firmware (G06.08 through G06.24) 1-36
SCF for Data Alignment (G06.17) 1-37
System Configuration Database 1-37
NonStop TCP/IPv6 (G06.20, G06.22, G06.23, G06.24) 1-38
TMF (G06.23 and G06.24) 1-38
TNOS Server and TNOS Utility (G06.17 through G06.24) 1-39
Visual Inspect (G06.20) 1-40
WAN Wizard Pro (G06.21, G06.22, G06.23, G06.24) 1-40
X25AM 1-41

Contents
G06.24 Software Installation and Upgrade Guide—528593-005
iii
2. G06.24 Upgrade Checklists
Part I. Upgrade Tasks
2. G06.24 Upgrade Checklists
G06.24 Upgrade Checklist 2-1
G06.24 Required Information Checklist 2-4
3. Installing SPRs Before Upgrading to the G06.24 RVU
Alerts 3-1
SPRs Required Before Upgrading 3-2
Summary of the SPR Installation Procedure 3-3
D46 SPR of DSM/SCM 3-3
Determining Your Current DSM/SCM Version 3-4
DSM/SCM Client and Server Compatibility 3-5
Fallback SPRs 3-6
NonStop SQL/MP Fallback SPRs 3-6
Interoperability SPRs 3-7
RDF Interoperability SPRs 3-7
NonStop SQL AUDSERV Interoperability SPRs 3-8
OSM Server and Client Compatibility SPRs 3-8
Determining the Current Version of OSM 3-9
TSM Server and Client Compatibility SPRs 3-10
Determining the Current Version of TSM Server Software 3-10
4. Preparing to Upgrade the Server Software
Save the Current Configuration File (CONFxxyy) 4-1
Upgrade the System Console Software 4-2
Verify System Operations 4-3
Check Processor Status (Using either TSM or OSM) 4-4
Check System Enclosure Components (Using TSM) 4-5
Check Critical System Processes 4-9
Check the Status of the ServerNet Addressable Controllers (SACs) 4-10
Check Disk Subsystem Status 4-10
Check the Swap File Configuration 4-11
Check the Status of the Spooler Collector 4-13
Check the Tape Drive Status 4-13
Record the Current SYSnn 4-14
Back Up Important Files 4-14

Contents
G06.24 Software Installation and Upgrade Guide—528593-005
iv
5. Installing the G06.24 RVU
5. Installing the G06.24 RVU
Alerts 5-1
Back Up Important Files 5-2
Receive New Software Into the Archive 5-3
Create a New Software Revision 5-8
Build and Apply the New Software Revision 5-13
Print Operator Instructions From the Target Interface (ZPHITI) 5-19
Recovery for Problems Installing the G06.24 RVU 5-22
Cancel Pending Build/Apply Requests 5-22
6. Replacing the Disk Bootstrap Microcode (Pre-G06.06)
7. Updating Service Processor (SP) Firmware
Alerts 7-2
Before You Begin 7-3
Determine the Current and New Versions of SP Firmware 7-4
Verify That Your Current RVU Is Running the Correct Version of SP Firmware
(Using TSM) 7-5
If Necessary, Reset the SPs Prior to Updating the SP Firmware 7-5
Download the SP Firmware File to the System Console 7-6
Update SP Firmware Using the TSM Service Application 7-8
Determining If a Problem Has Occurred 7-14
Verify the Firmware Updates (Using TSM) 7-14
Problems Updating SP Firmware (Using TSM) 7-14
Other Indications of SP Firmware Update Problems 7-15
Problems Resetting an SP (Using TSM) 7-15
Recovery for Problems Updating SP Firmware (Using TSM) 7-15
If an SP Firmware Update Fails 7-15
Checking the State of the Service Connection 7-16
Correcting a Failed SP Firmware Update (Using TSM) 7-16
Updating Firmware Using the TSM Low-Level Link Application 7-17
Resetting an SP Using the TSM Low-Level Link 7-18
Updating SP Firmware Using the OSM Service Connection 7-20
Notes for Using OSM to Update SP Firmware 7-20
Firmware Update for Fabric Side-Y (Using OSM) 7-20
Firmware Update for Fabric Side-X (Using OSM) 7-24
Verifying the SP Firmware Update (Using OSM) 7-26
Correcting a Failed SP Firmware Update (Using the OSM Service
Connection) 7-28

Contents
G06.24 Software Installation and Upgrade Guide—528593-005
v
7. Updating Service Processor (SP)
Firmware (continued)
7. Updating Service Processor (SP) Firmware (continued)
Using OSM and Downloading the SP Firmware File to the System Console
(Optional) 7-28
Updating Firmware Using the OSM Low-Level Link Application (Optional) 7-30
8. Updating Processor Boot Code
Before You Begin Updating the Boot Millicode 8-3
Check Processor Status 8-3
Verify Your TSM and OSM Versions 8-3
Verify Location and Version of Processor Boot Code 8-3
Method 1: Using G06.24 OSM or TSM SPRs, Update Processor Boot Code Using the
Online Option 8-4
Using TSM, Update Processor Boot Code Using the Online Option and G06.24 or
Later TSM SPRs 8-5
Using OSM, Update Processor Boot Code Using the Online Option and G06.24 or
Later OSM SPRs 8-7
Method 2: Using Your Current Pre-G06.24 OSM or TSM SPRs, Update the Processor
Boot Code and Issue a Hard Reset or Equivalent 8-10
Using TSM, Update the Processor Boot Code and Issue a Hard Reset or
Equivalent 8-10
Using OSM, Update the Processor Boot Code and Issue a Hard Reset or
Equivalent 8-14
Reset the Processors To Complete Updating the Processor Boot Code (Both for
OSM and TSM) 8-16
9. Updating SCSI Boot Code
(Pre-G06.08 RVU)
SCSI Boot Code Product Numbers 9-1
Using TSM to Update SCSI Boot Code (If Necessary) 9-2
Using OSM to Update SCSI Boot Code (If Necessary) 9-4
10. Running ZPHIRNM
Alerts 10-1
Back Up (Copy) Files in the $SYSTEM.ZTCPIP Subvolume 10-2
Stop All Applications 10-3
Drain the Spooler 10-3
Back Up the Spooler Control Files 10-4
ZPHIRNM 10-4
Using ZPHIRNM PREVIEW Mode 10-4
Steps for Running ZPHIRNM 10-5
Verify That ZPHIRNM Ran Successfully 10-8

Contents
G06.24 Software Installation and Upgrade Guide—528593-005
vi
11. Loading the G06.24 RVU
11. Loading the G06.24 RVU
Alerts 11-1
Halt the Processors 11-2
Replace Processor or Other System CRUs 11-3
System Load Using the TSM or OSM
Low-Level Link 11-4
Reload the Remaining Processors (If Necessary) 11-6
Check the Status of the Processors 11-7
Recovery Operations for System Load 11-7
Performing a System Load From the Mirror System Disk 11-7
The Reset Operation 11-8
12. Resuming Normal Operations
Update TCP/IP Configuration Files 12-1
Step 1: Copy the Sample TCP/IP Files into $SYSTEM.ZTCPIP (Optional) 12-1
Step 2: Check the PROTOCOL File 12-2
Step 3: Ensure That PORTCONF and SERVICES Files Are Complete 12-3
Reconfigure System Console Applications 12-4
Using TSM to Reconfigure Primary and Backup Dial-Out Points 12-4
Using TSM to Reconfigure Your Site Contact Information 12-4
Using OSM (If Installed) to Reconfigure Site Contact Information and Backup Dial-
Out Points 12-4
Check Processor Status (Using TSM or OSM) 12-4
Perform Other Firmware Updates 12-5
Update SWAN and SWAN 2 CLIP Firmware 12-5
Update NonStop ServerNet Switch Firmware 12-5
Update ServerNet Adapter Firmware 12-5
Update ServerNet/FX and ServerNet/FX2 Firmware (Overview) 12-6
Configure the Spooler 12-9
Start User and System Applications 12-10
Before Starting DSM/SCM 12-10
Start DSM/SCM 12-11
Reset and Start the Mirror System Disk (If Necessary) 12-11
Configure Specific Products (Post-System Load) 12-12
Configure Expand and New Profiles 12-12
Configure OSS 12-13
Configure SMF (Optional) 12-14
Configure the Remote Duplicate Database Facility (RDF) 12-15
Upgrade the WAN Manager (T8365), (Optional) 12-15

Contents
G06.24 Software Installation and Upgrade Guide—528593-005
vii
12. Resuming Normal Operations (continued)
12. Resuming Normal Operations (continued)
Upgrade the TNOS Server and TNOS Utility (Optional) 12-16
Part II. Fallback Tasks
13. Preparing to Fall Back
Alerts 13-1
Summary of Fallback Tasks 13-2
Fallback Considerations for Specific Products 13-2
DP2 13-3
DLL (Dynamic-Link Libraries) 13-3
DSM/SCM 13-3
Spooler 13-4
Open System Services (OSS) 13-4
OSM and TSM 13-4
SMF 13-4
SQL/MX 2.0 13-5
TMF 13-5
WAN Manager (T8365) 13-5
14. Backing Out the DSM/SCM Revision
Before Backing Out the Revision 14-1
Start the Target Interface (ZPHITI) 14-2
Submit a Backout Request 14-3
Monitor the Backout Process 14-7
15. Returning Firmware to Previous Versions
Alerts 15-1
Returning Processor Boot Code to the Previous Version (Using TSM) 15-1
Determine the Correct Version of the Previous Processor Boot Code 15-1
Return the Processor Boot Code to the Previous Version 15-2
Returning SP Firmware to the Previous Version (Using TSM) 15-2
Determine the Correct Version of the Previous SP Firmware 15-2
Download the Previous SP Firmware File to the System Console 15-3
Return the SP Firmware to the Previous Version 15-3
Returning SCSI Boot Code to the Previous Version (Using TSM) 15-3
Determine the Correct Version of the Previous SCSI Boot Code 15-3
Return the SCSI Boot Code to the Previous Version (Using TSM) 15-4
Returning SP Firmware to the Previous Version (Using OSM) 15-5

Contents
G06.24 Software Installation and Upgrade Guide—528593-005
viii
15. Returning Firmware to Previous
Versions (continued)
15. Returning Firmware to Previous Versions (continued)
Returning Bootcode Firmware to the Previous Version (Using OSM) 15-6
16. Running ZPHIRNM to Reactivate the Previous Software
Revision
Alerts 16-1
Drain the Spooler 16-1
Run ZPHIRNM 16-2
Using PREVIEW Mode 16-2
Run ZPHIRNM 16-2
Verify That ZPHIRNM Ran Successfully 16-3
17. Loading the Previous RVU and Resuming Normal
Operations
Alerts 17-1
Prepare to Stop the System 17-2
Halt the Processors 17-2
Remove Hardware Installed During Migration 17-2
Perform a System Load With the Previous SYSnn and CONFxxyy 17-3
Reload the Remaining Processors 17-3
Resume Normal Operations 17-4
Configure Spooler 17-5
A. Using DSM/SCM to Install SPRs
Tools for Managing SPRs A-1
Scout for NonStop Servers A-1
DSM/SCM A-2
SPRNOTES A-2
Install SPRs With DSM/SCM A-2
Save the Current Configuration A-2
Determine the Current SYSnn A-3
Receive the SPR Into the DSM/SCM Archive A-4
Create a New Software Configuration That Includes the SPR A-5
Build the New Revision A-5
Print Operator Instructions From the Target Interface (ZPHITI) A-6
Run ZPHIRNM A-6
If Running INSTALL^TEMPLATES Is Required A-7
If a System Load Is Required A-9
Halt the Processors A-9

Contents
G06.24 Software Installation and Upgrade Guide—528593-005
ix
A. Using DSM/SCM to Install SPRs (continued)
A. Using DSM/SCM to Install SPRs (continued)
Perform a System Load A-10
Reload the Processors (If Necessary) A-11
Start Your Applications and Processes A-11
B. Installing the Latest DSM/SCM SPRs and Client Software
Before You Begin Installing DSM/SCM and Client SPRs B-1
Before You Begin Installing the Software Identification (SWID) SPR B-3
Alerts B-3
Determine the Product Version of DSM/SCM on the Host System B-4
Determine the Product Version of DSM/SCM on the Client B-4
Copy (RESTORE) the D46 DSM/SCM Product Version and SWID (Optional) to
Disk B-6
Receive the D46 SPRs for DSM/SCM B-6
Create a New Software Revision for DSM/SCM D46 SPR and SWID B-10
Build and Apply the DSM/SCM D46 Software Revision B-11
Rename the Applied DSM/SCM D46 Files B-13
If Running INSTALL^TEMPLATES Is Required B-13
Restart Applications B-15
Before Starting DSM/SCM B-15
Start DSM/SCM B-15
Verify That the D46 Product Version of DSM/SCM Is Installed B-16
Verify That SWID Is Installed B-17
Recovery for Problems While Installing the D46 Version of DSM/SCM B-18
If NonStop Errors Are Displayed B-18
Install the DSM/SCM Client From ZDSMSCM B-18
Alert (DSM/SCM T6031D46^ABJ Client) B-19
Determine Your DSM/SCM Client Software Version B-19
Determine the Current IP Address and Port Number B-19
Copy the ZDSMSCM Client File From the Host B-20
Install the DSM/SCM Client Software B-21
Create an Emergency Repair Disk (ERD) B-25

Contents
G06.24 Software Installation and Upgrade Guide—528593-005
x
C. Updating SWAN Concentrator CLIP Firmware
C. Updating SWAN Concentrator CLIP Firmware
Using the SWAN Fast Firmware Update Guided Procedure (Recommended if Using
TSM) C-2
If the SWAN Fast Firmware Update Fails C-7
Using the TSM Firmware Update Dialog Box to Update SWAN Firmware C-8
Alert C-8
Before Updating SWAN CLIP Firmware C-8
List the Names of the SWAN Concentrators and CLIPs C-9
Check Location and Version of New SWAN CLIP Firmware C-10
Check Firmware Version Currently Running in SWAN CLIPs C-10
Summary of SWAN Concentrator CLIP Firmware Update Steps (Using TSM) C-12
Required for Upgrading From T7953AAG and Later Firmware Versions C-12
Step 1: Stop the SWAN Concentrator and CLIPs C-13
Step 2: Point SWAN Concentrators to the New Firmware Object Code File C-15
Step 3: Initiate the Firmware Update Using TSM C-16
Step 4: Start the SWAN Concentrator and CLIPs C-18
Step 5: Verify That the SWAN CLIPs Are Running the Latest Firmware C-18
Step 6: Start Stopped Lines (If Necessary) C-18
Using the OSM Multi-Resource Actions Dialog Box to Update SWAN and SWAN 2
Firmware C-18
Summary of Steps for Upgrading From T7953AAG and Later SWAN Firmware
Versions (Using OSM) C-18
Step 1: Stop the SWAN Concentrator and CLIPs C-19
Step 2: Check the Location and Version of the SWAN Firmware C-20
Step 3: Initiate the Firmware Update C-20
Step 4: Start the SWAN Concentrator and CLIPs C-22
If a CLIP Fails to Update (Using OSM) C-22
Glossary
Index

Contents
G06.24 Software Installation and Upgrade Guide—528593-005
xi
Tables
Tables
Table 1-1. G06.24 Updateable Firmware for Processors, SPs, and SCSI
SACs 1-9
Table 1-2. G06.24 Updateable Firmware for ServerNet Adapters 1-10
Table 1-3. G06.24 Updateable Firmware for ServerNet WAN (SWAN and SWAN 2)
Concentrators 1-11
Table 1-4. G06.24 Updateable Firmware for the NonStop ServerNet Switch 1-11
Table 1-5. G06.24 IOAM Firmware 1-12
Table 1-6. Tasks and Tools for Installing the G06.24 RVU 1-14
Table 1-7. Tasks and Tools for Falling Back to the Previous RVU 1-20
Table 1-8. Pathway Licensing Errors 1-21
Table 1-9. Upgrading to NonStop S-Series CRUs and Falling Back 1-32
Table 2-1. G06.24 Upgrade Checklist 2-1
Table 2-2. G06.24 Required Information Checklist 2-4
Table 3-1. DSM/SCM Client and Server Compatibility 3-5
Table 3-2. SPRs Required for NonStop SQL/MP Fallback (pre-G06.13) 3-6
Table 3-3. SPRs Required for NonStop SQL/MX Release 2.0 Fallback 3-7
Table 3-4. RDF Interoperability SPRs 3-8
Table 4-1. Verify System Operations 4-3
Table 7-1. Firmware Components and Associated CRUs 7-1
Table 8-1. Processor Boot Code to Be Updated 8-1
Table B-1. G-Series DSM/SCM PVUs and SPRs B-1

G06.24 Software Installation and Upgrade Guide—528593-005
xiii
What’s New in This Manual
Manual Information
G06.24 Software Installation and Upgrade Guide
Abstract
This manual provides detailed procedures for upgrading an HP NonStop™ S-series
server to the G06.24 release version update (RVU) from any G06.06 or later RVU.
Product Version
N.A.
Supported Release Version Updates (RVUs)
This publication supports the G06.24 RVU only.
Document History
New and Changed Information
The following summarizes major changes in this.005 edition:
•With the introduction of the G06.24 RVU and the new boot code firmware
(T7892ABD) needed for the S88000 processor, potential system problems can
result if you upgrade the boot millicode and you not have the G06.24 OSM or TSM
SPRs installed. See Section 8, Updating Processor Boot Code. See also the
G06.24 RVU upgrade checklist in Section 2, G06.24 Upgrade Checklists.
•New information regarding OSS SPRs used to configure OSS as a persistent
process can be found in OSS (G06.12 through G06.24) on page 1-25.
•New instructions are provided for installing EMS templates. See If Running
INSTALL^TEMPLATES Is Required on page A-7 and If Running
INSTALL^TEMPLATES Is Required on page B-13.
•A missing step has been added in Appendix C, Updating SWAN Concentrator
CLIP Firmware, in Using the SWAN Fast Firmware Update Guided Procedure
(Recommended if Using TSM).
Part Number Published
528593-005 January 2005
Part Number Product Version Published
528593-005 NA January 2005
528593-004 NA October 2004
528593-003 NA August 2004
528593-002 NA August 2004

G06.24 Software Installation and Upgrade Guide—528593-005
xv
About This Manual
This guide describes:
•Upgrading a single NonStop S-series server to the G06.24 release version update
(RVU) of the HP NonStop Kernel operating system from any G06.06 or later
G-series RVU, including installing DSM/SCM client software.
•Falling back from the G06.24 RVU to a previous (G06.06 or later) G-series RVU.
If you are migrating from an RVU prior to G06.06, contact your service provider trained
by HP.
Who Should Use This Guide
This guide is written for operations staff and support personnel and requires a working
knowledge of Windows 2000 Professional or Windows XP Professional, TSM or HP
NonStop Open System Management (OSM) client and server components, system
console software, the Distributed Systems Management/Software Configuration
Manager (DSM/SCM) Planner Interface, Target Interface (ZPHITI), and ZPHIRNM
applications.
What This Guide Does Not Cover
•System migration planning. System-wide issues involved in migrating to the latest
G-series RVU are covered in:
°G06.24 Release Version Update Compendium
°Interactive Upgrade Guide
•Installing the G06.24 RVU from a host system to a remote or separate network-
connected target system using an Expand connection or tape. See the DSM/SCM
User’s Guide for information on setting up target systems.
•Stopping and starting the ServerNet wide area network concentrator (SWAN) and
SWAN 2, Expand lines, and other networking products and adapters. (SWAN
firmware updates are covered in Appendix C, Updating SWAN Concentrator CLIP
Firmware.)
•Installing HP NonStop Kernel Open System Services (OSS).
•Upgrading HP NonStop system console workstation applications. To install or
upgrade HP and third-party system console client software, see the NonStop
System Console Installer Guide.
•Installing and configuring the HP NonStop Open System Management (OSM)
client-based and server components. To install and configure the OSM
components, see the OSM Migration Guide.

About This Manual
G06.24 Software Installation and Upgrade Guide—528593-005
xvi
How This Guide Relates to Other Manuals
•Installing, configuring, and migrating to HP NonStop SQL/MX. The SQL/MX
Installation and Management Guide for SQL/MX Release 2.0 describes step-by-
step instructions for installing SQL/MX for Release 2.0, including fallback
procedures.
•Installing and configuring the I/O Adapter module (IOAM) enclosure and its
components. See your HP service provider.
How This Guide Relates to Other Manuals
•The NonStop System Console Installer Guide contains information on installing
TSM client software Version 2003A, OSM client-based components, and other
applications on the system consoles. (See instructions for installing the DSM/SCM
client in Appendix B, Installing the Latest DSM/SCM SPRs and Client Software.)
•The NonStop System Console Guide for Migrating to Microsoft Windows XP
Professional describes how to migrate a system console running the Microsoft
Windows 2000 operating system to the Microsoft Windows XP Professional
operating system.
•The G06.24 Release Version Update Compendium provides summary information
on the new features and migration and fallback issues for the G06.24 RVU.
•The Interactive Upgrade Guide, a Web-based delivery tool, accessed through NTL,
that generates customized migration planning information and lists new features
for D4x and G-series RVUs based on a desired platform.
•The TSM Online User Guide, TSM application online help, and TSM ReadMe
describe how to use TSM 2003A applications to bring up and maintain HP
NonStop S-series servers.
•The OSM Migration Guide describes how to prepare for migration from TSM to the
HP NonStop Open System Management (OSM) Interface. Topics include
comparison of OSM and TSM software, hardware products for which OSM is
required, workstation hardware and software requirements for using OSM,
coexistence and fallback issues, how to migrate an existing TSM system list for
OSM use, and how to configure and start OSM server-side processes.
•The OSM User's Guide provides an overview of all OSM applications and
components, how to configure and get started with OSM, and how to use the
primary OSM interface, OSM Service Connection, to monitor and perform actions
on system and cluster resources.
•The OutsideView online help provides information on configuring OutsideView
sessions.
•The DSM/SCM User’s Guide provides detailed, task-oriented instructions for using
the DSM/SCM Planner Interface to perform the various tasks associated with
installing and managing software revisions.

About This Manual
G06.24 Software Installation and Upgrade Guide—528593-005
xvii
Notation Conventions
•The NonStop S-Series Planning and Configuration Guide provides information for
planning and configuring the installation of a NonStop S-series server.
•The NonStop S-Series Hardware Installation and FastPath Guide provides detailed
instructions and checklists for installing NonStop S-series servers.
•The SQL/MX Installation and Management Guide for SQL/MX Release 2.0
describes step-by-step instructions for installing SQL/MX for Release 2.0.
Notation Conventions
Hypertext Links
Blue underline is used to indicate a hypertext link within text. By clicking a passage of
text with a blue underline, you are taken to the location described. For example:
This requirement is described under Backup DAM Volumes and Physical Disk
Drives on page 3-2.
General Syntax Notation
The following list summarizes the notation conventions for syntax presentation in this
manual.
UPPERCASE LETTERS. Uppercase letters indicate keywords and reserved words; enter
these items exactly as shown. Items not enclosed in brackets are required. For
example:
MAXATTACH
lowercase italic letters. Lowercase italic letters indicate variable items that you supply.
Items not enclosed in brackets are required. For example:
file-name
computer type. Computer type letters within text indicate C and Open System Services
(OSS) keywords and reserved words; enter these items exactly as shown. Items not
enclosed in brackets are required. For example:
myfile.c
italic computer type. Italic computer type letters within text indicate C and Open
System Services (OSS) variable items that you supply. Items not enclosed in brackets
are required. For example:
pathname
[ ] Brackets. Brackets enclose optional syntax items. For example:
TERM [\system-name.]$terminal-name
INT[ERRUPTS]
About This Manual
G06.24 Software Installation and Upgrade Guide—528593-005
xviii
General Syntax Notation
A group of items enclosed in brackets is a list from which you can choose one item or
none. The items in the list may be arranged either vertically, with aligned brackets on
each side of the list, or horizontally, enclosed in a pair of brackets and separated by
vertical lines. For example:
FC [ num ]
[ -num ]
[ text ]
K [ X | D ] address
{ } Braces. A group of items enclosed in braces is a list from which you are required to
choose one item. The items in the list may be arranged either vertically, with aligned
braces on each side of the list, or horizontally, enclosed in a pair of braces and
separated by vertical lines. For example:
LISTOPENS PROCESS { $appl-mgr-name }
{ $process-name }
ALLOWSU { ON | OFF }
| Vertical Line. A vertical line separates alternatives in a horizontal list that is enclosed in
brackets or braces. For example:
INSPECT { OFF | ON | SAVEABEND }
… Ellipsis. An ellipsis immediately following a pair of brackets or braces indicates that you
can repeat the enclosed sequence of syntax items any number of times. For example:
M address [ , new-value ]…
[ - ] {0|1|2|3|4|5|6|7|8|9}…
An ellipsis immediately following a single syntax item indicates that you can repeat that
syntax item any number of times. For example:
"s-char…"
Punctuation. Parentheses, commas, semicolons, and other symbols not previously
described must be entered as shown. For example:
error := NEXTFILENAME ( file-name ) ;
LISTOPENS SU $process-name.#su-name
Quotation marks around a symbol such as a bracket or brace indicate the symbol is a
required character that you must enter as shown. For example:
"[" repetition-constant-list "]"
About This Manual
G06.24 Software Installation and Upgrade Guide—528593-005
xix
Notation for Messages
Item Spacing. Spaces shown between items are required unless one of the items is a
punctuation symbol such as a parenthesis or a comma. For example:
CALL STEPMOM ( process-id ) ;
If there is no space between two items, spaces are not permitted. In the following
example, there are no spaces permitted between the period and any other items:
$process-name.#su-name
Line Spacing. If the syntax of a command is too long to fit on a single line, each
continuation line is indented three spaces and is separated from the preceding line by
a blank line. This spacing distinguishes items in a continuation line from items in a
vertical list of selections. For example:
ALTER [ / OUT file-spec / ] LINE
[ , attribute-spec ]…
Notation for Messages
The following list summarizes the notation conventions for the presentation of
displayed messages in this manual.
Bold Text. Bold text in an example indicates user input entered at the terminal. For
example:
ENTER RUN CODE
?123
CODE RECEIVED: 123.00
The user must press the Return key after typing the input.
Nonitalic text. Nonitalic letters, numbers, and punctuation indicate text that is displayed or
returned exactly as shown. For example:
Backup Up.
lowercase italic letters. Lowercase italic letters indicate variable items whose values are
displayed or returned. For example:
p-register
process-name
[ ] Brackets. Brackets enclose items that are sometimes, but not always, displayed. For
example:
Event number = number [ Subject = first-subject-value ]
A group of items enclosed in brackets is a list of all possible items that can be
displayed, of which one or none might actually be displayed. The items in the list might
About This Manual
G06.24 Software Installation and Upgrade Guide—528593-005
xx
Notation for Messages
be arranged either vertically, with aligned brackets on each side of the list, or
horizontally, enclosed in a pair of brackets and separated by vertical lines. For
example:
proc-name trapped [ in SQL | in SQL file system ]
{ } Braces. A group of items enclosed in braces is a list of all possible items that can be
displayed, of which one is actually displayed. The items in the list might be arranged
either vertically, with aligned braces on each side of the list, or horizontally, enclosed in
a pair of braces and separated by vertical lines. For example:
obj-type obj-name state changed to state, caused by
{ Object | Operator | Service }
process-name State changed from old-objstate to objstate
{ Operator Request. }
{ Unknown. }
| Vertical Line. A vertical line separates alternatives in a horizontal list that is enclosed in
brackets or braces. For example:
Transfer status: { OK | Failed }
% Percent Sign. A percent sign precedes a number that is not in decimal notation. The
% notation precedes an octal number. The %B notation precedes a binary number.
The %H notation precedes a hexadecimal number. For example:
%005400
%B101111
%H2F
P=%p-register E=%e-register

G06.24 Software Installation and Upgrade Guide—528593-005
1-1
1Overview of Installing G06.24
This section introduces the tools and requirements for:
•Upgrading a single NonStop S-series server to the G06.24 RVU from any G06.06
or later G-series RVU
•Falling back from G06.24 to a previous (G06.06 or later) G-series RVU
Disk Space Requirements
The maximum site update tape (SUT) with all standard products, plus all optional
products available to customers, contains approximately 2 or 3 gigabytes (GB) of data,
depending on optional products (however, actual disk space required can be much
greater).
System Console Requirements
A system console is an HP-approved personal computer used to run maintenance and
diagnostic software for NonStop S-series servers. New system consoles are
preconfigured with the required HP and third-party software, which means that OSM is
the preinstalled client, and Windows XP Professional is the default operating system.
When upgrading to the latest RVU, software upgrades can be installed from the HP
NonStop System Console Installer CD (S7X-SWV1, Update 3), which must be ordered
separately from Scout for NonStop Servers through HP NonStop eServices Portal at
https://onepoint.nonstop.compaq.com/buildpage.asp. Always check Scout for any
Installer updates. Depending on your current RVU, a Windows 2000 Service Pack
might need to be installed. See the NonStop System Console Installer Guide for
detailed information on installing the system console software.
Note that you can still install TSM from the Installer CD. TSM is compatible with both
XP Professional and Windows 2000. Windows XP Professional is recommended for
OSM and must be ordered separately. You must order the HP NonStop System
Console Kit for Migrating to Microsoft Windows XP Professional. See the NonStop
System Console Guide for Migrating to Microsoft Windows XP Professional.
Unless OSM is already installed and configured on your server, use the TSM client and
TSM server software to update firmware and perform a system load to the new G06.24
RVU. To use OSM, certain client-side system requirements must be met. See the
NonStop System Console Installer Guide and the OSM Migration Guide for PC system
requirements and information on migrating to OSM.
You can have both the TSM client and the OSM client-based components on your
system consoles. However, to avoid duplicate dial-outs, use either the OSM
Notification Director (ND) or TSM Notification Director, but not both.

Overview of Installing G06.24
G06.24 Software Installation and Upgrade Guide—528593-005
1-2
TSM Client Applications
To ensure that the OSM Notification Director runs as a persistent service:
1. Select Start > Settings > Control Panel > Administrative Tools > Services.
2. Select the OSM Notification Director from the list of Services.
3. Right-click and select Properties.
4. Select the Recovery tab and change the properties for First, Second and
Subsequent failures to Restart the Service.
5. Click OK to apply the changes.
TSM Client Applications
After installing the appropriate software product revisions (SPRs) (see D46 SPR of
DSM/SCM on page 3-3), upgrade your TSM client software.
Use the NonStop System Console Installer to upgrade TSM applications on the
Microsoft Windows 2000 Professional or Windows XP Professional operating system.
For instructions on using this CD to upgrade your system console, see the NonStop
System Console Installer Guide.
After installing the appropriate TSM SPR and upgrading your system console to TSM
client software Version 2003A, use the TSM Service Application and the TSM
Low -Level Link Application to update firmware and to halt and restart the system. After
you have migrated to G06.24, you can then install and configure OSM (if not previously
installed.)
OSM Client-Based Components
OSM is designed to support new functions introduced in G06.21 and later.
Client installation instructions are included in the NonStop System Console Installer
Guide. The previous T2752 product is replaced by three client-based OSM
components. All three OSM components are installed from the NonStop System
Console Installer CD, either from the master installer or individually from their own
separate installers:
•OSM Low-Level Link (T0633)
•OSM Notification Director (T0632)
•OSM Console Tools (T0634):
°Start menu shortcuts for launching OSM applications
°Default home pages for easy access to systems for the OSM Service
Connection and OSM Event Viewer
Note. For future RVUs, only OSM is designed to support new functions.
Overview of Installing G06.24
G06.24 Software Installation and Upgrade Guide—528593-005
1-3
HP NonStop Server Software Requirements
HP NonStop Server Software Requirements
You must install:
•The newest TSM server (T7945ABN or later) SPR if you are installing NonStop
S78000 and S88000 servers.
For TSM, if you have to install the most recent server SPRs, follow the instructions
in the appropriate softdocs. Depending on your current configuration, for most TSM
server SPRs, such as TSM Bind, the process might need to be aborted and then
restarted using the Subsystem Control Facility (SCF). See the appropriate softdoc
for pre-installation and post-installation details.
•OSM SPRs if you decide that you want to install and use OSM. These SPRs are
available on the G06.24 SUT and on Scout:
°T2723 (OSM Connection Library
°T2724 (OSM Provider Interface Library)
°T2725 (OSM Configuration)
°T2726 (OSM XML API)
°T2727 (OSM CIMOM)
°T2728 (OSM Service Provider)
°T2730 (OSM Event Viewer)
°T2751 (OSM client-based Suite, which includes the OSM Service Connection
and OSM Event Viewer)
Check Scout for any new SPRs or requisite SPRs. See also the Interactive
Upgrade Guide for new features and the OSM Migration Guide for installation and
configuration information.
°Use OSM to manage and configure the new HP NonStop ServerNet Switch
(model 6780).
°HP recommends using the OSM Service Connection (rather than the TSM
Service Application) for all systems that are part of an HP NonStop ServerNet
cluster. OSM suppresses generation of alarms and dial-outs on all nodes in the
cluster when service actions are performed on a cluster from any node. This
protection is not available if some nodes are being managed by TSM because
TSM cannot communicate with OSM.
°Only OSM, not TSM, automatically recognizes online disk remirroring.
°Unless OSM is already installed, configure OSM after you have used TSM to
update firmware and performed a system load of the new RVU. For information
on OSM configuration, see the OSM Migration Guide.
°Only OSM supports the I/O adapter module (IOAM) enclosure and its
components. OSM provides the necessary ability to configure an IOAM
enclosure before it is integrated into the system.

Overview of Installing G06.24
G06.24 Software Installation and Upgrade Guide—528593-005
1-4
HP NonStop Server Software Requirements
•SQL/MX Release 2.0 fallback SPRs. See Section 3, Installing SPRs Before
Upgrading to the G06.24 RVU.
•A D46 product version of DSM/SCM on your host system before you install the
SUT. Appendix B, Installing the Latest DSM/SCM SPRs and Client Software
describes how to restore from tape and install the recommended D46 SPR of
DSM/SCM. The D46 DSM/SCM client and server version enable you to manage
OSS files.
°If you are upgrading to the G06.24 RVU, download the most current client
version of DSM/SCM (T6031D46) from the ZDSMSCM subvolume after the
D46 new product version has been restored and activated from the SUT tape.
The DSM/SCM T6031D46^ABJ client software supports T6031D46^ABJ
server software and T6030/T6031D30^AAO and previous DSM/SCM server
software (including T6031D31). To install the DSM/SCM client, see
Appendix B, Installing the Latest DSM/SCM SPRs and Client Software.
°Even if you installed the D46 product version update (PVU) introduced in
G06.18, you should install the new D46 T6031^ABJ SPR introduced in G06.24.
See Appendix B, Installing the Latest DSM/SCM SPRs and Client Software. If
you have to fall back to a pre-D46 T6031 product version of DSM/SCM, you
must run the FALLBACK macro available in T6031D46 and later product
versions. You can export the FALLBACK macro from the DSM/SCM Archive.
•If you are running on a pre-G06.20 RVU, you must also install the Software
Identification (SWID) product (T9298AAJ) before receiving the SUT. See
Appendix B, Installing the Latest DSM/SCM SPRs and Client Software.
Note. All OSS SUT-based products with pax files must have the A7CINFO file in their distributed
subvolumes (DSVs) to be installed by DSM/SCM. Check the appropriate product softdocs and the
Interactive Upgrade Guide to ensure DSM/SCM installation is possible.
OSS products that are not released with an A7CINFO file in their DSVs can still be installed using
PINSTALL /COPYOSS. See the appropriate OSS manuals.
To ensure that OSS-managed files can be correctly restored in case of a fall back to an earlier RVU,
do not use the PINSTALL /COPYOSS utilities to install those OSS products that DSM/SCM has
installed on an OSS file system.
During the Build/Apply phase to manage OSS files, DSM/SCM indicates which OSS products in a
configuration are not DSM/SCM-enabled. For those OSS products, use PINSTALL/COPYOSS.

Overview of Installing G06.24
G06.24 Software Installation and Upgrade Guide—528593-005
1-5
DSM/SCM and the G06.24 RVU
DSM/SCM and the G06.24 RVU
Starting with the G06.18 RVU, a new configuration file, A7CINFO, is introduced for the
managing of OSS files. To manage OSS files, you must install the T6031 D46 PVU on
the host system before receiving the SUT. The corresponding client version of the
software must also be installed.
To upgrade the DSM/SCM client, the DSM/SCM client version must be downloaded
from the ZDSMSCM subvolume. (If you have acquired new system consoles, the most
up-to-date DSM/SCM client is already installed.) For download and installation
instructions for both the server-side and client-side, see Appendix B, Installing the
Latest DSM/SCM SPRs and Client Software.
Installing Required or Recommended SPRs Before Installing a
New RVU
Before installing G06.24, install required or recommended SPRs. An SPR could be
required for any of these reasons:
•To prepare for fallback
•To install a defect repair for a product that is required for a successful upgrade
•To maintain interoperability for a product across a network
To determine which SPRs you should apply to your current RVU before you install
G06.24, see Section 3, Installing SPRs Before Upgrading to the G06.24 RVU.
To install SPRs using DSM/SCM, see Appendix A, Using DSM/SCM to Install SPRs.
Installing the G06.24 RVU Using DSM/SCM
1. Receive new software into the DSM/SCM Archive.
When software is received, the files from each product are stored in the DSM/SCM
Archive, a holding area for your software. File attributes are stored in the
DSM/SCM host database. Each time a new version of a product is received, only
changed files are placed in the Archive, and file attributes are updated in the Host
database.
2. Create a new software revision.
A software revision is a list of products stored in the DSM/SCM Archive that will be
built into a new software revision. A software revision can include a SUT, SPRs,
and third-party software. When you create a new software revision, DSM/SCM
selects the products in the SUT that are licensed for your site and replaces
previous versions of the products.

Overview of Installing G06.24
G06.24 Software Installation and Upgrade Guide—528593-005
1-6
Managing Microcode and Firmware
3. Build and apply the new software configuration revision.
The Build process creates an activation package containing all the products listed
in the new software revision. During the Apply process, the activation package is
transferred to the target system, and the new software is placed on the target
system’s subvolumes. When the Apply request is finished, a snapshot is
automatically created and returned to the Host.
4. Activate the new operating system image.
During the Build/Apply phase, DSM/SCM places product files in their target
subvolumes (TSVs) with temporary (fabricated) file names so that the new files do
not conflict with the file names of currently running programs. You run the
ZPHIRNM program on the target system to:
•Rename the files that currently have actual file names to fabricated names.
These files become obsolete when the new files are renamed.
•Rename the new files, which have fabricated names, to their actual names.
Managing Microcode and Firmware
You must ensure all microcode and firmware within your system is managed properly,
updating it as necessary when new versions become available. Failure to do so can
result in a wide range of system problems, from intermittent faults to partial or complete
system outages.
Updating Disk and Tape Bootstrap Microcode
When you perform a system load, a disk or tape bootstrap microcode file is used by
the system during its startup process. You must use the SCF program to update these
files as new versions become available.
The SCF CONTROL DISK, REPLACEBOOT command converts a work file
(SYSDISC) containing the new disk bootstrap loader and controller microcode to a
special format and then writes it into space reserved for bootstrap microcode on the
system disk.
Note. Always check Scout for the most recent updateable firmware.

Overview of Installing G06.24
G06.24 Software Installation and Upgrade Guide—528593-005
1-7
Updating Firmware
Bootstrap Microcode Update Requirements for the G06.24
RVU
The disk and tape bootstrap programs (T8494) are unchanged in G06.24. A new disk
bootstrap program (T8494AAA) became available in G06.06. Revive your mirrored disk
as soon as possible after performing a system load.
Updating Firmware
Updateable firmware exists in many of the components in your system, such as:
•PMFs and IOMFs
•ServerNet LAN and WAN adapters
•ServerNet device adapters
•ServerNet Switch (6770) and ServerNet Switch (6780)
•IOAM Maintenance Entity (See your service provider for more information.)
You can perform many firmware updates manually using OSM, but some can be
performed with SCF or by following TSM or OSM-guided procedures.
NonStop Cluster Switch Firmware
To monitor and manage a ServerNet Cluster product configured with 6780 switches,
you can use either the OSM Service Connection or SCF commands. See the
ServerNet Cluster 6780 Operations Guide for more information.
For information on required software, installation, migration, and fallback procedures,
see the ServerNet Cluster 6780 Planning and Installation Guide.
ServerNet Adapter Firmware
You can manage firmware in most ServerNet adapters either manually with either OSM
or TSM, or automatically, when the autofirmup attribute is set by SCF (the default when
you add an adapter). If you choose to disable the autofirmup attribute of these
adapters, then you must use the OSM Service Connection or TSM Service Application
to manage the firmware manually based on the information in the table below.
Note. The ServerNet/FX and ServerNet/FX2 adapters do not provide the autofirmup capability.
The firmware for these adapters must be managed manually.

Overview of Installing G06.24
G06.24 Software Installation and Upgrade Guide—528593-005
1-8
Updating Firmware
The ServerNet adapters are:
•ATM3SA
•CCSA
•E4SA
•FESA
•GESA
•TRSA
•G4SA
•ServerNet/FX and ServerNet/FX2
•FCSA (ServerNet I/O adapter)
For more information, see the adapters’ respective installation and support guides.
Firmware Updates and DSM/SCM (ZPHITI)
The DSM/SCM Target Interface (ZPHITI) provides operator instructions that inform you
if any firmware needs to be updated before you run the ZPHIRNM (rename) program.
Firmware Updates Using OSM or TSM
Use the TSM Service Application or the OSM Service Connection (if OSM is already
installed) to update service processor (SP) firmware and processor boot code before
system load and to update SCSI boot code (pre-G06.08), SWAN concentrator CLIP,
and other firmware after system load. Adapter firmware is generally automatically
downloaded when a ServerNet adapter is started during system load. The easiest
method for updating firmware is to use the OSM Service Connection Multi-Resource
Actions dialog box to update firmware.
Firmware Update Requirements for the G06.24 RVU
If any of the firmware on your system does not match the versions listed in Table 1-2,
G06.24 Updateable Firmware for ServerNet Adapters, on page 1-10, you must perform
firmware updates. If OSM is not already installed and configured, use TSM to update
firmware and load the system to the new RVU. If OSM is installed and configured, use
the OSM Service Connection Multi-Resource Actions dialog box.
Caution. Before upgrading boot millicode using the online update function to T7892ABD, you
must have the G06.24 or later version of either the TSM server (T7945ABN) or all OSM server-
based SPRs (along with their prerequisites) configured and running. Otherwise, a system
outage will result. For a list of G06.24 OSM SPRs, see OSM Server and Client Compatibility
SPRs on page 3-8.

Overview of Installing G06.24
G06.24 Software Installation and Upgrade Guide—528593-005
1-9
Updating Firmware
You must use OSM to update firmware for the HP NonStop Cluster 6780 Switch. For
information on using OSM to update firmware, see the OSM online help.
Table 1-1 lists the updateable firmware for processors, SPs, and SCSI SACs.
Note. When migrating to G06.24 from an RVU prior to G06.08, update SCSI boot code after
the system load. Update SP and processor boot code before performing the system load of
G06.24.
Table 1-1. G06.24 Updateable Firmware for Processors, SPs, and SCSI SACs
Product
Number Description Host
CRU/FRU Disk File
Name Default
Location Mgmt Tool Related
Information
T0503AAB SCSI boot
code PMF and
PMF 2 IBOOT SYSnn
subvolume TSM SA
and LLL
OSM SC
and LLL
Section 11,
Loading the
G06.24
RVU; TSM
or OSM
online help
T1089ABP SP firmware PMF and
PMF 2;
IOMF and
IOMF2
SPCODE9 SYSnn
subvolume TSM SA
and LLL
OSM SC
and LLL
Section 7,
Updating
Service
Processor
(SP)
Firmware;
TSM or
OSM online
help
T8461AAE NonStop
S7000
processor
firmware
PMF and
PMF 2 CPUCODE8 SYSnn
subvolume TSM SA
and LLL
OSM SC
and LLL
Section 8,
Updating
Processor
Boot Code;
TSM or
OSM Online
User Guide
T7892ABD NonStop
S70000,
S74000,
S7600,
S7800,
S78000
S8x000
processor
firmware
PMF and
PMF 2 CPUCODE9 SYSnn
subvolume TSM SA
and LLL
OSM SC
and LLL
Section 8,
Updating
Processor
Boot Code;
TSM or
OSM Online
User Guide

Overview of Installing G06.24
G06.24 Software Installation and Upgrade Guide—528593-005
1-10
Updating Firmware
Table 1-2 lists the product numbers and updateable firmware for all ServerNet adapters
that are installed on S-series servers and other modules connected to S-series
servers.
Table 1-3 lists the firmware for ServerNet SWAN concentrators.
Table 1-2. G06.24 Updateable Firmware for ServerNet Adapters
Product
Number Description Host
CRU/FRU Disk File
Name Default
Location Mgmt
Tool Related
Information
T0059AAB ServerNet/FX
(FOX Gateway)
firmware
FXSA M6740 SYSnn
subvolume TSM
SA
OSM
SA
ServerNet/FX
Adapter
Installation and
Support Guide
T0232G05 3862 Token-Ring
ServerNet
adapter
TRSA C0232R00 SYSnn
subvolume TSM
SA
OSM
SC
Token-Ring
Adapter
Installation and
Support Guide
T0283G06 3863 Fast
Ethernet
ServerNet
adapter firmware
FESA C0283R00 SYSnn
subvolume TSM
SA
OSM
SC
Fast Ethernet
Adapter
Installation and
Support Guide
T0309G08 6763 Common
Communication
ServerNet
adapter firmware
CCSA C0309R00 SYSnn
subvolume TSM
SA
OSM
SC
6763 Common
Communication
ServerNet
Adapter
Installation and
Support Guide
T0426AAA ServerNet/FX 2
(FOX Gateway 2)
firmware
FX2SA M6770 SYSnn
subvolume TSM
SA
OSM
SC
ServerNet/FX
2 Adapter
Installation and
Support Guide
T0507G06 3865 Gigabit
Ethernet
ServerNet
adapter (GESA)
firmware
GESA-C
(copper)
and
GESA-F
(fiber optic)
C0506R00 SYSnn
subvolume TSM
SA
OSM
SC
Gigabit
Ethernet
Adapter
Installation and
Support Guide
T7824G01^
AAA 3861 Ethernet 4
ServerNet
adapter (E4SA)
firmware
E4SA C7824R00 SYSnn
subvolume TSM
SA
OSM
SC
Ethernet
Adapter
Installation and
Support Guide
T8158G02 ATM3 ServerNet
adapter
(ATM3SA)
firmware
ATM3SA C8158R00 SYSnn
subvolume TSM
SA
OSM
SC
ATM Adapter
Installation and
Support Guide
T0612G06 Gigabit 4-port
ServerNet
adapter (G4SA)
G4SA C0612R00 SYSnn
subvolume OSM
SC G4SA Adapter
Installation and
Support Guide

Overview of Installing G06.24
G06.24 Software Installation and Upgrade Guide—528593-005
1-11
Updating Firmware
Table 1-3. G06.24 Updateable Firmware for ServerNet WAN (SWAN and SWAN 2)
Concentrators
Table 1-4 lists the product number and updateable firmware information for the cluster
switch. Check with Scout for the latest SPRs.
Product
Number Description Host
CRU/FRU Disk File
Name Default
Location Mgmt
Tool Related
Information
T0097AAA SWAN 2
Kernel
firmware
SWAN 2
concentrator
CLIPs
C7953Q00 CSSnn
subvolume SCF;
TSM SA
Guided
Procedure
OSM SC
SWAN 2
Concentrator
Installation and
Support Guide
T7953AAN SWAN
Kernel
firmware
SWAN
concentrator
CLIPs
C7953P00 CSSnn
subvolume SCF;
TSM SA
Guided
Procedure
OSM SC
Appendix C,
Updating
SWAN
Concentrator
CLIP
Firmware;
SWAN
Concentrator
Installation and
Support Guide
Table 1-4. G06.24 Updateable Firmware for the NonStop ServerNet Switch
Product
Number Description Host
CRU/FRU
Disk
File
Name Default
Location Mgmt Tool Related
Information
T0569AAF Cluster switch
firmware Cluster
Switch M6770 SYSnn
subvolume SCF; TSM
SA NonStop
ServerNet
Cluster
Manual
T2790AAB Cluster switch
firmware
(logic board
configuration)
6780
ServerNet
Switch
M2789 SYSnn
subvolume SCF; OSM
SC ServerNet
Cluster 6780
Operations
Guide
T2789AAB Cluster switch
firmware
(logic board:
router-2
firmware)
6780
ServerNet
Switch
(Router-2
ASIC*)
C2790 SYSnn
subvolume SCF; OSM
SC ServerNet
Cluster 6780
Operations
Guide
T2819AAB Cluster switch
firmware
(FPGA** for
hardware
monitoring)
6780
ServerNet
Switch
(FPGA)
LBC2819 SYSnn
subvolume SCF; OSM
SC ServerNet
Cluster 6780
Operations
Guide
*ASIC (application-specific integrated circuit); **FPGA (field-programmable gate array)

Overview of Installing G06.24
G06.24 Software Installation and Upgrade Guide—528593-005
1-12
Updating Firmware
Table 1-5 lists the product number and updateable firmware information for the IOAM
Maintenance Entity and FCSA. Check with your HP service provider for more
information.
Updating Firmware Before System Load
Use the TSM Service Application to update SP firmware and processor boot code
before you perform a system load with the new RVU. HP recommends using the online
processor boot code option in TSM.
If OSM is already installed and configured on your current RVU, including the client,
use the OSM Service Connection Multi-Resource Actions dialog box to update
firmware. HP recommends using the online processor boot code option in OSM.
Updating Firmware After System Load
Use the TSM Service Application or the OSM Service Connection (if OSM is already
installed and configured) to update all remaining firmware, such as the SWAN
concentrator as necessary, after you perform a system load with the new RVU.
If you are employing the 6780 ServerNet switch, you must use the OSM Service
Connection to update the firmware. The same is true for updating firmware for the
IOAM.
Table 1-5. G06.24 IOAM Firmware
Product
Number Description Host
CRU/FRU
Disk
File
Name Default
Location Mgmt Tool Related
Information
T2805A01* Maintenance
Entity firmware IOAM M2805 SYSnn
subvolume OSM SC Modular I/O
Installation
and
Configuration
Guide
T0630G06* Fibre Channel
ServerNet
adapter (FCSA)
FCSA I0630 SYSnn
subvolume OSM SC Fibre
Channel
ServerNet
Adapter
(FCSA)
Installation
and Support
Guide
*Only HP service providers are authorized to update the firmware. Check Scout for the latest SPRs.
Caution. A system outage can occur if you use the online processor boot code update option
with down rev TSM and OSM SPRs. See Section 3, Installing SPRs Before Upgrading to the
G06.24 RVU and the Interactive Upgrade Guide for the correct SPRs.

Overview of Installing G06.24
G06.24 Software Installation and Upgrade Guide—528593-005
1-13
Investigating a New RVU
Investigating a New RVU
Several resources are available to help you plan for installing a new RVU:
•The Release Version Update Compendium provides highlights of the new products
and features for each G-series RVU. It also discusses the effect these changes
have on installation and configuration, operations and management, data files,
applications, and networks.
•The Interactive Upgrade Guide simplifies the planning of software and hardware
for RVUs. Select the products and RVUs you use, and the Interactive Upgrade
Guide automatically displays customized migration instructions and lists new
features.
•The Managing Software Changes manual explains the TRM2000 and provides
information about system migration and installation processes, software product
revision (SPR) analysis, and resources for investigating new RVUs and SPRs.
•Scout for NonStop Servers is a Web-based SPR analysis and delivery tool. You
can access Scout through HP NonStop eServices Portal at
https://onepoint.nonstop.compaq.com/buildpage.asp. Online help for using Scout is
available on the Scout Website.
•The DSM/SCM Planner Interface provides a facility for viewing and printing
softdocs after you receive new software into the archive. See the DSM/SCM User’s
Guide for more information.
Installing a New RVU
Table 1-6 maps the major tasks involved in installing a new RVU to the tools with which
you perform the tasks and the sections in which these tasks are documented.
Note. A checklist is provided in Section 2, G06.24 Upgrade Checklists that summarizes the
tasks required to upgrade to G06.24.

Overview of Installing G06.24
G06.24 Software Installation and Upgrade Guide—528593-005
1-14
Installing a New RVU
Table 1-6. Tasks and Tools for Installing the G06.24 RVU (page 1 of 2)
To Perform This Task... Use This Tool... Documented in...
1. Install a D46 product version
of DSM/SCM and
fallback/interoperability
SPRs. HP recommends that
you install the D46 SPR on
the host and on the client.
You must also install the
SWID product
T9298D40^AAK if you are
running an RVU before
G06.20.
DSM/SCM Planner
Interface Section 3, Installing SPRs
Before Upgrading to the
G06.24 RVU
Appendix B, Installing the
Latest DSM/SCM SPRs
and Client Software
2. Save the current
configuration file
(CONFxxyy).
Subsystem Control
Facility (SCF) Section 4, Preparing to
Upgrade the Server
Software
3. Upgrade the system console
to TSM client software
Version 2003A (if necessary).
or upgrade the OSM client-
component software
NonStop System Console
Installer NonStop System Console
Installer Guide
System Console
Requirements on page 1-1.
4. Receive new G06.24
software into the DSM/SCM
Archive.
DSM/SCM Planner
Interface Section 5, Installing the
G06.24 RVU
5. Create a new software
revision. DSM/SCM Planner
Interface Section 5, Installing the
G06.24 RVU
6. Build and apply the activation
package. DSM/SCM Planner
Interface Section 5, Installing the
G06.24 RVU
7. Install and configure the
latest TSM or OSM server
SPRs
DSM/SCM Planner
Interface See the OSM Migration
Guide or the TSM softdocs.
See also support note
S03133A.
8. Replace disk bootstrap
microcode (if migrating from
an RVU prior to G06.06).
Subsystem Control
Facility (SCF) Section 6, Replacing the
Disk Bootstrap Microcode
(Pre-G06.06)
9. Perform firmware updates
required before system load. TSM Service Application
or OSM Service
Connection (if OSM is
installed)
Section 7, Updating
Service Processor (SP)
Firmware
Section 8, Updating
Processor Boot Code
10. Activate the new software
revision. DSM/SCM ZPHIRNM
program Section 10, Running
ZPHIRNM

Overview of Installing G06.24
G06.24 Software Installation and Upgrade Guide—528593-005
1-15
Upgrading NonStop S-Series Servers
Upgrading NonStop S-Series Servers
If you are upgrading from the NonStop S7000 system (NSR-W), and before you
upgrade to S76000 (NSR-X), S86000 (NSR-Y) / S7600 (NSR-E), NonStop S7800
(NSR-J), S78000 (NSR-H), S88000 (NSR-Z), you must change the
SYSTEM_PROCESSOR_TYPE in the ALLPROCESSORS paragraph in the
CONFTEXT file. In the CONFTEXT file, you can specify only one processor type.
Neither NSR-D (S7400), nor NSR-W (S7000) can be specified in a system with mixed
processor types.
For processor model S70000 running G06.24 and later, you must change the
processor type from NSR-G to NSR-C in the ALLPROCESSORS paragraph in the
CONFTEXT file. Failure to change the processor type when loading the new SYSnn
causes an immediate %100441 halt. All other references to NSR-G are still valid,
which means that any query performed on the system will return NSR-G if the PMF is a
model 1951 PMF CRU (S70000).
11. Update EMS template files (if
necessary). INSTALL^TEMPLATES
TACL macro If Running
INSTALL^TEMPLATES Is
Required on page A-7
12. Halt the processors. TSM Low-Level Link
Application or OSM Low-
Level Link
Halt the Processors on
page 11-2
13. Load the new operating
system from disk into the
memory of one processor
(system load).
TSM Low-Level Link
Application or OSM Low-
Level Link
Section 11, Loading the
G06.24 RVU
14. Reload the new operating
system into the rest of the
processors.
TACL RELOAD
command Section 11, Loading the
G06.24 RVU
15. Perform firmware updates
required after system load. TSM Service Application
or OSM Service
Connection. (Must use
OSM for 6780 switch and
MSIO.)
Section 9, Updating SCSI
Boot Code (Pre-G06.08
RVU)
Section C, Updating SWAN
Concentrator CLIP
Firmware
16. Configure specific optional
products SCF, macros Configure Specific Products
(Post-System Load) on
page 12-12
Table 1-6. Tasks and Tools for Installing the G06.24 RVU (page 2 of 2)
To Perform This Task... Use This Tool... Documented in...

Overview of Installing G06.24
G06.24 Software Installation and Upgrade Guide—528593-005
1-16
Installing an IOAM Enclosure and Other
Components
After you change the CONFTEXT file, you must perform all required DSM/SCM
requests to create a new SYSnn, including the new processor type. Perform a system
load of the new SYSnn after the new hardware is installed.
For details on processor types, see the NonStop S-Series Planning and Configuration
Guide.
Installing an IOAM Enclosure and Other Components
An IOAM enclosure enables you to access additional disk storage. It is mounted into a
standard 19-inch rack and connects to the MSEB of S76000 and later S-series
systems. IOAM enclosures contain several components, including specially-designed
ServerNet I/O adapters. One adapter of this type is the Fibre Channel ServerNet
Adapter (FCSA), which is used to connect to additional disk storage, such as an
Enterprise Storage System (ESS) disk.
In preparation, note that:
•Your site must be equipped with an operational LAN.
•Your site must have access to a DHCP server, or you must have software that
mimics one.
•IP addresses are assigned dynamically.
•Both Tetra-8 and Tetra-16 are supported for IOAM installation.
Before the HP service providers install and configure the IOAM and its other hardware
components, the G06.24 SUT is installed and a system load is performed. You must
have the latest OSM client and server installed and configured.
Certain limitations exist for configurations that include ESS or IOAM enclosures. For a
comprehensive list of these limitations, contact your HP representative. Some
limitations are:
•If you migrate data from a NonStop S-series system to an ESS, and the data is
located on disks within I/O enclosures, these I/O enclosures must be populated
with IOMF 2 CRUs.
•Only ESS-trained technicians can handle or configure ESS equipment. For any
activities that involve installing, configuring, or operating the ESS, the technician
trained for working with the ESS must be on site and available.
Caution. Never load the new SYSnn that contains the new processor type into your current
processors. Otherwise, a system outage will result, and you will have to fall back to your
previous RVU. To check your current processor type, use either OSM, if installed and
configured, or TSM.
Caution. IOAM enclosures must be installed by service providers trained by HP.
Note. For more information about installing and configuring FCSAs or the ESS, contact your
HP service provider.

Overview of Installing G06.24
G06.24 Software Installation and Upgrade Guide—528593-005
1-17
Falling Back to the Previous RVU
•You must install the IOAM enclosure as group 11, 12, 13, 14, or 15. The presence
of an IOAM enclosure in your system requires that certain other groups be left
empty. For more information, contact your service provider.
•You must isolate SWAN adapters on your system before you install an IOAM
enclosure. For more information, contact your service provider.
Migrating Existing Data to ESS
The migration of existing data from internal SCSI-attached, 514-byte sector disks to
industry standard, 512-byte sector disk subsystems includes an improved method for
checksum protection. The new checksum protection method employed for unstructured
files requires the data stored on disk be contiguous and aligned in units of 28KB.
When a non-partitioned unstructured file is created or migrated to ESS, the extent
sizes are rounded up to a mod-14 boundary, since an extent page is 2KB. This
ensures continuity of the data set protected by the checksum. This design ensures the
best possible performance for unstructured files, without adding significant overhead
for checksums. Each 28KB of data is protected with a 4KB check block, which contains
the checksum information.
Partitioned unstructured files cannot be migrated to an ESS without first performing a
migration of all partitions of the unstructured file set to a mod-14 extent boundary.
Partitioned unstructured files must use the same extent size and maximum extents for
all partitions because positioning is dependent upon a consistent size for each of the
partitions. Online migration attempts will abort when an unstructured partitioned file
without mod-14 extent sizes is present on the source disk.
Before attempting a migration to ESS, rebuild all partitions, using a mod-14 extent size.
Usually, this is accomplished by an offline copy to a new partition set.
The FCHECK utility (G06.24) includes a migration option that reports the files that
cannot be migrated to ESS because of this format limitation, in addition to reporting the
amount of disk space required for check block protection.
Falling Back to the Previous RVU
If you encounter a problem that cannot be resolved while running G06.24, you can fall
back to a previous G-series RVU, provided you have already installed the appropriate
fallback SPRs for your system.
Fallback SPRs are described in Section 3, Installing SPRs Before Upgrading to the
G06.24 RVU.
Overview of Installing G06.24
G06.24 Software Installation and Upgrade Guide—528593-005
1-18
Using DSM/SCM FALLBACK and CLEANOSS
Macros
Using DSM/SCM FALLBACK and CLEANOSS Macros
If you need to fall back from an RVU that does not have installed a D46 DSM/SCM
PVU, you must run the DSM/SCM FALLBACK macro from the ZDSMSCM subvolume.
The interactive macro must be run by the DSM/SCM owner or by super ID (255,255).
The FALLBACK macro reverts the DSM/SCM Host or Target, or both, database back to
a pre-D46 state for use by a pre-D46 product version of DSM/SCM. The FALLBACK
macro removes all DSM/SCM OSS management information. Therefore, you must
always use the COPYOSS procedures to install OSS software until you re-enable
DSM/SCM to manage OSS files.
To later manage OSS files again, you must migrate to the DSM/SCM D46 PVU and re-
receive the software into the archive to properly process the DSM/SCM-enabled OSS
software.
If a Host and Target system are running on the D46 product version of DSM/SCM and
only the Host falls back to a pre-D46 product version, run the FALLBACK macro only
on the Host system.
Notes on the FALLBACK Macro
The FALLBACK macro will not be available in the ZDSMSCM subvolume when you fall
back to an RVU prior to G06.18. Therefore, you must retrieve the FALLBACK macro
from the SUT prior to falling back or use the FUP DUP command to copy it to a
subvolume for use during fallback.
Note that you can migrate back to an earlier RVU SUT version without migrating back
to an earlier DSM/SCM version. To do this and eliminate the need to run the
FALLBACK macro, copy T6031D46 into the configuration on top of the older SUT. See
the DSM/SCM User’s Guide for more information.
Notes on the CLEANOSS Macro
If you fall back and then migrate to a G06.18 or later RVU, DSM/SCM might notify you
during the Apply that the CLEANOSS macro must be run. The current OSS
environment is being managed by a logical target other than the one trying to manage
OSS files with the current DSM/SCM Build/Apply. You must cancel the Apply, and run
the CLEANOSS macro. The EMS message gives you basic instructions:
The current OSS environment is managed by target oss-system
(according to /zzDSMSCM.Managed). To switch OSS management
from oss-system to target-system, CANCEL the Apply, run
CLEANOSS, run Verify Database, then RESTART the Apply.
If you receive the following EMS message (5305), or a similar one, it indicates that you
are running the D46 PVU of T6031 but not the most current EMS templates to
effectively display the CLEANOSS message. It is possible that you restored the
T6041D46 PVU from tape and activated it, but the correct templates were either not
properly installed or the NonStop Kernel is pointing to the wrong template files:

Overview of Installing G06.24
G06.24 Software Installation and Upgrade Guide—528593-005
1-19
DSM/SCM Client and Server Compatibility
11:43:03 AM 10/27/03 $Z420 DSM/SCM: *5305* Server Class TA-001 of PATHMON
\TINY.$YPHI activity id \TINY211933793397226152, activity code 20, planner id
SUPER.SUPER in stage 202:
EMSTEXT -- No template and no TEXT token for event. SSID = TANDEM.DSMSCM.D30
Event number = 5305 Subject = \TINY211933793397226152
See the DSM/SCM Messages Manual for more information on what message should
be displayed. You can probably continue, but you will not receive properly formatted
and detailed DSM/SCM EMS messages.
For detailed information on using the FALLBACK macro and CLEANOSS, see Section
12 in the DSM/SCM User’s Guide. For more information on configuring DSM/SCM
Targets, see the DSM/SCM User's Guide.
DSM/SCM Client and Server Compatibility
The D46 DSM/SCM client is backward compatible with other DSM/SCM product
versions (backward compatible to T6030D30/T6031D30 [AAO and later]).
Using ZPHIRNM
After you have returned the SP firmware, processor boot code, and SCSI boot code
back to the previous versions, if needed, you must run the ZPHIRNM program again to
change the temporary names of the previous product files to their actual names.
ZPHIRNM renames all files associated with the software revision last applied to the
operating system image (SYSnn) subvolume.
Table 1-7 maps the major tasks involved with falling back to a previous RVU to the
tools with which you perform the tasks and the sections in this guide in which these
tasks are documented.
Note. In most instances, it is not necessary to return SP firmware or SCSI boot code back to
the previous firmware versions when falling back to an earlier RVU. Check with Scout for SPR
backward compatibility. If you are returning to an RVU prior to G06.16, you must return
processor boot code back to the previous version before performing a system load of the
previous RVU. If you are returning to a G06.16 or later RVU, it is not necessary to return
processor boot code back to the previous version.

Overview of Installing G06.24
G06.24 Software Installation and Upgrade Guide—528593-005
1-20
Resecuring and Licensing Requirements
Resecuring and Licensing Requirements
Following are important resecuring and licensing requirements.
NonStop TCP/IP FTP (G06.08)
ALL files in the CSSnn subvolume must be secured “NUNU” to work properly. See the
T6022AAG or later softdoc for details.
Do Not Move or Relicense Pathway Files
The HP NonStop TS/MP PATHMON (T8344) product and Pathway/iTS (T8343) must
be licensed before the PATHMON process can start an application.
If you receive a licensing error as listed in Table 1-8, TS/MP has not been licensed.
Table 1-7. Tasks and Tools for Falling Back to the Previous RVU
To Perform This Task... Use This Tool... Documented in This
Section...
1. Submit a backout request. DSM/SCM Target
Interface (ZPHITI) Section 14, Backing Out the
DSM/SCM Revision
2. Return the firmware back to the
prevision versions (if necessary). TSM Service
Application
OSM Service
Connection (if
installed)
Section 15, Returning
Firmware to Previous
Versions
3. Reactivate the previous software
revision. DSM/SCM
ZPHIRNM
program
Section 16, Running
ZPHIRNM to Reactivate the
Previous Software Revision
4. Load the NonStop Kernel from the
previous RVU into the first
processor.
TSM Low-Level
Link Application
OSM Low-Level
Link (if installed)
Section 17, Loading the
Previous RVU and
Resuming Normal
Operations
5. Reload the remaining processors. TACL RELOAD
command Section 17, Loading the
Previous RVU and
Resuming Normal
Operations
6. Run the FALLBACK macro if
DSM/SCM has been reverted back
to a pre-T6031D46 version.
FALLBACK macro Section 17, Loading the
Previous RVU and
Resuming Normal
Operations
Caution. DSM/SCM requires the presence of HP NonStop TS/MP. The DSM/SCM product
places these files in the correct volume and subvolume. The ZLICSA59 and ZLICSA58 files
must be installed in the subvolume $SYSTEM.ZPATHWAY. Do not move these files.

Overview of Installing G06.24
G06.24 Software Installation and Upgrade Guide—528593-005
1-21
Secure SCF Product Modules (Gnn.nn)
Secure SCF Product Modules (Gnn.nn)
You can secure SCF product modules with network read and execute access, NxNx.
SCF product modules are named ZxxxSCF (where xxx is the three-letter product
acronym) and are installed on $SYSTEM.SYSTEM.
Resecure Visual Inspect (Gnn.nn)
Visual Inspect consists of a server component (T9756), a standard product distributed
on all SUTs, and a client component (T7877), which is an independent product (IP). If
necessary, resecure the server INSPECT files (INSPBRKR, INSPRULE, INSPSVR,
and INSPSMSG) in the SYSnn subvolumes with network read and execute access,
NxNx.
For other migration issues, see Visual Inspect (G06.20) on page 1-40.
G06.24 Installation and Fallback Alerts for
Products
Review carefully the following alerts for products before upgrading to the G06.24 RVU.
Several tasks are required either before or during the upgrade to ensure that you will
be able to upgrade to G06.24 or to fall back to a G06.06 or subsequent G-series RVU
if necessary.
•4619 Disk Drives on page 1-22
•6780 ServerNet Switch (G06.21) on page 1-22
•Backup and Restore 2 (BR2) (G06.24) on page 1-23
•C++ (G06.20) on page 1-23
•DP2 (G06.16, G06.23, G06.24) on page 1-24
•Gigabit Ethernet ServerNet Adapter (G06.16) on page 1-24
Table 1-8. Pathway Licensing Errors
Licensing
Error Description
1163 The PATHMON process could not start because it could not confirm that either
the TS/MP product or the Pathway/iTS product is licensed for your site.
1164 A command to a remote system requires the TS/MP or the Pathway/iTS
product, but the PATHMON process cannot confirm that the required product is
licensed for the remote system. For example, you will receive this error if you
attempt to use PATHCOM to define a server class on a remote system when
TS/MP is not licensed for that remote system.
3245 Your application program has attempted to issue a SCREEN COBOL SEND
operation to an external terminal control process (TCP) on a remote system,
but the local TCP could not confirm that the Pathway/iTS product is licensed
for the remote system. The SEND operation fails.

Overview of Installing G06.24
G06.24 Software Installation and Upgrade Guide—528593-005
1-22
4619 Disk Drives
•Gigabit Ethernet ServerNet Adapter (G06.16) on page 1-24
•Minimum Memory Requirements (G06.16) on page 1-24
•OSM Configuration and Fallback (G06.08 to G06.24) on page 1-25
•OSS (G06.12 through G06.24) on page 1-25
°Open System Services (OSS) and DSM/SCM (T6031D46 PVU) on page 1-27
°OSS EasySetup (T0585) (G06.16, G06.23) on page 1-28
•NonStop SQL/MP on page 1-28
•NonStop SQL/MX Release 2.0 (G06.23 and G06.24) on page 1-28
•NonStop Kernel (NSK) Utilities (T9070AAK) (G06.22, 23, 24) on page 1-24
•NonStop Processor Multifunction (PMF) CRUs (G06.08 through G06.24) on
page 1-32
•Spooler (G06.00 through G06.19) on page 1-33
•SCF Storage Subsystem (Online Disk Remirroring) (G06.21)
•Tandem Failure Data System (TFDS) on page 1-35
•TSM Client and Server Software (G06.22, G06.23, G06.24) on page 1-35
•Service Processor (SP) Firmware (G06.08 through G06.24) on page 1-36
•SCF for Data Alignment (G06.17) on page 1-37
•System Configuration Database on page 1-37
•SWID (T9298D40^AAK) (G06.20) on page 1-35
•NonStop TCP/IPv6 (G06.20, G06.22, G06.23, G06.24) on page 1-38
•TMF (G06.23 and G06.24) on page 1-38
•TNOS Server and TNOS Utility (G06.17 through G06.24) on page 1-39
•Visual Inspect (G06.20) on page 1-40
4619 Disk Drives
The 4619 disk drive can be installed in the same system enclosure as disk drives of
different model numbers. However, disk drives in a mirrored volume must always be
the same model number, even if they are of the same capacity. Because of the
difference in rotational speed between the 4618 (10K rpm) and 4619 (15K rpm) disk
drives, placing the 4618 and 4619 disk drives in a mirrored volume is supported only
during an online disk replacement procedure.
6780 ServerNet Switch (G06.21)
For information on required software, installation, migration, and fallback procedures,
see the ServerNet 6780 Planning and Installation Guide.
Overview of Installing G06.24
G06.24 Software Installation and Upgrade Guide—528593-005
1-23
Backup and Restore 2 (BR2) (G06.24)
Backup and Restore 2 (BR2) (G06.24)
Backup and Restore 2.0 supports OSS and SQL/MX files and consists of these major
components:
•Backup and Restore Command Interface (BRCOM) (T2721)
•Data Service (T2750)
•Data Management Application (DMA) (T2749)
•Tape Service (T2722)
For more information on these SPRs, see the Interactive Upgrade Guide.
These Backup and Restore 2.0 SPRs that support OSS files are included on the
G06.24 SUT:
•T2721AAB (BR 2 BRCOM)
•T2722AAB (BR 2 Tape Services)
•T2749AAB (BR 2 DMA & Cmd Stream Proc
•T2750AAB (BR 2 Data Services)
•T2826AAB (BR 2 OSS Agent)
To use Backup and Restore 2.0 for SQL/MX tables, you must apply these or
superceding SPRs:
•T2721AAC (BR 2 BRCOM)
•T2722AAC (BR 2 Tape Services)
•T2749AAC (BR 2 DMA & Cmd Stream Proc)
•T2750AAC (BR 2 Data Services)
The AAC SPRs are not included on the G06.24 SUT. You must also install any
co-requisite SPRs listed in the softdocs. For more information on the SPRs, see the
Interactive Upgrade Guide. Information for backing up and restoring SQL/MX tables
and OSS files is documented in the Backup and Restore 2.0 Manual.
C++ (G06.20)
The G06.20 RVU includes a fully ANSI 98-compliant C++ run-time library, designated
as the C++ v3 run-time library (v3 RTL). Starting in G06.20, you have a choice of three
different C++ language dialects: v1, v2, and v3. The default compiler dialect setting is
changed from v1 to v3. The build file for any product that invokes a TNS/R native C++
must be examined and changed according to certain rules that are documented in the
Interactive Upgrade Guide.
Overview of Installing G06.24
G06.24 Software Installation and Upgrade Guide—528593-005
1-24
DP2 (G06.16, G06.23, G06.24)
DP2 (G06.16, G06.23, G06.24)
If you set the AUDITTRAILBUFFER or the SQLMXBUFFER attribute to 128 or more,
you need to reset these values to 0 before falling back to G06.16 or an earlier RVU. If
you fail to do so, TMF might not start, or a disk volume might go offline. You can
recover from this situation by using the SCF ALTER command. See the Interactive
Upgrade Guide for details.
If you are planning to use SQL/MX Release 2.0, HP recommends that you apply one of
these DP2 fallback SPRs on your current SYSnn before upgrading to G06.23 or
G06.24:
•T9053AOY, if the system uses the online disk remirror feature
•T9053AOZ, if the system does not use the online disk remirror feature.
After installing the fallback SPR, test it sufficiently for production use. Then you can
migrate to G06.23 or G06.24. If you are using SQL/MX Release 2.0 and you have to
fall back to a previous RVU, and you have created SQL/MX objects or audit records,
you must have this fallback SPR installed on your current SYSnn.
See the Interactive Upgrade Guide and support note S04057.
If you are planning on using the new TMF format 2 audit trail format, migration issues
might apply for DP2. The T9053G11 PVU provides support for TMF large audit trails
and two new disk attributes for REVIVE. See the softdoc T9053G11.
Gigabit Ethernet ServerNet Adapter (G06.16)
Any Gigabit Ethernet ServerNet adapters (GESAs) installed while migrating to G06.24
must be removed from the system during any fallback to an RVU prior to G06.16.
Minimum Memory Requirements (G06.16)
Beginning with the G06.16 RVU, NonStop S-series servers require a minimum 256 MB
of main memory.
NonStop Kernel (NSK) Utilities (T9070AAK) (G06.22, 23, 24)
Under rare circumstances, the branch prediction logic of an NonStop S-series server
can cause a hardware error freeze (HEF). The patch utility is applicable to only
S74000/S7600 and S72000/S7400 processors. If you have S74000/S7600 processors,
you can still continue to use T9070AAK. The utility is not needed for the newest
processors S7800, S78000, and S88000. If you have S76000 or S86000 processors,
read HS02830. For detailed information on the branch prediction logic utility, including
its applicability to your environment, read HS02774 (HS02774F). Note that whenever
the processor is reloaded, offline maintenance activities can make the patch inactive.

Overview of Installing G06.24
G06.24 Software Installation and Upgrade Guide—528593-005
1-25
OSM Configuration and Fallback (G06.08 to G06.24)
OSM Configuration and Fallback (G06.08 to G06.24)
For fallback issues, see the OSM Migration Guide. The guide covers OSM and TSM
co-existence and fallback issues, such as:
•Comparison of OSM to TSM
•OSM hardware and software requirements
•Migrating an existing TSM system list to a new console for OSM use
•Co-existence issues for using both OSM and TSM
•Fallback instructions for changing configuration from OSM back to TSM
OSS (G06.12 through G06.24)
As of G06.12, the format of the records in the OSS configuration databases has
changed. A special SPR, T8622AAH, ensures backward compatibility if you need to fall
back to an RVU prior to G06.12.
These are additional considerations for OSS upgrade and configuration:
•Disk volumes that are accessed by the OSS environment, including the $SYSTEM
volume where the OSS Monitor’s configuration files are kept, must not be
configured for administration by the HP NonStop Storage Management Foundation
(SMF).
•Beginning with the G06.18 RVU, OSSMON is not dependent on $zsmp to be
started. In earlier G-series and D-series RVUs, when you configured OSSMON to
start automatically during the system load process, you had to configure the
Safeguard security manager process $ZSMP to start automatically before
OSSMON was started.
For more information, see:
°Open System Services Installation Guide
°Open System Services Management and Operations Guide
°Interactive Upgrade Guide
°Support Note S01025
Note. Note that T8622AAH cannot be applied to RVUs prior to G06.00. If you are migrating to
G06.24 from an RVU prior to G06.00, you cannot fall back to your previous RVU unless you
follow very strict guidelines.

Overview of Installing G06.24
G06.24 Software Installation and Upgrade Guide—528593-005
1-26
OSS (G06.12 through G06.24)
•Beginning with the G06.18 RVU, all OSS SUT-based products with pax files must
have the A7CINFO file in their DSVs to be installed by DSM/SCM. Before installing
the SUT:
°Check the Interactive Upgrade Guide for DSM/SCM support and other new
features and possible migration issues.
°Check the appropriate softdoc for the OSS product.
°Check that all OSS file sets used by DSM/SCM for OSS file installation are
mounted and started.
•Beginning with the G06.23 RVU, you can use SCF to configure an OSS process as
a persistent process under the persistence manager ($ZKRN). To configure OSS
persistent processes, you must have all of these SPRs installed (available at
G06.24 unless otherwise indicated):
°T1084G06AAH
°T1085G06AAL
°T6586G07AAU
°T5800G06AAP
°T9082ACX (SCF)
°T9082G02ACX
°T8624G10AAM (now available, starting in August 2004)
°T8397G00ABA (see your service provider for availability)
OSS persistent processes can be used without SPRs T8624G10AAM and
T8397G00ABA. If those SPRs are not installed, some OSS applications might fail
at processor startup unless modified to include an initial delay (on the order of 10
seconds). This delay is not needed when you install those SPRs.
Without T8624G10AAM and T8397G00ABA, when an OSS shell is launched
immediately after a processor comes up, the shell needs to wait until processor
components of the OSS environment such as the OSS pipe server finish
initialization. The necessary delay can be achieved by adding an OSS sleep 10
command either to the STARTUPMSG attribute or as the first entry in the script
launched by the STARTUPMSG attribute.
See the sleep(1) reference page either online or in the Open System Services
Shell and Utilities Reference Manual for more information about the sleep
command.
For more information about the new attribute and considerations for its use, see
the SCF Reference Manual for the Kernel Subsystem.
•Beginning with the G06.24 RVU, the OSS gtacl command has two more optional
flags added to its command line. See the T8628AAJ softdoc for more information.
If you have to fall back to a previous RVU, scripts that contain one or more of these
optional flags must be revised because the function will not be available.
Overview of Installing G06.24
G06.24 Software Installation and Upgrade Guide—528593-005
1-27
OSS (G06.12 through G06.24)
Open System Services (OSS) and DSM/SCM (T6031D46 PVU)
Starting with the G06.18 RVU, all OSS SUT-based products with pax files must have
the A7CINFO file in their DSVs to be installed by DSM/SCM. Check the Interactive
Upgrade Guide or the softdoc corresponding to the OSS products to ensure that the
A7CINFO file is present.
If the OSS product is released without the A7CINFO file, you can still install the product
by using PINSTALL or COPYOSS.
If the OSS product is released with the A7CINFO, do not use PINSTALL/COPYOSS to
install those pax (archive) files; these files are installed and maintained by DSM/SCM.
The Receive Software activity for the OSS products with A7CINFO files in their DSVs
can only be performed when the installation of the new product version (PVU)
T6031D46 is complete on the Host. The T6031D46 PVU of DSM/SCM is required to
process the A7CINFO files present in the DSVs of the OSS products.
When using DSM/SCM to receive the SUT and perform a Build/Apply, you must
perform the following tasks:
1. When performing a DSM/SCM Receive Software activity on the Host, select the
Receive all files option.
2. In the Planner Interface for the Target system, select the Manage OSS Files
option.
3. Check that the OSS Root Name Server $ZPNS is running on the Target. The
volume where the SYSnn is being placed must be up as $SYSTEM to install OSS
files.
4. After you run ZPHIRNM, run the merge_whatis command.
Unautomated configuration and OSS startup is described in Appendix B in the Open
System Services Management and Operations Guide.
DSM/SCM (T6031D46) Fallback
The FALLBACK macro is in the ZDSMSCM directory. Run the FALLBACK macro if
DSM/SCM has been reverted back to a pre-T6031D46 version. The FALLBACK macro
will not be available in the ZDSMSCM subvolume when you fall back to a prior G06.18
RVU. Thus, you must retrieve the FALLBACK macro from the SUT prior to falling back
or use the FUP DUP command to copy it to a subvolume for use during fallback.
See the DSM/SCM User’s Guide and online help for more information.

Overview of Installing G06.24
G06.24 Software Installation and Upgrade Guide—528593-005
1-28
NonStop SQL/MP
OSS EasySetup (T0585) (G06.16, G06.23)
The OSS EasySetup product (T0585) is available for automated setup, as described in
the Open System Services Installation Guide. OSS EasySetup is a series of TACL
scripts that assist a site when configuring and installing a minimal OSS subsystem for
the first time or when starting, stopping, or removing an OSS subsystem. OSS
EasySetup requires the process $NULL and the installation of SPI template files.
The product NULL (T6025) is included on each SUT even though for G06.23 and later,
with new PARAMs introduced, $NULL and $ZSMP are no longer required to bring up
the OSS Monitor. You no longer are forced to install them.
Starting in G06.23, EasySetup allows use of ZSPI definition files installed other than in
the default location and allows use of a non-default ISV disk for OSS.
NonStop SQL/MP
In general, when migrating to a new version of NonStop SQL/MP software, you should
be reasonably sure you do not want to revert to the previous version of the software
before you perform any of the following actions:
•Create a NonStop SQL/MP catalog whose version is newer than the previous
version of the NonStop SQL/MP software. This situation occurs automatically when
you create a catalog on a node running the new version of the software.
•Create a NonStop SQL/MP table using new features that cause the version of the
table to be newer than the previous version of NonStop SQL/MP software.
•Compile a program using the new version of the NonStop SQL/MP compiler.
NonStop SQL/MX Release 2.0 (G06.23 and G06.24)
See the G06.23 Release Version Update Compendium, the Interactive Upgrade Guide,
and the SQL/MX Installation and Management Guide for more information about
migrating to SQL/MX Release 2.0. See also the SQL/MX Comparison Guide for
SQL/MP Users and the T0650ABA softdoc, which is the master softdoc for software
components included in SQL/MX Release 2.0.
Note. SQL/MX Release 2.0 requires processors that support IEEE floating-point functions. All
processors in a node on which SQL/MX Release 2.0 is installed must be Model 1954 (S72000) or
newer. A processor halt%005101 can result when one or more processors in a system do not meet the
minimum hardware requirements for installing SQL/MX Release 2.0.
In addition to supporting IEEE floating-point functions, a NonStop system on which SQL/MX Release 2.0
is installed must support the SQL/MX minimum requirement of 1GB per processor. For more information
about the SQL/MX hardware and memory requirements, see the SQL/MX Installation and Management
Guide.

Overview of Installing G06.24
G06.24 Software Installation and Upgrade Guide—528593-005
1-29
NonStop SQL/MX Release 2.0 (G06.23 and G06.24)
SQL/MX Release 2.0 delivers the newly architected, standards-based SQL/MX tables
for NonStop servers. SQL/MX Release 2.0 provides general availability support for
operations against SQL/MP tables. Support for SQL/MX tables is not included in the
G06.24 RVU. The function, when available, will be shipped as SPRs and is planned to
be compatible with G06.23 and G06.24.
Migration Considerations for SQL/MX Release 2.0
Metadata tables created and used by SQL/MX Release 2.0 running on the G06.23 and
G06.24 RVUs are different from those metadata tables used on prior SQL/MX
releases, and the tables are very different from those used by SQL/MP. You must be
on at least Release 1.8 to migrate to SQL/MX Release 2.0, and Release 1.8 is the only
version of SQL/MX, which you can fall back to from Release 2.0.
Only the metadata from R1.8 should be migrated to the Release 2.0 format. To
facilitate migrating metadata, a migrate utility is provided with Release 2.0.
Migration and fallback considerations do apply. See also TMF (G06.23 and G06.24) on
page 1-38 and DP2 (G06.16, G06.23, G06.24). In multinode installations, where
queries must access data on other nodes, all nodes must migrate to SQL/MX Release
2.0 at the same time. A mixture of nodes running SQL/MX Release 1.8 and SQL/MX
Release 2.0 is not supported. Because SQL/MX Release 2.0 is an optional product, it
can be un-installed after it has been installed on an S-series system. You must perform
a system load, but you do not need to change your current RVU unless you want to
use a previous release of SQL/MX.
A quick summary of fallback and migration considerations include:
•To fall back to SQL/MX Release 1.8, you must reinstall your previous RVU and
certain versions of some pre- or co-requisite software product.
•Fallback to SQL/MX releases earlier than SQL/MX Release 1.8 is not supported. If
you are using a SQL/MX release that preceded Release 1.8, you must migrate to
an RVU that supports Release 1.8 (G06.18 through G06.22) before migrating to
SQL/MX Release 2.0 (G06.23 or later).
•If you are migrating from an SQL/MP or SQL/MX Release 1.8 environment, do not
delete your SQL/MP metadata tables until you are sure you do not need to fall
back. (Deleting these tables will prevent a successful fallback.)
•SQL/MX Release 2.0 applications you have developed prior to fallback are not
usable with the SQL/MX Release 1.8.
•To fall back to an SQL/MP database environment, you do not have to reinstall your
previous RVU. (SQL/MP is included in the G06.23 and G06.24 RVUs.) To fall back
to an Enscribe database environment, you do not have to reinstall your previous
RVU. (Enscribe is included in the G06.23 and G06.24 RVUs.)
•Applications that you compiled with the SQL/MX Release 2.0 compiler need to be
recompiled with the previous release of the SQL compiler after fallback.

Overview of Installing G06.24
G06.24 Software Installation and Upgrade Guide—528593-005
1-30
NonStop SQL/MX Release 2.0 (G06.23 and G06.24)
•If you modify or create new SQL/MP aliases, defaults, or stored procedures in Java
(SPJs) in the SQL/MX Release 2.0 environment, there are no automated tools for
moving the associated SQL/MX metadata back to SQL/MP metadata tables.
Moving metadata will require you to execute SQLCI commands such as CREATE
MPALIAS, CREATE PROCEDURE, and INSERT INTO DEFAULTS after
reinstalling SQL/MX Release 1.8. For information about these commands, see the
SQL/MX Reference Manual.
•If you fall back to a database environment that does not support multienvironment
SQL modules, any and all locally-placed modules must be converted to globally-
placed before you fall back. You will be unable to fall back successfully if a naming
conflict exists between locally-placed or globally-placed modules. For more
information, see the SQL/MX Installation and Management Guide.
•Before migrating to SQL/MX Release 2.0, HP recommends that you install one of
these DP2 fallback SPRs on the Release 1.8 system and test it sufficiently for
production use:
°T9053AOY, if the system uses the online disk remirror feature
°T9053AOZ, if the node does not use the online disk remirror feature
Then you can migrate to G06.24. If a fallback becomes necessary at a later time,
you can fall back to the tested environment. For the steps to fall back from
SQL/MX Release 2.0, see the SQL/MX Installation and Management Guide.
•You should remove all SQL/MX Release 2.0 objects and their resource forks
before attempting to fall back. SQL/MX objects are difficult to remove from a
system with an RVU earlier than G06.23. Typically, you use the MXCI DROP
command to drop all SQL/MX Release 2.0 objects. If you encounter problems
using MXCI to drop SQL/MX Release 2.0 objects, you can use the mxtool GOAWAY
command instead. (GOAWAY is an OSS command line utility.) For information about
MXCI and mxtool commands, see the SQL/MX Reference Manual. After you fall
back, the SQL/MX GOAWAY utility will not be available and SQL/MX objects will be
much more difficult to remove.
• After falling back, if you have to remove any residual SQL/MX objects:
1. Use the FUP INFO command to locate any SQL/MX files remaining on the
system. Because SQL/MX objects reside in subvolumes that begin with the
letters ZSD, use this command to find them:
1>FUP INFO $*.ZSD*.*
2. Use the DELETE command of the DIRCHECK disk utility to delete the files.
For example:
Note. Note that a system load is required to install the DP2 fallback SPR.

Overview of Installing G06.24
G06.24 Software Installation and Upgrade Guide—528593-005
1-31
NonStop SQL/MX Release 2.0 (G06.23 and G06.24)
2>$system.zutil.dircheck delete name $data08.zsdm819j.wdxhp600
System: \MOLE PID: (0, 72) 8-Apr-2004 18:06:57
*WARNING* SQL Catalog will not be updated when SQL labels are deleted.
*WARNING* Extents are lost when file/table labels are deleted.
3. Rebuild the disk free-space table by using the SCF CONTROL DISK $volume,
REBUILDDFS command. For more information about CONTROL DISK, see
the SCF Reference Manual for the Storage Subsystem.
Installing SQL/MX Release 2.0
Check that TMF is configured and running on the system node where you will install
SQL/MX. See the TMF Planning and Configuration Guide for TMF installation
guidelines. Note that all SQL/MX objects must reside on volumes audited by TMF.
SQL/MX program files do not need to reside on audited volumes.
Before installing SQL/MX, review the SQL/MX Installation and Management Guide.
Make sure that you have performed all pre-installation instructions as outlined in
sections 1 and 2. Section 3 describes, in detail, how to install SQL/MX.
You install SQL/MX after performing a system load of the new RVU and performing
other post-installation steps. (See Section 12, Resuming Normal Operations.)
Note. When using DIRCHECK, remember:
•You must be the super ID (255,255).
•The DIRCHECK DELETE command deletes any internal labels associated with a specified
file. Because of this, DIRCHECK indicates that multiple labels have been deleted after you
delete one file.
To view online help for DIRCHECK, enter:
$system.zutil.dircheck help
To view online help for the DIRCHECK DELETE command, enter:
$system.zutil.dircheck help delete

Overview of Installing G06.24
G06.24 Software Installation and Upgrade Guide—528593-005
1-32
NonStop Processor Multifunction (PMF) CRUs
(G06.08 through G06.24)
NonStop Processor Multifunction (PMF) CRUs (G06.08 through
G06.24)
If you upgrade to NonStop PMF CRUs while installing G06.24 and have to return to an
RVU prior to G06.24, review Table 1-9 to see if you have to remove PMF CRUs:
Table 1-9. Upgrading to NonStop S-Series CRUs and Falling Back
NonStop PMF CRU RVU Action
S7400 G06.08 S7400 PMF CRUs must be removed; these
PMF CRUs are supported in G06.08 and later
RVUs only.
S74000 G06.08 S74000 PMF CRUs must be removed; these
PMF CRUs are supported in G06.08 and later
RVUs only.
S7600 G06.17 S7600 PMF CRUs must be removed. NonStop
S7600 PMF CRUs are supported for G06.17
and later RVUs only.
S76000 G06.16 S76000 PMF CRUs must be removed.
NonStop S76000 PMF CRUs are supported
for G06.16 and later RVUs only.
S86000 G06.16 S86000 PMF CRUs must be removed.
NonStop S86000 PMF CRUs are supported
for G06.16 and later RVUs only.
S7800 G06.23 S7800 CRUs must be removed. NonStop
S7800 CRUs are supported for G06.16 and
later RVUs only. The correct OSM or TSM
SPRs (for instance, TSM T7945ABL or later)
must be installed. See the Interactive Upgrade
Guide for details.
S78000 G06.24 S78000 CRUs must be removed. NonStop
S78000 CRUs are supported for G06.16 and
later RVUs only. The correct OSM or TSM
SPRs (for instance, TSM T7945ABN or later)
must be installed. See the Interactive Upgrade
Guide for details.
S88000 G06.24 S88000 CRUs must be removed. NonStop
S88000 CRUs are supported for G06.24 and
later RVUs only. See the Interactive Upgrade
Guide for details.

Overview of Installing G06.24
G06.24 Software Installation and Upgrade Guide—528593-005
1-33
Spooler (G06.00 through G06.19)
Spooler (G06.00 through G06.19)
If your current product version of spooler is T9101D41 ADM or later, you do not need
to restore copies of both the control file and the collector data files if you must back out
of the new RVU. All versions of T9101D41, starting with T9101D41 ADM, contain
Version 5 of the spooler control file and are compatible with the T9101D46 and D48
product versions of spooler. However, it is always recommended that the spooler
control file and collector data files be backed up prior to any migration or change in
configuration.
Checking Current Version
To find out which version of the spooler you are currently running, enter a VPROC
command for $SYSTEM.SYSTEM.SPOOLCOM. The following example shows that a
D48 product version of the spooler is running:
$USER0 PRS 5> vproc $system.system.spoolcom
VPROC - T9617G03 - (30 AUG 2002) SYSTEM \IGATE Date 08 JUL 2003,
21:16:17 Copyright Compaq Computer Corporation 1986 - 2002
$SYSTEM.SYSTEM.SPOOLCOM
Binder timestamp: 08JUN2003 21:24:34
Version procedure: T9101D48^08AUG2003^IPM^T9101AEZ
Target CPU: UNSPECIFIED
Backing Up the Spooler Environment
Prior to backing up the spooler environment, use the SPOOLCOM;SPOOLER,DRAIN
command to perform an orderly shutdown of the spooler. This strategy ensures that all
spooler control files and collector data files are closed. Failure to drain the spooler prior
to backing up the control file and collection files could cause problems while attempting
to recover the spooler environment.
Prior to executing the SPOOLCOM;SPOOLER,DRAIN command:
•Use the SPOOLCOM;COLLECT $collector-process, LISTOPENS command
to identify processes that currently have jobs open.
•Use the SPOOLCOM;JOB (STATE PRINT) command to determine which jobs are
currently printing.
Take the appropriate action to ensure that these jobs either terminate when finished or
are stopped.
Caution. To maintain the integrity of the spooler environment, wait until the spooler has
finished draining rather than stop any spooler processes by using the TACL STOP command.
The control file can be corrupted during the next warm start or rebuild.

Overview of Installing G06.24
G06.24 Software Installation and Upgrade Guide—528593-005
1-34
SCF Storage Subsystem (Online Disk Remirroring)
(G06.21)
Upon receipt of the SPOOLER DRAIN command, the supervisor stops accepting jobs
for collection or printing (new opens are rejected with a file-system error 66—device
downed). Each collector stops when it has no more open jobs. Each print process
finishes printing any active jobs and then stops.
After all collectors and print processes have stopped, the supervisor process stops
itself. The spooler enters the dormant state, ready to be warm started.
An example of backing up the spooler control files:
BACKUP/OUTSPLBKUP/$TAPE,($SYSTEM.SPOOLER.*,$DATA01.SPOOLER.DATA),LISTALL
See Support Notes S97057 (T9101D41 Spooler Collector Data Files Have Changed
Format) and S99086 (NSK Spooler—Migration and Draining Instructions) for more
information.
CSPOOL Set at HIGHPIN
Beginning with G06.19, a new Spooler SPR T9101D48^AEY is introduced. This PVU is
installed by DSM/SCM with CSPOOL at HIGHPIN. If you do not want this setting, you
can change CSPOOL to use LOWPIN by issuing the BINDER command:
CHANGE HIGHPIN OFF IN CSPOOL
SCF Storage Subsystem (Online Disk Remirroring) (G06.21)
OSM automatically recognizes online remirrored disks (ODR). However, if you use
TSM, special steps are required before TSM can recognize online remirrored disks.
Online reconfiguration of a mirror drive cannot be performed while TSM ($ZTSM) is
running. Therefore, you must always stop the TSM server process before you
implement online disk remirroring. After issuing SCF commands for online disk
remirroring, restart the TSM server.
During the ODR operation when using TSM, error 00012 might appear. For cause and
recovery information, see Appendix B in the SCF Reference Manual for the Storage
Subsystem.
Detailed syntax and explanations for using SCF commands to configure ODR are
documented in the SCF Reference Manual for the Storage Subsystem.
Note. DSM/SCM automatically sets CSPOOL to HIGHPIN. DSM/SCM automatically overlays
the current object file CSPOOL with the original from the SUT whenever a subsequent
Build/Apply is performed. See Support Note S03006A.

Overview of Installing G06.24
G06.24 Software Installation and Upgrade Guide—528593-005
1-35
SWID (T9298D40^AAK) (G06.20)
SWID (T9298D40^AAK) (G06.20)
SWID is the software identification tool invoked by the SYSGENR program that audits
file identification information about your software. If you are currently on a post G06.19
RVU (G06.20 or G06.21 RVU), you do not need to restore and receive the new SWID
PVU before you install the G06.24 SUT. If you are on a pre-G06.20 RVU, you must
restore and receive the new SWID PVU before you install the G06.24 SUT. See Copy
(RESTORE) the D46 DSM/SCM Product Version and SWID (Optional) to Disk on
page B-6.
Tandem Failure Data System (TFDS)
Ensure that TFDS is configured properly on the system. (TFDS monitors processors in
NonStop servers for software failure notifications.) The dump volume should not be
protected by Safeguard, and should also be properly configured.
TNS/R CRE Heap Manager (G06.15)
The G06.15 RVU introduced a new heap manager, NSK CRE/RTL (T1269), an
alternative to the Native CRE/RTL product (T8431). Either heap manager can be
chosen during the creation of a system configuration revision. Consequently, the
choice of which one to install is an independent decision for your system. See support
note S02001 for migration considerations and S03104 for installation instructions.
Note that if you are installing and using OSM, HP recommends that the NSK CRE/RTL
(T1269) product be installed on the system, as opposed to the Native CRE/RTL
(T8431), which is the default. Refer to the support note S02001 for migration
considerations for T1269.
TSM Client and Server Software (G06.22, G06.23, G06.24)
Part of the G06.24 installation process may involve upgrading your system console to
TSM client software Version 2003A.
If you have to fall back to an earlier RVU after installing G06.24, you can continue to
use TSM client software Version 2003A on your system console.
Caution. You cannot simultaneously use both heap managers (T8431 and T1269) on the
same system.
Note. You must install and configure the latest TSM server SPR and client before updating
processor bootcode firmware online.

Overview of Installing G06.24
G06.24 Software Installation and Upgrade Guide—528593-005
1-36
Service Processor (SP) Firmware (G06.08 through
G06.24)
TSM does not support or adequately support these new features, beginning with the
G06.21 RVU:
•Online Disk Remirroring (FDR) (G06.21). Only OSM automatically recognizes
online remirrored disks. TSM can recognize online remirrored disks only if $ZTSM
is aborted and then restarted.
•HP NonStop ServerNet cluster (G06.21). HP recommends using the OSM Service
Connection (rather than the TSM Service Application) for all systems that are part
of an HP NonStop ServerNet cluster.
•HP Ultrium Linear Tape Open (LTO) Tape Drive (introduced in the G06.21 RVU).
•The new DAT (digital audio tape) drive for use on NonStop S-Series systems
compatible with G06.23.
•The I/O Adapter Module (IOAM) enclosure (introduced in the G06.24 RVU) and its
related components for use on S76000 NonStop S-Series systems and above.
•Enterprise Storage System (ESS).
•The CT9841FC-x tape drive (introduced in G06.24), which is a replacement for the
CT9840FC-x tape products.
Service Processor (SP) Firmware (G06.08 through G06.24)
Before you update SP firmware, HP recommends that you download the SP firmware
file to your system console. (See Download the SP Firmware File to the System
Console on page 7-6). You can use either OSM or TSM, depending on which
application you are currently using.
Normally, you use the TSM Service Application to update SP firmware, because it
takes much longer to update SP firmware using the TSM Low-Level Link Application
(approximately 30 minutes for each SP). However, you can use the TSM Low-Level
Link Application to update and reset SP firmware if you are unable to perform a G06.24
system load. If you already have OSM installed and configured, use the OSM
Low-Level Link in the same way if you cannot perform a G06.24 system load and need
to update the firmware.

Overview of Installing G06.24
G06.24 Software Installation and Upgrade Guide—528593-005
1-37
SCF for Data Alignment (G06.17)
SCF for Data Alignment (G06.17)
Starting with the G06.17 RVU, three attributes are added to the ALTER SUBSYS
command of the Subsystem Control Facility (SCF). These attributes are intended to
help application programmers find and correct misaligned data in their programs.
These data alignment errors might lead to incorrect or unpredictable results. The new
SCF attributes provide for the detection and reporting of data alignment errors, using a
new tracing facility, and for the control of program behavior when a misalignment is
detected. The new attributes are:
•MISALIGNLOG
Enables logging of data alignment errors.
•NATIVEATOMICMISALIGN
Controls the behavior of TNS/R native programs when a data alignment error
occurs.
•TNSMISALIGN
Controls the behavior of TNS programs when a data alignment error occurs.
See the SCF Reference Manual for the Kernel Subsystem for details on these SCF
attributes.
System Configuration Database
To ensure system configuration integrity, always save the current system configuration
database (CONFIG) before installing software or making changes to your system
configuration. You must load the G06.24 operating system before making changes to
the configuration database.
See Save the Current Configuration File (CONFxxyy) on page 4-1 for information on
saving the current system configuration database.
Note. Note that these three attributes are maintained system-wide; the settings affect all
processors in the node. The misalignment events (if any) are viewed by using existing EMS
event viewers (for example, Viewpoint, TSM, and OSM). The EMS subsystem identifier is
GUARDLIB, and the event number is 108. For information on how to check EMS logs, see the
EMS Manual.
Caution. Starting with the G06.06 RVU, the configuration file is automatically upgraded to alter
records for all storage devices. Loading the system with an upgraded configuration file and a
previous RVU causes a processor halt (disk-process error code%011500).

Overview of Installing G06.24
G06.24 Software Installation and Upgrade Guide—528593-005
1-38
NonStop TCP/IPv6 (G06.20, G06.22, G06.23,
G06.24)
NonStop TCP/IPv6 (G06.20, G06.22, G06.23, G06.24)
With the introduction of NonStop TCP/IPv6 in the G06.20 RVU, all NonStop TCP/IPv6
protocol files are located in $SYSTEM.ZTCPIP subvolume. If you are upgrading from a
pre-G06.20 RVU, back up your NonStop TCP/IP configuration files before running
ZPHIRNM. (HP recommends backing up your TCP/IP configuration files before running
ZPHIRNM even if you are on a G06.20 or later RVU). If you have to restore information
on network services and connections, you will need these files for the proper network
information.
When resuming normal operations after a system load has been performed, you must
have all the TCP/IP configuration files in your $SYSTEM.ZTCPIP subvolume.
Otherwise, applications dependent on proper network connections will fail.
For complete installation instructions, see Back Up (Copy) Files in the
$SYSTEM.ZTCPIP Subvolume on page 10-2 and Update TCP/IP Configuration Files
on page 12-1.
TMF (G06.23 and G06.24)
TMF Migration Considerations for SQL/MX Release 2.0
If you install SQL/MX Release 2.0, fallback and migration concerns could apply if you
have to fall back to a previous RVU. See the T8607AFH or later softdoc for detailed
migration information for TMF. See also the TMF Planning and Configuration Guide
and the TMF Operations and Recovery Guide.
If the Install SQL/MX Script has not been run on your system while running on the new
RVU, and no native-format SQL/MX metadata tables (or their resource forks) or audit
records for them have been created, there are no TMF fallback considerations.
Otherwise, you must use the appropriate DP2 (T9053) fallback SPR if you have not
performed a clean TMF shutdown.
HP strongly recommends that you successfully complete a clean TMF shutdown (with
all audited disks up) before falling back to a prior RVU. This is particularly important
whenever the RVU you are falling back from supports any new format files or objects
or audit records for them, and the fallback RVU does not.
Note.
•For the DSM/SCM Planner Interface to be operational, the PORTCONF file must have
the correct entry for DSM/SCM. The SERVICES file must have an entry that specifies
DSM and its corresponding port number.
•Keep your current PROTOCOL file in your $SYSTEM.ZTCPIP subvolume. Update it
with the new lines from the sample PROTOCOL file (SMPLPROT).
Overview of Installing G06.24
G06.24 Software Installation and Upgrade Guide—528593-005
1-39
TNOS Server and TNOS Utility (G06.17 through
G06.24)
To establish complete TMF file recovery protection for your SQL/MX metadata tables,
update your TMF online dump (and Backup) scripts to include the names of all
SQL/MX metadata tables, including those that are SQL objects and their resource
forks. The TMFCOM DUMP FILES and RECOVER FILES commands support all the
new SQL/MX metadata tables (using their Guardian names).
TMF Migration Considerations for Format 2 Audit Trails
TMF provides the capability to create much larger audit-trail files with G06.24, but TMF
must be stopped in a clean state to execute the TMFCOM command that enables this
ability. If audit-trail files greater than 2GB are part of the long-term audit-trail
configuration strategy, consider altering the audit-trail format at migration time, given
that TMF is already stopped. If not done at this time, then altering the audit-trail
configuration to enable format 2 audit-trail files will require a STOP TMF command at
some later date.
TMF Fallback from G06.24
If no changes to the TMF audit-trail configuration are planned, then there are no issues
related to fallback associated for TMF with G06.24. You should be able to migrate to
G06.24 from a prior RVU and then fall back to that same RVU without issues related to
TMF. However, if any changes to the audit-trail configuration are planned, such as
altering the file size of a given trail or changing the audit-trail configuration to use
format 2 files, then it becomes very important to understand the fallback issues.
After you execute either the ALTER AUDITTRAIL command with the new FILESIZE
option, or the ALTER TMF command with the new ATFORMAT option, then the
fallback to a prior RVU involves a series of steps that must be followed precisely.
Executing a DELETE TMF command may also be one of the required steps if you alter
the audit-trail format and then find it necessary to fallback.
Refer to the HP NonStop TMF Supplement for Large Audit-Trail Files for details related
to falling back after using these new TMF command options in G06.24.
TNOS Server and TNOS Utility (G06.17 through G06.24)
The TNOS Server (T8666) and the TNOS Utility (T8667), two components of HP
NonStop ODBC/MP, have been updated in G06.17 and later to correct data alignment
problems. To avoid data alignment problems, users of the TNOS Server and TNOS
Utility who are migrating to an RVU before G06.17 must also upgrade their TNOS
Server and TNOS Utility to these new versions:
•T8666ACL or later (for TNOS Server)
•T8667ACL or later (for TNOS Utility)
The marketing ID for the new versions is SJ08V1, and the Independent Product (IP)
name is NonStop ODBC Server and Client.

Overview of Installing G06.24
G06.24 Software Installation and Upgrade Guide—528593-005
1-40
Visual Inspect (G06.20)
Post installation instructions can be found in the appropriate PVU softdoc. New EMS
templates are required for the T8666D35 PVU.
See support note S02075B for details concerning TNOS and data alignment problems.
Visual Inspect (G06.20)
G06.20 includes the Inspect subsystem (T9226G06) and the Visual Inspect server
(T9756AAH) that support PIC programs and DLLs. This version of the server requires
version 2.4 of the Visual Inspect client (T7877AAD).
If you run client product version 2.3 with a G06.20 or later RVU, the client is connected
automatically to the previous version of the server (T9756AAG), and you will not be
able to debug or analyze snapshot dumps from a PIC process.
Unfortunately, client product version 2.4 is incompatible with earlier versions of the
server. Therefore, it can be difficult to debug from the same workstation on multiple
systems, where some systems run G06.20 or later RVUs and some run earlier RVUs.
There are two ways to approach this problem:
•Install the newer server on the older NonStop systems, along with a compatible
version of the Inspect subsystem. You can install Visual Inspect server SPR
T9756AAH and Inspect subsystem SPR T9226AAK on an HP NonStop K-series
server running the D45.00 or later RVU, or on a NonStop S-series server running
G05.00 through G06.19 RVUs. See the T9756AAH softdoc.
•Install both Visual Inspect client product versions 2.3 and 2.4 on the workstation.
However, you cannot run both at the same time, and version 2.3 can encounter
problems after 2.4 has run.
WAN Wizard Pro (G06.21, G06.22, G06.23, G06.24)
The NonStop System Console Installer CD (S7X-SWV1, Update 3) includes the WAN
Wizard Pro client version 4.00. This client version is compatible with G06.21 and later
SUTs only. If you have to fall back to a pre-G06.21 RVU, you must de-install the
previous WAN Wizard Pro and re-install the previous WAN Wizard Pro on your system
console. See the WAN Wizard Pro Support Note S04064 for details.
Note. Note that the Visual Inspect client is an independent product and must be ordered
separately. HP strongly recommends that you upgrade both the client and server products
at the same time.
See all related softdocs for installation and configuration information.
Overview of Installing G06.24
G06.24 Software Installation and Upgrade Guide—528593-005
1-41
X25AM
X25AM
A new SCF line modifier, EMSFORFRMR, is provided so that an EMS message is
displayed when a link reset occurs from a Frame Reject (FRMR) condition on an
X25AM line. The modifier accepts values in the range from 0 to 200. Configure this
SCF modifier with a nonzero value to enable the generation of an EMS message
during an FRMR condition. (By default, the feature is disabled.)
See the X25AM Configuration and Management Manual and the X25AM Management
Programming Manual for more information.
Because there are changes included in T1096 (WANX25LAPB), T0051 (CSSLAPB -
X21DRIVER), and T9323 (X25 SCF-PM) for this new feature, provide the SPR
requisites documented in the T9060AFM (X25AM) softdoc.

G06.24 Software Installation and Upgrade Guide—528593-005
Part I. Upgrade Tasks
Part I describes the tasks for upgrading a single NonStop S-series server to the
G06.23 RVU, as follows:
•Section 2, G06.24 Upgrade Checklists
•Section 3, Installing SPRs Before Upgrading to the G06.24 RVU
•Section 4, Preparing to Upgrade the Server Software
•Section 5, Installing the G06.24 RVU
•Section 6, Replacing the Disk Bootstrap Microcode (Pre-G06.06)
•Section 7, Updating Service Processor (SP) Firmware
•Section 8, Updating Processor Boot Code
•Section 9, Updating SCSI Boot Code (Pre-G06.08 RVU)
•Section 10, Running ZPHIRNM
•Section 11, Loading the G06.24 RVU
•Section 12, Resuming Normal Operations
•Appendix C, Updating SWAN Concentrator CLIP Firmware

G06.24 Software Installation and Upgrade Guide—528593-005
2-1
2G06.24 Upgrade Checklists
Use the checklist in Table 2-1 as you perform the tasks required to upgrade to the
G06.24 RVU and the checklist in Table 2-2 to record the information needed when
performing these tasks.
Task durations are included in Table 2-1. Most of these baseline durations were
established on an NonStop S72002 server running the G06.12 RVU under minimal
load (one user).
Note that these durations generally do not include operations such as starting a TSM
Service application or performing a System Discovery in the TSM or OSM Low-Level
Link Application.
If you use DSM/SCM to manage OSS files, the Build/Apply operation is longer (about
an hour).
G06.24 Upgrade Checklist
Table 2-1. G06.24 Upgrade Checklist (page1of3)
Task Description Minimum
Duration Documentation Done
?
1. Install the latest
DSM/SCM SPR, SWID
(if necessary)
40 minutes Appendix B, Installing the Latest
DSM/SCM SPRs and Client
Software
2. Run Install^Templates
macro 5 minutes If Running INSTALL^TEMPLATES
Is Required on page B-13.
3. Install the DSM/SCM
client version 5 minutes Install the DSM/SCM Client From
ZDSMSCM on page B-18
4. Install required or
recommended fallback or
interoperability SPRs (if
necessary).
0.0 minutes*Section 3, Installing SPRs Before
Upgrading to the G06.24 RVU
Appendix A, Using DSM/SCM to
Install SPRs
5. Save current system
configuration file <1 minute Save the Current Configuration
File (CONFxxyy) on page 4-1
6. Upgrade system console
software 90 minutes Upgrade the System Console
Software on page 4-2
7. Verify system operations 15 minutes Verify System Operations on
page 4-3
8. Receive G06.24 RVU
SUT into the DSM/SCM
software archive
33 minutes
(Full SUT --
all products)
Receive New Software Into the
Archive on page 5-3 and follow
Alerts on page 5-1.
9. Create G06.24 software
configuration revision 1 minute Create a New Software Revision
on page 5-8
G06.24 Upgrade Checklists
G06.24 Software Installation and Upgrade Guide—528593-005
2-2
G06.24 Upgrade Checklist
10. Build and apply G06.24
software revision 2 hours with
OSS files Build and Apply the New Software
Revision on page 5-13
11. Print the DSM/SCM
Operator Instructions <1 minute Print Operator Instructions From
the Target Interface (ZPHITI) on
page 5-19
12. Install and configure the
OSM SPRs or TSM
SPRs (optional)
0.0 minutes** See the OSM Migration Guide or
TSM softdocs. See also support
note S03133A.
13. Replace the disk
bootstrap program (if
necessary)
<1 minute Section 6, Replacing the Disk
Bootstrap Microcode (Pre-G06.06)
14. Update service
processor (SP) firmware
(if necessary)
9 minutes per
SP Section 7, Updating Service
Processor (SP) Firmware
15. Update processor boot
code 5 minutes ** Section 8, Updating Processor
Boot Code
16. Run ZPHIRNM 12 minutes Running ZPHIRNM on page 10-1
17. Update EMS template
files (if necessary) 5 minutes If Running INSTALL^TEMPLATES
Is Required on page A-7
18. Halt processors 4 minutes Halt the Processors on page 11-2
19. Load the system with the
G06.24 RVU 10 minutes System Load Using the TSM or
OSM Low-Level Link on page 11-4
20. Update SCSI boot code
(if necessary) 1 minute per
controller Section 9, Updating SCSI Boot
Code (Pre-G06.08 RVU)
21. Recover the TCP/IP files
(if necessary) 2 minutes Update TCP/IP Configuration
Files on page 12-1
22. Reconfigure TSM or
OSM ND applications (if
necessary)
0.0 minutes** Reconfigure System Console
Applications on page 12-4
23. Check processor status <1 minute Check Processor Status (Using
TSM or OSM) on page 12-4
24. Configure WANMGR (if
necessary) 20 minutes Upgrade the WAN Manager
(T8365), (Optional) on page 12-15
25. Update SWAN
concentrator CLIP
firmware (if necessary)
4 minutes per
SWAN
concentrator
Appendix C, Updating SWAN
Concentrator CLIP Firmware
26. Update ServerNet/FX
firmware (if necessary) 3 minutes per
adapter Update ServerNet/FX and
ServerNet/FX2 Firmware
(Overview) on page 12-6
Table 2-1. G06.24 Upgrade Checklist (page2of3)
Task Description Minimum
Duration Documentation Done
?

G06.24 Upgrade Checklists
G06.24 Software Installation and Upgrade Guide—528593-005
2-3
G06.24 Upgrade Checklist
27. Configure the Spooler (if
necessary) 2 minutes Configure the Spooler on
page 12-9
28. Start system and
application software 11 minutes Start User and System
Applications on page 12-10
29. Reset and start the
system mirror disk (if
necessary)
2 minutes
(not including
the REVIVE)
Reset and Start the Mirror System
Disk (If Necessary) on page 12-11
30. Configure OSS (if
necessary) 20 minutes*** Configure OSS on page 12-13
31. Configure SMF (if
necessary) 60 minutes Configure SMF (Optional) on
page 12-14
32. Configure RDF (if
necessary) 5 minutes Configure the Remote Duplicate
Database Facility (RDF) on
page 12-15
33. Install, and configure
OSM client-based
components and server
(if not done in Step 12)
20 minutes** See the OSM Migration Guide and
support note S03133A.
* Duration is dependent upon the SPRs (if any) you need to install.
**Duration is dependent upon selected TSM or OSM installation and configuration options.
***Duration of each remaining task dependent upon what products are installed on your system
*
**
***
Table 2-1. G06.24 Upgrade Checklist (page3of3)
Task Description Minimum
Duration Documentation Done
?

G06.24 Upgrade Checklists
G06.24 Software Installation and Upgrade Guide—528593-005
2-4
G06.24 Required Information Checklist
G06.24 Required Information Checklist
Table 2-2. G06.24 Required Information Checklist
Type of Information Value
Volume where SYSnn subvolumes are located
(usually $SYSTEM)
Current SYSnn (before upgrading to G06.24)
SYSnn created during G06.24 Build/Apply
Volume where ZDSMSCM subvolume is located
(by default, $DSMSCM)
Volume where audit trails are located (by default,
$AUDIT)
Name of saved configuration file
Service processor (SP) firmware version for
current RVU (spcode9)
SP firmware version for G06.24 RVU (spcode9)
Processor boot code version for current RVU
(cpucode8 or cpucode9)
Processor boot code version for G06.24 RVU
(cpucode8 or cpucode9)
SCSI boot code version for current RVU (I1000 or
IBOOT)
Check for DSM/SCM product version (server and
client)
Check for TSM or OSM server and client versions
Check for processor type if upgrading to a new
NonStop S-series server. See Upgrading NonStop
S-Series Servers on page 1-15.

G06.24 Software Installation and Upgrade Guide—528593-005
3-1
3
Installing SPRs Before Upgrading to
the G06.24 RVU
This section describes the SPRs you should install on your current RVU before you
upgrade to the G06.24 RVU. SPRs provide new features between RVUs or correct
previous software problems.
Alerts
•Before installing an SPR:
°Do not apply any SPR unless you verify that you can apply it to your current
G-series RVU. Review the SPR Introduction Document (SID) for the SPR or
use the Web-based Scout for NonStop Servers analysis tool to check the
“Usable With RVUs” information for the SPR.
°Do not install an SPR for products that are not supported for your current
G-series RVU.
°Check with your service provider or Scout to verify that you have the most
current SPRs for your current G-series RVU and to see if any of the SPRs
listed in this section have been superseded by newer SPRs.
°Check the softdoc for each product for additional installation considerations.
•The G06.13 RVU introduced new NonStop SQL/MP features and support for
Format 2 partitions. An upgrade to the G06.24 RVU from a pre-G06.13 RVU can
be significant. For information on fallback SPRs, access Scout. For an overall
explanation on fallback and installation, see the Interactive Upgrade Guide.
•The G06.23 and G06.24 RVUs introduce new NonStop SQL/MX features. An
upgrade to the G06.24 RVU from a pre-G06.18 RVU can be significant. Fallback
SPRs might be required. See the Interactive Upgrade Guide for more information.
•The G06.14 RVU introduced ServerNet Cluster release 3. Should you need to fall
back to a previous RVU, you might be able acquire the functional equivalent by
applying certain SPRs. See the ServerNet Cluster Manual for details.
•The TSM client version (2003A) is compatible with T7945AAG through T7945ABN.
•You must install and configure either the latest TSM or OSM SPRs if you want to
use the online processor bootcode option and T7892ABD.

Installing SPRs Before Upgrading to the G06.24
RVU
G06.24 Software Installation and Upgrade Guide—528593-005
3-2
SPRs Required Before Upgrading
SPRs Required Before Upgrading
Depending on which RVU you are currently running, a number of SPRs must be
installed on your current RVU before you upgrade to the G06.24 RVU:
•D46 DSM/SCM: At least a D46 DSM/SCM product version must be installed on the
host system before the site update tape (SUT) can be received into the archive.
Note that:
°The D46 DSM/SCM client version enables you to manage Open System
Services (OSS) files. To obtain the client D46 version, you must download
DSM/SCM client from the ZDSMSCM subvolume after the T6031D46 server
software has been activated.
°The new DSM/SCM Planner Interface has been enhanced to provide
installation and auditing functions for OSS files.
•You can still use the T6031 ABB client with the T6031D46 server version to
manage Guardian files. However, you cannot use the T6031ABB client to manage
and audit OSS files. Therefore, HP recommends that the DSM/SCM client be at
the latest version (ABJ) and the server product version be T6031D46^ABJ.
•Fallback: If you encounter a problem that cannot be resolved while running the
G06.24 RVU, you can fall back to a previous G-series RVU, provided that you have
installed appropriate SPRs (referred to as fallback SPRs) on your system prior to
installing the G06.24 RVU, as discussed under Fallback SPRs on page 3-6.
•Interoperability: SPRs might also be required to maintain interoperability when
you migrate one or more nodes in a multinode environment to the G06.24 RVU, as
discussed under Interoperability SPRs on page 3-7.
•You can also continue to use TSM client software Version 2003A on your system
console if you have to fall back to your earlier RVU. See the softdocs for
installation instructions. If OSM is not installed when migrating to the G06.24 RVU,
use TSM to update the firmware and perform system loads, noting that TSM does
not support new guided procedures, and tape and storage functions inherent in
G06.21 an later RVUs. TSM does support the new processors: S7800, S78000,
and S88000.
•OSM Software Compatibility: New OSM SPRs are available on the G06.24 SUT.
However, always check Scout for NonStop Servers for any new SPRs that are
released. The T1089 ABO or later SP firmware SPR is available on the G06.24
SUT and should be installed even if you have already installed T1089 ABK. If OSM
is not installed when migrating to the G06.24 RVU, use TSM to update the
firmware and perform system loads, noting that TSM does not support new guided
procedures, tape and storage functions inherent in G06.21 and later RVUs. OSM
does support the new processors: S7800, S78000, and S88000.
Caution. Do not attempt to install a G05.00 or later RVU with a C32 product version of
DSM/SCM. System outages will result.

Installing SPRs Before Upgrading to the G06.24
RVU
G06.24 Software Installation and Upgrade Guide—528593-005
3-3
Summary of the SPR Installation Procedure
Summary of the SPR Installation Procedure
1. Use Scout to verify that you can apply the DSM/SCM SPR to your current G-series
RVU.
2. Use DSM/SCM to install the required SPRs. For detailed instructions, see
Appendix A, Using DSM/SCM to Install SPRs.
3. If necessary, use TSM to update firmware (DSM/SCM notifies you if firmware
needs updating).
4. If needed, use the Install^Templates macro located in the TACLMACS file to install
EMS template object files from SPRs on a running system if SYSGEN and system
load are not required. This macro uses SCF.
5. Run ZPHIRNM.
6. Perform a system load if SYSGEN is required.
For DSM/SCM D46 and OSM SPRs, different instructions apply.
D46 SPR of DSM/SCM
The T6031D46 product version update (PVU) requires that you install both the client
and the server-side version to manage OSS files. HP always recommends that you
upgrade to the newest software product revision (SPR) of DSM/SCM. Apply the
T6031D46^ABJ SPR of DSM/SCM before receiving the G06.24 SUT.
After you activate the T6031D46 ABJ or later server software, the ZDSMEXE file will
be available to download from the ZDSMSCM subvolume so that you can update the
client. (You do not need to update the DSM/SCM client to the D46 server side
immediately to receive the G06.24 RVU successfully.)
However, HP recommends that, for your production environment, both the client and
server side of DSM/SCM PVUs match.
Appendix B, Installing the Latest DSM/SCM SPRs and Client Software contains
instructions for installing a D46 SPR of DSM/SCM, including the client.
Caution. Failure to install a D30 or later DSM/SCM product version causes G05.00 and later
shared run-time libraries (SRL) products to be installed incorrectly. Incorrectly installed SRLs
cause major system problems and prevent successful upgrades to new RVUs.
You must install the D46 client version of DSM/SCM to activate DSM/SCM management of
OSS files for a target.
Installing SPRs Before Upgrading to the G06.24
RVU
G06.24 Software Installation and Upgrade Guide—528593-005
3-4
Determining Your Current DSM/SCM Version
Determining Your Current DSM/SCM Version
To verify which version of DSM/SCM is currently installed on your system, use the
VPROC command to determine the product version of TAEXE (Apply product of
DSM/SCM) and CBEXE (Build product of DSM/SCM). At a TACL prompt, enter:
> volume $dsmscm_vol.ZDSMSCM
> vproc taexe
> vproc cbexe
The following examples show a D30 version of DSM/SCM with T6030D30^AAO and
T6031D30^AAO:
8> volume $dsmscm.zdsmscm
9> vproc taexe
VPROC - T9617G03 - (30 MAR 1999) SYSTEM \ELI Date 03 NOV 1999, 10:37:37
COPYRIGHT TANDEM COMPUTERS INCORPORATED 1986 - 1995
$DSMSCM.ZDSMSCM.TAEXE
Binder timestamp: 08JUN1999 17:13:38
Version procedure: S7032D20^15OCT97^SWARCCP^AAG
Version procedure: T6031D30_31MAR99_21MAY99AAO
Target CPU: UNSPECIFIED
AXCEL timestamp: 08JUN1999 17:17:11
$DSMSCM ZDSMSCM 3> vproc cbexe
VPROC - T9617G03 - (30 MAR 1999) SYSTEM \ELI Date 03 NOV 1999, 10:37:48
COPYRIGHT TANDEM COMPUTERS INCORPORATED 1986 - 1995
$DSMSCM.ZDSMSCM.CBEXE
Binder timestamp: 08JUN1999 10:26:48
Version procedure: S7032D20^15OCT97^SWARCCP^AAG
Version procedure: T6030D30_31MAR99_05MAR99AAO
Target CPU: UNSPECIFIED
AXCEL timestamp: 08JUN1999 10:29:03
The following shows the latest D46 product version of DSM/SCM after DSM/SCM has
been activated:
$TDSV ZDSMSCM 8> vproc cbexe
VPROC - T9617G03 - (07 AUG 2003) SYSTEM \TINY Date 18 AUG 2004, 13:36:49
Copyright 2003 Hewlett-Packard Development Company, L.P.$TDSV.ZDSMSCM.CBEXE
Binder timestamp: 20APR2004 03:37:46
Version procedure: S7032D20^27FEB04^SWARCCP^AAH
Version procedure: T6031D46_10MAY2004_19APR2004ABJ
Target CPU: UNSPECIFIED
AXCEL timestamp: 20APR2004 03:40:33
$TDSV ZDSMSCM 7> vproc taexe
VPROC - T9617G03 - (07 AUG 2003) SYSTEM \TINY Date 18 AUG 2004, 13:36:39
Copyright 2003 Hewlett-Packard Development Company, L.P.
$TDSV.ZDSMSCM.TAEXE
Binder timestamp: 20APR2004 04:34:37
Version procedure: S7032D20^27FEB04^SWARCCP^AAH
Version procedure: T6031D46_10MAY2004_19APR2004ABJ
Target CPU: UNSPECIFIED
AXCEL timestamp: 20APR2004 04:38:09

Installing SPRs Before Upgrading to the G06.24
RVU
G06.24 Software Installation and Upgrade Guide—528593-005
3-5
DSM/SCM Client and Server Compatibility
DSM/SCM Client and Server Compatibility
The D46 DSM/SCM client is backward compatible with other DSM/SCM product
versions (backward compatible to T6030D30/T6031D30 [AAO and later]).
Table 3-1. DSM/SCM Client and Server Compatibility
This version of the
DSM/SCM Planner
Interface...
With this version of
DSM/SCM server
software... Results in...
T6030D30^AAT T6030D30/T6031D30
(pre-AAO) You can perform all DSM/SCM
functions available with the DSM/SCM
product version you are running.
T6030D30^AAT T6030D30/T6031D30
(AAO and later),
T6031D31, or T6031D46
•You do not get a version mismatch
message when you log on to the
Planner Interface.
•You can perform all pre-AAO
DSM/SCM functions.*
•You cannot use the new options
made available in the AAO and
later SPRs. (See the appropriate
softdoc and DSM/SCM User’s
Guide.)
T6031D46^ABF
through ABJ T6030D30/T6031D30
(pre AAO)
T6030C32/T6031C32
•A version mismatch warning
message appears when you log
on to the Planner Interface.
•Limited DSM/SCM operation is
available: you cannot perform a
Build/Apply.
•An error message appears when
you attempt to perform an
unsupported operation.
T6031D46^ABF
through ABJ T6030D30/T6031D30
(AAO and later)
or T6031D31
You cannot use the new OSS options
to manage OSS files.
T6031D46^ABF
through ABJ T6031D46 You can use the new options made
available with the T6031D46 product
version. (See the appropriate softdoc
and DSM/SCM User's Guide.)
* Although pre-AAO client software supports AAO and later server software, HP recommends that you run the
same client/server versions.

Installing SPRs Before Upgrading to the G06.24
RVU
G06.24 Software Installation and Upgrade Guide—528593-005
3-6
Fallback SPRs
Fallback SPRs
You must install fallback SPRs on your system before upgrading to the G06.24 RVU, or
fallback is not possible.
NonStop SQL/MP Fallback SPRs
As of G06.13, the NonStop SQL/MP Format 2 partitions program provides the ability to
extend the existing 2 GB partition limit up to a maximum of 1 terabyte (TB). No fallback
SPRs are available to fall back to pre-G06.03 RVUs. Fallback SPRs are available for
G06.03 through G06.13. See Scout for more information.
For more information on the fallback support contained in the SPRs listed in Table 3-2,
see the Interactive Upgrade Guide.
Fallback SPRs might also be needed for SQL/MX Release 2.0, as listed in Table 3-3
on page 3-7. Note that you must be on SQL/MX Release 1.8 to migrate to 2.0.
Caution. If you are running an RVU prior to G06.03, you cannot fall back to your current RVU.
If you want to ensure that you can fall back from the G06.24 RVU, you must:
1. Upgrade to a G06.13 or later RVU, with all the appropriate fallback SPRs applied. Run on
that RVU long enough to verify that your applications still function correctly.
2. Migrate to the G06.24 RVU.
Table 3-2. SPRs Required for NonStop SQL/MP Fallback (pre-G06.13)
Product SPR (or
superseding) Applicable RVUs
DP2 Fallback T9053AMN G06.03 through G06.07
T9053AMQ G06.08 through G06.10
T9053AMO G06.11 through G06.12
TMF Fallback T2076ADR
T8606ADZ
T8607ADR
T8608ADR
T8609ADR
T8652ADR
T8694ADR
T8695ADR
T8696ADR
T8697ADN
T8698ADR
G06.03 through G06.12
DSAP/DCOM T9543AAT G06.03 through G06.12
FUP T6553ABT G06.00 through G06.12 (No
support for SQL/MP Format 2
partitions.)

Installing SPRs Before Upgrading to the G06.24
RVU
G06.24 Software Installation and Upgrade Guide—528593-005
3-7
Interoperability SPRs
Interoperability SPRs
Node interoperability is the ability of the nodes (systems) in a network of NonStop
Kernel operating system nodes to communicate and interact with each other.
See the Interactive Upgrade Guide for more details on maintaining interoperability for
the RDF and NonStop SQL AUDSERV products.
RDF Interoperability SPRs
The SPRs listed in Table 3-4 enable RDF on a node running an RVU prior to G06.00 or
D46.00 to interoperate with RDF on a node running a G06.00 or later or D46.00 or later
RVU. The RDF interoperability SPR must be applied to the down-level node as a part
of the migration of any other node in the RDF environment to a G06.00 or later
G-series, or D46.00 or later, D-series RVU.
Table 3-3. SPRs Required for NonStop SQL/MX Release 2.0 Fallback
Product SPR (or
Superseding) Notes
DP2 T9053AOY or
T9053AOZ
If applied, a system load is required before
upgrading to the new RVU. The SPRs are
applicable to RVUs G06.13 through G06.22.
See DP2 (G06.16, G06.23, G06.24) on
page 1-24.
SQL/MP T9195AAnTo minimize the risks involved with falling
back without a clean TMF shutdown, use
the appropriate SQL GOAWAY utility to drop
all SQL/MX objects and their resource forks.
Before doing so, see Migration
Considerations for SQL/MX Release 2.0 on
page 1-29.
TMF T8607AFnNo fallback SPRs are required if you are
running on G06.18 through G06.23 or if a
TMF clean shutdown is performed and other
installation and fallback steps are taken for
SQL/MX Release 2.0.
Note. Interoperability support exists in various earlier SPRs, but HP recommends that you use
the most current SPRs, because they contain several important corrections to the
interoperability support.

Installing SPRs Before Upgrading to the G06.24
RVU
G06.24 Software Installation and Upgrade Guide—528593-005
3-8
NonStop SQL AUDSERV Interoperability SPRs
NonStop SQL AUDSERV Interoperability SPRs
NonStop SQL AUDSERV is the product that executes SQL Online DDL modification
commands, such as MOVE (Partition) WITH SHARED ACCESS.
See the Interactive Upgrade Guide for migration issues regarding format 2 files,
including any interoperability issues regarding SQL AUDSERV.
OSM Server and Client Compatibility SPRs
After you have performed a system load and run your system tests, you can, if you
want, install and use OSM. However, if you have not done so already, make sure that
your system consoles meet the minimum hardware requirements. See the OSM
Migration Guide for more information.
You should use the OSM Service Connection (rather than the TSM Service
Application) for all systems that are part of a ServerNet cluster, such as the new
ServerNet switch hardware (6780). OSM suppresses generation of alarms and dial-
outs on all nodes in the cluster when service actions are performed on a cluster from
any node. This protection is not available if some nodes are being managed by OSM
because it cannot communicate with TSM.
Check with Scout for NonStop Servers for the latest OSM server-based SPRs:
•T2723 (OSM Connection Library)
•T2724 (OSM Provider Interface Library)
•T2725 (OSM Configuration)
•T2726 (OSM XML API)
•T2727 (OSM CIMOM)
•T2728 (OSM Service Provider)
•T2730 (OSM Event Viewer)
•T2751 (OSM Web-based Suite)
Table 3-4. RDF Interoperability SPRs
If a primary or backup node
within the RDF environment
is running this RVU...
And any other node in the RDF environment is
upgraded to a G06.00 or later or D46.00 or later RVU,
install this (or a superseding) SPR on the down-level
node...
D32.00 through D39.00 T5864ABD
D42.00 through D45.00 T5864ABE
G02.00 through G05.00 T5864ABE
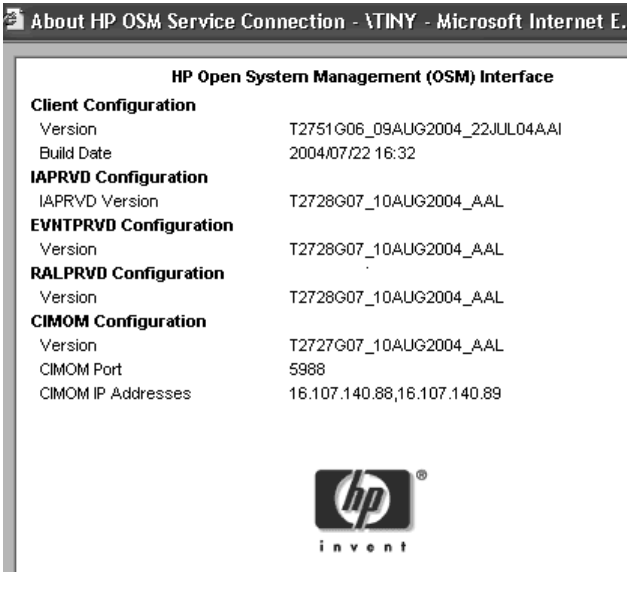
Installing SPRs Before Upgrading to the G06.24
RVU
G06.24 Software Installation and Upgrade Guide—528593-005
3-9
Determining the Current Version of OSM
Configuring OSM Server Settings
For detailed information about configuring OSM server processes, see the OSM
Migration Guide.
Determining the Current Version of OSM
To determine the current product version of OSM for both the client portion and server,
select About OSM from the OSM Service Connection Help menu. (You must be
logged on to the OSM Service Connection.) Current product versions are:
•Client Configuration (T2751)
•IAPRVD Configuration (T2728)
•EVNTPRVD Configuration (T2728)
•RALPRVD Configuration (T2728)
•CIMON Configuration (T2727)
For example (SPRs might be different):
VST937.vsd

Installing SPRs Before Upgrading to the G06.24
RVU
G06.24 Software Installation and Upgrade Guide—528593-005
3-10
TSM Server and Client Compatibility SPRs
TSM Server and Client Compatibility SPRs
The newest TSM server SPR is T7945ABN, and the TSM client version 2003A
(T8154G07) is compatible with T7945AAG through T7945ABN. You must install
T7945ABN or later when installing S7800, S78000, and S88000 PMF CRUs. You
should always install the latest TSM SPR and corresponding client.
If you decide to use TSM to install the RVU and use TSM to monitor your system, HP
recommends that you upgrade your system console to TSM client software Version
2003A (T8154G07^ABG) before you install the G06.24 RVU. Doing so enables you to
use the latest TSM client software for G06.24 RVU upgrade tasks. It also enables you
to continue using TSM client software Version 2003A on your system console even if
you have to fall back to an earlier RVU.
Follow the installation instructions outlined in the softdoc, including preinstallation and
post-installation steps.
Determining the Current Version of TSM Server Software
1. At the TACL prompt, enter:
VPROC $SYSTEM.SYSnn.SRM
2. Read the last line of the VPROC information.
This example shows that T7945ABL (TSM Bind) has been installed on the system:
\itty $SYSTEM.STARTUP 1> vproc $system.sys23.srm
VPROC - T9617G03 - (07 AUG 2003) SYSTEM \ITTY Date 23 JUN 2004, 09:06:49
Copyright 2003 Hewlett-Packard Development Company, L.P.
Version procedure: T8432G05_15NOV97_CRTLMAIN
Version procedure: T8156G06_30AUG2002_19JUN02ABD
Version procedure: T8153G06_30AUG2002_10JUL02ABD__Fv
.
.
.
Version procedure: T8159G06_22NOV2002_15NOV02ABE
Version procedure: T8146G06_19SEP2003_01SEP03ABJ
Version procedure: T8151G06_30AUG2002_19JUN02ABD
Version procedure: T7945G06_12MAY2004_28APR04ABL
Native Mode: runnable file
Note. Starting with the G06.24 RVU, the CSSI Web snapshot is no longer provided on the
installer CD, but the CSSI website can be accessed from the NonStop Technical Library (NTL).
See the NonStop System Console Installer Guide for more information.

G06.24 Software Installation and Upgrade Guide—528593-005
4-1
4
Preparing to Upgrade the Server
Software
Use this section to perform these tasks before you upgrade your server software:
1. Save the Current Configuration File (CONFxxyy)
2. Upgrade the System Console Software
3. Verify System Operations
4. Record the Current SYSnn
Save the Current Configuration File
(CONFxxyy)
A saved system configuration file contains a copy of the current configuration database
CONFIG file, saved for future use. For fallback purposes, save a copy of the current
CONFIG file by using a unique file name. Do not omit this step.
You can use the saved configuration file to return to an earlier, stable configuration. If
you need to fall back to the previous RVU, you must load the system by using a saved
configuration file and the SYSnn containing the previous operating system.
To save the current system configuration database CONFIG file, use the SCF SAVE
command:
1. At a TACL prompt, start SCF:
2> SCF
2. List the saved configuration files. At the SCF prompt, enter:
-> FUP INFO $SYSTEM.ZSYSCONF.CONF*
3. Save the current configuration by using a unique file name. At the prompt, enter:
-> SAVE CONFIGURATION xx.yy
where xx.yy variable is a number from 0.0 through 99.99.
This example saves the current system configuration to the file
$SYSTEM.ZSYSCONF.CONF1101:
-> SAVE CONFIGURATION 11.1
The configuration file $SYSTEM.ZSYSCONF.CONF1101 has been created.

Preparing to Upgrade the Server Software
G06.24 Software Installation and Upgrade Guide—528593-005
4-2
Upgrade the System Console Software
If you specify a configuration file that already exists, SCF asks if you want to replace it.
If you specify that you do not want to replace the existing file, SCF does not overwrite
the file. You must enter another SAVE command to save the current configuration file.
In case of fallback (see Section 17, Loading the Previous RVU and Resuming Normal
Operations), specify that this saved CONFxxyy file be used when you load the system
from the original SYSnn (see Perform a System Load With the Previous SYSnn and
CONFxxyy on page 17-3).
Upgrade the System Console Software
Starting with the G06.22 RVU, you must order the Installer CD separately from Scout
for NonStop Servers.
The NonStop System Console Installer Guide describes how to upgrade a system
console (formerly known as a TSM workstation) running the Windows 2000
Professional or the Windows XP Professional operating system to the set of
applications delivered on the HP NonStop System Console Installer version
S7X-SWV1, Upgrade 3. The contents of the Installer include:
•Microsoft Internet Explorer 6.0
•Acrobat Reader 6.0
•Service Pack 3 for Windows 2000 (SP3)
•OutsideView 7.1
•Carbon Copy Version 5.7
•HP NonStop System Console Software Master Installer
•TSM Client 2003A, T8154G07^ABG
•OSM client-based components
•SP Tool version 2.8.
•WAN Wizard Pro Version 4.00
To install the DSM/SCM client software (T6031D46^ABJ), see Appendix B, Installing
the Latest DSM/SCM SPRs and Client Software.
Starting with the G06.24 RVU, the CSSI Web snapshot is no longer provided on the
installer CD, but the CSSI website can be accessed from the NonStop Technical
Library (NTL).
To install Windows XP Professional, which is the recommended operating system for
using OSM, see the NonStop System Console Guide for Migrating to Microsoft
Windows XP Professional.
Note. To install OutsideView32 Version 7.1, you need a serial number and license key. If you
do not have a serial number and a license key for OutsideView32 Version 7.1, contact your
service provider.
Preparing to Upgrade the Server Software
G06.24 Software Installation and Upgrade Guide—528593-005
4-3
Verify System Operations
.
HP recommends that you upgrade to Microsoft Windows XP Professional first before
upgrading your NonStop system console. However, if you use the Installer CD first, and
then migrate to Windows XP Professional, use the Installer CD again to make sure that
all the applications are correctly installed.
If you want to use the OSM client-based components and server software before or
after installing the G06.24 RVU, see the OSM Migration Guide.
Verify System Operations
Verify the integrity of your current system environment to ensure your system is
operating normally before you install the G06.24 RVU by checking Table 4-1.
Note. New system console requirements must be met if you decide to use OSM as your
default client whether you migrate to Windows XP Professional. See the OSM Migration Guide
or the NonStop System Console Installer Guide for more information.
Table 4-1. Verify System Operations
Steps Activity Done?
1. Check Processor Status (Using either TSM or OSM)
Using TSM
Using OSM
2. Check Critical System Processes
Using TSM
Using OSM
3. Check the Status of the ServerNet Addressable Controllers
(SACs)
4. Check Disk Subsystem Status
5. Check the Swap File Configuration
6. Check the Status of the Spooler Collector
7. Check the Tape Drive Status
Preparing to Upgrade the Server Software
G06.24 Software Installation and Upgrade Guide—528593-005
4-4
Check Processor Status (Using either TSM or OSM)
Check Processor Status (Using either TSM or OSM)
Check Processor Status (Using TSM)
Verify that the NonStop Kernel is running in all processors:
1. Log on to the TSM Low-Level Link Application and perform a System Discovery.
2. From the toolbar, click Processor Status.
The Processor Status dialog box appears. The Processor Status for all
processors should be Executing NonStop OS.
If a different status appears, determine the problem and correct it:
•Check EMS messages or messages at the TACL prompt.
•Check the halt codes appearing in the Processor Status box.
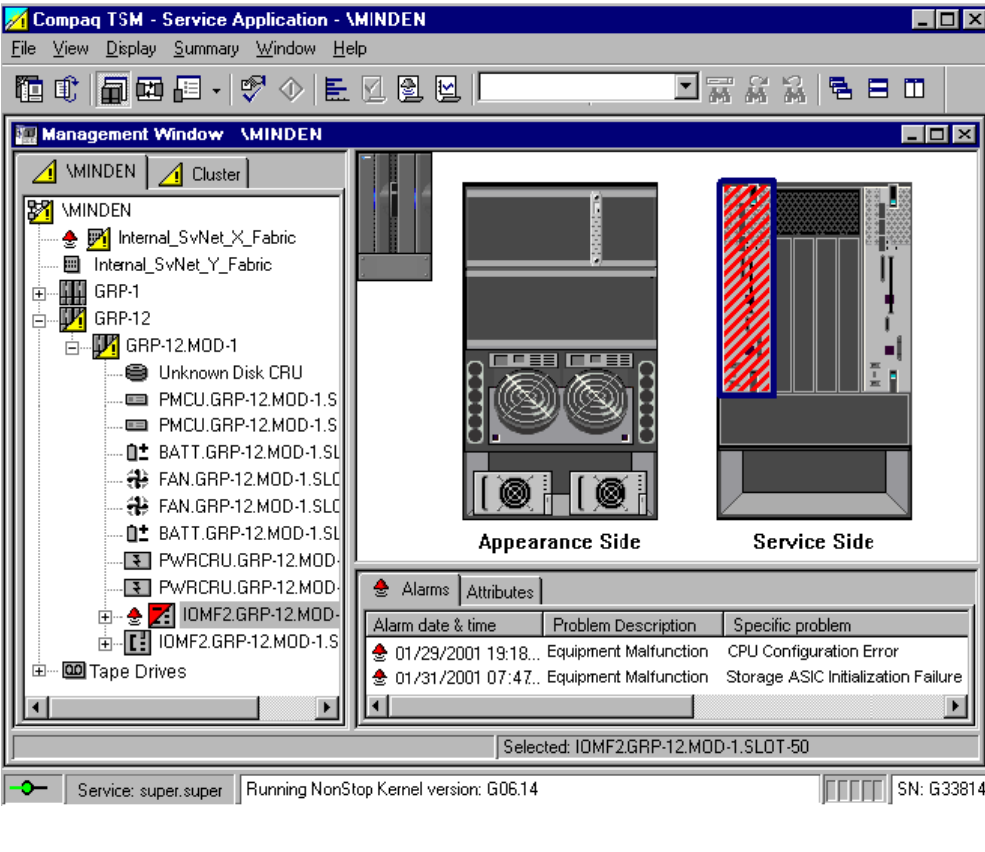
Preparing to Upgrade the Server Software
G06.24 Software Installation and Upgrade Guide—528593-005
4-5
Check System Enclosure Components (Using TSM)
Check System Enclosure Components (Using TSM)
Verify the operational status of the components in each system enclosure:
1. Log on to the TSM Service Application.
2. Check for alarm conditions in the tree pane of the management window. For
example:
VST200.vsd
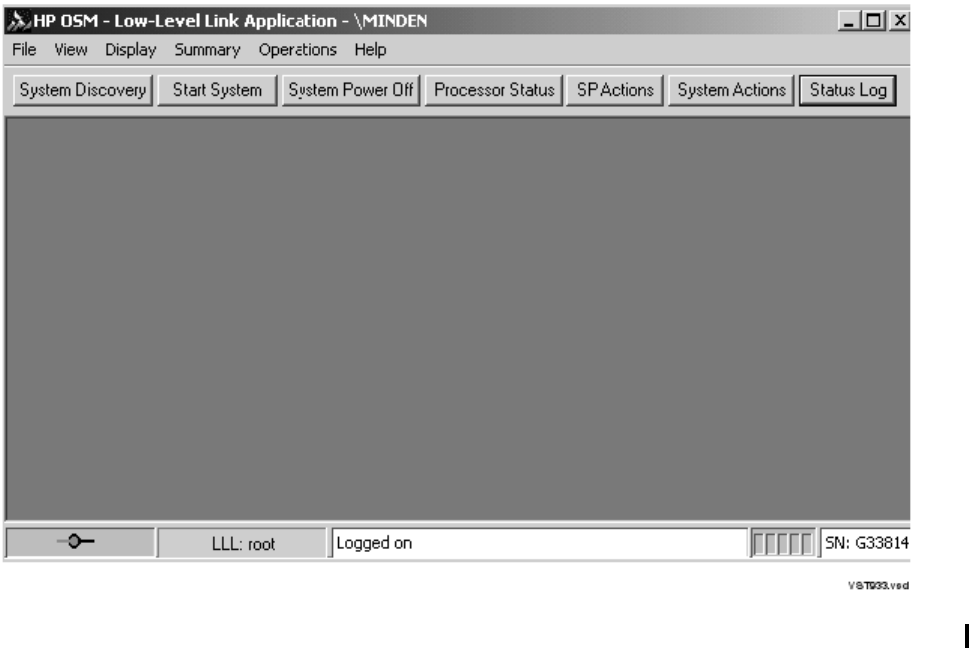
Preparing to Upgrade the Server Software
G06.24 Software Installation and Upgrade Guide—528593-005
4-6
Check System Enclosure Components (Using TSM)
3. Select an item in the tree pane that shows alarm conditions, and then click the
Alarms tab to view the alarms associated with the selected item.
•If a yellow triangle appears over an enclosure diagram, determine the cause of
the problem. Correct the problem if possible. Determine if you can proceed
without affecting the installation of software. All processors, all service
processors, the $SYSTEM volume, the $DSMSCM volume, and the $AUDIT
volume must be working properly.
•If a red triangle appears over an enclosure diagram, you have a severe system
problem. Do not continue with the upgrade procedure. Contact your service
provider.
Check Processor Status (Using OSM)
1. Log on to the OSM Low-Level Link.
The OSM Low-Level Link Application appears.
2. Select System Discovery.
3. Select Processor Status.
The Processor Status dialog box appears. The Processor Status for all
processors should be Executing NonStop OS.
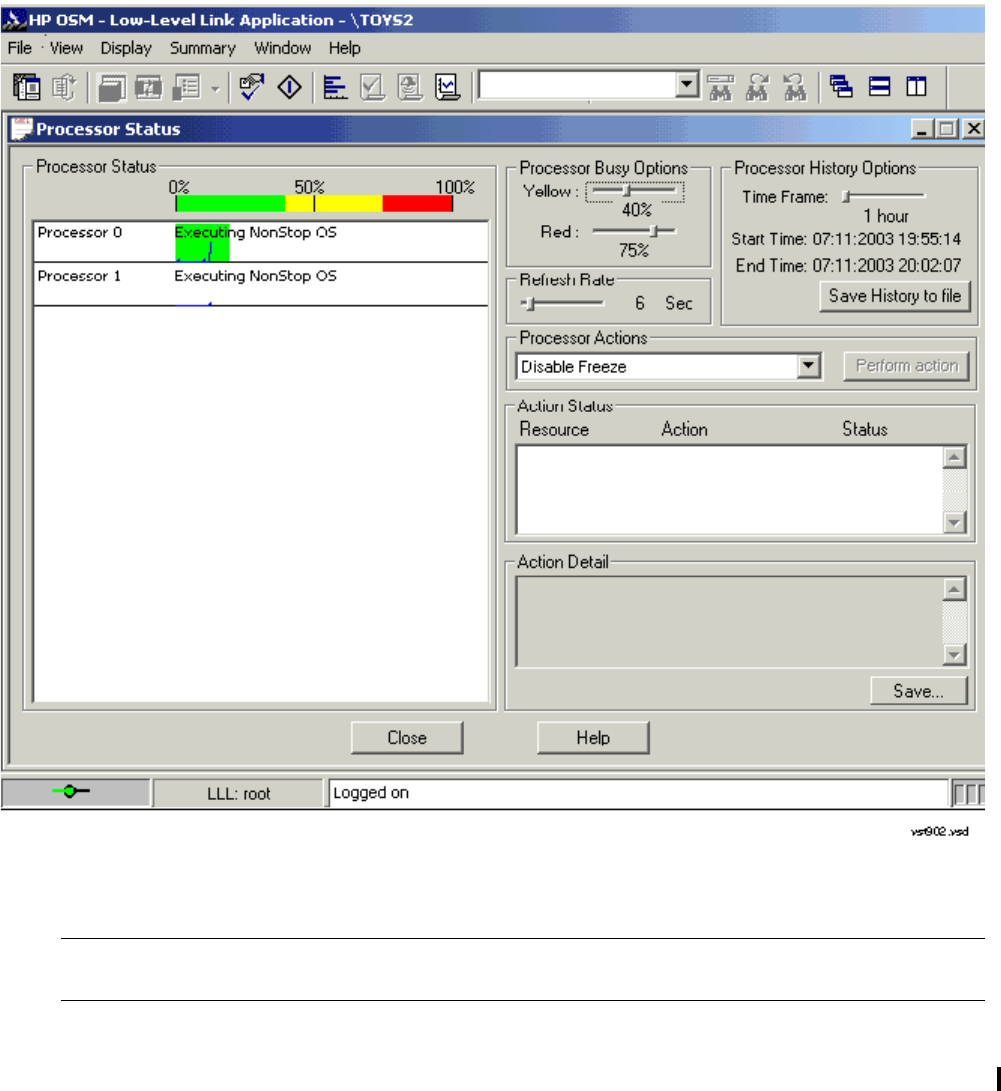
Preparing to Upgrade the Server Software
G06.24 Software Installation and Upgrade Guide—528593-005
4-7
Check System Enclosure Components (Using TSM)
Check System Components (Using OSM)
1. Log on to the OSM Service Connection.
See the OSM Migration Guide if you have any problems accessing OSM.
The T2752AAI or later OSM Service Connection browser session starts in a new
browser window and eliminates the use of standard Internet Explorer buttons.
(Clicking the Internet Explorer’s Refresh ends your current OSM Service
Connection session and forces you to open a new browser window to reestablish a
new connection to the system you are monitoring.)
°After the browser session begins, you can close the original IE window.
Note. Do not launch the OSM Service Connection if you do not already have OSM server
processes configured. If OSM is not installed, use TSM to migrate to the G06.24 RVU.
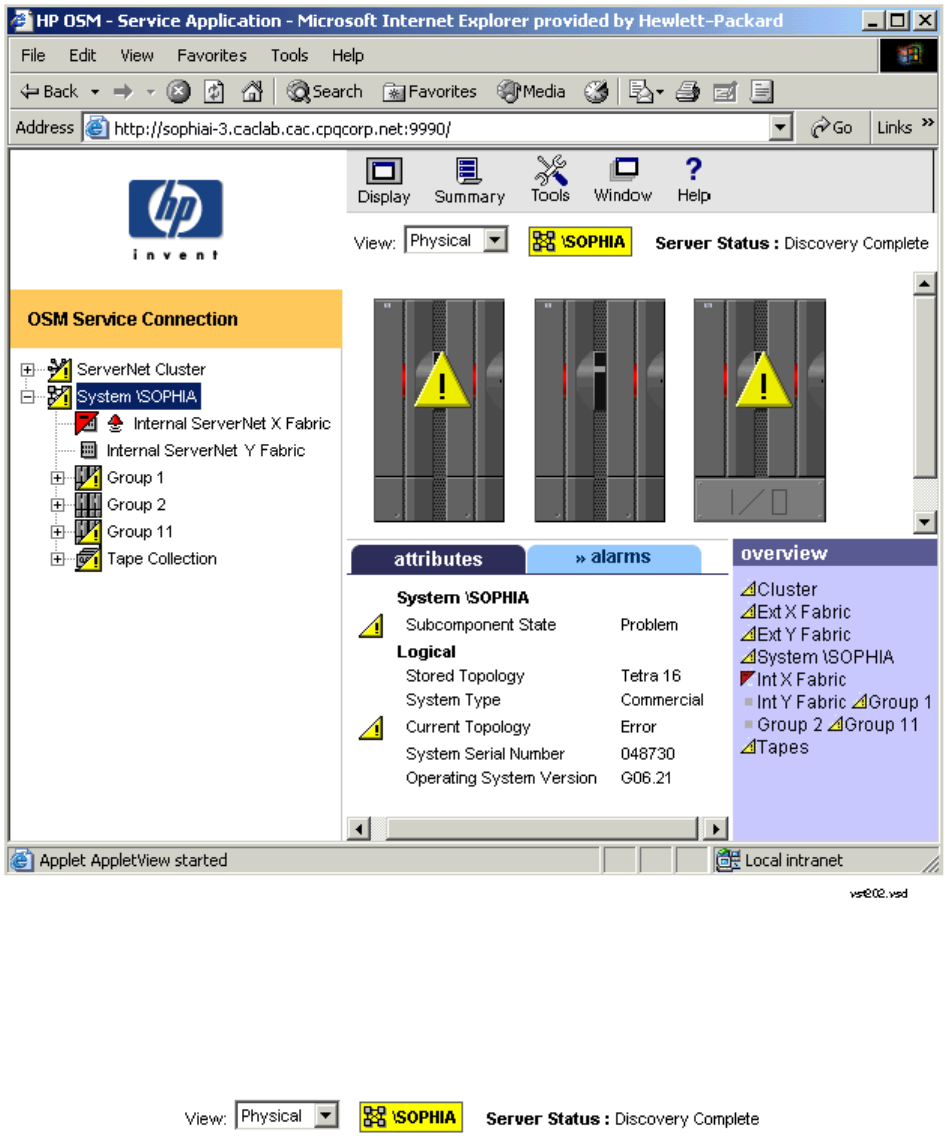
Preparing to Upgrade the Server Software
G06.24 Software Installation and Upgrade Guide—528593-005
4-8
Check System Enclosure Components (Using TSM)
°If you are on an earlier OSM Service Connection version, remember to use the
OSM Refresh, Reanalyze, or Rediscover actions for updating interface
display for the desired resource objects.
2. The System Status window indicates the overall health of a system by the color of
the system icon. Green indicates that the overall health is fine; yellow indicates a
possible system problem. From the Summary menu, select System Status. For
example:
Preparing to Upgrade the Server Software
G06.24 Software Installation and Upgrade Guide—528593-005
4-9
Check Critical System Processes
3. Select an item in the tree pane that shows alarm conditions, and then click the
Alarms tab to view the alarms associated with the selected item.
•If a yellow triangle appears over an enclosure diagram, determine the cause of
the problem. Expand the tree. Correct the problem if possible. Determine if you
can proceed without affecting the installation of software. All processors, all
service processors, the $SYSTEM volume, the $DSMSCM volume, and the
$AUDIT volume must be working properly.
•If a red triangle appears over an enclosure diagram, you have a severe system
problem. Do not continue with the upgrade procedure. Contact your service
provider.
•To find out more about an item, select Display>Alarms. Click Detail on the
Alarms screen for specific information on the resource and problem.
Check Critical System Processes
Verify the status of all software processes that are critical for your system to operate
normally:
1. Make a list of all critical system processes for your system.
2. At a TACL prompt, start SCF and enter a LISTDEV command.
3. Verify that the LISTDEV display includes all critical processes. For example:
1> scf listdev
SCF - T9082G02 - (15APR98) (04MAR98) - 02/23/99 13:47:49 System \ELI
Copyright Tandem Computers Incorporated 1986 - 1998
LDev Name PPID BPID Type RSize Pri Program
0 $0 0,5 1,5 ( 1,0 ) 102 201 \ELI.$SYSTEM.SYS00.OSIMAGE
3 $YMIOP 0,256 1,256 ( 6,4 ) 80 205 \ELI.$SYSTEM.SYS00.OSIMAGE
5 $Z0 0,7 1,7 ( 1,2 ) 102 200 \ELI.$SYSTEM.SYS00.OSIMAGE
6 $SYSTEM 0,257 1,257 ( 3,42) 4096 220 \ELI.$SYSTEM.SYS00.OSIMAGE
7 $ZOPR 0,8 1,8 ( 1,0 ) 102 201 \ELI.$SYSTEM.SYS00.OSIMAGE
59 $ZZKRN 0,15 1,18 (66,0 ) 132 180 \ELI.$SYSTEM.SYS00.OZKRN
60 $ZZWAN 0,267 1,274 (50,3 ) 132 180 \ELI.$SYSTEM.SYS00.WANMGR
61 $ZZSTO 0,272 1,280 (65,0 ) 4096 180 \ELI.$SYSTEM.SYS00.TZSTO
62 $ZZLAN 0,14 1,15 (43,0 ) 132 180 \ELI.$SYSTEM.SYS00.LANMAN
66 $ZSNET 0,15 1,18 (66,0 ) 132 180 \ELI.$SYSTEM.SYS00.OZKRN
67 $ZNET 0,3 1,14 (50,63) 3900 175 \ELI.$SYSTEM.SYS00.SCP
70 $ZM01 1,11 0,0 (45,0 ) 132 201 \ELI.$SYSTEM.SYS00.QIOMON
71 $ZM00 0,13 0,0 (45,0 ) 132 201 \ELI.$SYSTEM.SYS00.QIOMON
72 $ZLOG 0,285 0,0 ( 1,0 ) 4024 150 \ELI.$SYSTEM.SYS00.EMSACOLL
82 $TAPE0 0,277 1,272 ( 4,9 ) 2048 200 \ELI.$SYSTEM.SYS00.OTPPROCP
89 $DSMSCM 0,280 1,269 ( 3,41) 4096 220 \ELI.$SYSTEM.SYS00.TSYSDP2
90 $DATA14 2,268 3,264 ( 3,41) 4096 220 \ELI.$SYSTEM.SYS00.TSYSDP2
98 $AUDIT 0,279 1,270 ( 3,41) 4096 220 \ELI.$SYSTEM.SYS00.TSYSDP2
111 $ZTCP1 1,281 0,299 (48,0 ) 32000 200 \ELI.$SYSTEM.SYS00.TCPIP
112 $ZTCP0 0,288 1,278 (48,0 ) 32000 200 \ELI.$SYSTEM.SYS00.TCPIP
113 $ZTNT0 0,298 1,276 (46,0 ) 6144 170 \ELI.$SYSTEM.SYS00.TELSERV
140 $ZTN20 2,287 3,273 (46,0 ) 6144 170 \ELI.$SYSTEM.SYS00.TELSERV
142 $ZTC20 2,286 3,272 (48,0 ) 32000 200 \ELI.$SYSTEM.SYS00.TCPIP
196 $ZPHI 0,268 1,288 ( 1,0 ) 4024 198 \ELI.$SYSTEM.SYS00.EMSACOLL
199 $Z14W 3,35 0,0 ( 1,30) 132 150 \ELI.$SYSTEM.SYS00.EMSDIST
205 $Z14X 2,23 0,0 ( 1,30) 132 150 \ELI.$SYSTEM.SYS00.EMSDIST

Preparing to Upgrade the Server Software
G06.24 Software Installation and Upgrade Guide—528593-005
4-10
Check the Status of the ServerNet Addressable
Controllers (SACs)
Check the Status of the ServerNet Addressable Controllers
(SACs)
Check the status of the SACs in the ServerNet LAN Systems Access (SLSA)
subsystem using SCF:
5> scf
SCF - T9082G02 - (15APR98) (04MAR98) - 02/23/99 14:11:31 System \ELI
Copyright Tandem Computers Incorporated 1986 - 1998
(Invoking \ELI.$SYSTEM.SUPER.SCFCSTM)
1-> assume $zzlan
$ZZLAN 2-> status sac *
SLSA Status SAC
Name Owner State Trace Status
$ZZLAN.MIOE0.0 0 STARTED OFF
$ZZLAN.E0153.0 0 STARTED OFF
$ZZLAN.E0153.1 0 STARTED OFF
$ZZLAN.TR1.0 0 STARTED OFF
The SACs must be in the STARTED state before continuing with the migration.
Check Disk Subsystem Status
Verify that these disk volumes are started:
•$SYSTEM (mirrored volume)
•The volume containing the DSM/SCM target subvolume (by default $DSMSCM)
•The DSM/SCM Archive volume (by default $AUDIT)
1. At a TACL prompt, enter:
> SCF STATUS DISK $*, SUB magnetic
2. Verify that the STATUS DISK display includes all the disk subsystems shown in this
example:
3> scf status disk $*, sub magnetic
SCF - T9082G02 - (15APR98) (04MAR98) - 02/23/99 14:23:59 System \ELI
Copyright Tandem Computers Incorporated 1986 - 1998
STORAGE - Status DISK \ELI.$SYSTEM
LDev Primary Backup Mirror MirrorBackup Primary Backup
PID PID
6 *STARTED STARTED *STARTED STARTED 0,257 1,257
STORAGE - Status DISK \ELI.$DSMSCM
LDev Primary Backup Mirror MirrorBackup Primary Backup
PID PID
146 *STARTED STARTED *STARTED STARTED 0,299 1,267
STORAGE - Status DISK \ELI.$AUDIT
LDev Primary Backup Mirror MirrorBackup Primary Backup
Note. See the DSM/SCM User’s Guide for information on these DSM/SCM database volumes.
Preparing to Upgrade the Server Software
G06.24 Software Installation and Upgrade Guide—528593-005
4-11
Check the Swap File Configuration
PID PID
177 *STARTED STARTED *STARTED STARTED 0,291 1,276
3. If the $SYSTEM, DSM/SCM, and Archive volumes are not listed in the display,
contact your service provider.
4. Verify that the primary path, backup paths, mirror path, and mirror backup path are
started for the mirrored $SYSTEM volume. If any paths are stopped, start them.
5. Verify that the primary path and backup path are started for the $DSMSCM volume
and the $AUDIT volume. If any paths are stopped, start them.
Check the Swap File Configuration
You must ensure that you have configured kernel-managed swap files of sufficient size
for all your system and application software processes. The optimal amount of swap
space varies, depending on the configuration of your system. The default swap files
can allocate up to 128 megabytes (MB) per processor. However, many processes and
applications require more swap space. Inadequate swap space can cause process-
creation errors, abended processes, and halts.
To check the size of the configured swap files for each processor:
1. At a TACL prompt, start NSKCOM and enter an INFO SWAPFILE * command.
For example:
3> nskcom info swapfile *
NSKCOM - T5838G05 BASE (04AUG98) - Jul 27 1998
Copyright (c) 1995, 1997 Tandem Computers Incorporated
$SYSTEM.SYSTEM.ZSYSCFG
KMS.SWAPFILE = 0 $AUDIT0.ZSYSSWAP.CPU0
KMS.SWAPFILE = 1 $AUDIT0.ZSYSSWAP.CPU1
KMS.SWAPFILE = 2 $AUDIT0.ZSYSSWAP.CPU2
KMS.SWAPFILE = 3 $AUDIT0.ZSYSSWAP.CPU3A
.
.
.
$AUDIT0.ZSYSSWAP.CPU0
Extent Size 512 disk pages
MaxExtents 512
File Size 512 MB
CPU 0
Threshold Default
$AUDIT0.ZSYSSWAP.CPU1
Extent Size 512 disk pages
MaxExtents 512
File Size 512 MB
CPU 1
Threshold Default
$AUDIT0.ZSYSSWAP.CPU2
Extent Size 512 disk pages
MaxExtents 512
File Size 512 MB
CPU 2
Threshold Default

Preparing to Upgrade the Server Software
G06.24 Software Installation and Upgrade Guide—528593-005
4-12
Check the Swap File Configuration
$AUDIT0.ZSYSSWAP.CPU3A
Extent Size 128 disk pages
MaxExtents 128
File Size 32 MB
CPU 3
Threshold Default
.
.
.
2. Verify that each processor in the system has a configured swap file of at least 256
MB in the minimum for any G-series system. Depending on how many processes
you have, your system configuration might require more swap space.
For each processor, configure at least twice as much swap space as there is
memory. For example, if you have 256 MB of memory for each processor,
configure 512 MB of swap space. If you have 1 GB or 2 GB memory per processor,
you might need additional swap space.
3. From NSKCOM, perform a STATUS to verify which swap files are in use. For
example:
4> nskcom status swapfile *
NSKCOM - T5838G05 BASE (04AUG98) - Jul 27 1998
Copyright (c) 1995, 1997 Tandem Computers Incorporated
$SYSTEM.SYSTEM.ZSYSCFG
KMS.SWAPFILE = 0 $AUDIT0.ZSYSSWAP.CPU0
KMS.SWAPFILE = 1 $AUDIT0.ZSYSSWAP.CPU1
KMS.SWAPFILE = 2 $AUDIT0.ZSYSSWAP.CPU2
KMS.SWAPFILE = 3 $AUDIT0.ZSYSSWAP.CPU3A
.
.
.
Status of $AUDIT0.ZSYSSWAP.CPU0
CPU 0
CPU Pages: Total 32768 Reserved 9038 Available 23730
Peak CPU Pages ever reserved 12869
Threshold 27852 CPU pages
Status of $AUDIT0.ZSYSSWAP.CPU1
CPU 1
CPU Pages: Total 32768 Reserved 5275 Available 27493
Peak CPU Pages ever reserved 10978
Threshold 27852 CPU pages
Status of $AUDIT0.ZSYSSWAP.CPU2
CPU 2
CPU Pages: Total 32768 Reserved 8541 Available 24227
Peak CPU Pages ever reserved 13228
Threshold 27852 CPU pages
Status of $AUDIT0.ZSYSSWAP.CPU3A
CPU 3
CPU Pages: Total 2048 Reserved 1541 Available 507
Peak CPU Pages ever reserved 1638
Threshold 1740 CPU pages
Note. Configure swap files if necessary. See the Kernel-Managed Swap Facility
(KMSF) Manual for information about how to configure swap files and for guidelines
about how much swap space should be allocated per processor.
Preparing to Upgrade the Server Software
G06.24 Software Installation and Upgrade Guide—528593-005
4-13
Check the Status of the Spooler Collector
.
.
Check the Status of the Spooler Collector
Check that the spooler collector is active and not 100 percent full.
At a TACL prompt, start SPOOLCOM and issue a COLLECT, STATUS command. For
example:
1> spoolcom $spls; collect, status
COLLECT STATE FLAGS CPU PRI UNIT DATA FILE %FULL
$S ACTIVE 3 , 1 154 4 $OPS0.SPL.DATA 44
Check the Tape Drive Status
Check that the tape drive to be used to install the SUT is started and online:
1. At a TACL prompt, enter:
> SCF STATUS TAPE $*
2. Verify that the STATUS TAPE display includes the tape subsystem you plan to use
to load the SUT. For example:
STORAGE - Status TAPE \ELI.$SILO2
LDev State Primary Backup DeviceStatus
PID PID
138 STARTED 0,295 1,279 ONLINE
3. If the tape subsystem you plan to use is not listed, select another tape drive or add
the tape drive to your system configuration. The state of that tape drive must be
STARTED, and the device status must be ONLINE.
4. If the status of the tape drive is stopped or not ready, start the tape drive and put
the tape drive online.
Preparing to Upgrade the Server Software
G06.24 Software Installation and Upgrade Guide—528593-005
4-14
Record the Current SYSnn
Record the Current SYSnn
Identify and record the current SYSnn subvolume on your system. You will have to
specify this SYSnn subvolume if you need to fall back from the G06.24 RVU.
At a TACL prompt, issue the status command to determine the current SYSnn
subvolume. For example:
3> status 0,0
System \ELI
Process Pri PFR %WT Userid Program file Hometerm
0,0 201 P R 000 255,255 $SYSTEM.SYS01.OSIMAGE $YMIOP.#CLCI
Swap File Name: $SYSTEM.#0
Back Up Important Files
Before you upgrade to the newest RVU, back up to tape critical host applications, such
as the following:
•NonStop SQL/MP files
HP recommends that you always have a current backup copy of the
$SYSTEM.SYSTEM.ZZSQLCI2 file in case you need to initialize SQL later if you
have problems with your new RVU during or after installation.
•NonStop SQL/MX files
•Spooler Control files
•TMF files

G06.24 Software Installation and Upgrade Guide—528593-005
5-1
5Installing the G06.24 RVU
Installing a new RVU involves these DSM/SCM tasks:
1. Receive New Software Into the Archive
2. Create a New Software Revision
3. Build and Apply the New Software Revision
Alerts
Do not use this procedure to upgrade more than one NonStop S-series server at a time
or to install SPRs.
Before you install the G06.24 RVU, these requirements must be met:
•Always install the latest D46 software product version (SPR) of DSM/SCM and the
DSM/SCM client before receiving the SUT. If you are using a pre-G06.20 RVU, use
RESTORE and activate the SWID (T9298D40^AAK) product. See Appendix B,
Installing the Latest DSM/SCM SPRs and Client Software before continuing.
•If you are managing OSS files with DSM/SCM, check that the OSS Root Name
Server $ZPNS is started and running on the DSM/SCM Target. (See Create a New
Software Revision on page 5-8.) The volume where the SYSnn is being placed
must be activated as $SYSTEM to install the OSS files. See Appendix B in the
Open System Services Management and Operations Guide or if using EasySetup,
see Section 1 in the Open System Services Installation Guide.
•Install the appropriate TSM or OSM server SPRs, and upgrade the system console
to the set of software delivered on the NonStop System Console Installer CD.
•Check that SPRs have been installed for SQL/MX, DP2, if needed. See Table 3-3,
SPRs Required for NonStop SQL/MX Release 2.0 Fallback, on page 3-7
•Check that other SPRs required for falling back from the G06.24 RVU have been
installed, including any SPRs for SQL/MX Release 2.0. (You cannot install SPRs
required for fallback after you have installed the G06.24 RVU.) A special OSS
SPR, T8622AAH, or later, ensures backward compatibility if you need to fall back
to an RVU prior to G06.12.
•Save the configuration database.
•Verify system operations. Review Section 4, Preparing to Upgrade the Server
Software.
Note. Until the T6031ABE, or later, SPR of DSM/SCM is installed, you should select the
Receive-all-files option on all inputs into the DSM/SCM Archive whether or not you want
to manage OSS files. When the T6031ABE, or later, SPR is applied, you can then choose
the Receive-all-files only if you want to manage OSS files.
Installing the G06.24 RVU
G06.24 Software Installation and Upgrade Guide—528593-005
5-2
Back Up Important Files
•Obtain a user name and password authorized to use the DSM/SCM Planner
Interface. See the DSM/SCM User’s Guide for more information about configuring
which users are allowed to use DSM/SCM and which tasks they are permitted to
perform.
•Check that the OutsideView Startup TACL ($YMIOP.#CLCI) and EMS Event
Stream windows are open. These windows must remain open while DSM/SCM is
performing a Build/Apply; otherwise, Build/Apply errors result.
•Pause the hometerm configured for use by DSM/SCM Pathway servers and other
processes when DSM/SCM is running. The default hometerm is $ZHOME. See the
DSM/SCM User’s Guide for more information about the hometerm used by
DSM/SCM Pathway servers.
•If you are upgrading from the NonStop S7000 system (NSR-W), before you
upgrade to NonStop S76000 (NSR-X) / S86000 (NSR-Y) / S7600 (NSR-E),
NonStop S7800 (NSR-J), S78000 (NSR-H), S88000 (NSR-Z), change the
processor type entry in the CONFTEXT file. In the CONFTEXT file, you can specify
only one processor type. Neither NSR-D (S7400), nor NSR-W (S7000) can be in a
system with mixed processor types. Failure to change the processor type will result
in system instability and a backout to a previous RVU will be required.
For processor model S70000 running G06.24 and later, you must change the
processor type from NSR-G to NSR-C in the ALLPROCESSORS paragraph in the
CONFTEXT file. Failure to change the processor type when loading the new
SYSnn causes an immediate %100441 halt. All other references to NSR-G are still
valid, which means that any query performed on the system will return NSR-G if
the PMF is a model 1951 PMF CRU (S70000).
Back Up Important Files
If you are on a production system, make sure that important files have been backed up
(such as, TMF, SQL/MP, SQL/MX, and so forth).
Drain the spooler and back up spooler control files.
Installing the G06.24 RVU
G06.24 Software Installation and Upgrade Guide—528593-005
5-3
Receive New Software Into the Archive
Receive New Software Into the Archive
Receiving software into the Archive might take several hours.
To receive the SUT containing the G06.24 RVU into the DSM/SCM Archive:
1. Start TMF and DSM/SCM if they are not already running. For example:
> TMFCOM START TMF
> VOLUME $dsmscm_vol.ZDSMSCM
> RUN STARTSCM
8> startscm
DSM/SCM Process Startup Function - STARTSCM - T6031D46 - (31MAR2003)
Copyright Hewlett Packard Development Company L.P. 1993-2003
NOTICE: * If the hometerm chosen during INITENV, $zhome,
* is not currently in a paused state, STARTSCM andDSM/SCM
* server processes may hang indefinitely. Be sure this
* hometerm has been paused!
PATHWAY CONTROL FILE DATED: 21 APR 2003, 03:52:16
$Z03N: WARN - *1079* SERVER CB-001, NO STATIC SERVERS DEFINED
$Z03N: WARN - *1079* SERVER IS-001, NO STATIC SERVERS DEFINED
$Z03N: WARN - *1079* SERVER MISERVER, NO STATIC SERVERS DEFINED
$Z03N: SERVER OM-001, STARTED
$Z03N: SERVER SM-001, STARTED
$Z03N: SERVER SM-T-001, STARTED
$Z03N: SERVER T9154-HELP-SERV, STARTED
$Z03N: WARN - *1079* SERVER TA-001, NO STATIC SERVERS DEFINED
$Z03N: WARN - *1079* SERVER TISERVER, NO STATIC SERVERS DEFINED
$Z03N: WARN - *1079* SERVER US-001, NO STATIC SERVERS DEFINED
$Z03N: TCP TCP-H,STARTED
$Z03N: TCP TCP-T,STARTED
2. Start the DSM/SCM Planner Interface (Start>Programs>Dsm_scm>DSMSCM).
3. When the Logon dialog box appears, enter the user ID and password and click
OK.
The Planner Interface screen displays two dialog boxes:
•The Software in Archive dialog box lists the software that is currently in the
DSM/SCM Archive.
•The Configuration Revisions dialog box lists the current software revisions. For
example:
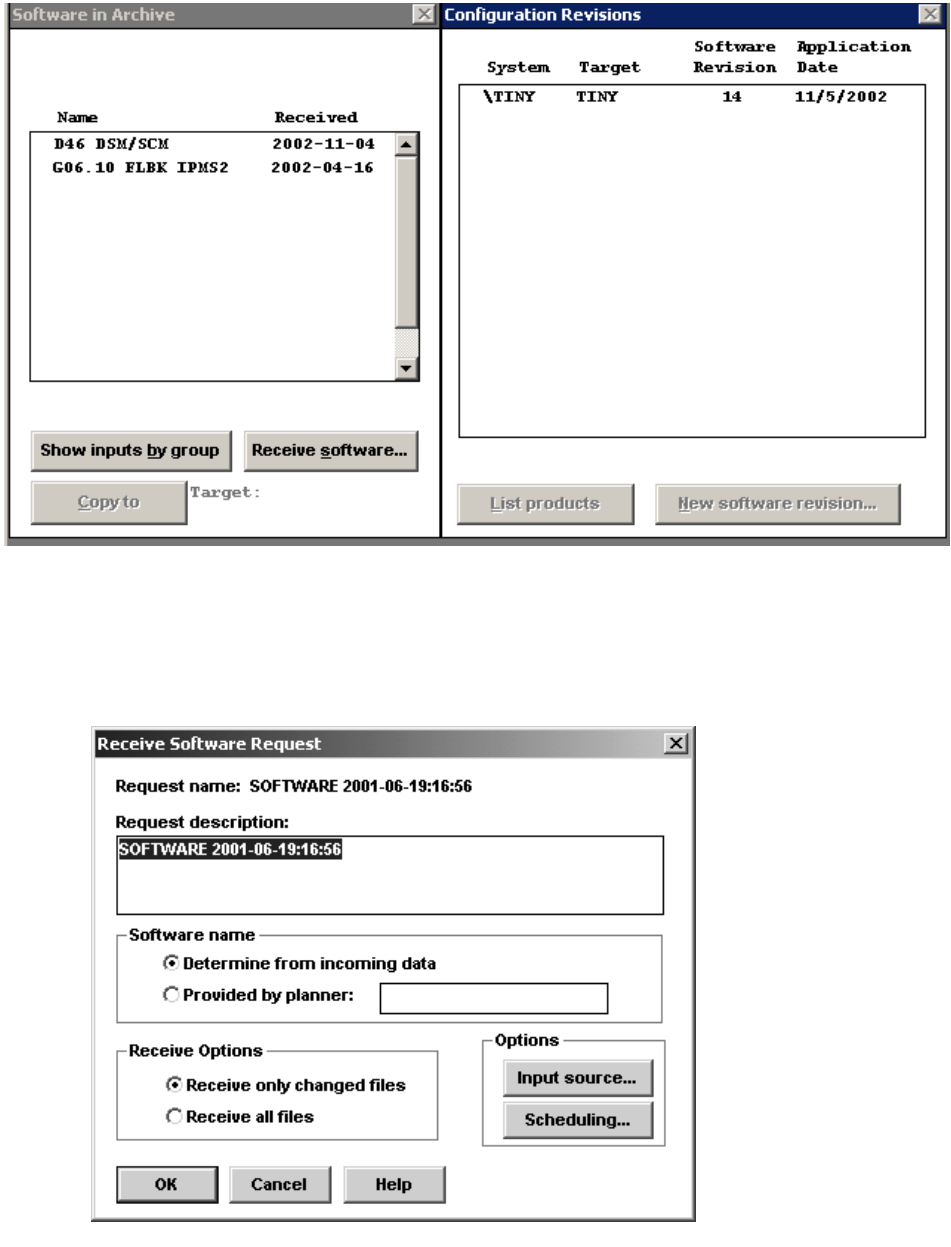
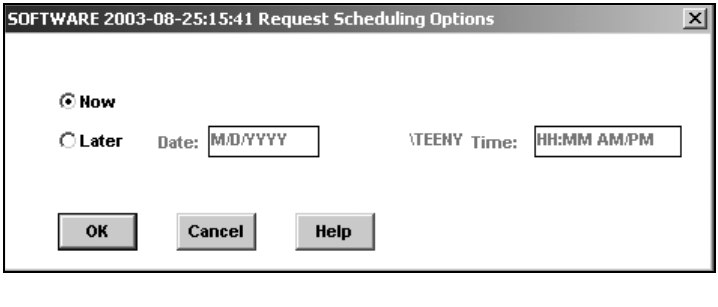
Installing the G06.24 RVU
G06.24 Software Installation and Upgrade Guide—528593-005
5-5
Receive New Software Into the Archive
5. In the Receive Options group box, do the following, depending on your system
environment:
°Select Receive only changed files if you do not want to manage OSS files.
°Select Receive all files if you want to manage OSS files. If this option is
selected, the receive will take about an hour or two even if you have recently
upgraded to a new RVU.
6. Under Software name, select Provided by planner and enter a name for the RVU.
7. In the Options group box, click Input source.
The Request Source Options dialog box appears.
8. Select Tape drive.
9. From the list, select the tape drive that contains the SUT, and click OK.
The Request Source Options dialog box closes.
10. (Optional) In the Options group box of the Receive Software Request dialog box,
click Scheduling.
The Request Scheduling Options dialog box appears. Make the appropriate
selections and click OK.
The Request Scheduling Options dialog box closes.
11. In the Receive Software Request dialog box, click OK.
A Status window appears and is updated automatically at regular intervals.
VST553.vsd
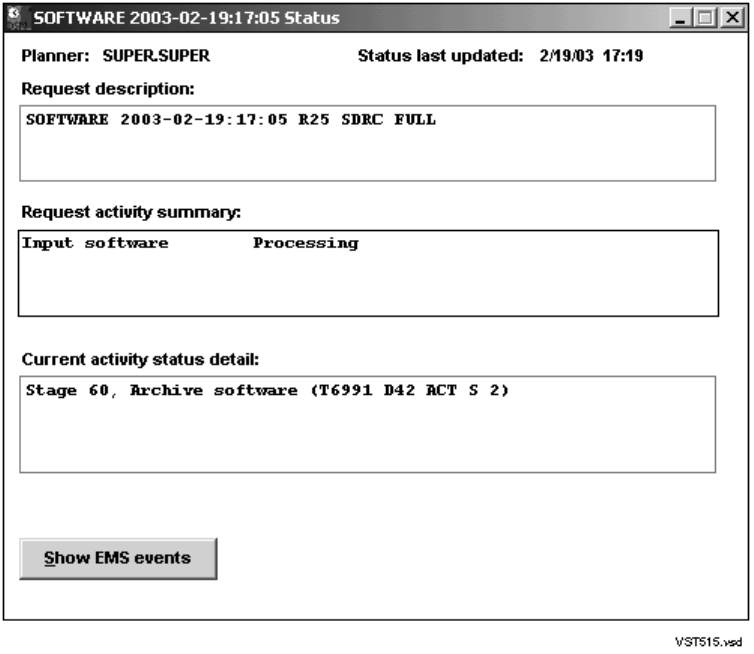
Installing the G06.24 RVU
G06.24 Software Installation and Upgrade Guide—528593-005
5-6
Receive New Software Into the Archive
12. While waiting for the request to finish, check:
•The status of the request in the Status window. For example:
•EMS event messages to see if a new reel (or cartridge on a nonautoloading
drive) of the SUT needs to be mounted. EMS messages are displayed in the
following windows:
°The OutsideView EMS Event Stream window
°The EMS Events window displayed by DSM/SCM when you click Show
EMS events from the Status window
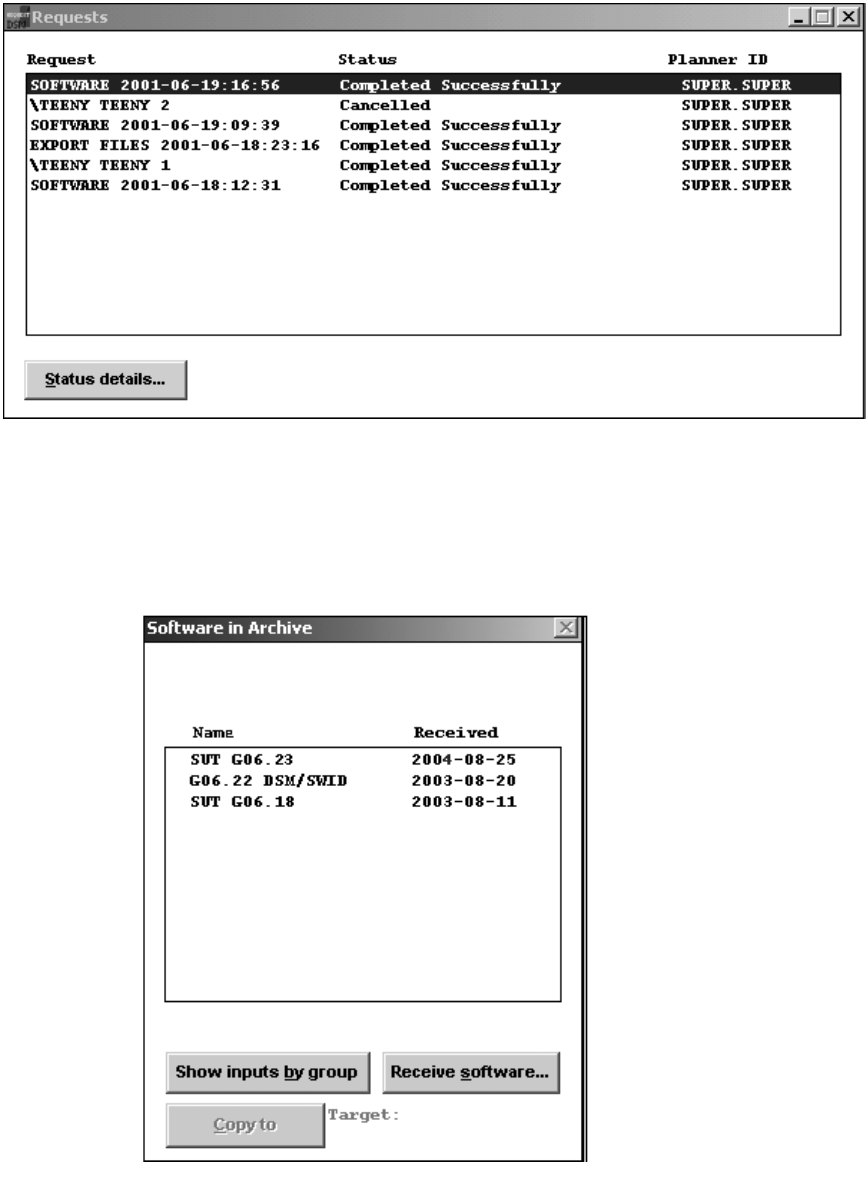
Installing the G06.24 RVU
G06.24 Software Installation and Upgrade Guide—528593-005
5-7
Receive New Software Into the Archive
You can also check the Requests window to ensure that the request is finished.
(Select Requests>Requests list). For example:
13. When the request is finished, close the Status and Requests windows.
14. Update the Software in Archive dialog box to show the newly received SUT. Select
Window>Refresh. The new SUT appears in the window:
VST525.vsd
vst556.vsd

Installing the G06.24 RVU
G06.24 Software Installation and Upgrade Guide—528593-005
5-8
Create a New Software Revision
15. Keep the Planner Interface open for the next task.
Create a New Software Revision
When you create a new software revision, DSM/SCM selects the products in the SUT
that are licensed for your site and replaces any previous versions of the products.
The following steps assume that you are creating a new software revision that
manages OSS files. If you are not, go to step 6 after you are in the Planner Interface
Configuration Revisions window. These instructions also assume that you have
installed OSS. To configure OSS for the first time, see the Open System Services
Installation Guide. For details on modifying a DSM/SCM target, see the DSM/SCM
User’s Guide.
1. Check that the OSS Root Name Server $ZPNS is running on the Target. The
volume where the SYSnn is being placed must be activated as $SYSTEM to install
OSS files. To determine the server process, issue an SCF STATUS SERVER
command or an SCF LISTDEV command. An example of the STATUS SERVER
command is:
TACL>SCF STATUS SERVER $ZPMON.*
SCF - T9082G02 - (30APR03) (29JAN03) - 04/04/2003 14:39:49 System
\TINY
Copyright Compaq Computer Corporation 1986 - 2003
OSS Status SERVER \TINY.$ZPMON.*
ServerName State LastError ErrorDetail
#ZMSGQ STARTED 0 0
#ZPLS STARTED 0 0
#ZPNS STARTED 0 0
#ZTA00 STARTED 0 0
#ZTA01 STARTED 0 0
#ZTA02 STARTED 0 0
#ZTA03 STARTED 0 0
#ZTA04 STOPPED 0 0
#ZTA05 STOPPED 0 0
#ZTA06 STOPPED 0 0
#ZTA07 STOPPED 0 0
#ZTA08 STOPPED 0 0
#ZTA09 STOPPED 0 0
#ZTA10 STOPPED 0 0
#ZTA11 STOPPED 0 0
#ZTA12 STOPPED 0 0
#ZTA13 STOPPED 0 0
#ZTA14 STOPPED 0 0
#ZTA15 STOPPED 0 0
Total Errors = 0 Total Warnings = 0
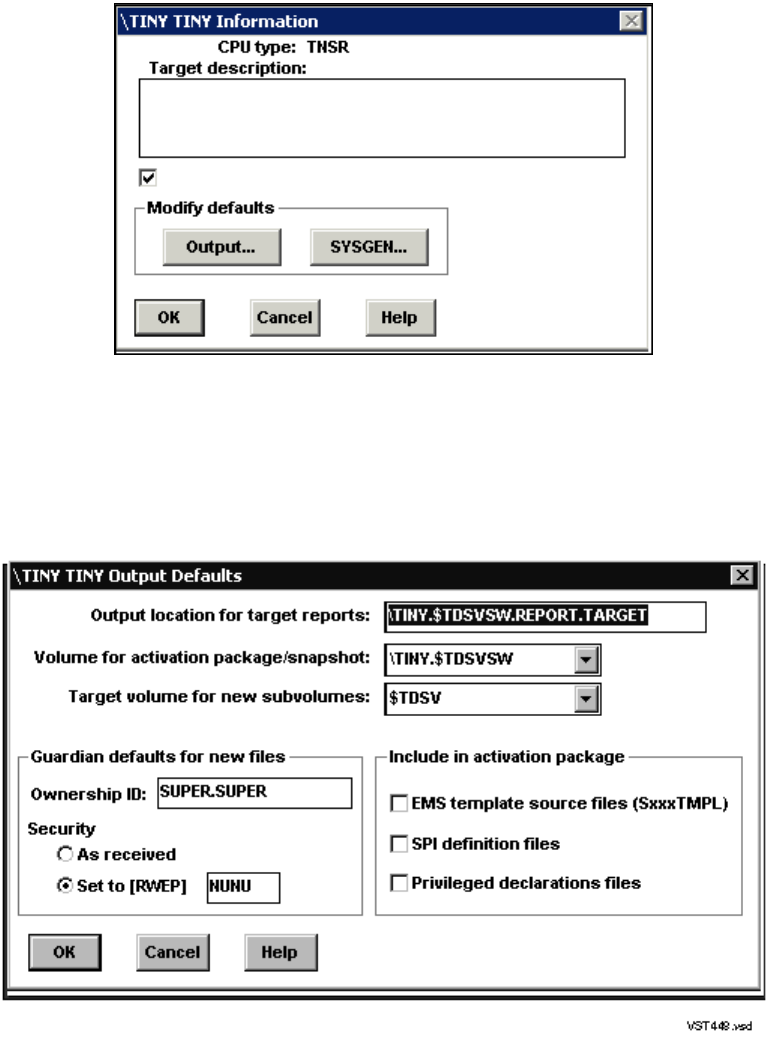
Installing the G06.24 RVU
G06.24 Software Installation and Upgrade Guide—528593-005
5-9
Create a New Software Revision
2. In DSM/SCM, the Planner Interface, in the Configuration Revisions window, select
the target configuration.
3. Select Maintain>Target Maintenance>Modify.
a. Select the Manage OSS Files option.
b. Click Output to view the default ouput values.
c. Enter default output values in the data fields as needed.
d. Click OK.
Manage OSS Files
VST447.vsd
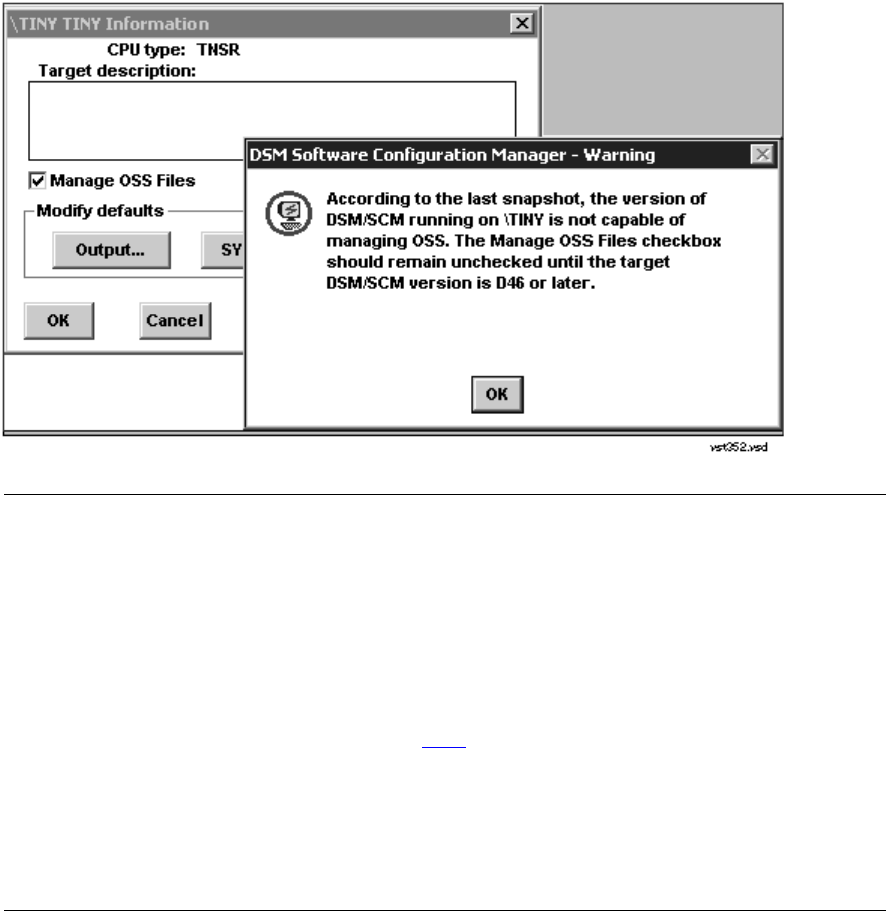
Installing the G06.24 RVU
G06.24 Software Installation and Upgrade Guide—528593-005
5-10
Create a New Software Revision
.
DSM/SCM returns you to the Target Information dialog box.
4. Click OK to return to the Configuration Revisions dialog box.
5. Click OK to return to the Planner Interface.
6. Select New software revision.
DSM/SCM opens a New software revisions dialog box that shows the products in
the last software revision that was built for the target system. It might take several
minutes for the dialog box to appear.
a. In the New software revision dialog box, click Edit revision notes.
A Revision Notes text box containing existing revision notes appears.
Note. If you receive this error message stating that the current target is pre-D46, you can
continue with the installation if you are certain that you have installed the DSM/SCM
T6031D46 PVU or later SPR. To check the correct product version:
1. Use the following DSM/SCM VPROC commands:
> volume $dsmscm_vol.ZDSMSCM
> vproc taexe
> vproc cbexe
2. Log on to TI by running ZPHITI (page 5-19). The current target version appears.
> RUN ZPHITI
3. To continue with the installation, click OK.
If you have previously installed the D46 DSM/SCM PVU and created a snapshot, the error
message does not appear.
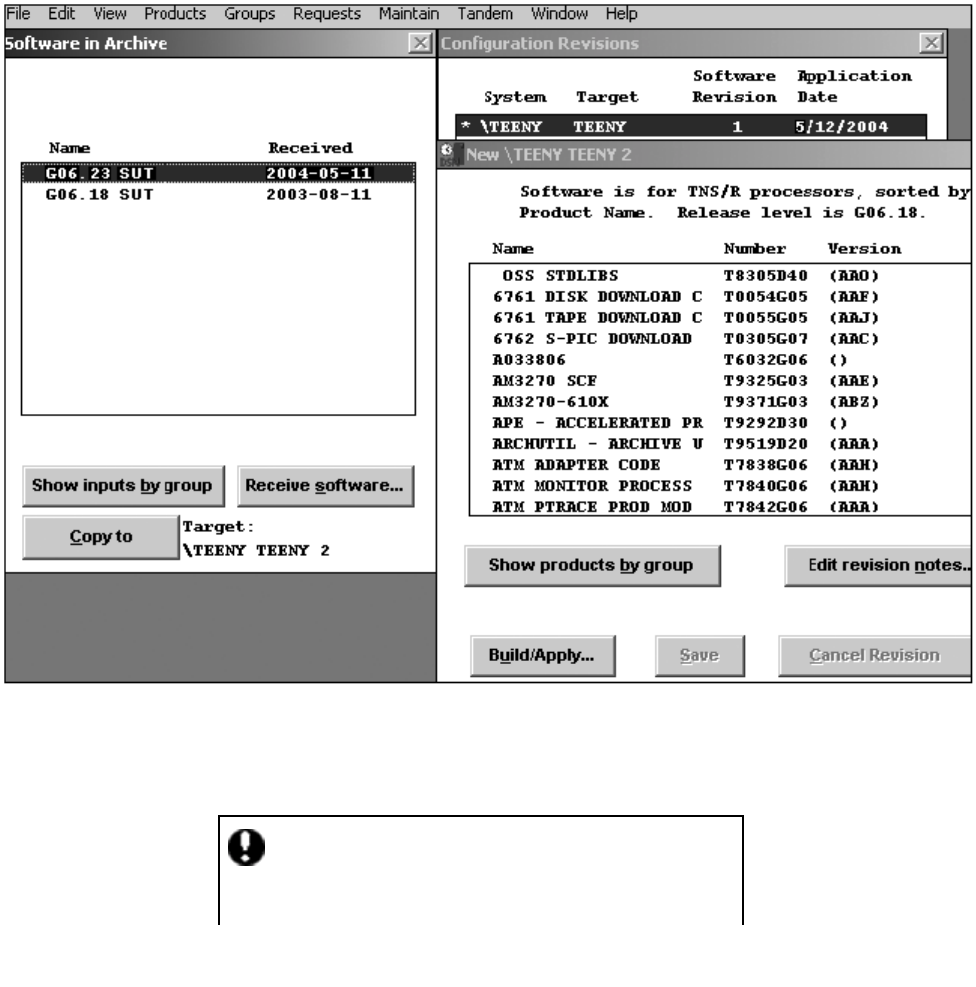
Installing the G06.24 RVU
G06.24 Software Installation and Upgrade Guide—528593-005
5-11
Create a New Software Revision
b. Add a description describing the new software revision (such as G06.24 SUT)
and click OK.
c. On the Software in Archive window, select the G06.24 RVU that was just
received into the archive and click Copy to.
7. Click Continue when the Confirmation message appears:
Note that if there are any discrepancies between the set of products included in the
previous configuration and the set in your new configuration, a warning message
appears listing any products missing in the current configuration that were present
in the previous configuration. (These products are removed from the system by
DSM/SCM during the Build/Apply of the new configuration.)
VST559.vsd
The current contents of the new revision will be
deleted. Products named in this target’s custfile
will be required for the new revision.
vst560.vsd
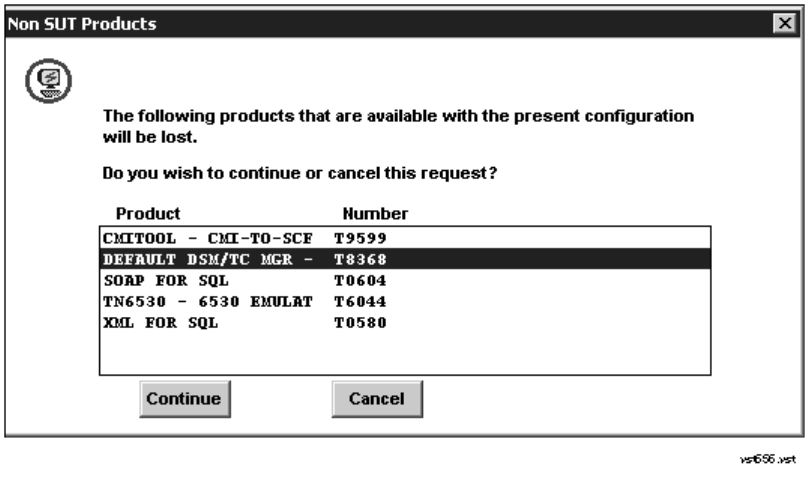
Installing the G06.24 RVU
G06.24 Software Installation and Upgrade Guide—528593-005
5-12
Create a New Software Revision
An example of a product version mismatch might occur when T9225D46 (TNS/R
C++ Compiler) is installed using DSM/SCM. If you are not currently running
TT9225D46, the Planner Interface displays a "Version Mismatch" message to
indicate that the version of this SPR is different from the version of the base
component. Click Continue.
Note also that for OSS files, the Activation Package contains installation
instructions for the pax files for those OSS products that contain A7CINFO files in
their distributed subvolumes. DSM/SCM will install only these pax (archive) files on
the OSS file system. Other files will be delivered to the target in the ZOSSUTL
subvolume, but will not be installed on the OSS file system. You might receive a
warning that certain OSS products (such as T6035, T5893) are not DSM/SCM
enabled. If this is the case, install them using PINSTALL/COPYOSS. See the
appropriate OSS manuals for using PINSTALL and COPYOSS.
8. Click Continue if the Non SUT Products message appears. The message lists
non-SUT products installed on the previous SYSnn that are not available on the
new configuration. For example:
The New software revision list now displays the new RVU level. For example:
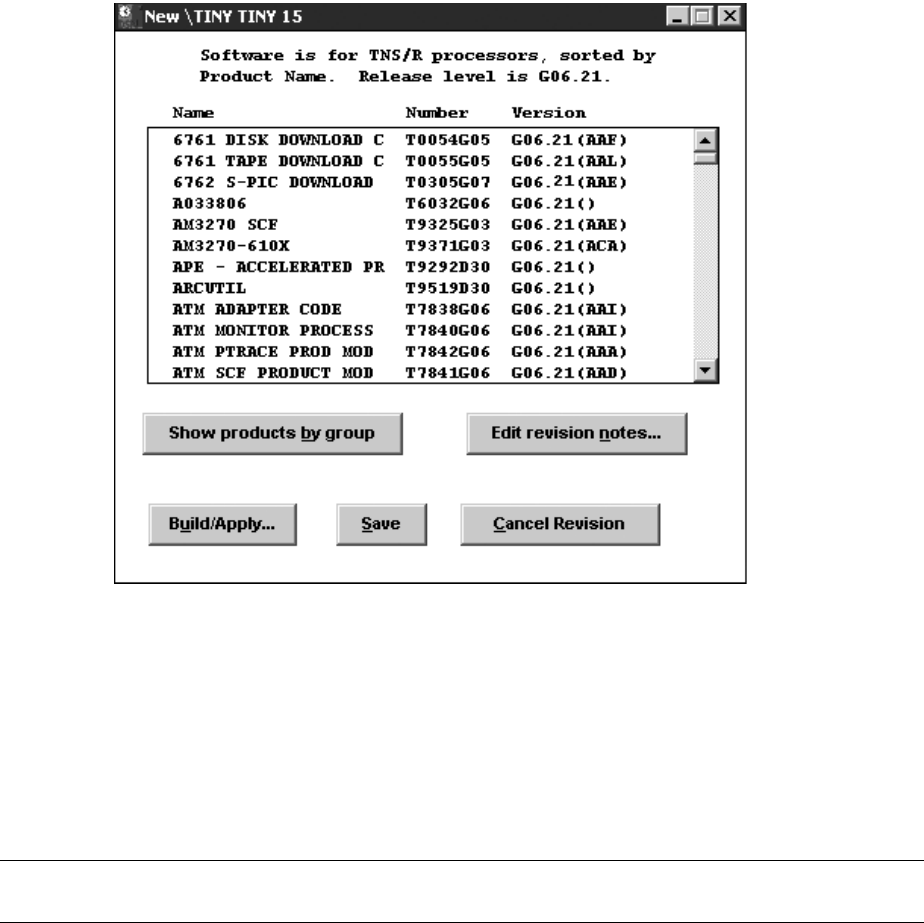
Installing the G06.24 RVU
G06.24 Software Installation and Upgrade Guide—528593-005
5-13
Build and Apply the New Software Revision
9. Keep the Planner Interface open for the next task.
Build and Apply the New Software Revision
The Build process creates an activation package containing all the products listed in
the new software revision.
To avoid disrupting other system activity, schedule the Build to run at night and the
Apply to run immediately after the Build. See the DSM/SCM User’s Guide for
information about scheduling the Build/Apply to run at different times.
To build and apply the new software revision:
1. In the New software revision dialog box, click Build/Apply to display the options
for your Build/Apply.
It might take several minutes for DSM/SCM to assemble the build information.
During this time, the Build/Apply Request dialog box options and commands are
dimmed and unavailable.
Note. The Activation Package contains installation instructions for the pax files of those OSS
products that contain A7CINFO files in their distributed subvolumes.
vst555.vsd
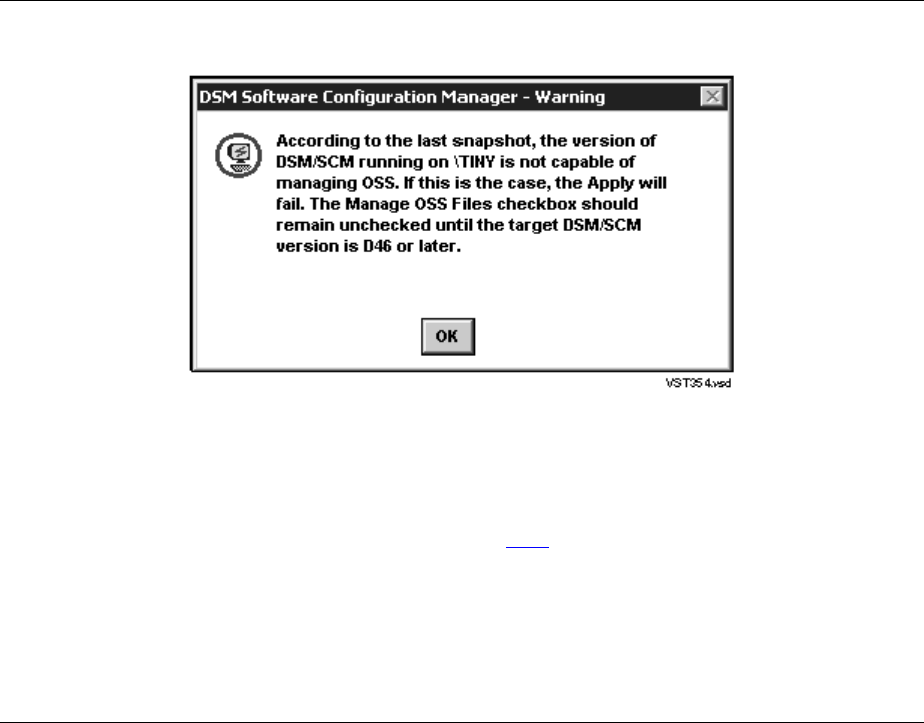
Installing the G06.24 RVU
G06.24 Software Installation and Upgrade Guide—528593-005
5-14
Build and Apply the New Software Revision
When the Build information is assembled, the Build/Apply Request dialog box is
refreshed. It displays default options and assigns a name to the Build/Apply
request. For example:
Note. You might receive this message:
The message is warning you that the last DSM/SCM snapshot was created by a pre-T6031D46
version of DSM/SCM, which would be the case if you have not installed the T6031D46 product
version. If you are certain that you are on a D46 PVU of DSM/SCM, ignore the message and
continue with the G06.24 installation. If you are unsure of the DSM/SCM product version, logon
to the Target Interface (TI) by running ZPHITI (page 5-19). The current version of TI appears
on the logon screen.
If you know that you have activated the D46 DSM/SCM product version, click OK and continue
with the installation.
If you have previously installed the D46 DSM/SCM PVU and created a snapshot, the error
message does not appear.
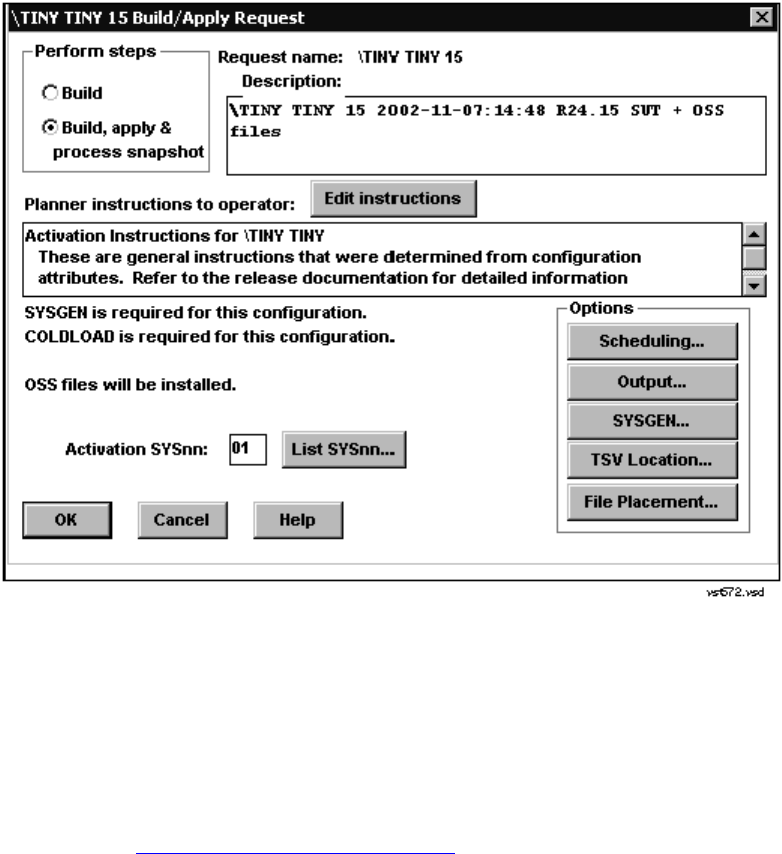
Installing the G06.24 RVU
G06.24 Software Installation and Upgrade Guide—528593-005
5-15
Build and Apply the New Software Revision
2. Under Perform steps, select Build, apply & process snapshot.
3. In the Activation SYSnn: box, enter a unique number to create a new SYSnn
subvolume. The value nn must be a two-digit octal number in the range%00...%77.
You can issue a FILEINFO command at a TACL prompt to view the SYSnn
subvolumes that are currently on your system. (For other ways to determine the
SYSnn, see Determine the Current SYSnn on page A-3.)
> fileinfo $system.*.osimage
4. Make a note of the new SYSnn. You will specify this SYSnn subvolume when:
•Using the VPROC command to verify the location and version of your firmware
•Specifying the location of firmware for the new RVU
•Running ZPHIRNM
•Loading the G06.24 RVU
5. Click Edit instructions to display the Planner Instructions box.
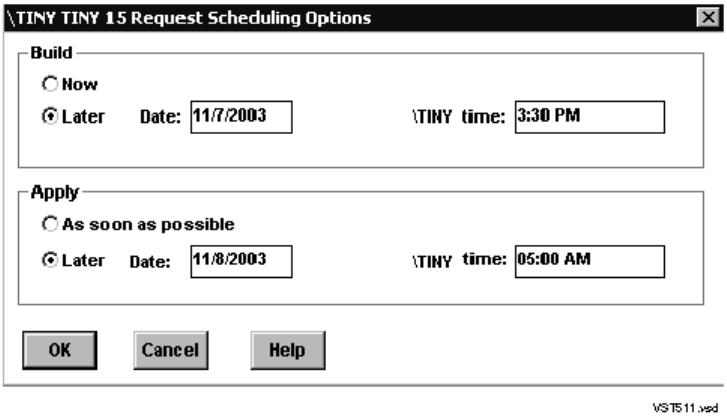
Installing the G06.24 RVU
G06.24 Software Installation and Upgrade Guide—528593-005
5-16
Build and Apply the New Software Revision
6. Edit the instructions to provide the correct (new) SYSnn number, and then click
OK.
The Planner Instructions box closes.
7. Select the Scheduling, Output, SYSGEN, TSV Location, and File Placement
options and configure as appropriate for your system. (See the DSM/SCM User’s
Guide or the online help for more information about Build/Apply Request options.)
In particular, you might want to create a system image tape (SIT) during the
Build/Apply. For example:
8. Confirm that the spooler is active and not 100 percent full before executing the
Build/Apply request. At a TACL prompt, start SPOOLCOM and issue a COLLECT,
STATUS command. For example:
12> spoolcom $spls; collect, status
COLLECT STATE FLAGS CPU PRI UNIT DATA FILE %FULL
$S ACTIVE 3 , 1 154 4 $OPS0.SPL.DATA 4
9. In the Build/Apply Request dialog box, click OK.
DSM/SCM runs the Build and Apply steps and displays a Status window, which is
automatically updated at regular intervals. For example:
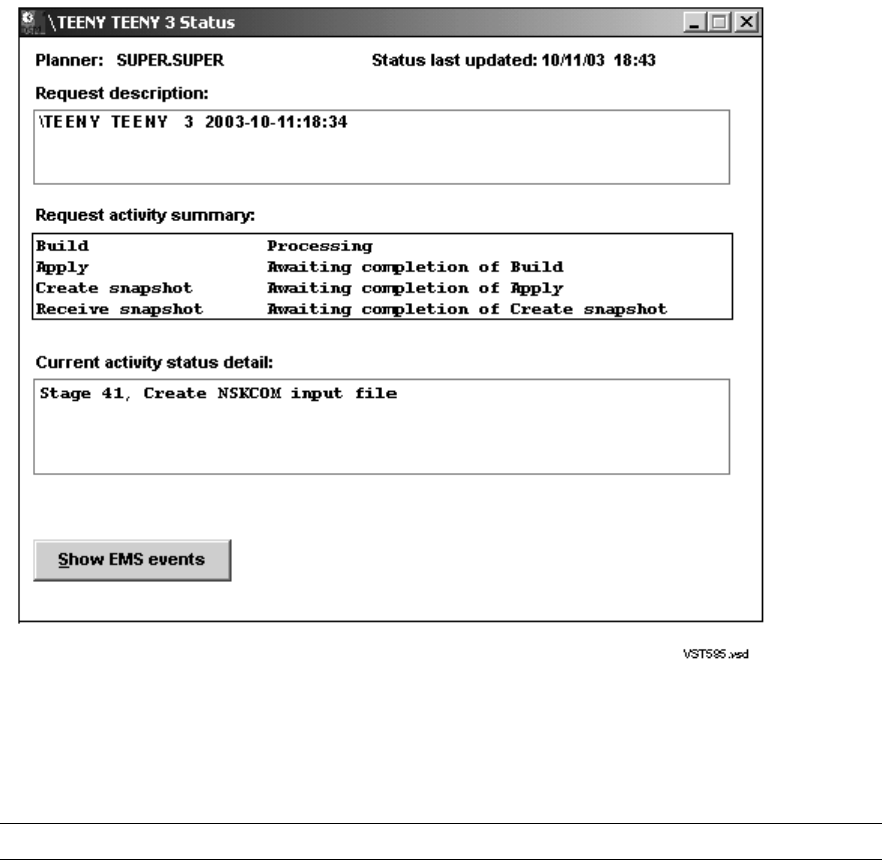
Installing the G06.24 RVU
G06.24 Software Installation and Upgrade Guide—528593-005
5-17
Build and Apply the New Software Revision
10. Check EMS messages for more detailed information about your Build/Apply:
a. In the Events window, click Refresh to see newer messages.
b. When finished viewing, click Close.
When the Build/Apply finishes successfully and a snapshot is received into the
host database:
•The Request activity summary in the Status window shows that the Build,
Apply, Create snapshot, and Receive snapshot activities finished. For example:
Note. If you encounter any problems, see the DSM/SCM User’s Guide or online help.
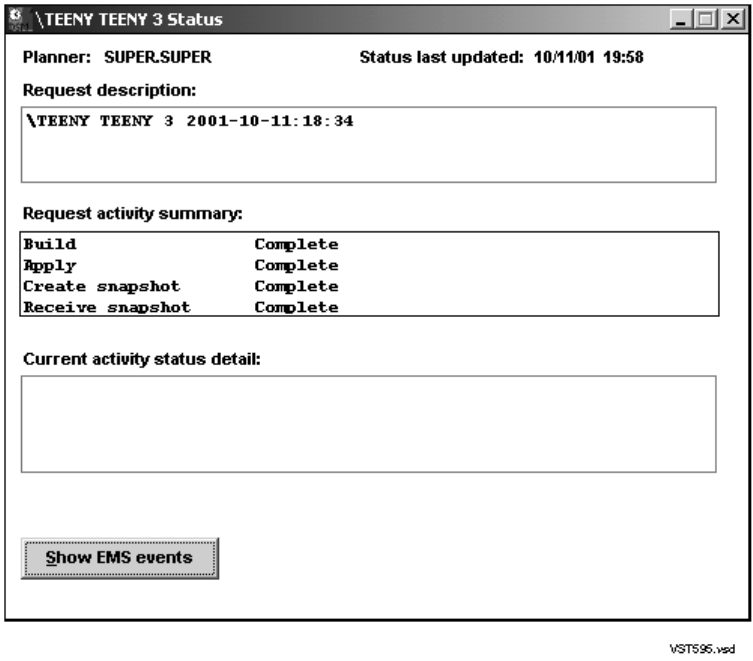
Installing the G06.24 RVU
G06.24 Software Installation and Upgrade Guide—528593-005
5-18
Build and Apply the New Software Revision
•The last message in the EMS Events window shows that the input snapshot
finished successfully.
•The Requests window shows that the request is finished. (Select Requests>
Requests list).
11. Close the EMS Events, Status, and Request windows.
12. Exit the DSM/SCM Planner Interface.

Installing the G06.24 RVU
G06.24 Software Installation and Upgrade Guide—528593-005
5-19
Print Operator Instructions From the Target Interface
(ZPHITI)
Print Operator Instructions From the Target
Interface (ZPHITI)
Print the operator instructions that you edited in Step 6 on page 5-16.
1. Enter the following from the DSM/SCM subvolume to display the TI Logon screen:
RUN ZPHITI
DSM Software Configuration Manager TI Logon
==============================================================================
User ID:__________
Password:__________
==============================================================================
==============================================================================
This software is licensed by Hewlett Packard Development Company L.P. and
is subject to restrictions on use, disclosure and copying and is Commercial
Software. If a user is an entity of the United States Government, only
LIMITED RIGHTS or RESTRICTED RIGHTS are granted.
HP and the HP logo are trademarks of
Hewlett Packard Development Company L.P.
T6031D46^ABJ 16JAN2004
(c) Hewlett Packard Development Company L.P., 1994-2002
All Rights Reserved
==============================================================================
F1-Logon F8-Clear entry
F15-Help SF16-Exit
Ready
2. Enter your user ID and password and press F1 to log on to the Target Interface.
The Main Menu appears:
DSM Software Configuration Manager Main Menu
==============================================================================
\WARRIOR Prior snapshot 2002-11-09:12:18:44
Selection number: 0
==============================================================================
Choose an action by entering the selection number of an item from the list
below.
==============================================================================
1 Create system report
2 Create system snapshot
3 Perform target activities
4 Perform audit
5 Perform database verify
9 Enable trace (for support use only)
==============================================================================
F1-Select F4-Show Messages
F15-Help F16-Return SF16-Exit
Ready
Installing the G06.24 RVU
G06.24 Software Installation and Upgrade Guide—528593-005
5-20
Print Operator Instructions From the Target Interface
(ZPHITI)
3. From the ZPHITI Main Menu, enter 3 (Perform target activities) in the Selection
number field, and press F1 to display the Target Menu - Select Target screen.
DSM Software Configuration Manager Target Menu - Select Target
==============================================================================
\WARRIOR Prior snapshot 2000-09-20:12:18:44
Selection number:
==============================================================================
Choose a target selection number from the list below. Status information is
shown for requests still in progress.
==============================================================================
1 NEW CONFIG
2 DEFAULT
3
4
5
6
7
8
9
===========================More Targets PgDn/PgUp=============================
F1-Select
F15-Help F16-Return SF16-Exit
Ready
4. In the Selection number field, enter the number corresponding to the logical
target to which you applied the software (selection 2 in this example), and press F1
to display the Target Menu - Select Action screen.
DSM Software Configuration Manager Target Menu - Select Action
==============================================================================
\WARRIOR Prior snapshot 2002-11-20:12:18:44
DEFAULT Last S/W applied on SYS 00 on 2002-11-22:12:17
Selection number:
==============================================================================
Choose an action by entering the selection number of an item from the list
below.
==============================================================================
1 Perform/Review apply request
2 Perform backout to S/W Applied on SYS 01 on 2000-09-13:15:44
3 Review operator instructions for the last apply completed.
==============================================================================
F1-Select
F15-Help F16-Return SF16-Exit
Ready
5. Enter 3 (Review operator instructions for the last apply completed) in the Selection
number field, and press F1 to display the operator instructions.
6. Enter a printer location in the Print operator instructions field, and press F9 to
print the operator instructions.

Installing the G06.24 RVU
G06.24 Software Installation and Upgrade Guide—528593-005
5-21
Print Operator Instructions From the Target Interface
(ZPHITI)
An example might look like this:
Activation Instructions for \WARRIOR DEFAULT
These are general instructions that were determined from configuration
attributes. Refer to the release documentation for detailed information
on migrating to this software configuration.
1. Stop all applications. Keep OSS running.
2. Update FIRMWARE.
Run TMDS (or TSM for S-Series) to check firmware and perform
firmware updates.
T7892 S70000 BOOT MILLICOD includes firmware changes.
T1089 S-SERIES SP FW includes firmware changes.
3. RUN ZDSMSCM.ZPHIRNM SYSnn
(Note: replace nn with correct number)
4. Check for $0 EMS messages.
Correct any errors indicated in the $0 EMS messages.
Do not proceed until this step has been successfully completed.
5. Coldload is required.
6. Run merge_whatis if ZPHIRNM indicates it is needed.
7. Restart all applications.
7. Press SF16 to exit the Target Interface.
In the Activation instructions, you might see information regarding the merge_whatis
OSS command.
Run merge_whatis if zphirnm indicates it is needed.
When you finally run ZPHIRNM, the following lines are written to the log:
Note: merge_whatis needs to be run to update the man pages.
Files in a whatis.frag directory have changed.
The merge_whatis is a shell script in /bin. It creates and updates the whatis
database used by the OSS shell man, apropos, and whatis commands. You must
run the merge_whatis command once against each directory that contains the man
page files to be used.
You will run merge_whatis after using ZPHIRNM. Running the merge_whatis
command is documented in Steps for Running ZPHIRNM on page 10-5.
Note. If the operator instructions require you to run the INSTALL^TEMPLATES macro, see If
Running INSTALL^TEMPLATES Is Required on page A-7 for detailed instructions.
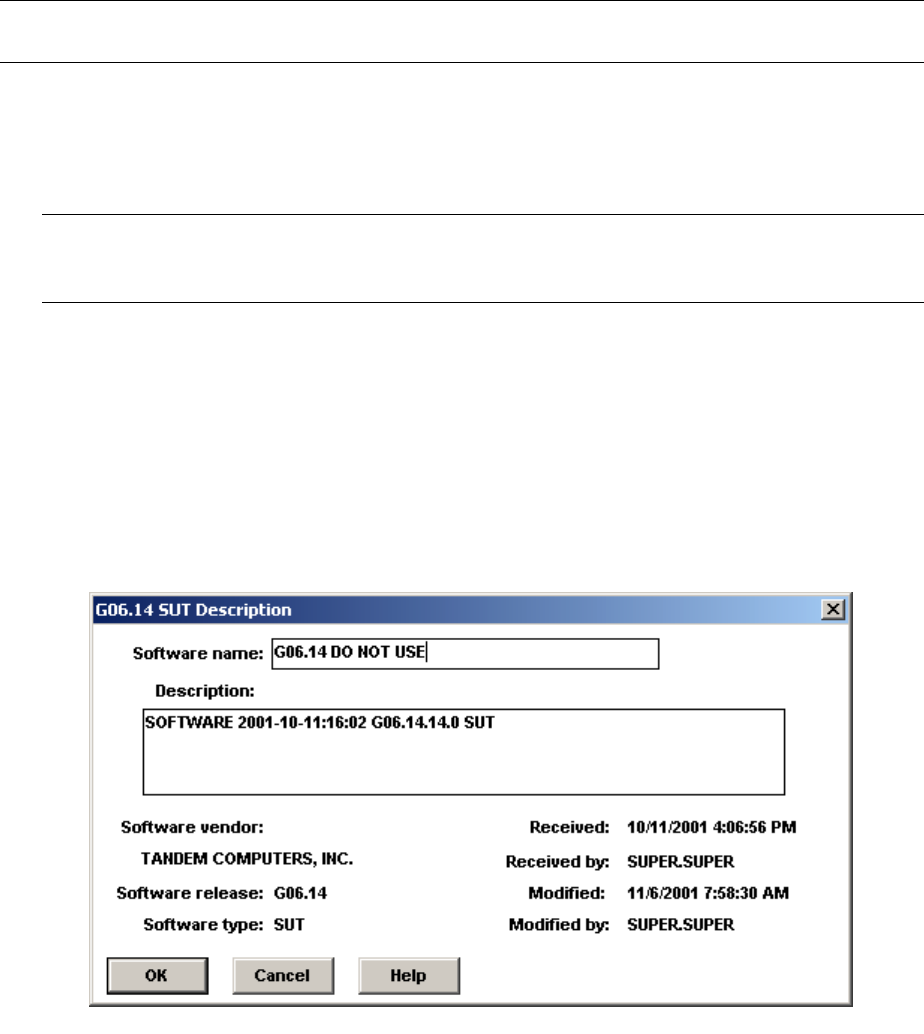
Installing the G06.24 RVU
G06.24 Software Installation and Upgrade Guide—528593-005
5-22
Recovery for Problems Installing the G06.24 RVU
Recovery for Problems Installing the G06.24
RVU
If you receive an error indication in the Requests, Status, or EMS Events windows, you
might have to reinitiate the Build/Apply. See the DSM/SCM Messages Manual to
determine the nature and severity of the problem.
Cancel Pending Build/Apply Requests
1. Select the request to be canceled.
2. Select Requests>Cancel request.
The cancel request action takes a few minutes to finish.
3. Using the Planner Interface, rename the old software inputs:
a. In the Software in Archive dialog box, select the G06.24 RVU software input.
b. Select File>Show software input description to display the SUT Description
dialog box.
c. In the Software name box, edit the software input name so that another
operator will know it is a DSM/SCM input that should not be used to build a
new software revision. For example:
Note. If you inadvertently close the Status dialog box, reopen it by selecting Requests>
Requests list and then double-clicking the request.
Note. If you cannot cancel the Build request through the DSM/SCM Planner Interface, use
the DSM/SCM Target Interface (ZPHITI) to cancel the request. See the DSM/SCM User’s
Guide and online help for more information.
VST583.vsd

G06.24 Software Installation and Upgrade Guide—528593-005
6-1
6Replacing the Disk Bootstrap
Microcode (Pre-G06.06)
As of the G06.06 RVU, a new disk bootstrap program is available. If you are migrating
to the G06.24 RVU from an RVU prior to G06.06, you must replace the existing disk
bootstrap microcode with this new version, as described in this section. If you update
the disk boot code, you must down the mirrored disk. The mirror should be revived as
soon as possible after performing a system load.
In this procedure, you use the SCF CONTROL DISK, REPLACEBOOT command. See
the SCF Reference Manual for the Storage Subsystem for detailed instructions and
procedures that can help you recover if the SCF CONTROL DISK, REPLACEBOOT
command fails or if the bootstrap program is unusable.
To replace the bootstrap program on the primary system disk named $SYSTEM:
1. From a TACL prompt, enter a SCF CONTROL DISK, REPLACEBOOT command.
For example:
1> scf
SCF - T9082G02 - (24SEP99) (26JUL99) - 05/04/2000 13:28:33 System
\ELI
Copyright Compaq Computer Corporation 1986 - 1999
(Invoking \ELI.$SCM.ZDSMSCM.SCFCSTM)
1-> CONTROL DISK $SYSTEM, REPLACEBOOT $SYSTEM.SYSnn.SYSDISC
where nn is the number specified during the Build/Apply phase of installing the
G06.24 RVU.
SCF asks if you are sure you want to replace the bootstrap on $SYSTEM.
2. Enter yes (Y or y) to continue.
To facilitate recovery of a mirrored volume in the event of a failure, SCF asks
whether the mirror system disk should be stopped.
3. Enter yes (Y or y) to place the mirror system disk in a STOPPED state, substate
HARDDOWN.
SCF replaces the bootstrap program on the disk that is in a STARTED state.
Note. In the next procedure, when you enter yes (Y or y) at an SCF prompt, the action occurs
immediately. No confirmation prompt is given.
Caution. To avoid the potential outage of the system disk, do not start the stopped mirror
system disk until after performing a system load with the disk that has the new bootstrap
program (see Reset and Start the Mirror System Disk (If Necessary) on page 12-11).
Perform the system load using the updated primary $SYSTEM disk. Start the mirror system
disk only after a successful system load.

G06.24 Software Installation and Upgrade Guide—528593-005
7-1
7
Updating Service Processor (SP)
Firmware
SP firmware performs vital functions for NonStop S-series servers. This section
describes how to update the SP firmware to the proper version when upgrading to a
new RVU. Table 7-1 provides an overview of firmware and SP components.
Note. Update SP firmware only:
•If instructed to do so by DSM/SCM
•If you are not replacing the PMF CRUs in your system while migrating to the G06.24 RVU
See TSM or OSM online help for information about updating SP firmware when replacing an
I/O multifunction (IOMF) CRU or processor multifunction (PMF) CRU.
To update SP firmware using OSM, if it is installed and configured, see Updating SP Firmware
Using the OSM Service Connection on page 7-20.
Table 7-1. Firmware Components and Associated CRUs
Component Description Exists on
PMF CRUs Exists on
IOMF CRUs
SP firmware Firmware that enables the SP to
perform most of its functions XX
Processor boot code Millicode that is used to load,
reload, and dump the processor X
SCSI boot code Firmware that is downloadable to
the SCSI controllers X

Updating Service Processor (SP) Firmware
G06.24 Software Installation and Upgrade Guide—528593-005
7-2
Alerts
Alerts
•When using the TSM Service Application to update the service processor firmware,
use the Firmware Update dialog box. Do not use the Single SP Firmware dialog
box unless instructed to do so to recover from a failed service processor update.
•Check that no other service processor firmware updates are in progress before
updating service processor firmware.
•Depending on your current RVU, you might have to reset all service processors in
each ServerNet fabric (X and Y) before you begin updating service processor
firmware. Failure to do so could result in the loss of certain critical system
resources.
•Update first the service processor firmware in the fabric (X or Y) containing the
secondary master service processor (MSP).
•If the TSM service connection is lost, reconnect by using the TSM Service
Application. If the OSM service connection is lost, reconnect using the OSM
Service Application.
•If you have problems updating your SP firmware or resetting the SPs, see
Recovery for Problems Updating SP Firmware (Using TSM) on page 7-15.
•Yellow caution symbols might appear on enclosure icons, both in the physical view
and in the tree pane, during the SP firmware update. These caution symbols
should disappear after the system is loaded with the G06.24 RVU.
•As a precaution, download the SP firmware file (spntcde9), as described under
Download the SP Firmware File to the System Console on page 7-6. If you have
trouble updating your service processor and you cannot obtain a TSM service
connection, you can use the spntcde9 file with the TSM Low-Level Link Application
to update your SP, as described under Updating Firmware Using the TSM Low-
Level Link Application on page 7-17. If OSM is installed, you can also download
the SP firmware file (spntcde9) to the c:\osm\bin directory. You then use the OSM
Low-Level Link. See Using OSM and Downloading the SP Firmware File to the
System Console (Optional) on page 7-28.
•Always check with Scout for the latest SP firmware SPRs.

Updating Service Processor (SP) Firmware
G06.24 Software Installation and Upgrade Guide—528593-005
7-3
Before You Begin
Before You Begin
1. Verify that the system is up with at
least one processor running the
NonStop Kernel.
See Check Processor Status (Using
either TSM or OSM) on page 4-4.
2. Verify that you know the SYSnn for the
new RVU and for your current RVU. •The SYSnn for your current RVU was
determined in the Record the Current
SYSnn procedure on 4-14.
•The SYSnn for the G06.24 RVU was
created during the Build and Apply
the New Software Revision
procedure on 5-13.
3. Verify that you know the correct
version of the SP firmware for the new
RVU and for your current RVU.
See Determine the Current and New
Versions of SP Firmware on page 7-4.
4. Verify that each SP is running the
correct SP version for your current
RVU.
See Verify That Your Current RVU Is
Running the Correct Version of SP
Firmware (Using TSM) on page 7-5.
5. Reset each service processor. See If Necessary, Reset the SPs Prior to
Updating the SP Firmware on page 7-5.
After the SPs have updated, either TSM
or OSM asks you to reset the SP
firmware.
6. Optionally, download the SP firmware
file to the system console. See Download the SP Firmware File to
the System Console on page 7-6.
For OSM, the procedure is the same. See
Using OSM and Downloading the SP
Firmware File to the System Console
(Optional) on page 7-28.

Updating Service Processor (SP) Firmware
G06.24 Software Installation and Upgrade Guide—528593-005
7-4
Determine the Current and New Versions of SP
Firmware
Determine the Current and New Versions of SP Firmware
When updating SP firmware, you need:
•The SP firmware version for your current RVU to determine that the SPs are in a
known, good state before you begin the SP firmware update
•The SP firmware version for the G06.24 RVU to verify that the SP firmware has
successfully updated
You can also use this FILEINFO command to see all the firmware currently on all
SYSnn’s:
TACL> FILEINFO $SYSTEM.SYS*.*CODE*
To determine the correct versions of SP firmware using the VPROC command:
1. At a TACL prompt, issue the VPROC command to verify the location and version of
the SP firmware for the G06.24 RVU:
VPROC $SYSTEM.SYSnn.SPCODE9
where nn is the number specified during the Build/Apply phase of installing the
G06.24 RVU. For example:
9> vproc spcode9
VPROC - T9617G03 - (01 MAY 2001) SYSTEM \TEENY Date 26 AUG 2003,
11:27:55
COPYRIGHT TANDEM COMPUTERS INCORPORATED 1986 - 2001
$SYSTEM.SYS02.SPCODE9
Binder timestamp: 23JUL2003 03:45:04
Version procedure: T1089G06^26AUG03^23JUL03^ABK
Version procedure: T1088G06^26AUG03^23JUL03^ABK
2. Record the version of SP firmware.
3. Repeat Steps 1 and 2 by using the SYSnn for your current RVU. For example:
$SYSTEM SUPER 2> vproc $system.sys00.spcode9
VPROC - T9617G03 - (30 MAR 1999) SYSTEM \WARRIOR Date 21 SEP 2000,
11:39:58
COPYRIGHT TANDEM COMPUTERS INCORPORATED 1986 - 1995
$SYSTEM.SYS01.SPCODE9
Binder timestamp: 10AUG2000 17:44:06
Version procedure: T1089G06^31MAY00^10AUG00^AAX
Version procedure: T1088G06^31MAY00^10AUG00^AAX
Note. Version procedure dates might be different; these are examples only.

Updating Service Processor (SP) Firmware
G06.24 Software Installation and Upgrade Guide—528593-005
7-5
Verify That Your Current RVU Is Running the Correct
Version of SP Firmware (Using TSM)
Verify That Your Current RVU Is Running the Correct Version of
SP Firmware (Using TSM)
1. Log on to the TSM Service Application.
2. Select Display>SP Actions.
The Service Processor Actions dialog box appears. Wait for the firmware version of
each SP to appear (this might take several minutes).
3. Verify that the correct version of SP firmware for your current RVU is displayed for
each SP.
If any SP has a different version of SP firmware, update that SP to the correct
version for your current RVU:
a. Select Display>Firmware Update to update the SP firmware to the proper
version for your current RVU.
b. Monitor the status of the firmware update by using the Firmware Update Action
Summary:
•If the firmware update finishes successfully, reset the SP, as described
under Resetting an SP Using the TSM Low-Level Link on page 7-18.
•If the firmware update fails, you might have a faulty SP or a down-rev
customer-replaceable unit (CRU). Contact your service provider.
If Necessary, Reset the SPs Prior to Updating the SP Firmware
After verifying that the SPs are running the correct version of SP firmware for your
current RVU, and before you begin to update firmware, you might have to reset all SPs
in both ServerNet fabrics (X and Y). Failure to do so could result in the loss of critical
system resources. Each SP takes about two minutes to reset.
1. If necessary, log on to the TSM Service Application.
2. From the toolbar, select SP Actions, or select Display> SP Actions to display the
Service Processor Actions dialog box.
3. Click Select all Y Fabric SPs.
4. From the Available Actions list, select Reset and then click Perform action.
5. Click OK in response to this message:
This action takes up to 2 minutes for the SP to complete the reset even if the action
appears to complete immediately.
This action will cause any current Firmware Update actions against this SP to abort.
Verify there are no Firmware Updates being performed on this SP before continuing.
Are you sure you want to reset this SP?
WARNING. To avoid hardware damage, never reset an SP if the firmware update does not
finish successfully.

Updating Service Processor (SP) Firmware
G06.24 Software Installation and Upgrade Guide—528593-005
7-6
Download the SP Firmware File to the System
Console
6. Verify that the SP reset finishes successfully. Wait until the display in the Action
Status box shows that the reset is Completed.
If the Action Status box shows that the reset has failed or if the completed status
does not appear, contact your service provider.
7. Repeat Steps 3 through 6 for the X-fabric service processors.
Download the SP Firmware File to the System Console
SP firmware updates are normally performed through the TSM Service Application.
However, if you need to use the TSM Low-Level Link Application to perform firmware
updates on an SP, you must have access to spntcde9, the SP firmware file that runs
on a system console. HP recommends that you download the SP firmware file
(spntcde9) into the \tsm\bin directory, although you can use any directory you
want.
1. If necessary, start an OutsideView session.
2. Select Session>Receive file to display the IXF Receive dialog box.
3. In the Host box enter the host system name, and the volume and subvolume
where the firmware file resides, based on the SYSnn specified during the
Build/Apply phase of installing the new RVU. For example:
\prod2.$system.sys01
4. In the File box, enter spntcde9.
spntcde9 appears in the Local area File Name box. For example:
5. Under Download Path, click Browse to locate and select the \tsm\bin directory.
Under Options, verify that the Binary option is selected.
Note. If you have downloaded the spntcde9 file in previous RVU installations, verify that
the Overwrite local files option is also selected.
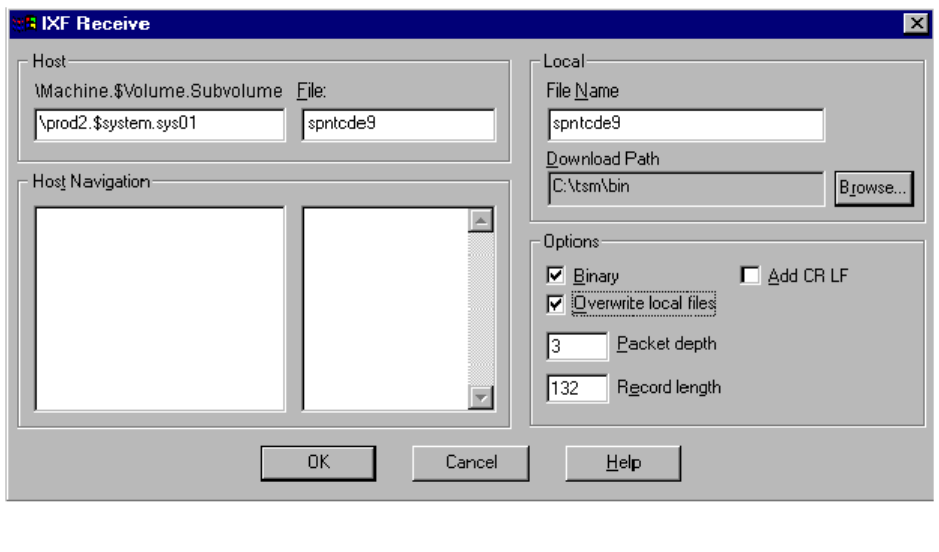
Updating Service Processor (SP) Firmware
G06.24 Software Installation and Upgrade Guide—528593-005
7-7
Download the SP Firmware File to the System
Console
6. Click OK.
The Browse window closes, and an IXF - Receive dialog box appears, showing the
download progress of the spntcde9 file. The download should take around 5
minutes.
7. When the IXF - Receive dialog box indicates that the transfer is finished, click End
Transfer.
vst642.vsd
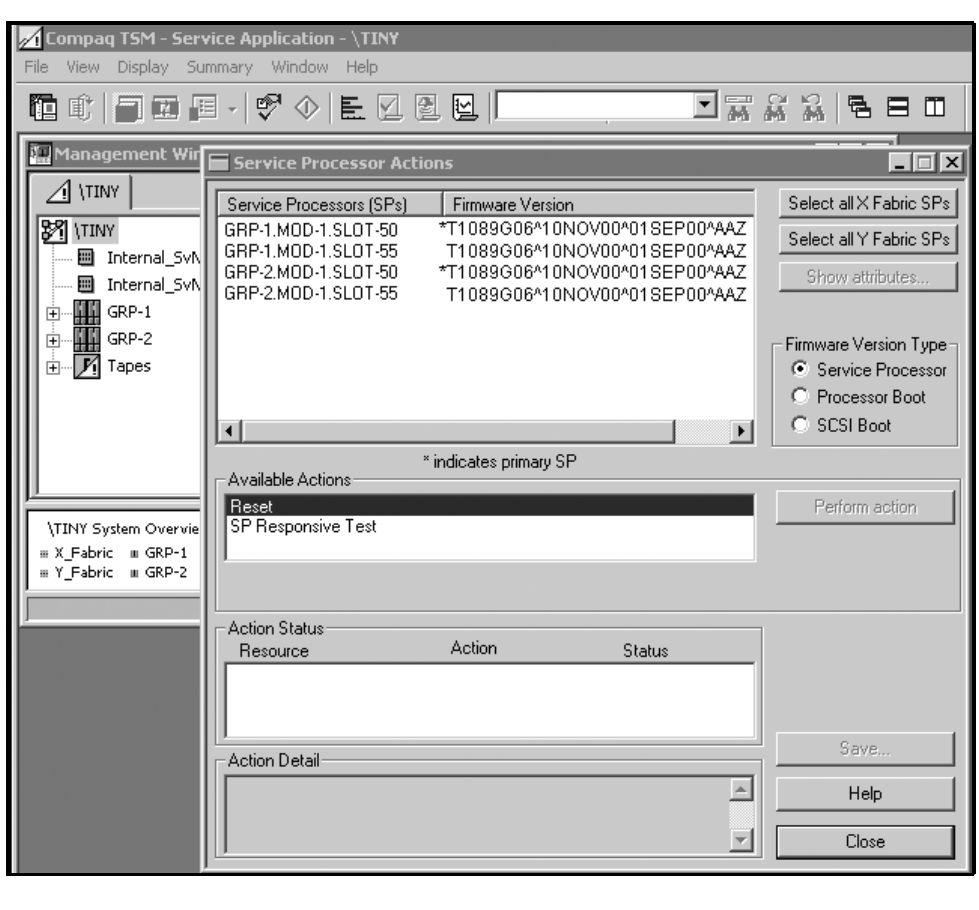
Updating Service Processor (SP) Firmware
G06.24 Software Installation and Upgrade Guide—528593-005
7-8
Update SP Firmware Using the TSM Service
Application
Update SP Firmware Using the TSM Service
Application
1. If necessary, log on to the TSM Service Application.
2. If necessary, display the Service Processor Actions dialog box, either by selecting
SP Actions in the toolbar or by selecting Display>SP Actions.
vst630.vsd
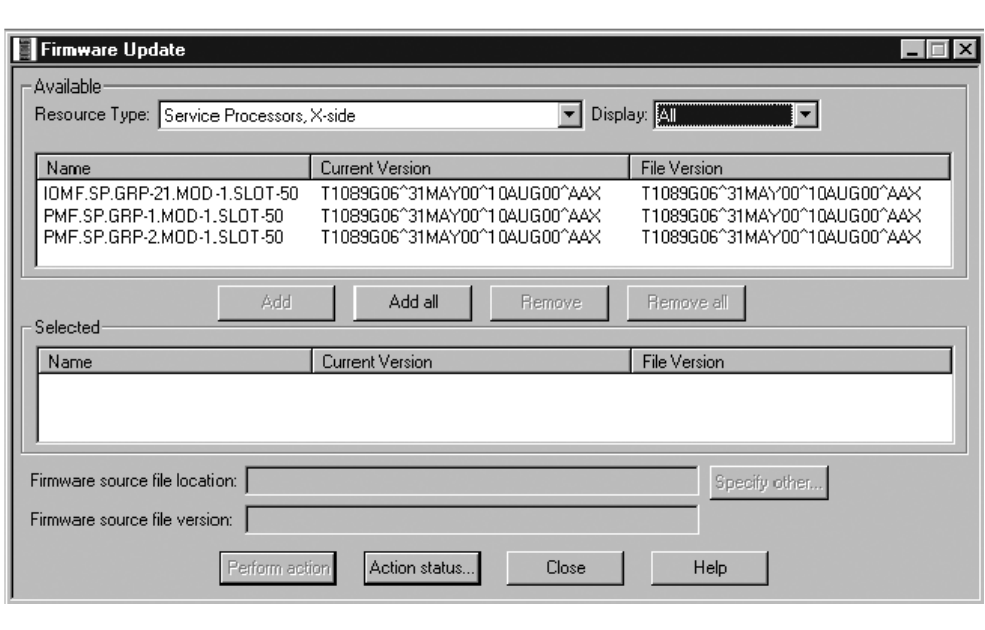
Updating Service Processor (SP) Firmware
G06.24 Software Installation and Upgrade Guide—528593-005
7-9
Update SP Firmware Using the TSM Service
Application
3. Using the Service Processors (SPs) list, determine which fabric (X or Y) contains
the secondary master service processor. (You must choose this fabric when you
begin updating service processor firmware):
•If an asterisk appears on the line for GRP-1.MOD-1.SLOT-50, then the Y fabric
contains the secondary master service processor; choose the Y fabric for the
remaining steps in this procedure.
•If an asterisk appears on the line for GRP-1.MOD-1.SLOT-55, then the X fabric
contains the secondary master service processor; choose the X fabric for the
remaining steps in this procedure.
4. Select Display>Firmware update.
The Firmware Update dialog box appears.
5. From the Resource Type list, select Service Processors, Y-side if you have
chosen to update the service processors in the Y fabric, or Service Processors,
X-side if you are updating the service processors in the X fabric.
6. From the Display list, select All to display the selected resources in the Available
area.
7. Click Add all to move the resources to the Selected box.
8. Click Specify other to display the Specify Firmware File Location dialog box.
VST645.vsd
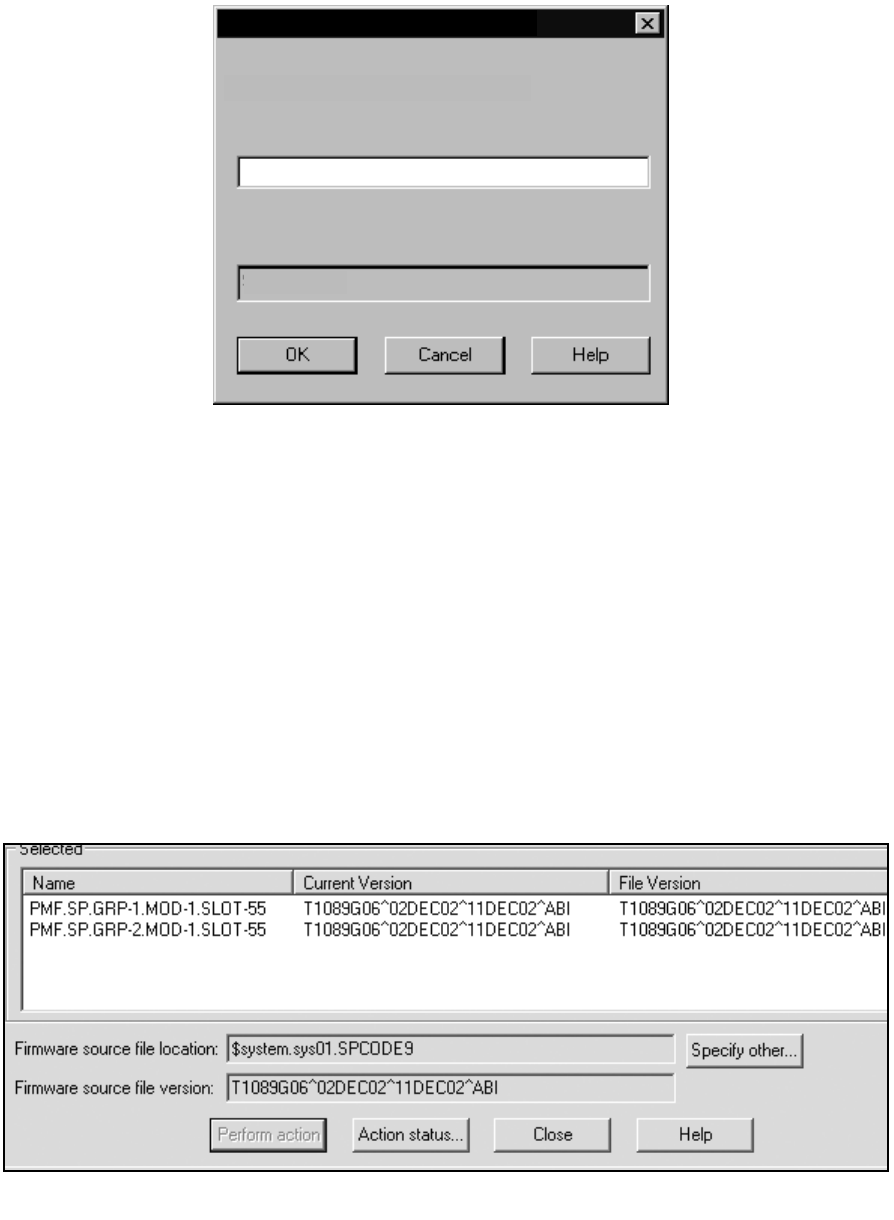
Updating Service Processor (SP) Firmware
G06.24 Software Installation and Upgrade Guide—528593-005
7-10
Update SP Firmware Using the TSM Service
Application
9. Enter the new file location. Use the $SYSTEM.SYSnn subvolume created during
the most recent DSM/SCM Build/Apply. For example:
10. Click OK.
11. Click Yes when a message appears, warning that you have specified a
nonstandard firmware file location.
You have specified a nonstandard firmware location.
Compaq TSM will try to get the firmware information. It may take a few seconds.
Do you want to use this nonstandard firmware location?
TSM retrieves firmware information, and the firmware source file version shows the
new version in the Firmware Update dialog box. (Note that the following examples
might not match the latest firmware version.) For example:
T1089G06^02DEC02^11DEC02^ABI
VST646.vsd
$system.sys02
File name
Enter firmware file location and name:
$volume.subvolume
Specify Firmware File Location
SPCODE9
vst662.vsd
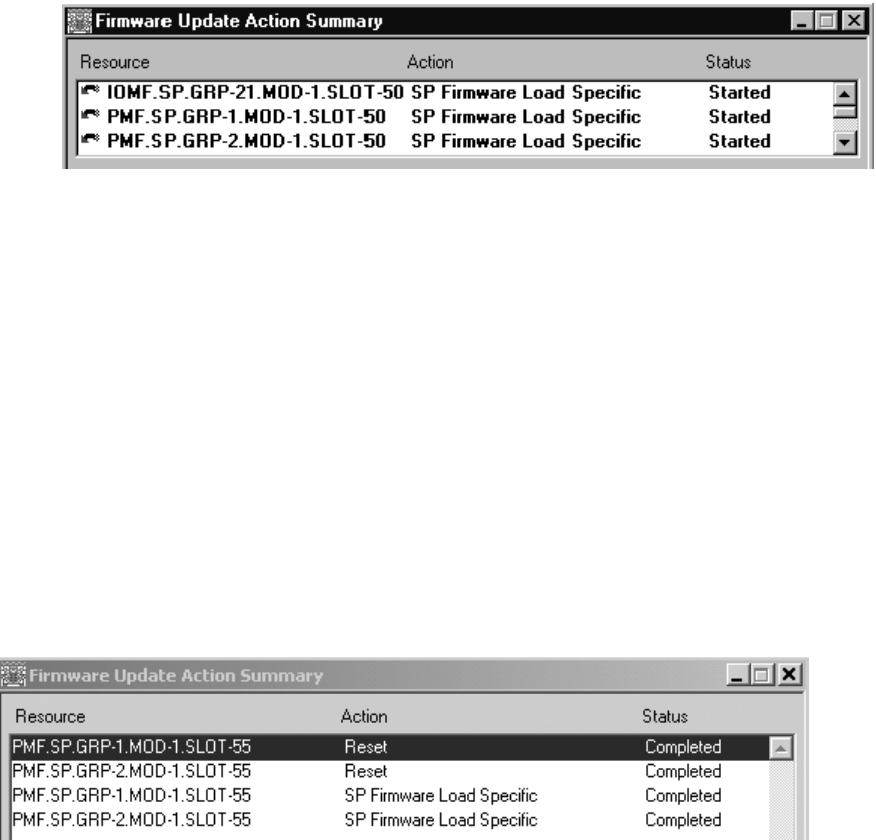
Updating Service Processor (SP) Firmware
G06.24 Software Installation and Upgrade Guide—528593-005
7-11
Update SP Firmware Using the TSM Service
Application
12. From the Firmware Update dialog box, click Perform action.
The update starts, and the Firmware Update Action Summary dialog box appears.
Updating each service processor takes approximately ten
minutes, and updating a master service processor takes
approximately twenty minutes.
13.Monitor the status of the service processor firmware update in the Firmware
Update Action Summary dialog box.
a. Verify that the firmware update for every SP on the chosen fabric (X or Y) has
started.
b. Verify that the status of all SPs changes to Completed.
14. Click Yes when asked if you want to reset all SPs that were successfully updated.
All of the service processor (SP) firmware updates have completed successfully.
In order for the firmware to be used, a reset must be performed on each SP.
Answering “Yes” will automatically reset all successfully updated SPs in this group.
Answering “No” will require each SP to be individually reset.
If the master service processor (MSP) is reset, you might lose the Compaq TSM service
connection with the S-series server. Use the System “Session Responsive Test” action
to determine if your current service connection is active.
Do you want to automatically reset all successfully updated SPs in this group?
15. Click OK when you are notified that all the SPs have been successfully reset.
All service processors (SPs) that had firmware updates applied have been reset successfully.
The Firmware Update Action Summary dialog box confirms that the SPs have
been reset. For example:
VST647.vsd

Updating Service Processor (SP) Firmware
G06.24 Software Installation and Upgrade Guide—528593-005
7-12
Update SP Firmware Using the TSM Service
Application
16. Verify that the correct firmware version is loaded for each SP:
a. If necessary, log on to the TSM Low-Level Link Application and perform a
System Discovery. (Do not log off the TSM Service Application.)
b. Display the Service Processor Actions dialog box, either by clicking SP
Actions in the toolbar or by selecting Display>SP Actions.
c. Check that the firmware version and date appear in the Service Processors
(SPs) list.
d. Click Refresh to update the information in the Service Processors (SP) list.
This step might take several minutes.
e. Verify that the correct version of SP firmware is displayed in the Service
Processors (SPs) list:
•The service processor is successfully updated and reset if the firmware
version and date for all SPs in the chosen fabric are exactly the same as
the VPROC version of the SP firmware for the G06.24 RVU.
•A service processor in the chosen fabric did not successfully update or
reset if it has a firmware version and date that are not exactly the same as
the VPROC version of the SP firmware for the G06.24 RVU.
Follow the directions in Recovery for Problems Updating SP Firmware
(Using TSM) on page 7-15 before you proceed to update the service
processors in the other fabric. Every SP on the chosen fabric must be
successfully updated and reset before updating the SPs on the other
fabric. This step is necessary to ensure that the firmware is operating
properly.
17. After you have verified that the correct version of SP firmware appears in the
Service Processors (SP) list for the service processors in the chosen fabric, return
to the TSM Service Application and repeat Steps 5 through 16 for the service
processors in the other fabric.
The firmware version for all SPs should now show the latest version. This example
shows T1089G06^ABI:
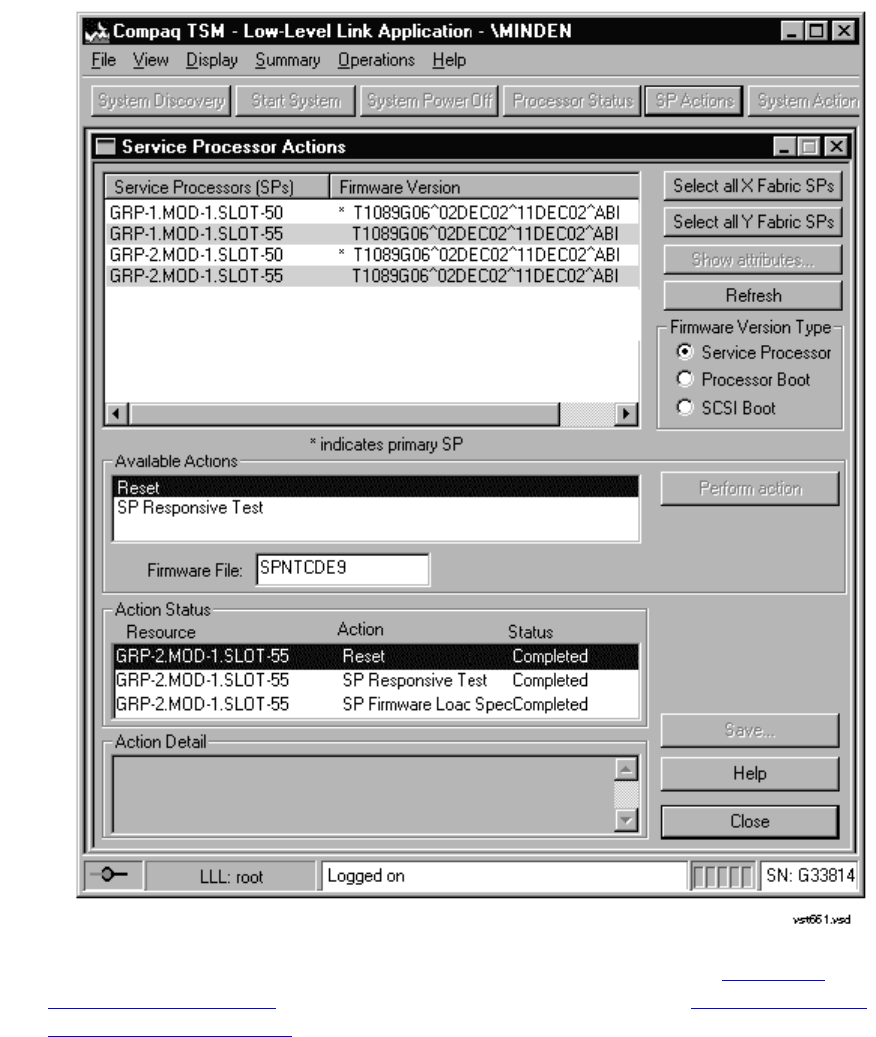
Updating Service Processor (SP) Firmware
G06.24 Software Installation and Upgrade Guide—528593-005
7-13
Update SP Firmware Using the TSM Service
Application
If all SPs were updated successfully, you can skip to Section 8, Updating
Processor Boot Code on page 8-1. Otherwise, continue with Determining If a
Problem Has Occurred on page 7-14 to diagnose and correct problems you
encountered.
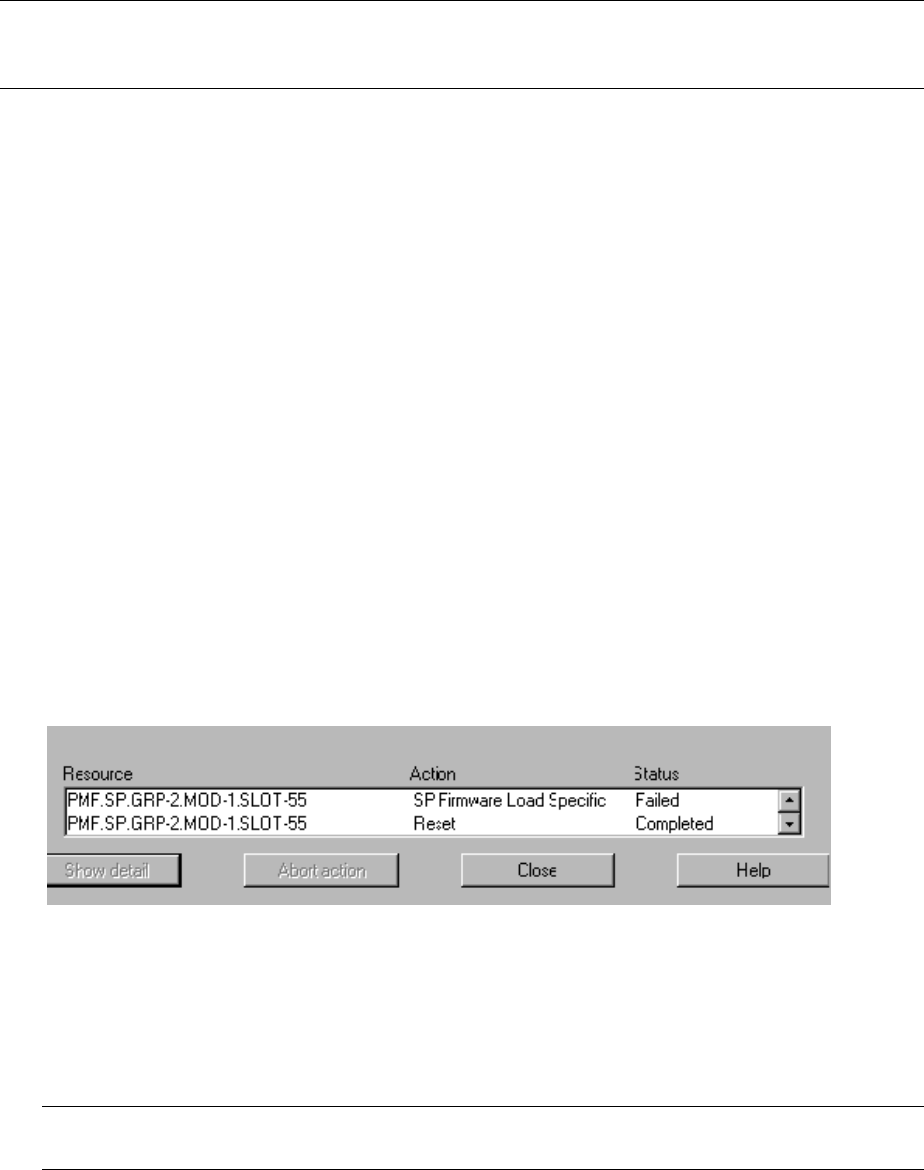
Updating Service Processor (SP) Firmware
G06.24 Software Installation and Upgrade Guide—528593-005
7-14
Determining If a Problem Has Occurred
Determining If a Problem Has Occurred
Follow all the verification steps included in the SP firmware update procedure.
Otherwise, you might not know that the firmware update or reset did not finish
successfully.
Verify the Firmware Updates (Using TSM)
1. Double-click the group containing the PMF or IOMF CRU containing the SP whose
status you want to verify.
2. Right-click the PMF or IOMF CRU and choose Attributes from the shortcut menu.
The Attributes dialog box appears.
3. From the Component/Subcomponent list, select Service Processor.
4. Under Attributes, scroll down to display the Service Processor State or Tandem
State (depending on your version of client software). This state should be
Updating, indicating that the firmware update is in progress for the SP.
Problems Updating SP Firmware (Using TSM)
A few indications that a problem has occurred when updating firmware are:
•The status indicates that the SP Firmware Load failed. For example:
•The SP Firmware Load for a service processor does not start, and no status is
shown for that SP.
•The status indicates that the SP Firmware Load started, but the status has not
changed to Completed within a reasonable amount of time.
•The status indicates that the SP Firmware Load is finished, but the correct version
of SP firmware does not appear after that SP is reset.
Note. Note that once the firmware update finishes and the SP is successfully reset, it can take
up to 20 minutes before the Service Processor Firmware Version attribute is updated to display
the new information.
Note. Updating a service processor takes about ten minutes, and updating a master
service processor takes about twenty minutes.
VST680.vsd

Updating Service Processor (SP) Firmware
G06.24 Software Installation and Upgrade Guide—528593-005
7-15
Other Indications of SP Firmware Update Problems
If any of these problems occur, see Recovery for Problems Updating SP Firmware
(Using TSM) on page 7-15.
Other Indications of SP Firmware Update Problems
These problem indicators, which might occur if you are having problems with your SP
firmware updates, should disappear after you reload the new operating system:
•Yellow caution symbols on enclosure icons
•A degraded State in the Attributes pane
Problems Resetting an SP (Using TSM)
During the multiple firmware update procedure, you might see that an SP has updated,
but has not reset automatically. In this case:
1. From the Firmware Update Actions Summary display, verify the SP has been
reset. (The action Reset and status Completed should appear for the SP.)
2. If the Resource, Action, and Status indications remain missing for that SP after 25
minutes or so, try resetting the SP, as described under Resetting an SP Using the
TSM Low-Level Link on page 7-18.
Recovery for Problems Updating SP Firmware
(Using TSM)
If an SP Firmware Update Fails
1. Verify that the SP is responding, as described under Checking the State of the
Service Connection.
•If the SP is not responding, contact your service provider.
•If the SP is responding, continue with Step 2.
2. Try to update the firmware, as described under Correcting a Failed SP Firmware
Update (Using TSM) on page 7-16.
3. If the SP is responding but the firmware update fails again, try updating the
firmware, as described under Updating Firmware Using the TSM Low-Level Link
Application on page 7-17.
WARNING. To avoid hardware damage, never reset an SP if the firmware update does not
finish successfully.

Updating Service Processor (SP) Firmware
G06.24 Software Installation and Upgrade Guide—528593-005
7-16
Checking the State of the Service Connection
Checking the State of the Service Connection
1. Using the TSM Service Application, open the Service Processor Actions dialog
box, either by clicking SP Actions on the toolbar or by selecting Display>SP
Actions.
2. From the Available Actions list, select SP Responsive Test.
3. Select the SP you want to test by clicking on it in the Service Processors (SPs) list.
4. Click Perform action.
5. Monitor the action in the Action Status box.
•Your service connection is active if the SP Responsive Test finishes
successfully.
•If the SP Responsive Test fails, wait one minute and retry the SP Responsive
Test action. If the SP Responsive Test fails again, you might have a hardware
problem. Contact your service provider.
Correcting a Failed SP Firmware Update (Using TSM)
When an SP fails to update using the multiple firmware update, a TSM Service
Application message appears. For example:
2 SP(s) successfully firmware updated. 1 SP(s) failed to complete firmware update. In
order for the firmware to be used, a reset must be performed on each SP. Answering
Yes will automatically reset all successfully updated SPs in this group. If the
master processor is reset, you might lose the TSM service connection....
1. Click Yes to automatically reset the SPs that updated successfully.
2. Select Display>Single SP Firmware Update facility to update each SP that failed
or did not start.
3. Monitor the status of the firmware update in the Firmware Update Action Summary
dialog box:
•If the firmware update finishes successfully, reset the SP, as described under
Resetting an SP Using the TSM Low-Level Link on page 7-18.
•If the firmware update fails again, you might have a faulty SP or a down-rev
customer-replaceable unit (CRU). Contact your service provider.
WARNING. To avoid hardware damage, never reset an SP if the firmware update does not
finish successfully.
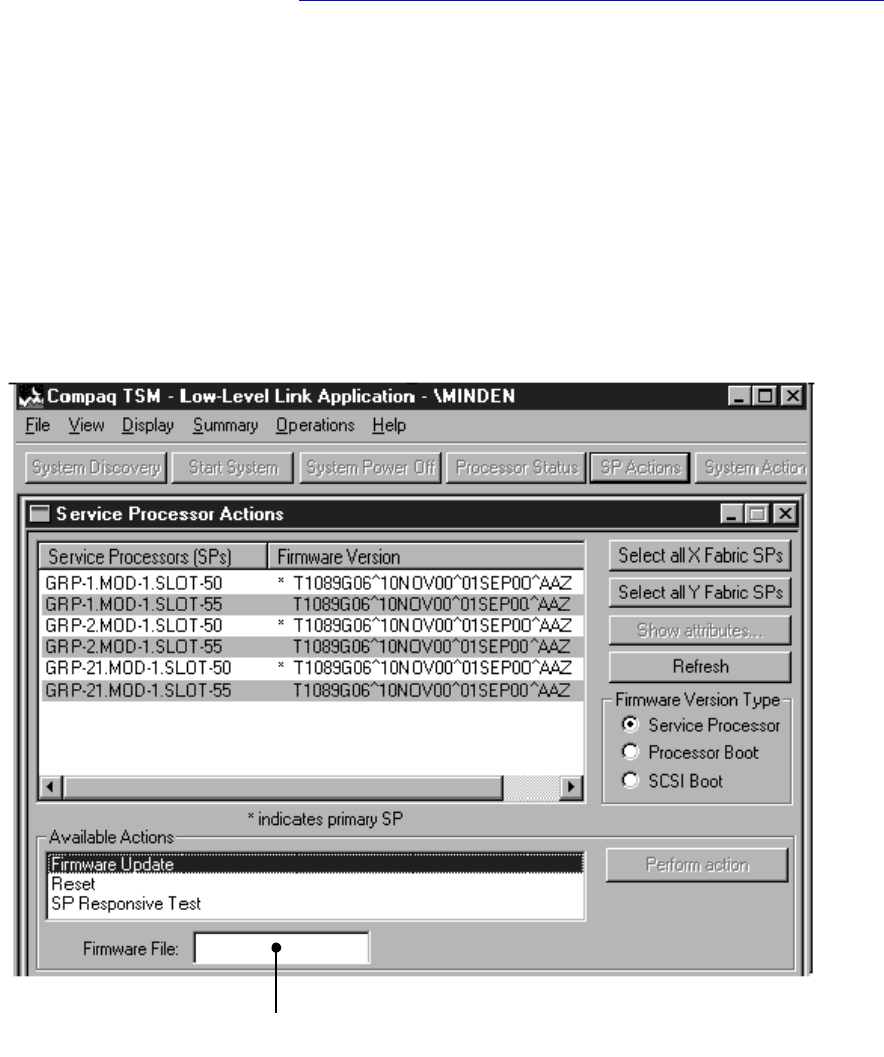
Updating Service Processor (SP) Firmware
G06.24 Software Installation and Upgrade Guide—528593-005
7-17
Updating Firmware Using the TSM Low-Level Link
Application
Updating Firmware Using the TSM Low-Level Link Application
If you are unable to use the TSM Service Application, you can still update each SP by
using the TSM Low-Level Link Application, if you have downloaded the firmware file
spntcde9, as described under Download the SP Firmware File to the System Console
on page 7-6. This scenario might occur if you are unable to log on to the TSM Service
Application because the NonStop Kernel operating system is not running on your
system.
1. If necessary, log on to the TSM Low-Level Link Application and perform a System
Discovery.
2. From the toolbar, click SP Actions, or select Display>SP Actions.
The Service Processor Actions dialog box appears.
3. From the Available Actions list, select Firmware Update.
The Firmware File box appears.
4. Select the SP to be updated in the Service Processors (SPs) list.
5. Click Perform action.
VST660.vsd
Firmware File box appears when the
Firmware Update action is selected

Updating Service Processor (SP) Firmware
G06.24 Software Installation and Upgrade Guide—528593-005
7-18
Resetting an SP Using the TSM Low-Level Link
6. When the SP update finishes successfully, reset it, as described under Resetting
an SP Using the TSM Low-Level Link on page 7-18.
See the TSM Low-Level Link Application online help for more information.
Resetting an SP Using the TSM Low-Level Link
To reset an SP, use the TSM Low-Level Link Application:
1. Log on to the TSM Low-Level Link Application and perform a System Discovery.
2. From the toolbar, click SP Actions to display the Service Processor Actions dialog
box.
3. Select the service processor to be reset.
4. From the Available Actions list, select Reset.
5. Click Perform Action.
6. Click OK when the warning message appears.
This action takes up to 2 minutes for the SP to complete the reset even if the action
appears to complete immediately.
This action will cause any Firmware Update actions against this SP to abort.
Verify there are no Firmware Updates being performed on this SP before continuing.
Are you sure you want to reset this SP?
7. When the status of the reset action appears as Completed in the Action Status
box, click Refresh to update the information in the Service Processors (SPs) list.
For example:
WARNING. To avoid hardware damage, never reset an SP if the firmware update does not
finish successfully.
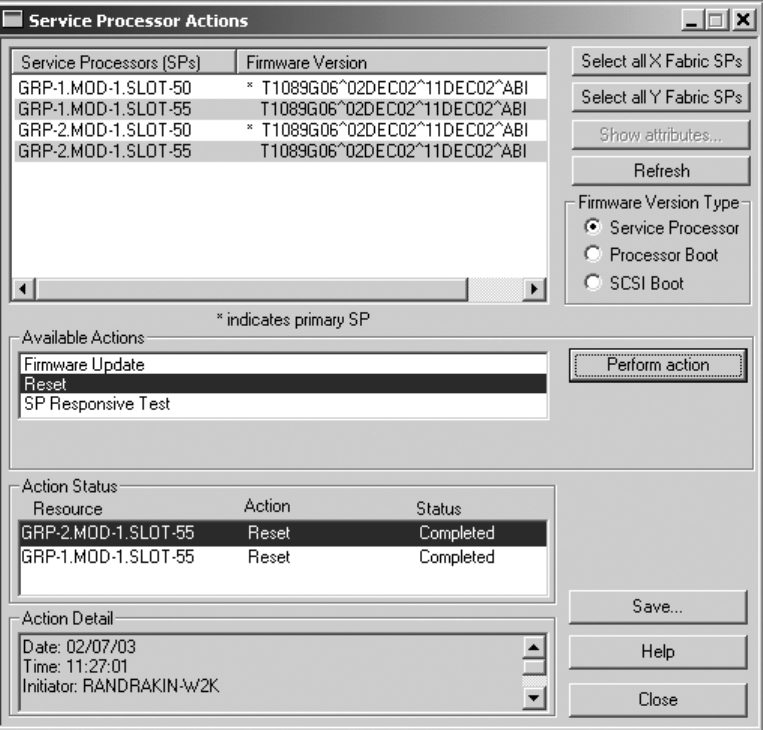

Updating Service Processor (SP) Firmware
G06.24 Software Installation and Upgrade Guide—528593-005
7-20
Updating SP Firmware Using the OSM Service
Connection
Updating SP Firmware Using the OSM Service
Connection
Use this procedure only if OSM is installed and configured. If TSM is installed and is
your default, use the TSM Service Connection to update your SP firmware.
Notes for Using OSM to Update SP Firmware
•The Multi-Resource Actions dialog box is used to update the SP firmware.
•After the SP firmware update is complete, you are asked to reset the SP.
•The T2752AAI or later OSM Service Connection browser session starts in a new
browser window and eliminates the use of standard Internet Explorer buttons. After
the browser session begins, you can close the original IE window. (Clicking the
Internet Explorer’s Refresh ends your current OSM Service Connection session
and forces you to open a new browser window to reestablish a new connection to
the system you are monitoring.) If you have a previous OSM Service Connection
version, use OSM Refresh, Reanalyze, or Rediscover actions for updating
interface display for the desired resource objects.
•(Optional) Before you begin updating your SP firmware, you should download the
spntcode9 file. The procedure for downloading the spntcode is similar to the
procedure documented in Download the SP Firmware File to the System Console
on page 7-6. The entire path to the SP file (spntcde9) for OSM in the Firmware
File box is:
C:\osm\bin\spntcde9
Firmware Update for Fabric Side-Y (Using OSM)
These instructions require that you have already installed and configured OSM and
have previously logged on to the OSM Service Connection and initiated a server
connection. If you have not, see the OSM Migration Guide.
1. Log on to the OSM Service Connection.
2. Before and after updating firmware, use the OSM Service Connection to check for
connection status. From the Summary menu, select Connection Status. At least
two IP addresses should be listed, and the Status should display Up.
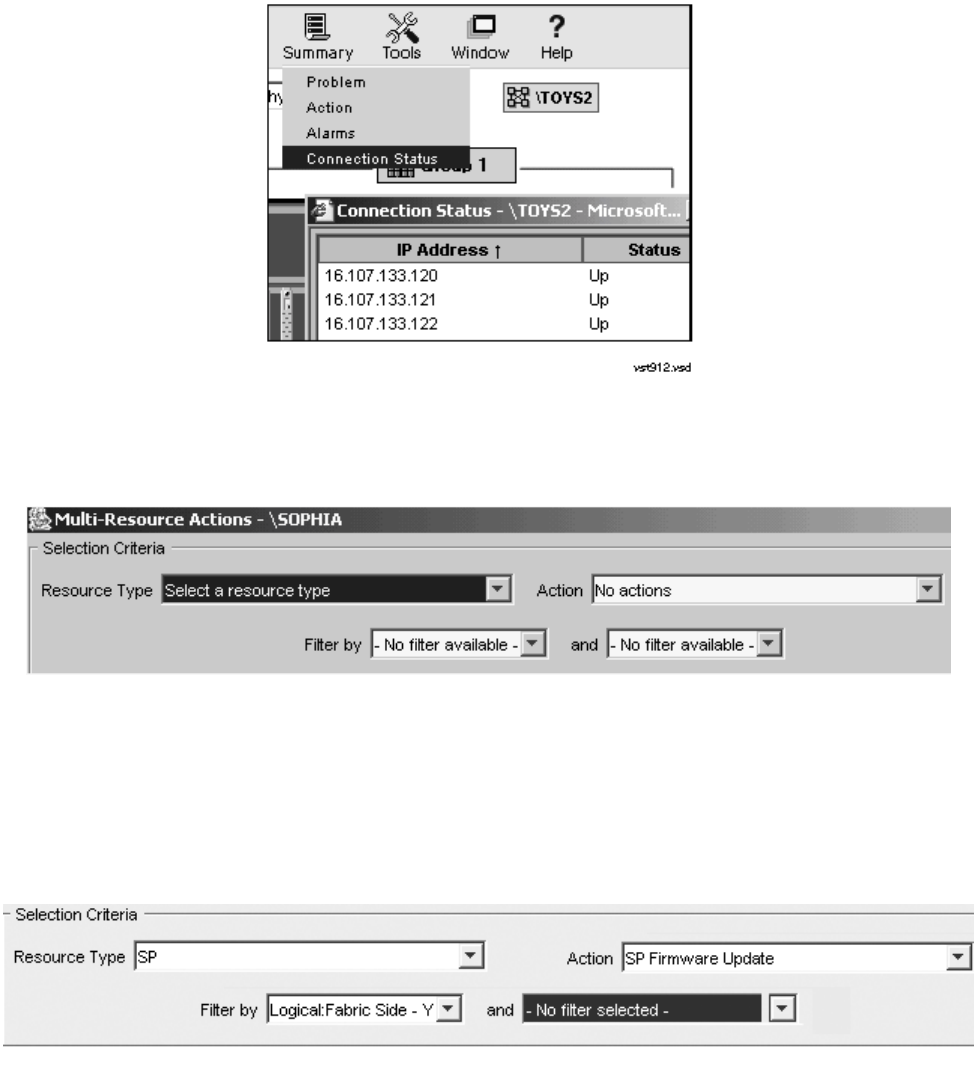
Updating Service Processor (SP) Firmware
G06.24 Software Installation and Upgrade Guide—528593-005
7-21
Firmware Update for Fabric Side-Y (Using OSM)
3. Select Display>Multi-Resource Actions. The Multi-Resource Actions screen
appears with unselected fields.
4. From the Resource Type list, select SP.
5. From the Action list, select SP Firmware Update.
6. In the Filter by list, select the appropriate filter, Logical:Fabric Side-Y first. For
example:
It might take a minute or so, for the SPs appear to appear in the SP Firmware list.
At this point in the update process, the Compare State displays “Same”. For
instance, the current firmware version might display
T1089G06^07NOV03^27OCT03^ABL. For example:
VST938.vsd
VST939.vsd
Updating Service Processor (SP) Firmware
G06.24 Software Installation and Upgrade Guide—528593-005
7-22
Firmware Update for Fabric Side-Y (Using OSM)
After the firmware update is complete with the SPs reset, the Compare State will
display Up-rev and the firmware Version will display the new firmware file version.
7. Click Add All to add the SPs you want to update to the lower list.
8. Click Perform action.
9. Click OK when the SP-Confirm SP Firmware Update dialog box appears:
The SP - Parameter Input dialog box appears. For example:
10. Enter the new file location. Use the $volume.subvolume.filename created
during the most recent DSM/SCM Build/Apply and click OK. For example:
$system.sys01.spcode9
After you click OK, the number of SPs that are currently being updated appear in
the Running column under SP Firmware Update Progress. For example:
VST949.vsd
VST906.vsd
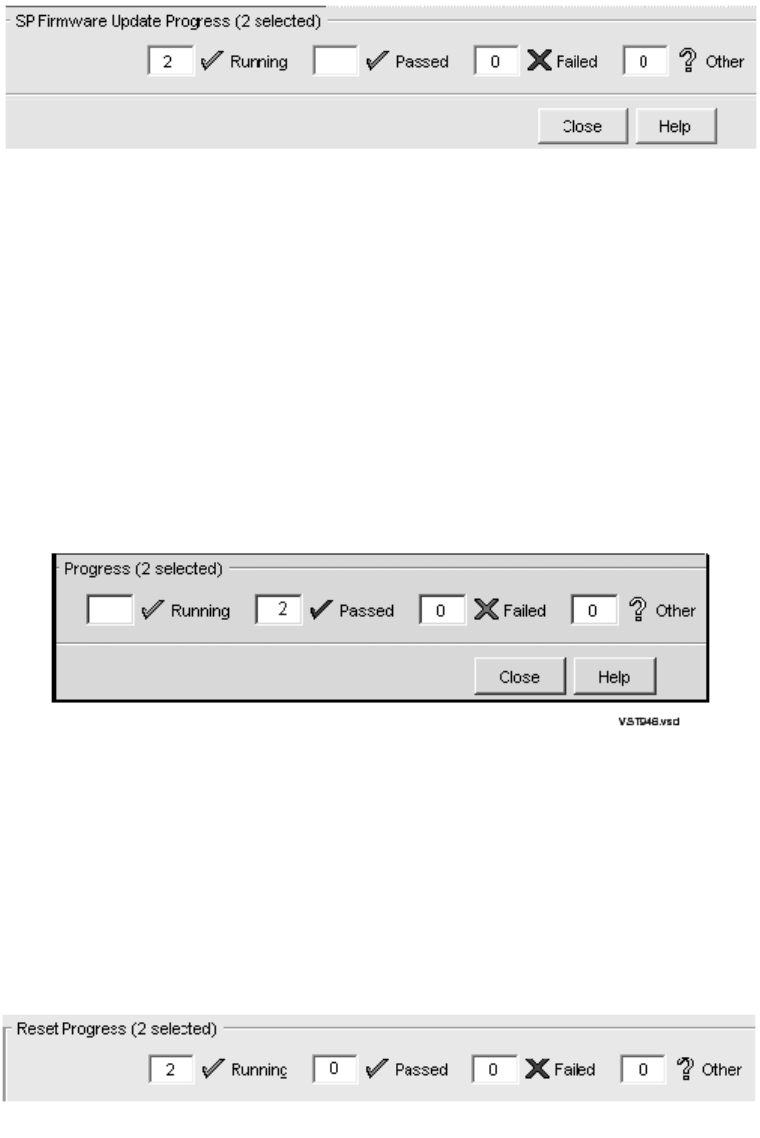
Updating Service Processor (SP) Firmware
G06.24 Software Installation and Upgrade Guide—528593-005
7-23
Firmware Update for Fabric Side-Y (Using OSM)
(Under Resource Name, the SP that has initially been updated displays a grey
checkmark beside it. The other SP, awaiting update, displays a yellow question
mark.)
11. To verify that firmware updates are in progress, select Action Summary. The
Action Status Summary window appears with information about recent actions,
including their status and their overall progress.
The SP Firmware Update Progress bar keeps track of the number of SPs that pass
the firmware update. When all the selected SPs have completed the firmware
update, the Passed column displays the number of SPs that are successfully
updated.
12. You are then asked to reset each SP. For example, to reset SP 2.1.55:
The firmware update needs to reset the Service Processor
to activate the updated firmware. Would you like to
reset the Service Processor?
13. Select Yes.
The number of SPs that are currently being updated appear in the Running column
under SP Firmware Update Progress. For example:
The message is displayed for all SPs that must be reset.
14. To verify that firmware resets are in progress, select Action Summary. The Action
Status Summary window appears with information about recent actions, including
their status and their overall progress. For example:
vst945.vsd
VST966.vsd
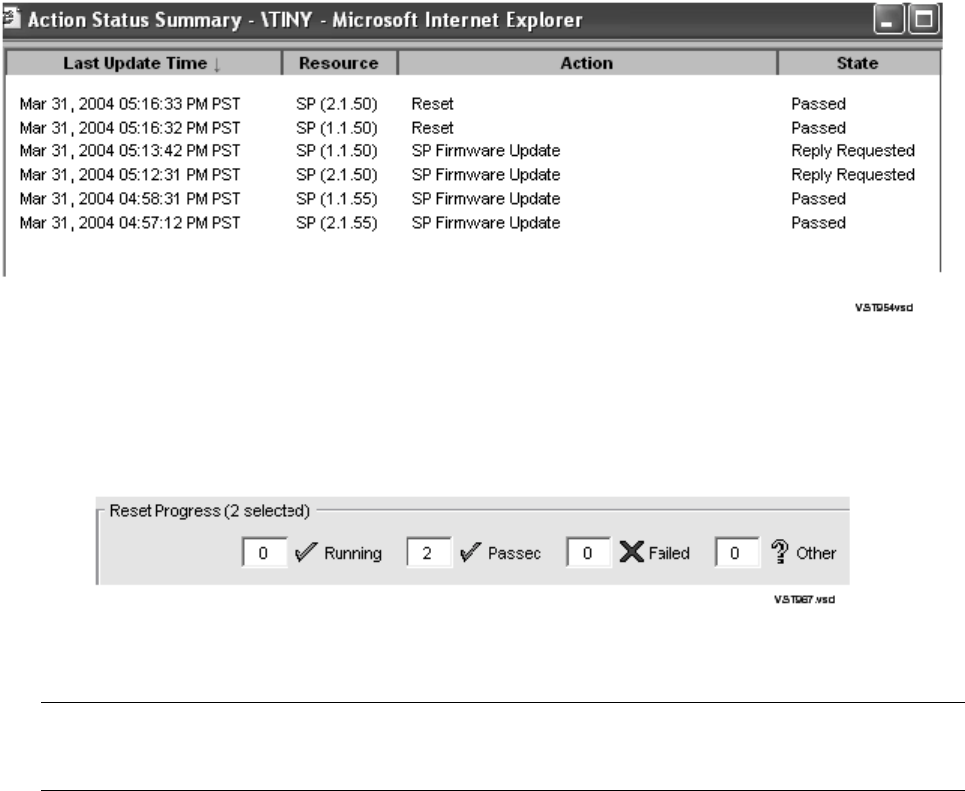
Updating Service Processor (SP) Firmware
G06.24 Software Installation and Upgrade Guide—528593-005
7-24
Firmware Update for Fabric Side-X (Using OSM)
The Reset Progress bar keeps track of those SPs that pass the firmware reset.
When all the selected SPs have completed the reset, the Passed column displays
the number that are successfully reset. (A green checkmark replaces the grey
checkmark by the SP under Resource Name in the SP Firmware resource list).
Firmware Update for Fabric Side-X (Using OSM)
1. From the Filter by list, select the appropriate filter, Logical:Fabric Side-X. The
following message appears:
Changing a required filter results in your
selections being cleared.
Do you still wish to change the filter?
2. Click OK.
3. Click Add All to add the SPs you want to update to the lower list.
4. Click Perform action.
5. Click OK when the Confirm SP Firmware Update dialog box appears.
The SP-Parameter Input dialog box appears.
Note. You can begin this procedure for updating the X-side by using Remove All to delete the
resources for the Y-side update. All the steps are the same, except the change filter message
is not displayed and Step 2 is unnecessary.)
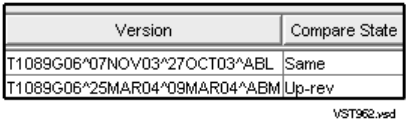
Updating Service Processor (SP) Firmware
G06.24 Software Installation and Upgrade Guide—528593-005
7-25
Firmware Update for Fabric Side-X (Using OSM)
6. Enter the new file location the SP - Parameter Input dialog box. Use the
$volume.subvolume.filename created during the most recent DSM/SCM
Build/Apply and click OK. For example:
$system.sys01.spcode9
After you click OK, the number of SPs that are currently being updated appear in
the Running column under SP Firmware Update Progress.
7. To verify that firmware updates are in progress, select Action Summary. The
Action Status Summary window appears with information about recent actions,
including their status and their overall progress.
The SP Firmware Update Progress bar keeps track of the number of SPs that pass
the firmware update. When all the selected SPs have completed the firmware
update, the Passed column displays the number of SPs that are successfully
updated.
You are then asked to reset each SP.
The firmware update needs to reset the Service Processor
to activate the updated firmware. Would you like to
reset the Service Processor?
8. Select Yes.
9. To verify that firmware resets are in progress, select Action Summary. The Action
Status Summary window appears with information about recent actions, including
their status and their overall progress.
The Reset Progress bar keeps track of the number of SPs that pass the firmware
reset. After a few minutes, the SP is reset. When all the selected SPs have
completed the reset, the Passed column displays the number that are successfully
reset. (A green checkmark replaces the grey checkmark by the SP under
Resource Name.)
After the firmware update is complete and the SPs reset, the Compare State
displays “Up-rev” and the firmware Version displays the new firmware file, such as,
T1089^25MAR04^09MAR04^ABM. For example:
Updating Service Processor (SP) Firmware
G06.24 Software Installation and Upgrade Guide—528593-005
7-26
Verifying the SP Firmware Update (Using OSM)
Verifying the SP Firmware Update (Using OSM)
1. In the OSM Service Connection, double-click the group containing the PMF or
IOMF CRU containing the SP whose status you want to verify.
2. Right click the SP. Select Attributes from the menu.
3. The Compare State should display Up-rev.
You can also use the OSM Low Level Link Application to verify the firmware update:
1. Log on to the OSM Low-Level Link Application. (Keep the OSM Service
Connection open.)
2. Display the Service Processor Actions dialog box, either by clicking SP Actions in
the toolbar or by selecting Display>SP Actions.
3. Check that the firmware version and date appear in the Service Processors (SPs)
list.
4. If desired, click either Select all X Fabric SPs or Select all Y Fabric SPs.
5. Select Service Processor from the Firmware Version Type.
6. Click Refresh to update the information in the Service Processors (SP) list. This
step might take several minutes.
7. Verify that the correct version of SP firmware is displayed in the Service
Processors (SPs) list:
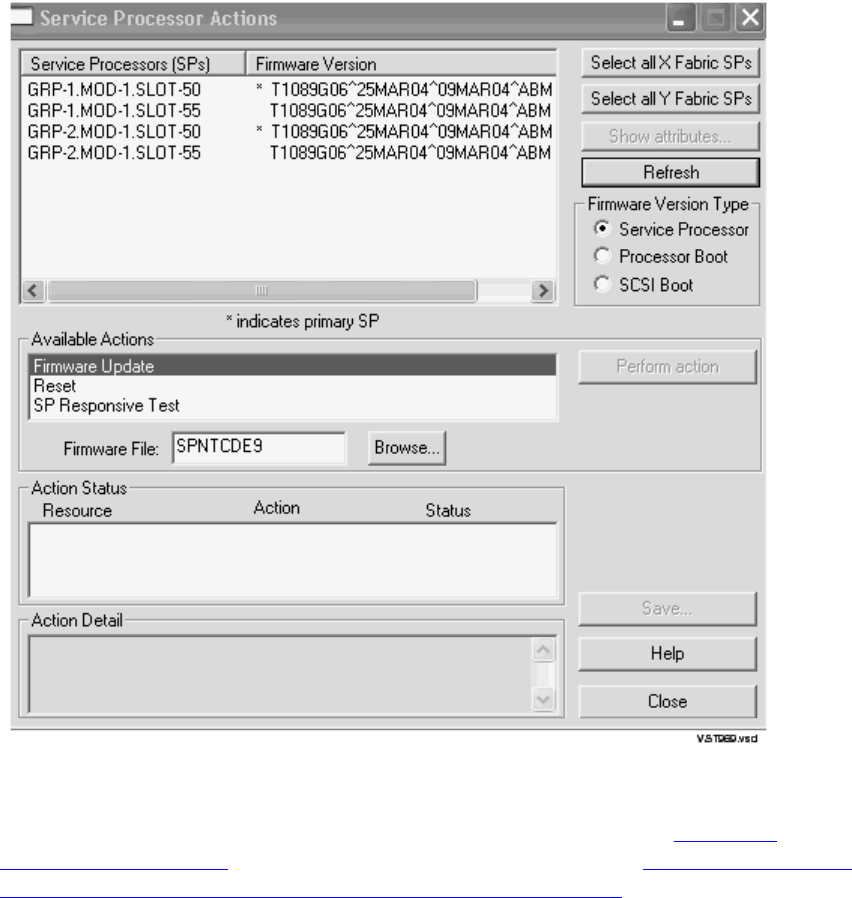
Updating Service Processor (SP) Firmware
G06.24 Software Installation and Upgrade Guide—528593-005
7-27
Verifying the SP Firmware Update (Using OSM)
8. Click Close.
If all SPs were updated successfully, you can skip to Section 8, Updating
Processor Boot Code on page 8-1. Otherwise, continue with Correcting a Failed
SP Firmware Update (Using the OSM Service Connection) on page 7-28 to
diagnose and correct problems you encountered.

Updating Service Processor (SP) Firmware
G06.24 Software Installation and Upgrade Guide—528593-005
7-28
Correcting a Failed SP Firmware Update (Using the
OSM Service Connection)
Correcting a Failed SP Firmware Update (Using the OSM Service
Connection)
When an SP fails to update using the multiple firmware update, the number of failed
SPs is displayed in the Failed column, and a red X appears by the SP that failed under
Resource name in the SP Firmware resource list:
1. Select Action Summary.
a. When the Action Summary screen appears, select the SP action that failed.
b. Select Details from the Action Summary screen or right click on the SP
resource to find out more details about the firmware failure.
2. Correct the problem. If you cannot update or reset an SP, call your service
provider.
Using OSM and Downloading the SP Firmware File to the
System Console (Optional)
SP firmware updates are normally performed through the OSM Service Connection.
However, if you need to use the OSM Low-Level Link to perform firmware updates on
an SP, you must have access to spntcde9, the SP firmware file that runs on a system
console. HP recommends that you download the SP firmware file (spntcde9) into the
\osm\bin directory, although you can use any directory you want.
1. If necessary, start an OutsideView session.
2. Select Session>Receive file to display the IXF Receive dialog box.
3. In the Host box enter the host system name, and the volume and subvolume
where the firmware file resides, based on the SYSnn specified during the
Build/Apply phase of installing the new RVU. For example:
\prod2.$system.sys01
4. In the File box, enter spntcde9.
spntcde9 appears in the Local area File Name box. For example:
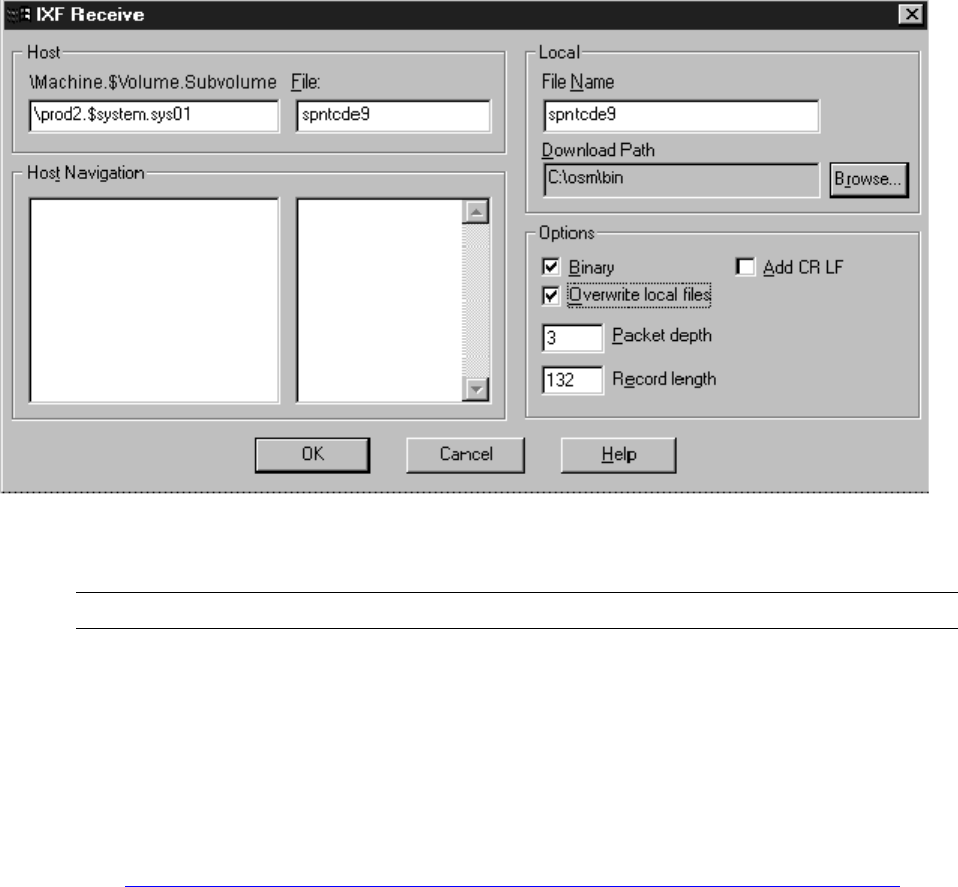
Updating Service Processor (SP) Firmware
G06.24 Software Installation and Upgrade Guide—528593-005
7-29
Using OSM and Downloading the SP Firmware File
to the System Console (Optional)
5. Under Download Path, click Browse to locate and select the \osm\bin directory.
Under Options, verify that the Binary option is selected.
6. Click OK.
The Browse window closes, and an IXF - Receive dialog box appears, showing the
download progress of the spntcde9 file. The download should take around 5
minutes.
7. When the IXF - Receive dialog box indicates that the transfer is finished, click End
Transfer.
8. See Updating Firmware Using the OSM Low-Level Link Application (Optional) on
page 7-30.
Note. Verify that the Overwrite local files option is also selected.

Updating Service Processor (SP) Firmware
G06.24 Software Installation and Upgrade Guide—528593-005
7-30
Updating Firmware Using the OSM Low-Level Link
Application (Optional)
Updating Firmware Using the OSM Low-Level Link Application
(Optional)
If you are unable to use the OSM Service Connection, you can still update each SP by
using the OSM Low-Level Link, if you have downloaded the firmware file spntcde9,
as described under Using OSM and Downloading the SP Firmware File to the System
Console (Optional) on page 7-28. This scenario might occur if you are unable to log on
to the OSM Service Connection because the NonStop Kernel operating system is not
running on your system. For more information, see the OSM online help.
1. Log onto the OSM Low-Level Link Application.
2. From the toolbar, click Display>SP Actions.
The Service Processor Actions dialog box appears (similar to the TSM Service
Processor Actions dialog box).
3. From the Resource Type list, select Service Processors, Y-side if you have
chosen to update the service processors in the Y fabric, or Service Processors,
X-side if you are updating the service processors in the X fabric.
4. Under Available Actions, select Firmware Update. The SP file (SPNTCDE9)
appears in the Firmware File box.
5. Select the SP to be updated.
6. Click Perform action.
7. A message appears telling you that the “action may take up to 30 minutes” for
each SP. Click OK.
8. When all the SP updates finish successfully, reset it, as described in the OSM
online help.
WARNING. To avoid hardware damage, never reset an SP if the firmware update does not
finish successfully.

G06.24 Software Installation and Upgrade Guide—528593-005
8-1
8Updating Processor Boot Code
Processor boot code controls device boot and power-on diagnostic functions.
This section describes the two common methods for updating the processor boot code
and how to use either the OSM Service Connection or TSM Service Application to
update the processor boot code for each PMF CRU in your system. See Table 8-1.
With the introduction of the G06.24 RVU and the new boot code firmware (T7892ABD)
needed for the S88000 processor, potential system problems can result if you upgrade
the boot millicode and you:
•Use the explicit online command option from either the Resource Type menu in
TSM or the Action menu in OSM and
•Do not have the G06.24 or later OSM and their prerequisite SPRs or TSM SPRs
installed and started. (See HS02865, OPN T7892G07 ABD Online Boot Code
Upgrade Warning.) For a list of OSM SPRs for G06.24, see OSM Server and Client
Compatibility SPRs on page 3-8.
Even if you are not installing new S88000s, if use the explicit online boot code option
and try to update to the T7892ABD boot millicode for other NonStop S-series
processors, such as S74000, S78000, and so forth, a processor halt will occur.
Table 8-1. Processor Boot Code to Be Updated
Boot Code Product
Number Description
S7000 boot millicode
(cpucode8)
S7x000, S8x000, S7800, S7400
S7600, S88000 boot millicode
(cpucode9)
T8461
T7892
Processor boot code is the processor
millicode that is used to load, reload, and
dump each processor.
Always check Scout for the latest processor boot code SPRs (T8461 and T7892).
Note. Update processor boot code only:
•If instructed to do so by DSM/SCM
•If you are not replacing the PMF CRUs in your system while migrating to the G06.24 RVU
Caution. Before using the online boot code option for upgrading boot millicode to T7892ABD
or later, you must have the G06.24 or later version of either TSM server (T7945ABN) or all
G06.24 OSM server-based SPRs (along with their prerequisites) installed and configured.
Otherwise, a processor halt will result.
Read HS02865 for background information and recommended upgrade options.

Updating Processor Boot Code
G06.24 Software Installation and Upgrade Guide—528593-005
8-2
As documented in HS02865, there are at least three strategies for updating processor
boot code firmware with subsequent methods for reloading the processors. See
HS02865 for further details.
This section combines the three Hotstuff strategies into two major methods:
•Method 1: Using G06.24 OSM or TSM SPRs, Update Processor Boot Code Using
the Online Option on page 8-4
With this method, it is assumed that you have at least the G06.24 OSM and TSM
SPRs installed on your client and server. If this is the case, you can use the explicit
online boot code update available in either TSM or OSM. Note that if you are on an
S7000, the online update option does not appear.
It is possible that you can update your OSM and TSM SPRs to the latest versions,
and still decide, based on previous adhered-to practices, not to update the
processor millicode using the explicit online option. Follow the steps described in
Method 2.
•Method 2: Using Your Current Pre-G06.24 OSM or TSM SPRs, Update the
Processor Boot Code and Issue a Hard Reset or Equivalent on page 8-10
With this method, it is assumed that you have down-rev G06.24 SPRs installed on
your client and server. If this is the case, you cannot use the explicit online boot
code update. It will cause a processor halt.
It is possible that you can update your OSM and TSM SPRs to the latest versions
and still decide not to update the processor millicode using the explicit online
option available in either TSM or OSM. In that case, you must issue a Hard Reset
action or a Reload. The Hard Reset or Reload action can be performed during the
system load procedure.

Updating Processor Boot Code
G06.24 Software Installation and Upgrade Guide—528593-005
8-3
Before You Begin Updating the Boot Millicode
Before You Begin Updating the Boot Millicode
Check Processor Status
Before you update your firmware, verify that the system is up with at least one
processor running a G06.00 or later version of the NonStop operating system:
1. If necessary, log on to the OSM or TSM Low-Level Link Application.
2. From the TSM or OSM toolbar, click Processor Status.
Processor status should be Executing NonStop OS.
Verify Your TSM and OSM Versions
See Determining the Current Version of OSM on page 3-9 and Determining the Current
Version of TSM Server Software on page 3-10.
Verify Location and Version of Processor Boot Code
1. At a TACL prompt, issue the VPROC command to verify the location and version of
the processor boot code for the G06.24 RVU:
•For processor boot code for the NonStop Server S7000, enter:
>VPROC $SYSTEM.SYSnn.CPUCODE8
•For processor boot code for NonStop servers S7x000, S8x000, S7400, S7600,
S7800, or S78000, enter:
>VPROC $SYSTEM.SYSnn.CPUCODE9
where nn is the number specified during the Build/Apply phase when you installed
the G06.24 RVU.
(\itty $SYSTEM.SYS05 7> vproc cpucode9
VPROC - T9617G03 - (07 AUG 2003) SYSTEM \ITTY Date 16 NOV 2004, 17:07:52
Copyright 2003 Hewlett-Packard Development Company, L.P.
$SYSTEM.SYS02.CPUCODE9
Binder timestamp: 24AUG2004 10:22:35
Version procedure: T7892G07^23AUG04^ABD^24Aug04^
\itty $SYSTEM.SYS10 6> vproc cpucode8
VPROC - T9617G03 - (07 AUG 2003) SYSTEM \ITTY Date 16 NOV 2004, 17:07:41
Copyright 2003 Hewlett-Packard Development Company, L.P.
$SYSTEM.SYS10.CPUCODE8
Binder timestamp: 13OCT2000 10:23:06
Version procedure: T8461G05^12OCT00^12Oct00
Note. Version procedure dates might be different; these are examples only. Bold lettering
is used to emphasize the vproc command and corresponding results.

Updating Processor Boot Code
G06.24 Software Installation and Upgrade Guide—528593-005
8-4
Method 1: Using G06.24 OSM or TSM SPRs,
Update Processor Boot Code Using the Online
2. Record the version of the processor boot code.
3. Repeat Steps 1 and 2 by using the SYSnn for your current RVU. For example:
$SYSTEM SUPER 7> vproc $system.sys01.cpucode8
VPROC - T9617G03 - (30 MAR 1999) SYSTEM \WARRIOR Date 21 SEP
2000, 11:49:55
COPYRIGHT TANDEM COMPUTERS INCORPORATED 1986 - 1995
$SYSTEM.SYS01.CPUCODE8
Binder timestamp: 25AUG1999 16:03:25
Version procedure: T8461G05^03SEP99^25Aug99
$SYSTEM SUPER 10> vproc $system.sys01.cpucode9
VPROC - T9617G03 - (30 MAR 1999) SYSTEM \WARRIOR Date 21 SEP 2000,
11:53:30
COPYRIGHT TANDEM COMPUTERS INCORPORATED 1986 - 1995
$SYSTEM.SYS01.CPUCODE9
Binder timestamp: 17JUL2000 12:45:44
Version procedure: T7892G06^23JUL00^AAJ^14Jul00^
Method 1: Using G06.24 OSM or TSM SPRs,
Update Processor Boot Code Using the Online
Option
This method allows you to update the processor boot code without resetting the
processors on completion of the update. You can use either TSM or OSM to update
the processor boot code using the online command option:
•Using TSM, Update Processor Boot Code Using the Online Option and G06.24 or
Later TSM SPRs on page 8-5
•Using OSM, Update Processor Boot Code Using the Online Option and G06.24 or
Later OSM SPRs on page 8-7
Caution: Before using the online boot code option for upgrading boot millicode to T7892ABD
or later, you must have the G06.24 or later version of either TSM server (T7945ABN) or all
OSM server-based SPRs (along with their prerequisites) installed and configured. Otherwise, a
processor halt will result.
Read HS02865 for detailed background information and upgrade options.

Updating Processor Boot Code
G06.24 Software Installation and Upgrade Guide—528593-005
8-5
Using TSM, Update Processor Boot Code Using the
Online Option and G06.24 or Later TSM SPRs
Using TSM, Update Processor Boot Code Using the Online
Option and G06.24 or Later TSM SPRs
Beginning with TSM 2001D (client and server versions) in G06.14, you can update the
processor boot code for NonStop S-series servers (S70000, S7x000, S7600, S7800,
S7400, S8x000) without taking the processor down for a hard reset action (or prime for
reload action). The online firmware update actions do not appear if the system is an
S7000.
1. Log on to the TSM Service Application.
2. Select Display>Firmware Update.
The Firmware Update dialog box appears.
3. From the Resource Type list, select Online Processor Boot Code, Y-side. For
example:
4. From the Display list, select All to list the selected resources in the Available box.
5. Click Add all to move the resources to the Selected box.
Caution. To use TSM to update processor boot code online, you must have already installed
and configured T7945ABN or later. Otherwise, a processor halt will result. If you have not
configured the latest TSM server side components, follow the instructions in Using TSM,
Update the Processor Boot Code and Issue a Hard Reset or Equivalent on page 8-10.
VST962.vsd
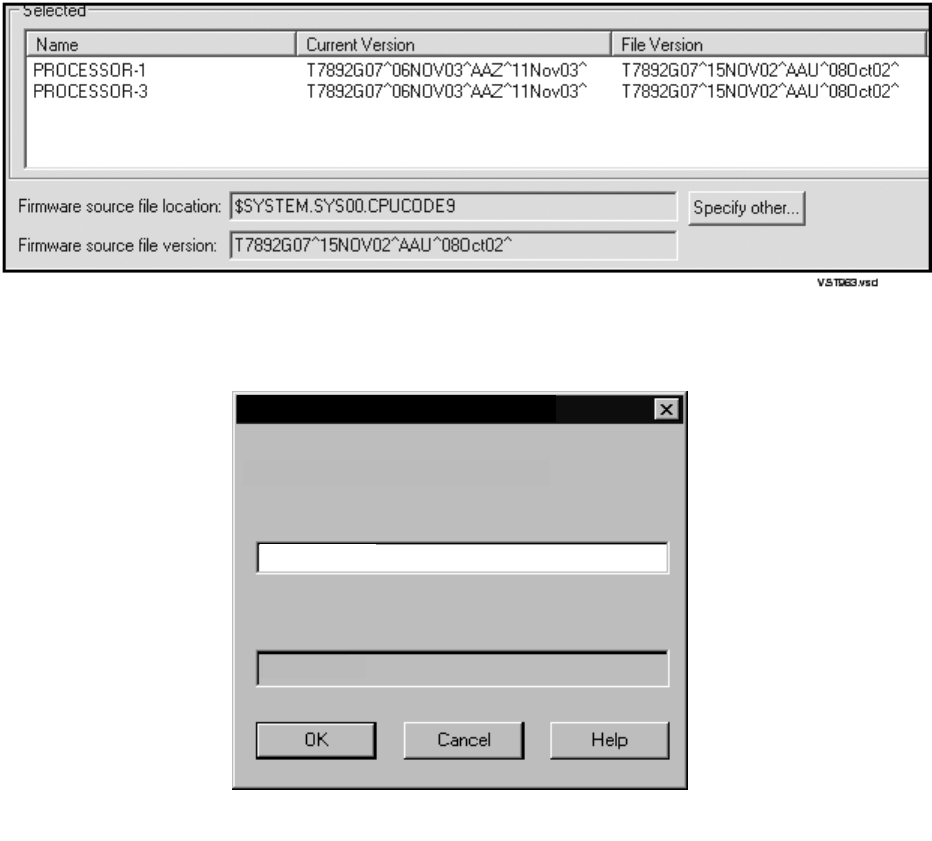
Updating Processor Boot Code
G06.24 Software Installation and Upgrade Guide—528593-005
8-6
Using TSM, Update Processor Boot Code Using the
Online Option and G06.24 or Later TSM SPRs
6. Click Specify other to display the Specify Firmware File Location dialog box.
7. Enter the volume and subvolume where the file to use as the source for the update
resides. Use the $SYSTEM.SYSnn created during the most recent DSM/SCM
Build/Apply.
8. Click OK.
9. Click Yes when this message appears:
You have specified a nonstandard firmware location.
Compaq TSM will try to get the firmware information. It may take a few seconds.
Do you want to use this nonstandard firmware location?
TSM retrieves firmware information, and the firmware source file version shows the
new RVU version:
VST654.vsd
$system.sys02
File name
Enter firmware file location and name:
$volume.subvolume
Specify Firmware File Location
CPUCODE9
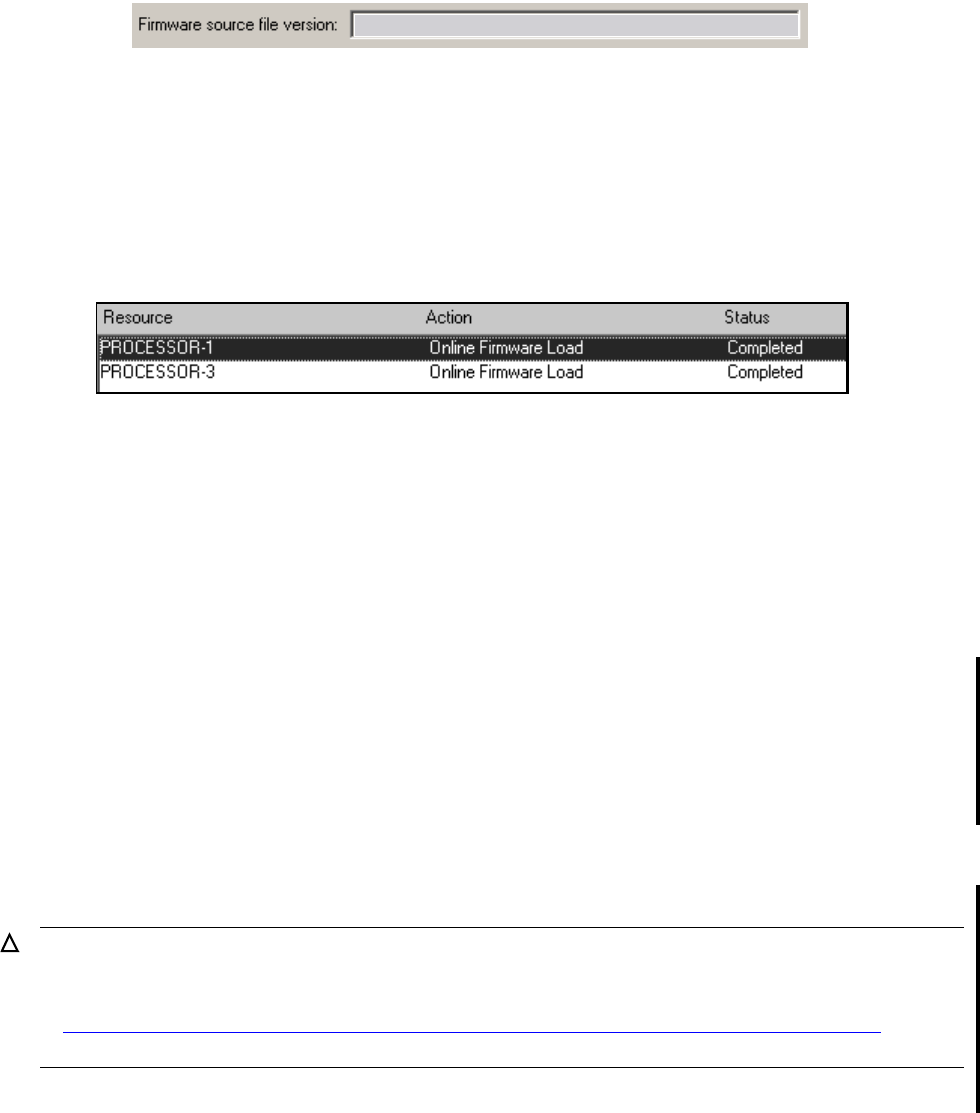
Updating Processor Boot Code
G06.24 Software Installation and Upgrade Guide—528593-005
8-7
Using OSM, Update Processor Boot Code Using the
Online Option and G06.24 or Later OSM SPRs
10. From the Firmware Update dialog box, click Perform action.
The update starts, and the Firmware Update Action Summary dialog box appears.
11. Monitor the status of the processor boot code update in the Firmware Update
Action Summary dialog box. For example:
When the action status appears as Completed, the processor boot code update is
finished.
12. Repeat Steps 2 through 10 to update the boot code using the TSM Online
Processor Boot Code, X-side option.
13. Close the Firmware Update and Firmware Update Action Summary dialog boxes.
Using OSM, Update Processor Boot Code Using the Online
Option and G06.24 or Later OSM SPRs
If you have at least the G06.24 OSM client and SPRS installed and configured, HP
recommends use of the explicit online option because it enables you to update the
processor boot code without resetting the processors on completion of the update. You
can update the processor boot code for NonStop S-series servers (S70000, S7x000,
S7600, S7800, S7400, and S8x000) without taking the processor down for a hard
reset. The online firmware update actions do not appear if the system is an S7000.
1. Log on to the OSM Service Connection.
2. Select Display> Multi-Resource Actions. The Multi-Resource Actions dialog box
appears with unselected fields.
Caution. To use OSM to update processor boot code online, you must have already installed
and configured T2728AAL. Otherwise, a processor halt will result. If you have not configured
the G06.24 or later OSM server side components, follow the instructions to update boot code
in Using OSM, Update the Processor Boot Code and Issue a Hard Reset or Equivalent on
page 8-14.
VST728.vsd
T7892G07^25AUG03^AAY^22Jul03^
VST964.vsd
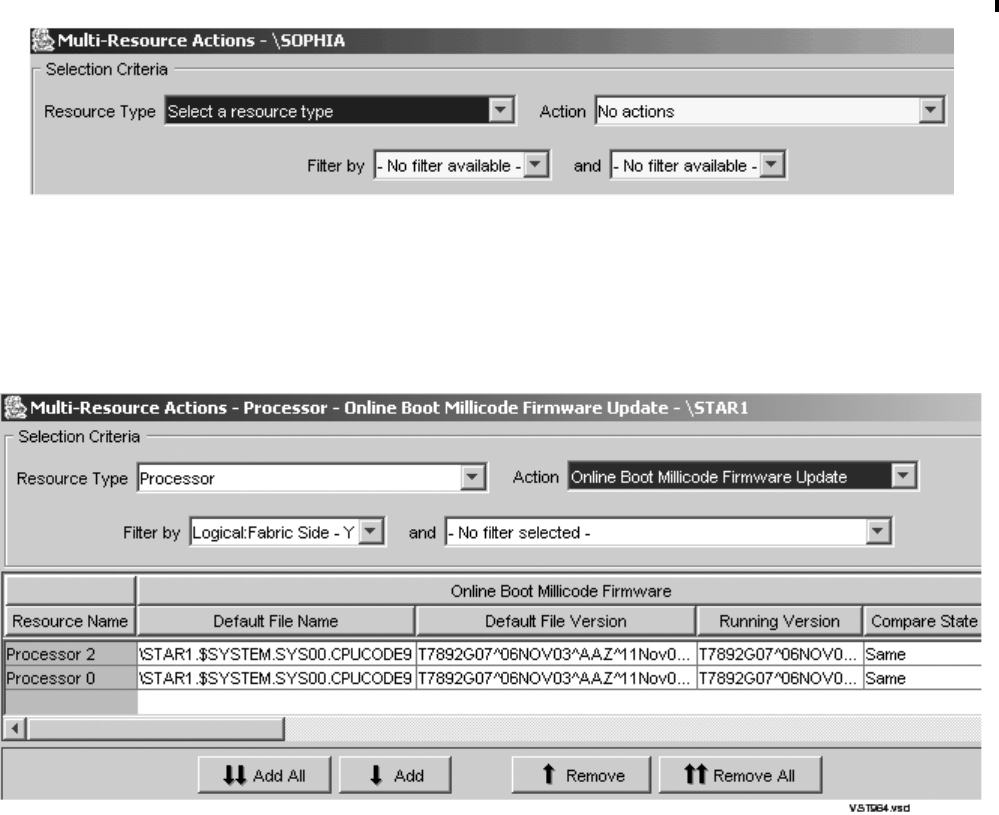
Updating Processor Boot Code
G06.24 Software Installation and Upgrade Guide—528593-005
8-8
Using OSM, Update Processor Boot Code Using the
Online Option and G06.24 or Later OSM SPRs
3. From the Resource Type list, select Processor.
4. From the Action list, select Online Boot Millicode Firmware Update.
5. From the Filter by list, select Logical: Fabric Side-Y. For example:
6. Click Add All to move the selected resources to update the lower list.
7. Click Perform Action.
8. Click OK when the Confirm Processor Boot Millicode Firmware Update dialog box
appears.
The Processor-Parameter Input dialog box appears.
9. Enter the file location. Use the $volume.subvolume.filename
($SYSTEM.SYSnn) subvolume created during the most recent DSM/SCM
Build/Apply and click OK. For example:
$system.sys01.cpucode9
As the firmware update is performed, information about it appears in the Progress
List.
VST938.vsd
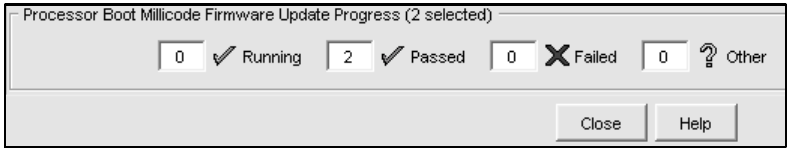
Updating Processor Boot Code
G06.24 Software Installation and Upgrade Guide—528593-005
8-9
Using OSM, Update Processor Boot Code Using the
Online Option and G06.24 or Later OSM SPRs
10. To verify that firmware resets are in progress, select Action Summary. The Action
Status Summary window appears with information about recent actions, including
their status and overall progress.
11. Update the X-fabric for the processor boot code. From the Filter by list, select the
appropriate filter, Logical:Fabric Side-X.
When you change the Filter by list from Y-side to X-side, this message appears:
Changing a required filter results in your
selections being cleared.
Do you still wish to change the filter?
12. Click OK.
13. Click Add All or Add to add the SPs you want to update to the lower resource list.
14. Click Perform Action.
15. Click OK when the Confirm Processor Boot Millicode Firmware Update dialog box
appears.
The Processor Parameter Input dialog box appears.
16. Enter the file location. Use the $volume.subvolume.filename
($SYSTEM.SYSnn) subvolume created during the most recent DSM/SCM
Build/Apply and click OK. For example:
$system.sys01.cpucode9
As the firmware update is performed, information about it appears in the Progress
List.
17. To verify that firmware updates are in progress, select Action Summary. The
Action Status Summary window appears with information about recent actions,
including their status and overall progress.
VST955vsd

Updating Processor Boot Code
G06.24 Software Installation and Upgrade Guide—528593-005
8-10
Method 2: Using Your Current Pre-G06.24 OSM or
TSM SPRs, Update the Processor Boot Code and
Method 2: Using Your Current Pre-G06.24 OSM
or TSM SPRs, Update the Processor Boot
Code and Issue a Hard Reset or Equivalent
•Using TSM, Update the Processor Boot Code and Issue a Hard Reset or
Equivalent on page 8-10
•Using OSM, Update the Processor Boot Code and Issue a Hard Reset or
Equivalent on page 8-14
Using TSM, Update the Processor Boot Code and Issue a Hard
Reset or Equivalent
From the TSM Service Application, use the Firmware Update dialog box to update the
processor boot code offline for each PMF CRU in your system:
1. Log on to the TSM Service Application.
2. Select Display>Firmware Update.
The Firmware Update dialog box appears.
3. From the Resource Type list, select Processor Boot Code, Y-side.
4. From the Display list, select All to list the selected resources in the Available box:
Note. You can also perform a hard reset using the TSM or OSM Low-Level Link on all
processors when you perform a system load instead of using the Reset action. See The Reset
Operation on page 11-8.
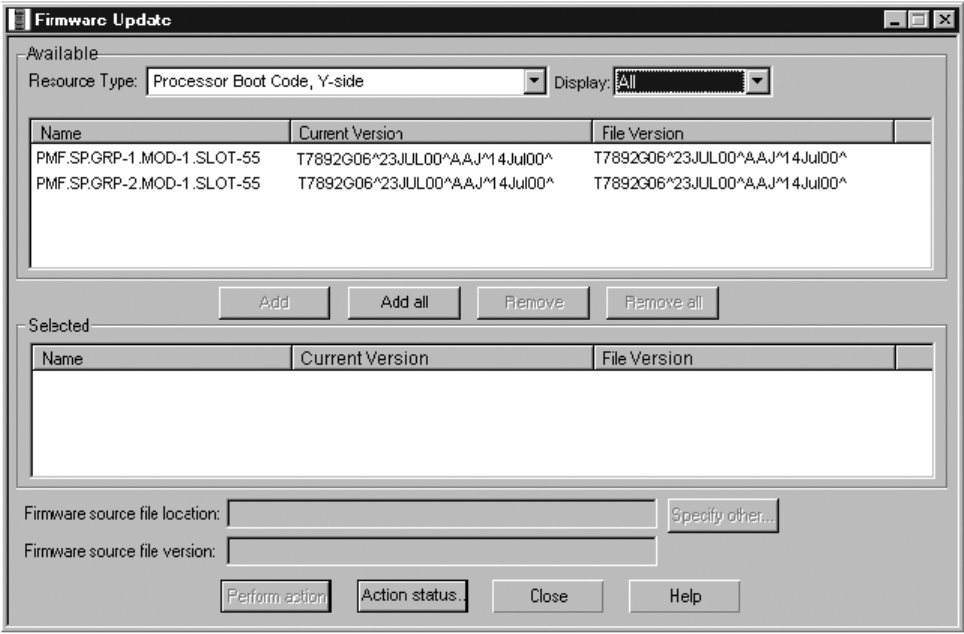
Updating Processor Boot Code
G06.24 Software Installation and Upgrade Guide—528593-005
8-11
Using TSM, Update the Processor Boot Code and
Issue a Hard Reset or Equivalent
5. Click Add all to move the resources to the Selected box.
6. Click Specify other to display the Specify Firmware File Location dialog box.
7. Enter the volume and subvolume where the file to use as the source for the update
resides. Use the $SYSTEM.SYSnn created during the most recent DSM/SCM
Build/Apply:
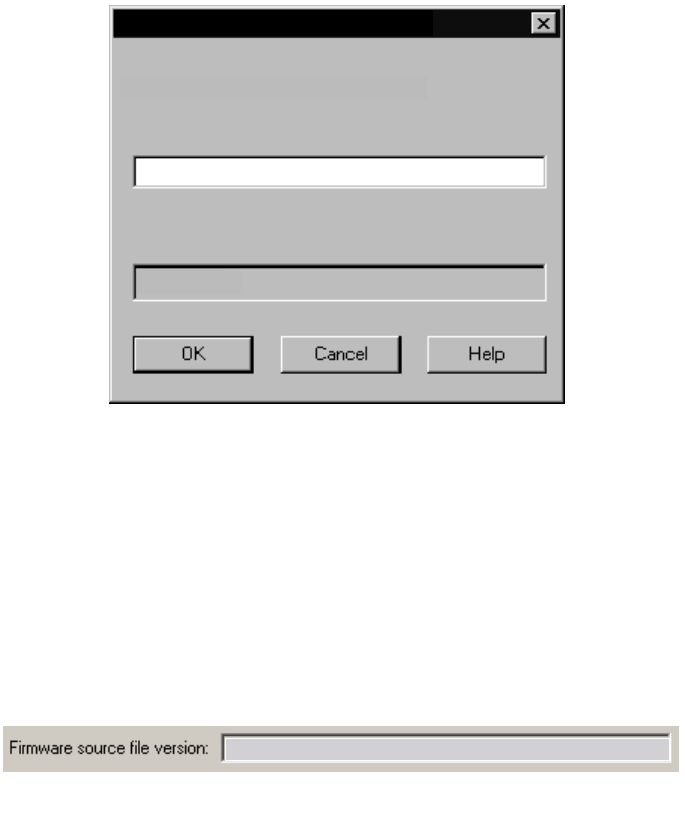
Updating Processor Boot Code
G06.24 Software Installation and Upgrade Guide—528593-005
8-12
Using TSM, Update the Processor Boot Code and
Issue a Hard Reset or Equivalent
8. Click OK.
9. Click Yes when this message appears:
You have specified a nonstandard firmware location.
Compaq TSM will try to get the firmware information. It may take a few seconds.
Do you want to use this nonstandard firmware location?
TSM retrieves firmware information, and the firmware source file version shows the
new RVU version:
10. From the Firmware Update dialog box, click Perform action.
The update starts, and the Firmware Update Action Summary dialog box appears.
VST654.vsd
$system.sys02
File name
Enter firmware file location and name:
$volume.subvolume
Specify Firmware File Location
CPUCODE9
VST728.vsd
T7892G07^25AUG03^AAY^22Jul03^
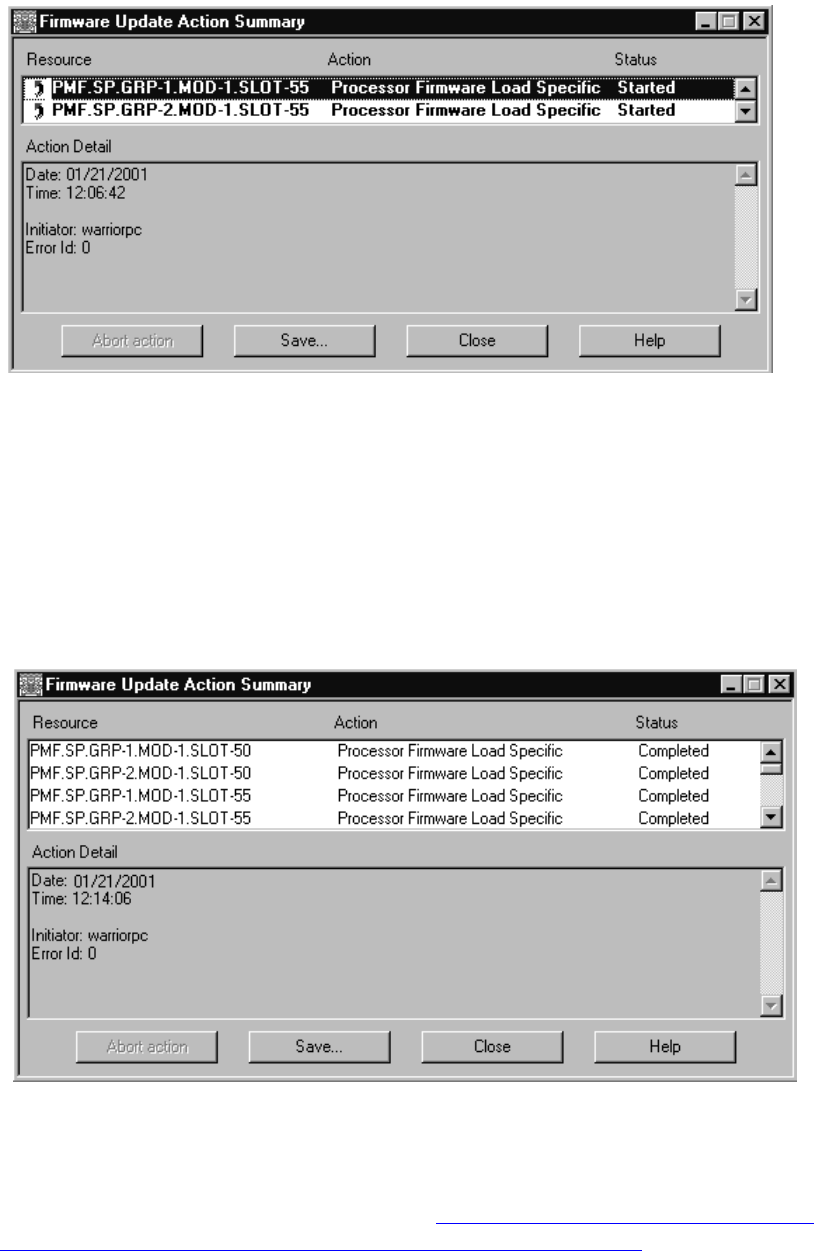
Updating Processor Boot Code
G06.24 Software Installation and Upgrade Guide—528593-005
8-13
Using TSM, Update the Processor Boot Code and
Issue a Hard Reset or Equivalent
11. Monitor the status of the processor boot code update in the Firmware Update
Action Summary dialog box. For example:
When the action status appears as Completed, the processor boot code update is
finished.
12. Repeat Steps 2 through 11 to update the Processor Boot Code, X-side.
The Firmware Update Action Summary dialog box should confirm that all
processor boot millicode for all PMF CRUs has been updated successfully. For
example:
13. Close the Firmware Update and Firmware Update Action Summary dialog boxes.
14. You must now reset the processors. See Reset the Processors To Complete
Updating the Processor Boot Code (Both for OSM and TSM) on page 8-16.
VST729.vsd
VST740.vsd
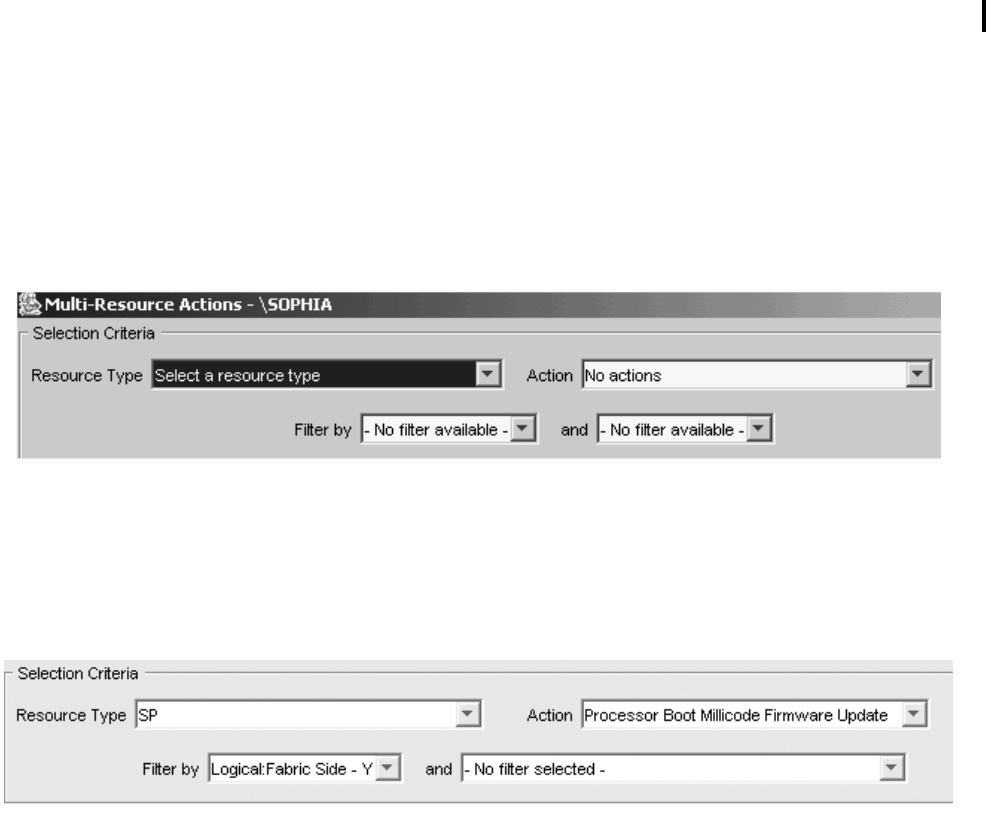
Updating Processor Boot Code
G06.24 Software Installation and Upgrade Guide—528593-005
8-14
Using OSM, Update the Processor Boot Code and
Issue a Hard Reset or Equivalent
Using OSM, Update the Processor Boot Code and Issue a Hard
Reset or Equivalent
You can use OSM to update processor boot code, provided that you use the Hard
Reset or Prime for Reload action option. This action can be done at the end of the
procedure or when performing a system load.
1. Log on to the OSM Service Connection.
2. Select Display> Multi-Resource Actions. The Multi-Resource Actions dialog box
appears with unselected fields.
3. From the Resource Type list, select SP.
4. From the Action list, select Processor Boot Millicode Firmware Update.
5. From the Filter by list, select Logical: Fabric Side-Y:
6. Click Add All to move the selected resources to update the lower list.
7. Click Perform Action.
8. Click OK when the Confirm Processor Boot Millicode Firmware Update dialog box
appears.
The Processor Parameter Input dialog box appears.
9. Enter the file location. Use the $volume.subvolume.filename
($SYSTEM.SYSnn) subvolume created during the most recent DSM/SCM
Build/Apply and click OK. For example:
$system.sys02.cpucode9
As the firmware update is performed, information about it appears in the Progress
List.
VST938.vsd
VST956.vsd
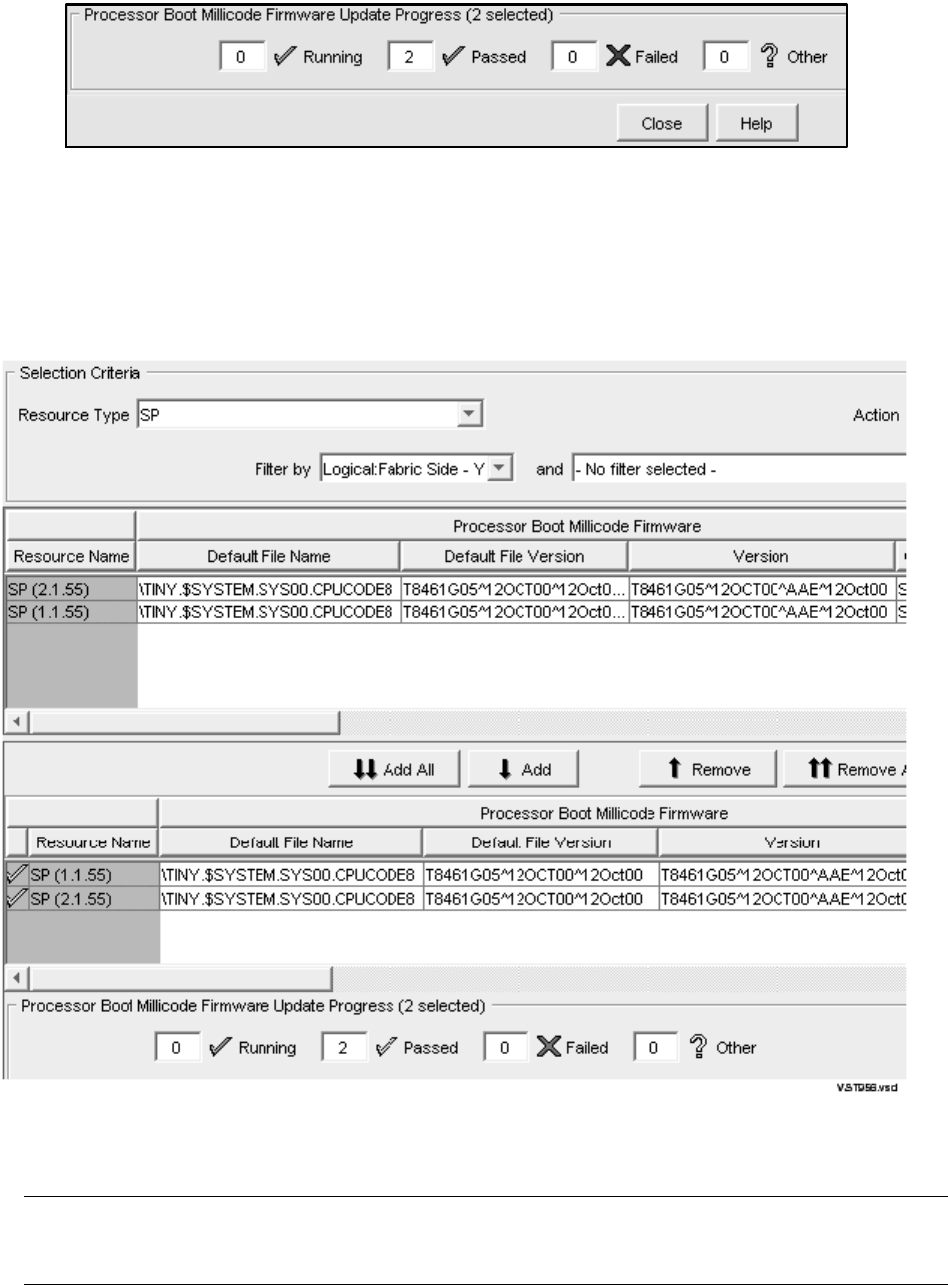
Updating Processor Boot Code
G06.24 Software Installation and Upgrade Guide—528593-005
8-15
Using OSM, Update the Processor Boot Code and
Issue a Hard Reset or Equivalent
10. To verify that firmware updates are in progress, select Action Summary. The
Action Status Summary window appears with information about recent actions,
including their status and overall progress.
A successful update (partial screen) for the Y-fabric of the processor boot code:
11. Update the X-fabric for the processor boot code. From the Filter by list, select the
appropriate filter, Logical:Fabric Side-X.
Note. You can begin this sequence of steps by using Remove All to delete the resources for
the Y-side update. All the steps are the same, except the change filter message is not
displayed and Step 12 is unnecessary.)
VST955vsd

Updating Processor Boot Code
G06.24 Software Installation and Upgrade Guide—528593-005
8-16
Reset the Processors To Complete Updating the
Processor Boot Code (Both for OSM and TSM)
When you change the Filter by list from Y-side to X-side, this message appears:
Changing a required filter results in your
selections being cleared.
Do you still wish to change the filter?
12. Click OK.
13. Click Add All to add the SPs you want to update to the Processor Boot Millicode
Firmware lower list.
14. Click Perform Action.
15. Click OK when the Confirm Processor Boot Millicode Firmware Update dialog box
appears.
The Processor Parameter Input dialog box appears.
16. Enter the file location. Use the $volume.subvolume.filename
($SYSTEM.SYSnn) subvolume created during the most recent DSM/SCM
Build/Apply and click OK. For example:
$system.sys02.cpucode9
As the firmware update is performed, information about it appears in the Progress
List.
17. To verify that firmware updates are in progress, select Action Summary. The
Action Status Summary window appears with information about recent actions,
including their status and overall progress.
You must now reset the processors. See Reset the Processors To Complete Updating
the Processor Boot Code (Both for OSM and TSM)
Reset the Processors To Complete Updating the Processor Boot
Code (Both for OSM and TSM)
You must perform a Hard Reset action or equivalent (reload) of the processors after
you have updated the processor boot code and if you did not use the explicit online
boot code option in either TSM or OSM. Use the Hard Reset action (or Prime for
Reload action) action from either the OSM or TSM LLL to terminate all processes
running on a processor, stop the processor, clear the processor’s memory, and reset
the processor’s internal mapping tables.
1. Log on to the server using the OSM Low-Level Link or TSM Low-Level Link
Application.
2. On the toolbar, click Processor Status.
The Processor Status dialog box appears.
Note. You can also perform a hard reset using the TSM or OSM Low-Level Link on all
processors when you perform a system load instead of using the Reset action. See The Reset
Operation on page 11-8.
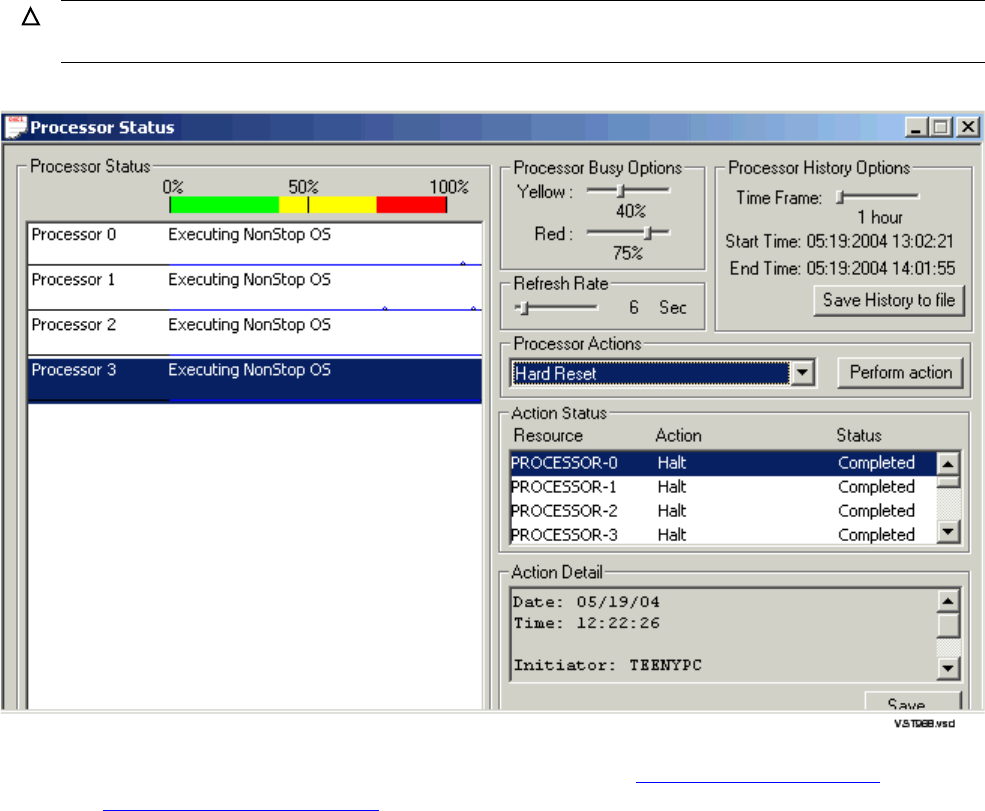
Updating Processor Boot Code
G06.24 Software Installation and Upgrade Guide—528593-005
8-17
Reset the Processors To Complete Updating the
Processor Boot Code (Both for OSM and TSM)
3. Select the processor(s) that you want to halt.
4. From the Processor Actions list, select Halt.
5. Click Perform action.
6. Monitor status of the halt action. After the halt action has successfully finished, a
completed message appears.
7. From the Processor Actions list, select Hard Reset and click Perform Action. For
example:
8. Reload the processor from the TACL prompt. See Reload the Remaining
Processors (If Necessary) on page 11-6.
9. Repeat all steps for each processor in the system.
Caution. Do not proceed until the Hard Reset action is completed because that could prevent
the update from taking effect.

G06.24 Software Installation and Upgrade Guide—528593-005
9-1
9
Updating SCSI Boot Code
(Pre-G06.08 RVU)
This section describes how to check and, if necessary, update SCSI boot code for
each PMF CRU in your system.
•Using TSM to Update SCSI Boot Code (If Necessary) on page 9-2
•Using OSM to Update SCSI Boot Code (If Necessary) on page 9-4
SCSI Boot Code Product Numbers
Use these SCSI boot code product numbers for the PMF CRUs to verify that the
update to the new version is successful:
Note. Update SCSI boot code only:
•If instructed to do so by DSM/SCM
•If you are not replacing the PMF CRUs in your system while migrating to the G06.24 RVU.
Note. If you are migrating to the G06.24 RVU from an RVU prior to G06.08, you must update
SCSI boot code after you perform the system load of the G06.24 RVU so that the TSM server
software uses the default ISP firmware file IBOOT (introduced with the G06.08 RVU).
OSM can be installed only on G06.08 RVUs or later.Therefore, the IBOOT (T0503) file should
already be installed. Instructions are provided when a new firmware file is introduced.
RVU Released
Product Number Object
Product Number File Name
G06.07 and earlier T1067 T1067 I1000
G06.08 and later T0503 T1067 and T0480 IBOOT

Updating SCSI Boot Code (Pre-G06.08 RVU)
G06.24 Software Installation and Upgrade Guide—528593-005
9-2
Using TSM to Update SCSI Boot Code (If
Necessary)
Using TSM to Update SCSI Boot Code (If
Necessary)
Before you update your firmware, verify that the system is up and running the G06.24
version of the NonStop Kernel operating system. This step is important if you are
coming from a pre-G06.08 RVU.
1. If necessary, log on to the TSM Low-Level Link Application.
2. On the toolbar, click Processor Status.
3. The Processor Status should be Executing NonStop OS.
4. At a TACL prompt, use the VPROC command to verify and record the location and
version of the SCSI boot code for the G06.24 RVU:
>VPROC $SYSTEM.SYSnn.IBOOT
where nn is the new operating system image subvolume. For example:
$SYSTEM SUPER 1> vproc $system.sys02.iboot
VPROC - T9617G03 - (30 MAR 1999) SYSTEM \WARRIOR Date 21 SEP 2000, 13:50:43
COPYRIGHT TANDEM COMPUTERS INCORPORATED 1986 - 1995
$SYSTEM.SYS02.IBOOT
Binder timestamp: 11MAY2000 13:22:07
Version procedure: T1067F40^05MAR00^TREV=01^AAN
Version procedure: T0480G06^11MAY00^TREV=01^AAA
Note that the version procedures for I1000, I1040, and IBOOT do not have to match.
From the TSM Service Application, use the Firmware Update dialog box to update the
SCSI boot code for each processor multifunction (PMF) customer-replaceable unit
(CRU) in your system.
1. Select Display>Firmware update to display the Firmware Update dialog box.
2. From the Resource Type list, select SCSI Boot Code, Y-side.
3. From the Display list, select All to list the selected resources in the Available box.
For example:
Note. Version procedure dates might be different; these are examples only.
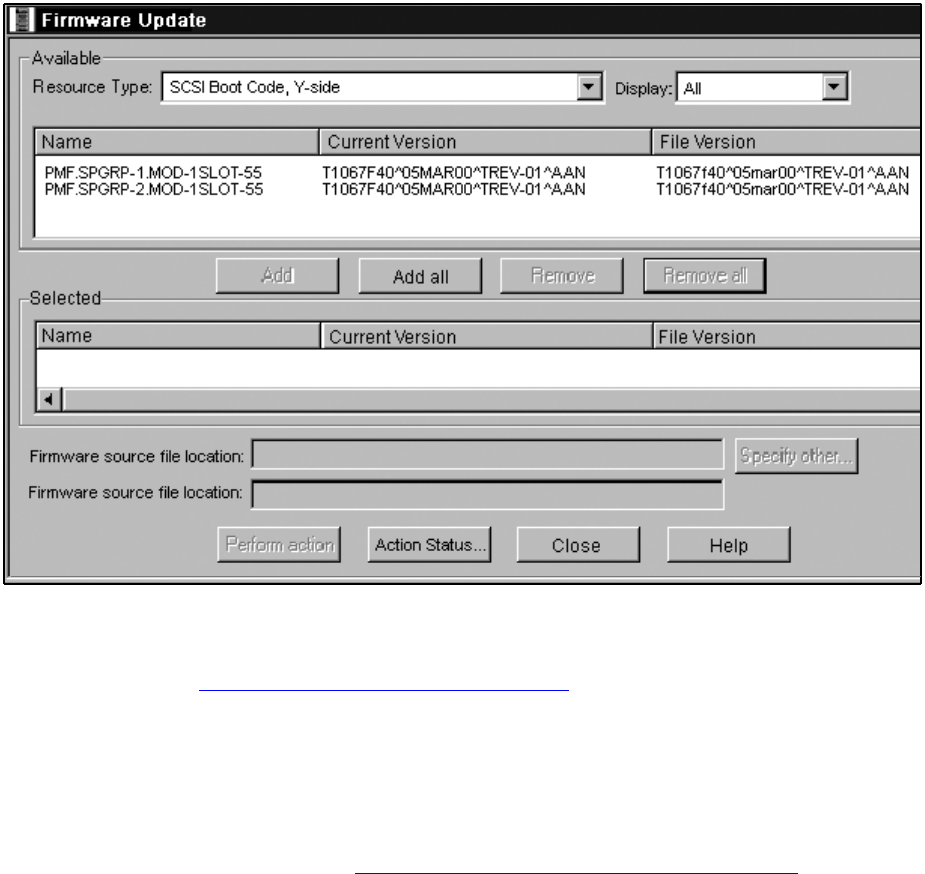
Updating SCSI Boot Code (Pre-G06.08 RVU)
G06.24 Software Installation and Upgrade Guide—528593-005
9-3
Using TSM to Update SCSI Boot Code (If
Necessary)
4. Select all resources that have a current version different from the file version
recorded in SCSI Boot Code Product Numbers on page 9-1, and then click Add to
move selected resources to the Selected box.
If all firmware versions match, you do not need to perform the update for the
selected fabric (X or Y). If you have not yet checked the firmware in the other
fabric, repeat Steps 2 through 6. Otherwise, close the Firmware Update and
Firmware Update Action Summary dialog boxes and resume the upgrade
procedure as described in Section 12, Resuming Normal Operations.
5. Click Perform action.
The update starts, and the Firmware Update Action Summary dialog box appears.
6. Monitor the status of the processor boot code update in the Firmware Update
Action Summary dialog box.
When the action status appears as Completed, the SCSI boot code update is
finished.
7. Repeat Steps 2 through 6 to update the SCSI Boot Code, X-side.
The Firmware Update Action Summary dialog box should confirm that all SCSI
boot code for all PMF CRUs has been updated successfully.
8. Close the Firmware Update and Firmware Update Action Summary dialog boxes.
vst900.vsd

Updating SCSI Boot Code (Pre-G06.08 RVU)
G06.24 Software Installation and Upgrade Guide—528593-005
9-4
Using OSM to Update SCSI Boot Code (If
Necessary)
Using OSM to Update SCSI Boot Code (If
Necessary)
1. Before you update your firmware, verify that the system is up and running the
G06.24 version of the NonStop Kernel operating system:
2. If necessary, log on to the OSM Low-Level Link and select Processor Status.
3. Log on to the OSM Service Connection. Select Display> Multi-Resource
Actions.
4. From the Resource Type list, select the appropriate resource.
5. From the Filter by list, select the appropriate filter, Logical:Fabric Side-Y.
6. Select Add All or Add to add the SPs you want to update to the lower list.
7. Click Perform action.
8. Click OK when the Confirm SCSI Boot Code firmware Update dialog box appears.
The SCSI Parameter Input dialog box appears.
9. Enter the new file location. Use the $volume.subvolume.filename created
during the most recent DSM/SCM Build/Apply and click OK.
As the firmware update is performed, information about it appears in the Progress
list.
10. (Optional) Select Action Summary if a firmware update fails.
a. Select the action that failed.
b. Select Details
11. Repeat Steps 2 through 10 to update the SCSI Boot Code, X-side.
Note. OSM can only be installed on G06.08 RVUs or later; thus the IBOOT (T0503) file should
already be installed. Instructions are provided in case a new firmware file is introduced after the
most current RVU is initially released.

G06.24 Software Installation and Upgrade Guide—528593-005
10-1
10 Running ZPHIRNM
During the Build/Apply phase, DSM/SCM places product files in their subvolumes with
temporary (fabricated) file names so that the new file names do not conflict with the file
names of currently running programs.
This section describes how to run the ZPHIRNM program on the target system to:
•Rename the files that currently have actual file names with fabricated names.
These files become obsolete when the new files are renamed.
•Rename the new files, which have fabricated names, with their actual names.
Warning, error, and completion messages are written to a log file if you choose to
create one. Error and completion messages are also displayed in the terminal-
emulation window.
Alerts
•If you are upgrading to the G06.24 RVU, back up copies of TCP/IP configuration
files in the ZTCPIP subvolume before running ZPHIRNM. (See Back Up (Copy)
Files in the $SYSTEM.ZTCPIP Subvolume on page 10-2.)
•Applications that use files that are being replaced should not be running. To avoid
any possibility of conflict, stop all applications, except for the TMF subsystem
before running ZPHIRNM.
•You must have rename (purge) access to all files being renamed. Run ZPHIRNM
as the super ID (255,255).
•If you are connected to an Expand network, you might see a message stating that
the NonStop SQL file, ZZSQLCI2, was not renamed during ZPHIRNM. However,
on further examination of the log file, you might find that ZPHIRNM did finally
rename the file, in which case you can ignore the error message and continue.
•If you are using DSM/SCM to manage OSS files, ZPHIRNM notifies you if and
when to run the merge_whatis command.
Running ZPHIRNM
G06.24 Software Installation and Upgrade Guide—528593-005
10-2
Back Up (Copy) Files in the $SYSTEM.ZTCPIP
Subvolume
Back Up (Copy) Files in the $SYSTEM.ZTCPIP
Subvolume
If you are upgrading to the G06.24 RVU, you must make backup copies of these files
in the $SYSTEM.ZTCPIP subvolume before running ZPHIRNM, which overwrites them
with sample versions.
You might need your previous versions for reference or for fallback:
•DNSBAK
•DNSBOOT
•DNSCACHE
•DNSHOSTS
•DNSLOCAL
•DNSREV
•DNREVBAK
•HOSTS
•NETWORKS
•PORTCONF
•PROTOCOL
•RESCONF
•SERVICES
•SMTPCONF
The file names of NonStop TCP/IPv6 that reside on the G06.24 SUT are:
•ztcpip.smplhost
•ztcpip.smplprot
•ztcpip.smplnetw
•ztcpip.smplport
•ztcpip.smplresc
•ztcpip.smplserv

Running ZPHIRNM
G06.24 Software Installation and Upgrade Guide—528593-005
10-3
Stop All Applications
Stop All Applications
Before running ZPHIRNM:
1. Stop DSM/SCM if it is still running. For example:
> VOLUME $dsmscm_vol.ZDSMSCM
> Run STOPSCM
STOP CNFGINFO server process $ZPHC
STOP DSM/SCM Pathway system $YPHI
PATHCOM $YPHI;SHUTDOWN !,WAIT
$Z02H: TCP TCP-H, STOPPED
$Z02H: TCP TCP-T, STOPPED
STOP DSM/SCM Alternate EMS Collector $ZPHI
where $dsmscm_vol is the DSM/SCM volume.
2. Stop all other applications, except for TMF and the OSS file system.
The NonStop Server S-Series Operations Guide contains detailed information on
stopping applications, devices, and processes in an orderly fashion.
Drain the Spooler
Always use the SPOOLCOM;SPOOLER,DRAIN command to perform an orderly
shutdown of the spooler. Failure to do so can cause problems during a warm start of
the spooler.
Before executing the SPOOLCOM;SPOOLER,DRAIN command:
1. Use the SPOOLCOM;COLLECT $collector-process, LISTOPENS command
to identify processes that currently have jobs open.
2. Use the SPOOLCOM;JOB (STATE PRINT) command to determine which jobs are
currently printing.
Take the appropriate action to ensure that these jobs either terminate when finished or
are stopped.
After receiving the SPOOLER DRAIN command, the supervisor stops accepting jobs
for collection or printing (new opens are rejected with a file-system error 66—device
downed). Each collector stops when it has no more open jobs. Each print process
finishes printing any active jobs and then stops.
After all collectors and print processes have stopped, the supervisor process stops
itself. The spooler enters the dormant state, ready to be warm started.
Note. Your site might have macros or OSS shell scripts set up to start and stop applications,
devices, and processes.
Caution. Never use the TACL STOP command to halt the spooler. The control file can be
corrupted during the next warmstart or rebuild.

Running ZPHIRNM
G06.24 Software Installation and Upgrade Guide—528593-005
10-4
Back Up the Spooler Control Files
See Support Note S99086, NSK Spooler—Migration and Draining Instructions, for
more information. You can also review Section 1 and Appendix H in the Spooler
Utilities Reference Manual.
Back Up the Spooler Control Files
While the spooler environment is closed, back up the spooler control files. Backing up
the spooler will render a known database from which you recover in case of a
catastrophic spooler failure. Make sure that you Drain the Spooler on page 10-3.
BACKUP/OUTSPLBKUP/$TAPE,($SYSTEM.SPOOLER.*,$DATA01.SPOOLER.DATA),LISTALL
ZPHIRNM
During the Build/Apply phase, DSM/SCM places product files in their subvolumes with
temporary (fabricated) file names so that the new file names do not conflict with the file
names of currently running programs. The ZPHIRNM program renames files that
currently have actual file names with fabricated names and renames new files, which
have fabricated names, with their actual names. ZPHIRNM is run from the DSM/SCM
subvolume.
Using ZPHIRNM PREVIEW Mode
You can do a preview run of ZPHIRNM to check that the target subvolumes (TSVs)
and associated map files are consistent. Running ZPHIRNM in PREVIEW mode
simulates the ZPHIRNM process without actually updating files or activating the
configuration. In PREVIEW mode, ZPHIRNM indicates whether or not TMF needs to
be up when running ZPHIRNM. For example, if no SQL program files need running,
TMF is not required to be running along with the ZPHIRNM program. For example:
Total Number of files to be renamed.........................827
Number of files to be renamed back during undo processing....0
Process Time:
Start........ 1/20/01 8:18:56
End ......... 1/20/01 8:20:09
Elapsed ..... 0:01:14
Errors & Warnings:
Total Errors ..... 0
Total Warnings ... 0
ZPHIRNM Preview for $SYSTEM.SYS00 finished successfully.
Note: TMF is not required to be running during the real ZPHIRNM
because no SQL program files need to be renamed.
PREVIEW mode also reveals most errors that ZPHIRNM would encounter if it were
run. If errors are revealed, you can evaluate and correct them interactively.
Running ZPHIRNM
G06.24 Software Installation and Upgrade Guide—528593-005
10-5
Steps for Running ZPHIRNM
The syntax for running ZPHIRNM in PREVIEW mode is (from the DSM/SCM
subvolume):
> RUN ZPHIRNM [$vol.]SYSnn , PREVIEW [STRICT] [,option] ...
If you enter a RUN ZPHIRNM command with no arguments, ZPHIRNM help text
displays information about PREVIEW mode. For more information, see the DSM/SCM
User’s Guide.
Steps for Running ZPHIRNM
1. At a TACL prompt, enter this command from the DSM/SCM subvolume:
> RUN ZPHIRNM $vol.SYSnn
where:
•$vol specifies the default current system load volume, usually $SYSTEM.
•SYSnn specifies the subvolume to which you just applied software. The SYSnn
subvolume must match the activation SYSnn that you specified earlier during
the Build/Apply phase.
2. When asked if you want to use a log file with the session, enter Y.
3. When prompted, enter a file name for the log file.
For example:
6> run zphirnm $system.sys00
DSM/SCM Utility - ZPHIRNM - T6031D31 - (31MAY2001)
Copyright Compaq Computer Corporation 1993-2001
Do you want to use a log file with this session? (Y/N): y
You may use any file for logging. If you request to use a disk
file that doesn't exist, it will be created as an edit file.
Please enter a filename: elist00
Log file is open, Zphirnm will now begin processing.
ZPHIRNM begins processing and provides status of its progress.
Running ZPHIRNM
G06.24 Software Installation and Upgrade Guide—528593-005
10-6
Steps for Running ZPHIRNM
For managing OSS files, you might see a display similar to:
OSS:
Directories:
Directories in new configuration .................. 110
Directories in old configuration .................. 110
Directories in new configuration only ............. 0
Directories in old configuration only ............. 0
Directories shared by new and old configurations .. 110
Directories processed in new config ............... 110
Directories processed in old config (obsolete) .... 0
OSS files Processed:
Files processed in new configuration ................... 2144
Files processed in new configuration only ....................2144
Files processed in old configuration only .................... 0
Files processed that are shared by new and old configuration . 0
Files processed & unchanged between new and old configuration 0
Files processed in obsolete TDLs ............................. 0
Files renamed from real name to fabricated name .............. 0
Files renamed from fabricated name to real name .............. 441
Files renamed from real name to fabricated (ZPG) name ........ 381
Files renamed from fabricated name to fabricated (ZPG) name .. 0
-------
Total Number of files renamed ................................ 822
Number of files renamed back during undo processing .......... 0
Process Time:
Start ....... 11/11/02 17:34:36
End ......... 11/11/02 17:41:14
Elapsed ..... 0:06:38
Errors & Warnings:
Total Errors ..... 0
Total Warnings ... 0
Note: merge_whatis needs to be run to update the man pages. Files in a
whatis.frag directory have changed.
ZPHIRNM for $SYSTEM($WHIT4).SYS01 finished successfully.

Running ZPHIRNM
G06.24 Software Installation and Upgrade Guide—528593-005
10-7
Steps for Running ZPHIRNM
4. Run the OSS merge_whatis command. (The merge_whatis command is a
shell script in /bin that creates and updates the whatis database used by the
OSS shell man, apropos, and whatis commands.) You might have a shell
script that runs either one or both of the following, depending on your OSS
environment:
/bin/merge_whatis
/bin/merge_whatis /nonnative/usr/share/man
The CISC version of the c89(1) man page resides in the /nonnative directory.
a. Log on to OSS as the super ID (255,255).
Current volume is $SYSTEM.STARTUP
$SYSTEM STARTUP 1> osh
b. Change directory using the cd command. For example:
/G/SYSTEM/STARTUP: cd /usr/share/man
c. Run the merge_whatis command:
/usr/share/man: merge_whatis
d. Enter the list (ls) command. For example:
/usr/share/man: ls
cat1 cat4 cat7 whatis.frag
cat2 cat5 cat8 whatis_old
cat3 cat6 whatis
/usr/share/man:
After you run merge_whatis, the directory will contain a file named whatis,
containing the database. If you have previously installed OSS, a file named
whatis_old is present, containing the previous version of the database.
5. If necessary, you can compare the creation dates of the whatis file to the
whatis_old file to see if any changes occurred:
a. Run the more command against the whatis file:
more /usr/share/man/whatis
b. After reviewing the displayed file, exit by entering q at the percentage (%)
prompt.
Note. You can run the Pcleanup utility on any file that is managed and audited by DSM/SCM
before running the merge_whatis command. However, the OSS utility, Pcleanup cleans up
OSS files, but not DSM/SCM files in the OSS file system. Only the DSM/SCM CLEANOSS
macro cleans up DSM/SCM files in the OSS file system. The CLEANOSS macro is run only if
you fall back and then migrate again to a T6031D46 product version. During a Build/Applly,
DSM/SCM automatically prompts you to run the CLEANOSS macro.
Running ZPHIRNM
G06.24 Software Installation and Upgrade Guide—528593-005
10-8
Verify That ZPHIRNM Ran Successfully
c. Repeat Steps a. and b. for the whatis_old file.
Verify That ZPHIRNM Ran Successfully
1. Review the log file.
2. If ZPHIRNM did not run successfully, correct whatever problems occurred and run
it again.
Two types of error and warning messages are issued during the renaming process:
•If a fatal error occurs, ZPHIRNM immediately issues an error message and
stops.
•A nonfatal error is one that affects processing only for a single subvolume. If a
nonfatal error occurs, ZPHIRNM issues an error message and attempts to
restore the subvolume it is currently processing to its original state.
°If the subvolume is successfully restored, ZPHIRNM continues with the
next subvolume.
°If the subvolume cannot be restored, ZPHIRNM issues an additional error
message and continues with the next subvolume.
° If the subvolume was successfully processed, you can ignore warning
messages.
See the DSM/SCM User’s Guide for troubleshooting procedures and the
DSM/SCM Messages Manual for a complete list of ZPHIRNM messages.

G06.24 Software Installation and Upgrade Guide—528593-005
11-1
11 Loading the G06.24 RVU
This section describes how to load the G06.24 version of the NonStop Kernel
operating system into the memory of each processor in a NonStop S-series server.
Unless OSM is installed and configured, TSM is used to load the system processors.
Alerts
Before performing a system load:
•Before halting the processors, stop any applications that are still running, including
TMF.
The NonStop S-Series Operations Guide contains detailed information on the best
methods for stopping applications, devices, and processes.
•Do not close the System Startup dialog box while startup is in progress. If you
attempt to close the dialog box, a message dialog box appears to alert you that the
system startup process will be stopped if you continue.
•If you stop a system startup before it has finished, the state of your system will be
unpredictable. You might need to perform another system startup to enable the
system to resume normal operation.
•If you must stop the system startup process, click Abort. (The abort process
should take effect within 30 seconds.)
•If OSM is installed and configured, use OSM to load the G06.24 RVU.
•Load the G06.24 RVU only on the primary disk in case there is something wrong
with the disk bootstrap code.
•Before a system load, you might have to run the SCF ALTER command for correct
placement of EMS templates:
-> ASSUME SUBSYS $ZZKRN
-> ALTER, RESIDENT_TEMPLATES $SYSTEM.SYSTEM.RTMPLATE, &
NONRESIDENT_TEMPLATES $SYSTEM.SYSTEM.TEMPLATE
Note. To stop TMF, at a TACL prompt, enter:
5> TMFCOM STOP TMF
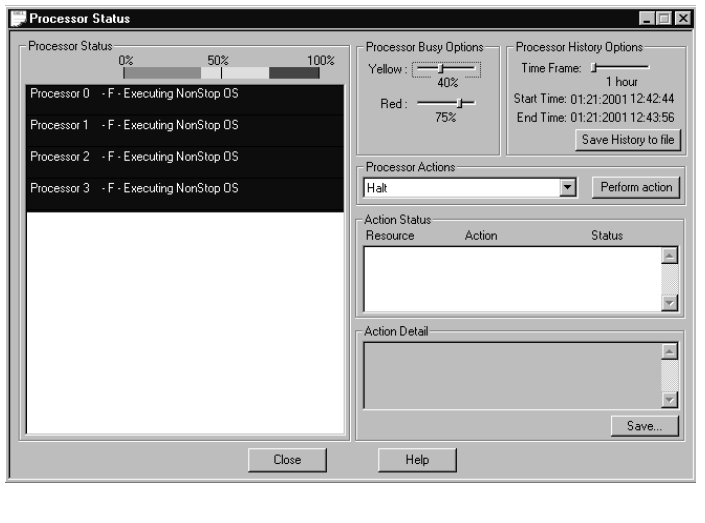
Loading the G06.24 RVU
G06.24 Software Installation and Upgrade Guide—528593-005
11-2
Halt the Processors
Halt the Processors
1. If necessary, log on to the TSM Low-Level Link Application or the OSM Low-Level
Link.
The following steps are similar whether you are using the TSM or OSM Low-Level
Link:
2. On the toolbar, click Processor Status to display the Processor Status dialog box.
3. In the Processor Status box, select all processors.
4. From the Processor Actions list, select Halt. For example:
5. Click Perform action.
6. Click OK when asked “Are you sure you want to do Halts?”
VST800.vsd
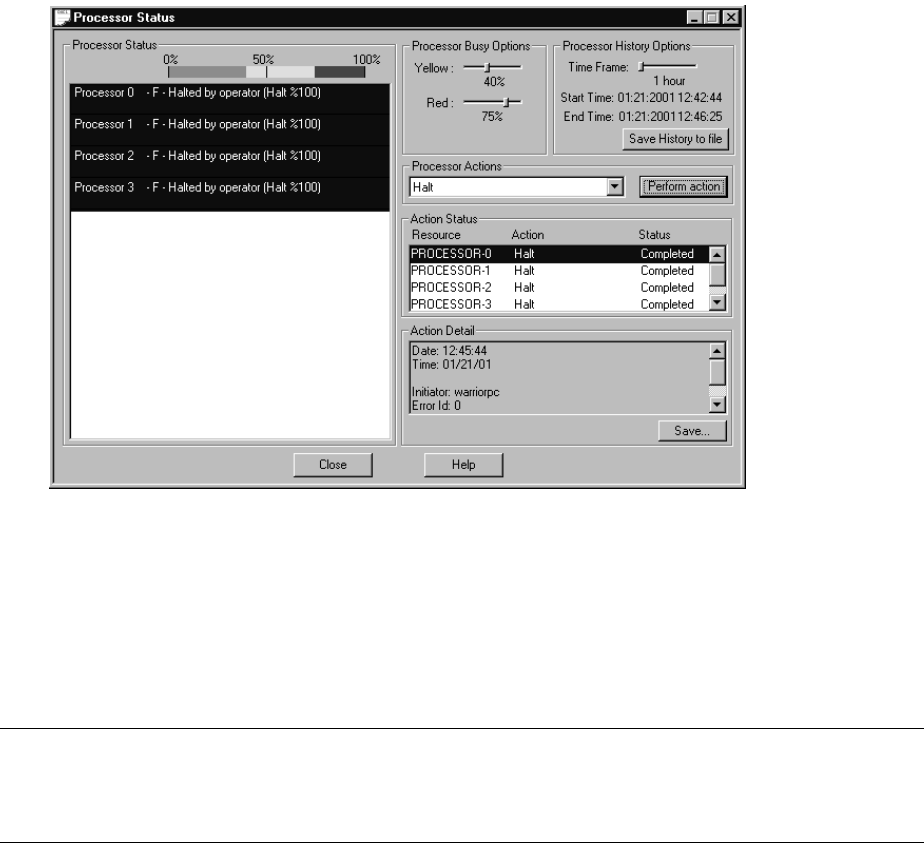
Loading the G06.24 RVU
G06.24 Software Installation and Upgrade Guide—528593-005
11-3
Replace Processor or Other System CRUs
7. When the Action Status box confirms that all processors have halted, close the
Processor Status dialog box. For example:
8. Close the OSM Service Connection or TSM Service Application window and any
OutsideView windows, but do not log off of the OSM or TSM Low-Level Link
Application; you will use it to perform a system load in the next procedure.
Replace Processor or Other System CRUs
After you halt all the processors in the system, you have an opportunity to replace or
upgrade CRUs in your system (for example, replacing existing PMF CRUs with
NonStop S78000 or S88000 PMF CRUs).
Note. If you are using TSM as the default, guided procedures for CRU replacement will not
perform correctly during online disk remirroring (ODR). However, when you stop $ZTSM and
restart it, TSM will rediscover the entire system (including the disk pair on which ODR was
run). TSM then displays correctly the current system information.
VST830.vsd

Loading the G06.24 RVU
G06.24 Software Installation and Upgrade Guide—528593-005
11-4
System Load Using the TSM or OSM Low-Level Link
System Load Using the TSM or OSM
Low-Level Link
The operating system is loaded from disk into the memory of one processor. (This
operation is sometimes also called a device load or cold load.) All possible paths to
processor 0 are tried. If these fail, all possible paths to processor 1 are tried.
The remaining processors are loaded by commands in the CIIN file. The initial TACL
process stops after executing the CIIN file.
1. If necessary, log on to the Low-Level Link.
2. Start the system by clicking Start System.
The System Startup dialog box appears.
3. In the SYSnn text box, enter the number of the system subvolume containing the
version of the operating system that you want to load.
The number of the SYSnn last used to start the system is displayed as the default.
Enter the correct two-digit number to load the new version of software stored in the
SYSnn subvolume on the system disk.
4. Under Configuration File, select Current (CONFIG).
Current (CONFIG) is the default configuration and represents the last running
configuration.
5. Verify that the CIIN disabled option is not selected.
6. Click Start system.
During system load, two startup event stream windows and two startup TACL
windows are automatically launched on the system console configured to receive
them.
Note. The System Startup dialog box requires that the primary and mirror system disks
($SYSTEM) are installed in Group 01, Module 01, slots 11 and 12. If the system load fails
along one load path, another load path is tried until the system load is successful. To start
your system with a system disk in disk slots other than 11 and 12, use the Processor
Status dialog box, Load action, to access the Load Processor-n from Disk dialog box. This
dialog box allows you to type the group, module, and slot number of the disk from which
you want to load. (It does not try alternate paths or alternate disk slots.) See the NonStop
S-Series Operations Guide for more information.
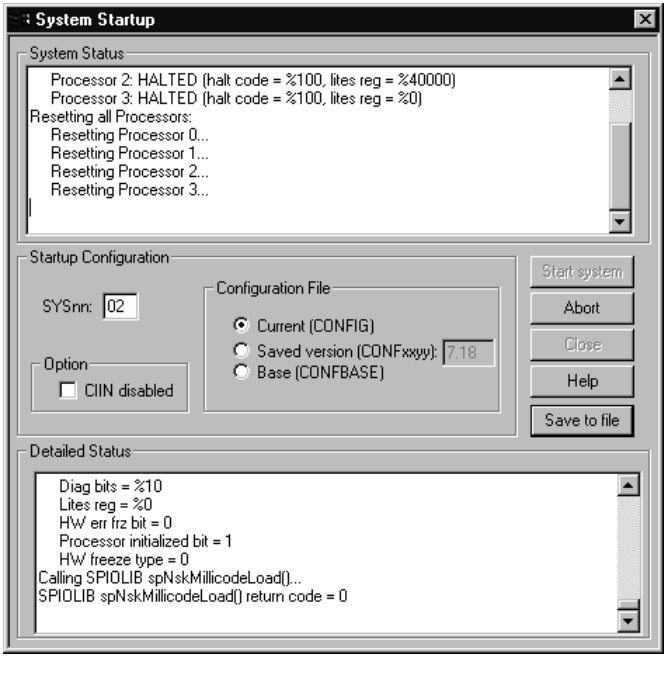
Loading the G06.24 RVU
G06.24 Software Installation and Upgrade Guide—528593-005
11-5
System Load Using the TSM or OSM Low-Level Link
7. Monitor the System Status (which contains initial high-level messages) and
Detailed Status (which contains low-level messages) boxes. For example, as
shown in TSM:
Messages indicate the progress and completion of the system load and the reload
of any processors configured in the CIIN file to start. When the processors are
reset and primed, and the system load of the first processor is finished, this
message appears:
SYSTEM STARTUP COMPLETE, NSK RUNNING ON PROCESSOR n
8. Close the System Startup dialog box.
VST810.vsd
Loading the G06.24 RVU
G06.24 Software Installation and Upgrade Guide—528593-005
11-6
Reload the Remaining Processors (If Necessary)
Reload the Remaining Processors (If
Necessary)
After the first processor is loaded, the initial TACL process automatically invokes the
CIIN file unless the CIIN file is disabled. The CIIN file contains commands that
establish the permanent TACL process pair for the system console. The CIIN file might
also contain commands to reload all processors.
The reload operation copies the operating system into other processors in the system
after the first processor has been successfully loaded from disk (by the system load).
If the CIIN file does not contain the commands to reload all processors, after processor
0 or processor 1 is successfully running the G06.24 NonStop Kernel, use the RELOAD
command to reload the remaining processors in the system.
At a TACL prompt on the system console OutsideView session window, log on to the
system as a super-group user (255,n) and enter:
RELOAD nn
where nn is the number of the processor(s) you want to reload.
If the reload is initiated successfully, this message appears:
PROCESSOR RELOAD: nn
This example shows the RELOAD command for a four-processor system:
9> reload (1,2,3)
NONSTOP OS PROCESSOR RELOAD - T9050G06 - (01MAY98)
Reload 1: Fabric: 0 (X)
Reload 2: Fabric: 0 (X)
Reload 3: Fabric: 0 (X)
Checking reloadee cpu(s) state.
Sent reload start-up packet to cpu 1
Sent reload start-up packet to cpu 2
Sent reload start-up packet to cpu 3
Sending OSIMAGE pages to Reloadee(s)
Integrating cpu 1
Starting system services on cpu 1
PROCESSOR RELOAD: 1
Services started successfully
Integrating cpu 2
Starting system services on cpu 2
PROCESSOR RELOAD: 2
Services started successfully
Integrating cpu 3
Starting system services on cpu 3
PROCESSOR RELOAD: 3
Services started successfully

Loading the G06.24 RVU
G06.24 Software Installation and Upgrade Guide—528593-005
11-7
Check the Status of the Processors
CPU 1: reloaded.
CPU 2: reloaded.
CPU 3: reloaded.
Check the Status of the Processors
1. Check the status of the processors to verify that they are all executing the NonStop
Kernel.
2. From the OSM Low-Level Link or the TSM Low-Level Link window toolbar, click
Processor Status to display the Processor Status dialog box.
3. When all processors are executing the NonStop Kernel, continue with the upgrade
procedure.
Recovery Operations for System Load
If the system load operation from the newly updated disk fails in any way:
1. Use the halt codes that appear in the OSM Low-Level Link or TSM Low-Level Link
System Startup dialog box to determine how to proceed.
For descriptions of these halt codes, see the Processor Halt Codes Manual.
2. If you still cannot perform a system load after following the halt code instructions,
try using the unchanged mirrored system disk to load the system.
Performing a System Load From the Mirror System Disk
1. Through the OSM Low-Level Link or the TSM Low-Level Link Application, power
off the primary system disk drive.
2. Check that the green power-on LED on the primary system disk drive is not lit.
3. Continue with the steps under System Load Using the TSM or OSM Low-Level
Link on page 11-4.
Note. The NonStop S-Series Operations Guide contains additional instructions on
troubleshooting and recovery operations if the following problems occur when you start a
system:
•Startup event stream and TACL windows do not appear.
•The CIIN file is not invoked during system startup.
•Processor reload fail.
•System load fails.

Loading the G06.24 RVU
G06.24 Software Installation and Upgrade Guide—528593-005
11-8
The Reset Operation
Because the primary system disk is powered off, the system load is forced to use
the mirror disk half (normally, the disk with the latest disk label timestamp is used,
and the other disk half is placed in a STOPPED state). The system load uses the
mirror disk regardless of its state when the system was stopped.
The Reset Operation
The Reset operation terminates all processes running on a processor, stops the
processor, and places the processor in a known state, ready for a Prime for Reload or
Load action.
1. If necessary, log on to the OSM Low-Level Link or the TSM Low-Level Link
Application.
2. From the toolbar, click Processor Status to display the Processor Status dialog
box.
3. From the Processor Status list, select the processors you want to reset.
4. From the Processor Actions list, select Reset.
5. Click Perform action.
6. From the Action Status display, monitor the status of the Reset action. After the
reset has finished successfully, a completed message appears.
If the reset fails, retry the action. If the action fails a second time, try the Hard Reset
action first. Use the Hard Reset action only if the Reset action fails.
If the hard reset fails, contact your service provider or the Global Customer Support
Center (GCSC).
Note. If you are loading your system with a system disk in disk slots other than Group 01,
Module 01, slots 11 and 12, you must go through the Processor Status dialog box, Load
action, to access the Load Processor-n from Disk dialog box. Type the group, module, and
slot number of the mirror disk half from which you want to load. See the NonStop S-Series
Operations Guide for more information.
Caution. Performing a hard reset on a processor results in an unrecoverable loss of data.
Use the Hard Reset action only to prepare for reloading the processors.

G06.24 Software Installation and Upgrade Guide—528593-005
12-1
12 Resuming Normal Operations
Several tasks must be performed after system load before you can resume normal
system operations, as described in this section.
•Update TCP/IP Configuration Files
•Check Processor Status (Using TSM or OSM)
•Perform Other Firmware Updates
•Configure the Spooler
•Start User and System Applications
•Reset and Start the Mirror System Disk (If Necessary)
•Configure Specific Products (Post-System Load)
Update TCP/IP Configuration Files
Step 1: Copy the Sample TCP/IP Files into $SYSTEM.ZTCPIP
(Optional)
You need to copy the sample files if you do not have any of the following TCP/IP
configuration files in your $SYSTEM.ZTCPIP subvolume:
•HOSTS
•PROTOCOL
•NETWORKS
•PORTCONF
•RESCONF
•SERVICES
Note. You must have all the TCP/IP configuration files in your $SYSTEM.ZTCPIP subvolume.
Otherwise, applications dependent on proper network connections will fail.
Alerts:
•See Back Up (Copy) Files in the $SYSTEM.ZTCPIP Subvolume on page 10-2.
•For the DSM/SCM Planner Interface to be operational, the PORTCONF file must have the
correct entry for DSM/SCM. The SERVICES file must have an entry that specifies DSM
and its corresponding port number.
•Keep your current PROTOCOL file in your $SYSTEM.ZTCPIP subvolume. Update it with
the new lines from the sample PROTOCOL file (SMPLPROT).

Resuming Normal Operations
G06.24 Software Installation and Upgrade Guide—528593-005
12-2
Step 2: Check the PROTOCOL File
Perform a FUP DUP operation to rename the sample configuration files from the
G06.24 SUT to the real file name.
The sample configuration files are named:
•SMPLHOST
•SMPLPROT
•SMPLNETW
•SMPLPORT
•SMPLRESC
•SMPLSERV
To copy the sample files:
>FUP DUP $SYSTEM.ZTCPIP.SMPLHOST, $SYSTEM.ZTCPIP.HOSTS
>FUP DUP $SYSTEM.ZTCPIP.SMPLPROT, $SYSTEM.ZTCPIP.PROTOCOL
>FUP DUP $SYSTEM.ZTCPIP.SMPLNETW, $SYSTEM.ZTCPIP.NETWORKS
>FUP DUP $SYSTEM.ZTCPIP.SMPLPORT, $SYSTEM.ZTCPIP.PORTCONF
>FUP DUP $SYSTEM.ZTCPIP.SMPLRESC, $SYSTEM.ZTCPIP.RESCONF
>FUP DUP $SYSTEM.ZTCPIP.SMPLSERV, $SYSTEM.ZTCPIP.SERVICES
Step 2: Check the PROTOCOL File
If the PROTOCOL configuration file exists in $SYSTEM.ZTCPIP, you must add two
lines from the sample PROTOCOL file (SMPLPROT). Find the lines in SMPLPROT
from the SUT that refer to IPV6 and ICMPV6 and copy those lines into your
$SYSTEM.ZTCPIP.PROTOCOL file. For example:
12> TYPE SMPLPROT
#
# @(#)protocols 1.1 Tandem
#
# Internet (IP) protocols
# This file is never consulted when the yellow pages are running
#
ip 0 IP # internet protocol, pseudo protocol
number
icmp 1 ICMP internet control message protocol
ggp 3 GGP gateway-gateway protocol
tcp 6 TCP transmission control protocol
pup 12 PUP PARC universal packet protocol
udp 17 UDP user datagram protocol
Note. Only copy these configuration files if you do not already have versions of these files.
Depending on your applications, if you copy the configuration files, you might have to insert
previous network port information into each individually copied file.
Caution. Even if you are running TCP/IPv6 in IPv4 or conventional TCP/IP mode, you must
make sure that the PROTOCOL file contains ipv6 and icmpv6 entries. If these entries are
absent, a network failure might occur because the new socket routines present in TELSERV,
LISTNER, and FTP access the entries in the PROTOCOL file.
Resuming Normal Operations
G06.24 Software Installation and Upgrade Guide—528593-005
12-3
Step 3: Ensure That PORTCONF and SERVICES
Files Are Complete
ipv6 41 IP internet protocol for v6
icmpv6 58 ICMP internet control message protocol for v6
Step 3: Ensure That PORTCONF and SERVICES Files Are
Complete
The PORTCONF file specifies the ports that the LISTNER process listens to and the
corresponding server program it invokes when the request comes in.
If you copied files as documented in Step 1, for the DSM/SCM Planner Interface to
work, you must add a services line corresponding to DSM/SCM in the PORTCONF file
(shown in bold lettering) and save the file. If you did not copy the files as documented
in Step 1, no action is necessary. An example of the PORTCONF file:
58> type portconf
#
# This file tells the listner program which ports to
# listen to, and what programs to run
# Telnet is directly, and does not use the listner's
# services.
# To run the listner use:
# $system.ztcpip.listner / name.../ [config-file-name]
# where config-file-name is this file.
#
ftp $system.ztcpip.ftpserv
finger $system.ztcpip.fingserv
$system.ztcpip.echoserv
phiwsock $tdsv.zdsmscm.pdpexe
Applications use the SERVICES file to retrieve the service port numbers and service
names. If you copied files as documented in Step 1, check that the last lines of the
SERVICES file have an entry similar to the following:
phiwsock 1089/tcp #DSM/SCM Planner Interface
For DSM/SCM, the port number is user-definable. The setup default is 1089. In the
ZDSMSCM subvolume, you can check the INITSTAT file for the recently configured
TCP/IP port number. INITSTAT is created by DSM/SCM when INITENV is run.

Resuming Normal Operations
G06.24 Software Installation and Upgrade Guide—528593-005
12-4
Reconfigure System Console Applications
Reconfigure System Console Applications
Using TSM to Reconfigure Primary and Backup Dial-Out Points
See the TSM client software online TSM Configuration Guide or the TSM Notification
Director Application online help for information on reconfiguring the primary and
backup dial-out points.
Using TSM to Reconfigure Your Site Contact Information
Use the TSM Notification Director Application to configure your site contact
information. See the TSM Configuration Guide or the TSM Notification Director
Application online help for more information.
Using OSM (If Installed) to Reconfigure Site Contact Information
and Backup Dial-Out Points
Perform this step if you want to use OSM when it is already installed and configured on
both the server and client side. See the OSM Notification Director online help for more
information.
Check Processor Status (Using TSM or OSM)
Before you update firmware, verify that all processors in the system are up and running
the G06.24 version of the NonStop Kernel operating system:
1. If necessary, log on to the TSM Low-Level Link or the OSM Low-Level Link
Application.
2. Check processor status by selecting Processor Status.
The Processor Status should be Executing NonStop OS.
Note. You can have both the TSM client and the OSM client-based components on your
system consoles. However, to avoid duplicate dial-outs, use either the OSM Notification
Director (ND) or TSM Notification Director, but not both.

Resuming Normal Operations
G06.24 Software Installation and Upgrade Guide—528593-005
12-5
Perform Other Firmware Updates
Perform Other Firmware Updates
Update SWAN and SWAN 2 CLIP Firmware
If you have a ServerNet wide area network (SWAN) concentrator connected to your
NonStop S-series server, follow the instructions in Appendix C, Updating SWAN
Concentrator CLIP Firmware, to update the CLIP firmware after doing a system load of
the G06.24 RVU.
If you have a SWAN connected to your NonStop S-series server, you can update CLIP
firmware in either of two ways:
•Use the SWAN Fast Firmware Update guided procedure. (HP recommends this
method if you are using TSM.)
•Use the Firmware Update dialog box in the TSM Service Application or use the
Multi-Resource Actions dialog box in the OSM Service Connection.
Update NonStop ServerNet Switch Firmware
If you have a 6780 ServerNet Switch in your system, you must use OSM to update the
firmware ServerNet Switch. For up-to-date SPRs, see Scout for NonStop Servers. For
information on the 6780 ServerNet switch installation, see the ServerNet Cluster 6780
Planning and Installation Guide.
Update ServerNet Adapter Firmware
Updateable firmware in most ServerNet adapters can be managed automatically by
higher-level system software, if the corresponding “autofirmup” attribute is set to “on”
using SCF (the default when a ServerNet adapter is added to a system). If you choose
to disable the autofirmup attribute of these adapters, then you must use either the TSM
Service Application or the OSM Service Connection to manage them yourself:
•ATM 3 ServerNet adapter (ATM3SA)
•Ethernet 4-Port ServerNet adapter (E4SA)
•Fast Ethernet ServerNet adapter (FESA)
•Gigabit Ethernet ServerNet adapter (GESA-C and GESA-F)
•Token-Ring ServerNet adapter (TRSA)
•6763 Common Communication ServerNet adapter (CCSA)
•Gigabit Ethernet 4-Port adapter (G4SA)
Note. The SWAN Fast Firmware Update guided procedure is supported only on G06.13
and subsequent RVUs. You can use it for both SWAN and SWAN 2s. However, OSM does
not support the SWAN Fast Firmware Update procedure.
Note. If you have to fall back to a previous G-series RVU, do not revert back to previous
versions of SWAN CLIP firmware. If you must fall back, keep the firmware change.
Resuming Normal Operations
G06.24 Software Installation and Upgrade Guide—528593-005
12-6
Update ServerNet/FX and ServerNet/FX2 Firmware
(Overview)
•Fibre Channel ServerNet adapter (FCSA)
Note that the ServerNet/FX and ServerNet/FX 2 adapters do not have the autofirmup
feature. Use either the TSM Service Application, or if installed, the OSM Service
Connection. Only an HP service provider is authorized to install and configure an
FCSA and G4SA.
Update ServerNet/FX and ServerNet/FX2 Firmware (Overview)
ServerNet/FX and ServerNet/FX 2 adapters cannot be managed automatically through
the autofirmup feature.
The FOX ring consists of two fiber-optic rings for fault tolerance. In each NonStop
S-series server, two ServerNet/FX (FXSA) or ServerNet/FX 2 adapter (FXSA2) field-
replaceable units (FRUs) are installed:
•The FOX-X controller connects to the FOX-X ring.
•The FOX-Y controller connects to the FOX-Y ring.
On the ServerNet side, one FXSA/FXSA2 FRU connects to the ServerNet X fabric, and
the other FXSA FRU connects to the ServerNet Y fabric. The ServerNet/FX is
considered a field-replaceable unit because of the necessary fiber-optic cable
connection.
If you are currently running a T0059AAB version (released in G05.00) of ServerNet/FX
firmware (T0059G05^19MAR98^04MAR98), you do not need to upgrade ServerNet/FX
FRUs.
To Load the FXSA or FX2SA Firmware (Using TSM)
1. Use SCF to stop the FXSA or FXSA2 FRU.
2. Log on to the TSM Service Application.
3. Select Display> Firmware Update.
4. From the Resource Type list, select ServerNet/FX FRU.
5. From the Display list, select All and then click Add All.
6. Click Specify other to specify the firmware source file location.
7. Click Perform action to start the firmware update process.
When the process is finished, the TSM Action dialog displays Completed and confirms
that FOX firmware is updated.

Resuming Normal Operations
G06.24 Software Installation and Upgrade Guide—528593-005
12-7
Update ServerNet/FX and ServerNet/FX2 Firmware
(Overview)
To Set a Cluster Number (Using TSM)
1. In the TSM Management window, select the FXSA FRU.
2. Select Display> Actions to display the TSM Actions dialog box.
3. Select Set FOX Cluster Number and then click Perform Action.
4. Select an integer number from 1 through 14 for a new cluster number, making sure
that it is different from the current cluster number.
5. To start the FXSA FRU, click Start and then click Perform Action.
6. When the process is finished, the TSM Action dialog box displays Completed, and
the new cluster number appears in the Attributes box.
For detailed instructions, see the ServerNet/FX Adapter Configuration and
Management Manual.
To Load the FXSA or FX2SA Firmware (Using OSM)
1. Log on to the OSM Service Connection.
2. Select Display>Multi-Resource Actions.
3. In the Multi-Resource Actions dialog box, select FXSA or FX2SA from the
Resource Type list.
4. If any of the FXSA or FX2SA FRUs are down-rev, check the Device State attribute
for those FRUs. If any of them need to be stopped, select Stop from the Action list.
(You can also use SCF to stop FXSA or FX2SA FRUs).
5. Click to highlight (shift-select to highlight multiple) FRUs to be stopped and click
Add to move them to the lower resource list. For example:
Resuming Normal Operations
G06.24 Software Installation and Upgrade Guide—528593-005
12-8
Update ServerNet/FX and ServerNet/FX2 Firmware
(Overview)
6. After moving all FXSA or FX2SA FRUs to be stopped to the lower resource list,
click Perform Action.
7. When the FRUs are in the Stopped state, select Firmware Update from the Action
list and click Perform Action to update the firmware for any FRUs listed in the
lower resource list.
Note. The associated LBU is also stopped.
VST450.vsd

Resuming Normal Operations
G06.24 Software Installation and Upgrade Guide—528593-005
12-9
Configure the Spooler
Confirmation dialog boxes prompt you to enter an (optional) alternative to the
default file location. The Progress bar at the bottom of the Multi-Resource Actions
dialog box tracks the success or failure of each action. (Click Action Summary to
get details on failed actions).
8. Upon successful completion of the firmware updates, select Start from the Action
list to start selected FRUs (and their associated LBUs).
9. Use the Actions dialog box or the Multi-Resource Actions dialog box to set the
FOX cluster number.
Configure the Spooler
Depending on the RVU from which you are upgrading, the spooler might require some
configuration. (Starting with the G06.00 RVU, a new control file was introduced in
T9101D46. Although it is still a type 128 file, internally it is considerably different from
the format of product versions released prior to T9101ADM). To ensure that you can
use a previous version of spooler, always back up the control files and the collector
files for that version before warm starting the new product version of spooler (see
Spooler (G06.00 through G06.19) on page 1-33).
For detailed instructions on configuring the spooler, see the Spooler Utilities Reference
Manual, Appendix H.
Starting with G06.19, the spooler SPR T9101AEY or later is installed by DSM/SCM
with CSPOOL set to HIGHPIN ON. If you want spooler to run at LOWPIN, set
HIGHPIN to OFF by using the BINDER command:
CHANGE HIGHPIN OFF IN CSPOOL
See Support Note S03006A.
Note. See Hotstuff HS02440 for information on warm starting the spooler after migration from
a product version prior to D41 to a D46 product version of the spooler if you are unable to
delete old jobs from the spooler subsystem.

Resuming Normal Operations
G06.24 Software Installation and Upgrade Guide—528593-005
12-10
Start User and System Applications
Start User and System Applications
You can now start your application software. Follow your site’s procedures for
executing the system configuration and startup (command) files to accomplish this.
DSM/SCM is often started automatically by a system command file. If not, you must
start it manually as described next.
Before Starting DSM/SCM
Initialize SQL
1. Check that TMF is started:
> TMFCOM STATUS TMF
2. Save a copy of the existing ZZSQLCI2 file on the $SYSTEM disk. For example:
> FUP DUP $SYSTEM.SYSTEM.ZZSQLCI2,$SYSTEM.BKUPZSQL.*, SAVEALL
3. Enter:
> SQLCI INITIALIZE SQL; EXIT;
4. Copy the ZZSQLCI2 file saved previously back to the $SYSTEM disk. For
example:
> FUP DUP $SYSTEM.BKUPZSQL.ZZSQLCI2, $SYSTEM.SYSTEM.*, SAVEALL
Cold Start the Pathway Configuration
1. Verify your current configuration against the cold start configuration in PATHHOST
(or PATHTARG) to check that the current configuration reflects all changes you
have made.
2. Run the PATHCOLD macro from the ZDSMSCM subvolume to cold start the
Pathway configuration.
Note. ZZSQLCI2 is a temporary file that contains the SQLCI2 program. SQLCI2 is the
process through which the NonStop SQL/MP conversational interface (SQLCI)
communicates with the NonStop SQL/MP executor to request various functions. After SQL
initialization is complete, ZZSQLCI2 is renamed and becomes the permanent SQLCI2
program.
HP recommends that you always have a current backup copy of the
$SYSTEM.SYSTEM.ZZSQLCI2 file in case you need to initialize SQL later for some
reason. If you cannot find a copy of ZZSQLCI2 on the $SYSTEM disk, use DSM/SCM to
Export the file from the software archive. (ZZSQLCI2 is a component file of the TSQLCI2
product, T9198.)
For more information, see the SQL/MP Installation and Management Guide. For
information on exporting the file from the Archive, see the DSM/SCM online help.

Resuming Normal Operations
G06.24 Software Installation and Upgrade Guide—528593-005
12-11
Start DSM/SCM
Start DSM/SCM
1. Run the STARTSCM macro from the ZDSM/SCM subvolume to start DSM/SCM:
> RUN STARTSCM
These messages appear:
Because the $ZHOME reliable home-term process is not an interactive process
and is always paused, no action is necessary.
2. Press Enter to have STARTSCM run the IP6031 TACL macro automatically. This
step takes several minutes.
Reset and Start the Mirror System Disk (If
Necessary)
This procedure is necessary only if you are migrating from a pre-G06.06 RVU to the
G06.24 RVU and had to replace the disk system load bootstrap program, as described
in Section 6, Replacing the Disk Bootstrap Microcode (Pre-G06.06).
After you have verified that the new disk bootstrap program is functional, reset and
start the unchanged mirror system disk (which is in the STOPPED state, substate
HARDDOWN) by using the SCF RESET and START commands. The SCF RESET
command moves the disk into the STOPPED state, substate DOWN, from which it can
be started.
8> startscm
DSM/SCM Process Startup Function - STARTSCM - T6031D46 - (31MAR2003)
Copyright Hewlett Packard Development Company L.P. 1993-2003
NOTICE: * If the hometerm chosen during INITENV, $zhome,
* is not currently in a paused state, STARTSCM and DSM/SCM
* server processes may hang indefinitely. Be sure this
* hometerm has been paused!
PATHWAY CONTROL FILE DATED: 21 APR 2003, 03:52:16
$Z03N: WARN - *1079* SERVER CB-001, NO STATIC SERVERS DEFINED
$Z03N: WARN - *1079* SERVER IS-001, NO STATIC SERVERS DEFINED
$Z03N: WARN - *1079* SERVER MISERVER, NO STATIC SERVERS DEFINED
$Z03N: SERVER OM-001, STARTED
$Z03N: SERVER SM-001, STARTED
$Z03N: SERVER SM-T-001, STARTED
$Z03N: SERVER T9154-HELP-SERV, STARTED
$Z03N: WARN - *1079* SERVER TA-001, NO STATIC SERVERS DEFINED
$Z03N: WARN - *1079* SERVER TISERVER, NO STATIC SERVERS DEFINED
$Z03N: WARN - *1079* SERVER US-001, NO STATIC SERVERS DEFINED
$Z03N: TCP TCP-H, STARTED
$Z03N: TCP TCP-T, STARTED
Caution. If you updated the disk boot code, you downed the mirrored disk. Revive the
mirrored disk as soon as possible after performing a system load. Failure to do so, can cause
data loss.

Resuming Normal Operations
G06.24 Software Installation and Upgrade Guide—528593-005
12-12
Configure Specific Products (Post-System Load)
For example:
> scf
SCF - T9082G02 - (14JAN02) (03JAN02) - 04/28/2003 10:54:23 System
\TEENY
Copyright Compaq Computer Corporation 1986 - 2002
(Invoking \TEENY.$SYSTEM.STARTUP.SCFCSTM)
1-> reset disk $system
2-> start disk $system
STORAGE W01001 To START the disk, SCF must revive the information on
\TEENY.$SYSTEM. This operation might IMPACT system
performance, especially users of $SYSTEM.
Do you want to start a disk revive on \TEENY.$SYSTEM (Y/[N])y
3-> status disk $system
STORAGE - Status DISK \TEENY.$SYSTEM
LDev Primary Backup Mirror MirrorBackup Primary
Backup
PID PID
6 *STARTED STARTED *STARTING STARTING 0,257 1,257
4-> status disk $system
STORAGE - Status DISK \TEENY.$SYSTEM
LDev Primary Backup Mirror MirrorBackup Primary Backup
PID PID
6 *STARTED STARTED *STARTED STARTED 0,257 1,257
SCF automatically revives the unchanged mirror disk, updating the old disk bootstrap
program from the new version copied earlier to the primary disk.
Configure Specific Products (Post-System
Load)
This subsection contains information about the configuration of various products such
as Expand, OSS, and SMF. See product-specific documentation for more information.
Configure Expand and New Profiles
Expand had significant changes starting in the G06.20 RVU (SPR T9057 AFK) that
were also released in SPR T9057AFL as a time-critical fix. The details of many of the
changes and all defect repair changes are described in the T9057G06^AFQ or later
softdoc.
Note. The SCF RESET DISK command does not touch paths that are in a STARTED state.
You could also issue a RESET DISK command for the $SYSTEM-M path and the
$SYSTEM-MB path.
Note. Always check Scout for NonStop Servers for the most up-to-date SPRs for Expand.
Also, review all softdocs for up-to-date installation instructions for the profiles.

Resuming Normal Operations
G06.24 Software Installation and Upgrade Guide—528593-005
12-13
Configure OSS
In summary, the latest Expand T9057 SPRs remove the use of Super Timefactors in
Expand routing. The original time factor method of routing used before
T9057G06^AEM (G06.08 RVU) is now used starting with SPR T9057AFL and G06.20.
SPEEDK is now mapped to a time factor, and values of SPEEDK for FOX networks or
faster are mapped to a time factor of 1. As a result, review settings for SPEEDK,
SPEED, and RSIZE to verify that the proper routing is maintained. (For example, if
both ServerNet and FOX exist between two adjacent nodes, set the time factor for the
preferred line to 1 and the less preferred line to either 2 or 3.)
A new LINETF modifier is provided and recommended to set the time factor of lines
directly. Neither SPEED nor SPEEDK is recommended.
In larger networks, incremental installation of the latest T9057G06^AFL SPR can
precipitate connection instability on nodes that are running earlier versions of Expand.
(Contact your service representative for assistance in using specific tools to resolve
network routing problems.)
The SPRs T0533G06^AEE, T0532G06^AAD and T0509G06^AAD, or later, have new
modifiers to set time factors directly and to allow some parameters to be set
persistently. SPR T0533G06^AEE, or later, has new modifiers to support IPv6
addresses. The default values of some parameters have been changed. See the
softdoc for any installation details and the Expand Configuration and Management
Manual for information on the new modifiers.
See support note S03040 for more information on changes to Expand routing.
Configure OSS
See the Open System Services Management and Operations Guide and the Open
System Services Installation Guide for information about updating and maintaining
OSS database files. See the Interactive Upgrade Guide for new OSS features and for
a summary of migration or installation issues.
Also note these general OSS alerts and considerations:
•Disk volumes that are accessed by the OSS environment, including the $SYSTEM
volume where the OSS Monitor’s configuration files are kept, must not be
configured for administration by SMF.
•For the OSS environment, certain configuration files require symbolic links from the
OSS file system. For more information, see the OSS Management and Operations
Guide for details.
Note. Always check the Interactive Upgrade Guide and Expand softdocs for changes to
Expand profiles. General configuration instructions are presented. For complete descriptions of
Expand profiles, modifiers, and attributes, see the Expand Configuration and Management
Manual.

Resuming Normal Operations
G06.24 Software Installation and Upgrade Guide—528593-005
12-14
Configure SMF (Optional)
The inetd process should be run immediately after loading the OSS product files into
the OSS environment. The inetd process listens for connections on certain Internet
sockets. When a connection is found on one of its sockets, inetd determines what
service the socket corresponds to and invokes a program to service the request.
See the inetd(8) reference page in the Open System Services Shell and Utilities
Reference Manual for more information. For installation instructions, see
T9660G07^AAG, or later, softdoc.
OSS Unautomated Configuration and Startup
Unautomated configuration and startup is described in Appendix B in the Open System
Services Management and Operations Guide.
OSS EasySetup (T0585)
The OSS EasySetup product (T0585) is available for automated setup, as described in
the Open System Services Installation Guide. OSS EasySetup is a series of TACL
scripts that assist a site when configuring and installing a minimal OSS subsystem for
the first time or when starting, stopping, or removing an OSS subsystem. For setup
and fallback purposes, OSS EasySetup provides:
• A journal file of all installation and configuration actions
•A file that records the directory structure of the initial OSS file installation
•A configuration file to partially automate restarting the OSS subsystem. This file
can be edited as needed when the configuration changes.
OSS EasySetup requires the process $NULL and the installation of SPI template files.
The product NULL (T6025) is included on each SUT.
Configure SMF (Optional)
If you plan to configure SMF, an optional product, note:
•Migration of data from direct volumes to SMF logical volumes is documented in the
Storage Management Foundation User's Guide.
•Performance-critical applications that optimize the physical location of their data
might need to specify the PHYSVOL option when creating data files, instead of
relying on the SMF file-placement algorithm.
•NonStop SQL/MP 3.x must be up and running before you start SMF.
Caution. To maintain data integrity, do not place:
•SWAP files on a virtual disk process (VDP)
•TMF audit data on a VDP.
•DSM/SCM files on a VDP.

Resuming Normal Operations
G06.24 Software Installation and Upgrade Guide—528593-005
12-15
Configure the Remote Duplicate Database Facility
(RDF)
To ensure system configuration integrity, always:
1. Save the system configuration after SMF configuration changes are made.
2. Reload the system from the current system configuration file or the latest version
with SMF changes.
If remote access to files supported by SMF is needed, the remote system must be
running one of these RVUs:
•Any G-series RVU
•D43.02 or later D4n.nn D-series RVUs
•D35.00, plus an additional set of D3n.nn SPRs, including:
°T9055ACR
°T9194ABQ
°T9196ACE
°T9197ABO
See the softdoc T8472ACK or later for interoperability considerations, including
information on SMF configuration.
Configure the Remote Duplicate Database Facility (RDF)
The AUDITTRAILBUFFER parameter is a modifier to DP2, which improves the
performance of RDF. Ensure that an appropriate value is specified for the
AUDITTRAILBUFFER modifier for the master audit-trail disk process. The
AUDITTRAILBUFFER parameter allows you to specify how many megabytes of buffer
space to allocate for the audit-trail buffers. See the SCF Reference Manual for the
Storage Subsystem for information on configuring the buffer size.
Upgrade the WAN Manager (T8365), (Optional)
The version of WAN Manager (WANMGR) delivered in the G06.07 and later RVUs
removes the limitation of configuring 100 SWAN adapters. Starting with the G06.07
RVU, the number of adapters you can configure is determined by the amount of
memory available to the WAN manager. See the T8365 softdoc for information on the
default WANMGR startup configuration and how to use SCF to increase it.
Before updating the SWAN or SWAN 2 firmware (Appendix C, Updating SWAN
Concentrator CLIP Firmware), first configure the WAN Manager.
Resuming Normal Operations
G06.24 Software Installation and Upgrade Guide—528593-005
12-16
Upgrade the TNOS Server and TNOS Utility
(Optional)
Upgrade the TNOS Server and TNOS Utility (Optional)
A miscoded TNS (non-native) program can erroneously generate operand addresses
that are not adequately aligned for the TNS instruction set architecture. The program
can then get unpredictable results when referencing those memory operands, on both
TNS and TNS/R systems, whether accelerated or not. The program might silently
corrupt adjacent data, compute wrong answers, or make wrong decisions.
Upgrade the TNOS Server and TNOS Utility to at least these versions:
•T8666ACL or later (for TNOS Server)
•T8667ACL or later (for TNOS Utility)
To obtain these new versions, contact your service provider. The marketing ID for the
new versions is SJ08V1, and the IP name is NonStop ODBC Server and Client. See
Support Note S02075B for details.

G06.24 Software Installation and Upgrade Guide—528593-005
Part II. Fallback Tasks
Part II describes the tasks for falling back from the G06.24 RVU to a G06.06 or later
RVU.
If you encounter a problem that cannot be resolved while running G06.24, you can fall
back to your previous G-series RVU, provided you have already installed the
appropriate fallback SPRs for your system.
These sections describe the tasks for falling back to your previous RVU from G06.24
RVU:
•Section 13, Preparing to Fall Back
•Section 14, Backing Out the DSM/SCM Revision
•Section 15, Returning Firmware to Previous Versions
•Section 16, Running ZPHIRNM to Reactivate the Previous Software Revision
•Section 17, Loading the Previous RVU and Resuming Normal Operations

G06.24 Software Installation and Upgrade Guide—528593-005
13-1
13 Preparing to Fall Back
If you encounter a problem that cannot be resolved while running the G06.24 RVU, you
can fall back to a G06.06 or later G-series RVU, provided that you have already
installed the appropriate fallback SPRs, as described in Section 3, Installing SPRs
Before Upgrading to the G06.24 RVU. If you did not install the appropriate fallback
SPRs before installing the G06.24 RVU, contact your service provider.
Alerts
Before falling back from the G06.24 RVU:
•Review G06.24 Installation and Fallback Alerts for Products on page 1-21.
•Verify that you have a saved configuration database (see Save the Current
Configuration File (CONFxxyy) on page 4-1).
•It is not necessary to return SP firmware (unless pre-G06.08) or SCSI boot code
back to the previous versions when falling back to an earlier RVU. However, if you
want to do so, HP recommends that you update the firmware before performing the
system load of the previous RVU.
•If you are falling back to an RVU prior to G06.13, you will not be able to access any
NonStop SQL/MP Format 2 partitions you might have created.
•If you are falling back to an RVU prior to G06.08 and you upgraded to NonStop
S7400 and S74000 PMF CRUs after installing G06.24, these PMF CRUs must be
removed. If you are falling back to a pre-G06.16 and you upgraded to NonStop
S7600, S76000, S86000, S7800, or S78000 PMF CRUs after installing G06.24,
these PMF CRUs must be removed. If you are falling back to any RVU prior to
G06.24, you must remove the S88000 PMF CRUs. You can generally retain TSM
and OSM software because they are compatible with earlier software. OSM
requires the SP firmware file T1089ABK or later.
•If you are falling back to an RVU prior to G06.16, you must return processor boot
code back to the previous version before performing a system load of the previous
RVU. HP recommends that you update the firmware before performing the system
load of the previous RVU.
•If you have to fall back to a pre-G06.21 RVU, you must deinstall the previous WAN
Wizard Pro and reinstall the previous WAN Wizard Pro on your system console.
Note. Do not revert back to pre-T7953AAG versions of SWAN concentrator firmware. The
T7953AAG and later versions are compatible with the earliest G-series RVUs and contain
important fixes and enhancements.

Preparing to Fall Back
G06.24 Software Installation and Upgrade Guide—528593-005
13-2
Summary of Fallback Tasks
•Starting with the G06.23 RVU, there are fallback considerations regarding NonStop
SQL/MX Release 2.0. See NonStop SQL/MX Release 2.0 (G06.23 and G06.24) on
page 1-28. For SQL/MX Release 2.0: Before falling back, to minimize the risks
involved with falling back without a clean TMF shutdown, use the appropriate SQL
(MX or special MP) GOAWAY utility to delete all native-format SQL/MX objects and
their resource forks. Do this before entering the first START TMF after you have
performed a system load with the previous RVU.
•If you installed the DSM/SCM D46 client version, you do not need to deinstall it.
However, you need to run the FALLBACK macro to convert both the Host and
Target database for use by the pre-T6031D46 version. You must run the macro
before you start DSM/SCM.
Summary of Fallback Tasks
1. Backing out the revision (DSM/SCM)
2. Replacing the bootstrap program on the primary system disk
3. Returning firmware to the previous versions (if needed)
4. Running ZPHIRNM
5. Halting the system processors
6. Removing any hardware not supported by your previous RVU
7. Loading the system from the previous operating system image
8. Starting the applications
Fallback Considerations for Specific Products
You might need to perform additional tasks for these products:
•DP2
•DLL (Dynamic-Link Libraries)
•DSM/SCM
•Spooler
•Open System Services (OSS)
•OSM and TSM
•SMF
•SQL/MX 2.0
•TMF
•WAN Manager (T8365)
Note. The FALLBACK macro can be retrieved from a D6031D46 distributed subvolume on
any G06.18 or later SUT. If the SUT is in the DSM/SCM archive, the FALLBACK macro can be
exported from the DSM/SCM archive.

Preparing to Fall Back
G06.24 Software Installation and Upgrade Guide—528593-005
13-3
DP2
DP2
If you have set the AUDITTRAILBUFFER or the SQLMXBUFFER attribute to 128 or
more, you need to reset the value to 0 before falling back to G06.16 or earlier RVU. If
you fail to do so, TMF might not start, or a disk volume could go offline. You can
recover from this situation after the fallback by using the SCF ALTER command. See
the Interactive Upgrade Guide for details.
If you are planning on using NonStop SQL/MX for the first time, it is recommended that
you perform a clean TMF shutdown. (A clean TMF shutdown is always recommended
in any case.) You can also apply the DP2 (T9053) fallback SPR on your current SYSnn
before upgrading to G06.24 if you are migrating from a pre-G06.23 RVU. If you are
using NonStop SQL/MX introduced in G06.23 and you have to fall back to a previous
RVU before G06.23, and have created native-format SQL/MX metadata tables or audit
records, you need the DP2 (T9053) fallback SPR on your current SYSnn. A SYSGEN
is required.
DLL (Dynamic-Link Libraries)
The G06.20 RVU provides programming and system tools to create position-
independent code (PIC) that can be used to create your own dynamic-link libraries
(DLLs) to run on NonStop S-series servers (G06.20 RVU only). The run-time libraries
on the SUT have changes to the mechanism for registering the programming
destructors for objects declared statically in C++ Version 2 and beyond.
If you install the DLL programming tools and you encounter system or application
problems that do not use PIC, fall back to your previous RVU. However, if you install
the DLL tools, and system problems occur because applications are trying to use PIC,
you can stop converting a program or library to DLLs by using the PIC compiler options
to recompile the program or library and the PIC linker to relink it.
See the appropriate programming documentation for details on C++ and compilers. For
a list of participating products, see the Interactive Upgrade Guide.
DSM/SCM
If you have to fall back to a pre-G06.18 RVU and a pre-D46 T6031 product version of
DSM/SCM, run the FALLBACK macro to convert both the Host and Target database for
use by a pre-T6031D46 DSM/SCM product version. You must run the FALLBACK
macro before starting DSM/SCM. If you fall back to a pre-D46 product version and then
migrate to a G06.18 or later RVU, DSM/SCM might notify you during the Apply that the
CLEANOSS macro must be run. You must cancel the Apply, and then run the
CLEANOSS macro. For detailed information on the FALLBACK and CLEANOSS
macros, see the DSM/SCM User’s Guide and Notes on the CLEANOSS Macro on
page 1-18.
The D46 DSM/SCM client software is backwards compatible with most DSM/SCM
server versions (AAO).

Preparing to Fall Back
G06.24 Software Installation and Upgrade Guide—528593-005
13-4
Spooler
Spooler
If you have to fall back to an RVU prior to G06.00 and the spooler control file format is
from a spooler version prior to T9101ADM, you must restore copies of both the control
file and the collection files that were in use.
If your previous product version of spooler was T9101D41 SPR ADM or later, you do
not need to restore copies of both the control file and the collector data files if you back
out of your G06.24 RVU. All versions of T9101D41, starting with T9101D41 SPR ADM,
contain Version 5 of the spooler control file and are compatible with T9101D46 and
D48 product versions of spooler. However, it is always recommended that you back up
the spooler control file and collector data files before migrating or applying spooler
SPRs.
See Support Notes S97057 (T9101D41 Spooler Collector Data Files Have Changed
Format) and S99086 (NSK Spooler — Migration and Draining Instructions) for more
information.
Open System Services (OSS)
Back up the OSS configuration database files before falling back. See the Open
System Services Management and Operations Guide for more information.
OSM and TSM
See the OSM Migration Guide for complete information. If you installed OSM after
installing the G06.24 RVU, and you want to fall back to a newer SPR of TSM, see TSM
Server and Client Compatibility SPRs on page 3-10 and the Interactive Upgrade
Guide.
SMF
The record format of the system configuration database sometimes changes between
RVUs and is automatically converted to the new format the first time the system is
loaded. To ensure system configuration integrity, always:
1. Save the system configuration after SMF configuration changes are made.
2. Reload the system from the current system configuration file or the latest version
with SMF changes.
See the Storage Management Foundation User’s Guide for more information.
Caution. Create a saved version of the configuration before loading a new RVU. If this step is
omitted, you cannot fall back to a previous RVU.

Preparing to Fall Back
G06.24 Software Installation and Upgrade Guide—528593-005
13-5
SQL/MX 2.0
SQL/MX 2.0
Metadata tables created and used by SQL/MX Release 2.0 running on or after G06.23
are different than those metadata tables used on prior SQL/MX releases, and the
tables are very different than those used by SQL/MP. You must be on at least Release
1.8 to migrate or to fall back. Migration and fallback considerations do apply. See TMF
(G06.23 and G06.24) on page 1-38 and DP2.
Before attempting to fall back, you should remove all SQL/MX objects and their
resource forks by using the SQL/MX GOAWAY utility. (GOAWAY is an OSS command
line utility run from mxtool.) After you fall back, the SQL/MX GOAWAY utility is not
available, and SQL/MX objects are much more difficult to remove. See NonStop
SQL/MX Release 2.0 (G06.23 and G06.24) on page 1-28.
TMF
Falling back to other RVUs, prior to G06.24, with format 2 audit trails, will cause
serious audit trail problems and requires a DELETE TMF, as well as other steps.
Fallback steps depend on whether you chose to alter the audit trail file size or format,
or both. If you do not alter the audit trail filesize or format, there are no fallback issues
with TMF for G06.24. If the audit trail file size is altered, but still within the 2,047
megabyte limit, fallback is still not a major issue, but you must take steps, before or
after fallback, to prevent deterioration in some algorithms. See TMF (G06.23 and
G06.24) on page 1-38 and DP2.
WAN Manager (T8365)
The version of WAN Manager (WANMGR) delivered in G06.07 and later RVUs
includes an SPR (first introduced by T8365AAJ) that removes the limitation of
configuring a maximum of 100 SWAN adapters. Starting with the G06.07 RVU, the
number of adapters that you can configure is determined by the amount of memory
available to the WAN manager.
If you have installed more than 100 SWAN adapters and have to fall back to a
pre-G06.07 RVU, after falling back, you must reinstall T8365AAN and its requisite
SPRs to continue using all the configured SWAN adapters. If you do not, the older
version of the WAN manager will not recognize the additional adapters or associated
entities. (EMS messages indicate storage has been exhausted.)
See the T8365AAN or later softdoc for more information.

G06.24 Software Installation and Upgrade Guide—528593-005
14-1
14
Backing Out the DSM/SCM Revision
This section describes how to submit a DSM/SCM backout request to return from
G06.24 to your previous RVU.
If you selected DSM/SCM to manage OSS files and you need to fall back to a pre-D46
DSM/SCM PVU, you must run the DSM/SCM FALLBACK macro from the ZDSMSCM
subvolume. The FALLBACK macro can be exported from any D46 PVU in the
DSM/SCM archive, and then placed in the ZDSMSCM subvolume.
Before Backing Out the Revision
1. Confirm that the spooler is active and not 100 percent full.
a. At a TACL prompt, start SPOOLCOM and issue a COLLECT, STATUS
command. For example:
12> spoolcom $spls; collect, status
COLLECT STATE FLAGS CPU PRI UNIT DATA FILE %FULL
$S ACTIVE 3 , 1 154 4 $OPS0.SPL.DATA 4
b. If the spooler is not active, start the spooler.
You will use the spooler to print out operator instructions when backing out the
revision.
2. Start the TMF subsystem and DSM/SCM if they are not already running. For
example:
4> TMFCOM START TMF
5> volume $dsmscm_vol.ZDSMSCM
6> RUN STARTSCM
where $dsmscm_vol is the DSM/SCM volume.
Backing Out the DSM/SCM Revision
G06.24 Software Installation and Upgrade Guide—528593-005
14-2
Start the Target Interface (ZPHITI)
Start the Target Interface (ZPHITI)
1. From the DSM/SCM subvolume, enter:
RUN ZPHITI
The TI Logon screen appears:
DSM Software Configuration Manager TI
Logon
==============================================================================
User ID:____________
Password:____________
==============================================================================
==============================================================================
This software is licensed by Hewlett Packard Development Company L.P. and
is subject to restrictions on use, disclosure and copying and is Commercial
Software. If a user is an entity of the United States Government, only
LIMITED RIGHTS or RESTRICTED RIGHTS are granted.
HP and the HP logo are trademarks of
Hewlett Packard Development Company L.P.
T6031D46^ABJ 16JAN2004
(c) Hewlett Packard Development Company L.P., 1994-2002
All Rights Reserved
==============================================================================
F1-Logon F8-Clear entry
F15-Help SF16-Exit
Ready
2. Enter your user ID and password and press F1 to log on to the Target Interface.
The Main Menu appears:
DSM Software Configuration Manager Main Menu
==============================================================================
\ELI Prior snapshot 2002-04-14:18:03:03
Selection number: 0
==============================================================================
Choose an action by entering the selection number of an item from the list
below.
==============================================================================
1 Create system report
2 Create system snapshot
3 Perform target activities
4 Perform audit
5 Perform database verify
9 Enable trace (for support use only)
==============================================================================
F1-Select F4-Show Messages
F15-Help F16-Return SF16-Exit
Ready
Backing Out the DSM/SCM Revision
G06.24 Software Installation and Upgrade Guide—528593-005
14-3
Submit a Backout Request
Submit a Backout Request
1. From the ZPHITI Main Menu, enter 3 (Perform target activities) in the Selection
number field, and press F1.
The Target Menu - Select Target screen appears:
DSM Software Configuration Manager Target Menu - Select Target
==============================================================================
\ELI Prior snapshot 2002-04-14:18:03:03
Selection number:
==============================================================================
Choose a target selection number from the list below. Status information is
shown for requests still in progress.
==============================================================================
1 NEW CONFIG
2 DEFAULT
3
4
5
6
7
8
9
===========================More Targets PgDn/PgUp=============================
F1-Select
F15-Help F16-Return SF16-Exit
Ready
2. In the Selection number field, enter the number corresponding to the logical target
that you want to back out of (selection 2 in this example), and press F1.
The Target Menu - Select Action screen appears:
DSM Software Configuration Manager Target Menu - Select Action
==============================================================================
\ELI Prior snapshot 2002-04-14:18:03:03
DEFAULT Last S/W applied on SYS 00 on 2000-04-14:18:01
Selection number:
==============================================================================
Choose an action by entering the selection number of an item from the list
below.
==============================================================================
1 Perform/Review apply request
2 Perform backout to S/W Applied on SYS 03 on 2000-04-14:15:41
3 Review operator instructions for the last apply completed.
==============================================================================
F1-Select
F15-Help F16-Return SF16-Exit
Ready
Backing Out the DSM/SCM Revision
G06.24 Software Installation and Upgrade Guide—528593-005
14-4
Submit a Backout Request
3. In the Selection number field, enter 2 (Perform backout to S/W), and press F1.
The Backout - Verify Request screen appears, which shows:
•The SYSnn, date, and timestamp of the current software revision and of the
previous revision, which becomes the current revision when the backout
request finishes
•The location where DSM/SCM will place the snapshot
•A warning that the request makes the last software applied on this target
inaccessible
DSM Software Configuration Manager Backout - Verify Request
==============================================================================
\ELI Prior snapshot 2002-04-14:18:03:03
DEFAULT Last S/W applied on SYS 00 on 2000-04-14:18:01
Snapshot location: \ELI.$SPR09
==============================================================================
ATTENTION - This request is not reversible. Once the current configuration
for this target is backed out, it cannot be made current again.
==============================================================================
Backout target revision will be performed:
From: SYS 02 applied on 2002-04-14:18:01
To: SYS 01 applied on 2002-04-17:15:41
==============================================================================
F1-Submit request
F15-Help F16-Return SF16-Exit
Ready
4. Press F1 to submit the backout request.
DSM/SCM automatically reapplies the previous software revision.
While the backout request is processing, DSM/SCM displays the
Backout - Processing Backout screen, which gives a description of the request, its
processing status, and the location of the previous SYSnn software affected by the
request. The screen is updated with current status information approximately every
15 seconds, as in these examples:
Backing Out the DSM/SCM Revision
G06.24 Software Installation and Upgrade Guide—528593-005
14-5
Submit a Backout Request
DSM Software Configuration Manager Backout - Processing Backout
==============================================================================
\ELI Prior snapshot 2002-04-14:18:03:03
DEFAULT Last S/W applied on SYS00 on 2000-04-14:18:01
Backout 2000-04-18:10:59:34
==============================================================================
Request is being processed. Status information will appear below indicating
progress.
==============================================================================
Backout Awaiting start. 2000-04-18:10:59:34
==============================================================================
F3-Restart F4-Show messages F6-Cancel request
F15-Help F16-Return SF16-Exit
DSM Software Configuration Manager Backout - Processing Backout
==============================================================================
\ELI Prior snapshot 2002-04-14:18:03:03
DEFAULT Last S/W applied on SYS00 on 2002-04-14:18:01
Backout 2000-04-18:11:00:39
==============================================================================
Request is being processed. Status information will appear below indicating
progress.
==============================================================================
Backout Processing. 2000-04-18:11:00:39
==============================================================================
F3-Restart F4-Show messages F6-Cancel request
F15-Help F16-Return SF16-Exit
After the software backout is finished, the Backout - Complete Backout screen
appears with operator instructions.
Backing Out the DSM/SCM Revision
G06.24 Software Installation and Upgrade Guide—528593-005
14-6
Submit a Backout Request
A complete set of operator instructions might look like this:
DSM Software Configuration Manager Backout - Complete Backout
==============================================================================
\ELI Prior snapshot 2002-04-14:18:03:03
DEFAULT Last S/W applied on SYS on 2000-04-14:18:01
Print operator instructions on:
==============================================================================
Placement of files for this Backout is complete. To activate the software
that has been placed follow the operator instructions displayed below.
===============================================================================
Activation Instructions for \ELI DEFAULT
These are general instructions that were determined from configuration
attributes. Refer to the release documentation for detailed information
on migrating to this software configuration.
1. Stop all applications.
2. PUP REPLACEBOOT $<SYS00 VOLUME NAME>, $<SYS00 VOLUME NAME>.SYS00.SYSDISC
OR for S-Series:
SCF CONTROL DISK $<SYS00 VOLUME NAME>,
REPLACEBOOT $<SYS00 VOLUME NAME>.SYSNN.SYSDISC
3. Update FIRMWARE.
Run TMDS (or TSM for S-Series) to check firmware and perform
firmware updates.
T1089 S-SERIES SP FW includes firmware changes.
T1067 ISP1000 CODE includes firmware changes.
T8461 S7000 PROM MILLICODE includes firmware changes.
T7892 S70000 BOOT MILLICOD includes firmware changes.
4. RUN ZDSMSCM.ZPHIRNM SYS00
(Note: replace nn with correct number)
5. Check for $0 EMS messages.
Correct any errors indicated in the $0 EMS messages.
Do not proceed until this step has been successfully completed.
6. Coldload is required.
7. Restart all applications.
==============================================================================
F4-Show Messages
F9-Print operator instructions F15-Help F16-Return SF16-Exit
Task completed successfully.
5. Enter a printer location and press F9 to print the operator instructions. You might
need to modify these instructions before returning to the previous RVU. For
instance, you might not need to change the firmware unless you have to replace
hardware that can be supported only by the new RVU.
6. Press SF16 to exit the Target Interface.
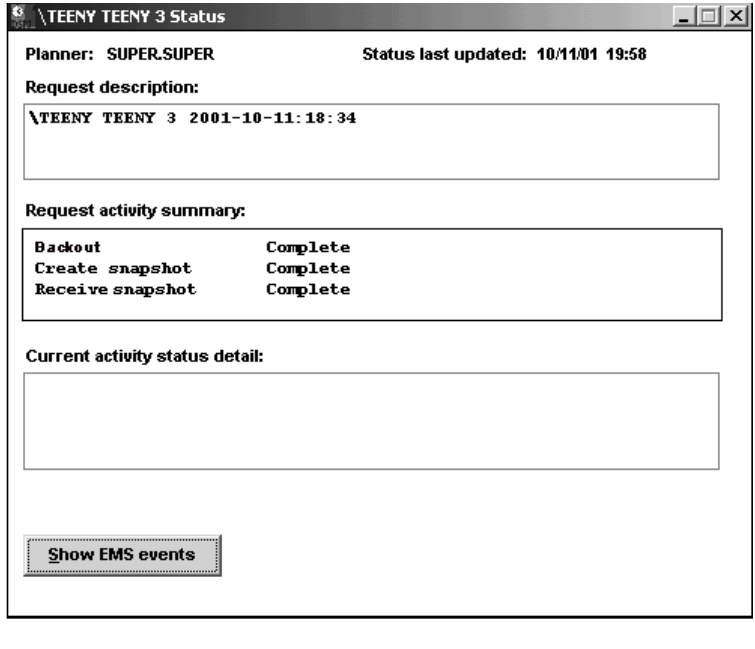
Backing Out the DSM/SCM Revision
G06.24 Software Installation and Upgrade Guide—528593-005
14-7
Monitor the Backout Process
Monitor the Backout Process
1. Log on to DSM/SCM (Start>Programs>Dsm_scm>DSMSCM).
2. Select Requests> Requests list.
The Requests dialog box appears, showing the type and status of various
DSM/SCM requests.
3. From the Request list, double-click your backout request.
The Status dialog box displays detailed information about your backout request.
This example indicates that the backout request finished successfully:
vst100.vsd

G06.24 Software Installation and Upgrade Guide—528593-005
15-1
15
Returning Firmware to Previous
Versions
This section describes how to return processor boot code, SP firmware, and SCSI boot
code back to the earlier product versions before loading the previous operating system
image.
Alerts
Processor Boot Code
If you are returning to an RVU prior to the G06.16 RVU, you must return processor
boot code back to the earlier PVU before performing a system load of your previous
RVU. If you are returning to a G06.16 or later RVU, it is not necessary to return
processor boot code back to the previous version.
SP Firmware and SCSI Boot Code
It is not necessary to return SP firmware or SCSI boot code back to the earlier product
update versions when falling back to your previous RVU. (See the T1089 softdoc for
compatible RVUs.) However, if you want to, HP recommends that you update the
firmware before performing a system load of the previous RVU. OSM requires
T1089ABK or later.
Returning Processor Boot Code to the
Previous Version (Using TSM)
To install the previous version of the processor boot code:
1. Determine the Correct Version of the Previous Processor Boot Code.
2. Return the Processor Boot Code to the Previous Version on page 15-2.
Determine the Correct Version of the Previous Processor Boot
Code
To determine the previous processor boot code version with the VPROC command,
see Verify Location and Version of Processor Boot Code on page 8-3.

Returning Firmware to Previous Versions
G06.24 Software Installation and Upgrade Guide—528593-005
15-2
Return the Processor Boot Code to the Previous
Version
For example:
$SYSTEM SUPER 8> vproc $system.sys01.cpucode9
VPROC - T9617G03 - (30 MAR 1999) SYSTEM \ELI Date 21 MAR
2000, 11:30:35
COPYRIGHT TANDEM COMPUTERS INCORPORATED 1986 - 1995
$SYSTEM.SYS01.CPUCODE9
Binder timestamp: 25AUG1999 13:42:26
Version procedure: T7892G05^03SEP99^25Aug99^
where SYS01 is the previous operating system image subvolume.
Use this information to verify that the update to the previous version was successful.
Return the Processor Boot Code to the Previous Version
If you are using TSM, follow the instructions under Using TSM, Update the Processor
Boot Code and Issue a Hard Reset or Equivalent on page 8-10 to return the processor
boot code back to the previous version, except in Step 6, enter the volume and
subvolume containing the previous operating system image. For example:
$system.sys01
If you are using OSM, follow the instructions in Returning Bootcode Firmware to the
Previous Version (Using OSM) on page 15-6.
Returning SP Firmware to the Previous
Version (Using TSM)
This subsection provides instructions for installing the previous version of the SP
firmware. Generally, you can keep your currently installed SP firmware. See Scout for
NonStop Servers for backwards compatibility.
Determine the Correct Version of the Previous SP Firmware
To determine the previous SP firmware version with the VPROC command, see
Determine the Current and New Versions of SP Firmware on page 7-4.
For example:
$SYSTEM SUPER 2> vproc $system.sys01.spcode9
VPROC - T9617G03 - (30 MAR 1999) SYSTEM \ELI Date 21 MAR
2000, 11:27:03
COPYRIGHT TANDEM COMPUTERS INCORPORATED 1986 - 1995
$SYSTEM.SYS01.SPCODE9
Binder timestamp: 20JUL1999 14:11:43
Version procedure: T1089G05^25JUN99^20JUL99^AAS
Version procedure: T1088G05^25JUN99^20JUL99^AAS
where SYS01 is the previous operating system image subvolume.

Returning Firmware to Previous Versions
G06.24 Software Installation and Upgrade Guide—528593-005
15-3
Download the Previous SP Firmware File to the
System Console
Use this information to verify that the update to the previous version was successful.
Download the Previous SP Firmware File to the System Console
Download the previous SP firmware file into the spcode9 directory on the hard drive of
your system console in the event you encounter problems when updating the SP
firmware.
Follow the instructions under Download the SP Firmware File to the System Console
on page 7-6, except in Step 3, enter the system, volume, and subvolume containing
the previous operating system image. For example:
$\prod2.system.sys01
Return the SP Firmware to the Previous Version
Follow the instructions under Update SP Firmware Using the TSM Service Application
on page 7-8 to return the SP firmware back to the previous version, except in Step 9,
enter the volume and subvolume containing the previous operating system image. For
example:
$system.sys01
Returning SCSI Boot Code to the Previous
Version (Using TSM)
This subsection provides instructions for installing the previous version of the SCSI
boot code.
Determine the Correct Version of the Previous SCSI Boot Code
At a TACL prompt, use the VPROC command to verify the location and version of the
SCSI boot code for the previous RVU.
>VPROC $SYSTEM.SYSnn.I1000
where nn is the previous operating system image subvolume. For example:
$SYSTEM SUPER 7> vproc $system.sys01.i1000
VPROC - T9617G03 - (30 MAR 1999) SYSTEM \ELI Date 21 MAR
2000, 12:39:29
COPYRIGHT TANDEM COMPUTERS INCORPORATED 1986 - 1995
$SYSTEM.SYS01.I1000
Binder timestamp: 12FEB1998 17:27:36
Version procedure: T1067F40^15JAN98^TREV=01^AAK
SYS01 is the previous operating system image subvolume.
Note. For pre-G06.08 RVUs, SCSI boot code is located in $system.sysnn.I1000. For
post-G06.08 RVUs, the SCSI boot code is located in $system.sysnn.IBOOT.
Returning Firmware to Previous Versions
G06.24 Software Installation and Upgrade Guide—528593-005
15-4
Return the SCSI Boot Code to the Previous Version
(Using TSM)
To check the new version of SCSI boot code, enter:
>VPROC $SYSTEM.SYSnn.IBOOT
Use this information from the VPROCs to verify that the update to the previous version
was successful.
Return the SCSI Boot Code to the Previous Version (Using TSM)
From the TSM Service Application, use the Firmware Update dialog box to update the
SCSI boot code for each PMF customer-replaceable unit (CRU) in your system.
1. Select Display>Firmware update to display the Firmware Update dialog box.
2. From the Resource Type list, select SCSI Boot Code, Y-side.
3. From the Display list, select All to list the selected resources in the Available box.
4. Click Add all to move the resources to the Selected box.
5. Click Specify other to display the Specify Firmware File Location dialog box.
6. Enter the volume and subvolume where the file to use as the source for the update
resides. Use the $SYSTEM.SYSnn created for the previous operating system
image.
7. Click OK.
8. Click Yes when asked if you want to use a nonstandard firmware location.
9. From the Firmware Update dialog box, click Perform action.
The update starts, and the Firmware Update Action Summary dialog box appears.
10. Monitor the status of the SCSI boot code update in the Firmware Update Action
Summary dialog box.
When the action status appears as Completed, the SCSI boot code update is
finished.
11. Repeat Steps 2 through 10 to update the SCSI Boot Code, X-side.
When the SCSI boot code for all PMF CRUs has updated successfully, the
Firmware Update Action Summary dialog box should confirm that all SCSI
firmware has been updated.
Returning Firmware to Previous Versions
G06.24 Software Installation and Upgrade Guide—528593-005
15-5
Returning SP Firmware to the Previous Version
(Using OSM)
Returning SP Firmware to the Previous
Version (Using OSM)
1. Select Display>Multi-Resource Actions. The Multi-Resource Actions dialog box
appears with unselected fields.
2. From the Resource Type list, select SP.
3. From the Action list, select SP Firmware Update.
4. From the Filter by list, select the appropriate filter, Logical:Fabric Side-Y first.
5. Click Add All or Add to add the SPs you want to update to the lower list.
6. Click Perform action.
7. Click OK when the Confirm SP Firmware Update dialog box appears.
The SP - Parameter Input dialog box appears.
8. Enter the previous file location. Use the $volume.subvolume.filename and
select OK.
As the firmware update is performed, information about it appears in the Progress
list.
9. You are then asked to reset the SP. Click OK.
The firmware update needs to reset the Service Processor
to activate the updated firmware. Would you like to
reset the Service Processor?
The Reset Progress bar keeps track of the number of SPs that pass the firmware
reset. After a few minutes, the SP is reset.
10. To verify that firmware updates are in progress, select Action Summary. The
Action Status Summary window appears with information about recent actions,
including their status and overall progress.
11. (Optional) Select Action Summary if a firmware update or reset fails.
a. Select the action that failed.
b. Select Details.
12. Update the X-fabric for the SP code. From the Filter by list, select the appropriate
filter, Logical:Fabric Side-X.
When you change the filter from Y-side to X-side, the following message appears:
Changing a required filter results in your
selections being cleared.
Do you still wish to change the filter?
13. Click OK.
14. Repeat Steps 5 through 10 to update the SP firmware, X-side.

Returning Firmware to Previous Versions
G06.24 Software Installation and Upgrade Guide—528593-005
15-6
Returning Bootcode Firmware to the Previous
Version (Using OSM)
15. Check that all SPs have completed successfully.
Returning Bootcode Firmware to the Previous
Version (Using OSM)
1. Log on to the OSM Service Connection.
2. Select Display> Multi-Resource Actions. The Multi-Resource Actions dialog box
appears with unselected fields.
3. From the Resource Type list, select SP.
4. From the Action list, select Processor Boot Millicode Firmware Update.
5. From the Filter by list, select Logical: Fabric Side-Y.
6. Click Add All to move the selected resources to update the lower list.
7. Click Perform Action.
8. Click OK when the Confirm Processor Boot Millicode Firmware Update dialog box
appears.
The Processor Parameter Input dialog box appears.
9. Enter the previous file location. Use the $volume.subvolume.filename
($SYSTEM.SYSnn) subvolume created during the most recent DSM/SCM
Build/Apply. For example:
$system.sys02.cpucode9
As the firmware update is performed, information about it appears in the Progress
List.
10. To verify that firmware resets are in progress, select Action Summary. The Action
Status Summary window appears with information about recent actions, including
their status and their overall progress.
11. Update the X-fabric for the processor boot code. From the Filter by list, select the
appropriate filter, Logical:Fabric Side-X.
VST956.vsd
Returning Firmware to Previous Versions
G06.24 Software Installation and Upgrade Guide—528593-005
15-7
Returning Bootcode Firmware to the Previous
Version (Using OSM)
When you change the filter from Y-side to X-side, this message appears:
Changing a required filter results in your
selections being cleared.
Do you still wish to change the filter?
12. Click OK.
13. Click Add All to add the SPs you want to update to the lower list.
14. Click Perform Action.
15. Click OK when the Confirm Processor Boot Millicode Firmware Update dialog box
appears.
The Processor Parameter Input dialog box appears.
16. Enter the previous file location. Use the $volume.subvolume.filename
($SYSTEM.SYSnn) subvolume created during the most recent DSM/SCM
Build/Apply. For example:
$system.sys02.cpucode9
As the firmware update is performed, information about it appears in the Progress
List.
17. To verify that firmware updates are in progress, select Action Summary. The
Action Status Summary window appears with information about recent actions,
including their status and their overall progress.
18. Close the Multi-Resource Actions dialog box.

G06.24 Software Installation and Upgrade Guide—528593-005
16-1
16
Running ZPHIRNM to Reactivate the
Previous Software Revision
This section describes how to run the ZPHIRNM program again to change the
temporary names of the previous product files back to their actual names.
Alerts
Before running ZPHIRNM:
•Applications that use files that are being replaced should not be running. To avoid
any possibility of conflict, stop all applications, except for the TMF subsystem,
before running ZPHIRNM.
•You must have rename (purge) access to all files being renamed. You can ensure
this access by running ZPHIRNM as the super ID (255,255).
•If you are connected to an Expand network, you might see a message stating that
the NonStop SQL file, ZZSQLCI2, was not renamed during ZPHIRNM. However,
on further examination of the log file, you may find that ZPHIRNM did finally
rename the file, in which case you can ignore the error message and continue.
•Make sure that you drain the spooler before running ZPHIRNM. If you drain the
spooler after running ZPHIRNM, an error message is displayed indicating that the
spooler program and library versions are different, and spooler terminates with
errors.
Drain the Spooler
Before executing the SPOOLCOM;SPOOLER,DRAIN command:
•Use the SPOOLCOM;COLLECT $collector-process, LISTOPENS command
to identify processes that currently have jobs open.
•Use the SPOOLCOM;JOB (STATE PRINT) command to determine which jobs
are currently printing.
1. Take the appropriate action to ensure that these jobs either terminate when
finished or are stopped.
2. Drain the spooler. To drain the spooler, log on as a super group user (255,n),
access SPOOLCOM, and enter the following command:
SPOOLCOM> SPOOLER, DRAIN

Running ZPHIRNM to Reactivate the Previous
Software Revision
G06.24 Software Installation and Upgrade Guide—528593-005
16-2
Run ZPHIRNM
This command causes the spooler to move from the active to the dormant state.
For more information on draining the spooler and recovery, see Section 1 in the
Spooler Utilities Reference Manual.
Run ZPHIRNM
Using PREVIEW Mode
You can do a preview run of ZPHIRNM to check that the target subvolumes (TSVs)
and associated map files are consistent. Running ZPHIRNM in PREVIEW mode
simulates the ZPHIRNM process without actually updating files or activating the
configuration. In PREVIEW mode, ZPHIRNM indicates whether or not TMF needs to
be up when running ZPHIRNM. See ZPHIRNM on page 10-4 for more information.
Run ZPHIRNM
1. At a TACL prompt, enter the following command from the DSM/SCM subvolume:
> RUN ZPHIRNM $vol.SYSnn
where:
•$vol specifies the default current system load volume, usually $SYSTEM.
•SYSnn specifies the SYSnn subvolume named previously in the backout
request. (See Submit a Backout Request on page 14-3, Step 3 on page 14-4,
which explains the entries in the Backout - Verify Request screen.)
For example:
> RUN ZPHIRNM $system.SYS00
2. When asked if you want to use a log file with the session, type Y and press Enter.
3. When prompted, type a file name for the log file, and press Enter.
4. ZPHIRNM issues the following message and begins processing:
Log file, <filename>, was successfully created.
Caution. Do not use the TACL STOP command to drain or stop the spooler. Also, do not
issue the TACL STOP command after you have issued the SPOOLCOM DRAIN command.
The control file can be corrupted during the next warmstart or rebuild.
Running ZPHIRNM to Reactivate the Previous
Software Revision
G06.24 Software Installation and Upgrade Guide—528593-005
16-3
Verify That ZPHIRNM Ran Successfully
Verify That ZPHIRNM Ran Successfully
1. Review the log file.
2. If ZPHIRNM did not run successfully, correct the problem and rerun.
Two types of error and warning messages are issued during the renaming process:
•If a fatal error occurs, ZPHIRNM immediately issues an error message and
stops.
•A nonfatal error is one that affects processing only for a single subvolume. If a
nonfatal error occurs, ZPHIRNM issues an error message and attempts to
restore the subvolume it is currently processing to its original state.
°If the subvolume is successfully restored, ZPHIRNM continues with the
next subvolume.
°If the subvolume cannot be restored, ZPHIRNM issues an additional error
message and continues with the next subvolume.
°If the subvolume was successfully processed, you can ignore warning
messages.
See the DSM/SCM User’s Guide for troubleshooting procedures and the
DSM/SCM Messages Manual for a complete list of ZPHIRNM messages.

G06.24 Software Installation and Upgrade Guide—528593-005
17-1
17
Loading the Previous RVU and
Resuming Normal Operations
This section describes how to load the previous RVU back into the memory of each
processor in the server and resume normal operations.
Alerts
Before performing a system load, note:
•If you are returning to an RVU prior to the G06.06 RVU, check that you have
replaced the bootstrap program on the primary system disk named $SYSTEM to
the earlier version by following the instructions in Section 6, Replacing the Disk
Bootstrap Microcode (Pre-G06.06) (specifying the previous SYSnn).
•Do not close the System Startup dialog box while startup is in progress. If you
attempt to close the dialog box, a TSM message dialog box appears, indicating
that the system startup process will be stopped if you continue.
•If you stop a system startup before it has finished, the state of your system
becomes unpredictable. You might need to perform another system startup to
enable the system to resume normal operation.
•If you must stop the system startup process, click Abort (the process should take
effect within 30 seconds).
•If you fall back and then try to migrate again to a G06.18 or later RVU, DSM/SCM
might notify you during the Apply that the CLEANOSS macro must be run. The
current OSS environment is being managed by a logical target other than the one
trying to manage OSS files with the current DSM/SCM Build/Apply. You must
cancel the Apply, and then run the CLEANOSS macro. See DSM/SCM
(T6031D46) Fallback on page 1-27.
•Before falling back, to minimize the risks involved with falling back without a clean
TMF shutdown, use the appropriate SQL (MX or special MP) utility to delete all
native-format SQL/MX objects and their resource forks. This step must be done
before entering the first START TMF after you have performed a system load with
the previous RVU. See NonStop SQL/MX Release 2.0 (G06.23 and G06.24) on
page 1-28 before continuing.
Loading the Previous RVU and Resuming Normal
Operations
G06.24 Software Installation and Upgrade Guide—528593-005
17-2
Prepare to Stop the System
Prepare to Stop the System
Before halting the processors:
1. Stop all user applications.
2. Stop TMF and DSM/SCM. For example:
5> TMFCOM STOP TMF
6> VOLUME $dsmscm_vol.ZDSMSCM
7> RUN STOPSCM
Halt the Processors
Halt all processors from the TSM Low-Level Link Application or from the OSM
Low-Level Link.
Remove Hardware Installed During Migration
If you installed or replaced hardware during your migration to the G06.24 RVU, you
might have to remove it before loading your previous RVU. For example:
•NonStop S74000 processors are not supported prior to the G06.08 RVU.
•NonStop S76000 and S86000 processors are not supported prior to the G06.16
RVU.
•NonStop S7800 and S78000 processors are not supported prior to the G06.16
RVU.
•NonStop 88000 processors are not supported prior to the G06.24 RVU.
•GESAs are not supported prior to the G06.16 RVU.
•SWAN 2 servers are not supported prior to the G06.16 RVU.
•Disconnect the IOAM and its components, which are supported only on G06.24
and later RVUs.
See the appropriate RVU-specific hardware documentation for additional information.

Loading the Previous RVU and Resuming Normal
Operations
G06.24 Software Installation and Upgrade Guide—528593-005
17-3
Perform a System Load With the Previous SYSnn
and CONFxxyy
Perform a System Load With the Previous
SYSnn and CONFxxyy
Perform a system load, except in Step 3, enter the SYSnn of your previous operating
system image subvolume, and in Step 4, select the Saved version of the CONFxxyy
configuration file that you created under Save the Current Configuration File
(CONFxxyy) on page 4-1.
Reload the Remaining Processors
Use the TACL RELOAD command to load the operating system into the remaining
processors.
You are now back to your previous RVU. You can start your applications, including
TMF.
Caution. Starting with the G06.06 RVU, the configuration file is automatically upgraded to
alter records for all storage devices. Loading the system with an upgraded configuration file
and a previous RVU causes a processor halt (disk-process error code%011500).

Loading the Previous RVU and Resuming Normal
Operations
G06.24 Software Installation and Upgrade Guide—528593-005
17-4
Resume Normal Operations
Resume Normal Operations
Resume normal operations by invoking the proper startup files to start system
processes and user applications after falling back to the previous RVU.
Note. If you receive this error message when you attempt to start DSM/SCM:
ERROR: *1081* PATHCTL FILE IS INCOMPATIBLE <COLD START REQUIRED>
1. Stop the $YPHI PATHMON process:
> VOLUME $dsmscm_vol.ZDSMSCM
> STOP $YPHI
2. Run the PATHCOLD macro:
> PATHCOLD
3. Start TMF:
TMFCOM>START TMF
If TMF is not started or running, a TACL error appears.
4. If needed, run the DSM/SCM FALLBACK macro:
a. Stop DSM/SCM if it is not already in the stopped state:
> RUN STOPSCM
b. Run the FALLBACK macro:
> RUN FALLBACK
The FALLBACK macro is interactive and extensive. Answer the prompts accordingly.
5. Start DSM/SCM:
> RUN STARTSCM
Loading the Previous RVU and Resuming Normal
Operations
G06.24 Software Installation and Upgrade Guide—528593-005
17-5
Configure Spooler
Configure Spooler
RVUs for G06.00 and later RVUs contain spooler product version T9101D46, which
introduced a spooler control file in a new format. Although it is still a type 128 file,
internally it is considerably different from the format used in the base T9101D41
spooler. For this reason, it is not possible to warm start a version of the spooler prior to
T9101ADI with a control file produced by the T9101D46 or D48 product version of the
spooler. You must save the control files and collection data files before warm starting
the new version of the spooler.
In G06.03, T9101D48 was introduced and its control file is the same as the D46
version.
To return to the previous version of spooler:
1. Restore the control files.
2. Restore the collector files.
3. Warm start the previous version.
For detailed instructions on warm starting the spooler, see the Spooler Utilities
Reference Manual. See also Support Note S03006.

G06.24 Software Installation and Upgrade Guide—528593-005
A-1
A
Using DSM/SCM to Install SPRs
SPRs provide new features between RVUs or correct software problems from a
previous RVU. This appendix describes tools available for investigating SPRs and
instructions on how to install SPRs.
See the G06.24 Release Version Update Compendium, the Interactive Upgrade Guide,
and Section 3, Installing SPRs Before Upgrading to the G06.24 RVU of this guide for
information on SPRs that you might need to apply to your current RVU before
upgrading to the G06.24 RVU.
Tools for Managing SPRs
Always keep an SPR log file that lists which SPRs have been reviewed, selected, and
installed on your system:
•Update the SPR log regularly to maintain accurate and current information about
the SPRs installed on your system.
•Document the reasons for a decision not to install SPRs that have been issued for
products you run on your system.
Scout for NonStop Servers
Using Scout for NonStop Servers, you can display detailed information about RVUs,
SPRs, and prerequisites for SPRs. You can also access:
•Outage Prevention Notifications (OPNs)
•Hotstuff messages
•Support Notes
•RVU (softdocs) and softdoc addendums
After researching available SPRs, you can download those you consider appropriate
for your system directly to your workstation and then use FTP to transfer downloaded
SPRs to your server, or you can request tape delivery.
Caution. Do not apply any SPR to an RVU without first verifying (using Scout for NonStop
Servers, for example) that the SPR can be installed on that specific G-series RVU.
Using DSM/SCM to Install SPRs
G06.24 Software Installation and Upgrade Guide—528593-005
A-2
DSM/SCM
DSM/SCM
DSM/SCM has automatic features that can help you keep records of SPRs. You can
use the DSM/SCM Planner Interface to generate a number of prepackaged reports,
including reports that list:
•The products on a system and the SPRs applied to those products
•The SPRs that have been replaced by a specific SPR
•The requisite SPRs for a selected SPR
You can also use the DSM/SCM Archive to export SPRs to different SYSnns.
See the DSM/SCM User’s Guide for more information.
SPRNOTES
You can use SPRNOTES to research an SPR before installing it. Read the installation
instructions and considerations documented in the SPRNOTE, which includes:
•A summary of SPR contents
•Lists of SPRs required for this SPR
•Installation considerations, including tasks to perform before and after running
DSM/SCM
•A summary of problems corrected
•A summary of known problems remaining
Keep a copy of each SPRNOTE and record the status of the related SPR. For
example, record whether the SPR is not applicable, is already installed, or needs to be
installed.
Install SPRs With DSM/SCM
The steps for using DSM/SCM to install SPRs are basically the same as those for
installing a SUT.
Save the Current Configuration
First, save the current system configuration database CONFIG file. Use the SCF SAVE
command:
1. At a TACL prompt, start SCF:
2> SCF
2. List the saved configuration files. At the SCF prompt, enter:
-> FUP INFO $SYSTEM.ZSYSCONF.CONF*
Using DSM/SCM to Install SPRs
G06.24 Software Installation and Upgrade Guide—528593-005
A-3
Determine the Current SYSnn
3. Save the current configuration by using a unique file name. At the SCF prompt,
enter:
-> SAVE CONFIGURATION xx.yy
where xx.yy variable is a number from 0.0 through 99.99.
This example saves the current system configuration to the file
$SYSTEM.ZSYSCONF.CONF1101:
-> SAVE CONFIGURATION 11.1
The configuration file $SYSTEM.ZSYSCONF.CONF1101 has been created.
If you specify a configuration file that already exists, SCF asks you if you want to
replace it. If you specify that you do not want to replace the existing file, SCF does not
overwrite the file. You must type another SAVE command to save the current
configuration file.
Determine the Current SYSnn
There are several ways to record the current SYSnn subvolume on your system.
You must use the current SYSnn subvolume if you need to fall back to your current
RVU. You must use a different SYSnn subvolume to create a new software revision.
1. At a TACL prompt, enter:
$SYSTEM SUPER 6> sysinfo
SYSINFO - T9268D37 - (27 Nov 97) SYSTEM \ELI Date 27 Mar 2000,
22:00:18
COPYRIGHT TANDEM COMPUTERS INCORPORATED 1985, 1987-1997
System name \ELI
EXPAND node number 033
Current SYSnn SYS01
System number 000000
Software release ID G06.06
2. Issue a TACL FILEINFO command on $system.*.osimage to list the SYSnn
subvolumes on your system and determine which one is open:
$SYSTEM.SYS00
CODE EOF LAST MODIFIED OWNER RWEP PExt SExt
OSIMAGE 0 57354240 15DEC1999 9:57 255,255 NUNU 200 200
$SYSTEM.SYS01
CODE EOF LAST MODIFIED OWNER RWEP PExt SExt
OSIMAGE 0 57393152 05APR2000 8:56 255,255 NUNU 200 200

Using DSM/SCM to Install SPRs
G06.24 Software Installation and Upgrade Guide—528593-005
A-4
Receive the SPR Into the DSM/SCM Archive
3. At a TACL prompt, enter a STATUS 0,0 command to see which SYSnn subvolume
is currently being used:
3> status 0,0
System \ELI
Process Pri PFR %WT Userid Program file Hometerm
0,0 201 P R 000 255,255 $SYSTEM.SYS01.OSIMAGE
$YMIOP.#CLCI
Swap File Name: $SYSTEM.#0
Receive the SPR Into the DSM/SCM Archive
Before Starting DSM/SCM
1. Verify that both OutsideView Startup TACL windows ($YMIOP.#CLCI) are open. If
these windows are closed, DSM/SCM cannot complete the Build/Apply without
errors. You will have to start the Build/Apply from the beginning.
2. Start TMF if it is not already running:
> TMFCOM START TMF
Bring the SPR Into the DSM/SCM Archive
1. Start DSM/SCM if it is not already running:
> volume $dsmscm_vol.ZDSMSCM
> RUN STARTSCM
2. Log on to the DSM/SCM Planner Interface.
3. In the Software in Archive dialog box, click Receive software.
The Receive Software Request dialog box appears and DSM/SCM automatically
assigns the software input a name based on information received from the SPR
input. You can enter a new name if you want.
4. In the Receive Software Request dialog box, click Input source to display the
Request Source Options dialog box.
5. If the SPR has been received on disk or has been restored from tape to disk, click
Volume.subvolume.
6. Enter the name of the distribution subvolume containing the SPR, and then click
Add.
If the SPR was received on tape, click Tape drive and select a tape drive from the
list.
7. Click OK.
Note. DSM/SCM notifies you in the Build/Apply Request dialog box if a SYSGEN is required
and then runs SYSGEN automatically.

Using DSM/SCM to Install SPRs
G06.24 Software Installation and Upgrade Guide—528593-005
A-5
Create a New Software Configuration That Includes
the SPR
8. In the Receive Software Request dialog box, click Scheduling.
9. Enter the time you want your Receive Software Request to run. The default option
is for the request to run immediately. If this is what you want, click OK.
Create a New Software Configuration That Includes the SPR
After the SPR has been received into the Archive, you can copy it. To create a new
software configuration that includes the SPR:
1. In the Configuration Revisions dialog box, select the configuration you are
updating, and click New Software Revision.
The New software revision dialog box appears.
2. In the Software in Archive dialog box, select SPRs to be added to the current
configuration and click Copy to.
Build the New Revision
After you have created a new software revision, prepare to install it on your target
systems by building it into an executable form:
1. In the New software revision dialog box, click Build/Apply to list options for your
Build/Apply.
The Build/Apply Request dialog box appears with all selections dimmed and
unavailable.
In a few minutes, the dialog box is refreshed with defaults selected.
2. Select Build (if not connected to an Expand network) or Build, apply & process
snapshot (if connected to an Expand network).
3. Include in the activation package either only changed files or all files.
4. In the Activation SYSnn: box, enter the current SYSnn (if no SYSGEN is required)
or the new SYSnn (if SYSGEN is required).
5. Select Scheduling, Output, SYSGEN, TSV Location, and File Placement
options and configure as appropriate for your system. See the DSM/SCM User’s
Guide or the online help (Building and Applying a New Configuration topic) for
more information about these Build/Apply Request options.
6. In the Build/Apply Request dialog box, click OK.
7. When the Status window indicates that the request is done, select
Window >Refresh.
Note. If the Build/Apply Request dialog box informs you that SYSGEN is required, make
sure the spooler is active and not 100 percent full before executing the Build/Apply
request. At a TACL prompt, start SPOOLCOM and issue a COLLECT, STATUS command.
Using DSM/SCM to Install SPRs
G06.24 Software Installation and Upgrade Guide—528593-005
A-6
Print Operator Instructions From the Target Interface
(ZPHITI)
This step updates the Software in Archive window to show the newly received
software.
8. Exit the DSM/SCM Planner Interface.
Print Operator Instructions From the Target
Interface (ZPHITI)
1. Make sure that spooler is active.
2. On the DSM/SCM subvolume, type:
RUN ZPHITI
The TI Logon screen appears.
3. Type your user ID and password and press F1 to log on to the Target Interface.
The Main Menu appears.
4. Type 3 (Perform target activities) in the Selection number field and press F1.
The Target Menu - Select Target screen appears.
5. In the Selection number field, type the number corresponding to the logical target
on which the new software was applied and press F1.
The Target Menu - Select Action screen appears.
6. In the Selection number field, type 3 (Review operator instructions for the last
apply completed) and press F1 to display the operator instructions.
7. Type a printer location in the Print operator instructions field and press F9 to print
the operator instructions.
Run ZPHIRNM
During the Build/Apply phase, DSM/SCM places product files in their subvolumes with
temporary (fabricated) file names so that the new files do not conflict with the file
names of currently running programs. After the Build/Apply finishes, run the ZPHIRNM
program on the target system to:
•Rename the files that currently have actual file names with fabricated names.
These files become obsolete when the new files are renamed.
•Rename the new files, which have fabricated names, with their actual names.
1. At a TACL prompt, enter the following command from the DSM/SCM subvolume:
> RUN ZPHIRNM $vol.SYSnn
where:

Using DSM/SCM to Install SPRs
G06.24 Software Installation and Upgrade Guide—528593-005
A-7
If Running INSTALL^TEMPLATES Is Required
•$vol specifies the default current system load volume, usually $SYSTEM.
•SYSnn specifies the current or new (depending on whether SYSGEN was
required) SYSnn subvolume.
For example:
> RUN ZPHIRNM $system.SYS00
2. When asked if you want to use a log file with the session, type Y and press Enter.
3. When prompted, type a file name for the log file and press Enter.
ZPHIRNM issues this message and begins processing:
Log file is open, Zphirnm will now begin processing.
4. Verify that ZPHIRNM ran successfully by reviewing the log file.
5. If ZPHIRNM did not run successfully, correct the problem and rerun.
See the DSM/SCM User’s Guide for troubleshooting procedures and the
DSM/SCM Messages Manual for a complete list of ZPHIRNM messages.
If Running INSTALL^TEMPLATES Is Required
If the operator instructions state that you should run INSTALL^TEMPLATES to update
EMS template files, you must be logged on as the super ID (255,255) user to run the
INSTALL^TEMPLATES macro. This macro cannot be run with the NOWAIT option and
takes approximately ten minutes to finish.
Since the G06.10 RVU, if there is a resident template file in any of the input
subvolumes, the INSTALL^TEMPLATES macro displays this error:
Invalid nonresident template file -- not key sequenced:
$SYSTEM.ZTEMPL.NEWRES
*** INSTALL^TEMPLATES: Terminated due to error ***
HP recommends that you designate another subvolume (for example,
$SYSTEM.TEMPLATE) to contain the output from INSTALL^TEMPLATES. When you
specify this location, a non-resident template file is not present in ZTEMPL, and the
error does not appear.
1. Set the volume and subvolume to $SYSTEM.ZINSAIDS:
-> volume $system.zinsaids
2. Load the TACLMACS file:
-> load /keep 1/ TACLMACS

Using DSM/SCM to Install SPRs
G06.24 Software Installation and Upgrade Guide—528593-005
A-8
If Running INSTALL^TEMPLATES Is Required
3. Choose a location on $SYSTEM to keep updated template files:
tacl>volume $system.template
4. Rename any existing templates:
tacl> rename newres, oldres
tacl> rename newnres, oldnres
5. Run INSTALL^TEMPLATES to create updated template files:
tacl>install^templates newres newnres $system.ztempl
The following error message might occur when running the INSTALL^TEMPLATES
macro:
>$SYSTEM.SYSTEM.SCF /NAME $Z019,INV :INBUF.1,OUTV :OUTBUF.1/
Current Nonresident template file is: $SYSTEM.TEMPLATE.NEWNRES
TEMPLATE and NONRESIDENT files must be different:
$SYSTEM.TEMPLATE.NEWNRES
*** INSTALL^TEMPLATES: Terminated due to error ***
The message indicates that the template and nonresident files specified in the
INSTALL^TEMPLATES command are identical to those on the current subvolume. The
INSTALL^TEMPLATES macro tries to create the newres and newnres files, but stops
when it finds that these template files already exist.
To correct the problem:
Note. If you run the INSTALL^TEMPLATES macro with no arguments, you are prompted
to provide required information.
For information on the INSTALL^TEMPLATES arguments, print the usage notes:
-> volume $system.zinsaids
-> load /keep 1/ TACLMACS
-> install^templates /out outdev/ help
where outdev is the name of the desired output device.
Note. Running this macro on G-series systems permanently changes the location of the EMS
template files. DSM/SCM creates new EMS templates when it creates a new SYSnn. However,
when the new system is loaded, the old template files named in the last execution of
INSTALL^TEMPLATES are opened instead of the new files. To use the new RTMPLATE and
TEMPLATE EMS files created by DSM/SCM, use the SCF ALTER command:
-> ASSUME SUBSYS $ZZKRN
-> ALTER, RESIDENT_TEMPLATES $SYSTEM.SYSTEM.RTMPLATE, &
NONRESIDENT_TEMPLATES $SYSTEM.SYSTEM.TEMPLATE
The files newres and newnres are meant to be used as temporary names until the next
SYSGEN and system load.

Using DSM/SCM to Install SPRs
G06.24 Software Installation and Upgrade Guide—528593-005
A-9
If a System Load Is Required
1. Rename the current files:
tacl> rename newres, oldres
tacl> rename newnres, oldnres
2. Run the INSTALL^TEMPLATES macro again and use the file names newres and
newnres.
The following message indicates that the templates are successfully installed:
>$SYSTEM.SYS00.FUP /NAME $Z03M,INV :INBUF.1,OUTV :OUTBUF.1/
File Utility Program - T6553D45 - (14APR2000) System \TINY
Copyright Tandem Computers Incorporated 1981, 1983, 1985-2000
SECURE
($SYSTEM.TEMPLATE.NEWRES,$SYSTEM.TEMPLATE.NEWNRES),"NUNU"
*** INSTALL^TEMPLATES: Completed sucessfully ***
If a System Load Is Required
If OSM is installed and configured, you can use these instructions to load your RVU.
Halt the Processors
1. If necessary, log on to the TSM Low-Level Link Application. If you are using OSM,
log on to the OSM Low-Level Link.
2. On the toolbar, select Processor Status to open the Processor Status dialog box.
Select the processors to be halted.
3. From the Processor Actions list, select Halt.
4. Click Perform action.
5. Click OK when asked if you are sure you want to halt.
6. When the Action Status box confirms that all the processors have been halted,
close the Processor Status dialog box.
Do not log off the OSM Low-Level Link or TSM Low-Level Link Application.

Using DSM/SCM to Install SPRs
G06.24 Software Installation and Upgrade Guide—528593-005
A-10
Perform a System Load
Perform a System Load
When you perform a system load, the operating system is loaded from disk into the
memory of one processor. (This operation is sometimes called a device load or cold
load.) All possible paths to processor 0 are tried; if these fail, all possible paths to
processor 1 are tried. The remaining processors are loaded by commands in the CIIN
file. The initial TACL process stops after executing the CIIN file.
1. Using the OSM Low-Level Link or TSM Low-Level Link Application, click Start
System.
The System Startup dialog box appears.
2. In the System Startup dialog box:
•In the SYSnn box, enter the number of the system subvolume containing the
version of the operating system that you want to load. The value nn must be a
two-digit octal number in the range %00...%77.
•In the Configuration File area, select Current (CONFIG).
•Make sure that the CIIN disabled option is not selected.
3. Click Start System.
When the system load has successfully initiated (the operating system loaded into
the memory of processor 0 or processor 1), the System Status box in the System
Startup dialog box shows:
SYSTEM STARTUP COMPLETE, NSK RUNNING ON PROCESSOR n
Note. The number of the SYSnn last used to start the system appears as the default.
Type over it with a new two-digit number to change to a different version of software
stored in the SYSnn subvolume on the system disk.
Note. The System Startup dialog box requires the primary and mirror system disks
($SYSTEM) to be installed in Group 01, Module 01, slots 11 and 12. It first tries slot
1.1.11 and then 1.1.12. Starting with the G06.06 RVU, you can install the system disk
in any two disk slots in Group 01.
To start your system with a system disk in disk slots other than 11 and 12, you must
go through the Processor Status dialog box, Load action, to access the Load
Processor-n from Disk dialog box. This dialog box enables you to enter the group,
module, and slot number of the disk from which you want to load; it does not try
alternate paths or alternate disk slots. See the NonStop S-Series Operations Guide for
more information.
Caution. If you want to stop the system startup process, click Abort (the process takes effect
within 30 seconds). If you stop a system startup before it has finished, the state of your system
cannot be predicted. You might need to perform another system startup to enable the system
to resume normal operation.
Do not close the Start System dialog box; otherwise, your system will not load.

Using DSM/SCM to Install SPRs
G06.24 Software Installation and Upgrade Guide—528593-005
A-11
Reload the Processors (If Necessary)
The other processors are now primed for reload.
4. On the toolbar of the OSM Low-Level Link or TSM Low-Level Link Application
window, select Processor Status.
The Processor Status dialog box should show Executing NonStop OS.
EMS event stream and startup TACL windows are automatically launched on the
system console. The process might take a few seconds.
5. If the EMS event stream window and the startup TACL window have not launched
on the system console or remain empty for more than a few minutes after the
system startup completion message appears, start alternate EMS event stream
and startup TACL windows. (Allow approximately 5 minutes.)
6. Close the System Startup dialog box. The Start System Status window closes
automatically.
Reload the Processors (If Necessary)
When CPU0 is running the NonStop Kernel operating system, you can reload the
processors by issuing the RELOAD command from a TACL prompt. (Depending on
your configuration, you might not need to reload the processors explicitly.) After
processor 0 or processor 1 is successfully running the NonStop Kernel operating
system, reload any remaining processors in the system.
Start Your Applications and Processes
After you have reloaded the processors and the Processor Status screen shows all
processors executing the NonStop Kernel operating system, you can start your
applications and processes.
Verify that your system is up and running.
Note. The startup TACL window might launch directly on top of the EMS event stream
window. Drag the startup TACL OutsideView window to the side to see the EMS event
stream window. You can also use the OutsideView buttons on the bottom bar of the
system console to toggle between the windows.

G06.24 Software Installation and Upgrade Guide—528593-005
B-1
B
Installing the Latest DSM/SCM SPRs
and Client Software
Before You Begin Installing DSM/SCM and
Client SPRs
Table B-1 on page B-1 describes all of the DSM/SCM versions introduced on
G-series RVUs.
Note.
•If you want DSM/SCM to manage OSS files, you must install both the D46 DSM/SCM SPR
and the client version before you receive the SUT. You can install the D46 client version
(T6031D46^ABJ) either before or after installing the D46 T6031^ABJ SPR. However, this
appendix describes installing the D46 SPR first on the server side and then on the client
side.
•If you are on a D31 product version of DSM/SCM and you do not need to manage new
OSS files, HP recommends that you always upgrade to the newest D46 DSM/SCM SPR
and client before installing the G06.24 RVU.
•The latest DSM/SCM client version (T6031D46^ABJ) is available only on the SUT unless
you have ordered new system consoles.
Table B-1. G-Series DSM/SCM PVUs and SPRs
PVU SPR RVU Description (Major changes)*
C32 G03
through
G04
Used for RVUs G03 through G04.Uses the
AC0INFO file.
D30 G05.00
through
G06.08
Used to manage the new SRLs introduced in
G05.00. New AC1INFO file is introduced.
T6031D31 AAR G06.09
through
G06.17
Merges four formerly separate product numbers
(T6029 [the CNFGINFO tool]), T6030 (Host/Planner
components), T6031 (Target components), and
T6033 (S-series Utility Package) into one product.
The T6031D31 product version of DSM/SCM is
identical to the D30-based T6030AAR (DSM/SCM
host/planner components) and T6031AAR
(DSM/SCM target components) versions, which
were introduced in the G06.08 RVU.
T6031D46 G06.18 Manages and audits OSS files. New AC7INFO file is
introduced.

Installing the Latest DSM/SCM SPRs and Client
Software
G06.24 Software Installation and Upgrade Guide—528593-005
B-2
Before You Begin Installing DSM/SCM and Client
SPRs
T6031D46 ABE G06.19 Provides an updated version of the DSM/SCM
CNFGINFO tool. OSS developers can use this tool
to create A7CINFO files in their products' DSVs.
A7CINFO files are required by DSM/SCM for
automated OSS file management.
T6031D46 ABF G06.20 DSM/SCM is enhanced so that changing the
alternate name of $SYSTEM disk does not display
an error.
T6031D46 ABG G06.21 Compatible with client software version
T6031D46^ABF. DSM/SCM is enhanced so that the
FALLBACK macro does not fail when rerun.
T6031D46 ABH G06.22 Compatible with client software version
T6031D46^ABH. Verify Database deletes fabricated
files for an unmanaged TSV. The CNFGINFO tool
validates correctly the TACL directory name.
T6031D46 ABI G06.23 Compatible with client software version
T6031D46^ABI.
DSM/SCM now creates the softdoc file on the
specified subvolume location with the standard file
name TnnnnVnn.The Build/Apply process now
completes without warnings when products
T6035PAX, T5893PAX are not OSS-enabled. These
new OSS files are placed under the ownership of
the Planner Interface.
T6031D46 ABJ G06.24 Compatible with client software version
T6031D46^ABJ.
DSM/SCM no longer replaces the customized
RTMPLATE file on the active SYSnn; the
Configuration Products report (ZPHIR10) no longer
lists duplicate entries.
* Always review the T6031D46 softdoc.
Table B-1. G-Series DSM/SCM PVUs and SPRs (continued)
PVU SPR RVU Description (Major changes)*

Installing the Latest DSM/SCM SPRs and Client
Software
G06.24 Software Installation and Upgrade Guide—528593-005
B-3
Before You Begin Installing the Software
Identification (SWID) SPR
Before You Begin Installing the Software
Identification (SWID) SPR
If you are upgrading from a pre-G06.20 RVU, besides restoring T6030D31 and
T6031D46, you must also upgrade the Software Identification (SWID) (T9298D40AAK)
product at the same time to avoid a problem with ZPHIRNM renaming hybrid SRLs to
fabricated names. (With the introduction of dynamic-link libraries (DLLs) for TNS/R
systems in G06.20, NSKCOM (T5838) provides new commands to NLD (T6017) so
that public SRLs are built as hybrid DLL-SRL objects.)
If you are on a G06.20 RVU or later, you do not need to restore the SWID product
before receiving the SUT. See Alerts in this appendix.
Alerts
•If you are on a pre-G06.20 RVU, besides restoring R6030D31 and R6031D46, you
must also receive R9298D40 in the DSMSCM Archive when you build the new
configuration. A new SWID SPR (T9298AAK) is introduced in G06.24, but you do
not need to restore and receive the SWID SPR if you are running a G06.20 RVU or
later. See Verify That SWID Is Installed on page B-17.
•Determine the Product Version of DSM/SCM on the Host System and Determine
the Product Version of DSM/SCM on the Client.
•Save the current configuration database (see Save the Current Configuration File
(CONFxxyy) on page 4-1).
•Keep the startup TACL windows, the EMS Event Stream window, and the
DSM/SCM client interface windows open whenever you are performing a
Build/Apply. Otherwise, Build/Apply errors will result.
•If you receive an error indication in the Request Status window, you might have to
reinitiate the Build/Apply. See the DSM/SCM Messages Manual to learn the nature
and severity of the problem.
Note. If you do not restore SWID, and you are run the G06.24 RVU and perform another
Build/Apply with the previous pre-G06.20 SWID that was used to build the hybrid SRLs, and
you do not require a system load, the DSM/SCM fingerprint file will be different. As a result:
•A new set of SRLs is created.
•When the ZPHIRNM is complete, the open SRLs are renamed to fabricated names.
Note. Until the T6031ABE, or later, SPR of DSM/SCM is installed, you must select the
Receive-all-files option on all software inputs into the DSM/SCM Archive whether or not
you want to manage OSS files. When the T6031ABE, or later, SPR is applied, you can
then choose the Receive-all-files only if you want to manage OSS files.

Installing the Latest DSM/SCM SPRs and Client
Software
G06.24 Software Installation and Upgrade Guide—528593-005
B-4
Determine the Product Version of DSM/SCM on the
Host System
Determine the Product Version of DSM/SCM on the Host System
To determine which product version of DSM/SCM is currently installed on your system,
use the VPROC command to determine the product version of TAEXE (Apply product
of DSM/SCM) and CBEXE (Build product of DSM/SCM).
At a TACL prompt, enter:
> volume $dsmscm_vol.ZDSMSCM
> vproc taexe
> vproc cbexe
If your VPROC commands do not display the following versions, install the latest D46
DSM/SCM product version as described in Copy (RESTORE) the D46 DSM/SCM
Product Version and SWID (Optional) to Disk on page B-6:
The following shows the latest D46 product version of DSM/SCM after DSM/SCM has
been activated. (Bold lettering is used to show the vproc command and the latest
version):
$TDSV ZDSMSCM 8> vproc cbexe
VPROC - T9617G03 - (07 AUG 2003) SYSTEM \TINY Date 18 AUG 2004, 13:36:49
Copyright 2003 Hewlett-Packard Development Company, L.P.$TDSV.ZDSMSCM.CBEXE
Binder timestamp: 20APR2004 03:37:46
Version procedure: S7032D20^27FEB04^SWARCCP^AAH
Version procedure: T6031D46_10MAY2004_19APR2004ABJ
Target CPU: UNSPECIFIED
AXCEL timestamp: 20APR2004 03:40:33
$TDSV ZDSMSCM 7> vproc taexe
VPROC - T9617G03 - (07 AUG 2003) SYSTEM \TINY Date 18 AUG 2004, 13:36:39
Copyright 2003 Hewlett-Packard Development Company, L.P.
$TDSV.ZDSMSCM.TAEXE
Binder timestamp: 20APR2004 04:34:37
Version procedure: S7032D20^27FEB04^SWARCCP^AAH
Version procedure: T6031D46_10MAY2004_19APR2004ABJ
Target CPU: UNSPECIFIED
AXCEL timestamp: 20APR2004 04:38:09
Determine the Product Version of DSM/SCM on the Client
To determine which product version of DSM/SCM client software is installed, start the
DSM/SCM Planner Interface. Before prompting you to log on, the About DSM/SCM
window briefly displays version information.
The latest DSM/SCM client version for the G06.24 RVU is:
Installing the Latest DSM/SCM SPRs and Client
Software
G06.24 Software Installation and Upgrade Guide—528593-005
B-6
Copy (RESTORE) the D46 DSM/SCM Product
Version and SWID (Optional) to Disk
Copy (RESTORE) the D46 DSM/SCM Product
Version and SWID (Optional) to Disk
To copy the D46 product version of DSM/SCM and the SWID product (optional,
depending on your current RVU) from the G06.24 RVU to disk, at a TACL prompt,
enter the RESTORE command:
>RESTORE/OUT $S.#nnn.DSM/$tape, ($*.R6030D31.*,$*.R6031D46.*,$*.R9298D40.*),
VOL $DSMSCM, LISTALL
where nnn is the RVU number (G06) and where $tape is the name of the tape drive
containing the G06.24 RVU.
If you are already on a G06.20 RVU, enter:
>RESTORE/OUT $S.#nnn.DSM/$tape, ($*.R6030D31.*,$*.R6031D46.*), VOL $DSMSCM,
LISTALL
If you are currently on a G06.08 RVU or later and all files are restored without error,
you might see a display for DSM/SCM similar to:
$TDSV.R6030D31
A0CINFO 963 3072 14Jul2000 9:59 255,0 AOAO K 212 1
T6030D31 101 40888 14Jul2000 9:59 255,0 AOAO
$TDSV.R6031D46
A0CINFO 963 27648 14Oct2002 15:38 255,0 AOAO K 212 1
CBEXE 100 3303424 28Jul2004 19:54 255,0 AOAO
CLEANOSS 101 1576 11Jun2002 10:43 255,0 AOAO
CNFGC 101 81740 4Oct2002 11:52 255,0 AOAO
CNFGCOB 101 81752 4Oct2002 11:52 255,0 AOAO
CNFGINFO 100 75776 8Oct2002 19:54 255,0 AOAO
.
.
Receive the D46 SPRs for DSM/SCM
1. Start TMF and DSM/SCM if they are not already running:
> TMFCOM START TMF
> VOLUME $dsmscm_vol.ZDSMSCM
> RUN STARTSCM
2. Log on to the DSM/SCM Planner Interface
(Start>Programs>Dsm_scm>DSMSCM).
3. In the Software in Archive dialog box, select Receive software.
DSM/SCM displays the Receive Software Request dialog box.
4. Under Software name, select Provided by planner and enter a name for the D46
DSM/SCM product version and SWID. (This field is 17 characters.) For example:
Installing the Latest DSM/SCM SPRs and Client
Software
G06.24 Software Installation and Upgrade Guide—528593-005
B-7
Receive the D46 SPRs for DSM/SCM
5. Under Options, click Input source.
DSM/SCM displays the Request Source Options dialog box.
6. Select Volume.subvolume.
7. In the Add text box, enter each distribution subvolume for the DSM/SCM files that
you specified earlier in the RESTORE command:
$DSMSCM.R6030D31
$DSMSCM.R6031D46
$DSMSCM.R9298D40
Your Request Source Options dialog box should look similar to this:
VST353.vsd
D46 DSM and SWID
SOFTWARE 2003-12-07-19:09:39
SOFTWARE 2003-12-07-19:09:39
Request name:
Request description:
Installing the Latest DSM/SCM SPRs and Client
Software
G06.24 Software Installation and Upgrade Guide—528593-005
B-8
Receive the D46 SPRs for DSM/SCM
8. Click OK.
You are returned to the Receive Software Request dialog box.
9. Click OK to run the request immediately. (The request takes approximately 15
minutes to finish.)
VST350.vsd
$DSMSCM.R6030D31
$DSMSCM.R6031D46
$DSMSCM.R6031D46
$DSMSCM.R9298D40
3
Installing the Latest DSM/SCM SPRs and Client
Software
G06.24 Software Installation and Upgrade Guide—528593-005
B-9
Receive the D46 SPRs for DSM/SCM
The Status dialog box appears. Wait until the display for the Request activity
summary appears as Complete, and then close the Status window. For example:
10. Select Window>Refresh to update the Software in Archive dialog box to include
the received software.
VST351.vsd
SOFTWARE 2002-12-07-19:09:39
Input software Complete
Installing the Latest DSM/SCM SPRs and Client
Software
G06.24 Software Installation and Upgrade Guide—528593-005
B-10
Create a New Software Revision for DSM/SCM D46
SPR and SWID
Create a New Software Revision for DSM/SCM
D46 SPR and SWID
1. In the Configuration Revisions dialog box, select the target system being upgraded
and the current revision of the system being upgraded. Select New software
revision.
DSM/SCM opens the New dialog box listing the products in the last software
revision that was built for the target. Allow several minutes for the dialog box to
appear.
2. In the Software in Archive dialog box, select the DSM/SCM software you just
received and click Copy to.
The DSM/SCM files are copied from the Archive to the new software revision.
3. From the New software revision dialog box, verify that the new version of
DSM/SCM and SWID (optional, depending on current RVU) are included in the
new software revision. For example:
4. Edit the revision notes for the new revision:
a. Click Edit revision notes.
The Revision Notes box appears, containing the existing revision notes.
vst557.vsd
Installing the Latest DSM/SCM SPRs and Client
Software
G06.24 Software Installation and Upgrade Guide—528593-005
B-11
Build and Apply the DSM/SCM D46 Software
Revision
b. Enter a description of the changes to the existing text. For example, if you are
migrating from a pre-G06.20 RVU, you might enter:
Added 05/07/2004: G06.24DSM/SWID
c. Click OK to add a written history of revisions to existing notes.
Build and Apply the DSM/SCM D46 Software
Revision
The Build process creates an activation package of products contained in the new
software revision. During the Apply process, the activation package is transferred to
the target system. When the Apply request is finished, a snapshot is automatically
created and returned to the host. Because you are building and applying only a few
files, it should take less than an hour before the Build and Apply requests are finished
and the snapshot is returned. When the Build and Apply requests are finished, the new
software is placed in the current SYSnn subvolume.
1. In the New software revision dialog box, click Build/Apply to display the options
for your Build/Apply.
It might take several minutes for DSM/SCM to assemble the build information.
During this time, the Build/Apply Request dialog box appears with all selections
dimmed and unavailable.
In a few minutes, the dialog box is refreshed with defaults selected. The name
assigned to the Build/Apply request appears after Request name.
2. Click Edit instructions to display the Planner Instructions box.
3. Edit the instructions to provide the current SYSnn number, and then click OK.
4. Complete the Build/Apply Request dialog box:
a. Under Perform steps, select Build, apply & process snapshot.
b. Type the current SYSnn in the Activation SYSnn text box (because no
SYSGEN is required).
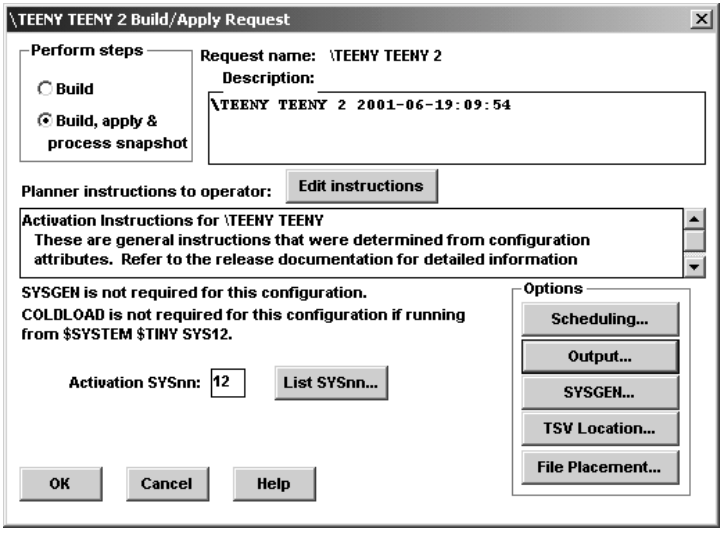
Installing the Latest DSM/SCM SPRs and Client
Software
G06.24 Software Installation and Upgrade Guide—528593-005
B-12
Build and Apply the DSM/SCM D46 Software
Revision
c. Click OK.
DSM/SCM runs the Build/Apply requests and displays a Status dialog box that is
automatically updated at regular intervals.
5. Check EMS messages for more detailed information about your Build/Apply:
•From the Status window, click Show EMS events.
•In the EMS Events window, click Refresh to see newer messages.
•When finished viewing, click Close.
6. To confirm that the Build and Apply tasks finish successfully and that a snapshot
has been received into the host database, wait until the status shows that all
requests are complete.
7. Select Window>Refresh.
The Configurations Revision dialog box is refreshed and shows the new software
configuration revision containing the D46 DSM/SCM SPR.
VST254.vsd

Installing the Latest DSM/SCM SPRs and Client
Software
G06.24 Software Installation and Upgrade Guide—528593-005
B-13
Rename the Applied DSM/SCM D46 Files
Rename the Applied DSM/SCM D46 Files
1. Stop DSM/SCM:
> VOLUME $dsmscm_vol.ZDSMSCM
> RUN STOPSCM
where $dsmscm_vol is the DSM/SCM volume.
2. Run ZPHIRNM:
> RUN ZPHIRNM $volume.SYSnn
where SYSnn is the current SYSnn (because no SYSGEN or system load is
required).
3. When asked if you want to use a log file with the session, enter Y.
4. When prompted, enter a file name for the log file.
ZPHIRNM displays this message:
Log file, filename, was successfully created.
ZPHIRNM processes the file renaming.
5. Verify that ZPHIRNM ran successfully by reviewing the specified log file.
If Running INSTALL^TEMPLATES Is Required
If the operator instructions state that you should run INSTALL^TEMPLATES to update
EMS template files, you must be logged on as the super ID (255,255) user to run the
INSTALL^TEMPLATES macro. This macro cannot be run with the NOWAIT option and
takes approximately ten minutes to finish.
Since the G06.10 RVU, if there is a resident template file in any of the input
subvolumes, the INSTALL^TEMPLATES macro displays this error:
Invalid nonresident template file -- not key sequenced:
$SYSTEM.ZTEMPL.NEWRES
*** INSTALL^TEMPLATES: Terminated due to error ***
HP recommends that you designate another subvolume (for example,
$SYSTEM.TEMPLATE) to contain the output from INSTALL^TEMPLATES. When you
specify this location, a non-resident template file is not present in ZTEMPL, and the
error does not appear.
1. Set the volume and subvolume to $SYSTEM.ZINSAIDS:
-> volume $system.zinsaids
2. Load the TACLMACS file:
-> load /keep 1/ TACLMACS

Installing the Latest DSM/SCM SPRs and Client
Software
G06.24 Software Installation and Upgrade Guide—528593-005
B-14
If Running INSTALL^TEMPLATES Is Required
3. Choose a location on $SYSTEM to keep updated template files:
->volume $system.template
4. Rename any existing templates:
-> rename newres, oldres
-> rename newnres, oldnres
5. Run INSTALL^TEMPLATES to create updated template files:
->install^templates newres newnres $system.ztempl
The following error message might occur when running the INSTALL^TEMPLATES
macro:
>$SYSTEM.SYSTEM.SCF /NAME $Z019,INV :INBUF.1,OUTV :OUTBUF.1/
Current Nonresident template file is: $SYSTEM.TEMPLATE.NEWNRES
TEMPLATE and NONRESIDENT files must be different:
$SYSTEM.TEMPLATE.NEWNRES
*** INSTALL^TEMPLATES: Terminated due to error ***
The message indicates that the template and nonresident files specified in the
INSTALL^TEMPLATES command are identical to those on the current subvolume. The
INSTALL^TEMPLATES macro tries to create the newres and newnres files, but stops
when it finds that these template files already exist.
To correct the problem:
Note. If you run the INSTALL^TEMPLATES macro with no arguments, you are prompted
to provide required information.
For information on the INSTALL^TEMPLATES arguments, print the usage notes:
-> volume $system.zinsaids
-> load /keep 1/ TACLMACS
-> install^templates /out outdev/ help
where outdev is the name of the desired output device.
Note. Running this macro on G-series systems permanently changes the location of the EMS
template files. DSM/SCM creates new EMS templates when it creates a new SYSnn. However,
when the new system is loaded, the old template files named in the last execution of
INSTALL^TEMPLATES are opened instead of the new files. To use the new RTMPLATE and
TEMPLATE EMS files created by DSM/SCM, use the SCF ALTER command:
-> ASSUME SUBSYS $ZZKRN
-> ALTER, RESIDENT_TEMPLATES $SYSTEM.SYSTEM.RTMPLATE, &
NONRESIDENT_TEMPLATES $SYSTEM.SYSTEM.TEMPLATE
The files newres and newnres are meant to be used as temporary names until the next
SYSGEN and system load.

Installing the Latest DSM/SCM SPRs and Client
Software
G06.24 Software Installation and Upgrade Guide—528593-005
B-15
Restart Applications
1. Rename the current files:
-> rename newres, oldres
-> rename newnres, oldnres
2. Run the INSTALL^TEMPLATES macro again and use the file names newres and
newnres.
The following message indicates that the templates are successfully installed:
>$SYSTEM.SYS00.FUP /NAME $Z03M,INV :INBUF.1,OUTV :OUTBUF.1/
File Utility Program - T6553D45 - (14APR2000) System \TINY
Copyright Tandem Computers Incorporated 1981, 1983, 1985-2000
SECURE
($SYSTEM.TEMPLATE.NEWRES,$SYSTEM.TEMPLATE.NEWNRES),"NUNU"
*** INSTALL^TEMPLATES: Completed sucessfully ***
Restart Applications
You can now start your application software. Follow your site’s procedures for
executing the system configuration and startup (command) files to accomplish this.
DSM/SCM is often started automatically by a system command file; if not, you must
start it manually as described next.
Before Starting DSM/SCM
Depending on your RVU, DSM/SCM will not work properly if SQLCI2 has changed and
DSM/SCM is still using the old version.
1. Check that TMF is started:
> TMFCOM STATUS TMF
2. Verify your current configuration against the cold start configuration in PATHHOST
(or PATHTARG) to check that the current configuration reflects all changes you
have made.
3. Run the PATHCOLD macro from the ZDSMSCM subvolume to cold start the
Pathway configuration.
Start DSM/SCM
1. Run the STARTSCM macro from the ZDSM/SCM subvolume to start DSM/SCM:
> RUN STARTSCM

Installing the Latest DSM/SCM SPRs and Client
Software
G06.24 Software Installation and Upgrade Guide—528593-005
B-16
Verify That the D46 Product Version of DSM/SCM Is
Installed
These messages appear:
Because the $ZHOME reliable home-term process is not an interactive process
and is always paused, no action is necessary.
PATHWAY CONTROL FILE DATED: 21 APR 2003, 03:52:16
$Z03N: WARN - *1079* SERVER CB-001, NO STATIC SERVERS DEFINED
$Z03N: WARN - *1079* SERVER IS-001, NO STATIC SERVERS DEFINED
$Z03N: WARN - *1079* SERVER MISERVER, NO STATIC SERVERS DEFINED
$Z03N: SERVER OM-001, STARTED
$Z03N: SERVER SM-001, STARTED
$Z03N: SERVER SM-T-001, STARTED
$Z03N: SERVER T9154-HELP-SERV, STARTED
$Z03N: WARN - *1079* SERVER TA-001, NO STATIC SERVERS DEFINED
$Z03N: WARN - *1079* SERVER TISERVER, NO STATIC SERVERS DEFINED
$Z03N: WARN - *1079* SERVER US-001, NO STATIC SERVERS DEFINED
$Z03N: TCP TCP-H, STARTED
$Z03N: TCP TCP-T, STARTED
2. If necessary, press Enter to have STARTSCM run the PM6031 TACL macro
automatically. This step takes several minutes.
Verify That the D46 Product Version of DSM/SCM Is Installed
To verify that the latest D46 product version of DSM/SCM is currently installed on your
system, use the VPROC command to display the product version of TAEXE (Apply
product of DSM/SCM) and CBEXE (Build product of DSM/SCM). At a TACL prompt,
enter:
> volume $dsmscm_vol.ZDSMSCM
> vproc taexe
> vproc cbexe
The following shows a D46 product version of DSM/SCM after DSM/SCM has been
activated:
8> startscm
DSM/SCM Process Startup Function - STARTSCM - T6031D46 - (31MAR2003)
Copyright Hewlett Packard Development Company L.P. 1993-2003
NOTICE:* If the hometerm chosen during INITENV, $zhome,
* is not currently in a paused state, STARTSCM and DSM/SCM
* server processes may hang indefinitely. Be sure this
* hometerm has been paused!
STARTSCM: A new version of DSM/SCM has been installed and IPM6031 needs to
be run. You can either exit and run IPM6031
manually or continue and IPM6031 will be run for you.
Enter <CR> to continue or BREAK to exit.
Installing the Latest DSM/SCM SPRs and Client
Software
G06.24 Software Installation and Upgrade Guide—528593-005
B-17
Verify That SWID Is Installed
\FOXII $GREECE.T6031ABJ 8> vproc cbexe
VPROC - T9617D42 - (20 DEC 2000) SYSTEM \FOXII Date 24 JAN 2004, 04:47:11
COPYRIGHT TANDEM COMPUTERS INCORPORATED 1986 - 2000
$GREECE.T6031ABJ.CBEXE
Binder timestamp: 16JAN2004 04:10:20
Version procedure: S7032D20^27FEB04^SWARCCP^AAH
Version procedure: T6031D46_13JAN2004_16JAN2004ABJ
Target CPU: UNSPECIFIED
\FOXII $GREECE.T6031ABJ 9>
\FOXII $GREECE.T6031ABJ 9> vproc taexe
VPROC - T9617D42 - (20 DEC 2000) SYSTEM \FOXII Date 24 JAN 2004, 04:49:15
COPYRIGHT TANDEM COMPUTERS INCORPORATED 1986 - 2000
$GREECE.T6031ABJ.TAEXE
Binder timestamp: 11JAN2004 02:38:21
Version procedure: S7032D20^27FEB04^SWARCCP^AAH
Version procedure: T6031D46_13JAN2004_10JAN2004ABJ
Target CPU: UNSPECIFIED
\FOXII $GREECE.T6031ABJ 10>
Verify That SWID Is Installed
If the AAI SPR is already installed on your SYSnn, you do not need to restore the latest
SWID SPR from tape and activate it.
This is an example of a previous SWID SPR (for G06.20 and G06.21 RVU):
$system.system.swid
Binder timestamp: 24JAN2003 13:51:31
Version procedure: T9298D40_29NOV2002_24JAN2003AAJ
Target CPU: TNS, TNS/R
Here is the latest SWID SPR:
$SYSTEM.SYSTEM.SWID
Binder timestamp: 13APR2004 23:11:20
Version procedure: T9298D40_04MAY2004_14APR2004AAK
Target CPU: TNS, TNS/R
AXCEL timestamp: 13APR2004 23:14:01

Installing the Latest DSM/SCM SPRs and Client
Software
G06.24 Software Installation and Upgrade Guide—528593-005
B-18
Recovery for Problems While Installing the D46
Version of DSM/SCM
Recovery for Problems While Installing the
D46 Version of DSM/SCM
If you encounter problems while installing the D46 version of DSM/SCM, see the
following information and the DSM/SCM User’s Guide.
If NonStop Errors Are Displayed
If you are on an earlier RVU (G05 or earlier), and receive NonStop SQL errors when
you try to install the D46 product version of DSM/SCM, you might need to run the
IPM6031 TACL macro:
$DSMSCM ZDSMSCM>IPM6031
Starting with the D30 PVU of DSM/SCM, the IPM6031 TACL macro is run
automatically during STARTSCM when DCSM/SCM detects that the DSM/SCM
servers or database managers have changed. The IPM6031 TACL macro also ensures
that the TAEXE and CBEXE programs are secured correctly.
Thus, if you are migrating from the T6031^ABB SPR to the T6031D46 PVU or from a
recent T6031D46^ABE SPR to T6031D46^AFB, STARTSCM automatically runs
IPM6031.
Install the DSM/SCM Client From ZDSMSCM
Starting with the G06.18 RVU, the D46 DSM/SCM client software is shipped only on
the SUT and not on the Installer CD. The ZDSMEXE file that is in ZDSMSCM
subvolume is the client version that is an exact match to the server software in
ZDSMSCM.
If you are using DSM/SCM to manage OSS file options, you must install the DSM/SCM
client software.
DSM/SCM T6031D46^ABJ client software supports all T6030/T6031D30^AAO and
later DSM/SCM server software (including T6031D31). If you have to fall back, you can
still use the newly installed ABJ client software.
Note. Before you begin, back up your current DSM/SCM folder to save the configuration
information and the Planner Interface version.
Check that unnecessary PC programs are not running before you begin the DSM/SCM client
installation and that no DSM/SCM Build or Applies are in progress.
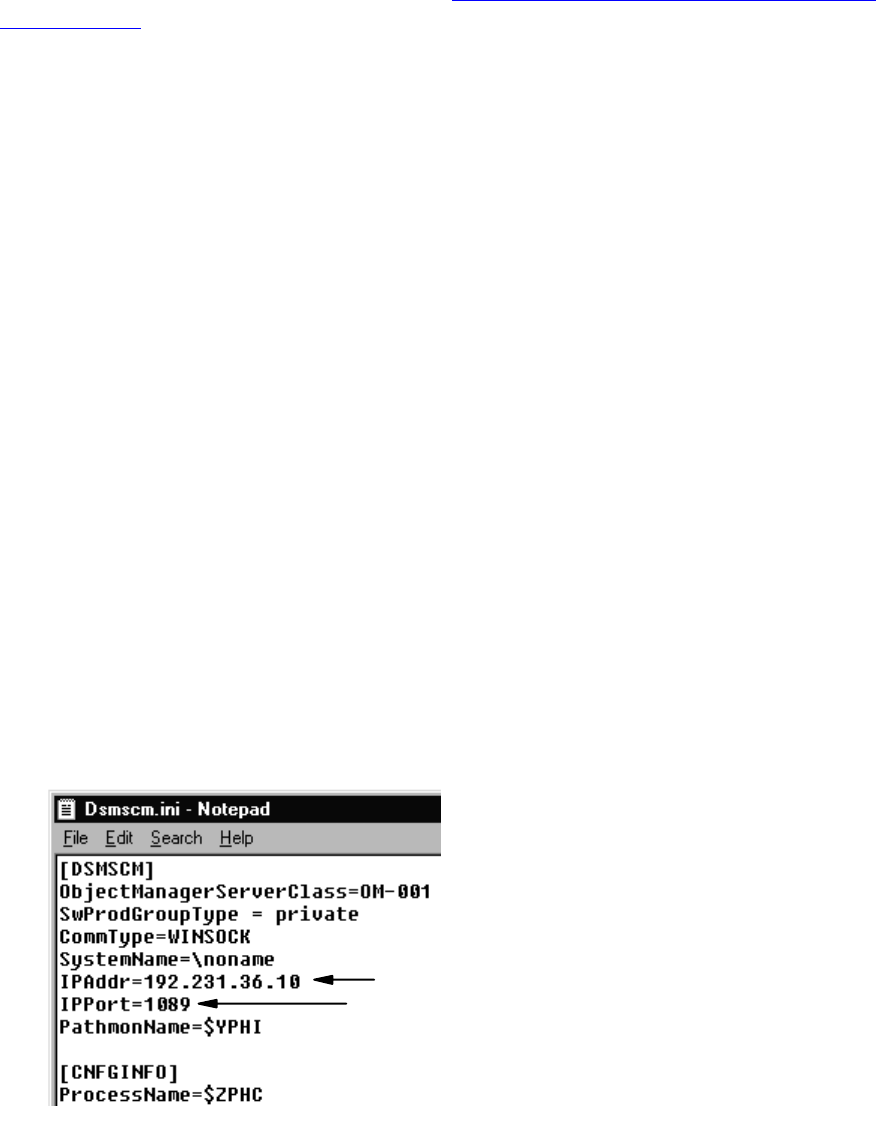
Installing the Latest DSM/SCM SPRs and Client
Software
G06.24 Software Installation and Upgrade Guide—528593-005
B-19
Alert (DSM/SCM T6031D46^ABJ Client)
Alert (DSM/SCM T6031D46^ABJ Client)
Do not attempt to use DSM/SCM T6031D46^ABJ client software until you have first
installed T6030/T6031D30^AAO or later software product revisions (SPRs) or the
T6031D46 PVU on your host system. See Table 3-1, DSM/SCM Client and Server
Compatibility, on page 3-5.
Limited DSM/SCM operation is available if you run T6031D46^ABJ client software with
pre-AAO server software. HP recommends that both the DSM/SCM product version
and DSM/SCM client be at the same version level at all times.
Determine Your DSM/SCM Client Software Version
To determine which version of DSM/SCM client software is installed, start the
DSM/SCM Planner Interface. Before prompting you to log on, the About DSM/SCM
window briefly displays version information.
Determine the Current IP Address and Port Number
When you install DSM/SCM client software, you are prompted to enter the IP address
of the host system with which DSM/SCM communicates and the IP port number for the
DSM/SCM Winsock service.
If the DSM/SCM client software on your system console is configured to communicate
with a host system, determine the configured IP address and port number:
1. Start Windows Explorer. Open My Computer if not already open.
2. Double-click the hard drive icon to display its contents.
3. Open the DsmScm folder to display its contents.
4. In the Contents pane, double-click dsmscm.ini.
Notepad opens the DSM/SCM initialization file. For example:
VST005.vsd
IP Address
IP Port Number

Installing the Latest DSM/SCM SPRs and Client
Software
G06.24 Software Installation and Upgrade Guide—528593-005
B-20
Copy the ZDSMSCM Client File From the Host
5. Make a note of the IP address and port number.
6. Close the dsmscm.ini file.
Copy the ZDSMSCM Client File From the Host
1. If you are using OutSideView, start an OutsideView session.
2. Select Session>Receive file to display the IXF Receive dialog box.
3. In the Host box, enter the host system name, and the volume and subvolume
where the file resides. Make $volume.ZDSMSCM the current subvolume.
4. In the File box, enter zdsmexe. (Or, you can type zdsm.exe, and ignore step 9.)
zdsmexe appears in the Local area File Name box.
5. Under Download Path, click Browse, and locate and select the c:\dsmscm
directory. Select OK. Under Options, verify that Binary is selected.
6. Verify that Overwrite local files is selected.
7. Click OK.
The download should take approximately 2 minutes.
8. When the IXF - Receive dialog box indicates that the transfer is finished, click End
Transfer.
9. Using Windows Explorer, rename the file from zdsmexe to zdsm.exe.
10. Double-click the zdsm.exe file to decompress the DSM/SCM client files.
11. Press any key to continue the setup.
12. If you are asked whether to overwrite the existing files, type Y for YES and press
Enter.
(To overwrite all the files, type A for ALL.)
After the setup program copies DSM/SCM files to your hard drive, your workstation
is ready for DSM/SCM client software installation.
Note. If you are not using OutSideView on the PC that manages DSM/SCM:
1. On the NonStop Kernel host system, make $volume.ZDSMSCM the current subvolume.
2. Use the file transfer protocol (FTP) to download the ZDSMEXE file from the ZDSMSCM
subvolume on the NonStop Kernel host system to the DSMSCM directory on the PC.
3. Go to step 9 and complete the download process.

Installing the Latest DSM/SCM SPRs and Client
Software
G06.24 Software Installation and Upgrade Guide—528593-005
B-21
Install the DSM/SCM Client Software
Install the DSM/SCM Client Software
1. Using Windows Explorer, double-click Setup.exe.
A DSM/SCM Setup screen appears, and an Enter Object Manager Server Class
dialog box appears with the default OM-001.
2. Click Next to accept the default.
The Enter Software Product Group Type (shared or private) dialog box appears.
VST010.vsd
VST021.vsd
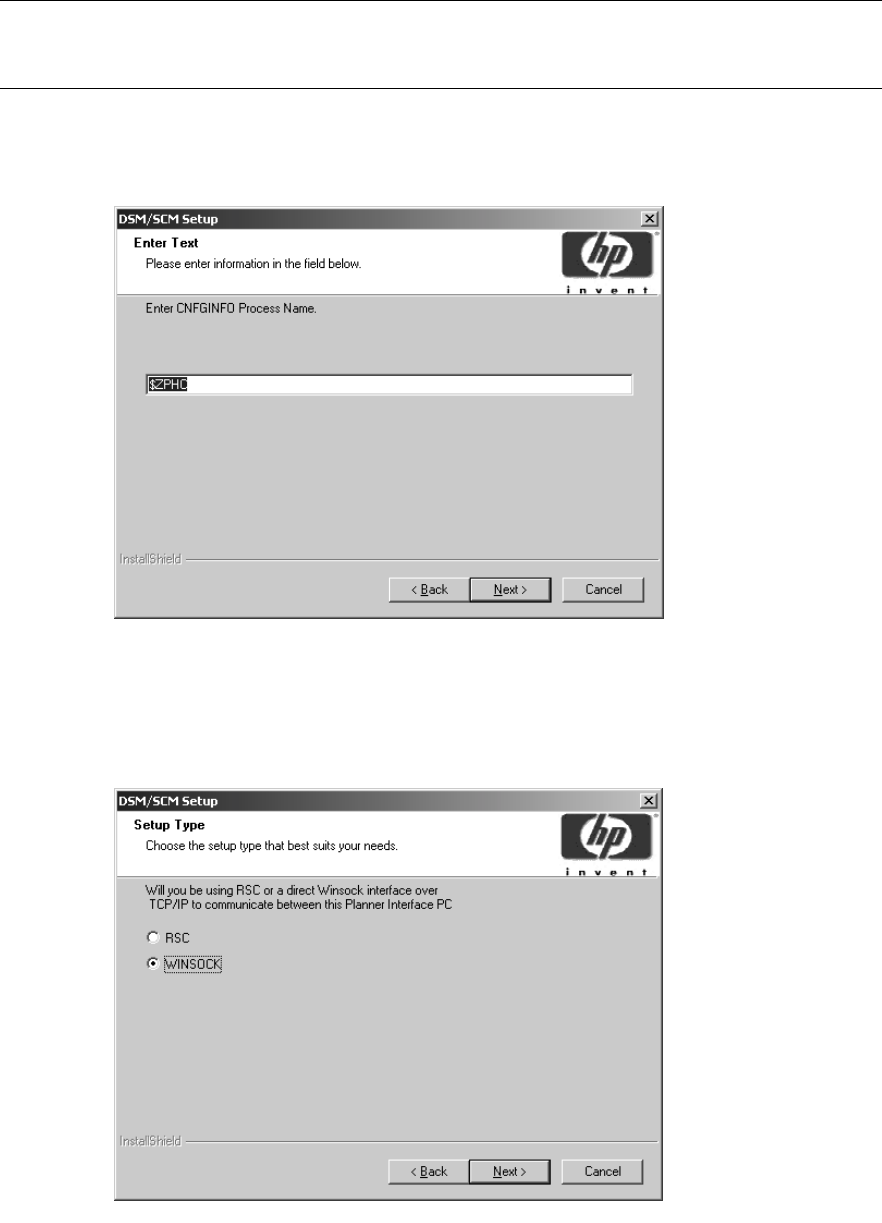
Installing the Latest DSM/SCM SPRs and Client
Software
G06.24 Software Installation and Upgrade Guide—528593-005
B-22
Install the DSM/SCM Client Software
3. Click Next to accept the default (private) or type in shared and click Next.
4. The Enter CNFGINFO Process Name dialog box appears with the default name
$ZPHC.
5. Click Next to accept the default.
The Setup Type dialog box appears.
6. Check that WINSOCK is selected. Click Next.
Note. Private software product groups can be used only by the planner who creates the
grouping. Shared software product groups can be used by other planners. For more
information on these options, see the DSM/SCM User’s Guide.
VST015.vsd
VST020.vsd
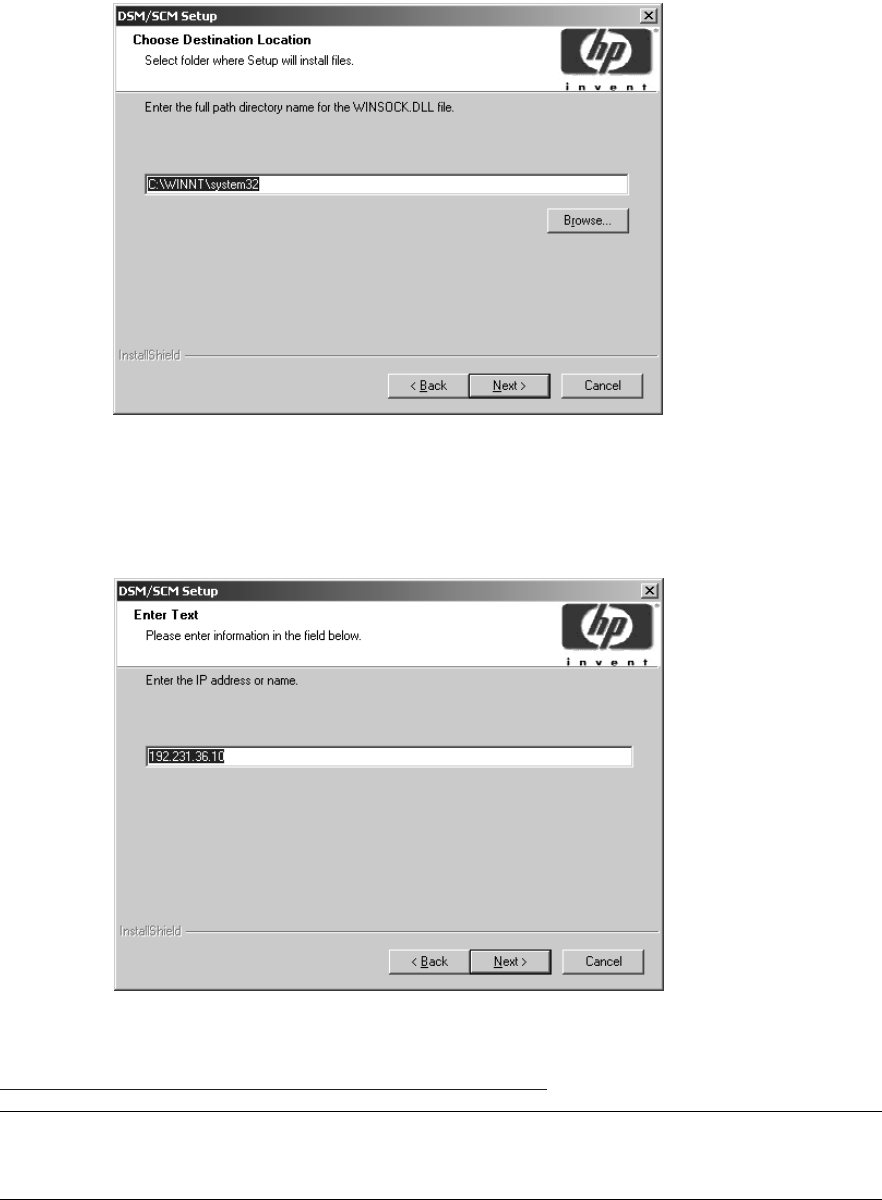
Installing the Latest DSM/SCM SPRs and Client
Software
G06.24 Software Installation and Upgrade Guide—528593-005
B-23
Install the DSM/SCM Client Software
The Choose Destination Location dialog box appears with the default path
displayed, based on your operating system (either Windows 2000 or Windows XP
Professional):
7. Click Next to accept the default.
You are now prompted to enter an IP address.
8. Type the IP address for the host system with which DSM/SCM communicates (see
Determine the Current IP Address and Port Number on page B-19), and click Next.
Note. If DSM/SCM is not currently configured to communicate with a host system, accept
the default IP address. You can always change this value later by editing the dsmscm.ini
file.
VST025.vsd
VST030.vsd

Installing the Latest DSM/SCM SPRs and Client
Software
G06.24 Software Installation and Upgrade Guide—528593-005
B-24
Install the DSM/SCM Client Software
You are now prompted to enter an IP port number.
9. Type the IP port number for the Winsock service (see Determine the Current IP
Address and Port Number on page B-19), and click Next.
You are now prompted to enter the host system name.
10. Type the host system name (or \noname if DSM/SCM is not currently configured to
communicate with a host system), and click Next to continue.
Note. If DSM/SCM is not currently configured to communicate with a host system, accept
the default IP port number. You can always change this value later by editing the
dsmscm.ini file.
VST035.vsd
VST040.vsd
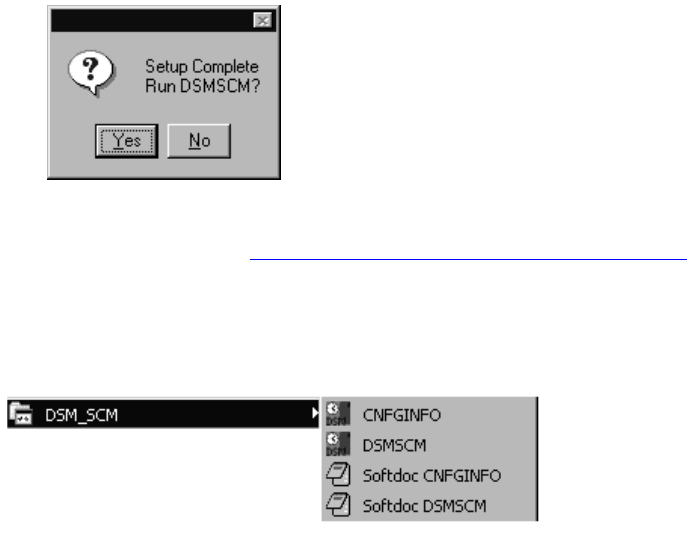
Installing the Latest DSM/SCM SPRs and Client
Software
G06.24 Software Installation and Upgrade Guide—528593-005
B-25
Create an Emergency Repair Disk (ERD)
You are asked if you would like to run DSM/SCM.
11. Click No and go to Create an Emergency Repair Disk (ERD) on page B-25.
The setup program adds the DSM/SCM client software to the
Windows Start>Programs menu. You can start the DSM/SCM Planner Interface or
CNFGINFO tool from the Start>Programs>DSM_SCM submenu. For example:
Create an Emergency Repair Disk (ERD)
HP recommends that you create an Emergency Repair Disk (ERD) after upgrading
system console software. The ERD saves repair information that can be used to
reconstruct Windows system files, system configuration, and startup environment
variables if they become corrupted.
You might need two disks for the following procedure (in which case you will be
prompted when you need to insert the second disk).
To create a new ERD or to update an existing ERD:
1. Select Start>Programs>Accessories>System Tools >Backup.
2. If you are running Windows XP:
•If the Backup utility is set on Wizard Mode, the Backup or Restore Wizard
dialog box appears. Follow the instructions on the screen to back up files and
settings and create an ERD.
•If the Backup utility is set on Advanced Mode, click Automated System
Recovery Wizard and follow the instructions on the screen to back up files
and settings and create an ERD.
VST045.vsd
VST130.vsd
Installing the Latest DSM/SCM SPRs and Client
Software
G06.24 Software Installation and Upgrade Guide—528593-005
B-26
Create an Emergency Repair Disk (ERD)
3. If you are running Windows 2000:
a. The Backup utility appears. Click Emergency Repair Disk.
b. You are prompted to insert a disk into drive A.
c. Label a disk Emergency Repair Disk and insert it into drive A. Click OK.
d. The Emergency Repair Disk utility copies repair information to the disk. When
this process finishes, you are informed that the repair information was saved
successfully.
e. Click OK to quit the Backup utility.
You have created an ERD. Remove the disk from the drive and store it in a secure
location.

G06.24 Software Installation and Upgrade Guide—528593-005
C-1
C
Updating SWAN Concentrator CLIP
Firmware
If necessary, you can update the SWAN or SWAN 2 concentrator CLIP firmware after
you have completed a system load of the new RVU. You can use either the OSM
Service Connection or TSM, depending on which one you have installed. TSM
provides a guided procedure for updating firmware for both SWAN and SWAN 2. OSM
provides a Multi-Resource Actions dialog box. If you have a SWAN or SWAN 2
concentrator connected to your NonStop S-series server, you can update CLIP
firmware in one of three ways:
•Using the SWAN Fast Firmware Update Guided Procedure (Recommended if
Using TSM) on page C-2. (Released in the G06.13 RVU, HP recommends this
method if using TSM.) This procedure, accessed through the TSM Service
Application, automates many of the required tasks involved in updating SWAN
CLIP firmware. The guided procedure:
°Automatically stops all CLIPs before updating the firmware
°Updates all or a specified collection of CLIPs simultaneously
°Restarts (optional) all CLIPs after the firmware update completes.
(The SWAN Fast Firmware Update Guided procedure essentially performs all
steps documented starting with Using the TSM Firmware Update Dialog Box to
Update SWAN Firmware on page C-8.)
•Using the TSM Firmware Update Dialog Box to Update SWAN Firmware on
page C-8.
•Using the OSM Multi-Resource Actions Dialog Box to Update SWAN and SWAN 2
Firmware on page C-18. If you have OSM installed and configured, you can update
SWAN and SWAN 2 CLIP firmware by using the Multi-Resource Actions dialog
box.
For troubleshooting information on SWAN or SWAN 2, see the SWAN Concentrator
and WAN Subsystem Troubleshooting Guide, Section 4.
Note. If the SWAN Fast Firmware Update Guided Procedure fails, try updating the firmware by
Using the TSM Firmware Update Dialog Box to Update SWAN Firmware on page C-8.
Caution. When using the SWAN Fast Firmware Update, T7945AAX must be resident or WAN
problems can result. T7945ABB is needed if using SWAN 2. To avoid possible path down and
post failure false dial-outs for SWAN or SWAN 2, T7953AAL, or later, is also necessary.
Note. If you have to fall back to a previous G-series RVU, do not revert back to previous
versions of SWAN CLIP firmware. If you must fall back, keep the firmware change.
Updating SWAN Concentrator CLIP Firmware
G06.24 Software Installation and Upgrade Guide—528593-005
C-2
Using the SWAN Fast Firmware Update Guided
Procedure (Recommended if Using TSM)
Yellow caution symbols might appear on enclosure icons and on SWANs during the
firmware update. These caution symbols should disappear after you have completed
the SWAN update.
Using the SWAN Fast Firmware Update Guided
Procedure (Recommended if Using TSM)
Follow the instructions in the guided procedure. For online help, open the Help menu
or click Help in any of the procedure’s dialog boxes. Before beginning, see Support
Note S04029.
1. Log on to the TSM Service Application.
2. Do one of the following:
•Select Display >SWAN Fast Firmware Update.
•Use the Actions dialog box:
a. Right-click the SWAN collection in the tree pane and select Actions from
the shortcut menu.
b. In the Actions dialog box, select the Fast Firmware Update action for the
SWAN collection object.
c. Click Perform action.
The SWAN Fast Firmware Update guided procedure is launched. For example:

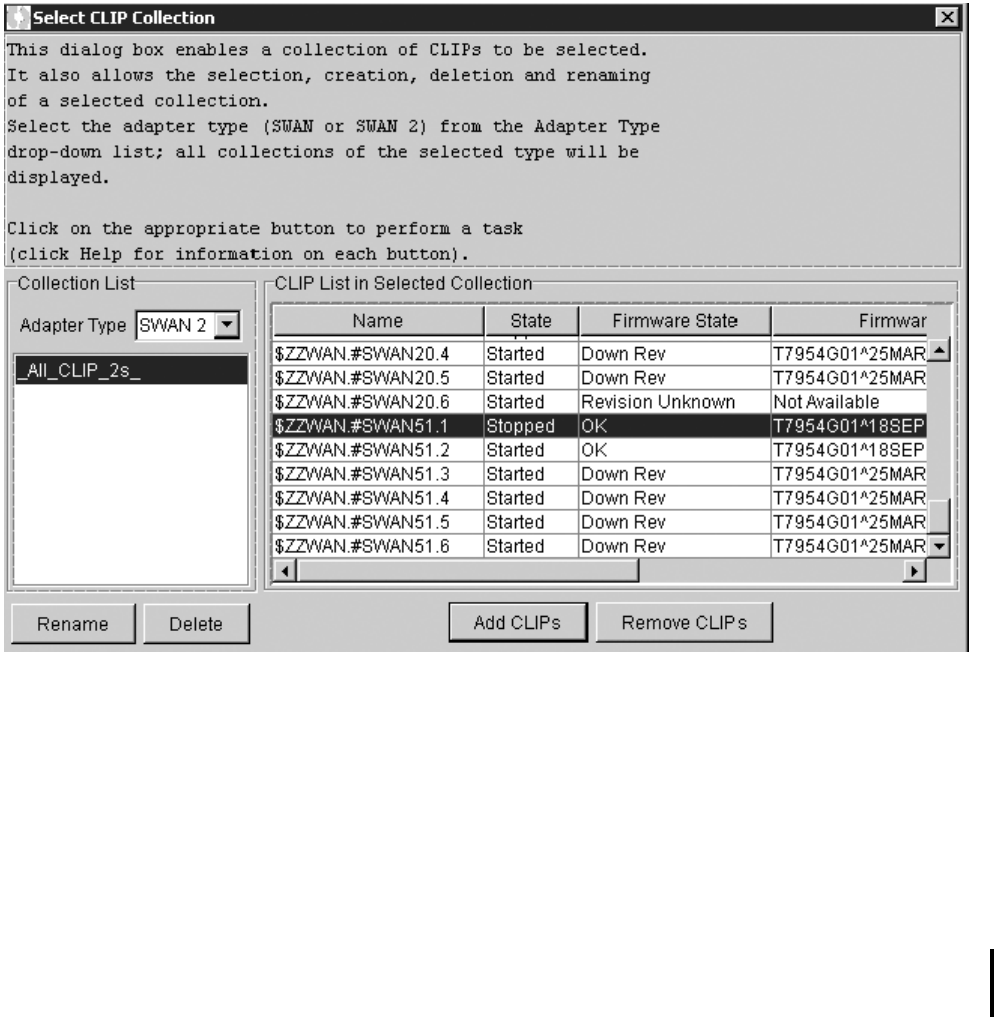
Updating SWAN Concentrator CLIP Firmware
G06.24 Software Installation and Upgrade Guide—528593-005
C-4
Using the SWAN Fast Firmware Update Guided
Procedure (Recommended if Using TSM)
5. In the Select CLIP Collection dialog box, select the CLIPs to be updated:
a. From the Adapter Type list, select either SWAN or SWAN2.
b. Select _All_CLIP_2s_if adapter is SWAN2 or _All_CLIP_s if adapter is
SWAN.
c. From the CLIP List in Selected Collection, select the required CLIPs and click
Add CLIPs.
d. Click Use.
The Select Action dialog box appears.
6. When the Select Action dialog box appears, select the CLIPs whose progress
should be monitored by selecting Activity state options.
The firmware file is automatically selected from $SYSTEM.CSSnn. Leave the
default (blank) if you have installed the new RVU.
7. To access SWAN firmware located in another subvolume, click Specify Other as
shown and type in the correct firmware location and click OK. For example:
vst864.vsd
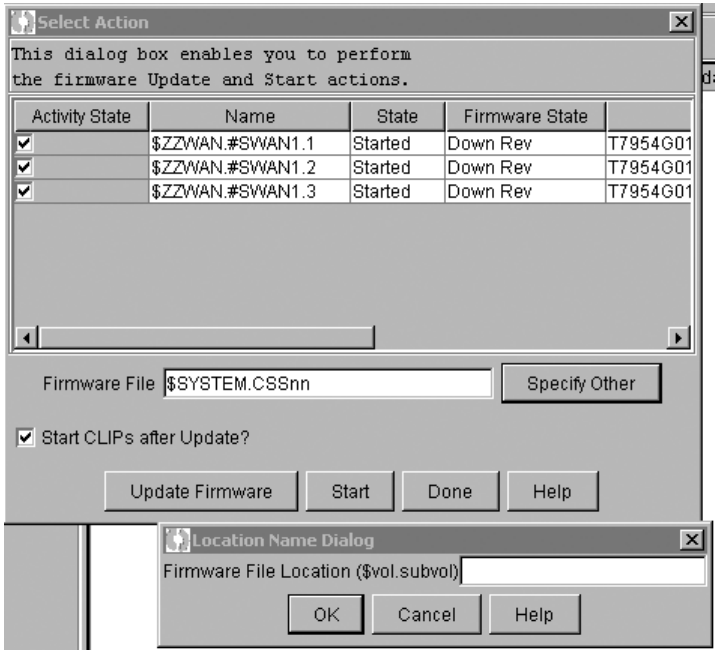
Updating SWAN Concentrator CLIP Firmware
G06.24 Software Installation and Upgrade Guide—528593-005
C-5
Using the SWAN Fast Firmware Update Guided
Procedure (Recommended if Using TSM)
8. If you want to start the CLIPs after firmware, select Start CLIPs after Update?
Otherwise, click Start after the SWAN CLIP firmware update is complete.
9. Click Update Firmware. TSM stops the SERVER objects and initiates a firmup of
the CLIPs. The Firmware Update Progress Dialog box appears.
10. In the Firmware Update Progress dialog box, monitor the SWAN CLIP update
progress.The Action Event dialog box displays the successful completion:
vst835.vsd
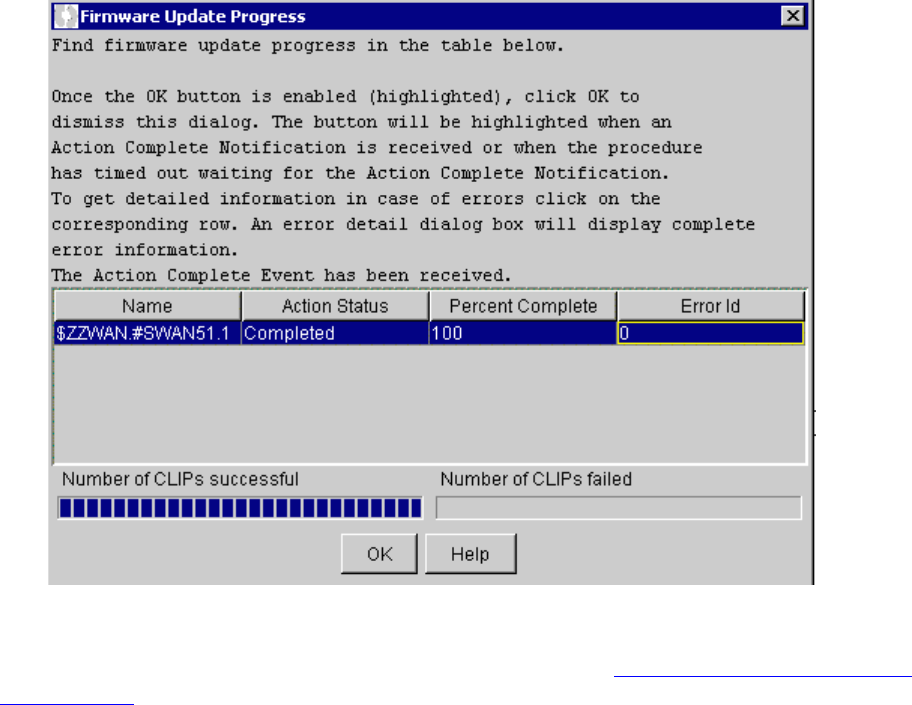
Updating SWAN Concentrator CLIP Firmware
G06.24 Software Installation and Upgrade Guide—528593-005
C-6
Using the SWAN Fast Firmware Update Guided
Procedure (Recommended if Using TSM)
11. When you have finished updating firmware, select OK.
If you have problems with the Fast Firmware Update, see If the SWAN Fast Firmware
Update Fails on page C-7.
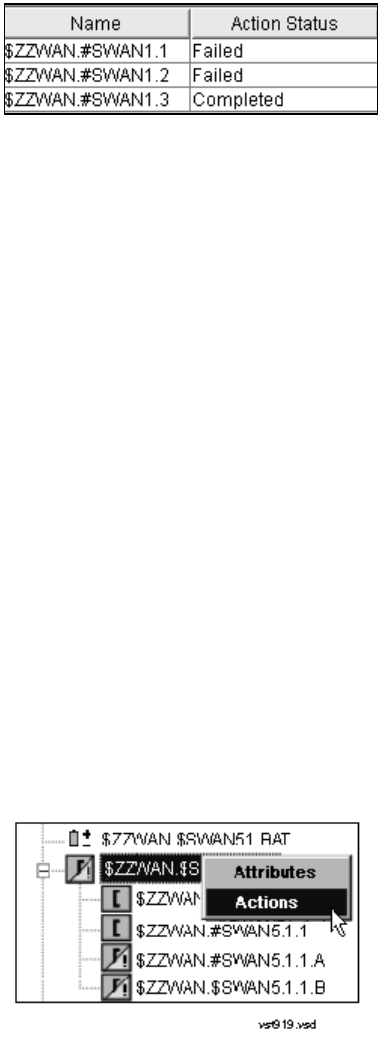
Updating SWAN Concentrator CLIP Firmware
G06.24 Software Installation and Upgrade Guide—528593-005
C-7
If the SWAN Fast Firmware Update Fails
If the SWAN Fast Firmware Update Fails
If any CLIPs fail, you are notified in the Firmware Update Progress dialog box:
1. To review the reason for the failure, select the corresponding row. A message
similar to the following might appear:
Object Name: $ZZWAN.#SWAN1.2
Action State: Failed
Error Id: 1083
Error Description: Problem: A non-path error occurred.
Error Id: 1083.
Error Description : CLIP in STARTED state.
Recovery: None.
Object Name: $ZZWAN.#SWAN1.1
Action State: Failed
Error Id: 1083
Error Description: Problem: A non-path error occurred.
Error Id: 1083.
Error Description : CLIP in STARTED state.
Recovery: None.
2. Using the Error Id number, check online help for recovery information.
3. Reissue the Fast Firmware Update only for those CLIPs for which the firmware
update failed by selecting the Down Rev option from the FFU procedure
4. If the update fails again, before initiating the Fast Firmware Update guided
procedure again, use SCF or TSM to stop the SWAN adapter:
a. In TSM, right-click the SWAN collection in the tree pane and select Actions
from the shortcut menu. For example:
b. In the Actions dialog box, select Stop and click Perform action. The SWAN
adapter object is stopped.
vst903.vsd

Updating SWAN Concentrator CLIP Firmware
G06.24 Software Installation and Upgrade Guide—528593-005
C-8
Using the TSM Firmware Update Dialog Box to
Update SWAN Firmware
To stop the SWAN adapter object, you can also enter the SCF STOP
command. For example:
12> SCF STOP ADAPTER $ZZWAN.#51, SUB ALL
c. Check if the SWAN adapter is stopped in TSM or use the SCF STATUS
SERVER command:
13> SCF STATUS SERVER $ZZWAN.#51.*
5. After the SWAN objects are stopped, try to update the SWAN CLIPs again.
If you are still having trouble stopping the SWAN object, see Support Note S04029
and the SWAN Concentrator and WAN Subsystem Troubleshooting Guide, topic
“Correcting SWAN Concentrator Hardware Problems.”
If you still have trouble using the guided procedure, see the Step 3: Initiate the
Firmware Update Using TSM on page C-16 to update your SWAN firmware.
Using the TSM Firmware Update Dialog Box to
Update SWAN Firmware
The firmware version format of SWAN CLIPs running T7953AAN is:
T7954Vnn^ddmmmyyyy^AAN
Alert
If you need to fall back to a previous G-series RVU, do not revert back to
pre-T7953AAG versions of SWAN CLIP firmware or a pre-T7909AAK version of the
WANBOOT product. The newer product versions are compatible with the earliest
G-series RVUs and contain important fixes and enhancements.
Before Updating SWAN CLIP Firmware
1. List the Names of the SWAN Concentrators and CLIPs.
2. Check Location and Version of New SWAN CLIP Firmware.
3. Check Firmware Version Currently Running in SWAN CLIPs.
Note. The instructions in this appendix require that you have performed a system load of the
G06.24 RVU and, as a result, are running the latest version of the WANBoot process (T7909)
and its requisites (WANMgr [T8365], WAN SCF Product Module [T7925], and ConMgr
[T7922]).

Updating SWAN Concentrator CLIP Firmware
G06.24 Software Installation and Upgrade Guide—528593-005
C-9
List the Names of the SWAN Concentrators and
CLIPs
List the Names of the SWAN Concentrators and CLIPs
Use the TSM Service Application or SCF to list the names of the SWAN concentrators
and CLIPs in your system:
• Using the TSM Service Application:
•Or (using SCF) enter:
4> scf names adapter $zzwan.#*
SCF - T9082G02 - (16OCT98) (25SEP98) - 09/08/1999 15:53:26 System \ELI
Copyright Tandem Computers Incorporated 1986 - 1998
WANMgr Names ADAPTER $ZZWAN.#*
ADAPTER
$ZZWAN.#S00
$ZZWAN.#S01
VST410.vsd
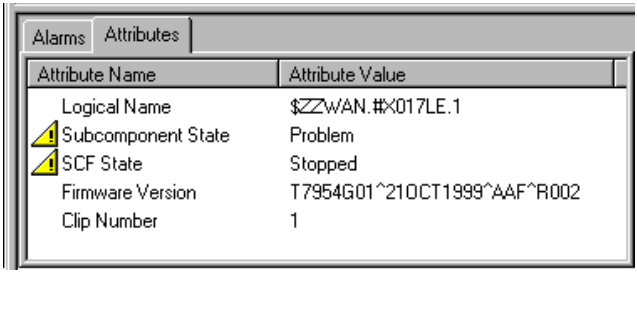
Updating SWAN Concentrator CLIP Firmware
G06.24 Software Installation and Upgrade Guide—528593-005
C-10
Check Location and Version of New SWAN CLIP
Firmware
Check Location and Version of New SWAN CLIP Firmware
The SWAN firmware object code file is a 510 disk file that resides on a NonStop
S-series server and is downloaded to the SWAN concentrator CLIP.
Check the location and version of the SWAN firmware object code file for the G06.24
RVU. At a TACL prompt, enter the VPROC command:
VPROC $SYSTEM.CSSnn.C7953P00
where nn is the number specified during the Build/Apply phase of installing the
G06.24 RVU. For example:
9> vproc $system.css04.c7953p00
VPROC - T9617G03 - (30 MAR 1999) SYSTEM \ELI Date 22 SEP 2000, 22:47:24
COPYRIGHT TANDEM COMPUTERS INCORPORATED 1986 - 1995
$SYSTEM.CSS04.C7953P00
Binder timestamp: 23JUL2000 17:04:56
Version procedure: T7954G01^28JUN2000^AAI^R004
Version procedure: T7953G01^28JUN2000^AAI^R004
Version procedure: T5814G01^28JUN2000^AAI^R004
Version procedure: T7955F40^28JUN2000^AAI^R004
Version procedure: T7848F40^28JUN2000^AAI^R004
Check Firmware Version Currently Running in SWAN CLIPs
Determine the firmware version currently running in each SWAN CLIP in one of these
ways:
•Use the TSM Service Application to show the attributes of each CLIP. For example:
VST400.vsd
Updating SWAN Concentrator CLIP Firmware
G06.24 Software Installation and Upgrade Guide—528593-005
C-11
Check Firmware Version Currently Running in
SWAN CLIPs
•Use the SCF STATUS SERVER $ZZWAN.#conc-name.clip-num, DETAIL
command. For example:
$SYSTEM ZWANTOOL 14> scf status server $zzwan.#s01.3, detail
SCF - T9082G02 - (12JUL99) (15JUN99) - 11/17/1999 09:19:28 System \ELI
Copyright Compaq Computer Corporation 1986 - 1999
WAN Manager STATUS SERVER for CLIP \ELI.$ZZWAN.#S01.3
State :......... STARTED
Path A..........: CONFIGURED
Path B..........: CONFIGURED
Number of lines. 2
Line............ 0 : FREE
Line............ 1 : $X25131
Clip VPROC........ T7954G01^21OCT1999^AAF^R002
PATH A DETAILS :
Last BOOTP Time :17 Nov 1999, 8:18:52.179
Status :......... UP
Status changed at:17 Nov 1999, 8:21:25.996
.
.
•Use the WANLNCK utility (part of the SWAN Tools product placed in the
ZWANTOOL subvolume). A DEVICE must be configured and in the STARTED
state on the CLIP for this purpose. For example:
$SYSTEM ZWANTOOL 12> run wanlnck line $x25131,diag $system.css04.d8155p00
-- Configuration Summary for LINE: \ELI.$X25131 --
WANMgr Obj Name: $ZZWAN.#X25131
LINE Name : $X25131
DEVICE State : Started
.
.
ADAPTER Name : $ZZWAN.#S01
TRACKID : X017KK
CLIP Number : 3, Line Number : 1
KERNELCode : \ELI.$SYSTEM.CSS04.C7953P00
VPROC from File: T7954G01^21OCT99^AAF^R002, EOF: 556032, SECURITY: NUNU
SNMPCode : \ELI.$SYSTEM.CSS04.C7849P00
VPROC from File: T7849F40^15APR97^31MAR97, EOF: 109568, SECURITY: NUNU
ADAPTER State : Started
SERVER State : Started
TASK State : Started
.
.
VPROC from CLIP: T7954G01^21OCT99^AAF^R002
.
.

Updating SWAN Concentrator CLIP Firmware
G06.24 Software Installation and Upgrade Guide—528593-005
C-12
Summary of SWAN Concentrator CLIP Firmware
Update Steps (Using TSM)
Summary of SWAN Concentrator CLIP
Firmware Update Steps (Using TSM)
Required for Upgrading From T7953AAG and Later Firmware
Versions
Step 1: Stop the SWAN Concentrator and CLIPs
Step 2: Point SWAN Concentrators to the New Firmware Object Code File
Step 3: Initiate the Firmware Update Using TSM
Step 4: Start the SWAN Concentrator and CLIPs
Step 5: Verify That the SWAN CLIPs Are Running the Latest Firmware
Step 6: Start Stopped Lines (If Necessary)
For information on starting and stopping devices, displaying attributes, and updating
firmware through TSM, see the TSM Service Application online help.
For complete SCF command syntax for the WAN subsystem, see the WAN Subsystem
Configuration and Management Manual.
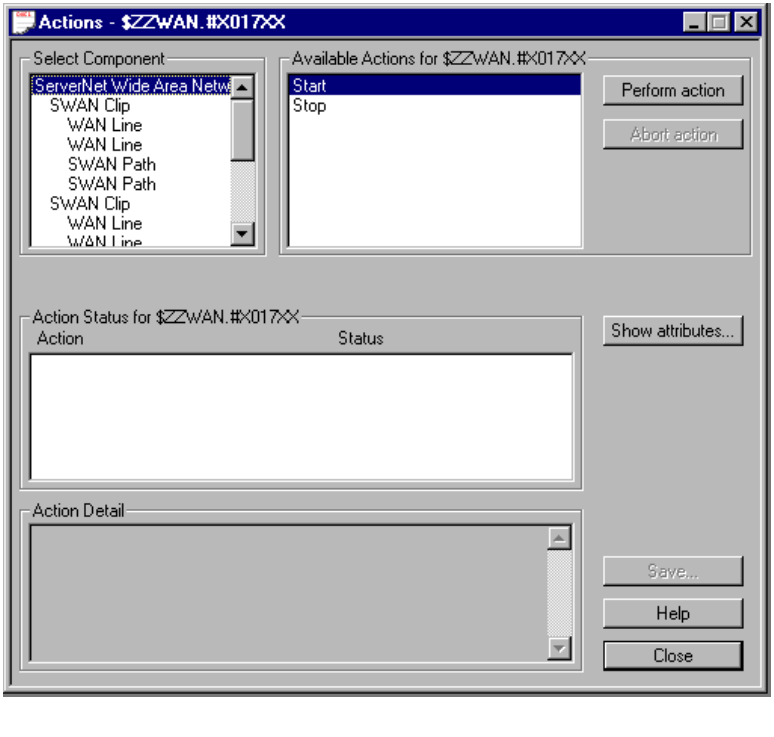
Updating SWAN Concentrator CLIP Firmware
G06.24 Software Installation and Upgrade Guide—528593-005
C-13
Step 1: Stop the SWAN Concentrator and CLIPs
Step 1: Stop the SWAN Concentrator and CLIPs
Use the TSM Service Application or SCF to stop the SWAN concentrators and
terminate operation of all CLIPs. For example:
Or (using SCF), enter:
5> SCF STOP ADAPTER $ZZWAN.#S01, SUB ALL
VST420.vsd
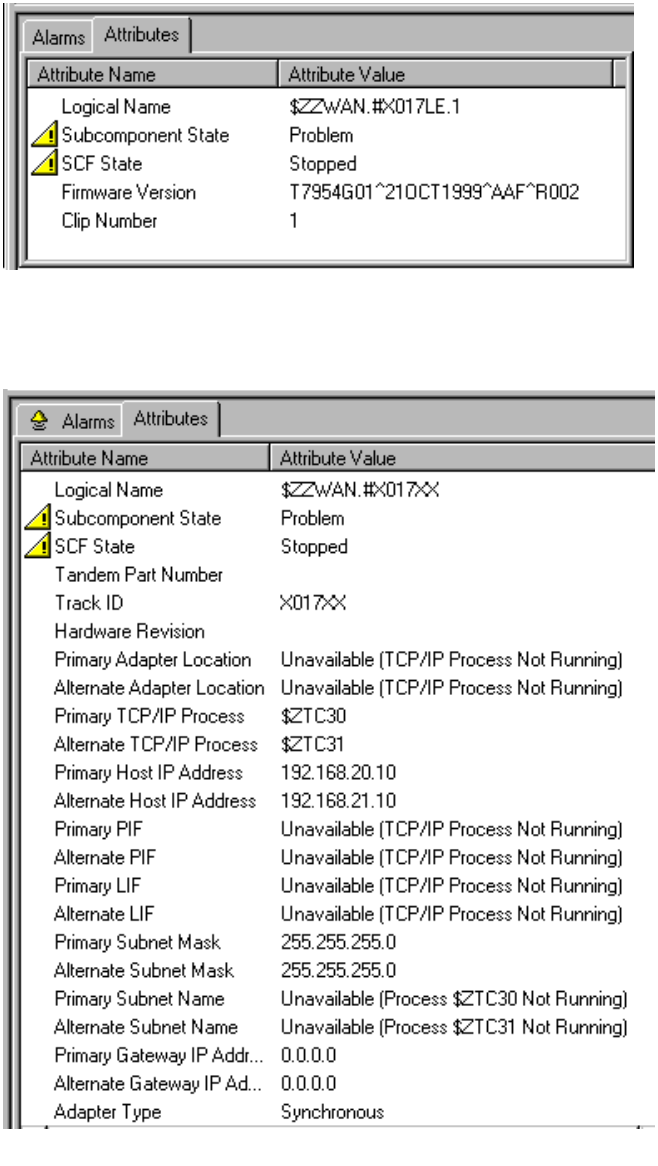
Updating SWAN Concentrator CLIP Firmware
G06.24 Software Installation and Upgrade Guide—528593-005
C-14
Step 1: Stop the SWAN Concentrator and CLIPs
Verify That CLIPs Are Stopped
Use the TSM Service Application or SCF to check that SWAN concentrators and
CLIPs are in the STOPPED state. For example, to see the state of the SWAN CLIPs:
To see the state of the SWAN concentrators:
VST400.vsd
VST422.vsd

Updating SWAN Concentrator CLIP Firmware
G06.24 Software Installation and Upgrade Guide—528593-005
C-15
Step 2: Point SWAN Concentrators to the New
Firmware Object Code File
Or (using SCF), enter:
2-> status server $zzwan.#s01.*
WAN Manager STATUS SERVER for CLIP \ELI.$ZZWAN.#S01.1
State :......... STOPPED
.
.
WAN Manager STATUS SERVER for CLIP \ELI.$ZZWAN.#S01.2
State :......... STOPPED
.
.
WAN Manager STATUS SERVER for CLIP \ELI.$ZZWAN.#S01.3
State :......... STOPPED
.
.
Step 2: Point SWAN Concentrators to the New Firmware Object
Code File
Change the default location for the SWAN firmware object code file with the SCF
ALTER ADAPTER, KERNELCODE command:
-> SCF ALTER ADAPTER $ZZWAN.#conc-name,
KERNELCODE swan-kernel-micode-file-name
By default, the SWAN firmware object file (C7953P00) resides in the
$SYSTEM.CSSnn subvolume (nn is the number of the $SYSTEM.SYSnn where the
new operating system image resides).
For example, to specify SYS04 in the DSM/SCM Build/Apply request for G06.24, enter:
SCF ALTER ADAPTER $ZZWAN.#S01, KERNELCODE $SYSTEM.CSS04.C7953P00
The SCF ALTER ADAPTER, KERNELCODE command changes the firmware file
location for all CLIPs associated with a SWAN concentrator.
Note. The SWAN concentrators (ADAPTER object) must be in the STOPPED state (as
performed in Step 5) for this command to work.
Note. When you specify an alternate firmware file location from the TSM Service Application
Specify Firmware File Location dialog box (see Step 8 on page C-17), the location is
changed only for those CLIPs being updated at the time.
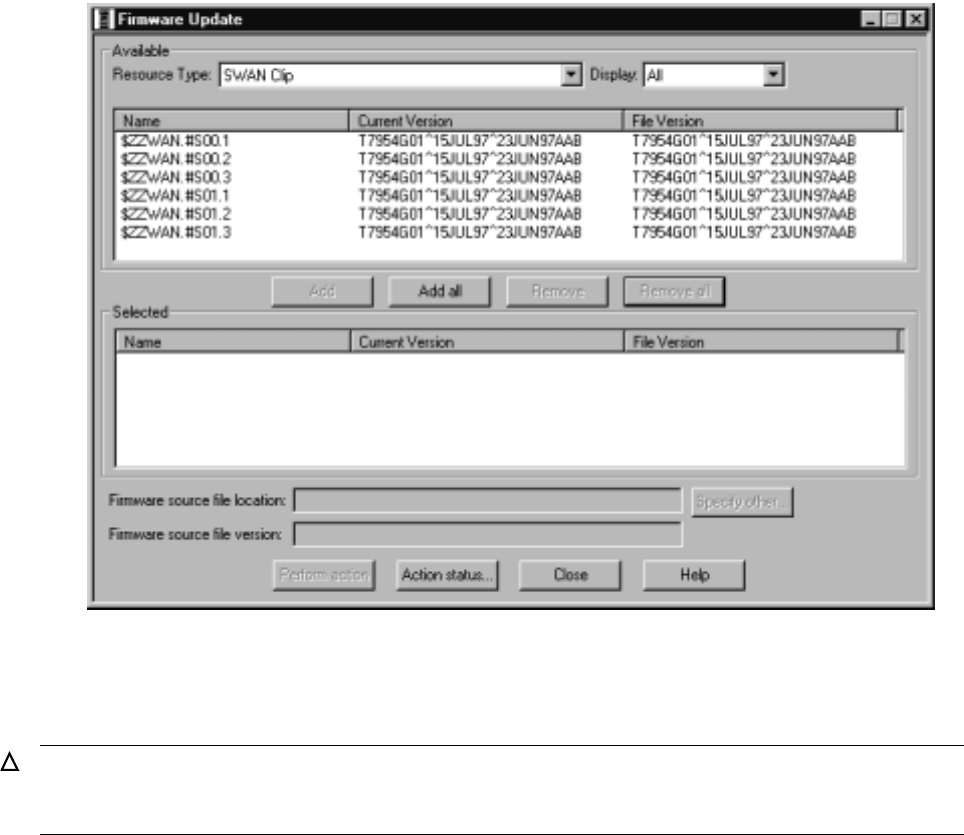
Updating SWAN Concentrator CLIP Firmware
G06.24 Software Installation and Upgrade Guide—528593-005
C-16
Step 3: Initiate the Firmware Update Using TSM
Step 3: Initiate the Firmware Update Using TSM
1. Log on to the TSM Service Application.
2. Select Display> Firmware update.
The Firmware Update dialog box appears.
3. From the Resource Type list, select SWAN Clip.
4. From the Display list, select All.
The SWAN CLIPs are listed in the Available box:
5. Select all SWAN CLIPs with a current file version that does not match the
T7953AAN version (T7954Vnn^ddmmmyyyy^AAN).
6. Click Add to move the CLIPs to the Selected box.
7. Click Specify other.
The Specify Firmware File Location dialog box appears.
Caution. If you are updating from a pre-T7953AAG firmware version, you must perform a
firmware update for all CLIPs on each SWAN concentrator. The firmware update should be
performed in parallel for a maximum of six SWAN CLIPs for each NonStop TCP/IP pair.
VST425.vsd
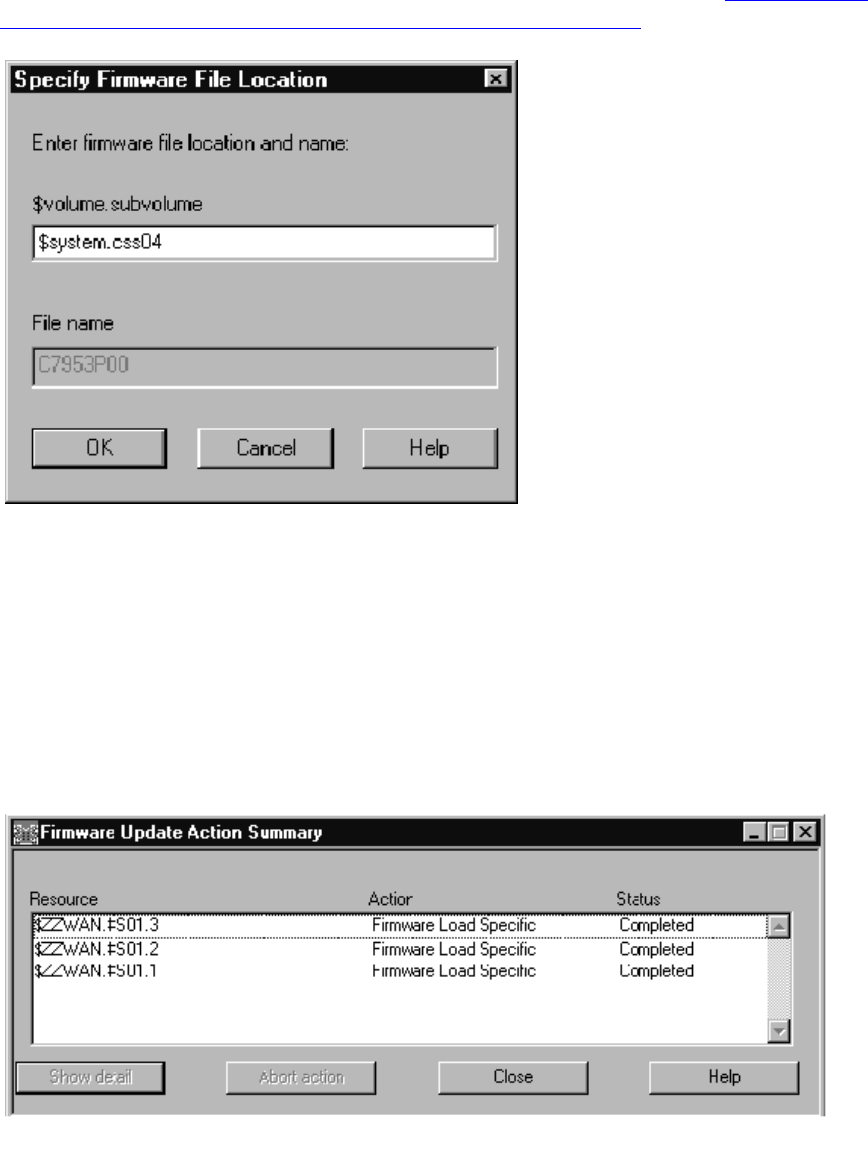
Updating SWAN Concentrator CLIP Firmware
G06.24 Software Installation and Upgrade Guide—528593-005
C-17
Step 3: Initiate the Firmware Update Using TSM
8. In the $volume.subvolume box, enter the new firmware file location (the value you
entered in the SCF ALTER ADAPTER, KERNELCODE command in Step 2: Point
SWAN Concentrators to the New Firmware Object Code File). For example:
9. Click OK.
10. Click Yes when a message appears, warning that you have specified a
nonstandard firmware file location.
11. In the Firmware Update dialog box, click Perform action.
The Firmware Update Action Summary dialog box appears and displays
Completed when the SWAN CLIPs have been updated. For example:
12. When all SWAN CLIPs have been successfully updated, close the Firmware
Update Action Summary and Firmware Update dialog boxes.
VST430.vsd
VST440.vsd

Updating SWAN Concentrator CLIP Firmware
G06.24 Software Installation and Upgrade Guide—528593-005
C-18
Step 4: Start the SWAN Concentrator and CLIPs
Step 4: Start the SWAN Concentrator and CLIPs
After the SWAN CLIP firmware has been updated, use the TSM Service Application or
SCF to start the updated SWAN concentrator and CLIPs.
Step 5: Verify That the SWAN CLIPs Are Running the Latest
Firmware
Verify that the updated SWAN CLIPs are in fact running at least the firmware version
by using one of the methods described under Check Firmware Version Currently
Running in SWAN CLIPs on page C-10.
Step 6: Start Stopped Lines (If Necessary)
Starting the SWAN concentrators in Step 4: Start the SWAN Concentrator and CLIPs
should bring all lines into the STARTED state. Check the status of the lines and, if
necessary, start any stopped lines on the started CLIPs for each SWAN concentrator.
Using the OSM Multi-Resource Actions Dialog
Box to Update SWAN and SWAN 2 Firmware
For SWAN firmware, you can use the OSM Multi-Resource Actions dialog box to select
any or all CLIPs. Then, you can stop all selected CLIPs, update their firmware, then
start them again. You can also right-click on the CLIP, select Actions, and select
Firmware Update from the Action list.
You must be running a G06.08 or later RVU, have already installed the SWAN firmware
version T7953AAG or later, and have installed and configured OSM.
For troubleshooting information on SWAN or SWAN 2, see section 4, “Correcting
SWAN Concentrator Hardware Problems” in the SWAN Concentrator and WAN
Subsystem Troubleshooting Guide.
Summary of Steps for Upgrading From T7953AAG and Later
SWAN Firmware Versions (Using OSM)
You cannot update the SWAN concentrator firmware unless you have installed and
configured OSM.
•Step 1: Stop the SWAN Concentrator and CLIPs
•Step 2: Check the Location and Version of the SWAN Firmware
•Step 3: Initiate the Firmware Update
•Step 4: Start the SWAN Concentrator and CLIPs
For information on starting and stopping devices, displaying attributes, see the OSM
Service Connection online help.
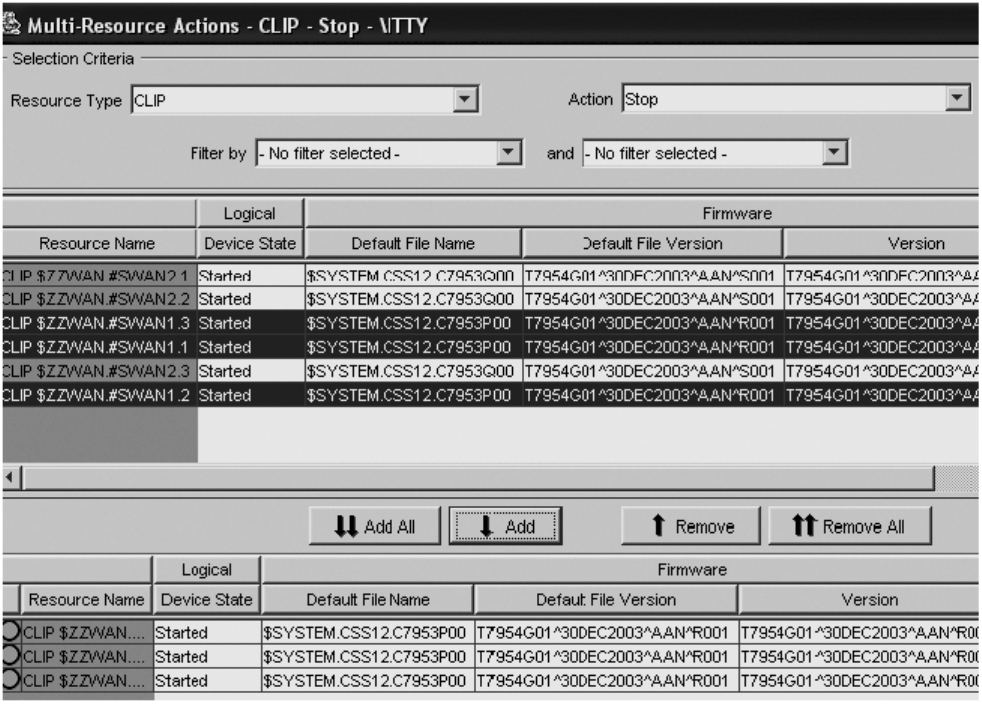
Updating SWAN Concentrator CLIP Firmware
G06.24 Software Installation and Upgrade Guide—528593-005
C-19
Step 1: Stop the SWAN Concentrator and CLIPs
Step 1: Stop the SWAN Concentrator and CLIPs
1. Select Display>Multi-Resource Actions. The Multi-Resource Actions dialog box
appears.
2. From the Resource Type list, select CLIP.
3. From the Actions menu, select Stop.
4. Select the SWAN CLIPS you want to stop and click Add or Add all. The selected
CLIPs are added. Note that they are still in the Started state.
5. Click Perform action.
This message appears:
VST960.vsd
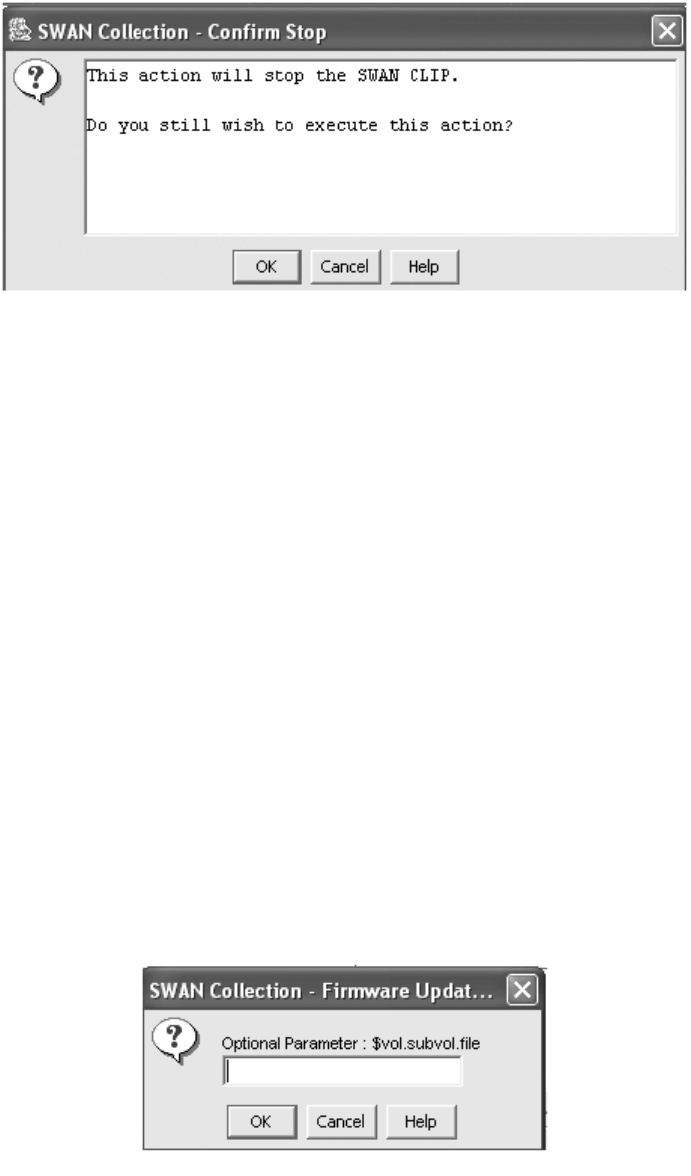
Updating SWAN Concentrator CLIP Firmware
G06.24 Software Installation and Upgrade Guide—528593-005
C-20
Step 2: Check the Location and Version of the
SWAN Firmware
6. Select OK.
7. The Progress list shows the status of the CLIP action. Wait until all the CLIPs are
stopped before proceeding.
Step 2: Check the Location and Version of the SWAN Firmware
In the OSM Service Connection, look under the Firmware heading in the Attribute pane
for SWAN CLIPS. The location and the version of the SWAN firmware is displayed.
The location and version of the SWAN firmware object code file for the G06.24 RVU is:
$SYSTEM.CSSnn.C7953P00
Step 3: Initiate the Firmware Update
1. From the Actions menu, select Firmware Update.
2. Click Add or Add all.
3. Click Perform Action.
4. Select OK when the SWAN Firmware Update Dialog box appears.
VST951.vsd
VST951.vsd
Updating SWAN Concentrator CLIP Firmware
G06.24 Software Installation and Upgrade Guide—528593-005
C-21
Step 3: Initiate the Firmware Update
5. Use the $SYSTEM.CSSnn subvolume and filename (CP7953P00) created during
the most recent DSM/SCM Build/Apply. Because you have just loaded the new
RVU, the SWAN firmware location should point to the correct subvolume and file
version. Click OK. However, if you have performed a Build/Apply for a new SWAN
firmware SPR, specify that location and select OK.
6. The Progress bar shows the number of CLIPs running and the number of CLIPs
that have been updated (passed). Any CLIPs that fail are also noted. Select Help
for more information. Under Resource Name, a green checkmark appears besides
all of those CLIPS that have been successfully updated. At this point, the CLIP
Firmware Version might display “Not Available” and the Compare State might
display “Unknown”.
7. If the Failed column displays a failed action on a CLIP, select Action Summary.
The Action Status Summary window appears with information about recent actions,
including their status and their overall progress
a. Select the CLIP action that failed.
b. Select Details or right click.
c. Correct the problem. See If a CLIP Fails to Update (Using OSM) on page C-22.
If you still have problems with the SWAN CLIP updating, see the WAN
Concentrator and WAN Subsystem Troubleshooting Manual, section 4.
When the SWAN CLIPs have been updated, you can then start them. See Step 4: Start
the SWAN Concentrator and CLIPs on page C-22.
VST961.vsd
Updating SWAN Concentrator CLIP Firmware
G06.24 Software Installation and Upgrade Guide—528593-005
C-22
Step 4: Start the SWAN Concentrator and CLIPs
Step 4: Start the SWAN Concentrator and CLIPs
1. With the Multi-Resource Actions dialog box still open, from the Action list, select
Start.
2. Click Add or Add all.
3. Click Perform Action.
The SWAN CLIPs should start. If they do not, see the SWAN Concentrator and WAN
Subsystem Troubleshooting Guide, section 4. You can also use SCF to start the CLIP
or use the Actions - CLIP dialog box.
If a CLIP Fails to Update (Using OSM)
Use the Actions dialog box to update an individual CLIP.
1. In OSM, right-click the SWAN collection and select Actions from the shortcut
menu.
2. From the Available Actions list, select Stop to stop the CLIP.
3. Select Perform action.
4. Click OK when the “Are you sure you want to do a stop?” message appears.
5. Monitor the progress in the Action Status menu.
a. If the CLIP is still in a Started state, use the SCF STATUS SERVER command
to verify status of the CLIP. For example:
13> SCF STATUS SERVER $ZZWAN.#SWAN2.1*
b. Enter the SCF STOP command similar to the following to stop the SWAN
adapter object:
3> SCF STOP ADAPTER $ZZWAN.#SWAN2.1, SUB ALL
Updating SWAN Concentrator CLIP Firmware
G06.24 Software Installation and Upgrade Guide—528593-005
C-23
If a CLIP Fails to Update (Using OSM)
c. Use the SCF STATUS SERVER command again to make sure that the SWAN
adapter object is stopped.
6. In the Available Actions list, select Firmware Update to update the firmware for
that particular CLIP.
7. Select Perform action.
8. Monitor the progress in the Action Status menu. To view details of the action, select
Details.
9. To start the individual CLIP, select Start from the Available Actions list and select
Perform action.
10. Monitor the progress in the Action Status menu. To view details of the action, select
Details.

G06.24 Software Installation and Upgrade Guide—528593-005
Glossary-1
Glossary
A0CINFO file. A distribution subvolume (DSV) file that contains information about a product
and each of its files, including product and file dependencies, how the files are used
and where they are placed, and on which type of processor the product runs. Every
product and SPR to be managed by the Distributed Systems Management/Software
Configuration Manager (DSM/SCM) is distributed in a subvolume, and that subvolume
must contain the product’s A0CINFO file.
A1CINFO file. A DSV file distributed with an SRL product that contains information about a
product and each of its files, including product and file dependencies, how the files are
used and where they are placed, and which type of processor the product runs on.
Every SRL product and SPR to be managed by DSM/SCM is distributed in a
subvolume, and that subvolume must contain the product's A1CINFO file. A1CINFO
files can only be received using a D30 or later product version of DSM/SCM.
A7CINFO file. A configuration file distributed with OSS products that contains information
about the contents of all pax (archive) files of an OSS DSV.
ALLPROCESSORS paragraph. A required paragraph in the CONFTEXT configuration file
that contains attributes defining the HP NonStop Kernel operating system image for all
system processors. The ALLPROCESSORS paragraph follows the optional DEFINES
paragraph.
Apply. The Distributed Systems Management/Software Configuration Manager (DSM/SCM)
action of executing the instructions contained in an activation package, such as placing
new software on the target system and taking a snapshot of the new target system.
Archive. A set of unstructured files used to collect the software received onto the host
system. Files received as input are placed in the Archive, and attributes of the files are
stored in the host database. The planner specifies the Archive location in the
Configuration Manager profile, using the Archive and Database Maintenance Interface.
Archive and Database Maintenance Interface. A block-mode interface run by a database
or system administrator at both the host system and target systems to perform
Distributed Systems Management/Software Configuration Manager (DSM/SCM)
maintenance functions.
Build. The Distributed Systems Management/Software Configuration Manager (DSM/SCM)
action of constructing the activation package, including the running of SYSGEN if
necessary. The inputs to the build are a software revision list of product versions, the
configuration file (CONFTEXT), the latest snapshot of the target system, and the
applicable DSM/SCM profiles.
CIIN. A command file in the SYSnn subvolume that is read and executed by the startup HP
Tandem Advanced Command Language (TACL) process after system load if the CIIN
file is specified in the CONFTEXT file and enabled in the TSM client software.

Glossary
G06.24 Software Installation and Upgrade Guide—528593-005
Glossary-2
CLIP
CLIP. See communications line interface processor (CLIP).
cluster switch. See HP NonStop™ Cluster Switch (model 6770) and HP NonStop™
ServerNet Switch (model 6780).
cold load. A synonym for system load or load (in the case of single processor load). System
load or load is the preferred term in this and other HP NonStop server system
manuals. See system load and load.
communications line interface processor (CLIP). The major programmable device within
the ServerNet wide area network (SWAN) concentrator, providing link-level protocol
and a software interface to the host. The CLIP stores and implements specific
communications protocols.
Compaq TSM client software. The component of the TSM package that runs on a system
console. The TSM client software consists of the TSM Low-Level Link Application, the
TSM Service Application, the TSM Notification Director Application, and the TSM EMS
Event Viewer Application.
Compaq TSM Low-Level Link Application. A component of the TSM client software. The
TSM Low-Level Link Application enables you to communicate with a NonStop S-series
server even when the HP NonStop Kernel operating system is not running. When the
operating system is running, you usually communicate with the server using the TSM
Service Application. See also Compaq TSM Service Application.
Compaq TSM Notification Director Application. A component of the TSM client software.
The TSM Notification Director Application receives notifications and incident reports
from an HP NonStop S-series server, displays them, and allows you to take action or
forward the incident reports to your service provider for resolution. The TSM
Notification Director Application can be configured to run on a system console at all
times, even when other TSM applications are not being used.
Compaq TSM server software. The component of the TSM package that runs on a
NonStop S-series server. When the NonStop Kernel operating system is running, the
TSM client software on a system console communicates with a server through the
TSM server software.
Compaq TSM Service Application. A component of the TSM client software. The TSM
Service Application enables you to communicate with a NonStop S-series server when
the NonStop Kernel operating system is running. When the operating system is not
running, communication must take place using the TSM Low-Level Link Application.
See also Compaq TSM Low-Level Link Application.
Dynamic Host Configuration Protocol (DHCP). An Internet protocol for automating the
configuration of computers that use TCP/IP. DHCP can automatically assign IP
addresses, deliver TCP/IP stack configuration parameters such as the subnet mask
and default router, and provide other configuration information such as the addresses
for printer, time, and news servers.

Glossary
G06.24 Software Installation and Upgrade Guide—528593-005
Glossary-3
dynamic-link library (DLL)
dynamic-link library (DLL). A collection of procedures whose code and data can be loaded
and executed at any virtual memory address, with run-time resolution of links to and
from the main program and other independent libraries. The same DLL can be used by
more than one process. Each process gets its own copy of DLL static data. Contrast
with shared run-time library (SRL).
dynamic loading. Loading and opening dynamic-link libraries under programmatic control
after the program is loaded and execution has begun.
Compaq TSM. Identifies a client or server software component used to manage or service
HP NonStop S-series servers.
CONFBASE file. In G-series RVUs, the basic system configuration database file, which is
stored on the $SYSTEM.SYSnn subvolume. See also configuration file.
CONFIG file. In G-series RVUs, the current system configuration database file, which is
stored on the $SYSTEM. ZSYSCONF subvolume. See also configuration file.
configuration file. In G-series RVUs, one of the following files: CONFBASE, CONFIG, one
or more saved configuration files named CONFxxyy and CONFSAVE. In RVUs prior
to G-series RVUs, the configuration file is either the OSCONFIG file used by the
Configuration Utility Program (COUP) or the CONFTEXT file used by SYSGENR.
configuration revision. A planner-defined set of software products and related
configuration information that the Distributed Systems Management/Software
Configuration Manager (DSM/SCM) can activate on a target system. Multiple
configuration revisions might exist on a target system. A configuration revision is made
up of the product versions named in its software revision list, its HP NonStop Kernel
operating system image, and the relevant profile items, such as the location of the
target subvolumes on the target system. It is created by a Build request and is included
in the activation package sent to the target system.
CONFxxyy file. In G-series RVUs, a saved configuration database file created by the
Subsystem Control Facility (SCF) and stored in the $SYSTEM.ZSYSCONF
subvolume. xxyy is the number you entered based on the version you entered as
x.y in SCF (xx indicates the base version and yy indicates the subversion). See
also configuration file.
CUSTFILE. An EDIT file included on every site update tape (SUT) as
$SYSTEM.Annnnnn.CUSTFILE, where nnnnnn is the system serial number of the
target system. The CUSTFILE contains information on the software products on the
SUT, their related files, and the destination and use of each file. HP customizes
information in the CUSTFILE for each customer’s system.
dial-out point. A system console from which incident reports are sent to a service provider.
Incident reports are sent only from the system consoles defined as the primary and
backup dial-out points (the primary and backup system consoles).

Glossary
G06.24 Software Installation and Upgrade Guide—528593-005
Glossary-4
discovery
discovery. For the SM package, the process of identifying the resources that exist on a
NonStop S-series server. See also incremental discovery and initial discovery.
Distributed Systems Management/Software Configuration Manager (DSM/SCM). A
graphical user interface (GUI)-based program that installs new software and creates a
new HP NonStop Kernel operating system. DSM/SCM creates a new software revision
and activates the new software on the target system.
DSM/SCM. See Distributed Systems Management/Software Configuration Manager
(DSM/SCM).
Enterprise Storage System (ESS). A collection of magnetic disks, their controllers, and the
disk cache in a stand-alone cabinet or cabinets. These disks are configured by an
attached console and presented to the attached server as logical volumes that can be
a fraction of a physical volume or can span volumes.
Event Management Service (EMS). A Distributed Systems Management (DSM) product
that provides event collection, event logging, and event distribution facilities. EMS
provides different event descriptions for interactive and programmatic interfaces, lets
an operator or an application select specific event-message data, and allows for
flexible distribution of event messages within a system or network.
Fibre Channel ServerNet adapter (FCSA). A ServerNet adapter that transmits data
between an HP NonStop™ S-series server and Fibre Channel storage devices. This
ServerNet adapter is installed in an IOAM enclosure.
Fibre Channel switch (FC switch). Networking hardware that can connect an Enterprise
Storage System and an HP NonStop™ S-series server. This switch allows any-to-any
connectivity.
firmware. Code in memory that is necessary for the power-up initialization and
communication with a host or device. The software for components of the ServerNet
architecture (for example, an adapter) is called firmware. Some firmware for ServerNet
components is downloaded when the system or component is loaded.
GCSC. See Global Customer Support Center (GCSC).
Gigabit Ethernet ServerNet adapter (GESA). A single-port ServerNet adapter that
provides 1000 megabits/second (Mbps) data transfer rates between HP NonStop™
S-series systems and Ethernet LANs. A GESA can be directly installed in slots 51
through 54 of an I/O enclosure and slots 53 and 54 of a processor enclosure.
Two versions of the GESA are available:
•3865 GESA-C (T523572): a single-port copper version compliant with the 1000
Base-T standard (802.3ab)
•3865 GESA-F (T523572): a single-port fiber version compliant with the 1000
Base-SX standard (802.z)

Glossary
G06.24 Software Installation and Upgrade Guide—528593-005
Glossary-5
Gigabit Ethernet 4-Port ServerNet adapter (G4SA).
Gigabit Ethernet 4-Port ServerNet adapter (G4SA). A multiport ServerNet adapter that
provides 1000 megabits/second (Mbps) data transfer rates between HP NonStop™
S-series systems and Ethernet LANs.
Global Customer Support Center (GCSC). A support organization that provides telephone
and remote diagnostic support for HP customers. There are GCSCs located all over
the world. See also Online Support Center (OSC).
halt. To stop a processor, terminating all processes running in it. Halt is a processor action
available in the TSM Service Application and the TSM Low-Level Link Application.
Halting a processor does not affect any other processors in the system unless they are
freeze-enabled.
An error that stops a processor, terminating all processes running in it. If a processor
halts on its own, the TSM server software issues an alarm such as CPU Software Halt.
hard reset. Use the hard reset action to terminate all processes running on a processor,
stop the processor, clear the processor’s memory, and reset the processor’s internal
mapping tables. Hard Reset is a processor action available in the TSM and OSM Low-
Level Link Application.
Caution: Performing a hard reset on a processor results in an unrecoverable loss of
data. Use the Hard Reset action only to prepare the processor for a Prime for Reload
or a Reload action.
HP NonStop™ S7000 server. The first mid-range server in a product line of HP NonStop
S-series servers that implements the ServerNet architecture and runs the HP NonStop
Kernel operating system.
HP NonStop™ S7400 server. A mid-range HP NonStop S-series server that provides an
upgrade option for migrating from an HP NonStop K-series server or a NonStop S7000
server. The NonStop S7400 server is based on the NonStop S72000 technology and
supports all NonStop S-series hardware products that are compatible with the NonStop
S72000 servers.
HP NonStop™ S7600 server. A mid-range HP NonStop S-series server that is based on
the NonStop S74000 technology and supports all NonStop S-series hardware products
that are compatible with the NonStop S74000 servers.
HP NonStop™ S7800 server. A mid-range HP NonStop S-series server that is based on
the NonStop S76000 technology and supports all NonStop S-series hardware products
that are compatible with the NonStop S76000 servers.
HP NonStop™ S70000 server. The first high-performance server in a product line of HP
NonStop S-series servers that implements the ServerNet architecture and runs the HP
NonStop Kernel operating system.
HP NonStop™ S72000 server. The high-performance successor of the NonStop S70000
line of HP NonStop S-series servers.

Glossary
G06.24 Software Installation and Upgrade Guide—528593-005
Glossary-6
HP NonStop™ S74000 server
HP NonStop™ S74000 server. The high-performance successor of the NonStop S72000
line of HP NonStop S-series servers.
HP NonStop™ S76000 server. The high-performance successor of the NonStop S74000
line of HP NonStop S-series servers.
HP NonStop™ S78000 server. The high-performance successor of the NonStop S76000
line of HP NonStop S-series servers.
HP NonStop™ S86000 server. The first premium high-performance server in a product line
of HP NonStop S-series servers that implements the ServerNet architecture and runs
the HP NonStop Kernel operating system.
HP NonStop™ S88000 server. The premium high-performance successor of the NonStop
S86000 line of HP NonStop S-series servers.
HP NonStop™ Sxx000 server. Any server in a family of high-performance or premium
high-performance HP NonStop S-series servers. This family includes the NonStop
S70000, S72000, S74000, S76000, S78000, S86000, and S88000 servers.
HP NonStop™ ServerNet Cluster (ServerNet Cluster). The product name for the
collection of hardware and software components that constitute a ServerNet cluster.
HP NonStop™ ServerNet Switch (model 6780). The cluster switch used in the layered
topology. The 6780 switch consists of a switch logic board, a midplane, plug-in cards,
power supplies, and fans.
HP NonStop™ S-series servers. The HP NonStop servers having product numbers
beginning with the letter S. These servers implement the ServerNet architecture and
run the HP NonStop Kernel operating system.
HP NonStop™ Storage Management Foundation (SMF). A subsystem used by the
storage subsystem that facilitates automation of storage management tasks by
providing location-independent naming, storage pools, and virtual disks on HP
NonStop™ S-series systems.
HP NonStop™ System RISC Model D processor (NSR-D processor). The model
designation for the TNS/R processor used in the HP NonStop S7400 server.
HP NonStop™ System RISC Model E processor (NSR-E processor). The model
designation for the TNS/R processor used in the HP NonStop S7600 server.
HP NonStop™ System RISC Model G processor (NSR-G processor). The model
designation for the TNS/R processor used in the HP NonStop S70000 server.
HP NonStop™ System RISC Model H processor (NSR-H processor). The model
designation for the TNS/R processor used in the HP NonStop S78000 server.
Glossary
G06.24 Software Installation and Upgrade Guide—528593-005
Glossary-7
HP NonStop™ System RISC Model J processor
(NSR-J processor)
HP NonStop™ System RISC Model J processor (NSR-J processor). The model
designation for the TNS/R processor used in the HP NonStop S7800 server.
HP NonStop™ System RISC Model T processor (NSR-T processor). The model
designation for the TNS/R processor used in the HP NonStop S72000 server.
HP NonStop™ System RISC Model V processor (NSR-V processor). The model
designation for the TNS/R processor used in the HP NonStop S74000 server.
HP NonStop™ System RISC Model W processor (NSR-W processor). The model
designation for the TNS/R processor used in the HP NonStop S7000 server.
HP NonStop™ System RISC Model X processor (NSR-X processor). The model
designation for the TNS/R processor used in the HP NonStop S76000 server.
HP NonStop™ System RISC Model Y processor (NSR-Y processor). The model
designation for the TNS/R processor used in the HP NonStop S86000 server.
HP NonStop™ System RISC Model Z processor (NSR-Z processor). The model
designation for the TNS/R processor used in the HP NonStop S88000 server.
HP NonStop™ TCP/IP process. An HP product that supports the Transmission Control
Protocol/Internet Protocol (TCP/IP) layers. TCP/IP processes are used together with
the communications line interface processor (CLIP) pNA+ to provide the transport layer
between wide area network (WAN) I/O processes and data link control (DLC) tasks,
between ConMgr and the Simple Network Management Protocol (SNMP) task,
between the WANBoot process and BOOTP tasks, and between an OSM or TSM
process and a DIAG task.
HP NonStop™ TCP/IP subsystem. A subsystem that allows the use of HP NonStop
TCP/IP to access an HP NonStop S-series host from Macintosh computers, personal
computers, and UNIX workstations. Applications running on a NonStop S-series
system or in an Expand network can transparently exchange data with NonStop
TCP/IP devices.
HP NonStop™ TCP/IPv6. An HP product that adds IP version 6 (IPv6) functionality to the
parallel library TCP/IP product. IPv6 is a TCP/IP protocol that extends the IP version 4
(IPv4) of 32 bits to 128 bits. NonStop TCP/IPv6 can be run in three modes: INET (only
IPv4 and is a direct replacement for parallel library TCP/IP), INET 6 (only IPv6), and
Dual (both IPv4 and IPv6 communications).
HP NonStop™ Technical Library (NTL). The application for accessing, searching, and
viewing technical publications and support information for the HP NonStop server. NTL
replaces Total Information Manager (TIM).
HP NonStop™ Cluster Switch (model 6770). An assembly that routes ServerNet
messages across an external fabric of a ServerNet cluster. The cluster switch consists
of a ServerNet II Switch, an uninterruptible power supply (UPS), and AC transfer
switch, and it can be packaged in a switch enclosure or in a 19-inch rack. The cluster

Glossary
G06.24 Software Installation and Upgrade Guide—528593-005
Glossary-8
HP NonStop™ ServerNet Switch (model 6780)
switch is used with star, split-star, and tri-star topologies. See also HP NonStop™
ServerNet Switch (model 6780).
HP NonStop™ ServerNet Switch (model 6780). The cluster switch used in the layered
topology. The 6780 switch consists of a switch logic board, a midplane, plug-in cards,
power supplies, and fans.
HP NonStop Open System Management (OSM) Interface. Replacement for TSM as the
system management tool of choice for NonStop S-series servers. OSM provides the
same functionality as TSM while overcoming limitations of TSM. OSM is required for
support of new functionality released in G06.22 and later.
HP NonStop servers. The entire line of HP NonStop servers, including NonStop K-series
and NonStop S-series servers.
hybrid shared run-time library (hybrid SRL). A shared run-time library (SRL) that has
been augmented by the addition of a dynamic section that exports the SRL’s symbols
in a form that can be used by position independent code (PIC) clients. A hybrid SRL
looks like a dynamic-link library (DLL) to PIC clients (except it cannot be loaded at
other addresses and cannot itself link to DLLs). The code and data in the SRL are no
different in a hybrid SRL, and its semantics for non-PIC clients are unchanged.
incremental discovery. Discovery of a NonStop S-series server when the TSM client
software has locally saved information but where there have been configuration
changes on the server since that information was saved.
initial discovery. Discovery of a NonStop S-series server with which the TSM client
software has had no prior contact and for which the TSM client software has no locally
saved information.
installation subvolume (ISV). A subvolume containing files that perform a specific function
during the installation process, such as organizing documentation in a specific location,
providing the components of the HP NonStop™ Kernel operating system image
(OSIMAGE), and containing files that are used after the installation process.
I/O adapter module (IOAM). A collection of modular components that provides I/O
connectivity and can include ServerNet switch boards, Fibre Channel ServerNet
adapters (FCSAs), fans, and power supplies. In the IOAM, each module is a logical
entity that represents a single service domain.
I/O adapter module enclosure (IOAM enclosure). The sheet-metal carrier that is installed
in a standard 19-inch rack and contains the IOAM components.
IOMF CRU. See I/O multifunction (IOMF) CRU.
IOMF 2 CRU. See I/O multifunction (IOMF) 2 CRU.

Glossary
G06.24 Software Installation and Upgrade Guide—528593-005
Glossary-9
I/O multifunction (IOMF) CRU
I/O multifunction (IOMF) CRU. (1) A NonStop S-series server customer-replaceable unit
(CRU) that connects the I/O enclosure to a processor enclosure, using a ServerNet
cable, and that supplies power to the components within the IOMF CRU, as well as
redundantly to the disk drives, SCSI terminators, and ServerNet adapters in that
enclosure. The IOMF CRU contains a power supply, a service processor, a ServerNet
router, an Ethernet controller, an external ServerNet port, and three SCSI ServerNet
addressable controllers (SACs) in a single unit. (2) A collective term for an IOMF CRU
and IOMF 2 CRU where a distinction between the two types of CRUs is not required.
I/O multifunction (IOMF) 2 CRU. An HP NonStop™ S-series customer-replaceable unit
(CRU) that connects an I/O enclosure to a processor enclosure through a ServerNet
cable and supplies power to the components within the IOMF 2 CRU as well as
redundantly to the disk drives, SCSI terminators, and ServerNet adapters in that
enclosure. The IOMF 2 CRU contains a power supply, a service processor (SP), a
ServerNet router 2, an Ethernet controller, three configurable ServerNet ports, and
three SCSI ServerNet addressable controllers (S-SACs) in a single unit. IOMF 2 CRUs
are supported on G06.10 and later software release version updates (RVUs).
load. (1) To transfer the HP NonStop Kernel operating system image or a program from disk
into a computer’s memory so that the operating system or program can run. (2) To
insert a tape into a tape drive, which prepares it for a tape operation (read or write).
low-level link. A connection between the TSM client software running on a system console
and the master service processors (MSPs) on a NonStop S-series server. When the
NonStop Kernel operating system is not running, communication must take place over
a low-level link. You can also communicate with a NonStop S-series server over a
low-level link when the operating system is running. See also service connection.
multifunction I/O board (MFIOB). A ServerNet adapter that contains ServerNet
addressable controllers (SACs) for SCSI and Ethernet; a service processor; ServerNet
links to the processor, to the two ServerNet adapter slots, and to one of the ServerNet
expansion board (SEB) slots; and connections to the serial maintenance bus (SMB),
which connects components within an enclosure to the service processor.
Online Support Center (OSC). The group of support specialists within the HP Global
Customer Support Center (GCSC) who respond to telephone calls regarding system
problems and diagnose malfunctioning systems using remote diagnostic links. See
also Global Customer Support Center (GCSC).
operating system image. See OSIMAGE.
OSIMAGE. A file built by the SYSGENR program and Subsystem Control Facility (SCF) that
contains the complete image of the NonStop Kernel operating system that runs in each
processor in the system.

Glossary
G06.24 Software Installation and Upgrade Guide—528593-005
Glossary-10
Physical view
Physical view. One of several views of a server available in the view pane of the
Management window of the OSM Service Connection, TSM Service Application, and
OSM and TSM Low-Level Link. A Physical view of a server is a view of all the
enclosures and is intended to represent the actual floor plan at the site. A Physical
view of an enclosure is a visual representation of the physical placement of supported
resources inside the enclosure.
Planner Interface. A graphical user interface (GUI) to the Distributed Systems
Management/Software Configuration Manager (DSM/SCM) that runs on the host
system. It provides an interface to all the host DSM/SCM planner functions.
position-independent code (PIC). Executable program or library code that is designed to
be loaded and executed at any virtual memory address, without any modification.
Addresses that can be modified by the loader do not appear in PIC code, only in data
that can be modified by the loader.
processor multifunction (PMF) CRU. (1) A NonStop S-series server customer-replaceable
unit (CRU) that contains a power supply, service processor (SP), ServerNet router 1,
Ethernet controller, three ServerNet addressable controllers (SACs), and a processor
and memory system in a single unit. The PMF CRU consists of three subassemblies:
the processor and memory board (PMB), the multifunction I/O board (MFIOB), and the
power supply subassembly. (2) A collective term for a PMF CRU and PMF 2 CRU
where a distinction between the two types of CRUs is not required.
processor multifunction (PMF) 2 CRU. a NonStop S-series server customer-replaceable
unit (CRU) that contains a power supply, service processor (SP), ServerNet router 2,
Ethernet controller, three ServerNet addressable controllers (SACs), and a processor
and memory system in a single unit. The PMF 2 CRU consists of three subassemblies:
the processor and memory board (PMB), the multifunction I/O board (MFIOB), and the
power supply subassembly.
RELOAD. an HP Tandem Advanced Command Language (TACL) command to load from
disk (over the ServerNet system area network [ServerNet SAN]) the HP NonStop
Kernel operating system image into the memory of the processor.
SCSI. See small computer system interface (SCSI).
ServerNet cluster. A network of servers (nodes) connected together using the ServerNet
protocol for interprocessor communication across a cluster and within its nodes. A
ServerNet cluster offers linear system expansion beyond the 8-processor or
16-processor limits of a single server, achieving comparable speeds for internal and
external ServerNet communication.
ServerNet expansion board (SEB). (1) A connector board that plugs in to the backplane to
allow one or more ServerNet cables to exit the rear of the enclosure. The SEBs and
ServerNet cables allow processors in one group to communicate with processors in
another group. Each SEB provides either the ServerNet X fabric or the ServerNet Y

Glossary
G06.24 Software Installation and Upgrade Guide—528593-005
Glossary-11
ServerNet/FX adapter
fabric for a group. (2) A collective term for both SEBs and modular SEBs (MSEBs)
when a distinction between the two types of SEBs is not required.
ServerNet/FX adapter. A ServerNet adapter that logically extends the ServerNet X and Y
fabrics to other clusters in a Fiber Optic Extension (FOX) ring by using fiber-optic lines.
Two 6740 ServerNet/FX adapters are used, one for the X ring and one for the Y ring.
ServerNet/FX 2 adapter. A ServerNet adapter that logically extends the ServerNet X and Y
fabrics to other clusters in a Fiber Optic Extension (FOX) ring by using fiber-optic lines.
Two 6742 ServerNet/FX 2 adapters are used, one for the X ring and one for the Y ring.
ServerNet LAN Systems Access (SLSA) subsystem. A subsystem of the HP NonStop™
Kernel operating system for configuration and management of ServerNet local area
network (LAN) objects in G-series release version updates (RVUs).
ServerNet wide area network (SWAN) concentrator. an HP data communications
peripheral that provides connectivity to a NonStop S-series server. The SWAN
concentrator supports both synchronous and asynchronous data over RS-232,
RS-449, X.21, and V.35 electrical and physical interfaces.
service connection. A connection between the TSM client software running on a system
console and the TSM server software running on an HP NonStop S-series server. A
service connection can be used only to communicate with the server when the HP
NonStop Kernel operating system is running. A service connection provides a
comprehensive service and maintenance picture of the server and is used to perform
most service management tasks. See also low-level link.
service processor (SP). A physical component of the processor multifunction (PMF)
customer-replaceable unit (CRU) or I/O multifunction (IOMF) CRU that controls
environmental and maintenance functions (including system load functions) in the
enclosure. SPs operate in pairs to provide fault tolerance. The two SPs in group 01 are
designated the master service processors (MSPs). Other pairs of SPs within a system
are called expansion service processors (ESPs).
service provider. (1) A person trained and qualified to service field-replaceable units
(FRUs). (2) An organization, such as the Global Customer Support Center (GCSC),
that helps you resolve problems with your NonStop S-series server. The TSM package
allows you to use the help of a service provider by configuring TSM to support remote
notification and remote access.
shared run-time library (SRL). A collection of procedures whose code and data can be
loaded and executed only at a specific assigned virtual memory address (the same
address in all processes). SRLs use direct addressing and do not have run-time
resolution of links to and from the main program and other independent libraries.
Contrast with dynamic-link library (DLL).
shell. In the Open System Services (OSS) environment, a program that interprets
sequences of text input as commands. A shell can operate on an input stream, or it
can interactively prompt and read commands from a terminal.

Glossary
G06.24 Software Installation and Upgrade Guide—528593-005
Glossary-12
site update tape (SUT)
site update tape (SUT). One or more tapes that contain each target system’s site-specific
subvolume and various products. Each product contains a softdoc and a complete set
of files. A SUT is delivered with every new NonStop S-series server and can be
ordered whenever a new RVU of the system software is available. A full SUT contains
the current RVU of the HP NonStop Kernel operating system and all product software
that has been ordered with it. A partial SUT contains a subset of products for the
current RVU.
small computer system interface (SCSI). An ANSI-standard protocol used by a controller
to access a device.
snapshot. (1) A file that can be created by OSM and TSM client software to record
information about the status of an HP NonStop™ S-series server, including the
attributes values of all system resources, at the time it was created. The file can be
forwarded to your service provider to help with troubleshooting problems. (2) For
Distributed Systems Management/Software Configuration Manager (DSM/SCM), a list
of the target system tape and disk locations, file fingerprints for files managed by
DSM/SCM, and DSM/SCM target information. The snapshot is compiled on the target
system from the target database and sent to the host system to store in the host
database. An instruction to create a snapshot is part of every activation package sent
from the host and can also be requested independently through the Target Interface.
software product revision (SPR). The method of releasing incremental software updates
on HP NonStop™ S-series systems. An SPR can include one or more corrections to
code, or it can contain code that adds new function to a software product.
SP. See service processor (SP).
Storage Management Foundation (SMF). A subsystem used by the storage subsystem
that facilitates automation of storage management tasks by providing location-
independent naming, storage pools, and virtual disks on NonStop S-series servers.
Subsystem Control Facility (SCF). An interactive interface for configuring, controlling, and
collecting information from SCF subsystems and objects. SCF enables you to
configure and reconfigure devices, processes, and some system variables without
having to take down your NonStop S-series server.
SUT. See site update tape (SUT).
SWAN concentrator. See ServerNet wide area network (SWAN) concentrator.
SWID. The software identification tool invoked by the SYSGENR program that audits file
identification information about your software.
SYSnn subvolume. A subvolume on the $SYSTEM volume where the new version of the
NonStop Kernel operating system image is located. Also located on the SYSnn
subvolume is system-dependent and RVU-dependent software. nn is an octal number
in the range %00 through %77.

Glossary
G06.24 Software Installation and Upgrade Guide—528593-005
Glossary-13
system console
system console. A PC-compatible workstation on which the TSM or OSM Application Suite
or web-based software is running. The system consoles configured as the primary and
backup dial-out points are referred to as the primary and backup system consoles.
system load. (1) To start the system; to load the HP NonStop Kernel operating system
image into the memory of a processor. (2) RELOAD. (3) The process of loading the
operating system. A system load changes a system from an inactive to an active (or
operational) state by loading software that establishes communication between the
operating system and configured system peripherals.
system resource model (SRM). A collection of C++ objects that model the diagnostic and
serviceability state behavior of the system resources discovered and managed by the
Compaq TSM package. The SRM has the following attributes:
Trivial File Transfer Protocol (TFTP). A protocol defined by Request for Comments (RFC)
1350. TFTP is used as a data link control (DLC) and diagnostic task.
Generic process name $ZZKRN.#TSM-SRM
Process name $ZTSM
Program file name $SYSTEM.SYSnn.SRM

G06.24 Software Installation and Upgrade Guide—528593-005
Index-1
Index
A
A7CINFO files
activation package 5-12
introduction, used in installation 1-4
Aborting the system startup process A-10
ALLPROCESSORS paragraph 1-15
Alternate system disk location,
specifying 11-4, 11-8, A-10
AUDITTRAILBUFFER parameter, DP2 and
RDF performance 12-15
B
Bootstrap 6-1
Build process, DSM/SCM 5-13
Build/Apply request
defined 1-6
C
C7953P00 C-10, C-20
CBEXE 3-4, B-4, B-16
CIIN file 11-4, A-10
CLEANOSS macro
different from FALLBACK macro 1-18
during Build/Apply 13-3
in falling back 1-19
overview of 1-18, 17-1
wrong EMS Template files 1-18
CONFIG file, saving 1-37, 4-1, A-2
Configuration database 1-37
Configuration File, System Startup dialog
box A-10
CONFTEXT file
ALLPROCESSORS paragraph 1-15
processor type changes,
summary 1-15
CPUCODE8 8-3
CPUCODE9 8-3
Critical system processes 4-9
CSPOOL 1-34
CSSI Web snapshot 3-10
CT9841FC-x tape drive 1-36
C++ v3 run-time library 1-23
C++, build rules 1-23
D
D46 Product Version of DSM/SCM 3-3
Disk bootstrap microcode,
firmware requirements 1-7
Disk bootstrap microcode, replacing 1-7,
1-14, 6-1
Disk subsystem, checking status of 4-10
DNREVBAK file 10-2
DNSBAK file 10-2
DNSBOOT file 10-2
DNSCACHE file 10-2
DNSHOSTS file 10-2
DNSLOCAL file 10-2
DNSREV file 10-2
DP2 fallback SPR, for SQL/MX and
TMF 1-30
DSM/SCM
build process 5-13
NonStop SQL errors B-18
prepackaged reports A-2
Target Interface 1-20
E
EasySetup 5-1
Emergency Repair Disk B-25
EMS event stream window 11-4, A-11
EMS templates, updating 5-21
ESS
FCHECK utility 1-17
in connection with IOAM 1-16
IOAM 1-36
migrating data 1-17

Index
G06.24 Software Installation and Upgrade Guide—528593-005
Index-2
F
mod-14 extent boundary. 1-17
partitioned unstructured files 1-17
Expand
LINETF 12-13
profiles 12-13
SPEEDK 12-13
F
Fabricated file names 1-6
Fallback
loading the previous release 17-1
resuming normal operations 17-4
returning SP/Processor/SCSI boot code
to previous versions 15-1
SPRs 3-6
submitting a backout request 14-1
summary of major tasks 1-19
ZPHIRNM 16-1
FALLBACK macro
falling back 1-20, 1-27
function 1-18, 14-1
running after reloading the operating
system 1-20
when not needed 1-18
FCHECK utility 1-17
FCSA 12-6
Fibre Channel ServerNet Adapters
(FCSA) 1-16
Firmware, updating
SCSI 9-2
service processor (SP) 7-1
FXSA 12-6
FXSA2 12-6
G
G4SA 12-6
Gigabit Ethernet ServerNet adapters
(GESAs) 1-24
GOAWAY 13-5
OSS command line utility 1-30
utility used for falling back 13-2
GOAWAY utility 13-2
H
HOSTS file 10-2
HP NonStop eServices Portal 1-1
HP Ultrium Linear Tape Open (LTO) Tape
Drive 1-36
I
IEEE floating-point functions 1-28
Inadequate swap space 4-11
inetd process 12-14
INITSTAT 12-3
Installing the DSM/SCM client from
ZDSMSCM B-18
INSTALL^TEMPLATES 5-21, A-7, B-13
Interactive Upgrade Guide -xiv
Interoperability
audit format issues 3-7
RDF SPRs 3-7
IOAM enclosure 1-16
IPM6031 TACL macro B-18
I/O Adapter Module (IOAM) 1-3, 1-36
K
Kernel-managed swap files 4-11
L
Licensing error
1163 1-21
1164 1-21
3245 1-21
Loading system 11-4, 11-7

Index
G06.24 Software Installation and Upgrade Guide—528593-005
Index-3
M
M
merge_whatis 10-7
Mirror system disk
loading system from 11-7
restarting after REPLACEBOOT 12-11
MXCI DROP command 1-30
N
Native CRE/RTL product (T8431) 1-35
NETWORKS file 10-2
New software revision, DSM/SCM 5-8
NonStop ODBC Server and Client, TNOS
server and TNOS utility 1-39
NonStop ServerNet Switch
firmware requirements 1-9
updating firmware 12-5
NonStop SQL errors, when installing D31
DSM/SCM B-18
NonStop SQL/MX 13-5
NonStop TCP/IP, sample configuration
files 12-2
NonStop TS/MP PATHMON 1-20
NSK CRE/RTL (T1269) 1-35
NSKCOM 4-11
NSR-C 1-15, 5-2
NSR-G 1-15
O
OSM
products supported 1-3
requirements 1-3
using the Heap Manager CRE
(T1269) 1-35
OSM Console Tools (T0634) 1-2
OSM Low-Level Link (T0633) 1-2
OSM Notification Director 12-4
OSM Notification Director (T0632) 1-2
OSMINI, copying 3-9
OSS
configuration databases 1-25
EasySetup 12-14
setting up symbolic links 12-13
P
Pathway/iTS, requirement for proper
licensing 1-20
Pcleanup utility 10-7
Planner Interface, changing profile
information 5-10
PORTCONF file 10-2, 12-3
Position-independent code (PIC) and C++
and DLLs 13-3
Post-installation
configure primary and backup dial-out
points 12-4
configuring OSS 12-13
configuring RDF 12-15
configuring SMF 12-14
Spooler 12-9
update NonStop Cluster Switch
firmware 12-5
updating adapter firmware 12-6
updating ServerNet/FX 12-6
updating SWAN and SWAN 2
firmware 12-5
updating TCP/IP configuration
files 12-1
upgrade the TNOS server and TNOS
utility 12-16
upgrade the WAN Manager
(T8365) 12-15
PREVIEW mode 10-4
Primary and backup dial-out,
reconfiguring 12-4
Processor boot code
definition 8-1
fallback 15-1
updating 8-1
version and location 8-3

Index
G06.24 Software Installation and Upgrade Guide—528593-005
Index-4
R
Processor reload 11-6
Processor type 1-15
Profiles, target, changing information 5-10
PROTOCOL
configuration file 12-2
file, backup copies 10-2
R
RDF
interoperability SPRs 3-7
Reinitializing NonStop SQL database for
DSM/SCM B-18
RELOAD command (TACL) 11-6
Reload operation 11-6
REPLACEBOOT 6-1
RESCONF file 10-2
Resetting an SP 7-18
RVUs 3-1
S
S7000 boot millicode 8-1
S7800 CRUs 1-32
S7x000 boot millicode 8-1
SCF CONTROL, REPLACEBOOT 6-1
Scout for NonStop Servers 3-1
SCSI boot code
fallback 15-1
product numbers 9-1
updating 9-1
Secure SCF product modules 1-21
ServerNet Adapter firmware 12-5
ServerNet addressable controllers,
checking the status of 4-10
ServerNet LAN Systems Access
(SLSA) 4-10
Service processor (SP), resetting 7-18
SERVICES file 10-2, 12-3
Site contact information, reconfiguring 12-4
SLSA (ServerNet LAN Systems
Access) 4-10
SMF, interoperability and
configuration 12-15
SMTPCONF file 10-2
Software revision 1-5
SP firmware
downloading SPNTCDE9 file 7-6, 7-28
fallback 15-1
resetting SP prior to updating 7-5
verifying correct version 7-5
SP firmware, updating
Low-Level Link Application 7-17, 7-30
SP Responsive Test 7-16
SP Tool T0355^G06^AAA 4-2
spcode9, using VPROC 7-4
spntcde9 7-7, 7-28
spntcde9, downloaded from the host 7-6
spntcde9, progress in download (IXF
Receive), using OSM 7-29
SPOOLCOM 1-33
Spooler
backing up control files 1-34
backing up, command for 10-4
checking status of collector 4-13
COLLECT, STATUS command 5-16,
14-1, A-5
DRAIN command 10-3
draining 1-33
resuming operations after fallback 17-5
SPOOLER DRAIN command 1-34
SPOOLER,DRAIN command 1-33
SPRNOTES A-2
SPRs
fallback 3-6
installing before upgrading 3-1
interoperability 3-7
RDF 3-7
SQL/MP Format 2 partitions
description of 3-6
SQL/MP Release 2.0 Fallback 13-2

Index
G06.24 Software Installation and Upgrade Guide—528593-005
Index-5
T
SQL/MX Release 2.0
falling back 1-29
Metadata tables, migrating of 1-29
Migrating to 1-29
requirements 1-28
START TMF 13-2
Startup TACL window
automatically launched at system
startup 11-4, A-11
starting alternate 4-1
Status dialog box, reopening 5-22
SUT, maximum size of 1-1
SWAN concentrator CLIP firmware
C7953P00 C-10, C-20
object code file C-10, C-20
updating 1-8
SWAN Fast Firmware Update
CLIPs fail C-7
SPRs needed C-1
SWID, installing 1-4
SYSnn subvolumes
listing 4-14, A-3
specifying in the System Startup
dialog 11-4, A-10
system configuration file A-2
System disk location, specifying
alternate 11-4, 11-8, A-10
System load
from mirror system disk 11-7
from Processor Status dialog box 11-4,
A-10
System operations, verifying 4-3
System processes, critical 4-9
System startup process, aborting A-10
System workstation
upgrade considerations for Version
2003A 1-35
T
T0650ABA softdoc 1-28
T6031D46^ABI 3-2
T7892ABD -xi, 8-1
T7945AAG 3-10
T7945ABN 1-3, 3-10
T8154G07 3-10
T8154G07^ABG 3-10
T8365AAN 13-5
T8494AAA 1-7
T9057G06^AFQ 12-12
TACL RELOAD command 1-20
TAEXE 3-4, B-4, B-16
Tape drive, checking status of 4-13
Target Interface (ZPHITI) 1-8
Target subvolumes (TSVs) 1-6
Target systems, changing profile
information 5-10
TCP/IPv6 1-38
TMF
fallback from G06.24 1-39
file recovery protection 1-39
shutdown 1-38
T8607AFH 1-38
TNOS Server (T8666) 1-39
TNOS Utility (T8667) 1-39
TNS/R CRE Heap Manager 1-35
TSM Client applications
how to upgrade 1-2
TSM client software Version 2003A
upgrading to 1-2
U
Updating firmware
before updating 12-4
Processor Boot Code 8-3
SCSI 9-2
SCSI boot code 9-2
SCSI boot code using OSM 9-4
service processor (SP) 7-1

Index
G06.24 Software Installation and Upgrade Guide—528593-005
Index-6
V
V
v3 RTL 1-23
Verifying system operations 4-3
Visual Inspect 1-21
VPROC command 3-4, B-4
W
WAN Wizard Pro Version 3.0 4-2
WANLNCK utility C-11
Windows XP Professional 1-1
Z
zdsmexe, in IXF Receive B-20
ZPHIRNM
PREVIEW mode 10-5
reactivating previous software
revision 16-1
running 10-1, A-6
ZPHITI
canceling a Build/Apply request 5-22
starting 14-2
Special Characters
$AUDIT 4-10
$DSMSCM 4-10
$SYSTEM 4-10
$SYSTEM.ZTCPIP 12-1
$SYSTEM.ZTCPIP subvolume 1-38, 10-2
(DLLs) Dynamic-link libraries 13-3
