Huace Navigation Technology B01008 Data Collector User Manual
Shanghai Huace Navigation Technology LTD. Data Collector Users Manual
Contents
- 1. User Manual
- 2. Users Manual
Users Manual
il
LT600SERIES|GETTINGSTARTEDGUIDE
GNSSDATACOLLECTINGTERMINAL
CONTENTS
1.Introduction...................................................................................................................3
1.1.TechnicalAssistance........................................................................................3
1.2.YourComments...............................................................................................3
1.3.SafetyInformation..........................................................................................3
1.4.WarningandCautions.....................................................................................3
1.5.UseandCare...................................................................................................3
2.Overview........................................................................................................................5
2.1.Features...........................................................................................................5
2.2.Specifications..................................................................................................5
3.LT600Overview.............................................................................................................7
3.1.FrontView.......................................................................................................7
3.2.BackView........................................................................................................9
3.3.SideView......................................................................................................10
4.BasicOperation...........................................................................................................11
4.1.InsertSIMCardandpoweron......................................................................11
4.2.Language&input..........................................................................................13
4.3.SetDate/Time...............................................................................................13
4.4.Display...........................................................................................................14
4.5.WIFI...............................................................................................................16
4.6.Bluetooth......................................................................................................16
4.7.USBConnection............................................................................................17
4.8.UseCamera...................................................................................................18
4.9. Scheduledpoweron&off............................................................................19
4.10.Location.........................................................................................................20
5.GettingStartedWithMapCloud3.0...........................................................................21
5.1.BuildNewProject..........................................................................................21
5.2.CoordinateSystemSettings..........................................................................22
5.3.ImportBaseMap...........................................................................................23
5.4.DataCollection..............................................................................................24
5.5.ExportData...................................................................................................25
5.6.SoftwareRegistration....................................................................................26
6.GettingStartedWithGNSSTool...................................................................................27
6.1.Connection....................................................................................................27
6.2.CORSLogin....................................................................................................29
6.3.SkyPlot..........................................................................................................30
6.4.DebuggingData.............................................................................................31
Page3
1. INTRODUCTION
ThankyouforchoosingCHCLT600SeriesGNSSHand‐heldReceiver.
ThisGettingStartedGuidewillprovideusefulinformationaboutyourreceiver.Itwillalso
guideyouthroughyourfirststepsofusingLT600Seriesinthefield.
1.1. TECHNICALASSISTANCE
Ifyouhaveaproblemandcannotfindtheinformationyouneedintheproduct
documentation,contactyourlocaldealerfromwhichyoupurchasedtheLT600Series.
Alternatively,pleaserequesttechnicalsupportusingtheCHCWebsite(www.chcnav.com)or
CHCtechnicalsupportemail(support@chcnav.com).
1.2. YOURCOMMENTS
YourfeedbackaboutthisGettingStartedGuidewillhelpustoimproveitinfuturerevision.
Pleasee‐mailyourcommentstosupport@chcnav.com.
1.3. SAFETYINFORMATION
ThismanualdescribesCHCLT600SeriesGNSSDataCollectingTerm inal.Beforeusingthe
LT600Series,pleasemakesurethatyouhavereadandunderstoodthisGettingStarted
Guide,aswellasthesafetyrequirements.
1.4. WARNINGANDCAUTIONS
Anabsenceofspecificalertsdoesnotmeanthattherearenosafetyrisksinvolved.
AWarningorCautioninformationisintendedtominimizetheriskofpersonalinjuryand/or
damagetotheequipment.
WARNING‐AWarningalertsyoutoapotentialmisusedorwrongsettingofthe
equipment.
CAUTION‐ACautionalertsyoutoapossibleriskofseriousinjurytoyourperson
and/ordamagetotheequipment.
1.5. USEANDCARE
Page4
TheLT600Seriesisdesignedtowithstandtheroughenvironmentthattypicallyoccursinthe
field.However,theLT600Seriesishigh‐precisionelectronicequipmentandshouldbe
treatedwithreasonablecare.

Page5
2. OVERVIEW
2.1. FEATURES
LT600isahighaccuracyGNSSdatacollectingterminalindependentlydevelopedbyCHC,
whichadoptsindustrialthirdleveldesign,IP65protectionlevel.Positioningaccuracyofthe
LT600couldreachdecimeter,withalternativeconfigurationof1D/2Dcodescanning,RFTD,
InfraredandMICsoon.Equippedwithhighsensitivepointtouchpen,LT600makesitmore
convenienttocollectdataandmapground.4GcellularmodemwithDual‐SIM‐Dual‐Standby
offersmorechoicesofexperiencinghighspeeddatatransmitting.With8inchscreenand
16:9scale,LT600providesyoumoreopenvisionandmoreconvenience.
2.2. SPECIFICATIONS
LT600
OperatingSystemAndroid5.1
CPUQuad‐core1GHz
RAM2GB
FlashMemory32GB
MemoryExtendMicroSD,upto128G
GNSSSupportGPS+GLONASSorGPS+BDS
AccuracyStandalone:2‐5m;SBAS:2m
Channel72
ColdStart30s
WarmStart 1s
WIFI802.11b/g/n
CellularModemLTE,
EDGE,GSM,GPRS
BluetoothV4.1
USBMicroUSB,OTG(supporthotplug)
BarCode1D/
2Dbarcodescanner(optional)
Li‐ionBattery9000mAh
Voltage3.8V
BatteryLife>12h(continuouswork)
ChargingTime<4h
FrontCamera2.0megapixel
BackCamera8.0megapixel
MICSupport
FlashLight Support
Page6
Physicalspecifications
Display
·Size:8inchCorningGorillaGlasstouchscreen
·Resolution:1280*800
·Brightness:450cd/m2
·Touchscreen:Capacitancetouch,5pointstouchscreen
·Pointtouchpen:Mappingpenwithhighdegreeofaccuracy
Physical
·Dustproofandwaterproof:IP65
·Shock:Survivesa1.5meterdropontoconcrete
·Humidity:5%RH‐95%RH(withoutcondensation)
·Dimension:235mm*138mm*30mm(L*W*H)
·Weight:660g(withbattery)
·Operatingtemperature:‐20°Cto+60°C
·Storagetemperature:‐30°Cto+70°C
PhysicalProperties
·Barcode:1D/2Dscanningmode(optional)
·G‐sensor:Support
·Lightsensor:Support
·Distancesensor:Support
·E‐compass:Support
·Gyroscope:Support
·MIC:Support
Page7
3. LT600OVERVIEW
3.1. FRONTVIEW
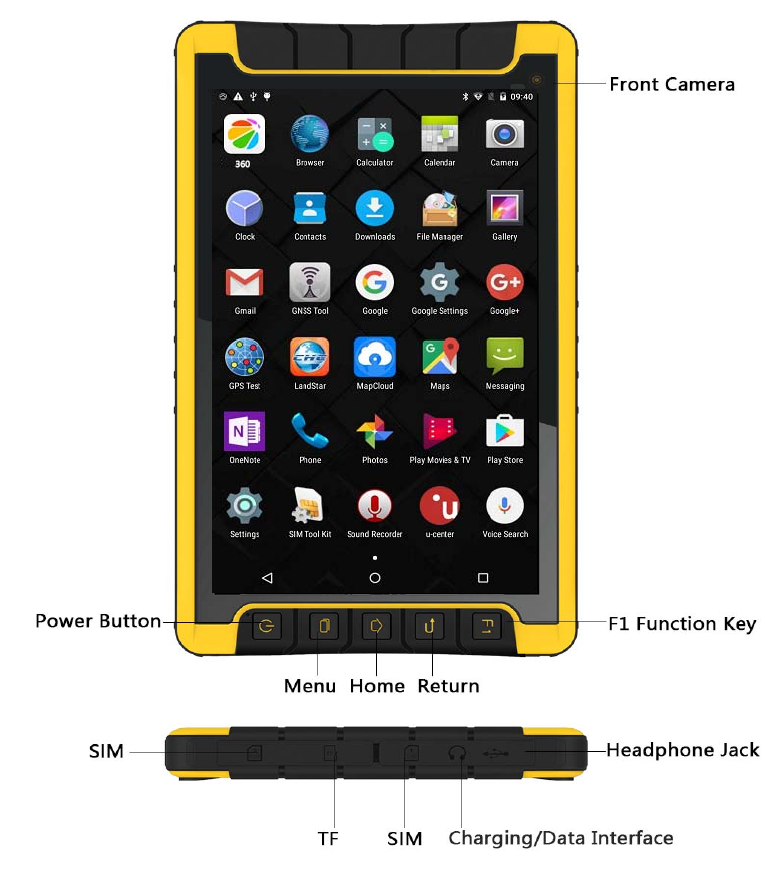
PowerButton
‐ TurnON:Pressthebuttonfor1‐2seconds,thePowerIndicatorwillturnonandtheboot
screenwillappear,andthentheLT600willentertheoperationsystemafter30seconds.
‐ TurnOFF:Pressthebuttonfor1‐2seconds,the“SELECT”dialogueboxwillpopup,select
“Poweroff”toturnoffthedevice.
‐ Restart:Pressthebuttonfor1‐2seconds,the“SELECT”dialogueboxwillpopup,select
“Restart”torestartthedevice.
Page8
MenuButton
Clickthisbuttontobringoutthestartmenu.
HomeButton
Usethehomebuttontoreturnmainmenu.
ReturnButton
Pressthisbuttontogobacktopreviousmenu.
SIM
InsertSIMcardintothiscardslot.
TF
InsertTFcardintothiscardslot.
Charging/DataInterface
ThisinterfaceisusedforbatterycharginganddatatransmissionbetweenLT600andPCusing
USBcable.
HeadsetJack
Insertyourheadsetintothissocket.
Page9
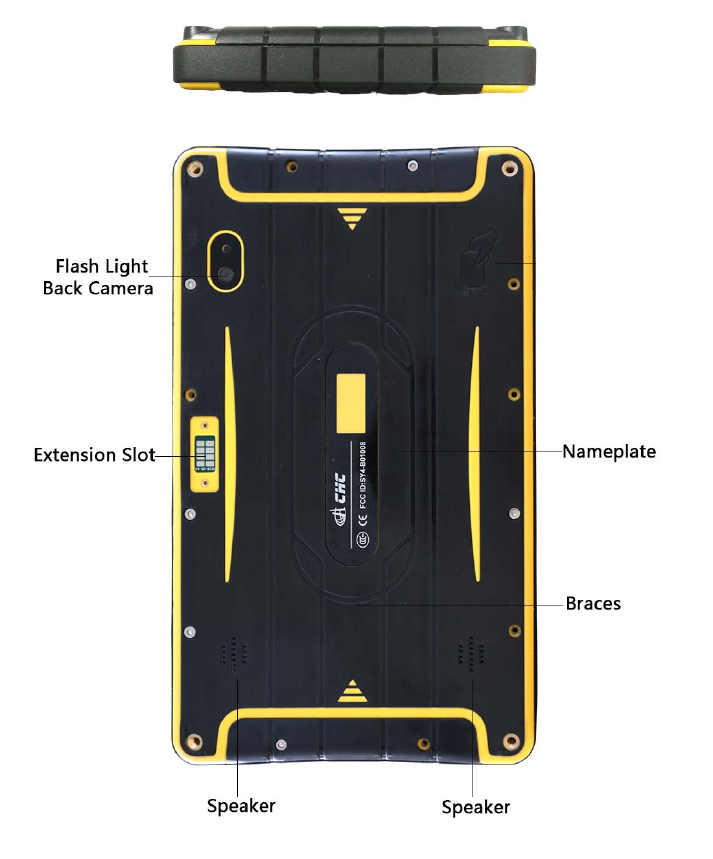
3.2. BACKVIEW
Page10
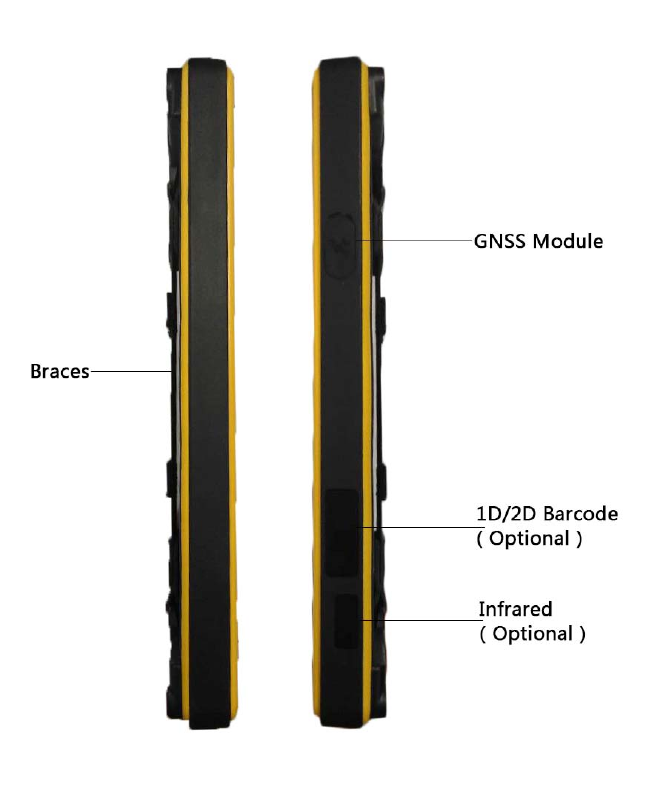
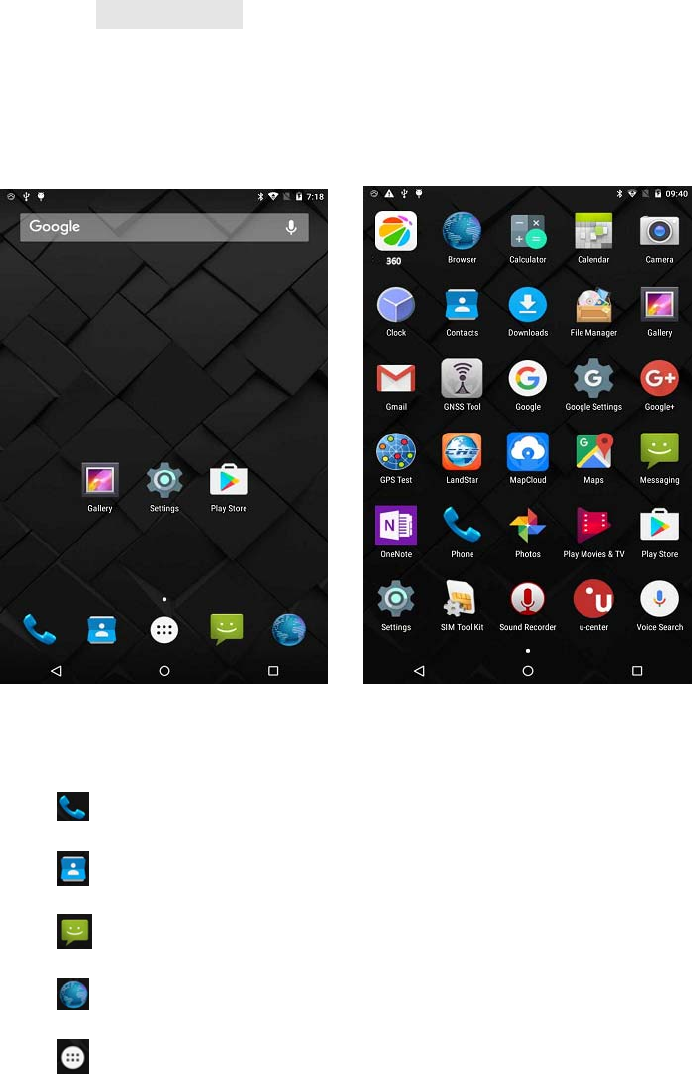
3.3. SIDEVIEW
Page11
4. BASICOPERATION
4.1. INSERTSIMCARDANDPOWERON
Refer3.3FrontViewtofindtheSIMcardandTFcardslot,andtheninsertthecards
intoslotscorrectly.
BeforepoweringonLT600,pleasemakesurethebatteryhasplentyofpower.Then
longpressthepowerbuttontoturnonLT600andenteritshomescreen.
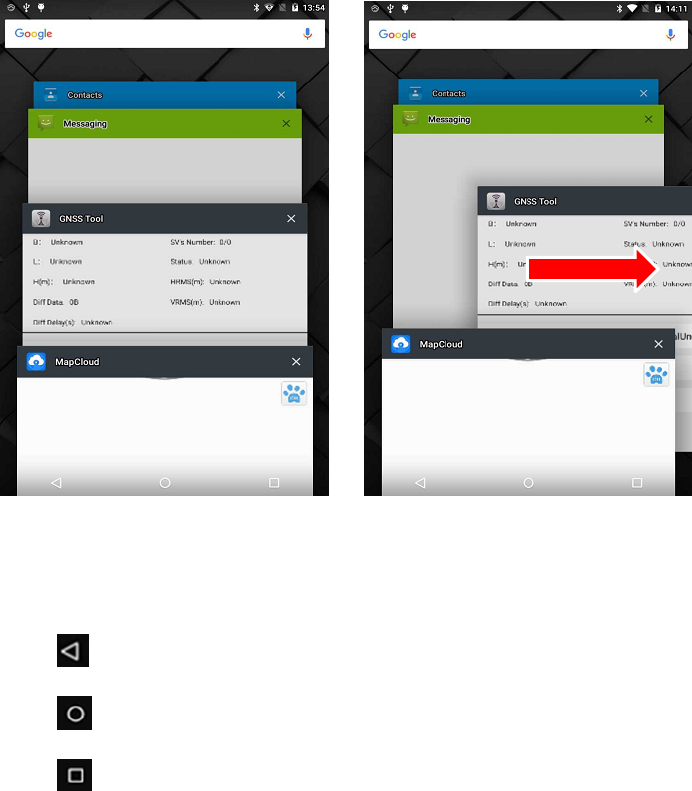
Figure1Figure2
Click tomakeaphonecall.
Click toaccesscontactsinformation.
Clicktoopenmessaging.
Clicktoopenbrowser.
Clicktoopenthedrawertoseealltheappsthathavebeeninstalled(Figure2).
Page12
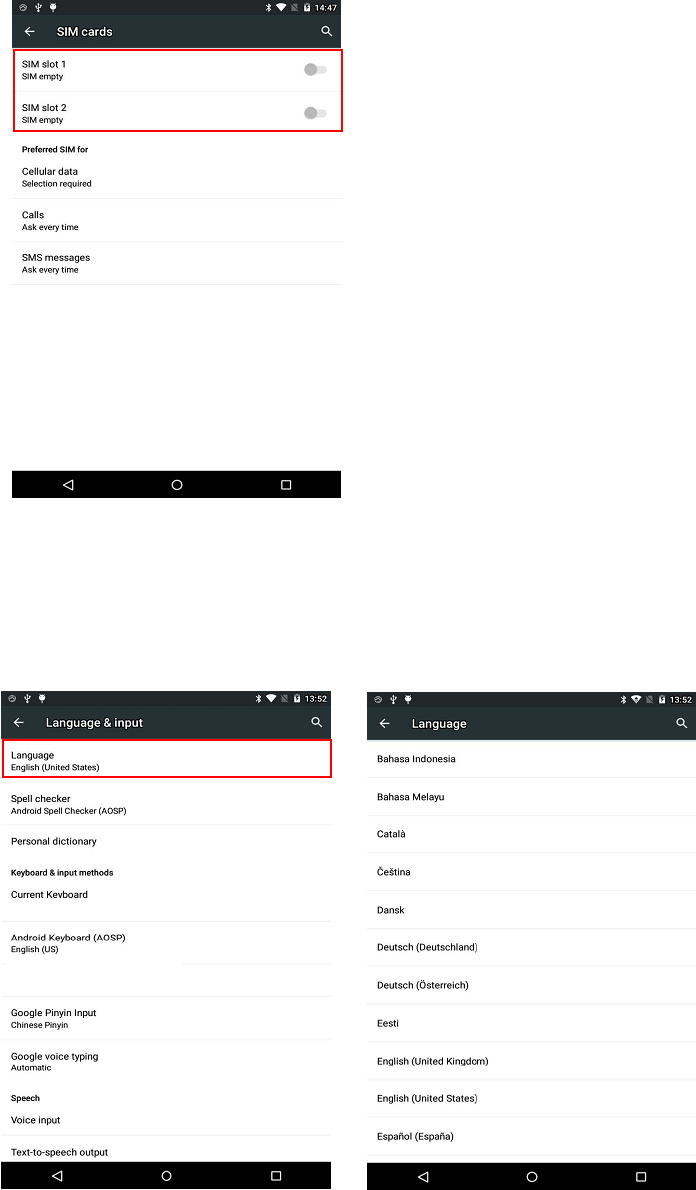
Figure3Figure4
UsevirtualbuttonkeytofacilitateyouroperationwithLT600.
Clicktogobacktopreviousmenu.
Click toreturnhomescreen.
Click toseealltherunningapps(Fig.3)andthenyoucanremoveappsbysliding
themtowardsleftorrightside(Fig.4).
AfterpoweringonLT600(referto4.2Poweron),ClickSettings/SIMcardtoturnon
theSIMcards.
Page13
4.2. LANGUAGE&INPUT
ClickSettings/Language&input/Languagetoselectlanguage.
4.3. SETDATE/TIME
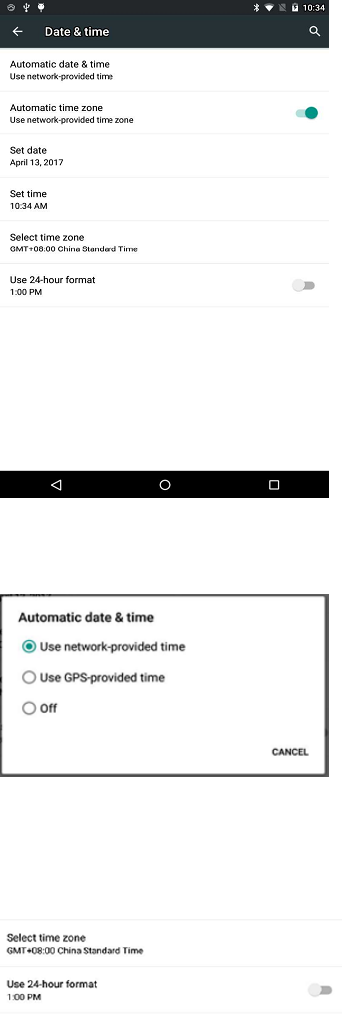
ClickSettings/Date&timeandenterDate&timeinterface.
Page14
IfyouwanttousedateandtimefromnetworkorGPS,clickAutomaticdate&timeto
selectUsenetwork‐providedtimeorUseGPS‐providedtime:
Ifyouwanttosetdateandtimebyyourself,pleaseturnofftheAutomaticdate&time
firstandthenclickSetdateandSettimetostartyourownsettings.
YOUCANALSOCUSTOMIZEYOURTIMEZONEANDCHOOSEWHETHERTOUSE24‐HOURFORMATINTHIS
INTERFACE.
4.4. DISPLAY
ClickSettings/DisplaytoenterDisplayinterface.

Page15
Brightnessadjusting:ClickBrightnessleveltoadjustitaccordingtoyourpreference.
Sleep:ClicktooptimizetheinactivitytimeLT600needstoclosescreen.
Fontsize:Clicktochangethefontsize.
Page16
4.5. WIFI
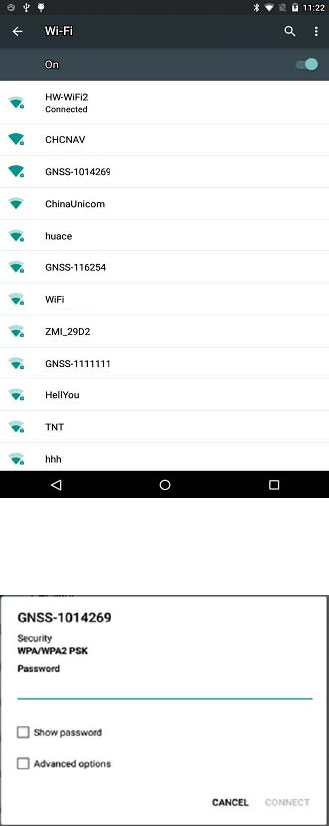
ClickSettings/WIFItoswitchonthebutton.
SelectWIFIandtypeinitspasswordtoconnect.
4.6. BLUETOOTH
ClickSettings/BluetoothtoturnontheBluetooth.

Page17
Findnearbydevicesandpairwithit.
4.7. USBCONNECTION
ForconnectionordatatransmissionbetweenLT600andofficecomputer,pleaseusethe
USBdatacableasshownbelow.
ClickSettings/Developeroptions/USBdebuggingtomakesurethisfunctionisswitched
on.AfterUSBdatacableisconnectedwithPC,waituntiltheAllowUSBdebuggingdialogue
popsup,clickOK.
Youcanalsousethirdpartysoftwaretomanagethedocumentsanddatastoredin
Page18
LT600andinstallsoftwarelikeMapCloud3.0,GNSSToolintoit.
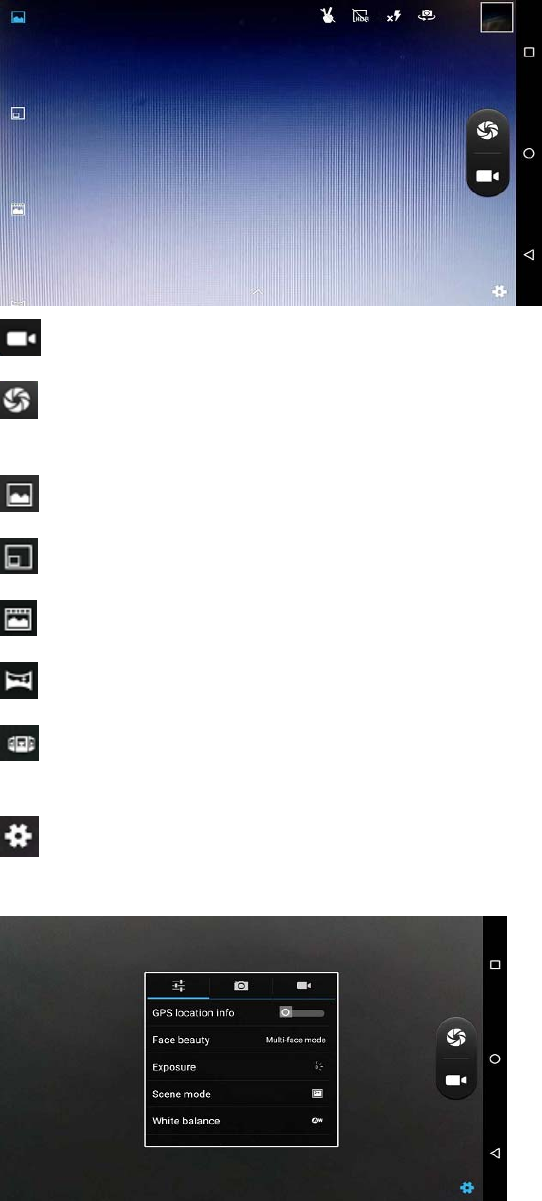
4.8. USECAMERA
Makesurethatthebatteryischargedandinstalledinthereceiver.
Clicktostartrecordingthevideo,clickagaintofinish.
Clicktotakeaphoto.
Slidefingersintheleftcolumntoswitchbetween5differentmodes:
Normalmode
PIPmode
Livephotomo:
Panaramamode
Multiangleviewmode
CameraSettings
Clicktoconfigurerelatedparameters
Page19
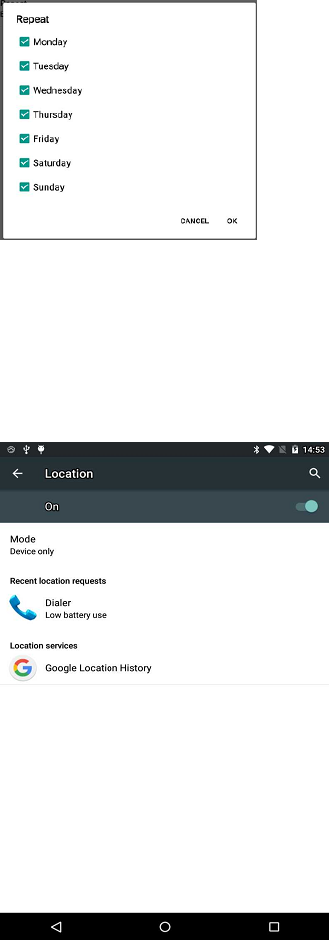
4.9. SCHEDULEDPOWERON&OFF
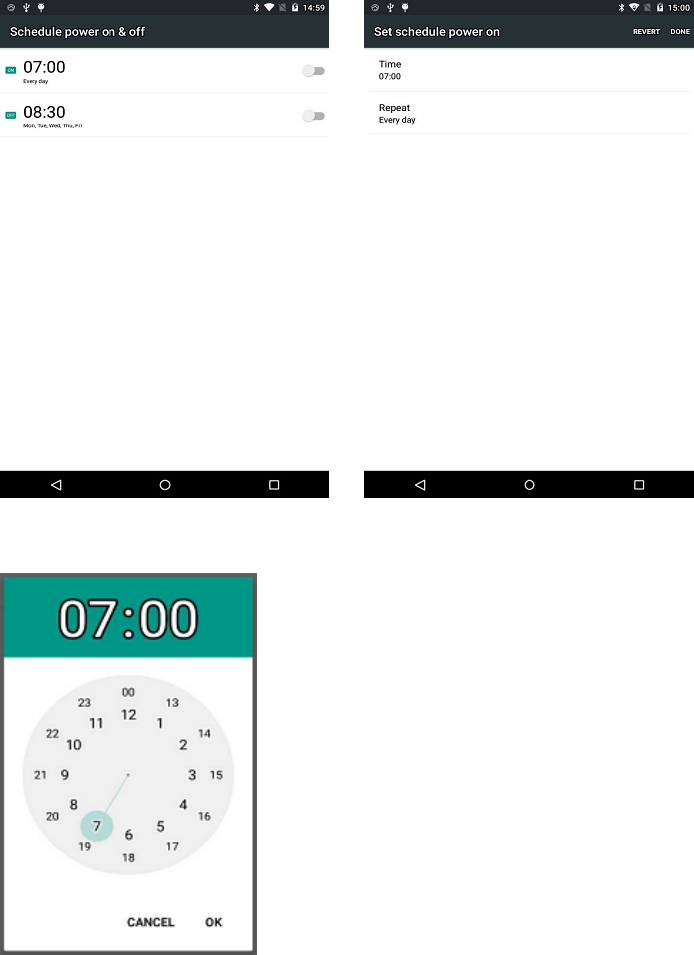
LT600allowsuserstoachievescheduledpoweronandoffbysettingthepowerup&off
timeandrepeattimebeforehand.
SettheScheduledpowerontimeandclickOK.
SetscheduledpoweronrepeattimeandclickOK.
Page20
ScheduledpowerofftimesettingsisthesamewithScheduledpoweron.
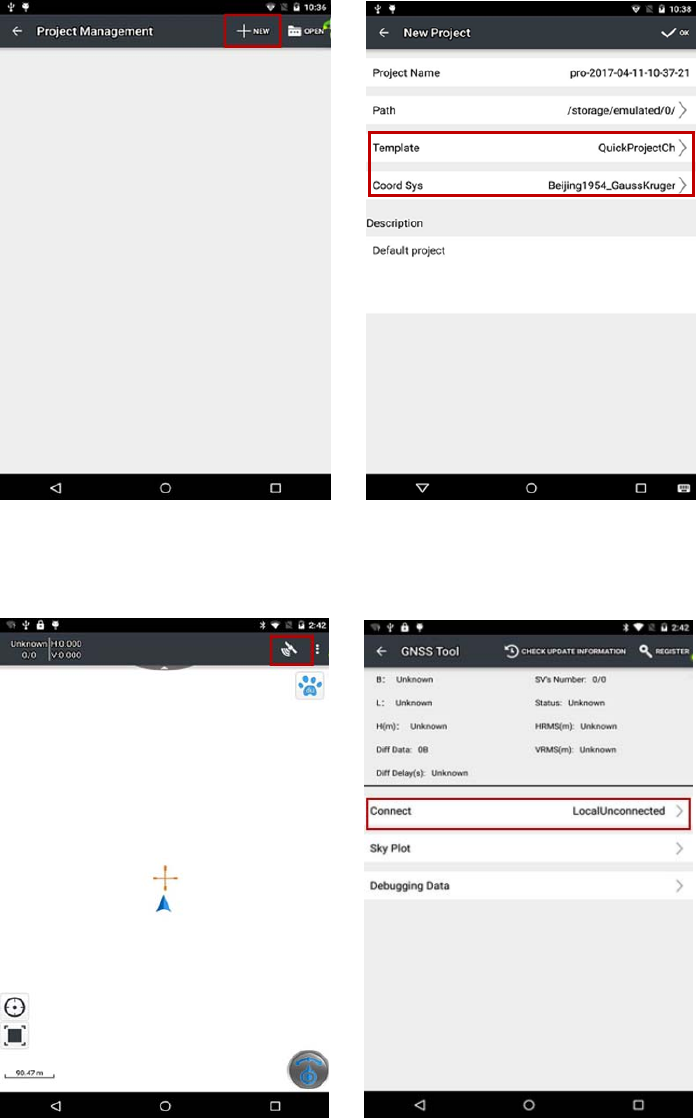
4.10. LOCATION
ClickSettings/Locationtoswitchonlocationservice.
Page21
5. GETTINGSTARTEDWITHMAPCLOUD3.0
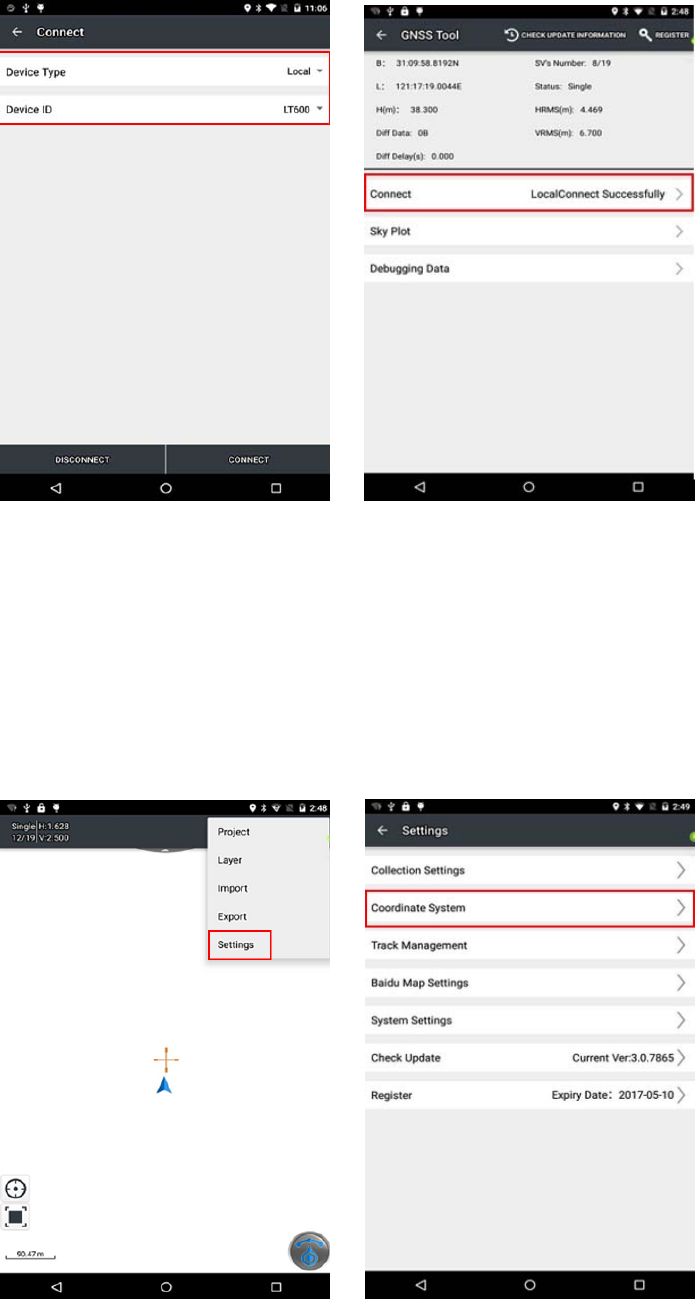
5.1. BUILDNEWPROJECT
OpenMapCloud3.0andclick"+"tobuildnewproject>choose"ProjectTem plate"and
"CoordinateSystem">click"√"tofinish;
Clicksatelliteiconintheupperrightcorner>click"Connect">choose"ConnectMethod,
DeviceType">LocalConnectionSuccessful>Return.
Page22
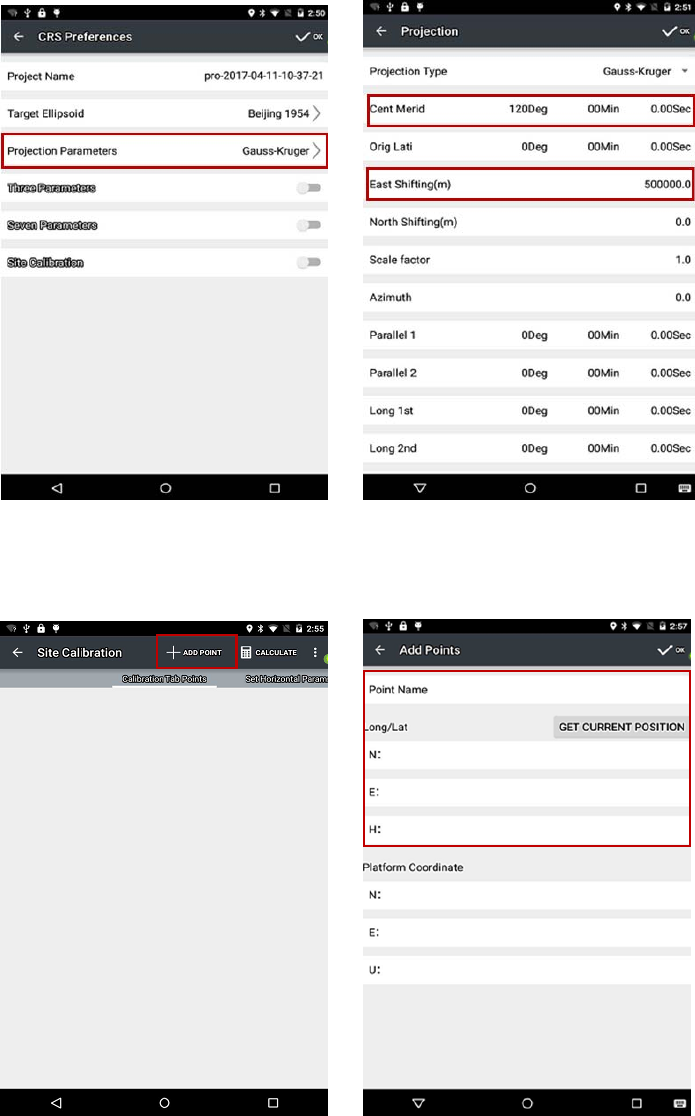
5.2. COORDINATESYSTEMSETTINGS
ClickMenu>"Settings">"CoordinateSystem">"ProjectionParameters">Set“Central
Meridian”and“EastShifting”>click"√"tosave;
Page23
Typein3or7parameters,oropen“SiteCalibration”>click"+"toaddknownpoint>click
“Calculate”>click"√"tosaveandthenstartscollecting.
5.3. IMPORTBASEMAP
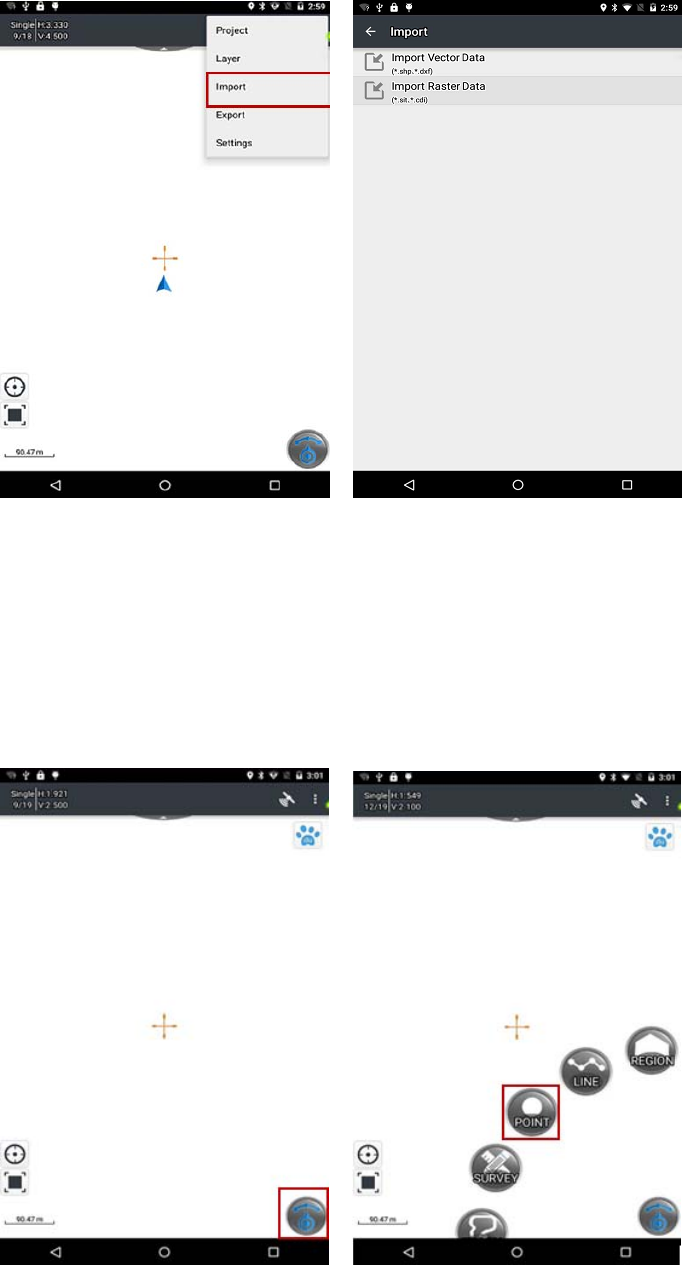
Clickmenubuttonofhand‐heldreceiver>”Import”>”ImportVectorData”or“Import
Map”>choosethefiletobeimported.
Page24
5.4. DATACOLLECTION
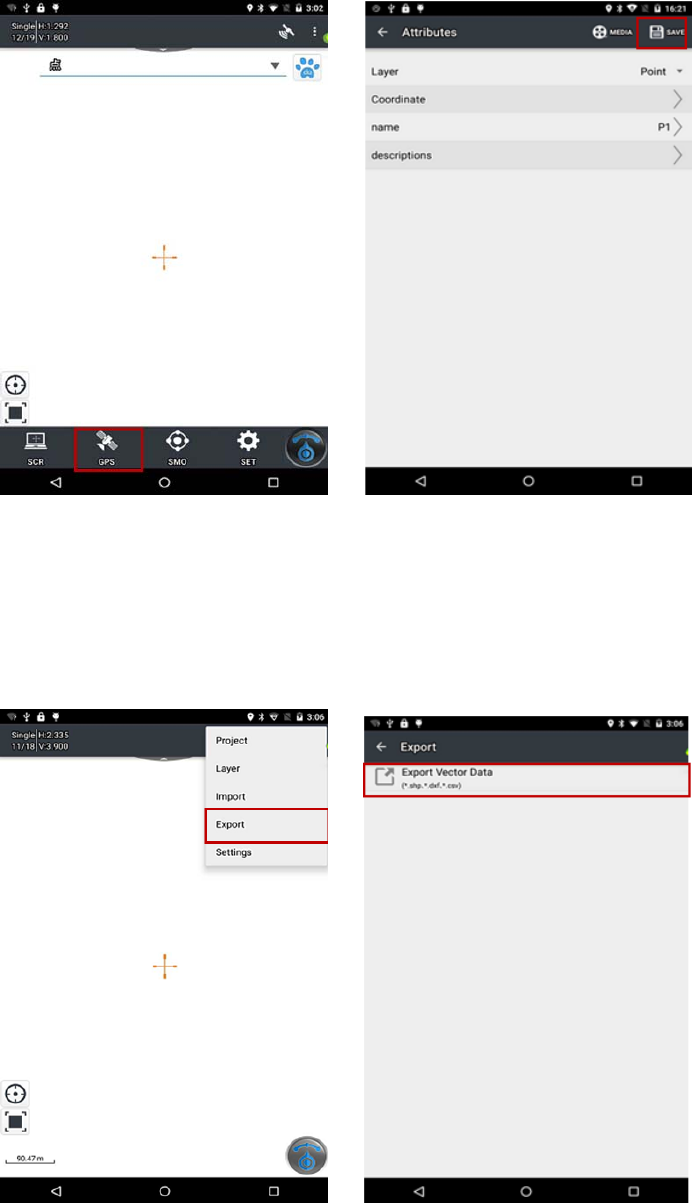
Clickthebuttoninthelowerrightcorner>”Point”>”GPS”>clicksavetofinishcollecting(the
sameforlineorareacollecting)
Page25
5.5. EXPORTDATA
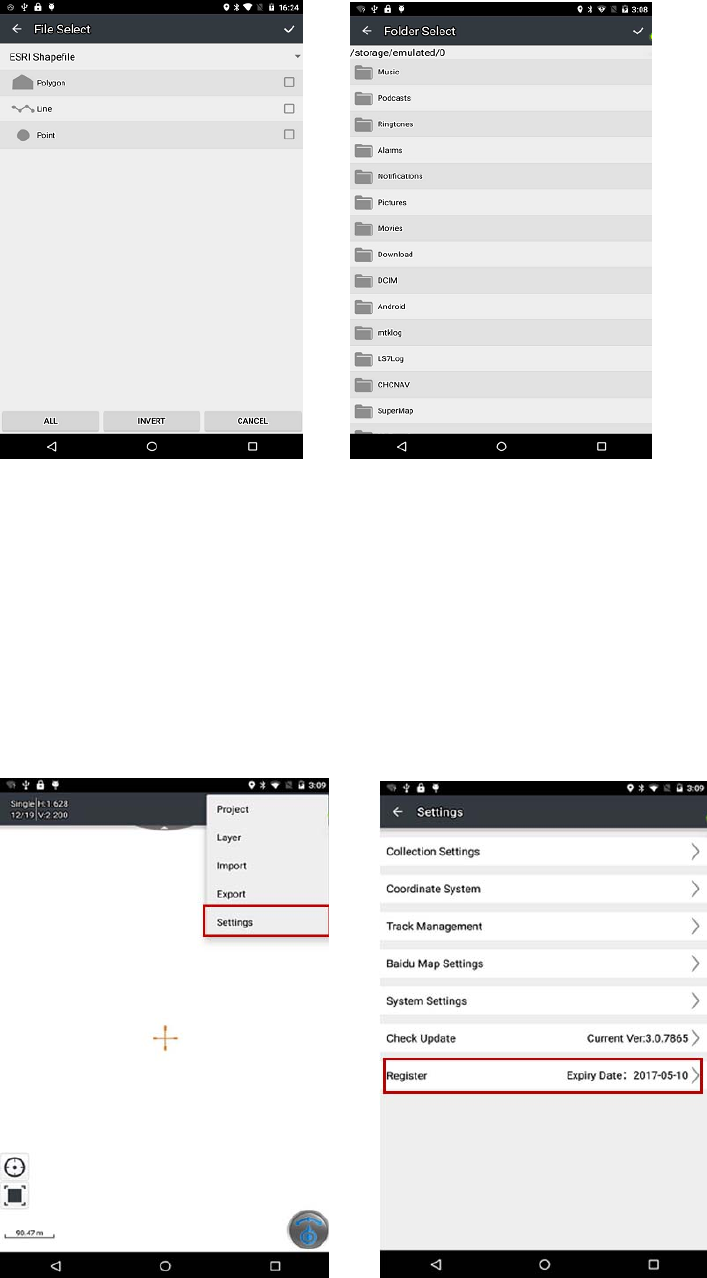
Clickmenubuttonofthehand‐heldreceiver>"Export">click“ExportVectorData”>choose
thepoint/line/arealayeranditsformatyouwanttoexport>click"√"toexport.
Page26
5.6. SOFTWAREREGISTRATION
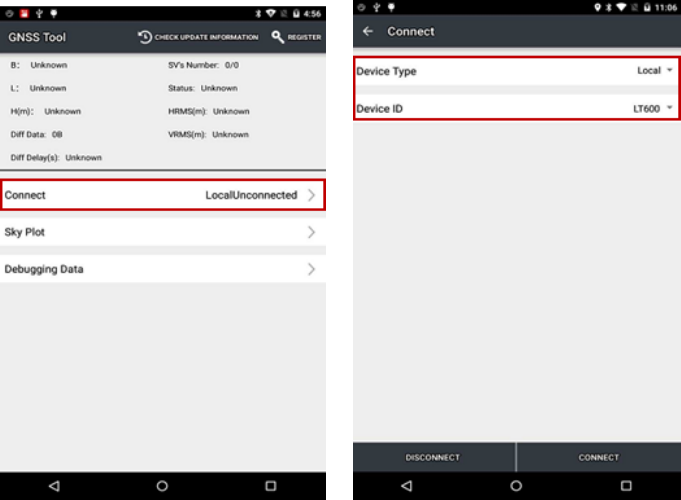
RegisterintheupperrightcornerofGNSSServercontainsGNSSServerversion,deviceID
andsoon;SoftwareregistrationsetbyMapCloud3.0includetheversionofMapCloud3.0,
deviceIDetc.UserscanregisterbyapplyingforregistrationcodefromCHC.
Page27
6. GETTINGSTARTEDWITHGNSSTOOL
GNSSToolisakindofservicemainlyusedforaccesstodataandlocal,BluetoothandWIFI
connection.ExternalAppcansendcommandtoreceiverbyusingGNSSToolthrough
broadcast.GNSSToolcancallCHCSDKtosendcommandtoreceiver.Usersonlyneedto
connectwithGNSSTooltocommunicatewiththereceiver.Itwillberunninginthe
backgroundonceconnectedandusersdon’tneedtostartit.
BeforeusingGNSSTool,usersneedtoregisterfirst.UnregisteredGNSSToolonlyallowfor30
minutestryout.
6.1. CONNECTION
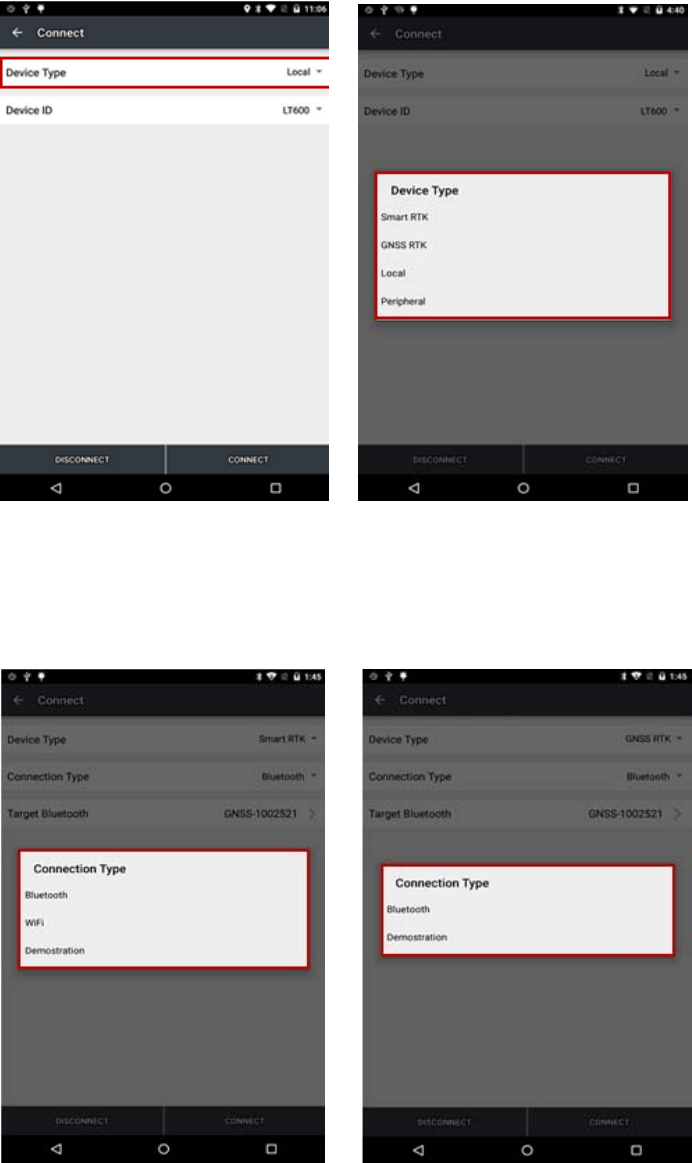
1. OpenGNSSTool,click[Connect]menuandselect[DeviceType]and[ConnectionType]/
[DeviceID]inconnectinterface.
2. DeviceType:GNSSToolcurrentlysupports4typesofDevice:SmartRTK,GNSSRTK,
LocalandPeripheral.LocalsupportstypicalmobilephoneandCHCcustomizedhandheld
controllerlikeLT40andLT600.PeripheralsupportsNMEA0183,X360Seriesandother
devices.
HereforLT600,wechooseLocal.
Page28
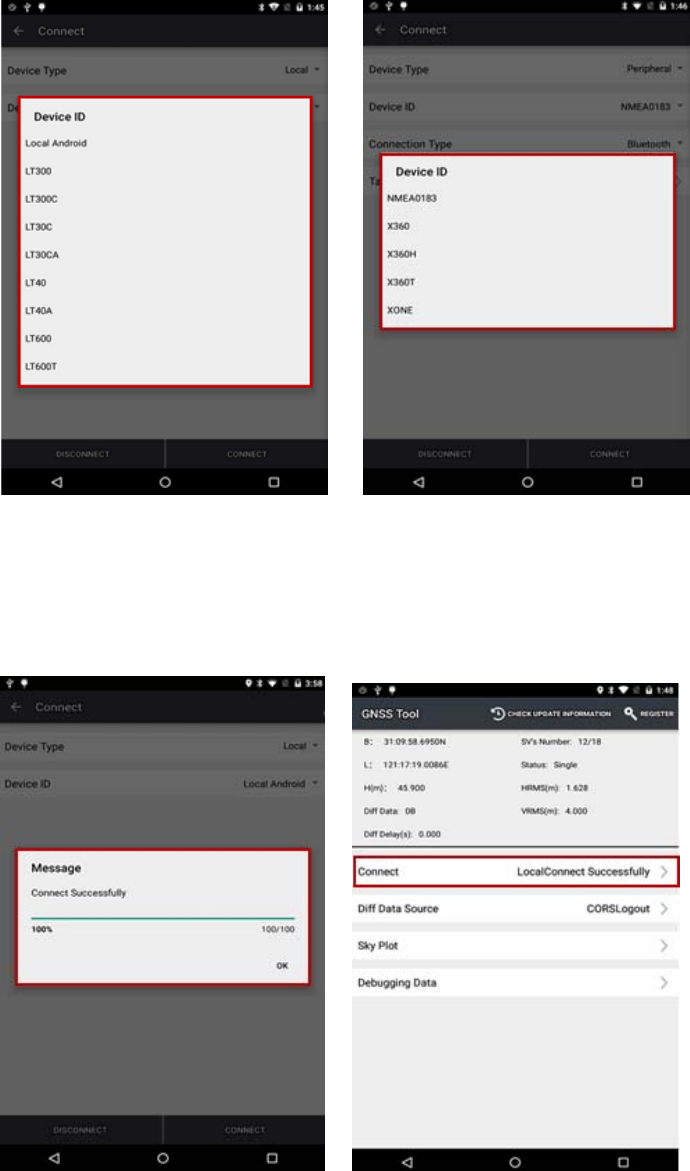
3. ConnectionType:ForsmartRTK(likei80),weselectBluetooth,WIFIorDemonstration.
ForGNSSRTK(likeX91),weselectBluetooth,andDemonstration.ForLocalandPeripheral,
weselectthespecificdevicetypethatweuse.HereweselectLT600forConnectionType.
Page29
4. Click[Connect]toconnectwiththereceiversuccessfullyandgobacktotheprevious
interface.
6.2. CORSLOGIN
Afterfinishingconnectionsuccessfully,wecanloginCORStoreceivedifferentialdata.Users
canloginCORSin4differentways:CORS,APIS,TCPandRTCMSDK.BeforeloginCORS,
pleasemakesurethedevicehasbeenconnectedandthehandheldisconnectedtothe
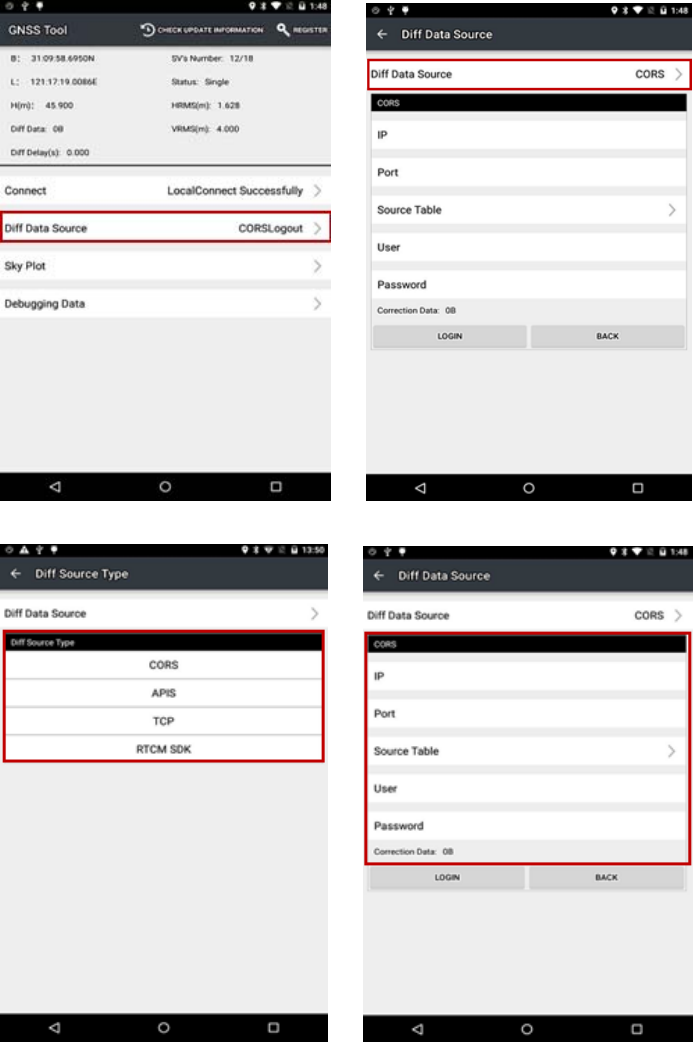
Page30
Internet.GNSSToolwillautomaticallydisconnectCORSifthedeviceisdisconnected.
1. ClickDiffDataSourceinthemaininterface,typeinIP,Port,SourceTableandother
parametersandthenclickLOGIN.
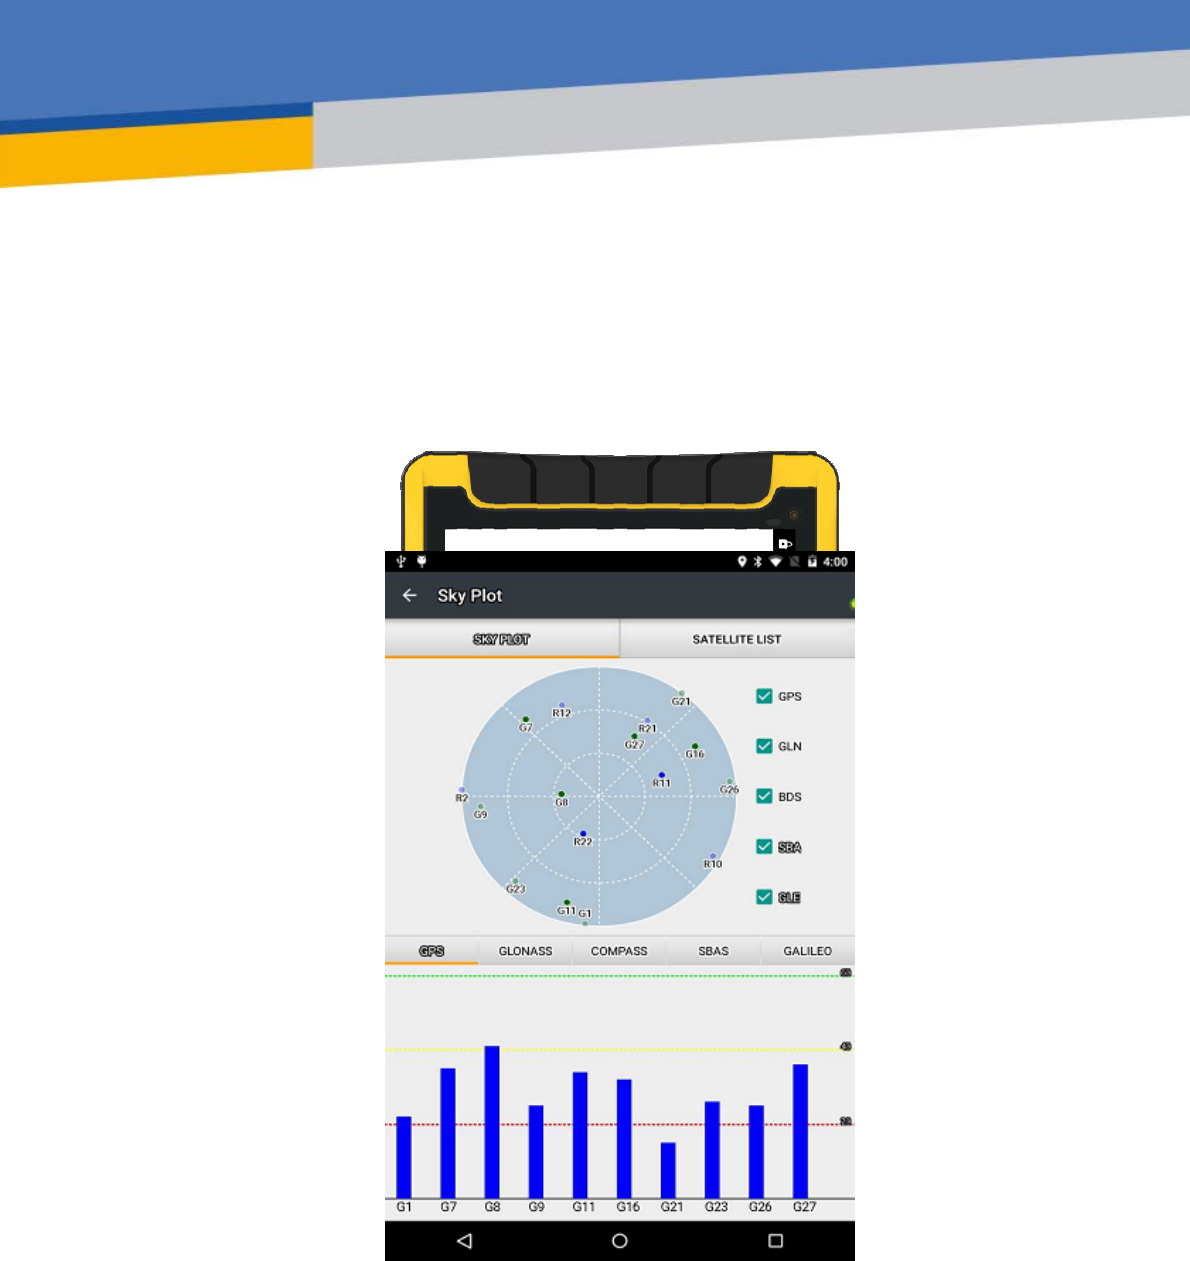
6.3. SKYPLOT
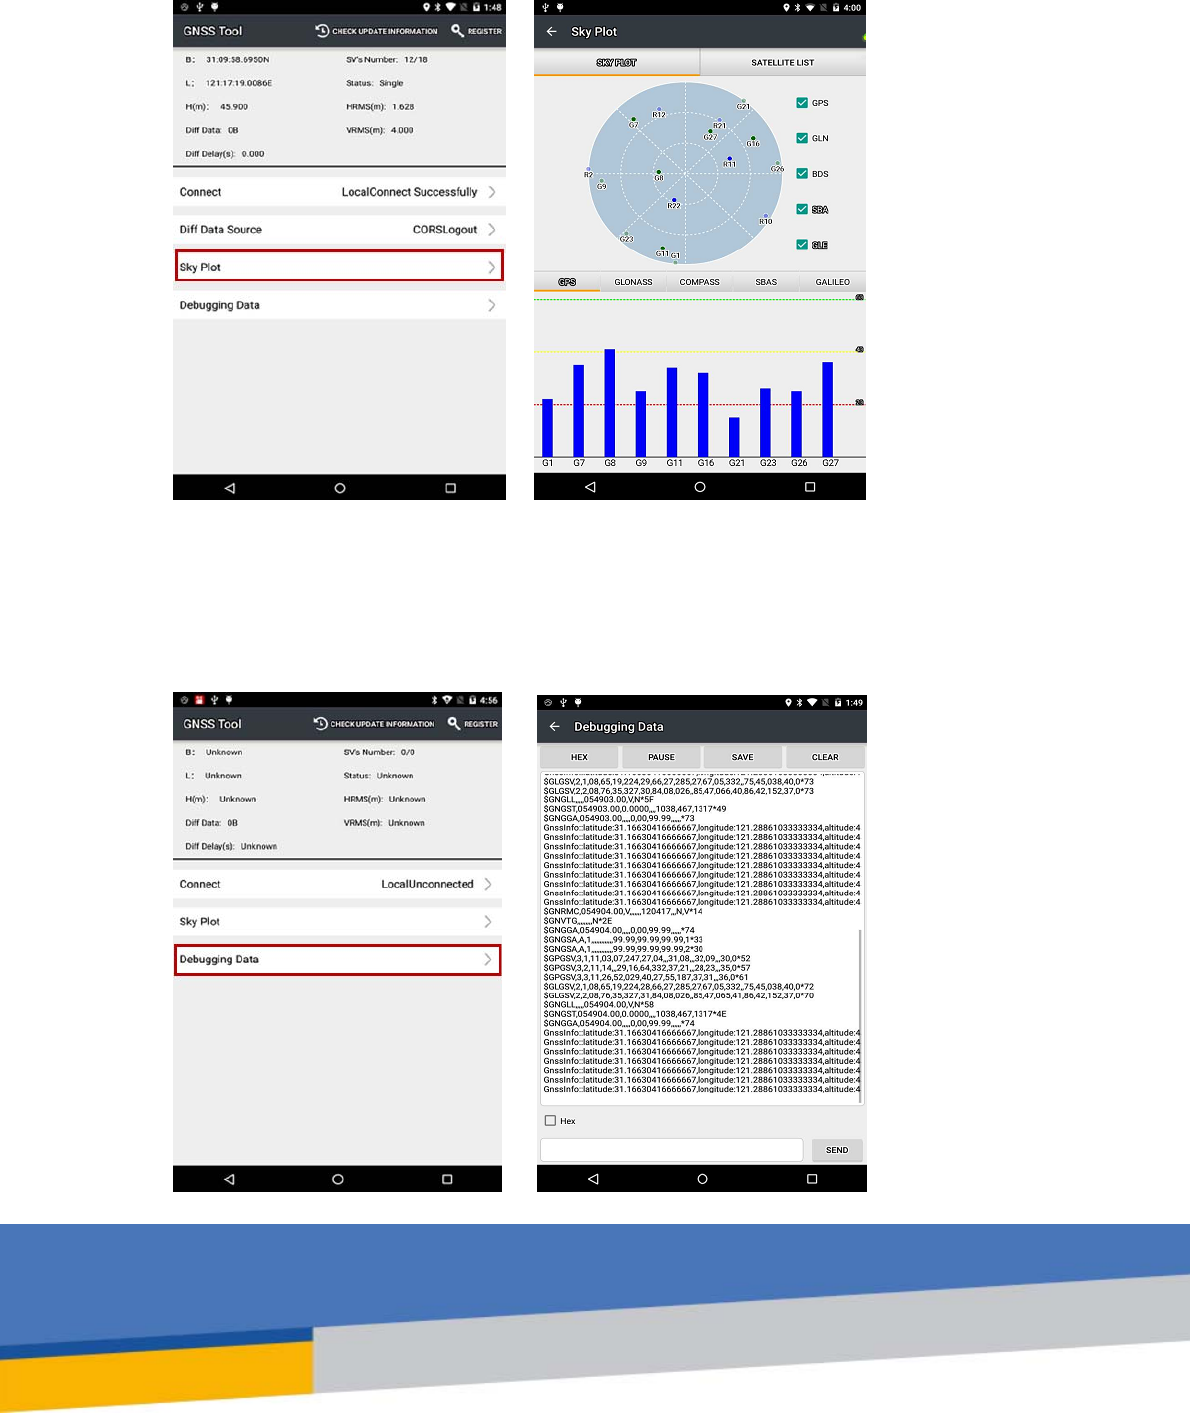
ClickSkyPlotandseehowmanysatellites(includingGPS,GLONASS,BDS,GALILEOandSBAS)
thedeviceiscurrentlytracking.
Page31
6.4. DEBUGGINGDATA
ClickDebuggingDatatoenterdatadebugginginterface.ClickHEXtochangethedatainto
txtformat,orpause,saveandclearthedatausingbuttonintheupperside.

Page32
CHC ‐ Shanghai HuaCe Navigation Technology Ltd.
Building C,599 Gaojing Road,Qingpu
District,Shanghai,China
Tel: +86-21-51508100-1241
Fax: +86-21-64851208
Email: sales@chcnav.com | support@chcnav.com
Website: www.chcnav.com
The SAR limit of USA (FCC)is 1.6W/Kg averaged over one gram of tissue. Product, model
number:LT-600;(FCC ID:SY4-B01008) has also been tested against this SAR limit. The
highest SAR value reported under this standard during product certification for use on the
body is 1.15 W/Kg .The device was test for body-worn operations & hotspot operations .
compliance with FCC RF exposure requirements
RF Exposure Information (SAR) :
This device complies with part 15 of the FCC Rules. Operation is subject to the following Two
conditions:(1) This device may not cause harmful interference , and (2)this device must accept
any interference received, including interference that may cause undesired operation.
Any changes or modifications not expressly approved by the party responsible for compliance
could void the user's authority to operate the equipment.
Note: This equipment has been tested and found to comply with the limits for a Class B digital
device, pursuant to part 15 of the FCC Rules. These limits are designed to provide reasonable
protection against harmful interference in a residential installation. This equipment generates,
uses and can radiate radio frequency energy and, if not installed and used in accordance with
the instructions, may cause harmful interference to radio communications. However, there is
no guarantee that interference will not occur in a particular installation. If this equipment does
cause harmful interference to radio or television reception, which can be determined by
turning the equipment off and on, the user is encouraged to try to correct the interference by
one or more of the following measures:
—Reorient or relocate the receiving antenna.
—Increase the separation between the equipment and receiver.
—Connect the equipment into an outlet on a circuit different from that to which the receiver is
connected.
—Consult the dealer or an experienced radio/TV technician for help.