Huace Navigation Technology B01012 Handheld GNSS Data Collector User Manual il
Shanghai Huace Navigation Technology LTD. Handheld GNSS Data Collector il
Contents
- 1. user_manual
- 2. Uaser_Manual
- 3. User manual
Uaser_Manual
LT700 SERIES | GETTING STARTED GUIDE
Handheld GNSS Data Collector
Shanghai Huace Navigation Technology LTD.

CONTENTS
Introduction ............................................................................................................................................. 2
1.1. Technical Assistance ............................................................................................................... 2
1.2. Your Comments ...................................................................................................................... 2
1.3. Safety Information .................................................................................................................. 2
1.4. Warning and Cautions ............................................................................................................ 2
1.5. Use and Care ........................................................................................................................... 2
Overview .................................................................................................................................................. 3
2.1. Features .................................................................................................................................. 3
2.2. Specifications .......................................................................................................................... 3
LT700 Overview ....................................................................................................................................... 5
3.1. Front View .............................................................................................................................. 5
3.2. Back View ............................................................................................................................... 7
3.3. Side View ................................................................................................................................ 8
3.4. Installation .............................................................................................................................. 8
Basic Operation ....................................................................................................................................... 9
4.1. Insert SIM Card and power on ................................................................................................ 9
4.2. Language & input ................................................................................................................. 11
4.3. Set Date/Time ....................................................................................................................... 11
4.4. Display .................................................................................................................................. 12
4.5. WIFI ...................................................................................................................................... 13
4.6. Bluetooth .............................................................................................................................. 14
4.7. USB Connection .................................................................................................................... 14
4.8. Use Camera .......................................................................................................................... 15
4.9. Log in 4G ............................................................................................................................... 16
4.10. Scheduled power on & off .................................................................................................... 16
4.11. Location ................................................................................................................................ 18
Getting Started With GnssTool .............................................................................................................. 19
5.1. Connection ........................................................................................................................... 19
5.2. CORS Login ............................................................................................................................ 21
5.3. Sky Plot ................................................................................................................................. 21
5.4. Debugging Data .................................................................................................................... 22

Page 2
INTRODUCTION
Thank you for choosing CHC LT700 Series GNSS Hand-held Receiver.
This Getting Started Guide will provide useful information about your receiver. It will also guide you through
your first steps of using LT700 Series in the field.
1.1. TECHNICAL ASSISTANCE
If you have a problem and cannot find the information you need in the product documentation, contact your
local dealer from which you purchased the LT700 Series. Alternatively, please request technical support using
the CHC Website (www.chcnav.com) or CHC technical support email (support@chcnav.com).
1.2. YOUR COMMENTS
Your feedback about this Getting Started Guide will help us to improve it in future revision. Please e-mail your
comments to support@chcnav.com.
1.3. SAFETY INFORMATION
This manual describes CHC LT700 Series GNSS Data Collecting Terminal. Before using the LT700 Series, please
make sure that you have read and understood this Getting Started Guide, as well as the safety requirements.
1.4. WARNING AND CAUTIONS
An absence of specific alerts does not mean that there are no safety risks involved.
A Warning or Caution information is intended to minimize the risk of personal injury and/or damage to the
equipment.
WARNING - A Warning alerts you to a potential misused or wrong setting of the equipment.
CAUTION - A Caution alerts you to a possible risk of serious injury to your person and/or damage
to the equipment.
1.5. USE AND CARE
The LT700 Series is designed to withstand the rough environment that typically occurs in the field. However,
the LT700 Series is high-precision electronic equipment and should be treated with reasonable care.

Page 3
OVERVIEW
2.1. FEATURES
LT700 is the high-end GNSS tablet which supports Android 7.1 platform. It’s a FAD-W high accuracy tablet
which can reach 10cm to 2m accuracy as different hardware configuration. Meanwhile, its dust and water proof
level is IP67 and can survive 1.2m fall onto concrete. With 8000mAh Li-ion battery, it can continuously work
more than 15h. QC 3.0 and fingerprint technology will enormously enhance the speed of charging and the
security of data. LT700 can track GPS+GLONASS or GPS+BDS as user wanted.
2.2. SPECIFICATIONS
Operating System Android 7.1
CPU Eight-core 1.4 GHz
RAM 3GB (4GB optional)
Flash Memory 32GB (64 GB or 128 GB optional)
Memory Extend Micro SD, up to 128G
GNSS Support GPS+GLONASS or GPS+BDS
Accuracy Stand alone: <2.5m; SBAS: 2m
Channel 72
Cold Start 30s
Warm Start 1s
WIFI 802.11 a/b/g/n/ac
Cellular Modem TDLTE, TDSCDMA, EVDO, GSM, WCDMA
Bluetooth V4.1
USB Type C
Li-ion Battery 8000mAh
Voltage 3.8V
Battery Life >15h(continuous work)
Charging Time 5.5 h
Front Camera 2.0 megapixel
Back Camera 8.0 megapixel
Flash Light Support

Page 4
Physical specifications
Display
· Size: 8inch Corning Gorilla Glass touch screen
· Resolution: 1280*800
· Brightness: 450cd/m2
· Touch screen: Capacitance touch, 5 points touch screen
· Point touch pen: Mapping pen with high degree of accuracy
Physical
· Dust proof and waterproof: IP67
· Shock: Survives a 1.2meter drop onto concrete
· Humidity: 5%RH - 95%RH (without condensation)
· Dimension: 235mm*146mm* 13mm (L*W*H)
· Weight: 560g (with battery)
· Operating temperature:-20℃ to + 35℃
· Storage temperature: -30℃ to + 70℃
Physical Properties
· NFC: Optional
· G-sensor: Support
· Light sensor: Support
· Distance sensor: Support
· E-compass: Support
· Gyroscope: Support
Page 5
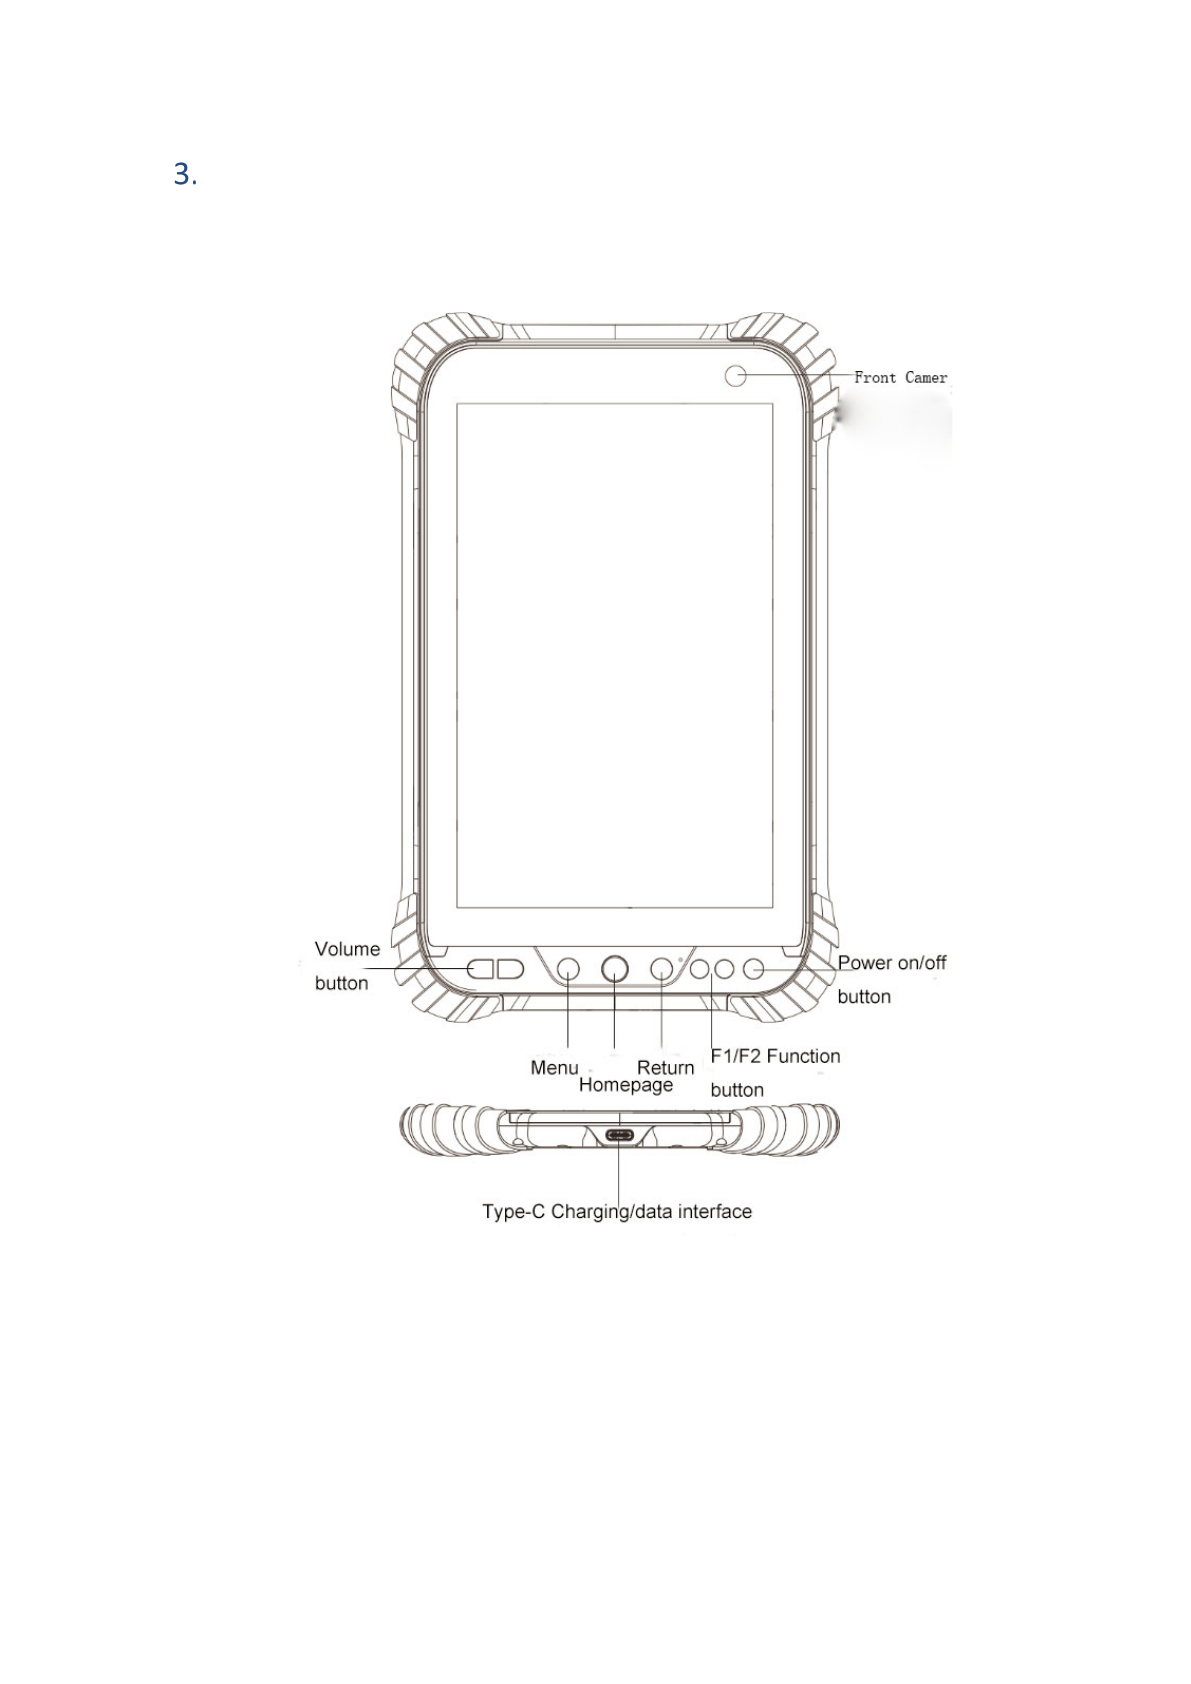
LT700 OVERVIEW
3.1. FRONT VIEW
• Power Button
- Power ON: Press the button for 1-2 seconds, the Power Indicator will turn on and the boot screen will
appear, and then the LT700 will enter the operation system after 30 seconds.
- Power OFF: Press the button for 1-2 seconds, the “SELECT” dialogue box will pop up, select “Power off” to
turn off the device.
- Return: Press the button to go back to last menu.

Page 6
-
• Menu Button
Click this button to bring out the start menu.
• Homepage
Use the Homepage button to main menu.
• F1/f2 Function Button
This key is a shortcut key to the preset function or menu.
• Type C
This interface is used for battery charging and data transmission between LT700 and PC using USB cable.
• Volume button
This 2 buttons are used for increase/decrease the volume.
Page 7
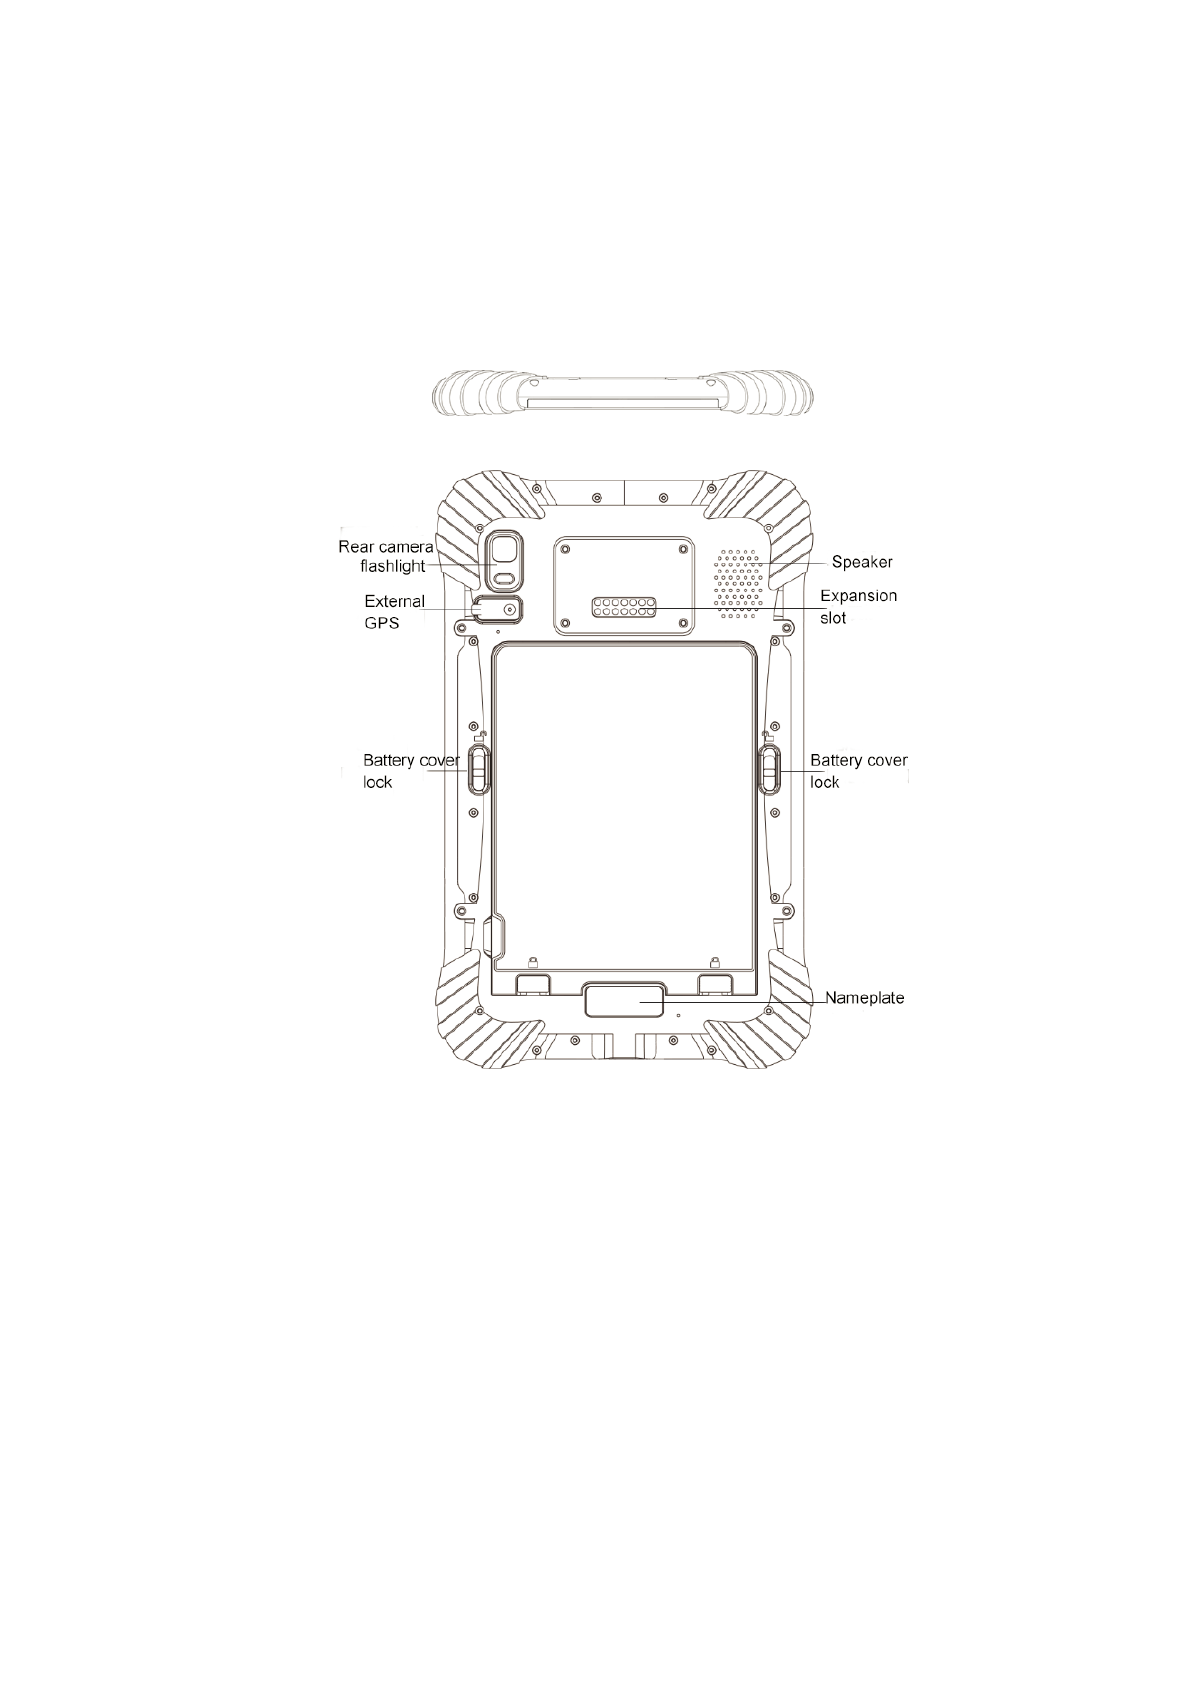
3.2. BACK VIEW
Page 8
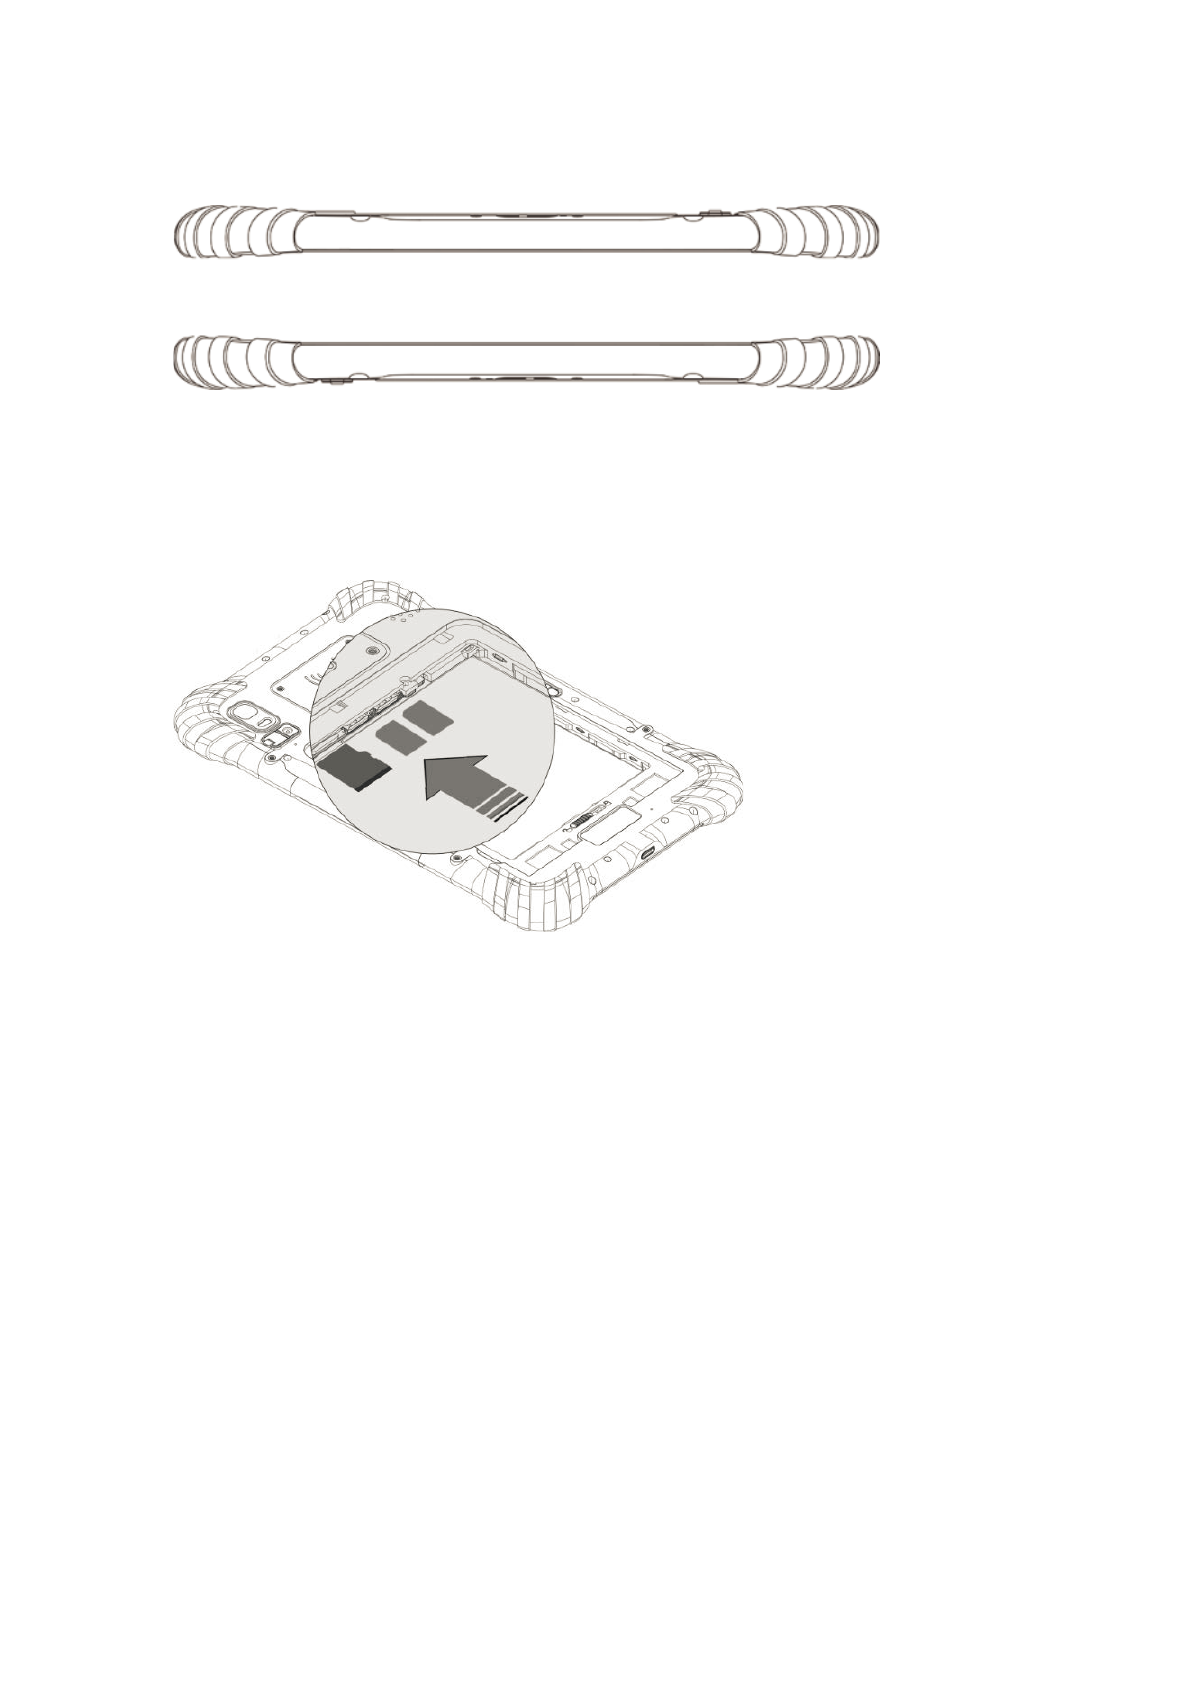
3.3. SIDE VIEW
3.4. INSTALLATION
Please insert the SIM card and the MicroSD card in the direction of the diagram.
Page 9
BASIC OPERATION
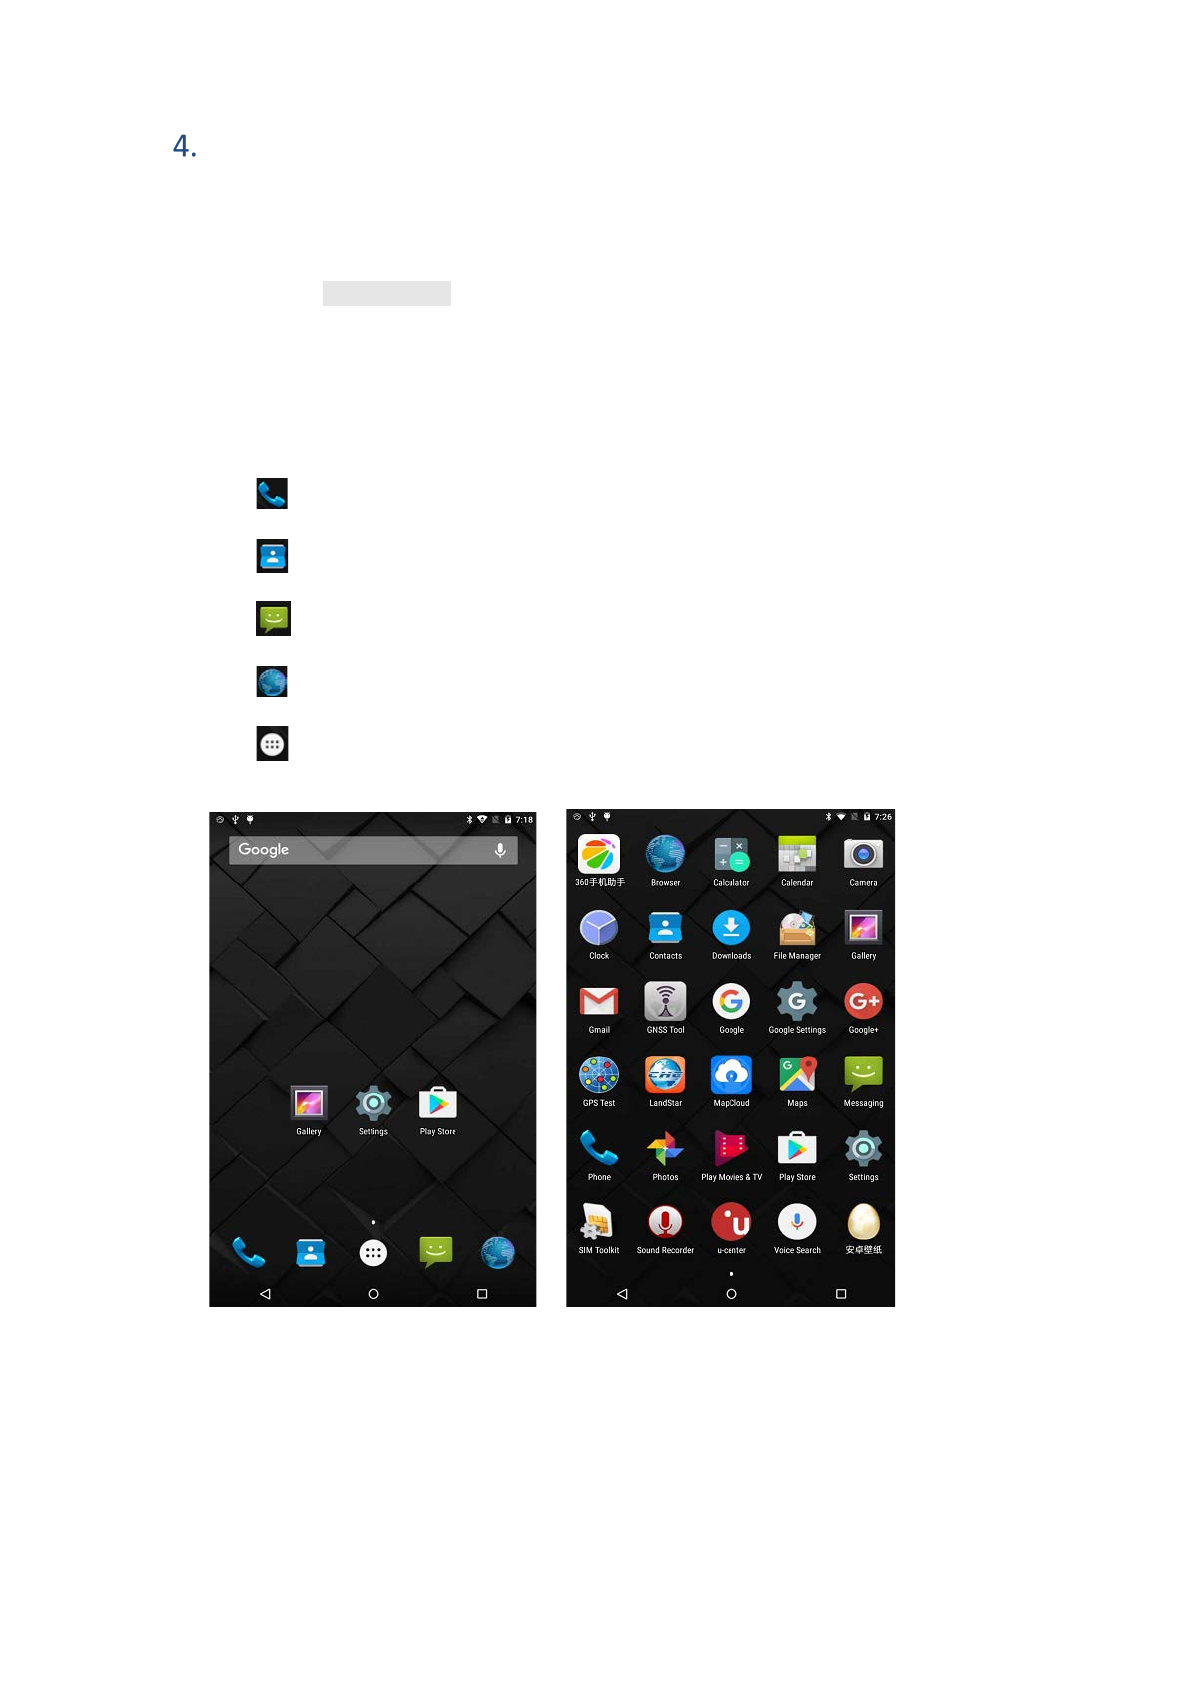
4.1. INSERT SIM CARD AND POWER ON
• Refer to 3.4 Installation find the SIM card and TF card slot, and then insert the cards into slots
correctly.
• Before powering on LT700, please make sure the battery has plenty of power. Then long press the
power button to turn on LT700 and enter its home screen.
Click to make a phone call.
Click to access contacts information.
Click to open message.
Click to open browser.
Click to open the drawer to see all the apps that have been installed (Figure 2).
Figure 1 Figure 2
Page 10
Figure 3 Figure 4
Use virtual button key to facilitate your operation with LT700.
Click to go back to previous menu.
Click to return home screen.
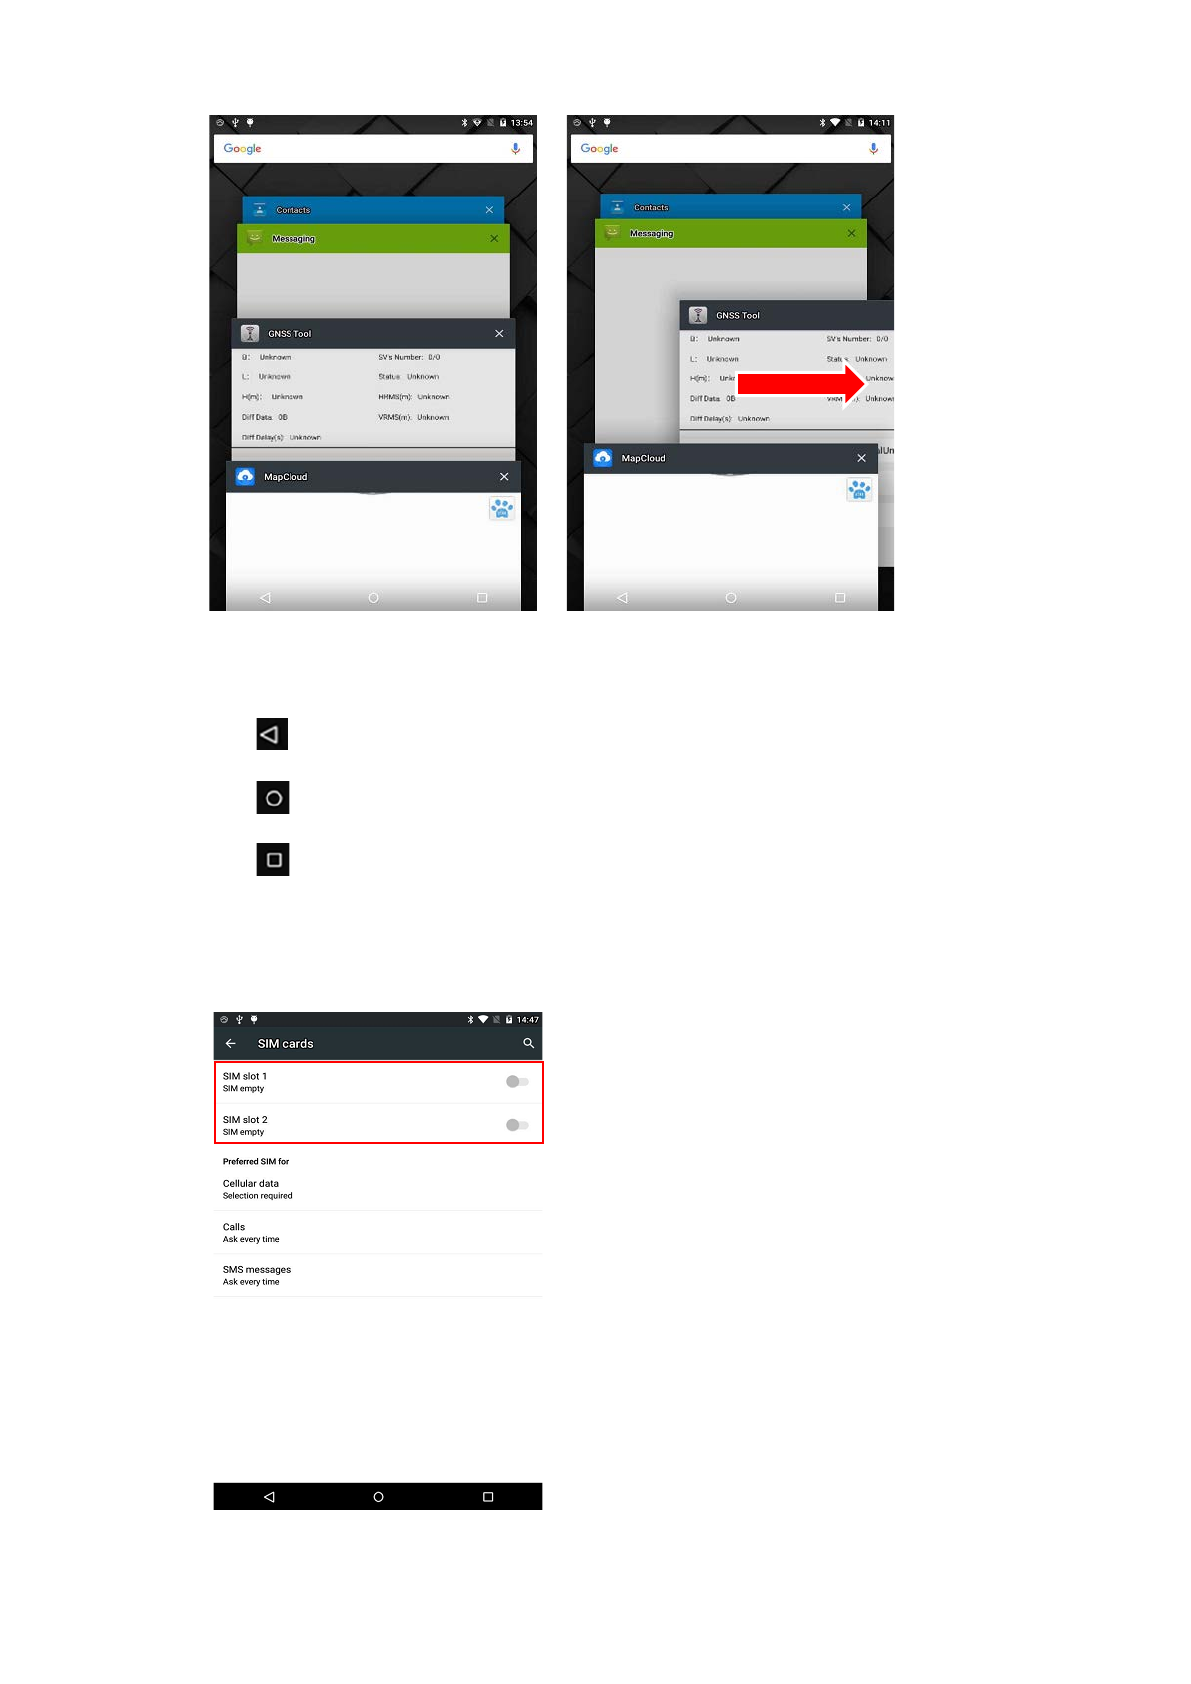
Click to see all the running apps (Fig. 3) and then you can remove apps by sliding them right (Fig. 4).
• After powering on LT700 (refer to 4.2 Power on), Click Settings/SIM card to turn on the SIM cards.
Page 11
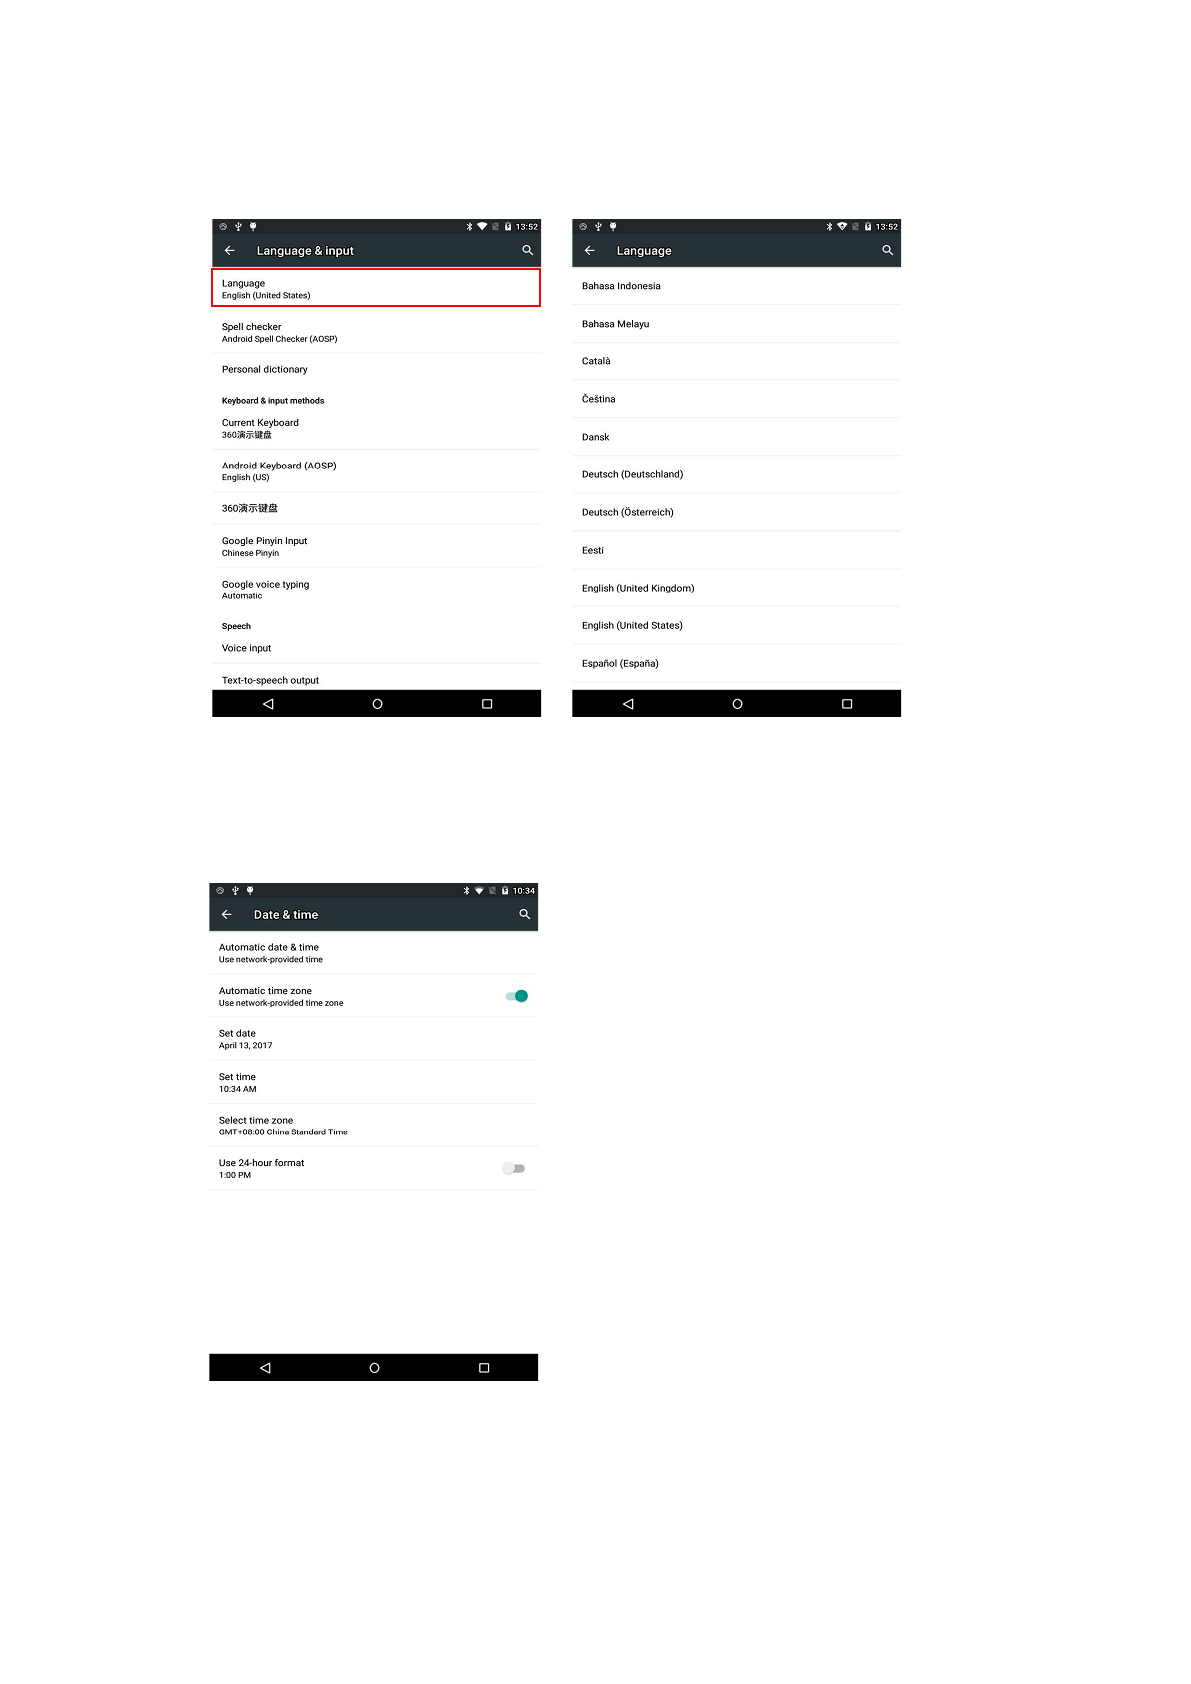
4.2. LANGUAGE & INPUT
Click Settings/Language & input/Language to select language.
4.3. SET DATE/TIME
Click Settings/Date & time and enter Date & time interface.
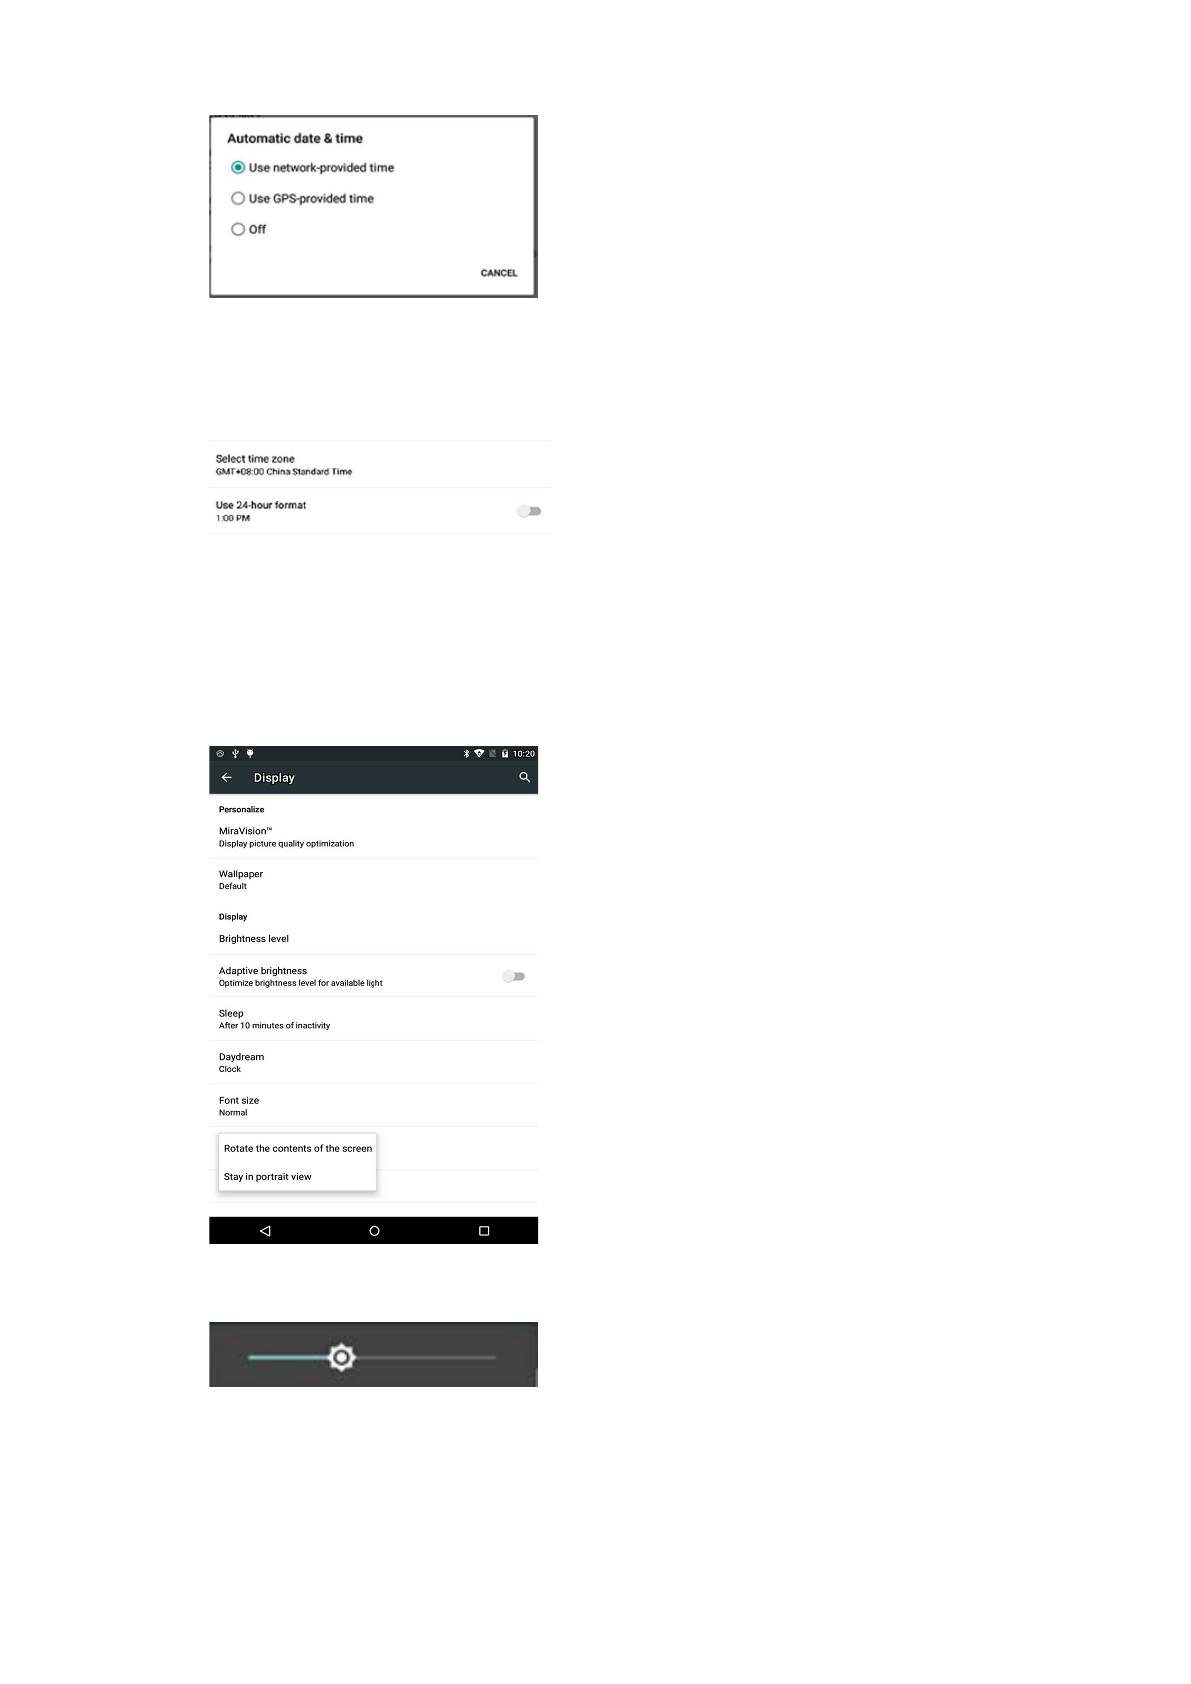
If you want to use date and time from network or GPS, click Automatic date & time to select Use
network-provided time or Use GPS-provided time:
Page 12
If you want to set date and time by yourself, please turn off the Automatic date & time first and then click
Set date and Set time to start your own settings.
YOU CAN ALSO CUSTOMIZE YOUR TIME ZONE AND CHOOSE WHETHER TO USE 24-HOUR FORMAT IN THIS INTERFACE.
4.4. DISPLAY
Click Settings/Display to enter Display interface.
Brightness adjusting: Click Brightness level to adjust it according to your preference.

Page 13
Sleep: Click to optimize the inactivity time LT700 needs to close screen.
Font size: Click to change the font size.
4.5. WIFI
Click Settings/WIFI to switch on the button.
Select WIFI and type in its password to connect.
Page 14
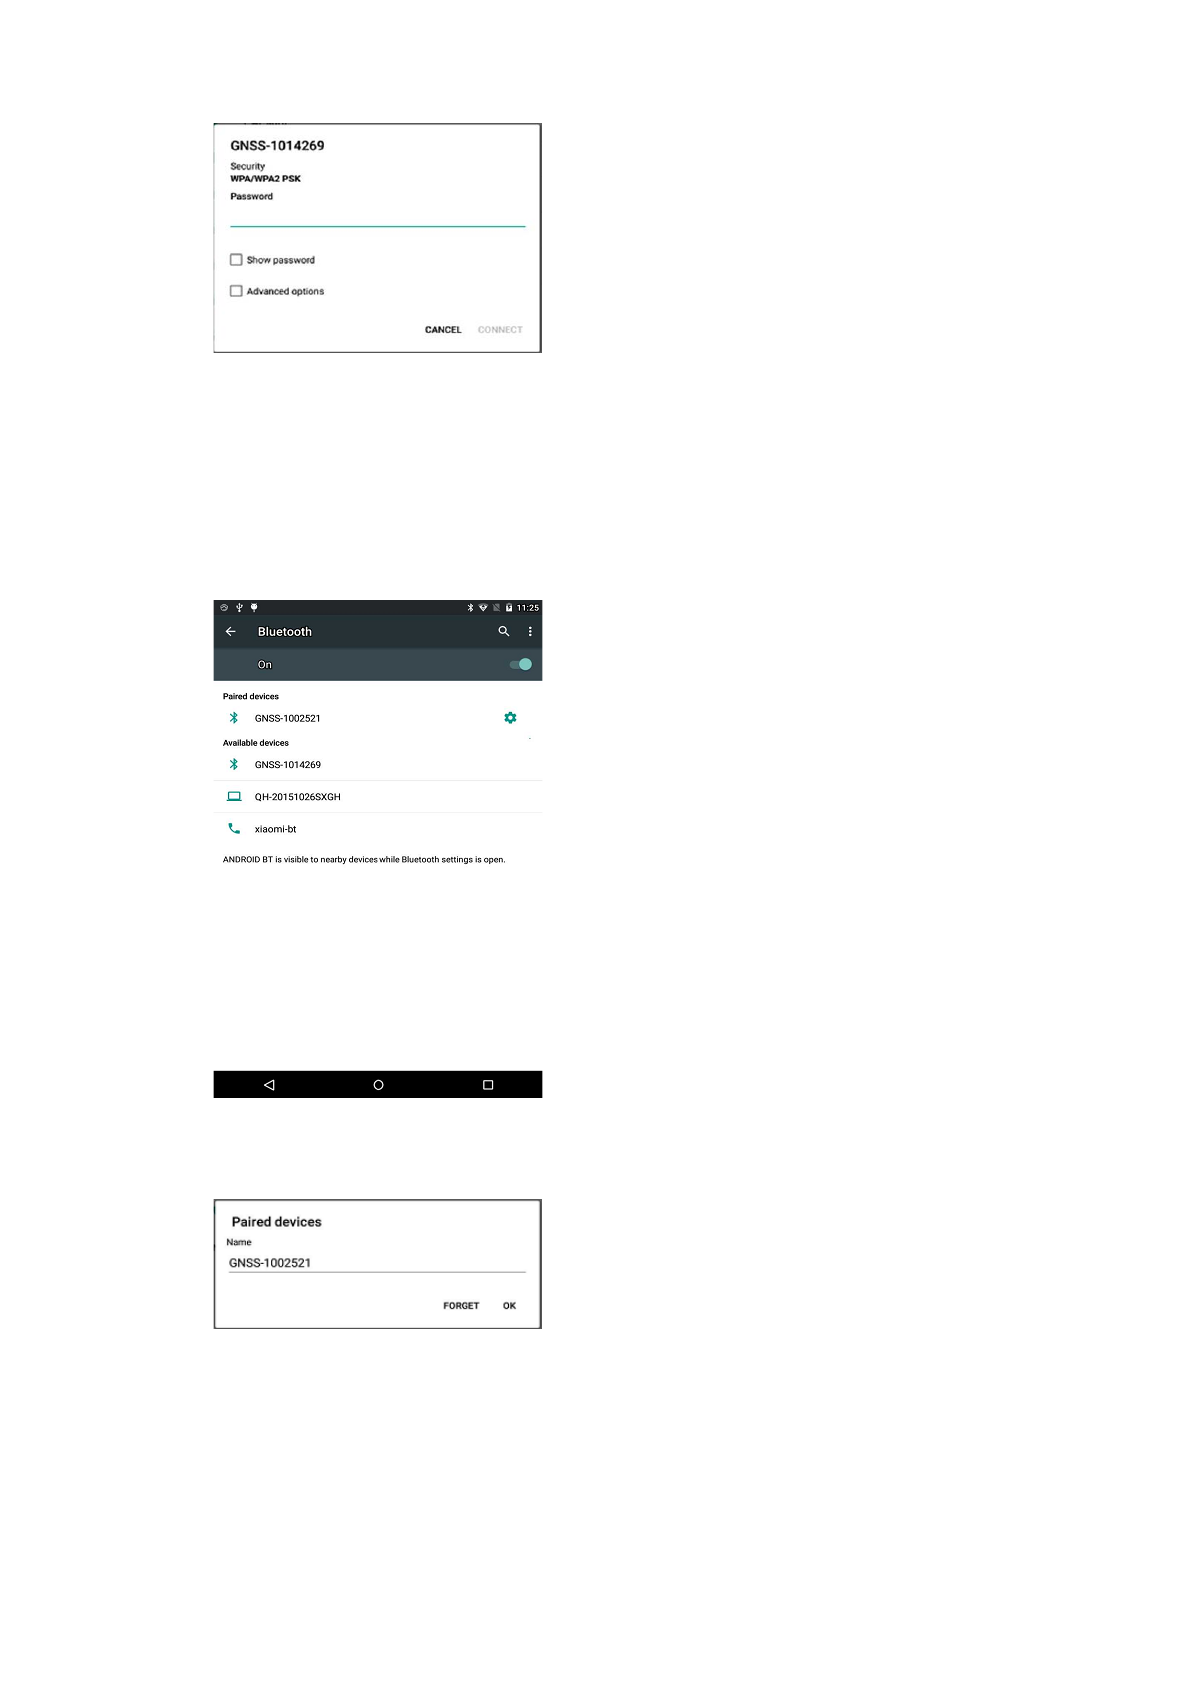
4.6. BLUETOOTH
Click Settings/Bluetooth to turn on the Bluetooth.
Find nearby devices and pair with it.
4.7. USB CONNECTION
For connection or data transmission between LT700 and office computer, please use the USB data cable as
Page 15
shown below.
Click Settings/Developer options/USB debugging to make sure this function is switched on. After USB
data cable is connected with PC, wait until the Allow USB debugging dialogue pops up, click OK.
You can also use third party software to manage the documents and data stored in LT700 and install
software like GNSS Tool into it.
4.8. USE CAMERA
Make sure that the battery is charged and installed in the receiver.
Click to start recording the video, click again to finish.
Click to take a photo.
Slide fingers in the left column to switch between 5 different modes:
Normal mode
PIP mode
Live photo mo:
Panarama mode
Multi angle view mode
Page 16
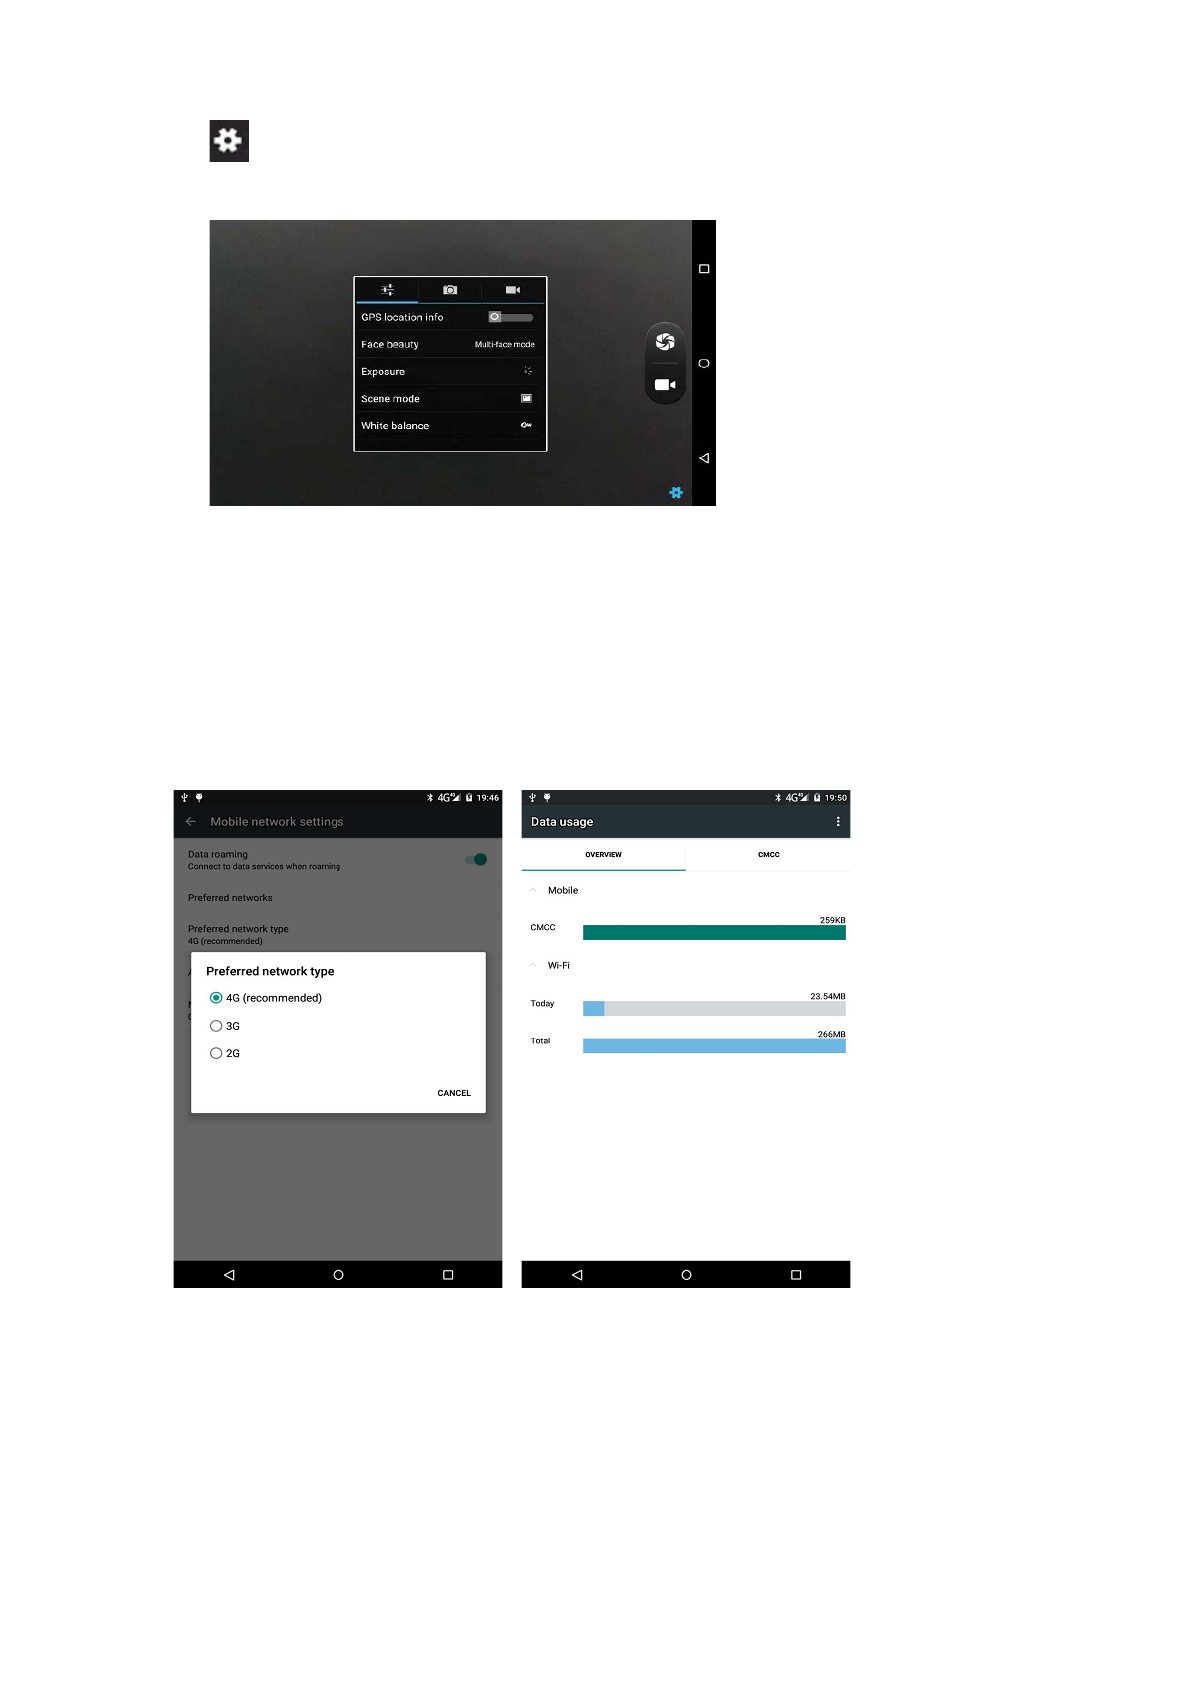
Camera Settings
Click to configure related parameters.
4.9. LOG IN 4G
After inserting your SIM card, click Settings/More/Mobile Networks/Preferred network type and select
corresponding network type of your SIM card. Then Click SIM card icon in the pull down menu and turn on
Mobile data and click More Settings to see data usage.
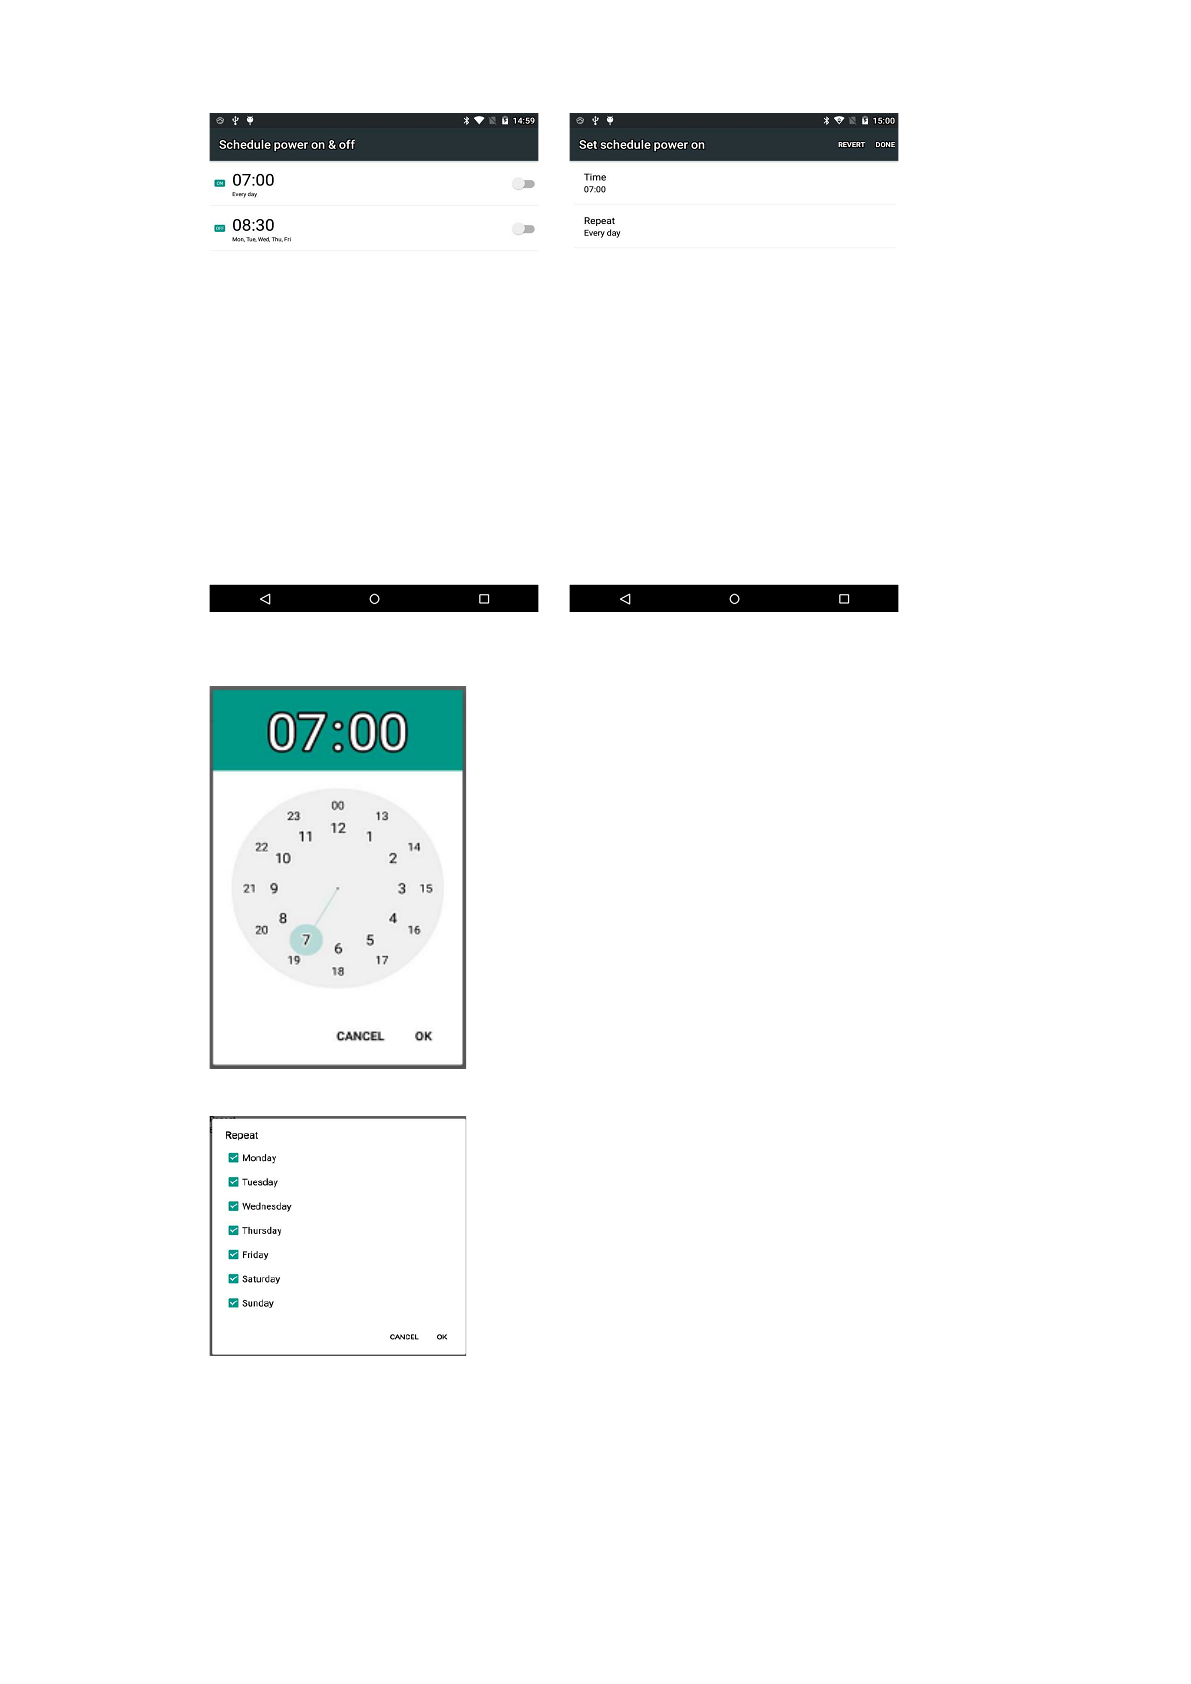
4.10. SCHEDULED POWER ON & OFF
LT700 allows users to achieve scheduled power on and off by setting the power up & off time and repeat
time beforehand.
Page 17
Set the Scheduled power on time and click OK.
Set scheduled power on repeat time and click OK.
Scheduled power off time settings is the same with Scheduled power on.
Page 18
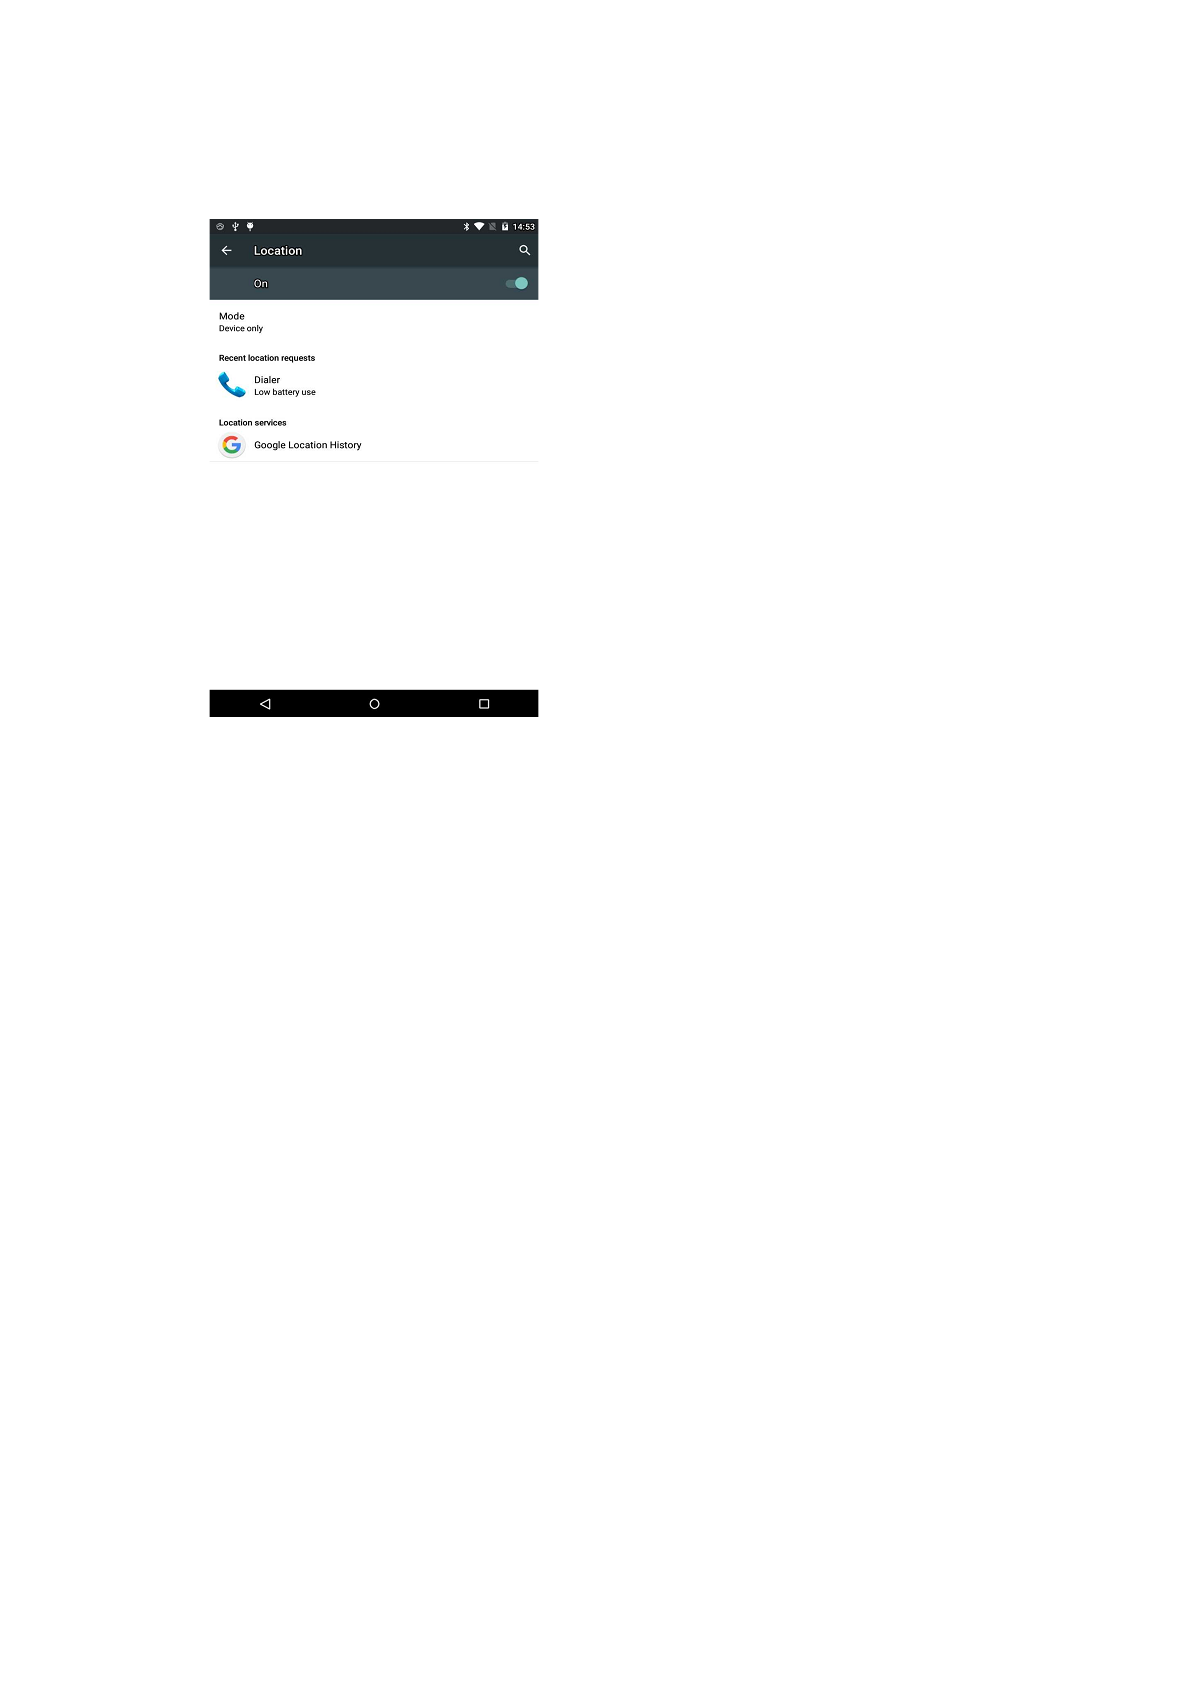
4.11. LOCATION
Click Settings/Location to switch on location service.
Page 19
GETTING STARTED WITH GNSSTOOL
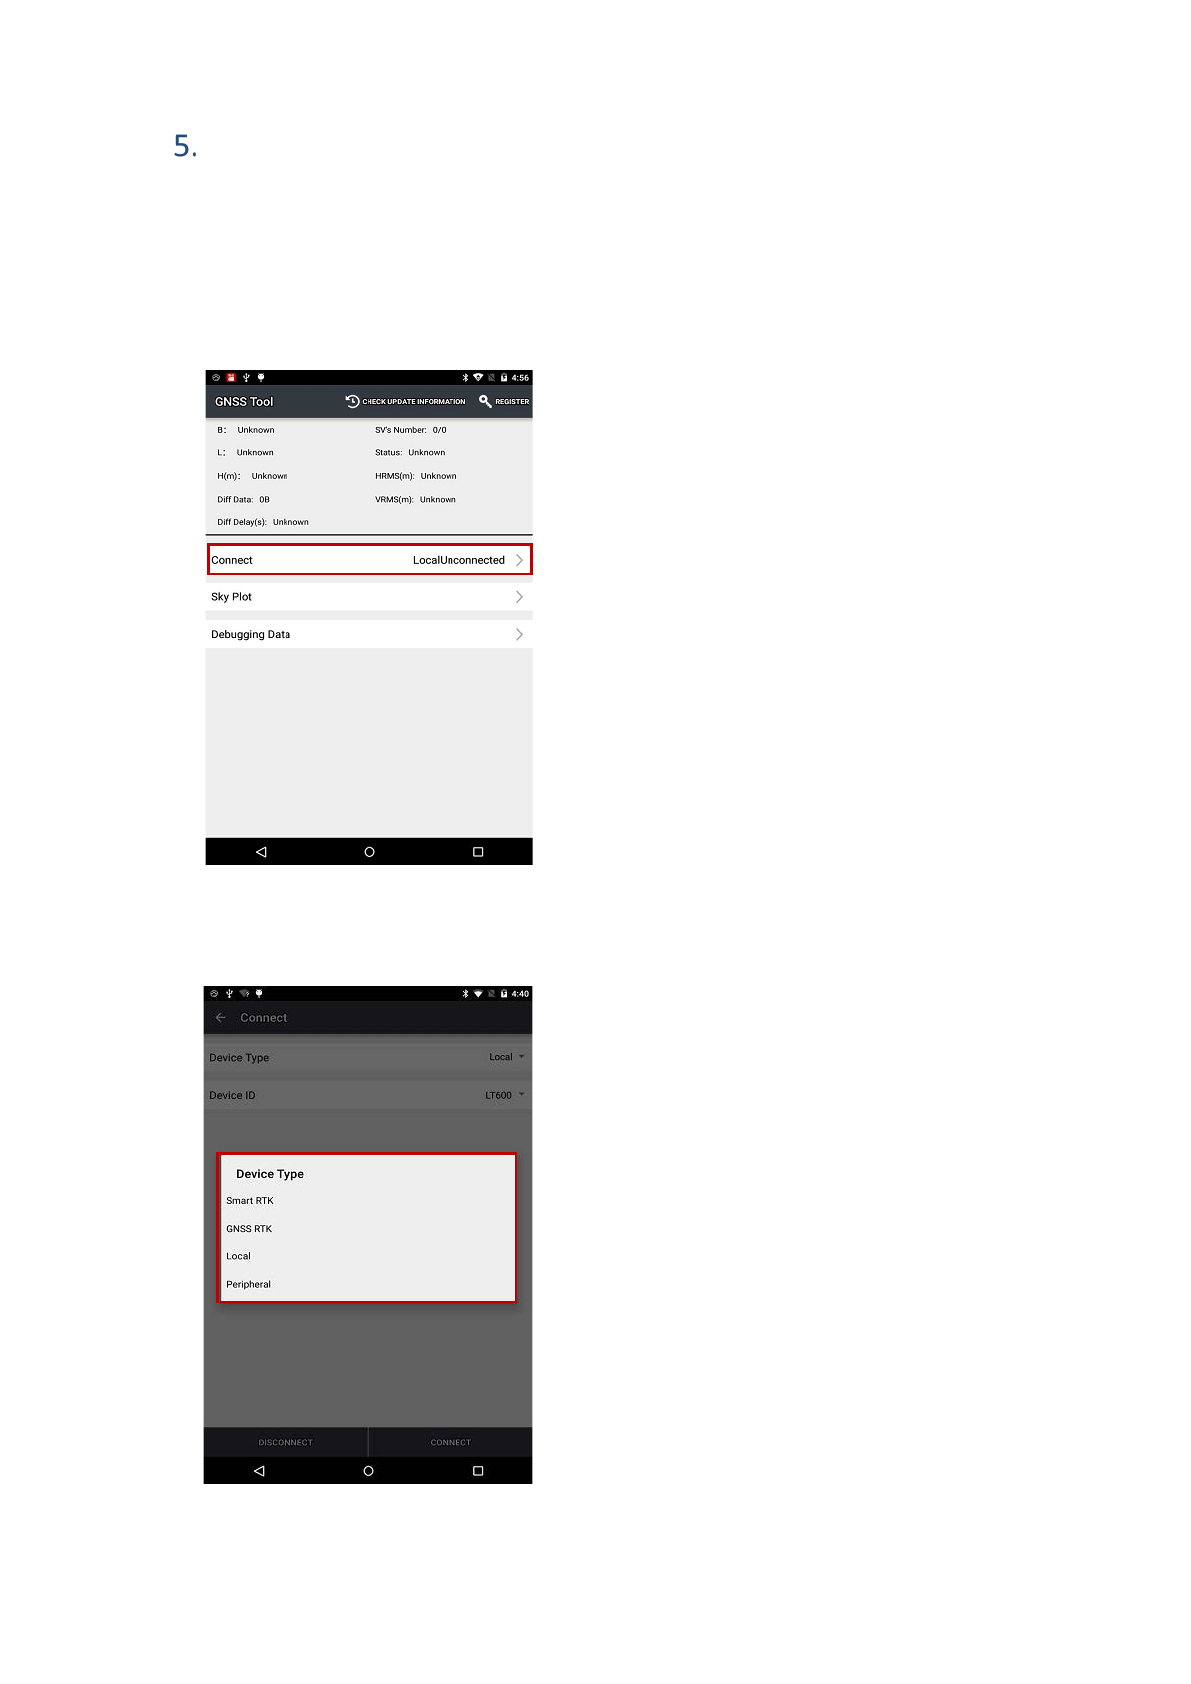
5.1. CONNECTION
1. Open GNSSTool and click [Connect] menu and select [Device Type] and [Connection Type] / [Device ID] in
connect interface.
2. Device Type: There are 4 types of Device Type: Smart RTK, GNSS RTK, Local and Peripheral. Here for
LT700, we choose Local.
Page 20
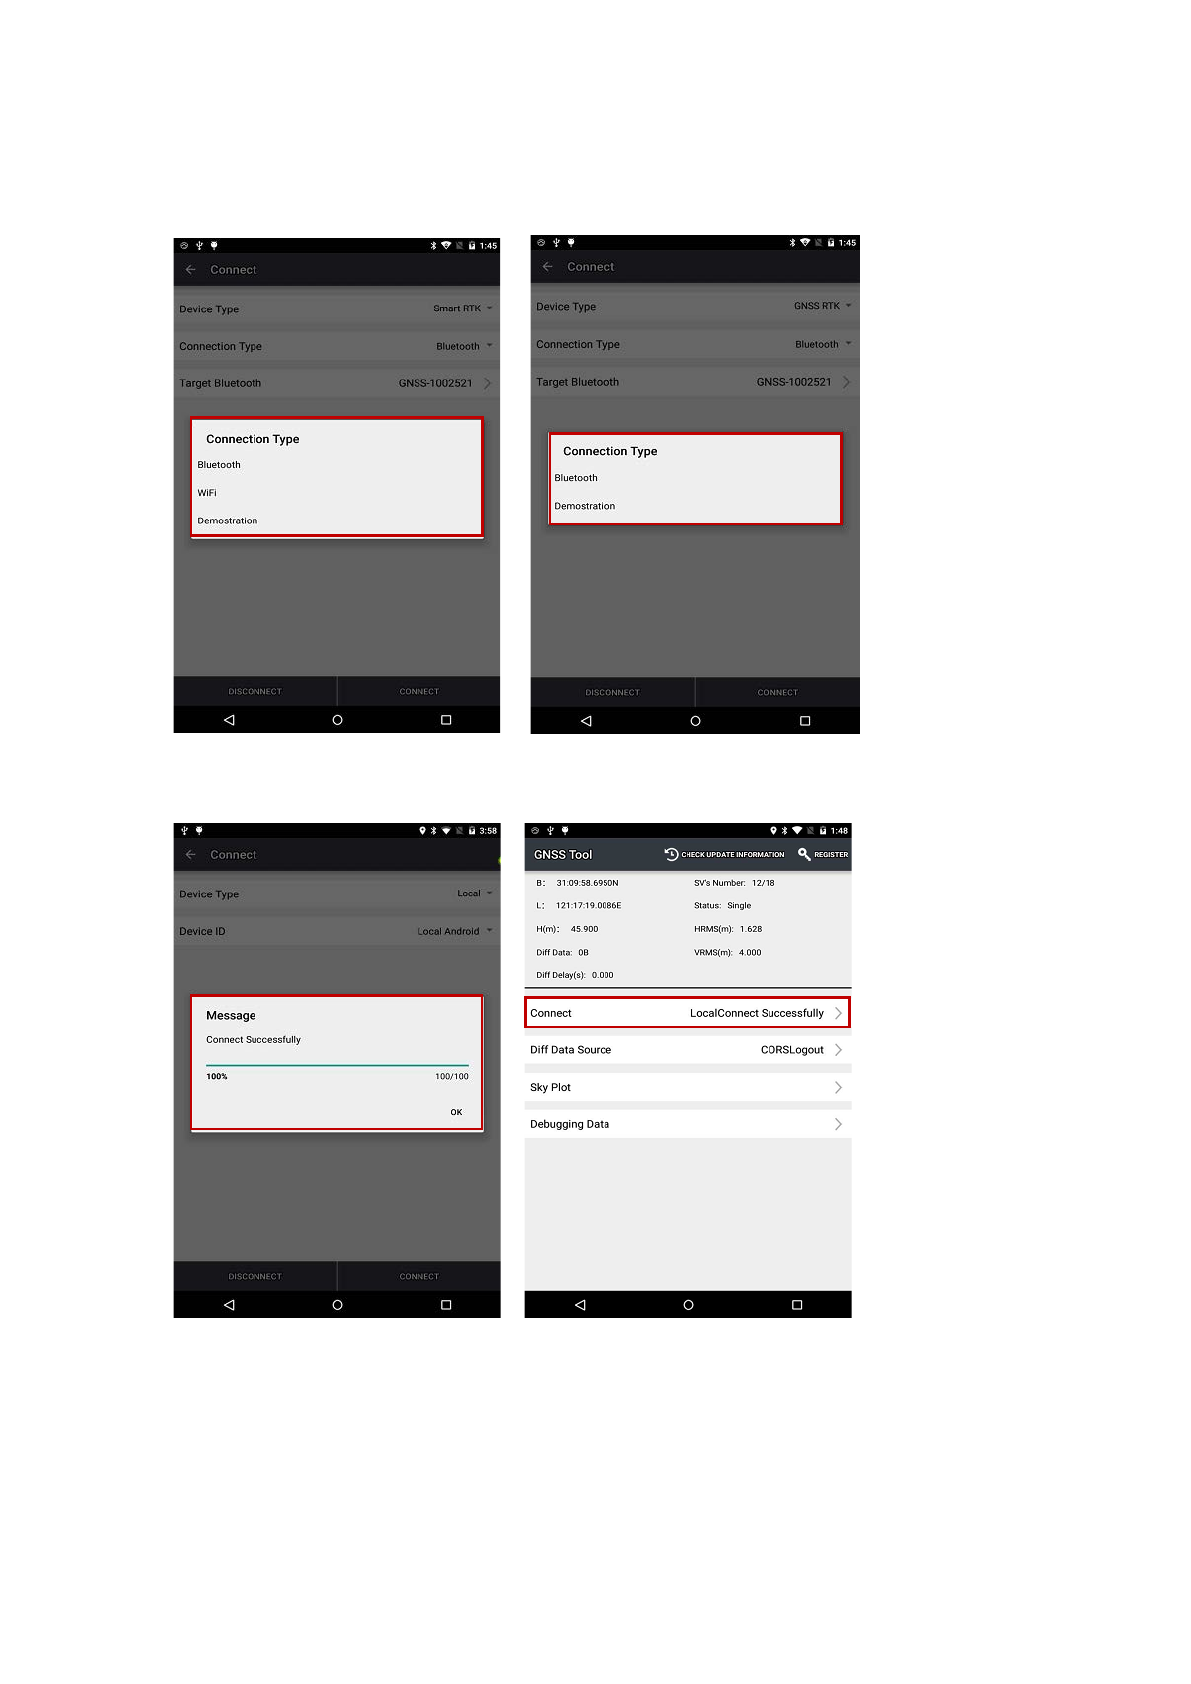
3. Connection Type: For smart RTK (like i80), we select Bluetooth, WIFI or Demonstration. For GNSS RTK
(like X91), we select Bluetooth, and Demonstration. For Local and Peripheral, we select the specific device type
that we use. Here we select LT700 for Connection Type.
4. Click [Connect] to connect with the receiver successfully and go back to the previous interface.
Page 21
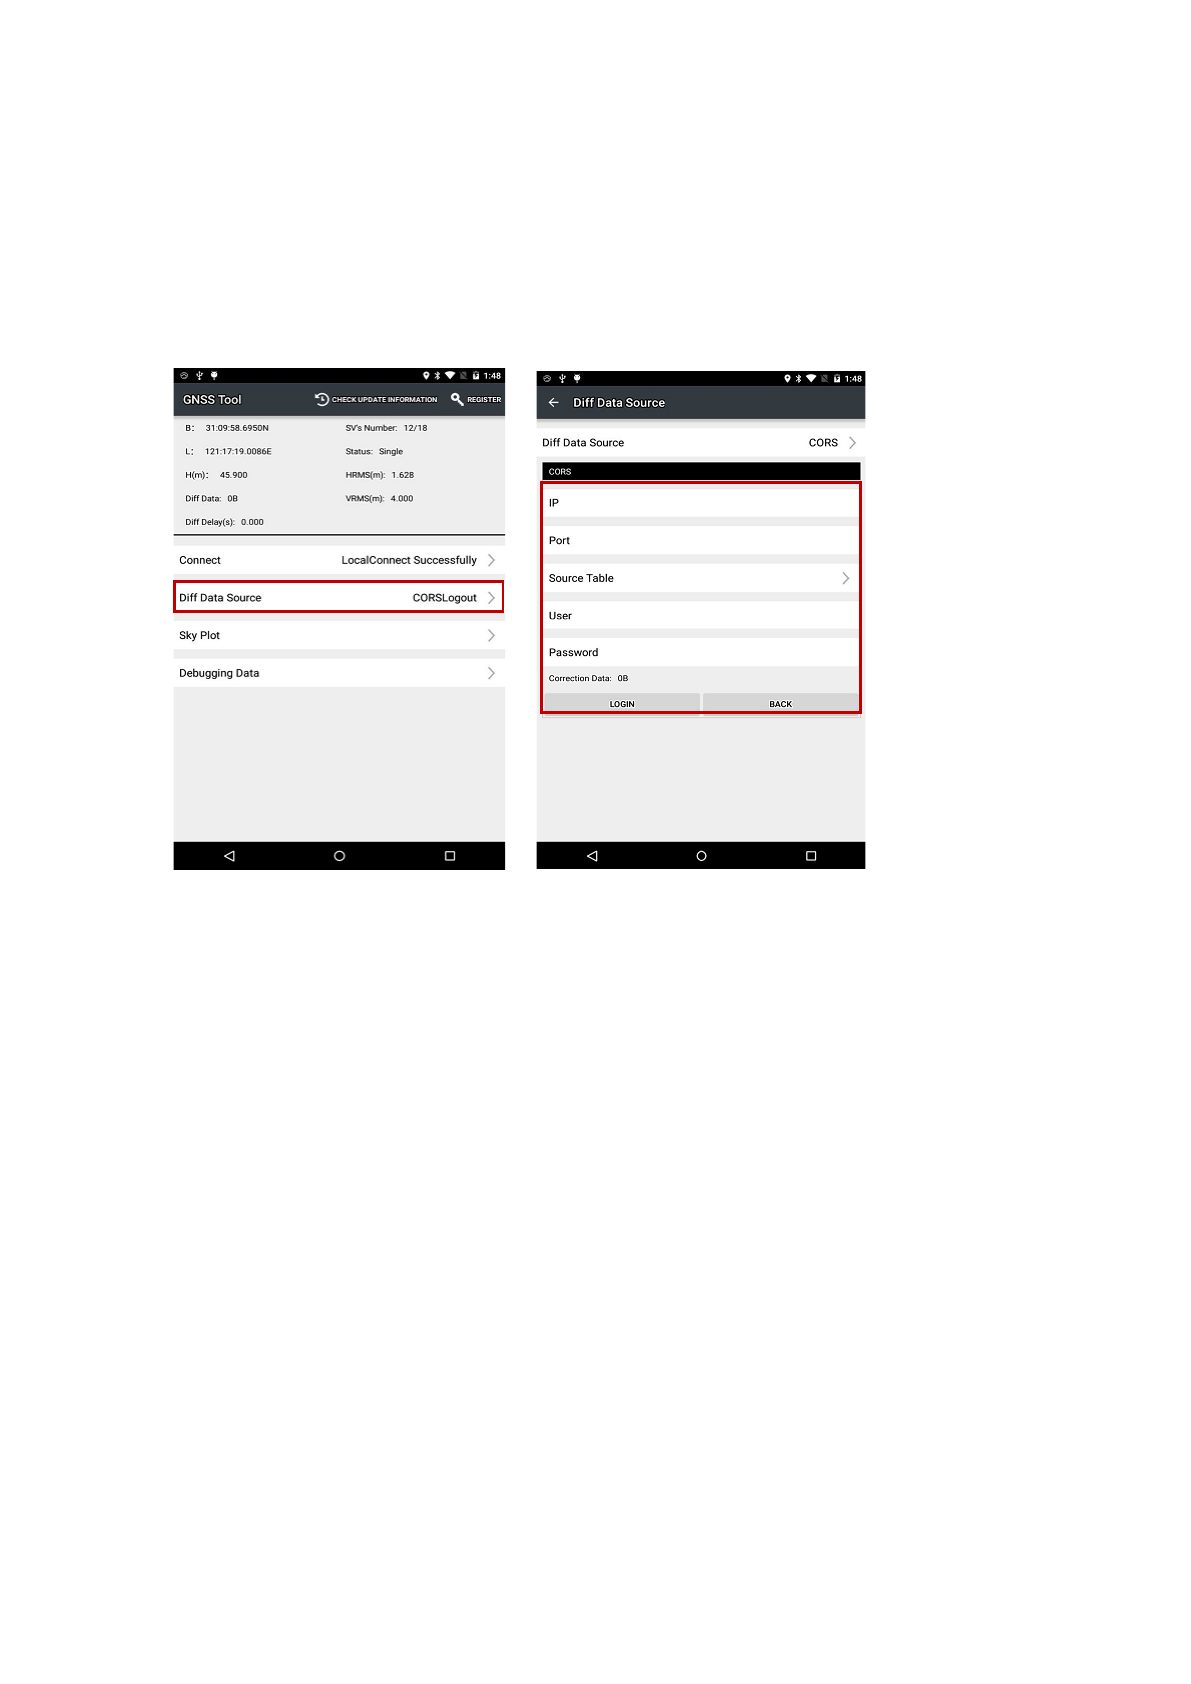
5.2. CORS LOGIN
After finishing connection successfully, we can log in CORS to receive differential data.
1. Click Diff Data Source in the main interface, type in IP, Port, Source Table and other parameters and then
click LOGIN.
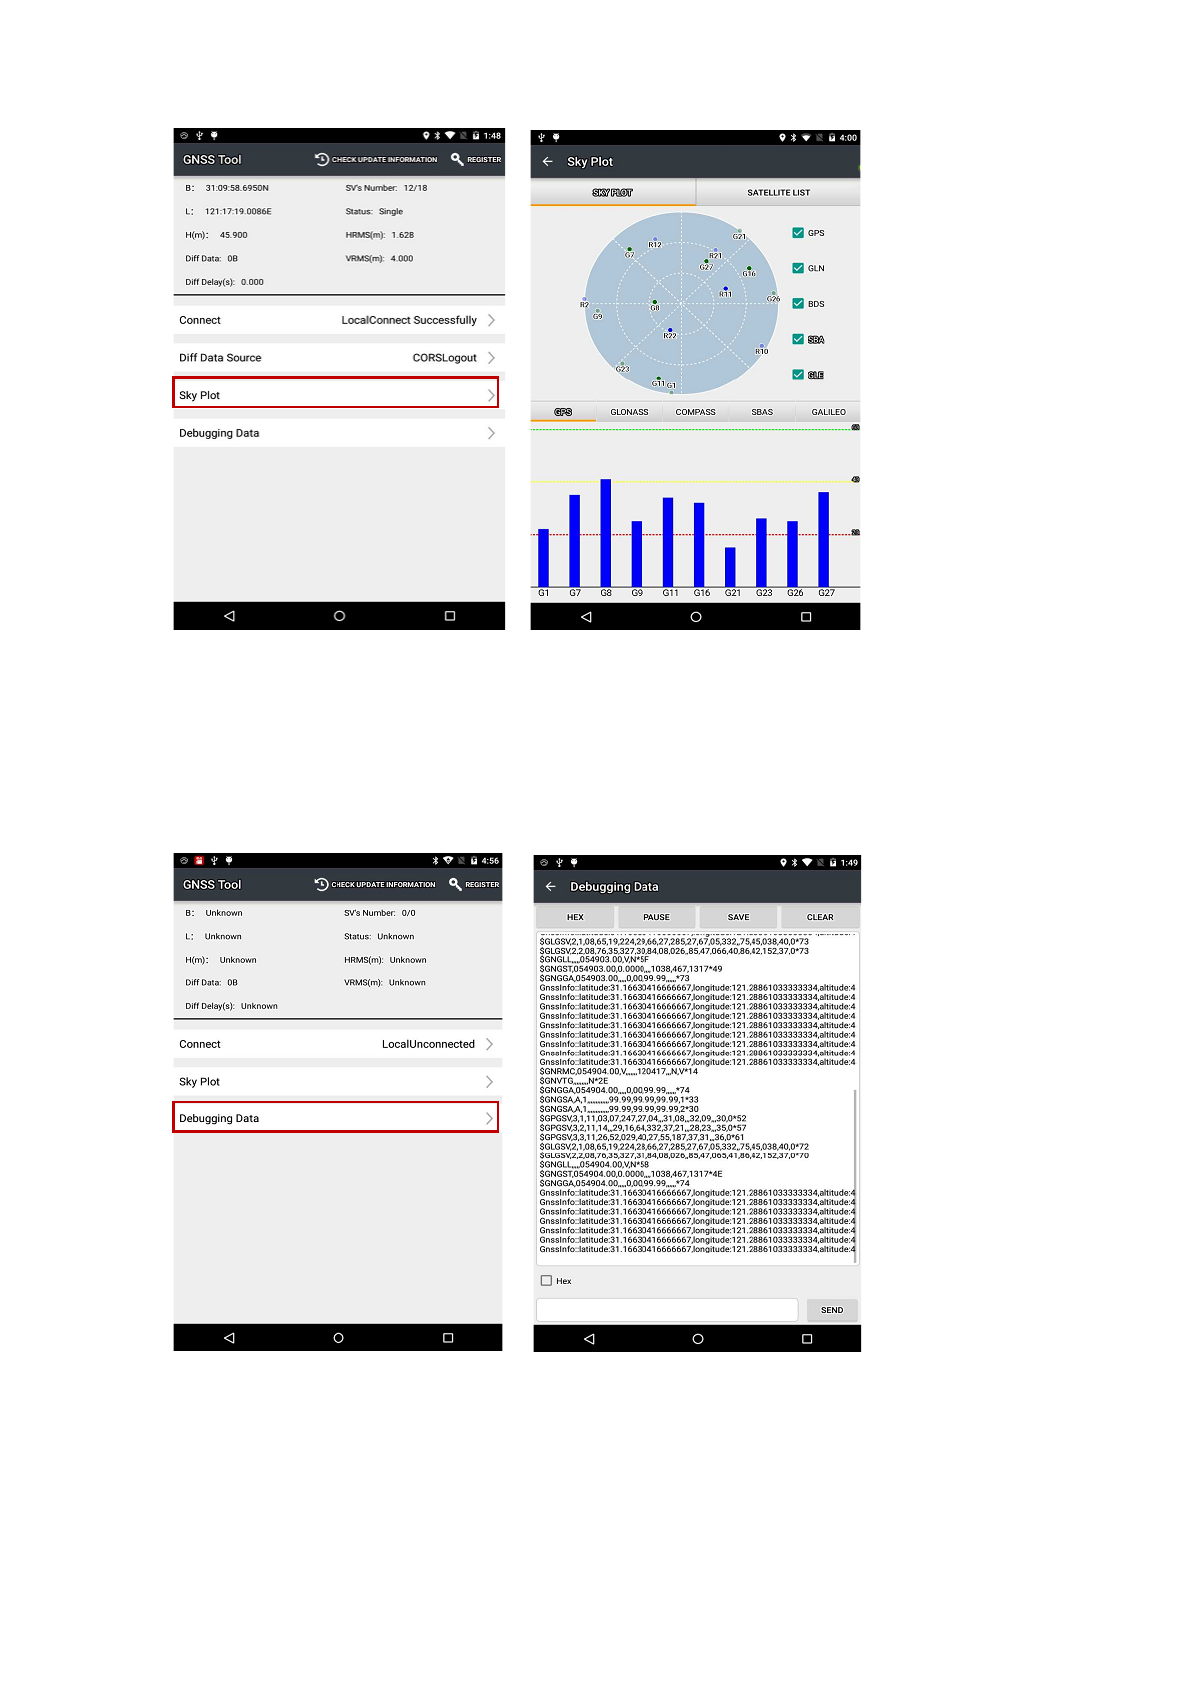
5.3. SKY PLOT
Click Sky Plot and see how many satellites (including GPS, GLONASS, BDS, GALILEO and SBAS) the device is
currently tracking.
Page 22
5.4. DEBUGGING DATA
Click Debugging Data to enter data debugging interface. Click HEX to change the data into txt format, you can
also pause, save and clear the data using button in the upper side.

Changes or modifications not expressly approved by the party responsible for compliance could
void the user's authority to operate the equipment。
Note: This equipment has been tested and found to comply with the limits for a Class B digital
device, pursuant to part 15 of the FCC Rules. These limits are designed to provide reasonable
protection against harmful interference in a residential installation. This equipment generates,
uses and can radiate radio frequency energy and, if not installed and used in accordance with the
instructions, may cause harmful interference to radio communications. However, there is no
guarantee that interference will not occur in a particular installation. If this equipment does
cause harmful interference to radio or television reception, which can be determined by turning
the equipment off and on, the user is encouraged to try to correct the interference by one or
more of the following measures:
—Reorient or relocate the receiving antenna.
—Increase the separation between the equipment and receiver.
—Connect the equipment into an outlet on a circuit different from that to which the receiver is
connected.
—Consult the dealer or an experienced radio/TV technician for help.
Caution: Any changes or modifications to this device not explicitly approved by manufacturer
could void your authority to operate this equipment.
This device complies with part 15 of the FCC Rules. Operation is subject to the following two
conditions: (1) This device may not cause harmful interference, and (2) this device must accept
any interference received, including interference that may cause undesired operation.
Specific Absorption Rate (SAR) information:
This Smart Phone meets the government's requirements for exposure to radio waves. The
guidelines are based on standards that were developed by independent scientific organizations
through periodic and thorough evaluation of scientific studies. The standards include a
substantial safety margin designed to assure the safety of all persons regardless of age or health.
FCC RF Exposure Information and Statement The SAR limit of USA (FCC) is 1.6 W/kg averaged
over one gram of tissue. Device types: Smart Phone (FCC ID: SY4-B01012) has also been tested
against this SAR limit. The highest SAR value reported under this standard during product
certification is 0.903W/kg when properly worn on the body. To maintain compliance with FCC RF
exposure requirements, use accessories that maintain a 00cm separation distance between the
user's body and the back of the Tablet PC. The use of belt clips, holsters and similar accessories
should not contain metallic components in its assembly. The use of accessories that do not
satisfy these requirements may not comply with FCC RF exposure requirements, and should
be avoided.
The device is restricted to indoor use only when operating in the 5150~5250MHzfrequency
range.