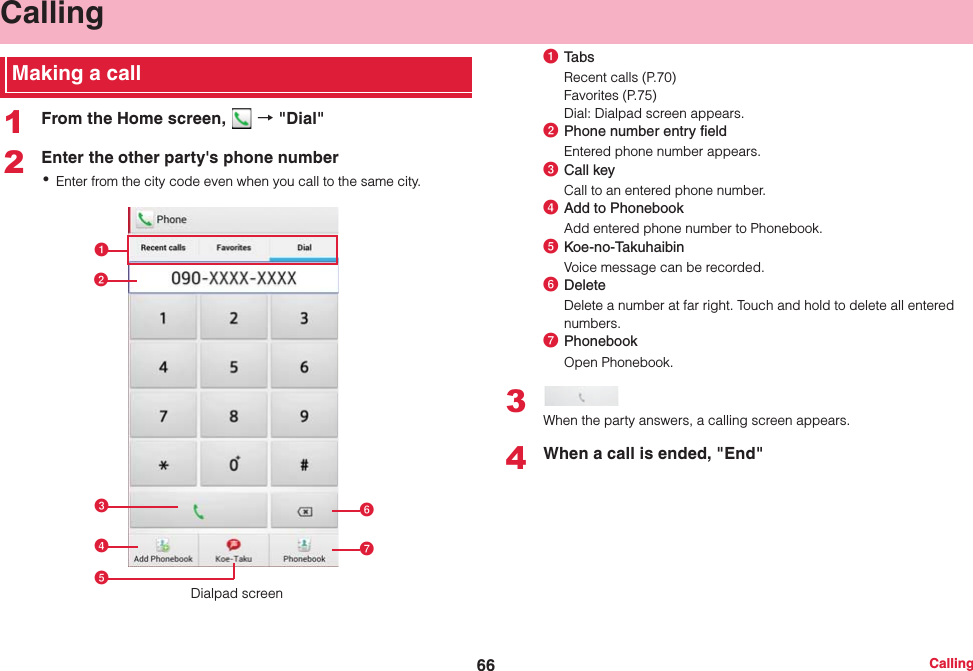
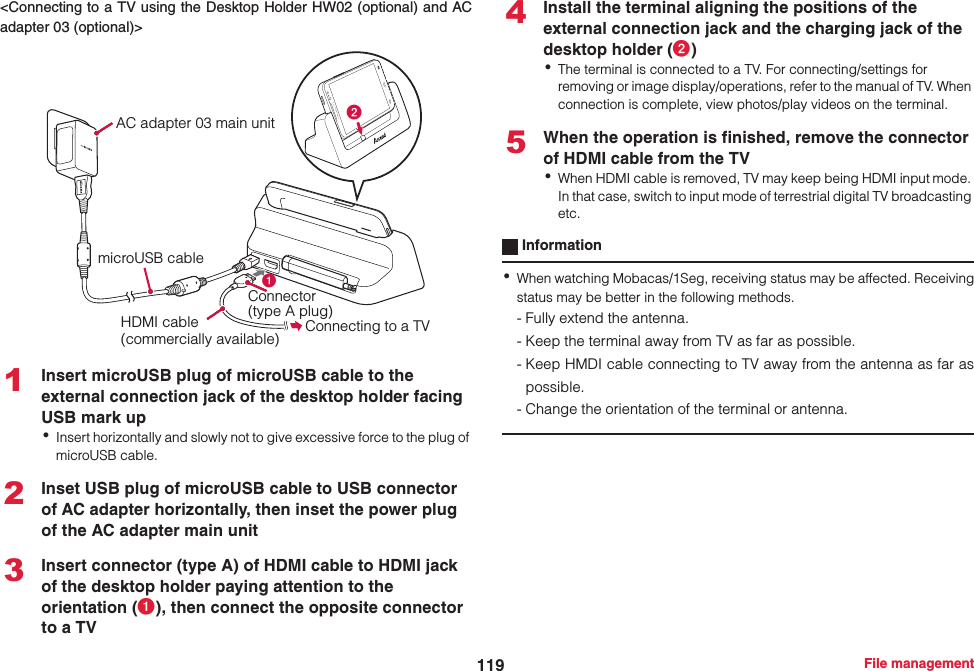
Huawei Technologies D2-6114 Mobile Cellular device supporting GSM850, PCS1900, UMTS FDD V, 802.11 b/g/n/a, Bluetooth and Near Field Communications (NFC) User Manual HW 03E manual 0315
Huawei Technologies Co.,Ltd Mobile Cellular device supporting GSM850, PCS1900, UMTS FDD V, 802.11 b/g/n/a, Bluetooth and Near Field Communications (NFC) HW 03E manual 0315
User Manual

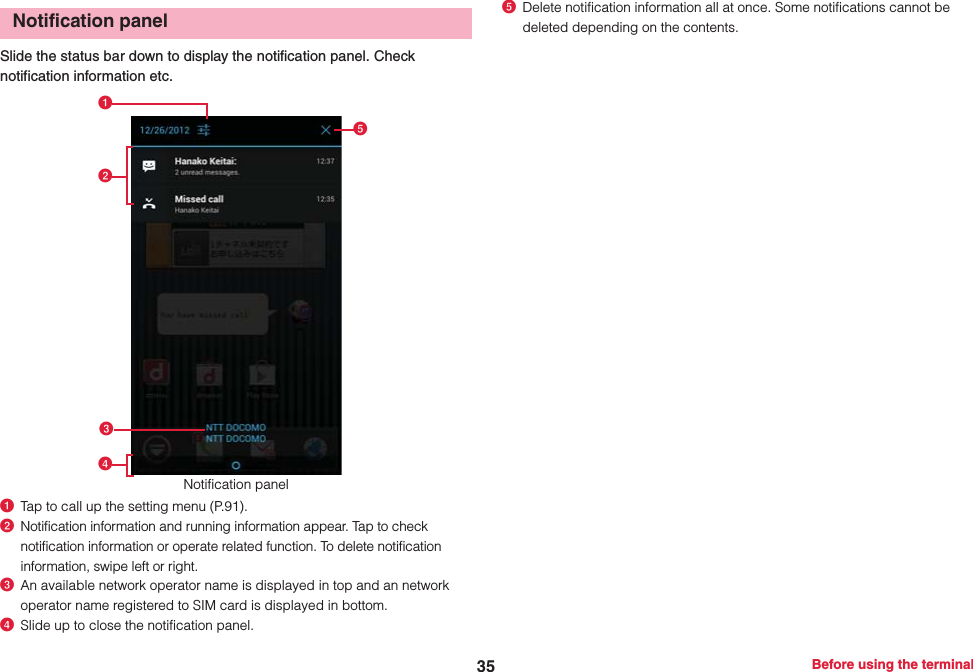


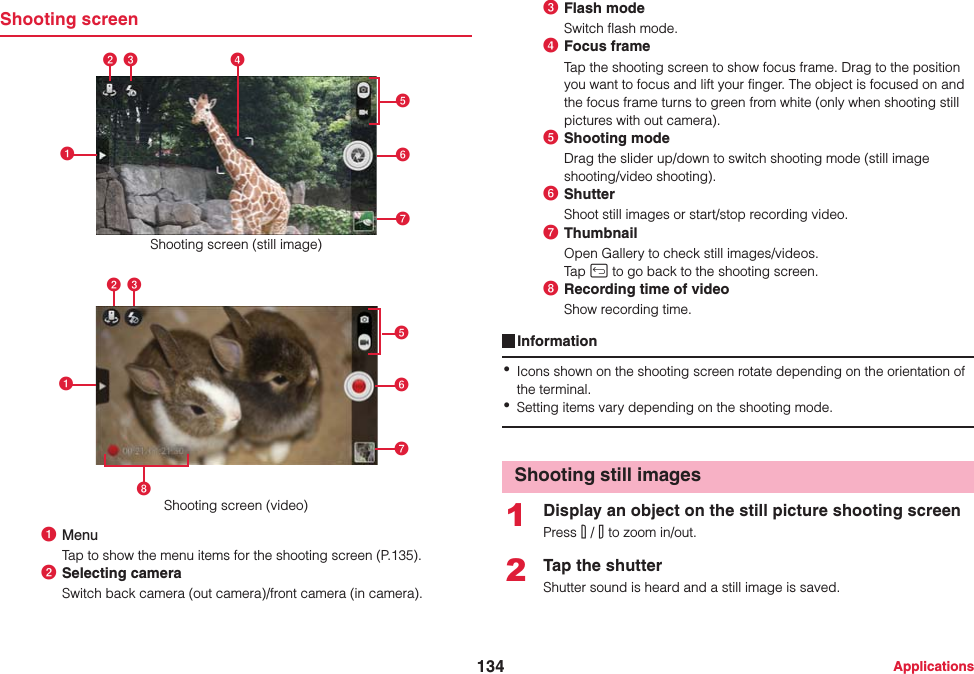
![78 Mail/BrowserMail/Browsersp-mode mailSend and receive mail using i-mode mail address (@docomo.ne.jp). Pictograms and deco-mail can be used, and automatic reception is also supported. ・For details on sp-mode mail, refer to "Mobile Phone User's Guide [sp-mode]smartphone version".1From the Home screen, 2Follow the onscreen instructions to download sp-mode mail applicationMessage (SMS)You can send and receive text messages up to 70 two-byte characters long (up to 160 one-byte characters for only alphanumerics) addressed to a mobile phone number.1From the Home screen, → "Messaging"23Enter mobile phone number of recipient in the To field・If you enter name or phone number, corresponding contacts are listed.・To enter several recipients, separate each phone number with a comma (,).■Selecting recipient from Phonebooka → Tap a contact you want to send4Enter message in the "Type message" field■Entering pictogramsaM → "Insert smiley" → Tap a pictogram you want to enter5・Tap B without sending message to save message (SMS) as a draft.Information・You can send and receive messages to and from users of overseas network operators. For available countries and overseas network operators, refer to "Mobile Phone User's Guide [International Services]" or DOCOMO International Services Website.・To send messages to users of overseas network operators, enter "+", "Country code" and then "the recipient mobile phone number". Enter the phone number without a leading "0", if any. You can also enter "010", "Country code" and "the recipient mobile phone number" to send messages. (To reply to the received SMS overseas, enter "010".)Creating and sending message (SMS)](https://usermanual.wiki/Huawei-Technologies/D2-6114/User-Guide-1925828-Page-80.png)


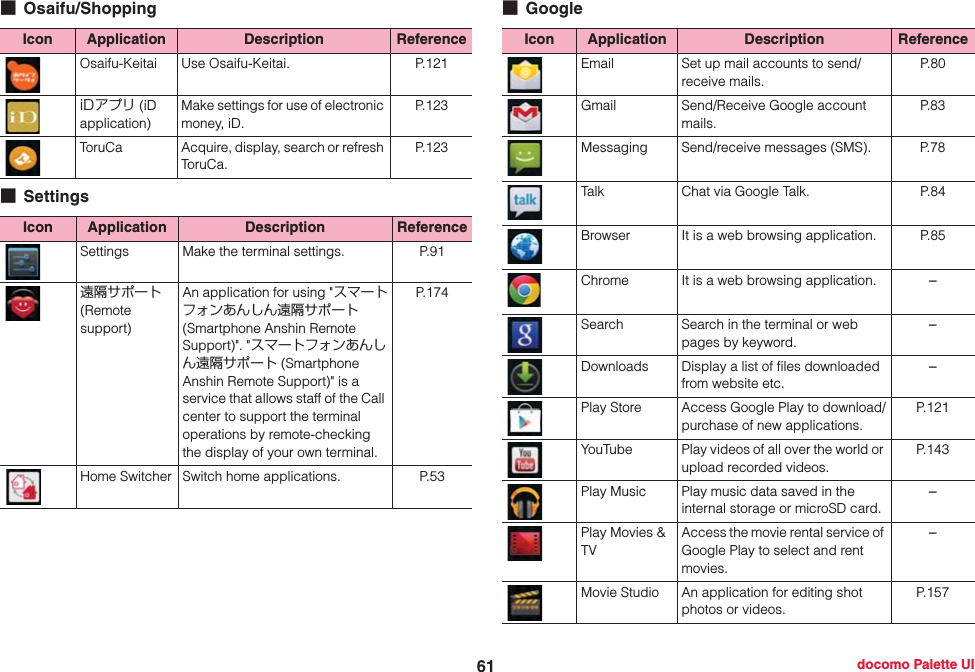
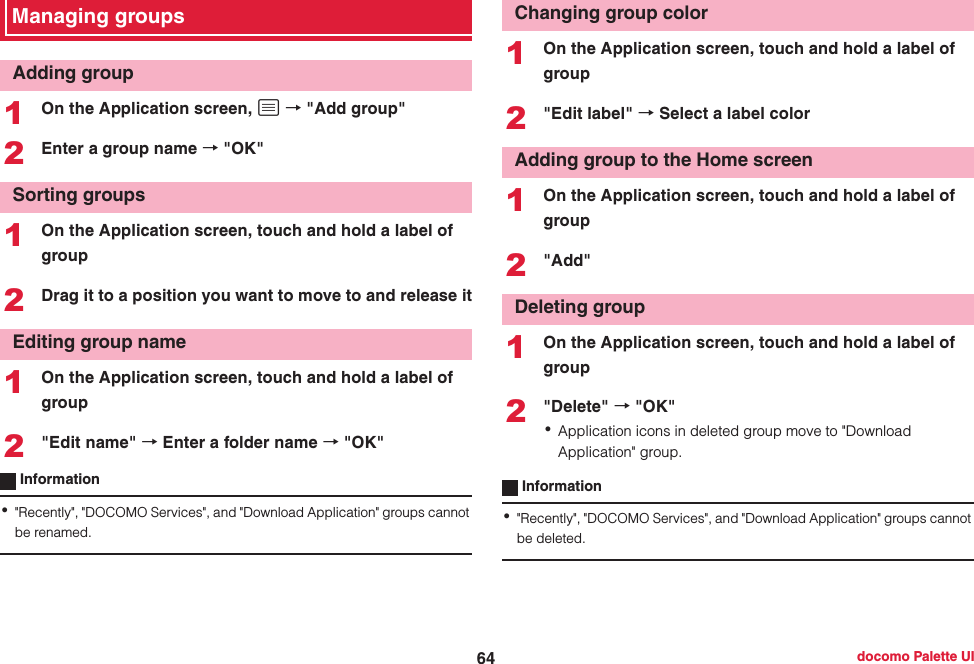
![121 ApplicationsPlay StoreYou can install applications available on Google Play to the terminal and use them.・To use Google Play, setting up a Google account is required.1From the Home screen, "Play Store"For the first activation, the terms of service appears. Read the content¨Tap "同意する (Agree)".2Search an application, check content and installInformation・Make sure to check the security of applications, then install ones at your own risk. The terminal may be infected with a virus and the data may be damaged.・NTT DOCOMO is not liable for malfunctions, if any, caused by the application you installed. In such case, the repair is charged even during the warranty period.・NTT DOCOMO is not liable for malfunctions, if any, caused by the application you installed.・Some applications automatically perform packet communications. Packet communication remains connected unless you disconnect or timeout error occurs.・Some applications automatically execute update process.・For paid applications, you can request a refund within specified period after the purchase. For details, M → "Help" → "Android Apps" → See "Buy apps".・To uninstall application, M → "My Apps" → Tap an application you want to uninstall → "Uninstall" → "OK"・For details on Google Play, on the Google Play screen, M→ "Help" to refer.Osaifu-KeitaiOsaifu-Keitai is equipped with IC card and allows you to pay money or to use coupon or stamp rally only by holding the terminal over the IC card reader in stores etc.You can access site or web site by holding the terminal over IC card reader, obtain the latest coupon by using communication, credit electronic money, or check the usage. In addition, you can lock your Osaifu-Keitai to provide against loss or theft, and you can use it with safe.For details on Osaifu-Keitai, refer to "Mobile Phone User's Guide [sp-mode] smartphone version".・A setting from the dedicated website or application is required to use Osaifu-Keitai compatible services.・The data (including electronic money, points, etc.) in the IC card may be lost or modified because of the malfunction of the terminal (When we take your Osaifu-Keitai for repair etc., as we cannot take it with data remained, you are required to erase the data by yourself). For support such as reissuance, restoration, temporary preservation or transfer of data, contact Osaifu-Keitai compatible service providers. For important data, be sure to use an Osaifu-Keitai compatible service with backup service.・If the data in the IC card is lost, modified or damaged by any means related to Osaifu-Keitai compatible service such as malfunction or model change, DOCOMO assumes no responsibility for the loss of data.・If the terminal is stolen or misplaced, immediately contact Osaifu-Keitai compatible service provider for an advice.Installing applicationsPrecautions on using Osaifu-Keitai](https://usermanual.wiki/Huawei-Technologies/D2-6114/User-Guide-1925828-Page-123.png)
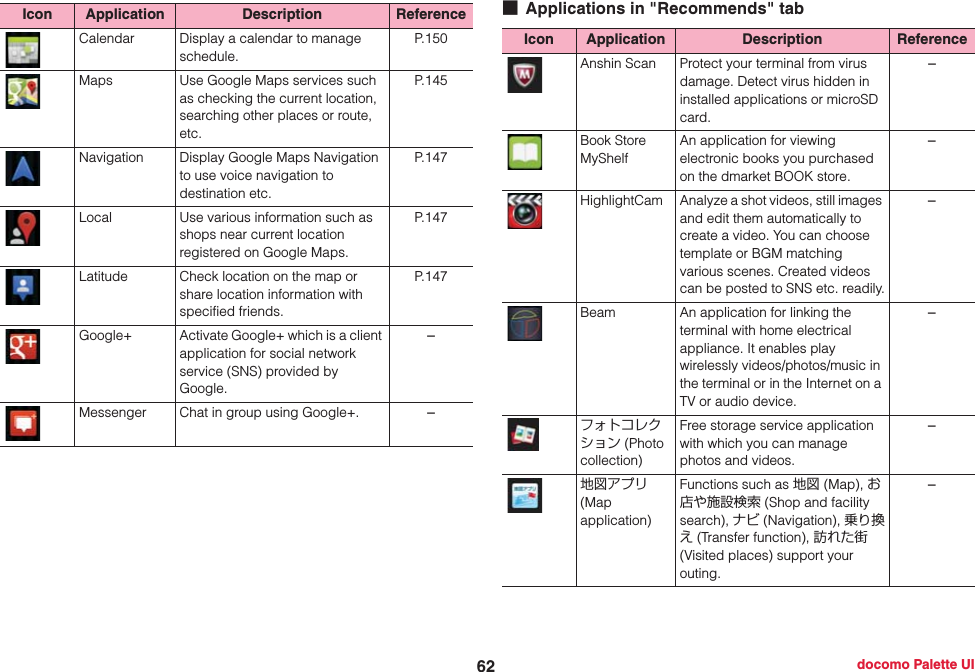
![122 ApplicationsThe iC transfer service is a service which helps you transfer all data in the IC card for Osaifu-Keitai to your new Osaifu-Keitai when you change Osaifu-Keitai for repair, changing of the model.Visit a sales outlet such as docomo Shop to use the iC transfer service.For details on iC transfer service, refer to "Mobile Phone User's Guide [sp-mode] smartphone version".1From the Home screen, → "Osaifu-Keitai"For the first activation, initial setting screen appears. Follow the onscreen instructions to make settings.2Select a service you want to use from the service listFollow the onscreen instructions to make settings.You can use Osaifu-Keitai by holding mark over the card reader.・Pay attention not to hit the terminal against the card reader when holding over mark.・Slowly put the terminal close to the card reader when holding mark.・Hold mark horizontally over the center of the card reader. If the mark cannot be scanned even if you hold it in front of the center of the scanner, slightly lift up the terminal, or move it backwards/forwards or to the left/right.・ mark sometimes cannot be scanned if there is a metal object between the mark and the scanner. Also, note that stickers or other objects near mark might affect communications performance.You can lock Osaifu-Keitai function to prevent using related services.1From the Home screen, → "Osaifu-Keitai"2"Lock Settings" → "Osaifu-Keitai Lock"iC transfer serviceUsing Osaifu-KeitaiHold Osaifu-Keitai over card readerLocking Osaifu-Keitai functionmark](https://usermanual.wiki/Huawei-Technologies/D2-6114/User-Guide-1925828-Page-124.png)
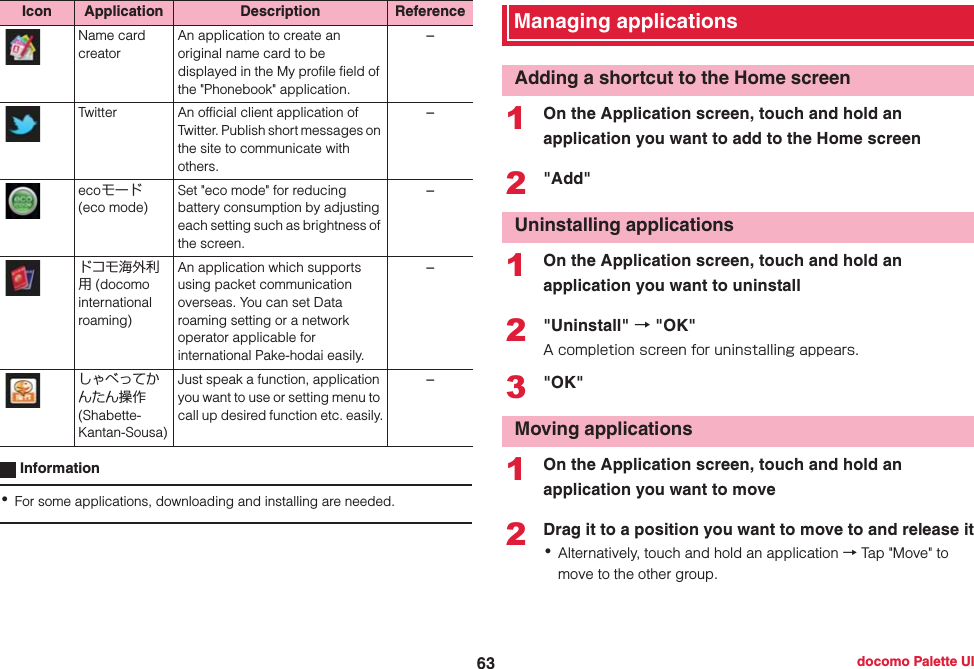
![123 Applications3Follow the onscreen instructions to set Osaifu-Keitai Lock password.Osaifu-Keitai Lock activates and appears on the status bar.・Osaifu-Keitai Lock password is required to unlock.Information・To cancel Osaifu-Keitai lock, on the Osaifu-Keitai screen, "Lock settings" → "Osaifu-Keitai Lock" → Enter locking password → Tap "Continue" → "OK"."iD" is a convenient electronic money by credit clearance scheme. You can enjoy shopping simply and conveniently only by holding Osaifu-Keitai with credit information set or the iD-compatible card over the IC card reader in stores. Because up to 2 types of credit information can be registered in Osaifu-Keitai, you can use them according to the benefits, etc. It also supports cashing, depending on the card issuer.・To use "iD" with Osaifu-Keitai, subscribing to a card issuer that supports iD, settings for iD application are required.・The charges required for iD service (including the annual charge) vary by card issuer.・Packet communication charge is applied separately.・A packet communication fee for overseas use differs from the one in Japan.・For details on iD, refer to iD website (http://id-credit.com/ (in Japanese only)).ToruCa is an electronic card that can be obtained to mobile terminals. It can be obtained from the IC card reader or site as store information, coupon ticket, etc. Obtained ToruCa is saved to the "ToruCa" application. Use the "ToruCa" application to view, search or update it.For details on ToruCa, refer to "Mobile Phone User's Guide [sp-mode] smartphone version".Information・For obtaining, displaying or updating ToruCa, a packet communication charge may be applied.・Some ToruCa provided to i-mode terminal may not be obtained/displayed/updated.・Depending on the settings of IP (Information Provider), the following functions may not be available.- Obtaining, updating from the IC card reader, sharing ToruCa, moving/copying to microSD card, displaying map・Some ToruCa which can be displayed in a map from ToruCa (details) may not be displayed in a map from the ToruCa list depending on the IP settings.・While using Osaifu-Keitai lock settings, you cannot obtain ToruCa with an IC card reader.・If you enable 重複チェック(Duplication check), obtaining the same ToruCa as the saved one redundantly is not available. To obtain the same ToruCa redundantly, disable Duplication check.・When you send ToruCa attaching to email, it is sent in the condition before obtaining ToruCa (details).・Depending on email application, ToruCa received via email may not be saved.・Depending on browser, ToruCa cannot be obtained.・When ToruCa is moved/copied to the microSD card, it is moved/copied in the condition before obtaining ToruCa (details).・You may not be able to obtain ToruCa with an IC card reader, if you do not make initial setting for Osaifu-Keitai.iDアプリ (iD application)ToruCa](https://usermanual.wiki/Huawei-Technologies/D2-6114/User-Guide-1925828-Page-125.png)


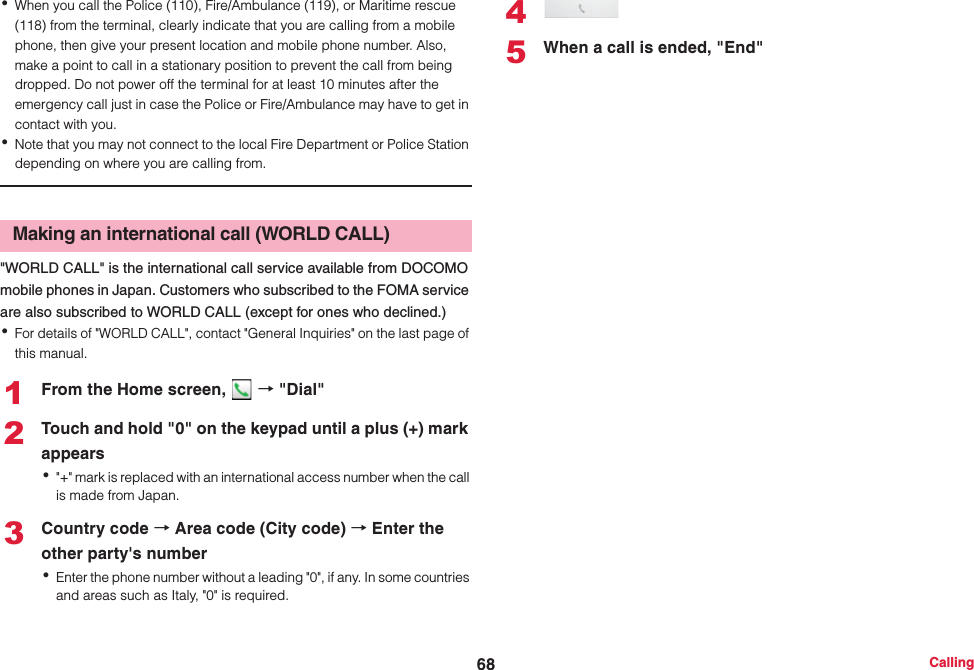
![160 International roamingInternational roamingOutline of international roaming (WORLD WING)With the international roaming (WORLD WING), you can use the terminal without changing phone number or mail address in the service area of the overseas network operator affiliated with DOCOMO. You can use Phone and SMS without changing settings.■Supported networksThe terminal is Class 4. The terminal works in a 3G network and GSM/GPRS network service area. Also, it works in countries or districts where 3G 850 MHz/GSM 850MHz is applied. Check the service area.Use 3G network or GSM/GPRS network overseas because Xi is not available overseas.■Refer to the following documents before using the terminal overseas.・"Mobile Phone User's Guide [International Services]"・DOCOMO International Services websiteInformation・For Country codes, International call access codes, Universal number international prefix, available countries/regions, and network operators, refer to "Mobile Phone User's Guide [International Services]" or DOCOMO International Services Website.Available service overseas*1: To use data communication during roaming, mark "Data roaming" in Mobile networks setting (P.163).Information・Some services may not be available depending on the network operator or network overseas.Main communication services 3G 3G850 GSM (GPRS)Call ○○○Message (SMS) ○○○Mail*1 ○○○Browser*1 ○○○](https://usermanual.wiki/Huawei-Technologies/D2-6114/User-Guide-1925828-Page-162.png)
![161 International roamingChecking for usingTo use the terminal overseas, check the following in Japan.・Check if you subscribe to WORLD WING. For details, contact "General Inquiries" on the last page of this manual.・Use optional "FOMA AC Adapter 02" or "AC adapter 03" for travelling overseas.・Overseas usage charges (call and packet communication) differ from those in Japan.・Since some applications automatically perform communications, packet communication charges may become high. For operation of applications, contact application providers by yourself.If you subscribe to network services, you can use network services such as Voice Mail Service, Call Forwarding Service, Caller ID Display Request Service, etc., even overseas. Some network services are not available.・To use network services overseas, you need to set "Remote operation settings" to activate. You can set "Remote operation settings" in the country you visit.・Even if the setting/canceling operation is available, some network services cannot be used depending on overseas network operators.When you arrive overseas and turn the terminal ON, a connection to the available network is established automatically.When you have set search mode of "Available networks" in "Network operators" to "Select automatically", optimized network is automatically selected.Connect to the network operator conducted in flat-rate service to use the terminal overseas with packet communication charge in flat-rate of upper limit per day.To use this service, subscription of packet flat-rate service in Japan is required. For details, refer to "Mobile Phone User's Guide [International Services]" or DOCOMO International Services Website.Before leaving JapanSubscriptionChargingUsage chargeAdvance preparationSetting network serviceAfter arriving overseasConnectivity](https://usermanual.wiki/Huawei-Technologies/D2-6114/User-Guide-1925828-Page-163.png)
![162 International roamingA network type in use appears on the status bar.: Roaming・You can check the name of the connected network operator on the Notification panel.When "Automatic date & time"or "Automatic time zone" is marked, the date, time and time differences of the terminal are corrected by receiving information related to time and time differences from the network of overseas telecommunications carrier you connect to.・Correction of the time or time differences may not be performed correctly depending on the network of overseas network operator. In that case, set time zone manually.・Timing of correction varies by the overseas network operator.・"Date & time" (P.110).・For loss or theft of the terminal or UIM/docomo mini UIM card, immediately contact DOCOMO from the spot to take the necessary steps for suspending the use. For inquiries, see the last page of this manual. Note that you are still liable for the call and communication charge incurred after the loss or theft occurred.・For using from land-line phone, entering "International call access code" or "Universal number international prefix" for the country is needed.Making settings for overseas useBy default, the terminal detects available network in the country you stay and connects to it automatically. But you can set it manually.To connect to network operator compatible with GSM network overseas, change the network type.1From the Home screen, M → "Settings"2"More..." → "Mobile networks" → "Network Mode"3Tap a network to use・LTE/3G/GSM (Auto): Select available network mode automatically.・LTE/3G: Use 3G network (LTE is not available overseas).・GSM: Use GSM/GPRS network.Information・By default, "LTE/3G/GSM (Auto)" is set. You do not need to change the settings for using the terminal in Japan and in a region with only 3G network operators.・If the mode is set to [LTE/3G/GSM (Auto)] and a GSM/GPRS network and 3G network of the same network operator are detected at the same time, connection to a 3G network is given priority.DisplayDate & timeAbout inquiriesSetting network type](https://usermanual.wiki/Huawei-Technologies/D2-6114/User-Guide-1925828-Page-164.png)
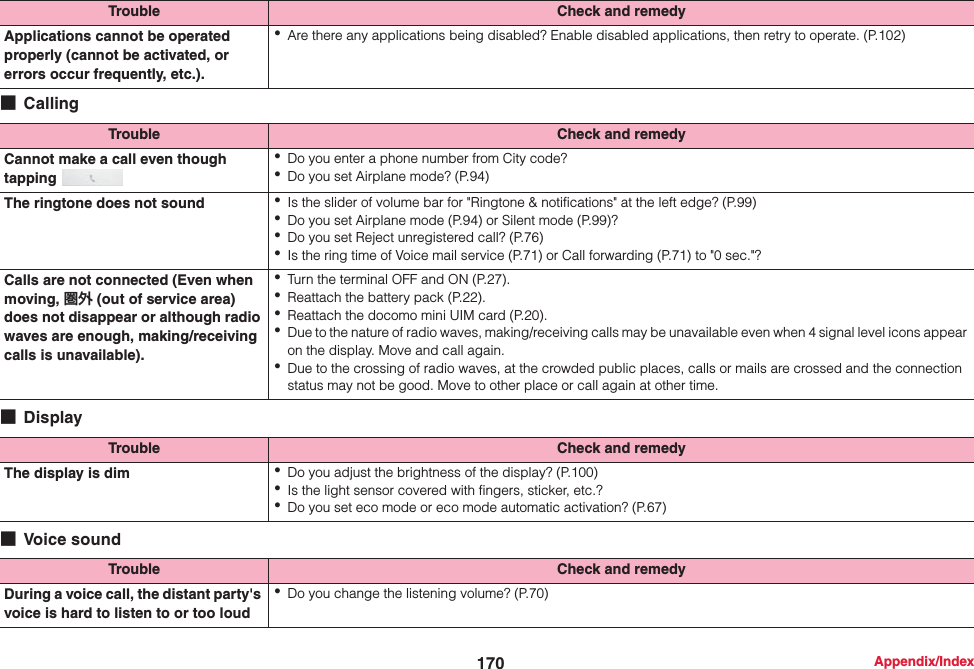
![171 Appendix/Index■Mail■Camera■1Seg■Osaifu-Keitai■International roamingTrouble Check and remedyMails are not received automatically ・Is "Inbox check frequency" in the account setting of Email set to "Never"? (P.81)Trouble Check and remedyPhotos and videos taken with the camera are blurred・Check if clouds or dirt attach to the lens of camera.・When you shoot portrait, mark "Face detection" (P.136).Trouble Check and remedyCannot watch 1Seg ・Are you out of the terrestrial TV broadcasting service area or in an area with poor signal strength?・Do you set channels?Trouble Check and remedyOsaifu-Keitai function is unavailable ・When removing the battery pack or activating Omakase Lock, Osaifu-Keitai functions are unavailable regardless of the Osaifu-Keitai lock settings.・Is Osaifu-Keitai lock activated? (P.122)・Do you place mark of the terminal over IC card reader? (P.122)Trouble Check and remedyCannot use the terminal overseas [when signal status icon is displayed]・Do you subscribe to WORLD WING? Check if you subscribe to WORLD WING.](https://usermanual.wiki/Huawei-Technologies/D2-6114/User-Guide-1925828-Page-173.png)
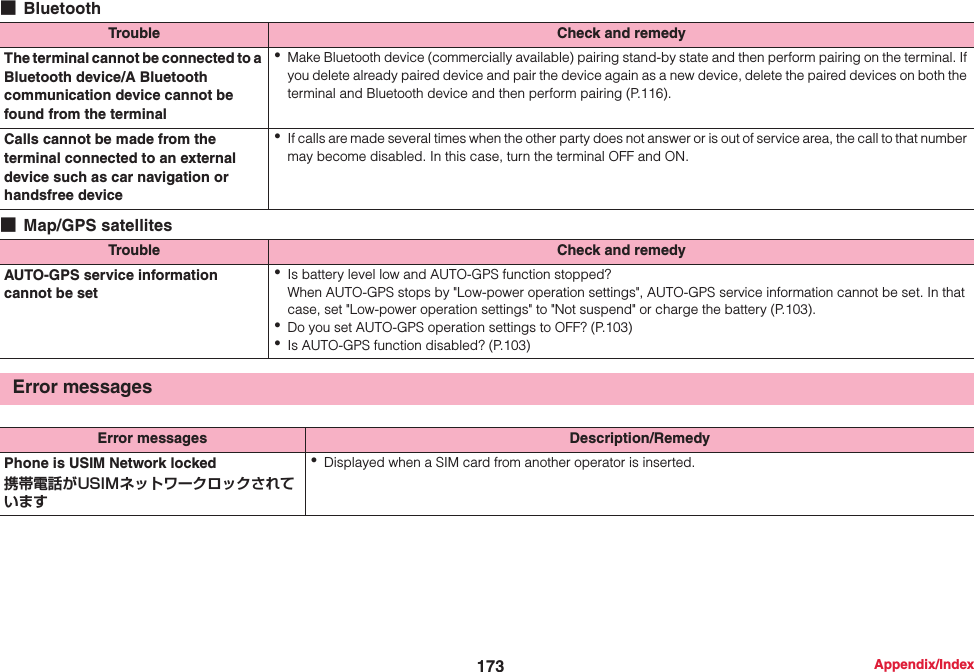
![172 Appendix/Index■Data managementCannot use the terminal overseas [when 圏外 (out of area) is displayed]・Are you out of the international roaming service area or in an area with poor signal strength? Check if the service area and network operator are available, referring to "Mobile Phone User's Guide [International Services]" or DOCOMO International Services website.・Change network setting or overseas network operator setting.Change "Network Mode" to "LTE/3G/GSM (Auto)" (P.162).Set "Network operators" to "Select automatically" (P.163).・It may be recovered by turning the terminal OFF and ON.Cannot perform data communication overseas・Mark "Data roaming"(P.163).Cannot use the terminal suddenly while using overseas・Does usage amount exceed the limit of maximum charges for use? For use of International roaming (WORLD WING), the limit of maximum charges for use is set in advance. When it exceeds the limit of maximum charges for use, pay the charges.There is no incoming call overseas ・Is "Restricting incoming calls" set to "Activate restricting"? (P.165)No caller ID is notified/A notified caller ID is different from that of the caller/Functions for using contents saved in Phonebook or those using Caller ID notification do not operate・Even when a caller notifies its caller ID, it is not displayed on the terminal unless it is notified from your network or network operator. And, a different caller ID may be notified by some networks or network operators you use.Trouble Check and remedyData transfer is not performed ・Do you use USB HUB? If you use USB HUB, operations may not be performed correctly.Data saved in microSD card is not displayed・Reattach the microSD card (P.21).Trouble Check and remedy](https://usermanual.wiki/Huawei-Technologies/D2-6114/User-Guide-1925828-Page-174.png)


![185Appendix/IndexDisposal and recycling informationThis symbol (with or without a solid bar) on the device, batteries (if included), and/or the packaging, indicates that the device and its electrical accessories (for example, a headset, adapter, or cable) and batteries should not be disposed of as household garbage. These items should not be disposed of as unsorted municipal waste and should be taken to a certified collection point for recycling or proper disposal.For more detailed information about device or battery recycling, contact your local city office, household waste disposal service, or retail store.Disposal of the device and batteries (if included) is subject to WEEE Directive Recast (Directive 2012/19/EU) and Battery Directive (Directive 2006/66/EC). The purpose of separating WEEE and batteries from other waste is to minimize the potential environmental impacts and human health risk of any hazardous substances that may be present.Reduction of hazardous substancesThis device is compliant with the REACH Regulation [Regulation (EC) No 1907/2006] and RoHS Directive Recast (Directive 2011/65/EU). Batteries (if included) are compliant with the Battery Directive (Directive 2006/66/EC). For up-to-date information about REACH and RoHS compliance, please visit the web site www.huaweidevice.com/certification.EU regulatory conformanceBody worn operationCertification information (SAR)The device complies with RF specifications when used near your ear or at a distance of 1.5 cm from your body. Ensure that the device accessories, such as a device case and device holster, are not composed of metal components. Keep the device away from your body to meet the distance requirement.This device meets guidelines for exposure to radio waves.StatementHereby, Huawei Technologies Co., Ltd. declares that this device is in compliance with the essential requirements and other relevant provisions of Directive 1999/5/EC.Restrictions in the 5 GHz band:WLAN function of this device is restricted only to indoor use when operating in the 5150 to 5350 MHz frequency range.For the declaration of conformity, visit the web site www.huaweidevice.com/certification.The following marking is included in the product:This device may be operated in all member states of the EU.Notice:Observe national and local regulations where the device is used.This device may be restricted for use, depending on the local network.Your device is a low-power radio transmitter and receiver. As recommended by international guidelines, the device is designed not to exceed the limits for exposure to radio waves. These guidelines were developed by the International Commission on Non-Ionizing Radiation Protection (ICNIRP), an independent scientific organization, and include safety measures designed to ensure the safety of all users, regardless of age and health.The Specific Absorption Rate (SAR) is the unit of measurement for the amount of radio frequency energy absorbed by the body when using a device. The SAR value is determined at the highest certified power level in laboratory conditions, but the actual SAR level during operation can be well below the value. This is because the device is designed to use the minimum power required to reach the network.The SAR limit adopted by Europe is 2.0 W/kg averaged over 10 grams of tissue, and the highest SAR value for this device complies with this limit.The highest SAR value reported for this device type when tested at the ear is 0.433 W/kg, and when properly worn on the body is 0.421 W/kg.0168](https://usermanual.wiki/Huawei-Technologies/D2-6114/User-Guide-1925828-Page-187.png)