Huawei Technologies D2-6114 Mobile Cellular device supporting GSM850, PCS1900, UMTS FDD V, 802.11 b/g/n/a, Bluetooth and Near Field Communications (NFC) User Manual HW 03E manual 0315
Huawei Technologies Co.,Ltd Mobile Cellular device supporting GSM850, PCS1900, UMTS FDD V, 802.11 b/g/n/a, Bluetooth and Near Field Communications (NFC) HW 03E manual 0315
User Manual

INSTRUCTION MANUAL ’
13.03
HW-03E
0
Introduction
Thank you for purchasing "HW-03E" mobile terminal.
Before using your terminal, or when necessary, read this manual to ensure
safe use and handling.
Operations of HW-03E are described in the followings.
■"Quick Start Guide" (included accessory) (in Japanese
only)
This manual provides information about operations and screens of basic
functions.
■"取扱説明書 (Instruction manual)" (application in the
terminal) (in Japanese only)
This manual provides detail information about functions, operations,
screens, etc.
Ta p "Ascendアプリ (Ascend application)" from the Application screen
(P.58) → "取扱説明書 (Instruction manual)" to activate.
・For the first activation, follow onscreen instructions to download and install
the application.
Because data of the application is large, a high packet communication fee
will be applied for downloading. Subscription of packet flat-rate service is
highly recommended.
■"Instruction manual" (PDF file)
This manual provides detail information about functions, operations,
screens, etc.
Download from the following NTT DOCOMO website.
http://www.nttdocomo.co.jp/english/support/trouble/manual/download/
index.html
* The latest information of "Quick Start Guide" (Japanese) is available. The
URL and contents are subject to change without prior notice.
Learning operations
■ スマホなるほどツアーズ for docomo with series (Widget
in the terminal) (Tips of smartphone for docomo with
series) (In Japanese only)
It is a widget with which you can learn useful functions and basic
operations you should know in a joyful way with Docomodake.
From the Home screen (P.53), tap .
1
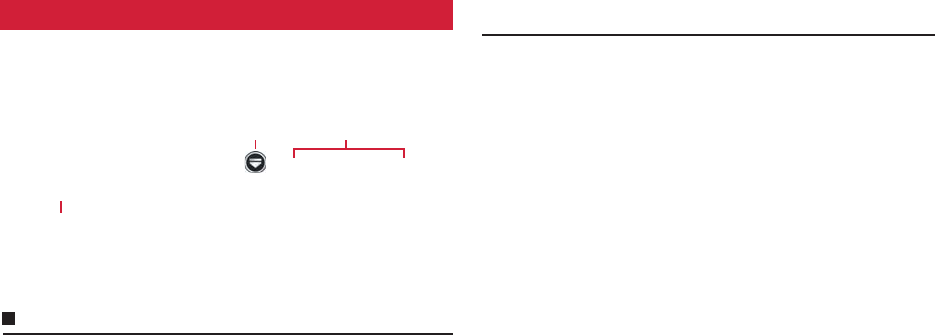
In this manual, consecutive operation steps for menu operation etc. are
simplified as follows.
<Example: Operation steps when operating an icon on the Home screen
and then selecting an application, menu item, etc. consecutively>
aIcon without name
bSelection item with name such as icon or menu
cKey (P.18)
Information
・In this manual, "HW-03E" mobile terminal is usually referred to as "the
terminal". Please be forewarned.
・Operation steps and screens are mainly described for the terminal in the
default state. They may vary by adding/changing the applications, services,
etc.
・The images or illustration used in this manual are examples. They may differ
from the actual product or screen.
・In this manual, explanations and screens for docomo Palette UI as Home
application are provided.
・For several ways of operating functions or settings, it is explained with the
simple one.
・Registration methods or operations of application in this manual are subject
to change by registration destination or update of application without prior
notice.
・The contents in this manual, URL and contents are subject to change without
prior notice.
Operation steps
1From the Home screen, → "Phonebook"
2M → "Others" → "Import/Export"
ab
c
2Contents/Precautions
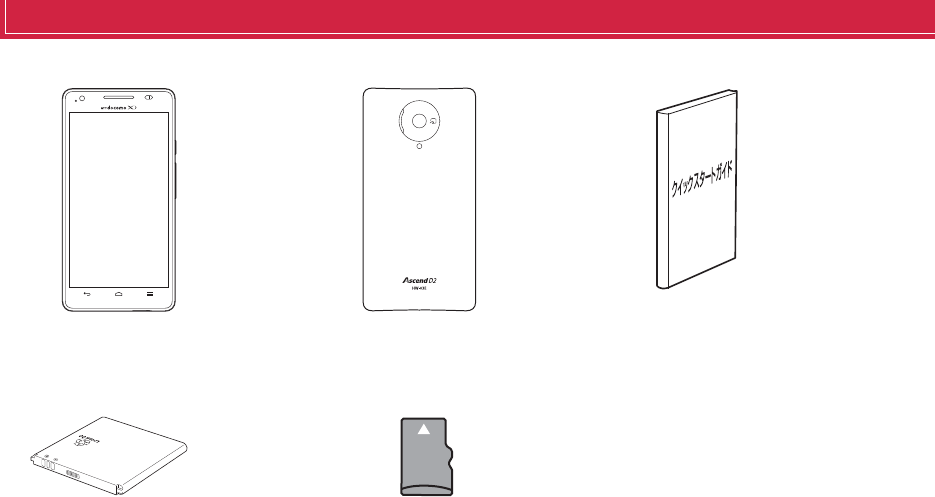
Basic package
■ HW-03E terminal (including warranty) ■ Back Cover HW06 ■ Quick Start Guide (in Japanese only)
■ Battery Pack HW03 ■ microSDHC card (4GB)
(Sample)

3Contents/Precautions
v
Contents
■Basic package.................................. 2
■Before using the terminal ................. 5
■Precautions (Always follow these
directions) ............................................ 6
■Handling precautions.........................13
Part names and functions .................................. 18
docomo mini UIM card ...................................... 20
microSD card ..................................................... 21
Battery pack ....................................................... 22
Charging ............................................................ 24
Turning power ON/OFF ...................................... 27
Basic operation .................................................. 28
Initial settings ..................................................... 30
Screen/Icon ........................................................ 31
Character entry .................................................. 36
Home screen ...................................................... 53
Managing the Home screen .............................. 54
Application screen ............................................. 58
Managing applications ...................................... 63
Managing groups ............................................... 64
Searching applications ...................................... 65
Switching display of Application screen ............ 65
Installing "Recommends" applications ............... 65
Home application information ............................ 65
Making a call ......................................................66
Receiving a call ..................................................69
Operations during a call .....................................69
Call history ..........................................................70
Call settings ........................................................71
Phonebook .........................................................73
sp-mode mail ......................................................78
Message (SMS) ..................................................78
Email ...................................................................80
Gmail ..................................................................83
Google Talk .........................................................84
Early warning "Area Mail" ....................................84
Web browser ......................................................85
Setting menu ......................................................91
WIRELESS & NETWORKS ..................................91
DEVICE ...............................................................98
PERSONAL .......................................................103
SYSTEM ............................................................110
File Manager .....................................................113
Bluetooth communication .................................115
Connecting external device .............................117
dmenu .............................................................. 120
dmarket ............................................................ 120
Play Store ......................................................... 121
Osaifu-Keitai .................................................... 121
Mobacas .......................................................... 124
1Seg ................................................................. 127
Camera ............................................................ 133
Gallery .............................................................. 137
Media Player .................................................... 141
YouTube ........................................................... 143
GPS/Navigation ................................................ 144
Clock ................................................................ 148
Calendar .......................................................... 150
Memo ............................................................... 154
Calculator ......................................................... 154
SD card backup ............................................... 155
Movie Studio .................................................... 157
Polaris Office .................................................... 159
Outline of international roaming (WORLD WING)
.................................................................... 160
Available service overseas .............................. 160
Checking for using ........................................... 161
Making settings for overseas use .................... 162
Making/Receiving a call in the country you stay
.................................................................... 163
Making settings for international roaming ........ 165
After returning to Japan ................................... 166
Before using the terminal
docomo Palette UI
Calling
Mail/Browser
Settings
File management
Application
International roaming

4Contents/Precautions
Options and related devices ........................... 167
Troubleshooting (FAQ) ..................................... 168
Smartphone Anshin Remote Support .............. 174
Warranty and After-Sales Service .................... 174
Software update ............................................... 176
Main specifications .......................................... 180
Specific Absorption Rate (SAR) of Mobile Phones
..................................................................... 182
Operating Environment .................................... 183
Certification Information (SAR) ........................ 183
FCC Statement ................................................. 184
Disposal and Recycling Information ................ 184
Reduction of Hazardous Substances .............. 185
EU Regulatory Conformance ........................... 185
Software complying with GPL/LGPL ................ 186
Export Controls and Regulations ..................... 186
Intellectual Property Right ................................ 187
SIM unlock ....................................................... 188
Index ................................................................ 189
Appendix/Index

5Contents/Precautions
Before using the terminal
・This terminal supports LTE, W-CDMA, GSM/GPRS, Wireless LAN System.
・Because your terminal uses wireless transmission, it may not function in
locations where it is difficult for radio waves to penetrate, such as tunnels,
underground passages and some buildings, in areas where radio waves are
weak, or out of Xi and FOMA service area. Even when you are high up in a
tall building or condominium and nothing blocks your view outside, your
terminal may not be able to receive or transmit signals. Also, communication
may be interrupted even when there are strong radio waves with 4-antenna
mark on the terminal and you are not moving (traveling).
・Because your terminal uses radio waves to communicate, it is possible that
a third party may attempt to tap your calls. However, the LTE, W-CDMA, GSM/
GPRS automatically applies a confidential communication function to all
calls, so even if a third party could somehow tap a call, they only hear noise.
・Your terminal encodes voice communication as digital data. When you are
operating your terminal while moving to a location subject to weaker radio
wave conditions, the transmitted digital data may not be correctly decoded
and as a result the decoded voice may differ somewhat from the actual voice.
・This terminal supports Xi Area, FOMA Plus-Area and FOMA HIGH-SPEED
Area.
・Maintain a separate record of the data you saved (Phonebook etc.) in the
terminal. Note that DOCOMO assumes no responsibility for any loss of saved
contents of data resulting from malfunction, repair, changing of the model or
other handling of the terminal.
・You are recommended to save important data to microSD card.
・In the terminal, as it is for a PC, some applications that you install may give
instability of the operation of your terminal, or may send location information
or personal information registered to the terminal to outside via the Internet
and the information may be used improperly. Please thoroughly check a
provider and operation status of the application etc. which you want to use
beforehand and then use it.
・Depending on applications or services, packet communication charges may
be applied even if you set data communication to be disabled.
・The terminal does not support i-mode sites (programs) or i-Dppli.
・The terminal automatically performs communication for some functions, for
example, to synchronize data, check the latest software or maintain
connection with the server. If you transmit a large amount of data such as
downloading applications or watching video, a packet communication
charge becomes high. Subscription of packet flat-rate service is highly
recommended.
・Depending on applications or services, packet communication charges may
be applied even while you use Wi-Fi connection.
・Note that, even when Silent mode is set, shutter sound or start/end shooting
sound of the camera, playback sound of music/video or alarm sound are
emitted.
・Update for improving the terminal's quality or upgrading the operation
system (OS) may be performed. And some applications used in the previous
version of OS may not be available or some unintended bugs may occur after
upgrading.
・Set the screen lock to ensure the security of your terminal for its loss (P.107).
・Mobacas is a service linking communication. For use of service, packet
communication charge is applied. You are recommended to subscribe to
packet flat-rate service.
・For the information on the services provided by Google, refer to the terms of
use for Google Inc. And for the details on other web services, read terms of
use for each service.
・You can use the terminal only with docomo mini UIM card. If you have a UIM
or FOMA card, bring it to a docomo Shop to replace.
・If your terminal is lost, change your each account password using a PC to
prevent other persons from using Google services such as Google Talk,
Gmail, Google Play, etc. and Twitter.
・The terminal supports only sp-mode, mopera U and Business mopera
Internet. Other providers are not supported.
・To use tethering, a subscription to sp-mode is required.
・Packet communication charge when using tethering varies depending on the
charging plan you use. Subscription of packet flat-rate service is highly
recommended.
・For details on usage fee, refer to http://www.nttdocomo.co.jp/english/.
6Contents/Precautions
Precautions (Always follow these directions)
■Before using your terminal, or when necessary, read the precautions
below to ensure safe use and handling. After reading this manual, keep
it carefully.
■These precautions are intended to protect you and others around you.
Read and follow them carefully to avoid injury, damage to the product or
damage to property.
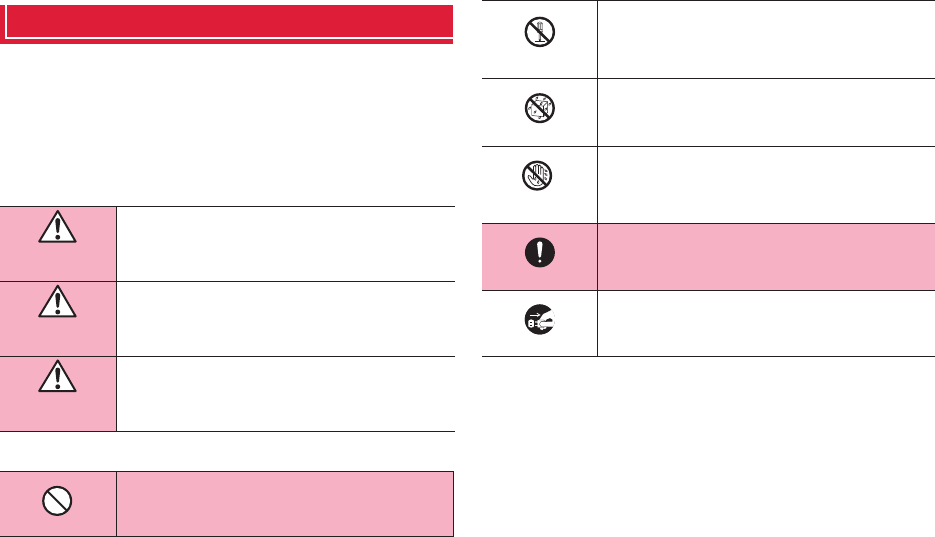
■The signs below differentiate between the levels of danger that can
occur if the product is not used within the specified guidelines.
■The symbols below show specific directions.
■Precautions contain the description below.
1. Handling the terminal, battery pack, adapter and docomo mini UIM card
(common) ................................................................................................. P.7
2. Handling the terminal............................................................................ P.8
3. Handling battery pack ........................................................................ P.10
4. Handling adapter................................................................................ P.11
5. Handling docomo mini UIM card........................................................ P.12
6. Handling mobile phones near electronic medical equipment............ P.12
7. Material list .......................................................................................... P.13
DANGER
This sign denotes that death or serious injury may
directly result from improper use.
WARNING
This sign denotes that death or serious injury may result
from improper use.
CAUTION
This sign denotes that minor injury or damage to
property may result from improper use.
This symbol denotes that the action is prohibited.
Don’t
This symbol denotes that disassembling the phone or
its components is not allowed.
This symbol denotes that using the phone or its
components in a bathroom or other highly humid area
is not allowed.
This symbol denotes that using the phone or its
components with wet hands is not allowed.
This symbol denotes that an instruction must be
obeyed at all times.
This symbol denotes that the equipment should be
unplugged.
No
disassembly
No liquids
No wet
hands
Do
Unplug
7Contents/Precautions
DANGER
Do not use, store or leave the terminal in hot places (e.g. by
the fire, near a heater, under a kotatsu, in direct sunlight, in
a car in the hot sun).
May cause fire, burns or injuries.
Do not put the terminal into heating cooking device such as
microwave oven or high-pressure container.
May cause fire, burns, injuries, electric shock.
Do not disassemble or remodel the equipment.
May cause fire, burns, injuries, electric shock.
Do not let the terminal get wet with water, drinking water,
urine of pet animals, etc.
May cause fire, burns, injuries, electric shock.
Use the battery pack and adapter specified by NTT
DOCOMO for your terminal.
May cause fire, burns, injuries, electric shock.
WARNING
Do not throw the equipment or give a strong force or hard
shock to it.
May cause fire, burns, injuries, electric shock.
Keep conductive materials (metal pieces, pencil lead, etc.)
from coming in contact with the charging jack or external
connection jack. Do not put those materials inside the
terminal.
May cause fire, burns, injuries, electric shock.
Do not cover or wrap the terminal with a blanket, etc while
using or charging.
May cause fire or burns.
Turn the terminal OFF and stop charging before entering a
place such as a gas station where flammable gases are
generated.
The gas may catch fire.
When using Osaifu-Keitai in a place as a gas station, turn OFF
the terminal before using it (When Osaifu-Keitai lock is
activated, deactivate it before turning OFF the terminal.)
If the equipment gives off a strange smell, overheats,
becomes discolored or deformed during use, charging or in
storage, immediately perform the following operations.
・Remove the power plug from the wall outlet or cigarette
lighter socket.
・Turn the terminal OFF.
・Remove the battery pack from the terminal.
May cause fire, burns, injuries, electric shock.
1. Handling the terminal, battery pack, adapter and
docomo mini UIM card (common)
Don’t
Don’t
No
disassembly
No liquids
Do
Don’t
Don’t
Don’t
Do
Do
8Contents/Precautions
CAUTION
Do not leave the equipment on unstable or sloping surfaces.
The terminal may fall and cause injuries.
Do not store the equipment in extremely humid, dusty or hot
areas.
May cause fire, burns, electric shock.
Children using the equipment should be instructed in
proper operation by an adult. Do not allow them to use the
equipment without adult supervision.
May cause injuries.
Store the equipment out of reach of small children.
May be accidentally swallowed or cause injuries.
Be careful especially when using the terminal connected to
the adapter continuously for a long time.
If you watch 1Seg etc. while charging the battery for a long time,
the terminal, battery pack and adapter may be heated.
Directly touching a hot part for a long time, you may have
redness, itching or rash on your skin, or it may result in low-
temperature burns depending on your constitution and/or health
condition.
WARNING
Do not turn on the light by getting the lighting part closer to
other person's eyes. When shooting infants, keep at least
1 m away from the object.
May impair eyesight. And may cause accidents like injury etc.,
by dazzling or astounding other people.
Do not put foreign objects such as liquid like water, metal
pieces or burnable things into mini UIM card slot or microSD
card slot.
May cause fire, burns, injuries, electric shock.
Do not turn on the light aiming directly at the driver of the
car etc.
May disturb driving and cause an accident.
Turn the terminal OFF in areas where use is prohibited, such
as in airplanes and hospitals.
May cause electronic equipment or electronic medical
equipment to fail or malfunction. When using the phone in a
medical facility, be sure to observe the regulations of the facility.
If you do prohibited act such as using the phone in an airplane,
you will be punished according to law. If usage of the terminal in
an aircraft is admitted by setting airplane mode, etc., use the
terminal under the direction of the airline.
Don’t
Don’t
Do
Do
Do
2. Handling the terminal
Don’t
Don’t
Don’t
Do
9Contents/Precautions
When you talk by setting handsfree or ring alert is sounding,
keep the terminal away from your ear.
And, when connecting the earphone/microphone etc. to the
terminal and play a game or music, adjust the volume to a
moderate level.
Too loud volume may cause a hearing loss. And, if you cannot
hear the sound around you clearly, it may cause an accident.
If you have weak heart, be careful when setting the vibrate
alert (vibration) or alert volume setting.
May cause harmful effect on heart.
When you use electronic medical equipment, check with the
equipment manufacturer to determine how the device is
affected by radio waves before using.
May cause harmful effect on electronic medical equipment etc.
Turn the terminal OFF near high-precision electronic control
equipment or electronic equipment using low-power
signals.
May cause the equipment to fail or malfunction.
* Examples of electronic equipment to avoid
Hearing aids, implanted pacemakers or defibrillators, other
electronic medical equipment, fire alarms, automatic doors and
other automatic control equipment. Users wearing implanted
pacemakers or defibrillators or other electronic medical
equipment should check with the manufacturer or sales outlet
about the effect of radio frequencies on the equipment.
When the display or lens of the camera is accidentally
broken, be careful of broken glass or exposed internal parts
of the terminal.
If you mistakenly touch broken or exposed parts, you may be
injured.
CAUTION
Do not swing the terminal by the antenna, strap, etc.
May cause accident such as injury to yourself or others by
hitting.
Do not use the damaged terminal.
May cause fire, burns, injuries, electric shock.
When using the motion sensor, check the safety around you,
hold the terminal firmly, and do not shake it unnecessarily.
May cause accident such as injuries.
If the display part is accidentally broken and the liquid
crystal leaks out, do not make the substance contact with
your skin of face or hands.
May cause loss of sight or skin problems. If the liquid crystal
gets into your eyes or mouth, rinse it with clean water and see a
doctor immediately. And, if the liquid adheres to skin or clothing,
use alcohol etc. to wipe it off, then wash with soap.
To use the terminal in car, check with automobile
manufacturer or dealer to determine how the device is
affected by radio waves before using.
In rare cases, using the phone in some vehicle models can
cause the vehicle's electronic equipment to malfunction. In that
case, stop using the terminal immediately.
The use of the terminal may cause itching, rashes, eczema,
or other symptoms depending on the user's physical
condition. If you develop skin problems, stop using the
phone immediately, and see a doctor.
For materials of parts →P.13 "Material list"
Do
Do
Do
Do
Do
Don’t
Don’t
Don’t
Don’t
Do
Do
10 Contents/Precautions
When watching the display, take a certain distance from the
display in a fully bright place.
May reduce visual acuity.
■Check that the battery type matches the type displayed on the battery
pack label.
DANGER
Do not connect a wire or other metal objects to the jack.
And, do not carry or store the terminal with objects like a
metal necklace.
May cause battery pack to ignite, burst, heat or leak.
Check the orientation of the battery pack to attach to the
terminal, and do not try to force the battery pack onto the
terminal if you are having trouble attaching it.
May cause battery pack to ignite, burst, heat or leak.
Do not throw the battery pack into the fire.
May cause battery pack to ignite, burst, heat or leak.
Do not nail the battery pack, hit with a hammer or step on it.
May cause battery pack to ignite, burst, heat or leak.
If the battery pack's fluid etc. contacts eyes, immediately
flush the eyes with clean water and see a doctor right away.
Do not rub the eyes.
May cause loss of sight.
WARNING
If the battery pack seems to have abnormalities such as
deformation or scratches due to falling, never use it.
May cause battery pack to ignite, burst, heat or leak.
If the battery pack leaks or gives off a strange smell,
immediately remove it from the vicinity of open flames.
The vapors from leaking battery pack fluid may ignite or
explode.
Be careful not to let your pet bite the battery pack.
May cause battery pack to ignite, burst, heat or leak.
CAUTION
Do not discard old battery packs together with other
garbage.
May cause igniting or environmental destruction. Tape the
terminals of old battery packs to insulate them, and then bring
them into a sales outlet such as docomo Shop. If your local
municipality has a battery recycling program, dispose of them
as provided for.
Do not use or charge a wet battery pack.
May cause battery pack to ignite, burst, heat or leak.
3. Handling battery pack
Display Battery type
Li-ion 00 Li-ion polymer battery
Do
Don’t
Don’t
Don’t
Don’t
Do
Don’t
Do
Do
Don’t
Don’t
11 Contents/Precautions
If fluid etc. leaks out from the battery pack, do not make the
fluid contact with your skin of face or hands.
May cause loss of sight or skin problems.
If the fluid etc. put into your eyes or mouth, or contacts skin or
clothes, immediately flush the contacted area with clean water.
If the fluid etc. put into the eyes or mouth, immediately see a
doctor after flushing.
WARNING
Do not use the adapter cord if it gets damaged.
May cause fire, burns, electric shock.
Do not use the AC adapter or desktop holder in a bathroom
or other highly humid area.
May cause fire, burns, electric shock.
Always use the DC adapter with a negative-ground vehicle.
Do not plug it into a positive-ground vehicle.
May cause fire, burns, electric shock.
When it starts to thunder, do not touch adapter.
May cause electric shock.
Do not short the charging jack while it is connected to the
outlet or cigarette lighter socket. Do not touch the charging
jack with a part of your body such as your hand or finger.
May cause fire, burns, electric shock.
Do not place heavy objects on the adapter cord.
May cause fire, burns, electric shock.
When you insert and remove the AC adapter from power
outlet, do not contact a metal strap or other metal objects
with the jack.
May cause fire, burns, electric shock.
Do not touch the adapter cord or outlet with wet hands.
May cause fire, burns, electric shock.
Only use with the specified power source and voltage. When
charging the terminal overseas, use AC Adapter for global
use.
If incorrect voltage is used, this may cause fire, burns or electric
shock.
AC adapter : 100 V AC
DC adapter : 12 or 24 V DC (specific for negative ground
vehicle)
AC adapter for global use : Between 100 V and 240 V AC
(Connect to the AC outlet for internal household use)
If the DC adapter's fuse blows, replace it only with the
specified fuse.
May cause fire, burns, electric shock. For the specified fuse, see
the instructions that come with the DC adapter.
Wipe off any dust that accumulates on the power plug.
May cause fire, burns, electric shock.
When you connect the AC adapter to an outlet, firmly
connect to the outlet.
May cause fire, burns, electric shock.
4. Handling adapter
Do
Don’t
Don’t
Don’t
Don’t
Don’t
Don’t
Don’t
No wet
hands
Do
Do
Do
Do
12 Contents/Precautions
When you disconnect the power plug from the outlet or
cigarette lighter socket, do not pull the adapter cord with
excessive force. Instead, hold the adapter to disconnect.
May cause fire, burns, electric shock.
Always remove the power plug from the outlet or cigarette
lighter when not using the adapter for an extended period.
May cause fire, burns, electric shock.
Immediately remove the power plug from the outlet or
cigarette lighter socket if water or other fluids get into the
adapter.
May cause fire, burns, electric shock.
Always remove the power plug from the cigarette lighter
socket when cleaning the equipment.
May cause fire, burns, electric shock.
CAUTION
Be careful of the cut surface when removing docomo mini
UIM card.
May cause injuries.
■These precautions are based on the guidelines produced at the
Electromagnetic Compatibility Conference Japan, regarding the
protection of electronic medical equipment from radio waves emitted by
mobile phone units.
WARNING
Obey the following rules inside medical facilities.
・Do not bring the terminal into operating rooms (ORs), intensive
care units (ICUs) or coronary care units (CCUs).
・Turn the terminal OFF in hospital wards.
・Turn the terminal OFF in hospital lobbies and corridors if
electronic medical equipment could be nearby.
・If the medical facility has specified zones where use or
possession of mobile devices is prohibited, obey those
instructions.
Turn the terminal OFF in crowded trains or other public
places where pacemaker or defibrillator wearers could be
nearby.
The terminal's signals may affect the operation of implanted
pacemakers or defibrillators, and other devices.
Wearers of medical equipment such as implanted
pacemakers or defibrillators must carry and use the
terminal at least 22 cm away from the implanted device.
The terminal's signals may affect the performance of electronic
medical equipment.
When electronic medical equipment other than implanted
pacemakers or defibrillators are in use outside of medical
facilities (such as in home care settings), check with the
device manufacturer to determine how the device is affected
by electrical signals.
The terminal's signals may affect the performance of electronic
medical equipment.
5. Handling docomo mini UIM card
6. Handling mobile phones near electronic
medical equipment
Do
Un
p
lu
g
Unplug
Unplug
Do
Do
Do
Do
Do
13 Contents/Precautions
Handling precautions
■Do not get the terminal wet.
The terminal, battery pack, adapter, docomo mini UIM card are not
waterproof. Do not use in a bathroom or other highly humid area or do not let
rain touch. Or putting the terminal on your body, humidity of sweat may
cause internal corrosion and malfunction. Note that malfunctions, which are
determined to be caused by water as result of inspections, are not covered
by the warranty.
Since these conditions are outside the scope of the warranty, a repair, if at
all possible, is charged.
■Clean the terminal with a dry soft cloth (such as a cloth for eyeglasses).
・Rubbing it roughly with a dry cloth may scratch the display.
・Drops of water or dirt left on the display may cause stains.
・If the terminal is wiped with alcohol, paint thinner, benzine or detergent,
the printing may disappear or color may fade.
■Clean the jack occasionally with a dry cotton swab etc.
If the jack is soiled, connection gets worse and it may cause power to be
turned off or insufficient battery charge, so clean the jack with a dry cotton
swab etc. Also, be careful never to damage the jack when cleaning it.
■Do not place the terminal near an air-conditioner outlet.
The rapid change in temperature may cause condensation, causing internal
corrosion and malfunction.
■When using, be careful not to subject excessive force to the terminal or
the battery.
If the terminal is crammed into a brimming bag or placed in a pocket and sat
on, display, internal PCBs or battery pack may be damaged or malfunction.
And, if external devices are plugged into the external connection jack, the
breakage of the connector or malfunction may result.
■Do not rub or scrape the display with a metal piece etc.
May scratch the display, causing malfunction or damage.
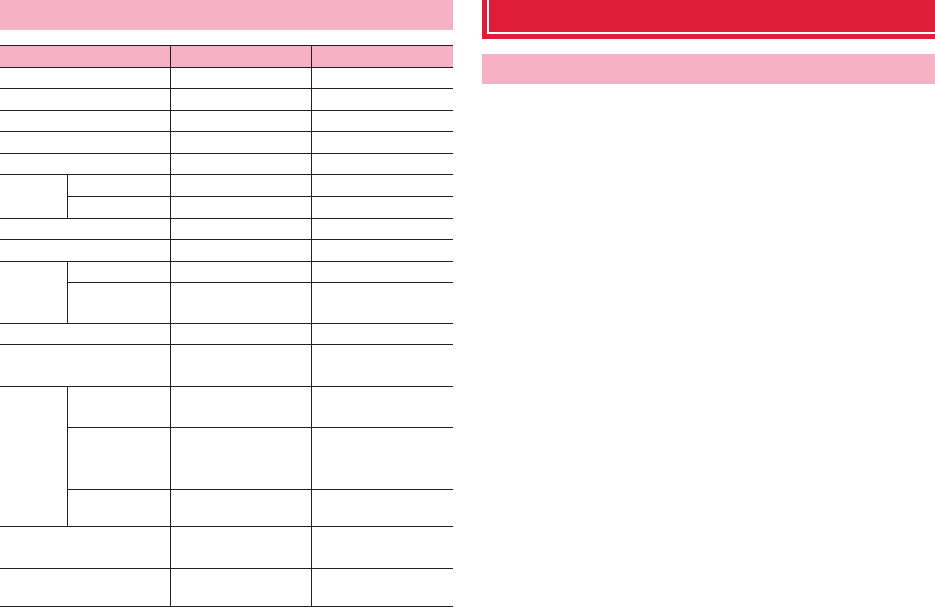
7. Material list
Part Material Surface treatment
Exterior case (front) PC resin None
Power key PC resin None
Earpiece protection net Stainless steel Etching
Surface Glass None
Volume key PC resin None
Camera Exterior panel Aluminum None
Lens Glass None
Flash cover PMMA resin None
Speaker net Stainless steel Etching
1Seg/
Mobacas
antenna
Top section PC resin None
Rod section Stainless steel None
Back cover PC resin None
Charging contacts for
desktop holder
Copper Gold plating
Battery
pack
Surface (Top/
Bottom)
ABS resin + PC resin None
Printed
section
(peripheral)
PET UV coating
Contacts FR-4 (glass epoxy
substrate)
Nickel plating + gold
plating
docomo mini UIM card
slot contacts
Stainless steel Nickel plating + gold
plating
microSD card slot Stainless steel Nickel plating + gold
plating
General

14 Contents/Precautions
■Carefully read the separate instructions that come with optional devices.
■Do not press the surface of the touch panel strongly or operate it with
sharp objects such as a nail, a ballpoint pen and a pin.
It may damage the touch panel.
■Avoid extreme temperature.
Use the terminal where the temperature ranges between 5 and 35°C and
humidity ranges between 35 and 85%.
■The terminal may affect land-line phones, TVs or radios in use nearby,
so use it as far as possible from these appliances.
■Maintain a separate record of the data you saved in the terminal.
If the data is deleted, DOCOMO assumes no responsibility for the loss of any
data.
■Do not drop the terminal or subject it to shocks.
May cause malfunction or damage.
■Do not plug external devices into the external connection jack at a slant,
or do not pull it forcibly while it is plugged.
May cause malfunction or damage.
■It is normal for the terminal to become warm during use or charging.
Continue to use it.
■Do not leave the terminal with the camera in areas under strong direct
sunlight.
May cause discoloring or burn-in of elements.
■Do not use the terminal with the back cover removed.
May cause removal of battery pack, malfunction or damage.
■While microSD card is being used, do not take the card out and do not
turn off the terminal.
May cause data loss or malfunction.
■Do not bring magnetic cards etc. close to the terminal.
Magnetic data in cash cards, credit cards, telephone cards, floppy disks,
etc. may be erased.
■Do not bring magnetized objects close to the terminal.
Bringing strong magnetism close may cause a malfunction.
■The battery pack is a consumable part.
Replace the battery pack if the terminal has extremely short operation time
on a full charge, though it may vary by operating conditions. Purchase a new
battery pack of the specified type.
■Charge the battery in an area within the proper ambient temperature
range (5-35°C).
■The operation time provided by the battery pack varies by the operating
environment and battery pack's deterioration.
■The battery pack may swell out as it comes to near the end of its lifetime
depending on the usage conditions, but it is not a problem.
■Be careful especially about the following points when preserving the
battery pack.
・Keeping under the state of the full charge (right after charging ends)
・Keeping under the state of the empty charge (too exhausted to turn on the
terminal)
They may cause the battery pack performance to be degraded or its lifetime
to be shortened.
A recommended battery level to keep the battery pack is approximately
40% of remaining battery level as a guide.
■Charge the battery in an area within the proper ambient temperature
range (5-35°C).
■Do not charge the battery in the areas below.
・In areas of excessive humidity, dust or vibrations
・Near land-line phones or TVs/radios
■It is normal for the adapter to become hot while charging. Continue to
use it.
The terminal
Battery pack
Adapter
15 Contents/Precautions
■When using the DC adapter for charging, keep the vehicle engine
running.
The vehicle's battery could become flat.
■When using an outlet with a mechanism preventing unplugging, follow
the handling instructions for that outlet.
■Do not give strong shock. Do not deform the external connection jack.
May cause malfunction.
■Do not use excessive force to install/remove docomo mini UIM card.
■Note that DOCOMO assumes no responsibility for malfunctions
occurring as the result of inserting and using docomo mini UIM card with
another IC card reader/writer.
■Always keep UIM ICs clean.
■Clean docomo mini UIM card with a soft, dry cloth (such as a cloth for
eyeglasses).
■Maintain a separate record of the data you saved in docomo mini UIM
card.
If the data is deleted, DOCOMO assumes no responsibility for the loss of any
data.
■To preserve the environment, bring the old docomo mini UIM card to a
sales outlet such as docomo Shop.
■Take care not to scratch, touch accidentally or short IC.
May cause data loss or malfunction.
■Do not drop docomo mini UIM card or subject it to shocks.
May cause malfunction.
■Do not bend docomo mini UIM card or place heavy objects on it.
May cause malfunction.
■Do not install docomo mini UIM card into the terminal with a label or
sticker put on.
May cause malfunction.
■This terminal is equipped with the security features,
that are compliant with Bluetooth standards for communication via
Bluetooth. However, depending on the settings, there may not be
enough security. Be aware of security risks when using Bluetooth.
■DOCOMO assumes no responsibility for any information which may be
leaked during communication via Bluetooth.
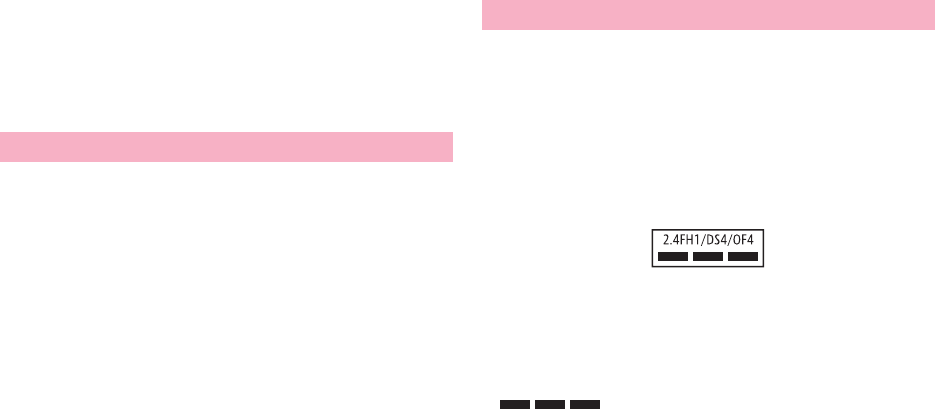
■Frequency bands
Frequency bands, modulation, and expected interference distance or
changeability of frequency used by the terminal Bluetooth/Wireless LAN
function are as below. Symbols indicate as follows.
2.4 : Radio equipment that uses the frequency 2400 MHz band.
FH1 : The Bluetooth modulation is FH-SS and expected interference
distance is 10 m or shorter.
DS4/OF4 : The Wireless LAN modulation is DS-SS, OFDM and
expected interference distance is 40 m or shorter.
: All bandwidths between 2400 MHz and 2483.5 MHz
are used, and the bandwidth used by mobile object
identification devices can be avoided.
・Available channel varies by countries.
・To use in airplane, confirm with airline company in advance.
■Cautions on using Bluetooth devices
In the bandwidth used by this terminal, in addition to home electric
appliances such as a microwave oven and industrial/scientific/medical
devices, in-plant radio stations used to identify mobile objects used in
production lines of a factory that require a license, specified low power
radio stations, or amateur radio stations that do not require a license
docomo mini UIM card
Bluetooth® devices

16 Contents/Precautions
(hereafter "other radio stations") can be in operation.
1. Before using this terminal, check whether other radio stations are in
operation in your neighborhood.
2. If radio wave interference occurs between the terminal and "other
radio stations", use the terminal in a different location or "Turn the power
OFF" to avoid the radio wave interference.
3. For details, contact "General Inquiries" on the last page of this
manual.
■Wireless LAN (WLAN) exchanges information using radio waves, and
allows you to freely establish LAN connection if you are within an area
where radio wave reaches. On the other side, if you communicate
without appropriate security settings, communications may be
intercepted or hacked by malicious parties. It is recommended to make
necessary security settings on your judgement and responsibility.
■Wireless LAN
Do not use Wireless LAN in a place where magnetized by electric
products, AV, OA equipment, etc. or where electromagnetic wave is
generated.
・If magnetism or electrostatic noise affects the terminal, noise may be
increased or communication may not be available (especially when using
microwave oven, it may affect the terminal).
・Using near TV or radio may cause poor reception or TV screen may be
blurred.
・When multiple wireless LAN access points exist near the terminal and they
use the same channel, search may not be performed correctly.
・To use WLAN overseas, places for using may be limited in some countries.
In such case, check the conditions such as available frequency,
regulations, etc. for the country to use it.
■Cautions on using 2.4 GHz devices
In the frequency band for WLAN devices, in addition to home electric
appliances such as a microwave oven and industrial/scientific/medical
devices, in-plant radio stations for identification of mobile objects used
in production lines of a factory (a license is required), specified low
power radio stations (a license is not required), or amateur radio
stations (a license is required) can be in operation.
1. Before using this device, confirm that in-plant radio stations for
identification of mobile objects, specified low power radio stations or
amateur radio stations are not in operation in your neighborhood.
2. If this device generates harmful radio wave interference against in-
plant radio stations for identification of mobile objects, change the using
frequency promptly or stop using wireless LAN function, and contact
"General Inquiries" on the last page of this manual, then consult about
treatment for prevention of the interference (for example, installation of
partitions etc.).
3. If this device generates harmful radio wave interference against in-
plant radio stations for identification of mobile objects or amateur radio
stations, or if any trouble, contact "General Inquiries" on the last page of
this manual.
■FeliCa reader/writer function of the terminal uses weak waves requiring
no licenses for radio stations.
■It uses 13.56 MHz frequency band. When using other reader/writers in
your surroundings, keep the terminal away sufficiently from them.
Before using the FeliCa reader/writer, confirm that there are no radio
stations using the same frequency band nearby.
Wireless LAN (WLAN)
FeliCa reader/writer

17 Contents/Precautions
■Do not use a remodeled terminal. Using a remodeled terminal violates
the Radio Law.
The terminal is certified according to technical standard conformance of
specified wireless equipment based on the Radio Law, and as a proof of it,
the "Technical Compliance Mark " is depicted on the engraved sticker of
the terminal.
If you remodel the terminal by removing its screws, your certification of
technical standard conformance becomes invalid.
Do not use the terminal with its certification of technical standard
conformance invalid as it violates the Radio Law.
■Be careful when you use the terminal while driving a car etc.
Using a mobile phone while driving is subject to penal regulations.
However, absolutely necessary cases such as rescue of a sick person or
maintaining public's safety are exempted.
■Use FeliCa reader/writer function only in Japan.
FeliCa reader/writer function of the terminal conforms to Japanese radio
standards. If you use this function overseas, you may be punished.
■Do not alter the basic software.
Repairs may be refused as a modification of software.
CAUTION
18 Before using the terminal
Before using the terminal
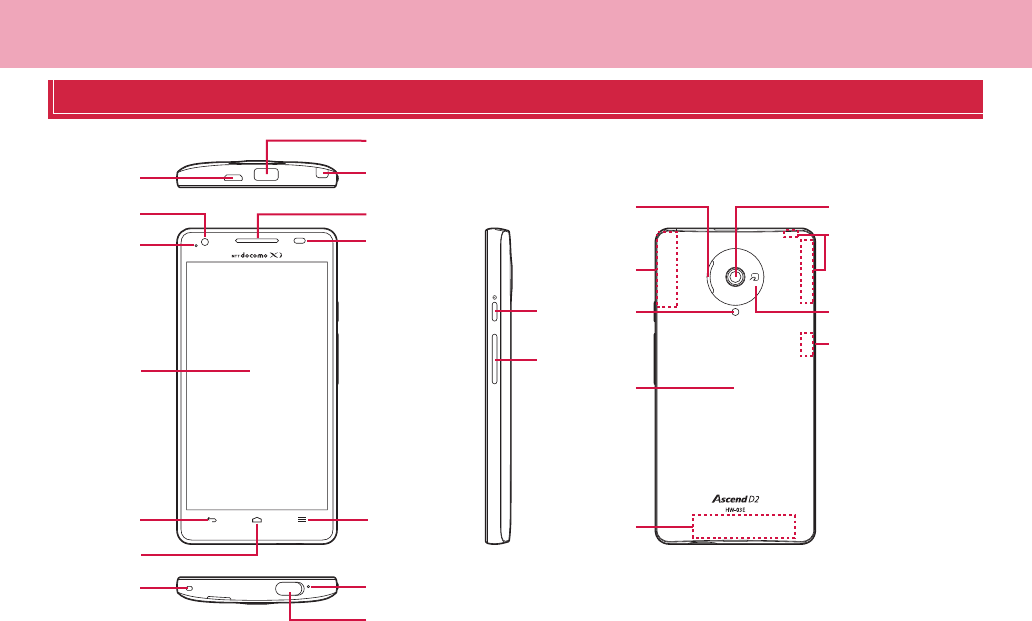
Part names and functions
k
i
b
o
p
j
n
m
c
f
e
a
d
h
g
l
s
r
t
u
qv
u
x
w
19 Before using the terminal
1Seg/Mobacas antenna
T Power key
・Turn the power ON/OFF, set sleep mode manually.
External connection jack
・Use for charging or connecting to a PC etc.
Headjet jack
・Use for earphones.
Infrared port
・Use for infrared communication
Earpiece
・
Hear the party's voice from here.
Display (Touch panel)
・Touch directly with the finger to operate.
J Home key (Touch key)
・Return to the Home screen.
・Touch and hold to display a list of recently used applications.
B Back key (Touch key)
・Back to the previous screen.
Microphone
・Send your voice to the party whom you are talking with or record the
voice.
・To attach a strap, remove the back cover, pick up rubber stuffing, pass a
strap through the hole of the terminal, hang the strap with the hook inside
of the terminal and then attach the back cover (attach the rubber stuffing
if required).
Light sensor/Proximity sensor*1
・Sense the ambient brightness to adjust brightness of the display.
・Sense a face closing during a call and prevent the erroneous operation of
the touch panel.
In-camera
・Shoot still images or videos.
LED light
・Turn on when charging or flash when the battery level is low.
・Flash to notify a missed call or incoming mail.
M Menu key (Touch key)
・Display menu on each screen.
Volume up/down key (+ / -)
・Adjust incoming ringtone, voice sound, playback sound of music, etc.
Strap hole
Bluetooth/Wi-Fi antenna*2
GPS antenna*2
Speaker
・Emit incoming ringtone or playback sound of music.
Back cover
・Do not press button cover of the power key forcibly when the back cover
is removed from the terminal. Key cover may be removed.
・Do not remove the sticker on the back side of the back cover. If it is
removed, IC card may not be able to be read/written.
FOMA/Xi antenna*2
Out-camera
・Shoot still images or videos.
Flash
・Light for camera shooting.
mark
・IC card is installed. Use Osaifu-Keitai function holding this mark over the
reader, or send/receive data via iC communication by downloading a
compatible application. IC card cannot be removed.
*1: Putting a protective sheet or seal on each sensor may cause
erroneous operation.
*2: The antenna is built-in the terminal. Covering around the antenna by
the hand may affect the quality of call or communication.
1
2
3
4
5
6
7
8
9
10
11
12
13
14
15
16
17
18
19
20
21
22
23
24

20 Before using the terminal
■Connecting earphone/microphone
To connect round plug (3.5 mmØ) of earphone/microphones etc. to the
external connection jack of the terminal, use the supplied Connecting
earphone adapter cable with antenna (Sample).
・Make sure the orientation of microUSB connector (front/back) and insert
horizontally.
docomo mini UIM card
The docomo mini UIM card is an IC card in which user information such as
your phone number etc. is saved. When docomo mini UIM card is not
inserted to the terminal, some functions (send/receive call etc.) are not
available.
・You can use the terminal only with docomo mini UIM card. If you have a UIM
or FOMA card, bring it to a docomo Shop to replace.
・For details on docomo mini UIM card, refer to the docomo mini UIM card
manual.
・Turn the terminal OFF, remove the back cover and the battery pack before
installing/removing docomo mini UIM card (P.23).
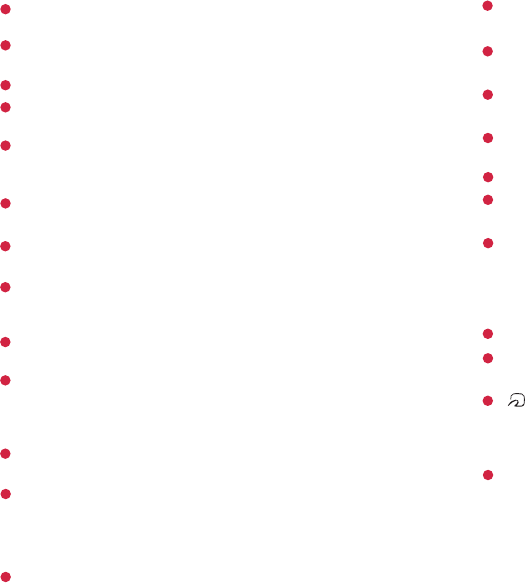
1Insert docomo mini UIM card into the card slot with the
IC side facing down in the direction of arrow until it is
stopped
・Check the orientation of docomo mini UIM card corner cut.
Connecting
earphone
adapter cable
with antenna
Orientation of microUSB
connector
Plug (3.5mmØ ) of
earphone/microphone
Installing/Removing docomo mini UIM card
Installing
21 Before using the terminal
1Lightly press docomo mini UIM card with fingertip and
slide in the arrow direction slowly to remove
Information
・
When handling docomo mini UIM card, take care not to touch or scratch the IC.
・Note that, installing/removing docomo mini UIM card forcibly may damage
the docomo mini UIM card.
・Be careful not to lose docomo mini UIM card after removed.
microSD card
Using microSD card allows you to save data in the terminal or import data
in the microSD card to the terminal.
・The terminal supports microSD card of up to 2 GB, and microSDHC card of
up to 32 GB (as of October, 2012).
・For compatible information on each microSD card, contact a manufacturer of
the microSD card.
・Remove the back cover before installing/removing microSD card (P.22).
1Insert microSD card into the card slot with the metal
side facing down in the direction of arrow until it is
stopped
Removing
Corner cut
IC
Installing/Removing microSD card
Installing
22 Before using the terminal
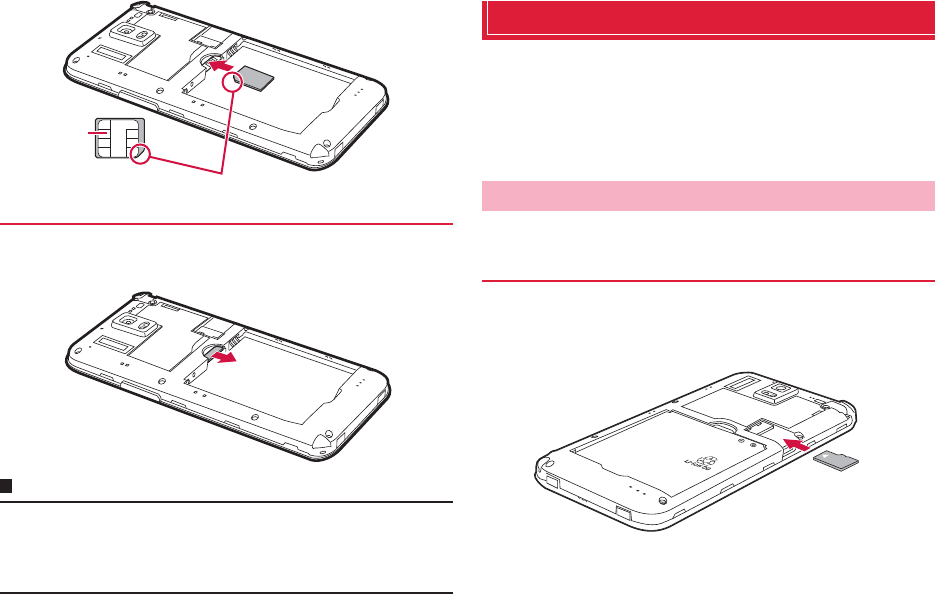
・Be sure to unmount microSD card before removing microSD card (P.101).
1Lightly press microSD card with fingertip and slide in
the arrow direction slowly to remove
Battery pack
・Attach/Remove the battery pack holding the terminal with hands after turning
off the power.
1Put your fingertip into the groove of the back cover,
then lift it up in the direction of the arrow to remove
Removing
Attaching/Removing the battery pack
Installing
Groove
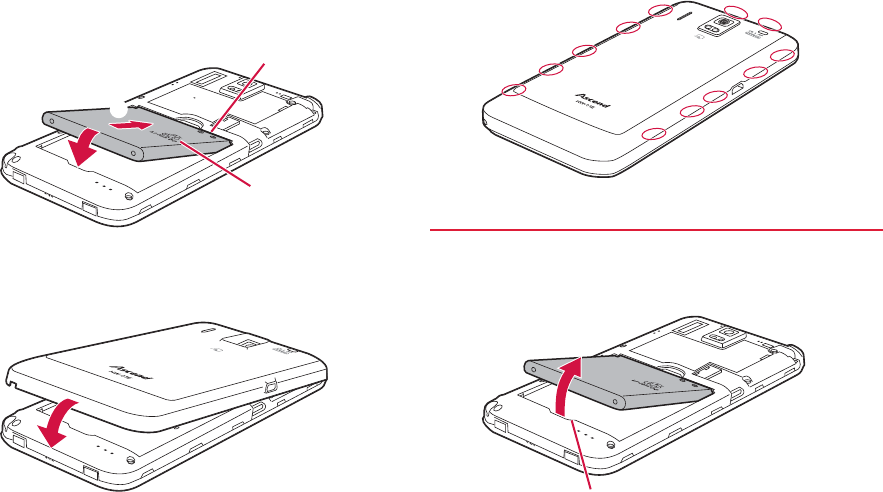
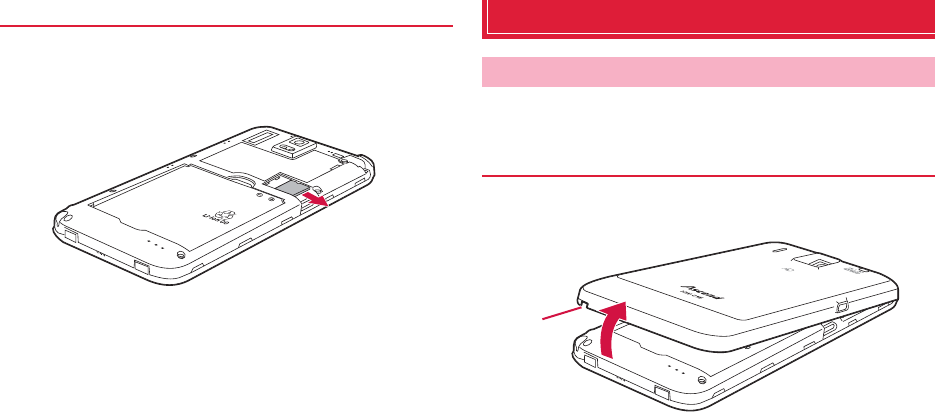
23 Before using the terminal
2With a recycle mark printed side up, align the contacts
of battery pack with the ones of the terminal, and then
pushing in the direction of a, push it in the direction
of b to attach
3Align the top of the back cover with the one of the
terminal, and then push in the direction of arrow to
attach
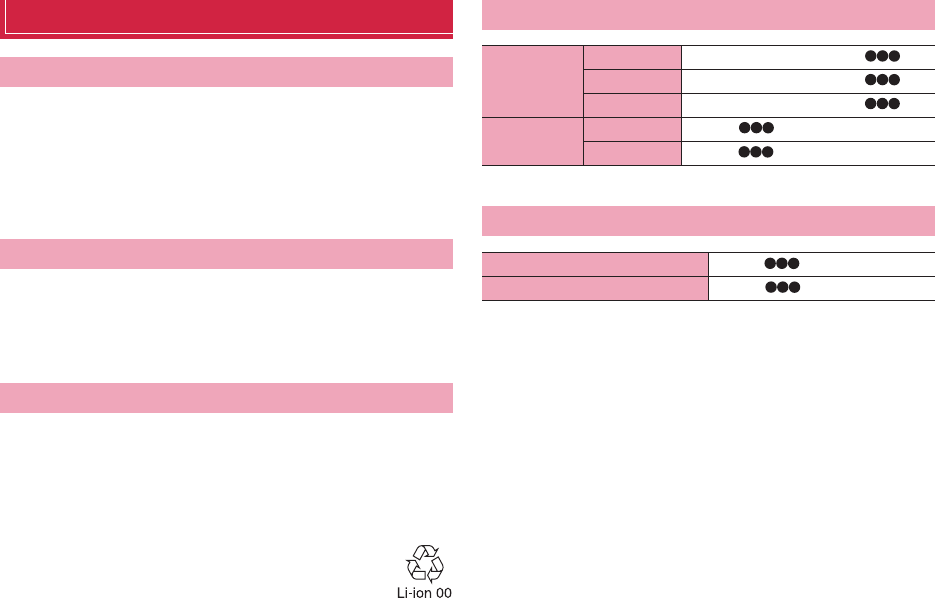
4Push ○ parts to check that no gaps exist between the
terminal and the back cover
1Remove the back cover, hook your fingertip etc. in the
groove of the terminal, and then lift the battery pack up
in the direction of the arrow
b
a
Metal contacts
Recycle mark
Removing
Groove
24 Before using the terminal
Charging
Charge the battery before using for the first time or after an extended
period of disuse.
・For estimate of charging time, stand-by time, calling time, see "Main
specifications" (P.180).
・If you use the terminal while charging, it may take time to complete charging
or charging may not complete.
・If charging starts with battery level is low, it may take time to turn on LED light.
・It is recommended to use AC adapter 03 (optional).
・Compatible power voltage for AC adapter 03 (optional) is between 100V AC
and 240V AC. When using the terminal overseas, use the adapter plug that
is suitable for use in your travel destination. Do not charge the battery with a
transformer for overseas travel.
・The battery pack is a consumable part. Each time it is charged, available
time with each charging reduces. Talking on the phone for a long time while
charging may reduce the battery pack lifetime.
・If available time with each charging becomes about a half of that for a new
battery, replacing the battery is recommended because it means near the
end of life. The battery pack may swell out as it comes to near the end of its
lifetime depending on the usage conditions, but it is not a problem.
*: When "Mobile networks" (P.162) is set to "LTE/3G/GSM (Auto)"
Precautions on charging
Charging
Battery pack life
Estimated usage time of battery pack
Continuous
stand-by time
LTE Stationary (Auto)* : Approx. H
FOMA/3G Stationary (Auto)* : Approx. H
GSM Stationary (Auto)* : Approx. H
Continuous
call time
FOMA/3G Approx. min.
GSM Approx. min.
Estimated charge time of battery pack
AC adapter 03 Approx. min.
DC adapter 03 Approx. min.
25 Before using the terminal
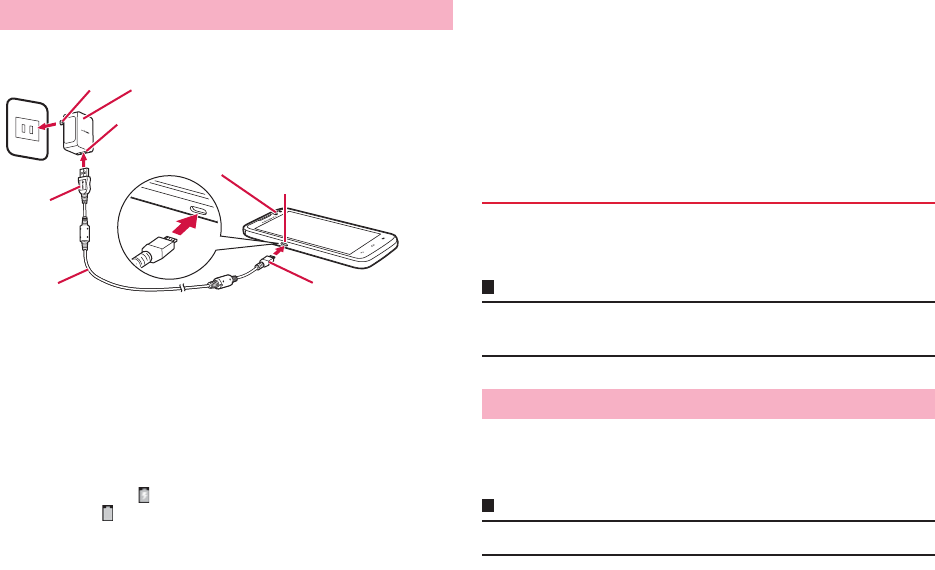
<Example : Changing with AC adapter 03 (optional)>
1Insert microUSB plug of microUSB cable into the
external connection jack of the terminal with USB
mark side down horizontally (a)
2Insert a USB plug of a microUSB cable into the USB
connector of AC adapter jack horizontally as shown
(b)
3Insert the AC adapter's power plug into an outlet (c)
Charging starts. appears on the status bar. When charging is
complete, appears on the status bar.
・LED light turns on while charging. Light color indicates charging state
estimation. Red indicates 14% or less, yellow indicates 15 – 90%,
green indicates 90% or more remaining battery level.
4When charging is complete, pull out the power plug of
the AC adapter main unit from the outlet
5Pull out microUSB plug of the microUSB cable from
the external connection jack of the terminal
horizontally
6Pull out USB plug of the microUSB cable from AC
adapter main unit horizontally
DC adapter is an adapter for connecting vehicle cigarette lighter socket
(12V/24V) and the terminal for charging. For details, refer to the manual of
DC adapter.
Information
・If the DC adapter's fuse blows, replace it only with the specified fuse. Fuse is
a consumable part. Purchase it at an auto-supply shop etc. near you.
You can charge connecting the terminal and a PC with Micro USB Cable
01 (optional).
・For procedure of connecting to a PC, see P.117.
Information
・Charging is not available when a PC is power off except for some devices.
Charging with AC adapter
c
b
a
USB plug
External connection
jack
Power plug
USB connector
LED light
AC adapter 03 main unit
microUSB cable microUSB plug
DC adapter (optional)
Charging with a PC
26 Before using the terminal
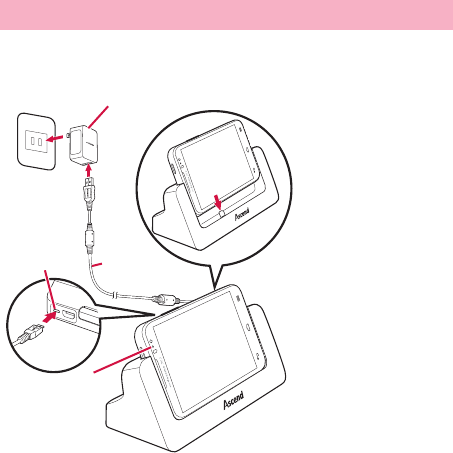
<Changing with Desktop Holder HW02 (optional) and AC adapter 03
(optional)>
1Insert microUSB plug of microUSB cable into the
external connection jack of the Desktop Holder with
USB mark side up horizontally (a)
・Insert slowly and horizontally so as not to give excessive force to the
plug of microUSB cable.
2Insert a USB plug of a microUSB cable into the USB
connector of AC adapter jack horizontally (b), then
insert the power plug of AC adapter into power outlet
(c)
3Align the external connection jack of the terminal and
charging jack of the Desktop Holder to attach (d)
LED light turns on while charging. It turns off when charging is complete.
・Firmly install the terminal to the desktop holder. If the external
connection jack is not connected to the charging jack of the desktop
holder properly, charging may be failed or charge connecting with a
PC (USB) may be indicated.
4When charging is complete, hold the desktop holder
with your hand and then lift the terminal up to remove
5Remove the AC adapter main unit from the outlet
6Pull out microUSB plug of the microUSB cable from
the external connection jack of the Desktop Holder
horizontally
7Pull out USB plug of the micro USB cable from the AC
adapter main unit horizontally
Charging with Desktop Holder
c
b
a
d
AC adapter 03 main unit
LED light
microUSB
cable
External
connection
jack
27 Before using the terminal
Turning power ON/OFF
1Press and hold T for 2 sec. or more
・When the power is ON for the first time, make initial settings (P.30).
2Cancel the screen lock
For canceling the screen lock, see "Canceling the screen lock" (P.28).
Information
・It may take 1 minute or more to display the Home screen after the power is
ON.
・When the terminal does not respond even if T is pressed, charging may
not be enough. Fully charge and retry operating.
・When the screen lock is set to "Touch", the notification panel can be displayed
on the lock screen.
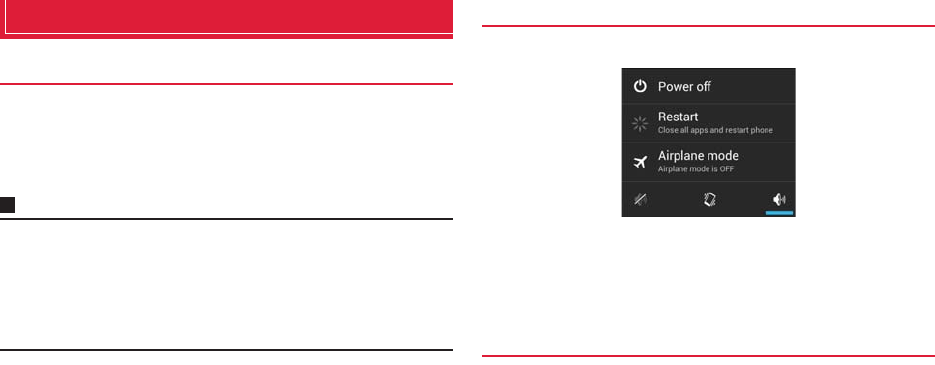
1Press and hold T for 1 sec. or more
2"Power off" → "OK"
・You can restart the terminal, set Airplane mode (P.94) or Silent mode
(P.99) from the mobile phone options screen.
When no operation is performed for certain period of time, the display is
automatically turned off and the terminal turns into sleep mode. To cancel
sleep mode, press T.
Turning power ON
Turning power OFF
Canceling sleep mode
Mobile phone options screen
28 Before using the terminal
By setting the screen lock (P.107), you can lock the terminal no to operate
it until the specified operation is performed after the power is ON or the
sleep mode is canceled. Also, you can lock the terminal manually to
prevent from erroneous operations.
<Example : When the screen lock is set to "Touch">
1On the lock screen, tap
・When the screen lock is set to "Touch", tap an icon on the lock screen
to activate the camera directly. And when there is notification of
missed call or sp-mode mail, number (number of notifications)
appears on the icon.
■To lock manually
aPress T
Basic operation
The display of the terminal is a touch panel for touching directly with finger
to operate. Various operations are available by touching patterns.
The touch panel of the terminal senses movements of finger using static
electricity to operate.
・The touch panel is designed for being touched lightly with fingers. Do not
push it forcibly with a finger or press it with sharp objects (nail, ballpoint pen,
pin, etc.).
・Touching the touch panel may not work in the following cases. Note that it
may cause malfunction.
- Operation with gloved hands
- Operation with tip of fingernail
- Operation with a foreign object on the display
- Operation with protective sheet, seal, etc. on the display
Information
・When you tap other than a confirmation screen or status bar while a pop-up
such as confirmation screen appears, an operation may be stopped.
Canceling the screen lock
Using the touch panel
Before using the touch panel
29 Before using the terminal
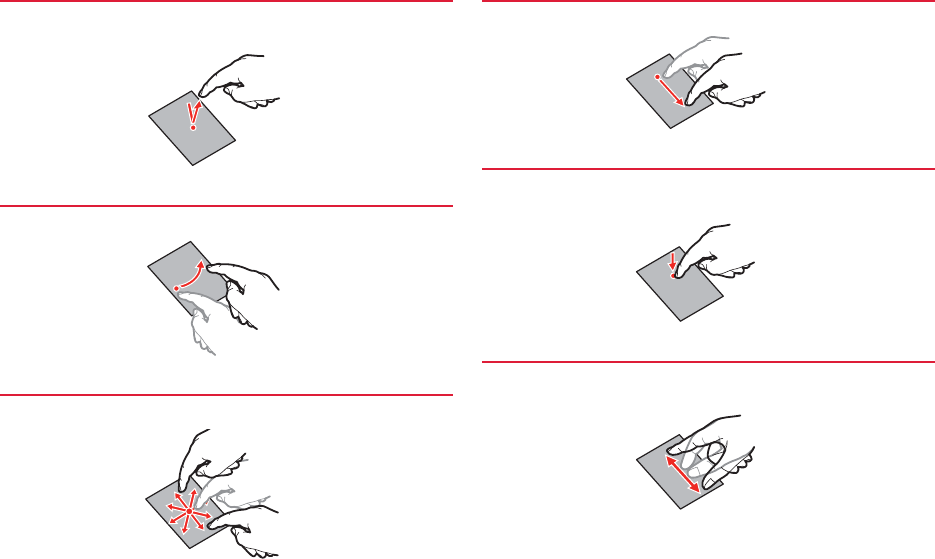
Touch the screen lightly and release the finger. Double-tap is an operation
of tapping twice on the same position.
Sweep quickly on the display with finger.
Touch the screen lightly with your finger and drag to the desired position.
Touch an icon etc. lightly and drag to the desired position.
Keep touching an icon or a key until target operation is done such as
displaying menu.
Touch the screen with two fingers and widen (pinch-out) or narrow (pinch-
in) the fingers distance. Use to zoom in/out image etc.
Tap/Double-tap
Swipe
Slide
Drag
Touch and hold
Pinch
30 Before using the terminal
Set to switch the display orientation automatically to portrait/landscape
view by sensing the orientation or tilt of the terminal.
1From the Home screen, M → "Settings" → "Display"
2Mark "Auto-rotate screen"
Information
・For Home screen or some function's screens, orientation may not be
switched automatically.
You can save content of screen display as an image (screenshot). Saved
screen shot can be viewed in Gallery (P.137).
1On the screen you want to save as screenshot, press
T and - at the same time for 1 second or more
・Screenshot is saved and appears on the status bar.
Open the notification panel and tap the notification to view saved
image.
Information
・Screenshot may not be saved depending on the function or application.
Initial settings
When you turn on the terminal for the first time or after performing "Factory
data reset" (P.109), docomo services initial settings screen appears.
1"進む (Go)"
Follow the onscreen instructions to make settings.
・アプリー括インストール (Install apps all at once)
・おサイフケータイの利用 (Osaifu-Keitai usage)
・ドコモアプリパスワードの設定 (docomo apps pasword setting)
・位置提供設定 (Location request setting)
・プリインアプリ利用状況送信 (Send preinstalled app usage status)
2"OK"
Information
・To switch the display language to English, from the Home screen, M → "本
体設定 (Settings)" → "言語と文字入力 (Language & input)" → "言語
(Language)" → Select "English".
Setting up a Google account allows you to use online services provided by
Google such as Gmail and Google Play.
1From the Home screen, M → "Settings"
2"Accounts & sync" → "ADD ACCOUNT" → "Google"
For subsequent operations, follow onscreen instructions.
Setting auto-switch of display orientation
Saving a screen display as an image
docomo services initial settings
Setting Google account
31 Before using the terminal
1From the Home screen, M → "Settings" → "Wi-Fi"
2"OFF"
"ON" appears and Wi-Fi turns ON.
Available access points are automatically detected and listed.
3Tap an access point to connect to
・When you connect a secured access point, enter password and then
tap "Connect".
Information
・Packet communication can be used while Wi-Fi is ON. However, Wi-Fi
network is given priority while Wi-Fi is connected.
・If Wi-Fi network is disconnected, connection automatically switches to LTE/
3G/GPRS network. Note that packet communication fee applies for using
LTE/3G/GPRS network.
・For Wi-Fi function details, see "Using Wi-Fi function" (P.92).
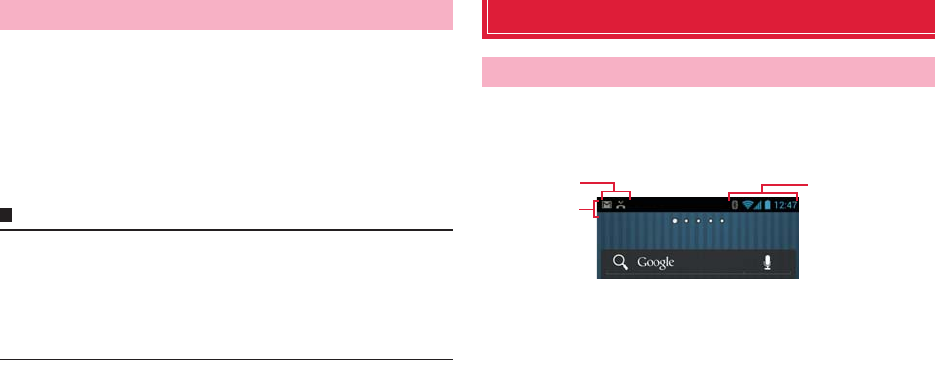
Screen/Icon
On the status bar shown at the top of the display, notification icons for
missed call, mail reception, or result of sending/receiving data, and status
icons indicating the terminal state appear.
Setting Wi-FI
Status bar
Status
Icon
Status bar
Notification
icon
32 Before using the terminal
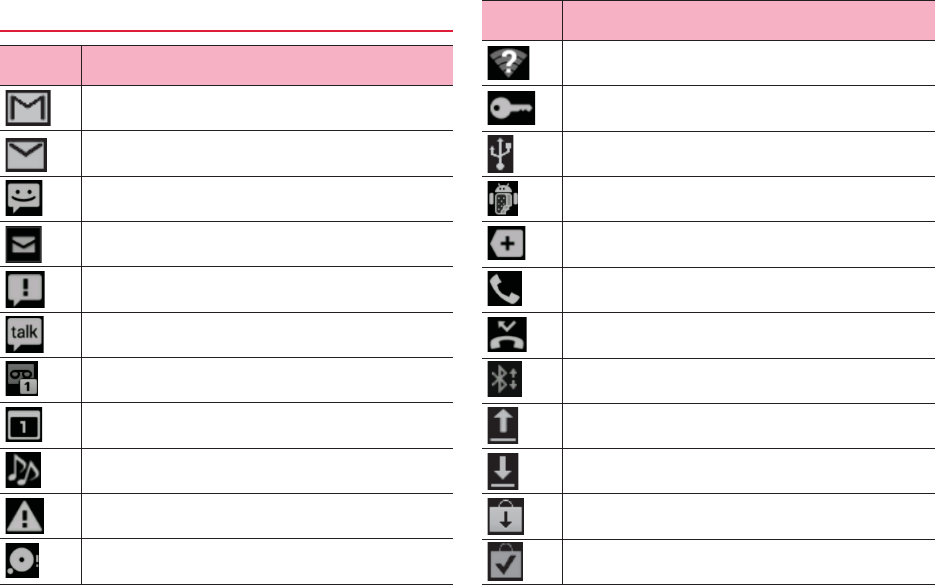
Main notification icons
Icon Status
New Gmail
New Email
New SMS
New sp-mode mail
Sending SMS is failed.
New instant message (Google Talk)
Message in Voice mail service (with number of items)
Notification of event (Calendar)
Playing music with Media Player
Error (synchronizing malfunction etc.)
Available memory space of the terminal is low
Wi-Fi is ON and Wi-Fi open network is available.
Connecting VPN
Connecting USB
Connecting in USB debug (debug mode)
Hidden notifications
Incoming call
Missed call
Receiving data via Bluetooth
Uploading data
Downloading data
Application updates in Google Play
Installing application from Google Play is complete.
Icon Status
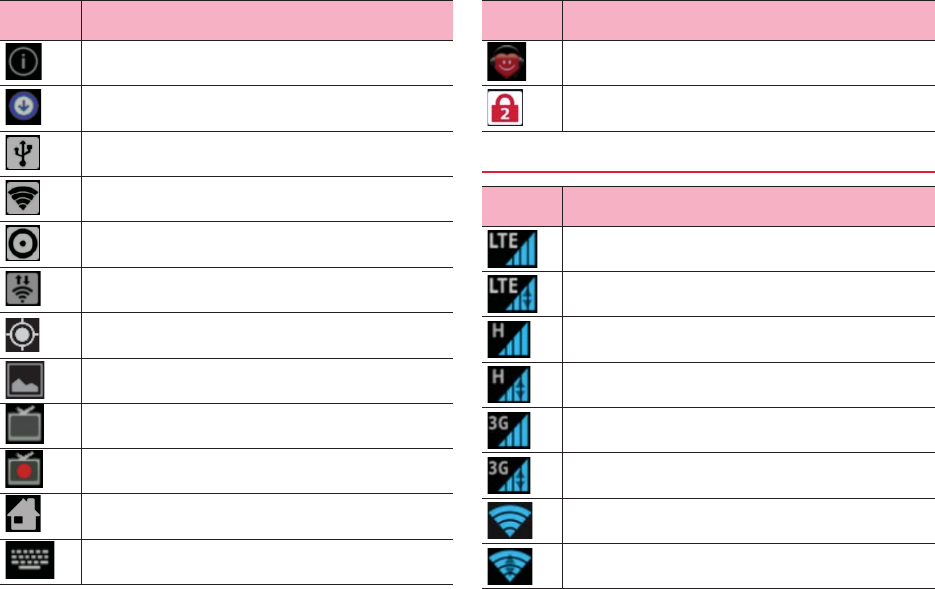
33 Before using the terminal
Application updates in dmarket
Software update available
USB tethering is set.
Wi-Fi tethering is set.
USB tethering and Wi-Fi tethering are set.
Wi-Fi Direct is activated.
GPS positioning
Saving screenshot is complete.
Watching 1Seg in the background
Recording 1Seg
Notification for Pesonal area etc.
Keyboard is displayed.
Icon Status
Anshin Remote Support is running.
Omakase Lock is set.
Main status icons
Icon Status
LTE available
LTE communicating
HSPA available
HSPA communicating
3G data communication available
3G data communicating
Connecting to Wi-Fi network
Data communicating via Wi-Fi network
Icon Status
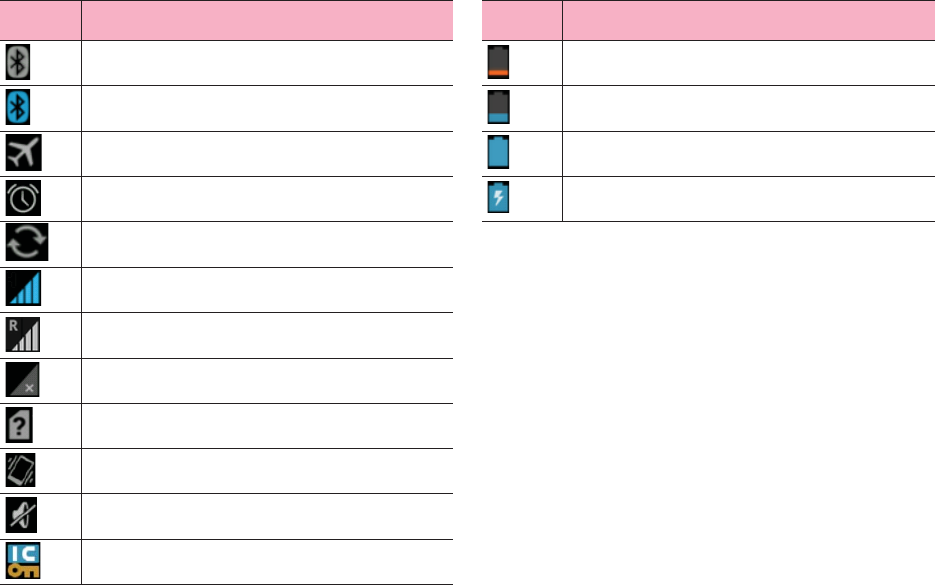
34 Before using the terminal
*: Appears in gray when signal level of packet communication is weak.
Bluetooth is activated.
Connecting to Bluetooth device
Airplane mode is set.
Alarm is set.
Synchronizing data
*Signal level
Roaming
Out of service area
docomo mini UIM card is not inserted.
Silent mode (Vibrate) is set.
Silent mode (Mute) is set.
Osaifu-Keitai lock is set.
Icon Status
Battery is nearly empty.
・Charge the battery.
Battery level is low.
Battery level is enough.
Charging
Icon Status
35 Before using the terminal
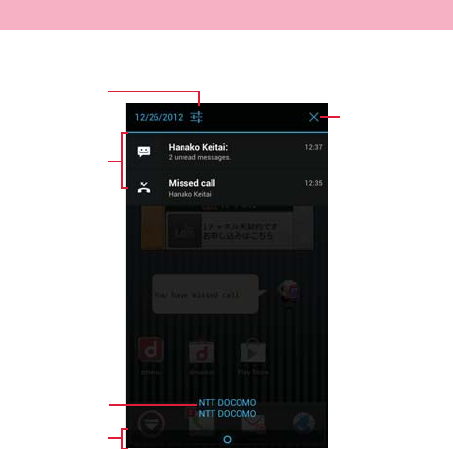
Slide the status bar down to display the notification panel. Check
notification information etc.
aTap to call up the setting menu (P.91).
bNotification information and running information appear. Tap to check
notification information or operate related function. To delete notification
information, swipe left or right.
cAn available network operator name is displayed in top and an network
operator name registered to SIM card is displayed in bottom.
dSlide up to close the notification panel.
eDelete notification information all at once. Some notifications cannot be
deleted depending on the contents.
Notification panel
Notification panel
b
c
e
d
a
36 Before using the terminal
Character entry
To enter characters, use keyboard displayed on the screen.
Input methods (keyboards) are following 6 types.
Information
・Display or operation of each keyboard may vary by usage condition. Or
dedicated keyboard may be displayed depending on application or function
you use.
1From the Home screen, M → "Settings"
2"Language & input" → "Default"
3Tap an input method you want to use
・"Google voice typing" cannot be selected. To use "Google voice
typing", each time you enter characters, select it in the way of the
following information.
Information
・Alternatively, open the notification panel while the keyboard is displayed, and
then tap "Select input method".
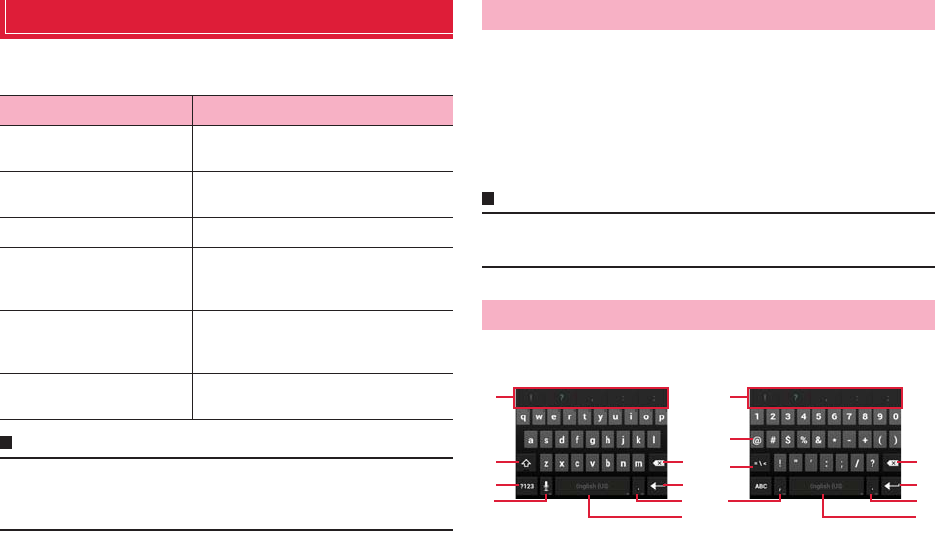
It is a QWERTY keyboard whose key arrangement is the same as a PC.
One-byte alphabets, one-byte numbers/symbols can be entered.
aEntry candidate or auto correct candidate appears. Tap a candidate to enter
characters. Tap a candidate twice to register to the user dictionary of
Android keyboard.
Input method (keyboard) Description
Android keyboard Select for entering only alphanumerics/
symbols. Japanese cannot be input.
FSKAREN Select for entering Japanese. It is default
input method.
Google voice typing Select for entering character by voice.
Huawei Input Method Select for entering Chinese. Pinyin input and
handwriting input on full-screen/half-screen
are available.
Simeji Select for entering Japanese. You can select
from various input methods or link with
mushroom application etc.
Shabette-Key-Nyuryoku Select for entering character by voice. After
entry, you can edit text.
Changing keyboard
Entering with Android keyboard
Enter one-byte alphabets Enter one-byte numbers/symbols
be
c
d
f
g
i
e
c
d
f
g
h h
a a
37 Before using the terminal
bSwitch upper case/lower case. Double-tap to switch to capitals lock.
cSwitch input mode to one-byte alphabet input mode or one-byte number/
symbol input mode. Touch and hold to display Android keyboard setting
screen.
dUse voice input or enter a comma.
・When appears, voice input is available by tapping.
・When "," appears, entering commas is available by tapping.
eDelete a character on the left of the cursor. Touch and hold to delete
characters continuously.
fFix entry or move the cursor.
・When "Next" appears, move the cursor to the next entry field.
・When "Done" appears, fix the entry.
・When appears, enter a linefeed.
・When appears, enter a smiley.
gEnter a period. Touch and hold to enter a symbol.
hEnter a space.
・Touch and hold to change the keyboard (P.36).
iSwitch types of symbols etc.
Information
・For some keys, touch and hold to display another character to enter.
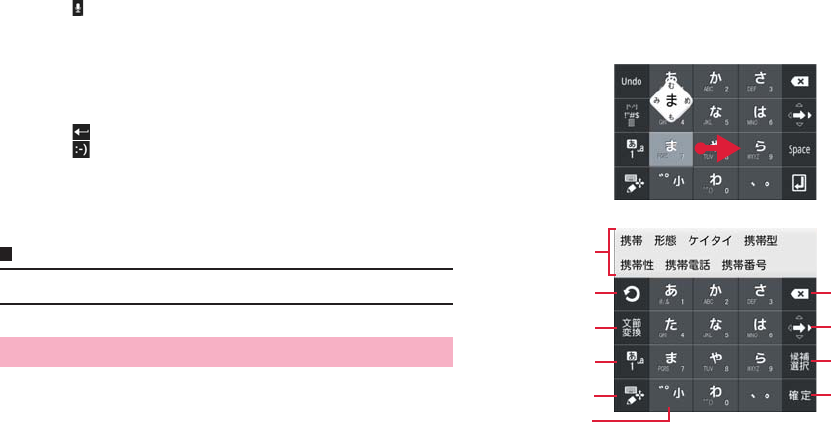
With FSKAREN, the following 3 types of keyboards are available.
■10 key input
Multiple characters are assigned to each key. Select from 3 types of input
methods : Flick input for entering a character by swipe, toggle input for
entering a character by tapping repeatedly until a target character appears,
and 2-touch input.
・Flick input is input method for entering by keeping touching a key assigned
line including character you enter and swiping up/down/left/right to select a
character. When you touch a key, pop-up appears on the key. Swipe in the
direction of character you want to enter. For entering a character in the center
of the pop-up, just tap the key.
(Example) To enter "め"
Keep touching "ま" key and then swipe in the direction where "め"
appears (right).
Entering with FSKAREN
10 key
bg
a
c
f
h
i
d
e j
38 Before using the terminal
aDisplay conversion candidates. Tap a candidate to enter characters.
・To switch conversion candidate display, swipe the conversion candidate
field left/right.
bFor toggle input display characters assigned in the 10 key input in the
reverse order.
・When "Undo"appears, return fixed characters to the characters before
conversion.
cConvert characters.
・When appears, use symbol/pictogram/smiley/phrase list (P.40).
・When "文節縮小 (Narrow paragraph)" appears, narrow down the
conversion range by a character.
dChange character input mode.
・Touch and hold to change personal mode (P.41).
eChange the keyboard type (P.39).
・Swipe right to display the cursor screen; move the cursor or select text to
copy/cut/paste/delete.
・Touch and hold it when there is not any unfixed character, "音声入力
(Voice input)" or "区点入力 (Code input)" is available.
fSwitch upper case/lower case of entering character or add voiced sound
mark/semi-voiced sound mark.
gDelete a character on the left of the cursor. Touch and hold to delete
characters continuously.
hSwipe up/down/left/right to move the cursor. Swipe to switch the direction of
the arrow. Just tap to move the cursor toward he direction of the arrow.
・When "文節拡大 (Widen paragraph)" appears, widen the conversion
range by a character.
iMove the cursor on a conversion candidate in the order.
・When "Space" appears, enter a space.
jFix entering characters.
・When appears, add a linefeed or execute.
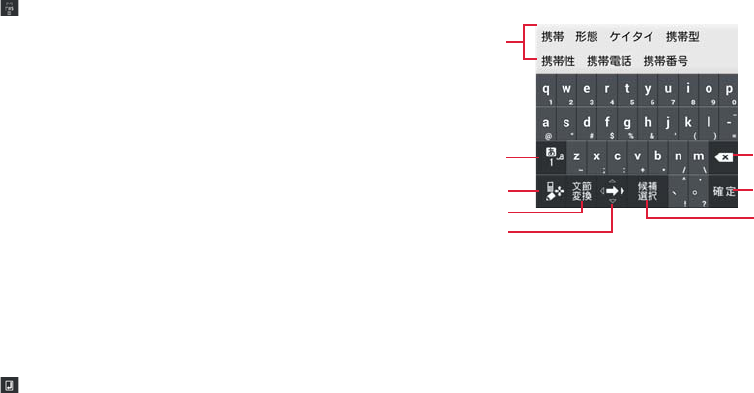
■QWERTY
Key arrangement is the same as the keyboard of a PC. To enter Japanese,
input by Roman letter.
・Swipe an alphabet key up to enter in upper case. And swipe a key down to
enter number or symbol assigned to the key.
・Tap "Shift" shown when entering one-byte alphanumeric/two-byte
alphanumeric characters to switch upper case/lower case letter.
・Tap "Alt" shown when entering numbers to display other symbols.
aDisplay conversion candidates. Tap a candidate to enter characters.
・To switch conversion candidate display, swipe the conversion candidate
field left/right.
bChange character input mode (P.40).
・Touch and hold to change personal mode (P.41).
cChange the keyboard type.
・Swipe right to display the cursor screen; move the cursor or select text to
copy/cut/paste/delete.
・Touch and hold it when there is not any unfixed character, "音声入力
(Voice input)" or "区点入力 (Code input)" is available.
dConvert characters.
QWERTY
f
g
h
a
d
b
c
e
39 Before using the terminal
・When appears, use symbol/pictogram/smiley/phrase list (P.40).
・When "文節縮小 (Narrow paragraph)" appears, narrow down the
conversion range by a character.
eSwipe up/down/left/right to move the cursor. Swipe to switch the direction of
the arrow. Just tap to move the cursor toward he direction of the arrow.
・When "文節拡大 (Widen paragraph)" appears, widen the conversion
range by a character.
fDelete a character on the left of the cursor. Touch and hold to delete
characters continuously.
gFix entering characters.
・When appears, add a linefeed or execute.
hMove the cursor on a conversion candidate in the order.
・When "Space" appears, enter a space.
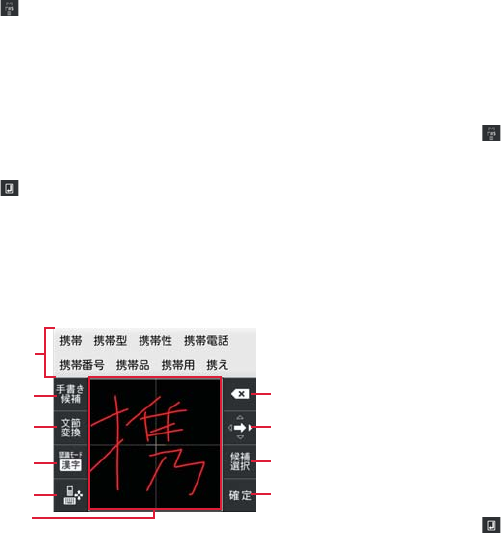
■Handwriting
Enter characters by handwriting input.
・Depending on touch panel recognition condition or character shape,
recognition may not be accurate.
aDisplay conversion candidates. Tap a candidate to enter characters.
・To switch conversion candidate display, swipe the conversion candidate
field left/right.
bDisplay candidates of handwriting character.
・When "Undo"appears, return fixed characters to the characters before
conversion.
cConvert characters.
・When appears, use symbol/pictogram/smiley/phrase list (P.40).
・When "文節縮小 (Narrow paragraph)" appears, narrow down the
conversion range by a character.
dChange character recognition mode (P.40).
・Touch and hold to change personal mode (P.41).
eChange the keyboard type (P.39).
・Swipe right to display the cursor screen; move the cursor or select text to
copy/cut/paste/delete.
・Touch and hold it when there is not any unfixed character, "音声入力
(Voice input)" or "区点入力 (Code input)" is available.
fEnter characters by handwriting input.
・In landscape view, even if you set the screen type is set to "Single screen"
(P.47), 2 areas appear.
gDelete a character on the left of the cursor. Touch and hold to delete
characters continuously.
hSwipe up/down/left/right to move the cursor. Swipe to switch the direction of
the arrow. Just tap to move the cursor toward he direction of the arrow.
・When "文節拡大 (Widen paragraph)" appears, widen the conversion
range by a character.
iMove the cursor on a conversion candidate in the order.
・When "Space" appears, enter a space.
jFix entering characters.
・When appears, add a linefeed or execute.
Handwriting
a
f
i
d
ej
b
c
g
h
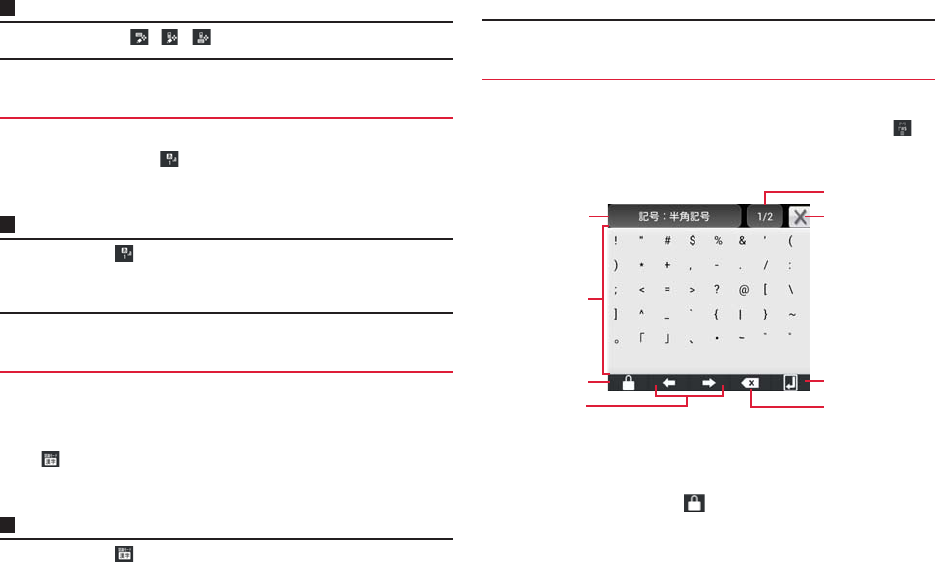
40 Before using the terminal
Information
・Alternatively, swipe / / up/down to change keyboard type.
1When 10キー (10 key)/QWERTY keyboard is displayed,
touch and hold
2Tap a character type
Information
・Alternatively, tap , or swipe up/right/down to switch the character input
mode to Kana/one-byte alphanumeric/number.
・Set character input mode can be checked on the status bar.
When using handwritten input, set a character recognition mode suitable
for handwritten character.
1When handwriting input is displayed, touch and hold
2Tap a character type
Information
・Alternatively, tap to switch the recognition mode to Japanese/one-byte
alphanumeric/symbol.
・Set character recognition mode can be checked on the status bar.
・Use when there is not any unfixed character.
1When the keyboard is displayed, touch and hold
2Tap a category
aA category in use appears. Tap to display a category list.
bTap to enter.
・For one-byte symbol/two-byte symbol, used history appears at the top.
cSwitch continuous entry. When appears, a list is closed even if you
enter.
dMove the cursor left/right.
eDisplay a page. Tap to switch to the next page.
fClose a symbol/smiley/phrase list.
gEnter a linefeed or execute.
Changing character input mode
Changing character recognition mode
Using symbol/pictogram/smiley/phrase
Example: One-byte symbol list
a
d
g
h
b
c
e
f
41 Before using the terminal
hDelete a character on the left of the cursor. Touch and hold to delete
characters continuously.
Information
・Alternatively, tap to display a symbol list. Swipe up/down to display
a smiley/phrase list.
・Pictogram category appears only on the screen that entry is available.
By changing personal mode, conversion candidates displayed when
entering characters can be changed.
1When the keyboard is displayed, touch and hold
・When handwriting input is displayed, touch and hold .
2Tap a personal mode
Use code input (4-digit number) to enter a kanji or symbol that cannot be
converted by kana-kanji conversion.
・Use when entering characters.
1When the keyboard is displayed, touch and hold /
/
2"区点入力 (Code input)" → Enter code input
・You can slide "キーボード (Keyboard)" left/right.
In Huawei Input Method, English input, 全屏手写 (handwriting in full screen)
input, 半屏手写 (handwriting in half screen) input and (Pinyin) input
can be used.
・Operations in English (English input) are explained here as example.
1While keyboard is displayed, touch and hold /
/ /
2"English"/"全屏手写 (handwriting in full screen)"/"半屏
手写 (handwriting in half-screen)"/" (Pinyin)"
Changing personal mode
Item Description
ノーマル (Normal) Display general conversion candidates
男性 (Male) Display conversion candidates for men
女性 (Female) Display conversion candidates for women
ビジネス
(Business)
Display conversion candidates for business
Entering by code input
Entering by Huawei Input Method
Changing input method
拼
音
拼音
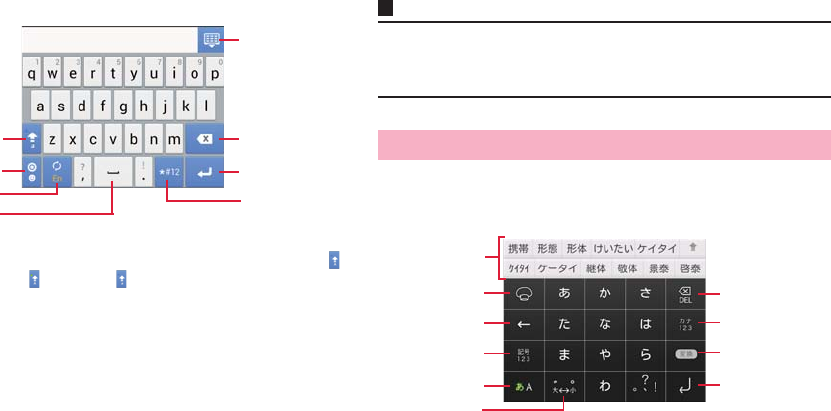
42 Before using the terminal
■Entering in English
aSwitch upper case/lower case. Each tapping switches to capitalization ,
fixed capitalization , lower case .
bShow smiley list. Touch and hold to display setting screen of Huawei Input
Method or keyboard changing screen.
・Display in smiley list differs from the actual smiley to be entered. Tap
"ABC" to return to the previous display.
cTouch and hold to show input setting screen.
dEnter spaces.
eHide the keyboard.
fDelete a character on the left of the cursor. Touch and hold to delete
characters continuously.
gEnter a linefeed.
・When "Next" appears, move the cursor to the next entry field.
hSwitch one-byte number/one-byte symbol.
・Tap "ALT" to return to one-byte alphabet input screen.
・Tap "ABC" to return to one-byte alphabet input screen.
Information
・After switching to "全屏手写 (handwriting in full screen)"/"半屏手写
(handwriting in half screen)"/" (Pinyin)", some keys and the operations
change.
With Simeji, you can select a input method from a lot of options. Default
setting (Japanese: Flick, English: Full keyboard) is explained here.
・For Flick input, see P.37.
English input
a
d
f
b
c
g
h
e
Entering by Simeji
拼音
a
f
bg
c
d
e
h
i
j
Japanese entry
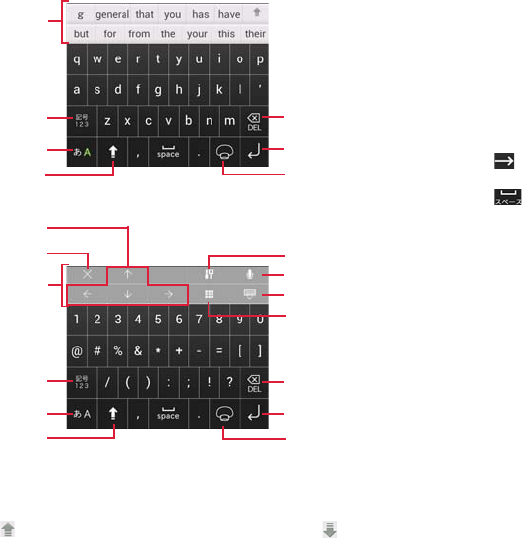
43 Before using the terminal
aDisplay conversion candidates. Tap a candidate to enter characters.
・When conversion candidate is not displayed, a control panel appears.
・Tap to display conversion candidates in full-screen. Tap to return
to the original display.
bTouch and hold to display a mushroom application list. Select it to activate.
cMove the cursor left.
dSwitch input mode to Number/Symbol.
・For entering numbers/symbols, when there is not any unfixed character,
each time you tap, contents in conversion candidate field change.
eSwitch input mode to English/Japanese.
fSwitch upper case/lower case of entering character or add voiced sound
mark/semi-voiced sound mark.
gDelete a character on the left of the cursor. Touch and hold to delete
characters continuously.
hDisplay conversion candidate of Kana/Number.
・When is displayed, move the cursor right.
iSwitch prediction conversion to normal conversion.
・When is displayed, enter a space.
jEnter a linefeed or execute.
・While entering characters, fix the characters.
kFor entering English, Switch upper case/lower case. Touch and hold to set
Caps Lock. Tap it again to return to the previous state. For entering number/
symbol, switch symbol types.
lMove the cursor up/down/left/right.
mClose the control panel.
nDisplay the setting menu.
oInput character by voice.
pHide the keyboard.
qSelect skin.
English entry
Number/symbol entry
a
k
d
e
g
j
b
m
l
o
p
q
n
a
k
d
e
g
j
b
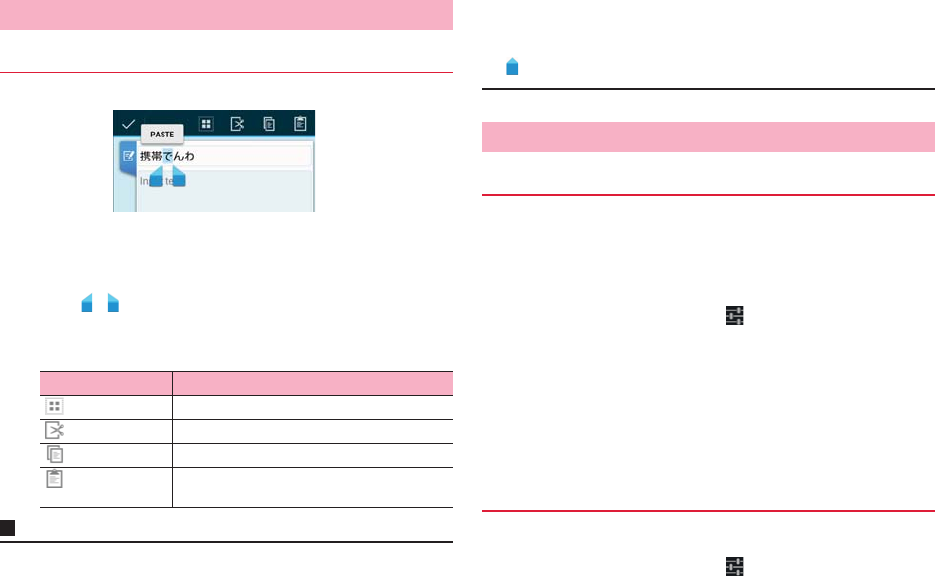
44 Before using the terminal
Entered text can be selected/copied/cut/pasted to use.
1Touch and hold an entered text
2Drag / to select a text
3Tap an icon
・Displayed icon varies by application.
Information
・To paste cut/copied text, operate as follows.
- When no character is entered: Touch and hold a character entry field
→ "Paste"
- When characters are enteried: Tap on a position you want to insert →
→ "Paste"
It is convenient to register kanji with specific reading, frequently-used
abbreviation, etc. To call out a registered word in the user dictionary, enter
a direction word in the character entry field to convert.
1From the Home screen, M → "Settings"
2"Language & input" → Tap displayed on the right of
"FSKAREN"
3"Dictionary Settings" → "User Dictionary"
4"Add" → Enter a word/ direction word and select a
word class → "Register"
5"OK" → "Close"
1From the Home screen, M → "Settings"
2"Language & input" → Tap displayed on the right of
"FSKAREN"
Editing character
Selecting/cutting/copying/pasting text
Icon Description
(All selected) Select all entered text.
(Cut) Cut selected text.
(Copy) Copy a selected text.
(Paste) Paste cut/copied text to selected text to
overwrite.
Text selection screen
Using user dictionary (FSKAREN)
Registering a word to the user dictionary
Editing user dictionary
45 Before using the terminal
3"Dictionary Settings" → "User Dictionary"
4Perform editing
■Editing registered content
aTap an item to edit → "Edit"
bChange the content → "OK" → "OK"
■Deleting registered content
aMark an item to be deleted
b"Delete" → "OK" → "OK"
■Registering the content as user conversion dictionary
a"Convert" → "OK"
・Collect words registered to the user dictionary to register as a
dictionary (user conversion dictionary). By registering, you
can use selectively by dictionary (P.45).
■Saving registered content
a"Backup" → "OK"
■Restoring saved content
a"Restore" → Tap an item to restore
b"Restore" → "OK" → "Close"
■Deleting saved content
a"Restore" → Tap an item to delete
b"Delete" → "OK" → "OK" → "Close"
Information
・When user dictionary (extension: suj) is saved, the content can be saved to
"FSKaren_UserDic" in the internal storage.
Set whether to use user conversion dictionary registered from user
dictionary when entering characters.
1From the Home screen, M → "Settings"
2"Language & input" → Tap displayed on the right of
"FSKAREN"
3"Dictionary Settings" → "User Conversion Dictionary"
4Mark a dictionary to use
1From the Home screen, M → "Settings"
2"Language & input" → Tap displayed on the right of
"FSKAREN"
3"Dictionary Settings" → "User Conversion Dictionary"
4Perform confirming/editing
■Confirming dictionary
aTap a dictionary to confirm → "Display" → "Close"
■Renaming dictionary
aTap a dictionary to edit → "Rename"
bRename a dictionary → "OK" → "OK"
■Deleting a dictionary
aTap a dictionary to delete → "Delete" → "OK" → "OK"
Add/edit phrase or smiley. You can reset to the default.
・Use in FSKAREN.
1From the Home screen, M → "Settings"
Using user conversion dictionary
Confirming/editing user conversion dictionary
Adding/editing/resetting phrase/smiley
46 Before using the terminal
2"Language & input" → Tap displayed on the right of
"FSKAREN"
3"Dictionary Settings" → "Common Phrases"
4Perform adding/editing
■Adding
aSelect a category → "Add"
bEnter a character → "OK" → "OK"
■Changing
aSelect a category → Tap an item to change → "Edit"
bChange content → "OK" → "OK"
■Deleting
aSelect a category → Tap an item to delete → "Delete"
■Moving
aSelect a category → Tap an item to move → "↑"/"↓"
■Resetting phrase/smiley to the default state.
a"Reset" → "OK" → "OK"
1From the Home screen, M → "Settings"
2"Language & input" → Tap on the right of"Android
keyboard"/"FSKAREN"/"Google voice typing"/
"Huawei Input Method"/"Simeji"/"Shabette-Key-
Nyuryoku"
3Set each item
■Android keyboard
Changing settings of keyboard
Item Description
Input languages Select language to enter.
Auto-capitalization Set whether to capitalize the first letter of
a sentence when entering English.
Vibrate on key press Set whether to vibrate when a key is
tapped.
Sound on keypress Set whether to emit operation sound
when a key is tapped.
Popup on keypress Set whether to display pop-up when a
key is tapped.
Show settings key Set whether to display the setting key.
Voice input key Set a keyboard position for voice input
key.
Auto correction Set whether to indicate a predictive
candidate in bold letter and auto-correct
by space or punctuation key.
Show correction
suggestions
Set whether to display entry candidate
when entering characters.
Item Description
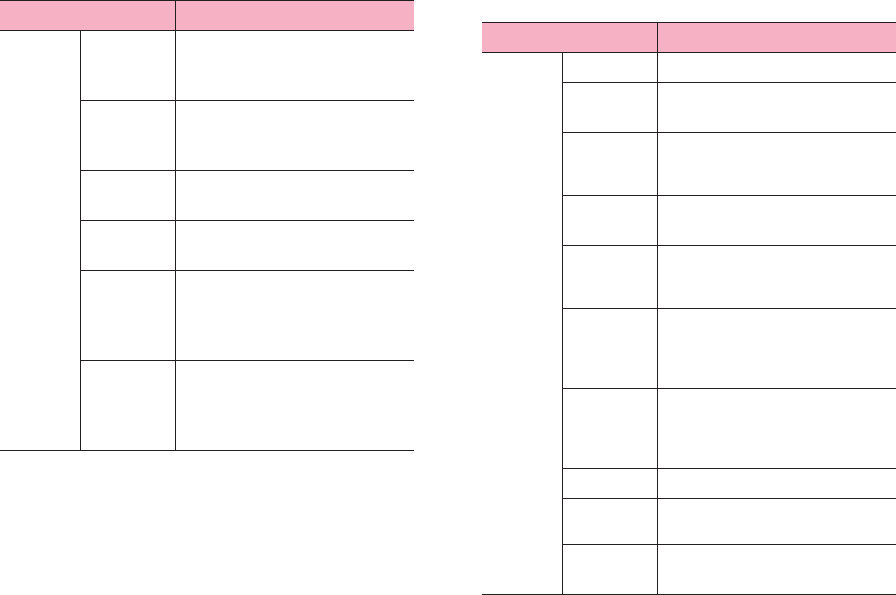
47 Before using the terminal
■FSKAREN
Advanced
settings
Key popup
dismiss
delay
Set a time for displaying pop-up when a
key is tapped.
Suggest
Contact
names
Set whether to use contact name as an
entry candidate or a correction
candidate.
Bigram
suggestions
Set whether to predict entry candidates
from the last word.
Enable
recorrections
Set whether to display entry candidate
based on usage frequency.
Keypress
vibration
duration
settings
Set vibration length for when a key is
tapped.
Keypress
sound
volume
settings
Set volume of operation sound for when
a key is tapped.
Item Description
Item Description
Keyboard
Settings
Theme Set a keyboard design.
Keyboard
type
Set a keyboard type for vertical screen.
Linage of
Candidates
Set number of lines for displaying
conversion candidates in vertical
screen.
Keyboard
type
Set a keyboard type for horizontal
screen.
10 key input
type
Set input method for 10 key input from
"Flick input"/"Toggle input"/"2-touch
input".
Flick input
Settings
Set whether to enable toggle input while
input method by swiping finger (flick
input) is set in 10 key input or set
sensitivity of flick input.
Toggle Input
Settings
Set whether to move the cursor
automatically after a character is
entered or set time for moving the cursor
in Toggle input.
Screen type Set a screen type for handwriting input.
Auto Select Set whether to fix automatically in
handwriting input.
Auto Select
Time
Set a time for auto-fix in handwriting
input.
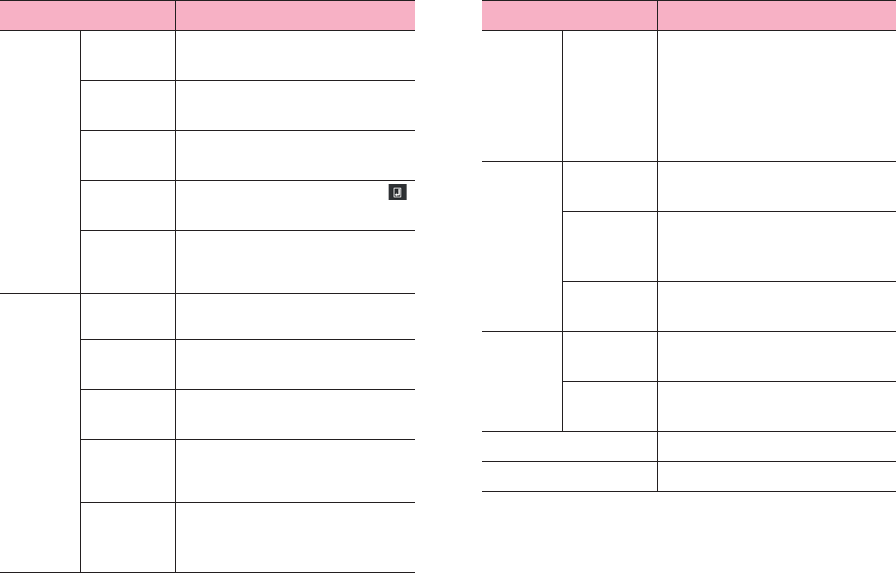
48 Before using the terminal
Key
Operation
Settings
Vibrate on
Key Press
Set whether to vibrate when a key is
tapped.
Sound on
Key Press
Set whether to emit effect sound when a
key is tapped.
Preview on
Key Press
Set whether to display pop-up for key
operation.
On Enter Key
Press
Set whether to add a linefeed when
is tapped.
On Space
Key Press
Set whether to select a conversion
candidate by Space key when linking
prediction candidates are displayed.
Conversion
Settings
Predictive Set preferred candidates for displaying
as prediction conversion candidates.
English
Predictive
Set whether to display English
prediction conversion candidates.
Previous
Usage
Set whether to display entry candidates
by predicting from fixed characters.
Emoticon
WordLink
Set whether to display entry candidates
of smiley by predicting from fixed
characters.
English
Previous
Usage
Set whether to display English entry
candidates by predicting from fixed
characters.
Item Description
Conversion
Settings
1 Character
Learning
Set whether to display candidates
memorized in 1 Character Learning for
segment conversion by entering a
character.
・1 Character Learning is memorizing
entered text in the past as a character.
Learning is automatically performed.
Dictionary
Settings
User
Dictionary
Use user dictionary (FSKAREN)(P.44).
User
Conversion
Dictionary
Use user dictionary(P.45).
Common
Phrase
Add/edit/reset phrase/smiley(P.45).
Reset Clear
Learning
Delete learning contents memorized by
FSKAREN.
Reset
Settings
Reset setting items of FSKAREN.
FSKAREN Community Access to FSKAREN community site.
FSKAREN Displays FSKAREN version etc.
Item Description
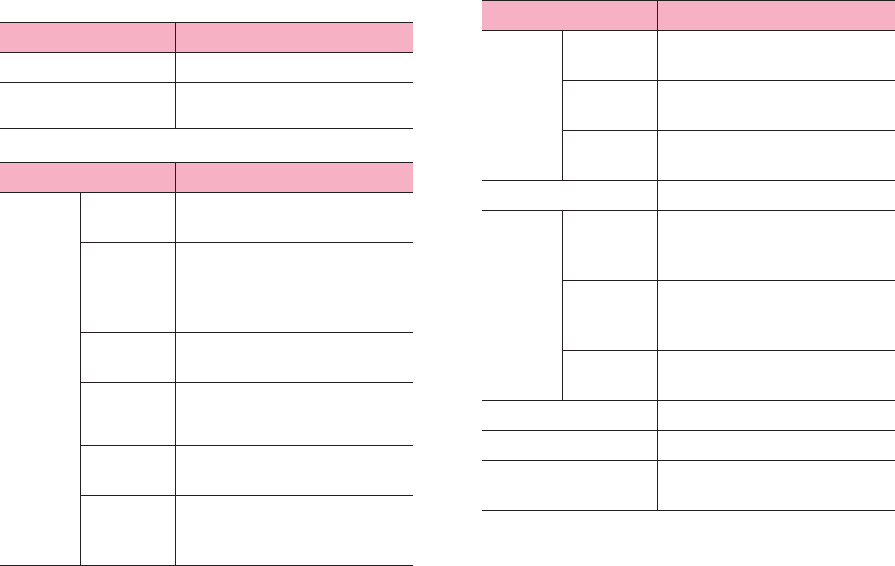
49 Before using the terminal
■Google voice typing
■Huawei Input Method
Item Description
Select input languages Select language to enter.
Block offensive words Set whether to display incorrect result of
voice recognition.
Item Description
Input
settings
Predict next
word
Set whether to display entry candidates
by predicting from fixed characters.
Mixed
Chinese/
English
input
Set whether to combine entries of
Chinese and English.
Fuzzy pinyin
settings
Set obscure entry in pinyin.
Auto
correction
Set whether to display correction
conversion candidates for incorrect
entry.
Word
prediction
Set whether to display English
prediction conversion candidates.
Auto match
for symbol
pairs
Set whether to enter paired symbol such
as brackets automatically.
Keyboard
settings
Sound on
keypress
Set whether to emit effect sound when a
key is tapped.
Vibrate on
keypress
Set whether to vibrate when a key is
tapped.
Keyboard
height
Adjust height of key.
Handwriting settings Set waiting time, style, color, width.
Dictionary
Management
Update
system
dictionary
Download dictionary update data via
Internet.
Update
popular
words
Download the latest frequent-used
words via Internet.
Contacts
dictionary
Import Chinese names from the
phonebook.
Theme change Set a keyboard design.
Input Langs Set an input method.
About Huawei Input
Method
Display information about Huawei.
Item Description
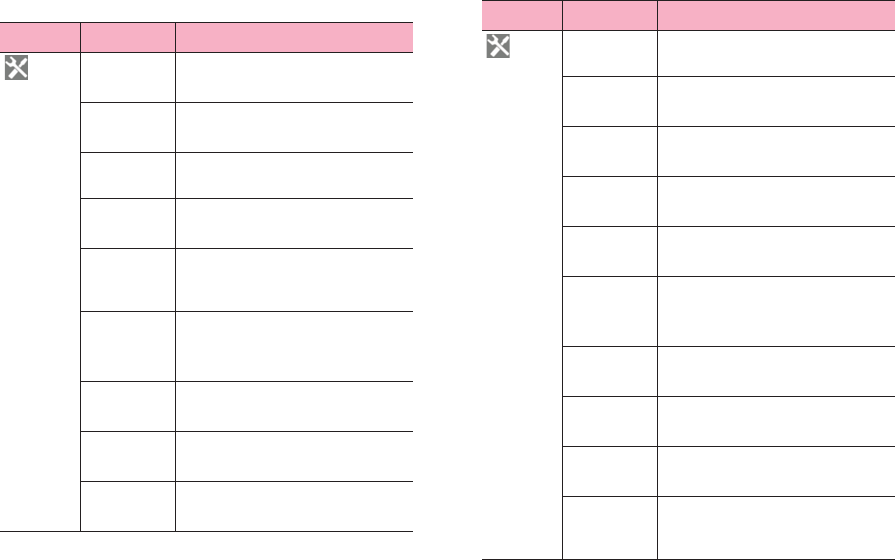
50 Before using the terminal
■Simeji
Icon Item Description
Sound on
Key Press
Set whether to emit sound when a key is
tapped.
Vibrate on
Key Press
Set whether to vibrate when a key is
tapped.
Key Preview Set whether to display pop-up for key
operation.
Auto
Capitalization
Set whether to capitalize the first letter of
a sentence when entering English.
Auto Space
Insert
Set whether to enter a space
automatically when selecting a
candidate in English input mode.
Auto
Katakana
Key
Set whether to display katakana key
automatically.
Control
Panel
Set whether to display a control panel.
Key Mode
(Japanese)*
Set a mode for displayed keyboard.
Candidate
font size
Set font size of conversion candidates.
Half space Set whether to use one-byte spaces for
kana input.
Japanese
(Flick)*
Set an input method for Japanese
keyboard.
Detail
Settings
Make advanced settings for selected
Japanese keyboard.
English
(Qwerty)*
Set an input method for English
keyboard.
Detail
Settings
Make advanced settings for selected
English keyboard.
English
Word
Prediction
Set whether to display English
conversion candidates.
Auto
Delimiter
Set whether to fix conversion by
termination character such as comma.
Input Word
Learning
Set whether to learn fixed word in
conversion.
Word
Prediction
Set whether to display prediction
conversion candidates.
Typing Error
Correction
Set whether to display correction
conversion candidates for incorrect
entry.
Icon Item Description
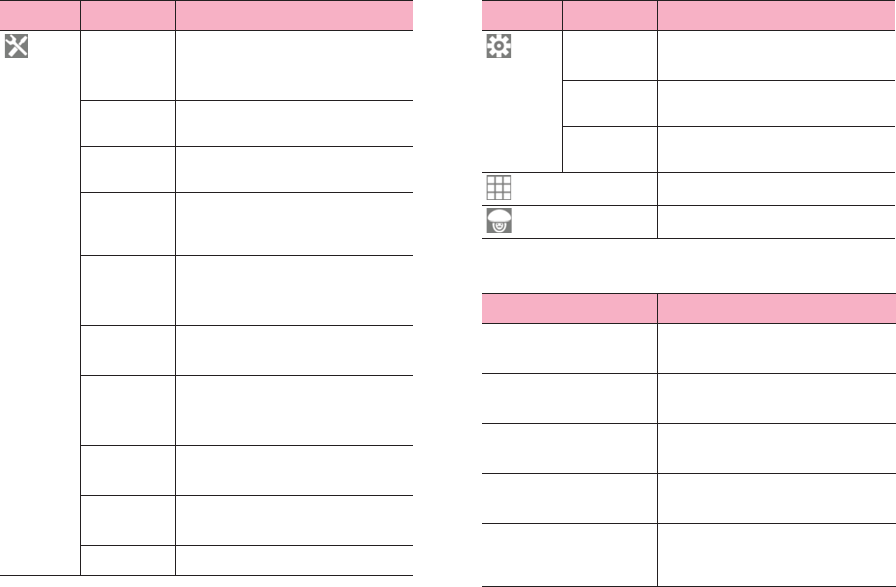
51 Before using the terminal
*: ( ) indicates setting value.
■Shabette-Key-Nyuryoku
Single
Candidates
Line
Set whether to make the display area of
conversion candidates in single stage.
Fullscreen Set whether to display an entry area in
full-screen for horizontal screen.
Cloud IME Set whether to use cloud conversion
engine.
Auto
Dictionary
Set whether to register results of cloud
conversion to user dictionary
automatically.
Japanese
User
Dictionary
Edit words in Japanese user dictionary.
English User
Dictionary
Edit words in English user dictionary.
Clear
Learning
Dictionary
Delete all contents of learning
dictionary.
Import
Dictionary
Load external dictionary files.
Export
Dictionary
Write out to an external dictionary file.
Settings I/O Load/save option settings.
Icon Item Description
Share your
skin
Tweet when the skin is changed in
Twitter etc.
Local Skin Select a skin stored in "skins" folder in
"Simeji" folder of the internal storage.
Mushroom Set whether to use installed Mushroom
application.
Select a skin.
Display information about Simeji.
Item Description
キー操作音 (Sound on
keypress)
Set whether to emit effect sound when a
key is tapped.
キー操作バイブ (Vibrate
on keypress)
Set whether to vibrate when a key is
tapped.
キーポップアップ (Key
preview)
Set whether to display pop-up for key
operation.
自動大文字変換 (Auto
capitalization)
Set whether to capitalize the first letter of
a sentence when entering English.
英字自動スペース入力
(Auto space insert)
Set whether to enter a space
automatically when selecting a
candidate in English input mode.
Icon Item Description
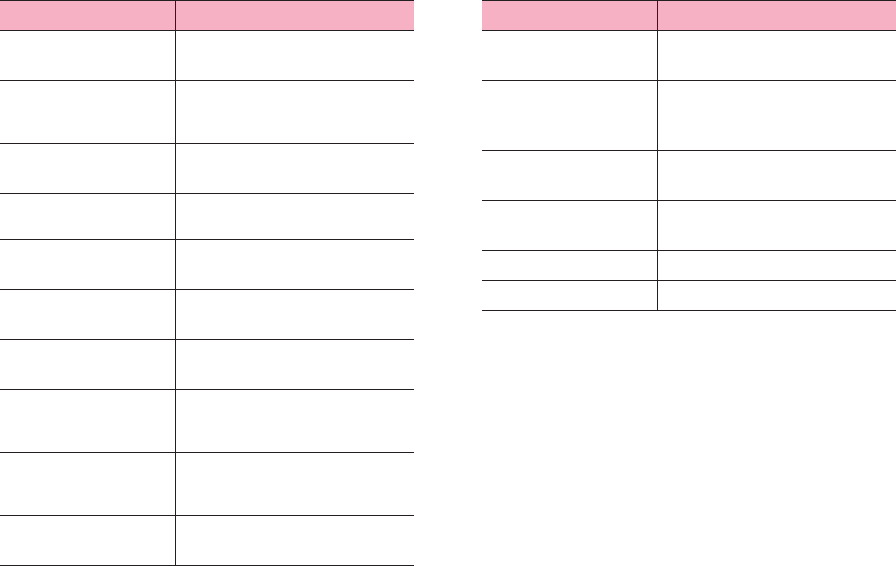
52 Before using the terminal
キーボードタイプ
(Keyboard type)
Set a keyboard type by screen
orientation or input mode.
フリック入力 (Flick input) Set whether to set to input method by
swiping finger (flick input) in 10 key
input.
フリック感度 (Flick
sensitivity)
Set sensitivity for flick input.
トグル入力 (Toggle input) Set whether to enable toggle input when
flick input is set in 10 key input.
自動カーソル移動
(Software trackball)
Set a moving speed of auto-cursor.
候補学習 (Candidate
learning)
Set whether to save fixed word in
conversion to learning dictionary.
予測変換 (Predictive
conversion)
Set whether to perform predictive
conversion.
入力ミス補正 (Typing
error correction)
Set whether to display correction
candidates for conversion candidates
for incorrect entry.
ワイルドカード予測
(Wildcard prediction)
Set whether to use wild-card prediction
which predicts conversion candidates
from number of characters of reading.
候補表示行数 (Single
candidates line)
Set number of lines for displaying
candidates.
Item Description
外部アプリ連携 (Linking
external app)
Set whether to use installed Mushroom
application.
日本語ユーザー辞書
(Japanese user
dictionary)
Edit Japanese user dictionary.
英語ユーザー辞書
(English user dictionary)
Edit English user dictionary.
学習辞書リセット (Clear
learning dictionary)
Reset learning dictionary.
使いかた (How to use) Check using.
アプリ情報 (About) Display application information.
Item Description
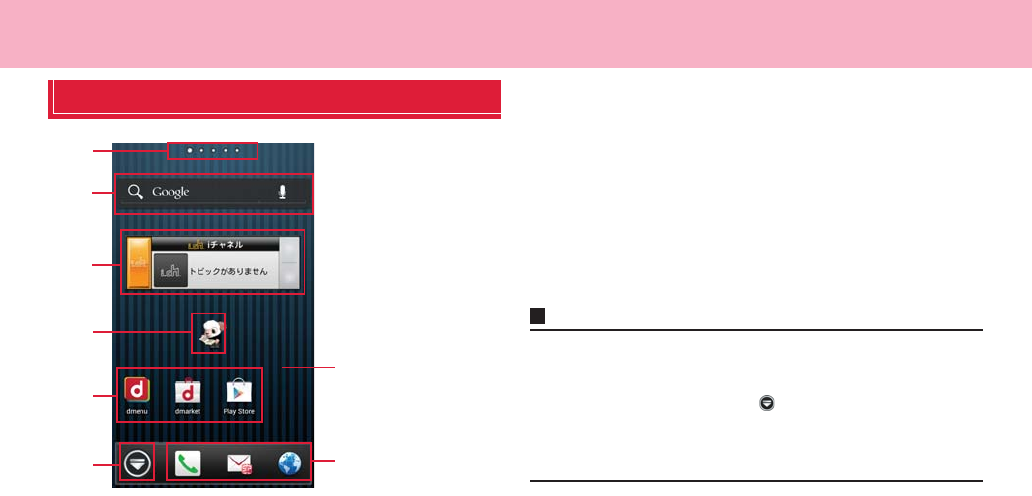
53 docomo Palette UI
docomo Palette UI
Home screen
aHome screen position
Indicate current current position of home screens. Switch swiping left or
right.
bWidget: Search
Activate or operate widget (search).
cWidget: i-channel
Activate or operate widget (i-channel).
dWidget: Machi-chara
Notify you of information such as mail reception or incoming call.
eShortcut (application)
Activate application or function.
fApplication button
Tap to display an application screen. (P.58)
gWallpaper
hDock
Always displayed even when the Home screen is switched. Allocate
shortcuts, folders, groups.
Information
・The home application can be switched to "docomo Palette UI" or "Launcher"
for the terminal.
By default, "docomo Palette UI" is set as home application. To switch home
applications, from the Home screen, → Tap "Home Switcher".
・When the home application is switched, widgets, shortcuts of applications,
etc. on the screen may not be properly displayed depending on the Home
screen layout.
Home screen
a
f
d
e
b
c
h
g
"ひつじのしつじくん®
(Butler Sheep)"
© NTT DOCOMO
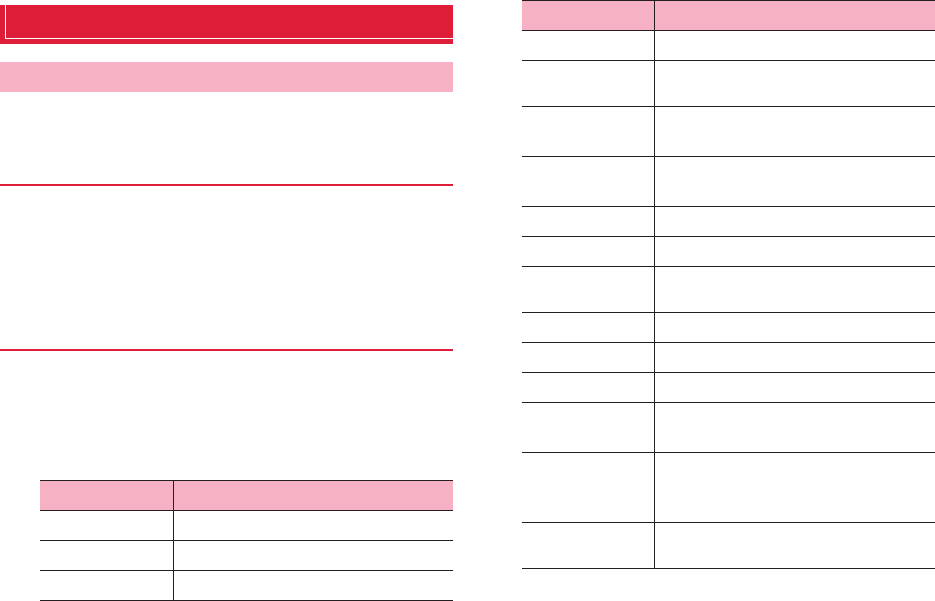
54 docomo Palette UI
Managing the Home screen
Add shortcuts, widgets, folders, application groups, etc. to the Home
screen.
1From the Home screen, touch and hold the wallpaper
area without shortcuts, widgets, etc.
2"Shortcut" → Tap an item you want to add to the Home
screen
1From the Home screen, touch and hold the wallpaper
area without shortcuts, widgets, etc.
2"Widget" → Tap an item you want to add to the Home
screen
Items to add to the Home screen
Adding shortcuts
Adding widgets
Widget Description
Analog clock Display analog clock
Bookmarks Display bookmarks in Browser
Bookmarks Display bookmarks in Google Chrome
Calendar Display calendar
Contents Headline Display the latest contents such as music,
videos, e-books
docomo location
information
Display docomo location information
application
docomo Wi-Fi
Easy Connection
Display docomo Wi-Fi
Email Display a part of Mail Inbox
Gmail Display Inbox etc. of Gmail
Google Play Music Play music data saved in the internal storage or
microSD card
Google Search Display Quick search
Google+ posts Display posted articles for Google+
Home screen tips Display tips for using the Home screen
IC Tag/Barcode
Reader
Scan IC tag and bar code
iチャネルウィ
ジェット (i-channel
Widget)
Display the latest information of news or
weather in ticker
Machi-chara Display a moving character on the Home
screen widget
Widget Description
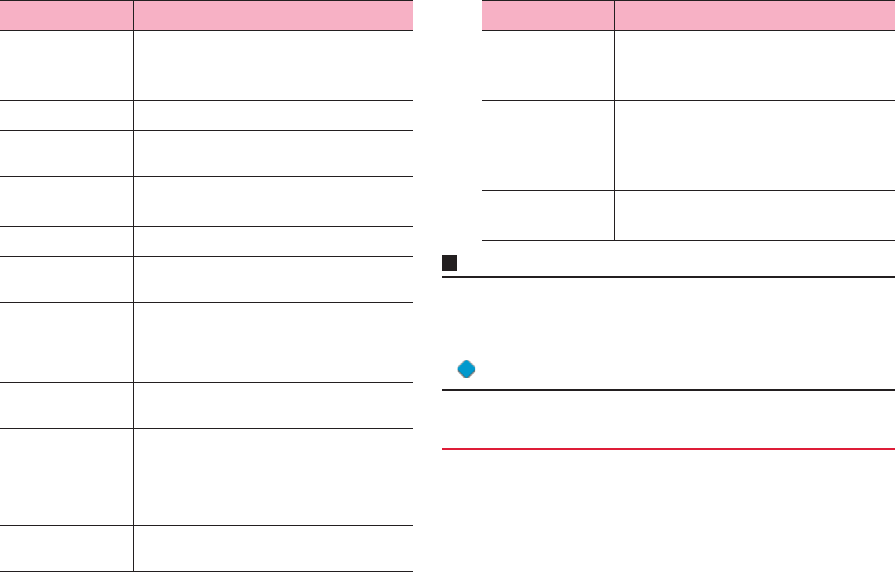
55 docomo Palette UI
Information
・If you install applications containing widgets from Google Play, installed
widgets are also displayed in the widget list.
・Some widgets may change the sizes. To change the size, from the Home
screen, touch and hold a widget you want to change size→"Resize"→Drag
displayed around the widget to change the size→Tap outside of widget.
1From the Home screen, touch and hold the wallpaper
area without shortcuts, widgets, etc.
2"Folder" → Tap a folder you want to add to the Home
screen
NOTTV ウィジェッ
ト (NOTTV
widget)
Display information or news of NOTTV
programs
Personal area Display My profile, My menu, etc.
Phonebook Display contacts from the Phonebook
application provided by DOCOMO
Phonebook Select
members
Display outgoing and incoming history for
registered contacts
Photo Gallery Display still images or videos in the Gallery
Play Store Display recommended applications by Google
Play
Power control Display ON buttons for Wi-Fi function, Bluetooth
function, and GPS function, setting buttons for
Accounts & sync, screen brightness
adjustment
Schedule & Memo Display memos or photo memos in the
Calendar
Traffic Enter a widget name and destination to display
amount of time required from the current
location to destination and widget on the Home
screen. Tap the widget to confirm traffic
situation
YouTube Display frequently played videos,
recommended videos, etc.
Widget Description
スマホなるほどツ
アーズ (Tips of
smartphone)
Learn convenient functions or basic operations
of the terminal
プリインアプリ利
用状況 (Usage of
preinstalled
applications)
Display usage of pre-installed applications
診断ツール
(Diagnosis tool)
Display diagnosis tool
Adding folders
Widget Description
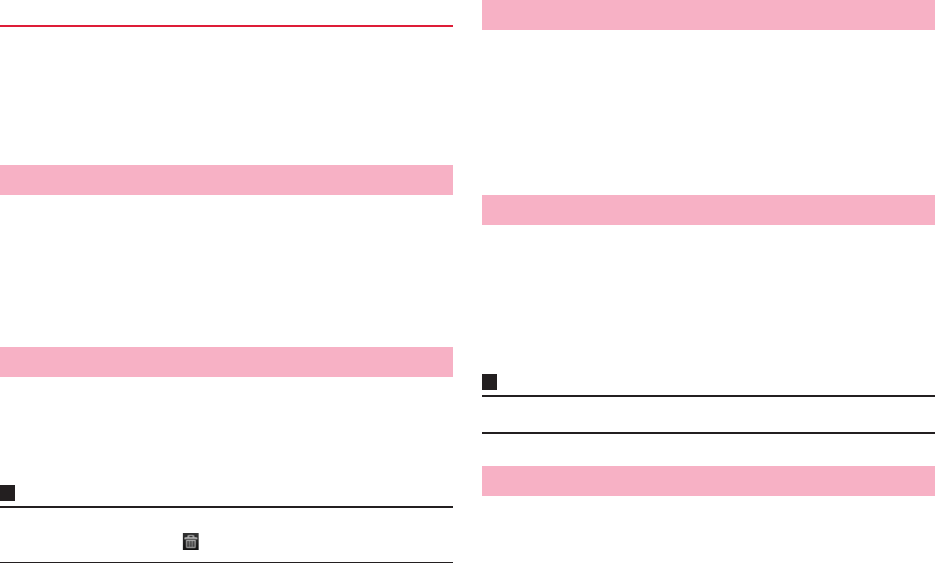
56 docomo Palette UI
1From the Home screen, touch and hold the wallpaper
area without shortcuts, widgets, etc.
2"Group"→Tap an application group you want to add to
the Home screen
1From the Home screen, touch and hold a shortcut,
widget, etc. you want to move
2Drag it to a position you want to move to and release it
・Keep touching and drag to the left or right of the home screen to
move to another home screen.
1From the Home screen, touch and hold a shortcut,
widget, etc. you want to delete
2"Delete"
Information
・Alternatively, from the Home screen, touch and hold a widget or shortcut you
want to delete and drag it to displayed at the bottom of the screen.
1From the Home screen, touch and hold an application
or widget you want to uninstall
2"Uninstall" → "OK"
A completion screen for uninstalling appears.
3"OK"
1From the Home screen, touch and hold a folder to
rename
・Folders that can be renamed are only folders created from "New
folder".
2"Edit name" → Enter a folder name → "OK"
Information
・Alternatively, open a folder then touch and hold the folder name to rename.
It is a function for setting Home screen wallpaper and Application screen
design all at once.
1From the Home screen, touch and hold the wallpaper
area without shortcuts, widgets, etc. → "Kisekae"
Adding an application group
Moving shortcuts etc.
Deleting shortcuts etc. from the Home screen
Uninstalling applications or widgets
Renaming folder
Changing Kisekae

57 docomo Palette UI
2Select a theme to set → "Set"
Information
・Alternatively, tap a Kisekae you want to change to.
・Contents of Kisekae can be added by tapping "Search"" and downloading
from website. To delete added Kisekae contents, select an image and tap
"Delete" → "Delete".
・Alternatively, from the Home screen, M → ¨Tap "Kisekae".
You can change the wallpaper of the Home screen as you like.
1From the Home screen, touch and hold the wallpaper
area without shortcuts, widgets, etc. → "Wallpaper"
2Select from "Gallery"/"Live Wallpapers"/"Wallpapers"/
"Wallpaper gallery" → Select a wallpaper
・For "Gallery", drag the trimming frame to specify area to be used
for wallpaper, and then tap "Save".
・For "Live Wallpapers"/"Wallpapers"/"Wallpaper gallery", tap "Set
wallpaper".
Information
・To display wallpaper repeatedly, from the Home screen, M → "Wallpaper
loop settings" → Mark "Wallpaper loop" and scroll/swipe the Home screen left
or right to switch the Home screen.
1From the Home screen, touch and hold the wallpaper
area without shortcuts, widgets, etc. → "Home
screens"
・Alternatively, pinch in on the Home screen to display a home
screen list.
2・Up to 12 screens can be added to the Home screen.
1From the Home screen, touch and hold the wallpaper
area without shortcuts, widgets, etc. → "Home
screens"
・Alternatively, pinch in on the Home screen to display a home
screen list.
2Touch and hold a thumbnail of home screens
3Drag it to a position you want to move to and release it
Changing wallpaper
Adding home screens
Sorting home screens
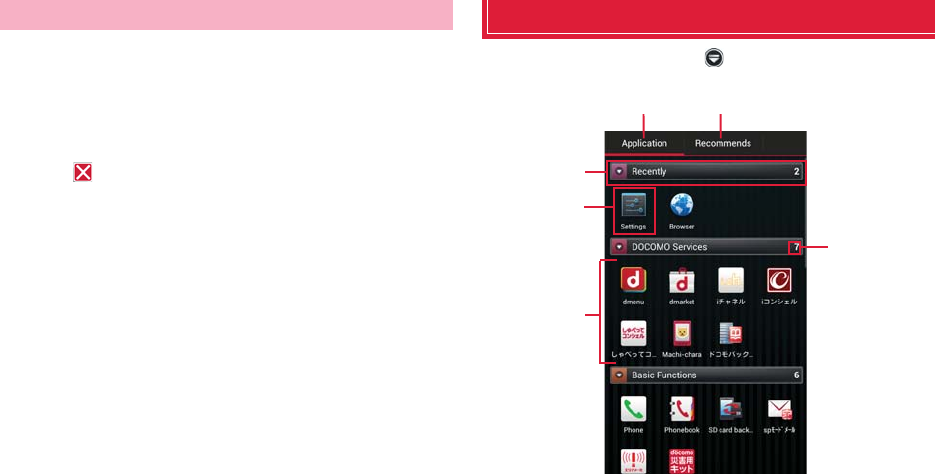
58 docomo Palette UI
1From the Home screen, touch and hold the wallpaper
area without shortcuts, widgets, etc. → "Home
screens"
・Alternatively, pinch in on the Home screen to display a home
screen list.
2Tap of a thumbnail of home screen you want to
delete
・Alternatively, touch and hold a thumbnail of home screen you
want to delete → Tap "Delete".
Application screen
1From the Home screen,
The Application screen appears.
aApplication tab
Display Application screen.
bRecommended tab
Install applications recommended by DOCOMO.
Deleting a home screen
Application screen
a
e
c
d
f
b
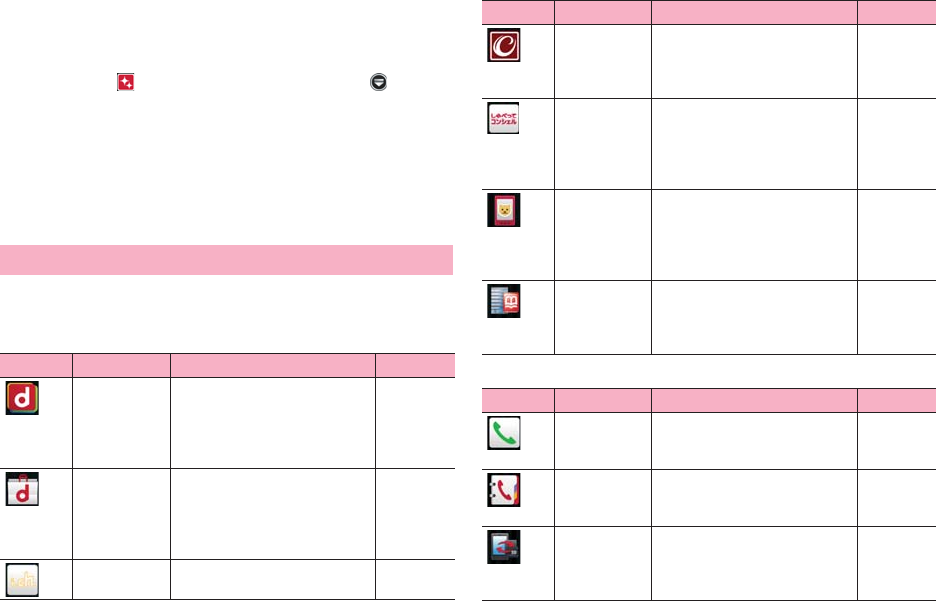
59 docomo Palette UI
cGroup name
Tap to show/hide applications in a group.
dApplication icon
When new applications are downloaded or existing applications are
updated, appears on the upper left of each icon. on the
Home screen is also framed in red.
For some icons, number of missed calls, unread mails, etc. displayed
in number.
eApplications in a group
Pinch out/in on the Application screen, show/hide all applications in
a group.
fNumber of applications in a group
Applications displayed in the default Application screen are as follows.
・For using some applications, subscription (charged) is required separately.
■DOCOMO Services
■Basic functions
Application list
Icon Application Description Reference
dmenu A shortcut application for "dmenu"
to find contents that you used in i-
mode and joyful and convenient
contents that for smartphone
readily.
P.120
dmarket Activate dmarket. On dmarket,
you can purchase contents such
as music, videos, e-books, etc.
Provide information of
applications on Google Play.
P.120
iチャネル (i-
channel)
Use i-channel. –
iコンシェル
(i-concier)
An application for using i-concier.
i-concier is a service with which a
mobile phone supports your life
like a butler or concierge.
–
しゃべってコ
ンシェル
(Shabette
concier)
By speaking "what you search" or
"what you do" to the terminal, this
app read the meaning of the word
and present the most appropriate
answer.
–
Machi-chara Display a desired character on the
terminal screen. The character
moves on the widget and notifies
you of i-concier information, mail
reception, incoming calls, etc.
–
ドコモバック
アップ
(docomo
backup)
An application for using "Data
Security service" or "Phonebook
backup". Back up and restore
data such as Phonebook.
–
Icon Application Description Reference
Phone Activate "Phone" application
provided by DOCOMO to make/
receive calls or switch calls.
P.66
Phonebook Activate a phonebook application
provided by DOCOMO to manage
contacts of friends and coworkers.
P.73
SD card
backup
Transfer or back up phonebook
entries, sp-mode mails,
bookmarks, etc. using external
memory such as a microSD card.
P.155
Icon Application Description Reference
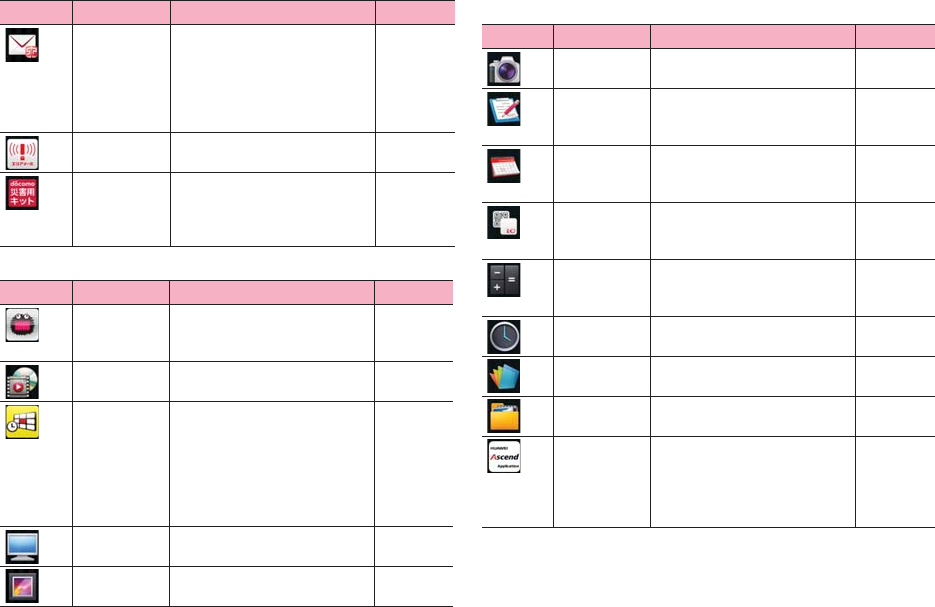
60 docomo Palette UI
■Entertainment
■Tools
spモードメー
ル (sp-mode
mail)
Send and receive mail using
DOCOMO mail address
(@docomo.ne.jp). Pictograms and
deco-mail can be used, and
automatic reception also is
supported.
P.78
Area Mail Receive early warning "Area Mail"
and view received Area Mail.
P.84
Disaster kit An application which helps you to
record and check messages on
the docomo Disaster Message
Board.
–
Icon Application Description Reference
NOTTV Watch Mobacas. Enjoy broadcast
programs/contents such as
"NOTTV".
P. 1 2 4
Media Player An application for playing music
and videos.
P. 1 4 1
Gガイド番組
表 (G-guide
program)
View program tables for ground-
based broadcasting, BS
broadcasting. Program search by
keywords, reservation of
watching/recording 1Seg program
or remote recording when you are
out are also available.
–
TV Watch TV etc. P.127
Gallery View/organize still images or
videos.
P. 1 3 7
Icon Application Description Reference
Icon Application Description Reference
Camera Take photos or record videos. P.133
Memo An application to create and
manage memos. It is supported to
i-concier service.
P.154
Schedule An application to create and
manage schedule. It is supported
to i-concier service.
–
IC Tag/
Barcode
Reader
Read IC tags and barcodes. –
Calculator Perform basic calculations such
as addition, subtraction,
multiplication, and division.
P.154
Clock Use alarm. P.148
Polaris Office Display, edit, create Office
document.
P.159
File Manager Check files in the terminal by
category.
P.113
Ascendアプリ
(Ascend
application)
Tap " 取扱説明書 (Manual)" to view
instruction manual of the terminal.
Tap " 製品情報 (Product
information)" to view production
information site of the terminal.
–
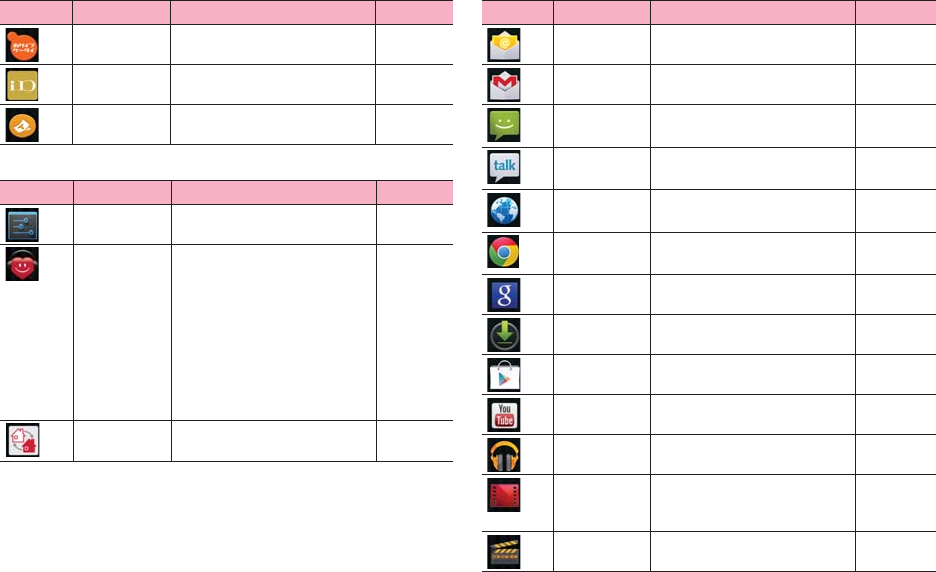
61 docomo Palette UI
■Osaifu/Shopping
■Settings
■Google
Icon Application Description Reference
Osaifu-Keitai Use Osaifu-Keitai. P.121
iDアプリ (iD
application)
Make settings for use of electronic
money, iD.
P.123
ToruCa Acquire, display, search or refresh
ToruCa.
P.123
Icon Application Description Reference
Settings Make the terminal settings. P.91
遠隔サポート
(Remote
support)
An application for using "スマート
フォンあんしん遠隔サポート
(Smartphone Anshin Remote
Support)". "スマートフォンあんし
ん遠隔サポート (Smartphone
Anshin Remote Support)" is a
service that allows staff of the Call
center to support the terminal
operations by remote-checking
the display of your own terminal.
P.174
Home Switcher Switch home applications. P.53
Icon Application Description Reference
Email Set up mail accounts to send/
receive mails.
P.80
Gmail Send/Receive Google account
mails.
P.83
Messaging Send/receive messages (SMS). P.78
Talk Chat via Google Talk. P.84
Browser It is a web browsing application. P.85
Chrome It is a web browsing application. –
Search Search in the terminal or web
pages by keyword.
–
Downloads Display a list of files downloaded
from website etc.
–
Play Store Access Google Play to download/
purchase of new applications.
P.121
YouTube Play videos of all over the world or
upload recorded videos.
P.143
Play Music Play music data saved in the
internal storage or microSD card.
–
Play Movies &
TV
Access the movie rental service of
Google Play to select and rent
movies.
–
Movie Studio An application for editing shot
photos or videos.
P.157
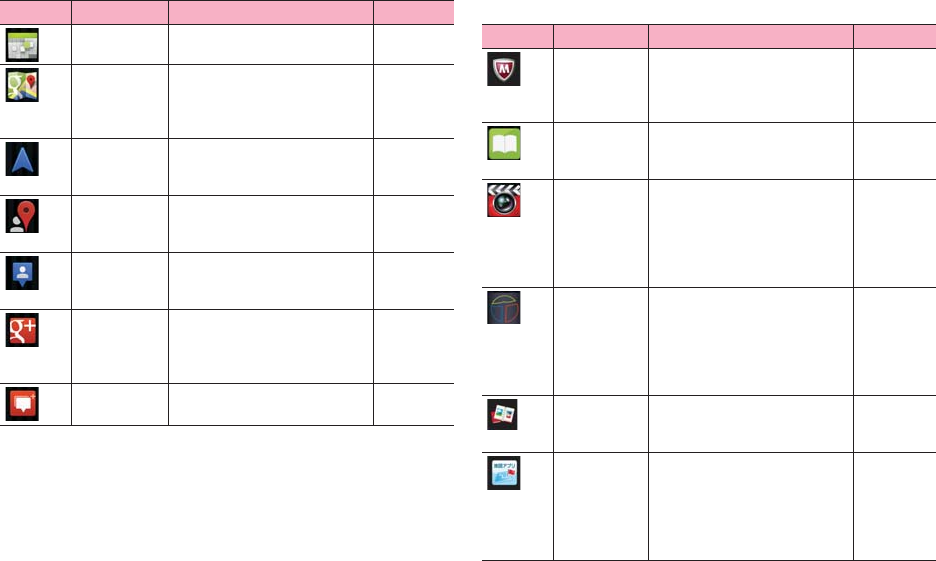
62 docomo Palette UI
■Applications in "Recommends" tab
Calendar Display a calendar to manage
schedule.
P. 1 5 0
Maps Use Google Maps services such
as checking the current location,
searching other places or route,
etc.
P. 1 4 5
Navigation Display Google Maps Navigation
to use voice navigation to
destination etc.
P. 1 4 7
Local Use various information such as
shops near current location
registered on Google Maps.
P. 1 4 7
Latitude Check location on the map or
share location information with
specified friends.
P. 1 4 7
Google+ Activate Google+ which is a client
application for social network
service (SNS) provided by
Google.
–
Messenger Chat in group using Google+. –
Icon Application Description Reference
Icon Application Description Reference
Anshin Scan Protect your terminal from virus
damage. Detect virus hidden in
installed applications or microSD
card.
–
Book Store
MyShelf
An application for viewing
electronic books you purchased
on the dmarket BOOK store.
–
HighlightCam Analyze a shot videos, still images
and edit them automatically to
create a video. You can choose
template or BGM matching
various scenes. Created videos
can be posted to SNS etc. readily.
–
Beam An application for linking the
terminal with home electrical
appliance. It enables play
wirelessly videos/photos/music in
the terminal or in the Internet on a
TV or audio device.
–
フォトコレク
ション (Photo
collection)
Free storage service application
with which you can manage
photos and videos.
–
地図アプリ
(Map
application)
Functions such as 地図 (Map), お
店や施設検索 (Shop and facility
search), ナビ (Navigation), 乗り換
え (Transfer function), 訪れた街
(Visited places) support your
outing.
–
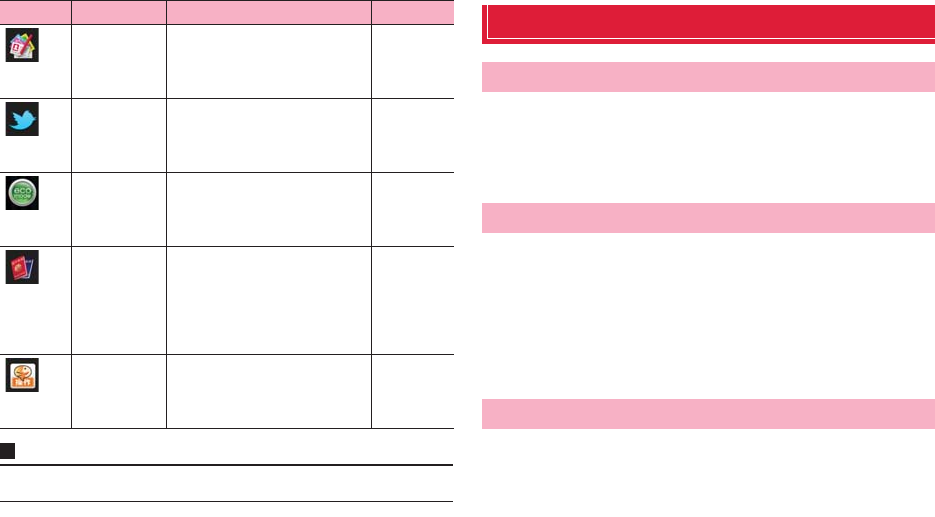
63 docomo Palette UI
Information
・For some applications, downloading and installing are needed.
Managing applications
1On the Application screen, touch and hold an
application you want to add to the Home screen
2"Add"
1On the Application screen, touch and hold an
application you want to uninstall
2"Uninstall" → "OK"
A completion screen for uninstalling appears.
3"OK"
1On the Application screen, touch and hold an
application you want to move
2Drag it to a position you want to move to and release it
・Alternatively, touch and hold an application → Tap "Move" to
move to the other group.
Name card
creator
An application to create an
original name card to be
displayed in the My profile field of
the "Phonebook" application.
–
Twitter An official client application of
Twitter. Publish short messages on
the site to communicate with
others.
–
ecoモード
(eco mode)
Set "eco mode" for reducing
battery consumption by adjusting
each setting such as brightness of
the screen.
–
ドコモ海外利
用 (docomo
international
roaming)
An application which supports
using packet communication
overseas. You can set Data
roaming setting or a network
operator applicable for
international Pake-hodai easily.
–
しゃべってか
んたん操作
(Shabette-
Kantan-Sousa)
Just speak a function, application
you want to use or setting menu to
call up desired function etc. easily.
–
Icon Application Description Reference
Adding a shortcut to the Home screen
Uninstalling applications
Moving applications
64 docomo Palette UI
Managing groups
1On the Application screen, M → "Add group"
2Enter a group name → "OK"
1On the Application screen, touch and hold a label of
group
2Drag it to a position you want to move to and release it
1On the Application screen, touch and hold a label of
group
2"Edit name" → Enter a folder name → "OK"
Information
・"Recently", "DOCOMO Services", and "Download Application" groups cannot
be renamed.
1On the Application screen, touch and hold a label of
group
2"Edit label" → Select a label color
1On the Application screen, touch and hold a label of
group
2"Add"
1On the Application screen, touch and hold a label of
group
2"Delete" → "OK"
・Application icons in deleted group move to "Download
Application" group.
Information
・"Recently", "DOCOMO Services", and "Download Application" groups cannot
be deleted.
Adding group
Sorting groups
Editing group name
Changing group color
Adding group to the Home screen
Deleting group

65 docomo Palette UI
Searching applications
1On the Application screen, M → "Search"
・For the first time use, a confirmation screen for permit of using
location information by Google appears. Confirm the contents
and tap "OK".
2Enter an application you want to search → Tap a
searched application
・To search application, on the search screen, M → "Settings" →
"Searchable items" → Mark "Apps".
Switching display of Application screen
1On the Application screen, M → "List format"/"Tile
format"
Installing "Recommends" applications
In "Recommends" tab , applications recommended by NTT DOCOMO are
displayed.
・To download an application, tap an application icon to display the
downloading screen and follow the onscreen instructions.
・Downloaded applications are displayed in the "Download Application" group
in the "Application" tab.
・Tap " もっとアプリを見る (More apps)" on the "Recommends" tab to activate
Browser and top page of "dmenu" appears.
Home application information
You can view the detailed descriptions or operation steps, etc. about
docomo Palette UI.
1From the Home screen, M → "Help"
1On the Application screen, M
2"Application info"
You can confirm docomo Palette UI provider, version
information, etc.
Version information
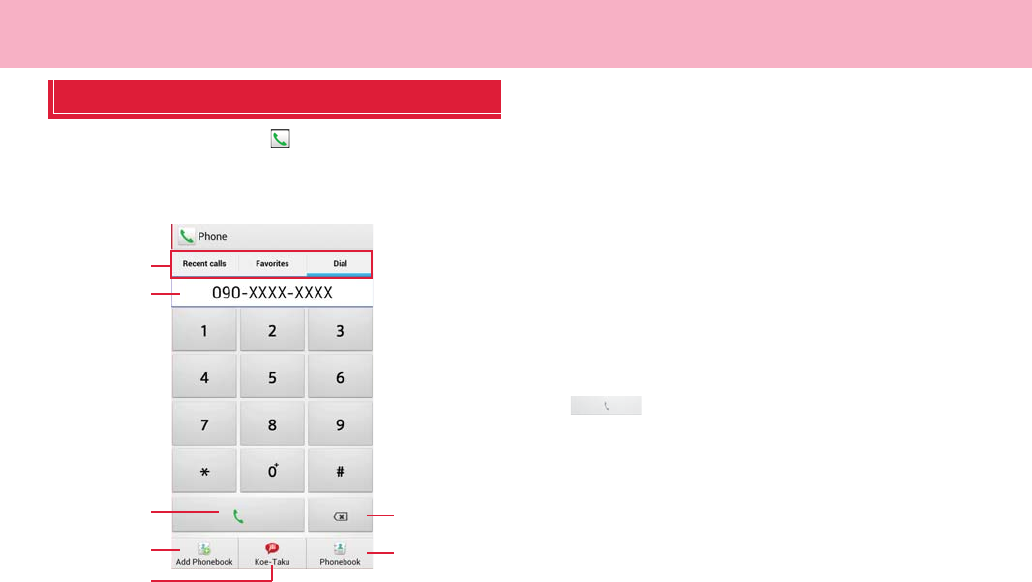
66 Calling
Calling
Making a call
1From the Home screen, → "Dial"
2Enter the other party's phone number
・Enter from the city code even when you call to the same city.
aTa b s
Recent calls (P.70)
Favorites (P.75)
Dial: Dialpad screen appears.
bPhone number entry field
Entered phone number appears.
cCall key
Call to an entered phone number.
dAdd to Phonebook
Add entered phone number to Phonebook.
eKoe-no-Takuhaibin
Voice message can be recorded.
fDelete
Delete a number at far right. Touch and hold to delete all entered
numbers.
gPhonebook
Open Phonebook.
3
When the party answers, a calling screen appears.
4When a call is ended, "End"
Dialpad screen
c
a
b
f
d
e
g
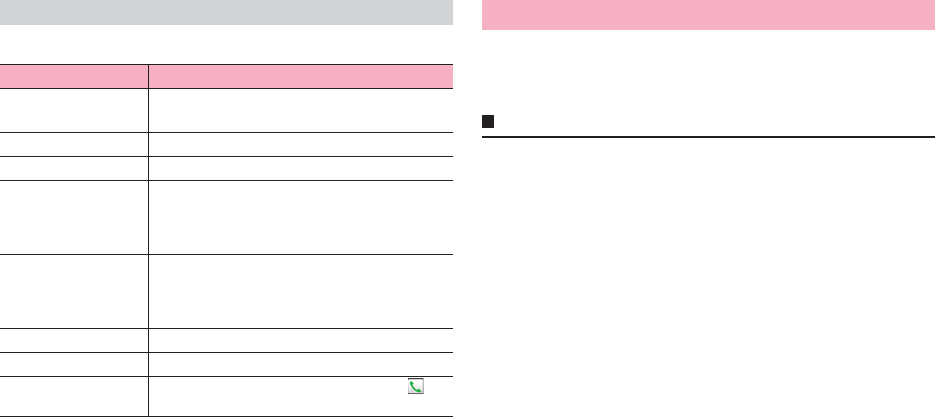
67 Calling
Ta p
M
on the dialpad screen to show the following items.
*1 Appears when entering phone number on the dialpad screen.
*2 Appears only when "Select prefix" is set.
If the terminal is within an area where radio wave reaches, emergency
calls to 110 (Police), 119 (Fire/Ambulance), 118 (Japan Coast Guard) can
be made.
Information
・In Japan, when docomo mini UIM card is not inserted to the terminal, from
the PIN entry screen or when PIN/PUK is locked, calling the emergency
numbers of 110/119/118 are not available.
・This terminal supports "Emergency call location notification". If you make a
call to emergency numbers such as 110, 119, 118, the information of a
location where you are calling from (location information) is automatically
notified to the Emergency call acceptance organization such as the Police
Station. The Emergency call acceptance organization may not be able to
figure out your exact location depending on the location where you place a
call or radio wave condition.
If you make a call hiding your caller ID, such as by entering a phone number
with "184" for each call, the location information and phone number are not
notified. However, the Emergency call acceptance organization may decide
to obtain the location information and phone number regardless of your
settings when they consider it is necessary for lifesaving, etc. Note that the
areas/time for which the "Emergency call location information" is ready to be
used vary depending on the preparatory state of each Emergency call
acceptance organization.
Menu on the dialpad screen
Item Description
Caller ID
notification*1
Set whether to notify/not to notify the caller ID.
Select prefix*1*2 Select whether to prefix.
International call*1 Use international call (P.68).
Add 2 sec. pause
*1
Enter a pause ",". Enter a phone number, pause (,)
and numbers consecutively and call, the call is
connected and the touch-tone signals are
automatically sent after about 2 seconds.
Add wait*1 Enter a timer ";". Enter a phone number, pause (;)
and numbers consecutively and call, the call is
connected and the touch-tone signals are
automatically sent after "Yes" is tapped.
Send SMS P.78
Call settings P.71
Set start-up screen Set the first displayed screen when tapping on
the Home screen.
Emergency calls
68 Calling
・When you call the Police (110), Fire/Ambulance (119), or Maritime rescue
(118) from the terminal, clearly indicate that you are calling from a mobile
phone, then give your present location and mobile phone number. Also,
make a point to call in a stationary position to prevent the call from being
dropped. Do not power off the terminal for at least 10 minutes after the
emergency call just in case the Police or Fire/Ambulance may have to get in
contact with you.
・Note that you may not connect to the local Fire Department or Police Station
depending on where you are calling from.
"WORLD CALL" is the international call service available from DOCOMO
mobile phones in Japan. Customers who subscribed to the FOMA service
are also subscribed to WORLD CALL (except for ones who declined.)
・For details of "WORLD CALL", contact "General Inquiries" on the last page of
this manual.
1From the Home screen, → "Dial"
2Touch and hold "0" on the keypad until a plus (+) mark
appears
・"+" mark is replaced with an international access number when the call
is made from Japan.
3Country code → Area code (City code) → Enter the
other party's number
・Enter the phone number without a leading "0", if any. In some countries
and areas such as Italy, "0" is required.
4
5When a call is ended, "End"
Making an international call (WORLD CALL)
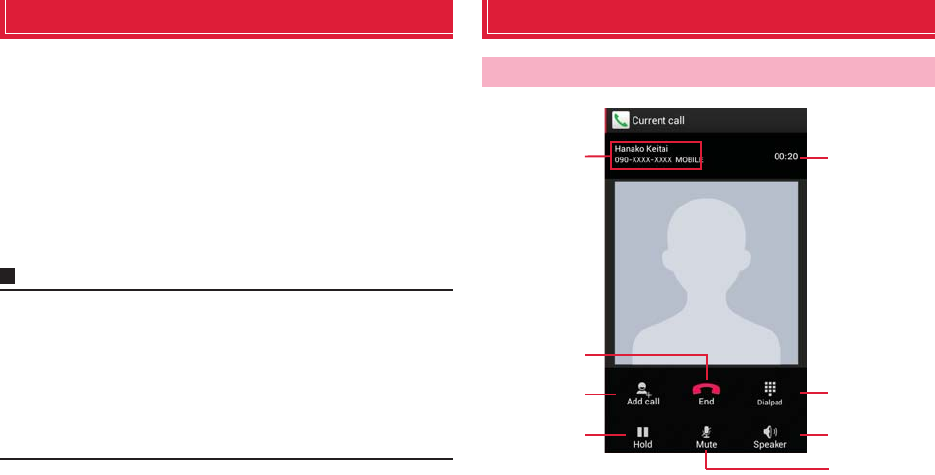
69 Calling
Receiving a call
1A call is received
Incoming call screen appears.
2"Activate" → "Accept"
Call starts.
■Declining a call
a"Activate" → "Reject"
■Declining a call and sending a message (SMS)
aM → "Quick responses" → Select a message
3When a call is ended, "End"
Information
・Press +, -, or T while receiving a call to stop ringtone, vibration.
・If you press T to stop ringtone or vibration, the screen backlight turns off.
Press T again to turn on the screen.
・Selecting "Custom message…" for quick response allows you to enter
message freely.
・When you do not answer phones such as missed calls or call rejection, the
terminal goes into sleep mode in about 10 seconds regardless of sleep mode
setting time.
Operations during a call
aName/number of the other party
bEnd
End call.
cAdd call*
Make another call.
Calling screen
Calling screen
c
a
b
f
dg
h
e
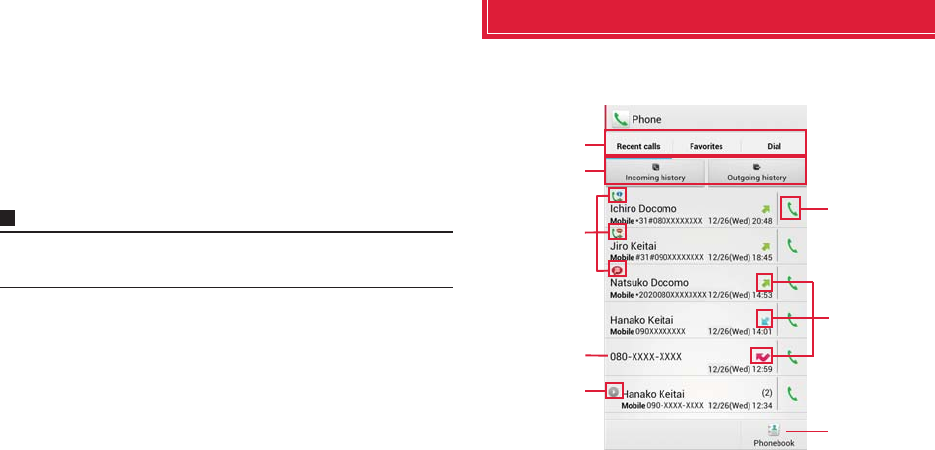
70 Calling
dHold*
Put/cancel a call on hold.
eCall time
fKeypad
Show keypad to send touch-tone signals.
gSpeaker
Hear the other party's voice from the speaker to make a handsfree call.
hMute
Make your voice inaudible to the other party.
*: A separate subscription for "Call Waiting" is required (P.71).
Information
・Press + or - to adjust call volume. Call volume can be adjusted only during a
call.
Call history
Outgoing history, incoming history, and missed calls can be checked in
Recent calls.
aTa b s
Recent calls: Call history appears.
Favorites (P.75)
Dial (P.66)
Recent calls screen
e
c
d
f
h
g
a
b
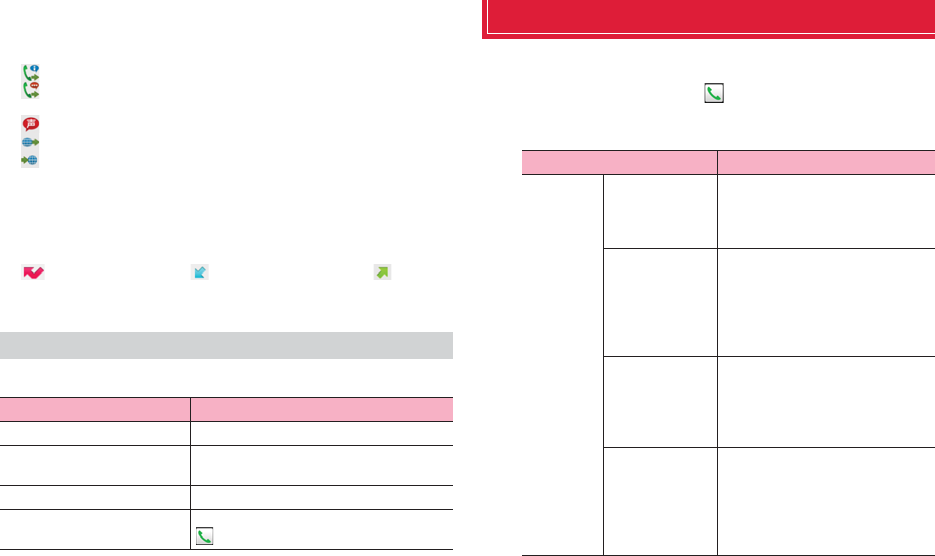
71 Calling
bSwitching history
Switch to incoming call history/outgoing history. Tap "Display all history" to
return to the call history screen.
cCall status icons
: When "Caller ID Notification" (P.72) is set to "Notify" or "186" is added
: When "Caller ID Notification" (P.72) is set to "Not notify" or "184" is
added
: A call is sent as Koe-no-Takuhaibin.
: An international call is made.
: An international call is received.
dPhone number/Name
eContinuous history with the same party
fCall icon
Tap to make a call.
gHistory icon
indicates a missed call, indicates an incoming call, indicates
an outgoing call, respectively.
hPhonebook
Ta p
M
on the call history screen to show the followings.
*: Does not appear on the incoming call history/outgoing call history screen.
Call settings
You can set network services and search available network.
1From the Home screen, → M → "Call settings"
・Alternatively, from the Home screen, M→"Settings"→"Call settings"
to view call setting menu.
Menu of Recent calls screen
Item Description
Delete all Delete all history.
Search location Use imadokokantan search to check the
other party's location.
Call settings
P. 7 1
Set start-up screen*Set the first displayed screen when tapping
on the Home screen.
Item Description
Network
service
Koe-no-
Takuhaibin
Koe-no-Takuhaibin is a service of
taking voice messages for you.
Activate service, check/change the
settings.
Voice Mail
Service
The Voice Mail Service takes
messages for you, if a call is
received when you cannot answer a
call.
Activate/deactivate service, set ring
time, etc.
Call Forwarding
Service
The Call Forwarding Service
forwards a call, if a call is received
when you cannot answer a call.
Activate/deactivate service, change
forwarding number, etc.
Call Waiting Call Waiting allows you to put the
current call on hold to answer the
second call or place a call to another
party.
Activate/deactivate service, check
the setting.
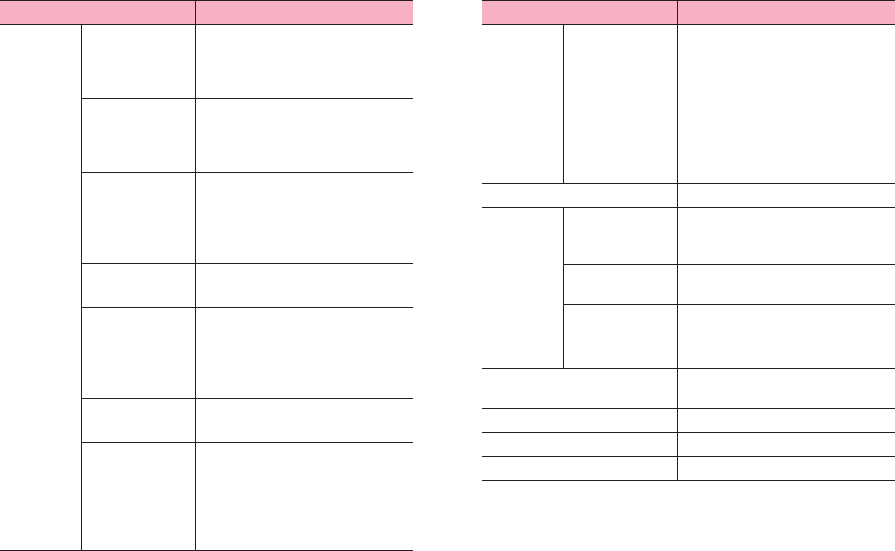
72 Calling
Network
service
Caller ID
Notification
When making a call, your phone
number is shown on the display of
the receiver's phone.
Make and check the setting.
Nuisance Call
Blocking
service
Save phone numbers to the call
rejection list.
Save, delete, check number of
saved items.
Caller ID
Display
Request
Service
An announcement requesting caller
ID responds for an incoming call
hiding caller ID.
Activate/deactivate service, check
the setting.
Second call
setting
Set actions for a second call.
Call notification Calls received while the terminal is
powered off or outside of the service
area are notified by SMS.
Activate/deactivate service, check
the setting.
English
guidance
Make and check the setting.
Remote access Set to operate Voice Mail Service or
Call forwarding Service using land-
line phone, pay phone or DOCOMO
mobile phone, etc.
Activate/deactivate service, check
the setting.
Item Description
Network
service
Public mode
(Power OFF)
settings
If a call is received while the terminal
powered off or in Airplane mode, the
caller hears an announcement
notifying that the receiver is in a
place requiring control of using
mobile phone, and the call is
disconnected.
Activate/deactivate service, check
the setting.
Roaming settings P.165
Advanced
call
settings
Sub address
settings
Set whether to recognize "*" and
subsequent numbers in a phone
number as a sub address.
Prefix settings Save and add prefix numbers such
as international access codes.
Reject
unregistered
call
Set whether to reject calls from
callers who are not saved in
Phonebook.
Quick responses Edit message for SMS which is sent
for declined calls.
Open source licenses Show Open source licenses.
Account Set Internet phone (SIP) account.
Use Internet calling Set Internet phone (SIP) call method.
Item Description
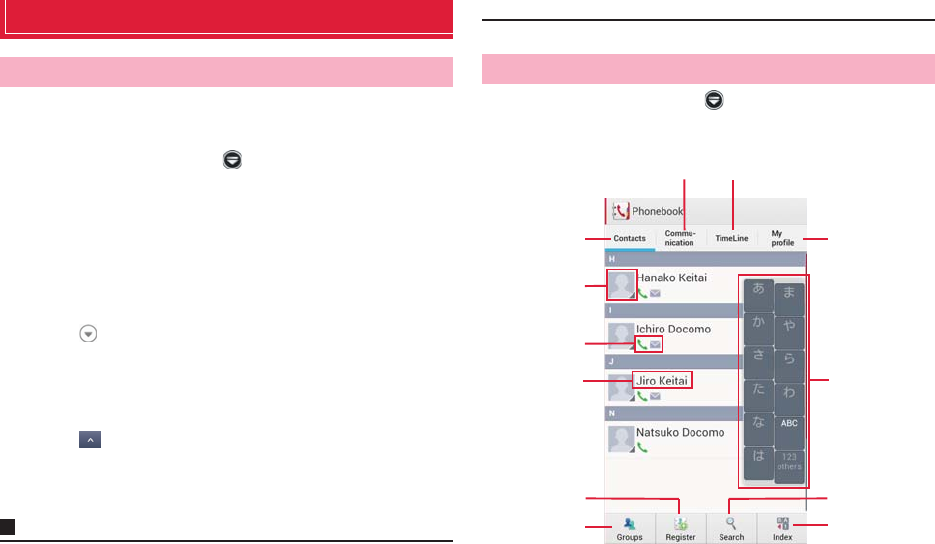
73 Calling
Phonebook
Use DOCOMO phonebook application to manage various information for
contacts, such as names, phone numbers, mail addresses.
1From the Home screen, → "Phonebook" →
"Contacts"
Contacts list appears.
2"Register" → Select saving location
・If a Google account is not set yet, select saving location screen does
not appear and contacts are saved to docomo account.
3Enter name on the editing profile screen
・Tap on "Given name/Family name" field to enter "Name prefix/
suffix", "Middle name", etc.
4Enter required items
・Tap "Add"/"Delete" to add/delete fields for selected items.
・Tap "Mobile" to select labels (types) for entered items.
・Tap in "Others" and tap "Add" to add information on address and
affiliation.
5"Save"
Information
・When you save "Phonetic name (family/given)", contacts list is shown
according to Japanese syllabary order or alphabets order of "Phonetic name".
・Depending on accounts to save to, ringtone can be set.
1From the Home screen, → "Phonebook" →
"Contacts"
Contacts list appears.
aContacts
bPicture set in phonebook entry
Add to Phonebook Checking/editing phonebook entries
Contacts list
f
a
e
l
j
gh
i
b
c
d
k
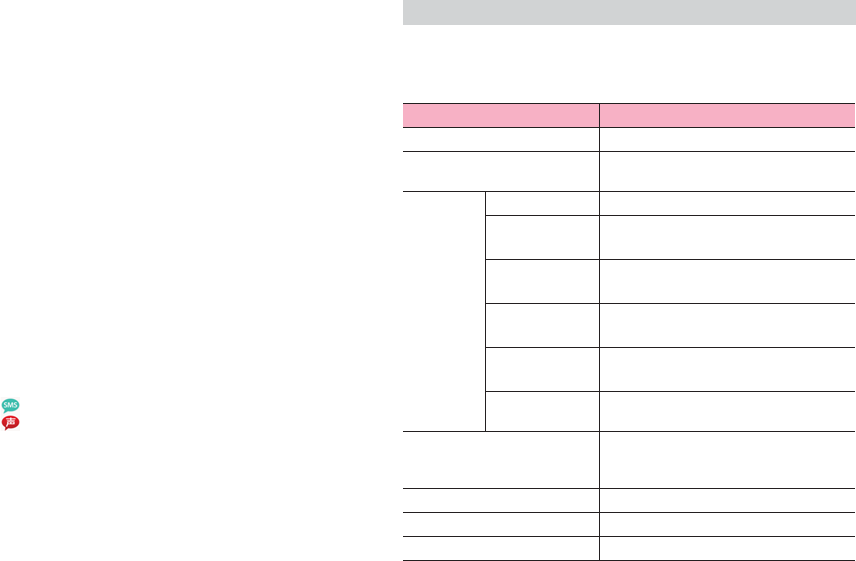
74 Calling
cSaved items
Saved items are indicated by icons.
dName saved in phonebook entry
eRegister
Save contacts.
fGroup
Select group to view.
gCommunication tab
Show call logs, sp-mode mail logs and SMS logs. You can dial or
send SMS from the logs.
hTimeline tab
Show a timeline of SNS and blog set in Linking to SNS. Tap to show
details and post comments and Like!
iMy profile tab
Check own phone number, edit/manage profile information, create
name card using name card creator app (P.76).
jIndexed characters
Tap "Index" to view contacts allocated to each character.
kSearch
lIndex
Show indexed characters.
2Tap a contact you want to check
Profile screen appears.
・Tap phone number to make a call.
・Tap on the phone number field to create a message (SMS).
・Tap on the phone number field to use Koe-no-Takuhaibin.
・Tap a mail address and select application to create mail message.
・Tap "Communication" to check call history and communication history
of sp-mode mail/Messaging (SMS)/SNS message with selected party.
■Editing contacts
aTap a contact you want to check → "Edit"
■Contacts list
Tap
M
on Contacts list to show the following items.
・Available menu options vary depending on tabs.
Menu on Contacts list/Profile screen
Item Description
Delete Delete contacts.
Help Check how to use Phonebook and notes on
it.
Others Import/Export P.77
Sync with the
server
Synchronize data with the back up center
to back up.
Contacts
display order
Change sorting order of contacts.
Accounts to
display
Contacts corresponding to the tapped
items are shown.
Linking to SNS
settings
Register accounts for SNSs and blog at
once.
About Check version of Phonebook app and
number of entries.
Sync. deleted items Reflect the latest call history of Phonebook
app and communication history of sp-
mode mail, Messaging apps.
Update SNS info. Update SNS information.
Update Timeline Update Timeline.
Top of the list Move to the top of the history.
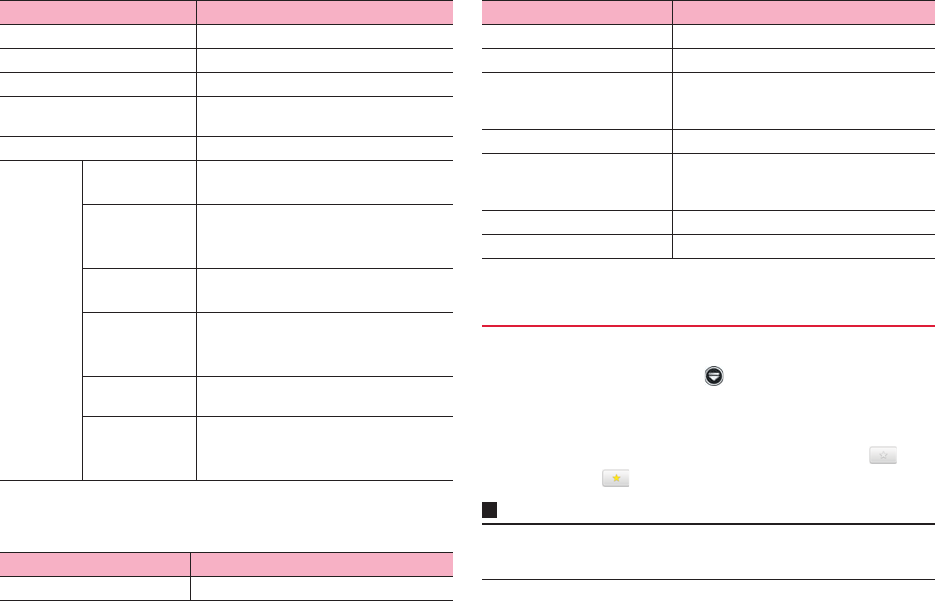
75 Calling
■ Profile screen
Tapping
M
on the profile screen shows the following items.
・Available menu options vary depending on tabs.
*: Appears only for docomo account.
Add contacts to "Favorites" group.
1From the Home screen, → "Phonebook" →
"Contacts"
Contacts list appears.
2Tap a contact you want to add to Favorites →
It changes to and added contact is shown in "Favorites" group.
Information
・Only contacts whose saving location is docomo account can be added to
Favorites.
SNS account settings Set up SNS account.
Share Send contacts via Bluetooth or mail.
Announcement Check i-concier information.
Loading name card Load name card data saved in the microSD
card.
Exchange logs Check name card exchanging history.
General
settings
Data
management
Import/export contacts/name card data
using a microSD card.
Name card
exchange
settings
Set to "Use"/"Not use" exchanging name
card.
Stop Linking to
SNS
Stop using Linking to SNS.
International
use setting for
phonebook
Set whether to use functions of Phonebook
app which require data communication
overseas.
Wi-Fi settings Make settings for using docomo services
via Wi-Fi.
Clear
temporary log
(SNS and Blog)
Delete timeline communication data saved
on the terminal.
Item Description
Share Send contacts via Bluetooth or mail.
Item Description
Delete
Delete contacts.
Set ringtone
Set individual ringtone.
Join/Separate Link related contacts such as family and
company to combine as one or separate
combined contact.
Linking to SNS settings Register accounts for SNSs and blog.
Sync. deleted items Reflect the latest call history of Phonebook
app and communication history of sp-mode
mail, Messaging apps.
Update Timeline Update Timeline.
Top of the list Move to the top of the history.
Adding contacts to Favorites
Item Description
76 Calling
Contacts can be managed and used according to the group to which
contacts are saved.
1From the Home screen, → "Phonebook" →
"Group"
Group tabs appear on the left of the screen. On each group tab, number
of saved contacts appears.
2Tap a group tab you want to check → Tap a contact
■Adding/editing group
a"Add" → Select an account
・To edit a group already saved, touch and hold a group you
want to edit → Tap "Edit group".
bSelect color and icon → Enter group name
c"OK"
■Deleting a group
aTouch and hold a group you want to delete → "Delete group"
→ "OK"
■Adding contacts to group
a"All" → Touch and hold a contact → Drag it to a group tab you
want to add to
■Deleting a contact from group
aTap a group tab including contact you want to delete →
Touch and hold the contact you want to delete → Drag it over
the group tab which has included the contact
Information
・Only contacts whose saving location is docomo account or Google account
can be added to groups.
1From the Home screen, → "Phonebook" →
"Contacts"
Contacts list appears.
2Tap a party you want to call
3Tap his or her number →"Call"
1From the Home screen, → "Phonebook" → "My
profile"
My profile screen appears.
2"Edit"
■Creating/editing name card data
a"Create new"/"Edit"
・To create or exchange name cards, you need to install
Name card creator app. For subsequent operations, follow
onscreen instructions.
3Enter required items → "Save"
■Starting Linking to SNS
a"Set" on the "SNS・Blog" field → "OK" → "Start right now" →
"Register" of SNS name you want to register → Operate
according to onscreen instructions
Checking contacts sorted by group Making a call from Phonebook entry
Saving My profile

77 Calling
Information
・Tap "Delete" to delete name card data.
・Tap "Exchange this name card" to exchange name cards with nearby party
via network.
・For information on Linking to SNS functions, from Contacts list, tap M →
"Help" and see Help.
Import or export contacts between a microSD card, docomo mini UIM card
and the terminal. Contacts can also be sent via mail.
1From the Home screen, → "Phonebook" →
"Contacts"
Contacts list appears.
2M → "Others" → "Import/Export"
3Perform the following operation
■Importing contacts
a"Import from SIM card"/"Import from SD card" → Select a
saving location
・If "Import from SD card" is selected, import contacts from
a microSD card.
・If a Google account is not set yet, select saving location
screen does not appear and contacts are saved to
docomo account.
・If several contact data (vCard) is saved on a microSD
card, select Phonebook screen appears. Follow the
onscreen instruction to select import method.
■Exporting contacts
a"Export to SD card" → Select export method → "OK"→ Follow
onscreen instructions
■Sending contact data (vCard)
a"Share phonebook data" → Select sending method
Transfer or back up phonebook entries, sp-mode mails, bookmarks, etc.
using external memory such as a microSD card.
・For SD card backup, see "Backing up data to microSD" (P.155).
Importing/exporting contacts Using SD card backup
78 Mail/Browser
Mail/Browser
sp-mode mail
Send and receive mail using i-mode mail address (@docomo.ne.jp).
Pictograms and deco-mail can be used, and automatic reception is also
supported.
・For details on sp-mode mail, refer to "Mobile Phone User's Guide [sp-mode]
smartphone version".
1From the Home screen,
2Follow the onscreen instructions to download sp-
mode mail application
Message (SMS)
You can send and receive text messages up to 70 two-byte characters
long (up to 160 one-byte characters for only alphanumerics) addressed to
a mobile phone number.
1From the Home screen, → "Messaging"
2
3Enter mobile phone number of recipient in the To field
・If you enter name or phone number, corresponding contacts are
listed.
・To enter several recipients, separate each phone number with a
comma (,).
■Selecting recipient from Phonebook
a → Tap a contact you want to send
4Enter message in the "Type message" field
■Entering pictograms
aM → "Insert smiley" → Tap a pictogram you want to enter
5・Tap B without sending message to save message (SMS) as a draft.
Information
・You can send and receive messages to and from users of overseas network
operators. For available countries and overseas network operators, refer to
"Mobile Phone User's Guide [International Services]" or DOCOMO
International Services Website.
・To send messages to users of overseas network operators, enter "+",
"Country code" and then "the recipient mobile phone number". Enter the
phone number without a leading "0", if any. You can also enter "010", "Country
code" and "the recipient mobile phone number" to send messages. (To reply
to the received SMS overseas, enter "010".)
Creating and sending message (SMS)
79 Mail/Browser
1From the Home screen, → "Messaging"
Thread (party you sent and received messages (SMS)) list appears.
2Tap a thread you want to read
Message (SMS) list appears.
・Received messages (SMS) appear in call-outs in white and sent
messages (SMS) appear in call-outs in green.
Information
・When a message (SMS) is received, appears on the status bar.
・Tap an image of the thread on the thread list to call to the other party who is
registered to phonebook, or to add to Phonebook if he or she is not registered.
Tap M on the thread list screen/message (SMS) list screen to show the
following items.
*1 Appears only on the thread list screen.
*2 Appears only on the message (SMS) list screen.
Checking received message (SMS) Menu on the thread list screen/message (SMS) list screen
Item Description
Settings Delete old
messages
Set whether to automatically delete
messages when number of messages
reaches to set number.
Text message
limit
Set number of messages to save per
thread.
Delivery reports Set whether to request SMS report for each
transmission.
Manage SIM
card messages
Check/delete messages copied on the
docomo mini UIM card or copy messages
to the terminal.
Notifications Set whether to show notification icon on the
status bar when a message (SMS) is
received.
Settings Choose
ringtone
Set ringtone which sounds when a
message (SMS) is received.
Vibrate Set whether to vibrate when a message
(SMS) is received.
Delete all threads*1 Delete all threads.
Insert smiley*2 Enter pictograms when creating a
message.
Delete thread*2 Delete a thread.
Add to People*2 Save phone number for thread to
phonebook.
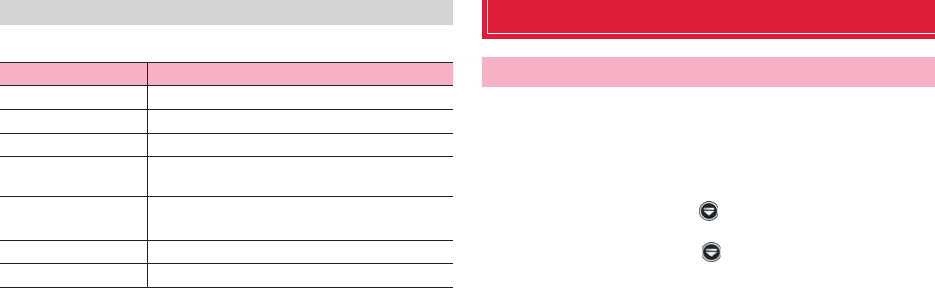
80 Mail/Browser
Touch and hold a message (SMS) sent or received to show the following items.
*: Appears only for messages (SMS) to which receiver confirmation is set.
Email
Set up Email account of mopera U mail or other POP3 or IMAP mail
accounts provided by general providers to send and receive email.
・For accounts unable to be set up automatically or accounts to be set up
manually, entering receiving setting and sending setting is required. Check
setup information of your Email accounts beforehand.
1
From the Home screen,
→
"Email"
■Setting up a second or subsequent mail account
aFrom the Home screen, → "Email" → M → "Settings" →
"ADD ACCOUNT"
2Tap an account type
3Enter each item → "Next"
・To set up Email address manually, tap "Manual setup" and follow the
onscreen instructions.
・For the second or subsequent mail address, mark "Send email from
this account by default" if necessary.
4Set account options → "Next"
・If setup cannot be made automatically and an account type selection
screen appears, follow the onscreen instructions.
5Enter account name → "Next"
・Entering "Your name" is required for some accounts.
Menu on the message screen
Item Description
Copy text Copy message (SMS) body.
Copy to SIM card Copy message (SMS) to docomo mini UIM card.
Forward Forward message (SMS).
Lock/Unlock Protect/unprotect message (SMS) to prevent from
accidental deletion.
View message
details
Show type, sender/receiver, and sent/received date
and time.
View report*Show receiver's address and status of distribution.
Delete Delete messages (SMS).
Setting Email account
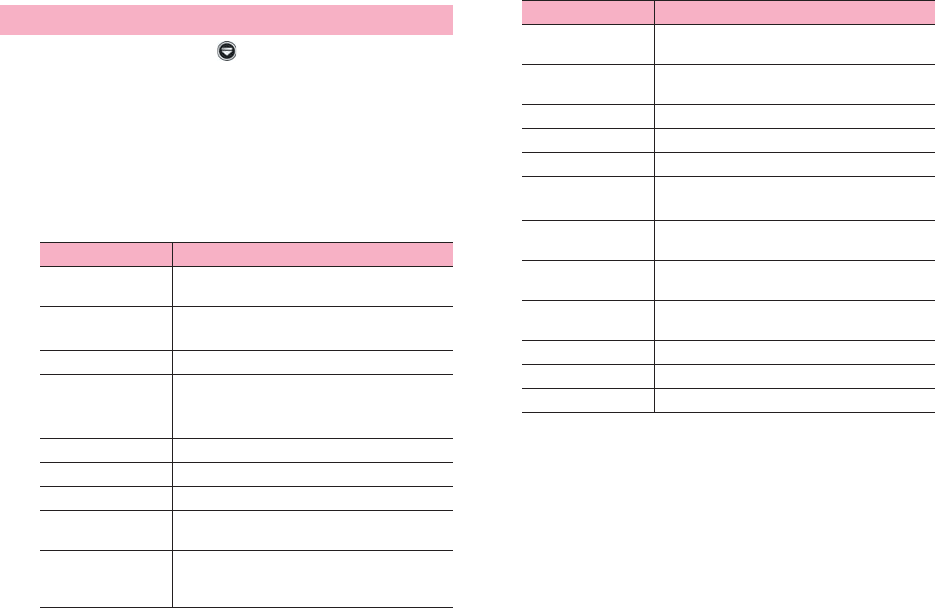
81 Mail/Browser
1
From the Home screen,
→
"Email"
Email list appears.
・If several accounts are set, tap an account name to select and show
email list.
2M → "Settings" → Tap "General"/an account to be
setup
3Set each item
・Items to be shown differ depending on accounts.
*1: Appears when "General" is tapped.
*2: Appears for Microsoft Exchange account.
Managing Email account
Item Description
Auto-advance*1 Select screen to be shown after email has been
deleted.
Message text
size*1
Set character size for email message screen.
Reply all*1 Set whether to send to all recipients when reply.
Restore Show
pictures to default
set*1
Set whether to show image.
Account name Change account name.
Your na me Change name.
Signature Edit or add signature.
Quick responses Save phrases you can enter when creating
email.
Default account Set whether to use as default Email account.
Marking this setting shows a checkmark on the
set account in Email account list.
Inbox checked Set a time interval to automatically receive new
email.
Days to sync*2 Set number of days between each
synchronization.
Sync email*2 Set whether to synchronize mail.
Sync contacts*2 Set whether to synchronize contacts.
Sync Calendar*2 Set whether to synchronize calendar.
Download
attachments
Set whether to automatically download
attachment files when Wi-Fi is connected.
Email notifications Set whether to show a notification icon on the
status bar when email is received.
Choose ringtone Set ringtone which sounds when email is
received.
Vibrate Set whether to vibrate the terminal when email
is received.
Incoming setting Change incoming mail server setting.
Outgoing settings Change outgoing mail server setting.
Remove account Delete email account.
Item Description
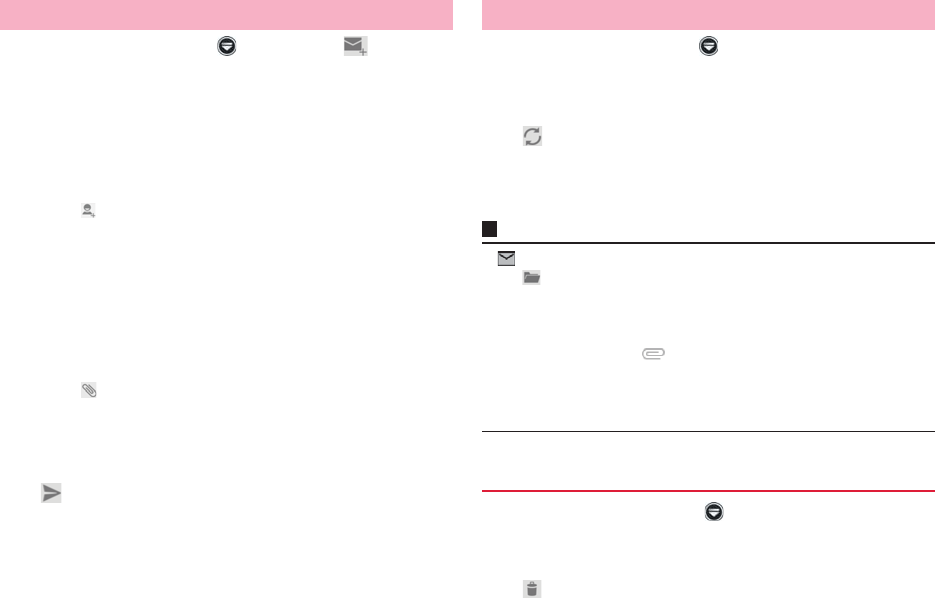
82 Mail/Browser
1
From the Home screen,
→
"Email"
→
Creating Email screen appears.
2Enter recipient mail address in To field.
・If you enter name or phone number, corresponding contacts are
listed.
・To enter several recipients, separate each phone number with a
comma (,).
■Selecting recipient from Phonebook
a → Tap a contact you want to send
■Adding Cc/Bcc
aM → "Add Cc/Bcc"
bEnter mail addresses in "Cc"/"Bcc" field
3Enter subject in "Subject" field
4Enter message in message field
・In the message field, "Compose mail" or signature appears.
■Attaching files
a → Select an application → Select a file
■Saving message as a draft
aM → "Save as draft"
■Stopping creating
aM → "Discard"
5
1
From the Home screen,
→
"Email"
Email list appears.
・If several accounts are set, tap an account name to select and show
email list.
2
3Tap email you want to check
Message screen appears.
Information
・ appears on the status bar when email is received.
・Tap on the email list screen to switch folders.
・Tap a sender's image on the message screen to perform "Compose email"/
"Add contact". For email whose sender is not saved to Phonebook, tap
"Add contact" to save address in Phonebook.
・For email attached data, appears in the email list. Tap "Attachment" tab
on the message screen (if attachment is not downloaded yet, tap "LOAD" )
and tap "VIEW" to open file and check it. Tap "SAVE" to save attached data to
the terminal.
1From the Home screen, → "Email"
2Tap email you want to delete
3
Creating/Sending email Checking received email
Deleting email
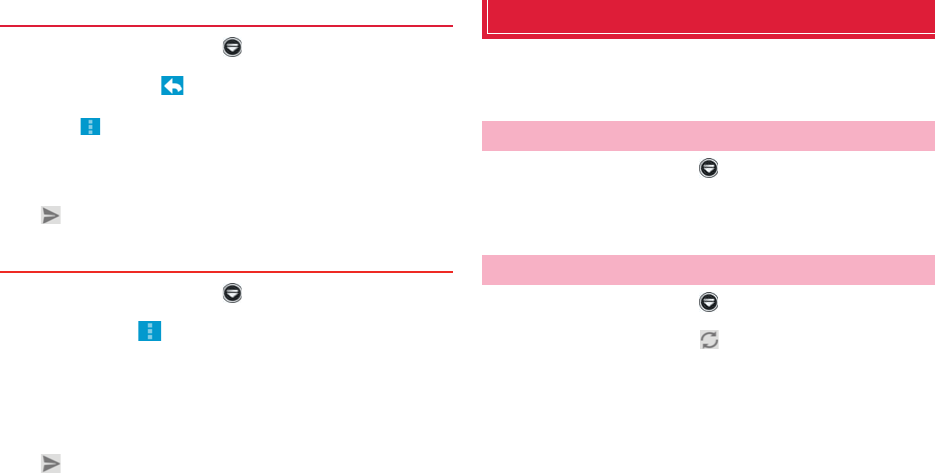
83 Mail/Browser
1From the Home screen, → "Email"
2Tap an email →
■Replying all members in To/Cc/Bcc fields
a → "Reply all"
3Enter message in message field
・In the message field, "Compose mail" or signature appears.
4
1From the Home screen, → "Email"
2Tap email → → "Forward"
3Enter mail address in "To" field
4Enter message in message field
・In the message field, "Compose mail" or signature appears.
5
Gmail
Email can be sent or received via Gmail.
・A Google account is required for using Gmail. If Google account setup
screen appears, set up your Google account.
1
From the Home screen,
→
"Gmail"
2Tap mail on the "Inbox" screen
Message of selected mail appears.
1
From the Home screen,
→
"Gmail"
2On the "Inbox" screen,
・The inbox is refreshed with Gmail on the terminal and Gmail on the
website synchronized with each other.
Replying to email
Forwarding email
Opening Gmail
Refreshing Gmail
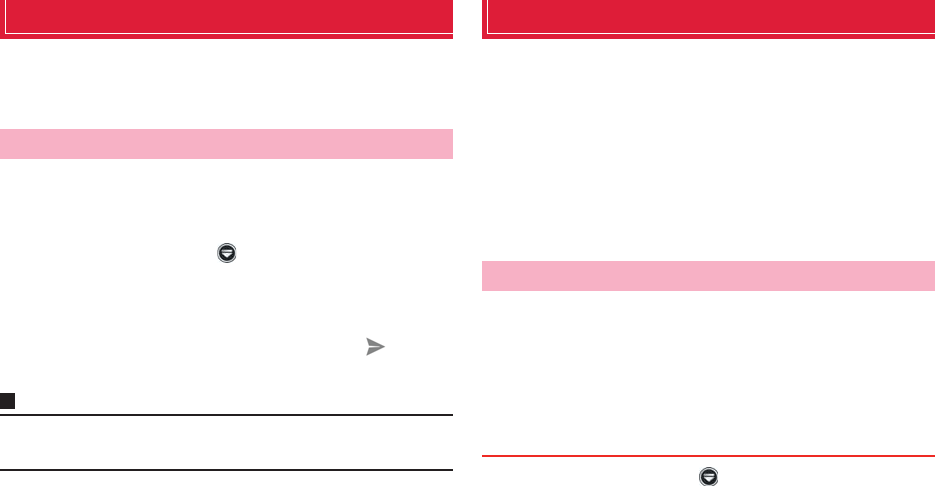
84 Mail/Browser
Google Talk
Google Talk is an instant message program provided by Google. You can
chat (exchanging text messages) with Google account users. To use
Google Talk, a Google account is required.
To use Google Talk, signing in and adding members are required.
However, if you have already set your Google account, you can use
Google Talk without signing in.
1
From the Home screen,
→
"Talk"
2Tap an account you want to chat
・Chat screen appears.
3Enter message in "Type message" field →
・Entered message is sent.
Information
・For details on Google Talk, on the Google Talk screen, M → Tap "Help" to see
Android OS Help.
Early warning "Area Mail"
This is a service with which you can receive emergency earthquake flash
report delivered by the Meteorological Agency etc.
・Area Mail is a free service and subscription is not required.
・Up to 50 items can be saved.
・Area Mail cannot be received when the power off or in Airplane mode, while
displaying PIN unlock screen, when docomo mini UIM card is not inserted,
when radio waves cannot be received, in data transmission, during W-Fi
tethering, while updating software, while upgrading OS version, during a call,
during packet communication (in streaming playback, data transmission).
When the terminal is low on memory, reception may be failed.
・Area Mail that could not be received cannot be received later.
When Area Mail is received, dedicated buzzer or ringtone sounds,
notification icon appears on the status bar, and the content display screen
opens.
・Buzzer or ringtone sounds at full volume. The setting cannot be changed.
・Ringtone sounds even in silent mode by default. This setting can be
changed.
1
From the Home screen,
→
"Area Mail"
2Tap an Area Mail you want to check
Online chat
When receiving early warning "Area Mail"
Viewing received Area Mail
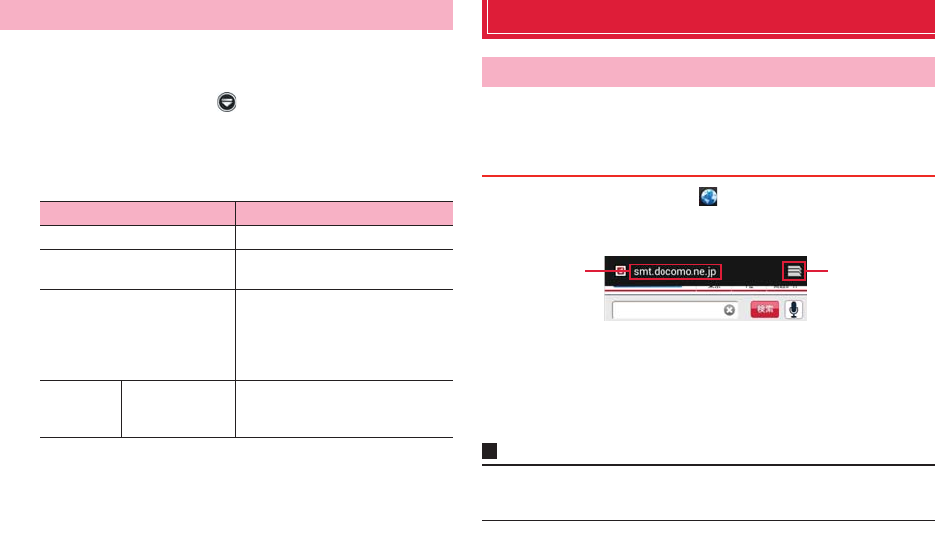
85 Mail/Browser
You can make receiving setting and ringtone setting. Also action when
receiving mail can be set.
1
From the Home screen,
→
"Area Mail"
2M → "Settings"
3Set each item
Web browser
Use web browser to view web pages.
・Some pages cannot be viewed or viewed properly.
1
From the Home screen,
Web browser activates and web page set as home page (dmenu
(http://smt.docomo.ne.jp/ (in Japanese only)) by default) appears.
aAddress bar
Enter a URL of web page or keyword for searching.
bWindow icon
Tap to view a list of web pages currently opened.
Information
・Address bar and window icon are shown at the top of the screen. Slide to scroll
the screen downwards.
Setting Early warning "Area Mail"
Item Description
Receive setting Set whether to receive Area Mail.
Beep tone Set beep time and whether to sound
beep tone in silent mode.
Check screen image and
beep tone
Check actual reception screen and
beep tone for Area Mail such as
emergency earthquake flash report,
tsunami warning, disaster/
evacuation information.
Other
settings
Receive entry Register/delete Area Mail you want
to receive except for emergency
earthquake flash report, etc.
Using web browser
Activating browser
ab
Browser screen
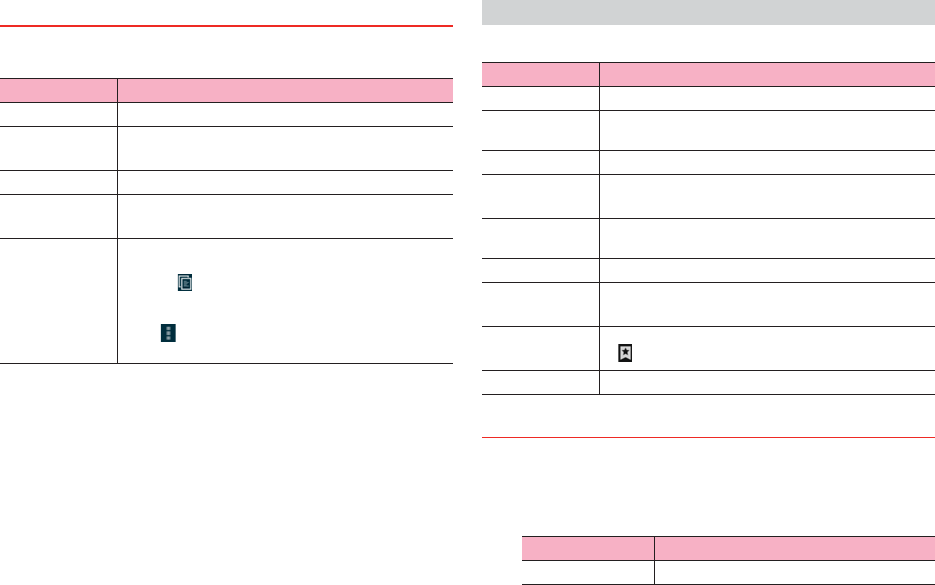
86 Mail/Browser
The following operations can be made on the browser screen.
・Depending on web pages opened, some operations cannot be made.
Tap M on the browser screen to show the following items.
1
Touch and hold a link on the browser screen
2Tap item you want to use
・Items shown defer depending on links.
Available operations while opening browser screen
Intention Operation
Zoom in/out Pinch in/out on the screen.
Fit image to
screen
Double tap the screen.
・Double tap an image fit to screen to zoom in.
Scroll Scroll/Swipe the screen.
Return to the
previous screen
Tap B.
Select/Copy text Touch and hold text.
・Drag the slider up/down/left/right to select text to copy
→ Tap to copy.
・Tap "SELECT ALL" to select all characters on the web
page.
・Tap to show menu and share selected text, search
or web-search for selected text.
Menu on the browser screen
Item Description
Refresh/Stop Refresh/stop refreshing web page.
Forward Return to the previous screen when a web page is viewed
by tapping B.
Bookmarks Show bookmark list (P.87).
Save to
bookmarks
Bookmark web page (P.87).
Share page Share URL of web pages through online services or send
URL via Bluetooth or mail.
Find on page Search in web page.
Request
desktop site
Set to open PC version web pages.
Save for offline
reading
Save currently viewed web page to read offline.
・ → "SAVED PAGES" to check content.
Settings Make browser settings.
Operating links on web page
Item Description
Open Open web page.
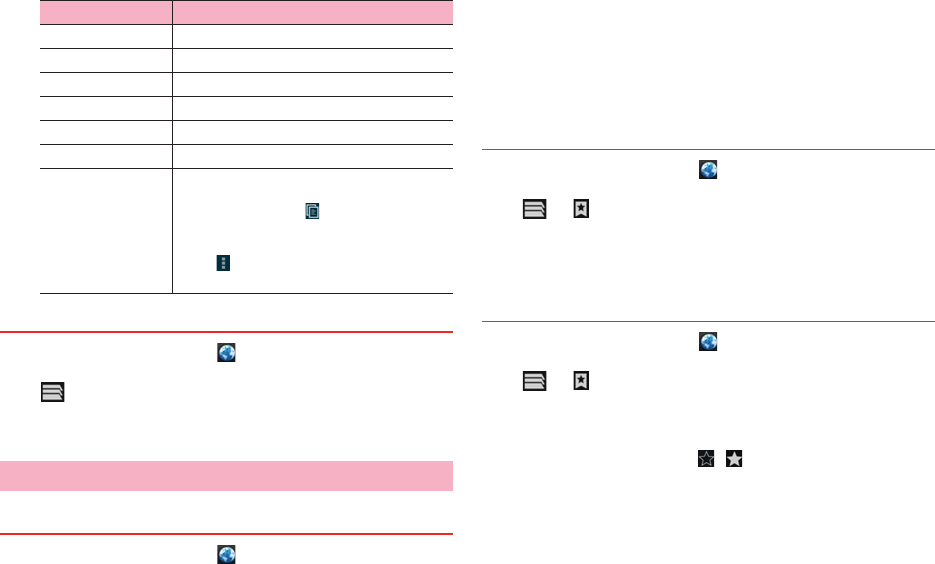
87 Mail/Browser
1
From the Home screen,
2 → M → "New incognito tab"
3Enter a URL or a keyword for searching
1
From the Home screen,
2Open web page to add to bookmarks → M → "Save to
bookmarks"
3Check/Change Label, Address, Account, Add to →
"OK"
1
From the Home screen,
2 →
Bookmark list appears.
3Tap a web page you want to view
1
From the Home screen,
2 → → "History"/"Saved pages"
History or saved page list appears.
3Tap a web page you want to view
・From the history screen, tap / to add to/delete from bookmarks.
・Open saved web page and tap M → "Go live" to refresh web page.
Open in new tab Open web page in a new window.
Save link Save web page.
Copy link URL Copy URL.
Save image Save image.
View image View image.
Set as wallpaper Set image as Home screen wallpaper.
Select text Select text.
・Drag the slider up/down/left/right to select
text to copy → Tap to copy.
・Tap "SELECT ALL" to select all characters on
the web page.
・Tap to show menu and share selected
text, search or web-search for selected text.
Using secret mode
Managing bookmarks and history
Adding to bookmarks
Item Description
Opening web pages from bookmarks
Opening web pages from history or saved web pages
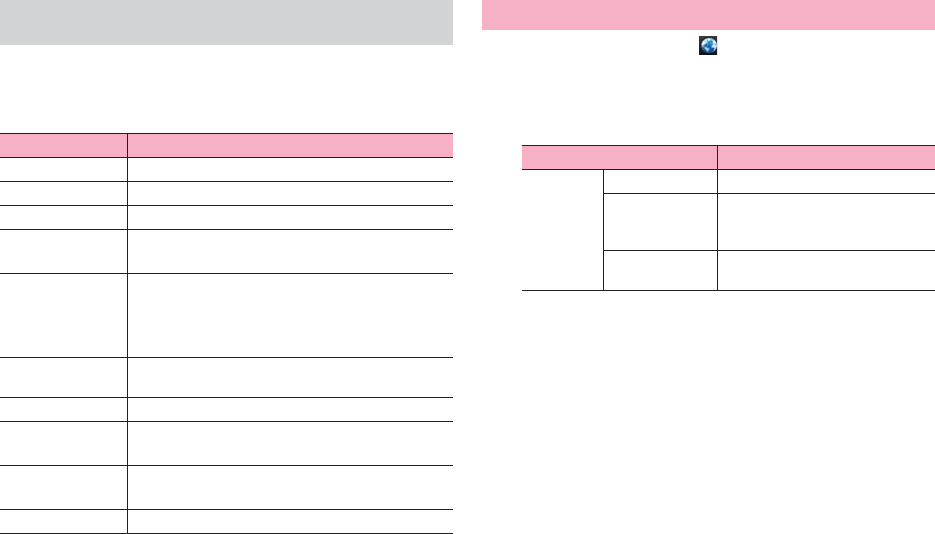
88 Mail/Browser
Touch and hold a web page in the list to show the following menu items.
・Items shown defer depending on web pages.
・On the saved page list screen, only "Delete saved page" appears to delete
saved pages.
*1 Appears only in bookmark list.
*2 Appears only in history list.
1
From the Home screen,
2M → "Settings"
3Set each item
Menu on the BOOKMARKS/HISTORY/SAVED PAGES
screen
Item Description
Open Open web page in the currently opened window.
Open in new tab Open web page in a new window.
Edit bookmark*1 Edit bookmark name/URL or change folder to save to.
Add shortcut to
home*1
Create a shortcut for bookmark on the Home screen.
Save to
bookmarks/
Remove from
bookmarks*2
Add to bookmarks/Delete from bookmarks.
Share link Share URL of web pages through online services or
send URL via Bluetooth or mail.
Copy link URL Copy URL.
Delete
bookmark*1
Delete from bookmarks.
Remove from
history*2
Delete web pages from the history.
Set as homepage Set web page as home page.
Setting browser
Item Description
General Set home page Set home page.
Form auto-fill Set whether to automatically enter
content saved in "Auto-fill text" when
an entry field for web form is tapped.
Auto-fill text Save content to enter an entry field
for web form.
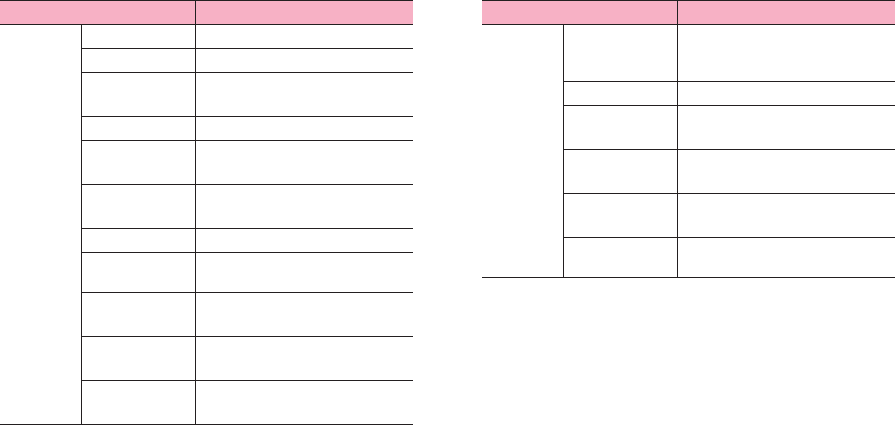
89 Mail/Browser
Privacy &
security
Clear cache Clear cache data.
Clear history Clear web page history.
Show security
warnings
Alert if security problem is
discovered in web page.
Accept cookies Allow to save, read Cookie.
Clear all
cookies
Clear saved Cookie.
Remember
form data
Save text entered in web page.
Clear form data Clear history of saved entered text.
Enable location Allow to access to the location
information of the terminal.
Clear location
access
Delete all location information saved
on the terminal.
Remember
passwords
Save user names, passwords
entered in web pages.
Clear
passwords
Delete saved user names,
passwords.
Item Description
Accessibility
Force enable
zoom
Set whether to enable "Accessibility"
setting to enable to zoom in/out in
every web page.
Text scaling Set font size.
Zoom on
double-tap
Set magnification ratio when double
tapping.
Minimum font
size
Set the smallest font size.
Inverted
rendering
Set whether to use reversal
rendering.
Contrast Set contrast when "Inverted
rendering" is marked.
Item Description
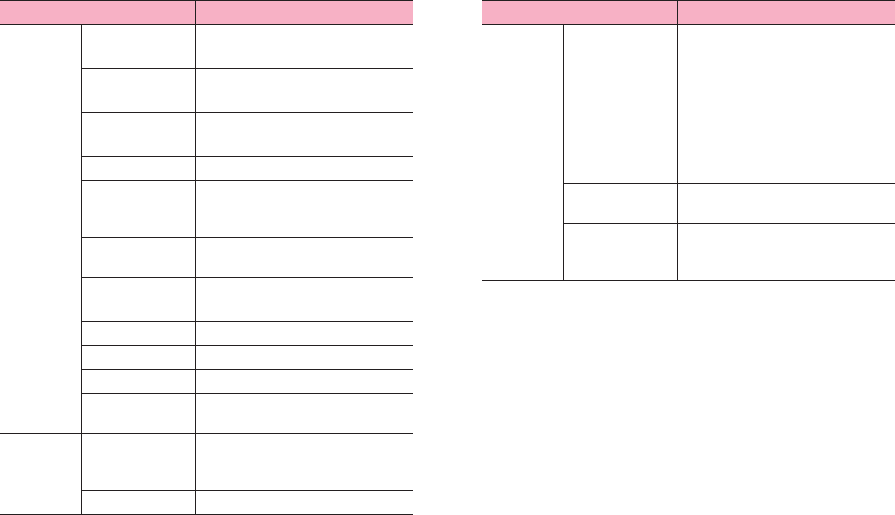
90 Mail/Browser
Advanced Set search
engine
Set search engine.
Open in
background
Open a new window behind of the
currently displayed window.
Enable
JavaScript
Enable JavaScript.
Enable plug-ins Enable plugin.
Website
settings
Show detailed information such as
web pages accessed to location
information.
Default zoom Set whether to zoom in/out web
page.
Open pages in
overview
Fit new opened web page to screen.
Auto-fit pages Show web pages in screen size.
Block pop-ups Block pop-up windows.
Text encoding Set character encoding.
Reset to default Return browser settings to the
default.
Bandwidth
management
Search result
preloading
Set to allow browser to preload
reliable search results in
background.
Load images Set whether to show image.
Item Description
Labs Quick controls Set whether to operate browser by
displaying quick control.
・Touch and hold the left/right
extremity to show quick control.
Drag the quick control to an icon
you want to operate and lift the
finger up to perform operations.
・Mark it to hide the address bar
and window icon.
Fullscreen Set whether to hide status bar and
show web page in full screen.
Switch
windows
Set whether to switch windows by
swiping from left/right end of screen
to the center.
Item Description
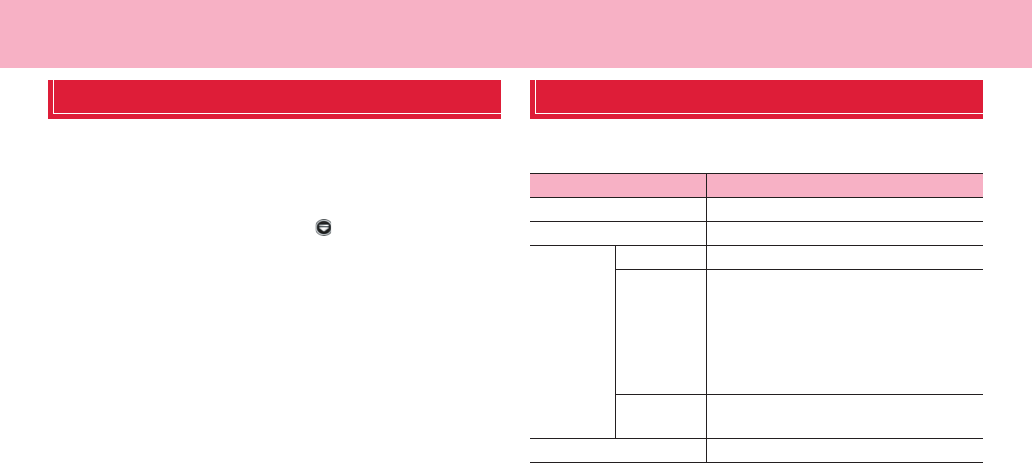
91 Settings
Settings
Setting menu
You can change and check terminal settings from the setting menu.
・
Some items cannot be viewed or selected depending on terminal status.
1From the Home screen, M → "Settings"
Setting menu is shown by category.
・Alternatively, from the Home screen, → Tap "Settings" to show
setting menu.
WIRELESS & NETWORKS
Make network connection setting, wireless connection setting such as
Wi-Fi and Bluetooth.
Item Description
Wi-Fi P.92
Bluetooth P.115
Data usage Mobile data Set whether to enable data communication.
Set mobile
data limit
Set upper limit for data usage.
・M → Mark "Data roaming" to allow data
roaming.
・M → Mark "Restrict background data" to
restrict background communication.
・M → Mark "Show W-Fi usage" to show
status when using Wi-Fi.
Data usage
cycle
Set period for measuring data usage.
More... P.93
92 Settings
Connect to home network, company network, or access points for public
wireless LAN services using Wi-Fi function to use mail and Internet.
Information
・Packet communication can be used while Wi-Fi is ON. However, Wi-Fi
network is given priority while Wi-Fi is connected.
・If Wi-Fi network is disconnected, connection automatically switches to LTE/
3G/GPRS network. Note that packet communication fee applies for using
LTE/3G/GPRS network.
■Reception interference caused by Bluetooth devices
The terminal's Bluetooth function and wireless LAN devices use the same
frequency band (2.4GHz).
If you use the terminal near a wireless LAN device, reception interference
may occur or the communications speed may lower. Also, you may hear
noise or have a connection problem. In these cases, do the following:
・
Keep the terminal 10 or more meters away from Bluetooth devices.
・
Within 10 meters, turn off Bluetooth devices.
1From the Home screen, M → "Settings" → "Wi-Fi"
Wi-Fi setting screen appears.
2"OFF"
"ON" appears and Wi-Fi turns ON.
Available access points are automatically detected and listed.
3Tap an access point to connect to
■Connecting to an open access point
Tap the access point to connect automatically.
■Connecting to a secured access point
aEnter a password → "Connect"
・Mark "Show password" to show entered password.
・Mark "Show advanced options" to show setting items for proxy
setting, IP setting (DHCP/static), etc. "WPS" field appears for
WPS supported access point. You can connect to it by using
WPS.
■Connecting to an access point by WPS button
aMark "Show advanced options" → Tap "WPS" → "Push button"
bPress WPS button on the access point
■Connecting to an access point by WPS PIN code
aMark "Show advanced options" → Tap "WPS" → "PIN from access
point"/"PIN from this device"
bEnter PIN code to the terminal or access point
Information
・To manually scan available access points, tap "Scan" on the Wi-Fi setting
screen.
・To set Wi-Fi sleep setting, from the Wi-Fi setting screen, M → "Advanced" →
"Keep Wi-Fi on during sleep" → Tap a condition.
To connect to a private access point, manually enter setting.
・
For the necessary information, refer to the instruction manual of your Wi-Fi
access point. To connect to a company network or public wireless LAN service,
ask network administrator or service provider for connection information.
1On the Wi-Fi connection screen, "ADD NETWORK"
Using Wi-Fi function
Connecting automatically to an access point
Connecting manually to an access point
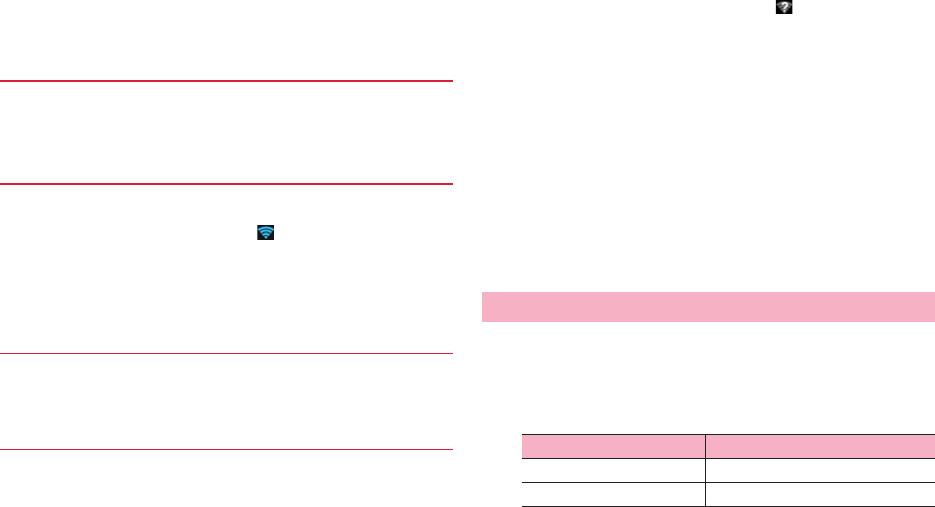
93 Settings
2Enter network SSID → Tap "Security" field → Select
security type → Enter password
Security type can be selected from "Open", "WEP", "WPA/WPA2 PSK",
and "802.1x EAP".
3"Save"
1Tap access point you want to disconnect on the Wi-Fi
setting screen → "Forget"
You can check Wi-Fi connection status as follows.
・
Status bar
When the terminal connects Wi-Fi network, appears on the status bar to
indicate signal strength.
・
Access point
Tap access point currently connected on the Wi-Fi setting screen to show
information such as connection status, security, signal strength.
1On the Wi-Fi setting screen, M → "Advanced"
MAC address/IP address of the terminal appears.
■Notifying Wi-Fi access point
You can set to notify when open network access points are detected.
・
You are notified if Wi-Fi is set to on but the terminal does not connect to access
point.
・
The setting is ON by default.
1On the Wi-Fi setting screen, M → "Advanced" → Mark
"Network notification"
・When available access points are found, appears on the status
bar to notify.
■Using static IP address
You can set the terminal to connect to a Wi-Fi access point using static IP
address.
1Tap access point you want to connect on the Wi-Fi
setting screen
2Mark "Show advanced options"
3Tap "IP settings" field → "Static" → Tap item to enter →
"Connect"
Set Airplane mode, VPN, tethering, etc.
1From the Home screen, M → "Settings"
2"More..."
Disconnecting Wi-Fi network
Checking Wi-Fi connection status
Checking MAC address/IP address
Making Wi-Fi advanced settings
Using other connection functions
Item Description
Airplane mode P.94
VPN P.94
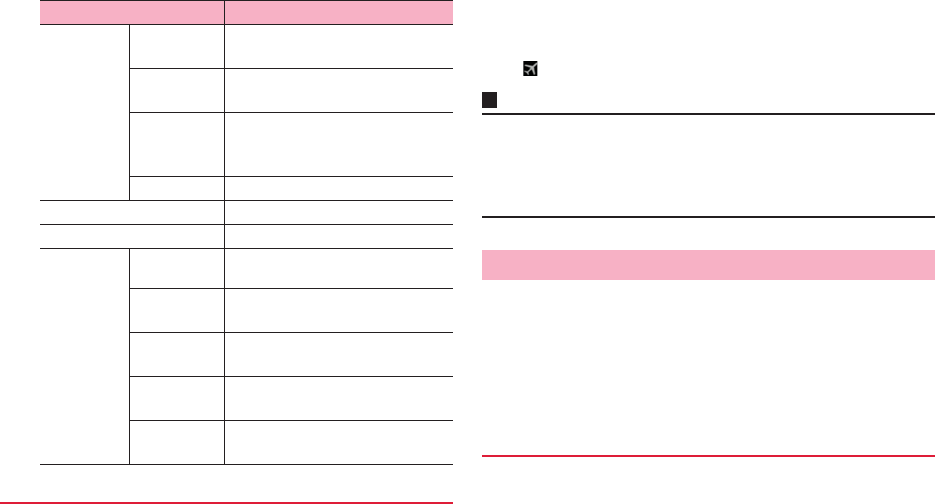
94 Settings
Stop sending and receiving radio wave with the terminal powered ON. If
enabled, functions which require sending and receiving radio wave such as
making/receiving calls, connecting to the Internet, sending/receiving mail
cannot be used.
1From the Home screen, M → "Settings" → "More..."
2Mark "Airplane mode"
appears on the status bar.
Information
・Alternatively, press and hold T → Tap "Airplane mode" to enable Airplane
mode.
・If Airplane mode is set, Wi-Fi function, Wi-Fi tethering and Bluetooth turn off.
However, Wi-Fi function and Bluetooth function can be turned on even in
Airplane mode.
VPN (Virtual Private Network) is a technology to connect to the information
in a protected local network from another network. VPNs are generally
available in companies, schools or other facilities. Users can access
information in a local network even from outside of the facilities.
To set up a VPN connection from the terminal, you need to retrieve
information related to security from your network administrator.
・
When ISP is set to sp-mode, PPTP is not available.
1From the Home screen, M → "Settings" → "More..."
2"VPN"
VPN setting screen appears.
・To use VPN, set screen unlock preference beforehand. If alert screen
about screen lock appears, read the alert → Tap "OK", then follow the
onscreen instructions.
Tethering USB
tethering
P.96
Wi-Fi
tethering
P.95
Configure
Wi-Fi
hotspot
P.95
Help Show Help.
Wi-Fi direct P.96
Wi-Fi Direct settings P.96
Mobile
networks
Data enabled Enable/Disable data communication
via mobile network.
Data
roaming
P.163
Access Point
Names
P.97
Network
Mode
P.162
Network
operators
P.163
Enabling Airplane mode
Item Description
Connecting to VPN
Adding a VPN
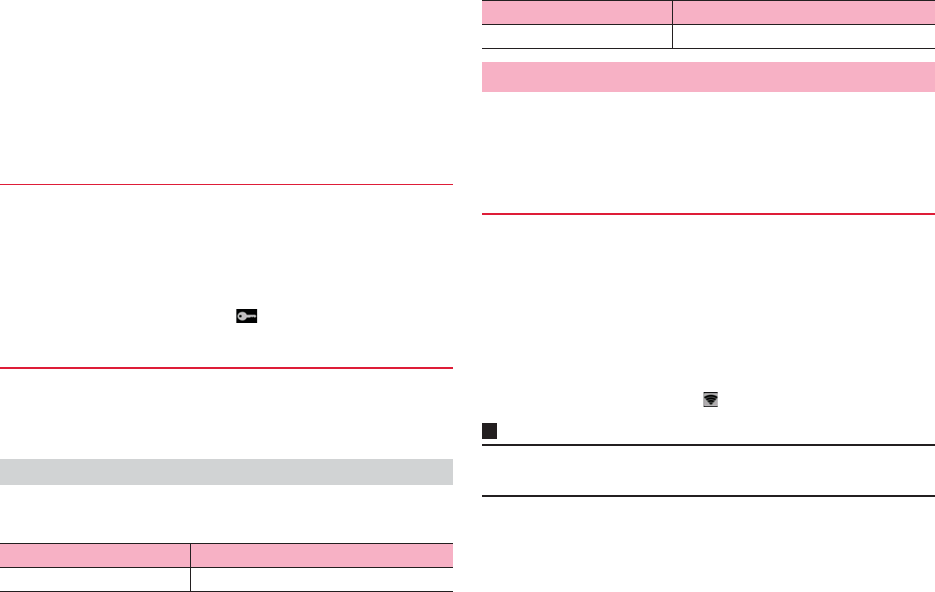
95 Settings
3"Add VPN network"
4Set items following instructions from a network
administrator
・Tap "Cancel" to cancel setting.
5"Save"
1Tap a VPN you want to connect on the VPN setting
screen
2Enter required authentication information →
"Connect"
When you are connected to VPN, appears on the status bar.
1Tap a VPN to disconnect on the VPN setting screen →
"Disconnect"
VPN is disconnected.
Touch and hold a VPN on the VPN setting screen to show the following menu
items.
Use tethering to connect other devices to the Internet via packet
communication of the terminal. 2 methods of tethering can be used.
・
Wi-Fi tethering (P.95)
・
USB tethering (P.96)
Use Wi-Fi tethering to connect other devices to the Internet via packet
communication of the terminal.
・
Up to 8 communication devices can be connected via the terminal at the same
time.
1From the Home screen, M → "Settings" → "More..."
2"Tethering" → "Wi-Fi tethering" → Confirm details of
notes → "OK"
"Wi-Fi tethering" is marked and appears on the status bar.
Information
・If Wi-Fi tethering is enabled while connected to Wi-Fi network, network
switches to packet network.
■Checking network SSID and security (password)
By default, "AndroidAP" for Network SSID, "WPA2 PSK" for security,
12-digit alphanumeric characters which differ from one device to
another for password are set.
Connecting to VPN
Disconnecting VPN
Menu on the VPN setting screen
Item Description
Edit network Edit items for VPN settings.
Delete network
Delete VPN.
Using tethering function
Using Wi-Fi tethering
Item Description
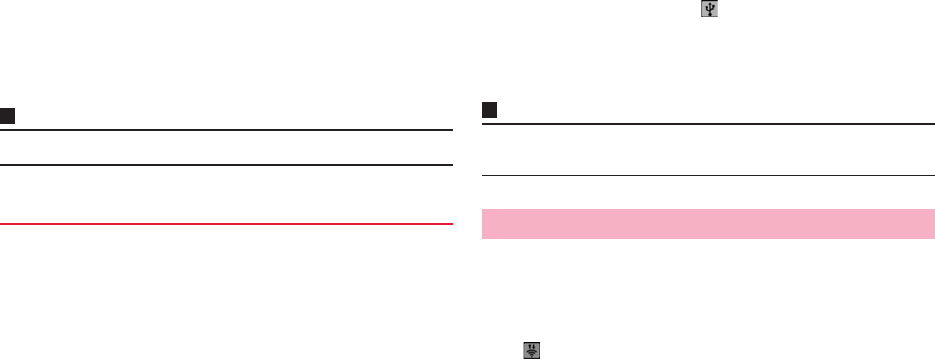
96 Settings
1From the Home screen, M → "Settings" → "More..."
2"Tethering" → "Configure Wi-Fi hotspot"
3Check network SSID and security (password)
・Security type can be selected from "Open", "WPA PSK", and "WPA2
PSK".
・Mark "Show password" to show entered password.
■Changing network SSID and security (password)
aChange network SSID and security (password) →
"Save"
Information
・Performing "Factory data reset" (P.109) initializes password.
Use Micro USB Cable 01 (optional) to connect the terminal and other
device. Make setting to connect other device to the Internet via packet
communication of the terminal.
・
For information on how to connect to the terminal and system requirement for
available PC, see "Connecting external device" (P.117).
・
Windows Vista PCs and Windows 7 PCs are available. For Windows XP PC,
download and install the latest version of Microsoft ActiveSync.
・
For details on USB tethering, from the Home screen,
M
→
"Settings"
→
"More..."
→
"Tethering"
→
"Help".
1Connect the terminal and communication device with
Micro USB Cable 01
・For information on how to connect, see "Connecting external device"
(P.117).
2From the Home screen, M → "Settings" → "More..."
3"Tethering"
・Make sure that notification indicating that USB is connected appears
under "USB tethering".
4"USB tethering" → Confirm details of notes → "OK"
"USB tethering" is marked and appears on the status bar.
■Canceling USB tethering setting
aUnmark "USB tethering"
bClick USB safely remove on the task try of your PC.
cRemove Micro USB Cable 01
Information
・While USB tethering is set, inserted microSD card or internal storage of the
terminal cannot be used from a PC as a USB storage.
Connect Wi-Fi Direct device to exchange data.
1From the Home screen, M → "Settings" → "More..."
2Mark "Wi-Fi direct"
appears on the status bar.
・If confirmation screen for starting Wi-Fi Direct appears, check the note
→
Tap "OK".
3"Wi-Fi Direct settings"
The Wi-Fi Direct setting screen appears. Scanned devices appear in the
"WI-FI DIRECT DEVICES" field.
4Tap a device to connect → "Connect"
Using USB tethering Using Wi-Fi Direct
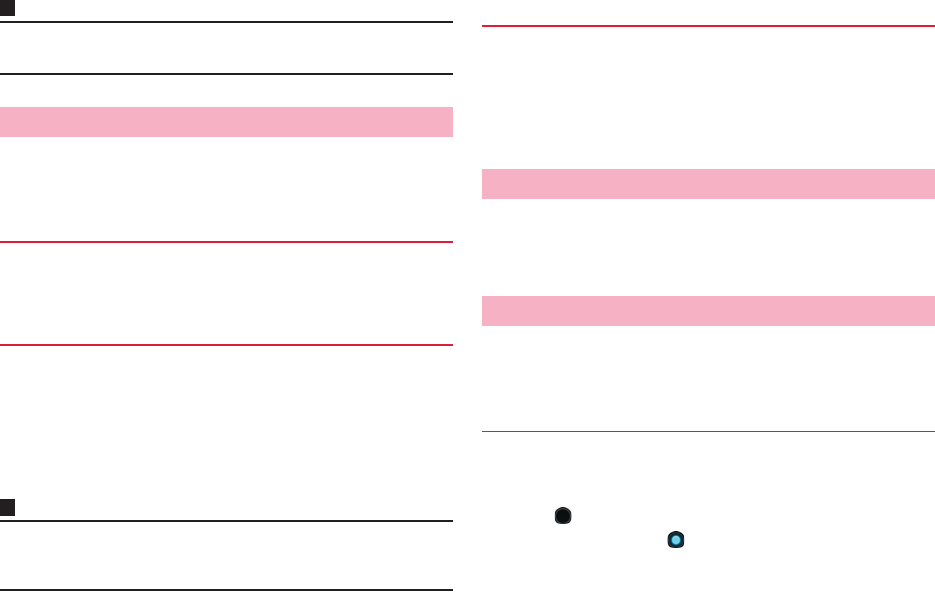
97 Settings
Information
・For manually scanning available devices, tap "Scan" on the Wi-Fi Direct
setting screen.
Access points (sp-mode, mopera U) to connect to the Internet are
registered by default, adding and editing access points are available.
By default, sp-mode is set as default access point.
1From the Home screen, M → "Settings" → "More..."
→ "Mobile networks" → "Access Point Names"
1From the Home screen, M → "Settings" → "More..."
→ "Mobile networks" → "Access Point Names"
2M → "New APN"
3Edit setting for access point → M → "Save"
Information
・Do not change the MCC/MNC to other than 440/10. The settings disappears
from the screen. In this case, initialize the access point or set a new access
point.
By initializing an access point, the default state is restored.
1From the Home screen, M → "Settings" → "More..."
→ "Mobile networks" → "Access Point Names"
2M → "Reset to default"
sp-mode is ISP for NTT DOCOMO smartphone. In addition to accessing
Internet, you can use the mail service using the same address as i-mode
mail (@docomo.ne.jp), etc. sp-mode is a service requiring subscription.
For details on sp-mode, refer to NTT DOCOMO website.
mopera U is ISP of NTT DOCOMO. If you have subscribed to mopera U,
you can use Internet after making the simple settings. mopera U is a
service requiring subscription.
1From the Home screen, M → "Settings" → "More..."
→ "Mobile networks" → "Access Point Names"
2Tap of "mopera U"/"mopera U設定 (mopera U
setting)" to turn to
Setting access point
Checking currently used access point
Adding access point
Initializing access point
sp-mode
mopera U
Setting mopera U
98 Settings
Information
・"mopera U設定 (mopera U setting)" is an access point for setting mopera U.
You can make mopera U setting via packet communication free of charge if
you use access point for mopera U setting. Note that the access point always
connects you to initial setting screen or editing setting screen.
For details on mopera U setting, refer to NTT DOCOMO website.
DEVICE
You can make settings for ringtone, notification, Silent mode, etc.
1From the Home screen, M → "Settings"
2"Sound"
Sound
Item Description
Volum e P.99
Silent mode P.99
Phone
ringtone
P.99
Default
notification
P.99
Vibration when
ring
Set whether to vibrate when an incoming call is
received.
Dial pad touch
tones
Set whether to emit dialpad sound when entering
phone number.
Touch sounds Set whether to emit operation sound when selecting
an application or menu item.
Screen lock
sound
Set whether to emit notification sound when locking/
unlocking screen.
Vibrate on
touch
Set whether to vibrate when tapping J / M / B or
taking specified actions.
99 Settings
You can adjust ringtone volume, media sound volume individually.
・
Music, video, games & other media
・
Vibrate and ring
・
Alarm
1From the Home screen, M → "Settings"
2"Sound" → "Volume"
3Drag the slider of volume bar left or right → "OK"
Information
・Alternatively, press + / - to adjust ringtone volume.
However, while using an application for playing videos or music ringtone
volume may not be adjustable.
・For some applications such as playing videos/music applications, media
sound can be adjusted using volume bar on the screen.
You can set not to emit ringtone and notification sound.
1From the Home screen, M → "Settings" → "Sound"
2"Silent mode" → "OFF"/"Vibrate"/"Mute"
When "Vibration"/"Mute" is selected, / appears on the status bar.
Information
・Note that, even when Silent mode is set, shutter sound or start/end shooting
sound of the camera, playback sound of music/video or alarm sound are
emitted.
・Alternatively, press and hold T → Tap / to enable Silent mode.
Set incoming call ringtone and notification sound when receiving new mail
etc.
1From the Home screen, M → "Settings" → "Sound"
2"Phone ringtone"/"Default notification"
3Select sound or music → "OK"
Set display brightness, screen auto rotation, backlight time-out period.
1From the Home screen, M → "Settings"
2"Display"
Adjusting volume
Setting Silent mode
Setting ringtone/notification sound
Display
Item Description
Brightness P.100
Wallpaper Set home screen wallpaper.
Auto-rotate screen P.30
Sleep P.100
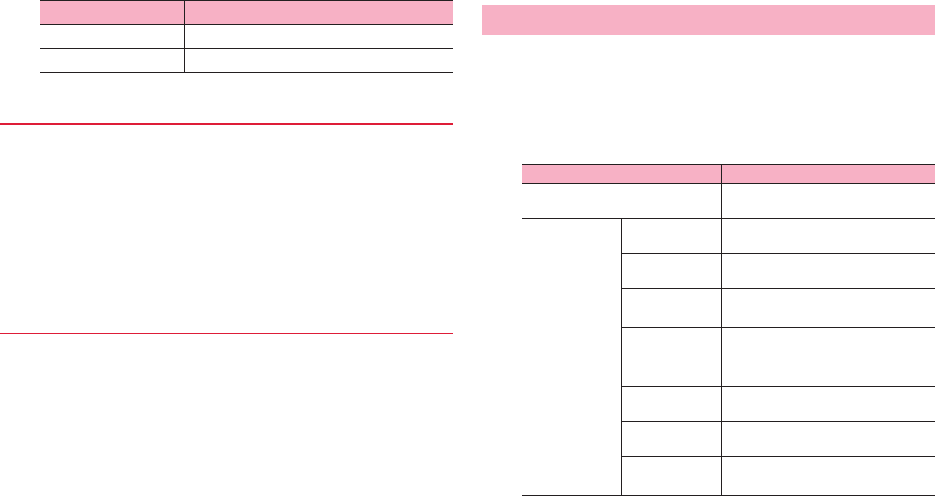
100 Settings
1From the Home screen, M → "Settings"
2"Display" → "Brightness"
3Drag the slider left or right → "OK"
・When "Automatic brightness" is marked, screen brightness cannot be
adjusted by the slider. Screen brightness is automatically adjusted
according to the ambient lighting.
1From the Home screen, M → "Settings"
2"Display" → "Sleep"
3Tap time before the terminal goes into sleep
Check amount of memory for the terminal, microSD card installed in the
terminal, etc.
1
From the Home screen,
M →
"Settings"
2"Storage"
Font size Set font size.
Font setting Set character font shown on the display.
Adjusting screen brightness
Setting time period before going into sleep mode
Item Description Storage
Item Description
Software Upgrade Update the terminal using the
software saved in microSD card.
INTERNAL
STORAGE
Total space Show total amount of the terminal
memory.
Apps Show data amount of applications
installed in the terminal.
Pictures,
videos*
Show data amount of pictures and
videos saved in the terminal.
Audio (Music,
ringtones,
podca)
Show sound data amount saved in
the terminal.
Misc.* Show amount of other data saved in
the terminal.
Available Show available memory space in
the terminal.
Erase Internal
Storage
Delete data saved in the terminal.
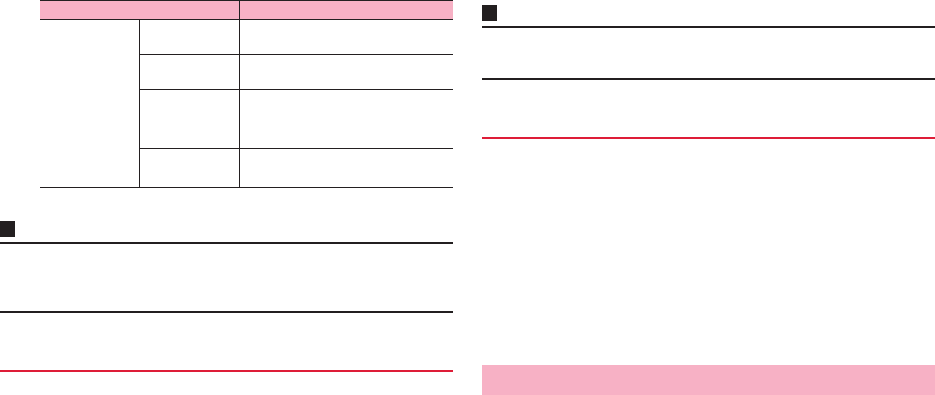
101 Settings
*: Appeared only when data is saved in the internal storage.
Information
・If the terminal has 5% or less of available memory space, the terminal
operations may become unstable. If the terminal is low on memory, delete
unnecessary data or applications.
Unmount microSD card to safely remove from the terminal.
1From the Home screen, M → "Settings"
2"Storage" → "Unmount SD card"
・Message appears. Check the content.
3"OK"
Information
・Unmounting microSD card makes it impossible to play or save data in the
internal storage.
Format microSD card.
・
Note that formatting microSD card erases all data in the microSD card.
1From the Home screen, M → "Settings"
2"Storage" → "Erase SD card" → "Erase SD card"
3"Erase everything"
After formatting is complete, the microSD card is automatically mounted
and ready to use.
・Deleted data cannot be restored.
Check the amount of battery power being used.
1From the Home screen, M → "Settings"
2"Battery"
SD CARD Total space Show total amount of data saved in
microSD card.
Available Show available memory space in
microSD card.
Unmount SD
card/Mount
SD card
P.101
Erase SD
card
P.101
Unmounting microSD card
Item Description
Formatting microSD card
Battery
102 Settings
You can check information on installed applications, force-close
applications, delete data, uninstall applications, etc.
1From the Home screen, M → "Settings" → "Apps"
2Tap a tab to check
・Tap M on the "DOWNLOADED" tab/"ON SD CARD" tab/"ALL" tab
screen to change the display order.
3Tap an application
・You can check application information and tap an item shown on the
screen to operate.
Information
・You may fail to uninstall some applications preinstalled by default.
You can disable applications and services you cannot uninstall. Disabled
applications are not shown on the screen or not operated but they are not
uninstalled.
1From the Home screen, M → "Settings" → "Apps"
2Tap an application to disable → "Disable"
3Read note shown and "OK"
・Tap "Enable" to enable it again.
Information
・If you disable an application, other applications linking with the disabled
application may not be operated correctly. Enable the application again to
operate linked applications correctly.
Apps
Disabling applications
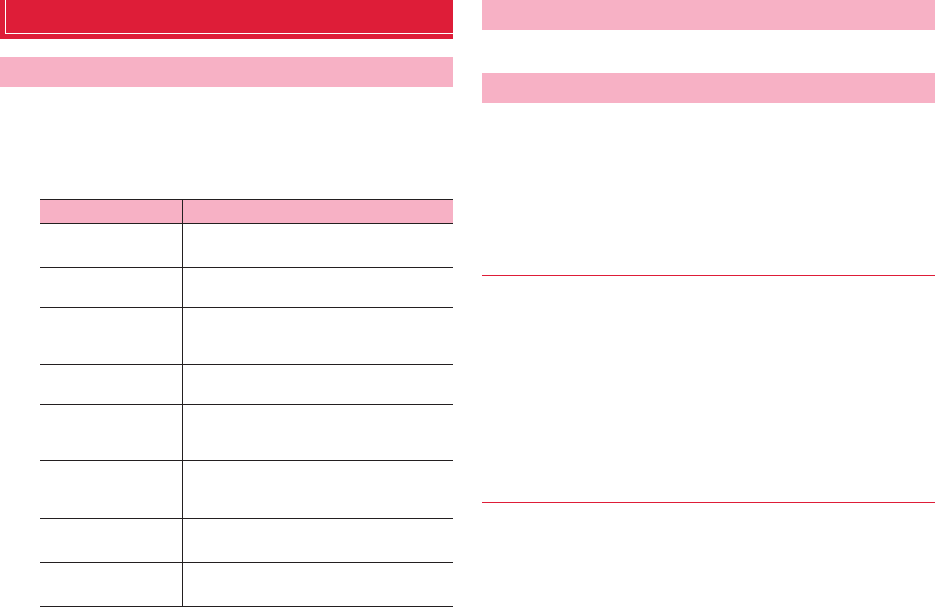
103 Settings
PERSONAL
Make setting for using docomo service.
1From the Home screen, M → "Settings"
2"docomo service"
Make call settings for network services, international roaming, etc. (P.71).
Set up accounts for online services such as Google and Microsoft
Exchange ActiveSync to the terminal to synchronize and update
information.
・
If you skip Google account setting in "Initial settings" (P.30), account setting
screen appears when you use Gmail, Google Play, etc. for the first time. Setting
up a Google account allows you to use online services provided Google such
as Gmail and Google Play.
1From the Home screen, M → "Settings"
2"Accounts & sync" → "ADD ACCOUNT"
3Tap a service of account you want to add
For subsequent operations, follow onscreen instructions.
・To set up Microsoft Exchange ActiveSync account, tap "Corporate".
For setup information, contact your network administrator or service
provider.
Make settings for online accounts and synchronization.
・
This service sometimes automatically communicates for synchronizing data,
etc. Communication fee may be charged.
1From the Home screen, M → "Settings"
docomo service
Item Description
Application
manager
Set checking frequency for updating.
Wi-Fi Make settings for using docomo services via
Wi-Fi.
docomo apps
password
Set password required when using docomo
applications.
・The setting is "0000" by default.
AUTO-GPS Set GPS function and show history of
positioning.
docomo location
information
Set location information service for imadoko
search/imadokokantan search/Keitai-
Osagashi Service.
docomo Wi-Fi Easy
Connection
Connect public wireless LAN service
"docomo Wi-Fi" or home Wi-Fi environment
readily.
Send preinstalled
apps usage status
Send application usage.
Open source
licenses
Show Open source licenses.
Call settings
Accounts & sync
Adding accounts
Setting up and synchronizing accounts
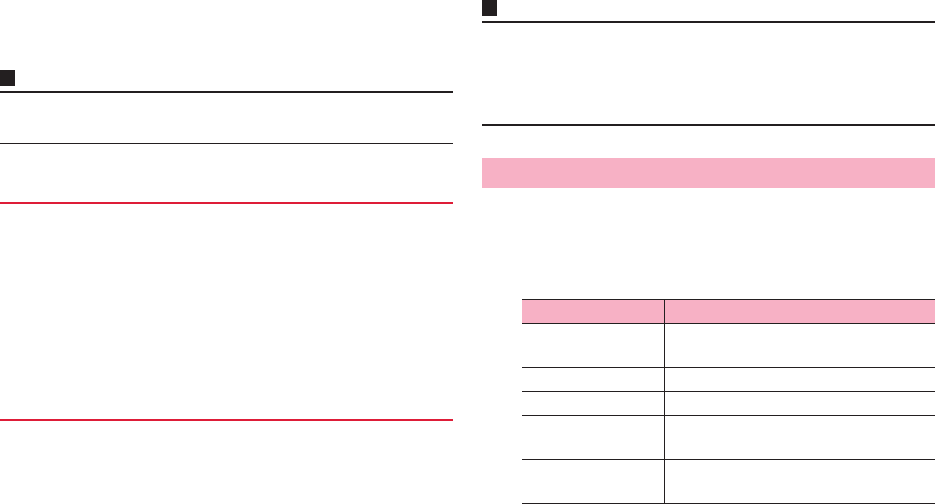
104 Settings
2"Accounts & sync"
3"OFF"/"ON" at the top right of the screen
Information
・To set items to be synchronized, tap an account → Mark items to be
synchronized.
1From the Home screen, M → "Settings"
2"Accounts & sync" → Tap accounts to be
synchronized
3M → "Sync now"
・While synchronizing, M → Tap "Cancel sync" to cancel
synchronizing.
Delete accounts, messages, contacts, setup information of online services
from the terminal.
・
Deleting accounts from the terminal does not delete information on the web.
1From the Home screen, M → "Settings"
2"Accounts & sync" → Tap accounts to be deleted
3M → "Remove account" → "Remove account"
Information
・If the account cannot be deleted because it is used by other applications,
perform "Factory data reset" (P.109) to delete it. Note that performing "Factory
data reset" restores data to the default. All data saved in the terminal such as
downloaded applications and registered information are erased.
・docomo account cannot be deleted.
Make settings for location information.
1From the Home screen, M → "Settings"
2"Location services"
Synchronizing accounts manually
Deleting accounts
Location services
Item Description
Google's location
service
P.144
GPS satellites P.144
GPS LED reminder LED flashes while using GPS.
GPS sound
reminder
Alert sounds while using GPS.
Location & Google
search
Set whether to allow Google to use location
information.
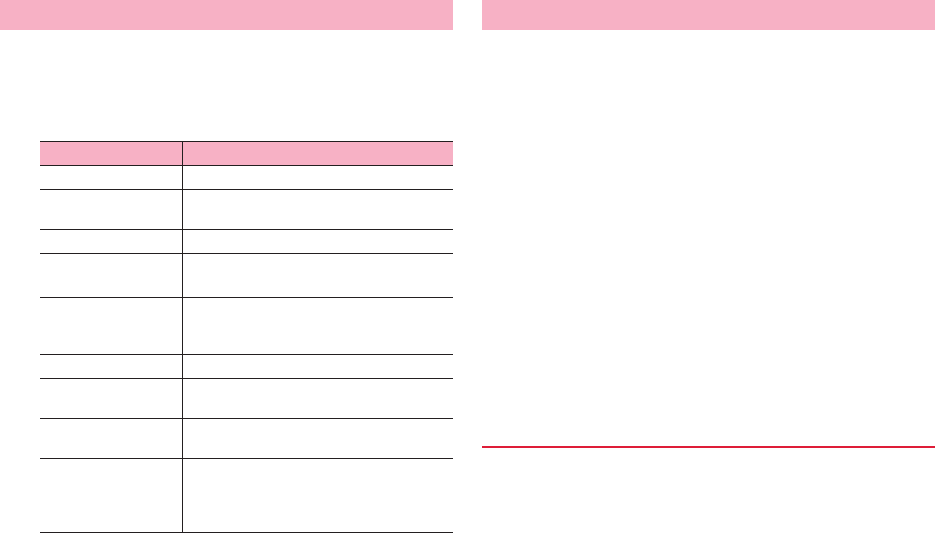
105 Settings
Make security settings.
1From the Home screen, M → "Settings"
2"Security"
Some functions provided for convenient use of the terminal require the
security code to use them.
Besides the security code for locking the terminal, the network security
code necessary for the network services etc. are available. Make use of the
terminal using an appropriate security code according to your purpose.
■Notes on the security codes
・
To set a security code, avoid imaginable numbers such as "birth date", "a part
of phone number", "street address or room number", "1111" or "1234". Maintain
a separate record not to forget the numbers.
・
Be careful never to reveal your security code to others. If a security code is
misused by others, DOCOMO assumes no responsibility for damages resulted
from it.
・
If you forget your security codes, you need to bring a document (a driver's
license etc.) to identify your subscription, the terminal and the docomo mini UIM
card to a docomo Shop. For details, contact "General Inquiries" on the last page
of this manual.
・
The PUK code is written on a subscription form (copy for user) handed at
subscription in a docomo Shop. For users subscribed in other than docomo
Shop, bring a document (a drivers license etc.) to identify your subscription and
the docomo mini UIM card to a docomo Shop, or contact "General Inquiries" on
the last page of this manual.
Security code for using screen lock function.
Security
Item Description
Screen lock P.107
Owner info Set whether to show user information on the
unlock screen.
Set up SIM card lock P.106
Make passwords
visible
Set whether to show password when entering
it.
Device
administrators
Enable/Disable manager's authority if terminal
manager is set.
・"Omakase Lock" is enabled by default.
Unknown sources P.108
Trusted credentials
Allow applications to access authentication
information or certificates.
Install from SD card Install encrypted certificates from microSD
card.
Clear credentials Delete all certificates (contents) in the
authentication information storage
(authentication information data used for VPN
connection) and reset password.
Security codes used on the terminal
PIN/Password for screen lock
106 Settings
The network security code is a 4-digit number necessary for identification
or using the docomo Network Services at reception of your request in
docomo Shop or at a docomo Shop, docomo Information Center. It can be
set any number at the subscription and also changed later by yourself.
You can change your network security code to a new one using a PC if you
have the "docomo ID/Password" for the "My docomo" * General support
site for PC.
If you use dmenu, "dmenu" → "お客様サポートへ (To Customer support)"*
→ You can change it yourself from "各種お申込・お手続き (Various
application/Procedures)" (in Japanese only).
*: For "My docomo" and "お客様サポート (Customer support)", see the
reverse side of the last page of this manual.
Security code called as PIN code can be set in the docomo mini UIM card.
The code is set to "0000" at the time of subscription, but you can change
the number by yourself.
PIN is a 4- to 8-digit number (code) that must be entered for user
confirmation to prevent unauthorized use by a third party every time you
insert the docomo mini UIM card into the terminal or when the terminal is
powered ON. Entering PIN enables making/answering a call and other
terminal operations.
・
If you purchased the terminal and install the docomo mini UIM card that you
have used on another terminal, use the PIN code set on the former terminal. If
you did not change the setting, the code is "0000".
・
If you enter a wrong PIN code 3 times consecutively, the PIN code is locked and
cannot be used anymore. In this case, unlock with "PUK".
The PUK code is an 8-digit number for canceling the locked PIN code. The
PUK code cannot be changed by yourself.
・
If you enter a wrong PUK code 10 times consecutively, the docomo mini UIM
card is locked. Please contact a docomo Shop.
Information
・If PIN code or docomo mini UIM card is locked, remove docomo mini UIM
card. The Home screen appears and communication via Wi-Fi is possible.
Set to request PIN when the terminal is powered ON to prevent
unauthorized use of docomo mini UIM card by a third party.
・
If you enter a wrong PIN 3 times consecutively, the PIN code is locked and
cannot be used anymore.
1From the Home screen, M → "Settings"
2"Security" → "Set up SIM card lock"
3"Lock SIM card" → Enter PIN → "OK"
"Lock SIM card" is marked.
■Changing PIN
・
This setting is available only when SIM card lock is enabled.
1From the Home screen, M → "Settings"
2"Security" → "Set up SIM card lock"
Network security code
PIN code
PUK code
Setting SIM card lock
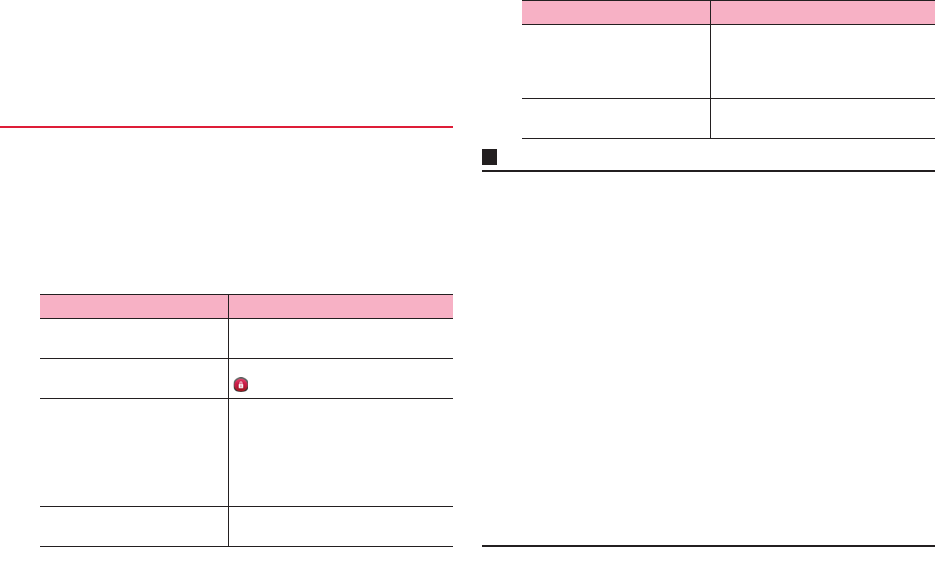
107 Settings
3"Change SIM PIN" → Enter current PIN → "OK"
4Enter a new PIN → "OK" → Re-enter the new PIN →
"OK"
Set to require security unlock operation when unlocking the screen.
1From the Home screen, M → "Settings"
2"Security" → "Screen lock"
・Enter unlock preference if other than "Not locked" and "Touch" is set.
3Follow the onscreen instructions.
Information
・You can set "PIN" (security code) of 4- to 16-digit numbers or "Password" of
4- to 16-alphanumeric characters (requiring at least 1 alphabet).
・Retaking a picture of your face for "Face Unlock" is available. From the Home
screen, M → "Security" → "Improve face matching" → Follow the onscreen
instructions to shoot.
・When "Pattern" is set, you can set to show the pattern traced with your finger.
From the Home screen, M → "Settings" → "Security" → Mark "Make pattern
visible".
・You can set the time period from when the display backlight turns off till when
the screen lock activates if other than "Not locked", "Touch" is set. From the
Home screen, M → "Settings" → "Security" → "Automatically lock" → Ta p a
time.
・You can set whether to vibrate when entering security unlock preference is
entered if other than "Note locked", "Face Unlock" is set. From the Home
screen, M → "Settings" → "Security" → Mark "Vibrate when touch".
・Set whether to show user information on the security unlock screen if other
than "Not Locked" is set. From the Home screen, M → "Settings" → "Security"
→ "Owner info" → Mark "Show owner info on lock screen" and enter user
information.
・If other than "Not locked", "Touch" is set, entering set security unlock
preference is required when performing "Factory data reset" (P.109).
Setting security unlock preference
Item Description
Not locked Set not to require security unlock
operation.
Touch Set to unlock the screen by tapping
.
Face Unlock Set to require face authentication
when unlocking the screen.
・Set pattern or PIN just in case face
authentication does not work or
when disabling face
authentication.
Pattern Set to unlock the screen by entering
pattern.
PIN code Set to unlock the screen by entering
security code.
・It does not mean "PIN code" set for
docomo mini UIM card.
Password Set to unlock the screen by entering
password.
Item Description

108 Settings
■If security unlock failed
If pattern, PIN, or password is set and entry failed 5 times, a message
asking to re-enter 30 seconds later appears.
・
If you forget security unlock pattern, on the re-entry screen, tap "Forgot pattern?"
and sign in to your Google account. You can create a new unlock pattern.
・
Note that if you have not set up your Google account or forget PIN or password,
you cannot unlock the screen.
If you cannot unlock the screen by face recognition, enter the pattern/PIN
set for Face Unlock.
Permit to install unknown sources applications such as applications
provided by third parties.
・
Pay attention to security when installing unknown sources applications.
1From the Home screen, M → "Settings"
2"Security"
3Mark "Unknown sources"
4Read the content → "OK"
Make settings for display language and keyboard used for character entry.
1From the Home screen, M → "Settings"
2"Language & input"
*: Japanese is not supported as of October 2012.
Permitting to install unknown sources applications
Language & input
Item Description
Language Set display language.
Spelling correction Set whether to run spell check.
Personal dictionary Save words used for Android
keyboard.
Default Set keyboard.
Android keyboard P. 3 6
FSKAREN P. 3 7
Google voice typing P. 3 6
Huawei Input Method P. 4 9
Simeji P. 5 0
Shabette-Key-Nyuryoku P. 5 1
Voic e
Search
Language Set language to be used for Google
voice typing.
SafeSearch Set adult filter for images and text
when using Voice Search.
Block
offensive
words
Set whether to show inappropriate
search results for Voice Search.
Text-to-
speech
output*
Pico TTS Make settings for speech synthesis
engine to be used for Text-to-speech
output.
Speech rate Set speed at which text is spoken.
Listen to an
example
Play speech synthesis sample.
Pointer speed Set pointer speed.
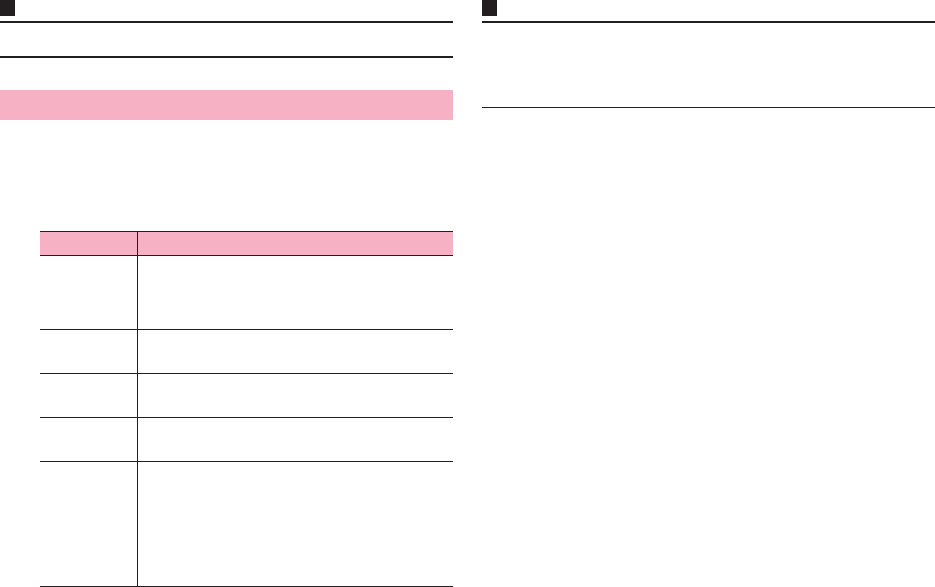
109 Settings
Information
・Voice data is not installed by default.
Make setting for data backup and terminal data reset.
1From the Home screen, M → "Settings"
2"Backup & reset"
Information
・Resetting makes the terminal returned to the default state. Not only saved
data but also function settings returns to the default state. For deleting only
shot photos or downloaded data such as music, from the Settings menu,
"Storage" → Tap "Erase Internal Storage" (P.100).
Backup & reset
Item Description
Back up my
data
Back up settings and data of Google services and
third parties' applications to the Google server. For
details on the backup function, contact application
developers.
Backup
account
Setup an account for backup.
Automatic
restore
Restore backed up settings and data when
reinstalling applications.
Data transfer
mode
Set mode to perform "iC transfer service".
Factory data
reset
Erase data saved in the terminal such as Google
accounts, downloaded applications, etc. and return
to the default.
・Back up important data before performing the
operation.
・To delete data saved in the microSD card, mark
"Erase SD card".
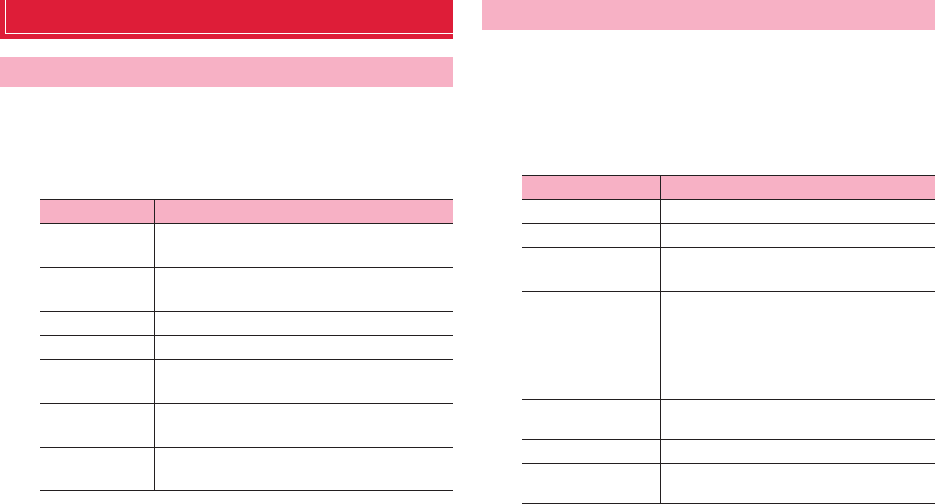
110 Settings
SYSTEM
Set date and time.
1From the Home screen, M → "Settings"
2"Date & time"
Make settings for applications and functions helping user operations.
1From the Home screen, M → "Settings"
2"Accessibility"
・When the screen reader notification screen appears, tap "OK" to
access Google Play to download "TalkBack".
Date & time
Item Description
Automatic date
& time
Set whether to automatically correct date and time
based on the information provided by the network.
Automatic time
zone
Set whether to automatically correct time zone
based on the information provided by the network.
Set date Set year, month, day manually.
Set time Set time manually.
Select time
zone
Set time zone manually.
Use 24-hour
format
Set whether to use 24-hour format.
Select date
format
Switch date format.
Accessibility
Item Description
SERVICES Installed services are shown.
Large text Set whether to view in large font.
Power button ends
call
Set to whether to end call by pressing T.
Auto-rotate screen Set whether to switch screen to vertical
position or horizontal position by detecting the
terminal orientation.
・For some applications, the screen
automatically rotates regardless of the
setting.
Speak passwords Set whether to read out entered passwords
using installed accessibility service.
Tap & hold delay Set time period for tapping touch panel.
Install web script Set whether to install script which allows you to
easily access web contents from applications.
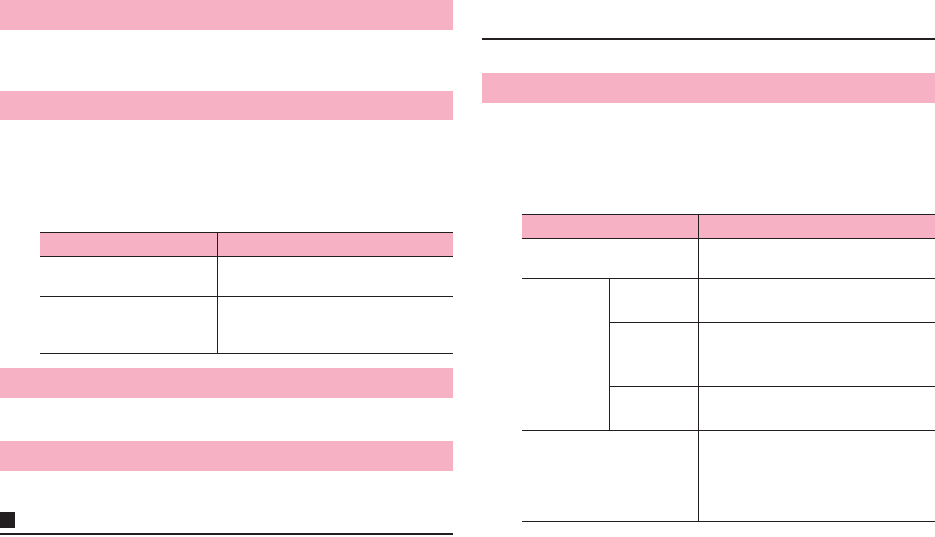
111 Settings
Change update setting for the terminal software and perform update
operations (P.176).
Reduce the battery consumption on the terminal.
1From the Home screen, M → "Settings"
2"Power saving mode"
Set options for using application development.
Reduce rebooting time of the terminal.
Information
・In the following cases, the terminal boots normally even if fast boot is set to
ON.
- SIM card lock is set
- Rebooting from phone options screen (P.27)
- The battery pack is removed while the power is off
Check own phone number, battery level, etc.
1From the Home screen, M → "Settings"
2"About phone"
Software update
Power saving mode
Item Description
Battery saver Reduce CPU operation to keep the
battery longer when "Balanced" is set.
Balanced Adjust battery consumption according
to ambient brightness to keep the
battery longer.
Developer options
Fast boot
About phone
Item Description
Status Show battery status, battery level,
phone number, etc.
Legal
information
Huawei
EULA
Check end user software license
agreement.
Open
source
licenses
Check open source license agreement.
Google
legal
Check Google legal.
Approval Information Show Technical Compliance Mark
which certifies that the terminal is
compliant with technical standards
based on the Telecommunications
Business Law and the Radio Law.
112 Settings
Model number,
Android version,
Baseband version,
Kernel version,
Build number
Information on the hardware, software,
Android OS, etc. of the terminal
Item Description
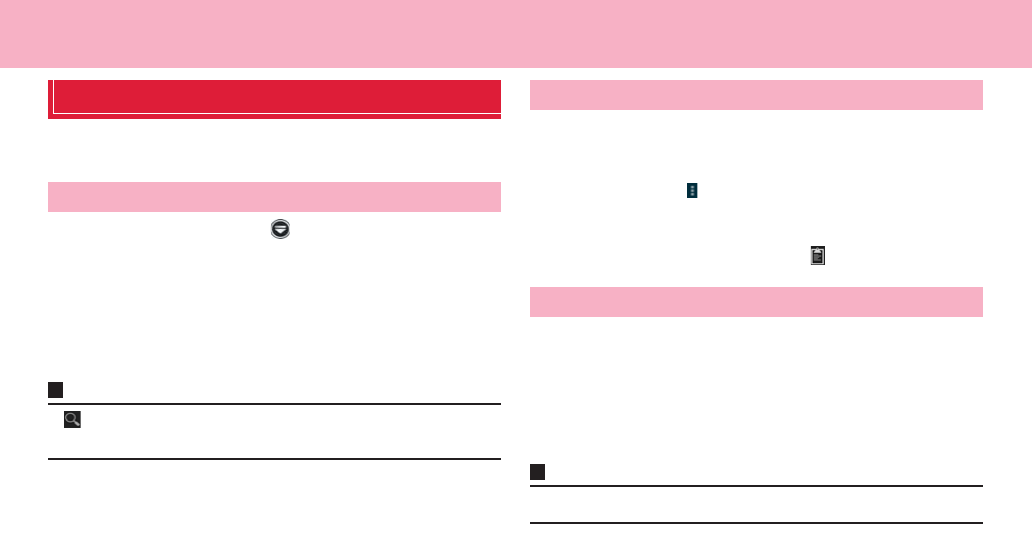
113 File management
File management
File Manager
View/play and manage files and folders saved in the internal storage and
microSD card.
1From the Home screen, → "File Manager"
2Tap the "Category"/"Internal"/"SD card" tab
3Tap a category or folder → Tap a file
Application for viewing/playing the file activates and the file can be
checked.
・Some files may not be able to be viewed on the terminal.
Information
・ on the "Category"/"Internal"/"SD card" tab → Enter text to search a folder
or file.
1Touch and hold a file or folder to move/copy on the
"Internal"/"SD card" tab → "Cut"/"Copy"
・To move/copy several files or folders, M → "Select item(s)" → Ta p
files or folders → → Tap "Cut"/"Copy".
・To select all files or folders, tap M → "Select item(s)" → "0 selected"
at the top of the screen → "Select all".
2Show location to move/copy →
1On the "Category" tab screen, "Applications" →
"Installed"/"My Market"
・You cannot manage applications stored in the "Not installed" folder.
2Tap an application → "Open"/"Copy to"/"Share"/"Add
to category"/"Uninstall"
Information
・Applications preinstalled by default are not shown on the "Category" tab.
Viewing/Playing files
Moving/Copying files or folders
Managing applications

114 File management
Touch and hold a file or folder on the File Manager screen to show the following
menu items.
・Items to be shown differ depending on types of files and folders.
Ta p
M
on the File manager screen to show the following items.
Menu on the File Manager screen
Item Description
Open Open files and folders.
Share Share file or folder via Bluetooth.
Set as Save in Phonebook or as wallpaper.
Cut Move file or folder.
Copy Copy file or folder.
Delete Delete file or folder.
Compress Compress file or folder.
Desktop shortcuts Create shortcut on the desktop.
Add bookmark Add to Bookmarks.
・Tap "Category" on the "Bookmarks" tab screen to
view file or folder to which bookmark is added.
・To delete a bookmark, on the "Category" tab,
"Bookmarks" → touch and hold a bookmark →
Tap "OK".
Rename Rename file or folder.
Details Check detailed information of file or folder.
Item Description
New folder Create a new folder.
Select item(s) Select several files or folders to move/copy,
compress, delete, etc.
Sort by Sort files and folders by name, size, date, etc.
Storage Check available memory in the internal storage and
microSD card.
Item Description

115 File management
Bluetooth communication
Send and receive data between the terminal and Bluetooth device.
・Note that connecting Bluetooth makes battery consumption increased.
・For the compatible versions or profiles, see "Main specifications" (P.180).
・For operations of Bluetooth device to be connected to the terminal, refer to
the device's instruction manual.
・Connection and operation availability with all commercial available
Bluetooth devices is not guaranteed.
■Notes on using Bluetooth function
・Connect with another Bluetooth device keeping the line-of-sight distance to
10 m or shorter. Distance available for connection may be shorter depending
on surrounding (wall, furniture, etc.) and structures of buildings.
・Place a Bluetooth device as far as possible from other devices (electric
appliances, audio-video equipment, office automation equipment, etc.).
Especially when using microwave oven, it may affect the terminal.
Connection may not be established correctly, or noises on TV or radio may
be generated.
・When there is a broadcasting station or wireless device nearby and
surrounding radio wave is strong, the terminal may not be connected
correctly.
・Radio wave emitted from Bluetooth devices may affect operations of medical
electronics etc. Turn off the terminal and nearby Bluetooth devices in place
such as train, airplane, hospital, place near automatic door or fire-alarm box,
where flammable gas is generated such as gas station because it may cause
an accident.
・You can connect Bluetooth device wirelessly even in a bag or pocket.
However, blocking between Bluetooth device and the terminal by body may
make the communication speed lower or cause noise.
■Radio wave interference with wireless LAN
Because a Bluetooth device and wireless LAN (IEEE802.11b/g/n) use the
same frequency band (2.4 GHz), if the device is used near a device with
wireless LAN capability, radio wave interference may occur, and
communication speed may be reduced, noise may occur, or connection
may not be established. In these cases, do the following:
・Keep the terminal 10 or more meters away from wireless LAN devices.
・Within 10 m, turn off wireless LAN devices.
1From the Home screen, M → "Settings" → "OFF" in
the "Bluetooth"
"ON" appears and Bluetooth turns ON.
appears on the status bar.
1From the Home screen, M → "Settings" →
"Bluetooth"
Bluetooth setting screen appears.
2"huawei HW-03E"
"Not visible to other Bluetooth devices" appears under
"huawei HW-03E" and countdown starts. After 2 minutes have passed,
the terminal becomes invisible.
・M → Tap "Visibility timeout" to set time period for being visible.
Turning ON Bluetooth function
Making the terminal visible
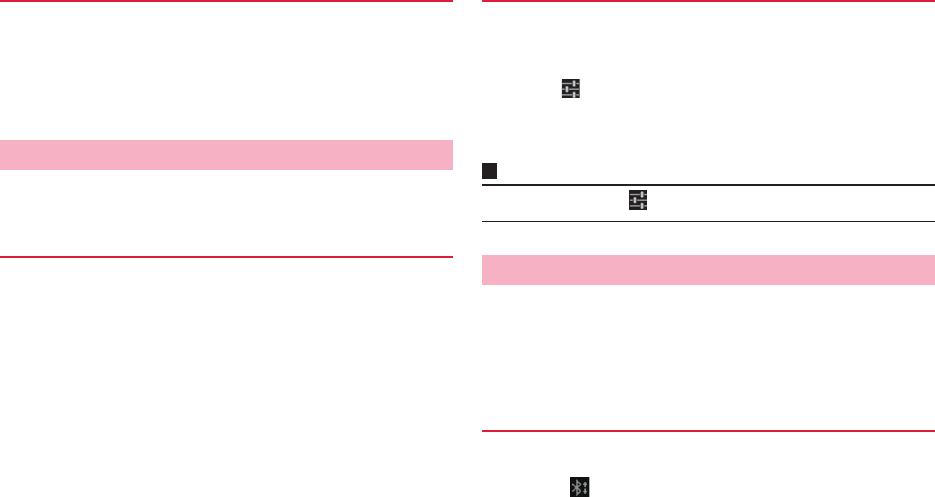
116 File management
Change the terminal name shown on other Bluetooth devices' screens.
1On the Bluetooth setting screen, M → "Rename
phone"
2Enter the terminal name → "Rename"
Pair/Connect the terminal with other Bluetooth device to enable data
communication.
1On the Bluetooth setting screen, "SEARCH FOR
DEVICES"
Scanned devices are listed in the "AVAILABLE DEVICES" field.
2Tap a device to pair/connect
3Follow the onscreen instructions to pair/connect
Paired/Connected device name appears in the "PAIRED DEVICES" field.
・Enter Bluetooth pass key (authentication code), if required. Entering
the same pass key on the both devices which exchange data is
required. For Bluetooth pass key, refer to the instruction manual of the
device.
1Perform canceling operation on the Bluetooth setting
screen
■ Unpairing Bluetooth device
a on the device name in "PAIRED DEVICES"
b"Unpair"
■ Disconnecting Bluetooth device
aTap the device name in "PAIRED DEVICES"
Information
・For some devices, tap to rename and change profile setting.
・Turn Bluetooth function of the terminal ON and pair receiver's device
beforehand.
・When a microSD card is installed to the terminal. all received data is saved
in the microSD card. For information on how to install microSD card, see
"Installing/Removing microSD card" (P.21).
1Send data from the other party's device
2When appears on the status bar, open the
notification panel → "Bluetooth share: Incoming file"
Renaming the terminal
Pairing/connecting
Pairing/Connecting with other Bluetooth device
Unpairing/Disconnecting
Sending/receiving data
Receiving data
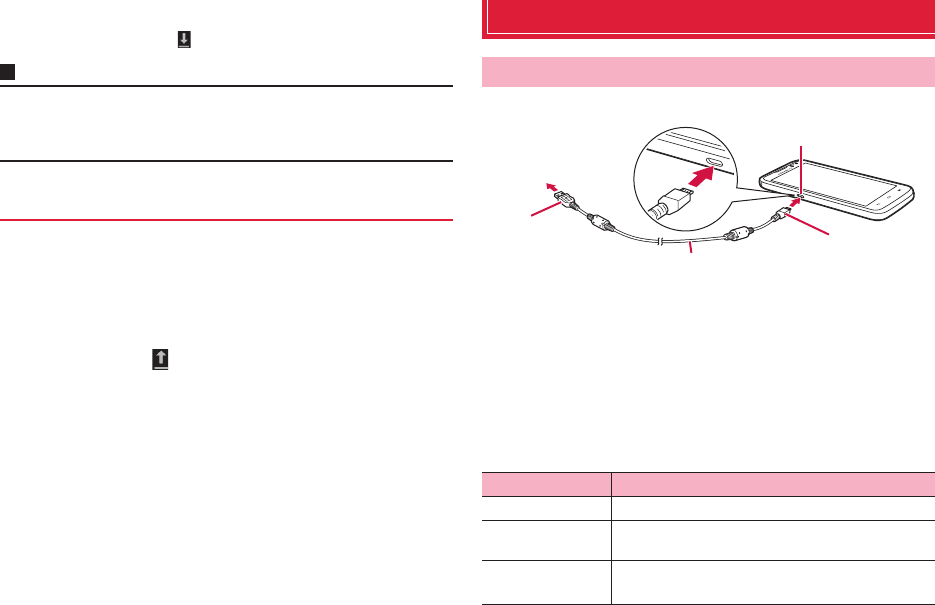
117 File management
3On the "File transfer" screen, "Accept"
Data communication starts.
When data is received, appears on the status bar.
Information
・To view received file, open the notification panel → "Bluetooth share:
Incoming file" → Tap the file or M on the Bluetooth setting screen → Tap
"Show received files".
You can send data such as Phonebook entries, still images, videos to
another Bluetooth device.
1From menu of applications, "Bluetooth"
2Tap receiver's device
Data communication starts.
When data is sent, appears on the status bar.
Connecting external device
Use Micro USB Cable 01 (optional) to connect the terminal and a PC.
1Insert microUSB plug of Micro USB Cable 01 into the
external connection jack of the terminal with USB
mark side down horizontally (a)
2Insert a USB plug of a Micro USB Cable 01 into the
USB connector of a PC horizontally (b)
・The system requirements for available PC are as follows.
Sending data
Connecting a PC
Item Description
PC PC-AT compatible PCs with USB ports equipped
OS Japanese version of Windows 7 (32/64 bit), Windows
Vista (32/64 bit), Windows XP (SP3 or later/32 bit)
Amount of
memory*
64 MB or more (128 MB or more is recommended)
External connection jack
a
b
microUSB plug
USB plug
To PC USB
connector
Micro USB Cable 01
118 File management
*: Amount of memory and available memory required for operation are shown.
Connect the terminal to a PC with Micro USB Cable 01 (optional) and send/
receive data to/from the internal storage or microSD card.
・You can set connection method depending on specifications of a PC or
purposes.
・If you select "HiSuite", "HiSuite" application is automatically installed to a PC.
"HiSuite" setup wizard appears on a PC. You can install "HiSuite" application.
For details on HiSuite, refer to the following website:
http://www.huaweidevice.com/hi-suite (Only in English/Chinese)
1Connect the terminal and a PC with Micro USB Cable
01
2Select connection method from "Media device (MTP)"/
"Camera (PTP)"/"Mass storage mode"/"HiSuite"
3Operate the PC to send or receive data to or from the
internal storage or microSD card.
■When being connected by "Mass storage mode"
1Perform USB safely remove on the PC
2Remove Micro USB Cable 01
■When being connected by other mode
・Make sure that data communication does not take place and remove Micro
USB Cable 01.
Information
・While data communication takes place, do not remove Micro USB Cable 01.
Doing so may damage data.
Use the desktop holder HW02 (optional) and commercially available HDMI
cable to display photos or videos saved in the terminal on a TV.
・To connect the desktop holder and a TV using HDMI cable, use while
charging the battery with using AC adapter and microUSB cable.
・Audio sound may not be output or image may not be viewed correctly
depending on TV.
・When connecting the desktop holder and a TV with HDMI cable, you can
switch audio output by Volume up/down key (+ /:-) on the terminal but cannot
adjust audio volume. To adjust volume, operate on a TV.
Available
memory*
64 MB or more
Using the terminal as a USB storage
Item Description Removing the terminal from the PC
Connecting to a TV with HDMI cable
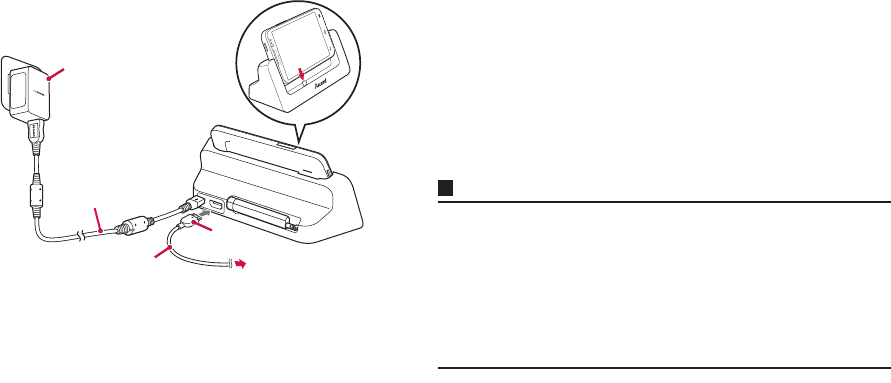
119 File management
<Connecting to a TV using the Desktop Holder HW02 (optional) and AC
adapter 03 (optional)>
1Insert microUSB plug of microUSB cable to the
external connection jack of the desktop holder facing
USB mark up
・Insert horizontally and slowly not to give excessive force to the plug of
microUSB cable.
2Inset USB plug of microUSB cable to USB connector
of AC adapter horizontally, then inset the power plug
of the AC adapter main unit
3Insert connector (type A) of HDMI cable to HDMI jack
of the desktop holder paying attention to the
orientation (a), then connect the opposite connector
to a TV
4Install the terminal aligning the positions of the
external connection jack and the charging jack of the
desktop holder (b)
・The terminal is connected to a TV. For connecting/settings for
removing or image display/operations, refer to the manual of TV. When
connection is complete, view photos/play videos on the terminal.
5When the operation is finished, remove the connector
of HDMI cable from the TV
・When HDMI cable is removed, TV may keep being HDMI input mode.
In that case, switch to input mode of terrestrial digital TV broadcasting
etc.
Information
・When watching Mobacas/1Seg, receiving status may be affected. Receiving
status may be better in the following methods.
- Fully extend the antenna.
- Keep the terminal away from TV as far as possible.
- Keep HMDI cable connecting to TV away from the antenna as far as
possible.
- Change the orientation of the terminal or antenna.
a
b
AC adapter 03 main unit
microUSB cable
HDMI cable
(commercially available)
Connector
(type A plug)
Connecting to a TV
120 Applications
Applications
dmenu
In dmenu, you can easily access sites recommended by DOCOMO or
convenient applications.
1From the Home screen, "dmenu"
・The browser activates and "dmenu" opens.
Information
・To use dmenu, Internet connection by packet communication (LTE/3G/
GPRS) or Wi-Fi is required.
・For connecting dmenu and downloading applications introduced in dmenu,
packet communication charge is applied separately. Some applications
automatically perform packet communications.
・Applications introduced by dmenu may include charged ones.
dmarket
You can obtain useful and interesting contents which meet your needs at
dmarket.
1From the Home screen, "dmarket"
Information
・For details on dmarket, refer to NTT DOCOMO website.
121 Applications
Play Store
You can install applications available on Google Play to the terminal and
use them.
・To use Google Play, setting up a Google account is required.
1From the Home screen, "Play Store"
For the first activation, the terms of service appears. Read the
content¨Tap "同意する (Agree)".
2Search an application, check content and install
Information
・Make sure to check the security of applications, then install ones at your own
risk. The terminal may be infected with a virus and the data may be
damaged.
・NTT DOCOMO is not liable for malfunctions, if any, caused by the application
you installed. In such case, the repair is charged even during the warranty
period.
・NTT DOCOMO is not liable for malfunctions, if any, caused by the application
you installed.
・Some applications automatically perform packet communications. Packet
communication remains connected unless you disconnect or timeout error
occurs.
・Some applications automatically execute update process.
・For paid applications, you can request a refund within specified period after
the purchase. For details, M → "Help" → "Android Apps" → See "Buy apps".
・To uninstall application, M → "My Apps" → Tap an application you want to
uninstall → "Uninstall" → "OK"
・For details on Google Play, on the Google Play screen, M→ "Help" to refer.
Osaifu-Keitai
Osaifu-Keitai is equipped with IC card and allows you to pay money or to
use coupon or stamp rally only by holding the terminal over the IC card
reader in stores etc.
You can access site or web site by holding the terminal over IC card reader,
obtain the latest coupon by using communication, credit electronic money,
or check the usage. In addition, you can lock your Osaifu-Keitai to provide
against loss or theft, and you can use it with safe.
For details on Osaifu-Keitai, refer to "Mobile Phone User's Guide
[sp-mode] smartphone version".
・A setting from the dedicated website or application is required to use Osaifu-
Keitai compatible services.
・The data (including electronic money, points, etc.) in the IC card may be lost
or modified because of the malfunction of the terminal (When we take your
Osaifu-Keitai for repair etc., as we cannot take it with data remained, you are
required to erase the data by yourself). For support such as reissuance,
restoration, temporary preservation or transfer of data, contact Osaifu-Keitai
compatible service providers. For important data, be sure to use an Osaifu-
Keitai compatible service with backup service.
・If the data in the IC card is lost, modified or damaged by any means related
to Osaifu-Keitai compatible service such as malfunction or model change,
DOCOMO assumes no responsibility for the loss of data.
・If the terminal is stolen or misplaced, immediately contact Osaifu-Keitai
compatible service provider for an advice.
Installing applications
Precautions on using Osaifu-Keitai
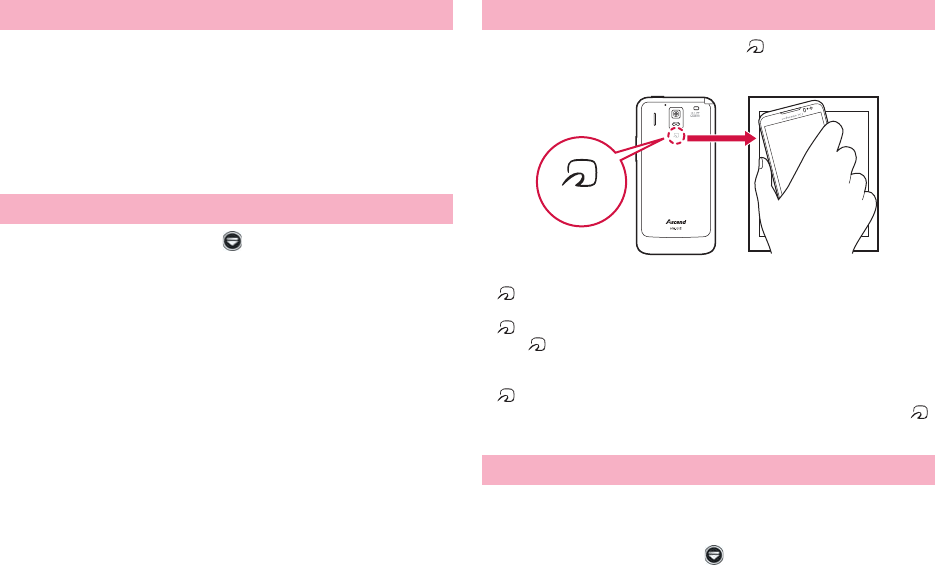
122 Applications
The iC transfer service is a service which helps you transfer all
data in the IC card for Osaifu-Keitai to your new Osaifu-Keitai
when you change Osaifu-Keitai for repair, changing of the model.
Visit a sales outlet such as docomo Shop to use the iC transfer
service.
For details on iC transfer service, refer to "Mobile Phone User's
Guide [sp-mode] smartphone version".
1From the Home screen, → "Osaifu-Keitai"
For the first activation, initial setting screen appears. Follow the onscreen
instructions to make settings.
2Select a service you want to use from the service list
Follow the onscreen instructions to make settings.
You can use Osaifu-Keitai by holding mark over the card
reader.
・Pay attention not to hit the terminal against the card reader when holding over
mark.
・Slowly put the terminal close to the card reader when holding
mark.
・Hold mark horizontally over the center of the card reader. If the mark
cannot be scanned even if you hold it in front of the center of the scanner,
slightly lift up the terminal, or move it backwards/forwards or to the left/right.
・ mark sometimes cannot be scanned if there is a metal object between
the mark and the scanner. Also, note that stickers or other objects near
mark might affect communications performance.
You can lock Osaifu-Keitai function to prevent using related
services.
1From the Home screen, → "Osaifu-Keitai"
2"Lock Settings" → "Osaifu-Keitai Lock"
iC transfer service
Using Osaifu-Keitai
Hold Osaifu-Keitai over card reader
Locking Osaifu-Keitai function
mark
123 Applications
3Follow the onscreen instructions to set Osaifu-Keitai
Lock password.
Osaifu-Keitai Lock activates and appears on the status bar.
・Osaifu-Keitai Lock password is required to unlock.
Information
・To cancel Osaifu-Keitai lock, on the Osaifu-Keitai screen, "Lock settings" →
"Osaifu-Keitai Lock" → Enter locking password → Tap "Continue" → "OK".
"iD" is a convenient electronic money by credit clearance
scheme. You can enjoy shopping simply and conveniently only by
holding Osaifu-Keitai with credit information set or the iD-
compatible card over the IC card reader in stores. Because up to
2 types of credit information can be registered in Osaifu-Keitai,
you can use them according to the benefits, etc. It also supports
cashing, depending on the card issuer.
・To use "iD" with Osaifu-Keitai, subscribing to a card issuer that supports iD,
settings for iD application are required.
・The charges required for iD service (including the annual charge) vary by
card issuer.
・Packet communication charge is applied separately.
・A packet communication fee for overseas use differs from the one in Japan.
・For details on iD, refer to iD website (http://id-credit.com/ (in Japanese only)).
ToruCa is an electronic card that can be obtained to mobile
terminals. It can be obtained from the IC card reader or site as
store information, coupon ticket, etc. Obtained ToruCa is saved to
the "ToruCa" application. Use the "ToruCa" application to view,
search or update it.
For details on ToruCa, refer to "Mobile Phone User's Guide [sp-
mode] smartphone version".
Information
・For obtaining, displaying or updating ToruCa, a packet communication
charge may be applied.
・Some ToruCa provided to i-mode terminal may not be obtained/displayed/
updated.
・Depending on the settings of IP (Information Provider), the following functions
may not be available.
- Obtaining, updating from the IC card reader, sharing ToruCa, moving/
copying to microSD card, displaying map
・Some ToruCa which can be displayed in a map from ToruCa (details) may not
be displayed in a map from the ToruCa list depending on the IP settings.
・While using Osaifu-Keitai lock settings, you cannot obtain ToruCa with an IC
card reader.
・If you enable 重複チェック(Duplication check), obtaining the same ToruCa
as the saved one redundantly is not available. To obtain the same ToruCa
redundantly, disable Duplication check.
・When you send ToruCa attaching to email, it is sent in the condition before
obtaining ToruCa (details).
・Depending on email application, ToruCa received via email may not be
saved.
・Depending on browser, ToruCa cannot be obtained.
・When ToruCa is moved/copied to the microSD card, it is moved/copied in the
condition before obtaining ToruCa (details).
・You may not be able to obtain ToruCa with an IC card reader, if you do not
make initial setting for Osaifu-Keitai.
iDアプリ (iD application)
ToruCa

124 Applications
Mobacas
Mobacas is a broadcasting service for smartphones. You can use
two watching styles. One of the two is "Real Time" (broadcasting
in real time style) that allows you to watch programs in real time.
The other one is "Shift Time" (broadcasting in storage style) that
allows you to enjoy comic, novels, music, games, etc. as well as
movies and dramas anytime and anywhere. Also, you can enjoy
new broadcasting services such as the collaboration with social
services using the communication function of the terminal.
For details on Mobacas, refer to the Mobacas broadcast station
website.
NOTTV http://www.nottv.jp/ (In Japanese only)
■Using Mobacas
・A separate pay-TV subscription to the Mobacas broadcast station (NOTTV)
is required to use Mobacas.
・You cannot receive and watch broadcasts without the docomo mini UIM card
being attached the terminal.
・Mobacas is a broadcasting service provided in Japan.
・A microSD card is required to use Shift Time. Use Class 4 microSD card or
faster.
■Broadcast wave and service area
The radio wave received via Mobacas differs from that of received
via FOMA service and 1Seg. For this reason, the signal cannot
be received at places where the broadcast does not reach or
while broadcasting is out of service, regardless of whether the
terminal is outside or inside the FOMA service area.
Also, in the following places, the signal status may become weak
or the signal may not be received even if the terminal is inside the
area of Mobacas broadcasting service.
・Places that are far from the base station that sends signal
・Places where the signal is disrupted due to the landscaper or structures such
as mountain areas or behind buildings
・Places where the signal is weak or does not reach, such as tunnels,
basements, or places inside buildings
■Improving reception status
・Fully extend the 1Seg/Mobacas antenna.
・Changing the direction of the 1Seg/Mobacas antenna or moving to other
location may improve signal reception.
・For 1Seg/Mobacas antenna, see "1Seg/Mobacas antenna" (P.128).
・If you use earphones, you can use supplied Earphone adapter cable with
antenna as an antenna. For information on how to connect, see "Connecting
earphone microphone" (P.20).
1From the Home screen, → "NOTTV"
NOTTV home screen appears.
・For the first activation, confirmation screen for initial setting appears.
Read the content → Ta p " 同意する (Agree)" to make initial setting.
・Make initial settings under a good communication condition.
2"すぐ見る (Watch now)"
3Select a program/content
Mobacas watching screen appears.
・To adjust volume, press + / -.
・To set subtitles and sound, tap M → "設定 (Settings)" → "表 示・音 声
(Display/Audio)".
Watching programs/contents
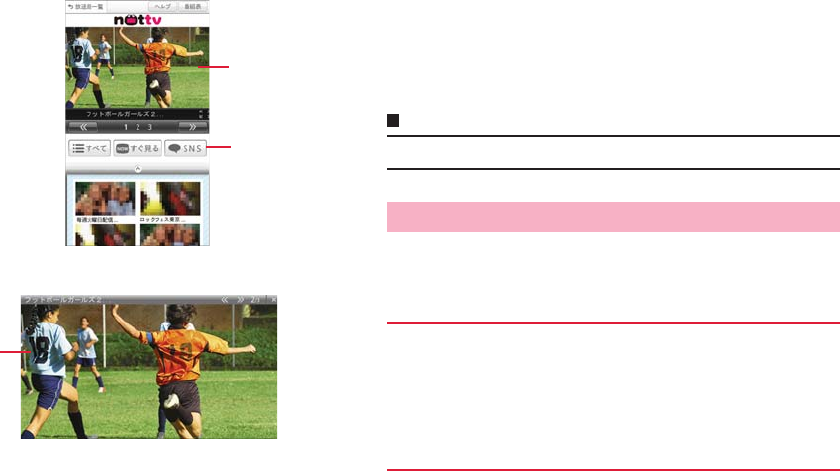
125 Applications
aContent display area
・Swipe left and right to select a channel (when watching in real
time).
・Tilt the terminal horizontal to switch the screen.
bSocial button
・Displays a timeline related to programs/contents.
Information
・Displayed content varies depending on the program/content.
You can search programs/contents within the application by
various methods.
1On the NOTTV home screen, "番組表 (Program guide)"
Real time program guide (radio and television program table) appears.
・Tap M to switch to the list-format program table.
2Tap a program
1On the NOTTV home screen, "すべて (All)"
2Tap an item
3Tap a program/content
Mobacas watching screen (portrait view)
Mobacas watching screen (landscape view)
a
b
a
Searching programs/contents
Searching from program guide (Real time)
Searching by specifying conditions
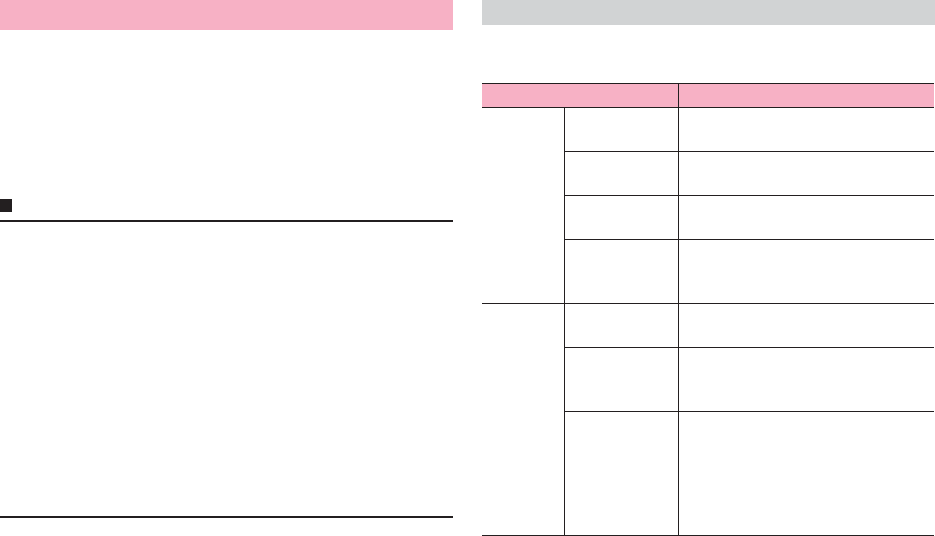
126 Applications
1On the NOTTV home screen, "すべて (All)"
2"コンテンツ予定表 (Contents schedule)"
The list of contents that will be broadcast appears.
3Tap a content you want to schedule
4"受信予約する (Reserve reception)"
Information
・Contents may not be received in the following condition.
- The terminal is powered OFF at a scheduled time.
- Remaining battery is insufficient.
- Out of Mobacas broadcasting area
- microSD card is not inserted or available memory is insufficient.
・If contents are temporarily saved on a microSD card, you can use them only
on the terminal in use.
・If expiration date has passed for a content, the content is automatically
deleted from the microSD card. You can also delete contents in your
operation if the expiration date has not passed.
・Contents may be automatically reserved even when you have not reserved.
・You can disable automatic reservation function.
・Depending on the signal reception, content data may not be received. In that
case, packet communication is automatically used to compliment data. The
function automatically complimenting data by packet communication can be
disabled in settings.
On the NOTTV home screen, M → Tap " 設定 (Settings)" to show the following
menu items.
Reserving reception Mobacas setting menu
Item Description
表示・音声
(Display/
Audio)
字幕表示
(Subtitle)
Set subtitles.
文字スーパー表
示 (Show telop)
Set whether to show telop.
音声 (Voice
sound)
Switch main sound and sub sound.
明るさ調整
(Adjust
brightness)
Adjust screen brightness.
自動処理
(Auto
process)
自動受信 (Auto
reception)
Enable/disable automatic reception of
contents.
おすすめのリ
セット (Reset
recommended)
Reset recommended programs and
contents.
番組・コンテン
ツ情報取得
(Obtain
program/
content
information)
Set period of time to obtain program/
content list information.
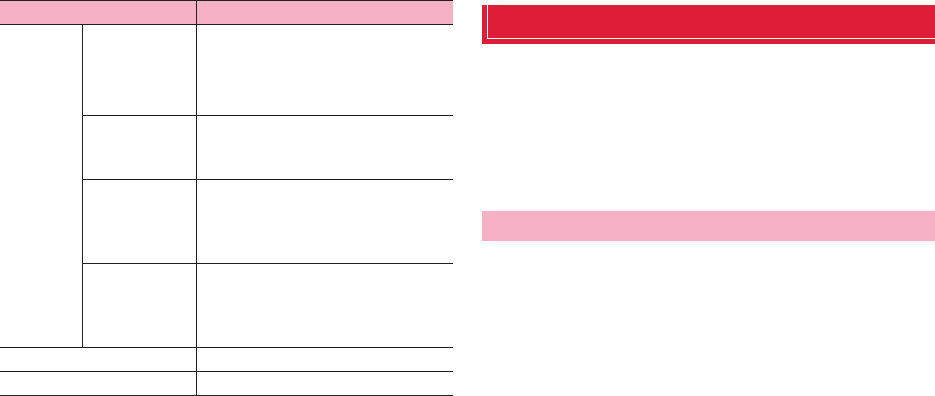
127 Applications
1Seg
1Seg is a terrestrial digital TV broadcasting service for mobile
devices, and can receive data broadcasts with image and voice.
It also allows you to obtain more detailed program information,
participate in quiz programs, and do shopping on TV with ease.
For details on the "1Seg" service, check the following website:
The Association for Promotion of Digital Broadcasting
http://www.dpa.or.jp/english/
1Seg is a service provided by TV broadcasters (broadcast
stations), etc. Transmission charges are not incurred for receiving
images, voice and sound. For details on NHK viewing fees,
contact NHK.
Available information in the area of data broadcasting is "data
broadcasting" and "data broadcast site" information.
"Data broadcasting" information is carried in a broadcast,
together with images, voice and sound, and "data broadcasting
site" information is used to access sites provided by the TV
broadcaster (broadcast station).
Packet communication charge is applied when accessing a site
such as a "data broadcasting site" or others.
・Some sites require information charges to be used.
自動処理
(Auto
process)
自動コンテンツ
補完 (Auto
complement)
Set whether to automatically complement
data using packet communication when
contents are not completely received
because of the reception status of
broadcast wave etc.
利用ログ送信
(Send using
history)
Set whether to send using history.
自動ライセンス
取得 (Auto
licence
acquisition)
Set whether to automatically acquire
licenses of contents.
ペアレンタルコ
ントロール
(Parental
control)
Restrict usage of programs/contents
according to age.
ブラウザ (Browser) Set Cookie and data broadcasting.
履歴 (History) Show histories.
Item Description
Using 1Seg
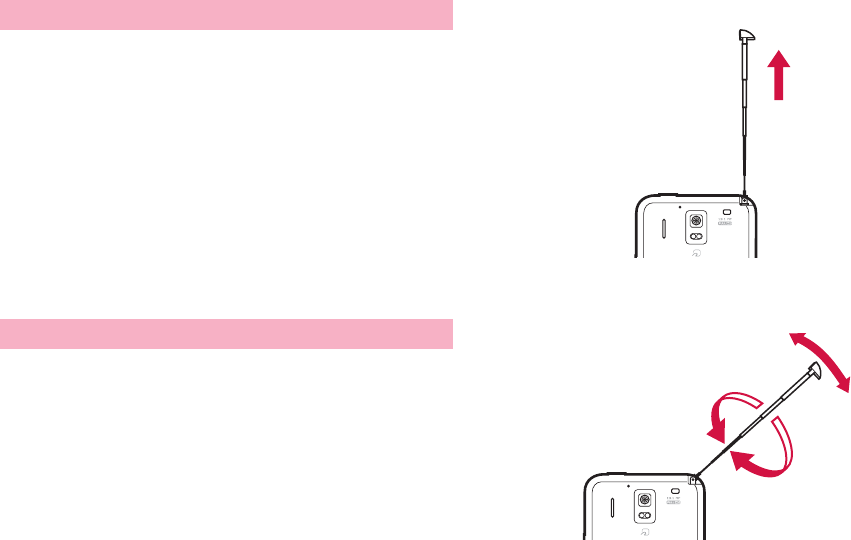
128 Applications
1Seg is one of the broadcasting services, and the receiving
signal (broadcast) differs from that of the FOMA service. For this
reason, the signal cannot be received at places where the
broadcast does not reach or while broadcasting is out of service,
regardless of whether the terminal is outside or inside the FOMA
service area.
Also, in the following places, the signal status may become weak
or the signal may not be received even if the terminal is inside the
area of a terrestrial TV broadcasting service.
・Places that are far from the broadcast transmission tower
・Places where the signal is disrupted due to the landscaper or structures such
as mountain areas or behind buildings
・Places where the signal is weak or does not reach, such as tunnels,
basements, or places inside buildings
For good signal reception, fully extend the 1Seg/Mobacas
antenna.
Changing the direction of the 1Seg/Mobacas antenna or moving
to other location may improve signal reception.
・Fully extend the 1Seg/Mobacas antenna until it fixes.
・1Seg/Mobacas antenna can be rotated by 360 degrees. Adjust the direction
of the antenna to improve reception condition.
About signal
1Seg/Mobacas antenna
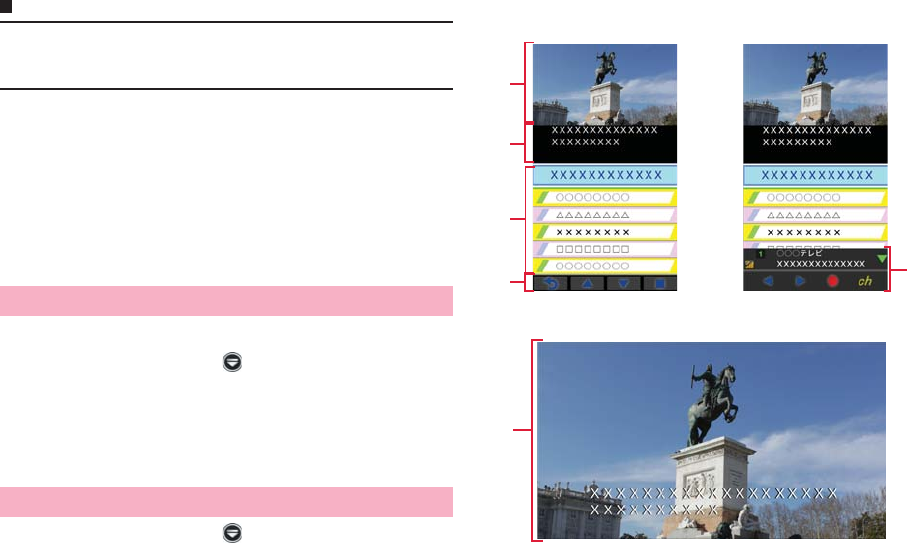
129 Applications
Information
・To change orientation of 1Seg/Mobacas antenna or house 1Seg/Mobacas
antenna, hold the root part of the 1Seg/Mobacas antenna. Changing the
orientation forcibly or holding the top part of the antenna may cause damage.
■Earphone adapter cable with antenna
You can connect supplied Earphone adapter cable with antenna
to use as 1Seg/Mobacas antenna.
・For good signal reception, adjust direction of the cable or put it away from
your body.
・For information on how to connect, see "Connecting earphone microphone"
(P.20).
・When you use both of 1Seg/Mobacas antenna and Earphone adapter cable
with antenna, reception can be switched by the better sensitive one.
To watch 1Seg, set channels beforehand.
1From the Home screen, → "TV"
2Tap an area → Tap prefecture, city, area following the
onscreen instructions
3"OK"
1From the Home screen, → "TV"
2"TV"
1Seg watching screen appears.
Setting channels
Watching 1Seg
1Seg watching screen (vertical screen)
a
b
c
de
1Seg watching screen (horizontal screen)
a
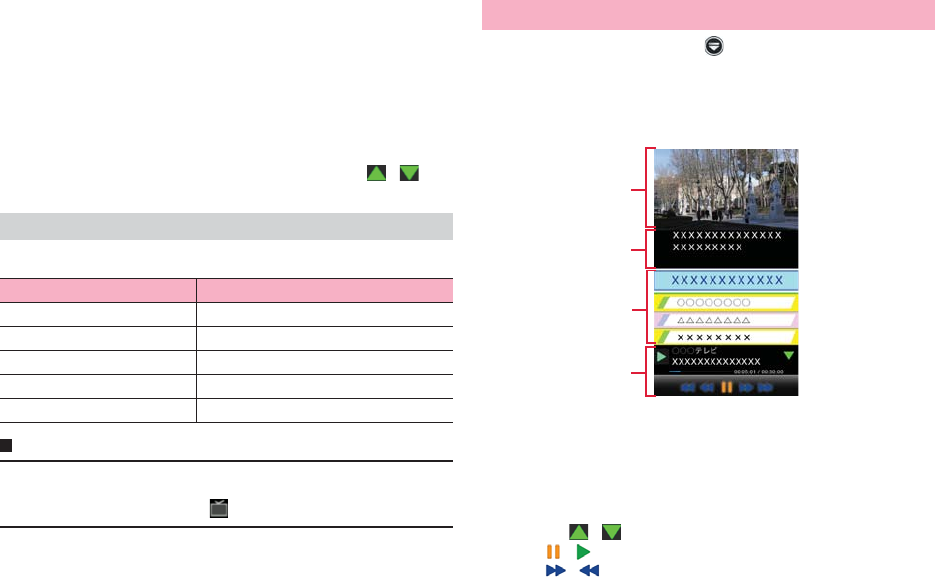
130 Applications
aTV image area
・Tap the screen to show TV operation panel.
・Swipe to the left or right to switch channels.
・Touch and hold the screen to show channel list.
bSubtitle area
cData broadcasting area
dData broadcasting operation button
eTV operation panel
Checking name of program and station, recording watching
program, switching channels, etc. are available. Tap / to
show/hide operation buttons.
Tap M on the 1Seg watching screen to show the following menu items.
Information
・To end the application from the 1Seg watching screen, tap B.
When you tap J and return to the Home screen or display menu, receiving
1Seg broadcasting is not ended ( appears on the status bar).
1From the Home screen, → "TV"
2"Playback Recorded Program"
3Tap a program you want to play
aRecording image area
・Tap the screen to show recording operation panel.
bSubtitle area
cData broadcasting area
dRecording operation pane
・Tap / to show/hide operation buttons.
・ / : Pause/Play
・ / (during playback) : Fast rewind/Fast forward (each time
you tap, speed increases)
Menu on the 1Seg watching screen
Item Description
Program guide Show program guide.
Reservation list Set timer recording/watching (P.131).
Change area Switch watching area.
Subtitle/Sound Set subtitles and sound.
Settings Make 1Seg settings (P.132).
Playing recorded programs
Playing screen
a
b
c
d
131 Applications
・ / (during playback) : Turn back approx. 15 seconds/Skip
approx. 30 seconds
・ / (during pause) : Frame-by-frame rewind /Frame-by-
frame advance
Tap M on the playing screen to show the following menu items.
You can schedule recording and watching 1Seg programs. Also setting to
notify by an alarm on a specified date and a time is available.
1From the Home screen, → "TV"
2"Reserve Recording/Viewing"
3M → "Reserve new recording" → "Viewing
reservation"/"Recording reservation"
4Set required items → "Save" → "YES"
Scheduled programs appear in the schedule list.
■Setting schedule notification
aM → "Reservation notice" → Tap a notification method
■Checking/Editing/Deleting scheduled programs
aTap a program
bM → "Edit"/"Delete"
■To check failed reservation result
aM → "Failed Reservation List"
■Checking available memory in a microSD card
aM → "Remaining memory"
Information
・Even if "Vibration" is set in "Reservation notice", the terminal does not vibrate
when the setting of "Vibration when ring" (P.102) is set to OFF.
To enable notification by vibration, set "Vibration when ring" to ON.
・To switch channels while viewing watching-reserved program, end watching
the program once and then activate the TV.
1From the Home screen, → "TV"
2"Program guide"
"Gガイド番組表 (G-GUIDE program table)" application activates.
3Tap a program to schedule → "ワンセグ連携 (Link 1
Seg)" → Select an item
・For detailed operations, on the Gガイド番組表 (G-GUIDE program
table) screen, M → "その他の設定 (Other sttings)"/"その他 (Others)"
→ "ヘルプ (Help)" to refer.
Information
・While recording/viewing reserved program and when the operation is
complete, / appears on the status bar respectively.
Menu on the playing screen
Item Description
Property Show detailed information for recorded
data.
Subtitle/Sound Set subtitles and sound.
Settings Make 1Seg settings (P.132).
Setting timer recording/watching Set programs using program table
132 Applications
For some data broadcasting programs, link information to related websites
can be saved as TVlink. You can use saved TVlinks later.
・Procedure to save TVlink varies by the program.
1From the Home screen, → "TV"
2"TV Link"
3Tap a TV link
■Deleting TV link
aTouch and hold TV link → "Delete"
Make settings for using information, off timer, etc.
1From the Home screen, → "TV"
2"Settings"
3Set each item
Using TVlink
Setting 1Seg
Item Description
Data
Broadcasting
settings
Confirm
connection
Set whether to show confirmation
messages when connection is
required.
Use location
info
Set whether to use location
information.
Use phone info Set whether to use terminal
information.
Delete station
data
Delete station memory.
Sleep Timer Set time before 1Seg automatically
ends.
Product Information Show product information of the
application.
133 Applications
Camera
・Although the camera is manufactured using extremely high-precision
technology, it may contain dots or lines that are always lit or that do not light.
When shooting under low light conditions, in particular, white lines, etc. are
likely to appear as noises. This is not a malfunction
・Clean the terminal with a dry soft cloth before shooting. Fingerprints or body
oil on the lens can affect images.
・Leaving the terminal in sunlight or in a high-temperature place may
deteriorate image quality.
・The captured images may be different from actual objects for color and
brightness.
・If you try to shoot an intense light source like the sun, a lamp, etc., shot
images may be dark or noisy.
・Hold the terminal steadily when shooting. Moving the terminal while shooting
cause noise in images.
・Keep the finger or hair out of the lens when shooting.
・Using the camera increases the battery consumption. If you try to shoot when
battery is low, the screen may become dark or affect images.
・If you activate the camera for a long time when shooting still images
continuously or shooting a video for a long time, for example, the terminal
may become hot and the camera may automatically end. This is not a
malfunction. Wait a while and use again.
・Even in Silent mode, shutter sound for still image shooting, start shooting
sound and stop shooting sound for video shooting are emitted.
1From the Home screen, → "Camera"
The shooting screen appears.
・To end the camera, on the shooting screen tap J / B.
Before using the camera
Copyrights and portrait rights
Taken pictures and recorded sounds by the terminal are not allowed to use
without the copyright holders authorization except for personal use etc. They
are protected by the Copyright law. Avoid using or altering pictures of others
without their consent, because it may infringe on portrait rights. Be careful not
to infringe the Copyright law or portrait rights when publishing shot images
on your website etc. Note that taking photos or recordings at some
demonstrations, performances or exhibitions may be prohibited even when
only for personal use. Transferring copyrighted images is prohibited except
for using them only to the extent allowed by the Copyright law.
If you cause the public any trouble using the terminal, you may be punished
under law or regulations (for example, nuisance prevention ordinance).
Take care not to infringe on privacy when shooting or sending images
with the phone equipped with camera.
Activating the camera
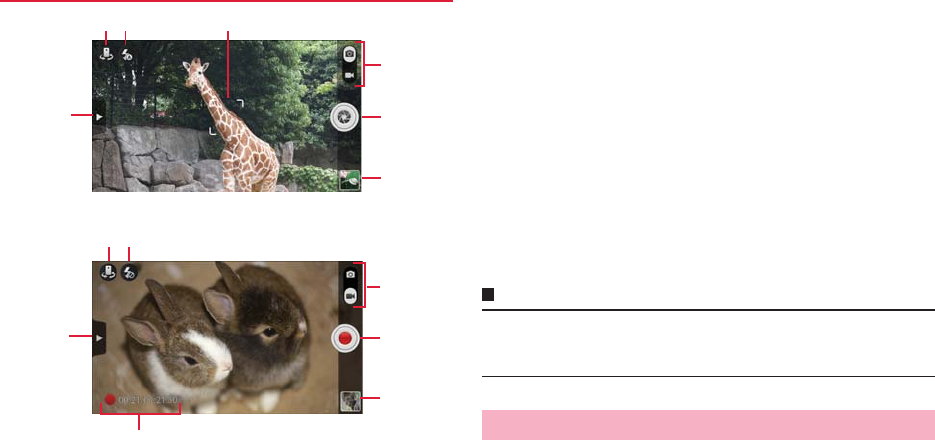
134 Applications
aMenu
Tap to show the menu items for the shooting screen (P.135).
bSelecting camera
Switch back camera (out camera)/front camera (in camera).
cFlash mode
Switch flash mode.
dFocus frame
Tap the shooting screen to show focus frame. Drag to the position
you want to focus and lift your finger. The object is focused on and
the focus frame turns to green from white (only when shooting still
pictures with out camera).
eShooting mode
Drag the slider up/down to switch shooting mode (still image
shooting/video shooting).
fShutter
Shoot still images or start/stop recording video.
gThumbnail
Open Gallery to check still images/videos.
Tap B to go back to the shooting screen.
hRecording time of video
Show recording time.
Information
・Icons shown on the shooting screen rotate depending on the orientation of
the terminal.
・Setting items vary depending on the shooting mode.
1Display an object on the still picture shooting screen
Press + / - to zoom in/out.
2Tap the shutter
Shutter sound is heard and a still image is saved.
Shooting screen
a
b c d
e
f
g
Shooting screen (still image)
Shooting screen (video)
a
b c
e
f
g
hShooting still images
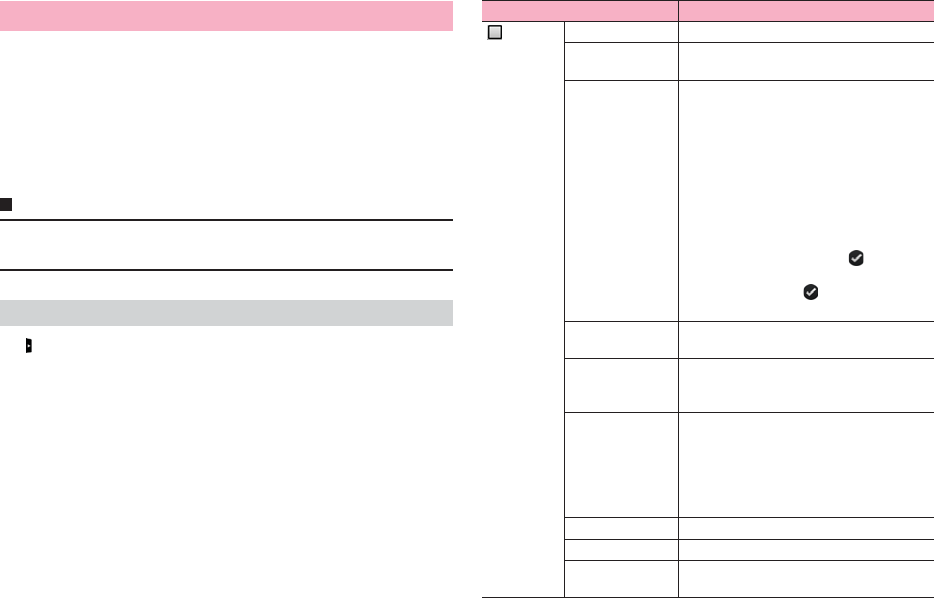
135 Applications
1Display an object on the video shooting screen
Press + / - to zoom in/out.
2Tap the shutter
Start shooting sound is heard and a shooting video is started.
3Tap the shutter to stop shooting
Stop shooting sound is heard and a video is saved.
Information
・Available shooting time differs depending on the available memory in the
microSD card and internal storage.
Tap on the shooting screen to show the following menu items.
・Displayed menu items differ between the in camera and out camera.
■For still images
Shooting videos
Menu on the shooting screen
Icon/Item Description
Single Set to normal shooting mode.
Instant Capture Set a mode to shoot image immediately by
tapping shutter (Burst function).
Group Set to suitable shooting mode for shooting
several people. 5 consecutive pictures are
taken by 1 click of shutter. Select the best
expression, etc. for each object from the 5
pictures and combine them to save a
photo.
・Select one of 5 images on the preview
screen → Tap the white frame shown on
the object (face, etc.) → Tap a round
frame shown on the zoomed part and
select one of 5 images → → Select
another object and then repeat same
operations → Tap to save combined
image.
HDR Set to HDR (High Dynamic Range) shooting
mode.
Burst Set to the mode in which 10 consecutive
pictures are taken by 1 click of shutter. All
10 pictures are saved.
Smile Set to Smile mode which starts detecting
smile by tapping the shutter and then
shooting automatically when it is detected.
・While smile is detected, the terminal
shoots continuously. To end shooting,
tap the shutter again.
Beauty Set to the mode which makes skin beautiful.
Panorama Set to panorama mode.
Low light Set to the mode suitable for shooting under
poor lighting conditions.
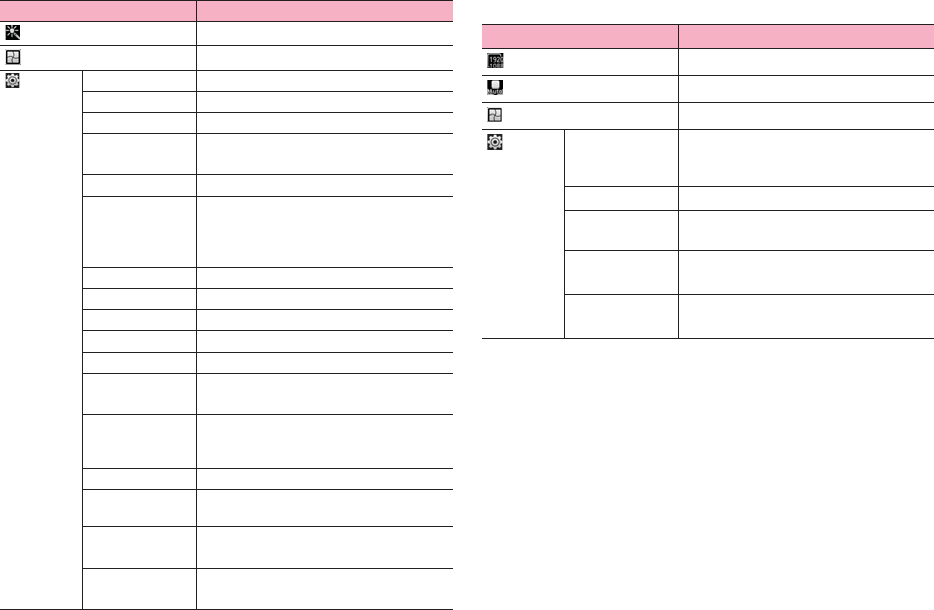
136 Applications
■For videos
*: When the terminal is rotated to right to landscape view, menu displayed by
tapping icon locates in the same position as portrait view.
*Set effects.
*Set to convert images.
Scene type Set scene mode.
White balance Set white balance.
ISO Set ISO.
Image
adjustments
Set exposure, intensity, contrast, screen
brightness.
Timer Set self-timer.
Review Set time for displaying preview screen after
shooting. While displaying preview screen,
sharing, setting for, and deleting shot still
image.
Picture quality Set image quality.
Picture size Set picture size.
Wide screen Set whether to use wide screen.
Auto focus Set whether to activate auto focus.
Face detection Set whether to activate face detection.
Red eye
reduction
Set whether to use red-eye reduction.
HDR Set whether to save both HDR (High
Dynamic Range) image and original image
for HDR shooting.
Grid Set whether to show grid.
GPS tag Set whether to add location information to
shot still images.
Preferred save
location
Set saving location for shot still images.
Restore
defaults
Restore the settings to default.
Icon/Item Description
Icon/Item Description
Set resolution.
Set white balance.
*Set to convert images.
Review Set time for displaying preview screen after
shooting. While displaying preview screen,
sharing, playing, and deleting shot video.
Video quality Set image quality.
GPS tag Set whether to add location information to
shot videos.
Preferred save
location
Set saving location for shot videos.
Restore
defaults
Restore the settings to default.

137 Applications
Gallery
Play still images/videos shot by the terminal and downloaded data. Also,
editing still images and sharing still images/videos are available.
・In Gallery, you can play data stored in the microSD card or internal storage.
・File extensions supported by the terminal are as follows. However, some files
may not be available.
* GIF animation is not supported.
1From the Home screen, → "Gallery"
The album list screen appears.
aSplit files into folders by selected theme.
bActivate the camera.
cShow folder names for selected theme.
Type Extension
Still images jpg, png, bmp, wbmp, gif
Videos mp4, 3gp, 3g2, avi, mkv, webm
Opening Gallery
Album list screen
c
ba
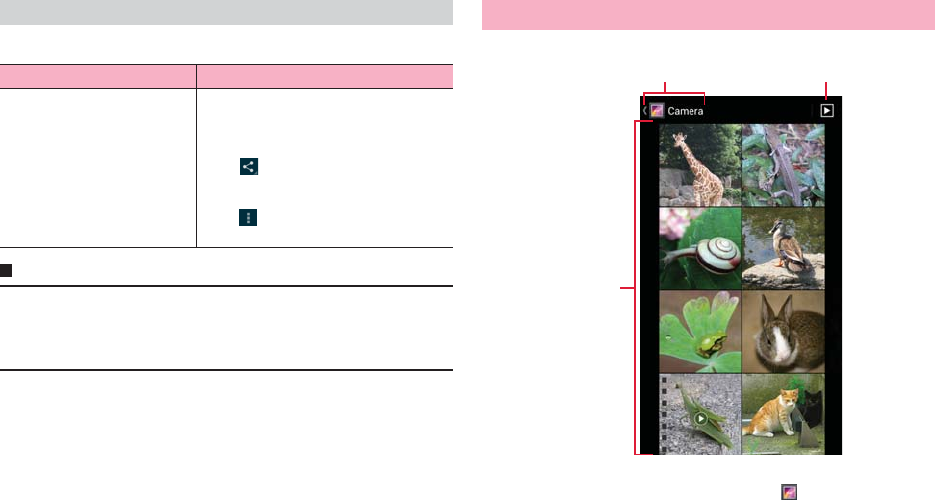
138 Applications
Tap M on the album list screen to show the following menu items.
Information
・Alternatively, touch and hold folders one by one on the album list screen to
select several folders.
・Depending on types of data, some applications to use for sharing may not
appear.
1Tap a folder to play on the album list screen
aShow current hierarchy of folders. Tap to show upper tier.
bShow slideshow of images in a folder.
cStill images/videos are shown as thumbnail images. Tap a
thumbnail image to play. Slide left/right to scroll through the
screen.
Menu on the album list screen
Item Description
Select album/Select group Tap to select several folders to share or
delete them.
・Tap "0 selected" → "Select all" to select all
folders.
・Tap to share data in the selected
folders on Picasa or via Bluetooth, mail,
etc.
・Tap to delete or check details of data
in the selected folders.
Playing still image/video
Thumbnail screen
c
ba
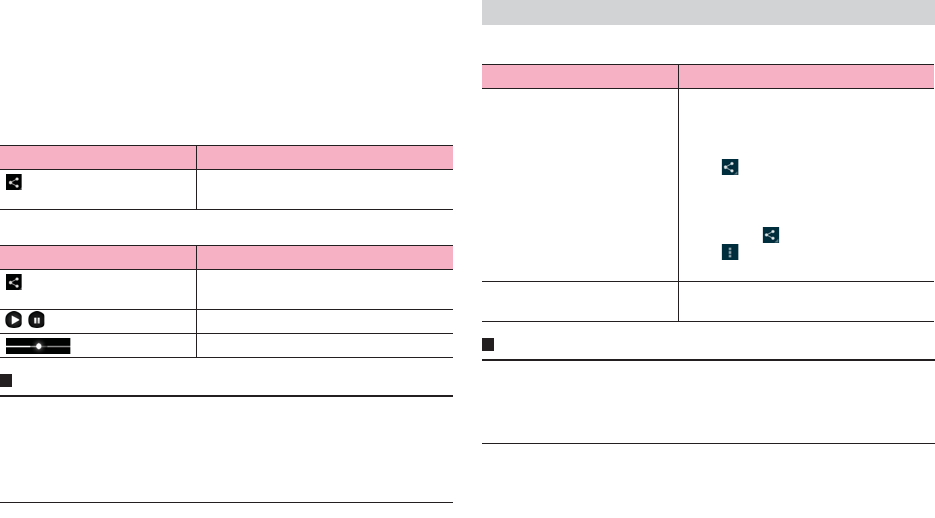
139 Applications
2Tap a still image/video
Icons appear on the screen then you can perform the following
operations.
・Depending on the terminal state, selection screen for application to
use may appear. Different icons may appear if other application is
selected.
■Playing still images
■Playing videos (When selecting "Movies")
Information
・Hidden icons reappear when tapping the screen.
・For still images, use the touch panel to perform the following operations.
- Swipe left/right : Show previous/next still image/video
- Double-tap : Zoom in/out
- Pinch-in/-out : Zoom out/in
Tap M on the thumbnail screen to show the following menu items.
Information
・Alternatively, touch and hold thumbnails one by one on the thumbnail screen
to select several thumbnails.
・Depending on types of data, some applications to use for sharing may not
appear.
Icon Description
Create memos, share still images on Picasa
or via Bluetooth or mail.
Icon Description
You can share videos on YouTube, Picasa
or via mail.
/Play or pause.
Drag left or right to rewind or forward.
Menu on the thumbnail screen
Item Description
Selecting an item Tap to select several thumbnails to share,
delete, or rotate them.
・Tap "XX selected" → "Select all" to select
all thumbnails.
・Tap to create memos from selected
data or share data on Picasa or via
Bluetooth, mail, etc.
* Depending on terminal condition,
items in menu appears by icons.
・Tap to edit, rotate, crop, delete
selected data, etc.
Group by Group images in a folder by specified
theme.
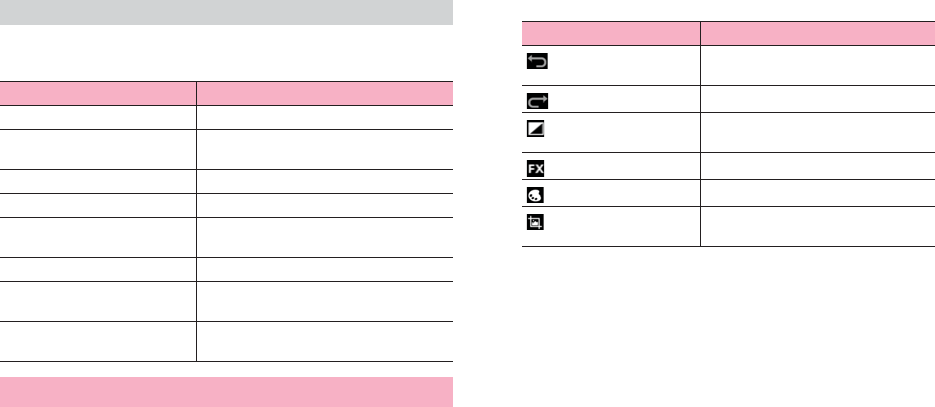
140 Applications
Tap M on the playing screen to show the following menu items.
・Displayed menu items differ between still images and videos.
1Tap a still image in the thumbnail screen
2M → "Edit"
3Edit image using icons
4"Save"
Menu on the playing screen
Item Description
Delete Delete still images/videos.
Slideshow Show slideshow of images in a folder. Tap
an image to stop slideshow.
Edit Edit still images (P.140).
Rotate Left Rotate a still image to the left at 90 degree.
Rotate Right Rotate a still image to the right at 90
degree.
Crop Crop still images.
Set picture as Set a still image as wallpaper or contact
picture.
Details Show detailed information of a still image/
video.
Editing still images
Item Description
Undo editing operation which has been
done and return to the previous status.
Redo canceled operation.
Adjust brightness, set highlight,
shadow, auto correction.
Set expression method.
Add color effect and graffiti.
Crop, reduce red eye, correct tilt,
rotate, invert, or set sharpness.
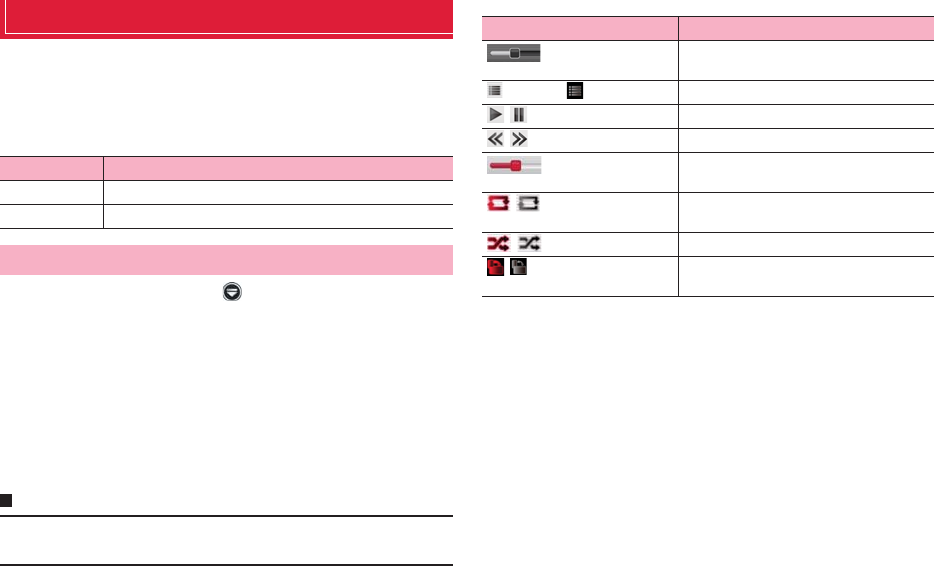
141 Applications
Media Player
You can use the Media player to play music/video stored in the microSD
card or internal storage and use contents from stores in dmarket.
・For details on how to save music/video files to the microSD card or internal
storage from a PC, see "Connecting to a PC with USB cable" (P.117).
・File formats supported by the terminal are as follows. However, some files
may not be available.
1From the Home screen, → "Media Player"
The data list screen appears.
2Tap an icon at the bottom of the screen
・Tap "Songs"/"Artists"/"Albums" to play music.
・Tap "Movies" to play video.
・Tap "MUSIC/VIDEO Store" to activate dmarket and you can use music/
video contents in stores.
3Tap a song or video
Selected song/video is played.
Information
・Contents protected by Digital Rights Management (DRM) technology may
not be able to be played if "Factory data reset" is performed.
■Operations on the music/video playing screen
・When the icon is off, tap the screen to display.
*1 Appears only on the music playing screen.
*2 Appears only on the video playing screen.
Type File format
Music AAC, HE-AAC v1, HE-AAC v2, MP3, MIDI
Videos H.263, H.264, MPEG-4, DivX, VP8
Playing music/video
Icon Description
Show current playback position. Drag left
and right to change playback position.
(Music)/ (Video) Show data list screen.
/Play or pause.
/Tap to skip the beginning of data/next data.
Show sound volume. Drag left and right to
change playback volume.
/*1 Set repeat mode (Repeat OFF/Repeat ALL/
Repeat).
/*1 Enable/disable shuffle play.
/*2 Set whether to automatically rotate screen
orientation.
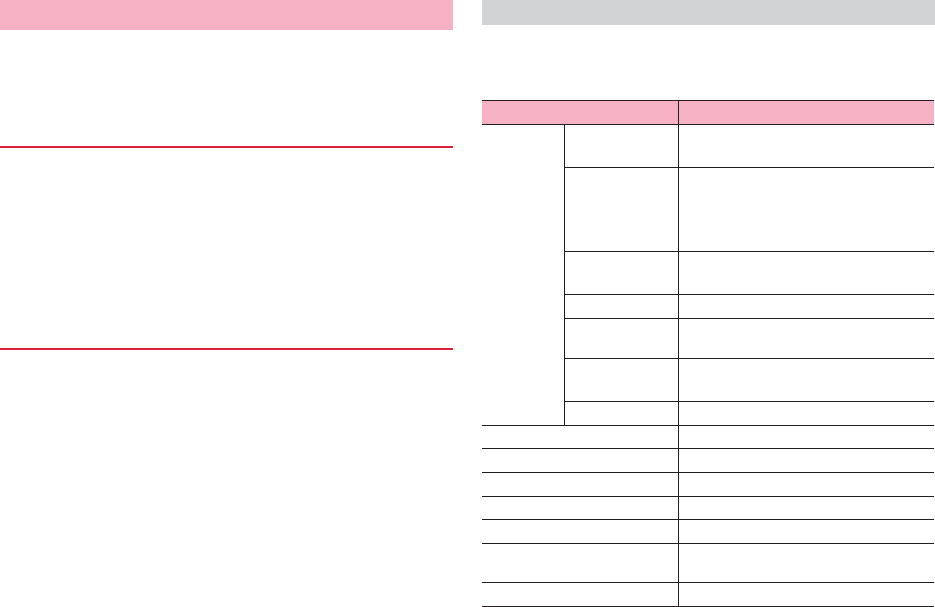
142 Applications
Use play list to play songs in your desired order.
・To create a play list, show "Play list" icon at the bottom of the screen. M →
Tap "Settings" → "Arrange icons" then drag the "Play list" icon to any of icons
shown at the bottom of the screen → Tap "Apply".
1On the data list screen, "Play list"
2"Create new " → Enter a title → "OK"
3"Add songs to playlist" → Select songs
・Tap "Artists"/"Albums" to search from artists or albums.
4"Apply" → "Save" → "OK"
1On the data list screen, "Play list"
■Playing a play list
aTap a play list you want to play
bTap a song
■Editing a play list
aTap a play list you want to edit
b"Edit"
cEdit title, add/delete songs, change order, etc.
■Deleting a play list
aOn the play list screen, "Edit"
bTap a play list you want to delete → "Save" → "OK"
Tap M on the data list screen or playing screen of the Media Player to show the
following menu items.
・Available menu options vary depending on screens.
Using play list
Create a play list
Playing/Editing/Deleting a play list
Menu of the Media Player
Item Description
Settings Audio effect
settings
Set effects.
Ringtone
settings/This
song : Ringtone
settings
Set as ringtone.
Movie sort
settings
Set sorting methods for videos.
Delete contents Delete songs/videos.
Arrange icons Change icons at the bottom of the data list
screen.
Update
database
Update data list.
Reset settings Reset settings.
Sort Change data order.
Switch display Switch list view/thumbnail view of data.
Search Connect dmenu to search.
Help Show Media Player Help.
About Show detailed information of Media Player.
About contents Show detailed information of playing
content.
Exit End Media Player.
143 Applications
YouTube
YouTube is an online video streaming service. You can play videos and
upload videos to this service.
1From the Home screen, → "YouTube"
YouTube screen appears.
2Search a video→Tap a video to play
The playing video screen appears.
・Tap the playing video screen to stop playing/play.
Information
・Rotate the terminal sideways to show video in full screen landscape mode.
・Available functions on the terminal may differ from ones for YouTube on PC
websites.
You can post videos to YouTube from the terminal.
・To post a video, sign in to YouTube with a Google account or YouTube
account.
1Tap an account name at the left of the screen
・When a video list screen appears, tap "YouTube" icon on the upper left
→Account name.
2"Uploads" → → Tap an application from which you
select video
3Tap a video to post
・If YouTube user name creation screen appears, operate according to
the onscreen instructions.
4Enter/Set required items → "Upload"
Uploading starts.
Playing videos
Posting videos

144 Applications
GPS/Navigation
・Note that DOCOMO is not liable for any damages that may occur as a result
of irregularities in the GPS system.
・Note that DOCOMO is not liable for pure economic loss if you cannot confirm
the positioning (communication) result with the terminal because of failure,
malfunction or external factors such as power failure (including battery
exhaustion).
・You cannot use the terminal as a navigation system for aircraft, vehicles,
persons, etc. For this reason, note that DOCOMO is not liable for losses
incurred by navigation performed by using location information.
・You cannot use the terminal as a high-accuracy measurement GPS. Note that
DOCOMO shall have no liabilities whatsoever even if you suffer damage or
loss due to a deviation of the location information.
・GPS is operated by the U.S. Department of Defense. The department
controls the accuracy of the system, and manages the system. Therefore,
GPS radio wave condition may be controlled (degradation of accuracy,
suspension of radio wave transmission, etc.) at the discretion of the U.S.
Department of Defense.
・Wireless communications products (mobile telephones, data detectors, etc.)
might interfere with satellite signals and cause signal reception to become
unstable.
・The displayed map based on the acquired location information (latitude and
longitude information) may be inaccurate because of the legal system in
each country and area.
■Where radio waves are difficult to receive
Note that since GPS is using radio waves for satellites, under the following
conditions, radio waves might not be able to be received or might be difficult
to receive.
・Inside or immediately under a building
・Inside a basement or tunnel, and below the ground or water
・Inside a bag or box
・In buildings-clustered or residential area
・Inside or under a thick covering of trees
・Near a high-voltage cable
・In a car, inside a train compartment
・Bad weather such as heavy rain or snow
・When there are obstructions (people or objects) near the terminal
To use applications requiring location information, set to use GPS function
or set to detect location information using Wi-Fi/mobile networks. Enabling
both functions helps to detect more accuracy location information.
1From the Home screen, M → "Settings"
2"Location services"
3Mark items
Using the GPS function
Enable location information
Item Description
Google's location service Detect location information using Wi-Fi/
mobile networks data.
GPS satellites Detect location information using radio
wave sent from GPS satellites
・Using this function increases power
consumption. To reduce battery
consumption, unmark the checkbox.
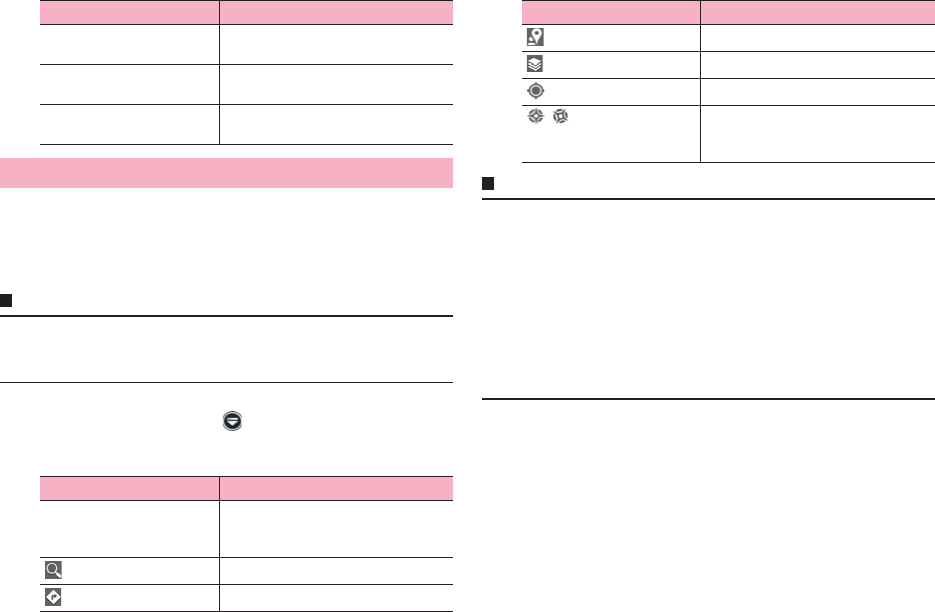
145 Applications
Use Google Maps to check current location or search location.
Also using Google Maps, you can access following applications.
・Google Latitude (P.147)
・Google Maps Navigation (P.147)
・Google+Local (P.147)
Information
・To use Google Maps, a network connection via LTE/3G/GPRS network or
Wi-Fi is required.
・In some areas, part of functions may not be available.
1From the Home screen, → "Maps"
Map screen appears.
・Tap an icon/item to perform following operations.
Information
・On the map screen, use the touch panel to perform the following operations.
- Slide : Scroll the map to show other area
- Touch and hold : Show address in a call-out
- Pinch-in/-out : Zoom out/in the map
- Double-tap : Zoom in the map
- Tap with 2 fingers in the same time : Zoom out the map
- Drag down with 2 fingers : Tilt and show the map in 3D
- Drag with 2 fingers to rotate the screen : Rotate the map
・Touch and hold the map and tap a call-out to show the information screen
which allows you to check detailed information, save to "STARRED", etc.
GPS LED reminder Set whether to flash LED while using
GPS satellites.
GPS sound reminder Set whether to emit alert sound while
using GPS satellites.
Location & Google search Set whether to allow Google to use
location information.
Using Google Maps
Icon/Item Description
Maps Use Google+Local, Google Map
Navigation, My Places, check location
history, etc.
Enter text to search on the map.
Show routes to the destination (P.146).
Item Description
Use Google+Local (P.147).
Use layer function (P.146).
Show current location.
/While viewing current location, show
the map with north/direction to which
you face up.
Icon/Item Description
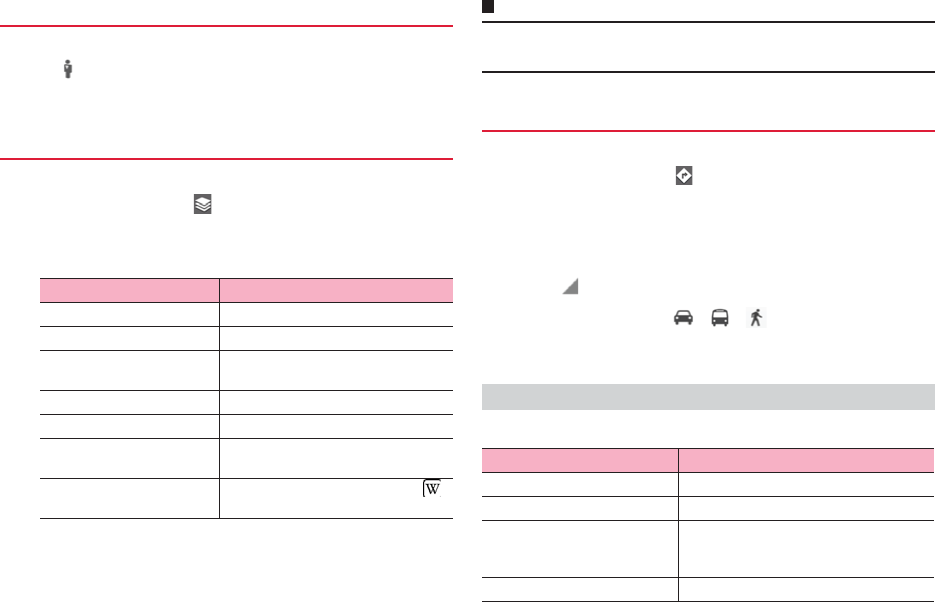
146 Applications
1Touch and hold a location on the map → Tap a call-out
→
・If a notification screen appears, tap "OK".
・Street View does not cover some areas.
You can add traffic information on the map and switch to aerial photograph.
1On the map screen,
2Tap an item
・Displayed menu items differ depending on conditions and areas.
Information
・Provided aerial photographs are not real-time images.
・In some areas, traffic information, rout map, etc. may not be available.
Set start point and end point to check route.
1On the map screen,
2Enter start point in "My Location"
3Enter end point in "End point:"
・M → Tap "Reverse Start & End" to switch start point and end point.
・Tap to set locations from contacts, points on the map, My Places.
4Tap transportation ( / / ) → "GET
DIRECTIONS"
Routes appear.
Tap M on the map screen to show the following menu items.
Viewing Street View
Using layer function
Item Description
Traffic Check real-time traffic information.
Satellite Switch to aerial photograph.
Terrain Switch to topography of the land
surface.
Transit Lines Show route map on the map screen.
Latitude Join Google Latitude.
My Maps Show My map (a map created by
yourself).
Wikipedia Show Wikipedia information icons ( )
on the map.
Searching routes
Menu on the map screen
Item Description
Clear Map Restore the map data to default.
Make available offline Download specified area map to use.
Settings Sign in or switch to Google account, make
cache settings, check various information,
etc.
Help Show Help.
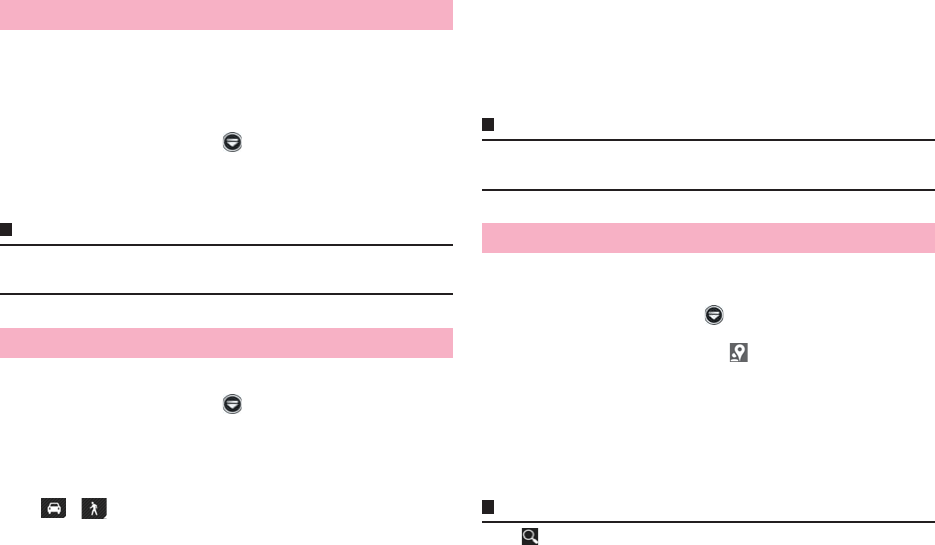
147 Applications
Check where friends are on the map and share location information via
Bluetooth or mail, etc. Also, routes to places where friends are can be
searched.
・To share location information, you need to join Latitude and invite friends who
give you their location information, or to receive an invitation from them.
1From the Home screen, → "Latitude"
Latitude screen appears.
2"MAP VIEW"
Information
・For details on Latitude, on the Latitude screen, M → Tap "Help" to check
Help.
Check routes toward destinations using navigation function.
1From the Home screen, → "Navigation"
・For the first activation, a message appears. Check the content¨Tap
"Accept".
・When a confirmation screen for location information settings appears,
tap "OK" and then enable scanning location information (P.144).
2 / → "Car"/"Walk"
3"Type destination" → Enter destination → Tap
destination from displayed locations.
Routes appear.
・Alternatively, tap "Speak destination" and speak a destination.
・You can search for an address saved in STARRED or Contacts by
swiping left or right.
Information
・For details on Google Maps Navigation, on the navigation screen, M→ Tap
"Help" to check Help.
You can search for restaurants, hotels, etc. in the vicinity of your current
location.
1From the Home screen, → "Local"
The category list screen appears.
・Alternatively, on the map screen,
2Tap a category
Information searched by the selected category is listed.
3Tap information to check
Detailed information appears. You can check, share detailed information
and save to STARRED, etc.
Information
・Tap on the category list screen to search by keyword.
・To add categories, on the category list screen, M → "Add a search" → Ta p
category to add. You can also enter a new category name.
Using Google Latitude
Using Google Maps Navigation
Using Google+Local
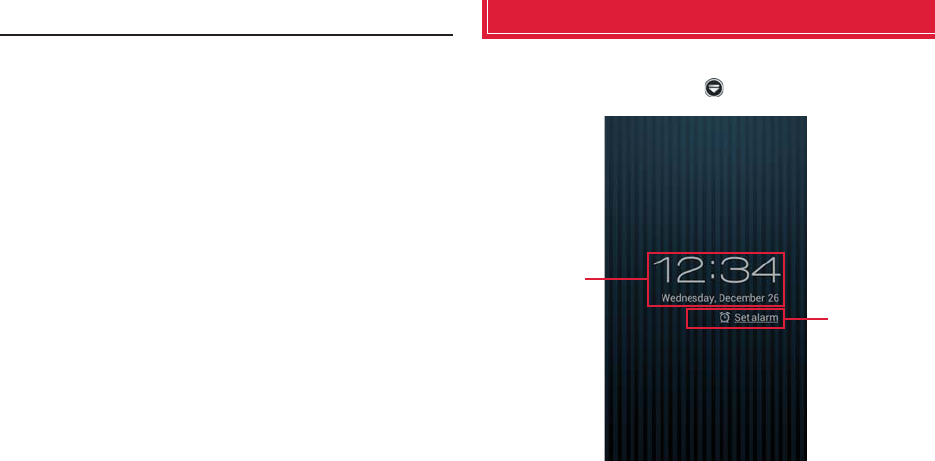
148 Applications
・On the information list screen, tap "MAP VIEW" to show information on the
map. Clock
Check time and set alarm.
1From the Home screen, → "Clock"
aShow current date and time.
bTap to show alarm setting screen. If alarms are set, closest alarm
time appears.
Desk clock screen
a
b
149 Applications
Information
・Tap the screen to darken the screen. Touch and hold the screen to show the
clock in full screen (blue text for date and time on black background).
1On the desk clock screen, "Set alarm"
The alarm setting screen appears.
2"Add alarm"
3Set required items
4"OK"
An alarm is added to the alarm setting screen.
appears on the status bar.
Information
・Mark/Unmark alarm on the alarm setting screen to set alarm ON/OFF.
・On the alarm setting screen, M → Tap "Desk clock" to return to the desk
clock screen.
When set alarm time comes, alarm sounds and alarm screen appears.
Tap "Snooze" to stop alarm and sound alarm again later.
Tap "Dismiss" to cancel alarm.
Information
・If set alarm time comes while the terminal powered OFF, the terminal
automatically turns ON with Airplane mode set.
1Tap an alarm to edit/delete on the alarm setting screen
2Edit/Delete alarm setting
■Editing alarm setting
aEdit setting → "OK"
■Deleting setting
a"Delete" → "OK"
Setting alarm
Item Description
Turn alarm on Activate/Deactivate alarm.
Time Set time.
Repeat Set to repeat.
Ringtone Set alarm sound.
Vibrate Activate/Deactivate vibration.
Label Enter message which appears at the
alarm time.
When sounding alarm
Editing/Deleting alarm setting

150 Applications
1On the alarm setting screen, M → "Settings"
2Set required items
Calendar
Use calendar to manage schedule. Also, the terminal's calendar can be
synchronized with Google Calendar, etc. on the web.
Operations for using calendar from "Calendar" application are described
here.
1From the Home screen, → "Calendar"
Making alarm basic settings
Item Description
Alarm in silent mode Set whether to sound alarm in Silent
mode.
Alarm volume Set alarm volume.
Snooze duration Set snooze duration.
Auto-silence Set time at which alarm automatically
mutes.
Volume buttons Set action when + / - is pressed while
alarm is sounding.
Set default ringtone Set alarm sound.
Using calendar
Showing calendar

151 Applications
aSwitching icons
Tap to switch Day/Week/Month/Agenda list view.
bCalendar
Appears in Day/Week/Month view mode.
・In Day/Week view mode, days which passed current date are
shown on gray background.
・In Month view mode, present month is shown on gray
background and current day is shown on white background.
・In Agenda list, event list for certain period of time appears. To
change period, scroll the screen and tap "Touch to view
events before (after) XX/XX/XXXX". Each tapping makes the
period long.
cCurrent day's icon
Tap to switch to the schedule list including the current day.
dEvents
Saved events appears.
eCurrent day and time
Current date and time appears.
・In Day/Week view mode, it appears on the current day and
time.
・For schedule list, it appears between schedules before the
current day and schedules after the current day. Schedules
before the current day are shown on gray background.
fNew event icon
In Week view mode, tap the calendar to show.
・In day view mode, tap the calendar to show "+New event".
Tap M on the calendar screen to show the following menu items.
・Displayed menu items differ depending on conditions.
Calendar screen (week view mode)
c
d
e
f
b
a
Menu on the calendar screen
Item Description
New event Create schedule (P.152).
Refresh Manually update schedule.
Search Search schedule.
Calendars to display Set synchronization/display of schedule.
Settings Change calendar setting (P.153).

152 Applications
1Tap an area to add an event on the calendar screen
(Week view mode) →
New event screen appears.
■Adding a new event on the calendar screen (Day view mode)
aTap an area to add an event → "+ New event"
■Adding a new event on the calendar screen (Month view
mode)
aTap a day to add a new event → Tap an area to save the event →
"+ New event"
2Set required items
・Tap an account shown at the top of screen to switch account.
・Displayed items differ depending on accounts.
3"DONE"
1Tap an event in the calendar screen
Event details screen appears.
■Editing an event
a・For events set repetition, tap "Change only this event"/
"Change all events in the series"/"Change this and all future
events".
bChange schedule → "DONE"
■Deleting an event
a・For events set repetition, tap "Only this event"/"This and
future events"/"All events".
b"OK"
When setting reminder for an event and set time arrives, appears on
the status bar.
1Opening the notification panel
2Tap a reminder to check/set Snooze/delete
Calendar notifications screen appears.
Adding new events in calendar
Item Description
Event name Enter event name.
Location Enter location for event.
FROM Set starting time for event.
TO Set ending time for event.
ALL DAY Mark for all-day event.
Time zone Set time zone.
GUESTS Schedule is sent to entered addresses.
Description Enter description for event.
REPETITION Set whether to repeat the schedule on a
regular basis.
REMINDERS Set reminder (P.153) for event.
・Tap "Add reminder" to add reminder.
SHOW ME AS Select from "Busy"/"Available".
PRIVACY Set whether to make public schedule.
Checking/Editing/Deleting events
Checking/Set Snooze for/Deleting reminder for events
Item Description
153 Applications
3Check/set Snooze for/delete reminder
■Checking reminder
aTap reminder to check
■Setting Snooze for reminder
a"Snooze all"
All notifications snooze and notify again 5 minutes later.
■Deleting reminder
a"Dismiss all"
Information
・If "Pop-up notification" (P.153) is marked, the calendar notification appears
when event notification time arrives. You can check/set Snooze/delete
notification.
The terminal's calendar can be synchronized with Google Calendar, etc. on
the web and viewed.
1On the calendar screen, M → "Settings" → Tap
account to set
2Mark/Unmark an account
1On the calendar screen, M → "Settings" → "General
settings"
2Set each item
Setting synchronization/display of schedule
Changing calendar settings
Item Description
Hide declined events Set whether to show events for which
invitations are declined.
Show week number Set to show week number on the left of
the calendar screen (month view
mode).
Week starts on Set the first day of the week.
Use home time zone Even while you are in an area of
different time zone, schedule is shown
in set time zone.
・Mark to change home time zone.
Clear search history Delete event search history.
Notifications Set whether to notify event.
Choose ringtone Set ringtone for schedule notifications.
Vibrate Set whether to vibrate when notifying
schedule.
Pop-up notification Set whether to show the calendar
notification screen when event
notification time arrives.
Default reminder time Set default value for event notification
time.
154 Applications
Memo
Enter text and save it as memos.
1From the Home screen, → "Memo"
Memo list screen appears.
2"新規作成 (New memo)" → Enter text
Add ToDo, time, alarm, attachment images as required.
3"Save"
1Touch and hold a memo to edit/delete on the memo list
screen
2Set each item
Calculator
You can four arithmetic operations (+, −, ×, ÷), functional calculus, etc.
1From the Home screen, → "Calculator"
Calculator screen appears.
・Swipe the keypad to the left or right to switch advanced panel/basic
panel.
2Tap keys to calculate.
Information
・On the keypad screen, M → Tap "Advanced panel"/"Basic panel" to switch
calculator.
・Turning the terminal sideways shows calculator in landscape mode.
Available keys differ depending on the orientation of the screen.
・Touch and hold numbers for calculate result on the calculator screen to cut/
copy/paste them. You can paste them to display field of calculator or other
application to use.
Creating memos
Editing/Deleting memos
Item Description
Edit Edit memos.
Delete one Delete a memo.
Display priority Show the memo at the top of the list.
Save one to SD card Save the memo to microSD card.
155 Applications
SD card backup
Transfer or back up phonebook entries, sp-mode mails, bookmarks, etc.
using external memory such as a microSD card.
・Do not remove the battery pack or microSD card from the terminal during
backup or restoration. The terminal data may be damaged.
・If the item names (e.g. Phone number, etc.) of another terminal phonebook
are different from those in the terminal, the item names may be changed or
deleted. Also, some text may be deleted in copied destination, because
savable characters in a phonebook entry vary by terminal.
・When backing up phonebook entries to microSD card, entries without name
cannot be copied.
・When available memory space of microSD card is not enough, backup may
not be executed. In such case, delete unnecessary files from the microSD
card to save the memory space.
・When the remaining battery gets low, backup or restoration may not be
executed. In such case, charge the battery of the terminal and then back up
or restore.
・For backing up or restoring, you need docomo apps password (P.103).
・Due to memory configuration of the terminal, if a microSD card is not
installed, still image data, video data, etc. are saved in the terminal. Only still
image data, video data, etc. saved in the terminal can be backed up by the
application. Data stored in a microSD card is not backed up.
Back up data such as phonebook entries, sp-mode mail, media files.
1From the Home screen, → "SD card backup"
For the first activation, License agreement appears. Check the content
→ Tap "Agree".
2"Backup" → Mark data to back up
3"Start backup" → "OK"
4Enter docomo apps password → "OK"
Selected data is saved to the microSD card.
Restore backed up data to the terminal.
1From the Home screen, → "SD card backup"
2"Restore" → "Select" for data to restore
3Mark data to restore → "Select"
4Tap for "Add"/"Overwrite" to turn → "Start
restore" → "OK"
5Enter docomo apps password → "OK"
Selected data is restored to the terminal.
Backing up
Restoring backed up data

156 Applications
1From the Home screen, → "SD card backup"
2"Phonebook account copy" → "Select" for phonebook
data to copy → "Overwrite"/"Add"
The copied contacts data is saved to the docomo account.
3"OK"
1From the Home screen, → "SD card backup"
2"Periodical backup" → "Add schedule" → Mark
"Schedule ON"
3"Select" → Mark data to back up → "Select"
4Select Repeat task → Set time to execute
5"Enter" → "Set" → Enter docomo apps password →
"OK"
Tap M to show following menu items.
Copying phonebook entries stored in Google
account or the terminal to docomo account
Backing up periodically
Menu for SD card backup
Item Description
Help Show Help.
About Display application information.
Exit Exit SD card backup application.
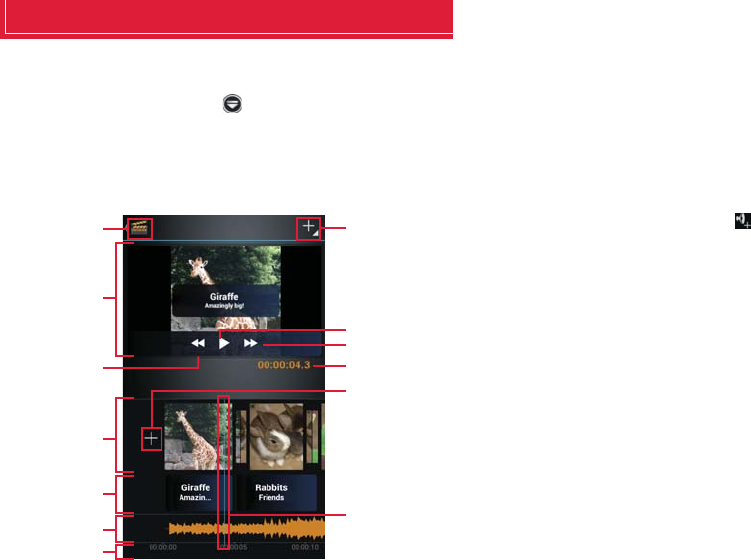
157 Applications
Movie Studio
Use files stored in the terminal or a microSD card to create original movies
(videos).
1From the Home screen, → "Movie Studio"
Project list screen appears.
2"Create New Project"
3Enter a project name → "OK"
aMovie Studio icon
Return to the Project list screen.
bPreview area
Project being edited appears.
cRewind icon
Tap while playing to rewind project.
dEditing movie (video) area*
Added movie file/image file and Transition effect appear and editing
operation becomes available.
eTitle editing area*
Added title appears. Editing is available.
fEditing music area*
Adding a video/image file shows and tap it to add music file.
gTime display
Show start time of project.
hOperation icon
Menu items appear then you can add file, etc.
iPlaying icon
Play a project being edited to check.
jFast forward icon
Tap while playing to fast forward project.
kPlay time for edit point
Play time to the edit point appears.
lAdding video file icon
Select to add video files saved in the terminal of microSD card.
mEdit point
Move video file/image file you want to edit to the point by dragging
left or right.
*: Pinch-out/-in each area with 2 fingers to zoom-in/out of time scale.
Creating project screen
m
i
j
k
b
a
c
d
e
h
l
f
g
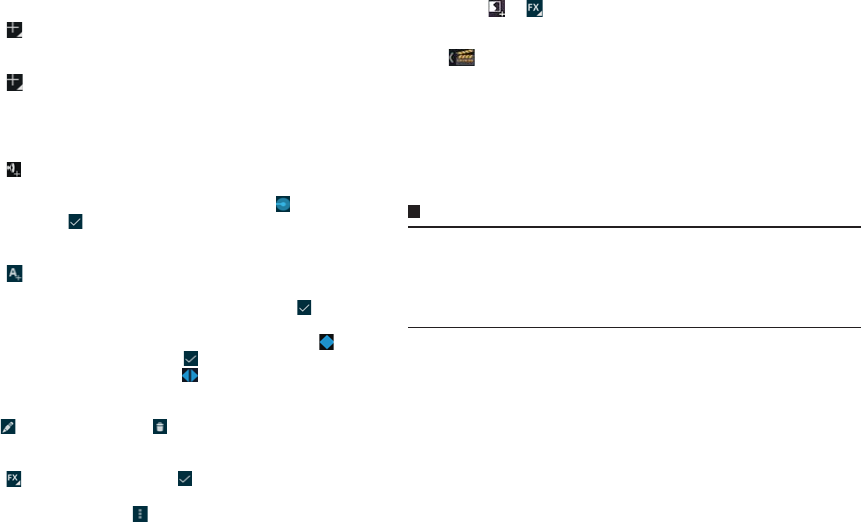
158 Applications
4Add video file/image file
Repeat the following operations to select several files.
■Adding saved video/image files
a → "Import video clip"/"Import image" → Select application to
view files → Select a file
■Shooting video or image to add
a → "Record a video"/"Take a photo"
bShoot video/image → "OK"
5Edit a project
■Adding music files
a in the editing music area → Tap an application
bTap a music file → "OK"
cTap music file in the editing music are → Drag left/right to set
volume →
■Adding title
aTap a file in the editing movie (video) area
b → "Add title"
c"Change template" → Tap a template to use
dEnter a title → Enter a subtitle as required → "OK"
・Title appears in the editing title area.
eTap a title from "Gradient", "Sepia", "Negative" → Drag to the
time you want to show the title
・Touch and hold a title → When appears, drag it left/right to
move display position. But title cannot be moved between different
files.
・ allows you to edit title, allows you to delete title.
■ Editing display effect
aTap a file in the editing movie (video) area
b → Tap an effect to use →
■ Deleting added file
aTap a file to delete → → "Remove" → "Yes"
■Editing switching effect (transition) of video/image
aTap a file in the editing movie (video) area
b or → "Transition into clip"/"Transition out of clip" → Select
a time → Select a type
6/B
Project is saved and the Project list screen appears.
■Saving a project as a movie (video)
aM → "Export movie"
bSetting "Movie size", "Movie quality"
・Some items cannot be set depending on the video files you are
using.
c"Export"
Information
・To play a movie (video) on other application, export project.
・To edit created project, tap a project to edit on the Project list screen.
・To delete a project, touch and hold the project on the Project list screen →
"Delete project" → Tap "Yes", or on the creating project screen, M → "Delete
project" → Tap "Yes".
159 Applications
Polaris Office
View/edit document such as Microsoft Word, Microsoft Excel, Microsoft
PowerPoint and Adobe PDF.
・For some documents, displayed contents may differ from ones displayed on
a PC or may be displayed improperly depending on document type or
version.
1From the Home screen, → "Polaris Office"
Polaris Office screen appears.
2Tap a document saved folder → Tap a document
A document opens.
・Tap M to zoom in/out, edit, search, send, etc. document.
1From the Home screen, → "Polaris Office"
2M → "New" → Tap a document type
3Create document → M → "Save"
4Enter a file name → Select saving location → "Save"
Displaying/editing document
Creating new document
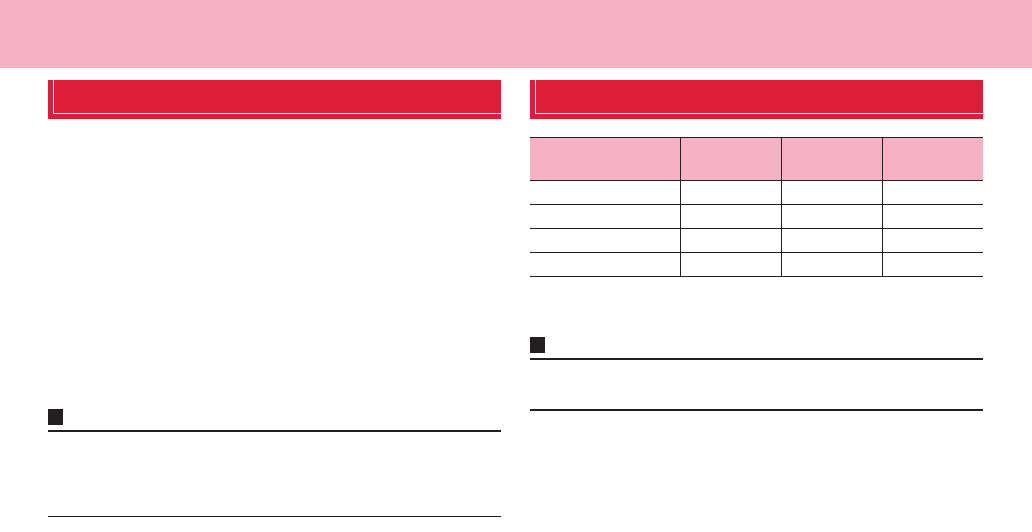
160 International roaming
International roaming
Outline of international roaming (WORLD WING)
With the international roaming (WORLD WING), you can use the terminal
without changing phone number or mail address in the service area of the
overseas network operator affiliated with DOCOMO. You can use Phone
and SMS without changing settings.
■Supported networks
The terminal is Class 4. The terminal works in a 3G network and GSM/GPRS
network service area. Also, it works in countries or districts where 3G 850 MHz/
GSM 850MHz is applied. Check the service area.
Use 3G network or GSM/GPRS network overseas because Xi is not available
overseas.
■Refer to the following documents before using the
terminal overseas.
・"Mobile Phone User's Guide [International Services]"
・DOCOMO International Services website
Information
・For Country codes, International call access codes, Universal number
international prefix, available countries/regions, and network operators, refer to
"Mobile Phone User's Guide [International Services]" or DOCOMO International
Services Website.
Available service overseas
*1: To use data communication during roaming, mark "Data roaming" in Mobile
networks setting (P.163).
Information
・Some services may not be available depending on the network operator or
network overseas.
Main communication
services 3G 3G850 GSM (GPRS)
Call ○○○
Message (SMS) ○○○
Mail*1 ○○○
Browser*1 ○○○
161 International roaming
Checking for using
To use the terminal overseas, check the following in Japan.
・Check if you subscribe to WORLD WING. For details, contact "General
Inquiries" on the last page of this manual.
・Use optional "FOMA AC Adapter 02" or "AC adapter 03" for travelling
overseas.
・Overseas usage charges (call and packet communication) differ from those
in Japan.
・Since some applications automatically perform communications, packet
communication charges may become high. For operation of applications,
contact application providers by yourself.
If you subscribe to network services, you can use network services such
as Voice Mail Service, Call Forwarding Service, Caller ID Display Request
Service, etc., even overseas. Some network services are not available.
・To use network services overseas, you need to set "Remote operation
settings" to activate. You can set "Remote operation settings" in the country
you visit.
・Even if the setting/canceling operation is available, some network services
cannot be used depending on overseas network operators.
When you arrive overseas and turn the terminal ON, a connection to the
available network is established automatically.
When you have set search mode of "Available networks" in "Network
operators" to "Select automatically", optimized network is automatically
selected.
Connect to the network operator conducted in flat-rate service to use the
terminal overseas with packet communication charge in flat-rate of upper
limit per day.
To use this service, subscription of packet flat-rate service in Japan is
required. For details, refer to "Mobile Phone User's Guide [International
Services]" or DOCOMO International Services Website.
Before leaving Japan
Subscription
Charging
Usage charge
Advance preparation
Setting network service
After arriving overseas
Connectivity
162 International roaming
A network type in use appears on the status bar.
: Roaming
・You can check the name of the connected network operator on the
Notification panel.
When "Automatic date & time"or "Automatic time zone" is marked, the
date, time and time differences of the terminal are corrected by receiving
information related to time and time differences from the network of
overseas telecommunications carrier you connect to.
・Correction of the time or time differences may not be performed correctly
depending on the network of overseas network operator. In that case, set
time zone manually.
・Timing of correction varies by the overseas network operator.
・"Date & time" (P.110).
・For loss or theft of the terminal or UIM/docomo mini UIM card, immediately
contact DOCOMO from the spot to take the necessary steps for suspending
the use. For inquiries, see the last page of this manual. Note that you are still
liable for the call and communication charge incurred after the loss or theft
occurred.
・For using from land-line phone, entering "International call access code" or
"Universal number international prefix" for the country is needed.
Making settings for overseas use
By default, the terminal detects available network in the country you stay
and connects to it automatically. But you can set it manually.
To connect to network operator compatible with GSM network overseas,
change the network type.
1From the Home screen, M → "Settings"
2"More..." → "Mobile networks" → "Network Mode"
3Tap a network to use
・LTE/3G/GSM (Auto): Select available network mode automatically.
・LTE/3G: Use 3G network (LTE is not available overseas).
・GSM: Use GSM/GPRS network.
Information
・By default, "LTE/3G/GSM (Auto)" is set. You do not need to change the
settings for using the terminal in Japan and in a region with only 3G network
operators.
・If the mode is set to [LTE/3G/GSM (Auto)] and a GSM/GPRS network and 3G
network of the same network operator are detected at the same time,
connection to a 3G network is given priority.
Display
Date & time
About inquiries
Setting network type
163 International roaming
The terminal is set to automatically connect to a suitable network operator
(network) in the area you stay by default. To connect to other network
operator manually, set as follows.
1From the Home screen, M → "Settings"
2"More..." → "Mobile networks" → "Network operators"
A list of detected network operators appears.
3Tap a network operator to connect
■To connect suitable network operator automatically
a"Select automatically"
■To search all available networks in the area you stay
a"Search networks" → Tap a name of network operator to connect
1From the Home screen, M → "Settings"
2"More..." → "Mobile networks"
3Mark "Data roaming" → "OK"
Making/Receiving a call in the country you stay
Use international roaming service to call from the country where you stay
to another country.
・For available countries/regions and network operators, refer to "DOCOMO
International Services Website".
1From the Home screen, → "Dial"
2Enter "+" (Touch and hold "0")-"Country code"-"Area
number (City code)"-"phone number of the party"
・Enter the phone number without a leading "0", if any. For example, to
call a mobile phone (080-xxxx-xxxx) in Japan (Country code: 81),
enter +81-80-xxxx-xxxx. In some countries and areas such as Italy,
"0" is required.
・If you make a call to the party using "WORLD WING" overseas, enter
the "+" and "81" (country code of Japan) regardless of the county
where the party stays.
・When "Automatic conversion function" in "International dial assist"
(P.165) is marked, you can make a call without entering the number
set in "Country code".
3
When the party answers, a calling screen appears.
4When a call is ended, "End"
Setting network operator to connect
Enabling data roaming
Making a call to Japan or outside the country you
stay
164 International roaming
You can make a call in the same way as you do in Japan.
1From the Home screen, → "Dial"
2Enter phone number including area number (City
code)
・If you make a call to the party using "WORLD WING", make a call as
an international call to Japan by entering the "+" and "81" (country
code of Japan) and without leading "0" of the party's phone number
even when making a call in the country you stay.
3When the party answers, a calling screen appears.
4When a call is ended, "End"
You can receive a call in the same way as you do in Japan.
Information
・An incoming call during the international roaming is forwarded from Japan
regardless of which country the call is from. A caller is charged for a call fee to
Japan, and the receiver is charged for a reception fee.
■To have the party in Japan call you overseas
Just have your phone number dialed as a domestic call in Japan.
■To have the party outside of Japan call you overseas
The party needs to dial from the international call access code and "81"
(country code of Japan) regardless of which country he/she stays in.
International call access code of the country of the caller -81-90 (or 80) -
XXXX - XXXX
Making a call inside the country you stay
Receiving a call in the country you stay
Making a call to your terminal
165 International roaming
Making settings for international roaming
・For some overseas network operators, settings may not be made.
1From the Home screen,
2M → Call settings" → "Roaming settings"
Item Description
Restricting incoming
calls
Restrict incoming calls during
international roaming.
Incoming notification
while roaming
Notify you of the missed call information
by SMS during international roaming.
Roaming guidance Notify the caller with guidance
indicating that the call is international
roaming for an incoming call during
international roaming.
International dial assist When "Automatic conversion function"
is marked, a country code or
international prefix is added for making
an international call. You can add/edit/
delete the country code and
international prefix.
Network
service
Remote
operation
(charged)
Set network services such as voice mail
etc. from overseas.
・Setting "Remote operation(charged)"
to ON in advance is required.
・If you make the settings overseas,
you are charged a call fee to Japan
from the country you stay.
・For some overseas network
operators, settings may not be
made.
Roaming ID
notification
request
service
(charged)
Roaming call
notification
(charged)
Roaming
guidance
(charged)
Voice mail
(charged)
Call
forwarding
(charged)
Item Description

166 International roaming
After returning to Japan
When you return to Japan, the terminal is connected to DOCOMO network
automatically. If connection is failed, perform the following operations.
・Change "Network Mode" to "LTE/3G/GSM (Auto)".
・Set "Available networks" in "Network operators" to "Select automatically".

167 Appendix/Index
Appendix/Index
Options and related devices
Combining the terminal with optional accessories supports a wide variety
of uses from personal use to business use. Some products are unavailable
depending on the area. For details, contact a sales outlet such as docomo
Shop.
For details about the optional devices, refer to the instruction manual for
each device.
・Battery pack HW03
・Back Cover HW04
・Desktop Holder HW02
・Earphone adapter cable with antenna SH01
・AC adapter HW01
・DriveNetCradle 01
・AC adapter 03
・DC adapter 03
・FOMA charging microUSB adapter T01
・FOMA AC Adapter 02
・Micro USB Cable 01
・Pocket charger 01/02
・FOMA Portable Charging Adapter 02
・FOMA DC Adapter 02
・Carry Case 02
・AC Adapter Converter Plug Type C 01
・Earphone/Microphone 02
・Stereo Earphone Set 02
・Earphone Plug Adapter 02
・Wireless Earphone Set 03
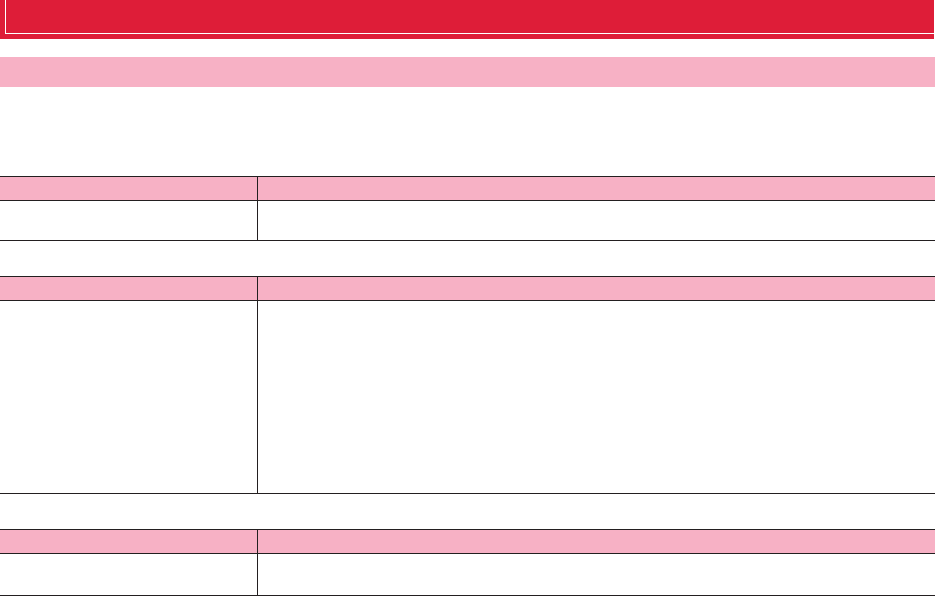
168 Appendix/Index
Troubleshooting (FAQ)
・Check for the necessity of software update first, and update the software if necessary. (P.176)
・When checking the following items does not to improve the state, contact "Repairs" on the last page of this manual (in Japanese only) or DOCOMO-specified
repair office.
■Battery
■Charging
■Terminal operations
Troubleshooting
Trouble Check and remedy
The terminal cannot be turned ON ・Is the battery pack installed correctly? (P.22)
・Is the battery exhausted? (P.25).
Trouble Check and remedy
Cannot charge the terminal (LED light
does not turn on, charging icon does
not appear on the status bar)
・Is the battery pack installed correctly? (P.22)
・Is the adapter's power plug or cigarette lighter plug inserted to the outlet or cigarette lighter socket correctly? (P.25)
・Are the adapter and the terminal set correctly? (P.25)
・When an AC adapter (optional) is used, is the microUSB plug of the AC adapter firmly connected to the terminal
or the desktop holder (optional)? (P.25, P.26)
・When the Desktop Holder (optional) is used (P.26), is the charging contacts for desktop holder of the terminal dirty?
If it is dirty, clean with a dry cotton swab etc.
・Is a PC turned on when you connect to a PC with Micro USB Cable 01 (optional)? (P.117)
・If you execute calls, communications or other operation for a long time while charging, the terminal may become
hot and charging may be unavailable. In this case, wait until the temperature of the terminal is down and retry
charging.
Trouble Check and remedy
The terminal, etc. become hot while
operating/charging
・While operating or charging, or when you use applications etc. for a long time, the terminal, battery pack or adapter
may become hot. There is no safety problems and you can continue to use it.

169 Appendix/Index
The operation time provided by the
battery pack is short
・Is the terminal left for a long time out of service area? Out of service area, a lot of power is consumed to search
available radio waves.
・The operation time provided by the battery pack varies by the operating environment and battery pack's
deterioration.
・The battery pack is a consumable part. Each time it is charged, available time with each charging reduces. Even
the full charge state, when the operation time is too short, purchase a new battery pack of the specified type.
The docomo mini UIM card is not
recognized
・Is the docomo mini UIM card installed in the right direction? (P.20)
No operation is performed when you
tap the touch panel/touch key or
press a key
・Is the terminal in sleep mode? Cancel sleep mode by pressing T. (P.27)
The touch panel/touch key or key
reacts slowly when a screen is tapped
or a key is pressed.
・When large amount of data is saved in the internal storage of the terminal or transferring large-size data between
the terminal and microSD card, the reactions on the screen may be delayed.
Time is incorrect. ・It may occur if you keep the terminal turned on for a long time. Check if "Automatic date and time" (P.110) is set to
ON, and turn OFF and then ON the terminal in a places where signal is strong.
Terminal operation is unstable ・It may be caused by applications installed to the terminal after purchase. If problems improve when you start in
Safe Mode, problems may be improved by uninstalling the applications.
*Safe Mode is a function to activate the phone in a mode similar to default.
・To start Safe Mode
1. From the Settings menu, turn off "Fast boot" (P.111) and then turn off the terminal
2. Press T for 2 seconds or more with the power of the terminal OFF, and then press and hold - (Volume key)
from when the logo of "HUAWEI Ascend" appears until the terminal vibrates once
*When safe mode is booted, "Safe mode" is displayed at the lower left of the Home screen.
*To exit the safe mode, turn power OFF and then ON.
・Back up the necessary data before using safe mode.
・Some widgets that you created may be removed.
・Safe mode is not usual active state. To use ordinarily, exit the safe mode.
Turning the power off or restarting
automatically happens
・If the contacts of battery pack are dirty, the contact may become poor and the power may shut OFF. If they are dirty,
clean with a dry cotton swab.
Trouble Check and remedy
170 Appendix/Index
■Calling
■Display
■Voice sound
Applications cannot be operated
properly (cannot be activated, or
errors occur frequently, etc.).
・Are there any applications being disabled? Enable disabled applications, then retry to operate. (P.102)
Trouble Check and remedy
Cannot make a call even though
tapping
・Do you enter a phone number from City code?
・Do you set Airplane mode? (P.94)
The ringtone does not sound ・Is the slider of volume bar for "Ringtone & notifications" at the left edge? (P.99)
・Do you set Airplane mode (P.94) or Silent mode (P.99)?
・Do you set Reject unregistered call? (P.76)
・Is the ring time of Voice mail service (P.71) or Call forwarding (P.71) to "0 sec."?
Calls are not connected (Even when
moving, 圏外 (out of service area)
does not disappear or although radio
waves are enough, making/receiving
calls is unavailable).
・Turn the terminal OFF and ON (P.27).
・Reattach the battery pack (P.22).
・Reattach the docomo mini UIM card (P.20).
・Due to the nature of radio waves, making/receiving calls may be unavailable even when 4 signal level icons appear
on the display. Move and call again.
・Due to the crossing of radio waves, at the crowded public places, calls or mails are crossed and the connection
status may not be good. Move to other place or call again at other time.
Trouble Check and remedy
The display is dim ・Do you adjust the brightness of the display? (P.100)
・Is the light sensor covered with fingers, sticker, etc.?
・Do you set eco mode or eco mode automatic activation? (P.67)
Trouble Check and remedy
During a voice call, the distant party's
voice is hard to listen to or too loud
・Do you change the listening volume? (P.70)
Trouble Check and remedy
171 Appendix/Index
■Mail
■Camera
■1Seg
■Osaifu-Keitai
■International roaming
Trouble Check and remedy
Mails are not received automatically ・Is "Inbox check frequency" in the account setting of Email set to "Never"? (P.81)
Trouble Check and remedy
Photos and videos taken with the
camera are blurred
・Check if clouds or dirt attach to the lens of camera.
・When you shoot portrait, mark "Face detection" (P.136).
Trouble Check and remedy
Cannot watch 1Seg ・Are you out of the terrestrial TV broadcasting service area or in an area with poor signal strength?
・Do you set channels?
Trouble Check and remedy
Osaifu-Keitai function is unavailable ・When removing the battery pack or activating Omakase Lock, Osaifu-Keitai functions are unavailable regardless
of the Osaifu-Keitai lock settings.
・Is Osaifu-Keitai lock activated? (P.122)
・Do you place mark of the terminal over IC card reader? (P.122)
Trouble Check and remedy
Cannot use the terminal overseas
[when signal status icon is displayed]
・Do you subscribe to WORLD WING? Check if you subscribe to WORLD WING.

172 Appendix/Index
■Data management
Cannot use the terminal overseas
[when 圏外 (out of area) is displayed]
・Are you out of the international roaming service area or in an area with poor signal strength? Check if the service
area and network operator are available, referring to "Mobile Phone User's Guide [International Services]" or
DOCOMO International Services website.
・Change network setting or overseas network operator setting.
Change "Network Mode" to "LTE/3G/GSM (Auto)" (P.162).
Set "Network operators" to "Select automatically" (P.163).
・It may be recovered by turning the terminal OFF and ON.
Cannot perform data communication
overseas
・Mark "Data roaming"(P.163).
Cannot use the terminal suddenly
while using overseas
・Does usage amount exceed the limit of maximum charges for use? For use of International roaming (WORLD
WING), the limit of maximum charges for use is set in advance. When it exceeds the limit of maximum charges for
use, pay the charges.
There is no incoming call overseas ・Is "Restricting incoming calls" set to "Activate restricting"? (P.165)
No caller ID is notified/A notified caller
ID is different from that of the caller/
Functions for using contents saved in
Phonebook or those using Caller ID
notification do not operate
・Even when a caller notifies its caller ID, it is not displayed on the terminal unless it is notified from your network or
network operator. And, a different caller ID may be notified by some networks or network operators you use.
Trouble Check and remedy
Data transfer is not performed ・Do you use USB HUB? If you use USB HUB, operations may not be performed correctly.
Data saved in microSD card is not
displayed
・Reattach the microSD card (P.21).
Trouble Check and remedy
173 Appendix/Index
■Bluetooth
■Map/GPS satellites
Trouble Check and remedy
The terminal cannot be connected to a
Bluetooth device/A Bluetooth
communication device cannot be
found from the terminal
・Make Bluetooth device (commercially available) pairing stand-by state and then perform pairing on the terminal. If
you delete already paired device and pair the device again as a new device, delete the paired devices on both the
terminal and Bluetooth device and then perform pairing (P.116).
Calls cannot be made from the
terminal connected to an external
device such as car navigation or
handsfree device
・If calls are made several times when the other party does not answer or is out of service area, the call to that number
may become disabled. In this case, turn the terminal OFF and ON.
Trouble Check and remedy
AUTO-GPS service information
cannot be set
・Is battery level low and AUTO-GPS function stopped?
When AUTO-GPS stops by "Low-power operation settings", AUTO-GPS service information cannot be set. In that
case, set "Low-power operation settings" to "Not suspend" or charge the battery (P.103).
・Do you set AUTO-GPS operation settings to OFF? (P.103)
・Is AUTO-GPS function disabled? (P.103)
Error messages
Error messages Description/Remedy
Phone is USIM Network locked
携帯電話がUSIMネットワークロックされて
います
・Displayed when a SIM card from another operator is inserted.
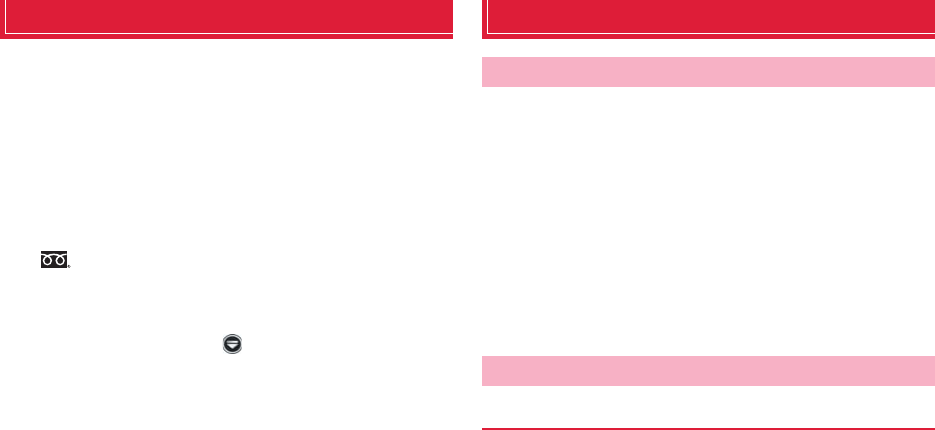
174 Appendix/Index
Smartphone Anshin Remote Support
By sharing screens of your terminal with DOCOMO, you can receive
technical support to make settings.
・This service is not available when your docomo mini UIM card is not inserted,
during international roaming, or in Airplane mode.
・Smartphone Anshin Remote Support is a service requiring subscription.
・Some operations and settings are not supported.
・For details of Smartphone Anshin Remote Support, refer to NTT DOCOMO's
website.
1Call スマートフォン遠隔サポートセンター (Smartphone
Remote Support center)
0120-783-360
Business hours: 9:00 a.m. to 8:00 p.m.
(open all year round) (In Japanese only)
2From the Home screen, → "遠隔サポート (Remote
support)"
・For the first using, agree to "ソフトウェア使用許諾書 (License
Agreement)".
3Enter connection number notified by DOCOMO
4Remote support starts when you are connected
Warranty and After-Sales Service
・The terminal is provided with a written warranty. Make sure that you receive
it. Check the written contents and items such as "販売店名・お買い上げ日
(Shop name/date of purchase)" and keep it in a safe place. If it does not
contain the necessary information, immediately contact the shop where you
bought it. The warranty is valid for a period of one year from the date of
purchase.
・This product and all accessories are subject to change, in part or whole, for
the sake of improvement without prior notice.
・Since troubles, repair or other handling of the terminal may cause contents in
the Phonebook etc. to be modified or deleted. DOCOMO recommends
making a copy of the Phonebook data etc., in case.
* Phonebook data in the terminal can be saved in a microSD card.
* Data such as phonebook entries can be backed up to Data center using Data
Security Service (subscription is required).
Before requesting repair, read the section on "Troubleshooting" in this
manual (P.168). If the problem still persists, contact "Repairs" on the last
page of this manual (in Japanese only).
Warranty
After Sales Services
When problems occur

175 Appendix/Index
Take the terminal to DOCOMO-specified repair office. Be sure to check the
opening hours of the office before you go. The warranty must be presented
to receive warranty service. Note that, repair may take longer time
depending on the state of damage.
■In the warranty period
・The terminal is repaired at no charge subject to the conditions of the
warranty.
・The warranty must be presented to receive warranty service. The subscriber
is charged for the repair of items not covered in the warranty or repairs of
defects resulting from misuse (damage of the liquid crystal/connector, etc.),
even during the warranty period.
・The subscriber is charged even during the warranty period for the repair of
failures caused by the use of devices or consumable items that are not
DOCOMO-specified.
■Repairs may not be possible in the following cases.
・When corrosion due to moisture, condensation, perspiration, etc. is detected,
or if any of the internal boards are damaged or deformed (repairs may not be
possible if external connection jack or liquid crystal is damaged, or the
terminal outer case is lifted)
* Even in case that a repair is possible, since those conditions are outside
the range of the warranty, a repair is charged.
■After expiration of the warranty
All repairs that are requested are charged.
■Replacement parts
Replacement parts (parts required to maintain the product functions) are
basically kept in stock for at least 6 years after termination of production.
However, repair may not be possible due to lack of repair parts, etc. Note that
repair may still be possible depending on the defective portion even if the stock
period has expired. Contact "Repairs" on the last page of this manual. (In
Japanese only)
●Do not modify the terminal or its accessories.
・May cause fire, injuries or malfunction.
・The modified terminal may be repaired only if the owner agrees on that all
the modified parts are restored to the original conditions. However,
repairs may be refused depending on the modifications. The following
cases may be regarded as modifications.
−A sticker etc. is put on the Liquid crystal or button part
−The terminal is embellished with adhesive material etc.
−Exteriors are replaced with other than DOCOMO's genuine parts
・Repair of failures and damage caused by modification are charged even
during the warranty period.
●Do not remove an inscription sticker attached to the terminal.
●The inscription sticker certifies that the terminal satisfies technical standards.
It should be noted that if the sticker is removed or is replaced with a different
sticker, and the original inscription sticker cannot be verified, it may disqualify
the unit from repairs due to not being able to determine the technical
standards of that particular phone.
●Function settings and information may be cleared (reset) by malfunctions,
repair or other handling of the terminal. Should that happen, set up the
functions again.
●If repair is executed, MAC address for Wi-Fi and Bluetooth address may be
changed regardless of malfunction part.
●Magnetic components are used in the following parts of the terminal. Do not
allow cash cards or other devices that are vulnerable to magnetism to come
into contact with the phone.
Part: speaker, microphone
●If inside of the terminal gets wet or moist, turn the power OFF, remove the
battery pack immediately, and bring the terminal to a repair office as soon as
possible. However, repair may not be possible depending on the condition of
the terminal.
If the result of inquiries indicates that a repair is
required
Notes
176 Appendix/Index
Note that data you created or data you retrieved or downloaded from
sources other than your terminal may be changed or lost when you change
the model or have repairs done to the terminal. DOCOMO shall have no
liability for any change or loss of any kind. Under some circumstances,
DOCOMO may replace your terminal with its equivalent instead of
repairing it. In that case, we cannot transfer these data to replaced
products except for some data.
Software update
This function allows you to connect the network and check if software in
the HW-03E needs to be updated, if software update is necessary, it
downloads software to update.
Check the NTT DOCOMO website to see if software updates are
necessary.
Software may be updated in following 3 methods :
・Automatic Update : Automatically download file to update at the specified
time.
・Now update : Update software immediately.
・Reserved update : Automatically update software at the time set in advance.
Information
・Software update can be done even when various data, such as phonebook
entries registered in terminal, camera images, mail, downloaded data, are
remaining; note that data protection sometimes cannot be secured
according to the conditions of your terminal (such as malfunction, damage,
or water leak). DOCOMO recommends backing up necessary data. However
some data such as downloaded data may not be backed up.
Precautions on memory dial (phonebook function) and
downloaded data
Software update
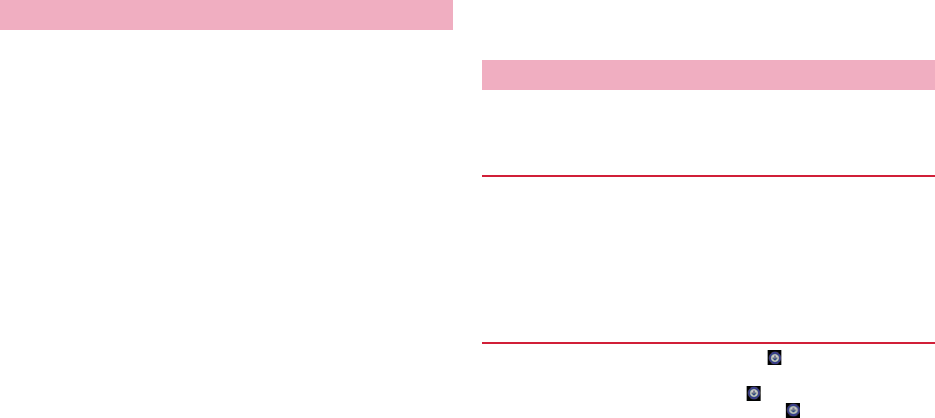
177 Appendix/Index
・Do not remove the battery pack while updating software. The update may fail.
・Software update should be done with battery fully charged. You are
recommended to connect charging cable when updating software.
・Software cannot be updated in the following cases.
- During a call
- When 圏外 (out of service area) is displayed *
- During international roaming
*
- When Airplane mode is on
*
- When date and time are not set correctly
- When the remaining battery is not sufficient for software update
- When the remaining memory is not sufficient for software update
*: During international roaming or when the terminal is out of service area,
updating software is not available even though you are connected via
Wi-Fi.
・Software update (downloading or rewriting) may take time.
・Making/Receiving calls, communication functions and other functions are
disabled during software update. Only incoming calls can be answered while
downloading.
・Stay in a place with strong radio wave condition when updating software.
Software update may be canceled if the radio wave condition is not good
enough.
・If software update is not needed, "No update is needed." appears.
・During international roaming, or out of service area, "When docomo network
is not available, or during roaming, install cannot be started even if Wi-Fi is
connected" appears. The same message appears even while connecting via
Wi-Fi.
・SMS sent during software update is stored in the SMS center.
・When updating software, your private information concerning HW-03E
(model, serial number, etc.) is automatically sent to the server for software
update managed by DOCOMO. DOCOMO does not use the sent information
for purposes except software update.
・When PIN code is set, the PIN code entry screen appears during resetting
after rewriting and you need to enter PIN code.
・While updating software, do not activate other applications.
Update file is automatically downloaded and software is updated at the
specified time.
The settings of Software Update is set to "Automatic Update" by default.
1From the Home screen, M → "Settings" → "Software
Update" → "Configure the software update"
2"Automatic Update"/"Manual Update"
If the update file is downloaded automatically, (software update
available) appears on the status bar to notify.
・When the rewrite start time is reached with (software update available)
displayed, software is automatically rewritten and (software update
available) disappears.
When updating software
Updating software automatically
Auto-update setting
When software update is necessary
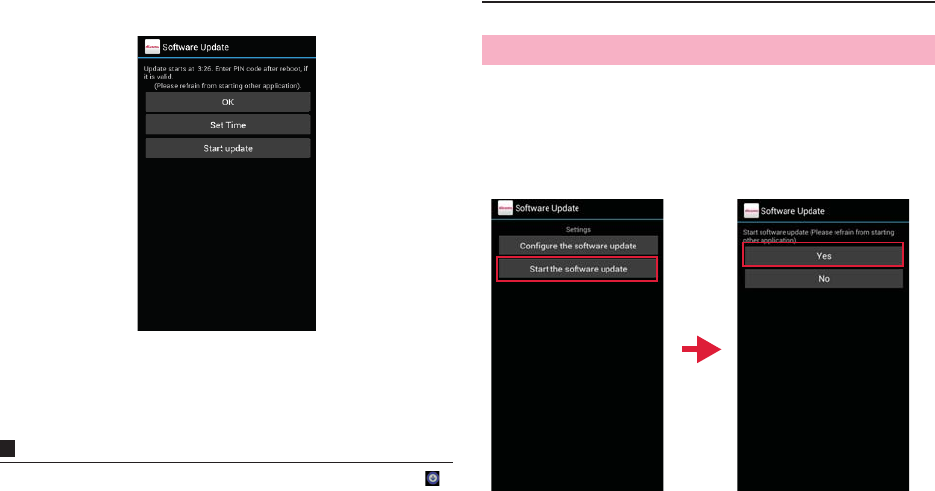
178 Appendix/Index
1Open the Notification panel → "Software update is
available"
Notice screen for update time appears.
2Perform target operations
・"OK": Updating starts when the preset time is reached.
・"Set Time": Change update time (P.179).
・"Start update": Update immediately (P.178).
Information
・If the software is not updated when the update notification is received,
(software update available) appears on the status bar to notify.
・If software update could not be performed at the preset time, the software
update will be performed at the same time the following day.
・Software cannot be updated automatically when the Auto-update setting is
set to "Manual Update" or while updating software by Now update.
Software update starts immediately.
・
There are 2 ways to activate software update: Activating from Software update
notice screen and activating from the menu.
1From the Home screen, M → "Settings" → "Software
Update" → "Start the software update" → "Yes"
■ Activating from Software update notice screen
aDisplay update notice screen → "Start update"
Updating software immediately
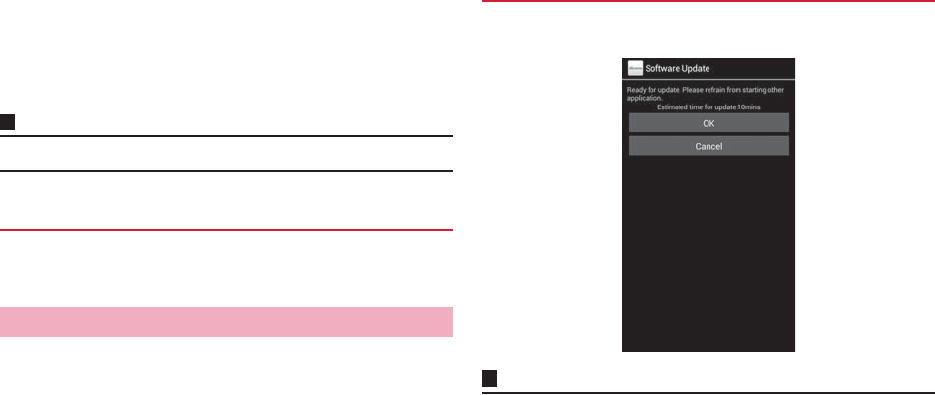
179 Appendix/Index
2Rewriting starts automatically approximately
10 seconds after "Start update" appears
・Rewriting starts when you tap "OK".
・While updating the software, all key operations become disabled. And
updating cannot be canceled.
・When the software update is complete, the terminal restarts
automatically and the Home screen appears.
Information
・If software update is not needed, "No update is needed" is displayed.
When software update is complete, a completion notification appears on
the status bar. Open the notification panel and tap the notification to
display the update completion screen.
You can preset time to update the software if you want to specify another
time for installing the update file.
1Display update notice screen → "Set Time"
2Enter time → "Set"
A rewriting screen appears at the update start time. Approximately 10
seconds after that, rewriting starts automatically.
Information
・While updating the software, all key operations become disabled. And
updating cannot be canceled.
・If software update could not be started at the preset time, the software
update will be performed at the same time the following day.
・Software is not updated at the reserved time during OS version up.
・When an alarm, etc. is set at the same time as the reserved time, priority will
be given to the software update.
・If HW-03E is turned OFF at the reserved time, the software update starts at
the same time as the reserved time after the terminal is turned ON.
Post-update display
Reserved software update
When the reserved time is reached
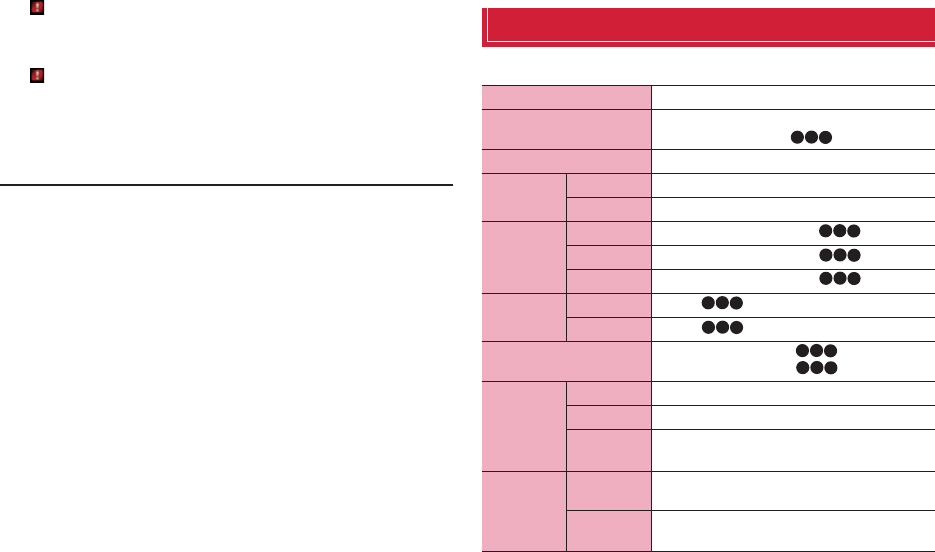
180 Appendix/Index
・If " Software update was suspended Please check the status of the
handset and retry." appears on the status bar at the software update start
time, check available memory space of the internal storage of the terminal
and retry to update.
・If " Updating software is stopped. Check the phone state and retry to
update" appears on the status bar at the software update start time, make
sure that the terminal is not in the following states and retry to update.
- Out of service area
- The battery pack is removed
- Other function is activated
Main specifications
■Terminal
Product name HW-03E
Size Approx. 133 mm (H) × 67 mm (W) ×9.9 mm (T)
(thickest part : Approx. mm)
Weight Approx. 145 g
Memory ROM 32 GB
RAM 2 GB
Continuous
stand-by
time
LTE Stationary (Auto)
*1 : Approx. H
FOMA/3G Stationary (Auto)
*1 : Approx. H
GSM Stationary (Auto)
*1 : Approx. H
Continuous
call time
FOMA/3G Approx. min.
GSM Approx. min.
Charging time AC adapter 03 : Approx. min.
DC adapter 03 : Approx. min.
Display Type TFT 16,777,216 colors
Size Approx. 4.7 inches
Number of
dots
720 (H) × 1280 (V) dots
Image
pickup
device
Type Out-camera: CMOS
In-camera: CMOS
Size Out-camera: 1/3.1 inches
In-camera: 1/6.0 inches
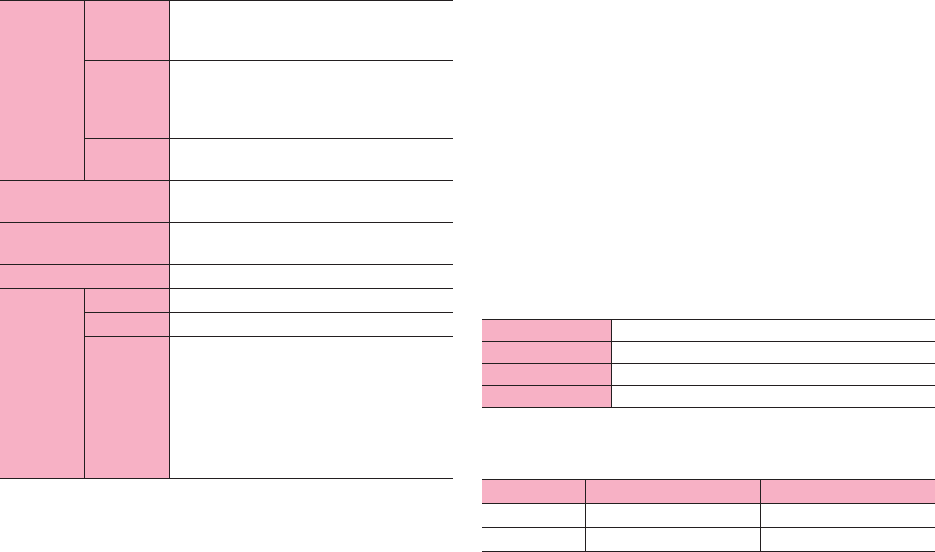
181 Appendix/Index
*1: "LTE/3G/GSM (Auto)" is set in "Mobile networks" (P.162)
*2: It is confirmed that the terminal and all Bluetooth devices are compliant
with Bluetooth standards designated by Bluetooth SIG, and they are
authenticated. However, procedures may differ or data transfer may not
be possible depending on the devices characteristics or specifications.
*3: These are created by standardizing connection procedures for
Bluetooth communications according to individual product properties.
・Continuous call time indicates the estimated call time that the phone can
send or receive radio waves normally.
・Continuous stand-by time indicates the estimated stand-by time when radio
signal reception is normal. Due to battery charging condition, function
settings, operating environment such as ambient temperature, radio wave
conditions in the area of use (the radio waves are weak or absent), etc. stand-
by time may be reduced to about a half.
・Connecting Internet reduces call (communication)/stand-by time. Using
functions such as mail, application, etc. reduces call (communication)/stand-
by time.
・Stationary continuous stand-by time indicates the estimated average
operation time when radio signal reception is normal.
・Charging time indicates the estimated time for charging an empty battery
pack with the terminal turned OFF. Charging with the terminal turned ON
requires longer time.
■Battery pack
■File format
Still images and videos taken by the terminal are saved in the following file
formats:
Camera Number of
effective
pixels
Out-camera: Approx. 13.1 million pixels
In-camera: Approx. 1.3 million pixels
Number of
recording
pixels
(Max.)
Out-camera: Approx. 13.1 million pixels
In-camera: Approx. 1.2 million pixels
Digital
zoom
Out-camera : Up to approx. 4.0 x
In-camera: Up to approx. 4.0 x
Continuous 1Seg
watching time
Approx. 290 min.
Continuous Mobacas
watching time
Approx. 220 min.
Wireless LAN IEEE802.11b/g/n (2.4GHz) compatible
Bluetooth Version Bluetooth standard Ver.3.0*2
Output Bluetooth standard Power Class 2
Supported
Bluetooth
profile*3
HFP (Hands-Free Profile)
HSP (Headset Profile)
OPP (Object Push Profile)
SPP (Serial Port Profile)
HID (Human Interface Device Profile)
A2DP (Advanced Audio Distribution Profile)
AVRCP (Audio/Video Remote Control Profile)
PBAP (Phone Book Access Profile)
Product name Battery pack HW03
Battery used Li-ion polymer battery
Vol tage 3.8V
Capacity 1800mAh
Type File format Extension
Still images JPEG jpg
Videos MP4 mp4

182 Appendix/Index
■Numbers of still images (Estimation)
*1: Quality setting: Normal
■Time length of shooting videos (Estimation)
*1: Quality setting: Normal
Specific Absorption Rate (SAR) of Mobile Phones
This model HW-03E mobile phone complies with Japanese technical regulations and
international guidelines regarding exposure to radio waves.
This mobile phone was designed in observance of Japanese technical regulations
regarding exposure to radio waves*1 and limits to exposure to radio waves
recommended by a set of equivalent international guidelines. This set of international
guidelines was set out by the International Commission on Non-Ionizing Radiation
Protection (ICNIRP), which is in collaboration with the World Health Organization
(WHO), and the permissible limits include a substantial safety margin designed to
assure the safety of all persons, regardless of age and health condition.
The technical regulations and international guidelines set out limits for radio waves as
the Specific Absorption Rate, or SAR, which is the value of absorbed energy in any 10
grams of tissue over a 6-minute period. The SAR limit for mobile phones is 2.0 W/kg.
The highest SAR value for this mobile phone when tested for use at the ear is 0.269
W/kg. There may be slight differences between the SAR levels for each product, but
they all satisfy the limit.
This is due to automatic changes to the power level of the device to ensure it only uses
the minimum required to reach the network. Therefore in general, the closer you are to
a base station, the lower the power output of the device.
This mobile phone can be used in positions other than against your ear. This mobile
phone satisfies the international guidelines when used with a carrying case or a
wearable accessory approved by NTT DOCOMO *2. In case you are not using the
approved accessory, please use a product that does not contain any metals, and one
that positions the mobile phone at least 1.5 cm away from your body.
Resolution
Number of images
that can be saved to
the internal
storage*1
Number of images
that can be saved to
the microSD card
(1 GB)*1
VGA (640×840) Up to approx. 40,000
images
Up to approx. 10,400
images
Resolution
Time of images that
can be saved to the
internal storage*1
Time of images that
can be saved to the
microSD card
(2 GB)*1
VGA (640×480) Up to approx. 240 min.
(Up to approx. 216
minutes per video)
Up to approx. 60 min.
(Up to approx. 60
minutes per video)
Specific Absorption Rate (SAR) of Mobile Phones

183Appendix/Index
The World Health Organization has stated that "a large number of studies have been
performed over the last two decades to assess whether mobile phones pose a
potential health risk. To date, no adverse health effects have been established as
being caused by mobile phone use."
Please refer to the WHO website if you would like more detailed information.
http://www.who.int/docstore/peh-emf/publications/facts_press/fact_english.htm
Please refer to the websites listed below if you would like more detailed information
regarding SAR.
Ministry of Internal Affairs and Communications Website:
http://www.tele.soumu.go.jp/e/sys/ele/index.htm
Association of Radio Industries and Businesses Website:
http://www.arib-emf.org/index02.html (in Japanese only)
NTT DOCOMO, INC. Website:
http://www.nttdocomo.co.jp/english/product/sar/
Huawei Device Co., Ltd. Website:
http://www.huaweidevice.jp/ascend/index.html (in Japanese only)
Refer to HW-03E in the above URL site. URL is subject to change without prior notice.
*1: Technical regulations are defined by the Ministerial Ordinance Related to Radio
Avoid dusty, damp, or dirty environments. Avoid magnetic fields. Using or charging
your device in these environments may result in circuit malfunctions.
Do not use your device during thunderstorms to protect your device against any
danger caused by lightning.
Observe local laws and regulations, and respect the privacy and legal rights of others.
Law (Article 14-2 of Radio Equipment Regulations).
*2: Regarding the method of measuring SAR when using mobile phones in positions
other than against the ear, international standards (IEC62209-2) were set in
March 2010. On the other hand, technical regulation is currently being
deliberated on by national council.
Operating Environment
Protecting your hearing when using a headset
Child's safety
Interference with medical equipment
・
・
・
Avoid touching the antenna when you are on a call. Touching the antenna affects call
quality, increases power consumption, and reduces talk and standby time.
・
Ideal operating temperatures are 5
0
C to 35
0
C. Ideal storage temperatures are
-20
0
C to 70
0
C. Extreme heat or cold may damage your device or accessories.
・
Comply with all precautions with regard to child's safety. Letting children play with the
device or its accessories may be dangerous. The device includes detachable parts that
may present a choking hazard. Keep away from children.
To prevent possible hearing damage, do not listen at high volume
levels for long periods.
The device and its accessories are not intended for use by children. Children should
only use the device with adult supervision.
・
・
・
Using a headset at high volumes may damage your hearing. To reduce this risk,
lower the headset volume to a safe and comfortable level.
Exposure to high volumes while driving may cause distraction and increase your
risk of an accident.
・
・
Follow rules and regulations set forth by hospitals and health care facilities. Do not use
your device where prohibited.
・
Do not expose your device to direct sunlight (such as on a car dashboard) for
prolonged periods.
Do not place your device or batteries on or in heating devices, such as microwave
ovens, stoves, water heaters, or radiators. Batteries may explode if overheated.
Stop using your device or applications for a while if the device is overheated. If skin
is exposed to an overheated device for an extended period, low temperature burn
symptoms, such as red spots and darker pigmentation, may occur.
・
・
・
If your device has a camera flash, do not use it directly in the eyes of people or pets.
Otherwise temporary loss of vision or damage to the eyes may occur.
・
Do not allow children or pets to bite or suck the device or battery. Doing so may
result in damage or explosion.
・

Areas with flammables and explosives
184Appendix/Index
Pacemaker manufacturers recommend that a minimum distance of 15 cm be
maintained between a device and a pacemaker to prevent potential interference
with the pacemaker. If using a pacemaker, hold the device on the side opposite
the pacemaker and do not carry the device in your front pocket.
Some wireless devices may affect the performance of hearing aids or pacemakers.
Consult your service provider for more information.
・
・
Do not use the device where flammables or explosives are stored (in a gas station, oil
depot, or chemical plant, for example). Using your device in these environments
increases the risk of explosion or fire. In addition, follow the instructions indicated
in text or symbols.
・
Do not store or transport the device in containers with flammable liquids, gases,
or explosives.
・
Traffic security
Cleaning and maintenance
Observe local laws and regulations while using the device. If using the device while
driving a vehicle, observe the following guidelines:
Concentrate on driving. Your first responsibility is to drive safely.
・
Do not hold the device while driving. Use hands-free accessories.
・
When you must make or answer a call, pull of the road safely and park the vehicle first.
・
RF signals may affect the electronic systems of motor vehicles. For more information,
consult the vehicle manufacturer.
・
Do not place the device over the air bag or in the air bag deployment area in a motor
vehicle. Doing so may hurt you because of the strong force when the air bag inflates.
・
Do not use your device while flying in an aircraft. Power off your device before
boarding. Using wireless devices in an aircraft may disrupt wireless networks,
present a hazard to aircraft operation, or be illegal.
・
Before you clean or maintain the device, power it off, and disconnect it from the
charger.
・
Environmental protection
The device and its accessories, including but not limited to the power adapter,
headset, and battery (if included) should not be disposed of with household garbage.
・
Disposal of the device and its accessories is subject to local regulations. Support proper
collection and recycling.
・
Emergency calls
The availability of emergency calls is subject to your cellular network quality, service
provider policy, and local laws and regulations. Never rely solely on your device for
critical communications like medical emergencies.
Do not use any chemical detergent, powder, or other chemical agents (such as alcohol
and benzene) to clean the device or charger. These substances may cause damage to
parts or present a fire hazard. Use a clean, soft, and dry cloth to clean the device and
charger.
Keep the device and accessories dry. Protect them from water and humidity. Do not
touch the device or the charger with wet hands. Doing so may lead to short circuits,
malfunctions, or electric shocks.
・
・
Avoid collision, which may lead to battery leakage, device malfunctions,
overheating, fire, or explosion.
・
Do not place magnetic storage media, such as magnetic cards and floppy disks, near
the device. Radiation from the device may erase the information on magnetic storage
media.
・
Do not expose your device, battery, or charger to extreme heat or cold. These
environments may interfere with proper function and may lead to fire or explosion.
Battery performance is affected at temperatures lower than 0 0C.
Do not place sharp metal objects, such as pins, near the earpiece or speaker. The
earpiece may attract these objects and result in injury.
・
・
Do not dismantle the device or accessories. This voids the warranty and releases the
manufacturer from liability for damage.
・
If the device screen is broken in a collision, immediately stop using the device. Do not
touch or attempt to remove the broken parts. Promptly contact an authorized service
center.
・
185Appendix/Index
Disposal and recycling information
This symbol (with or without a solid bar) on the device, batteries
(if included), and/or the packaging, indicates that the device and its
electrical accessories (for example, a headset, adapter, or cable) and
batteries should not be disposed of as household garbage. These items
should not be disposed of as unsorted municipal waste and should be
taken to a certified collection point for recycling or proper disposal.
For more detailed information about device or battery recycling, contact your local city
office, household waste disposal service, or retail store.
Disposal of the device and batteries (if included) is subject to WEEE Directive Recast
(Directive 2012/19/EU) and Battery Directive (Directive 2006/66/EC). The purpose of
separating WEEE and batteries from other waste is to minimize the potential
environmental impacts and human health risk of any hazardous substances
that may be present.
Reduction of hazardous substances
This device is compliant with the REACH Regulation [Regulation (EC) No 1907/2006]
and RoHS Directive Recast (Directive 2011/65/EU). Batteries (if included) are compliant
with the Battery Directive (Directive 2006/66/EC). For up-to-date information about
REACH and RoHS compliance, please visit the web site
www.huaweidevice.com/certification.
EU regulatory conformance
Body worn operation
Certification information (SAR)
The device complies with RF specifications when used near your ear or at a distance
of 1.5 cm from your body. Ensure that the device accessories, such as a device case and
device holster, are not composed of metal components. Keep the device away from
your body to meet the distance requirement.
This device meets guidelines for exposure to radio waves.
Statement
Hereby, Huawei Technologies Co., Ltd. declares that this device is in compliance with
the essential requirements and other relevant provisions of Directive 1999/5/EC.
Restrictions in the 5 GHz band:
WLAN function of this device is restricted only to indoor use when operating in the
5150 to 5350 MHz frequency range.
For the declaration of conformity, visit the web site www.huaweidevice.com/certification.
The following marking is included in the product:
This device may be operated in all member states of the EU.
Notice:
Observe national and local regulations where the device is used.
This device may be restricted for use, depending on the local network.
Your device is a low-power radio transmitter and receiver. As recommended by
international guidelines, the device is designed not to exceed the limits for exposure
to radio waves. These guidelines were developed by the International Commission on
Non-Ionizing Radiation Protection (ICNIRP), an independent scientific organization,
and include safety measures designed to ensure the safety of all users, regardless of
age and health.
The Specific Absorption Rate (SAR) is the unit of measurement for the amount of radio
frequency energy absorbed by the body when using a device. The SAR value is
determined at the highest certified power level in laboratory conditions, but the
actual SAR level during operation can be well below the value. This is because the
device is designed to use the minimum power required to reach the network.
The SAR limit adopted by Europe is 2.0 W/kg averaged over 10 grams of tissue, and
the highest SAR value for this device complies with this limit.
The highest SAR value reported for this device type when tested at the ear is 0.433 W/kg,
and when properly worn on the body is 0.421 W/kg.
0168

186Appendix/Index
FCC Regulatory Compliance
Body worn operation
Certification information (SAR)
Restrictions in the 5 GHz band:
FCC statement
The device complies with RF specifications when used near your ear or at a distance
of 1 cm from your body. Ensure that the device accessories, such as a device case and
device holster, are not composed of metal components. Keep the device away from
your body to meet the distance requirement.
This device is also designed to meet the requirements for exposure to radio waves
established by the Federal Communications Commission (USA).
The SAR limit adopted by the USA is 1.6 W/kg averaged over one gram of tissue.
The highest SAR value reported to the FCC for this device type complies with this limit.
The highest SAR value reported to the FCC for this device type when tested for use at
the ear is 0.67 W/kg, when properly worn on the body is 1.23 W/kg, and when using
the Wi-Fi hotspot function is 1.23 W/Kg.
This equipment has been tested and found to comply with the limits for a Class B digital
device, pursuant to Part 15 of the FCC Rules. These limits are designed to provide
reasonable protection against harmful interference in a residential installation.
This equipment generates, uses and can radiate radio frequency energy and, if not
installed and used in accordance with the instructions, may cause harmful interference
to radio communications. However, there is no guarantee that interference will not
occur in a particular installation. If this equipment does cause harmful interference to
radio or television reception, which can be determined by turning the equipment off
and on, the user is encouraged to try to correct the interference by one or more of the
following measures:
--Reorient or relocate the receiving antenna.
--Increase the separation between the equipment and receiver.
-- Connect the equipment into an outlet on a circuit different from that to which the
receiver is connected.
-- Consult the dealer or an experienced radio/TV technician for help.
This device complies with Part 15 of the FCC Rules. Operation is subject to the following
two conditions: (1) this device may not cause harmful interference, and (2) this device
must accept any interference received, including interference that may cause undesired
operation.
Any changes or modifications to this device not expressly approved by Huawei
Technologies Co., Ltd. for compliance could void the user's authority to operate the
equipment.
Within the 5.15 to 5.25 GHz band, UNII devices will be restricted to indoor operations
to reduce any potential for harmful interference to co-channel Mobile Satellite System
(MSS) operations.
Sales: NTT DOCOMO, INC.
Manufacturer: Huawei Technologies Co., Ltd.
Don't forget your mobile phone ・・・ or your manners!
When using your mobile phone in a public place, don't forget to
show common courtesy and consideration for others around you.
General Inquiries
<docomo Information Center>
-81-3-6832-6600* (toll free)
International call access code
for the country you stay
0120-005-250 (toll free)
Repairs
Loss or theft of terminal or payment of cumulative cost overseas
<docomo Information Center>
Failures encountered overseas
<Network Support and Operation Center>
201.0 (1st Edition)
* Service available in: English, Portuguese, Chinese, Spanish, Korean.
* Unavailable from part of IP phones.
(Business hours : 9:00 a.m. to 8:00 p.m.)
■ From DOCOMO mobile phones (In Japanese only)
(No prefix) 151 (toll free)
* Unavailable from land-line phones, etc.
■ From land-line phones (In Japanese only)
0120-800-000 (toll free)
* Unavailable from part of IP phones.
(Business hours : 9:00 a.m. to 8:00 p.m. (open all year round))
(available 24 hours a day)
● From DOCOMO mobile phones
* You are charged a call fee to Japan when calling from a land-line phone, etc.
※ If you use HW-03E, you should dial the number 81-3-6832-6600 (to enter ‘+’, touch
and hold the ‘0’ key for at least one second).
-8000120-0151*
Universal number
international prefix
● From land-line phones <Universal number>
*
You might be charged a domestic call fee according to the call rate for the country you stay.
※ For international call access codes for major countries and universal number
international prefix, refer to DOCOMO International Services website.
● If you lose your terminal or have it stolen, immediately take the steps necessary for suspending the use of the terminal.
● If the terminal you purchased is damaged, bring your terminal to a repair counter specified by DOCOMO after returning to Japan.
-81-3-6718-1414* (toll free)
International call access code
for the country you stay
(available 24 hours a day)
● From DOCOMO mobile phones
* You are charged a call fee to Japan when calling from a land-line phone, etc.
※ If you use HW-03E, you should dial the number 81-3-6718-1414 (to enter ‘+’, touch
and hold the ‘0’ key for at least one second).
-8005931-8600*
Universal number
international prefix
● From land-line phones <Universal number>
*
You might be charged a domestic call fee according to the call rate for the country you stay.
※ For international call access codes for major countries and universal number
international prefix, refer to DOCOMO International Services website.
● Please confirm the phone number before you dial.
● For Applications or Repairs and After-Sales Service, please contact the above-mentioned information center or the docomo Shop etc. near you on the NTT DOCOMO website.
NTT DOCOMO website http://www.nttdocomo.co.jp/english/
■ From DOCOMO mobile phones (In Japanese only)
(No prefix) 113 (toll free)
* Unavailable from land-line phones, etc.
■ From land-line phones (In Japanese only)
0120-800-000 (toll free)
* Unavailable from part of IP phones.
(Business hours : 24 hours (open all year round))