Huawei Technologies EM770U HSPA MODULE User Manual
Huawei Technologies Co.,Ltd HSPA MODULE Users Manual
UserManual.wiki
>
Huawei Technologies
>
EM770U User Manual
>
Users Manual
Contents
1.
User manual
2.
User Manual
3.
Users Manual
4.
User Manual 1 of 2
5.
User Manual 2 of 2
Users Manual
Navigation menu
Upload a User Manual
Namespaces
Wiki Guide
HTML
PDF
Info
Views
User Manual
Discussion / Help
Navigation

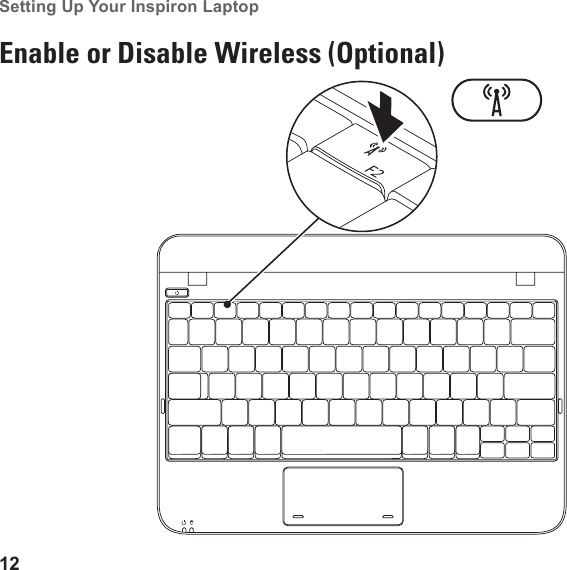
![44Using Support Tools System MessagesIf your computer has an issue or an error, it may display a System Message that will help you identify the cause and action needed to resolve the issue. NOTE: If the message you received is not listed in the following examples, see the documentation for either the operating system or the program that was running when the message appeared. Alternatively you could see the Dell Technology Guide available on your hard drive or at support.dell.com/manuals or contact Dell (see “Contacting Dell” on page XX for assistance).Alert! Previous attempts at booting this system have failed at checkpoint [nnnn]. For help in resolving this problem, please note this checkpoint and contact Dell Technical Support — The computer failed to complete the boot routine three consecutive times for the same error (see “Contacting Dell” on page XX for assistance).CMOS checksum error — Possible motherboard failure or RTC battery low. Replace the battery (see the Service Manual at support.dell.com/manuals or see “Contacting Dell” on page XX for assistance).Hard-disk drive failure — Possible hard disk drive failure during POST (see “Contacting Dell” on page XX for assistance).Hard-disk drive read failure — Possible hard disk drive failure during HDD boot test (see “Contacting Dell” on page XX for assistance).Keyboard failure — Keyboard failure or loose cable. Replace the keyboard, (see the Service Manual at support.dell.com/manuals).No boot device available — No bootable partition on hard drive, the hard disk drive cable is loose, or no bootable device exists.If the hard drive is your boot device, ensure •that the cables are connected and that the](https://usermanual.wiki/Huawei-Technologies/EM770U.Users-Manual/User-Guide-1213627-Page-46.png)