Huawei Technologies EM820U HSPA+ Module User Manual EM820U QSG English
Huawei Technologies Co.,Ltd HSPA+ Module EM820U QSG English
Contents
- 1. User Manual part 1
- 2. User Manual part 2
- 3. user's manual FCC statement
- 4. user's manual_Rev1
User Manual part 2

Copyright © 2008 Huawei Technologies Co., Ltd.
ted in any form or by any means without
ritten consent of Huawei Technologies Co., Ltd.
Trademarks and Permissions
All Rights Reserved
No part of this document may be reproduced or transmit
prior w
and other Huawei trademarks are trademarks of Huawei Technologies Co., Ltd.
All other trademarks and trade names mentioned in this document are the property of their
espective holders.
n made in
ommendations in this document do not constitute the warranty of any kind,
ess or implied.
r
Notice
The information in this document is subject to change without notice. Every effort has bee
the preparation of this document to ensure accuracy of the contents, but all statements,
information, and rec
expr

i
Table of Contents
Getting to Know the EM820U .......................................................................................................3
Requirements for the PC ................................................................................................................4
Preparing the EM820U...................................................................................................................4
U
tion Guide........................................................................................................................... 4
Installa

2
using Huawei EM820U HSPA+ Embedded PC Module (hereinafter referred to as
The signal strength and the transmission rate are affected by the actual environment.
Thank you for purchasing Huawei EM820U HSPA+ Embedded
PC Module.
Note:
This manual briefly describes the preparation, the process for installing/uninstalling, and safety
precautions for
the EM820U).
You are recommended to read the manual before using the EM820U.
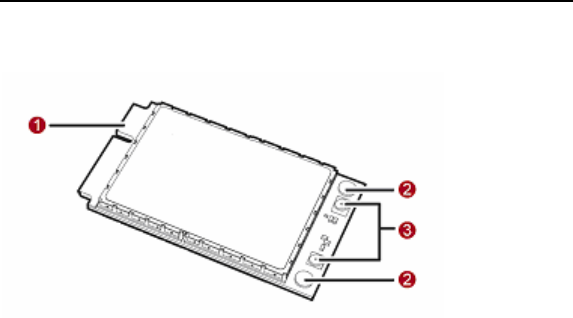
Getting to Know the EM820U
3
The following figure shows the appearance of the EM820U. The actual product may differ.
n
se M820U to the WWAN Mini PCI Express interface of the PC.
a he main board of the PC with screws.
They are used to connect antennas.
Mini PCI Express connector
It is u d to connect the E
o Screw holes
They re used to fix the EM820U on t
p Antenna interfaces

4
s he following requirements:
Requirements for the PC
To u e the EM820U, the PC must meet t
WWAN Mini PCI Express interface.
Windows 2000 SP4, Windows XP SP2, and Windows Vista
The hardware of your PC must meet or exceed the recommended system requirements for the
installed version of OS.
The antenna gain:850M<4.28dBi,1900M<3.0 dBi
Display resolution: 800 × 600 or above.
Preparing the EM820U
Locate the WWAN Mini PCI Express interface on the main board of the PC. Find the main antenna
and the auxiliary antenna.
If a USIM/SIM card is provided by your service provider, insert the USIM/SIM card into the USIM/SIM
card slot on the main board of the PC.
Note:
In certain cases, your PC may be disassembled only by the professionals.
Before you install the EM820U onto the main board of the PC, consult the PC manufacturer or
read the user manual of the PC.
Installation Guide
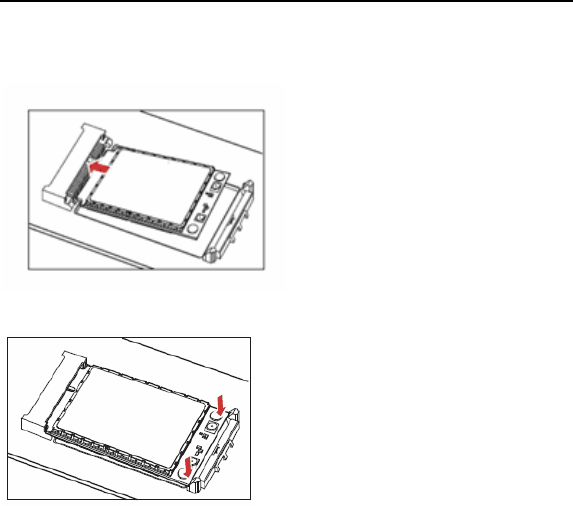
Installing the EM820U onto the Main Board of the PC
5
1. the EM820U into the WWAN Mini PCI Express Insert the Mini PCI Express connector of
interface on the main board of the PC.
2. Press downwards to fix the EM820U in the module slot.
6
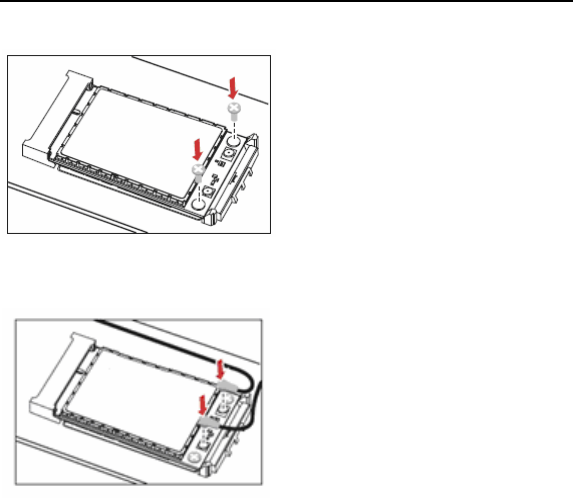
3. 820U onto the main board of the PC with two screws provided
in the EM820U packing box.
Use a screwdriver to fix the EM
4.
f the auxiliary
antenna into the AUX antenna interface (A) of the EM820U in the same way.
Insert the connector of the main antenna into the MAIN antenna interface (M) of the EM820U
according to the indication on the label of the EM820U. Insert the connector o
Note:
7
or the EM820U cannot work normally.
Ensure that the antenna cables are routed through the channel in the frame of the PC and do
not lay across the raised edges of the frame.
U. You can lift the connectors with a small
Insert the antenna connectors vertically into the antenna interfaces of the EM820U.
Do not pinch the antenna cable or damage the connectors. Otherwise, the wireless
performance of the EM820U may be reduced
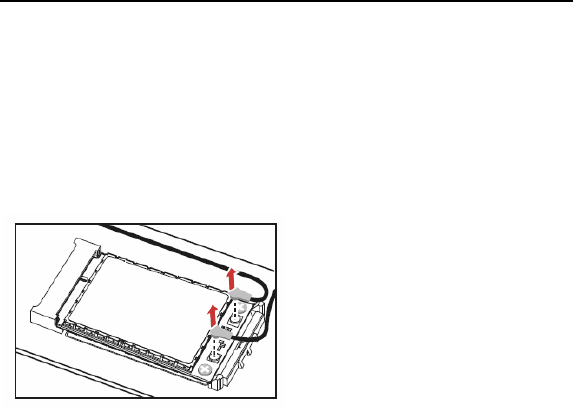
Removing the EM820U from the Main Board of the PC
1. Disconnect the antenna cables from the EM820
screwdriver.
2. Remove the two screws with the screwdriver.
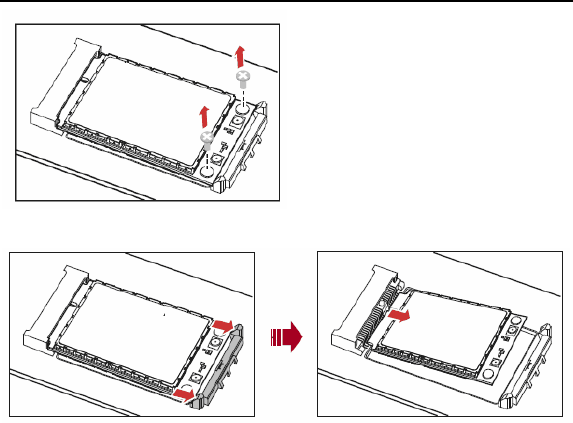
8
3. Slide backwards the two clips to release the EM820U from the slot. Then, lift up the EM820U.
EM820U packing box. The disk contains the management program and the
Installing the EM820U Software
A disk is provided in the
driver of the EM820U.

9
he disk into the disk drive of the PC.
the auto-run program does not respond, find the AutoRun.exe file under the disk path. Then
b
3. f the installation wizard.
After the program is installed, the shortcut icon of the management program is displayed on
the desktop.
ment Program
1. rt > Control Panel.
the management program, and click Add/Remove Program to uninstall the management
It is recommended to restart the PC after the uninstallation to ensure that the management
program is completely uninstalled.
*
1. Insert t
2. The OS automatically starts the installation wizard.
Note:
If
dou le-click AutoRun.exe to run the program.
Follow the prompts o
4.
Uninstalling the Manage
Choose Sta
2. Find
program.
Note: