Huawei Technologies ETS2259 Fixed Wireless Terminal User Manual
Huawei Technologies Co.,Ltd Fixed Wireless Terminal
Users Manual
Wonderful Communication, Mobile Life.
Welcome to HUAWEI ETS2059/2259/2559 Fixed Wireless Terminal.
HUAWEI ETS2059/2259/2559 Fixed Wireless Terminal
User Guide

Copyright © 2007 Huawei Technologies Co., Ltd.
All Rights Reserved
No part of this manual may be reproduced or transmitted in any form or by any
means without prior written consent of Huawei Technologies Co., Ltd.
Trademarks
and HUAWEI are trademarks of Huawei Technologies Co., Ltd. All other
trademarks and trade names mentioned in this manual are the property of their
respective holders.
Notice
The information in this manual is subject to change without notice. Every effort
has been made in the preparation of this manual to ensure accuracy of the contents,
but all statements, information, and recommendations in this manual do not
constitute the warranty of any kind, expressed or implied.

i
Table of Contents
1 Warnings and Precautions .....................................................................................................1
2 Introduction ...........................................................................................................................5
Packing List ...................................................................................................................5
Antenna and Feeder (Optional) .................................................. 错误!未定义书签。
Appearance of the FWT ................................................................................................6
Icons...............................................................................................................................9
3 Installation...........................................................................................................................10
Installing the UIM Card (Optional).............................................................................10
Installing the Power Adapter or the Spare Battery......................................................11
Installing the Antenna..................................................................................................12
Connecting the FWP to a PC.......................................................................................12
Placing the FWT..........................................................................................................13
Validating.....................................................................................................................14
4 Basic Operations .................................................................................................................15
Powering the FWT On or Off......................................................................................15
Making a Call ..............................................................................................................15
Answering a Call .........................................................................................................16
Operations During a Call.............................................................................................16
Locking the Keypad ....................................................................................................17
5 Text Entry ............................................................................................................................18
Text Input Mode ..........................................................................................................18
Entering Letters ...........................................................................................................18
6 Messages .............................................................................................................................20
Writing and Sending a Message ..................................................................................20
Viewing a Message......................................................................................................20
Deleting a Message......................................................................................................21
Voice Mail....................................................................................................................21
Message Settings .........................................................................................................22
7 Phone Book .........................................................................................................................25

ii
Adding a Contact.........................................................................................................25
Searching for a Contact ...............................................................................................25
Editing a Contact .........................................................................................................25
Deleting a Contact .......................................................................................................26
Copying a Contact .......................................................................................................26
Groups..........................................................................................................................27
Memory Status.............................................................................................................27
Saving My FWT Number............................................................................................27
8 Settings ................................................................................................................................28
Call Settings.................................................................................................................28
Shortcut Key Settings ..................................................................................................29
Profile Settings ............................................................................................................29
Security Settings ..........................................................................................................30
Supplementary Services Settings ................................................................................31
Setting Data Services...................................................................................................32
9 FM Radio (Optional)...........................................................................................................33
Switching the Radio On/Off........................................................................................33
Searching for a Channel ..............................................................................................33
Setting a Frequency .....................................................................................................34
Adding a Channel ........................................................................................................34
Deleting a Channel ......................................................................................................35
10 Fun & Utility .....................................................................................................................36
11 Menu Commands ..............................................................................................................37
12 Maintenance and Troubleshooting....................................................................................39
Maintenance.................................................................................................................39
Troubleshooting...........................................................................................................39
13 Specifications ....................................................................................................................41

1
1 Warnings and Precautions
Before using the HUAWEI Fixed Wireless Terminal (hereinafter referred to as FWT), read
the following cautions and let your children know these, so that you can use your FWT
correctly and safely.
Basic Cautions
According to the packing list, check items in the package box to make sure that they are
complete and undamaged.
Before installing and using FWT, read the user manual carefully.
Electronic Device
Switch off your FWT near high-precision electronic devices such as hearing aids,
pacemakers, fire alarm systems, automatic gates, and other automatic-control devices. The
FWT may affect the performance of these devices.
Such devices include hearing aids, pacemakers, fire alarm systems, automatic gates, and
other automatic-control devices. If you are using an electronic medical device, consult the
device manufacturer and confirm whether the radio waves affect the operation of the
electronic device.
Hospital
Pay attention to the following points in hospitals or health care facilities:
y Do not take your FWT into the operating room (OR), intensive care unit (ICU), or
coronary care unit (CCU).
y Switch off your FWT near medial devices.
y Observe any instructions wherever the use of wireless device is prohibited.
Traffic Safety
y Do not use your FWT while driving. Secure the FWT on its holder. Do not place the
FWT on the seat or other places where it can get loose in a sudden stop or collision.
y Observe the rules and regulations of airline companies. Switch off your FWT before
boarding an aircraft.

2
Operating Environment
y Do not place magnetic storage media such as magnetic cards and floppy disks near the
FWT. Radiation from the FWT may erase the information stored on them.
y Do not put your FWT, battery, or other accessories in containers with strong magnetic
field, such as the induction cooker and microwave oven. Otherwise, circuit failure, fire,
or explosion may result.
y Do not place or use the FWT, the battery or the power adapter near any heat sources such
as fire or a heater; or places with flammable gases; or areas with electrical appliances
that give out heat. Otherwise, it will cause fire, explosion and breakdown of the FWT.
y Because FWT needs to eliminate heat during working, put the FWT and the power
supply in a ventilated and shadowy place. Never airproof the FWT or put something on it
or place it near water, fire as well as inflammable and explosive materials.
y Place the FWT in a dry place. Do not put a towel over the FWT, or put it in a box or a
suitcase while using.
y Because FWT contains precision devices, you should put it in a dry place and away from
moist materials.
y Before cleaning FWT, turn off the FWT, and then disconnect the power supply and take
out the battery. Before moving FWT, disconnect the external power supply.
y Do not subject your FWT, battery, and power adapter to serious collision or shock.
Otherwise, battery leakage, FWT malfunction, overheats, fire, or explosion may result.
y Do not place sharp metal objects such as pins near the earpiece. The earpiece may attract
these objects and hurt you when you are using the FWT.
y Do not place the FWT in the area over the air bag or in the air bag deployment area.
Otherwise, the FWT may hurt you owing to the strong force when the air bag inflates.
y Put your FWT, battery, and power adapter in places beyond the reach of children. Do not
allow children to use the FWT, battery, or power adapter without guidance.
y Do not touch the antenna when a call is going on. Touching the antenna may affect call
quality and cause the FWT to operate at a power level higher than needed.
y The network signal condition will directly affect the quality and stability of the call.
Consequently, you should place FWT in a place where it can receive network signal well.
Do not put FWT in a building with an iron or metal roof. The distance between FWT and
other metal materials (such as metal brackets or metal doors and windows) should be
greater than 25 cm and the distance between FWTs should be greater than 30 cm.
y Do not open the chassis in any case and the device should be maintained by a qualified
maintenance department.
y Without permission, you are not allowed to modify the architecture and security design
of FWT. You must bear any consequence resulted from the operation without permission
y Your FWT is designed to conform to the authoritative international radio frequency (RF)
specifications. Use FWT accessories approved by Huawei only.
y The antenna(s) used for this transmitter must be installed to provide a separation distance
of at least 20cm from all persons.

3
Emergency Call
You can use your FWT for emergency calls. However, connections in all conditions cannot
be guaranteed. You should never rely solely on the FWT for essential communications.
Battery
y If the battery fluid gets into eyes, do not rub them. Wash with clean water and seek
medical assistance immediately.
y If the battery fluid contacts skin or cloth, wash with clean water immediately to avoid
irritation to the skin.
y Do not dispose of the battery in fire. Otherwise, the battery may ignite or explode.
y When installing the battery on your FWT, do not push the battery by force lest battery
fluid leak out or the battery crack.
y Do not connect two poles of the battery with metallic materials such as cables.
y Do not disassemble the battery or solder the battery poles. Otherwise fluid leakage,
overheat, fire, or explosion may result.
y If there is battery leakage, smoke, or strange smell, stop using the battery and keep it
away from open flame to avoid fire or explosion.
y Disconnect the power adapter and take out the spare battery when FWT is not used for a
long time.
y Do select its self-contained complete battery and power adapter, otherwise, FWT may be
spoiled. Dispose of used batteries according to the instructions.
y Dispose of the battery according to local laws or regulations.
Power Adapter
y Use AC power as specified for the power adapter. Any violation of this rule may result in
fire or malfunction of the power adapter.
y Do not short-circuit the power adapter. Short-circuiting the power adapter may cause fire
or malfunction of the power adapter.
y Remove the dust on the power plug regularly.
y Do not use worn-out power cords. Otherwise, electric shock, short-circuiting of the
power adapter, or fire may result.
y Do not put the power adapter near the container filled with liquid such as water. If the
liquid comes into the power adapter, electrical leakage or other faults may result.
y If the liquid such as water comes into the power adapter accidentally, remove the plug of
the power adapter from the socket immediately.
y Disconnect the power adapter from the socket before cleaning or maintaining it.
Otherwise, electric shock or short-circuiting of the battery or power adapter may result.
y Ensure the plug of the power adapter is properly inserted into the power socket when
charging the battery. Improper insertion may result in electric shock, fire, or explosion.
y Do not place any heavy object on the power cord of the power adapter. Do not damage,
change, or pluck the power cord.

4
Using the Data Cable
When using the data cable, observe the following requirements. Otherwise, the FWP or PC
may fail:
y When the data cable is used to connect the FWP to a PC, connect the data cable with the
FWP first.
y When the FWP communicates with a PC, do not disconnect the data cable. Otherwise,
the FWP or PC may fail.
y When disconnecting the data cable, disconnect it from the PC first.
Environmental Protection
Abide by the local laws in disposing of the package materials of your FWT, consumed
batteries and used FWT, and try to recycle them.
Please observe the national local regulations in the location where product is to be used.
This product may be restricted for use in some or all countries of European Union.

5
2 Introduction
Packing List
The FWT package box contains the following items. If any of the items is lost or damaged,
contact your local dealer.
Item Quantity Item Quantity
Main unit, handset, and coiled
cord
1 Certificate of Quality 1
Power adapter 1 Spare battery 1
Fixed Wireless Terminal User
manual
1 Antenna (optional) 1
6
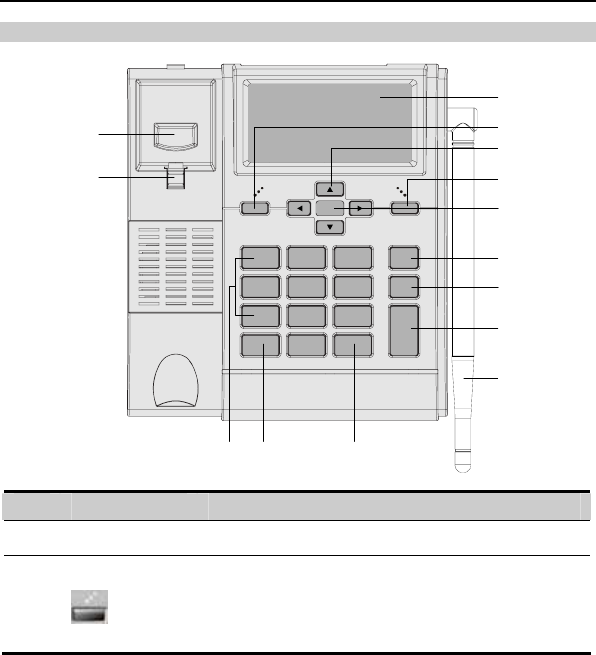
Appearance of the FWT
Front View
2
1
3
4
5
6
7
8
9
13
14
101112
No. Item Description
1 Display screen To display information.
2 Left soft key
z In the standby mode, press it to access the main menu.
z In the non-standby mode, press it to perform the
operation displayed on the lower left corner of the
screen.
z Press this key to answer a call.
7
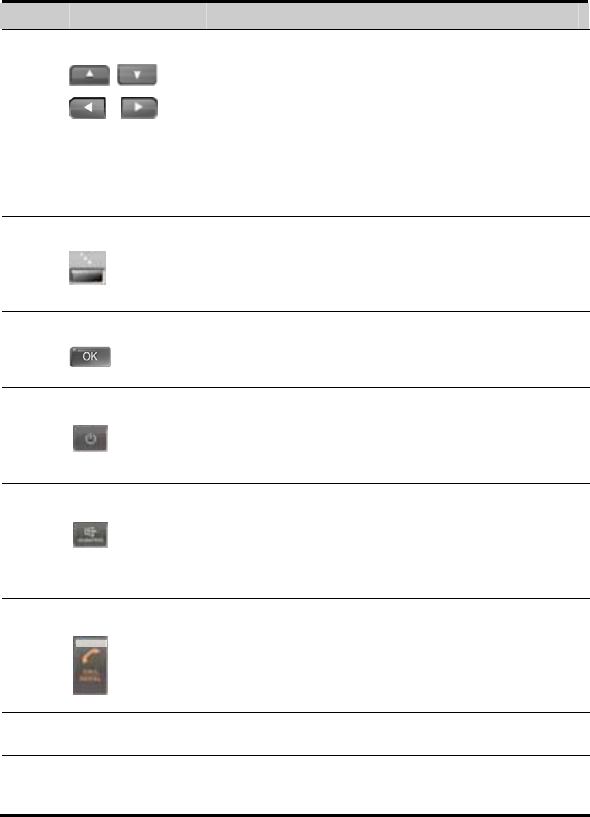
No. Item Description
3 Scroll key
z Up key: In the standby mode, press it to access the
Calendar screen; during a call, press it to increase the
volume.
z Down key: In the standby mode, press it to enable the
radio (or alarm clock); during a call, press it to decrease
the volume.
z Left key: In the standby mode, press it to view the call
records.
z Right key: In the standby mode, press it to access the
Write message screen.
4 Right soft key
z In the standby mode, press it to access the Phone Book
screen.
z In the non-standby mode, press it to perform the
operation displayed on the lower right corner of the
display screen.
5 OK key
z In the standby mode, press it to access the home screen.
z In the non-standby mode, press it to perform the
operation displayed on the lower left corner of the
display screen.
6 End key
z Press it to end a call or cancel the dialing.
z Press and hold it for two seconds to power your FWT
on or off.
z In the non-standby mode, press it to return to the standby
mode.
7 HANDFREE key
z In the standby mode, press it to make or answer a call
without lifting the handset.
z When dialing a number in the hands-free mode, press it
to cancle the dialing.
z During a call in the hands-free mode, press it to end the
current call.
8 Call/Redial key
z Press it to make or answer a call.
z In the standby mode, press it to view the call history.
9 # key z In the standby mode, press and hold it to lock the FWT.
z Press it to switch between input methods and so on.
10 * key z In the standby mode, press and hold it repeatedly to
activate/cancel the quiet profile.
z Press it repeatedly to enter a symbol and so on.
8
No. Item Description
11 Number keys Press 0–9 keys to enter numbers/characters or speed dial a
phone number.
12 Handset retaining
clip
When the FWT is wall-mounted, it is used it to fix the
handset.
13 Heaver End the current call or other operations.
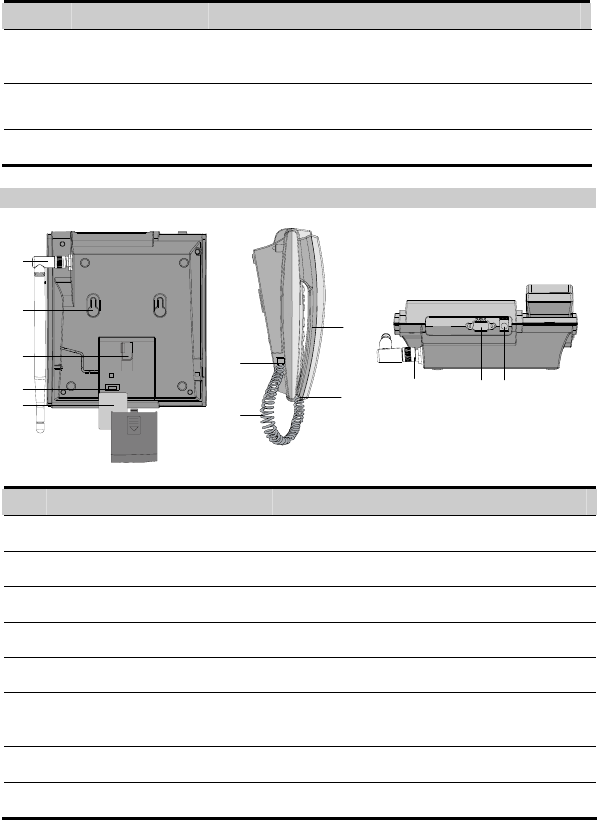
Back View
1
2
3
4
5
6
7
9
810 11 12
No Item Description
1 Antenna To receive signals.
2 Hook To fix the FWT when installed vertically.
3 UIM case slot To house the UIM card
4 Battery cord jack To connect to the battery cord.
5 Spare battery To supply the FWT with power.
6 Coiled cord jack on the Main
unit
To connect to the handset coiled cord.
7 Coiled cord To connect to the handset to the Main unit.
8 Coiled cord jack on handset To connect to the handset coiled cord.
9
No Item Description
9 Handset To make a call or answer a call by lifting it.
10 DB9 serial port To maintain the FWT and realize data
services through it.
11 Power jack To connect to the power adapter for power
supply.
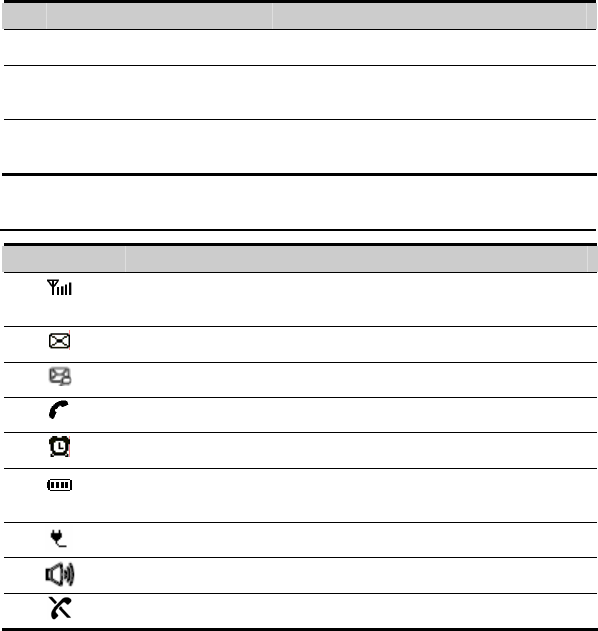
Icons
Icon Description
Indicates the signal strength. The more the bars, the stronger the signal
strength.
Indicates there is a new message.
Indicates there is a new voice message.
Indicates there is an outgoing call or an ongoing call.
Indicates the alarm clock is activated.
Indicates the battery power level. The more the bars, the higher the
power level.
Indicates the FWT is powered by the power adapter.
Indicates the FWT is in hands-free mode.
Indicates the network not available.
10
3 Installation
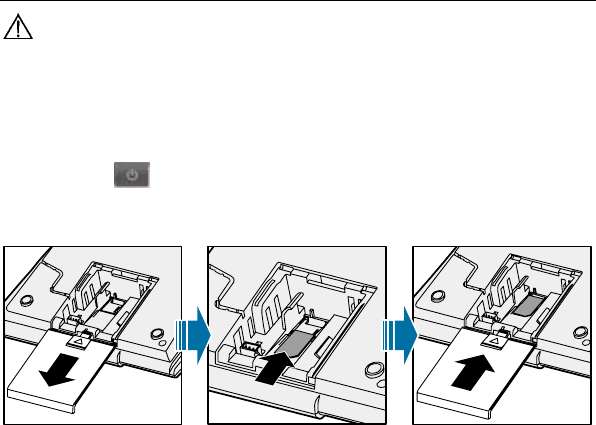
Installing the UIM Card (Optional)
Caution:
y Consult your service provider to decide whether to use a user identity module
(UIM) card.
y The UIM card and its golden contact can be easily damaged by a scratch or
bend. Be careful when installing or removing the UIM card.
Press and hold to power your FWT off and then disconnect it from the power
socket. Install the UIM card according to the following figure. Make sure that the golden
contact of the UIM card is facing downwards.
11
Installing the Power Adapter or the Spare Battery
Note:
y The FWT can be powered by the power adapter or the spare battery.
y If the FWT is connected to the power adapter and the spare battery is inserted,
the FWT is powered by the power adapter, and meanwhile, the spare battery is
charged.
y Charge the spare battery for at least eight hours for the first time. If a
fully-charged spare battery is left unused for a long time, charge it for at least
five minutes before using it again.
y If the FWT is powered solely by the spare battery, the talk time is three hours to
five hours or the standby time is 40 hours to 120 hours (the talk time and the
standby time are network dependent).
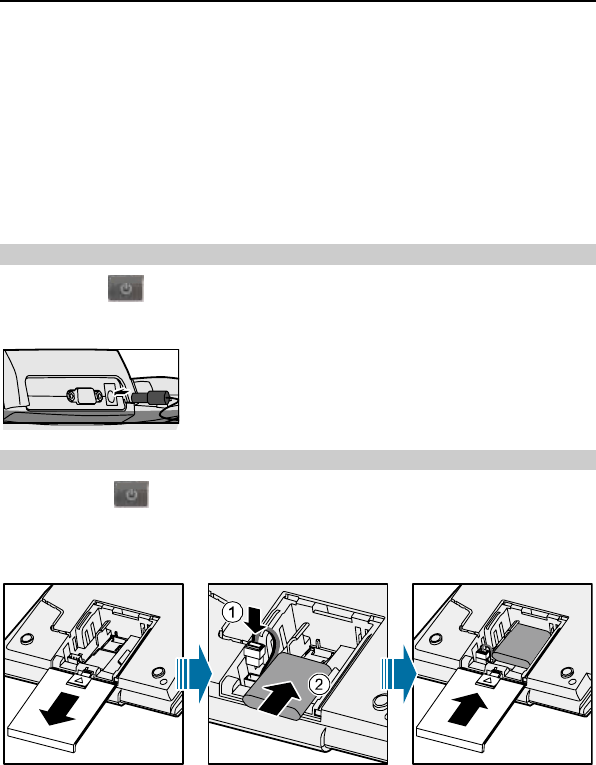
Installing the Power Adapter
Press and hold to power off your FWT. Connect the power adapter to the FWT, and
plug it to the power socket.
Installing the Spare Battery
Press and hold to power off your FWT and then disconnect the FWT from the
power socket. Then install the spare battery as shown in the following figure. When
installing the spare battery, make sure that the battery cord plug matches the battery jack.
Do not insert conversely.
12
Removing the Spare Battery
Press and hold to power off your FWT and then disconnect the FWT from the
power socket. Then remove the battery house cover. Disconnect the battery cord and take
out the spare battery.
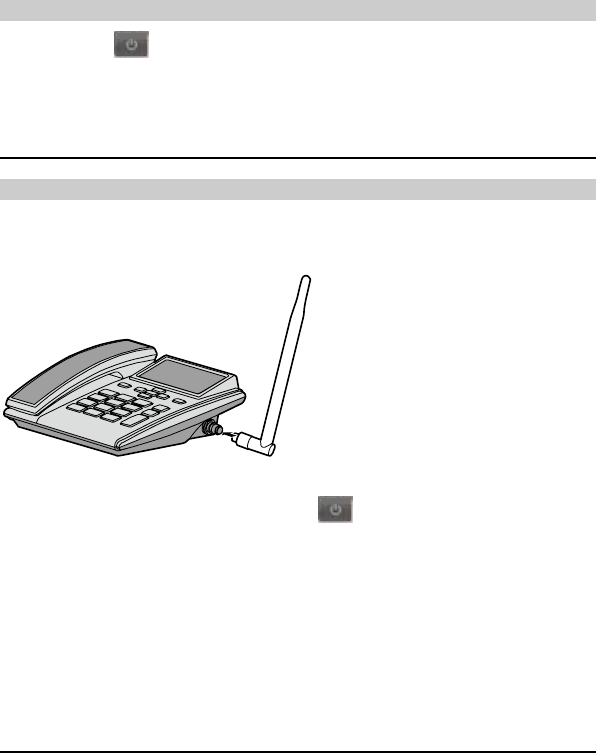
Installing the Antenna
Installing the Antenna
Power off your FWT and disconnect the FWT from the power socket. Then connect the
antenna to the antenna jack on the Main unit. Make sure that the antenna is stably
connected to the antenna jack.
Checking the Signal Strength
1. After installing the antenna, press and hold to power on your FWT. Wait until
the signal strength icon appears or you can hear the dialing tone when you lift the
handset.
2. If the signal strength icon does not appear after five minutes or you hear the failure
tone when you lift the handset, it indicates that the FWT is not receiving signals. In this
case, you need to adjust the direction of the antenna until you can hear the dialing tone
on lifting the handset.
3. If there is no signals even after you adjust the antenna in 360 degrees angle, it indicates
that the signal is weak in the particular site. Either change the site or consult your
service provider.
Connecting the FWP to a PC
The FWP can be connected to a PC to provide data services. Data services include Internet
surfing and faxing. To use data services, you need to purchase the data service suite and
connect the FWP to a PC as show in the following figure
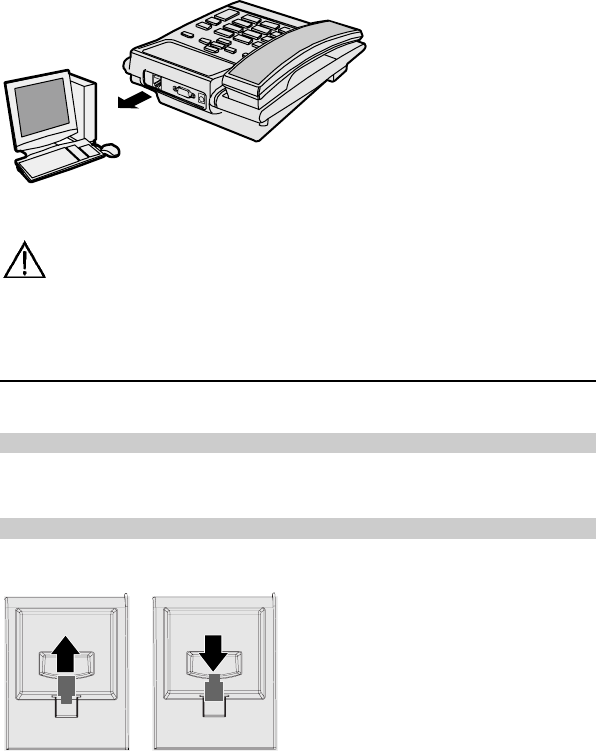
13
Connect the one end of the data cable to PC and the other end to the FWP. Fasten the
captive screw to ensure reliable connection.
Caution:
To avoid damaging the device when making connection, power off the FWP and use the
data cable provided by the manufacturer.
Placing the FWT
You can place the FWT horizontally or vertically.
Horizontally
Place the FWT on a flat surface. Select a cool and ventilated site for the FWT to dissipate
the heat.
Vertically
1. Pull out the handset retaining clip from the slot and turn it around. Then push it back so
that the handset will not fall down when FWT is placed vertically.
2. According to the distance between the two hooks (7.7 cm), hammer two nails into the
wall with 3 mm end left out.
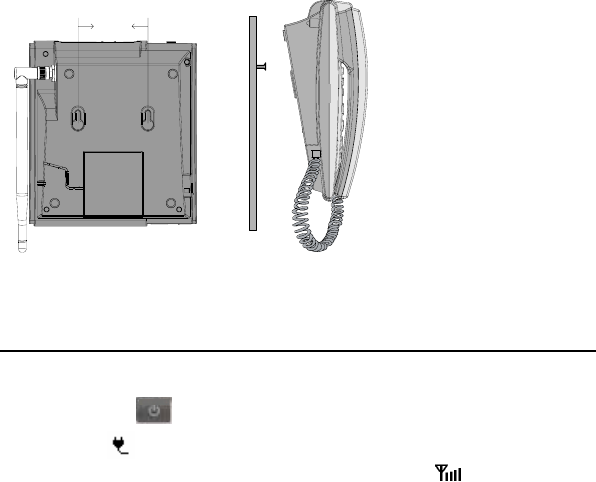
14
7.7cm
3. Snap the hooks to the nails.
Validating
After installing the FWT, you can make a call to check whether it is correctly installed.
1. Press and hold to power on your FWT. After connecting the FWT to the power
socket, the icon appears, indicating that the FWT is powered normally.
2. Lift the handset. In the standby mode, the signal strength icon appears normally.
3. If you are able to make a call, it indicates that the FWT is installed correctly.

15
4 Basic Operations
Powering the FWT On or Off
When the FWT is powered off, press and hold to power it on.
In the standby mode, press and hold to power it off.
Making a Call
Making a Call Through the Keypad
1. In the standby mode, press number keys to enter a phone number. If the entered phone
number is wrong, press .
2. Press to dial the phone number.
3. Press to end the call or cancel the dialing.
Making a Call from the Dialed Calls List
1. In the standby mode, press to access the Dialed Calls screen.
2. Press the Up/Down key to scroll up or down the dialed calls.
3. Press to dial.
Making a Call from the Phone Book
1. In the phone book, search for the contact to dial.
2. Press to dial.
Speed Dialing a Call
The speed dial function allows you to dial a phone number by pressing one number key.
16
You can only set the speed dial function for contacts saved in the FWT.
1. Select Menu > Phone Book > Speed Dial.
2. Press the Up/Down key to scroll up or down the items.
3. If a number key is not assigned to a contact, press to select a contact from the
phone book.
4. If a number key is assigned to a contact, press for the following options:
y Change: Change a contact.
y Delete: Delete the contact.
Answering a Call
In the standby mode, you can lift the handset, press ,or to answer a call.
Activating the Any Key Answer Function
In the standby mode, select Menu > Settings > Call Settings > Any-key Answer to set the
any-key answer function.
If the any-key answer function is activated, you can press any key to answer an incoming
call (except and ).
Rejecting a Call
If you want to reject an incoming call, press or .
Adjusting the Volume
During a call, you can press the up/right key to increase the volume or press the down/left
key to decrease the volume.
Operations During a Call
During a call, press to select the following options:
y Mute: If the mute mode is activated, the part that has activated the function can hear the
voice of the other part, but cannot be heard by the other part. The conversation can be
resumed normally when the mute mode is deactivated
y Save Number: Enter a phone number and save it to the phone book.
17
y Phone Book: Access the Phone Book screen.
y Messages: Access the Messages screen.
y Third Party Call: The function is network dependent. For details, consult your service
provider.
y Voice Privacy: The function is network dependent. For details, see "Voice Privacy" on
page 28.
Locking the Keypad
Even when the keypad is locked, you can perform data service operations or answer a call.
You can lift the handset, press or press to answer a call.
Locking the Keypad Manually
Press and hold the # key for two seconds to lock the keypad.
Locking the Keypad Automatically
With the keyguard function activated, if there is no operation within the preset time when
the FWT is in the standby mode, the keypad is automatically locked.
1. Select Menu > Settings > Phone Settings > Keyguard.
2. Press the Up/Down key to select:
y Off: Deactivate the keyguard function.
y 30 Seconds, 2 Minutes or 5 Minutes: Set the FWT to lock automatically if there is no
operation in 30 seconds, 2 minutes or 5 minutes.
Unlocking the Keypad
Press . Then press the * key to unlock the keypad.
18
5 Text Entry
Text Input Mode
While entering text, you can press the # key to change the input mode. The following table
lists the input modes and their indicators.
Indicator Text Input Mode
eZiEn Smart English
ABC English upper case
abc English lower case
123 Numbers
Note:
In the edit mode, press once to delete the letter on the left of the cursor.
Press and hold for over two seconds to delete all letters.
Entering Letters
Smart English Input
In the "eZiEn" input mode, follow the steps described below to enter English words.
1. According to the word to enter, press the corresponding number keys once, and the
FWT makes out candidate words.
2. Press the Up/Down key or the * key to select the word.
3. Press the right key to confirm your selection. The word is displayed in the input area.
Alternatively, press the 0 key to confirm your selection and enter a space behind the
word.

19
Note:
y After you enter several letters, the FWT can give other letters to make out the
candidate words. Press the Up/Down key or the * key to scroll the words and
press the right key to confirm; or press number keys to enter letters.
y Press repeatedly the 1 key to enter full stop.
y Press the 0 key to enter a space.
y Press the * key to display the symbol list.
y Press the # key to change the case of letters.
Alphabetical Text Input
Alphabetical text input allows you to enter uppercase ("ABC") or lowercase ("abc") English
letters. You can press the number key labeled with desired letters once to enter the first
letter on the key, twice to enter the second letter on the key, and by analogy.
If the letter you want to enter is on the same key as the previous one, you can enter the
letter only after the cursor appears again or after you move the cursor to the next space.
Press the 1 key to enter a full stop or other symbols. Press the 0 key to enter a space. Press
the * key to display the symbol list.
Entering Numbers
Do the following to enter numbers:
y In the "123" input mode, press number keys labeled with desired digits.
y In the "ABC" or "abc" input mode, press the number key repeatedly until the desired
digit appears on the screen.
y In the "eZiEn" input mode, press the number key and then press the Up/Down key until
the desired digit appears on the display screen.
Entering Symbols
1. In any input mode, press the * key to display the symbol list.
2. Press the Up/Down key to scroll up or down the symbol list.
3. Press the corresponding number key to enter a symbol.
20
6 Messages
Writing and Sending a Message
1. Select Menu > Messages > Write Message.
2. Write the message. When writing the message, you can press for the following
operations:
y Insert Templates: Insert a commonly used phrase.
y Insert Phone Number: Insert a contact number from the phone book.
3. After writing the message, press for the following operations:
y Priority: Set the priority for messages sent from the short message service center
(SMSC).
y Send: Send the message.
y Send&Save: Send the message and save it to the outbox.
y Save: Save the message to the draft.
4. You can insert up to 10 recipients. Do the following:
y Enter the phone number directly, press the up/down key to enter more recipients
numbers, and then press to group-send the message.
y Select Search >Search Phone Book to insert a contact from the phone book. Press
up/down to select a contact from the phone book and press to confirm; select
several contacts from the phone book, then press to group-send the message.
y Select Search > Search Groups to insert a contact from the message group.
5. Press the to send a message.
Viewing a Message
Viewing the Inbox
The inbox stores received messages.
When there is a new message, the FWT alerts and the icon appears on the display

21
screen. If the icon blinks, it indicates that the message memory is full. Do the
following to view the inbox:
1. Select Menu > Messages > Inbox.
2. Press the Up/Down key to scroll up or down the messages.
3. Press (View) to view the message.
4. Press (Options) to select Reply, Delete, Forward, Call or Save Number.
Viewing the Outbox and the Draft
The outbox stores messages that are sent successfully. You can delete, forward or re-send a
message in the outbox.
The draft stores drafts and messages that are not sent successfully. You can edit, send or
delete messages in the draft.
Deleting a Message
1. Select Menu > Messages > Delete All.
2. Select the messages to delete:
y Inbox: Delete messages in the inbox.
y Outbox: Delete messages in the outbox.
y Draft: Delete messages in the draft.
y UIM Card: Delete messages saved in the UIM card. Applicable only if a UIM card is
available.
y Phone: Delete messages saved in the FWT.
y All: Delete messages saved in both the FWT and the UIM card.
3. If you select Inbox, the following options are available: (the options are only available
for Inbox)
y All: To delete all messages in the Inbox.
y Read: To delete the read messages.
y Delivery Ack: To delete the delivery reports.
4. Press (Yes) to delete and press (No) to cancel.
Voice Mail
Calling the Voice Mail Center
1. Select Menu > Messages > Voice Mail > Options.
22
2. Select Call Voice Mail Center and press (Select) to call the voice mail center.
Setting or Viewing the Voice Mail Number
1. Select Menu > Messages > Voice Mail > Voice Mail Number.
2. If the voice mail number is already set, you can view and edit it; if not, enter the voice
mail number and press (OK).
Note:
The voice mail function is network dependent. You must subscribe for the service.
For the voice mail number and other information, consult your service provider.
Message Settings
Setting a Template
Your FWT provides 10 commonly used phrases. You can insert these phrases when you edit
a message. You can also customize the phrases.
1. Select Menu > Message > Message Settings > Templates.
2. Press the Up/Down key to scroll up or down the phrases.
3. Press (Select) to select the phrase to edit.
4. Press (OK) to save the edited phrase.
Setting a Message Group
You can send a message to a message group directly instead of group members one by one.
It is different from the phone book group. You can set up to 10 message groups. You can
only add contacts saved in the FWT to a message group.
1. Select Menu > Messages > Message Settings > Group Settings.
2. Press the Up/Down key to scroll up or down the message groups.
3. Press (Options) to select View, Add, Rename or Delete All.
Setting the Auto Save Function
Select Menu > Messages > Message Settings > Auto Save to set the auto save function.
You can select:

23
y Send And Save: Activate the auto save function. Messages are automatically saved after
being sent. Messages sent successfully are saved to the outbox. Messages not sent are
saved to the draft.
y Send Only: Deactivate the auto save function.
Setting the Auto Delete Function
Select Menu > Messages > Message Settings > Auto Delete.
y On: Activate the auto delete function. If the memory in use is full and there is a new
message, the FWT automatically deletes the earliest message.
y Off: Deactivate the auto delete function. If the memory in use is full, the FWT cannot
receive messages. You need to delete some messages manually. Then the FWT can
receive new messages.
Setting the Priority
Select Menu > Messages > Message Settings > Priority. You can set the sending
sequence of messages from the short message service center (SMSC). The priority level
from low to high is normal, urgent, and emergency.
The priority function is network dependent. For details, consult your service provider.
Setting the Callback Number
Select Menu > Messages > Message Settings > Callback Number to activate/deactivate
the callback number function.
y On: Enter a phone number. Press or to save the number and the callback
number function is activated.
y Off: The callback number function is deactivated.
Setting the Deferred Delivery
Select Menu > Messages > Message Settings > Deferred Delivery. Then select
Immediate, After 12 Hours, After 1 day or After 3 day to set the deferred time of
message delivery.
Setting the Validity Period
Select Menu > Messages > Message Settings > Validity Period. Then select Forever,
After 12 Hours, After 1 Day or After 3 Days to set the validity period of messages.

24
Setting the New Message Alert
Select Menu > Messages > Message Settings > New Message Alert. Then select Off, 5
Minutes, 10 Minutes, 20 Minutes or 30 Minutes to set the time for alerting new
messages.
Setting the Delivery Ack
Select Menu > Messages > Message Settings > Delivery Ack. You can set whether to
receive a delivery report after a message is sent.
Setting the Memory Status
Select Menu > Messages > Message Settings > Memory Status to view the memory
status.

25
7 Phone Book
Adding a Contact
A contact is saved to the memory in use.
1. Select Menu > Phone Book > Add New.
2. Enter the name and press (OK).
3. Set other options:
y If the memory in use is the FWT, you can set: Name, General Number, Home
Number, Office Number, and Memo (you need to set at least one phone number).
y If the memory in use is the UIM card, you can set General Number only.
4. Press (OK) to save the settings and press the Up/Down key to set other items.
5. Press (Save) to save the contact or press (Back) to cancel.
Searching for a Contact
1. Select Menu > Phone Book > Search.
2. Enter the name and press (OK).
3. Press the Up/Down key to scroll up or down the contacts.
y Press (View) to view the details of the contact.
Note:
Press (OK) to display the contacts. Press the number key labeled with the
initial letter of the contact. The contacts names beginning with the letter (or the
adjacent letter) are displayed.
Editing a Contact
1. Select Menu > Phone Book > Search to search for the contact to edit.
26
2. Press (Options) and select Edit to edit a contact.
3. Press (Save) to save the contact or press (Back) to cancel.
Deleting a Contact
Delete a Contact
1. Select Menu > Phone Book > Search to search for a contact to delete.
2. Press (Options) and select Delete.
3. Press (Yes) to delete the contact or press (No) to cancel.
Delete All Contacts
1. Select Menu > Phone Book > Delete All.
2. Enter the correct FWT lock code and press (OK).
y Select Phone to delete all the contacts saved in the FWT.
If the UIM card is available, select UIM Card to delete all the contacts saved in the UIM
card.
Copying a Contact
If the UIM card is available, you can copy one or all contacts from the FWT to the UIM
card and from the UIM card to the FWT.
Copying a Contact
1. Search for a contact to copy.
2. Press (Options) and select Copy To UIM or Copy To Phone. If the contact is
saved in UIM card, select Copy To Phone to copy it to the FWT. If the contact is saved
in FWT, select Copy To UIM to copy it to the UIM card.
3. Press (Yes) to copy the contact or press (No) to cancel.
Copying All Contacts
1. Select Menu > Phone Book > Copy All.
2. Select UIM To Phone or Phone To UIM.
y If you select UIM To Phone, all contacts are copied to the FWT.
y If you select Phone To UIM, all contacts are copied to the UIM card.
27
3. Press (Yes) to copy the contacts or press (No) to cancel.
Groups
You can sort contacts into different groups for easy management. You can set up to 10
groups.
1. Select Menu > Phone Book > Groups.
2. Press the Up/Down key to scroll up or down the groups.
3. Press (Options) for the following options:
y View: View the contacts of a group.
y Add: Add a contact to the group.
y Group Ring: Set a ring tone for the incoming calls of the group members.
y Rename: Rename the group.
y Delete All: Delete all contacts of a group.
Memory Status
Your FWT can save up to 500 contacts. The number of contacts that can be saved in the
UIM card is determined by its capacity.
Viewing the Memory Status
Select Menu > Phone Book > Memory Status to view the memory status.
Saving My FWT Number
1. Select Menu > Phone Book > My Phone Num.
2. Press (Edit) to edit the FWT number.
3. Press (OK) to save the FWT number.

28
8 Settings
Call Settings
Minute Alert
If the minute alert function is activated, your FWT notifies you of the call duration by
giving an alert 10 seconds before the end of each minute.
1. Select Menu > Settings > Call Settings > Minute Alert.
2. Select one of the following options:
y On: Activate the minute alert function.
y Off: Deactivate the minute alert function.
Voice Privacy
The voice privacy function can protect your conversion from interception. The voice
privacy function is network dependent. For details, consult your service provider.
Select Menu > Settings > Call Settings > Voice Privacy:
y Standard: Deactivate the voice privacy function.
y Enhanced: Activate the voice privacy function.
Call Time
Select Menu > Settings > Call Settings > Call Time to select whether to display the call
duration.
Auto Dial
If the auto dial function is activated, it means that the phone number you keyed in is dialed
automatically at the time you set without pressing the key. If the time you set for
auto dialing is too short, an incomplete number may be dialed before you key in the whole
number.
1. Select Menu > Settings > Call Settings >Auto Dial.
2. Select one of the following options: "Off", "After 3 Seconds", "After 4 Seconds",
"After 5 Seconds", After 6 Seconds", "After 7 Seconds", "After 8 Seconds" and
"After 9 Seconds".
29
Shortcut Key Settings
The FWT provides shortcut keys for your convenience.
Note:
In the standby mode, the default shortcut key settings are shown as follows:
y : press it to access the Calendar screen; during a call, press it to increase
the volume.
y : press it to enable the radio (or alarm clock); during a call, press it to
decrease the volume.
y : press it to view the call records.
y : press it to access the Write message screen.
1. In the standby mode, Select Menu> Settings> Phone Settings> Shortcut to set the
shortcut keys.
2. Press / // to set the corresponding shortcut keys.
y Press [Select] to select one of the following shortcut key options: Disable, Message Edit,
Message Inbox, Radio, Lunar Date, Calculator, Volume Setting, Message Menu,
Alarm, Schedule, Stopwatch, World Clock, Gallery, Line Game, Smash Game,
Profile, Voice Message, Phone Book, and Call History.
Profile Settings
Your FWT provides three profiles. You can activate or customize a profile.
Selecting a Profile
1. In the standby mode, select Menu > Profiles.
2. Press the Up/Down key to scroll up or down the profiles: General and Quiet.
3. Press (Select) and select Set to activate the profile.
Note:
In the standby mode, press and hold the * key to activate the quiet mode. Press and
hold the * key again to restore the FWT to the previous mode.
Editing a Profile
1. In the standby mode, select Menu > Profiles.
2. Press the Up/Down key to scroll up or down the profiles: General and Quiet.
3. Press (Select) and select Edit to edit a profile. You can set the following items:
30
y Volume: Adjust the volume of Ring and Key.
y Incoming Call: Select a ring tone for incoming calls. 10 ring tones are available.
y Alarm Clock: Select an alert tone for the alarm clock. 10 alert tones are available.
y SMS Alert: Select a message tone. 5 message tones are available.
y Key Tone: Select a keypad tone. Select Off to deactivate the keypad tone.
y Power On/Off Tone: Activate or deactivate the power-on and power-off tone.
Security Settings
Note:
The emergency call function of the FWT is not affected by the operation of FWT
lock function.
Setting the FWT Lock
The FWT lock protects your FWT from unauthorized usage. If necessary, you can activate
the FWT lock. You can change the default FWT lock code (000000) into a numeric string of
4 to 8 digits.
Remember the FWT code. In case you forget it, contact your service provider.
If the FWT lock activated, you have to enter the FWT code every time you power on the
FWT. Enter the correct FWT lock code and press (OK).
1. Select Menu > Settings > Security > Phone Lock.
2. Enter the correct FWT lock code and press (OK).
3. Select On/Off to activate or deactivate the FWT lock.
4. Select Change Code. Then enter the new FWT lock code and press (OK).
5. Re-enter the new FWT lock code and press (OK).
Setting the PIN Lock
The personal identification number (PIN) code protects the UIM card from unauthorized
usage. The PIN unblocking key (PUK) code can unblock the PIN code. PIN and PUK are
delivered with the UIM card. For details, consult your service provider.

31
Note:
y If you enter wrong PIN codes three times consecutively, the FWT prompts you
to enter the correct PUK code. If you enter wrong PUK code several times,
consult your service provider for the correct PUK code.
y If you enter wrong PUK codes 10 times consecutively, the UIM card is
invalidated. Contact your service provider to retrieve a new card.
If the PIN code is activated, you have to enter the PIN code every time you power on the
FWT. Enter the correct PIN code and press (OK).
Do the following to set the PIN code:
1. Select Menu > Settings > Security > PIN Lock.
2. Enter the correct PIN code and press (OK).
3. Select On/Off to activate or deactivate PIN code.
4. Select Change Code to change the PIN code.
Changing the PIN Lock
When the FWT is working well, you can change the PIN code by referring to the process of
setting the PIN lock.
When the PIN code is locked, you can enter a correct PUK code to unlock the PIN code. If
you enter wrong PUK codes 10 times consecutively, the UIM card is invalidated. Contact
your service provider to retrieve a new card.
1. Enter correct PUK code and press (OK).
2. Enter new PIN code and press (OK).
3. Re-enter the new PIN code and press (OK).
Supplementary Services Settings
For the specific supplementary services of the FWT, consult the carrier. The supplementary
services need special commission. This section only introduces some typical supplementary
services.
y Caller ID display: When there is an incoming call, the FWT displays the phone number
of the caller on the screen.
y Three way calling: Three parties can hold a conversation at the same time.
y Call forwarding: The incoming calls are forwarded to the specified phone accordingly to
facilitate you to answer.
Supplementary services are network dependent. For details, consult your service provider.

32
Setting Data Services
The FWT supports data services. Data services include Internet surfing and faxing. For
details, see Data Service User Manual.
33
9 FM Radio (Optional)
Switching the Radio On/Off
Switching the Radio On
1. In the standby mode, select Menu > FM Radio.
The FWT displays "Radio On!". The radio is switched on and the broadcasting screen
is displayed.
2. Select a channel to listen to the radio broadcast.
Note:
y The coiled cord connected the main unit and handset functions as the radio antenna.
y When you search for a channel or listen to the radio, if the signal strength is weak, you
can lift the handset and keep the coiled cord straight for a better effect.
Switching the Radio Off
1. In the standby mode, select Menu > FM Radio.
2. Press (Options) and select Switch Off.
3. Press (Select) to switch the radio off and return to the home screen.
Searching for a Channel
Auto Tuning
1. In the standby mode, select Menu > FM Radio.
2. Press (Options) and select Auto Tuning.
3. The FWT searches the available channels and saves them.
Note:
The FWT can save up to 20 channels.
34
Manual Tuning
1. In the standby mode, select Menu > FM Radio.
2. Press (Options) and select Manual Tuning. You can tune the radio channel
manually.
3. The FWT searches for an available channel.
4. Press the Up/Down key to switch a channel.
5. Press (Set) to add the channel to the channel list or press (Back) to stop
tuning and return to the broadcasting screen.
Inching Tuning
1. In the standby mode, select Menu > FM Radio.
2. Press (Options) and select Inching Tuning.
3. Press the Up/Down key and the FWT searches for all available channels between 87.5
MHz and 108.0 MHz. The tuning increases or decreases 0.1 MHz each time.
4. Press (Set) to add a channel to the channel list and return to the broadcasting
screen or press (Back) to stop tuning and return to the broadcasting screen.
Setting a Frequency
1. In the standby mode, select Menu > FM Radio.
2. Press (Options) and select Set Frequency.
3. Enter a frequency ranges from 87.5 MHz to 108.0 MHz.
If you enter 3 digits before the decimal, the cursor moves to the right of the decimal
automatically; if you enter 2 digits before the decimal, press the right key to move the
cursor to the right of the decimal.
4. Press (Save) to save the settings and return to the broadcasting screen; press
(Clear) to clear the settings and return to the broadcasting screen; press the
Left/Right key to move the cursor to clear all the settings.
Adding a Channel
1. After searching for or set a frequency, press .
2. Press the Up/Down key to scroll up or down the channel list.

35
3. Press (OK) to complete the settings.
If you set the frequency of the selected channel, the FWT prompts "Replace existing
channel?" Press (Yes) to replace. Press (No) to re-select.
Deleting a Channel
1. In the standby mode, select Menu > FM Radio.
2. Press (Options) and select Delete Channel.
3. Press the Up/Down key to scroll up or down the channel list.
4. Press (Delete) to delete a non-empty channel.
5. Press (Yes) to delete; press (No) to cancel.

36
10 Fun & Utility
Alarm Clock
After the alarm clock is activated, it rings at the specified time when your FWT is powered
on. You can set up to five alarm clocks.
1. Select Menu > Fun&Utility > Alarm.
2. Press the Up/Down key to scroll up or down the alarm clocks.
3. Press (Select) to select an alarm clock.
4. Select Alarm On to startup the alarm clock.
5. Enter the time and press (OK).
6. Select:
y Once: The alarm clock rings only once.
y Everyday: The alarm clock rings once every day.
y Custom: The alarm clock rings on the specified days.
Note:
y When the alarm clock rings, press (Stop) to turn off the alarm clock.
Alternatively, press (Snooze) to snooze the alarm clock for five minutes.
y If you do not turn off the alarm clock in 45 seconds, the alarm clock
automatically snoozes. After five minutes, the alarm clock rings again. It alerts
automatically for 6 times before it stops.
Schedule
1. Select Menu > Fun&Utility > Schedule.
2. Press (Options) to select: Add Schedule, View Current Month, View All,
Delete All, Delete Passed, Memory Status and Go To Date.
37
11 Menu Commands
Phone Book
See "Phone Book" on page 25.
Messages
See "Messages" on page 20.
Call History
Missed Calls
Received Calls
Dialed Calls
z Press the Up/Down key to scroll up or down the
records (up to 20).
z Press to dial a record.
z You can save, delete or send a message to a record.
Call Duration z The FWT records the duration of the last call, dialed
calls, received calls, and all calls. You can view or reset
the duration.
z The call duration recorded by the FWT may differ
from that in the call detail record (CDR) of your
service provider. The difference is determined by
factors such as the network functioning and the
round-up settings.
Delete All You can delete all the missed calls, received calls or
dialed calls.
Fun & Utility
Alarm See "Alarm Clock" on page 36.
Schedule See "Schedule" on page 36.
Calculator You can use the calculator for basic calculations. Press
the # key to enter the decimal point. Press the * key to
select operations such as add, subtract, multiply and
divide. Press to display the results.

38
Stopwatch The FWT provides the stopwatch function, which can
record up to 9 hours 59 minutes 59 seconds and 990
milliseconds.
World Clock You can view the Greenwich Mean Time (GMT),
current time of other 31 major time zones around the
world, and local time.
Line Game For details, see Help in your FWT.
Smash Game For details, see Help in your FWT.
Profiles
See "Profile Settings" on page 27.
Settings
Display You can set backlight, contrast, date format, time
format, and banner.
You can set the backlight to off, always on, 10 seconds,
20 seconds or 30 seconds.
You can press the Left/Right key to increase or
decrease the contrast.
You can set the date format to yyyy-mm-dd,
dd-mm-yyyy or mm-dd-yyyy.
You can set the time format to 12-hour or 24-hour.
You can activate or deactivate the banner.
Call Settings See "Call Settings" on page 28.
Phone Settings You can set data services, select a language, set the
keyguard function and shortcut keys.
Provide the functions of data service.
You can select English or Chinese as the FWT
language.
For details of the keyguard settings, see "Locking the
Keypad" on chapter 4.
For details of the setting of shortcut keys, see "Shortcut
Key Settings" on chapter 8.
Security See "Security Settings" on page 30.

39
12 Maintenance and
Troubleshooting
Maintenance
1. Place the FWT in a clean and dry environment. The temperature of the place should be
no higher than +55°C or lower than –10°C.
2. If the FWT is covered with dust, clean it with fine clean cloth. Do not clean it with
cleanser or other chemical solvents.
3. If the FWT does not operate normally due to a failed spare battery, replace the spare
battery in time or use the power adapter to supply the FWT with power.
4. If the FWT does not work normally, contact your service provider.
Troubleshooting
The display screen does not turn on after the FWT is powered on (the
FWT is not connected to the power adapter).
1. Make sure that the spare battery is installed.
2. The battery level is low. Connect the FWT to the power adapter.
The display screen does not turn on after the FWT is powered on (the
FWT is connected to the power adapter).
1. The voltage output of the power adapter does not meet the requirement of the FWT.
Check whether the AC input is normal and the power adapter is the approved one.
2. The external voltage of the power adapter is low or unstable; disrupting the normal
functioning of the FWT. Check whether the external voltage of the power adapter is
normal. You can also install the spare battery in the FWT.
There is no signal icon on the display screen.
1. Make sure that the antenna is installed properly.
2. If still there is no signal, contact your service provider to check whether the FWT is in
the signal coverage area.
Time is not displayed.
1. Make sure that idle time is set "On" Status through pressing Setting > Display > Idle
Time

40
2. If the problem persists. Make sure that the antenna is installed properly.
3. Adjust the antenna direction or move the FWT to a place covered where the signal is
better.
4. If the problem persists, contact your service provider to check whether the FWT is
within the signal coverage area.
The FWT works normally. When someone calls you, "Sorry, the
calling is out of service, please call later" is heard.
Do not enable the PC fax function while the network does not support it. To answer an
incoming call, disable the PC fax function. Do the following to disable the PC fax function:
1. Select Menu > Settings > Phone Settings > Data Service > Fax Mode.
2. Enter the Fax Mode and select Off to disable the PC fax function
The FWT works normally. The FWT displays that there is an incoming
call. However, there is no ring tone. You cannot answer the call by
pressing .
Do not enable the PC fax function while the network supports it. To answer an incoming
call, disable the PC fax function.
After the FWT is powered off, there is no display sometimes while
sometimes there is power supply icon and blinking battery icon.
No information on the display screen is a normal status of FWT after power-off. The power
supply icon and a blinking battery icon indicate that the battery is being charged.
There is the ring tone after the busy tone.
The ring tone indicates that there is an incoming call. If you are not in a call, you can
answer the call.
After lifting the handset, there is a ring tone when you are ready to
dial or are dialing a phone number.
It indicates that there is an incoming call. If you are not in a conversation, you can answer
the call.
There is only the battery icon on the display screen.
It indicates that the FWT is powered by the spare battery. If the FWT is powered solely by
the spare battery and the battery icon is blinking without any bar inside, it indicates that the
battery level is low. Use the power adapter to charge the battery or replace the spare battery.

41
13 Specifications
Item Description
Dimensions (W × D × H) 210 mm × 183 mm × 81 mm
Weight Less than 700 g
Placement mode Horizontal or wall mounting
Input voltage liner power source:
AC: 230 V
DC: 12 V
Switch power source:
AC: 100–240 V
DC: 12 V
Spare battery Type: NiMH
Capacity: 3.6 V 1000 mAh
Maximum transmitter power ≥ 23 dBm
Typical conversation power
consumption
1.2 W
Typical stand-by power consumption 40 mW
Version: V200R002_01 Part Number: 31017831