Huawei Technologies HG520C1 HOME GATEWAY User Manual USERS MANUAL
Huawei Technologies Co.,Ltd HOME GATEWAY USERS MANUAL
USERS MANUAL
EchoLife HG520/HG520e
Home Gateway
User Manual
Free Communication, Wonderful Life
Thank you for purchasing EchoLife HG520/HG520e Home
Gateway of Huawei.
EchoLife HG520/HG520e Home Gateway
User Manual
Manual Version: T2-202001-20060622-V1.01
Product Version: V200R001

Copyright © 2006 Huawei Technologies Co., Ltd.
All Rights Reserved
No part of this document may be reproduced or transmitted in any
form or by any means without prior written consent of Huawei
Technologies Co., Ltd.
Trademarks and Permissions
and other Huawei trademarks are trademarks of Huawei
Technologies Co., Ltd.
All other trademarks and trade names mentioned in this document are
the property of their respective holders.
Notice
The information in this document is subject to change without notice.
Every effort has been made in the preparation of this document to
ensure accuracy of the contents, but all statements, information, and
recommendations in this document do not constitute the warranty of
any kind, express or implied.

Huawei Technologies Proprietary
Note:
HG520/HG520e Home Gateway (hereinafter referred to as HG520) is
used indoors only. Pay attention to the following when installing and
using HG520.
Basic requirements
Read this manual carefully before installing and using the
equipment.
Take waterproof measures during storage, transportation and
operation of the equipment.
Avoid collision during storage, transportation and operation of the
equipment.
Do not dismantle the equipment by yourself. In case of failure,
send the equipment to an authorized maintainer.
Without prior written consent from Huawei, no company or
individual is allowed to decompile, disassemble, modify or
reverse engineer the equipment and shall be solely responsible
for any effect resulted from such action.
While using the equipment, observe related laws and regulations,
and respect the legal rights of others.
Environmental Requirements
Place the equipment in a well-ventilated place. Avoid direct
irradiation of any strong light (such as sunlight).
Keep the equipment clean.
Place the equipment on a flat and stable platform which is beyond
the reach of children.

Huawei Technologies Proprietary
Do not put heavy objects on the equipment.
Leave at least 10 cm space around the equipment for heat
dissipation.
Do not put the equipment on any object that is flammable or not
transcalent, such as foam and rubber.
Do not cover the equipment with any object or block the
ventilation holes of the equipment.
Keep the equipment away from any heat source or exposed fire,
such as an electronic warmer and a candle.
Keep the equipment away from appliances with a strong electric
field or magnetic field, such as a microwave oven and a
refrigerator.
Keep the equipment away from moisture or containers with liquid,
such as a vase and a cup.
Usage
Do not allow children to use the equipment alone.
Do not allow children to touch or play with the small fittings, to
avoid danger of deglutition.
Use the power adapter provided with the equipment only.
Use the accessories approved by the manufacturer.
The power supply shall meet the equipment specifications.
Before plugging or unplugging the cables, turn off the equipment
and unplug the power supply.
While plugging or unplugging the cables, keep your hands dry
and do not touch the metallic part of a cable.
Do not trample on, stretch, or over bend the equipment cables, to
avoid equipment failure.
Do not use broken or worn wires. If a wire is broken or worn,
contact your supplier for change.

Huawei Technologies Proprietary
In a lightning storm, turn off the equipment and unplug the power
supply, to avoid lightning strike.
Unplug the power supply if the equipment is not used for a long
time.
In case of exceptions, turn off the equipment and unplug the
power supply immediately. Then contact your supplier for
maintenance. For example, the equipment emits smoke, peculiar
smell or exceptional sounds.
Cleaning
Before cleaning the equipment, turn off the equipment and unplug
the power supply.
Clean the equipment shell with a piece of soft cloth.
It is forbidden to spray liquid onto the equipment, to avoid damage
to the internal circuit.
Keep the power socket clean and dry, to avoid electric shock or
other dangers.
Note
If the device is in use for a long time, temperature of the shell will
go up. Please do not worry. This is normal and the device can
work normally.

Huawei Technologies Proprietary
About This Manual
This manual introduces the function, features and operation of
EchoLife HG520/HG520e. The main contents are as follows:
To know Refer to
Features, network application
and hardware structure Chapter 1 Introduction
Installation Chapter 2 Installation
Web-based configuration Chapter 3 Web Configuration
Technical specifications Chapter 4 Technical
Specifications
FCC materials, technical terms
and abbreviations Chapter 5 Appendix
Environmental Protection
This product has been designed to comply with the requirements on
environmental protection. For the proper storage, use and disposal of
this product, national laws and regulations must be observed.
Huawei Technologies Proprietary
i
Table of Contents
Chapter 1 Introduction ..................................................................... 1
1.1 Functions............................................................................... 1
1.2 Network Application .............................................................. 2
1.3 Appearance........................................................................... 2
1.3.1 Front Panel ................................................................. 3
1.3.2 Rear Panel.................................................................. 5
Chapter 2 Installation ....................................................................... 6
2.1 Connecting Cables................................................................ 6
2.2 Simple Configuration............................................................. 7
2.2.1 Preparing for Configuration ........................................ 7
2.2.2 Logging In to the Configuration Interface ................... 7
Chapter 3 Web Configuration.......................................................... 9
3.1 Home Page ........................................................................... 9
3.2 Basic Configuration ............................................................. 10
3.2.1 Service Information .................................................. 10
3.2.2 System Information .................................................. 11
3.2.3 WAN Configuration................................................... 12
3.2.4 LAN Configuration .................................................... 20
3.2.5 DHCP Configuration ................................................. 22
3.2.6 Wireless Configuration ............................................. 24
3.3 Advanced Configuration...................................................... 27
3.3.1 IP Routing................................................................. 27
3.3.2 ADSL ........................................................................ 29
3.3.3 VLAN ........................................................................ 30
Huawei Technologies Proprietary
ii
3.3.4 ACL........................................................................... 32
3.3.5 Filters........................................................................ 33
3.3.6 Firewall ..................................................................... 40
3.3.7 NAT .......................................................................... 42
3.3.8 QoS .......................................................................... 46
3.3.9 DNS ..........................................................................47
3.3.10 RIP.......................................................................... 48
3.4 Tools Configuration ............................................................. 50
3.4.1 System Password..................................................... 50
3.4.2 Configuration File ..................................................... 51
3.4.3 Firmware Upgrade.................................................... 52
3.5 Status .................................................................................. 53
3.5.1 System Log............................................................... 53
3.5.2 Diagnostics ............................................................... 54
3.5.3 Traffic Statistics ........................................................ 55
3.5.4 ATM Counter ............................................................ 56
3.5.5 LOS/LOF/ES............................................................. 57
Chapter 4 Technical Specifications .............................................. 58
Chapter 5 Appendix........................................................................ 61
5.1 FCC..................................................................................... 61
5.2 Acronyms and Abbreviations .............................................. 62

Huawei Technologies Proprietary
1
Chapter 1 Introduction
Thank you for purchasing EchoLife HG520/HG520e Home
Gateway (hereinafter referred to as HG520). HG520 is an ADSL
Access Point (AP) router for high-speed Internet access.
This manual will introduce how to install and configure HG520.
Note:
Compared to HG520, HG520e does not provide the USB interface
and USB function.
1.1 Functions
The functions of HG520 are as follows:
Built-in ADSL/ADSL2+ modem for high-speed Internet
access
Support Network Address Translation (NAT) and IP filtering
Support network sharing and firewall protection
Four Ethernet interfaces for Internet access through LAN
Support the DHCP protocol
Support web-based configuration
Support IEEE 802.11g 54 Mbit/s and can be used as
wireless AP equipment
Huawei Technologies Proprietary
2
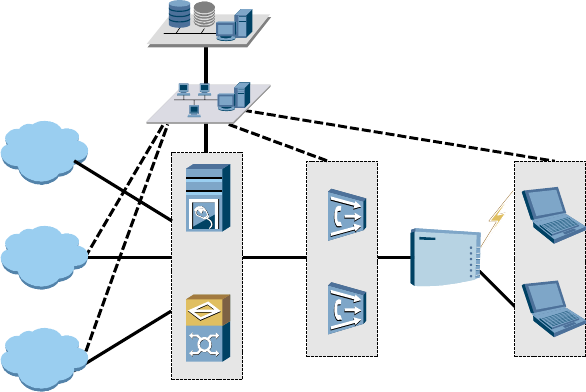
1.2 Network Application
HG520 is located on the user access layer of the network.
It enables the following users to access an IP network through the
ADSL uplink interface:
Small and medium enterprises
Family users
HG520 provides both wired and wireless access. Figure 1-1
shows the network application of HG520.
N2000 NMS
DSLAM
BRAS
IPTV
NGN
Internet
Carrier's OSS
ACS
CDN IP
Network
HG520
Figure 1-1 Network application of HG520
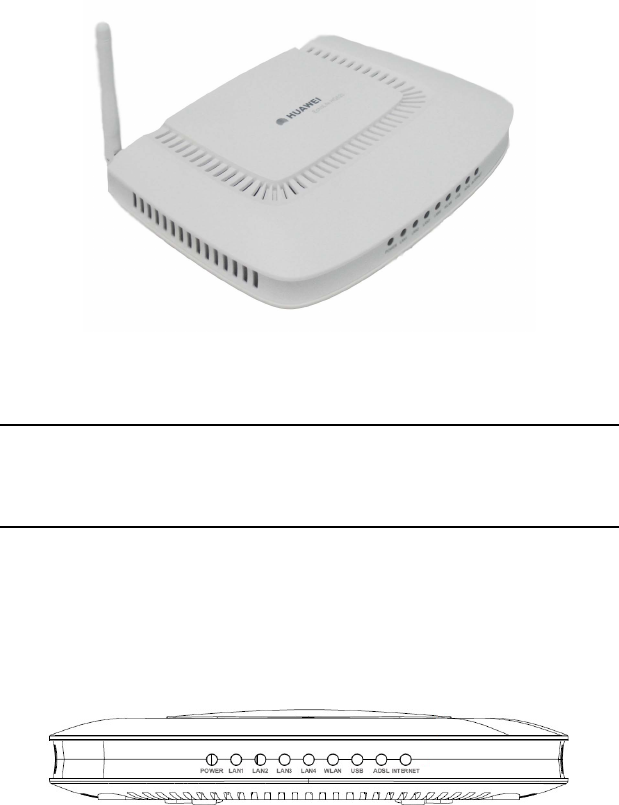
1.3 Appearance
Figure 1-2 shows the appearance of HG520.
Huawei Technologies Proprietary
3
Figure 1-2 HG520
Note:
There is no USB indicator and USB port on HG520e.
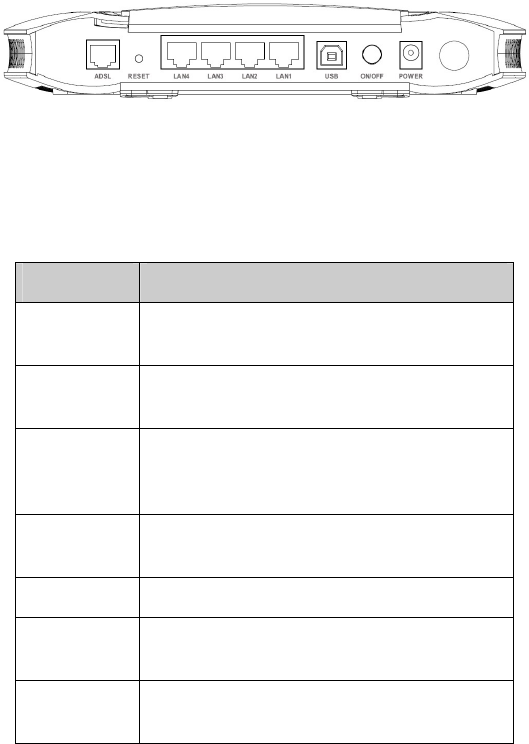
1.3.1 Front Panel
Figure 1-3 shows the front panel of HG520.
Figure 1-3 Front panel of HG520
Table 1-1 describes these indicators.

Huawei Technologies Proprietary
4
Table 1-1 Description of indicators
Indicator Status Description
On The power is on.
POWER
Off The power is off.
On The LAN link is normal.
Off The LAN link is not established.
LAN 1-4
Blinking The LAN data is being transferred.
On The WLAN link is normal.
Off The WLAN link is not established.
WLAN
Blinking The WLAN data is being transferred.
On The USB link is normal.
Off The USB link is not established.
USB
Blinking The USB data is being transferred.
On The ADSL link is normal.
Off The ADSL link is not established.
ADSL
Blinking The ADSL link is being activated.
On The link is normal in the routing
mode.
Off The link is not established in the
bridging mode or routing mode.
INTERNET
Blinking Data is being transferred in the
routing mode.
Huawei Technologies Proprietary
5
1.3.2 Rear Panel
Figure 1-4 shows the rear panel of HG520.
Figure 1-4 Rear panel of HG520
For description of external interfaces and buttons on the rear
panel, see Table 1-2.
Table 1-2 Description of external interfaces
Port/Button Description
ADSL It is the RJ-11 port used to connect with
the phone jack on the wall or a splitter.
Reset It is used to restore the default settings of
HG520.
LAN1-4 It is the RJ-45 port used to connect with
the Ethernet port of a computer or a LAN
hub.
USB It is used to connect with the USB
interface of your computer.
ON/OFF It is used to switch on/off HG520.
Power It is used to connect with the power
adapter.
Antenna It is used for wireless connection with the
LAN devices.

Huawei Technologies Proprietary
6
Chapter 2 Installation
2.1 Connecting Cables
You need to connect HG520 with the phone jack on the wall, your
computer(s), and the power adapter.
Caution:
Before operation, you need to power off your computer(s), LAN
hub/switch, and HG520.
I. Connect the ADSL line
Use a telephone line to connect the ADSL interface of HG520
with either of the following two interfaces:
the phone jack on the wall
the Modem interface of a splitter
II. Connect the network cable
To connect HG520 to a LAN or computer, do as follows:
Use a network cable to connect the hub port or the Ethernet
interface of your computer with a LAN interface of HG520.
Huawei Technologies Proprietary
7
III. Connect the power supply
Use the power adapter to connect the POWER interface of
HG520 with the power socket.
IV. Start up the network devices
Switch on HG520 and start up your computer, hub or other
network devices.
V. Configure HG520 through the Web interface
For detailed configuration descriptions, see "Chapter 3 Web
Configuration".
2.2 Simple Configuration
2.2.1 Preparing for Configuration
Before the configuration, make sure that you have made the
following preparations:
1) Connect HG520 and your computer with a network cable.
2) Power on HG520 and start up the computer.
3) Configure the computer to obtain IP address automatically.
Alternatively, configure your computer to be in the same
network segment as HG520. The default IP address of
HG520 is 192.168.1.1.
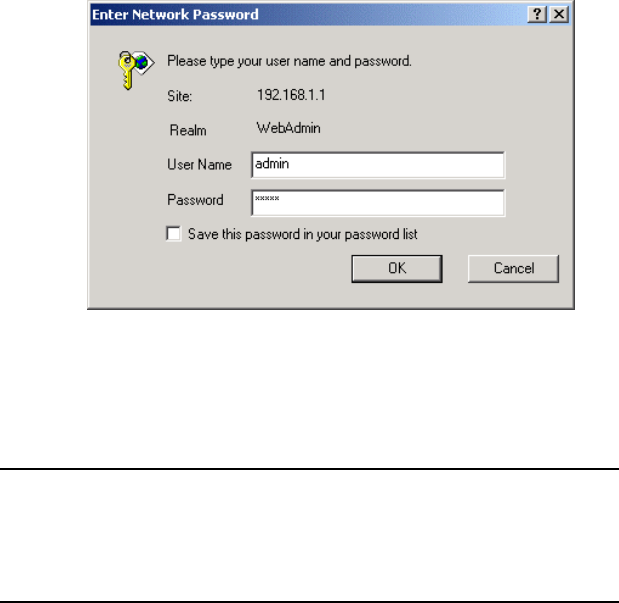
2.2.2 Logging In to the Configuration Interface
The steps are as follows:
Huawei Technologies Proprietary
8
1) Enter the IP address of HG520 (192.168.1.1 by default) in
the address bar of IE browser. The following dialog box is
displayed.
Figure 2-1 Authentication
2) Enter the default user name admin and password admin.
3) Click OK.
Note:
If you have problems during the configuration, contact your ISP for
help.
Huawei Technologies Proprietary
9
Chapter 3 Web Configuration
3.1 Home Page
After authentication, the home page of HG520 is displayed. See
Figure 3-1.
Figure 3-1 Home page of HG520
The left part is the navigation bar, providing links for you to
access different pages.

Huawei Technologies Proprietary
10
The right part is the information area, showing details of
configuration and management.
Note:
There is no USB port on HG520e, and the diagrams in this chapter are
for your reference only.
3.2 Basic Configuration
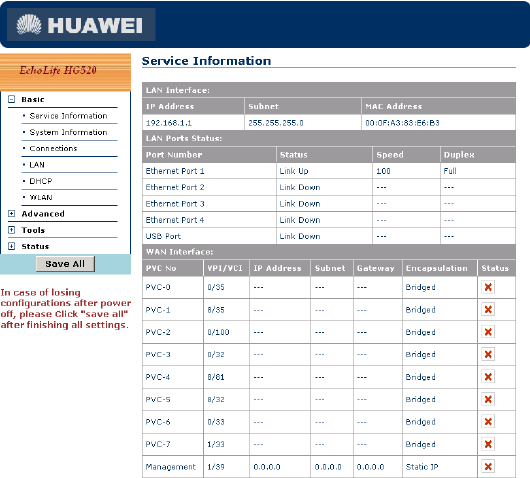
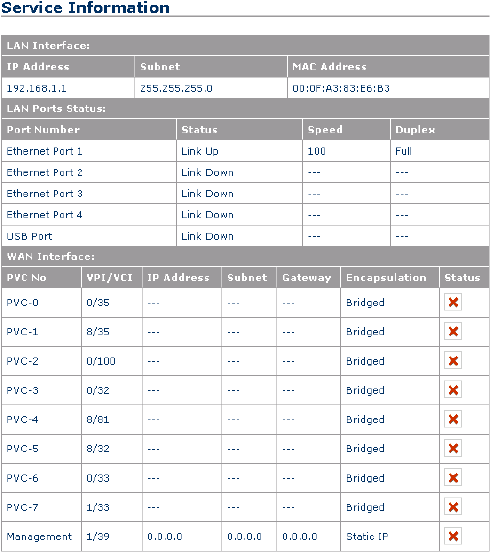
3.2.1 Service Information
Click Service Information of Basic in the navigation bar to
display the service information of HG520.
Huawei Technologies Proprietary
11
Figure 3-2 Service information
This page displays the service information of LAN and WAN.
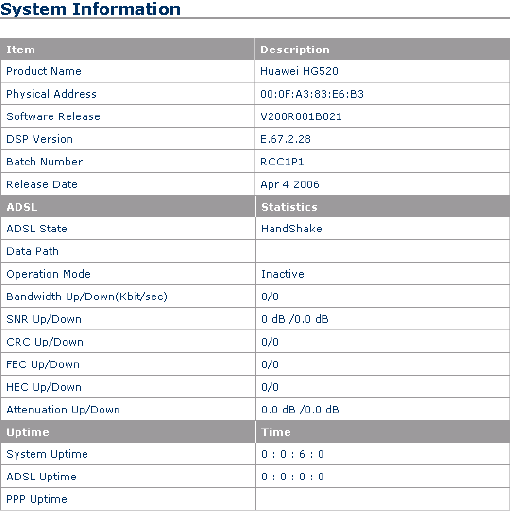
3.2.2 System Information
Click System Information of Basic in the navigation bar to
display the system information of HG520.
Huawei Technologies Proprietary
12
Figure 3-3 System information
This page displays the general information of HG520 and the
current ADSL statistics.
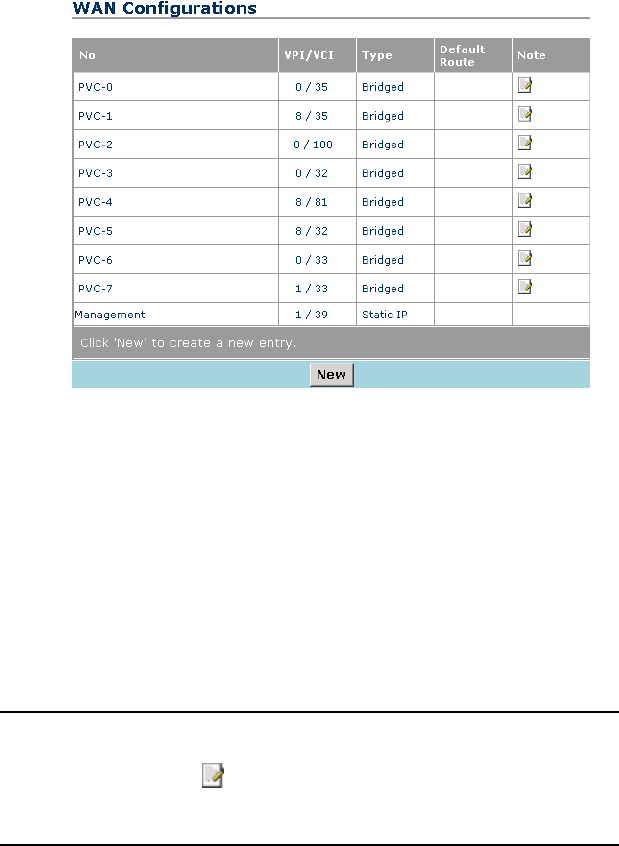
3.2.3 WAN Configuration
Click Connections of Basic in the navigation bar to display the
WAN Configurations page.
Huawei Technologies Proprietary
13
Figure 3-4 WAN configuration
The system provides eight PVCs. This page displays the
information of existing PVCs. Usually, you can use the default
settings.
You need to delete existing PVCs before adding new PVCs. You
can click New to add PVC. If you create new PVC, you need to enter
the VPI and VCI values provided by your ISP.
Note:
You can click the icon to modify the configuration of existing PVCs
or delete the PVC.
Huawei Technologies Proprietary
14
The WAN connection includes the following types:
Bridge
DHCP
Static IP
2684 Route
PPPoE
PPPoA
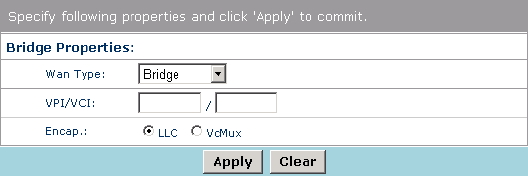
I. Bridge
The bridge configuration page is as shown in Figure 3-5.
Figure 3-5 Bridge
Select the encapsulation mode and enter the VPI and VCI values.
After the configuration, click Apply to save the settings, or click
Clear to clear the settings.
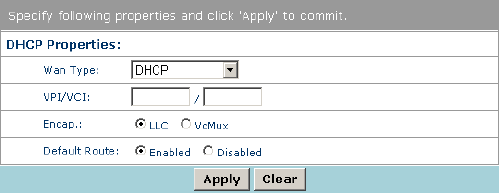
II. DHCP
The DHCP configuration page is as shown in Figure 3-6.
Huawei Technologies Proprietary
15
Figure 3-6 DHCP
Select the encapsulation mode and enter the VPI and VCI values.
If you enable Default Route, the DHCP server will dynamically
specify a route for the data from the LAN side. By default, Default
Route is enabled.
If you select Disabled, only the data whose route is included in
the IP routing table will be sent out through the WAN interface. Other
data will be discarded.
After the configuration, click Apply to save the settings, or click
Clear to clear the settings.
III. Static IP
The static IP configuration page is shown in Figure 3-7.

Huawei Technologies Proprietary
16
Figure 3-7 Static IP
Select the encapsulation mode and enter the VPI and VCI values.
You need to enter the IP address and subnet mask of HG520,
which is provided by your ISP.
If you enable Default Route, HG520 will transmit the LAN side
data to the default gateway. In this case, you need to enter the IP
address of the default gateway, which is provided by your ISP.
By default, Default Route is enabled. If you select Disabled,
only the data whose route is included in the IP routing table will be
transmitted through the WAN interface. Other data will be discarded.
After the configuration, click Apply to save the settings, or click
Clear to clear the settings.
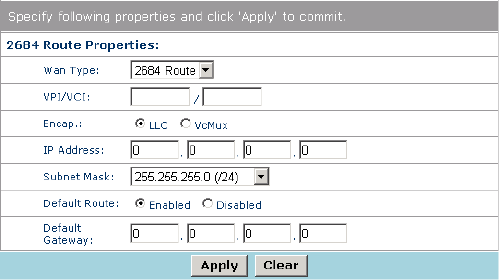
IV. 2684 Route
The 2684 route configuration page is as shown in Figure 3-8.
Huawei Technologies Proprietary
17
Figure 3-8 2684 route
Select the encapsulation mode and enter the VPI and VCI values.
You need to enter the IP address and subnet mask of HG520,
which is provided by your ISP.
If you enable Default Route, HG520 will transmit the LAN side
data to the default gateway. In this case, you need to enter the IP
address of the default gateway, which is provided by your ISP.
By default, Default Route is enabled. If you select Disabled,
only the data whose route is included in the IP routing table will be
transmitted through the WAN interface. Other data will be discarded.
Huawei Technologies Proprietary
18
After the configuration, click Apply to save the settings, or click
Clear to clear the settings.
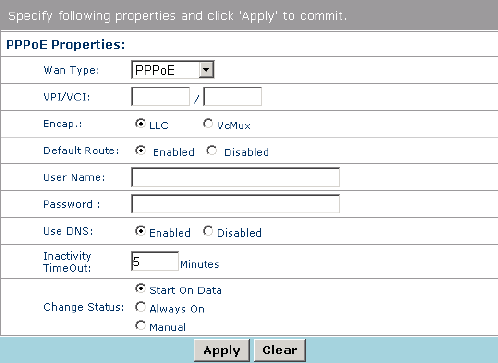
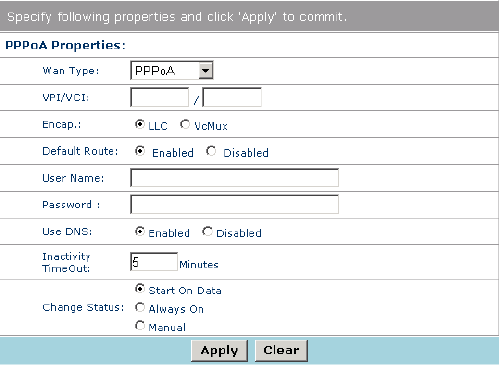
V. PPPoE/PPPoA
The PPPoE and PPPoA configuration pages are as shown in
Figure 3-9 and Figure 3-10.
Figure 3-9 PPPoE
Huawei Technologies Proprietary
19
Figure 3-10 PPPoA
Select the encapsulation mode and enter the VPI and VCI values.
If you enable Default Route, the office side server will
dynamically specify a route for the LAN side data.
By default, Default Route is enabled. If you select Disabled,
only the data whose route is included in the IP routing table will be
transmitted through the WAN interface. Other data will be discarded.
You need to enter the user name and password for PPP dialing.
It is recommended that you set Use DNS to Enabled, in this way,
HG520 will obtain the DNS address during the PPP dialing. Otherwise,
you need to enter addresses of the primary DNS server and the
secondary DNS server on the DNS configuration page manually.
It is recommended that you set Change Status to Start On Data,
in this way HG520 will establish the PPP dialing when receive a linking

Huawei Technologies Proprietary
20
request. You need to enter a value in Inactivity Timeout text box. The
default value is 5.
If you select Always On, HG520 will establish the PPP dialing
when it is powered on.
If you select Manual, the PPP dialing will be established
manually.
After the configuration, click Apply to save the settings, or click
Clear to clear the settings.
Note:
You need to reboot HG520 after change the WAN configuration.
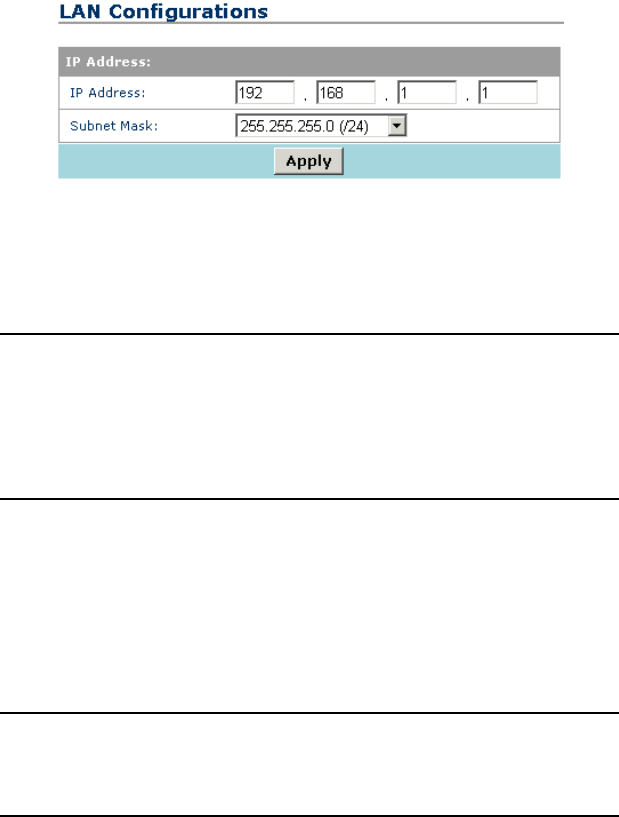
3.2.4 LAN Configuration
Click LAN of Basic in the navigation bar to display the LAN
configuration page.
You can change the default LAN IP address and subnet mask.
Ensure that the IP address of your computer and the LAN IP address
are in the same network segment.
Huawei Technologies Proprietary
21
Figure 3-11 LAN configuration
Enter the IP address for the Ethernet LAN interface. By default, it
is 192.168.1.1.
Note:
The public IP address assigned by your ISP is not the LAN IP address.
The public IP address identifies the WAN interface that the ADSL
gateway connects to Internet.
Enter the subnet mask for the Ethernet LAN interface. By default,
it is 255.255.255.0.
After the configuration, click Apply to save the settings.
Note:
If you change the IP address, you need to reboot HG520.
Huawei Technologies Proprietary
22
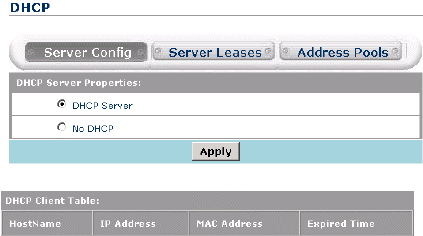
3.2.5 DHCP Configuration
Click DHCP of Basic in the navigation bar to display the DHCP
configuration page. You can set HG520 as the DHCP server.
I. Server configuration
The default mode is DHCP Server. This mode is to configure
HG520 as the DHCP server of LAN. Then HG520 will provide IP
settings for your PC. Otherwise, the IP address of your computer
needs to be configured manually or obtained from the DHCP server at
the office end.
Figure 3-12 DHCP server configuration
Huawei Technologies Proprietary
23
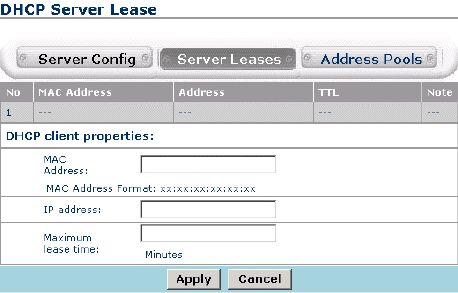
II. DHCP server leases
Figure 3-13 DHCP server leases
You need to make the following configurations in this page:
Enter the MAC address of your computer in the MAC
Address text box.
Enter the IP address of your computer in the IP Address text
box.
Enter the validity period of the IP address in the Maximum
lease time text box.
After configuration, click Apply to save the settings, or click
Cancel to clear the settings.
Huawei Technologies Proprietary
24
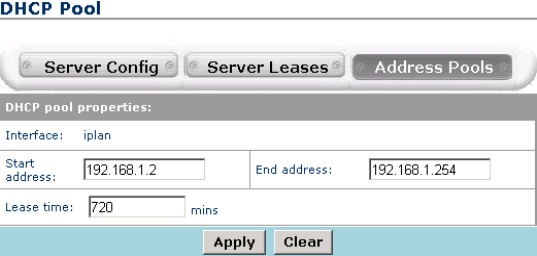
III. DHCP Pool
Figure 3-14 DHCP address pool
You need to make the following configurations in this page:
Enter the start IP address and end IP address in the Start
address and End address text boxes. These two IP
addresses specify the range of IP addresses that can be
assigned by the DHCP server.
Enter the validity period of the IP addresses assigned by the
DHCP server in the Lease time text box.
After configuration, click Apply to save the settings, or click Clear
to clear the settings.
3.2.6 Wireless Configuration
Click WLAN of Basic in the navigation bar to display the WLAN
configuration page.
Huawei Technologies Proprietary
25
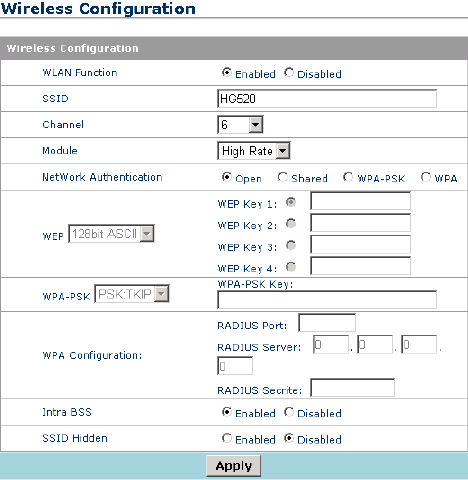
Figure 3-15 Wireless configuration
You need to make the following configurations in this page:
For WLAN Function, you can select Enabled to enable the
WLAN function of HG520.
Enter the SSID (Service Set Identifier) for wireless
connection. SSID identifies the members of a service set. To
connect with HG520 in the wireless mode, all the wireless
devices in your LAN must use the same SSID as specified in
this page.
Select a channel used for your wireless LAN from the
Channel drop-down list. Remember that all wireless devices
communicating with HG520 must use the same channel as
specified in this page.
Huawei Technologies Proprietary
26
HG520 provides multiple wireless modules. Select a
suitable one from the Module drop-down list. The
modulation modes available are 802.11B, 802.11G, High
Rate and Auto.
Select the network authentication mode.
If you select Open, the data will not be encrypted.
If you select Shared, HG520 will use WEP (Wired
Encryption Protocol) to encrypt data through predefined
key. HG520 offers 64-bit ASCII/Hex and 128-bit
ASCII/Hex encryption, with four keys available. Select
an encryption level from the WEP drop-down list, and
then enter a WEP key with proper length.
If you select WPA-PSK, HG520 will use the simplified
WPA (Wi-Fi Protected Access) to encrypt data. WPA is
designed to provide improved data encryption and user
authentication. HG520 provides TKIP (Temporal Key
Integrity Protocol) and AES (Advanced Encryption
Standard) arithmetic. Enter a key with proper length.
If you select WPA, you need to enter the RADIUS server
IP address, port number and RADIUS secrite (the
password used by external radius server, the length of
Radius Secrite must be 1–64)
You can select Enabled for Intra BSS to enable different
wireless devices in your LAN to access Internet and
communicate with each other.
Intra BSS traffic is traffic between wireless stations in the
same BSS. If there are two wireless stations connecting to
Internet through HG520 and the Intra-BSS function is
enabled, both stations can access Internet and

Huawei Technologies Proprietary
27
communicate with each other through the access point. If
this function is disabled, then both stations can still access
Internet but cannot communicate with each other through
the access point.
If you select Enabled for SSID Hidden, the SSID will be
hidden and cannot be viewed by WLAN clients.
After configuration, click Apply to save the settings.
Note:
You need to reboot HG520 after change the WLAN settings.
3.3 Advanced Configuration
3.3.1 IP Routing
Click IP Routing of Advanced in the navigation bar to display the
IP routing configuration page.
IP routing configuration defines gateways and hops used to route
data traffic. Usually, you do not need to use this feature, as the
previously configured default gateway and LAN IP settings on your
computers should be sufficient.
You may need to define routes if:
your LAN includes two or more networks or subnets, or
you connect to two or more ISP services, or
Huawei Technologies Proprietary
28
you connect to a remote corporate LAN
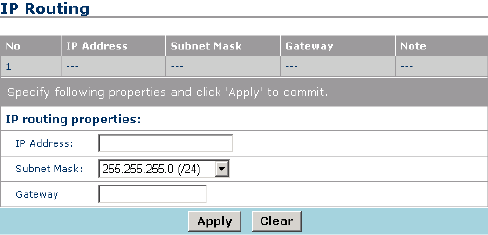
To add an IP route, click New to display the configuration page as
shown in Figure 3-16.
Figure 3-16 IP routing
Description of the parameters is as follows:
IP Address specifies the IP address of the destination
computer. You can enter the IP address of a specific
computer or an entire network. The IP address can also be
specified as all zeros to indicate that this route is applied to
all destinations that have no specified routes.
Subnet Mask specifies the subnet mask of the destination
computer.
Gateway specifies the address of the gateway through
which data to the destination computer will be forwarded.
After configuration, click Apply to save the settings, or click Clear
to clear the settings.
Huawei Technologies Proprietary
29
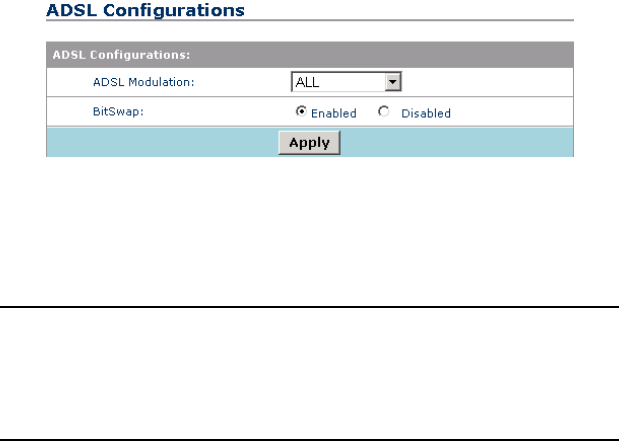
3.3.2 ADSL
Click ADSL of Advanced in the navigation bar to display the
ADSL configuration page.
Figure 3-17 ADSL configuration
This configuration is used to change the ADSL modulation mode.
Note:
Do not change the ADSL modulation mode unless you are instructed
by your ISP.
Description of the parameters is as follows:
HG520 supports multiple ADSL modulation modes. If you
are instructed by your ISP to change the modulation mode
used for your service, select the desired modulation mode.
The modulation modes available are All, G.Dmt, ADSL2,
ADSL2+, ADSL2+DELT, ADSL2M, ADSL2M+, T1.413,
G.Lite and Multimode.

Huawei Technologies Proprietary
30
If BitSwap is enabled, HG520 allows the simple rate control
to adjust the line speed automatically.
After configuration, click Apply to save the settings.
Note:
You need to reboot HG520 after change the ADSL modulations.
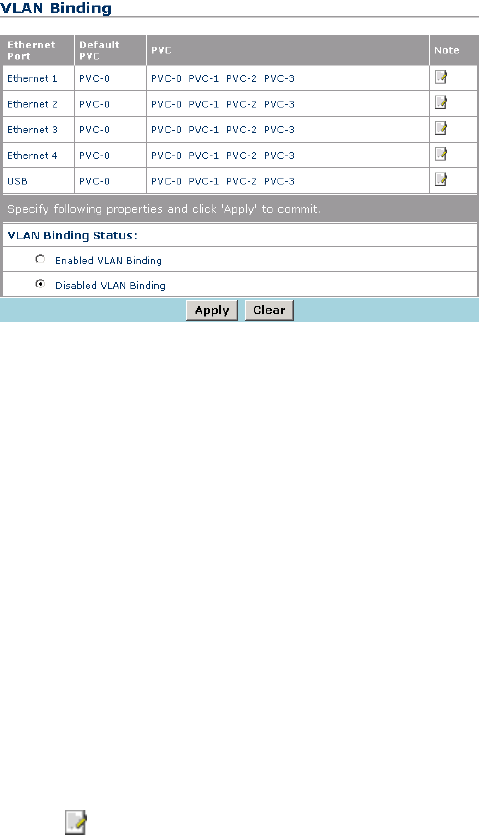
3.3.3 VLAN
Click VLAN of Advanced in the navigation bar to display the
VLAN binding configuration page.
A VLAN works like an ordinary LAN, but devices in a VLAN do not
have to be physically connected to the same segment. While clients
and servers may locate anywhere in a network, they can be grouped
together by the VLAN technology, and broadcasts can be sent to
devices within the VLAN.
Huawei Technologies Proprietary
31
Figure 3-18 VLAN binding
Description of the parameters is as follows:
For VLAN Binding Status, you can select Enabled VLAN
Binding to enable the VLAN function. By default, it is
disabled.
Ethernet Port displays the Ethernet port of HG520.
Default PVC displays the default PVC, which is to work as
the VLAN port for VLAN binding PVCs. Thus, all the packets
transmitting through bound PVCs will be transmitted through
the default PVC.
PVC displays the PVCs bound to the VLAN. A maximum of
eight PVCs can be added to a VLAN group.
After the configuration, click Apply to save the settings, or click
Clear to clear the settings.
Click the icon of a relative port, the VLAN Port Binding
Properties page will be displayed at the lower part. You can modify
the binding PVCs and default PVC for an Ethernet port.
Huawei Technologies Proprietary
32
Note:
If you change VLAN settings, you need to reboot HG520.
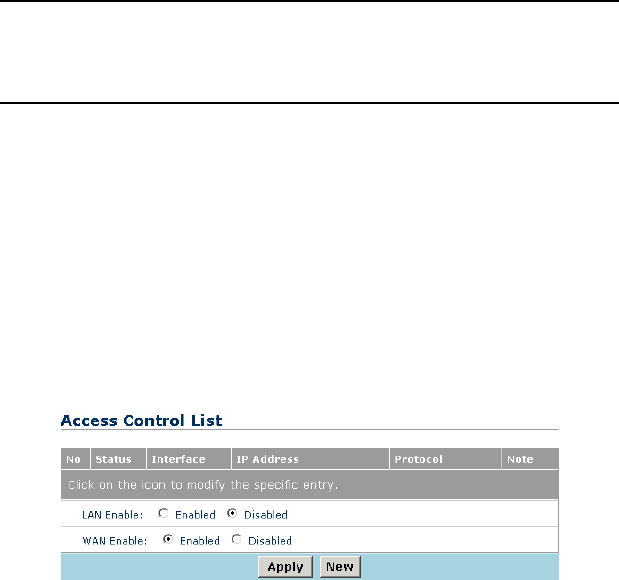
3.3.4 ACL
Click ACL of Advanced in the navigation bar to display the ACL
configuration page. Access control list is used to allow or deny the
access from one or more specific IP addresses in LAN and WAN.
The access control list configuration page is as shown in Figure
3-19.
Figure 3-19 Access control list
If you set LAN Enable to enabled, HG520 will only allow the
computers whose IP address is included in the access control list to
access Internet. By default, it is Disabled, all the LAN IP addresses
can access Internet.
If you set WAN Enable to enabled, HG520 will only allow the
computers whose IP address is included in the access control list to
Huawei Technologies Proprietary
33
access HG520. By default, it is Enabled, all the WAN IP addresses
can access HG520.
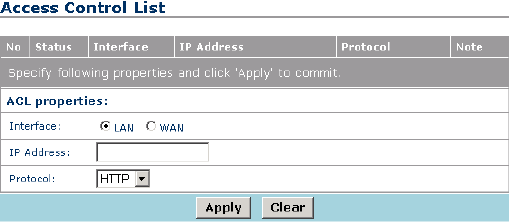
Click New to add an access control list.
Figure 3-20 Access control list – New
Description of this configuration page is as follows:
For Interface, select the type of interface.
For IP Address, enter the IP address of the interface.
For Protocol, select the protocol from the drop-down list.
3.3.5 Filters
Click Filters of Advanced in the navigation bar to display the IP
filter configuration page.
Filters are used to deny or allow LAN computers to access
Internet. Through the configuration of IP filters, you can refuse
computers with the specified IP or MAC addresses to access Internet.
You can also block access from Internet to your LAN.

Huawei Technologies Proprietary
34
I. IP Filters
You can deny computers with specified IP addresses from
accessing Internet of LAN with IP filters. You can deny a specific port
or all ports of a specified IP address.
The existing IP filters are listed in the page. You can click the icon
to modify an IP filter.
Figure 3-21 IP filters configuration—status
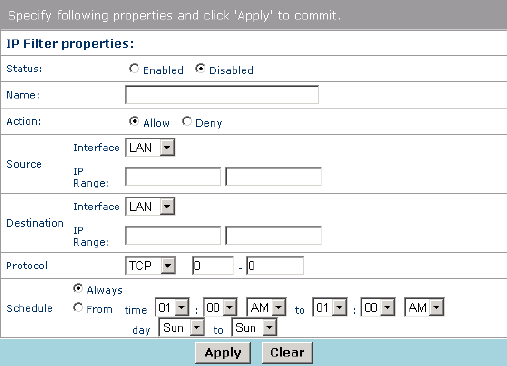
Click New to add IP filters.
The IP filter configuration page is as shown in Figure 3-22.
Huawei Technologies Proprietary
35
Figure 3-22 IP filters configuration
Description of this configuration page is as follows:
For Status, you can enable or disable the IP filter function.
For Name, enter a name for the IP filter rule for easier
identification.
For Action, you can select Allow to permit packets from the
specified IP address to pass through HG520. To refuse
packets from a specified IP address to pass through HG520,
you can select Deny.
For Source Interface, if you select LAN, the filter rule will
apply to packets from the specified range of IP address of
your LAN.
If you select WAN, the filter rule will apply to packets form
the specified range of IP addresses of the WAN side.
If you select both, the filter rule will apply to packets from
both sides.
Huawei Technologies Proprietary
36
For Destination Interface, if you select LAN, the filter rule
will apply to packets whose destination is in the specified
range of IP addresses of your LAN.
If you select WAN, the filter rule will apply to packets whose
destination is in the specified range of IP addresses of the
WAN side.
If you select both, the filter rule will apply to packets to both
sides.
For Protocol, select the transmission protocol from the
drop-down list. You can select TCP, UDP, ICMP or Any.
For Schedule, if you select Always, the rules set above will
always be applied. On the other hand, you can set the period
during which the filter rule will be applied from Time and Day
drop-down list.
After configuration, click Apply to save the settings, or click Clear
to clear the settings.
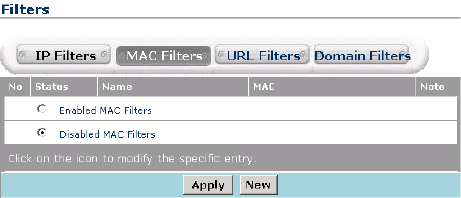
II. MAC Filters
Through MAC filter configuration, you can deny LAN computers
to access Internet.
Figure 3-23 MAC filters configuration—status
Huawei Technologies Proprietary
37
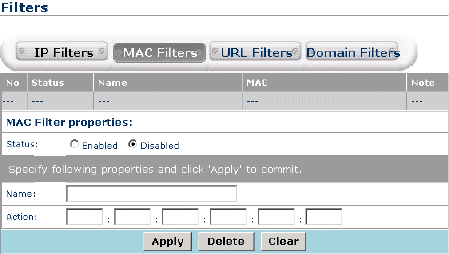
You can click New to add a MAC filter.
The MAC filter configuration page is as shown in Figure 3-24.
Figure 3-24 MAC filters configuration
Description of the configuration page is as follows:
For Status, you can enable or disable the MAC filter
function.
For Name, enter a name for the rule, for easier identification
later.
For Action, enter the MAC address of the LAN computer.
After configuration, click Apply to save the settings. To
delete a specified MAC filter, click Delete. To cancel the new
settings, click Clear.
III. URL Filters
Through URL filter configuration, you can deny LAN computers to
access specified web sites. Then URL (Uniform Resource Locator) will
reject the specified web sites. URL is a specially formatted text string
that defines a location on Internet. If any part of the URL contains the
blocked word, the web site will not be allowed to access.

Huawei Technologies Proprietary
38
Select Disabled URL Filter or Enabled URL Filter to disable or
enable the URL filter function.
Figure 3-25 URL filters configuration
Click New to add URL filters.
Figure 3-26 URL filters configuration
Enter the web site that needs to be blocked in the URL Address
text box.
After configuration, click Apply to save the settings, or click Clear
to clear the settings.
Huawei Technologies Proprietary
39
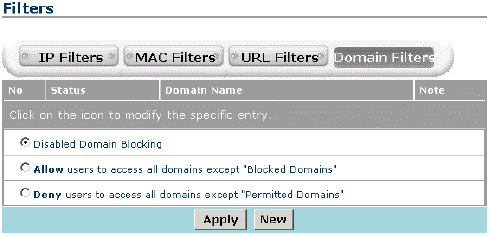
IV. Domain Filters
Through domain filter configuration, you can deny or allow LAN
computers to access specified domains on Internet. That is, it will deny
or allow requests such as http and ftp to a specified domain.
Figure 3-27 Domain filters configuration
Description of this page is as follows:
If you select Disabled Domain Blocking, the domain filter
function is disabled.
If you select Allow, the LAN computers can access all
domains except the blocked domains.
If you select Deny, the LAN computers can only access the
permitted domains.
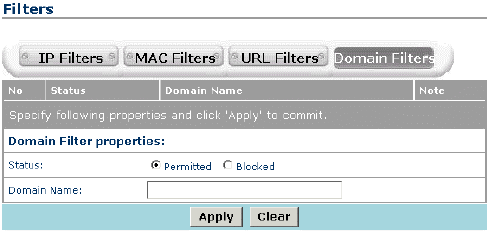
Click New to add domain filters.
Huawei Technologies Proprietary
40
Figure 3-28 Domain filters configuration
You can configure a domain filter in this page.
Description of this configuration page is as follows:
1) For Status, select Permitted to permit the LAN computers
to access the domain specified in Domain Name. You can
also select Blocked to block the domain specified in
Domain Name.
2) For Domain Name, enter the name of the specified domain.
After configuration, click Apply to save the settings, or click Clear
to clear the settings.
3.3.6 Firewall
Click Firewall of Advanced in the navigation bar to display the
firewall rules configuration page.
The firewall configuration enables you to protect the system
against Denial of Service (DoS) attacks and other types of
unauthorized accesses to your LAN.

Huawei Technologies Proprietary
41
I. Configuration page
Figure 3-29 Firewall configuration
II. Parameter explanation
Description of this configuration page is as follows:
For Black List Status, select Enabled to enable the black
list function. Thus, packets from the addresses specified in
the black list cannot pass through HG520. Or you can select
Disabled to disable the black list function.
For Block Duration, enter the duration that an IP address
will remain on the black list.
For Use Attack Protection, select Allow to use the built-in
firewall protections that prevent the following common types
of attacks:
IP Spoofing: sends packets over the WAN interface by
using an internal LAN IP address as the source address
Tear Drop: sends packets that contain overlapping
fragments
Huawei Technologies Proprietary
42
Smurf and Fraggle: sends packets that use the WAN or
LAN IP broadcast address as the source address
Land Attack: sends packets that use the same address
as the source and destination address
Ping of Death: sends IP packets with illegal length
For Use DoS Protection, select Allow to use the following
denial of service protections: SYN DoS, ICMP DoS, and
Per-host DoS protection.
For Max TCP Open Handshaking Count, enter the
maximum number of TCP connections. If the TCP
connections exceed this number, HG520 will discard the
new incoming TCP connections.
For Max ICMP Count, enter the maximum number of ICMP
connections. If the ICMP connections exceed this number,
HG520 will discard the new incoming ICMP connections.
For Max Host Count, enter the maximum number of host,
including hosts on the LAN.
After configuration, click Apply to save the settings.
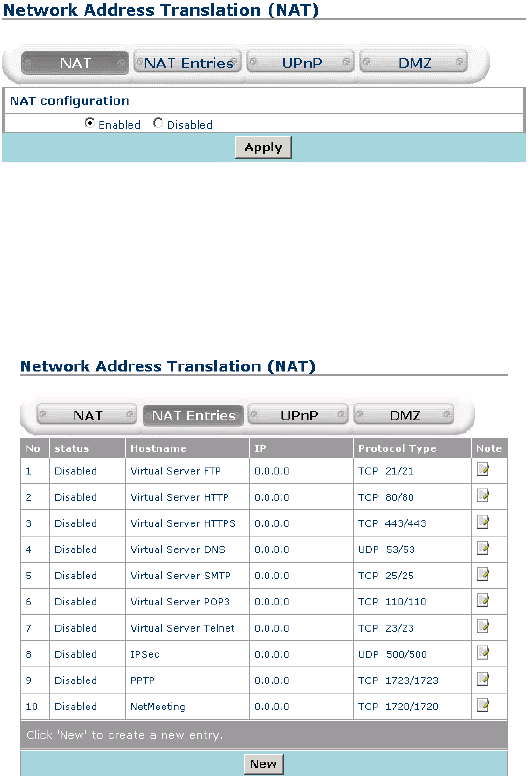
3.3.7 NAT
Click NAT of Advanced in the navigation bar to display the NAT
configuration page.
Network Address Translation (NAT) is to transfer the internal
addresses of your LAN computers into a public address when the LAN
computers access the external network. NAT is only applicable to TCP
or UDP based applications.
Huawei Technologies Proprietary
43
I. NAT
Figure 3-30 NAT
Select Enabled or Disabled to enable or disable the NAT
function.
II. NAT Entries
Figure 3-31 NAT entries
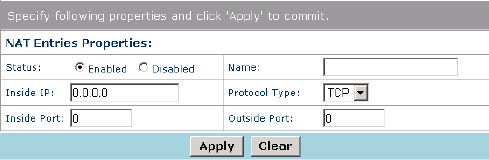
Click New to add a NAT entry.
Huawei Technologies Proprietary
44
Figure 3-32 NAT entry configuration
Description of this configuration page is as follows:
For Status, select Enabled or Disabled to enable or disable
the NAT function.
For Name, enter a name for the NAT entry.
For Inside IP and Inside Port, enter the IP address and port
of a LAN computer. In case the external network accesses
the internal network, the request will be forwarded to the
specified LAN computer.
For Protocol Type, select the protocol for NAT from the
drop-down list. You can select TCP, UDP or Both.
For Outside Port, enter the outside port of an external
access.
After configuration, click Apply to save the settings, or click Clear
to clear the settings.
Huawei Technologies Proprietary
45
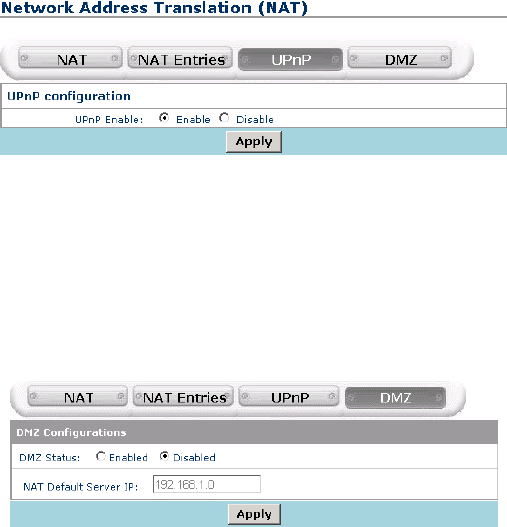
III. UPnP
Figure 3-33 UPnP
Select Enable or Disable to enable or disable the UPnP
(Universal Plug and Play) function.
After configuration, click Apply to save the settings.
IV. DMZ
Figure 3-34 DMZ
Select Enabled or Disabled to enable or disable the DMZ
(Demilitarized Zone) function.
Enter the IP address of a LAN computer in the NAT Default
Server IP text box. External accesses that are not specified in the NAT
configuration will be forwarded to this LAN computer first.
Setting a LAN computer as the default NAT server may expose it
to security risk. Thus, it is suggested that you do not use this function.
After configuration, click Apply to save the settings.
Huawei Technologies Proprietary
46
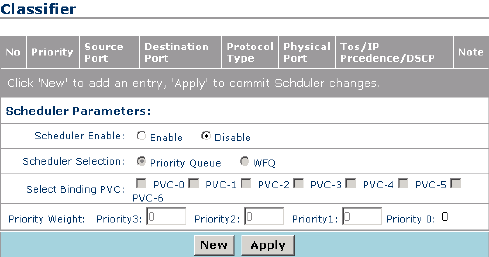
3.3.8 QoS
Click QoS of Advanced in the navigation bar to display the QoS
(Quality of Service) configuration page.
Figure 3-35 QoS
Select Enable to enable the QoS function.
Scheduler Selection
If you select Priority Queue, HG520 will determine
application’s priority according to the classifier list.
If you select WFQ (Weighted Fair Queuing), HG520 will
determine application’s priority according to the priority
queue and priority weight. You need to enter the Priority
Weight.
Select the PVCs that need to apply the scheduler.
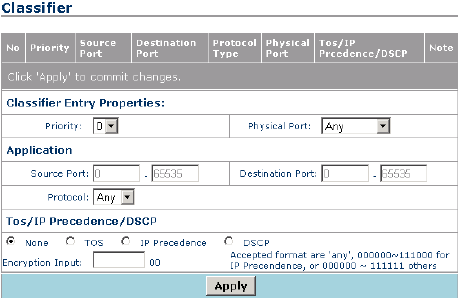
You can click New to add one priority entry.
Huawei Technologies Proprietary
47
Figure 3-36 QoS – New
Description of this configuration page is as follows:
For Classifier Entry Properties, you can select the priority
level and the physical port from drop-down list.
For Application, you can select one protocol from Protocol
drop-down list. If you select TCP or UDP, you need to enter
the source port and destination port.
For Tos/IP Precedence/DSCP, you can select one type of
QoS. The QoS types available are TOS (Type of Service), IP
Precedence and DSCP (Differentiated Services Code
Point). In this case, you need to enter an accepted format
value in Encryption Input text box.
After configuration, click Apply to save the settings.
3.3.9 DNS
Click DNS of Advanced in the navigation bar to display the DNS
configuration page.
Huawei Technologies Proprietary
48
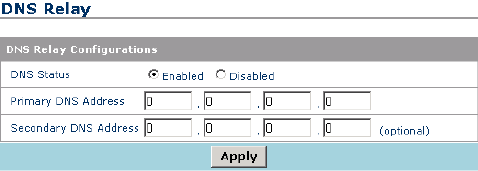
Multiple DNS addresses are useful to provide alternatives when
one of the servers is shut down or encountering heavy traffic. ISPs
usually provide primary and secondary DNS addresses.
Figure 3-37 DNS
Description of this configuration page is as follows:
For DNS Status, if you select Enabled, the DNS addresses
will be assigned automatically. If you select Disabled, the
DNS addresses need to be configured below manually.
For Primary DNS Address and Secondary DNS Address,
enter the DNS addresses manually.
After configuration, click Apply to save the settings.
3.3.10 RIP
Click RIP of Advanced in the navigation bar to display the RIP
configuration page.
HG520 supports RIP v1 and RIP v2 to share routing tables with
other Layer 3 routing devices on your local network or remote LAN. If
your network does not employ another IP routing device, it is not
necessary to enable RIP.
Huawei Technologies Proprietary
49
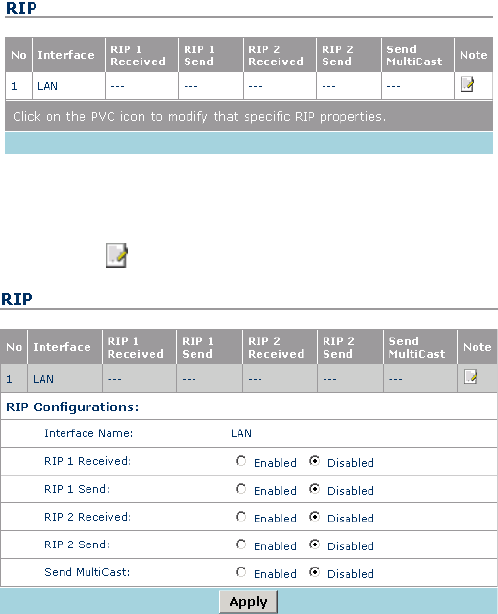
Figure 3-38 RIP configuration
RIP can be enabled on any existing WAN or LAN interface.
You can click to modify the specified RIP configuration.
Figure 3-39 RIP configuration
Description of the RIP configuration page is as follows:
Interface Name displays the interface on which you want to
share routing table information with other routing devices.
For RIP 1 Received, if you select Enabled, HG520 can
receive packets that use the RIP 1 protocol.
For RIP 1 Send, if you select Enabled, HG520 can send
packets that use the RIP 1 protocol.
Huawei Technologies Proprietary
50
For RIP 2 Received, if you select Enabled, HG520 can
receive packets that use the RIP 2 protocol.
For RIP 2 Send, if you select Enabled, HG520 can send
packets that use the RIP 2 protocol.
For Send MultiCast, if you select Enabled, HG520 can
send multicast packets.
After configuration, click Apply to save the settings.
3.4 Tools Configuration
3.4.1 System Password
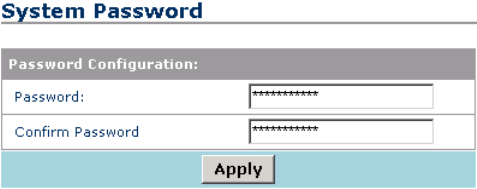
Click System Password of Tools in the navigation bar to display
the password setting page.
The administrator has read/write ability on the web page and can
modify the configurations. You can change the default password for
security concern.
Figure 3-40 System password
Huawei Technologies Proprietary
51
Note:
You need to remember your password.
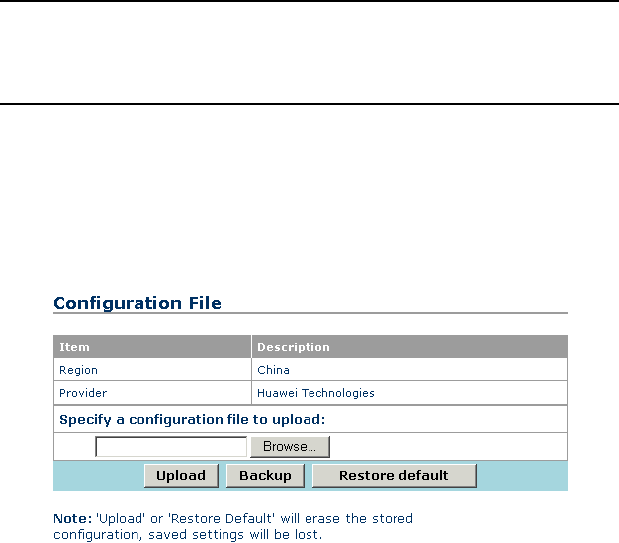
3.4.2 Configuration File
Click Configuration File of Advanced in the navigation bar to
back up or upload the configuration file of the system.
Figure 3-41 Configuration file
Description of this page is as follows:
Click Upload to update the configuration of HG520. Click
Browse to select the configuration file from the local hard
disk, and then click Upload. Then the configuration file will
be loaded to HG520.
Click Backup to save the current system settings as a
configuration file onto the local hard disk. The settings will be
saved as a .cfg file.
Huawei Technologies Proprietary
52
Click Restore default to restore the factory settings of
HG520. You need to take cautions when using this button.
This operation will clear previously saved settings.
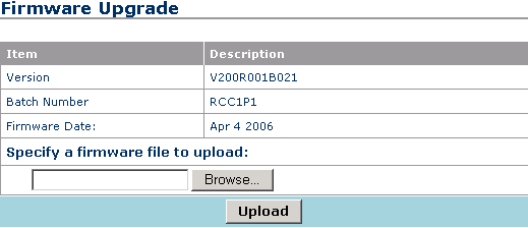
3.4.3 Firmware Upgrade
Firmware upgrade is used to load the latest firmware for HG520.
Note that the system settings may be restored to the factory settings,
so ensure that you have saved the system settings.
Click Firmware Upgrade of Tools in the navigation bar to
upgrade the system firmware.
Figure 3-42 Firmware upgrade
To upgrade the firmware, enter the name and path of the file or
click Browse to search for the file. Then click Upload. The file will be
loaded and HG520 will restart automatically.
Huawei Technologies Proprietary
53
3.5 Status
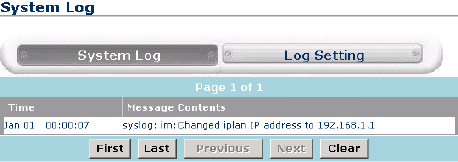
3.5.1 System Log
The log files keep record of the events and activities occurring on
HG520. It can display up to 200 latest events. When your restart
HG520, the logs are automatically cleared.
I. System Log
Figure 3-43 System log
Description of this page is as follows:
Click First to display the first page of the logs.
Click Last to display the last page of the logs.
Click Previous to go back to the previous log page.
Click Next to go to the next log page.
Click Clear to clear the logs completely.
Click Log Settings to display the log configuration page.
Huawei Technologies Proprietary
54
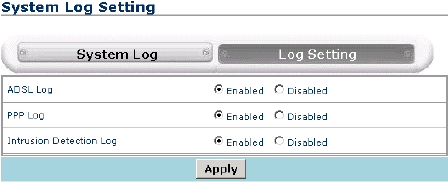
II. Log Setting
Figure 3-44 Log setting
In this configuration page, select the type of logs you want to
record. Then click Apply to save the settings.
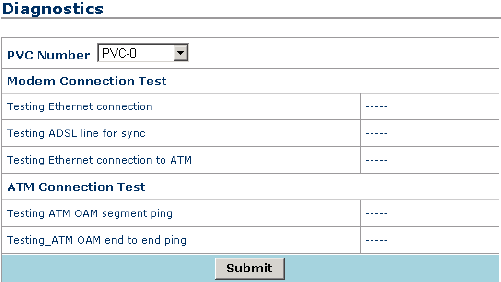
3.5.2 Diagnostics
The diagnostics function executes a series of test on your system
software and hardware connections. You can use this function for
troubleshooting.
Click Diagnostics of Status in the navigation bar to perform the
basic diagnostics for HG520.
Huawei Technologies Proprietary
55
Figure 3-45 Diagnostics
Select a PVC and click Submit. A message will be displayed,
informing you whether the loop test succeeded or failed.
The diagnostics utility will run a series of tests to check whether
connections of HG520 are normal of not. This takes only a few
seconds. The program reports whether the test passed or failed. A test
may be skipped if no suitable interface is configured for running the
test.
3.5.3 Traffic Statistics
Click Statistics of Status in the navigation bar to view the traffic
statistics.

Huawei Technologies Proprietary
56
Figure 3-46 Traffic statistics
This page shows the received and transmitted packets count
through ADSL, LAN and USB LAN port. You can click Refresh to
update the statistics.
Note:
There is no USB LAN port on HG520e.
3.5.4 ATM Counter
Click ATM Counter of Status in the navigation bar to view the
ATM statistics.

Huawei Technologies Proprietary
57
Figure 3-47 ATM counter
This page shows the received and transmitted frame and cell
count on ATM. You can click Counters Reset to reset the statistics
and click Counters Refresh to update the statistics.
3.5.5 LOS/LOF/ES
Click LOS/LOF/ES of Status in the navigation bar to view the
LOS/LOF/ES statistics.
Figure 3-48 LOS/LOF/ES
You can click Refresh to update the statistics.

Huawei Technologies Proprietary
58
Chapter 4 Technical Specifications
General Specifications
Item Feature
ADSL Standards:
ANSI T1.413 Issue 2
ITU G.992.1 (G.dmt) Annex A
ITU G.992.2 (G.lite) Annex A
ITU G 994 1 (G.hs)
ADSL2 Standards:
ITU G.992.3 (G.dmt.bis) Annex A
ADSL Standards
ADSL2+ Standards:
ITU G.992.5 Annex A
ADSL Data Rate
Downstream: up to 24 Mbit/s
Upstream: up to 1 Mbit/s
One ADSL port RJ-11, inner pair (pin 2, 3)
Performance Pass DSL Forum TR-048/TR-067
Performance Criteria
Four Fast Ethernet
ports
RJ-45, 10/100 Mbit/s, MDI/MDIX
Auto-sensing
Standard Compliance IEEE 802.3, IEEE 802.3u
One USB port Type B connector (for HG520 only)
Standard Compliance USB Implementation Forum USB 1.1
Specification

Huawei Technologies Proprietary
59
General Specifications
IEEE 802.11
IEEE 802.11b
Wireless Standard
Compliance
IEEE 802.11g
IEEE 802.11b: DQPSK, DBPSK,
DSSS, and CCK
Wireless Radio and
Modulation Type IEEE 802.11g: BPSK, QPSK, 16QAM,
64QAM, OFDM
Wireless Operating
Frequency 2400 MHz – 2484.5 MHz ISM band
11 channels for United States
13 channels for European Countries
Wireless Channel
Numbers
14 channels for Japan
IEEE 802.11b:1, 2, 5.5, and 11Mbit/s
Wireless Data Rate IEEE 802.11g: 6, 9, 12, 18, 24, 36, 48,
54Mbit/s
Reset Button Reset to factory default after push the
button for 3 seconds.

Huawei Technologies Proprietary
60
Physical and Environmental Specifications
Power Adapter: 12 V AC 1.2 A
Working Temperature: -5℃ – 50℃
Humidity: 5% – 95% (non-condensing)
Dimensions: 215 mm × 172 mm × 41 mm
Weight: 370 g
Huawei Technologies Proprietary
61
Chapter 5 Appendix
5.1 FCC
1. Company Name: Futurewei Technologies Inc
Individual or Department: Mr. Evan Bai
Address: 1700 Alma Dr., Suite 500, Plano TX 75075
City: Plano
State: TX
Zip: 75075
Phone: 972-509-5599
URL: www.futurewei.com
Email: terminal@huawei.com
2. Warning: Changes or modifications to this unit not expressly
approved by the party responsible for compliance could void the
user authority to operate the equipment.
This device complies with Part 15 of the FCC Rules. Operation
is subject to the following two conditions:
1) This device may not cause harmful interference, and
2) This device must accept any interference received, including
interference that may cause undesired operation.
Huawei Technologies Proprietary
62
NOTE: This equipment has been tested and found to comply
with the limits for a Class B digital device, pursuant to Part 15 of the
FCC Rules. These limits are designed to provide reasonable
protection against harmful interference in a residential installation.
This equipment generates, uses and can radiate radio frequency
energy and, if not installed and used in accordance with the
instructions, may cause harmful interference to radio
communications.
However, there is no guarantee that interference will not occur
in a particular installation. If this equipment does cause harmful
interference to radio or television reception, which can be
determined by turning the equipment off and on, the user is
encouraged to try to correct the interference by one or more of the
following measures:
Reorient or relocate the receiving antenna.
Increase the separation between the equipment and
receiver.
Connect the equipment into an outlet on a circuit different
from that to which the receiver is needed.
Consult the dealer or an experienced radio/TV technician for
help.
3. Frequency: 2412 – 2462MHz
4. Channel: 1 - 11
5.2 Acronyms and Abbreviations
A
ADSL Asymmetric Digital Subscriber Line
To comply with FCC RF exposure compliance requirements, a separation
distance of at least 20 cm must be maintained between the antenna of this
device and all persons.
Huawei Technologies Proprietary
63
AES Advanced Encryption Standard
AP Access Point
ATM Asynchronous Transfer Mode
D
DoS Denial of Service
DHCP Dynamic Host Configuration Protocol
DNS Domain Name Server
DMZ Demilitarized Zone
DSLAM Digital Subscriber Line Access Multiplex
I
IP Internet Protocols
ICMP Internet Control Message Protocol
ISP Internet Service Provider
L
LAN Local Area Network
M
MAC Media Access Control
N
Huawei Technologies Proprietary
64
NAT Network Address Translation
P
PPP Point to Point Protocol
PPPoA PPP over ATM
PPPoE PPP over Ethernet
PVC Permanent Virtual Connection
Q
QoS Quality of Service
R
RIP Routing Information Protocol
S
SSID Service Set Identifier
T
TCP Transfer Control Protocol
TKIP Temporal Key Integrity Protocol
U
UDP User Datagram Protocol
Huawei Technologies Proprietary
65
UPnP Universal Plug and Play
USB Universal Serial Bus
V
VCI Virtual Channel Identifier
VPI Virtual Path Identifier
W
WAN Wide Area Network
WEP Wireless encryption Protocol
WFQ Weighted Fair Queuing
WPA Wi-Fi Protected Access
Huawei Technologies Co., Ltd.
A
dministration Building, Huawei Technologies
Co., Ltd., Bantian, Longgang District,
Shenzhen, P. R. China
Postal Code: 518129
Website: http://www.huawei.com
Email: terminal@huawei.com