Huawei Technologies U1309 HSDPA/UMTS/GPRS/GSM Mobile Phone with BT User Manual
Huawei Technologies Co.,Ltd HSDPA/UMTS/GPRS/GSM Mobile Phone with BT
User Manual

Preface
Thank you for purchasing the H12HW WCDMA handset (hereinafter referred to as this product). For proper hand
set use, read this manual beforehand. Please keep this manual in a safe place for future reference. If you have any
concern, contact Customer Center.
Running environment
Basic requirements for running software:
CPU: Pentium 300 Mhz or above
Memory: 64 MB or above (128 MB or above is recommended)
Harddisk: 64 MB or above free disk space
Operating system: Windows 2000 / Windows 2003 / Windows XP / Windows Vista
1ᪿ൮‛ߦߟߡ
ᧄຠߪޔ⇇ਛߩߔߴߡߩ࿖ߢ↪ߔࠆߎߣ߇ߢ߈߹ߔޕWCDMA 1700 ߣGSM/GPRS 900/1800/1900 ࡀ࠶࠻
ࡢࠢߩಾࠅᦧ߃ߪ⥄േ⊛ߦⴕࠊࠇ߹ߔޕߒߚ߇ߞߡޔߤߎߦߡ߽៤Ꮺ㔚ߢㅢߔࠆߎߣ߇ߢ߈߹ߔޕ
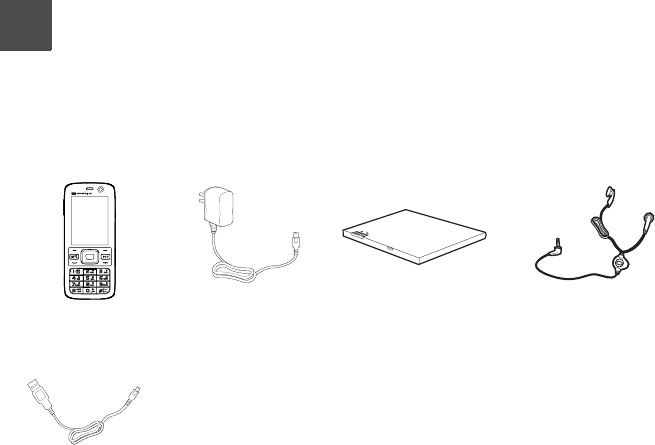
߅⾈ߍߚߛߚᧄຠߩⵝ▫ߦߪޔᰴߩ߽ߩ߇ 1ߟߕߟߞߡ߹ߔޕ
៤Ꮺ↪ల㔚ེ ࠴࠙ࡓࠗࠝࡦࡃ࠶࠹ ࠗࡗࡎࡦ
H12HW ៤Ꮺ㔚
USB ࠤࡉ࡞ ขᛒ⺑ᦠ㧔ᧄ✬㧕
⸽ᦠ㧔AC ࠕ࠳ࡊ࠲㧕
⸽ᦠ㧔ᧄຠ㧕
◲ᤃขᛒ⺑ᦠ

1
Table of Contents 1
How to Use This Guide 1
Before Using the Phone 2
ᅝܼϞȃǩ⊼ᛣ ..........................................2
ǩՓ⫼Ϟȃǟ丬Ǚ ....................................14
ǩ߽⫼ǙǴǵǤȀǗǴǸǻ .....................18
Profession ................................................19
How to Use the USIM Card .....................21
USIM PINs................................................23
Your Phone ..............................................25
Charging the Battery ................................29
Powering On/Off.......................................32
Setting the date and time .........................32
Accessing the function screen..................33
Memory card ............................................34
Headset and Headset Adapter .................36
Basic Operations 37
Making a Call............................................37
Answering or Rejecting a Call ..................37
Operations During a Voice Call ................39
Call Log ....................................................41
Calls status...............................................44
Emergency Calls ......................................44
My number ...............................................45
Text Entry 46
Text Input Interface ..................................46
Switching Input Modes .............................46
Keypad Assignments ............................... 47
Entering Characters ................................. 48
User dictionary ......................................... 57
Contacts 59
Creating Contacts .................................... 59
Groups ..................................................... 62
Using Contacts......................................... 63
Editing Contacts....................................... 65
Video Call 68
Getting Started......................................... 68
Making a Video Call ................................. 68
Answering a Video Call............................ 69
Video Call Settings................................... 72
Messaging 75
About Message ........................................ 75
MMS......................................................... 78
SMS ......................................................... 88
Push Inbox ............................................... 95
web set mail ............................................. 96
Voice Mail Number................................... 96
Daily and Internet Phrases ...................... 96
Browser 97
About Browser .........................................97
EMnet....................................................... 97
Entering URL ...........................................98
Bookmarks ............................................... 99
Internet Settings..................................... 102
Camera 103
1Table of Contents
2
Before Using the Camera.......................103
Camera...................................................104
Video Camera ........................................107
Camera Settings.....................................108
Sending a Picture/Video Clip..................111
Editing a Picture .....................................111
Mediaplayer 113
Before Playing Audio&Video ..................113
Playing Audio Files.................................114
Playing Video ClipV................................117
Folder 119
Composition ...........................................119
Viewing files ...........................................119
Using files...............................................121
Managing folders....................................123
Memory card ..........................................123
Connections 124
Bluetooth ................................................124
USB ........................................................129
Settings 132
Phone settings........................................132
Profiles ...................................................133
Ringtone Settings ...................................134
Display settings ......................................136
Call Settings ...........................................138
Security Settings ....................................141
Network settings.....................................141
Security Settings 143
Reset...................................................... 143
Password lock........................................ 143
Change password .................................. 143
Fixed dialer number ............................... 144
DRM setting ........................................... 145
Organiser & Tools 146
SIM ToolKit ............................................146
Alarms.................................................... 146
Calendar ................................................ 148
Calculator............................................... 153
Unit Converter........................................ 153
Currency Converter................................ 154
Synchronise ........................................... 155
Task ....................................................... 156
Voice Recorder ...................................... 159
Memo ..................................................... 160
World Time............................................. 161
Stopwatch .............................................. 162
Timer...................................................... 163
Service Dial Number .............................. 163
Option Service 164
Call Forwarding...................................... 164
Call barring............................................. 164
Call Waiting............................................ 165
Appendix 167
Functions ............................................... 167
Troubleshooting ..................................... 168
Symbol List ............................................170

3
Pictograph List........................................171
Memory List............................................171
Specifications .........................................172
Index 1
ֱ䀐ǽȪɝɇόȽόɛɁȀǹǙǻ 8
ֱ䀐ȀǹǙǻ..............................................8
ׂ⧚ȀǹǙǻ .............................................8
ǩ⊼ᛣ.........................................................8
㺰ׂ⫼䚼ક ................................................9
1
1How to Use This Guide
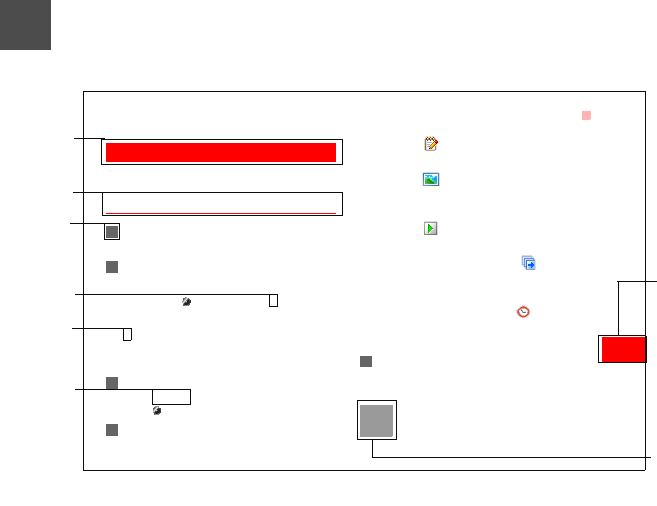
Multimedia Messages
Messaging
6
Multimedia Messages
You can send messages attached with images, text
and music under this mode.
Creating a Multimedia Message
1Select Messaging>White MMS from the main
menu.
2Select To,Cc and Bcc.
• Select an entry from the recipients list, and
then press or select Options > Edit to enter
a phone number.
• Select a position from the recipients list, select
Options > Contact or Group, and then select
phone numbers.
3Select Back to return to the Edit MMS screen,
select Subject to enter text as subject, and then
press .
4Select Content to edit the pages.
(1) Select to access the text entry field, and
then edit text.
(2) Select to enter the image-editing field
and then you can select images or video files in
My Files.
(3) Select to enter the music-editing field and
then you can select audio files in My Files.
(4) Access the field indicated by and press
the left/right scroll key to select one from differ-
ent pages if there are more pages.
(5) Access the field indicated by and press the
left/right scroll key to adjust the playing time of
the current page.
5 Return to the Edit MMS screen, and select
Options > send to send the multimedia
message.
Note If the video file is chosen in the image-edit-
ing field, you cannot edit the music-editing
field any more.
Level-2 Title
Level-3 Title
Operation
Parallel
Enter by level
Small
Additional
Sequence
Operation
Operation
Tas k
Entry
Notes
2
2Before Using the Phone
ᅝܼϞȃǩ⊼ᛣ
Ǩȃ NjᅝܼϞȃǩ⊼ᛣnjȄǃǟՓǙȀǿȠҎșǃҪ
ȃҎȍȃॅᆇǃ䉵⫷ȍȃ᧡ᆇȧ✊Ȁ䰆ǣǃᅝܼȀ
ℷǬǤǟՓǙǙǴǵǤǴȖȃݙᆍȧ㿬䓝ǬǻǙȓ
ǮDŽǩՓ⫼ȃ䱯ȀȄǃᖙǯ㿬䓝џ䷙ȧǟᅜȟǤǵǪ
ǙDŽȓǴǃǟ䂁ȔȀǿǸǴᕠȄߛȀֱㅵǬǻǤǵ
ǪǙDŽ
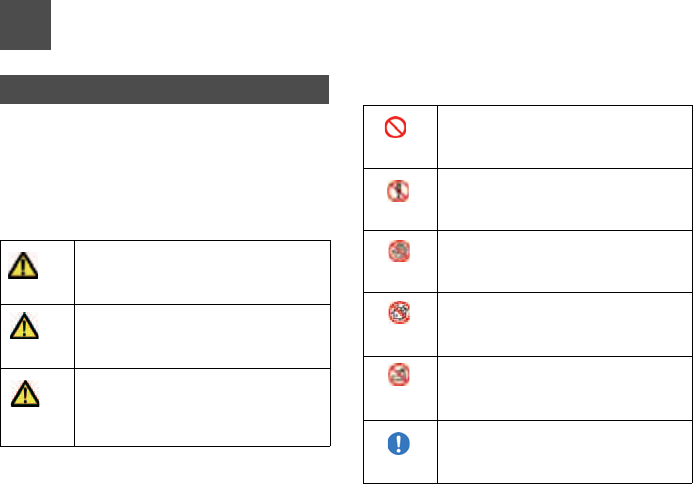
㸼⼎㿬োȃ䂀ᯢ
Ǩȃ㸼⼎ȃݙᆍȧ⛵㽪Ǭǻǃ䁸ǸǴপ
ȟᡅǙȧǮȠǽǃҎǡ⅏ѵȓǴȄ䞡ڋ
ȧ䉴Ǜॅ䱎ǡߛ䖿Ǭǻ⫳ǭȠǨǽǡᛇ
ᅮǪȡȠݙᆍȧ⼎ǬǻǙȓǮDŽ
Ǩȃ㸼⼎ȃݙᆍȧ⛵㽪Ǭǻǃ䁸ǸǴপ
ȟᡅǙȧǮȠǽǃҎǡ⅏ѵȓǴȄ䞡ڋ
ȧ䉴Ǜৃ㛑ᗻǡᛇᅮǪȡȠݙᆍȧ⼎Ǭ
ǻǙȓǮDŽ
Ǩȃ㸼⼎ȃݙᆍȧ⛵㽪Ǭǻǃ䁸ǸǴপ
ȟᡅǙȧǮȠǽǃҎǡڋᆇȧ䉴Ǜৃ㛑
ᗻǡᛇᅮǪȡȠݙᆍǃǟȝȈ⠽ⱘ᧡ᆇ
ȃȔȃⱎ⫳ǡᛇᅮǪȡȠݙᆍȧ⼎Ǭǻ
ǙȓǮDŽ
ෂ㒾
⼊๔
ᵈᗧ
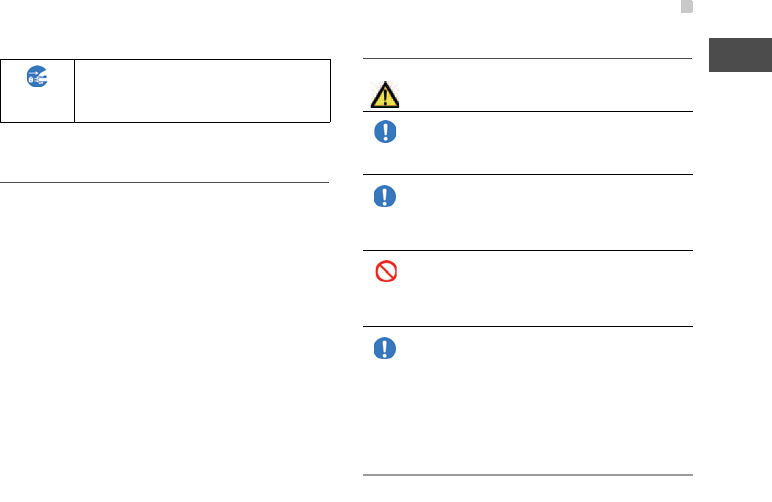
ೇ㿬োȃ䂀ᯢ
ᴀ㻑કȃপȟᡅǙȀǟǦȠ⽕ℶџ䷙
˄ǬǻȄǙǦǿǙǨǽ˅ȧ⼎ǬǻǙȓ
ǮDŽ
ᴀ㻑કȧߚ㾷ǮȠǽᛳ䳏ǿǾȃڋᆇȧ
䉴ǛǟDzȡǡǗȠȃǼǃߚ㾷ǬǻȄǙ
ǦǿǙǨǽȧ⼎ǬǻǙȓǮDŽ
ᴀ㻑કȧ▵ȡǴǼᡅǛǽᛳ䳏ǮȠǟ
DzȡǡǗȠȃǼǃ▵ȡǴǼ㾺ǸǻȄ
ǙǦǿǙǨǽȧ⼎ǬǻǙȓǮDŽ
ᴀ㻑કȧ∈Ȁ▵ȞǮǿǾǬǻՓ⫼ǮȠ
ǽⓣ䳏ȀȝȠᛳ䳏șⱎ☿ȃǟDzȡǡǗ
ȠȃǼǃ∈Ȁ▵ȞǬǻȄǙǦǿǙǨǽ
ȧ⼎ǬǻǙȓǮDŽ
ᴀ㻑કȧ乼ਖǃȿɫɷόᅸǼՓ⫼ǮȠ
ǽⓣ䳏ȀȝȠᛳ䳏șⱎ☿ȃǟDzȡǡǗ
ȠȃǼǃ乼ਖǃȿɫɷόᅸǼՓ⫼ǬǻȄ
ǙǦǿǙǨǽȧ⼎ǬǻǙȓǮDŽ
ᴀ㻑કȃপȟᡅǙȀǟǦȠᣛ⼎џ䷙
˄ᖙǯᅳ㸠ǬǻǙǴǵǤǨǽ˅ȧ⼎Ǭǻ
ǙȓǮDŽ
ᱛ
ಽ⸃ᱛ
Ứࠇᚻᱛ
᳓Ứࠇᱛ
㘑ํޔࠪࡖࡢ㨺ቶ
ߢߩ↪ᱛ
ᜰ␜
ᅝܼϞȃǩ⊼ᛣ
3
Before Using the Phone
2
ԧⱘǿݙᆍȄೇ㿬োǽǽȗȀ᭛ゴǼ⼎ǬȓǮDŽ
ܡ䊀џ䷙
☿♑ǟȝȈഄ䳛ǿǾȃ♑ᆇǃϝ㗙ȀȝȠ㸠⚎ǃDz
ȃҪȃџᬙǃǟᅶǪȓȃᬙᛣȓǴȄ䘢༅ǃ䁸⫼ǃDz
ȃҪ⭄ᐌǿᴵӊϟǼȃՓ⫼Ȁȝȟ⫳ǭǴ᧡ᆇȀ䭶Ǭ
ǻǃᔧ⼒Ȅϔߛȃ䊀ӏȧ䉴ǙȓǰȨDŽ
ᴀ㻑કȃՓ⫼ȓǴȄՓ⫼ϡ㛑ǠȞ⫳ǯȠҬ䱣ⱘǿ᧡
ᆇ ˄㿬䤆ݙᆍȃໝ࣪ǃ⍜༅ǃ䗮ֵǿǾȃ″Ӯȧ䗗Ǭ
ǴǴȖȀ⫳ǭǴ᧡ᆇǃџὁ߽Ⲟȃ᧡༅ǃџὁȃЁᮁ
ǿǾ˅Ȁ䭶Ǭǻǃᔧ⼒Ȅϔߛȃ䊀ӏȧ䉴ǙȓǰȨDŽ
পᡅ䂀ᯢȃ㿬䓝ݙᆍȧᅜȞǿǙǨǽȀȝȟ⫳ǭǴ
᧡ᆇȀ䭶Ǭǻǃᔧ⼒Ȅϔߛȃ䊀ӏȧ䉴ǙȓǰȨDŽ
ᔧ⼒ǡ䭶ϢǬǻǙǿǙ㍮″఼ǃɅɝɐȮȯȪǽȃ
㌘Ȕড়ȤǰȀȝȠ䁸ࢩǿǾǠȞ⫳ǭǴ᧡ᆇȀ䭶Ǭ
ǻǃᔧ⼒Ȅϔߛȃ䊀ӏȧ䉴ǙȓǰȨ
Џᴎ
ᴀ㻑કǡࢩǮȠəɅȻɻȃ䳏⑤ɟɱ
ȸȧᖙǯȻɻɃɻɐǠȞᡰǙǻǙǴǵ
ǤǨǽȧ⼎ǬǻǙȓǮDŽ
ೇ㿬োȃ䂀ᯢ
㔚Ḯࡊࠣࠍᔅߕࠦ
ࡦࡦ࠻߆ࠄᛮߊ
ᖙǯᇖ⫼ȃ″఼ȧǩՓ⫼ǤǵǪǙDŽᣛ
ᅮҹȃ″఼ȧՓ⫼ǮȠǽǃⱎ➅ǃⱎ
☿ǃ⸈㺖ǃᬙ䱰ȃॳǽǿȟȓǮDŽ
䒞ϵȃ䘟䒶ЁȀᴀ㻑કȧՓ⫼ǬǿǙǼ
ǤǵǪǙDŽѸ䗮џᬙȃॳǽǿȟȓǮDŽ
䒞ϵȧᅝܼǿจ᠔ȀℶȖǻǠȞǩՓ⫼
ǤǵǪǙDŽ
㟾ぎ″ݙș⮙䰶ǿǾǃՓ⫼ȧ⽕ℶǪȡ
ǻǙȠจ᠔ǼȄՓ⫼ǬǿǙǼǤǵǪǙDŽ
䳏ᄤ″఼șएⰖ″఼Ȁᕅ䷓ȧঞȑǮǟ
DzȡǡǗȟǃџᬙȃॳǽǿȟȓǮDŽ
ỡ䖐Ȕൟᖗ㞧ɢόɁɩόȳόǟȝȈỡ
䖐Ȕൟ䰸㌄ࢩ఼ȧ㺙ⴔǪȡǻǙȠจড়
Ȅǃ㺙ⴔ䚼ԡǠȞ 22cm ҹϞ䲶Ǭǻᨎ
㸠ǟȝȈՓ⫼ǬǻǤǵǪǙDŽ䳏⊶ȃᕅ
䷓Ǽǃỡ䖐Ȕൟᖗ㞧ɢόɁɩόȳόǟ
ȝȈỡ䖐Ȕൟ䰸㌄ࢩ఼ǡ䁸ࢩǮȠǨ
ǽǡǗȟȓǮDŽ
⼊๔
ᜰ␜
ᜰ␜
ᱛ
ᜰ␜

ᅝܼϞȃǩ⊼ᛣ
4
વ䳏䒞ȃЁǿǾ⏋䲥ǬǴจ᠔ǼȄǃ
Ҭ䖥Ȁỡ䖐Ȕൟᖗ㞧ɢόɁɩόȳόǟ
ȝȈỡ䖐Ȕൟ䰸㌄ࢩ఼ȧ㺙ⴔǬǻǙȠ
ᮍǡǙȠৃ㛑ᗻǡǗȟȓǮȃǼǃ˄əɅ
Ȼɻȃ䳏⑤ȧߛȟǃ˅ᴀ㻑કȃՓ⫼ȧ
ǝǻǤǵǪǙDŽ䳏⊶ȃᕅ䷓Ǽǃỡ䖐Ȕ
ൟᖗ㞧ɢόɁɩόȳόǟȝȈỡ䖐Ȕൟ
䰸㌄ࢩ఼ǡ䁸ࢩǮȠǨǽǡǗȟȓǮDŽ
एⰖ″䭶ȃሟݙǼȄҹϟȃǨǽȧᅜǸ
ǻՓ⫼ǬǻǤǵǪǙDŽ㸧ᅸǃ䲚Ё⊏
Ⱆᅸ (ICU)ǃݴ⢊ࢩ㛜⮒ᙷⲷ㽪⮙ᅸ
(CCU) ȀȄᴀ㻑કȧᣕǶ䖐ȓǿǙǼǤ
ǵǪǙDŽ
•⮙ẳݙǼȄǃ˄əɅȻɻȃ䳏⑤ȧߛ
ȟǃ˅ᴀ㻑કȧՓ⫼ǬǿǙǼǤǵǪ
ǙDŽ
•ɵɛόǿǾǼǗǸǻȗҬ䖥Ȁए⫼䳏⇫
″఼ǡǗȠจড়Ȅǃ˄əɅȻɻȃ䳏⑤
ȧߛȟǃ˅ᴀ㻑કȧՓ⫼ǬǿǙǼǤǵ
ǪǙDŽ
ᜰ␜
ᜰ␜
•एⰖ″䭶ǡןdžȀՓ⫼⽕ℶǃᣕǶ䖐Ȕ
⽕ℶǿǾȃจ᠔ȧᅮȖǻǙȠจড়Ȅǃ
DzȃएⰖ″䭶ȃᣛ⼎ȀᕧǸǻǤǵǪ
ǙDŽ
•㞾ᅙⰖ仞ǿǾएⰖ″䭶ȃǼǃỡ䖐Ȕ
ൟᖗ㞧ɢόɁɩόȳόǟȝȈỡ䖐Ȕൟ
䰸㌄ࢩ఼ҹȃए⫼䳏⇫″఼ȧՓ⫼Ǫ
ȡȠจড়ǃ䳏⊶ȀȝȠᕅ䷓ȀǹǙǻן
߹Ȁए⫼䳏⇫″఼ɩόȳόǿǾȀǩ⺎
䁡ǤǵǪǙDŽ䳏⊶ȃᕅ䷓Ǽǃ䳏ᄤ″఼
ȃࢩȀᕅ䷓ȧঞȑǮǟDzȡǡǗȟȓ
ǮDŽ
•催㊒ᑺǿ䳏ᄤ″఼ȃ䖥ǤǼȄ䳏⑤ȧߛ
ǸǻǤǵǪǙDŽ䳏ᄤ″఼ȃࢩȀᕅ䷓
ȧঞȑǮǟDzȡǡǗȟȓǮDŽ
Ćᕅ䷓ȧফǦȠǟDzȡǡǗȠ″఼ȃ՟˖
ᖗ㞧ɢόɁɩόȳό㺰㙈఼DzȃҪ
ए⫼䳏⇫″఼☿♑ฅⶹ఼㞾ࢩɑȪ
ǿǾDŽᖗ㞧ɢόɁɩόȳόșDzȃҪए
Ⱆ⫼䳏ᄤ″఼ȧǟՓǙȃจড়Ȅǃ䳏⊶
ȀȝȠᕅ䷓ȀǹǙǻ″఼ɩόȳόǃ
ȗǬǤȄ䉽ໆὁ㗙ȀǩⳌ䂛ǤǵǪǙDŽ
ᅝܼϞȃǩ⊼ᛣ
5
Before Using the Phone
2
ᴀԧȀǹǙǻǃȃǨǽȧǟᅜȟǤǵ
ǪǙDŽⱎ➅ǃⱎ☿ǃ⸈㺖șᛳ䳏ȃॳ
ȀǿȟȓǮDŽ
•ߚ㾷ǃᬍ䗴ȧǬǿǙǼǤǵǪǙDŽǿǟ
ᴀ㻑કȃᬍ䗴Ȅ䳏⊶⊩䘩ডȀǿȟȓ
ǮDŽ
•Ⳉᇘ᮹ܝș➅乼ǡⳈᔧǴȠ᠔ǃ♢
ϟȃ䒞ݙǃᱪ᠓఼ȃDzȅǿǾǃ催⏽
ȀǿȠ᠔ǼȃՓ⫼ǃᬒ㕂ȄǬǿǙǼǤ
ǵǪǙDŽᴀ㻑કǡ催⏽ȀǿȟǃșǦǾ
ȃॳȀǿȠৃ㛑ᗻǡǗȟȓǮDŽ
•䳏ᄤɴɻɀǿǾȃࡴ➅䂓⧚″఼ș催
ᆍ఼ȀܹȡǿǙǼǤǵǪǙDŽ
•ȴɅɲɻɁɇɻɑǿǾᓩ☿ǃ⟚ⱎȃǟ
DzȡǡǗȠจ᠔ǼȄՓ⫼ǬǿǙǼǤǵ
ǪǙDŽ
•▵ȡǴǼ㾺ȞǿǙǼǤǵǪǙDŽ
•⍈ᅸǿǾǼՓ⫼ǬǴȟǃ∈ȃЁȀǹǦ
ǴȟǬǿǙǼǤǵǪǙDŽ
•ȻɋɟȃDzȅǿǾǃ⎆ԧǡǨȑȡȠǟ
DzȡǡǗȠจ᠔ǼȄՓ⫼ǬǿǙǼǤǵ
ǪǙDŽ
ᱛ
•ᔋǙ㸱ᩗȧϢǝǴȟǃᡩǧǹǦǴȟǬ
ǿǙǼǤǵǪǙDŽ
•ᴀԧșȪɻɎɒȀ⛵⧚ǿȧࡴǝǿǙ
ǼǤǵǪǙDŽ
ϛϔǃ⭄⠽ ˄䞥ሲ⠛∈⎆ԧ˅ǡ㻑
કȃݙ䚼ȀܹǸǴจড়Ȅǃȓǯ AC Ȫ
ɈɟɇȧȻɻɃɻɐǠȞᡰǢǃᴀԧȃ
䳏⑤ȧߛȟǃ䳏∴əɋȷȧǬǃǩ༥
㋘ܜȃଣǙড়ȤǰでষȀǩ䗷㌵ǤǵǪ
ǙDŽDzȃȓȓՓ⫼ǮȠǽ☿♑șᛳ䳏ȃ
ॳǽǿȟȓǮDŽ
✭ǡߎǻǙȠǃໝǿ㟁ǙǡǮȠǿǾȃ
⭄ᐌ⢊ᜟȀȄǃǮǥȀ AC ȪɈɟɇȧ
ȻɻɃɻɐǠȞᡰǢǃᴀԧȃ䳏⑤ȧߛ
ȟǃ䳏∴əɋȷȧǬǻǤǵǪǙDŽDz
ȃȓȓՓ⫼Ǭ㍮ǦȠǽǃⱎ➅ǃⱎ☿ȃ
ॳǽǿȟȓǮDŽ✭ǡߎǿǤǿǸǴǨ
ǽȧ⺎䁡Ǭǻǩ༥㋘ܜȃଣǙড়Ȥǰで
ষǿǾȍǩ䗷㌵ǤǵǪǙ
ᜰ␜
㔚Ḯࡊࠣࠍᔅߕࠦ
ࡦࡦ࠻߆ࠄᛮߊ
ᅝܼϞȃǩ⊼ᛣ
6
㨑䳋ȃǟDzȡǡǗȠǽǢȄǃǮǥȀ AC
ȪɈɟɇȧȻɻɃɻɐǠȞᡰǢǃ䳏⑤
ȧߛǸǻǤǵǪǙDŽ㨑䳋ǃᛳ䳏ǃⱎ☿
ȃॳǽǿȟȓǮDŽȓǴሟȃจড়Ȅ
ᅝܼǿจ᠔ȍ⿏ࢩǬǻǤǵǪǙDŽ
㟾ぎ⊩˓ˏᴵȃːˑ䷙ȃ㽣ᅮȀ
ǺǤ Njᑇ៤ˍ˕ᑈೳѸ䗮ⳕਞ⼎
ˍˍˎˌোnjȀǻǃ㟾ぎ″ݙǼȄᨎᐃ
䳏䁅″ȧᐌȀ OFF ǽǮȠᮼǃਞ⼎Ǫȡ
ǻǙȓǮDŽ㟾ぎ″ȀǩᨁЫǪȡȠ䱯Ȅ
NjAuto On and Offnjȧ OFF Ȁ䀁ᅮǬǃ
ǩᨁЫ䷖ǢȓǮᾬǃǟ丬ǙǬȓǮDŽ
ǥȞǹǙǴৄȃϞșڒǙǴ᠔ǿǾǃϡ
ᅝᅮǿจ᠔Ȁ㕂ǠǿǙǼǤǵǪǙDŽ㨑
ϟǬǻǃǦǡșᬙ䱰ȃॳǽǿȟȓǮDŽ
㞾ࢩ䒞ȃ䳏ᄤ″఼Ȁᕅ䷓ǡߎȠจড়Ȅ
Փ⫼ǬǿǙǼǤǵǪǙDŽᅝܼ䍄㸠ȧ᧡
ǿǛǟDzȡǡǗȟȓǮDŽ
㔚Ḯࡊࠣࠍᔅߕࠦ
ࡦࡦ࠻߆ࠄᛮߊ
ᜰ␜
ᵈᗧ
ᱛ
ᱛ
Ҏǡᆚ䲚ǬǻǙȠจ᠔ǼȄǃՓ⫼Ǭǿ
ǙǼǤǵǪǙDŽȪɻɎɒǿǾǼǦǡȧ
ǮȠǟDzȡǡǗȟȓǮDŽ
ȪɻɎɒǡພȡǴȓȓǼǃՓ⫼ǬǿǙ
ǼǤǵǪǙDŽ㾺ǸǴǽǢȀșǦǾǃǦ
ǡȃॳǽǿȟȓǮDŽ
ȪɻɎɒȧᣕǸǻᤃȟಲǪǿǙǼǤǵ
ǪǙDŽᴀҎșҪȃҎȀǦǡȧǪǰȠॳ
ǽǿȟȓǮDŽȓǴᬙ䱰ȃॳǽǿȟ
ȓǮDŽ
䭋ᰖ䭧ȃ䗷㍮Փ⫼ǿǾǼᴀ㻑કǡ⏽Ǡ
ǤǿȠǨǽǡǗȟȓǮǡǃǼ㾺ȡȠ
ǨǽȃǼǢȠ⏽ᑺǼǗȡȅ⭄ᐌǼȄǗ
ȟȓǰȨDŽǴǵǬǃ䭋ᰖ䭧㾺ȡǴȓȓ
Փ⫼ǬǻǙȠǽǃԢ⏽șǦǾȀǿȠǟ
DzȡǡǗȟȓǮDŽ
ᬙ䱰ȃॳǽǿȟȓǮȃǼǃȐǨȟș
⇫ȃᇥǿǙจ᠔ȀֱㅵǬǻǤǵǪǙDŽ
ᱛ
ᱛ
ᱛ
ᜰ␜
ᜰ␜
ᅝܼϞȃǩ⊼ᛣ
7
Before Using the Phone
2
ᇣܤǡՓ⫼ǮȠ䱯Ȁǃֱ䅋㗙ǡՓ⫼ᮍ
⊩ȧ䭧䘩ǝǻǙǿǙǠ⺎䁡ǬǃℷǬǙ
পȟᡅǙᮍ⊩ȧᬭǝǻǤǵǪǙDŽ䭧䘩
ǸǴՓ⫼ȄǦǡȃॳǽǿȠৃ㛑ᗻǡ
ǗȟȓǮȃǼकߚȀǩ⊼ᛣǤǵǪǙ
ȷɴɀɋɐȳόɑǿǾȧᴀ㻑કȀ䖥Ǻ
ǦǿǙǼǤǵǪǙDŽȷɴɀɋɐȳόɑ
ǿǾȃ⺕⇫ȳόɑɏόɇǡ⍜ǝȠǟDz
ȡǡǗȟȓǮDŽ
microSD ȳόɑȧপȟǮǽǢȄǃᣛ
ǼȳόɑȧᢐǬ䖐ȔǃȳόɑǡߎǻǢ
ǻȗǃǮǥȀᣛȧ䲶ǪǿǙȝǛȀǬǻ
ǤǵǪǙDŽȓǴǃপȟҬǦȠǽǢȄǃ
ȳόɑǡȳɉɋǽ䷇ǡǮȠȓǼǬǸǠ
ȟǽᢐǬ䖐ȔǃǮǥȀᣛȧ䲶ǪǿǙǼ
ǤǵǪǙDŽ microSD ȳόɑȧ㺙ⴔǬǻ
ǙȠȳόɑɁɵɋɐȧ丨ȃᮍȀǦǻǃ
পȟҬǦǴȟǃপȟǪǿǙǼǤǵǪ
ǙDŽᗹȀᣛȧ䲶Ǯǽǃȳόɑǡ亯Ȉߎ
Ǭॅ䱎ǼǮDŽ
ᜰ␜
ᜰ␜
ᜰ␜
Ⲃ㝮Ȁ⭄ᐌǡ⫳ǭǴจড়ȄǃǴǵǶȀ
Փ⫼ȧℶȖǃएȃ䀎ᮁȧফǦǻǤǵ
ǪǙDŽǟᅶǪȓȃԧ䊾șԧ䂓ȀȝǸǻ
ȄǃǠțȔǃǠȋȡǃ⮍ǿǾǡ⫳ǭ
Ƞจড়ǡǗȟȓǮDŽᴀ㻑કȄҹϟȀ㿬
䓝ȃᴤ᭭ȃՓ⫼ș㸼䴶DŽ
Parts Materials Surface
Outer case PC resin Spray-paint
Main lens Pmma resin Back print
Battery cover Aluminum
alloy
Spray-paint
Screw cover (below
the screen)
PC resin Back print
Sub Camera Lens Pmma resin Back print
Camera Lens Glass Back print
Sub Lens Pmma resin IML
Volume +/- keys,
Rec Key
PC resin Spray-paint
External port cover PC resin and
TPU latex
Spray-paint
ᜰ␜
ᅝܼϞȃǩ⊼ᛣ
8
Battery
䳏∴əɋȷ ˄ɲɉȮɨȬȲɻ䳏∴əɋȷ˅ȀǹǙ
ǻǃȃǨǽȧǟᅜȟǤǵǪǙDŽⱎ➅ǃⱎ☿ǃ⸈㺖
șᛳ䳏ȃॳȀǿȟȓǮDŽ
Music Key (side) PC resin Spary-paint
Strap eyelet PC resin Spray-paint
Keypad deco, and
direction signs
TPE resin +
Rubber resin
Film-paint
Keypad Thin PC resin üü
Scroll keys Copper Surface laser
(CD lines)
Keypad frame TPE latex +
Rubber latex
üü
OK key Thin PC resin Sputtering
Battery connector
on the mobile
phone
PPS resin,
copper
Gold plating
on nickel plat-
ing
Battery Resin part: PC
resin.
Label: PET
resin.
üü
Battery connect Copper Gold plating
on nickel plat-
ing
Parts Materials Surface
ᴀ㻑કǼՓ⫼ǼǢȠ䳏∴əɋȷȄǃ˄ଚ
કȻόɑ˅ȓǴȄ߹ໆȃ ˄ଚકȻό
ɑ˅ǼǮDŽǨȡҹȃ䳏∴əɋȷȄՓ
⫼ǬǿǙǼǤǵǪǙDŽ
㺙ⴔǮȠǽǢǃ䳏∴əɋȷȃǢǡ≎
ȖȞȡǻǙȓǮDŽᴀ㻑કȀǛȓǤ㺙ⴔ
ǼǢǿǙǽǢȄǃ⛵⧚ȧǬǿǙǼǤǵ
ǪǙDŽ䳏∴əɋȷȃǢȧ⺎ǠȖǻǠ
ȞপȟҬǦǻǤǵǪǙDŽ
ܙ䳏ȀȄǃҬሲȃ˝˟ȪɈɟɇ ˄ଚક
Ȼόɑ˅ҹȃȗȃȧՓ⫼ǬǿǙǼǤ
ǵǪǙDŽȓǴǃ䳏∴əɋȷȄᣛᅮ″఼
ҹȃ″఼ȀȄՓ⫼ǬǿǙǼǤǵǪǙDŽ
ෂ㒾
ᜰ␜
ᜰ␜
ᜰ␜
ᅝܼϞȃǩ⊼ᛣ
9
Before Using the Phone
2
Ⳉ᮹ܝȃᔧǴȠ᠔șǃ♢ϟȃ䒞ݙǃ
☿șɁɐόɞȃDzȅǿǾȃ催⏽ȃจ᠔
Ȁᬒ㕂ǬǿǙǼǤǵǪǙDŽ
䞱ȧࠎǮǃɗɻɦόǼǴǴǤǃ䏣Ȕǹ
ǦȠǿǾȃᔋǙ㸱ᩗȧϢǝǴȟǃᡩǧ
ҬǦǴȟǬǿǙǼǤǵǪǙDŽ ڋǃໝ
ᔶȃ㨫ǬǙ䳏∴əɋȷȄՓ⫼ǬǿǙǼ
ǤǵǪǙǃ
ߚ㾷ǃᬍ䗴ǃɗɻɈҬǦȧǬǿǙǼǤ
ǵǪǙDŽ
∈ș☿ȃЁȀᡩܹǬǴȟǃࡴ➅ǬǿǙ
ǼǤǵǪǙ
ッᄤȧȿɯόɐǪǰǿǙǼǤǵǪǙDŽ
䞥ሲᇣ⠽ ˄䥉ǃȪȷɃȽɲόǃɕɋȷ
ɴɁǿǾ˅ǽϔ㎦ȀᣕǶ䘟Ȩǵȟǃֱ
ㅵǬǴȟǬǿǙǼǤǵǪǙDŽ
䳏⑤ȻɻɃɻɐș㞾ࢩ䒞ȃȿȴɴɋɐ
ɱȬɇόȃᏂǬ䖐ȔষㄝȀⳈ㍮Ǭ
ǿǙǼǤǵǪǙDŽȴɅɲɻɁɇɻɑǿ
Ǿᓩ☿ǃ⟚ⱎȃǟDzȡǡǗȠจ᠔ǼȄ
䳏⑤ȧߛǸǻǤǵǪǙDŽ
ᜰ␜
ᜰ␜
ಽ⸃ᱛ
ᜰ␜
ᜰ␜
ᱛ
䳏∴əɋȷǠȞȗȡǴ⎆ǡⴐȀܹǸǴ
ǽǢȀȄǃǢȡǙǿ∈Ǽ⋫ǙǃǮǥȀ
एȃ⊏ⰖȧফǦǻǤǵǪǙDŽ༅ᯢȃ
ǟDzȡǡǗȟȓǮDŽ
䳏ᄤɴɻɀș催ᆍ఼ȀܹȡǿǙǼǤ
ǵǪǙDŽ
▵ȡǴǼ㾺ȞǿǙǼǤǵǪǙDŽ
ȻɋɟȃDzȅǿǾǃ⎆ԧǡǨȑȡȠǟ
DzȡǡǗȠจ᠔ǼȄՓ⫼ǬǿǙǼǤǵ
ǪǙDŽ
∈ș⍋∈Ȁ⍌ǦǴȟǃ䲼ⓈǿǾǼ▵Ȟ
ǪǿǙǼǤǵǪǙDŽϛϔǃ▵ȡǴจড়
ȀȄǃⳈǶȀՓ⫼ȧșȖǻǤǵǪǙDŽ
䳏∴əɋȷǠȞ⎆ǡȗȡǴȟ⭄㟁ǡǮ
ȠǽǢȀȄǃⳈǶȀՓ⫼ȧșȖǻ☿⇫
ȝȟ䘴ǫǦǻǤǵǪǙDŽ
ᜰ␜
⼊๔
ᱛ
Ứࠇᚻᱛ
᳓Ứࠇᱛ
᳓Ứࠇᱛ
ᱛ
ᅝܼϞȃǩ⊼ᛣ
10
⎆ȗȡǃໝ㡆ǃໝᔶǿǾҞȓǼǽ⭄ǿ
ȠǨǽȀ⇫ǡǹǙǴǽǢȄǃՓ⫼Ǭǿ
ǙǼǤǵǪǙDŽ
ܙ䳏ᰖȀ᠔ᅮȃܙ䳏ᰖ䭧ȧ䍙ǝǻȗܙ
䳏ǡᅠњǬǿǙจড়Ȅǃܙ䳏ȧℶȖǻ
ǤǵǪǙDŽ
✭ǡߎǻǙȠǃໝǿ㟁ǙǡǮȠǿǾȃ
⭄ᐌ⢊ᜟȃจড়ȄǃǮǥȀ˝˟ȪɈɟ
ɇȧȻɻɃɻɐǠȞᡰǢǃᴀԧȃ䳏⑤
ȧߛȟǃ䳏∴əɋȷȧǬǃǩ༥㋘ܜ
ȃଣǙড়ȤǰでষȀǩ䗷㌵ǤǵǪǙDŽ
DzȃȓȓՓ⫼Ǭ㍮ǦȠǽǃⱎ➅ǃⱎ☿
ȃॳȀǿȟȓǮDŽ
ܙ䳏Ȅᖙǯˌ̚ːˌćȃ㆘ೆǼ㸠Ǹǻ
ǤǵǪǙDŽ
ܙ䳏ᮍ⊩ȀǹǙǻȄǃᴀপᡅ䂀ᯢȧ
ȝǤǟ䂁ȔǤǵǪǙDŽ
ᱛ
ᜰ␜
ᜰ␜
ᵈᗧ
ᜰ␜
䳏∴əɋȷݙ䚼ȃ⎆ǡⲂ㝮ș㸷串ȀҬ
ⴔǬǴจড়ȀȄǃǮǥȀǢȡǙǿ∈Ǽ
⋫Ǚ⌕ǬǻǤǵǪǙDŽⲂ㝮ǡǠȋȡǴ
ȟǮȠॳǽǿȠǨǽǡǗȟȓǮDŽ
䳏∴əɋȷȧᴀԧȀ㺙ⴔǮȠ䱯ȀǃȽ
ɛǃ⭄㟁ⱎ➅DzȃҪ⭄ᐌǽᗱȤȡǴ
ǽǢȄǃ䳏∴əɋȷȧᴀԧȀ㺙ⴔǬǿ
ǙǼǩ༥㋘ܜȃଣড়ǰでষȀǩᣕখǤ
ǵǪǙDŽ
ᇣܤǡՓ⫼ǮȠ䱯ȀȄǃֱ䅋㗙ǡপᡅ
䂀ᯢȃݙᆍȧᬭǝǃȓǴǃՓ⫼ȃ䗨
ЁȀǟǙǻȗǃপᡅ䂀ᯢǾǟȟȀՓ
⫼ǬǻǙȠǠǾǛǠ⊼ᛣǬǻǤǵǪǙDŽ
ᛳ䳏șǦǡȃॳǽǿȟȓǮDŽ
чᑐܤȃȃሞǠǿǙ᠔ȀֱㅵǬǻǤ
ǵǪǙDŽȓǴǃՓ⫼ǮȠ䱯Ȁȗǃчᑐ
ܤǡᴀ㻑કǠȞপȟߎǪǿǙȝǛȀ⊼
ᛣǬǻǤǵǪǙDŽ䭧䘩ǝǻ仆Ȕ䖐ȕǿ
ǾǃџᬙșǦǡȃॳǽǿȟȓǮDŽDŽ
ᜰ␜
ᜰ␜
ᜰ␜
ᜰ␜
ᅝܼϞȃǩ⊼ᛣ
11
Before Using the Phone
2
Charger
ᴀԧȀ㍮ǮȠ AC ȪɈɟɇȄǃᖙǯ
Ҭሲȃ ˄ଚકȻόɑ˅ȧՓ⫼ǬǻǤǵ
ǪǙDŽҪȃ AC ȪɈɟɇȄՓ⫼ǬǿǙ
ǼǤǵǪǙDŽ
Ҭሲȃ AC ȪɈɟɇȄȻɻɃɻɐȀⳈ
㍮ǬǻǤǵǪǙDŽɇȻ䎇䜡㎮Ȅ䘢
➅Ǭǃ☿♑ȃॳǽǿȟȓǮDŽ
Փ⫼ǪȡǿǙǽǢȀȄǃᅝܼȃǴȖǃ
AC ȪɈɟɇȧȻɻɃɻɐǟȝȈᴀԧǠ
ȞǬǻǟǙǻǤǵǪǙDŽ
✭ǡߎǻǙȠǃໝǿ㟁ǙǡǮȠǿǾȃ
⭄ᐌ⢊ᜟȃจড়ȄǃDzȃȓȓՓ⫼Ǭ㍮
ǦȠǽǃⱎ➅ǃⱎ☿ȃॳǽǿȟȓǮDŽ
ǮǥȀ AC ȪɈɟɇȧȻɻɃɻɐǠȞ
ᡰǢǃᴀԧȃ䳏⑤ȧߛȟǃ䳏∴əɋȷ
ȧǬǃǩ༥㋘ܜȃଣǙড়ȤǰでষȀ
ǩ䗷㌵ǤǵǪǙDŽ
⼊๔
ᱛ
ᜰ␜
ᜰ␜
ᜰ␜
㸼⼎ǪȡǴ䳏⑤䳏ҹȃ䳏ǼՓ⫼
ǬǿǙǼǤǵǪǙDŽDzȡҹȃ䳏Ǽ
Փ⫼ǪȡȓǮǽǃ☿♑ȃॳǽǿȟȓ
ǮDŽ
AC ȪɈɟɇ˖˄100-240˅V
▵ȡǴǼ AC ȪɈɟɇȧᡰǢᏂǬǬ
ǿǙǼǤǵǪǙDŽᛳ䳏ȃǟDzȡǡǗȟ
ȓǮDŽ
AC ȪɈɟɇȧ∈șDzȃҪȃ⎆ԧȀǹǦ
Ǵȟǃ▵ȞǬǴȟǬǿǙǼǤǵǪǙDŽ
ȻɋɟȃDzȅǿǾǃ⎆ԧǡǨȑȡȠǟ
DzȡǡǗȠจ᠔ǼȄՓ⫼ǬǿǙǼǤǵ
ǪǙDŽצȡǻݙ䚼Ȁ∈ǿǾǡܹȟȓǮ
ǽǃ☿♑șᛳ䳏ȃॳǽǿȟȓǮDŽ
ǟᅶǪȓȀȝȠᬍ䗴șߚ㾷ׂ⧚ȄǬ
ǿǙǼǤǵǪǙDŽ
AC ȪɈɟɇȀᔋǙ㸱ᩗȧϢǝǴȟǃᡩ
ǧҬǦǴȟǬǿǙǼǤǵǪǙDŽ
AC ȪɈɟɇȀ䞱䞥ǿǾȃ䞥ሲȧᏂǬ䖐
ȨǵȟǬǿǙǼǤǵǪǙDŽ
ᱛ
Ứࠇᚻᱛ
᳓Ứࠇᱛ
᳓Ứࠇᱛ
ᱛ
ᜰ␜
ᱛ
ᅝܼϞȃǩ⊼ᛣ
12
ȻόɑȧڋǹǦǴȟǃ⸈᧡ǬǴȟǃࡴ
ᎹǬǴȟǬǿǙǼǤǵǪǙDŽȓǴ䞡Ǚ
ȗȃȧ䓝ǰǴȟǃᓩǸᔉǸǴȟǃ⛵⧚
Ȁ᳆ǧǴȟǮȠǽȻόɑȧڋȖǃ☿♑
șᛳ䳏ȃॳǽǿȟȓǮDŽ
㨑䳋ȃǟDzȡǡǗȠǽǢȄǃ㨑䳋Ȁȝ
Ƞᛳ䳏☿♑ȃ䰆ℶȃǴȖǃᴀԧȃ䳏
⑤ȧߛȟǃ AC ȪɈɟɇȧȻɻɃɻɐǠ
ȞᡰǙǻǤǵǪǙDŽ
䭋ᳳ䭧Փ⫼ǪȡǿǙǽǢȀȄǃᅝܼȃ
ǴȖǃ AC ȪɈɟɇȧȻɻɃɻɐǟȝȈ
ᴀԧǠȞǬǻǟǙǻǤǵǪǙDŽ
AC ȪɈɟɇȧᡰǤǽǢȄǃȻόɑȧᓩ
ǸᔉȞǿǙǼǤǵǪǙDŽȻόɑǡڋǹ
Ǣǃ☿♑ǃᛳ䳏ȃॳǽǿȠǨǽǡǗ
ȟȓǮDŽ
਼ೆ⏽ᑺ 0̚ 40 ćǃᑺ 35 ̚ 85ˁȃ
㆘ೆǼǩՓ⫼ǤǵǪǙDŽ
ᜰ␜
ᜰ␜
ᜰ␜
ᵈᗧ
ᜰ␜
ᜰ␜
Ⳉᇘ᮹ܝȃᔧǴȠจ᠔ǼՓ⫼ǟȝȈᬒ
㕂ǬǿǙǼǤǵǪǙDŽ
ȐǨȟȃǙจ᠔Ȁ㕂ǠǿǙǼǤǵǪ
ǙDŽ
㨑ϟǪǰǴȟ㸱ᩗȧϢǝǿǙǼǤǵǪ
ǙDŽ
Ȼόɑȃḍܗ䚼ߚȧ⛵⧚Ȁ᳆ǧǿǙǼ
ǤǵǪǙDŽ
䞡Ǚȗȃȧ䓝ǰǿǙǼǤǵǪǙDŽ
䳏⑤ɟɱȸǡڋȨǵȟǃȻɻɃɻɐȃ
ᏂǬ䖐ȔǡțȠǙǽǢȄՓ⫼ǬǿǙǼ
ǤǵǪǙDŽ
ᏗǿǾǼǤȠȓǿǙǼǤǵǪǙDŽ
䳏ᄤɴɻɀș催ᆍ఼ȀܹȡǿǙǼǤ
ǵǪǙDŽ
ᜰ␜
ᜰ␜
ᜰ␜
ᱛ
ᜰ␜
ᜰ␜
ᜰ␜
ᱛ
ᅝܼϞȃǩ⊼ᛣ
13
Before Using the Phone
2
USB Cable
ߚ㾷ǃᬍ䗴ǬǿǙǼǤǵǪǙDŽ☿♑ǃ
Ǧǡǃᛳ䳏ǿǾȃџᬙȓǴȄᬙ䱰ȃॳ
ǽǿȟȓǮDŽ
☿ȃDzȅșǃɁɐόɞȃDzȅǃⳈᇘ᮹
ܝȃᔋǙǽǨȢș♢ϟȃ䒞ݙǿǾȃ
催⏽ȃจ᠔ǼՓ⫼ǃᬒ㕂ǬǿǙǼǤǵ
ǪǙDŽ
″఼ȃໝᔶǃᬙ䱰ǃⱎ➅ǃⱎ☿ȃॳ
ǽǿȟȓǮDŽ
▵ȞǪǿǙǼǤǵǪǙDŽ
∈șɢɋɐȃሓǿǾȃ⎆ԧǡܹȠǽǃ
ᛳ䳏ǃ☿♑ǃᬙ䱰ȃॳǽǿȟȓǮDŽ
Փ⫼จ᠔ǃপȟᡅǙȀǩ⊼ᛣǤǵǪǙDŽ
ෂ㒾
ᱛ
ᜰ␜
ᜰ␜
䳏ᄤɴɻɀǿǾȃࡴ➅䂓⧚″఼ș催
ᆍ఼ȀǃܹȡǿǙǼǤǵǪǙDŽ
ᬙ䱰ș☿♑ȃॳǽǿȟȓǮDŽ
ᔋǙ㸱ᩗȧϢǝǴȟǃᡩǧǹǦǴȟǬ
ǿǙǼǤǵǪǙDŽ
ᬙ䱰ș☿♑ȃॳǽǿȟȓǮDŽ
ッᄤȀᇢ䳏ᗻ⭄⠽ ˄䞥ሲ⠛ǃ䠯ㄚȃ㢃
ǿǾ˅ǡ㾺ȡǿǙȝǛȀǬǻǤǵǪǙDŽ
ȓǴǃݙ䚼ȀܹȡǿǙȝǛȀǬǻǤǵ
ǪǙDŽ
ȿɯόɐȀȝȠ☿♑șᬙ䱰ȃॳǽǿ
ȟȓǮDŽ
䳋ǡ勈ȟߎǬǴȞǃ USB ȹόɞɳȀȄ
㾺ȡǿǙǼǤǵǪǙDŽ
㨑䳋ǃᛳ䳏ȃॳǽǿȟȓǮDŽ
⼊๔
ᱛ
ᱛ
ᜰ␜
ᜰ␜
ǩՓ⫼Ϟȃǟ丬Ǚ
14
Attached CD-ROM
ǩՓ⫼Ϟȃǟ丬Ǚ
݅䗮
•ᴀ㻑કȄ䰆∈ҩᾬǼȄǗȟȓǰȨDŽ⍈ᅸșࡴ఼
ȃDzȅǽǙǸǴ⪄๗șǃ䲼ǡ䰡ȟǠǠȠ⪄๗
ϟǼȄՓ⫼ǬǿǙǼǤǵǪǙDŽȓǴ⋫◃″Ǽ⋫Ȥ
ǿǙǼǤǵǪǙDŽᬙ䱰ȃॳǡ∈▵ȡǼǗȠǽ߸
ᯢǬǴจড়ǃֱ䀐ȃᇒ䈵ǽǿȟȓǮDŽ
•ȃȝǛǿὉッǿ⏽ᑺ⪄๗ǼȃՓ⫼Ȅ䙓ǦǻǤǵ
ǪǙDŽ
Ⳉᇘ᮹ܝȃᔧǴȠจ᠔ǃᱪ᠓䀁٭șɤȬɱόȃ䖥
ǤǿǾǃ⡍Ȁ⏽ᑺǡϞǡȠจ᠔DŽ
ᇣܤǡՓ⫼ǮȠจড়Ȅǃֱ䅋㗙ǡপȟ
ᡅǙȃݙᆍȧᬭǝǻǤǵǪǙDŽȓǴǃ
Փ⫼ЁȀǟǙǻȗǃᣛ⼎ǾǟȟȀՓ⫼
ǬǻǙȠǠȧǩ⊼ᛣǤǵǪǙDŽǦǡǿ
ǾȃॳǽǿȟȓǮDŽ
чᑐܤȃȃሞǠǿǙจ᠔ȀֱㅵǬǻ
ǤǵǪǙDŽ䁸Ǹǻ仆Ȕ䖐ȨǵȟǃǦǡ
ǿǾȃॳǽǿȟȓǮDŽ
⇫șȐǨȟȃǙจ᠔ș催⏽ȀǿȠ
จ᠔ǼȃՓ⫼șֱㅵȄǬǿǙǼǤǵǪ
ǙDŽᬙ䱰ȃॳǽǿȟȓǮDŽ
USB ȹόɞɳȧপȟǮจড়ȄǃȻό
ɑȧᓩǸᔉȞǯȻɕȷɇȧᣕǸǻᡰǙ
ǻǤǵǪǙDŽ
ȻόɑȧᓩǸᔉȠǽȻόɑǡڋǹǢǃ
ᛳ䳏ǃ☿♑ȃॳǽǿȟȓǮDŽ
USB ȹόɞɳȃȻόɑȃϞȀ䞡Ǚȗȃ
ȧ䓝ǰǴȟǬǿǙǼǤǵǪǙDŽᛳ䳏ǃ
☿♑ȃॳǽǿȟȓǮDŽ
ᵈᗧ
ᜰ␜
ᜰ␜
ᜰ␜
ᜰ␜
Ҭሲȃ CD-ROM Ȅǃϔ㠀ȲόɏȫȲ⫼
ȃCD ɟɴόɬόǼȄ㍊ᇒȀՓ⫼Ǭǿ
ǙǼǤǵǪǙDŽݡ⫳䷇ȀȝǸǻ㘇ȧ⮯
ȖǴȟǃɁɜόȳόȧ⸈᧡ǮȠǟDzȡ
ǡǗȟȓǮ
⼊๔
ᱛ

ǩՓ⫼Ϟȃǟ丬Ǚ
15
Before Using the Phone
2
㻑∋םᑿǿǾǃ⡍Ȁ⏽ᑺǡϟǡȠจ᠔DŽ
•ȰȪȻɻߎষȃ䖥ǤǿǾǼՓ⫼ǬǿǙǼǤǵǪ
ǙDŽ⏽ᑺǡᗹ▔Ȁໝ࣪ǮȠǨǽȀȝȟ㌤䴆ǡⱎ⫳
Ǭǻǃᬙ䱰ȃॳǽǿȟȓǮDŽ
•㨑ǽǬǴȟᔋǙ㸱ᩗȧϢǝǴȟ᳆ǧǴȟǬǿǙǼ
ǤǵǪǙDŽ
㨑ǽǬǴȟǃ䞡Ǚ⠽ȃϟᭋǢȀǬǴȟǃໝǿᣕǶ
ᮍȧǬǻ᳆ǧȠǿǾǃ⛵⧚ǿȧࡴǝǿǙǼǤǵ
ǪǙDŽᬙ䱰ȃॳǽǿȟȓǮDŽǨȃจড়ǃֱ䀐ȃ
ᇒ䈵ǽǿȟȓǮDŽ
•∮ȡǴȟ∈ⓈǡҬǙǴȟǬǴǽǢȄǃђǙǴᶨȞ
ǠǙᏗǼᣁǢপǸǻǤǵǪǙDŽȪɳȻόɳǃɡɻ
ɀɻǃȿɻɒόǿǾȃ㮀કșǃ⾥ᄺ䲥Ꮢǃ⋫࠸ǿ
Ǿȧ⫼ǙȠǽǃ㺙șॄࠋǡໝ䊾ǮȠǨǽǟDzȡ
ǡǗȟȓǮȃǼǃՓ⫼ǬǿǙǼǤǵǪǙDŽȓǴǃ
⋫◃″Ǽ⋫ȤǿǙǼǤǵǪǙDŽ
•ǸǴ㸷串ȃɥȹɋɐȀܹȡǻᣕǶ䘟ȅǿǙǼǤ
ǵǪǙDŽ
㸷串ȃɥȹɋɐȀǨȗȠ∫ǿǾȃ⇫ǡᬙ䱰ȃॳ
ǽǿȟȓǮDŽ
•⛵⧚ǿǡǠǠȠȝǛǿจ᠔Ȁ㕂ǠǿǙǼǤǵǪ
ǙDŽ
㥋⠽ȃǹȓǸǴȳɘɻȀܹȡȠǽǢȄǃ䞡Ǚȗȃ
ȃϟȀǿȞǿǙȝǛǩ⊼ᛣǤǵǪǙDŽ
•ϔ㠀ȃ䳏䁅″șɎɴɛɱɀȲǿǾȧǟՓǙȀǿ
ǸǻǙȠ䖥ǤǼՓ⫼ǮȠǽǃᕅ䷓ȧϢǝȠจড়ǡ
ǗȟȓǮȃǼǃǿȠȎǤ䲶ȡǴจ᠔ǼǩՓ⫼Ǥǵ
ǪǙDŽ
ᴀԧ
•Փ⫼ЁȀᴀ㻑કǡ⏽ǠǤǿȠǨǽǡǗȟȓǮǡ
Ǽ㾺ȡȠǨǽȃǼǢȠ⏽ᑺǼǗȡȅ⭄ᐌǼȄǗȟ
ȓǰȨDŽDzȃȓȓǟՓǙǤǵǪǙDŽǴǵǬǃ䭋ᰖ
䭧㾺ȡǴȓȓՓ⫼ǬǻǙȠǽԢ⏽șǦǾȀǿȠǟ
DzȡǡǗȟȓǮDŽ
•ǟᅶǪȓǩ㞾䑿Ǽᴀ㻑કȀⱏ䤆ǪȡǴᚙฅݙᆍ
Ȅǃ߹ȀɩɪȧপȠǿǾǬǻֱㅵǬǻǤǵǪȠȝ
Ǜǟ丬ǙǬȓǮDŽϛǡϔǃⱏ䤆ǪȡǴᚙฅݙᆍǡ
⍜༅ǬǻǬȓǛȝǛǿǨǽǡǗǸǻȗǃᔧ⼒ǽǬ
ǻȄ䊀ӏȧ䉴ǙǠȂȓǮȃǼǗȞǠǭȖǩњᡓǤ
ǵǪǙDŽ
•ɂɤɻșɁȳόɐȃᕠȢɥȹɋɐǿǾȀᴀ㻑કȧ
ܹȡǴȓȓǃộᄤǿǾȀᑻȞǿǙǼǤǵǪǙDŽȓ

ǩՓ⫼Ϟȃǟ丬Ǚ
16
ǴȳɘɻȃᑩǿǾ⛵⧚ǿǡǠǠȠȝǛǿจ᠔Ȁ
ȄܹȡǿǙǼǤǵǪǙDŽ
•ᴀԧȧⳈᇘ᮹ܝȃᔧǴȠ᠔Ȁᬒ㕂ǬǿǙǼǤǵǪ
ǙDŽໝ㡆ȧ䍋ǨǮจড়ǡǗȟȓǮDŽ
•ᣕǶ䘟ȋǽǢșՓ⫼ǬǿǙǽǢȄǃᖙǯȵόɤό
ɑȧ䭝ǭǻǃҬሲȃȹόɁȀܹȡǻǤǵǪǙDŽȹ
όɁȀܹȡǯȀᣕǶ䘟ȋǽǃ⬏䴶ǡࡆȡǴȟڋǹ
ǙǴȟǬȓǮDŽ
•⬏䴶ȄǃǽǢǾǢђǙǴᶨȞǠǙᏗǼᣁǙǻǃ∮
ȡǿǙȝǛȀǬǻǤǵǪǙDŽ∮ȡǴȓȓ⬏䴶ȧɇ
ɋɟǮȠǽڋǹǤǨǽșǃɁɇȬɱɁɢɻȃǮȎ
ȟǡᙾǤǿȠǨǽǡǗȟȓǮDŽ
•㸼⼎䚼ȧ䭟ǙǴ⢊ᜟǼ㸼⼎䚼ǵǦȧᣕǸǻ⿏ࢩǬ
ǴȟǃᤃȟಲǬǴȟǬǿǙǼǤǵǪǙDŽᴀԧǡ
ȡǃ㨑Ƕǻ⸈᧡ǬǴȟᬙ䱰ȃॳǽǿȟȓǮDŽ
•⬏䴶ȧᔋǤᢐǪǝǴȟǃ⟾ș⹀Ǚȗȃǃܜȃǽǡ
ǸǴȗȃǼ᪡ǬǴȟǬǿǙǼǤǵǪǙDŽ⬏䴶ǿ
ǾȧڋȖȠǨǽǡǗȟȓǮDŽ
•ᴀԧȃϞȀ串ǿǾȧȃǰǿǙǼǤǵǪǙDŽ䁸Ǹ
ǻ串ǿǾȃϞǠȞȧࡴǝȠǽǃ⸈᧡ȃॳǽ
ǿȟȓǮDŽ
•さ䍋䚼ȃǗȠ⹀Ǚȗȃ ˄ȷɲɋɟǿǾ˅ǽϔ㎦Ȁ
ܹȡǴȟǃɘɋȸȃᑩȀܹȡǿǙǼǤǵǪǙDŽܹ
ȡǠǴșপȟᡅǙǠǴ ˄䁸ǸǻǃȋǹǦǴȟ㨑ǽ
ǮǿǾ˅ȀȝǸǻȄǃ⸈᧡ȃॳǽǿȟȓǮDŽ
•ɁɇȬɱɁɢɻȃܜș⬏䴶ȃ∮ȡȧপǸǻ᪡Ǭ
ǻǤǵǪǙDŽ∮ȡǴȓȓ᪡ǮȠǽǃ⬏䴶Ȁڋǡ
ǹǙǴȟǃɁɇȬɱɁɢɻȃǮȎȟǡᙾǤǿȠǨ
ǽǡǗȟȓǮDŽ
•Փ⫼ЁȀǃᔋǙ⺕ȧ䖥ǺǦǿǙǼǤǵǪǙDŽᬙ
䱰ȃॳǽǿȟȓǮDŽ
䳏∴əɋȷ
•䳏∴əɋȷȄ⍜㗫કǼǮDŽकߚȀܙ䳏ǬǻȗՓ⫼
⢊ᜟǿǾȀȝǸǻȗ⭄ǿȟȓǮǡǃՓ⫼ᰖ䭧ǡὉ
ッȀⷁǤǿǸǴǽǢȄ䳏∴əɋȷȃѸᰖᳳǼ
ǮDŽᣛᅮȃᮄǬǙ䳏∴əɋȷȧǟ䊋Ǚ∖ȖǤǵǪ
ǙDŽ
•߱ȖǻǟՓǙȃǽǢșǃ䭋ᰖ䭧ǩՓ⫼ȀǿȞǿǠ
ǸǴǽǢȄǃǩՓ⫼ࠡȀᖙǯܙ䳏ǬǻǤǵǪǙDŽ
•䳏∴əɋȷȃՓ⫼ᰖ䭧ȄǃՓ⫼⪄๗ș䳏∴əɋȷ
ȃࡷ࣪ᑺȀȝȟ⭄ǿȟȓǮDŽ

ǩՓ⫼Ϟȃǟ丬Ǚ
17
Before Using the Phone
2
•䳏∴əɋȷȃՓ⫼ᴵӊȀȝȟǃᇓੑǡ䖥ǺǤȀǹ
ȡǻ䳏∴əɋȷǡ㝼ȡȠจড়ǡǗȟȓǮǡଣ丠Ǘ
ȟȓǰȨDŽ
•Ⳉᇘ᮹ܝǡᔧǴȞǯǃ乼䗮Ǭȃ㡃Ǚ⎐ǬǙจ᠔Ȁ
ֱㅵǬǻǤǵǪǙDŽ䭋ᰖ䭧Փ⫼ǬǿǙǽǢȄǃՓ
ǙߛǸǴ⢊ᜟǼᴀ㻑કȓǴȄܙ䳏఼ǠȞǬǃ䳏
∴əɋȷȧࣙ㺙ǬǻǙȠɛɓόɳ㹟ǿǾȀܹȡǻ
ֱㅵǬǻǤǵǪǙDŽ
AC ȪɈɟɇ
•ܙ䳏ЁǃAC ȪɈɟɇǡ⏽ǠǤǿȠǨǽǡǗȟȓǮ
ǡ⭄ᐌǼȄǗȟȓǰȨȃǼǃDzȃȓȓǩՓ⫼Ǥǵ
ǪǙDŽ
•ᔋǙ㸱ᩗȧϢǝǿǙǼǤǵǪǙDŽȓǴǃܙ䳏ッ
ᄤǃッᄤȴȬɑȧໝᔶǪǰǿǙǼǤǵǪǙDŽ
ȳɩɱ
•ȳɩɱȀⳈᇘ᮹ܝǡᔧǴȞǿǙȝǛȀǬǻǤǵǪ
ǙDŽⳈᇘ᮹ܝǡᔧǴȠ⢊ᜟǼᬒ㕂ǮȠǽǃ㋴ᄤȃ
䗔㡆Ϧ✐ҬǦȧ䍋ǨǮǨǽǡǗȟȓǮDŽ
•ߛǿ᪂ᕅȧǮȠǽǢȄǃᖙǯ䀺Ǭ᪂ȟȧǬǻℷ
ǬǤ᪂ᕅǪȡȠǨǽȧ⺎䁡ǬǻǤǵǪǙDŽ
•ǟᅶǪȓǡᴀ㻑કȧ߽⫼Ǭǻ݀㸚Ȁ㨫ǬǤ䗋ᚥȧ
ǠǦȠϡ㡃㸠⚎ㄝȧ㸠Ǜจড়ǃ⊩ᕟǃᴵҸ ˄䗋ᚥ
䰆ℶᴵ՟ㄝ˅ȀᕧǙ㕄ǪȡȠǨǽǡǗȟȓǮDŽ
᪂ᕅș⬏ڣ䗕ֵȧ㸠Ǜ䱯ȄǃɟɱȬɘȿόㄝȀǩ
䜡ᝂǤǵǪǙDŽ
•䉽ໆǪȡǻǙȠ串ș᪂ᕅȃ䀅ৃǪȡǻǙǿǙ᭛
ᄫᚙฅȃ㿬䤆ȀȄՓ⫼ǬǿǙǼǤǵǪǙDŽ
USB ɥόɐˋȳόɑɁɵɋɐ
•USBɥόɐș microSD ȳόɑɁɵɋɐǿǾȀȼɧ
șɣȻɲϦ䞥ሲ⠛ǿǾȃ⭄⠽ȧ㍊ᇒȀܹȡǿǙȝ
ǛȀǬǻǤǵǪǙDŽDzȡȞǡܹȠǽǃᬙ䱰ș㿬䤆
ݙᆍȃ⍜༅ȃॳǽǿȟȓǮDŽ
•USBɥόɐș microSD ȳόɑɁɵɋɐǿǾȀȄȳ
ɘόǡǗȟȓǮDŽՓ⫼ǬǻǙǿǙǽǢȄǃȳɘό
ȧ䭝ǭǻǤǵǪǙDŽ
• The USB cable are not in the range of warranty.
• Clean the connector with a clean cotton bud.
• Clean the USB port with dry and soft cloth.
• Do not forcibly pull the cable. Do not install or
uninstall the cable with the method other than the
specified one.

ǩ߽⫼ǙǴǵǤȀǗǴǸǻ
18
⎆㸼⼎
•⎆əɕɳȄ䴲ᐌȀ㊒ᆚᑺȃ催Ǚᡔ㸧ǼȞȡǻ
ǟȟȓǮǡǃ⬏㋴Ǧșᐌᰖ⚍♃ǮȠȗȃǡǗȟ
ȓǮDŽǨȡȞȄȳɱό⎆ɏȫɁɟɴȬȃᾟ䗴Ȁ
ȝȠȗȃǼᬙ䱰ǼȄǗȟȓǰȨDŽǗȞǠǭȖǩњ
ᡓǤǵǪǙDŽ
•⬏䴶ɇɋɟȃ᪡ȄǃҬሲȃɁɇȬɱɁɢɻȧՓ
ǸǻǤǵǪǙDŽ䠯ㄚșȿɫόɟɢɻȿɳǿǾȃܜ
ȃǽǡǸǴȗȃȄǃՓȤǿǙǼǤǵǪǙDŽ
•⬏䴶șᴀԧȀᔋǙȧࡴǝǴǽǢǃ⬏䴶ȃϔ䚼ǡ
ϔⶀ咦ǯȕǨǽǡǗȟȓǮǡǃᬙ䱰ǼȄǗȟȓǰ
ȨDŽ
ɗɻɑɁɐɱɋɟ
ɁɐɱɋɟপȟҬǦえȀȄǃᨎᐃ䳏䁅⫼ǿǾȀ䉽ໆ
ǪȡǻǙȠᏖ䉽ȃɗɻɑɁɐɱɋɟȧপȟҬǦȠǨ
ǽǡǼǢȓǮDŽɗɻɑɁɐɱɋɟȃ。串ȀȝǸǻȄ
পȟҬǦȞȡǿǙจড়ȗǗȟȓǮȃǼǃᑫ丁Ǽপȟ
ҬǦǡৃ㛑ǼǗȠǨǽȧ⺎䁡ǬǻǠȞǩ䋐ܹǤǵǪ
ǙDŽǿǟǃɗɻɑɁɐɱɋɟȧপȟҬǦǴ⢊ᜟǼɗ
ɻɑɁɐɱɋɟȧᣕǸǻᤃȟಲǬǴȟǃɗɻɑɁɐ
ɱɋɟȧᔋǤᓩǸȆȠǿǾɁɐɱɋɟপȟҬǦえȀ
ᔋǙǡࡴȤȠ㸠⚎Ȅ㸠ȤǿǙǼǤǵǪǙDŽᬙ䱰ș
⸈᧡ȃॳǽǿȟȓǮDŽ
݀㸚ȃจǼՓ⫼ǮȠǽǢ
•ɎɴɛǃɱɀȲǃᨎᐃ䳏䁅″ǿǾ䳏⺕⊶ǡⱎ⫳Ǯ
Ƞ⠽ȃ䖥ǤǼՓ⫼ǬǿǙǼǤǵǪǙDŽǟѦǙȀᕅ
䷓ȧফǦȠจড়ǡǗȟȓǮȃǼǃǿȠȎǤ䲶ȡǻ
ǩՓ⫼ǤǵǪǙDŽ
•ᴀ㻑કǡᣕǹ䷇ໄ䗮䁅ǟȝȈ䗮ֵ″㛑Ȅǃ᮹ᴀ
ݙǼȃՓ⫼ȧⳂⱘȀ䀁㿜ǪȡǻǙȓǮDŽ⍋ǼȄ
Փ⫼ǬǿǙǼǤǵǪǙDŽ
ǩ߽⫼ǙǴǵǤȀǗǴǸǻ
ȽόɛɁȰɲȪݙǼǗǸǻȗǃሟݙș䳏䒞ȃЁǃɐ
ɻɕɳǃഄϟǃɛɳȃ䱄ǃቅ䭧䚼ǿǾ䳏⊶ȃӱȤȟ
ȀǤǙǽǨȢǼȄǃ䗮ֵǡǼǢǿǙจড়ǡǗȟȓ
ǮDŽȓǴഄඳⱘȀ䳏⊶ȃӱȤȟȀǤǙจ᠔ȗǗȟȓ
ǮȃǼǗȞǠǭȖǩњᡓǤǵǪǙDŽ
ᴀ㻑કȄɏɀɇɳᮍᓣȃ⡍ᖈǽǬǻ䳏⊶⢊ᜟǡᙾǙ
ǽǨȢǼǗǸǻȗ催ક䊾ǿ䗮ֵȧֱǹǨǽǡǼǢȓ
ǮDŽǬǠǬǃ䳏⊶⢊ᜟǡϔᅮҹϞᙾǤǿǸǴจড়Ȁ

Profession
19
Before Using the Phone
2
Ȅǃさ✊䗮ֵǡ䗨ߛȡȠǨǽǽǿȟȓǮDŽǗȞǠǭ
ȖǩњᡓǤǵǪǙDŽ
ᴀ㻑કȄ催Ǚ⾬ओᗻȧ᳝ǬǻǟȟȓǮǡǃ䳏⊶ȧՓ
⫼ǬǻǙȠҹϞǃϝ㗙Ȁ䗮ֵȧ١ফǪȡȠৃ㛑ᗻ
ǡǿǙǽȄǙǝȓǰȨDŽ⬭ᛣǬǻǩ߽⫼ǤǵǪǙDŽ
ᴀ㻑કȄ᮹ᴀݙǼȃǩ߽⫼ȧࠡᦤǽǬǻǙȓǮDŽ
⍋ȀᣕǶߎǬǻȃՓ⫼ȄǼǢȓǰȨDŽ
This product is exclusively for use in Japan.
ᴀ㻑કȄ䳏⊶⊩ȀǺǤ⛵㎮ሔǼǮȃǼǃ䳏⊶⊩Ȁ
ǺǤỰ᷏ȧফǦǻǙǴǵǤǨǽǡǗȟȓǮDŽ
݀݅ȃจǼǩՓ⫼ȃ䱯Ȅǃ਼ȟȃᮍȃ䗋ᚥȀǿȞǿ
ǙȝǛȀǩ⊼ᛣǤǵǪǙDŽ
EM chip ȧপȟҬǦǻǙǿǙ⢊ᜟǼȄՓ⫼ǼǢȓǰ
ȨDŽ
ᴀǟȝȈᴀȀ㿬䓝ǪȡǴ㻑કȃՓ⫼ȀȝǸǻⱎ
⫳ǬǴ᧡ᆇǃǟȝȈDzȃಲᕽȀ㽕ǮȠ䊏⫼ȀǹǙǻ
Ȅǃᔧ⼒Ȅϔߛȃ䊀ӏȧ䉴ǙȓǰȨDŽ
ᴀ㻑કȃՓǙǠǴȧ䁸ǸǴǽǢș䴭䳏⇫ǃ䳏⇫ⱘɖ
Ȭɂȃᕅ䷓ȧফǦǴǽǢǃȓǴǃᬙ䱰ׂ⧚ȃǽǢ
ș䳏∴Ѹȃᮍ⊩ȧ䁸ǸǴǽǢȄⱏ䤆ǬǻǙȠᚙฅ
ǡ⍜༅ǮȠᘤȡǡǗȟȓǮǡǃᔧ⼒Ȅϔߛȃ䊀ӏȧ
䉴ǙȓǰȨDŽ
ᴀ㻑કȀⱏ䤆ǬǴᚙฅȄᖙǯ߹ȀɩɪȧপȠǿǾǬ
ǻֱㅵǬǻǤǵǪȠȝǛǟ丬ǙǬȓǮDŽ
Profession
All Rights Reserved
No part of this manual may be reproduced or trans-
mitted in any form or by any means without prior writ-
ten consent of Huawei Technologies Co., Ltd.
ɲȽȬȷɳȀǹǙǻ
ᨎᐃ䳏䁅
PHSџὁ㗙Ȅǃ⪄๗ȧֱ䅋Ǭ䊈䞡ǿ䊛⑤
ȧݡ߽⫼ǮȠǴȖȀǃǟᅶǪȓǡϡ㽕ǽǿǸǻǟᣕ
ǶȀǿȠ䳏䁅″ッ 䳏∴ ܙ䳏఼ȄɲȽȬȷɳǮ
ȠǴȖǩ䖨ैǼǢȓǰȨDŽɟɱȬɘȿόֱ䅋ȃǴ
Ȗǃ䳏䁅″ッȀ㿬ដǪȡǻǙȠǟᅶǪȓȃᚙฅ
˄䳏䁅ᐇǃ䗮ֵሹⅈǃɩόɳǿǾ˅ȄџࠡȀ⍜এǬ
ǻǤǵǪǙDŽ

Profession
20
Trademarks
and HUAWEI are trademarks of Huawei Technol-
ogies Co., Ltd. All other trademarks mentioned in this
manual are the properties of their respective holders.
݇Ѣߎষㅵ⧚㾘ࠊ
ᴀ㻑કȄ᮹ᴀݙǼȃǩ߽⫼ȧࠡᦤǽǬǻǙȓǮDŽ
⍋ȀᣕǶߎǬǻȃՓ⫼ȄǼǢȓǰȨDŽ
Notice
The information in this manual is subject to change
without notice. Every effort has been made in the
preparation of this manual to ensure accuracy of the
contents, but all statements, information, and recom-
mendations in this manual do not constitute a war-
ranty of any kind, expressed or implied.
Please read the safety precautions carefully to
ensure the correct and safe use of your wireless
device. For detailed information, refer to the section
“Warnings and Precautions” and "Handing
Precautions"
ᨎᐃ䳏䁅″ȃ↨ঢ⥛ (SAR) ȀǹǙǻ
Ǩȃ″。 ˄ൟ⬾˅ȃᨎᐃ䳏䁅″ȄǃǡᅮȖǴ䳏⊶
ȃҎԧঢȀ䭶ǮȠᡔ㸧⑪Ȁ䘽ড়ǬǻǙȓǮDŽǨ
ȃᡔ㸧⑪ȄǃҎԧ丁䚼ȃDzȅǼՓ⫼ǮȠᨎᐃ䳏䁅
″ǿǾȃ⛵㎮″఼ǠȞ䗕ߎǪȡȠ䳏⊶ǡҎԧȃعᒋ
Ȁᕅ䷓ȧঞȑǪǿǙȝǛǃ⾥ᄺⱘḍᢴȀǺǙǻᅮ
ȖȞȡǴȗȃǼǗȟǃҎԧو丁䚼ȀঢǪȡȠ䳏⊶
ȃᑇഛȰɕɳȶό䞣ȧ㸼Ǯ↨ঢ⥛ (SAR:Specific
Absorption Rate) ȀǹǙǻǃǨȡǡ 2W/kg Ćȃ䀅ᆍ
ȧ䍙ǝǿǙǨǽǽǬǻǙȓǮDŽǨȃ䀅ᆍȄǃՓ
⫼㗙ȃᑈ唶ș䑿ԧȃǢǪȀ䭶֖ǿǤकߚǿᅝܼ⥛
ȧȨǼǟȟǃϪ⬠ֱع″ᾟ (WHO) ǽन䭶֖Ȁ
ǗȠ䱯䴲䳏䲶ᬒᇘ㎮䰆䅋ྨવӮ (ICNIRP) ǡ⼎Ǭ
Ǵ䱯ⱘǿȴȬɑɱȬɻǽৠǭȗȃǽǿǸǻǙȓ
ǮDŽ
Ǩȃᨎᐃ䳏䁅″ H12HW ȃSAR Ȅǃ W/kg Ǽ
ǮDŽǨȃȄǃǡᅮȖǴᮍ⊩ȀᕧǙǃᨎᐃ䳏䁅″
ȃ䗕ֵ䳏ȧ᳔ȀǬǻ␀ᅮǪȡǴ᳔ȃǼǮDŽ
ןdžȃ㻑કȀȝǸǻ SAR ȀᇥȃᏂ⭄ǡ⫳ǭȠǨ
ǽȗǗȟȓǮǡǃǙǯȡȗ䀅ᆍȧ䎇ǬǻǙȓ
ǮDŽȓǴǃᨎᐃ䳏䁅″Ȅǃᨎᐃ䳏䁅ഄሔǽȃ䗮ֵ

⪺ᮭ╬ߦߟߡ
21
߅ߦߥࠆ೨ߦ
2
ߦᔅⷐߥᦨૐ㒢ߩㅍା㔚ജߦߥࠆࠃ߁⸳⸘ߐࠇߡ
ࠆߚޔታ㓙ߦㅢߒߡࠆ⁁ᘒߢߪޔㅢᏱ 5#4 ߪ
ࠃࠅዊߐ୯ߣߥࠅ߹ߔޕ
5#4ߦߟߡޔߐࠄߦߒᖱႎࠍ߅⍮ࠅߦߥࠅߚ
ᣇߪޔਅ⸥ߩࡎࡓࡍࠫࠍߏෳᾖߊߛߐޕ
✚ോ⋭ߩࡎࡓࡍࠫ
http://www.tele.soumu.go.jp/j/ele/index.htm
␠࿅ᴺੱ㔚ᵄ↥ᬺળߩࡎࡓࡍࠫ
http://www.arib-emf.org/index02.html
ࠗࡕࡃࠗ࡞ߩࡎࡓࡍࠫ
http://www.emobile.jp/
㧔Huawei㧕ߩࡎࡓࡍࠫ
http://www.huawei.com
The SAR limit adopted by the 1999/519/EC is 2.0
watts/kilogram (W/kg) averaged over ten gram of tis-
sue. The highest SAR value for this device type when
tested at the ear is 0.636 W/kg, and when properly
worn on the body is 0.631 W/kg.
The SAR limit adopted by the USA and Canada is 1.6
watts/kilogram (W/kg) averaged over one gram of tis-
sue. The highest SAR value reported to the FCC and
IC for this device type when tested for use at the ear
is 0.961 W/kg, and when properly worn on the body is
0.522 W/kg. For body worn operation, this phone has
been tested and meets FCC RF exposure guidelines
when used with an accessory that contains no metal
and that positions the handset a minimum of 15 mm
from the body. Use of other accessories may not
ensure compliance with FCC RF exposure guidelines
FCC Statement
This device complies with Part 15 of the FCC Rules.
Operation is subject to the condition that this device
does not cause harmful interference.
This equipment has been tested and found to comply
with the limits for a Class B digital device, pursuant to
Part 15 of the FCC Rules. These limits are designed
to provide reasonable protection against harmful
interference in a residential installation. This equip-
ment generates, uses and can radiate radio fre-
quency energy and, if not installed and used in
accordance with the instructions, may cause harmful
interference to radio communications. However,
there is no guarantee that interference will not occur
in a particular installation. If this equipment does
cause harmful interference to radio or television
reception, which can be determined by turning the

EM chip ߩ↪ᣇᴺ
22
equipment off and on, the user is encouraged to try to
correct the interference by one or more of the follow-
ing measures:
• Reorient or relocate the receiving antenna.
• Increase the separation between the equipment
and receiver.
• Connect the equipment into an outlet on a circuit
different from that to which the receiver is con-
nected.
• Consult the dealer or an experienced radio/TV
technician for help.
This device complies with Part 15 of the FCC Rules
and with RSS-210 of Industry Canada.
Operation is subject to the following two conditions:
(1) This device may not cause harmful interference,
and
(2) This device must accept any interference
received, including interference that may cause
undesired operation.
Warning: Changes or modifications made to this
equipment not expressly approved by HUAWEI may
void the users' authorization to operate this equip-
ment.
EM chip ߩ↪ᣇᴺ
EM chip ߪEMOBILE ߇ᄾ⚂ᤨߦ߅ቴߐ߹ߦߏឭଏߔ
ࠆޔᒰ␠ኾ↪ߩ USIM (Universal Subscriber Identity
Module) ࠞ࠼ߩߎߣߢߔޕ߅ቴ᭽ߩ៤Ꮺ㔚⇟ภ
߿ޔ⸽ߥߤߦ㑐ߔࠆᖱႎࠍ⸥㍳ߒߡࠅޔޔ㔚
Ꮽ࠺࠲߿ SMS ࡔ࠶ࠫ↪ߩ৻ቯߩኈ㊂ߩࡔࡕ
߽߃ߚ IC ࠞ࠼ߢߔޕ㔚ࠍ↪ߔࠆ೨ߦ EM
chip ࠍⵝ⌕ߒߡߊߛߐޕEM chip ࠍᱜߒߊ↪ߔ
ࠆߚߦޔᰴߩᵈᗧ㗄ࠍࠃߊ⺒ࠎߢߊߛߐޕ
•EM chipߩᝌ㧛ขࠅᄖߒࠍⴕ߁ߣ߈ߪޔㆊߥജ
ࠍട߃ߥࠃ߁ߦߒߡߊߛߐޕ
•EM chipߩ┵ሶ߹ߚߪIC࠴࠶ࡊߦ⸅ࠇߥߢߊߛߐ
ޕᕈ⢻߇ૐਅߒߚࠅ EM chip ߩ⼂߇ᅹߍࠄࠇ
ߚࠅߔࠆߎߣ߇ࠅ߹ߔޕ
•EMOBILEߪޔEM chip ߩಽ⸃߹ߚߪᄌᦝߩߚߦ
⊒↢ߒߚ࠺࠲ߩ៊ᄬ߿៊ኂߦኻߒߡ⽿છࠍ⽶
߹ߖࠎޕ
•Ἣ᳇߿⊒ᾲߔࠆᯏེߩㄭߊߥߤޔ㜞᷷ߦߥࠆ႐ᚲ
ߩㄭߊߦ EM chip ࠍ⟎߆ߥߢߊߛߐޕ
EM chip ߩ↪ᣇᴺ
23
߅ߦߥࠆ೨ߦ
2
•EM chipߪ㐳ᤨ㑆↪ߔࠆߣᾲߊߥࠆߎߣ߇ࠅ߹
ߔޕߎࠇߪᱜᏱߥ⁁ᘒߢߔߩߢޔ⛯ߌߡ↪ߒߡ
߽㗴ࠅ߹ߖࠎޕ
•EM chipߪޔᜰቯߐࠇߚᯏེߢ↪ߒߡߊߛߐޕ
ઁߩᯏེߢ↪ߔࠆߣޔ࠺࠲߇ᄬࠊࠇߚࠅ EM
chip ߇㓚ߒߚࠅߔࠆ႐ว߇ࠅ߹ߔޕߎߩࠃ߁
ߥ႐วޔEMOBILE ߪ៊ᄬ߹ߚߪ៊ኂߦኻߒߡ⽿
છࠍ⽶߹ߖࠎޕ
•EM chipߦኻߒߡⴣ᠄ࠍਈ߃ߚࠅޔߨߓᦛߍߚࠅޔ
᳓ߦỨࠄߒߚࠅޔ߹ߚߪ㊀‛ࠍߦ⟎ߚࠅߒ
ߥߢߊߛߐޕ
•ૐ᷷ޔ㜞᷷ޔᄙḨޔ߹ߚߪ߶ߎࠅߩᄙ႐ᚲߦ EM
chip ࠍ⟎ߒߥߢߊߛߐޕ
•EM࠴࠶ࡊߪሶߤ߽ߩᚻߩዯ߆ߥ႐ᚲߦ▤ߒߡ
ߊߛߐޕ
•ICㇱಽߪᷡẖߥ⁁ᘒߦ⛽ᜬߒߡߊߛߐޕ
•EM chipࡈࠔࠗ࡞ࠍࡃ࠶ࠢࠕ࠶ࡊߒߡߊߛߐޕ
EMOBILE ߪࡈࠔࠗ࡞ߩ៊ᄬߦኻߒߡ⽿છࠍ⽶
߹ߖࠎޕ
•EM chipߩᝌ߹ߚߪขࠅᄖߒߪޔᘕ㊀ߦⴕ߁ࠃ߁
ߦߒߡߊߛߐޕ
•ᜰቯߐࠇߚ EM chip ࠍ↪ߒߡߊߛߐޕ
•ICㇱಽࠍ⎕៊ߒߚࠅ⍴⛊ߐߖߚࠅߒߥߢߊߛ
ߐޕ
EM chip ࠍขࠅઃߌࠆ
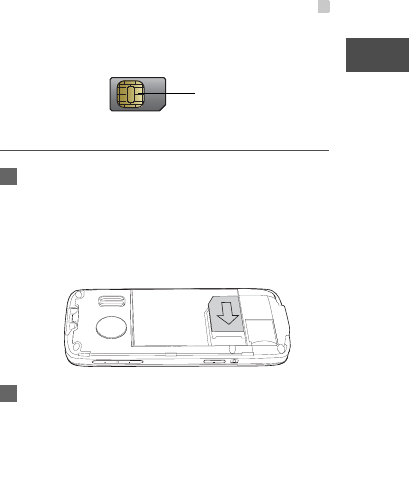
1ࠞ࠼ࠬࡠ࠶࠻ߩᏅߒㄟߺญߦࠞ࠼ࠍᝌߒ
߹ߔޕߎߩߣ߈ޔࠞ࠼ߩะ߈߇ਅ࿑ߣหߓߦ
ߥࠆࠃ߁ߦߒߡߊߛߐޕⷺ߇ᰳߌߡࠆࠦ
࠽߇ฝਅߦߥࠅ߹ߔޕᰴߦ࿑ߦ␜ߔࠃ߁ߦࠬ
ࠗ࠼ߐߖ߹ߔޕ
2ᧄߩᓟㇱߦࠆࡃ࠶࠹ࠬࡠ࠶࠻ߦࡃ࠶࠹
ࠍࠇ߹ߔޕࠞ࠴࠶ߣ㖸ࠍ┙ߡߡࡃ࠶࠹
߇ㆡಾߥ⟎ߦ߹ࠆ߹ߢࡃ࠶࠹ࠍ
ߒਅߍ߹ߔޕ
IC
EM chip ߩ↪ᣇᴺ
24
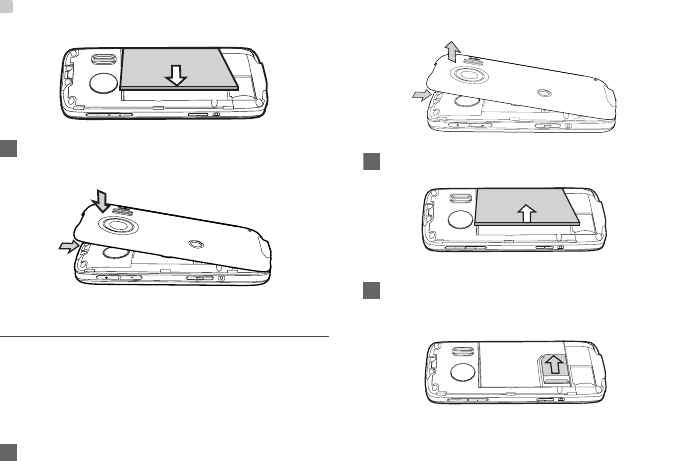
3⢛㕙ࠞࡃࠍࠬࠗ࠼ߐߖߡᧄߦขࠅઃߌ
߹ߔޕ
EM chip ࠍขࠅᄖߔ
ᔅߕ㔚ߩ㔚Ḯࠍಾߞߚᓟߢ EM chip ߣࡃ࠶࠹
ࠍขࠅᄖߒߡߊߛߐޕ㔚Ḯࠍಾࠄߥߣޔ㔚߇
⎕៊ߔࠆ႐ว߇ࠅ߹ߔޕ
EM chip ࠍขࠅᄖߔߦߪޔᰴߩᚻ㗅ߦᓥ߹ߔޕ
1㔚߆ࠄ⢛㕙ࠞࡃࠍขࠅᄖߒ߹ߔޕ
2ࡃ࠶࠹ࠍขࠅߒ߹ߔޕ
31ᧄߩᜰߢ EM chip ࠍߐ߃ߥ߇ࠄޔࠬࡠ࠶࠻߆ࠄ
ࠬࠗ࠼ߐߖߡขࠅߒ߹ߔޕ

EM chip ߩPIN
25
߅ߦߥࠆ೨ߦ
2
EM chip ߩPIN
PIN
PIN㧔ੱ⼂⇟ภ㧕ࠦ࠼ߪޔEM chip ߇ਇᱜߦ
↪ߐࠇࠆߩࠍ㒐ߋߚߦ↪ߐࠇ߹ߔޕEMOBILE
߇EM chip ࠍߏឭଏߔࠆ႐วߦߪޔPIN ࠍ߅ቴ᭽ߦ
ߏឭଏߒߡ߅ࠅ߹ߔ߇ޔࡠࡒࡦࠣ╬ߢߏ↪ߩ
㓙ޔઁߩㅢାᬺ⠪᭽ߩ SIM ࠞ࠼ࠍߏ↪ߩ႐ว
ߦߪޔㅢାᬺ⠪᭽߆ࠄឭଏߐࠇߡࠆࠍᓮ⏕
ߊߛߐޕPIN ࠦ࠼ࠍ⚗ᄬߒߚ႐วߪޔᦨነࠅߩ
⽼ᄁᐫޔߪࠞࠬ࠲ࡑࡦ࠲ߦ߅วࠊߖ
ߊߛߐޕޓዏޔઁߩㅢାᬺ⠪᭽ߩ SIM ߩ႐ว
ߪޔߘߩㅢା᳇ᬺ⠪᭽ߦ߅วࠊߖߊߛߐޕ
PIN2
EM chip ߢߪ PIN2 ࠦ࠼߇ឭଏߐࠇ߹ߔޕޟ࿕ቯ࠳
ࠗࡗ࡞⇟ภޠߩࠃ߁ߥ৻ㇱߩ․ᱶߥᯏ⢻ߪޔPIN2
ࠦ࠼ࠍജߔࠆ߹ߢ↪ߢ߈߹ߖࠎޕ߹ߚޔEM
chip ߇ߎࠇࠄߩᯏ⢻ࠍࠨࡐ࠻ߒߡࠆᔅⷐ߇ࠅ
߹ߔޕ
PUK
ࡠ࠶ࠢߐࠇߡࠆ EM chip ߩࡠ࠶ࠢࠍ⸃㒰ߔࠆߦ
ߪޔPUK㧔PIN ⸃㒰ࠠ㧕ࠦ࠼ࠍജߔࠆᔅⷐ߇
ࠅ߹ߔޕㅢᏱޔࠨࡆࠬࡊࡠࡃࠗ࠳߆ࠄ EM chip
ࠍᚻߒߚߣ߈ߦ PUK ࠦ࠼߇ឭଏߐࠇ߹ߔޕPIN
ࠦ࠼ࠍᚻߒߡߥ߆ߞߚࠅ⚗ᄬߒߚࠅߒߚ႐ว
ߪޔࠨࡆࠬࡊࡠࡃࠗ࠳ߦวࠊߖߡߊߛߐޕ
PUK2
EM chip ߢߪޔࡠ࠶ࠢߐࠇߡࠆ PIN2 ࠦ࠼ߩ
ࡠ࠶ࠢࠍ⸃㒰ߔࠆߚߦ↪ߔࠆ PUK2 ࠦ࠼߇ឭ
ଏߐࠇ߹ߔޕㅢᏱޔࠨࡆࠬࡊࡠࡃࠗ࠳߆ࠄࠞ࠼
ࠍᚻߒߚߣ߈ߦ PUK2 ࠦ࠼߇ឭଏߐࠇ߹ߔޕ
PIN ࠦ࠼ࠍᚻߒߡߥ߆ߞߚࠅ⚗ᄬߒߚࠅߒߚ
႐วߪޔࠨࡆࠬࡊࡠࡃࠗ࠳ߦวࠊߖߡߊߛߐ
ޕ
ฦㇱߩฬ⒓ߣᯏ⢻
26
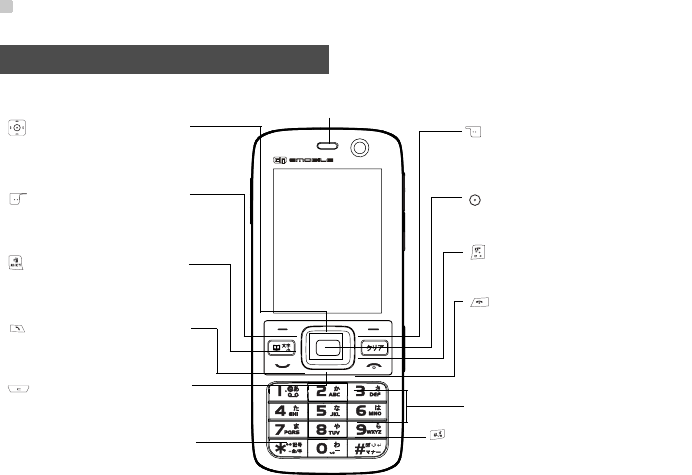
ฦㇱߩฬ⒓ߣᯏ⢻
TV ㅢ
ࡒࡘࠫ࠶ࠢࠠ㧛ࡑࠢࠠ
ࠬࠢࡠ࡞ࠠ
Ꮐᯏ⢻ࠠ
ㅢࠠ
ࠢࠕࠠ
✬㓸ࡕ࠼ߢࠞ࠰࡞ߩ೨ߦࠆᢥሼࠍ
㒰ߒ߹ߔޕ
ㅍญ
ฝᯏ⢻ࠠ
OK ࠠ
ฃญ
㔚Ḯ㧛⚳ࠠ
ߣ߈ߦߒ⛯ߌ߹ߔޕ
ࠠ
ߩࡊࡠࡈࠔࠗ࡞߆ࠄળ⼏ࡊࡠࡈࠔࠗ࡞ߦಾࠅᦧ߃ࠆ
•ࡔ࠾ࡘࠍࠬࠢࡠ࡞ߔࠆߦߪߎߩࠠࠍߒ߹
ߔޕ
•ࡉ࠙ࠩޔ㔚Ꮽޔࡔ࡞✬㓸ޔ߅ࠃ߮࠺࠲
•↹㕙ߩࡊࡠࡦࡊ࠻ࡃᏀߩᯏ⢻ࠍലߦߒ߹ߔޕ
•ᓙฃࡕ࠼ߢࡔࠗࡦࡔ࠾ࡘߦࠕࠢࠬߒ߹ߔޕ
•TV㔚ࠍ߆ߌ߹ߔޕ
•ᓙฃࡕ࠼ߢޟㅢጁᱧޠߩ⊒ାጁᱧ↹㕙ߦࠕࠢ
ࠬߒ߹ߔޕ
•㔚ࠍ߆ߌߚࠅᔕ╵ߒߚࠅߒ߹ߔޕ
•ᓙฃࡕ࠼ߢޟㅢጁᱧޠߩ⊒ାጁᱧ↹㕙ߦ
ࠕࠢࠬߒ߹ߔޕ
•↹㕙ߩࡊࡠࡦࡊ࠻ࡃฝߩᯏ⢻ࠍലߦߒ߹ߔޕ
•ᓙฃࡕ࠼ߢޟࡎࡓࡍࠫޠߦࠕࠢࠬߒ߹ߔޕ
•ࡔ࠾ࡘߢㆬᛯߒߚᯏ⢻ࠍ㐿ᆎߒ߹ߔޕ
•ᓙฃࡕ࠼ߢࡔࠗࡦࡔ࠾ࡘߦࠕࠢࠬߒ߹ߔޕ
•ޟࡒࡘࠫ࠶ࠢޠ↹㕙ߦࠕࠢࠬߒ߹ߔޕ
•ࠝࡊ࡚ࠪࡦ㗄⋡ߩ࠴ࠚ࠶ࠢࡏ࠶ࠢࠬࠍㆬᛯߒ߹ߔޕ
•ㅢਛߩ㔚ࠍ⚳ੌߒߚࠅޔ⌕ାߒߚ㔚ࠍᒝ
⊛ߦಾࠅ߹ߔޕ
•ࡎࡓ↹㕙ߦᚯࠅ߹ߔޕ
•ᧄߩ㔚Ḯࠍࠇࠆߣ߈ޔ߹ߚߪಾࠆߣ߈ߦޔ
ߎߩࠠࠍߒ⛯ߌ߹ߔޕ
⇟ภࠠ
ᢙሼ߿ᢥሼࠍജߔࠆߣ߈ߦ↪ߒ߹ߔޕ
ฦㇱߩฬ⒓ߣᯏ⢻
27
߅ߦߥࠆ೨ߦ
2
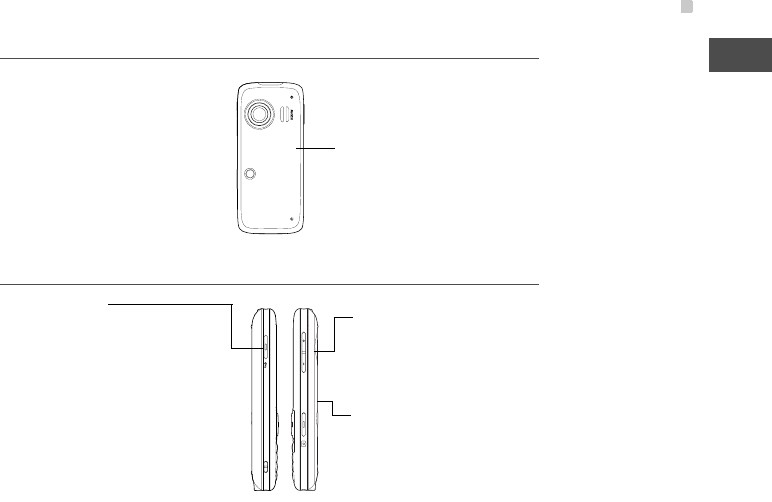
ᱜ㕙ߣ⢛㕙
㕙
ࡃ࠶࠹
ޔ
ࠞࡃ
㖸㊂ࠠ
ࠞࡔࠠ
ࡒࡘࠫ࠶ࠢࠠ
•ᧄࠍ㐿ߡᓙฃࡕ࠼ߢߒ⛯ߌࠆߣޔࠞࡔ
߇ലߦߥࠅ߹ߔޕ
•ᧄࠍ㐽ߓߡᓙฃࡕ࠼ߢߒ⛯ߌࠆߣޔࠝ
࠺ࠖࠝࡈࠔࠗ࡞ߩౣ↢ᤨߦߪࡒࡘࠫ࠶ࠢᠲ
ࠠ߇ࡠ࠶ࠢ㧛ࡠ࠶ࠢ⸃㒰ߐࠇ߹ߔޕߘࠇએᄖ
ߩ႐วߦߪ㍳㖸߇㐿ᆎ㧛⚳ੌߒ߹ߔޕ
•ᓙฃࡕ࠼߹ߚߪㅢਛߦ㖸㊂ࠍ
⺞▵ߔࠆߦߪޔߎࠇࠄߩࠠࠍ
ߒ߹ߔޕ
•ߎࠇࠄߩࠠࠍߔߣޔࠝ࠺ࠖࠝ
ࡈࠔࠗ࡞ߩౣ↢ᤨߦࠬࡇࠞ㖸㊂
ࠍ⺞▵ߢ߈߹ߔޕ
ᓙฃࡕ࠼ߢߎߩࠠࠍߒ⛯ߌࠆ
ߣޔᦨᣂߩࡒࡘࠫ࠶ࠢౣ↢↹㕙ߦ
ࠕࠢࠬߢ߈߹ߔޕ߹ߚߪࡒࡘ
ࠫ࠶ࠢౣ↢↹㕙߇⚳ੌߒ߹ߔޕ
ฦㇱߩฬ⒓ߣᯏ⢻
28
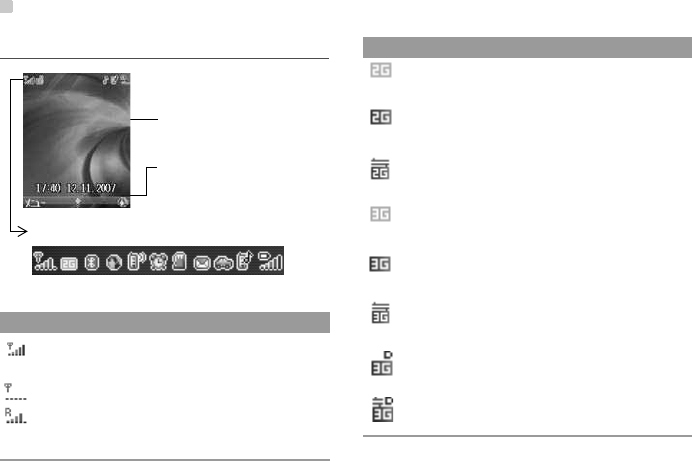
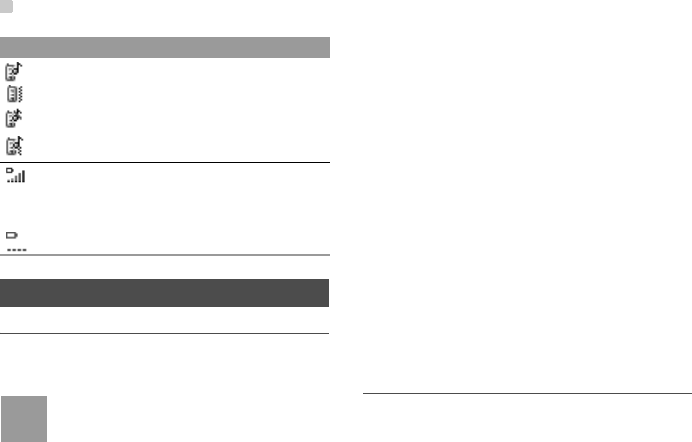
ᓙฃ↹㕙
ࠕࠗࠦࡦ ⺑
ାภᒝᐲࠍ␜ߒ߹ߔޕ❑ะ߈ߩ߇ᄙ
߶ߤାภ߇ᒝߎߣࠍߒߡ߹ߔޕ
ࡀ࠶࠻ࡢࠢାภ߇ࠅ߹ߖࠎޕ
ࡠࡒࡦࠣࠨࡆࠬࠍ↪ߒߡ߹ߔޕ
ࠕࠗࠦࡦࡃ
࠺ࠬࠢ࠻࠶ࡊ
ࡊࡠࡦࡊ࠻ࡃ
ᠲߣᯏ⢻ߩࠝࡊ࡚ࠪࡦࠍ
␜ߒ߹ߔޕ
↪ߢ߈ࠆᠲࠍ␜
ߒ߹ߔޕ
㔚ߪ GSM ࡀ࠶࠻ࡢࠢౝߦࠅ
߹ߔޕ
GSM ࡀ࠶࠻ࡢࠢߣ GPRS ࡀ࠶࠻ࡢࠢ
ߩਔᣇࠍ↪ߔࠆߎߣ߇ߢ߈߹ߔޕ
GPRS ࡀ࠶࠻ࡢࠢߢ࠺࠲ࠨࡆࠬࠍ
ታⴕߒߡ߹ߔޕ
㔚ߪ WCDMA ࡀ࠶࠻ࡢࠢౝߦ
ࠅ߹ߔޕ
WCDMA ࡀ࠶࠻ࡢࠢߣ࠺࠲ࠨࡆࠬ
ߩਔᣇࠍ↪ߔࠆߎߣ߇ߢ߈߹ߔޕ
WCDMA ࡀ࠶࠻ࡢࠢߢ࠺࠲ࠨࡆࠬ
ࠍታⴕߒߡ߹ߔޕ
HSDPA ࡀ࠶࠻ࡢࠢߣ࠺࠲ࠨࡆࠬߩ
ਔᣇࠍ↪ߔࠆߎߣ߇ߢ߈߹ߔޕ
HADPS ࡀ࠶࠻ࡢࠢߢ࠺࠲ࠨࡆࠬࠍ
ታⴕߒߡ߹ߔޕ
ࠕࠗࠦࡦ ⺑
ฦㇱߩฬ⒓ߣᯏ⢻
29
߅ߦߥࠆ೨ߦ
2
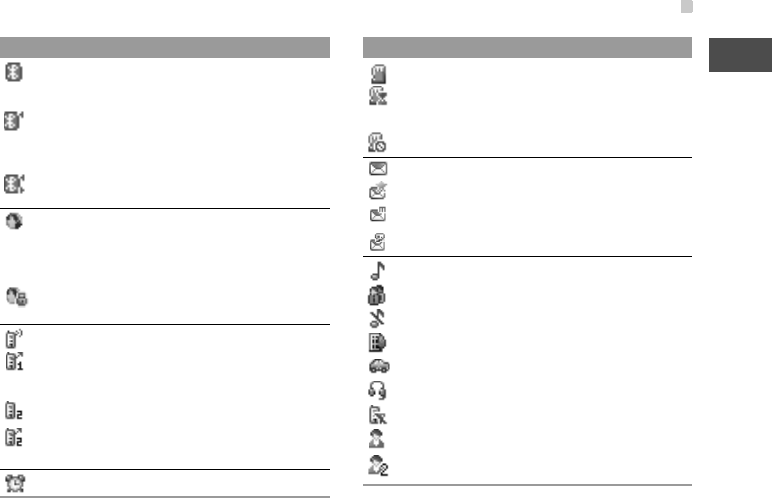
Bluetooth ᯏ⢻ߪലߢߔ߇ޔઁߩ࠺ࡃࠗࠬ
߆ࠄ៤Ꮺ㔚ࠍᬌߔࠆߎߣ߇ߢ߈߹ߖࠎޕ
Bluetooth ᯏ⢻߇ലߦߥߞߡߡޔઁߩ
࠺ࡃࠗࠬ߆ࠄ៤Ꮺ㔚ࠍᬌߔࠆߎߣ߇
ߢ߈߹ߔޕ
Bluetooth ߢߩォㅍࠍታⴕߒߡ߹ߔޕ
•ࡀ࠶࠻ࡢࠢߩធ⛯⁁ᘒࠍ␜ߒ߹ߔޕ
•㔚ࠍߒߡ PC ߇ࠗࡦ࠲ࡀ࠶࠻ߦធ
⛯ߐࠇߡ߹ߔޕ
ࡀ࠶࠻ࡢࠢߩࠠࡘ࠹ࠖធ⛯⁁ᘒࠍ
␜ߒ߹ߔޕ
㔚߇߮ߐࠇߡ߹ߔޕ
⌕ାߒߚ㔚⊒ାࠍߔߴߡ࿁✢ 1ߦォㅍ
ߒߡ߹ߔޕ
ޔ࿁✢ 2߇ലߢߔޕ
⌕ାߒߚ㔚⊒ାࠍߔߴߡ࿁✢ 2ߦォㅍ
ߒߡ߹ߔޕ
ࠕࡓ߇ലߢߔޕ
ࠕࠗࠦࡦ ⺑
SD ࠞ࠼߇ᝌߐࠇߡ߹ߔޕ
SD ࠞ࠼߆ࠄ࠺࠲߇㔚ߦォㅍߐࠇߡ
߹ߔޕ
SD ࠞ࠼߇ήലߢߔޕ
ᣂߒ࠹ࠠࠬ࠻ࡔ࠶ࠫ߇ࠅ߹ߔޕ
ᣂߒࡊ࠶ࠪࡘࡔ࡞߇ࠅ߹ߔޕ
ᣂߒࡑ࡞࠴ࡔ࠺ࠖࠕࡔ࠶ࠫ߇ࠅ߹ߔޕ
ᣂߒ⇐⇟㔚߇ࠅ߹ߔޕ
ᮡḰࡕ࠼߇ലߢߔޕ
ࡑ࠽ࡕ࠼߇ലߢߔޕ
ࠨࠗࡦ࠻ࡕ࠼߇ലߢߔޕ
ࠕ࠙࠻࠼ࠕࡕ࠼߇ലߢߔޕ
࠼ࠗࡉࡕ࠼߇ലߢߔޕ
ࠗࡗࡎࡦࡕ࠼߇ലߢߔޕ
ࠝࡦࠗࡦࡕ࠼߇ലߢߔޕ
ࡕ࠼ 1߇ലߢߔޕ
ࡕ࠼ 2߇ലߢߔޕ
ࠕࠗࠦࡦ ⺑
ࡃ࠶࠹ࠍల㔚ߔࠆ
30
ࡃ࠶࠹ࠍల㔚ߔࠆ
ࡃ࠶࠹ࠍల㔚ߔࠆ೨ߩᵈᗧ㗄
ࡃ࠶࠹ࠍల㔚ߔࠆ೨ߦޔᵈᗧ㗄ࠍࠃߊ⺒ࠎߢ
߅ߡߊߛߐޕ㧔ψ P2㧕
ᵈ•ೋߡࡃ࠶࠹ࠍల㔚ߔࠆߣ߈ߪޔᦨૐ
12 ᤨ㑆ߪల㔚ߒߡߊߛߐޕ
•↪ߒߡߥߊߡ߽ࡃ࠶࠹ߪ㔚ߐ
ࠇ߹ߔޕ㐳ᦼ㑆↪ߒߥ߆ߞߚ႐วߪޔ
ల㔚ߒߡ߆ࠄ↪ߔࠆࠃ߁ߦߊߛߐޕ
•ల㔚ᤨ㑆ߪ࿐᷷ᐲߣࡃ࠶࠹ߩ↪
ᦼ㑆ߦࠃߞߡ⇣ߥࠅ߹ߔޕ
•ࡃ࠶࠹ߪల㔚ߢ߈߹ߔ߇ᓢޘߦഠൻ
ߒ߹ߔޕㅢᏱㅢࠅߦࡃ࠶࠹ࠍల㔚ߒ
ߡ߽ޔ㔚ജߩଏ⛎ᤨ㑆߇ㅢᏱࠃࠅ⍴႐
วߪޔหߓ⒳㘃ߩࡃ࠶࠹ߦᦧߒߡ
ߊߛߐޕ
•ࡃ࠶࠹ߦኻߒߡⴣ᠄ࠍਈ߃ߚࠅޔ
ࠅᛩߍߚࠅޔੂߦᛒߞߚࠅߒߥߢߊ
ߛߐޕᶧ߽ࠇޔᧄߩ៊்ޔㆊᾲޔ
⊒ޔ߹ߚߪ⊒Ἣߔࠆน⢻ᕈ߇ࠅ߹ߔޕ
•ᧄߦઃዻߩల㔚ེࠍ↪ߒߡࡃ࠶࠹
ࠍల㔚ߒߡߊߛߐޕ
ࡃ࠶࠹ߩขࠅઃߌߣขࠅᄖߒ
ᔅߕ㔚ߩ㔚Ḯࠍಾߞߚᓟߢࡃ࠶࠹ࠍขࠅᄖߒ
ߡߊߛߐޕ㔚Ḯࠍಾࠄߥߣޔ㔚߇⎕៊ߔࠆ႐
ว߇ࠅ߹ߔޕ
⌕ା㖸߇ലߢߔޕ
ࡃࠗࡉ࠲߇ലߢߔޕ
ࡒࡘ࠻ࡕ࠼߇ലߢߔޕ
⌕ା㖸ߣࡃࠗࡉ࠲߇ലߢߔޕ
ࡃ࠶࠹ߩ㔚ജࡌ࡞ࠍ␜ߒ߹ߔޕ
߇ᄙ߶ߤࡃ࠶࠹ߩ㔚ജࡌ࡞߇㜞
ߎߣࠍ␜ߒ߹ߔޕ
ࡃ࠶࠹ߩᱷ㊂߇ૐਅߒߡ߹ߔޕ
ࠕࠗࠦࡦ ⺑
ࡃ࠶࠹ࠍల㔚ߔࠆ
31
߅ߦߥࠆ೨ߦ
2
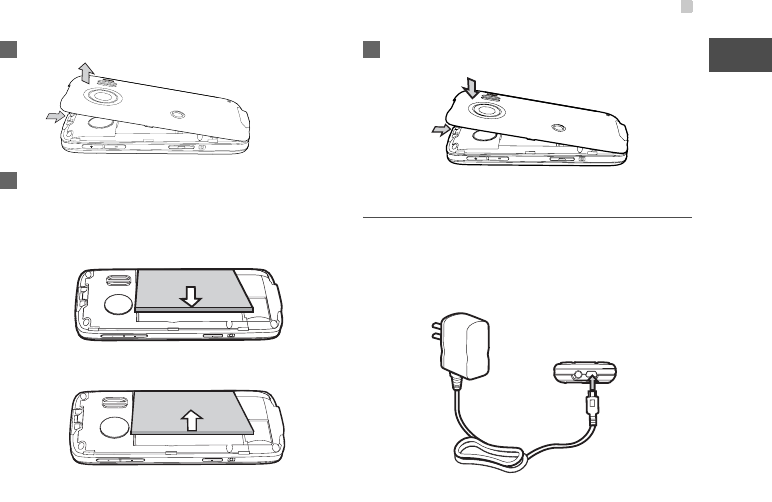
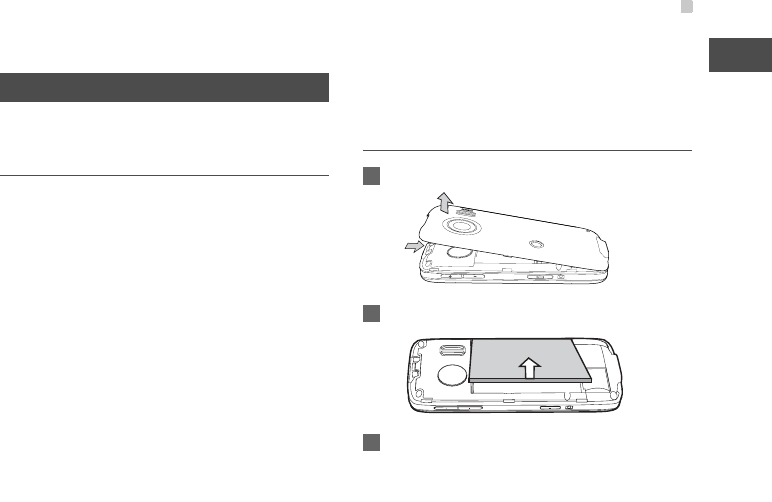
1㔚߆ࠄ⢛㕙ࠞࡃࠍขࠅᄖߒ߹ߔޕ
2ᧄߩᓟㇱߦࠆࡃ࠶࠹ࠬࡠ࠶࠻ߦࡃ࠶࠹
ࠍࠇ߹ߔޕࠞ࠴࠶ߣ㖸ࠍ┙ߡߡࡃ࠶࠹
߇ㆡಾߥ⟎ߦ߹ࠆ߹ߢࡃ࠶࠹ࠍ
ߒਅߍ߹ߔޕ
ࡃ࠶࠹ࠍขࠅߒ߹ߔޕ
3⢛㕙ࠞࡃࠍࠬࠗ࠼ߐߖߡᧄߦขࠅઃߌ߹ߔޕ
ࠤࡉ࡞ల㔚ེࠍߞߡల㔚ߔࠆ
ࠤࡉ࡞ల㔚ེࠍߞߡࡃ࠶࠹ࠍల㔚ߔࠆ೨
ߦޔࡃ࠶࠹߇ᧄߦᱜߒߊขࠅઃߌࠄࠇߡࠆ
ߎߣࠍ⏕ߒߡߊߛߐޕ
ࡃ࠶࠹ࠍల㔚ߔࠆߦߪޔᰴߩᚻ㗅ߦᓥ߹ߔޕ
㔚Ḯߩࠝࡦ㧛ࠝࡈ
32
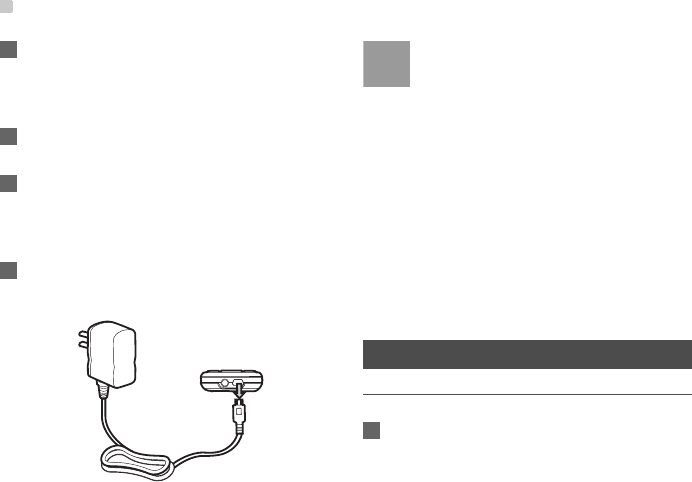
1ߩ࿑ߦ␜ߔࠃ߁ߦޔᧄߩࠦࡀࠢ࠲ߦల㔚ེ
ߩࡊࠣࠍᏅߒㄟߺ߹ߔޕࡊࠣࠍᏅߒㄟ೨
ߦޔల㔚ེߩജࠫࡖ࠶ࠢߩ⍫ශ߇㔚ߩ೨㕙
ࠍᜰߒߡࠆߎߣࠍ⏕ߒߡߊߛߐޕ
2ల㔚ེߩࠦࡀࠢ࠲ࠍ㔚Ḯ࠰ࠤ࠶࠻ߦᏅߒㄟߺ
߹ߔޕ
3ࡃ࠶࠹ߩల㔚ਛߪޔల㔚ࠗࡦࠫࠤ࠲߇ὐ
Ṍߒ⛯ߌ߹ߔޕల㔚ࠗࡦࠫࠤ࠲ߩὐṌ߇ᱛ
߹ߞߚࠄޔࡃ࠶࠹ߩల㔚߇ቢੌߒߚߎߣࠍ
␜ߒ߹ߔޕ
4ల㔚߇ቢੌߒߚࠄޔ㔚Ḯ࠰ࠤ࠶࠻߆ࠄ㔚Ḯࠕ࠳
ࡊ࠲ߩࡊࠣࠍᛮ߈ޔ៤Ꮺ㔚߆ࠄల㔚ེߩࡊ
ࠣࠍᛮߡ߆ࠄ⼔ࠞࡃࠍ㐽ߓ߹ߔޕ
ᵈ•㔚Ḯࠍࠝࡈߦߒߡᧄࠍ㐽ߓߚ⁁ᘒߢల
㔚ߒߡࠆ㑆ޔࡃ࠶࠹ߩ㔚ജࡌ࡞
ࠍ␜ߔ⁁ߩࠕࠗࠦࡦ߇↹㕙ߦ␜ߐࠇޔ
ὐṌߒ⛯ߌ߹ߔޕ⁁ߩࠕࠗࠦࡦߩ㔚ജ
ࡌ࡞߇ᦨᄢߦߥࠅὐṌ߇ᱛ߹ࠆߣޔల
㔚߇ቢੌߒߚߎߣࠍ␜ߒ߹ߔޕ
•ᧄࠍ㐽ߓߡ㔚Ḯࠍࠇߚ⁁ᘒߢ៤Ꮺ㔚
ࠍల㔚ߔࠆߣޔࡃ࠶࠹ࠕࠗࠦࡦߪ
ᄖઃߌ࠺ࠖࠬࡊࠗߩฝߢὐṌߒ߹ߔޕ
ߒ߫ࠄߊߔࠆߣޔᄖઃߌ࠺ࠖࠬࡊࠗߪ
⥄േ⊛ߦࠝࡈߦߥࠅ߹ߔޕ㕙ߩࠠߦ
シߊ⸅ࠇࠆߣల㔚⁁ᘒࠍ⏕ߔࠆߎߣ߇
ߢ߈߹ߔޕࡃ࠶࠹ࠕࠗࠦࡦߩὐṌ߇
ᱛ߹ࠆߣల㔚ߪቢੌߢߔޕ
㔚Ḯߩࠝࡦ㧛ࠝࡈ
㔚Ḯࠍࠇࠆ
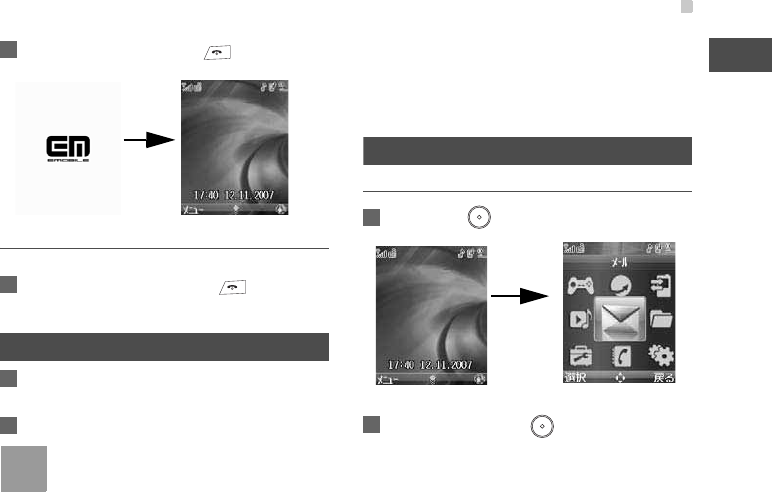
1ᧄຠߩᧄࠍ㐿߈߹ߔޕ
ᣣઃߣᤨೞࠍ⸳ቯߔࠆ
33
߅ߦߥࠆ೨ߦ
2
2៤Ꮺ㔚ߩ㔚Ḯ߇ࠆ߹ߢ ޔࠍߒ⛯ߌ
߹ߔޕ
㔚Ḯࠍಾࠆ
1៤Ꮺ㔚ߩ㔚Ḯ߇ಾࠇࠆ߹ߢޔ ࠍߒ⛯ߌ
߹ߔޕ
ᣣઃߣᤨೞࠍ⸳ቯߔࠆ
1ޟ⸳ቯޠ>ޟ৻⥸⸳ቯޠ>ޟᣣઃ㧛ᤨೞ⸳ቯޠࠍ
ㆬᛯߒ߹ߔޕ
2ᣣઃߣᤨೞࠍജߒ߹ߔޕ
ᵈ•࠲ࠗࡓ࠱ࡦߩ⸳ቯ㧔ψ P165㧕
•ᄐᤨ㑆ߩ⸳ቯ㧔ψ P165㧕
•ᣣઃ␜ᒻᑼߩ⸳ቯ㧔ψ P135㧕
•៤Ꮺ㔚ߩᣣઃߣᤨೞߪޔ2000 ᐕ13ᣣ
ඦ೨ 0ᤨ߆ࠄ 2099 ᐕ11ᣣඦ೨ 0ᤨ
߹ߢߦ㒢ߐࠇߡ߹ߔޕ
ᯏ⢻ࠍ߮ߔ
ࡔࠗࡦࡔ࠾ࡘ߆ࠄᯏ⢻ࠍ߮ߔ
1ᓙฃ↹㕙ߢ ࠍߒ߹ߔޕ
2⋡⊛ߩᯏ⢻ࠍㆬᛯߒޔ ࠍߒ߹ߔޕ
ᯏ⢻ࠍ߮ߔ
34
࡚ࠪ࠻ࠞ࠶࠻ࠠࠍߞߡᯏ⢻↹㕙ࠍ
␜ߔࠆ
ᓙฃ↹㕙ߦ␜ߐࠇࠆ࠺ࡈࠜ࡞࠻ߩ࡚ࠪ࠻ࠞ࠶࠻
ࠠߩᓎഀࠍએਅߦ␜ߒ߹ߔޕ
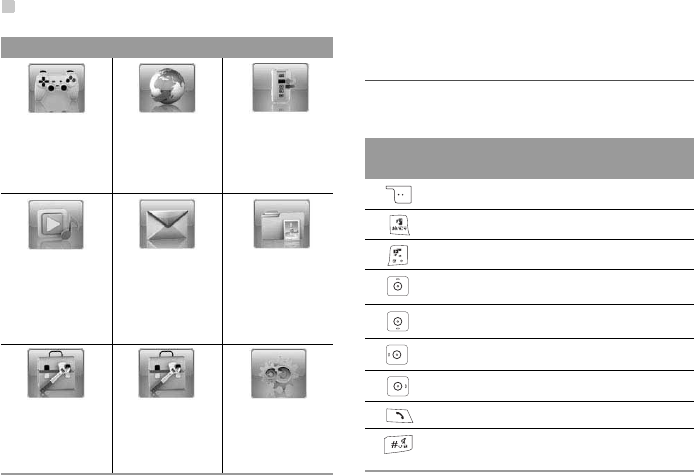
ࡔࠗࡦࡔ࠾ࡘߦ␜ߐࠇࠆࠕࠗࠦࡦߣᗧ
ࠛࡦ࠲࠹ࠗࡔࡦ࠻
ࠞࡔߣࡒࡘࠫ࠶
ࠢࠕࡊࠤ࡚ࠪࡦ
ࠍ↪ߒ߹ߔޕ
ࡉ࠙ࠩ
ࡕࡃࠗ࡞ࠗࡦ࠲
ࡀ࠶࠻ߩ↪ߣ⸳
ቯࠍⴕ߹ߔޕ
ㅢጁᱧ
ㅢጁᱧࠕࡊ
ࠤ࡚ࠪࡦࠍ↪
ߒ߹ߔޕ
ࡒࡘࠫ࠶ࠢ
ࡒࡘࠫ࠶ࠢߣࡊ
ࠗࠬ࠻ࠕࡊ
ࠤ࡚ࠪࡦࠍ↪
ߒ߹ߔޕ
ࡔ࡞
ࡔ࡞߹ߚߪ
SMS ࠍᚑ㧛␜
ߒ߹ߔޕ
࠺࠲ࡈࠜ࡞࠳
ᧄ㧛ࡑࠗࠢࡠ
ࠞ࠼ߦሽߐࠇ
ߡࠆࡈࠔࠗ࡞ࠍ
␜ߒ߹ߔޕ
࠷࡞
ࠕࡓ߿ࠞࡦ
࠳ࠍ⸳ቯߒ߹ߔޕ
㔚Ꮽ
ㅢవޔࡔ࡞ㅍ
ାవࠍ⊓㍳ߒ߹ߔޕ
⸳ቯ
㔚ߩ⸳ቯࠍ⺞
ᢛ㧛ࠞࠬ࠲ࡑࠗ࠭
ߒ߹ߔޕ
࡚ࠪ࠻
ࠞ࠶࠻ ⺑
EMnet ߩWeb ࠨࠗ࠻ߦࠕࠢࠬߒ߹ߔޕ
ㅢጁᱧߦࠕࠢࠬߒ߹ߔޕ
ࡒࡘࠫ࠶ࠢߦࠕࠢࠬߒ߹ߔޕ
ࡉ࠙ࠩߦࠕࠢࠬߒ߹ߔޕ
㔚Ꮽߦࠕࠢࠬߒ߹ߔޕ
ޟࡔ࡞✬㓸ޠ↹㕙ߦࠕࠢࠬߒ߹ߔޕ
࠺࠲ࡈࠜ࡞࠳ߦࠕࠢࠬߒ߹ߔޕ
ㅢጁᱧߦࠕࠢࠬߒ߹ߔޕ
ᮡḰࡕ࠼ߣࡑ࠽ࡕ࠼ࠍಾࠅᦧ߃
߹ߔ㧔ᦨૐ 1⑽㑆ߒ⛯ߌ߹ߔ㧕ޕ
ࡔࡕࠞ࠼
35
߅ߦߥࠆ೨ߦ
2
࠽ࡆ࡚ࠥࠪࡦߩ࡚ࠪ࠻ࠞ࠶࠻ߩ⸳ቯ㧔ψ P136㧕
ࡔࡕࠞ࠼
ᧄຠߢߪޔࡔࡕኈ㊂߇ᦨᄢ 2GB ߩmicroSD
ࠞ࠼ࠍࠨࡐ࠻ߒߡ߹ߔޕ
ࡔࡕࠞ࠼ࠍ↪ߔࠆ೨ߦ
microSD ࡔࡕࠞ࠼ߩ↪ߣขࠅᛒ㑐ߒߡޔᰴ
ߩᵈᗧ㗄ߦᵈᗧߒߡߊߛߐޕ
•ࡔࡕࠞ࠼ߦࡌ࡞߿ࠪ࡞ࠍ⾍ࠄߥߢߊߛ
ߐޕࠞ࠼ߩᕈ⢻ߦᓇ㗀ߒߚࠅᖱႎ߇ᄬࠊࠇߚ
ࠅߔࠆน⢻ᕈ߇ࠅ߹ߔޕ
•ࡔࡕࠞ࠼ߪ㜞♖ᐲߥ㔚ሶᯏེߢߔޕࡔࡕ
ࠞ࠼ࠍߨߓᦛߍߚࠅޔᒝⴣ᠄ࠍਈ߃ߚࠅߒߥ
ߢߊߛߐޕᖱႎ߇ᄬࠊࠇߚࠅޔធ⸅ਇ⦟ࠍ
ߎߒߚࠅߔࠆน⢻ᕈ߇ࠅ߹ߔޕ
•ࡔࡕࠞ࠼ࠍಽ⸃ߒߚࠅᡷㅧߒߚࠅߒߥߢߊ
ߛߐޕ
•ࡔࡕࠞ࠼ߪޔ߶ߎࠅ߇ᄙ႐ᚲޔᄙḨޔ߹ߚ
ߪ㜞᷷ߥ႐ᚲ߆ࠄ㔌ࠇߚ႐ᚲߦ▤ߒߡߊߛߐޕ
•ࡔࡕࠞ࠼ߩ┵ሶߦ⸅ߞߚࠅޔ┵ሶࠍ㊄ዻߦធ
⸅ߐߖߚࠅߒߥߢߊߛߐޕ
•ᾲḮࠍㆱߌޔἫߩࠆ႐ᚲߦ⟎ߒߥߢߊߛߐޕ
•ଚ㘩ᕈߩࠟࠬ߇ࠆ႐ᚲߢߪ↪ߒߥߢߊߛߐޕ
•ࡔࡕࠞ࠼ߪᶖ⠻ຠߢߔޕࠞ࠼ߩᕈ⢻ߪ↪
ߦߞߡഠൻߒ߹ߔޕ
ࡔࡕࠞ࠼ߩขࠅઃߌ㧛ขࠅᄖߒ
1㔚߆ࠄ⢛㕙ࠞࡃࠍขࠅᄖߒ߹ߔޕ
2ࡃ࠶࠹ࠍขࠅߒ߹ߔޕ
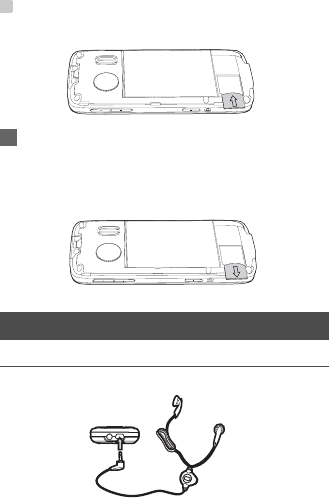
3ᰴߩ࿑ߦ␜ߔࠃ߁ߦޔࠬࡠ࠶࠻ߦࡔࡕࠞ࠼
ࠍᏅߒㄟߺ߹ߔޕ
ࠗࡗࡎࡦߣࠗࡗࡎࡦᄌ឵ࠕ࠳ࡊ࠲
36
4ࡔࡕࠞ࠼ࠍขࠅᄖߔ႐วޔᧄߩ㔚Ḯࠍ
ಾߞߡࡃ࠶࠹ࠍขࠅᄖߒ߹ߔޕࡔࡕࠞ࠼
ࠍシߊߒㄟߺ߹ߔޕࡔࡕࠞ࠼ߪ⥄ὼߦᄖࠇ
߹ߔޕᰴߩ࿑ߦ␜ߔࠃ߁ߦขࠅߒ߹ߔޕ
ࠗࡗࡎࡦߣࠗࡗࡎࡦᄌ឵ࠕ࠳ࡊ࠲
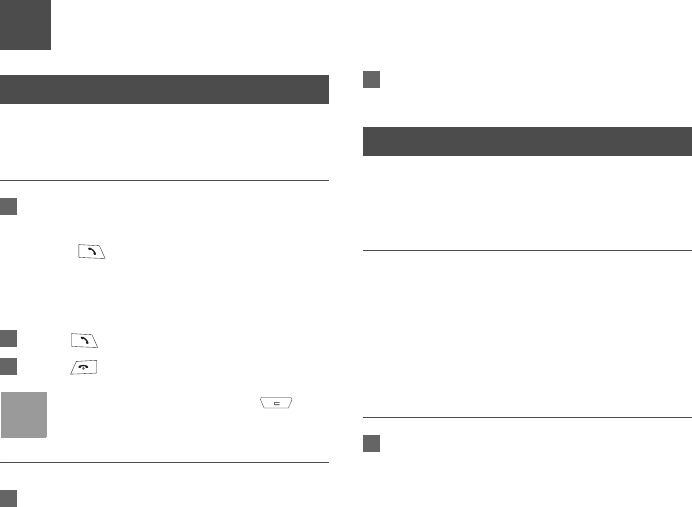
ࠗࡗࡎࡦ
ᰴߩ࿑ߦ␜ߔࠃ߁ߦޔᧄߦࠗࡗࡎࡦࠍធ⛯ߒ߹ߔޕ
37
3Basic Operations
Making a Call
For oeprations about mobile phoneContacts.
(ė 3 For operations about video calls. ( ėP68
Making a Voice Call
1Enter a phone number.
• Enter a phone number through the keypad.
• Press , and choose a number from Call
Log.
• Select a number in Contacts. For detailed
operations, refer to Contacts.
2Press to dial out.
3Press to end the call.
Note To delete a wrong number, press once
to delete the digit to the left of the cursor.
Making a Call Using SDN
1In Contacts, set the Speed Dial Number (SDN).
(ėP64
2In Standby mode, press the predefined SDN key
for 1+ seconds to make a voice call.
Answering or Rejecting a Call
Your mobile phone rings or vibrates when there is an
incoming call. If the number of the incoming call is in
Contacts, the corresponding name is displayed.
Setting the Answer Mode
You can set the following answer modes. ( ėP139
• Open flip
• Any key
• Send key
• Enable and set Auto answer.
Answering a Call When the Auto
Answer Is Disabled
1Answer a call:
• Open flip: You can answer a call when you
open the flip.
Answering or Rejecting a Call
38
• Any key: Open the flip, press any key except
and to answer a call.
• Send key: Open the flip, press to answer
a call.
• If the headset is plugged in, press the headset
key to answer a call.
2End a call:
• Close the flip or press to end a call.
• If the headset is plugged in, press the headset
key to end a call.
Answering a Call When the Automatic
Answer Is Enabled
1Answer a call:
• Immediate answer: Your mobile phone
answers the call after 5 seconds.
• Message: Your mobile phone sends the pre-
defined SMS to the calling party after 20 sec-
onds.
• Recorded message: The mobile phone plays
the 10 seconds record after 20 seconds, and
then records the calling party's message.
(ėP139
2End a call:
• Close the flip or press to end a call.
• If the headset is plugged in, press the headset
key to end a call.
Rejecting Calls
When the mobile phone rings or vibrates,
• Press to reject the incoming call.
• When the H12HW is not in a call, press the volume
keys for 2+ seconds to reject the call.
• When the flip is opened, close the flip to reject the
call.
Note • The headset key functions only when you
answer or end a call. You cannot reject a
call with the headset key.
• When the flip is closed and the mobile
phone is in a call, press the camera key
for 1+ seconds to disable the incoming
call ringtone.
Operations During a Voice Call
39
Basic Operations
3
Operations During a Voice Call
Icon Description
: A voice call is ongoing.
: The voice call is on hold.
: There is a new incoming voice call during a call.
Adjusting the mobile phone Volume
1While in a call, press the side volume keys to
adjust the volume.
Making a Second Call
Enable Call waiting first. ( ė 3
In this case, you can make or answer many calls dur-
ing a call. Add max to 6 parties.
1Edit a phone number:
• Enter a phone number;
•Select Options > New call. Enter the phone
number;
•Select Options > Other applications >
Contacts. Select a phone number from Con-
tacts.
2Press to dial out.
Holding a Call
When you enable the Hold, the calling party can only
hear the Hold tone. You can answer another call.
Operations During a Voice Call
40
1During a call, press or select Options >
Hold to enable the Hold function.
2Press or select Options > Resume to
resume a call.
Switching Between Handsfree and
Earpiece
1During a call, press to swtch between the
handsfree device and the earpiece.
Starting/Stopping Recording
You can record the voice of the calling party during a
call.
1Select Options > Start recording to start the
record.
2Select Options > Stop recording stop the
record.
Note • When the record completes, the audio file
is automatically saved to the File/Music
folder.
• During a call, when the call ends the
record automatically stops. The audio file
is automatically saved to the File/Music
folder.
Other Operations During a Voice Call
Item Description
Mute
Unmute
During a call, you can press to
make your voice mute or to restart the
conversation by pressing it again
Swap Select Options > Swap to swap
between calls during a 3-part call.
Conference
call
If there are three or more parites
involved in the same call, you can
select Options > Conference call to
add all the saved parties into a
conference. Add max to 6 parties to a
conference call.
Private call During a conference call, you can
select Options > Private call to talk
privately to one of the parties who
involved in the call conference.

Call Log
41
Basic Operations
3
Note For all Multiparty Calls, Call Waiting should
be enabled. The Call Waiting function needs
to be subscribed.
Call Log
1Press or to access the Call Log
screen.
2Press or to switch between All calls,
Missed,Received and Dialed.
End During the call, you can select
Options > End to end all calls, the
active call, the current call or the on
hold call.
Contacts During the call, you can select
Options > Other Applications >
Contacts to access the Contacts
screen.
SMS During the call, you can select
Options > Other Applications >SMS
to access the SMS screen.
Call Log During the call, you can select
Options > Other Applications >Call
Log to access the Call Log screen.
P41
Item Description
Item Description
All calls All incoming and outgoing calls.
Missed All missed incoming calls.
Received All received incoming calls.
Dialed All outgoing calls.
Call Log
42
Icon Description
: A call is ongoing.
: The call is on hold.
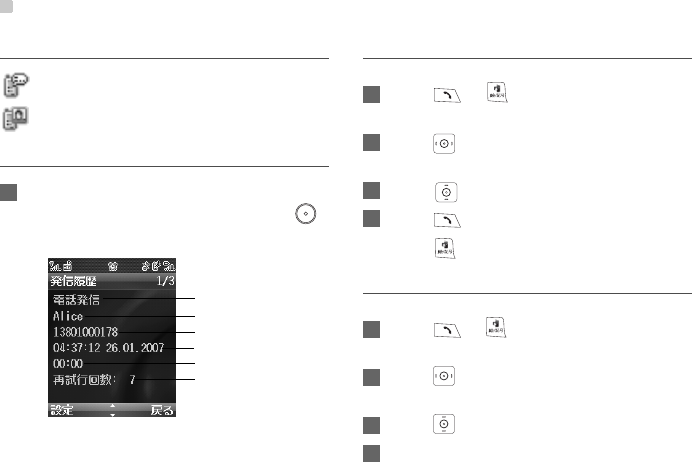
Viewing a call log detail
1In the All calls,Missed,Received or Dialed
screen, select one call log, and then press
to view the detail.
Making a Call Using the Call Log
1Press or to access the Call Log
screen.
2Press to switch between All calls,Missed,
Received and Dialed.
3Press to select a call log record.
4Press to make a voice call.
Press to make a video call.
Saving a number
1Press or to access the Call Log
screen.
2Press to switch between All calls,Missed,
Received and Dialed.
3Press to select a call log record.
4Select Options > Save number.
Call Type
Name
Number
Call time
Total time
Retry times

Call Log
43
Basic Operations
3
• Save to phone: to save the numbers of the
selectes record to the phone.
• Save to SIM: to save the numbers of the
selectes record to USIM card.
• Append to existing: to save the numbers of the
selectes record to an existing contact.
Deleting Call Log Records
Delete one call log record.
1Press or to access the Call Log
screen.
2Press to switch between All calls,Missed,
Received and Dialed.
3Press to select a call log record.
4Select Options > Delete > Yes.
Delete all call log records.
1Press or to access the Call Log
screen.
2Press to switch between All calls,Missed,
Received and Dialed.
3Select Options > Mark all.
4Select Options > Delete > Yes.
Call log options
Select Options in the Call log screen for the following
options.
Item Description
Edit before
call
To edit the number before making a
call.
Write SMS To access Edit SMS screen.
Save
Number
To save the numbers of the selectes
record. ( ėP42
Call To make a call. ( ėP42
Display
mode
You can select Normal to display all
records or select Simple to ignore the
repeated records.
Delete To delete the call log records. ( ėP43
Mark/
Unmark
To mark/unmark a record or all records.
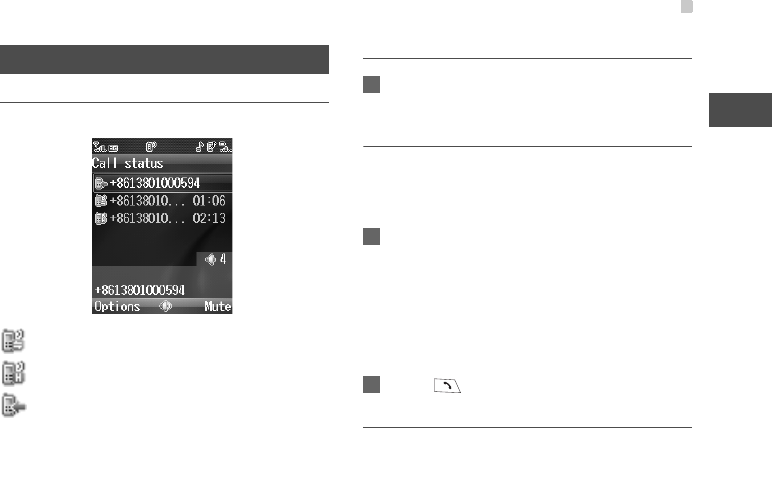
Calls status Display the information of voice calls,
video calls or data services.P44

Calls status
44
Calls status
Display the information of voice calls, video calls or
data services. You can perform this funtion on the
screen of missed calls. the received calls or the
dialed calls.
1Press or to access the Call Log
screen.
2Press to switch between All calls,Missed,
Received and Dialed.
3Press to select a call log record.
4Select Options > Calls status.
• Voice call: Displying the last voice call
duration, the incoming voice call duration, the
outgoing voice call duration, the total time of all
voice calls, and the last reset time.
• Video call: Displying the last video call
duration, the incoming video call duration, the
outgoing video call duration, the total time of all
video calls, and the last reset time.
• Data: Displying the total uplink flow, the total
downlink flow, and the total connecting
duration; the last uplink flow, the last downlink
flow, and the last connecting duration; and the
last reset time.
Note • From any of the Voice call, Video call or
Data service screen, you can reset all the
statistic infomation on that screen by
selecting Reset.
• If you do not reset the time, the latest
reset time will not be displayed.
Emergency Calls
Call 110(police), 119(Fire&Ambulance) or 118(Coast
Guard) enve when some mobile phone restrictions
are active.
H12HW Status Available Numbers
Offline mode is active.
(ėP133
None
Phone lock is active. (ėP143110,119,118
PIN lock is active. ( ėP143110,119,118
My number
45
Basic Operations
3
Note You can use your phone for emergency
calls. However, connections in all conditions
cannot be guaranteed. You should never
rely solely on the phone for essential
communications.
My number
Your mobile phone automatically obtains your num-
ber from the USIM card. You can view and edit the
number.
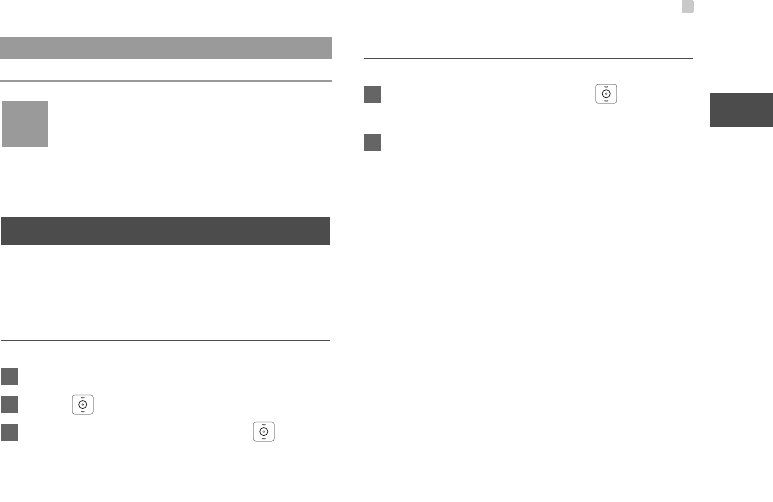
View My number
1Select Settings in the main menu.
2Press to select Call settings > My number.
3Into the My bnumber screen, press to view
the selected number.
Edit My number
1In the My number screen, press to select a
number.
2Select Options,
• Edit number: Edit the selected number.
• Edit name: Edit the name of the specified num-
ber.
• Delete: Delete the select number and the cor-
responding name.
USIM card is not insert. 110,119,118
H12HW Status Available Numbers
46
4Text Entry
Enter hiragana, kanji, katakana, alphanumeric,
symbols, and pictographs.
Text Input Interface
Switching Input Modes
Text entry modes may be limited in some text entry
fields or windows.
1In a text entry window, press .
2Select Input mode.
3Select an input mode and press .
Note • Press to switch between input meth-
ods, including Kanji,Kana,Abc,ABC,
abc, and numbers.
• To switch between full pitch and half pitch,
select Options >Full Pitch/Half Pitch.
Except the Kanji input mode, you can
press and hold to switch between
full pitch and half pitch.
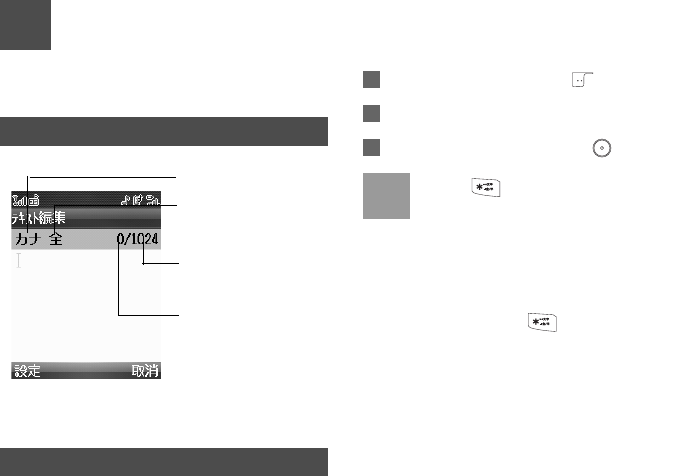
Current Entry Mode
Full-pitch/Half-pitch
alphanumerics
Character Count:
Remaining number of
enterable characters
appears, regardless of
input mode.
Supports a maximum
number
Keypad Assignments
47
4
Text Entry
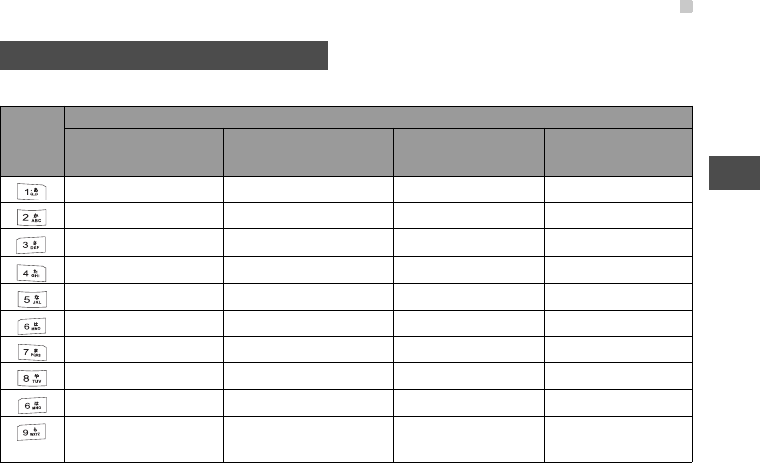
Keypad Assignments
Multiple character are assigned to each key. Press a key repeatedly until the target character appears.
Keypad
Input Modes
Kanji/Hiragana
(Full Pitch)
Katakana
(Full Pitch/Half Pitch)
Alphanumerics
(Full Pitch/Half Pitch)
Numbers
(Full Pitch/Half Pitch)
ǗǙǛǝǟǖǘǚǜǞ ȪȬȮȰȲȩȫȭȯȱ . @ ʽ˛ 1
ǠǢǤǦǨ ȳȵȷȹȻ a b c A B C 2 2
ǪǬǮǰDz ȽȿɁɃɅ d e f D E F 3 3
ǴǶǹǻǽǸ ɇɉɌɎɐɋ g h i G H I 4 4
ǿȀȁȂȃ ɒɓɔɕɖ j k l J K L 5 5
ȄȇȊȍȐ ɗɚɝɠɣ m n o M N O 6 6
ȓȔȕȖȗ ɦɧɨɩɪ p q r s P Q R S 7 7
șțȝȘȚȜ ɬɮɰɫɭɯ t u v T U V 8 8
ȞȟȠȡȢ ɱɲɳɴɵ w x y z W X Y Z 9 9
ȤȧȨȣ ޔDŽϔ ƽ̚
! ? Spaceޓ
ɷɺɻό Space Space 0 0
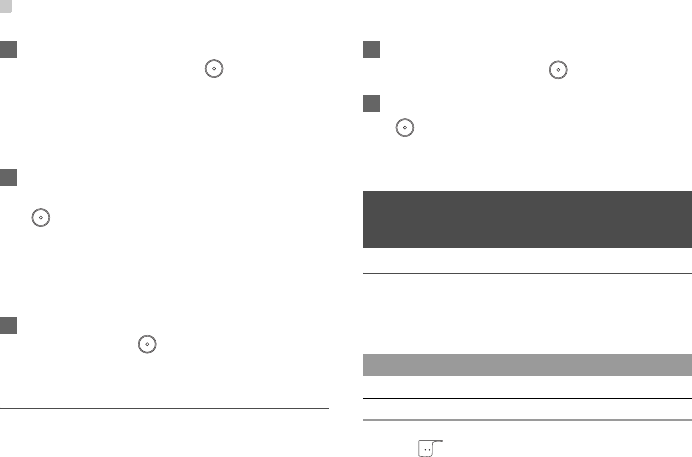
Entering Characters
48
Note Press to delete the letter before the
cursor.
Entering Characters
• Switching input mode.( ėP46
Entering Kanji/Hiragana
In Kanji mode, enter kanji and hiragana. Example,
enter ড়ǛǮȠ
1In a text entry window, select Kanji.
2To enter hiragana, press and select Ǘ.
3Press , press three times, and then
select Ǜ.

Entering Characters
49
4
Text Entry
4Press and hold until ড়Ǜis displayed. Select
ড়Ǜ .
5Press to enter ড়Ǜ .
6Press three times, and then to enterǮ.
Enter Ƞ in the same way.
Entering Katakana
In FullPitch Kana or HalfPitch Kana mode, enter
katakana. Example, enter ɇȬɟ
1In FullPitch Kana mode or HalfPitch Kana mode,
press a key to enter the assigned character.
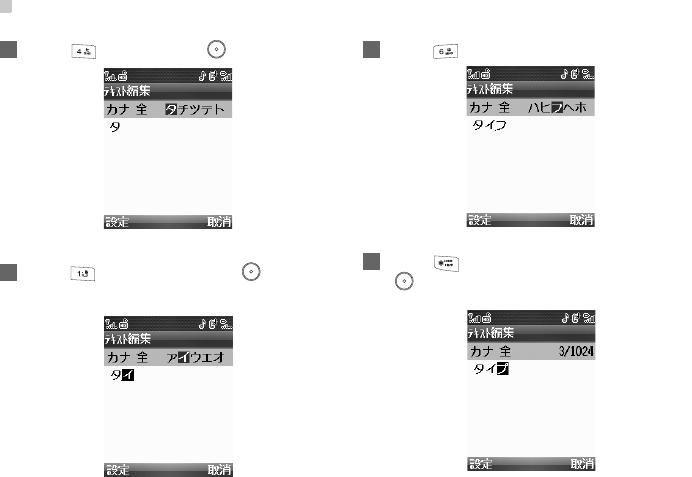
Entering Characters
50
2Press , and then press to enter ɇ.
3Press twice, and then press to enter
Ȭ.
4Press three times. The ɝis displayed.
5Press twice. The ɟ is displayed and press
to enter ɟ.
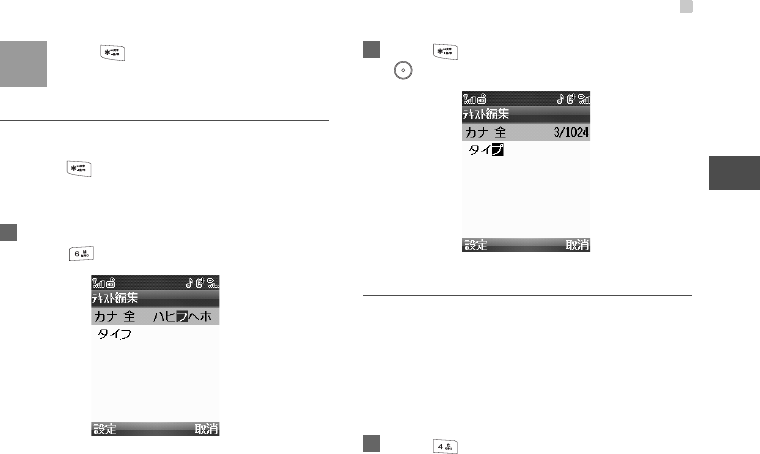
Entering Characters
51
4
Text Entry
Note Press to add the upper conner mark
symbol.
Addingࠐorࠑ
In Kanji, FullPitch Kana or HalfPitch Kana mode, you
can press to addࠐorࠑ.
Example, enter ɟ.
1In FullPitch Kana mode or HalfPitch Kana mode,
press three times. The ɝis displayed.
2Press twice. The ɟ is displayed and press
to enter ɟ.
Entering Roman Letters
In FullPitch Abc, HalfPitch Abc, FullPitch ABC,
HalfPitch ABC, FullPitch abc, or HalfPitch abc mode,
you can consecutively press a letter key to enter a
letter.
Example, enter Hello.
1Press that carries "H" repeatedly and all let-
ters carried by this key will be displayed succes-
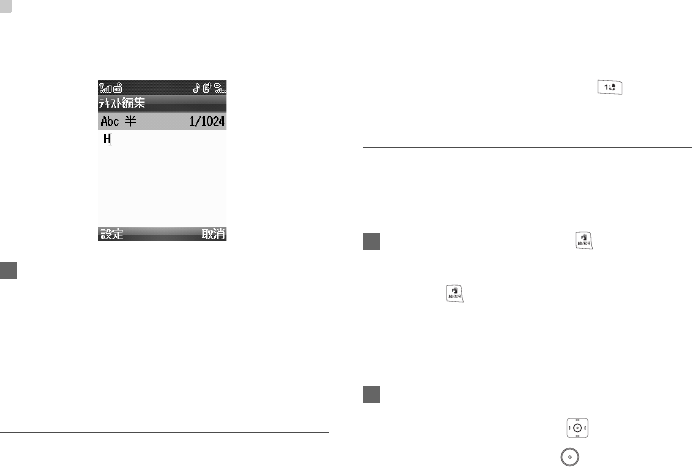
Entering Characters
52
sively on the screen. Stop when you see an "H"
on the screen
2After entering the first letter, you can directly
press another key to enter the next letter. If the
next desired letter is on the same key as the cur-
rent one, wait until the cursor appears to the right
of the current letter and then you can enter the
next one. Enter "e", "l", "l" and "o" in the same
way.
Entering Numbers
In FullPitch Number or HalfPitch Number mode,
press number keys to enter corresponding fullpictch
or halfpitch numbers. For example, to enter "1" with
the "FullPitch Number" or "HalfPitch Number"
numeric input method, you can press . Then "1"
appears on the screen.
Entering Symbols/Pictographs
Symbols and pictograhs do not appear in messages
sent to incompatible mobile phones or Email
addresses.
1In a text entry window, press to display
symbols.
• Press to switch between symbols and
pictograms.
• The selected symbols and pictographs are
displayed in the history view.
2Select symbols or pictographs.
• In symbols window, press to select
symbols, and then press . The symbols
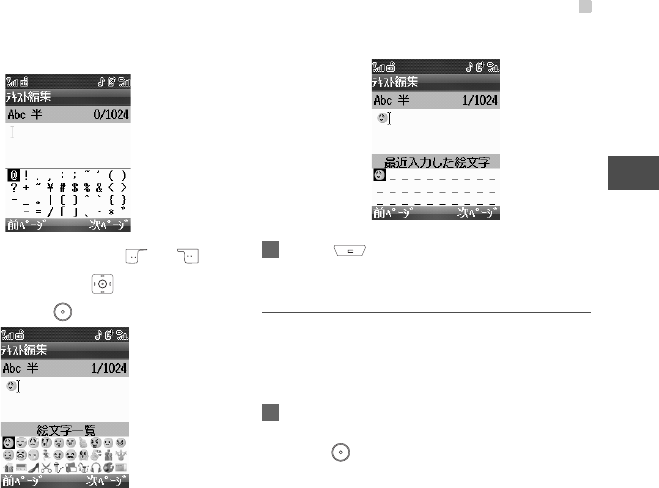
Entering Characters
53
4
Text Entry
include fullpitch and halfpitch symbols.
(ė3
• In pictographs window, press or to
view pictographs. Press to select a
symbol and press . ( ė3
• The selected pictograhs are saved in History.
3Press to exit from the symbols or
pictographs window.
Entering Commonly-used SMS Texts
ƹDaily Phrase
You can enter some daily phrases as templates in the
mobile phone.
1In a text entry window, select Options >
Common phrases > Daily Phrase, and then
press .
Entering Characters
54
2The daily phrases predefined in the mobile
phone are displayed. Press to select a
phrase as required.
• To edit the phrases. ( ė3
ƹShort-cuts for Email and URL
1In a text entry window, select Options >
Common phrases > Internet, and then press
.
• The following can be displayed: .ne.jp/, .co.jp/,
.or.jp/, .ac.jp/, .com.jp/, http://www. , and www.
• To edit them. ( ė3
2The Email addresses and URL lists are
displayed. Press to select an address as
required.
Inserting contact information
You can insert a contact's number from the mobile
phone or USIM card into the text.
1In a text entry window, select Options >Insert
number, and then press .
2Search for a contact's number and then press
.
• Searching methods. ( ė3
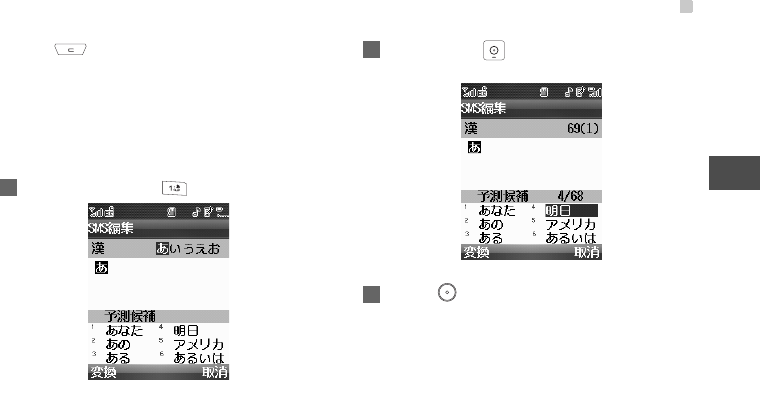
Conversion Methods (Japanese
Only)
Predictive
With the predictive fuction, you can enter easily and
quickly Japanese words with predictive wording
scheme.
• Press to switch the prediction function to
normal function.
Item Description
Prediction Show candidates likely to convert
Normal Matching candidates
Entering Characters
55
4
Text Entry
• Press to switch the normal function to
prediction function.
• Prediction screen can be cancelled.( ėP57)
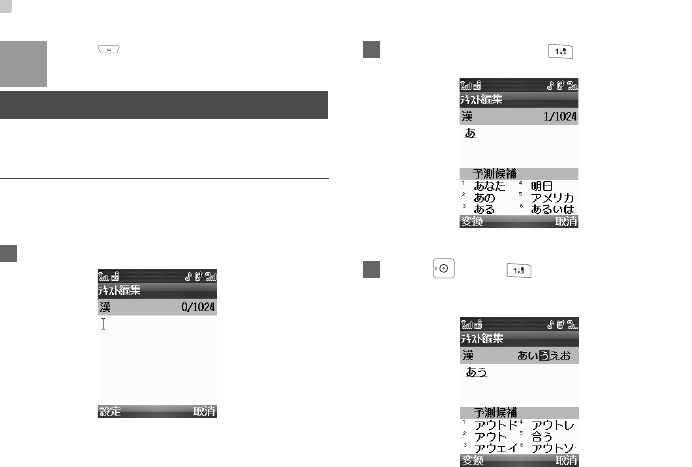
ƹUsing Predictive function
Example, enter ᯢ᮹ .
1In Kanji mode, press and select Ǘ.
2Press and hold until ᯢ᮹is displayed. Select
ᯢ᮹ .
3 Press .
ƹUsing Normal function
Example, enter ᯢ᮹ .
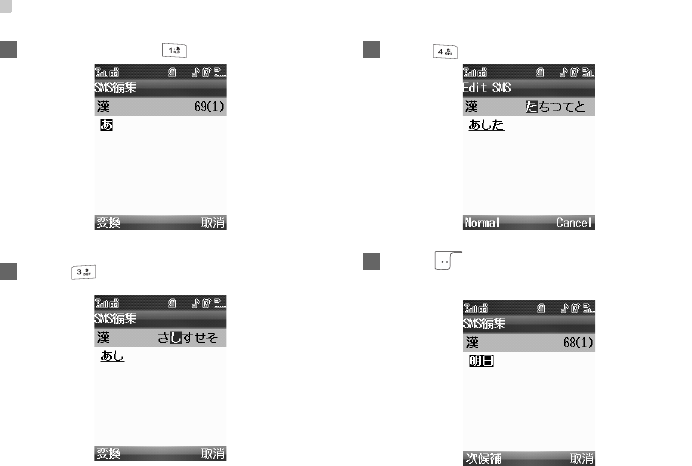
Entering Characters
56
1In Kanji mode, press and select Ǘ.
2Press twice, and then select Ǭ.
3Press , and then select Ǵ.
4Press to select Normal. The screen will
display ᯢ᮹ .
User dictionary
57
4
Text Entry
ƹResting learing
Clear log of words selected in Kanji conversion.
1In a text entry window, Slecet Options > Rest-
ing learing, press .
2Press Yes.
ƹActivating or disactivating prediction function
1In a text entry window, Slecet Options > Predic-
tive.
2Press to select On/Off .
• On: to activate the prediction function.
• Off: to disactivate the presiction function.
User dictionary
Save frequently used words or phrases.
Adding items
1In a text entry window, Select Options > User
dictionary.
2In the Input notation screen, enter a word or
phrase and press .
• Enter up to 25 characters including symbols
and pictographs per word or phrase.
3In the Input reading screen, enter a keyword or
a reading and press .
• Enter up to 16 full pitch hiragana.
Using User dictionary
Example, enter ⬄Ёǃ࣫ᴥǽ൷⬄
1In a text entry window, Slecet Options > User
dictionary.
2In the Input notation screen, enter⬄Ёǃ࣫ᴥ
ǽ൷⬄

User dictionary
58
3In the Input reading screen, enter ǗǠǪ .
4Select Save.
In a text entry window, if you want to input ⬄Ёǃ࣫
ᴥǽ൷⬄ , you can only input ǗǠǪ . The ⬄Ёǃ࣫
ᴥǽ൷⬄ will display.
59
5Contacts
You can save phone numbers, Email addresses, and
for up to 1,000 entries in contacts of the phone; USIM
card contacts capacity varies with cards. You can
also assign eight frequently-used numbers to speed
dialing keys.
Creating Contacts
Options in Phone and USIM Card
ƹOptions in Phone
ƹOptions in USIM Card
Item Description
Name Enter name.
Reading Automatically entered when Name
are first entered. Reading can be
edited. Search Phone Book by
Reading.
Mobile phone Enter mobile phone numbers
Office No. Enter office phone numbers
Home No. Enter home phone numbers
Email Enter mail addresses
Fax No. Enter fax numbers
Voice call
tone
Set incoming voice call ringtone
Video call
tone
Set incoming video call ringtone
Country Enter country
Province Enter province
City Enter city
Street Enter street
Post Code Enter post code
Icon image Save a still image to appear for
incoming calls
Birthday Enter birth date
Item Description
Name Enter Name
Reding Automatically entered when Name are
first entered. Reading can be edited.
Search Phone Book by Reading.
Phone Enter Phone number
Item Description
Creating Contacts
60
Creating a Contact
ƹCreating a contact in Phone
1Select Contacts in the main menu.
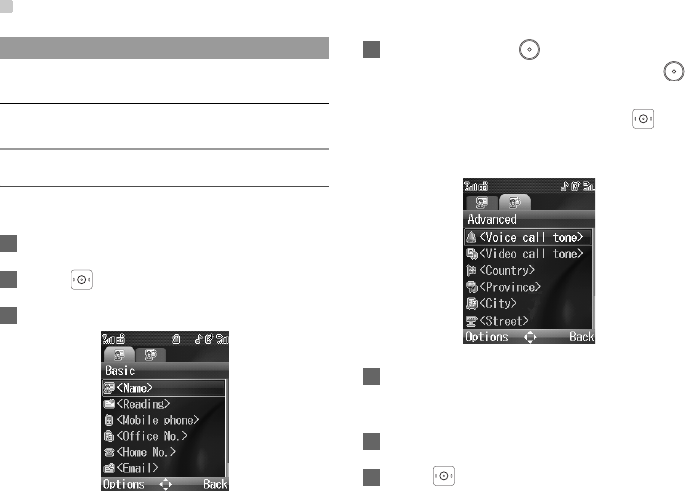
2Press to select Phone.
3Select Options > New.
4Select a field, press to edit the field, enter
the information as required, and then press
to save it.
After entering basic information, press to
set advanced information. Descriptions about
text input. ( ėP46
5Select Options > Save to save it.
ƹCreating a contact in USIM Card
1Select Contacts in the main menu.
2Press to select SIM.
Phone Enter another phone number (This item
is related with the USIM card
Email Enter mail addresses This item is
related with the USIM card
Item Description
Creating Contacts
61
5
Contacts
3Select Options > New.
4Select a field, press to edit the field, enter
the information as required, and then press
to save it.
5Select Options > Save.
Creating a Contact Through Call Logs
Save phone numbers from Call Log to new or exist-
ing Contact entries.
1Select Call Log in the main menu.
2Presss to select a record.
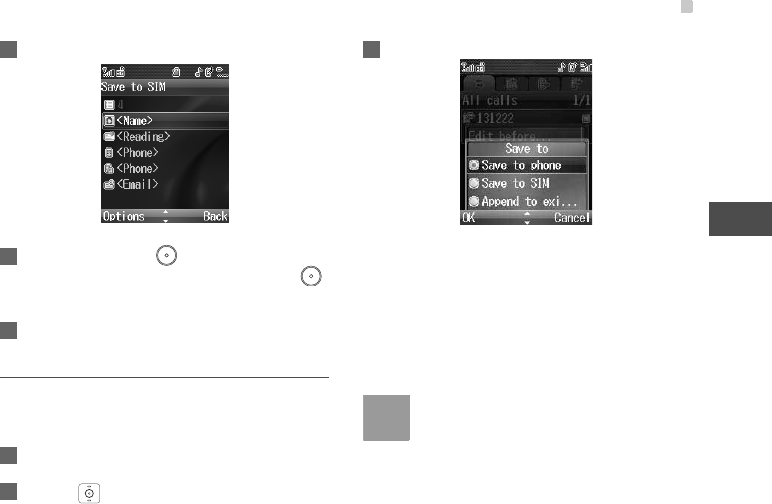
3Select Options > Save number.
• Save to phone: Select a phone contact entry, enter
other information, and then select Options > Save.
• Save to SIM:Select a SIM contact entry,enter
other information, and then select Options >Save.
• Append to existing: Search the number and select
the number.
Note •If the contact entry is alreay saved, you
are notified whether to replace the current
number.
•Searching a numebr. ( ėP63
Groups
62
Groups
You can rename a group, add group members, and
delete a group.
Adding/Deleting Group Members
You can add a member to a group in your phone or
delete a member from it.
1Select Contacts in main menu.
2Press to select Groups.
3Select a group and press to view the details.
4Select Options > Add. Select a contact and
press . The member you added will be dis-
played in the group member list.
To delete a group member, select a member from the
group member list, and then select Options >
Delete.
Managing a Group
1Select Contacts in the main menu.
2Press to select Groups.
3Select a group and select Options for the follow-
ing options.
• Details: to view the details of a group.
• Rename: to change the name of a group.
• Create Message: to send a text message or
MMS to all members of a group.
• Delete: to delete a group and all members of
the group.
Note You cannot rename or delete any group pre-
set in your phone.
Using Contacts
63
5
Contacts
Using Contacts
Finding a Contact
You can find a contact from the contacts list easily
and quickly by using this function on both the Phone
screen and the SIM screen.
1Select Contacts in the main menu.
2Press to select Phone or SIM .
3Select Options > Search.
4Enter the contact name reading or enter the first
letter of contact name you are searching for. The
contact will be displayed.
Note The search result will include all matched
contacts from both the phone and SIM
memories, no matter from which screen
(Phone or SIM) you start searching.
Making a Call
You can make a voice/video call with a contact
selected from the contacts list.
1Select Contacts in the main menu.
2 Press to select Phone or SIM .
3 Select a contact and select Options > Call.
Then, you can select Voice Call or Video Call to
make a call. Alternatively, you can select Edit
before call to edit the number before making the
call.
Creating a Message
You can creat an MMS or SMS with a contact
selected from the contacts list.
1Select Contacts in the main menu.
2 Press to select Phone or SIM .
Using Contacts
64
3 Select a contact and select Options > Create
message. Then, you can select MMS or SMS to
create a message. If the current contact does
not have an Email address, you cannot create
an MMS.
Speed Dialing
You can set the frequently-used phone numbers to
Speed Dialing keys. You can select -
from the keypad to set the speed dial number.
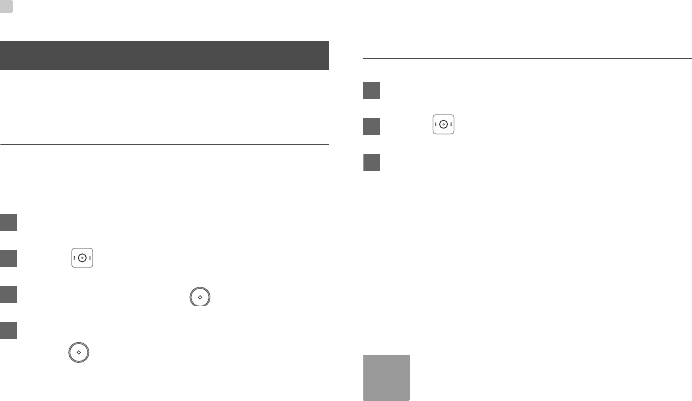
ƹSetting speed dial number
1Select Contacts in the main menu.
2Press to select Phone or SIM .
3Select Options > Speed Dial Number.
4Select a speed dial key from . - on
the keypad.
5Search the contact to be set as the speed dialing
contact.
6If the contact has multiple numbers, select one
as the speed dialing number.
7Press to save.
ƹUsing speed dialing keys
In standby mode, press and hold keys from -
to dial out the number.
Other Options
Describes other options such as sending contacts,
name card backup, and storage information.
1Select Contact in the main menu.
2Press to select Phone or SIM .
3Select Options for the following options.
Item Description
Details To view the details of contact.
Editing Contacts
65
5
Contacts
Editing Contacts
Modifying a Contact
1Select Contacts in the main menu.
Edit
before
call
You can edit the number before making
the call.
Create
Message
To send SMS or MMS to the selected
contact.( ėP63
New To create a new contact.
Call To make a voice call or video call to the
selected contact.( ėP63
Search To find a contact from the contacts list
easily and quickly.
Send
contact
To send a contact to other devices sup-
porting SMS or Bluetooth.
Copy to
SIM/Copy
to phone
To Copy one or more contacts from your
phone to the SIM card or from your SIM
card to the phone.
Speed
Dial Num-
ber
To assign often-used numbers to speed
dialing keys - .
My busi-
ness card
To save your own information to a Busi-
ness Card. You can send the information
by SMS or Bluetooth.
Item Description
Backup
contacts
• Backup contacts:To back up your con-
tacts from your phone to a memory
card.
• Restore contacts:To restore your con-
tacts from memory card to your phone.
• Synchronise: To synchronize informa-
tion on the phone book and on the net-
work server. ( ė3
Delete To delete the selected contact
Mark/
Unmark
To mark/unmark a record or all records
in your phone or SIM card
Memory
status
To view the memory status of both your
phone and SIM card
Settings Auto save: Select On, Off, or Prompt
before.
Item Description
Editing Contacts
66
2 Press to select Phone or SIM .
3Search the contact to be edited and press .
4Select the field to be edited, press or select
Options > Edit. Enter new information and
press to save it.
5Select Options > Save to save the edited con-
tact.
Copying to Handset/USIM Card
You can copy one or more entries from your phone to
USIM card or from your USIM card to phone.
1Select Contacts in the main menu.
2 Press to select Phone or SIM .
• If you need to copy multiple records, do the fol-
lowing to each record: Select Options > Mark/
Unmark > Mark to tick the checkbox on the
right of the entry. Alternatively, you can select
Options > Mark/Unmark >Unmark to cancel
the selection.
• If you need to copy all contacts, select
Options > Mark/Unmark > Mark all.
• If you need to copy only one contact, you can
copy the contact directly.
3Select Options > Copy marked to SIM or Copy
marked to phone; If copy only one contact,
select Options > Copy to SIM or Copy to
Phone. At the prompt, select Yes to confirm or
select No to cancel.
Note When you copy contacts from phone to SIM,
you can only copy the items supported by
the SIM card.
Deleting Contacts
You can delete entries from the phone or SIM card.
1Select Contacts in the main menu.
2 Press to select Phone or SIM .

Editing Contacts
67
5
Contacts
3To delete contacts,
• To delete multiple contacts, do the following to
each contact: select Options > Mark/Unmark
>Mark to tick the checkbox on the right of the
entry. Alternatively, you can select Options >
Mark/Unmark > Unmark to cancel the selec-
tion.
• To delete all contacts, select Options > Mark/
Unmark > Mark all.
• To delete only one contact, delete it directly.
4Select Options > Delete marked ; If you delete
only one record, select Options > Delete. At the
prompt, select Yes to confirm or select No to
cancel.
68
6Video Call
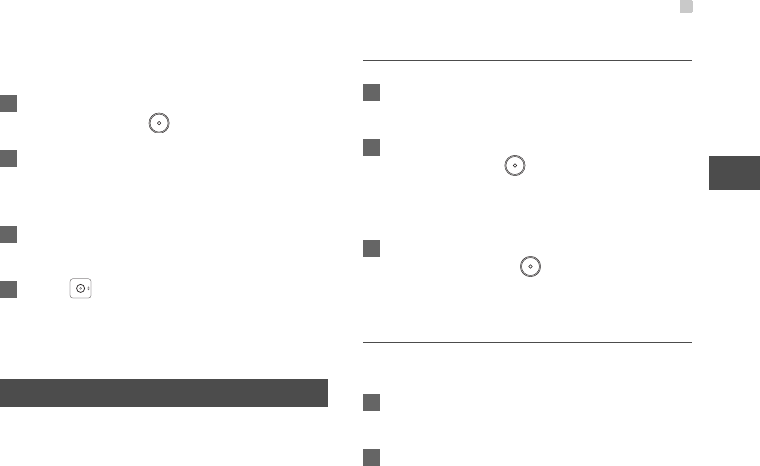
Getting Started
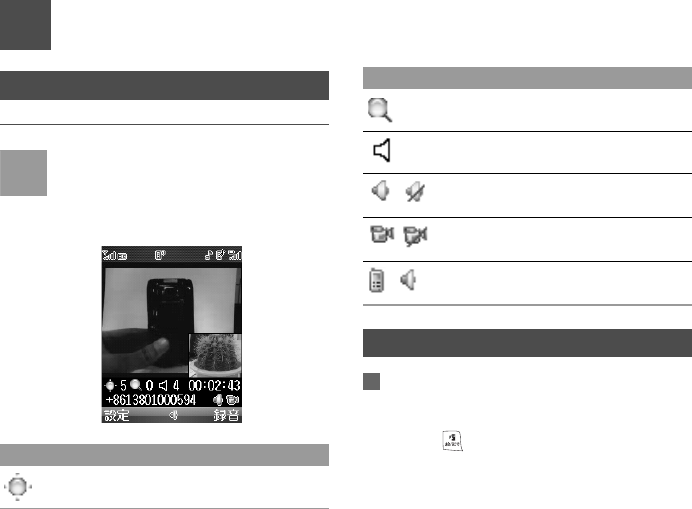
Video Call Window
Note •A video call can be made only in the 3G
network.
•Your handset may get warm during a
video call. This is a normal case and not a
failure.
Making a Video Call
1Enter a phone number:
• Enter a phone number by the keypad.
• Press , and choose a number from the call
logs lists.( ėP42
• Select a number from Contacts. ( ėP63
Icon Description
Press the up/down scroll key to adjust
the brightness.
Press the left/right scroll key to zoom in
or zoom out.
Press the volume keys to adjust the vol-
ume.
Press the keys to enable and disable the
audio channel. ( ėP70
Press the keys to enable and disable the
video channel. ( ėP70
Press the keys to enable Handsfree or
Earpiece. ( ėP69
Icon Description
Answering a Video Call
69
6
Video Call
2Press to dial out.
3Press to end the call.
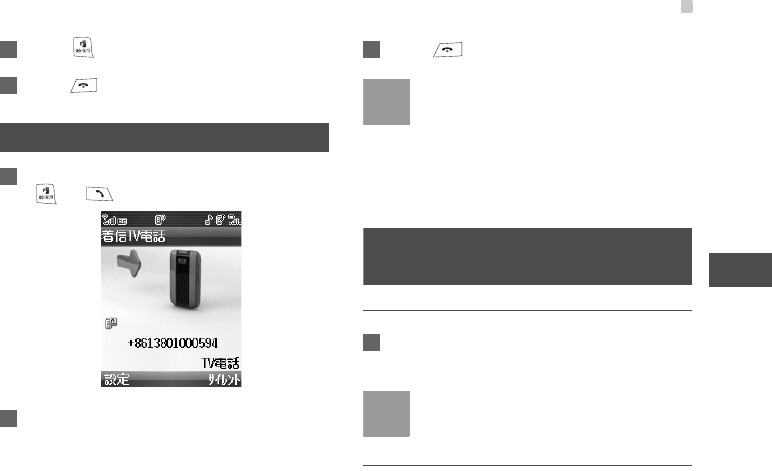
Answering a Video Call
1When there is an incoming video call, press
or to answer the call.
2Select Yes or No to set whether to Send the
local video.
• Yes: Camera image is sent.
• No: Select image is sent.
3Press to end the call.
Note •Setting image. ( ėP74
• If the headset is plugged in, you can press
the headset key to answer or end a video
call.
•If Camera off is off, the prompt in Step 2 is
not displayed. ( ėP73
Basic Operations During a Video
Call
Earpiece Volume
1Press the side volume keys to adjust the ear-
piece volume during a video call.
Note The default level of earpiece volume during
a call is 4.
Handfree / Earpiece
Switch between Handfree and Earpiece.
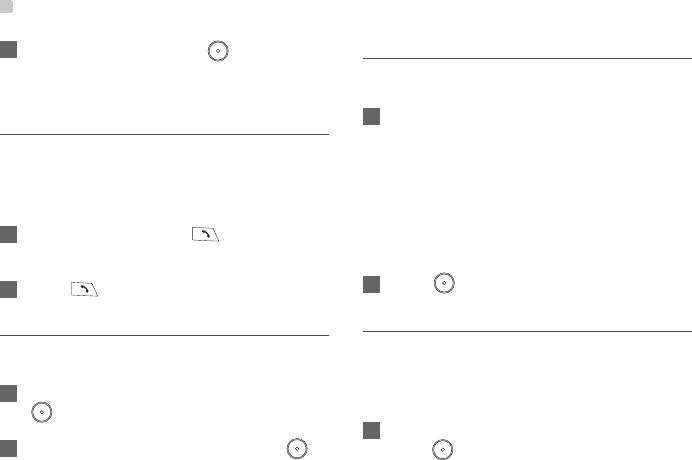
Answering a Video Call
70
1During a call, you can press to switch
between the loudspeaker mode and the ear-
piece mode
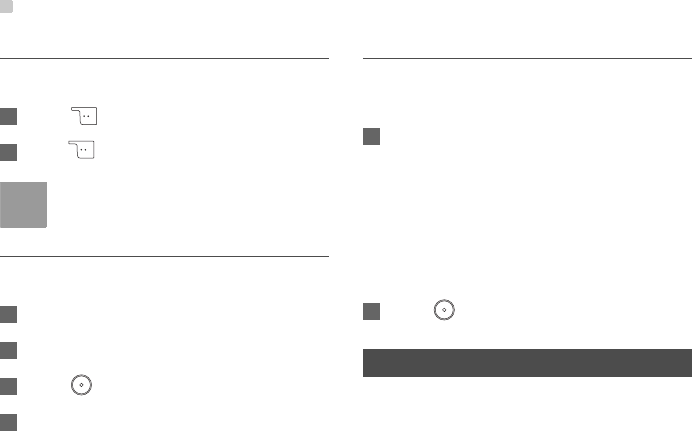
Holding a Video Call
When you enable the Hold, the calling party can only
see your party specific file. You can set the Send spe-
cific file. ( ėP74
1During a video call, press to enable the
Hold function.
2Press to resume a video call.
Audio off/Open audio
Mute your mobile phone microphone.
1During a call, select Options > Audio off and press
to mute your voice.
2Select Options > Open audio and press to
restart the conversation.
Switch picture
Switch between image windows.
1Select Options > Switch picture
• Far end: To display your image in the small
window and the other party's image in the
large window.
• Near end: To display yours in the large window
and the other party's image in the small win-
dow.
2Press .
Camera off/Open video
When you close the video channel of your party. The
handset sends the predefined image to the calling
party. Setting predefined image. ( ėP74
1During a call, select Options > Camera off and
press to close your video channel.

Answering a Video Call
71
6
Video Call
2Select Options > Open video and press to
open your video channel.
External view/Internal view
Adjust the direction of the camera lens.
1During a call, select Options > External view
and press to switch to the external view.
2Select Options > Internal view and press
to switch to the internal view.
Note When the camera is disabled, this function
is unavailable.
Picture in picture
This function is to adjust the picture size during a
video call.
1During a video call, select Options > Picture in
picture.
• Off: Disable the small display.
• Top left: The small display is in the upper left of
the screen.
• Top right: The small display is in the upper right
of the screen.
• Bottom left:The small display is in the lower left
of the screen.
• Bottom right: The small display is in the lower
right of the screen.
2Press .
Image quality
This function is to adjust the image quality.
1During a video call, select Options > Image
quality.
• Best quality: The image is displayed in the best
quality.
• More Smooth: The image is the most smoothly
displayed.
2Press .
Video Call Settings
72
Record
Record the other party’s image.
1Press to record the other party’s image.
2Press to stop the record.
Note A recorded video clip is saved to the My
Files/Videos directory.
Play file
Play video clips or images to the other party.
1Select Options > Play file to access My Files.
2Select the file as required.
3Press .
4Select Options > Close file to close the file.
Other applications
To access Contacts, SMS, or Call Log during a video
call.
1During a call, select Options > Other applica-
tions.
• Contacts: To access the Contacts screen, refer
to
• SMS: To access the SMS screen, refer to
• Call log: To access the Call log screen.
(ėP41
2Press .
Video Call Settings
You can change the settings for the Video Call func-
tion, including Picture in picture, Switch display,
Image quality, Camera off, Audio off, Auto voice call,
Send specific file and Auto answer.

Video Call Settings
73
6
Video Call
Picture in picture
1Select Settings in the main menu.
2Select Video call > Picture in picture.
3Select the position of the small display.( ėP71
Switch picture
1Select Settings in the main menu.
2Select Video call >Switch picture.
3Select Far end or Near End. ( ėP70
Image quality
1Select Settings in the main menu.
2Select Video call > Image quality.
3Select Best quality or More smooth. ( ėP71
Camera
1Select Settings in the main menu.
2Select Video call > Camera .
• On: The video channel is enabled when answer
a video call.
• Off: By default, the video channel is disabled
when answer a video call.
Audio
1Select Settings in the main menu.
2Select Video call > Audio.
• On: By default, the audio channel is enabled.
• Off: The audio channel is disabled.
Auto voice call
1Select Settings in the main menu.

Video Call Settings
74
2Select Video call > Auto voice call.
• On: To enable the auto voice call function. The
phone auto makes a voice call, when the other
party's phone does not support the video call
service.
• Off: To disable the auto voice call function.
Send specific file
1Select Settings in the main menu.
2Select Video call > Send specific file.
• Select image: Select the image as you need.
• Use default image: Use the default image in
your handset.
3If you select Select image, you are in My Files
and you can select an image and press .
Auto answer
1Select Settings in the main menu.
2Select Video call > Auto answer.
• On: Enable the auto answer function. When
there is an incoming video call, the handset
automatically answer the call after five sec-
onds.
• Off: Disable the auto answer function.

75
7Messaging
About Message
Send messages via MMS or SMS.
• For details about MMS/SMS communication
charges, consult your service provider.
• To enable the MMS, you need to sign relevant
network protocols.
Available entry items& Character enter limits
Item Description
MMS Through MMS, you can send data such
as text, image, and music between two
handsets that support the MMS function.
SMS Through SMS, you can send text
messages to phone numbers that
support SMS protocol.
Item MMS SMS
E-mail
address
Supports a
maximum of 128
DBC case
characters or 10
addresses
_
Phone
number
_ Supports a
maximum of 20
DBC case
numbers or 100
numbers
Subject Supports a
maximum of 40
DBC case
characters
_
Text Supports a
maximum of 1024
DBC case
characters
Each message
supports a
maximum of 160
DBC case
characters
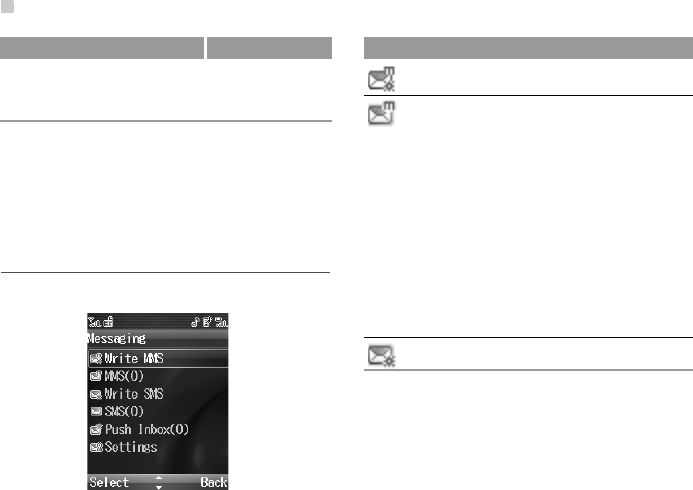
About Message
76
• An MMS including subject, content, and attachment
cannot exceed 500 KB. The attachment size
determines the maximum text number.( ėP94
• The content of an MMS contains a maximum of
1024 characters.
Messaging Folders
Messages are organized in folders by message type.
Attachment Supports a
maximum of 10
files
_
Item MMS SMS Menu Description
Write MMS Create an MMS.
MMS • Inbox: contains the received
MMS messages.
• Drafts: contains the draft MMS
messages or MMS messages
failed to send.
• Sent: contains the sent MMS
messages.
• Templates: contains the MMS
templates.
• Folders: additional folders, and
you can move MMS files to
those folders.
Write SMS Create an SMS.
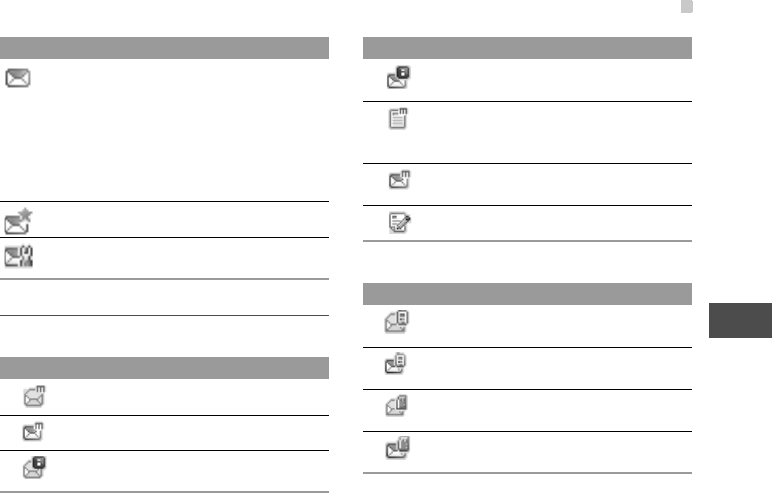
About Message
77
7
Messaging
Icons Description
Icons in the MMS folder
Icons in the SMS folder
SMS • Inbox: contains the received
SMS messages.
• Drafts: contains the draft SMS
messages or SMS messages
failed to send.
• Sent: contains the sent SMS
messages.
Push Inbox Contains Push messages.
Settings Settings of all types of
messages.
Icon Description
a read message in Inbox box.
an unread message in Inbox box.
a read notice or delivery report for MMS
in Inbox box.
Menu Description
an unread notice or delivery report for
MMS in Inbox box.
a multimedia message saved in Drafts
box after you created it or a multimedia
message failed to be sent.
a multimedia message has been sent in
Sent box.
a template saved in Push Inbox.
Icon Description
a read message in the phone memory in
Inbox box.
an unread message in the phone mem-
ory in Inbox box.
a read message on the USIM card mem-
ory in Inbox box.
an unread message on the USIM card
memory in Inbox box.
Icon Description
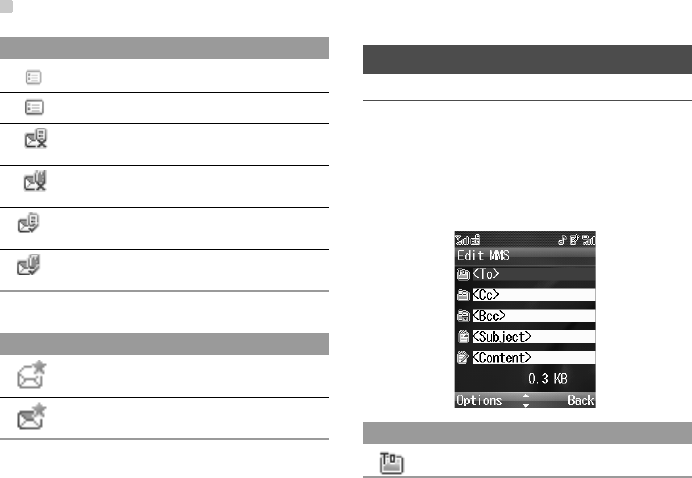
MMS
78
Icons in the Push Inbox folder
MMS
Creating and sending an MMS
• Available entry items and Character enter limits.
(ėP75
• Character input modes. ( ėP46
• Before editing and sending an MMS message, you
need to set the MMS.( ėP87
a read message report in Inbox box.
an unread message report in Inbox box.
a text message saved to the phone in
Drafts box.
a text message saved to the USIM card
in Drafts box.
a text message that has been sent and
saved to the phone in Sent box
a text message that has been sent and
saved to the USIM card in Sent box
Icon Description
a read Push message in Push Inbox
box
an unread Push message in Push
Inbox box
Icon Description
Icon Description
Email address of the MMS recipient
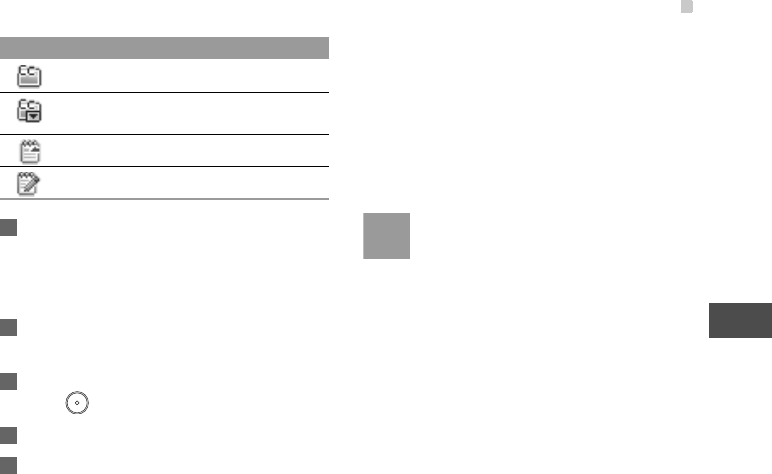
MMS
79
7
Messaging
1Select Messaging > Write MMS in the main
menu.
• Select Messaging > MMS > Drafts > Options
>New MMS
2In Edit MMS, enter the addresses of To,cc, and
bcc.P80
3Select Subject to enter text as subject, and then
press .
4Select Content to edit the pages.( ėP81
5Return to the Edit MMS screen, and select
Options
• Send: To send the multimedia message.
• Save to drafts: save the MMS to Drafts.
• Add to template: save the MMS as a template
to Templates.
• Send setting: To set parameters relates to
sending multimedia messages.( ėP87
• Size: view the size the current MMS
Note • When you set Delivery report to On, you
will receive a prompt message that is
automatically sent by MMS center; the
prompt message tells you the receiving
party has received your MMS. For
methods to set Delivery report, refer to.
• When your handset has insufficient
memeory, you cannot create, edit, reply,
or forward MMS.
• When the recipient's handset is powered
off or in weak network signal area, the
MMS is kept in service center.
Email address of the MMS that copies to
Email address of the MMS that blind
copies to
Subject of the MMS
Content of the MMS
Icon Description

MMS
80
ƹEditing Recipient List
Add Email addresses of To, cc, and bcc. The bcc
address cannot be viewed by others.
1In Edit MMS, select To,Cc, or Bcc, and then
press .
2Enter addresses of recipients.
• Select an entry from the recipients list, and
then press to enter an Email address.
• Select a position from the recipients list, and
then select Options > Contact to search a
contact. Search a contact in this screen.
(ėP63. Press to select the contact.
• Select a position from the recipients list, and
then select Options > Group. Select the group
to be added.
3Select Back to return to the Edit MMS screen.
Note • When searching contacts through
Contacts, you can search all contacts
information contains Email address.
• When adding contacts through Group, if
the contact does not have Email address,
the contact cannot be added to the
recipient's address.
• The adding addresses of contacts module
contains Recipients,Cc, and Bcc
screens, select Options, and then you
can select Set To,Set Cc,Set Bcc to
change the sending mode of the selected
address.
• The adding addresses of contacts module
contains Recipients,Cc, and Bcc
screens, select Options, and then you
can select Delete or Delete all to delete
one or all contacts addresses.

MMS
81
7
Messaging
ƹEditing an MMS
1In Edit MMS, select Content, and then press
.
2Select to access the text entry field, and
then edit text.
3Select to enter the image-editing field and
then you can select images or video files in My
Files.
4Select to enter the music-editing field and
then you can select audio files in My Files.
5Access the field indicated by and press
to select one from different pages if there are
more pages.
• To add a new page, select Options > Insert
page in Edit MMS.
6Access the field indicated by and press
to adjust the playing time of the current page.
•Select Options > Perview to preview the
MMS.
7Select Back.
Note • If the video file is chosen in the image-
editing field, you cannot edit the music-
editing field any more.
• Some files may not be attached
depending on the file format or size.
• Some copyrighted files may not be sent.
Receiving an MMS
A prompt message is displayed when you receive an
MMS. Setting an MMS. ( ėP87
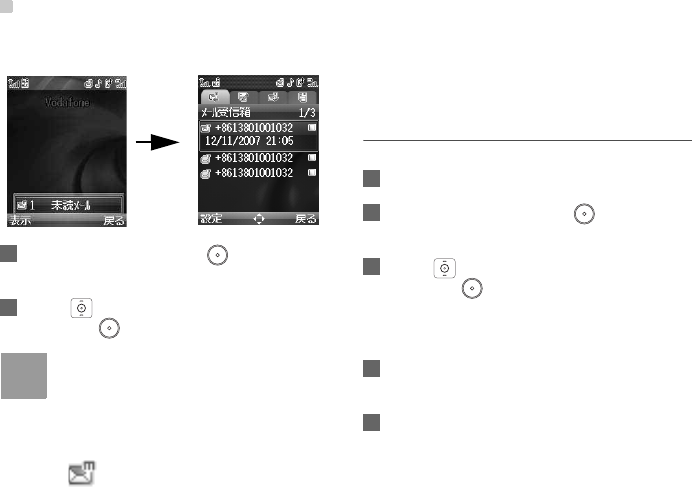
MMS
82
When an MMS is received, the handset displays as
follows:
1In infomation window, press to access the
Inbox of MMS.
2Press to select the MMS to be viewed,and
then press .
Note • A maximum of 200 MMS (in Inbox, Drafts,
Sent, and Templates) messages can be
saved.
• When Inbox is full of MMS messages and
a new MMS message is received, the
icon blinks and a prompt dialog box
is displayed. You need to delete some
messages from Inbox. Deleting MMS
messages. P85
Viewing an MMS
1Select Messaging in the main menu.
2Select MMS, and then press to access the
Inbox.
3Press to select the MMS to be viewed, and
then press .
• Descriptions about icons in Inbox of MMS.
(ėP77
4When viewing an MMS, you can select Stop to
stop playing the MMS.
5When the MMS is stopped playing, you can
select Options to perform the following
operations:
MMS
83
7
Messaging
• Reply MMS: To access the Edit MMS screen.
(ėP78
• Reply SMS : To the Edit SMS screen. P88
• Forward: To access Edit MMS to forward the
MMS. ( ėP84
• Edit before call: To access Edit number to call
back the sender of the MMS.
• Next page: To play the next page.
• Pervious page: To play the Pervious page.
• Rewind: To return to the first page.
• Save: Press to select a item, and then
save the selected item in the MMS to My Files/
Other.
• Object list: After entering the content list of this
message, you may select an item and select
Save to save the message to a corresponding
directory of the folder.
• Save number: To save the numbers retrieved
from MMS to phone or USIM memory or an
existing entry in the contacts.
• Extract URL: To extract URL address from
MMS for browsing web pages or stream
media.
• Save Email address: To retrieve email address
from MMS and save.
Replying an MMS
1In Inbox of MMS,press to select the MMS.
2Select Options > Reply MMS or Reply SMS.
3Press to access the Edit MMS screen to edit
the MMS.
Note You can also select Options > Reply MMS
or Reply SMS when playing the MMS to
reply the MMS. ( ėP82
MMS
84
Forwarding an MMS
1In Inbox or Sent in MMS, press to select
the MMS.
2Select Options > Forward.
3Press to access the Edit MMS screen to edit
the MMS.
Note You can also select Options > Forward to
forward the current MMS. ( ėP82
Edit before call
1In Inbox in MMS, press to select the MMS.
2Select Options > Edit before call.
3Press to access the Edit number screen to
make a call.
Note • You can also select Options > Edit
before call to call back the sender's
number when you view an MMS. ( ėP82
• If the sender does not have phone
numebr, Edit before call is unavailable.
Saving a contact
1In Inbox in MMS, press to select the MMS.
2Select Options > Save contact.
• Save to phone: To save the Email address of
the sender to the handset.
• Save to SIM: To save the Email address of the
sender to the USIM card.
• Append to existing: To save the Email address
of the sender to an existing contact. In Search
in Contacts, search a contact to be appended.
Note To save an Email address to the USIM card,
the USIM card should support Email
address.
MMS
85
7
Messaging
Folders
In MMS, there are seven additional folders besides
four main folders (Inbox, Drafts, Sent, Templates).
You can rename the additional folders and move
MMS messages to them.
ƹRenaming additional folders
1In Inbox/Drafts/Sent/Templates, select
Options > Folder.
2Select Options > Rename.
3Enter the folder's name, and then press .
Note You cannot rename the main folders.
ƹMoving MMS messages between folders
1Access any folders of Inbox/Drafts/Sent/
Templates.
2Select the MMS to move to an additional folder,
and then select Options > Move to folder.
3Select an additional folder and press .
Note You can also move MMS messages from an
additional folders to another one. The
operation are the same as that in Step 2.
Deleting MMS messages
You can delete MMS messages or MMS prompt
messages. When you receiving an MMS prompt
message, you can delete the MMS message without
receiving it.
ƹDeleting an MMS, MMS Prompt, or MMS tem-
plate
1In any folder of MMS, press to select a
message.
2Select Options > Delete, and then press .
3Press to select Yes or press to
select No.
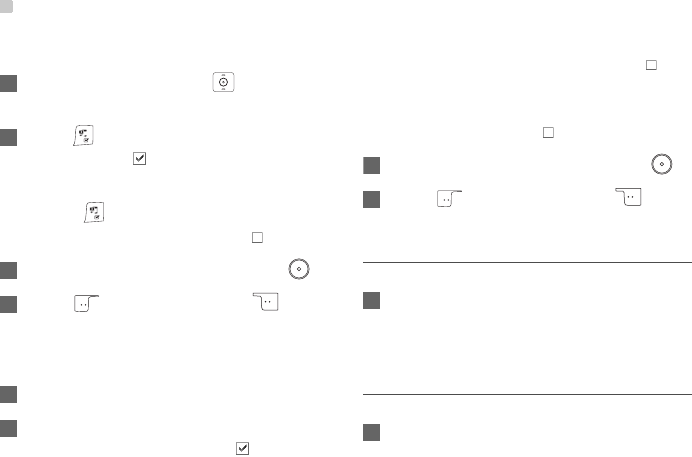
MMS
86
ƹDeleting multiple MMS messages at a time
1In any folders of MMS, press to select mes-
sages.
2Press to mark a message, the icon on the
right changes to . You can mark multiple
messages to be deleted.
• Press again to unmark the message. The
icon on the right changes back to .
3Select Options > Delete, and then press .
4Press to select Yes or press to
select No.
ƹDeleting all messages of a folder
1Access any folder in MMS.
2Select Options > Mark all. Icons of all
messages on the right change to .
•Select Options > Unmark all. Icons of all
messages on the right change back to .
•Select Options > Unmark to unmark the
current selected message. The icon on the
right changes back to .
3Select Options > Delete, and then press .
4Press to select Yes or press to
select No.
Sorting MMS messages
1In any folder in MMS, select Options > Sort
• Sender: to sort the MMS by recipients.
• Date: to sort the MMS by date.
Viewing memory status
1In any folder in MMS, select Options > Memory
status.
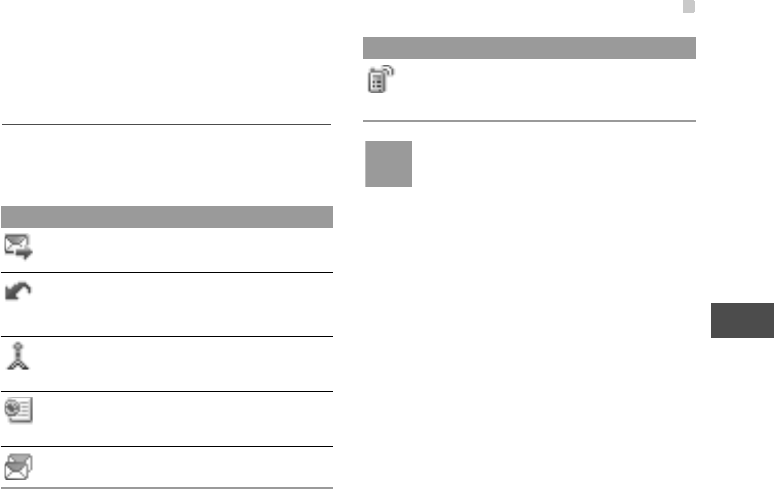
MMS
87
7
Messaging
• You can view memory status of MMS,
including Inbox,Drafts,Sent,Template,
Folder, and Total.
MMS Settings
In the Messaging screen, select Settings > MMS,
and then you can set parameters related to multime-
dia messages. It contains the following submenus
Note If you accidentally delete or modify pre-
defined settings, consult your service
provider.
ƹSending
• Valid period: The time for a multimedia message
stored in the message centre after it is sent.
• Delivery report: To set whether to accept a delivery
report.
• Send limit: To set the size limit of a multimedia mes-
sage to be sent.
• Save on send: To set whether a multimedia mes-
sage to the sent folder after it has been sent.
ƹReceving
• Send delivery report: You have two alternatives, On
and Off. When this mode is enabled (On), the net-
Menu Description
Sending To set parameters related to send-
ing multimedia messages. P87
Receiving To set parameters related to
retrieval of multimedia messages.
P87
Network
Access Point
Network Access Point is preset for
your convenience.
WAP
gateway
WAP gateway is preset for your
convenience.
MMS center MMS center is preset for your con-
venience.
Connection
type
To set the connection type of
multimedia messages. For details,
consult your service provider.
Menu Description

SMS
88
work sends a report to the sender indicating that
you have received the message.
• Receiving limit: To set the size limit of a multimedia
message that you can receive.
• Auto receive: To set whether the phone automati-
cally receives multimedia messages or not.
SMS
Creating and sending an SMS
• Available entry items and Character enter limits.
P75
• Character input modes. ( ėP46
• Before editing and sending an SMS, you need to
set SMS settings. ( ėP94
1Select Messaging > Write SMS in the main
menu.
•Select Messaging > SMS > Drafts/Inbox >
Options > New.
2In the Edit SMS screen, enter a message. Select
Options:
• Send: To access the Edit numbers screen.
For operations in the Edit numbers screen,
refer to Step 3.

SMS
89
7
Messaging
• Full Pitch/Half Pitch: Switch between full pitch
and half pitch.
• Insert number: You can insert a phone number
saved on the phone or the USIM card.
• Common phrases: You can select one from
daily and Internet phrases. In this way, you can
speed up the process of entering text.
• Predictive: To activate or disactivate prediction
function.( ėP57
• Reset learning: To clear log of words selected
in Kanji conversion.( ėP57
• Input mode: You may select one of the input
modes to enter the message contents.(ėP46
3After editing the message, press to access
the Edit numbers screen.
• Enter a phone number.
• Select Options > Contacts to access the
Search screen, and then select one or multiple
phone numbers. ( ėP63
• Select Options > Group to select a group.
4In Edit SMS, press or select Options >
Send.
•Select Options > Save to save the message.
Note When you set Delivery report to On, you
will receive a prompt message that is
automatically sent by MMS center; the
prompt message tells you the receiving
party has received your MMS. To set Deliv-
ery report. (ėP94
Receiving an SMS
When you receive an SMS, you will receive an SMS
prompt message first. Setting prompt messages.
(ė3
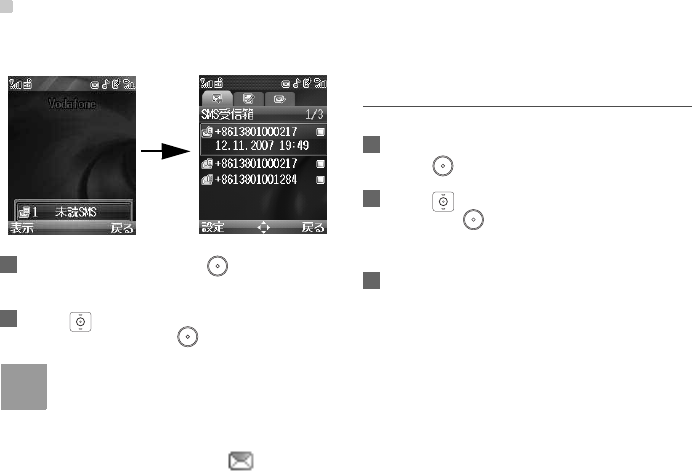
SMS
90
When receiving an SMS message, the handset
displays as follows:
1In infomation window, press to access the
Inbox of SMS
2Press to select an SMS message to be
viewed, and then press .
Note • A maximum of 500 SMS messages can
be saved in the handset (Inbox,Drafts,
and Sent).
• When the Inbox is full and a new SMS
message is received, the starts
blinking and a prompt dialog box is
displayed. You need to delete some
messages. ( ėP93
Viewing an SMS
1In the Messaging screen, select SMS, and then
press to access Inbox.
2Press to select the SMS to be viewed, and
then press .
• Icon descriptions in SMS. ( ėP77
3When viewing an SMS message, select Options
to perform the following operations:
• Reply: To access the Edit SMS screen.
(ėP88
• Forward: To access the Edit SMS screen and
forward the SMS message. ( ėP91
• Edit before call: To access the Edit number
screen and to call back the sender of the
selected message.
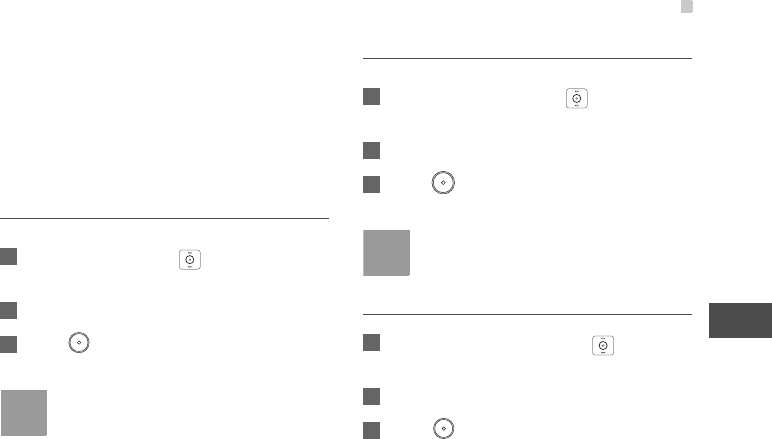
SMS
91
7
Messaging
• Save number: To save the numbers retrieved
from SMS to phone or USIM memory or an
existing entry in the contacts.( ėP92
• Extract URL: To extract URL address from
SMS for browsing web pages or stream media.
• Save Email address: To retrieve email address
from SMS and save.
Replying an SMS
1In Inbox in SMS, press to select the SMS
message.
2Select Options > Reply.
3Press to access the Edit SMS screen to edit
the SMS.
Note You can also select Options > Reply to
reply the current SMS. ( ėP90
Forwarding an SMS
1In any folder in SMS, press to select an
SMS message.
2Select Options > Forward.
3Press to access the Edit SMS screen to edit
the SMS.
Note You can also select Options > Forward to
forward the current SMS message. ( ėP90
Edit before call
1In Inbox or Sent in SMS, press the SMS
message.
2Select Options > Edit before call.
3Press to access the Edit number screen to
make a call.
SMS
92
Note You can also select Options > Edit before
call to call the sender's number. ( ėP90)
Saving a number
1In Inbox or Sent in SMS, press the SMS
message.
2Select Options > Save number.
• Save to phone: Save the sender's phone
number to the handset.
• Mobile phone: Save the sender's phone
number as the mobile phone number.
• Office phone: Save the sender's phone
number as the office phone numebr.
• Home phone: Save the sender's phone
number as the home phone number.
• Save to SIM: Save the sender's phone number
to the USIM card.
• Append to existing: Save the sender's phone
number to to an existing contact.
Note • You can also select Options > Save
number, and then save the number as in
Step 2.
• Creating a contact.( ėP60)
Copying messages to the USIM card
You can copy SMS messages from the handset to
the USIM card.
1In any folder in SMS, press to select a
message stored in the handset.
• The icon in front of the SMS message
determins the storage position. To view the
icon descriptions. ( ėP77)
• Press . The icon on the left changes to
and you can mark multiple messages.
2Select Options > Copy to SIM.
SMS
93
7
Messaging
Deleting an SMS
You can delete SMS messages or SMS prompt
messages.
ƹDeleting an SMS or SMS prompt message
1In any folder in SMS, press to select the
message.
2Select Options > Delete, and then press .
3Press to select Yes or press to
select No.
ƹDeleting multiple SMS messages or SMS
prompt messages
1In any folder in SMS, press to select the
message to be deleted.
2Press to mark the SMS message. The icon
on the right changes to and you can mark
multiple messages to be deleted.
• Press again to unmark the selection and
the icon changes back to .
3Select Options > Delete, and then press .
4Press to select Yes or press to
select No.
ƹDeleting all messages in any SMS folder
1Access any folder in SMS.
2Select Options > Mark/Unmark > Mark all. All
icons change to .
•Select Options > Mark/Unmark > Unmark all
to unmark all messages. All icons change back
to .
•Select Options > Unmark to unmark the
current SMS message and the icon changes
back to .
3Select Options > Delete, and then press .
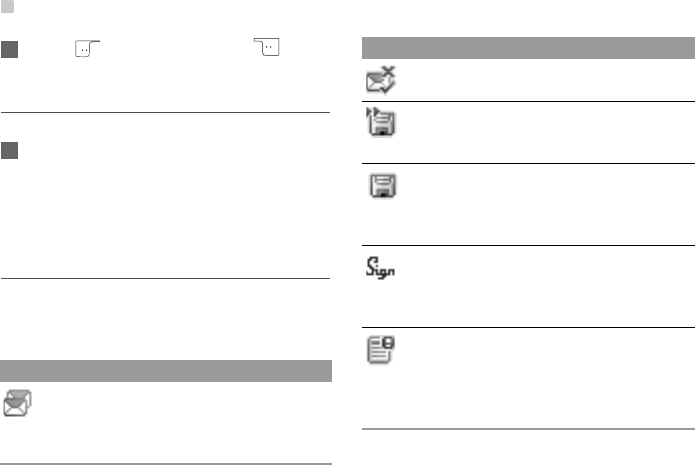
SMS
94
4Press to select Yes or press to
select No.
Viewing SMS memory status
1In any folder in SMS, select Options > Memory
status.
• To view the memory status of the phone and
the USIM card, inculding quantity of saved
messages and the total capacity.
SMS Settings
In the Messaging screen, select Settings > SMS,
and then you can set parameters related to mes-
sages. It contains the following submenus:
Menu Description
Message
center
You can set your mobile phone to
retrieve the message centre num-
ber from the USIM card or the
phone.
Valid period The time a message is kept in the
message centre after it is sent.
Auto save You can set whether a message
will be saved automatically to
Sent when it is sent.
Save to To set the position for saving
newly created messages,
received messages, and sent
messages.
Signature To set whether your signature will
be sent along with the message.
You can edit the signature while
creating a new message.
Status
report
You can set it to On or Off. If you
set it to On, the network will send
you the information on whether
the message has reached the
recipient.
Menu Description
Push Inbox
95
7
Messaging
Note If you accidentally delete or modify pre-
defined settings, consult your service
provider.
Push Inbox
Viewing Push Messages
1In the Messaging screen, select Push Inbox,
and then press .
2Press to select a push message, and then
press .
• Icons descriptions in Push Inbox. ( ėP77)
• Select Options >Load to start the WAP
broswer. Connect a URL specified by the Phsh
message and view the details.
Push Inbox Settings
In the Messaging screen, select Settings > Push
messages, and then you can set parameters related
to push messages. It contains the following sub-
menus
Menu Description
Push
message setting
You can set the acceptable push
messages.
• Accept all: to set to accept all
Phush messages.
• Accept trusted: to set to accept
only the trusted Push messages.
• Accept MMS Push: to set to
accept only the Push messages
prompting you with a multimedia
message.
• Accept none: to set to accept no
Push message.
Enable
push SL
You can enable or disable the
push SL function by selecting On
or Off.

web set mail
96
web set mail
In the Messaging screen, select Settings > web set
mail. The Browser is enabled and connect to the
pre-defined EMobile website.
Voice Mail Number
In the Messaging screen, select Settings > Voice
Mail number to set the voice mail number. To use the
voice mail services, you need to apply to your net-
work operator. After setting the correct number pro-
vided by your network operator, if you press and hold
in standby mode, the phone will dial out the
voice mail number automatically.
Daily and Internet Phrases
Your handset has been preset with some commonly
used phrases, sending messages while answering a
call and auto replying.
You can edit them if you want.
1In the Messaging screen, select Settings >
Daily phrases/Internet.
2In the Daily phrases or Internet screen, press
to select a phrase.
3Select Modify to access Edit common
phrases.

97
8Browser
About Browser
The built-in browser makes it easy and pleasant to
tour around the Internet. You can access the Browser
screen by Browser selecting from the main menu.
Cache Memory
Retrived information is temporarily saved in Cache
Memory. When full, the latest information cannot be
automatically saved.
• Previously viewed pages may load from Cache
Memory. To view latest, update information.
(ėP101)
• You can delete information saved in Cache Mem-
ory.( ėP101)
• Information remains in Cache Memory even after
the mobile phone is disconnected from the Network
or mobile phone power is turned off. If you change
for another USIM card, the information is automati-
cally deleted.
SSL/TLS
Secure Socket Layer (SSL) and Transport Layer
Security (TLS) are encryption protocols for secure
Internet transmissions of important/sensitive informa-
tion such as credit card numbers. Electronic certifi-
cates are preseted on H12HW.
Note When a security notice appears, subscrib-
ers must decide for themselves whether or
not to open the page. Opening secure
pages constitues agreement to the terms of
usage. EMobile cannot be held liable for
any damages associated with the use of
SSL and TLS.
EMnet
1Select Browser in the main menu.
2Press to select EMnet to access pre-defined
webpages.
3Press to link connections, press to
access the highlighted connection.

Entering URL
98
• Moving cursor: To select items on the page,
move the cursor to the right or left through
; or move the cursor to the next line or pre-
vious line through .
• Scrolling pages: Scroll bar appears on right
side of screen when page content continues
beyond view. Press to scroll. In addition,
press volume keys on the side to scroll page
up and down.
• Moving to previous page/next page: Previously
viewed pages are temporarily saved in Cache
Memory. Press to return to previous page.
Some pages cannot be displayed even after
you press .
4When browsing web pages, you can select
Options to perform operations.( ėP100)
Note •In standby mode, press to access
the predefined homepage.
•When browsing web pages, select
Options > Homepage to access the
homepage.
•Some pages require user authentication
for access. If required, enter user ID and
password, and then press .
•When the on the icon bar is blinking,
your phone is connecting the Internet.
Entering URL
1Select Browser in main menu.
2Press to select Enter URL,and then press
.
3Enter the URL.
4Press to access the URL.
Press to select the entered URL, select options,
and you can perform the following operations:
• Goto: Access the URL.
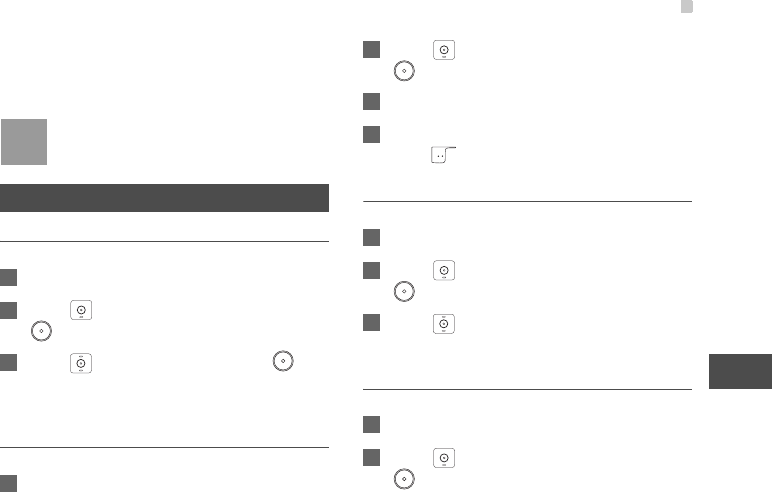
Bookmarks
99
8
Browser
• Edit: Edit the URL.
• Delete: Delete the URL.
• Delete all: Delete all entered URLs.
Note When browsing web pages, you can access
Enter URL.( ėP100)
Bookmarks
Go To a Bookmark
1Select Browser in the main menu.
2Press to select Bookmarks,and then press
.
3Press to select a bookmark. Press or
select Options >Goto to access the highlighted
bookmark.
Adding a Bookmark
1Select Browser in the main menu.
2Press to select Bookmarks,and then press
.
3Select Options > Add to create a bookmark.
4Enter the Title and Address of the bookmark.
Press to save the settings.
Editing a Bookmark
1Select Browser in the main menu.
2Press to select Bookmarks,and then press
.
3Press to select a bookmark, and then select
Options > Edit to edit the highlighted bookmark.
Deleting a Bookmark
1Select Browser in the main menu.
2Press to select Bookmarks,and then press
.
Bookmarks
100
3Press to select a bookmark, and then select
Options > Delete or press to delete the
highlighted bookmark.
Operations and Settings in
Browsing Web Pages
Operations in browsing Web Pages
When browsing web pages, select Options and you
can perform the following operations:
Note The Options of Homepage is the same as
the preset homepage name. Set homepage
name.( ėP101)
Function Description
Home-
page
(EMnet)
To access the homepage. Other
methods to access the homepage.
(ėP102)
Forward To go forward when you browse web
pages.
Book-
marks
To access the bookmark directory and
view the saved bookmarks.
Enter
URL
To enter a web site address and connect
it.
Recent
pages
To access pages you have browsed
recently. Ten entries of records can be
saved.
Save
page
To save the pages in your phone. Web
pages will be saved to the Saved
pages.
Save item To save contents on the page to the fold-
ers in your phone.
Refresh To refresh the current web page.
Saved
pages
To browse the saved pages offline.
Select Options > Goto to connect the
server end. Select Option > Delete to
delete the selected pages.
Settings To change the relevant settings for the
web page. Setting descriptions.
(ėP101)
Exit To exit the current web page.
Function Description

Bookmarks
101
8
Browser
Settings in browsing Web Pages
When browsing web pages, select Options and you
can perform the following operations:
• Save as homepage: to save the current page as the
homepage. You can press key to switch
between the title editing bar and the address editing
bar.
• Multimedia: to set whether to show images or play
background music.
– Image > On/Off: To allow or restrict loading image
information.
– Music > On/Off: To allow or restrict loading
background music.
• Cache: To set the cache to On/Off and clear the
cache.
– Cache > On/Off: To enable or disable Cache
Memory.
– Clear cache > Yes/No: To clear or cancel the
clearance of the Cache information.
• Cookies: To enable (On) or disable (Off) cookies
and clear cookies.
– Cookies > On/Off: To enable or disable Cookies.
When Cookies is on, the user information is
automatically saved to the mobile phone.
– Clear cookies > Yes/No: To clear or cancel the
clearance of the Cache information.
• Security: to show the "Current certificate", "CA cer-
tificates" and “Session info“.
– Current certificate: For browsing security
webpages.
– CA certificates: Pre-set security certificates in the
mobile phone.
– Session info: Session information when browsing
security webpages.
• Character set: to select one of the character sets,
including "Automatically", "UTF-8", "UCS-2", "ISO
2022-JP", "EUC-JP", and "Shift_JIS".
• Clear recent page list: to clear recent page list.

Internet Settings
102
Internet Settings
These are preset for you to use the Internet service. If
you need to modify them, open the Browser and
select Internet Settings.
In Internet settings window, select a Profile.
EMOBILE is the preset profile for H12HW and you
cannot modify it.
To create a profile, do the following:
1Select Profile2,Profile3,Profile4, or Profile5,
and then press .
2Set the following five options:
• Homepage: This item is optional. Enter the
Title and Address of the homepage and press
to switch between title bar and address
bar.
• WAP gateway: Enter the IP address, IP port,
User name, and Password. Enter the user
name and password as required. For details,
consult your service provider. Press to
switch between textboxes.
• Network Access Point: Select an access point.
• Connection type: Select the connection type
for the Browser.
• Time out: To set the timeout period when
connecting to the Internet. If the connection
exceeds the timeout period, it automatically
disconnects.
3Press and select Options to perform the
following operations:
• Edit: Edit the current Profile.
• Select: Select the current Profile.
• Rename: Rename the current Profile.
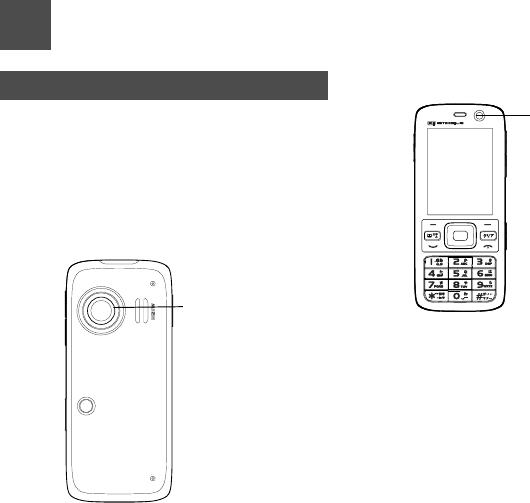
103
9Camera
Before Using the Camera
Your mobile phone has two cameras, the main cam-
era on the outer part of the flip and the assistant
camera on the inner part of the flip. You can use both
cameras to take still pictures and record videos. The
main camera supports the image resolution at 2
mega pixels and the assistant camera support the
image resolution at 0.3 mega pixels.
The images and video clips are automatically saved
in the Pictures and Videos folders in My Files.
You can send images and video clips in a multimedia
message or by using Bluetooth connectivity.
When taking a picture, note the following:
• Clean dust or oil from lens cover with a soft cloth
before capturing images.
Main camera/
External camera
Assistant camera
/Internal camera
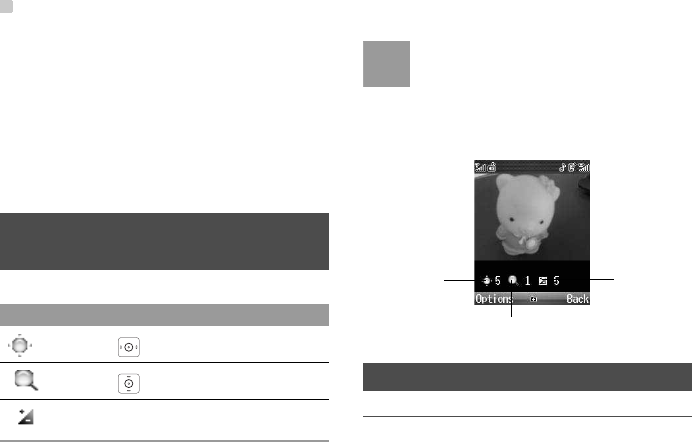
Camera
104
• Mobile phone movement may blur images; hold
your H12HW mobile phone firmly or place it on a
stable surface and use Timer.
• Camera is a precision instrument, howerver, some
pixels may appear brighter or darker.
• Exposing the lens to direct sunlight will damage the
camera's color filter.
Icons in Taking Pictures/Shoot-
ing Videos
In the viewfinder screen, you can:
Note •If you use the main camera and set the
resolution to 1600 × 1200, you cannot do
the operation of zoom in or zoom out.
•If you use the assistant camera and set
the resolution to 640 × 480, you cannot do
the operation of zoom in or zoom out.
Camera
Capture Mode
In the viewfinder screen, you can select Options >
Capture Mode to set the shooting mode.
Icon Operation
Press to adjust the brightness.
Press to zoom in or zoom out.
Press the volume keys to adjust the con-
trast.
Brightness
Contrast
Zoom
Camera
105
9
Camera
There are three capture modes for the cameras: Sin-
gle mode,4 shots, and 9 shots.
Take Pictures
1Press the Camera key or select Entertainment
>Camera to launch the camera.
2Select Options > Capture Mode > Single
mode.
3The handset screen functions as a viewfinder.
Move the handset towards the object.
4Press to take a picture.
5Pictures are automatically saved to the Pictures
folder in My Files.
Mode Description Image size
Single
mode
Take one picture
at a time.
W1600 hH1200 dots
W1280 hH1024 dots
W1280 hH960 dots
W1024 hH768 dots
W800 hH600 dots
W640 hH480 dots
W320 hH240 dots
W160 hH120dots
Screen size
4 shots Take four pic-
tures at a time
W320 hH240 dots
W160 hH120dots
Screen size
9 shots Take nine pictures
at a time
W320 hH240 dots
W160 hH120dots
Screen size
Mode Description Image size
Camera
106
After taking a picture, you can select Options for the
following operations.
• Send: To send the picture through MMS or Blue-
tooth.
• Set as: To set the picture as the wallpaper or the
image of a contact.
• Edit: To edit the picture.
• Delete: To delete the picture.
Menu Functions Overview
In the viewfinder screen, you can select Options to
choose from the following operations
Options Description
Video cam-
era
To record a video clip
Frame To choose a frame for pictures
Normal size/
Screen size
To set the viewfinder size
Go to gallery To access the My Files/Pictures direc-
tory to view pictures
White bal-
ance
The phone provides you with sev-eral
modes:
•Auto
• Fluorescent
• Incandescent
• Outdoor
• Indoor
• Night mode
Internal/
External
view
To switch between the assistant lens
and the main lens
Capture
mode
To set the shooting mode
• Single mode
• 4 shots
• 9 shots
Self timer To set the countdown time for the
phone to take a picture automatically
Options Description
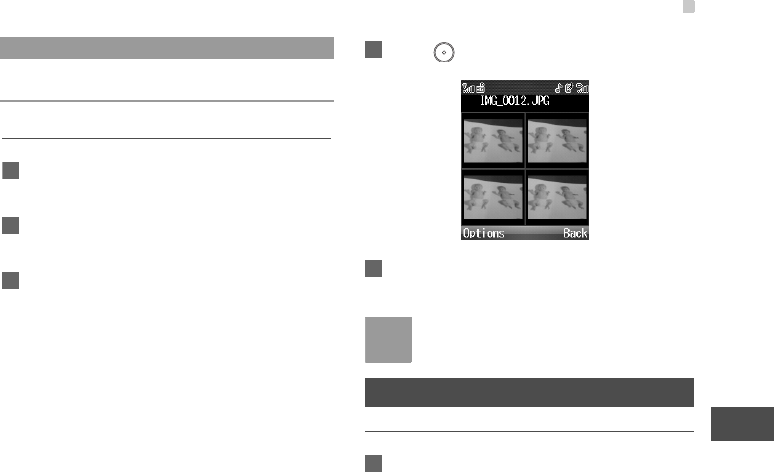
Video Camera
107
9
Camera
Take Pictures in a Sequence
1Press the Camera key or select Entertainment
>Camera to launch the camera.
2Select Options > Capture Mode > 4 shots/9
shots.
3The handset screen functions as a viewfinder.
Move the handset towards the object.
4Press . The handset takes four or nine pic-
tures in a sequence.
5Pictures are automatically saved to the Pictures
folder in My Files.
Note When you close the flip, you cannot take
pictures in a sequence.
Video Camera
Taking a Video Clip
1Press the Camera key or select Entertainment
>Camera to launch the camera.
Settings To change the relevant settings for
camera function
Options Description

Camera Settings
108
2Select Options > Video camera to launch the
video camera
3The handset screen functions as a viewfinder.
Move the handset towards the object.
4Press to start recording the video
During the recording, you can execute the following
operations:
• Pause/Record: To pause and then to start recording
again.
• Stop/Back: To stop recording.
Menu Functions Overview
In the viewfinder screen, you can select Options to
choose from the following operations.
Camera Settings
Setting the Camera
1Press the Camera key or select Entertainment
> Camera to launch the camera.
2Select Options > Settings
Options Description
Camera To launch the camera
Record To start recording the video
Zoom display To zoom in or zoom out
Internal/
External view
To switch between the assistant lens
and the main lens
Go to gallery To access the My Files/Videos
directory to view videos
Settings To change the relevant settings for
video camera function
Available
memory
Display the available memory and
duration of video clips
Options Description

Camera Settings
109
9
Camera
Item Description
Size Set the image size:
•1600h1200
•1280h1024
•1280h960
•1024h768
•800h600
•640h480
•320h240
•160h120
• Screen size
Effects Set image colors:
•Sepia
• Monochrome
• Colour
Image
quality
Set image quality:
•High
• Medium
• Low
White bal-
ance
Set white balance:
• Auto: In this mode, the camera auto-
matically select the proper white bal-
ance.
• Fluorescent: Select this mode under
a fluorescent lamp.
• Incandescent: Select this mode under
a incandescent lamp.
• Outdoor: Select this mode in outdoor
environment.
• Indoor: Select this mode in indoor
environment.
• Night mode: Select this mode at
night.
Item Description

Camera Settings
110
Setting the Video Camera
1Press the Camera key or select Entertainment
>Camera to launch the camera.
2Select Options > Video camera to launch the
video camera
3Select Options > Settings
Save to Select the phone or memory card to
save images.
Shutter
tone
To set shutter tone:
• Dulcet
• Traditional
•Hi
Reset Set the current camera settings to
default.
Item Description Item Description
Size Set the video clip size:
• 176 h144
• 128 h96
Quality Set the video clip quality:
•High
• Medium
• Low
Frame rate Set the frame rate. Frame rate indi-
cates the screen quality.
•High
• Medium
• Low
Audio Set the audio on or off when recording
video clips.

Sending a Picture/Video Clip
111
9
Camera
Sending a Picture/Video Clip
After taking a picture or recoring a video clip, select
Options > Send.
• As MMS: To send the picture or video clip through
MMS.( ėP78
• Via Bluetooth: To send the picture or video clip
through Bluetooth.( ė 3
Editing a Picture
After taking a picture( ėP105, you can select
Options >Editedit the picture.
Duration Set duration of recording video clips:
• 50KB: The recording automatically
stops when the video clip reaches 50
KB.
• 100KB: The recording automatically
stops when the video clip reaches
100 KB.
• 200KB: The recording automatically
stops when the video clip reaches
200 KB.
• 300KB: The recording automatically
stops when the video clip reaches
300 KB.
• 3 minutes: The recording automati-
cally stops when the video clip
reaches three minutes.
• 5 minutes: The recording automati-
cally stops when the video clip
reaches five minutes.
• No limit: No limit to the duration of a
video clip.
Item Description
Save to Select the phone or memory card to
save images.
Reset Set the current video camera settings
to default.
Item Description

Editing a Picture
112
Edit Options Description
Cut picture You can cut part of the picture and
save it as a seperate picture. Press
the scroll keys to select the part to be
cut.
• Select Options > Cut, the selected
part of the picture will be saved as
a seperate picture.
• Select Options > size, you can
select Wallpaper,Thumbnail,or
Free size.
Add text You can insert texts into the picture.
• Select Options > Input. You can
input the text to be displayed on
the picture.
• Select Options > Zoom/Move.
You can zoom the textbox or move
the textbox to a proper position.
• Select Options >Colour. You can
set the text colour.
Add frame You can add a frame to the picture.
Select Options > Select. Select the
frame to be added.
Rotate You can rotate the picture to 90
degrees left or right.
Mirror You can mirror the picture horizon-
tally or vertically.
Zoom You can Zoom in/Zoom out the pic-
ture
Effect • Select Effect > Contrast, you can
decrease or increase the contrast
of the picture;
• Select Effect > Sharpen, you can
blur or sharpen the picture.
Edit Options Description
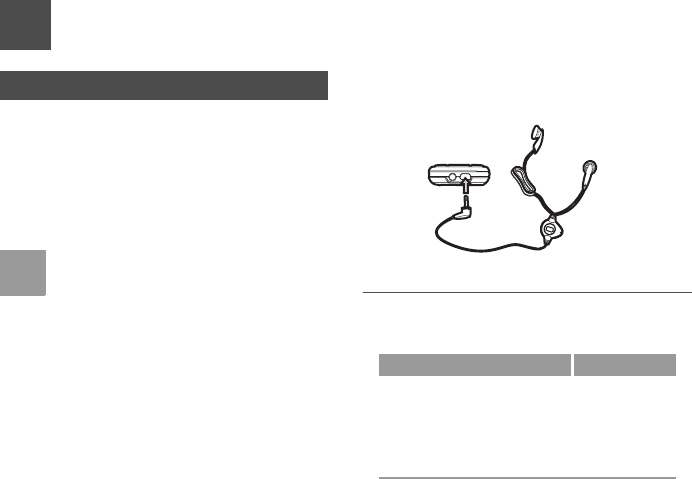
113
10Mediaplayer
Before Playing Audio&Video
The audio files that are recorded, downloaded from
WAP, or received from Bluetooth are saved in the
Music folder in My Files.
The video files that are recorded, downloaded from
WAP, or received from Bluetooth are saved in the
Video folder in My Files.
Note To download audio and video files, you
need to purchase them and obtain their
authorizations. If a file is protected by copy-
right or the key expires, an icon is displayed.
For more information, contact your service
provider.
When using a headset, connect the headset to the
headset jack correctly, as shown in the following pic-
ture.
File Formats
The following file formats are compatible with Audio
and Video Players:
Audio Player Video Player
File
Format
WAV(ADPCM),
MIDI, AMR(NB),
MP3, AAC, AAC+,
Enhanced AAC Plus,
MMF, QCP
MP4, 3GP,
3G2, PMD
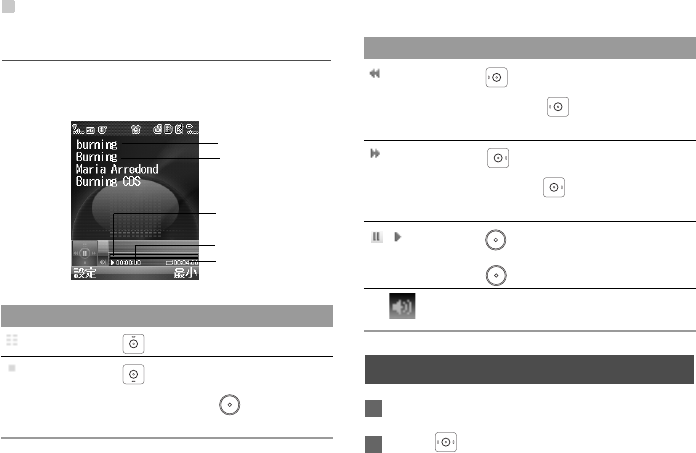
Playing Audio Files
114
Icons in Playing Music
During playing the audio file, you can execute the fol-
lowing operations on the audio file.
Playing Audio Files
1Select My Files > Music or Music > My music.
2Press to switch audio files between the
mobile phone and memory card.
Operation Description
Press to access the current playlist.
Press to go back the begining of
the current file. Press to replay this
file.
Title
Artist
Total time
Elapsed Time
Process bar
Press to access to the last file.
Press and hold. to fast backward
the current file.
Press to access the next file.
Press and hold to fast forward the
current file.
/Press to pause the playing.
Press again to resume the playing.
Press the volume keys to adjust the vol-
ume.( ėP26
Operation Description
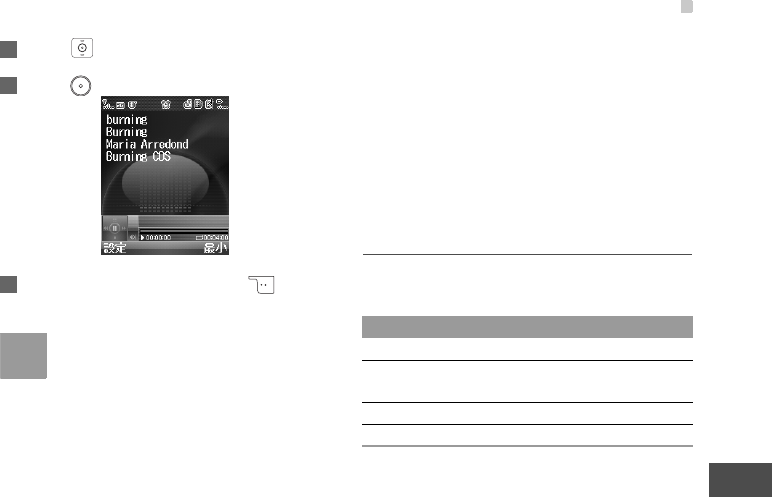
Playing Audio Files
115
10
Mediaplayer
3Press to select the audio file to be played.
4Press to play the file.
5During playing the music file, press to
enable the background play fuction.
Note •In closed audio playing mode, press and
hold the music key to access or exit from
the music player.
• In closed audio playing mode, press and
hold the camera key to lock or unlock the
music touch keys.
• When audio files are played folded and
the music touch keys are unlocked, you
can play, stop, go to next/last track by the
Music Touch Key.
• When a call is coming:
– If a music file is being played, the music
file continues to play from where it was
interrupted after the call.
–If the music has been paused, the music
file is still in the pausing state after the
call.
Menu Functions Overview
During playing the music file, select Options for the
following operations.
Options Description
Nowplaying To access the current playlist.
Mute/
Unmute
To mute or unmute the music.
Bookmarks To access the bookmark list.
Paylist To access the music playlist.
Playing Audio Files
116
Playlist
There are 10 Playlists. When you save audio files to
a Playlist, you can play the same audio files in the
Playlist as last time and you do not need to select
those files.
1Select Music > Playlist.
2 Select a palylist you want to listen.
3Select Options > Play in the Playlist screen.
• Options > Edit: To the current playlist screen.
• Options > Rename: To rename the current
playlist.
• Press to access the currnet list, and then
select Options > Add to add the music or
select Options > Remove to remove one
music.
Play in
background
After the background play fuction is
enabled, you can use other functions
of the phone when enjoying music.
Shuffle On/Off the random play.
Loop To select to cycle play current music,
play all music or close.
Equilibrium To select the music style.
Settings • To set the full screen direction: Left
or right.
• Streaming settings:
Select the Network Access Point
Swith on /off the Streaming gateway
Switch on/off QoS
Video cam-
era
To enable the video camera function
History To display the records of the played
files
Info. To view the information of the current
audio files.
Options Description
Exit To exit the audio play screen
Options Description
Playing Video Clips
117
10
Mediaplayer
Note If an audio file in the Playlist is stored in the
MicroSD card, you cannot play the audio file
without inserting the MicroSD card.
Playing Video ClipV
1Select My files > Videos.
2Press to switch video clips between the
mobile phone and memory card.
3Press to select a video clip.
4Press to play the video clip.
Note When a call is coming:
• If a music file is being played, the music
file continues to play from where it was
interrupted after the call;
•If the music has been paused, the music
file is still in the pausing state after the
call.
Menu Functions Overview
During playing the video file, you can execute the fol-
lowing operations on the video file.
Options Description
Nowplaying To access the current playlist.
Full screen To view the video clip in full screen.
Mute/
Unmute
To mute or unmute the music.
Bookmarks To access the bookmark list.
Paylist To access the video playlist.
Shuffle On/Off the random play.
Loop To select to cycle play current video,
play all videos or close.
Settings • To set the full screen direction: Left
or right.
• Streaming settings:
Select the Network Access Point
Swith on /off the Streaming gateway
Switch on/off QoS

Playing Video Clips
118
Video cam-
era
To enable the video camera function.
History To display the records of the played
files.
Info. To view the information of the current
video files.
Exit To exit the video play screen.
Options Description
119
11Folder
My Files enables you to manage the Pictures, Ring-
tones, Music, Videos and others files conveniently.
Composition
Viewing files
Viewing files
1Select My Files in the main menu.
2Press to select the saving location of the
file.
3Press to select a file, and then press to
view.
Note •You can view a picture in the Pictures
folder according to preceding Step 1-3.
You can zoom in or zoom out the picture
by pressing .
folder Description File Format
Picture To save image
files of
many formats.
JP G, PN G, BM P,
GIF, BCI, WBMP,
SVG, and SVGZ.
Music To save music
files of
many formats.
WAV(ADPCM),
MIDI, AMR(NB),
MP3, AAC,
AAC+, Enhanced
AAC Plus, MMF,
QCP
Ringtone To save ringtone
files of
many formats.
WAV(ADPCM),
MIDI, AMR(NB),
MP3, AAC,
AAC+, Enhanced
AAC Plus, MMF,
QCP
Videos To save video
files of
many formats.
3GP, MP4, 3G2,
and PMD.
Other To save any kind
of files.
txt, DOC etc.
folder Description File Format
Viewing files
120
• Press to switch to the previous picture;
press to switch to the next picture.
• The potential file icons are as follows:
File Icon Description
Image
(green lock)
Usable and forwardable
image file.
(green lock)
Usable and unforwardable
image file.
(red lock)
Unusable and forwardable
image file.
(red lock)
Unusable and unforward-
able image file.
Audio
(green lock)
Usable and forwardable
audio file.
(green lock)
Usable and unforwardable
audio file.
(red lock)
Unusable and forwardable
audio file.
(red lock)
Unusable and unforward-
able audio file.
Video
(green lock)
Usable and forwardable
video file.
(green lock)
Usable and unforwardable
video file.
(red lock)
Unusable and forwardable
video file.
(red lock)
Unusable and unforward-
able video file.
File Icon Description
Using files
121
11
Folder
Rearranging files
1Select My Files in main menu.
2Press to select the saving location of the
file.
3Select Options >Sort by name or Sort by date
to rearrang files by the file name.
Using files
Using image files
1Select a image file, and press to view.
2Select Options > Set as to set the image file as
the wallpaper or contact image.
• Set as wallpaper:
(1) Select Wallpaper.
(2) Press left function key to confirm.
• Set as contact image:
(1) Select Contact image.
(2) Search the contact to be set as the contact
image in Contacts. Searching a contact.
(ėP63)
(3) Press to select the contact.
(4) Select Options > Save.
Using audio files
1Select an audio file.
2Select Options > Set as to set the audio file as
the voice call tone or contact voice call tone.
• Set as incoming call tone: Select voice call or
video call to set the audio file as the ring tone
for the incoming call.
• Set as contact ring tone:
(1) Select Contact voice call or Contact
video call.
(2) Search the contact to set the ring tone in
Contacts. Searching a contact. ( ėP63)

Using files
122
(3) Press to select the contact.
(4) Select Options > Save.
Note •The audio files can be set as ring tones
are MP3, AAC/AAC+, AMR, MID,
WAV(ADPCM), MMF, QCP, MP4, 3GP,
and 3g2. When the MP4, 3GP, and 3g2 is
not video files, they can be set as ring
tones.
• In this mobile phone, the music file to be
set as the incoming call tone must meet
the following requirements:
– The file is protected by the DRM.
–The rights protection allows the file to be
set as a tone.
Function menu overview
Access Pictures, Ringtones, Music, Videos or
Other folder, select Options you can perform the fol-
lowing operations on files.
Operation Description
View To view the picture file.
Send To send the selected file by message
or Bluetooth.
Set as Wall-
paper/Con-
tact image
To set a picture as thumbnail of a con-
tact or the wallpaper.
Picture edit To edit a picture file.
Rename To rename the selected file.
Cut To cut the selected file.
Copy To copy the selected file.
Sort by
name/date
To sort the all files by name or by
date.
Delete To delete the selected file.
Mark/
Unmark
To select one or more files or cancel
the selection.
Info. To view the properties of one or more
files.
Play To play a selected file.
Managing folders
123
11
Folder
Managing folders
Creating a folder in Other
1Select My Files in the main menu.
2Press to select the Other folder.
3Select Options > New folder, input the folder
name, press to save.
Deleting a folder in Other
1Select My Files in the main menu.
2Press to select Other folder.
3Press to select the folder to be deleted,
select Options > Delete to delete the folder.
Memory card
Displaying contents of the memory
card
1To properly insert or remove a memory card.
(ėP35)
2When the phone detects and recognises the
memory card, Memory card is displayed as a
tab on the top of the My Files screen. Press
to select Memory card.
3You can execute the same operations on the
contents in the memory card as those in the
phone.
•Options > Format: to format your memory
card.
Set as ring-
tone
To set a ringtone as voice call tone,
video call tone or specific contact
tone.
Operation Description

124
12Connections
You can synchronise data between your phone and a
PC through USB cable or Bluetooth function. You can
transfer files between your phone and other Blue-
tooth devices. You can also use the built-in modem of
your phone to establish a dialup connection for your
PC to access the Internet.
Bluetooth
Before Using Bluetooth
Note •H12HW may not work with all Bluetooth
devices.
• Wirelessly connect the phone to a com-
patible Bluetooth device within 10 meters.
• The 2.4GHz band used by Bluetooth
devices is used by other devices that may
reduce transmission rates or distance.
• The Bluetooth connection can be subject
to interference from obstructions such as
walls or other electornic devices.
• USB and Bluetooth cannot be used at the
same time when you use the memory card
by USB cable.
ƹBluetooth specifications
Option Description
Version Bluetooth specifications Ver.1.2
Output Bluetooth Power Class2
Frequency Bands 2.4 GHz(2.402 GHz-2.480 GHz)
Communication
Distance
About 10 meters
Supported Profiles OPP: Object Push Profile;
FTP: File Transfer Profile;
SP: Synchronize Profile;
HSP: Headset Profile;
HFP: Hands-Free Profile;
DUN: Dial-Up Networking Proile;
SDP: Service Discovery Proile;
A2DP: Advanced Audio Distribu-
tion Profile.
Bluetooth
125
12
Connections
ƹFiles to transmit
Note How successfully Bluetooth works depends
on the compatibility of the Bluetooth devices
you use. For more information, refer to the
user manuals of related devices, or consult
the manufacturer of related devices.
ƹSwitch on Bluetooth
1Select Settings > Connectivity > Bluetooth >
Switch On/Off .
2Press to select On, and then press .
3The Bluetooth icon is displayed in the icon bar in
the home screen.
ƹVisibility Visible
Set the handset visible to other Bluetooth devices.
File Description
Contact entries Transmit one file at a time
Memo entries Transmit one file at a time
6chedule entries • Transmit one file at a time
• When transmitting or receiving
data, the following settings
cannot be transferred or
received:
Category, Sound on/off, Vibra-
tion on/off, Alert tone, Alert
type, and Alert image
7askentries • Transmit one file at a time
• When transmitting or receiving
data, the following settings
cannot be transferred or
received:
Sound alart, Vibration on/off,
and Task type
Data folder files • Transmit one file at a time
• Files protected by copyrights
cannot be transmitted
File Description
Bluetooth
126
1Select Settings > Connectivity > Bluetooth >
Visibility.
2Press to select Visibile, press to con-
firm.
ƹSearch new devices
Note •Before searching new devices, you need
to switch on Bluetooth functions on both
devices and set both Visibility Visible to
On.
• A maximum of 30 Bluetooth devices can
be searched and paired at a time.
• Bluetooth Passcode (1 to 16 digits) is
required to connect Bluetooth devices;
sender and receiver must input the same
code to complete file transfers.
•Bluetooth passcodes are not necessary
for paired devices.
1Select Settings > Connectivity >Bluetooth >
Search new devices.
2Select a device from the searched list and then
select Options > Pair to pair the device.
3Enter Bluetooth passcode, and then press
to confirm.
• Enter the passcode for the receiving device in
15 seconds to complete the pair.
• For the Bluetooth headset, find the PIN code in
the Bluetooth headset user guide, and then
enter the PIN code.
4If the pairing succeeds, a dialog box prompting
the pairing succeeds is displayed, and queries
whether to set the device as a trusted one.
5You can select Yes or No to confirm or cancel it.
Select Settings > Connectivity > Bluetooth >
Devices. The paired devices are displayed in this list.
Select a device from the list, select Options, and you
can perform the following operations:

Bluetooth
127
12
Connections
Note •The device list will keep the information of
all paired devices. If your Bluetooth head-
set is used for the first time, you need to
enter the PIN code for authentication.
From then on you can use the headset
directly.
• The way for using a Bluetooth loud-
speaker is similar to that for a Bluetooth
headset. For details, refer to the user
manual supplied with your Bluetooth loud-
speaker.
•Only when the connection has been
established, you can adjust the volume of
the Bluetooth headset.
Options Descriptions
Search To search another Bluetooth
device.
Pair/Unpair To pair a device or unpair a paired
device.
Set as trusted/
Set as
untrusted
• Set as trusted:The handset auto-
matically receives data when
there is a data transmission
request.
• Set as untrusted:The handset
prompts you whether to receive
data when there is a data trans-
mission request.
Add to
whitelist/
Remove from
whitelist
Add the selected device to the
whitelist or delete it from the
whitelist.
Rename You can rename the Bluetooth
device.
Delete You can delete the Bluetooth
device from the device list.
Delete all You can delete all Bluetooth
devices from the device list.
Device details You can view the detailed informa-
tion of the Bluetooth device.
Options Descriptions

Bluetooth
128
Accessing the Internet Using
Bluetooth Technology
You can create Bluetooth-based Internet access
through the Mobile Phone PC Assistant supplied with
your mobile phone.
Note •Windows 2000 and Windows XP are sup-
ported.
•Make sure that your PC supports the
Bluetooth function and your SIM card
allows the Internet access service.
1Select Settings > Connectivity >Modem and
set the port to Modem via Bluetooth.
2Select Settings > Connectivity > Bluetooth >
Switch On/Off > On.
3Make sure that Bluetooth modem is in Device
Manager/Modem of your PC. Run the driver
program for Bluetooth on your PC, and then pair
the mobile phone. After the PC has detected the
mobile phone dial-up network service you can
activate this service.
4Install the Mobile Phone PC Assistant. After
inserting the CD, follow the prompts to complete
the install.
5Run the Mobile Phone Dial-up Internet on the
PC.
For details of the operation, refer to the Help of the
Mobile Phone Dial-up Internet from CD-ROM.
Setting the Bluetooth Device
Select Settings >Connectivity > Bluetooth, you
can execute the basic settings for the Bluetooth func-
tions.
Options Descriptions
Switch On/Off set the Bluetooth device to On or
Off.
Search new
devices
You can search for new Bluetooth
devices.

USB
129
12
Connections
USB
Before Using USB
You can synchronise data between your phone and
PC, surf the Internet with your phone and read the
memory card by USB cable.
To use USB cable, please strictly obey the following
rules. Otherwise, your phone or PC may be dam-
aged.
Note •To connect your phone with a PC through
USB cable, first connect the USB connec-
tor to your phone, and then connect the
other end of the cable to the PC. To dis-
connect your phone from the PC, first dis-
able the Mobile Phone PC Assistant, then
disconnect the USB connector from the
PC, and finally disconnect the USB cable
from your phone.
• If the PC cannot recognise your phone
when connecting through the USB cable,
power off and restart the PC and then
retry.
Devices You can view all detected Bluetooth
devices.
Visibility You can set whether your phone
can be found by other devices
when the Bluetooth function is
enabled..
Rename You can rename your phone.
My device
information
You can view the detailed informa-
tion of your phone, such as the
device name and device address.
Uninterrupted
access On/Off
When Uninterrupted access On/Off
is On, requests of devices in
Whitelist are accepted. If it is Off,
requests of devices not in Whitelist
are rejected.
Options Descriptions

USB
130
•Do not plug the USB cable in and out of
your mobile phone frequently.
USB Synchronising
Your mobile phone supports the synchronisation
requests from a PC to your phone.
With USB cable and the Mobile Phone PC Assistant,
your phone can communicate with a PC. You can
back up the contact entries and messages saved on
your phone and the SIM card to a PC. You can also
synchronise contacts, schedule events and To Do
tasks between your phone and Outlook.
1Install the Mobile Phone PC Assistant. After
inserting the CD, follow the guide to complete
the install.
2Select Settings > Connectivity > Modem from
the main menu of your phone and set the port to
Modem via USB.
3Connect your phone and PC with the USB cable.
4Run the Mobile Phone PC Assistant on the PC.
5Now you can operate the synchrotion.
USB Accessing the Internet
Connecting your phone and PC with the USB cable
enables the PC to use the phone as a modem to
establish a dial-up connection to the Internet.
Note Only Windows 2000 / Windows 2003 / Windows
XP / Windows Vista are supported.
To use the Mobile Phone PC Assistant supplied with
your mobile phone to access the Internet, follow
these steps:
1Select Settings > Connectivity > Modem and
set the port to Modem via USB.
2Install the Mobile Phone PC Assistant. After
inserting the CD, follow the prompts to complete
the install.
3Connect your phone and PC with USB cable.

USB
131
12
Connections
4Confirm the USB device is shown in Device
Manager/Port of your PC.
5Run the Mobile Phone Dial-up Internet on the
PC.
For details of the operation, refer to the Help of the
Mobile Phone Dial-up Internet from CD-ROM.
132
13Settings
Phone settings
Phone language
1Select Settings in the main menu.
2Select Phone settings > Phone language.
3Press to select the phone language:
• Auto: to set the phone language to be the
same as that used in your USIM card.
• English: to set the phone language to be
English.
• Japanese: to set the phone language to be
Japanese.
4Press to save.
Option dictionary
This function perset the emotion icon and place-
name.
• emoticon dictionary & emoticon dictionary2: to save
the emotion icon in your mobile phone. Select On
to enable it.
Example, when you enter ȤȞǙ , you can input
(^_^), (*^^*), (*^ Ƹ^*)etc.
• Tokyo landmark dictionary & Tokyo osa kobe dictio-
nary : to switch the address resding to the Tokyo
landmark or Tokyo osa kobe when you enter text.
Select On to enable it.
Date and Time
1Select Settings in the main menu.
2Select Phone settings > Date and time.
3Enter the date and time, and then press .
Date format
1Select Settings in the main menu.
2Select Phone settings > Date format.
3Select a date format:
Profiles
133
13
Settings
• yy.mm.dd: The date format is year, month, and
date.
• mm.dd.yy: The date format is month, date, and
year.
• dd.mm.yy: The date format is date, month, and
year.
4Press to save.
Shortcuts
1Select Settings in the main menu.
2Select Phone settings > Shortcuts.
3Select a scroll key, and then press .
4Select a function in Settings, and then press
.
Auto On and Off
1Select Settings in the main menu.
2Select Phone settings > Auto ON and OFF.
3Press to select Auto ON,set the cycle for
Auto On,Then select Save.
4Press to select Time, set the time for Auto
On,Then select OK.
5Press to select Auto OFF,set the cycle for
Auto OFF,Then select Save.
6Press to select Time, set the time for Auto
OFF,Then select OK.
7Select Options > Save to save the settings.
Profiles
About Profiles
You can select different profiles for the phone to fit
different environmental situations.
1Select Settings in the main menu.
2Select Phone settings > Profiles.
3Your mobile phone provides several profiles
including Normal,Meeting,Silent,Activity,
Ringtone Settings
134
Car,Headset,Offline,My profile1 and My
profile2.
Setting
1Select Settings in the main menu.
2Select Phone settings > Profiles.
3Press to select a profile, select Options >
Edit to edit it.
Switching
1Select Settings in the main menu.
2Select Phone settings > Profiles.
3Press to select a profile, select Options >
On to activate it.
Ringtone Settings
1Select Settings in the main menu.
2Select Phone settings > Profiles.
3Press to select a profile and select Options
>Edit to edit it.
•Voice call tone:
(1) Press to select Voice call tone.
(2) Select the saving position of audio files.
(3) Select the audio file to set as voice call
tone, and then select Confirm.
•Video call tone:
(1) Press to select Video call tone.
(2) Select the saving position of audio files.
(3) Select the audio file to set as video call
tone, and then select Confirm.
•Message tone:
(1) Press to select Message tone.
(2) Select the saving position of audio files.
(3) Select the audio file to set as the message
tone, and then select Confirm.
Ringtone Settings
135
13
Settings
•Tone volume:
(1) Press to select Tone volume.
(2) Press to set the volume of incoming
call rings and incoming message rings.
(3) Press to confirm.
•Earpiece volume:
(1) Press to select Earpiece volume.
(2) Press to set the volume of the ear-
piece.
(3) Press to confirm.
•Key tone volume:
(1) Press to select Key tone volume.
(2) Press to set the volume of the key-
beep.
(3) Press to confirm.
• Prompt tone volume:
(1) Press to select Prompt tone volume.
(2) Press to set the volume of the prompt
tone.
(3) Press to confirm.
•Vibration:
(1) Press to select Vibration.
(2) Press to set enable or disable the
vibration prompt mode.
(3) Press to confirm.
•Flip tone:
(1) Press to select Flip tone.
(2) Press to set whether to make a sound
when you open/close your phone.
(3) Press to confirm.
Display settings
136
•On-off tone:
(1) Press to select On-off tone.
(2) Press to set whether to make a sound
when you power your phone on/off.
(3) Press to confirm.
Display settings
Wallpaper
ƹStandard
1Select Settings in the main menu.
2Select Display settings > Wallpaper > Stan-
dard.
3Press to select a image file, press to
confirm.
ƹMy Files
1Select Settings in the main menu.
2Select Display settings > Wallpaper > My
Files.
3Select the saving position of image files.
4Press to select a image file, and then press
.
ƹLayout
1Select Settings in the main menu.
2Select Display settings > Wallpaper >Layout.
3Press to select the wallpaper layout, and
then press .
• Center: The wallpaper is displayed in the cen-
ter of the screen.
• Fit-to-screen: The wallpaper is stretched to fit
the whole screen.
• Tile: The wallpaper is flatly displayed in the
screen.
4Press to confirm.
Display settings
137
13
Settings
Colour themes
1Select Settings in the main menu.
2Select Display settings > Colour themes.
3Press to select Theme1 or Theme2, and
then press .
Brightness
1Select Settings in the main menu.
2Select Display settings > Brightness.
3Press to set the brightness of the screen,
and then press .
Note There are three levels of brightness for the
screen. Press to descend; press
to ascend.
Keypad backlight
Describes how to set the keypad backlight.
1Select Settings in the main menu.
2Select Display settings >Keypad backlight.
3Press to set enable or disable the keypad
backlight, press to confirm.
Backlight time
Describes how to set the backlight time.
1Select Settings in the main menu.
2Select Display settings > backlight time.
3Press to set the backlight time:
• 5 senconds: The duration of the backlight is
five seconds.
• 15 senconds: The duration of the backlight is
15 seconds.
• 30 senconds: The duration of the backlight is
30 seconds.
• Always on: The backlight is always on.
4Press .
Call Settings
138
LCD sleep delay
Describes how to set the backlight time.
1Select Settings in the main menu.
2Select Display settings > LCD sleep delay.
3Press to set the LCD sleep delay time:
• 5 senconds: The duration of the LCD sleep
delay is five seconds.
• 20 senconds: The duration of the LCD sleep
delay is 20 seconds.
• 1 minute: The duration of the LCD sleep is one
minute.
4Press .
Greeting message
1Select Settings in the main menu.
2Select Display settings > Greeting message.
3Enter a greeting message that appears on the
screen when you power on your phone.
4 Press to confirm.
Call Settings
Option service
Note The option service are network-dependent.
For more information, please consult your
service provider.
Auto Redial
This function is used to auto redial the dialed number
if the dialing failed.
Service Meaning
Call forward-
ing
It is used to forward incoming
calls. ( ė3
Call barring It is used to set the call barring
mode for the phone.( ė3
Call Waiting It is used to enable or disable the
call waiting function.( ė3

Call Settings
139
13
Settings
1In the main screen, select Settings >Call set-
tings > Auto Redial.
2Select On or Off to enable or disable the auto
redial function.
Answer Mode
It is used to set the mode for answering an incoming
call.
1In the main screen, select Settings >Call set-
tings > Answer Mode.
2You can answer a call with the following way:
• Open flip: To open the phone to answer a call.
• Any key: To open the phone and press any key
to answer a call.
• Send key: To press to answer a call.
Auto Answer
It is used to select auto answering for incoming calls.
1In the main screen, select Settings >Call set-
tings > Auto Answer.
2You will have the following options:
• Immediate answer: To answer an incoming call
immediately.
• Message: To auto send a text message that is
preset and chosen from the "Common
phrases" to the current caller.
• Recorded message: To answer an incoming
call by auto playing a recorded message.
Press to start recording, and then select
OK to enable the fuction.
• Disable: To disable the auto answer function.
Calling ID
With this function, you can select whether your phone
number is shown on the called phone.
1In the main screen, select Settings >Call set-
tings > Calling ID.

Call Settings
140
2You will have the following options:
• Auto: Whether your phone number will be
shown on the called phone depends on the
network.
• Send: Your phone number will be shown (if the
network supports this service).
• Hide: Your phone number will not be shown (if
the network supports this service).
Select Line
It is used to set the call line for your phone.
In the main screen, select Settings >Call settings >
Select line, two options are available: Line 1 and
Line 2
My Number
With this function, you can save your own phone
numbers on the SIM card. In the main screen, select
Settings >Call settings > My Number, you can
select Options to edit or delete the records.
Call Barring Password
This function is used to change the password for call
barring.
1In the main screen, select Settings >Call set-
tings > Call barring password.
2Enter the old call barring password. (This is pro-
vided by your network operator if it is the first
time for you to change the password.)
3Enter a new call barring password.
4Enter once again the new call barring password,
and then press .
Prompt to save
This function is used to prompt whether to save the
number when there is an incoming call.
1In the main screen, select Settings >Call set-
tings > Prompt to save.
2Select On or Off to enable or disable this func-
tion.
Security Settings
141
13
Settings
Security Settings
You can change settings related to the phone secu-
rity, inculding Reset, Password lock, Change pass-
word, Fixed dialer number, DRM setting.( ė3
Network settings
Mode
1Select Settings in the main menu.
2Select Network > Mode.
3Press to select the network mode:
• UMTS: The mobile phone searches the net-
work signal only in the UMTS network.
• GSM: The mobile phone searches the network
signal only in the GSM network.
• Auto: The mobile phone automatically
searches the network signal in the current net-
work.
4Press .
Select network
1Select Settings in the main menu.
2Select Network > Select network.
3Press to select the network.
• Auto: Press to select Auto. The mobile
phone automatically searches the network sig-
nal and registers to the network.
• Manual:
(1) Press to select manual.
(2) Press to select to select the network to
be registered in Operator list.
(3) Press .
4Press to confirm.
My PLMN list
1Select Settings in the main menu.
2Select Network > My PLMN list.

Network settings
142
3Press to to select My public land mobile net-
work (PLMN).
4Press .
143
14Security Settings
Reset
1Select Settings in the main menu.
2Select Security > Reset to reset your phone to
the factory settings.
3Select Yes or No to confirm or cancel it.
Password lock
1Select Settings in the main menu.
2Select Security > Password lock.
• Phone lock:
(1) Press to select Phone lock.
(2) Press to to select On or Off.
(3) Enter the phone password, press to
confirm.
• PIN lock:
(1) Press to select PIN lock.
(2) Press to to select On or Off.
(3) Enter the PIN code, press to confirm.
Change password
• For further information about PINs:( ėP23
1Select Settings in the main menu.
2Select Security > Change password.
• Phone password:
(1) Press to select Phone password.
(2) Enter the old password (The initial phone
password is 0000).
(3) Enter a new password.
(4) Enter the new password again to confirm.
• PIN code (To modify the PIN code, you must
set the "PIN lock" to "On" first.):
(1) Press to select PIN code.
(2) Enter the old password.
Fixed dialer number
144
(3) Enter a new password.
(4) Enter the new password again to confirm.
•PIN2 code:
(1) Press to select PIN2 code.
(2) Enter the old password.
(3) Enter a new password.
(4) Enter the new password again to confirm.
Note • If you enter the wrong PIN or PIN2
three times, the SIM card will be
locked. You need the PUK or PUK2
code to unlock the SIM card. If you
enter the wrong PUK or PUK2 code
10 times in total, the SIM card will be
locked permanently.
• PUK or PUK2 code are delivered with
the SIM card. If you do not have one
or forget it, contact your service pro-
vider.
Fixed dialer number
1Select Settings in the main menu.
2Select Security > Fixed dialer number.
3Press to enable or disable the function.
• To enable fixed dialer number function:
(1) Press to select ON.
(2) Enter the PIN2 code.
(3) Press to confirm.
• To disable fixed dialer number function:
(1) Press to select Off.
(2) Enter the PIN2 code.
(3) Press to confirm.
• To view the FDN list: Press to select FDN
list, you can view fixed dialer number list

DRM setting
145
14
Security Settings
DRM setting
1Select Settings in the main menu.
2Select Security >DRM setting.
3Enter the phone password (The initial phone
password is 0000).
4Select Delete all rights to delete all rights.
5Select Yes or No to confirm or cancel it.
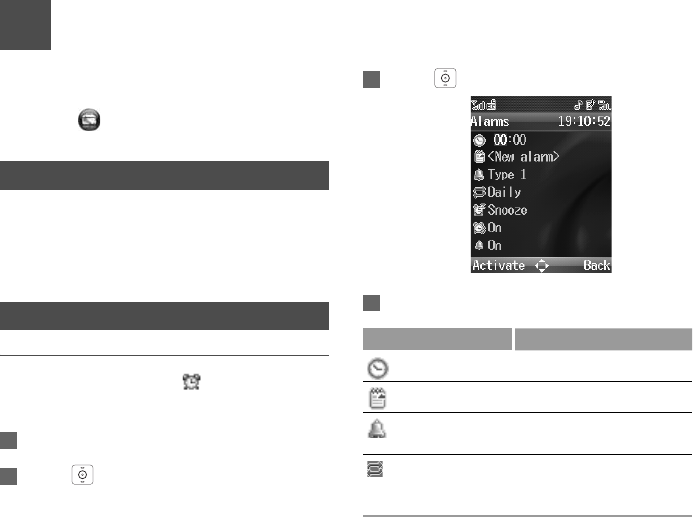
146
15Organiser & Tools
This function provides you with various assistant
tools. You can access the Organiser & Tools screen
by selecting from the main menu.
SIM ToolKit
Your mobile phone supports a number of clever Sim
ToolKit (STK) functions. The contents depends on
your USIM card. For more information, consult your
service provider.
Alarms
Setting Alarm Clocks
You can set up to six alarms. appears in standby
when alarm is set.
1Select Organiser&Tools in the main menu.
2Press to select Alarms.
3Press to select an alarm.
4Set the following as required.
Icon Item Description
Time Alarm time.
Tips Alarm tips.
Select tone Select Standard tone or
select one from My Files.
User-defined Select Daily, Once, Mon-
Fri, or any day from Mon-
day to Sunday.
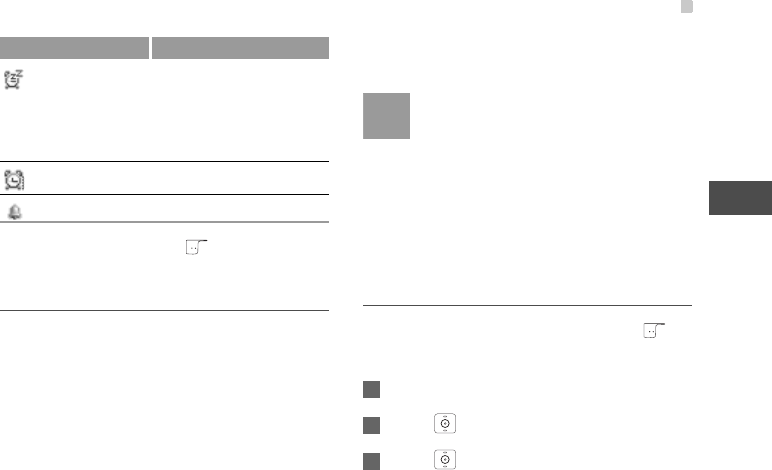
Alarms
147
15
Organiser & Tools
After setting the alarm, press to select Activate.
The alarm is activated.
Prompt Interface for an Alarm
When the alarm time arrives, alarm tone sounds/
vibrates as setand a prompt interface is displayed.
• You can stop the ringing by pressing any key or by
folding/unfolding your phone.
• If you do nothing to the alarm, alarm tone sounds/
vibrates for fifty-five seconds, repeating up to three
times at five minutes intervals.
• If snooze is on, you can select to snooze the alarm
on the prompt inferface.
Note •If your phone is powered off, the alarm
clock can still ring. When the alarm rings,
you can choose to power on the phone.
• When you are making a call, alarm tone
does not sound/virbrate , while the prompt
interface is displayed.
•The operation of snooze can be executed
for many times and the delay time is five
minutes.
Stopping the Alarm Clock
Select an alarm clock from the list, and press to
deactivate it.
1Select Organiser&Tools in the main menu.
2Press to select Alarms.
3Press to select an activated alarm.
Snooze Select whether to enable
this function. Select
Snooze, the alarm auto-
matically postpones five
minutes.
Vibration Set vibration On or Off.
Sound alarm Set sound alarm On or Off.
Icon Item Description
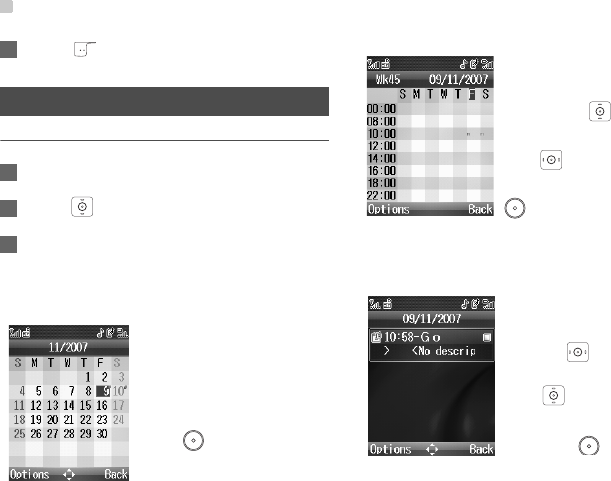
Calendar
148
4Press to stop it.
Calendar
Display the Calendar
1Select Organiser&Tools in the main menu.
2Press to select Calendar.
3Select Options > View mode to view calendar
in Monthly,Weekly or Daily. Example, when
current view mode is Monthly view screen, you
can only select Weekly or Daily.
Monthly View Screen
On the Monthly view screen,
you can press scroll keys to
switch among the days and
select the needed day. Then,
press to access the
schedule events list of the day.
Weekly View Screen
On the Weekly View Screen,
you can press to switch
among diferent weeks; and
press to switch among the
days of a week. Then, press
to create a schedule event
or view the details of a schedule
event.
Daily View Screen
On the Daily View Screen, you
can press to switch among
different days of a week; and
press to switch among the
events of a day.
Then, press to create a
schedule event or view the
details of a schedule event.
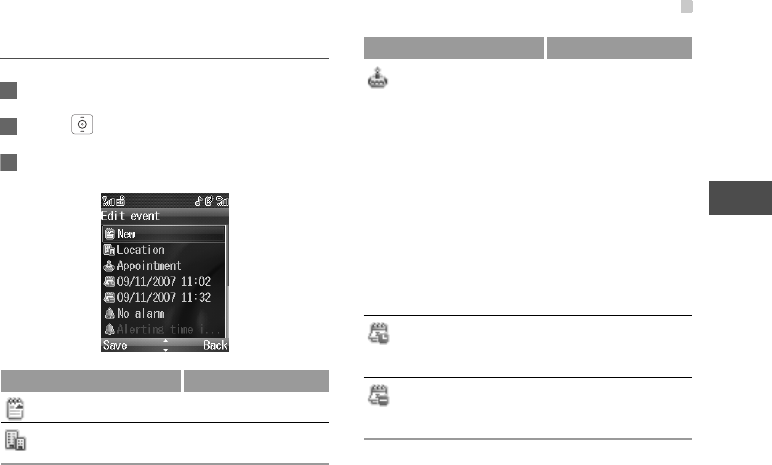
Calendar
149
15
Organiser & Tools
New Schedule
1Select Organiser&Tools in the main menu.
2Press to select Calendar.
3Select Options > New to create the schedule
events for the current day.
Icon Item Description
Schedule title Enter schedule title
Schedule location Enter schedule loca-
tion
Schedule type Select schedule type
• Appointment
• Personal
• Work
•Meeting
• Phone
• Courses
• Travel
• Holiday
•Other
Startdate&time of
the schedule
Set start date and
time of the schedule
event
End date&time of
the schedule
Set end date and
time of the schedule
event
Icon Item Description
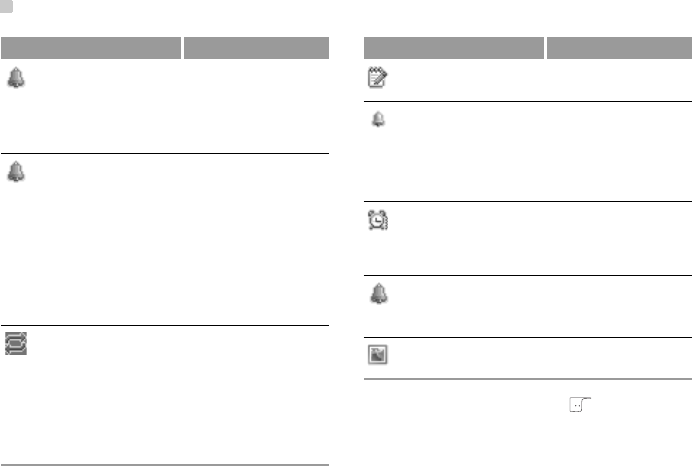
Calendar
150
After setting the schedule, press to save the
schedule event.
Alarm type Whether the alarm is
on
• No alarm
• Alarm
Alerting time in
advance
when to prompt
before the start time
•On time
• 10 mins before
• 30 mins before
• 60 mins before
•Custom
Alarm cycle Set the alarm cycle
as:
• Once
• Any day from Mon-
day to Sunday
•Monthly
Icon Item Description
Schedule details Enter Schedule con-
tent
Sound alarm Set Sound alarm as:
•Off
•On
Vibration Set Vibration as:
•Off
•On
Select alarm tone Select schedule alarm
ringtone from Stan-
dard tone or My Files
Image files Select image file from
My Files
Icon Item Description
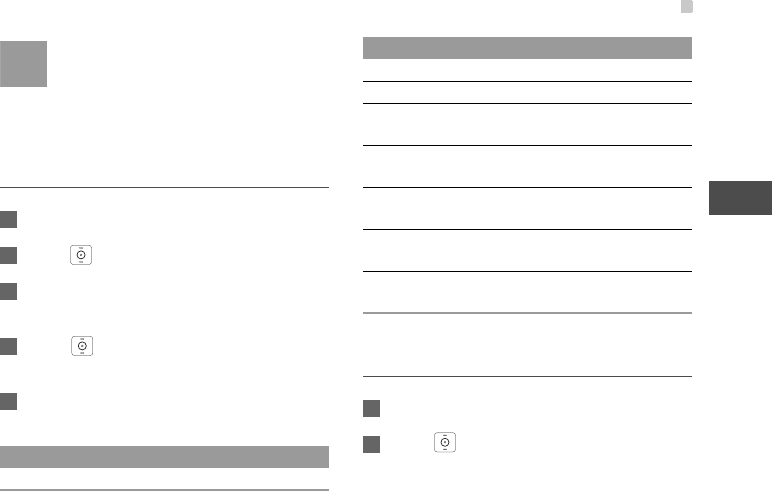
Calendar
151
15
Organiser & Tools
Note You can create up to 500 schedules in total
and 15 for each day. While creating a new
schedule, you need to set the alarm on
before setting the alerting time in advance,
the alarm cycle, the sound alarm, the vibra-
tion, the alarm tone and the image.
Operations to Schedule
1Select Organiser&Tools in the main menu.
2Press to select Calendar.
3Select Options > Display event > All to view
all the schedule events.
4Press to select the schedule event to oper-
ate.
5Press Options, you can select the following
operations to the schedule event.
Other Menu Options in Calendar
1Select Organiser&Tools in the main menu.
2Press to select Calendar. The default main
view is Monthly view.
Item Description
Edit To edit the schedule event.
Delete To delete the schedule event.
New To create a new schedule event.
Copy To copy the event to phone or to mem-
ory card.
Send
event(s)
To send event through SMS or blue-
tooth.
Export To export the event to the Calendar
folder in Memory card.
Import To import the event in the memory card
folder to the phone.
Mark/
Unmark
To mark/unmark an event or all events .
Item Description
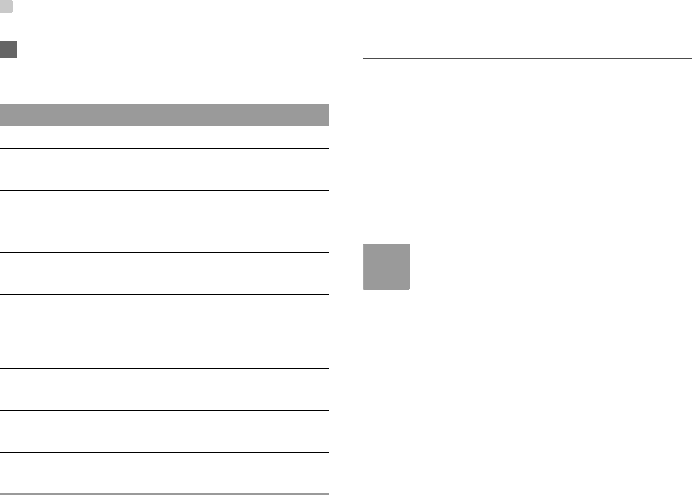
Calendar
152
3Select Options, you can perform the following
operations.
Prompt Interface for a Schedule
When it is time to remind you of a schedule, alarm
tone sounds/vibrates as setand a prompt interface is
displayed.
• You can stop the ringing by pressing any key or by
folding/unfolding your phone.
• On the prompt interface, you can snooze the alarm
or stop the prompt.
Note •If your phone is powered off, the alarm
tone can still ring/vibrate. When the alarm
rings, you can choose to power on the
phone.
• When you are making a call, alarm tone
does not sound/virbrate , while the prompt
interface is displayed.
•The operation of snooze can be executed
for many times and the delay time is five
minutes.
Item Description
New To create a new schedule.
Go to To go to a certain date directly from the
Month view screen.
Display
event
To view all events, specified events, Cal-
endar files and to back up all schedules
to a memory card.
View
mode
To view the calendar in the other two dif-
ferent modes: day view or week view.
Manage-
ment
To manage all schedules
• Backup all
• Restore data
Delete
event
To delete all events, all overdue events
or specific period events.
Settings To set save location, main view, week
begin day.
Memory
status
To view the memory status, including the
used space and the total space.
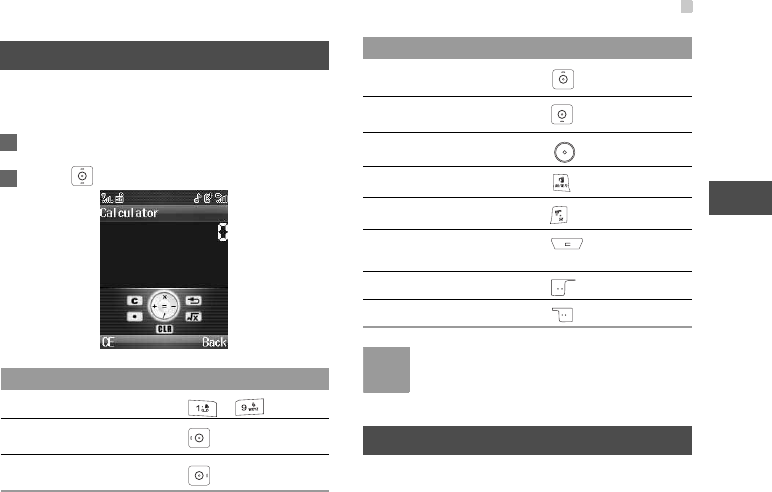
Calculator
153
15
Organiser & Tools
Calculator
You can perform addition, subtraction, multiplication,
division andextraction operations on your phone.
1Select Organiser&Tools in the main menu.
2Press to select Calculator.
Note With the Calculator, you can only calculate
positive real numbers and cannot enter neg-
ative real numbers.
Unit Converter
You can convert units of length and weight .
Operation Assigned Key
Number(0-9) -
+
-
*
/
=
Decimal point
Extraction of square root
Delete the character on the
left of the cursor
Clear
Exit
Operation Assigned Key
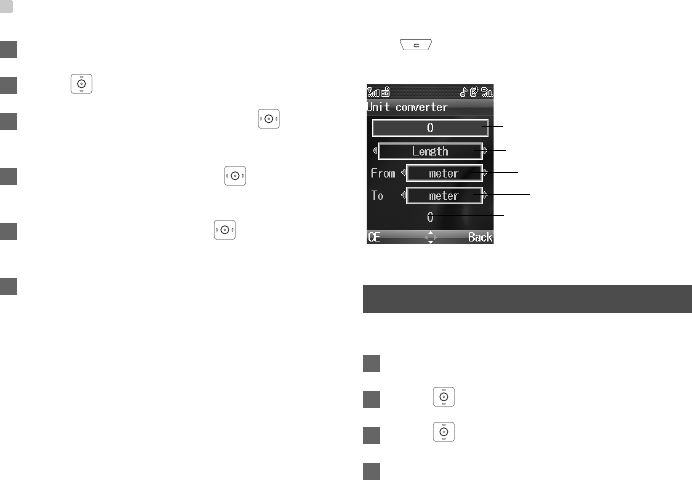
Currency Converter
154
1Select Organiser&Tools in the main menu.
2Press to select Unit converter.
3On the unit type selection bar, press to
select weight or length.
4On the original unit bar, press to select the
unit to be converted from.
5On the target unit bar, press to select the
unit to be converted to.
6On the input bar, enter a numeric value to be
converted.
Then you can view the conversion result.
Press or select CE to clear the numeric values
you entered.
Currency Converter
You can convert currencies for various countries.
1Select Organiser&Tools in the main menu.
2Press to select Currency converter.
3Press to switch between the setup items
4On the Input bar, press the number keys to enter
a numeric value to be converted.
Original unit bar
Target unit bar
Enter a value in original unit
Unit type selection bar
The converted value appears
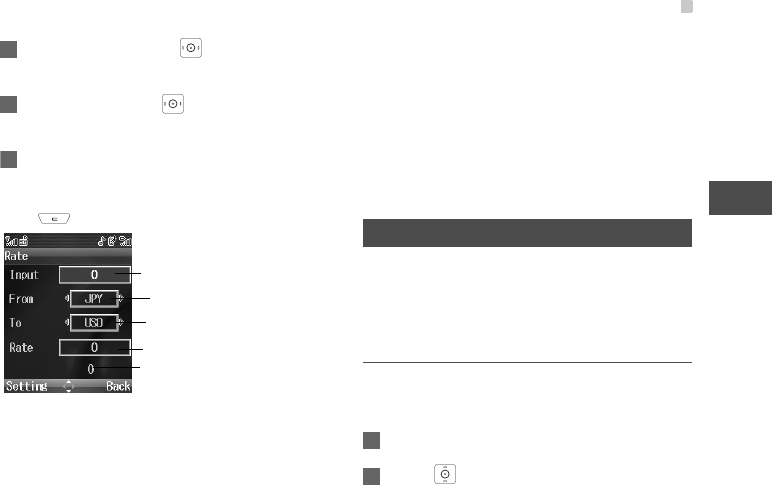
Synchronise
155
15
Organiser & Tools
5On the From bar, press to select the cur-
rency to be converted from.
6On the To bar, press to select the currency
to be converted to.
7On the Rate bar, enter the currency rate.
Then you can view the conversion result.
Press to clear the numeric values you entered.
Press Setting in the currency converter screen, and
you can select frequently used currency units. This
makes it easy to switch between selected units in the
From or To bar.
• CNY: Chinese currency
• USD: United States currency
•HKD:Hong Kong currency
•GBP:Great Britain currency
•EUR:European currency
•JPY:Japanese currency
Synchronise
With this funciton, you can synchronize the informa-
tion in the phone and that on the server through the
wireless network. The information includes the Con-
tacts, the Calendar and the Task.
Set Profile
Before you use the synchronise function, you need to
set a profile.
1Select Organiser&Tools in the main menu.
2Press to select Synchronise.
Enter a value in original
currency
Original currency
Target currency
Currency rate
The converted value appears
Task
156
3Select Options > New to create a profile.
4Input profile name, then press to save it.
5Press to switch between Synchronise
item,Server Setting, and Network profile.
6In the Synchronise item screen, select the item
to be synchronized and press to confirm it.
Then, enter the Database name,User name,
Password of the synchronization item.
7In the Server Setting screen, enter the Server
Address,User name and Password.
8In the Network profile screen, enter the Proxy
address and Proxy port. Then, select a Network
Access Point.
9Return to the previous menu and select Options
>Synchronise to start synchronising.
Note This service is network dependent. It is not
available in all networks. Please contact
your service provider for more information.
Operations to Profile
After setting the synchronization profile, you can
select Options to perform the following operations:
Task
You can define and manage tasks to be conducted
before a certain time. Your phone can remind you of
these tasks and track them automatically.
The tasks are classified into three kinds: pending,
done, and all.
Operation Description
Synchronise To start synchronization
New To create new profile
Edit To edit the profile
View log To view the latest synchronization log
Rename To rename the profile
Delete To delete the profile
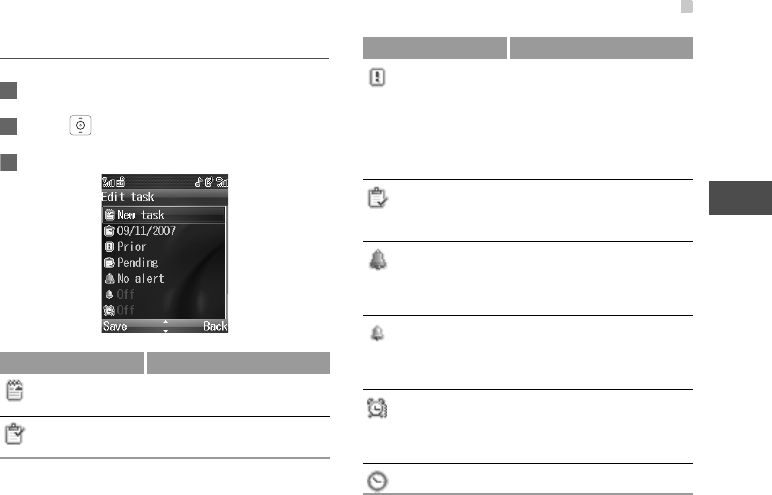
Task
157
15
Organiser & Tools
New Task
1Select Organiser&Tools in the main menu.
2Press to select Task.
3Select Options > New to create a new task.
Icon Item Description
Task title Enter the title of the new
task
Deadline date Set the deadline date of the
new task
Priority Set the priority level of the
new task:
•Prior
• Important
• General
Task state Set the accomplishment sta-
tus of the task according to
the process
Task alert Whether to alert
• No alert
•Alert
Sound alarm Set Sound alarm as:
•Off
•On
Vibration Set Vibration as:
•Off
•On
Alert time Set the alert time of the task
Icon Item Description
Task
158
After setting the task, press to save the task.
Note You can define up to 1000 tasks on your
phone. While creating a new schedule, you
need to set the alert on before setting the
sound alarm, vibration and the alert time.
Operations to Task
1Select Organiser&Tools in the main menu.
2Press to select Task.
3Press to switch between Pending,Done,
and All Tasks.
4Select Options, you can perform the following
operations.
Prompt Interface for a Task
When it is time to remind you of a task, alarm tone
sounds/vibrates as setand a prompt interface is dis-
played.
Task type Set the type of the task:
• Personal
•Work
•Other
Icon Item Description
Item Description
Edit To edit the task.
New To create a new task.
Send To send the task through SMS or blue-
tooth.
Copy To copy the task.
Day view To view.
Set as
done
To set the accomplishment status of the
task as done.
Delete To delete the task.
Delete all To delete all the tasks.
Memory
status
To view the memory status, including the
used space and the total space.

Voice Recorder
159
15
Organiser & Tools
• You can stop the ringing by pressing any key or by
folding/unfolding your phone.
• On the prompt interface, you can snooze the alarm
or stop the prompt
Note •If your phone is powered off, the alarm
tone can still ring/vibrate. When the alarm
rings, you can choose to power on the
phone.
• When you are making a call, alarm tone
does not sound/virbrate , while the prompt
interface is displayed.
•The operation of snooze can be executed
for many times and the delay time is five
minutes.
Voice Recorder
You can record voices or sounds on your phone.
Recording Voice
ƹStart Recording
1Select Organiser&Tools in the main menu.
2Press to select Voice recorder.
3Press to start recording or select Options >
Record to start recording.
Change the recording duration. P160
ƹOperations During the Recording
• Record/Pause: During recording, press to
pause, and press again to resume.
• Stop and save: During recording, press to stop
recording.The audio file is saved in My Files\Music
automatically.
ƹOperations After the Recording
After recording is complete, you can select Options
to do the following operations:
Memo
160
• Send: To send the record file through MMS or blue-
tooth.
• Play: To play the record file instantly.
• Delete: To delete the record file.
Playing Record
1Select Organiser&Tools in the main menu.
2Press to select Voice recorder.
3Select Options > Go to gallery.
4Press to select the record file you want to
play.
5Press to play the record file.
Play record file. ( ėP114
Note After recording is complete, you can select
Options > Play to play the audio file
instantly.
Setting Record Duration
1Select Organiser&Tools in the main menu.
2Press to select Voice recorder.
3Select Options > Duration, you can set the
record duration as:
• 1 minute
• 5 minutes
•No limit
Memo
You can take down important events on your phone.
You can save up to 100 such memos.
New Memo
1Select Organiser&Tools in the main menu.
2Press to select Memo.
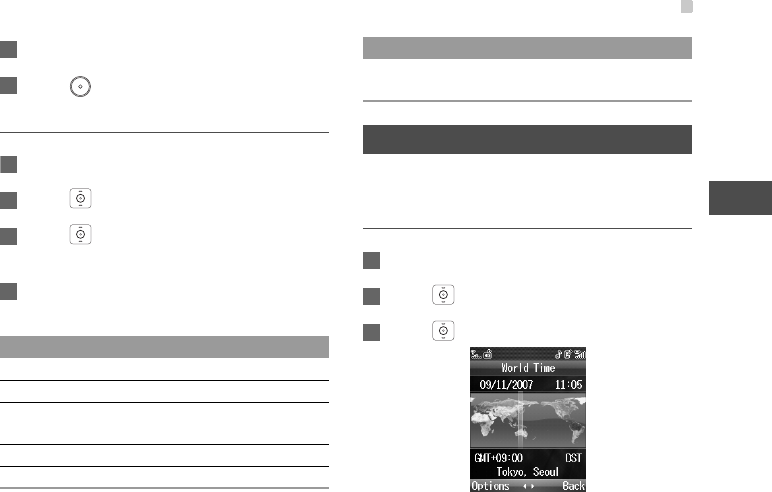
World Time
161
15
Organiser & Tools
3Select Options > New to create a new memo.
4Press to save the memo.
Operations to Memo
1Select Organiser&Tools in the main menu.
2Press to select Memo.
3Press to select a memo you want to oper-
ate.
4Select Options, you can perform the following
operations:
World Time
You can view the time of important cities around the
world.
Viewing the Time Zone
1Select Organiser&Tools in the main menu.
2Press to select World Time.
3Press to switch among the time zones.
Item Description
Edit To edit the memo.
New To create a new memo.
Send To send the memo through SMS or
bluetooth.
Delete To delete the memo.
Delete all To delete all the memos.
Memory
status
To view the memory status, including the
used space and the total space.
Item Description
Stopwatch
162
Setting the Time Zone
ƹSet time zone
1In the viewing time zone screen, press to
switch to the desired time.
2Select Options > Set time zone
ƹSet to DST
If the daylight saving time (DST) is used in your city,
you need to set the phone to DST. Then, you can get
the right local time.
To set the phone to DST:
1In the viewing time zone screen, press to
switch to the desired time.
2Select Options > Set to DST.
Stopwatch
You can use the stopwatch function and save up to
five records on your phone.
1Select Organiser&Tools in the main menu.
2Press to select Stopwatch.
3On the Stopwatch screen, you can perform the
following operations:
• Start: Press or press to start timing.
• Save: Press or press to save the first item
of timing. Then the second item starts automati-
cally. Go on operating in turn.
• Pause: Press to pause timing.
• Continue: In pause state, press or select
Options > Continue to continue timing from where
it paused.
• Reset: In pause state, select Options > Reset to
clear all the stopwatch records.
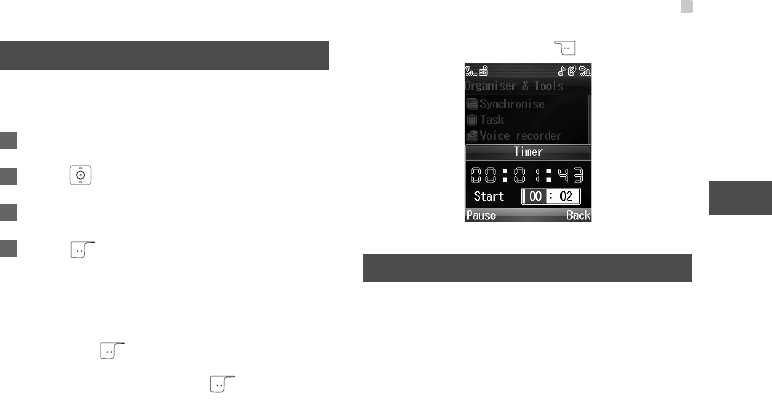
Timer
163
15
Organiser & Tools
Timer
You can set a timer for up to 99 hours and 59 min-
utes.
1Select Organiser&Tools in the main menu.
2Press to select Timer.
3Enter the time.
4Press to start the timer. The Timer is dis-
played on the home screen.
After the timer is started, repeat the preceding Step 1-
2 to perform the following oeprations:
• Pause: Press to pause timing.
• Continue: In pause state, press to continue
timing from where it paused.
• Reset: In pause state, press to reset the timer.
Service Dial Number
With this number, you can get in touch with your ser-
vice provider.

164
16Option Service
The option service are network-dependent. For more
information, please consult your service provider.
Call Forwarding
1In the main screen, select Settings >Call set-
tings > Call forwarding.
2Select the forwarding condition from All calls, If
out of reach,If busy, and If not answer.
3Then select the forwarding type from Voice call,
Data call and All services. You will have the fol-
lowing options.
• Activate: Enter the forwarded-to number and
press to forward incoming call to this num-
ber.
• Deactivate: Cancel call forwarding settings.
• Check status: Check the status of call forward-
ing service.
Alternatively, you can selectDisable all and then
selectone from the four items: Voice call,Data call
and All services. Then press to disable all call for-
wardingservices of this type.
Disable AllCall Forwarding
1In the main screen, select Settings >Call set-
tings > Call forwarding.
2SelectDisable all and then selectone from the
four items: Voice call,Data call and All ser-
vices.
3press to disable all call forwardingservices
of this type.
Call barring
Select Call setting > Call barring for the following
options:
Barring outgoing calls:
1Select the barring condition from All outgoing
calls,International calls, and International
calls except home.
Call Waiting
165
16
Option Service
2Then select the barring type from Voice call,
Data call, and All services. You will have the
following options:
• Activate: Enter the call barring password and
press to enable this service.
• Deactivate: Enter the call barring password
and press to disable this service.
• Check status: Check the status of the call bar-
ring service.
Barring incoming calls:
1Select the barring condition from All incoming
calls and Incoming calls when abroad.
2Then select the barring type from Voice call,
Data call, and All services. You will have the
following options:
• Activate: Enter the call barring password and
press to enable this service.
• Deactivate: Enter the call barring password
and press to disable this service.
• Check status: Check the status of the call bar-
ring service
Disable All
Select one type from Voice call,Data call and All
services, and then enter the call barring password.
Press to cancel all call barring services of each
type.
Call Waiting
The call waiting function is network-dependent. For
more information, please consult your service pro-
vider.
1In the main screen, select Settings >Call set-
tings > Call Waiting.
2You will have the following options:
• On: To enable the call waiting function.

Call Waiting
166
• Off: To disable the call waiting function.
• Check status: To check the status of the call
waiting service.
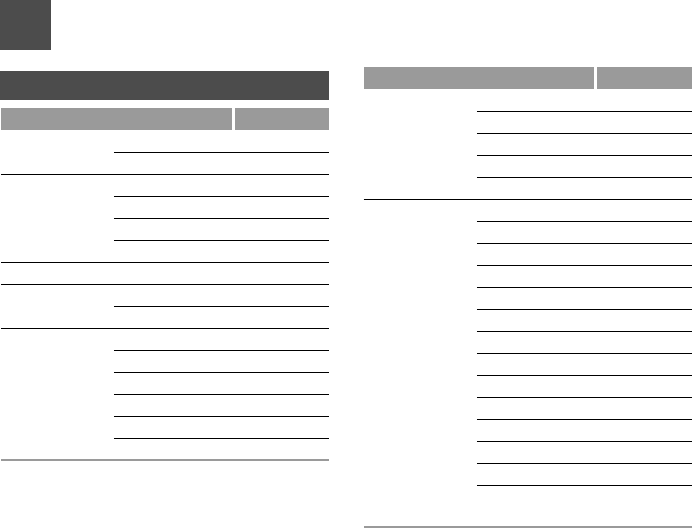
167
17Appendix
Functions
Main Menu Item Item Page
Entertainment Camera P103
Music P113
Broswer
EMnet P97
Enter URL P98
Bookmarks P99
Internet settings P102
Call Log - P41
Music My music P113
Playlist P116
Messaging
Write MMS P78
MMS P78
Write SMS P88
SMS P88
Push Inbox P95
Settings P87,P94,P95
My Files
Pictures P119
Music P119
Ringtones P119
Videos P119
Other P119
Organiser&Tools
Sim ToolKit P146
Alarms P146
Calendar P148
Calculator P153
Unit converter P153
Current converter P154
Synchronise P155
Task P156
Voice recorder P159
Memo P160
World Time P161
Stopwatch P162
Timer P163
Service dial num-
ber
P163
Main Menu Item Item Page
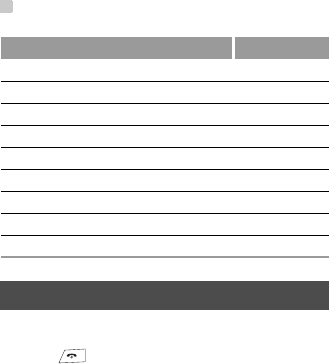
Troubleshooting
168
Troubleshooting
• Mobile phone does not turn on
– Was pressed for more than two seconds?
– Is battery inserted properly? ( ėP29
– Is battery level sufficient? If the battery is low,
please recharge the battery. ( ėP30
• The PIN screen is displayed when H12HW is turned
on.
– The PIN lock function is enabled, and you need to
enter the PIN code.( ėP143
• The Phone password screen is displayed when
H12HW is turned on.
– The Phone password function is enabled, and
you need to enter the phone password. The
default password of H12HW is 0000. ( ėP143
• The Insert USIM screen is displayed when H12HW
is turned on.
– The USIM card is not inserted or incorrctly
inserted. Insert the USIM card.( ėP22
– Make sure that the USIM card is a valid one.
– USIM card IC chip may be dirty. Wipe with a clean
cloth, then insert USIM card properly.
• The music touch keys do not response when play-
ing music files.
– Make sure whether the touch key lock is enabled.
If there is a lock on the upper right conner of the
external display, press and hold the camera key
to unlock it.
Contacts - P59
Settings Phone settings P132
Display settings P136
Message settings P87,P94,P95
Call settings P138,P164
Video call P72
Connectivity P124
Network P141
Security P141,P143
Main Menu Item Item Page

Troubleshooting
169
17
Appendix
• Calls or Video Calls cannot be connected or mes-
sage and web connections are not available.
– Check whether No service is displayed, or is
H12HW out-of-range or in a location where signal
is weak or unstable? If yes, move to a location
where sighnal is strong.
– Check whether your mobile phone is Offline. If
there is on the upper right conner of the dis-
play, switch to another profile. ( ėP133
• Calls or Video Calls cannot be connected.
– Are Calls long distance calls? If yes, consult your
service provider.
– Is restricting outgoing calls in Call Barring?
(ėP164
• No names are displayed for received messages or
calls
– Those contacts’ names are not saved in your
Contacts.
– This may occur just after turnning H12HW on.
Return to Standby and retry later.
• The predefined contents such as ringtone, image,
and name cannot be displayed when a call or video
call is received
– This may occur just after turning H121HW on.
When you receive a call or video call at this time,
you can only see the number but not the image.
• Bad commuication quality and calls often discon-
nect
– Is H12HW out-of-range or in a location where sig-
nal is weak or unstable? Move to a location where
sighnal is strong.
• Cannot charge batery
– Make sure the AC charger is firmly connected to
H12HW. ( ėP30
– Is AC charger securely plugged into an outlet?
– Is battery installed in H12HW correctly?( ėP29
– Make sure H12HW, battery, AC charger terminals
are clean.
– Battery may not charge beyond +ć and +35 ć.
– Battery may need to be replaced.

Symbol List
170
• H12HW/accessories feel warm
– AC charger may warm during charging. H12HW
may ward during long use.
– This is normal if you can hold it comfortably. Low
temperature burns may occur if H12HW is held
agains skin for long periods.
• Battery operating time is greatly reduced.
– Environmental factors such as temperature,
charging conditions, or signal strength, as well as
by operations and settings.
Note If you did not find the remedy to your problem
here, please contact the Customer Center.
Symbol List
㧙ޓ
Full-pitch Symbol List
Half-pitch Symbol List
Pictograph List
171
17
Appendix
Pictograph List Memory List
Shared Memory
Mes-
saging
MMS Storing up to 200 MMSs
SMS Storing up to 500 SMSs
Web Enter URL Storing up to10 history
URL
Bookmarks Storing up to 50 book-
marks
Saved pages Storing up to12 pages
Phone
Book
- Storing up to 1,000 con-
tacts
Call
Log
Missed call Storing up to 50 missed
calls
Received call Storing up to 50
received calls
Dialed calls Storing up to 50 dialed
calls
Specifications
172
Note The number of savable items varies deped-
ing on data amount.
Specifications
H12HW
Battery
AC Charger
Item Specification
Weight 97.8 mm h 49.5 mm h 17.5 mm
Dimensions
(L h W h H)
< 105 g (including the battery)
Continuous
standy time
• GSM: Approx. 460 hours
• 3G: Approx. 640 hours
Continuous talk
time
• GSM Talk: Approx. 190 minutes
• 3G Talk: Approx. 180 minutes
• 3G Video Talk: Approx. 120
minutes
Charge time 2.5 hours
Item Specification
Voltage 3.7V
Battery Li-ion
Capacity 850mAh
Dimensions Approx. 37.8*5.7*44.5mm
Item Specification
Proswer Source AC 100V-240V
Input Current 0.2A MAX
Output Voltage/
Current
5.3V/650mA
Dimensions
(L h W h H)
59.6*61*28mm
Cord Length 1800 f50mm

1
㺰ׂ⫼䚼ક .............................................................. 9
About Browser ....................................................... 97
About Message ...................................................... 75
About Profiles....................................................... 133
Accessing the Function Screen Through the Main
Menu ...................................................................... 33
Accessing the Function Screen Through the Shortcut
Keys ....................................................................... 34
Accessing the function screen ............................... 33
Accessing the Internet Using Bluetooth Technology ..
128
AC ȪɈɟɇ .......................................................... 17
Adding a Bookmark................................................ 99
Adding items .......................................................... 57
Adding/Deleting Group Members........................... 62
Addingࠐorࠑ........................................................ 51
Adjusting the mobile phone Volume ...................... 39
Alarms.................................................................. 146
All Rights Reserved ............................................... 19
Answer Mode ....................................................... 139
Answering a Call When the Auto Answer Is Disabled
37
Answering a Call When the Automatic Answer Is En-
abled ...................................................................... 38
Answering a Video Call.......................................... 69
Answering or Rejecting a Call................................ 37
Attached CD-ROM ................................................. 14
Audio off/Open audio ............................................. 70
Audio...................................................................... 73
Auto Answer ........................................................ 139
Auto answer........................................................... 74
Auto On and Off................................................... 133
Auto Redial .......................................................... 138
Auto voice call ....................................................... 73
ᅝܼϞȃǩ⊼ᛣ ....................................................... 2
Backlight time ...................................................... 137
Barring incoming calls: ........................................ 165
Barring outgoing calls: ......................................... 164
Battery Installation and Removal........................... 29
Battery ..................................................................... 8
Before Charing the Battery .................................... 29
Before Playing Audio&Video ............................... 113
Before Using Bluetooth........................................ 124
Before Using the Camera .................................... 103
Before using the memory card .............................. 34
Before Using USB ............................................... 129
Bluetooth ............................................................. 124
Bookmarks............................................................. 99
Brightness............................................................ 137
ֱ䀐ȀǹǙǻ ........................................................... 8
ᴀԧ ...................................................................... 15
Cache Memory ...................................................... 97
Calculator ............................................................ 153
Calendar .............................................................. 148
Call Barring Password ......................................... 140
Call barring .......................................................... 164
Call Forwarding ................................................... 164
Call log options ...................................................... 43
Index
2
Call Log.................................................................. 41
Call Settings......................................................... 138
Call Waiting.......................................................... 165
Callback ................................................................. 84
Calling ID ............................................................. 139
Calls status ............................................................ 44
Camera off/Open video.......................................... 70
Camera Settings .................................................. 108
Camera ................................................................ 104
Camera .................................................................. 73
Capture Mode ...................................................... 104
Cell information .................................................... 141
Change password ................................................ 143
Charger .................................................................. 11
Charging the Battery .............................................. 29
Charging with a Cable Charger.............................. 30
Colour themes...................................................... 137
Composition ......................................................... 119
Copying messages to the USIM card .................... 92
Copying to Handset/USIM Card............................. 66
Creating a Contact Through Call Logs................... 61
Creating a Contact ................................................. 60
Creating a folder in Other..................................... 123
Creating a Message............................................... 63
Creating and sending an MMS .............................. 78
Creating and sending an SMS ............................... 88
Creating Contacts .................................................. 59
Currency Converter.............................................. 154
Daily and Internet Phrases .................................... 96
Date and Time ..................................................... 132
Date format.......................................................... 132
Deleting a Bookmark ............................................. 99
Deleting a folder in Other..................................... 123
Deleting an SMS ................................................... 92
Deleting Call Log Records..................................... 43
Deleting Contacts .................................................. 66
Deleting MMS messages....................................... 85
Disable AllCall Forwarding................................. 164
Disable All............................................................ 165
Display settings ................................................... 136
Display the Calendar ........................................... 148
Displaying contents of the memory card ............. 123
DRM setting......................................................... 145
䳏∴əɋȷ ............................................................ 16
Earpiece Volume ................................................... 69
Edit before call....................................................... 91
Edit My number ..................................................... 45
Editing a Bookmark ............................................... 99
Editing a Picture .................................................. 111
Editing Contacts .................................................... 66
Emergency Calls ................................................... 44
EMnet .................................................................... 97
Entering Characters............................................... 48
Entering Commonly-used SMS Texts ................... 53
Entering Kanji/Hiragana......................................... 48
Entering Katakana ................................................. 49
Entering Numbers.................................................. 52
Entering Roman Letters......................................... 51

3
Entering Symbols/Pictographs............................... 52
Entering URL ......................................................... 98
External view/Internal view .................................... 71
File Formats ......................................................... 113
Finding a Contact................................................... 63
Fixed dialer number ............................................. 144
Folders ................................................................... 85
Forwarding an MMS............................................... 84
Forwarding an SMS ............................................... 91
Front View and Back View ..................................... 26
Function menu overview ...................................... 122
Functions ............................................................. 167
Getting Started....................................................... 68
Go To a Bookmark................................................. 99
Greeting message................................................ 138
Groups ................................................................... 62
݅䗮........................................................................ 14
݀㸚ȃจǼՓ⫼ǮȠǽǢ ....................................... 18
݇Ѣߎষㅵ⧚㾘ࠊ .................................................. 20
Handfree / Earpiece ............................................... 69
Headset adapter .................................................... 36
Headset and Headset Adapter............................... 36
Headset.................................................................. 36
Holding a Call......................................................... 39
Holding a Video Call .............................................. 70
Home Screen ......................................................... 27
How to Use the USIM Card ................................... 21
Icon Description ..................................................... 39
Icon Description ..................................................... 42
Icons Description ................................................... 77
Icons in Playing Music ......................................... 114
Image quality ......................................................... 71
Image quality ......................................................... 73
Inserting contact information ................................. 54
Inserting/Taking out of the memory card ............... 35
Internet Settings .................................................. 102
Keypad Assignments............................................. 47
Keypad backlight ................................................. 137
LCD sleep delay .................................................. 138
Loading the USIM Card ......................................... 22
Making a Call Using SDN ...................................... 37
Making a Call Using the Call Log .......................... 42
Making a Call......................................................... 37
Making a Call......................................................... 63
Making a Second Call............................................ 39
Making a Video Call............................................... 68
Making a Voice Call............................................... 37
Managing a Group................................................. 62
Managing folders ................................................. 123
Memo................................................................... 160
Memory card........................................................ 123
Memory card.......................................................... 34
Memory List ......................................................... 171
Menu Functions Overview ................................... 106
Menu Functions Overview ................................... 108
Menu Functions Overview ................................... 115
Menu Functions Overview ................................... 117
Messaging Folders ................................................ 76
4
MMS Settings......................................................... 87
MMS....................................................................... 78
Mode .................................................................... 141
Modifying a Contact ............................................... 66
My Number .......................................................... 140
My number ............................................................. 45
My PLMN list........................................................ 142
ܡ䊀џ䷙................................................................... 3
Network settings .................................................. 141
New Memo........................................................... 160
New Schedule...................................................... 149
New Task ............................................................. 157
Notice..................................................................... 20
Operations During a Voice Call.............................. 39
Operations in browsing Web Pages..................... 100
Operations to Memo ........................................... 161
Operations to Profile ............................................ 156
Operations to Schedule ....................................... 151
Operations to Task .............................................. 158
Option dictionary .................................................. 132
Option service ...................................................... 138
Options in Phone and USIM Card.......................... 59
Other applications .................................................. 72
Other Menu Options in Calendar ......................... 151
Other Operations During a Voice Call.................... 40
Other Options......................................................... 64
Password lock...................................................... 143
Phone language................................................... 132
Phone settings ..................................................... 132
Pictograph List..................................................... 171
Picture in picture.................................................... 71
Picture in picture.................................................... 73
PIN......................................................................... 23
PIN2....................................................................... 23
Play file .................................................................. 72
Playing Audio Files .............................................. 114
Playing Record .................................................... 160
Playing Video ClipV.............................................. 117
Playlist ................................................................. 116
Powering Off.......................................................... 32
Powering On.......................................................... 32
Powering On/Off .................................................... 32
Predictive............................................................... 54
Profession.............................................................. 19
Profiles................................................................. 133
Prompt Interface for a Schedule.......................... 152
Prompt Interface for a Task ................................. 158
Prompt Interface for an Alarm ............................. 147
Prompt to save .................................................... 140
PUK ....................................................................... 24
PUK2 ..................................................................... 24
Push Inbox Settings............................................... 95
Push Inbox............................................................. 94
Rearranging files ................................................. 121
Receiving an MMS ................................................ 81
Receiving an SMS ................................................. 89
Record ................................................................... 72
Recording Voice .................................................. 159

5
Rejecting Calls ....................................................... 38
Replying an MMS................................................... 83
Replying an SMS ................................................... 91
Reset.................................................................... 143
Ringtone Settings................................................. 134
Saving a contact .................................................... 84
Saving a number.................................................... 42
Saving a number.................................................... 91
Security Settings .................................................. 141
Select Line ........................................................... 140
Select network ..................................................... 141
Send specific file .................................................... 74
Sending a Picture/Video Clip ............................... 111
Service Dial Number ............................................ 163
Set Profile ............................................................ 155
Setting Alarm Clocks............................................ 146
Setting Record Duration....................................... 160
Setting the Answer Mode....................................... 37
Setting the Bluetooth Device................................ 128
Setting the Camera .............................................. 108
Setting the date and time ....................................... 32
Setting the Time Zone.......................................... 162
Setting the Video Camera.................................... 110
Setting.................................................................. 134
Settings in browsing Web Pages ......................... 101
Shortcuts.............................................................. 133
Side View .............................................................. 26
SIM ToolKit .......................................................... 146
SMS Settings ......................................................... 94
SMS....................................................................... 88
Sorting MMS messages ........................................ 86
Specifications ...................................................... 172
Speed Dialing ........................................................ 64
SSL/TLS ................................................................ 97
Starting/Stopping Recording.................................. 40
Stopping the Alarm Clock .................................... 147
Stopwatch............................................................ 162
Switch picture ........................................................ 70
Switch picture ........................................................ 73
Switching Between Handsfree and Earpiece ........ 40
Switching Input Modes .......................................... 46
Switching ............................................................. 134
Symbol List .......................................................... 170
Synchronise......................................................... 155
Take Pictures in a Sequence............................... 107
Take Pictures....................................................... 105
Taking a Video Clip ............................................. 107
Task..................................................................... 156
Text Input Interface................................................ 46
Timer ................................................................... 163
Trademarks ........................................................... 20
Troubleshooting................................................... 168
Wallpaper ............................................................ 136
web set mail........................................................... 95
Video Call Settings ................................................ 72
Video Call Window ................................................ 68
Video Camera...................................................... 107
View My number.................................................... 45
6
Viewing a call log detail.......................................... 42
Viewing an MMS .................................................... 82
Viewing an SMS..................................................... 90
Viewing files ......................................................... 119
Viewing files ......................................................... 119
Viewing memory status.......................................... 86
Viewing Push Messages........................................ 94
Viewing SMS memory status ................................. 93
Viewing the Time Zone ........................................ 161
Unit Converter...................................................... 153
Unloading the USIM card....................................... 22
Voice Mail Number................................................. 96
Voice Recorder .................................................... 159
World Time........................................................... 161
USB Accessing the Internet ................................. 130
USB Cable ............................................................. 13
USB Synchronising .............................................. 130
USB...................................................................... 129
USB ɥόɐˋȳόɑɁɵɋɐ .............................. 17
User dictionary ....................................................... 57
USIM PINs ............................................................. 23
Using audio files................................................... 121
Using Contacts....................................................... 63
Using files ............................................................ 121
Using image files.................................................. 121
Using User dictionary............................................. 57
ᨎᐃ䳏䁅″ȃ↨ঢ⥛ (SAR) ȀǹǙǻ ................ 20
ׂ⧚ȀǹǙǻ .......................................................... 8
Your Phone ............................................................ 25
⎆㸼⼎ ............................................................... 18
Џᴎ ......................................................................... 3
ǩ߽⫼ǙǴǵǤȀǗǴǸǻ .................................. 18
ǩՓ⫼Ϟȃǟ丬Ǚ ................................................. 14
ǩ⊼ᛣ...................................................................... 8
ȳɩɱ ................................................................... 17
ɗɻɑɁɐɱɋɟ ................................................. 18
ɲȽȬȷɳȀǹǙǻ .............................................. 19

1ֱ䀐ǽȪɝɇόȽόɛɁȀǹǙǻ
ֱ䀐ȀǹǙǻ
ǟ䊋ϞǧǙǴǵǤǽǃֱ䀐ǡҬǙǻǙȓǮDŽ
㿬䓝ݙᆍǟȝȈ Njǟ䊋Ϟǧ᮹ƽ䉽ໆᑫnjȃ㿬䓝џ䷙
ȧȝǤǟ⺎ǠȖȃϞǃߛȀֱㅵǬǻǤǵǪǙDŽ
ֱ䀐ݙᆍȀǹǙǻȄֱ䀐Ȁ㿬䓝ǪȡǻǟȟȓǮDŽ
ׂ⧚ȀǹǙǻ
ׂ⧚ȧձ丐ǪȡȠจড়ǃǨȃ䂀ᯢȧǟ䂁ȔȀǿ
ȟǃȗǛϔᑺǩՓ⫼ᮍ⊩ș䀁ᅮ⢊ᜟȧǩ⺎䁡ǤǵǪ
ǙDŽDzȡǼȗᬍǃᕽᮻǬǿǙจড়Ȅǃǩ༥㋘ܜȃ
ǟଣড়ȤǰでষȓǼǩⳌ䂛ǤǵǪǙDŽ
ֱ䀐ᳳ䭧Ёȃׂ⧚˖ֱ䀐ȃ㿬䓝ݙᆍȀǺǙǻׂ
⧚ǙǴǬȓǮDŽ
ֱ䀐ᳳ䭧㌠䘢ᕠȃׂ⧚˖ׂ⧚Ȁȝȟ″㛑ǡ㎁ᣕǼǢ
Ƞจড়ȄǃǟᅶǪȓȃǩ㽕ᳯȀȝȟ᳝۳Ȁǻׂ⧚Ǚ
ǴǬȓǮDŽ
ǩ⊼ᛣ
Ǩȃ㻑કȄҬሲકȧȖǃᬍ㡃ȃǴȖќਞǿǤ㻑ક
ȃܼ䚼ȓǴȄϔ䚼ȧໝǮȠǨǽǡǗȟȓǮȃǼǃ
ǗȞǠǭȖǩњᡓǤǵǪǙDŽ
ᴀ㻑કȃᬙ䱰ǃ䁸ࢩȓǴȄϡড়ǿǾȀȝȟǃ䗮
ֵㄝȃ″Ӯȧ䘌ǬǴǴȖȀⱎ⫳ǬǴ䱰ᆇǿǾҬ䱣ⱘ
ǿ䱰ᆇȃֱ䀐ȀǹǙǻȄᔧ⼒ȄϔߛDzȃ䊀ӏȧ䉴Ǚ
ȓǰȨȃǼǗȞǠǭȖǩњᡓǤǵǪǙDŽ
ᬙ䱰ȓǴȄׂ⧚ȀȝȟǃǟᅶǪȓǡⱏ䤆ǪȡǴɏό
ɇșǟᅶǪȓǡ⣀㞾Ȁ䀁ᅮǃȬɻɁɐόɳǪȡǴɅ
ɝɐǡ⍜এǪȡȠ ˄ߎ㥋ᰖȃ߱ᳳ⢊ᜟǽǿȠ˅จড়
ǡǗȟȓǮDŽ

㺰ׂ⫼䚼ક
ᴀ㻑કȧߚ㾷ǃᬍ䗴ǮȠǽ䳏⊶⊩Ȁ㾺ȡȠǨǽǡǗ
ȟȓǮDŽȓǴǃᬍ䗴ǪȡǴจড়Ȅׂ⧚ȧফҬǼǢȓ
ǰȨȃǼǩ⊼ᛣǤǵǪǙDŽ
㺰ׂ⫼䚼ક
ᴀ㻑કǟȝȈ਼䖎″఼ȃ㺰ׂ⫼ᗻ㛑䚼કȃ᳔Ԣֱ᳝
ᳳ䭧Ȅ⫳⫷㌖њᕠ Nᑈ䭧ǼǮDŽ㺰ׂ⫼ᗻ㛑䚼કǽ
ȄǃDzȃ㻑કȃ″㛑ȧ㎁ᣕǮȠǴȖȀᖙ㽕ǿ䚼કǼ
ǮDŽ