Huawei Technologies U8220 HSPA/UMTS/GPRS/GSM/EDGE Mobile Phone with BT and WLAN User Manual User Guide
Huawei Technologies Co.,Ltd HSPA/UMTS/GPRS/GSM/EDGE Mobile Phone with BT and WLAN User Guide
Contents
- 1. User Guide Part 1
- 2. User Guide Part 2
User Guide Part 1

1
Notice
Notice
1 Notice
Copyright © Huawei Technologies Co., Ltd. 2009. All
rights reserved.
No part of this document may be reproduced or transmitted in any form or
by any means without prior written consent of Huawei Technologies Co.,
Ltd.
The product described in this manual may include copyrighted software of
Huawei Technologies Co., Ltd and possible licensors. Customers shall not in
any manner reproduce, distribute, modify, decompile, disassemble,
decrypt, extract, reverse engineer, lease, assign, or sublicense the said
software, unless such restrictions are prohibited by applicable laws or such
actions are approved by respective copyright holders under licenses.
Trademarks and Permissions
, , HUAWEI, are trademarks or registered trademarks of
Huawei Technologies Co., Ltd.
Other trademarks, product, service and company names mentioned are the
property of their respective owners.
Notice
Some features of the product and its accessories described herein rely on
the software installed, capacities and settings of local network, and may
not be activated or may be limited by local network operators or network
service providers. Thus the descriptions herein may not exactly match the
product or its accessories you purchase.
Huawei Technologies Co., Ltd reserves the right to change or modify any
information or specifications contained in this manual without prior notice
or obligation.
Huawei Technologies Co., Ltd. is not responsible for the legitimacy and
quality of any products that you upload or download through this mobile
phone, including but not limited to the text, pictures, music, movies, and
non-built-in software with copyright protection. Any consequences arising
from the installation or usage of the preceding products on this mobile
phone shall be borne by yourself.
NO WARRANTY
THE CONTENTS OF THIS MANUAL ARE PROVIDED “AS IS”. EXCEPT AS
REQUIRED BY APPLICABLE LAWS, NO WARRANTIES OF ANY KIND, EITHER
EXPRESS OR IMPLIED, INCLUDING BUT NOT LIMITED TO, THE IMPLIED
WARRANTIES OF MERCHANTABILITY AND FITNESS FOR A PARTICULAR
PURPOSE, ARE MADE IN RELATION TO THE ACCURACY, RELIABILITY OR
CONTENTS OF THIS MANUAL.
2
Notice
TO THE MAXIMUM EXTENT PERMITTED BY APPLICABLE LAW, IN NO CASE SHALL
HUAWEI TECHNOLOGIES CO., LTD BE LIABLE FOR ANY SPECIAL, INCIDENTAL,
INDIRECT, OR CONSEQUENTIAL DAMAGES, OR LOST PROFITS, BUSINESS, REVENUE,
DATA, GOODWILL OR ANTICIPATED SAVINGS.
Import and Export Regulations
Customers shall comply with all applicable export or import laws and regulations and
will obtain all necessary governmental permits and licenses in order to export,
re-export or import the product mentioned in this manual including the software and
technical data therein.

3
Safety Precautions
Safety Precautions
2 Safety Precautions
Please read the safety precautions carefully to ensure the correct and use
of your wireless device. For detailed information, refer to the
section"Warnings and Precautions".
Do not switch on your phone when it is prohibited to
use mobile phones or when the phone may cause
interference or danger.
Do not use your phone while driving.
Follow any rules or regulations in hospitals and health
care facilities. Switch off your phone near medical
apparatus.
Switch off your phone in aircraft. The phone may cause
interference to control signals of the aircraft.
Switch off your phone near high-precision electronic
devices. The phone may affect the performance of these
devices.
Do not attempt to disassemble your phone or its
accessories. Only qualified personnel are allowed to
service or repair the phone.
Do not place your phone or its accessories in containers
with strong electromagnetic field.
Do not place magnetic storage media near your phone.
Radiation from the phone may erase the information
stored on them.
Do not put your phone in a high temperature place or
use it in a place with flammable gas such as a gas
station.

4
Safety Precautions
Keep your phone and its accessories away from children.
Do not allow children to use your phone without
guidance.
Use only approved batteries and chargers to avoid the
risk of explosions.
Observe any laws or regulations on the use of wireless
device. Respect others’ privacy and legal rights when
using your wireless device.
Strictly follow the relevant instructions of this manual
while using the USB cable. Otherwise your phone or PC
may be damaged.
Do not use your mobile phone in a moist environment,
such as the bathroom. Prevent your mobile phone from
being soaked or washed in liquid.
Do not crash, throw, or puncture your mobile phone.
Avoid the falling, squeezing, and bending of your mobile
phone.
5
Getting to Know Your Mobile
Getting to Know Your Mobile Phone
3 Getting to Know Your Mobile Phone
Packing List
The package of your mobile phone contains the following items:
• Mobile phone
• Battery
•Charger
• Data cable
• CD-ROM including the User Guide
• Quick Start Guide
• Warranty card
•Pouch
6
Getting to Know Your Mobile Phone
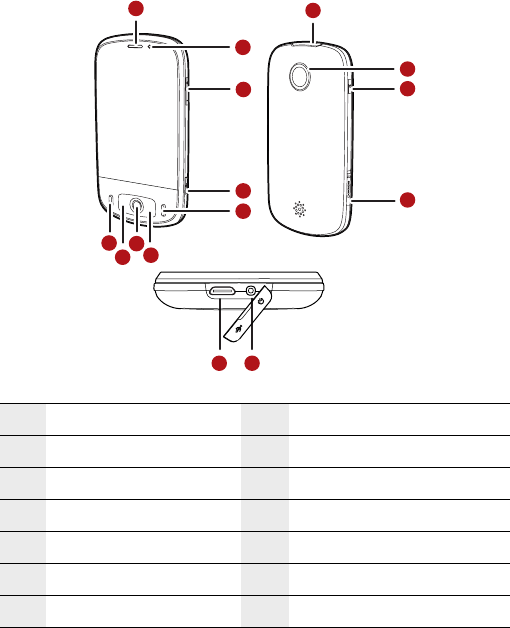
Mobile Phone View
Appearance
1Earpiece 2 Secondary camera
3 Volume control 4 Capture
5End 6Home/Back
7Trackball 8MENU
9Send 10 Connectors on the top
11 3.2 megapixel camera 12 Power
13 MicroSD card slot 14 Charging/Data interface
3
7
1
4
2
6
5
8
9
10
13
12
11
1514

7
Getting to Know Your Mobile Phone
Key Functions
15 Earphone jack
Key Function
Power Press or press and hold to power on your mobile
phone. Press and hold the Power key to open the
phone options menu. When your mobile phone is on,
press to lock the screen.
Send Press to go to the dialing screen.
MENU Press to open the menu of an active screen. While on
the text editing screen, press and hold to open or
close the keyboard.While on the locked screen, press
to unlock the screen.
Trackball To press or press and hold the trackball is similar to
perform operations on the screen with your
fingertips. While on the Home screen, press to zoom
out or zoom in on the screen.
Home/Back Press to return to the upper-level screen or exit from
the running application. Press and hold to return to
the Home screen.
End While on a call, press to hang up. While on other
screens, press to return to the Home screen.
8
Getting to Know Your Mobile Phone
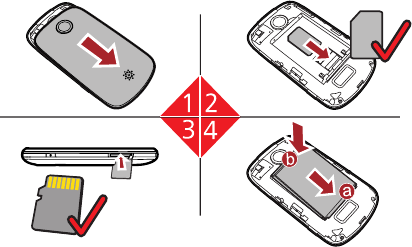
Installing and Removing the USIM
Card or SIM Card, and the
MicroSD Card
Installing the USIM Card or SIM Card, MicroSD
Card, and Battery
You can install your UMTS Subscriber Identity Module (USIM) card or SIM card,
MicroSD card, and battery according to the following figure.
Note: The MicroSD card is an optional accessory.
1) Remove the battery cover.
2) Insert the USIM card or SIM card.
3) Insert the MicroSD card in the correct direction.
4) Insert the battery from a to b.
Note:
• Insert the MicroSD card with the gold contacts facing up.
• During normal usage, do not randomly insert or remove the MicroSD
card.
9
Getting to Know Your Mobile Phone
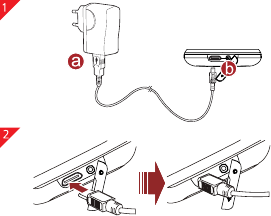
Charging Your Mobile Phone
Before you charge the battery, read the following instructions:
Note:
If your mobile phone battery is not in use for a long time or wears
out, you may not be able to switch on your mobile phone when
recharging the battery. This is normal. Charge the battery for a
while. Then, your mobile phone can be switched on for use.
The battery can be charged for many times; however, the battery
is easy to wear out. Therefore, if the standby duration of your
mobile phone significantly decreases after normal charging,
replace the battery with a new one.
The charging duration of the battery varies with the temperature
and the aging degree of the battery.
When the battery level is low, your mobile phone generates low
power alarm tones at a certain interval and displays a prompt. If
the battery level is too low to support the operations on your
mobile phone, your mobile phone is automatically switched off.
Before using the travel charger for charging, make sure that the battery is correctly
installed in your mobile phone.
1) Connect the USB cable that is delivered with your mobile phone to the
charger, as shown in a
2) Connect the USB cable to your mobile phone, as shown in b. Then, plug in
the connector of the charger to a power socket.
10
Using the Touch Screen
Using the Touch Screen
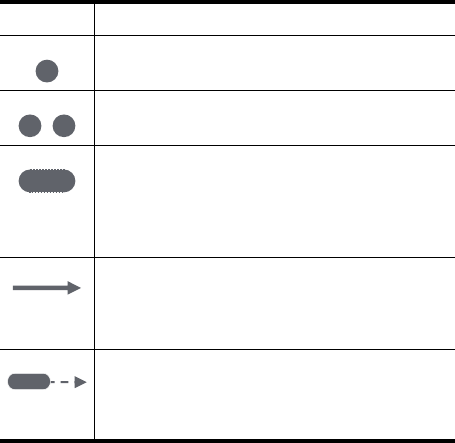
4 Using the Touch Screen
Action Description
Your mobile phone supports the following actions. Through these actions,
you can perform operations on your mobile phone.
Note: If you tap and hold certain screens, menu options
are displayed.
Icon Description
Touch: Touch a desired item with your fingertip to
confirm your selection or start an application.
Touch twice: Touch a desired item, for example, a
widcard, you can touch twice to expand it.
Touch and hold: Touch and hold the screen until
your mobile phone responds. For example, while
on any screen, you can touch and hold the screen
to open the shortcut menu on the active screen in
most circumstances.
Flick: To flick means to drag your finger vertically
or horizontally across the screen. For example, you
can flick your finger left and right to switch
between pictures.
Drag: Touch and hold your desired item with your
finger. Then, drag your finger to any part of the
screen to move the item. For example, you can
drag to move or delete an icon on the screen.
11
Using the Touch Screen
Rotating Your Mobile Phone
When you rotate your mobile phone, the screen adjusts itself to the rotation.
Tips: You can only rotate your mobile phone counterclockwise.
12
Home Screen
Home Screen
5 Home Screen
After you power on your mobile phone and access the system, the Home
screen is displayed.
Note: If the Community function is enabled on your mobile phone,
the default screen is changed from the Home screen to the
Community screen. Contact your network operator for details.
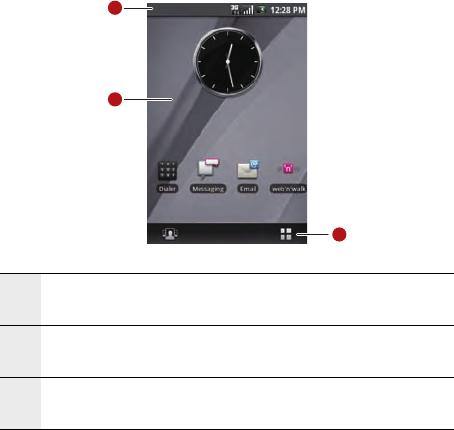
Knowing the Home Screen
1Notification bar: displays the reminders and status icons
of your mobile phone.
2Display area: displays the operation and display areas of
your mobile phone.
3Icons at the bottom of the screen: displays the
Community icon and main menu icon.
1
2
3
13
Home Screen
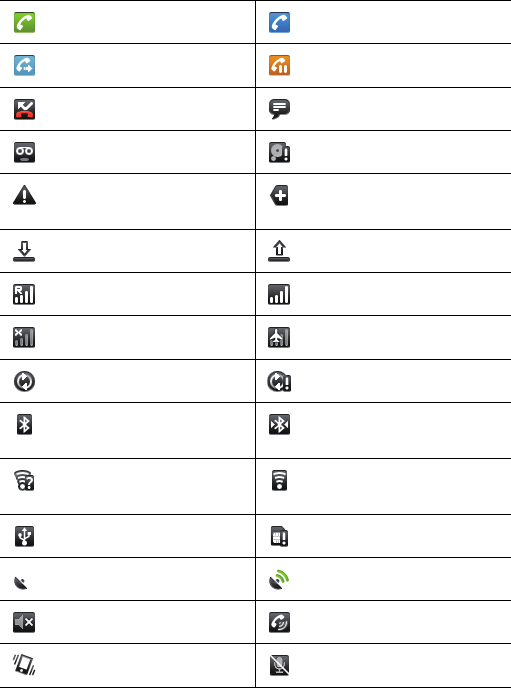
Status Icons
Call in progress Call via Bluetooth device
Call forwarding on Call on hold
Missed call New instant message
New voicemail Memory card is full
Problem with
sign-in/sync
More undisplayed
notifications
Downloading data Uploading data
Roaming Signal strength
No signal Airplane mode
Data is syncing Sync is error
Bluetooth is on Connected to another
Bluetooth device
Wi-Fi is on Connected to a Wi-Fi
network
Connected to PC No SIM card
GPS is on GPS is connected
Sound off Speakerphone on
Vibrate mode Phone is mute
14
Home Screen
Switching the Home Screen
There are two shortcut icons at the bottom of the Home screen of your mobile
phone. You can touch either of these icons to go to different screens.
Community Screen
Touch to open the Community screen.
GPRS connected GPRS in use
EDGE connected EDGE in use
3G connected 3G in use
Battery is full Battery is very low
Battery is charging Alarm is set
15
Home Screen
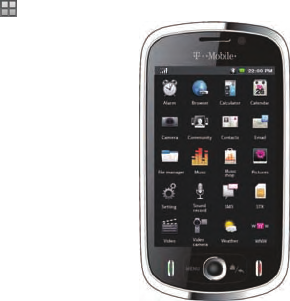
Main Menu Screen
Touch to open the Main Menu screen.
Canvas
The Canvas is an easily customizable space that allows you to create and arrange
applications, widgets and widcards.
Creating an Icon
Touch and hold the screen. Then, a options menu with the following options is
displayed. You can add one of the following options to the main menu.
• Application
•Widcard
•Shortcut
• Widget
•Wallpaper
Touch to expand your desired icon type, and then touch the related icon to create an
icon on the desktop.
16
Home Screen
Deleting an Icon
1) Touch and hold the icon to be deleted until your mobile phone vibrates and
displays the Trash button on the toolbar in the lower part of the screen.
2) Then, drag the icon to the Trash button to delete it.
Setting the Icon Background
You can customize a background color for an icon.
While on the Home screen, press the Menu key to open the options menu. Then,
choose More > Main Menu Style to use Grey or Colorful as the background.
Widcard
Widcard function provides a shortcut to or the preview of your desired application.
A widcard can be displayed as an icon or a preview window.
You can create the widcards of Calendar, Email, Music, Notepad, Picture, Video, and
Web, and display these widcards on the desktop. With the widcard function, you can
conveniently view the files and information stored in your mobile phone on the
desktop.
After creating a widcard on the desktop, you can perform the following operations
on the widcard of the Home screen:
• Touch the widcard icon twice to zoom out the widcard and display the detailed
information. Touch the widcard title bar to zoom in the widcard.
• Touch the widcard icon to open the widcard.
• Touch the widcard title to display the options related to the widcard.
17
Home Screen
• Touch and hold the widcard, and then drag your finger to move the widcard.
Note: The Calendar you create is shown on the Canvas as My
events. The Calendar function requires the support from the
network. If the support is unavailable, you cannot create events.
Browsing the Canvas
The desktop can be expanded unlimitedly.To expand the desktop, drag an icon to
the edge of the desktop and release it
If there are lots of items on the screen, you can browse them by clicking the
trackball.
On the zoom-in screen, you can slide the screen, and then tap twice or click the
trackball again to zoom out the selected area.
Note:
• During the browsing of the Canvas, you can press the Home/Back key to quickly
return to the default screen.
• On the Home screen, press the Menu key and choose More > Reset Canvas. The
Home screen is restored to the factory state.

18
Community
Community
6 Communit y
Your mobile phone supports the Community function. You can take the full
benefit of this function using the following features.
Note: Not all operator networks support the Community
function. Contact your network operator for details.
Creating a contact
1) Choose > Contacts to access contacts.
2) Press the Menu key to open the contacts menu. Then, touch
Create contact to create a contact. You can add information such as
the name, telephone number, address, email address, IM, and birthday
for the contact. In addition, you can set a ringing tone for the contact.
Note: When creating a contact, you can choose Ringtone
to customize the ringtone for the contact. Select a
ringtone stored on your mobile phone by touching Select
ringtone or download a ringtone from the Internet by
touching Download ringtone. After a ringtone is
downloaded, you need to select it from your mobile
phone, and then use it as the ringtone for the contact.
Creating a Contact Group
1) Choose > Contacts to access contacts.
2) On the All Contacts tab, press the MENU key.
3) Choose Create group to create a contact group.
4) You can define the group name, ringtone of the incoming calls
from the group, and group members.
Managing Contact Groups
1) Choose > Contacts to access contacts.
2) Touch the tab of the contact group to be operated, and then press
the MENU key.
•Choose
Search to search for the desired contact in the group.

19
Community
•Choose Show on home screen to display the contact group in the
community desktop application.
•Choose
Group SMS/MMS to send short messages or multimedia messages to
group members.
•Choose
Group e-mail to send email messages to group members.
•Choose
edit group to edit the contact group.
• Choose More to sort group members, delete a contact group, or create a contact
group.
Viewing the Event List
1) Choose > Contacts to access contacts.
2) Touch the Event List tab. You can view the activity logs, anniversaries,
and birthday of a contact in the event list.
Updating MyProfile
You can update your personal information in MyProfile. Your personal information is
displayed in the community contacts on the devices of your friends.
1) Choose > Contacts to access contacts.
2) Touch the MyProfile tab.
3) Press the Menu key, and then you can perform one of the following options:
Choose Edit MyProfile to edit your personal information. Choose Send MyProfile
to send your personal information to your friends. Choose Settings to set the
contact synchronisation options.
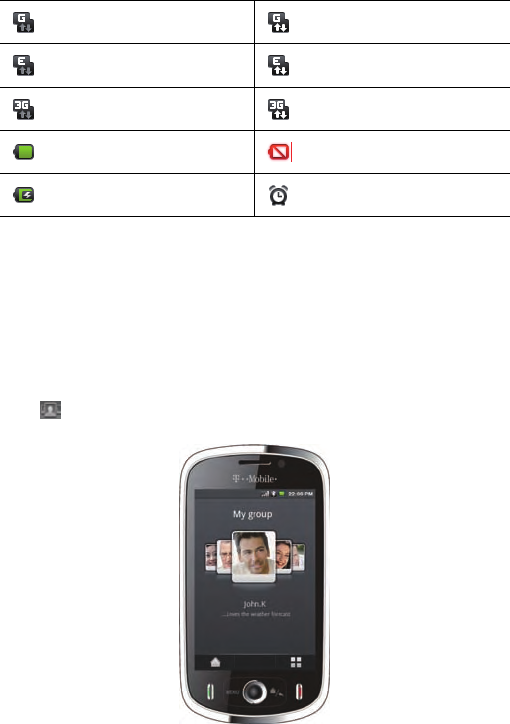
Using the Desktop Community Application
If you choose Show on home screen for a contact group, the contact group is
displayed in the community desktop application.
You can touch Community on the standby screen to access the desktop
community application.
• You can flick the contact images left and right to switch major contacts and drag
contacts to change the order of the contacts.
• You can touch the icon of a major contact to open the related options menu.
Then, you can call the contact, send messages and email messages to the contact,
start a chat with the contact, and view the activity logs of the contact.
20
Community
Note: You can chat with your friend only when both of you have
a chat ID. Apply for a chat ID from Google Talk and save it to
Contacts.
Locking and Unlocking Your
Mobile Phone
Locking Your Mobile Phone
If you do not use your mobile phone for a while, press the Power key or End key to
switch off the screen and lock your mobile phone.
After a period of inactivity, your mobile phone is automatically locked. You can
choose Settings > Sound & display > Screen timeout to define the time before your
mobile phone is automatically locked.
Unlocking Your Mobile Phone
If your mobile phone is locked, you can press any key to activate the screen and
unlock your mobile phone by:
•Pressing the Menu key.
• Flicking the red spot upwards according to the prompt.
21
Community
Using Pattern
You can define the screen unlock pattern to make your mobile phone securer. After
you enable the pattern function and create a pattern, you need to draw the correct
pattern on the screen to unlock your mobile phone.
You can choose Settings > Security & location > Require pattern to define your
pattern and enable the pattern function.
Using Mission List
On any screen, press and hold the Power key to open the phone options. You can
view the list of six applications that have been used recently by selecting Mission
List. Then, you can touch the application icon to open the desired application.
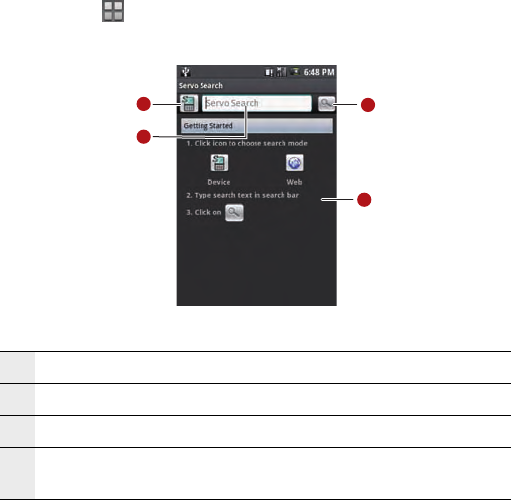
Using Servo Search
Your mobile phone supports a powerful searching function. With the Servo Search,
you can quickly find out the information or file you need from your mobile phone or
the network.
22
Community
Starting Searching
1) Choose > Servo Search to go to the searching screen.
2) Touch the related area to select the searching scope and content, and then
start searching.
Using Advanced Searching
When you need to accurately search files or information, you can also press the
Menu key and touch Advanced to go to the advanced searching screen. With
advanced searching, you can define a detailed searching scope to improve searching
efficiency.
1 Touch to enter the key words of the content you search for.
2 Touch to enter the key words of the content you search for.
3 Touch to search.
4 This is the information display area. Your mobile phone displays
prompts or search results here.
1
2
3
4
23
Using Your Mobile Phone
Using Your Mobile Phone
7 Using Your Mobile Phone
Calling
Making a Call
There are many ways to reach your friends and contacts using Dialer,
Contacts, and Call Log.
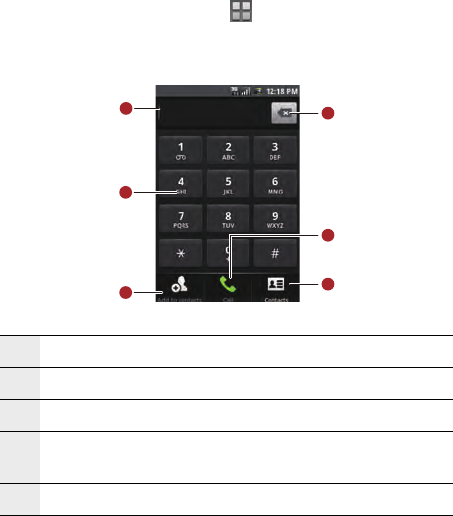
Making a Call Through Dialer
1) Press the Send key or choose > Dialer to display the dialing
panel.
2) Touch the intended phone number on the screen.
3) Touch Call to dial the phone number.
1 Displays the phone number you entered.
2 Touch to enter the number.
3 Touch to view the call log.
4 Touch to erase each subsequent digit of a number. Tap
and hold to erase the entire number.
5 Touch to dial the phone number you entered.
1
2
3
4
5
6
24
Using Your Mobile Phone
Making a Call Through Community
Access the community screen. Touch the desired contact from in the list. Then, touch
call.
Making a Call Through Contacts
1) Choose > Contacts to display the contact list.
2) Touch the desired contact from in the list.
3) Touch Call to dial the phone number.
Making a Call Through CallLog
1) Choose > CallLog to display the call log.
2) Touch the desired contact from in the list.
3) Touch Call to dial the phone number.
Answering a Call
When there is an incoming call, press the Send key to answer the call and press the
End key to hang up.
When a call comes, press the Volume control key to mute the speaker.
Note: When you have been on a call for a while, the screen is
automatically locked to avoid unintended operations. You can
touch the icon on the screen twice to unlock the screen.
Rejecting a Call
You can press the End key or Home/Back key to reject a call.
Other Operations During a Call
Your mobile phone support also additional call features to make your
communication simple.
6 Touch to view the contacts.

25
Using Your Mobile Phone
Make a conference Call
While on a call, you can press the Menu key, and then choose Add call on the menu
panel that is displayed, to establish a conference call.
You can also choose one party in a conference call for private conversation.
Note: For the availability of multiparty calling on the network,
consult your network service provider.
Using Other Functions
While on a call, you can press the Menu key to open the call operation panel. The
buttons on the panel enable you to perform your desired operations.
While on a call, you can press the Home/Back key to return to the Home screen and
use other functions. You can press the End key to hang up.
If you need to return to the calling screen again, slide the notification bar down with
your fingertip and tap Current Call.
You can also press the MENU key to choose other operations.
Swap calls While holding two or more calls, touch to switch between
the calling or called parties.
Merge calls While holding two or more calls, touch to add multiple
parties into a multiparty conference call.
Add call Touch to add a new party into a multiparty conference
call.
End call Touch to end the ongoing call.
Hold Touch to hold the ongoing call.
Mute Touch to toggle between turning the microphone on or
off.
Speaker Touch to turn the speaker on or off.
Bluetooth Touch to toggle between using the phone speaker and
microphone or the paired Bluetooth device.
26
Using Your Mobile Phone
Input
Text Input
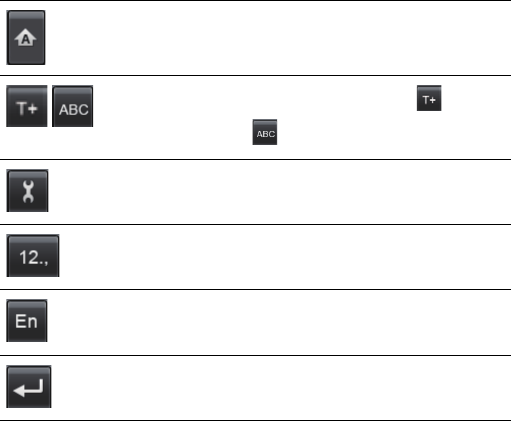
Knowing the Keyboard
Your mobile phone supports text input through the virtual keyboard. On the text
input screen, touch the corresponding keys to enter letters, numbers, or symbols.
You can open or close the virtual keyboard by pressing and holding the Menu key.
Tips: Touch and hold the text input area to open the menu to select your desired
input method.
Press the Home/Back key to hide the keyboard; touch the text box to show the
keyboard.
On the input screen, you can do as follows:
Switch between the input of uppercases and that of
lowercases.
/Switch between the intelligent input mode ( ) and
normal input mode ( ).
Open the panel for setting the input mode.
Switch to the number input panel.
Switch the input language.
Add a carriage return.
27
Using Your Mobile Phone
Using the Intelligent Input Method
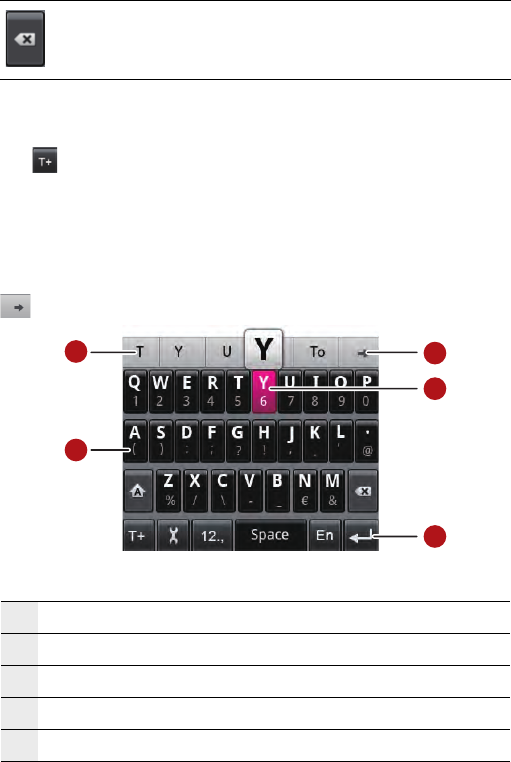
1) Touch the input mode switching key to switch to the intelligent input mode
().
2) You can enter a letter by touching the onscreen key marked with the letter.
In intelligent input mode, after you enter a letter, the candidate word area
displays the letter you select, letters on the keys to the right and left of the
touched key, and words that are possibly spelled by these letters.
For example, touch Y. Then the candidate word area shows T, Y,
U, and words such as To for you to choose from. You can touch
to view all candidate words.
Delete a character to the left of the cursor. Press and
hold to delete all the characters to the left of the cursor.
1 This is the candidate word area. Touch the desired word to enter.
2 Touch to enter a letter.
3 Touch to list all candidate words.
4 The touched key turns red and a prompt appears.
5 This is the function button area.
1
2
3
4
5
28
Using Your Mobile Phone
3) Touch a key left and right to enter the letter or symbol in the upper left or
upper right of the key. Flick a key down to enter the number or symbol under
the key.
Switching the Input Method
Your mobile phone supports three input modes, that is, QWERTY, 12–key phonepad,
and CooTek T+. You can flick the keyboard area left and right to switch the input
mode.
Note: You can rotate your mobile phone to facilitate your input.
QWERTY
• Touch a key to enter the number on the key.
• Touch and hold a key to display the list of all letters, numbers, and symbols on the
key.
• Flick a key down to enter the number or symbol on the key.
29
Using Your Mobile Phone
12–Key Phonepad
• Touch a key, and then enter the letter above the virtual keyboard.
• Touch and hold a key to display the list of all letters, numbers, and symbols on the
key.
• Flick a key down to enter the number or symbol under the key.
CooTek T+
• Touch a key, and enter the letter above the virtual keyboard.
• Touch and hold a key to display the list of all letters, numbers, and symbols on the
key.
30
Using Your Mobile Phone
Messaging
SMS and MMS
Sending an SMS
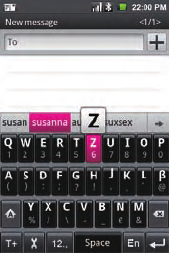
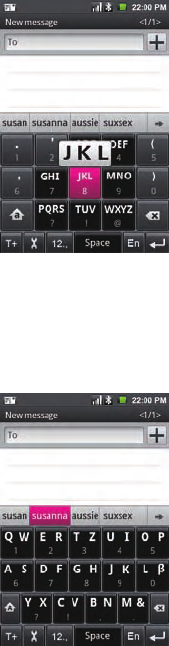
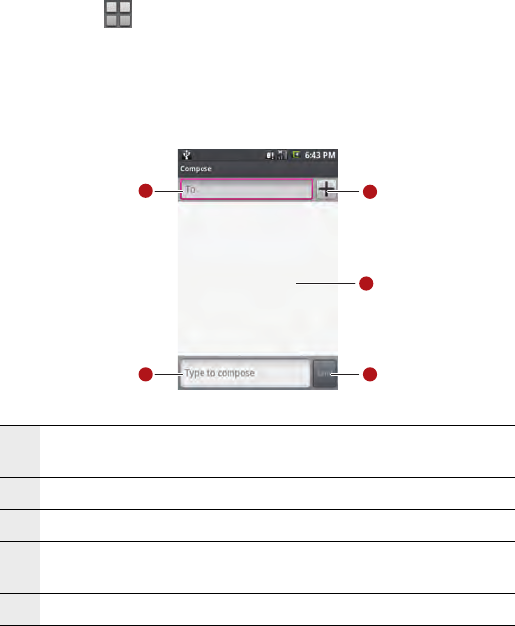
1) Choose > Messaging > New Message to go to the message
editing screen.
2) In the To field, enter the desired phone number. You can also touch + to
select the desired phone number from Contacts.
3) In the Type to compose field, enter the message contents.
4) Touch send to send the message.
1 Touch to enter the telephone number or email address of the
recipient.
2 Touch to enter the message content.
3 Touch to access Contacts and select the desired contact number.
4 Displays all the messages sent by and received from the current
contact.
5 Touch to send the message after the editing.
1
2
3
4
5
31
Using Your Mobile Phone
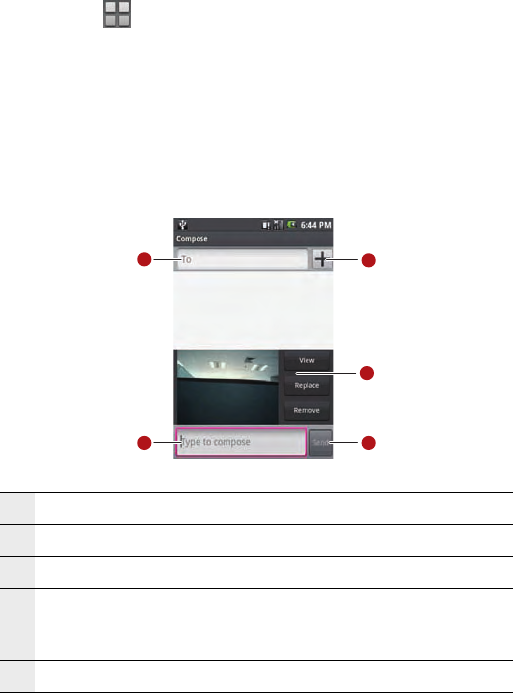
Sending an MMS
1) Choose > Messaging > New Message to open the message
editing screen.
2) In the To field, enter the intended phone number. You can also tap + to
select the intended phone number from Contacts.
3) Press the Menu key to display the message options menu, and touch Add
subject to add the message subject. The message is switched to the
multimedia message mode.
4) Press the Menu key to display the message options menu, and touch
Attach to add the attachment. You can send files such as picture files, music
files, and video files.
1 Touch to enter the text of the MMS.
2 Touch to enter the text of the MMS.
3 Touch to access Contacts and select the desired contact number.
4 Displays the preview of the inserted file. Touch View to view the
entire MMS; touch Replace to replace the inserted file; touch
Remove to delete the inserted file.
5 Touch to send the message after the editing.
1
2
3
4
5

32
Using Your Mobile Phone
5) If you need to add multiple pictures in the message, press the MENU key,
and then choose Attach > Slideshow > Add slide to select the desired
pictures.
1 Displays the preview of the current slide.
2 Touch to enter the text of the MMS.
3 Touch to switch to the previous or next slide.
4 Displays the preview of the inserted file. Touch Preview to view the
entire MMS; touch Replace picture to replace the picture inserted
into the current slide; touch Remove slide to delete the current
slide.
5 Touch to complete the editing and return to the sending screen.
1
2
3
4
5
33
Using Your Mobile Phone
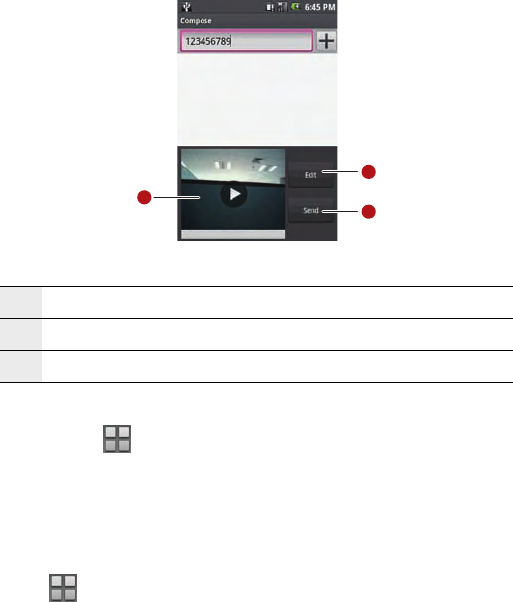
6) On the sending screen, you can edit your MMS again by touching Edit and
send your MMS by touching Send.
Reading and Replying a Message
1) Choose > Messaging to display the message list. The messages in
the list are stored by sender.
2) Touch the intended sender to read the message content.
3) You can enter the message content in the Type to compose field, and
then ttouch send to directly reply the sender.
Managing Your Messages
Choose > Messaging to display the message list. The messages in the list are
stored by sender.
You can press the Menu key to open the option panel and perform one of the
following options:
•Touch
Compose to create a new message.
•Touch
Delete threads to delete all the threads listing in Messaging.
1 Touch to view your MMS.
2 Touch to edit your MMS again.
3 Touch to send your MMS.
1
2
3

34
Using Your Mobile Phone
•Ttouch Common phrase to edit the common phrase.
•Touch
Settings to set the Messaging.
You also can touch and hold a message thread to open the options menu of the
current thread:
•Touch
View thread to open the current thread to read the message.
•Touch
Add to Contacts to add the phone number to Contacts.
•Touch
Delete thread to delete the current thread.
Message Settings
On the messaging screen, press the MENU key and choose Settings.
SMS settings
Delivery reports Choose whether to receive delivery reports.
Manage SIM card
messages
Manage the information stored in your SIM card,
delete the information, or copy the information to
your mobile phone.
MMS settings
Delivery reports Choose whether to receive delivery reports.
Read reports Choose whether to receive read reports.
Auto-retrieve Choose whether to automatically retrieve a
message. When you receive a multimedia
message, your mobile phone displays only the
message title. You can touch the message and
choose to download the message.
Roaming
auto-retrieve
Choose whether to retrieve a message in roaming
mode.
Notifications settings
Notifications Choose whether to display message notifications
on the status bar.

35
Using Your Mobile Phone
Email
Configuring the Email Box
When using the email function for the first time, you need to configure your email
box.
1) Choose Main Menu > E-mail to access the screen for configuring the
email box.
2) After you enter certain information such as the email account and password
according to the prompts, your mobile phone automatically configures your
email box.
3) If your mobile phone cannot identify your email account, choose Manual
Setup to configure the mail server.
Sending an Email Message
1) On the Inbox screen, press the MENU key to open the email box options
menu, and then choose Compose.
2) Enter the name or email address of thedesired recipient in the To field.
3) Enter the subject and content of the email message.
4) Touch Send to send the email message.
Google Mail
Google Mail groups each message you send with all the responses you receive. This
conversation list continues to grow as new replies arrive. Therefore, you can always
see your messages in context. Conversations are also referred to as message
threads. A new message or a change to the subject of a current message begins a
new thread.
To Open Google Mail
Press the Home/Back key, touch the main menu tab, and then touch Google Mail.
The Inbox conversations list appears. The Inbox view is your default Google Mail
Select ringtone Select a message ringtone.
Vibrate Choose whether your mobile phone vibrates after
a message is received.
36
Using Your Mobile Phone
view. All email messages which you fetch to your mobile phone are delivered to
your Inbox folder.
Create and Send Email Messages
1) In the conversations list, press the Menu key, and then touch Compose.
2) Enter the email subject and compose your message.
3) Touch send.
Other Operations
1) In the conversations list, press the Menu key, and then touch More.
2) You can perform your desired operations.
37
Using Your Mobile Phone
Network
Your mobile phone supports the accesses to the Internet through the GPRS/3G
network or the Wi-Fi network.
Setting Network Connections
GPRS/3G
Your mobile phone comes with the GPRS/3G network settings of T-mobile. Thus,
you can directly access the Internet through the services of T-mobile.
Wi-Fi
1) Touch Main Menu, and then choose Settings > Wireless
controls > Wi-Fi to enable the Wi-Fi function.
2) Touch Main Menu, and then choose Settings > Wireless
controls > Wi-Fi settings. The list that is displayed shows the names and
security settings (open or WEP encryption) of all available Wi-Fi network
connections. You can also choose Add Wi-Fi network to manually add
other available Wi-Fi networks.
3) Select the Wi-Fi network to be accessed and enter the WEP password. Then,
touch Connect. Your mobile phone automatically connects to the selected
network.
38
Using Your Mobile Phone
Browsing the Internet
Your mobile phone comes with the browser. You can access and browse the Internet
through the browser.
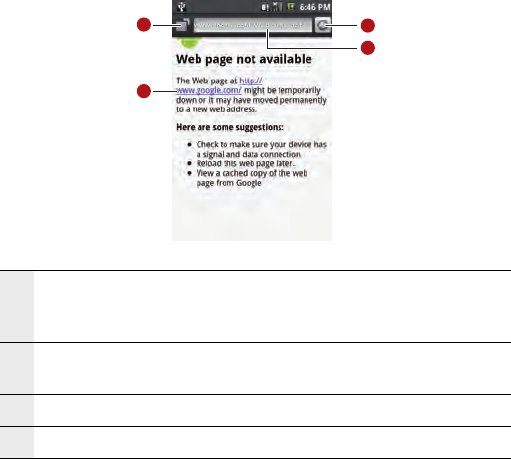
1) Touch , and then choose Browser to open the network browser.
2) Enter the address of a website in the address bar, and then touch Go to visit
the website.
3) When browsing a Web page, you can flick the screen left and right to open
the zoom-in and zoom-out buttons. Touch the desired button to adjust the font
size. You can press the Menu key to open the browser options menu and
perform one of the following operations:
•Touch
Go to open the address bar and enter the desired website .
•Touch
BookMarks to open the favorite folder.
1 Touch to go to the Web page management view. Then, you can
switch between Web pages, open a new Web page, or close a Web
page.
2 Touch the link shown on the Web page. Then, the link is opened on
a new Web page.
3 Touch to refresh the active Web page.
4 This is the address bar. Touch to enter the desired website.
1
2
3
4
39
Using Your Mobile Phone
•Touch Windows to go to the web preview screen. You can
switch to another web page or open a new web page on the
screen.
•Touch
Refresh to refresh the current page.
•Touch
Forward to browse the next Web page or send the
current website.
•Touch
More to open other menus. Then, you can perform
operations such as searching, text selecting, downloading, and
setting.
Note: When browsing a Web page, you can touch the screen
twice to quickly increase or reduce the text size on the page.
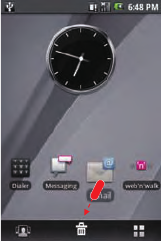
W'n'W
You can directly access the T-mobile homepage by touching W'n'W on the Home
screen. You can use W'n'W as the default homepage.

40
Using Your Mobile Phone
Using Google Maps
Google Maps lets you track your current location, view real-time traffic situations
(depending on availability), and receive detailed directions to your destination. It also
provides a search tool where you can locate places of interest or an address on a
vector, satellite, or street map.
Enabling My Location Source
Before you open Maps and find your location or search for places of interest, you
must enable Location source. Do as follows:
1) Touch , then touch Settings.
2) Touch Security & location.
3) Below the My Location settings section, select Wireless networks, GPS
satellites, or both.
Finding My Location
On the main Map screen, press the Menu key and touch My Location. Your
location is shown on the map as a blinking blue dot.
Searching for a Place
1) On the main Maps screen, press Menu key and touch Search.
2) Enter the place you want to search for in the search box.
3) Touch the search icon. Your search results display.
4) Touch a place of interest to show its location on the map

41
Using Your Mobile Phone
Connection
Connecting to a PC
You can connect your mobile phone to a PC through the USB cable or Bluetooth.
Then, with the PC Suite provided by Huawei, you can synchronise the contacts and
calendar on your mobile phone with the PC.
For connection and synchronisation operations, refer to the Help included in the PC
Suite.
Synchronising Infomation with Google Mail
Some Google applications on your phone (Google Mail, Calendar, and Contacts)give
you access to the same personal information that you can add, view, and edit on
your computer using Google Mail. This means that when you add, change, or delete
your information in any of these applications on the web, the updated information
also appears on your phone, and vice versa. Also, if you lose your phone or if your
phone is destroyed, your personal information remains intact and will appear, as
before, on a replacement phone.
1) Touch , and then touch Settings >Data synchronization.
2) You can enable Auto-sync on the synchronisation setting screen. In
addition, you can choose to synchronise the contents in Google Mail, Calendar,
or Contacts.
Connection Through Bluetooth
Your mobile phone supports the wireless connection through Bluetooth. You can
establish wireless connections between your mobile phone and other compatible
devices to realize data transfer. The wireless connections can be established
between your mobile phone and the devices that are located at most 10 meters
away. The connections through Bluetooth may be interfered by obstacles such as a
wall or other electronic devices.
Your mobile phone supports the following Bluetooth status:
• On: indicates that the Bluetooth function is enabled. In this state, your mobile
phone can search for other Bluetooth devices but cannot be found by other
Bluetooth devices.

42
Using Your Mobile Phone
• Discoverable: indicates that the Bluetooth function is enabled. In this state, your
mobile phone can search for other Bluetooth devices and can be found by other
Bluetooth devices.
• Off: indicates that the Bluetooth function is disabled.
Turning on Bluetooth and Making Your Mobile Phone
Discoverable
1) Touch , and then touch Settings.
2) Touch Wireless controls, and then select the Bluetooth check box to
turn on Bluetooth. When on, the Bluetooth icon appears in the Status bar.
3) Bluetooth visibility is off by default. Touch Bluetooth settings, then
select the Discoverable check box to make the phone visible to other
Bluetooth devices on.
Pairing and Connecting a Bluetooth Device
Before using your mobile phone as a Bluetooth device, you need to pair your mobile
phone with the target device as follows:
1) Make sure that the Bluetooth function on your mobile phone is enabled.
2) Touch Bluetooth settings. Your mobile phone starts to scan for Bluetooth
devices within range.
3) Touch the desired device to be paired with.
4) Enter the password to complete the pairing.
Sending Files via Bluetooth
With Bluetooth, you can share pictures, videos, or music files with your family and
friends. To send files via Bluetooth, do as follows:
1) Touch to open File Manager.
2) Touch and hold the file to be sent. The options menu is displayed.
3) Choose Share > Bluetooth to select the paired device from the detected
Bluetooth devices.

43
Using Your Mobile Phone
Entertainment
Music
Opening the Music Player
Touch , and then choose Music to open the music player and display the media
library.
Note: When your mobile phone plays music in the background,
you can open the notification bar and touch the music file to go
to the music playing screen.
Using the Player
The music player works in album view mode or disc view mode. You can select either
mode to play music.
On the playback screen, press the Menu key to display the options menu for the
following options:
•Touch
Browse to view the media library.
•Touch
Send to send the audio file via MMS, Bluetooth or Email.
•Touch
T-Mobile Music to open the T-Mobile Music website.
•Touch
Add to playlist to add the song to your playlist.
•Touch
Toggle favorite to add the song to your favorites.
•Touch
More, you can view the file information, delete the song, or use the song
as ringtones.
44
Using Your Mobile Phone
Using the album view mode
1 Touch to switch between the repeat modes: Repeat all songs,
Repeat current song, or Don’t repeat.
2 Show the album cover art.
3 Touch to turn shuffle on and off. (Shuffle is off when icon is gray.)
4 Touch to adjust the volume.
5 This is the playing control panel, touch the corresponding icons to
pause, play the previous song, or the next song.
6 Drag to jump to any part of the song.
1
2
3
4
5
6
45
Using Your Mobile Phone
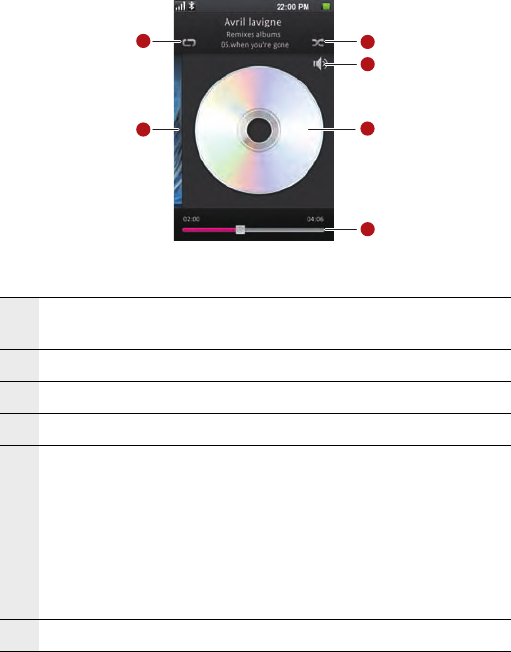
Using the disc view mode
In album view mode, you can flick the album left to go to the disc view mode.
1 Touch to cycle through the repeat modes: Repeat all songs,
Repeat current song, or Don’t repeat.
2 Touch to switch to the album view mode.
3 Touch to turn shuffle on and off. (Shuffle is off when icon is gray.)
4 Touch to adjust the volume.
5 Show the virtual disc, You can touch the disk image to pause or
resume playing.
You can flick the disk image to four directions and perform one of
the following operations:
• Up: View music details.
• Down: Return to the main screen of the player.
• Left: Play the last music.
• Right: Play the next music.
6 Tap and drag to jump to any part of the song.
1
2
3
4
5
6