Huawei Technologies U8220 HSPA/UMTS/GPRS/GSM/EDGE Mobile Phone with BT and WLAN User Manual User Guide
Huawei Technologies Co.,Ltd HSPA/UMTS/GPRS/GSM/EDGE Mobile Phone with BT and WLAN User Guide
Contents
- 1. User Guide Part 1
- 2. User Guide Part 2
User Guide Part 2
46
Using Your Mobile Phone
Using the Media Library
The music stored in your mobile phone is classified into the following categories:
Artists, Albums, Songs, and Playlists. You can touch the desired category to display
the list of music files falling into this category.
You can touch the desired music file for playing.
Creating a playlist
1) Touch a category on the Music Library screen.
2) In the list that appears, use the TRACKBALL to navigate to the song that you
want to add in the playlist.
3) Touch and hold the song or press the Menu key, then touch Add to
playlist on the options menu.
4) On the Add to playlist screen, to add the song to an existing playlist, touch
the playlist name in the list. Or you can press the menu key and touch Create
new playlist to create a new list.
Note: While on any screen of music, except on the music playing
screen, you can rotate your mobile phone counterclockwise to go
to the album selection screen.
47
Using Your Mobile Phone
Picture and video
The Gallery application can automatically search for the pictures and videos stored
on your mobile phone and MicroSD card. In addition, the Gallery application sorts
these pictures and videos with folders. With the Gallery application, you can view
and edit pictures, use a picture as the wallpaper or a contact image, and watch the
videos stored on your mobile phone and MicroSD card.
Using the Gallery
To open the Gallery application, do as follows:
•Touch , and then choose Gallery to open the viewer.
• On the picture preview screen of the camera, press the Menu key, and then
choose Gallery to open the viewer.
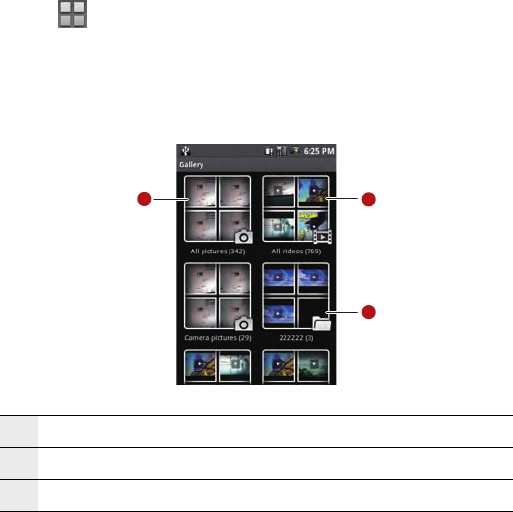
The Gallery application categorizes your pictures and videos by storage location and
stores these files in folders. The two folders in the upper part of the Gallery screen
are All Pictures and All Videos. You can touch either of the folders to view pictures or
videos.
Press the Menu key to display the Gallery panel. On the panel, you can do as follows:
• Touch Capture picture to open the camera and switch to the picture capture
mode.
1 Touch to display all videos.
2 Touch to display all videos.
3 Displays pictures and videos in folders.
12
3

48
Using Your Mobile Phone
• Touch Capture video to open the camera and switch to the video capture mode.
• Touch Slideshow to play pictures as a slideshow if the selected folder stores
pictures.
• Touch Settings to go to the Gallery setting screen. Then, you can set the size of a
picture, the arrangement of pictures, whether to prompt confirmation upon the
deletion of a picture, and how to play a slideshow.
Viewing a Picture
1) Tap the intended folder to view the pictures contained in the folder.
2) Tap the intended picture to view it full-screen.
When viewing a picture in full screen, flick the picture left and right to view the
previous or next picture.
1 Touch to zoom in on a picture.
2 Drag to zoom in or zoom out on a picture.
3 Touch to zoom out on a picture.
1
2
3
49
Using Your Mobile Phone
The picture viewer supports the automatic rotation function. When you rotate your
mobile phone, the picture adjusts itself to the rotation.
Editing and Setting a Picture
When viewing a picture in full screen, press the Menu key to display the operation
panel. You can edit or set a picture by selecting the desired option.
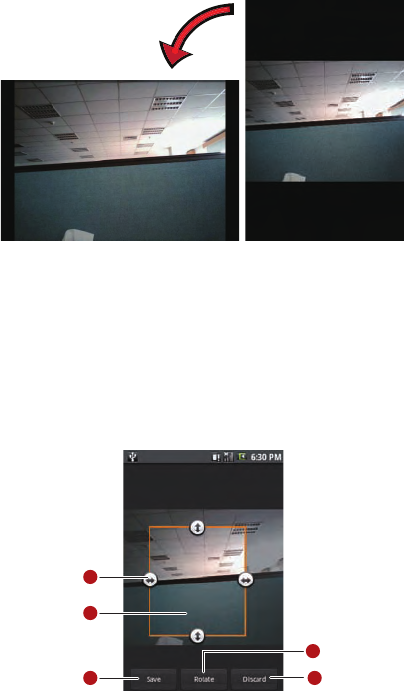
• To crop a picture, do as follows:
a) Press the Menu key to display the operation panel. Then, touch
Crop.
b) Touch the related areas to adjust the size and position of the
cropper.
1
2
4
53

50
Using Your Mobile Phone
c) Touch Save to save the cropped picture.
• To rotate a picture, do as follows:
a) Press the Menu key to display the operation panel. Then, touch
Rotate.
b) Select either Rotate left or Rotate right.
• To share a picture, do as follows:
a) Press the Menu key to display the operation panel. Then, touch
Share.
3) From the options menu that is displayed, select Bluetooth, Email, Google
mail, Messaging, Picasa, or RoadSync Message to share a picture with your
friend.
• To display your pictures as a slideshow, do as follows:
Press the Menu key to display the operation panel. Then, touch
Slideshow. Your pictures in the selected folder are displayed as a
slideshow.
• To use a picture as the wallpaper or incoming call image, do as follows:
a) Press the Menu key to display the operation panel, and then
choose More > Set as.
4) Use a picture as the contact icon, group icon, or wallpaper.
•Other operations
You can also delete a picture, view the picture details, or configure the
picture viewer by using the operation panel.
1 Touch and drag the cropper arrows inwards to or outwards from
the center of the cropper to resize the cropper.
2 Touch and hold inside the cropper, and drag your finger to the
desired position.
3 Touch to apply the changes to the picture.
4 Touch to rotate the onscreen picture.
5 Touch to discard the changes.
51
Using Your Mobile Phone
Playing a Video
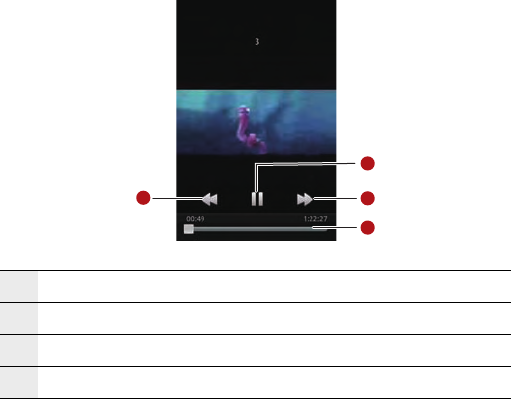
Playing a Video
Touch the video you want to watch in Gallery to start playing the video. Touch the
screen or press the trackball to show the play control panel.
1 Touch to rewind the video.
2 Touch to pause or resume playing the video.
3 Touch to fast forward the video.
4 Drag the progress slider to jump to any part of the video.
1
2
3
4
52
Using Your Mobile Phone
Camera
Opening and Closing the Camera
•Touch , and then choose Camera to open the camera.
• On the picture capture screen, press the Home/Back key to close the camera.
Note: You can press the Capture key when your mobile phone
displays any screen to open the camera.
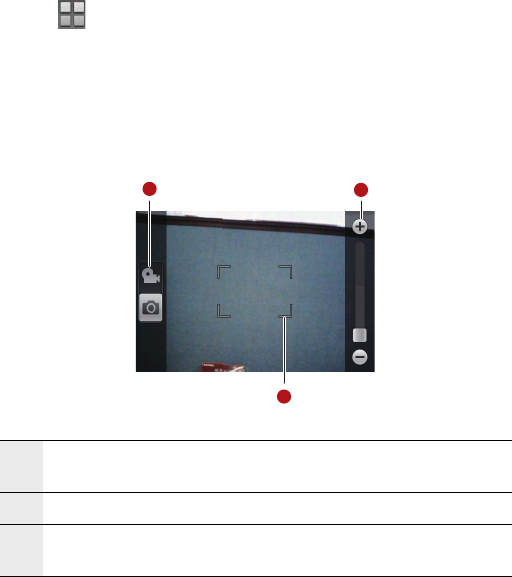
Picture Capture Screen
On the picture capture screen, touch the screen to show capture controls.
1 Switch between the picture capture mode and video capture
mode.
2 Drag to zoom in or zoom out.
3 When the focus frame turns red, it indicates that your subject is
framed.
12
3

53
Using Your Mobile Phone
On the picture capture screen, press the Menu key to show the picture capture
panel.
Capturing a Picture
1) Frame the picture within the screen.
2) Press half-way down on the Capture key. The camera automatically focuses.
When the focus frame turns green, it indicates that the focusing is done.
3) Press the Capture key fully to capture the picture.
Gallery Touch to open the Gallery application.
Secondary
camera /
Main camera
Touch to switch between the main camera and the
secondary camera.
Settings Touch to show the camera settings menu.
Camerasettings:
• Store location in pictures:Choose to save the captured picture
to the Pictures folder.
•Storage in use:Choose to save the captured picture to your
mobile phone or the MicroSD card.
• Show captured picture:Choose to show the captured picture
and operation menu after the capturing.
• Picture resolution:Choose to define the resolution of the
captured picture.
Video Camerasettings:
•Storage in use:Choose to save the captured video to your
mobile phone or the MicroSD card.
• Show recorded video:Choose to show the captured video and
operation menu after the capturing.
• Mute during recording:Choose to mute the speaker during
the capturing.
• Video resolution:Choose to define the resolution of the video
captured.
• Video size:Choose to define the size of the video to be
captured.
54
Using Your Mobile Phone
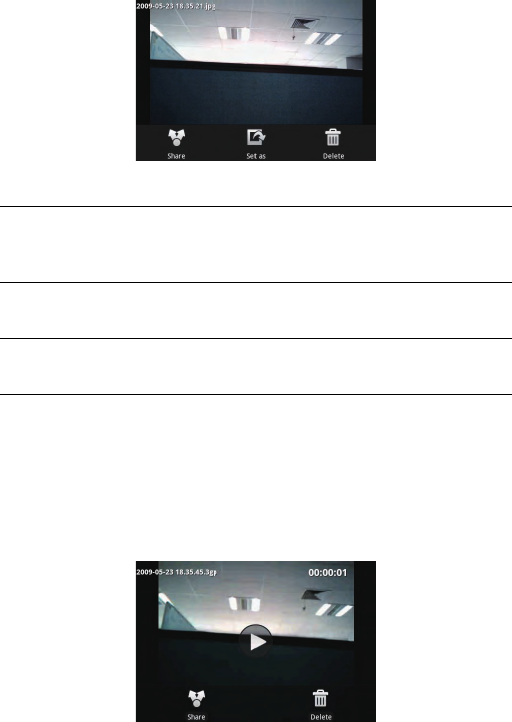
4) After the picture is captured, you can share, set, or delete it..
Capturing a Video
1) Switch the capture mode to video capture mode.
2) Frame your object.
3) Press the Capture key or trackball to capture the video. Stop the capturing
and save the capture video by pressing the Capture key or trackball again.
4) Then, you can share or delete the captured video.
Share Touch to show the picture sharing menu. You can share the
captured picture using Bluetooth, Email, Gmail, Messaging,
Picasa, or RoadSync Message.
Set as Touch to show the picture setting menu. You can use the
picture as the contact icon, group icon, or wallpaper.
Delet
e
Touch to delete the captured picture.

55
Using Your Mobile Phone
Share Touch to show the picture sharing menu. You can share the
capture video using Bluetooth, Email, Google mail, Messaging,
YouTube, or RoadSync Message.
Delete Touch to delete the captured video.
56
Using Your Mobile Phone
Game
Your mobile phone supports the game function. For details, refer to the help
document delivered with the desired game.
57
Using Your Mobile Phone
Applications
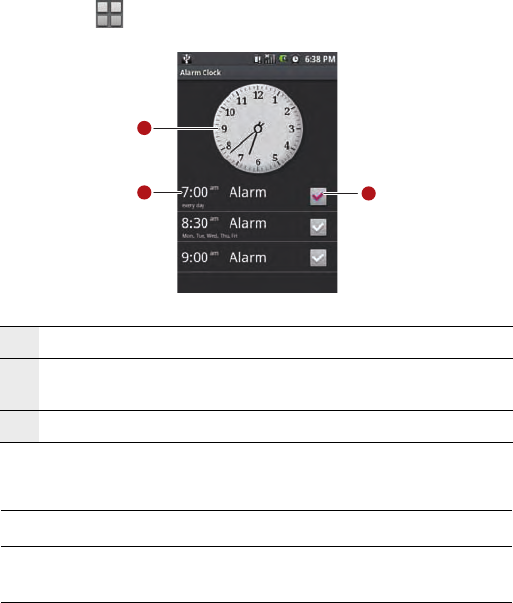
Alarm Clock
1) Touch , and then choose Alarm Clock to open the alarm clock.
2) Then, you can define your alarm.
3) Press the MENU key to display the alarm clock control panel.
1 Shows the current time. Touch to change the clock display.
2 Touch to access the alarm setting screen. You can define the alarm
time, ringtone, vibration, and repeat mode.
3 Touch to enable or disable an alarm.
Add alarm Touch to add a new alarm.
Hide clock /
Show clock
Touch to toggle between showing or hiding the clock.
1
23
58
Using Your Mobile Phone
Calendar
With the calendar function, you can view dates and set the reminders for
appointments and meetings.
1) Touch , and then choose Calendar to open the calendar.
2) By default, the calendar is displayed in agenda mode. Press the MENU key
to display the calendar menu. Then, you can touch Month, Week, or Day
to switch the view mode.
3) Press the MENU key, and then choose Calendar to create a reminder for a
new appointment or meeting.
Note: You need to obtain a Google account before using this
function. To obtain a Google account, follow the instructions in
the wizard.
Calculator
Touch , and then choose Calculator to open the calculator.
• Press the Menu key to open the calculator menu. Then, you can choose either the
basic mode or the advanced mode. In advanced mode, you can perform
calculations based on advanced functions.
• Touch the virtual keys to enter numbers or mathematical operators. Touch Clear
to clear the entered information.
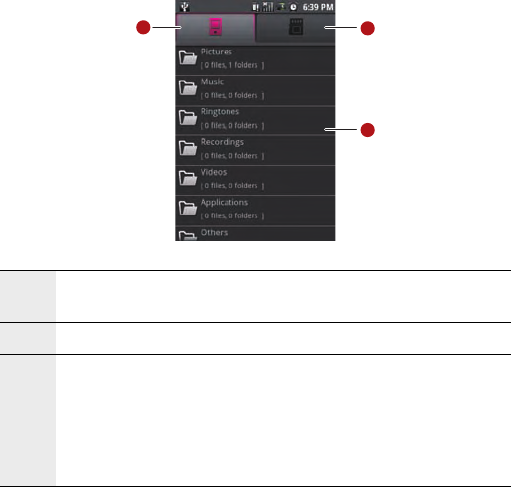
File Management
Browsing a file
Touch , and then choose File Manager to open the file manager.
Settings Touch to show the alarm setting menu. Then you can
set whether alarms play when your phone is in silent
mode.
59
Using Your Mobile Phone
With the file manager, you can edit and delete files and folders.
Note: The options menu for file management may not be
completely shown on one page. Therefore, you need to flick the
menu upwards and downwards, or roll the trackball to browse all
options.
Cutting or Copying a File
1) In the file manager, press the Menu key to show the operation panel. Then,
touch Cut or Copy.
2) Touch the desired file or folder. The selected file is ticked in red.
3) You can also press the Menu key to open the operation panel. Then, touch
Select All to select all files in the desired folder or touch Unselect All to cancel the
selection.
1 Touch to show the files and folders in your mobile phone
memory.
2 Touch to show the files and folders on the MicroSD card.
3 Shows the list of files and folders. You can flick the list to
browse all files and touch the desired file to open it. In addition,
you can open the file operation menu by touching and holding
the desired file or folder. Then, you can open, cut, copy, delete,
and rename the file or folder, and see the details about the file
or folder.
12
3
60
Using Your Mobile Phone
4) Press the Menu key to open the operation panel. Then, touch Done to
complete the cutting or copying operation.
5) Select the path to which the picture is pasted. Press the Menu key to open
the operation panel, and then touch Paste to paste the file to the selected path.
Deleting a File
1) In the file manager, press the Menu key to open the operation panel. Then,
touch Delete.
2) Touch the file or folder to be deleted. The selected file is ticked in red.
3) You can also press the Menu key to open the operation panel. Then, touch
Select All to select all files in the desired folder or touch Unselect All to cancel the
selection.
4) Press the Menu key to open the operation panel. Then, touch Done to
complete the deletion.
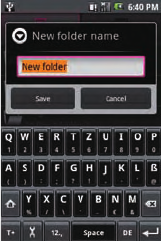
Creating a Folder
1) In the file manager, touch to access the desired directory of the folder to be
created.
2) Press the Menu key to open the operation panel, and then touch New
folder.
3) Enter the new folder name in the text box.
4) Touch Save to create the folder.
61
Using Your Mobile Phone
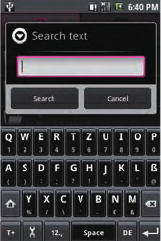
Quick Search
1) In the file manager, touch to access the directory where your desired file is
stored.
2) Press the Menu key to open the operation panel, and then touch Search.
3) Enter the key word of the name of the desired file or folder in the search text
box.
4) Touch Search. Your mobile phone starts to search the files in all folders and
subfolders of the selected directory.
5) The search result is shown in a list. Touch the desired file to open it.
6) Touch New search for a new search; press the Home/Back key to return to
the file manager screen.
Managing Memory
In the file manager, press the Menu key to open the operation panel, and then touch
Memory Status to go to the memory management screen.
Then you can view the memory status and available memory of your mobile phone
and the MicroSD card. In addition, you can format and upgrade your mobile phone
and the MicroSD card.
Refer to Managing Storage for details.
Note: If no MicroSD card is inserted, all files are automatically
saved to your mobile phone memory. To ensure the smooth
running of your mobile phone, do not save too many files to the
phone memory.
62
Using Your Mobile Phone
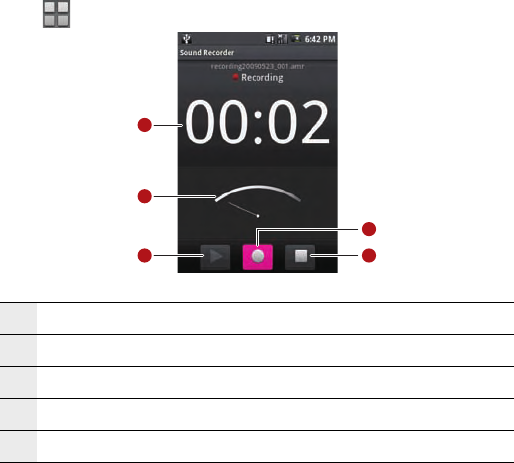
Recorder
Touch , and then choose Sound Recorder to open the recorder.
Android Market
Android Market provides direct access to useful applications and fun games which
you can download and install on your mobile phone. Android Market also allows you
to send feedback and comments about an application, or flag an application that
you find objectionable or incompatible with your phone.
1 Shows the recording duration.
2 Shows the volume of the captured audio signals.
3 Touch to play back or pause the recording.
4 Touch to start to record your message.
5 Touch to stop recording or playing back.
1
2
3
4
5
63
Using Your Mobile Phone
Using Android Market
1) Touch , and then choose Market to open Android Market.
2) If you use Android Market for the first time, define your Google account
according to the prompts.
Getting Help
If you ever need help or have questions about Android Market, press the Menu key
and touch Help. The Browser will take you to the Android Market Help webpage.
1 Shows featured applications. You can touch the icon to view the
detailed information about your desired application.
2 Shows the name of the selected application.
3 Touch to show the application list.
4 Touch to show the game application list.
5 Touch to go to the search screen. Then, you can search for your
desired application in Android Market.
6 Touch to view the downloaded application.
1
2
3
4
5
6
64
Using Your Mobile Phone
Finding Applications
The Android Market home page provides several ways to find applications. It
showcases featured applications and includes a list of item applications by category,
a list of games, a link to search, and a link to My downloads.
Scroll horizontally through the featured items or select a category to browse its
contents, then select a subcategory. Within each subcategory you can select to view
items sorted By popularity or By date.
All items in a subcategory are listed in each tab; those in the By popularity tab are
sorted from most popular to least popular, and those in the By date tab are sorted
from newest to oldest.
Installing an Application
1) Navigate to the item you want to download, and select it.
2) In the item details screen, read more about the application, including its
cost, overall rating, and comments by users. If you scroll down to the About the
developer section, you can view more applications by this developer, visit the
developer’s website, and send the developer an email message.
3) To install the item, select either Install (if item is free) or Buy, whichever
appears.
4) To check the progress of the download, open the Notifications panel. Most
applications are installed within seconds. If you want to stop downloading the
item, touch Cancel download.
65
Managing Your Mobile Phone
Managing Your Mobile Phone
8 Managi ng Your Mobil e Phone
You can choose Settings from the main menu to configure your mobile
phone.
Setting the Date and Time
Settings/Date & time
You can set the date, time, time zone, and format of the date and time.
Your mobile phone can automatically use the time provided by the
network.
Note: When the time provided by the network is
automatically used, you cannot set the date, time, and
time zone by yourself.
On the setting screen, touch UP or DOWN to adjust your settings. Then,
touch Settings to complete your setting.
Setting Sound and Display
Settings/Sound & display
Setting Sound
You can set the ringtone volume, media volume, phone ringtone, vibration,
notification ringtone, audible tap tone, audible operation tone, and
MicroSD card notification tone.
Note: The description of a setting is displayed below the
corresponding setting option.
Setting Display
You can set whether the screen adjusts itself to the rotation of your mobile
phone and whether to display animations when you open or display a
screen. You can also set the screen brightness and the standby duration of
the screen.
Setting the Locale and Text
Settings/Locale & text
66
Managing Your Mobile Phone
You can set the display language (area) of your mobile phone. In addition, you can
customize the dictionary that is used during text input and add certain frequently
used phrases to the dictionary.
Setting Calling
Settings>Call settings
You can set the parameters related to the calling function.
• Fixed Dialing Numbers (FDNs): FDN allows you to restrict outgoing calls to a fixed
set of numbers. To enable this feature you must know the SIM PIN2 code of your
mobile phone. You can obtain the PIN2 code from your wireless service provider,
assuming this feature is supported.
• Voicemail: Set the voicemail number.
• Call forwarding: Select how you want your phone to handle busy, unanswered,
and unreachable calls. You can also set the call forwarding option for all incoming
calls.
• Additional call settings: Turn the caller ID and call waiting services on or off.
• Network operators: Scan and select a wireless network operator manually, or set
the network selection to Automatic.
Setting the Network
Settings/Wireless controls
You can set whether to enable the Wi-Fi function, the Bluetooth function, and
whether to enable the flying mode. You can also select the network.
For the settings of the Wi-Fi function and Bluetooth function, see the chapter
"Connection."
Note: Press and hold the Power key. Then, you can choose the
flying mode on the displayed screen.
Setting the Contacts
Settings/MyPhonebook settings
You can define your contacts, copy the contacts in the SIM card to your mobile
phone, manage your contacts, and set birthday reminders.
67
Managing Your Mobile Phone
Sync Settings
Settings/Sync Settings
You can define the device that your mobile phone synchronises with. It can be the
T-Mobile server, the Google server, or a PC.
Data synchronization
Settings/Data synchronization
You can define which applications to be synchronised through the network and
whether to allow background data synchronisation or automatic data
synchronisation.
Note: You need to obtain a Google account before using this
function. To obtain a Google account, follow the instructions in
the wizard.
Setting the Security
Settings/Security & location
You can set whether to enable the GPS or set the password for your mobile phone.
My Location Sources
• User Wireless networks: Choose whether to use network positioning in other
applications.
• Enable GPS satellites: Choose whether to enable the GPS.
SIM Card Lock
You can set whether to lock the SIM card or change the personal identification
number (PIN) of the SIM card.
Note: The PIN code is used to protect your SIM card from
unauthorized use. Usually you will be supplied with the PIN code
when you get the SIM card from your service provider. If you have
not got one or you have lost it, please consult your service
provider.

68
Managing Your Mobile Phone
Passwords
You can set whether to display the entered letters when you enter the password.
Managing Applications
Settings/Application settings
You can manage the applications installed on your mobile phone.
• Unknown sources: Set whether to allow the installation of the applications from
not-Market.
• Manage applications: Manage the applications installed on your mobile phone.
• Development: This is for the configuration from developers.
Managing Storage
Using Memory Management
Choose > Settings > SD card & phone storage to go to the memory
management screen.
In memory management, you can view the memory status and available memory of
your mobile phone and the MicroSD card. In addition, you can format and upgrade
your mobile phone and the MicroSD card.
• Unmount SD card:Touch to stop your mobile phone reading and writing the
MicroSD card. Then, you can safely remove the MicroSD card.
•Format SD card:Touch to format the MicroSD card.
• Factory data reset:Touch to reset your mobile phone to its initial state and clear
all the data in your mobile phone.
• Upgrade:Touch to upgrade the system version of your mobile phone. Refer to
Upgrading the System Version of Your Mobile Phone for details.
Note:
•The Format SD card option deletes all data on the MicroSD card. Back up
the data on the MicroSD card before you format the MicroSD card.
•The Factory data reset option deletes all data on your mobile phone and
resets your mobile phone to its initial state — the state you turned on
your mobile phone for the first time. Make sure to back up important
data you have on your mobile phone before you perform a factory data
reset.

69
Managing Your Mobile Phone
Upgrading the System Version of Your Mobile Phone
You can upgrade the system version of your mobile phone using the software
upgrade package downloaded from the website of your operator. Do as follows:
1) Download the upgrade file to the root directory of the MicroSD card.
2) Choose > Settings > SD card & phone storage to go to the
memory management screen, and then touch Upgrade to start the upgrade.
Note: You can download the software upgrade files from the
following websites:
• TMCZ: http://www.t-mobile.cz
•TMNL:
http://www.t-mobile.nl/persoonlijk/htdocs/page/service-contact/software-update
s.aspx
• TMD: http://www.t-mobile.de/meinhandy
•TMA:
http://www.t-mobile.at/privat/service_hilfe/Download_Center/Software_Downlo
ads/index.html
• TMUK: http://www.t-mobile.co.uk/
• ERA: http://www.era.pl
70
Warnings and Precautions
Warnings and Precautions
9 Warnings and Precautions
This section contains important information pertaining to the operating
instructions of your device. It also contains information about how to use
the mobile safely. Read this information carefully before using your device.
Electronic Device
• Power off your device if using the device is prohibited. Do not use the
device when it causes danger or interference with electronic devices.
Medical Device
• Power off your device and follow the rules and regulations set forth by
the hospitals and health care facilities.
• Pacemaker manufacturers recommend that a minimum distance of 15
cm be maintained between a device and a pacemaker to prevent
potential interference with the pacemaker. If you are using a pacemaker,
use the device on the opposite side of the pacemaker and do not carry
the device in your front pocket.
• Some wireless devices may affect the performance of the hearing aids.
For any such problems, consult your service provider.
Potentially Explosive Atmospheres
• Switch off your device in any area with a potentially explosive
atmosphere, and comply with all signs and instructions. Areas that may
have potentially explosive atmospheres include the areas where you
would normally be advised to turn off your vehicle engine. Triggering of
sparks in such areas could cause an explosion or fire, resulting in bodily
injuries or even deaths. Do not switch on the device at refueling points
such as service stations. Comply with restrictions on the use of radio
equipment in fuel depots, storage, and distribution areas, and chemical
plants. Also, adhere to restrictions in areas where blasting operations are
in progress. Before using the device, watch out for areas that have
potentially explosive atmosphere that are often, but not always, clearly
marked. Such locations include areas below the deck on boats, chemical
transfer or storage facilities and areas where the air contains chemicals
or particles such as grain, dust, or metal powders. Ask the manufacturers
of vehicles using liquefied petroleum gas (such as propane or butane) if
this device can be safely used in their vicinity.
71
Warnings and Precautions
Traffic Security
Observe local laws and regulations while using the device. Also, if using the device
while driving a vehicle, please comply with the following guidelines:
• Concentrate on driving. Your first responsibility is to drive safely.
• Do not talk on the device while driving. Use hands-free accessories.
• When you have to make or answer a call, park the vehicle at the road side before
using your device.
• RF signals may affect electronic systems of motor vehicles. For more information,
consult the vehicle manufacturer.
• In a motor vehicle, do not place the device over the air bag or in the air bag
deployment area. Otherwise, the device may hurt you owing to the strong force
when the air bag inflates.
• Do not use your device while flying in an aircraft. Switch off your device before
boarding an aircraft. Using wireless devices in an aircraft may be dangerous to the
operation of the aircraft, disrupt the wireless telephone network, and may be
considered illegal.
Operating Environment
• Do not use or charge the device in dusty, damp or dirty places or places with
magnetic fields. Otherwise, the circuit may not function properly.
• The device complies with the RF specifications when the device is used near your
ear or at a distance of 1.5 cm from your body. Ensure that the device accessories
such as a device case and a device holster are not composed of metal
components. Keep your device 1.5 cm away from your body to meet the
requirement earlier mentioned.
• On a thunder and stormy day, do not use your device when it is being charged, to
prevent any danger caused by lightning.
• When you are on a call, do not touch the antenna. Touching the antenna affects
the call quality and results in increase in power consumption. As a result, the talk
time and standby time are reduced.
• While using the device, observe the local laws and regulations, and respect others'
privacy and legal rights.
• Use accessories authorized by manufacturers. Using unauthorized accessories will
render the warranty null and void.
72
Warnings and Precautions
• Keep the ambient temperature between -10 ℃ and 45 ℃ while the device is being
charged. Keep the ambient temperature between -10 ℃ to 45 ℃ for using the
device powered by battery.
Preventing Hearing Damage
Using the receiver, earbuds, headphones, speakerphone, or earpieces at high
volume can result in permanent hearing loss. Be extremely careful when listening at
high decibel levels. Set the volume to a safe level. If you experience strange sounds
in your ears like ringing or if you hear muffled speech, get your hearing checked. If
you continue to use high volume, your hearing will soon get affected.
Hearing experts offer the following suggestions to protect your hearing:
• Reduce the time you use the receiver, earbuds, headphones, speakerphone, or
earpieces at high volume.
• Do not increase the volume to block noisy surroundings.
• Reduce the volume if you can’t hear people speaking near you.
Safety of Children
Please comply with all precautions with regard to children's safety. Letting the child
play with your device or its accessories, which may include parts that can be
detached from the device, may prove dangerous, as it may present a choking
hazard. Make sure that small children are kept away from the device and
accessories.
Environment Protection
Follow all the local regulations regarding the disposal of your devices or electrical
accessories (such as chargers, headsets, or batteries). Recycle them. Do not dispose
of an exhausted battery or a used device in a garbage can.
Accessories
Use only the accessories, such as the charger, battery, and headset, delivered by
manufacturer. Using accessories of other manufacturers or vendors with this device
model might invalidate any approval or warranty applicable to the device, might
result in the non-operation of the device, and might be dangerous.
73
Warnings and Precautions
Battery and Charger
• The battery can be charged and discharged hundreds of times before it eventually
wears out. When the standby time and talk time are shorter than normal, replace
the battery.
• Use the AC power supply defined in the specifications of the charger. An improper
power voltage may cause fire or the charger may not function properly.
• Do not connect two poles of the battery with conductors such as metal materials,
keys or jewelries. Otherwise, the battery may be short-circuiting and may cause
injuries and burns on your body.
• Do not disassemble the battery or solder the battery poles. Otherwise, it may lead
to electrolyte leakage, overheating, fire, or explosion.
• If battery electrolyte leaks out, make sure that the electrolyte does not touch your
skin and eyes. When the electrolyte touches your skin or splashes into your eyes,
wash your eyes with clean water immediately and consult a doctor.
• If the battery is damaged, or the color changes or gets abnormally heated while
you charge or store the battery, remove the battery immediately and stop using it.
Otherwise, it may lead to battery leakage, overheating, explosion, or fire.
• If the power cable is damaged (for example, the lead is exposed or broken), or the
plug loosens, stop using the cable at once. Otherwise, it may lead to electric
shock, short-circuit of the charger, or a fire.
• Do not dispose of batteries in fire as they may explode. Batteries may also explode
if damaged.
Clearing and Maintenance
• The device, battery, and charger are not water-resistant Keep them dry. Protect
the device, battery and charger from water or vapor. Do not touch the device and
charger with a wet hand. Otherwise, it may lead to short-circuit or malfunction of
the device and electric shock to the user.
• Do not place your device, battery, or charger in places where it can get damaged
because of collision. Otherwise, it may lead to battery leakage, device
malfunction, overheating, fire, or explosion.
• If the ambient temperature is considerably low or high, the capacity and life of the
battery is reduced. When the temperature is lower than 0 ℃, performance of the
battery is affected.
• Do not place magnetic storage media such as magnetic cards and floppy disks
near the device. Radiation from the device may erase the information stored on
them.
74
Warnings and Precautions
• Do not leave your device, battery, or charger in a very hot or cold place.
Otherwise, they may not function properly and may lead to a fire or an explosion.
• Do not place sharp metal objects such as pins near the earpiece. The earpiece may
attract these objects and hurt you when you are using the device.
• Before you clean or maintain the device, power off the device and disconnect it
from the charger.
• Do not use any chemical detergent, powder, or other chemical agents (such as
alcohol and benzene) to clean the device and the charger. Otherwise, parts of the
device may get damaged or a fire can be caused. You can clean the device and the
charger with a piece of damp and soft antistatic cloth.
• Do not dismantle the device or accessories. Otherwise, manufacturer is not liable
to pay for damages as the device and accessories are not covered by warranty.
Emergency Call
You can use your device for emergency calls in the service area. The connection,
however, cannot be guaranteed in all conditions. You should not rely solely on the
device for essential communications.
Certification Information (SAR)
This device meets guidelines for exposure to radio waves.
Your device is a low-power radio transmitter and receiver. As recommended by
international guidelines, the device is designed not to exceed the limits for exposure
to radio waves. These guidelines were developed by the independent scientific
organization ICNIRP and include safety measures designed to ensure safety for all
users, regardless of age and health.
Specific Absorption Rate (SAR) is the unit of measurement for the amount of radio
frequency energy absorbed by the body when using a device. The SAR value is
determined at the highest certified power level in laboratory conditions, but the
actual SAR level of the device when being operated can be well below the value. This
is because the device is designed to use the minimum power required to reach the
network.
The SAR limit adopted by USA and Canada is 1.6 watts/kilogram (W/kg) averaged
over one gram of tissue. The highest SAR value reported to the FCC and IC for this
device type when tested for use at the ear is 0.662 W/kg, and when properly worn
on the body is 0.474 W/kg.
The SAR limit also adopted by Europe is 2.0 watts/kilogram (W/kg) averaged over 10
gram of tissue. The highest SAR value for this device type when tested at the ear is
0.719 W/kg.
75
Warnings and Precautions
FCC Statement
This equipment has been tested and found to comply with the limits for a Class B
digital device, pursuant to Part 15 of the FCC Rules.
This device complies with part 15 of the FCC Rules. Operation is subject to the
following two conditions: (1) This device may not cause harmful interference, and (2)
this device must accept any interference received, including interference that may
cause undesired operation.
These limits are designed to provide reasonable protection against harmful
interference in a residential installation. The operation is subject to the condition
that this device does not cause harmful interface.
This equipment generates, uses and can radiate radio frequency energy and, if not
installed and used in accordance with the instructions, may cause harmful
interference to radio communications. There is no guarantee, however, that
interference does not occur in a particular installation. If this equipment does cause
harmful interference to radio or television reception, which can be determined by
turning the equipment off and on, the user is encouraged to try to correct the
interference by one or more of the following measures:
• Reorient or relocate the receiving antenna.
• Increase the separation between the equipment and receiver.
• Connect the equipment into an outlet on a circuit different from that to which the
receiver is connected.
• Consult the dealer or an experienced radio/TV technician for help.
Warning: Changes or modifications made to this device not
expressly approved by Huawei Technologies Co., Ltd. may void
the FCC authorization to operate this device.
EU regulatory conformance
Hereby, Huawei Technologies Co., Ltd. declares that this device is in compliance with
the essential requirements and other relevant provisions of Directive 1999/5/EC.
For the declaration of conformity, visit the Web site
www.huaweidevice.com/certification.
Notice: Observe the national local regulations in the location where the device is to
be used. This device may be restricted for use in some or all countries of European
Union.
France: Outdoor use limited to 10 mW e.i.r.p. within the band 2454-2483.5 MHz.
Italy: For private use, a general authorisation is required if WAS/RLAN’s are used
outside own premises. For public use, a general authorisation is required.
76
Warnings and Precautions
Luxembourg: General authorisation required for network and service supply.
Norway: This subsection does not apply for the geographical area within a radius of
20 km from the centre of Ny-Ålesund.
You can find a copy of the Declaration of Conformity at…