Huawei Technologies U8600-1 HSDPA/UMTS/GPRS/GSM/EDGE Mobile Phone with BT User Manual U8600 user guide
Huawei Technologies Co.,Ltd HSDPA/UMTS/GPRS/GSM/EDGE Mobile Phone with BT U8600 user guide
Contents
- 1. User's Manual-1
- 2. User's Manual-2
- 3. User's Manual-3
- 4. User's Manual-4
User's Manual-3

Entertainment
81
Viewing Your Videos
1. After recording a video, a thumbnail of the video you have just
recorded is shown in the upper right corner of the Capture screen.
Touch the thumbnail to view it.
2. Touch the onscreen button to do any of the following:
Touch Share to send the video in a message or post it online.
Touch Delete to delete the video.
Touch More to see the details of this video.
On the video playing screen, touch the controls to skip forward or
back or to play or pause the video.
3. If you want to view more videos, flick your finger left or right across
the screen.
Using the Gallery
Your clever Gallery application can automatically search for pictures
and videos on your mobile phone and microSD card. It can also sort
them into folders, and lets you view and edit pictures, watch videos
and set a picture as the wallpaper or the photo for a contact.
How to open the Gallery
On the Home screen, touch > Gallery to open the viewer.
The Gallery application categorizes your pictures and videos by
storage location and stores these files in folders. Touch a folder to view
the pictures or videos inside.
Browsing Pictures
How to view a picture
1. In the Gallery, touch the folder that contains the pictures you want
to view.
2. Touch the picture to view it in full-screen mode.
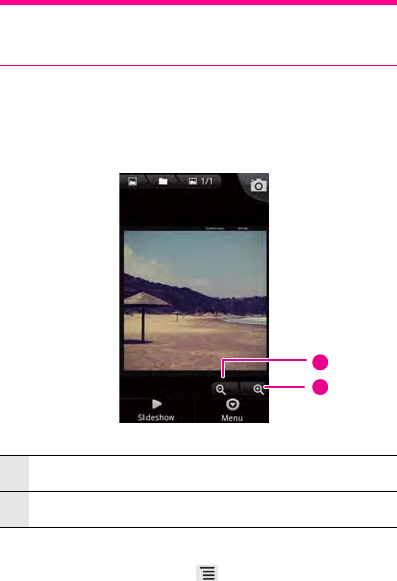
3. Touch the screen. Then the zoom panel appears. You can zoom in
or zoom out on the picture.
Entertainment
82
Tip: The picture viewer supports the automatic rotation function.
When you rotate your mobile phone, the picture adjusts itself to the
rotation.
How to zoom in and out on a picture
When viewing a picture in full screen, touch the screen to display the
picture panel.
How to rotate a picture
1. When viewing a picture, touch to display the operations panel.
2. Touch More.
3. Select either Rotate Left or Rotate Right. The picture is saved with
the new orientation.
1Touch to zoom out on a picture.
2Touch to zoom in on a picture.
2
1
Entertainment
83
How to crop a picture
1. When viewing a picture, touch to display the more operations
panel, and then touch More > Crop.
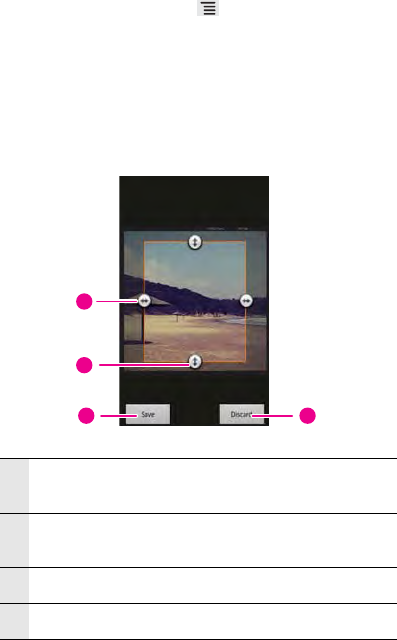
2. Use the cropping tool to select the portion of the picture to crop.
Drag from the inside of the cropping tool to move it.
Drag an edge of the cropping tool to resize the image.
Drag a corner of the cropping tool to resize the image without
changing the length to width ratio.
3. Touch Save to save the cropped picture. Touch Discard to discard
the changes.
1Touch and drag the cropper arrows in or out from the centre of
the cropper to resize it.
2Touch and hold inside the cropper, and then drag the cropper
to place it where you want.
3Touch to apply the changes to the picture.
4Touch to discard the changes.
1
2
34

Entertainment
84
How to share a picture
1. When viewing a picture, touch to display the more operations
panel
2. Touch Share, then an options menu will appear.
3. Choose the way you want to share your picture.
Browsing Videos
How to play a video
1. Open the Gallery application, and then touch the video you want to
play. The video will start to play.
2. Touch the screen to show the play control panel.
1Touch to fast backward the video.
2Drag to jump to any part of the video.
3Touch to pause or resume playing the video.
4Touch to fast forward the video.
1
2
4
3
Entertainment
85
How to share a video
Touch and hold a video, touch Share, and then choose the way of
sharing the video with your friends.
Listening to the FM Radio
FM Radio lets you listen to the radio programs on your mobile phone.
Before using the FM Radio, connect your headset to the phone.
How to turn on the FM Radio
1. On the Home screen, touch > FM Radio to open the
application.
2. The first time you open FM Radio, touch Auto tuning, which
automatically scans for available FM channels, saves them as
presets, and plays the first FM channel found.
Tip: To launch the FM radio quickly, you can add the FM Radio widget
to the Canvas screen.
How to tune the FM Radio
1. On the Home screen, touch > FM Radio to open the
application.
2. Touch > Inching tuning to fine tune the frequency at 0.1 MHz
or +0.1 MHz intervals by touching or .
3. Touch OK when you are satisfied.
4. After tuning, touch , and then touch Save channel to save the
channel.
Tip: If you know the frequency of certain FM channel, you can touch
> Input frequency to input the frequency and save the channel
directly.
Entertainment
86
How to use the FM Radio
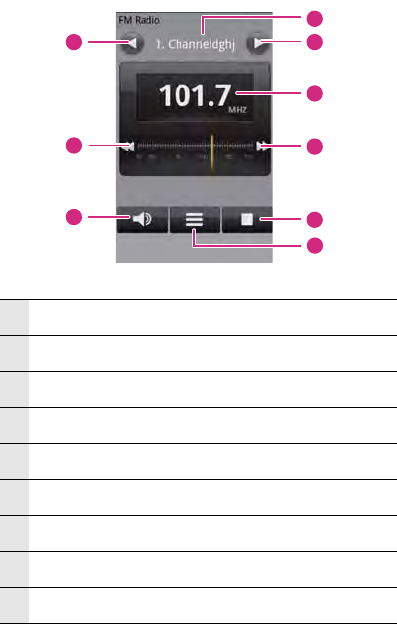
1Touch to switch to the previous station saved in the list.
2Shows the station name.
3Touch to go to the next station saved in the list.
4Shows the radio frequency.
5Touch to search for the frequency of the next station.
6Touch to turn on or off the FM radio.
7Touch to display the station list.
8Touch to listen to the radio through the loudspeaker.
9Touch to search for the frequency of the previous station.
1
9
8
3
2
4
5
6
7

Entertainment
87
How to minimize or turn off the FM Radio
When you touch or , the FM radio continues to play in the
background and allows you to continue listening to the radio while you
use other programs.
To turn off the FM radio, touch (turn off icon) on the radio screen and
then touch to turn off the radio.

88
Google Services
Creating a Google Account
Note: Availability of Google applications, services, and features may
vary according to your country or carrier. Please follow the local laws
and regulations to use them.
When you turn on the mobile phone for the first time, touch the Google
services such as Talk, Gmail, and Market, you will be prompted to sign
in to your Google account.
Note: Make sure that your mobile phone has an active data
connection (3G/GPRS) before you sign in to your Google account.
If you already have a Google account, you can sign in straight away by
touching Sign in. Then you just have to enter your username and
password.
If you do not have a Google account, here is how you can create one:
1. Read the setup information on the screen, and then touch Next.
2. Touch Create.
3. Enter a username and password for your Google account, and
then touch Next. Then the mobile phone will connect to the
Google server to check if the username is available. If the
username you entered is already in use, you will have to think up
another one or select one from a list.
4. Enter and confirm your Google account password.
5. Select a security question from the drop down menu, and then
enter the answer.
Google Services
89
6. Touch Create.
7. When the Google Terms of Service screen appears, touch I agree,
Next.
8. Enter the characters that appear on the screen, and then touch
Next.
Tip: To use another Google account, go to the Accounts & sync
settings screen, and touch Add account to select which type of
accounts you want to add.
Using Gmail
Super search engine Google does super email accounts too. Gmail
arranges your inbox so that sent messages are grouped together with
their relevant replies. That means an email conversation or “thread” is
conveniently kept together and is easy to see as it is arranged by
subject in your inbox. A new message or new subject begins a new
thread.
How to open Gmail
On the Home screen, touch > Gmail. The Inbox mail list appears.
Any emails you decide to keep on your mobile phone will go to your
Inbox folder.
How to switch between accounts
1. In the mail list, touch , and then touch Accounts.
2. Touch the account that contains the email you want to read.
How to refresh Gmail
In the mail list, touch , and then touch Refresh to receive new
emails and to synchronize your emails with your Gmail account on the
web.
How to create and send an email
1. On the Home screen, touch > Gmail.
2. Touch and then touch Compose.
Google Services
90
3. Enter the message recipient’s email address in the To field. If you
are sending the email to several recipients, separate the email
addresses with a comma. You can add as many message
recipients as you want.
Tip: If you want to send a carbon copy (Cc) or a blind carbon copy
(Bcc) of the email to other recipients, touch , and then touch Add
Cc/Bcc.
4. Enter the email subject and write your message.
Tip: If you want to add a picture attachment, touch , and then
touch Attach. Select the picture you want to attach.
5. After composing your email, touch Send.
How to read an email
Gmail groups each message you send with all the responses you
receive. This conversation list continues to grow as new replies arrive,
so you can always see your messages in context. Conversations are
also referred to as message threads. A new message or a change to
the subject of a current message will begin a new thread.
Depending on your notification settings, the mobile phone plays a
ringtone, vibrates, or displays the email message briefly in the
notifications bar when you receive a new email. A new email message
icon also appears in the notifications bar to notify you of a new email.
Touch the notifications bar, and then flick down to open the
notifications panel. Touch New email to view it.
While in the Inbox folder, touch the unread email or the
conversation with the unread email to view it.
How to reply to or forward an email
1. In the mail list, touch the email that you want to reply to or forward.
2. Touch to reply. You can also touch , and then touch Reply,
Reply all, or Forward.
3. Do one of the following:
If you selected Reply or Reply all, enter your message.
Google Services
91
If you selected Forward, specify the message recipients and add
any additional text you want to include with the forwarded
message.
4. Touch to send, or touch to save as a draft.
How to search for an email
1. In the mail list, touch , and then touch Search.
2. Enter the search keywords in the box, and then touch .
How to view your sent emails
In the mail list, touch , and then touch Go to labels > Sent.
How to add a signature to emails
1. In the mail list, touch , and then touch More > Settings.
2. Touch to select the account you want to add the signature, then
touchSignature.
3. Enter your signature in the text box, and then touch OK.
How to synchronize your Gmail messages
1. In the mail list, touch , and then touch More > Settings
2. Touch to select the account you want to add the signature, then
touch Sync inboxes and labels.
3. Touch a label whose synchronization settings you want to change:
Sync none: Do not download any messages that have only this
label.
Sync last 4 days: Download the previous 4 (or number of days
you set) of messages.
Sync all: Download all messages with this label.
Tip: On the Label synchronization settings screen, touch Amount of
mail to sync to set how many days of messages to synchronize.

Google Services
92
How to customize your Gmail settings
1. In the mail list, touch , and then touch More > Settings to
customizing your Gmail.
2. Select the account you want to customize, then set the following
options:
Priority Inbox: Touch to make Priority Inbox your default inbox
for this account.
Signature: Touch to enter a signature that is appended at the
end of your emails.
Confirm actions: Select the check box to show a confirmation
box when you archive, delete or send a conversation.
Reply all: Touch to make reply all the default for responding to
message.
Auto-advance: Touch to select a screen to show after you delete
or archive a conversation.
Message text size: Touch to set the message text size.
Batch operations: Select the check box to show the batch
operations feature. The batch operations feature lets you
archive, delete, or apply a label to multiple emails at once.
Sync inboxes and labels: Touch to select which Gmail labels to
synchronize.
Email notifications: Select the check box to show a notification
icon on the notifications bar when you receive a new email.
Select ringtone: Touch to choose a ringtone for a new email
message. You will get to hear a short sample of the ringtone
when you select it. If you do not want a ringtone to play when you
receive a new email message, touch Silent. Then touch OK to
confirm your ringtone selection.
Notify once: Select the check box to notice once for new email.
Using Talk
Who said patience is a virtue? With instant messaging on Talk, waiting
is a thing of the past. So as long as your friends use Talk (either from

Google Services
93
their mobile phone or computer) you can enjoy quick-fire
conversations all the time.
How to open Talk
On the Home screen, touch > Talk to open the application.
Note: Your Talk account is based on the Google account you set up
with your mobile phone.
How to add a new friend
1. In the friends list, touch , and then touch Add friend.
2. Enter the Talk instant messaging ID or Gmail address of the friend
you want to add.
3. Touch Send invitation.
How to accept an invitation
1. If you have invited anyone to chat or if someone else has invited
you to chat, this information will appear in the friends list.
2. Touch a pending invitation, and then touch Accept.
How to change your online status
1. In the friends list, touch the online status icon beside your name,
and then select the status you want on the menu.
2. Touch the text box on the left of your online status icon, and then
enter your status message using the onscreen keyboard.
3. Save your changes.
How to start a chat
1. In the friends list, touch a friend's name in the friends list.
2. Use the onscreen keyboard to enter text and chat with your friend.
3. After entering your message, touch Send.
How to switch between active chats
1. While on a chat screen or in the friends list, touch , and then
touch Switch chats.
Google Services
94
2. On the panel that opens, touch the friend you want to chat with.
How to end a chat
In the friends list, touch and hold a friend with an active chat, and
then touch End chat on the menu.
While on a chat screen, touch , and then touch End chat.
How to block a friend
1. In the friends list, find the friend you want to block.
2. Touch and hold the friend’s name, and then touch Block friend.
Your friend is removed from your friends list and is added to the
blocked-friends list.
How to set notifications for new instant messages
Whenever you receive an instant message, your mobile phone can
play a sound, vibrate, or display an icon. To set up one of these handy
notifications, start in the friends list, and then touch . Then touch
Settings. Now choose from one of the following:
How to set mobile indicators
You can check what type of device your friend is using to chat in Talk.
In the friends list, check the image that appears to the right of your
IM
notifications
Select the check box to receive a notification on the
notification bar when you receive an instant
message.
Select
ringtone
Touch to choose the ringtone used for a new instant
message. You will get to hear a short sample of the
ringtone when you select it. To turn the ringtone off,
select Silent.
Vibrate Touch to let your mobile phone vibrate when you
receive a new instant message.
Invitation
notifications
Select the check box to receive a notification on the
notification bar when you receive an invitation.

Google Services
95
friend’s name. When you do not see an image, it indicates that your
friend signed in last from a computer.
You can also choose to show a mobile indicator.
1. In the friends list, touch > Settings.
2. Select the Mobile indicator check box, and then touch . The
mobile indicator icon will display along with your name in other
people’s Friends list and will let your friends know what type of
mobile device you are using.
How to sign in automatically
You can sign in to your Talk account automatically every time you turn
on your mobile phone.
1. In the friends list screen, touch , and then touch Settings.
2. Select the Automatically sign in check box, and then touch .
How to sign out of Talk
In the friends list screen, touch , and then touch Sign out to quit
Talk.
Using Maps
Maps lets you find your current location, view real-time traffic situations
(depending on availability), and get detailed directions to different
destinations (on different types of maps, like a vector, satellite, or street
map).
How to enable location source
Before you open Google Maps and find your location or search for
places of interest, you must enable "location source".
1. On the Home screen, touch > Settings.
2. Touch Location & security.
3. In the My Location settings section, select Use wireless networks
check box, Use GPS satellites check box, or both.

Google Services
96
How to open Maps
On the Home screen, touch > Maps to open the application.
How to find your location on the map
On the map, touch to find your location on the map.
How to search for places of interest
1. On the map, touch , and then touch Search.
2. Enter the place you want to search for in the search box, and then
touch the Search icon.
3. Your search results will then be displayed. Touch a place you are
interested in and the application will show where it is on the map.
How to navigate on a map
Flick your finger in any direction on the screen to view other areas of
the map.
How to change the map mode
1. While viewing a map, touch .
2. Select Traffic, Satellite, Terrain, or Latitude.
How to get directions
1. While viewing a map, touch , and then touch Directions.
2. Enter the starting point in the first text box, and then enter your
destination in the second text box.
3. Touch the icon for car, public transit, or walking directions.
4. Touch Get Directions. Your directions will appear in a list.
5. Touch a direction item on the list to show it on the map.
6. When you finish viewing or following the directions, touch and
touch Clear Map to reset the map.
How to find your friends with Google Latitude
Google Latitude lets you and your friends view each others’ locations
on maps and share status messages with each other. On Latitude you
Google Services
97
can also send messages and emails, make phone calls, and get
directions to your friends’ locations.
Your location is not shared automatically. You must join Latitude and
then invite your friends to view your location, or accept invitations from
your friends.
To join Latitude
1. While viewing a map in any mode (except in Street View mode),
touch and then touch Join Latitude (obviously!).
2. Read the privacy policy. If you agree with it, touch Agree & share.
Tip: When you’ve joined Latitude, the menu item changes to Latitude.
To open Latitude
While viewing a map, touch and touch Latitude.
To invite friends to share their locations
After you join Latitude, you can start sharing your location with your
friends. Only friends whom you have explicitly invited or accepted can
see your location.
1. In Latitude, touch and then touch Add friends.
2. Choose how to add friends:
Select from Contacts. (Friends already on Latitude have an
icon next to their names).
Add via email address. Enter an email address.
3. Touch Add friends at the bottom of the screen.
Your friends already using Latitude will then get an email request and
a notification on Latitude. If they’re not on Latitude, they receive an
email request that tells them to join (and they’re sure to if they want to
know where you are and what you’re up to!).
To respond to an invitation
Got a sharing request from a friend? You can:
Accept and share back. You can see your friend’s location, and
your friend can see yours.

Google Services
98
Accept, but hide my location. You can see your friend's location,
but they can't see yours.
Don't accept. No location information is shared between you and
your friend.
Of course, you can change how your location is shared with each
friend at any time.
To view your friends' locations
You can view your friends’ locations on a map or in a list.
Map view. You can see your friends’ locations in Google Maps.
Each friend has a photo icon with an arrow pointing to his or her
approximate location. If a friend has enabled city-level sharing,
their icon will not have an arrow and appears in the middle of the
city.
List view. To show a list of your friends in Maps, touch and then
touch Latitude.
To see a friend’s profile and connect with him or her, select your
friend’s name from the list.
To connect with and manage connections with your friends
Touch a friend’s contact details balloon in Map view or touch a friend
in List view to open the friend’s profile. In the Profile screen, you can
communicate with your friend and set privacy options:
Map: Get the friend’s location on the map.
Directions: Get directions to the friend’s location.
Street view: Get the friend's location from street view.
Ping for check in: Send the friend a notification asking him or her
to check in.
Real-time updating: Touch to see faster location updates.
Sharing options: Select one mode to share your location with the
friend among Share best available location, Share only city level
location and Hide from this friend.
Remove this friend: Remove the friend from your list and stop
sharing locations altogether.

Google Services
99
To control what you share
You have control over how and when your friends can find you. Only
the last location sent to Latitude is stored with your Google account. If
you turn off Latitude or hide your location, no location is stored.
Open Latitude, touch your own name, and touch Edit privacy settings.
Detect your location: Let Latitude detect and update your location
as you move. The update frequency is determined by several
factors, such as your phone’s battery charge level and how
recently your location has changed.
Set your location: Set the location shared with others as an
address you enter; or, from Contacts, pick a spot on a map, or
resume having Latitude share your actual location.
Do not update your location: Your location is not updated and your
friends cannot see it.
Enable location history: Let you to share or hide your location
history with your friends.
Sign out of Latitude: Sign out of Latitude and stop sharing your
location or status. You can always sign in Latitude again.
Using YouTube
That cat that plays the piano, the dirty dancing bride and groom, the
spoof ads, mad pranks and slickest chart videos – YouTube reads like
a who’s who of every online tape sensation. And this free online video
streaming service now works on your mobile phone. To make the most
of the full YouTube features (such as viewing "My account"), however,
you must first create a YouTube account on your computer before you
can use it on your mobile phone.
How to open YouTube
On the Home screen, touch > YouTube. You will then see the
YouTube screen.
How to watch a video
1. On the Home screen, touch > YouTube. You will then see the
YouTube screen.
2. Touch a category to see the videos within it.

Google Services
100
3. Touch a video to play.
4. Touch the screen to display the playback controls.
5. Touch to stop playback and return to the videos list.
How to search for a video
1. On the YouTube screen, touch , and then touch Search.
2. Enter a search keyword, and then touch the Search icon.
3. You will see a number of search results displayed below the
notification bar. Scroll through the results and touch a video to
watch it.
How to share a video
From the video list on the YouTube screen, select a video clip and
touch More > Share.
Using Market
Android Market gives you direct access to useful applications and fun
games downloadable to your phone. It also lets you send feedback
and comments about an application, or flag an application that you
find objectionable or incompatible with your phone.
How to open Market
1. On the Home screen, touch > Market.
2. When you open Market for the first time, the Android Market Terms
of Service window will appear. Touch Accept to continue.
Google Services
101
How to get help
If you ever need help or have questions about Market, touch , and
then touch Help. The browser will take you to the help web page.
How to search for applications
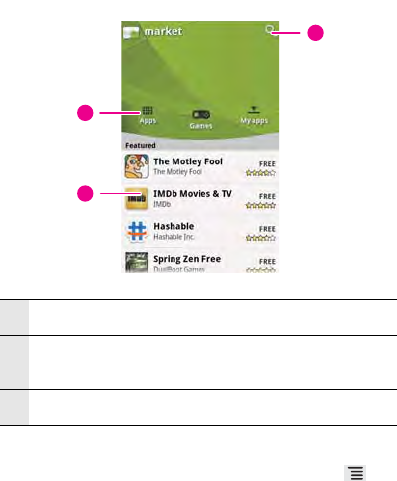
There are a few different ways to find applications from the Market
screen, including:
Featured applications – scroll horizontally to view more.
A list of applications by category – including subcategories, which
you can sort by popularity (most to least) or by date (newest to
oldest).
A list of games.
1Touch a category to open it.
2Shows featured applications. Touch the icon to view detailed
info about an application.
3Touch to search Market.
1
2
3
Google Services
102
A search function.
My apps.
How to install an application
Note: If you want to install a non-Market application, touch >
Settings > Applications, and then select the Unknown sources check
box to allow installation of the non-Market application.
1. In the Market, touch Apps.
2. Touch a category, and then touch the item you want to download.
3. On the item details screen, read more about the application,
including its cost, overall rating, and user comments. If you scroll
down to the Developer Info section, you can see other applications
from the same developer, link to the developer's website, or send
the developer an email.
4. To install the item, touch FREE (if the item is free) or touch the
button with a price (if the item is not free), and then touch OK.
5. To check the progress of a download, open the notification panel.
Most applications are installed within seconds. To stop an item
from downloading, touch Cancel.
6. After the application has been downloaded and installed on your
mobile phone, the content download icon appears in the
notification bar.
How to manage applications
On the Market screen, touch My apps to view your downloaded
applications.
On any of the Market screens, touch , and then touch My apps
to view your downloaded applications.
How to uninstall an application
1. On the Market screen, touch My apps.
2. Touch the application you want to uninstall, and then touch
Uninstall.
Google Services
103
3. When prompted, touch OK to remove the application from your
mobile phone.
4. Choose the reason for removing the application, and then touch
OK.

104
Synchronizing Information
How complicated it sounds! All this really means is that some
applications on your phone (like your Calendar and Contacts) can
match up with information that you’ve viewed, added or changed on
your computer. And it works the other way round too, so if you add,
change, or delete anything on your phone, your PC will be updated too
– the information is synchronised.
How does it work? Using over-the-air data synchronisation, of course!
It’s pretty techy stuff, but nothing to worry about. And because the
synchronising process goes on behind the scenes so it doesn’t
interfere with what you’re doing, you’ll simply know it’s happening
when a tiny icon shows in the notifications bar.
Managing Your Accounts
You can synchronize contacts, email, and other information to your
mobile phone from multiple Google accounts, Microsoft Exchange
ActiveSync accounts, or other kinds of accounts, depending on the
applications installed on your mobile phone.
For example, you could start by adding your personal Google
account, so your personal email, contacts, and calendar are always
available. Then you could add an Exchange ActiveSync account from
work, so you can read your work email and have your work contacts
handy. You can even add multiple Google accounts and other
accounts.
How to add an account
To add some accounts, you may need to obtain details from an IT
support representative about the service to which the account
Synchronizing Information
105
connects. For example, you may need to know the account’s domain
or server address.
When you add an account, Contacts compares any new contacts that
you synchronize to your mobile phone with your existing contacts and
attempts to join duplicates into a single entry in Contacts. This does
not join that data for the accounts themselves; it just presents it as a
single contact.
1. Touch > Settings > Accounts & sync. The screen displays your
current synchronization settings and a list of your current
accounts.
Note: In some cases, you may need to obtain account details from an
IT support. For example, you may need to know the account’s domain
or server address.
2. Touch Add account.
3. Touch the kind of account to add.
4. Follow the onscreen steps to enter the required and optional
information about the account. Most accounts require a username
and password, but the details depend on the kind of account and
the configuration of the service to which you are connecting.
5. Configure the account. Depending on the kind of account, you
may be asked to configure what kind of data you want to sync to
the mobile phone, to name the account, and for other details.
When you are finished, the account is added to the list in the
Accounts & sync settings screen.
How to add an Exchange Account
1. On the Home screen, touch > Settings > Accounts & sync.
2. Touch Add account > Corporate.
3. Follow the instructions and enter the required information about
the exchange account you want to add. For details, contact the
server administrator.
4. Touch Next to display the Account options screen. configure the
synchronization settings you want for this account.

Synchronizing Information
106
5. Touch Next to finish configuring the account settings. If emails are
not synchronized properly, contact the server administrator.
How to remove an account
You can remove an account to delete it and all information associated
with it from your mobile phone, including email, contacts, settings, and
so on. You cannot remove some accounts, such as the first account
you signed into on the mobile phone, except by deleting all personal
information from your mobile phone.
Note: You can only remove the first Google Account by resetting the
phone to factory defaults.
1. On the Accounts & sync settings screen, touch the account to be
deleted.
2. Touch Remove account.
3. Confirm that you want to remove the account.
Customizing Your Account
Synchronization
You can configure the use of background data and set
synchronization options for all of the applications on your mobile
phone. You can also configure what kinds of data you synchronize for
each account.
For some accounts, synchronizing is bi-directional: Changes that you
make to the information on your mobile phone are made to the copy of
that information on the web. Other accounts support only one-way
sync: The information on your mobile phone is read-only.
How to configure general sync settings
On the Accounts & sync settings screen, do the following:
Select or clear the Background data check box to control whether
applications and services can transmit data when you are not

Synchronizing Information
107
working with them directly (that is, when they are running in the
background).
If you clear this option, Gmail stops receiving new mail, Calendar
stops synchronizing events, and so on, until you touch the Refresh
menu item or send an email.
Select or clear the Auto-sync check box to control whether
changes you make to information on the phone or on the web are
automatically synchronized with each other.
For example, when this option is selected, changes that you make
in Contacts on the phone are automatically made in Google
Contacts on the web.
How to change account’s synchronization settings
1. On the Accounts & sync settings screen, touch the account whose
synchronization settings you want to change. The data and
synchronization screen opens, displaying a list of the kinds of
information the account can synchronize.
2. Selected items are configured to synchronize to your mobile
phone.
3. Select or clear the check box of information you want to
synchronize to the mobile phone.
Using the Hi Suite to Synchronize
Because the Hi Suite has been stored on your microSD card, to install
the Hi Suite, connect your mobile phone to your PC by using the USB
cable. Set the microSD card as the USB mass storage. Find the
Setup.exe on the microSD card and double-click it. Then follow the
instructions on the PC to complete the installation. You can now
synchronize your contacts and calendar appointments between your
PC and mobile phone.
Tip: For more information, refer to “How to use the microSD card as
the USB mass storage” on page 7.

Synchronizing Information
108
Note: The Hi Suite is designed to work on Windows XP SP2, Windows
Vista 32, Windows Vista 64, and Windows 7. We recommend you use
one of these systems.
How to synchronize your contacts and calendar
1. Connect your phone to your PC using your USB cable.
2. Run the Hi Suite on your PC.
3. Click Synchronize and then click Next to synchronize your
contacts or calendar.
4. Select a data management software to be synchronized with your
mobile phone.
5. Click Start to start the synchronization.
How to backup the Logs of your mobile phone
1. Connect your phone to your PC using the USB cable with your
phone.
2. Run the Hi Suite on your PC.
3. Click Back & Restore > Backup.
4. Select the contents you want to backup and select the path you
want to save the logs on your PC.
5. Click Start to start backup.
Note: During backup, all applications will be closed. For example: if
you are listening to music, the music player will be closed.
How to restore the logs to your mobile phone
1. Connect your phone to your PC using the USB cable with your
phone.
2. Run the Hi Suite on your PC.
3. Click Back & Restore > Restore.
4. Select the log on your PC to restore to your mobile phone.
5. Click Start to start backup.

Synchronizing Information
109
Note: Make sure your mobile phone has enough power, and do not
disconnect your mobile phone during the restoration.
110
Using Other Applications
Using the Clock
In addition to displaying the date and time, the Clock application
displays information about the weather and your phone. You can also
use Clock to turn your mobile phone into an alarm clock.
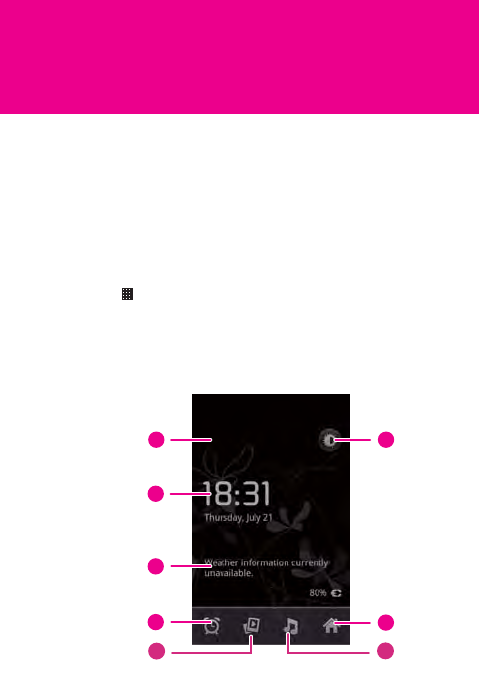
Opening the Clock
Touch > Clock to open the application.
Clock opens with the date and time displayed on your Home screen
wallpaper, along with your local weather and other useful information.
Clock screen
2
3
8
47
6
5
1
Using Other Applications
111
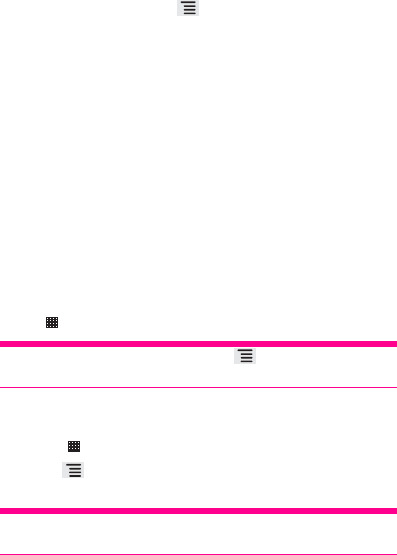
On the alarm list screen, touch to display the alarm clock control
panel.
Desk clock: Touch to back to the clock screen.
Add alarm: Touch to add a new alarm.
Settings: Touch to show the alarm settings menu.
How to add an alarm
1. On the alarm list screen, touch Add alarm to add a new alarm.
2. Touch Time to set the time of the alarm.
3. Touch Repeat to set the days when you want the alarm to sound.
4. Touch Ringtone to select a ringtone for the alarm.
5. Select the Vibrate check box to have the phone vibrate, in addition
to playing the ringtone.
6. Touch Label to enter a name for the alarm.
7. Touch Done.
Tip: The alarm clock still works when the phone is powered off.
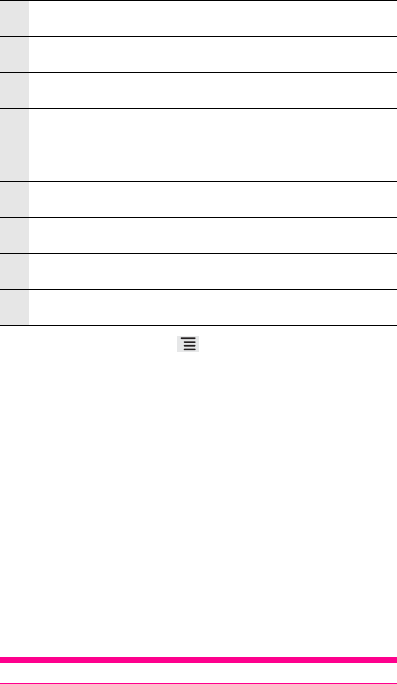
1Show the next alarm.
2Show the current time.
3Show the weather information.
4
Touch to access the alarm settings screen. You can add a new
alarm, and set it's alarm time, ringtone, vibration, and repeat
mode.
5Touch to view photo albums as slideshows.
6Touch to play background music.
7Touch to back to Home screen.
8Touch to adjust the display brightness.
Using Other Applications
112
How to delete an alarm
On the alarm list screen, touch the alarm that you want to delete, and
then touch Delete to delete the alarm.
How to customize alarm settings
On the alarm list screen, touch , and then touch Settings.You can
do the following:
Alarm in silent mode: Select to let the alarm play even when the
phone is in silent mode.
Alarm volume: Touch to set the alarm volume.
Snooze duration: Touch to set the snooze duration.
Using the Calendar
Planning a secret rendezvous? A birthday party? A power lunch? A
wicked weekend away? Whatever the occasion, you will never forget
about it when you have got your mobile calendar to jog your memory.
Depending on your synchronization settings, the calendar on your
mobile phone should be in synchronization with your Internet
calendar.
How to open the Calendar
Touch > Calendar to open the application.
Tip: To access Google calendar, touch , and then touch More >
Calendars.
How to change the calendar view
1. Touch > Calendar to open the application.
2. Touch , and then touch Day, Week, Month, or Agenda (current
view is not in the menu panel).
Tip: You can also touch the buttons on the lower part of the screen to
change the calendar view.
Using Other Applications
113
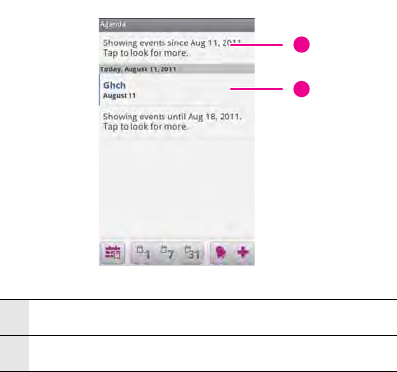
Agenda view
1Touch to view earlier or later events.
2Touch an event to view its details.
2
1
Using Other Applications
114
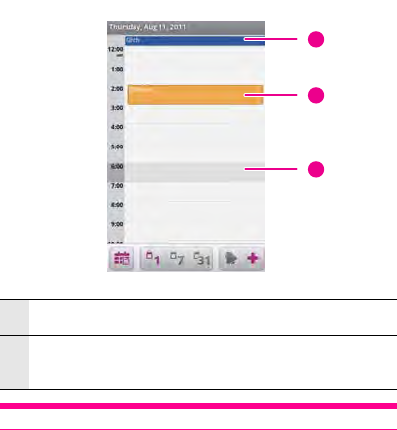
Day view
Tip: Flick left or right to view earlier or later days.
1Touch an event to view its details.
2Touch and hold a time slot or an event to create a new event at
that time.
2
1
3
Using Other Applications
115
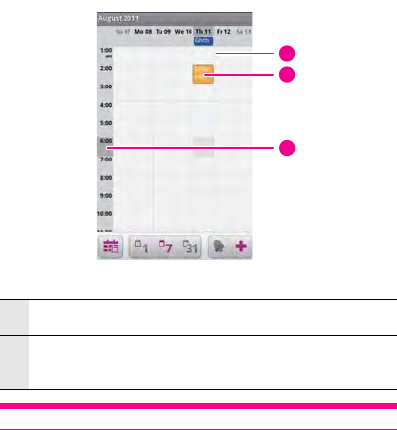
Week view
Tip: Flick left or right to view earlier or later weeks.
1Touch an event to view its details.
2Touch and hold a time slot or an event to create a new event at
that time.
1
2
3
Using Other Applications
116
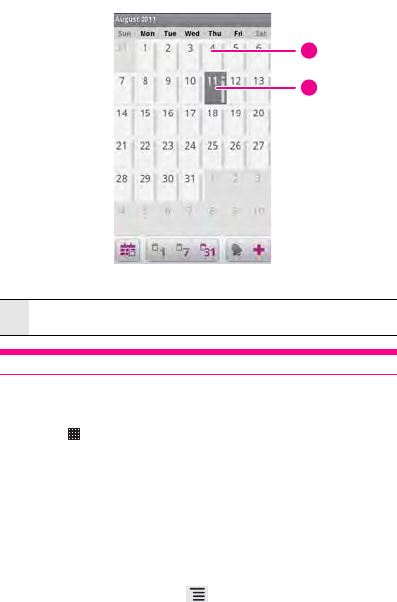
Month view
Tip: Flick up or down to view earlier or later months.
How to view the event details
1. Touch > Calendar to open the application.
2. In the Agenda, Day, or Week view, touch an event to view its
details.
3. In the Month view, touch a day to switch to Day view. Then touch
an event to open a summary, and touch the summary to view the
details.
How to create an event
1. On any calendar view, touch . Then touch New event to open
the event details screen.
2. Enter the event name.
1Touch a day to view the events of that day.
1
2
Using Other Applications
117
If there is a time frame for the event, touch From and To to set the
beginning and end times of the event.
If the event is a special occasion such as a birthday or a day-long
activity, set the date for From and To, and then select the All day
check box.
3. Enter the location of the event and the description.
4. If you have more than one calendar, select the calendar where you
want to save the event.
5. Enter the email address to invite guests to the event.
6. Set the time of your event reminder in Reminders, and then specify
in Repetition whether the event recurs and, if it does, how
frequently.
7. Touch Done.
Tip: To quickly create an event in the Day, Week, or Month view, touch
and hold an empty time slot, and then touch New event. A new event
details screen will appear with the selected time slot and date in the
From and To fields.
How to edit an event
1. Touch > Calendar to open the application.
2. On any calendar view, touch an event to view its details.
3. Touch . Then touch Edit event to open the event details screen.
4. Make your changes to the event.
Tip: Touch , and then touch Show extra options to add or edit
event details.
5. When you finished, touch Done.
How to set an event reminder
1. On any calendar view, touch an event to view its details or an event
summary.
Using Other Applications
118
2. Touch the Add reminder button to add a reminder. Or touch the
reminder’s “-” button to delete an existing reminder.
3. Touch the reminder time, and then touch the length of time before
the event when you want to be reminded. When the time comes,
you will receive a notification about the event.
How to respond to the reminder
When you have set an event reminder, an icon for the event will appear
in the notifications bar when your reminder is due. You can do any of
the following to view, dismiss, or snooze the reminder:
1. Touch the notifications bar, and then flick down to open the
notifications panel.
2. Touch the upcoming event name to display the event. If you have
some event reminders still to come, these will also appear on the
screen.
3. Then touch, you can do the following:
Snooze all: Touch to snooze all event reminders for five minutes.
Dismiss all: Touch to dismiss all event reminders.
Or touch to keep the reminders pending in the notifications
bar.
How to show or hide calendars
1. Touch > Calendar to open the application.
2. On any calendar view, touch , and then touch More >
Calendars.
3. Select or clear a calendar's check box to show or hide it.
How to customize the calendar settings
On any calendar view, touch . Then touch More > Settings.
Hide declined events: Select to hide events for which you have
declined invitations.
Use home time zone: Select to display calendars and event times
in your home time zone when traveling.
Home time zone: Touch to set your home time zone.

Using Other Applications
119
First day of the week: Touch to set the Month and Week views to
start on a day of the week.
Set alerts & notifications: Touch to set event reminders to alert you,
send you a notification, or to turn off event notifications on your
mobile phone.
Select ringtone: Touch to select the ringtone to sound when you
receive an event reminder.
Vibrate: Select to vibrate the mobile phone when you receive an
event notification.
Default reminder time: Touch to select the default time before an
event for event reminders to occur.
Using the Notepad
You may want to make a note on the occasion without a pen or paper.
Don't worry-your mobile phone put a Notepad at your fingertips.
1. Touch > Notepad to open the application.
2. Touch , and then touch Add note to create a note.
3. Touch > Save to save the note.
Using the Calculator
Haven’t flexed your mathematical muscles in a while? Your mobile
calculator should be a big plus.
How to open the Calculator
Touch > Calculator to open the application.
How to switch to the Advanced panel
On the Calculator screen, flick the screen to the right or left to switch
between Advanced panel and Basic panel.
Using the File Manager
Using your File Manager is like having a pocket-sized personal
assistant (PA), letting you rationalise, edit and delete files and folders.
Using Other Applications
120
How to open the File Manager
Touch > File Manager to open the application.
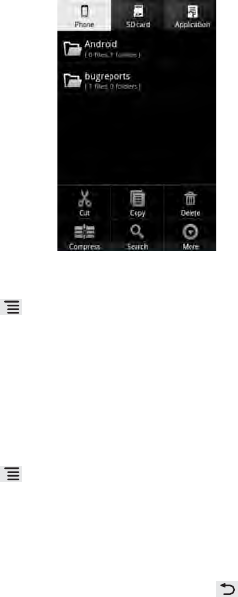
Tip:
• The options menu of the file manager may not be completely
shown on one page. Therefore, you need to flick the menu up-
wards or downwards to browse all options.
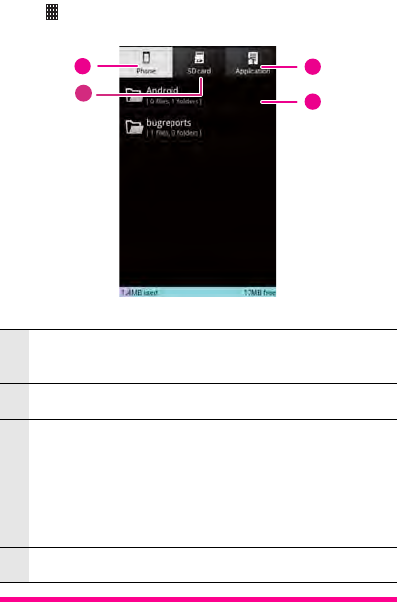
1Touch to show the files and folders in your mobile phone
memory.
2Touch to show the files and folders on the microSD card.
3
Touch to show your list of files, folders, applications,
bookmarks and recent files. You can flick the list to browse all
files and touch a file to open it. To open the file options menu,
touch and hold the file or folder. You will then be able to open,
cut, copy, delete, or rename the file or folder. You will also see
details about the file or folder.
4Touch to show the applications you installed.
14
23
Using Other Applications
121
• The tabs of the file manager may not be completely shown on one
page. Therefore, you need to flick the tab right or left to browse all
tabs.
How to cut or copy a file
1. On the File Manager screen, touch to show the options panel,
and then touch Cut or Copy.
2. Touch the file or folder you want to move or copy. When selected, a
check mark will appear.
To select all files, touch to open the options panel. Then touch
Select all to select all files in a folder (touch Unselect all to cancel
the selection).
3. Touch to open the options panel, and then touch Done to cut
or copy the file.
4. Now select the path to where you want the file to be copied or
moved. Touch to open the options panel, and then touch
Paste to move or copy the file to the selected path.
How to delete a file
1. On the File Manager screen, touch to open the options panel.
Then touch Delete.
2. Touch the file or folder you want to delete – when selected, a green
tick will appear.
Tip: To delete all files at a time, touch to open the options panel.
Then touch Select all to select all files in a folder (touch Unselect all to
cancel the selection).
3. Touch to open the options panel. Touch Done to delete the file
or folder.
Using Other Applications
122
How to create a folder
1. On the File Manager screen, access the directory of the folder you
want to create.
2. Touch to open the options panel, and then touch More > New
folder.
3. Enter the name of the new folder in the text box.
4. Touch Save and your new folder is ready to go.
How to do a quick search for a file
1. On the File Manager screen, touch a folder to access the directory
where the file you want is located.
2. Touch to open the options panel, and then touch Search.
3. Write a key word of the name of your file or folder in the search box.
4. Touch Search. Your mobile phone will start the search.
5. A list of search results will be displayed. Touch a file in the list to
open it.
6. Touch New search for a new search or touch to return to the
file manager screen.
Compressing or extracting files
Your phone supports compressing and extracting files.